Embed Size (px)
Citation preview

i
Precision ElectronicTreadmill*
Owner’s Manual
R
R
USAR
*Several versions of this owner’s manual exist. Thisis a copy of the last version published. If theassembly instructions do not coincide with yourtreadmill, please call Precor Customer Service.

ii
When using an electrical appliance, basic precautions should always be taken, including thefollowing:
• Read all instructions before using the M9.1 or M9.2s Precision Electronic Treadmill. Theseinstructions are written to ensure your safety and to protect the treadmill.
Before beginning any fitness program, you should obtain a complete physical examination byyour physician.
Il est conseillé de subir un examen médical complet avant d’entreprendre tout programmed’exercise. Si vous avez des étourdissements ou des faiblesses, arrêtez les exercicesimmédiatement.
DANGERTo reduce the risk of electrical shock always unplug the M9.1 or M9.2s Precision ElectronicTreadmill from the electrical outlet immediately after using and before cleaning.
WARNINGTo reduce the risk of burns, fire, electric shock, or injury to persons, take the following precau-tions:
• When it is plugged in, do not leave the M9.1 or M9.2s treadmill unattended. Unplug thetreadmill from the power source when it is not in use, and before putting on or taking offparts.
• Close supervision is necessary when the M9.1 or M9.2s is used by, on, or near children,invalids, or disabled persons.
• Use the M9.1 or M9.2s treadmill only for its intended use as described in this manual. Donot use accessory attachments that are not recommended by the manufacturer—suchattachments might cause injuries.
• Never operate the treadmill if it has a damaged cord or plug, if it is not working properly, ifit has been dropped or damaged, or dropped in water. Return the treadmill to a servicecenter for examination and repair.
• Turn OFF and unplug the treadmill when adjusting or working near the rear roller. Do notmake adjustments to the running belt when someone is standing on the unit.
• Keep the power cord and plug away from heated surfaces.
• Never drop or insert objects into any opening. Keep hands away from moving parts.
• Do not use outdoors.
• Do not operate where aerosol (spray) products are being used or where oxygen is beingadministered.
• To disconnect, turn the power switch to the OFF (O) position, then remove the power plugfrom the wall outlet.
WARNINGConnect the M9.1 or M9.2s to a properly grounded outlet only. See Grounding Instructions.
IMP
OR
TA
NT
S
AFE
TY
IN
ST
RU
CT
ION
S
IMPORTANT SAFETY INSTRUCTIONS
SAVE THESE INSTRUCTIONS

iii
Personal Safety
• Always attach the safety clip to your clothing at waist level prior to beginning your workout.The safety clip is connected by a cord to the magnetic safety key in the electronic console. Ifyou encounter difficulties, you can stop the running belt by pulling on the cord to disengagethe magnetic safety key from inside the console. To resume operation, the magnetic safetykey must be replaced.
• When the treadmill is not being used, remove the magnetic safety key and store it in a safeplace to prevent unauthorized use.
• Check the M9.1 or M9.2s treadmill before each use. Completely assemble the treadmill beforeusing it.
• Assemble and operate the M9.1 or M9.2s on a solid, level surface. Locate the treadmill atleast 4 feet from walls or furniture. Keep the area behind the treadmill clear.
• Wear proper exercise clothing and shoes for your workout—no loose clothing. Do not wearshoes with heels or leather soles. Check the soles of your shoes and remove any dirt andembedded stones. Tie long hair back.
• Keep all loose clothing and towels away from the running surface. The running belt will notstop immediately if an object becomes caught in the belt or rollers.
• Use care when getting on or off the treadmill. Use the handrails whenever possible. Step ontothe running belt when the speed is at or below 1 mile per hour (1.6 kilometers per hour).Never step off the treadmill while the running belt is moving.
• Before the running belt begins moving (prior to your workout), and after it stops (at the endof your workout), straddle the belt by placing your feet firmly on the right and left sideplatforms.
• Never turn ON the treadmill when someone is standing on the machine.
• Keep your body and head facing forward. Never attempt to turn around on the treadmill whenthe running belt is moving.
• Do not rock the unit. Do not stand or climb on the handrails, electronic console, or hood.
• Keep all electrical components, such as the motor, power cord, and ON/OFF switch, awayfrom water or other liquids to prevent shock. Do not set anything on the handrail, electronicconsole, or hood. Never place liquids on any part of the unit.
• Do not attempt to service the M9.1 or M9.2s treadmill yourself other than the assembly andmaintenance instructions found in this manual. The M9.1 or M9.2s treadmill is for householduse only. See Obtaining Service in the maintenance section of this manual.
• Do not overexert yourself or work to exhaustion.
• Stop your workout immediately if you feel any pain or abnormal symptoms, and consult yourphysician
Precor Smart Weights—Safety Guidelines
The Precor Smart Weights were created and designed exclusively for Precor products. Please taketime to read the following guidelines:
• Handle Precor Smart Weights with care. Do not drop the equipment. It might damage theweights and you could void the manufacturer’s limited warranty.
• Keep the equipment dry. Do not immerse the equipment in water.
• With every use, check that the remote signal is working before you begin your workout. Afterextensive use, the battery in the remote head may wear out. See Replacing the Battery in yourPrecor Smart Weights Owner’s Manual.
Precor treadmills are designed for the enjoyment of the serious runner as well as the dedicatedwalker. By following the above precautions and using good common sense, you will have manysafe and pleasurable hours of healthful exercise with your Precor treadmill.

iv
Information Regarding International Use
FCC Communications Commission, part 15
The M9.1 or M9.2s treadmill has tested and it complies with the limits for a Class B digital device,pursuant to part 15 of the FCC Rules. These limits are designed to provide reasonable protectionagainst harmful interference in a residential installation. The M9.1 or M9.2s treadmill generates,uses, and can radiate radio frequency energy and, if not installed and used in accordance with theowner’s manual instructions, may cause harmful interference to radio communications. However,there is no guarantee that interference will not occur in a particular installation.
If the M9.1 or M9.2s treadmill does cause harmful interference to radio or television reception,which can be determined by turning the M9.1 or M9.2s treadmill OFF and ON, you are encouragedto try to correct the interference using one or more of the following measures:
• Reorient or relocate the receiving antenna for your TV, radio, VCR, etc.
• Increase separation between the M9.1 or M9.2s treadmill and the receiver (TV, radio, etc.).
• Connect the M9.1 or M9.2s treadmill into a different power outlet—on a dedicated circuitdifferent from the one used by the receiver (TV, radio, etc.). No other appliance should beplugged into the same power outlet that the treadmill is connected to.
• Consult your dealer or an experienced radio/TV technician for help.
Canadian Department of Communications
“This digital apparatus does not exceed the Class B limits for radio noise emissions from digitalapparatus set out in the Radio Interference Regulations of the Canadian Department of Communi-cations.”
“Le présent appareil numérique n’émet pas de bruits radioéélectriques dépassant les limitesapplicables aux appareils numériques de la class B prescrites dans le Règlement sur lebrouillage radioélectrique édicté par le ministére des Communications du Canada.”
*Indiquer seulement la classe duappareils numériques correspondent à l’application visée.

v
Grounding Instructions
The M9.1 or M9.2s Precision Electronic Treadmill must be grounded. If it should malfunction orbreak down, grounding provides a path of least resistance for electric current which reduces therisk of electrical shock. The treadmill is equipped with a power cord having an equipment-grounding conductor and a grounding plug. The plug must be inserted into an appropriate outletthat is properly installed and grounded in accordance with all local codes and ordinances.
DANGERImproper connection of the equipment-grounding conductor can result in a risk of electric shock.Check with a qualified electrician or service person if you are in doubt as to whether the treadmill isproperly grounded. Do not modify the plug provided with the treadmill—if it doesn’t fit the outlet,get a proper outlet installed by a qualified technician.
Proper grounding plug andpower outlet for 120vconnection
Diagram A
The treadmill is for use on a nominal 120-volt circuit (refer to the WARNING below and to theInstallation Requirements on page 3) and has a grounding plug that looks like the plug illustrated inDiagram A.
WARNINGThis product is rated for more than 15 amps and is for use on a circuit having a nominal rating of120 volts and is factory-equipped with a specific electric cord and plug to permit connection to aproper electric circuit. Make sure that the product is connected to an outlet having the sameconfiguration as the plug. No adapter should be used with this product. If the treadmill must bereconnected for use on a different type of electric circuit, the reconnection should be made byqualified service personnel.
ATTENTION: Haute Tension
Débranchez avant de réparer

vi
Table of Contents
Safety Information ........................................................................................................... ii
Important Safety Instructions ........................................................................................... iiPersonal Safety ................................................................................................................. iiiPrecor Smart Weight Option—Safety Guidelines ............................................................. iiiInformation Regarding International Use ........................................................................ ivGrounding Instructions ...................................................................................................... v
Before You Begin ............................................................................................................ 1
Unpacking the Treadmill ................................................................................................... 1Optional Equipment: Smart Weights ................................................................................. 1
Setting Up the M9.1 or M9.2s Treadmill........................................................................ 3
Installation Requirements ................................................................................................. 3Assembly Instructions ...................................................................................................... 3Checking the Alignment of the Running Belt .................................................................... 9
Using the M9.1 or M9.2s Treadmill ............................................................................. 10
Locating the ON and OFF Switch .................................................................................... 10Using the Magnetic Safety Key ....................................................................................... 10Understanding the Electronic Console. ........................................................................... 11Displays on the Electronic Console ................................................................................. 11Keys on the Electronic Console ...................................................................................... 12Changing the Display to U.S. Standard or Metric ........................................................... 13Selecting the TIME or DISTANCE prompt on the M9.2s ................................................. 13
Working Out on Your Treadmill .................................................................................... 14
Changing Incline on the M9.1 ......................................................................................... 16Retrieving the Previous Workout Program ..................................................................... 16Pausing Your Workout ................................................................................................... 16Cooling Down After a Workout ....................................................................................... 16Ending Your Workout ..................................................................................................... 16Using the Manual Course Mode ...................................................................................... 17Changing the Interval Course Profile .............................................................................. 17Using the M9.2s Preprogrammed Courses ..................................................................... 18
Getting the Most Out of Your Workout ......................................................................... 20
How Hard Should I Exercise? ......................................................................................... 21How Long Should I Exercise? ......................................................................................... 22How Often Should I Exercise? ........................................................................................ 22
Maintaining Your Treadmill ......................................................................................... 23
Cleaning the Equipment .................................................................................................. 23Aligning the Running Belt ............................................................................................... 23Adjusting the Tension of the Belt .................................................................................... 24Servicing the Treadmill ................................................................................................... 25Power Cord Maintenance ................................................................................................ 25M9.1 and M9.2s Long Term Storage .............................................................................. 25Obtaining Service ........................................................................................................... 25
12
3
4
5
6

page 1
Before You Begin1 Thank you for purchasing the Precor M9.1 or M9.2s Precision Electronic Treadmill. Thesetreadmills feature one of the most sophisticated and beneficial technologies Precor has evercreated: Integrated Footplant Technology.
Integrated Footplant Technology (IFT) is a microprocessor-regulated motor control system. Thispatented technology collects motor and belt speed data and uses it to monitor your workout andenhance your safety and comfort. It replicates the natural walking and running motion of your feet.By allowing slight, natural speed variations throughout your stride, Precor treadmills reduce shockand pounding to your body.
The easy-to-understand electronic console provides motivating feedback about your workout whichincludes: distance covered, elapsed time, current speed, calories burned, and percent of incline.On the M9.1, use the easy-to-reach incline crank handle on the console to change incline. On theM9.2s you can change inclines by pressing the INCLINE key on the electronic console. Inclinesfrom 0 to 10 percent are available.
Two exercise modes come with the M9.1 treadmill: Manual and Interval. Manual Mode lets youcontrol your workload throughout your workout session. In the Interval Mode, the treadmillreminds you to raise and lower the workload during your session in interval training fashion,helping you to achieve aerobic fitness in a shorter period of time.
Three different modes come with the M9.2s, Manual, Interval, (same as the M9.1) and Program.Program mode provides ten factory-programmed courses with predetermined inclines where youchoose the speed and distance of your workout. All three modes provide variety to help entice andmotivate you during your workout.
Unpacking the M9.1 or M9.2s Treadmill
The M9.1 or M9.2s Precision Electronic Treadmill is intended for household use only and has manyunique features which set it apart from conventional treadmills. To maximize your use of thetreadmill, please study this manual thoroughly. Your treadmill is carefully inspected beforeshipment. Precor ships the unit in seven pieces as listed below:
• running bed assembly • handrails
• lift column assembly • lift column trim
• electronic console display • incline crank handle (M9.1 only)
• owner’s manual, limited warranty card, and hardware kit (hardware kit shown in Diagram 1.)
Carefully unpack the pieces of the treadmill and lay them on the floor near the location where youplan to use the treadmill.
Important: If you have a M9.2s, do not cut the cable tie that runs through the elevation tube andthe lift column. The elevation tube is calibrated at the factory and the plastic cable tie preventsexcessive movement during shipment. While you are unpacking the treadmill, do not cut this cabletie. It will be cut, when you perform step 7 in the assembly process.
Optional Equipment
• Precor Smart WeightsTM
The optional Precor Smart Weights are now available from your local dealer. Smart Weights canprovide variety and intensity to your workout. Its remote capability allows you to work out with acombination of 1- or 2-pound hand weights and change the treadmill’s incline and speed, or stopthe running belt, without ever touching the electronic console! Handrail carriers provide convenientlocations to store your Smart Weights. Call your local dealer to find out about the details. To locatethe dealer nearest you, call 1-800-4-PRECOR.
This manual explains how to assemble, use,and maintain the M9.1 or M9.2s PrecisionElectronic Treadmill. The following conventionsare used in this manual:
“Note:” Contains additional information thatapplies to the preceding text.
“Important:” Indicates information to whichyou should pay special attention.
“CAUTION:” Indicates steps or informationnecessary to prevent harm to yourself ordamage to the equipment.
“WARNING:” Provides instructions to preventelectrical damage to the equipment and preventinjuries to yourself or others.
“DANGER:” Indicates steps you must take toprevent electrical shock.
CAUTION: This unit weighs over 160 pounds.To avoid injury and to ensure the safety of theunit and yourself, get adequate assistancebefore dropping the sidewalls of the box andsliding the running bed assembly out of thebox. Do not lift the running bed from the box.

page 2
Diagram 1 Hardware kit
After unpacking the treadmill, open the hardware kit (refer to Diagram 1) and make sure that youhave the following items:
(A) Five flanged nuts — for installing the base plate
(B) four upper handrail console screws
(C) four upper handrail clamp screws
(D) one crank handle screw (M9.1 only)
(E) two external star washers — handrail clamp to column
(F) one 5/32" hex key — upper handrail clamp and display console
(G) one 3/16" hex key — crank handle and lower handrail clamp
(H) one 1/4" hex key — belt tracking and tension adjustment
(I) one magnetic safety key, cord, and clip
If any items are missing, contact the dealer from whom you purchased the treadmill, or call 1-800-4-PRECOR for the authorized Precor dealer nearest you.
Important: The packaging for this equipment was designed to protect it during shipment. If youplan on moving in the near future, please store the original packaging in a safe place.
I
G FH
A B C D
E

page 3
Setting Up the M9.1 or M9.2s Treadmill
2 You do not need any special knowledge or experience to set up the M9.1 or M9.2s treadmill.However, you must carefully review and follow the instructions in this manual. If you do notassemble and use this treadmill according to the following guidelines, you could void the Precorlimited warranty.
Installation Requirements
Follow these installation requirements when installing the treadmill:
• Fill out and mail the limited warranty card. The serial number is written on a label locatedunderneath the treadmill on the left, rear corner of the running bed. The best time to locateand write the serial number onto the limited warranty card and in this owner’s manual is whilethe treadmill is on its side during the assembly process. Refer to Obtaining Service, page 25.
• Additional tools required. To assist with the assembly process, acquire a 7/16" socket andrachet with a 3" extension.
• Set up the treadmill on a solid, flat surface. Do not install the treadmill on deeply padded,plush, or shag carpeting due to possible damage to the carpet and machine. If the treadmill isplaced on a carpeted surface, place a piece of heavy cardboard, plywood, or other smooth, flatsurface under the unit to protect the carpet and treadmill. If the floor is not even, the runningbelt will not track properly. Refer to Checking the Alignment of the Running Belt, page 9.
• Locate the treadmill at least 4 feet from walls and furniture. Be sure to provide ample spacein front of the machine to allow easy access to the ON/OFF switch. Open space to the sidesand rear of the machine makes for a safer mount and dismount and easier belt adjustment.
• Use a standard 120-volt household outlet. Precor recommends that you plug your unit into agrounded outlet dedicated to a 20 amp house circuit breaker. The treadmill is equipped with a20 amp circuit breaker to protect the electrical and electronic components from sustainedoverloads. An integral 3-prong plug protects the machine and is grounded for your safety.
Assembly Instructions
To assist you in the assembly of the treadmill, the items in the hardware kit, shown in Diagram 1,correspond to a particular letter in the alphabet. These letters appear throughout the assemblyinstructions. Refer to Diagram 1 while performing the steps below.
To assemble the M9.1 or M9.2s treadmill, take the following steps:
1. Locate the power switch at the front of the treadmill. Make sure that the power switch is in theOFF position and the treadmill’s power cord is unplugged. Do not assemble the treadmill if itis plugged in and turned ON.
2. Obtain appropriate assistance to lay the treadmill on its left-hand side. Placing the foamblocks on the hood of the treadmill, as shown in Diagram 2 (on the next page), helps elevatethe treadmill and keep pressure off the hood and side rail during assembly.
Note: Right and left are determined while standing to the rear of the treadmill facing towardthe hood.
CAUTION: Do not remove the 3-prong plug orotherwise bypass it with an adapter orextension cord in order to use a non-groundedoutlet.
CAUTION: Do not try to assemble the treadmillby yourself. Because of the weight of thetreadmill and its parts, get additional helpbefore performing the following steps.

page 4
3. Pick up and rotate the lift column so that the crossbar is at a 90 degree angle to the base ofthe treadmill. The guide tube, on the M9.1 only, should align with the grommet hole in thecrossbeam. Refer to Diagram 2. If necessary, remove the lower cable connector from insidethe crossbar.
4. Slide the crossbar a few inches out of the lift column. Insert the top of the lift column into thecrossbeam. Push the lift column through until the base plate is flush with the crossbeam. SeeDiagram 2. Have your assistant support the far end of the lift column.
5. Align the five holes in the lift column’s base plate with the studs in the crossbeam. Have yourassistant slide and hold the lift column into place while you put a flanged nut (A) on each ofthe five studs. Finger-tighten the nuts onto the studs.
6. Using your 7/16" socket wrench (a 3" extension rachet is helpful), begin to tighten the flangednuts. Alternate between each one, until the base plate is snug up against the crossbeam. Donot overtighten the nuts.
Note — M9.1 owners: Skip steps 7 and 8 if you have an M9.1 treadmill. Continue to step 9.
7. On the M9.2s, clip the tie wrap holding the clevis pin in the elevation tube. Remove the clevisand hitch pins. Due to the sensitivity of the lift calibrations, do not rotate the elevation tubemore than 90 degrees in either direction.
8. Carefully align the mounting holes on the crossbar and elevation tube and slide the crossbaronto the elevation tube. Insert the clevis pin (head of the clevis pin should be toward the rearof the treadmill) through both holes and re-attach the hitch pin.
Note: The M9.2s lift is elevated to a 1 percent incline for ease of assembly. The functioningand accuracy the lift mechanism depends on properly installing the clevis and hitch pins.
Install liftcolumn
Diagram 2
Crossbeam
Elevation tube location (M9.2s only)1
12
Foam blocksCrossbar
Ribbon cableBase plate
Lift columnGuide tube (M9.1s only)
Hood
Tie wrap (M9.2s only)Clevis pin (M9.2s only)

page 5
12. Place two external star washers (E) onto two of the upper handrail console screws (B) andalign the upper handrail clamp with the mounting holes on the lift column. See Diagram 4.
13. Insert the screws (B) through the handrail clamp and into the lift column. Tighten the screwssecurely with the hex key (F) provided.
14. Carefully route the ribbon cable through the slot on the left-hand side of the handrail clamp.
Note: Right and left are determined while standing to the rear of the treadmill facing towardthe hood.
15. If your hands are dirty, wash your hands before continuing to the next step. This will helpkeep the electronic console display clean.
Plugconnectorinto lowerboard
Diagram 3
Ribbon cable receptacle
Flanged nuts (A)Base plate
Motor chassisCross beam
Install upperhandrailclamp
Diagram 4
Handrail clamp
Ribbon cable
Lift column
9. Route the ribbon cable as shown in Diagram 3, so that you have easy access to the receptacleon the motor chassis.
10. Align the tab on the ribbon cable connector with its counterpart located on the receptacle inthe motor chassis. Plug the connector into the receptacle. See Diagram 3. The plastic flangeson the receptacle should clip onto the connector when you plug it in. Since the connector isdesigned to engage in one direction only, do not force the connector into the receptacle.
11. Have your assistants help you return the treadmill to an upright position, so that the base isflat on the floor.
Incline crank shaft (M9.1 only)
Ribbon cable connector
External star washers (E)Handrail console screws (B)

page 6
16. Hold the electronic console over the handrail clamp to attach the ribbon cable connector intoits receptacle. On the M9.1, make sure that you hold the potentiometer cable away from thereceptacle as you push the connector into place. See Diagram 5. Align the tab on the ribboncable connector with its counterpart located on the receptacle and plug the connector into thereceptacle using your fingers as shown in Diagram 5. The plastic flanges on the receptacleshould clip onto the connector when you plug it in. The connector is designed to engage inone direction only. Do not force the connection.
If, at a later date, you need to disengage the connector, push the flanges off of the connectorand use your fingers to pull the connector away from its receptacle.
INCLINE
CAUTIONKeep hands and clothing aw
bed, belt and rear roller when tread
is in operation. As with any power
drivern equipment, DO NOT allow
children and persons unfamiliar with
operation on or near this treadmill.
Always straddle belt when starting
the treadmill. Step onto belt only at
speeds 1mph and slower.
Diagram 5 Attach cable to display
ConnectorPlastic flange on receptacle
Ribbon cablePotentiometer cable (M9.1 only)
Diagram 6
Handrail clamp
Electronic console
Ribbon cable
Lift column
17. Align the electronic console mounting holes with the handrail clamp. Mount the electronicconsole onto the handrail clamp by inserting the two remaining handrail console screws (B).See Diagram 6. Insert the screws through the base of the handrail clamp and into theelectronic console. Tighten the screws securely with the hex key (F) provided.
18. Carefully push the excess cable up inside the handrail console compartment. Check to be surethe cable forms a smooth loop. If the cable is pinched or damaged by improper installation, itwill not be covered by the limited warranty.
Note: M9.2s owners skip to step 20.
Incline crank shaft (M9.1 only)
Lift column
Handrail clamp not shown
Handrail console screws (B)
Attach electronic console tohandrail clamp
page 7
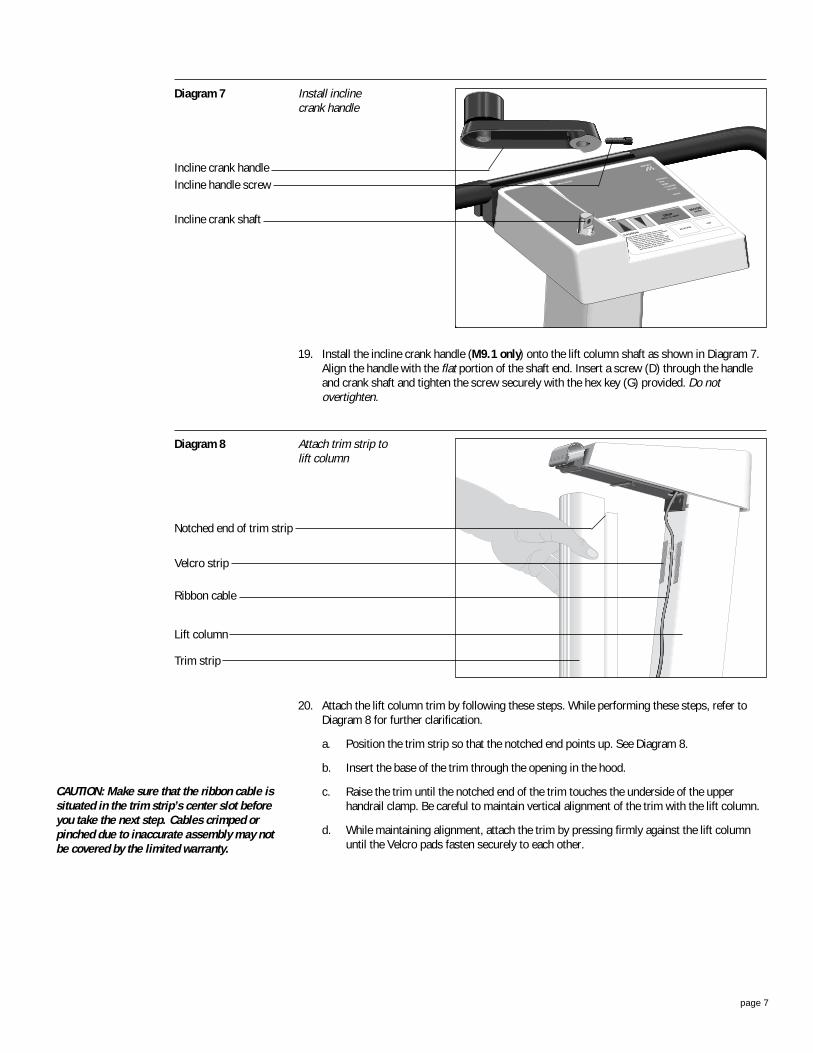
19. Install the incline crank handle (M9.1 only) onto the lift column shaft as shown in Diagram 7.Align the handle with the flat portion of the shaft end. Insert a screw (D) through the handleand crank shaft and tighten the screw securely with the hex key (G) provided. Do notovertighten.
20. Attach the lift column trim by following these steps. While performing these steps, refer toDiagram 8 for further clarification.
a. Position the trim strip so that the notched end points up. See Diagram 8.
b. Insert the base of the trim through the opening in the hood.
c. Raise the trim until the notched end of the trim touches the underside of the upperhandrail clamp. Be careful to maintain vertical alignment of the trim with the lift column.
d. While maintaining alignment, attach the trim by pressing firmly against the lift columnuntil the Velcro pads fasten securely to each other.
ERGO/SMART DISTANCE
TIMESPEED
CALORIES
INCLINE
MODE
SPEEDSTOP
HOLD TO RESET
MODEENTER
ACTIVATE
OFF
CAUTION
Keep hands and clothing away from
bed, belt and rear roller when treadmill
is in operation. As with any power
drivern equipment, DO NOT allow
children and persons unfamiliar with
operation on or near this treadmill.
Always straddle belt when starting
the treadmill. Step onto belt only at
speeds 1mph and slower.
Diagram 7 Install inclinecrank handle
Incline crank handleIncline handle screw
Incline crank shaft
Diagram 8 Attach trim strip tolift column
Ribbon cable
Trim strip
Lift column
Velcro strip
Notched end of trim strip
CAUTION: Make sure that the ribbon cable issituated in the trim strip’s center slot beforeyou take the next step. Cables crimped orpinched due to inaccurate assembly may notbe covered by the limited warranty.

page 8
21. Insert the upper end of a handrail into the upper handrail clamp until the black foam wrap justtouches the clamp. See Diagram 9. Set the base of the handrail on the floor. Repeat this stepfor the other handrail.
Note: Look underneath the upper handrail clamp to be sure that the handrail ends meet in themiddle of the clamp.
22. Insert the four upper handrail clamp screws (C) into the upper handrail clamp and finger-tighten. Do not tighten the screws more than finger tight at this point.
Attach lowerhandrails
23. To mount the lower portion of the handrails to the treadmill, refer to Diagram 10 while takingthe following steps:
Note: Perform these steps on one side of the treadmill before proceeding to the other side.
a. Use the supplied hex key (G) to remove the screws that hold the lower handrail clamp inplace.
b. Place the lower portion of the handrail onto the plastic cradle. You may need to gentlyflex the lower portion of the handrail toward the front of the treadmill to securely seat theend of the tube onto the projecting ledge of the cradle.
c. Re-install the handrail clamp over the tube, align the screw holes, insert and finger-tighten each screw.
d. To secure the handrail inside the clamp, use the hex key (G) provided. Do not overtightenthe screw or damage may occur to the clamp.
Upper handrail
Electronic console display
Trim stripUpper handrail clamp
Diagram 9 Install upperhandrails
Upper handrail clamp
Cable tie & fastener
Ribbon cable
Lower handrail clamp
Projecting ledge
Plastic cradle
Handrail
Side rail
Diagram 10
Screw hole

page 9
Note: After extensive use, vibrations from the treadmill may cause the clamp to loosen.You may need to periodically inspect the screws and, if necessary, tighten the handrailclamp screws using the hex key (G) provided.
e. Proceed to the other side of the treadmill and follow steps a through d to complete theinstallation of the lower handrails.
24. Return to the upper handrail clamp, look underneath the clamp to be sure that the handrailends meet in the middle of the clamp, readjust the handrails if necessary, and tighten thescrews securely using the hex key (F) provided.
25. If you need to move the treadmill, ask for additional assistance. Check to be sure the treadmillis turned OFF and the power cord is unplugged from the power outlet. Roll the treadmill on itsfront wheels to the new location by lifting the rear end of the unit.
26. Plug the treadmill into a standard 120v household outlet. Make sure that no other appliancesuse the same circuit as the treadmill.
27. Continue on to Checking the Alignment of the Running Belt on the following page to completethe installation of the treadmill.
Checking the Alignment of the Running Belt
The belt is aligned at the factory before shipment. However, during shipment or by using thetreadmill on an uneven surface, the belt might move off center. Proper belt alignment is importantbecause it allows the belt to remain centered and assures smooth operation. Follow these steps tocheck the alignment:
1. On the electronic console, move the magnetic safety key to the ACTIVATE position. Locate theON/OFF switch at the front of the treadmill and turn ON the treadmill.
2. Stand beside the treadmill and answer the standard start-up questions as instructed below:
a. At the “ENTER WEIGHT” prompt, specify a weight and press the SCAN/ENTER key.
b. At the “SELECT COURSE” prompt, use the arrow keys to select “MANL” (Manual) modeand press SCAN/ENTER.
3. Continue standing next to the treadmill and bring the running belt up to a speed of 2 miles perhour by pressing the SPEED key.
4. Walk to the back of the treadmill and observe the belt as it moves (watch for a couple ofminutes).
If the running belt,… Then,...
tracks within the green portion the belt is functioning correctlyof the label and no adjustment is necessary.
runs or drifts into the red portion you need to adjust the belt;of the label see Aligning the Running Belt in
Chapter 6.
Important: If you notice that the belt needs alignment, make the adjustments at once. Failureto do so might cause the belt to tear or fray which is not covered by the Precor limitedwarranty.
5. Press STOP or SPEED until the running belt stops.
If the belt is functioning correctly, the treadmill is ready to use.
CAUTION: Do not walk on the running beltduring this procedure.
CAUTION: If you hear or notice any chafing orthe running belt appears to be gettingdamaged, stop the running belt immediatelyby pressing the STOP key. Contact a PrecorService Representative.
CAUTION: Do not remove the 3-prong plug orotherwise bypass it with an adapter in orderto use a non-grounded outlet.

page 10
Using the M9.1 or M9.2s Treadmill
3 As simple as using the M9.1 or M9.2s treadmill might seem, you should read this section so thatyou can use it safely and effectively. This section provides information about the electronic consolefeatures which include the following:
• information about the ON/OFF (I/O) switch
• instructions for using the magnetic safety key
• a brief description of the electronic console
• instructions for changing the display from U.S. Standard to Metric
• M9.2s only — instructions for selecting the Time or Distance prompt
Locating the ON and OFF Switch
Use the ON/OFF (I/O) power switch to turn the treadmill ON or OFF. This switch is located at thefront of the treadmill, near the power cord.
Note: You cannot turn ON (I) the treadmill until the magnetic safety key is placed in the ACTIVATEposition.
Using the Magnetic Safety Key
The magnetic safety key lets you stop the treadmill’s running belt. Use this key in an emergency orwhen you are finished exercising. Pulling the key off the console or moving it to the OFF position,has the same effect as turning OFF the treadmill using the ON/OFF switch. Once you remove thekey from the ACTIVATE position, the running belt slows to a gradual stop.
Important: Always attach the magnetic safety key to your clothing before each workout. Use theclip provided on the end of the cord.
Diagram 11 Magnetic safety key
ENTER
Speed
Incline
Scan
STOPHold to Reset
Electronic console label
ACTIVATE OFF
Magnetic safety key
Before you can operate the treadmill, you must move the magnetic safety key to the ACTIVATEposition on the electronic console. See Diagram 11. The treadmill will not turn ON unless the safetykey is in this position.
page 11
Understanding the Electronic Console
The electronic console lets you control your workout session. As you work out, the electronicdisplay provides constant feedback about your progress. Information about distance covered,elapsed time, speed, calories burned, and degree of incline is available at any time. Diagram 12shows an example of the M9.2s electronic console display.
Displays on the Electronic Console
The indicator lights on the electronic console show you what information is being displayed.Information from five distinct fields (shown in Diagram 12) can appear: DISTANCE, TIME, SPEED,CALORIES, and INCLINE.
Diagram 12 M9.2s electronicconsole display
DISTANCE: The distance you have travelled appears once you begin a workout. Distance canappear in miles or kilometers. If you bought your treadmill in the U.S., it is programmed at thefactory to display the U.S. standard unit of measure. If you wish to change the display, you canfollow the instructions found in Changing the Display to U.S. Standard or Metric. The maximumdistance you can travel in a single workout is 99.99 miles (161 km) before the odometer resets at00.00 and begins over again.
TIME: During your workout, a time (00:00) display appears automatically and stops whenever youstop walking or running. As you work out, you will notice that the time starts at zero and counts upwhen you use manual or interval modes.
SPEED: Once you begin a workout, the speed at which you are travelling appears in this display.Your speed can appear in miles per hour (.5 to 9 mph) or kilometers per hour (.8 to 14 kph). If youwish to change the display, see Changing the Display to U.S. Standard or Metric.
CALORIES: When you enter your accurate weight, the number of calories you are burning appearsin this display while you work out. At the end of your workout, the total calories burned isdisplayed.
INCLINE: The M9.1 and M9.2s treadmills provide a range of inclines from 1% to 10%. On the M9.1you have to use the incline crank to adjust the incline. On the M9.2s, you press the INCLINE keys to increase or decrease the incline level of your workout.
DistanceTimeSpeedCaloriesIncline
Scan

page 12
Keys on the Electronic Console
The keys on the electronic console let you change the speed, stop the treadmill, reset the displays,or control which features appear on the display. Each key and its function is explained below:
SPEED : Use the SPEED keys to change belt speed. Belt speed starts at .5 miles per hour(mph) and increases in .1 mph (.2 kph) increments while you hold the key. You can increasespeed up to 9 mph (14 kph). When you decrease speed, belt speed decreases at a rate of .1 mph(.2 kph) while you hold the key. You can stop the running belt in this way.
Anytime during your workout, you can view your speed in minutes per mile (or kilometer). In otherwords, you can see how many minutes it takes you to walk or jog a mile (or kilometer). To use thisfeature, simultaneously press both SPEED keys and the information will appear on the screen.When you release both keys, the speed display returns to the per hour measurement you originallyset. See Changing the Display to U.S. Standard or Metric.
STOP: To pause or end your workout, press the STOP key. The running belt stops and the displayson the console freeze.
SCAN/ENTER: The SCAN/ENTER key has three functions which let you:
• alternate between the displays every few seconds (SCAN).
• accept specific prompt selections (ENTER).
• highlight specific displays (ENTER).
SCAN
In general, the electronic console display is set to scan, so the different features (DISTANCE,TIME, SPEED, CALORIES, and INCLINE) alternately appear in sequence every few seconds. Ifthe display is set to “scan,” two indicator lights appear to the left of the word SCAN on thedisplay and remain stationary while you are in the SCAN mode. Another two indicator lightsappear next to the field that is being displayed. The indicator lights move sequentially througheach field every time a new field appears on the display.
ENTER
To cause a specific feature, such as the SPEED, to continuously appear on the display, pressthe ENTER key until the two round indicator lights appear next to the word “SPEED.”
To specify a weight, select a workout mode (INTV or MANL), or reset U.S. Standard or Metricconfigurations, you need to use the ENTER key.
If you wish to display a particular feature during your workout, press the ENTER key until thepair of lights appear next to the feature you want to display. The pair of lights next to aparticular feature, such as TIME, indicate which feature is currently being displayed.
ACTIVATE: If the magnetic safety key is not in the ACTIVATE position, you cannot turn ON thetreadmill. If used properly, the magnetic safety key helps to protect you from injury during yourworkout. Attach the magnetic safety key to your clothing prior to stepping onto the running bedand beginning your workout. If you encounter a problem during your workout, simply pull on thesafety key’s cord to stop the running belt. When the magnetic safety key is removed from theACTIVATE position, it trips the treadmill’s circuit breaker, turns OFF the treadmill, and stops therunning belt.
OFF: After completing your workout by pressing the STOP key, place the magnetic safety key onthe OFF position. This turns OFF the treadmill. Remove the magnetic safety key and store it in asafe place to ensure that children or an unauthorized person will not be able to activate or use thetreadmill.

page 13
Changing the Display to U.S. Standard or Metric
The M9.1 or M9.2s treadmill can display speed in either miles per hour (mph) or kilometers perhour (kph). When the treadmill is shipped from the factory, it is set to display in U.S. Standardunits of measure. You can easily change these settings by taking the following steps:
Note: The treadmill will retain your selection even when it is turned OFF and unplugged. You canchange your selection at any time, simply by repeating the following steps.
1. Place the magnetic safety key in the ACTIVATE position on the electronic console. Walk to thefront of the treadmill and turn the power switch ON. (The magnetic safety key must be placedin the ACTIVATE position before you can turn ON the treadmill.)
2. Straddle the running belt with your feet firmly planted on the right and left side platforms.(Stand close enough to the electronic console, so that you can extend your arm and touch thekeypad.) Use the clip on the magnetic safety key and attach it to your clothing at yourwaistline.
3. At the “ENTER WEIGHT” prompt, simultaneously press and hold the SPEED key and theSCAN key. The prompt, “PRESS FOR MPH & MILES MODE OR FOR KPH & KILOME-TERS MODE” appears on the display. Release both keys.
4. Use the appropriate SPEED or key to indicate your selection.
You can continue your workout by following the appropriate steps found in Quick Steps to Working Out or turn OFF the treadmill by moving the magnetic safety key to the OFF position.
Selecting the Time or Distance Prompt on the M9.2s
When using a M9.2s preprogrammed course, you can measure your workout by distance or time.You see the “SELECT DISTANCE” or “SELECT TIME” prompt after you enter a course selection. Thedefault measurement is distance.
To change the prompt, follow the steps above in Changing the Display to U.S. Standard or Metric.
1. After step 4 above, two messages scroll across the display: one confirms your mph or kphselection and the other states, “PUSH FOR DISTANCE FOR TIME OR ‘STOP’ FOR ASK.”Press the appropriate key after answering one of the following if/then scenarios:
If you want,... Then,...
your workout measured by distance press the key
your workout measured by time press the key
the option of selecting time ordistance prior to each workout press STOP
After you press an arrow key, a message scrolls across the displayconfirming your selection.
2. Continue with your workout or turn OFF the treadmill by removing the magnetic safety keyfrom the ACTIVATE position on the electronic console. If you turn OFF the treadmill, be sure tostore the safety key in a safe place to prevent unauthorized use.

page 14
Working Out on Your Treadmill4 A variety of exercise options are available on the M9.1 and M9.2s treadmills which are discussed inthis section and include:
• instructions for exercising on the treadmill
• an explanation of how to change incline on the M9.1
• information about how to retrieve a previous workout
• instructions for pausing or ending your workout
• information about how to incorporate a cool-down period
• information about using Manual, Interval, and Program modes
Before using your treadmill, we recommend that you read these instructions and go through apreliminary demonstration of the treadmill. Then, you will be familiar with the treadmill when youbegin your workout.
When using the treadmill, follow these general guidelines:
• At the beginning of a workout, take several minutes to bring your heart rate into your trainingzone, which is shown in Diagram 14 later in this manual.
• After your workout, walk slowly for several minutes to cool down your body and lower yourheart rate.
• Using the clip provided, attach the magnetic safety key to your clothing before each workout.Then, if you encounter difficulties or want to end your workout, you can easily stop therunning belt by pulling on the cord.
• Gently stretch your lower body and back before and after a workout to help prevent stiffnessor soreness.
Photo 1 Working out onthe treadmill
CAUTION: If this is the first time you haveoperated this treadmill, DO NOT STAND onthe running belt until you become familiarits operation.

page 15
To workout on the treadmill, follow these instructions.
1. On the electronic console, place the magnetic safety key in the ACTIVATE position. Walk to thefront of the treadmill and turn ON the treadmill using the ON/OFF switch. The safety key mustbe in the ACTIVATE position before you can turn ON the treadmill.
2. Straddle the running belt with your feet firmly planted on the right and left side platforms.Stand close enough to the electronic console so you can extend your arms and touch thekeypad.
3. Using the clip provided, securely attach the magnetic safety key to your clothing at yourwaistline where it will not interfere with your workout.
4. When you see “ENTER WEIGHT” scroll across the display, specify your weight using the keys. When the correct weight is displayed, press ENTER.
The number on the display moves in 5-pound (2-kilogram) increments. You must select theweight closest to your to your actual weight so that the treadmill can provide accuratefeedback about calories burned during a workout.
Once your weight is specified, you may not need to enter it again. The treadmill automaticallyremembers the last weight entered. At your next workout, simply press ENTER at the “ENTERWEIGHT” prompt. (If another person has used the machine and changed the weight, you willneed to re-enter your weight as described in this step.)
5. At the “SELECT COURSE” prompt, choose your workout mode, either Interval (INTV), Manual(MANL), or one of the preprogrammed courses (M9.2s only). Press the keys until yousee the desired mode, then press ENTER. For more information about the two differentmodes, read the following pages.
Once you specify the mode, the treadmill automatically remembers it. If no one else uses thetreadmill or makes any changes before your next workout, you can simply press ENTER at the“SELECT COURSE” prompt and activate the same mode.
Important: If you choose “INTV” mode, refer to Changing the Interval Course Profile beforecontinuing on to the next steps.
6. Hold onto the handrail with one hand and press the SPEED key with the other hand. Steponto the running belt while it is at or below 1 mph. Once you are comfortable with the walkingor running speed, you may remove your hands from the handrail.
Note: To pause during your workout session, press the STOP key. The features on the displayremain, but your workout statistics stop accumulating. See Pausing Your Workout or EndingYour Workout for more information. Remember to hold onto the handrail when using theelectronic console and when slowing down or stopping the running belt.
7. When you are finished exercising, hold onto the handrail and press STOP or press SPEED .The running belt slows to a stop. You can then review your workout results as the displayscans through DISTANCE, TIME, and CALORIES.
Important: Always allow yourself a cool-down period of a few minutes before bringing therunning belt to a complete stop. On the M9.2s, press STOP twice in quick succession at theend of a course to access Manual mode and begin a cool-down period.
8. If desired, after reviewing the displays, reset them to zero by pressing and holding STOP forseveral seconds.
9. Detach the magnetic safety key cord from your clothing and place the safety key in the OFFposition on the electronic console. The treadmill turns OFF. To prevent unauthorized use,remove the safety key from the treadmill and store it in a safe place.
Quick Steps to Working Out
Position the Safety Key on ACTIVATE.1Turn ON treadmill.
Straddle belt.2
Attach safety clip to clothing.3
Enter Weight4
Tip—If you want to access thelast course stored in memory, atthe “ENTER WEIGHT” prompt, tapthe ENTER key 3 times.
Select Course.5
6 Start working out.
Tip—Use the optional SmartWeights to enjoy the added benefitof an upper body workout. (Pause)To purchase Smart Weights, callyour local dealer 1-800-4-PRECOR.
End workout.7
(Cool down)
Review workout statistics.(Press HOLD TO RESET)
Remove Safety Key and store it in asecure place. Turn OFF the treadmill.
8
9

page 16
Changing Incline on the M9.1
When you use the incline crank handle, you can change the incline, up to 10 %.
• to raise the incline, rotate the handle clockwise
• to lower the incline, rotate the handle counterclockwise
Incline changes occur in 1% increments. Whenever you change the incline, the percent of inclineautomatically appears on the console display.
You can change incline anytime during your workout. However, you should stand on the sides ofthe treadmill (the side platforms) and straddle the running belt when you change the incline.
Retrieving the Previous Workout Program
To retrieve the previous workout program, simply tap the ENTER key successively three timeswhile the start-up prompt “ENTER WEIGHT” is being displayed. Note that if someone else hasexercised on the treadmill after your workout, whatever program he or she used will be the one thatis restored from memory.
Pausing Your Workout
You can pause at any time during your workout. Use this feature to rest or take a short break. Topause while working out, press the STOP key. The running belt stops. Remove the safety key clipand straddle the running belt so that you can safely step off the treadmill. Your workout statisticsfreeze and remain displayed on the console until you resume your workout.
Do not rely on the Pause feature as a way to end your workout. If you wish to end your workout,follow the instructions in Ending Your Workout.
To resume your workout, straddle the running belt, attach the safety key clip to your clothing,press the SPEED key to start the running belt, hold the handrail, and step onto the running beltwhile the speed is at or below 1 mph. Your workout statistics continue from where you left off.Continue to press the SPEED key, to increase the speed to a comfortable level. Once you arecomfortable with the walking or running speed, you can remove your hands from the handrail.
Cooling Down After a Workout
Cooling down after your workout is important because it helps reduce muscle stiffness andsoreness by transporting excess lactic acid out of the working muscles. It also provides a smoothtransition that allows your heart rate to return to its normal (non-exercising) state.
You can cool down after a workout by accessing manual mode (MANL). Manual mode lets youchange the speed and incline and adapt a cool-down period to your particular workout. TappingSTOP twice in quick succession accesses MANL mode from any of the treadmill’s programs.
Ending Your Workout
To end your workout, take the following steps:
1. Hold onto the handrail and press the STOP key or press the SPEED key until the runningbelt slows to a gradual stop. The displays on the console freeze which lets you review yourworkout statistics.
2. Continue to press STOP (HOLD TO RESET) for a few more seconds to add your workoutstatistics to the cumulative totals and return to the “ENTER WEIGHT” prompt.
3. Straddle the running belt and step off the treadmill.
4. To prevent unauthorized use, remove the magnetic safety key and store it in a safe place. Toaccess the same program the next time you workout, tap the ENTER key successively threetimes.

page 17
Using the Manual Course Mode
Manual mode lets you use the treadmill for an indefinite period of time while controlling the speedand incline of your workout. All of your workout statistics are compiled and displayed on theelectronic console.
To use Manual mode, follow the steps in Working Out on Your Precor Treadmill. At the “SELECTCOURSE” prompt, choose “MANL.”
On the M9.2s, if the “SELECT MILES” or “SELECT TIME” prompt scrolls across the display, specifythe length of your course or the length of your workout using the keys, and then, press ENTER.
Note: On the M9.2s, you can choose a distance from .5 to 99.5 miles (kilometers) or a length oftime from 5 to 99 minutes. You can select which prompt appears by following the instructions inSelecting the Time or Distance Prompt.
Changing the Interval Course Profile
Interval training provides numerous benefits. Since interval training segments the workout intosmaller components, a 20- or 30-minute workout seems to pass more quickly. In addition, studieshave shown that it is a more efficient method for achieving aerobic benefits—you start seeingimproved cardiovascular fitness much sooner with less effort. Studies also show that people whointerval train are more likely to stick with their fitness program.
The interval course on the M9.1 or M9.2s treadmill lets you set course intervals according to yourtraining regimen. It alternates between 60 seconds of “Rest” and 60 seconds of “Work.” During theRest interval, you can walk or jog slowly; during the Work interval, you can stride quickly or run.You set the speed for the first rest and work interval and the software takes over from there,repeating the intervals throughout the course until you press the STOP key.
At any point during the workout, you can change the speed of the current interval. For example, if 8mph is a little faster than you prefer during a Work interval, simply use the SPEED key to reducespeed. The software remembers the new speed for the next Work interval.
To help you monitor your workout, you can set the treadmill’s electronic display to SCAN bypressing the SCAN key until the indicator lights appear next to the word SCAN on the display. Thismode displays a sequential readout on DISTANCE, TIME, SPEED, CALORIES, and INCLINE.
Note: If you pause your workout during an Interval mode, you must reset the speed of the modeyou were in when you paused your workout. For example, if you paused your workout during theRest interval, you must reset the speed for that interval. In this example, you would not need toreset the speed for the Work interval since it is stilled stored in memory.
Below are some suggestions that may help you incorporate the Interval mode into your workout:
• If you are starting an exercise program, the Interval mode option can help you increase yourworkload gradually. For example, in the beginning, you may simply want to specify the samespeed and incline for both Work and Rest intervals. Then, to increase your effort level, changeto a higher speed and/or incline for your Work interval.
• If you are training with the goal of maintaining a constant pace when on level ground or grade,specify the same speed for both Work and Rest intervals. Then, gradually increase the inclineduring the Work interval until you can maintain a constant pace.
To use the interval course, follow the steps in Quick Steps to Working Out. “SELECT COURSE” prompt, use the keys to display “INTV,” and press ENTER.
To set the interval for the course, take the following steps:
1. When you see the scrolling prompt requesting that you enter your rest speed (and incline —M9.2s only), stand on the running belt with one hand on the handrail, prepared to startwalking. With your other hand, press the SPEED key until you reach a comfortable restspeed, either running or walking. When the desired speed is displayed, simply continueworking out—you do not need to press ENTER.

page 18
Once you reach your desired rest speed, the treadmill remembers that speed and returns to itat the beginning of each rest interval, until you change the speed or end your workout.
2. The next scrolling prompt requests that you specify your work speed (and work incline —M9.2s only). With one hand on the handrail, use the other hand to press the SPEED keysuntil the desired work speed (up to 9 mph) is shown. When you are comfortable with the restand work speeds, you can let go of the handrail.
Note: On the M9.1, use the incline crank handle to change the degree of incline. Hold onto thehandrail with one hand while you rotate the crank in a clockwise direction to raise the inclinewith the other hand. To lower the incline, rotate the handle counterclockwise.
Each rest and work interval lasts 60 seconds. The display automatically counts down to the nextinterval. When the count reaches 30 seconds, the display changes and gives information aboutdistance travelled, time elapsed, speed, calories burned, and percent of incline.
When the treadmill changes intervals, it informs you by scrolling a message across the display.
Using the interval course mode, you can cool down before ending your workout by pressing STOPtwice in quick succession. The treadmill enters manual mode, letting you specify the speed of yourcool-down period.
Using the M9.2s Preprogrammed Courses
To use a preprogrammed course, follow the instructions below. Remember, when you use theelectronic console, hold onto the handrail to maintain your balance. You should also use thehandrail whenever you speed up, slow down, or stop the treadmill.
1. On the electronic console, move the magnetic safety key to the ACTIVATE position as shownin Diagram 11, page 10. Walk to the front of the treadmill and turn ON the treadmill using theON/OFF switch. The treadmill switch will not turn ON unless the safety key is seated securelyin the ACTIVATE position.
2. Straddle the running belt with your feet firmly planted on the right and left side platforms.Stand close enough to the electronic console so that you can extend your arms and activatethe keys.
3. Using the clip provided, securely attach the magnetic safety key to your clothing at yourwaistline, where it will not interfere with your workout.
4. When you see “ENTER WEIGHT” scroll across the display, specify your weight using any key. When the correct weight is displayed, press ENTER. This information allows the M9.2s tocalculate how many calories you use during your workout.
The number on the display moves in 5-pound increments up or down, depending on thearrow key pressed. Use to increase and to decrease the weight displayed.
Once your weight is specified, you may not need to enter it again. The treadmill automaticallyremembers the last weight entered (unless the treadmill is turned OFF). At your next workout,you restore your weight from the treadmill’s memory by simply pressing ENTER at the“ENTER WEIGHT” prompt. However, if someone else has used the treadmill and madechanges prior to your workout, you will need to re-enter your weight.
Note: The prompt “PRESS ENTER TO BEGIN” appears after a few seconds if you have notchosen a course and pressed ENTER. This prompt continues to scroll across the display everyfew seconds until you press ENTER.
CAUTION: Before beginning any fitnessprogram, you should have a completephysical examination by your physician. If youare unsure about your level of fitness, consultyour physician. Always start your workout atthe low or “WALK 1” level and work toincrease your level of fitness before perform-ing moderate or advanced workout routines.
CAUTION: If this is the first time you haveoperated this treadmill, DO NOT STAND onthe running belt until you become familiarthe M9.2s operation. Be sure to read andfollow the general guidelines found in“Working Out on Your Precor Treadmill.”

page 19
5. At the “SELECT COURSE” prompt, choose your workout course using the keys: eitherWALK 1 through WALK 5 or RUN 1 through RUN 5 and then press ENTER. The course youchoose takes you through a set series of incline intervals with inclines varying according tothe level of the course.
The label on the electronic console shows the available courses. The courses combine .5-milesegments with a set series of inclines. The percent of incline and the frequency with whichinclines are encountered indicate the difficulty of the course. For example, WALK 1 takes theuser through inclines ranging from 0 to 3 percent grade, while RUN 5 uses inclines in theminimum to maximum range on a more frequent basis. The program repeats the .5-milesegments until the distance or time limit you set is reached, or you press the STOP key.
Note: If you do not press ENTER to select a course, after 10 seconds the prompt “PRESSENTER TO BEGIN” appears. This prompt continues to scroll across the display every fewseconds until ENTER is pressed.
6. At the “SELECT MILES (kilometers)” prompt, specify the length of your course. Press thearrow keys to choose distance; the display moves in .5 increments, from .5 to 99.5 miles (.8to 160 kilometers). Press ENTER when the desired distance appears.
Note: You can change the “SELECT TIME” prompt to “SELECT DISTANCE” if you prefer tomeasure your workout by distance. Follow the procedure in Selecting the Time or DistancePrompt.
If you see “SELECT TIME” scroll across the display, specify the length of your workout. Pressthe or key to choose time; the display moves in 1-minute increments, from 5 to 99minutes. Press ENTER when the desired time appears.
7. Stand on the running belt with one hand on the handrail, prepared to start walking. With yourother hand, press the SPEED until you reach your desired speed.
The course will continue until the specified distance or time is reached, or until the STOP keyis pressed. Any time during your workout, you can change your speed. However, since theincline is preset, the incline keys are disabled.
8. When you are finished working out or you have come to the end of the course, hold onto thehandrail and press STOP. The treadmill will come to a safe stop. Be sure to remove the safetyclip from your clothing and return it to the OFF position on the electronic console. To preventunauthorized use, remove the safety key and store it in a safe place.
Note: If desired, you can cool down before ending your workout by pressing STOP twice inquick succession. The treadmill will stop and enter the Manual mode, allowing you to specifythe speed and incline of your cool-down period.
page 20
Getting the Most Out of Your Workout
5 A workout on the M9.1 or M9.2s Precision Electronic Treadmill provides excellent and efficientcardiovascular conditioning, while strengthening and toning all the major muscle groups in thelower body. Darkened areas in Diagram 13 indicate the muscles improved.
Diagram 13
1. Trapezius
2. Deltoid
3. Pectorals
4. Rhomboids
5. Triceps
6. Biceps
7. Latissimus Dorsi
8. Forearm Flexors/Extensors
9. Abdominals
10. Erector Spinae
11. Gluteals
12. Hip Flexors
13. Quadriceps
14. Hamstrings
15. Gastrocnemius/Soleus
16. Peroneus Longus/Brevis
Muscles improved
To get the most out of each workout, a general understanding of the principles behind aerobictraining is invaluable. The best source of information is your specialty fitness dealer. In addition toproviding information on which exercise equipment is best for your individual needs, your fitnessdealer can provide useful advice on training, technique, and exercise physiology. Your dealer canalso recommend good books and videos on these subjects.
To help you get started in planning and carrying out your fitness program, this section providessome basic information on aerobic exercise—such as how hard should you work out, how longeach session should be, and how often you need to exercise to benefit from a regular program.
9
16
6
12
2
1
43
16
1
8
5
8
1314
15
11
107

page 21
Diagram 14 Training zones
How Hard Should I Exercise?
Studies show that to achieve the benefits of aerobic exercise, it is necessary to work out hardenough to raise your heart rate to a certain minimum level, called the “training zone.” Your trainingzone depends on your age and level of fitness.
Diagram 14 shows your recommended heart rate training zone, which is calculated using your ageand your maximum aerobic heart rate. The chart is based on a resting heart rate of about 72 formales and 80 for females. Your optimum training zone is between 65% and 80% of your maximumaerobic heart rate. For efficient aerobic exercise, work only hard enough to keep your heart rate inthis zone. You will obtain the greatest fat-burning benefits when you exercise within the optimumtraining zone.
Pushing yourself beyond the recommended range, (that is, exercising so hard that your heart raterises above 80% of maximum) can overstress your muscles. To increase cardiovascular improve-ment, exercise longer, not harder.
Keep in mind that this zone is an approximation, to be used as a guideline—individual heart ratesvary according to several physiological factors. To determine your training zone, find your age onthe diagram, and then find the line where they intersect. For example, if you are 35 years old, yourtraining zone is between 120 and 148 beats per minute. Remember this zone—this is the heart ratezone you should try to maintain as you work out.
If you do not have an accurate heart rate monitor, you can determine your heart rate by taking yourpulse at a place that you can reach easily and comfortably while you exercise. Typical places formeasuring heart rate are directly over the heart on the left side of the chest, on either side of theneck, over the temple, or on the thumb side of either wrist. Wherever you measure your pulse,make sure that you use your index and middle fingers—not your thumb. Your thumb has a strongpulse and can affect your pulse rate reading.
HEART RATE TRAINING ZONE
70
80
90
100
120
130
140
150
160
170
180
190
200
20 25 30 35 40 45 50 55 60 65 70 75YOUR AGE
YOUR
HEA
RT R
ATE
MAX.HEARTRATE
80% OFMAX.HEARTRATE65% OFMAX.HEARTRATE
130 127120 117 114 111 107 104
97
160156
148144
140136
132128
124120
190185
180175
170165
160155
150145
RECOMMENDED TRAINING ZONE
94
124
152
116
101
195200

page 22
Once you locate your pulse, look at a clock with a second hand, and count the beats for sixseconds. Multiply that number by 10 to determine the total number of beats per minute. Forexample, if you count 14 beats over six seconds, the total number of beats per minute is 140.Compare the total number of beats with your training zone as identified in Diagram 14. If neces-sary, increase or decrease your activity level to bring your heart rate into your training zone. Youcan regulate your work level (and heart rate) by changing belt speed and incline. Remember—your heart rate is the definitive measure of how hard you are working.
Regardless of your fitness level, avoid doing too much too soon. Running or walking too fast orchoosing too high of an incline are common errors. Give yourself time to become familiar withyour treadmill and to improve your fitness level. Then you can gradually increase speed and inclineto make your workouts more challenging.
How Long Should I Exercise?
The length of each exercise session depends on your fitness level. Exercise physiologists havedetermined that, to attain cardiovascular benefits from exercise, you should maintain your heartrate in its training zone for at least 15 minutes. This is in addition to your warm-up time, and doesnot include cool down. You should always allow several minutes to bring your heart rate into thetraining zone, by starting out slowly and gradually increasing work level. Similarly, use severalminutes of light exercise after the workout to bring your heart rate down to near resting level.
The higher your fitness level, the longer you should maintain your heart rate in the training zone(between 20 and 30 minutes). Beginners should always start slowly, and gradually bring theirsessions up to 20 minutes or more.
How Often Should I Exercise?
Research indicates that aerobic sessions of 20 minutes or more should be done at least three tofive times a week to obtain significant cardiovascular benefits. Most experts agree that sensibleeating habits and regular aerobic exercise are the keys to weight control and fitness. A recentstudy, which tracked several subjects over a period of years, conclusively shows that exercise, notdieting, is the key factor to long-term weight loss.

page 23
Maintaining Your Treadmill
The M9.1 or M9.2s Precision Electronic Treadmill requires little maintenance to keep it runningsmoothly and efficiently. However, the customer is responsible for the typical maintenance taskssuch as, cleaning the treadmill and adjusting the running belt. If you fail to maintain the treadmillas described below, it could affect or void the Precor limited warranty.
Cleaning the Equipment
Your Precor treadmill relies on low friction for efficient operation. To keep the friction low, thetreadmill must be as clean as possible.
Before a workout, use a damp, soft, clean cloth to clean the side platforms and running bed, (referto the callouts in Diagram 15 on page 24). This removes any dirt or dust that might affect thesmooth operation of the treadmill.
Vacuum the floor underneath the unit every week to prevent the accumulation of dust and dirt onthe running belt.
To periodically clean the treadmill’s frame, electronic console, and running belt use a solution ofmild soap and water and dampen a clean cloth. To clean the running belt and the groves on theplastic trim strip, use a soft nylon scrub brush. Never pour water or spray liquids on the electronicconsole. Allow the treadmill to dry completely before using it.
Manually advance the running belt to clean the opposite side. Do not clean the belt while therunning belt is moving. Liquid can splash onto the motor causing damage to the equipment andpossibly injuring you.
Aligning the Running Belt
Before aligning the running belt, check its operation by following the procedure in Checking theAlignment of the Running Belt earlier in this manual. If you determine that the belt needs adjust-ment, follow the instructions here.
Realigning the belt takes a few simple adjustments. If you are unsure about this procedure, callyour authorized Precor dealer for service (see Obtaining Service on page 25).
Follow the steps on the next page to adjust the running belt on the treadmill. To ensure your safety,make all adjustments while the treadmill is OFF.
1. Make sure the treadmill is OFF and the running belt has completely stopped.
2. Locate the left belt adjustment bolt at the rear of the treadmill. See Diagram 15 on the nextpage. The direction you turn the bolt depends on how the belt is tracking. Make all beltadjustments on the left rear corner bolt using the hex key (H) provided.
• If the belt is off center to the LEFT, turn the adjusting bolt 1/4 turn clockwise, whichmoves the running belt to the right.
• If the belt tracks off center to the RIGHT, turn the bolt 1/4 turn counterclockwise; thismoves the belt to the left.
Important: Do not turn the adjusting bolt more than 1/4 turn at a time. Overtightening the boltcan damage the treadmill.
3. Place the magnetic safety key in the ACTIVATE position and turn ON ( I ) the treadmill, answerthe start-up prompts, then increase the running belt speed to 2 miles per hour by pressing theSPEED key.
4. Observe the running belt for a couple of minutes. The belt should track centered on therunning bed.
CAUTION: Turn OFF the treadmill anddisconnect the power cable before performingmost maintenance tasks.
CAUTION: Special care must be taken whenaligning the running belt. Turn OFF thetreadmill while adjusting or working near therear roller. Remove any loose clothing andtie back your hair. Be very careful to keepyour fingers or any other object clear of thebelt and rollers, especially in front of theroller and behind the deck. The treadmill willnot stopimmediately if an object becomescaught in the belt or rollers.
6
CAUTION: If you hear a chafing sound or thebelt begins to tear or fray, stop the runningbelt immediately by pressing the STOP key orpulling the magnetic safety key off of theACTIVATE position. Contact your Precorservice representative.

page 24
CAUTION: Turn OFF the treadmill and wit for the belt to stopwhen adjusting or working near the rear roller. Be very careful
to keep your fingers or any loose object clear of the belt androllers. The treadmill wll not stop immeadiately if an object
becomes caught in the belt or rollers.
Diagram 15 Aligning the running belt
Rear roller
Belt adjustment bolt
5. Press STOP or SPEED until the running belt comes to a complete stop.
6. If the belt needs additional alignment, repeat steps 1 through 5 of this procedure until the beltis properly aligned.
Adjusting the Tension of the Belt
Proper belt tension is important for a smooth, steady run. If your physical condition permits, testthe belt tension by jogging at 6 mph. If the belt tension is too loose, you will feel a pause in the beltwith each footplant (step).
To adjust the running belt tension, take the following steps:
1. Make sure that the treadmill is OFF. If the treadmill is ON, switch it to OFF. Wait for therunning belt to come to a complete stop.
Diagram 16 Adjusting the tensionof the running belt
2. Standing behind the treadmill, use the rear belt adjustment bolts (each one at opposite sidesof the rear roller). See Diagrams 15 and 16. Simply turn each bolt clockwise 1/4 turn toadjust the tension of the belt.
3. Turn ON the treadmill, answer the start-up prompts, then increase the speed of the runningbelt to 6 mph by pressing the SPEED key.
4. Jog on the running belt for 1 minute or more. If you feel a pause in the belt with eachfootplant (step), you need to continue to adjust the belt tension.
Running belt
Side platformRunning bed
Side platformRunning bed
Rear roller
Belt adjustment bolt

page 25
5. Press STOP or SPEED until the running belt comes to a complete stop.
6. Continue with steps 1 through 5 until the belt tension has been properly adjusted and you nolonger feel the pause in the belt with each footplant.
Important: Do not turn the adjusting bolts more than 1/4 turn at a time. Overtightening thebolts can damage or cause premature failure of the precision bearings in the front and rearrollers.
Servicing the Treadmill
Do not attempt to service the M9.1 or M9.2s yourself except for the maintenance tasks describedin this manual. The M9.1 or M9.2s does not contain any user-serviceable parts, or parts thatrequire lubrication. For information about product operation or service, contact an authorizedPrecor dealer at 1-800-4-PRECOR.
Power Cord Maintenance
When the M9.1 or M9.2s is in use, ensure that the power supply cord is away from moving partsand cannot be damaged.
If the M9.1 or M9.2s power supply cord is damaged, it can only be replaced in a repair shopappointed by Precor because special tools are required.
M9.1 or M9.2s Long Term Storage
When the M9.1 or M9.2s is not in use, ensure that the power supply cord is unplugged from thewall outlet and is positioned so that it will not become damaged or interfere with other equipmentor people.
There are no special storage requirements for the M9.1 or M9.2s other than ensuring that it is keptfree from dirt, moisture, or damage.
Obtaining Service
Do not attempt to service the M9.1 or M9.2s Precision Electronic Treadmill yourself except forminor belt adjustments and maintenance as described in this manual. The treadmill does notcontain any user-serviceable parts.
For information about product operation or service, contact an authorized Precor dealer or a PrecorFactory Authorized Service Company. To locate the dealer or servicer nearest you, call 1-800-4-PRECOR.
To help the customer service representative expedite your call, have your serial number available.
The serial number on the treadmill is written on a label located underneath the treadmill at the left,rear corner of the running bed frame. If you haven’t already written the serial number in the spaceprovided below during the assembly process, you will need to get on your knees and bend down tosee it.
Model number: _____ Serial number: ___________________________________________
Model number: _____ Serial number: ___________________________________________
If you have any questions regarding the treadmill, use the model and serial numbers whenever youcall your Precor dealer or servicer.
M 9.1
M 9.2s

page 26
USAR
Precor IncorporatedP.O. Box 3004Bothell, WA USA 98041-3004
Precor and “M” are registered trademarks of Precor Incorporated.© 1996 Precor Incorporated.
Specifications subject to change without notice.1-800-4-PRECOR
NOTICE:Precor is widely recognized for its innovative, award winning designs of exerciseequipment. Precor aggressively seeks U.S. and foreign patents for both themechanical construction and the visual aspects of its product design. Any partycontemplating the use of Precor’s product designs is hereby forewarned thatPrecor considers the unauthorized appropriation of its proprietary rights to be avery serious matter. Precor will vigorously pursue all unauthorized appropriationof its proprietary rights.
P/N 37601-101 8/96
M9.1 and M9.2s Precision Electronic Treadmills
SpecificationsLength: 67.75 inches (172 cm)
Width: 26.75 inches (68 cm)Height: 43.5 inches (110.5 cm)
Motor: 1.5 hp continuous duty 90V DC
Speed: 0.5 to 9 mph (0.8 to 14.48 kph)9 mph is equivalent to a 6.7 minute mile
Incline: 0 to 10% grade
Power: 50/60Hz, 120v AC single phaseWeight: 192 lbs (87 kg)
Electronic Specifications
M9.1 Program s:
Manual
Interval (1 minute rest: 1 minute work)
M9.2s Program s:
ManualInterval (1 minute rest: 1 minute work)
Programmed courses
5 “Walk” courses 5 “Run” courses
Electronic Displays
Distance
Time
Speed
Calories
Incline
Scan