Embed Size (px)
Citation preview

USER MANUAL
Powerhouse330-WATT DAYLIGHT LED MONOLIGHT
2 Powerhouse 330-Watt Daylight LED Monolight - USER MANUAL
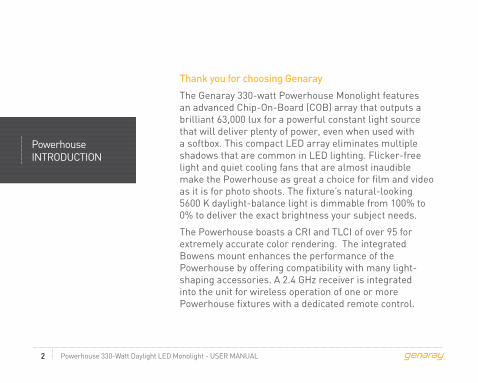
Thank you for choosing Genaray
The Genaray 330-watt Powerhouse Monolight features an advanced Chip-On-Board (COB) array that outputs a brilliant 63,000 lux for a powerful constant light source that will deliver plenty of power, even when used with a softbox. This compact LED array eliminates multiple shadows that are common in LED lighting. Flicker-free light and quiet cooling fans that are almost inaudible make the Powerhouse as great a choice for film and video as it is for photo shoots. The fixture’s natural-looking 5600 K daylight-balance light is dimmable from 100% to 0% to deliver the exact brightness your subject needs.
The Powerhouse boasts a CRI and TLCI of over 95 for extremely accurate color rendering. The integrated Bowens mount enhances the performance of the Powerhouse by offering compatibility with many light-shaping accessories. A 2.4 GHz receiver is integrated into the unit for wireless operation of one or more Powerhouse fixtures with a dedicated remote control.
PowerhouseINTRODUCTION
Powerhouse 330-Watt Daylight LED Monolight - USER MANUAL 3
· Please read and follow these instructions, and keep this manual in a safe place.
· Keep this unit away from water and any flammable gases or liquids.
· Make sure the unit is powered off when plugging it into a power source.
· Use only the correct, recommended voltage.
· Handle the unit with care.
· Do not attempt to disassemble or repair the equipment—doing so will void the warranty, and Genaray will not be responsible for any damage.
· Do not stare directly at the lights when they are powered on.
· Clean the unit with only a soft, dry cloth.
· Images are for illustrative purposes only.
PRECAUTIONS
Prec
autio
ns
4 Powerhouse 330-Watt Daylight LED Monolight - USER MANUAL
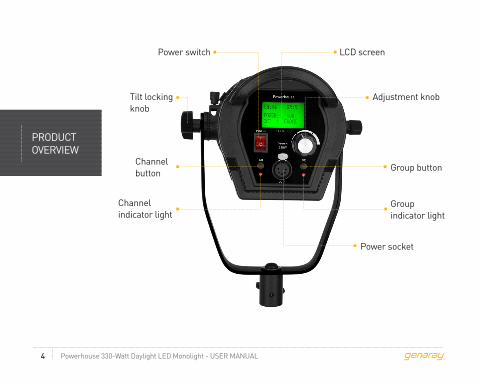
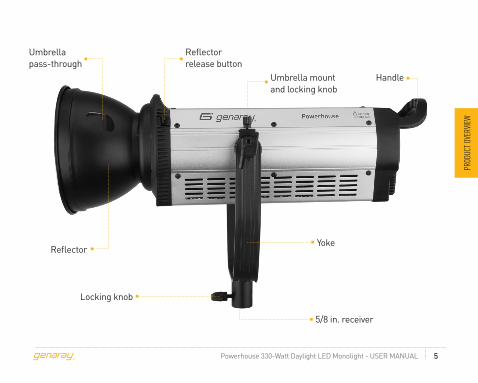
PRODUCT OVERVIEW
Power switch
Channel button
Channel indicator light
Adjustment knob
Group button
Group indicator light
Power socket
LCD screen
Tilt locking knob
Powerhouse 330-Watt Daylight LED Monolight - USER MANUAL 5
Prod
uct o
verv
iew
Reflector
Reflector release button
Yoke
Umbrella mount and locking knob
5/8 in. receiver
Locking knob
Handle
Umbrella pass-through
6 Powerhouse 330-Watt Daylight LED Monolight - USER MANUAL
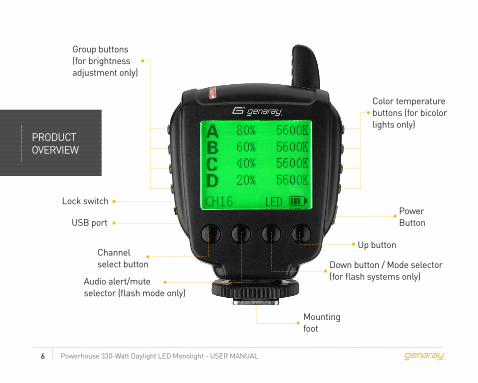
PRODUCT OVERVIEW
Power Button
Group buttons (for brightness adjustment only)
Color temperature buttons (for bicolor lights only)
Channel select button
Audio alert/mute selector (flash mode only)
Up button
Down button / Mode selector (for flash systems only)
Lock switch
Mounting foot
USB port
Powerhouse 330-Watt Daylight LED Monolight - USER MANUAL 7
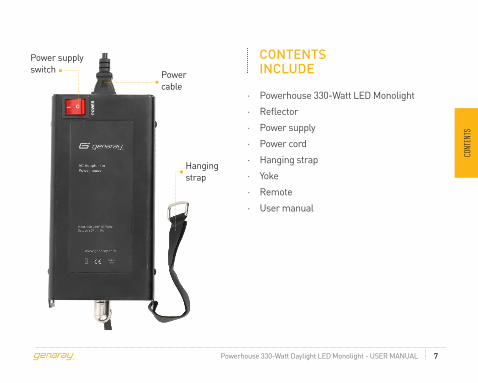
CONTENTS INCLUDE
· Powerhouse 330-Watt LED Monolight
· Reflector
· Power supply
· Power cord
· Hanging strap
· Yoke
· Remote
· User manual
cont
ents
Power cable
Power supply switch
Hanging strap
8 Powerhouse 330-Watt Daylight LED Monolight - USER MANUAL
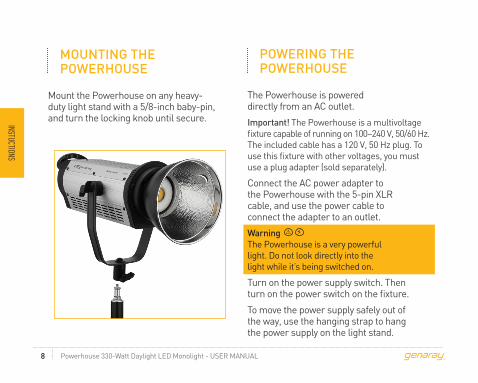
The Powerhouse is powered directly from an AC outlet.
Important! The Powerhouse is a multivoltage fixture capable of running on 100–240 V, 50/60 Hz. The included cable has a 120 V, 50 Hz plug. To use this fixture with other voltages, you must use a plug adapter (sold separately).
Connect the AC power adapter to the Powerhouse with the 5-pin XLR cable, and use the power cable to connect the adapter to an outlet.
Warning The Powerhouse is a very powerful light. Do not look directly into the light while it’s being switched on.
Turn on the power supply switch. Then turn on the power switch on the fixture.
To move the power supply safely out of the way, use the hanging strap to hang the power supply on the light stand.
MOUNTING THE POWERHOUSE
POWERING THE POWERHOUSE
Mount the Powerhouse on any heavy-duty light stand with a 5/8-inch baby-pin, and turn the locking knob until secure.instuctions
Powerhouse 330-Watt Daylight LED Monolight - USER MANUAL 9
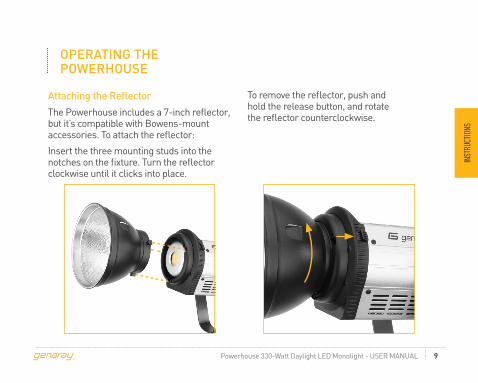
OPERATING THE POWERHOUSE
Attaching the ReflectorThe Powerhouse includes a 7-inch reflector, but it’s compatible with Bowens-mount accessories. To attach the reflector:
Insert the three mounting studs into the notches on the fixture. Turn the reflector clockwise until it clicks into place.
To remove the reflector, push and hold the release button, and rotate the reflector counterclockwise.
inst
ruct
ions
10 Powerhouse 330-Watt Daylight LED Monolight - USER MANUAL
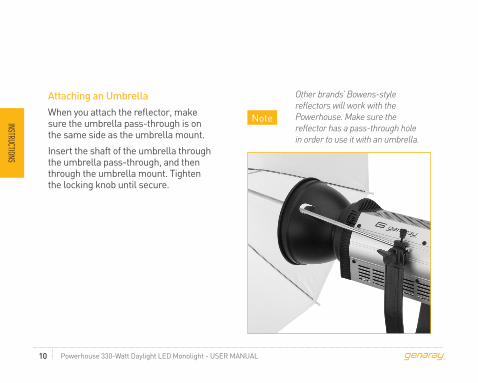
Attaching an UmbrellaWhen you attach the reflector, make sure the umbrella pass-through is on the same side as the umbrella mount.
Insert the shaft of the umbrella through the umbrella pass-through, and then through the umbrella mount. Tighten the locking knob until secure.
Other brands’ Bowens-style reflectors will work with the Powerhouse. Make sure the reflector has a pass-through hole in order to use it with an umbrella.
Noteinstructions

Powerhouse 330-Watt Daylight LED Monolight - USER MANUAL 11
Adjusting the BrightnessThe Adjustment Knob controls the brightness from 100% to 0% in 10% increments.
Setting the Channel and GroupThe Powerhouse and remote must be set to the same channel and group for wireless remote operation.
Channel Selection Press the CHANNEL button on the Powerhouse. While the channel indicator light is on, use the adjustment knob to select channel 1 to 16.
Group Selection Press the GROUP button. While the group indicator light is on, use the adjustment knob to select group A, B, C, D, or E.
inst
ruct
ions

12 Powerhouse 330-Watt Daylight LED Monolight - USER MANUAL
REMOTE OPERATION
The Powerhouse’s brightness can be controlled by the included 2.4 GHz wireless remote. The integrated receiver has 16 channels and five groups, so you can control several Powerhouse fixtures with a single remote from up to 300 feet away.
Powering On the RemotePress and hold the power button until the screen illuminates.
Mode SelectionImportant! The PH300-LED will operate with the remote only when LED mode is selected.
The remote defaults to LED mode when it's powered on.
Flash mode is not functional with the PH300-LED light.Note If the screen shows FLASH, the remote
is in Flash mode. Press and hold the mode selector to switch to LED mode.instructions
Powerhouse 330-Watt Daylight LED Monolight - USER MANUAL 13
Setting the ChannelThe remote and Powerhouse must be set to the same channel and group for wireless remote operation.
Channel Selection
Press the channel button to highlight the channel number, and use the up/down buttons to select the desired channel.
Group Selection
Select a group by pressing the appropriate group button. To select group E, press and hold the group D button. In LED, mode the brightness level will be highlighted.
Adjusting BrightnessPress the group button to highlight the brightness level of the group you want to adjust. Use the up/down buttons to adjust the brightness.
All Powerhouse lights that are set to the same channel and group will be adjusted to the same brightness level. To adjust the brightness of each light individually, assign each light to a different group.
Note
inst
ruct
ions
14 Powerhouse 330-Watt Daylight LED Monolight - USER MANUAL
PRODUCT SPECIFICATIONS
LED chip type: COB
Color temperature: 5600 K ±200 K
Luminance: 63,000 lx @ 3 ft.
Coverage: 120°
CRI: ≥95
TLCI: ≥95
Output power: 330 W
Working voltage: 100 to 240 V AC, 50/60 Hz
Mount: 5/8 in.
Channels and groups: 16 channels, 5 groups (A, B, C, D, E)
Dimensions: 16 × 9 × 9 in. (40.4 × 22.9 × 22.9 cm) with yoke and handle
Weight: 7.75 lb. (3.5 kg)
sPecifications

ONE-YEAR LIMITED WARRANTYThis Genaray product is warranted to the original purchaser to be free from defects in materials and workmanship under normal consumer use for a period of one (1) year from the original purchase date or thirty (30) days after replacement, whichever occurs later. Genaray’s responsibility with respect to this limited warranty shall be limited solely to repair or replacement, at Genaray’s discretion, of any product that fails during normal use of this product in its intended manner and in its intended environment. Inoperability of the product or part(s) shall be determined by Genaray. If the product has been discontinued, Genaray reserves the right to replace it with a model of equivalent quality and function.
This warranty does not cover damage or defect caused by misuse, neglect, accident, alteration, abuse, improper installation or maintenance. EXCEPT AS PROVIDED HEREIN, GENARAY MAKES NEITHER ANY EXPRESS WARRANTIES NOR ANY IMPLIED WARRANTIES, INCLUDING BUT NOT LIMITED TO ANY IMPLIED WARRANTY OF MERCHANTABILITY OR FITNESS FOR A PARTICULAR PURPOSE. This warranty provides you with specific legal rights, and you may also have additional rights that vary from state to state.
To obtain warranty coverage, contact the Genaray Customer Service Department to obtain a return merchandise authorization (“RMA”) number, and return the defective product to Genaray along with the RMA number and proof of purchase. Shipment of the defective product is at the purchaser’s own risk and expense.
For more information, or to arrange service, visit www.genaray.com or contact us at [email protected].
© 2018 Genaray. All Rights Reserved.

GG2