Embed Size (px)
Citation preview

index
Introduction to Apophysis: ........................................................................................................................... 3
Useful Resources to start with:..................................................................................................................... 3
How I came up with this tutorial .................................................................................................................. 4
What do we need and why? .......................................................................................................................... 6
The main tiles. ............................................................................................................................................... 7
Xform 1.................................................................................................................................................................... 7
Xform 2: .................................................................................................................................................................. 7
Xform 3: .................................................................................................................................................................. 7
Xform 4: .................................................................................................................................................................. 7
Xform 5: .................................................................................................................................................................. 8
Tiles: a bit more. ........................................................................................................................................... 9
Xform 6: .................................................................................................................................................................. 9
The filling .................................................................................................................................................... 11
Xform 7: ................................................................................................................................................................ 11
Xform 8: ................................................................................................................................................................ 12
FXform:....................................................................................................................................................... 13
3
Introduction to Apophysis:
Apophysis is a fractal flame editor and renderer. It was created by Mark Townsend by translating ScottDraves' original C code into Delphi and adding a graphical user interface
It has since been improved and updated by Peter Sdobnov, Piotr Borys, and Ronald Hordijk. It is opensource, licensed under the terms of the GNU General Public License (GPL).
2001-2004 Mark Townsend2004-2008 Peter "zueuk" Sbodnov, Piotr "utak3r" Borys2009-2010 Georg "xyrus" Kiehne
Apophysis has many features for creating and editing fractal flames, including an editor which allows oneto directly edit the transforms that comprise the fractal flame, a mutations window, which applies randomedits to the triangles, an adjust window, which allows the adjustment of coloring and location of theimage, and even a scripting language with direct access to most of the components of the fractal, whichallows for effects such as animations, which are also fractal flames. Users can export fractal flames toother fractal flame rendering programs, such as FLAM3.
There is a separate version of Apophysis that has support for 3D, although all computations are done in2D space, and now Georg "xyrus" Kiehne has created a Apophysis version call 7x which combine bothversion into one unique freeware.
Useful Resources to start with:
Apophysis 7x.14
Apophysis Install
What Icon I’m Clicking
A wonderful series of tutorial for beginner
Claire Jones Apophysis Guide

4
How I came up with this tutorial
A long time, the wonderful fractalist call Joel Faber, work on a effect called the flipped disc.This effect really gives Apo a new way to create effect and he open minds to a lot’s of us.Then he starts working with nGon plugin, and here come the very first “Portal” look flame I’ve seen onthe web.
I was totally amaze by this technique and I’m starting working on too (like a lot’s of us in 2006)
Then after few years in which I really increase my skill with Apophysis, I decide to work once more onthis kind of fractal, but instead of using a flipped disc, I’ve decide to use crackles plugin to give it anotherkind of aspect.
5
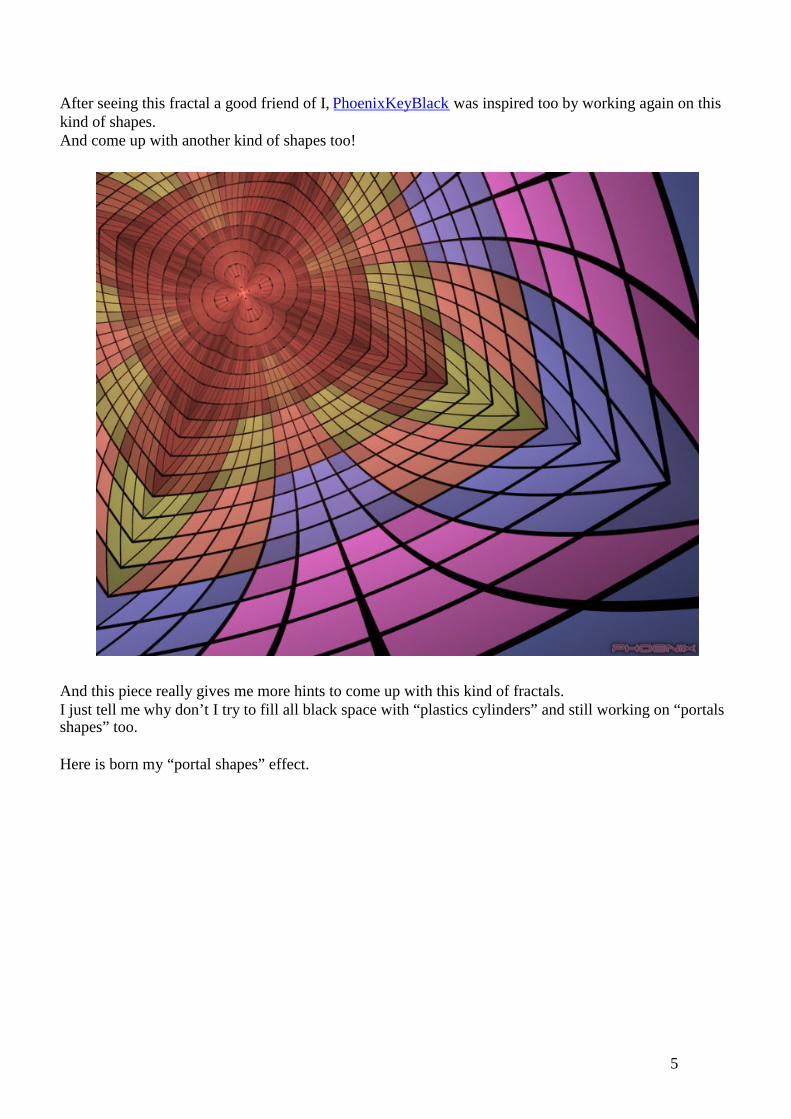
After seeing this fractal a good friend of I, PhoenixKeyBlack was inspired too by working again on thiskind of shapes.And come up with another kind of shapes too!
And this piece really gives me more hints to come up with this kind of fractals.I just tell me why don’t I try to fill all black space with “plastics cylinders” and still working on “portalsshapes” too.
Here is born my “portal shapes” effect.

6
What do we need and why?
Apophysis 7x14 (or any version that allow you to install variations plugins)Available on Xyrus pages.
Square and nGon pluginsSo in this fractal you will need some “extra” plugins.Those plugins are not available directly when you install Apophysis, but you can add them when youwant.
So download the Aposhack Plugins Pack by Phoenixkeyblack, and add to your plugin collection, thesquare and nGon plugins.
10 - 15min to create this fractal.
7
So first of all start we a new blank flame. (CTRL + N or simply click on the blank sheet on the top bar)
So the first thing we need to do is to create the main shape.Here, the main shape is square but not only.It’s a tilled square effect.
So first let’s create
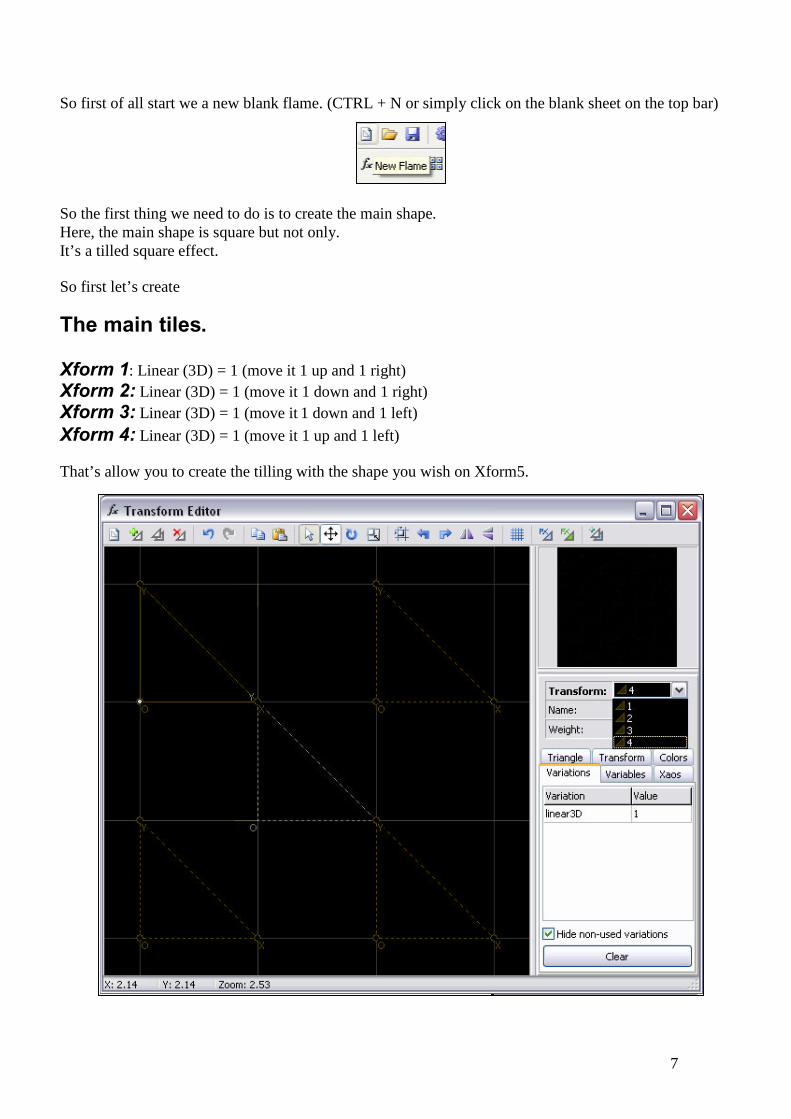
The main tiles.
Xform 1: Linear (3D) = 1 (move it 1 up and 1 right)Xform 2: Linear (3D) = 1 (move it 1 down and 1 right)Xform 3: Linear (3D) = 1 (move it 1 down and 1 left)Xform 4: Linear (3D) = 1 (move it 1 up and 1 left)
That’s allow you to create the tilling with the shape you wish on Xform5.
8
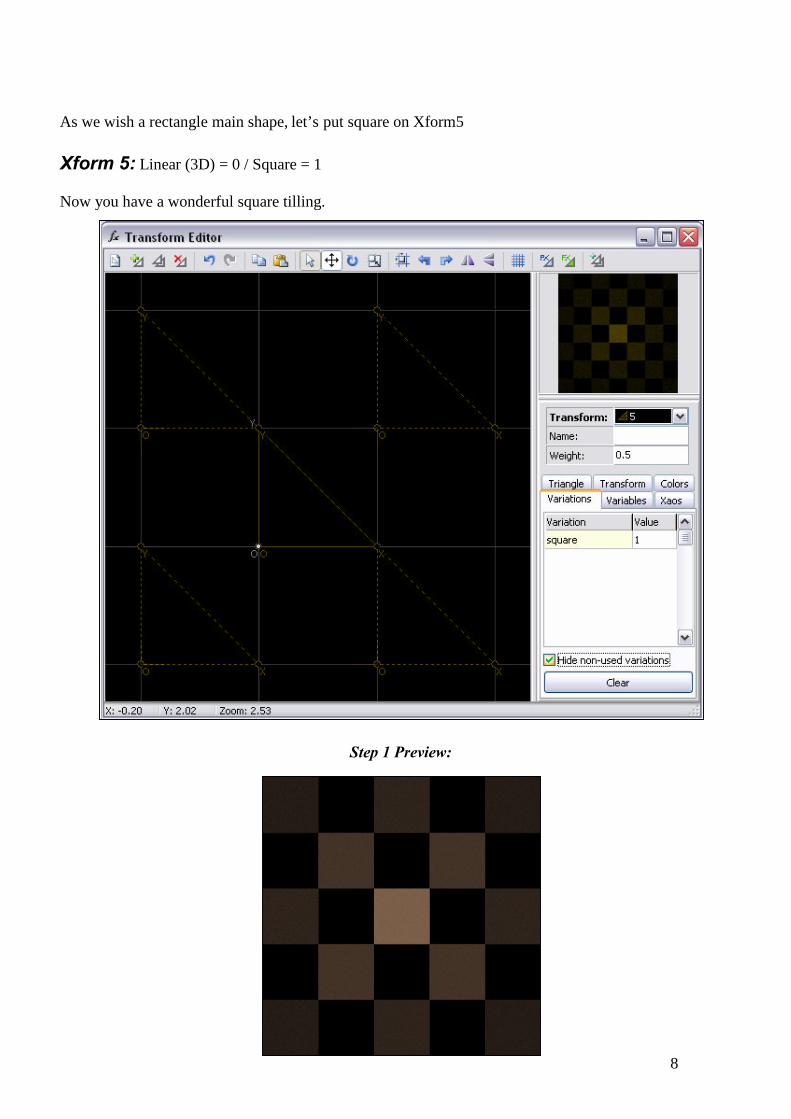
As we wish a rectangle main shape, let’s put square on Xform5
Xform 5: Linear (3D) = 0 / Square = 1
Now you have a wonderful square tilling.
Step 1 Preview:
9
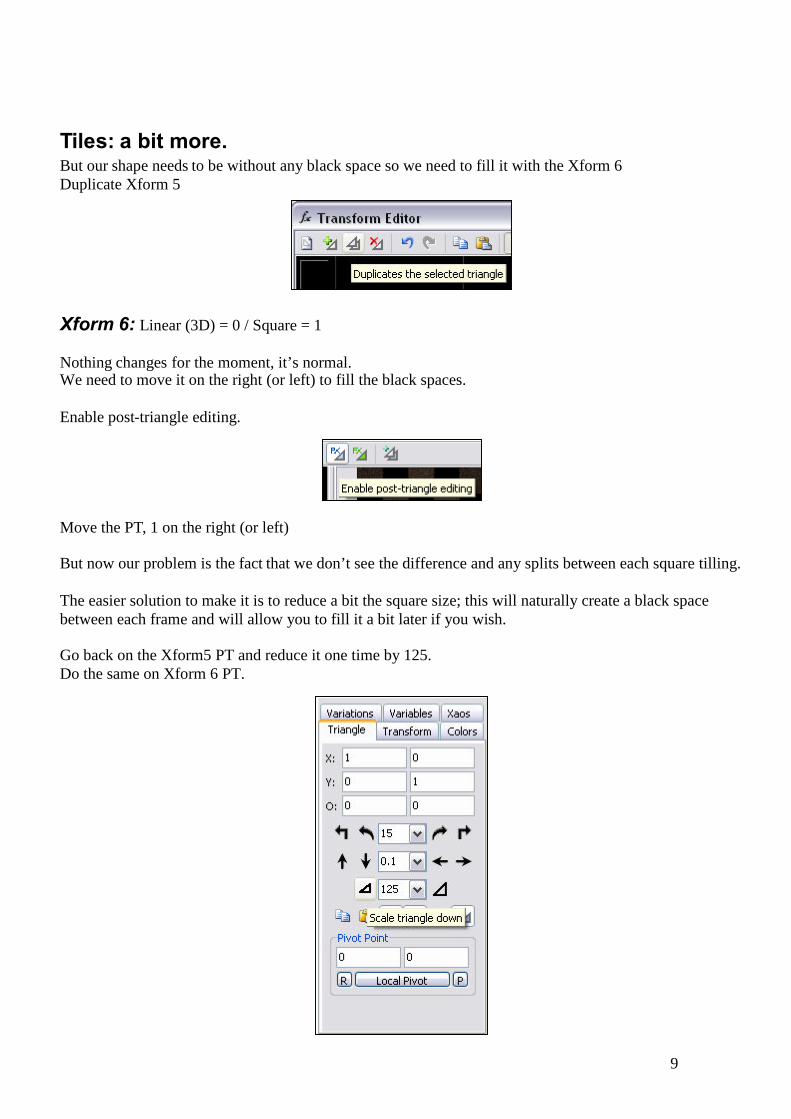
Tiles: a bit more.But our shape needs to be without any black space so we need to fill it with the Xform 6Duplicate Xform 5
Xform 6: Linear (3D) = 0 / Square = 1
Nothing changes for the moment, it’s normal.We need to move it on the right (or left) to fill the black spaces.
Enable post-triangle editing.
Move the PT, 1 on the right (or left)
But now our problem is the fact that we don’t see the difference and any splits between each square tilling.
The easier solution to make it is to reduce a bit the square size; this will naturally create a black spacebetween each frame and will allow you to fill it a bit later if you wish.
Go back on the Xform5 PT and reduce it one time by 125.Do the same on Xform 6 PT.
10
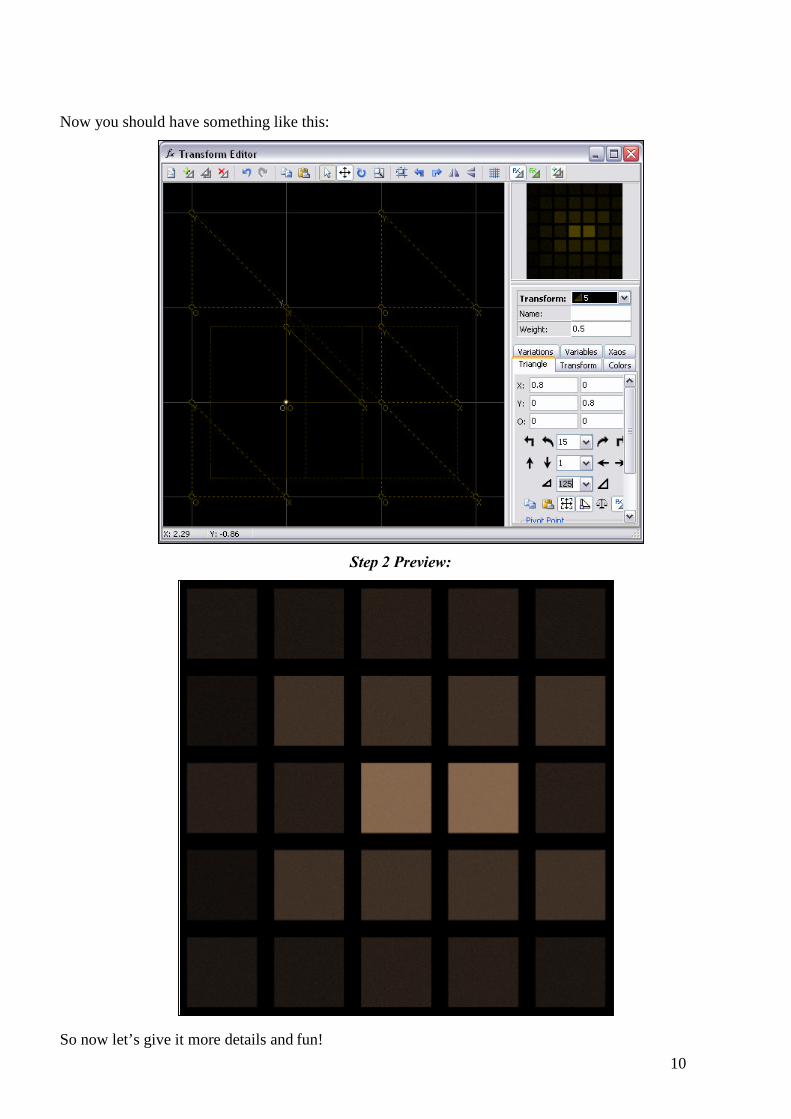
Now you should have something like this:
Step 2 Preview:
So now let’s give it more details and fun!
11
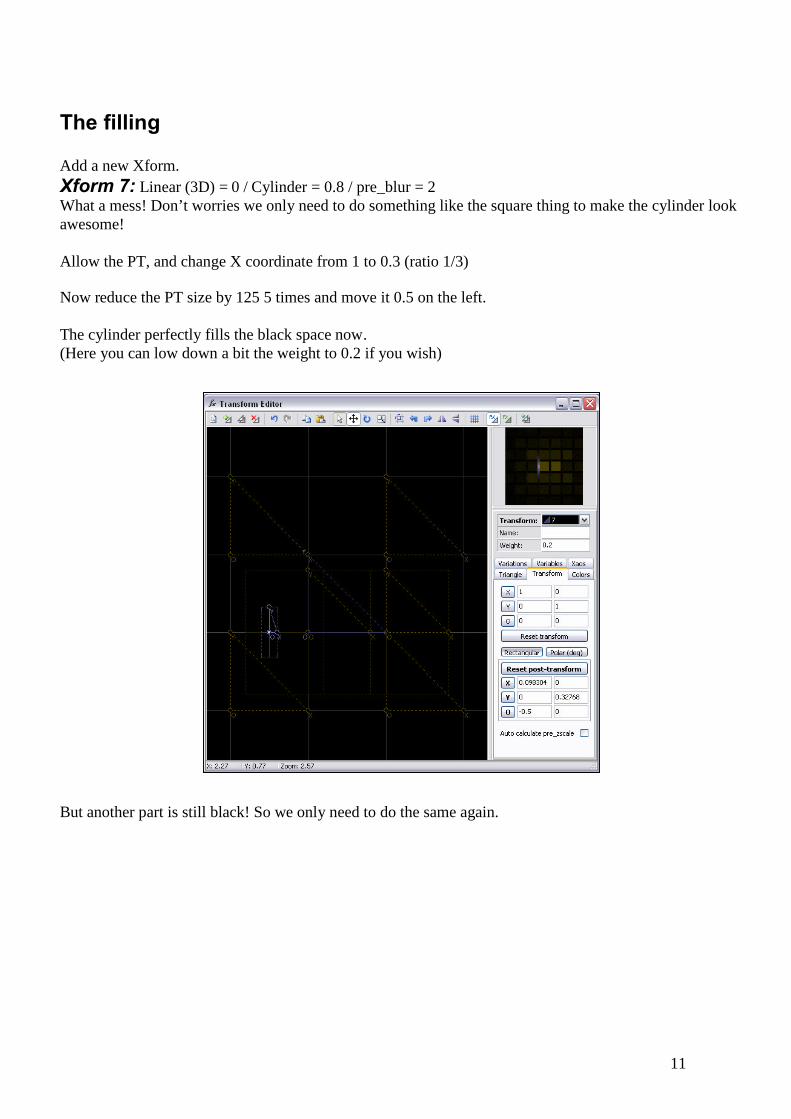
The filling
Add a new Xform.Xform 7: Linear (3D) = 0 / Cylinder = 0.8 / pre_blur = 2What a mess! Don’t worries we only need to do something like the square thing to make the cylinder lookawesome!
Allow the PT, and change X coordinate from 1 to 0.3 (ratio 1/3)
Now reduce the PT size by 125 5 times and move it 0.5 on the left.
The cylinder perfectly fills the black space now.(Here you can low down a bit the weight to 0.2 if you wish)
But another part is still black! So we only need to do the same again.
12
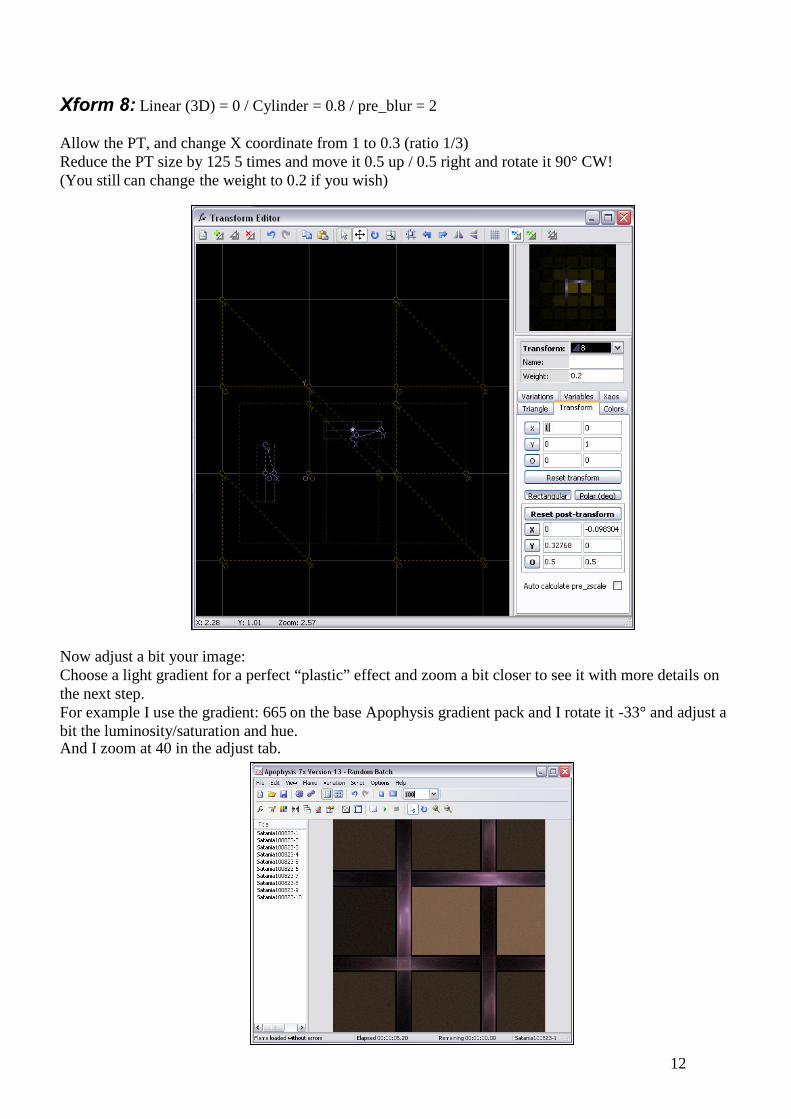
Xform 8: Linear (3D) = 0 / Cylinder = 0.8 / pre_blur = 2
Allow the PT, and change X coordinate from 1 to 0.3 (ratio 1/3)Reduce the PT size by 125 5 times and move it 0.5 up / 0.5 right and rotate it 90° CW!(You still can change the weight to 0.2 if you wish)
Now adjust a bit your image:Choose a light gradient for a perfect “plastic” effect and zoom a bit closer to see it with more details onthe next step.For example I use the gradient: 665 on the base Apophysis gradient pack and I rotate it -33° and adjust abit the luminosity/saturation and hue.And I zoom at 40 in the adjust tab.
13
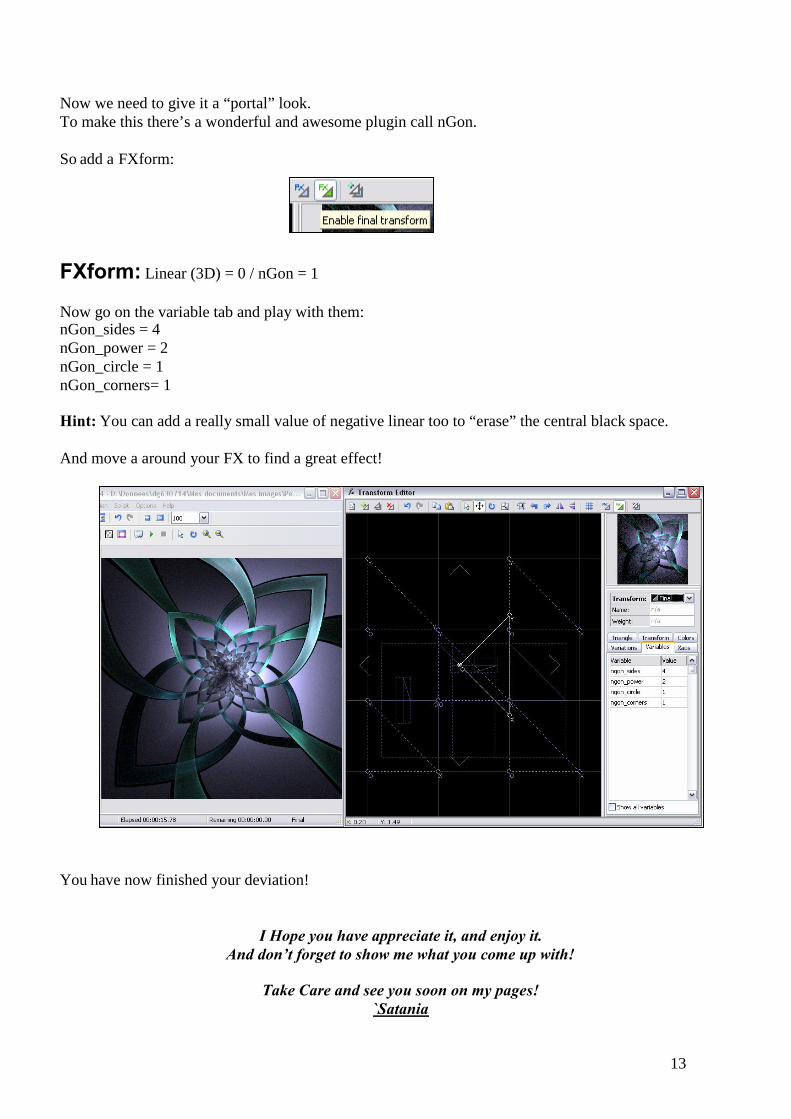
Now we need to give it a “portal” look.To make this there’s a wonderful and awesome plugin call nGon.
So add a FXform:
FXform: Linear (3D) = 0 / nGon = 1
Now go on the variable tab and play with them:nGon_sides = 4nGon_power = 2nGon_circle = 1nGon_corners= 1
Hint: You can add a really small value of negative linear too to “erase” the central black space.
And move a around your FX to find a great effect!
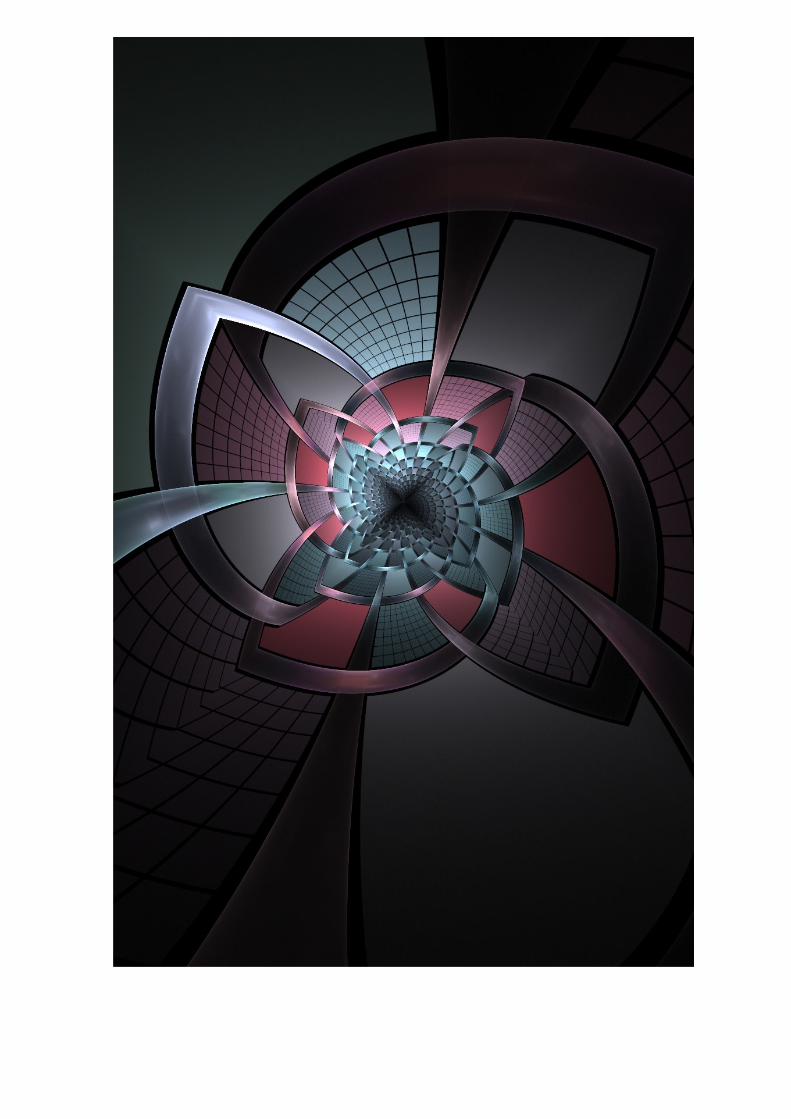
You have now finished your deviation!
I Hope you have appreciate it, and enjoy it.And don’t forget to show me what you come up with!
Take Care and see you soon on my pages!`Satania


![[XLS] · Web view1 2 41 500000 8269 0 8269 2 2 40 1240 0 1240 3 2 13 827 0 827 4 2 73 3721 0 3721 14057 5 5 49 500000 8269 0 8269 6 5 47 1240 0 1240 7 5 19 827 0 827 8 5 21 827 0](https://img.pdfslide.us/doc/110x75/5ad91cce7f8b9a991b8e2e67/xls-view1-2-41-500000-8269-0-8269-2-2-40-1240-0-1240-3-2-13-827-0-827-4-2-73-3721.jpg)