Embed Size (px)
Citation preview

for Ver 1.0Piapro Studio Operation Manual


PIAPRO STUDIO END USER LICENSE AGREEMENT
Crypton Future Media, INC. ("CRYPTON") is willing to provide Piapro Studio ("Software") to you only on the condition that you accept all of the terms contained in this Software License Agreement ("Agreement"). Please read the following Agreement carefully before you install the Software. By installing this Software, you accept all of the terms of the Agreement. If you do not agree to be bound by the terms, please do not install the Software, and you must delete or destroy the entire Software.
TERMS OF USE
1. SCOPE OF USEYou may install and use the Software on one computer only. You may not distribute the Software to third parties.
2. COPYINGYou may make copies of the Software solely for backup or archival purposes.
3. RESTRICTIONSYou may not;(1) copy the Software except as expressly permitted in 2 above.(2) modify, disassemble, decompile, or reverse-engineer the Software.(3) sell, distribute, rent, lease, lend, assign or transfer the Software to any third party.
4. INTELLECTUAL PROPERTY RIGHTSAll title and intellectual property rights in and to the Software and any copies you are permitted to make herein are owned by CRYPTON. The Software is protected by applicable copyright or other intellectual property laws and treaties. The Software is licensed, not sold nor given to you. Any intellectual property rights in and to the Software are not granted to you. You do not have a right to license the Software to any third party.
5. USE OF THIRD PARTY APPLICATION ON THE SOFTWAREIf you use any third party application program on the Software, you acknowledge and agree that your use of any such third party application program is governed by such third party application program provider's terms of use, license agreement, or other such agreement, and you must ensure you do not violate any of those agreements. You agree that the use of any third party application program on the Software is at your sole responsibility and CRYPTON expressly disclaims any liability in connection with any such third parties’ application program or Agreement.
6. LIMITATION OF LIABILITYTO THE MAXIMUM EXTENT NOT PROHIBITED BY LAW, IN NO EVENT SHALL CRYPTON OR ITS AUTHORIZED SUPPLIERS BE LIABLE FOR ANY SPECIAL, INCIDENTAL, INDIRECT, OR CONSEQUENTIAL DAMAGES WHATSOEVER (INCLUDING, WITHOUT LIMITATION, DAMAGES FOR LOSS OF INFORMATION, LOSS OF DATA, CORRUPTION OF FILES, OR ANY OTHER PECUNIARY LOSS) ARISING OUT OF THE USE OF OR INABILITY TO USE THE SOFTWARE, EVEN IF CRYPTON HAS BEEN ADVISED OF THE POSSIBILITY OF SUCH DAMAGES.
7. TERM AND TERMINATIONThis Agreement is effective from the moment you accept all of the terms of this Agreement and install the Software, and will remain in full force until termination. This Agreement will terminate immediately if you fail to comply with any provision of this Agreement. Upon termination, you must destroy all copies of the Software.
8. GOVERNING LAWAny action related to this Agreement will be governed by the laws of Japan. The Sapporo District Court in Japan shall have exclusive jurisdiction to adjudicate any dispute arising out of this Agreement.
9. ACKNOWLEDGEMENTCrypton may at any time revise this Agreement, and you agree to be bound by this Agreement in the latest form by accepting any such revisions notified by Crypton or continue to use the Software knowing such revisions thereafter.
picojson BSD License
Copyright 2009-2010 Cybozu Labs, Inc.Copyright 2011 Kazuho Oku
Redistribution and use in source and binary forms, with or without modification, are permitted provided that the following conditions are met:
1. Redistributions of source code must retain the above copyright notice, this list of conditions and the following disclaimer.
2. Redistributions in binary form must reproduce the above copyright notice, this list of conditions and the following disclaimer in the documentation and/or other materials provided with the distribution.
THIS SOFTWARE IS PROVIDED BY CYBOZU LABS, INC. ``AS IS'' AND ANY EXPRESS OR IMPLIED WARRANTIES, INCLUDING, BUT NOT LIMITED TO, THE IMPLIED WARRANTIES OF MERCHANTABILITY AND FITNESS FOR A PARTICULAR PURPOSE ARE DISCLAIMED. IN NO EVENT SHALL CYBOZU LABS, INC. OR CONTRIBUTORS BE LIABLE FOR ANY DIRECT, INDIRECT, INCIDENTAL, SPECIAL, EXEMPL ARY, OR CONSEQUENTIAL DAMAGES (INCLUDING, BUT NOT LIMITED TO, PROCUREMENT OF SUBSTITUTE GOODS OR SERVICES; LOSS OF USE, DATA, OR PROFITS; OR BUSINESS INTERRUPTION) HOWEVER CAUSED AND ON ANY THEORY OF LIABILITY, WHETHER IN CONTRACT, STRICT LIABILITY, OR TORT (INCLUDING NEGLIGENCE OR OTHERWISE) ARISING IN ANY WAY OUT OF THE USE OF THIS SOFTWARE, EVEN IF ADVISED OF THE POSSIBILITY OF SUCH DAMAGE.
The views and conclusions contained in the software and documentation are those of the authors and should not be interpreted as representing official policies, either expressed or implied, of Cybozu Labs, Inc.

Table of Contents
Introduction . . . . . . . . . . . . . . . . . . . . . . . . . . . . . . . . . . . . . . . . . . . . . . . . . . . . . 7About Auto Update . . . . . . . . . . . . . . . . . . . . . . . . . . . . . . . . . . . . . . . . . . . . . . . . . . . . . 7
About the Piapro Studio Website . . . . . . . . . . . . . . . . . . . . . . . . . . . . . . . . . . . . . . . . . 7
Tutorial . . . . . . . . . . . . . . . . . . . . . . . . . . . . . . . . . . . . . . . . . . . . . . . . . . . . . . . . . 9Setup . . . . . . . . . . . . . . . . . . . . . . . . . . . . . . . . . . . . . . . . . . . . . . . . . . . . . . . . . . . . . . . . 10
1. Start Studio One 2 . . . . . . . . . . . . . . . . . . . . . . . . . . . . . . . . . . . . . . . . . . . . . . 102. Set up Audio Devices. . . . . . . . . . . . . . . . . . . . . . . . . . . . . . . . . . . . . . . . . . . . 113. Create New Song . . . . . . . . . . . . . . . . . . . . . . . . . . . . . . . . . . . . . . . . . . . . . . . 124. Starting Piapro Studio. . . . . . . . . . . . . . . . . . . . . . . . . . . . . . . . . . . . . . . . . . . 13
Piapro Studio Main Screen . . . . . . . . . . . . . . . . . . . . . . . . . . . . . . . . . . . . . . . . . . . . . 14Piapro Studio Plug-in Window . . . . . . . . . . . . . . . . . . . . . . . . . . . . . . . . . . . . . . . 14Piapro Studio Editor Window. . . . . . . . . . . . . . . . . . . . . . . . . . . . . . . . . . . . . . . . 14
About Pitch & Note Length . . . . . . . . . . . . . . . . . . . . . . . . . . . . . . . . . . . . . . . . . . . . . 16Pitch . . . . . . . . . . . . . . . . . . . . . . . . . . . . . . . . . . . . . . . . . . . . . . . . . . . . . . . . . . . . 16Note Length . . . . . . . . . . . . . . . . . . . . . . . . . . . . . . . . . . . . . . . . . . . . . . . . . . . . . . 17
Compose a Vocal Song with Piapro Studio . . . . . . . . . . . . . . . . . . . . . . . . . . . . . . . 18Playback . . . . . . . . . . . . . . . . . . . . . . . . . . . . . . . . . . . . . . . . . . . . . . . . . . . . . . . . . 181. Setting the Tempo and Time Signature . . . . . . . . . . . . . . . . . . . . . . . . . . . . 182. Making a Track . . . . . . . . . . . . . . . . . . . . . . . . . . . . . . . . . . . . . . . . . . . . . . . . . 193. Making a Region . . . . . . . . . . . . . . . . . . . . . . . . . . . . . . . . . . . . . . . . . . . . . . . . 194. Inputting Notes. . . . . . . . . . . . . . . . . . . . . . . . . . . . . . . . . . . . . . . . . . . . . . . . .205. Inputting Lyrics . . . . . . . . . . . . . . . . . . . . . . . . . . . . . . . . . . . . . . . . . . . . . . . . .226. Making a Chorus Track . . . . . . . . . . . . . . . . . . . . . . . . . . . . . . . . . . . . . . . . . .237. Volume Balance. . . . . . . . . . . . . . . . . . . . . . . . . . . . . . . . . . . . . . . . . . . . . . . . .23
Advanced / TIPS . . . . . . . . . . . . . . . . . . . . . . . . . . . . . . . . . . . . . . . . . . . . . . . . . . . . . .24Using the Automation Track . . . . . . . . . . . . . . . . . . . . . . . . . . . . . . . . . . . . . . . .24Control the performance for each note. . . . . . . . . . . . . . . . . . . . . . . . . . . . . . .26Dividing Notes (Divide on vowel) . . . . . . . . . . . . . . . . . . . . . . . . . . . . . . . . . . . .27Add Vibrato. . . . . . . . . . . . . . . . . . . . . . . . . . . . . . . . . . . . . . . . . . . . . . . . . . . . . . .28About Tuning - A Small Pronunciation Guide . . . . . . . . . . . . . . . . . . . . . . . . . .28

Reference . . . . . . . . . . . . . . . . . . . . . . . . . . . . . . . . . . . . . . . . . . . . . . . . . . . . . 31Menu . . . . . . . . . . . . . . . . . . . . . . . . . . . . . . . . . . . . . . . . . . . . . . . . . . . . . . . . . . . . . . . .32
Application(Mac Only). . . . . . . . . . . . . . . . . . . . . . . . . . . . . . . . . . . . . . . . . . . . .32File . . . . . . . . . . . . . . . . . . . . . . . . . . . . . . . . . . . . . . . . . . . . . . . . . . . . . . . . . . . .32Edit . . . . . . . . . . . . . . . . . . . . . . . . . . . . . . . . . . . . . . . . . . . . . . . . . . . . . . . . . . . .33Track . . . . . . . . . . . . . . . . . . . . . . . . . . . . . . . . . . . . . . . . . . . . . . . . . . . . . . . . . . . .34Region . . . . . . . . . . . . . . . . . . . . . . . . . . . . . . . . . . . . . . . . . . . . . . . . . . . . . . . . . . .35Note . . . . . . . . . . . . . . . . . . . . . . . . . . . . . . . . . . . . . . . . . . . . . . . . . . . . . . . . . . . .35View . . . . . . . . . . . . . . . . . . . . . . . . . . . . . . . . . . . . . . . . . . . . . . . . . . . . . . . . . . . .36Transport . . . . . . . . . . . . . . . . . . . . . . . . . . . . . . . . . . . . . . . . . . . . . . . . . . . . . . . .36Settings (Windows Only) . . . . . . . . . . . . . . . . . . . . . . . . . . . . . . . . . . . . . . . . . . .37Help . . . . . . . . . . . . . . . . . . . . . . . . . . . . . . . . . . . . . . . . . . . . . . . . . . . . . . . . . . . .37
Preference Panel . . . . . . . . . . . . . . . . . . . . . . . . . . . . . . . . . . . . . . . . . . . . . . . . . . . . . .38General . . . . . . . . . . . . . . . . . . . . . . . . . . . . . . . . . . . . . . . . . . . . . . . . . . . . . . . . . .38VOCALOID . . . . . . . . . . . . . . . . . . . . . . . . . . . . . . . . . . . . . . . . . . . . . . . . . . . . . . .39Detail . . . . . . . . . . . . . . . . . . . . . . . . . . . . . . . . . . . . . . . . . . . . . . . . . . . . . . . . . . . . 41
Tool Bar . . . . . . . . . . . . . . . . . . . . . . . . . . . . . . . . . . . . . . . . . . . . . . . . . . . . . . . . . . . . . .42
Bar Line . . . . . . . . . . . . . . . . . . . . . . . . . . . . . . . . . . . . . . . . . . . . . . . . . . . . . . . . . . . . . .43
Meter / Tempo Track . . . . . . . . . . . . . . . . . . . . . . . . . . . . . . . . . . . . . . . . . . . . . . . . . . .43
Track . . . . . . . . . . . . . . . . . . . . . . . . . . . . . . . . . . . . . . . . . . . . . . . . . . . . . . . . . . . . . . . .44Region . . . . . . . . . . . . . . . . . . . . . . . . . . . . . . . . . . . . . . . . . . . . . . . . . . . . . . . . . . .45Piano Roll . . . . . . . . . . . . . . . . . . . . . . . . . . . . . . . . . . . . . . . . . . . . . . . . . . . . . . . . 47Notes . . . . . . . . . . . . . . . . . . . . . . . . . . . . . . . . . . . . . . . . . . . . . . . . . . . . . . . . . . . .48Lyrics . . . . . . . . . . . . . . . . . . . . . . . . . . . . . . . . . . . . . . . . . . . . . . . . . . . . . . . . . . . .48Singing Style . . . . . . . . . . . . . . . . . . . . . . . . . . . . . . . . . . . . . . . . . . . . . . . . . . . . .50Vibrato. . . . . . . . . . . . . . . . . . . . . . . . . . . . . . . . . . . . . . . . . . . . . . . . . . . . . . . . . . . 51Automation Track . . . . . . . . . . . . . . . . . . . . . . . . . . . . . . . . . . . . . . . . . . . . . . . . . 51Create a chorus by layering the Region . . . . . . . . . . . . . . . . . . . . . . . . . . . . . .54
Transport bar . . . . . . . . . . . . . . . . . . . . . . . . . . . . . . . . . . . . . . . . . . . . . . . . . . . . . . . . .55
Appendix . . . . . . . . . . . . . . . . . . . . . . . . . . . . . . . . . . . . . . . . . . . . . . . . . . . . . . 57Shortcut keys . . . . . . . . . . . . . . . . . . . . . . . . . . . . . . . . . . . . . . . . . . . . . . . . . . . . . . . . .58


Piapro .Studio .Operation .Manual(v1 .0)
© Crypton Future Media, INC. 7
IntroductionPiapro Studio is the VSTi compliant Vocal Editor that provides you the seamless operation between Host Applications. You can control KAITO V3 / HATSUNE MIKU V3 very intuitively and without experiencing limitation of bar numbers. Piapro Studio supports popular DAW applications like PresSonus Studio One, Steinberg Cubase, Cakewalk SONAR, Ableton Live and MOTU Digital Performer 8 and other.
Manipulation of Piapro Studio is quite easy. Just input the melody into the typical piano roll screen and English or Japanese lyrics. You can easily edit the dynamics or vibrato of each note by double-clicking on it. This manual guides you from basic to hands-on operation.
About Auto UpdatePiapro Studio implements an Auto Update function. As
soon as the update deployed to our Crypton Future Media website, the pop-up window shown left will display (Internet connectivity required). When the pop-up window appears, click the "Update" button.
If the computer that hosts Piapro Studio does not have Internet connectivity, please view our Piapro Studio special website.
About the Piapro Studio WebsiteThe most recently updated information and support for Piapro Studio software can be accessed on the Piapro Studio portal site. Any functions which have been installed on a trial basis, along with the easy to use guide and song making course will also be updated.
http://piaprostudio.com


Tutorial

http://piaprostudio.com10
SetupYou need to start VSTi compliant DAW Host Application first to use with Piapro Studio. This manual explains how to operate Piapro Studio using "Studio One Artist Piapro Edition ("Studio One 2")" bundled with KAITO V3 / HATSUNE MIKU V3.
1. Start Studio One 2After the installation of "Studio One 2" and rebooting your PC, you will see the icon shown left on your desktop. Start Studio One 2 by double clicking this short-cut.
If you are using a mac pc, double click on the Studio One logo in the applications folder in the Finder.
When Studio One 2 has started up, the start page (shown below) will appear. Configure the Audio Device so that you can hear the sound from monitor speakers or headphones.
Piapro .Studio .Operation .Manual(v1 .0)
© Crypton Future Media, INC. 11
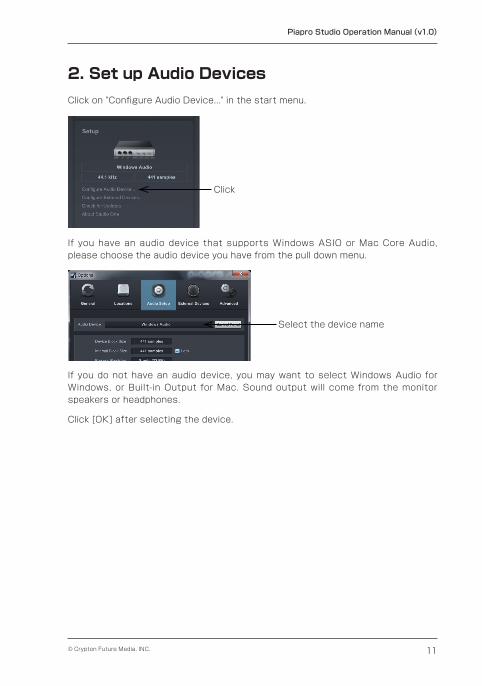
2. Set up Audio DevicesClick on "Configure Audio Device..." in the start menu.
Click
If you have an audio device that supports Windows ASIO or Mac Core Audio, please choose the audio device you have from the pull down menu.
Select the device name
If you do not have an audio device, you may want to select Windows Audio for Windows, or Built-in Output for Mac. Sound output will come from the monitor speakers or headphones.
Click [OK] after selecting the device.

http://piaprostudio.com12
3. Create New SongAfter configuring the Audio Device, click on the "Create a new Song" button in the left of the start menu as shown below.
You will see the setting screen where you can set the song title, save destination, sound quality and tempo and more. Select the appropriate value in each box and click OK.
Style / Interface You can select a template built in Studio One 2
User You can select a template which was developed by an end-user.
Song Title You can input the Song Title. You can also assign the destination of saving files.
Sample Rate Sample Rate is the number of samples of a sound that is taken per second to represent the input, e.g. of a microphone. Please set the sample rate to to 44.1kHz, 48kHz or 96kHz whenever you compose a song using Piapro Studio.
Resolution Resolution is the amount of information per sample. The larger resolution means the higher quality of sounds. For a basic setting select "24Bit"
Timebase Indicates time axis. Select "Bar".
Song Length Provides the maximum length of a song.
Tempo Sets tempo of a song.
Time Signature Sets time of a song.
Stretch audio files to song tempo
If you select this, the audio files with tempo information will be stretched and match when they are imported to Studio One 2.

Piapro .Studio .Operation .Manual(v1 .0)
© Crypton Future Media, INC. 13
4. Starting Piapro StudioAfter you create a new song, the screen below will appear. Click on "Browse" and then "Instruments" at the bottom right corner of the screen.
Click on "Instruments" → "Piapro Studio VSTi" will be displayed. Just drag and drop it to the left side of the window as shown on the illustration below.
After drag&drop, "Piapro Studio Plug-in Window" will appear (see below). Click on it to start "Piapro Studio Plug-in Window".
Click
You are ready to compose when the "Piapro Studio Editor Window" has been set up as shown below. Let's proceed to the next chapter "Compose a Vocal Song with Piapro Studio" to try it out.

http://piaprostudio.com14
Piapro Studio Main Screen
Piapro Studio Plug-in WindowThis VSTi Plug-in will open Piapro Studio
Editor Window. You can start Piapro Studio Editor Window by clicking on this window. Note that you can only open one instance of
this Plug-in in a project.
Piapro Studio Editor Window
This is the window where you can create a vocal part using KAITO V3 / HATSUNE MIKU V3 voice library.
Menu
Windows:
Mac:
You can select/use many functions from here. Please refer to the chapter "Menu" for more details.
Piapro .Studio .Operation .Manual(v1 .0)
© Crypton Future Media, INC. 15
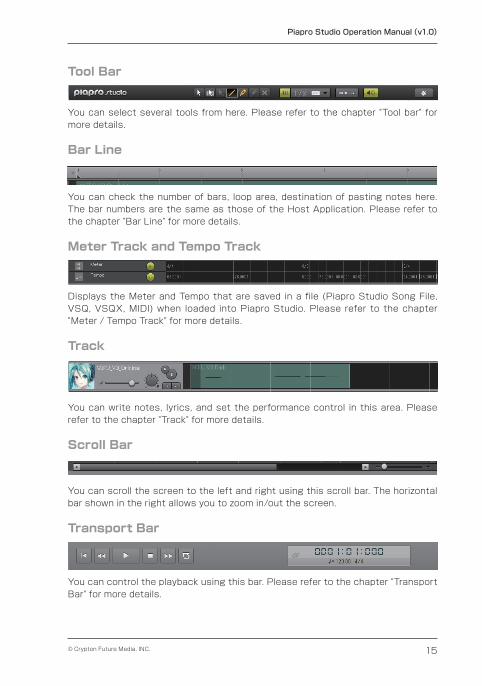
Tool Bar
You can select several tools from here. Please refer to the chapter "Tool bar" for more details.
Bar Line
You can check the number of bars, loop area, destination of pasting notes here. The bar numbers are the same as those of the Host Application. Please refer to the chapter "Bar Line" for more details.
Meter Track and Tempo Track
Displays the Meter and Tempo that are saved in a file (Piapro Studio Song File, VSQ, VSQX, MIDI) when loaded into Piapro Studio. Please refer to the chapter "Meter / Tempo Track" for more details.
Track
You can write notes, lyrics, and set the performance control in this area. Please refer to the chapter "Track" for more details.
Scroll Bar
You can scroll the screen to the left and right using this scroll bar. The horizontal bar shown in the right allows you to zoom in/out the screen.
Transport Bar
You can control the playback using this bar. Please refer to the chapter "Transport Bar" for more details.

http://piaprostudio.com16
About Pitch & Note LengthIn the Piapro Studio piano roll screen, the vertical grid displays the pitch (interval) in the higher grid position which is the higher pitch and vice versa. The horizontal grid displays the timing and length of each note. The song is played back from left to right. The horizontal bars written in the grid are actually notes.
PitchThe picture below displays how notes are written in Piapro Studio screen. Piapro Studio can of course play higher/lower pitch notes which are not shown in this screen shot.
C3 D3 E3 F3 G3 A3 B3 C4 D4 E4 F4 G4 A4 B4 C5

Piapro .Studio .Operation .Manual(v1 .0)
© Crypton Future Media, INC. 17
Note Length1 common bar contains 4 quarter notes.
Whole NoteHalf Note
QuarterEighth
http://piaprostudio.com18
Compose a Vocal Song with Piapro StudioNow you have set up the Host Application and Piapro Studio. Let's start composing a Vocal Song.
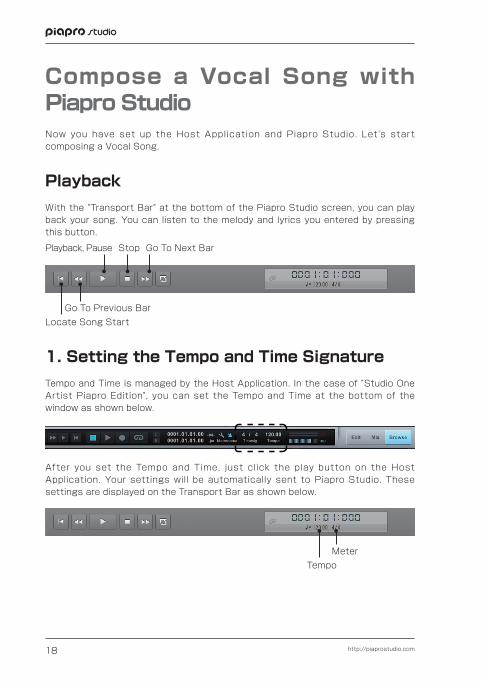
PlaybackWith the "Transport Bar" at the bottom of the Piapro Studio screen, you can play back your song. You can listen to the melody and lyrics you entered by pressing this button.
Locate Song Start
Stop Go To Next Bar
Go To Previous Bar
Playback, Pause
1. Setting the Tempo and Time SignatureTempo and Time is managed by the Host Application. In the case of "Studio One Artist Piapro Edition", you can set the Tempo and Time at the bottom of the window as shown below.
After you set the Tempo and Time, just click the play button on the Host Application. Your settings will be automatically sent to Piapro Studio. These settings are displayed on the Transport Bar as shown below.
TempoMeter

Piapro .Studio .Operation .Manual(v1 .0)
© Crypton Future Media, INC. 19
2. Making a TrackAfter setting Tempo and Time, let's create a track in Piapro Studio.
Click the [+] button.
Select the voice DB and double-click it.
Click this icon when you replace the voice Data Base ("DB") with another one.
3. Making a RegionAfter creating a track, you need to create a "Region" in the track where you can input notes and lyrics. Select the "Pen Tool" in the Tool Bar, click and drag to the right in a track.
Select Pen Tool Click and drag to the right in a Vocal Track
The Region will be set when you release the left mouse button.
Drag the end of Region to the left/right.
You can change the length of the Region by dragging (click&hold) the end of it to the left/right.
Drag the Region itself to the left/right.
To move the entire Region, click on it and hold the button while dragging to the left/right.
You can delete the Region by hitting the Delete/Backspace key after selecting it.

http://piaprostudio.com20
4. Inputting NotesLet's input notes into a Region.
Notes can be inputted in the Piano Roll Editor that appears when you double-click on the Region. Select "Pen Tool" and click&drag in the piano roll. You can draw the note as a bar and release the mouse when you are done.
S e l e c t "Pen Tool"
Pitch Check ( C l i c k o n Keyboard)
Double click on the Region
Cl ick&drag to the right in the Piano Roll Editor
Set the length of a note by releasing the mouse button
Select a Note
Select a note by clicking on it with the "Select Tool" or "Pen Tool". The color will turn yellow when selected. Hold down the Ctrl(Win) / Command(Mac) Key to select several notes. This is very useful when moving/deleting several notes simultaneously.
By clicking&dragging on the editor screen using the Select Tool as shown on the left, all notes in the area will be selected.
Change Note Length
Drag the edge of the note to the left/right.
You can adjust the length of each note by dragging the edge of the note.
Moving and copying Notes
Drag note itself to the left/right.
You can drag a note itself to left/right by selecting and dragging it. You can also copy it by holding down the Ctrl (Win) / Option(Mac) Key and draging the note to the left/right.
Piapro .Studio .Operation .Manual(v1 .0)
© Crypton Future Media, INC. 21
Deleting a Note
You can delete a note by selecting it and hitting Delete key or Backspace key.
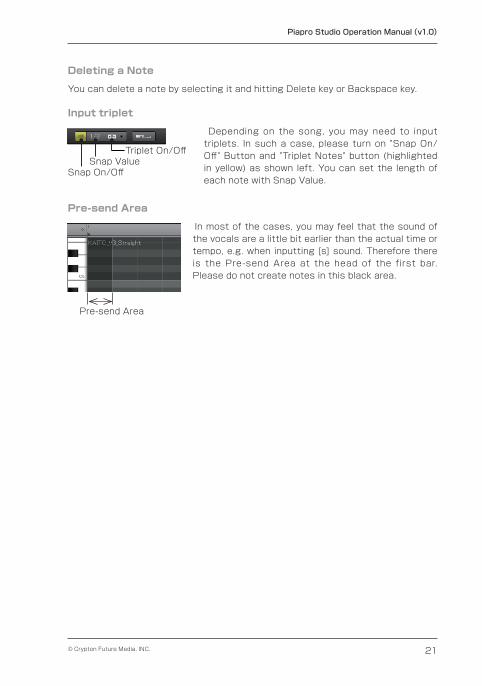
Input triplet
Snap ValueSnap On/Off
Triplet On/Off
Depending on the song, you may need to input triplets. In such a case, please turn on "Snap On/Off" Button and "Triplet Notes" button (highlighted in yellow) as shown left. You can set the length of each note with Snap Value.
Pre-send Area
Pre-send Area
In most of the cases, you may feel that the sound of the vocals are a little bit earlier than the actual time or tempo, e.g. when inputting [s] sound. Therefore there is the Pre-send Area at the head of the first bar. Please do not create notes in this black area.

http://piaprostudio.com22
5. Inputting LyricsAfter inputting notes, let's input lyrics. Double click on the first note of the melody, then the "Lyrics Palette" will pop-up (as shown below).
Double click on the first note
In the Japanese Voice DB, you can input lyrics using Japanese Characters Hiragana, Zenkaku Katakana, and 2 sequential Roman characters. You cannot type in Kanji, numbers, or the alphabet other than the system described above. Please change it to Hiragana or Zenkaku Katakana.
Hiragana Katakana Roman characters re-flecting the Japanese syllable sytem
In the English Database, you can only input English words. Numbers, special characters and Japanese characters cannot be pronounced. Please use only the alphabet.
After typing in all lyrics, click the OK button.

Piapro .Studio .Operation .Manual(v1 .0)
© Crypton Future Media, INC. 23
6. Making a Chorus TrackAfter you have create the Vocal Track, you can create a chorus (harmony). You can just duplicate the Vocal Track to easily create such a Chorus Track. Right click on the track, then select "Duplicate Track" from the drop down menu as shown below.
1. Right click 2. Select "Duplicate Track" Done
The duplicated track includes all information of the original track, such as the Region. When the track has been added, double click on the Region and open the Piano Roll Editor. Select all the notes and shift it up/down for changing the pitch. This is an easy way to create a chorus.
Drag all the notes with Selection Tool Drag up/down for shift pitch
7. Volume Balance
Drag Left/Right
You can make the chorus sound more natural by reducing the volume of its track. Each track has a "Volume Fader" and you can adjust the volume by dragging its fader to the left or right.

http://piaprostudio.com24
Advanced / TIPS
Using the Automation Track
Modify the texture of each sound by using the Automation Track
If the consonant stands out too much, or you can hear a harsh noise after the release (end of a sound), decrease the Brightness (BRI) along with time sequence so that it has a softer and smoother sound. If the vocals are not clear enough, increase the Clearness (CLE) at the Attack of the voice. It will make the sound and pronunciation sharper. If you need to fine tune the volume, use Dynamics (DYN). When you input/adjust the parameter for the automation, note that you should draw a curve that will change the parameters smoothly.
Adjusting brightness of sounds
Adjusting clearness of sounds
Adjusting dynamics of sounds
Use Dynamics (DYN) for creating movement of the phrase and melody.
Use DYN for creating movement of the phrase and melody.
Not only each note's volume, but also intonation of the phrase at the crescendo can be controlled by the Dynamics (DYN) control. Dynamics can control intonation over several notes and the total phrasing dynamics.

Piapro .Studio .Operation .Manual(v1 .0)
© Crypton Future Media, INC. 25
"Exhaling" and "Attack of the voice" can be performed by the Brightness (BRI) parameter
"Exhaling" "Attack of the voice" can be performed by the [ BRI ]
Brightness (BRI) controls the clearness of the sound. For example, you can utilize this parameter to per form "exhaling" voice p e r f o r m a n c e b y c h a n g i n g i t f r o m approximately 64 to 35 at the end of the phrase little by little. Also, a slowly starting phrase can be performed by increasing Brightness from 35 to 64 little by little. To make it smooth, you should increase the Brightness around the first half of a note and decrease around the end of a note.
When the consonant is too harsh / too soft use "Velocity Control"
Adjust the length of consonants
If sounds are too sharp or noisy, unclear or dull, modify the Velocity Control. However, please note that fricative sounds that start with "Sa" o r "Ha" tend to be more emphasized by a decreasing velocity. That is because the consonant becomes longer and is therefore heard more easily when the velocity is decreased.
On the other hand, the consonants of plosive sounds like "Pa" or "Ba", tend to shorten by increasing velocity, which will sound dull or plain.

http://piaprostudio.com26
Control the performance for each note
Singing Style
Double-click on this icon
You can control the intonation of each note by setting the "Decay" and "Accent" in the "Singing Style" window as shown left. You can pop-up the Singing Style window by double clicking the icon that is shown on the top left side of each note.
Decay is the parameter that sets how sound goes gradually silent when the note is kept longer. By decreasing this parameter, you can keep the sound not being attenuated. By increasing this parameter, you can make the sound attenuate quickly. The Accent is the parameter that changes the nuance on the attack of the sound. Increasing Accent emphasizes the attack, decreasing makes it soft and gentle.
Note that changing Accent a lso changes the volume of the note. You may need to review the total dynamics or volume parameters after you altered the Accent.
For example, if you want to connect 2 notes smoothly, you should increase the Decay of the first note, and then decrease the Accent of the second note. Vice versa, decreasing the Decay of the first note and increasing the Accent of the second note makes the voice staccato and articulate.
Isolating a Note
When you find notes whose pitch or pronunciation sounds incorrect, try to cut and shorten the notes so that they are isolated from the phrase. By making a staccato voice in that way, the later note could be pronounced clearly and the pitch might be corrected.
Isolate the sound in question
※ Depending on the situation, isolating a note could cause other issues such as making the later note sound harsh. You will find the right way by getting used to this feature.

Piapro .Studio .Operation .Manual(v1 .0)
© Crypton Future Media, INC. 27
Dividing Notes (Divide on vowel)If you find a note sounding unclear, or the pronunciation sounds incorrect, just divide the note on the position of the vowel. For example, the sound "Ka" (K + a) can be divided into "K" and "A" phonemes. This can "sound" as one word, but actually when the nuance of the vowel or consonant and the flow of the sound are changed, it will reflect the pronunciation of the word. If the original note is relatively long, e.g. a quarter note or an eighth note, you can change each length after dividing them. Please note that dividing a note into smaller pieces can make the phrase more attractive. But sometimes it also makes its pronunciation sound incorrect. Please be careful.
Dividing the notes sounds " もー (Moo)" into " も (MO)" and " お (O)"
A typical performance technique for a singer is to start singing from a little bit lower pitch and then sliding up to the correct pitch, or to slide down to the next note with a legato, which makes the song more expressive and passionate. You can replicate this performance by the [Divide on vowel] technique in Piapro Studio. This means, if you make the first note of the divided phrase a whole step or half step lower, then you can replicate the sliding up effect. If you make the second note (vowel) of the divided phrase higher, you can perform the legato technique.
Sliding up from " き(KI)" to " い(I)" of "KII"

http://piaprostudio.com28
Add Vibrato
Double click on the wavy line
When a note is inputted by default setting, a vibrato is automatically set as a default value (66% of the length of a note). But when the long note is shortened or a short note is adjusted for a long tone, the setting range of a vibrato may change and it may become unnatural.
Let's keep in mind that an impression changes a lot by the existence of a vibrato in the long tone (long note) especially.
Moreover, especially when "note division" is carried out, caution is required for the setup of a vibrato.
About Tuning - A Small Pronunciation GuideAt times, you will want to be able to modify the pronunciation of words sung, into a tuning you desire or prefer. At other times, you will encounter so called homographs. Homographs are words that are written the same, but have a different pronunciation. For example:
- record (vinyl) vs. record (to record)- tear (when crying) vs. tear (to tear)- live (e.g. live band) vs. live (to live)
These are only a few examples, but you will encounter more words like these. It is yet impossible for VOCALOID technology to distinguish between these words, since they are inputted just the same way and therefore this decision can only be done through human intelligence.
This short column will show you how you can tune Miku's voice and pronunciation into the style you desire or prefer.

Piapro .Studio .Operation .Manual(v1 .0)
© Crypton Future Media, INC. 29
How to change Miku's pronunciation
There are two fields when inputting lyrics in Piapro Studio (see image below).
The upper one is where you can just type in the lyrics you want Miku to sing. The lower part is the equivalent to your lyrics in phonetic VOCALOID symbols.
When you wish to change a pronunciation of a word, you click into the phonetic symbol field and change the according phonetic symbol. It will change then to a red color, indicating that you made a change.
List of VOCALOID Phonetic Symbols
The list on the next page contains the VOCALOID phonetic symbols, with which you can modify each pronunciation by just replacing the original phonetic symbol. The VOCALOID phonetic symbol (on the left-hand side) is equivalent to the parts in bold of the sample words (middle), and to the phonetic symbols that are often used in dictionaries (right-hand side).
Be .careful!Through the original connectivity of vowels with consonants, there might sometimes occur the case that pronunciations are distorted when you change them. This technique needs some practicing time, but when mastered it is a very powerful tool.
Find tutorials and more information on piaprostudio.com/

http://piaprostudio.com30
VOCALOID Phonetic Symbol
Usage Example Phonetic Symbol (Vowels)
[ V ] cut study success famous[ { ] pat cat bag[ Q ] lot dog soft[ i: ] see eat speak[ I ] city picture[ u: ] boot two school[ U ] put book[ e ] end red[ O: ] auto ball wall[ Q@ ] arm heart[ @r ] girl work[ aI ] fly like[ aU ] out cow sound[ I@ ] ear here dear[ U@ ] poor sure[ eI ] day eight rain[ e@ ] air chair careful [ OI ] oil voice[ O@ ] door more for[ @U ] slow old toast
VOCALOID Phonetic Symbol
Usage Example Phonetic Symbol (Consonants)
[ ph ] [ p ] park help[ bh ] [ b ] baby job[ th ] [ t ] telephone hit[ dh ] [ d ] door old[ kh ] [ k ] coffee talk[ gh ] [ g ] girl pig[ f ] flower leaf[ T ] think tooth[ D ] that with[ s ] small ice[ S ] ship wash[ z ] zoo as[ tS ] church teach[ dZ ] Japan page[ h ] hand behind[ v ] voice have[ Z ] usual treasure [ l0 ] [ l ] letter ball [ r ] rocket carry[ w ] watch sweet[ j ] you beauty[ m ] member farm[ n ] nose lesson[ N ] English song

Reference

http://piaprostudio.com32
Menu
Application(Mac Only)
About Piapro Studio Shows a small screen describing the current version
Preferences Displays the Preference Panel.
File
New Creates a New Song
Import
Piapro Studio Song File
Opens Piapro Studio Song File (.ppsf).
VOCALOID Sequence File
Open VSQX files saved in VOCALOID3 Editor or Tiny VOCALOID3 Editor, and VSQ files saved in VOCALOID2 Editor.
MIDI File Reads in MIDI Files (.mid) that were created using VOCALOID Editor, VOCALOID2 Editor or other DAW application.
MIDI .Data .which .is .readable .in .Piapro .Studio
・ .MIDI .File .of .VOCALOID .Editor:Except for parameters such as "Resonance" which is specific to VOCALOID Editor.
・ .MIDI .File .of .VOCALOID2 .Editor:All notes, lyrics and parameters are applied.
* If you want to read in vocal parts which were composed with VOCALOID 2 Editor, it is recommended to import the VSQ file. .
・ .MIDI .File .of .DAW .application:Note, Pitchbend and Pitchbend Sensitivity are applied.
Meter/Tempo Data from File
Reads in only Tempo and Time Signature from Piapro Studio Song File, VSQ File, VSQX File, and MIDI File.

Piapro .Studio .Operation .Manual(v1 .0)
© Crypton Future Media, INC. 33
Export
Piapro Studio Song File
Saves in Piapro Studio song file(.ppsf).
Audio File Exports selected Region as WAV file.
VOCALOID Sequence File
Saves in VSQX files for VOCALOID3 Editor or Tiny VOCALOID3 Editor.
Close Window Closes Piapro Studio Editor window. You can re-open it by clicking on the Piapro Studio Plug-in window.
About saving data
When a project file is saved with a Host Application (DAW), the composed contents (vocal parts) of Piapro Studio will also be saved. If you just want to save the vocal parts, save them to a Piapro Studio Song File (.ppsf) or a VOCALOID sequence file (.vsqx).
Edit
Undo Reverts the previous action
Redo Reverts Undo
Cut Cuts selected Region, Note, Automation curve
Copy Copies selected Region, Note, Automation curve
Paste Pastes cut or copied contents
Erase Deletes selected Region, Note, Automation curve
Select All Selects all Regions or Notes
Deselect All
Deselects all selections
Maximize Track Size
Opens the Piano Roll for the selected track. When more than one Track is selected, it will be displayed in a layer.
When the Piano Roll is already opened, this menu will change to "Close Piano Roll Editor".
Snap Snaps the Region and Notes automatically to the vertical grid. The interval of each grid can be set from 1 bar to a sixty-fourth note. You can also set Triplets for the selected grid interval.

http://piaprostudio.com34
Track
New Track
VOLALOID3 Track
Creates a new track for VOCALOID3. When you create a new track, the "default vocalist", vocal database will be assigned automatically that is set in the "Piapro Studio Setting" screen mentioned below
Duplicate Track Copies selected track. When the track contains a Region, it will also be copied.
Delete Track Deletes selected track. If the track contains a Region, it will also be deleted.
Select Singer Selects/reassigns the vocalist database to selected track. When the Vocal Track has already been selected, this menu will change to "VOCALOID3 Track Setting". Please double-click on the new vocalist database.
Mute/Solo
Mute Track Mutes selected track
Solo Track Only the selected track will play back
Unmute / Unsolo All Tracks
Clears all the Mute/Solo settings
Automation Track
Select Automation Tracks
Open the Automation Track for the selected track. When the Vocal Track has been selected, [Select Automation Track] window will pop up. Please click on the desired item in this screen to show the appropriate Automation Track.
Close Automation Tracks
Closes the Automation Tracks for the selected Vocal Track
Close Automation Tracks
Closes all Automation Tracks for the selected Vocal Track

Piapro .Studio .Operation .Manual(v1 .0)
© Crypton Future Media, INC. 35
Region
Mute Region Mutes selected Region. The Region muted turns gray. When you select the muted Region, this menu will change to "Unmute Region"
Render Region This function will be implemented in the next version of Piapro Studio
Export Region Exports the selected Region data into WAV file.
Note
Transpose
Half Tone Up Sets the selected note half step up
Half Tone Down Sets the selected note half step down
1 Octave Up Sets the selected note 1 octave up
1 Octave Down Sets the selected note 1 octave down
Edit Lyrics Opens the "Lyrics Palette" for the selected notes
Edit Singins Style Opens the "Singing Style Palette" for the selected notes
Edit Vibrato Opens the "Vibrato Style Palette" for the selected notes
Normalize Releases the overlapping notes automatically
Sound Preview On When this feature is turned on, you will be able to have a preview of the pronunciation when clicking on or dragging the notes.

http://piaprostudio.com36
View
Minimize Track Header Minimizes/Narrows the track header of the Vocal Track
Close Meter / Tempo Track
Closes the Meter / Tempo Track shown on the screen.
Track Height
Minimize selected track
Minimizes the height o f se lected Vocal o r Automation Track
Selected Track Standaed Size
Normalizes the height of selected Vocal or Automation Track to default
Minimize All Tracks Minimizes the height of all Vocal and Automation Tracks.
All Tracks Standard Size
Normalizes the height of all Vocal and Automation Tracks to default.
Scroll
Scroll to Previous Bar Scrolls 1 bar to the left
Scroll to Next Bar Scrolls 1 bar to the right
Scroll Left Scrolls left along contents
Scroll Right Scrolls right along contents
Zoom In Zooms in to displayed contents
Zoom Out Zooms out of displayed contents
Zoom to Selection Zooms in to the selected area
Vertical Zoom Out Piano Roll
Shrinks Piano Roll contents vertically
Vertical Zoom In Piano Roll
Expands Piano Roll contents vertically
Transport
Playback Plays track in Piapro Studio. Playback in DAW Host Application will still be prioritized over this command.
Stop Stops Piapro Studio

Piapro .Studio .Operation .Manual(v1 .0)
© Crypton Future Media, INC. 37
Locate Song Start Moves playback bar to the head of the first bar
Go To Previous Bar Moves playback bar 1 bar back
Go To Next Bar Moves playback bar 1 bar forward
Locate Loop Start Moves playback bar to the Loop starting point
Locate Loop End Moves playback bar to the Loop ending point
Loop Playback On Enables Loop playback. When turned on, the song will be repeated within the yellow colored area.
Auto Scroll On Auto scroll during the playback: the display follows the song position.
Loop Selection Loops the area that has been selected with the Selection Tool
Settings (Windows Only)
Preferences Displays the Preference Panel
Languages Choose your desired language (Japanese, English, Trad. Chinese)
Change Graphics Engine
Selects the graphics engine for Piapro Studio. If you have problems with the graphics, try to select DirectX or Windows GDI.
Help
Operation Manual Shows the operation manual (PDF)
Check For Updates Automatically checks for updates (requires Internet Connectivity)
piaprostudio.com Links to the Piapro Studio special website.
About Piapro Studio Shows a small screen describing the current version

http://piaprostudio.com38
Preference Panel
General
Save Window Position When checked, the position of Piapro Studio window will be saved in the data of Host Application.
Animation This function will be implemented in next version of Piapro Studio.
Restore Layout When Undo
This function will be implemented in next version of Piapro Studio.
Mouse wheel
Type A Mouse wheel Vertical scrolling+Shift Horizontal scrolling+Ctrl+Shift Horizontal zoom (Windows)+Command+Shift Horizontal zoom (Mac)
Type B Mouse wheel Horizontal scrolling+Shift Vertical scrolling+Ctrl Horizontal zoom (Windows)+Command Horizontal zoom (Mac)
Type C Mouse wheel Vertical scrolling+Shift Horizontal scrolling+Ctrl Horizontal zoom (Windows)+Command Horizontal zoom (Mac)
Type D Mouse wheel Vertical zoom+Shift Horizontal scrolling+Ctrl Vertical scrolling (Windows)+Command Vertical scrolling (Mac)
Piapro .Studio .Operation .Manual(v1 .0)
© Crypton Future Media, INC. 39
VOCALOID
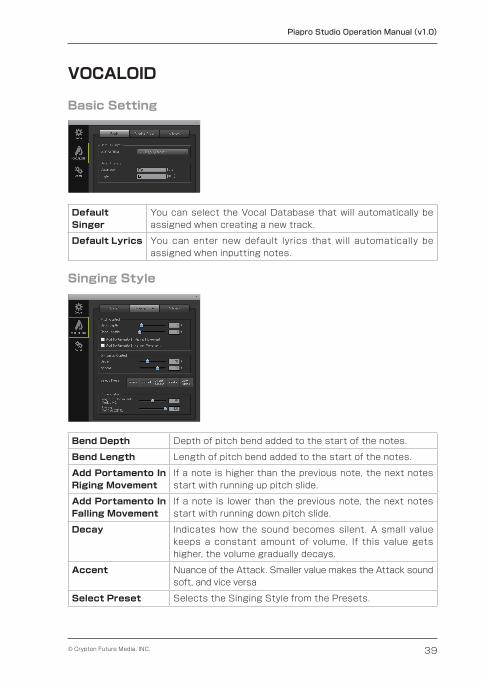
Basic Setting
Default Singer
You can select the Vocal Database that will automatically be assigned when creating a new track.
Default Lyrics You can enter new default lyrics that will automatically be assigned when inputting notes.
Singing Style
Bend Depth Depth of pitch bend added to the start of the notes.
Bend Length Length of pitch bend added to the start of the notes.
Add Portamento In Riging Movement
If a note is higher than the previous note, the next notes start with running up pitch slide.
Add Portamento In Falling Movement
If a note is lower than the previous note, the next notes start with running down pitch slide.
Decay Indicates how the sound becomes silent. A small value keeps a constant amount of volume. If this value gets higher, the volume gradually decays.
Accent Nuance of the Attack. Smaller value makes the Attack sound soft, and vice versa
Select Preset Selects the Singing Style from the Presets.

http://piaprostudio.com40
Length of Consonants (Velocity)
Sets the velocity value
Opening (VOCALOID3)
Sets the value that indicates how wide the singer's mouth opens
Vibrato
Enable Auto Vibrato When checked, all inputted notes will automatically have a default vibrato
Minimum Note Length for Auto Vibrato
Notes longer than this length have Auto Vibrato.
Vibrato Length Sets the default length of the Auto vibrato
Vibrato Type Indicates current vibrato type
Select Presets Select the Auto Vibrato from the presets

Piapro .Studio .Operation .Manual(v1 .0)
© Crypton Future Media, INC. 41
Detail
System
Graphics Engine Indicates current graphics engine. You can see the device name and the driver version number in parentheses.
Automatically Check for Updates
The interval between auto updates. As this function requires accessing the server of Crypton Future Media. Internet Connectivity is needed.
VOCALOID
Pre-Send Time Vocal sound can be heard a little bit earlier than actual timing (The sound of "Su" from phonetic [S] is a good example). You can set this Pre-send Time to send the event on appropriate timing in milliseconds so that the voice and the words will sound more natural and realistic. This value will be indicated in the "Pre-send Area" that exists at the head of the first bar.
Import VOCALOID2 (VSQ)
When you import a VSQ file, the Velocity data and Opening data can be managed by these settings. You can import or ignore this data.
Export VOCALOID3 (VSQX)
You can set the resolution of the Automation Track when exporting a VSQX file.
Sound Preview Pre-send Time
You can preview the pronunciation by clicking on the piano roll keyboard or on the notes themselves.

http://piaprostudio.com42
Tool Bar
1 2 3 4 5 6 7 8 9 10 11 12 13 14
1 Piapro Studio Links to the Piapro Studio special website.
2 Selection Tool Tool fo r select ing Tracks , Region , Notes and Automation.
3 Range Tool Every Region, Notes or Automation can be selected by dragging this tool. Also, you can set the loop area by dragging in Bar line (to be described). The Loop area will be highlighted in yellow.
4 Timestretch Tool This function will be implemented in next version of Piapro Studio.
5 Pen Tool Tool for creating Region, Notes and Automation curves.
6 Split Tool Tool for cutting Region and Notes.
7 Glue Tool This function will be implemented in next version of Piapro Studio.
8 Mute Tool Tool for muting Region or Notes by clicking on them.
9 Snap On/Off Switches the snap function.
10 Snap Value Selects the absolute defined value for Regions or Notes which snap to the vertical grid.
11 Triplets Changes snap grid into Triplets.
12 Auto Scroll When playback starts, the screen will automatically scroll synchronized with the song.
13 Sound Preview When this feature is turned on, you will be able to have a preview of the pronunciation when clicking on or dragging the notes.
14 Preference Panel Opens "Preference Panel" screen. See also the chapter "Menu"

Piapro .Studio .Operation .Manual(v1 .0)
© Crypton Future Media, INC. 43
Bar Line
The number shown in this line means the number of bars and is synchronized with the Host Application. By clicking the Selection Tool, the red playback bar (vertical line) moves to the pointer. Then you can assign the playback point or pasting destination. By dragging in this area using the "Range Tool", you can set the loop area. The loop area is highlighted in yellow.
Meter / Tempo Track
Displays Meter and Tempo data saved in files (Piapro Studio Song File, MIDI, VSQ, VSQX) that can be imported via [File] > [Import] in the Menu or via drag & drop function.
When creating a song that frequently changes in Meter or Tempo, then first export a MIDI File with this data in the Host Application (DAW Application). You can then import the exported MIDI File via [File] > [Import] > [Meter and Tempo] in the Menu of Piapro Studio. By doing this, the Host Application (DAW Application) and Piapro Studio will be precisely synchronized.
Please note that the option "Export Meter / Tempo Track" will be implemented in the next update.
Display/Hide of Meter/Tempo Track
You can display or hide the Meter / Tempo Track by clicking the button shown on the left.
Import
By turning off button [A] shown on the left, Meter and Tempo of the track will not be imported. Instead, the track will be synchronized with the Meter and Tempo setting of the Host Application (DAW Application).

http://piaprostudio.com44
Track
Track is the place where you input the notes, lyrics, and the performance parameters for the vocal part. You can use several tracks in Piapro Studio. Also, each track can have one vocal database. By making use of tracks, you can switch the vocal database along with a song or you can establish refined choruses.
Creating a New Track
You can make a new track by clicking on this button. The default vocal database that is set in [Default Singer] in [Preference Panel] will be automatically assigned to a new track.
Track Header detail
Singer IconTrack Name
New Track
Track Header
VolumePan
MuteSolo
Select Automation TrackClose all Automation Tracks
New Track Creates a New Track
Vocalist Icon Indicates the picture and the name of selected vocalist database. Click the icon for changing the vocalist database in the window [VOCALOID3 Track Settings].
Track Name Indicates the default voice DB name that is set for Default Singer in the Preference Panel. You can change this text by double clicking on it.
Volume Track volume.
Pan Volume balance of the stereo channel.
Solo If you have several tracks, all the other tracks will be muted. You can select several solo tracks by pressing Shift+click.

Piapro .Studio .Operation .Manual(v1 .0)
© Crypton Future Media, INC. 45
Mute Mutes the Track
Select Automation Track
"Select Automation Track" window will be displayed. Please check the items you want to show on this screen for displaying the selected Automation in the track.
Close All Automation Tracks
Closes all Automation Tracks shown on the screen.
Context MenuContext menu will be shown when you right click on the track.
Duplicate Track
Copies selected track. When the track contains the Region, it will also be copied.
Delete track Delete selected track. When the track contains the Region, it will also be deleted.
Select Singer [VOCALOID3 Track Settings] window will be shown
Mute Track Activates Mute button
Solo Track Activates Solo button
Unmute / Unsolo All Tracks
Clear all Mute/Solo settings
Select Automation Track
[Select Automation Track] window will be shown. Please click on the Automation Track you want to have displayed.
Region
Region Name
To write notes and lyrics, you need to create a Region on the Vocal Track using the Pen Tool. The Piano Roll Editor will be shown for inputting notes and lyrics by double clicking on the Region. Please double click on the Piano Roll or Track Header to close the piano roll.

http://piaprostudio.com46
Changing Region LengthYou can change the length of a Region by dragging the edges of it.
Selecting RegionYou can select a Region by clicking the Selection Tool or Pen Tool, and the selected Region will be highlighted. By holding down the Ctrl(Win) / Command(Mac) Key, you can select several Regions. Dragging with the "Range Tool", all Regions on same time axis will be selected.
Moving and Copying RegionsRegions can be dragged and moved anywhere. You can even move it to other Vocal Tracks. If there are no other tracks, you can drag and drop down to create a new track. If you drag and drop down while pressing the Ctrl(Win) / Option(Mac) Key, you can copy the Region.
Dividing RegionClick on the position you want to cut using the Split Tool.
Delete RegionSelect a Region, then hit Delete key or Backspace key.
Rename RegionDouble click on the Region name.
Context Menu in RegionBy right clicking on a Region, you will see these features:
Mute Region Mutes a Region
Render Region This function will be implemented in the next version of Piapro Studio
Export Region Exports a Region into WAV format

Piapro .Studio .Operation .Manual(v1 .0)
© Crypton Future Media, INC. 47
Piano Roll
Zoom In/Out
Region NameKeyboard
Show Automation Tracks Pre-send Area RegionOutput Channels
Keyboard Indicates the pitch of a note.
Region This is the area where you can input notes. You can change the length by dragging the edge.
Region name Indicates Region Name. You can modify this text when the Piano Roll is closed.
Automation Track Button
You can show/hide the Automation Track. Please refer to the chapter "Automation Track" for more details.
Output Channels Select the output channels connected to the Host Application.
Pre-send Area Vocal sound can be heard a little bit earlier than actual timing (The sound of "Su" from phonetic [S] is a good example). It can be shown in the head of the first bar. Please be careful that the notes written inside this area are soundless. Its length refers to the setting in "Pre-send Time" in [Preference Panel] window.
Zoom In/Out Zoom In or Out of the contents.
http://piaprostudio.com48
Notes
Inputting NotesYou can input a note by dragging inside the Piano Roll using the Pen Tool. You can also create a note using the Selection Tool: just hold down the Ctrl key and it turns into the Pen Tool. The default lyrics will be automatically assigned to the note right after you input on the Piano Roll ([La] in the English version). Default lyrics are set in the [Preference Panel].
Select NotesYou can select notes by clicking the Selection Tool or Pen Tool, and the selected notes will be highlighted. With Ctrl key, you can select several notes. Dragging with "Range Tool", all notes on the same time axis will be selected.
Moving and Copying notesNotes can be dragged and moved anywhere. You can even move it to other Vocal Tracks. If there are no other tracks, you can drag and drop down to create a new track. If you drag and drop down while pressing the Ctrl(Win) / Option(Mac) Key, you can copy the notes.
Delete notesSelect a note, then hit Delete key or Backspace key.
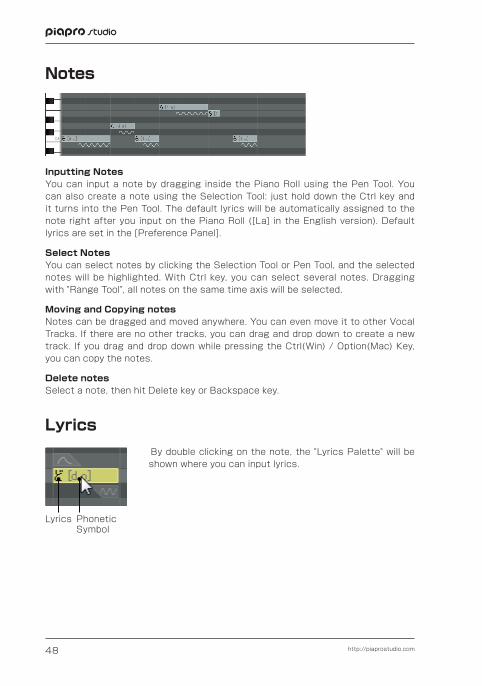
Lyrics
Lyrics Phonetic Symbol
By double clicking on the note, the "Lyrics Palette" will be shown where you can input lyrics.

Piapro .Studio .Operation .Manual(v1 .0)
© Crypton Future Media, INC. 49
Lyrics Palette Detailed Settings
This will be shown when clicking on "Detailed Settings"
Lyrics Input BoxPhonetic Symbol Input Box
Lyrics Input Box You can type in Hiragana / Zenkaku Katakana / Roman characters (single byte) for the Japanese vocal database . When you t ype in Roman characters, each word must be delimited by a single byte blank space. When you use the English vocal database, please input Roman characters and single blank spaces.
Phonetic Symbol Input Box
When you input something into the Lyrics Input Box, this field is automatically filled with the phonetic symbols. The appendix of this manual contains all phonetic symbols. Please type in these symbols directly when necessary. The manually inputted phonetic symbols will turn red. When overwriting on the red characters, the [Assign Lyrics] window will be shown. Please click "Yes" and reassign Lyrics and phonetic symbols.
Included in Notes
Small "tsu" Treat "tsu" and short sounds as one note.
Long Tone " ー " Treat " ー " and short sounds as one note.
Extra Lyrics
Discard Cuts off the lyrics because of notes shortage.
Add Extra Note Add notes automatically on notes shortage.
Sum up in Last Note Sum up all lyrics into the last note on notes shortage. Dividing the note using the Split Tool, the lyrics will also divided.
Note Length on Addition Length of the note that will be automatically added on notes shortage.

http://piaprostudio.com50
Singing Style
Double-click on this icon
You will see an icon that pops up on the top left of a note when hovering over it. When double clicking the icon the Singing Style window will open. If you select several notes and click the icon, you can set the style for all the notes at once.
Bend Depth Sets the depth of the pitch bend added to the head of the note.
Bend Length Sets the length of the pitch bend added to the head of the note.
Add Portamento In Riging Movement
If a note is higher than the previous note, the next notes start with running up pitch slide.
Add Portamento In Falling Movement
If a note is lower than the previous note, the next notes start with running down pitch slide.
Decay Indicates how the sound becomes silent. A small value keeps a constant amount of volume. If this value gets higher, the volume gradually decays.
Accent Nuance of the attack. Smaller value makes the attack sound soft, and vice versa.
Select Preset Selects the Singing Style from the Presets.
Length of Consonant (Velocity)
Sets the velocity value
Opening (VOCALOID3)
Sets the value that indicates how wide the singer's mouth opens
Singing Style
Vibrato

Piapro .Studio .Operation .Manual(v1 .0)
© Crypton Future Media, INC. 51
Vibrato
Double click on the wavy line
When you move the mouse over a note, you will see a wavy line icon on the bottom right of it. Double click the icon to open the Vibrato window.
If you select several notes and click the wavy line, you can set the Vibrato for all the notes at once.
Vibrato Length
Default length of the auto vibrato
Vibrato Type Indicates current vibrato type
Select Preset Selects the preset for Auto Vibrato
Automation Track
Close Automation Track
Automation Button
Parameter Name
Level SliderHandle
Parameter Name
Each parameter name will be shown here. The detail of the parameter will be described later.
Handle If there are several Automation Tracks, you can change their order by dragging this handle.
Slider You can change the parameter value only when the blue horizontal line is indicated here. After you created the curved line using the Pen Tool, this function will be disabled.
Automation Button
Turn On/Off Automation. Automation curves that are turned on will be highlighted in yellow and applied to the playback. This button is not available for [VEL] Velocity and [OPE] Opening.
Close Automation Track
Close Automation Track

http://piaprostudio.com52
The prepared parameters and their abbreviation
Volume Track volume
Pan Controls the stereo channels balance.
Velocity(VEL)
Controls the length of the consonant. Increasing this value shortens the consonants at the head of the lyrics, which emphasizes the Attack of the pronunciation.
Decreasing this value causes each consonant (especially "s" or "f") to be extended and create a slower sound with less attack
Dynamics(DYN)
Controls Dynamics - volume, mellowness, crescendo and diminuendo
Breathiness(BRE)
Controls how breathy the voice is. Higher value makes the vocals more breathy.
Brightness(BRI)
Controls the high frequency of the vocals. Higher values make the vocals bright and brilliant. Lower values make them smooth and chilled. It is suggested to decrease this value to makea gentle and whispery phrase.
Clearness(CLE)
The function of this parameter is similar to Brightness, but the result is slightly different. Higher values make the vocals clear and sharp, lower values make it thicker and deep.
Opening(OPE)
Controls the size of the mouth opening. Higher values mean a larger opening of the mouth.
Gender Factor(GEN)
Controls the formant of the vocals. Higher values make the vocals appear more male, and lower ones make it sound more feminine. You can create cartoon character-like vocals by utilizing this parameter.
Portamento Timing(POR)
Controls the position of the portamento, where the pitch changes.
Pitch(PIT)
Controls the pitch. The range of this parameter is -8192 to 8191. 0 makes no change. With the maximum value of the parameter "Pitch Bend Sensitivity (discussed below)", you can control the pitch up to 2 octaves.
Pitch Bend Sensitivity(PBS)
Controls the amount of change of the Pitch above. In "24" (24 half steps) you can shift pitch +/- 2 Octaves and in "12" (12 half steps) you can shift pitch +/- 1 octave.
Singer This function will be implemented in the next version of Piapro Studio
Vibrato Vibrato Depth controls the depth of the vibrato, whereas the Vibrato Rate controls the speed of the vibrato.

Piapro .Studio .Operation .Manual(v1 .0)
© Crypton Future Media, INC. 53
Input AutomationYou can enter an automation by using the Pen Tool. When this tool is already selected, you can also just press and hold the Ctrl (Windows) / Option (Mac) Key while dragging in the Automation Track.
The Automation Track of Piapro Studio operates with the interpolation mode (in a straight line connecting the dots), which allows you to enter the automation by simply clicking on the Pen Tool in the Automation Track.
Edit AutomationA dot will appear when you hover the mouse over the automation (see image on the left). If you move this up, down, left or right (by choosing the backspace key or delete key), you can edit the automation easily. You can also add a dot by clicking on the pencil tool.
>If you click on the dot in the
selection tool by holding down the Alt (Win) / Command (Mac) Key, you can switch the interpolation mode or hold mode (same value
until the next dot).
Select, Move, Copy AutomationDragging with Selection Tool, you can select every parameter within the area. Dragging with Range Tool, you can select every event on the same time axis. Selected Parameter can be moved to the left and right. By dragging the selection with holding down the Ctrl key, you can make a copy.
Delete AutomationA curve styled Automation can be deleted after being selected by the Selection Tool or Range Tool. Select them and hit Delete key or Backspace key. The parameter that belongs to notes (Velocity and Opening) cannot be deleted.
Height of the Automation TrackDouble click on the Automation Track maximizes its height. Double click with Ctrl key minimizes the track. Double click while holding the Ctrl key + Shift key minimizes all Automation Tracks of one track.
Context MenuContext menu will be shown when you right click on the track.
Select Automation Track [Select Automation Track] window will be shown. Please click on the Automation Track you want to show.
Close Automation Track Close Automation Track
Close all Automation Tracks Close all Automation Tracks
http://piaprostudio.com54
Create a chorus by layering the Region
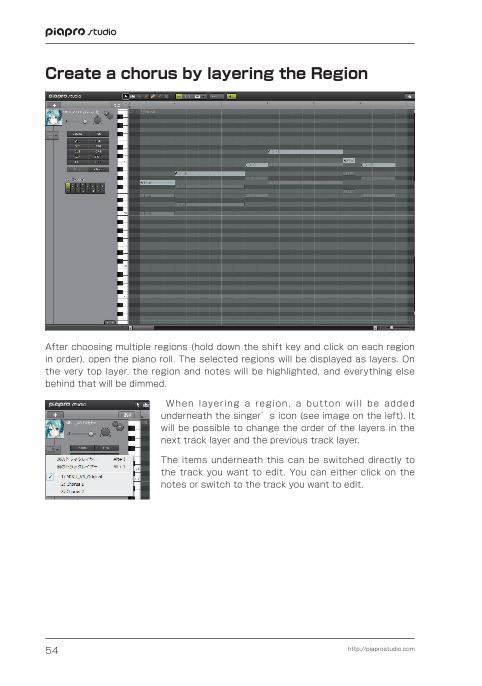
After choosing multiple regions (hold down the shift key and click on each region in order), open the piano roll. The selected regions will be displayed as layers. On the very top layer, the region and notes will be highlighted, and everything else behind that will be dimmed.
When layer ing a region, a button wil l be added underneath the singer’s icon (see image on the left). It will be possible to change the order of the layers in the next track layer and the previous track layer.
The items underneath this can be switched directly to the track you want to edit. You can either click on the notes or switch to the track you want to edit.

Piapro .Studio .Operation .Manual(v1 .0)
© Crypton Future Media, INC. 55
Transport bar
Locate Song Start
Stop
TempoGo To Previous Bar Go To Next Bar Link Icon Meter
Playback, Pause Loop Playback On/Off Playback Position
All buttons can only be active when the Host Application is stopped. Playback of the Host Application disables all buttons in Piapro Studio since Piapro Studio is synchronized with the Host.
Locate Song Start Playback bar (red vertical line) moves to beginning of the song.
Go To Previous Bar
Playback bar moves back 1 bar
Playback, Pause Plays song in Piapro Studio. This button turns into the Pause Button when playing back
Stop Stops playing back and Playback bar goes back to the beginning of the song. The same happens if you click on this button during pause.
Go To Next Bar Playback bar moves forward 1 bar
Loop Playback On/Off
Switches Loop playback On or Off. When switched on, this button will be highlighted in yellow color.
Link Icon This icon will be highlighted when the Host Application starts playing back.
Playback Position Indicates current playback position. These numbers indicate (from left to right) Bar Number, Tempo, Tick Number.
Tempo Indicates current Tempo
Meter Indicates current Meter


Appendix

http://piaprostudio.com58
Shortcut keysTransport
Space / Enter Playback / Pause[.] or Shift + Enter StopCtrl + [0] Go back to the beggining of the songAlt + [0] 1 bar backAlt + [ . ] 1 bar forward[0] Move to loop start position[ . ] Move to loop end position(Win) Ctrl+R (Mac) Command+R
Loop playback On/Off
Shift + R or Alt + Drag Make selected area as loop
Tool
1 Selection ToolR Range ToolT Time Stretch Tool (This function will be implemented
in next version of Piapro Studio)V or P Pen ToolC or K Split ToolB or L Glue ToolX Mute Tool
Editing
(Win) Ctrl + Z (Mac) Command + Z
Undo
(Win) Ctrl + Y (Mac) Command + Y
Redo
(Win) Ctrl + X (Mac) Command + X
Cut
(Win) Ctrl + C (Mac) Command + C
Copy
(Win) Ctrl + V (Mac) Command + V
Paste
Del or BS Delete selected object(s)Shift + Click When first and last Region / note are clicked, all the
Regions / Notes within the area will be selected(Win) Ctrl + Click (Mac) Command + Click
Select several Regions / Notes

Piapro .Studio .Operation .Manual(v1 .0)
© Crypton Future Media, INC. 59
Track
(Win) Shift+Ctrl+3 (Mac) Shift+Option+3
Create new Track
(Win) Shift+Ctrl+D (Mac) Shift+Option+D
Copy selected Track
(Win) Shift+Ctrl+Del (Mac) Shift+Command+Del
Delete selected Track
M or D Mute selected TrackS Solo selected TrackShift + M or Shift + D Unmute all Tracks(Win) Ctrl+1 (Mac) Command+1
Minimize / Maximize Track Header
(Win) Ctrl+Shift+G (Mac)Command+Shift+G
Minimize Selected Track
(Win) Ctrl+Shift+H (Mac) Command+Shift+H
Maximize Selected Track
Shift + Alt + [Up arrow] Minimize all TracksShift + Alt + [Down arrow] Maximize all TracksAlt + [Up arrow] Switch To Next Track LayerAlt + [Down arrow] Switch To Prev Track Layer
Region / notes
(Win) Ctrl+Alt+M (Mac) Command+Option+M
Mute selected Region
(Win) Ctrl+Alt+R (Mac) Command+Option+R
Render selected Region (This function will be implemented in the next version of Piapro Studio)
(Win) Ctrl+Alt+E (Mac) Command+Option+E
Export selected Region
(Win) Ctrl+Alt+Click (Mac) Command+Option+Click
Ctrl + Alt + Click
(Win) Ctrl+ クリック (Mac) Option+ クリック
Insert Region / Notes
(Win) Ctrl+ [Up arrow] (Mac) Command+ [Up arrow]
Transpose selected note half step up
(Win) Ctrl+ [Down arrow] (Mac) Command+ [Down arrow]
Transpose selected note half step down
(Win) Shift+Ctrl+ [Up arrow] (Mac) Shift+Command+ [Up arrow]
Transpose selected note 1 octave up
(Win) Shift+Ctrl+ [Down arrow] (Mac) Shift+Command+ [Down arrow]
Transpose selected note 1 octave down
(Win) Ctrl+Alt+N (Mac) Command+Option+N
Normalize selected note
Q Snap On/Off

http://piaprostudio.com60
Screen Control
[Left arrow] Scroll 1 bar back[Right arrow] Scroll 1 bar forwardShift + [Left arrow] Scroll leftShift + [Right arrow] Scroll rightG or [+] Zoom InCtrl + mouse wheel Zoom In/OutH or [-] Zoom OutShft + Z or Shift + G Zoom in selected area(Win) Shift+Ctrl+[ (Mac) Shift+Command+[
Make Piano Roll smaller
(Win) Shift+Ctrl+] (Mac) Shift+Command+]
Make Piano Roll larger
Shift + A Auto scroll On/Off(Win) Ctrl+E (Mac) Command+E
Open Piano Roll
(Win) Ctrl+W (Mac) Command+W
Close Window
(Win) Ctrl+; (Mac) Command + ,
Open "Preference Panel" window
F1 or Help Open Manual

Piapro .Studio .Operation .Manual(v1 .0)
© Crypton Future Media, INC. 61
How to use Mutant VSTi (Windows Only)
This is the VSTi version of the Sound Material Management Software "Mutant". Mutant is provided by "SONICWIRE", the Online Download Shop for Sound Material and Virtual Instruments Software.
Prepare Mutant VSTi
To start Mutant VSTi, you need to start your Host Application first. In this manual, we are going to use "Studio One Artist Piapro Edition"(Studio One 2)as an example.
When you create a "New Song" in Studio One 2, the screen below will be displayed. Click on the "Browse" button at the right bottom corner then click on the "Instruments" button.
Click on "Mutant VSTi" in "Instruments", and drag&drop this from the right panel to the left as shown below.
You are ready when "Mutant VSTi" is being shown.
Register the sound to Mutant VSTi
After you installed the Mutant VSTi, the "Soundroot" folder will be created in your C-drive (default OS boot hard disk) root. All Bonus Samples (SONICWIRE Bonus Samples) will be placed in the "Soundroot" folder. Please drag&drop th is fo lde r into the Mutant VST i window.

http://piaprostudio.com62
Mutant VSTi Screen
1 2 3 4 5
6
7
9
10 11
12 13 14 15 16
8
1 MY CONTENTS Switch to Sounds Library Browser
2 BOOKMARK Switch to Bookmarks
3 SONICWIRE.COM Show SONICWIRE.COM
4 TRASH CAN Show files deleted on Mutant
5 Search Search sound registered in Mutant
6 View Mode Switch Smallen the width of Mutant
7 Folder List Show all the folders registered in Mutant
8 Sound List Show sounds in the selected folders
9 Bookmark bar Always indicate the folder in Bookmarks
10 Folder List Command Button
From left to right: "Add New Directory", "Add Folder", "Delete Folder", "Property"
11 Sound List Command Button
From left to right: "Bookmarks", "Property", "Delete File", "Show/Hide Rows", "Show/Hide Time Bar", "Show/Hide Wave of the Sound"
12 Loop Playback Turn On/Off Loop Playback
13 Go Back to Sample Go back to currently selected sample
14 Volume Control the volume by sliding left or right
15 Display Display the title and time of the file now playing
16 Control button From left to right: "Play Previous Sound", "Stop", "Play/Pause", "Play Next Sound"
See also the Mutant special website for more details.http://sonicwire.com/mutant/

Piapro Studio Operation Manual v1 .02013 © Crypton Future Media, INC. 2013 © YAMAHA Corporation.All Rights Reserved. 2013/Aug. issue
11F NIHON SEIMEI SAPPORO BLDG ., 1-1 NISHI4 KITA3, CHUO-KU, SAPPORO 060-0003 JAPANWEBSITE:http://www .crypton .co .jp/ Fax:(011)222-0707E-Mail: mpsales@crypton .co .jp
国内販売元:
本書の一部またはすべてを、クリプトン・フューチャー・メディア株式会社に無断で複写、複製、転載、翻訳する事を禁じます。内容は予告無しに変更される場合があります。VOCALOID はヤマハ株式会社の登録商標です。VST は Steinberg Media Technologies GmbH の登録商標です。Studio One は PreSonus Audio Electronics, Inc. の登録商標です。Piapro Studio はヤマハ株式会社よりVOCALOID API の使用許諾を受けて開発されました。その他、本書に記載されている会社名、製品名は、各社の商標または登録商標です。

piaprostudio.com