Embed Size (px)
Citation preview
1-(800) 877-2745 | www.Ashlar-Vellum.com
Photo-realism FundamentalsUsing Cobalt™, Xenon™, Argon™
Copyright © 2008 Ashlar Incorporated. All rights reserved.
Photo-realism FundamentalsPhoto-realistic rendering borrows terminology and technology from many disciplines. From photography to painting, there is often more going on behind the scene than the viewer realizes. To make an interesting composition, Cobalt, Xenon and Argon provide an extensive library of materials, lights and decals for use in a scene, but making that scene come to life will require some fundamental techniques.
In this lesson are some general guidelines to help make your renderings look real. These include:
Creating the Environment
• Modeling Tips for More Realism
• Creating Floor Surfaces and Backdrops
• How to View the Scene
• Composition: Arranging Objects in the Scene
• Making Reflective Objects Look Real
Lighting the Environment
• The 3-point Light Setup
• Specific Lighting Situations
• Lighting Color
• Shadows
Adding Realistic Materials
• Basics of Materials
• Types of Plastic
• How to Make Metal
• How to Make Clear Materials
• Image-based Textures
• Practice Makes Perfect
4-2
Creating the Environment
Creating the EnvironmentModeling Tips for More Realism
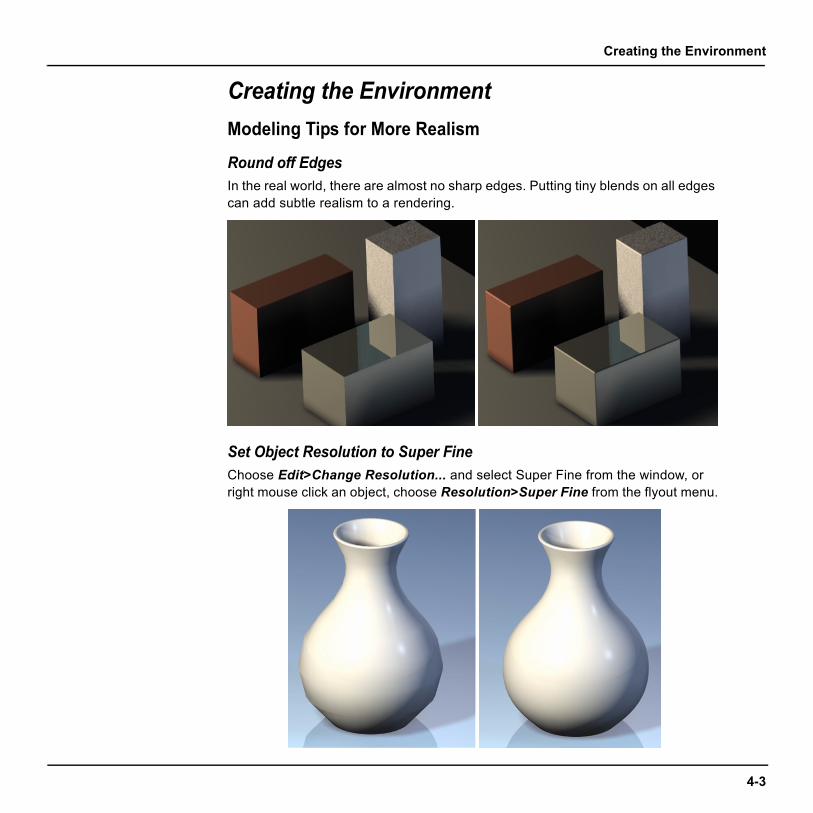
Round off EdgesIn the real world, there are almost no sharp edges. Putting tiny blends on all edges can add subtle realism to a rendering.
Set Object Resolution to Super FineChoose Edit>Change Resolution... and select Super Fine from the window, or right mouse click an object, choose Resolution>Super Fine from the flyout menu.
4-3
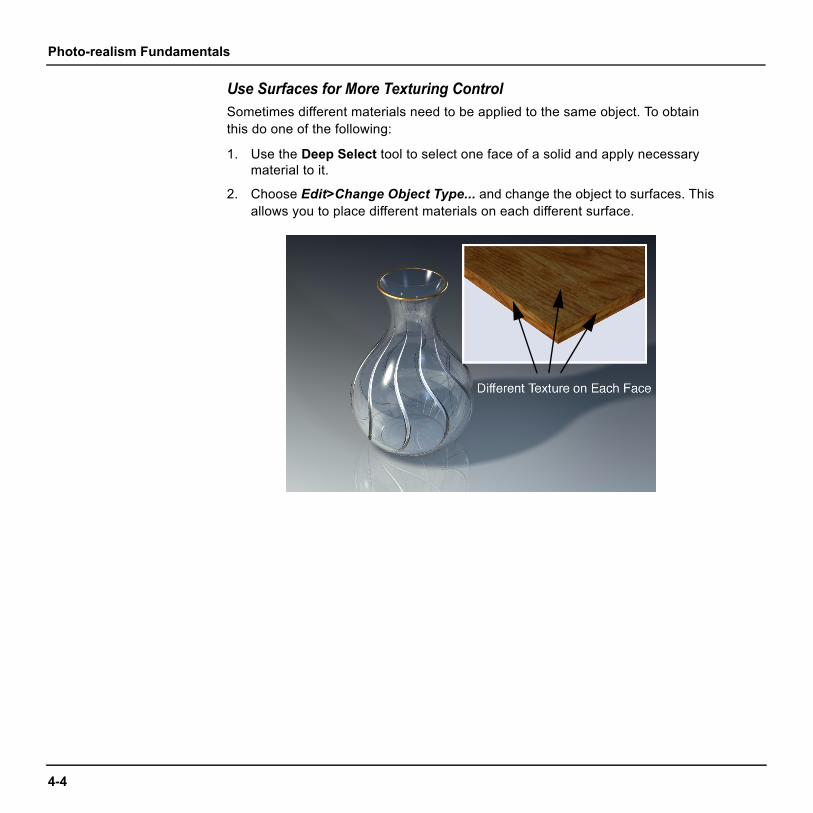
Photo-realism Fundamentals
4-4
Use Surfaces for More Texturing ControlSometimes different materials need to be applied to the same object. To obtain this do one of the following:
1. Use the Deep Select tool to select one face of a solid and apply necessary material to it.
2. Choose Edit>Change Object Type... and change the object to surfaces. This allows you to place different materials on each different surface.
Creating the Environment
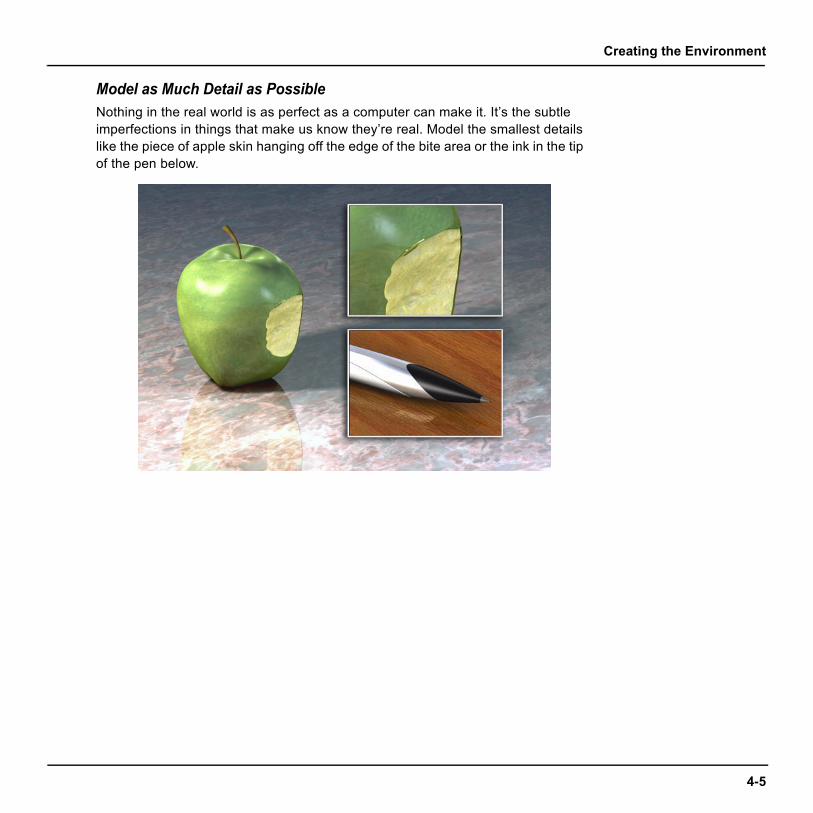
Model as Much Detail as PossibleNothing in the real world is as perfect as a computer can make it. It’s the subtle imperfections in things that make us know they’re real. Model the smallest details like the piece of apple skin hanging off the edge of the bite area or the ink in the tip of the pen below.
4-5
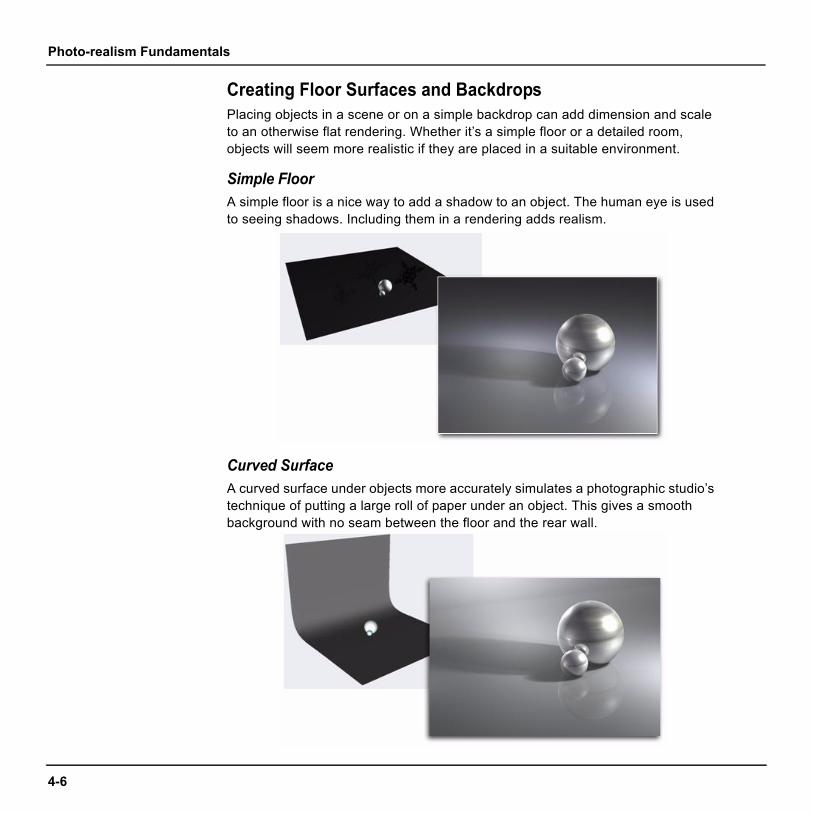
Photo-realism Fundamentals
4-6
Creating Floor Surfaces and BackdropsPlacing objects in a scene or on a simple backdrop can add dimension and scale to an otherwise flat rendering. Whether it’s a simple floor or a detailed room, objects will seem more realistic if they are placed in a suitable environment.
Simple FloorA simple floor is a nice way to add a shadow to an object. The human eye is used to seeing shadows. Including them in a rendering adds realism.
Curved SurfaceA curved surface under objects more accurately simulates a photographic studio’s technique of putting a large roll of paper under an object. This gives a smooth background with no seam between the floor and the rear wall.
Creating the Environment
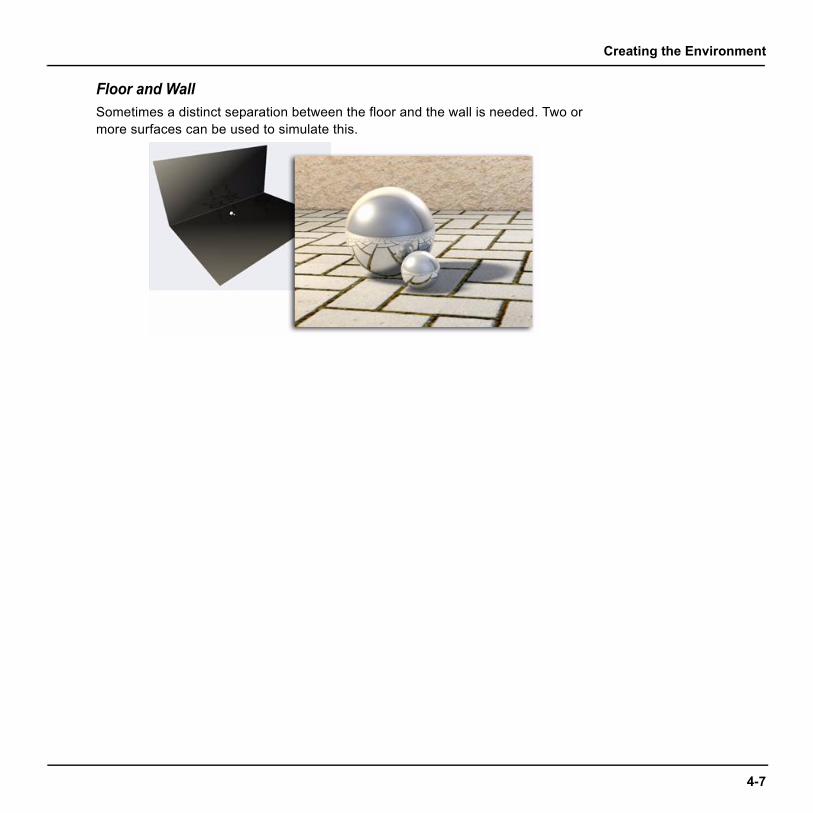
Floor and WallSometimes a distinct separation between the floor and the wall is needed. Two or more surfaces can be used to simulate this.
4-7
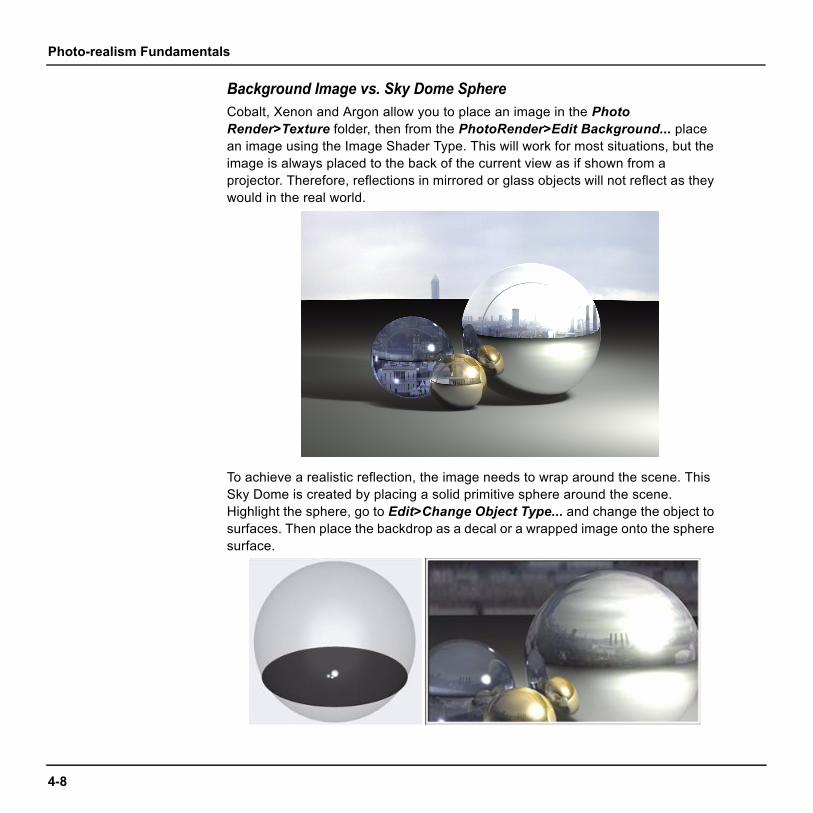
Photo-realism Fundamentals
4-8
Background Image vs. Sky Dome SphereCobalt, Xenon and Argon allow you to place an image in the Photo Render>Texture folder, then from the PhotoRender>Edit Background... place an image using the Image Shader Type. This will work for most situations, but the image is always placed to the back of the current view as if shown from a projector. Therefore, reflections in mirrored or glass objects will not reflect as they would in the real world.
To achieve a realistic reflection, the image needs to wrap around the scene. This Sky Dome is created by placing a solid primitive sphere around the scene. Highlight the sphere, go to Edit>Change Object Type... and change the object to surfaces. Then place the backdrop as a decal or a wrapped image onto the sphere surface.
Creating the Environment
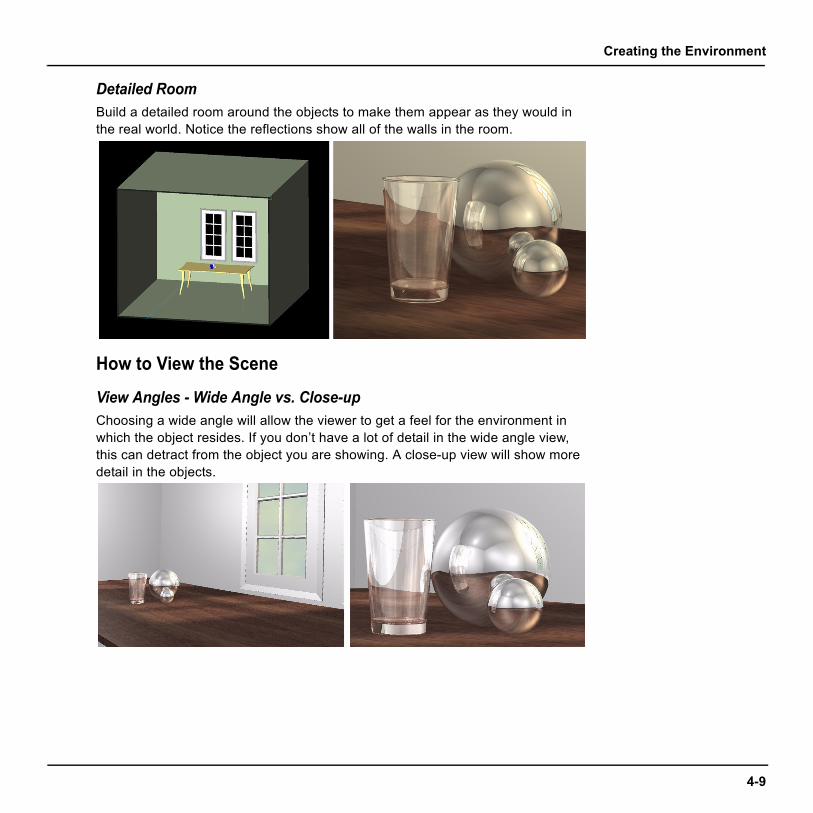
Detailed Room Build a detailed room around the objects to make them appear as they would in the real world. Notice the reflections show all of the walls in the room.
How to View the Scene
View Angles - Wide Angle vs. Close-upChoosing a wide angle will allow the viewer to get a feel for the environment in which the object resides. If you don’t have a lot of detail in the wide angle view, this can detract from the object you are showing. A close-up view will show more detail in the objects.
4-9
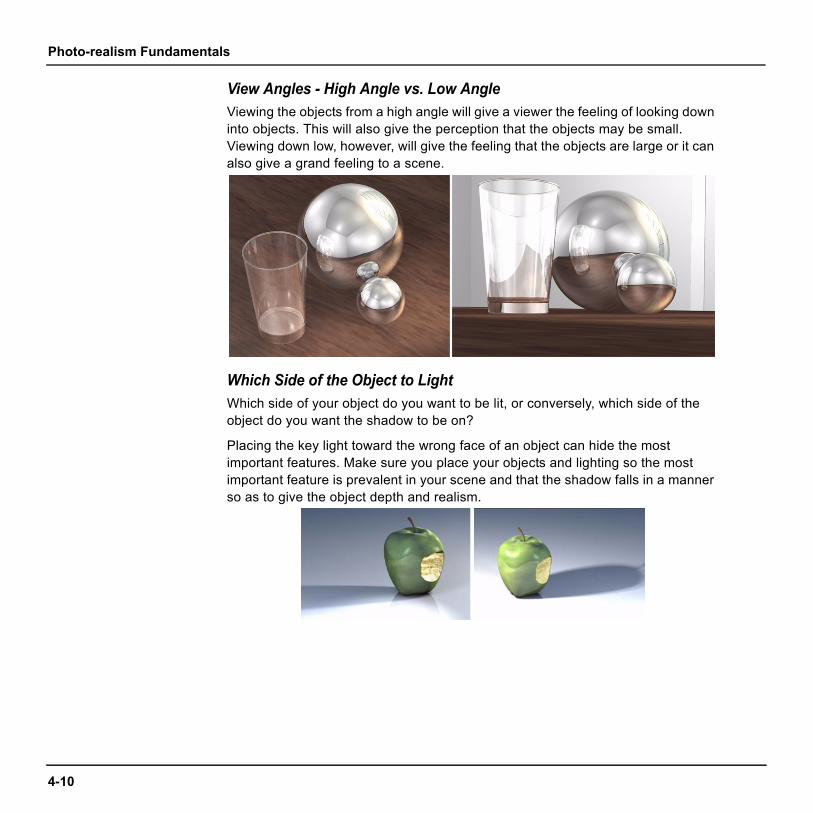
Photo-realism Fundamentals
4-10
View Angles - High Angle vs. Low AngleViewing the objects from a high angle will give a viewer the feeling of looking down into objects. This will also give the perception that the objects may be small. Viewing down low, however, will give the feeling that the objects are large or it can also give a grand feeling to a scene.
Which Side of the Object to LightWhich side of your object do you want to be lit, or conversely, which side of the object do you want the shadow to be on?
Placing the key light toward the wrong face of an object can hide the most important features. Make sure you place your objects and lighting so the most important feature is prevalent in your scene and that the shadow falls in a manner so as to give the object depth and realism.
Creating the Environment
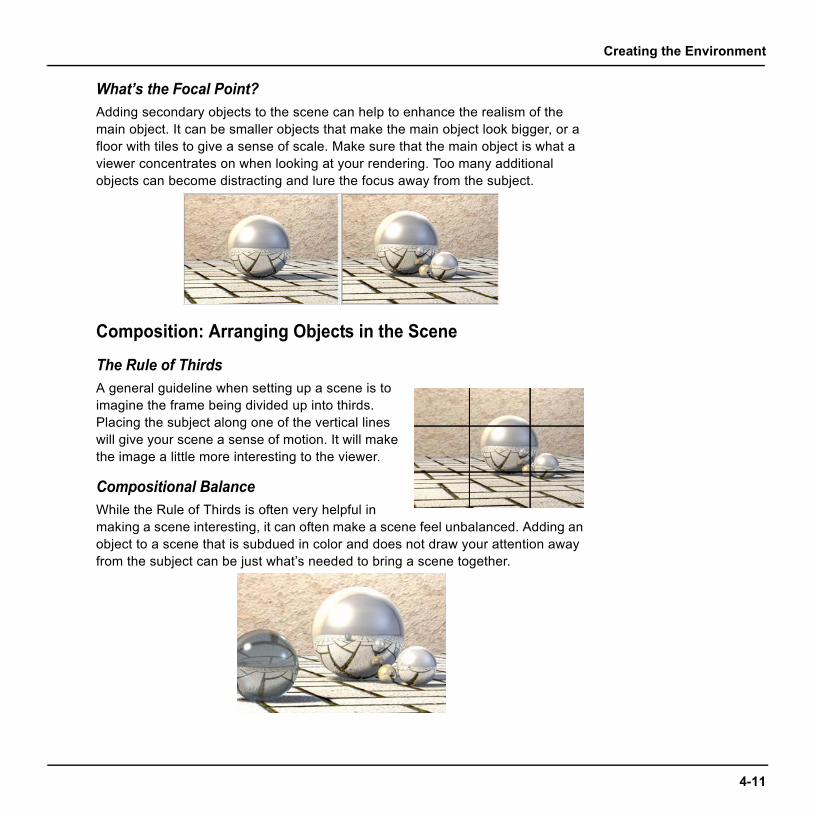
What’s the Focal Point?Adding secondary objects to the scene can help to enhance the realism of the main object. It can be smaller objects that make the main object look bigger, or a floor with tiles to give a sense of scale. Make sure that the main object is what a viewer concentrates on when looking at your rendering. Too many additional objects can become distracting and lure the focus away from the subject.
Composition: Arranging Objects in the Scene
The Rule of ThirdsA general guideline when setting up a scene is to imagine the frame being divided up into thirds. Placing the subject along one of the vertical lines will give your scene a sense of motion. It will make the image a little more interesting to the viewer.
Compositional BalanceWhile the Rule of Thirds is often very helpful in making a scene interesting, it can often make a scene feel unbalanced. Adding an object to a scene that is subdued in color and does not draw your attention away from the subject can be just what’s needed to bring a scene together.
4-11
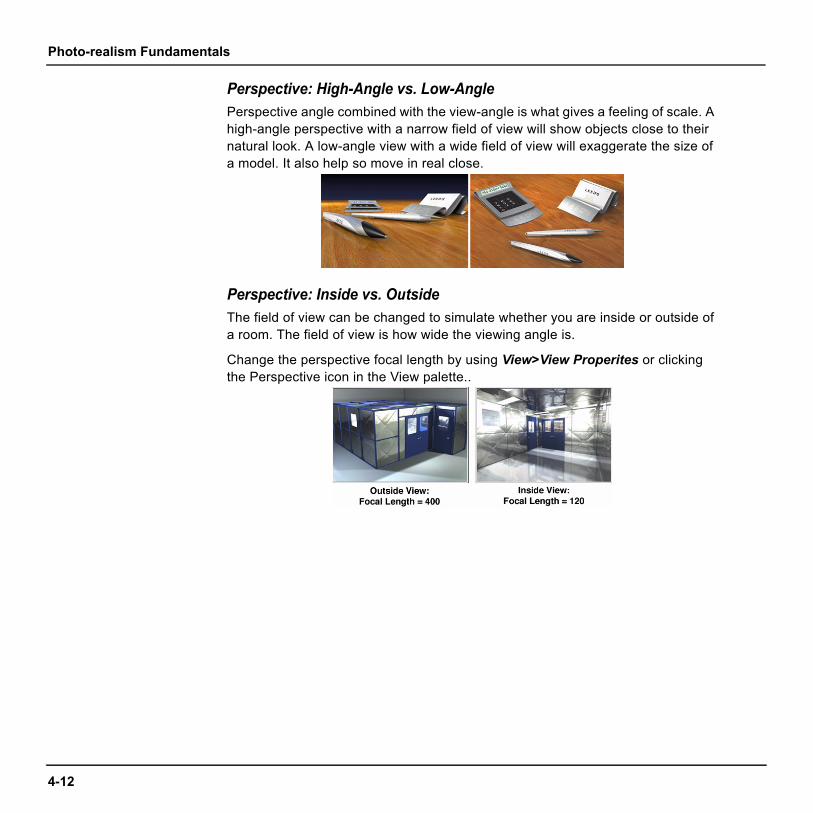
Photo-realism Fundamentals
4-12
Perspective: High-Angle vs. Low-AnglePerspective angle combined with the view-angle is what gives a feeling of scale. A high-angle perspective with a narrow field of view will show objects close to their natural look. A low-angle view with a wide field of view will exaggerate the size of a model. It also help so move in real close.
Perspective: Inside vs. OutsideThe field of view can be changed to simulate whether you are inside or outside of a room. The field of view is how wide the viewing angle is.
Change the perspective focal length by using View>View Properites or clicking the Perspective icon in the View palette..
Creating the Environment
Making Reflective Objects Look Real
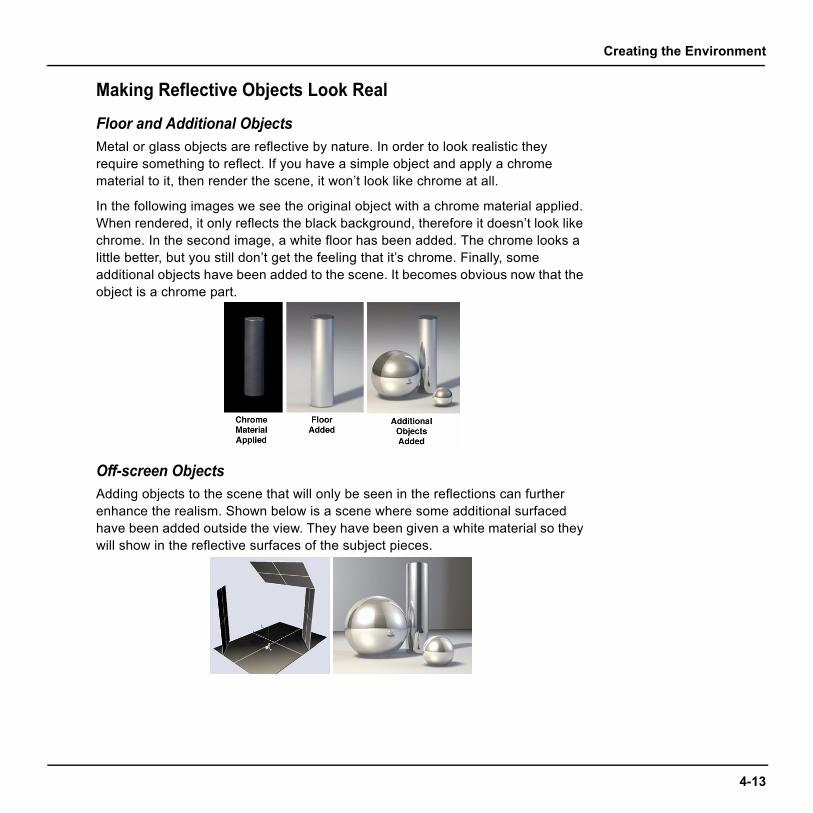
Floor and Additional ObjectsMetal or glass objects are reflective by nature. In order to look realistic they require something to reflect. If you have a simple object and apply a chrome material to it, then render the scene, it won’t look like chrome at all.
In the following images we see the original object with a chrome material applied. When rendered, it only reflects the black background, therefore it doesn’t look like chrome. In the second image, a white floor has been added. The chrome looks a little better, but you still don’t get the feeling that it’s chrome. Finally, some additional objects have been added to the scene. It becomes obvious now that the object is a chrome part.
Off-screen ObjectsAdding objects to the scene that will only be seen in the reflections can further enhance the realism. Shown below is a scene where some additional surfaced have been added outside the view. They have been given a white material so they will show in the reflective surfaces of the subject pieces.
4-13
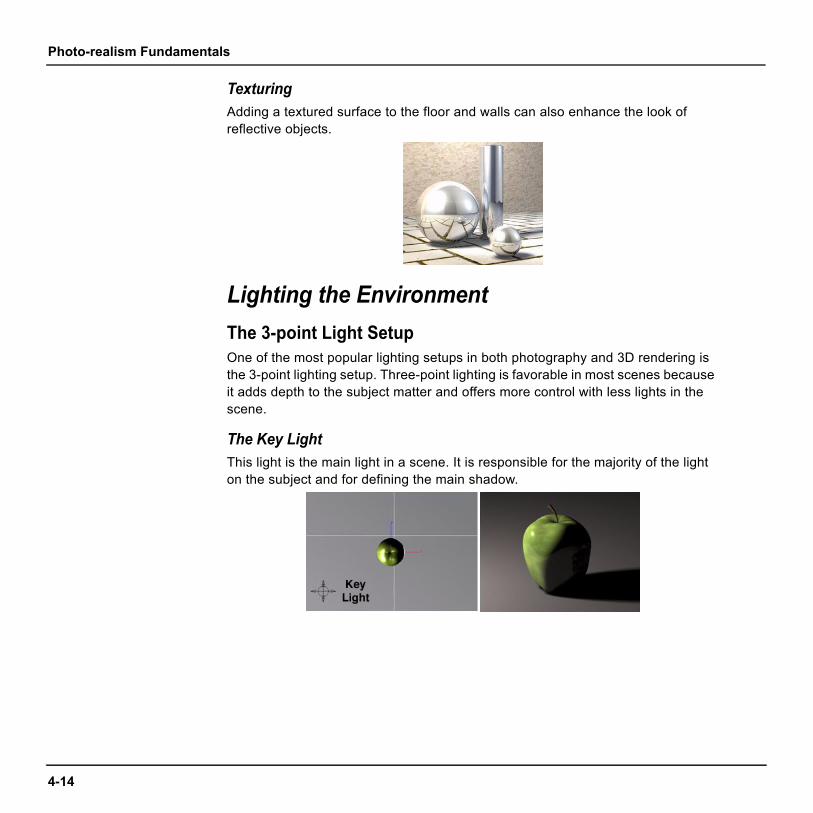
Photo-realism Fundamentals
4-14
TexturingAdding a textured surface to the floor and walls can also enhance the look of reflective objects.
Lighting the EnvironmentThe 3-point Light SetupOne of the most popular lighting setups in both photography and 3D rendering is the 3-point lighting setup. Three-point lighting is favorable in most scenes because it adds depth to the subject matter and offers more control with less lights in the scene.
The Key LightThis light is the main light in a scene. It is responsible for the majority of the light on the subject and for defining the main shadow.
Lighting the Environment
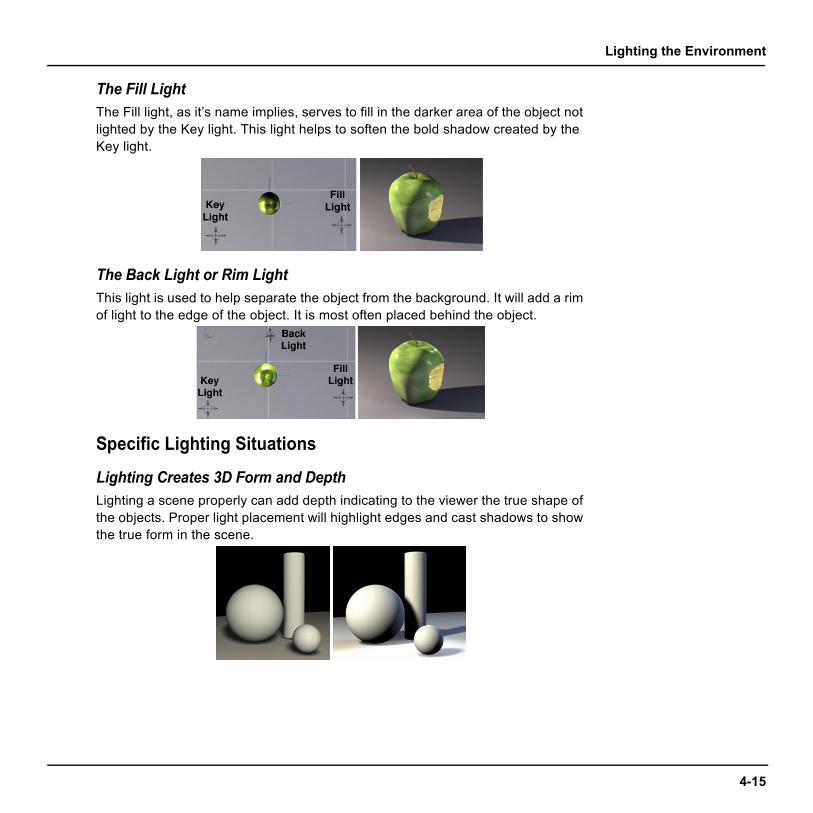
The Fill LightThe Fill light, as it’s name implies, serves to fill in the darker area of the object not lighted by the Key light. This light helps to soften the bold shadow created by the Key light.
The Back Light or Rim LightThis light is used to help separate the object from the background. It will add a rim of light to the edge of the object. It is most often placed behind the object.
Specific Lighting Situations
Lighting Creates 3D Form and DepthLighting a scene properly can add depth indicating to the viewer the true shape of the objects. Proper light placement will highlight edges and cast shadows to show the true form in the scene.
4-15
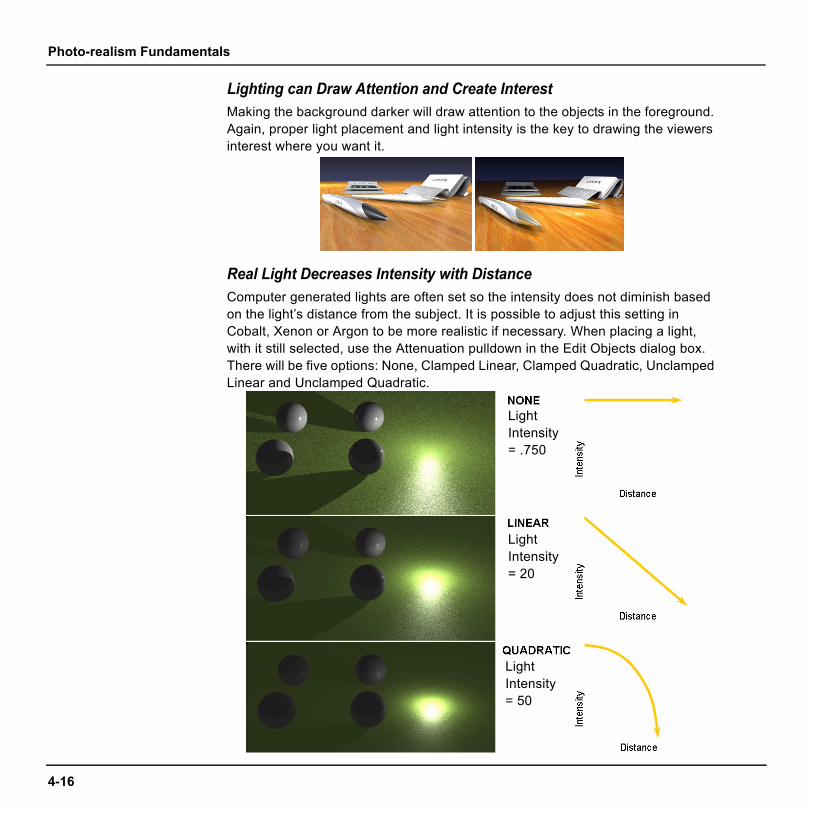
Photo-realism Fundamentals
4-16
Lighting can Draw Attention and Create InterestMaking the background darker will draw attention to the objects in the foreground. Again, proper light placement and light intensity is the key to drawing the viewers interest where you want it.
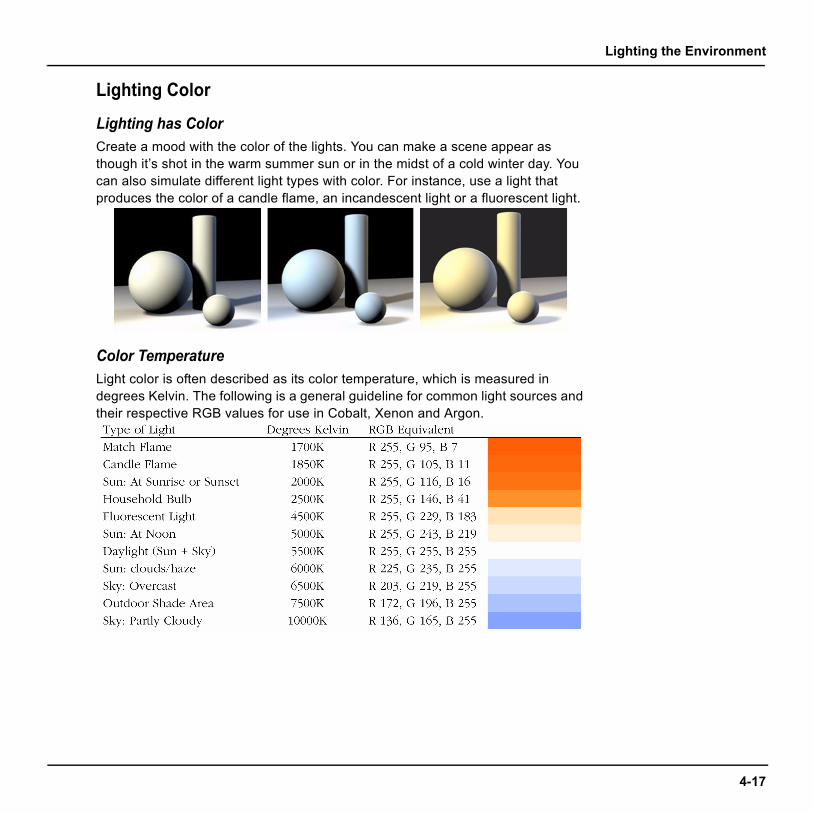
Real Light Decreases Intensity with DistanceComputer generated lights are often set so the intensity does not diminish based on the light’s distance from the subject. It is possible to adjust this setting in Cobalt, Xenon or Argon to be more realistic if necessary. When placing a light, with it still selected, use the Attenuation pulldown in the Edit Objects dialog box. There will be five options: None, Clamped Linear, Clamped Quadratic, Unclamped Linear and Unclamped Quadratic.
LightIntensity= .750
LightIntensity= 20
LightIntensity= 50
Lighting the Environment
Lighting Color
Lighting has ColorCreate a mood with the color of the lights. You can make a scene appear as though it’s shot in the warm summer sun or in the midst of a cold winter day. You can also simulate different light types with color. For instance, use a light that produces the color of a candle flame, an incandescent light or a fluorescent light.
Color TemperatureLight color is often described as its color temperature, which is measured in degrees Kelvin. The following is a general guideline for common light sources and their respective RGB values for use in Cobalt, Xenon and Argon.
4-17
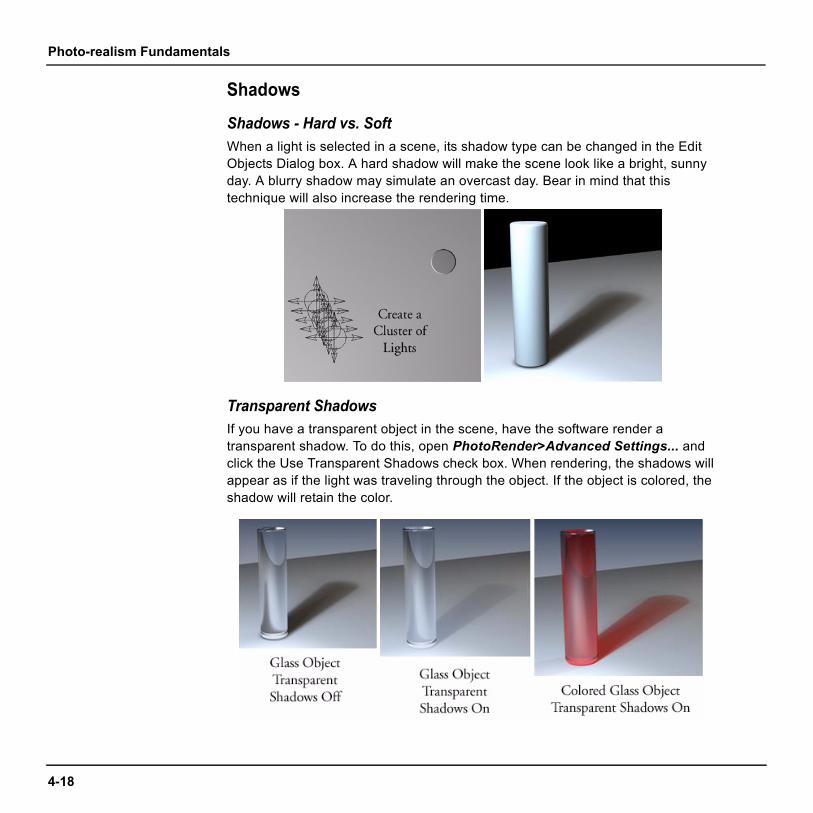
Photo-realism Fundamentals
4-18
Shadows
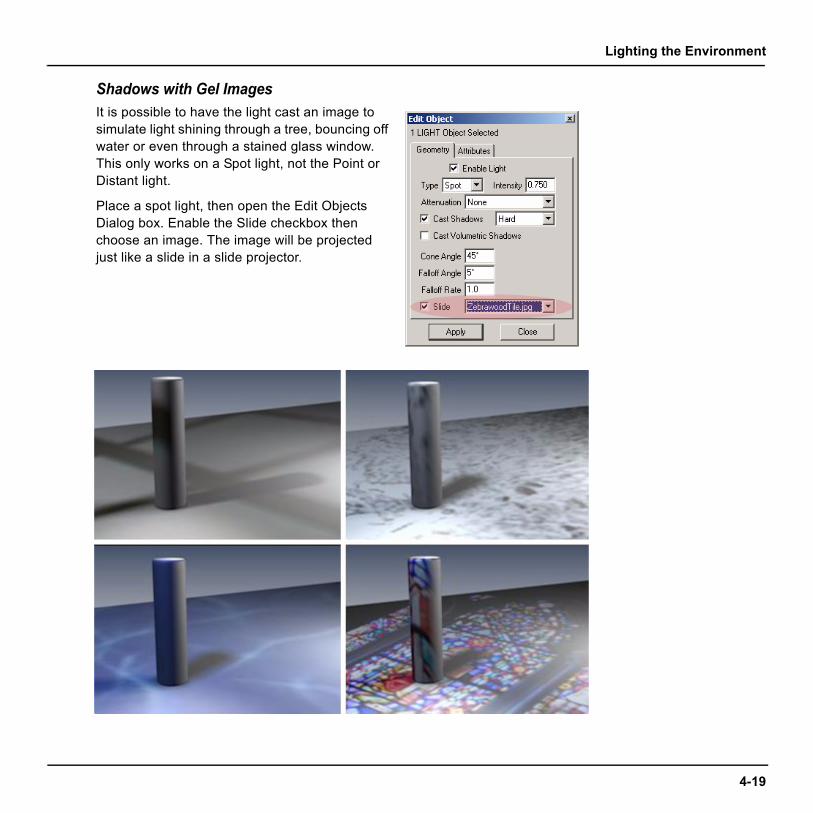
Shadows - Hard vs. SoftWhen a light is selected in a scene, its shadow type can be changed in the Edit Objects Dialog box. A hard shadow will make the scene look like a bright, sunny day. A blurry shadow may simulate an overcast day. Bear in mind that this technique will also increase the rendering time.
Transparent ShadowsIf you have a transparent object in the scene, have the software render a transparent shadow. To do this, open PhotoRender>Advanced Settings... and click the Use Transparent Shadows check box. When rendering, the shadows will appear as if the light was traveling through the object. If the object is colored, the shadow will retain the color.
Lighting the Environment
Shadows with Gel ImagesIt is possible to have the light cast an image to simulate light shining through a tree, bouncing off water or even through a stained glass window. This only works on a Spot light, not the Point or Distant light.
Place a spot light, then open the Edit Objects Dialog box. Enable the Slide checkbox then choose an image. The image will be projected just like a slide in a slide projector.
4-19
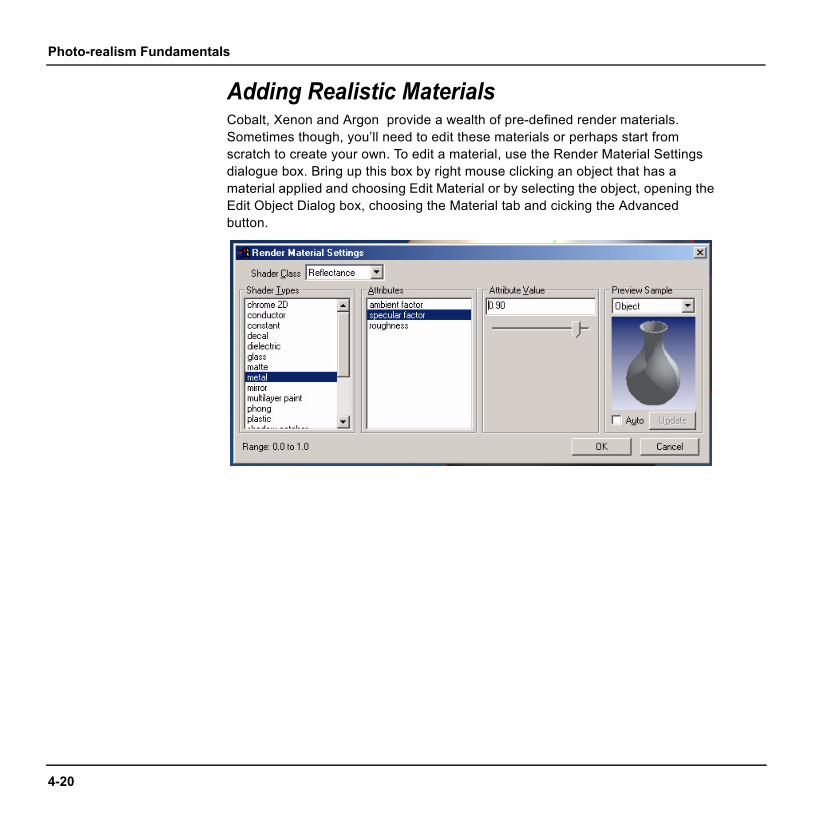
Photo-realism Fundamentals
4-20
Adding Realistic MaterialsCobalt, Xenon and Argon provide a wealth of pre-defined render materials. Sometimes though, you’ll need to edit these materials or perhaps start from scratch to create your own. To edit a material, use the Render Material Settings dialogue box. Bring up this box by right mouse clicking an object that has a material applied and choosing Edit Material or by selecting the object, opening the Edit Object Dialog box, choosing the Material tab and cicking the Advanced button.
Adding Realistic Materials
Basics of Materials
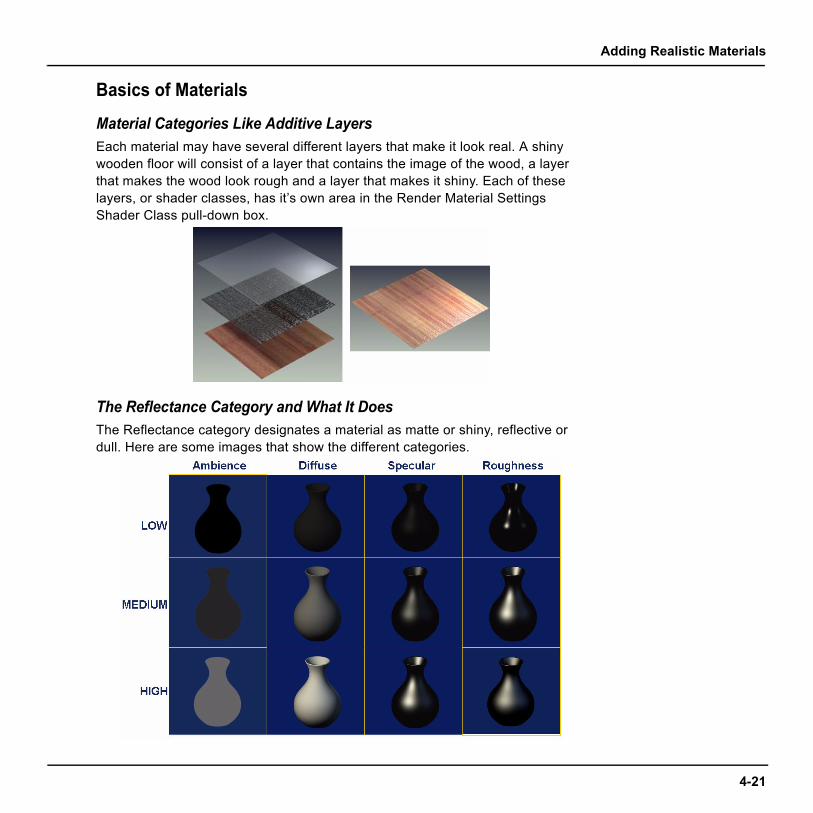
Material Categories Like Additive LayersEach material may have several different layers that make it look real. A shiny wooden floor will consist of a layer that contains the image of the wood, a layer that makes the wood look rough and a layer that makes it shiny. Each of these layers, or shader classes, has it’s own area in the Render Material Settings Shader Class pull-down box.
The Reflectance Category and What It DoesThe Reflectance category designates a material as matte or shiny, reflective or dull. Here are some images that show the different categories.
4-21

Photo-realism Fundamentals
4-22
Combined Reflectance Attributes
Types of Plastic
Smooth Plastic and Rough PlasticNote the Reflectance and Displacement Shader Class settings to make plastic smooth or rough.
Adding Realistic Materials
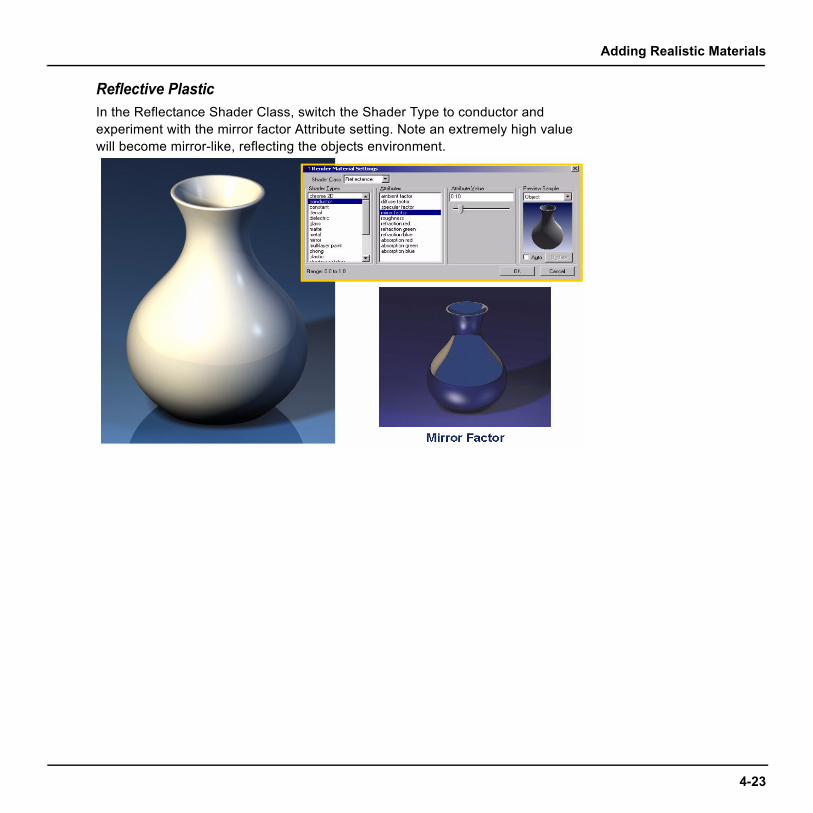
Reflective PlasticIn the Reflectance Shader Class, switch the Shader Type to conductor and experiment with the mirror factor Attribute setting. Note an extremely high value will become mirror-like, reflecting the objects environment.
4-23
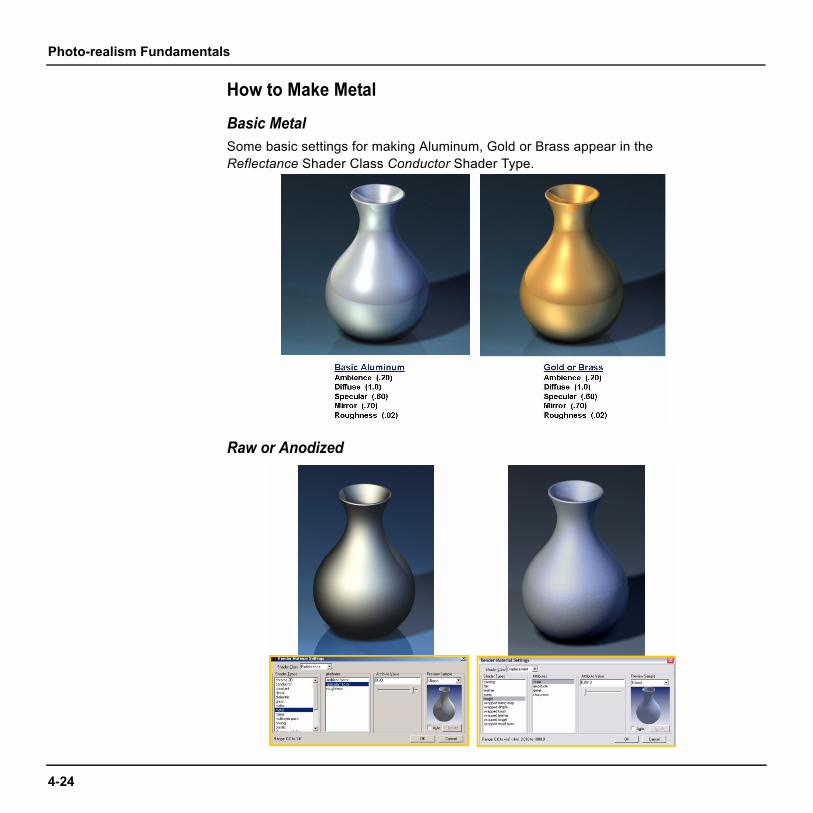
Photo-realism Fundamentals
4-24
How to Make Metal
Basic MetalSome basic settings for making Aluminum, Gold or Brass appear in the Reflectance Shader Class Conductor Shader Type.
Raw or Anodized
Adding Realistic Materials
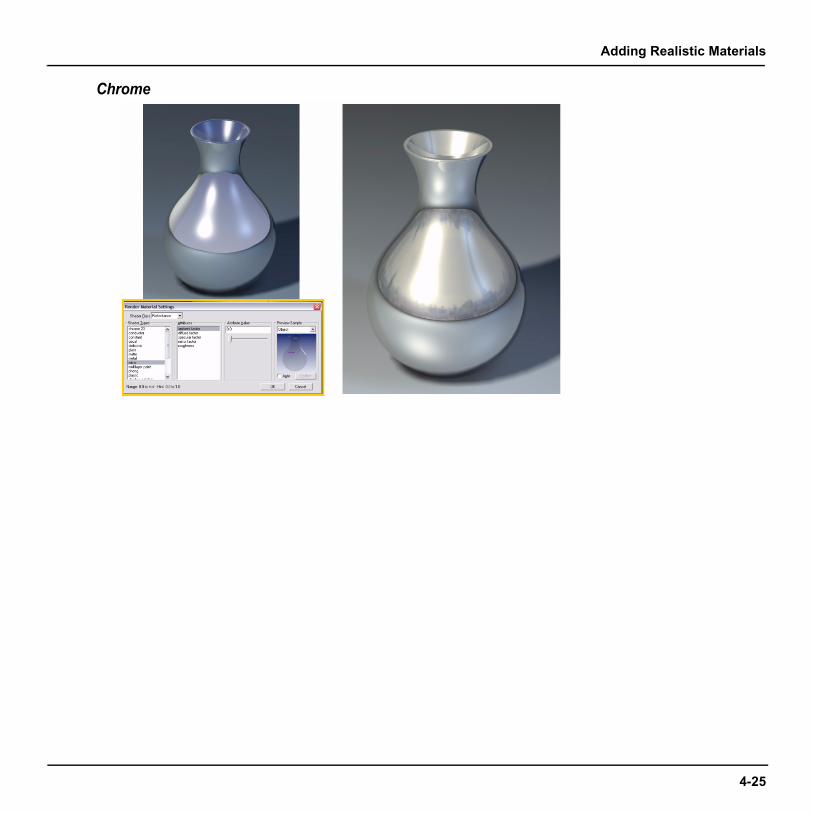
Chrome
4-25
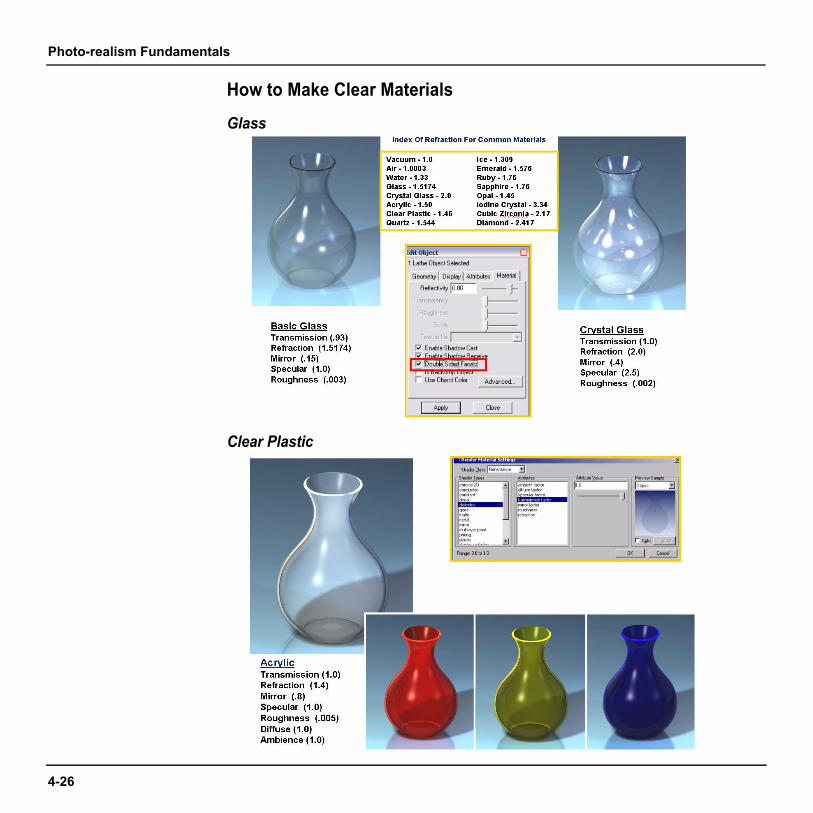
Photo-realism Fundamentals
4-26
How to Make Clear Materials
Glass
Clear Plastic
Adding Realistic Materials
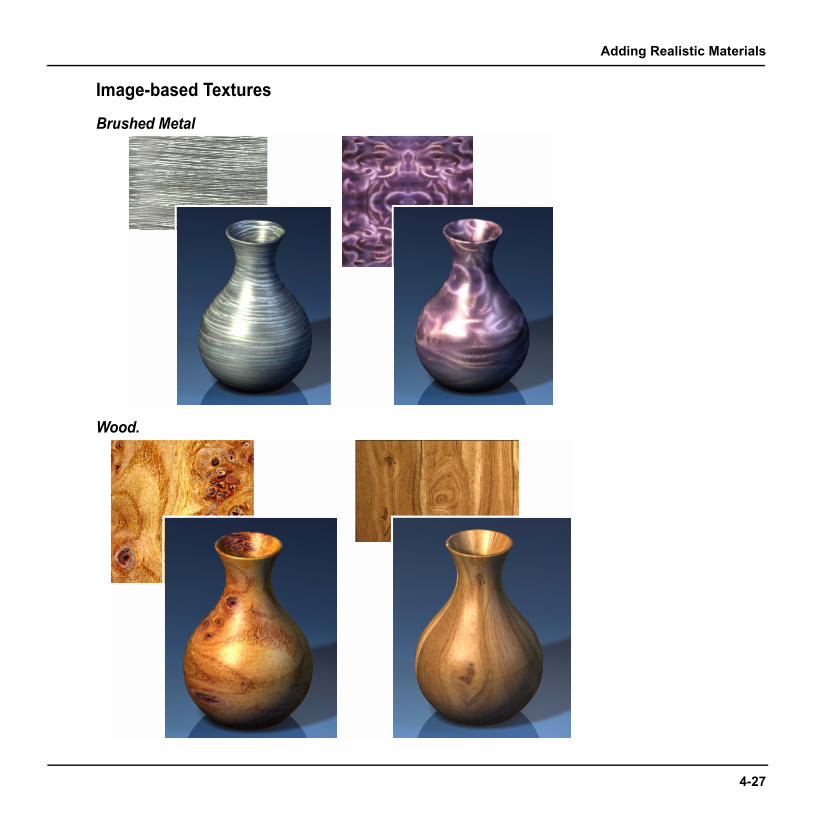
Image-based Textures
Brushed Metal
Wood.
4-27
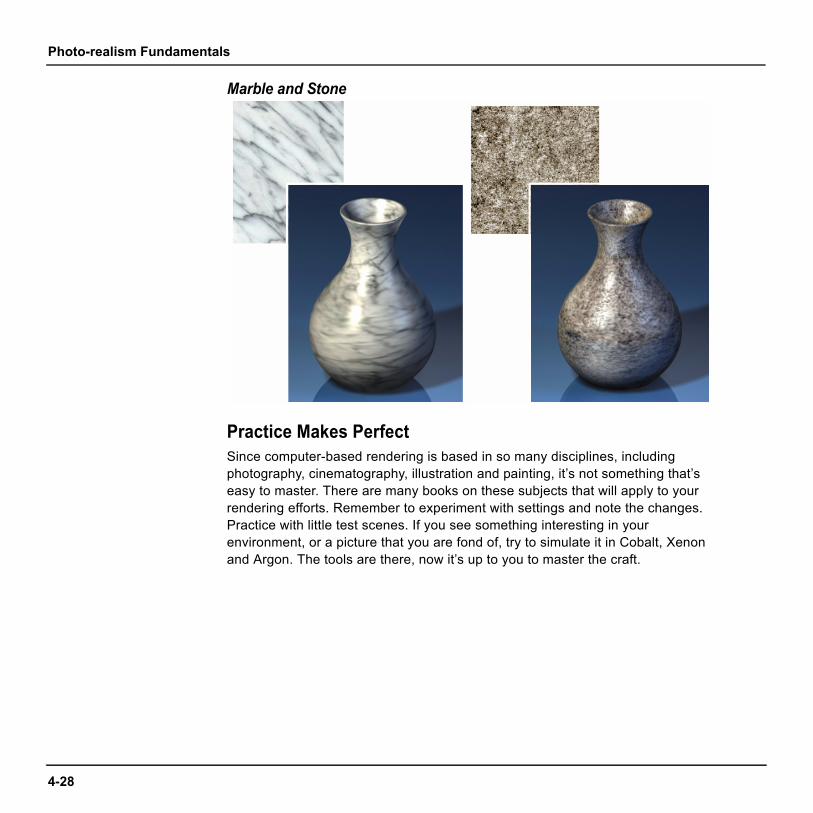
Photo-realism Fundamentals
4-28
Marble and Stone
Practice Makes PerfectSince computer-based rendering is based in so many disciplines, including photography, cinematography, illustration and painting, it’s not something that’s easy to master. There are many books on these subjects that will apply to your rendering efforts. Remember to experiment with settings and note the changes. Practice with little test scenes. If you see something interesting in your environment, or a picture that you are fond of, try to simulate it in Cobalt, Xenon and Argon. The tools are there, now it’s up to you to master the craft.