Embed Size (px)
Citation preview

Technical Beta courtesy CanyoneeringUSA.com Material not reviewed by Petzl. © 2012 Imlay Canyon Gear LLC
Petzl Pirana – a Canyoneer’s Rappelling Tool
Pirana Basics The Pirana is a Figure Eight based Rappel Device made by Petzl specifically for canyoneering. It has several friction settings, so the correct friction for the rope/canyoneer/situation can usually be found with little hassle. It is quick to put on the rope, and quick to take off. For Class-C canyoning, like in Ouray, the Pirana performs well in waterfalls, because it tolerates of twists in the rope and of debris tangled in the rope. If you have to do rescue stuff, it offers opportunities for locking off quickly and easily and for rappelling with two people (not covered in this chapter). The Pirana snugly attaches to a carabiner by design, making it quite difficult to lose the device when doing a floating disconnect. This also means only specific carabiners work with the Pirana: the Petzl Attache, Petzl William, and the Pirate carabiners from Rock Exotica are the common options. The Pirana can be hard to get on the biner, but a little lubrication (spit) and persistence will eventually get it into place.
Technical Beta courtesy CanyoneeringUSA.com Material not reviewed by Petzl. © 2012 Imlay Canyon Gear LLC
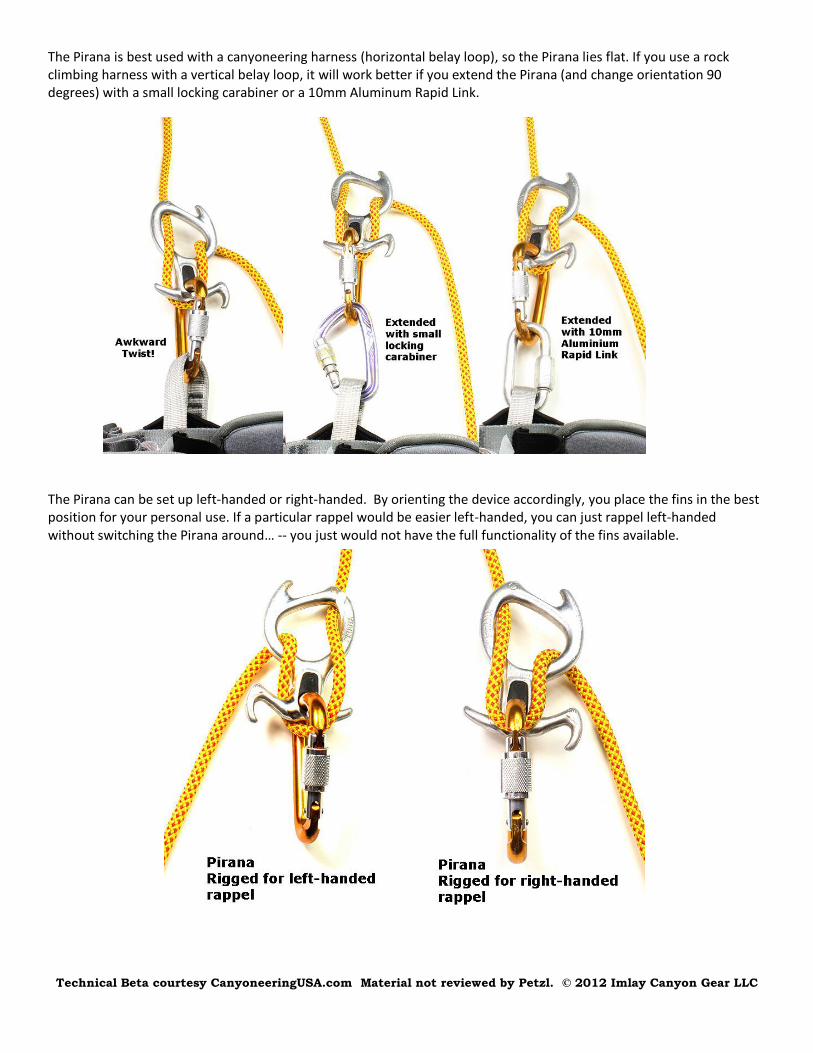
The Pirana is best used with a canyoneering harness (horizontal belay loop), so the Pirana lies flat. If you use a rock climbing harness with a vertical belay loop, it will work better if you extend the Pirana (and change orientation 90 degrees) with a small locking carabiner or a 10mm Aluminum Rapid Link.
The Pirana can be set up left-handed or right-handed. By orienting the device accordingly, you place the fins in the best position for your personal use. If a particular rappel would be easier left-handed, you can just rappel left-handed without switching the Pirana around… -- you just would not have the full functionality of the fins available.

Technical Beta courtesy CanyoneeringUSA.com Material not reviewed by Petzl. © 2012 Imlay Canyon Gear LLC
The best feature of the Pirana is it makes several different friction options available at your fingertips. We call these different modes the Zero, One and Two settings. To rig the Pirana for rappelling:
1. Step over the rope, so the rope is on your right-hand side as you face the anchor. 2. Lay the Pirana OVER the rope, and pull the rope up through the large hole. Drop the rope into the carabiner and
lock it.
3. This is the ZERO setting. Decide which friction setting you wish to use. Increased friction is found by flipping the rope around one or both of the fins at the tail (bottom) of the Pirana.

Technical Beta courtesy CanyoneeringUSA.com Material not reviewed by Petzl. © 2012 Imlay Canyon Gear LLC
How do you know which setting to use? Mostly from experience, but here are some starting guidelines: Single line, 8.3mm Canyon Fire Rope: ZERO up to 90 pounds ONE 90 to 140 pounds TWO 140 to 180 pounds Single line, 9.2mm Canyonero Rope: Subtract 1/3 a setting. Single line, 8.0 Imlay Canyon Rope, or BlueWater Canyon Pro: Add 1/3 a setting. Double line, rather than Single line: Subtract 1 full setting. Long Rappel, longer than 80 feet: Add ½ a setting. Brand new rope? Add ½ a setting. First rappel of the day? Add ½ a setting. Tired, dark, cold or extra-scared? Add ½ a setting. For instance, if you weight 150 lbs, you are at the low end of the Two setting, so would expect to be on the slow end for a single-line, 8.3mm rappel. If the rappel was 200 feet (+1/3 setting), that would move you into the middle/top of the Two setting. But, say you were on a new BlueWater Canyon Pro 8mm for that rappel – add another 1/3 setting and now you are off the top, meaning you will want to add friction with a leg loop biner maybe halfway down that rappel. Or maybe you just like it faster or slower? Adjust accordingly. While experimenting and finding what works for you, it is a good idea to have a bottom-belay, in case you misjudge your needs. If you are a “big boy”, you may have noticed you are going to have trouble getting enough friction. At 180 pounds myself, I often have trouble getting enough friction with these basic settings, on long rappels. The Sterling ATS (link to store) is a similar device that offers more friction, thus may be a better choice for canyoneers weighing 180 lbs or more. Using the William carabiner with the Pirana seems to provide slightly more friction than other biners do. On long rappels, I add additional friction using an off-hand-leg-loop carabiner, and then quite often I increase that with a Z-rig. Additional Friction Settings It is possible to use the mouth fin and the tail fin hook to gain more friction. “3” Setting The “3” setting is difficult to get to while on rappel, because to move to it from the “2” setting, you necessarily pass through a zone

Technical Beta courtesy CanyoneeringUSA.com Material not reviewed by Petzl. © 2012 Imlay Canyon Gear LLC
of lesser friction. Presumably you want MORE friction, so going through the lesser friction zone could prove dangerous – and has been a contributing factor to at least one nearly-fatal accident. When you get it there, the “3” setting is not all that secure, as the rope can pop off the mouth hook fairly easily. “4” Setting – Soft Stop! The “4” setting is more easily attained and significantly more secure, but for most uses it provides way too much friction to be useful. It is used for rappelling with two people, when loads are in the 300 to 400 pound range. For normal people, normal conditions, the “4” setting acts as a “Soft Stop” – no braking force is required to stay in place, but the rappeller needs to hold onto the brake line, and be attentive as the rope can slip off the hooks. When doing meat anchors, we often rig the Pirana like this, or with another full warp, and then just grasp mass of rope with the brake hand. Hard Stop with a Pirana Of more interest is the “Hard Stop”, where the device is tied off, freeing both hands for a task. We start from the “4” setting, and poke a bight of rope from the brake-hand side through the carabiner. Make a half-twist such that the brake-hand strand goes UNDER, then put this loop over the cleat formed by the two hooks, and pull snug.

Technical Beta courtesy CanyoneeringUSA.com Material not reviewed by Petzl. © 2012 Imlay Canyon Gear LLC
Hard Stop with a Sterling ATS In many ways the ATS and Pirana function the same, but for the hard stop, the ATS is easier. From the “4” setting, push a bight through the carabiner and… well, the cleat is right there and empty of distractions, so make a half-twist and toss the loop around the hooks on the left side. Additional Features
1. The Pirana allows adjustment of the friction, without going “off-rope” -- kinda sorta. You can adjust it, if you can get your weight off the rappel rope, say on a small ledge. With tension off the rope, you can move up or down a setting. I find this useful when a rappel starts off down a low-angle slab, then goes over an edge. I can rappel the slab with a low setting, then add more friction before I go over the edge, as long as I find a spot to get my weight off the rope.
2. Caution: The ease of changing the friction setting CREATES a problem. When doing an awkward start, over an edge or around a corner, the Pirana can change settings on its own. If the rappel rope is not under tension, the rope can hop out from behind one or both of the little arms. When doing this kind of an awkward start, check to make sure the friction setting is still where you want it, before you lean back and commit to the rope.
3. When using a climbing harness with a vertical belay loop, the Pirana will be 90 degrees out of the design orientation. This is easily fixed by extending your device with a small locking carabiner, or a large rapid link. I like the Wichard 10mm aluminum rapid link for this task, as it is lightweight and has enough space inside for the locking sleeve of the Attache carabiner to move freely (see above).
4. The extended Pirana tends to flop around in a most-inconvenient manner while walking and down-climbing. Tame your Pirana by clipping the big into a carabiner on your left-side gear loop.
5. The Pirana has a bite to it. If your fingers get too close, they can get pinched between the rope and the device. Ouch! Keep your hands at least one hand-width away from the Pirana.
6. After a rappel of 50 feet or more, the Pirana will be quite hot. When wearing shorts, you may notice smoke arising from your thighs – be alarmed! Consciously manage the piping hot Pirana after a long rappel until it cools to a non-scorching temperature.
Technical Beta courtesy CanyoneeringUSA.com Material not reviewed by Petzl. © 2012 Imlay Canyon Gear LLC
Extending the Pirana
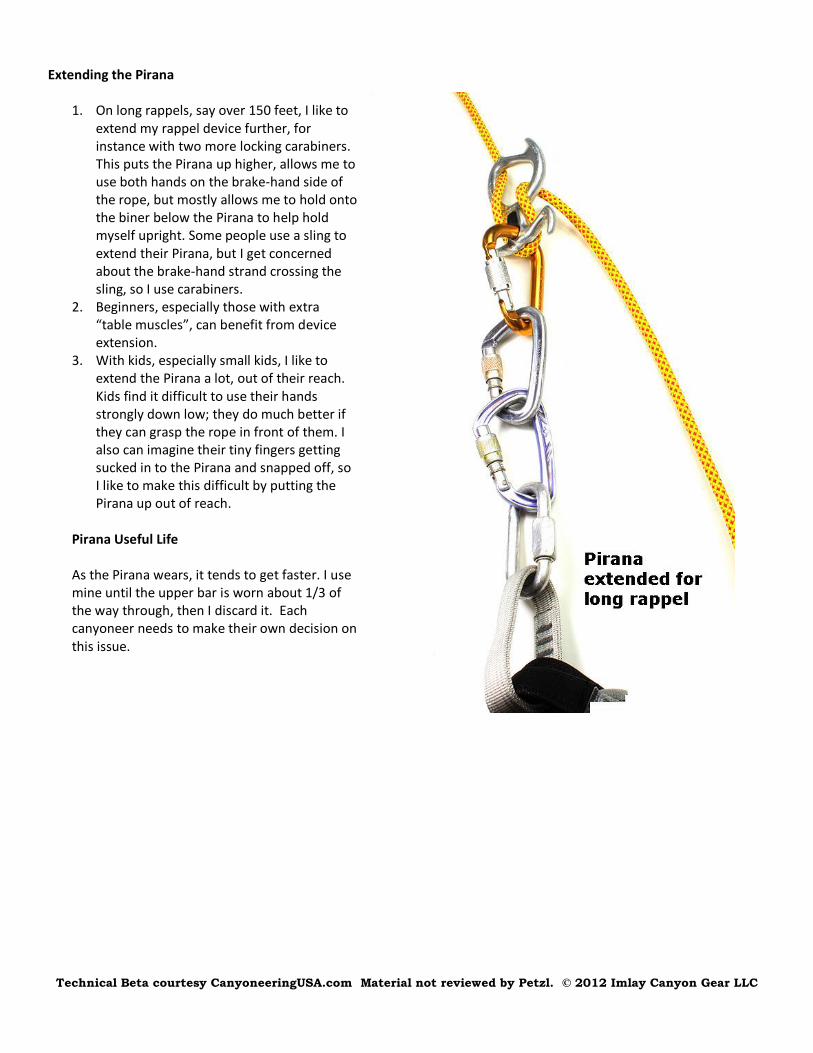
1. On long rappels, say over 150 feet, I like to extend my rappel device further, for instance with two more locking carabiners. This puts the Pirana up higher, allows me to use both hands on the brake-hand side of the rope, but mostly allows me to hold onto the biner below the Pirana to help hold myself upright. Some people use a sling to extend their Pirana, but I get concerned about the brake-hand strand crossing the sling, so I use carabiners.
2. Beginners, especially those with extra “table muscles”, can benefit from device extension.
3. With kids, especially small kids, I like to extend the Pirana a lot, out of their reach. Kids find it difficult to use their hands strongly down low; they do much better if they can grasp the rope in front of them. I also can imagine their tiny fingers getting sucked in to the Pirana and snapped off, so I like to make this difficult by putting the Pirana up out of reach.
Pirana Useful Life As the Pirana wears, it tends to get faster. I use mine until the upper bar is worn about 1/3 of the way through, then I discard it. Each canyoneer needs to make their own decision on this issue.