Embed Size (px)
Citation preview
P E T L I N X 6 T U T O R I A L - G R O O M I N G
© Software Revolutions Ltd www.petlinx.com
PetLinx™ 6 Tutorial
Using the Grooming Module
P E T L I N X 6 T U T O R I A L - G R O O M I N G
2
Table of Contents
1. INTRODUCTION ................................................................................................. 3
2. STARTING PETLINX FOR THE FIRST TIME (DESKTOP EDITIONS ONLY) ... 4
Setting up your database ............................................................................................................ 4
The demo “Nag” screen............................................................................................................... 5
Choosing modules ....................................................................................................................... 7
3. SETTING SYSTEM OPTIONS ............................................................................ 8
4. THE MAIN FORM, MENU AND RIBBON .......................................................... 10
4. SETTING UP GROOMERS AND SYSTEM USERS ......................................... 13
5. SETTING UP GROOMING SERVICES ............................................................. 15
6. ADDING A NEW CUSTOMER .......................................................................... 17
Defining attributes ...................................................................................................................... 18
7. ADDING A NEW PET ........................................................................................ 20
Adding a new vet ........................................................................................................................ 20
Adding pet photos ...................................................................................................................... 21
Adding pet vaccination information ......................................................................................... 21
Adding a pet groom style .......................................................................................................... 21
8. MAKING A GROOMING BOOKING ................................................................. 22
Adding a new grooming booking ............................................................................................. 22
Checking In a booking ............................................................................................................... 24
Completing a booking ................................................................................................................ 24
9. CREATING AN INVOICE .................................................................................. 25
10. OTHER THINGS YOU CAN DO IN PETLINX ................................................... 27
11. OTHER SYSTEM OPTIONS SETTINGS ........................................................... 29

P E T L I N X 6 T U T O R I A L - G R O O M I N G
3
1. Introduction
This tutorial has been designed for first time users of PetLinx, and provides a comprehensive outline of how to use the software and of the many features PetLinx has to offer. This version of the tutorial deals specifically with using the grooming module; for tutorials of the other modules, please look under the PetLinx 6 menu of the Windows start button, or by using the Tutorials ribbon option in the PetLinx program.
Our goal is to have you familiar with working in PetLinx as soon as possible. Some of the many sections that will be covered in this tutorial include starting PetLinx for the first time, setting up your groomers and users, adding customers, pets and bookings, and creating an invoice. Please refer to the table of contents for an in-depth list of topics covered in this tutorial.
We feel that this tutorial will be of the most value to you if it is read while you use PetLinx. It is therefore recommended that you print a copy so that you can easily refer to it.
Occasionally you will come across sections labelled “Desktop Network/Cloud editions only” with content in italics. This tutorial has been created to cover all editions of PetLinx. If you installed the Desktop Single edition then this content will not be applicable to you so please just continue on past this to the next section.
The screenshots shown throughout this tutorial may appear slightly different than the ones you see when you are using PetLinx as they are taken from the Desktop Network edition with USA address formats. Thank you for your interest in our product. We hope you enjoy using PetLinx, and we look forward to receiving any questions, comments or suggestions you may have.

P E T L I N X 6 T U T O R I A L - G R O O M I N G
4
2. Starting PetLinx for the first time (Desktop
editions only)
To start PetLinx, either double click on the shortcut labeled PetLinx 6 on your computer desktop, or choose the Start / PetLinx 6 / PetLinx 6 Windows menu option.
Setting up your database If an existing PetLinx 4 or 5 database is found on the computer then you will be prompted that the database will be upgraded. Please note that once upgraded to PetLinx 6 format, you will not be able to open the database using PetLinx 4 or 5 again.
Otherwise if this is the first time that you have run PetLinx on the computer then you will be asked to setup the PetLinx database.
Figure 2.1 The Setup PetLinx Database dialog (from the Desktop Single Edition)
If you have never used PetLinx before:
You will want to choose the “Create new database” option, and specify your country and preferred time format. It is very important to select your correct country here as it dictates the format of addresses, and also controls how your tax settings will be configured initially. Also you will need to specify if you use the 12 hour or 24 hour clock format (for example, five in the afternoon may be shown as 5:00 PM in 12 hour format, or 17:00 in 24 hour format). Again it is very important to have this setting correct for your location and it should match the regional time settings as defined in your Windows Region settings. Note: The currency symbol to be used in PetLinx is also defined in your Windows Region settings.

P E T L I N X 6 T U T O R I A L - G R O O M I N G
5
If you are upgrading from PetLinx 4 or later:
You may already have a previous backup of your PetLinx 4 or 5 database that you wish to use. In this case, choosing “Restore existing database from backup” will allow you to choose this backup file and restore it.
If you are upgrading from PetLinx 3 or earlier:
Versions of PetLinx up to PetLinx 3 used a different database format than used now. You can upgrade your database from these previous versions by choosing the “Upgrade my PetLinx 3 database” and selecting the PetLinx.mdb file to upgrade. You can choose not to upgrade inactive customers, their pets and bookings, and invoices. If this option is ticked then this data will not be included in the PetLinx 6 database, however you can still lookup these customers using your previous version of PetLinx. Note: PetLinx 6 can only upgrade databases from PetLinx version 3.50 onwards, so if you are using a version of PetLinx earlier than this you will need to download, install, and run the last version of PetLinx 3 first to have your database automatically upgraded to the format required for PetLinx 6. Please see the “Download” page at www.petlinx.com to download the latest version of PetLinx 3.
Desktop Network edition – connecting to an existing database:
For users of the Desktop Network edition, you will first need to choose the database server that either has an existing PetLinx 6 database, or you wish to create one on. The list of database servers will be all those on your network that have Microsoft SQL Server installed on them (SQL Server is the program that hosts the PetLinx database). The server to choose will typically be like “{Computer Name}\PETLINX”
Choose the option “Connect to existing database” if a PetLinx database has already been installed on the specified computer, and you wish to connect to that database from this computer. Choosing any of the other options will create a database on that computer.
The demo “Nag” screen
If you are using the 30 day demo of PetLinx and have not yet purchased it, then you will be presented with the “Nag” screen. The Nag screen lets you know how many days you have left before the trial period will expire, and also contains information on ordering PetLinx. If you do decide to purchase PetLinx, then the serial number you will be issued with can be entered here under the “Register” button.

P E T L I N X 6 T U T O R I A L - G R O O M I N G
6
Figure 2.2 The Demo “Nag” screen
If you purchase PetLinx then this Nag screen will not appear. To continue loading PetLinx without purchasing it yet, just click on the “Continue Unregistered” button.
Desktop Network/Cloud editions - Logging in
In the Desktop Network/Cloud editions the login dialog will now display, which controls access to PetLinx.
FIGURE 2.3 The Login dialog
If you are the first person to use PetLinx, then you can login by typing admin into the user name field, and petlinx into the password field (the password for the admin user can be changed later from within the Employees form). Alternatively, if another user has already set up a login for you, you should enter the user name and password they have supplied you with. Click “OK” to continue.
If your user name or password was incorrect, then you will be alerted to this and asked to try again. (Note that the password is case sensitive)
P E T L I N X 6 T U T O R I A L - G R O O M I N G
7
Choosing modules
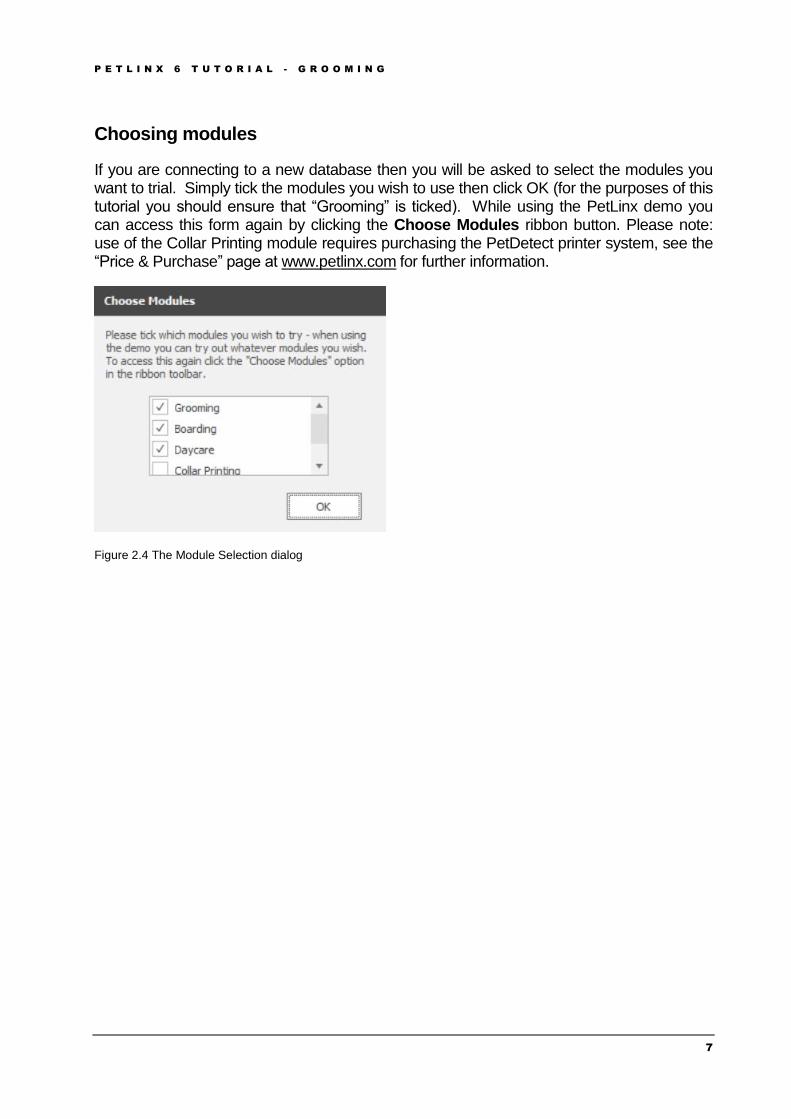
If you are connecting to a new database then you will be asked to select the modules you want to trial. Simply tick the modules you wish to use then click OK (for the purposes of this tutorial you should ensure that “Grooming” is ticked). While using the PetLinx demo you can access this form again by clicking the Choose Modules ribbon button. Please note: use of the Collar Printing module requires purchasing the PetDetect printer system, see the “Price & Purchase” page at www.petlinx.com for further information.
Figure 2.4 The Module Selection dialog

P E T L I N X 6 T U T O R I A L - G R O O M I N G
8
3. Setting system options
The System Options form allows you to define system settings which change how PetLinx works. You can access this screen again by choosing the System Options button on the PetLinx Menu. Only the Business Details and Grooming tabs are covered here, please see chapter 12 “Other system options settings” for information on other tabs.
Tip: Notice the button at the bottom left of the System Options form? You will find this on most of the forms in PetLinx, clicking the button will take you directly to the relevant section in PetLinx help system for the form you are on.
FIGURE 3.1 The System Options form
The Business Details tab
The details you enter here will appear on your invoices so make sure all of the fields on this screen are completed with the correct details. Please Note: the country you choose controls the formatting of addresses and other information throughout PetLinx, so please ensure you set this correctly.
If you have your business logo stored as an image file on your computer, you can upload it into PetLinx by clicking the logo Upload button. The logo will then be displayed in invoices and receipts, as well as in the Online Portal (the Online portal is a website that enables customers to maintain their details and their pet's details themselves, and request new bookings with you; please see www.petlinx.com or email us at [email protected] for more information on the Online Portal).
P E T L I N X 6 T U T O R I A L - G R O O M I N G
9
A Terms and Conditions document can also be uploaded into PetLinx, which is presented in the Online Portal for new customers to agree to as part of their registration. The Terms and Conditions document must be a plain text file (.txt format).
The Grooming tab
This tab contains information specifically for grooming including the days and hours that your business operates, and is used to define how bookings are handled.
- The "Open On" and "Opening" and "Closing" times control how the Grooming Calendar is setup. Days that are non-working will be indicated in red in the Month View and will not be visible when using the "Work Week" view. Times before and after the work times will be shaded a darker color in the "Day" and "Work Week" views to identify them as "out of hours". Note if you setup employees as groomers then their specific work times will override the business work times when viewing the calendar for that groomer.
- "Use Groom Styles" if unticked, will hide the Groom Style tab on the Customers and Pets form and remove the Groom Style section on the Grooming Booking form. You should untick this if you don't want to keep detailed records of the trim styles that are applied to a pet.
- The “Default Booking Duration” field is used when you create a new booking, and dictates the initial value that the booking duration is set to. The duration is initially set to one hour (1:00) but can be changed here if your bookings take generally longer than an hour.
- “Create Recurring Bookings…” dictates how far into the future PetLinx will create new recurring bookings. By default, PetLinx will move any recurring bookings due to be created on a holiday to the next available working day. To change this, untick the "Move booking..." setting.
- The "Confirmation Letters" section enables you to have a confirmation sent automatically to the customer after you create a new booking, or change the date or time of an existing booking. You can choose to have a confirmation emailed, sent by SMS (requires a SMS account, see “The Email and SMS tab” section above), or printed. Click the "Choose Letter" buttons to specify the letter to use, you can choose the same letter for new and changed bookings or have a different letter for each (letters can be created in the Letter Editor). Alternatively you can base the type of confirmation to send on the customer's "Preferred Contact Method" field, in which case you will be prompted to select the letter each time. If sending by email you should also enter the subject to be used in the emails.
P E T L I N X 6 T U T O R I A L - G R O O M I N G
10
4. The Main form, menu and ribbon
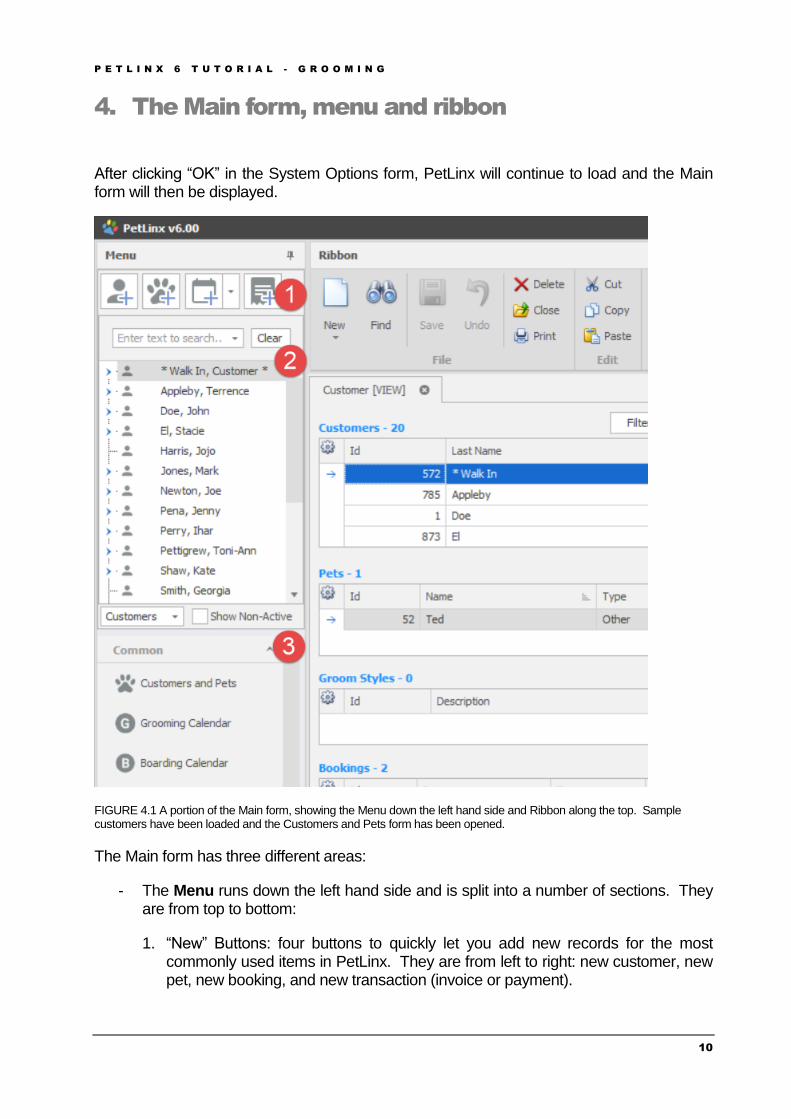
After clicking “OK” in the System Options form, PetLinx will continue to load and the Main form will then be displayed.
FIGURE 4.1 A portion of the Main form, showing the Menu down the left hand side and Ribbon along the top. Sample customers have been loaded and the Customers and Pets form has been opened.
The Main form has three different areas:
- The Menu runs down the left hand side and is split into a number of sections. They are from top to bottom:
1. “New” Buttons: four buttons to quickly let you add new records for the most commonly used items in PetLinx. They are from left to right: new customer, new pet, new booking, and new transaction (invoice or payment).
P E T L I N X 6 T U T O R I A L - G R O O M I N G
11
2. Customer/Pet List: shows the list of customers and pets you have added. Click the arrow next to each customer to display their pets underneath. You can quickly find a customer or pet by typing their name into the box at the top of the list, which filters the list down to those matching your criteria. Click “Clear” to show the full list again. To change the list to instead display pets with their owner listed underneath, change the drop-down from Customers to Pets at the bottom of the list. Clicking “Show Non-Active” displays all customers with a status of Inactive, as well as pets who are now deceased or have been transferred to other owners.
3. Form Buttons: These buttons provide access to the various forms in PetLinx. The most commonly used forms are listed in the “Common” group, forms used to configure or set up data items in PetLinx are listed in the “Setup” group, and forms used to design letter content and reports are under the “Editors” group.
- The Ribbon runs along the top of the Main form and contains a number of buttons grouped together. The File group contains buttons that work on the current form, such as adding a new record or saving changes. Edit provides you with the cut, copy, and paste options. Skins allows you to choose a “skin” to be used throughout PetLinx which changes the colors, fonts, and graphics. Help includes links to help, tutorials, and technical support information. And finally Exit enables you to exit PetLinx, along with a choice to log off the current user if using the Desktop Network/Cloud editions.
- The remaining area of the Main form is where the various forms within PetLinx are displayed. Each form you open becomes a “tab” in the Main form so you can open multiple forms (including more than instance of each form) and access each form by clicking on its tab.
The File group of buttons in the ribbon are used on many of the forms in PetLinx and require further explanation:
New clears all the fields on the current form and enables you to begin entering a new record. Once you have set the form to New mode the form title will have [NEW] at the end of it (e.g. if adding a customer the form title will display Customer [NEW]).
Other options for New: right clicking on the form and choosing New from the menu that appears, or hitting Ctrl + N on your keyboard.
Find clears all the fields on the form, after which you can enter criteria into any of the form fields to find matches on the criteria. Once you have set the form to Find mode the form title will have [FIND] at the end of it (e.g. in the customer form the title will display Customer [FIND]). After entering find criteria, clicking Find again starts the search, and any records matching the criteria will be listed.
P E T L I N X 6 T U T O R I A L - G R O O M I N G
12
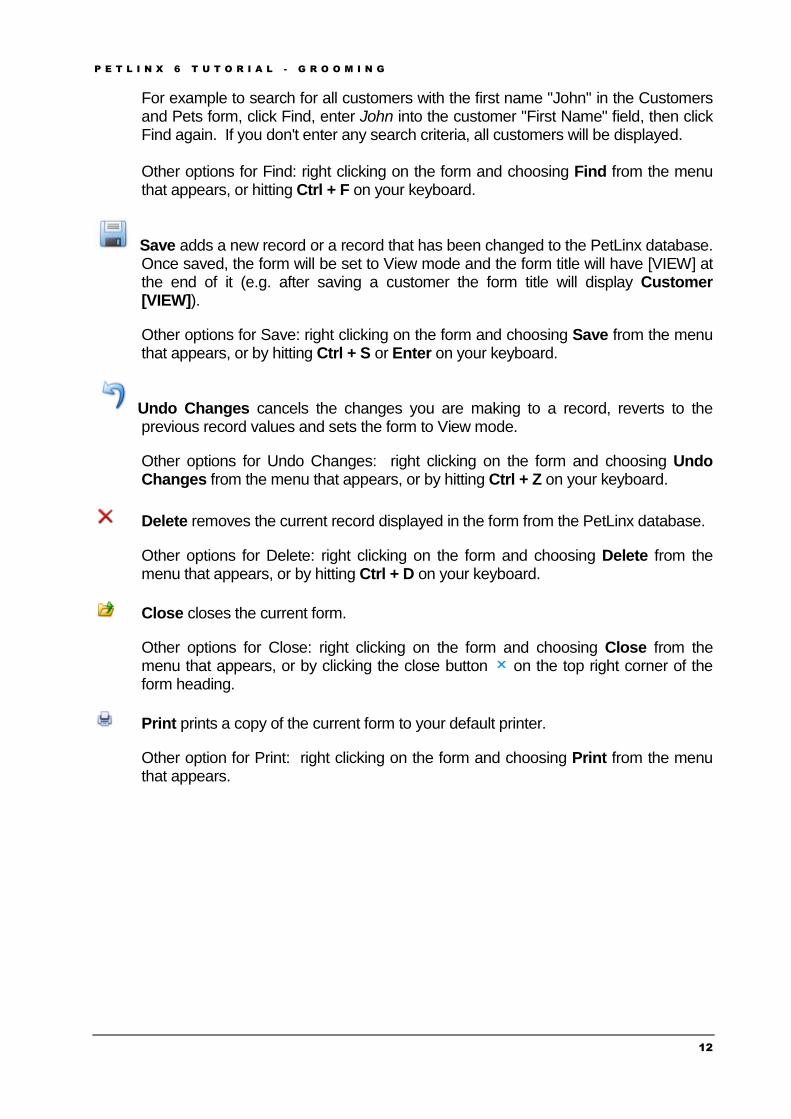
For example to search for all customers with the first name "John" in the Customers and Pets form, click Find, enter John into the customer "First Name" field, then click Find again. If you don't enter any search criteria, all customers will be displayed. Other options for Find: right clicking on the form and choosing Find from the menu that appears, or hitting Ctrl + F on your keyboard.
Save adds a new record or a record that has been changed to the PetLinx database. Once saved, the form will be set to View mode and the form title will have [VIEW] at the end of it (e.g. after saving a customer the form title will display Customer [VIEW]).
Other options for Save: right clicking on the form and choosing Save from the menu that appears, or by hitting Ctrl + S or Enter on your keyboard.
Undo Changes cancels the changes you are making to a record, reverts to the previous record values and sets the form to View mode.
Other options for Undo Changes: right clicking on the form and choosing Undo Changes from the menu that appears, or by hitting Ctrl + Z on your keyboard.
Delete removes the current record displayed in the form from the PetLinx database.
Other options for Delete: right clicking on the form and choosing Delete from the menu that appears, or by hitting Ctrl + D on your keyboard.
Close closes the current form.
Other options for Close: right clicking on the form and choosing Close from the menu that appears, or by clicking the close button on the top right corner of the form heading.
Print prints a copy of the current form to your default printer.
Other option for Print: right clicking on the form and choosing Print from the menu that appears.
P E T L I N X 6 T U T O R I A L - G R O O M I N G
13
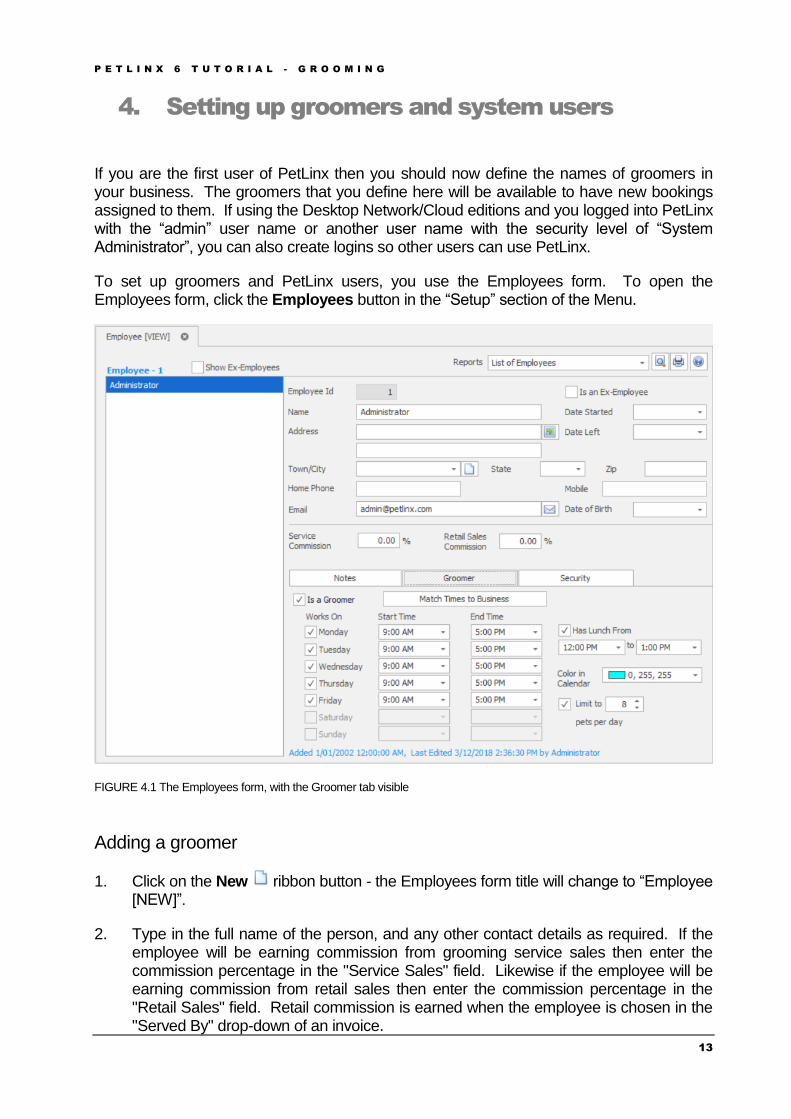
4. Setting up groomers and system users
If you are the first user of PetLinx then you should now define the names of groomers in your business. The groomers that you define here will be available to have new bookings assigned to them. If using the Desktop Network/Cloud editions and you logged into PetLinx with the “admin” user name or another user name with the security level of “System Administrator”, you can also create logins so other users can use PetLinx.
To set up groomers and PetLinx users, you use the Employees form. To open the Employees form, click the Employees button in the “Setup” section of the Menu.
FIGURE 4.1 The Employees form, with the Groomer tab visible
Adding a groomer
1. Click on the New ribbon button - the Employees form title will change to “Employee [NEW]”.
2. Type in the full name of the person, and any other contact details as required. If the employee will be earning commission from grooming service sales then enter the commission percentage in the "Service Sales" field. Likewise if the employee will be earning commission from retail sales then enter the commission percentage in the "Retail Sales" field. Retail commission is earned when the employee is chosen in the "Served By" drop-down of an invoice.

P E T L I N X 6 T U T O R I A L - G R O O M I N G
14
3. To mark the employee as a groomer, click the “Groomer” tab then tick the “Is a Groomer” tickbox. You should define their work days, start and end times, and lunch hours which are reflected in the Grooming Calendar. Clicking “Match Times to Business” is a quick way to set the groomer’s work times to that of the business. You can also choose a color for the groomer to appear in the Grooming Calendar, or leave it as blank and the system will choose one for you. Finally you can define a maximum number of pets for the groomer to handle each day, if set you will be alerted if the number of bookings created for the groomer on a given day exceeds the number.
4. To save the new employee entry, click on the Save ribbon button or hit CTRL + S - you will note the Employees form title will change to “Employee – [VIEW]”.
In the Desktop Network/Cloud editions if you would also like this person to be a user of PetLinx, then click the Security tab then tick the “Is a System User” checkbox. Enter a login name and password for the user with which they will login to PetLinx. Then select the appropriate security group for the user – only System Administrators can access the Employees form and add new users, change passwords, etc. so most users should only need to be General Users. Further permissions for users in the General User group can be configured in the System Options form, Security tab.
With the Cloud Multi-Location edition, you set the employee’s location with the “Location” drop-down. If the employee is a groomer they will show in the Grooming Calendar when that location is selected. If the employee is a PetLinx user, tick “Restricted to maintaining data in their location only” under the Security tab to restrict them to only viewing and creating bookings for groomers in their location. Leaving this option unticked results in the employee able to view and create bookings and transactions (i.e. invoices) for any location.
Repeat the above process for each groomer and/or user you wish to add to PetLinx, and then close the Employees form by clicking the close button on the top right corner of the form heading.

P E T L I N X 6 T U T O R I A L - G R O O M I N G
15
5. Setting up grooming services
The next step is to set up the grooming services that you provide to your customers, using the Services form. To open the Services form, click on the Services button in the “Setup” section of the Menu.
FIGURE 6.1 The Services form
There are a number of services that come pre-installed with PetLinx, these can be changed or deleted as required to suit your business.
Adding a service
1. Change the Type drop-down to “Grooming Services” if it isn’t already.
2. Click on the New ribbon button - the form title will change to “Service [NEW]”.
3. Type in the name of the service. If the service is charged by the hour, choose “Hourly Rate” as the Charge Type, otherwise set to “Fixed Charge”. Enter the rate you charge for this service and if the rate applies for each pet in a booking, or once per booking. If you have setup PetLinx to use tax, then tick whether tax should be applied or not for this service.

P E T L I N X 6 T U T O R I A L - G R O O M I N G
16
4. Fill out the other fields if applicable then to save the new service, click on the
Save ribbon button or hit CTRL + S.
Repeat the above process for each service you provide, and then close the Services form.
P E T L I N X 6 T U T O R I A L - G R O O M I N G
17
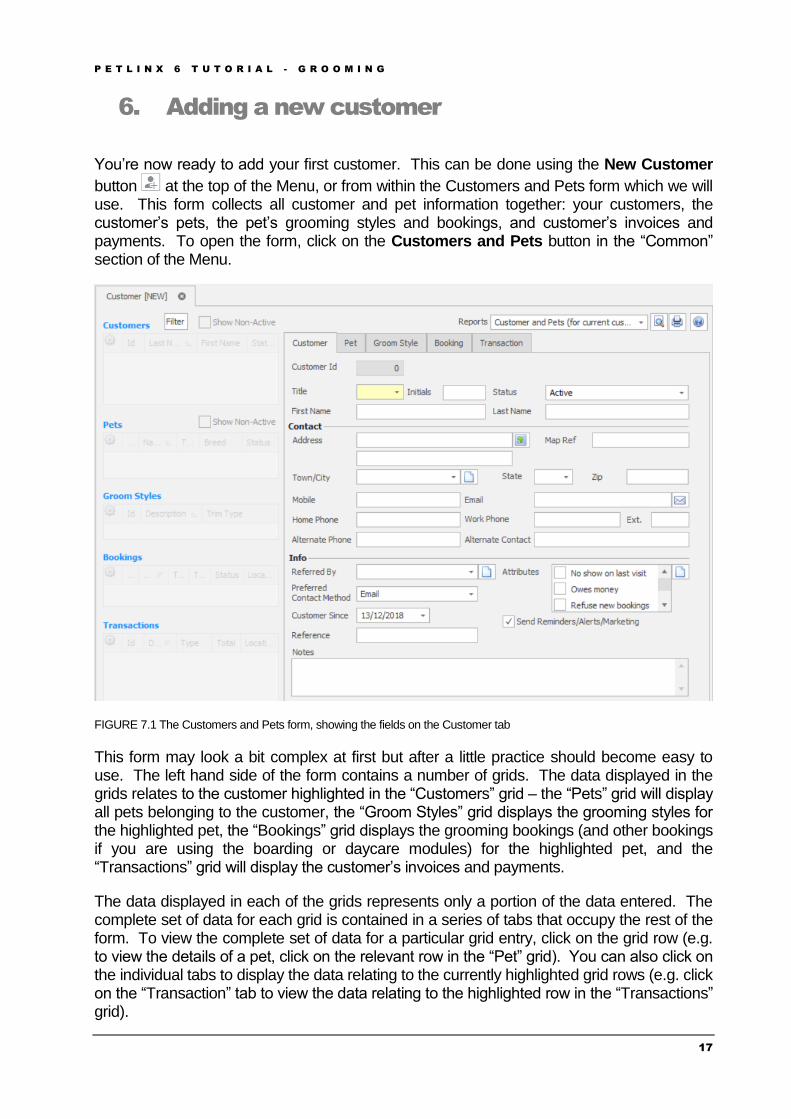
6. Adding a new customer
You’re now ready to add your first customer. This can be done using the New Customer
button at the top of the Menu, or from within the Customers and Pets form which we will use. This form collects all customer and pet information together: your customers, the customer’s pets, the pet’s grooming styles and bookings, and customer’s invoices and payments. To open the form, click on the Customers and Pets button in the “Common” section of the Menu.
FIGURE 7.1 The Customers and Pets form, showing the fields on the Customer tab
This form may look a bit complex at first but after a little practice should become easy to use. The left hand side of the form contains a number of grids. The data displayed in the grids relates to the customer highlighted in the “Customers” grid – the “Pets” grid will display all pets belonging to the customer, the “Groom Styles” grid displays the grooming styles for the highlighted pet, the “Bookings” grid displays the grooming bookings (and other bookings if you are using the boarding or daycare modules) for the highlighted pet, and the “Transactions” grid will display the customer’s invoices and payments.
The data displayed in each of the grids represents only a portion of the data entered. The complete set of data for each grid is contained in a series of tabs that occupy the rest of the form. To view the complete set of data for a particular grid entry, click on the grid row (e.g. to view the details of a pet, click on the relevant row in the “Pet” grid). You can also click on the individual tabs to display the data relating to the currently highlighted grid rows (e.g. click on the “Transaction” tab to view the data relating to the highlighted row in the “Transactions” grid).

P E T L I N X 6 T U T O R I A L - G R O O M I N G
18
To add a new customer
1. Ensure you are viewing the customer fields by clicking on the “Customer” tab.
2. Click on the New ribbon button - the form title will change to “Customer [NEW]”.
3. Fill out the name, address, various phone fields, and email as appropriate.
Defining attributes
Customers, pets, and groom styles in PetLinx each have an Attributes list. Attributes can be used to record important characteristics about a customer / pet / groom style, for example you may want to know if a certain customer often doesn’t show up for bookings, or if a pet bites or has medical problems. Once you have defined the attributes you wish to record, you simply tick the attributes that apply to each customer / pet / groom style.
To define attributes, click the New button to the right of the Attributes list to open the Data Lists pop-up form in “New” mode”.
FIGURE 7.3 The Data Lists pop-up form, with Customer Attributes showing
Enter the attribute name and tick “Raises a warning” if you want to be alerted to customers
with this attribute when creating a new grooming booking. Click on the Save form button when finished. You can also modify existing attributes by changing the name and saving them.
Tip: Opening the Data Lists form by clicking the Data Lists button in the PetLinx Menu allows you to edit all the different types of data lists used throughout PetLinx.
Finally click on the OK button to close the form and return to the Customers and Pets form. You will notice that the Attributes list has been updated with your changes. Tick the attributes that will apply to this customer.

P E T L I N X 6 T U T O R I A L - G R O O M I N G
19
To save the new customer entry, click on the Save ribbon button. You will notice that the customer’s name appears in the Customer grid in the left hand side of the Customers and Pets form.
Tip: You can also add a new customer when creating a new booking in the Grooming Calendar form.
P E T L I N X 6 T U T O R I A L - G R O O M I N G
20
7. Adding a new pet
Now that you’ve added your first customer, you’re ready to add a pet that belongs to the customer. To do this, you need to bring the fields on the Pet tab into view by clicking on the
tab labelled “Pet” or by clicking on the Pet grid. Then click on the New ribbon button to start adding the pet.
Enter the name of the pet, and then move onto the “Type” field. If you choose “Cat” from this field then the “Breed” drop-down will contain a list of cat breeds, likewise choosing “Dog” will fill the “Breed” with a list of dog breeds. The other fields on this tab should be filled out where applicable.
Adding a new vet
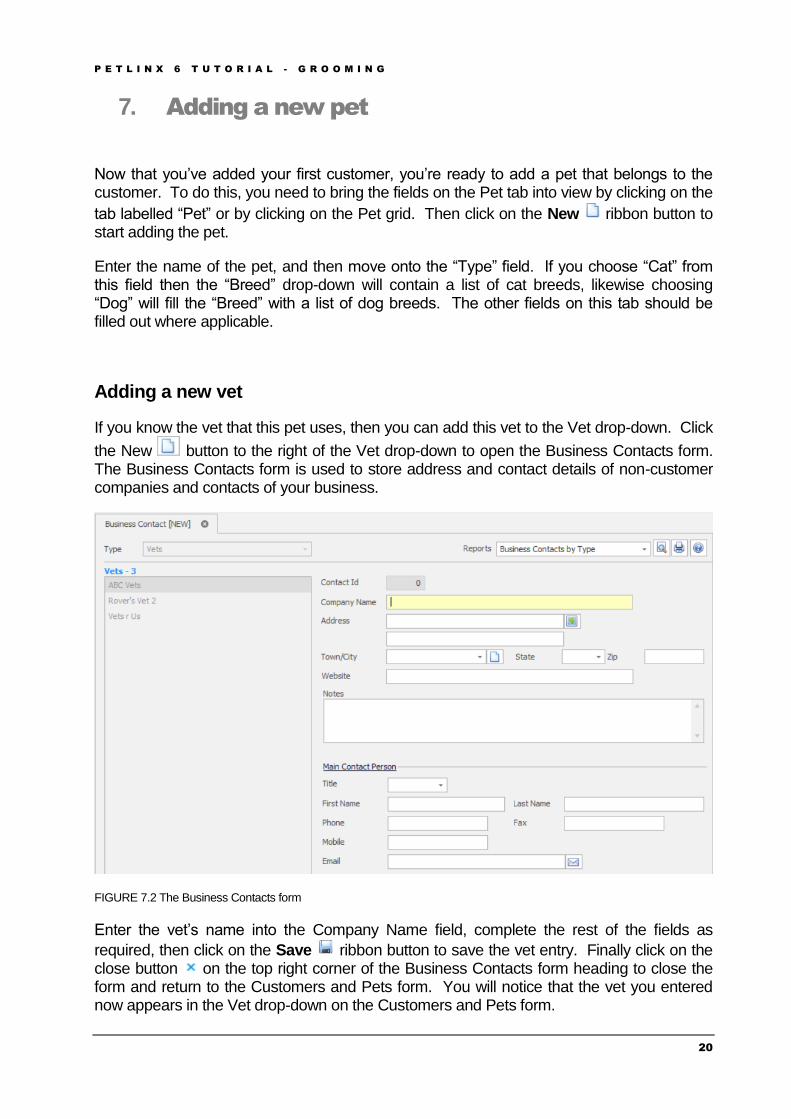
If you know the vet that this pet uses, then you can add this vet to the Vet drop-down. Click
the New button to the right of the Vet drop-down to open the Business Contacts form. The Business Contacts form is used to store address and contact details of non-customer companies and contacts of your business.
FIGURE 7.2 The Business Contacts form
Enter the vet’s name into the Company Name field, complete the rest of the fields as
required, then click on the Save ribbon button to save the vet entry. Finally click on the close button on the top right corner of the Business Contacts form heading to close the form and return to the Customers and Pets form. You will notice that the vet you entered now appears in the Vet drop-down on the Customers and Pets form.

P E T L I N X 6 T U T O R I A L - G R O O M I N G
21
When you have finished entering the pet’s details, click on the Save ribbon button. You will notice that the pet’s name appears in the Pet grid in the left hand side of the Customers and Pets form. Whenever you select the customer in the Customer grid again, PetLinx will display the pet record you just added in the Pet grid below it.
A second pet can be easily added to the same customer by repeating the steps above.
Adding pet photos
If you have taken photos of the pet and have them stored on your computer or network, you can link these to the pet’s details by clicking the "+" button below the photo field (where it says "Click + button to add a photo"). This will open a file open window where you can select a photo file. You can repeat this step to add as many photos of the pet as you wish.
You can enter a caption for each photo by clicking the Key button .
Use the VCR buttons to cycle through the photos you have added of the pet.
Adding pet vaccination information
You can also store any vaccination information to do with the pet. To do this, go to the Vaccinations grid and tick the vaccinations that have been applied to the pet. The date the vaccination was applied defaults to today’s date, and can be changed if required. The Expires date will default to a future date depending on the lifetime of the vaccination.
The list of vaccination types can be changed by clicking the New button above the Vaccinations grid, which opens the Data Lists pop-up form. Here for each vaccination type you can add or change the name, the type of pet it is for, the length of time the vaccination lasts for, and whether it is compulsory for pets using your business to have this vaccination or not.
Adding a pet groom style
When you have completed all the applicable fields in the “Pet” tab, you can add details of the pet’s grooming styles. Grooming styles enable you to enter detailed records of the service you provide for a pet, such as the trim type, hair lengths, and shampoo and conditioner to use.
To add a groom style click the “Groom Style” tab, then click on the New ribbon button,
complete the fields as required, and click Save . You can add multiple groom styles for the same pet by simply click the New button again after you have saved the first groom style.
P E T L I N X 6 T U T O R I A L - G R O O M I N G
22
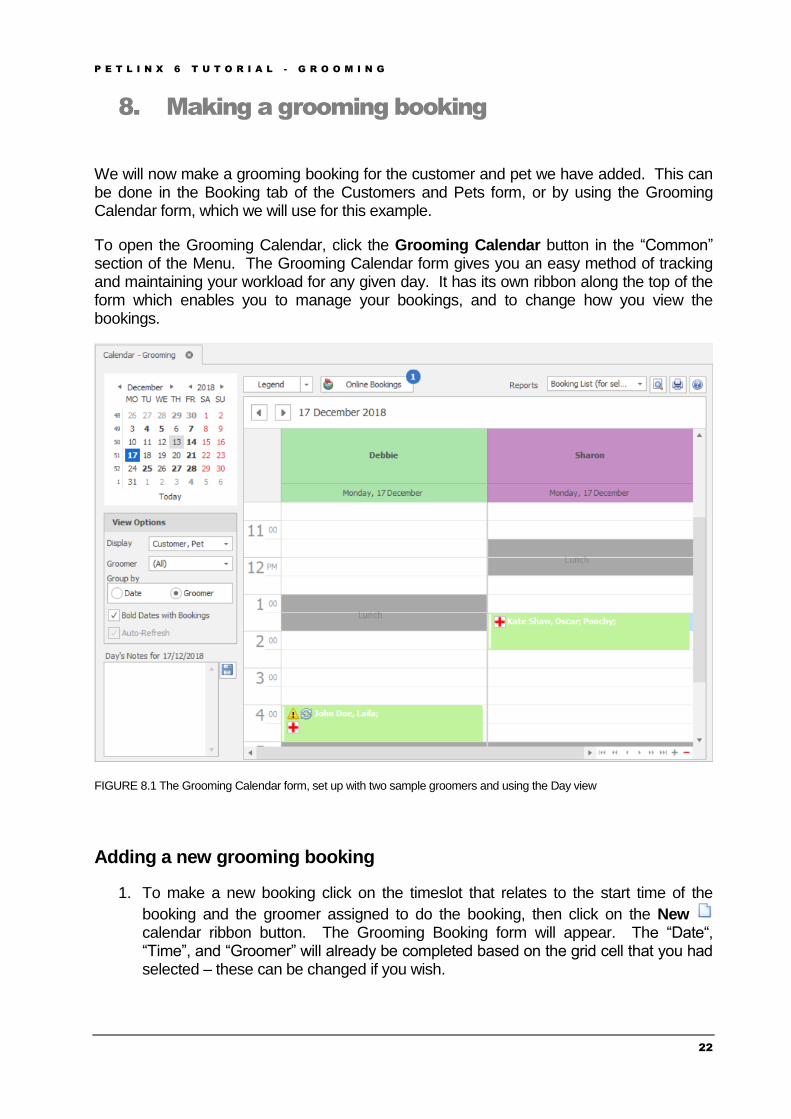
8. Making a grooming booking
We will now make a grooming booking for the customer and pet we have added. This can be done in the Booking tab of the Customers and Pets form, or by using the Grooming Calendar form, which we will use for this example.
To open the Grooming Calendar, click the Grooming Calendar button in the “Common” section of the Menu. The Grooming Calendar form gives you an easy method of tracking and maintaining your workload for any given day. It has its own ribbon along the top of the form which enables you to manage your bookings, and to change how you view the bookings.
FIGURE 8.1 The Grooming Calendar form, set up with two sample groomers and using the Day view
Adding a new grooming booking
1. To make a new booking click on the timeslot that relates to the start time of the
booking and the groomer assigned to do the booking, then click on the New calendar ribbon button. The Grooming Booking form will appear. The “Date“, “Time”, and “Groomer” will already be completed based on the grid cell that you had selected – these can be changed if you wish.

P E T L I N X 6 T U T O R I A L - G R O O M I N G
23
FIGURE 8.2 The Grooming Booking form
2. Select the customer from the Customer drop-down – you can quickly add, edit, or
search for a customer by clicking the appropriate button next to the drop-down. Once the customer has been chosen the Pet grid will be populated with the selected customer’s pets – similar to customers, pets can be added or edited by
clicking the appropriate button next to the grid.
3. Tick the pets that the booking is for in the Pets grid, and complete the rest of the fields if applicable. A groom style can be created or selected for each pet by clicking the “…” button in the Groom Style column of the pet grid. The Vaccinations column displays the current status of vaccinations for the pet, these can be viewed or edited by clicking the “...” button. You can also view any attributes or warnings for the pet by hovering the cursor over the entry in the Attributes column.
4. You can choose if the booking recurs (is automatically created again in the future), on a regular schedule every x weeks or months, or on a given day of each month.
5. To select what services the pet will require, choose the service from the Service drop-down. Select which pet the service applies to if necessary, change the rate if required, then move off the row in the Services grid to add it to the booking. You can

P E T L I N X 6 T U T O R I A L - G R O O M I N G
24
add as many different services to the booking as you wish. The services chosen will update the duration of the booking.
When finished, click “OK” to add the new booking - if you configured PetLinx to send confirmations in the System Options – Grooming tab, a confirmation of the booking will be sent to the customer at this point.. You will notice the booking has been added to the calendar and is green which identifies it as a “Future Booking”, meaning it hasn’t been completed yet. Next we’ll assume that the pet has been brought in, so we’ll set the booking to “Checked In” within PetLinx.
Checking In a booking
To check in the pet, click on the booking in the Grooming Calendar form then click the Status drop-down in the ribbon and choose “Checked In”. This changes the booking status to “Checked In”, and the color of the booking changes to signify this.
Completing a booking
Once a booking has been completed, you can then set it to completed within PetLinx.
To complete a booking, click on the booking in the Grooming Calendar form then click the Status drop-down in the ribbon and choose “Checked Out and Completed”. This changes the booking status to “Checked Out and Completed”, and the color of the booking changes to signify this.

P E T L I N X 6 T U T O R I A L - G R O O M I N G
25
9. Creating an invoice
When a customer pays you for one or more completed grooming bookings, or the purchase of products from your business, you can create and print an invoice to give to the customer.
Invoices can be created in the Transaction tab of the Customers and Pets form, but to invoice a completed grooming booking it is easiest to do it directly in the Grooming
Calendar – simply click the booking to be invoiced, then click on the Create Invoice ribbon button to open a new blank invoice.
FIGURE 9.1 The Transaction form
The invoice date will default to today’s date, which can be changed. You can also set the name of the employee who served the customer, in the “Served By” drop-down.
P E T L I N X 6 T U T O R I A L - G R O O M I N G
26
The booking you had selected in the calendar will be ticked, and you can also add other bookings to the invoice by ticking each booking in the “Bookings Included” section. They will appear shaded yellow when selected for the invoice, and the invoice total will be updated accordingly.
Products (as defined in the Products form) can also be added to the invoice at this stage. Select the item to add from the Description drop-down in the “Retail Sales”, and change the quantity and retail price if required.
If the customer had an outstanding balance you could add this into the invoice total by ticking “Include Previous Balance” – the customer’s current balance is shown at the top of the form. You can also enter the amount of any tips at this stage.
To enter details of a payment from the customer, select the Payment Method, enter a reference number (e.g. credit card authorization number) if required, and enter the amount of the payment. You can enter details of a second payment by ticking “Split Payment”, and link existing payments to the invoice by clicking “Select Linked Payments”. If the total payment amount is more than the invoice total, then the “Change” field will display the difference that should be returned to the customer. If the customer doesn’t receive this amount, tick “Add Change to Balance” to have it added to their current balance.
When you have completed the invoice click Save and if you wish to print a copy for the customer, click on the Print button.
Payments by the customer not related to an invoice can also be entered with the Customer and Pets - Transaction tab, by selecting “Payment” instead of “Invoice” in the “Type” field when adding a new record.
Tip: Invoices and payments can be printed using a receipt printer, you can use a barcode scanner to quickly add products to an invoice, you can configure a cash drawer to be opened when an invoice is printed, and you can process payments with a merchant account. See the Using POS Hardware and Features topic in the help file
(the Help Topics ribbon button) for further information on these.

P E T L I N X 6 T U T O R I A L - G R O O M I N G
27
10. Other things you can do in PetLinx
This completes the PetLinx tutorial. There are other areas in PetLinx that are not covered in this tutorial, including:
▪ Reports: There are many reports available in PetLinx. The Reporting Center form allows you to print or preview on screen any of the reports using a wide set of criteria. Most of the forms in PetLinx allow you to print or preview reports that relate to them (e.g. when viewing the Pet tab in the Customers and Pets form, you can print a list of pets sorted alphabetically, or a list of pets grouped by breed). You can even make your own custom versions of the PetLinx reports, using the “Reports Setup” tab.
▪ Alerts: Alerts are a proactive reminder service to you to let you know to remind customers of their bookings, send a pet a happy birthday postcard, or remind a customer their pet’s vaccination is about to expire. If any alerts are awaiting action, the Alerts form will automatically open when you start PetLinx from where you can print a report, create letters, send bulk emails, or text/voice messages relating to the alert. You can also open the Alerts form using the Alerts button.
▪ Products: If your business sells retail products to customers, then your product range can be defined using the Products form. Products can be added to customer invoices in the Transaction tab of the Customers and Pets form.
▪ Emails and SMS: You can create colorful, professional HTML letters and send bulk emails to your customers using letter templates that you create in the Letter Editor form. You can also create messages to send via text and voice message using this form. To do a mailout using the letter templates, you use the Mailouts tab of the Reporting Center form and they are also used when sending letters, emails, or text/voice messages from the Alerts form.
We have created some sample letters for each of the different letter types you can create, you will see these when choosing the Open ribbon option in the Letter Editor.
▪ Export to QuickBooks: If you use QuickBooks in your business, you can transfer your customers, vendors, products, services, and transactions from PetLinx into QuickBooks whenever you require - just go into the QuickBooks Export tab in the Reporting Center form.
▪ Online Portal (BookMy.Pet): The Online Portal at BookMy.Pet is a simple to use, mobile friendly website enabling your customers to enter details of their pets and their own contact information, and make new booking requests. Changes made by the customer at the BookMy.Pet website sync with your PetLinx database, reducing the time you currently spend keeping customer and pet records up to date. Booking requests display at the top of the PetLinx calendars from which you can review, then accept or decline them. BookMy.Pet is very easy for your customers to use and as it's your actual schedule that is presented to them, you'll be able to fill those gaps in your calendar yet prevent being overbooked!

P E T L I N X 6 T U T O R I A L - G R O O M I N G
28
The Online Portal cannot be trailed during the PetLinx trial period, however if you sign up with PetLinx you will then receive 30 days free use of the Online Portal. After the 30 day trial period a subscription is required to continue to use it. To find out further information please see www.petlinx.com or email us at [email protected].
▪ Printing Collars: The Collar Printing module allows you to print temporary, hard-wearing pet identification collars directly from PetLinx, using the information entered for the pet. These collars enable you and your staff to positively identify each pet, and if the pet escapes your premises the contact information on the collar ensures the pet can be quickly identified and returned.
To print collars from PetLinx requires purchase of the Collar Printing module and PetDetect printer system, both of which can be purchased directly from our website. Please see the “Pricing - Hardware” page at www.petlinx.com for more information.
▪ Help: An extensive help system has been created which explains how to use every feature of PetLinx in detail. Help can be displayed by clicking the Help Topics ribbon button, or by hitting the F1 key. Each form in PetLinx also has a Help button
which will be either in the bottom left or top right corner of the form, clicking this will take you directly to the relevant section of the help system. Use the help system if you get stuck when trying to accomplish a certain task. If you’re still stuck after consulting help, then please use one of our support options.
▪ Technical Support: Any errors that may occur whilst using PetLinx are recorded. It is recommended that you let the PetLinx technical support team know of these errors by sending a support request, accessed through the Technical Support ribbon button. This will enable the technical support team to work towards a speedy resolution to your problem.
For tutorials on using the other modules, please see under the Tutorials ribbon option (you will see options for these if you have selected multiple modules to be used in PetLinx) or via the Start / PetLinx 6 Windows menu option.
Thank you for your interest in our product. We hope you enjoy using PetLinx, and we look forward to receiving any questions, comments or suggestions you may have. Contact information is listed in the help system or on our website, www.petlinx.com.
P E T L I N X 6 T U T O R I A L - G R O O M I N G
29
11. Other system options settings
A full list of System Options settings and their purpose are explained here. System Options are accessed by choosing the System Options button on the PetLinx Menu. For information on the Boarding and Daycare tabs, please read the relevant tutorial. (Users of the Desktop Network/Cloud editions who do not have the Administrator security level will not have all of the tabs mentioned below).
The Business Details tab
The details you enter here will appear on your invoices so make sure all of the fields on this screen are completed with the correct details. Please Note: the country you choose controls the formatting of addresses and other information throughout PetLinx, so please ensure you set this correctly.
If you have your business logo stored as an image file on your computer, you can upload it into PetLinx by clicking the logo Upload button. The logo will then be displayed in invoices and receipts, as well as in the Online Portal (the portal is a website that enables customers to maintain their details and their pet's details themselves, and request new bookings with you; please see www.petlinx.com or email us at [email protected] for more information on the Online Portal).
A Terms and Conditions document can also be uploaded into PetLinx, which is presented in the Online Portal for new customers to agree to as part of their registration. The Terms and Conditions document must be a plain text file (.txt format).
The Backup tab
This tab provides you with information on when the last full backup of the PetLinx database was done (the first time you run PetLinx this will be set to a default value), using the PetLinx Database Manager program. This program can be opened via the Windows Start / PetLinx 6 / Database Manager menu option or from the shortcut labeled PetLinx 6 Database Manager on your computer desktop. To keep your database safe and secure, you should perform regular backups of the PetLinx database using this program and store the backups on a USB drive or some other storage device away from your business premises.
You can also control aspects of the AutoBackup feature in the Backup tab. When enabled, AutoBackup will make copies of your database while you work, which are stored in the AutoBackup folder. By default this folder is set to c:\program files (x86)\petlinx4\AutoBackup, but can be changed to any valid folder.
Tip: If you use a cloud storage facility such as Dropbox, you can select your DropBox folder as the AutoBackup path to have PetLinx backup to the cloud as you work.
You can change how often AutoBackup runs by changing the “Run AutoBackup Every” fields. The “Keep AutoBackup files for up to” fields dictate how long the AutoBackup backup files are stored before they are deleted from the AutoBackup folder.

P E T L I N X 6 T U T O R I A L - G R O O M I N G
30
The Email and SMS tab
If you wish to send letter and reminder emails and/or text and voice messages from within PetLinx, then this section must be completed.
- Email Display Name" should be your name as you want it to appear to the recipients of your email, and "Email Address" of course is your email address.
- "SMTP Server Name", "Port", "User Name", "Password", and "Enable SSL/TLS" are needed for PetLinx to connect to your email system to send the emails; if you are unsure what to enter in here, make them the same as the settings in your email application (i.e. Outlook, Eudora) or contact your ISP (Internet Service Provider) for help.
To send text messages you first need to create an account on either our own platform, PetLinx Online Send (presently USA/Canada only), or with our partners at Esendex. Select the provider you wish to use, then click the logo to open the account setup web page and fill out and complete the page. Once completed and you have received your account details, simply enter these details into the relevant fields in the Email and SMS Configuration tab. You will be provided with a number of free credits to test with, then credits will need to be purchased to continue using the SMS service.
The Form Settings tab
This tab contains settings relating to the forms used in PetLinx.
For users of the Desktop Network/Cloud editions of PetLinx, please note that the changes that you make in this screen will only affect your logon.
- The "Confirmations" section allows you to choose whether to be prompted when doing certain tasks within PetLinx.
- "Field Colors" sets the color of read-only fields and the current field in the PetLinx forms.
- "When PetLinx Starts" controls what forms are opened when PetLinx starts.
- "Open a single copy of each form" prevents PetLinx from opening multiple copies of a form each time you click the form button in the Menu.
- "Display relevant tab when grid is clicked" applies to the Customers and Pets form only. If ticked it will bring the relevant tab forward when the grid is clicked. For example if you are viewing a customer's details on the Customer tab and click one of their pets listed in the pet grid, it will bring forward the Pet tab.
- For the Calendar forms, if "Prompt about past uncompleted bookings when opening" is ticked you will be prompted about any uncompleted bookings when you open a calendar, which you can then view and update the status of. "Prompt to include past uninvoiced bookings when invoicing" indicates whether you will be prompted to
P E T L I N X 6 T U T O R I A L - G R O O M I N G
31
include all past uninvoiced bookings (if any) when invoicing a booking for a customer.
- If "Prompt about expired or missing compulsory vaccinations" is ticked you will be alerted when updating a pet or making a booking if the pet's compulsory vaccinations are not up to date.
The General Options tab
This tab contains settings for using times in PetLinx and other miscellaneous settings;
- "Time Format" controls how times are shown in PetLinx i.e. 4'oclock in the afternoon will be "04:00 pm" when 12 Hour is chosen or “16:00 if 24 Hour is chosen.
- "Time Intervals" controls the interval between times available in the time drop-downs used in PetLinx. For example setting this to 15 minutes would provide times of 9:00, 9:15, 9:30, 9:45, etc, to be available when setting times for bookings and bookings.
- "Restrict Time Fields" enables you to restrict the times available in the time drop-downs used in PetLinx to those that are relevant to your business. For example setting the first time to 6am and the second time to 8pm would mean you wouldn't see any times in the night after 8pm and before 6am being listed in the time fields.
- "Default Customer Contact Method" is used when creating a new customer, the "Preferred Contact Method" field defaults to this.
- "Restrict Time Fields" enables you to restrict the times available in the time drop-downs used in PetLinx to those that are relevant to your business. For example setting the first time to 6am and the second time to 8pm would mean you wouldn't see any times in the night after 8pm and before 6am being listed in the time fields.
- “Use Alerts”, if ticked will create Alerts for booking reminders, pet birthdays, vaccination reminders, and backup reminders.
- “Use Products and Retail Sales”, if ticked enables the maintenance of products and adds the ability to add retail sales of products to invoices.
- (Desktop editions only) - "Photos, Letters, and Custom Reports are stored” determines if these types of files are stored in the PetLinx database, or on disk. We recommend leaving this setting as is to store the files in the database.
The Grooming tab
This tab contains information specifically for grooming including the days and hours that your business operates, and is used to define how bookings are handled.
- The "Open On" and "Opening" and "Closing" times control how the Grooming Calendar is setup. Days that are non-working will be indicated in red in the Month View and will not be visible when using the "Work Week" view. Times before and

P E T L I N X 6 T U T O R I A L - G R O O M I N G
32
after the work times will be shaded a darker color in the "Day" and "Work Week" views to identify them as "out of hours". Note if you setup employees as groomers then their specific work times will override the business work times when viewing the calendar for that groomer.
- "Use Groom Styles" if unticked, will hide the Groom Style tab on the Customers and Pets form and remove the Groom Style field on the Grooming Booking form. You should untick this if you don't want to keep detailed records of the trim styles that are applied to a pet.
- The “Default Booking Duration” field is used when you create a new booking, and dictates the initial value that the booking duration is set to. The duration is initially set to one hour (1:00) but can be changed here if your bookings take generally longer than an hour.
- “Create Recurring Bookings…” dictates how far into the future PetLinx will create new recurring bookings. By default, PetLinx will move any recurring bookings due to be created on a holiday to the next available working day. To change this, untick the "Move booking..." setting.
- The "Confirmation Letters" section enables you to have a confirmation sent automatically to the customer after you create a new booking, or change the date or time of an existing booking. You can choose to have a confirmation emailed, sent by SMS (requires a SMS account, see “The Email and SMS tab” section above), or printed. Click the "Choose Letter" buttons to specify the letter to use, you can choose the same letter for new and changed bookings or have a different letter for each (letters can be created in the Letter Editor). Alternatively you can base the type of confirmation to send on the customer's "Preferred Contact Method" field, in which case you will be prompted to select the letter each time. If sending by email you should also enter the subject to be used in the emails.
The Invoicing tab
This tab contains settings used when creating and printing invoices and payments.
- “Next Invoice/Payment #” is the number to use for the next invoice or payment created in PetLinx.
- "Show Tip Field" if unticked will hide the Tip field from being shown on the Invoice tab and printed invoice (applicable for countries where tips are not normally paid).
- "Set Bookings to Completed when added to an invoice" if ticked will automatically change the status of all bookings added to an invoice to "Checked Out and Completed", if their status is still set to "Future Booking" or "Checked In".
- "Use Linked Payments" if ticked enables payment records to be “linked” to an invoice, useful if invoices can be paid off by the customer making multiple payments.
- "Number of copies to print" - when the "Print Invoice" button is clicked on the Invoice tab, this controls how many copies will be printed.

P E T L I N X 6 T U T O R I A L - G R O O M I N G
33
- "Title" is printed at the top of the invoice and can be changed to whatever is required, for example certain countries require invoices to have the title "Tax Invoice".
- "Show tax number" if unticked will hide the Tax Number from being shown on the printed invoice.
- "Footer Message" is printed at the bottom of the invoice and can contain any message that you want to display here, such as a thank you message.
- The "Emailing of Transactions" section enables you to specify the subject and content used when you email a transaction as a PDF attachment. Enter the subject of the email, note you can use two special codes as part of the subject; use <Number> to have the actual transaction number inserted here, and <Type> to have the actual transaction type (i.e. "Invoice" or "Payment") when the email is created. Leave the Content Letter field blank to be prompted to choose the letter each time you email a transaction, or click the "Choose Letter" buttons to specify the letter to use always. If you haven't created a letter to use, this can be done using the Letter Editor. Please note the letter must be set to a type of "Customer Transaction Email" in the Letter Editor's "Mail Merge - Set Letter Type" ribbon option.
If you reside in the USA you will notice a “Payment Processing” section where you can choose to process payments using a merchant account. If you are interested in finding out
more, please click the Help button in the bottom left hand corner of the form.
The Printers and Cash Drawer tab
This tab allows you to choose the paper size and printer to use for printing reports and invoices, and also enables a cash drawer to be setup.
For users of the Desktop Network/Cloud editions of PetLinx, please note that the changes that you make in this screen will only affect your logon.
- The "Reports and Letters Printing" section enables you to choose whether to print reports and letters at Letter or A4 size, and also choose the printer that PetLinx will use. If this will be your Windows default printer then leave the setting as "* Default Printer".
- The "Invoice and Receipt Printing" section enables you to choose whether to print invoices and receipts at Letter/A4 size, or using a receipt printer. The printer to be used should be selected here, if it will be the Windows default printer then leave the setting as "* Default Printer". See the “Using a Receipt Printer” help topic for further information on setting up a receipt printer.
- The "Cash Drawer" section enables you to configure a cash drawer to be used with PetLinx. See the “Using a Cash Drawer” help topic for further information on setting up a cash drawer.

P E T L I N X 6 T U T O R I A L - G R O O M I N G
34
The Security tab (Desktop Network/Cloud editions only)
The Security tab enables or disables various capabilities of PetLinx users who are in the "General User" security group (as specified in the Employees form).
The Tax tab
This tab allows you to configure taxes to be used throughout the system.
- "Tax Number" is your business' tax number, and appears on your invoices (although you can hide this in the System Options Invoicing tab). Depending on your country this may be labelled as something else, i.e. ABN in Australia, GST Number in New Zealand.
- “Prices are Exclusive/Inclusive of Tax” dictates whether tax is included in service and product prices, or excluded and added onto the prices.
- The rest of the fields on the Tax tab will be set to a default based on the country you chose when PetLinx was first started. You can change any of these options including the name of the tax, the tax rates for use by products and services, and you can also tell PetLinx to use a second tax by ticking the “Use Tax 2” tickbox (for Canadian customers, this allows you to setup GST and PST). Please note for each tax you use, you must enter a tax rate for both products and services. If one of the rates is not used, enter zero in the tax rate (for example, if products have a 10% tax rate, but services do not incur tax, enter 0 in the "Service Tax Rate" field).
- If "Use Tax 2" is ticked, you have the option of setting whether the tax is compounded. Tick the "Tax 2 is Compounded" tickbox if tax 2 is based on the price plus tax 1, or leave it unticked if tax 2 is based solely on price excluding tax 1.