Embed Size (px)
Citation preview

1
PERCEPTION® ESTI-MATE
Estimating
Ship Repair
A Training Tutorial

2
This training tutorial outlines the basic features
of the PERCEPTION system for developing cost
estimates for ship repair.
It is a supplement to the user manual entitled
“PERCEPTION Cost Estimating for New
Construction & Ship Repair,” which provides
more details for the user.
Before using this tutorial, the user should first
view the preliminary training tutorial, “Getting
Started With PERCEPTION.”

3
Training Directory
Continue
New Contract & Project
Define the Work Center
Define Detail Cost Items
Material Escalation
Setting Global Values
Validate the Cost Data
Cost Estimate Rollup
Reporting
Ship Characteristics
The Parts Catalog
The CER Library
The Standard Package Library
Cost Estimating Toolbox
Cost Risk

4
PERCEPTION cost estimating is
designed specifically for shipyards and
naval engineering agencies.
It provides features that support cost
estimating at any given level of detail
required, from rough order of
magnitude (ROM) to detail estimates.

5
1. PERCEPTION has flexible features to address almost any
estimating situation, whether for commercial or government
requirements.
2. PERCEPTION offers a toolbox of easy-to-use functions to help
the estimator expedite the process and ensure the estimate is
both complete and accurate.
3. PERCEPTION allows cost data to be cataloged in convenient
and easy-to-use database libraries.
4. PERCEPTION cost libraries ensure all estimators are using
consistent information.
5. PERCEPTION libraries can be configured to accurately define
standard shipyard production processes to ensure every
estimate is complete, nothing is missing.
Why Use PERCEPTION?

6
Steps To Generate An Estimate
1. Create the new project and its WBS.
2. Define the work center(s) and labor rates.
3. Define the detail cost items cataloging them to the
project WBS and to the project work center(s).
4. Validate the detail cost items to ensure there is no
missing information that is required for a correct
cost estimate calculation.
5. Perform a cost estimate “rollup” that summarizes the
costs of the cost items up through the project WBS.
6. Generate the necessary detail and summary reports.

7
Special Note:
To add new records in any worksheet, click on the Add
button on the toolbar or the down-arrow on your
keyboard.
To save data entered into any worksheet, click on the
Save button on the toolbar.
To delete records from any worksheet, highlight those
records (rows) to be deleted, then click on the Delete
button on the toolbar.

8
• PERCEPTION allows the user to develop a cost
estimate to any required level of detail.
• Each cost item of the estimate defines a labor and/or
material cost.
• PERCEPTION also allows the cost items to reference
an element of the project’s Work Breakdown
Structure, or WBS.
• This WBS enables the system to summarize the
detailed costs into meaningful general categories.
9
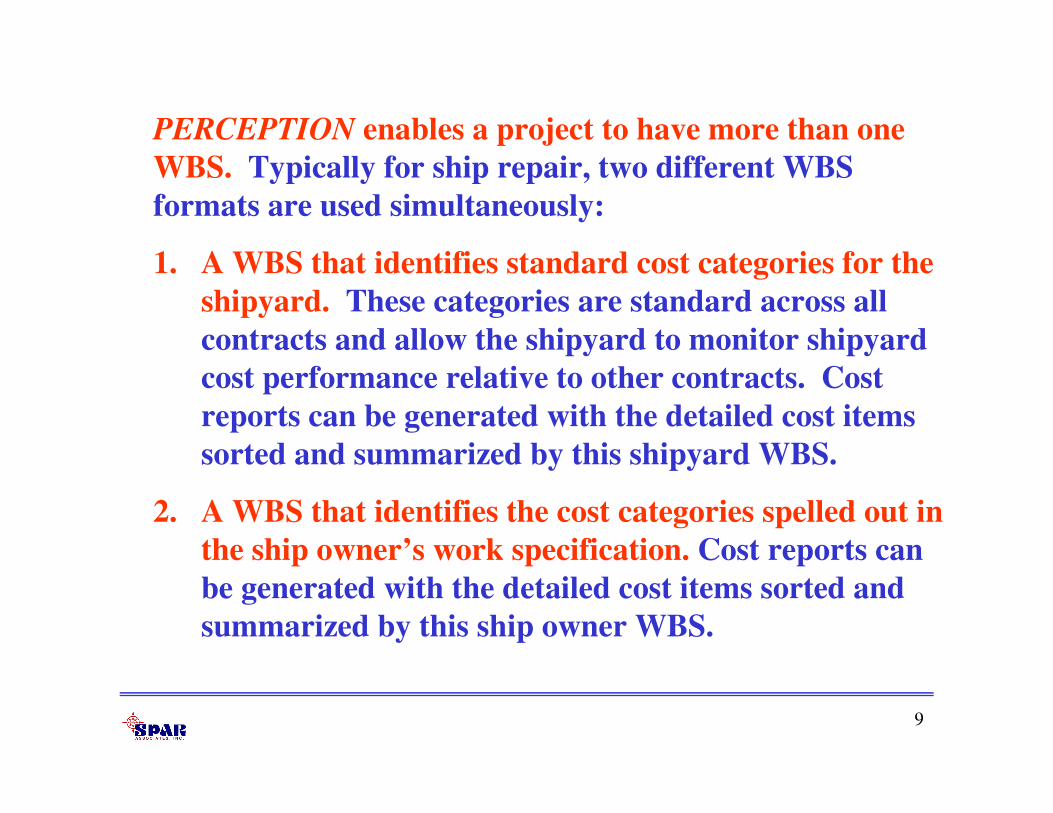
PERCEPTION enables a project to have more than one
WBS. Typically for ship repair, two different WBS
formats are used simultaneously:
1. A WBS that identifies standard cost categories for the
shipyard. These categories are standard across all
contracts and allow the shipyard to monitor shipyard
cost performance relative to other contracts. Cost
reports can be generated with the detailed cost items
sorted and summarized by this shipyard WBS.
2. A WBS that identifies the cost categories spelled out in
the ship owner’s work specification. Cost reports can
be generated with the detailed cost items sorted and
summarized by this ship owner WBS.

10
The PERCEPTION System Work Breakdown Structure
(SWBS) is one of several WBS categories that can be used
to catalog internal shipyard costs.
Others include a Product Oriented Work Breakdown
Structure (PWBS), and a Chart of Accounts (COA).
Each has its own purpose and potential benefits for the
shipyard.
For ship repair, SWBS is often the WBS of choice for
standardizing the shipyards cost categories.
The PERCEPTION Contract Line Item (CLIN) is a WBS
oriented around the ship owner’s own breakdown of the
spec sheet.

11
SWBS is a 2-level hierarchical
structure for cost categories.
SWBS Accounts, the lower level,
summarize detail costs pertinent to
a specific type of work, such as
“Hull Cleaning.”
SWBS Accounts that are similar in
type of work are cataloged under
SWBS Groups. “Hull Cleaning”
and “Tank Cleaning” may be two
SWBS Accounts that can be
grouped under a common SWBS
Group category for “Cleaning.”

12
CLINs are cost categories defined by the ship owner’s bid
specification. Most bid specifications typically require the
shipyard to respond directly to the ship owner’s spec sheet
organization.
CLINs can be different from contract to contract.
13
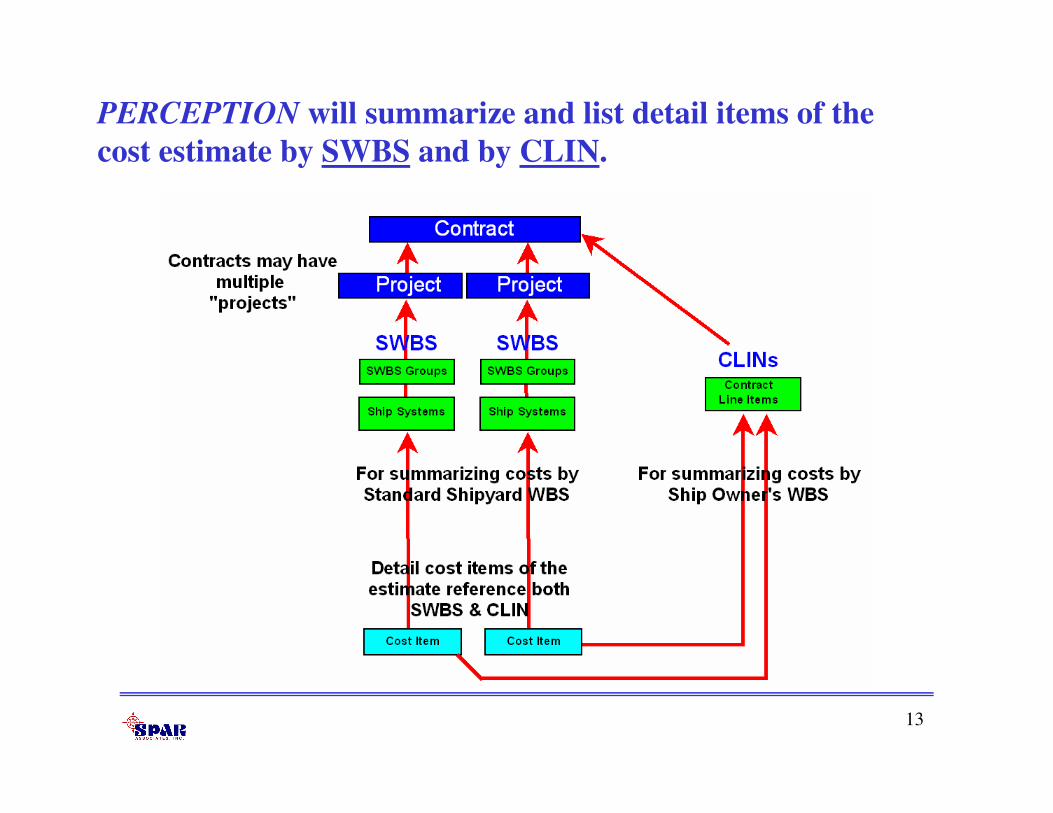
PERCEPTION will summarize and list detail items of the
cost estimate by SWBS and by CLIN.
14
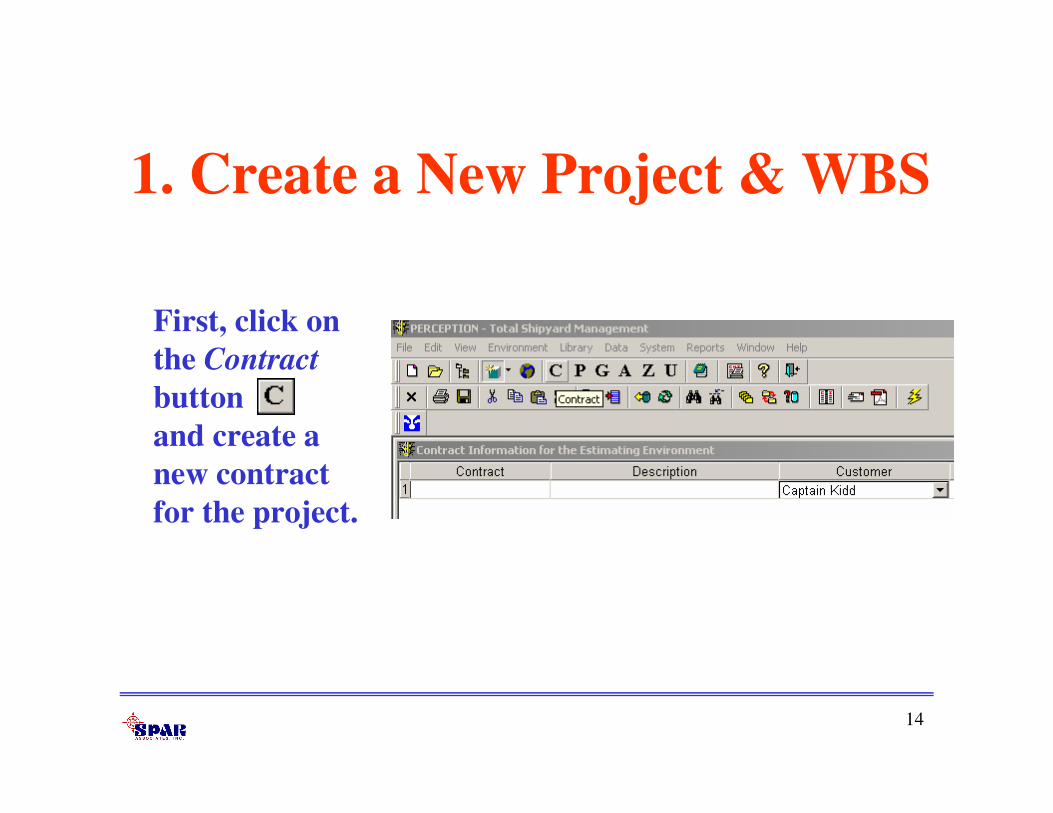
First, click on
the Contract
button
and create a
new contract
for the project.
1. Create a New Project & WBS

15
Next, click on the
Drill-Down button
to create the project(s)
under the contract.
The contract may have more than one project.
16
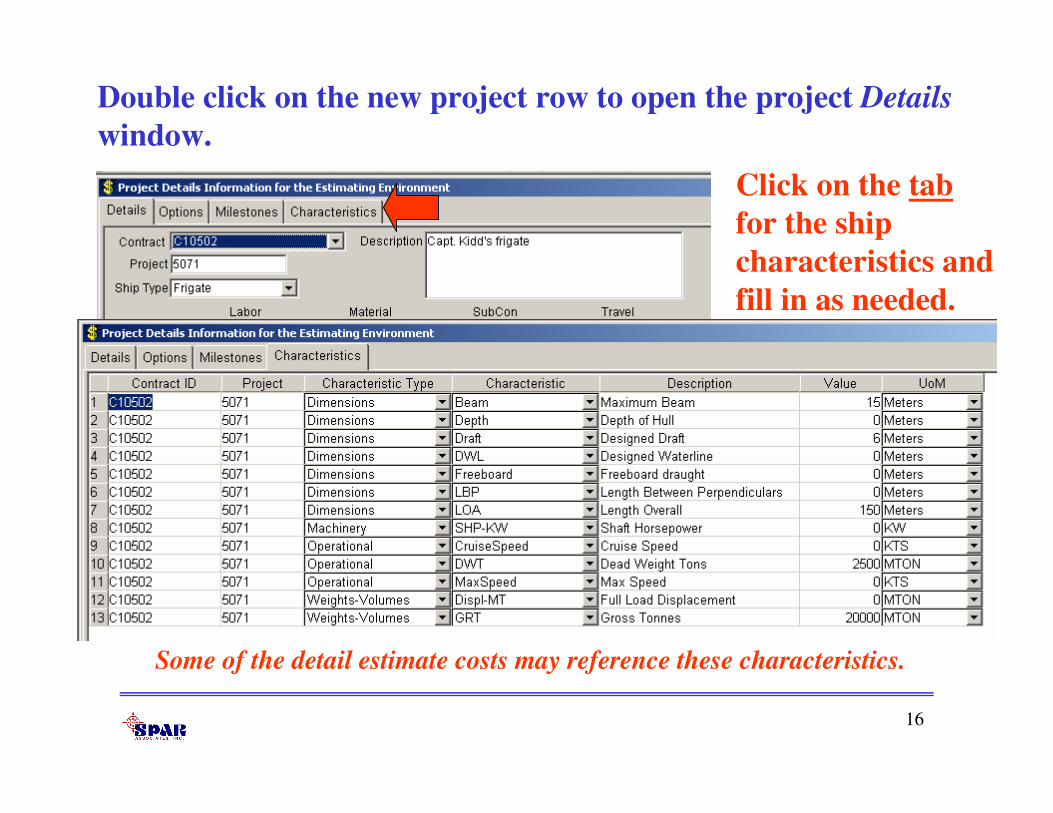
Double click on the new project row to open the project Details
window.
Click on the tab
for the ship
characteristics and
fill in as needed.
Some of the detail estimate costs may reference these characteristics.
17
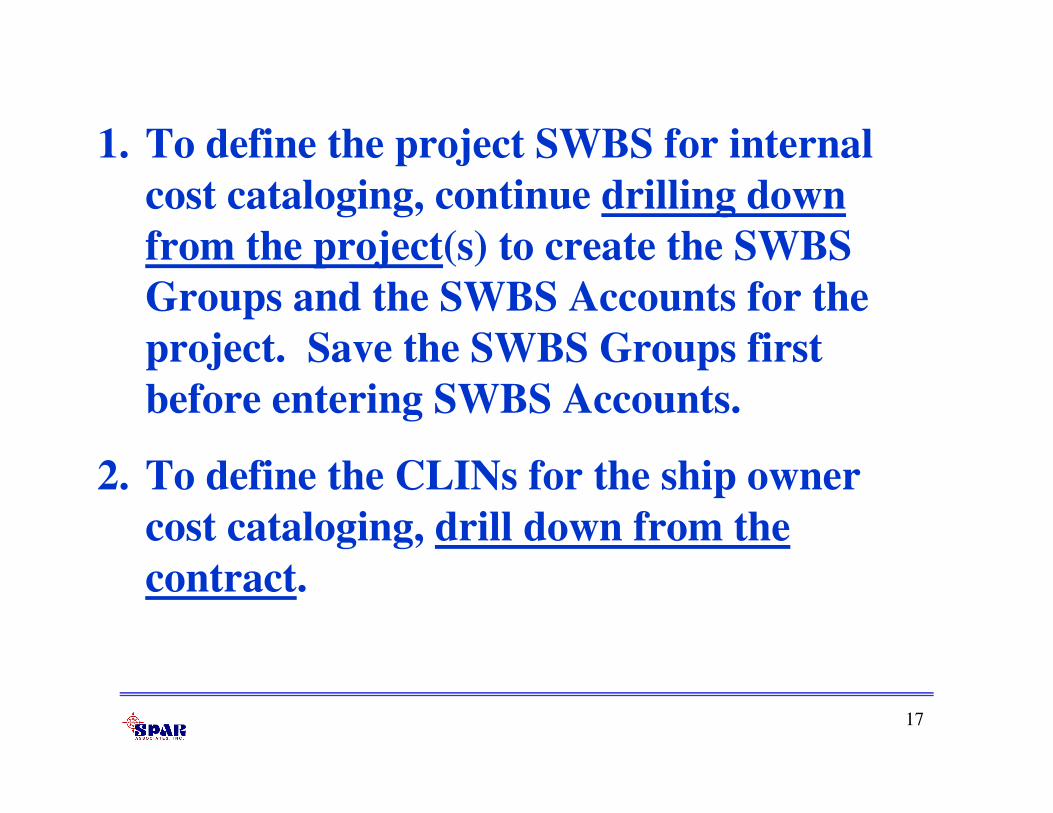
1. To define the project SWBS for internal
cost cataloging, continue drilling down
from the project(s) to create the SWBS
Groups and the SWBS Accounts for the
project. Save the SWBS Groups first
before entering SWBS Accounts.
2. To define the CLINs for the ship owner
cost cataloging, drill down from the
contract.

18
SWBS Groups, SWBS Accounts and CLINs
each need their IDs and descriptions defined.
Remaining info for each is mostly summary
costs rolled up by system from detail cost
items.

19
Click on Windows/Cascade on the main menu to see all open
windows.
Click on any window header bar to open it up again.

20
2. Define Project Work Center(s) and
Rate Tables
Project labor costs are computed by the system from
labor hour estimates entered on estimate cost items.
The system uses labor cost rates stored on work centers
defined for the project.
1. Any number of work centers can be used for a
project estimate and each center can carry its own
labor rate.
2. Each center also can have different rates for different
calendar years.

21
Every cost item must be
identified with a work center.
Therefore, different cost items
can be assigned different labor
rates.

22
Define Project Work Centers
To define these project work
center rates, open the
project worksheet.
If it is not already open,
click on the button on the
toolbar and select the
project.

23
Define Project Work Centers
Highlight the project in this
work sheet and then, click on the
Drill Down button on the
toolbar.
Scroll down the drill-down
selections and click on Rate
Tables.

24
NOTE: This drop-down list of centers identifies a
master list of work centers previously defined under
Library/Work Centers from the main menu.
In the worksheet that the system displays, add
all project work centers (identify each
from the drop-down selections).

25
Define Work Center
Rate Tables
For each of these work centers, highlight it and click
on the Drill-Down button again and select
DETAILS. The system will display the project
center rate table

26
The system will display the Rate Table for the project
work center:
1. Labor Cost Rate (per hour)
2. Subcontractor Labor Cost Rate
3. Percentage of applied rate (Profit, G&A, Overhead, Local &
Federal Tax)

27
Add a rate table for each year that will apply to the project.

28
Taxes are taxes paid to vendors and suppliers and are added costs to a
project.
Overhead is a percentage applied to direct costs that account for all
indirect costs of the shipyard operation: facilities depreciation, utilities,
etc. When used with labor, overhead is applied to the direct labor cost
estimate and includes all fringe benefits paid by the shipyard to the
employees.
G&A are the indirect costs associated with general administration of
projects. This cost category often is used when performing government
contracts. For commercial contracts, G&A more typically is included
in the overhead.
Profit is the percentage fee that is added to the estimated costs for the
project.
Enter the required rates and click on the Save button.
29
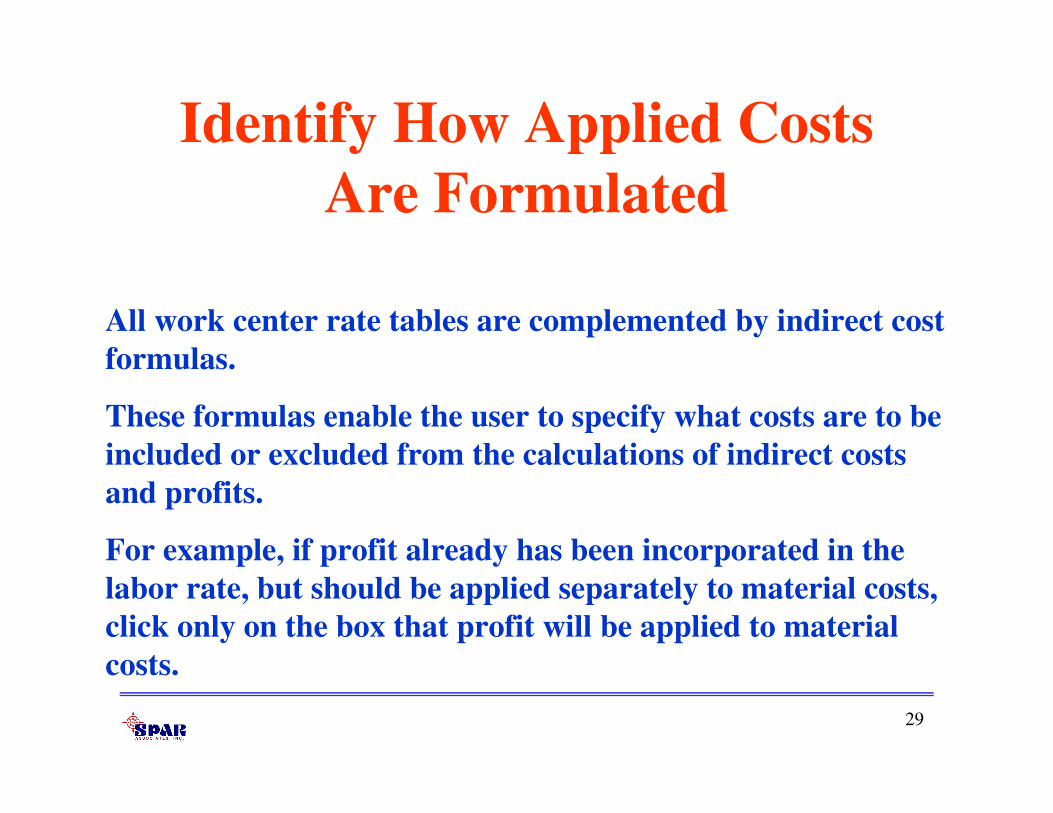
Identify How Applied Costs
Are Formulated
All work center rate tables are complemented by indirect cost
formulas.
These formulas enable the user to specify what costs are to be
included or excluded from the calculations of indirect costs
and profits.
For example, if profit already has been incorporated in the
labor rate, but should be applied separately to material costs,
click only on the box that profit will be applied to material
costs.

30
To open the rate formula window, click on the Apply Rates
to…tab
This window allows the user to define how all indirect costs and profit can be
applied in the system’s cost calculations.
31
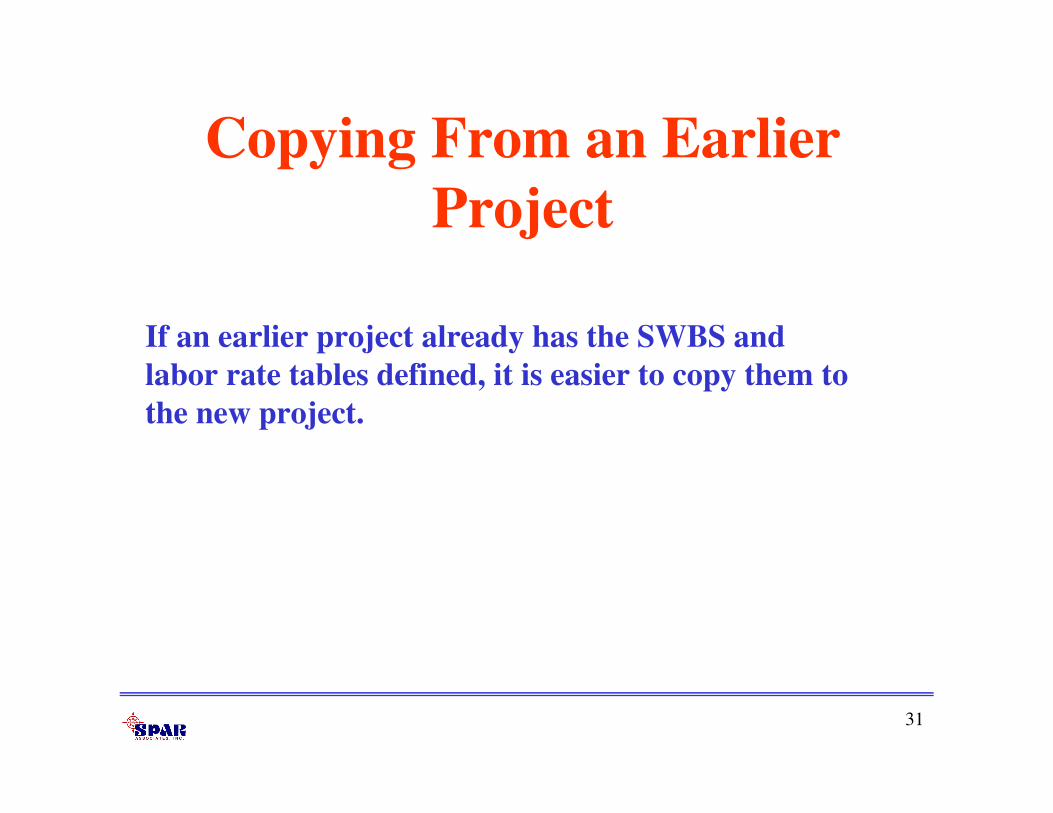
If an earlier project already has the SWBS and
labor rate tables defined, it is easier to copy them to
the new project.
Copying From an Earlier
Project

32
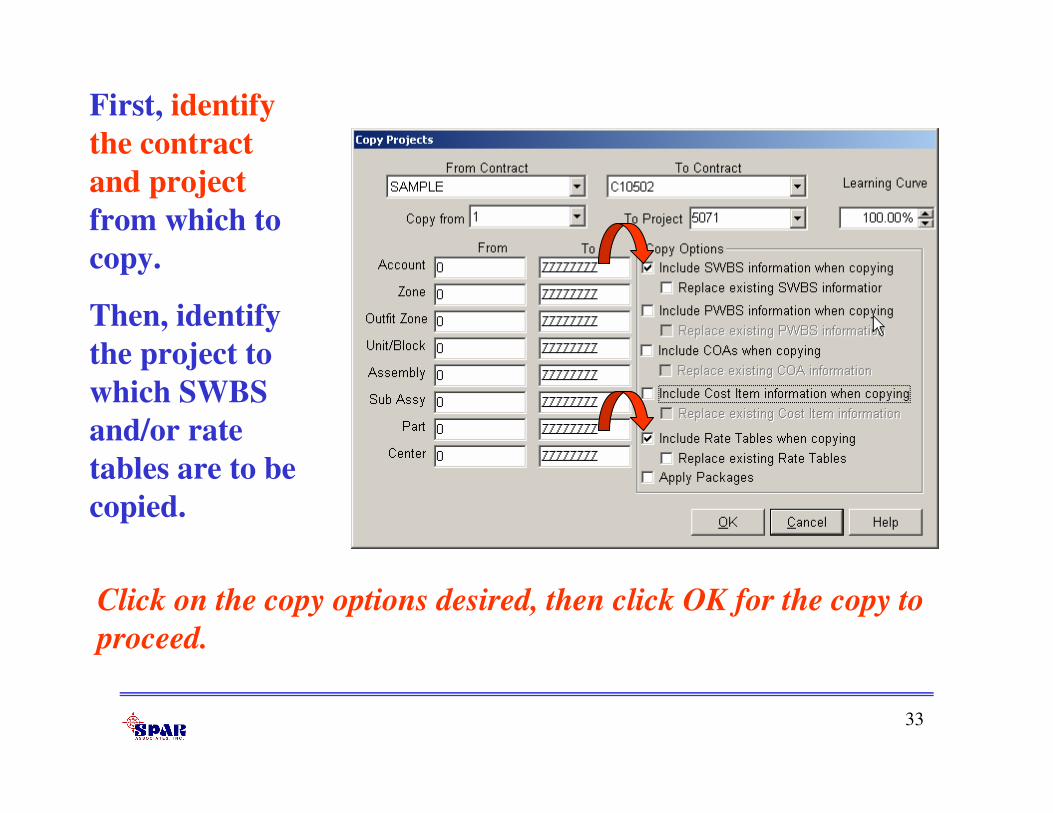
Use the toolbox selection from the main menu:
Environment/Cost Estimating/Cost Estimator’s Toolbox.
Then select Copy Project.
33
First, identify
the contract
and project
from which to
copy.
Then, identify
the project to
which SWBS
and/or rate
tables are to be
copied.
Click on the copy options desired, then click OK for the copy to
proceed.

34
1. Select
Environment/Cost
Estimating/Cost
Items from the
main menu.
2. Or, Drill Down
from the Project
worksheet and
select Cost Items.
3. Define Detail Cost Items
Begin entering cost items as required to define the scope of
work and material requirements. The Cost Item worksheet
can be accessed a number of different ways:

35
3. Or, by drilling down from the CLIN worksheet.

36
Each cost item must include the
following information besides labor and
material cost:
1. Cost Item Number (usually sequential).
2. Project work center (so that the system can use the correct
labor rate).
3. SWBS Account (so that the system can summarize costs by
project WBS).
4. CLIN (so that the system can summarize costs by the Ship
Owner’s Spec Sheet). If cost items are entered via a drill-
down from a CLIN, the system will provide the CLIN
number automatically.
37
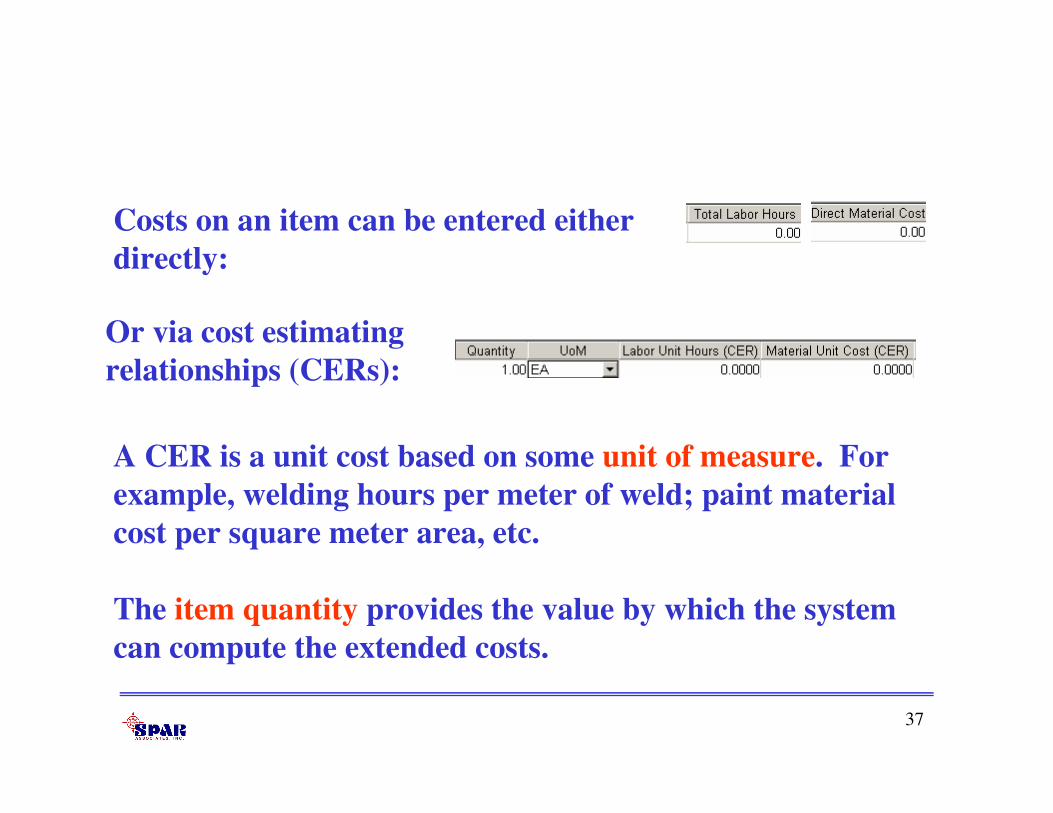
Costs on an item can be entered either
directly:
Or via cost estimating
relationships (CERs):
A CER is a unit cost based on some unit of measure. For
example, welding hours per meter of weld; paint material
cost per square meter area, etc.
The item quantity provides the value by which the system
can compute the extended costs.

38
Material Escalation
Material costs defined on estimate cost items are assumed
by the system to be valid for the Base Year defined on the
cost item.
The Base Year date on the cost item is either assigned by
default by the system (equal to the current year) or
manually by the user.

39
If material costs are being brought to the cost item via
library CERs, Standard Packages and/or the Parts
Catalog, these library costs may be on the database
under different base years than the Base Year for the
cost item.
The system automatically will apply an escalation factor
to these library material costs so that they are assumed
to be valid for the cost item’s Base Year using the
following formula:
Cost Item Material Cost = Library Material Cost x Factor

40
The “Factor” is developed by the system from the Escalation
Table.
Click on Environment/Cost Estimating/Escalation to view this
table and to keep its information up to date:
The “Factor” is computed as
follows:
Factor = Cost Item Cost Base Year Factor/
Library Cost Base Factor
41
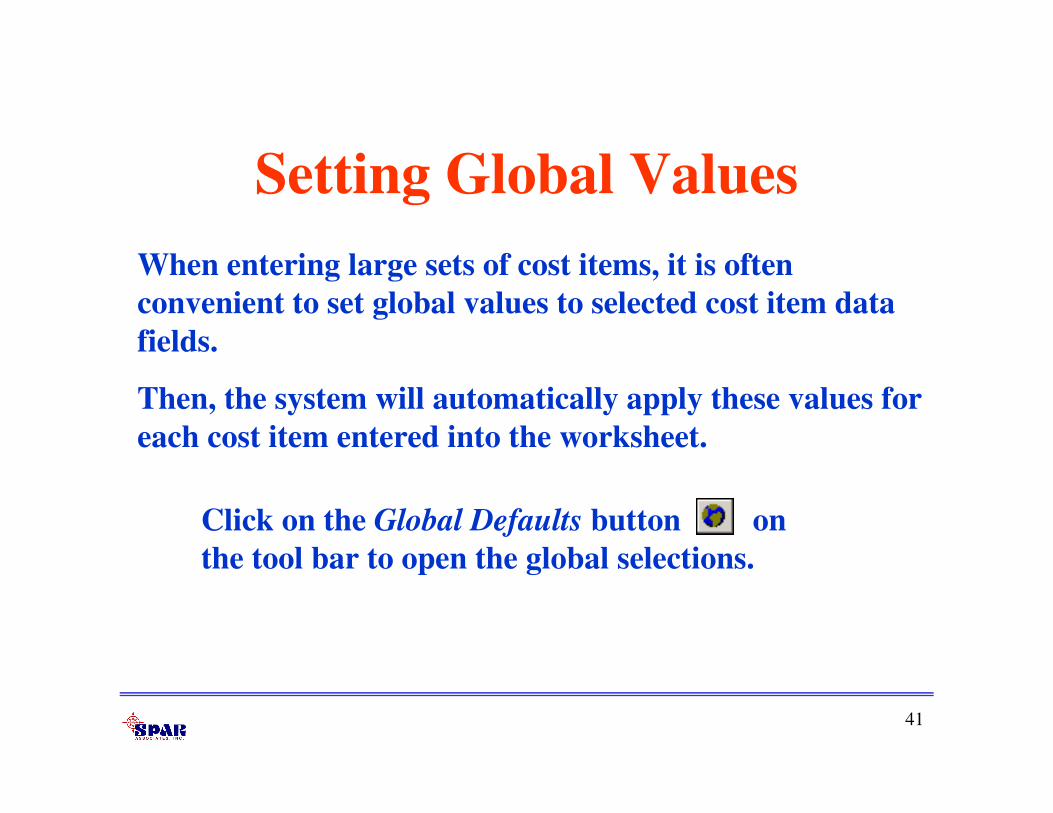
Click on the Global Defaults button on
the tool bar to open the global selections.
Setting Global Values
When entering large sets of cost items, it is often
convenient to set global values to selected cost item data
fields.
Then, the system will automatically apply these values for
each cost item entered into the worksheet.

42
Global Variables:

43
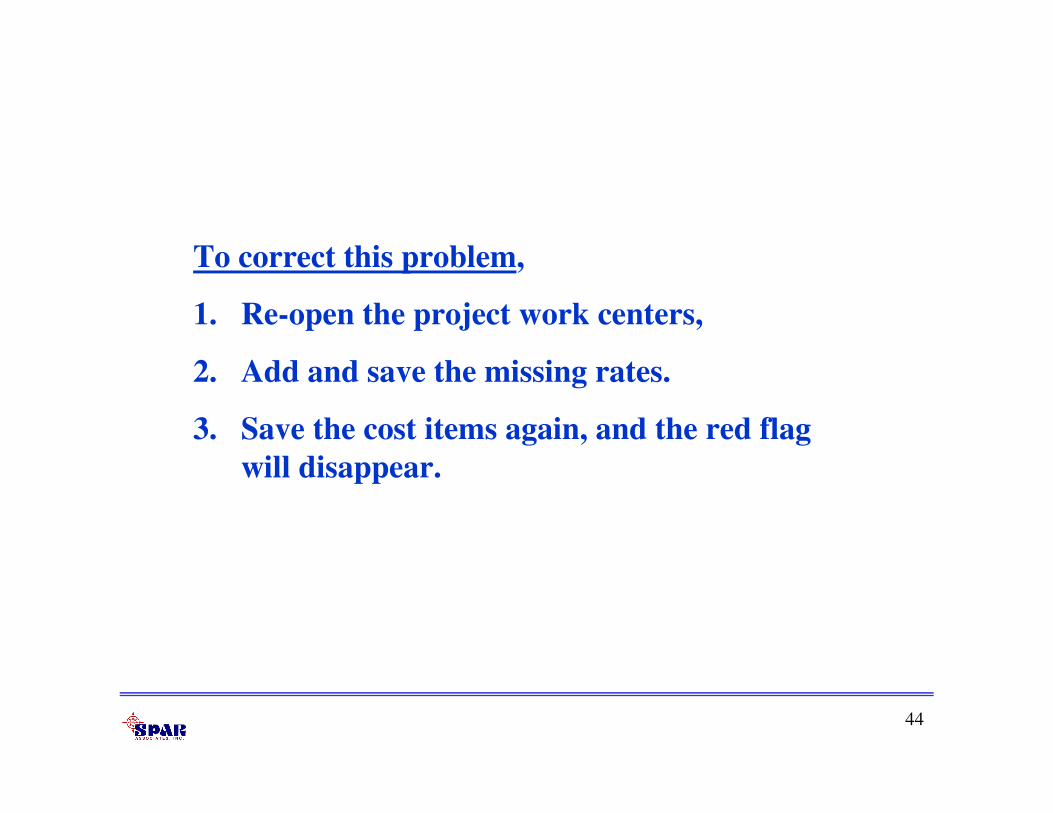
4. Validate the Cost Data
Once all of the project cost items have been entered, save
them to the database.
Items still flagged red after the save do not have work center
rate tables for the year in question defined for the project.
44
To correct this problem,
1. Re-open the project work centers,
2. Add and save the missing rates.
3. Save the cost items again, and the red flag
will disappear.

45
Click on the Validate Displayed Data button to check
for other items of information that might be missing.
The system will
display any and all
missing information
from the cost items,
like missing SWBS,
work centers, etc.
Correct the problems and re-validate until all cost items
pass this test.
46
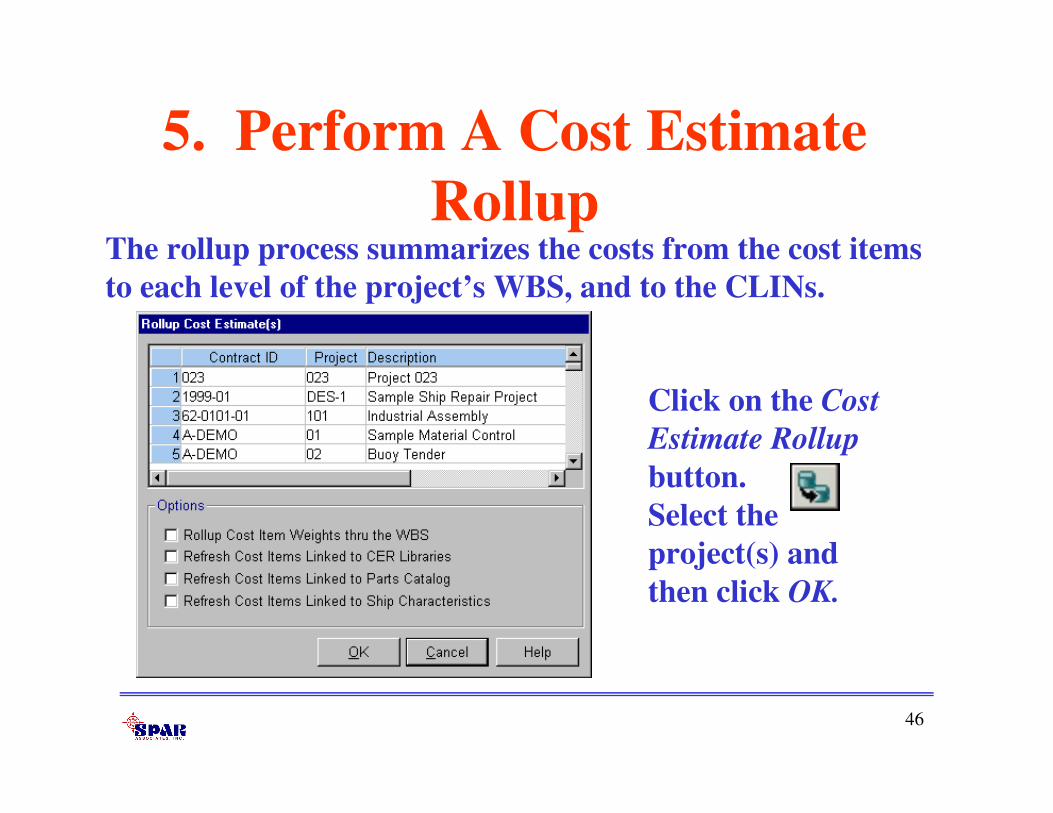
5. Perform A Cost Estimate
RollupThe rollup process summarizes the costs from the cost items
to each level of the project’s WBS, and to the CLINs.
Click on the Cost
Estimate Rollup
button.
Select the
project(s) and
then click OK.

47
6. Generate Reports
There is a wide variety of
reports for the cost estimate.
From the main menu, select
Environment/Cost
Estimating/Reports.

48
The system will list, in
various categories, all
reports available on the
system.

49
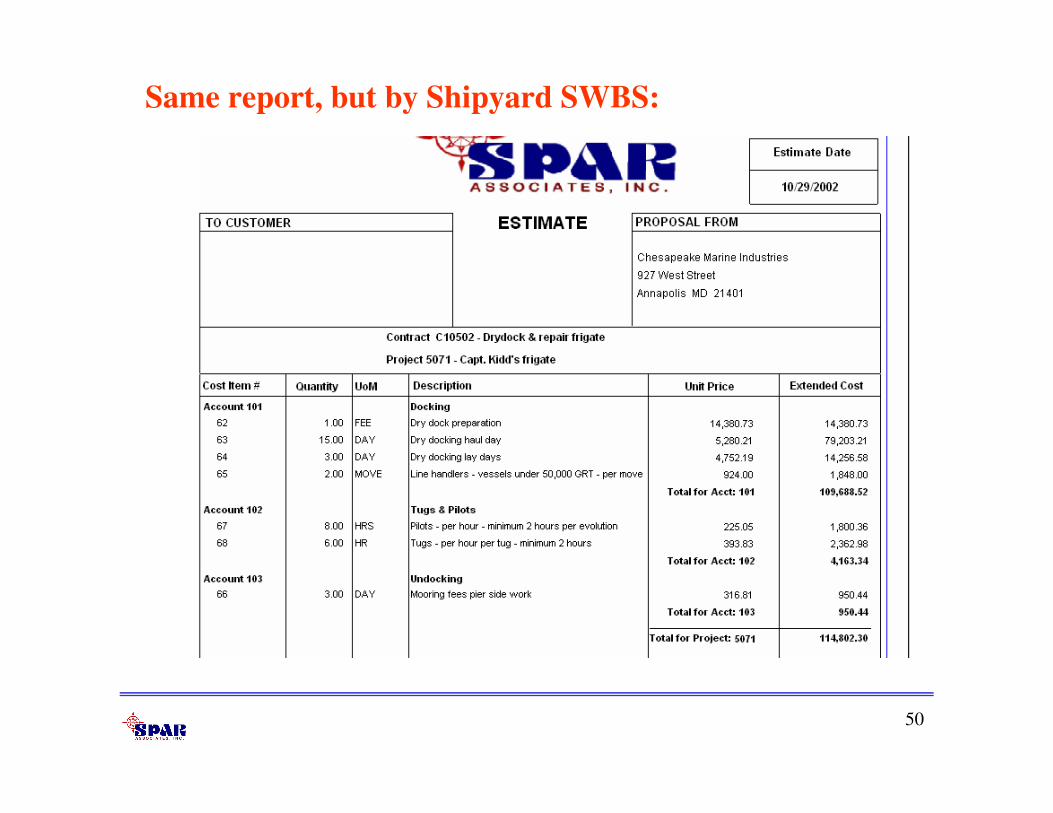
Cost Estimate report by Ship Owner’s CLIN:
50
Same report, but by Shipyard SWBS:

51
Advanced Features
Advanced features for developing estimate cost items:
1. Using Values of Ship Characteristics to Define Item
Quantity
2. Using a Parts Catalog for standardized material costs
3. Using the CER Libraries
4. Using the Standard Package Library
52
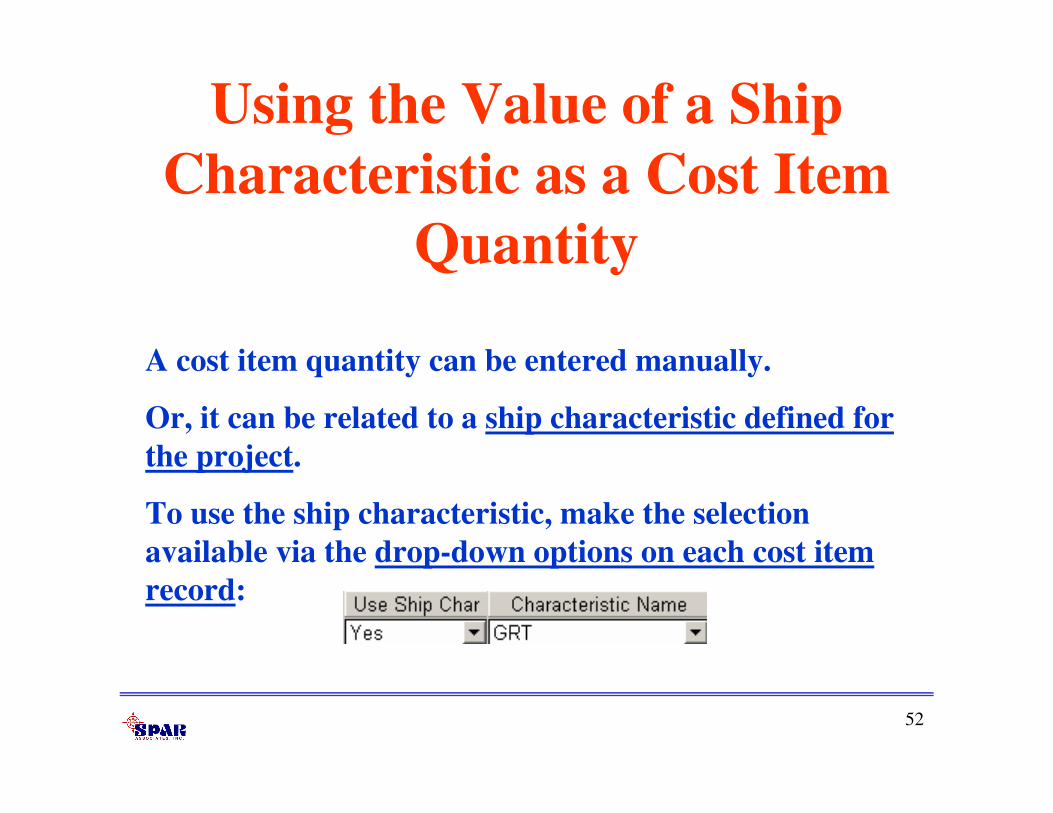
Using the Value of a Ship
Characteristic as a Cost Item
Quantity
A cost item quantity can be entered manually.
Or, it can be related to a ship characteristic defined for
the project.
To use the ship characteristic, make the selection
available via the drop-down options on each cost item
record:

53
Using the Parts Catalog
Material costs can be entered manually on any cost item
record. However, if the material is available on the
Parts Catalog, the current catalog cost can be applied.
To apply a catalog cost to a cost item, enter the Part ID
on the cost item record.
If the user has not yet provided a cost item description, the
system will apply the description from the Parts Catalog.

54
Click on the Add Parts button to open the wizard.
Select all parts needed (highlight, then click on >>) and
define their required quantities. Click on Finish.
Catalog parts also can be entered as cost
items using the system wizard.
The system
will create
cost items
for each part
selected.
55
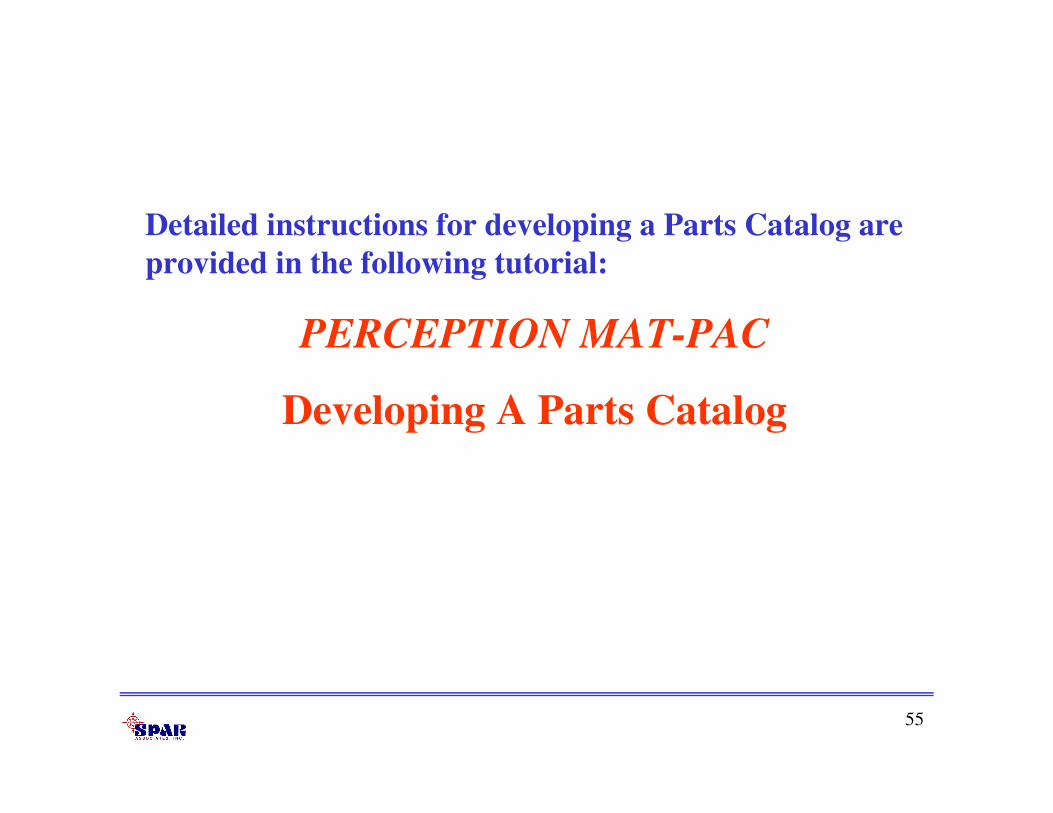
Detailed instructions for developing a Parts Catalog are
provided in the following tutorial:
PERCEPTION MAT-PAC
Developing A Parts Catalog
56
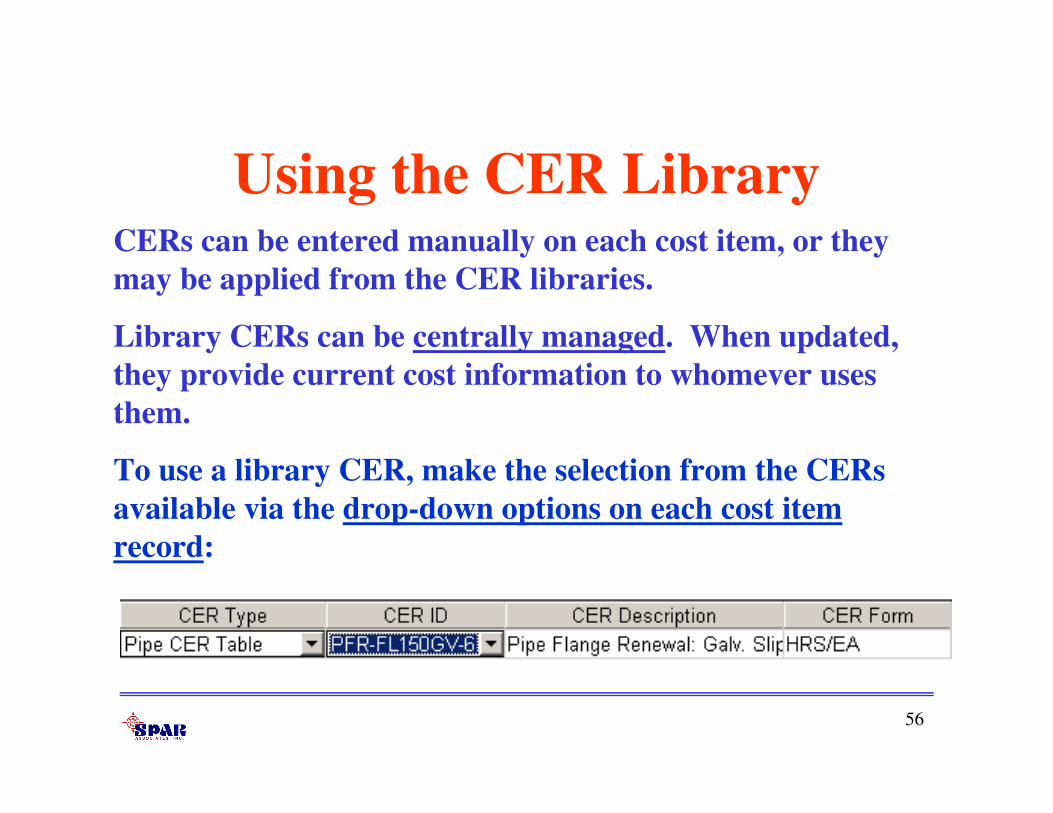
Using the CER LibraryCERs can be entered manually on each cost item, or they
may be applied from the CER libraries.
Library CERs can be centrally managed. When updated,
they provide current cost information to whomever uses
them.
To use a library CER, make the selection from the CERs
available via the drop-down options on each cost item
record:
57
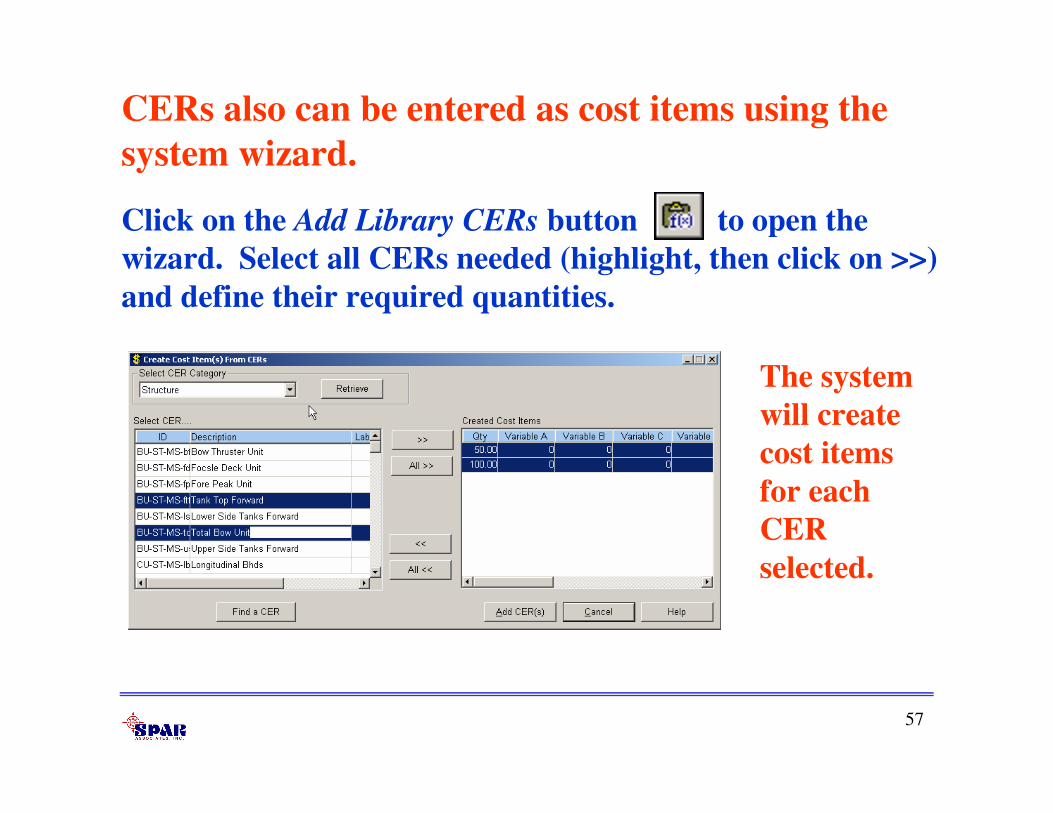
Click on the Add Library CERs button to open the
wizard. Select all CERs needed (highlight, then click on >>)
and define their required quantities.
CERs also can be entered as cost items using the
system wizard.
The system
will create
cost items
for each
CER
selected.
58
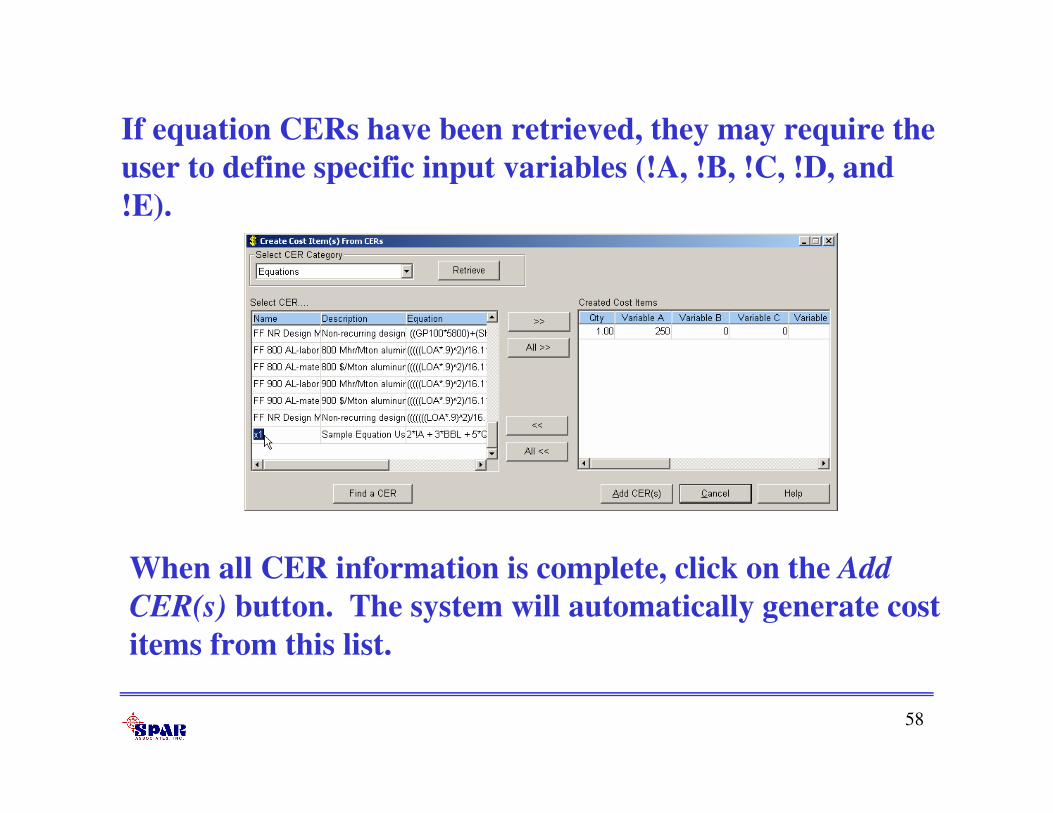
If equation CERs have been retrieved, they may require the
user to define specific input variables (!A, !B, !C, !D, and
!E).
When all CER information is complete, click on the Add
CER(s) button. The system will automatically generate cost
items from this list.

59
If the retrieved list of CERs is large, the Find a CER
button will enable to user to locate desired CERs from
this retrieved list using a text-matching “find” process.
Enter the text expression for the desired CER and the
system will scan down through both the CER ID and
CER Description for a match. The system will highlight
the CER where there is a match.

60
NOTE: If the Global Defaults are not set for contract,
project, and work center, these fields will have to be
manually entered on the new cost items.
Also note that immediately after the system has installed
these CERs as project cost items, the system will not yet
have applied the work center rates to compute direct
labor costs. This will be done when the cost item record is
saved if there is a corresponding record for the rate year
in the project center rate table.
When the system applies the labor rates, it removes the
red flag on the cost item. If it cannot find the rate table,
the items will continue to be identified with a red flag.
61
NOTE: If a cost item uses a library CER and the user
subsequently changes the cost item’s CER value
manually, the system will re-tag the cost item as no
longer referencing that library CER.
The system will re-tag the cost item as a Manual CER.
62
Detailed instructions for developing cost data libraries
are provided in the following tutorial:
PERCEPTION ESTI-MATE
Cost Estimating Libraries

63
Using the Standard Package
Library
Standard production processes, like dry docking, can be
developed and stored on a special Standard Package library.
Each package can be as detailed as needed and can specify
both labor and material requirements.
A package can be complete in and of itself, or it can be made
parametric to accommodate a range of estimating
requirements.
A package can use the library CERs as well as costs from the
Parts Catalog.
64
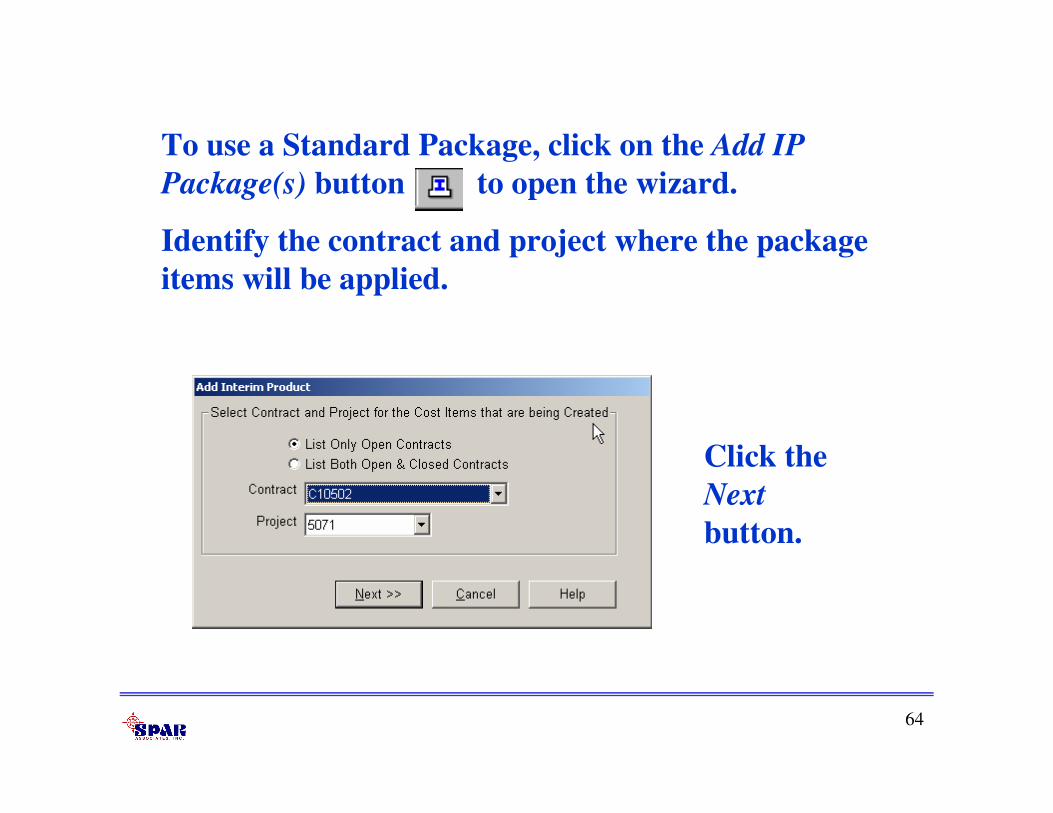
To use a Standard Package, click on the Add IP
Package(s) button to open the wizard.
Identify the contract and project where the package
items will be applied.
Click the
Next
button.

65
Select all standard packages needed (highlight, then
click on >>) and define their required quantities. Click
on Finish.
The system will create cost items for each package selected.

66
In order to narrow the group of packages possible for
selection, the user may use the Package Classification
and Sub-Classification selection criteria buttons.
In addition, after a group of packages have been
loaded into the Package List box (left side of the
window), the Find A Package button allows the user
to locate a package by description that matches a
specific word or expression.

67
Edit the details of the package items as necessary.

68
Detailed instructions for developing a Standard
Packages are provided in the following training tutorial:
PERCEPTION ESTI-MATE
Cost Estimating Libraries
69
Updating
CER Library & Standard
Parts Costs

70
When library CERS and Standard Parts are used in a
project estimate, and when their CERs are modified, the
project estimate can be quickly updated with the new CER
values using the Cost Estimate Rollup.
The rollup can be
made by selecting
Environment/Cost
Estimating/Rollup
from the main menu.
Then select the Cost
Estimate Rollup from
the pop-up window.
71
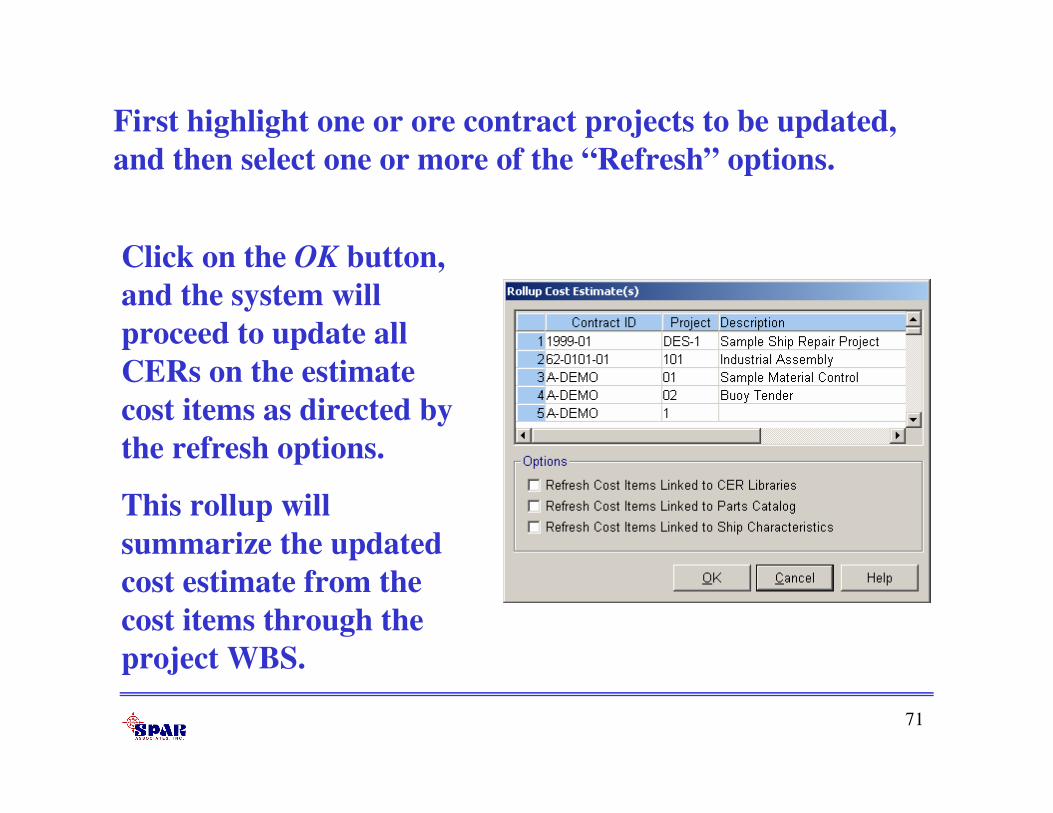
First highlight one or ore contract projects to be updated,
and then select one or more of the “Refresh” options.
Click on the OK button,
and the system will
proceed to update all
CERs on the estimate
cost items as directed by
the refresh options.
This rollup will
summarize the updated
cost estimate from the
cost items through the
project WBS.
72
Note: this updating process will not
update CERs in the Standard Package
Library.
However, if the project estimate uses
standard packages, the cost items will be
updated where the package items
reference library CERs or the Parts
Catalog.

73
The system provides a cost estimator’s toolbox of
special functions to help the estimator.
Click on the Estimating Toolbox button on the
tool bar to open a window of toolbox selections.
Cost Estimating Toolbox
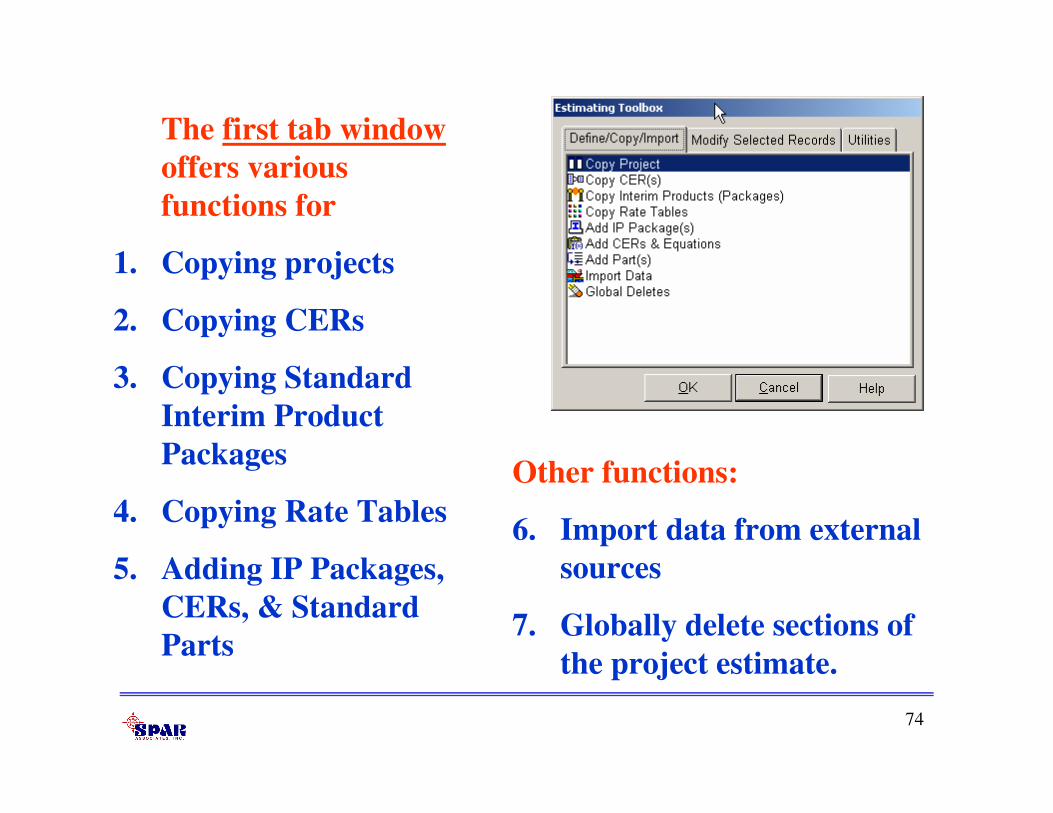
74
The first tab window
offers various
functions for
1. Copying projects
2. Copying CERs
3. Copying Standard
Interim Product
Packages
4. Copying Rate Tables
5. Adding IP Packages,
CERs, & Standard
Parts
Other functions:
6. Import data from external
sources
7. Globally delete sections of
the project estimate.

75
The second tab toolbox
window offers selections to:
1. Modify rate tables
2. Modify the indirect
formulas of applied costs.
3. Globally modify labor
hours and costs using
specified percentages
4. Modify cost item
assignments to WBS, Base
Year (Start Date), and
work centers
76
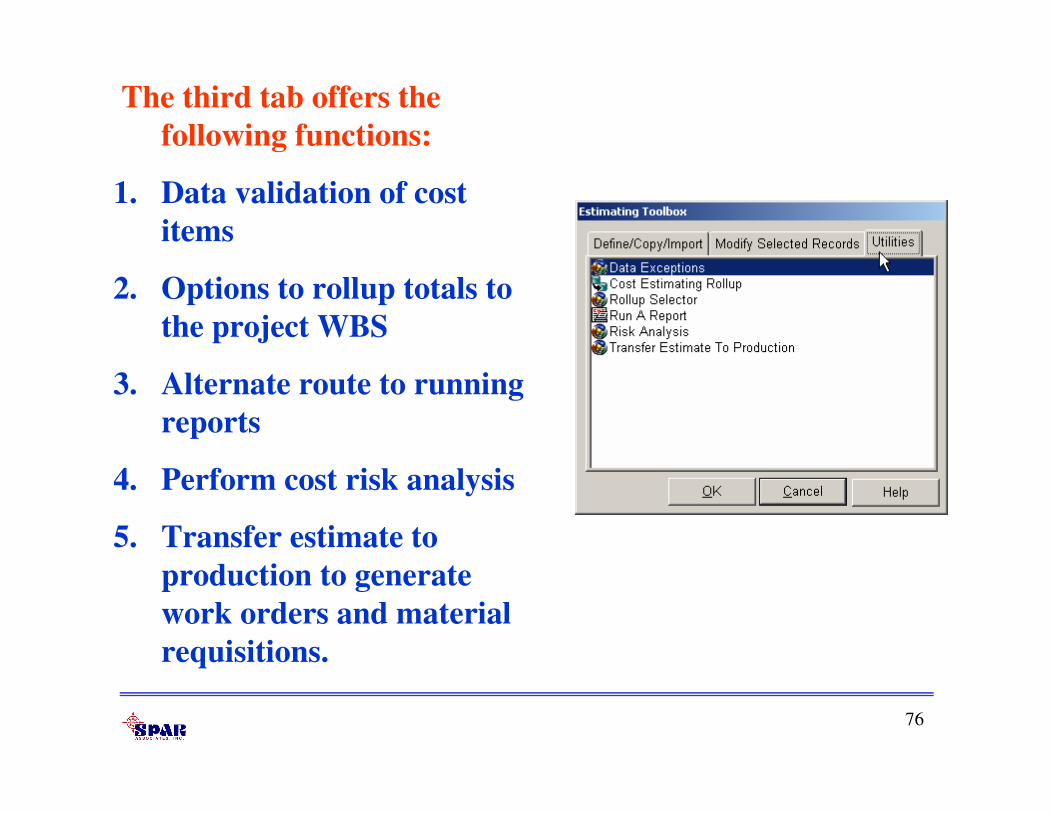
The third tab offers the
following functions:
1. Data validation of cost
items
2. Options to rollup totals to
the project WBS
3. Alternate route to running
reports
4. Perform cost risk analysis
5. Transfer estimate to
production to generate
work orders and material
requisitions.

77
Cost Risk
PERCEPTION can evaluate the risk of a cost estimate and
can measure the probability that the estimate will not be
exceeded by actual costs.
The final “bid price” that is ultimately submitted to the ship
owner would have to be based upon an examination of the
competition, and that is outside the scope of the cost model.
78
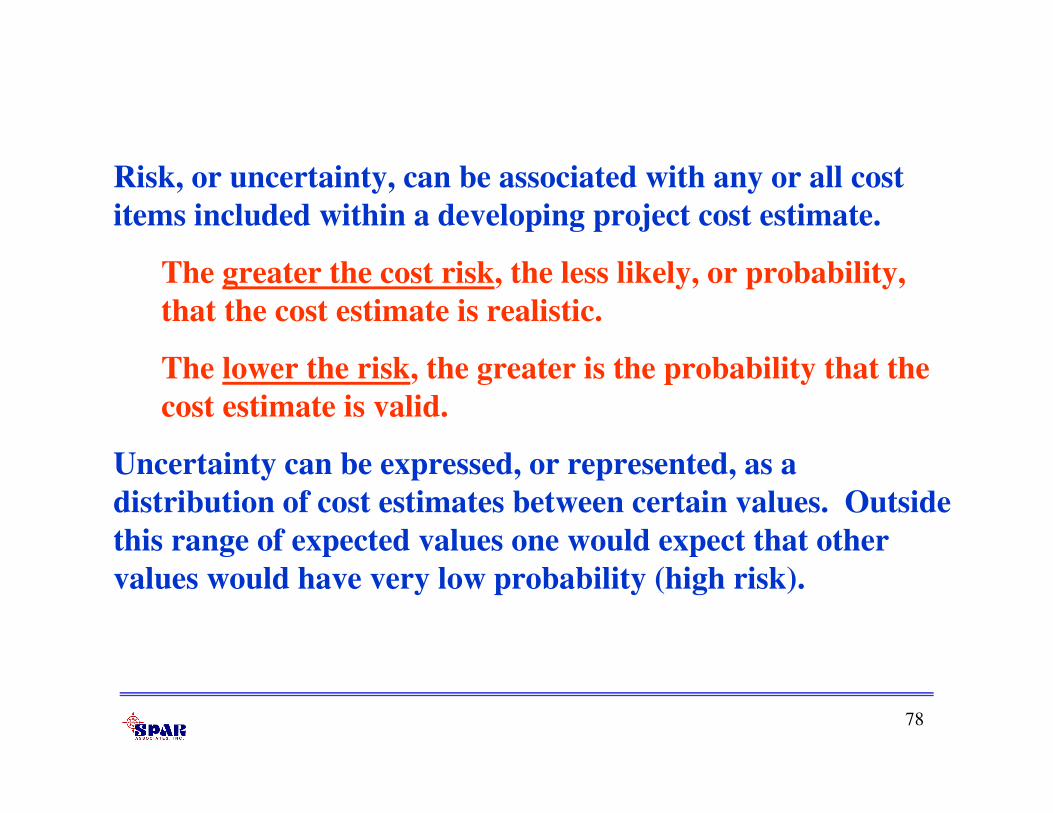
Risk, or uncertainty, can be associated with any or all cost
items included within a developing project cost estimate.
The greater the cost risk, the less likely, or probability,
that the cost estimate is realistic.
The lower the risk, the greater is the probability that the
cost estimate is valid.
Uncertainty can be expressed, or represented, as a
distribution of cost estimates between certain values. Outside
this range of expected values one would expect that other
values would have very low probability (high risk).

79
The PERCEPTION Monte Carlo cost risk analysis
runs through all of the cost items many times
collecting its simulation information.
For each run and within each cost item’s cost range,
the system applies its random number generator to
determine what cost to use within that cost range.
The cost risk probability is derived from the results of
this multiple cost simulation process.

80
To execute the cost risk analysis, the user has to select
Environment/Cost Estimating/Risk Analysis from the main
menu.
The Analysis Selection
Tool will open up where
user can choose the
project.
When the project is
chosen, check the Monte
Carlo Analysis check box
and click the Process
button. It will start the
cost risk calculations.

81
After the process is performed, the Estimate Cost Risk
window will open up. The first tab page displays the results:
Cost
Model
Monte
Carlo
Cost
Risk
Analysis
Results

82
The results of the cost risk analysis are summarized as
follows:
1. Minimum and Maximum Total Cost
2. Estimated Total Cost (expected)
3. Not-to-exceed probability of Estimated Total Cost
4. Total costs for various levels of not-to-exceed probabilities
5. Statistical data (mean, variance, deviation, skewness, kurtosis)
6. Number of iterations
7. Date and Time of the calculations
For detailed information about the terminology used by the cost risk
analysis, refer to the PERCEPTION ESTI-MATE “Cost Estimating
New Construction & Ship Repair User Manual.”

83
The Monte Carlo Graph tab displays the range of “Total
Cost Versus Not-To-Exceed Probability.”


![Unsupervised Adaptive Neural Network Regularization for ...optimization routines, e.g, the ADAM optimizer [23]. (R2) Reconstruction update: After having obtained an esti-mate for ,](https://img.pdfslide.us/doc/110x75/6006950609c81230385f83c7/unsupervised-adaptive-neural-network-regularization-for-optimization-routines.jpg)
![Mesoscale eddies in the South Atlantic Bightoomg.meas.ncsu.edu/.../2016/11/Castelao_HE_JGR.pdf · (NODC) processed as in Castelao [2011] were used to esti-mate the internal Rossby](https://img.pdfslide.us/doc/110x75/5fdbe474594e2b21d93224c6/mesoscale-eddies-in-the-south-atlantic-nodc-processed-as-in-castelao-2011-were.jpg)