Embed Size (px)
Citation preview
PeopleSoft Financials/Supply Chain Management 9.2 In-Memory Real-Time Bottom Line Installation (through Update Image 11)
March 2015
PeopleSoft Financials/Supply Chain Management 9.2 In-Memory Real-Time Bottom Line Installation (through Update Image 11)SKU irtbl92_032015Copyright © 2015, Oracle and/or its affiliates. All rights reserved.Trademark NoticeOracle and Java are registered trademarks of Oracle and/or its affiliates. Other names may be trademarks of their respective owners.
Intel and Intel Xeon are trademarks or registered trademarks of Intel Corporation. All SPARC trademarks are used under license and are trademarks or registered trademarks of SPARC International, Inc. AMD, Opteron, the AMD logo, and the AMD Opteron logo are trademarks or registered trademarks of Advanced Micro Devices. UNIX is a registered trademark of The Open Group.
License Restrictions Warranty/Consequential Damages DisclaimerThis software and related documentation are provided under a license agreement containing restrictions on use and disclosure and are protected by intellectual property laws. Except as expressly permitted in your license agreement or allowed by law, you may not use, copy, reproduce, translate, broadcast, modify, license, transmit, distribute, exhibit, perform, publish, or display any part, in any form, or by any means. Reverse engineering, disassembly, or decompilation of this software, unless required by law for interoperability, is prohibited.
Warranty DisclaimerThe information contained herein is subject to change without notice and is not warranted to be error-free. If you find any errors, please report them to us in writing.
Restricted Rights NoticeIf this is software or related documentation that is delivered to the U.S. Government or anyone licensing it on behalf of the U.S. Government, then the following notice is applicable:
U.S. GOVERNMENT END USERS:
Oracle programs, including any operating system, integrated software, any programs installed on the hardware, and/or documentation, delivered to U.S. Government end users are "commercial computer software" pursuant to the applicable Federal Acquisition Regulation and agency-specific supplemental regulations. As such, use, duplication, disclosure, modification, and adaptation of the programs, including any operating system, integrated software, any programs installed on the hardware, and/or documentation, shall be subject to license terms and license restrictions applicable to the programs. No other rights are granted to the U.S. Government.
Hazardous Applications NoticeThis software or hardware is developed for general use in a variety of information management applications. It is not developed or intended for use in any inherently dangerous applications, including applications that may createa risk of personal injury. If you use this software or hardware in dangerous applications, then you shall be responsible to take all appropriate fail-safe, backup, redundancy, and other measures to ensure its safe use. Oracle Corporation and its affiliates disclaim any liability for any damages caused by use of this software or hardware in dangerous applications.
Third Party Content, Products, and Services DisclaimerThis software or hardware and documentation may provide access to or information about content, products, and services from third parties. Oracle Corporation and its affiliates are not responsible for and expressly disclaim all warranties of any kind with respect to third-party content, products, and services unless otherwise set forth in an applicable agreement between you and Oracle. Oracle Corporation and its affiliates will not be responsible for anyloss, costs, or damages incurred due to your access to or use of third-party content, products, or services, except asset forth in an applicable agreement between you and Oracle.
Documentation AccessibilityFor information about Oracle's commitment to accessibility, visit the Oracle Accessibility Program website at http://www.oracle.com/pls/topic/lookup?ctx=acc&id=docacc.
Access to Oracle Support

Oracle customers have access to electronic support through My Oracle Support. For information, visit http://www.oracle.com/pls/topic/lookup?ctx=acc&id=info or visit http://www.oracle.com/pls/topic/lookup?ctx=acc&id=trs if you are hearing impaired.

Copyright © 2015, Oracle and/or its affiliates. All Rights Reserved. 5
Contents
PrefaceAbout This Documentation ................................................................................................................................... 7Understanding This Documentation ........................................................................................................................ 7Audience .................................................................................................................................................................. 7Typographical Conventions ..................................................................................................................................... 8Products .................................................................................................................................................................... 9Related Information ............................................................................................................................................... 10Comments and Suggestions ................................................................................................................................... 10
Installing PeopleSoft Real-Time Bottom Line ................................................................................................... 11Understanding PeopleSoft Real-Time Bottom Line Installation ........................................................................... 11Prerequisites ........................................................................................................................................................... 11Downloading and Installing the RTBL Schema Files ............................................................................................ 12Preparing to Install the RTBL Database Schema ................................................................................................... 12
Understanding Pre-Installation Steps for RTBL ............................................................................................... 13Creating New Tablespaces ................................................................................................................................ 13Creating a TNS Entry for the New RTBL Schema ........................................................................................... 15Running DBSETUP .......................................................................................................................................... 15Altering System Settings for Indexes ............................................................................................................... 23
Installing the RTBL Database Schema Using Manual Steps ................................................................................. 23Installing the RTBL Database Schema Using the Installer .................................................................................... 26
Understanding RTBL Installation Using the Installer ...................................................................................... 26Running the Installer in Console Mode ............................................................................................................ 26
Installing RTBL Web, Application, and Process Scheduler Servers ..................................................................... 34Deleting Summary Trees for the System Database ................................................................................................ 34Verifying the RTBL Database Installation ............................................................................................................ 34Changing the Default and Temporary Tablespaces for the RTBL Owner ID ....................................................... 37Updating the Databases to the Latest PeopleTools Release ................................................................................... 38Completing Tablespace Setup ................................................................................................................................ 38
Understanding Post-Installation Tablespace Setup ........................................................................................... 38Adding New Tablespaces to the PeopleTools Metadata ................................................................................... 38Adding a New Tablespace for Indexes ............................................................................................................. 39Rebuilding Indexes ........................................................................................................................................... 40
Reviewing the Log Files ........................................................................................................................................ 40Configuring Portal .................................................................................................................................................. 40
Understanding Portal Configuration ................................................................................................................. 41
Contents
6 Copyright © 2015, Oracle and/or its affiliates. All Rights Reserved.
Configuring the Production Instance ................................................................................................................ 41Configuring the Modeling Instance .................................................................................................................. 52Setting Folder Security for RTBL ..................................................................................................................... 69Verifying Single Portal Installation .................................................................................................................. 70
Copyright © 2015, Oracle and/or its affiliates. All Rights Reserved. 7
About This Documentation
This preface discusses:
• Understanding This Documentation
• Audience
• Typographical Conventions
• Products
• Related Information
• Comments and Suggestions
Understanding This Documentation
This documentation is designed to direct you through your PeopleSoft installation. It is not a substitute for the database administration documentation provided by your relational database management system (RDBMS) vendor, the network administration documentation provided by your network vendor, or the installation and configuration documentation for additional software components that are used with PeopleSoft products.
Required updates to this installation documentation are provided in the form of "Required at Install" incidents, which are available on My Oracle Support.
Instructions for installing Oracle's PeopleSoft PeopleTools are provided in PeopleSoft PeopleTools installation guides. Application-specific installation instructions are provided in a separate document for the PeopleSoft application. For instance, if you are installing Oracle's PeopleSoft Customer Relationship Management (CRM), you need both the PeopleSoft PeopleTools installation guide and the additional instructions provided for installingPeopleSoft CRM.
To find the installation documentation for PeopleSoft PeopleTools or for your PeopleSoft application, go to My Oracle Support and search for the installation guide for your product and release.
Note. Before proceeding with your installation, check My Oracle Support to ensure that you have the latest version of this installation guide for the correct release of the PeopleSoft product that you are installing.
Audience
This documentation is written for the individuals responsible for installing and administering the PeopleSoft environment. This documentation assumes that you have a basic understanding of the PeopleSoft system. One of the most important components in the installation and maintenance of your PeopleSoft system is your on-site expertise.
You should be familiar with your operating environment and RDBMS and have the necessary skills to support that environment. You should also have a working knowledge of:
• SQL and SQL command syntax.
• PeopleSoft system navigation.
• PeopleSoft windows, menus, and pages, and how to modify them.
• Microsoft Windows.
Preface
8 Copyright © 2015, Oracle and/or its affiliates. All Rights Reserved.
Oracle recommends that you complete training, particularly the PeopleSoft Server Administration and Installationcourse, before performing an installation.
See Oracle University, http://education.oracle.com.
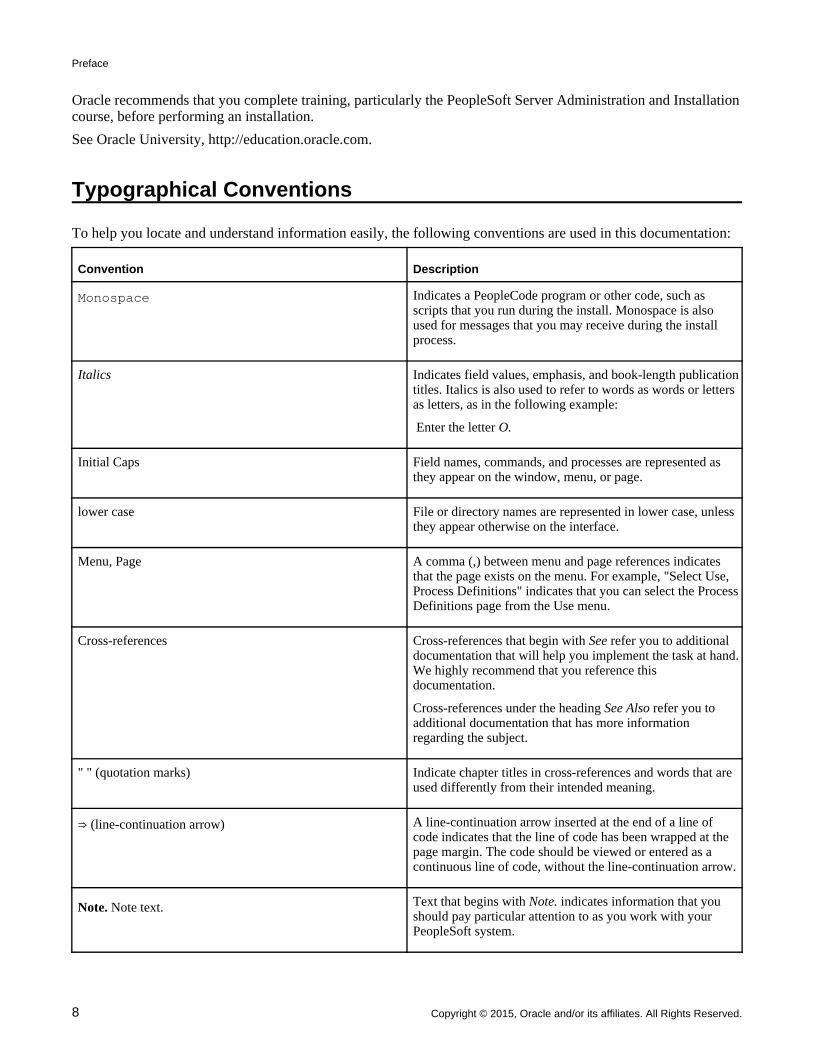
Typographical Conventions
To help you locate and understand information easily, the following conventions are used in this documentation:
Convention Description
Monospace Indicates a PeopleCode program or other code, such as scripts that you run during the install. Monospace is also used for messages that you may receive during the install process.
Italics Indicates field values, emphasis, and book-length publicationtitles. Italics is also used to refer to words as words or letters as letters, as in the following example:
Enter the letter O.
Initial Caps Field names, commands, and processes are represented as they appear on the window, menu, or page.
lower case File or directory names are represented in lower case, unless they appear otherwise on the interface.
Menu, Page A comma (,) between menu and page references indicates that the page exists on the menu. For example, "Select Use, Process Definitions" indicates that you can select the ProcessDefinitions page from the Use menu.
Cross-references Cross-references that begin with See refer you to additional documentation that will help you implement the task at hand.We highly recommend that you reference this documentation.
Cross-references under the heading See Also refer you to additional documentation that has more information regarding the subject.
" " (quotation marks) Indicate chapter titles in cross-references and words that are used differently from their intended meaning.
⇒ (line-continuation arrow) A line-continuation arrow inserted at the end of a line of code indicates that the line of code has been wrapped at the page margin. The code should be viewed or entered as a continuous line of code, without the line-continuation arrow.
Note. Note text. Text that begins with Note. indicates information that you should pay particular attention to as you work with your PeopleSoft system.

Preface
Copyright © 2015, Oracle and/or its affiliates. All Rights Reserved. 9
Convention Description
Important! Important note text. A note that begins with Important! is crucial and includes information about what you need to do for the system to function properly.
Warning! Warning text. A note that begins with Warning! contains critical configuration information or implementation considerations;for example, if there is a chance of losing or corrupting data. Pay close attention to warning messages.
Products
This documentation may refer to these products and product families:
• Oracle® BPEL Process Manager
• Oracle® Enterprise Manager
• Oracle® Tuxedo
• Oracle® WebLogic Server
• Oracle's PeopleSoft Application Designer
• Oracle's PeopleSoft Change Assistant
• Oracle's PeopleSoft Change Impact Analyzer
• Oracle's PeopleSoft Data Mover
• Oracle's PeopleSoft Process Scheduler
• Oracle's PeopleSoft Pure Internet Architecture
• Oracle's PeopleSoft Customer Relationship Management
• Oracle's PeopleSoft Financial Management
• Oracle's PeopleSoft Human Capital Management
• Oracle's PeopleSoft Enterprise Learning Management
• Oracle's PeopleSoft Pay/Bill Management
• Oracle's PeopleSoft PeopleTools
• Oracle's PeopleSoft Enterprise Performance Management
• Oracle's PeopleSoft Portal Solutions
• Oracle's PeopleSoft Staffing Front Office
• Oracle's PeopleSoft Supply Chain Management
Note. This documentation may refer to both Oracle's PeopleSoft Portal Solutions and to PeopleSoft PeopleTools portal or portal technologies. PeopleSoft Portal Solutions is a separate application product. The PeopleSoft PeopleTools portal technologies consist of PeopleSoft Pure Internet Architecture and the PeopleSoft PeopleTools portal technology used for creating and managing portals.
See http://www.oracle.com/us/products/applications/peoplesoft-enterprise/index.html for a list of PeopleSoft Enterprise products.
Preface
10 Copyright © 2015, Oracle and/or its affiliates. All Rights Reserved.
Related Information
Oracle provides reference information about PeopleSoft PeopleTools and your particular PeopleSoft application. The following documentation is available on My Oracle Support:
• PeopleTools: Getting Started with PeopleTools PeopleBook for your release. This documentation provides a high-level introduction to PeopleSoft PeopleTools technology and usage.
• PeopleSoft Application Fundamentals PeopleBook for your PeopleSoft application and release. This documentation provides essential information about the setup, design, and implementation of your PeopleSoft application.
To access PeopleSoft PeopleBooks for your application and release, go to the PeopleSoft Online Help website:
http://docs.oracle.com/cd/E17566_01/epm91pbr0/eng/psbooks/psft_homepage.htm
To install additional component software products for use with PeopleSoft products, including those products thatare packaged with your PeopleSoft products, you should refer to the documentation provided with those products,as well as this documentation.
Comments and Suggestions
Your comments are important to us. We encourage you to tell us what you like, or what you would like changed about our documentation, PeopleSoft PeopleBooks, and other Oracle reference and training materials. Please sendyour suggestions to:
While we cannot guarantee to answer every email message, we will pay careful attention to your comments and suggestions. We are always improving our product communications for you.
Copyright © 2015, Oracle and/or its affiliates. All Rights Reserved. 11
Installing PeopleSoft Real-Time Bottom Line
This chapter discusses:
• Understanding PeopleSoft Real-Time Bottom Line Installation
• Prerequisites
• Downloading and Installing the RTBL Schema Files
• Preparing to Install the RTBL Database Schema
• Installing the RTBL Database Schema Using Manual Steps
• Installing the RTBL Database Schema Using the Installer
• Installing RTBL Web, Application, and Process Scheduler Servers
• Deleting Summary Trees for the System Database
• Verifying the RTBL Database Installation
• Changing the Default and Temporary Tablespaces for the RTBL Owner ID
• Updating the Databases to the Latest PeopleTools Release
• Completing Tablespace Setup
• Reviewing the Log Files
• Configuring Portal
Understanding PeopleSoft Real-Time Bottom Line Installation
This document is a technical guide for installers and system administrators who will implement and maintain Oracle's PeopleSoft Financials/Supply Chain Management 9.2 Real-Time Bottom Line (RTBL) product. This technical guide provides the steps necessary for installing PeopleSoft Real-Time Bottom Line 9.2.
PeopleSoft Real-Time Bottom Line 9.2 is intended to run on Oracle Exadata or Oracle SuperCluster hardware andhas been certified on the Oracle platform.
Prerequisites
Ensure that you meet the following prerequisites before you install the PeopleSoft Financials/Supply Chain Management 9.2 In-Memory Real-Time Bottom Line schema:
• PeopleSoft PeopleTools 8.53.10 or higher patch level, or PeopleTools 8.54.08 or higher patch level.
Both the PeopleSoft FSCM production schema and the PeopleSoft Real-Time Bottom Line schema must be atthe same PeopleSoft PeopleTools release.
Installing PeopleSoft Real-Time Bottom Line
12 Copyright © 2015, Oracle and/or its affiliates. All Rights Reserved.
• PeopleSoft Financials/Supply Chain Management 9.1 or 9.2 application, with PeopleSoft General Ledger.
See the PeopleTools installation guide for your PeopleTools release and database platform for information about completing database setup steps, if necessary.
• PeopleSoft Financials/Supply Chain Management 9.2 In-Memory Real-Time Bottom Line Schema Virtual CD (VCD).
• If you have a PeopleSoft FSCM 9.1 production schema, ensure that you have installed PeopleSoft FMS Financials 9.1 Bundle #28, Resolution #889840.
• If you have a PeopleSoft FSCM 9.2 production schema, ensure that you have applied updates from PeopleSoftFSCM Image 9.2.011, as follows:
• Create and apply a change package to get current on PeopleSoft General Ledger.
• Create and apply a change package for bug 17306358 for the RTBL project.See PeopleSoft Update Manager Home Page (My Oracle Support, Doc ID 1641843.2), select the PeopleSoft Update Image Home Pages tab, and then select the FSCM Update Image Home Page link.
Task 1-1: Downloading and Installing the RTBL Schema Files
Before beginning the installation, you must obtain the PeopleSoft Financials and Supply Chain Management 9.2 In-Memory Real-Time Bottom Line Schema VCD installation software by downloading it from the Oracle Software Delivery Cloud portal. Use the documentation available on the Oracle Software Delivery Cloud portal toensure that you obtain all of the files that are required for your environment.
To download and install the RTBL schema files:
1. Download the installation files from Oracle Software Delivery Cloud.
See Oracle Software Delivery Cloud, https://edelivery.oracle.com.
2. Double-click the setup.sh file from your PeopleSoft Financials and Supply Chain Management 9.2 In-MemoryReal-Time Bottom Line Schema VCD to start the installer, Oracle's PeopleSoft InstallAnywhere.
See the PeopleTools installation guide for Oracle for your PeopleTools release, Using the PeopleSoft Installer chapter, for instructions.
Note. PeopleSoft Real-Time Bottom Line should be installed into its own PS_APP_HOME directory.
Task 1-2: Preparing to Install the RTBL Database Schema
This section discusses:
• Understanding Pre-Installation Steps for RTBL
• Creating New Tablespaces
• Creating a TNS Entry for the New RTBL Schema
• Running DBSETUP
• Altering System Settings for Indexes
Installing PeopleSoft Real-Time Bottom Line
Copyright © 2015, Oracle and/or its affiliates. All Rights Reserved. 13
Understanding Pre-Installation Steps for RTBL
PeopleSoft Real-Time Bottom Line (RTBL) requires a second schema within the same database instance as your production database. Through the use of synonyms and triggers, the RTBL schema will be able to access much of the production data in real time.
Before installing the RTBL schema, you need to complete the following tasks:
• Create new tablespaces.
• Create a new TNS entry for the new RTBL schema.
• Run DBSETUP to create the import script.
• Alter system settings for indexes.
Task 1-2-1: Creating New Tablespaces
This section discusses:
• Understanding Creating New Tablespaces
• Creating New Tablespaces for RTBL
• Adding a New Temporary Tablespace for RTBL
• Adding a Default Tablespace for the RTBL Owner ID
Understanding Creating New Tablespaces
Oracle strongly recommends that you do not share tablespaces between your production database schema and the RTBL schema. Ensure that you increase the temporary tablespace size to a minimum of 1200 MB.
PeopleSoft Data Mover provides the set space command to change the assigned tablespaces during import. Use this SET command to import data into a different tablespace than what is specified in the input file.
For example, you can modify your database import script by adding the following command:
SET SPACE old_tablespace AS new_space;
The new tablespaces must be created prior to running the import. After the RTBL installation has completed, you will need to add the new tablespaces to the PeopleSoft PeopleTools metadata to make them available for PeopleSoft Application Designer.
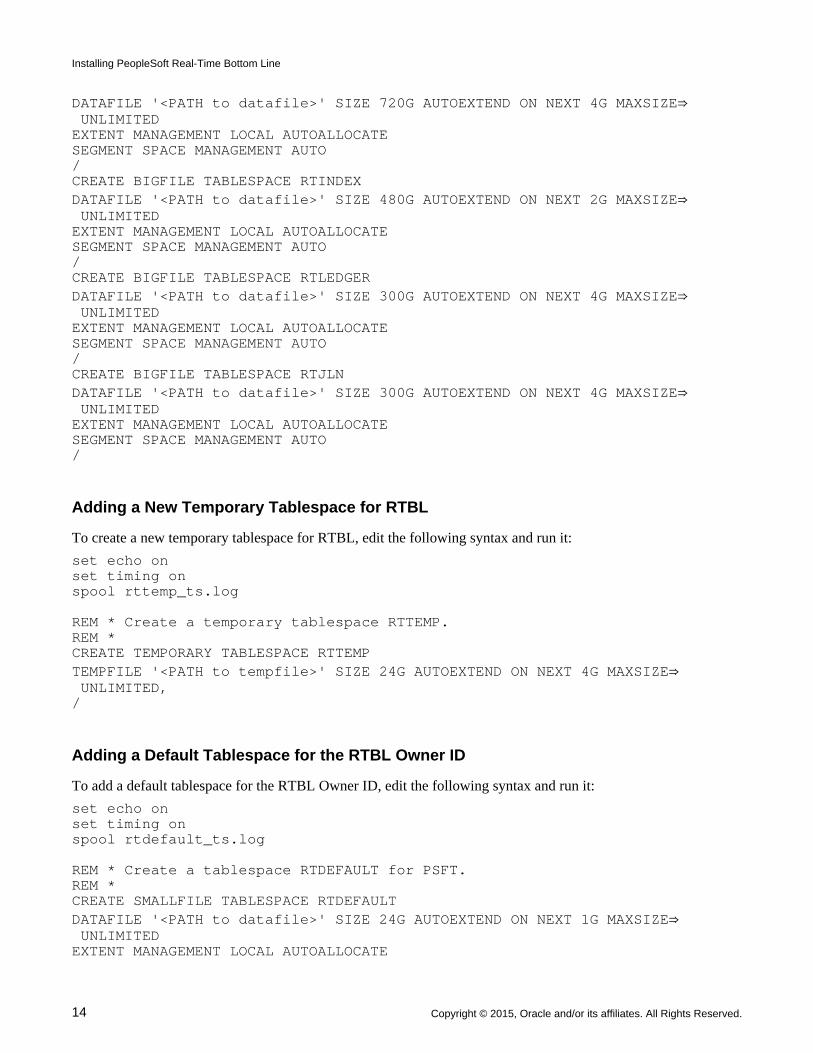
Creating New Tablespaces for RTBL
In this step, you run a script to create new tablespaces for RTBL. If you modify the tablespace names here, you will also need to make similar modifications in your database import script and in the steps to update the PeopleTools metadata, in the task Completing Tablespace Setup, Adding New Tablespaces to the PeopleTools Metadata.
Following is an example of a script for creating the new tablespaces for tables:
set echo onset timing onspool rttablespaces_ts.log
REM *CREATE BIGFILE TABLESPACE RTTABLE
Installing PeopleSoft Real-Time Bottom Line
14 Copyright © 2015, Oracle and/or its affiliates. All Rights Reserved.
DATAFILE '<PATH to datafile>' SIZE 720G AUTOEXTEND ON NEXT 4G MAXSIZE⇒ UNLIMITEDEXTENT MANAGEMENT LOCAL AUTOALLOCATESEGMENT SPACE MANAGEMENT AUTO/CREATE BIGFILE TABLESPACE RTINDEXDATAFILE '<PATH to datafile>' SIZE 480G AUTOEXTEND ON NEXT 2G MAXSIZE⇒ UNLIMITEDEXTENT MANAGEMENT LOCAL AUTOALLOCATESEGMENT SPACE MANAGEMENT AUTO/CREATE BIGFILE TABLESPACE RTLEDGERDATAFILE '<PATH to datafile>' SIZE 300G AUTOEXTEND ON NEXT 4G MAXSIZE⇒ UNLIMITEDEXTENT MANAGEMENT LOCAL AUTOALLOCATESEGMENT SPACE MANAGEMENT AUTO/CREATE BIGFILE TABLESPACE RTJLNDATAFILE '<PATH to datafile>' SIZE 300G AUTOEXTEND ON NEXT 4G MAXSIZE⇒ UNLIMITEDEXTENT MANAGEMENT LOCAL AUTOALLOCATESEGMENT SPACE MANAGEMENT AUTO/
Adding a New Temporary Tablespace for RTBL
To create a new temporary tablespace for RTBL, edit the following syntax and run it:
set echo onset timing onspool rttemp_ts.log
REM * Create a temporary tablespace RTTEMP.REM *CREATE TEMPORARY TABLESPACE RTTEMPTEMPFILE '<PATH to tempfile>' SIZE 24G AUTOEXTEND ON NEXT 4G MAXSIZE⇒ UNLIMITED,/
Adding a Default Tablespace for the RTBL Owner ID
To add a default tablespace for the RTBL Owner ID, edit the following syntax and run it:
set echo onset timing onspool rtdefault_ts.log
REM * Create a tablespace RTDEFAULT for PSFT.REM *CREATE SMALLFILE TABLESPACE RTDEFAULTDATAFILE '<PATH to datafile>' SIZE 24G AUTOEXTEND ON NEXT 1G MAXSIZE⇒ UNLIMITEDEXTENT MANAGEMENT LOCAL AUTOALLOCATE
Installing PeopleSoft Real-Time Bottom Line
Copyright © 2015, Oracle and/or its affiliates. All Rights Reserved. 15
SEGMENT SPACE MANAGEMENT AUTO/
Task 1-2-2: Creating a TNS Entry for the New RTBL Schema
Before installing the RTBL database schema, you need to create a TNS entry for the new schema. It should be identical to the entry for your production database, with only the database name changed. Copy the TNS entry of the production database and replace the database name with a name to identify the RTBL schema. Keep the SID the same for the RTBL schema as for the production schema.
In the following examples of the TNS entries for the production database and RTBL database, Production DBNAME is the existing production or demo database and RTBL DBNAME is the RTBL database to be created:
• <Production DBNAME> = (DESCRIPTION = (ADDRESS_LIST = (ADDRESS = (PROTOCOL = TCP)(Host = <SERVER> )(Port = 1521)) ) (CONNECT_DATA = (SERVICE_NAME =<Production DBNAME>) )
• <RTBL DBNAME> = (DESCRIPTION = (ADDRESS_LIST = (ADDRESS = (PROTOCOL = TCP)(Host = <SERVER>)(Port = 1521)) ) (CONNECT_DATA = (SERVICE_NAME =<Production DBNAME>) )
The RTBL DBNAME cannot be the same as the Production DBNAME. Update the following variables shown in the examples to reflect your environment:
• Production DBNAME
• RTBL DBNAME
• SERVER
• 1521 (Port)
The name that you enter for RTBL DBNAME in the TNS entry is the name that you will use in the next task, Running DBSETUP, to generate the import script.
Task 1-2-3: Running DBSETUP
In this task, you run DBSETUP to generate the import script:
1. Launch PeopleSoft Data Mover using the NT client in bootstrap mode to connect to your existing database.
This means that you need to connect using the database access ID, not the PeopleSoft user ID.
Installing PeopleSoft Real-Time Bottom Line
16 Copyright © 2015, Oracle and/or its affiliates. All Rights Reserved.
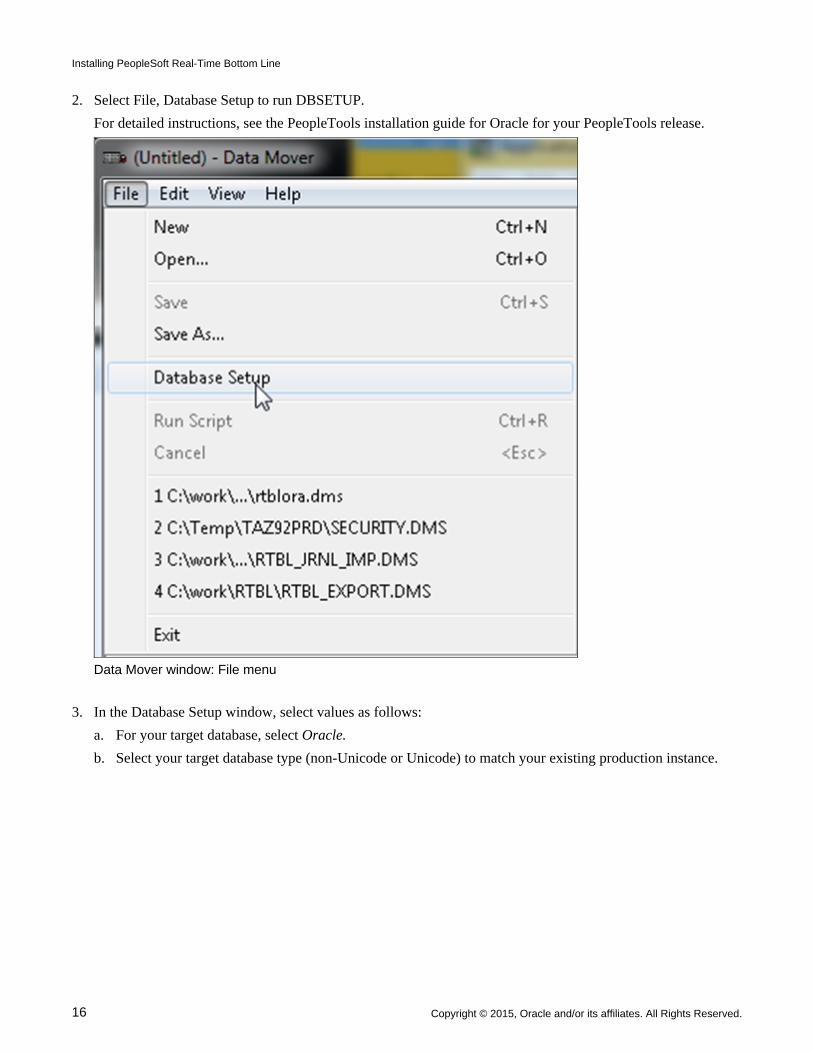
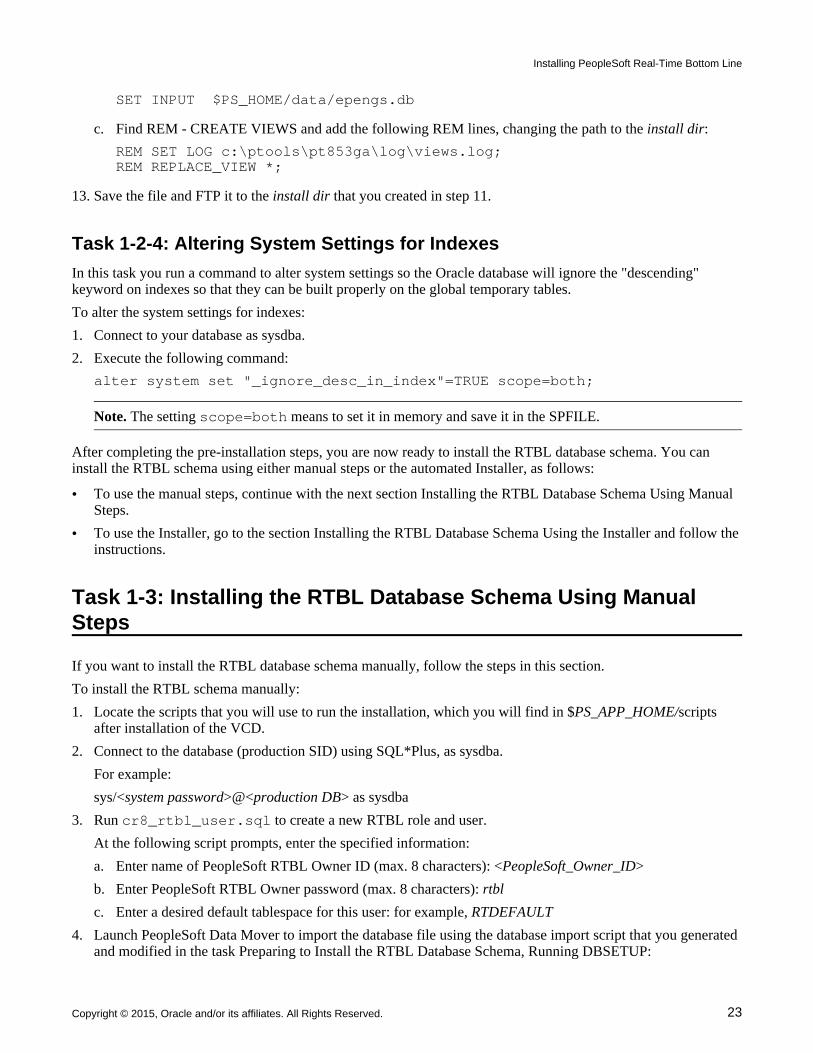
2. Select File, Database Setup to run DBSETUP.
For detailed instructions, see the PeopleTools installation guide for Oracle for your PeopleTools release.
Data Mover window: File menu
3. In the Database Setup window, select values as follows:
a. For your target database, select Oracle.
b. Select your target database type (non-Unicode or Unicode) to match your existing production instance.

Installing PeopleSoft Real-Time Bottom Line
Copyright © 2015, Oracle and/or its affiliates. All Rights Reserved. 17
c. Select your character set to match your existing production instance.
The following example shows the Database Setup window.
Database Setup window
4. Click Next.
The Database Setup - Select PeopleSoft Application window appears.
Installing PeopleSoft Real-Time Bottom Line
18 Copyright © 2015, Oracle and/or its affiliates. All Rights Reserved.
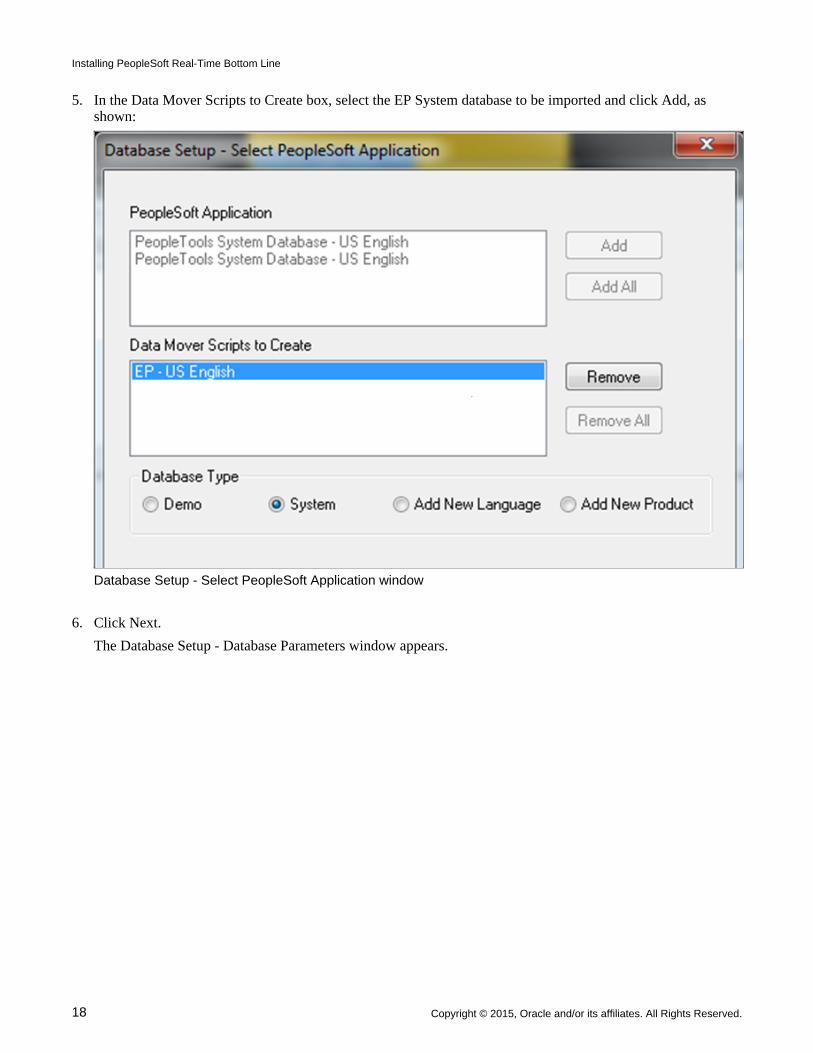
5. In the Data Mover Scripts to Create box, select the EP System database to be imported and click Add, as shown:
Database Setup - Select PeopleSoft Application window
6. Click Next.
The Database Setup - Database Parameters window appears.
Installing PeopleSoft Real-Time Bottom Line
Copyright © 2015, Oracle and/or its affiliates. All Rights Reserved. 19
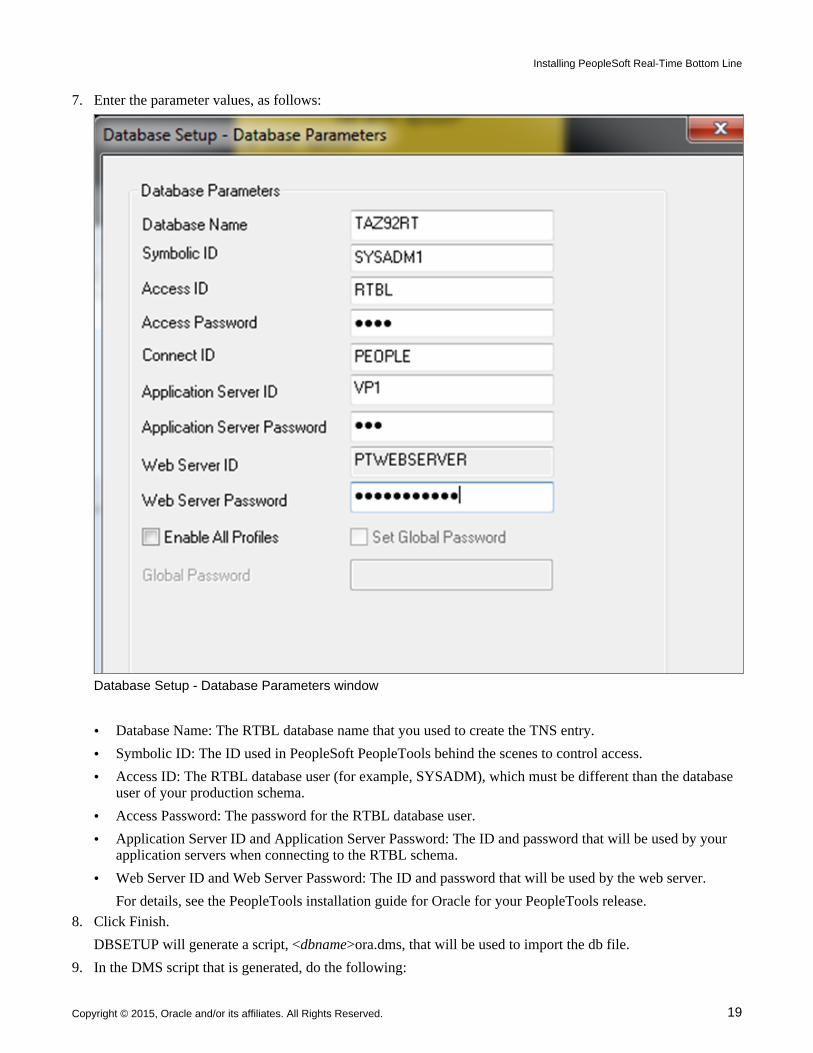
7. Enter the parameter values, as follows:
Database Setup - Database Parameters window
• Database Name: The RTBL database name that you used to create the TNS entry.
• Symbolic ID: The ID used in PeopleSoft PeopleTools behind the scenes to control access.
• Access ID: The RTBL database user (for example, SYSADM), which must be different than the database user of your production schema.
• Access Password: The password for the RTBL database user.
• Application Server ID and Application Server Password: The ID and password that will be used by your application servers when connecting to the RTBL schema.
• Web Server ID and Web Server Password: The ID and password that will be used by the web server.
For details, see the PeopleTools installation guide for Oracle for your PeopleTools release.
8. Click Finish.
DBSETUP will generate a script, <dbname>ora.dms, that will be used to import the db file.
9. In the DMS script that is generated, do the following:
Installing PeopleSoft Real-Time Bottom Line
20 Copyright © 2015, Oracle and/or its affiliates. All Rights Reserved.
a. Verify the location and name of the database file to be imported.
b. Locate and comment out the following final PeopleSoft Data Mover command to replace views:
REM REPLACE_VIEW *;
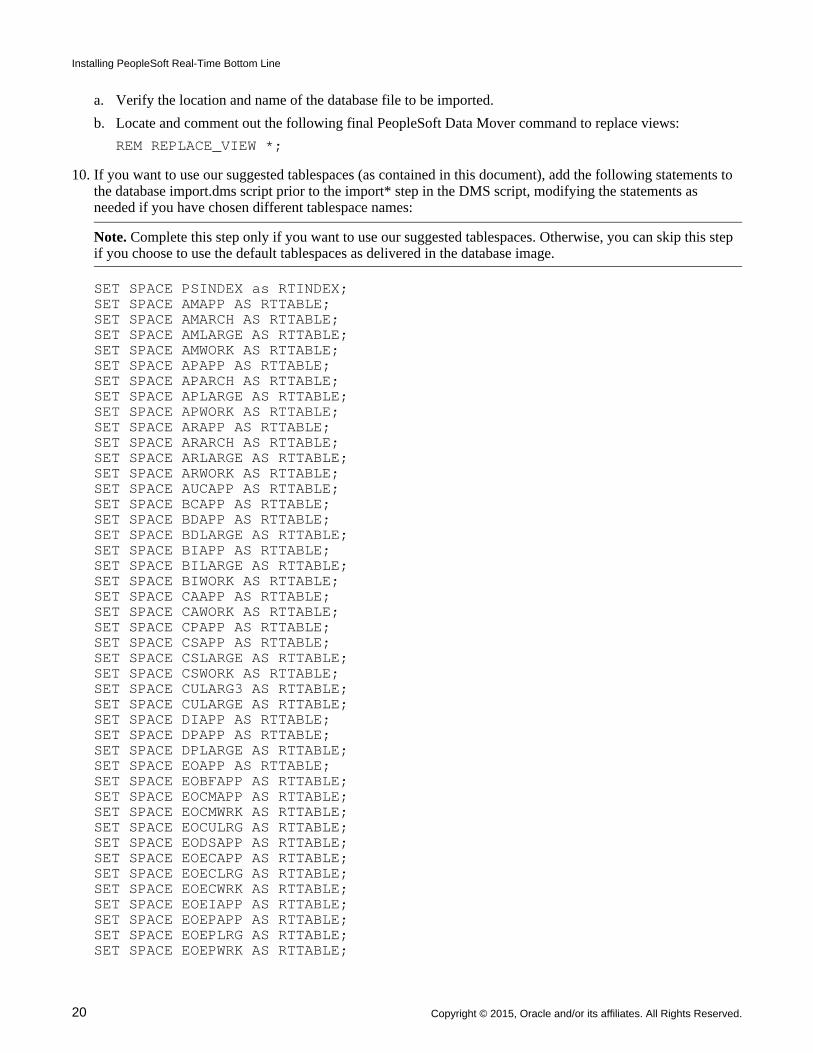
10. If you want to use our suggested tablespaces (as contained in this document), add the following statements to the database import.dms script prior to the import* step in the DMS script, modifying the statements as needed if you have chosen different tablespace names:
Note. Complete this step only if you want to use our suggested tablespaces. Otherwise, you can skip this step if you choose to use the default tablespaces as delivered in the database image.
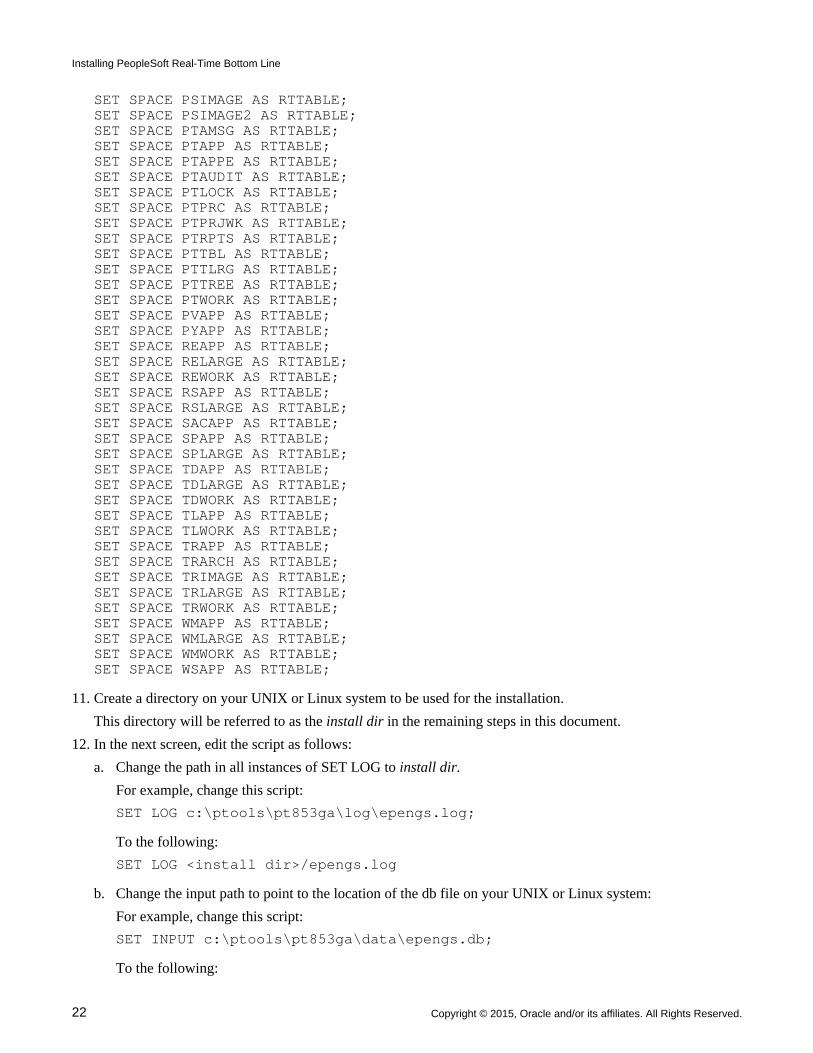
SET SPACE PSINDEX as RTINDEX;SET SPACE AMAPP AS RTTABLE; SET SPACE AMARCH AS RTTABLE; SET SPACE AMLARGE AS RTTABLE; SET SPACE AMWORK AS RTTABLE; SET SPACE APAPP AS RTTABLE; SET SPACE APARCH AS RTTABLE; SET SPACE APLARGE AS RTTABLE; SET SPACE APWORK AS RTTABLE; SET SPACE ARAPP AS RTTABLE; SET SPACE ARARCH AS RTTABLE; SET SPACE ARLARGE AS RTTABLE; SET SPACE ARWORK AS RTTABLE; SET SPACE AUCAPP AS RTTABLE; SET SPACE BCAPP AS RTTABLE; SET SPACE BDAPP AS RTTABLE; SET SPACE BDLARGE AS RTTABLE; SET SPACE BIAPP AS RTTABLE; SET SPACE BILARGE AS RTTABLE; SET SPACE BIWORK AS RTTABLE; SET SPACE CAAPP AS RTTABLE; SET SPACE CAWORK AS RTTABLE; SET SPACE CPAPP AS RTTABLE; SET SPACE CSAPP AS RTTABLE; SET SPACE CSLARGE AS RTTABLE; SET SPACE CSWORK AS RTTABLE; SET SPACE CULARG3 AS RTTABLE; SET SPACE CULARGE AS RTTABLE; SET SPACE DIAPP AS RTTABLE; SET SPACE DPAPP AS RTTABLE; SET SPACE DPLARGE AS RTTABLE; SET SPACE EOAPP AS RTTABLE; SET SPACE EOBFAPP AS RTTABLE; SET SPACE EOCMAPP AS RTTABLE; SET SPACE EOCMWRK AS RTTABLE; SET SPACE EOCULRG AS RTTABLE; SET SPACE EODSAPP AS RTTABLE; SET SPACE EOECAPP AS RTTABLE; SET SPACE EOECLRG AS RTTABLE; SET SPACE EOECWRK AS RTTABLE; SET SPACE EOEIAPP AS RTTABLE; SET SPACE EOEPAPP AS RTTABLE; SET SPACE EOEPLRG AS RTTABLE; SET SPACE EOEPWRK AS RTTABLE;

Installing PeopleSoft Real-Time Bottom Line
Copyright © 2015, Oracle and/or its affiliates. All Rights Reserved. 21
SET SPACE EOEWAPP AS RTTABLE; SET SPACE EOIUAPP AS RTTABLE; SET SPACE EOPPAPP AS RTTABLE; SET SPACE EOTPAPP AS RTTABLE; SET SPACE EOTPLRG AS RTTABLE; SET SPACE EXAPP AS RTTABLE; SET SPACE EXARCH AS RTTABLE; SET SPACE EXLARGE AS RTTABLE; SET SPACE EXWORK AS RTTABLE; SET SPACE FAAPP AS RTTABLE; SET SPACE FGAPP AS RTTABLE; SET SPACE FGLARGE AS RTTABLE; SET SPACE FGWORK AS RTTABLE; SET SPACE FIAPP AS RTTABLE; SET SPACE FOAPP AS RTTABLE; SET SPACE FOIMAGE AS RTTABLE; SET SPACE FOLARGE AS RTTABLE; SET SPACE FOWORK AS RTTABLE; SET SPACE FSAPP AS RTTABLE; SET SPACE FSAPP1 AS RTTABLE; SET SPACE FSLARGE AS RTTABLE; SET SPACE FSWORK AS RTTABLE; SET SPACE GLAPP AS RTTABLE; SET SPACE GLARCH AS RTTABLE; SET SPACE GLLARGE AS RTTABLE; SET SPACE GLWORK AS RTTABLE; SET SPACE GMAPP AS RTTABLE; SET SPACE HRAPP AS RTTABLE; SET SPACE HRLARGE AS RTTABLE; SET SPACE HTAPP AS RTTABLE; SET SPACE INAPP AS RTTABLE; SET SPACE INARCH AS RTTABLE; SET SPACE INLARGE AS RTTABLE; SET SPACE INWORK AS RTTABLE; SET SPACE LCAPP AS RTTABLE; SET SPACE LCLARGE AS RTTABLE; SET SPACE MGAPP AS RTTABLE; SET SPACE MGLARGE AS RTTABLE; SET SPACE MPAPP AS RTTABLE; SET SPACE OMAPP AS RTTABLE; SET SPACE OMLARGE AS RTTABLE; SET SPACE OMWORK AS RTTABLE; SET SPACE PBAPP AS RTTABLE; SET SPACE PBLARGE AS RTTABLE; SET SPACE PBWORK AS RTTABLE; SET SPACE PCAPP AS RTTABLE; SET SPACE PCARCH AS RTTABLE; SET SPACE PCLARGE AS RTTABLE; SET SPACE PGMAPP AS RTTABLE; SET SPACE PGMLARGE AS RTTABLE; SET SPACE PGMWORK AS RTTABLE; SET SPACE PLAPP AS RTTABLE; SET SPACE PLLARGE AS RTTABLE; SET SPACE PLWORK AS RTTABLE; SET SPACE POAPP AS RTTABLE; SET SPACE POLARGE AS RTTABLE; SET SPACE POWORK AS RTTABLE;
Installing PeopleSoft Real-Time Bottom Line
22 Copyright © 2015, Oracle and/or its affiliates. All Rights Reserved.
SET SPACE PSIMAGE AS RTTABLE; SET SPACE PSIMAGE2 AS RTTABLE; SET SPACE PTAMSG AS RTTABLE; SET SPACE PTAPP AS RTTABLE; SET SPACE PTAPPE AS RTTABLE; SET SPACE PTAUDIT AS RTTABLE; SET SPACE PTLOCK AS RTTABLE; SET SPACE PTPRC AS RTTABLE; SET SPACE PTPRJWK AS RTTABLE; SET SPACE PTRPTS AS RTTABLE; SET SPACE PTTBL AS RTTABLE; SET SPACE PTTLRG AS RTTABLE; SET SPACE PTTREE AS RTTABLE; SET SPACE PTWORK AS RTTABLE; SET SPACE PVAPP AS RTTABLE; SET SPACE PYAPP AS RTTABLE; SET SPACE REAPP AS RTTABLE; SET SPACE RELARGE AS RTTABLE; SET SPACE REWORK AS RTTABLE; SET SPACE RSAPP AS RTTABLE; SET SPACE RSLARGE AS RTTABLE; SET SPACE SACAPP AS RTTABLE; SET SPACE SPAPP AS RTTABLE; SET SPACE SPLARGE AS RTTABLE; SET SPACE TDAPP AS RTTABLE; SET SPACE TDLARGE AS RTTABLE; SET SPACE TDWORK AS RTTABLE; SET SPACE TLAPP AS RTTABLE; SET SPACE TLWORK AS RTTABLE; SET SPACE TRAPP AS RTTABLE; SET SPACE TRARCH AS RTTABLE; SET SPACE TRIMAGE AS RTTABLE; SET SPACE TRLARGE AS RTTABLE; SET SPACE TRWORK AS RTTABLE; SET SPACE WMAPP AS RTTABLE; SET SPACE WMLARGE AS RTTABLE; SET SPACE WMWORK AS RTTABLE; SET SPACE WSAPP AS RTTABLE;
11. Create a directory on your UNIX or Linux system to be used for the installation.
This directory will be referred to as the install dir in the remaining steps in this document.
12. In the next screen, edit the script as follows:
a. Change the path in all instances of SET LOG to install dir.
For example, change this script:
SET LOG c:\ptools\pt853ga\log\epengs.log;
To the following:
SET LOG <install dir>/epengs.log
b. Change the input path to point to the location of the db file on your UNIX or Linux system:
For example, change this script:
SET INPUT c:\ptools\pt853ga\data\epengs.db;
To the following:
Installing PeopleSoft Real-Time Bottom Line
Copyright © 2015, Oracle and/or its affiliates. All Rights Reserved. 23
SET INPUT $PS_HOME/data/epengs.db
c. Find REM - CREATE VIEWS and add the following REM lines, changing the path to the install dir:
REM SET LOG c:\ptools\pt853ga\log\views.log;REM REPLACE_VIEW *;
13. Save the file and FTP it to the install dir that you created in step 11.
Task 1-2-4: Altering System Settings for Indexes
In this task you run a command to alter system settings so the Oracle database will ignore the "descending" keyword on indexes so that they can be built properly on the global temporary tables.
To alter the system settings for indexes:
1. Connect to your database as sysdba.
2. Execute the following command:
alter system set "_ignore_desc_in_index"=TRUE scope=both;
Note. The setting scope=both means to set it in memory and save it in the SPFILE.
After completing the pre-installation steps, you are now ready to install the RTBL database schema. You can install the RTBL schema using either manual steps or the automated Installer, as follows:
• To use the manual steps, continue with the next section Installing the RTBL Database Schema Using Manual Steps.
• To use the Installer, go to the section Installing the RTBL Database Schema Using the Installer and follow theinstructions.
Task 1-3: Installing the RTBL Database Schema Using Manual Steps
If you want to install the RTBL database schema manually, follow the steps in this section.
To install the RTBL schema manually:
1. Locate the scripts that you will use to run the installation, which you will find in $PS_APP_HOME/scripts after installation of the VCD.
2. Connect to the database (production SID) using SQL*Plus, as sysdba.
For example:
sys/<system password>@<production DB> as sysdba
3. Run cr8_rtbl_user.sql to create a new RTBL role and user.
At the following script prompts, enter the specified information:
a. Enter name of PeopleSoft RTBL Owner ID (max. 8 characters): <PeopleSoft_Owner_ID>
b. Enter PeopleSoft RTBL Owner password (max. 8 characters): rtbl
c. Enter a desired default tablespace for this user: for example, RTDEFAULT
4. Launch PeopleSoft Data Mover to import the database file using the database import script that you generated and modified in the task Preparing to Install the RTBL Database Schema, Running DBSETUP:
Installing PeopleSoft Real-Time Bottom Line
24 Copyright © 2015, Oracle and/or its affiliates. All Rights Reserved.
$PS_HOME/bin/psdmtx -CT ORACLE -CD <oracle_sid> -CO <rtbl_user> -CP <⇒rtbl_pswd> -CI people -CW peop1e -FP <path/<dbname>ora.dms
5. Connect to your new RTBL schema, and update the PeopleTools metadata to assign temporary tables and regular tables to new tablespaces, using these SQL examples:
a. Assign all regular tables to RTTTABLE as follows:
update psrectblspc a set a.ddlspacename='RTTABLE' where exists ⇒(select 'x' from psrecdefn B where B.rectype=0 AND A.RECNAME=⇒B.RECNAME ) ;
b. Assign RTBL_JLN tables to RTJLN as follows:
update psrectblspc a set a.ddlspacename='RTJLN' where recname='RTBL_⇒JLN';
c. Assign RTBL_LEDGER tables to RTLEDGER as follows:
update psrectblspc a set a.ddlspacename='RTLEDGER' where recname=⇒'RTBL_LEDGER';
d. Commit the changes.
commit;
6. Copy the following files from $PS_HOME/scripts to the install dir that you created in the task Running DBSETUP:
• rtbl_install.sh
• cr8_grant.sql
• cr8_gtt.sql
• cr8_partitions.sql
• cr8_rtbl_user.sql
• cr8_sy2.sql
• cr8_syn.sql
• cr8_trigger.sql
• replace_view.dms
• rtbl_misc.sql
• rtbl_sce_partition.sql
7. From the install dir, run the shell script rtbl_install.sh.
The script will create a subdirectory with the same name as the RTBL DB name that you provided. Create the subdirectory on a specified location, such as PS_HOME/rtblscripts, so it is not confused with the similar directory PS_HOME/scripts. The log will be written into this subdirectory. It will execute several scripts to perform specific RTBL tasks.
This example of the rtbl_install script is written to be executed on Linux:
echo "Enter directory containing scripts: "read SCRIPTSDIR
echo "Enter RTBL User:"read RTBLID
Installing PeopleSoft Real-Time Bottom Line
Copyright © 2015, Oracle and/or its affiliates. All Rights Reserved. 25
echo"Enter RTBL user's Password:"read RTBLPWDecho "Enter Production DB User:"read OWNERecho "Enter Production user's Password:"read PRD_OWNER_PWDecho "Enter database SID:"read DBecho "Enter RTBL DB name:"read RTBLDBecho "Enter ORACLE_HOME:"read ORACLE_HOME
Enter parameter values according to the following descriptions:
• Enter directory containing scripts: This is the directory in which you put the install script and the files zipped with it. It must be writeable.
• Enter RTBL User: This is the user created in step 3.
• Enter Production DB User: This is the user for the regular FMS schema.
8. Next, the following scripts will run automatically:
• rtbl_misc.sql
• cr8_gtt.sql
• rtbl2_drop_gtt.sql (created during installation)
• rtbl3_build_gtt.sql (created during installation)
• rtbl4_indices.sql (created during installation)
• cr8_syn.sql
• rtbl5_build_syn.sql (created during installation)
• cr8_sy2.sql
• rtbl6_sy2.sql (created during installation)
• rtbl1_grant.sql (created during installation)
• cr8_trigger.sql
• rtbl8_triggers.sql (created during installation)
• rtbl_sce_partition.sql
• cr8_partitions.sql
• rtbl9_partitions.sql (created during installation)
9. The following files will be generated and then run automatically:
• RTBL_INSTALL.log: Log of all the database activities.
• OUTPUT.TXT: Log of the installation progress.
10. Reconnect to your new RTBL database using PeopleSoft Data Mover in bootstrap mode and run replace_view.dms.
To verify that your RTBL installation was successful, continue with the tasks Installing RTBL Web, Application, and Process Scheduler Servers, Deleting Summary Trees for the System Database, and Verifying the RTBL Database Installation.

Installing PeopleSoft Real-Time Bottom Line
26 Copyright © 2015, Oracle and/or its affiliates. All Rights Reserved.
Task 1-4: Installing the RTBL Database Schema Using the Installer
This section discusses:
• Understanding RTBL Installation Using the Installer
• Running the Installer in Console Mode
Understanding RTBL Installation Using the Installer
Before running the Installer, you must run DBSETUP to prepare the database import script that will be used during the automated installation.
In this task, you will run the RTBL Installer. After installing the VCD, the RTBL Installer is located at
$PS_APP_HOME/setup/rtbl/<platform>/setup.bin.
The installer will execute scripts in sequence to complete the following tasks:
• Create a user and schema for RTBL.
• Load the RTBL db file into the newly created schema.
• Build global temporary tables for the RTBL Application Engine processes.
• Create synonyms and triggers to allow RTBL to access production data.
• Create partitions for model Ledger and Project Resource tables.
Task 1-4-1: Running the Installer in Console Mode
Before using the automated Installer, ensure that you have completed the task Running DBSETUP to generate thedatabase import script. You are installing an EP system database.
To run the automated Installer in console mode:
1. Launch the Installer in console mode using the following command:
./setup.bin
The Installer will unpack itself and guide you through the steps to enter the necessary information, as shown in the following example:
Preparing to install...Extracting the JRE from the installer archive...Unpacking the JRE...Extracting the installation resources from the installer archive...Configuring the installer for this system's environment...
Launching installer...
====================================================================Peoplesoft RTBL Database Configuration (created with InstallAnywhere)--------------------------------------------------------------------
Preparing CONSOLE Mode Installation...
2. Enter the installation folder location and press ENTER.
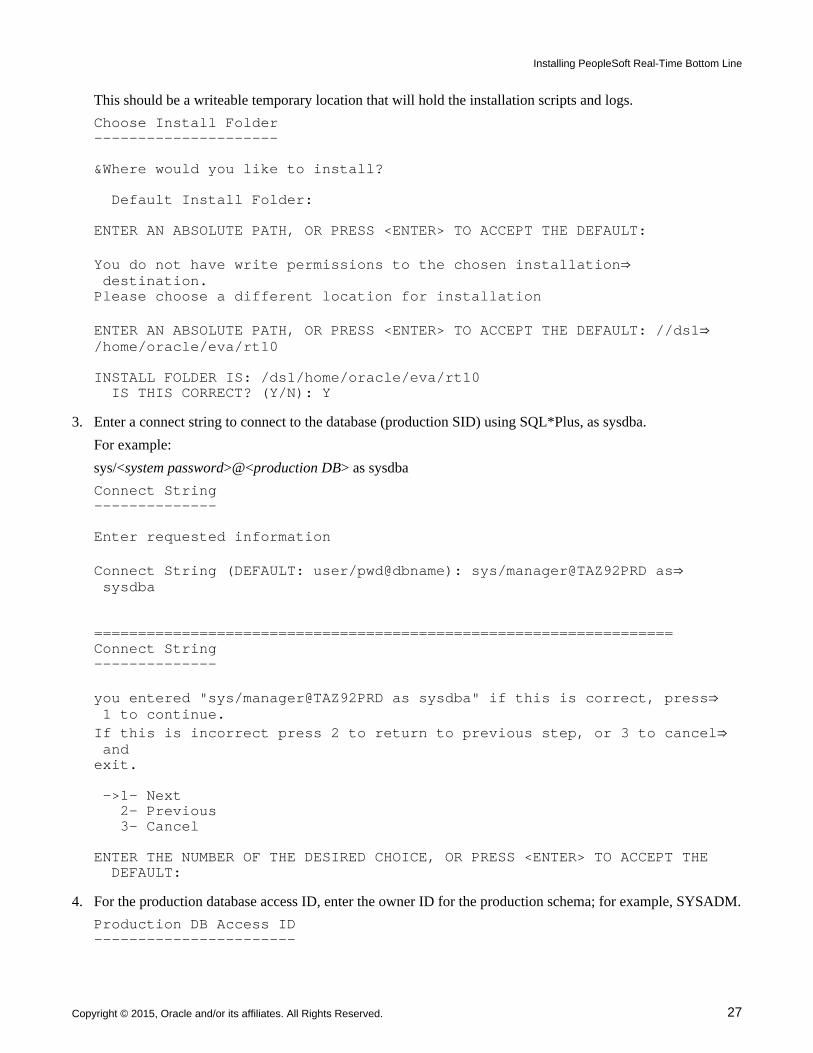
Installing PeopleSoft Real-Time Bottom Line
Copyright © 2015, Oracle and/or its affiliates. All Rights Reserved. 27
This should be a writeable temporary location that will hold the installation scripts and logs.
Choose Install Folder---------------------
&Where would you like to install?
Default Install Folder:
ENTER AN ABSOLUTE PATH, OR PRESS <ENTER> TO ACCEPT THE DEFAULT:
You do not have write permissions to the chosen installation⇒ destination.Please choose a different location for installation
ENTER AN ABSOLUTE PATH, OR PRESS <ENTER> TO ACCEPT THE DEFAULT: //ds1⇒/home/oracle/eva/rt10
INSTALL FOLDER IS: /ds1/home/oracle/eva/rt10 IS THIS CORRECT? (Y/N): Y
3. Enter a connect string to connect to the database (production SID) using SQL*Plus, as sysdba.
For example:
sys/<system password>@<production DB> as sysdba
Connect String--------------
Enter requested information
Connect String (DEFAULT: user/pwd@dbname): sys/manager@TAZ92PRD as⇒ sysdba
==================================================================Connect String--------------
you entered "sys/manager@TAZ92PRD as sysdba" if this is correct, press⇒ 1 to continue.If this is incorrect press 2 to return to previous step, or 3 to cancel⇒ andexit.
->1- Next 2- Previous 3- Cancel
ENTER THE NUMBER OF THE DESIRED CHOICE, OR PRESS <ENTER> TO ACCEPT THE DEFAULT:
4. For the production database access ID, enter the owner ID for the production schema; for example, SYSADM.
Production DB Access ID-----------------------
Installing PeopleSoft Real-Time Bottom Line
28 Copyright © 2015, Oracle and/or its affiliates. All Rights Reserved.
Enter requested information
Production Schema Access ID (DEFAULT: SYSADM): SYSADM
===================================================================Production DB Access ID-----------------------
you entered "SYSADM"
if this is correct, press 1 to continue. If this is incorrect press 2 toreturn to previous step, or 3 to cancel and exit.
->1- Next 2- Previous 3- Cancel
ENTER THE NUMBER OF THE DESIRED CHOICE, OR PRESS <ENTER> TO ACCEPT THE DEFAULT:
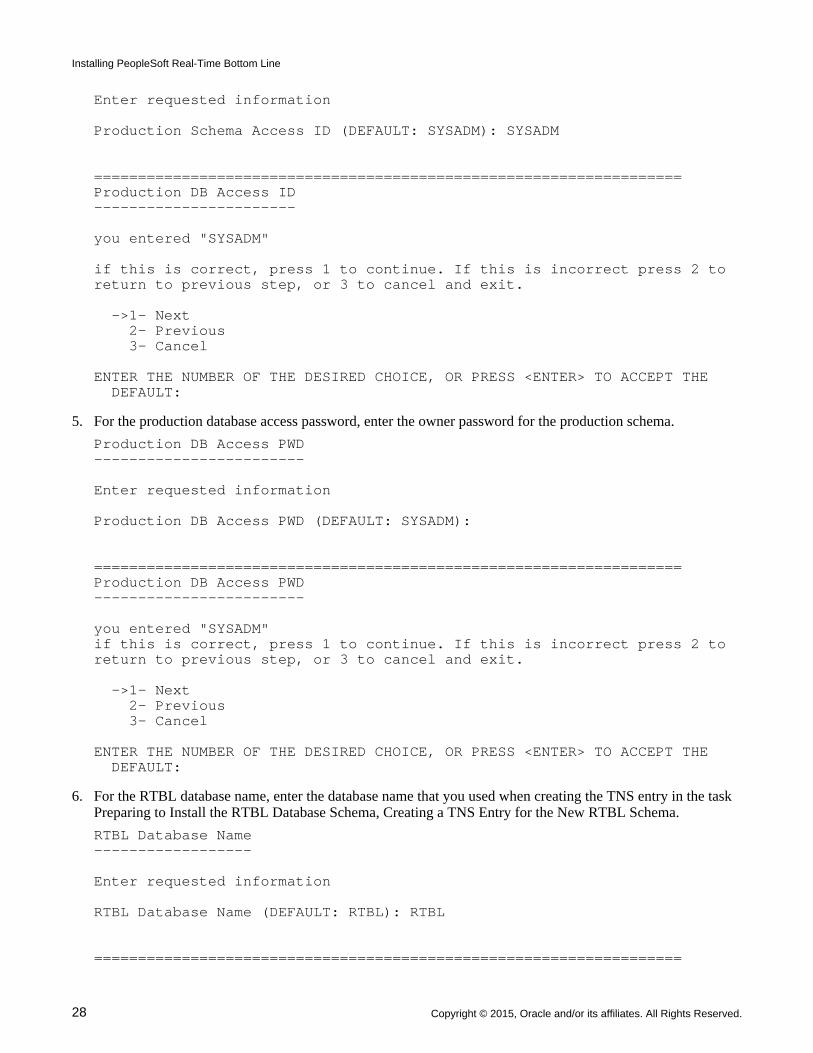
5. For the production database access password, enter the owner password for the production schema.
Production DB Access PWD------------------------
Enter requested information
Production DB Access PWD (DEFAULT: SYSADM):
===================================================================Production DB Access PWD------------------------
you entered "SYSADM"if this is correct, press 1 to continue. If this is incorrect press 2 toreturn to previous step, or 3 to cancel and exit.
->1- Next 2- Previous 3- Cancel
ENTER THE NUMBER OF THE DESIRED CHOICE, OR PRESS <ENTER> TO ACCEPT THE DEFAULT:
6. For the RTBL database name, enter the database name that you used when creating the TNS entry in the task Preparing to Install the RTBL Database Schema, Creating a TNS Entry for the New RTBL Schema.
RTBL Database Name------------------
Enter requested information
RTBL Database Name (DEFAULT: RTBL): RTBL
===================================================================
Installing PeopleSoft Real-Time Bottom Line
Copyright © 2015, Oracle and/or its affiliates. All Rights Reserved. 29
RTBL Database Name------------------
you entered "RTBL"
if this is correct, press 1 to continue. If this is incorrect press 2 toreturn to previous step, or 3 to cancel and exit.
->1- Next 2- Previous 3- Cancel
ENTER THE NUMBER OF THE DESIRED CHOICE, OR PRESS <ENTER> TO ACCEPT THE DEFAULT:
7. For the RTBL database access ID, enter the database user that you want to create for the new RTBL schema.
RTBL Database Access ID (database user)---------------------------------------
Enter requested information
RTBL Database Access ID (database user) (DEFAULT: rtbl): rtbl
===================================================================RTBL Database Access ID (database user)---------------------------------------
you entered "rtbl"
if this is correct, press 1 to continue. If this is incorrect press 2 toreturn to previous step, or 3 to cancel and exit.
->1- Next 2- Previous 3- Cancel
ENTER THE NUMBER OF THE DESIRED CHOICE, OR PRESS <ENTER> TO ACCEPT THE DEFAULT:
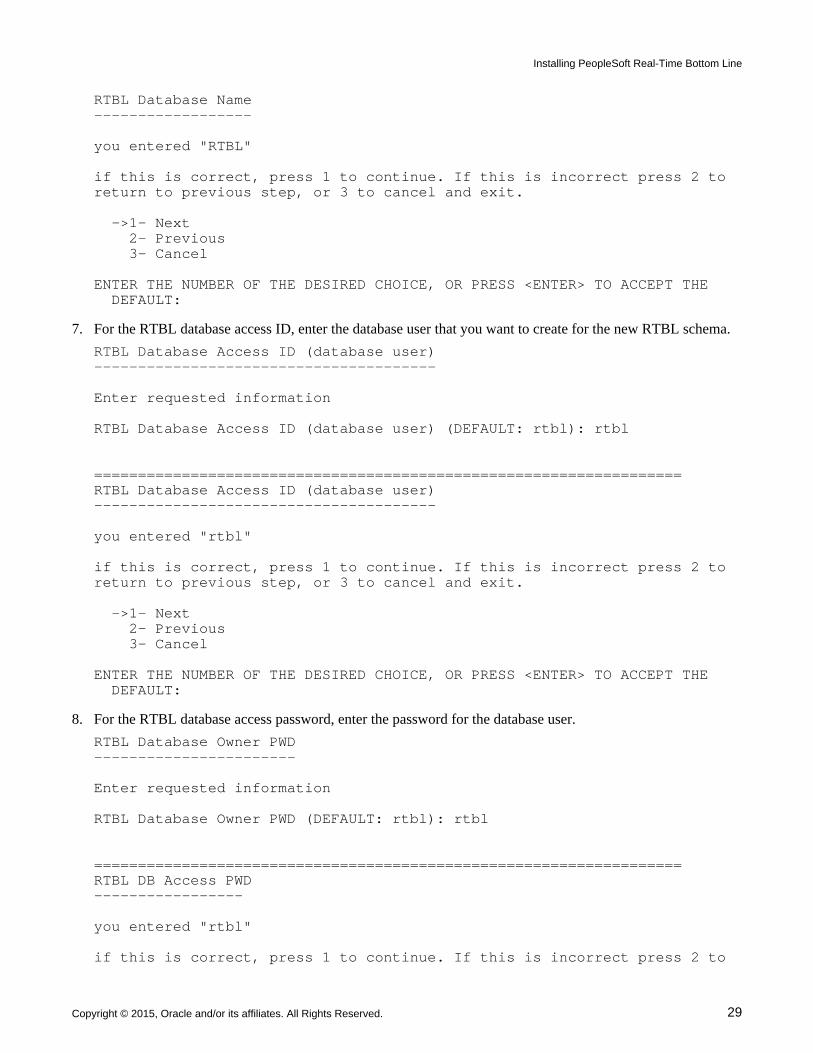
8. For the RTBL database access password, enter the password for the database user.
RTBL Database Owner PWD-----------------------
Enter requested information
RTBL Database Owner PWD (DEFAULT: rtbl): rtbl
===================================================================RTBL DB Access PWD-----------------
you entered "rtbl"
if this is correct, press 1 to continue. If this is incorrect press 2 to
Installing PeopleSoft Real-Time Bottom Line
30 Copyright © 2015, Oracle and/or its affiliates. All Rights Reserved.
return to previous step, or 3 to cancel and exit.
->1- Next 2- Previous 3- Cancel
ENTER THE NUMBER OF THE DESIRED CHOICE, OR PRESS <ENTER> TO ACCEPT THE DEFAULT:
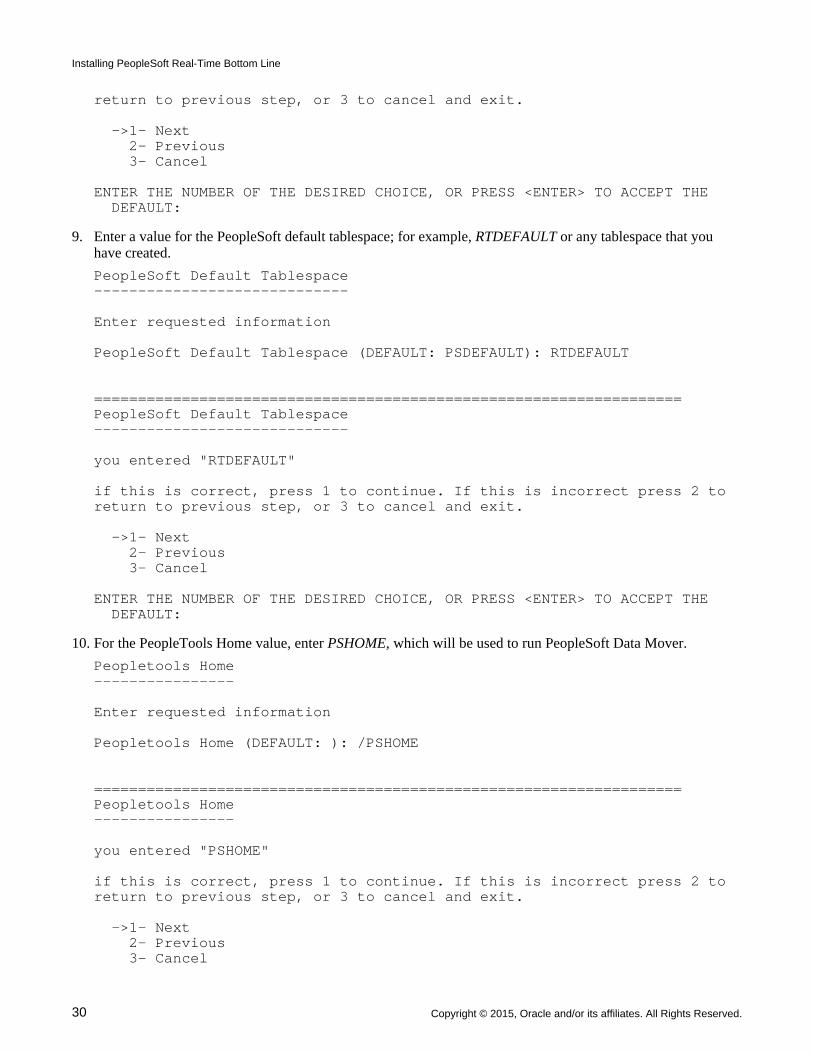
9. Enter a value for the PeopleSoft default tablespace; for example, RTDEFAULT or any tablespace that you have created.
PeopleSoft Default Tablespace-----------------------------
Enter requested information
PeopleSoft Default Tablespace (DEFAULT: PSDEFAULT): RTDEFAULT
===================================================================PeopleSoft Default Tablespace-----------------------------
you entered "RTDEFAULT"
if this is correct, press 1 to continue. If this is incorrect press 2 toreturn to previous step, or 3 to cancel and exit.
->1- Next 2- Previous 3- Cancel
ENTER THE NUMBER OF THE DESIRED CHOICE, OR PRESS <ENTER> TO ACCEPT THE DEFAULT:
10. For the PeopleTools Home value, enter PSHOME, which will be used to run PeopleSoft Data Mover.
Peopletools Home----------------
Enter requested information
Peopletools Home (DEFAULT: ): /PSHOME
===================================================================Peopletools Home----------------
you entered "PSHOME"
if this is correct, press 1 to continue. If this is incorrect press 2 toreturn to previous step, or 3 to cancel and exit.
->1- Next 2- Previous 3- Cancel
Installing PeopleSoft Real-Time Bottom Line
Copyright © 2015, Oracle and/or its affiliates. All Rights Reserved. 31
ENTER THE NUMBER OF THE DESIRED CHOICE, OR PRESS <ENTER> TO ACCEPT THE DEFAULT:
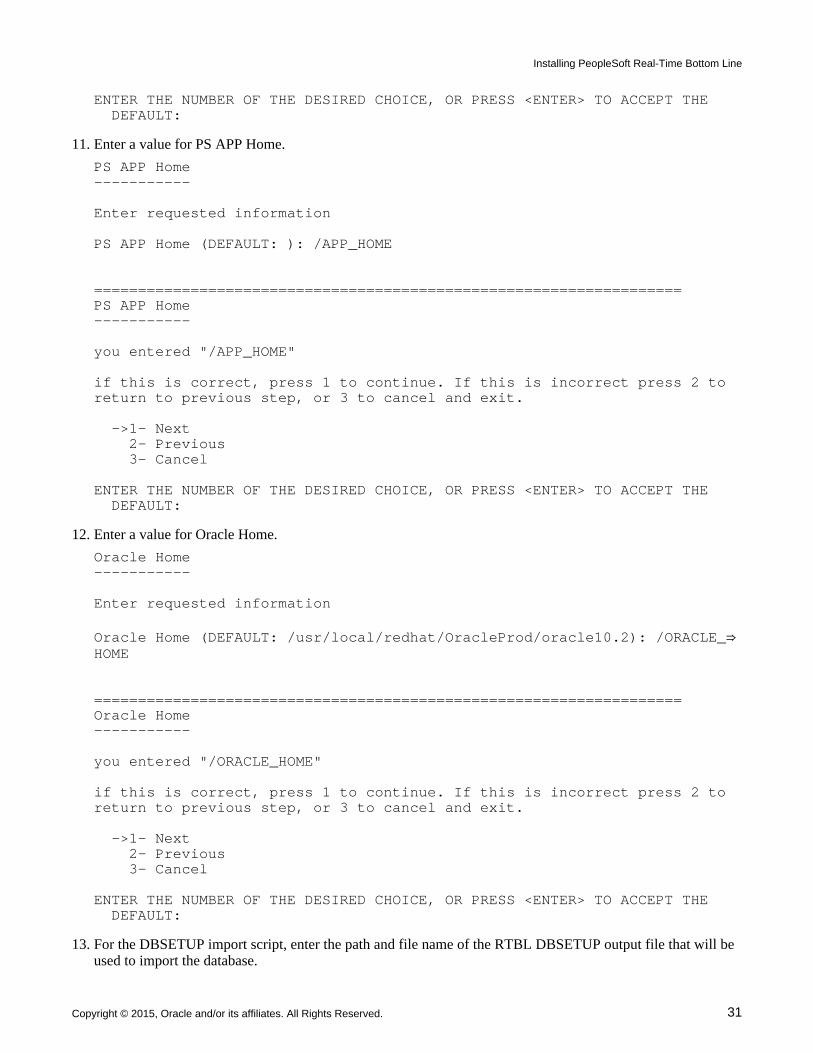
11. Enter a value for PS APP Home.
PS APP Home-----------
Enter requested information
PS APP Home (DEFAULT: ): /APP_HOME
===================================================================PS APP Home-----------
you entered "/APP_HOME"
if this is correct, press 1 to continue. If this is incorrect press 2 toreturn to previous step, or 3 to cancel and exit.
->1- Next 2- Previous 3- Cancel
ENTER THE NUMBER OF THE DESIRED CHOICE, OR PRESS <ENTER> TO ACCEPT THE DEFAULT:
12. Enter a value for Oracle Home.
Oracle Home-----------
Enter requested information
Oracle Home (DEFAULT: /usr/local/redhat/OracleProd/oracle10.2): /ORACLE_⇒HOME
===================================================================Oracle Home-----------
you entered "/ORACLE_HOME"
if this is correct, press 1 to continue. If this is incorrect press 2 toreturn to previous step, or 3 to cancel and exit.
->1- Next 2- Previous 3- Cancel
ENTER THE NUMBER OF THE DESIRED CHOICE, OR PRESS <ENTER> TO ACCEPT THE DEFAULT:
13. For the DBSETUP import script, enter the path and file name of the RTBL DBSETUP output file that will be used to import the database.

Installing PeopleSoft Real-Time Bottom Line
32 Copyright © 2015, Oracle and/or its affiliates. All Rights Reserved.
This file was created in the task Preparing to Install the RTBL Database Schema, Running DBSETUP.
DB Setup Import Script----------------------
Enter full path and filename of your <db name>ora.dms script.
DB Setup Import Script (DEFAULT: <path>/<dbname>ora.dms): /rtbldbora.dms
===================================================================DB Setup Import Script----------------------
you entered "/rtbldbora.dms"
if this is correct, press 1 to continue. If this is incorrect press 2 toreturn to previous step, or 3 to cancel and exit.
->1- Next 2- Previous 3- Cancel
ENTER THE NUMBER OF THE DESIRED CHOICE, OR PRESS <ENTER> TO ACCEPT THE DEFAULT:
14. Review the pre-installation summary information and then press ENTER to accept the installation configuration.
Pre-Installation Summary------------------------Please Review the Following Before Continuing:
Product Name: Peoplesoft RTBL Database Configuration
Install Folder: /ds1/home/oracle/eva/rt10
Link Folder: /tmp/install.dir.22881/Do_Not_Install
ORACLE_HOME /ORACLE_HOME
RTBL Database Name RTBL
RTBL AccessID rtbl
RTBL Access Password rtbl
Default Tablespace RTDEFAULT
Production AccessID
Installing PeopleSoft Real-Time Bottom Line
Copyright © 2015, Oracle and/or its affiliates. All Rights Reserved. 33
SYSADM
Peopletools Home /PSHOME
PS App Home /APP_Home
Connect string: sys/manager@TAZ92PRD as sysdba
Disk Space Information (for Installation Target): Required: 94,830,961 Bytes Available: 153,298,321,408 Bytes
PRESS <ENTER> TO CONTINUE:
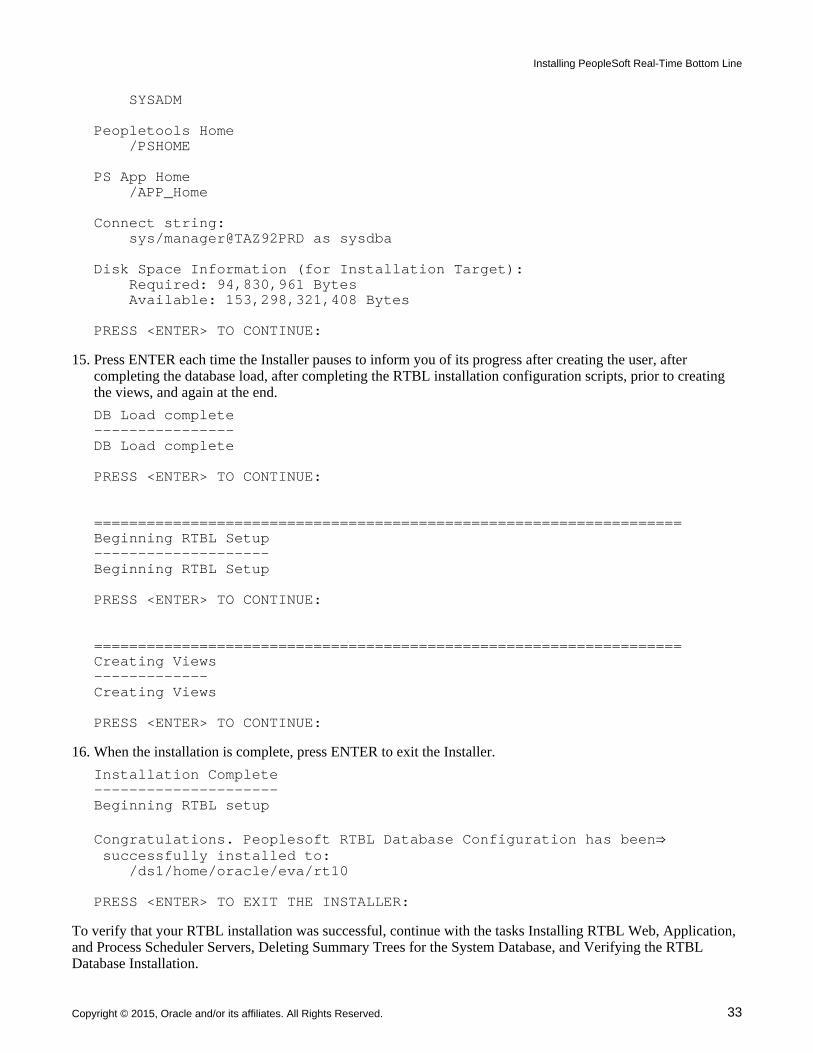
15. Press ENTER each time the Installer pauses to inform you of its progress after creating the user, after completing the database load, after completing the RTBL installation configuration scripts, prior to creating the views, and again at the end.
DB Load complete----------------DB Load complete
PRESS <ENTER> TO CONTINUE:
===================================================================Beginning RTBL Setup--------------------Beginning RTBL Setup
PRESS <ENTER> TO CONTINUE:
===================================================================Creating Views-------------Creating Views
PRESS <ENTER> TO CONTINUE:
16. When the installation is complete, press ENTER to exit the Installer.
Installation Complete---------------------Beginning RTBL setup
Congratulations. Peoplesoft RTBL Database Configuration has been⇒ successfully installed to: /ds1/home/oracle/eva/rt10
PRESS <ENTER> TO EXIT THE INSTALLER:
To verify that your RTBL installation was successful, continue with the tasks Installing RTBL Web, Application, and Process Scheduler Servers, Deleting Summary Trees for the System Database, and Verifying the RTBL Database Installation.
Installing PeopleSoft Real-Time Bottom Line
34 Copyright © 2015, Oracle and/or its affiliates. All Rights Reserved.
Task 1-5: Installing RTBL Web, Application, and Process Scheduler Servers
After installing the RTBL database schema, you must install web, application, and process scheduler servers for RTBL. Follow the same steps to set up the web, application, and process scheduler servers as for other PeopleSoftinstances. For details, see the PeopleTools installation guide for Oracle for your PeopleTools release.
You also must add the Jquery libraries in the web server path. After installing the VCD, you will find the Jquery files in $PS_APP_HOME/setup/rtbl.
To add the Jquery libraries:
1. Shut down the web server.
2. Unzip the Jquery libraries in the following web server home path:
web_home\applications\peoplesoft\PORTAL.war\
You should have the following folders:
• web_home\applications\peoplesoft\PORTAL.war\JQUERY\
• web_home\applications\peoplesoft\PORTAL.war\JQUERY\CSS
• web_home\applications\peoplesoft\PORTAL.war\JQUERY\JS
• web_home\applications\peoplesoft\PORTAL.war\JQUERY\CSS\Images
3. Restart the web server.
Task 1-6: Deleting Summary Trees for the System Database
Run the following script only against the System (SYS) database for PeopleSoft FSCM:
EPCLNTRE.DMS -- Tree Definitions
This script deletes all of the summary trees from the database. It only runs against the System (SYS) database.
Task 1-7: Verifying the RTBL Database Installation
In this task you run and review the SYSAUDIT and DDDAUDIT SQR reports to verify that your RTBL database installation is complete.
To verify the RTBL database installation:
1. After you have installed the code line into the new PS_APP_HOME directory, find the following files in
$PS_APP_HOME/sqr:
• 853audrt.sqr
• 853indrt.sqc
• 853tblrt.sqc
• 853trgrt.sqc
• 854audrt.sqr
• 854indrt.sqc
Installing PeopleSoft Real-Time Bottom Line
Copyright © 2015, Oracle and/or its affiliates. All Rights Reserved. 35
• 854tblrt.sqc
• 854trgrt.sqc
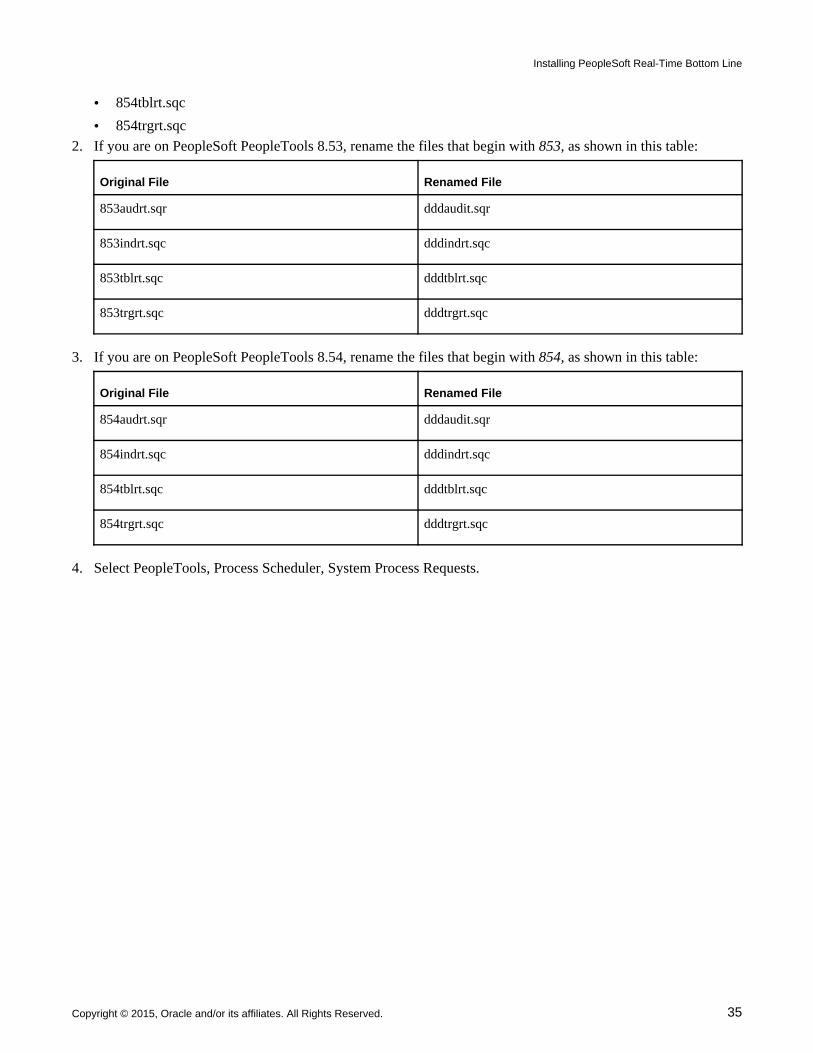
2. If you are on PeopleSoft PeopleTools 8.53, rename the files that begin with 853, as shown in this table:
Original File Renamed File
853audrt.sqr dddaudit.sqr
853indrt.sqc dddindrt.sqc
853tblrt.sqc dddtblrt.sqc
853trgrt.sqc dddtrgrt.sqc
3. If you are on PeopleSoft PeopleTools 8.54, rename the files that begin with 854, as shown in this table:
Original File Renamed File
854audrt.sqr dddaudit.sqr
854indrt.sqc dddindrt.sqc
854tblrt.sqc dddtblrt.sqc
854trgrt.sqc dddtrgrt.sqc
4. Select PeopleTools, Process Scheduler, System Process Requests.
Installing PeopleSoft Real-Time Bottom Line
36 Copyright © 2015, Oracle and/or its affiliates. All Rights Reserved.
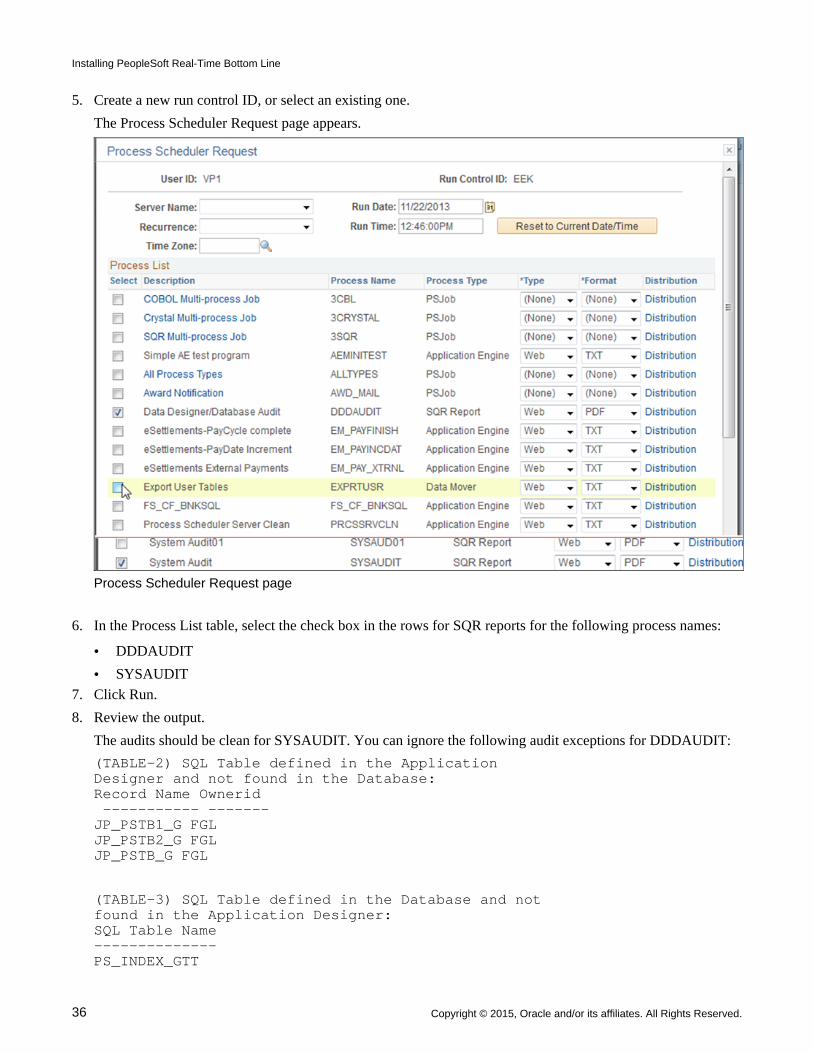
5. Create a new run control ID, or select an existing one.
The Process Scheduler Request page appears.
Process Scheduler Request page
6. In the Process List table, select the check box in the rows for SQR reports for the following process names:
• DDDAUDIT
• SYSAUDIT
7. Click Run.
8. Review the output.
The audits should be clean for SYSAUDIT. You can ignore the following audit exceptions for DDDAUDIT:
(TABLE-2) SQL Table defined in the ApplicationDesigner and not found in the Database:Record Name Ownerid ----------- -------JP_PSTB1_G FGLJP_PSTB2_G FGLJP_PSTB_G FGL
(TABLE-3) SQL Table defined in the Database and notfound in the Application Designer:SQL Table Name--------------PS_INDEX_GTT
Installing PeopleSoft Real-Time Bottom Line
Copyright © 2015, Oracle and/or its affiliates. All Rights Reserved. 37
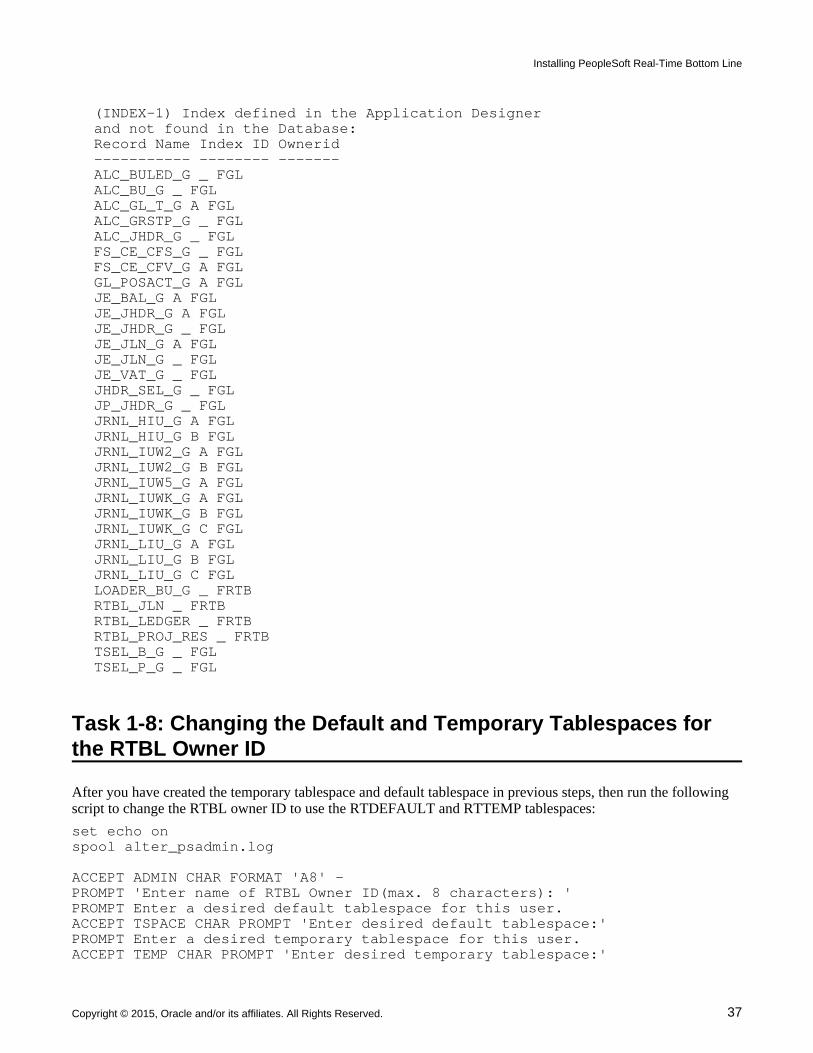
(INDEX-1) Index defined in the Application Designerand not found in the Database:Record Name Index ID Ownerid----------- -------- -------ALC_BULED_G _ FGLALC_BU_G _ FGLALC_GL_T_G A FGLALC_GRSTP_G _ FGLALC_JHDR_G _ FGLFS_CE_CFS_G _ FGLFS_CE_CFV_G A FGLGL_POSACT_G A FGLJE_BAL_G A FGLJE_JHDR_G A FGLJE_JHDR_G _ FGLJE_JLN_G A FGLJE_JLN_G _ FGLJE_VAT_G _ FGLJHDR_SEL_G _ FGLJP_JHDR_G _ FGLJRNL_HIU_G A FGLJRNL_HIU_G B FGLJRNL_IUW2_G A FGLJRNL_IUW2_G B FGLJRNL_IUW5_G A FGLJRNL_IUWK_G A FGLJRNL_IUWK_G B FGLJRNL_IUWK_G C FGLJRNL_LIU_G A FGLJRNL_LIU_G B FGLJRNL_LIU_G C FGLLOADER_BU_G _ FRTBRTBL_JLN _ FRTBRTBL_LEDGER _ FRTBRTBL_PROJ_RES _ FRTBTSEL_B_G _ FGLTSEL_P_G _ FGL
Task 1-8: Changing the Default and Temporary Tablespaces for the RTBL Owner ID
After you have created the temporary tablespace and default tablespace in previous steps, then run the following script to change the RTBL owner ID to use the RTDEFAULT and RTTEMP tablespaces:
set echo onspool alter_psadmin.log
ACCEPT ADMIN CHAR FORMAT 'A8' -PROMPT 'Enter name of RTBL Owner ID(max. 8 characters): 'PROMPT Enter a desired default tablespace for this user.ACCEPT TSPACE CHAR PROMPT 'Enter desired default tablespace:'PROMPT Enter a desired temporary tablespace for this user.ACCEPT TEMP CHAR PROMPT 'Enter desired temporary tablespace:'
Installing PeopleSoft Real-Time Bottom Line
38 Copyright © 2015, Oracle and/or its affiliates. All Rights Reserved.
REMARK -- Alter PeopleSoft RTBL Administrator schema to use RTDEAFULT as⇒ default tablespace and RTTEMP as temporary tablespace.
alter user &ADMIN default tablespace &TSPACEtemporary tablespace &TEMP;
spool off
Task 1-9: Updating the Databases to the Latest PeopleTools Release
After verifying the RTBL database installation, you must apply the Required at Install PeopleSoft PeopleTools Patch 10 on both your production and modeling schemas to update them to PeopleSoft PeopleTools 8.53.10. If your production and modeling schemas are on PeopleSoft PeopleTools 8.54, you must update them to PeopleSoft PeopleTools 8.54.08. Follow the instructions in the delivered PeopleTools patch user documentation to apply the database changes.
Task 1-10: Completing Tablespace Setup
This section discusses:
• Understanding Post-Installation Tablespace Setup
• Adding New Tablespaces to the PeopleTools Metadata
• Adding a New Tablespace for Indexes
• Rebuilding Indexes
Understanding Post-Installation Tablespace Setup
After the installation of the RTBL database schema is complete and the application and web servers have been restarted, you will need to complete the tablespace setup for the new tablespaces that you created in the task Preparing to Install the RTBL Database Schema, Creating New Tablespaces.
Task 1-10-1: Adding New Tablespaces to the PeopleTools Metadata
In this step, you add the new tablespaces to the PeopleSoft PeopleTools metadata. Perform this step only if you modified tablespaces during the database import.
Note. If you are adding a new tablespace just for indexes, you should follow the steps in Adding a New Tablespace for Indexes.
To add the new tablespaces to the PeopleSoft PeopleTools metadata:
1. Log on to your database through PeopleSoft Pure Internet Architecture and select PeopleTools, Utilities, Administration, Tablespace Utilities.
2. Add another row to the table and enter the following information:
Installing PeopleSoft Real-Time Bottom Line
Copyright © 2015, Oracle and/or its affiliates. All Rights Reserved. 39
• Tablespace name
• Database name
• Type: Use Regular, Large, or LOB if you have CLOB or BLOB columns. For RTBL, use Large.
3. Click Save.
The new tablespaces should now appear in PeopleSoft Application Designer.
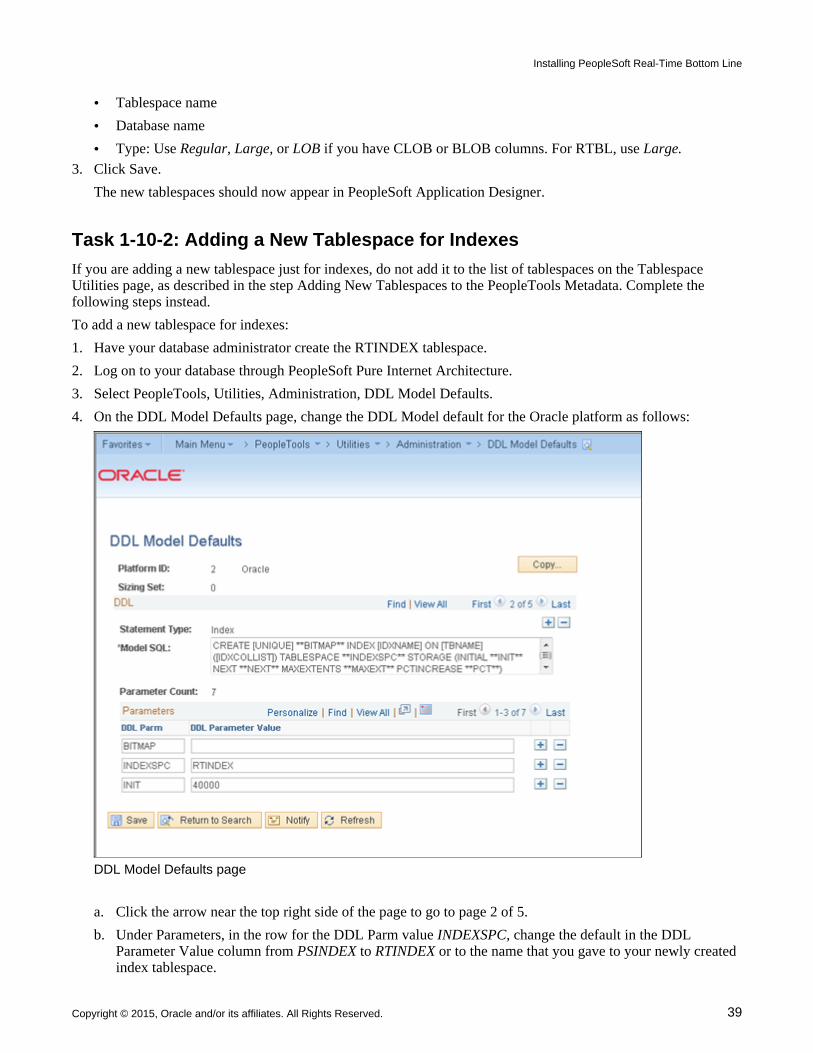
Task 1-10-2: Adding a New Tablespace for Indexes
If you are adding a new tablespace just for indexes, do not add it to the list of tablespaces on the Tablespace Utilities page, as described in the step Adding New Tablespaces to the PeopleTools Metadata. Complete the following steps instead.
To add a new tablespace for indexes:
1. Have your database administrator create the RTINDEX tablespace.
2. Log on to your database through PeopleSoft Pure Internet Architecture.
3. Select PeopleTools, Utilities, Administration, DDL Model Defaults.
4. On the DDL Model Defaults page, change the DDL Model default for the Oracle platform as follows:
DDL Model Defaults page
a. Click the arrow near the top right side of the page to go to page 2 of 5.
b. Under Parameters, in the row for the DDL Parm value INDEXSPC, change the default in the DDL Parameter Value column from PSINDEX to RTINDEX or to the name that you gave to your newly created index tablespace.
Installing PeopleSoft Real-Time Bottom Line
40 Copyright © 2015, Oracle and/or its affiliates. All Rights Reserved.
5. Click Save.
Task 1-10-3: Rebuilding Indexes
Sign in to your new RTBL database in PeopleSoft Application Designer and rebuild the indexes for the following partitioned records:
• RTBL_LEDGER
• RTBL_JLN
• RTBL_PROJ_RES
Task 1-11: Reviewing the Log Files
After the RTBL database schema installation has completed, review the logs output by PeopleSoft Data Mover during the database import step. These logs will be located in your install_dir or your PeopleSoft Data Mover log directory, as specified in the RTBL database import script.
You should also review the logs that were generated by the install scripts rtbl_install.sh and its descendants. Theselogs will also be located in your install_dir. Detailed logs from the individual scripts are located in install_dir/*.log.
If you installed the RTBL database schema using the automated Installer, you should also review the additional logs from the Installer.
Review the following script output files in your install_dir:
• Rtbl_install.log
• Rtbl_ora.log
• Rtbl_user.log
• Rtbl_views.log
Detailed logs from the individual scripts are located in install_dir/scripts/*.log.
The following summary logs are located in install_dir/scripts/<your db name>:
• Rtbl_install.log
• Output.txt
After you have reviewed the log files satisfactorily, you should delete the install_dir and all of its contents as a security measure.
Task 1-12: Configuring Portal
This section discusses:
• Understanding Portal Configuration
• Configuring the Production Instance
• Configuring the Modeling Instance
• Setting Folder Security for RTBL
• Verifying Single Portal Installation
Installing PeopleSoft Real-Time Bottom Line
Copyright © 2015, Oracle and/or its affiliates. All Rights Reserved. 41
Understanding Portal Configuration
You will need to perform Portal configuration steps for the production instance and for the RTBL modeling instance.
In this task you will set up the following nodes:
• Default local node (for each instance)
• Portal host node, PSFT_RTBL (for each instance)
• Remote node (for each instance, using the same named node as the default local node for the other instance)
• ERP node (modeling instance only)
• Trusted nodes for single signon (for each instance)
Task 1-12-1: Configuring the Production Instance
To configure the production instance:
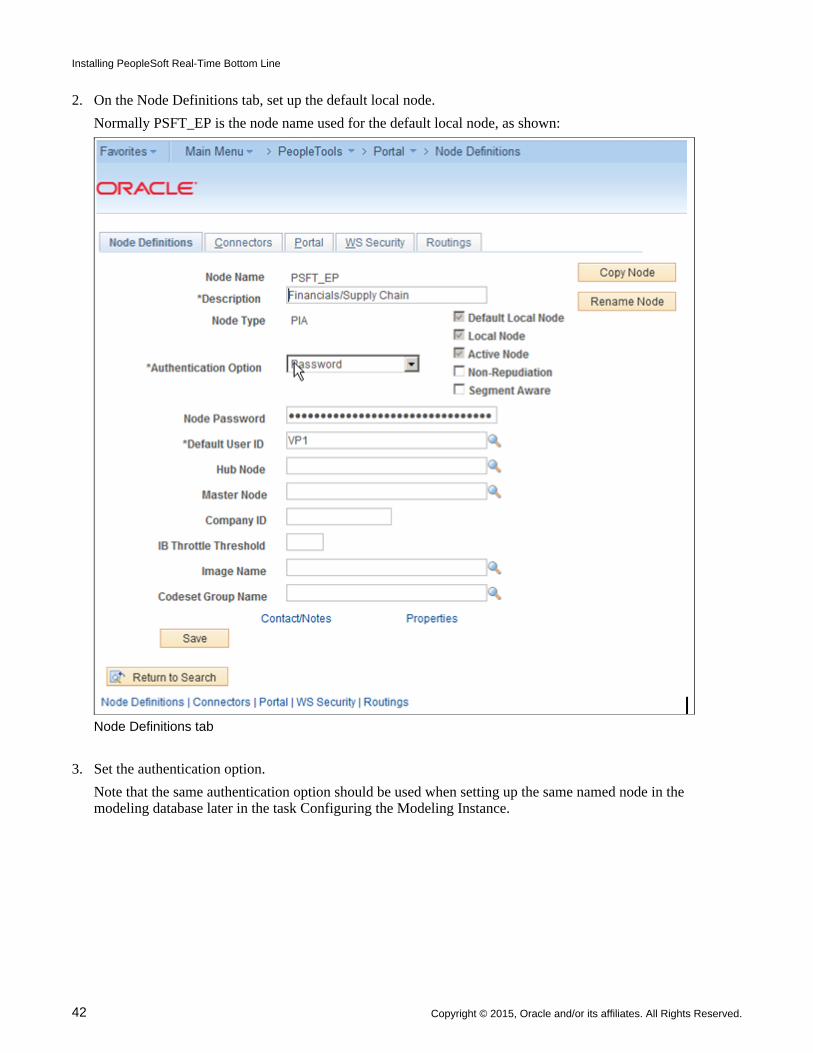
1. Select PeopleTools, Portal, Node Definitions.
Installing PeopleSoft Real-Time Bottom Line
42 Copyright © 2015, Oracle and/or its affiliates. All Rights Reserved.
2. On the Node Definitions tab, set up the default local node.
Normally PSFT_EP is the node name used for the default local node, as shown:
Node Definitions tab
3. Set the authentication option.
Note that the same authentication option should be used when setting up the same named node in the modeling database later in the task Configuring the Modeling Instance.
Installing PeopleSoft Real-Time Bottom Line
Copyright © 2015, Oracle and/or its affiliates. All Rights Reserved. 43
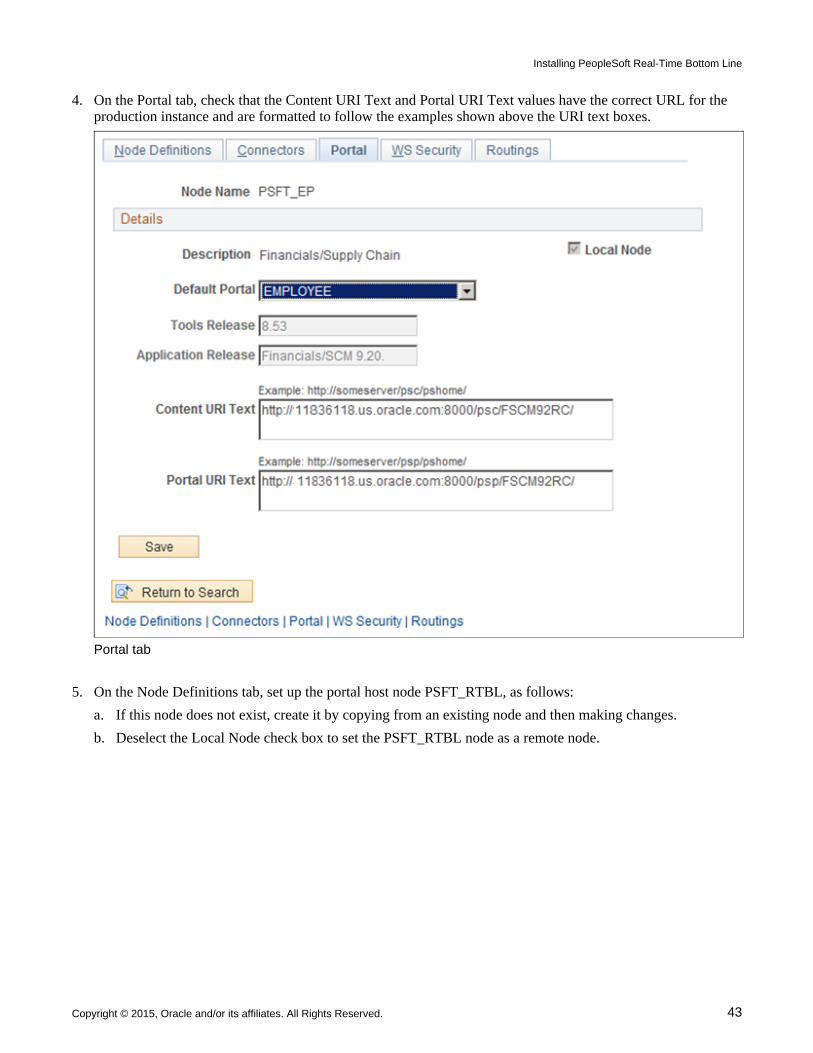
4. On the Portal tab, check that the Content URI Text and Portal URI Text values have the correct URL for the production instance and are formatted to follow the examples shown above the URI text boxes.
Portal tab
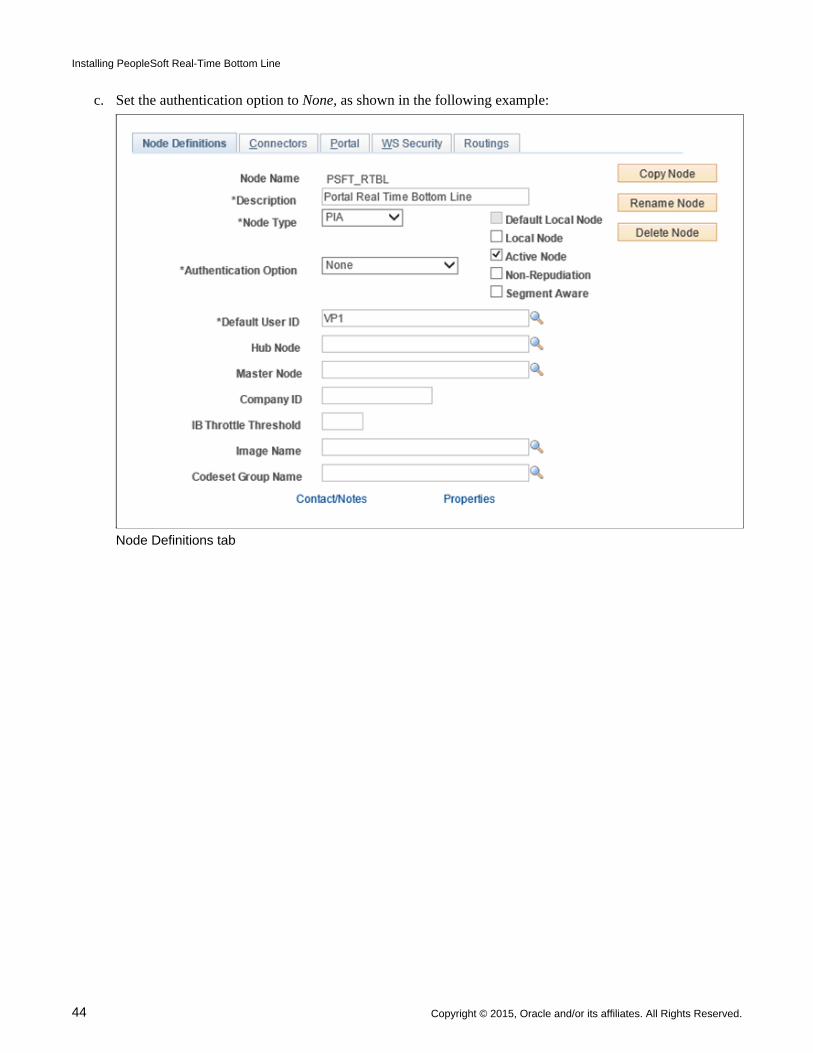
5. On the Node Definitions tab, set up the portal host node PSFT_RTBL, as follows:
a. If this node does not exist, create it by copying from an existing node and then making changes.
b. Deselect the Local Node check box to set the PSFT_RTBL node as a remote node.
Installing PeopleSoft Real-Time Bottom Line
44 Copyright © 2015, Oracle and/or its affiliates. All Rights Reserved.
c. Set the authentication option to None, as shown in the following example:
Node Definitions tab
Installing PeopleSoft Real-Time Bottom Line
Copyright © 2015, Oracle and/or its affiliates. All Rights Reserved. 45
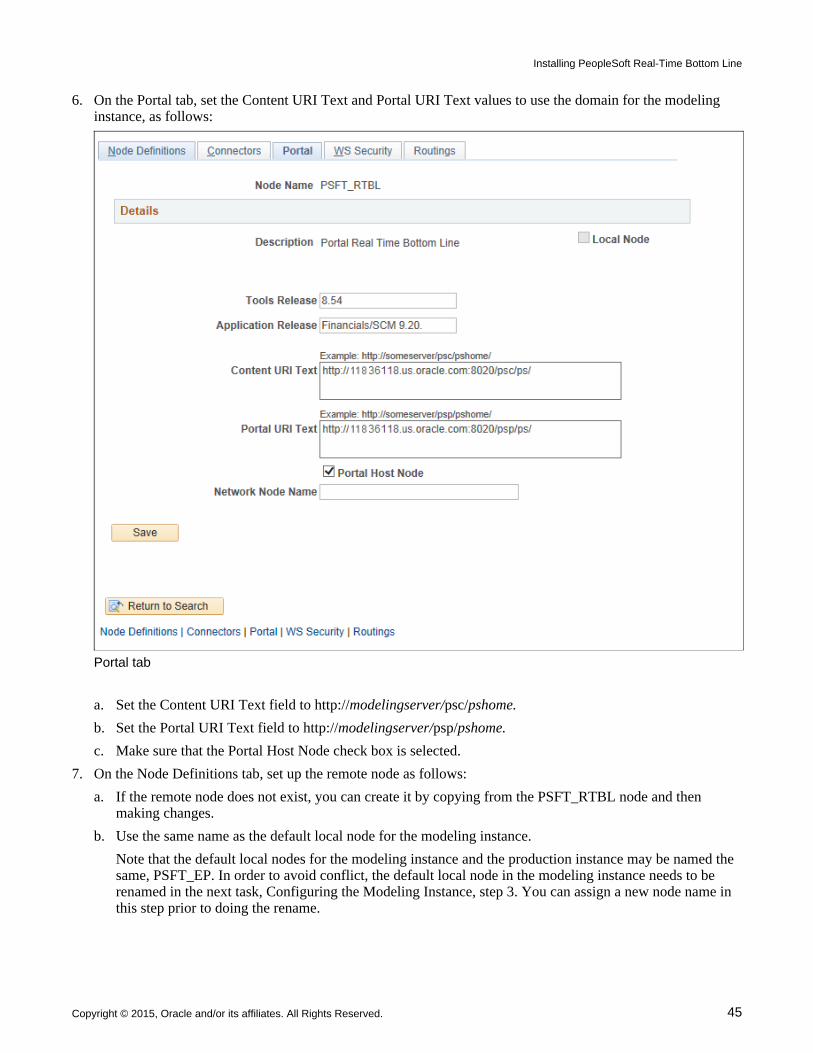
6. On the Portal tab, set the Content URI Text and Portal URI Text values to use the domain for the modeling instance, as follows:
Portal tab
a. Set the Content URI Text field to http://modelingserver/psc/pshome.
b. Set the Portal URI Text field to http://modelingserver/psp/pshome.
c. Make sure that the Portal Host Node check box is selected.
7. On the Node Definitions tab, set up the remote node as follows:
a. If the remote node does not exist, you can create it by copying from the PSFT_RTBL node and then making changes.
b. Use the same name as the default local node for the modeling instance.
Note that the default local nodes for the modeling instance and the production instance may be named the same, PSFT_EP. In order to avoid conflict, the default local node in the modeling instance needs to be renamed in the next task, Configuring the Modeling Instance, step 3. You can assign a new node name in this step prior to doing the rename.
Installing PeopleSoft Real-Time Bottom Line
46 Copyright © 2015, Oracle and/or its affiliates. All Rights Reserved.
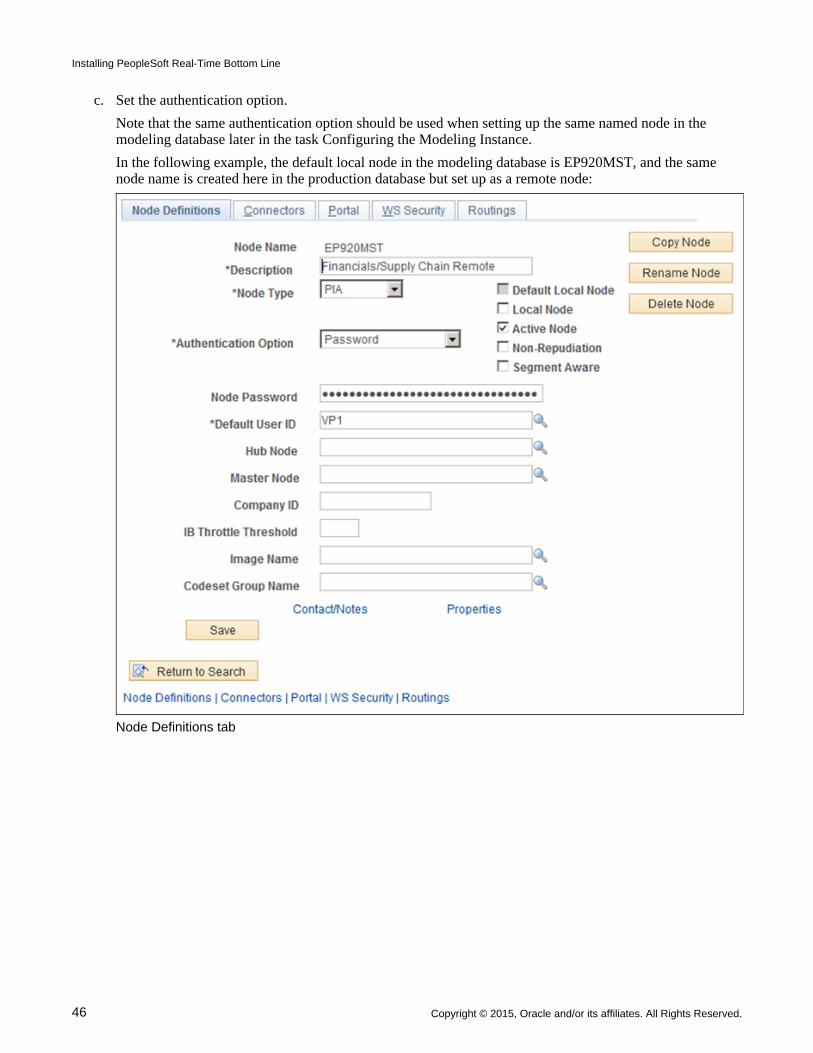
c. Set the authentication option.
Note that the same authentication option should be used when setting up the same named node in the modeling database later in the task Configuring the Modeling Instance.
In the following example, the default local node in the modeling database is EP920MST, and the same node name is created here in the production database but set up as a remote node:
Node Definitions tab

Installing PeopleSoft Real-Time Bottom Line
Copyright © 2015, Oracle and/or its affiliates. All Rights Reserved. 47
8. On the Portal tab, set the Content URI Text and Portal URI Text values to use the same domain as defined for the modeling instance in the PSFT_RTBL node.
If you copied the node from PSFT_RTBL, the URI text values should already reflect the correct values. Following is an example of the Portal tab:
Portal tab
Installing PeopleSoft Real-Time Bottom Line
48 Copyright © 2015, Oracle and/or its affiliates. All Rights Reserved.
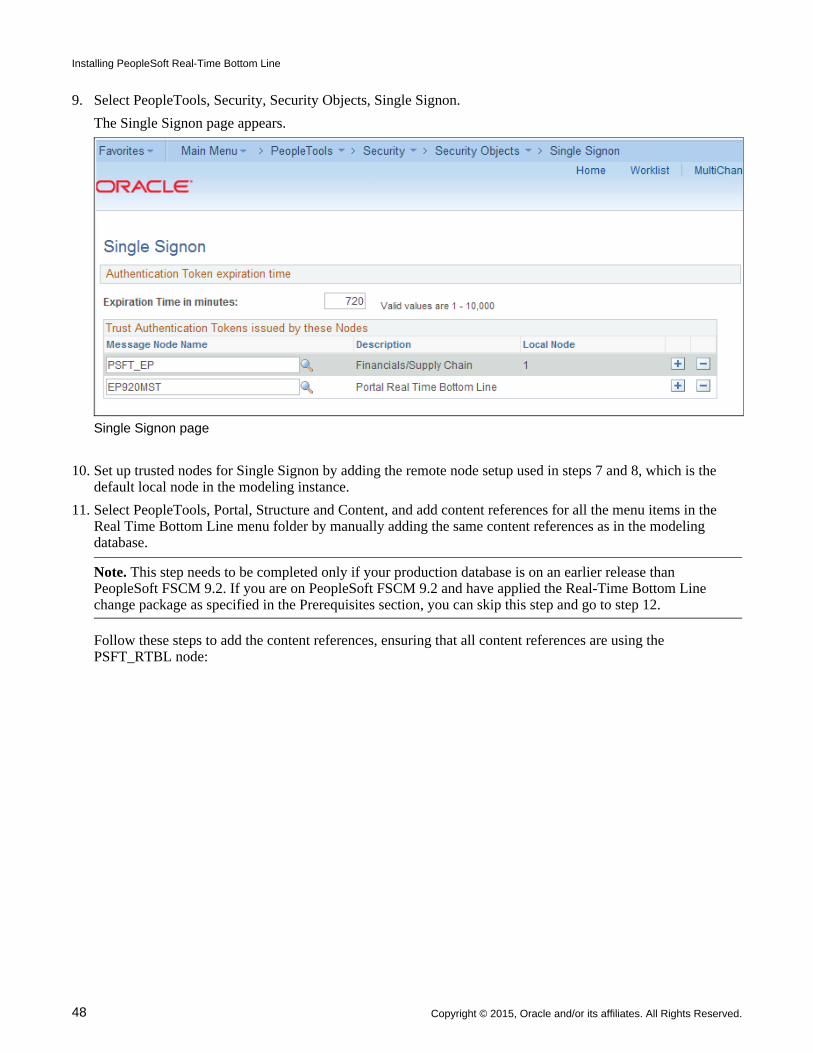
9. Select PeopleTools, Security, Security Objects, Single Signon.
The Single Signon page appears.
Single Signon page
10. Set up trusted nodes for Single Signon by adding the remote node setup used in steps 7 and 8, which is the default local node in the modeling instance.
11. Select PeopleTools, Portal, Structure and Content, and add content references for all the menu items in the Real Time Bottom Line menu folder by manually adding the same content references as in the modeling database.
Note. This step needs to be completed only if your production database is on an earlier release than PeopleSoft FSCM 9.2. If you are on PeopleSoft FSCM 9.2 and have applied the Real-Time Bottom Line change package as specified in the Prerequisites section, you can skip this step and go to step 12.
Follow these steps to add the content references, ensuring that all content references are using the PSFT_RTBL node:
Installing PeopleSoft Real-Time Bottom Line
Copyright © 2015, Oracle and/or its affiliates. All Rights Reserved. 49
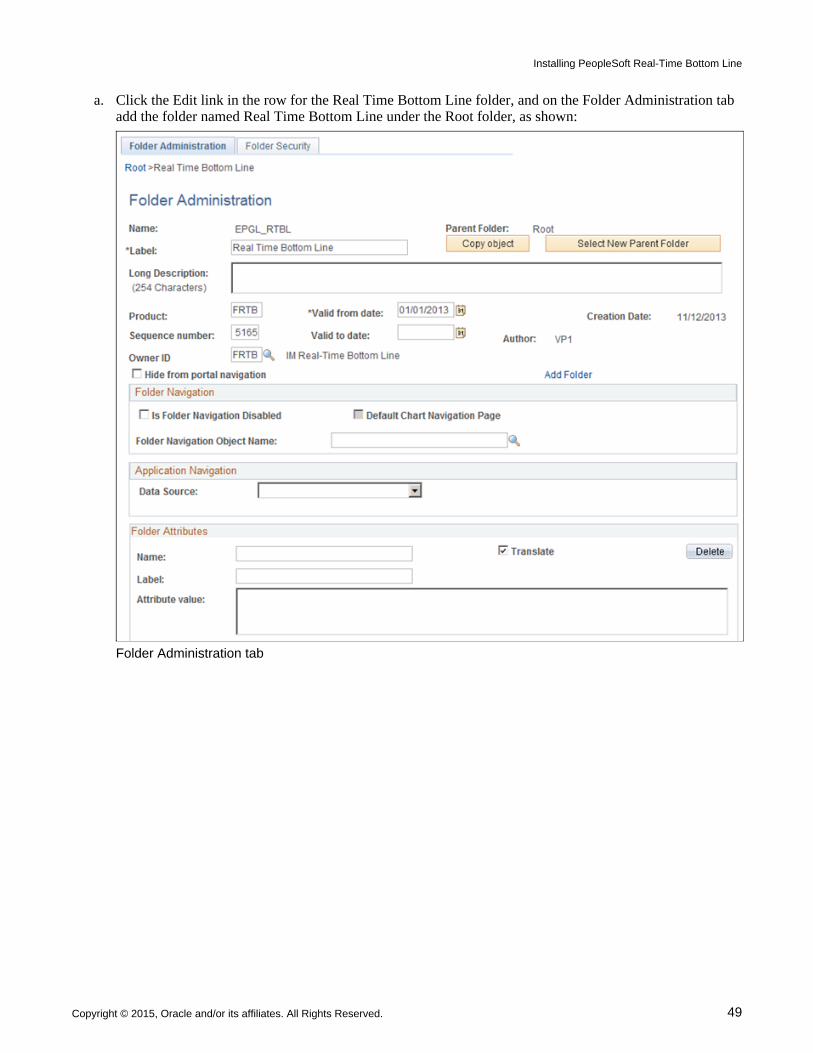
a. Click the Edit link in the row for the Real Time Bottom Line folder, and on the Folder Administration tab add the folder named Real Time Bottom Line under the Root folder, as shown:
Folder Administration tab
Installing PeopleSoft Real-Time Bottom Line
50 Copyright © 2015, Oracle and/or its affiliates. All Rights Reserved.
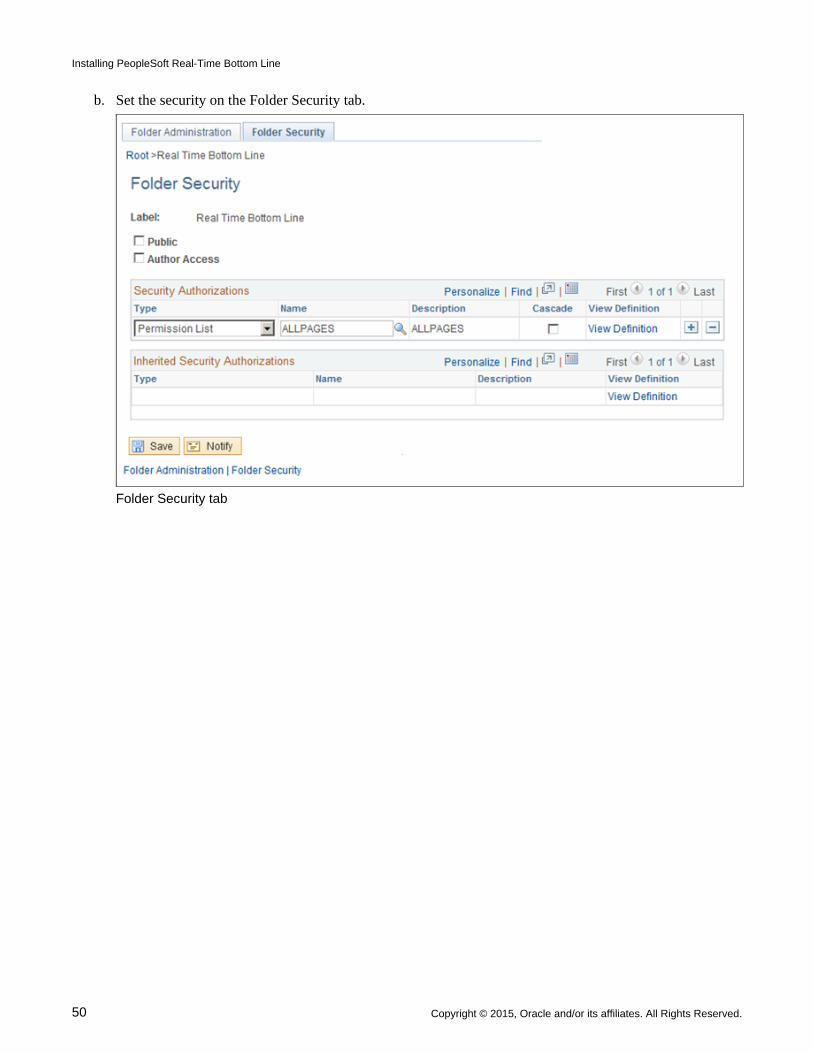
b. Set the security on the Folder Security tab.
Folder Security tab
Installing PeopleSoft Real-Time Bottom Line
Copyright © 2015, Oracle and/or its affiliates. All Rights Reserved. 51
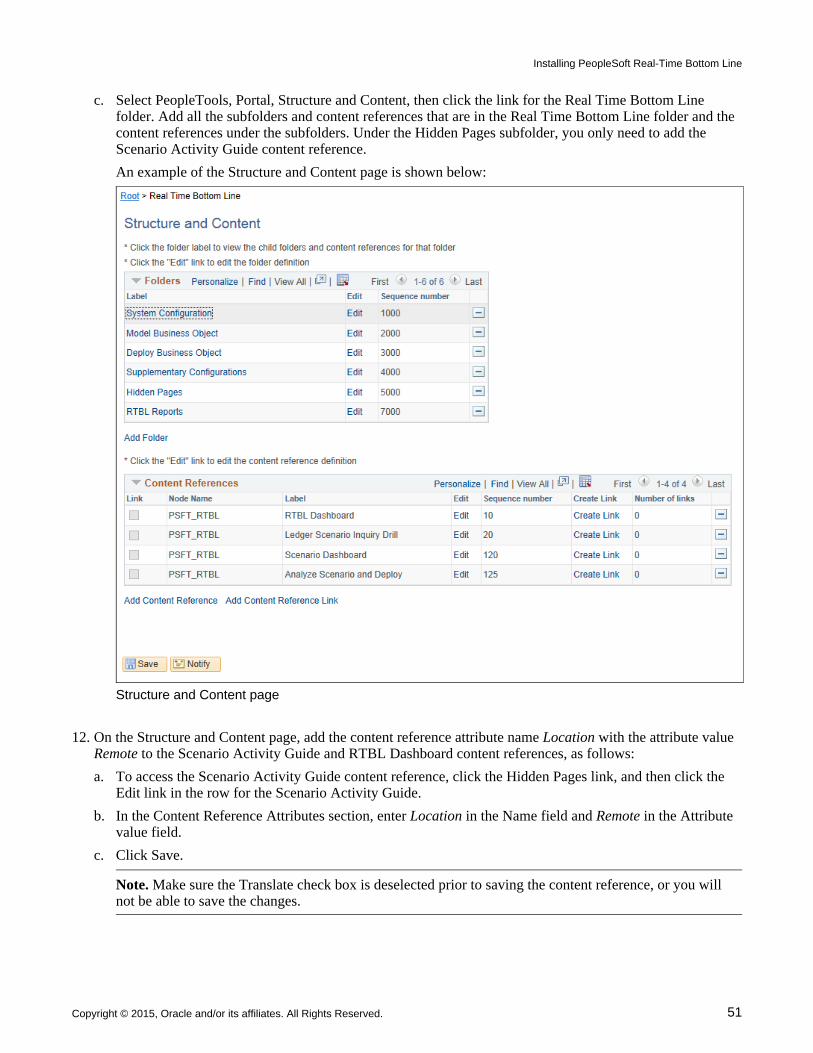
c. Select PeopleTools, Portal, Structure and Content, then click the link for the Real Time Bottom Line folder. Add all the subfolders and content references that are in the Real Time Bottom Line folder and the content references under the subfolders. Under the Hidden Pages subfolder, you only need to add the Scenario Activity Guide content reference.
An example of the Structure and Content page is shown below:
Structure and Content page
12. On the Structure and Content page, add the content reference attribute name Location with the attribute value Remote to the Scenario Activity Guide and RTBL Dashboard content references, as follows:
a. To access the Scenario Activity Guide content reference, click the Hidden Pages link, and then click the Edit link in the row for the Scenario Activity Guide.
b. In the Content Reference Attributes section, enter Location in the Name field and Remote in the Attribute value field.
c. Click Save.
Note. Make sure the Translate check box is deselected prior to saving the content reference, or you will not be able to save the changes.
Installing PeopleSoft Real-Time Bottom Line
52 Copyright © 2015, Oracle and/or its affiliates. All Rights Reserved.
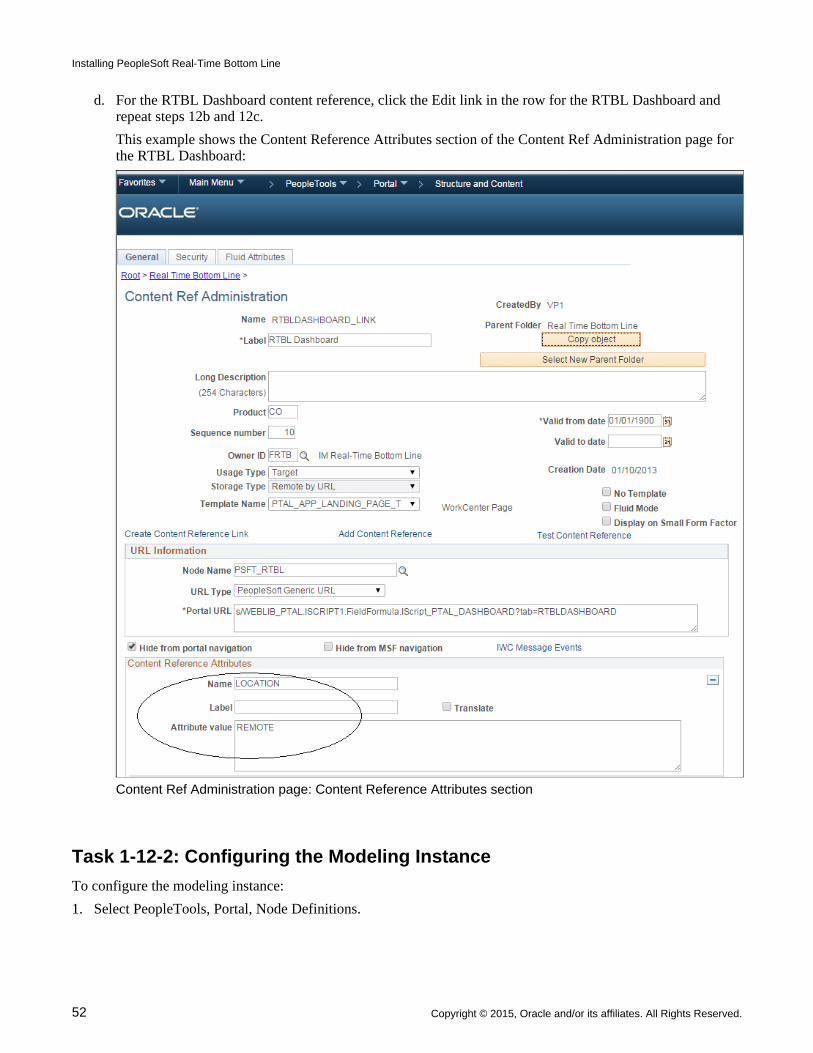
d. For the RTBL Dashboard content reference, click the Edit link in the row for the RTBL Dashboard and repeat steps 12b and 12c.
This example shows the Content Reference Attributes section of the Content Ref Administration page for the RTBL Dashboard:
Content Ref Administration page: Content Reference Attributes section
Task 1-12-2: Configuring the Modeling Instance
To configure the modeling instance:
1. Select PeopleTools, Portal, Node Definitions.
Installing PeopleSoft Real-Time Bottom Line
Copyright © 2015, Oracle and/or its affiliates. All Rights Reserved. 53
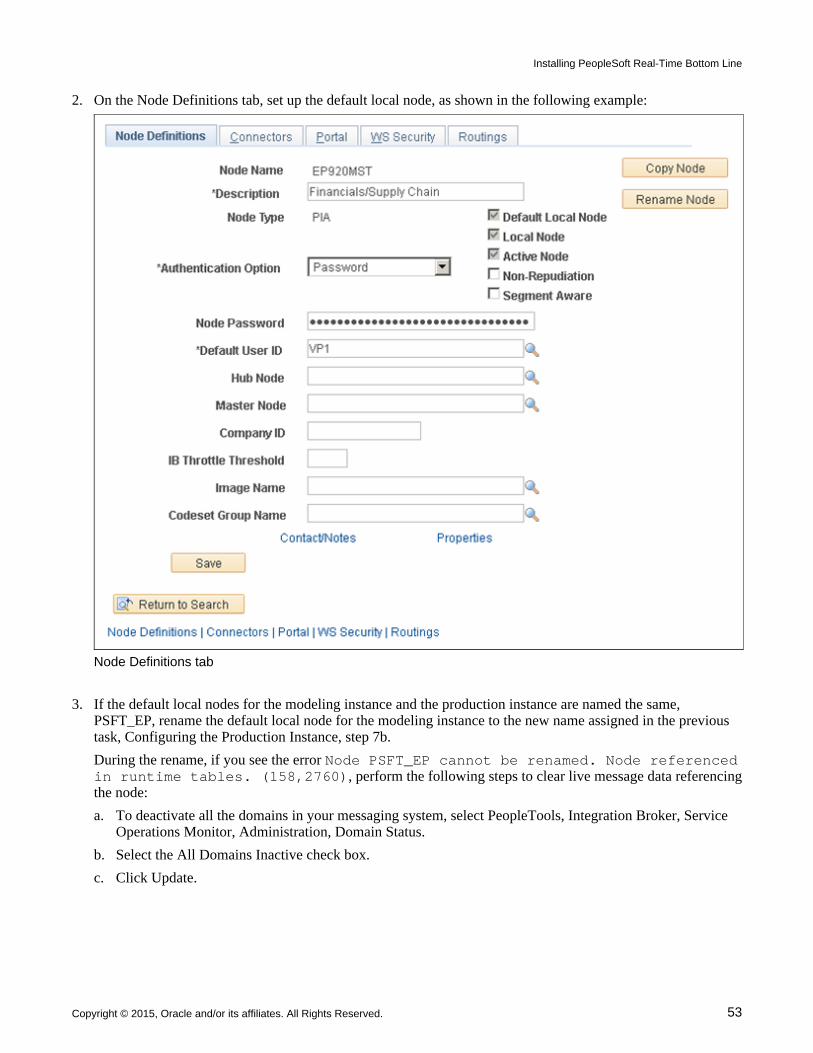
2. On the Node Definitions tab, set up the default local node, as shown in the following example:
Node Definitions tab
3. If the default local nodes for the modeling instance and the production instance are named the same, PSFT_EP, rename the default local node for the modeling instance to the new name assigned in the previous task, Configuring the Production Instance, step 7b.
During the rename, if you see the error Node PSFT_EP cannot be renamed. Node referencedin runtime tables. (158,2760), perform the following steps to clear live message data referencingthe node:
a. To deactivate all the domains in your messaging system, select PeopleTools, Integration Broker, Service Operations Monitor, Administration, Domain Status.
b. Select the All Domains Inactive check box.
c. Click Update.
Installing PeopleSoft Real-Time Bottom Line
54 Copyright © 2015, Oracle and/or its affiliates. All Rights Reserved.
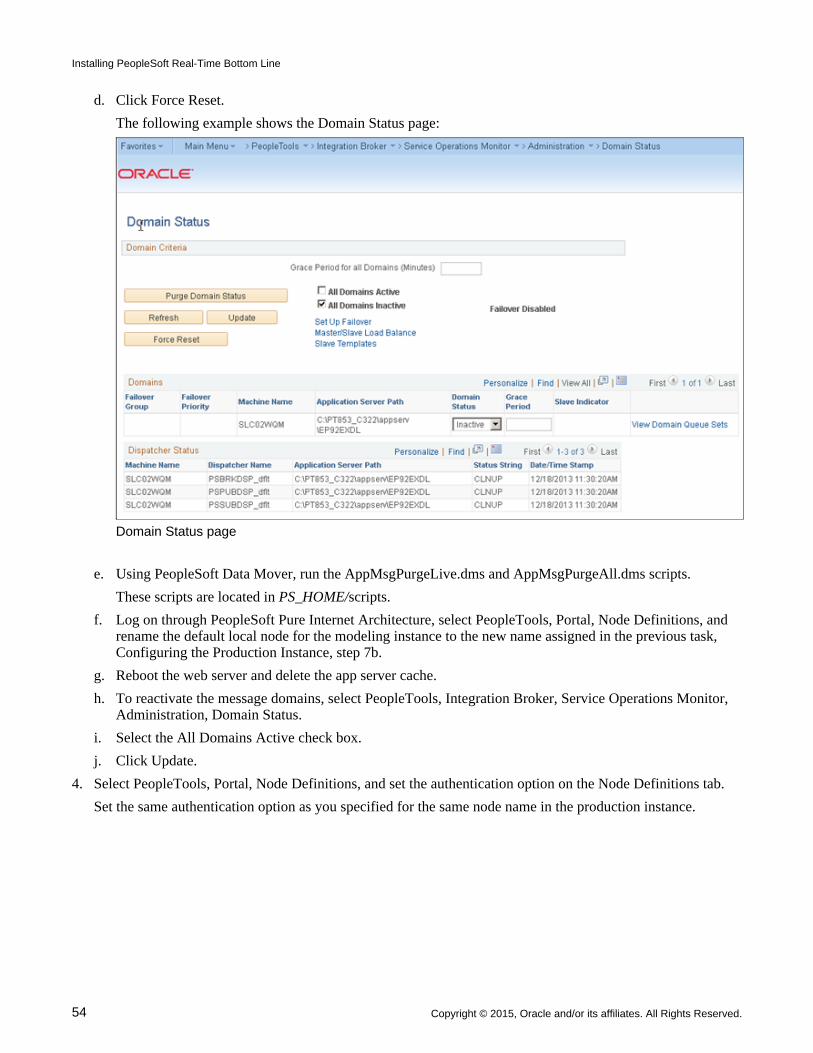
d. Click Force Reset.
The following example shows the Domain Status page:
Domain Status page
e. Using PeopleSoft Data Mover, run the AppMsgPurgeLive.dms and AppMsgPurgeAll.dms scripts.
These scripts are located in PS_HOME/scripts.
f. Log on through PeopleSoft Pure Internet Architecture, select PeopleTools, Portal, Node Definitions, and rename the default local node for the modeling instance to the new name assigned in the previous task, Configuring the Production Instance, step 7b.
g. Reboot the web server and delete the app server cache.
h. To reactivate the message domains, select PeopleTools, Integration Broker, Service Operations Monitor, Administration, Domain Status.
i. Select the All Domains Active check box.
j. Click Update.
4. Select PeopleTools, Portal, Node Definitions, and set the authentication option on the Node Definitions tab.
Set the same authentication option as you specified for the same node name in the production instance.
Installing PeopleSoft Real-Time Bottom Line
Copyright © 2015, Oracle and/or its affiliates. All Rights Reserved. 55
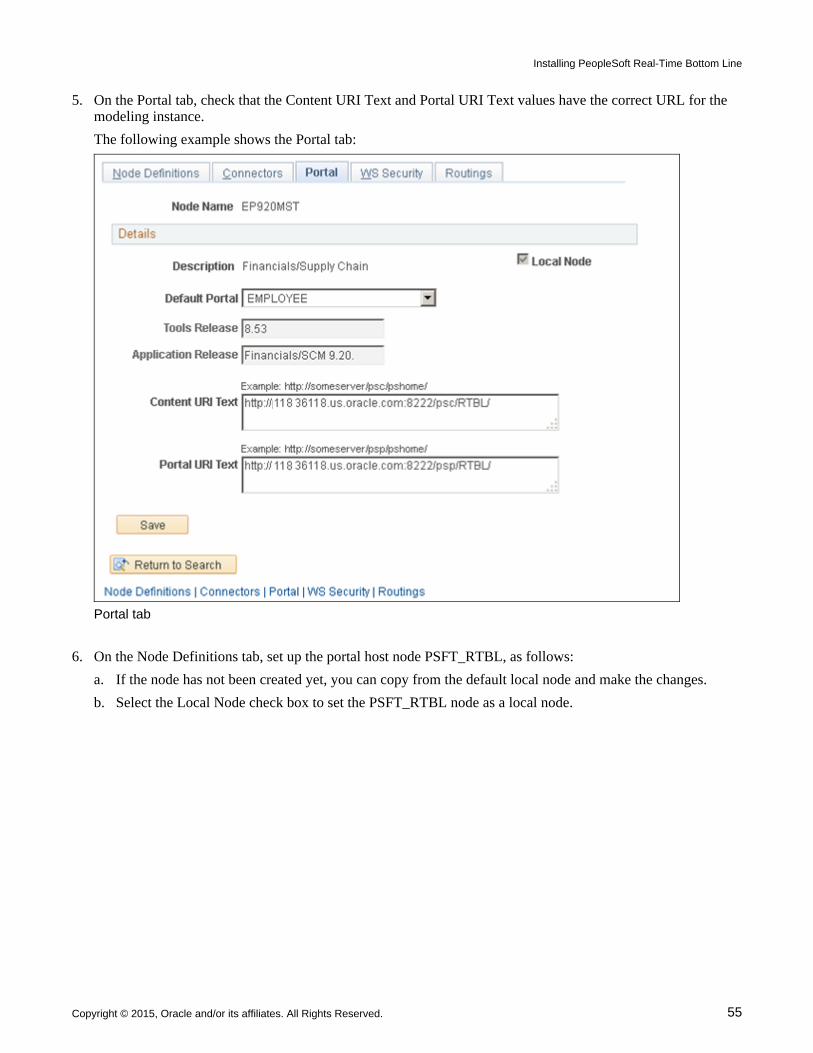
5. On the Portal tab, check that the Content URI Text and Portal URI Text values have the correct URL for the modeling instance.
The following example shows the Portal tab:
Portal tab
6. On the Node Definitions tab, set up the portal host node PSFT_RTBL, as follows:
a. If the node has not been created yet, you can copy from the default local node and make the changes.
b. Select the Local Node check box to set the PSFT_RTBL node as a local node.
Installing PeopleSoft Real-Time Bottom Line
56 Copyright © 2015, Oracle and/or its affiliates. All Rights Reserved.
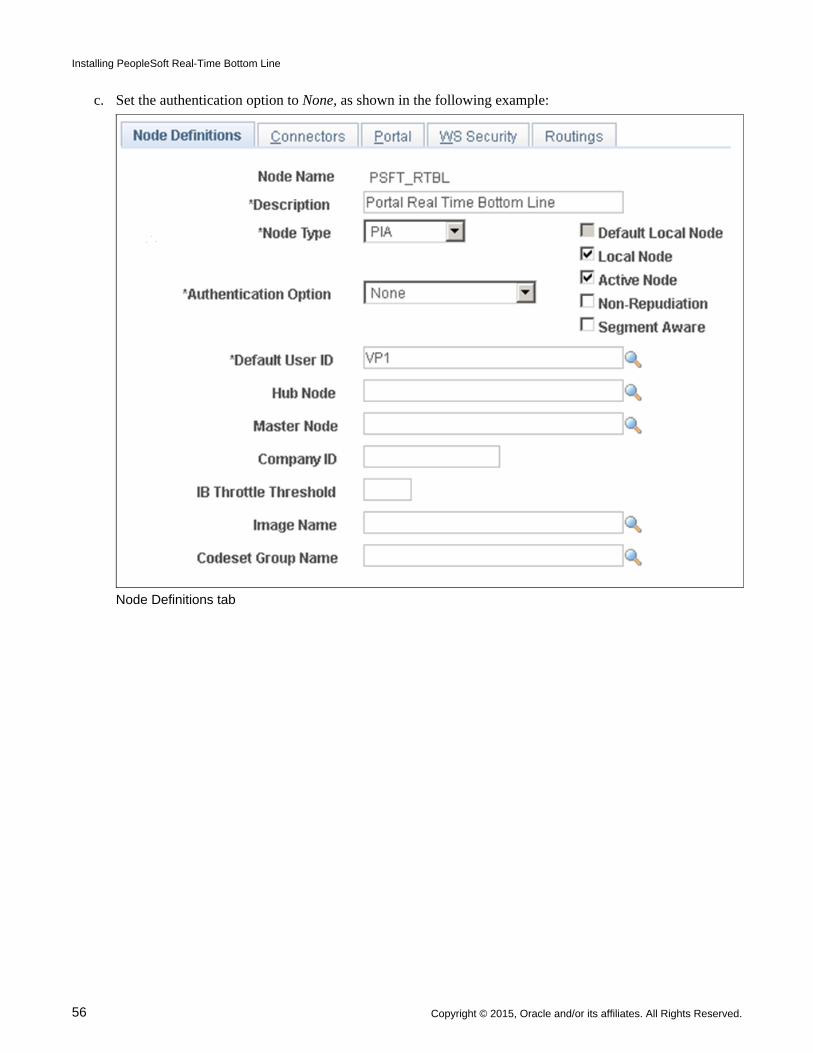
c. Set the authentication option to None, as shown in the following example:
Node Definitions tab
Installing PeopleSoft Real-Time Bottom Line
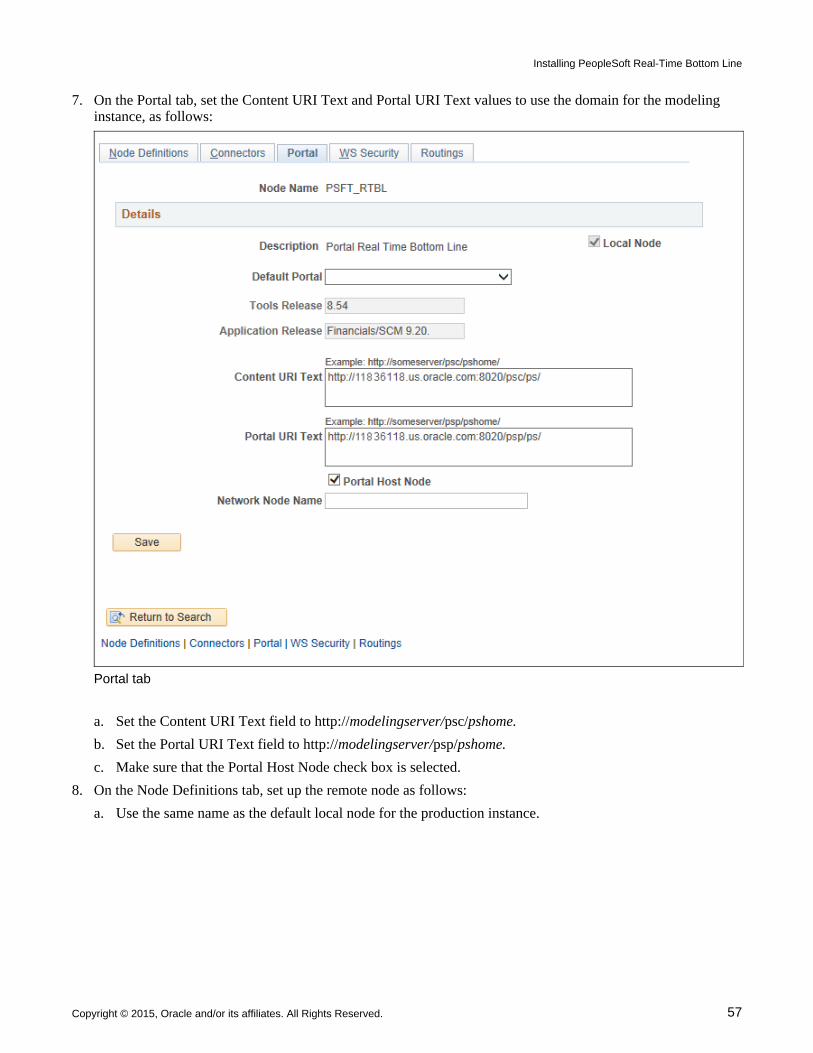
Copyright © 2015, Oracle and/or its affiliates. All Rights Reserved. 57
7. On the Portal tab, set the Content URI Text and Portal URI Text values to use the domain for the modeling instance, as follows:
Portal tab
a. Set the Content URI Text field to http://modelingserver/psc/pshome.
b. Set the Portal URI Text field to http://modelingserver/psp/pshome.
c. Make sure that the Portal Host Node check box is selected.
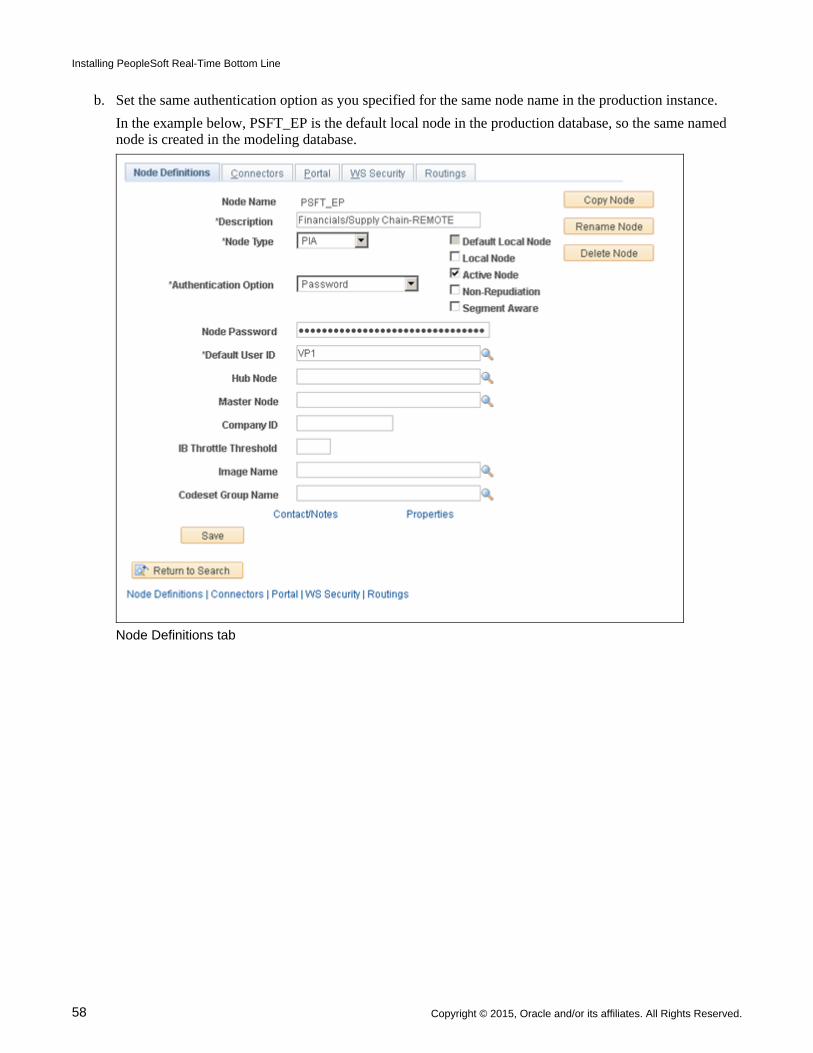
8. On the Node Definitions tab, set up the remote node as follows:
a. Use the same name as the default local node for the production instance.
Installing PeopleSoft Real-Time Bottom Line
58 Copyright © 2015, Oracle and/or its affiliates. All Rights Reserved.
b. Set the same authentication option as you specified for the same node name in the production instance.
In the example below, PSFT_EP is the default local node in the production database, so the same named node is created in the modeling database.
Node Definitions tab
Installing PeopleSoft Real-Time Bottom Line
Copyright © 2015, Oracle and/or its affiliates. All Rights Reserved. 59
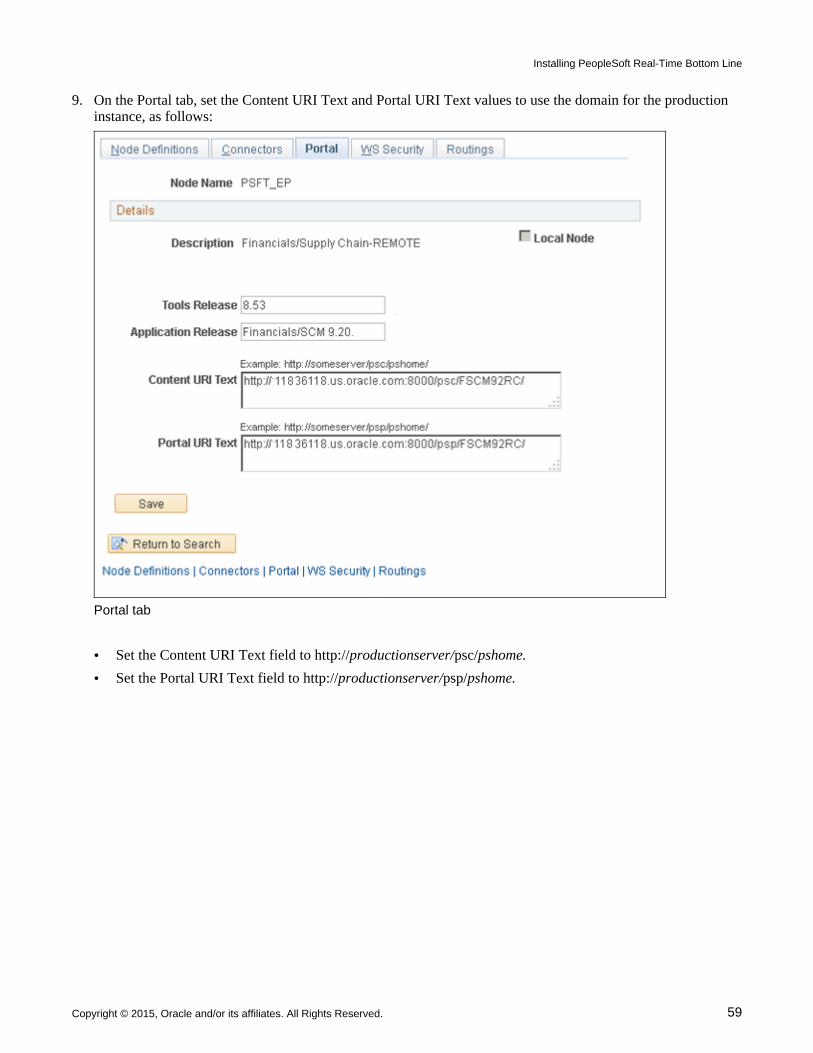
9. On the Portal tab, set the Content URI Text and Portal URI Text values to use the domain for the production instance, as follows:
Portal tab
• Set the Content URI Text field to http://productionserver/psc/pshome.
• Set the Portal URI Text field to http://productionserver/psp/pshome.
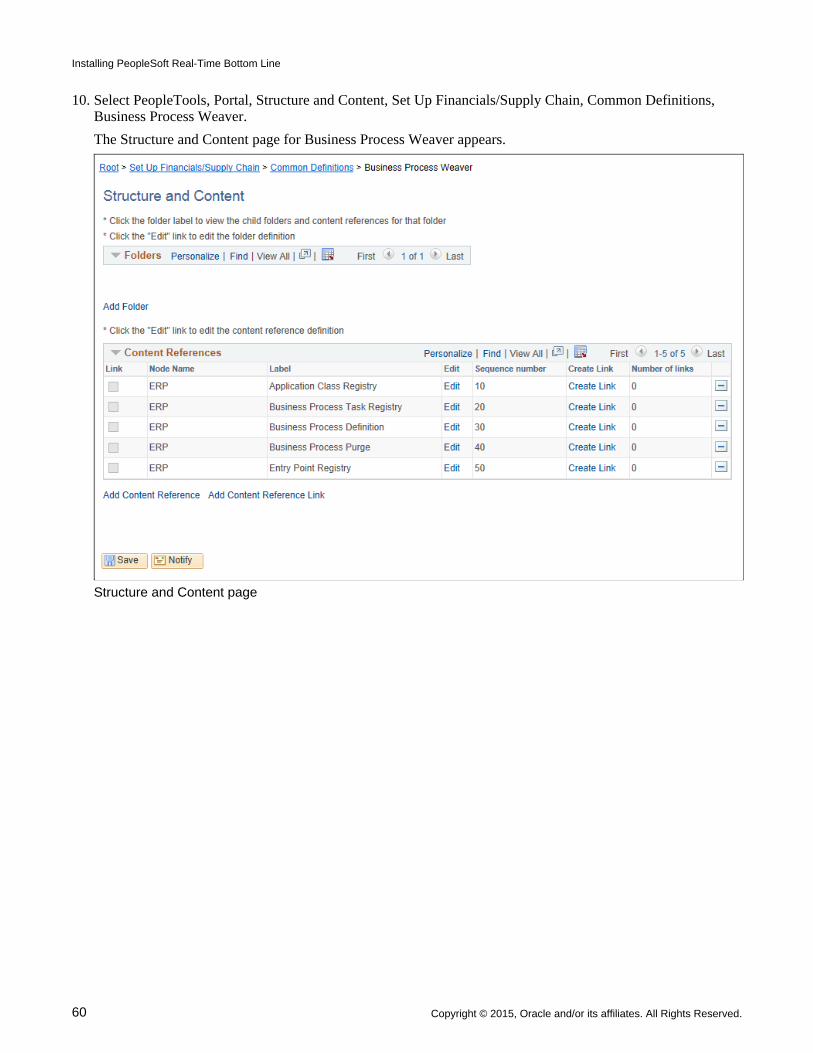
Installing PeopleSoft Real-Time Bottom Line
60 Copyright © 2015, Oracle and/or its affiliates. All Rights Reserved.
10. Select PeopleTools, Portal, Structure and Content, Set Up Financials/Supply Chain, Common Definitions, Business Process Weaver.
The Structure and Content page for Business Process Weaver appears.
Structure and Content page
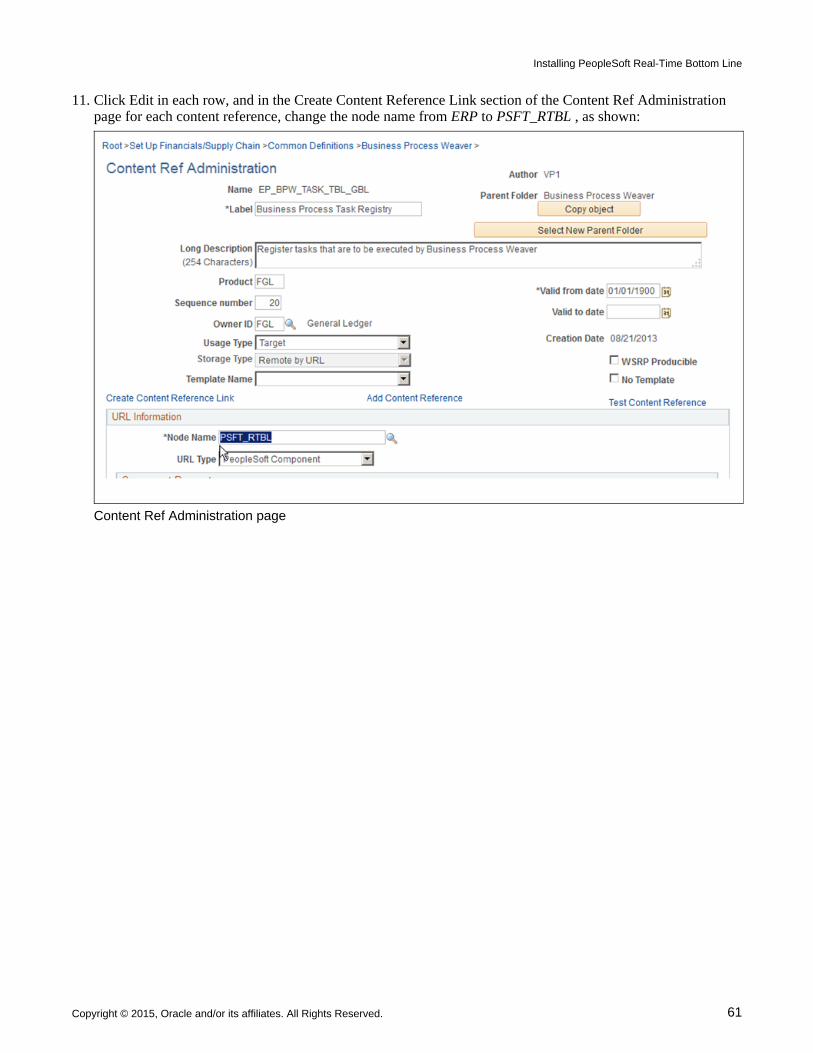
Installing PeopleSoft Real-Time Bottom Line
Copyright © 2015, Oracle and/or its affiliates. All Rights Reserved. 61
11. Click Edit in each row, and in the Create Content Reference Link section of the Content Ref Administration page for each content reference, change the node name from ERP to PSFT_RTBL , as shown:
Content Ref Administration page
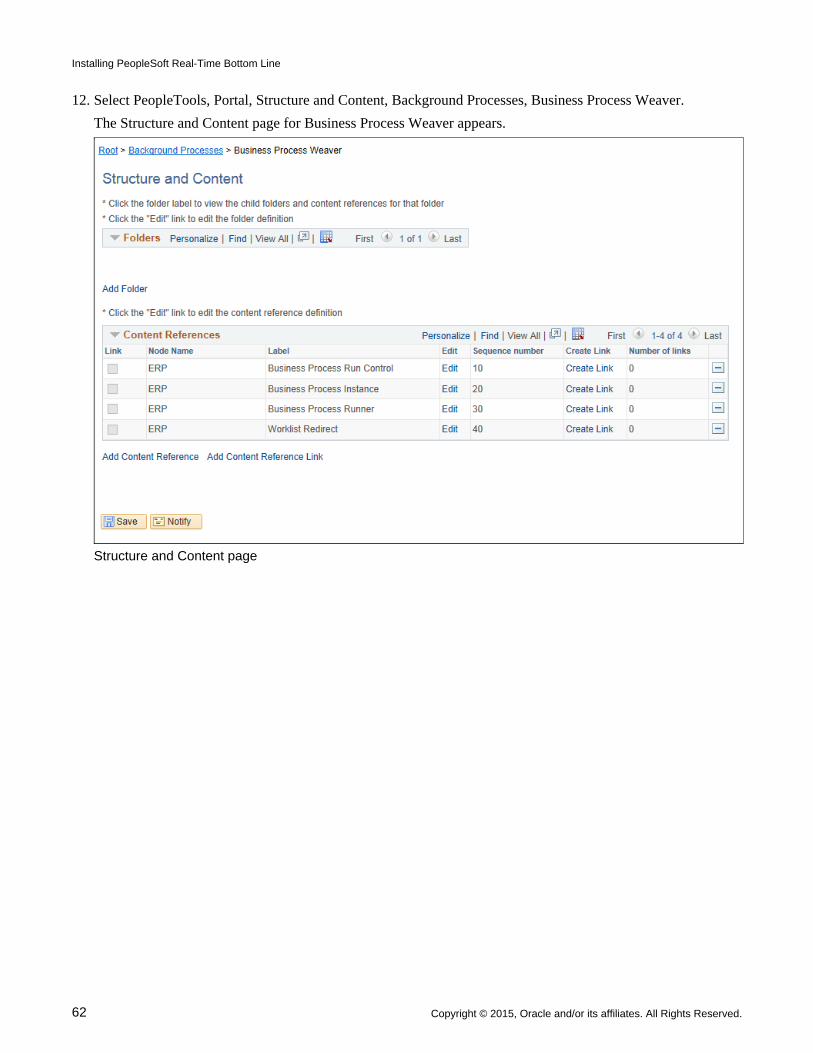
Installing PeopleSoft Real-Time Bottom Line
62 Copyright © 2015, Oracle and/or its affiliates. All Rights Reserved.
12. Select PeopleTools, Portal, Structure and Content, Background Processes, Business Process Weaver.
The Structure and Content page for Business Process Weaver appears.
Structure and Content page
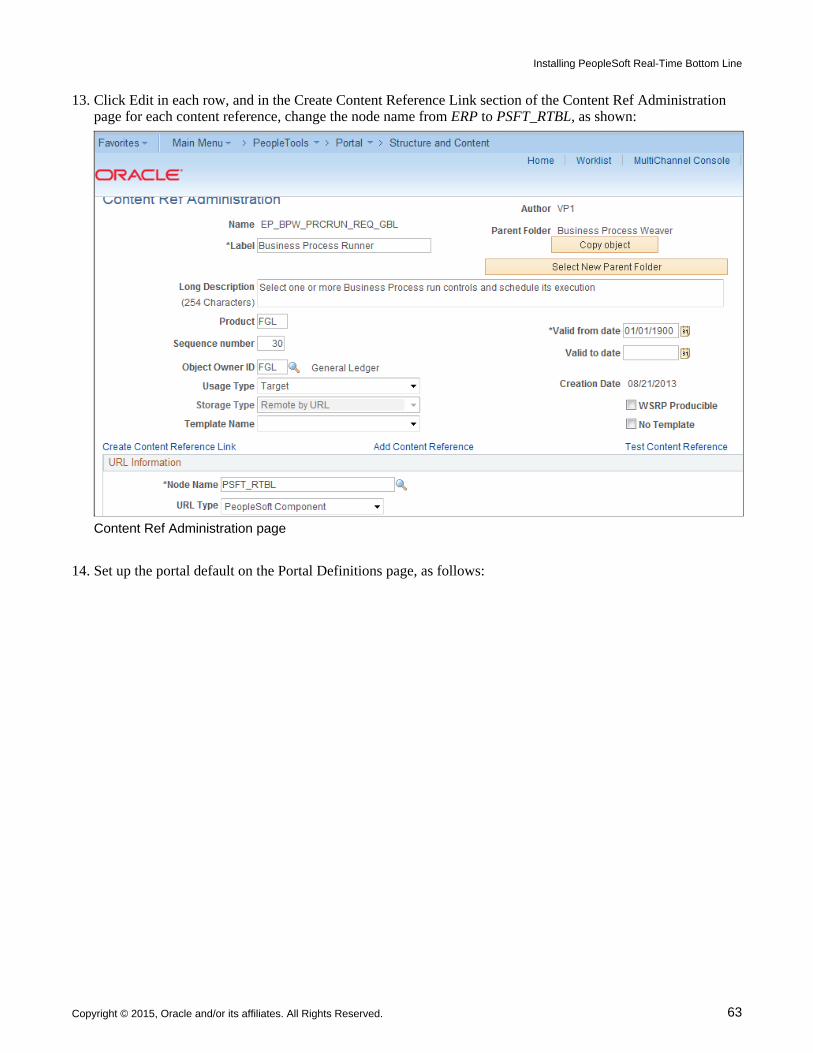
Installing PeopleSoft Real-Time Bottom Line
Copyright © 2015, Oracle and/or its affiliates. All Rights Reserved. 63
13. Click Edit in each row, and in the Create Content Reference Link section of the Content Ref Administration page for each content reference, change the node name from ERP to PSFT_RTBL, as shown:
Content Ref Administration page
14. Set up the portal default on the Portal Definitions page, as follows:
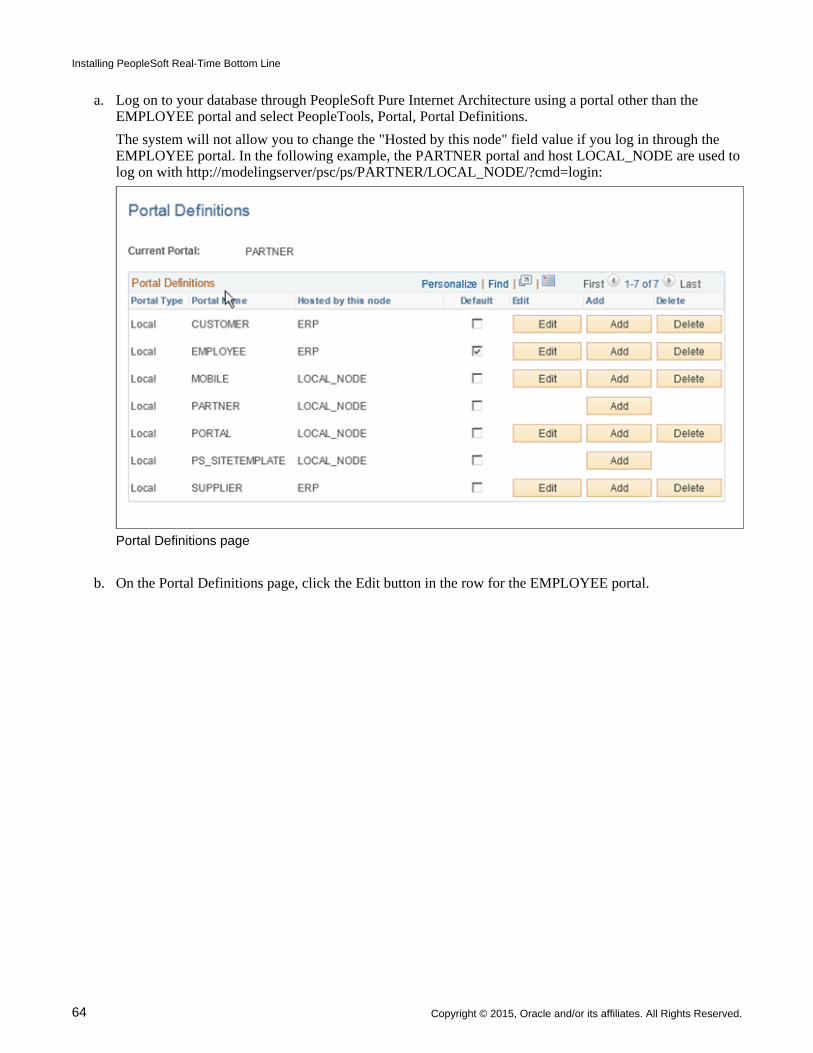
Installing PeopleSoft Real-Time Bottom Line
64 Copyright © 2015, Oracle and/or its affiliates. All Rights Reserved.
a. Log on to your database through PeopleSoft Pure Internet Architecture using a portal other than the EMPLOYEE portal and select PeopleTools, Portal, Portal Definitions.
The system will not allow you to change the "Hosted by this node" field value if you log in through the EMPLOYEE portal. In the following example, the PARTNER portal and host LOCAL_NODE are used tolog on with http://modelingserver/psc/ps/PARTNER/LOCAL_NODE/?cmd=login:
Portal Definitions page
b. On the Portal Definitions page, click the Edit button in the row for the EMPLOYEE portal.
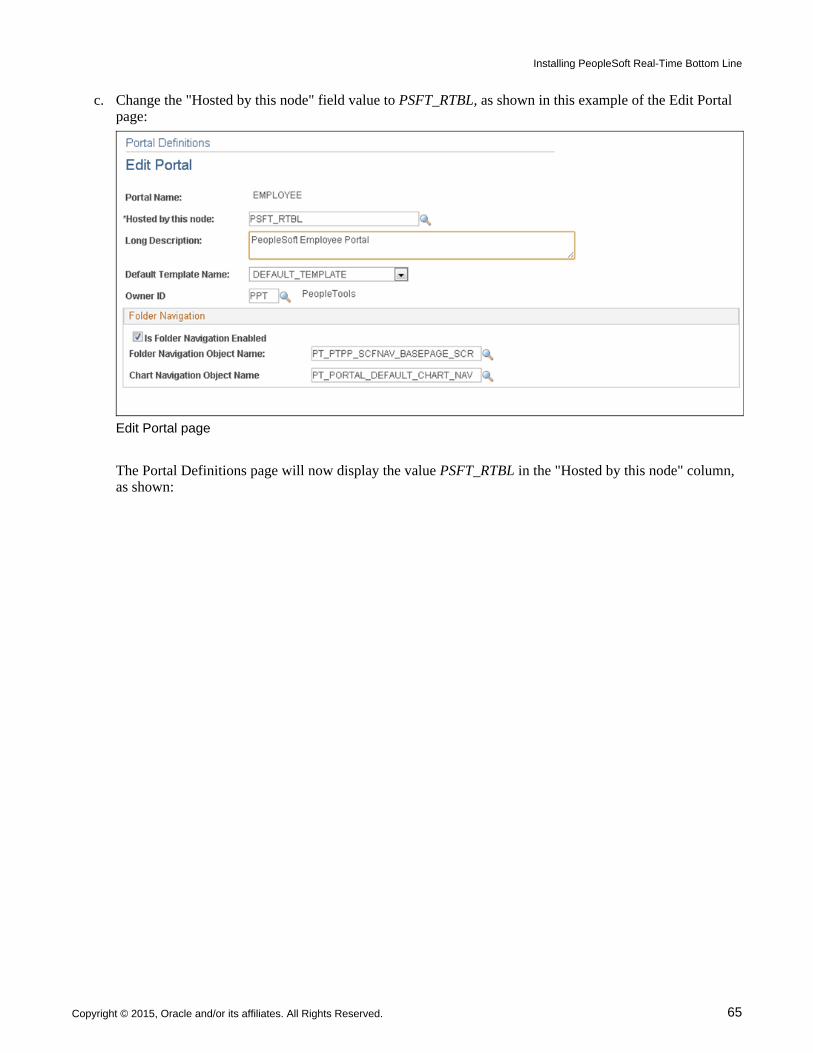
Installing PeopleSoft Real-Time Bottom Line
Copyright © 2015, Oracle and/or its affiliates. All Rights Reserved. 65
c. Change the "Hosted by this node" field value to PSFT_RTBL, as shown in this example of the Edit Portal page:
Edit Portal page
The Portal Definitions page will now display the value PSFT_RTBL in the "Hosted by this node" column, as shown:
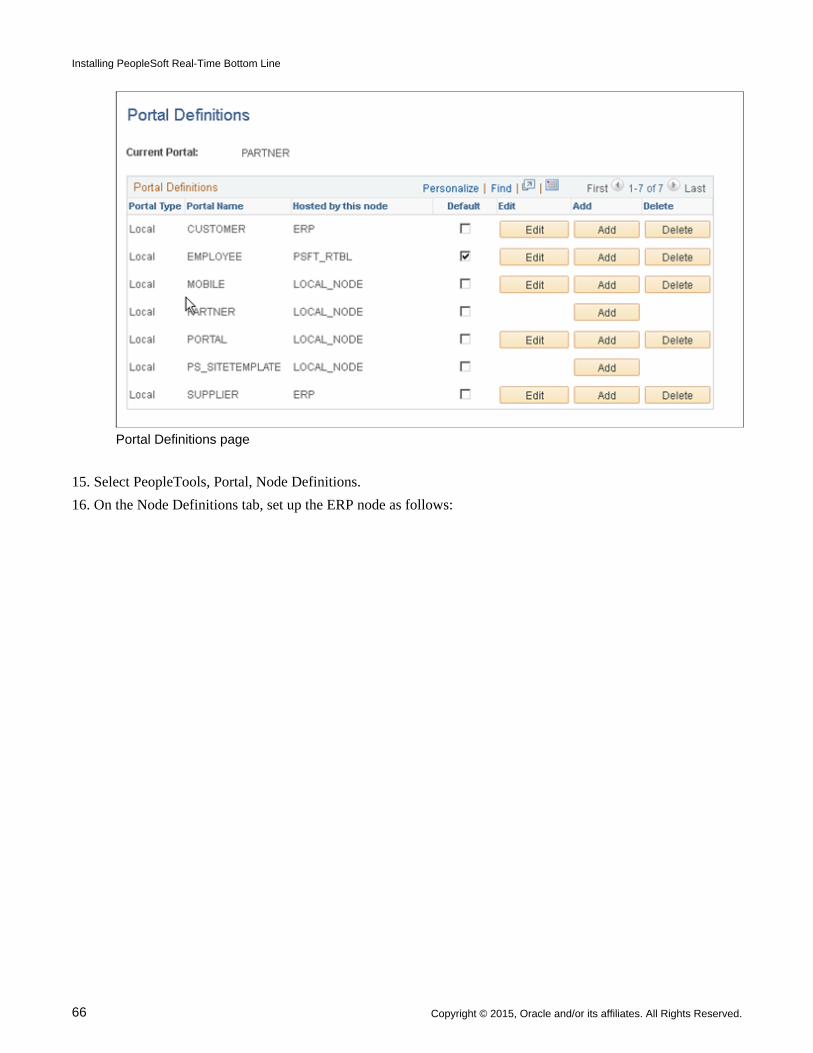
Installing PeopleSoft Real-Time Bottom Line
66 Copyright © 2015, Oracle and/or its affiliates. All Rights Reserved.
Portal Definitions page
15. Select PeopleTools, Portal, Node Definitions.
16. On the Node Definitions tab, set up the ERP node as follows:
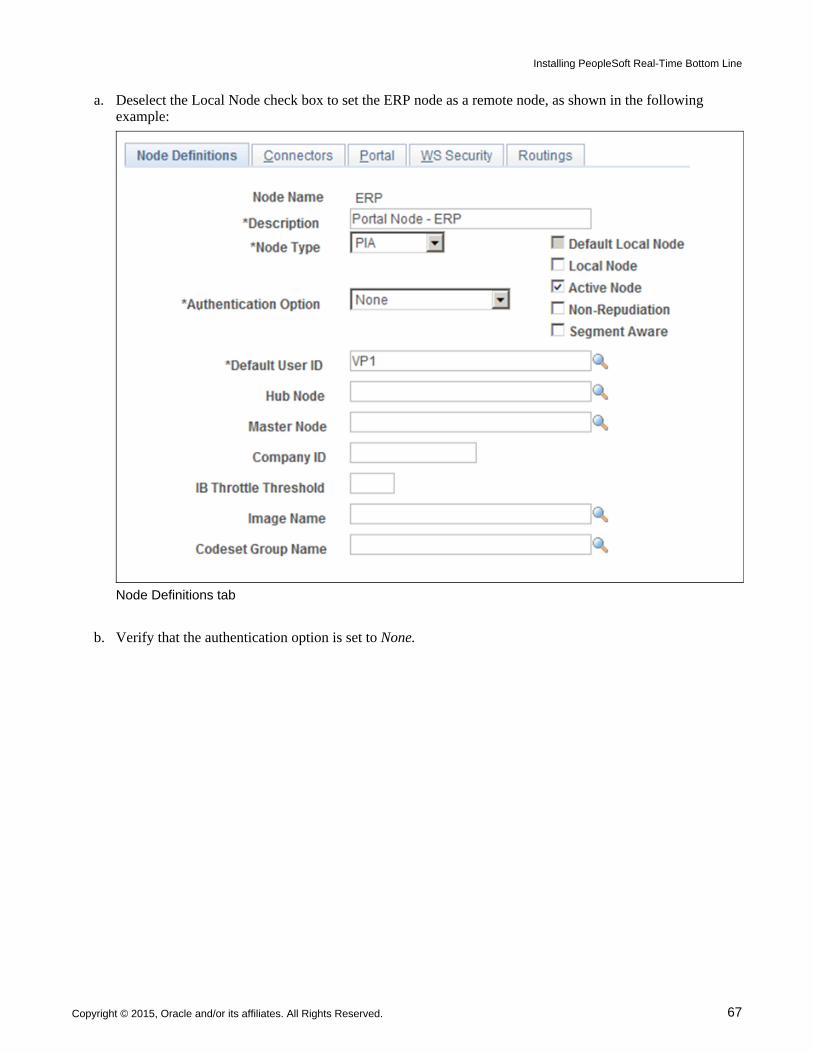
Installing PeopleSoft Real-Time Bottom Line
Copyright © 2015, Oracle and/or its affiliates. All Rights Reserved. 67
a. Deselect the Local Node check box to set the ERP node as a remote node, as shown in the following example:
Node Definitions tab
b. Verify that the authentication option is set to None.
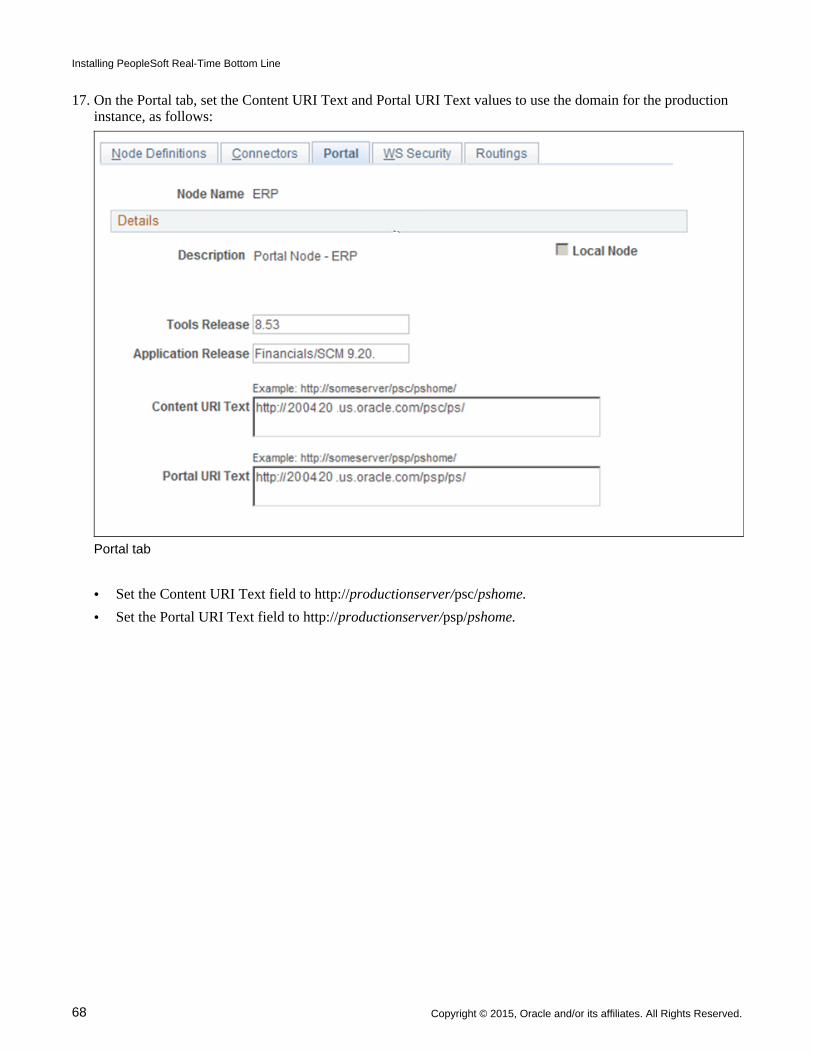
Installing PeopleSoft Real-Time Bottom Line
68 Copyright © 2015, Oracle and/or its affiliates. All Rights Reserved.
17. On the Portal tab, set the Content URI Text and Portal URI Text values to use the domain for the production instance, as follows:
Portal tab
• Set the Content URI Text field to http://productionserver/psc/pshome.
• Set the Portal URI Text field to http://productionserver/psp/pshome.
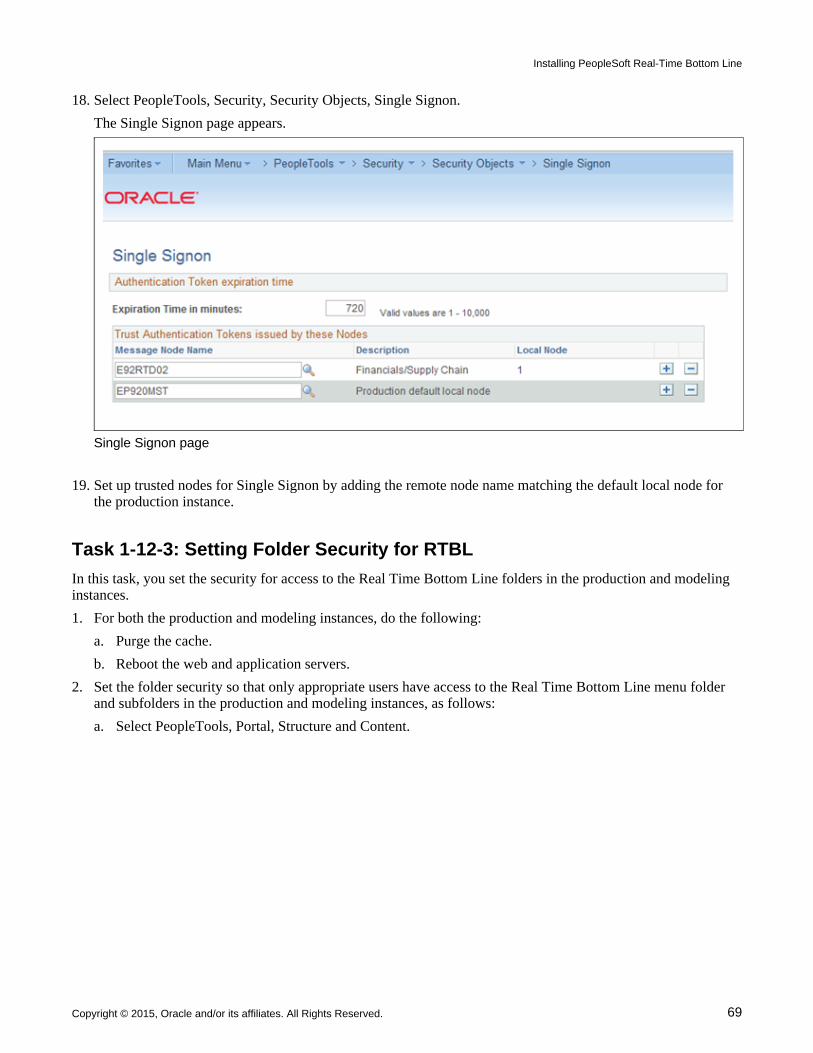
Installing PeopleSoft Real-Time Bottom Line
Copyright © 2015, Oracle and/or its affiliates. All Rights Reserved. 69
18. Select PeopleTools, Security, Security Objects, Single Signon.
The Single Signon page appears.
Single Signon page
19. Set up trusted nodes for Single Signon by adding the remote node name matching the default local node for the production instance.
Task 1-12-3: Setting Folder Security for RTBL
In this task, you set the security for access to the Real Time Bottom Line folders in the production and modeling instances.
1. For both the production and modeling instances, do the following:
a. Purge the cache.
b. Reboot the web and application servers.
2. Set the folder security so that only appropriate users have access to the Real Time Bottom Line menu folder and subfolders in the production and modeling instances, as follows:
a. Select PeopleTools, Portal, Structure and Content.
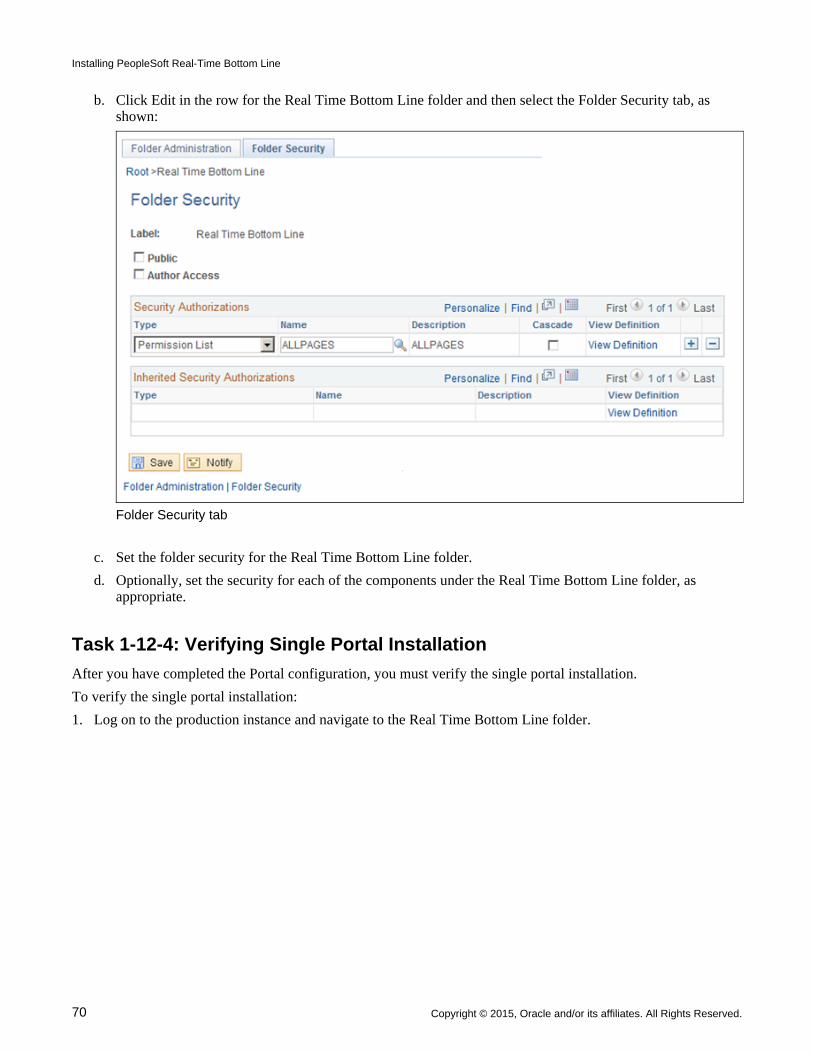
Installing PeopleSoft Real-Time Bottom Line
70 Copyright © 2015, Oracle and/or its affiliates. All Rights Reserved.
b. Click Edit in the row for the Real Time Bottom Line folder and then select the Folder Security tab, as shown:
Folder Security tab
c. Set the folder security for the Real Time Bottom Line folder.
d. Optionally, set the security for each of the components under the Real Time Bottom Line folder, as appropriate.
Task 1-12-4: Verifying Single Portal Installation
After you have completed the Portal configuration, you must verify the single portal installation.
To verify the single portal installation:
1. Log on to the production instance and navigate to the Real Time Bottom Line folder.
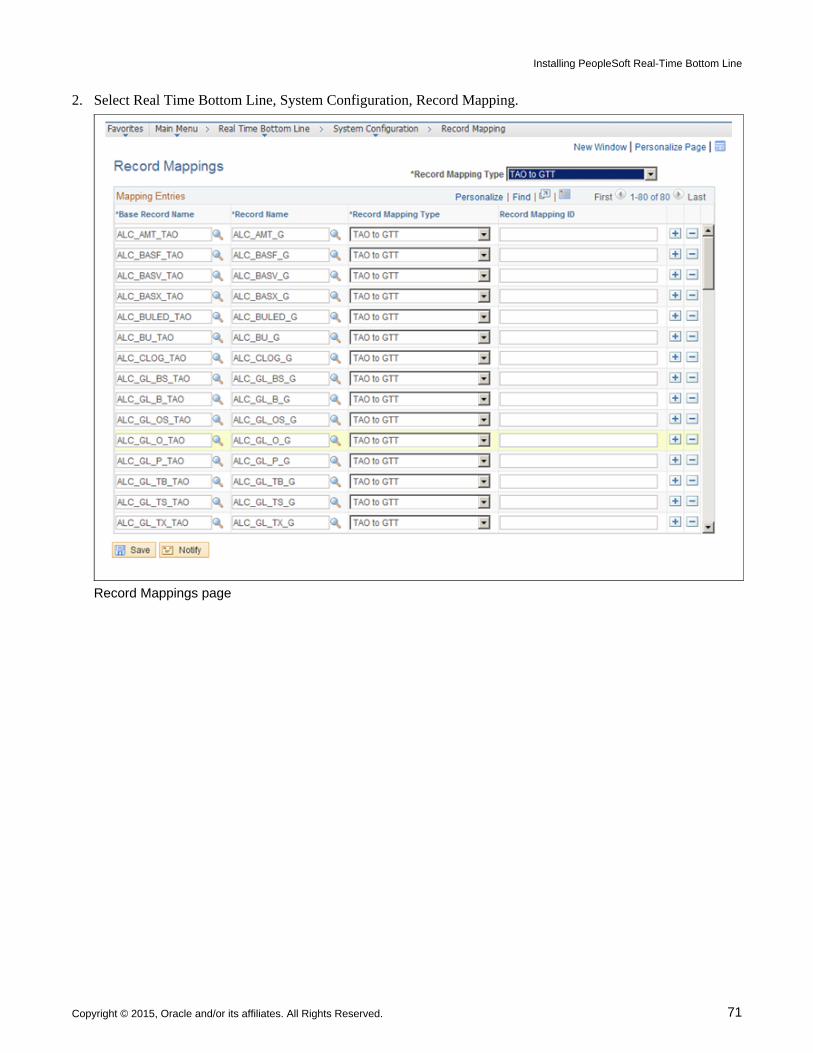
Installing PeopleSoft Real-Time Bottom Line
Copyright © 2015, Oracle and/or its affiliates. All Rights Reserved. 71
2. Select Real Time Bottom Line, System Configuration, Record Mapping.
Record Mappings page
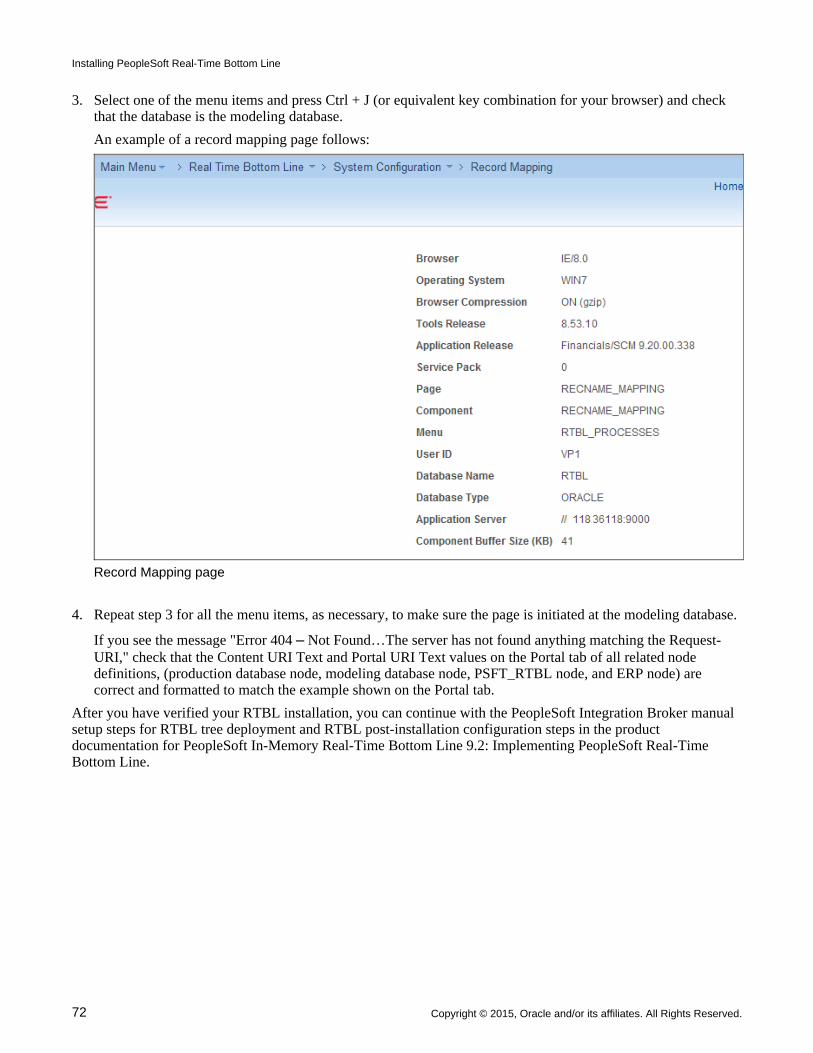
Installing PeopleSoft Real-Time Bottom Line
72 Copyright © 2015, Oracle and/or its affiliates. All Rights Reserved.
3. Select one of the menu items and press Ctrl + J (or equivalent key combination for your browser) and check that the database is the modeling database.
An example of a record mapping page follows:
Record Mapping page
4. Repeat step 3 for all the menu items, as necessary, to make sure the page is initiated at the modeling database.
If you see the message "Error 404 – Not Found…The server has not found anything matching the Request-URI," check that the Content URI Text and Portal URI Text values on the Portal tab of all related node definitions, (production database node, modeling database node, PSFT_RTBL node, and ERP node) are correct and formatted to match the example shown on the Portal tab.
After you have verified your RTBL installation, you can continue with the PeopleSoft Integration Broker manual setup steps for RTBL tree deployment and RTBL post-installation configuration steps in the product documentation for PeopleSoft In-Memory Real-Time Bottom Line 9.2: Implementing PeopleSoft Real-Time Bottom Line.