Embed Size (px)
Citation preview
PeopleSoft Financials/Supply ChainManagement 9.2Installation
March 2013
PeopleSoft Financials/Supply Chain Management 9.2InstallationSKU ifscm92_032013
Copyright © 2013, Oracle and/or its affiliates. All rights reserved.
Trademark NoticeOracle and Java are registered trademarks of Oracle and/or its affiliates. Other namesmay be trademarks of theirrespective owners.Intel and Intel Xeon are trademarks or registered trademarks of Intel Corporation. All SPARC trademarks are usedunder license and are trademarks or registered trademarks of SPARC International, Inc. AMD, Opteron, the AMDlogo, and the AMDOpteron logo are trademarks or registered trademarks of AdvancedMicro Devices. UNIX is aregistered trademark of The Open Group.
License Restrictions Warranty/Consequential Damages DisclaimerThis software and related documentation are provided under a license agreement containing restrictions on use anddisclosure and are protected by intellectual property laws. Except as expressly permitted in your license agreementor allowed by law, youmay not use, copy, reproduce, translate, broadcast, modify, license, transmit, distribute,exhibit, perform, publish, or display any part, in any form, or by anymeans. Reverse engineering, disassembly, ordecompilation of this software, unless required by law for interoperability, is prohibited.
Warranty DisclaimerThe information contained herein is subject to change without notice and is not warranted to be error-free. If you findany errors, please report them to us in writing.
Restricted Rights NoticeIf this is software or related documentation that is delivered to the U.S. Government or anyone licensing it on behalfof the U.S. Government, the following notice is applicable:
U.S. GOVERNMENT RIGHTS
Programs, software, databases, and related documentation and technical data delivered to U.S. Government customersare "commercial computer software" or "commercial technical data" pursuant to the applicable Federal AcquisitionRegulation and agency-specific supplemental regulations. As such, the use, duplication, disclosure, modification, andadaptation shall be subject to the restrictions and license terms set forth in the applicable Government contract, and,to the extent applicable by the terms of the Government contract, the additional rights set forth in FAR 52.227-19,Commercial Computer Software License (December 2007). Oracle America, Inc., 500 Oracle Parkway, RedwoodCity, CA 94065.
Hazardous Applications NoticeThis software or hardware is developed for general use in a variety of informationmanagement applications. It isnot developed or intended for use in any inherently dangerous applications, including applications that may create arisk of personal injury. If you use this software or hardware in dangerous applications, then you shall be responsibleto take all appropriate fail-safe, backup, redundancy, and other measures to ensure its safe use. Oracle Corporationand its affiliates disclaim any liability for any damages caused by use of this software or hardware in dangerousapplications.
Third Party Content, Products, and Services Disclaimer
This software or hardware and documentationmay provide access to or information on content, products, andservices from third parties. Oracle Corporation and its affiliates are not responsible for and expressly disclaimall warranties of any kind with respect to third-party content, products, and services. Oracle Corporation and itsaffiliates will not be responsible for any loss, costs, or damages incurred due to your access to or use of third-partycontent, products, or services.
Contents
PrefaceAbout This Documentation... . . . . . . . . . . .. . . . . . . . . . . . . . . . . . . . . . . . . . . . . . . . . .. . . . . . . . . . . . . . . . . . . . . . . . . . . . . . . . .xvUnderstanding This Documentation.. . . . . . . . . . . . . . . . . . . . . . . . . . . . . . . . . . . . . . . . . . . . . . . . . . . . . . . . . . . . . . . . . . . . . . . . . . . . . . . .xvAudience.. .. . . . . . . . . . . . . . . . . . . . . . . . . . . . . . . . . . . . . . . . . . . . . . . . . . . . . . . . . . . . . . . . . . . . . . . . . . . . . . . . . . . . . . . . . . . . . . . . . . . . . . . . . . . . . .xvTypographical Conventions.. . . . . . . . . . . . . . . . . . . . . . . . . . . . . . . . . . . . . . . . . . . . . . . . . . . . . . . . . . . . . . . . . . . . . . . . . . . . . . . . . . . . . . . . . .xviProducts.. . . . . . . . . . . . . . . . . . . . . . . . . . . . . . . . . . . . . . . . . . . . . . . . . . . . . . . . . . . . . . . . . . . . . . . . . . . . . . . . . . . . . . . . . . . . . . . . . . . . . . . . . . . . . . .xviiRelated Information.. . . . . . . . . . . . . . . . . . . . . . . . . . . . . . . . . . . . . . . . . . . . . . . . . . . . . . . . . . . . . . . . . . . . . . . . . . . . . . . . . . . . . . . . . . . . . . . . . .xviiiComments and Suggestions.. . . . . . . . . . . . . . . . . . . . . . . . . . . . . . . . . . . . . . . . . . . . . . . . . . . . . . . . . . . . . . . . . . . . . . . . . . . . . . . . . . . . . . . .xviii
Chapter 1Part I: Common Elements to Install PeopleSoft FMS, ESA, SFO, and SCMApplications.... . . . . . . . . . . . .. . . . . . . . . . . . . . . .. . . . . . . . . . . . . . . . .. . . . . . . . . . . . .. . . . . . . . . . . . . .. . . . . . . . . . . . . .. . . . . . . . . . . .1Understanding Part I. . . . . . . . . . . . . . . . . . . . . . . . . . . . . . . . . . . . . . . . . . . . . . . . . . . . . . . . . . . . . . . . . . . . . . . . . . . . . . . . . . . . . . . . . . . . . . . . . . . . .1Using the Oracle Software Delivery Cloud to Obtain Installation Files.. . . . . . . . . . . . . . . . . . . . . . . . . . . . . . . . . . . . . . . . . . .1
Chapter 2Installing PeopleSoft PeopleTools and Creating the PeopleSoft Financials/SupplyChain Management Database.... . . . . . . . . . . . . . . .. . . . . . . . . . . . . . . . . . . . . . . . . . . . . . . . . . . . . . . . . . . . . . . . . . . . . . . . . . . . .3Prerequisites.. . . . . . . . . . . . . . . . . . . . . . . . . . . . . . . . . . . . . . . . . . . . . . . . . . . . . . . . . . . . . . . . . . . . . . . . . . . . . . . . . . . . . . . . . . . . . . . . . . . . . . . . . . . . .3Installing PeopleSoft PeopleTools and Creating the PeopleSoft FSCM Database. . . . . . . . . . . . . . . . . . . . . . . . . . . . . .3
Verifying the PeopleSoft PeopleTools Version.. . . . . . . . . . . . . . . . . . . . . . . . . . . . . . . . . . . . . . . . . . . . . . . . . . . . . . . . .. . . . . . . . . .4Reviewing the PeopleSoft FSCM Demo Database Sizing Information.. . . . . . . . . . . . . . . . . . . . . . . . . . . . .. . . . . . . . . .4Installing Application Files to the Custom PS_APP_HOME Location. . . . . . . . . . . . . . . . . . . . . . . . . . . . . . .. . . . . . . . . .4Installing the PeopleSoft FSCM Database on Sybase.. .. . . . . . . . . . . . . . . . . . . . . . . . . . . . . . . . . . . . . . . . . . . . . .. . . . . . . . . .5Reviewing EDM Pool Considerations.. . . . . . . . . . . . . . . . . . . . . . . . . . . . . . . . . . . . . . . . . . . . . . . . . . . . . . . . . . . . . . . . . . .. . . . . . . . . .5Setting Up Installation Defaults for the PeopleSoft FSCM System Database.. . . . . . . . . . . . . . . . . . . . .. . . . . . . . . .5Deleting Summary Trees for the PeopleSoft FSCM System Database.. . . . . . . . . . . . . . . . . . . . . . . . . . . .. . . . . . . . . .5Reviewing DDDAUDIT Result . . . . . . . . . . . . . . . . . . . . . . . . . . . . . . . . . . . . . . . . . . . . . . . . . . . . . . . . . . . . . . . . . . . . . . . . . . . .. . . . . . . . . .5
Chapter 3Configuring Application SQRs and COBOL for DB2 and the OS/390 Server. . . . . . . . . . . . . . . . . . . . .7Understanding SQR and COBOL Processing on the DB2 z/OS Server. . . . . . . . . . . . . . . . . . . . . . . . . . . . . . . . . . . . . . . . . .7
Copyright © 2013, Oracle and/or its affiliates. All rights reserved. v
Contents
Allocating Data Sets on the OS/390 File.. . . . . . . . . . . . . . . . . . . . . . . . . . . . . . . . . . . . . . . . . . . . . . . . . . . . . . . . . . . . . . . . . . . . . . . . . . . . .7Modifying the JCL Shells. . . . . . . . . . . . . . . . . . . . . . . . . . . . . . . . . . . . . . . . . . . . . . . . . . . . . . . . . . . . . . . . . . . . . . . . . . . . . . . . . . . . . . . . . . . . . . . .9
Chapter 4Setting Database Requirements to Run the ChartField Configuration Process. . . . . . . . . . . . . . .11Understanding Database Requirements for the ChartField Configuration Process. . . . . . . . . . . . . . . . . . . . . . . . . . .11Defining Settings to Run ChartField Configuration.. . . . . . . . . . . . . . . . . . . . . . . . . . . . . . . . . . . . . . . . . . . . . . . . . . . . . . . . . . . . . . . .11
Chapter 5Setting Up Mobile Approvals.... . . . . . . . . .. . . . . . . . . . . . . .. . . . . . . . . . . . . . .. . . . . . . . . . . . . .. . . . . . . . . . . . . . . . . . . . . . .13Prerequisites.. . . . . . . . . . . . . . . . . . . . . . . . . . . . . . . . . . . . . . . . . . . . . . . . . . . . . . . . . . . . . . . . . . . . . . . . . . . . . . . . . . . . . . . . . . . . . . . . . . . . . . . . . . .13Granting Security to Users.. . . . . . . . . . . . . . . . . . . . . . . . . . . . . . . . . . . . . . . . . . . . . . . . . . . . . . . . . . . . . . . . . . . . . . . . . . . . . . . . . . . . . . . . . . .13Configuring Mobile Approvals... . . . . . . . . . . . . . . . . . . . . . . . . . . . . . . . . . . . . . . . . . . . . . . . . . . . . . . . . . . . . . . . . . . . . . . . . . . . . . . . . . . . . . .13
Chapter 6Configuring Global Search Using Oracle Secure Enterprise Search (SES). . . . . . . . . . . . . . . . . . . . .15Understanding Configuring Global Search Using Oracle Secure Enterprise Search.. . . . . . . . . . . . . . . . . . . . . . . . .15Prerequisites.. . . . . . . . . . . . . . . . . . . . . . . . . . . . . . . . . . . . . . . . . . . . . . . . . . . . . . . . . . . . . . . . . . . . . . . . . . . . . . . . . . . . . . . . . . . . . . . . . . . . . . . . . . .15Defining New Roles for Global Search.. . . . . . . . . . . . . . . . . . . . . . . . . . . . . . . . . . . . . . . . . . . . . . . . . . . . . . . . . . . . . . . . . . . . . . . . . . . . .16Defining Search Group Display.. . . . . . . . . . . . . . . . . . . . . . . . . . . . . . . . . . . . . . . . . . . . . . . . . . . . . . . . . . . . . . . . . . . . . . . . . . . . . . . . . . . . . .17
Understanding Search Group Display.. . . . . . . . . . . . . . . . . . . . . . . . . . . . . . . . . . . . . . . . . . . . . . . . . . . . . . . . . . . . . . . . . .. . . . . . . .17Adding the Search Group to the Home Page Search Context. . . . . . . . . . . . . . . . . . . . . . . . . . . . . . . . . . . . . . .. . . . . . . .17Enabling the Global Search Box in the Page Header.. . . . . . . . . . . . . . . . . . . . . . . . . . . . . . . . . . . . . . . . . . . . . . . . .. . . . . . . .17
Verifying the Setup of Portal Node in PeopleSoft FSCM ... . . . . . . . . . . . . . . . . . . . . . . . . . . . . . . . . . . . . . . . . . . . . . . . . . . . . . .18Configuring Attachments for FSCM Search Definitions.. . . . . . . . . . . . . . . . . . . . . . . . . . . . . . . . . . . . . . . . . . . . . . . . . . . . . . . . . .18Deploying and Indexing Delivered Search Definitions.. . . . . . . . . . . . . . . . . . . . . . . . . . . . . . . . . . . . . . . . . . . . . . . . . . . . . . . . . . . .20
Deploying Indexes.. . . . . . . . . . . . . . . . . . . . . . . . . . . . . . . . . . . . . . . . . . . . . . . . . . . . . . . . . . . . . . . . . . . . . . . . . . . . . . . . . . . . . . . . .. . . . . . . .20Building an Index.. . . . . . . . . . . . . . . . . . . . . . . . . . . . . . . . . . . . . . . . . . . . . . . . . . . . . . . . . . . . . . . . . . . . . . . . . . . . . . . . . . . . . . . . . .. . . . . . . .20
Upgrading File Attachments.. . . . . . . . . . . . . . . . . . . . . . . . . . . . . . . . . . . . . . . . . . . . . . . . . . . . . . . . . . . . . . . . . . . . . . . . . . . . . . . . . . . . . . . . . .21
Chapter 7Part II: Installing PeopleSoft FMS, ESA and SFO Applications.. . . . . . . . . . . . . . . . . . . . . . . . . . . . . . . . . . .25Understanding Part II. . . . . . . . . . . . . . . . . . . . . . . . . . . . . . . . . . . . . . . . . . . . . . . . . . . . . . . . . . . . . . . . . . . . . . . . . . . . . . . . . . . . . . . . . . . . . . . . . .25
vi Copyright © 2013, Oracle and/or its affiliates. All rights reserved.
Contents
Chapter 8Installing PeopleSoft 9.2 General Ledger.. . . . . . . . . . . . . . . . . . . . . . . . . . . . . . . . . . . . . . . . . . . . . . . . . . . . . . . . . . . . . .27Prerequisites.. . . . . . . . . . . . . . . . . . . . . . . . . . . . . . . . . . . . . . . . . . . . . . . . . . . . . . . . . . . . . . . . . . . . . . . . . . . . . . . . . . . . . . . . . . . . . . . . . . . . . . . . . . .27Changing a URL Definition for General Ledger File Import (Optional). . . . . . . . . . . . . . . . . . . . . . . . . . . . . . . . . . . . . . . . . .27Defining an Environmental Variable on a Process Scheduler Server. . . . . . . . . . . . . . . . . . . . . . . . . . . . . . . . . . . . . . . . . . .28Running File Import Processes Using the z/OS Database.. . . . . . . . . . . . . . . . . . . . . . . . . . . . . . . . . . . . . . . . . . . . . . . . . . . . . . .28
Chapter 9Installing and Setting Up Forms Processing for PeopleSoft 9.2 Grants.. . . . . . . . . . . . . . . . . . . . . . . .29Understanding Forms Processing.. . . . . . . . . . . . . . . . . . . . . . . . . . . . . . . . . . . . . . . . . . . . . . . . . . . . . . . . . . . . . . . . . . . . . . . . . . . . . . . . . . .29Downloading the Forms from the Sponsor Web Sites.. . . . . . . . . . . . . . . . . . . . . . . . . . . . . . . . . . . . . . . . . . . . . . . . . . . . . . . . . . . .29Setting Up the Forms URL Maintenance Area in PeopleSoft. . . . . . . . . . . . . . . . . . . . . . . . . . . . . . . . . . . . . . . . . . . . . . . . . . . . .30Entering the Names of the PDF Templates (Optional).. . . . . . . . . . . . . . . . . . . . . . . . . . . . . . . . . . . . . . . . . . . . . . . . . . . . . . . . . . . .31Printing the Forms (Optional). . . . . . . . . . . . . . . . . . . . . . . . . . . . . . . . . . . . . . . . . . . . . . . . . . . . . . . . . . . . . . . . . . . . . . . . . . . . . . . . . . . . . . . . .32Viewing Reports.. . . . . . . . . . . . . . . . . . . . . . . . . . . . . . . . . . . . . . . . . . . . . . . . . . . . . . . . . . . . . . . . . . . . . . . . . . . . . . . . . . . . . . . . . . . . . . . . . . . . . . .33
Chapter 10Installing PeopleSoft 9.2 Expenses.... . . . . . . . . . . . .. . . . . . . . . . . . . . . .. . . . . . . . . . . . . . . .. . . . . . . . . . . . . . . . . . . . . . .37Configuring PeopleSoft Integration Broker.. . . . . . . . . . . . . . . . . . . . . . . . . . . . . . . . . . . . . . . . . . . . . . . . . . . . . . . . . . . . . . . . . . . . . . . . .37
Understanding the PeopleSoft Integration Broker Configuration.. . . . . . . . . . . . . . . . . . . . . . . . . . . . . . . . . . . .. . . . . . . .37Setting Up Gateways.. .. . . . . . . . . . . . . . . . . . . . . . . . . . . . . . . . . . . . . . . . . . . . . . . . . . . . . . . . . . . . . . . . . . . . . . . . . . . . . . . . . . . .. . . . . . . .37Activating the Local Domain.. . . . . . . . . . . . . . . . . . . . . . . . . . . . . . . . . . . . . . . . . . . . . . . . . . . . . . . . . . . . . . . . . . . . . . . . . . . . . .. . . . . . . .39Activating Queue Definitions.. . . . . . . . . . . . . . . . . . . . . . . . . . . . . . . . . . . . . . . . . . . . . . . . . . . . . . . . . . . . . . . . . . . . . . . . . . . . .. . . . . . . .40Setting up Service and Handlers.. . . . . . . . . . . . . . . . . . . . . . . . . . . . . . . . . . . . . . . . . . . . . . . . . . . . . . . . . . . . . . . . . . . . . . . .. . . . . . . .41Verifying the Message Channel Status.. . . . . . . . . . . . . . . . . . . . . . . . . . . . . . . . . . . . . . . . . . . . . . . . . . . . . . . . . . . . . . . . .. . . . . . . .43
Configuring the Employee Portal Servlet URL.... . . . . . . . . . . . . . . . . . . . . . . . . . . . . . . . . . . . . . . . . . . . . . . . . . . . . . . . . . . . . . . . . . .44
Chapter 11Installing PeopleSoft 9.2 Pay/Bill Management... . . . . . . . . . . . . . . . . . . . . . . . . . . . . . . . . . . . . . . . . . . . . . . . . . . . . .47Understanding PeopleSoft 9.2 Pay/Bill Management. . . . . . . . . . . . . . . . . . . . . . . . . . . . . . . . . . . . . . . . . . . . . . . . . . . . . . . . . . . . .47Prerequisites.. . . . . . . . . . . . . . . . . . . . . . . . . . . . . . . . . . . . . . . . . . . . . . . . . . . . . . . . . . . . . . . . . . . . . . . . . . . . . . . . . . . . . . . . . . . . . . . . . . . . . . . . . . .47Verifying Integration Points.. . . . . . . . . . . . . . . . . . . . . . . . . . . . . . . . . . . . . . . . . . . . . . . . . . . . . . . . . . . . . . . . . . . . . . . . . . . . . . . . . . . . . . . . . . .47
Understanding Integration Points Verification... . . . . . . . . . . . . . . . . . . . . . . . . . . . . . . . . . . . . . . . . . . . . . . . . . . . . . . . .. . . . . . . .48Setting Up Node Definitions for Single Signon.. . . . . . . . . . . . . . . . . . . . . . . . . . . . . . . . . . . . . . . . . . . . . . . . . . . . . . . .. . . . . . . .48Setting Up Portal Nodes.. . . . . . . . . . . . . . . . . . . . . . . . . . . . . . . . . . . . . . . . . . . . . . . . . . . . . . . . . . . . . . . . . . . . . . . . . . . . . . . . . .. . . . . . . .52Setting Up Single Signon.. . . . . . . . . . . . . . . . . . . . . . . . . . . . . . . . . . . . . . . . . . . . . . . . . . . . . . . . . . . . . . . . . . . . . . . . . . . . . . . . .. . . . . . . .56Setting Up Integration Gateways.. . . . . . . . . . . . . . . . . . . . . . . . . . . . . . . . . . . . . . . . . . . . . . . . . . . . . . . . . . . . . . . . . . . . . . . .. . . . . . . .57
Copyright © 2013, Oracle and/or its affiliates. All rights reserved. vii
Contents
Activating Local Domains.. . . . . . . . . . . . . . . . . . . . . . . . . . . . . . . . . . . . . . . . . . . . . . . . . . . . . . . . . . . . . . . . . . . . . . . . . . . . . . . . .. . . . . . . .63Activating Queue Definitions.. . . . . . . . . . . . . . . . . . . . . . . . . . . . . . . . . . . . . . . . . . . . . . . . . . . . . . . . . . . . . . . . . . . . . . . . . . . . .. . . . . . . .64Setting Up the PeopleSoft System-Delivered Service Operations.. . . . . . . . . . . . . . . . . . . . . . . . . . . . . . . . . .. . . . . . . .68
Verifying the Installation Table for PeopleSoft HCM and PeopleSoft FSCM.... . . . . . . . . . . . . . . . . . . . . . . . . . . . . . . . .68Verifying the Installation Table for PeopleSoft HCM... . . . . . . . . . . . . . . . . . . . . . . . . . . . . . . . . . . . . . . . . . . . . . . . .. . . . . . . .68Verifying the Installation Table for PeopleSoft FSCM... . . . . . . . . . . . . . . . . . . . . . . . . . . . . . . . . . . . . . . . . . . . . . . .. . . . . . . .69
Chapter 12Installing Notifications Framework for PeopleSoft 9.2 Purchasing.. . . . . . . . . . . . . . . . . . . . . . . . . . . . . .71Understanding Notifications Framework for PeopleSoft 9.2 Purchasing.. . . . . . . . . . . . . . . . . . . . . . . . . . . . . . . . . . . . . . .71Activating the Local Domain.. . . . . . . . . . . . . . . . . . . . . . . . . . . . . . . . . . . . . . . . . . . . . . . . . . . . . . . . . . . . . . . . . . . . . . . . . . . . . . . . . . . . . . . . .71Verifying the Message Channel Status.. . . . . . . . . . . . . . . . . . . . . . . . . . . . . . . . . . . . . . . . . . . . . . . . . . . . . . . . . . . . . . . . . . . . . . . . . . . . .72Configuring the Employee Portal Servlet URL... . . . . . . . . . . . . . . . . . . . . . . . . . . . . . . . . . . . . . . . . . . . . . . . . . . . . . . . . . . . . . . . . . . .72
Chapter 13Installing PeopleSoft 9.2 ESA and FSCM Portal Packs... . . . . . . . . . . . . . . . . . . . . . . . . . . . . . . . . . . . . . . . . . . .75Granting Access to Navigation Pages.. . . . . . . . . . . . . . . . . . . . . . . . . . . . . . . . . . . . . . . . . . . . . . . . . . . . . . . . . . . . . . . . . . . . . . . . . . . . . .75Granting Access to Personalize the Portal Homepage... . . . . . . . . . . . . . . . . . . . . . . . . . . . . . . . . . . . . . . . . . . . . . . . . . . . . . . . . .75Enabling Pagelet Creation and Access with Portal Utilities.. . . . . . . . . . . . . . . . . . . . . . . . . . . . . . . . . . . . . . . . . . . . . . . . . . . . . .75
Chapter 14Integrating PeopleSoft 9.2 Project Costing and Program Management withMicrosoft Project 2007 or 2010..... . . . . . . . . . . . . . . . . . . . . . . . . . . . . . . . . . . . . . . . . . . . . . . . . . . . . . . . . . . . . . . . . . . . . . . . .77Understanding the PeopleSoft-Microsoft Project Integration.. . . . . . . . . . . . . . . . . . . . . . . . . . . . . . . . . . . . . . . . . . . . . . . . . . . .77Installing the PeopleSoft-Microsoft Project Integrator. . . . . . . . . . . . . . . . . . . . . . . . . . . . . . . . . . . . . . . . . . . . . . . . . . . . . . . . . . . . .77Configuring the PeopleSoft-Microsoft Project Integrator. . . . . . . . . . . . . . . . . . . . . . . . . . . . . . . . . . . . . . . . . . . . . . . . . . . . . . . . . .78
Chapter 15Defining an FTP Server for File Attachments in PeopleSoft 9.2 Project Costing . . . . . . . . . . . . .81Understanding File Attachment Storage.. .. . . . . . . . . . . . . . . . . . . . . . . . . . . . . . . . . . . . . . . . . . . . . . . . . . . . . . . . . . . . . . . . . . . . . . . . .81Setting Up File Attachment Storage on the Database.. . . . . . . . . . . . . . . . . . . . . . . . . . . . . . . . . . . . . . . . . . . . . . . . . . . . . . . . . . . .81Setting Up File Attachment Storage on a File Server.. . . . . . . . . . . . . . . . . . . . . . . . . . . . . . . . . . . . . . . . . . . . . . . . . . . . . . . . . . . . .81
Chapter 16Setting Up PeopleSoft 9.2 Staffing Front Office.. . . . . . . . . . . . . . . . . . . . . . . . . . . . . . . . . . . . . . . . . . . . . . . . . . . . . .83
viii Copyright © 2013, Oracle and/or its affiliates. All rights reserved.
Contents
Setting Up Document Attachments.. . . . . . . . . . . . . . . . . . . . . . . . . . . . . . . . . . . . . . . . . . . . . . . . . . . . . . . . . . . . . . . . . . . . . . . . . . . . . . . . .83Setting Up the Secured Enterprise Search Engine.. . . . . . . . . . . . . . . . . . . . . . . . . . . . . . . . . . . . . . . . . . . . . . . . . . . . . . . . . . . . . . .85Integrating Resume Parsing for PeopleSoft Staffing Front Office.. . . . . . . . . . . . . . . . . . . . . . . . . . . . . . . . . . . . . . . . . . . . . . .85
Understanding Resume Parsing for PeopleSoft Staffing Front Office. .. . . . . . . . . . . . . . . . . . . . . . . . . . . . .. . . . . . . .85Setting up Staffing Installation Options for Resume Parsing... . . . . . . . . . . . . . . . . . . . . . . . . . . . . . . . . . . . . . . .. . . . . . . .85Configuring the PeopleSoft Integration Broker. . . . . . . . . . . . . . . . . . . . . . . . . . . . . . . . . . . . . . . . . . . . . . . . . . . . . . . . .. . . . . . . .87Setting Up Mapping.. . . . . . . . . . . . . . . . . . . . . . . . . . . . . . . . . . . . . . . . . . . . . . . . . . . . . . . . . . . . . . . . . . . . . . . . . . . . . . . . . . . . . . .. . . . . . . .94Assigning Mapping Setups.. . . . . . . . . . . . . . . . . . . . . . . . . . . . . . . . . . . . . . . . . . . . . . . . . . . . . . . . . . . . . . . . . . . . . . . . . . . . . . .. . . . . . .102Defining Mapping Values.. . . . . . . . . . . . . . . . . . . . . . . . . . . . . . . . . . . . . . . . . . . . . . . . . . . . . . . . . . . . . . . . . . . . . . . . . . . . . . . . .. . . . . . .103
Chapter 17Integrating PeopleSoft Transaction Billing Processor with PeopleSoft CustomerRelationship Management... . . . . . . . . . . . . . . . . . . . . . . . . . . . . . . . . . . . . . . . . . . . . . . . . . . . . . . . . . . . . . . . . . . . . . . . . . . . . . .105Understanding PeopleSoft Transaction Billing Processor and PeopleSoft Customer RelationshipManagement Integration... . . . . . . . . . . . . . . . . . . . . . . . . . . . . . . . . . . . . . . . . . . . . . . . . . . . . . . . . . . . . . . . . . . . . . . . . . . . . . . . . . . . . . . . . . . .105Turning On and Activating the Integration Queues.. . . . . . . . . . . . . . . . . . . . . . . . . . . . . . . . . . . . . . . . . . . . . . . . . . . . . . . . . . . . . .105Turning On and Activating the Integration Services and Routings.. . . . . . . . . . . . . . . . . . . . . . . . . . . . . . . . . . . . . . . . . . . . .106Transforming the Contract Transaction Service.. . . . . . . . . . . . . . . . . . . . . . . . . . . . . . . . . . . . . . . . . . . . . . . . . . . . . . . . . . . . . . . . . .112
Chapter 18Installing PeopleSoft 9.2 Maintenance Management with Microsoft Project2007/2010... . . . . . . . . . . . . . . . . . . . . . . . . . . . . . . . . . . . . . . . . . . . . . . . . . . . . . . . . . . . . . . . . . . . . . . . . . . . . . . . . . . . . . . . . . . . . . . . . . . .117Prerequisites.. . . . . . . . . . . . . . . . . . . . . . . . . . . . . . . . . . . . . . . . . . . . . . . . . . . . . . . . . . . . . . . . . . . . . . . . . . . . . . . . . . . . . . . . . . . . . . . . . . . . . . . . . .117Installing the PeopleSoft PeopleTools Process Scheduler on a Microsoft Windows Machine. . . . . . . . . . . . . .117Installing Microsoft Project 2007/2010.. . . . . . . . . . . . . . . . . . . . . . . . . . . . . . . . . . . . . . . . . . . . . . . . . . . . . . . . . . . . . . . . . . . . . . . . . . . . .118Configuring the Microsoft Project Integration Process.. . . . . . . . . . . . . . . . . . . . . . . . . . . . . . . . . . . . . . . . . . . . . . . . . . . . . . . . . . .118
Chapter 19Installing PeopleSoft Maintenance Management 9.2 Work Order Attachment Print. . . . . . . . .121Understanding PeopleSoft Work Order Attachment Print. . . . . . . . . . . . . . . . . . . . . . . . . . . . . . . . . . . . . . . . . . . . . . . . . . . . . . . .121Prerequisites.. . . . . . . . . . . . . . . . . . . . . . . . . . . . . . . . . . . . . . . . . . . . . . . . . . . . . . . . . . . . . . . . . . . . . . . . . . . . . . . . . . . . . . . . . . . . . . . . . . . . . . . . . .121Verifying the URLs and the Installation Location.. . . . . . . . . . . . . . . . . . . . . . . . . . . . . . . . . . . . . . . . . . . . . . . . . . . . . . . . . . . . . . . . .122
Modifying the Attachment Print Command URL... . . . . . . . . . . . . . . . . . . . . . . . . . . . . . . . . . . . . . . . . . . . . . . . . . . . . .. . . . . . .122Modifying the Attachment Print Directory URL for an Alternate Download Holding Directory. . . .. . . . . . .123
Enabling the PeopleSoft Work Order Attachment Print Features.. . . . . . . . . . . . . . . . . . . . . . . . . . . . . . . . . . . . . . . . . . . . . .123
Copyright © 2013, Oracle and/or its affiliates. All rights reserved. ix
Contents
Chapter 20Integrating PeopleSoft 9.2 Asset Management and Physical Inventory Solutions. . . . . . . . . . .125Understanding the Integration of PeopleSoft 9.2 Asset Management with Physical InventoryUsing Web Services.. . . . . . . . . . . . . . . . . . . . . . . . . . . . . . . . . . . . . . . . . . . . . . . . . . . . . . . . . . . . . . . . . . . . . . . . . . . . . . . . . . . . . . . . . . . . . . . . . .125Configuring the Local Gateway.. . . . . . . . . . . . . . . . . . . . . . . . . . . . . . . . . . . . . . . . . . . . . . . . . . . . . . . . . . . . . . . . . . . . . . . . . . . . . . . . . . . . .125Configuring the Inbound Nodes.. . . . . . . . . . . . . . . . . . . . . . . . . . . . . . . . . . . . . . . . . . . . . . . . . . . . . . . . . . . . . . . . . . . . . . . . . . . . . . . . . . . .126Activating Service Operations.. . . . . . . . . . . . . . . . . . . . . . . . . . . . . . . . . . . . . . . . . . . . . . . . . . . . . . . . . . . . . . . . . . . . . . . . . . . . . . . . . . . . . .128Running Message Channel. . . . . . . . . . . . . . . . . . . . . . . . . . . . . . . . . . . . . . . . . . . . . . . . . . . . . . . . . . . . . . . . . . . . . . . . . . . . . . . . . . . . . . . . . .133Activating the Domain for Asynchronous Messaging.. . . . . . . . . . . . . . . . . . . . . . . . . . . . . . . . . . . . . . . . . . . . . . . . . . . . . . . . . . . .134
Chapter 21Integrating PeopleSoft 9.2 IT Asset Management with Network Inventory DiscoverySystems.... . . . . . . . . . . . . . . .. . . . . . . . . . . . . . . . . . . . .. . . . . . . . . . . . . . . . . .. . . . . . . . . . . . . . . . . .. . . . . . . . . . . . . . . . .. . . . . . . . . . .137Understanding the Integration of PeopleSoft 9.2 IT Asset Management with Network InventoryDiscovery Systems... . . . . . . . . . . . . . . . . . . . . . . . . . . . . . . . . . . . . . . . . . . . . . . . . . . . . . . . . . . . . . . . . . . . . . . . . . . . . . . . . . . . . . . . . . . . . . . . . .137Configuring the Local Gateway.. . . . . . . . . . . . . . . . . . . . . . . . . . . . . . . . . . . . . . . . . . . . . . . . . . . . . . . . . . . . . . . . . . . . . . . . . . . . . . . . . . . . .137Configuring the Inbound Nodes.. . . . . . . . . . . . . . . . . . . . . . . . . . . . . . . . . . . . . . . . . . . . . . . . . . . . . . . . . . . . . . . . . . . . . . . . . . . . . . . . . . . .138Activating Service Operations.. . . . . . . . . . . . . . . . . . . . . . . . . . . . . . . . . . . . . . . . . . . . . . . . . . . . . . . . . . . . . . . . . . . . . . . . . . . . . . . . . . . . . .140Managing Queue Status.. . . . . . . . . . . . . . . . . . . . . . . . . . . . . . . . . . . . . . . . . . . . . . . . . . . . . . . . . . . . . . . . . . . . . . . . . . . . . . . . . . . . . . . . . . . . .143Activating the Domain for Asynchronous Messaging.. . . . . . . . . . . . . . . . . . . . . . . . . . . . . . . . . . . . . . . . . . . . . . . . . . . . . . . . . . . .144
Chapter 22Part III: Installing PeopleSoft Supply Chain Management Applications. . . . . . . . . . . . . . . . . . . . . . . .147Understanding Part III. . . . . . . . . . . . . . . . . . . . . . . . . . . . . . . . . . . . . . . . . . . . . . . . . . . . . . . . . . . . . . . . . . . . . . . . . . . . . . . . . . . . . . . . . . . . . . . . .147
Chapter 23Installing PeopleSoft 9.2 eProcurement... . . . . . . . . . . . . . . . . . . . . . . . . . . . . . . . . . . . . . . . . . . . . . . . . . . . . . . . . . . . . .149Understanding PeopleSoft eProcurement 9.2. . . . . . . . . . . . . . . . . . . . . . . . . . . . . . . . . . . . . . . . . . . . . . . . . . . . . . . . . . . . . . . . . . . . .149Installing PeopleSoft eProcurement CUP Item Export. . . . . . . . . . . . . . . . . . . . . . . . . . . . . . . . . . . . . . . . . . . . . . . . . . . . . . . . . . .149
Chapter 24Installing PeopleSoft 9.2 Mobile Inventory Management... . . . . . . . . . . . . . . . . . . . . . . . . . . . . . . . . . . . . . . . .153Understanding the PeopleSoft 9.2 Mobile Inventory Management Product. . . . . . . . . . . . . . . . . . . . . . . . . . . . . . . . . . .153Prerequisites.. . . . . . . . . . . . . . . . . . . . . . . . . . . . . . . . . . . . . . . . . . . . . . . . . . . . . . . . . . . . . . . . . . . . . . . . . . . . . . . . . . . . . . . . . . . . . . . . . . . . . . . . . .154Accessing Installation Files. . . . . . . . . . . . . . . . . . . . . . . . . . . . . . . . . . . . . . . . . . . . . . . . . . . . . . . . . . . . . . . . . . . . . . . . . . . . . . . . . . . . . . . . . .155Installing the Oracle WebLogic Server for Mobile.. . . . . . . . . . . . . . . . . . . . . . . . . . . . . . . . . . . . . . . . . . . . . . . . . . . . . . . . . . . . . . . .156
x Copyright © 2013, Oracle and/or its affiliates. All rights reserved.

Contents
Understanding the Oracle WebLogic Server Installation for Mobile. . . . . . . . . . . . . . . . . . . . . . . . . . . . . . . . .. . . . . . .156Installing the Oracle WebLogic Server for PeopleSoft Mobile Inventory Management.. . . . . . . . . . .. . . . . . .156Starting the Configuration Wizard to Define a New Domain.. . . . . . . . . . . . . . . . . . . . . . . . . . . . . . . . . . . . . . . . .. . . . . . .162
Installing the Oracle Application Development Runtime Installer for PeopleSoft Mobile InventoryManagement.. . . . . . . . . . . . . . . . . . . . . . . . . . . . . . . . . . . . . . . . . . . . . . . . . . . . . . . . . . . . . . . . . . . . . . . . . . . . . . . . . . . . . . . . . . . . . . . . . . . . . . . . . .171
Understanding the Oracle Application Development Runtime Installer for PeopleSoft MobileInventory Management.. . . . . . . . . . . . . . . . . . . . . . . . . . . . . . . . . . . . . . . . . . . . . . . . . . . . . . . . . . . . . . . . . . . . . . . . . . . . . . . . . . .. . . . . . .172Installing the Oracle Application Development Runtime Installer for PeopleSoft MobileInventory Management.. . . . . . . . . . . . . . . . . . . . . . . . . . . . . . . . . . . . . . . . . . . . . . . . . . . . . . . . . . . . . . . . . . . . . . . . . . . . . . . . . . .. . . . . . .172Configuring Components Using the Configuration Wizard.. . . . . . . . . . . . . . . . . . . . . . . . . . . . . . . . . . . . . . . . . . .. . . . . . .181Starting the Administration Server... . . . . . . . . . . . . . . . . . . . . . . . . . . . . . . . . . . . . . . . . . . . . . . . . . . . . . . . . . . . . . . . . . . . . .. . . . . . .188
Applying the PeopleSoft Mobile Inventory Management Authentication Provider. . . . . . . . . . . . . . . . . . . . . . . . . . . .189Prerequisites.. . . . . . . . . . . . . . . . . . . . . . . . . . . . . . . . . . . . . . . . . . . . . . . . . . . . . . . . . . . . . . . . . . . . . . . . . . . . . . . . . . . . . . . . . . . . . . .. . . . . . .189Applying the PeopleSoft Mobile Inventory Management Authentication Provider. . . . . . . . . . . . . . . . .. . . . . . .189
Installing the PeopleSoft Database.. . . . . . . . . . . . . . . . . . . . . . . . . . . . . . . . . . . . . . . . . . . . . . . . . . . . . . . . . . . . . . . . . . . . . . . . . . . . . . . .202Understanding the PeopleSoft Mobile Inventory Management Installation and Set Up WithinPeopleSoft. . . . . . . . . . . . . . . . . . . . . . . . . . . . . . . . . . . . . . . . . . . . . . . . . . . . . . . . . . . . . . . . . . . . . . . . . . . . . . . . . . . . . . . . . . . . . . . . . . .. . . . . . .203Setting Up Integration with the PeopleSoft System... . . . . . . . . . . . . . . . . . . . . . . . . . . . . . . . . . . . . . . . . . . . . . . . . .. . . . . . .203Reviewing the Set Up of PeopleSoft Mobile Inventory Management in PeopleSoft IntegrationBroker.. . . . . . . . . . . . . . . . . . . . . . . . . . . . . . . . . . . . . . . . . . . . . . . . . . . . . . . . . . . . . . . . . . . . . . . . . . . . . . . . . . . . . . . . . . . . . . . . . . . . . . .. . . . . . .209Granting Security to PeopleSoft Mobile Inventory Management Objects. . . . . . . . . . . . . . . . . . . . . . . . . . .. . . . . . .214Rebooting the PeopleSoft Application Server. . . . . . . . . . . . . . . . . . . . . . . . . . . . . . . . . . . . . . . . . . . . . . . . . . . . . . . . . .. . . . . . .214Verifying PeopleSoft Integration Broker is Web Service Enabled for the PeopleSoft FSCMDatabase.. . . . . . . . . . . . . . . . . . . . . . . . . . . . . . . . . . . . . . . . . . . . . . . . . . . . . . . . . . . . . . . . . . . . . . . . . . . . . . . . . . . . . . . . . . . . . . . . . . . .. . . . . . .214Setting Installation Options.. . . . . . . . . . . . . . . . . . . . . . . . . . . . . . . . . . . . . . . . . . . . . . . . . . . . . . . . . . . . . . . . . . . . . . . . . . . . . . .. . . . . . .215
Deploying the Mobile Application to Oracle Application Developer for an Oracle WebLogic Server. . . . . . . .216Undeploying the Mobile Application.. . . . . . . . . . . . . . . . . . . . . . . . . . . . . . . . . . . . . . . . . . . . . . . . . . . . . . . . . . . . . . . . . . . . . . . . . . . . . . . .224
Chapter 25Configuring WS-Security for PeopleSoft Mobile Inventory Management... . . . . . . . . . . . . . . . . . . . .229Understanding WS-Security.. . . . . . . . . . . . . . . . . . . . . . . . . . . . . . . . . . . . . . . . . . . . . . . . . . . . . . . . . . . . . . . . . . . . . . . . . . . . . . . . . . . . . . . . .229Prerequisites.. . . . . . . . . . . . . . . . . . . . . . . . . . . . . . . . . . . . . . . . . . . . . . . . . . . . . . . . . . . . . . . . . . . . . . . . . . . . . . . . . . . . . . . . . . . . . . . . . . . . . . . . . .229Understanding the Configuration Process.. . . . . . . . . . . . . . . . . . . . . . . . . . . . . . . . . . . . . . . . . . . . . . . . . . . . . . . . . . . . . . . . . . . . . . . .230Configuring WS-Security for PeopleSoft Mobile Inventory Management. . . . . . . . . . . . . . . . . . . . . . . . . . . . . . . . . . . . . .231
Running the Oracle Repository Creation Utility.. . . . . . . . . . . . . . . . . . . . . . . . . . . . . . . . . . . . . . . . . . . . . . . . . . . . . . . .. . . . . . .231Installing the Oracle Web Service Manager.. . . . . . . . . . . . . . . . . . . . . . . . . . . . . . . . . . . . . . . . . . . . . . . . . . . . . . . . . . . .. . . . . . .239Configuring the Certificates.. . . . . . . . . . . . . . . . . . . . . . . . . . . . . . . . . . . . . . . . . . . . . . . . . . . . . . . . . . . . . . . . . . . . . . . . . . . . . .. . . . . . .248Creating and Configuring the Keystore and Credential Store. . . . . . . . . . . . . . . . . . . . . . . . . . . . . . . . . . . . . . . .. . . . . . .252Adding the SAML Definition Information to the PeopleSoft System.. . . . . . . . . . . . . . . . . . . . . . . . . . . . . . . .. . . . . . .256Updating the connections.xml to Enforce Security Policies.. . . . . . . . . . . . . . . . . . . . . . . . . . . . . . . . . . . . . . . . . .. . . . . . .260
Copyright © 2013, Oracle and/or its affiliates. All rights reserved. xi
Contents
Chapter 26Creating and Deploying a Customization Environment for PeopleSoft MobileInventory Management... . . . . . . . . . . . . . . . . . . . . . . . . . . . . . . . . . . . . . . . . . . . . . . . . . . . . . . . . . . . . . . . . . . . . . . . . . . . . . . . . . .263Understanding the Customization Environment for PeopleSoft Mobile Inventory Management. . . . . . . . . . . .263Prerequisites.. . . . . . . . . . . . . . . . . . . . . . . . . . . . . . . . . . . . . . . . . . . . . . . . . . . . . . . . . . . . . . . . . . . . . . . . . . . . . . . . . . . . . . . . . . . . . . . . . . . . . . . . . .263Creating a Customization Environment for PeopleSoft Mobile Inventory Management. . . . . . . . . . . . . . . . . . . . .264
Creating the Customization Environment.. . . . . . . . . . . . . . . . . . . . . . . . . . . . . . . . . . . . . . . . . . . . . . . . . . . . . . . . . . . . . .. . . . . . .264Creating the Customization EAR File.. . . . . . . . . . . . . . . . . . . . . . . . . . . . . . . . . . . . . . . . . . . . . . . . . . . . . . . . . . . . . . . . . . .. . . . . . .265
Chapter 27Configuring eMail URLS in PeopleSoft SCM Applications... . . . . . . . . . . . . . . . . . . . . . . . . . . . . . . . . . . . . . .269Understanding eMail Configuration in PeopleSoft SCM Applications.. . . . . . . . . . . . . . . . . . . . . . . . . . . . . . . . . . . . . . . . .269Configuring eMail URLs for Item Loader Exceptions.. . . . . . . . . . . . . . . . . . . . . . . . . . . . . . . . . . . . . . . . . . . . . . . . . . . . . . . . . . . .269Configuring eMail URLs for Supplier Facing Applications.. . . . . . . . . . . . . . . . . . . . . . . . . . . . . . . . . . . . . . . . . . . . . . . . . . . . . .270Configuring eMail URLs for PeopleSoft eBill Payment. . . . . . . . . . . . . . . . . . . . . . . . . . . . . . . . . . . . . . . . . . . . . . . . . . . . . . . . . . .272
Chapter 28Setting Up PeopleSoft 9.2 Supplier Contract Management.. . . . . . . . . . . . . . . . . . . . . . . . . . . . . . . . . . . . . . .273Understanding the PeopleSoft 9.2 Supplier Contract Management Setup.. . . . . . . . . . . . . . . . . . . . . . . . . . . . . . . . . . .273
Chapter 29Setting Up PeopleSoft SCM Pagelets... . . . . . . . . . . . . . . . . . . . . . . . . . . . . . . . . . . . . . . . . . . . . . . . . . . . . . . . . . . . . . . . .275Accessing Pagelets.. . . . . . . . . . . . . . . . . . . . . . . . . . . . . . . . . . . . . . . . . . . . . . . . . . . . . . . . . . . . . . . . . . . . . . . . . . . . . . . . . . . . . . . . . . . . . . . . . .275Enabling Pagelet Creation and Access with Portal Utilities.. . . . . . . . . . . . . . . . . . . . . . . . . . . . . . . . . . . . . . . . . . . . . . . . . . . . .275
Chapter 30Granting Access to Navigation Pages in PeopleSoft SCM.... . . . . . . . . . . . . . . . . . . . . . . . . . . . . . . . . . . . . .277Adding User Roles to All User IDs.. . . . . . . . . . . . . . . . . . . . . . . . . . . . . . . . . . . . . . . . . . . . . . . . . . . . . . . . . . . . . . . . . . . . . . . . . . . . . . . . .277
Chapter 31Accessing PeopleSoft Financials, ESA, and SCM Applications in PeopleSoft PortalSolutions.... . . . . . . . . . . . . . .. . . . . . . . . . . . . . .. . . . . . . . . . . . . . . .. . . . . . . . . . . . . . . .. . . . . . . . . . . . .. . . . . . . . . . . . . .. . . . . . . . . . .279Accessing Applications.. . . . . . . . . . . . . . . . . . . . . . . . . . . . . . . . . . . . . . . . . . . . . . . . . . . . . . . . . . . . . . . . . . . . . . . . . . . . . . . . . . . . . . . . . . . . . .279
xii Copyright © 2013, Oracle and/or its affiliates. All rights reserved.

Contents
Appendix AConfiguring PeopleSoft 9.2 IT Asset Management with Network Discovery Systems.... . . . . . . . . . . . . . . . . . . . . . . . . . . . . . . . . . . . . . . . . . . . . . . . . . .. . . . . . . . . . . . . . . . . . . . . . . . . . . . . . . . . . . . . . . . . . . . . . . . . . . . . . . . . . . . .281
Index .... . . . . . . . . . . . . . .. . . . . . . . . . . . . . . .. . . . . . . . . . . . . . . . .. . . . . . . . . . . . . . . .. . . . . . . . . . . . . . . .. . . . . . . . . . . . . .. . . . . . . . . . .283
Copyright © 2013, Oracle and/or its affiliates. All rights reserved. xiii

Contents
xiv Copyright © 2013, Oracle and/or its affiliates. All rights reserved.
About This Documentation
This preface discusses:
• Understanding This Documentation
• Audience
• Typographical Conventions
• Products
• Related Information
• Comments and Suggestions
Understanding This DocumentationThis documentation is designed to direct you through a basic PeopleSoft installation. It is not a substitute for thedatabase administration documentation provided by your relational database management system (RDBMS)vendor, the network administration documentation provided by your network vendor, or the installation andconfiguration documentation for additional software components that are used with PeopleSoft products.
Required updates to this installation documentation are provided in the form of “Required for Install”incidents, which are available on My Oracle Support.
Instructions for installing Oracle’s PeopleSoft PeopleTools are provided in PeopleSoft PeopleTools installationguides. Application-specific installation instructions are provided in a separate document for the PeopleSoftapplication. For instance, if you are installing Oracle’s PeopleSoft Customer Relationship Management(CRM), you need both the PeopleSoft PeopleTools installation guide and the additional instructions providedfor installing PeopleSoft CRM.
To find the installation documentation for PeopleSoft PeopleTools or for your PeopleSoft application, go toMy Oracle Support and search for the installation guide for your product and release.
Note. Before proceeding with your installation, check My Oracle Support to ensure that you have the latestversion of this installation guide for the correct release of the PeopleSoft product that you are installing.
AudienceThis documentation is written for the individuals responsible for installing and administering the PeopleSoftenvironment. This documentation assumes that you have a basic understanding of the PeopleSoft system.One of the most important components in the installation and maintenance of your PeopleSoft system isyour on-site expertise.
You should be familiar with your operating environment and RDBMS and have the necessary skills to supportthat environment. You should also have a working knowledge of:
• SQL and SQL command syntax.
• PeopleSoft system navigation.
Copyright © 2013, Oracle and/or its affiliates. All rights reserved. xv
Preface
• PeopleSoft windows, menus, and pages, and how to modify them.• Microsoft Windows.
Oracle recommends that you complete training, particularly the PeopleSoft Server Administration andInstallation course, before performing an installation.
See Oracle University http://education.oracle.com
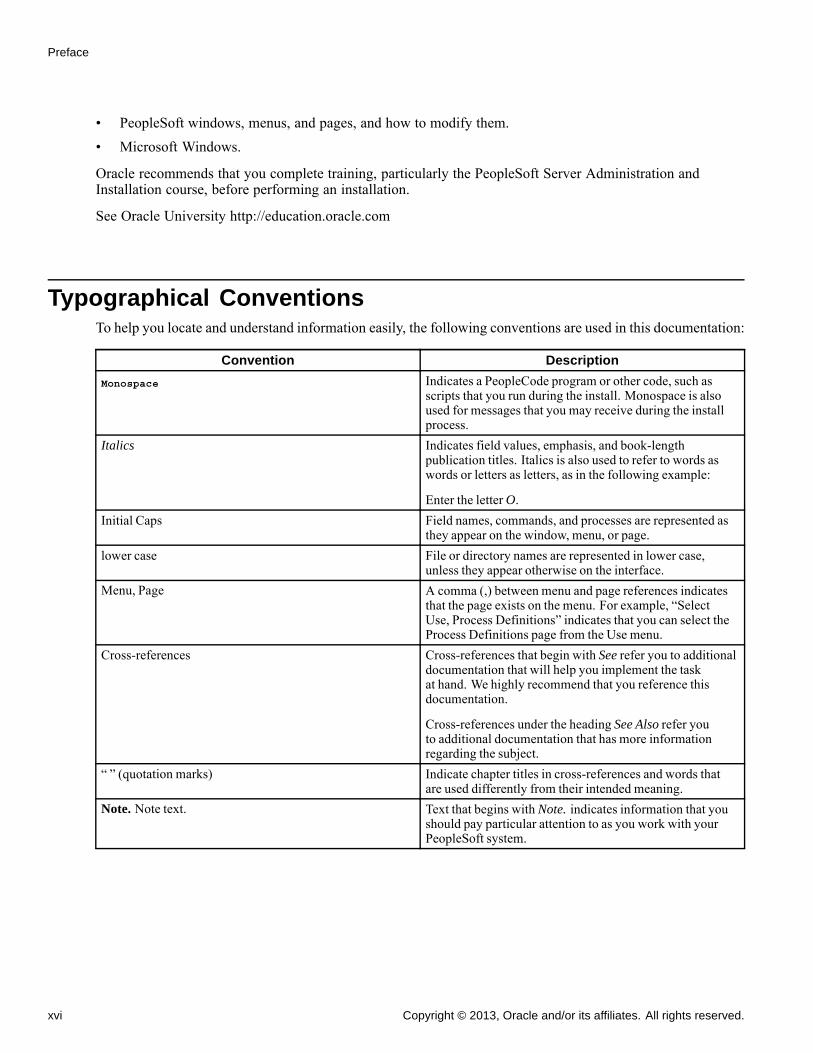
Typographical ConventionsTo help you locate and understand information easily, the following conventions are used in this documentation:
Convention Description
Monospace Indicates a PeopleCode program or other code, such asscripts that you run during the install. Monospace is alsoused for messages that you may receive during the installprocess.
Italics Indicates field values, emphasis, and book-lengthpublication titles. Italics is also used to refer to words aswords or letters as letters, as in the following example:
Enter the letterO.Initial Caps Field names, commands, and processes are represented as
they appear on the window, menu, or page.lower case File or directory names are represented in lower case,
unless they appear otherwise on the interface.Menu, Page A comma (,) between menu and page references indicates
that the page exists on the menu. For example, “SelectUse, Process Definitions” indicates that you can select theProcess Definitions page from the Use menu.
Cross-references Cross-references that begin with See refer you to additionaldocumentation that will help you implement the taskat hand. We highly recommend that you reference thisdocumentation.
Cross-references under the heading See Also refer youto additional documentation that has more informationregarding the subject.
“ ” (quotation marks) Indicate chapter titles in cross-references and words thatare used differently from their intended meaning.
Note. Note text. Text that begins with Note. indicates information that youshould pay particular attention to as you work with yourPeopleSoft system.
xvi Copyright © 2013, Oracle and/or its affiliates. All rights reserved.
Preface
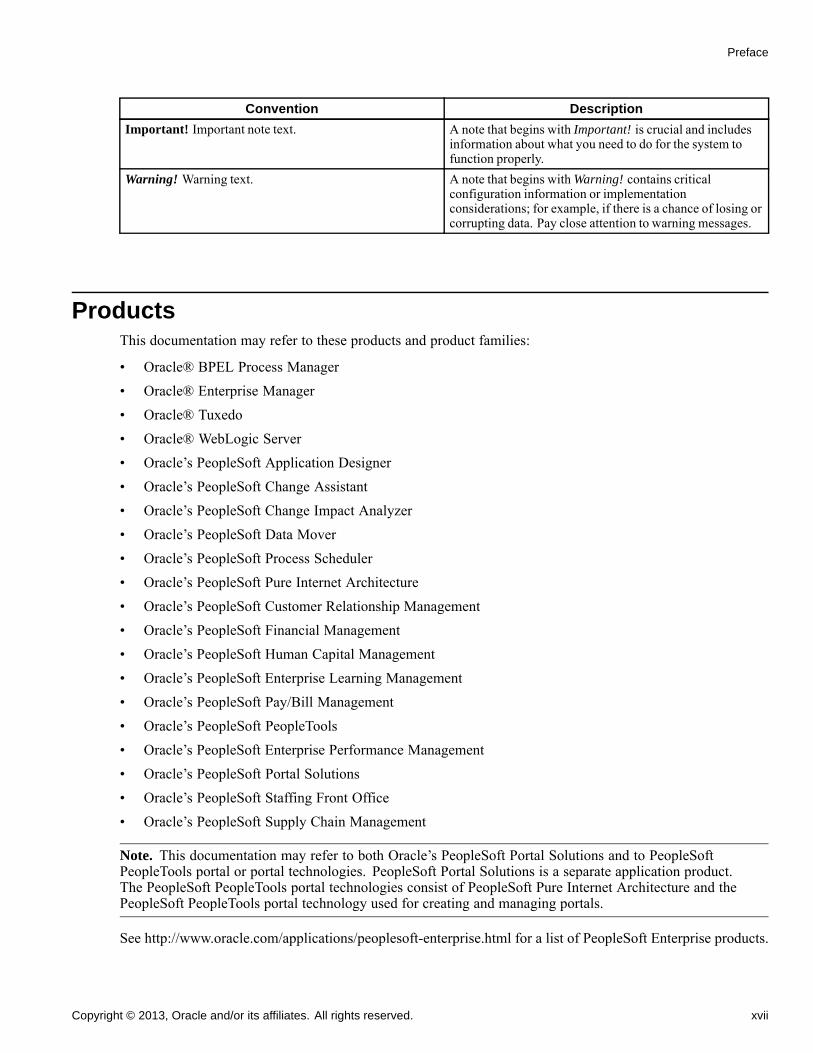
Convention Description
Important! Important note text. A note that begins with Important! is crucial and includesinformation about what you need to do for the system tofunction properly.
Warning! Warning text. A note that begins withWarning! contains criticalconfiguration information or implementationconsiderations; for example, if there is a chance of losing orcorrupting data. Pay close attention to warning messages.
ProductsThis documentation may refer to these products and product families:
• Oracle® BPEL Process Manager• Oracle® Enterprise Manager• Oracle® Tuxedo• Oracle® WebLogic Server• Oracle’s PeopleSoft Application Designer• Oracle’s PeopleSoft Change Assistant• Oracle’s PeopleSoft Change Impact Analyzer• Oracle’s PeopleSoft Data Mover• Oracle’s PeopleSoft Process Scheduler• Oracle’s PeopleSoft Pure Internet Architecture• Oracle’s PeopleSoft Customer Relationship Management• Oracle’s PeopleSoft Financial Management• Oracle’s PeopleSoft Human Capital Management• Oracle’s PeopleSoft Enterprise Learning Management• Oracle’s PeopleSoft Pay/Bill Management• Oracle’s PeopleSoft PeopleTools• Oracle’s PeopleSoft Enterprise Performance Management• Oracle’s PeopleSoft Portal Solutions• Oracle’s PeopleSoft Staffing Front Office• Oracle’s PeopleSoft Supply Chain Management
Note. This documentation may refer to both Oracle’s PeopleSoft Portal Solutions and to PeopleSoftPeopleTools portal or portal technologies. PeopleSoft Portal Solutions is a separate application product.The PeopleSoft PeopleTools portal technologies consist of PeopleSoft Pure Internet Architecture and thePeopleSoft PeopleTools portal technology used for creating and managing portals.
See http://www.oracle.com/applications/peoplesoft-enterprise.html for a list of PeopleSoft Enterprise products.
Copyright © 2013, Oracle and/or its affiliates. All rights reserved. xvii
Preface
Related InformationOracle provides reference information about PeopleSoft PeopleTools and your particular PeopleSoftapplication. The following documentation is available on My Oracle Support:
• Product documentation for PeopleTools: Getting Started with PeopleTools for your release. Thisdocumentation provides a high-level introduction to PeopleSoft PeopleTools technology and usage.
• Product documentation for PeopleSoft Application Fundamentals for your PeopleSoft application andrelease. This documentation provides essential information about the setup, design, and implementation ofyour PeopleSoft application.
To access PeopleSoft Online Help (PeopleBooks), go to My Oracle Support and search for the PeopleSoftOnline Help (PeopleBooks) for your application and release.
To install additional component software products for use with PeopleSoft products, including those productsthat are packaged with your PeopleSoft products, you should refer to the documentation provided with thoseproducts, as well as this documentation.
Comments and SuggestionsYour comments are important to us. We encourage you to tell us what you like, or what you would likechanged about our documentation, PeopleSoft Online Help (PeopleBooks), and other Oracle reference andtraining materials. Please send your suggestions to:
While we cannot guarantee to answer every email message, we will pay careful attention to your commentsand suggestions. We are always improving our product communications for you.
xviii Copyright © 2013, Oracle and/or its affiliates. All rights reserved.
CHAPTER 1
Part I: Common Elements to Install PeopleSoftFMS, ESA, SFO, and SCM Applications
Understanding Part IThe chapters in this section of the documentation include installation instructions that apply to Oracle’sPeopleSoft Financial Management Solutions (FMS), PeopleSoft Enterprise Service Automation (ESA),PeopleSoft Staffing Front Office (SFO), and PeopleSoft Supply Chain Management (SCM) applications.
This section includes:
• Installing PeopleSoft PeopleTools and Creating the PeopleSoft Financial/Supply Chain ManagementDatabase.
• Configuring Application SQRs and COBOL for DB2 and the OS/390 Server.
• Setting Database Requirements to Run the ChartField Configuration Process.
• Setting up Mobile Approvals
• Configuring Global Search using Oracle Secure Enterprise Search
Task 1-1: Using the Oracle Software Delivery Cloudto Obtain Installation Files
Before beginning the installation, you must obtain the PeopleSoft Financial/Supply Chain Management(FSCM) 9.2 installation software by downloading the necessary zip files from the Oracle Software DeliveryCloud portal. Use the documentation available on Oracle Software Delivery Cloud to ensure that you obtainall of the zip files that your environment requires.
See Oracle Software Delivery Cloud portal at http://edelivery.oracle.com
Copyright © 2013, Oracle and/or its affiliates. All rights reserved. 1

Part I: Common Elements to Install PeopleSoft FMS, ESA, SFO, and SCM Applications Chapter 1
2 Copyright © 2013, Oracle and/or its affiliates. All rights reserved.
CHAPTER 2
Installing PeopleSoft PeopleTools and Creatingthe PeopleSoft Financials/Supply ChainManagement Database
This chapter discusses:
• Prerequisites
• Installing PeopleSoft PeopleTools and Creating the PeopleSoft FSCM Database
PrerequisitesThis section provides prerequisite installation instructions that are a requirement to create the PeopleSoftFinancials/Supply Chain Management (FSCM) database.
Before you install specific applications, you must install PeopleSoft PeopleTools and create your PeopleSoftFSCM database. You must also set up the installation defaults and delete the summary trees from the System(SYS) database.
Note. Unless otherwise noted, PeopleSoft FSCM 9.2 requires the installation of PeopleSoft PeopleTools8.53.02 or higher.
See the chapters on creating a database in the PeopleSoft PeopleTools Installation for your database platform.
Task 2-1: Installing PeopleSoft PeopleTools and Creatingthe PeopleSoft FSCM Database
This section discusses:
• Verifying the PeopleSoft PeopleTools Version
• Reviewing the PeopleSoft FSCM Demo Database Sizing Information
• Installing Application Files to the Custom PS_APP_HOME Location
• Installing the PeopleSoft FSCM Database on Sybase
• Reviewing EDM Pool Considerations
• Setting Up Installation Defaults for the PeopleSoft FSCM System Database
Copyright © 2013, Oracle and/or its affiliates. All rights reserved. 3

Installing PeopleSoft PeopleTools and Creating the PeopleSoft Financials/Supply Chain Management Database Chapter 2
• Deleting Summary Trees for the PeopleSoft FSCM System Database
• Reviewing DDDAUDIT Result
Task 2-1-1: Verifying the PeopleSoft PeopleTools VersionThe PeopleSoft FSCM 9.2 database requires the installation of PeopleSoft PeopleTools 8.53.02 or higher.
See the chapters on creating a database in the PeopleSoft PeopleTools Installation for your database platform
Task 2-1-2: Reviewing the PeopleSoft FSCM DemoDatabase Sizing InformationThe following table lists the approximate PeopleSoft FSCM 9.2 Demo database size for each RDBMS platform.
Platform Approximate Database Size
Oracle—Non-Unicode/Unicode 16.9 GBDB2 LUW—Non-Unicode 52 GBDB2 LUW—Unicode 82 GBDB2 z/OS—Non-Unicode 32.3 GBDB2 z/OS—Unicode 40.3 GBSybase 25 GBInformix 19 GBMicrosoft SQL Server—Non-Unicode 6 GBMicrosoft SQL Server—Unicode 8.2 GB
Important! For more information regarding Sybase and Informix platforms, please see Note:1531302.1on My Oracle Support.
Note. Oracle recommends that you increase the Database Size Heap for the DB2 LUW platform only to aminimum of 20,000 to avoid any temporary table failure during Demo database creation.
Note. For the sake of brevity, this documentation sometimes refers to DB2 UDB for z/OS as DB2 z/OS, and itsometimes refers to DB2 UDB for Linux, UNIX, and Microsoft Windows as DB2 LUW.
Task 2-1-3: Installing Application Files to the CustomPS_APP_HOME LocationBeginning with PeopleSoft PeopleTools 8.53, you can elect to install your PeopleSoft application files into acustom location that is identified by the PS_APP_HOME environment variable.
You can continue to install applications into PS_HOME using the traditional approach, or you can install to thecustom location PS_APP_HOME. Electing to continue using the traditional PS_HOME structure brings noimpact to your implementation, and you can carry on the same as before. However, if you are seeking furthermodularity and more streamlined implementations, then installing your PeopleSoft application into a separatePS_APP_HOME location is an attractive alternative.
4 Copyright © 2013, Oracle and/or its affiliates. All rights reserved.
Chapter 2 Installing PeopleSoft PeopleTools and Creating the PeopleSoft Financials/Supply Chain Management Database
For more information about PS_APP_HOME and the corresponding instructions to configure and implementthis option, you can refer to the following documentation that is available on My Oracle Support, the OracleTechnology Network and the Hosted PeopleBooks web sites:
See PeopleTools 8.53 Release Notes
See the chapters on creating a database in the PeopleSoft PeopleTools Installation for your database platform
See PeopleTools 8.53: System and Server Administration
Note. For the purposes of this installation document, use the reference <PS_APP_HOME> as the locationwhere the application files will reside. If you are not implementing the split location, then this variablewill be equal to <PS_HOME>.
Task 2-1-4: Installing the PeopleSoft FSCM Database on SybasePeopleSoft FSCM 9.2 requires a minimum 4K page size on Sybase.
Task 2-1-5: Reviewing EDM Pool ConsiderationsThe PeopleSoft installation procedure places all tables for the product that you are installing into multiple,physical DB2 z/OS databases using a shared table space methodology. Depending on the applications that youare installing, the DB2 subsystem could have a minimum EDM Pool Size of 10–30 MB.
Task 2-1-6: Setting Up Installation Defaults for thePeopleSoft FSCM System DatabaseRun the following script against the System (SYS) database only for PeopleSoft FSCM:
EPINSSYS.DMS -- Installation Defaults
This script establishes the installation defaults for the database. This only runs against the System (SYS)database.
Task 2-1-7: Deleting Summary Trees for the PeopleSoftFSCM System DatabaseRun the following script only against the System (SYS) database only for PeopleSoft FSCM:
EPCLNTRE.DMS -- Tree Definitions
This script deletes all of the summary trees from the database. This only runs against the System (SYS)database.
Task 2-1-8: Reviewing DDDAUDIT ResultFor both Sybase and Informix , the following DDDAUDIT exceptions will be expected and can be ignored.
(TABLE-2) SQL Table defined in the Application Designer and not found in the Database
Record Name Owner ID
FUS_GL_XFR_INTF FGL 1
Copyright © 2013, Oracle and/or its affiliates. All rights reserved. 5

Installing PeopleSoft PeopleTools and Creating the PeopleSoft Financials/Supply Chain Management Database Chapter 2
6 Copyright © 2013, Oracle and/or its affiliates. All rights reserved.
CHAPTER 3
Configuring Application SQRs and COBOLfor DB2 and the OS/390 Server
This chapter discusses:
• Understanding SQR and COBOL Processing on the DB2 z/OS Server
• Allocating Data Sets on the OS/390 File
• Modifying the JCL Shells
Understanding SQR and COBOL Processingon the DB2 z/OS Server
This section applies if you are using the PeopleSoft FSCM 9.2 product on the DB2 OS/390 database platformand want to run SQR and COBOL processes on the OS390 server that requires reading and writing of externalfiles.
For both SQR and COBOL processing on the DB2 z/OS server, the process scheduler provides standard JCLtemplates to submit jobs in the z/OS server. These shells accommodate basic input and output files that aredetermined by the program engines themselves. However; for those SQR and COBOL processes that requirespecial input or output files, additional modifications must be made to the JCL templates to accommodatethese files.
PeopleSoft General Ledger and PeopleSoft Cash Management both contain several of these special files incertain SQR processes. To accommodate these files, data sets must be pre-allocated on the OS/390 file system,as well as modifications made to the JCL shells.
Task 3-1: Allocating Data Sets on the OS/390 FileSequential or partitioned data sets can be used in COBOL and SQR processing. The DISP parameter in theJCL is critical to the successful execution of a JCL job submission and very sensitive to the data set dispositionat the initiation of the job. For this reason, Oracle strongly recommends the use of a partitioned data set, ratherthan sequential data sets—particularly for output files—and for input files, when the existence of the actual filedrives the processing path that the program takes.
Copyright © 2013, Oracle and/or its affiliates. All rights reserved. 7
Configuring Application SQRs and COBOL for DB2 and the OS/390 Server Chapter 3
All like processes share the same JCL Shells. An invalid file disposition in the process can prevent that processand all the processes from executing successfully. For this reason Oracle recommends using DISP=SHR in theJCL Shells, as discussed later in this document. DISP=SHR presumes that the data set exists at the time a jobexecution is initiated. If the data set does not exist, a JCL error occurs. The PDS requires only the root data set,for it the individual member does not need to exist. If the member does not exist, it is automatically createdby the OS/390 file management system.
You should allocate partitioned data sets that include the following attributes:
• The record format should be variable block (RECFM=VB).• The record length should be slightly wider than the record length of the file, which is defined within
the SQR itself.Refer to the table below for SQR LRECL definitions.
• The data set name type should be PDS (DSORG=PO).
The following is an example of a JCL statement to allocate a PDS:
//*
//PDSALL DD DSN=PSHLQ.PPVVV.SQRFILES,
// DISP=(,CATLG,DELETE),
// DCB=(DSORG=PO,RECFM=VB,LRECL=500),
// VOL=SER=,
// SPACE=(TRK,(200,95,75),RLSE),
// UNIT=SYSDA
// *
The following table details the information that you can use to both pre-allocate the data set and modify theJCL Shells for PeopleSoft FMS in the next step.
PeopleSoftProduct
SQR or COBOLProgram Name DD Card Name1
Data Set Type /Record Format /Record Length
Member Name orRandom Name2
General Ledger GLS7500 Defined and enteredby the customer
PDS/VB/850 Specific Membername (OUTPUTFILE)
Treasury ECIN0001 Defined and enteredby the customer.
PDS/VB/500 Specific Membername (OUTPUTFILE)
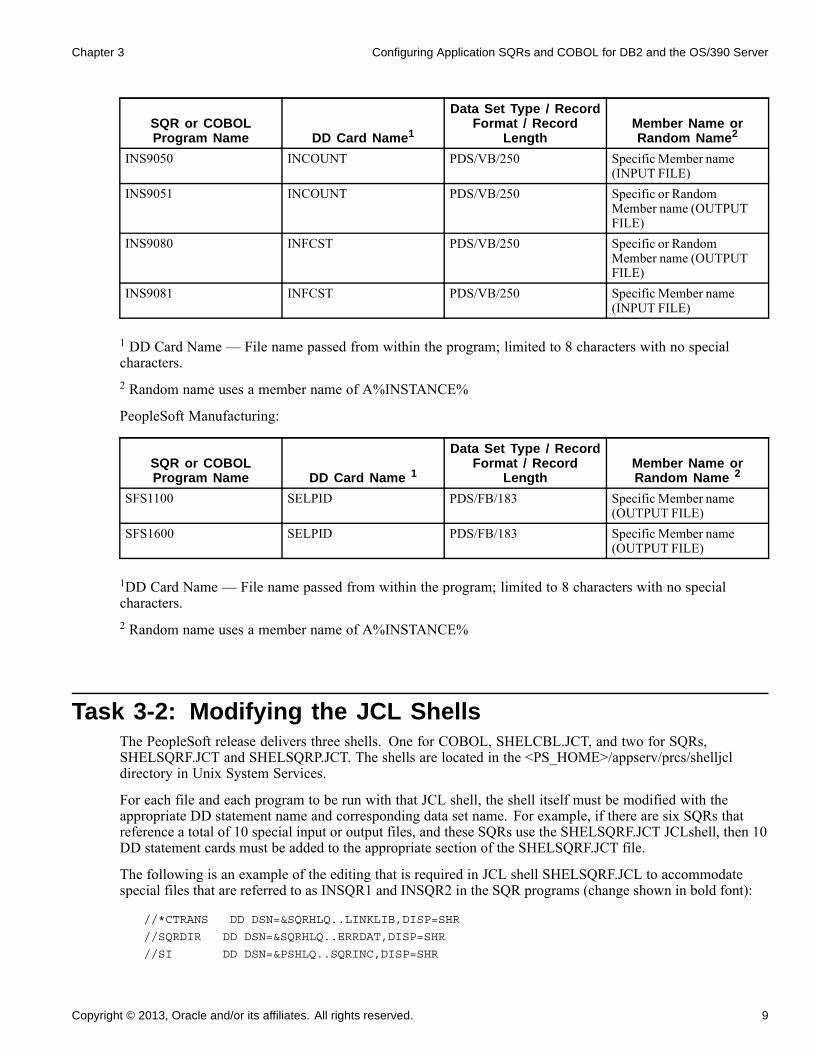
1 DD Card Name — File name passed from within the program; limited to 8 characters with no specialcharacters.2 Random name uses a member name of A%INSTANCE%
The following tables detail the information that you can use to both pre-allocate the data set and modify theJCL Shells for PeopleSoft SCM in the next step.
PeopleSoft Inventory:
8 Copyright © 2013, Oracle and/or its affiliates. All rights reserved.
Chapter 3 Configuring Application SQRs and COBOL for DB2 and the OS/390 Server
SQR or COBOLProgram Name DD Card Name1
Data Set Type / RecordFormat / Record
LengthMember Name orRandom Name2
INS9050 INCOUNT PDS/VB/250 Specific Member name(INPUT FILE)
INS9051 INCOUNT PDS/VB/250 Specific or RandomMember name (OUTPUTFILE)
INS9080 INFCST PDS/VB/250 Specific or RandomMember name (OUTPUTFILE)
INS9081 INFCST PDS/VB/250 Specific Member name(INPUT FILE)
1 DD Card Name — File name passed from within the program; limited to 8 characters with no specialcharacters.2 Random name uses a member name of A%INSTANCE%
PeopleSoft Manufacturing:
SQR or COBOLProgram Name DD Card Name 1
Data Set Type / RecordFormat / Record
LengthMember Name orRandom Name 2
SFS1100 SELPID PDS/FB/183 Specific Member name(OUTPUT FILE)
SFS1600 SELPID PDS/FB/183 Specific Member name(OUTPUT FILE)
1DD Card Name — File name passed from within the program; limited to 8 characters with no specialcharacters.2 Random name uses a member name of A%INSTANCE%
Task 3-2: Modifying the JCL ShellsThe PeopleSoft release delivers three shells. One for COBOL, SHELCBL.JCT, and two for SQRs,SHELSQRF.JCT and SHELSQRP.JCT. The shells are located in the <PS_HOME>/appserv/prcs/shelljcldirectory in Unix System Services.
For each file and each program to be run with that JCL shell, the shell itself must be modified with theappropriate DD statement name and corresponding data set name. For example, if there are six SQRs thatreference a total of 10 special input or output files, and these SQRs use the SHELSQRF.JCT JCLshell, then 10DD statement cards must be added to the appropriate section of the SHELSQRF.JCT file.
The following is an example of the editing that is required in JCL shell SHELSQRF.JCL to accommodatespecial files that are referred to as INSQR1 and INSQR2 in the SQR programs (change shown in bold font):
//*CTRANS DD DSN=&SQRHLQ..LINKLIB,DISP=SHR
//SQRDIR DD DSN=&SQRHLQ..ERRDAT,DISP=SHR
//SI DD DSN=&PSHLQ..SQRINC,DISP=SHR
Copyright © 2013, Oracle and/or its affiliates. All rights reserved. 9
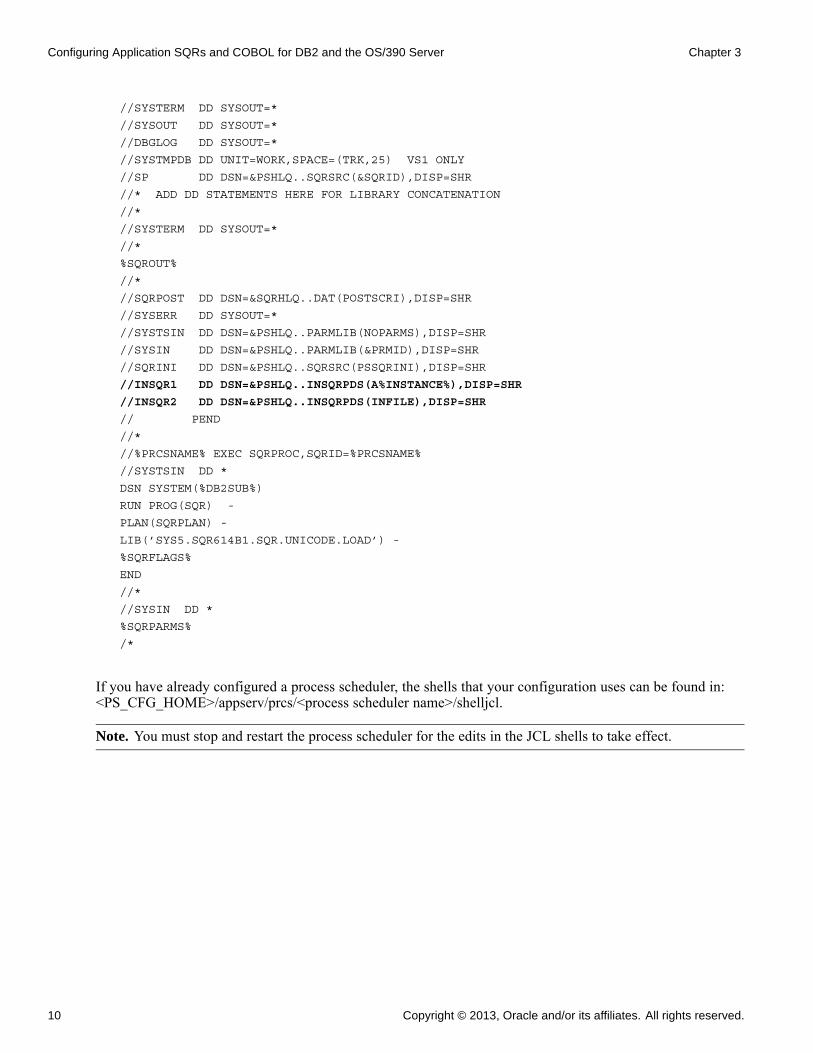
Configuring Application SQRs and COBOL for DB2 and the OS/390 Server Chapter 3
//SYSTERM DD SYSOUT=*
//SYSOUT DD SYSOUT=*
//DBGLOG DD SYSOUT=*
//SYSTMPDB DD UNIT=WORK,SPACE=(TRK,25) VS1 ONLY
//SP DD DSN=&PSHLQ..SQRSRC(&SQRID),DISP=SHR
//* ADD DD STATEMENTS HERE FOR LIBRARY CONCATENATION
//*
//SYSTERM DD SYSOUT=*
//*
%SQROUT%
//*
//SQRPOST DD DSN=&SQRHLQ..DAT(POSTSCRI),DISP=SHR
//SYSERR DD SYSOUT=*
//SYSTSIN DD DSN=&PSHLQ..PARMLIB(NOPARMS),DISP=SHR
//SYSIN DD DSN=&PSHLQ..PARMLIB(&PRMID),DISP=SHR
//SQRINI DD DSN=&PSHLQ..SQRSRC(PSSQRINI),DISP=SHR
//INSQR1 DD DSN=&PSHLQ..INSQRPDS(A%INSTANCE%),DISP=SHR
//INSQR2 DD DSN=&PSHLQ..INSQRPDS(INFILE),DISP=SHR
// PEND
//*
//%PRCSNAME% EXEC SQRPROC,SQRID=%PRCSNAME%
//SYSTSIN DD *
DSN SYSTEM(%DB2SUB%)
RUN PROG(SQR) -
PLAN(SQRPLAN) -
LIB(’SYS5.SQR614B1.SQR.UNICODE.LOAD’) -
%SQRFLAGS%
END
//*
//SYSIN DD *
%SQRPARMS%
/*
If you have already configured a process scheduler, the shells that your configuration uses can be found in:<PS_CFG_HOME>/appserv/prcs/<process scheduler name>/shelljcl.
Note. You must stop and restart the process scheduler for the edits in the JCL shells to take effect.
10 Copyright © 2013, Oracle and/or its affiliates. All rights reserved.
CHAPTER 4
Setting Database Requirements to Run theChartField Configuration Process
Understanding Database Requirements for theChartField Configuration Process
Due to the large number of updates performed by the ChartField Configuration Application Engine program(FS_CFCONFIG), you may encounter certain database errors when running the program. This is particularlytrue if you are adding or deleting ChartFields in your configuration. To address this, Oracle recommends thatyou use the database settings given in the following section as a starting point; however, you may need toadjust these upward if you encounter errors while running the utility.
Task 4-1: Defining Settings to Run ChartField ConfigurationUse the following settings when running the ChartField Configuration for the database platforms thatOracle supports:
• DB2 LUW• Update the locking mode to share:
db2set DB2_RR_TO_RS = yes
This sets Lock mode requested = Next Key Share (NS).• Include the following command in the DBMCFG.SQL configuration file:
UPDATE DBM CFG USING QUERY_HEAP_SZ 64000
• Log file size (4KB): (LOGFILSIZ) = 24000
• Number of primary log files: (LOGPRIMARY) = 20
Copyright © 2013, Oracle and/or its affiliates. All rights reserved. 11
Setting Database Requirements to Run the ChartField Configuration Process Chapter 4
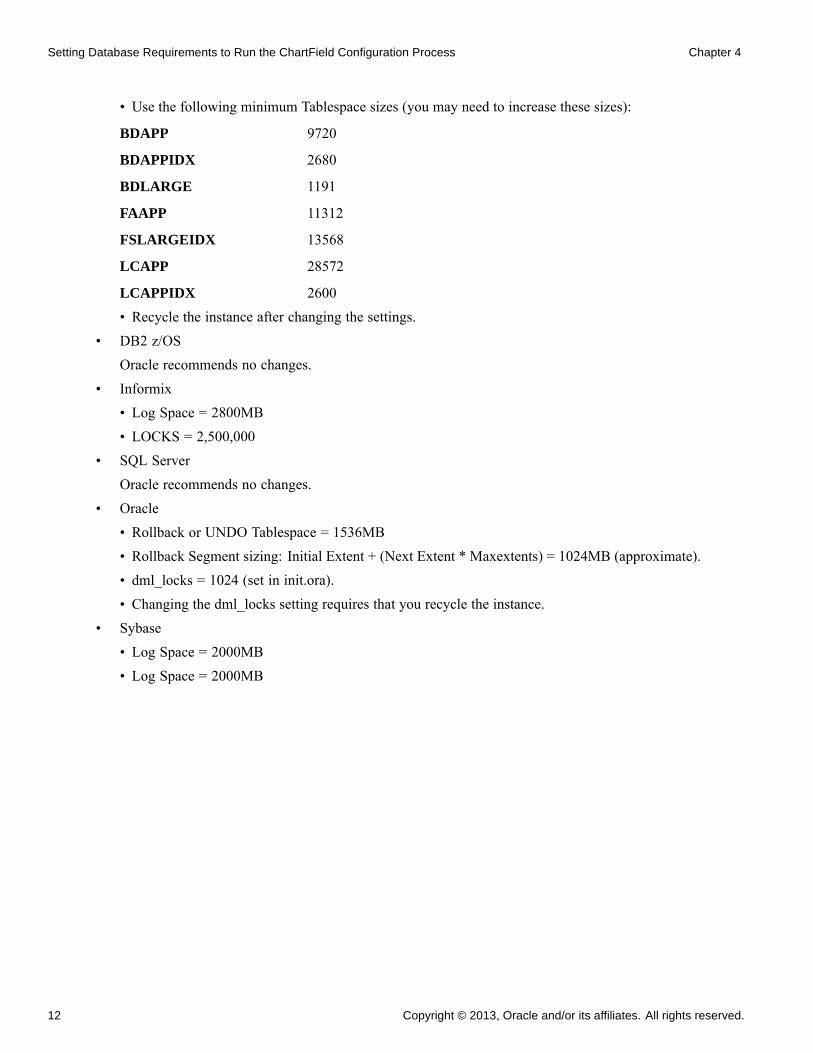
• Use the following minimum Tablespace sizes (you may need to increase these sizes):
BDAPP 9720
BDAPPIDX 2680
BDLARGE 1191
FAAPP 11312
FSLARGEIDX 13568
LCAPP 28572
LCAPPIDX 2600• Recycle the instance after changing the settings.
• DB2 z/OSOracle recommends no changes.
• Informix• Log Space = 2800MB
• LOCKS = 2,500,000
• SQL ServerOracle recommends no changes.
• Oracle• Rollback or UNDO Tablespace = 1536MB
• Rollback Segment sizing: Initial Extent + (Next Extent * Maxextents) = 1024MB (approximate).
• dml_locks = 1024 (set in init.ora).
• Changing the dml_locks setting requires that you recycle the instance.
• Sybase• Log Space = 2000MB
• Log Space = 2000MB
12 Copyright © 2013, Oracle and/or its affiliates. All rights reserved.
CHAPTER 5
Setting Up Mobile Approvals
This chapter discusses:
• Prerequisites
• Granting Security to Users
• Configuring Mobile Approvals
PrerequisitesYou can use Mobile Approvals to access the pending approvals. However before accessing the pendingapprovals, complete the approval setup for each of these transactions.
Task 5-1: Granting Security to UsersThe user is granted access to the iScript functions in record WEBLIB_FIN_MBL in order to access theapplication.
The administrator is granted access to the FIN_MBL_TYPE_SETUP component in menuFIN_MOBILE_APPROVAL , in order to set up the Mobile Approval Options.
There are two Permission Lists delivered:
Mobile Approval Type Description
EOAW2000 – Mobile Approvals Administrator This Permission List allows user access to both theapplication and the setup page.
EOAW2100 –Mobile Approvals User This Permission List allows user access to the applicationonly.
Task 5-2: Configuring Mobile ApprovalsIn this step you will configure Mobile Approvals.
To configure Mobile Approvals:
1. Select Main Menu, Enterprise Components, Approvals, Approvals, Mobile Approval Options.
Copyright © 2013, Oracle and/or its affiliates. All rights reserved. 13
Setting Up Mobile Approvals Chapter 5
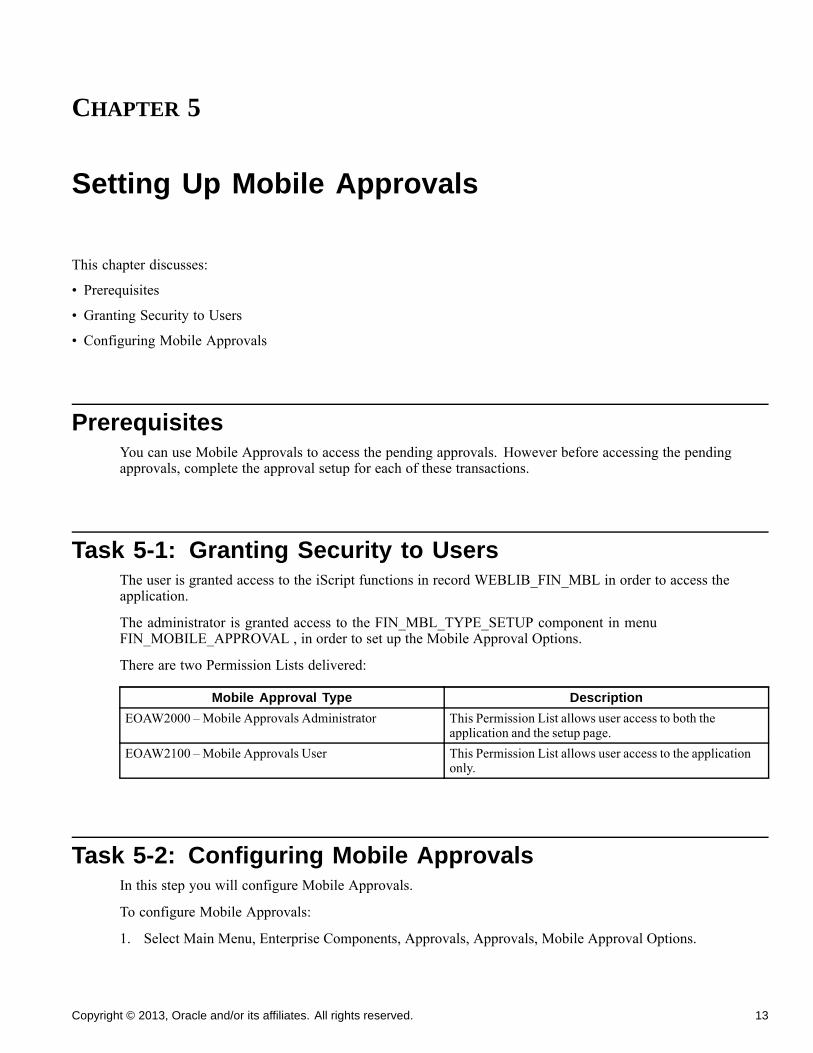
The Mobile Approval Options page appears as shown in the following example:
Mobile Approval Options page
2. Select the checkboxes in Included column to access approval transactions from Mobile Approvals.3. It is optional to select the Display Attachments to allow displaying attachments in Mobile Approvals. If
Display Attachments is selected, then enter the Process Server with a distribution node set up.4. Modify the other options if required.
14 Copyright © 2013, Oracle and/or its affiliates. All rights reserved.
CHAPTER 6
Configuring Global Search Using OracleSecure Enterprise Search (SES)
This chapter discusses:
• Understanding Configuring Global Search Using Oracle Secure Enterprise Search
• Prerequisites
• Defining New Roles for Global Search
• Defining Search Group Display
• Verifying the Setup of Portal Node in PeopleSoft FSCM
• Configuring Attachments for FSCM Search Definitions
• Deploying and Indexing Delivered Search Definitions
• Upgrading File Attachments
Understanding Configuring Global Search UsingOracle Secure Enterprise Search
PeopleSoft Search Framework is a PeopleSoft PeopleTools 8.53 indexed search technology that relies on theOracle Secure Enterprise Search (SES) engine by way of PeopleSoft Integration Broker. PeopleSoft IntegrationBroker provides the interface between PeopleSoft Search Framework and the Oracle SES engine to deploy thesearch definitions, build the indexes, and return the search results. In addition to the replacement of productspecific Verity functionality with SES, PeopleSoft Financial/Supply Chain Management 9.2 supports newsearch capability within selected components like the Search Pages, as well as Global Search in the home page.Using Global Search functionality users can do unstructured keyword search for the selected componentsincluded in the ‘Procure to Pay’ business process.
See PeopleSoft FSCM: Applications Fundamentals for more information.
PrerequisitesThis section describes the required setup for SES to enable the Global Search functionality within theFinancial/Supply Chain Management product line.
Copyright © 2013, Oracle and/or its affiliates. All rights reserved. 15
Configuring Global Search Using Oracle Secure Enterprise Search (SES) Chapter 6
Important! You should only perform these steps if you have completed the tasks discussed in the PeopleSoftPeopleTools 8.53 Installation guide, Discretionary Installation,“Configuring Integration Between PeopleSoftPeopleTools and Oracle SES.”
See Also
PeopleTools: PeopleSoft Search Technology
Task 6-1: Defining New Roles for Global SearchSample roles are provided for the Global Search and the Search Pages. You will need to determine whichusers will need access to these roles for searching. Your PeopleSoft administrator needs to complete thesteps below to add roles.
To add the roles for search:
1. Select PeopleTools, Security, User Profiles, User Profiles.
2. On the User Profiles page, select the Roles tab.
3. In the grid, add the roles shown in the following table, appropriate to the user who can access theGlobal Search:
Global Search Category ROLE Permission List
Accounts Payable Search Accounts Payable EPSR1040Asset Management Search Asset Management EPSR1030Catalog Items Search Catalog EPSR1080Expenses Search Expenses EPSR1050General Ledger Search General Ledger EPSR1060Procure to Pay Search PtoP EPSR1000Purchasing/Procurement Search Procurement EPSR1020Strategic Sourcing Search Strategic Sourcing EPSR1010Supplier Information Search Supplier Information EPSR1080
In addition there are several PeopleTools roles created for users who access the Search Definitions and areallowed to run and schedule the search indexes. These roles are:
• Search Server – required only for the user setup as the Callback user for the Search Instance• Search Query Administrator – required to access Queries associated with all Search Definitions, this is
required for the Callback user as well as for any user who will need to modify these queries.• Search Administrator – required for any user who will be allowed to submit jobs for indexing.• Search Developer – required for any user who will be granted access to the design of Search Definitions
For more information, see PeopleTools: PeopleSoft Search Technology.
16 Copyright © 2013, Oracle and/or its affiliates. All rights reserved.
Chapter 6 Configuring Global Search Using Oracle Secure Enterprise Search (SES)
Task 6-2: Defining Search Group DisplayThis section discusses:
• Understanding Search Group Display
• Adding the Search Group to the Home Page Search Context
• Enabling the Global Search Box in the Page Header
Task 6-2-1: Understanding Search Group DisplayIn order for the Search Group to display in the Global Search Header and drop-down list, you must add theSearch Group to the Home Page Search Context and enable the global search box in the header.
Task 6-2-2: Adding the Search Group to the HomePage Search ContextComplete the steps below to add the Search Group to the Home Page Search Context.
To add the Search Group to the Home Page Search Context:
1. Select PeopleTools, Search Framework, Administration, Define Search Context.
2. On the Define Search Context page, open the Search Context for Context Type "Home Page".
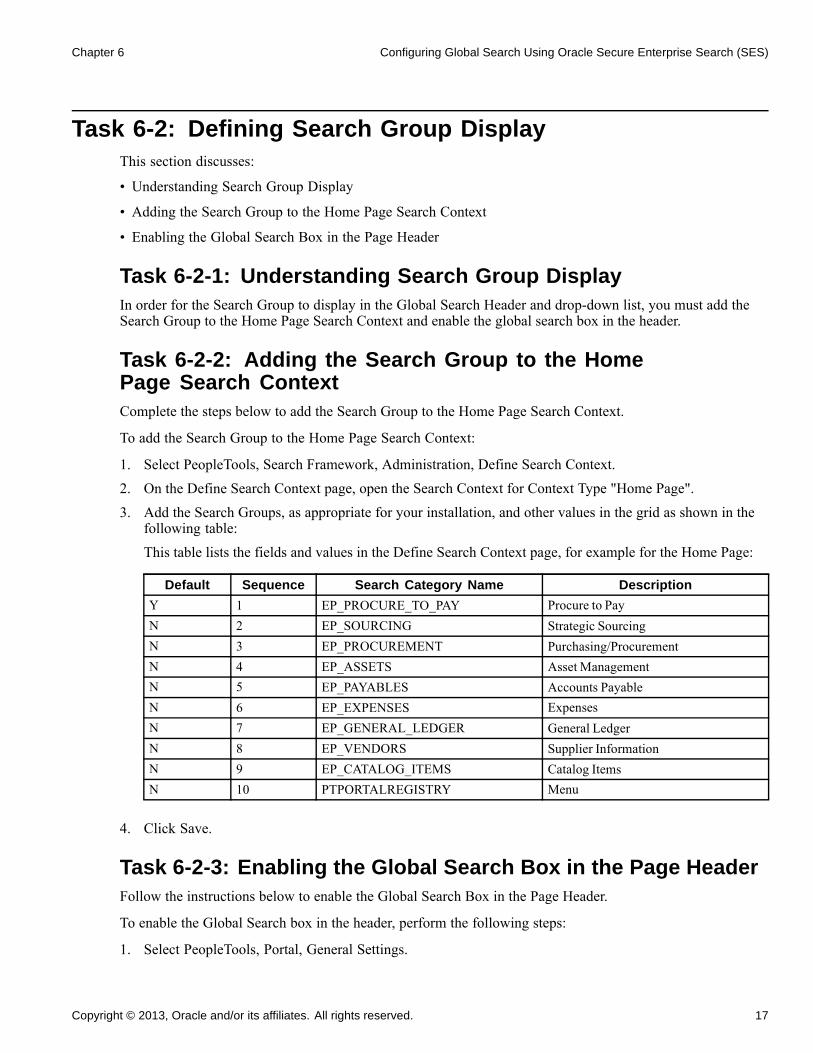
3. Add the Search Groups, as appropriate for your installation, and other values in the grid as shown in thefollowing table:
This table lists the fields and values in the Define Search Context page, for example for the Home Page:
Default Sequence Search Category Name Description
Y 1 EP_PROCURE_TO_PAY Procure to PayN 2 EP_SOURCING Strategic SourcingN 3 EP_PROCUREMENT Purchasing/ProcurementN 4 EP_ASSETS Asset ManagementN 5 EP_PAYABLES Accounts PayableN 6 EP_EXPENSES ExpensesN 7 EP_GENERAL_LEDGER General LedgerN 8 EP_VENDORS Supplier InformationN 9 EP_CATALOG_ITEMS Catalog ItemsN 10 PTPORTALREGISTRY Menu
4. Click Save.
Task 6-2-3: Enabling the Global Search Box in the Page HeaderFollow the instructions below to enable the Global Search Box in the Page Header.
To enable the Global Search box in the header, perform the following steps:
1. Select PeopleTools, Portal, General Settings.
Copyright © 2013, Oracle and/or its affiliates. All rights reserved. 17
Configuring Global Search Using Oracle Secure Enterprise Search (SES) Chapter 6
2. Select Display Global Search in Header checkbox.3. Click Save.
Task 6-3: Verifying the Setup of Portal Node inPeopleSoft FSCM
In this step you will verify the setup of the Portal Node in your PeopleSoft FSCM environment.
To verify the Portal Node in your environment:
1. Select PeopleTools, Integration Broker, Integration Setup, Nodes.
2. On the Nodes search page, search for and select the Portal node PSFT_EP.
The Node Definitions page appears.
3. On the Node Definitions page, select the Portal tab.
4. On the Portal page, in the Content URI field, verify that you have entered an address that corresponds toyour PeopleSoft FSCM environment.
For example: http://<server>:<port>/psc/pshome/
5. In the Portal URI field, verify that you have entered an address that corresponds to your PeopleSoftFSCM environment.
For example: http://<server>:<port>/psp/pshome/
6. Click Save.
For more information about Integration Broker setup, see PeopleTools: PeopleSoft Integration BrokerAdministration.
Task 6-4: Configuring Attachments for FSCMSearch Definitions
Search Attachments are documents that can be included in a Search Index. Depending on the application andsetup, attachments can be stored on the FTP server, the SFTP server, or in the database. When attachmentsare to be included in a search index, they must be defined on the Attachment Properties tab of the SearchDefinition page. You can also find pre-defined attachments on the Search Definition page.
Note. Complete this step only if you are installing a Demo database. If you are installing a SYS databaseyou can skip this step.
This table illustrates the Financial and Supply Chain search definitions that can search for attachments:
Search Definition Description Used In
EP_AM_ASSET Assets Global / Search PagesEP_AP_VENDOR Suppliers Global / Search Pages
18 Copyright © 2013, Oracle and/or its affiliates. All rights reserved.
Chapter 6 Configuring Global Search Using Oracle Secure Enterprise Search (SES)
Search Definition Description Used In
EP_AP_VOUCHERS Vouchers Global / Search PagesEP_CS_DOC_ADHOC Adhoc Documents Search Content in Supplier Contract
MgmtEP_CS_DOC_CONTRACTS Contract Documents Search Content in Supplier Contract
MgmtEP_CS_DOC_PURCHORDRS Purchase Order Documents Search Content in Supplier Contract
MgmtEP_CS_DOC_SOURCING Sourcing Event Documents Search Content in Supplier Contract
MgmtEP_PO_CONTRACTS PO Contracts Global / Search PagesEP_PO_PURCHASE_ORDERS Purchase Orders Global / Search PagesEP_PO_REQUISITIONS Requisitions Global / Search PagesEP_SS_EVENTS Sourcing Events Global / Search Pages
In order to utilize these attachments, you need to make sure that attachment URLs are configured for yourenvironment.
Complete the procedure below if you wish to have SES crawl attachments related to components in the‘Procure to Pay’ business process area and you use FTP or SFTP based file attachments. After the URLgets configured, verify it in PeopleTools.
Note. If your attachments are all stored within the database these steps are not required. For any existingnon-URL (FTP) based file attachment setup which is crawled, there is a URL definition created in the SESURL Equivalent column on the Administer File Attachment page . The corresponding URLs are automaticallyset up in PeopleTools. You need to verify that the file attachments for FSCM are set up.
To verify the setup of the file attachments:
1. Navigate to Set Up Financials/Supply Chain, Common Definitions, File Attachments, Administer FileAttachments.
2. Click Save.Verify that the SES URL equivalent appears in the SES URL Equivalent field.
3. Make a note of the URL.
Note. You cannot delete a server after you save the row and quit the component. After you quit, the systemassumes that attachments are stored on this server location.
See PeopleSoft FSCM: Applications Fundamentals
4. To verify the URL, select PeopleTools, Utilities, Administration, URLs.5. Search for the URL that appears in the SES URL Equivalent column from the previous page.6. Verify that the settings on this page match the username/password which was previously set up.
Copyright © 2013, Oracle and/or its affiliates. All rights reserved. 19

Configuring Global Search Using Oracle Secure Enterprise Search (SES) Chapter 6
Task 6-5: Deploying and Indexing DeliveredSearch Definitions
This section discusses:
• Deploying Indexes
• Building an Index
Task 6-5-1: Deploying IndexesAfter the indexes are defined, you need to deploy the search definition. You must also deploy the searchcategories that contain more than one index. Search categories with only one index, that have the same nameas the search definitions, are automatically deployed.
Warning! The Deploy Search Definitions page also allows you to delete search definitions. Deleted searchdefinitions are not reversible.
Note. When Deploying and Building Search Definitions defined for Global Search, this also automaticallyenables the Keyword Search within Search Pages for the components associated on the Search Definition.
Note. If your environment does not contain licenses for all products within the Procure to Pay Search Categoryyou will need to deploy the underlying indexes for the product. However, you do not need to build the indexes.As an alternative, you can customize the Procure to Pay Search Category to remove Search Definitionsrelated to products that are not licensed.
To deploy a search definition:
1. Select the check box in the left column.2. Scroll to the bottom of the Deploy Search Definitions page, and click the Deploy button.3. Select the Search Categories tab.
Confirm that the category with the same name as the search definition is automatically deployed.4. If a category contains more than one search definition, such as EP_PROCURE_TO_PAY, you can deploy
it by following the same steps for a search definition and using the Search Categories tab. Deploying thesesearch categories can occur before or after individual search definitions are indexed.
For more information about the Deploy Search Definitions page and the Deploy Search Category page, seePeopleTools: PeopleSoft Search Technology, “Administering Search Definitions and Search Categories”.
Task 6-5-2: Building an IndexIn this step you will use the Schedule Search Index page to build an index.
To build an index:
1. Select PeopleTools, Search Framework, Administration, Schedule Search Index to display the ScheduleSearch Index page.
2. Enter the Search Definition name in the Search Definition field.
20 Copyright © 2013, Oracle and/or its affiliates. All rights reserved.
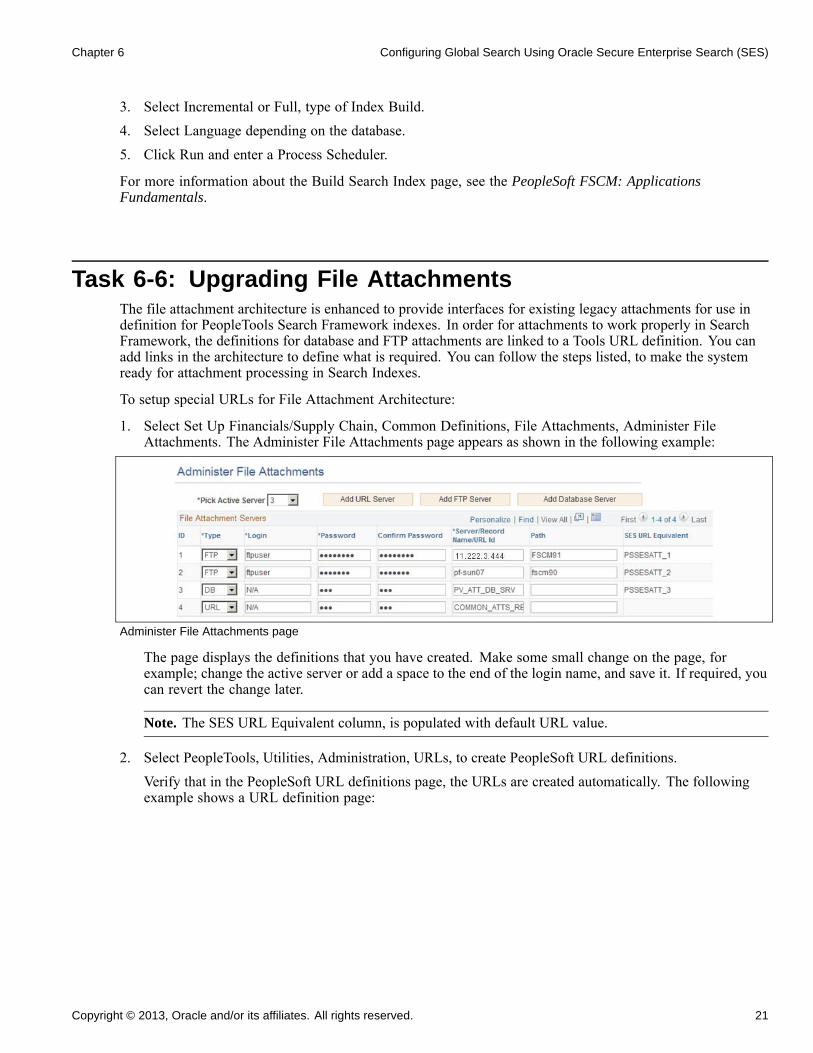
Chapter 6 Configuring Global Search Using Oracle Secure Enterprise Search (SES)
3. Select Incremental or Full, type of Index Build.4. Select Language depending on the database.5. Click Run and enter a Process Scheduler.
For more information about the Build Search Index page, see the PeopleSoft FSCM: ApplicationsFundamentals.
Task 6-6: Upgrading File AttachmentsThe file attachment architecture is enhanced to provide interfaces for existing legacy attachments for use indefinition for PeopleTools Search Framework indexes. In order for attachments to work properly in SearchFramework, the definitions for database and FTP attachments are linked to a Tools URL definition. You canadd links in the architecture to define what is required. You can follow the steps listed, to make the systemready for attachment processing in Search Indexes.
To setup special URLs for File Attachment Architecture:
1. Select Set Up Financials/Supply Chain, Common Definitions, File Attachments, Administer FileAttachments. The Administer File Attachments page appears as shown in the following example:
Administer File Attachments page
The page displays the definitions that you have created. Make some small change on the page, forexample; change the active server or add a space to the end of the login name, and save it. If required, youcan revert the change later.
Note. The SES URL Equivalent column, is populated with default URL value.
2. Select PeopleTools, Utilities, Administration, URLs, to create PeopleSoft URL definitions.Verify that in the PeopleSoft URL definitions page, the URLs are created automatically. The followingexample shows a URL definition page:
Copyright © 2013, Oracle and/or its affiliates. All rights reserved. 21
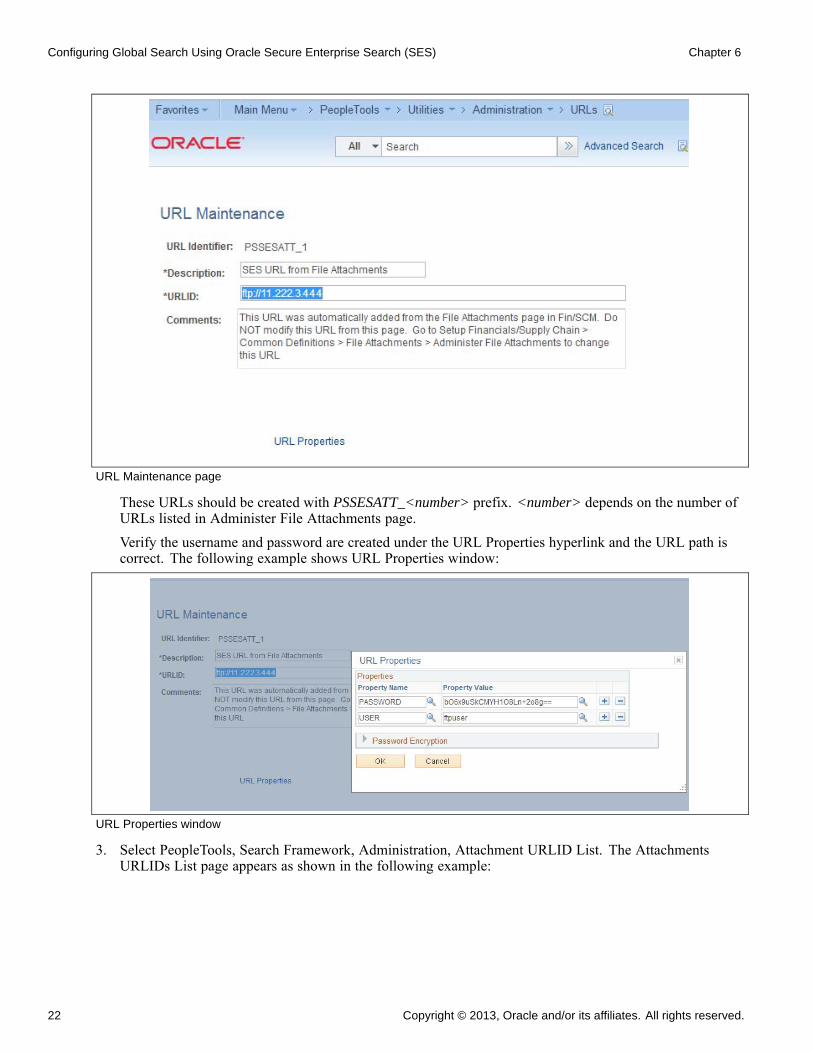
Configuring Global Search Using Oracle Secure Enterprise Search (SES) Chapter 6
URL Maintenance page
These URLs should be created with PSSESATT_<number> prefix. <number> depends on the number ofURLs listed in Administer File Attachments page.Verify the username and password are created under the URL Properties hyperlink and the URL path iscorrect. The following example shows URL Properties window:
URL Properties window
3. Select PeopleTools, Search Framework, Administration, Attachment URLID List. The AttachmentsURLIDs List page appears as shown in the following example:
22 Copyright © 2013, Oracle and/or its affiliates. All rights reserved.
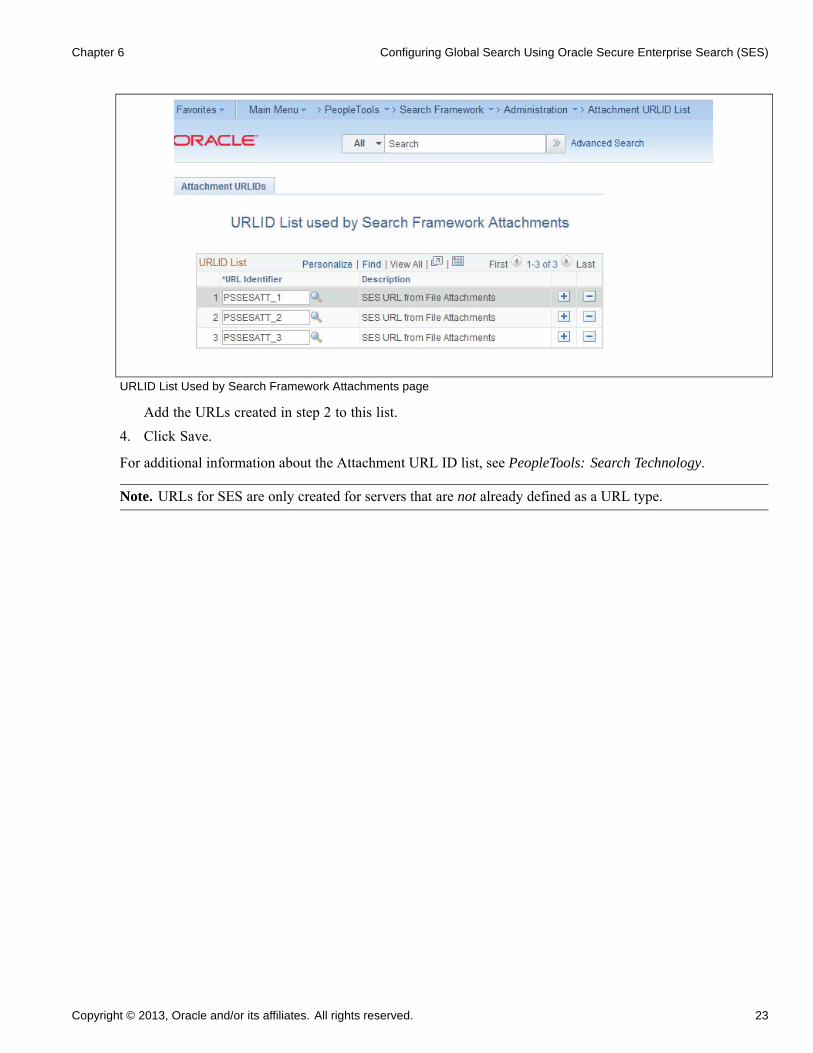
Chapter 6 Configuring Global Search Using Oracle Secure Enterprise Search (SES)
URLID List Used by Search Framework Attachments page
Add the URLs created in step 2 to this list.4. Click Save.
For additional information about the Attachment URL ID list, see PeopleTools: Search Technology.
Note. URLs for SES are only created for servers that are not already defined as a URL type.
Copyright © 2013, Oracle and/or its affiliates. All rights reserved. 23

Configuring Global Search Using Oracle Secure Enterprise Search (SES) Chapter 6
24 Copyright © 2013, Oracle and/or its affiliates. All rights reserved.
CHAPTER 7
Part II: Installing PeopleSoft FMS, ESAand SFO Applications
Understanding Part IIThis section includes:
• Installing PeopleSoft 9.2 General Ledger• Installing and Setting Up Forms Processing for PeopleSoft 9.2 Grants• Installing PeopleSoft 9.2 Expenses• Installing PeopleSoft 9.2 Pay/Bill Management• Installing PeopleSoft 9.2 ESA and FSCM Portal Packs• Integrating PeopleSoft 9.2 Project Costing and Program Management with Microsoft Project 2007• Defining an FTP Server for File Attachments in PeopleSoft 9.2 Project Costing• Setting Up PeopleSoft 9.2 Staffing Front Office• Integrating PeopleSoft Transaction Billing Processor with PeopleSoft Customer Relationship Management• Installing PeopleSoft 9.2 Maintenance Management with Microsoft Project 2007• Integrating PeopleSoft 9.2 Asset Management with eCenterOne Space Management Solution (Optional)• Integrating PeopleSoft 9.2 Asset Management and Physical Inventory Solutions• Integrating PeopleSoft 9.2 IT Asset Management with Network Inventory Discovery Systems
Copyright © 2013, Oracle and/or its affiliates. All rights reserved. 25

Part II: Installing PeopleSoft FMS, ESA and SFO Applications Chapter 7
26 Copyright © 2013, Oracle and/or its affiliates. All rights reserved.
CHAPTER 8
Installing PeopleSoft 9.2 General Ledger
This chapter discusses:
• Prerequisites
• Changing a URL Definition for General Ledger File Import (Optional)
• Defining an Environmental Variable on a Process Scheduler Server
• Running File Import Processes Using the z/OS Database
PrerequisitesThis document describes the steps necessary to establish the file attachment storage location for documentsthat you import to PeopleSoft General Ledger and the database specifics for various file import processes.
The following table lists the setup dependencies for the file import processes in this chapter:
Process Description
GL_JRNL_IMP Flat file journal importGL_LED_IMP Flat file ledger importGL_EXCL_JRNL Spreadsheet journal batch importGL_F2_MAF FACTS II Load MAF DataGLFACTSI_MAF FACTS I Load Data (FACTSIMAF, SGL Accounts,
Trading Partners)GL_GOALS_IMP GOALS Disbursement/Receipt Files (Ledger Activity and
Trial Balance)
Task 8-1: Changing a URL Definition for GeneralLedger File Import (Optional)
The URL definition GL_FILE_IMPORT defines the storage location of the file attachment. By default, thispoints to a database record. You may want to change the storage location of the file attachment to anotherlocation, such as an FTP server. This is optional.
To change the URL definition:
1. Select PeopleTools, Utilities, Administrations, URLs.
Copyright © 2013, Oracle and/or its affiliates. All rights reserved. 27
Installing PeopleSoft 9.2 General Ledger Chapter 8
2. Open GL_FILE_IMPORT.3. Change the URL definition to an FTP server location of your choice.
See Also
PeopleTools: PeopleCode Developer’s Guide
Task 8-2: Defining an Environmental Variable ona Process Scheduler Server
The system requires that you define an environmental variable, PS_FILEDIR. This variable defines thetemporary flat file location on the process scheduler that runs the file import process.
• If you are using a UNIX or z/OS process scheduler, edit the psconfig.sh file and specify the flat filelocation in the environment variable PS_FILEDIR. For example:
PS_FILEDIR=/tmp;export PS_FILEDIR
• If you are using a Microsoft Windows process scheduler, from your Start menu select Programs, ControlPanel, System. Select the Advanced Tab and click Environment Variables. Add or modify the systemvariable PS_FILEDIR and specify its value. For example:
C:\TEMP
Note. For more technical information on this topic, refer to the PeopleSoft PeopleTools description ofGetFile() PeopleCode for details, or consult your system administrator.
Task 8-3: Running File Import Processes Usingthe z/OS Database
This is a general reminder for those who run import processes. If the import process enables you to specifyCharacter Set, select the Character Set appropriate to the flat file that you are importing. For example, you mayselect ISO_8859-6 for Arabic, and JIS_X_0208 or Shift_JIS for Japanese.
For those who are running the following specific import processes:
GL_F2_MAF
GLFACTSI_MAF
GL_GOALS_IMP
If you have a DB2/390 database and you prepare the flat file in ASCII format, you can only run the process on aMicrosoft Windows or a UNIX process schedule server. If you prepare the flat file in EBCDIC format, you canonly run the import process on a OS390 process schedule server. For all other databases, there is no limitationon the type of process schedule servers. The appropriate process scheduler should be set up for these processes.
28 Copyright © 2013, Oracle and/or its affiliates. All rights reserved.
CHAPTER 9
Installing and Setting Up Forms Processingfor PeopleSoft 9.2 Grants
This chapter discusses:
• Understanding Forms Processing
• Downloading the Forms from the Sponsor Web Sites
• Setting Up the Forms URL Maintenance Area in PeopleSoft
• Entering the Names of the PDF Templates (Optional)
• Printing the Forms (Optional)
• Viewing Reports
Understanding Forms ProcessingThe PeopleSoft Enterprise Grants forms printing solution uses file layouts to generate XML. This isaccomplished by using existing PeopleSoft PeopleTools functionality. Through the use of ML/XFDF, thePeopleSoft Grants forms solution maps all of the required data elements to the actual sponsor forms. As aresult, you can edit and print forms online using Adobe Acrobat Reader 5.0 (or higher). There is no longer aneed to engage an additional third party component application for any form printing requirements because thesolution uses standard PeopleSoft PeopleTools technology.
You can use the new forms printing solution with the following forms:
• Grant Application (PHS 398)This is the set of proposal application forms that the National Institutes of Health requires for fundingrequests. This form set is in the process of being superceded by SF-424 R&R submissions throughGrants.gov.
• Non-Competing Grant Progress Report (PHS 2590)This is an interim progress report that the National Institutes of Health requires recipients to submit forfunding. You typically submit this form on an annual basis.
Task 9-1: Downloading the Forms from the Sponsor Web SitesTo set up the forms solution for your database, you must download the following .pdf files from the sponsorweb sites:
Copyright © 2013, Oracle and/or its affiliates. All rights reserved. 29
Installing and Setting Up Forms Processing for PeopleSoft 9.2 Grants Chapter 9
• http://grants.nih.gov/grants/funding/2590/2590_forms.pdfFull Package of 2590 Reports that includes: Grant Progress Report, Form Page 1 - Continued, DetailedBudget for Next Budget Period – Direct Costs Only, Budget Justification/Current Budget Period, ProgressReport Summary, Checklist, All Personnel Report, Next Budget Period, Targeted/Planned EnrollmentTable, Inclusion Enrollment Report, Trainee Diversity Report.
• http://grants.nih.gov/grants/funding/phs398/398_forms.pdfGrant Application.
• http://grants.nih.gov/grants/funding/phs398/biosketch.pdfBiographical Sketch.
• http://grants.nih.gov/grants/funding/phs398/continuation.pdfContinuation Format Page.
• http://grants.nih.gov/grants/funding/phs398/fp4.pdfDetailed Budget for Initial Budget Period Direct Costs Only.
• http://grants.nih.gov/grants/funding/2590/enrollment.pdfTargeted/Planned Enrollment Form.
Place these files in the location that is defined for the URL maintenance area, as described in the followingsection.
See Setting Up the Forms URL Maintenance Area in PeopleSoft
Task 9-2: Setting Up the Forms URL MaintenanceArea in PeopleSoft
In this section you will set up the Forms URL Maintenance Area.
To set up the Forms URL Maintenance Area:
1. Select PeopleTools, Utilities, Administration, URLs.2. On the URL search page, search for and select GM_FORMS_LOCATION.
The URL Maintenance page appears, as shown in the following example:
30 Copyright © 2013, Oracle and/or its affiliates. All rights reserved.
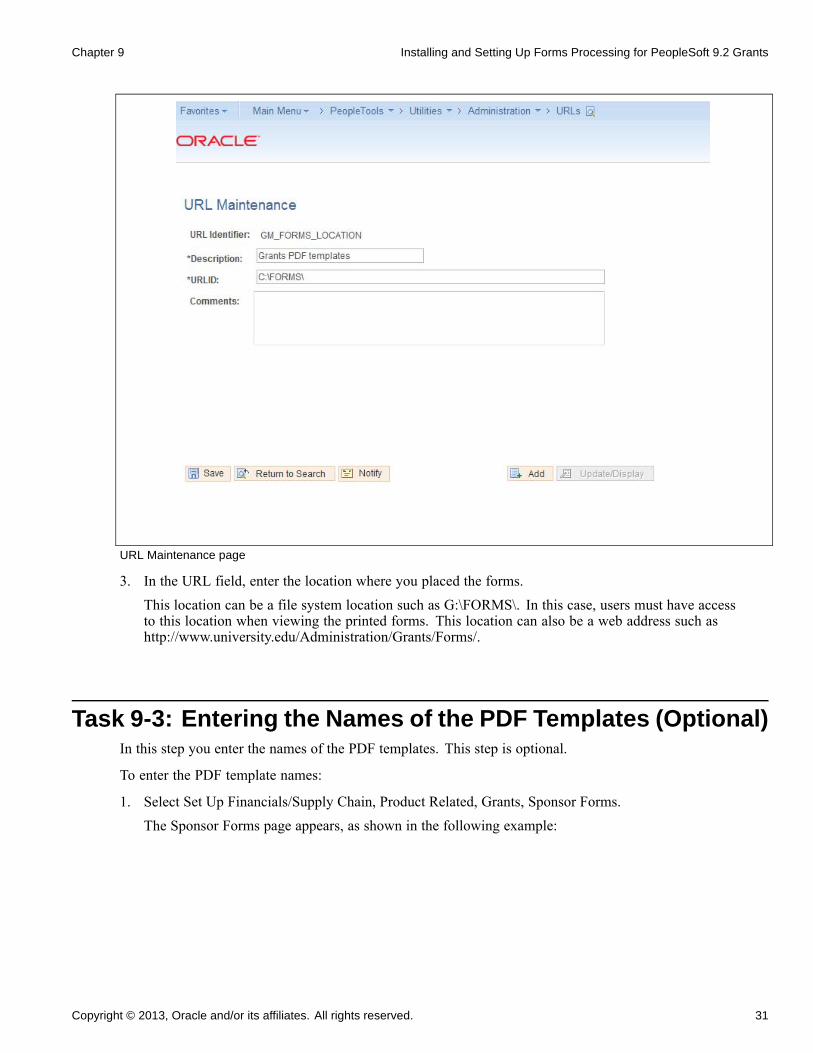
Chapter 9 Installing and Setting Up Forms Processing for PeopleSoft 9.2 Grants
URL Maintenance page
3. In the URL field, enter the location where you placed the forms.This location can be a file system location such as G:\FORMS\. In this case, users must have accessto this location when viewing the printed forms. This location can also be a web address such ashttp://www.university.edu/Administration/Grants/Forms/.
Task 9-3: Entering the Names of the PDF Templates (Optional)In this step you enter the names of the PDF templates. This step is optional.
To enter the PDF template names:
1. Select Set Up Financials/Supply Chain, Product Related, Grants, Sponsor Forms.
The Sponsor Forms page appears, as shown in the following example:
Copyright © 2013, Oracle and/or its affiliates. All rights reserved. 31
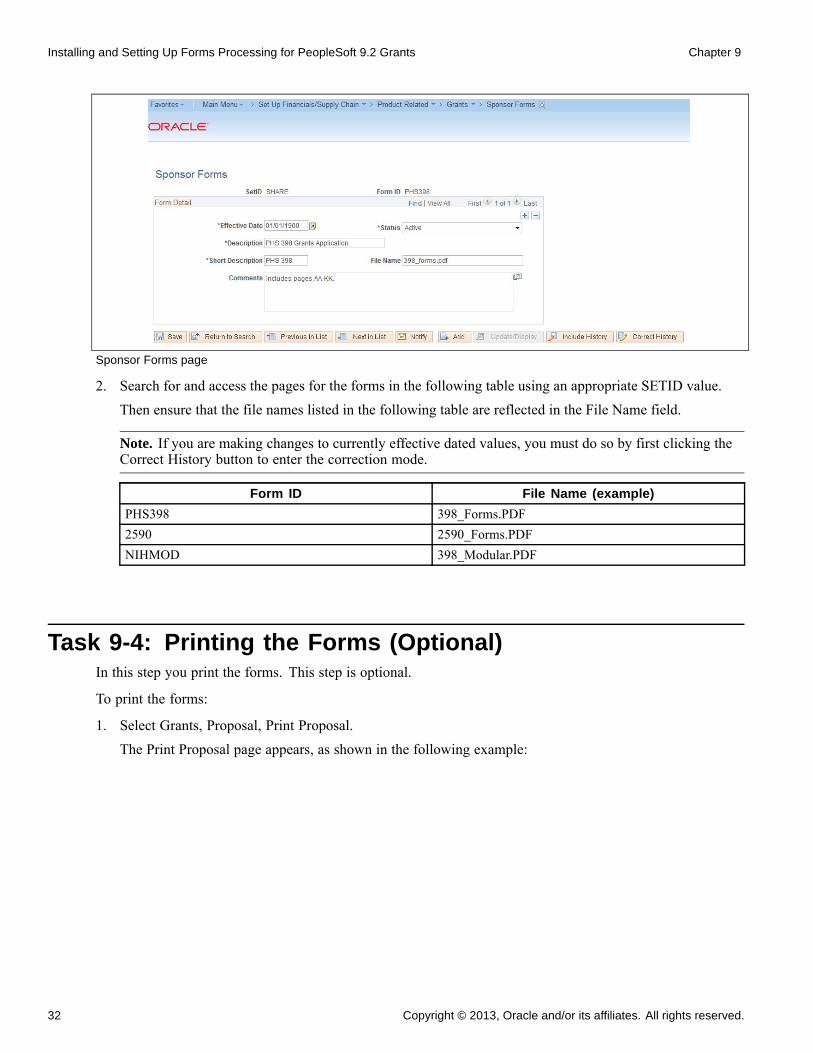
Installing and Setting Up Forms Processing for PeopleSoft 9.2 Grants Chapter 9
Sponsor Forms page
2. Search for and access the pages for the forms in the following table using an appropriate SETID value.
Then ensure that the file names listed in the following table are reflected in the File Name field.
Note. If you are making changes to currently effective dated values, you must do so by first clicking theCorrect History button to enter the correction mode.
Form ID File Name (example)
PHS398 398_Forms.PDF2590 2590_Forms.PDFNIHMOD 398_Modular.PDF
Task 9-4: Printing the Forms (Optional)In this step you print the forms. This step is optional.
To print the forms:
1. Select Grants, Proposal, Print Proposal.The Print Proposal page appears, as shown in the following example:
32 Copyright © 2013, Oracle and/or its affiliates. All rights reserved.
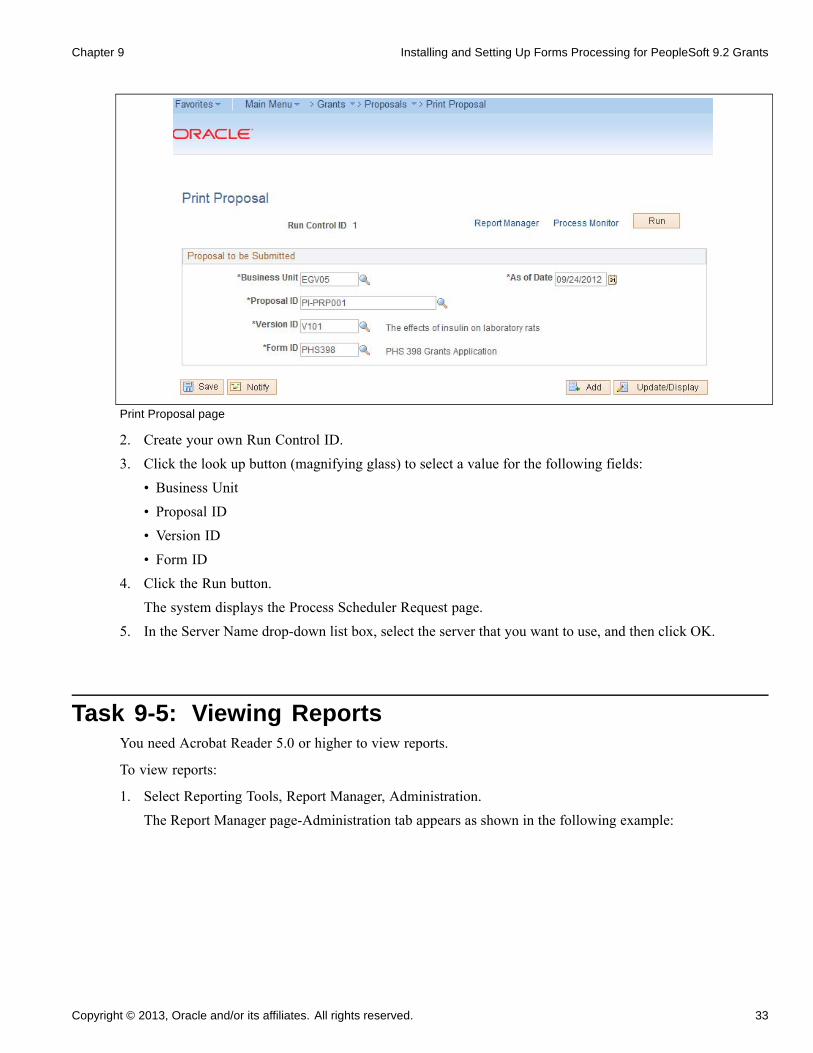
Chapter 9 Installing and Setting Up Forms Processing for PeopleSoft 9.2 Grants
Print Proposal page
2. Create your own Run Control ID.3. Click the look up button (magnifying glass) to select a value for the following fields:
• Business Unit• Proposal ID• Version ID• Form ID
4. Click the Run button.The system displays the Process Scheduler Request page.
5. In the Server Name drop-down list box, select the server that you want to use, and then click OK.
Task 9-5: Viewing ReportsYou need Acrobat Reader 5.0 or higher to view reports.
To view reports:
1. Select Reporting Tools, Report Manager, Administration.The Report Manager page-Administration tab appears as shown in the following example:
Copyright © 2013, Oracle and/or its affiliates. All rights reserved. 33
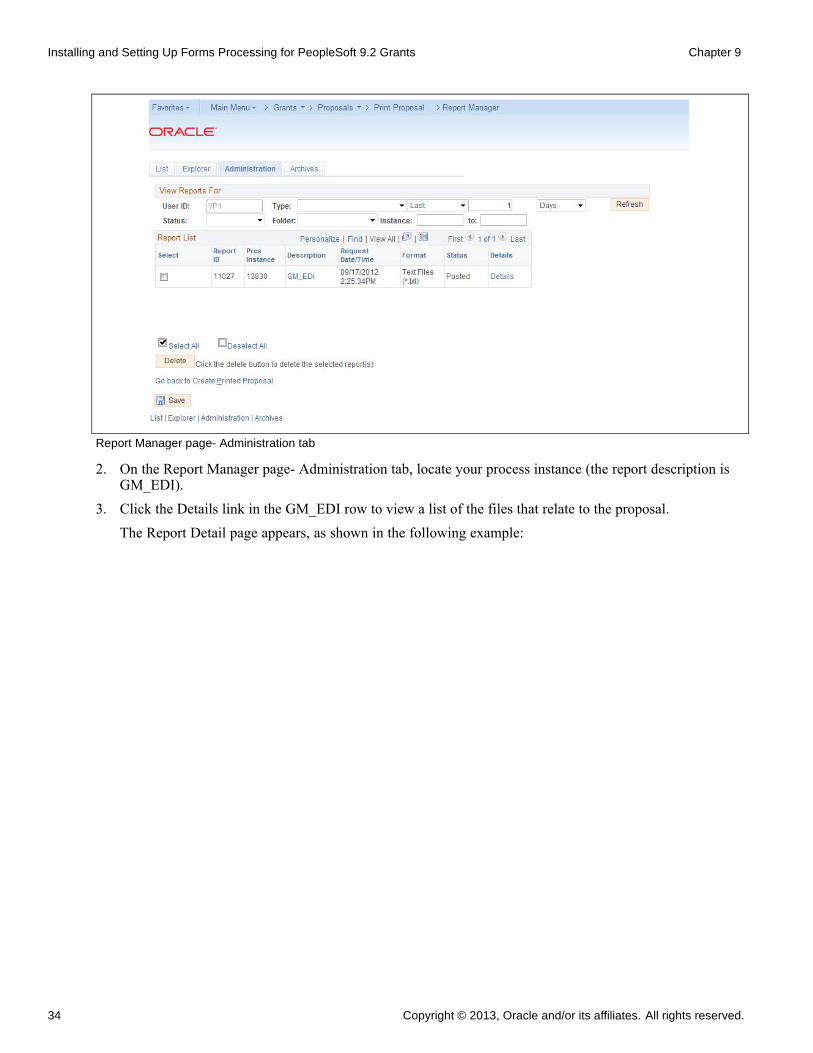
Installing and Setting Up Forms Processing for PeopleSoft 9.2 Grants Chapter 9
Report Manager page- Administration tab
2. On the Report Manager page- Administration tab, locate your process instance (the report description isGM_EDI).
3. Click the Details link in the GM_EDI row to view a list of the files that relate to the proposal.The Report Detail page appears, as shown in the following example:
34 Copyright © 2013, Oracle and/or its affiliates. All rights reserved.
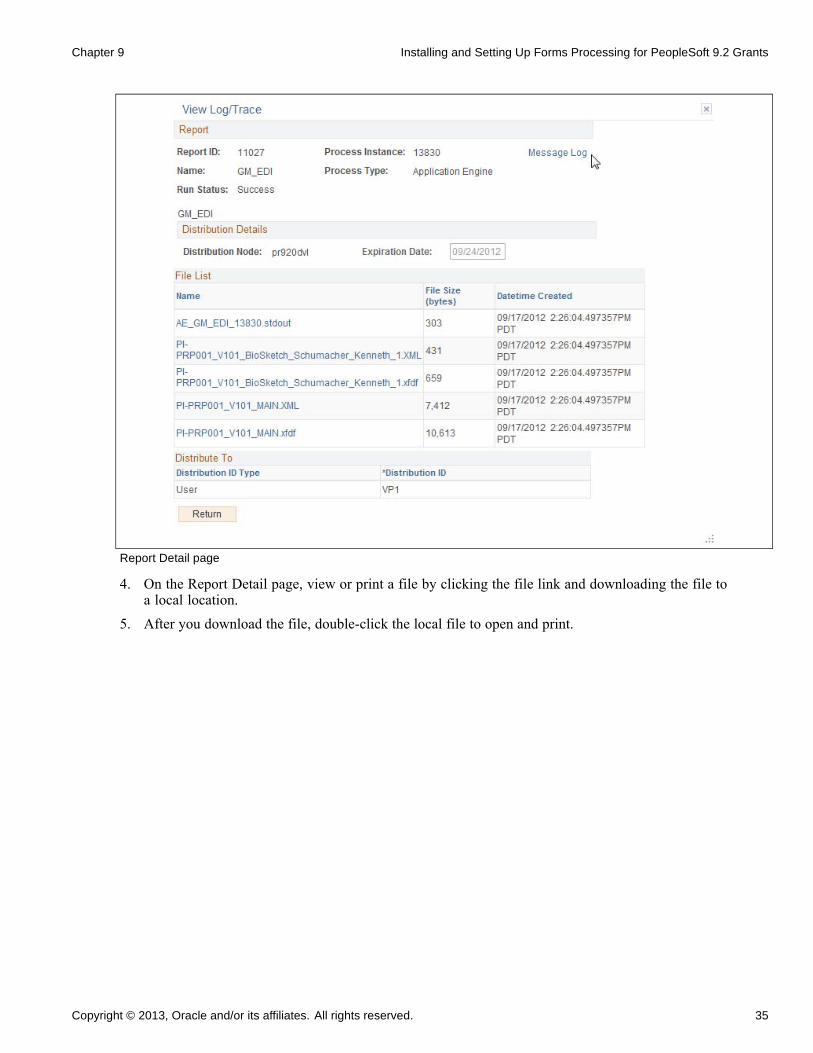
Chapter 9 Installing and Setting Up Forms Processing for PeopleSoft 9.2 Grants
Report Detail page
4. On the Report Detail page, view or print a file by clicking the file link and downloading the file toa local location.
5. After you download the file, double-click the local file to open and print.
Copyright © 2013, Oracle and/or its affiliates. All rights reserved. 35

Installing and Setting Up Forms Processing for PeopleSoft 9.2 Grants Chapter 9
36 Copyright © 2013, Oracle and/or its affiliates. All rights reserved.
CHAPTER 10
Installing PeopleSoft 9.2 Expenses
This chapter discusses:
• Configuring PeopleSoft Integration Broker
• Configuring the Employee Portal Servlet URL
Task 10-1: Configuring PeopleSoft Integration BrokerThis section discusses:
• Understanding the PeopleSoft Integration Broker Configuration
• Setting Up Gateways
• Activating the Local Domain
• Activating Queue Definitions
• Setting up Service and Handlers
• Verifying the Message Channel Status
Understanding the PeopleSoft Integration Broker ConfigurationThis task details the configuration of the PeopleSoft Integration Broker for Approvals.
Task 10-1-1: Setting Up GatewaysSet up a Gateway to begin configuring PeopleSoft Integration Broker.
To set up the local gateway and load balancer:
1. Select PeopleTools, Integration Broker, Configuration, Gateways.2. Click Search.
The Gateways page for the local gateway automatically appears by default, as shown in the followingexample:
Copyright © 2013, Oracle and/or its affiliates. All rights reserved. 37
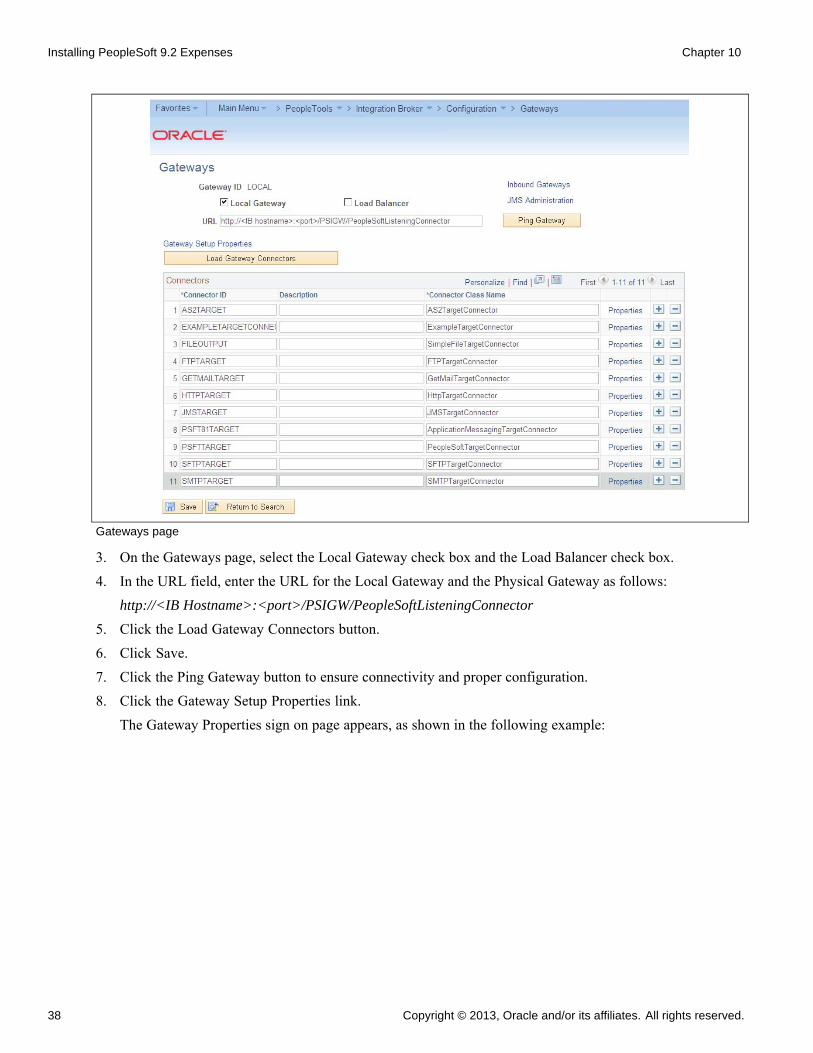
Installing PeopleSoft 9.2 Expenses Chapter 10
Gateways page
3. On the Gateways page, select the Local Gateway check box and the Load Balancer check box.
4. In the URL field, enter the URL for the Local Gateway and the Physical Gateway as follows:
http://<IB Hostname>:<port>/PSIGW/PeopleSoftListeningConnector
5. Click the Load Gateway Connectors button.
6. Click Save.
7. Click the Ping Gateway button to ensure connectivity and proper configuration.
8. Click the Gateway Setup Properties link.
The Gateway Properties sign on page appears, as shown in the following example:
38 Copyright © 2013, Oracle and/or its affiliates. All rights reserved.
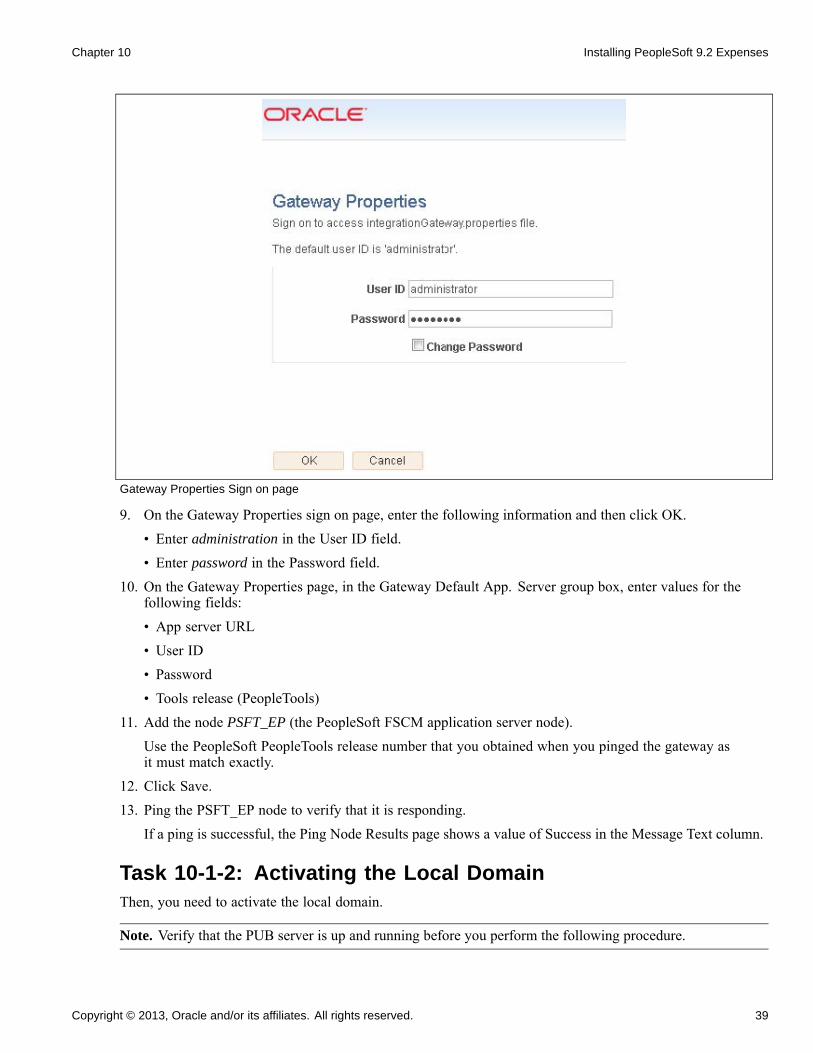
Chapter 10 Installing PeopleSoft 9.2 Expenses
Gateway Properties Sign on page
9. On the Gateway Properties sign on page, enter the following information and then click OK.
• Enter administration in the User ID field.
• Enter password in the Password field.
10. On the Gateway Properties page, in the Gateway Default App. Server group box, enter values for thefollowing fields:
• App server URL
• User ID• Password• Tools release (PeopleTools)
11. Add the node PSFT_EP (the PeopleSoft FSCM application server node).
Use the PeopleSoft PeopleTools release number that you obtained when you pinged the gateway asit must match exactly.
12. Click Save.
13. Ping the PSFT_EP node to verify that it is responding.
If a ping is successful, the Ping Node Results page shows a value of Success in the Message Text column.
Task 10-1-2: Activating the Local DomainThen, you need to activate the local domain.
Note. Verify that the PUB server is up and running before you perform the following procedure.
Copyright © 2013, Oracle and/or its affiliates. All rights reserved. 39
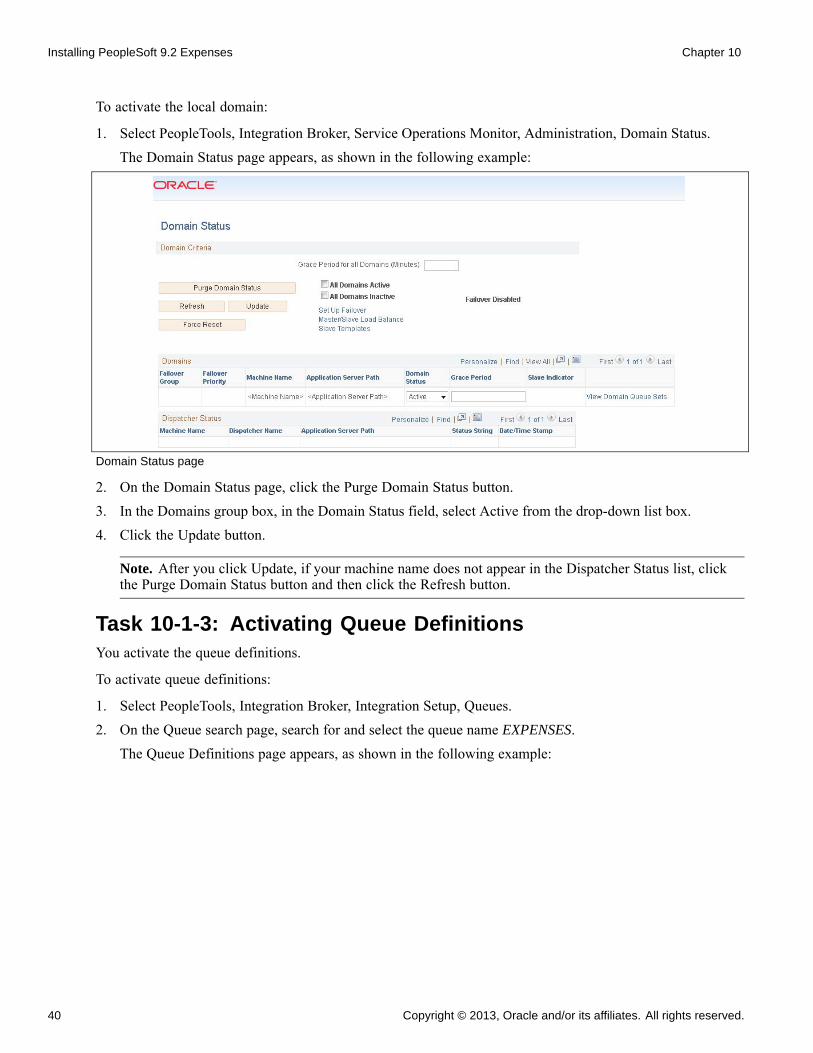
Installing PeopleSoft 9.2 Expenses Chapter 10
To activate the local domain:
1. Select PeopleTools, Integration Broker, Service Operations Monitor, Administration, Domain Status.
The Domain Status page appears, as shown in the following example:
Domain Status page
2. On the Domain Status page, click the Purge Domain Status button.3. In the Domains group box, in the Domain Status field, select Active from the drop-down list box.4. Click the Update button.
Note. After you click Update, if your machine name does not appear in the Dispatcher Status list, clickthe Purge Domain Status button and then click the Refresh button.
Task 10-1-3: Activating Queue DefinitionsYou activate the queue definitions.
To activate queue definitions:
1. Select PeopleTools, Integration Broker, Integration Setup, Queues.2. On the Queue search page, search for and select the queue name EXPENSES.
The Queue Definitions page appears, as shown in the following example:
40 Copyright © 2013, Oracle and/or its affiliates. All rights reserved.
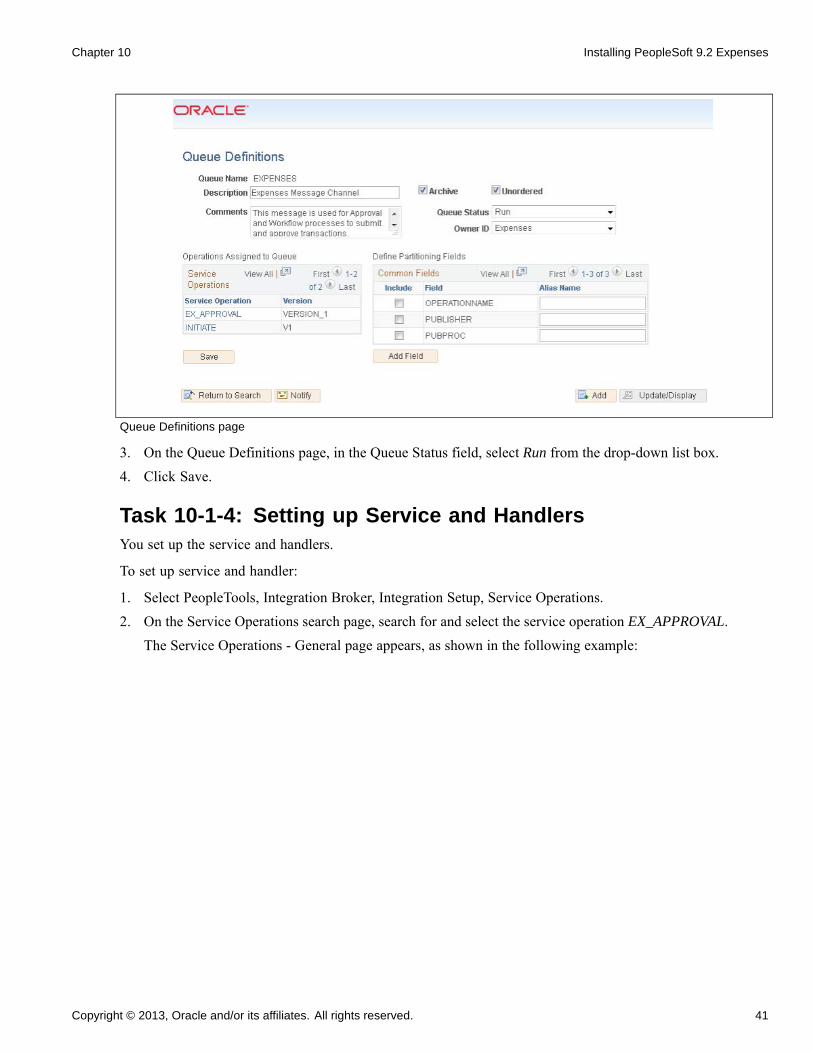
Chapter 10 Installing PeopleSoft 9.2 Expenses
Queue Definitions page
3. On the Queue Definitions page, in the Queue Status field, select Run from the drop-down list box.4. Click Save.
Task 10-1-4: Setting up Service and HandlersYou set up the service and handlers.
To set up service and handler:
1. Select PeopleTools, Integration Broker, Integration Setup, Service Operations.
2. On the Service Operations search page, search for and select the service operation EX_APPROVAL.
The Service Operations - General page appears, as shown in the following example:
Copyright © 2013, Oracle and/or its affiliates. All rights reserved. 41
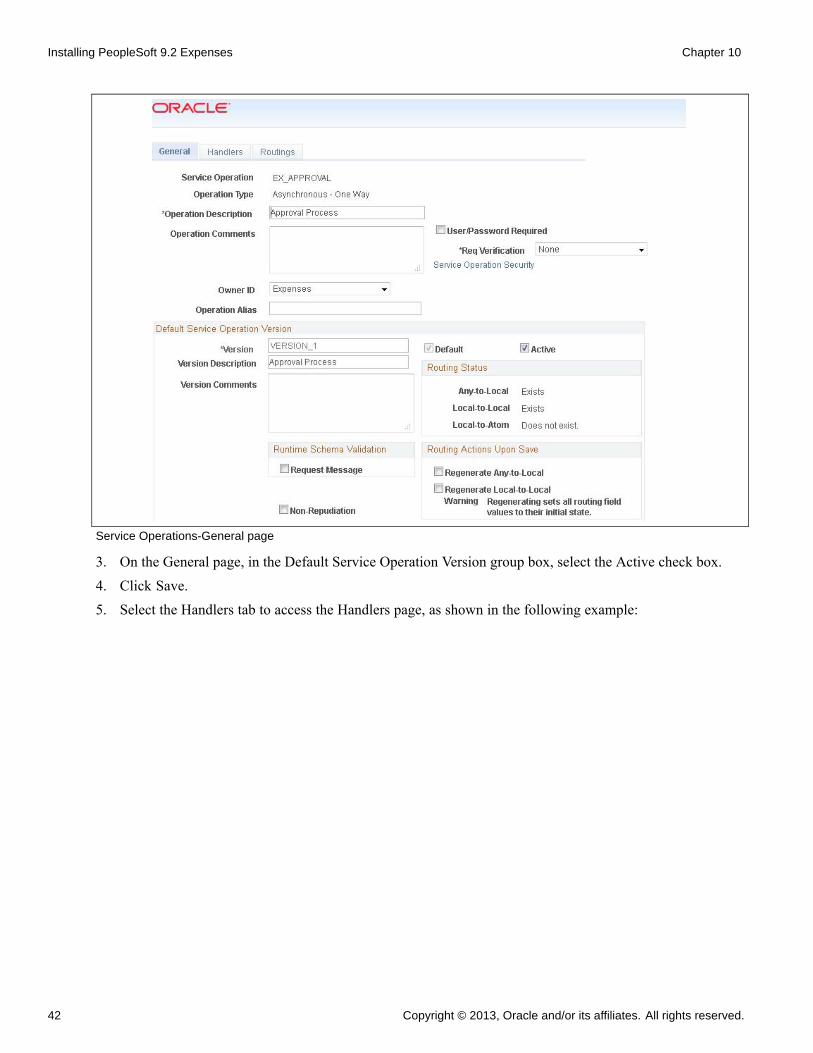
Installing PeopleSoft 9.2 Expenses Chapter 10
Service Operations-General page
3. On the General page, in the Default Service Operation Version group box, select the Active check box.4. Click Save.5. Select the Handlers tab to access the Handlers page, as shown in the following example:
42 Copyright © 2013, Oracle and/or its affiliates. All rights reserved.
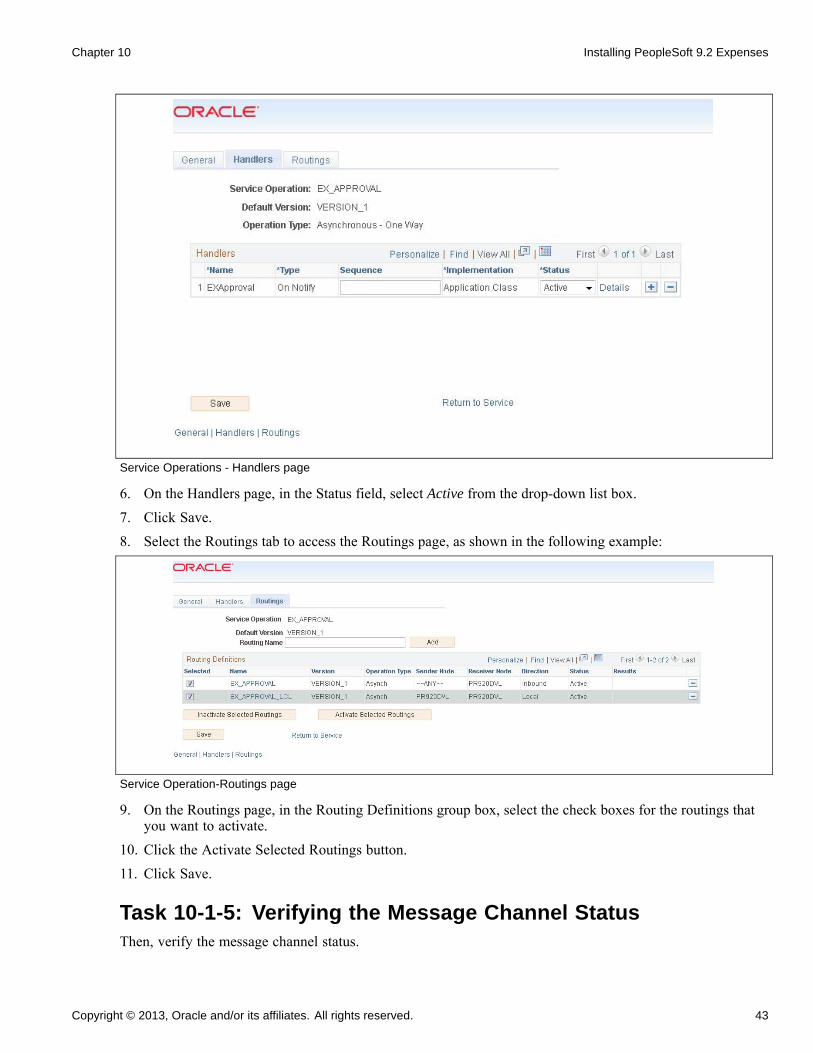
Chapter 10 Installing PeopleSoft 9.2 Expenses
Service Operations - Handlers page
6. On the Handlers page, in the Status field, select Active from the drop-down list box.7. Click Save.8. Select the Routings tab to access the Routings page, as shown in the following example:
Service Operation-Routings page
9. On the Routings page, in the Routing Definitions group box, select the check boxes for the routings thatyou want to activate.
10. Click the Activate Selected Routings button.11. Click Save.
Task 10-1-5: Verifying the Message Channel StatusThen, verify the message channel status.
Copyright © 2013, Oracle and/or its affiliates. All rights reserved. 43
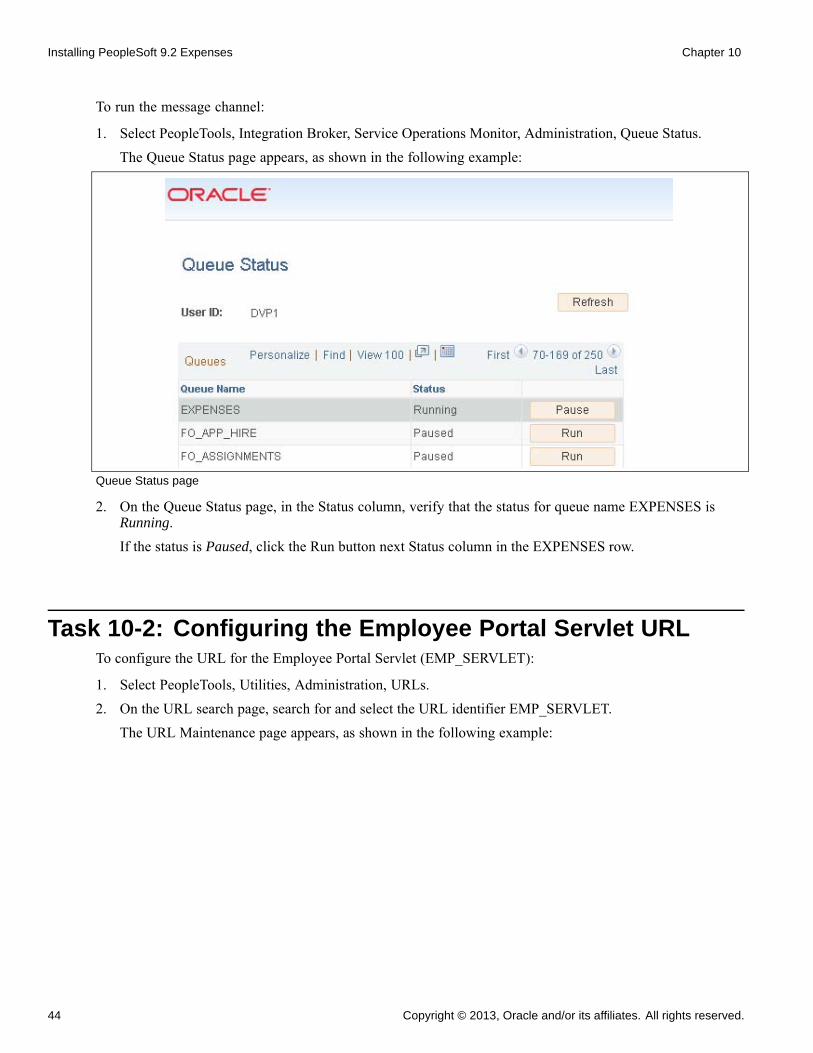
Installing PeopleSoft 9.2 Expenses Chapter 10
To run the message channel:
1. Select PeopleTools, Integration Broker, Service Operations Monitor, Administration, Queue Status.
The Queue Status page appears, as shown in the following example:
Queue Status page
2. On the Queue Status page, in the Status column, verify that the status for queue name EXPENSES isRunning.If the status is Paused, click the Run button next Status column in the EXPENSES row.
Task 10-2: Configuring the Employee Portal Servlet URLTo configure the URL for the Employee Portal Servlet (EMP_SERVLET):
1. Select PeopleTools, Utilities, Administration, URLs.2. On the URL search page, search for and select the URL identifier EMP_SERVLET.
The URL Maintenance page appears, as shown in the following example:
44 Copyright © 2013, Oracle and/or its affiliates. All rights reserved.
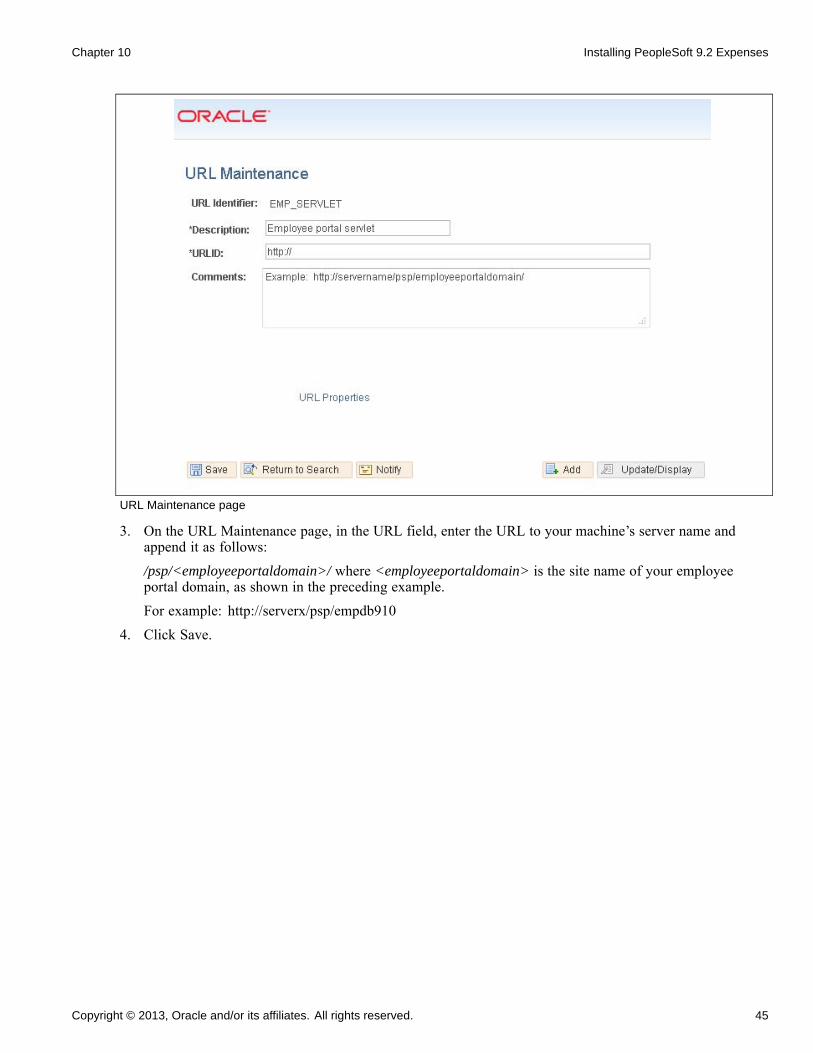
Chapter 10 Installing PeopleSoft 9.2 Expenses
URL Maintenance page
3. On the URL Maintenance page, in the URL field, enter the URL to your machine’s server name andappend it as follows:/psp/<employeeportaldomain>/ where <employeeportaldomain> is the site name of your employeeportal domain, as shown in the preceding example.For example: http://serverx/psp/empdb910
4. Click Save.
Copyright © 2013, Oracle and/or its affiliates. All rights reserved. 45

Installing PeopleSoft 9.2 Expenses Chapter 10
46 Copyright © 2013, Oracle and/or its affiliates. All rights reserved.
CHAPTER 11
Installing PeopleSoft 9.2 Pay/Bill Management
This chapter discusses:
• Understanding PeopleSoft 9.2 Pay/Bill Management
• Prerequisites
• Verifying Integration Points
• Verifying the Installation Table for PeopleSoft HCM and PeopleSoft FSCM
Understanding PeopleSoft 9.2 Pay/Bill ManagementOracle delivers all PeopleSoft Pay/Bill Management Enterprise Integration Points (EIP) with settings enabledfor full functionality, with the exception of PeopleSoft Integration Broker web services. When you integratePeopleSoft Pay/Bill Management with PeopleSoft HRMS, you must activate PeopleSoft Integration Brokerweb services. For more information, refer to the following documentation:
See PeopleSoft FSCM: Pay/Bill Management
See PeopleTools: Integration Broker Administration,for your release.
PrerequisitesYou must install PeopleSoft Pay/Bill Management 9.2 for PeopleSoft HRMS before you can fully utilize thePeopleSoft Pay/Bill Management application. The complete installation instructions for PeopleSoft Pay/BillManagement for PeopleSoft HRMS are available on My Oracle Support.
See PeopleSoft Human Capital Management Installation
Note. Oracle only supports PeopleSoft Pay/Bill Management on Microsoft SQL Server, Oracle and DB2UDB for Linux, UNIX, and Microsoft Windows.
Task 11-1: Verifying Integration PointsThis section discusses:
• Understanding Integration Points Verification
• Setting Up Node Definitions for Single Signon
Copyright © 2013, Oracle and/or its affiliates. All rights reserved. 47
Installing PeopleSoft 9.2 Pay/Bill Management Chapter 11
• Setting Up Portal Nodes
• Setting Up Single Signon
• Setting Up Integration Gateways
• Activating Local Domains
• Activating Queue Definitions
• Setting Up the PeopleSoft System-Delivered Service Operations
Understanding Integration Points VerificationIn this task, you verify integration points for the PeopleSoft Financials/Supply Chain Management (FSCM)9.2 and PeopleSoft Human Capital Management (HCM) 9.2 environments. Each environment contains bothPSFT_EP and PSFT_HR message nodes. You must set both message nodes in both the PeopleSoft FSCM 9.2and PeopleSoft HCM 9.2 environments.
PSFT_EP is the default local node in PeopleSoft FSCM, but PSFT_HR also exists in PeopleSoft FSCM. Thissection details how to set both nodes in the PeopleSoft FSCM environment.
PSFT_HR is the default local node for PeopleSoft HCM, but PSFT_EP also exists in PeopleSoft HCM. Thissection details how to set both nodes in the PeopleSoft HCM environment.
Note. Verify that your application servers, for both the PeopleSoft HRMS and PeopleSoft FSCM installations,are set to manage Pub/Sub server.
Task 11-1-1: Setting Up Node Definitions for Single Signon
Understanding Node Definition Set Up for Single Signon
The PeopleSoft FSCM and PeopleSoft HCM environments contain both message nodes PSFT_EP andPSFT_HR. You must set both message nodes in both environments.
PSFT_EP is the default local node in PeopleSoft FSCM. PSFT_HR also exists in PeopleSoft FSCM andmust be set.
PSFT_HR is the default local node in PeopleSoft HCM. PSFT_EP also exists in PeopleSoft HCM and mustbe set.
Setting Up Message Node Definitions in PeopleSoft FSCM
To set up message node definitions in the PeopleSoft FSCM environment:
1. In your PeopleSoft FSCM 9.2 environment, select PeopleTools, Integration Broker, Integration Setup,Nodes.
2. On the Nodes search page, search for and select the node name PSFT_EP.
The Node Definitions page appears, as shown in the following example:
48 Copyright © 2013, Oracle and/or its affiliates. All rights reserved.
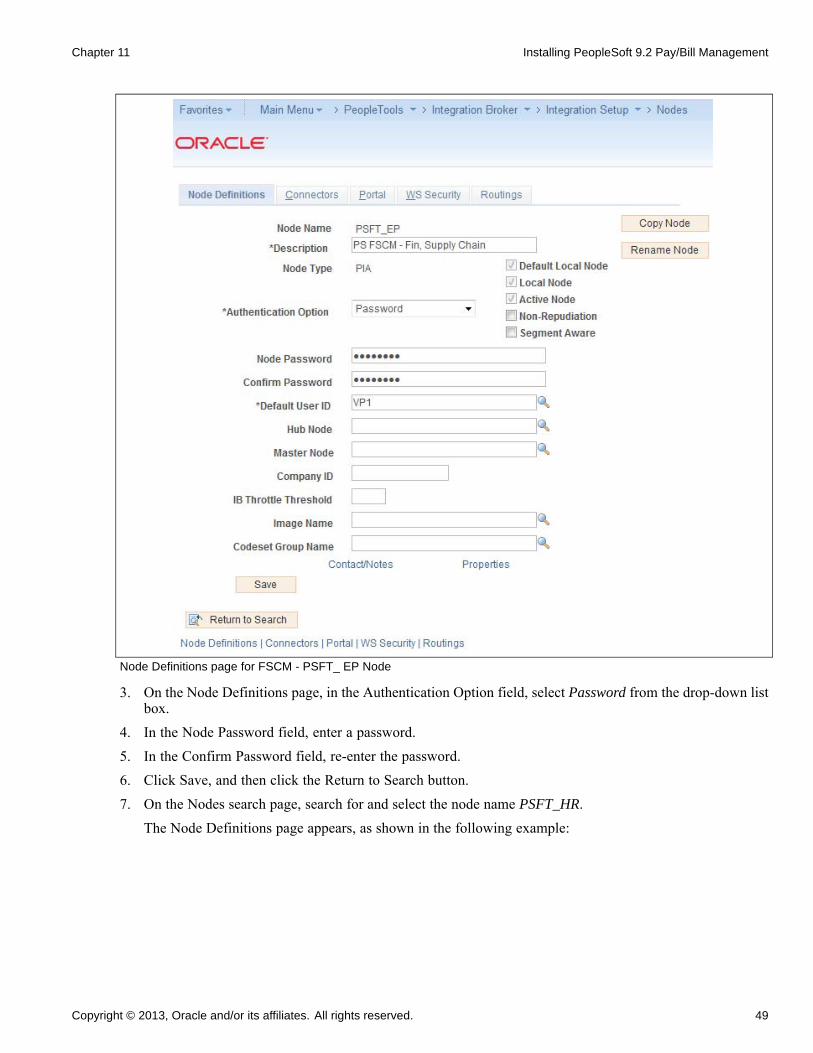
Chapter 11 Installing PeopleSoft 9.2 Pay/Bill Management
Node Definitions page for FSCM - PSFT_ EP Node
3. On the Node Definitions page, in the Authentication Option field, select Password from the drop-down listbox.
4. In the Node Password field, enter a password.
5. In the Confirm Password field, re-enter the password.
6. Click Save, and then click the Return to Search button.
7. On the Nodes search page, search for and select the node name PSFT_HR.
The Node Definitions page appears, as shown in the following example:
Copyright © 2013, Oracle and/or its affiliates. All rights reserved. 49
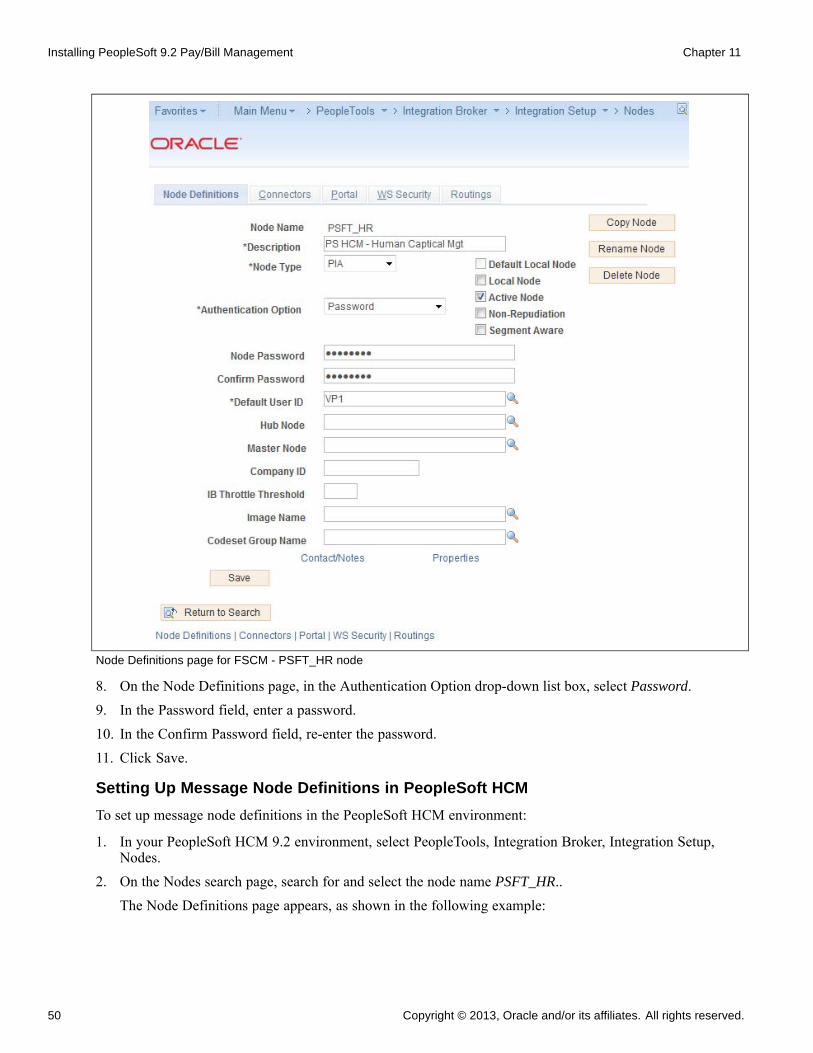
Installing PeopleSoft 9.2 Pay/Bill Management Chapter 11
Node Definitions page for FSCM - PSFT_HR node
8. On the Node Definitions page, in the Authentication Option drop-down list box, select Password.9. In the Password field, enter a password.10. In the Confirm Password field, re-enter the password.11. Click Save.
Setting Up Message Node Definitions in PeopleSoft HCM
To set up message node definitions in the PeopleSoft HCM environment:
1. In your PeopleSoft HCM 9.2 environment, select PeopleTools, Integration Broker, Integration Setup,Nodes.
2. On the Nodes search page, search for and select the node name PSFT_HR..The Node Definitions page appears, as shown in the following example:
50 Copyright © 2013, Oracle and/or its affiliates. All rights reserved.
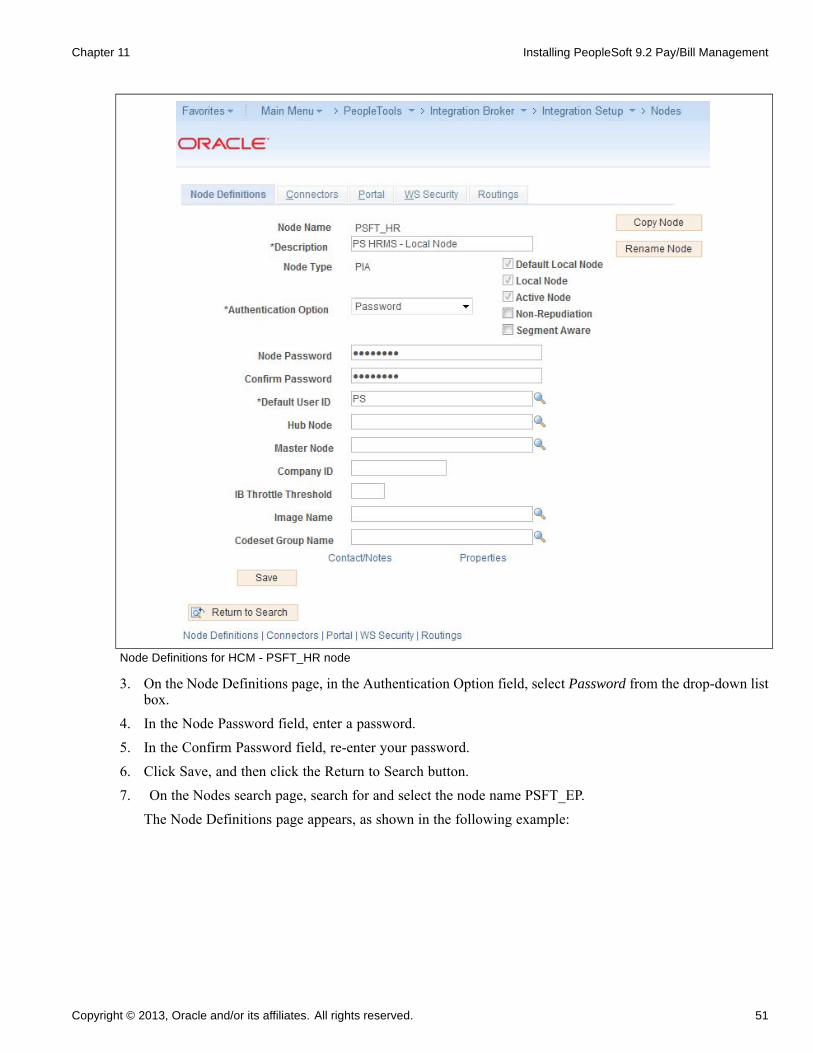
Chapter 11 Installing PeopleSoft 9.2 Pay/Bill Management
Node Definitions for HCM - PSFT_HR node
3. On the Node Definitions page, in the Authentication Option field, select Password from the drop-down listbox.
4. In the Node Password field, enter a password.5. In the Confirm Password field, re-enter your password.6. Click Save, and then click the Return to Search button.7. On the Nodes search page, search for and select the node name PSFT_EP.
The Node Definitions page appears, as shown in the following example:
Copyright © 2013, Oracle and/or its affiliates. All rights reserved. 51
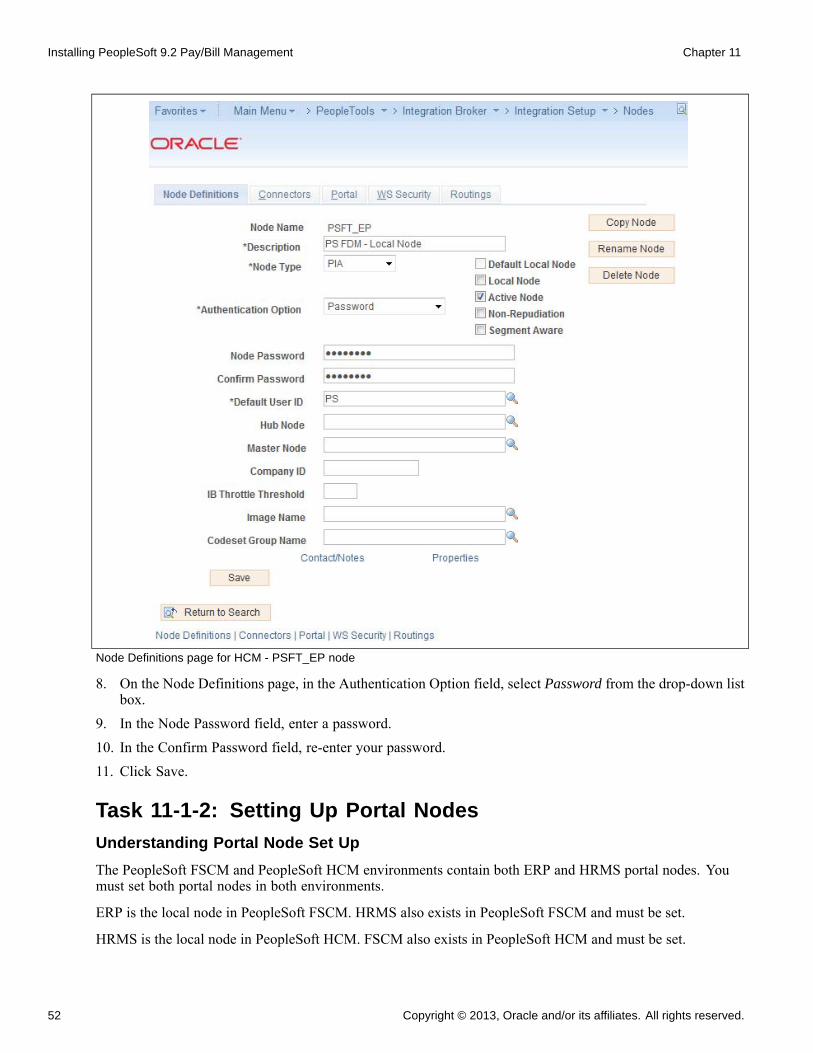
Installing PeopleSoft 9.2 Pay/Bill Management Chapter 11
Node Definitions page for HCM - PSFT_EP node
8. On the Node Definitions page, in the Authentication Option field, select Password from the drop-down listbox.
9. In the Node Password field, enter a password.10. In the Confirm Password field, re-enter your password.11. Click Save.
Task 11-1-2: Setting Up Portal Nodes
Understanding Portal Node Set Up
The PeopleSoft FSCM and PeopleSoft HCM environments contain both ERP and HRMS portal nodes. Youmust set both portal nodes in both environments.
ERP is the local node in PeopleSoft FSCM. HRMS also exists in PeopleSoft FSCM and must be set.
HRMS is the local node in PeopleSoft HCM. FSCM also exists in PeopleSoft HCM and must be set.
52 Copyright © 2013, Oracle and/or its affiliates. All rights reserved.
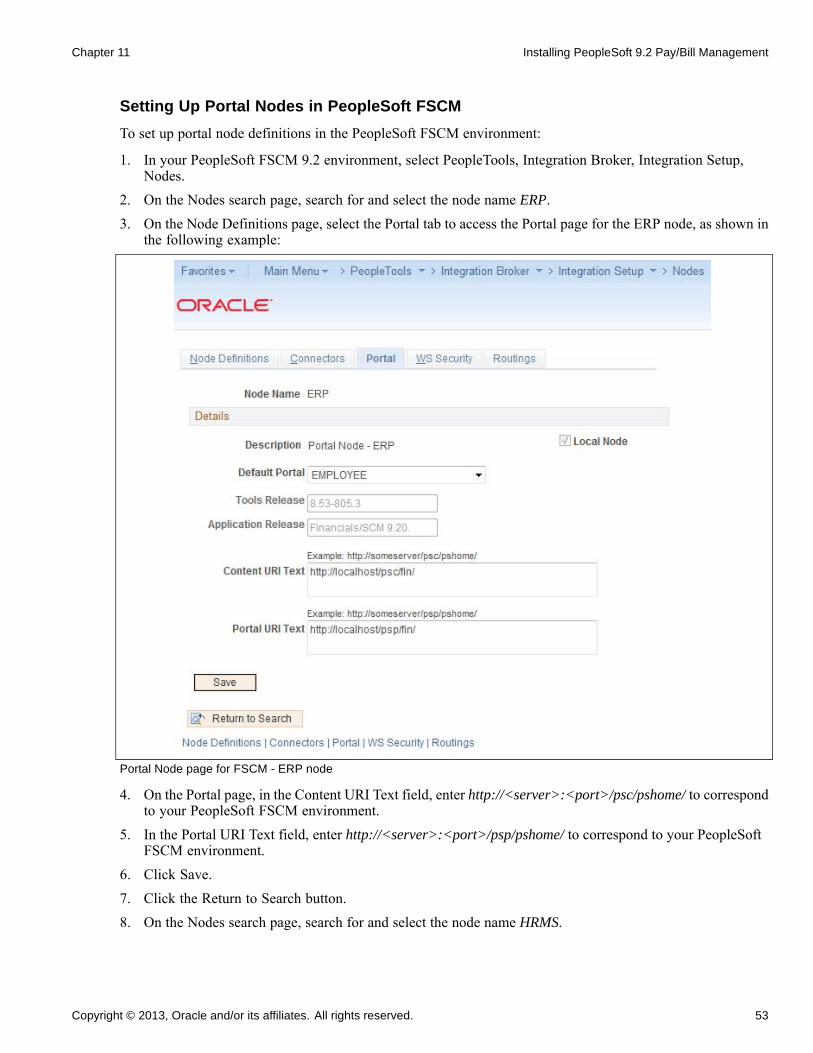
Chapter 11 Installing PeopleSoft 9.2 Pay/Bill Management
Setting Up Portal Nodes in PeopleSoft FSCM
To set up portal node definitions in the PeopleSoft FSCM environment:
1. In your PeopleSoft FSCM 9.2 environment, select PeopleTools, Integration Broker, Integration Setup,Nodes.
2. On the Nodes search page, search for and select the node name ERP.3. On the Node Definitions page, select the Portal tab to access the Portal page for the ERP node, as shown in
the following example:
Portal Node page for FSCM - ERP node
4. On the Portal page, in the Content URI Text field, enter http://<server>:<port>/psc/pshome/ to correspondto your PeopleSoft FSCM environment.
5. In the Portal URI Text field, enter http://<server>:<port>/psp/pshome/ to correspond to your PeopleSoftFSCM environment.
6. Click Save.7. Click the Return to Search button.8. On the Nodes search page, search for and select the node name HRMS.
Copyright © 2013, Oracle and/or its affiliates. All rights reserved. 53
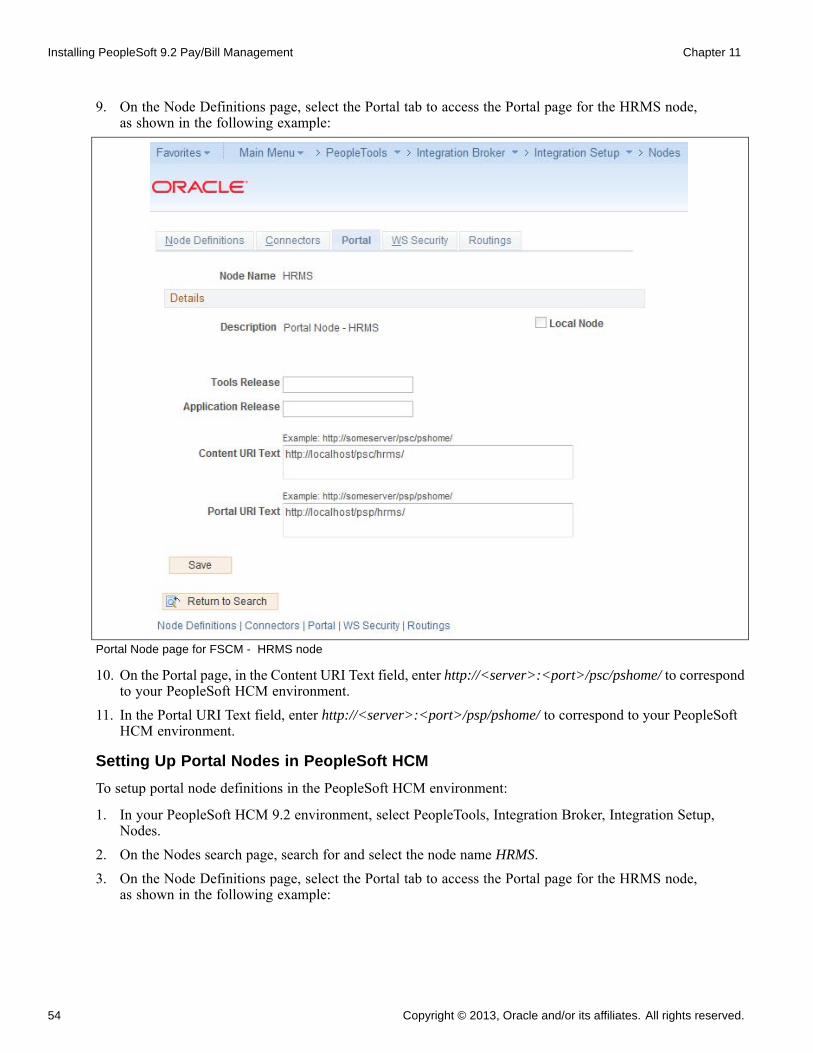
Installing PeopleSoft 9.2 Pay/Bill Management Chapter 11
9. On the Node Definitions page, select the Portal tab to access the Portal page for the HRMS node,as shown in the following example:
Portal Node page for FSCM - HRMS node
10. On the Portal page, in the Content URI Text field, enter http://<server>:<port>/psc/pshome/ to correspondto your PeopleSoft HCM environment.
11. In the Portal URI Text field, enter http://<server>:<port>/psp/pshome/ to correspond to your PeopleSoftHCM environment.
Setting Up Portal Nodes in PeopleSoft HCM
To setup portal node definitions in the PeopleSoft HCM environment:
1. In your PeopleSoft HCM 9.2 environment, select PeopleTools, Integration Broker, Integration Setup,Nodes.
2. On the Nodes search page, search for and select the node name HRMS.3. On the Node Definitions page, select the Portal tab to access the Portal page for the HRMS node,
as shown in the following example:
54 Copyright © 2013, Oracle and/or its affiliates. All rights reserved.
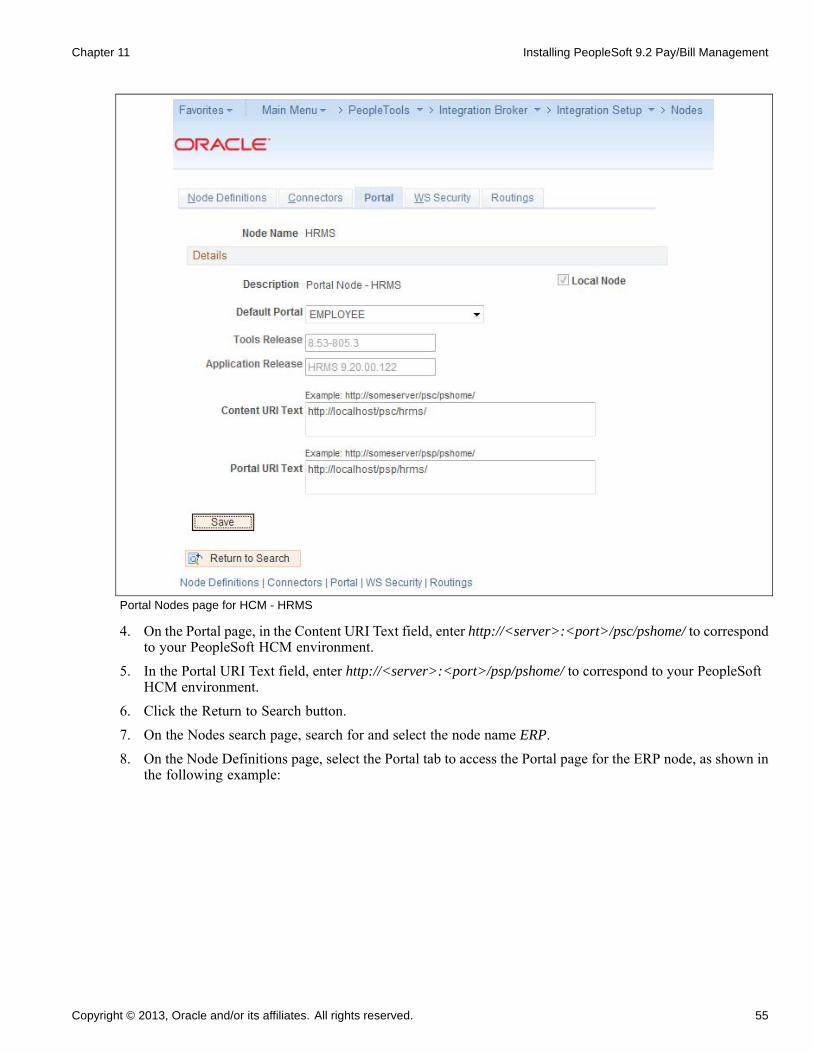
Chapter 11 Installing PeopleSoft 9.2 Pay/Bill Management
Portal Nodes page for HCM - HRMS
4. On the Portal page, in the Content URI Text field, enter http://<server>:<port>/psc/pshome/ to correspondto your PeopleSoft HCM environment.
5. In the Portal URI Text field, enter http://<server>:<port>/psp/pshome/ to correspond to your PeopleSoftHCM environment.
6. Click the Return to Search button.7. On the Nodes search page, search for and select the node name ERP.8. On the Node Definitions page, select the Portal tab to access the Portal page for the ERP node, as shown in
the following example:
Copyright © 2013, Oracle and/or its affiliates. All rights reserved. 55
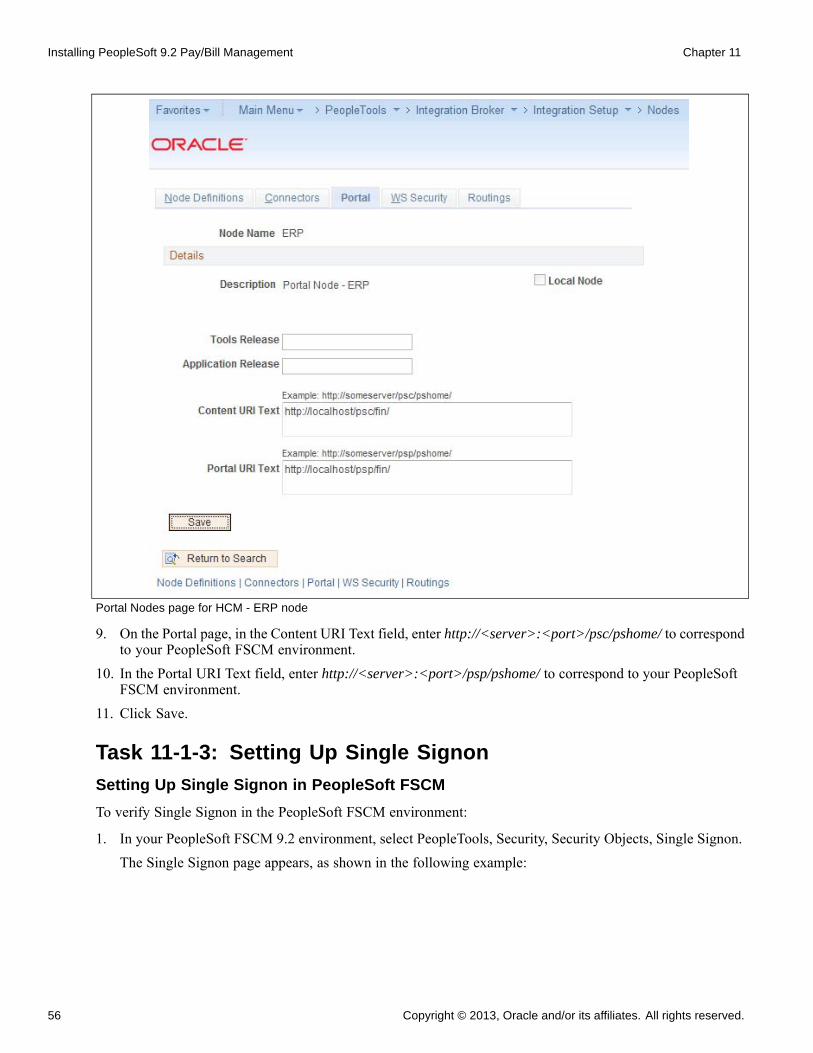
Installing PeopleSoft 9.2 Pay/Bill Management Chapter 11
Portal Nodes page for HCM - ERP node
9. On the Portal page, in the Content URI Text field, enter http://<server>:<port>/psc/pshome/ to correspondto your PeopleSoft FSCM environment.
10. In the Portal URI Text field, enter http://<server>:<port>/psp/pshome/ to correspond to your PeopleSoftFSCM environment.
11. Click Save.
Task 11-1-3: Setting Up Single Signon
Setting Up Single Signon in PeopleSoft FSCM
To verify Single Signon in the PeopleSoft FSCM environment:
1. In your PeopleSoft FSCM 9.2 environment, select PeopleTools, Security, Security Objects, Single Signon.The Single Signon page appears, as shown in the following example:
56 Copyright © 2013, Oracle and/or its affiliates. All rights reserved.
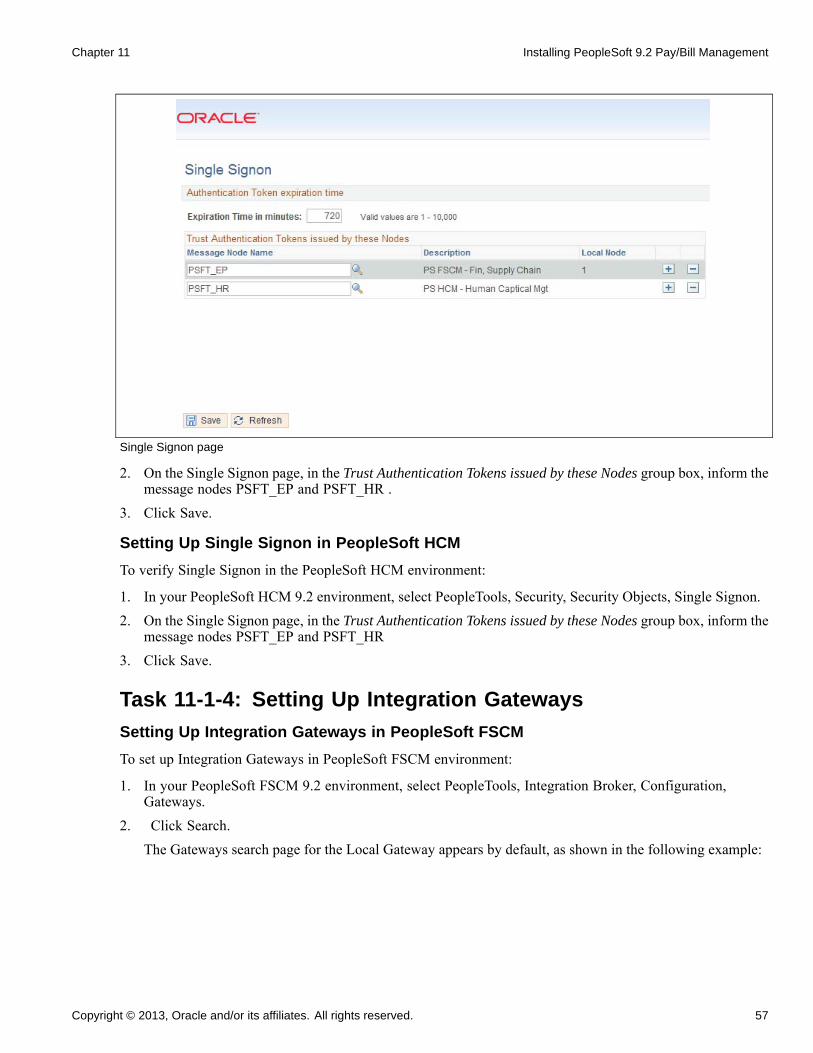
Chapter 11 Installing PeopleSoft 9.2 Pay/Bill Management
Single Signon page
2. On the Single Signon page, in the Trust Authentication Tokens issued by these Nodes group box, inform themessage nodes PSFT_EP and PSFT_HR .
3. Click Save.
Setting Up Single Signon in PeopleSoft HCM
To verify Single Signon in the PeopleSoft HCM environment:
1. In your PeopleSoft HCM 9.2 environment, select PeopleTools, Security, Security Objects, Single Signon.2. On the Single Signon page, in the Trust Authentication Tokens issued by these Nodes group box, inform the
message nodes PSFT_EP and PSFT_HR3. Click Save.
Task 11-1-4: Setting Up Integration Gateways
Setting Up Integration Gateways in PeopleSoft FSCM
To set up Integration Gateways in PeopleSoft FSCM environment:
1. In your PeopleSoft FSCM 9.2 environment, select PeopleTools, Integration Broker, Configuration,Gateways.
2. Click Search.
The Gateways search page for the Local Gateway appears by default, as shown in the following example:
Copyright © 2013, Oracle and/or its affiliates. All rights reserved. 57
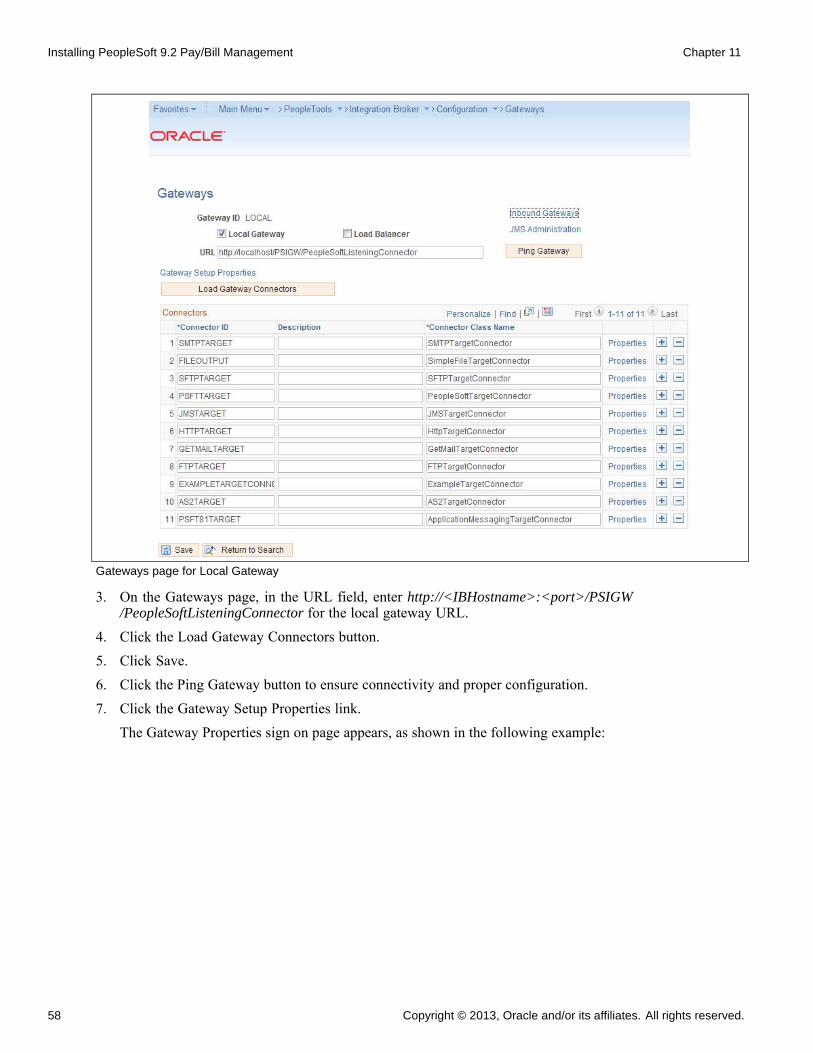
Installing PeopleSoft 9.2 Pay/Bill Management Chapter 11
Gateways page for Local Gateway
3. On the Gateways page, in the URL field, enter http://<IBHostname>:<port>/PSIGW/PeopleSoftListeningConnector for the local gateway URL.
4. Click the Load Gateway Connectors button.
5. Click Save.
6. Click the Ping Gateway button to ensure connectivity and proper configuration.
7. Click the Gateway Setup Properties link.
The Gateway Properties sign on page appears, as shown in the following example:
58 Copyright © 2013, Oracle and/or its affiliates. All rights reserved.
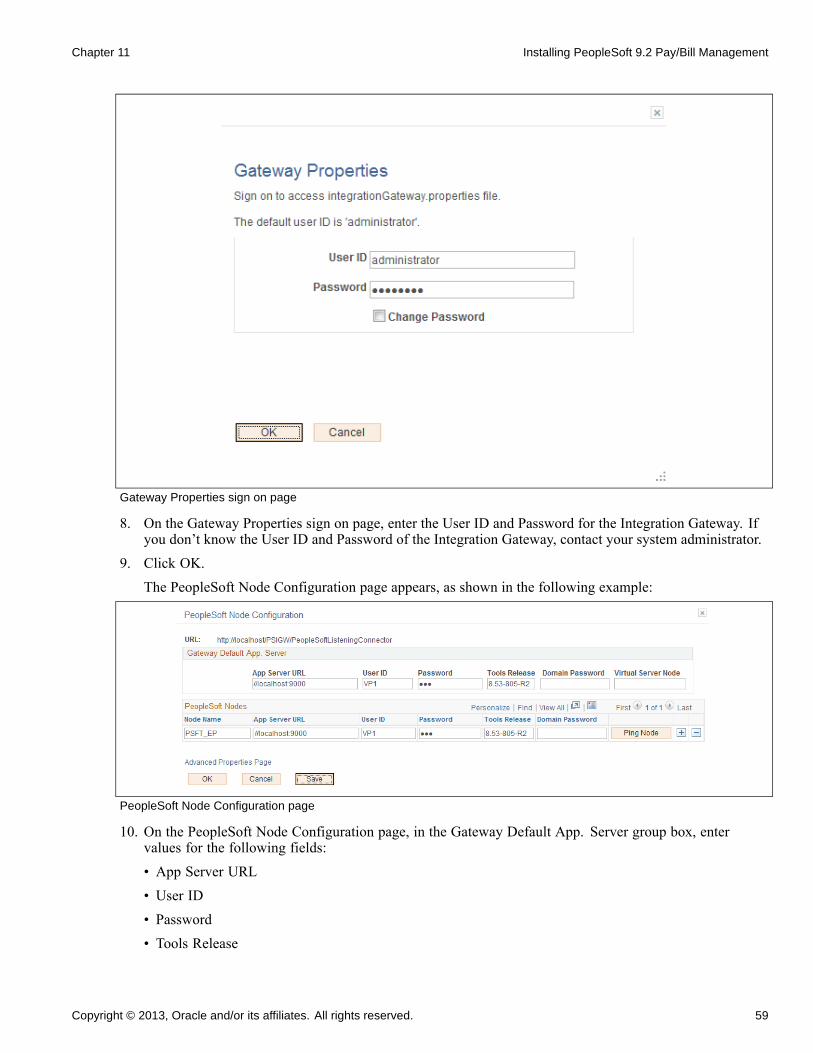
Chapter 11 Installing PeopleSoft 9.2 Pay/Bill Management
Gateway Properties sign on page
8. On the Gateway Properties sign on page, enter the User ID and Password for the Integration Gateway. Ifyou don’t know the User ID and Password of the Integration Gateway, contact your system administrator.
9. Click OK.The PeopleSoft Node Configuration page appears, as shown in the following example:
PeopleSoft Node Configuration page
10. On the PeopleSoft Node Configuration page, in the Gateway Default App. Server group box, entervalues for the following fields:• App Server URL• User ID• Password• Tools Release
Copyright © 2013, Oracle and/or its affiliates. All rights reserved. 59
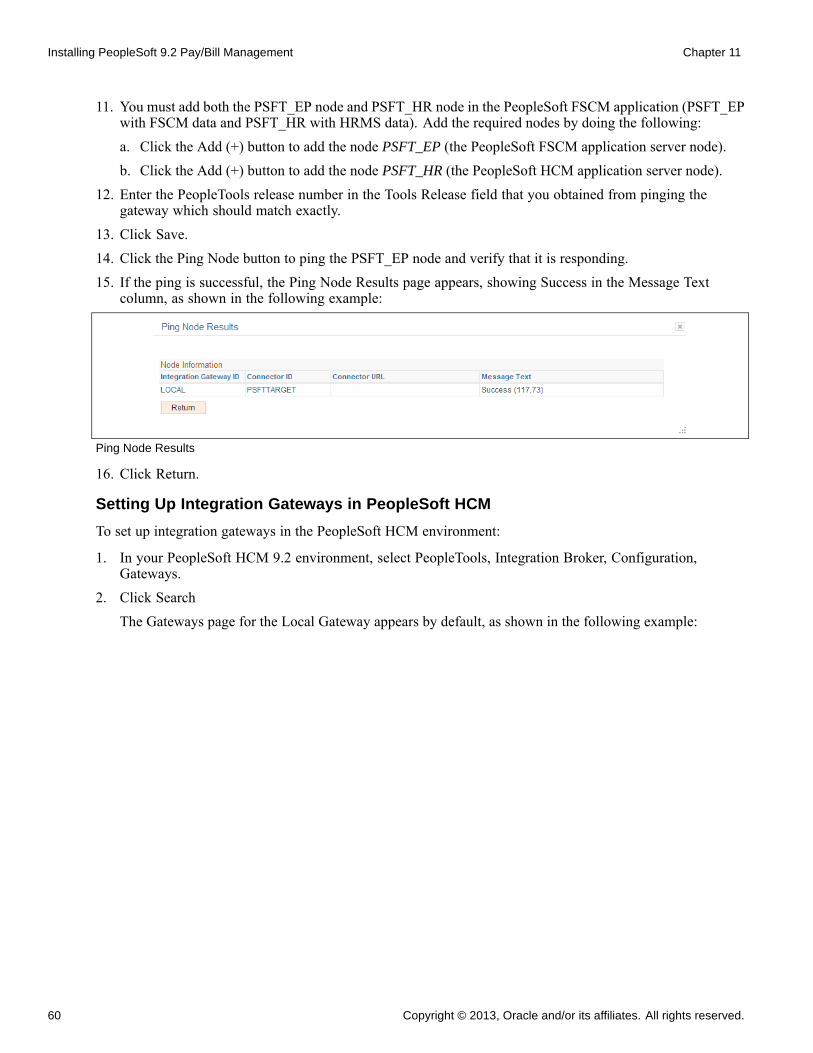
Installing PeopleSoft 9.2 Pay/Bill Management Chapter 11
11. You must add both the PSFT_EP node and PSFT_HR node in the PeopleSoft FSCM application (PSFT_EPwith FSCM data and PSFT_HR with HRMS data). Add the required nodes by doing the following:a. Click the Add (+) button to add the node PSFT_EP (the PeopleSoft FSCM application server node).b. Click the Add (+) button to add the node PSFT_HR (the PeopleSoft HCM application server node).
12. Enter the PeopleTools release number in the Tools Release field that you obtained from pinging thegateway which should match exactly.
13. Click Save.14. Click the Ping Node button to ping the PSFT_EP node and verify that it is responding.15. If the ping is successful, the Ping Node Results page appears, showing Success in the Message Text
column, as shown in the following example:
Ping Node Results
16. Click Return.
Setting Up Integration Gateways in PeopleSoft HCM
To set up integration gateways in the PeopleSoft HCM environment:
1. In your PeopleSoft HCM 9.2 environment, select PeopleTools, Integration Broker, Configuration,Gateways.
2. Click SearchThe Gateways page for the Local Gateway appears by default, as shown in the following example:
60 Copyright © 2013, Oracle and/or its affiliates. All rights reserved.
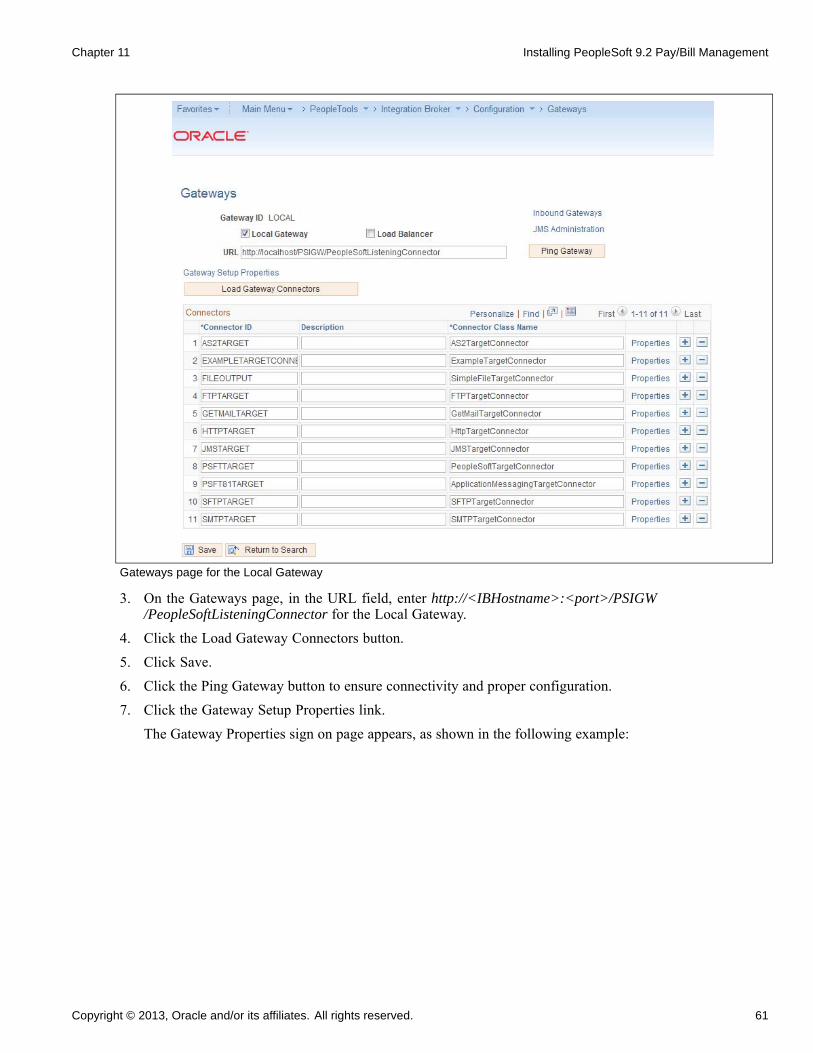
Chapter 11 Installing PeopleSoft 9.2 Pay/Bill Management
Gateways page for the Local Gateway
3. On the Gateways page, in the URL field, enter http://<IBHostname>:<port>/PSIGW/PeopleSoftListeningConnector for the Local Gateway.
4. Click the Load Gateway Connectors button.
5. Click Save.
6. Click the Ping Gateway button to ensure connectivity and proper configuration.
7. Click the Gateway Setup Properties link.
The Gateway Properties sign on page appears, as shown in the following example:
Copyright © 2013, Oracle and/or its affiliates. All rights reserved. 61
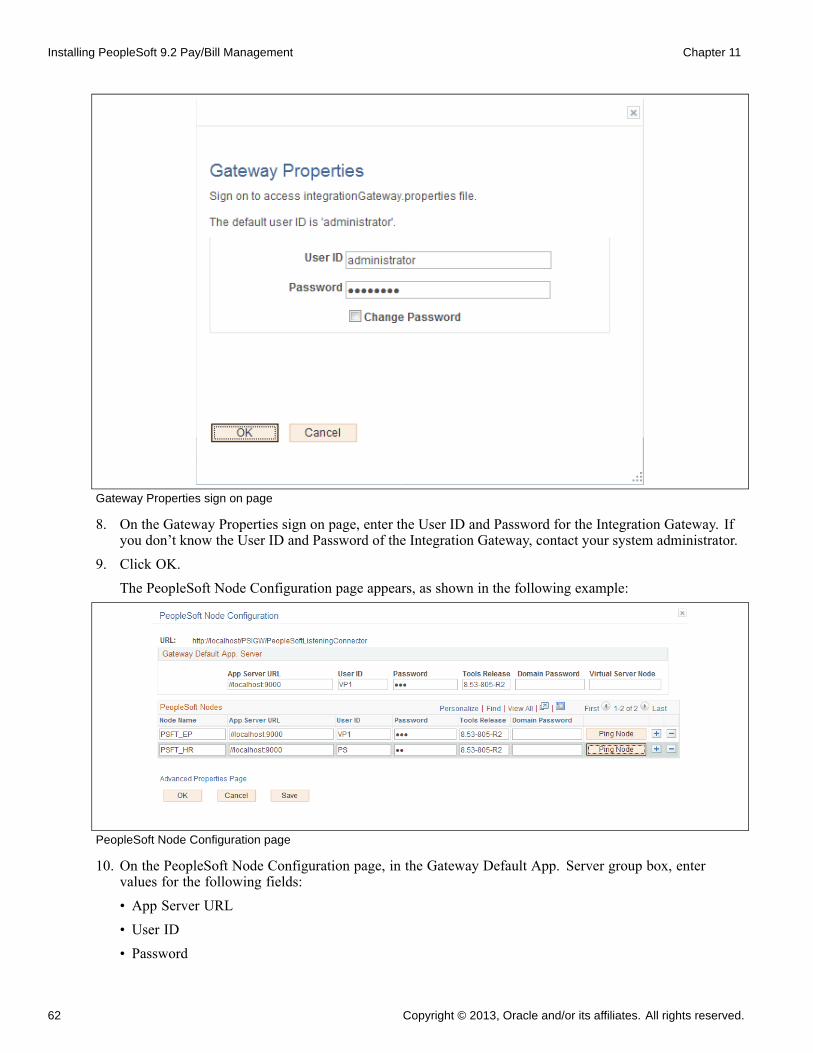
Installing PeopleSoft 9.2 Pay/Bill Management Chapter 11
Gateway Properties sign on page
8. On the Gateway Properties sign on page, enter the User ID and Password for the Integration Gateway. Ifyou don’t know the User ID and Password of the Integration Gateway, contact your system administrator.
9. Click OK.The PeopleSoft Node Configuration page appears, as shown in the following example:
PeopleSoft Node Configuration page
10. On the PeopleSoft Node Configuration page, in the Gateway Default App. Server group box, entervalues for the following fields:• App Server URL• User ID• Password
62 Copyright © 2013, Oracle and/or its affiliates. All rights reserved.
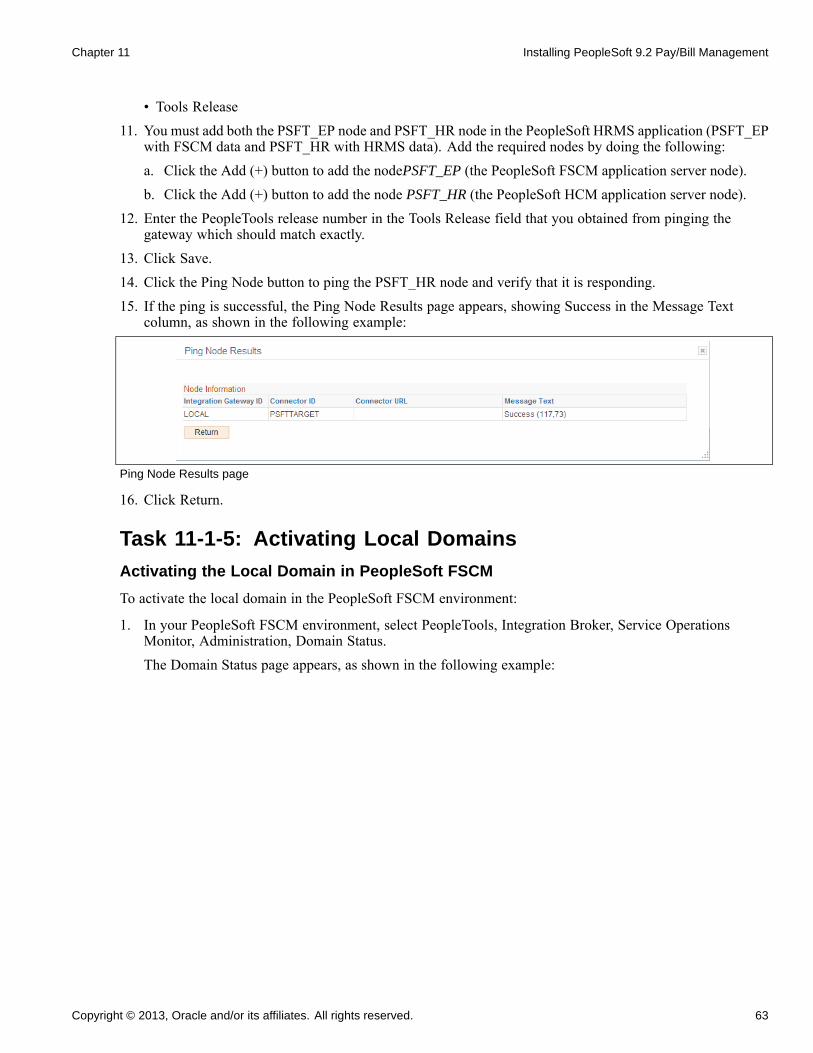
Chapter 11 Installing PeopleSoft 9.2 Pay/Bill Management
• Tools Release11. You must add both the PSFT_EP node and PSFT_HR node in the PeopleSoft HRMS application (PSFT_EP
with FSCM data and PSFT_HR with HRMS data). Add the required nodes by doing the following:a. Click the Add (+) button to add the nodePSFT_EP (the PeopleSoft FSCM application server node).b. Click the Add (+) button to add the node PSFT_HR (the PeopleSoft HCM application server node).
12. Enter the PeopleTools release number in the Tools Release field that you obtained from pinging thegateway which should match exactly.
13. Click Save.14. Click the Ping Node button to ping the PSFT_HR node and verify that it is responding.15. If the ping is successful, the Ping Node Results page appears, showing Success in the Message Text
column, as shown in the following example:
Ping Node Results page
16. Click Return.
Task 11-1-5: Activating Local Domains
Activating the Local Domain in PeopleSoft FSCM
To activate the local domain in the PeopleSoft FSCM environment:
1. In your PeopleSoft FSCM environment, select PeopleTools, Integration Broker, Service OperationsMonitor, Administration, Domain Status.The Domain Status page appears, as shown in the following example:
Copyright © 2013, Oracle and/or its affiliates. All rights reserved. 63
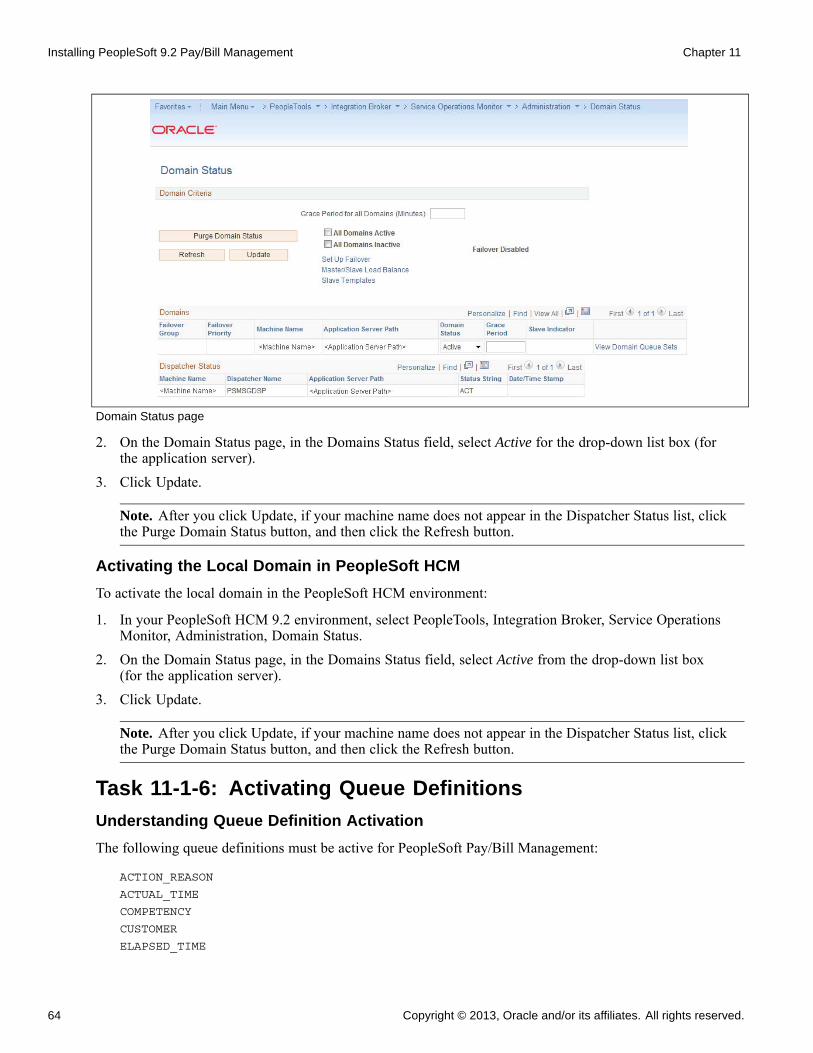
Installing PeopleSoft 9.2 Pay/Bill Management Chapter 11
Domain Status page
2. On the Domain Status page, in the Domains Status field, select Active for the drop-down list box (forthe application server).
3. Click Update.
Note. After you click Update, if your machine name does not appear in the Dispatcher Status list, clickthe Purge Domain Status button, and then click the Refresh button.
Activating the Local Domain in PeopleSoft HCM
To activate the local domain in the PeopleSoft HCM environment:
1. In your PeopleSoft HCM 9.2 environment, select PeopleTools, Integration Broker, Service OperationsMonitor, Administration, Domain Status.
2. On the Domain Status page, in the Domains Status field, select Active from the drop-down list box(for the application server).
3. Click Update.
Note. After you click Update, if your machine name does not appear in the Dispatcher Status list, clickthe Purge Domain Status button, and then click the Refresh button.
Task 11-1-6: Activating Queue Definitions
Understanding Queue Definition Activation
The following queue definitions must be active for PeopleSoft Pay/Bill Management:
ACTION_REASON
ACTUAL_TIME
COMPETENCY
CUSTOMER
ELAPSED_TIME
64 Copyright © 2013, Oracle and/or its affiliates. All rights reserved.
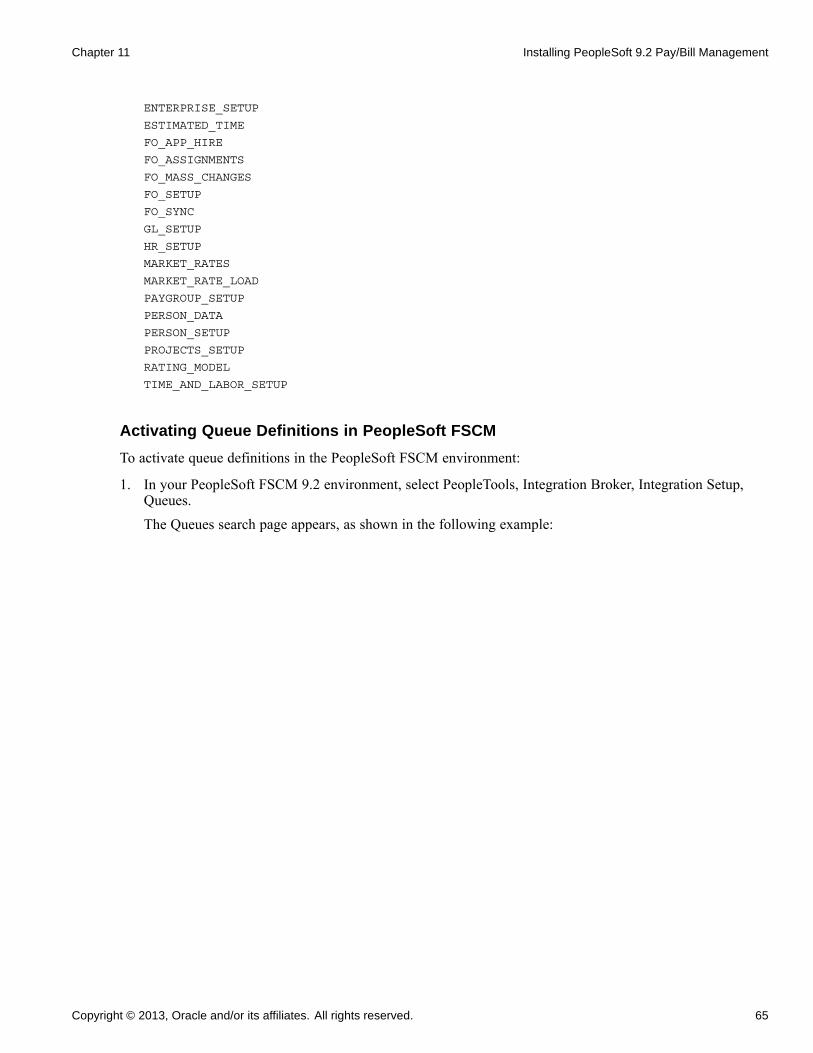
Chapter 11 Installing PeopleSoft 9.2 Pay/Bill Management
ENTERPRISE_SETUP
ESTIMATED_TIME
FO_APP_HIRE
FO_ASSIGNMENTS
FO_MASS_CHANGES
FO_SETUP
FO_SYNC
GL_SETUP
HR_SETUP
MARKET_RATES
MARKET_RATE_LOAD
PAYGROUP_SETUP
PERSON_DATA
PERSON_SETUP
PROJECTS_SETUP
RATING_MODEL
TIME_AND_LABOR_SETUP
Activating Queue Definitions in PeopleSoft FSCM
To activate queue definitions in the PeopleSoft FSCM environment:
1. In your PeopleSoft FSCM 9.2 environment, select PeopleTools, Integration Broker, Integration Setup,Queues.The Queues search page appears, as shown in the following example:
Copyright © 2013, Oracle and/or its affiliates. All rights reserved. 65
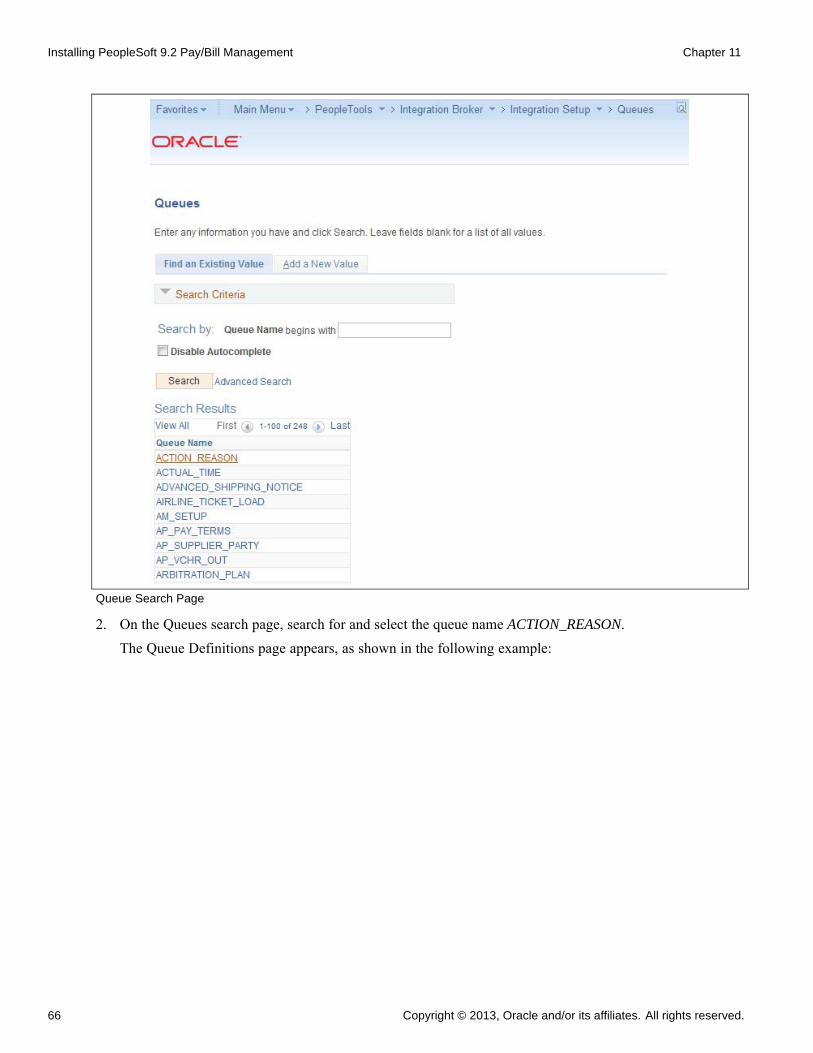
Installing PeopleSoft 9.2 Pay/Bill Management Chapter 11
Queue Search Page
2. On the Queues search page, search for and select the queue name ACTION_REASON.The Queue Definitions page appears, as shown in the following example:
66 Copyright © 2013, Oracle and/or its affiliates. All rights reserved.
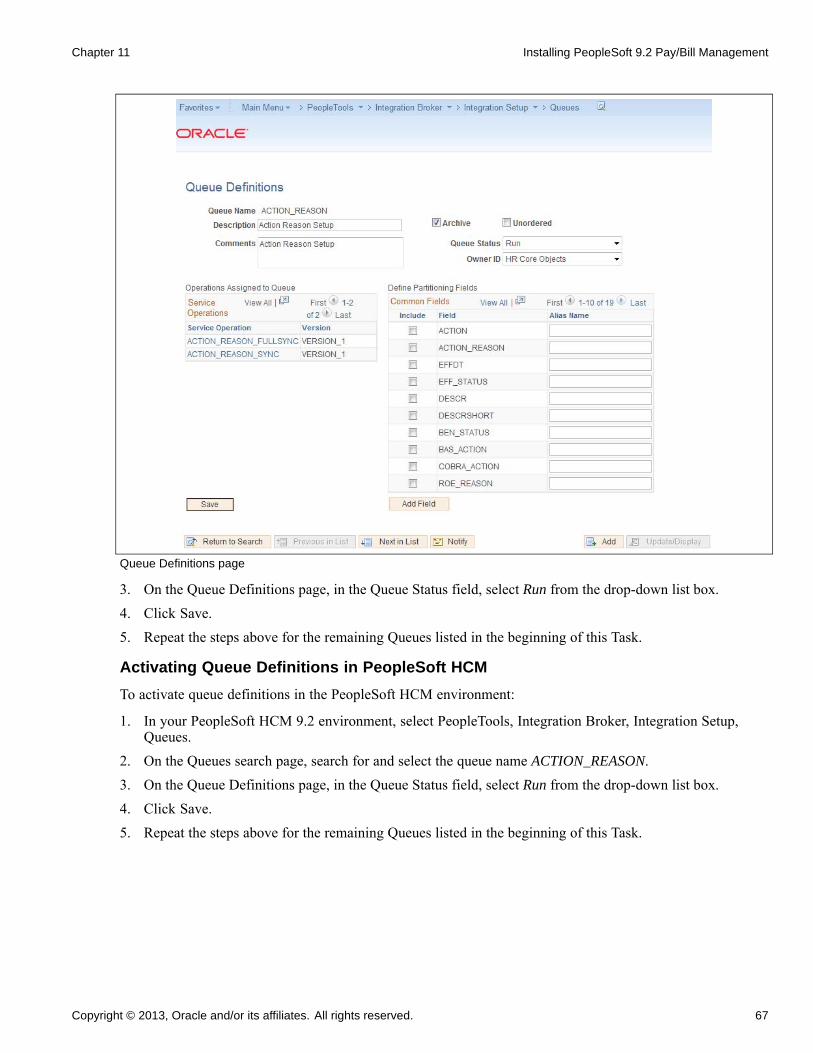
Chapter 11 Installing PeopleSoft 9.2 Pay/Bill Management
Queue Definitions page
3. On the Queue Definitions page, in the Queue Status field, select Run from the drop-down list box.4. Click Save.5. Repeat the steps above for the remaining Queues listed in the beginning of this Task.
Activating Queue Definitions in PeopleSoft HCM
To activate queue definitions in the PeopleSoft HCM environment:
1. In your PeopleSoft HCM 9.2 environment, select PeopleTools, Integration Broker, Integration Setup,Queues.
2. On the Queues search page, search for and select the queue name ACTION_REASON.3. On the Queue Definitions page, in the Queue Status field, select Run from the drop-down list box.4. Click Save.5. Repeat the steps above for the remaining Queues listed in the beginning of this Task.
Copyright © 2013, Oracle and/or its affiliates. All rights reserved. 67
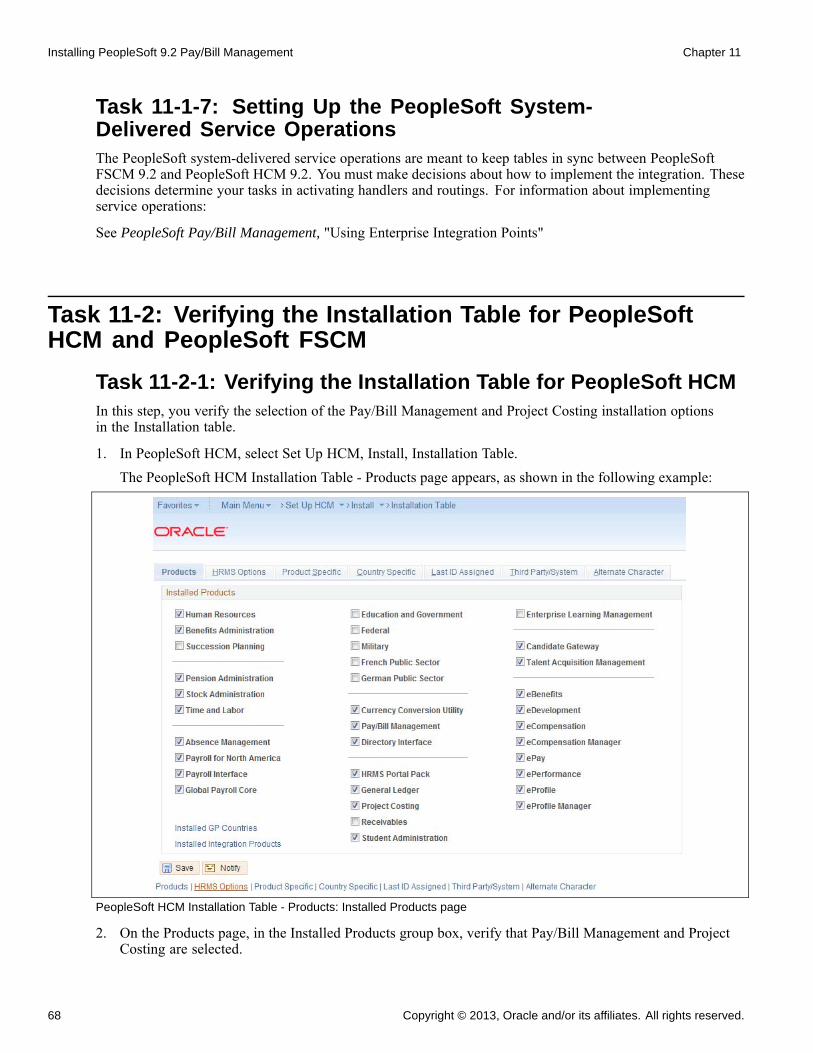
Installing PeopleSoft 9.2 Pay/Bill Management Chapter 11
Task 11-1-7: Setting Up the PeopleSoft System-Delivered Service OperationsThe PeopleSoft system-delivered service operations are meant to keep tables in sync between PeopleSoftFSCM 9.2 and PeopleSoft HCM 9.2. You must make decisions about how to implement the integration. Thesedecisions determine your tasks in activating handlers and routings. For information about implementingservice operations:
See PeopleSoft Pay/Bill Management, "Using Enterprise Integration Points"
Task 11-2: Verifying the Installation Table for PeopleSoftHCM and PeopleSoft FSCM
Task 11-2-1: Verifying the Installation Table for PeopleSoft HCMIn this step, you verify the selection of the Pay/Bill Management and Project Costing installation optionsin the Installation table.
1. In PeopleSoft HCM, select Set Up HCM, Install, Installation Table.The PeopleSoft HCM Installation Table - Products page appears, as shown in the following example:
PeopleSoft HCM Installation Table - Products: Installed Products page
2. On the Products page, in the Installed Products group box, verify that Pay/Bill Management and ProjectCosting are selected.
68 Copyright © 2013, Oracle and/or its affiliates. All rights reserved.
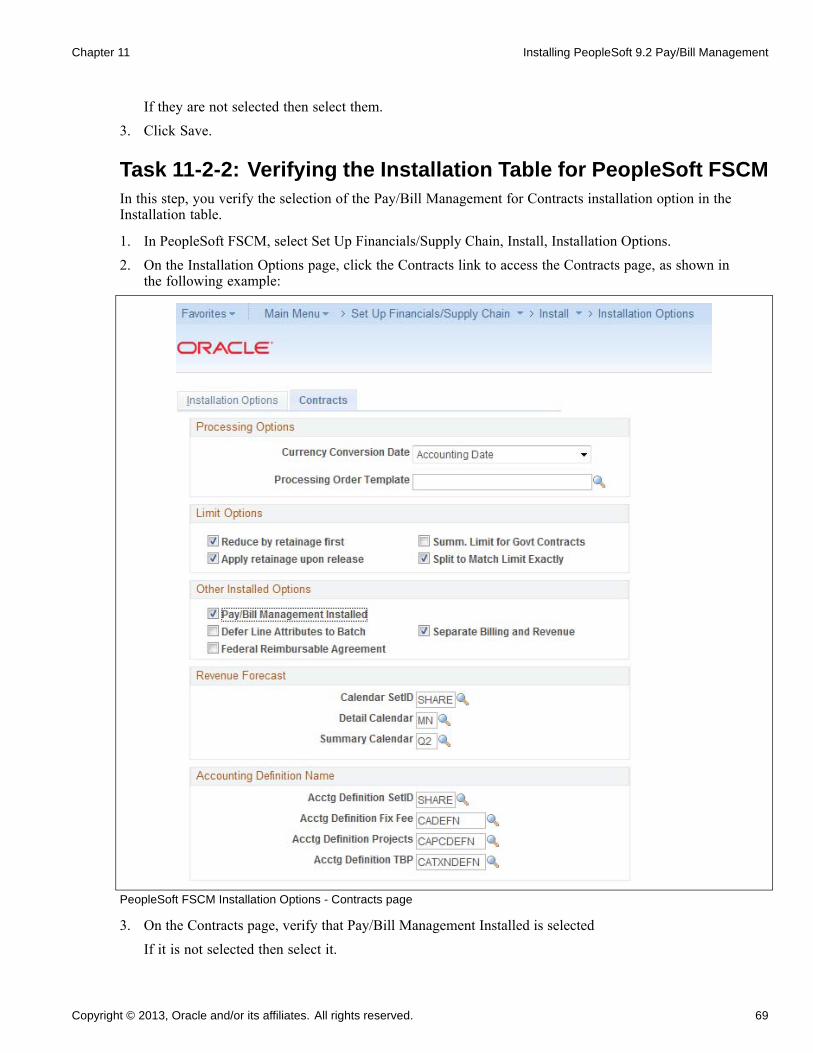
Chapter 11 Installing PeopleSoft 9.2 Pay/Bill Management
If they are not selected then select them.3. Click Save.
Task 11-2-2: Verifying the Installation Table for PeopleSoft FSCMIn this step, you verify the selection of the Pay/Bill Management for Contracts installation option in theInstallation table.
1. In PeopleSoft FSCM, select Set Up Financials/Supply Chain, Install, Installation Options.
2. On the Installation Options page, click the Contracts link to access the Contracts page, as shown inthe following example:
PeopleSoft FSCM Installation Options - Contracts page
3. On the Contracts page, verify that Pay/Bill Management Installed is selectedIf it is not selected then select it.
Copyright © 2013, Oracle and/or its affiliates. All rights reserved. 69

Installing PeopleSoft 9.2 Pay/Bill Management Chapter 11
4. Click Save.
70 Copyright © 2013, Oracle and/or its affiliates. All rights reserved.
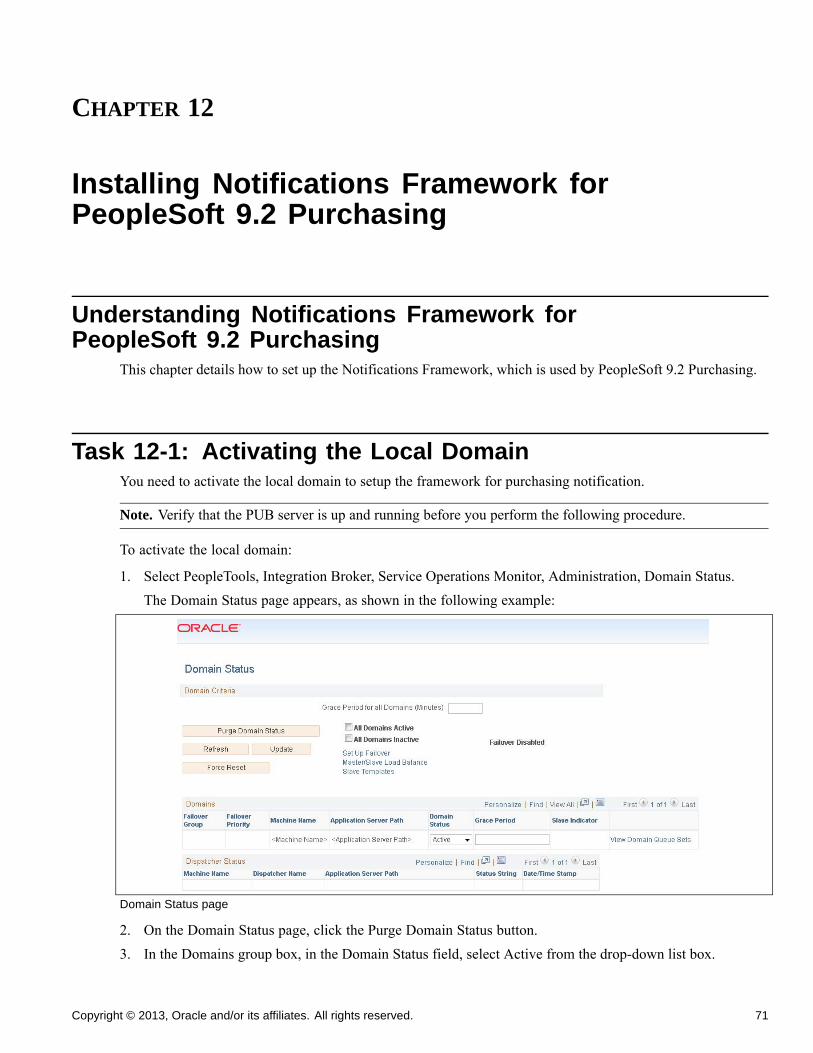
CHAPTER 12
Installing Notifications Framework forPeopleSoft 9.2 Purchasing
Understanding Notifications Framework forPeopleSoft 9.2 Purchasing
This chapter details how to set up the Notifications Framework, which is used by PeopleSoft 9.2 Purchasing.
Task 12-1: Activating the Local DomainYou need to activate the local domain to setup the framework for purchasing notification.
Note. Verify that the PUB server is up and running before you perform the following procedure.
To activate the local domain:
1. Select PeopleTools, Integration Broker, Service Operations Monitor, Administration, Domain Status.
The Domain Status page appears, as shown in the following example:
Domain Status page
2. On the Domain Status page, click the Purge Domain Status button.3. In the Domains group box, in the Domain Status field, select Active from the drop-down list box.
Copyright © 2013, Oracle and/or its affiliates. All rights reserved. 71
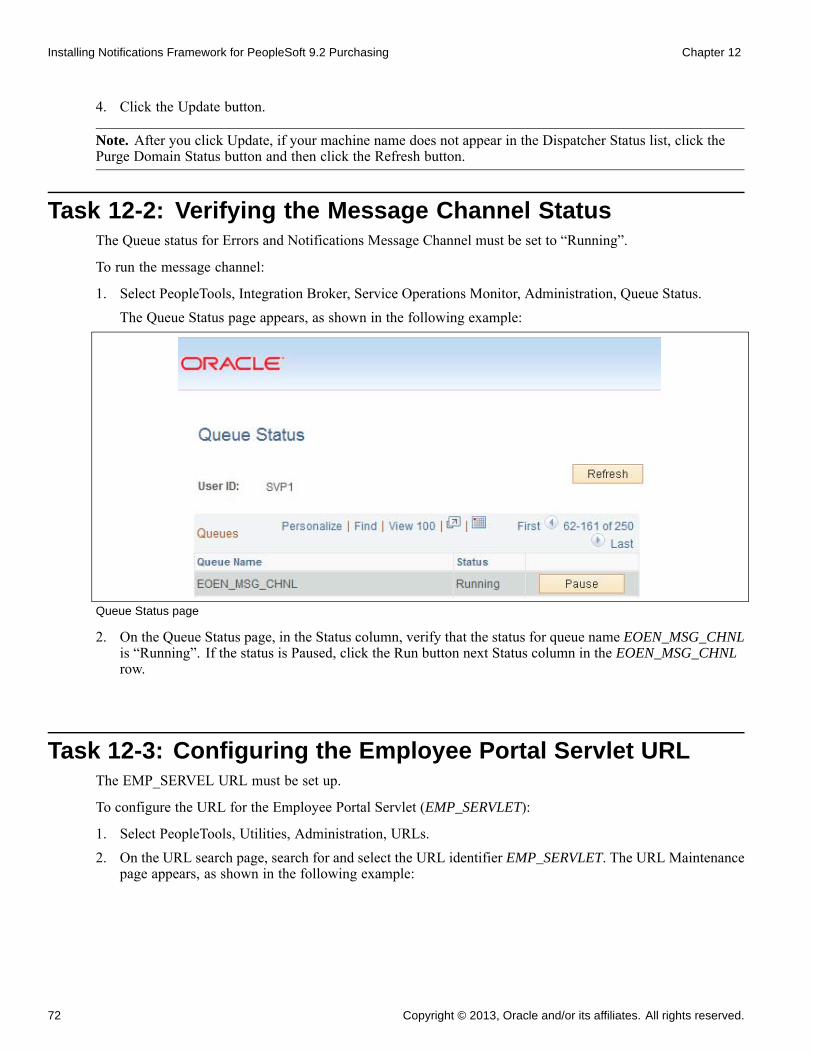
Installing Notifications Framework for PeopleSoft 9.2 Purchasing Chapter 12
4. Click the Update button.
Note. After you click Update, if your machine name does not appear in the Dispatcher Status list, click thePurge Domain Status button and then click the Refresh button.
Task 12-2: Verifying the Message Channel StatusThe Queue status for Errors and Notifications Message Channel must be set to “Running”.
To run the message channel:
1. Select PeopleTools, Integration Broker, Service Operations Monitor, Administration, Queue Status.The Queue Status page appears, as shown in the following example:
Queue Status page
2. On the Queue Status page, in the Status column, verify that the status for queue name EOEN_MSG_CHNLis “Running”. If the status is Paused, click the Run button next Status column in the EOEN_MSG_CHNLrow.
Task 12-3: Configuring the Employee Portal Servlet URLThe EMP_SERVEL URL must be set up.
To configure the URL for the Employee Portal Servlet (EMP_SERVLET):
1. Select PeopleTools, Utilities, Administration, URLs.2. On the URL search page, search for and select the URL identifier EMP_SERVLET. The URL Maintenance
page appears, as shown in the following example:
72 Copyright © 2013, Oracle and/or its affiliates. All rights reserved.
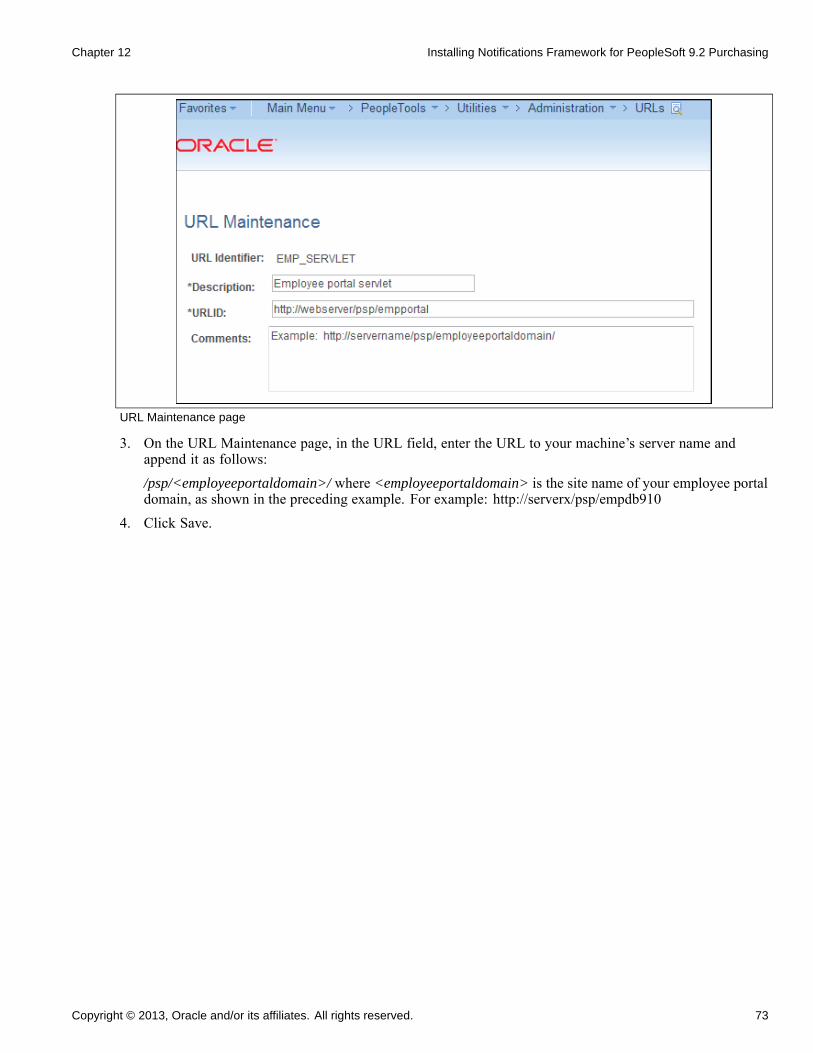
Chapter 12 Installing Notifications Framework for PeopleSoft 9.2 Purchasing
URL Maintenance page
3. On the URL Maintenance page, in the URL field, enter the URL to your machine’s server name andappend it as follows:/psp/<employeeportaldomain>/ where <employeeportaldomain> is the site name of your employee portaldomain, as shown in the preceding example. For example: http://serverx/psp/empdb910
4. Click Save.
Copyright © 2013, Oracle and/or its affiliates. All rights reserved. 73

Installing Notifications Framework for PeopleSoft 9.2 Purchasing Chapter 12
74 Copyright © 2013, Oracle and/or its affiliates. All rights reserved.
CHAPTER 13
Installing PeopleSoft 9.2 ESA and FSCMPortal Packs
This chapter discusses:
• Granting Access to Navigation Pages
• Granting Access to Personalize the Portal Homepage
• Enabling Pagelet Creation and Access with Portal Utilities
Task 13-1: Granting Access to Navigation PagesTo access the navigation pages, you must grant all users security to the Navigation Page IScripts. UsingPeopleSoft Data Mover, run the EOPP_ ADD_ROLE.DMS script that is in <PS_APP_HOME>\scripts.
Note. When you create a new user ID, you should add the EOPP_USER role to the new user ID.
Task 13-2: Granting Access to Personalize thePortal Homepage
To add, remove or change the layout of the homepage, you must grant the homepage personalization securityaccess to all non-guest users.
To update the homepage personalization permission list, use PeopleSoft Data Mover to run thePORTAL_HP_PERS.DMS script.
To add the Portal User role to the user IDs, use PeopleSoft Data Mover to run the PORTAL_ADD_ROLE.DMSscript. You can find both scripts in <PS_APP_HOME>\scripts.
Note. You should grant the PAPP_USER role to all new user IDs for access to the homepage personalization.After running this script, you should manually remove the role PAPP_USER from any GUEST User IDbecause the GUEST user should not be personalizing the common homepage.
Task 13-3: Enabling Pagelet Creation and Accesswith Portal Utilities
To enable pagelet creation and viewing using the Enterprise Components Portal Utilities, you can usePeopleSoft Data Mover to run the EOPP_PORTAL_PACK.DMS script in <PS_APP_HOME>\scripts.
Copyright © 2013, Oracle and/or its affiliates. All rights reserved. 75
Installing PeopleSoft 9.2 ESA and FSCM Portal Packs Chapter 13
Note. Only perform this task if you are licensed for PeopleSoft Financials Portal Pack or Enterprise Portal.
76 Copyright © 2013, Oracle and/or its affiliates. All rights reserved.

CHAPTER 14
Integrating PeopleSoft 9.2 Project Costingand Program Management with MicrosoftProject 2007 or 2010
This chapter discusses:
• Understanding the PeopleSoft-Microsoft Project Integration
• Installing the PeopleSoft-Microsoft Project Integrator
• Configuring the PeopleSoft-Microsoft Project Integrator
Understanding the PeopleSoft-Microsoft Project IntegrationThe PeopleSoft-Microsoft Project Integrator is a required if you are integrating PeopleSoft Project Costingor PeopleSoft Program Management with Microsoft Project 2007 (Microsoft Windows XP) or MicrosoftProject 2010. PeopleSoft-Microsoft Project Integrator must be installed and running on each file server thatyou plan to use as a point of integration.
Note. PeopleSoft-Microsoft Project Integrators must be installed on the machine that is configured withMicrosoft Project 2007 or Microsoft Project 2010. It is important that this machine is not used for any otherpurpose. The Integrator supports Windows Terminal Server which means that one machine can be used torun multiple Integrators.
Task 14-1: Installing the PeopleSoft-MicrosoftProject Integrator
To install the project integrator:
1. Create a directory, <MSP_HOME>, for the MSP Integrator on the Microsoft Windows machine thatyou dedicate as the Microsoft Project Integrator.For example: C:\MSP\.
2. From your file server, copy the files in <PS_APP_HOME>/src/vb/msp to the <MSP_HOME> directory.3. To register any missing ActiveX controls in the Microsoft Windows machine that you dedicate as the
Microsoft Project Integrator, check the Windows system installation directory (<WINDOWS_INST>), forexample C:\WINNT\SYSTEM32 or C:\WINDOWS\SYSTEM32, for the following OCX files:• Richtx32.ocx• TABCTL32.OCX
Copyright © 2013, Oracle and/or its affiliates. All rights reserved. 77
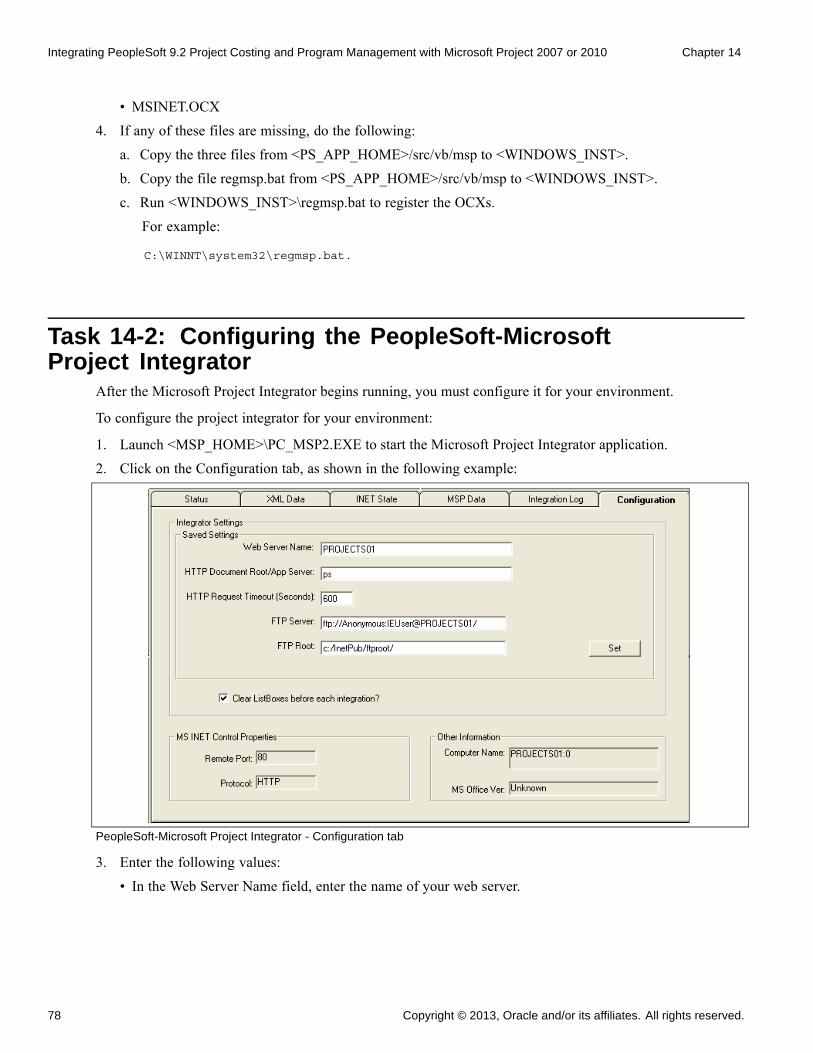
Integrating PeopleSoft 9.2 Project Costing and Program Management with Microsoft Project 2007 or 2010 Chapter 14
• MSINET.OCX4. If any of these files are missing, do the following:
a. Copy the three files from <PS_APP_HOME>/src/vb/msp to <WINDOWS_INST>.b. Copy the file regmsp.bat from <PS_APP_HOME>/src/vb/msp to <WINDOWS_INST>.c. Run <WINDOWS_INST>\regmsp.bat to register the OCXs.
For example:
C:\WINNT\system32\regmsp.bat.
Task 14-2: Configuring the PeopleSoft-MicrosoftProject Integrator
After the Microsoft Project Integrator begins running, you must configure it for your environment.
To configure the project integrator for your environment:
1. Launch <MSP_HOME>\PC_MSP2.EXE to start the Microsoft Project Integrator application.
2. Click on the Configuration tab, as shown in the following example:
PeopleSoft-Microsoft Project Integrator - Configuration tab
3. Enter the following values:• In the Web Server Name field, enter the name of your web server.
78 Copyright © 2013, Oracle and/or its affiliates. All rights reserved.
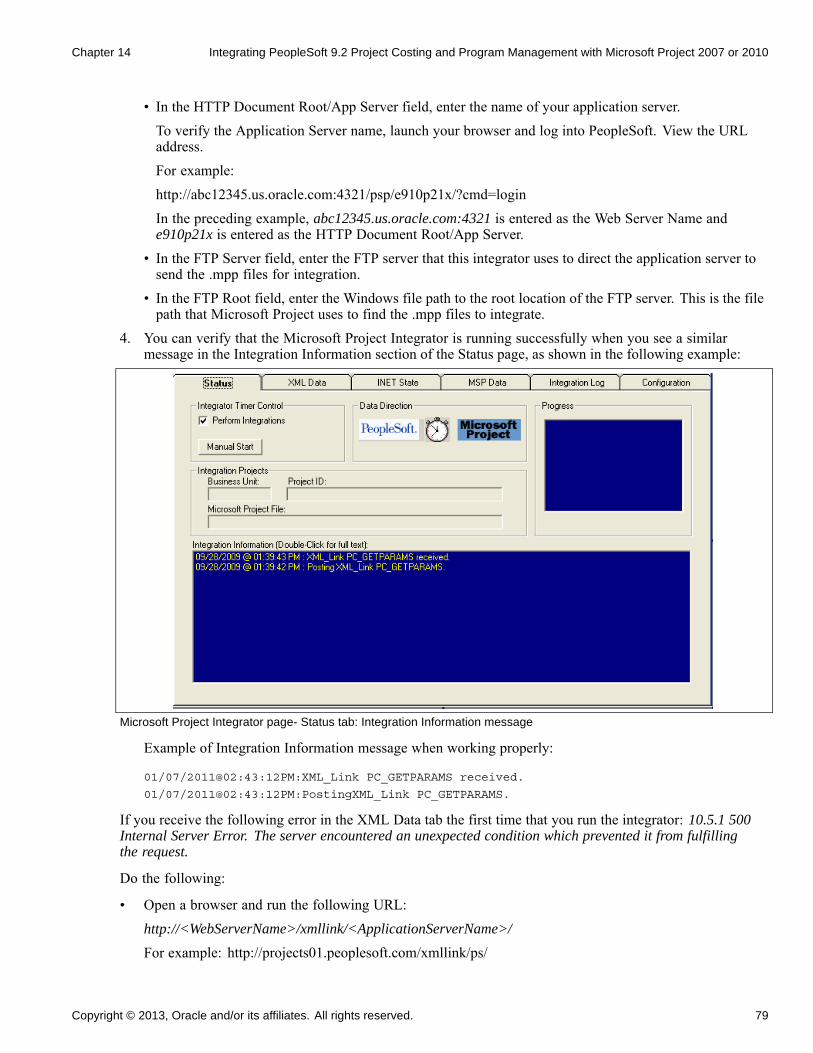
Chapter 14 Integrating PeopleSoft 9.2 Project Costing and Program Management with Microsoft Project 2007 or 2010
• In the HTTP Document Root/App Server field, enter the name of your application server.To verify the Application Server name, launch your browser and log into PeopleSoft. View the URLaddress.For example:http://abc12345.us.oracle.com:4321/psp/e910p21x/?cmd=loginIn the preceding example, abc12345.us.oracle.com:4321 is entered as the Web Server Name ande910p21x is entered as the HTTP Document Root/App Server.
• In the FTP Server field, enter the FTP server that this integrator uses to direct the application server tosend the .mpp files for integration.
• In the FTP Root field, enter the Windows file path to the root location of the FTP server. This is the filepath that Microsoft Project uses to find the .mpp files to integrate.
4. You can verify that the Microsoft Project Integrator is running successfully when you see a similarmessage in the Integration Information section of the Status page, as shown in the following example:
Microsoft Project Integrator page- Status tab: Integration Information message
Example of Integration Information message when working properly:
01/07/2011@02:43:12PM:XML_Link PC_GETPARAMS received.
01/07/2011@02:43:12PM:PostingXML_Link PC_GETPARAMS.
If you receive the following error in the XML Data tab the first time that you run the integrator: 10.5.1 500Internal Server Error. The server encountered an unexpected condition which prevented it from fulfillingthe request.
Do the following:
• Open a browser and run the following URL:
http://<WebServerName>/xmllink/<ApplicationServerName>/
For example: http://projects01.peoplesoft.com/xmllink/ps/
Copyright © 2013, Oracle and/or its affiliates. All rights reserved. 79
Integrating PeopleSoft 9.2 Project Costing and Program Management with Microsoft Project 2007 or 2010 Chapter 14
• Then run the integrator again.
To launch the project integrator upon start up, create a shortcut to PC_MSP2.EXE in the server’s Startupfolder to ensure it initiates upon start up.
80 Copyright © 2013, Oracle and/or its affiliates. All rights reserved.
CHAPTER 15
Defining an FTP Server for File Attachmentsin PeopleSoft 9.2 Project Costing
This chapter discusses:
• Understanding File Attachment Storage
• Setting Up File Attachment Storage on the Database
• Setting Up File Attachment Storage on a File Server
Understanding File Attachment StorageThis chapter details how to specify an FTP server for project and activity file attachments. You can storefile attachments on the database or on a file server. You can then upload and download files by using theAttachments page that is available at both the project and activity levels in PeopleSoft Project Costing.
Task 15-1: Setting Up File Attachment Storageon the Database
To store file attachments on the database:
1. Select Set Up Financials/Supply Chain, Install, Installation Options, Project Costing.2. On the Project Costing page, in the File Attachment Option section, select the Database option.3. Click Save.
Note. PeopleSoft Project Costing delivers the PC_PROJECTS_DB_ATTACHMENT URL. No additional stepis necessary to set up this method for file attachments.
Task 15-2: Setting Up File Attachment Storage on a File ServerTo store file attachments on a file server:
1. Verify that your FTP server has adequate disk storage to store the project and activity documents.2. Select PeopleTools, Utilities, Administration, URLs.3. On the URLs search page, search for and select the URL PC_PROJECTS_DOC_ATTACHMENT.
Copyright © 2013, Oracle and/or its affiliates. All rights reserved. 81
Defining an FTP Server for File Attachments in PeopleSoft 9.2 Project Costing Chapter 15
Note. PeopleSoft Project Costing delivers this URL.
4. On the URL Maintenance page, enter the URL path to the designated FTP server in the following format:ftp://<userID>:<password>@<machinename>
Note. The user name and password that you specify here are critical. The system uses these to connectall users to the FTP attachment server.
• In the User ID field, enter the user ID of the user account under which all users connect to the FTPserver to add, update, view and delete documents.
• In the Password field, enter the password that is associated with the user account under which all usersconnect to the FTP server.
• In the Machine Name field, enter the machine name by which you physically identify the FTP serveron the network.If you create an optional directory for document storage on the server, include the directory name whenyou cite the path. You can also store attachments in the root directory of the FTP server.
5. Click Save.6. On the Installation Options - Project Costing page, in the File Attachment Options section, select the File
Server option and enter the home directory where you store the attachment files.7. Click Save.
For more information on the PeopleSoft URL Maintenance page, see PeopleTools: System and ServerAdministration, “Using PeopleTools Utilities”.
For more information on the PeopleSoft Installation Options - Project Costing page, see PeopleSoft FSCM:Application Fundamentals “Setting Installation Options for PeopleSoft Applications.
82 Copyright © 2013, Oracle and/or its affiliates. All rights reserved.
CHAPTER 16
Setting Up PeopleSoft 9.2 Staffing Front Office
This chapter discusses:
• Setting Up Document Attachments
• Setting Up the Secured Enterprise Search Engine
• Integrating Resume Parsing for PeopleSoft Staffing Front Office
Task 16-1: Setting Up Document AttachmentsPeopleSoft Staffing Front Office 9.2 uses the standard file attachments functionality. Many PeopleSoftproducts and components utilize this functionality.
Note. Oracle only supports PeopleSoft Staffing Front Office on Microsoft SQL Server, Oracle and DB2UDB for Linux, UNIX, and Microsoft Windows.
If you are planning to use file attachments for Applicants, Employees, Orders, Assignments, Customers, orContacts, then you need to set up a File Attachments server. PeopleSoft Staffing Front Office supports any ofthe file attachment server types shown in the Administer File Attachments page below.
Select Set Up Financials/Supply Chain, Common Definitions, File Attachments, Administer File Attachmentsto access the correct page.
The system stores and retrieves Attachments to PeopleSoft Staffing Front Office Orders and Assignments fromthe server locations that you define here. System administrators can configure one or more servers to storeattachments. These servers can be FTP, URLs, or Database servers.
Using this page, system administrators can set up new servers and identify the active server. Administratorscan add or modify the FTP root folder for FTP servers.
Use the following example and list of fields on the Administer File Attachments page to configure a Databaseserver.
If you wish to configure an FTP or URL server, then you can find more information for setting up FileAttachments in FSCM Architecture, in PeopleSoft FSCM: Applications Fundamentals
Copyright © 2013, Oracle and/or its affiliates. All rights reserved. 83
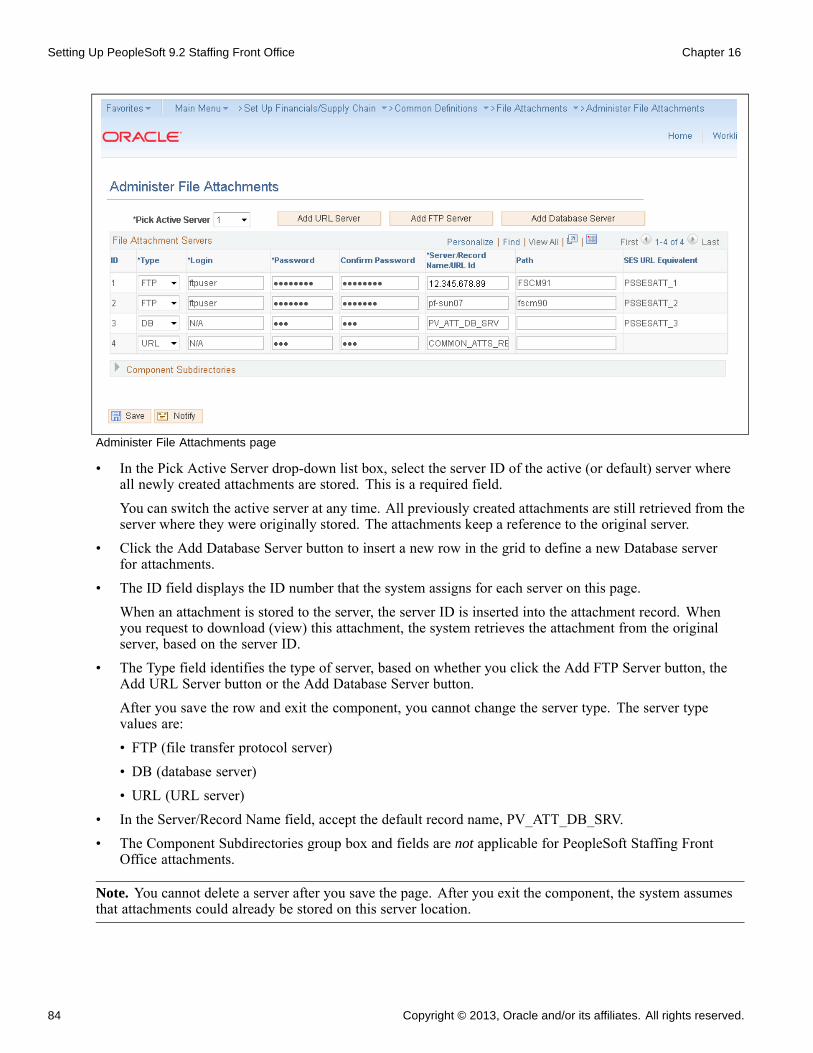
Setting Up PeopleSoft 9.2 Staffing Front Office Chapter 16
Administer File Attachments page
• In the Pick Active Server drop-down list box, select the server ID of the active (or default) server whereall newly created attachments are stored. This is a required field.You can switch the active server at any time. All previously created attachments are still retrieved from theserver where they were originally stored. The attachments keep a reference to the original server.
• Click the Add Database Server button to insert a new row in the grid to define a new Database serverfor attachments.
• The ID field displays the ID number that the system assigns for each server on this page.When an attachment is stored to the server, the server ID is inserted into the attachment record. Whenyou request to download (view) this attachment, the system retrieves the attachment from the originalserver, based on the server ID.
• The Type field identifies the type of server, based on whether you click the Add FTP Server button, theAdd URL Server button or the Add Database Server button.After you save the row and exit the component, you cannot change the server type. The server typevalues are:• FTP (file transfer protocol server)• DB (database server)• URL (URL server)
• In the Server/Record Name field, accept the default record name, PV_ATT_DB_SRV.• The Component Subdirectories group box and fields are not applicable for PeopleSoft Staffing Front
Office attachments.
Note. You cannot delete a server after you save the page. After you exit the component, the system assumesthat attachments could already be stored on this server location.
84 Copyright © 2013, Oracle and/or its affiliates. All rights reserved.
Chapter 16 Setting Up PeopleSoft 9.2 Staffing Front Office
Task 16-2: Setting Up the Secured Enterprise Search EnginePeopleSoft Staffing Front Office 9.2 utilizes the Secured Enterprise Search (SES) engine to address its searchneeds. The SES engine is a common functionality between PeopleSoft Staffing and Resource Management.
You can deploy the Search Definitions in PeopleTools, Search Framework, Administration, Deploy/DeleteObject.
For more information on installation of SES, see PeopleTools: PeopleSoft Search Technology, “UnderstandingPeopleSoft Search Framework”.
Task 16-3: Integrating Resume Parsing for PeopleSoftStaffing Front Office
This section discusses:
• Understanding Resume Parsing for PeopleSoft Staffing Front Office
• Setting up Staffing Installation Options for Resume Parsing
• Configuring the PeopleSoft Integration Broker
• Setting Up Mapping
• Assigning Mapping Setups
• Defining Mapping Values
Understanding Resume Parsing for PeopleSoftStaffing Front OfficeResume parsing strips resumes of their formatting, leaving behind the work history, skill set, educationand other data in a basic and consistent format. You can then load this extracted data into a database andthe appropriate fields for searching and processing.
You can use PeopleSoft Staffing Front Office (SFO) to integrate with additional component (third-party)resume parsing software (must be HR-XML Candidate standard compliant) to retrieve the extracted data.
Task 16-3-1: Setting up Staffing Installation Optionsfor Resume ParsingTo set up PeopleSoft Staffing Front Office installation options to utilize resume parsing:
1. Select Set Up Financials/Supply Chain, Install, Installation Options.2. Select the Staffing tab to access the Staffing Installation page, as shown in the following example:
Copyright © 2013, Oracle and/or its affiliates. All rights reserved. 85
Setting Up PeopleSoft 9.2 Staffing Front Office Chapter 16
Installation Options-Staffing Installation page showing the PeopleSoft Domain (1 of 2)
3. On the Staffing Installation page, in the PeopleSoft Domain field, enter or browse to select the PeopleSoftdomain.For example:PSFT
86 Copyright © 2013, Oracle and/or its affiliates. All rights reserved.
Chapter 16 Setting Up PeopleSoft 9.2 Staffing Front Office
Installation Options - Staffing Installation page showing the Resume Parsing Provider (2 of 2)
4. In the 3rd Party Integrations group box, select the Resume Parsing Provider check box.The remaining fields in this section vary, depending on the resume parsing provider that you select.
Note. After you complete your basic PeopleSoft FSCM 9.2 and PeopleSoft SFO installation, you cancomplete the remaining Staffing Installation options and fields on this page, using the implementationinstructions in the PeopleSoft 9.2 Staffing Front Office documentation.
Task 16-3-2: Configuring the PeopleSoft Integration Broker
Activating the Domain
To activate the local domain in PeopleSoft FSCM:
1. In your PeopleSoft FSCM 9.2 environment, select PeopleTools, Integration Broker, Service OperationsMonitor, Administration, Domain Status.The Domain Status page appears, as shown in the following example:
Copyright © 2013, Oracle and/or its affiliates. All rights reserved. 87
Setting Up PeopleSoft 9.2 Staffing Front Office Chapter 16
Domain Status page
2. On the Domain Status page, in the Domain Status field, select Active from the drop-down list box.3. Click the Update button.
Note. After you click Update, if your machine name does not appear in the list, click the Purge DomainStatus button, and then click the Refresh button.
Setting Up Integration Gateways
To set up integration gateways in PeopleSoft FSCM:
1. In your PeopleSoft FSCM 9.2 environment, select PeopleTools, Integration Broker, Configuration,Gateways and click Search.The Gateways page for the Local Gateway appears by default, as shown in the following example:
88 Copyright © 2013, Oracle and/or its affiliates. All rights reserved.
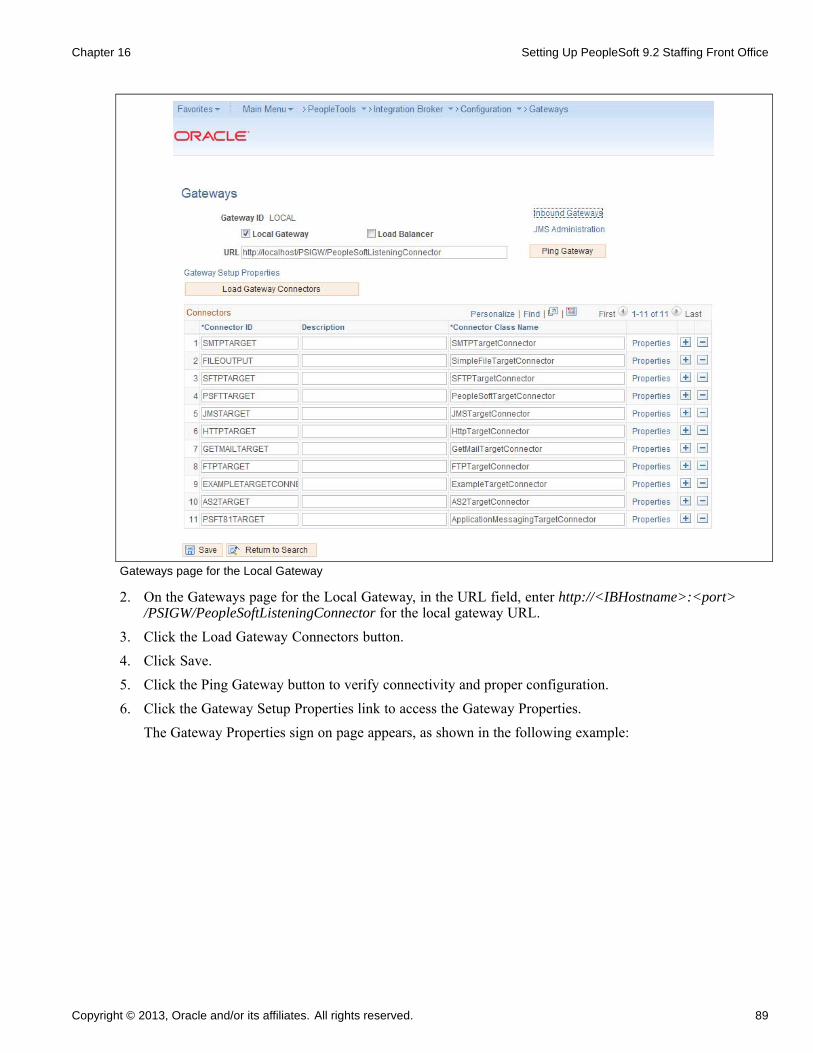
Chapter 16 Setting Up PeopleSoft 9.2 Staffing Front Office
Gateways page for the Local Gateway
2. On the Gateways page for the Local Gateway, in the URL field, enter http://<IBHostname>:<port>/PSIGW/PeopleSoftListeningConnector for the local gateway URL.
3. Click the Load Gateway Connectors button.
4. Click Save.
5. Click the Ping Gateway button to verify connectivity and proper configuration.
6. Click the Gateway Setup Properties link to access the Gateway Properties.
The Gateway Properties sign on page appears, as shown in the following example:
Copyright © 2013, Oracle and/or its affiliates. All rights reserved. 89
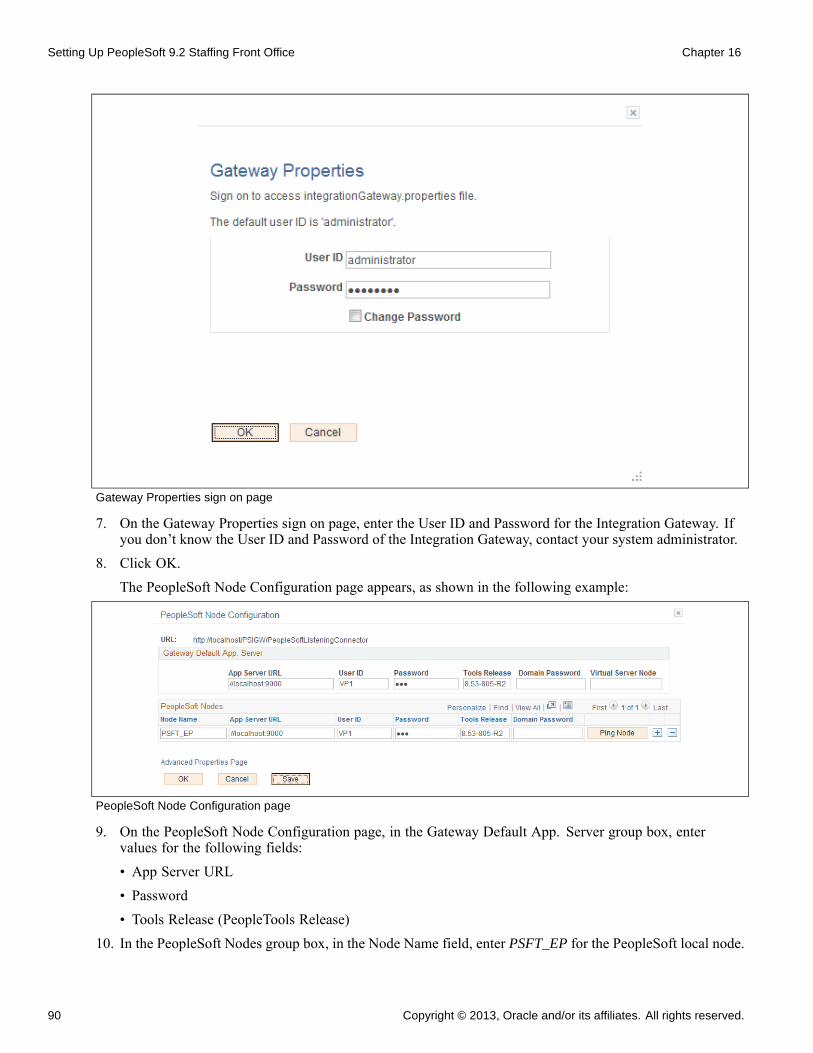
Setting Up PeopleSoft 9.2 Staffing Front Office Chapter 16
Gateway Properties sign on page
7. On the Gateway Properties sign on page, enter the User ID and Password for the Integration Gateway. Ifyou don’t know the User ID and Password of the Integration Gateway, contact your system administrator.
8. Click OK.The PeopleSoft Node Configuration page appears, as shown in the following example:
PeopleSoft Node Configuration page
9. On the PeopleSoft Node Configuration page, in the Gateway Default App. Server group box, entervalues for the following fields:• App Server URL• Password• Tools Release (PeopleTools Release)
10. In the PeopleSoft Nodes group box, in the Node Name field, enter PSFT_EP for the PeopleSoft local node.
90 Copyright © 2013, Oracle and/or its affiliates. All rights reserved.
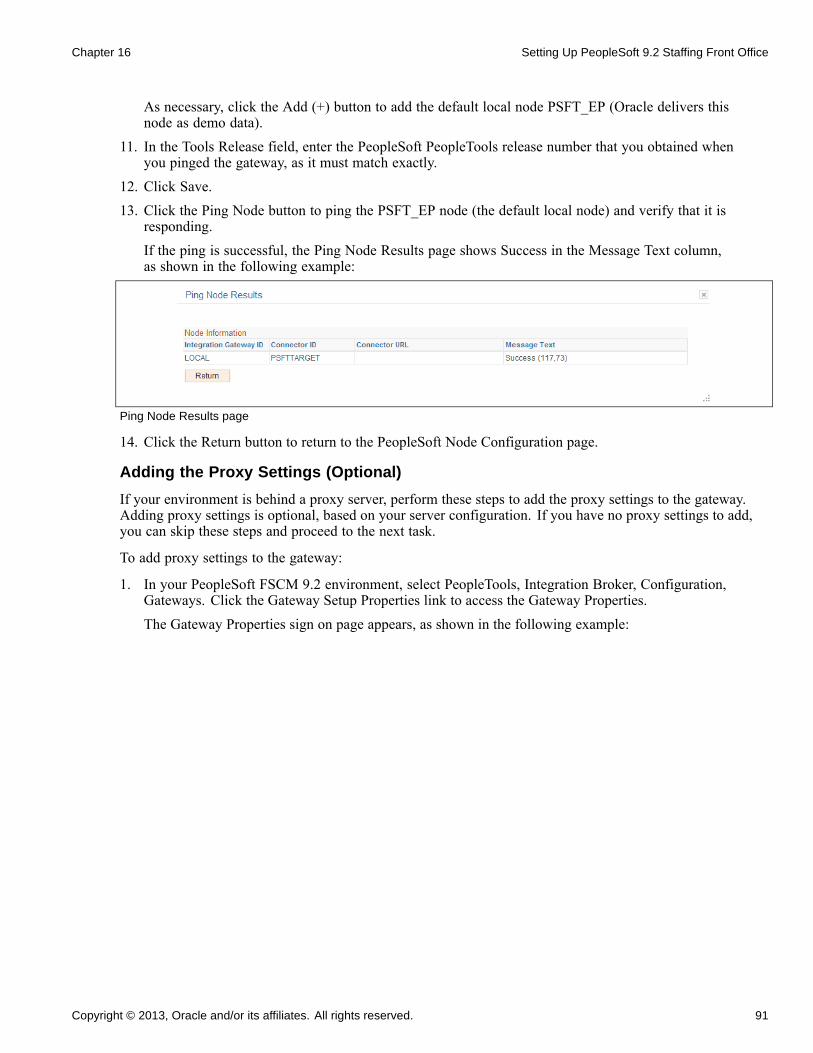
Chapter 16 Setting Up PeopleSoft 9.2 Staffing Front Office
As necessary, click the Add (+) button to add the default local node PSFT_EP (Oracle delivers thisnode as demo data).
11. In the Tools Release field, enter the PeopleSoft PeopleTools release number that you obtained whenyou pinged the gateway, as it must match exactly.
12. Click Save.13. Click the Ping Node button to ping the PSFT_EP node (the default local node) and verify that it is
responding.If the ping is successful, the Ping Node Results page shows Success in the Message Text column,as shown in the following example:
Ping Node Results page
14. Click the Return button to return to the PeopleSoft Node Configuration page.
Adding the Proxy Settings (Optional)
If your environment is behind a proxy server, perform these steps to add the proxy settings to the gateway.Adding proxy settings is optional, based on your server configuration. If you have no proxy settings to add,you can skip these steps and proceed to the next task.
To add proxy settings to the gateway:
1. In your PeopleSoft FSCM 9.2 environment, select PeopleTools, Integration Broker, Configuration,Gateways. Click the Gateway Setup Properties link to access the Gateway Properties.The Gateway Properties sign on page appears, as shown in the following example:
Copyright © 2013, Oracle and/or its affiliates. All rights reserved. 91
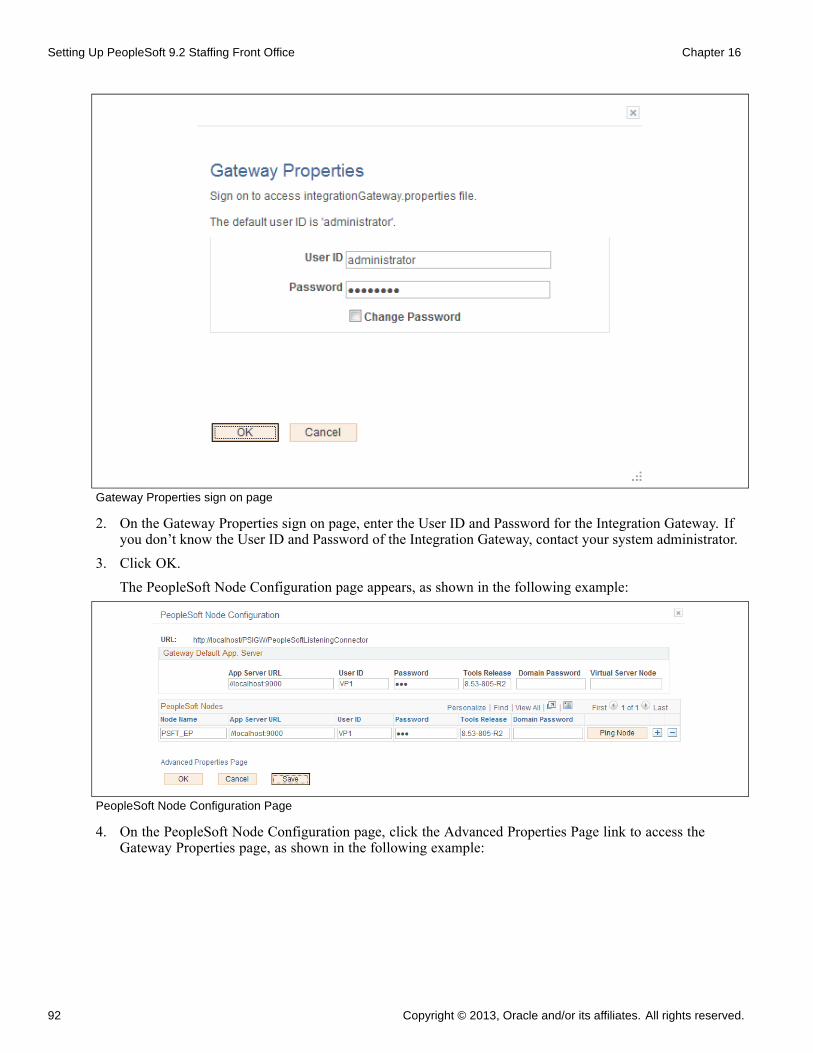
Setting Up PeopleSoft 9.2 Staffing Front Office Chapter 16
Gateway Properties sign on page
2. On the Gateway Properties sign on page, enter the User ID and Password for the Integration Gateway. Ifyou don’t know the User ID and Password of the Integration Gateway, contact your system administrator.
3. Click OK.The PeopleSoft Node Configuration page appears, as shown in the following example:
PeopleSoft Node Configuration Page
4. On the PeopleSoft Node Configuration page, click the Advanced Properties Page link to access theGateway Properties page, as shown in the following example:
92 Copyright © 2013, Oracle and/or its affiliates. All rights reserved.
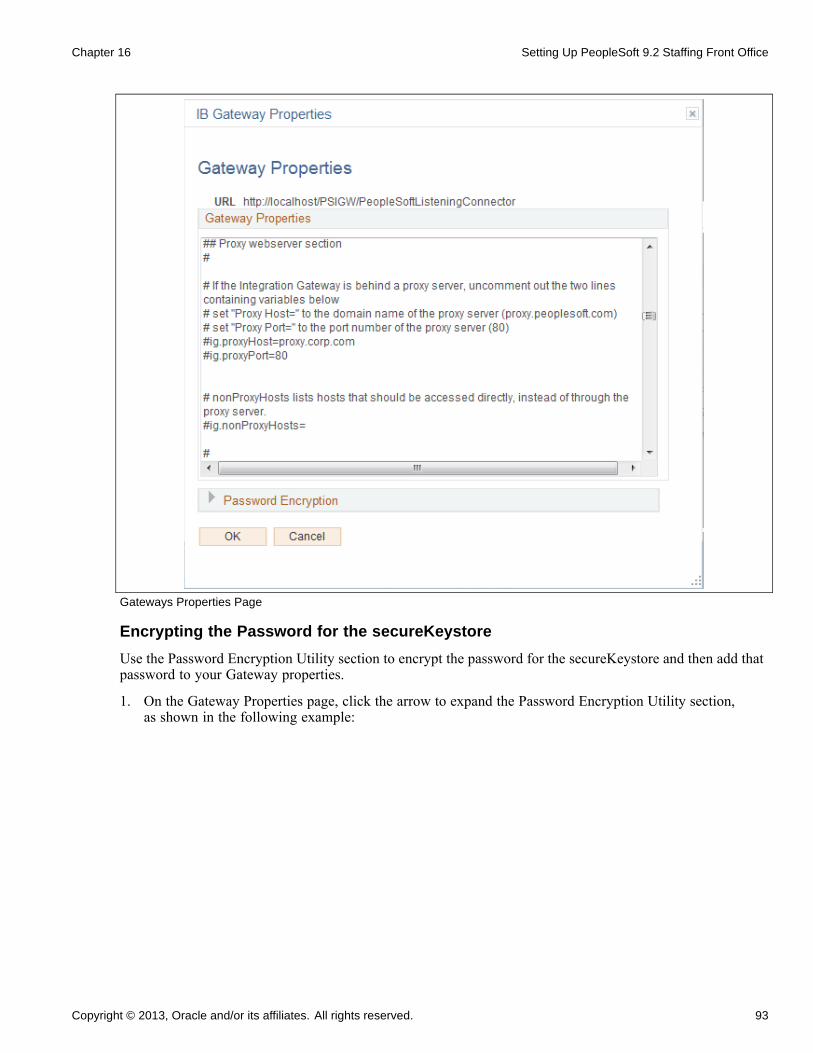
Chapter 16 Setting Up PeopleSoft 9.2 Staffing Front Office
Gateways Properties Page
Encrypting the Password for the secureKeystore
Use the Password Encryption Utility section to encrypt the password for the secureKeystore and then add thatpassword to your Gateway properties.
1. On the Gateway Properties page, click the arrow to expand the Password Encryption Utility section,as shown in the following example:
Copyright © 2013, Oracle and/or its affiliates. All rights reserved. 93
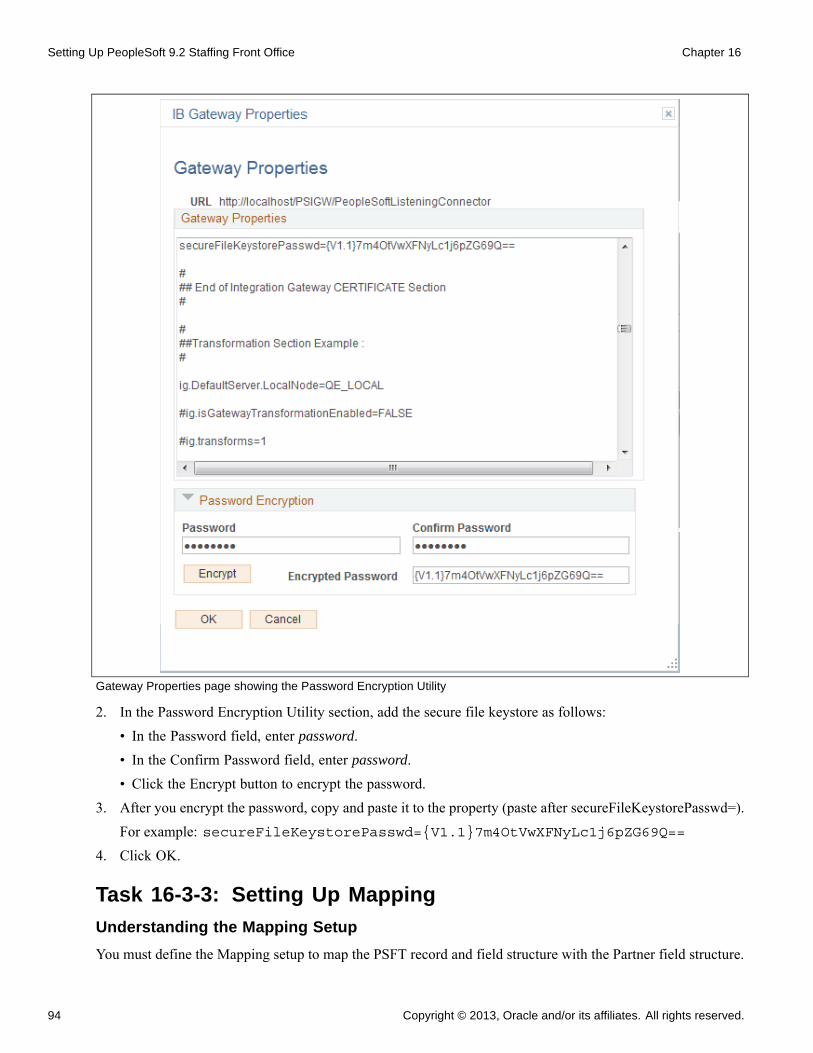
Setting Up PeopleSoft 9.2 Staffing Front Office Chapter 16
Gateway Properties page showing the Password Encryption Utility
2. In the Password Encryption Utility section, add the secure file keystore as follows:• In the Password field, enter password.• In the Confirm Password field, enter password.• Click the Encrypt button to encrypt the password.
3. After you encrypt the password, copy and paste it to the property (paste after secureFileKeystorePasswd=).For example: secureFileKeystorePasswd={V1.1}7m4OtVwXFNyLc1j6pZG69Q==
4. Click OK.
Task 16-3-3: Setting Up Mapping
Understanding the Mapping Setup
You must define the Mapping setup to map the PSFT record and field structure with the Partner field structure.
94 Copyright © 2013, Oracle and/or its affiliates. All rights reserved.
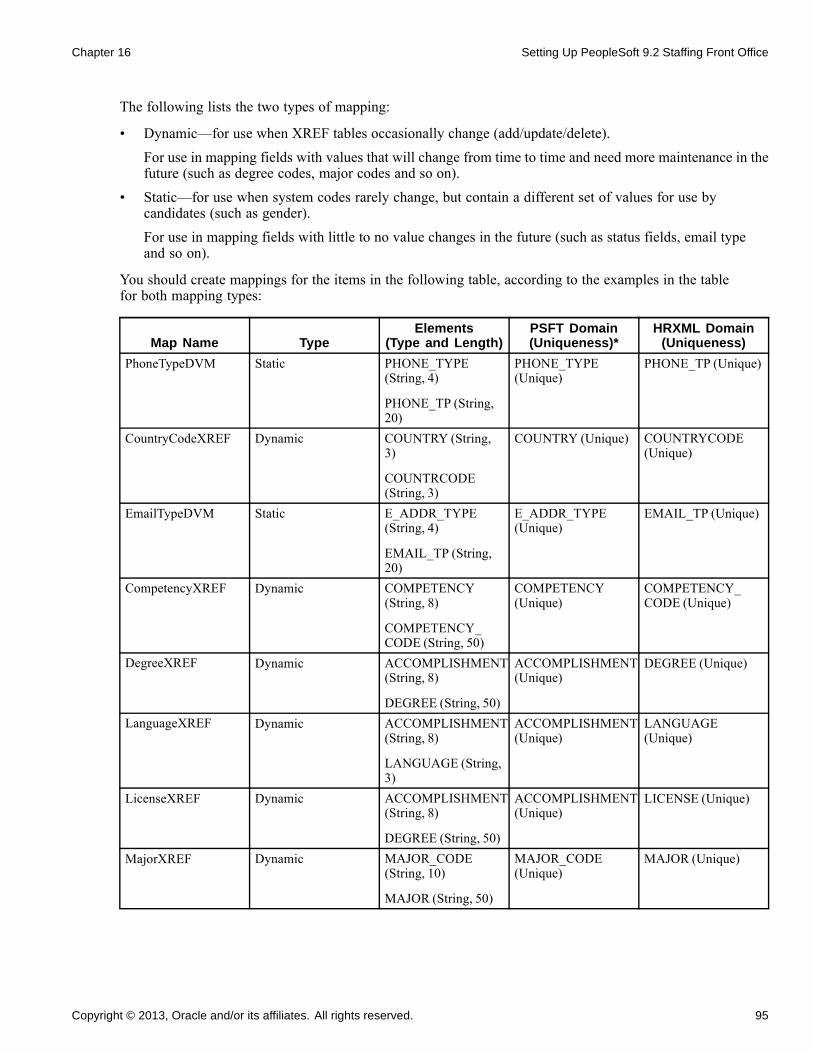
Chapter 16 Setting Up PeopleSoft 9.2 Staffing Front Office
The following lists the two types of mapping:
• Dynamic—for use when XREF tables occasionally change (add/update/delete).
For use in mapping fields with values that will change from time to time and need more maintenance in thefuture (such as degree codes, major codes and so on).
• Static—for use when system codes rarely change, but contain a different set of values for use bycandidates (such as gender).
For use in mapping fields with little to no value changes in the future (such as status fields, email typeand so on).
You should create mappings for the items in the following table, according to the examples in the tablefor both mapping types:
Map Name TypeElements
(Type and Length)PSFT Domain(Uniqueness)*
HRXML Domain(Uniqueness)
PhoneTypeDVM Static PHONE_TYPE(String, 4)
PHONE_TP (String,20)
PHONE_TYPE(Unique)
PHONE_TP (Unique)
CountryCodeXREF Dynamic COUNTRY (String,3)
COUNTRCODE(String, 3)
COUNTRY (Unique) COUNTRYCODE(Unique)
EmailTypeDVM Static E_ADDR_TYPE(String, 4)
EMAIL_TP (String,20)
E_ADDR_TYPE(Unique)
EMAIL_TP (Unique)
CompetencyXREF Dynamic COMPETENCY(String, 8)
COMPETENCY_CODE (String, 50)
COMPETENCY(Unique)
COMPETENCY_CODE (Unique)
DegreeXREF Dynamic ACCOMPLISHMENT(String, 8)
DEGREE (String, 50)
ACCOMPLISHMENT(Unique)
DEGREE (Unique)
LanguageXREF Dynamic ACCOMPLISHMENT(String, 8)
LANGUAGE (String,3)
ACCOMPLISHMENT(Unique)
LANGUAGE(Unique)
LicenseXREF Dynamic ACCOMPLISHMENT(String, 8)
DEGREE (String, 50)
ACCOMPLISHMENT(Unique)
LICENSE (Unique)
MajorXREF Dynamic MAJOR_CODE(String, 10)
MAJOR (String, 50)
MAJOR_CODE(Unique)
MAJOR (Unique)
Copyright © 2013, Oracle and/or its affiliates. All rights reserved. 95
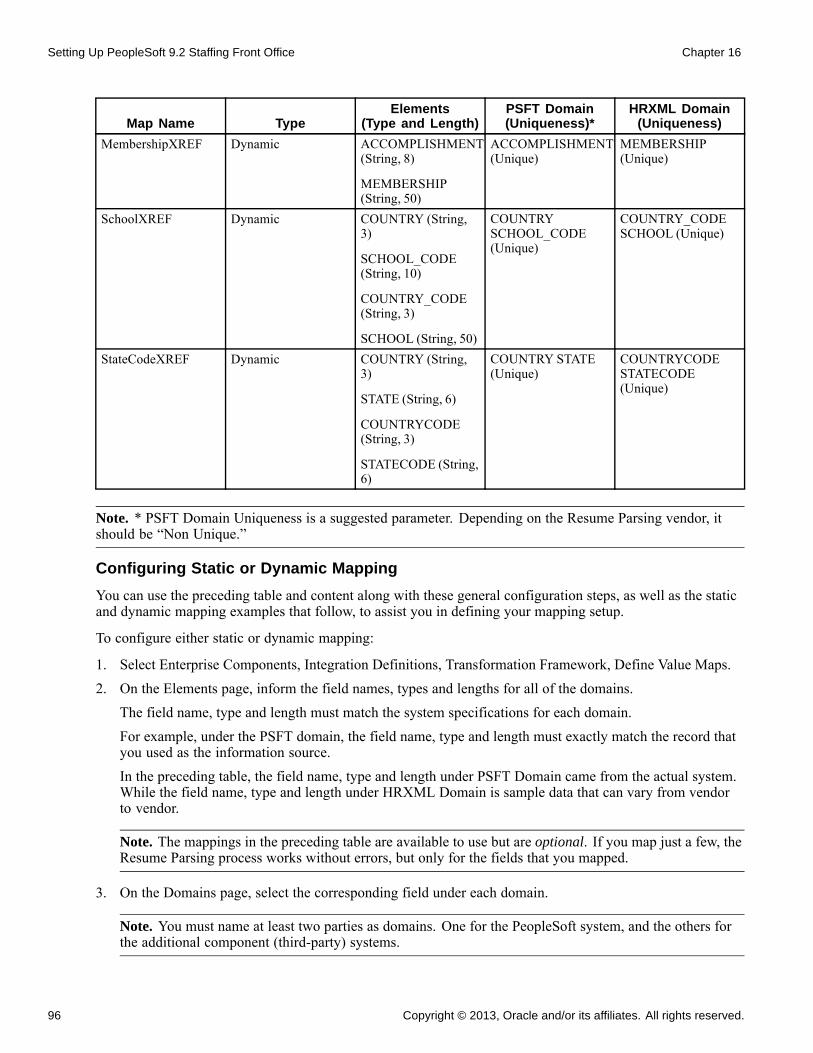
Setting Up PeopleSoft 9.2 Staffing Front Office Chapter 16
Map Name TypeElements
(Type and Length)PSFT Domain(Uniqueness)*
HRXML Domain(Uniqueness)
MembershipXREF Dynamic ACCOMPLISHMENT(String, 8)
MEMBERSHIP(String, 50)
ACCOMPLISHMENT(Unique)
MEMBERSHIP(Unique)
SchoolXREF Dynamic COUNTRY (String,3)
SCHOOL_CODE(String, 10)
COUNTRY_CODE(String, 3)
SCHOOL (String, 50)
COUNTRYSCHOOL_CODE(Unique)
COUNTRY_CODESCHOOL (Unique)
StateCodeXREF Dynamic COUNTRY (String,3)
STATE (String, 6)
COUNTRYCODE(String, 3)
STATECODE (String,6)
COUNTRY STATE(Unique)
COUNTRYCODESTATECODE(Unique)
Note. * PSFT Domain Uniqueness is a suggested parameter. Depending on the Resume Parsing vendor, itshould be “Non Unique.”
Configuring Static or Dynamic Mapping
You can use the preceding table and content along with these general configuration steps, as well as the staticand dynamic mapping examples that follow, to assist you in defining your mapping setup.
To configure either static or dynamic mapping:
1. Select Enterprise Components, Integration Definitions, Transformation Framework, Define Value Maps.2. On the Elements page, inform the field names, types and lengths for all of the domains.
The field name, type and length must match the system specifications for each domain.For example, under the PSFT domain, the field name, type and length must exactly match the record thatyou used as the information source.In the preceding table, the field name, type and length under PSFT Domain came from the actual system.While the field name, type and length under HRXML Domain is sample data that can vary from vendorto vendor.
Note. The mappings in the preceding table are available to use but are optional. If you map just a few, theResume Parsing process works without errors, but only for the fields that you mapped.
3. On the Domains page, select the corresponding field under each domain.
Note. You must name at least two parties as domains. One for the PeopleSoft system, and the others forthe additional component (third-party) systems.
96 Copyright © 2013, Oracle and/or its affiliates. All rights reserved.
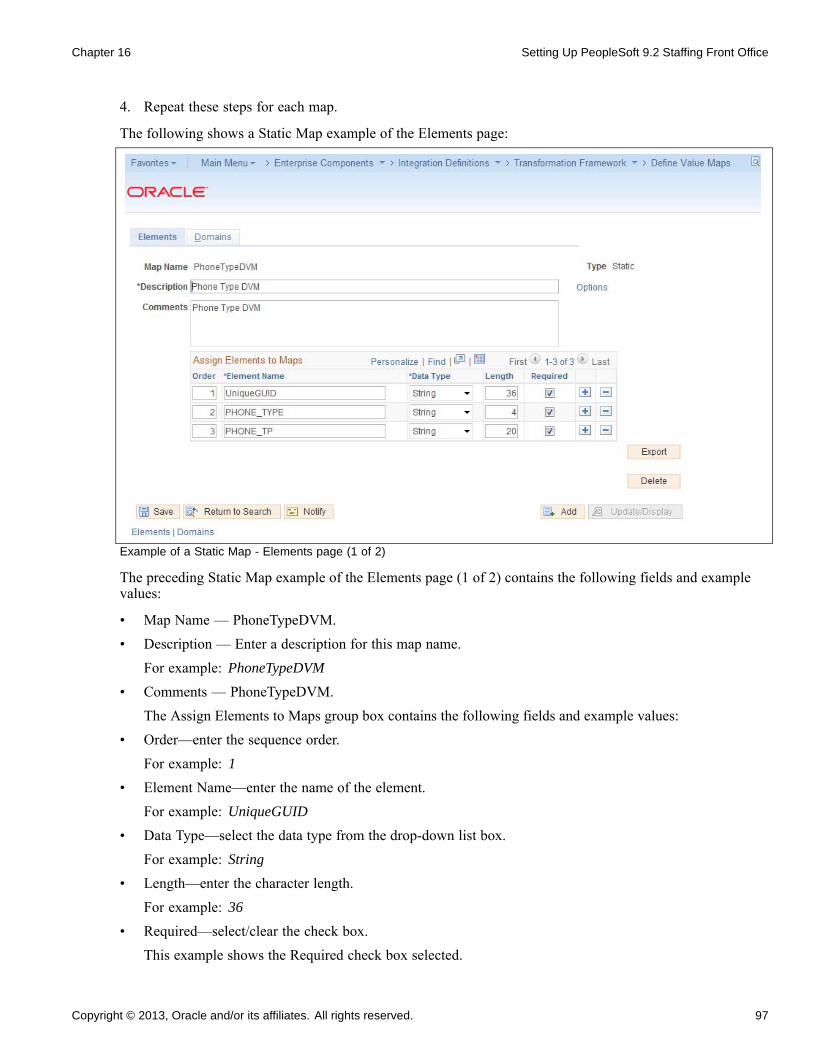
Chapter 16 Setting Up PeopleSoft 9.2 Staffing Front Office
4. Repeat these steps for each map.
The following shows a Static Map example of the Elements page:
Example of a Static Map - Elements page (1 of 2)
The preceding Static Map example of the Elements page (1 of 2) contains the following fields and examplevalues:
• Map Name — PhoneTypeDVM.• Description — Enter a description for this map name.
For example: PhoneTypeDVM
• Comments — PhoneTypeDVM.The Assign Elements to Maps group box contains the following fields and example values:
• Order—enter the sequence order.For example: 1
• Element Name—enter the name of the element.For example: UniqueGUID
• Data Type—select the data type from the drop-down list box.For example: String
• Length—enter the character length.For example: 36
• Required—select/clear the check box.This example shows the Required check box selected.
Copyright © 2013, Oracle and/or its affiliates. All rights reserved. 97
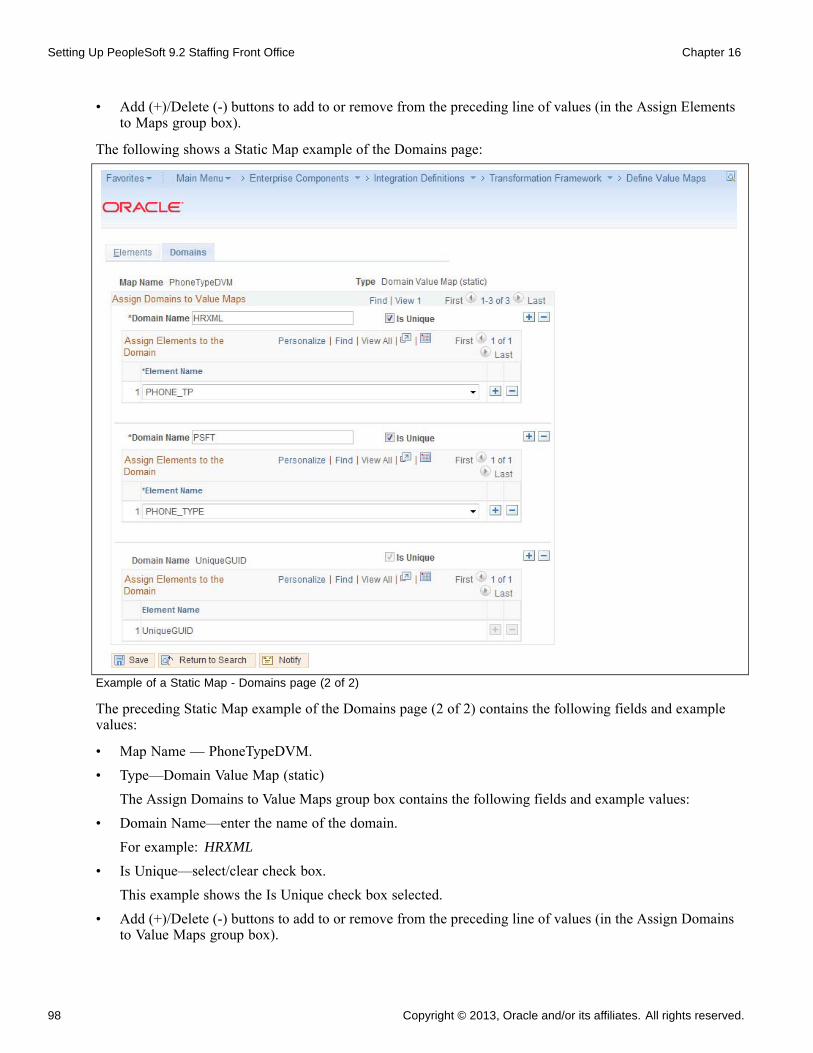
Setting Up PeopleSoft 9.2 Staffing Front Office Chapter 16
• Add (+)/Delete (-) buttons to add to or remove from the preceding line of values (in the Assign Elementsto Maps group box).
The following shows a Static Map example of the Domains page:
Example of a Static Map - Domains page (2 of 2)
The preceding Static Map example of the Domains page (2 of 2) contains the following fields and examplevalues:
• Map Name — PhoneTypeDVM.
• Type—Domain Value Map (static)
The Assign Domains to Value Maps group box contains the following fields and example values:
• Domain Name—enter the name of the domain.
For example: HRXML
• Is Unique—select/clear check box.
This example shows the Is Unique check box selected.
• Add (+)/Delete (-) buttons to add to or remove from the preceding line of values (in the Assign Domainsto Value Maps group box).
98 Copyright © 2013, Oracle and/or its affiliates. All rights reserved.
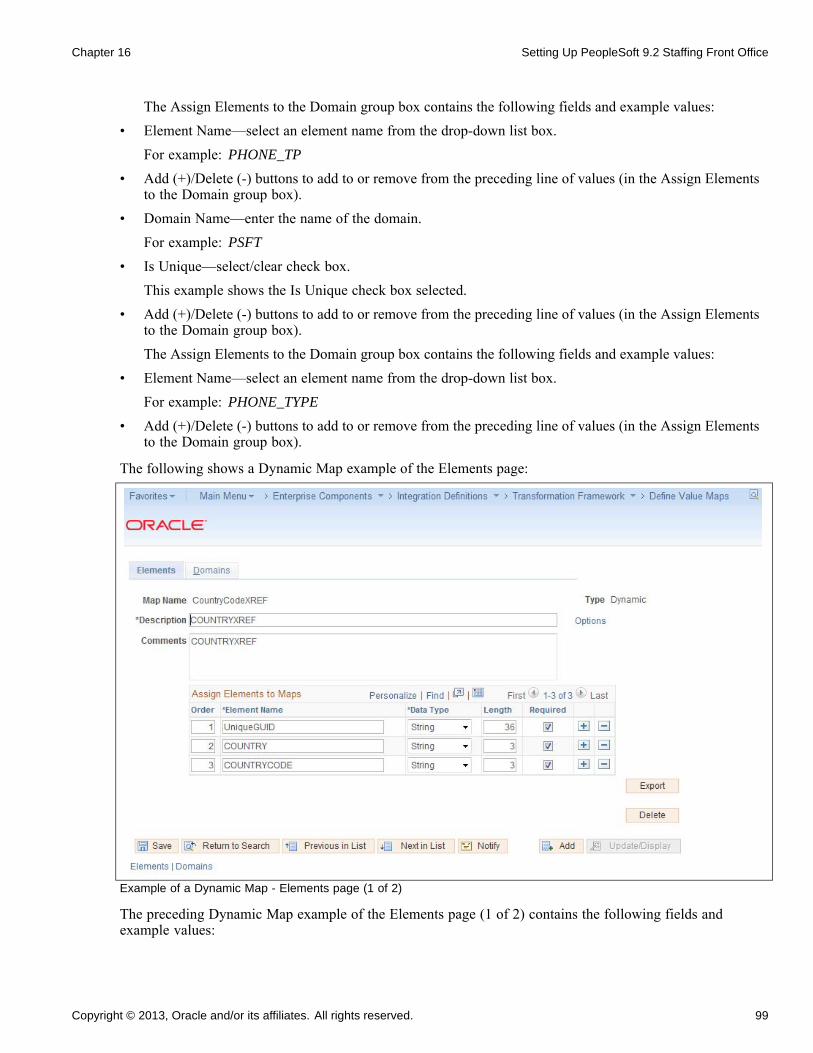
Chapter 16 Setting Up PeopleSoft 9.2 Staffing Front Office
The Assign Elements to the Domain group box contains the following fields and example values:• Element Name—select an element name from the drop-down list box.
For example: PHONE_TP
• Add (+)/Delete (-) buttons to add to or remove from the preceding line of values (in the Assign Elementsto the Domain group box).
• Domain Name—enter the name of the domain.For example: PSFT
• Is Unique—select/clear check box.This example shows the Is Unique check box selected.
• Add (+)/Delete (-) buttons to add to or remove from the preceding line of values (in the Assign Elementsto the Domain group box).The Assign Elements to the Domain group box contains the following fields and example values:
• Element Name—select an element name from the drop-down list box.For example: PHONE_TYPE
• Add (+)/Delete (-) buttons to add to or remove from the preceding line of values (in the Assign Elementsto the Domain group box).
The following shows a Dynamic Map example of the Elements page:
Example of a Dynamic Map - Elements page (1 of 2)
The preceding Dynamic Map example of the Elements page (1 of 2) contains the following fields andexample values:
Copyright © 2013, Oracle and/or its affiliates. All rights reserved. 99
Setting Up PeopleSoft 9.2 Staffing Front Office Chapter 16
• Map Name — CountryCodeXREF.• Type—Dynamic.• Description — Enter a description for this map name.
For example: CountryCodeXREF
• Comments — CountryCodeXREF.The Assign Elements to Maps group box contains the following fields and example values:
• Order—enter the sequence order.For example: 1
• Element Name—enter the name of the element.For example: UniqueGUID
• Data Type—select from the drop-down list box.For example: String
• Length—enter the character length.For example: 36
• Required—select/clear the check box.This example shows the Required check box selected.
• Add (+)/Delete (-) buttons to add to or remove from the preceding line of values (in the Assign Elementsto Maps group box).
The following shows a Dynamic Map example of the Domains page:
100 Copyright © 2013, Oracle and/or its affiliates. All rights reserved.
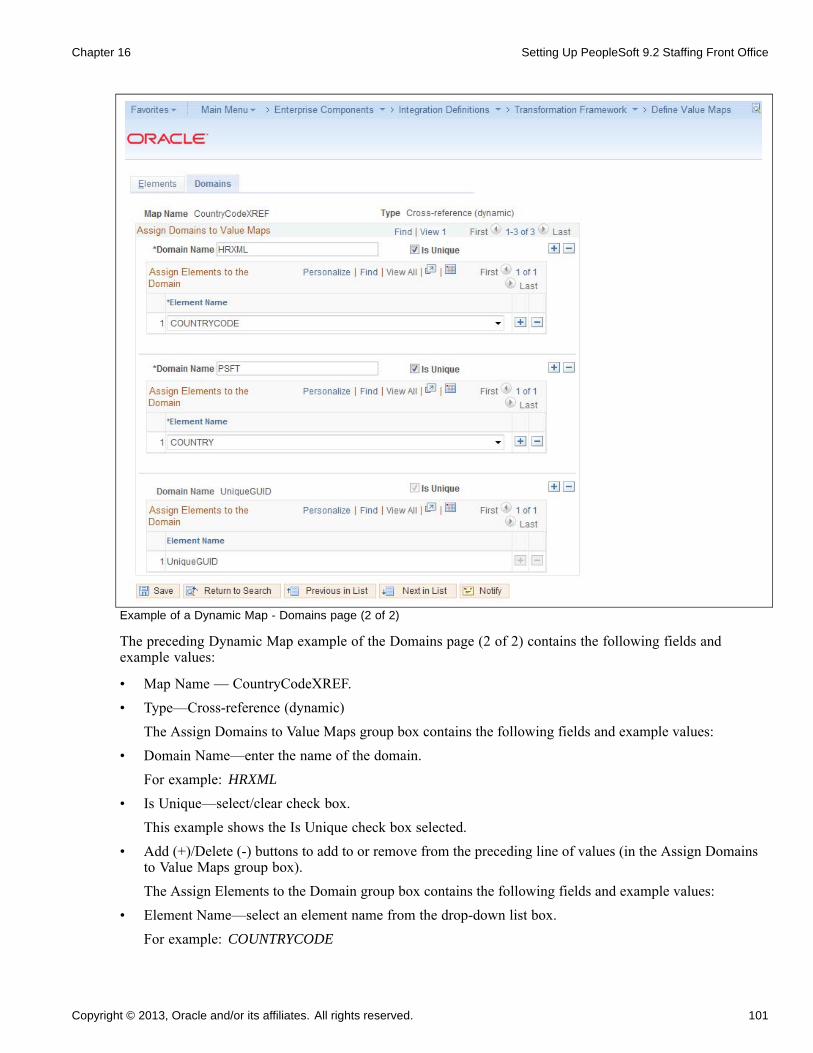
Chapter 16 Setting Up PeopleSoft 9.2 Staffing Front Office
Example of a Dynamic Map - Domains page (2 of 2)
The preceding Dynamic Map example of the Domains page (2 of 2) contains the following fields andexample values:
• Map Name — CountryCodeXREF.
• Type—Cross-reference (dynamic)
The Assign Domains to Value Maps group box contains the following fields and example values:
• Domain Name—enter the name of the domain.
For example: HRXML
• Is Unique—select/clear check box.
This example shows the Is Unique check box selected.
• Add (+)/Delete (-) buttons to add to or remove from the preceding line of values (in the Assign Domainsto Value Maps group box).
The Assign Elements to the Domain group box contains the following fields and example values:
• Element Name—select an element name from the drop-down list box.
For example: COUNTRYCODE
Copyright © 2013, Oracle and/or its affiliates. All rights reserved. 101
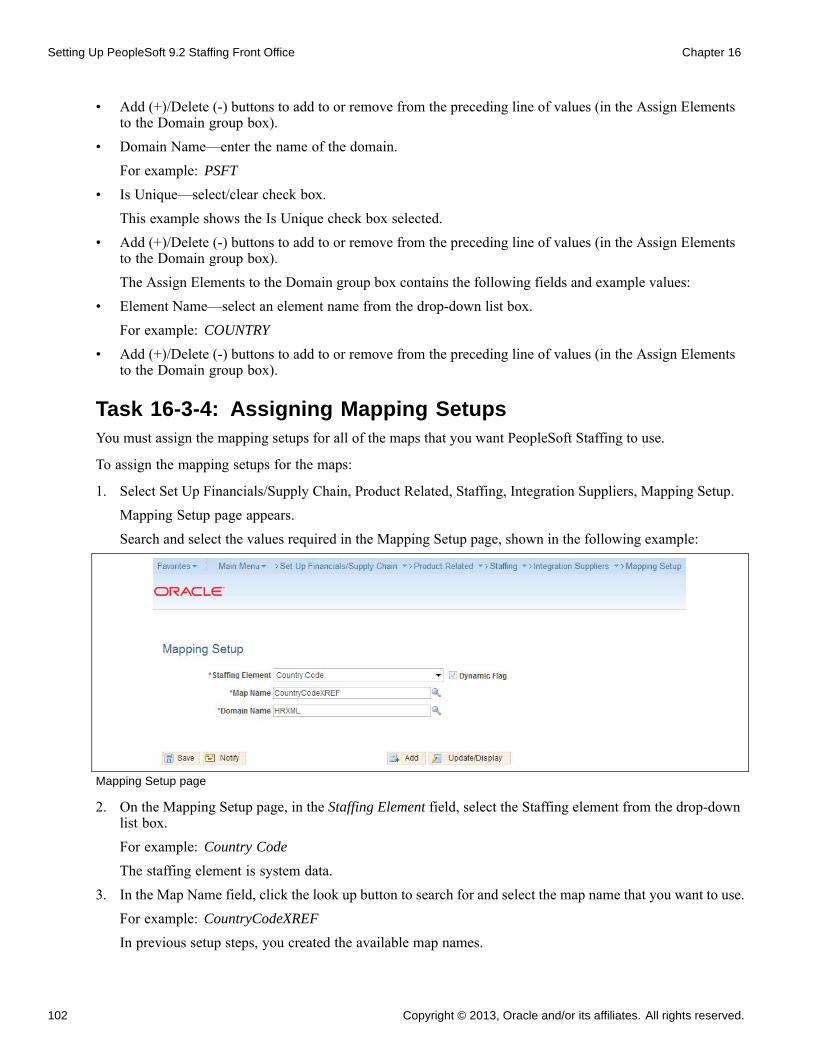
Setting Up PeopleSoft 9.2 Staffing Front Office Chapter 16
• Add (+)/Delete (-) buttons to add to or remove from the preceding line of values (in the Assign Elementsto the Domain group box).
• Domain Name—enter the name of the domain.For example: PSFT
• Is Unique—select/clear check box.This example shows the Is Unique check box selected.
• Add (+)/Delete (-) buttons to add to or remove from the preceding line of values (in the Assign Elementsto the Domain group box).The Assign Elements to the Domain group box contains the following fields and example values:
• Element Name—select an element name from the drop-down list box.For example: COUNTRY
• Add (+)/Delete (-) buttons to add to or remove from the preceding line of values (in the Assign Elementsto the Domain group box).
Task 16-3-4: Assigning Mapping SetupsYou must assign the mapping setups for all of the maps that you want PeopleSoft Staffing to use.
To assign the mapping setups for the maps:
1. Select Set Up Financials/Supply Chain, Product Related, Staffing, Integration Suppliers, Mapping Setup.Mapping Setup page appears.Search and select the values required in the Mapping Setup page, shown in the following example:
Mapping Setup page
2. On the Mapping Setup page, in the Staffing Element field, select the Staffing element from the drop-downlist box.For example: Country Code
The staffing element is system data.3. In the Map Name field, click the look up button to search for and select the map name that you want to use.
For example: CountryCodeXREF
In previous setup steps, you created the available map names.
102 Copyright © 2013, Oracle and/or its affiliates. All rights reserved.
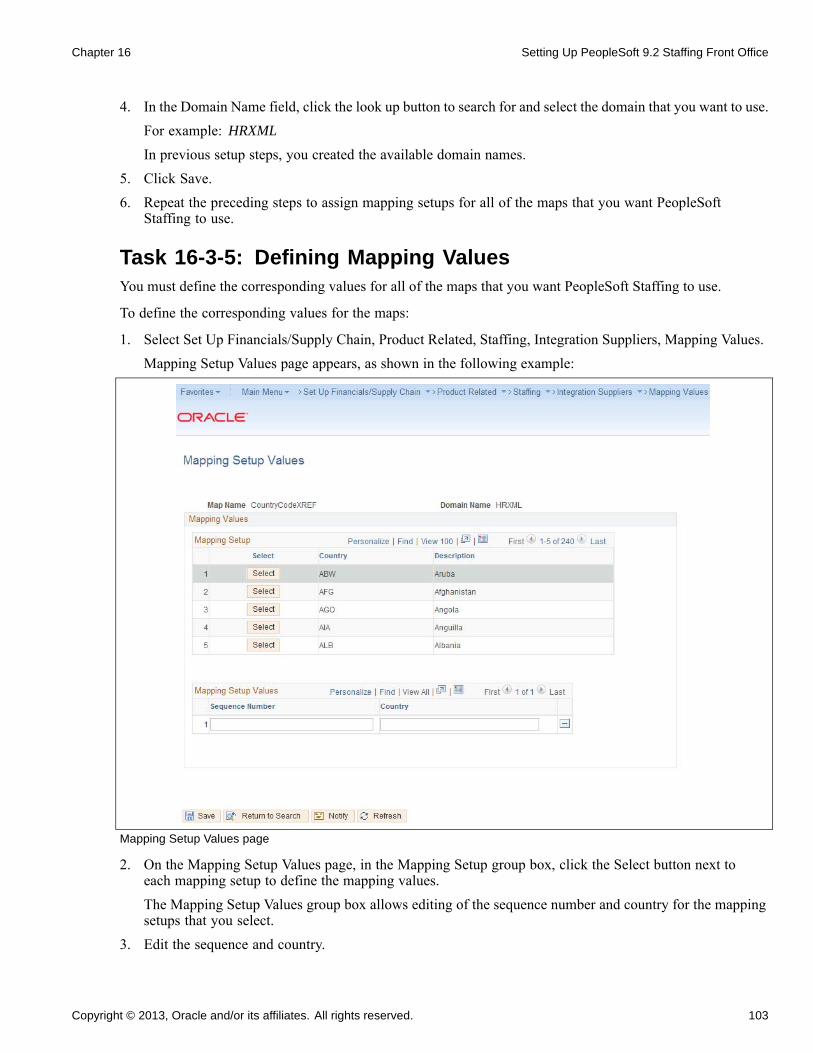
Chapter 16 Setting Up PeopleSoft 9.2 Staffing Front Office
4. In the Domain Name field, click the look up button to search for and select the domain that you want to use.For example: HRXML
In previous setup steps, you created the available domain names.5. Click Save.6. Repeat the preceding steps to assign mapping setups for all of the maps that you want PeopleSoft
Staffing to use.
Task 16-3-5: Defining Mapping ValuesYou must define the corresponding values for all of the maps that you want PeopleSoft Staffing to use.
To define the corresponding values for the maps:
1. Select Set Up Financials/Supply Chain, Product Related, Staffing, Integration Suppliers, Mapping Values.Mapping Setup Values page appears, as shown in the following example:
Mapping Setup Values page
2. On the Mapping Setup Values page, in the Mapping Setup group box, click the Select button next toeach mapping setup to define the mapping values.The Mapping Setup Values group box allows editing of the sequence number and country for the mappingsetups that you select.
3. Edit the sequence and country.
Copyright © 2013, Oracle and/or its affiliates. All rights reserved. 103
Setting Up PeopleSoft 9.2 Staffing Front Office Chapter 16
4. Click Save.5. Repeat the preceding steps to define mapping values for all of the maps that you want PeopleSoft
Staffing to use.
Note. Before you can use the Resume Parsing feature, you must define the vendor at Set Up Financials/SupplyChain, Product Related, Staffing, Integration Suppliers, Supplier Integration Setup.
For additional information on installation options, supplier setup and mapping configuration, see PeopleSoftFSCM: Staffing Front Office.
104 Copyright © 2013, Oracle and/or its affiliates. All rights reserved.

CHAPTER 17
Integrating PeopleSoft Transaction BillingProcessor with PeopleSoft CustomerRelationship Management
This chapter discusses:
• Understanding PeopleSoft Transaction Billing Processor and PeopleSoft Customer Relationship ManagementIntegration
• Turning On and Activating the Integration Queues
• Turning On and Activating the Integration Services and Routings
• Transforming the Contract Transaction Service
Understanding PeopleSoft Transaction Billing Processor andPeopleSoft Customer Relationship Management Integration
The following instructions detail the process to integrate PeopleSoft 9.2 Transaction Billing Processor (TBP)with the PeopleSoft 9.2 Customer Relationship Management (CRM) database. PeopleSoft Real EstateManagement (REM) also uses PeopleSoft TBP functionality; however, being in the same database does notrequire any additional setup.
Only perform the following tasks if you want to integrate your PeopleSoft FSCM and PeopleSoft CRMdatabases.
Task 17-1: Turning On and Activating the Integration QueuesTo turn on the integration queues (channels):
1. Sign in to PeopleSoft Pure Internet Architecture (PIA).2. Select PeopleTools, Integration Broker, Integration Setup, Queues.3. On the Queues search page, search for and select the queue name CONTRACT.
The Queue Definitions page appears, as shown in the following example:
Copyright © 2013, Oracle and/or its affiliates. All rights reserved. 105
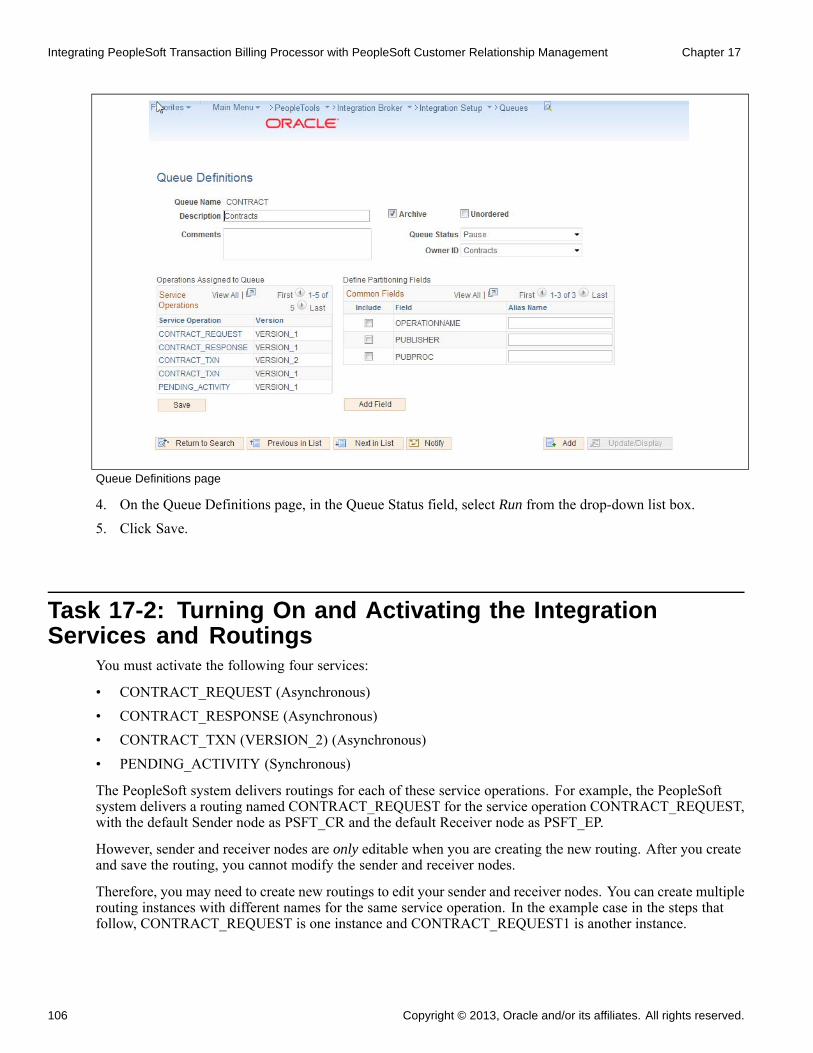
Integrating PeopleSoft Transaction Billing Processor with PeopleSoft Customer Relationship Management Chapter 17
Queue Definitions page
4. On the Queue Definitions page, in the Queue Status field, select Run from the drop-down list box.5. Click Save.
Task 17-2: Turning On and Activating the IntegrationServices and Routings
You must activate the following four services:
• CONTRACT_REQUEST (Asynchronous)• CONTRACT_RESPONSE (Asynchronous)• CONTRACT_TXN (VERSION_2) (Asynchronous)• PENDING_ACTIVITY (Synchronous)
The PeopleSoft system delivers routings for each of these service operations. For example, the PeopleSoftsystem delivers a routing named CONTRACT_REQUEST for the service operation CONTRACT_REQUEST,with the default Sender node as PSFT_CR and the default Receiver node as PSFT_EP.
However, sender and receiver nodes are only editable when you are creating the new routing. After you createand save the routing, you cannot modify the sender and receiver nodes.
Therefore, you may need to create new routings to edit your sender and receiver nodes. You can create multiplerouting instances with different names for the same service operation. In the example case in the steps thatfollow, CONTRACT_REQUEST is one instance and CONTRACT_REQUEST1 is another instance.
106 Copyright © 2013, Oracle and/or its affiliates. All rights reserved.
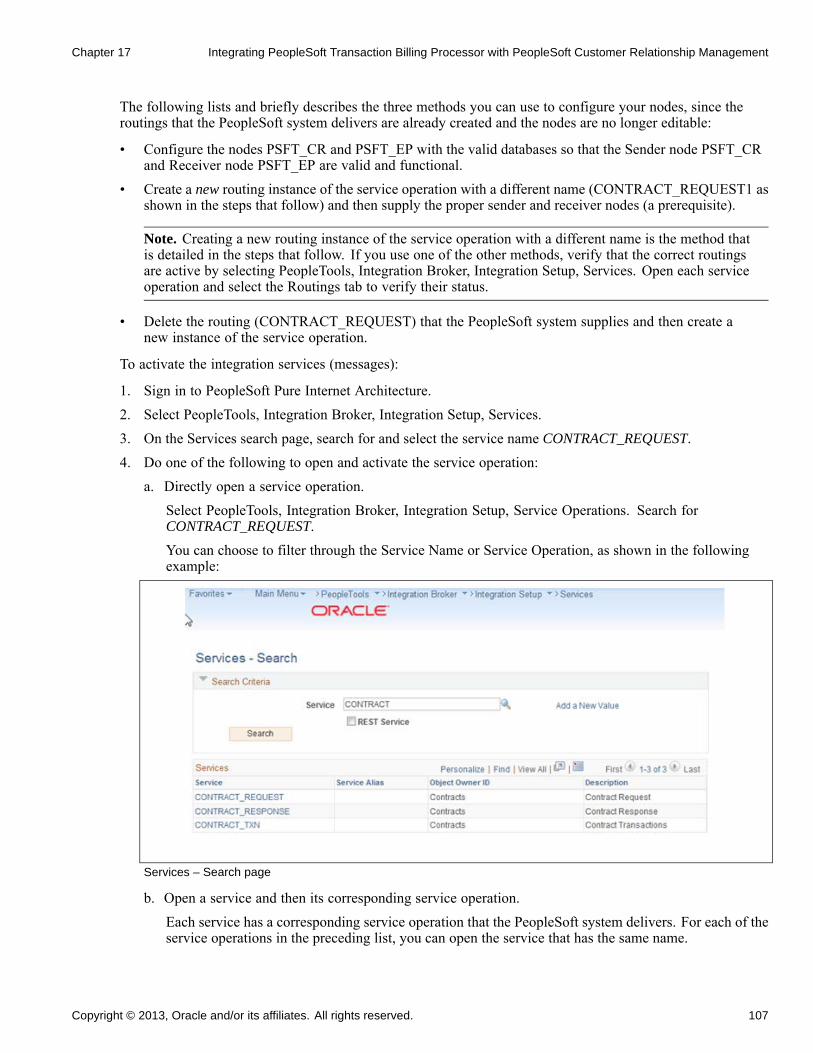
Chapter 17 Integrating PeopleSoft Transaction Billing Processor with PeopleSoft Customer Relationship Management
The following lists and briefly describes the three methods you can use to configure your nodes, since theroutings that the PeopleSoft system delivers are already created and the nodes are no longer editable:
• Configure the nodes PSFT_CR and PSFT_EP with the valid databases so that the Sender node PSFT_CRand Receiver node PSFT_EP are valid and functional.
• Create a new routing instance of the service operation with a different name (CONTRACT_REQUEST1 asshown in the steps that follow) and then supply the proper sender and receiver nodes (a prerequisite).
Note. Creating a new routing instance of the service operation with a different name is the method thatis detailed in the steps that follow. If you use one of the other methods, verify that the correct routingsare active by selecting PeopleTools, Integration Broker, Integration Setup, Services. Open each serviceoperation and select the Routings tab to verify their status.
• Delete the routing (CONTRACT_REQUEST) that the PeopleSoft system supplies and then create anew instance of the service operation.
To activate the integration services (messages):
1. Sign in to PeopleSoft Pure Internet Architecture.2. Select PeopleTools, Integration Broker, Integration Setup, Services.3. On the Services search page, search for and select the service name CONTRACT_REQUEST.4. Do one of the following to open and activate the service operation:
a. Directly open a service operation.Select PeopleTools, Integration Broker, Integration Setup, Service Operations. Search forCONTRACT_REQUEST.You can choose to filter through the Service Name or Service Operation, as shown in the followingexample:
Services – Search page
b. Open a service and then its corresponding service operation.Each service has a corresponding service operation that the PeopleSoft system delivers. For each of theservice operations in the preceding list, you can open the service that has the same name.
Copyright © 2013, Oracle and/or its affiliates. All rights reserved. 107
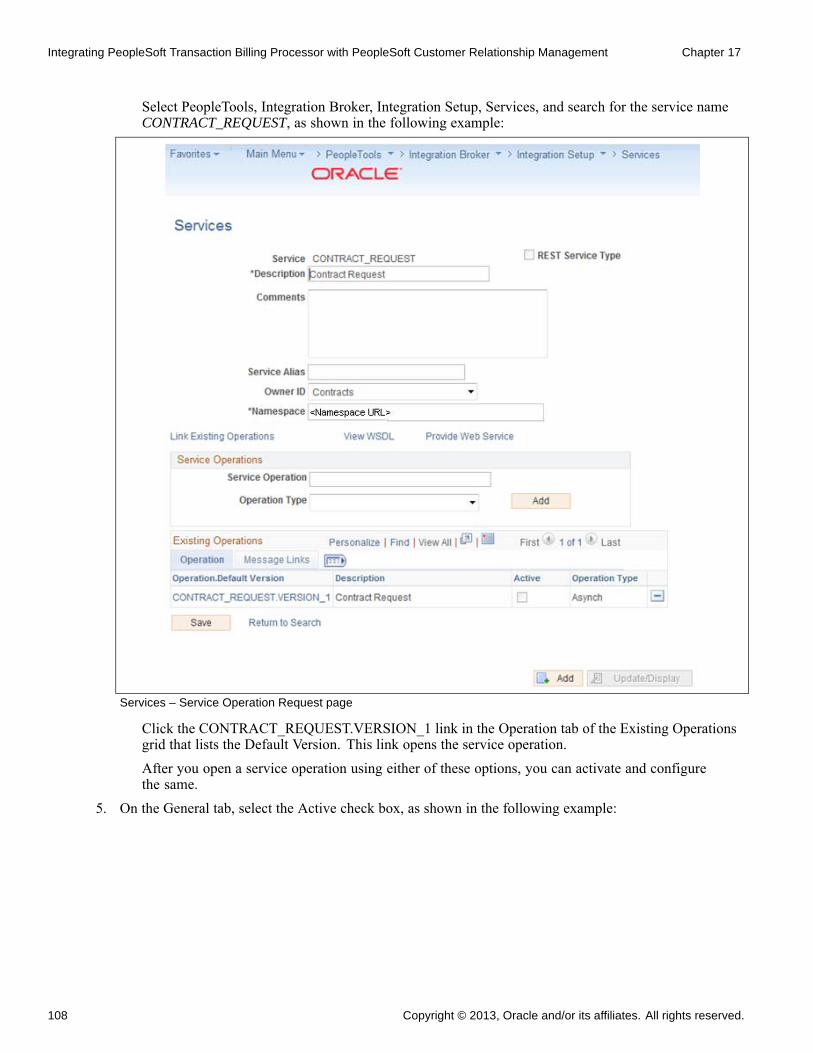
Integrating PeopleSoft Transaction Billing Processor with PeopleSoft Customer Relationship Management Chapter 17
Select PeopleTools, Integration Broker, Integration Setup, Services, and search for the service nameCONTRACT_REQUEST, as shown in the following example:
Services – Service Operation Request page
Click the CONTRACT_REQUEST.VERSION_1 link in the Operation tab of the Existing Operationsgrid that lists the Default Version. This link opens the service operation.
After you open a service operation using either of these options, you can activate and configurethe same.
5. On the General tab, select the Active check box, as shown in the following example:
108 Copyright © 2013, Oracle and/or its affiliates. All rights reserved.

Chapter 17 Integrating PeopleSoft Transaction Billing Processor with PeopleSoft Customer Relationship Management
Service Operation page: General tab
6. Click Save.7. Select the Handlers tab to access the Handlers page.8. On the Handlers page, if there are any handlers, select Active from the Status drop-down list box.
In the example that follows, the status is set to Active for the handler name ContractRequest.
Note. CONTRACT_REQUEST and CONTRACT_TXN have handlers defined in PeopleSoft FSCM forContracts.
Copyright © 2013, Oracle and/or its affiliates. All rights reserved. 109

Integrating PeopleSoft Transaction Billing Processor with PeopleSoft Customer Relationship Management Chapter 17
Service Operation page: Handlers tab
9. Select the Routings tab to access the Routings page.10. On the Routings page, in the Routing Name field, enter a value such as CONTRACT_REQUEST1.11. Click the Add (+) button to add the new routing.
The Routing Definitions page for the routing CONTRACT_REQUEST1 appears, as shown in thefollowing example:
110 Copyright © 2013, Oracle and/or its affiliates. All rights reserved.
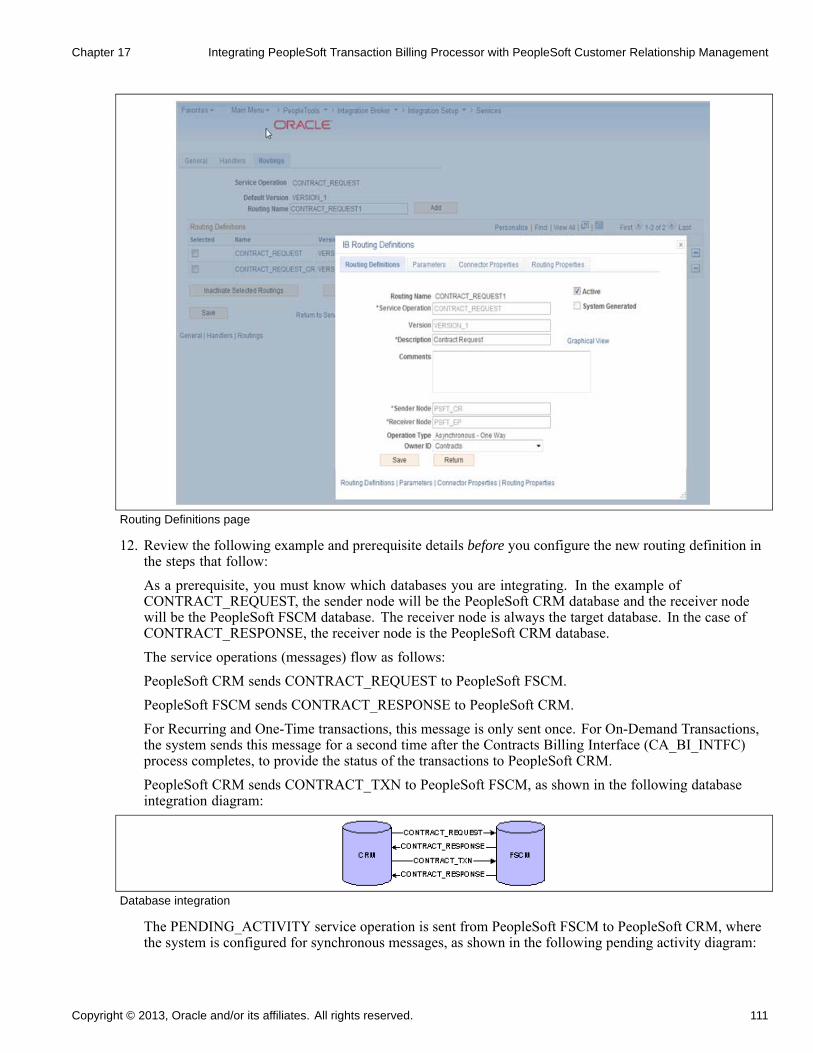
Chapter 17 Integrating PeopleSoft Transaction Billing Processor with PeopleSoft Customer Relationship Management
Routing Definitions page
12. Review the following example and prerequisite details before you configure the new routing definition inthe steps that follow:As a prerequisite, you must know which databases you are integrating. In the example ofCONTRACT_REQUEST, the sender node will be the PeopleSoft CRM database and the receiver nodewill be the PeopleSoft FSCM database. The receiver node is always the target database. In the case ofCONTRACT_RESPONSE, the receiver node is the PeopleSoft CRM database.The service operations (messages) flow as follows:PeopleSoft CRM sends CONTRACT_REQUEST to PeopleSoft FSCM.PeopleSoft FSCM sends CONTRACT_RESPONSE to PeopleSoft CRM.For Recurring and One-Time transactions, this message is only sent once. For On-Demand Transactions,the system sends this message for a second time after the Contracts Billing Interface (CA_BI_INTFC)process completes, to provide the status of the transactions to PeopleSoft CRM.PeopleSoft CRM sends CONTRACT_TXN to PeopleSoft FSCM, as shown in the following databaseintegration diagram:
Database integration
The PENDING_ACTIVITY service operation is sent from PeopleSoft FSCM to PeopleSoft CRM, wherethe system is configured for synchronous messages, as shown in the following pending activity diagram:
Copyright © 2013, Oracle and/or its affiliates. All rights reserved. 111
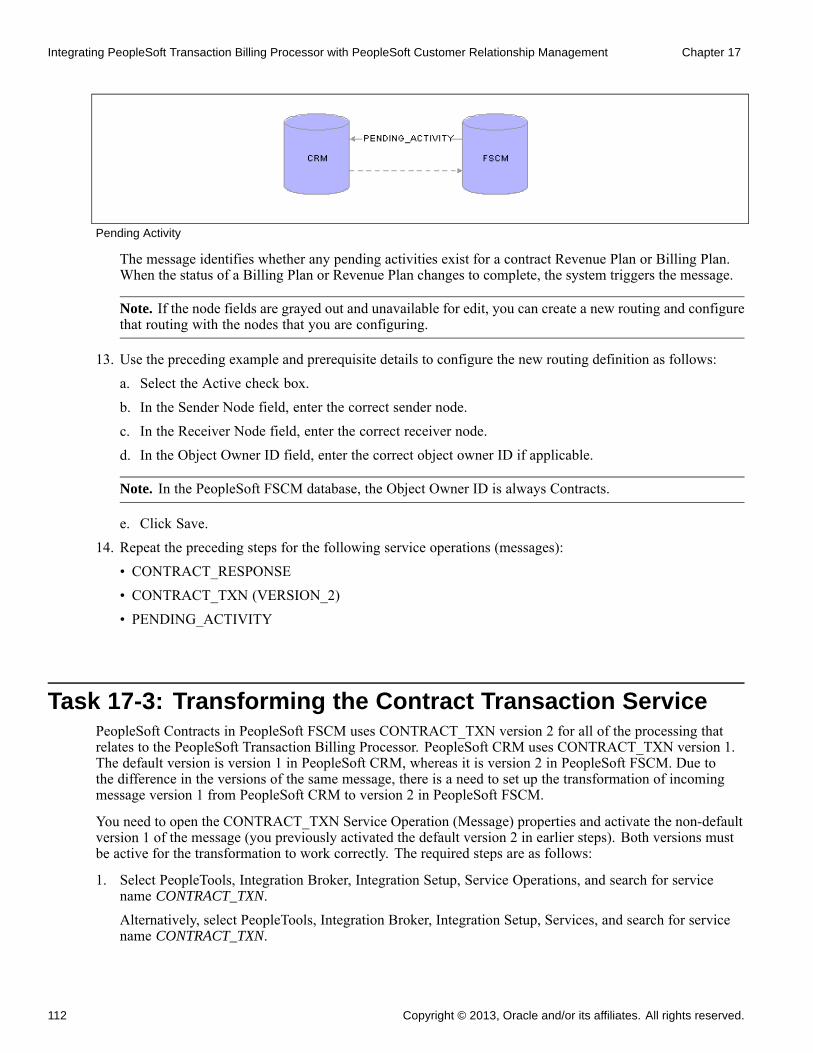
Integrating PeopleSoft Transaction Billing Processor with PeopleSoft Customer Relationship Management Chapter 17
Pending Activity
The message identifies whether any pending activities exist for a contract Revenue Plan or Billing Plan.When the status of a Billing Plan or Revenue Plan changes to complete, the system triggers the message.
Note. If the node fields are grayed out and unavailable for edit, you can create a new routing and configurethat routing with the nodes that you are configuring.
13. Use the preceding example and prerequisite details to configure the new routing definition as follows:
a. Select the Active check box.
b. In the Sender Node field, enter the correct sender node.
c. In the Receiver Node field, enter the correct receiver node.
d. In the Object Owner ID field, enter the correct object owner ID if applicable.
Note. In the PeopleSoft FSCM database, the Object Owner ID is always Contracts.
e. Click Save.14. Repeat the preceding steps for the following service operations (messages):
• CONTRACT_RESPONSE• CONTRACT_TXN (VERSION_2)• PENDING_ACTIVITY
Task 17-3: Transforming the Contract Transaction ServicePeopleSoft Contracts in PeopleSoft FSCM uses CONTRACT_TXN version 2 for all of the processing thatrelates to the PeopleSoft Transaction Billing Processor. PeopleSoft CRM uses CONTRACT_TXN version 1.The default version is version 1 in PeopleSoft CRM, whereas it is version 2 in PeopleSoft FSCM. Due tothe difference in the versions of the same message, there is a need to set up the transformation of incomingmessage version 1 from PeopleSoft CRM to version 2 in PeopleSoft FSCM.
You need to open the CONTRACT_TXN Service Operation (Message) properties and activate the non-defaultversion 1 of the message (you previously activated the default version 2 in earlier steps). Both versions mustbe active for the transformation to work correctly. The required steps are as follows:
1. Select PeopleTools, Integration Broker, Integration Setup, Service Operations, and search for servicename CONTRACT_TXN.Alternatively, select PeopleTools, Integration Broker, Integration Setup, Services, and search for servicename CONTRACT_TXN.
112 Copyright © 2013, Oracle and/or its affiliates. All rights reserved.
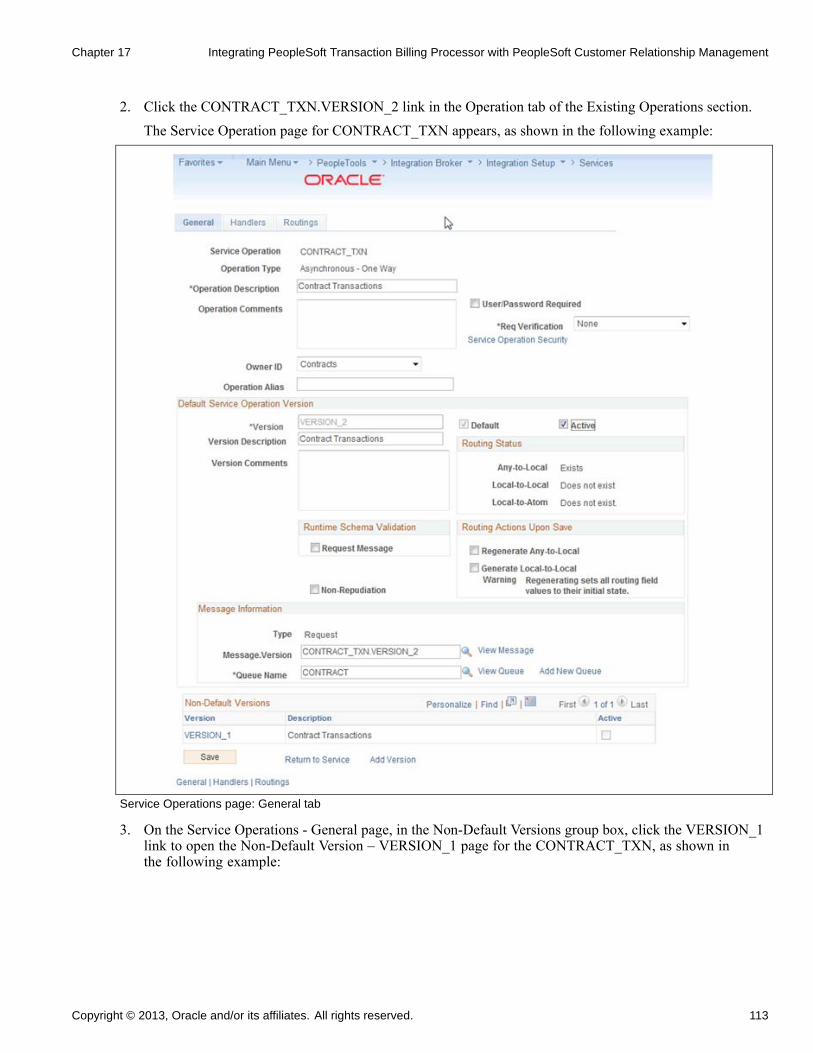
Chapter 17 Integrating PeopleSoft Transaction Billing Processor with PeopleSoft Customer Relationship Management
2. Click the CONTRACT_TXN.VERSION_2 link in the Operation tab of the Existing Operations section.The Service Operation page for CONTRACT_TXN appears, as shown in the following example:
Service Operations page: General tab
3. On the Service Operations - General page, in the Non-Default Versions group box, click the VERSION_1link to open the Non-Default Version – VERSION_1 page for the CONTRACT_TXN, as shown inthe following example:
Copyright © 2013, Oracle and/or its affiliates. All rights reserved. 113
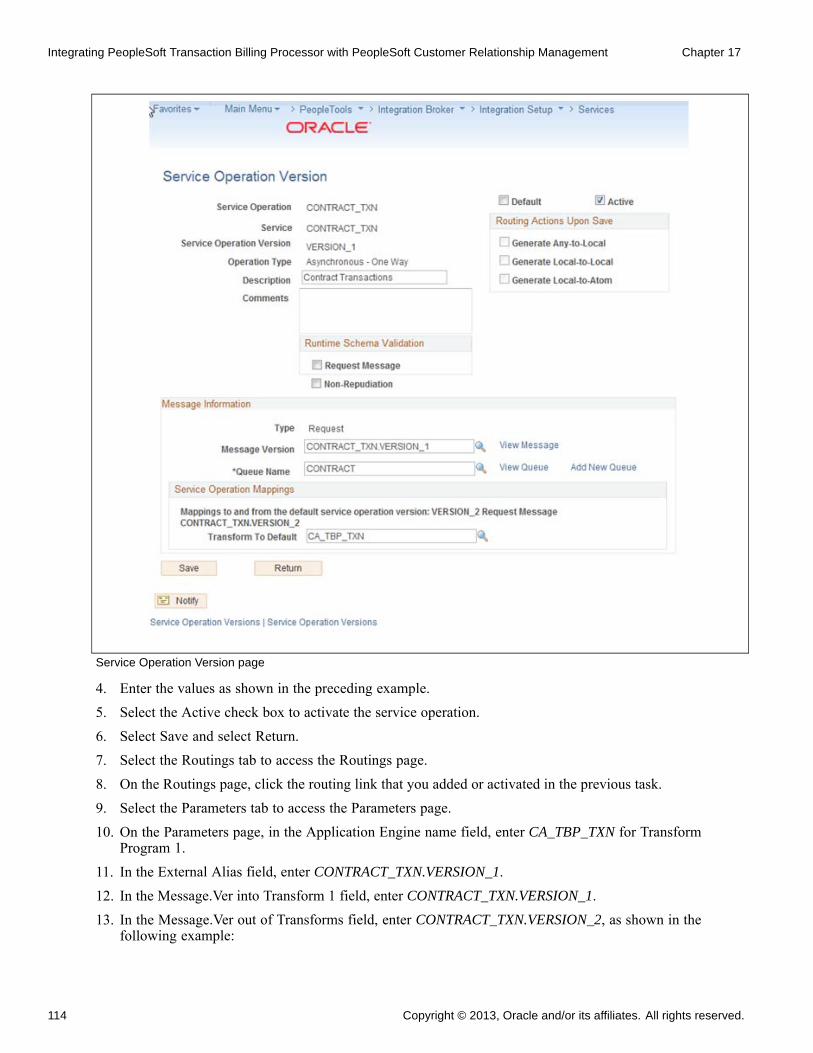
Integrating PeopleSoft Transaction Billing Processor with PeopleSoft Customer Relationship Management Chapter 17
Service Operation Version page
4. Enter the values as shown in the preceding example.
5. Select the Active check box to activate the service operation.
6. Select Save and select Return.
7. Select the Routings tab to access the Routings page.
8. On the Routings page, click the routing link that you added or activated in the previous task.
9. Select the Parameters tab to access the Parameters page.
10. On the Parameters page, in the Application Engine name field, enter CA_TBP_TXN for TransformProgram 1.
11. In the External Alias field, enter CONTRACT_TXN.VERSION_1.
12. In the Message.Ver into Transform 1 field, enter CONTRACT_TXN.VERSION_1.
13. In the Message.Ver out of Transforms field, enter CONTRACT_TXN.VERSION_2, as shown in thefollowing example:
114 Copyright © 2013, Oracle and/or its affiliates. All rights reserved.

Chapter 17 Integrating PeopleSoft Transaction Billing Processor with PeopleSoft Customer Relationship Management
IB Routings Definitions page: Parameters tab
14. Click Save.15. Clear the Application Server and Web Server cache before you use the system.
Note. The installation of PeopleSoft Transaction Billing Processor 9.2 for PeopleSoft FMS is now complete.
See Also
PeopleSoft CRM: Services Foundation "Setting Up an Integration to the Transaction Billing Processor"
Copyright © 2013, Oracle and/or its affiliates. All rights reserved. 115

Integrating PeopleSoft Transaction Billing Processor with PeopleSoft Customer Relationship Management Chapter 17
116 Copyright © 2013, Oracle and/or its affiliates. All rights reserved.
CHAPTER 18
Installing PeopleSoft 9.2 MaintenanceManagement with Microsoft Project 2007/2010
This chapter discusses:
• Prerequisites
• Installing the PeopleSoft PeopleTools Process Scheduler on a Microsoft Windows Machine
• Installing Microsoft Project 2007/2010
• Configuring the Microsoft Project Integration Process
PrerequisitesThis chapter elaborates the installation to integrate PeopleSoft Maintenance Management with MicrosoftProject 2007 or Microsoft Project 2010. The integration software requires that you previously install andconfigure the following items:
• A process scheduler server set up on a Microsoft Windows machine to run against the PeopleSoft 9.2Maintenance Management database.The integration with Microsoft Project 2007 or Microsoft Project 2010 uses a PeopleSoft ProcessScheduler server to communicate with the Microsoft Project.
• Install the Microsoft Project 2007 or Microsoft Project 2010 software on the PeopleSoft Process Schedulerserver.
Important! It is important that you carry out the tasks in this chapter in the order given.
Task 18-1: Installing the PeopleSoft PeopleTools ProcessScheduler on a Microsoft Windows Machine
Follow the standard installation instruction to install PeopleSoft PeopleTools on a Microsoft Windowsmachine, and then configure that machine as a process scheduler to connect to the PeopleSoft 9.2 FSCMdatabase where the PeopleSoft Maintenance Management product resides.
Copyright © 2013, Oracle and/or its affiliates. All rights reserved. 117
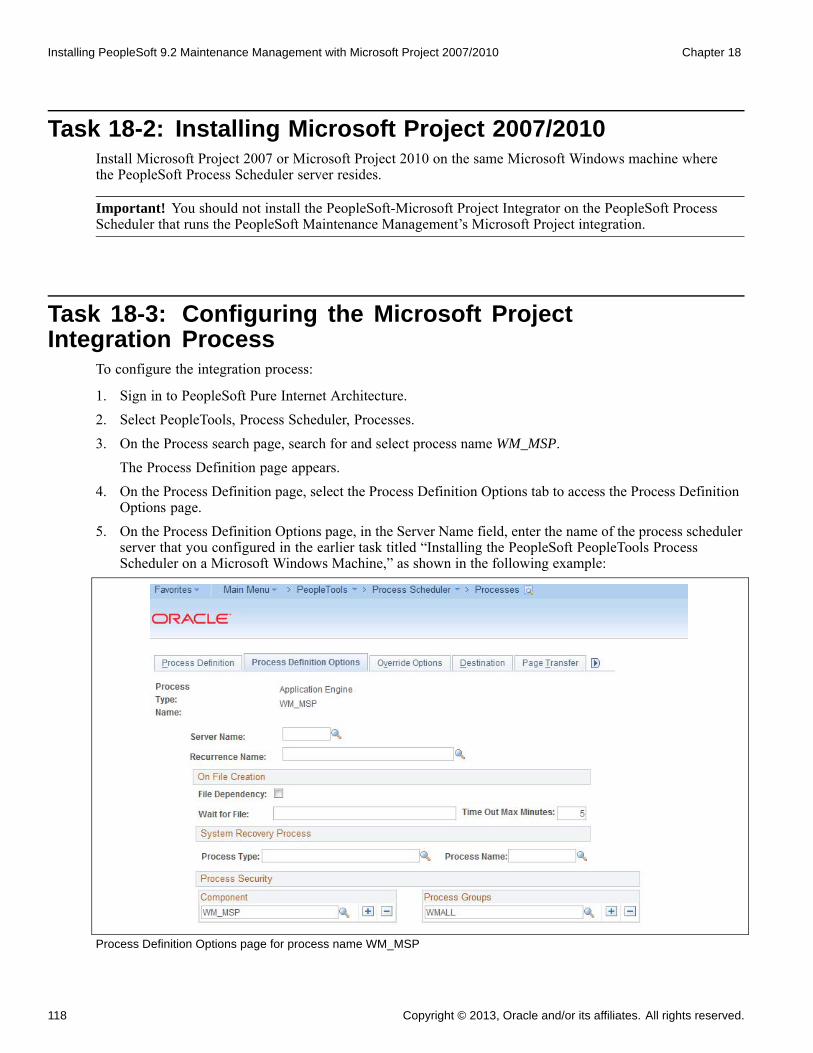
Installing PeopleSoft 9.2 Maintenance Management with Microsoft Project 2007/2010 Chapter 18
Task 18-2: Installing Microsoft Project 2007/2010Install Microsoft Project 2007 or Microsoft Project 2010 on the same Microsoft Windows machine wherethe PeopleSoft Process Scheduler server resides.
Important! You should not install the PeopleSoft-Microsoft Project Integrator on the PeopleSoft ProcessScheduler that runs the PeopleSoft Maintenance Management’s Microsoft Project integration.
Task 18-3: Configuring the Microsoft ProjectIntegration Process
To configure the integration process:
1. Sign in to PeopleSoft Pure Internet Architecture.2. Select PeopleTools, Process Scheduler, Processes.3. On the Process search page, search for and select process name WM_MSP.
The Process Definition page appears.4. On the Process Definition page, select the Process Definition Options tab to access the Process Definition
Options page.5. On the Process Definition Options page, in the Server Name field, enter the name of the process scheduler
server that you configured in the earlier task titled “Installing the PeopleSoft PeopleTools ProcessScheduler on a Microsoft Windows Machine,” as shown in the following example:
Process Definition Options page for process name WM_MSP
118 Copyright © 2013, Oracle and/or its affiliates. All rights reserved.
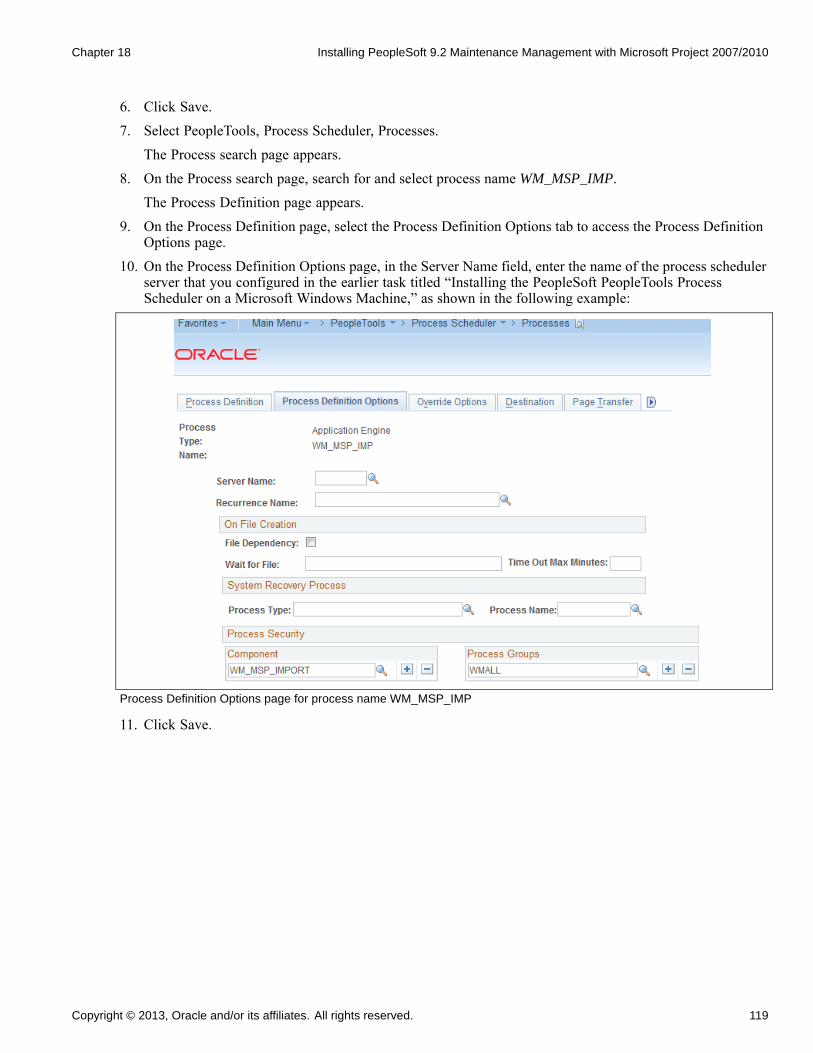
Chapter 18 Installing PeopleSoft 9.2 Maintenance Management with Microsoft Project 2007/2010
6. Click Save.7. Select PeopleTools, Process Scheduler, Processes.
The Process search page appears.8. On the Process search page, search for and select process name WM_MSP_IMP.
The Process Definition page appears.9. On the Process Definition page, select the Process Definition Options tab to access the Process Definition
Options page.10. On the Process Definition Options page, in the Server Name field, enter the name of the process scheduler
server that you configured in the earlier task titled “Installing the PeopleSoft PeopleTools ProcessScheduler on a Microsoft Windows Machine,” as shown in the following example:
Process Definition Options page for process name WM_MSP_IMP
11. Click Save.
Copyright © 2013, Oracle and/or its affiliates. All rights reserved. 119

Installing PeopleSoft 9.2 Maintenance Management with Microsoft Project 2007/2010 Chapter 18
120 Copyright © 2013, Oracle and/or its affiliates. All rights reserved.
CHAPTER 19
Installing PeopleSoft Maintenance Management9.2 Work Order Attachment Print
This chapter discusses:
• Understanding PeopleSoft Work Order Attachment Print
• Prerequisites
• Verifying the URLs and the Installation Location
• Enabling the PeopleSoft Work Order Attachment Print Features
Understanding PeopleSoft Work Order Attachment PrintPeopleSoft Maintenance Management Work Order Attachment Print utilizes the printing capabilities of manyadditional component (third-party) applications that support printing files from a command-line interface. Avariety of documents that are created using Microsoft Office, such as Microsoft Word, Microsoft PowerPoint,Microsoft Excel, as well as other types of documents such as PDF, TXT, JPEG, GIF and BMP can be printeddepending on the chosen additional component application.
PrerequisitesEnsure that you meet the following requirements:
• You have installed an additional component application that allows you to print a list of files of varioustypes to a network printer from a single command-line interface.
• You have installed the additional component application on the PeopleSoft Process Scheduler serverthat you use to print Work Order Attachments.This should be the same process scheduler server that you currently use to print the Work Order TaskDetails report.
• You are running PeopleSoft PeopleTools 8.53.02 or higher.
Note. An instance of the additional component application cannot be running in memory on the server, exceptas managed by the PeopleSoft Work Order Attachment Print process.
If the additional component application is provided with a quick-start utility, that utility will typically needto be disabled on the server.
Copyright © 2013, Oracle and/or its affiliates. All rights reserved. 121
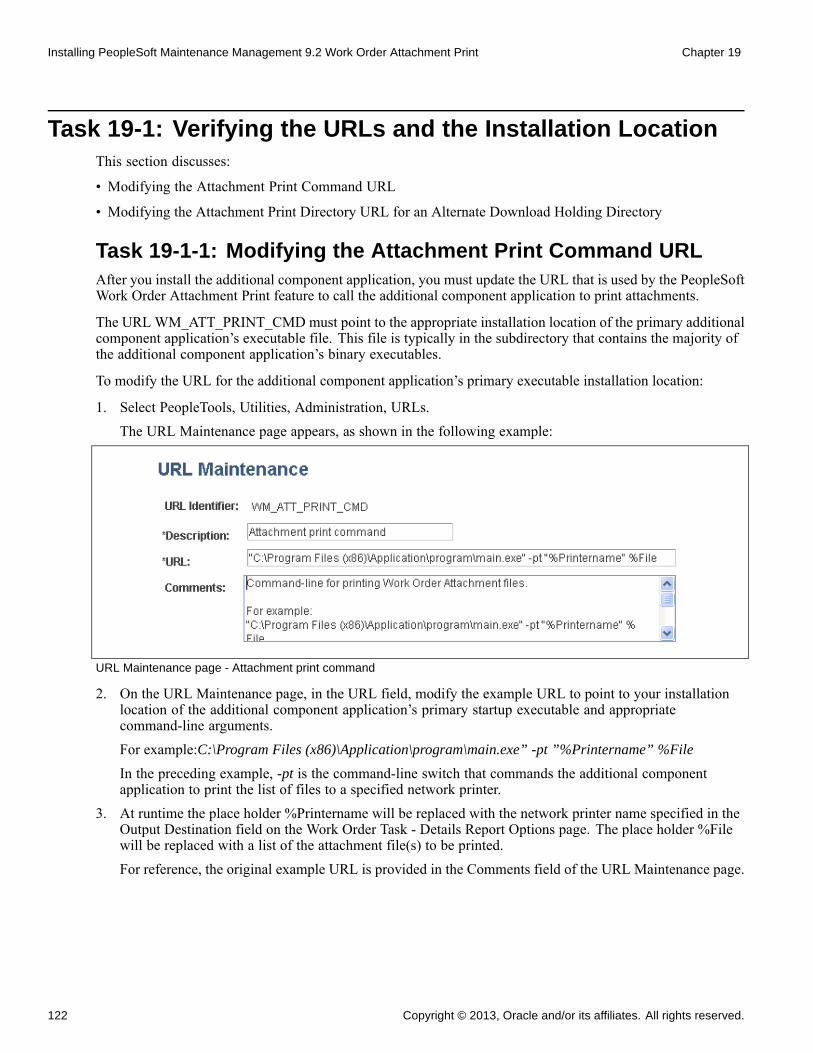
Installing PeopleSoft Maintenance Management 9.2 Work Order Attachment Print Chapter 19
Task 19-1: Verifying the URLs and the Installation LocationThis section discusses:
• Modifying the Attachment Print Command URL
• Modifying the Attachment Print Directory URL for an Alternate Download Holding Directory
Task 19-1-1: Modifying the Attachment Print Command URLAfter you install the additional component application, you must update the URL that is used by the PeopleSoftWork Order Attachment Print feature to call the additional component application to print attachments.
The URL WM_ATT_PRINT_CMD must point to the appropriate installation location of the primary additionalcomponent application’s executable file. This file is typically in the subdirectory that contains the majority ofthe additional component application’s binary executables.
To modify the URL for the additional component application’s primary executable installation location:
1. Select PeopleTools, Utilities, Administration, URLs.The URL Maintenance page appears, as shown in the following example:
URL Maintenance page - Attachment print command
2. On the URL Maintenance page, in the URL field, modify the example URL to point to your installationlocation of the additional component application’s primary startup executable and appropriatecommand-line arguments.For example:C:\Program Files (x86)\Application\program\main.exe” -pt ”%Printername” %File
In the preceding example, -pt is the command-line switch that commands the additional componentapplication to print the list of files to a specified network printer.
3. At runtime the place holder %Printername will be replaced with the network printer name specified in theOutput Destination field on the Work Order Task - Details Report Options page. The place holder %Filewill be replaced with a list of the attachment file(s) to be printed.For reference, the original example URL is provided in the Comments field of the URL Maintenance page.
122 Copyright © 2013, Oracle and/or its affiliates. All rights reserved.
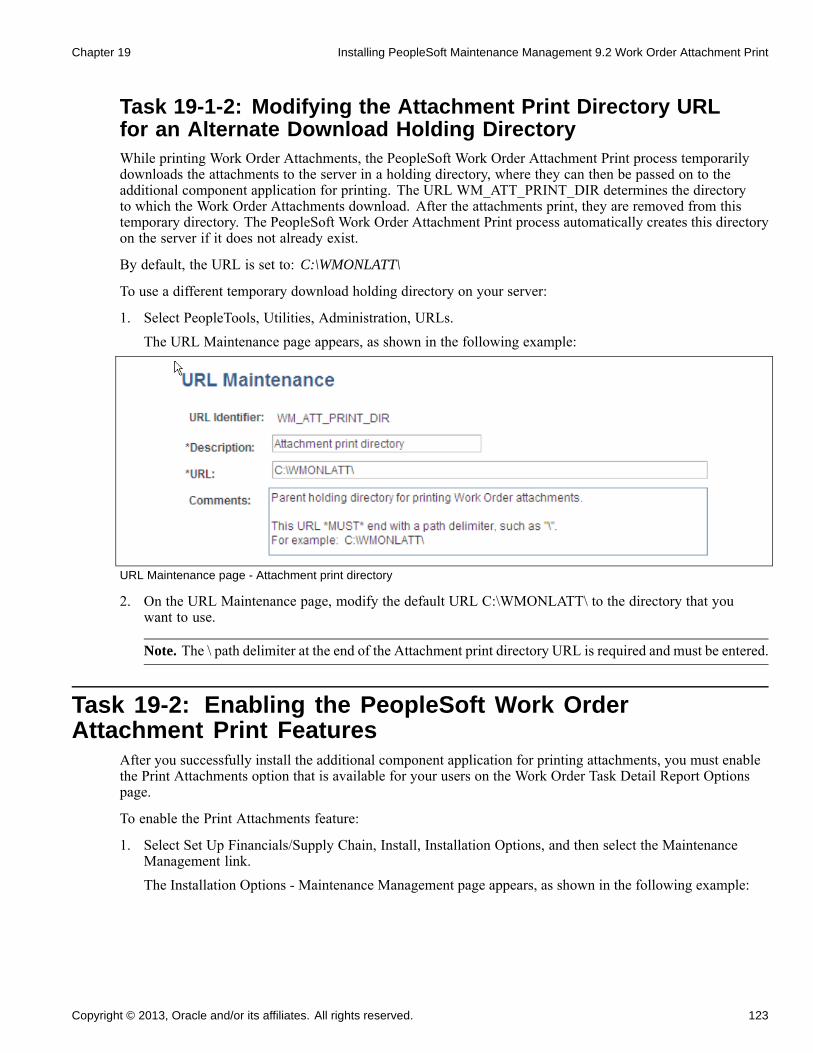
Chapter 19 Installing PeopleSoft Maintenance Management 9.2 Work Order Attachment Print
Task 19-1-2: Modifying the Attachment Print Directory URLfor an Alternate Download Holding DirectoryWhile printing Work Order Attachments, the PeopleSoft Work Order Attachment Print process temporarilydownloads the attachments to the server in a holding directory, where they can then be passed on to theadditional component application for printing. The URL WM_ATT_PRINT_DIR determines the directoryto which the Work Order Attachments download. After the attachments print, they are removed from thistemporary directory. The PeopleSoft Work Order Attachment Print process automatically creates this directoryon the server if it does not already exist.
By default, the URL is set to: C:\WMONLATT\
To use a different temporary download holding directory on your server:
1. Select PeopleTools, Utilities, Administration, URLs.The URL Maintenance page appears, as shown in the following example:
URL Maintenance page - Attachment print directory
2. On the URL Maintenance page, modify the default URL C:\WMONLATT\ to the directory that youwant to use.
Note. The \ path delimiter at the end of the Attachment print directory URL is required and must be entered.
Task 19-2: Enabling the PeopleSoft Work OrderAttachment Print Features
After you successfully install the additional component application for printing attachments, you must enablethe Print Attachments option that is available for your users on the Work Order Task Detail Report Optionspage.
To enable the Print Attachments feature:
1. Select Set Up Financials/Supply Chain, Install, Installation Options, and then select the MaintenanceManagement link.The Installation Options - Maintenance Management page appears, as shown in the following example:
Copyright © 2013, Oracle and/or its affiliates. All rights reserved. 123
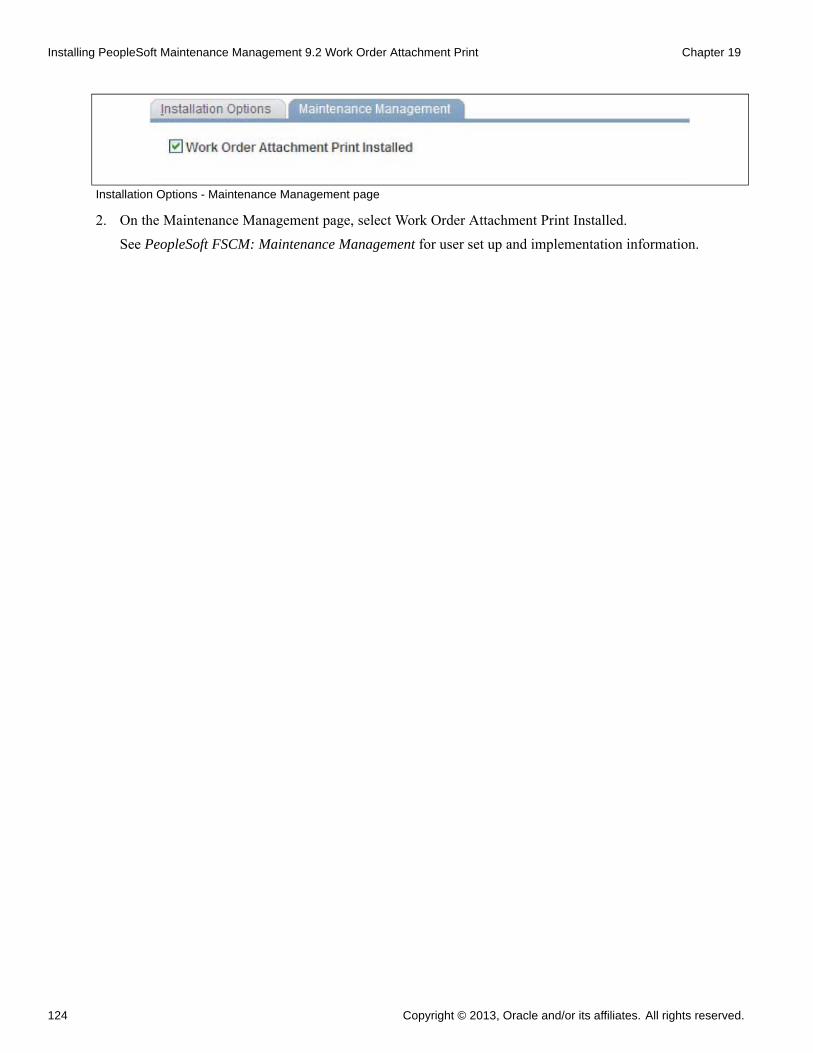
Installing PeopleSoft Maintenance Management 9.2 Work Order Attachment Print Chapter 19
Installation Options - Maintenance Management page
2. On the Maintenance Management page, select Work Order Attachment Print Installed.See PeopleSoft FSCM: Maintenance Management for user set up and implementation information.
124 Copyright © 2013, Oracle and/or its affiliates. All rights reserved.
CHAPTER 20
Integrating PeopleSoft 9.2 Asset Managementand Physical Inventory Solutions
This chapter discusses:
• Understanding the Integration of PeopleSoft 9.2 Asset Management with Physical Inventory Using Web Services.
• Configuring the Local Gateway
• Configuring the Inbound Nodes
• Activating Service Operations
• Running Message Channel
• Activating the Domain for Asynchronous Messaging
Understanding the Integration of PeopleSoft 9.2 AssetManagement with Physical Inventory Using Web Services.
PeopleSoft 9.2 Asset Management integrates with additional component (third-party) Physical InventorySolutions to provide the following functionality:
• Publish lists of assets in asset repository that need to undergo the physical inventory process.• Upload results of the physical inventory into asset repository.
Note. In prior PeopleSoft releases, this feature is only available using flat files. If you do not implement thePhysical Inventory feature, or you implement using flat files, the tasks in this chapter are optional.
Task 20-1: Configuring the Local GatewayTo configure the local gateway:
1. Select PeopleTools, Integration Broker, Configuration, Gateways.The Gateways search page appears.
2. On the Gateways search page, click Search.The Local Gateway page appears, as shown in the following example:
Copyright © 2013, Oracle and/or its affiliates. All rights reserved. 125

Integrating PeopleSoft 9.2 Asset Management and Physical Inventory Solutions Chapter 20
Gateways page
3. On the Gateways page for the Local Gateway, in the URL field, enter the URL as follows:
http://<WEBSRV:PORT>/PSIGW/PeopleSoftListeningConnector
4. Click Save.
5. Click the Load Gateway Connectors button.
This ensures that all of the existing connectors install on the gateway.
6. Click Save.
This completes the installation of the Connectors.
Task 20-2: Configuring the Inbound NodesTo configure the inbound nodes:
1. Select PeopleTools, Integration Broker, Integration Setup, Nodes.2. On the Nodes search page, search for and select the node name PSFT_XINBND.
The Node Definitions page for the PSFT_XINBND node appears, as shown in the following example:
126 Copyright © 2013, Oracle and/or its affiliates. All rights reserved.
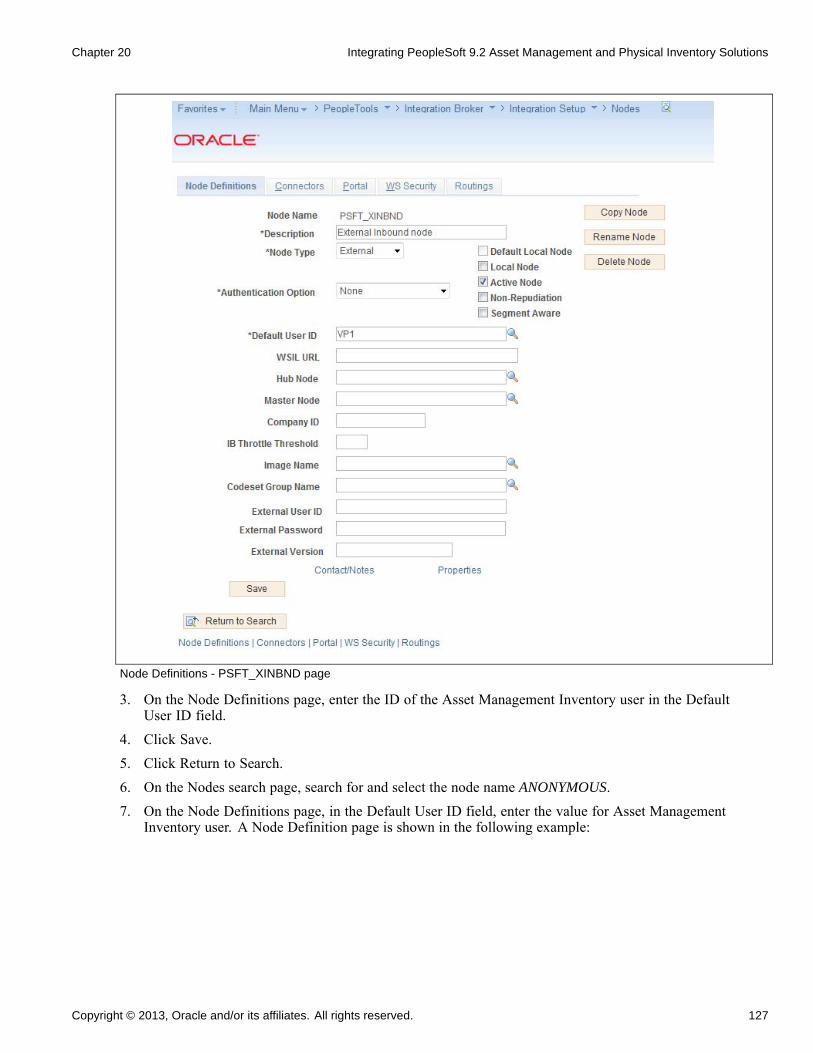
Chapter 20 Integrating PeopleSoft 9.2 Asset Management and Physical Inventory Solutions
Node Definitions - PSFT_XINBND page
3. On the Node Definitions page, enter the ID of the Asset Management Inventory user in the DefaultUser ID field.
4. Click Save.5. Click Return to Search.6. On the Nodes search page, search for and select the node name ANONYMOUS.7. On the Node Definitions page, in the Default User ID field, enter the value for Asset Management
Inventory user. A Node Definition page is shown in the following example:
Copyright © 2013, Oracle and/or its affiliates. All rights reserved. 127
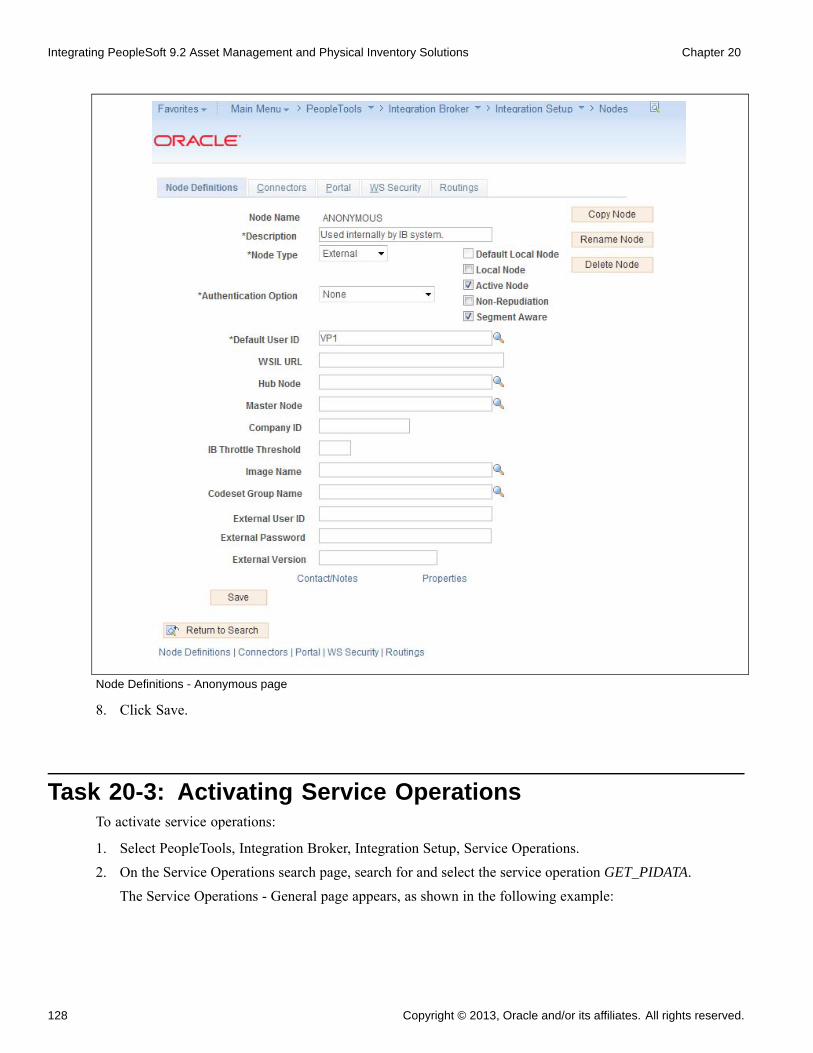
Integrating PeopleSoft 9.2 Asset Management and Physical Inventory Solutions Chapter 20
Node Definitions - Anonymous page
8. Click Save.
Task 20-3: Activating Service OperationsTo activate service operations:
1. Select PeopleTools, Integration Broker, Integration Setup, Service Operations.
2. On the Service Operations search page, search for and select the service operation GET_PIDATA.
The Service Operations - General page appears, as shown in the following example:
128 Copyright © 2013, Oracle and/or its affiliates. All rights reserved.
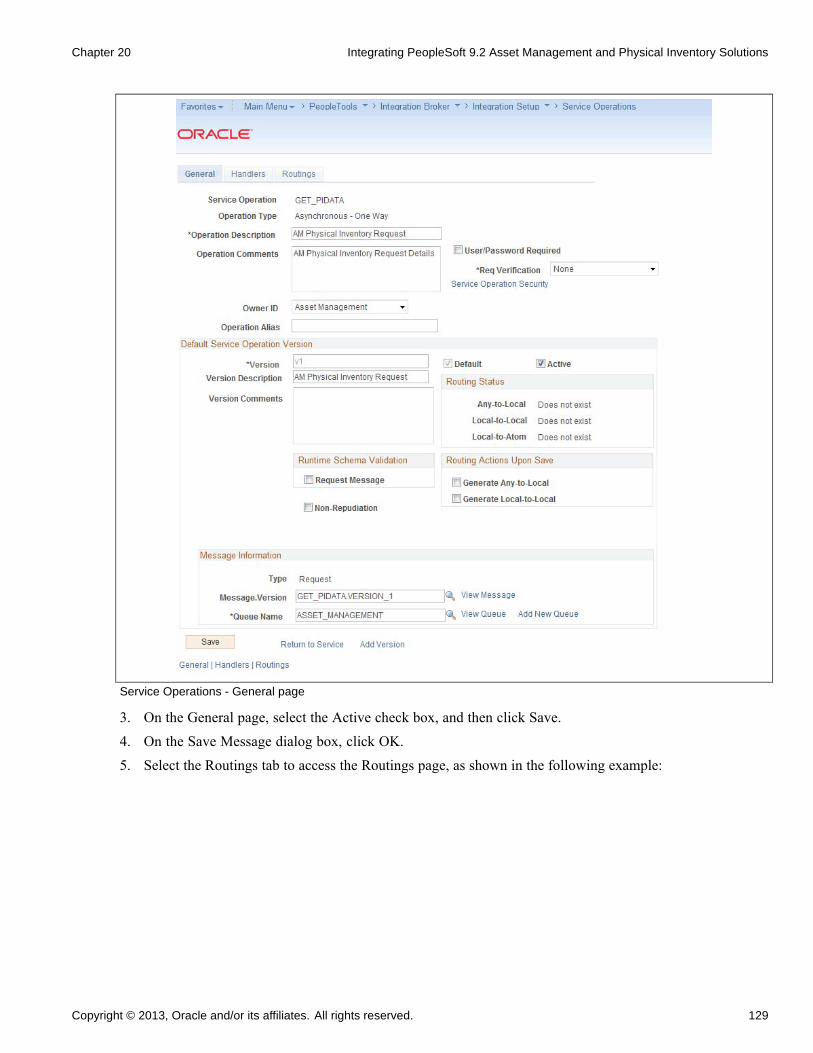
Chapter 20 Integrating PeopleSoft 9.2 Asset Management and Physical Inventory Solutions
Service Operations - General page
3. On the General page, select the Active check box, and then click Save.4. On the Save Message dialog box, click OK.5. Select the Routings tab to access the Routings page, as shown in the following example:
Copyright © 2013, Oracle and/or its affiliates. All rights reserved. 129
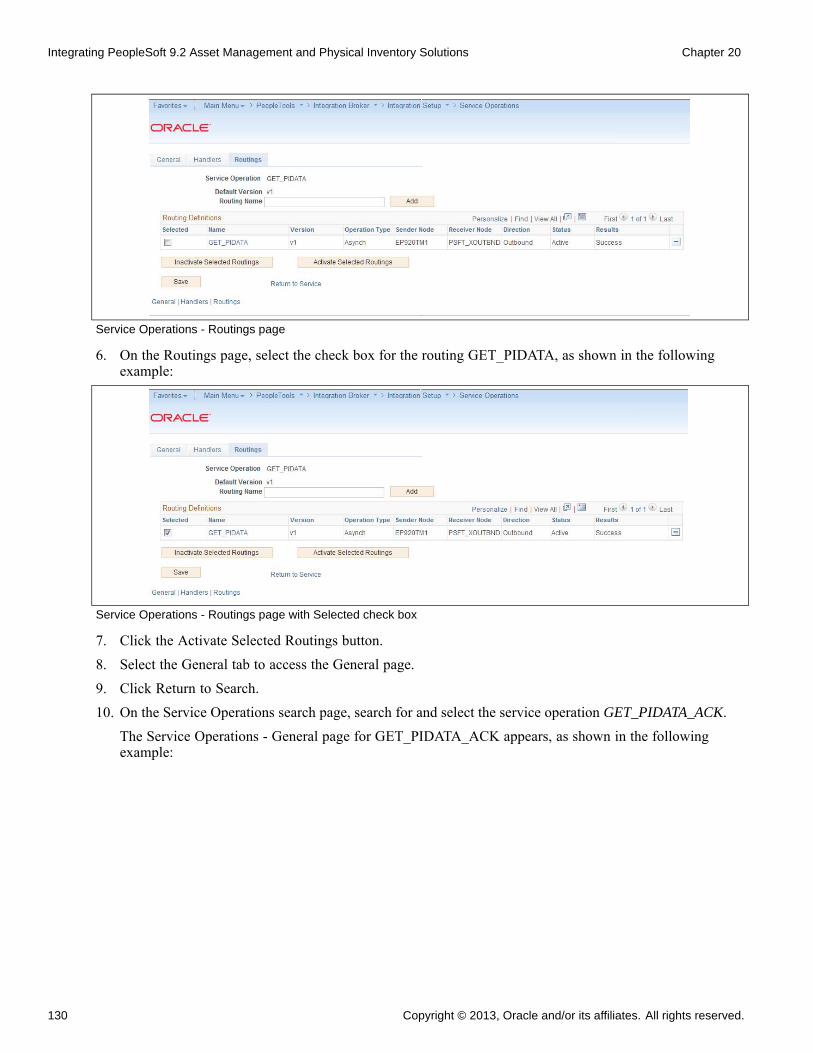
Integrating PeopleSoft 9.2 Asset Management and Physical Inventory Solutions Chapter 20
Service Operations - Routings page
6. On the Routings page, select the check box for the routing GET_PIDATA, as shown in the followingexample:
Service Operations - Routings page with Selected check box
7. Click the Activate Selected Routings button.
8. Select the General tab to access the General page.
9. Click Return to Search.
10. On the Service Operations search page, search for and select the service operation GET_PIDATA_ACK.
The Service Operations - General page for GET_PIDATA_ACK appears, as shown in the followingexample:
130 Copyright © 2013, Oracle and/or its affiliates. All rights reserved.
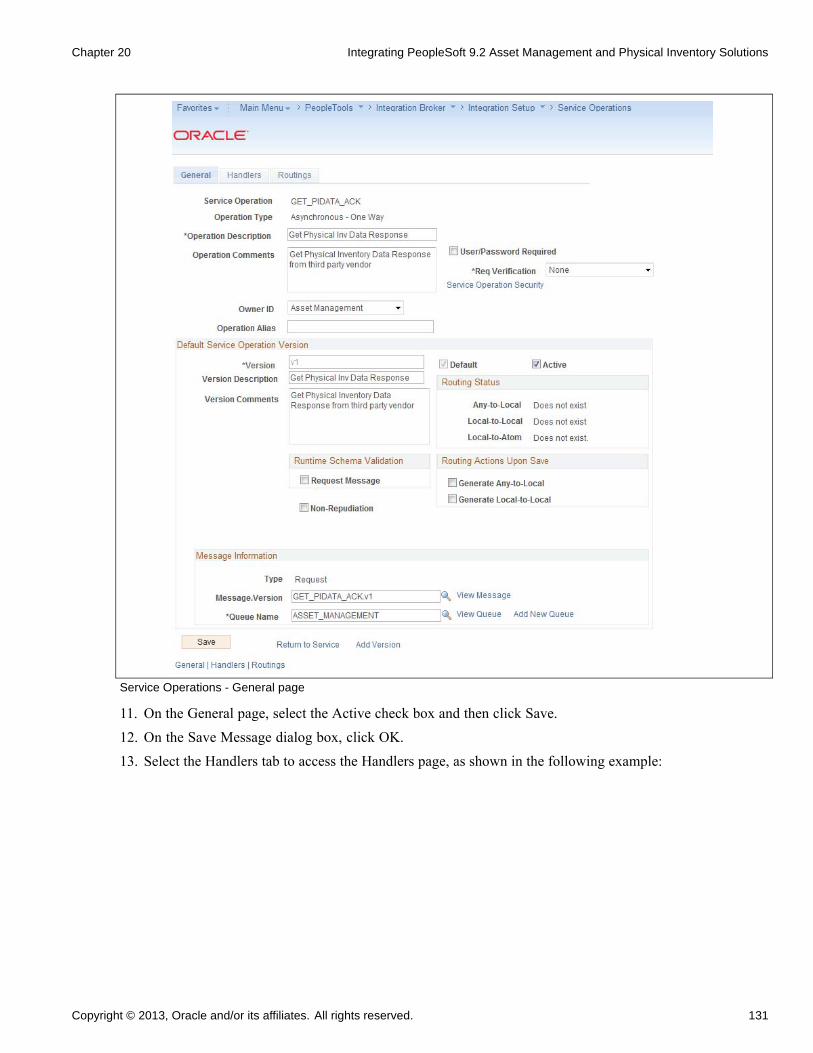
Chapter 20 Integrating PeopleSoft 9.2 Asset Management and Physical Inventory Solutions
Service Operations - General page
11. On the General page, select the Active check box and then click Save.
12. On the Save Message dialog box, click OK.
13. Select the Handlers tab to access the Handlers page, as shown in the following example:
Copyright © 2013, Oracle and/or its affiliates. All rights reserved. 131
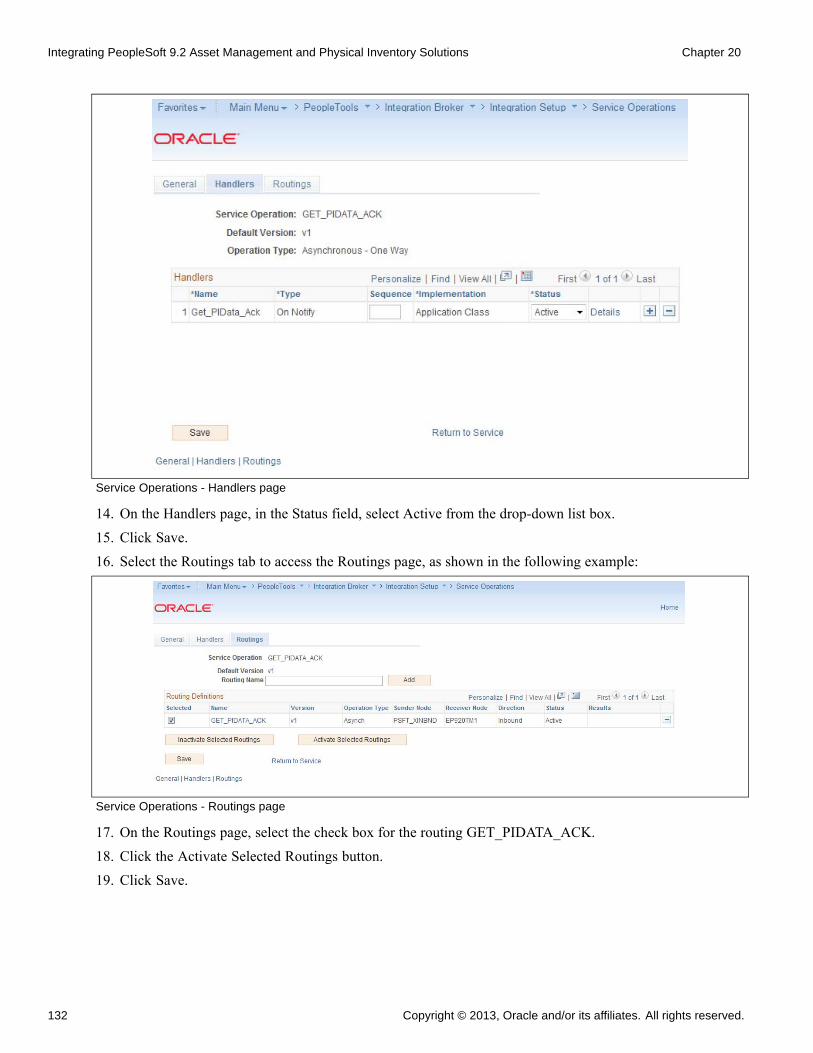
Integrating PeopleSoft 9.2 Asset Management and Physical Inventory Solutions Chapter 20
Service Operations - Handlers page
14. On the Handlers page, in the Status field, select Active from the drop-down list box.15. Click Save.16. Select the Routings tab to access the Routings page, as shown in the following example:
Service Operations - Routings page
17. On the Routings page, select the check box for the routing GET_PIDATA_ACK.18. Click the Activate Selected Routings button.19. Click Save.
132 Copyright © 2013, Oracle and/or its affiliates. All rights reserved.
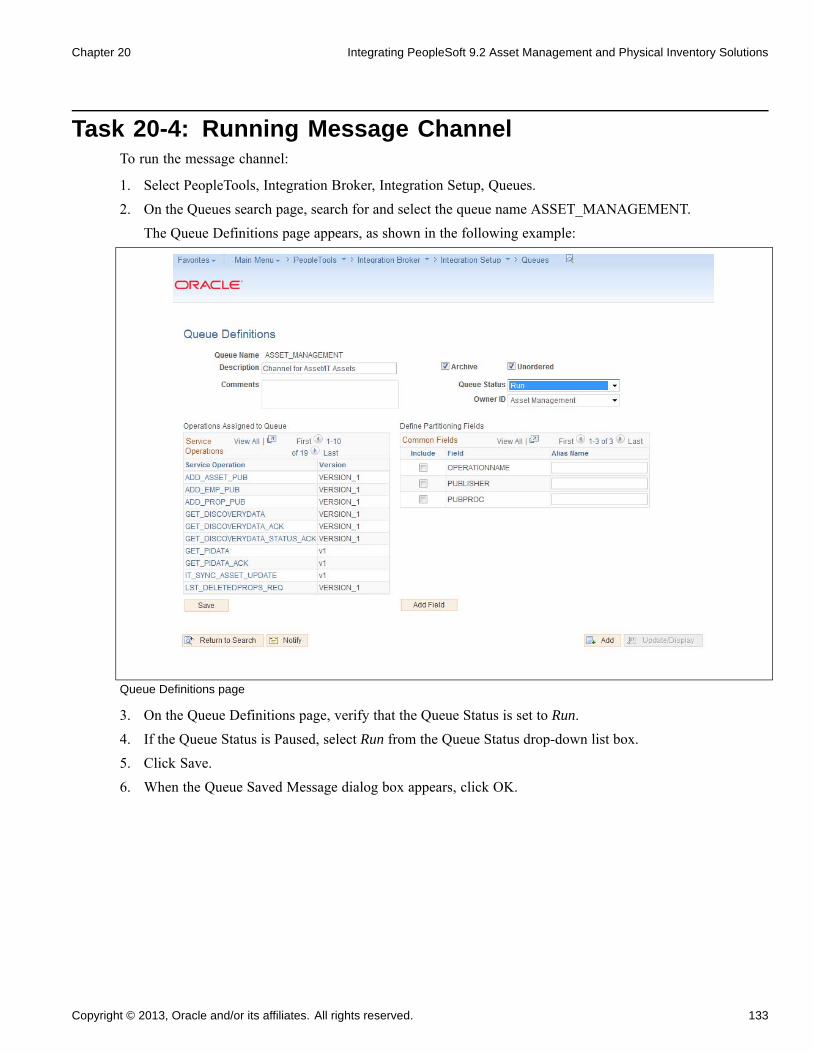
Chapter 20 Integrating PeopleSoft 9.2 Asset Management and Physical Inventory Solutions
Task 20-4: Running Message ChannelTo run the message channel:
1. Select PeopleTools, Integration Broker, Integration Setup, Queues.
2. On the Queues search page, search for and select the queue name ASSET_MANAGEMENT.
The Queue Definitions page appears, as shown in the following example:
Queue Definitions page
3. On the Queue Definitions page, verify that the Queue Status is set to Run.4. If the Queue Status is Paused, select Run from the Queue Status drop-down list box.5. Click Save.6. When the Queue Saved Message dialog box appears, click OK.
Copyright © 2013, Oracle and/or its affiliates. All rights reserved. 133
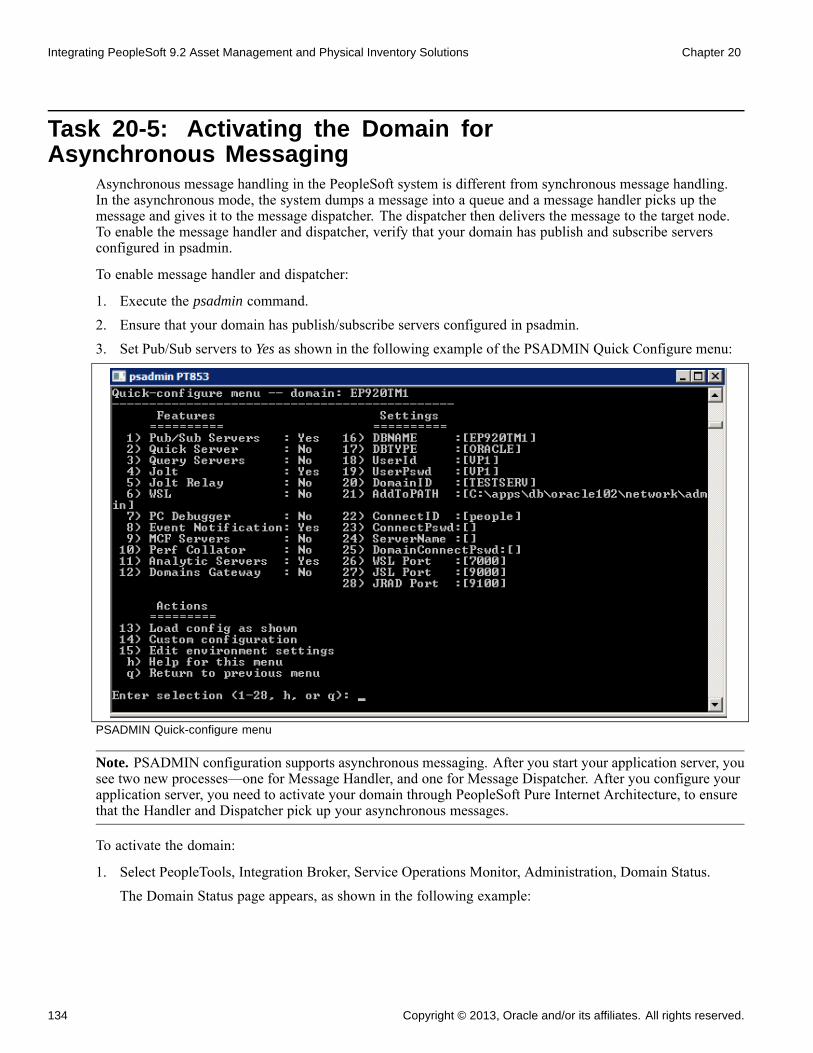
Integrating PeopleSoft 9.2 Asset Management and Physical Inventory Solutions Chapter 20
Task 20-5: Activating the Domain forAsynchronous Messaging
Asynchronous message handling in the PeopleSoft system is different from synchronous message handling.In the asynchronous mode, the system dumps a message into a queue and a message handler picks up themessage and gives it to the message dispatcher. The dispatcher then delivers the message to the target node.To enable the message handler and dispatcher, verify that your domain has publish and subscribe serversconfigured in psadmin.
To enable message handler and dispatcher:
1. Execute the psadmin command.
2. Ensure that your domain has publish/subscribe servers configured in psadmin.
3. Set Pub/Sub servers to Yes as shown in the following example of the PSADMIN Quick Configure menu:
PSADMIN Quick-configure menu
Note. PSADMIN configuration supports asynchronous messaging. After you start your application server, yousee two new processes—one for Message Handler, and one for Message Dispatcher. After you configure yourapplication server, you need to activate your domain through PeopleSoft Pure Internet Architecture, to ensurethat the Handler and Dispatcher pick up your asynchronous messages.
To activate the domain:
1. Select PeopleTools, Integration Broker, Service Operations Monitor, Administration, Domain Status.
The Domain Status page appears, as shown in the following example:
134 Copyright © 2013, Oracle and/or its affiliates. All rights reserved.
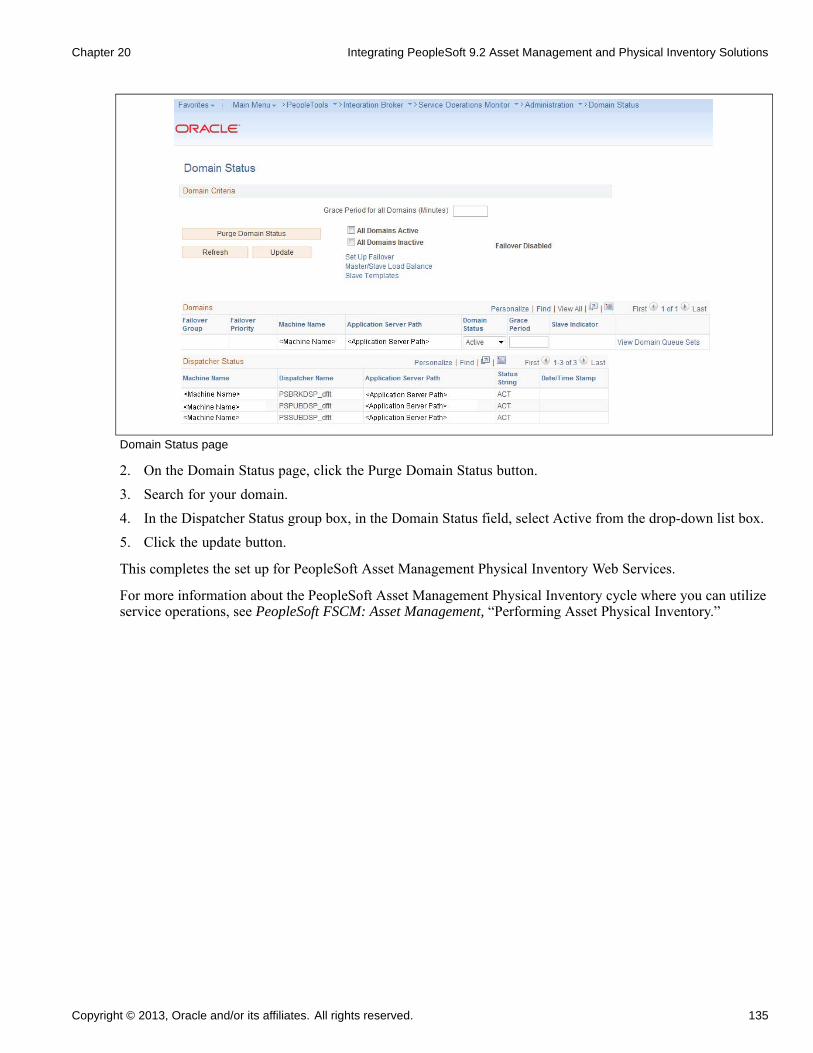
Chapter 20 Integrating PeopleSoft 9.2 Asset Management and Physical Inventory Solutions
Domain Status page
2. On the Domain Status page, click the Purge Domain Status button.3. Search for your domain.4. In the Dispatcher Status group box, in the Domain Status field, select Active from the drop-down list box.5. Click the update button.
This completes the set up for PeopleSoft Asset Management Physical Inventory Web Services.
For more information about the PeopleSoft Asset Management Physical Inventory cycle where you can utilizeservice operations, see PeopleSoft FSCM: Asset Management, “Performing Asset Physical Inventory.”
Copyright © 2013, Oracle and/or its affiliates. All rights reserved. 135

Integrating PeopleSoft 9.2 Asset Management and Physical Inventory Solutions Chapter 20
136 Copyright © 2013, Oracle and/or its affiliates. All rights reserved.
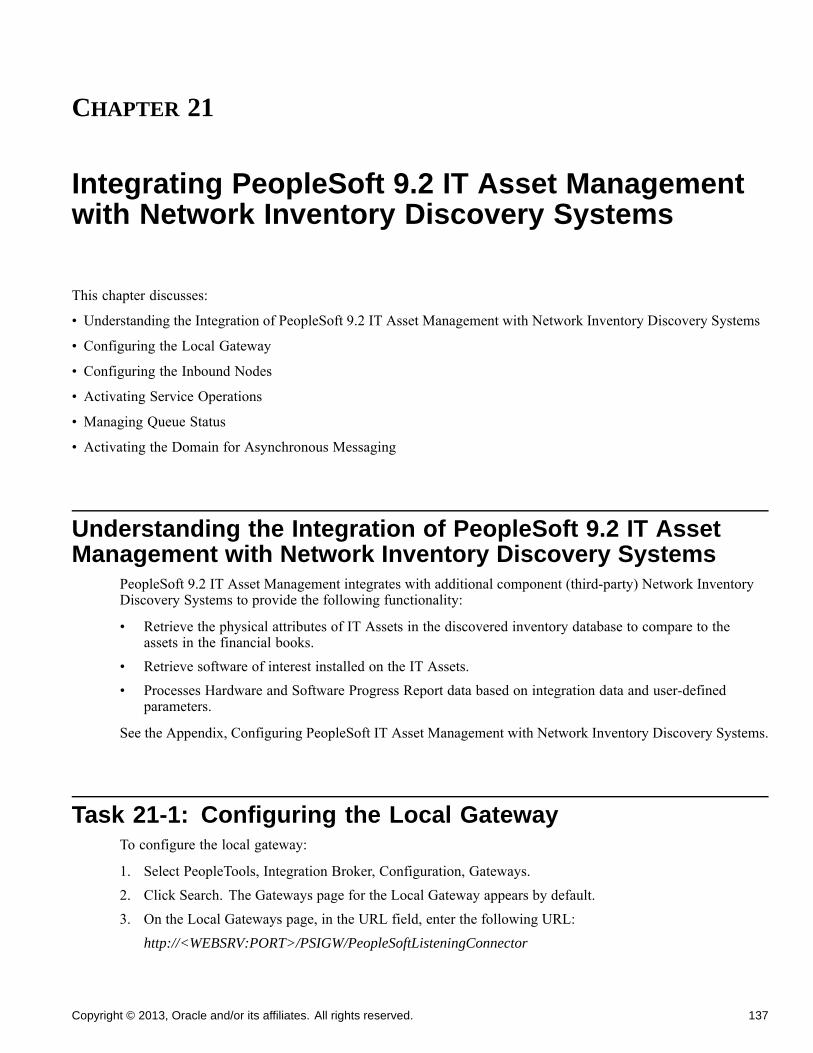
CHAPTER 21
Integrating PeopleSoft 9.2 IT Asset Managementwith Network Inventory Discovery Systems
This chapter discusses:
• Understanding the Integration of PeopleSoft 9.2 IT Asset Management with Network Inventory Discovery Systems
• Configuring the Local Gateway
• Configuring the Inbound Nodes
• Activating Service Operations
• Managing Queue Status
• Activating the Domain for Asynchronous Messaging
Understanding the Integration of PeopleSoft 9.2 IT AssetManagement with Network Inventory Discovery Systems
PeopleSoft 9.2 IT Asset Management integrates with additional component (third-party) Network InventoryDiscovery Systems to provide the following functionality:
• Retrieve the physical attributes of IT Assets in the discovered inventory database to compare to theassets in the financial books.
• Retrieve software of interest installed on the IT Assets.• Processes Hardware and Software Progress Report data based on integration data and user-defined
parameters.
See the Appendix, Configuring PeopleSoft IT Asset Management with Network Inventory Discovery Systems.
Task 21-1: Configuring the Local GatewayTo configure the local gateway:
1. Select PeopleTools, Integration Broker, Configuration, Gateways.2. Click Search. The Gateways page for the Local Gateway appears by default.3. On the Local Gateways page, in the URL field, enter the following URL:
http://<WEBSRV:PORT>/PSIGW/PeopleSoftListeningConnector
Copyright © 2013, Oracle and/or its affiliates. All rights reserved. 137
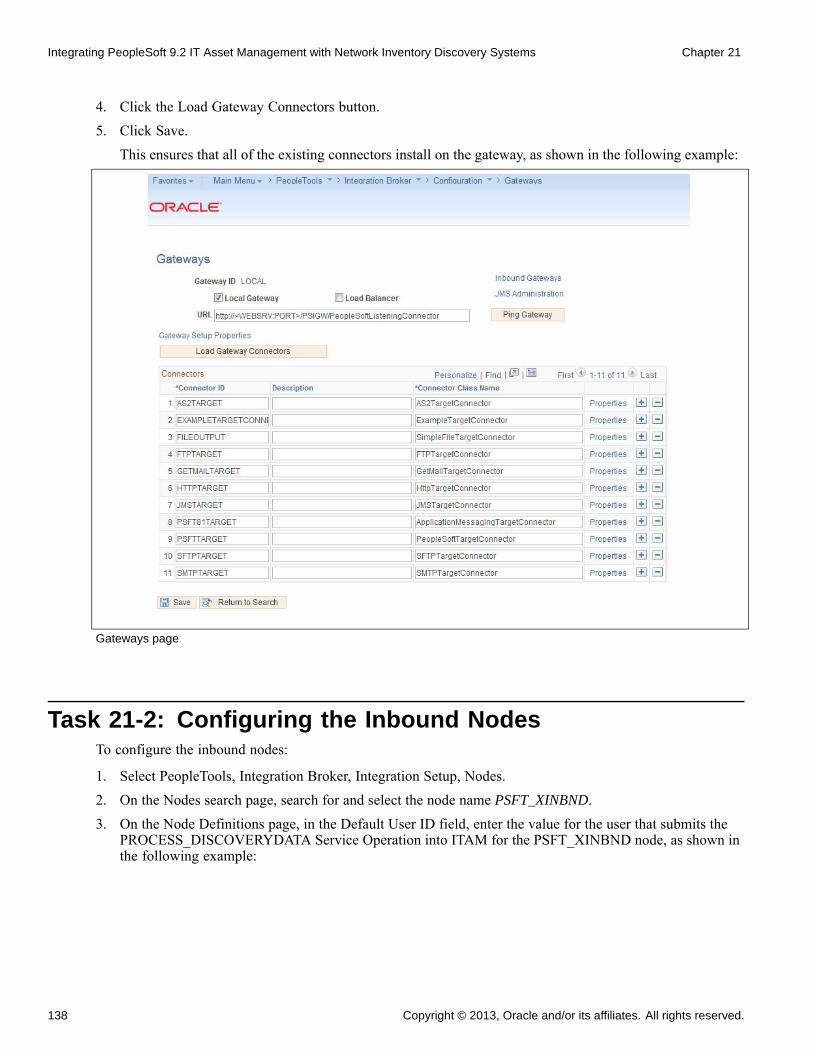
Integrating PeopleSoft 9.2 IT Asset Management with Network Inventory Discovery Systems Chapter 21
4. Click the Load Gateway Connectors button.5. Click Save.
This ensures that all of the existing connectors install on the gateway, as shown in the following example:
Gateways page
Task 21-2: Configuring the Inbound NodesTo configure the inbound nodes:
1. Select PeopleTools, Integration Broker, Integration Setup, Nodes.2. On the Nodes search page, search for and select the node name PSFT_XINBND.3. On the Node Definitions page, in the Default User ID field, enter the value for the user that submits the
PROCESS_DISCOVERYDATA Service Operation into ITAM for the PSFT_XINBND node, as shown inthe following example:
138 Copyright © 2013, Oracle and/or its affiliates. All rights reserved.

Chapter 21 Integrating PeopleSoft 9.2 IT Asset Management with Network Inventory Discovery Systems
Node Definitions page for PSFT_XINBND
4. Click Save.5. Click Return to Search.6. On the Nodes search page, search for and select the node name ANONYMOUS.7. On the Node Definitions page, in the Default User ID field, enter the value for the user that submits the
PROCESS_DISCOVERYDATA Service Operation into ITAM for the ANONYMOUS node, as shown inthe following example:
Copyright © 2013, Oracle and/or its affiliates. All rights reserved. 139
Integrating PeopleSoft 9.2 IT Asset Management with Network Inventory Discovery Systems Chapter 21
Node Definitions page for ANONYMOUS
8. Click Save.
Task 21-3: Activating Service OperationsTo activate service operations:
1. Select PeopleTools, Integration Broker, Integration Setup, Service Operations.
2. On the Service Operations search page, search for and select the service operationPROCESS_DISCOVERYDATA.
3. On the Service Operations - General page, verify that the Active check box is selected, as shown inthe following example:
140 Copyright © 2013, Oracle and/or its affiliates. All rights reserved.
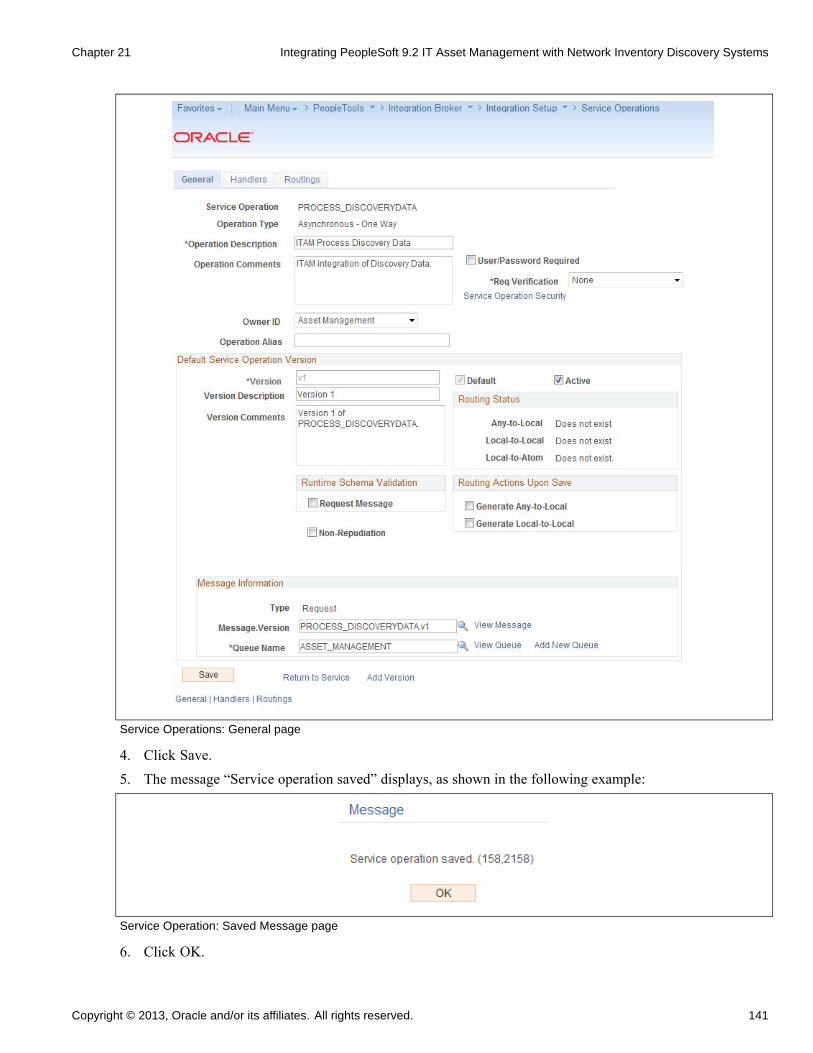
Chapter 21 Integrating PeopleSoft 9.2 IT Asset Management with Network Inventory Discovery Systems
Service Operations: General page
4. Click Save.
5. The message “Service operation saved” displays, as shown in the following example:
Service Operation: Saved Message page
6. Click OK.
Copyright © 2013, Oracle and/or its affiliates. All rights reserved. 141
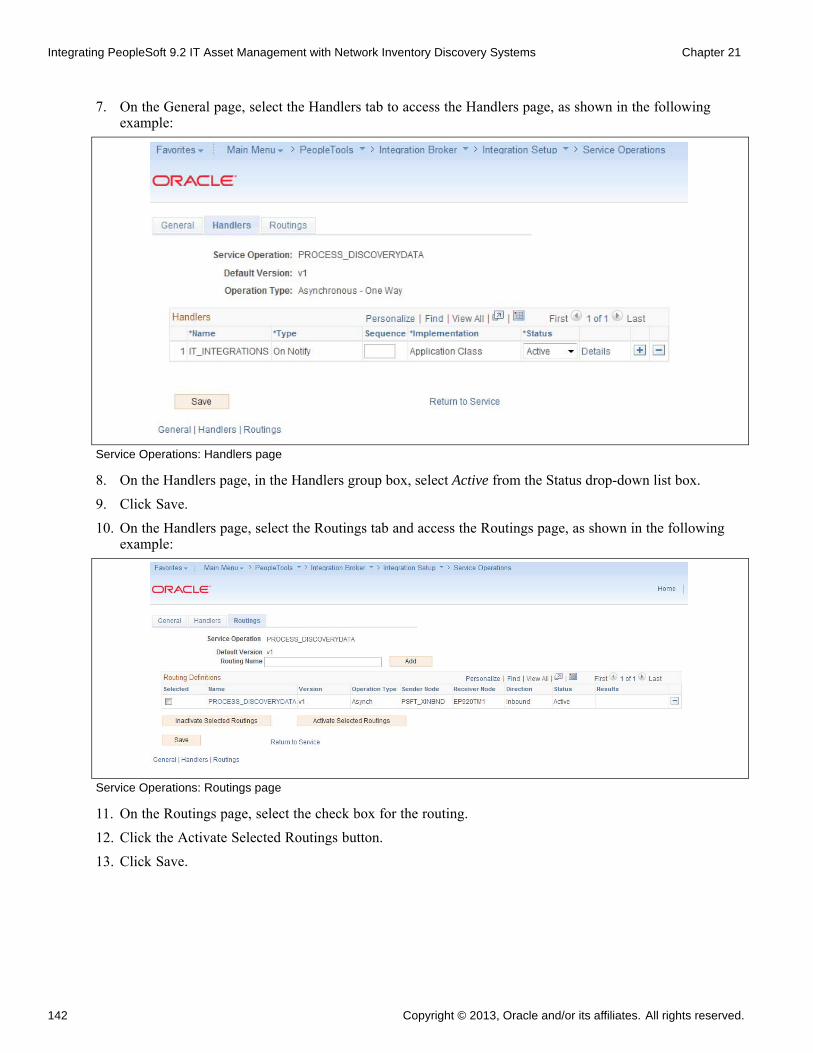
Integrating PeopleSoft 9.2 IT Asset Management with Network Inventory Discovery Systems Chapter 21
7. On the General page, select the Handlers tab to access the Handlers page, as shown in the followingexample:
Service Operations: Handlers page
8. On the Handlers page, in the Handlers group box, select Active from the Status drop-down list box.9. Click Save.10. On the Handlers page, select the Routings tab and access the Routings page, as shown in the following
example:
Service Operations: Routings page
11. On the Routings page, select the check box for the routing.
12. Click the Activate Selected Routings button.
13. Click Save.
142 Copyright © 2013, Oracle and/or its affiliates. All rights reserved.
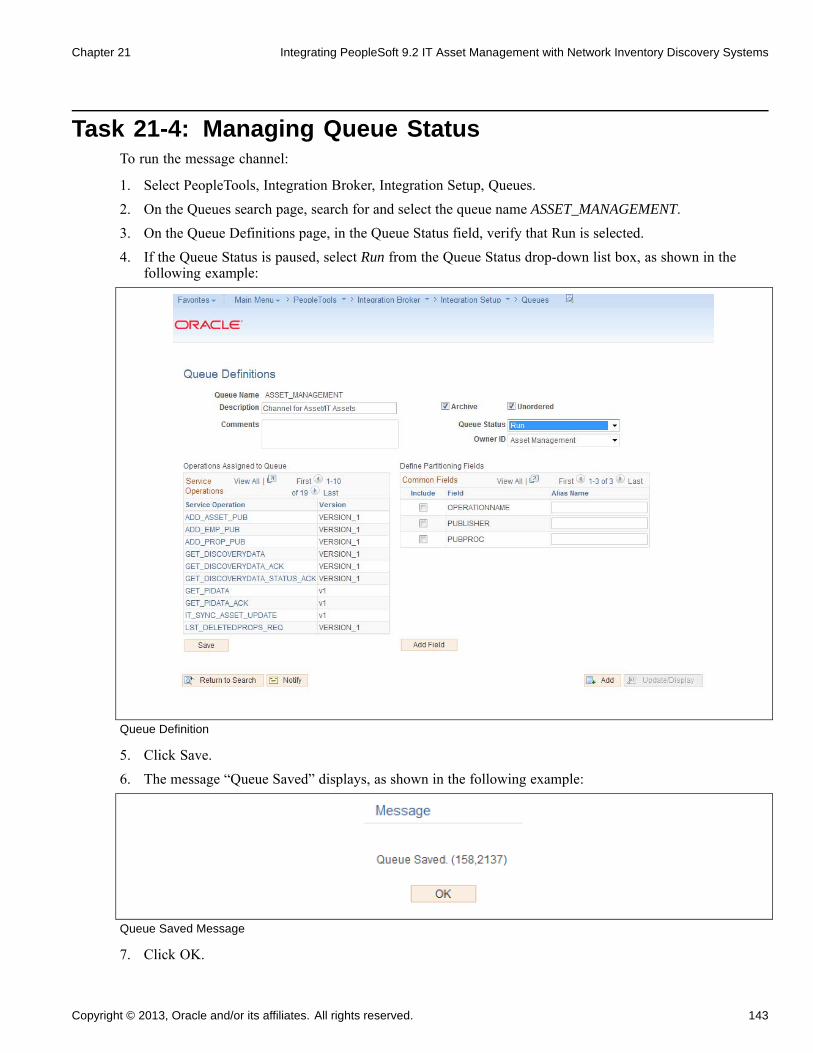
Chapter 21 Integrating PeopleSoft 9.2 IT Asset Management with Network Inventory Discovery Systems
Task 21-4: Managing Queue StatusTo run the message channel:
1. Select PeopleTools, Integration Broker, Integration Setup, Queues.
2. On the Queues search page, search for and select the queue name ASSET_MANAGEMENT.
3. On the Queue Definitions page, in the Queue Status field, verify that Run is selected.
4. If the Queue Status is paused, select Run from the Queue Status drop-down list box, as shown in thefollowing example:
Queue Definition
5. Click Save.6. The message “Queue Saved” displays, as shown in the following example:
Queue Saved Message
7. Click OK.
Copyright © 2013, Oracle and/or its affiliates. All rights reserved. 143
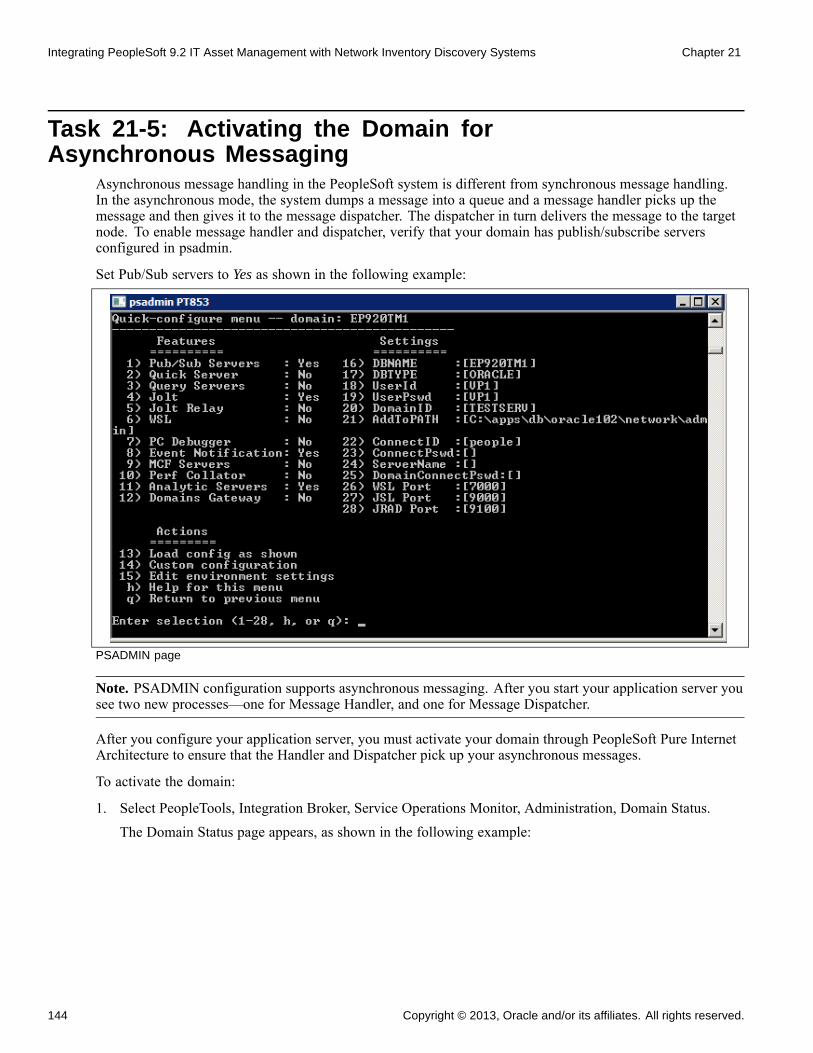
Integrating PeopleSoft 9.2 IT Asset Management with Network Inventory Discovery Systems Chapter 21
Task 21-5: Activating the Domain forAsynchronous Messaging
Asynchronous message handling in the PeopleSoft system is different from synchronous message handling.In the asynchronous mode, the system dumps a message into a queue and a message handler picks up themessage and then gives it to the message dispatcher. The dispatcher in turn delivers the message to the targetnode. To enable message handler and dispatcher, verify that your domain has publish/subscribe serversconfigured in psadmin.
Set Pub/Sub servers to Yes as shown in the following example:
PSADMIN page
Note. PSADMIN configuration supports asynchronous messaging. After you start your application server yousee two new processes—one for Message Handler, and one for Message Dispatcher.
After you configure your application server, you must activate your domain through PeopleSoft Pure InternetArchitecture to ensure that the Handler and Dispatcher pick up your asynchronous messages.
To activate the domain:
1. Select PeopleTools, Integration Broker, Service Operations Monitor, Administration, Domain Status.
The Domain Status page appears, as shown in the following example:
144 Copyright © 2013, Oracle and/or its affiliates. All rights reserved.

Chapter 21 Integrating PeopleSoft 9.2 IT Asset Management with Network Inventory Discovery Systems
Domain Status page
2. On the Domain Status page, click the Purge Domain Status button.3. Search for your domain/machine name, and in the Domain Status field, select Active from the drop-down
list box.4. Click the Update button.
This completes the set up for PeopleSoft Asset Management with Network Inventory Discovery Systems.
For more information about this integration, see PeopleSoft FSCM: Asset Management, “Working withthe IT Asset Inventory Tool”.
Copyright © 2013, Oracle and/or its affiliates. All rights reserved. 145
Integrating PeopleSoft 9.2 IT Asset Management with Network Inventory Discovery Systems Chapter 21
146 Copyright © 2013, Oracle and/or its affiliates. All rights reserved.
CHAPTER 22
Part III: Installing PeopleSoft Supply ChainManagement Applications
Understanding Part IIIThis section includes:
• Installing PeopleSoft 9.2 eProcurement• Installing PeopleSoft 9.2 Mobile Inventory Management• Configuring eMail URLS in PeopleSoft SCM Applications• Setting Up PeopleSoft 9.2 Supplier Contract Management• Setting Up PeopleSoft SCM Pagelets• Granting Access to Navigation Pages in PeopleSoft SCM• Accessing PeopleSoft SCM Applications in PeopleSoft 9.2 Portal Solutions
Copyright © 2013, Oracle and/or its affiliates. All rights reserved. 147

Part III: Installing PeopleSoft Supply Chain Management Applications Chapter 22
148 Copyright © 2013, Oracle and/or its affiliates. All rights reserved.
CHAPTER 23
Installing PeopleSoft 9.2 eProcurement
Understanding PeopleSoft eProcurement 9.2PeopleSoft eProcurement is an application that enables all employees to use web pages to meet theirprocurement needs. Using electronic catalogs, employees can order the supplies and services they need todo their jobs. Buyers can use PeopleSoft eProcurement to efficiently create and process purchase orders.Suppliers can use PeopleSoft eProcurement to enter invoices.
Note. To install PeopleSoft eProcurement, you must have administrator access rights to the local machinethat you are using for the installation.
Task 23-1: Installing PeopleSoft eProcurementCUP Item Export
When you install the PeopleSoft Financials/Supply Chain Management (FSCM) application, the systemdownloads the CUP (catalog update process) Item Export setup program to your workstation.
The installation of the PeopleSoft FSCM application downloads the PeopleSoft eProcurement CUP setup tothe following directory path on your local drive:
<PS_APP_HOME>\setup\eProcurement\eng\Setup.exe
Note. You can find the Setup.exe file in the folder named after your language code. For example, if thelanguage is English, the Setup.exe should reside in the eng folder.
To install PeopleSoft eProcurement CUP Item Export:
1. Double click Setup.exe.The PeopleSoft CUP Item Export - Welcome page appears, as shown in the following example:
Copyright © 2013, Oracle and/or its affiliates. All rights reserved. 149
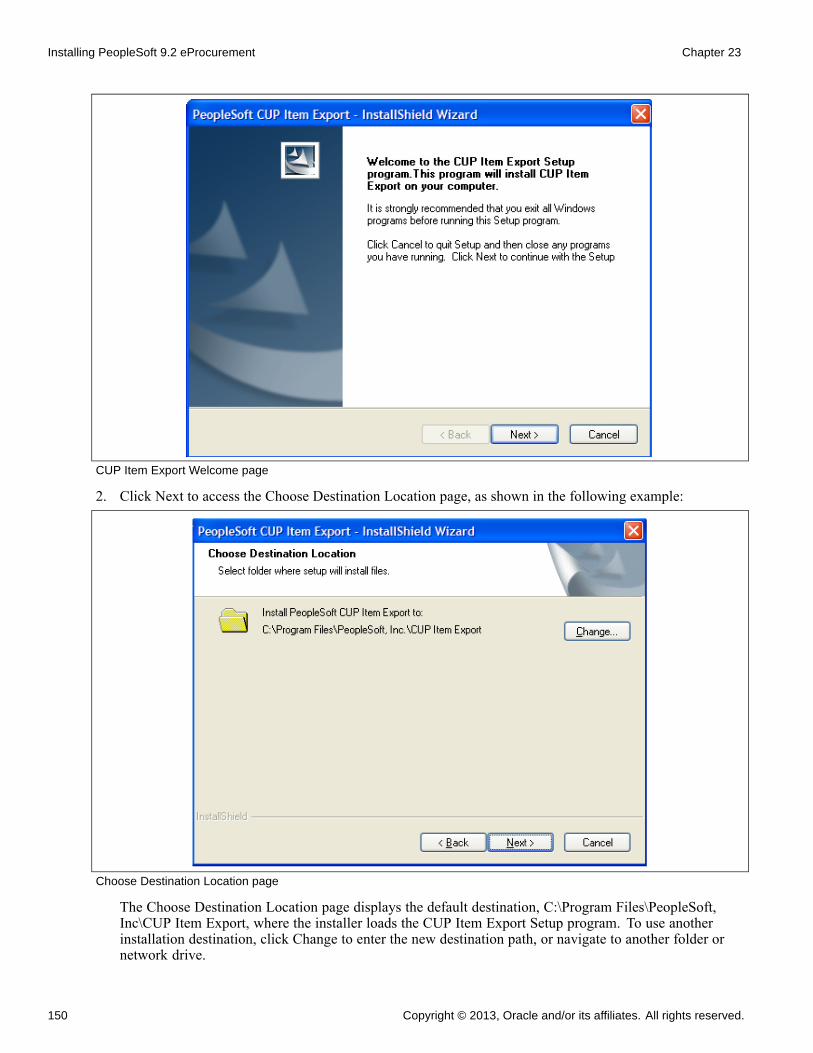
Installing PeopleSoft 9.2 eProcurement Chapter 23
CUP Item Export Welcome page
2. Click Next to access the Choose Destination Location page, as shown in the following example:
Choose Destination Location page
The Choose Destination Location page displays the default destination, C:\Program Files\PeopleSoft,Inc\CUP Item Export, where the installer loads the CUP Item Export Setup program. To use anotherinstallation destination, click Change to enter the new destination path, or navigate to another folder ornetwork drive.
150 Copyright © 2013, Oracle and/or its affiliates. All rights reserved.
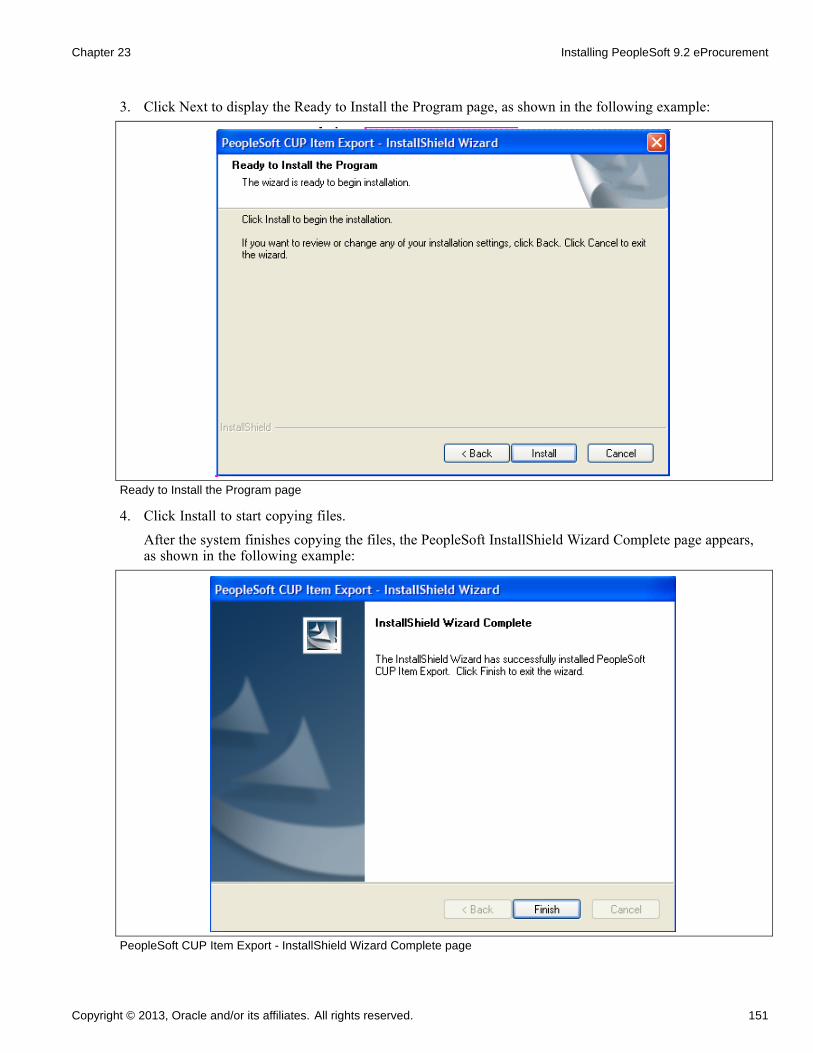
Chapter 23 Installing PeopleSoft 9.2 eProcurement
3. Click Next to display the Ready to Install the Program page, as shown in the following example:
Ready to Install the Program page
4. Click Install to start copying files.After the system finishes copying the files, the PeopleSoft InstallShield Wizard Complete page appears,as shown in the following example:
PeopleSoft CUP Item Export - InstallShield Wizard Complete page
Copyright © 2013, Oracle and/or its affiliates. All rights reserved. 151
Installing PeopleSoft 9.2 eProcurement Chapter 23
5. Click Finish.This completes the local installation of the PeopleSoft eProcurement CUP Item Export on your machine.
152 Copyright © 2013, Oracle and/or its affiliates. All rights reserved.
CHAPTER 24
Installing PeopleSoft 9.2 Mobile InventoryManagement
This chapter discusses:
• Understanding the PeopleSoft 9.2 Mobile Inventory Management Product
• Prerequisites
• Accessing Installation Files
• Installing the Oracle WebLogic Server for Mobile
• Installing the Oracle Application Development Runtime Installer for PeopleSoft Mobile Inventory Management
• Applying the PeopleSoft Mobile Inventory Management Authentication Provider
• Installing the PeopleSoft Database
• Deploying the Mobile Application to Oracle Application Developer for an Oracle WebLogic Server
• Undeploying the Mobile Application
Understanding the PeopleSoft 9.2 Mobile InventoryManagement Product
The PeopleSoft Mobile Inventory Management product provides tools that integrate handheld bar code datacollection devices with the PeopleSoft Supply Chain Management system, improving efficiency and costsavings. Oracle Application Developer Framework uses the PeopleSoft Integration Broker and PeopleSoftComponent Interfaces (CIs) to enable this process. The Oracle Application Developer Framework software ispart of Oracle Fusion Middleware.
PeopleSoft CIs are PeopleTools components that enable exposure of a PeopleSoft component for synchronousaccess from another application and act as a web service in the PeopleTools Integration Broker. The systemthen publishes web services through the PeopleSoft Integration Broker to pass transaction data betweenPeopleSoft applications and additional component (third-party) applications.
For more information on setting up PeopleSoft application servers and web services, refer to the topic,“Installing the PeopleSoft Database” later in this chapter, as well as the following reference documentsthat are available on My Oracle Support:
See PeopleTools: System and Server Administration, for your database platform.
See PeopleSoft FSCM: Mobile Inventory Management
The following diagram illustrates the interface between PeopleSoft and mobile devices:
Copyright © 2013, Oracle and/or its affiliates. All rights reserved. 153
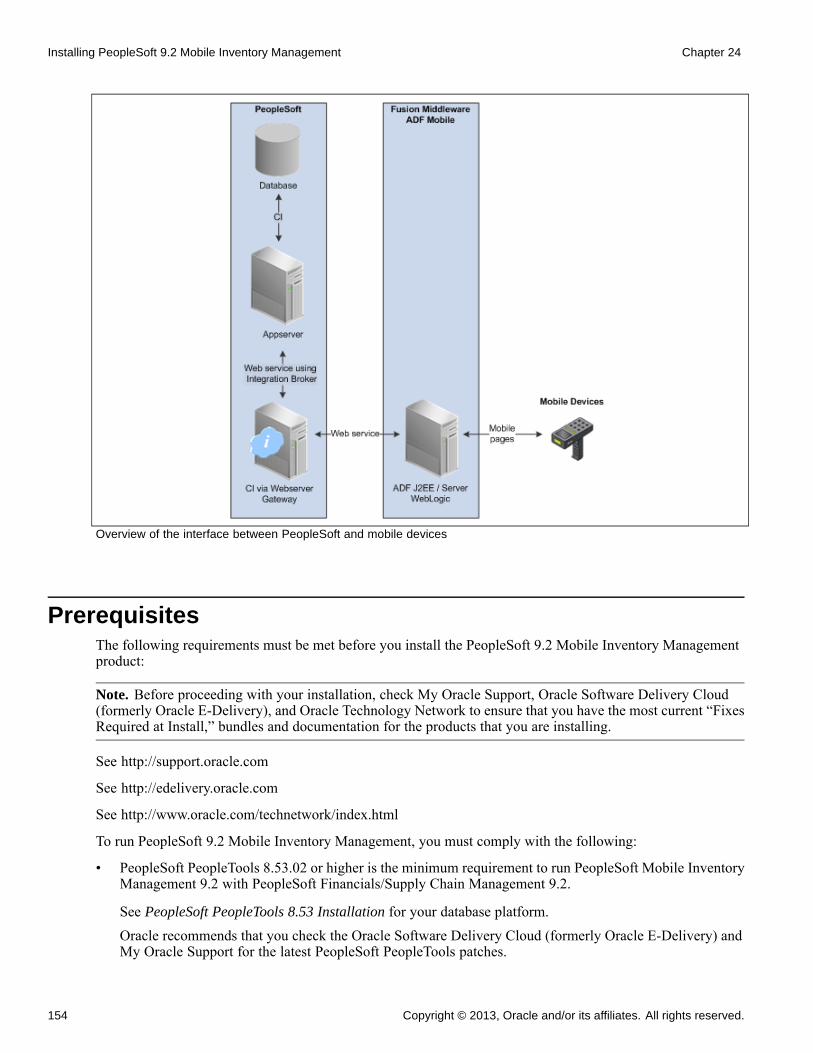
Installing PeopleSoft 9.2 Mobile Inventory Management Chapter 24
Overview of the interface between PeopleSoft and mobile devices
PrerequisitesThe following requirements must be met before you install the PeopleSoft 9.2 Mobile Inventory Managementproduct:
Note. Before proceeding with your installation, check My Oracle Support, Oracle Software Delivery Cloud(formerly Oracle E-Delivery), and Oracle Technology Network to ensure that you have the most current “FixesRequired at Install,” bundles and documentation for the products that you are installing.
See http://support.oracle.com
See http://edelivery.oracle.com
See http://www.oracle.com/technetwork/index.html
To run PeopleSoft 9.2 Mobile Inventory Management, you must comply with the following:
• PeopleSoft PeopleTools 8.53.02 or higher is the minimum requirement to run PeopleSoft Mobile InventoryManagement 9.2 with PeopleSoft Financials/Supply Chain Management 9.2.
See PeopleSoft PeopleTools 8.53 Installation for your database platform.Oracle recommends that you check the Oracle Software Delivery Cloud (formerly Oracle E-Delivery) andMy Oracle Support for the latest PeopleSoft PeopleTools patches.
154 Copyright © 2013, Oracle and/or its affiliates. All rights reserved.
Chapter 24 Installing PeopleSoft 9.2 Mobile Inventory Management
See http://edelivery.oracle.com
See http://support.oracle.com• PeopleSoft Financials/Supply Chain Management 9.2 Application.
To run PeopleSoft 9.2 Mobile Inventory Management, you must be using PeopleSoftFinancials/SupplyChain Management 9.2.
• The current 64-bit Java, if you are installing on a 64-bit server.Go to www.java.com to download the current 64-Bit Java to use with the PeopleSoft Mobile InventoryManagement installation.
• Oracle Application Developer 11gR1 (11.1.1.6 or higher, Oracle Application Developer 11gR2 is notyet supported).Before you install PeopleSoft Mobile Inventory Management 9.2, you must complete the installationof Oracle Application Development Runtime 11.1.1.6 (or higher) on an Oracle WebLogic 10.3.6 (orhigher) Server instance. You can access the complete Oracle Application Developer 11.1.1.6 (or higher)Installation guide and the complete Oracle WebLogic 10.3.6 (or higher) Installation guide from the OracleFusion Middleware Documentation Library at: http://download.oracle.com/docs/cd/E12839_01/index.htm
See Oracle Application Developer 11.1.1.6 Installation
See Oracle WebLogic 10.3.6 Installation
• PeopleSoft Inventory 9.2.Before you install PeopleSoft Mobile Inventory Management 9.2, you must complete the installationand set up of PeopleSoft Inventory 9.2.
• PeopleSoft Purchasing 9.2.Before you install PeopleSoft Mobile Inventory Management 9.2, you must complete the installation andset up of PeopleSoft Purchasing 9.2. This is only a requirement if you plan to use receiving and delivery.
• Run audit reports to clean your target databases.Oracle recommends that you run audit reports to ensure that your target databases are clean, before youbegin the installation process.
For hardware and software information, you can refer to the following documents that are available on MyOracle Support and the Oracle Technology Network:
See PeopleTools Hardware and Software Requirements from Certification tab of My Oracle Support.
See PeopleSoft Financials/Supply Chain Management Hardware and Software Requirements, "DefiningPeopleSoft Mobile Inventory Management Hardware and Software Requirements."
See Oracle Application Development Framework 11.1.1.6 Hardware and Software Requirements.
Task 24-1: Accessing Installation FilesUse the Oracle Technology Network to access and download prerequisite application software and installationdocumentation as follows:
Copyright © 2013, Oracle and/or its affiliates. All rights reserved. 155
Installing PeopleSoft 9.2 Mobile Inventory Management Chapter 24
• To access the current Oracle WebLogic installation files, access the Oracle Technology Network athttp://www.oracle.com/technetwork/index.html, select Downloads, Fusion Middleware 11g, and then in the"For Development" section select the current version.
• To access the Oracle Application Development Runtime Installer, access the Oracle Technology Networkat http://www.oracle.com/technetwork/index.html, select Downloads, JDeveloper and ADF, and then in theOracle Application Development Runtime Installer section (on that page) click the Download link.
Check the Oracle Technology Network, Oracle Software Delivery Cloud (formerly Oracle E-Delivery),and My Oracle Support to ensure that you obtain the most current fixes required at install, bundles anddocumentation for the products that you are installing.
See http://www.oracle.com/technetwork/index.html
See http://edelivery.oracle.com
See http://support.oracle.com
Task 24-2: Installing the Oracle WebLogic Server for MobileThis section discusses:
• Understanding the Oracle WebLogic Server Installation for Mobile
• Installing the Oracle WebLogic Server for PeopleSoft Mobile Inventory Management
• Starting the Configuration Wizard to Define a New Domain
Understanding the Oracle WebLogic ServerInstallation for MobileOracle Application Developer for Mobile installs on top of the Oracle WebLogic Server. Therefore, you mustfirst install the Oracle WebLogic Server.
The Oracle WebLogic Server supports the Oracle Application Developer and the Application DeveloperMobile browser that extends Oracle Application Developer to browsers running on mobile devices. Thefollowing steps detail a general installation of the Oracle WebLogic Server for PeopleSoft Mobile InventoryManagement.
Task 24-2-1: Installing the Oracle WebLogic Server forPeopleSoft Mobile Inventory ManagementTo install the Oracle WebLogic Server for PeopleSoft Mobile Inventory Management:
Note. You can access the complete installation guide for the Oracle WebLogic Server 10.3.6 (or higher) fromthe Oracle Fusion Middleware Documentation Library at: http://www.oracle.com/technetwork/middleware/ias/downloads/wls-main-097127.html
1. Download the Oracle WebLogic Server installation files from the Oracle Technology Network.
Access the Oracle Technology Network at http://www.oracle.com/technetwork/index.html, selectDownloads, Fusion Middleware 11g, and then in the "For Development" section select the current version.
156 Copyright © 2013, Oracle and/or its affiliates. All rights reserved.

Chapter 24 Installing PeopleSoft 9.2 Mobile Inventory Management
See “Accessing Installation Files”
Note. The following installation instructions are based on the Microsoft Windows operating system. ForUNIX installation instructions, see the Oracle® Fusion Middleware Installation guide for the OracleWebLogic Server. Graphical and console mode are supported for Oracle WebLogic installation.
2. Double-click the executable file to start the Oracle Installer Wizard that launches the Oracle WebLogicServer 11g R1.The Oracle Installer - WebLogic 10.3.6 (or higher) Welcome page appears, as shown in the followingexample:
Oracle Installer WebLogic 10.3.6.0 – Welcome page
3. On the Welcome page, click Next.The Oracle Installer WebLogic - Choose Middleware Home Directory page appears, as shown in thefollowing example:
Copyright © 2013, Oracle and/or its affiliates. All rights reserved. 157
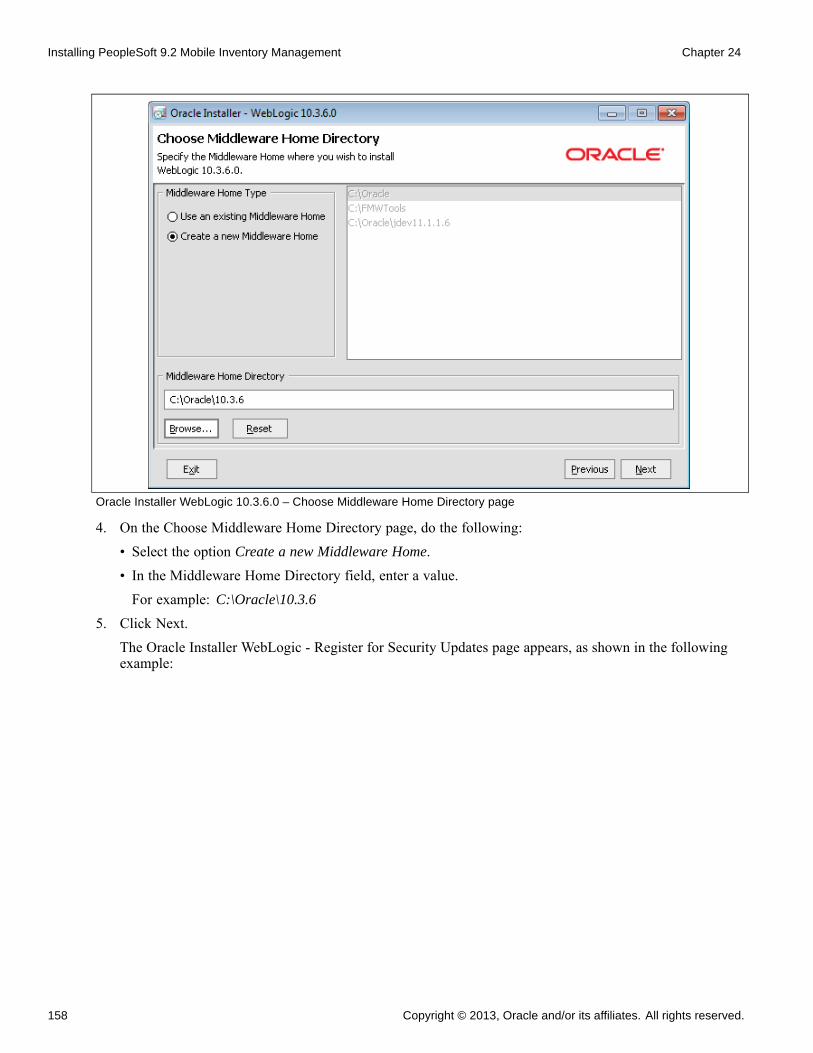
Installing PeopleSoft 9.2 Mobile Inventory Management Chapter 24
Oracle Installer WebLogic 10.3.6.0 – Choose Middleware Home Directory page
4. On the Choose Middleware Home Directory page, do the following:• Select the option Create a new Middleware Home.• In the Middleware Home Directory field, enter a value.For example: C:\Oracle\10.3.6
5. Click Next.The Oracle Installer WebLogic - Register for Security Updates page appears, as shown in the followingexample:
158 Copyright © 2013, Oracle and/or its affiliates. All rights reserved.
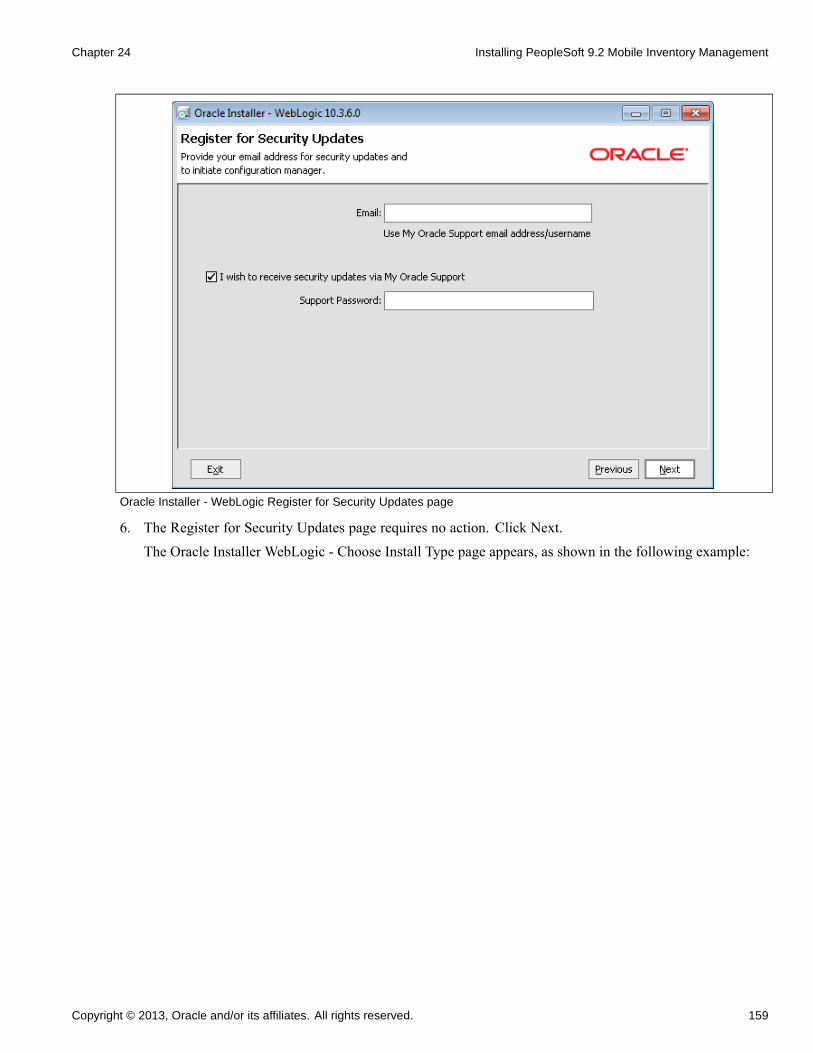
Chapter 24 Installing PeopleSoft 9.2 Mobile Inventory Management
Oracle Installer - WebLogic Register for Security Updates page
6. The Register for Security Updates page requires no action. Click Next.The Oracle Installer WebLogic - Choose Install Type page appears, as shown in the following example:
Copyright © 2013, Oracle and/or its affiliates. All rights reserved. 159
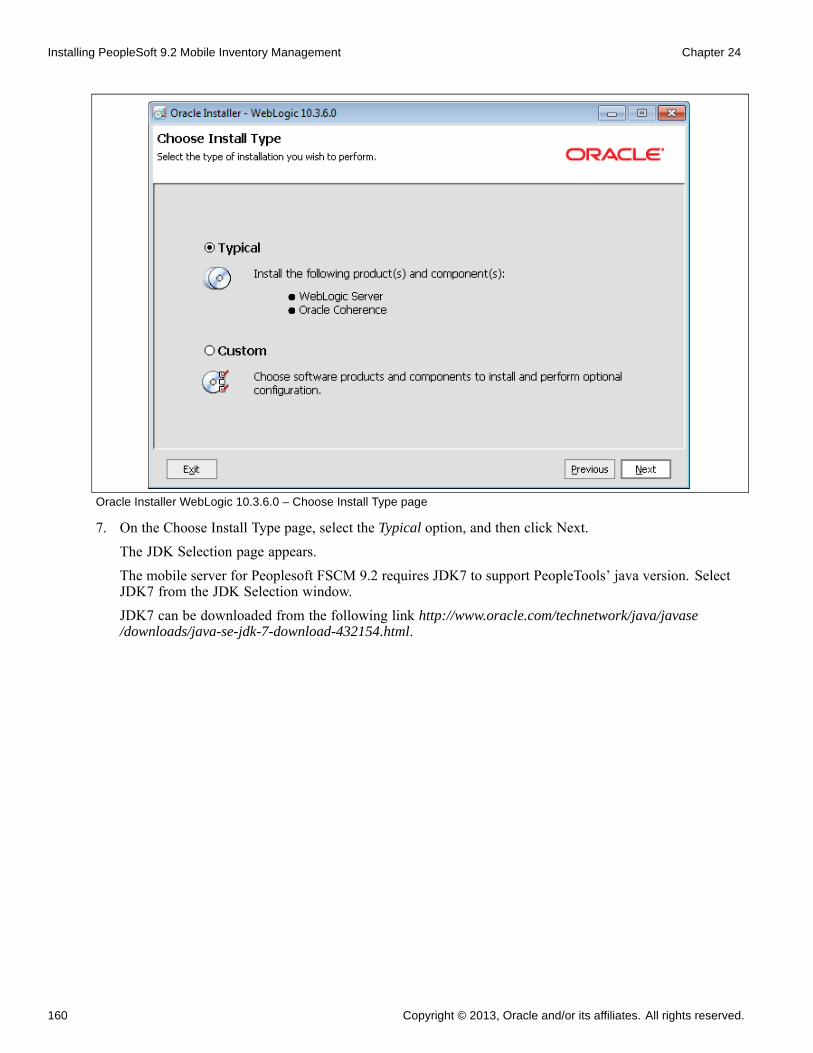
Installing PeopleSoft 9.2 Mobile Inventory Management Chapter 24
Oracle Installer WebLogic 10.3.6.0 – Choose Install Type page
7. On the Choose Install Type page, select the Typical option, and then click Next.The JDK Selection page appears.The mobile server for Peoplesoft FSCM 9.2 requires JDK7 to support PeopleTools’ java version. SelectJDK7 from the JDK Selection window.JDK7 can be downloaded from the following link http://www.oracle.com/technetwork/java/javase/downloads/java-se-jdk-7-download-432154.html.
160 Copyright © 2013, Oracle and/or its affiliates. All rights reserved.
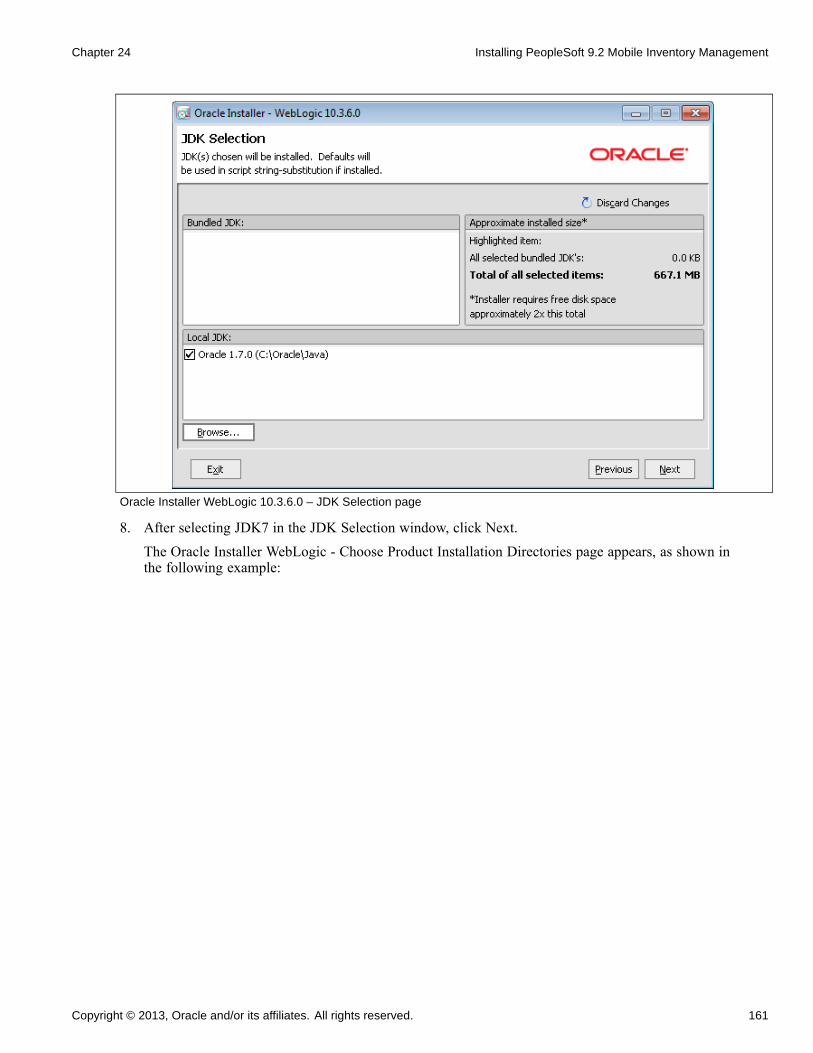
Chapter 24 Installing PeopleSoft 9.2 Mobile Inventory Management
Oracle Installer WebLogic 10.3.6.0 – JDK Selection page
8. After selecting JDK7 in the JDK Selection window, click Next.The Oracle Installer WebLogic - Choose Product Installation Directories page appears, as shown inthe following example:
Copyright © 2013, Oracle and/or its affiliates. All rights reserved. 161
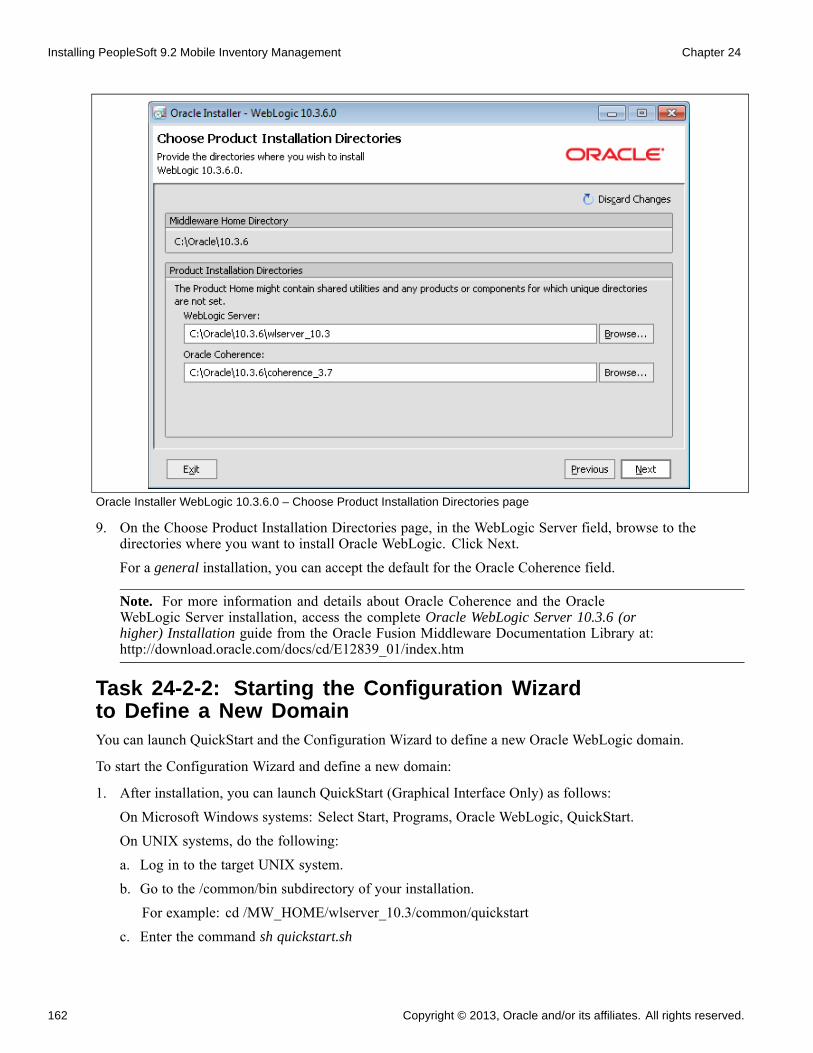
Installing PeopleSoft 9.2 Mobile Inventory Management Chapter 24
Oracle Installer WebLogic 10.3.6.0 – Choose Product Installation Directories page
9. On the Choose Product Installation Directories page, in the WebLogic Server field, browse to thedirectories where you want to install Oracle WebLogic. Click Next.For a general installation, you can accept the default for the Oracle Coherence field.
Note. For more information and details about Oracle Coherence and the OracleWebLogic Server installation, access the complete Oracle WebLogic Server 10.3.6 (orhigher) Installation guide from the Oracle Fusion Middleware Documentation Library at:http://download.oracle.com/docs/cd/E12839_01/index.htm
Task 24-2-2: Starting the Configuration Wizardto Define a New DomainYou can launch QuickStart and the Configuration Wizard to define a new Oracle WebLogic domain.
To start the Configuration Wizard and define a new domain:
1. After installation, you can launch QuickStart (Graphical Interface Only) as follows:
On Microsoft Windows systems: Select Start, Programs, Oracle WebLogic, QuickStart.
On UNIX systems, do the following:
a. Log in to the target UNIX system.
b. Go to the /common/bin subdirectory of your installation.
For example: cd /MW_HOME/wlserver_10.3/common/quickstart
c. Enter the command sh quickstart.sh
162 Copyright © 2013, Oracle and/or its affiliates. All rights reserved.
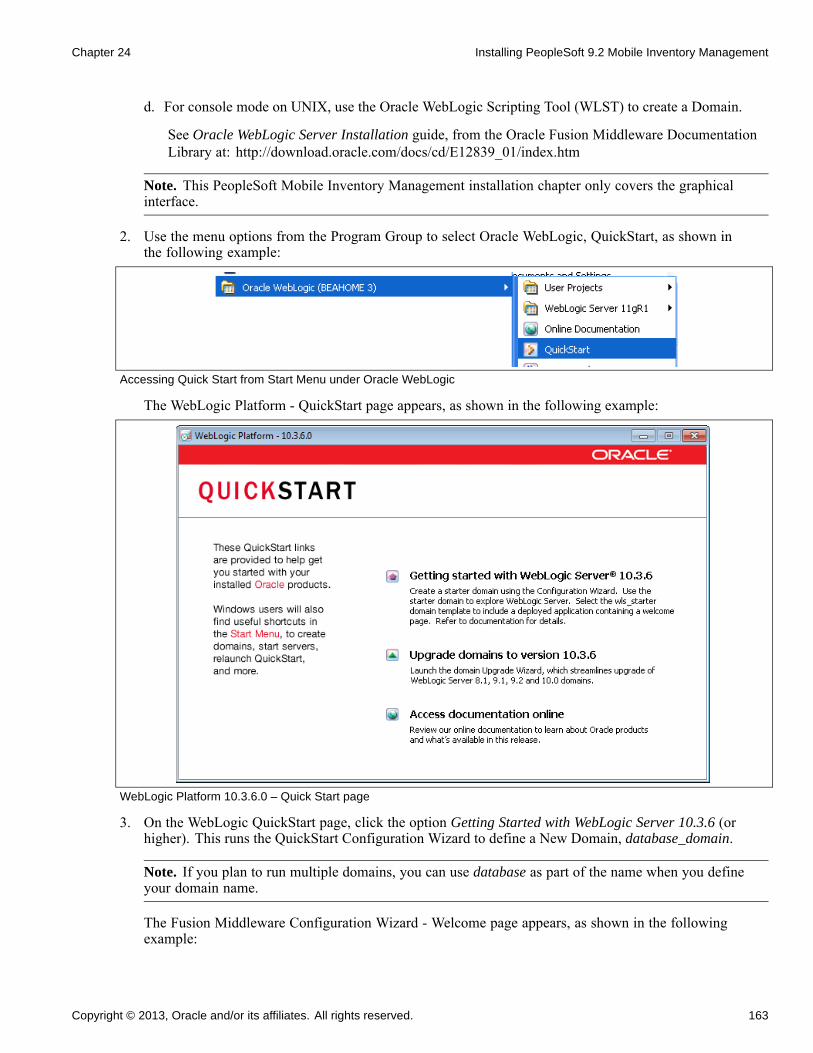
Chapter 24 Installing PeopleSoft 9.2 Mobile Inventory Management
d. For console mode on UNIX, use the Oracle WebLogic Scripting Tool (WLST) to create a Domain.
See Oracle WebLogic Server Installation guide, from the Oracle Fusion Middleware DocumentationLibrary at: http://download.oracle.com/docs/cd/E12839_01/index.htm
Note. This PeopleSoft Mobile Inventory Management installation chapter only covers the graphicalinterface.
2. Use the menu options from the Program Group to select Oracle WebLogic, QuickStart, as shown inthe following example:
Accessing Quick Start from Start Menu under Oracle WebLogic
The WebLogic Platform - QuickStart page appears, as shown in the following example:
WebLogic Platform 10.3.6.0 – Quick Start page
3. On the WebLogic QuickStart page, click the option Getting Started with WebLogic Server 10.3.6 (orhigher). This runs the QuickStart Configuration Wizard to define a New Domain, database_domain.
Note. If you plan to run multiple domains, you can use database as part of the name when you defineyour domain name.
The Fusion Middleware Configuration Wizard - Welcome page appears, as shown in the followingexample:
Copyright © 2013, Oracle and/or its affiliates. All rights reserved. 163

Installing PeopleSoft 9.2 Mobile Inventory Management Chapter 24
Fusion Middleware Configuration Wizard: Welcome page
4. On the Welcome page, select the option Create a new WebLogic domain. Click Next.
The Fusion Middleware Configuration Wizard - Select Domain Source page appears, as shown in thefollowing example:
164 Copyright © 2013, Oracle and/or its affiliates. All rights reserved.
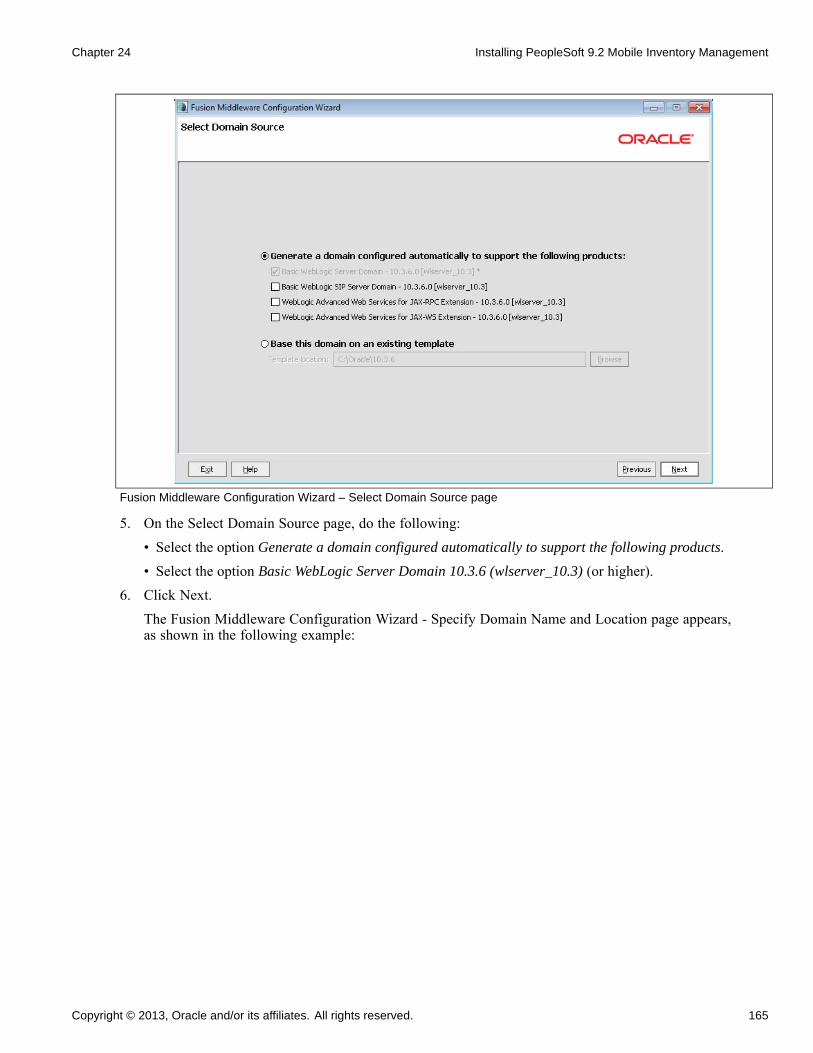
Chapter 24 Installing PeopleSoft 9.2 Mobile Inventory Management
Fusion Middleware Configuration Wizard – Select Domain Source page
5. On the Select Domain Source page, do the following:• Select the option Generate a domain configured automatically to support the following products.• Select the option Basic WebLogic Server Domain 10.3.6 (wlserver_10.3) (or higher).
6. Click Next.The Fusion Middleware Configuration Wizard - Specify Domain Name and Location page appears,as shown in the following example:
Copyright © 2013, Oracle and/or its affiliates. All rights reserved. 165
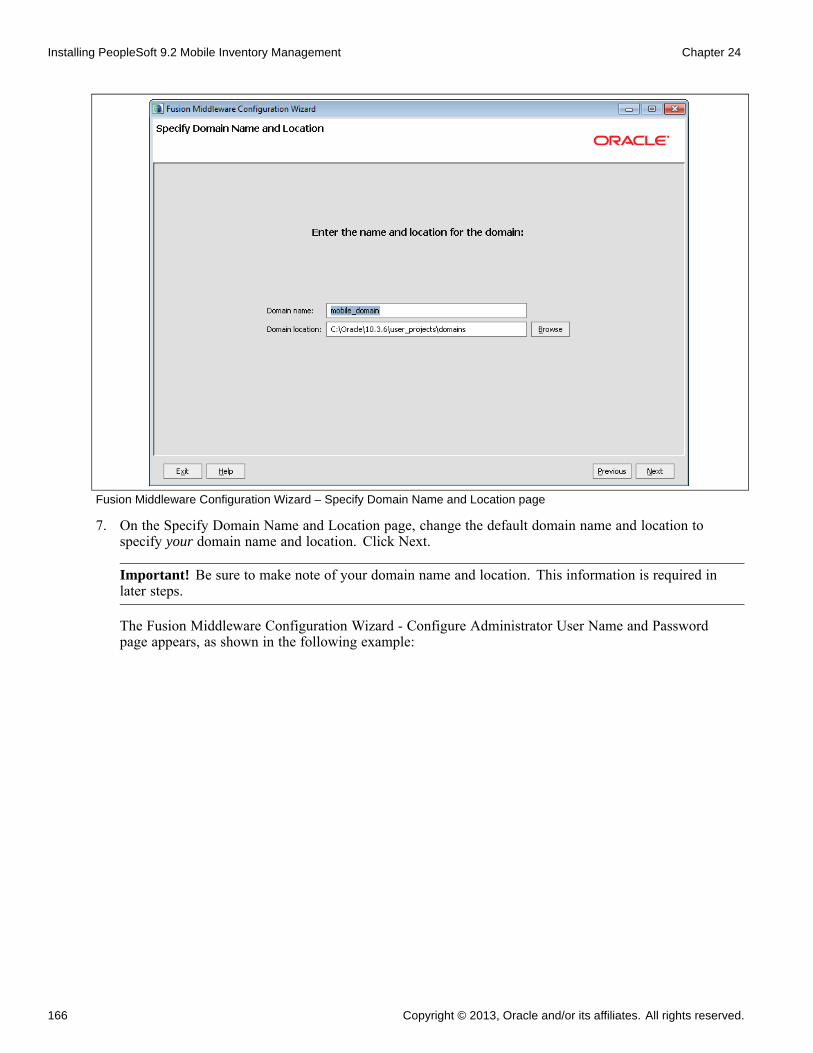
Installing PeopleSoft 9.2 Mobile Inventory Management Chapter 24
Fusion Middleware Configuration Wizard – Specify Domain Name and Location page
7. On the Specify Domain Name and Location page, change the default domain name and location tospecify your domain name and location. Click Next.
Important! Be sure to make note of your domain name and location. This information is required inlater steps.
The Fusion Middleware Configuration Wizard - Configure Administrator User Name and Passwordpage appears, as shown in the following example:
166 Copyright © 2013, Oracle and/or its affiliates. All rights reserved.

Chapter 24 Installing PeopleSoft 9.2 Mobile Inventory Management
Fusion Middleware Configuration Wizard – Configure Administrator User Name and Password page
8. On the Configure Administrator User Name and Password page, enter your user name and password.Click Next.The Fusion Middleware Configuration Wizard - Configure Server Start Mode and JDK page appears,as shown in the following example:
Copyright © 2013, Oracle and/or its affiliates. All rights reserved. 167

Installing PeopleSoft 9.2 Mobile Inventory Management Chapter 24
Fusion Middleware Configuration Wizard – Configure Server Start Mode and JDK page
Note. Make sure to select JDK7 during the mobile server domain creation. PeopleTools require JDK7 formobile authentication security. If JDK7 is not selected then users cannot login into mobile application afterthe deployment. The tools will fail to authenticate the user at the time of login.
9. On the Configure Server Start Mode and JDK page, accept the default options Development Mode andAvailable JDKs and click Next.The Fusion Middleware Configuration Wizard - Select Optional Configuration page appears, as shown inthe following example:
168 Copyright © 2013, Oracle and/or its affiliates. All rights reserved.
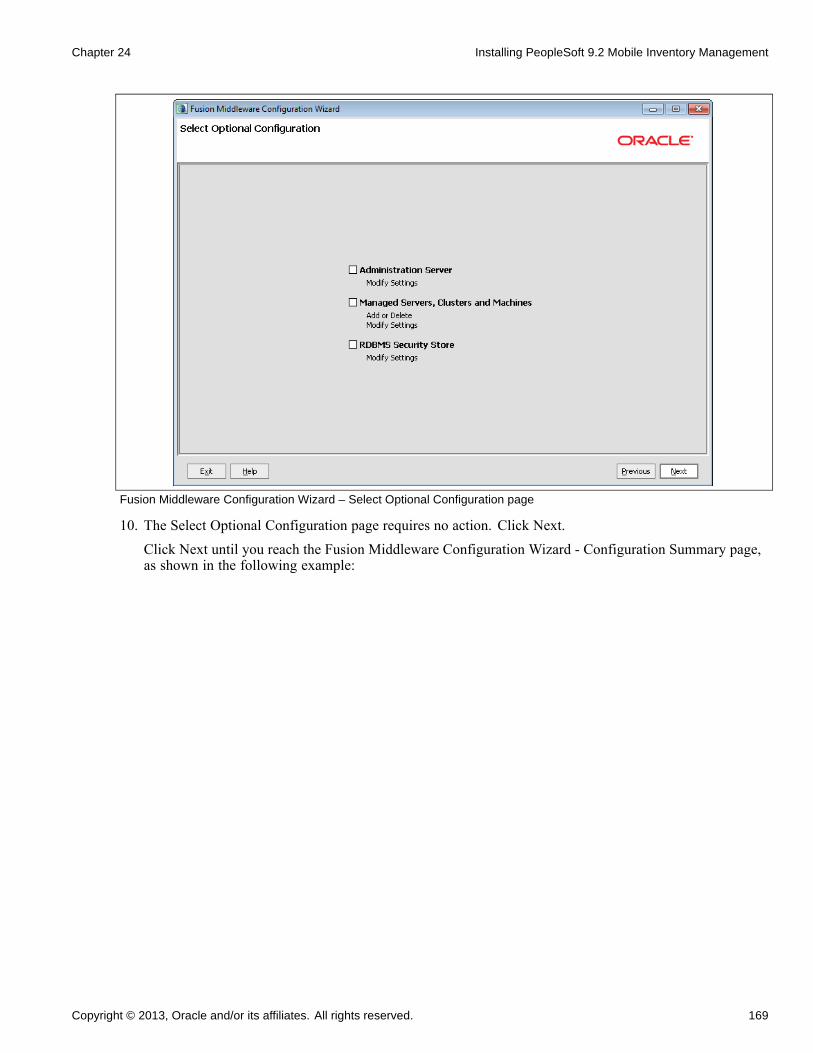
Chapter 24 Installing PeopleSoft 9.2 Mobile Inventory Management
Fusion Middleware Configuration Wizard – Select Optional Configuration page
10. The Select Optional Configuration page requires no action. Click Next.Click Next until you reach the Fusion Middleware Configuration Wizard - Configuration Summary page,as shown in the following example:
Copyright © 2013, Oracle and/or its affiliates. All rights reserved. 169
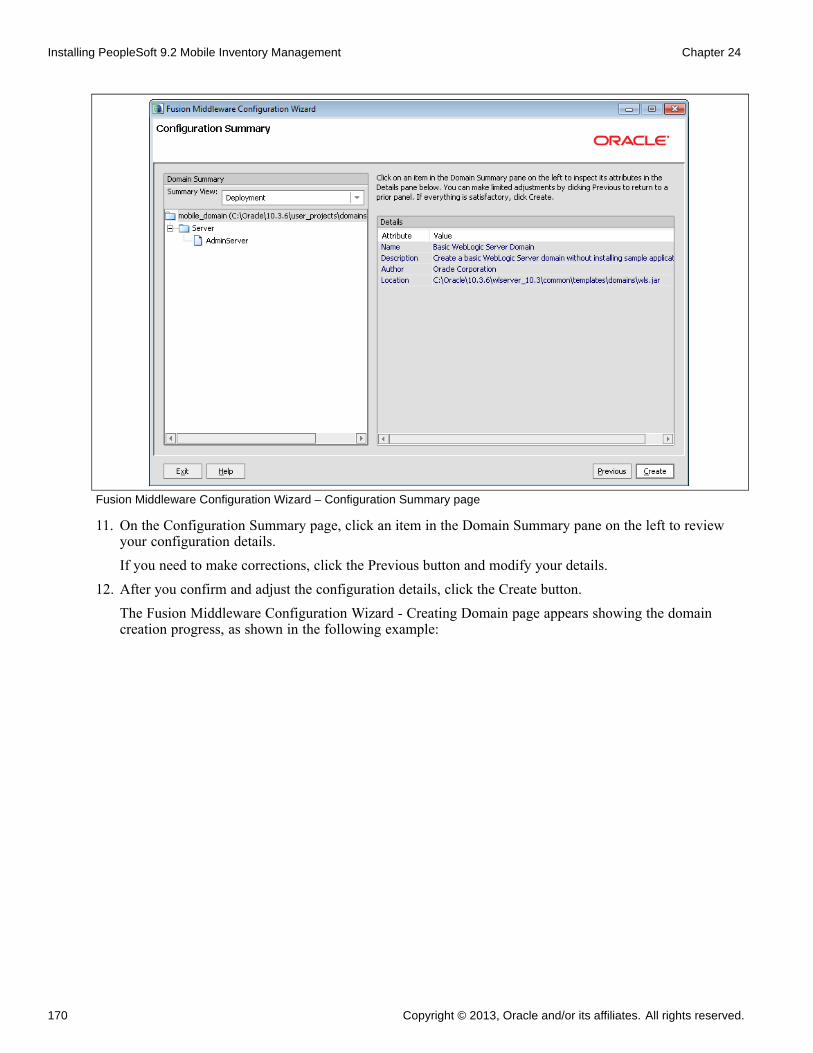
Installing PeopleSoft 9.2 Mobile Inventory Management Chapter 24
Fusion Middleware Configuration Wizard – Configuration Summary page
11. On the Configuration Summary page, click an item in the Domain Summary pane on the left to reviewyour configuration details.If you need to make corrections, click the Previous button and modify your details.
12. After you confirm and adjust the configuration details, click the Create button.The Fusion Middleware Configuration Wizard - Creating Domain page appears showing the domaincreation progress, as shown in the following example:
170 Copyright © 2013, Oracle and/or its affiliates. All rights reserved.
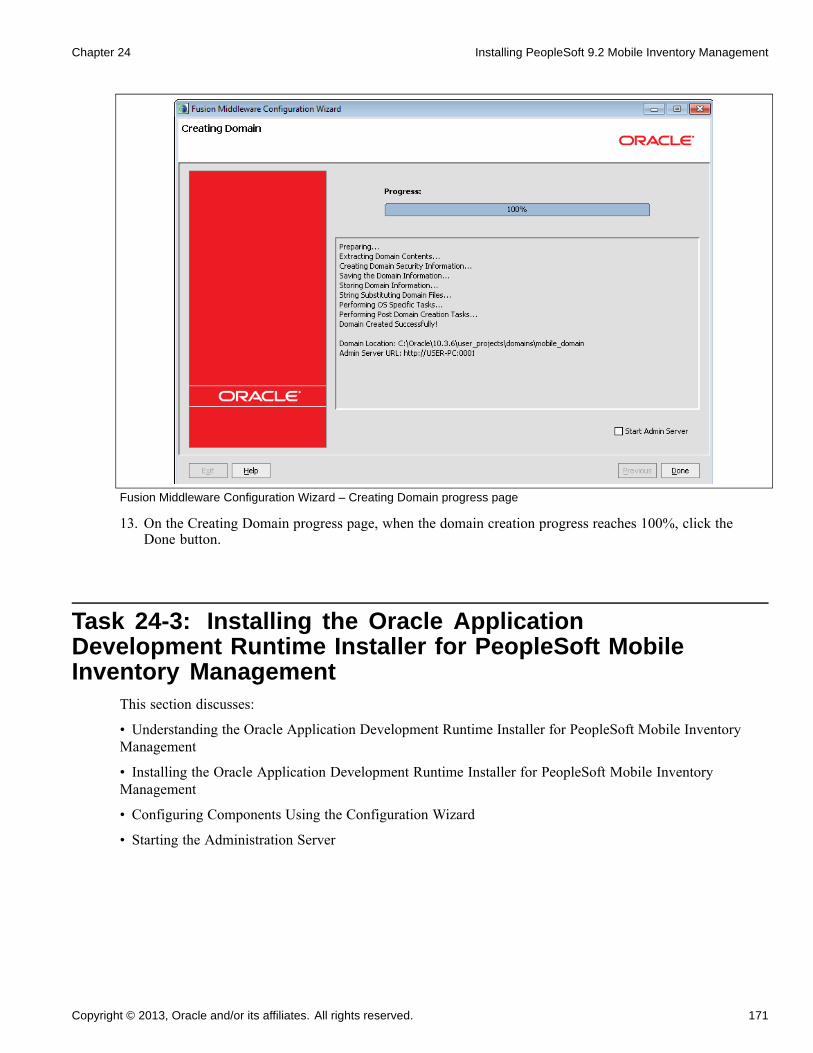
Chapter 24 Installing PeopleSoft 9.2 Mobile Inventory Management
Fusion Middleware Configuration Wizard – Creating Domain progress page
13. On the Creating Domain progress page, when the domain creation progress reaches 100%, click theDone button.
Task 24-3: Installing the Oracle ApplicationDevelopment Runtime Installer for PeopleSoft MobileInventory Management
This section discusses:
• Understanding the Oracle Application Development Runtime Installer for PeopleSoft Mobile InventoryManagement
• Installing the Oracle Application Development Runtime Installer for PeopleSoft Mobile InventoryManagement
• Configuring Components Using the Configuration Wizard
• Starting the Administration Server
Copyright © 2013, Oracle and/or its affiliates. All rights reserved. 171
Installing PeopleSoft 9.2 Mobile Inventory Management Chapter 24
Understanding the Oracle Application Development RuntimeInstaller for PeopleSoft Mobile Inventory ManagementThis task discusses the Oracle Application Development Runtime Installer for use with PeopleSoft MobileInventory Management. You must configure and activate the Oracle WebLogic Server to pass data betweenPeopleSoft and the mobile devices. Refer to the earlier task “Installing the Oracle WebLogic Server forMobile.”
Note. Oracle Application Development Runtime Installer requires a graphical environment. To run theinstallation program in graphical mode, the console attached to the machine on which you are installing thesoftware must support a Java-based GUI. All consoles for Microsoft Windows systems support Java-basedGUIs, but not all consoles for UNIX systems do.
The system requires a Java-enabled web server to extend the PeopleSoft architecture to the internet andintranet. When you install the PeopleSoft Pure Internet Architecture on the web server, you install a collectionof PeopleSoft Java servlets that handle a wide range of PeopleSoft transactions originating from the internetor intranet. PeopleSoft PeopleTools provides and supports the Oracle WebLogic Server for use within yourPeopleSoft implementation.
Oracle WebLogic is a server software application that runs on a middle-tier between back-end databases (inthis case, the PeopleSoft database) and related applications and browser-based thin clients (in this case, mobiledevices). The Oracle WebLogic Server supports the Oracle Application Development Runtime and theApplication Developer Mobile browser that extends Oracle Application Development Runtime to browsersrunning on mobile devices. The following steps detail a general installation of the Oracle ApplicationDevelopment Runtime for PeopleSoft Mobile Inventory Management.
Note. You only install the Oracle Application Development Runtime one time per Oracle WebLogic Serverinstallation.
Task 24-3-1: Installing the Oracle Application DevelopmentRuntime Installer for PeopleSoft Mobile Inventory ManagementTo install the Oracle Application Development Runtime Installer for PeopleSoft Mobile InventoryManagement:
Note. You can access the complete installation guide for the Oracle Application Developer 11.1.1.6(orhigher) from the Oracle Fusion Middleware Documentation Library at: http://download.oracle.com/docs/cd/E12839_01/index.htm
1. Download the Oracle Application Development Runtime Installer from the Oracle Technology Network.Access the Oracle Technology Network at http://www.oracle.com/technetwork/index.html, selectDownloads, JDeveloper and ADF, and then in the “Oracle Application Development Runtime Installer”section (on that page) click the Download link.
See “Accessing Installation Files”2. Start the installer by going to the directory where you unpacked the archive file and switch to the Disk1
directory.• On UNIX operating systems:cd unpacked_archive_directory/Disk1 ./runInstaller -jreLoc JRE_LOCATION
172 Copyright © 2013, Oracle and/or its affiliates. All rights reserved.
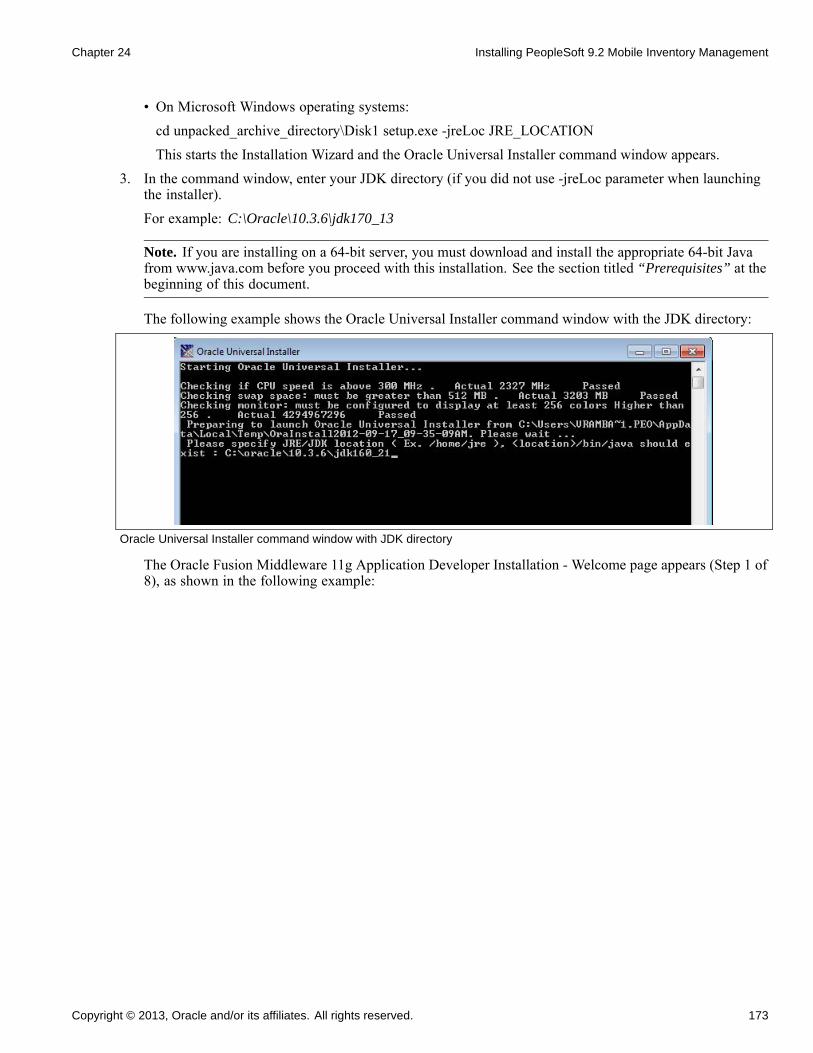
Chapter 24 Installing PeopleSoft 9.2 Mobile Inventory Management
• On Microsoft Windows operating systems:cd unpacked_archive_directory\Disk1 setup.exe -jreLoc JRE_LOCATIONThis starts the Installation Wizard and the Oracle Universal Installer command window appears.
3. In the command window, enter your JDK directory (if you did not use -jreLoc parameter when launchingthe installer).For example: C:\Oracle\10.3.6\jdk170_13
Note. If you are installing on a 64-bit server, you must download and install the appropriate 64-bit Javafrom www.java.com before you proceed with this installation. See the section titled “Prerequisites” at thebeginning of this document.
The following example shows the Oracle Universal Installer command window with the JDK directory:
Oracle Universal Installer command window with JDK directory
The Oracle Fusion Middleware 11g Application Developer Installation - Welcome page appears (Step 1 of8), as shown in the following example:
Copyright © 2013, Oracle and/or its affiliates. All rights reserved. 173
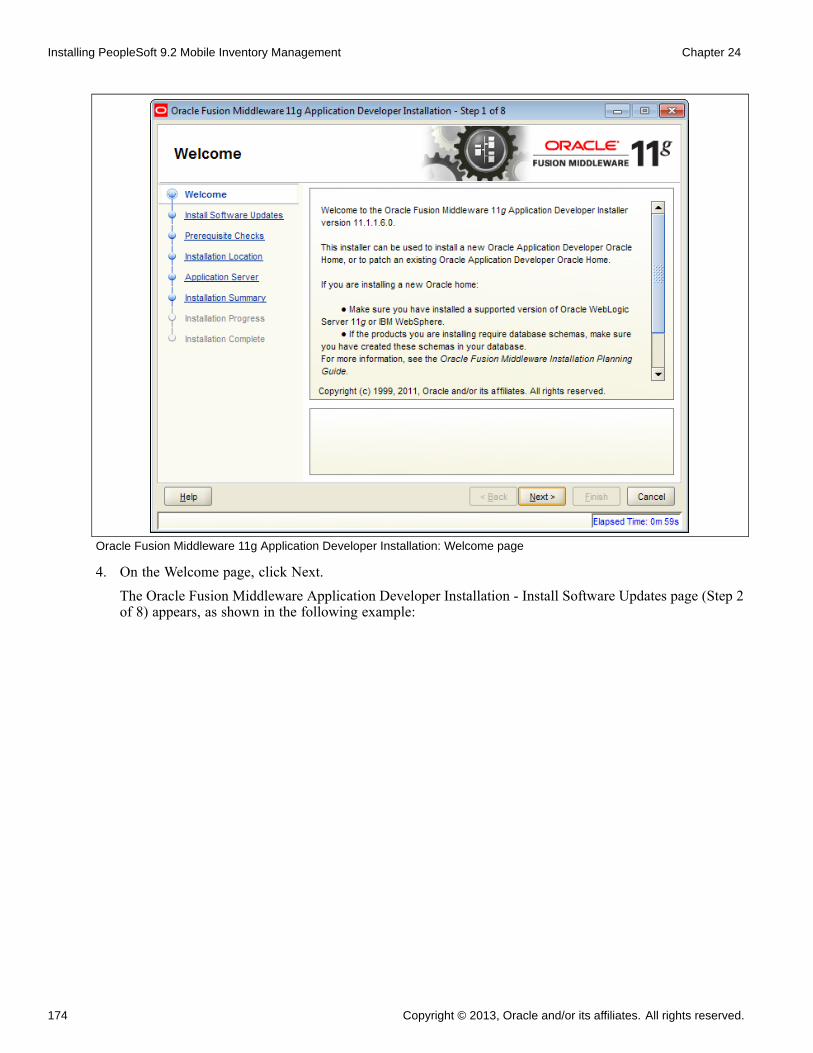
Installing PeopleSoft 9.2 Mobile Inventory Management Chapter 24
Oracle Fusion Middleware 11g Application Developer Installation: Welcome page
4. On the Welcome page, click Next.The Oracle Fusion Middleware Application Developer Installation - Install Software Updates page (Step 2of 8) appears, as shown in the following example:
174 Copyright © 2013, Oracle and/or its affiliates. All rights reserved.
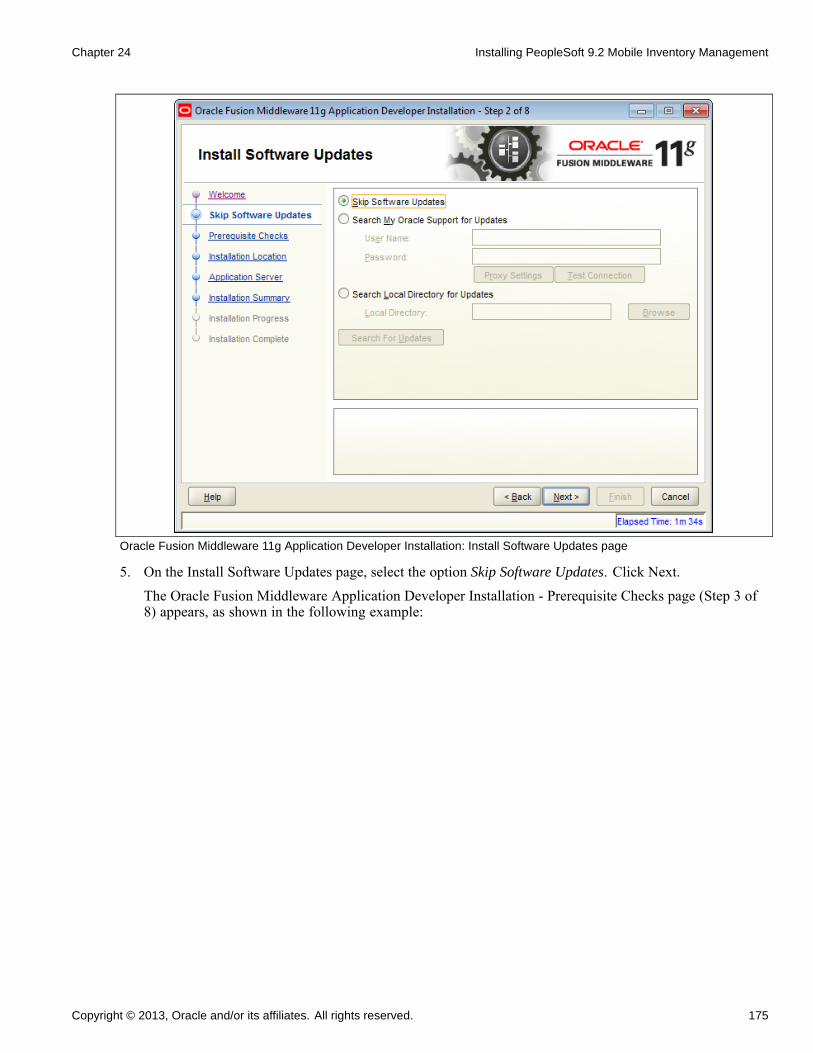
Chapter 24 Installing PeopleSoft 9.2 Mobile Inventory Management
Oracle Fusion Middleware 11g Application Developer Installation: Install Software Updates page
5. On the Install Software Updates page, select the option Skip Software Updates. Click Next.The Oracle Fusion Middleware Application Developer Installation - Prerequisite Checks page (Step 3 of8) appears, as shown in the following example:
Copyright © 2013, Oracle and/or its affiliates. All rights reserved. 175
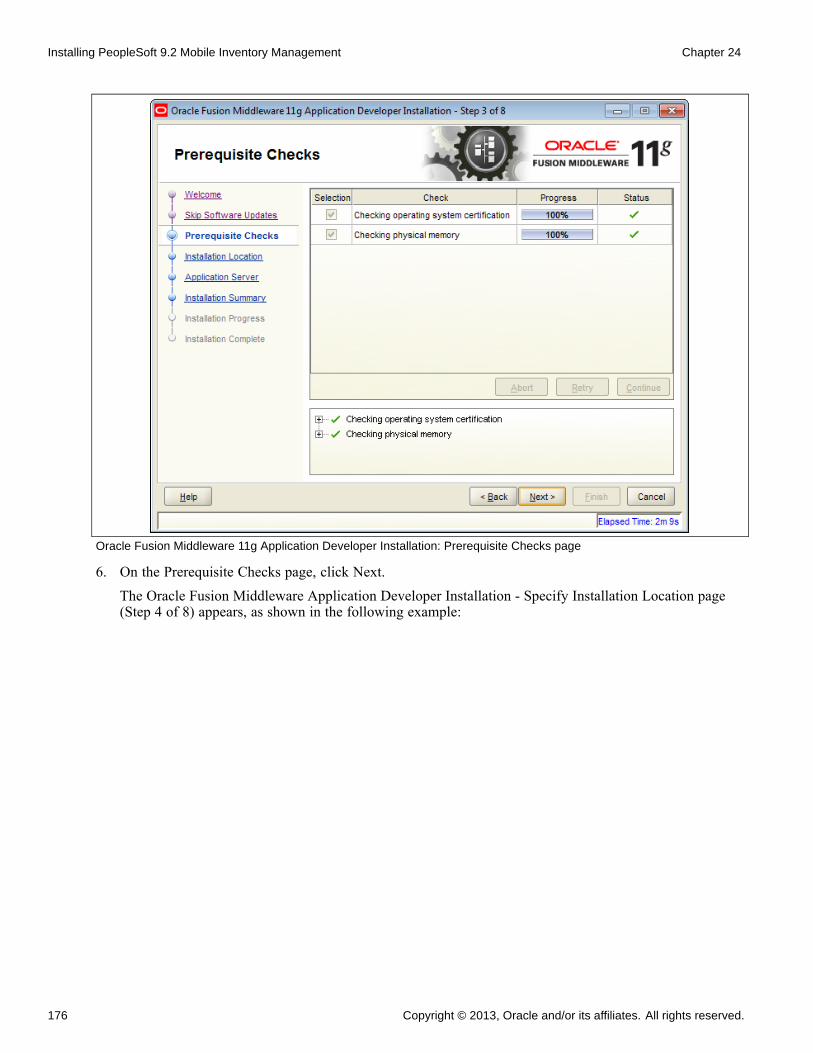
Installing PeopleSoft 9.2 Mobile Inventory Management Chapter 24
Oracle Fusion Middleware 11g Application Developer Installation: Prerequisite Checks page
6. On the Prerequisite Checks page, click Next.The Oracle Fusion Middleware Application Developer Installation - Specify Installation Location page(Step 4 of 8) appears, as shown in the following example:
176 Copyright © 2013, Oracle and/or its affiliates. All rights reserved.
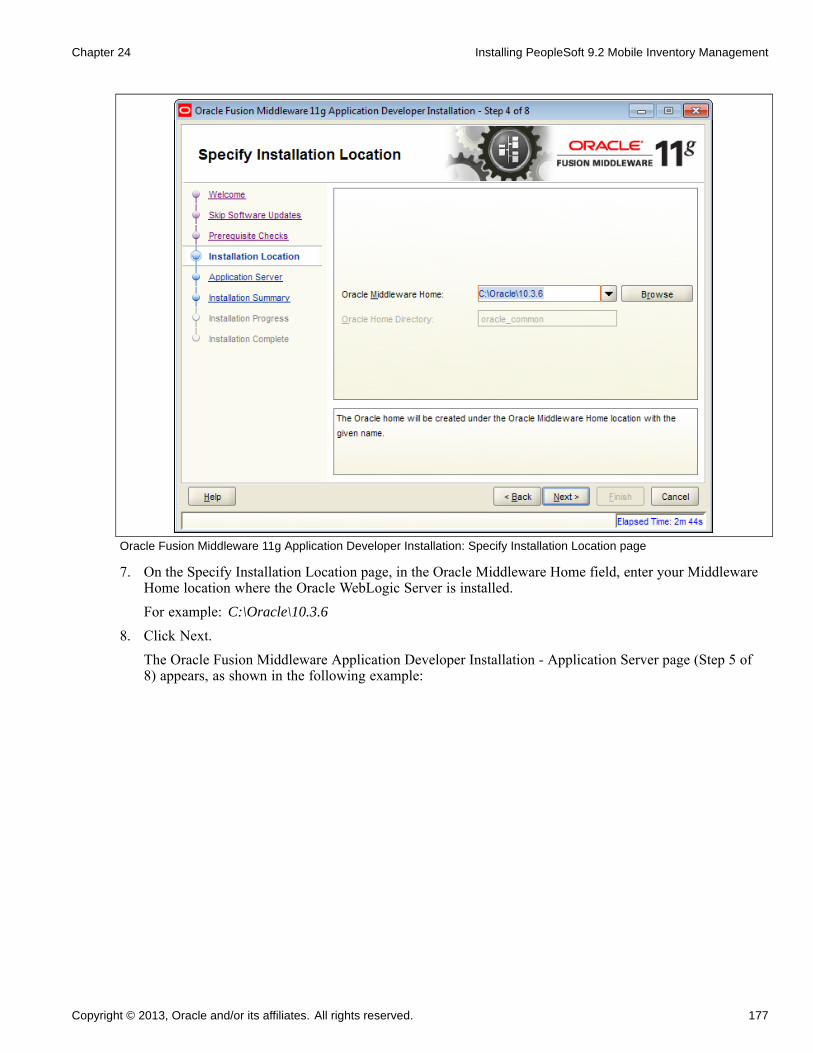
Chapter 24 Installing PeopleSoft 9.2 Mobile Inventory Management
Oracle Fusion Middleware 11g Application Developer Installation: Specify Installation Location page
7. On the Specify Installation Location page, in the Oracle Middleware Home field, enter your MiddlewareHome location where the Oracle WebLogic Server is installed.For example: C:\Oracle\10.3.6
8. Click Next.The Oracle Fusion Middleware Application Developer Installation - Application Server page (Step 5 of8) appears, as shown in the following example:
Copyright © 2013, Oracle and/or its affiliates. All rights reserved. 177
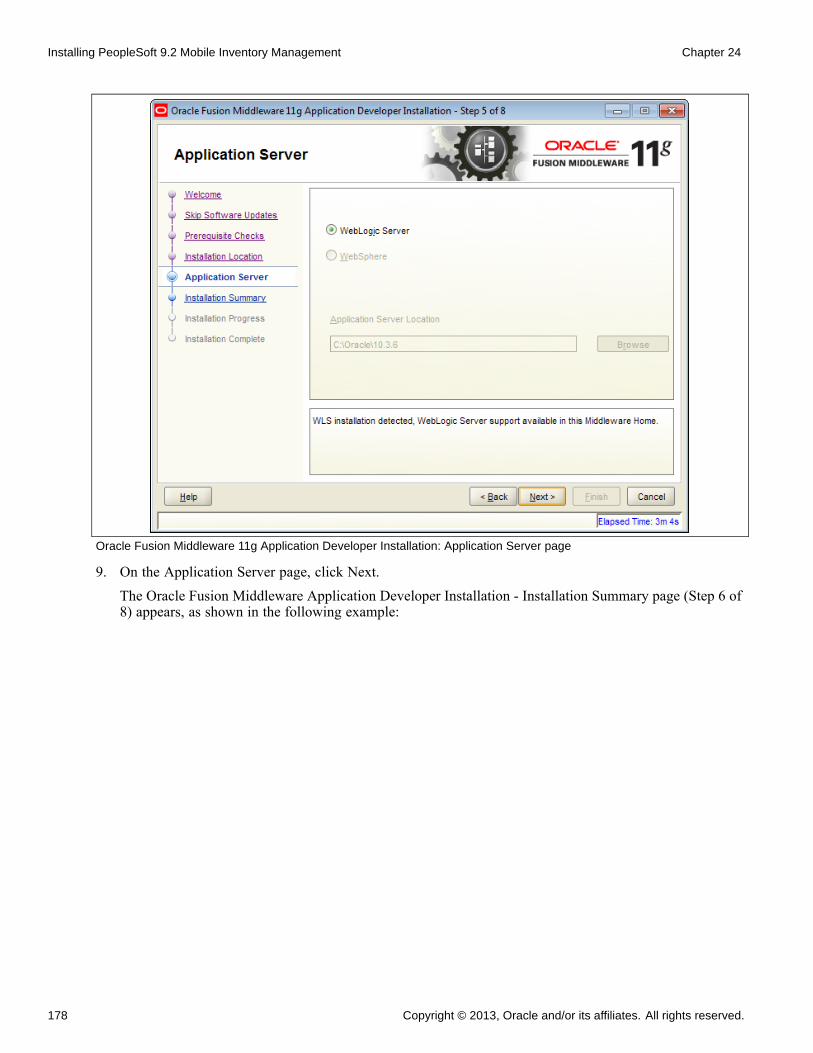
Installing PeopleSoft 9.2 Mobile Inventory Management Chapter 24
Oracle Fusion Middleware 11g Application Developer Installation: Application Server page
9. On the Application Server page, click Next.The Oracle Fusion Middleware Application Developer Installation - Installation Summary page (Step 6 of8) appears, as shown in the following example:
178 Copyright © 2013, Oracle and/or its affiliates. All rights reserved.
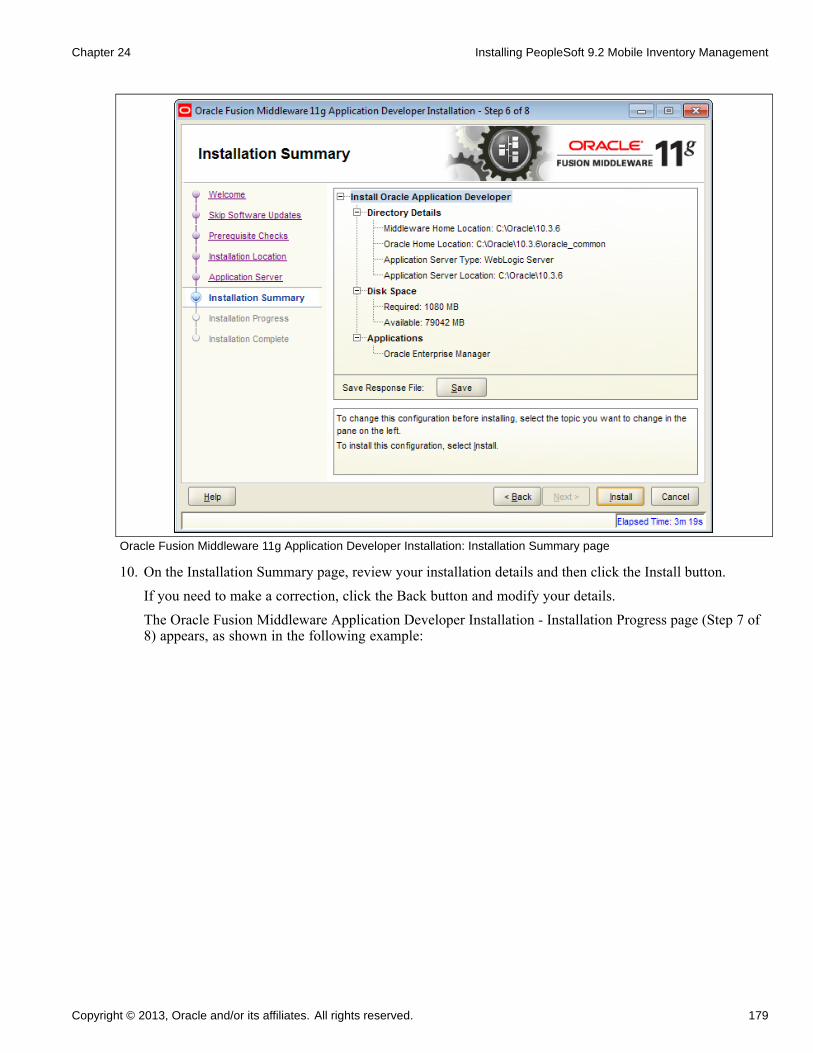
Chapter 24 Installing PeopleSoft 9.2 Mobile Inventory Management
Oracle Fusion Middleware 11g Application Developer Installation: Installation Summary page
10. On the Installation Summary page, review your installation details and then click the Install button.If you need to make a correction, click the Back button and modify your details.The Oracle Fusion Middleware Application Developer Installation - Installation Progress page (Step 7 of8) appears, as shown in the following example:
Copyright © 2013, Oracle and/or its affiliates. All rights reserved. 179
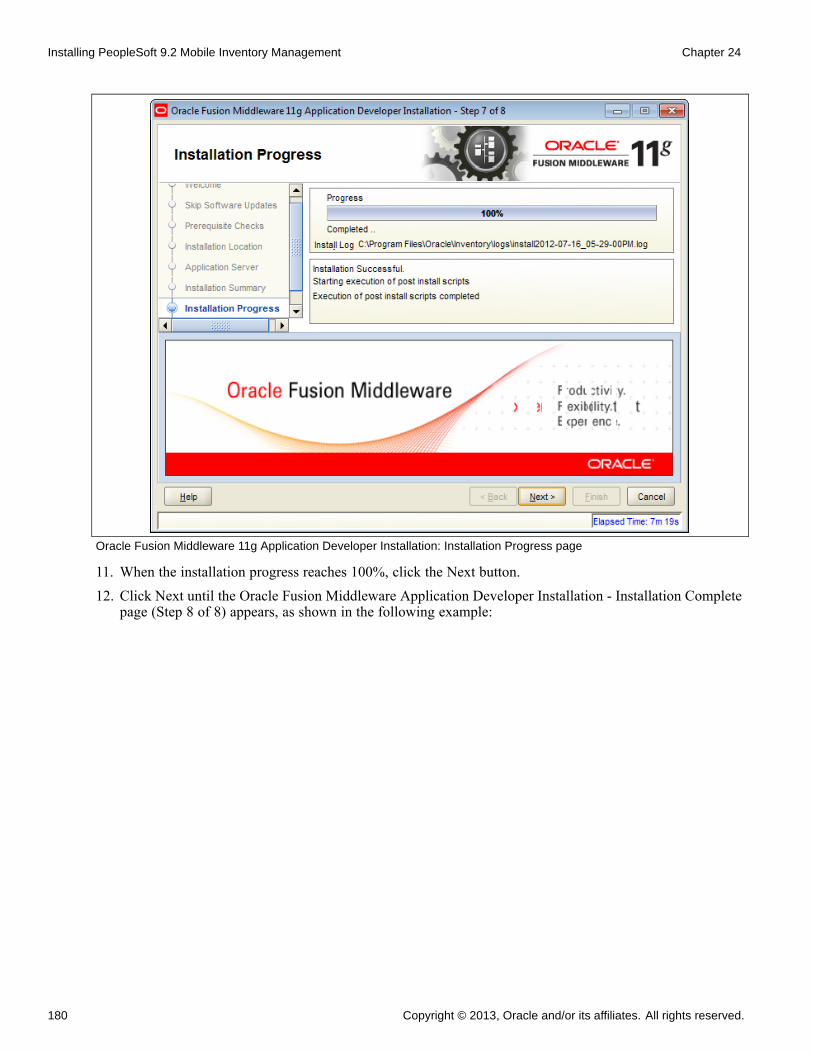
Installing PeopleSoft 9.2 Mobile Inventory Management Chapter 24
Oracle Fusion Middleware 11g Application Developer Installation: Installation Progress page
11. When the installation progress reaches 100%, click the Next button.12. Click Next until the Oracle Fusion Middleware Application Developer Installation - Installation Complete
page (Step 8 of 8) appears, as shown in the following example:
180 Copyright © 2013, Oracle and/or its affiliates. All rights reserved.
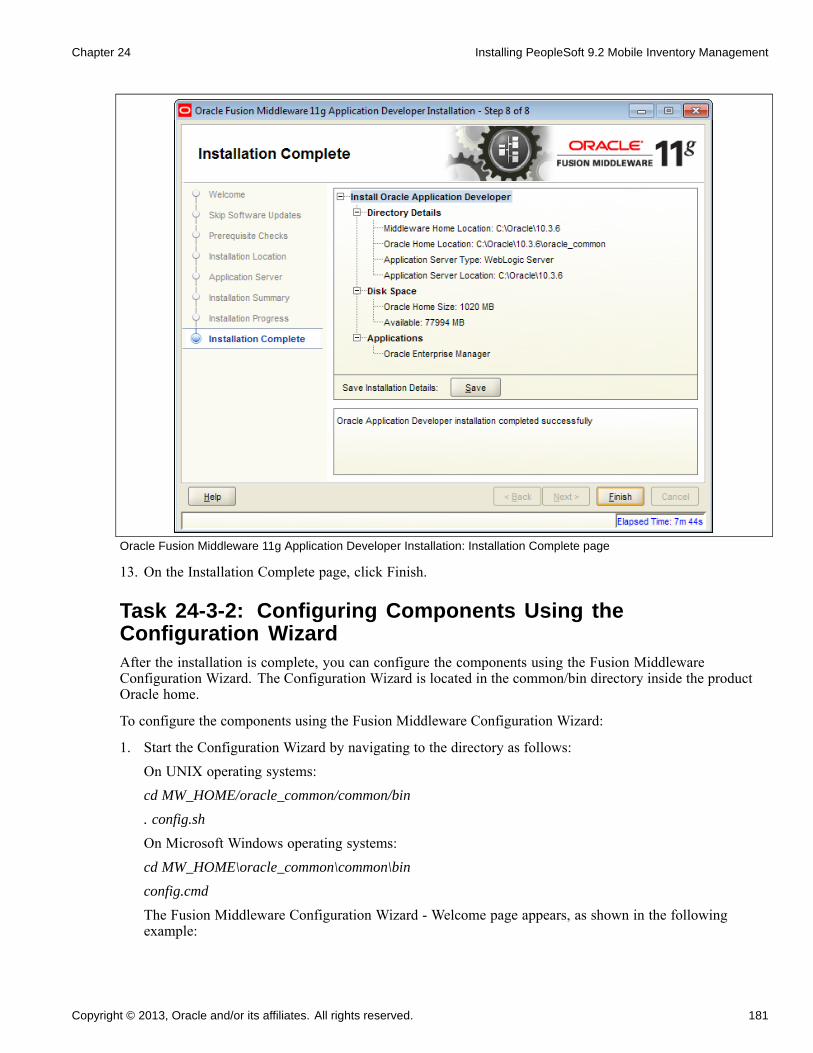
Chapter 24 Installing PeopleSoft 9.2 Mobile Inventory Management
Oracle Fusion Middleware 11g Application Developer Installation: Installation Complete page
13. On the Installation Complete page, click Finish.
Task 24-3-2: Configuring Components Using theConfiguration WizardAfter the installation is complete, you can configure the components using the Fusion MiddlewareConfiguration Wizard. The Configuration Wizard is located in the common/bin directory inside the productOracle home.
To configure the components using the Fusion Middleware Configuration Wizard:
1. Start the Configuration Wizard by navigating to the directory as follows:On UNIX operating systems:cd MW_HOME/oracle_common/common/bin
. config.sh
On Microsoft Windows operating systems:cd MW_HOME\oracle_common\common\bin
config.cmd
The Fusion Middleware Configuration Wizard - Welcome page appears, as shown in the followingexample:
Copyright © 2013, Oracle and/or its affiliates. All rights reserved. 181
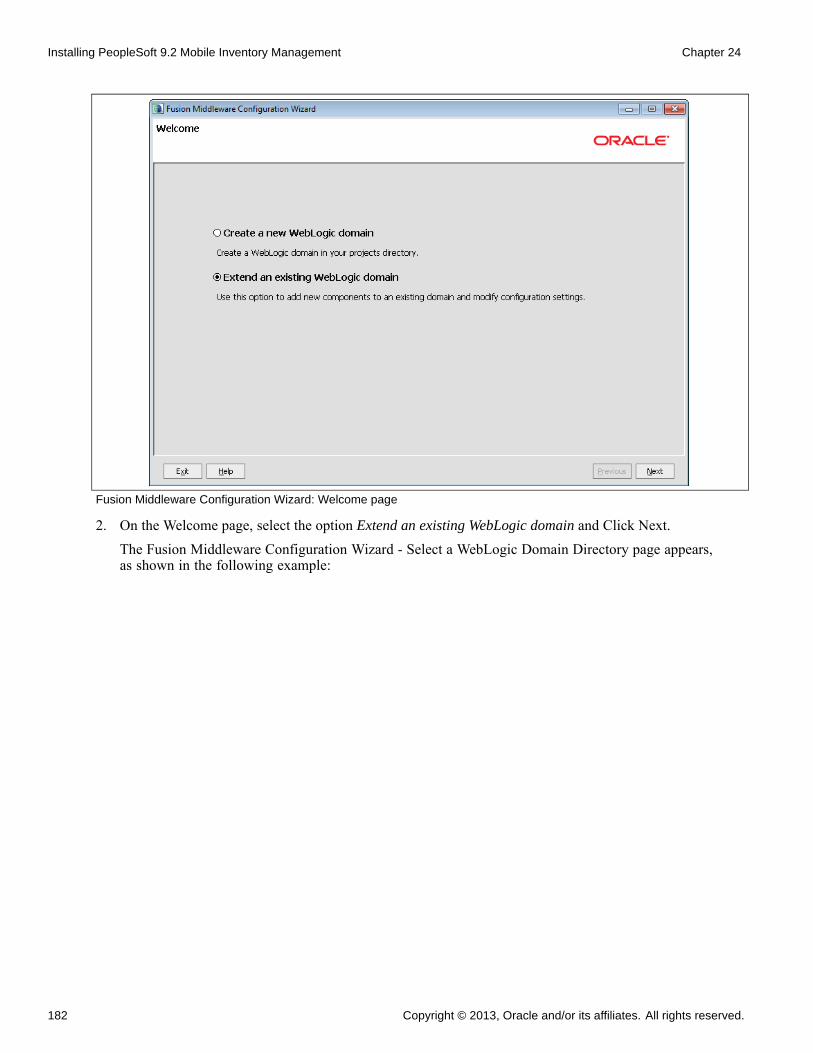
Installing PeopleSoft 9.2 Mobile Inventory Management Chapter 24
Fusion Middleware Configuration Wizard: Welcome page
2. On the Welcome page, select the option Extend an existing WebLogic domain and Click Next.The Fusion Middleware Configuration Wizard - Select a WebLogic Domain Directory page appears,as shown in the following example:
182 Copyright © 2013, Oracle and/or its affiliates. All rights reserved.
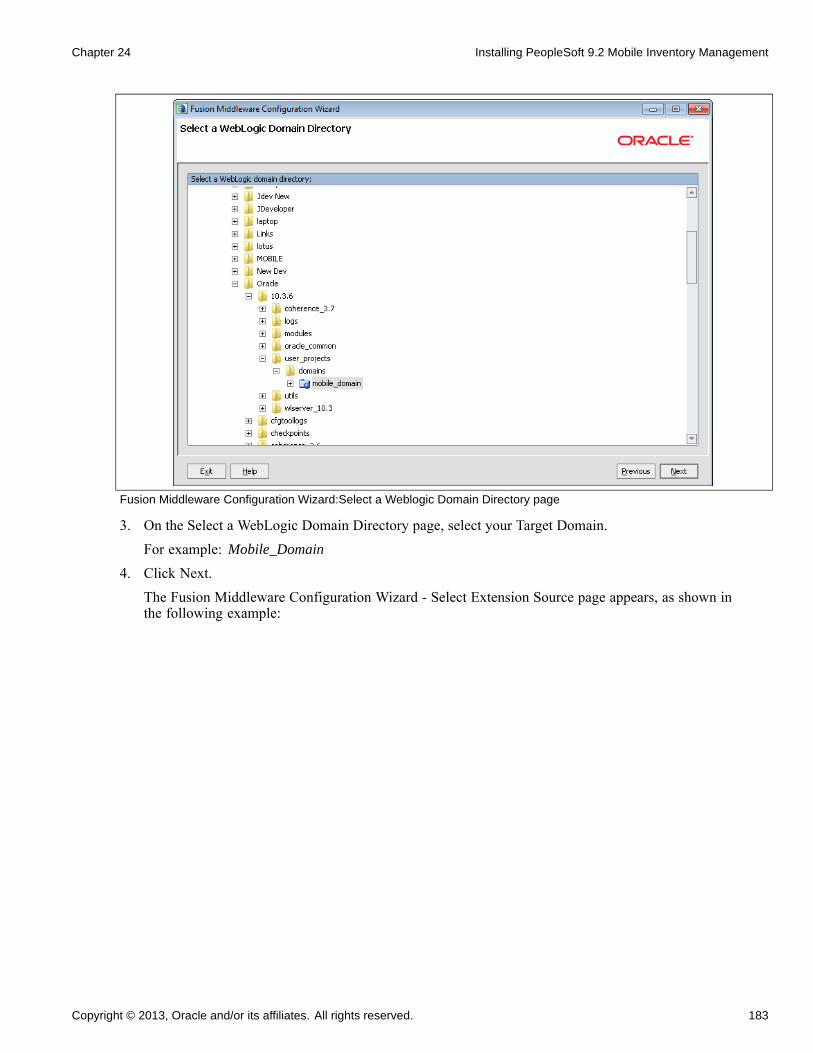
Chapter 24 Installing PeopleSoft 9.2 Mobile Inventory Management
Fusion Middleware Configuration Wizard:Select a Weblogic Domain Directory page
3. On the Select a WebLogic Domain Directory page, select your Target Domain.For example: Mobile_Domain
4. Click Next.The Fusion Middleware Configuration Wizard - Select Extension Source page appears, as shown inthe following example:
Copyright © 2013, Oracle and/or its affiliates. All rights reserved. 183
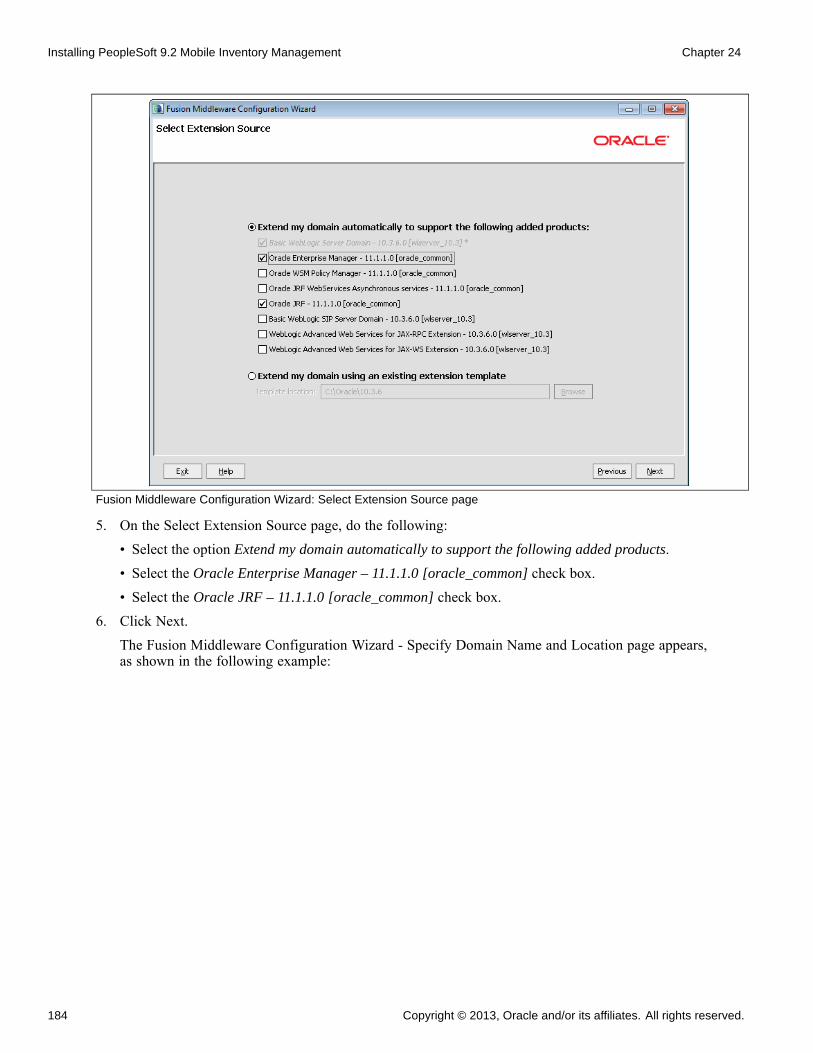
Installing PeopleSoft 9.2 Mobile Inventory Management Chapter 24
Fusion Middleware Configuration Wizard: Select Extension Source page
5. On the Select Extension Source page, do the following:• Select the option Extend my domain automatically to support the following added products.• Select the Oracle Enterprise Manager – 11.1.1.0 [oracle_common] check box.• Select the Oracle JRF – 11.1.1.0 [oracle_common] check box.
6. Click Next.The Fusion Middleware Configuration Wizard - Specify Domain Name and Location page appears,as shown in the following example:
184 Copyright © 2013, Oracle and/or its affiliates. All rights reserved.
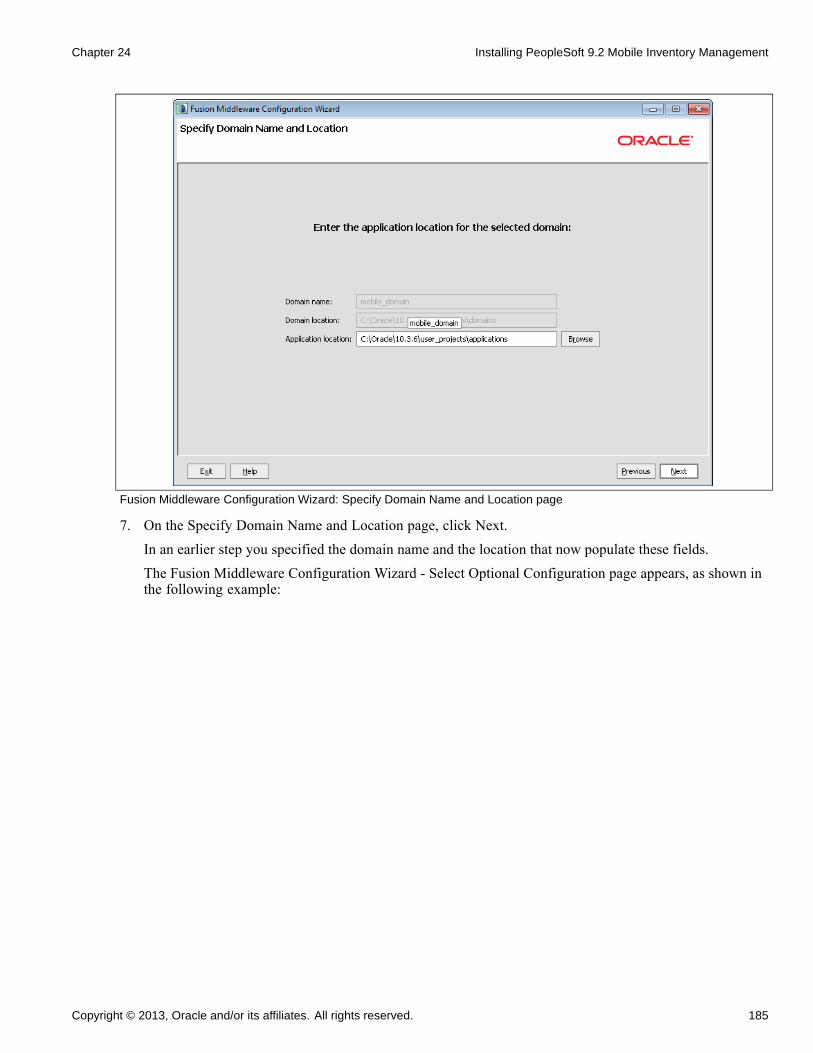
Chapter 24 Installing PeopleSoft 9.2 Mobile Inventory Management
Fusion Middleware Configuration Wizard: Specify Domain Name and Location page
7. On the Specify Domain Name and Location page, click Next.In an earlier step you specified the domain name and the location that now populate these fields.The Fusion Middleware Configuration Wizard - Select Optional Configuration page appears, as shown inthe following example:
Copyright © 2013, Oracle and/or its affiliates. All rights reserved. 185
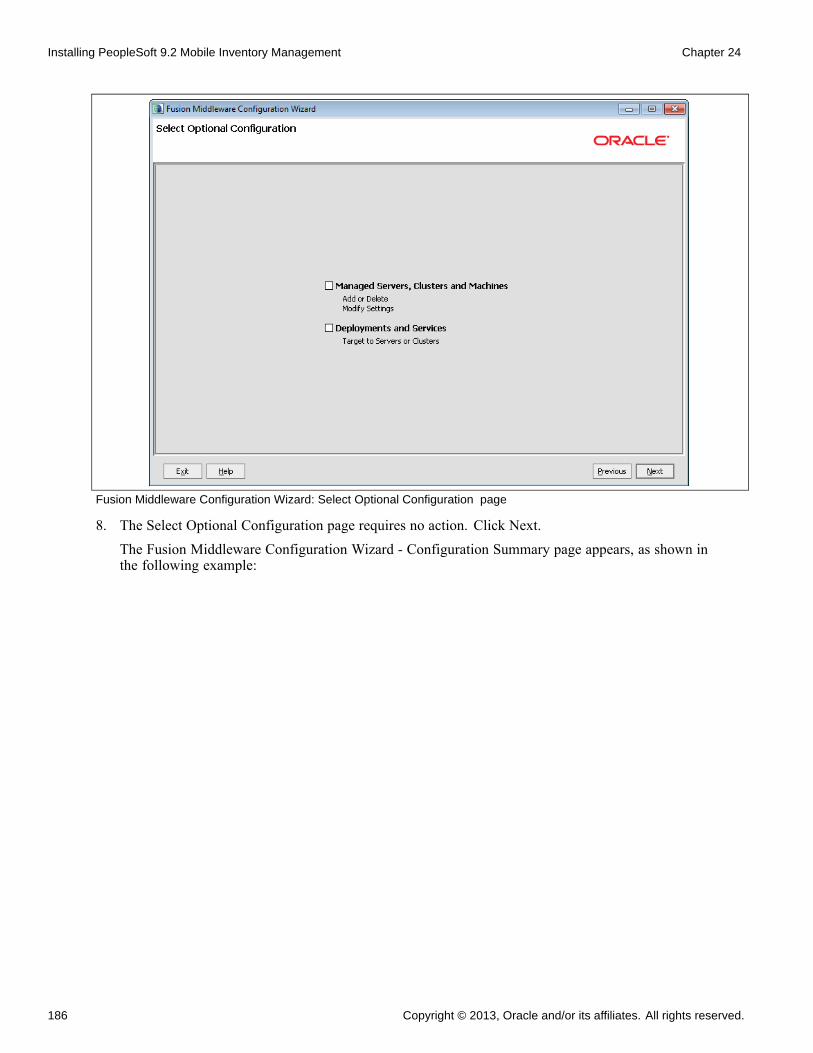
Installing PeopleSoft 9.2 Mobile Inventory Management Chapter 24
Fusion Middleware Configuration Wizard: Select Optional Configuration page
8. The Select Optional Configuration page requires no action. Click Next.The Fusion Middleware Configuration Wizard - Configuration Summary page appears, as shown inthe following example:
186 Copyright © 2013, Oracle and/or its affiliates. All rights reserved.
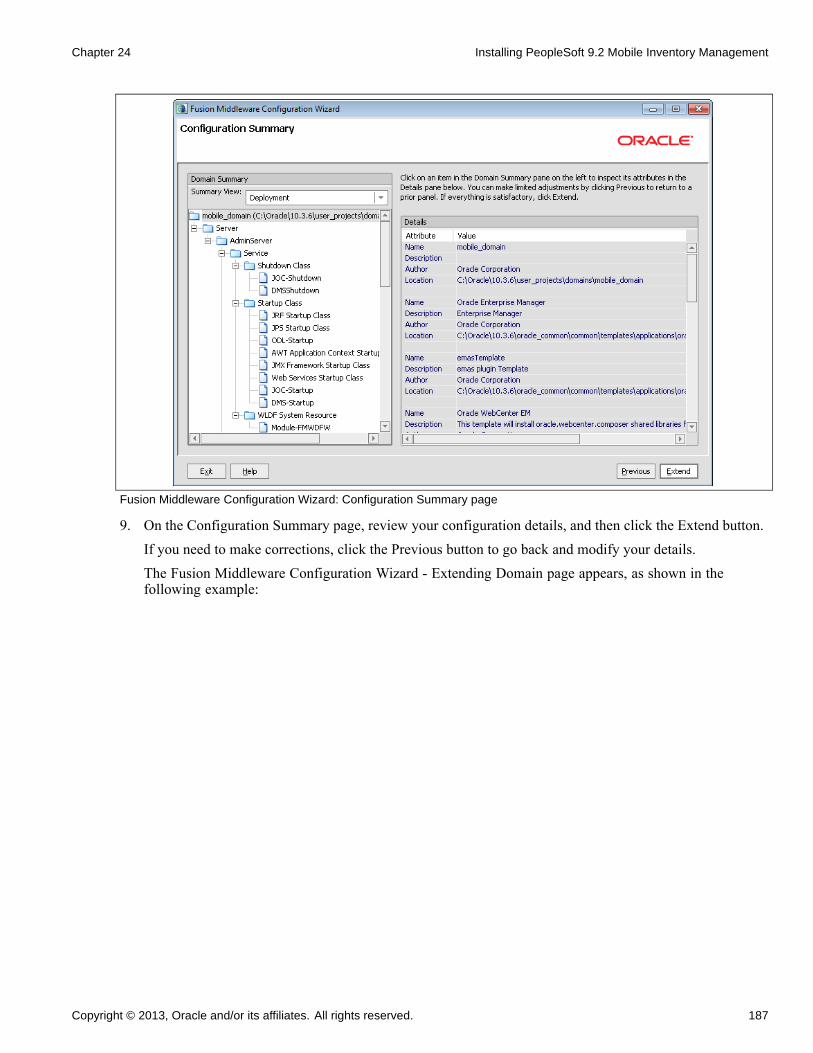
Chapter 24 Installing PeopleSoft 9.2 Mobile Inventory Management
Fusion Middleware Configuration Wizard: Configuration Summary page
9. On the Configuration Summary page, review your configuration details, and then click the Extend button.If you need to make corrections, click the Previous button to go back and modify your details.The Fusion Middleware Configuration Wizard - Extending Domain page appears, as shown in thefollowing example:
Copyright © 2013, Oracle and/or its affiliates. All rights reserved. 187
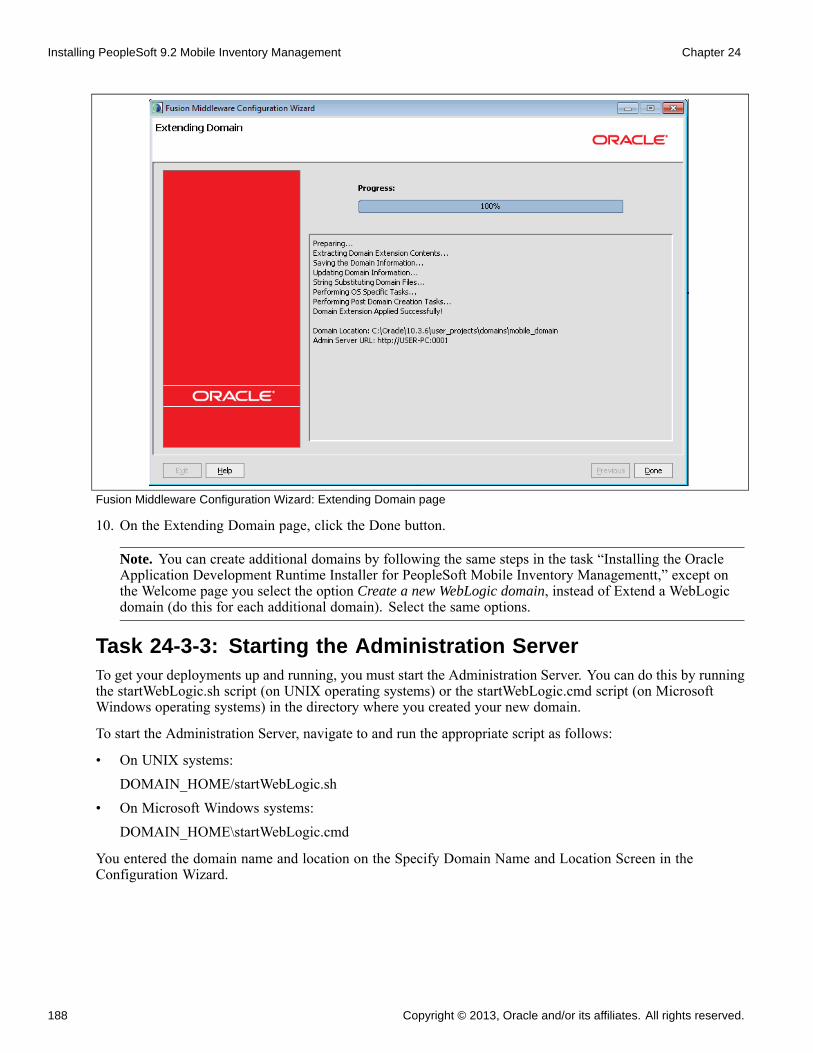
Installing PeopleSoft 9.2 Mobile Inventory Management Chapter 24
Fusion Middleware Configuration Wizard: Extending Domain page
10. On the Extending Domain page, click the Done button.
Note. You can create additional domains by following the same steps in the task “Installing the OracleApplication Development Runtime Installer for PeopleSoft Mobile Inventory Managementt,” except onthe Welcome page you select the option Create a new WebLogic domain, instead of Extend a WebLogicdomain (do this for each additional domain). Select the same options.
Task 24-3-3: Starting the Administration ServerTo get your deployments up and running, you must start the Administration Server. You can do this by runningthe startWebLogic.sh script (on UNIX operating systems) or the startWebLogic.cmd script (on MicrosoftWindows operating systems) in the directory where you created your new domain.
To start the Administration Server, navigate to and run the appropriate script as follows:
• On UNIX systems:DOMAIN_HOME/startWebLogic.sh
• On Microsoft Windows systems:DOMAIN_HOME\startWebLogic.cmd
You entered the domain name and location on the Specify Domain Name and Location Screen in theConfiguration Wizard.
188 Copyright © 2013, Oracle and/or its affiliates. All rights reserved.
Chapter 24 Installing PeopleSoft 9.2 Mobile Inventory Management
Task 24-4: Applying the PeopleSoft Mobile InventoryManagement Authentication Provider
This section discusses:
• Prerequisites
• Applying the PeopleSoft Mobile Inventory Management Authentication Provider
The PeopleSoft Authentication Provider authenticates a user name and password by connecting to a PeopleSoftApplication Server. With successful authentication, the system creates a Principal and Subject, identifying theauthorized use of a secure web server session. The system can use this subject to run a secure web session andprovide WS-Security parameters for subsequent calls to the PeopleSoft system.
PrerequisitesBefore you begin, verify that you meet the following requirements:
• Access to the wlPSFTSecurityProviders.jar file.The file location is in <PS_APP_HOME>\setup\oracle\adf\MobileInventory.The wlPSFTSecurityProviders.jar file can be found in the preceding directory location after you completethe Bundle 16 installation instructions that include the task titled “Installing PeopleSoft Mobile InventoryManagement.”
• Access to the psjoa.jar file.Oracle delivers the psjoa.jar file as part of PeopleSoft PeopleTools. This file must come from the versionof PeopleTools that is running your application server.For Microsoft Windows installations, this file is in the <PS_HOME>\web\psjoa\ subdirectory.For UNIX installations, this file is in the <PS_HOME>\appserv\classes\ subdirectory.
Task 24-4-1: Applying the PeopleSoft Mobile InventoryManagement Authentication Provider
Understanding Applying the PeopleSoft Mobile Inventory Management AuthenticationProvider
To apply the PeopleSoft Mobile Inventory Management Authentication Provider, you must perform thefollowing steps, specific to Microsoft Windows or UNIX, to copy the necessary .jar files and then add theauthentication provider to the security realm.
Copying the wlPSFTSecurityProviders.jar File
The PSFTSecurityProviders.jar file is a Managed Bean (Mbean). The Mbeans contain meta informationthat the Oracle WebLogic Server understands. All Mbeans that Oracle WebLogic uses are in the%WL_HOME%\server\lib\mbeantypes directory.
Note. The %WL_HOME% referred to here is <installation directory>+wlserver_10.3 directory, not theparent installation directory <installation directory>.
For example, c:\bea1036\wlserver_10.3
Copyright © 2013, Oracle and/or its affiliates. All rights reserved. 189
Installing PeopleSoft 9.2 Mobile Inventory Management Chapter 24
For Microsoft Windows:
Copy wlPSFTSecurityProviders.jar to %WL_HOME%\server\lib\mbeantypes
For UNIX:
Copy wlPSFTSecurityProviders.jar to ${WL_HOME}/server/lib/mbeantypes
Copying the PeopleSoft psjoa.jar File
The PeopleSoft PeopleTools library file psjoa.jar must be accessible to the mobile application that is runningon the Oracle WebLogic Server. The file psjoa is release dependent and must be the same PeopleSoftPeopleTools release as the version that you are running on the application server.
You must copy this jar file from your PS_HOME to the Mobile Inventory Oracle WebLogic Server and place itin the WL_HOME\server\lib\PeopleSoft\directory.
Important! Each time you apply maintenance, you must also replace the psjoa.jar file. For example, if thePeopleSoft PeopleTools release changes from 8.53.02 to 8.53.xx, you must copy a new version of the psjoa.jarfile to the Oracle WebLogic Server.
To copy the PeopleSoft psjoa.jar file to the %WL_HOME%\server\lib\PeopleSoft\directory, perform thefollowing steps specific to Microsoft Windows or UNIX:
1. Copy the psjoa.jar file to the WL_HOME\server\lib\PeopleSoft\ directory:For Microsoft Windows:
• Access your Mobile Inventory Oracle WebLogic Server.• Create a PeopleSoft directory under %WL_HOME%\server\lib\• Copy the psjoa.jar file from your PS_HOME\web\psjoa to %WL_HOME%\server\lib\PeopleSoft\
For UNIX:
(PS_HOME should be from a UNIX PeopleTools install)• Access your Oracle WebLogic Server for Mobile Inventory.• Create a PeopleSoft directory under %WL_HOME%/server/lib• Copy the psjoa.jar file from your PS_HOME/appserv/classes to ${WL_HOME}/server/lib/PeopleSoft/
2. Update the Weblogic classpath. This can be done for the entire Weblogic install or for the specific Domainwhere PeopleSoft Mobile Inventory is installed. For Microsoft Windows, you update the file ending in.cmd, for UNIX you update the file ending in .sh.For Microsoft Windows, update the file ending in .cmd:• Entire Weblogic: Update the file %WL_HOME%\common\bin\commEnv.cmd and prepend the followingto the WEBLOGIC_CLASSPATH environment variable.
%WL_HOME%\server\lib\PeopleSoft\psjoa.jar;
190 Copyright © 2013, Oracle and/or its affiliates. All rights reserved.
Chapter 24 Installing PeopleSoft 9.2 Mobile Inventory Management
• Specific Domain: Update the file domain_path\bin\setDomainEnv.cmd and prepend the preceding tothe PRE_CLASSPATH environment variable.The psjoa.jar file must be a fully qualified path.
Note. If there is no PRE_CLASSPATH variable, add it to the file.
For example, set PRE_CLASSPATH=%WL_HOME%\server\lib\PeopleSoft\psjoa.jar
For UNIX, update the file ending in .sh:• Entire Weblogic: Update the file %WL_HOME%/common/bin/commEnv.sh and prepend the following tothe WEBLOGIC_CLASSPATH environment variable.${WL_HOME}/server/lib/PeopleSoft/psjoa.jar${CLASSPATHSEP}
Important! For UNIX installations, be sure to update the file that ends in .sh and ensure that you prependthe WEBLOGIC CLASSPATH environment variable, {CLASSPATHSEP}, as shown in the precedingexample. Failure to do so will result in login failure when accessing the PeopleSoft system.
• Specific Domain: Update the file domain_path/bin/setDomainEnv.sh and prepend the preceding tothe PRE_CLASSPATH environment variable.
3. Restart the Oracle WebLogic Server and your domain for the changes to take affect.
Adding the PeopleSoft Authentication Provider to the Active Security Realm
To add the PeopleSoft Authentication Provider to the active Security Realm:
1. Log in to the Oracle WebLogic Server Administration Console.
a. In the browser instance, enter the location of the local host to start the Administration Console.
For example: http://localhost:7001/console
The Oracle WebLogic Server 11g Administration Console - Welcome and login page appears,as shown in the following example:
Copyright © 2013, Oracle and/or its affiliates. All rights reserved. 191
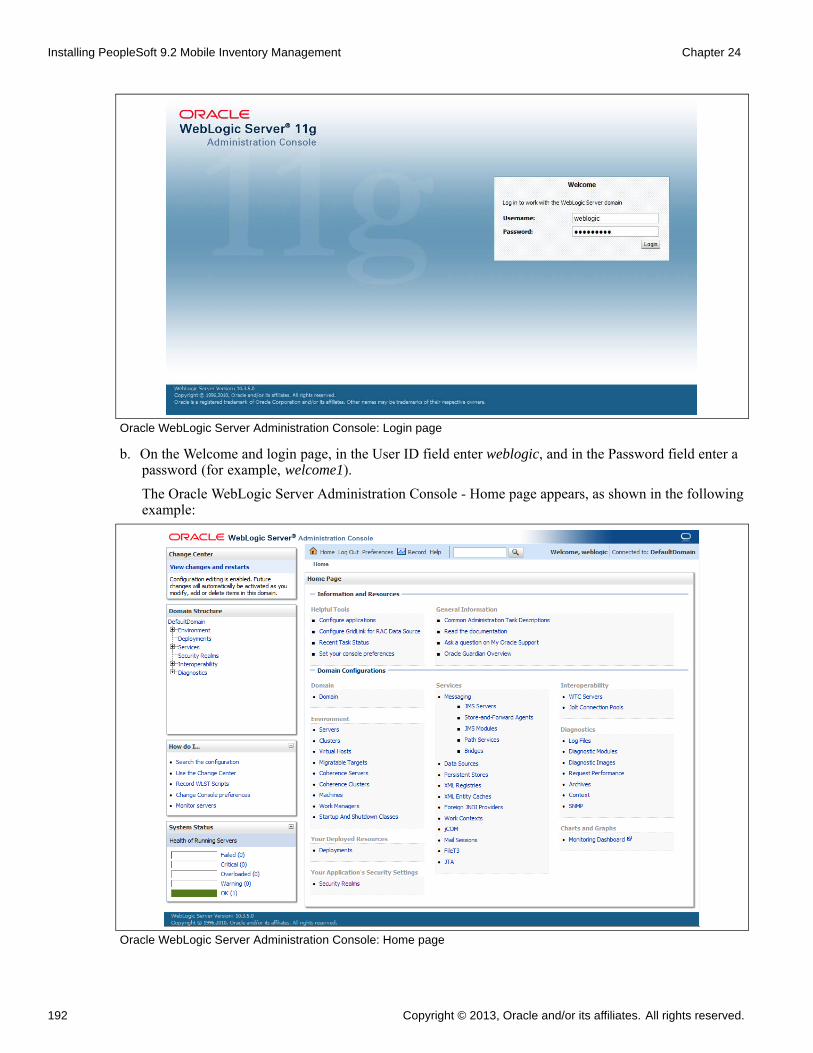
Installing PeopleSoft 9.2 Mobile Inventory Management Chapter 24
Oracle WebLogic Server Administration Console: Login page
b. On the Welcome and login page, in the User ID field enter weblogic, and in the Password field enter apassword (for example, welcome1).The Oracle WebLogic Server Administration Console - Home page appears, as shown in the followingexample:
Oracle WebLogic Server Administration Console: Home page
192 Copyright © 2013, Oracle and/or its affiliates. All rights reserved.
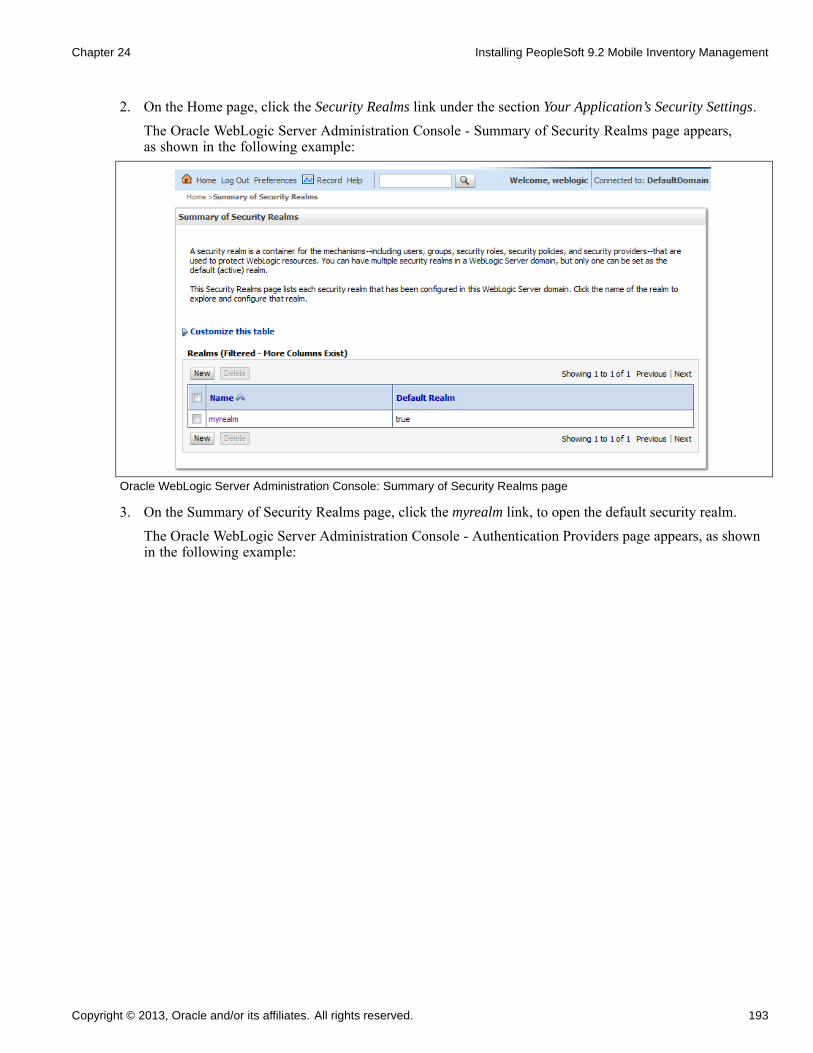
Chapter 24 Installing PeopleSoft 9.2 Mobile Inventory Management
2. On the Home page, click the Security Realms link under the section Your Application’s Security Settings.The Oracle WebLogic Server Administration Console - Summary of Security Realms page appears,as shown in the following example:
Oracle WebLogic Server Administration Console: Summary of Security Realms page
3. On the Summary of Security Realms page, click the myrealm link, to open the default security realm.The Oracle WebLogic Server Administration Console - Authentication Providers page appears, as shownin the following example:
Copyright © 2013, Oracle and/or its affiliates. All rights reserved. 193
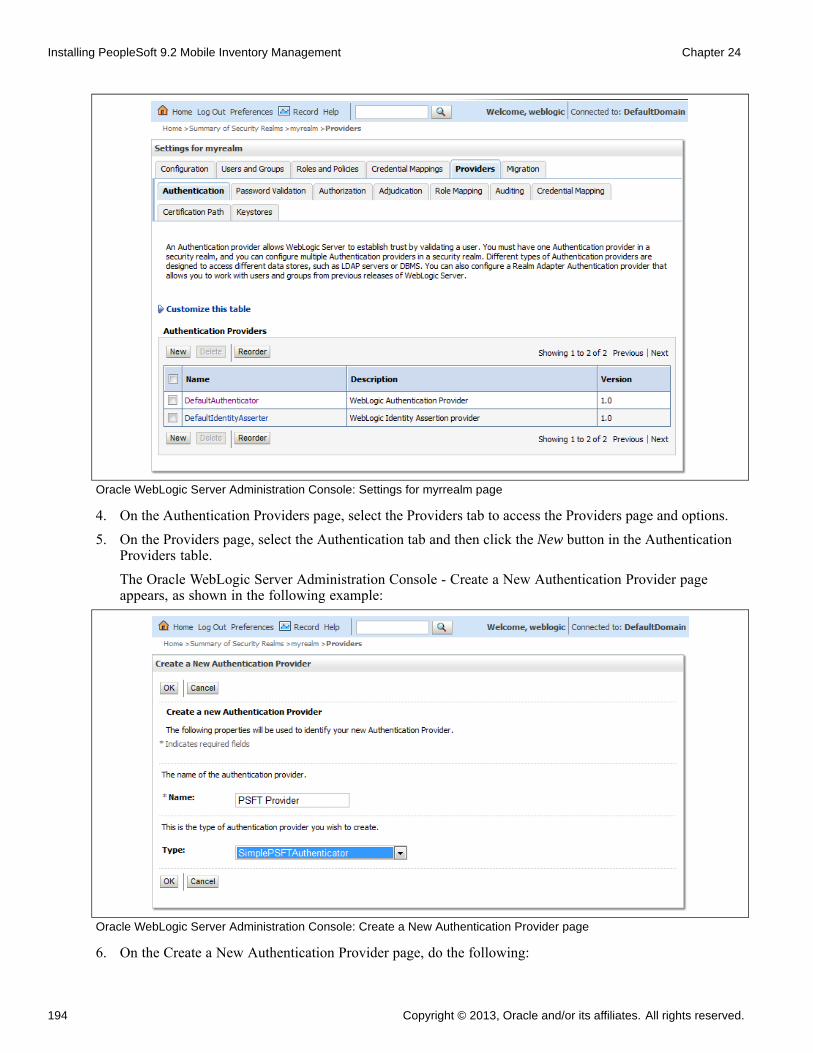
Installing PeopleSoft 9.2 Mobile Inventory Management Chapter 24
Oracle WebLogic Server Administration Console: Settings for myrrealm page
4. On the Authentication Providers page, select the Providers tab to access the Providers page and options.5. On the Providers page, select the Authentication tab and then click the New button in the Authentication
Providers table.The Oracle WebLogic Server Administration Console - Create a New Authentication Provider pageappears, as shown in the following example:
Oracle WebLogic Server Administration Console: Create a New Authentication Provider page
6. On the Create a New Authentication Provider page, do the following:
194 Copyright © 2013, Oracle and/or its affiliates. All rights reserved.
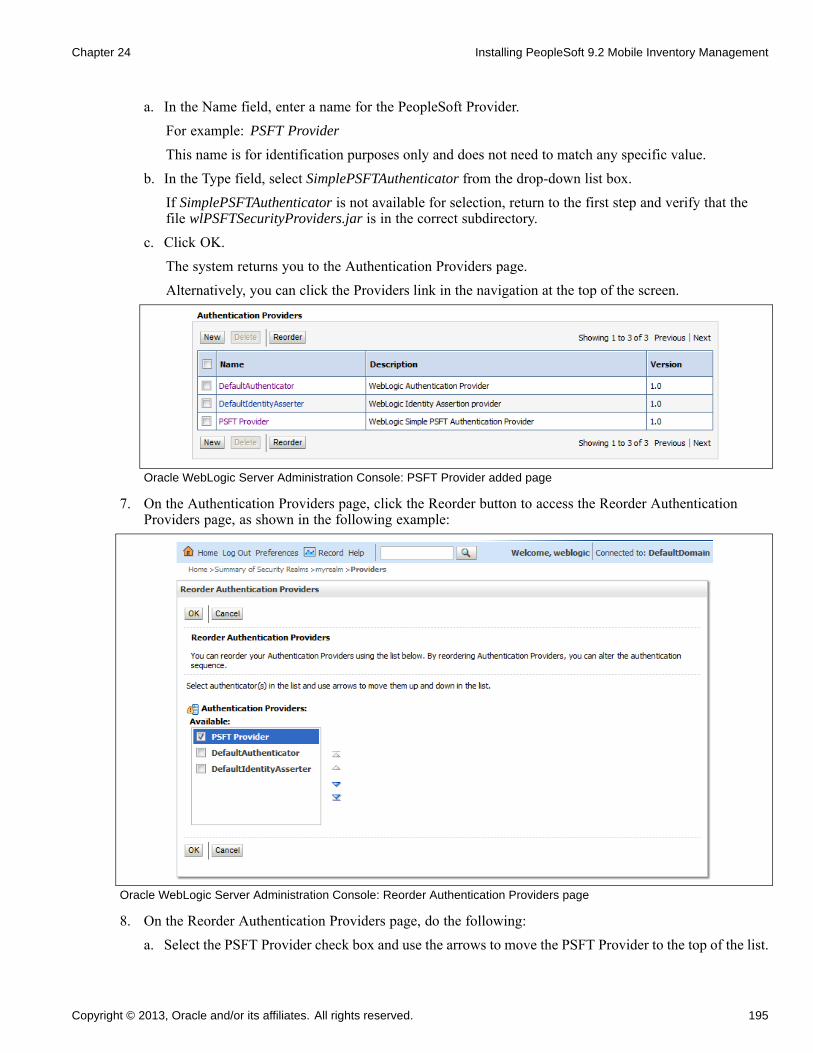
Chapter 24 Installing PeopleSoft 9.2 Mobile Inventory Management
a. In the Name field, enter a name for the PeopleSoft Provider.For example: PSFT Provider
This name is for identification purposes only and does not need to match any specific value.b. In the Type field, select SimplePSFTAuthenticator from the drop-down list box.
If SimplePSFTAuthenticator is not available for selection, return to the first step and verify that thefile wlPSFTSecurityProviders.jar is in the correct subdirectory.
c. Click OK.The system returns you to the Authentication Providers page.Alternatively, you can click the Providers link in the navigation at the top of the screen.
Oracle WebLogic Server Administration Console: PSFT Provider added page
7. On the Authentication Providers page, click the Reorder button to access the Reorder AuthenticationProviders page, as shown in the following example:
Oracle WebLogic Server Administration Console: Reorder Authentication Providers page
8. On the Reorder Authentication Providers page, do the following:a. Select the PSFT Provider check box and use the arrows to move the PSFT Provider to the top of the list.
Copyright © 2013, Oracle and/or its affiliates. All rights reserved. 195
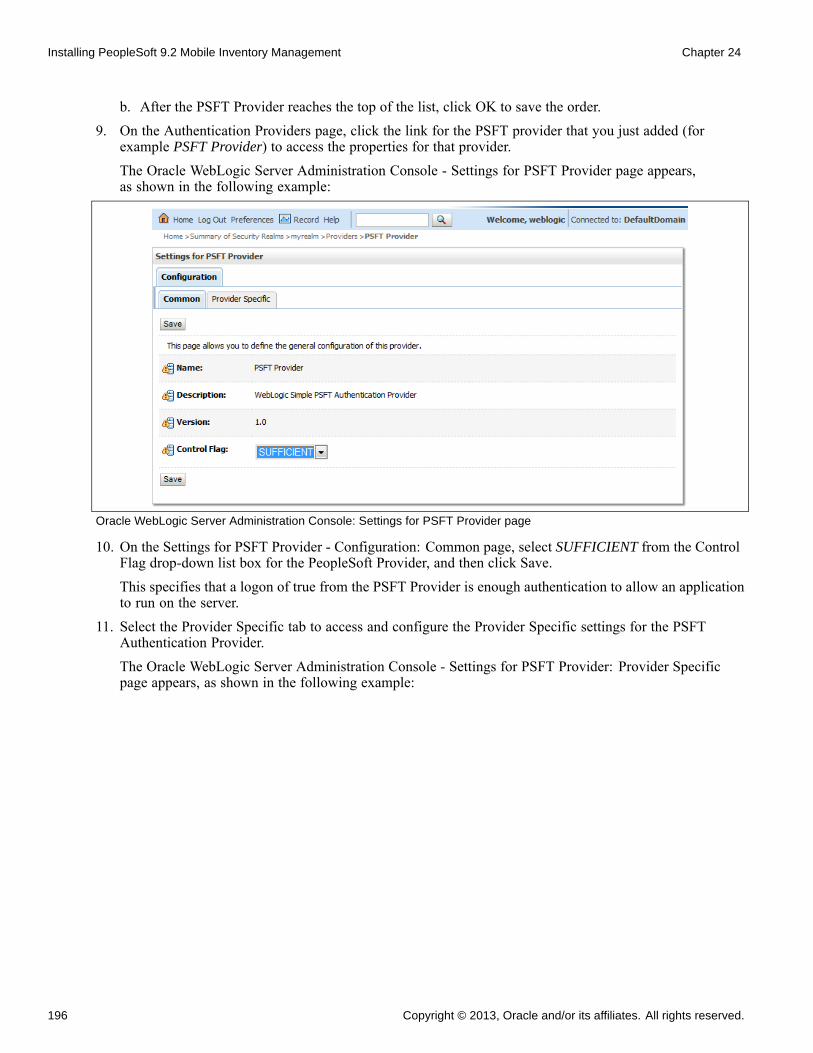
Installing PeopleSoft 9.2 Mobile Inventory Management Chapter 24
b. After the PSFT Provider reaches the top of the list, click OK to save the order.9. On the Authentication Providers page, click the link for the PSFT provider that you just added (for
example PSFT Provider) to access the properties for that provider.The Oracle WebLogic Server Administration Console - Settings for PSFT Provider page appears,as shown in the following example:
Oracle WebLogic Server Administration Console: Settings for PSFT Provider page
10. On the Settings for PSFT Provider - Configuration: Common page, select SUFFICIENT from the ControlFlag drop-down list box for the PeopleSoft Provider, and then click Save.This specifies that a logon of true from the PSFT Provider is enough authentication to allow an applicationto run on the server.
11. Select the Provider Specific tab to access and configure the Provider Specific settings for the PSFTAuthentication Provider.The Oracle WebLogic Server Administration Console - Settings for PSFT Provider: Provider Specificpage appears, as shown in the following example:
196 Copyright © 2013, Oracle and/or its affiliates. All rights reserved.
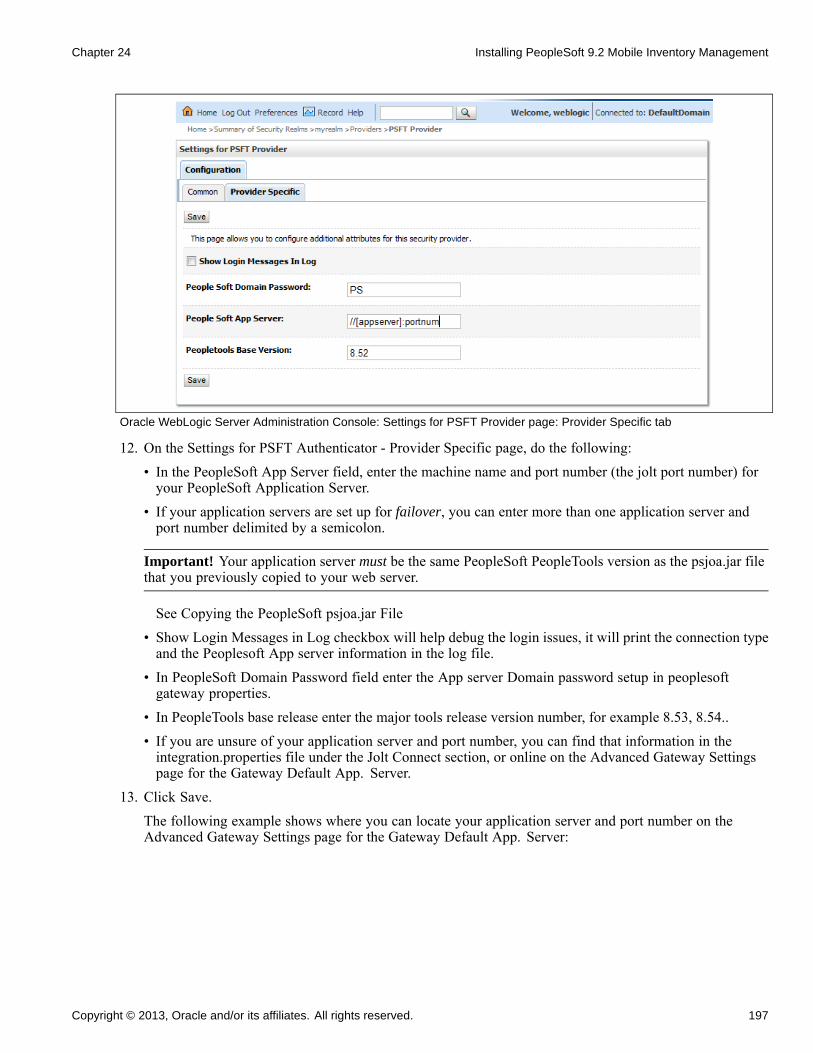
Chapter 24 Installing PeopleSoft 9.2 Mobile Inventory Management
Oracle WebLogic Server Administration Console: Settings for PSFT Provider page: Provider Specific tab
12. On the Settings for PSFT Authenticator - Provider Specific page, do the following:
• In the PeopleSoft App Server field, enter the machine name and port number (the jolt port number) foryour PeopleSoft Application Server.
• If your application servers are set up for failover, you can enter more than one application server andport number delimited by a semicolon.
Important! Your application server must be the same PeopleSoft PeopleTools version as the psjoa.jar filethat you previously copied to your web server.
See Copying the PeopleSoft psjoa.jar File• Show Login Messages in Log checkbox will help debug the login issues, it will print the connection typeand the Peoplesoft App server information in the log file.
• In PeopleSoft Domain Password field enter the App server Domain password setup in peoplesoftgateway properties.
• In PeopleTools base release enter the major tools release version number, for example 8.53, 8.54..• If you are unsure of your application server and port number, you can find that information in theintegration.properties file under the Jolt Connect section, or online on the Advanced Gateway Settingspage for the Gateway Default App. Server.
13. Click Save.The following example shows where you can locate your application server and port number on theAdvanced Gateway Settings page for the Gateway Default App. Server:
Copyright © 2013, Oracle and/or its affiliates. All rights reserved. 197
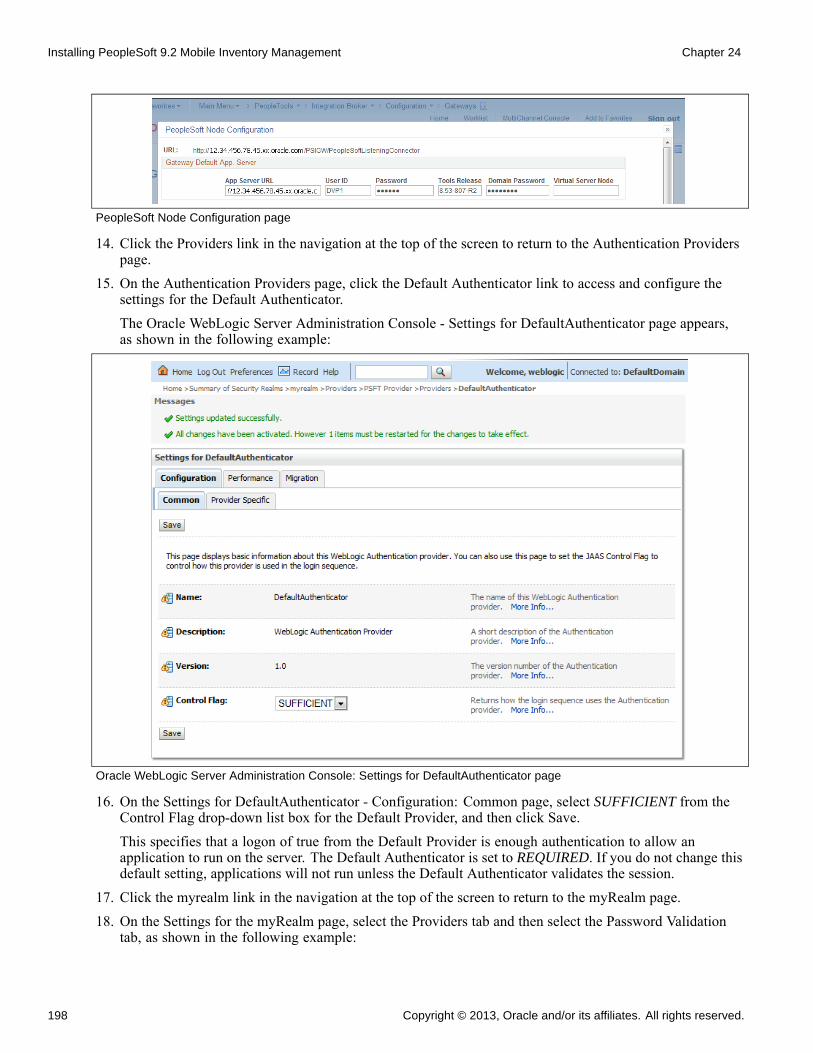
Installing PeopleSoft 9.2 Mobile Inventory Management Chapter 24
PeopleSoft Node Configuration page
14. Click the Providers link in the navigation at the top of the screen to return to the Authentication Providerspage.
15. On the Authentication Providers page, click the Default Authenticator link to access and configure thesettings for the Default Authenticator.The Oracle WebLogic Server Administration Console - Settings for DefaultAuthenticator page appears,as shown in the following example:
Oracle WebLogic Server Administration Console: Settings for DefaultAuthenticator page
16. On the Settings for DefaultAuthenticator - Configuration: Common page, select SUFFICIENT from theControl Flag drop-down list box for the Default Provider, and then click Save.This specifies that a logon of true from the Default Provider is enough authentication to allow anapplication to run on the server. The Default Authenticator is set to REQUIRED. If you do not change thisdefault setting, applications will not run unless the Default Authenticator validates the session.
17. Click the myrealm link in the navigation at the top of the screen to return to the myRealm page.18. On the Settings for the myRealm page, select the Providers tab and then select the Password Validation
tab, as shown in the following example:
198 Copyright © 2013, Oracle and/or its affiliates. All rights reserved.
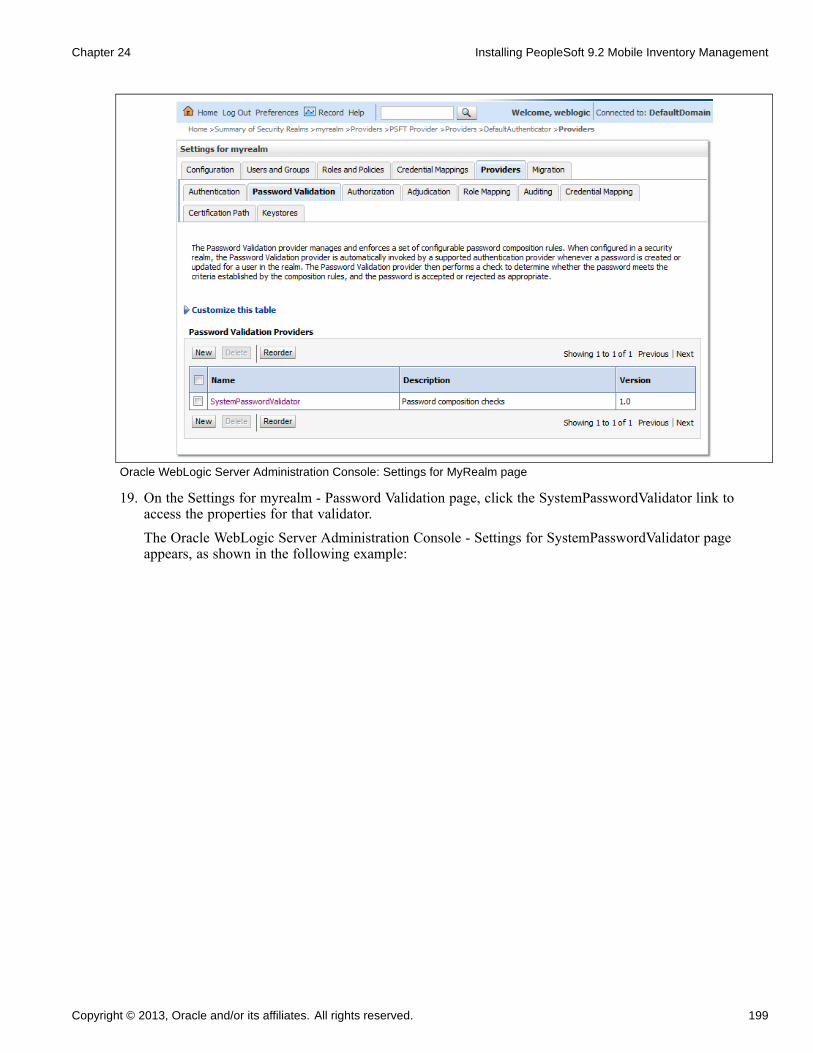
Chapter 24 Installing PeopleSoft 9.2 Mobile Inventory Management
Oracle WebLogic Server Administration Console: Settings for MyRealm page
19. On the Settings for myrealm - Password Validation page, click the SystemPasswordValidator link toaccess the properties for that validator.The Oracle WebLogic Server Administration Console - Settings for SystemPasswordValidator pageappears, as shown in the following example:
Copyright © 2013, Oracle and/or its affiliates. All rights reserved. 199
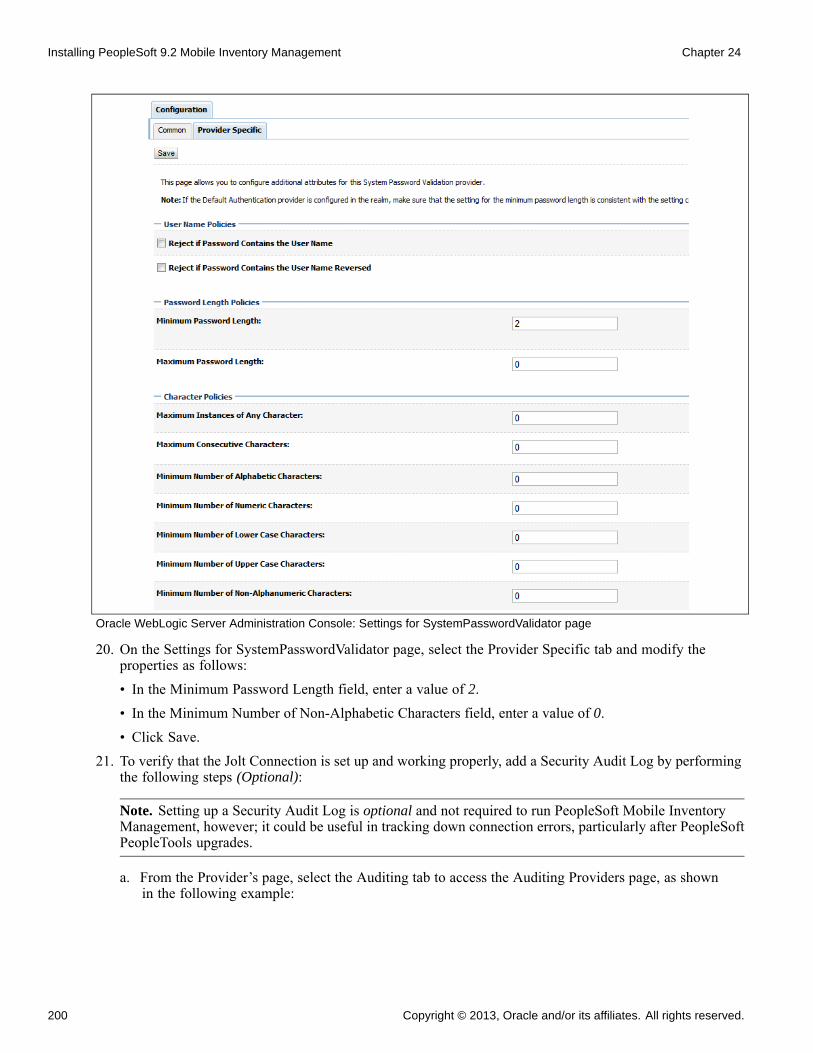
Installing PeopleSoft 9.2 Mobile Inventory Management Chapter 24
Oracle WebLogic Server Administration Console: Settings for SystemPasswordValidator page
20. On the Settings for SystemPasswordValidator page, select the Provider Specific tab and modify theproperties as follows:
• In the Minimum Password Length field, enter a value of 2.
• In the Minimum Number of Non-Alphabetic Characters field, enter a value of 0.
• Click Save.
21. To verify that the Jolt Connection is set up and working properly, add a Security Audit Log by performingthe following steps (Optional):
Note. Setting up a Security Audit Log is optional and not required to run PeopleSoft Mobile InventoryManagement, however; it could be useful in tracking down connection errors, particularly after PeopleSoftPeopleTools upgrades.
a. From the Provider’s page, select the Auditing tab to access the Auditing Providers page, as shownin the following example:
200 Copyright © 2013, Oracle and/or its affiliates. All rights reserved.

Chapter 24 Installing PeopleSoft 9.2 Mobile Inventory Management
Oracle WebLogic Server Administration Console: Auditing Providers page
b. On the Auditing Providers page, click the New button to access the Create a New Auditing Providersetup page, as shown in the following example:
Create a New Auditing Provider page
c. On the Create a New Auditing Provider page, in the Name field enter Default Auditor, and in the Typefield select Default Auditor from the drop-down list box.
d. Click OK.
Copyright © 2013, Oracle and/or its affiliates. All rights reserved. 201
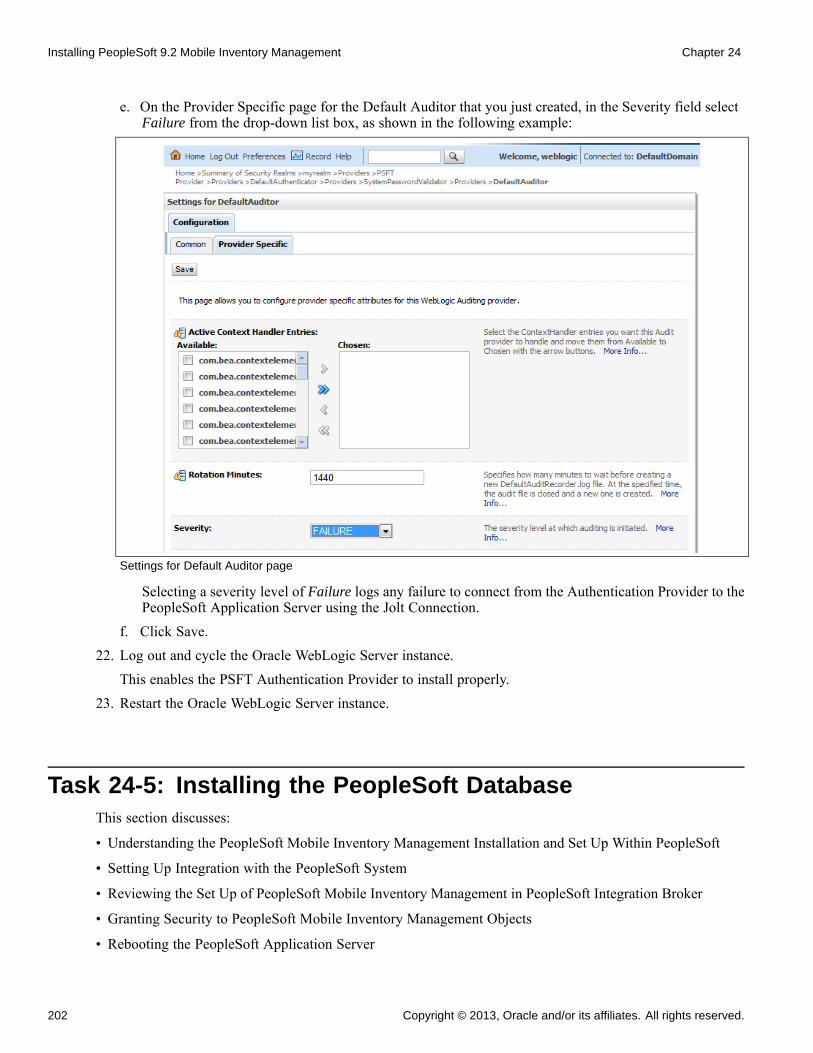
Installing PeopleSoft 9.2 Mobile Inventory Management Chapter 24
e. On the Provider Specific page for the Default Auditor that you just created, in the Severity field selectFailure from the drop-down list box, as shown in the following example:
Settings for Default Auditor page
Selecting a severity level of Failure logs any failure to connect from the Authentication Provider to thePeopleSoft Application Server using the Jolt Connection.
f. Click Save.22. Log out and cycle the Oracle WebLogic Server instance.
This enables the PSFT Authentication Provider to install properly.23. Restart the Oracle WebLogic Server instance.
Task 24-5: Installing the PeopleSoft DatabaseThis section discusses:
• Understanding the PeopleSoft Mobile Inventory Management Installation and Set Up Within PeopleSoft
• Setting Up Integration with the PeopleSoft System
• Reviewing the Set Up of PeopleSoft Mobile Inventory Management in PeopleSoft Integration Broker
• Granting Security to PeopleSoft Mobile Inventory Management Objects
• Rebooting the PeopleSoft Application Server
202 Copyright © 2013, Oracle and/or its affiliates. All rights reserved.
Chapter 24 Installing PeopleSoft 9.2 Mobile Inventory Management
• Verifying PeopleSoft Integration Broker is Web Service Enabled for the PeopleSoft FSCM Database
• Setting Installation Options
Understanding the PeopleSoft Mobile Inventory ManagementInstallation and Set Up Within PeopleSoftTo use PeopleSoft Mobile Inventory Management you must complete the set up steps within your PeopleSoftenvironment. These steps customize PeopleSoft Mobile Inventory Management to your specific needs bysetting up servers, identifying users, default values, mobile screen settings, and activating the integration points.
For more information on setting up PeopleSoft application servers and web services, refer to the followingreference documents that are available on My Oracle Support:
See PeopleTools: System and Server Administration, for your database platform.
See PeopleSoft FSCM: Mobile Inventory Management
Task 24-5-1: Setting Up Integration with the PeopleSoft System
Understanding How to Set Up Integration with the PeopleSoft System
The following steps detail the set up and integration with your PeopleSoft system for use with PeopleSoftMobile Inventory Management.
Configuring the PeopleSoft Integration Broker for the Gateway
You must update the PeopleSoft Integration Broker Gateway to recognize your PeopleSoft application server.
To configure the PeopleSoft Integration Broker Gateway:
1. Log in to your PeopleSoft application.2. Select PeopleTools, Integration Broker, Configuration, Gateways.
The Integration Broker Gateways page appears, as shown in the following example:
Copyright © 2013, Oracle and/or its affiliates. All rights reserved. 203
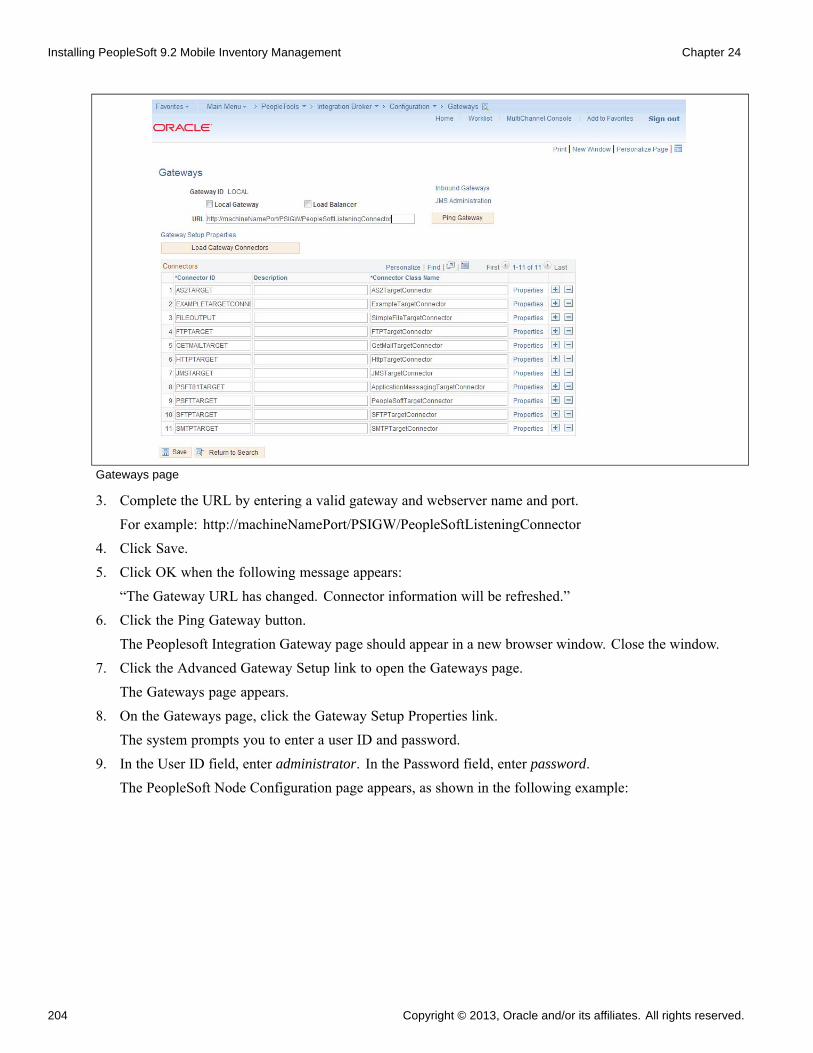
Installing PeopleSoft 9.2 Mobile Inventory Management Chapter 24
Gateways page
3. Complete the URL by entering a valid gateway and webserver name and port.For example: http://machineNamePort/PSIGW/PeopleSoftListeningConnector
4. Click Save.5. Click OK when the following message appears:
“The Gateway URL has changed. Connector information will be refreshed.”6. Click the Ping Gateway button.
The Peoplesoft Integration Gateway page should appear in a new browser window. Close the window.7. Click the Advanced Gateway Setup link to open the Gateways page.
The Gateways page appears.8. On the Gateways page, click the Gateway Setup Properties link.
The system prompts you to enter a user ID and password.9. In the User ID field, enter administrator. In the Password field, enter password.
The PeopleSoft Node Configuration page appears, as shown in the following example:
204 Copyright © 2013, Oracle and/or its affiliates. All rights reserved.
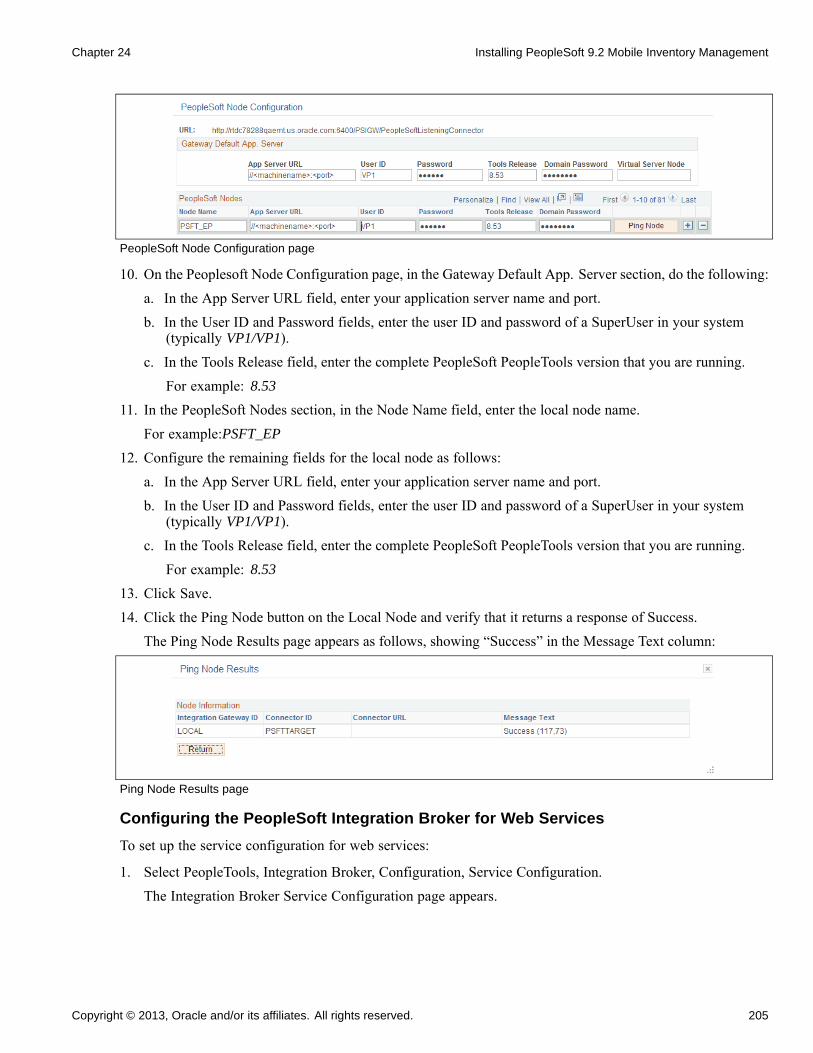
Chapter 24 Installing PeopleSoft 9.2 Mobile Inventory Management
PeopleSoft Node Configuration page
10. On the Peoplesoft Node Configuration page, in the Gateway Default App. Server section, do the following:
a. In the App Server URL field, enter your application server name and port.
b. In the User ID and Password fields, enter the user ID and password of a SuperUser in your system(typically VP1/VP1).
c. In the Tools Release field, enter the complete PeopleSoft PeopleTools version that you are running.
For example: 8.53
11. In the PeopleSoft Nodes section, in the Node Name field, enter the local node name.
For example:PSFT_EP
12. Configure the remaining fields for the local node as follows:
a. In the App Server URL field, enter your application server name and port.
b. In the User ID and Password fields, enter the user ID and password of a SuperUser in your system(typically VP1/VP1).
c. In the Tools Release field, enter the complete PeopleSoft PeopleTools version that you are running.
For example: 8.53
13. Click Save.14. Click the Ping Node button on the Local Node and verify that it returns a response of Success.
The Ping Node Results page appears as follows, showing “Success” in the Message Text column:
Ping Node Results page
Configuring the PeopleSoft Integration Broker for Web Services
To set up the service configuration for web services:
1. Select PeopleTools, Integration Broker, Configuration, Service Configuration.The Integration Broker Service Configuration page appears.
Copyright © 2013, Oracle and/or its affiliates. All rights reserved. 205
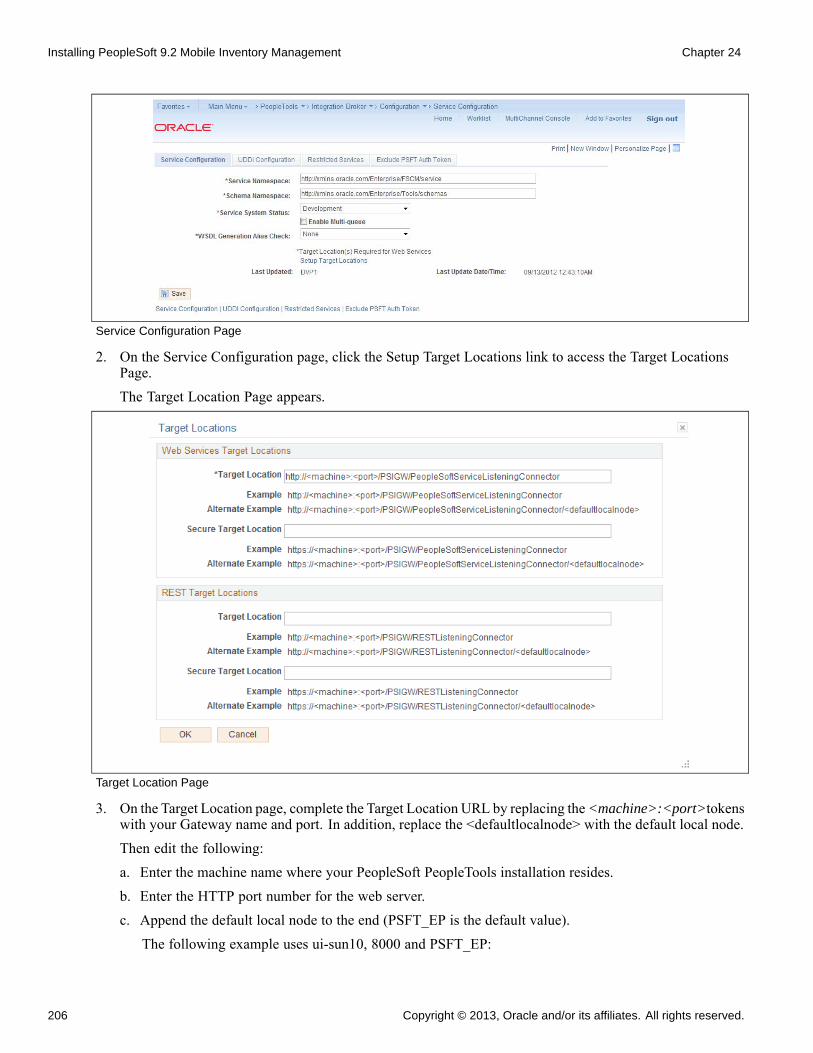
Installing PeopleSoft 9.2 Mobile Inventory Management Chapter 24
Service Configuration Page
2. On the Service Configuration page, click the Setup Target Locations link to access the Target LocationsPage.The Target Location Page appears.
Target Location Page
3. On the Target Location page, complete the Target Location URL by replacing the<machine>:<port>tokenswith your Gateway name and port. In addition, replace the <defaultlocalnode> with the default local node.Then edit the following:a. Enter the machine name where your PeopleSoft PeopleTools installation resides.b. Enter the HTTP port number for the web server.c. Append the default local node to the end (PSFT_EP is the default value).
The following example uses ui-sun10, 8000 and PSFT_EP:
206 Copyright © 2013, Oracle and/or its affiliates. All rights reserved.
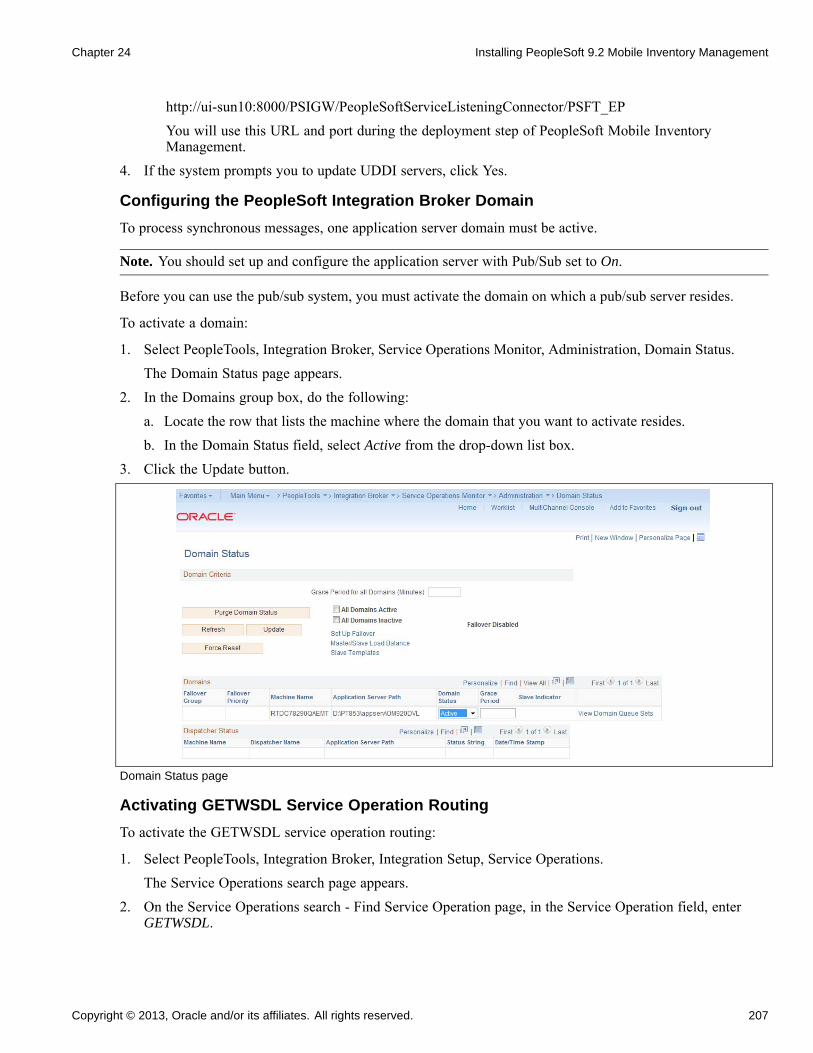
Chapter 24 Installing PeopleSoft 9.2 Mobile Inventory Management
http://ui-sun10:8000/PSIGW/PeopleSoftServiceListeningConnector/PSFT_EPYou will use this URL and port during the deployment step of PeopleSoft Mobile InventoryManagement.
4. If the system prompts you to update UDDI servers, click Yes.
Configuring the PeopleSoft Integration Broker Domain
To process synchronous messages, one application server domain must be active.
Note. You should set up and configure the application server with Pub/Sub set to On.
Before you can use the pub/sub system, you must activate the domain on which a pub/sub server resides.
To activate a domain:
1. Select PeopleTools, Integration Broker, Service Operations Monitor, Administration, Domain Status.The Domain Status page appears.
2. In the Domains group box, do the following:a. Locate the row that lists the machine where the domain that you want to activate resides.b. In the Domain Status field, select Active from the drop-down list box.
3. Click the Update button.
Domain Status page
Activating GETWSDL Service Operation Routing
To activate the GETWSDL service operation routing:
1. Select PeopleTools, Integration Broker, Integration Setup, Service Operations.The Service Operations search page appears.
2. On the Service Operations search - Find Service Operation page, in the Service Operation field, enterGETWSDL.
Copyright © 2013, Oracle and/or its affiliates. All rights reserved. 207
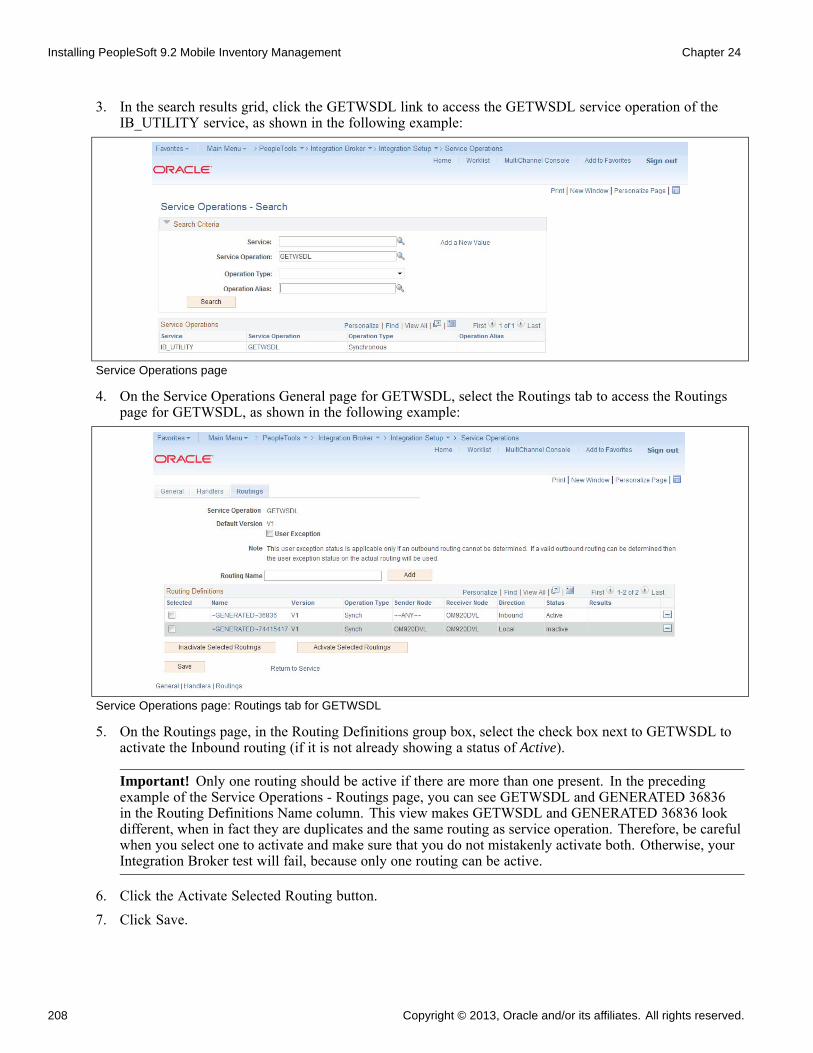
Installing PeopleSoft 9.2 Mobile Inventory Management Chapter 24
3. In the search results grid, click the GETWSDL link to access the GETWSDL service operation of theIB_UTILITY service, as shown in the following example:
Service Operations page
4. On the Service Operations General page for GETWSDL, select the Routings tab to access the Routingspage for GETWSDL, as shown in the following example:
Service Operations page: Routings tab for GETWSDL
5. On the Routings page, in the Routing Definitions group box, select the check box next to GETWSDL toactivate the Inbound routing (if it is not already showing a status of Active).
Important! Only one routing should be active if there are more than one present. In the precedingexample of the Service Operations - Routings page, you can see GETWSDL and GENERATED 36836in the Routing Definitions Name column. This view makes GETWSDL and GENERATED 36836 lookdifferent, when in fact they are duplicates and the same routing as service operation. Therefore, be carefulwhen you select one to activate and make sure that you do not mistakenly activate both. Otherwise, yourIntegration Broker test will fail, because only one routing can be active.
6. Click the Activate Selected Routing button.
7. Click Save.
208 Copyright © 2013, Oracle and/or its affiliates. All rights reserved.
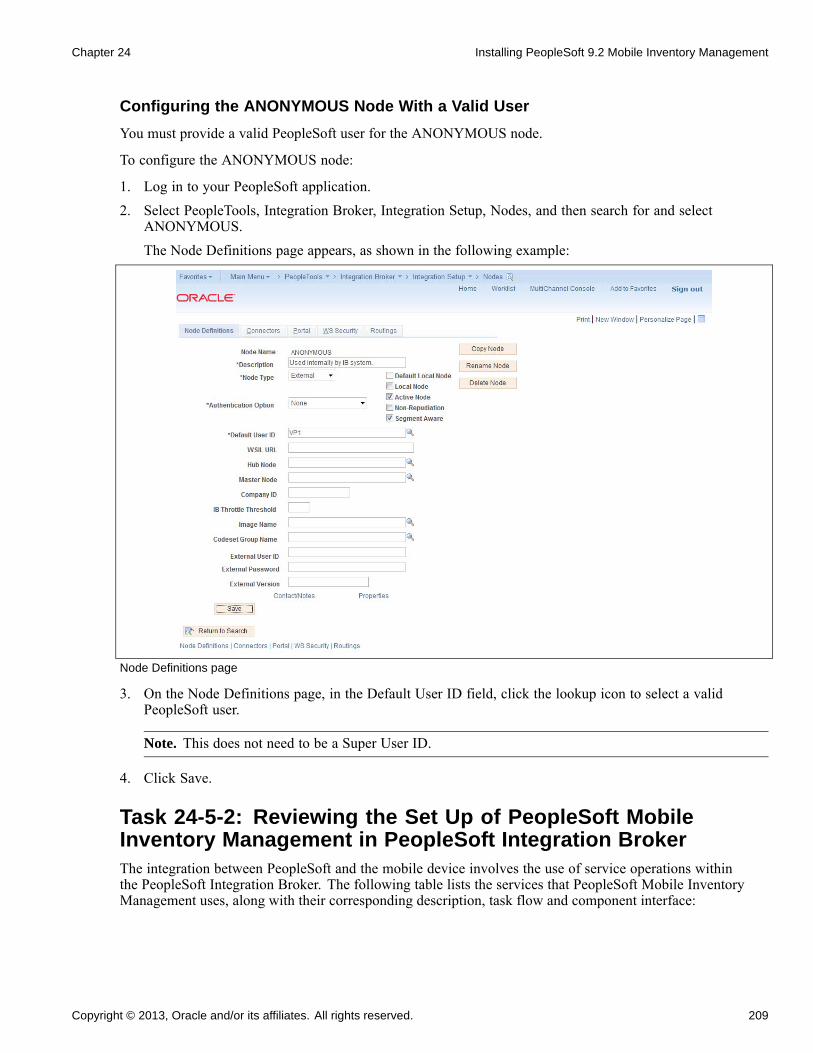
Chapter 24 Installing PeopleSoft 9.2 Mobile Inventory Management
Configuring the ANONYMOUS Node With a Valid User
You must provide a valid PeopleSoft user for the ANONYMOUS node.
To configure the ANONYMOUS node:
1. Log in to your PeopleSoft application.2. Select PeopleTools, Integration Broker, Integration Setup, Nodes, and then search for and select
ANONYMOUS.The Node Definitions page appears, as shown in the following example:
Node Definitions page
3. On the Node Definitions page, in the Default User ID field, click the lookup icon to select a validPeopleSoft user.
Note. This does not need to be a Super User ID.
4. Click Save.
Task 24-5-2: Reviewing the Set Up of PeopleSoft MobileInventory Management in PeopleSoft Integration BrokerThe integration between PeopleSoft and the mobile device involves the use of service operations withinthe PeopleSoft Integration Broker. The following table lists the services that PeopleSoft Mobile InventoryManagement uses, along with their corresponding description, task flow and component interface:
Copyright © 2013, Oracle and/or its affiliates. All rights reserved. 209
Installing PeopleSoft 9.2 Mobile Inventory Management Chapter 24
Services Description Used by Task Flows Component Interface
MIN_ADJUSTMENT Adjustments for Mobile Adjustments ADJUSTMENT_INVMIN_ALT_TYPES_GET Alternate Item Type for
MobileAll N/A
MIN_BIN_TRANSFER Bin to Bin Transfer forMobile
Bin to Bin Transfer N/A
MIN_CART_COUNT_GET
Get Par Locations forMobile
Par Count CART_COUNT_INV
MIN_CART_COUNT_GET
Get Par Locations forMobile
Par Count Ad Hoc CART_COUNT_INV
MIN_CART_COUNT_SAVE
Save Par Locations forMobile
Par Count CART_COUNT_INV
MIN_CART_COUNT_SAVE
Save Par Locations forMobile
Par Count Ad Hoc CART_COUNT_INV
MIN_COUNTING_EVENT_VALIDATE
Inventory Counting EventValidation
Guided Count N/A
MIN_COUNTING_EVENT_VALIDATE
Inventory Counting EventValidation
Count By Item N/A
MIN_COUNTING_EVENT_VALIDATE
Inventory Counting EventValidation
Count By Location N/A
MIN_COUNTING_EVENT_VALIDATE
Inventory Counting EventValidation
Manual Count N/A
MIN_COUNTING_EVENT_GET
Inventory Counting EventGet
Guided Count N/A
MIN_COUNTING_EVENT_GET
Inventory Counting EventGet
Count By Item N/A
MIN_COUNTING_EVENT_GET
Inventory Counting EventGet
Count By Location N/A
MIN_COUNTING_EVENT_GET
Inventory Counting EventGet
Manual Count N/A
MIN_COUNTING_EVENT_SET
Inventory Counting EventSet
Guided Count COUNT_INV_CI used byGuided Count, Count byItem and Count by Location.
MIN_COUNTING_EVENT_SET
Inventory Counting EventSet
Count By Item COUNT_INV_CI used byGuided Count, Count byItem and Count by Location.
MIN_COUNTING_EVENT_SET
Inventory Counting EventSet
Count By Location COUNT_INV_CI used byGuided Count, Count byItem and Count by Location.
MIN_COUNTING_EVENT_SET
Inventory Counting EventSet
Manual Count COUNT_INV_INF used byManual Count.
MIN_EXPRESS_ISSUE Express Issue for Mobile Express Issue EXPRESS_ISSUE_INV_CIMIN_EXPRESS_ISSUE_VALIDATE
Express Issue for MobileValidation
Express Issue N/A
MIN_ITEM_STK_INQ Item Stock Inquiry forMobile
Item Stock Inquiry PUTAWAY_INQ_INV
MIN_LOOKUP_GENERIC_GET
Generic Lookup for Mobile All N/A
210 Copyright © 2013, Oracle and/or its affiliates. All rights reserved.
Chapter 24 Installing PeopleSoft 9.2 Mobile Inventory Management
Services Description Used by Task Flows Component Interface
MIN_MENU Mobile Menu Service All N/AMIN_NPRCPT_SAVE Mobile Non-PO Receipt
ServiceReceiving MIN_NPO_RECV_CI
MIN_NPRCPT_SAVE Mobile Non-PO ReceiptService
Receiving Ad Hoc MIN_NPO_RECV_CI
MIN_OPTIONS Mobile Inventory Options All N/AMIN_PROMPT_EDIT Prompt table Edit Service Adjustments N/AMIN_PROMPT_EDIT Prompt table Edit Service Bin to Bin Transfer N/AMIN_PROMPT_EDIT Prompt table Edit Service Receiving PO N/AMIN_PROMPT_EDIT Prompt table Edit Service Receiving Ad Hoc N/AMIN_RCPT_CNTR_GET Mobile Receiving Get Receiving PO PO_RECEIPT_CIMIN_RCPT_CNTR_SAVE Mobile Receiving Save Receiving PO MIN_PO_RECV_CIMIN_RECV_DELIVERY Mobile Delivery Get Delivery RECV_DELIVERY_CIMIN_RECV_DELIVERY_SAVE
Mobile Delivery Save Delivery RECV_DELIVERY_CI
MIN_STCK_FEEDBK_FIND
Stockroom Feedback Find Stockroom Feedback PUTAWAY_FEEDBK_MBL
MIN_STCK_FEEDBK_GET
Stockroom Feedback Get Stockroom Feedback PUTAWAY_FEEDBK_MBL
MIN_STCK_FEEDBK_SAVE
Stockroom Feedback Save Stockroom Feedback PUTAWAY_FEEDBK_MBL
Note. Oracle delivers fully configured service operations for PeopleSoft Mobile Inventory Management.Therefore, the following steps are only required if any service operations are not active.
To activate the synchronous service operations for PeopleSoft Mobile Inventory Management, complete thefollowing steps in the PeopleSoft Integration Broker for each service in the preceding table:
1. Activate the service operation:a. Select PeopleTools, Integration Broker, Integration Setup, Service Operations.
The Service Operations - General page appears, as shown in the following example:
Copyright © 2013, Oracle and/or its affiliates. All rights reserved. 211
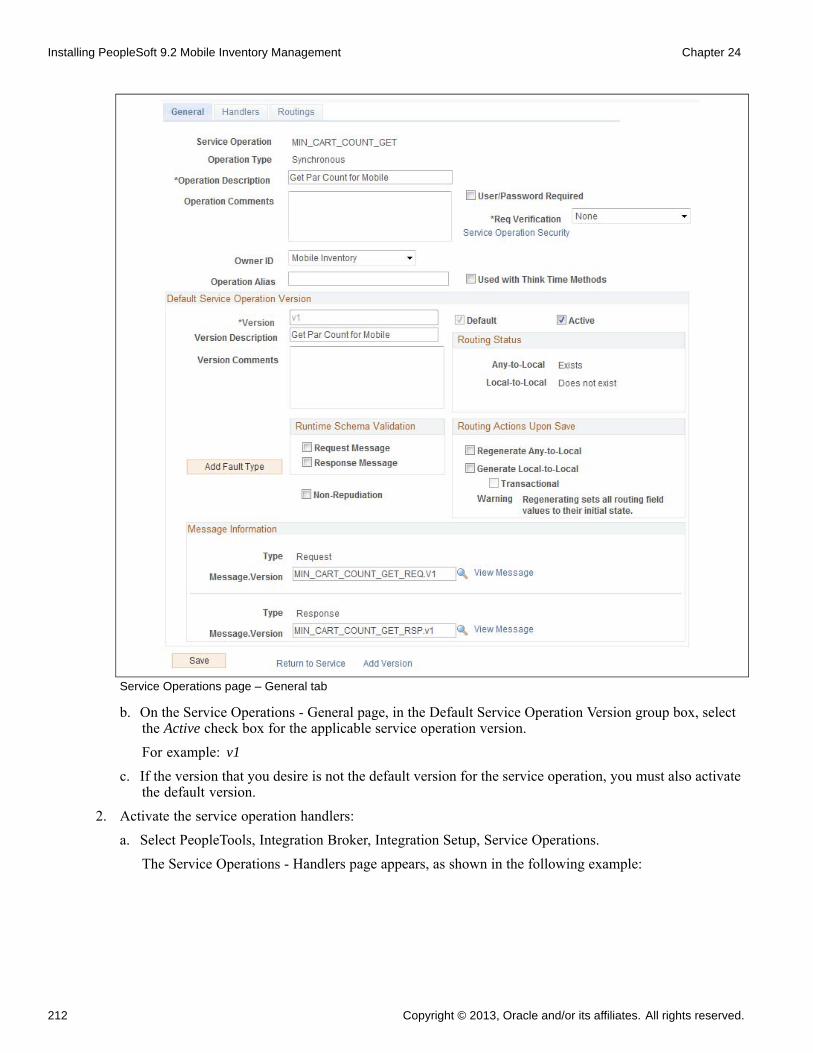
Installing PeopleSoft 9.2 Mobile Inventory Management Chapter 24
Service Operations page – General tab
b. On the Service Operations - General page, in the Default Service Operation Version group box, selectthe Active check box for the applicable service operation version.For example: v1
c. If the version that you desire is not the default version for the service operation, you must also activatethe default version.
2. Activate the service operation handlers:a. Select PeopleTools, Integration Broker, Integration Setup, Service Operations.
The Service Operations - Handlers page appears, as shown in the following example:
212 Copyright © 2013, Oracle and/or its affiliates. All rights reserved.
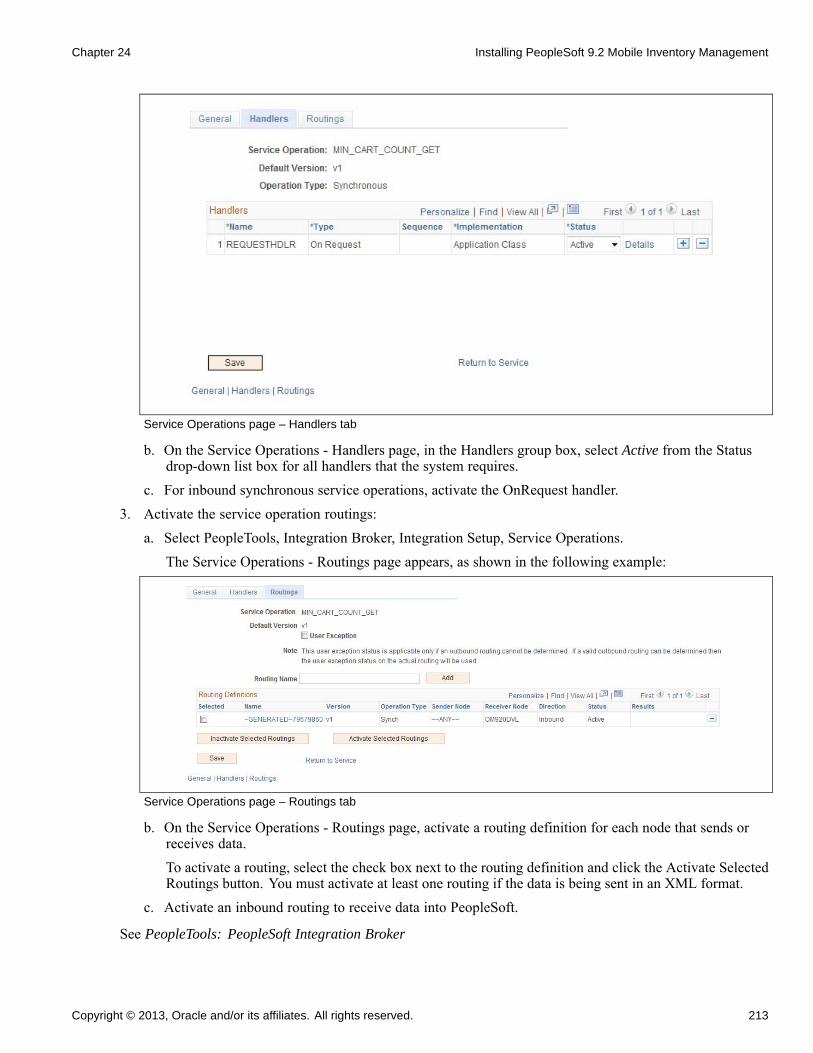
Chapter 24 Installing PeopleSoft 9.2 Mobile Inventory Management
Service Operations page – Handlers tab
b. On the Service Operations - Handlers page, in the Handlers group box, select Active from the Statusdrop-down list box for all handlers that the system requires.
c. For inbound synchronous service operations, activate the OnRequest handler.3. Activate the service operation routings:
a. Select PeopleTools, Integration Broker, Integration Setup, Service Operations.The Service Operations - Routings page appears, as shown in the following example:
Service Operations page – Routings tab
b. On the Service Operations - Routings page, activate a routing definition for each node that sends orreceives data.To activate a routing, select the check box next to the routing definition and click the Activate SelectedRoutings button. You must activate at least one routing if the data is being sent in an XML format.
c. Activate an inbound routing to receive data into PeopleSoft.
See PeopleTools: PeopleSoft Integration Broker
Copyright © 2013, Oracle and/or its affiliates. All rights reserved. 213
Installing PeopleSoft 9.2 Mobile Inventory Management Chapter 24
Task 24-5-3: Granting Security to PeopleSoft MobileInventory Management Objects
Understanding How to Grant Security to PeopleSoft Mobile Inventory ManagementObjects
Use the Portal Security Sync from PeopleSoft Pure Internet Architecture to grant security to PeopleSoft MobileInventory Management 9.2 objects to any custom Roles or Permission Lists that you maintain. Oracle deliversthe Roles and Permission Lists that are set up to run all transactions.
The following lists the Roles and Permission Lists that Oracle delivers:
• Roles• MIN Administrator — Gives Administrators full access to all Mobile pages.• MIN User — Gives User access to Mobile pages, but no Mobile setup pages.
• Permission Lists• EPMIN1000 — For use by MIN Administrator Role.• EPMIN1100 — For use by MIN User Role.
Granting Security to PeopleSoft Mobile Inventory Management Objects
To grant security to PeopleSoft Mobile Inventory Management Objects:
1. Select PeopleTools, Portal, Portal Security Sync.2. Select Run Control ID PORTAL_CSS.
If this run control ID is not already present, select the Add a new value tab and add this run control value.3. Select the Delete invalid security check box.4. Click Run.5. Click OK.
Task 24-5-4: Rebooting the PeopleSoft Application ServerAfter you complete the PeopleSoft Mobile Inventory Management 9.2 installation, you must shut down thePeopleSoft Application server, clear the cache and then restart the server.
Task 24-5-5: Verifying PeopleSoft Integration Broker is WebService Enabled for the PeopleSoft FSCM DatabaseAfter you complete the PeopleSoft Mobile Inventory Management 9.2 installation process, verify thatPeopleSoft Integration Broker is configured for Web Services. Web Services Description Language (WSDL)requires Web Services to communicate between PeopleSoft and the Mobile Inventory Web Server. Detailson how to configure PeopleSoft Integration Broker and Web Services are in the PeopleSoft PeopleToolsInstallation guide, available on My Oracle Support.
The following provides an example of a quick test for the PeopleSoft Integration Broker:
If the PeopleSoft Integration Broker is configured properly, the following URL should produce output similarto the example that follows:
http://machineNamePort/PSIGW/PeopleSoftServiceListeningConnector/PSFT_EP/MIN_OPTIONS.1.wsdl
214 Copyright © 2013, Oracle and/or its affiliates. All rights reserved.
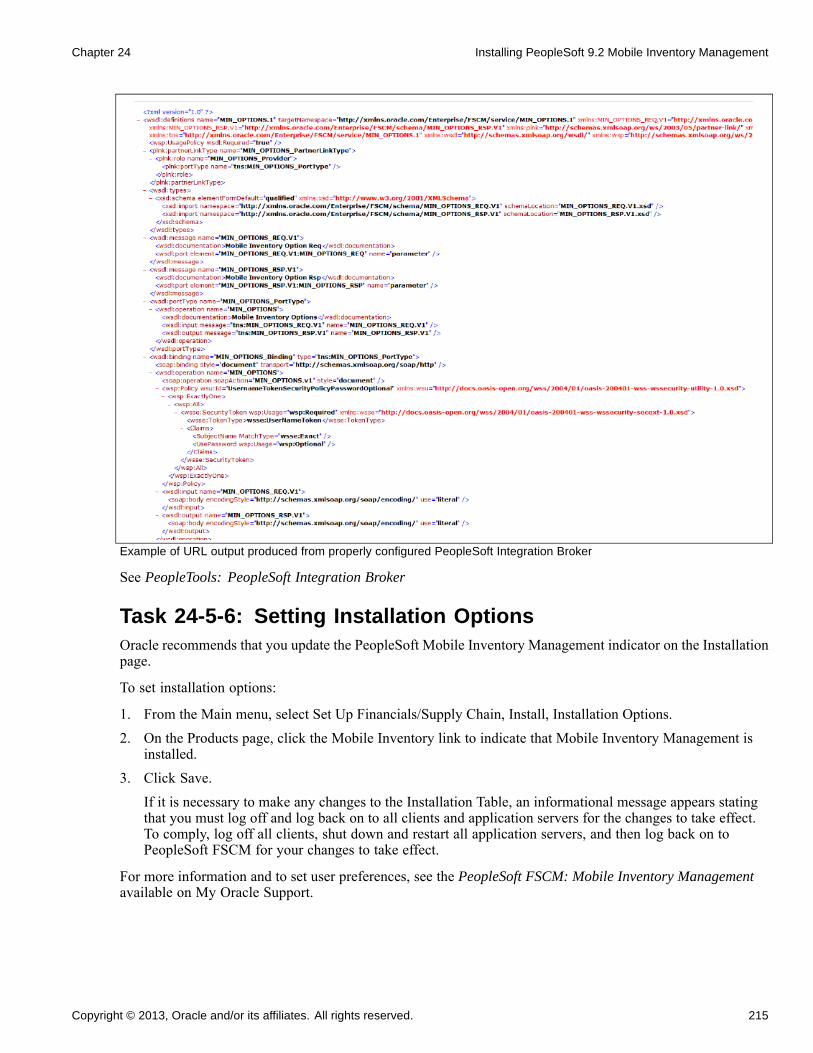
Chapter 24 Installing PeopleSoft 9.2 Mobile Inventory Management
Example of URL output produced from properly configured PeopleSoft Integration Broker
See PeopleTools: PeopleSoft Integration Broker
Task 24-5-6: Setting Installation OptionsOracle recommends that you update the PeopleSoft Mobile Inventory Management indicator on the Installationpage.
To set installation options:
1. From the Main menu, select Set Up Financials/Supply Chain, Install, Installation Options.2. On the Products page, click the Mobile Inventory link to indicate that Mobile Inventory Management is
installed.3. Click Save.
If it is necessary to make any changes to the Installation Table, an informational message appears statingthat you must log off and log back on to all clients and application servers for the changes to take effect.To comply, log off all clients, shut down and restart all application servers, and then log back on toPeopleSoft FSCM for your changes to take effect.
For more information and to set user preferences, see the PeopleSoft FSCM: Mobile Inventory Managementavailable on My Oracle Support.
Copyright © 2013, Oracle and/or its affiliates. All rights reserved. 215
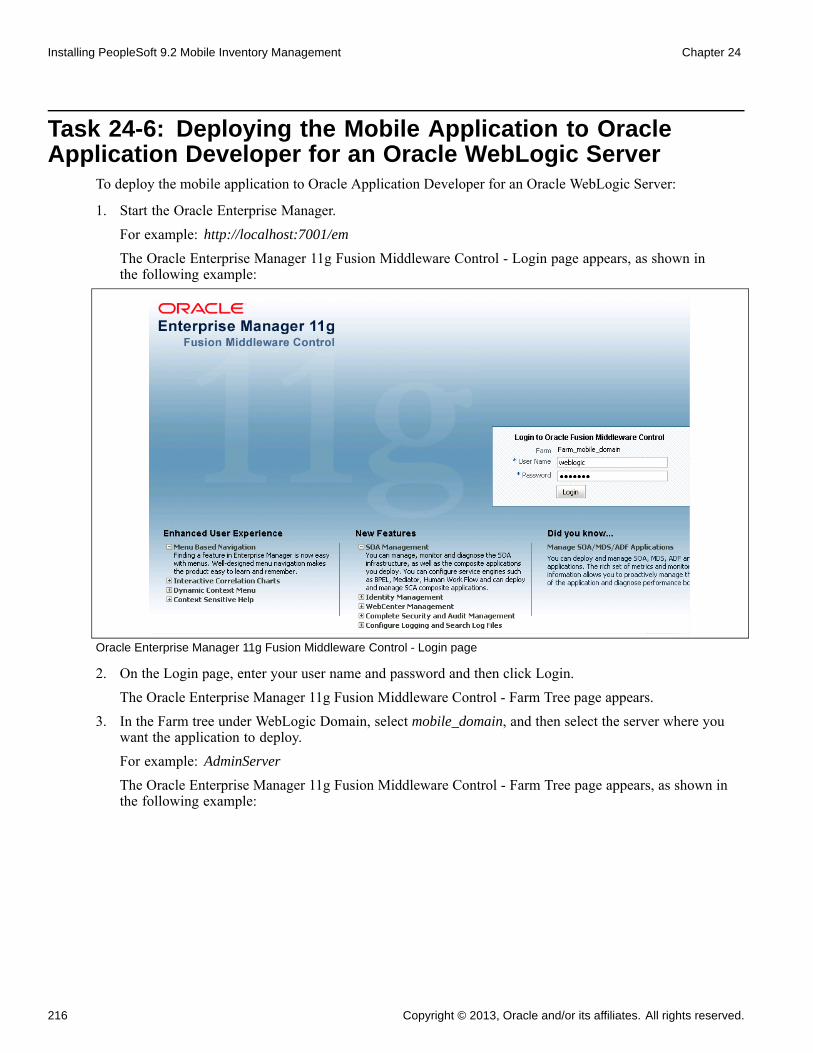
Installing PeopleSoft 9.2 Mobile Inventory Management Chapter 24
Task 24-6: Deploying the Mobile Application to OracleApplication Developer for an Oracle WebLogic Server
To deploy the mobile application to Oracle Application Developer for an Oracle WebLogic Server:
1. Start the Oracle Enterprise Manager.For example: http://localhost:7001/em
The Oracle Enterprise Manager 11g Fusion Middleware Control - Login page appears, as shown inthe following example:
Oracle Enterprise Manager 11g Fusion Middleware Control - Login page
2. On the Login page, enter your user name and password and then click Login.The Oracle Enterprise Manager 11g Fusion Middleware Control - Farm Tree page appears.
3. In the Farm tree under WebLogic Domain, select mobile_domain, and then select the server where youwant the application to deploy.For example: AdminServer
The Oracle Enterprise Manager 11g Fusion Middleware Control - Farm Tree page appears, as shown inthe following example:
216 Copyright © 2013, Oracle and/or its affiliates. All rights reserved.
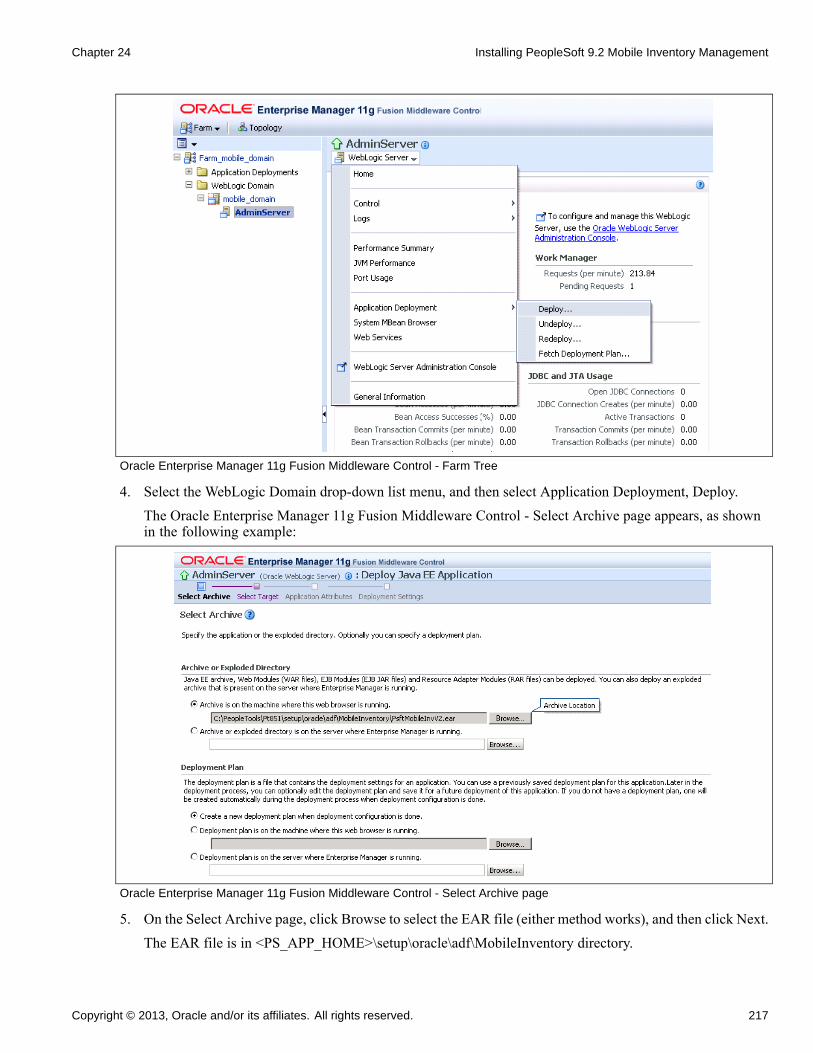
Chapter 24 Installing PeopleSoft 9.2 Mobile Inventory Management
Oracle Enterprise Manager 11g Fusion Middleware Control - Farm Tree
4. Select the WebLogic Domain drop-down list menu, and then select Application Deployment, Deploy.The Oracle Enterprise Manager 11g Fusion Middleware Control - Select Archive page appears, as shownin the following example:
Oracle Enterprise Manager 11g Fusion Middleware Control - Select Archive page
5. On the Select Archive page, click Browse to select the EAR file (either method works), and then click Next.The EAR file is in <PS_APP_HOME>\setup\oracle\adf\MobileInventory directory.
Copyright © 2013, Oracle and/or its affiliates. All rights reserved. 217
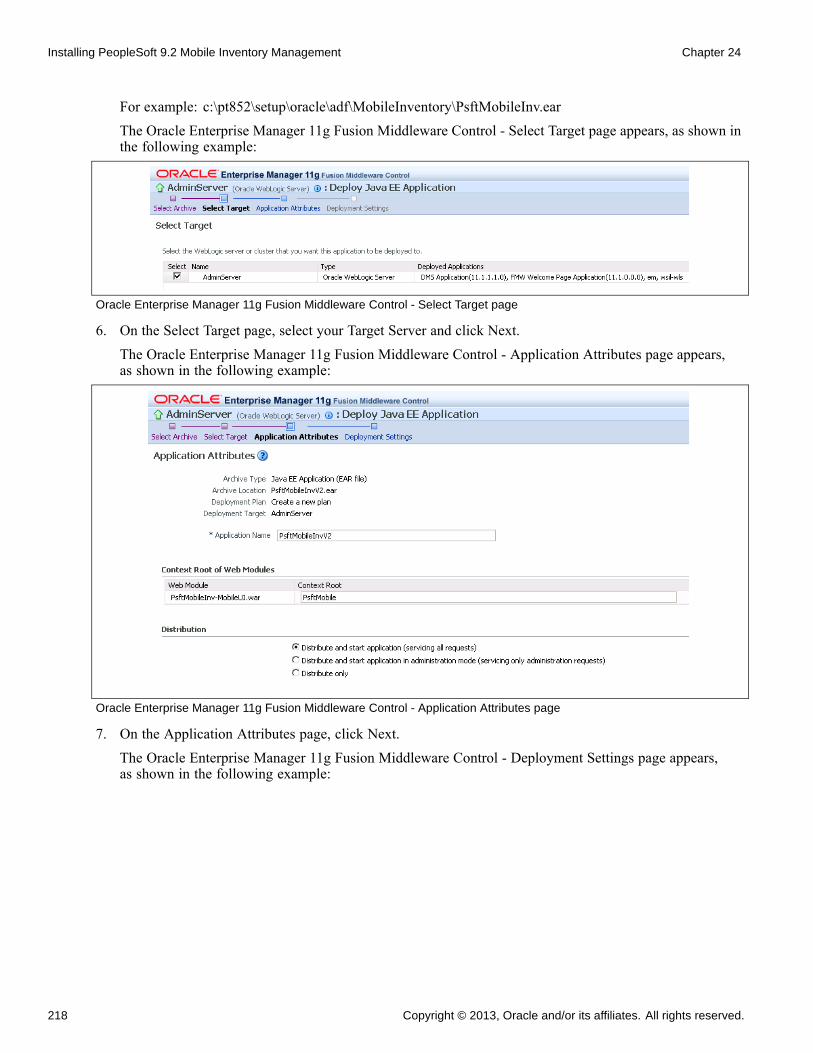
Installing PeopleSoft 9.2 Mobile Inventory Management Chapter 24
For example: c:\pt852\setup\oracle\adf\MobileInventory\PsftMobileInv.earThe Oracle Enterprise Manager 11g Fusion Middleware Control - Select Target page appears, as shown inthe following example:
Oracle Enterprise Manager 11g Fusion Middleware Control - Select Target page
6. On the Select Target page, select your Target Server and click Next.The Oracle Enterprise Manager 11g Fusion Middleware Control - Application Attributes page appears,as shown in the following example:
Oracle Enterprise Manager 11g Fusion Middleware Control - Application Attributes page
7. On the Application Attributes page, click Next.The Oracle Enterprise Manager 11g Fusion Middleware Control - Deployment Settings page appears,as shown in the following example:
218 Copyright © 2013, Oracle and/or its affiliates. All rights reserved.
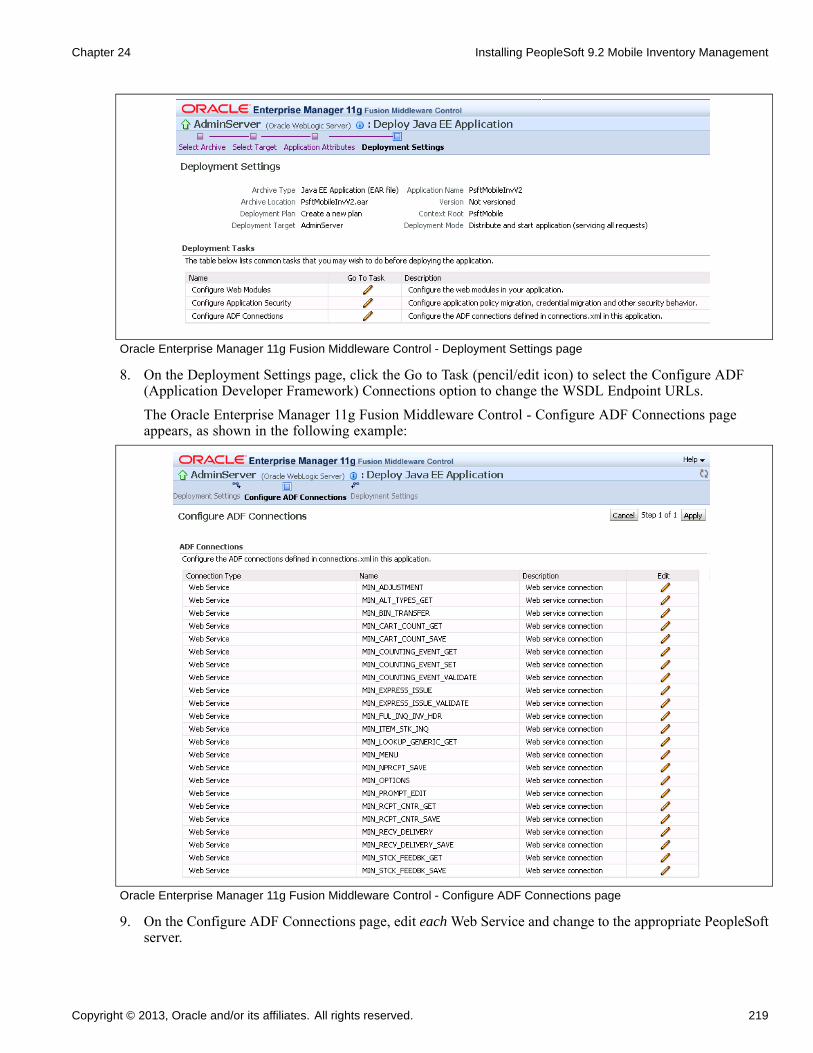
Chapter 24 Installing PeopleSoft 9.2 Mobile Inventory Management
Oracle Enterprise Manager 11g Fusion Middleware Control - Deployment Settings page
8. On the Deployment Settings page, click the Go to Task (pencil/edit icon) to select the Configure ADF(Application Developer Framework) Connections option to change the WSDL Endpoint URLs.The Oracle Enterprise Manager 11g Fusion Middleware Control - Configure ADF Connections pageappears, as shown in the following example:
Oracle Enterprise Manager 11g Fusion Middleware Control - Configure ADF Connections page
9. On the Configure ADF Connections page, edit each Web Service and change to the appropriate PeopleSoftserver.
Copyright © 2013, Oracle and/or its affiliates. All rights reserved. 219
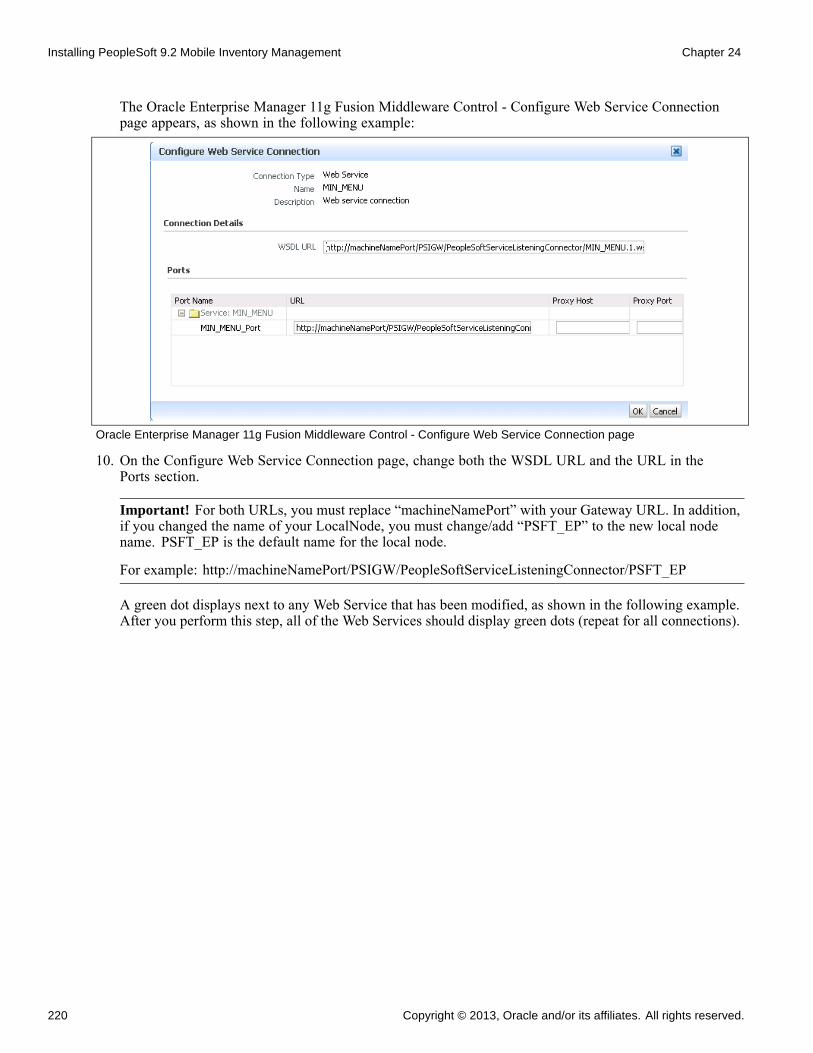
Installing PeopleSoft 9.2 Mobile Inventory Management Chapter 24
The Oracle Enterprise Manager 11g Fusion Middleware Control - Configure Web Service Connectionpage appears, as shown in the following example:
Oracle Enterprise Manager 11g Fusion Middleware Control - Configure Web Service Connection page
10. On the Configure Web Service Connection page, change both the WSDL URL and the URL in thePorts section.
Important! For both URLs, you must replace “machineNamePort” with your Gateway URL. In addition,if you changed the name of your LocalNode, you must change/add “PSFT_EP” to the new local nodename. PSFT_EP is the default name for the local node.
For example: http://machineNamePort/PSIGW/PeopleSoftServiceListeningConnector/PSFT_EP
A green dot displays next to any Web Service that has been modified, as shown in the following example.After you perform this step, all of the Web Services should display green dots (repeat for all connections).
220 Copyright © 2013, Oracle and/or its affiliates. All rights reserved.
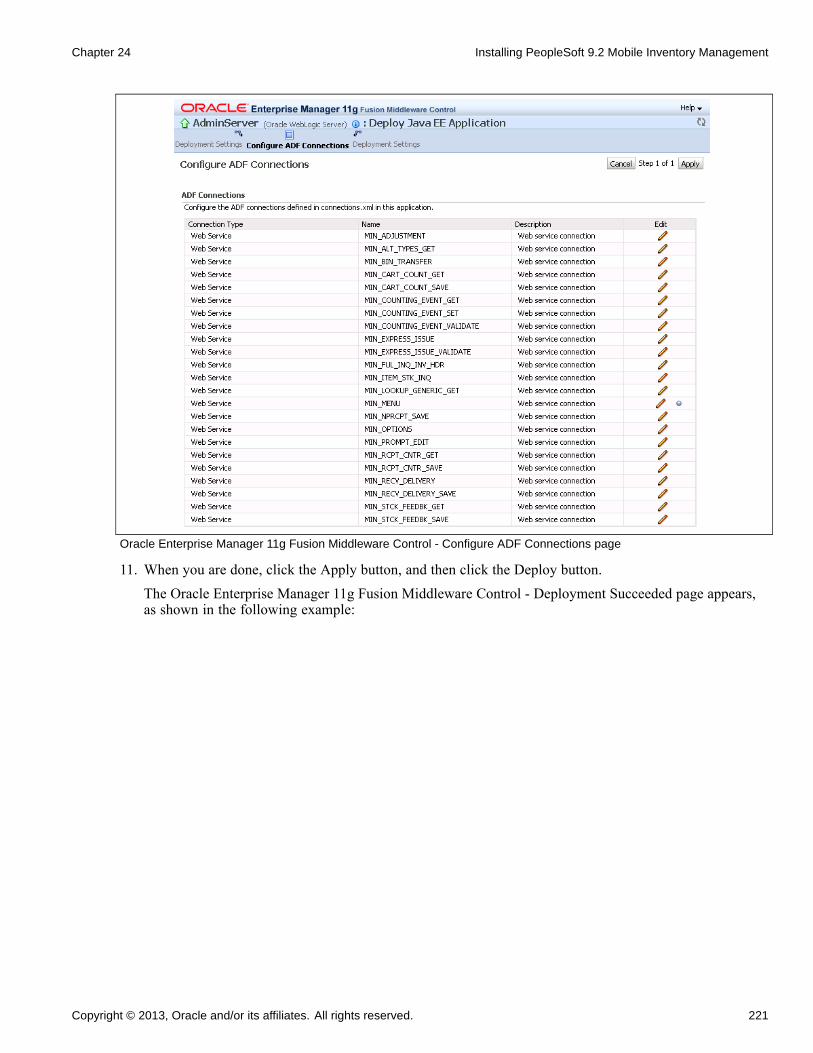
Chapter 24 Installing PeopleSoft 9.2 Mobile Inventory Management
Oracle Enterprise Manager 11g Fusion Middleware Control - Configure ADF Connections page
11. When you are done, click the Apply button, and then click the Deploy button.The Oracle Enterprise Manager 11g Fusion Middleware Control - Deployment Succeeded page appears,as shown in the following example:
Copyright © 2013, Oracle and/or its affiliates. All rights reserved. 221
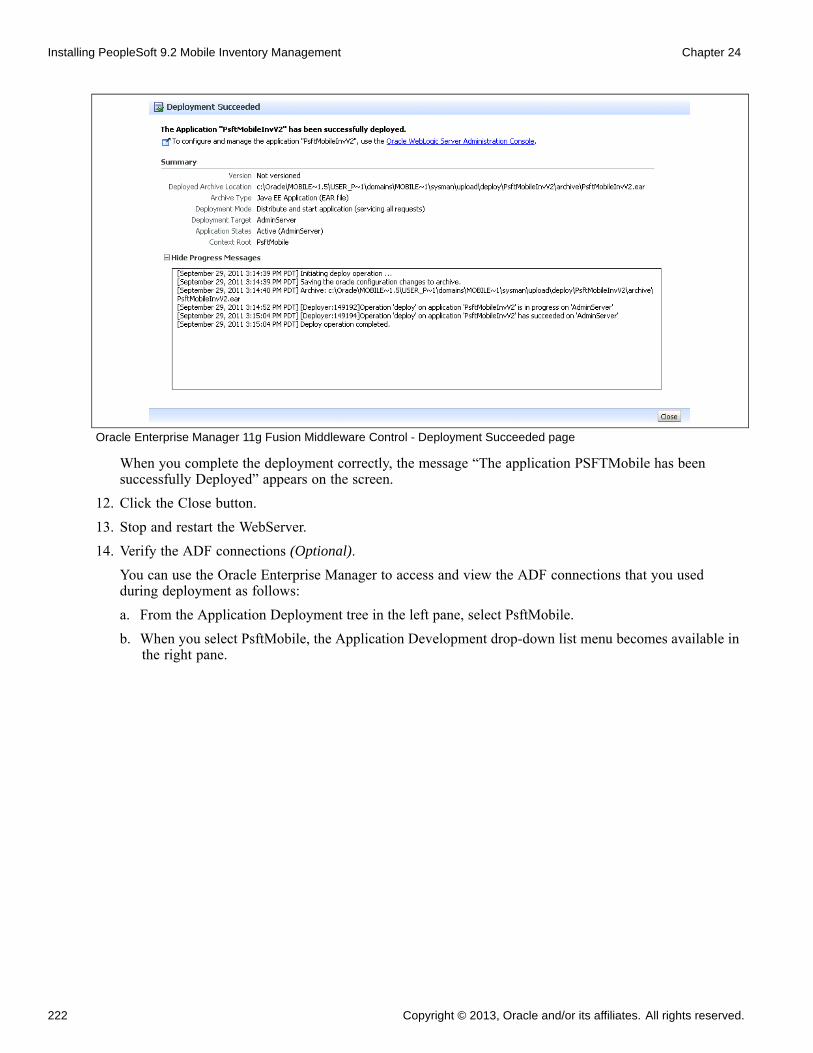
Installing PeopleSoft 9.2 Mobile Inventory Management Chapter 24
Oracle Enterprise Manager 11g Fusion Middleware Control - Deployment Succeeded page
When you complete the deployment correctly, the message “The application PSFTMobile has beensuccessfully Deployed” appears on the screen.
12. Click the Close button.13. Stop and restart the WebServer.14. Verify the ADF connections (Optional).
You can use the Oracle Enterprise Manager to access and view the ADF connections that you usedduring deployment as follows:a. From the Application Deployment tree in the left pane, select PsftMobile.b. When you select PsftMobile, the Application Development drop-down list menu becomes available in
the right pane.
222 Copyright © 2013, Oracle and/or its affiliates. All rights reserved.
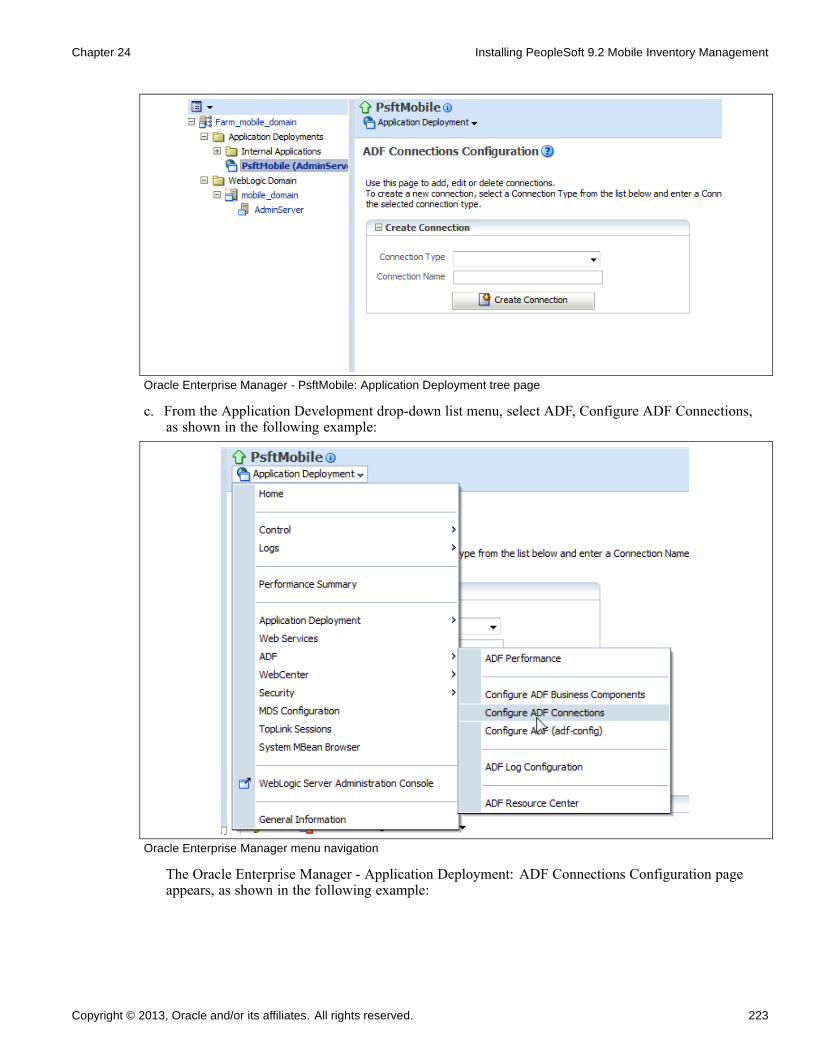
Chapter 24 Installing PeopleSoft 9.2 Mobile Inventory Management
Oracle Enterprise Manager - PsftMobile: Application Deployment tree page
c. From the Application Development drop-down list menu, select ADF, Configure ADF Connections,as shown in the following example:
Oracle Enterprise Manager menu navigation
The Oracle Enterprise Manager - Application Deployment: ADF Connections Configuration pageappears, as shown in the following example:
Copyright © 2013, Oracle and/or its affiliates. All rights reserved. 223
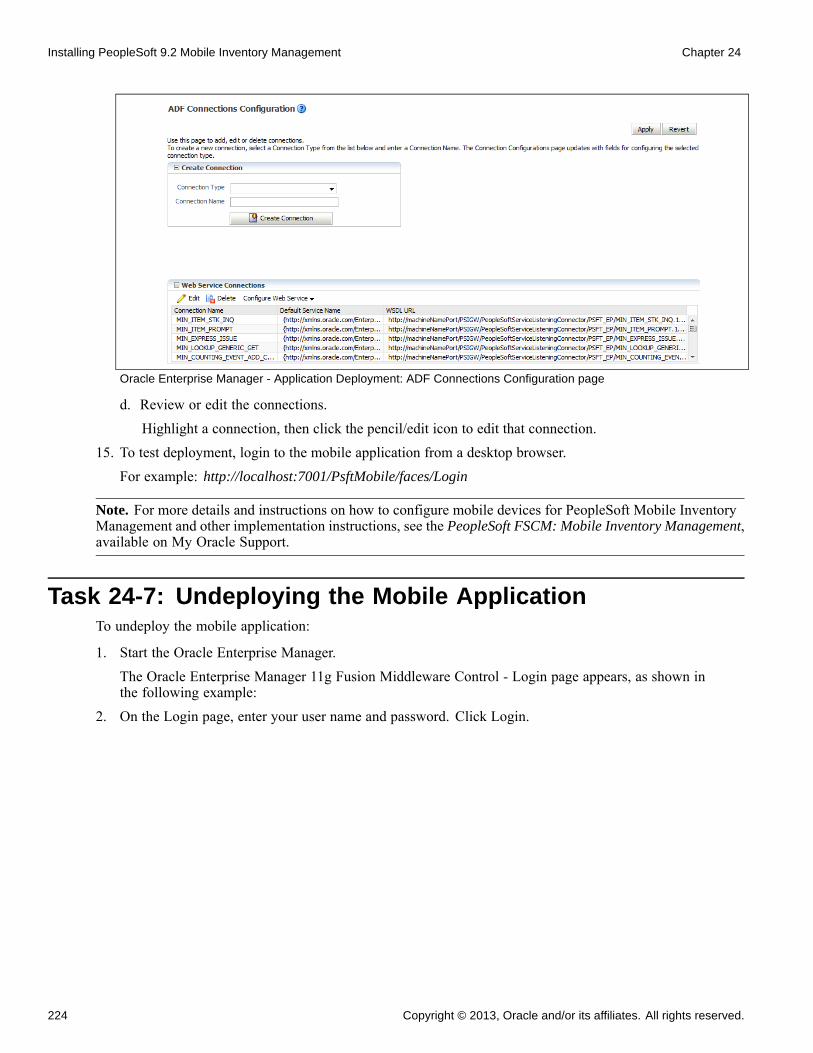
Installing PeopleSoft 9.2 Mobile Inventory Management Chapter 24
Oracle Enterprise Manager - Application Deployment: ADF Connections Configuration page
d. Review or edit the connections.Highlight a connection, then click the pencil/edit icon to edit that connection.
15. To test deployment, login to the mobile application from a desktop browser.For example: http://localhost:7001/PsftMobile/faces/Login
Note. For more details and instructions on how to configure mobile devices for PeopleSoft Mobile InventoryManagement and other implementation instructions, see the PeopleSoft FSCM: Mobile Inventory Management,available on My Oracle Support.
Task 24-7: Undeploying the Mobile ApplicationTo undeploy the mobile application:
1. Start the Oracle Enterprise Manager.The Oracle Enterprise Manager 11g Fusion Middleware Control - Login page appears, as shown inthe following example:
2. On the Login page, enter your user name and password. Click Login.
224 Copyright © 2013, Oracle and/or its affiliates. All rights reserved.
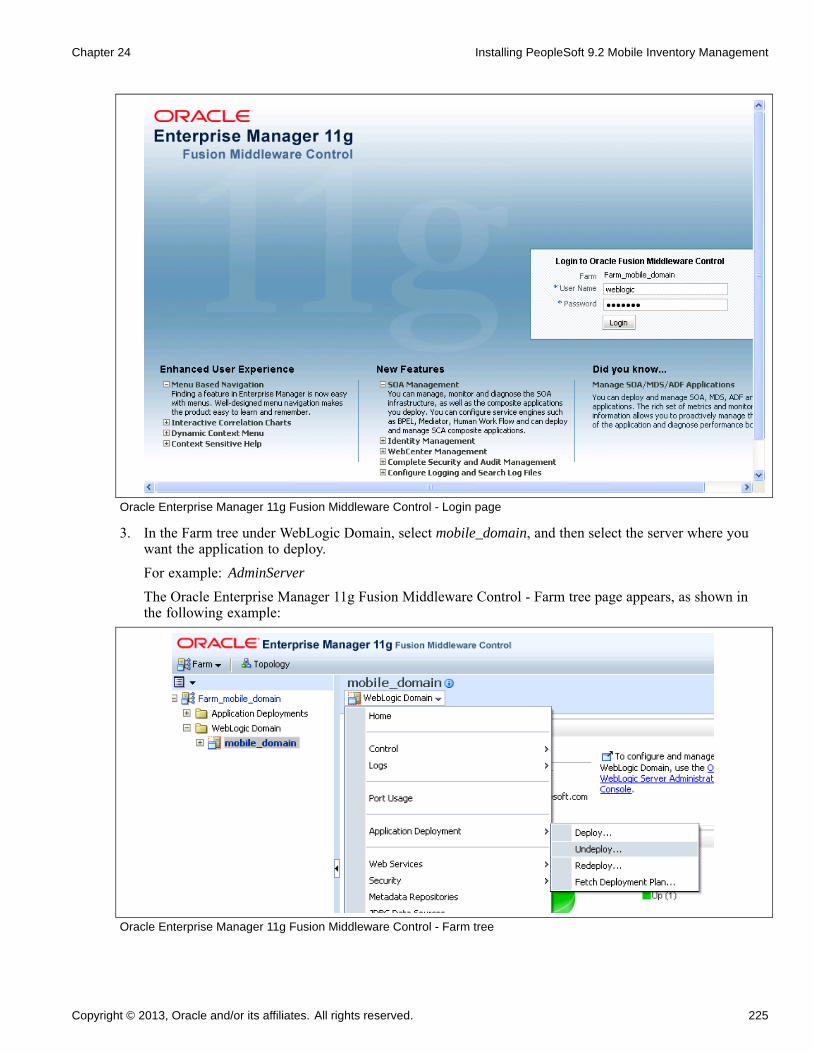
Chapter 24 Installing PeopleSoft 9.2 Mobile Inventory Management
Oracle Enterprise Manager 11g Fusion Middleware Control - Login page
3. In the Farm tree under WebLogic Domain, select mobile_domain, and then select the server where youwant the application to deploy.For example: AdminServer
The Oracle Enterprise Manager 11g Fusion Middleware Control - Farm tree page appears, as shown inthe following example:
Oracle Enterprise Manager 11g Fusion Middleware Control - Farm tree
Copyright © 2013, Oracle and/or its affiliates. All rights reserved. 225
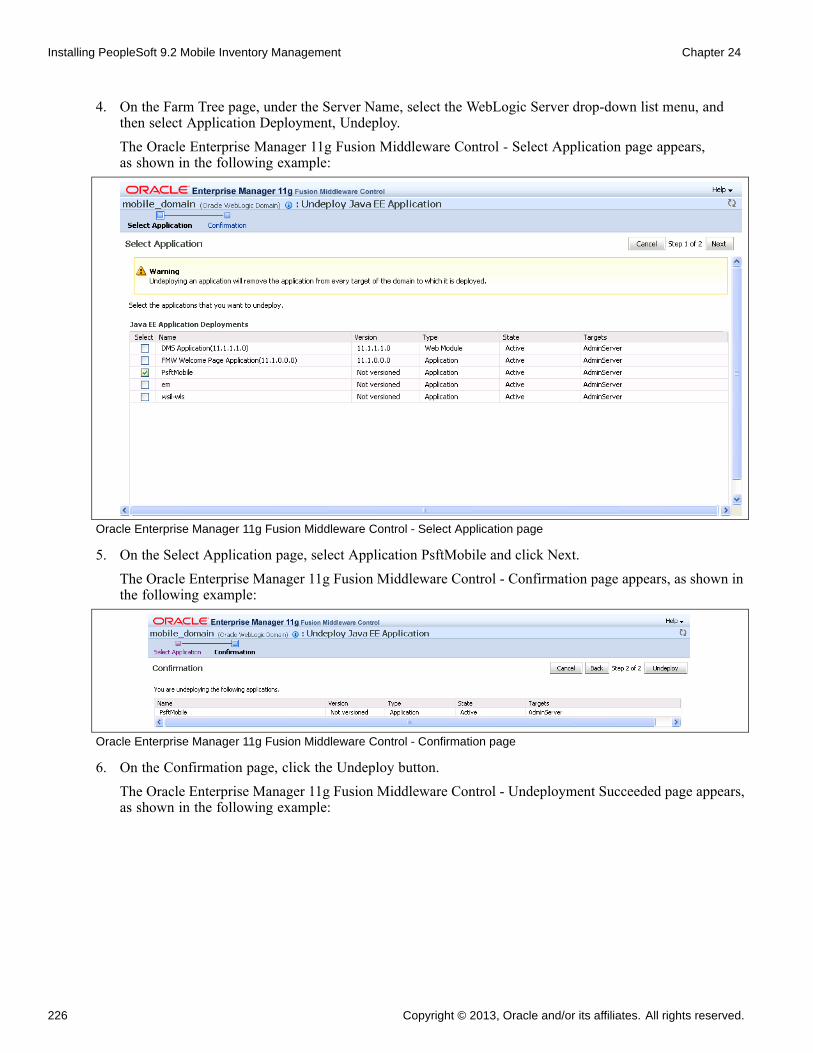
Installing PeopleSoft 9.2 Mobile Inventory Management Chapter 24
4. On the Farm Tree page, under the Server Name, select the WebLogic Server drop-down list menu, andthen select Application Deployment, Undeploy.The Oracle Enterprise Manager 11g Fusion Middleware Control - Select Application page appears,as shown in the following example:
Oracle Enterprise Manager 11g Fusion Middleware Control - Select Application page
5. On the Select Application page, select Application PsftMobile and click Next.
The Oracle Enterprise Manager 11g Fusion Middleware Control - Confirmation page appears, as shown inthe following example:
Oracle Enterprise Manager 11g Fusion Middleware Control - Confirmation page
6. On the Confirmation page, click the Undeploy button.
The Oracle Enterprise Manager 11g Fusion Middleware Control - Undeployment Succeeded page appears,as shown in the following example:
226 Copyright © 2013, Oracle and/or its affiliates. All rights reserved.
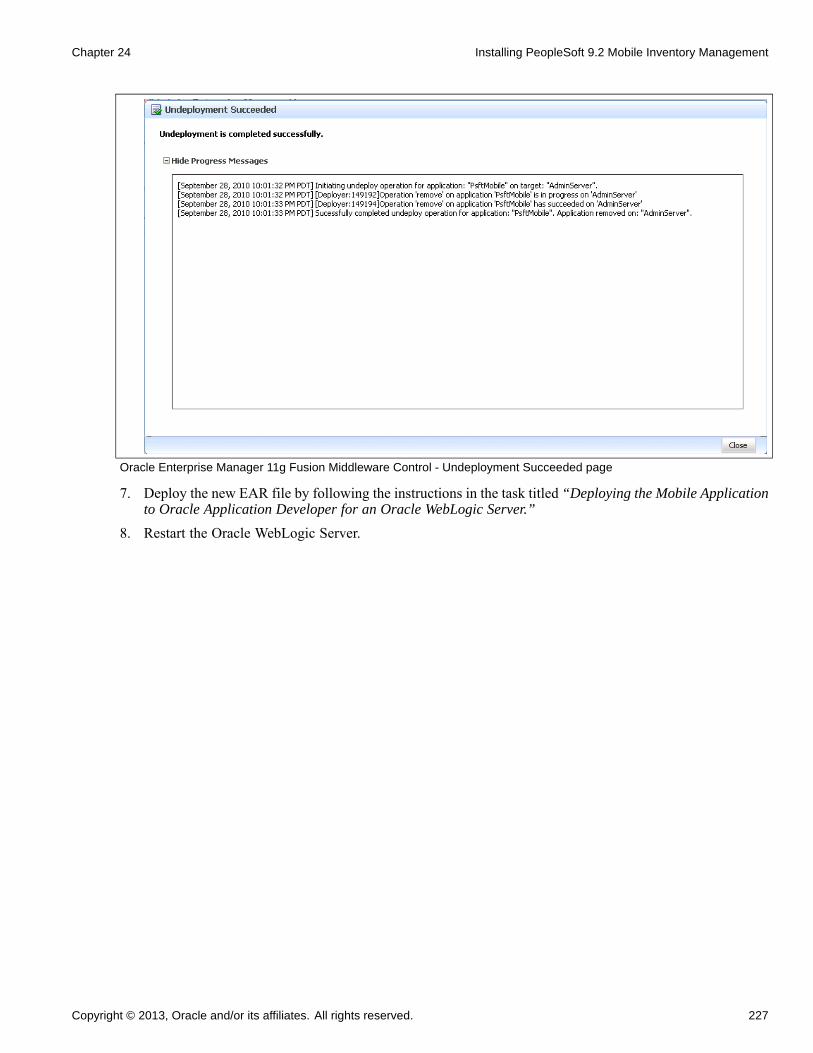
Chapter 24 Installing PeopleSoft 9.2 Mobile Inventory Management
Oracle Enterprise Manager 11g Fusion Middleware Control - Undeployment Succeeded page
7. Deploy the new EAR file by following the instructions in the task titled “Deploying the Mobile Applicationto Oracle Application Developer for an Oracle WebLogic Server.”
8. Restart the Oracle WebLogic Server.
Copyright © 2013, Oracle and/or its affiliates. All rights reserved. 227

Installing PeopleSoft 9.2 Mobile Inventory Management Chapter 24
228 Copyright © 2013, Oracle and/or its affiliates. All rights reserved.
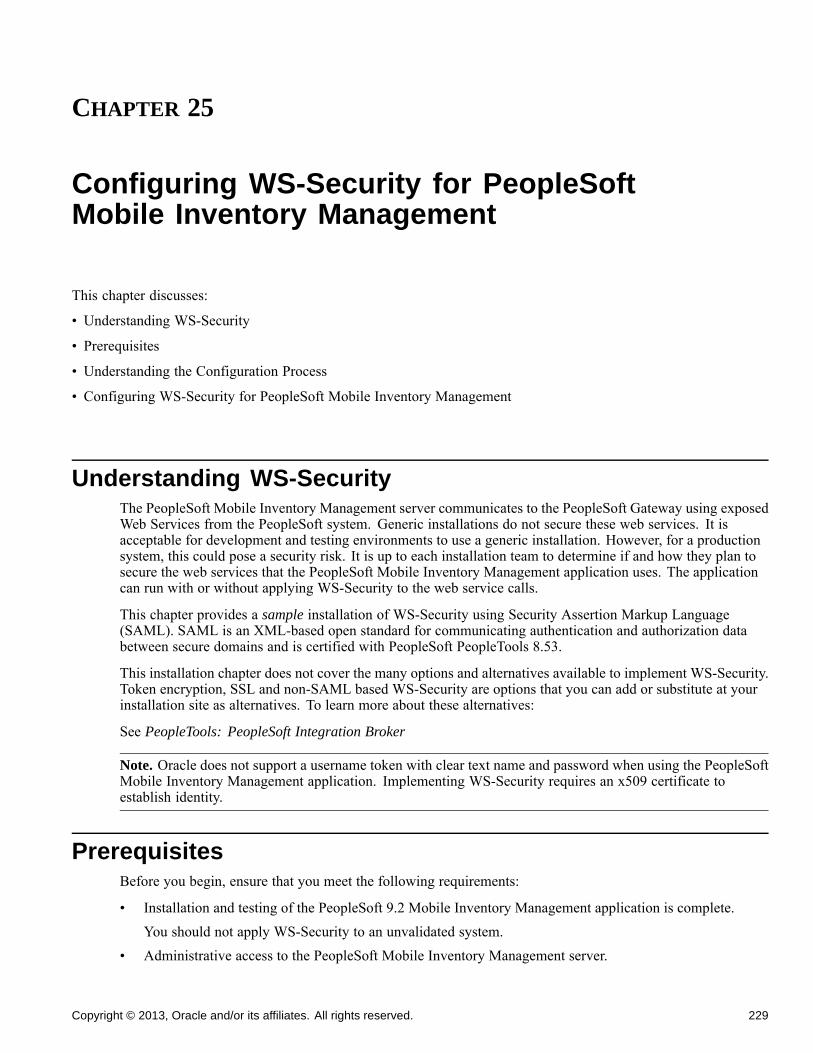
CHAPTER 25
Configuring WS-Security for PeopleSoftMobile Inventory Management
This chapter discusses:
• Understanding WS-Security
• Prerequisites
• Understanding the Configuration Process
• Configuring WS-Security for PeopleSoft Mobile Inventory Management
Understanding WS-SecurityThe PeopleSoft Mobile Inventory Management server communicates to the PeopleSoft Gateway using exposedWeb Services from the PeopleSoft system. Generic installations do not secure these web services. It isacceptable for development and testing environments to use a generic installation. However, for a productionsystem, this could pose a security risk. It is up to each installation team to determine if and how they plan tosecure the web services that the PeopleSoft Mobile Inventory Management application uses. The applicationcan run with or without applying WS-Security to the web service calls.
This chapter provides a sample installation of WS-Security using Security Assertion Markup Language(SAML). SAML is an XML-based open standard for communicating authentication and authorization databetween secure domains and is certified with PeopleSoft PeopleTools 8.53.
This installation chapter does not cover the many options and alternatives available to implement WS-Security.Token encryption, SSL and non-SAML based WS-Security are options that you can add or substitute at yourinstallation site as alternatives. To learn more about these alternatives:
See PeopleTools: PeopleSoft Integration Broker
Note. Oracle does not support a username token with clear text name and password when using the PeopleSoftMobile Inventory Management application. Implementing WS-Security requires an x509 certificate toestablish identity.
PrerequisitesBefore you begin, ensure that you meet the following requirements:
• Installation and testing of the PeopleSoft 9.2 Mobile Inventory Management application is complete.You should not apply WS-Security to an unvalidated system.
• Administrative access to the PeopleSoft Mobile Inventory Management server.
Copyright © 2013, Oracle and/or its affiliates. All rights reserved. 229
Configuring WS-Security for PeopleSoft Mobile Inventory Management Chapter 25
• Administrative access to the PeopleSoft Web server.• A PeopleSoft User ID that has permission to update security configuration information.• An x.509 and root certificate from a trusted certificate authority.
Note. The steps in this installation chapter generate a self validating certificate, instead of a trustedcertificate. Oracle does not recommend that you secure your production system with generated self-signedcertificates. You should obtain an x.509 and root certificate from a trusted certificate authority.
• Download of the Oracle Repository Creation Utility is complete.To perform the WS-Security tasks in this chapter, you must use the Oracle Repository Creation Utility.To access the Oracle Repository Creation Utility (RCU), access the Oracle Technology Network athttp://www.oracle.com/technetwork/index.html, select Downloads, SOA Suite, and then in the OracleSOA Suite 11g Installations section (on that page) expand the “Prerequisites & Recommended InstallProcess” section and download the RCU.
Important! The Oracle Repository Creation Utility (RCU) must be run prior to installing the Oracle WebService Manager (OWSM).
Understanding the Configuration ProcessSeveral tasks are necessary to configure WS-Security for the PeopleSoft Mobile Inventory Managementapplication. There may be dependencies between the steps. Therefore, Oracle recommends that you run thetasks in this chapter in the following order:
Note. The steps that follow detail the necessary tasks in the correct order.
1. Run the Oracle Repository Creation Utility (RCU) to create a metadata repository.Oracle Web Service Manager (OWSM) uses this repository to secure policies.
2. Install the Oracle Web Service Manager (OWSM), a prerequisite application that is part of Oracle FusionMiddleware.Using WS-Security client policies requires that you install OWSM on the PeopleSoft Mobile InventoryManagement web server.WS-Security requires OWSM. The installation instructions for OWSM are only available in this chapter.
3. Configure the certificates between the Mobile server and the PeopleSoft server.4. Create the keystore and credential store on the Mobile server.5. Add the SAML definition information to the PeopleSoft system so that the system can validate and enable
the identity of the Mobile server through WS-Security settings.Optionally, you can set policies on web services so that they cannot be called without the appropriatews-security.
6. Update the connections.xml to enforce security policies.Oracle delivers the connections.xml file with the PeopleSoft Mobile Inventory Management application.
230 Copyright © 2013, Oracle and/or its affiliates. All rights reserved.
Chapter 25 Configuring WS-Security for PeopleSoft Mobile Inventory Management
Task 25-1: Configuring WS-Security for PeopleSoftMobile Inventory Management
This section discusses:
• Running the Oracle Repository Creation Utility
• Installing the Oracle Web Service Manager
• Configuring the Certificates
• Creating and Configuring the Keystore and Credential Store
• Adding the SAML Definition Information to the PeopleSoft System
• Updating the connections.xml to Enforce Security Policies
Important! There may be dependencies between the tasks necessary to configure WS-Security for thePeopleSoft Mobile Inventory Management application. Oracle recommends that you run the following tasksin the order provided.
Task 25-1-1: Running the Oracle Repository Creation UtilityYou must run the Oracle Repository Creation Utility (RCU) prior to installing the Oracle Web ServiceManager (OWSM).
To download and run the Oracle RCU:
1. Download the Oracle Repository Creation Utility (RCU) from the Oracle Technology Network.Access the Oracle Technology Network at http://www.oracle.com/technetwork/index.html, selectDownloads, SOA Suite, and then in the Oracle SOA Suite 11g Installations section (on that page) expandthe Prerequisites & Recommended Install Process section and download the RCU.See the preceding “Prerequisites” section for this chapter.
2. Unzip the rcuHome.zip file into an accessible rcuHome drive.3. Launch the rcu executable file /rcuHome/bin/rcu.bat.
The startup dialog box on the Welcome page appears, as shown in the following example:
Copyright © 2013, Oracle and/or its affiliates. All rights reserved. 231
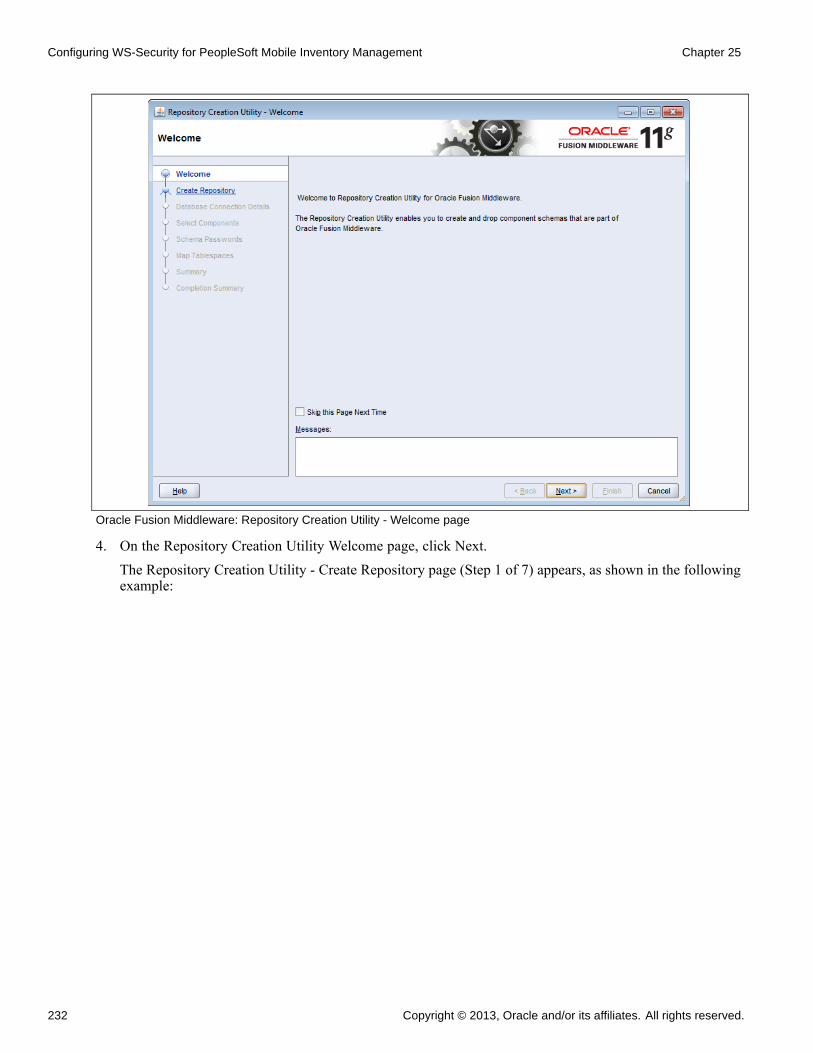
Configuring WS-Security for PeopleSoft Mobile Inventory Management Chapter 25
Oracle Fusion Middleware: Repository Creation Utility - Welcome page
4. On the Repository Creation Utility Welcome page, click Next.The Repository Creation Utility - Create Repository page (Step 1 of 7) appears, as shown in the followingexample:
232 Copyright © 2013, Oracle and/or its affiliates. All rights reserved.
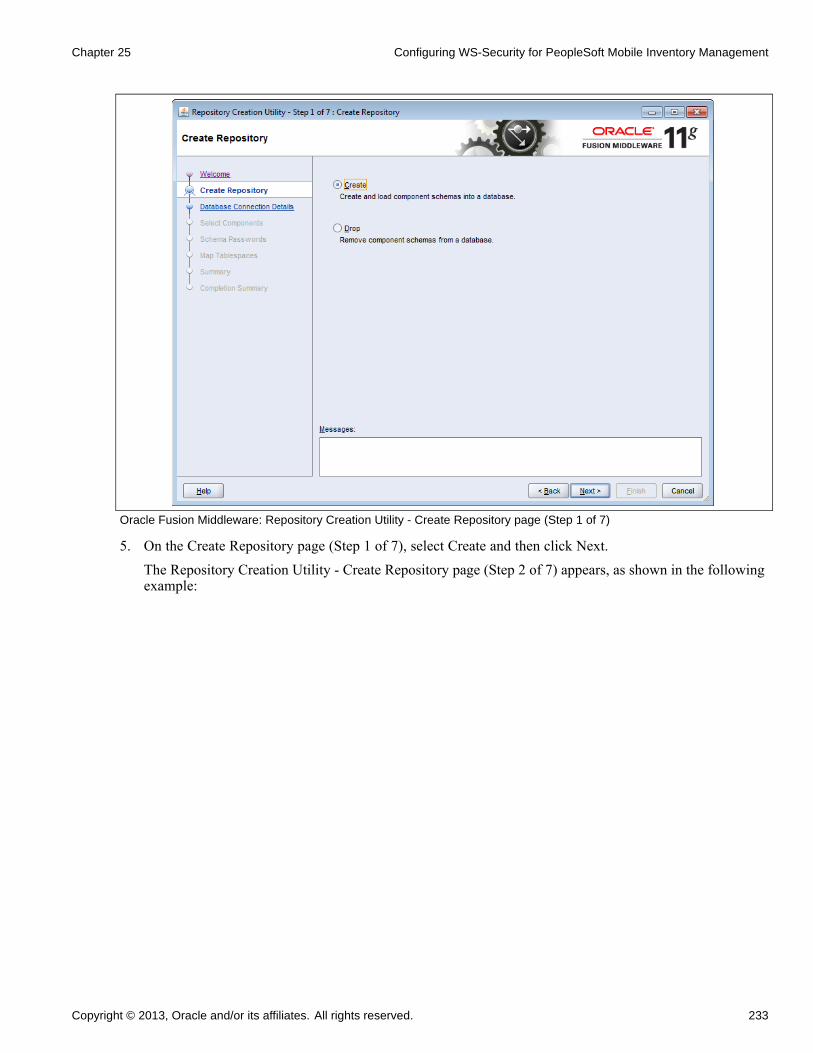
Chapter 25 Configuring WS-Security for PeopleSoft Mobile Inventory Management
Oracle Fusion Middleware: Repository Creation Utility - Create Repository page (Step 1 of 7)
5. On the Create Repository page (Step 1 of 7), select Create and then click Next.The Repository Creation Utility - Create Repository page (Step 2 of 7) appears, as shown in the followingexample:
Copyright © 2013, Oracle and/or its affiliates. All rights reserved. 233
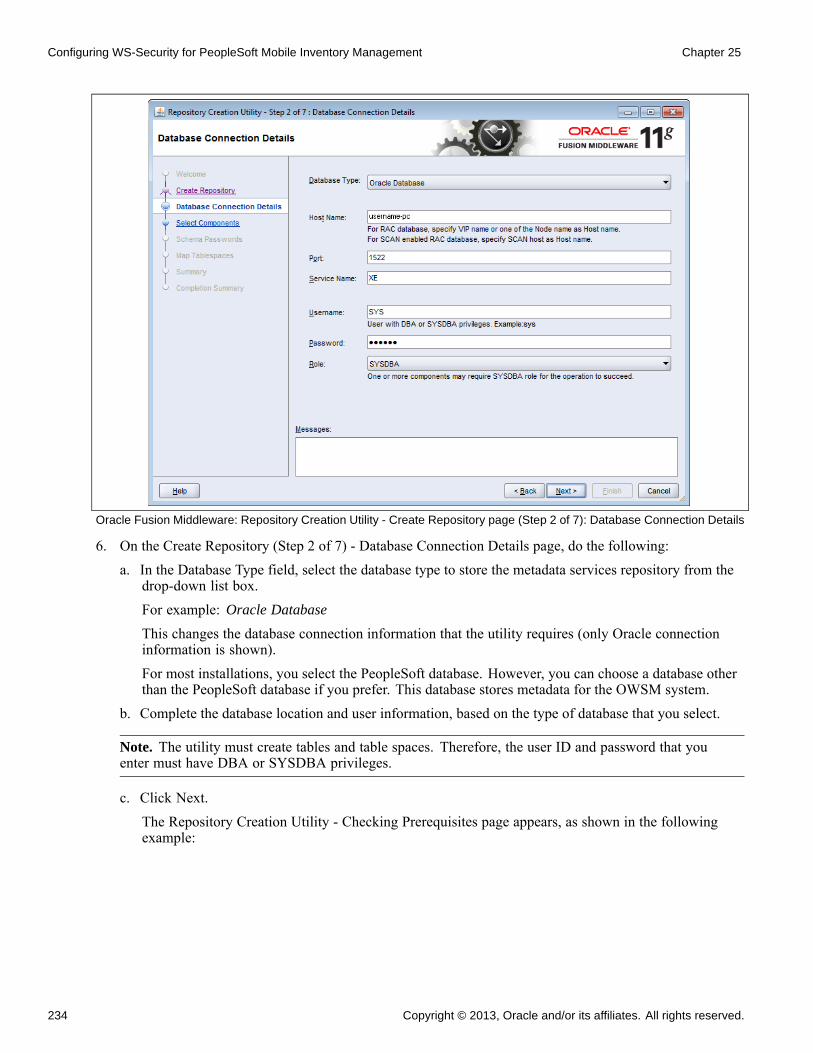
Configuring WS-Security for PeopleSoft Mobile Inventory Management Chapter 25
Oracle Fusion Middleware: Repository Creation Utility - Create Repository page (Step 2 of 7): Database Connection Details
6. On the Create Repository (Step 2 of 7) - Database Connection Details page, do the following:a. In the Database Type field, select the database type to store the metadata services repository from the
drop-down list box.For example: Oracle Database
This changes the database connection information that the utility requires (only Oracle connectioninformation is shown).For most installations, you select the PeopleSoft database. However, you can choose a database otherthan the PeopleSoft database if you prefer. This database stores metadata for the OWSM system.
b. Complete the database location and user information, based on the type of database that you select.
Note. The utility must create tables and table spaces. Therefore, the user ID and password that youenter must have DBA or SYSDBA privileges.
c. Click Next.The Repository Creation Utility - Checking Prerequisites page appears, as shown in the followingexample:
234 Copyright © 2013, Oracle and/or its affiliates. All rights reserved.
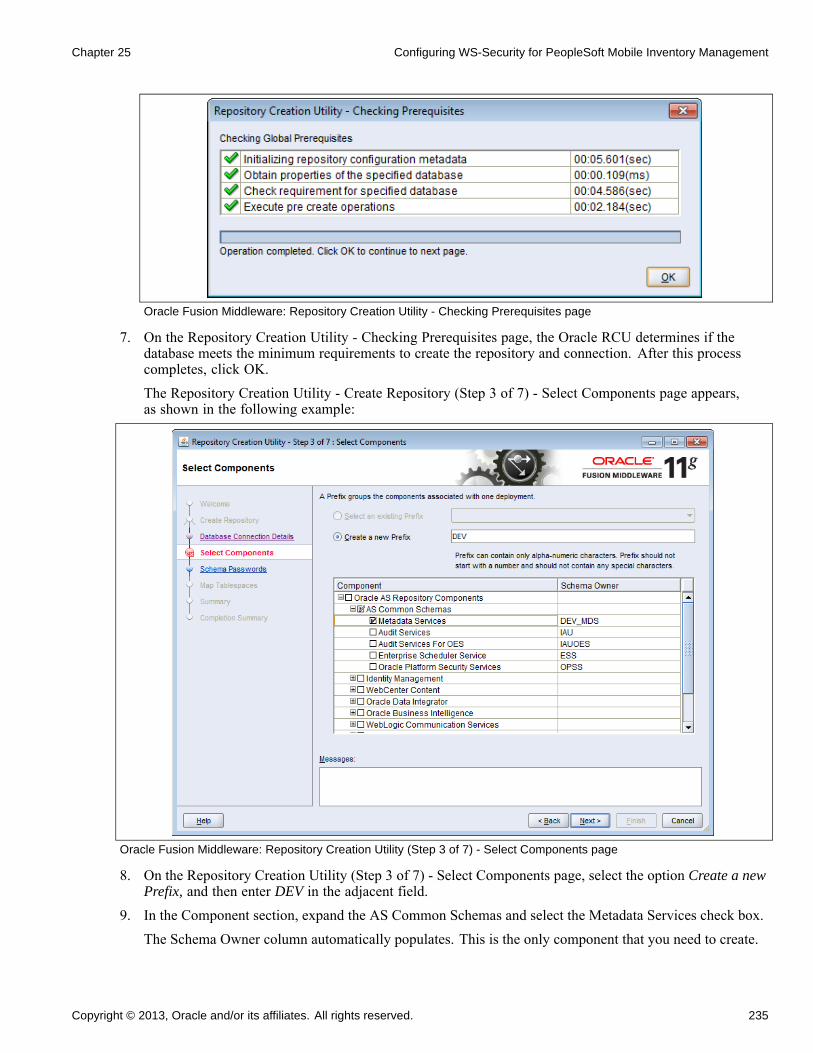
Chapter 25 Configuring WS-Security for PeopleSoft Mobile Inventory Management
Oracle Fusion Middleware: Repository Creation Utility - Checking Prerequisites page
7. On the Repository Creation Utility - Checking Prerequisites page, the Oracle RCU determines if thedatabase meets the minimum requirements to create the repository and connection. After this processcompletes, click OK.
The Repository Creation Utility - Create Repository (Step 3 of 7) - Select Components page appears,as shown in the following example:
Oracle Fusion Middleware: Repository Creation Utility (Step 3 of 7) - Select Components page
8. On the Repository Creation Utility (Step 3 of 7) - Select Components page, select the option Create a newPrefix, and then enter DEV in the adjacent field.
9. In the Component section, expand the AS Common Schemas and select the Metadata Services check box.The Schema Owner column automatically populates. This is the only component that you need to create.
Copyright © 2013, Oracle and/or its affiliates. All rights reserved. 235
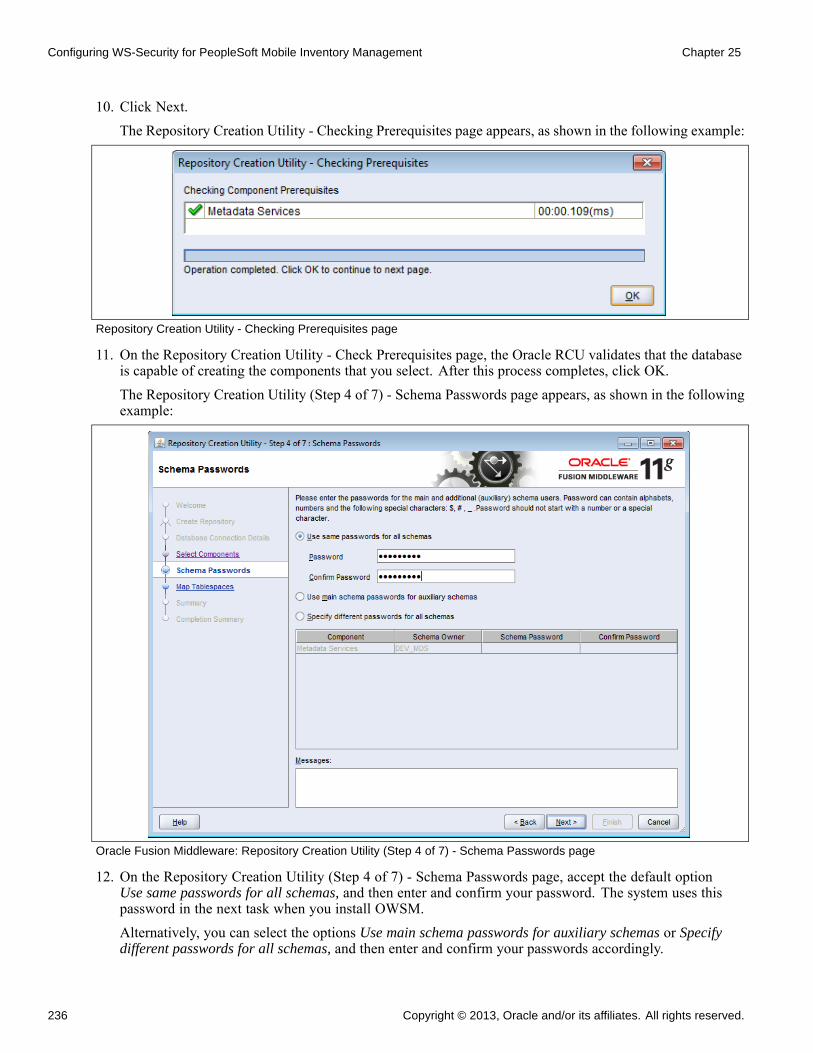
Configuring WS-Security for PeopleSoft Mobile Inventory Management Chapter 25
10. Click Next.The Repository Creation Utility - Checking Prerequisites page appears, as shown in the following example:
Repository Creation Utility - Checking Prerequisites page
11. On the Repository Creation Utility - Check Prerequisites page, the Oracle RCU validates that the databaseis capable of creating the components that you select. After this process completes, click OK.The Repository Creation Utility (Step 4 of 7) - Schema Passwords page appears, as shown in the followingexample:
Oracle Fusion Middleware: Repository Creation Utility (Step 4 of 7) - Schema Passwords page
12. On the Repository Creation Utility (Step 4 of 7) - Schema Passwords page, accept the default optionUse same passwords for all schemas, and then enter and confirm your password. The system uses thispassword in the next task when you install OWSM.Alternatively, you can select the options Use main schema passwords for auxiliary schemas or Specifydifferent passwords for all schemas, and then enter and confirm your passwords accordingly.
236 Copyright © 2013, Oracle and/or its affiliates. All rights reserved.
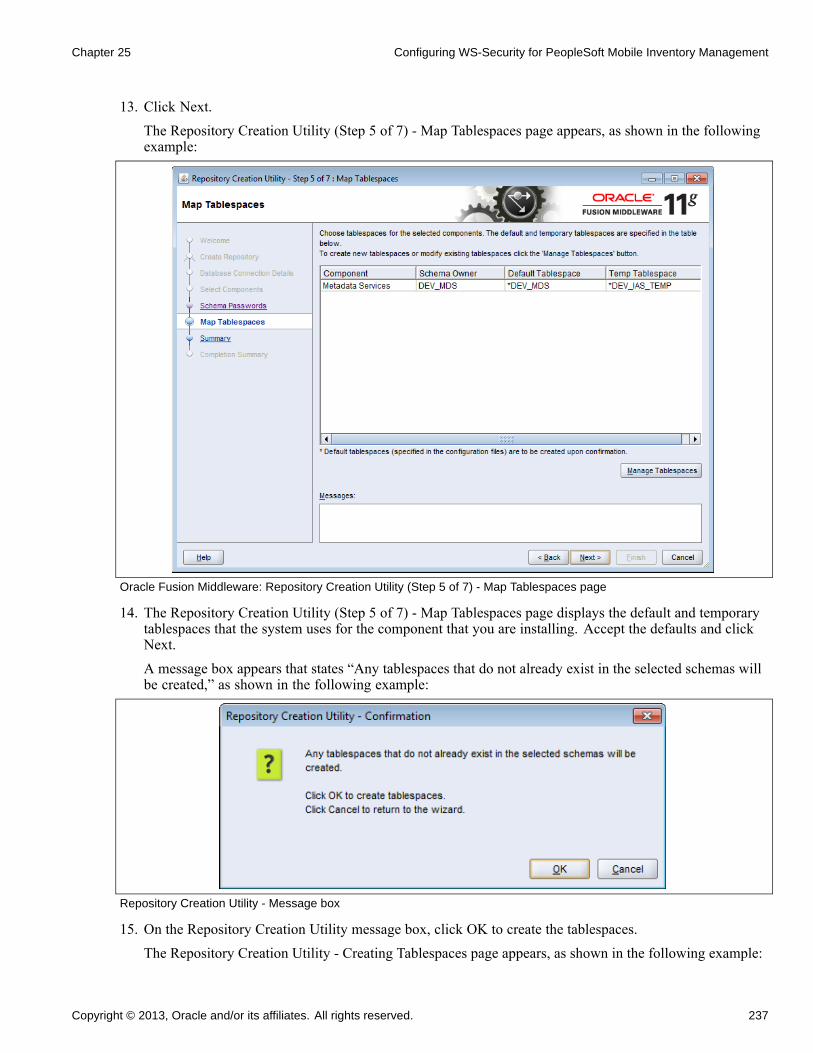
Chapter 25 Configuring WS-Security for PeopleSoft Mobile Inventory Management
13. Click Next.The Repository Creation Utility (Step 5 of 7) - Map Tablespaces page appears, as shown in the followingexample:
Oracle Fusion Middleware: Repository Creation Utility (Step 5 of 7) - Map Tablespaces page
14. The Repository Creation Utility (Step 5 of 7) - Map Tablespaces page displays the default and temporarytablespaces that the system uses for the component that you are installing. Accept the defaults and clickNext.A message box appears that states “Any tablespaces that do not already exist in the selected schemas willbe created,” as shown in the following example:
Repository Creation Utility - Message box
15. On the Repository Creation Utility message box, click OK to create the tablespaces.The Repository Creation Utility - Creating Tablespaces page appears, as shown in the following example:
Copyright © 2013, Oracle and/or its affiliates. All rights reserved. 237
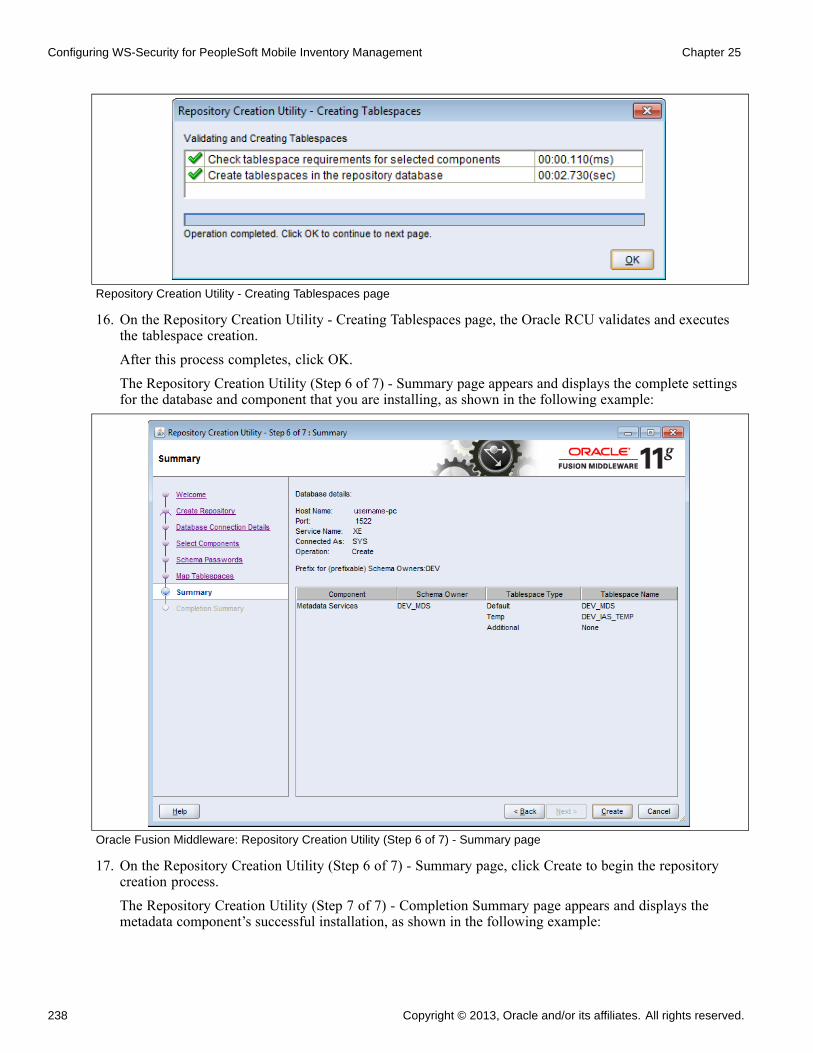
Configuring WS-Security for PeopleSoft Mobile Inventory Management Chapter 25
Repository Creation Utility - Creating Tablespaces page
16. On the Repository Creation Utility - Creating Tablespaces page, the Oracle RCU validates and executesthe tablespace creation.After this process completes, click OK.The Repository Creation Utility (Step 6 of 7) - Summary page appears and displays the complete settingsfor the database and component that you are installing, as shown in the following example:
Oracle Fusion Middleware: Repository Creation Utility (Step 6 of 7) - Summary page
17. On the Repository Creation Utility (Step 6 of 7) - Summary page, click Create to begin the repositorycreation process.The Repository Creation Utility (Step 7 of 7) - Completion Summary page appears and displays themetadata component’s successful installation, as shown in the following example:
238 Copyright © 2013, Oracle and/or its affiliates. All rights reserved.
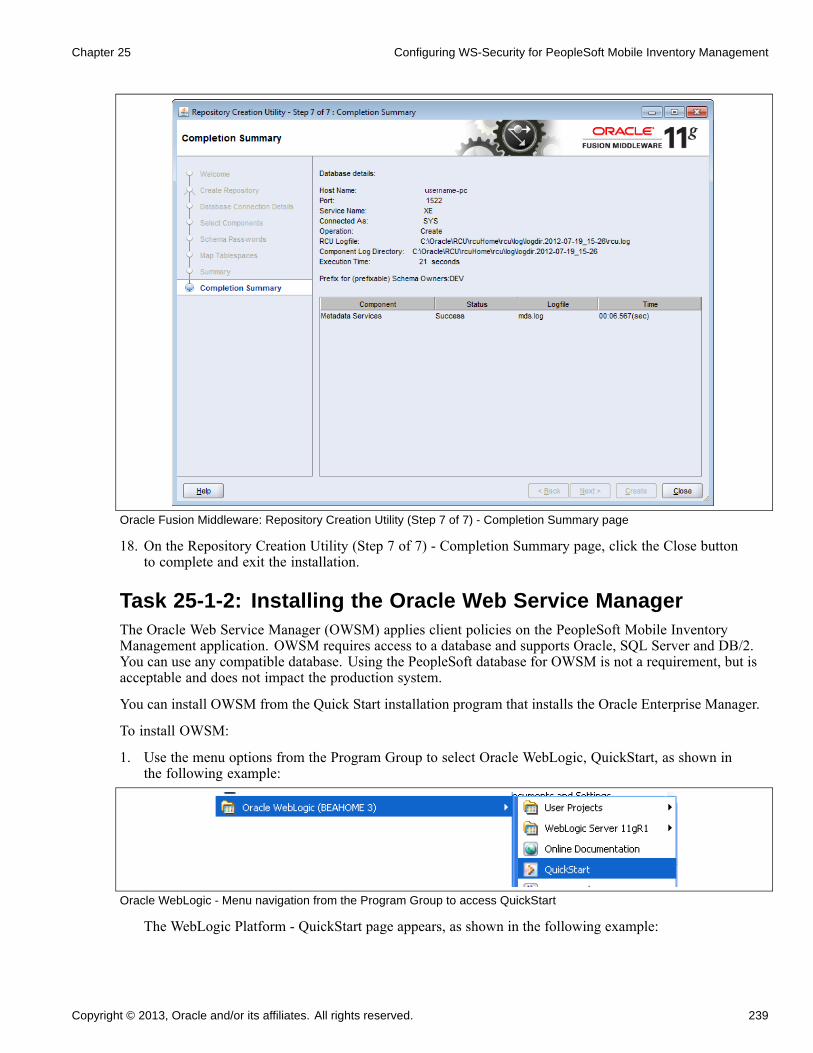
Chapter 25 Configuring WS-Security for PeopleSoft Mobile Inventory Management
Oracle Fusion Middleware: Repository Creation Utility (Step 7 of 7) - Completion Summary page
18. On the Repository Creation Utility (Step 7 of 7) - Completion Summary page, click the Close buttonto complete and exit the installation.
Task 25-1-2: Installing the Oracle Web Service ManagerThe Oracle Web Service Manager (OWSM) applies client policies on the PeopleSoft Mobile InventoryManagement application. OWSM requires access to a database and supports Oracle, SQL Server and DB/2.You can use any compatible database. Using the PeopleSoft database for OWSM is not a requirement, but isacceptable and does not impact the production system.
You can install OWSM from the Quick Start installation program that installs the Oracle Enterprise Manager.
To install OWSM:
1. Use the menu options from the Program Group to select Oracle WebLogic, QuickStart, as shown inthe following example:
Oracle WebLogic - Menu navigation from the Program Group to access QuickStart
The WebLogic Platform - QuickStart page appears, as shown in the following example:
Copyright © 2013, Oracle and/or its affiliates. All rights reserved. 239
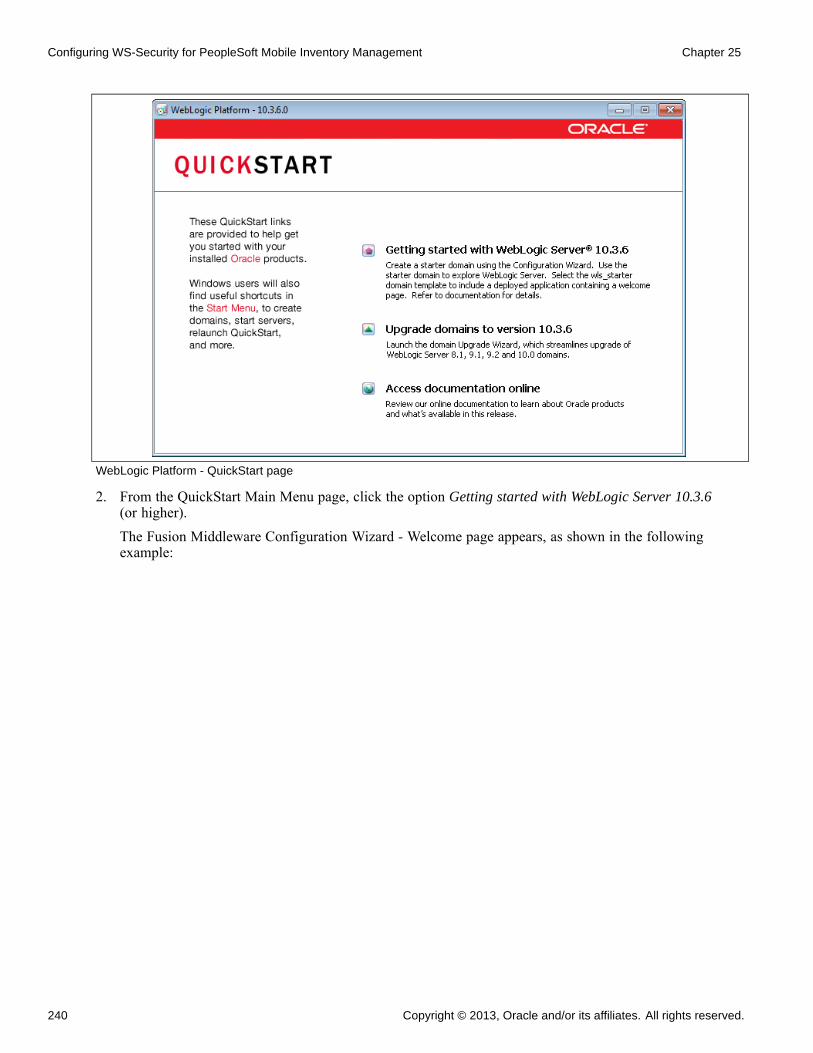
Configuring WS-Security for PeopleSoft Mobile Inventory Management Chapter 25
WebLogic Platform - QuickStart page
2. From the QuickStart Main Menu page, click the option Getting started with WebLogic Server 10.3.6(or higher).The Fusion Middleware Configuration Wizard - Welcome page appears, as shown in the followingexample:
240 Copyright © 2013, Oracle and/or its affiliates. All rights reserved.
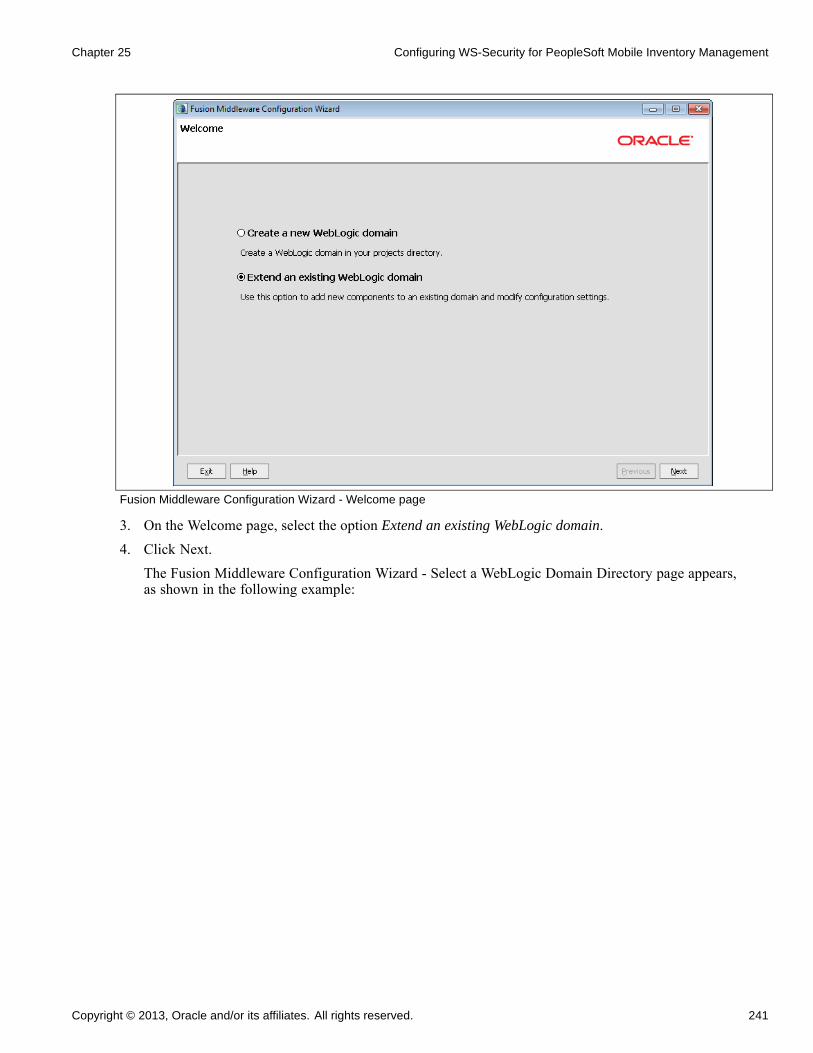
Chapter 25 Configuring WS-Security for PeopleSoft Mobile Inventory Management
Fusion Middleware Configuration Wizard - Welcome page
3. On the Welcome page, select the option Extend an existing WebLogic domain.4. Click Next.
The Fusion Middleware Configuration Wizard - Select a WebLogic Domain Directory page appears,as shown in the following example:
Copyright © 2013, Oracle and/or its affiliates. All rights reserved. 241
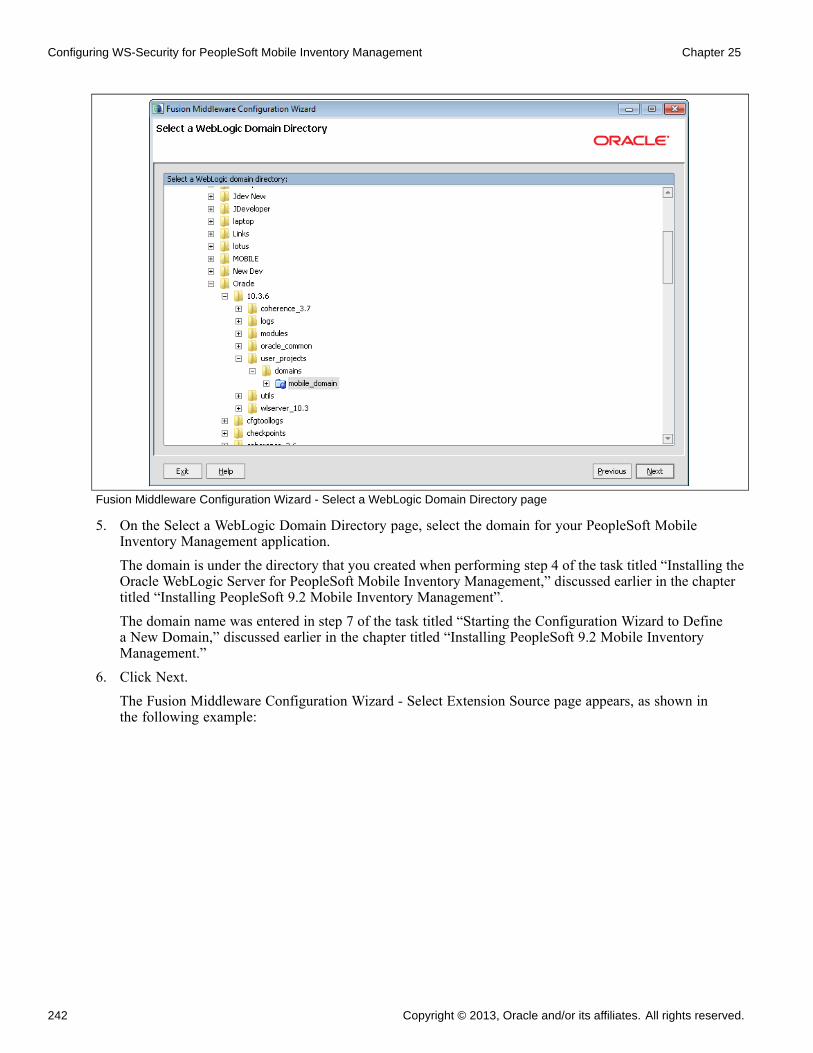
Configuring WS-Security for PeopleSoft Mobile Inventory Management Chapter 25
Fusion Middleware Configuration Wizard - Select a WebLogic Domain Directory page
5. On the Select a WebLogic Domain Directory page, select the domain for your PeopleSoft MobileInventory Management application.The domain is under the directory that you created when performing step 4 of the task titled “Installing theOracle WebLogic Server for PeopleSoft Mobile Inventory Management,” discussed earlier in the chaptertitled “Installing PeopleSoft 9.2 Mobile Inventory Management”.The domain name was entered in step 7 of the task titled “Starting the Configuration Wizard to Definea New Domain,” discussed earlier in the chapter titled “Installing PeopleSoft 9.2 Mobile InventoryManagement.”
6. Click Next.The Fusion Middleware Configuration Wizard - Select Extension Source page appears, as shown inthe following example:
242 Copyright © 2013, Oracle and/or its affiliates. All rights reserved.
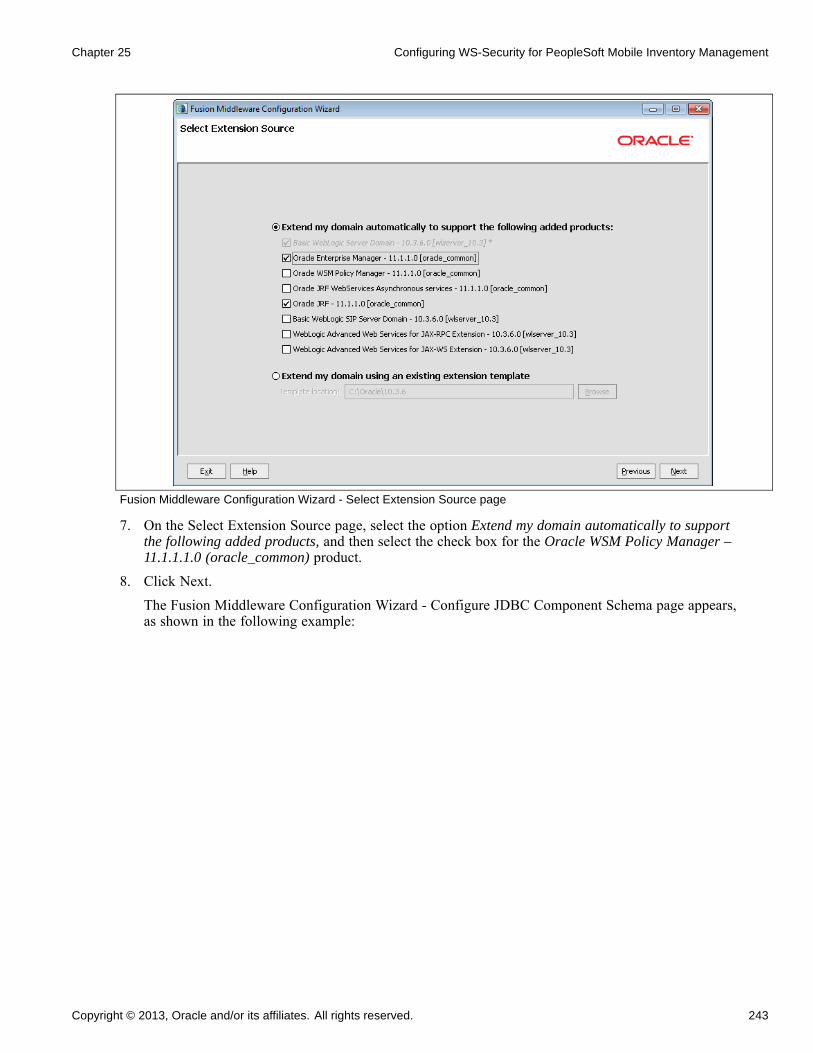
Chapter 25 Configuring WS-Security for PeopleSoft Mobile Inventory Management
Fusion Middleware Configuration Wizard - Select Extension Source page
7. On the Select Extension Source page, select the option Extend my domain automatically to supportthe following added products, and then select the check box for the Oracle WSM Policy Manager –11.1.1.1.0 (oracle_common) product.
8. Click Next.The Fusion Middleware Configuration Wizard - Configure JDBC Component Schema page appears,as shown in the following example:
Copyright © 2013, Oracle and/or its affiliates. All rights reserved. 243
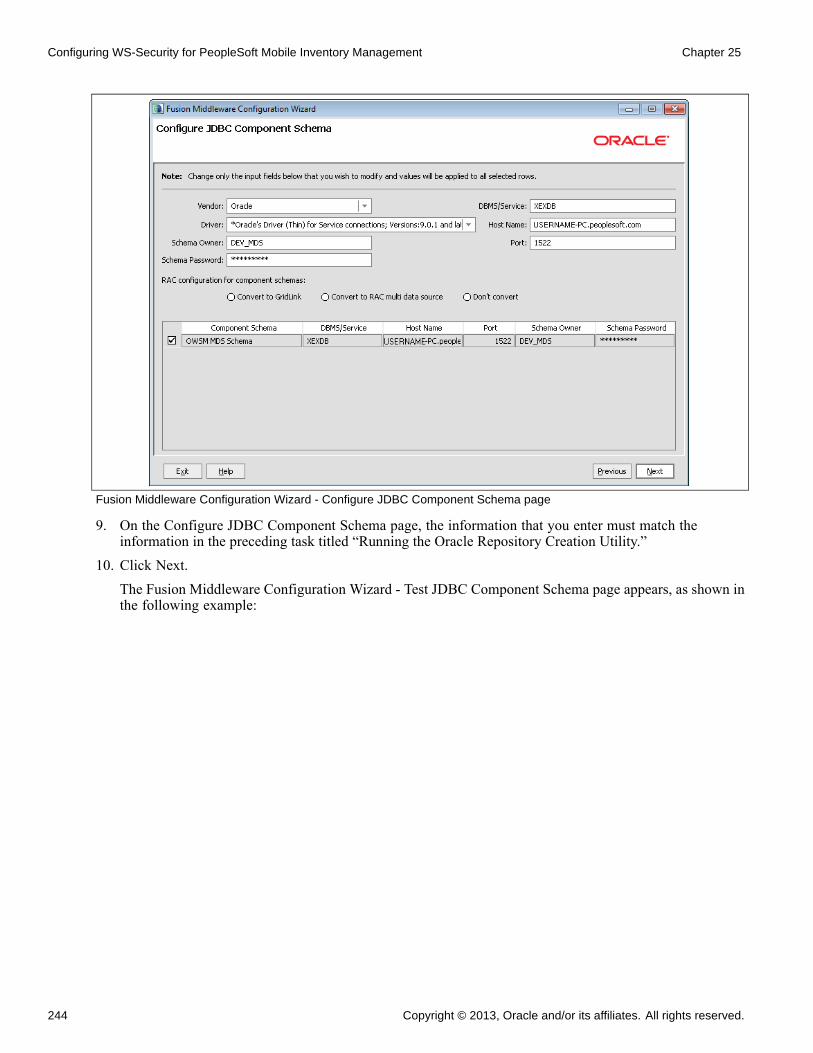
Configuring WS-Security for PeopleSoft Mobile Inventory Management Chapter 25
Fusion Middleware Configuration Wizard - Configure JDBC Component Schema page
9. On the Configure JDBC Component Schema page, the information that you enter must match theinformation in the preceding task titled “Running the Oracle Repository Creation Utility.”
10. Click Next.The Fusion Middleware Configuration Wizard - Test JDBC Component Schema page appears, as shown inthe following example:
244 Copyright © 2013, Oracle and/or its affiliates. All rights reserved.
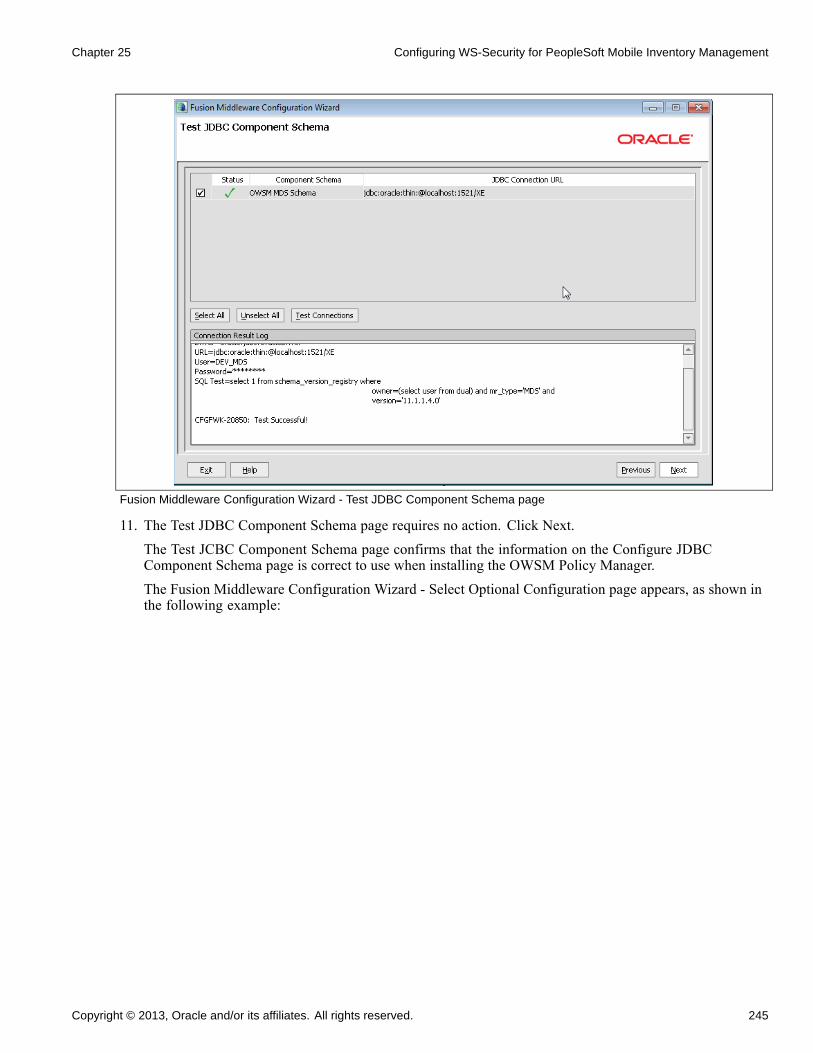
Chapter 25 Configuring WS-Security for PeopleSoft Mobile Inventory Management
Fusion Middleware Configuration Wizard - Test JDBC Component Schema page
11. The Test JDBC Component Schema page requires no action. Click Next.The Test JCBC Component Schema page confirms that the information on the Configure JDBCComponent Schema page is correct to use when installing the OWSM Policy Manager.The Fusion Middleware Configuration Wizard - Select Optional Configuration page appears, as shown inthe following example:
Copyright © 2013, Oracle and/or its affiliates. All rights reserved. 245
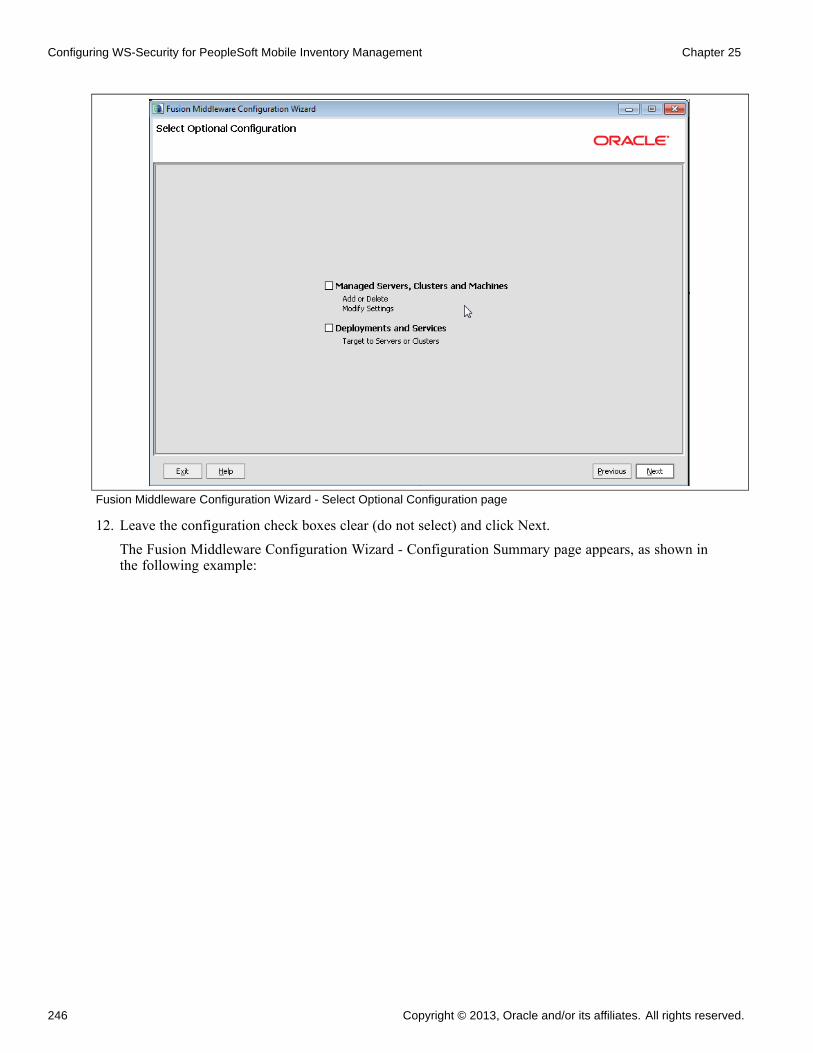
Configuring WS-Security for PeopleSoft Mobile Inventory Management Chapter 25
Fusion Middleware Configuration Wizard - Select Optional Configuration page
12. Leave the configuration check boxes clear (do not select) and click Next.The Fusion Middleware Configuration Wizard - Configuration Summary page appears, as shown inthe following example:
246 Copyright © 2013, Oracle and/or its affiliates. All rights reserved.
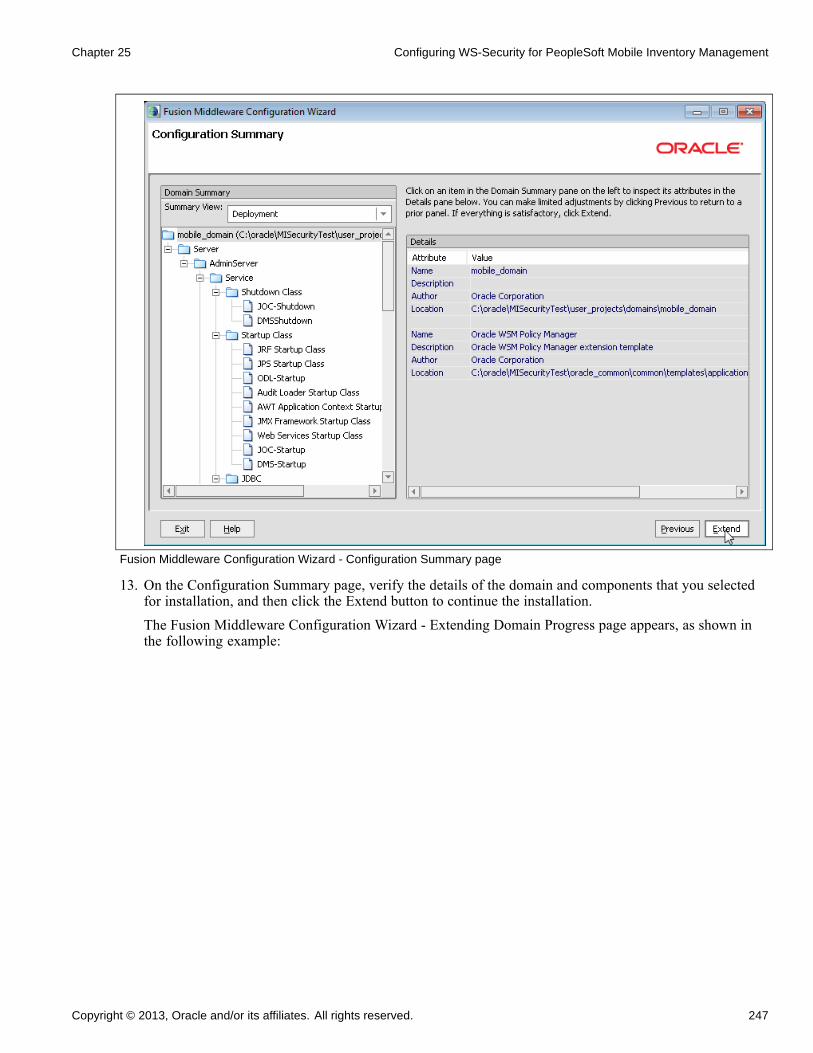
Chapter 25 Configuring WS-Security for PeopleSoft Mobile Inventory Management
Fusion Middleware Configuration Wizard - Configuration Summary page
13. On the Configuration Summary page, verify the details of the domain and components that you selectedfor installation, and then click the Extend button to continue the installation.
The Fusion Middleware Configuration Wizard - Extending Domain Progress page appears, as shown inthe following example:
Copyright © 2013, Oracle and/or its affiliates. All rights reserved. 247
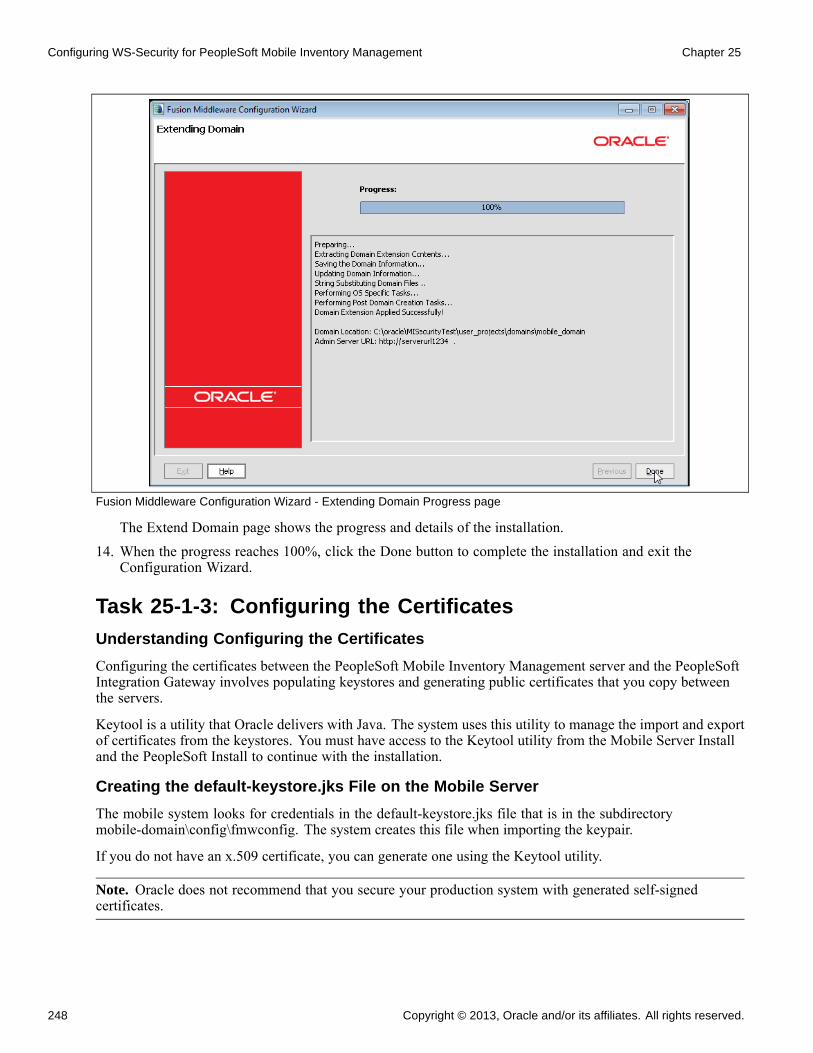
Configuring WS-Security for PeopleSoft Mobile Inventory Management Chapter 25
Fusion Middleware Configuration Wizard - Extending Domain Progress page
The Extend Domain page shows the progress and details of the installation.
14. When the progress reaches 100%, click the Done button to complete the installation and exit theConfiguration Wizard.
Task 25-1-3: Configuring the Certificates
Understanding Configuring the Certificates
Configuring the certificates between the PeopleSoft Mobile Inventory Management server and the PeopleSoftIntegration Gateway involves populating keystores and generating public certificates that you copy betweenthe servers.
Keytool is a utility that Oracle delivers with Java. The system uses this utility to manage the import and exportof certificates from the keystores. You must have access to the Keytool utility from the Mobile Server Installand the PeopleSoft Install to continue with the installation.
Creating the default-keystore.jks File on the Mobile Server
The mobile system looks for credentials in the default-keystore.jks file that is in the subdirectorymobile-domain\config\fmwconfig. The system creates this file when importing the keypair.
If you do not have an x.509 certificate, you can generate one using the Keytool utility.
Note. Oracle does not recommend that you secure your production system with generated self-signedcertificates.
248 Copyright © 2013, Oracle and/or its affiliates. All rights reserved.
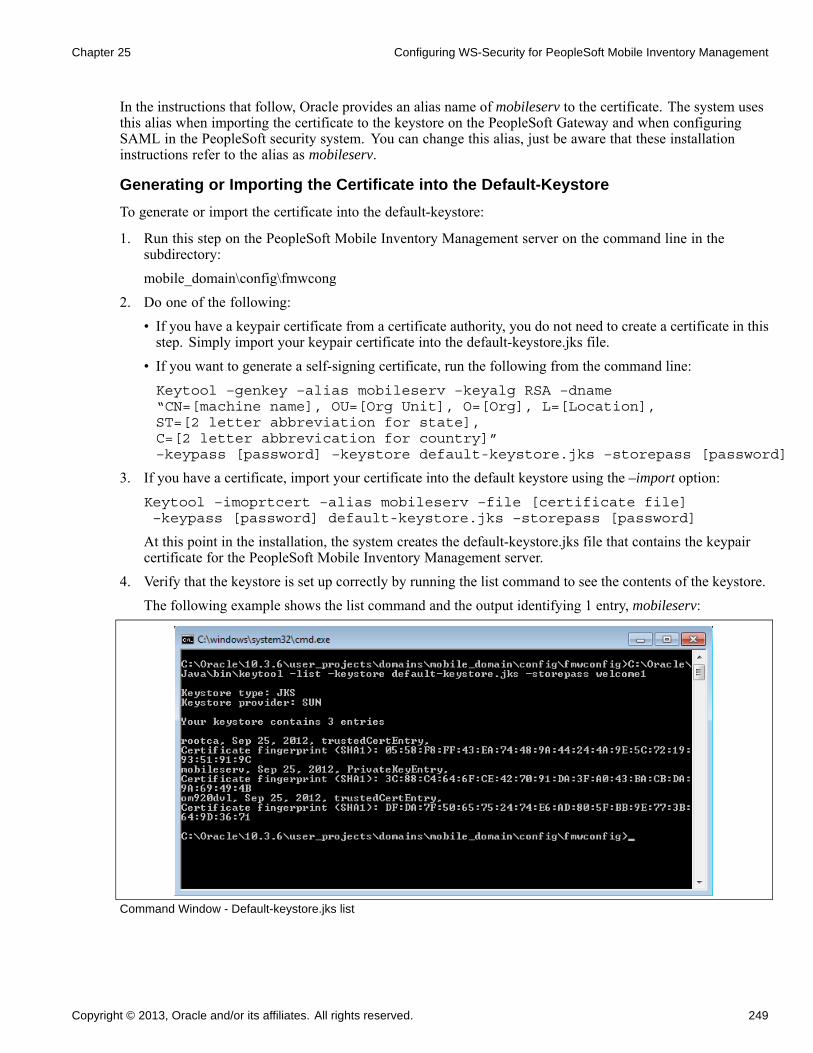
Chapter 25 Configuring WS-Security for PeopleSoft Mobile Inventory Management
In the instructions that follow, Oracle provides an alias name of mobileserv to the certificate. The system usesthis alias when importing the certificate to the keystore on the PeopleSoft Gateway and when configuringSAML in the PeopleSoft security system. You can change this alias, just be aware that these installationinstructions refer to the alias as mobileserv.
Generating or Importing the Certificate into the Default-Keystore
To generate or import the certificate into the default-keystore:
1. Run this step on the PeopleSoft Mobile Inventory Management server on the command line in thesubdirectory:mobile_domain\config\fmwcong
2. Do one of the following:• If you have a keypair certificate from a certificate authority, you do not need to create a certificate in thisstep. Simply import your keypair certificate into the default-keystore.jks file.
• If you want to generate a self-signing certificate, run the following from the command line:Keytool –genkey –alias mobileserv –keyalg RSA –dname“CN=[machine name], OU=[Org Unit], O=[Org], L=[Location],ST=[2 letter abbreviation for state],C=[2 letter abbrevication for country]”–keypass [password] –keystore default-keystore.jks –storepass [password]
3. If you have a certificate, import your certificate into the default keystore using the –import option:Keytool –imoprtcert –alias mobileserv –file [certificate file]–keypass [password] default-keystore.jks –storepass [password]
At this point in the installation, the system creates the default-keystore.jks file that contains the keypaircertificate for the PeopleSoft Mobile Inventory Management server.
4. Verify that the keystore is set up correctly by running the list command to see the contents of the keystore.The following example shows the list command and the output identifying 1 entry, mobileserv:
Command Window - Default-keystore.jks list
Copyright © 2013, Oracle and/or its affiliates. All rights reserved. 249
Configuring WS-Security for PeopleSoft Mobile Inventory Management Chapter 25
Exporting the mobileserv Public Key Certificate
To export the mobileserv public key certificate:
1. Run this step on the PeopleSoft Mobile Inventory Management server on the command line in thefollowing subdirectory:mobile_domain\config\fmwcong
2. To create the mobileserv.cer file, enter the following command:Keytool –exportcert –v –alias mobileserv –keystore default-keystore.jks –storepass [password] –rfc –file mobileserv.cer
3. Copy the mobileserv.cer file to the following subdirectory:PSHome\webserv\peoplesoft\applications\peoplesoft\PSIGW.war\WEB-INF\classesThis is the directory that contains the PeopleSoft keystore file interop.jks that Oracle delivers.
Importing the mobileserv Certificate into the Interop Keystore
To import the mobileserv certificate into the interop keystore:
1. Run this step from the command line in the following subdirectory:PSHome\webserv\peoplesoft\applications\peoplesoft\PSIGW.war\WEB-INF\classes
2. Run the command to import the mobileserv certificate into the PeopleSoft keystore, interop.jks. Thecertificate should be in the file mobileserv.cer that you copied in step 3 of the preceding subtask(“Exporting the mobileserv Public Key Certificate”).Keytool –importcert –alias mobileserv –file mobileserv.cer–keypass [password]–keystore interop.jks –storepass interop
3. Click Yes to trust the certificate.
Generating the Encryption Keypair in the Interop Keystore
The encryption node keypair encrypts the public key information in the soap header. The alias name for theencryption key should be the same as the default local node for the PeopleSoft system.
To generate the encryption keypair in the interop keystore:
1. Run this step from the command line in the following subdirectory:PSHome\webserv\peoplesoft\applications\peoplesoft\PSIGW.war\WEB-INF\classes
2. Run the following command:keytool -genkeypair -alias [default local node name] -keyalg RSA -dname“CN=[machine name], OU=[Org Unit], O=[Org], L=[Location],
ST=[2 letter abbreviation for state],C=[2 letter abbrevication for country]”-keystore interop.jks -storepass interop
At this point, the mobileserv and default local encryption certificates are in the interop.jks keystore.3. Verify that the import was successful by running the keystore –list command, as shown in the following
example:
250 Copyright © 2013, Oracle and/or its affiliates. All rights reserved.
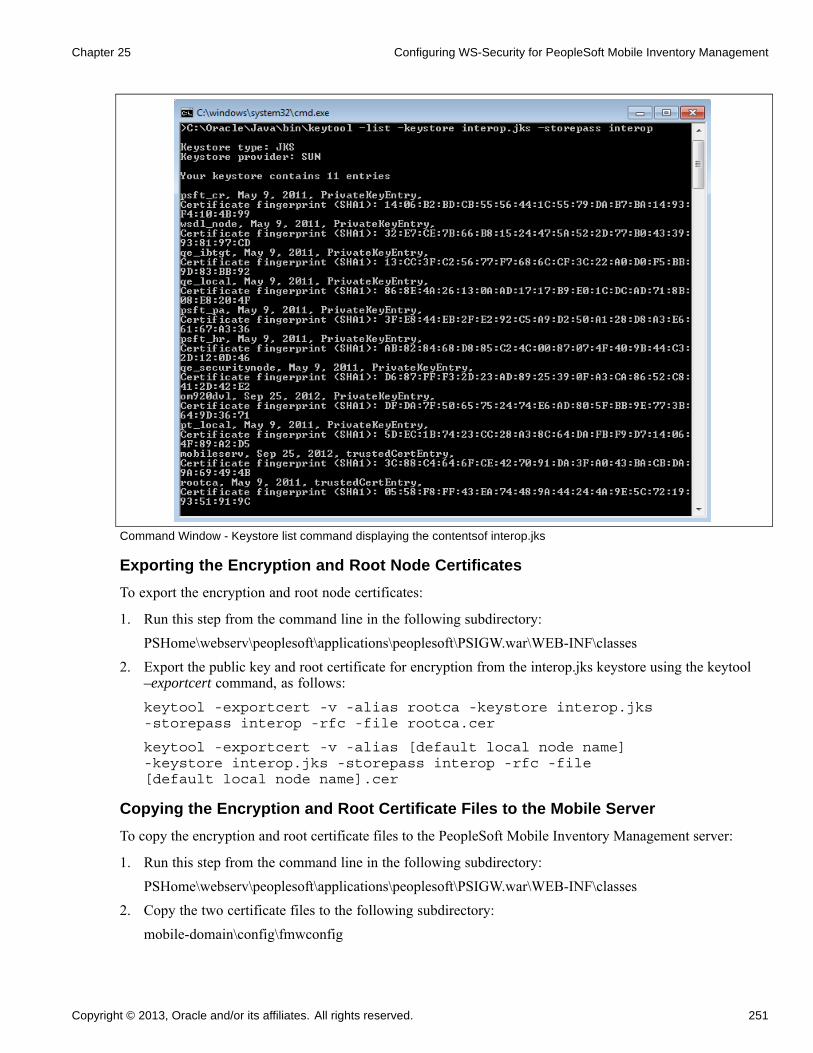
Chapter 25 Configuring WS-Security for PeopleSoft Mobile Inventory Management
Command Window - Keystore list command displaying the contentsof interop.jks
Exporting the Encryption and Root Node Certificates
To export the encryption and root node certificates:
1. Run this step from the command line in the following subdirectory:PSHome\webserv\peoplesoft\applications\peoplesoft\PSIGW.war\WEB-INF\classes
2. Export the public key and root certificate for encryption from the interop.jks keystore using the keytool–exportcert command, as follows:keytool -exportcert -v -alias rootca -keystore interop.jks-storepass interop -rfc -file rootca.cer
keytool -exportcert -v -alias [default local node name]-keystore interop.jks -storepass interop -rfc -file[default local node name].cer
Copying the Encryption and Root Certificate Files to the Mobile Server
To copy the encryption and root certificate files to the PeopleSoft Mobile Inventory Management server:
1. Run this step from the command line in the following subdirectory:PSHome\webserv\peoplesoft\applications\peoplesoft\PSIGW.war\WEB-INF\classes
2. Copy the two certificate files to the following subdirectory:mobile-domain\config\fmwconfig
Copyright © 2013, Oracle and/or its affiliates. All rights reserved. 251

Configuring WS-Security for PeopleSoft Mobile Inventory Management Chapter 25
3. Run the steps that follow on the PeopleSoft Mobile Inventory Management server on the command line inthe following subdirectory:mobile_domain\config\fmwcong
4. Run the following commands:keytool -importcert -alias rootca -file rootca.cer-keystore default-keystore.jks -storepass [password]
Click Yes to trust this certificate.keytool -importcert -alias [default local node name]-file [default local node name].cer -keystore default-keystore.jks -storepass [password]
Click Yes to trust this certificate.5. Verify that the import was successful by running the keytool –list command, as shown in the following
example:
Command Window - List view of the default-keystore.jks
At this point, both keystores, the default-keystore.jks and interop.jks should contain the following threecertificates:
• rootca• mobileserv• [default local node name]
Task 25-1-4: Creating and Configuring the Keystoreand Credential StoreTo create and configure the credential store on the PeopleSoft Mobile Inventory Management server:
1. Start the Oracle Enterprise Manager for the PeopleSoft Mobile Inventory Management server domain.2. From the Oracle Enterprise Manager menu, select WebLogic Domain, Security, Security Provider to access
the Security Provider Configuration page, as the navigation shows in the following example:
252 Copyright © 2013, Oracle and/or its affiliates. All rights reserved.
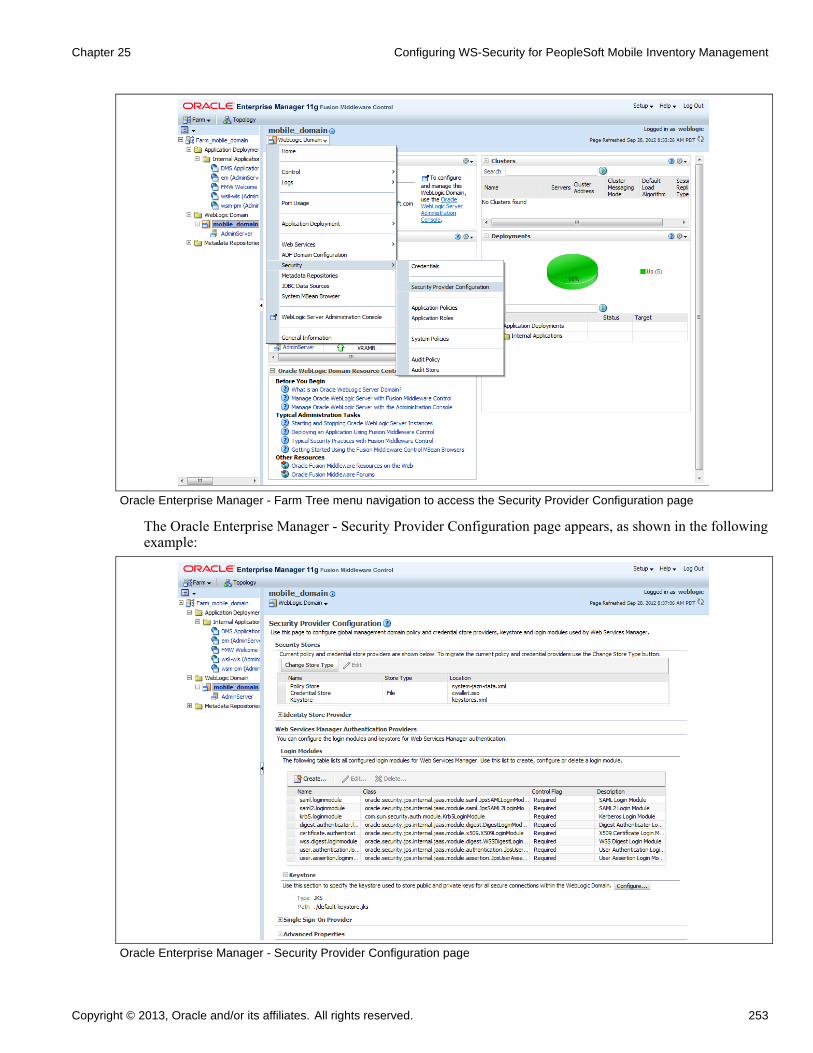
Chapter 25 Configuring WS-Security for PeopleSoft Mobile Inventory Management
Oracle Enterprise Manager - Farm Tree menu navigation to access the Security Provider Configuration page
The Oracle Enterprise Manager - Security Provider Configuration page appears, as shown in the followingexample:
Oracle Enterprise Manager - Security Provider Configuration page
Copyright © 2013, Oracle and/or its affiliates. All rights reserved. 253
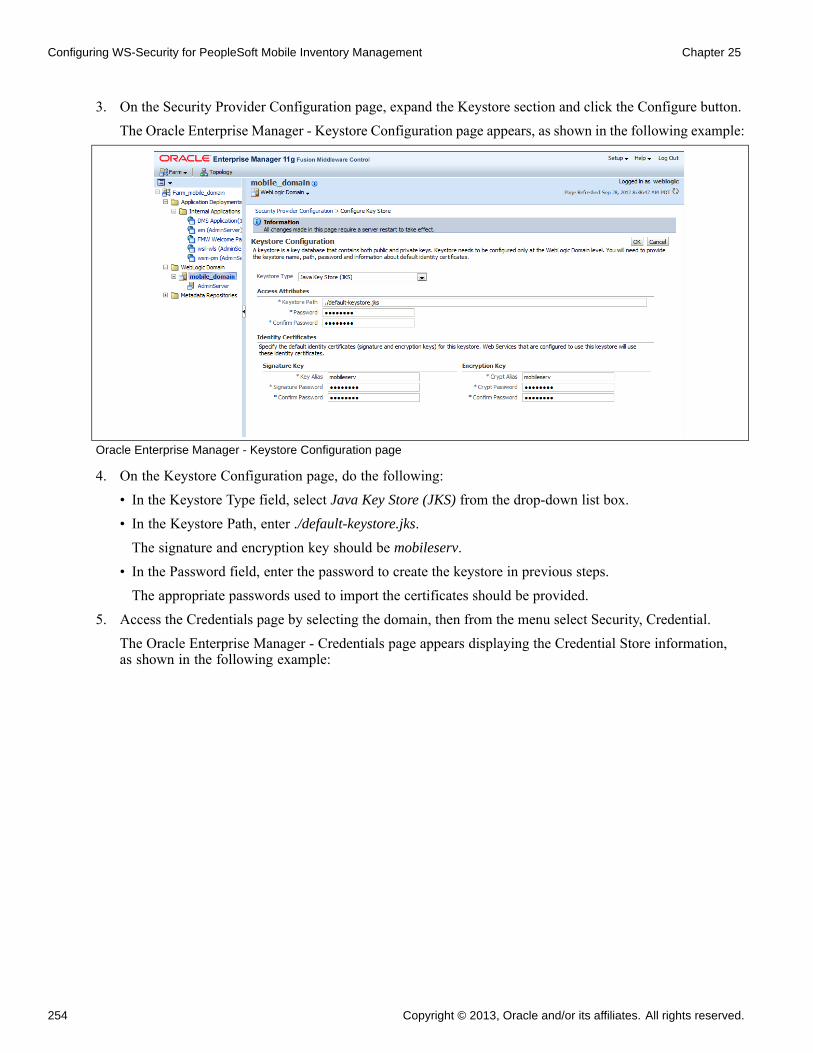
Configuring WS-Security for PeopleSoft Mobile Inventory Management Chapter 25
3. On the Security Provider Configuration page, expand the Keystore section and click the Configure button.The Oracle Enterprise Manager - Keystore Configuration page appears, as shown in the following example:
Oracle Enterprise Manager - Keystore Configuration page
4. On the Keystore Configuration page, do the following:• In the Keystore Type field, select Java Key Store (JKS) from the drop-down list box.• In the Keystore Path, enter ./default-keystore.jks.The signature and encryption key should be mobileserv.
• In the Password field, enter the password to create the keystore in previous steps.The appropriate passwords used to import the certificates should be provided.
5. Access the Credentials page by selecting the domain, then from the menu select Security, Credential.The Oracle Enterprise Manager - Credentials page appears displaying the Credential Store information,as shown in the following example:
254 Copyright © 2013, Oracle and/or its affiliates. All rights reserved.
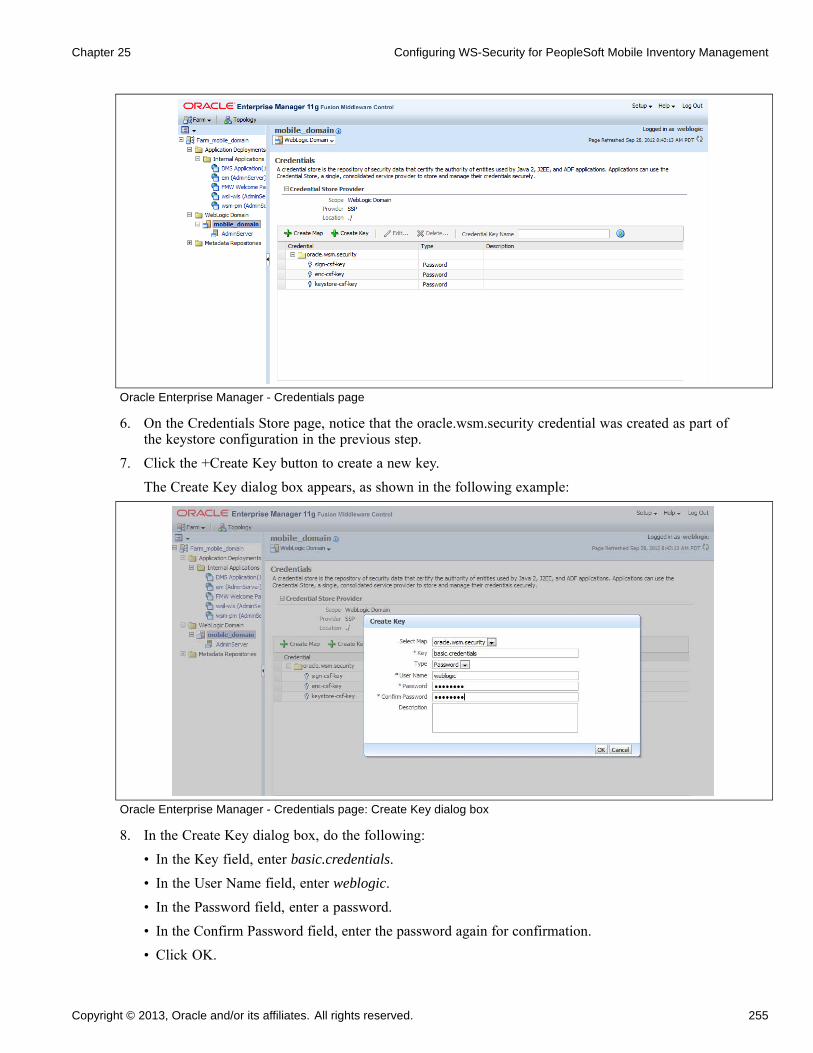
Chapter 25 Configuring WS-Security for PeopleSoft Mobile Inventory Management
Oracle Enterprise Manager - Credentials page
6. On the Credentials Store page, notice that the oracle.wsm.security credential was created as part ofthe keystore configuration in the previous step.
7. Click the +Create Key button to create a new key.The Create Key dialog box appears, as shown in the following example:
Oracle Enterprise Manager - Credentials page: Create Key dialog box
8. In the Create Key dialog box, do the following:• In the Key field, enter basic.credentials.• In the User Name field, enter weblogic.• In the Password field, enter a password.• In the Confirm Password field, enter the password again for confirmation.• Click OK.
Copyright © 2013, Oracle and/or its affiliates. All rights reserved. 255
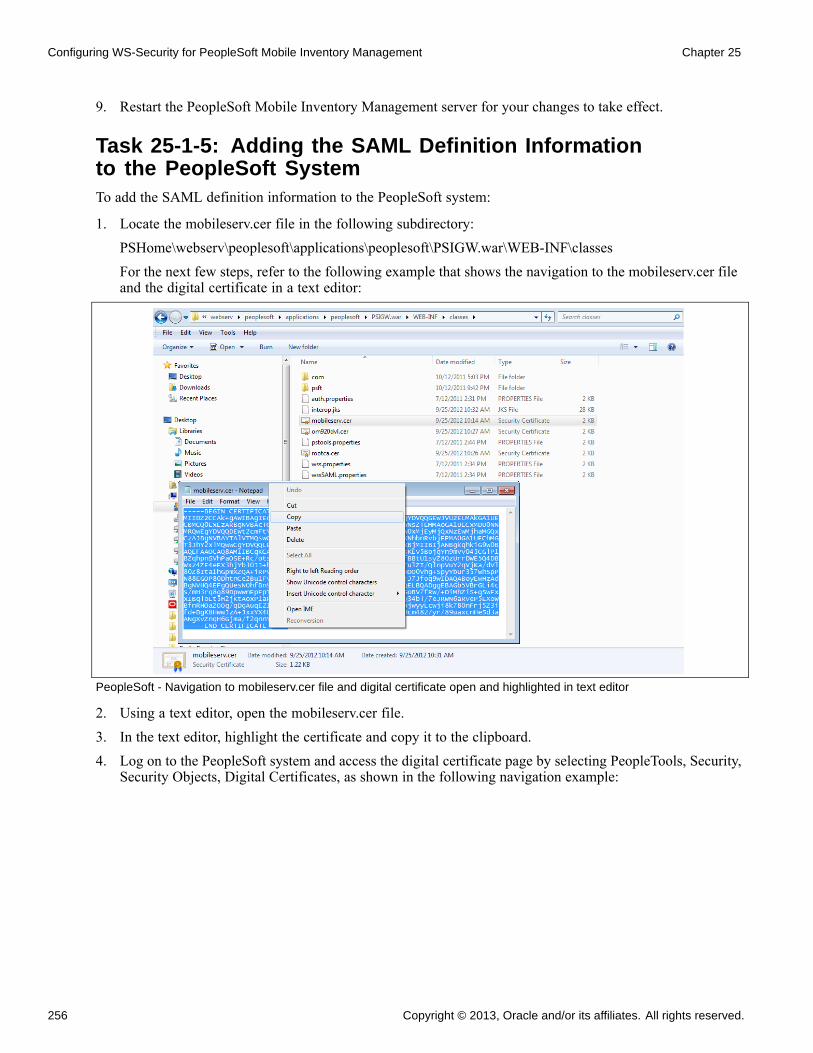
Configuring WS-Security for PeopleSoft Mobile Inventory Management Chapter 25
9. Restart the PeopleSoft Mobile Inventory Management server for your changes to take effect.
Task 25-1-5: Adding the SAML Definition Informationto the PeopleSoft SystemTo add the SAML definition information to the PeopleSoft system:
1. Locate the mobileserv.cer file in the following subdirectory:PSHome\webserv\peoplesoft\applications\peoplesoft\PSIGW.war\WEB-INF\classesFor the next few steps, refer to the following example that shows the navigation to the mobileserv.cer fileand the digital certificate in a text editor:
PeopleSoft - Navigation to mobileserv.cer file and digital certificate open and highlighted in text editor
2. Using a text editor, open the mobileserv.cer file.3. In the text editor, highlight the certificate and copy it to the clipboard.4. Log on to the PeopleSoft system and access the digital certificate page by selecting PeopleTools, Security,
Security Objects, Digital Certificates, as shown in the following navigation example:
256 Copyright © 2013, Oracle and/or its affiliates. All rights reserved.
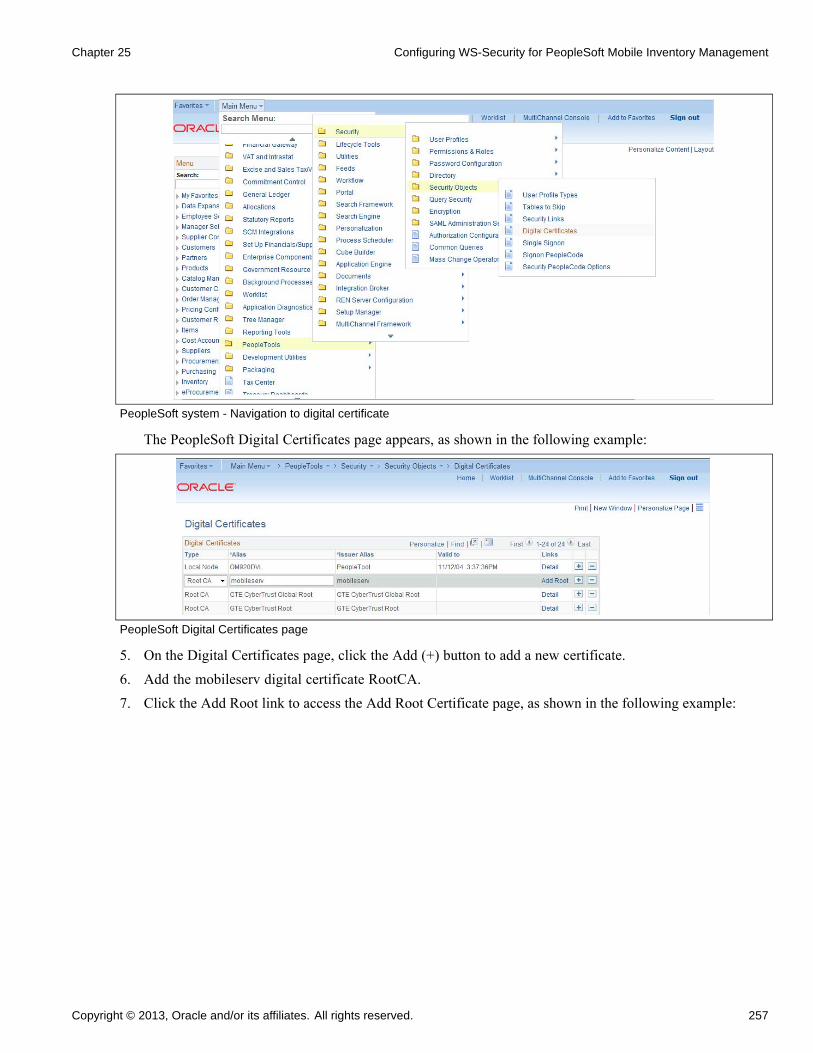
Chapter 25 Configuring WS-Security for PeopleSoft Mobile Inventory Management
PeopleSoft system - Navigation to digital certificate
The PeopleSoft Digital Certificates page appears, as shown in the following example:
PeopleSoft Digital Certificates page
5. On the Digital Certificates page, click the Add (+) button to add a new certificate.6. Add the mobileserv digital certificate RootCA.7. Click the Add Root link to access the Add Root Certificate page, as shown in the following example:
Copyright © 2013, Oracle and/or its affiliates. All rights reserved. 257
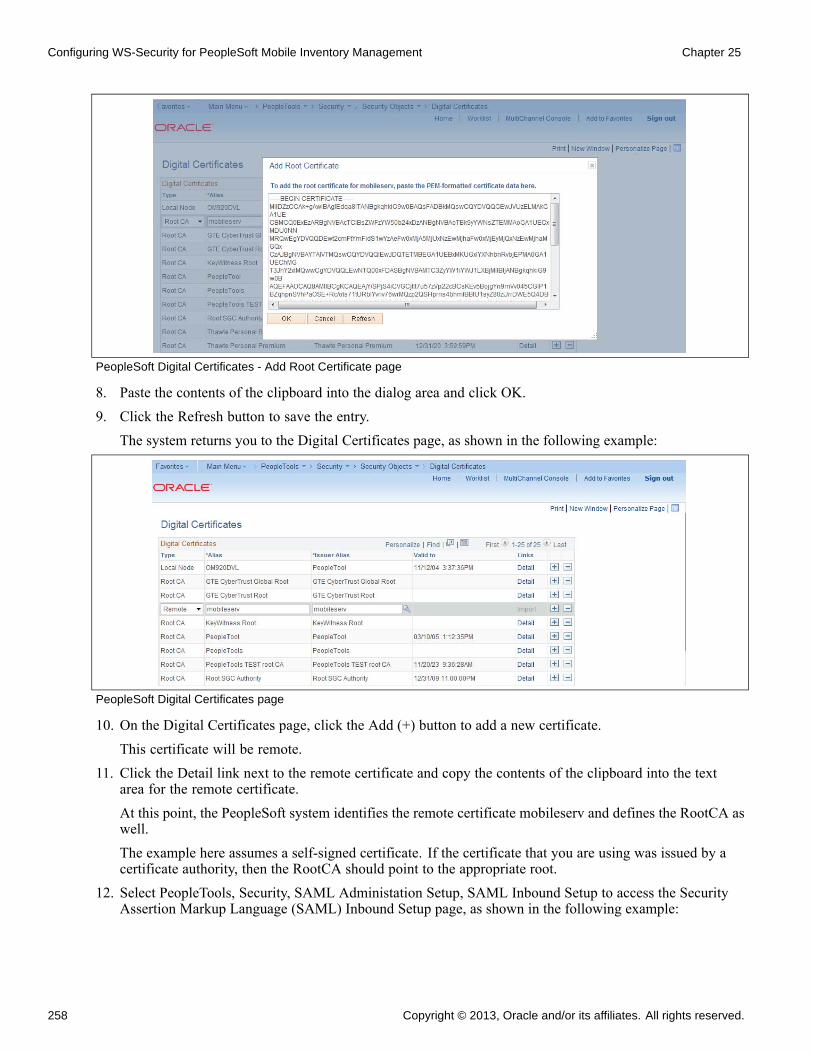
Configuring WS-Security for PeopleSoft Mobile Inventory Management Chapter 25
PeopleSoft Digital Certificates - Add Root Certificate page
8. Paste the contents of the clipboard into the dialog area and click OK.9. Click the Refresh button to save the entry.
The system returns you to the Digital Certificates page, as shown in the following example:
PeopleSoft Digital Certificates page
10. On the Digital Certificates page, click the Add (+) button to add a new certificate.This certificate will be remote.
11. Click the Detail link next to the remote certificate and copy the contents of the clipboard into the textarea for the remote certificate.At this point, the PeopleSoft system identifies the remote certificate mobileserv and defines the RootCA aswell.The example here assumes a self-signed certificate. If the certificate that you are using was issued by acertificate authority, then the RootCA should point to the appropriate root.
12. Select PeopleTools, Security, SAML Administation Setup, SAML Inbound Setup to access the SecurityAssertion Markup Language (SAML) Inbound Setup page, as shown in the following example:
258 Copyright © 2013, Oracle and/or its affiliates. All rights reserved.
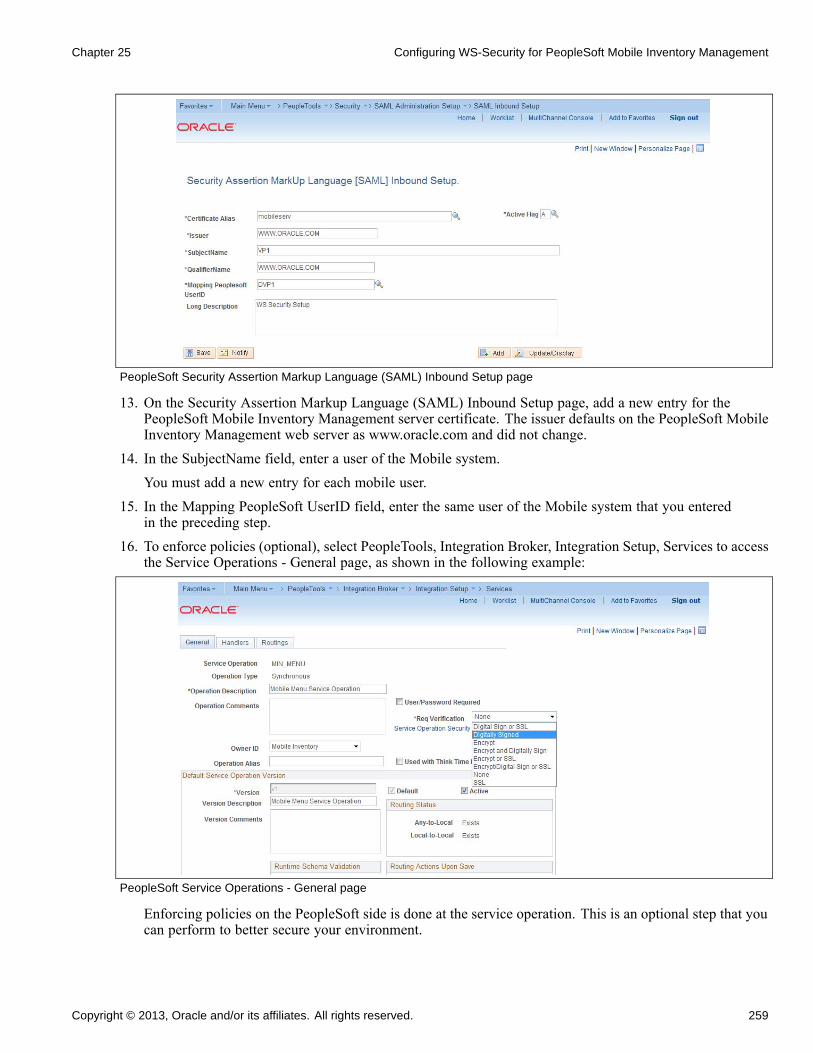
Chapter 25 Configuring WS-Security for PeopleSoft Mobile Inventory Management
PeopleSoft Security Assertion Markup Language (SAML) Inbound Setup page
13. On the Security Assertion Markup Language (SAML) Inbound Setup page, add a new entry for thePeopleSoft Mobile Inventory Management server certificate. The issuer defaults on the PeopleSoft MobileInventory Management web server as www.oracle.com and did not change.
14. In the SubjectName field, enter a user of the Mobile system.You must add a new entry for each mobile user.
15. In the Mapping PeopleSoft UserID field, enter the same user of the Mobile system that you enteredin the preceding step.
16. To enforce policies (optional), select PeopleTools, Integration Broker, Integration Setup, Services to accessthe Service Operations - General page, as shown in the following example:
PeopleSoft Service Operations - General page
Enforcing policies on the PeopleSoft side is done at the service operation. This is an optional step that youcan perform to better secure your environment.
Copyright © 2013, Oracle and/or its affiliates. All rights reserved. 259

Configuring WS-Security for PeopleSoft Mobile Inventory Management Chapter 25
17. Open the service operation and in the Req Verification field, select the appropriate policy enforcementfrom the drop-down list box.For example: Digitally Signed
18. Select PeopleTools, Integration Broker, Integration Setup, Nodes to access the WS Security page,as shown in the following example:
PeopleSoft Nodes - WS Security page
19. On the Nodes - WS Security page, select SAML Token from the Authentication Token Type drop-downlist box. This changes the Anonymous Node to identify the SAML Token Authentication Type.This is applied to all web services. Alternatively, you can do this at the routing level for each web servicewith SAML Authentication Type.
20. Modify the wssSAML.properties file that is in the following subdirectory: PSHome\webserv\peoplesoft\applications\peoplesoft\PSIGW.war\WEB-INF\classesChange the Issuer and subjectNameID.qualifier to www.oracle.com, as shown in the following example:
wssSAML.properties file
Task 25-1-6: Updating the connections.xml to EnforceSecurity PoliciesYou can only perform this step after you create a customization environment that you base on the source filesthat Oracle delivers. If you have not already done so, follow the instructions in the chapter titled “Creatingand Deploying a Customization Environment” to create this environment, then return here and proceedwith this step.
Oracle delivers the connections.xml file without any security policies. You can update the connections.xml filein the PeopleSoft Mobile Inventory Management application to include client security policies.
To update the connections.xml to enforce security policies:
260 Copyright © 2013, Oracle and/or its affiliates. All rights reserved.
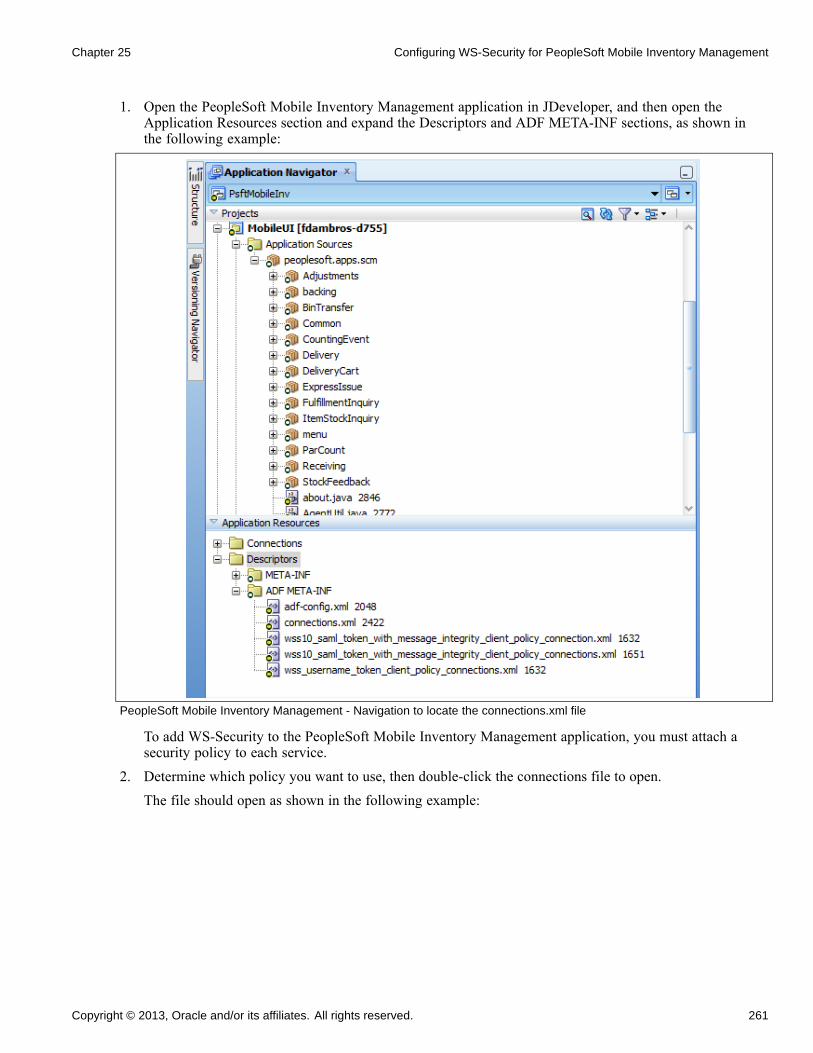
Chapter 25 Configuring WS-Security for PeopleSoft Mobile Inventory Management
1. Open the PeopleSoft Mobile Inventory Management application in JDeveloper, and then open theApplication Resources section and expand the Descriptors and ADF META-INF sections, as shown inthe following example:
PeopleSoft Mobile Inventory Management - Navigation to locate the connections.xml file
To add WS-Security to the PeopleSoft Mobile Inventory Management application, you must attach asecurity policy to each service.
2. Determine which policy you want to use, then double-click the connections file to open.
The file should open as shown in the following example:
Copyright © 2013, Oracle and/or its affiliates. All rights reserved. 261
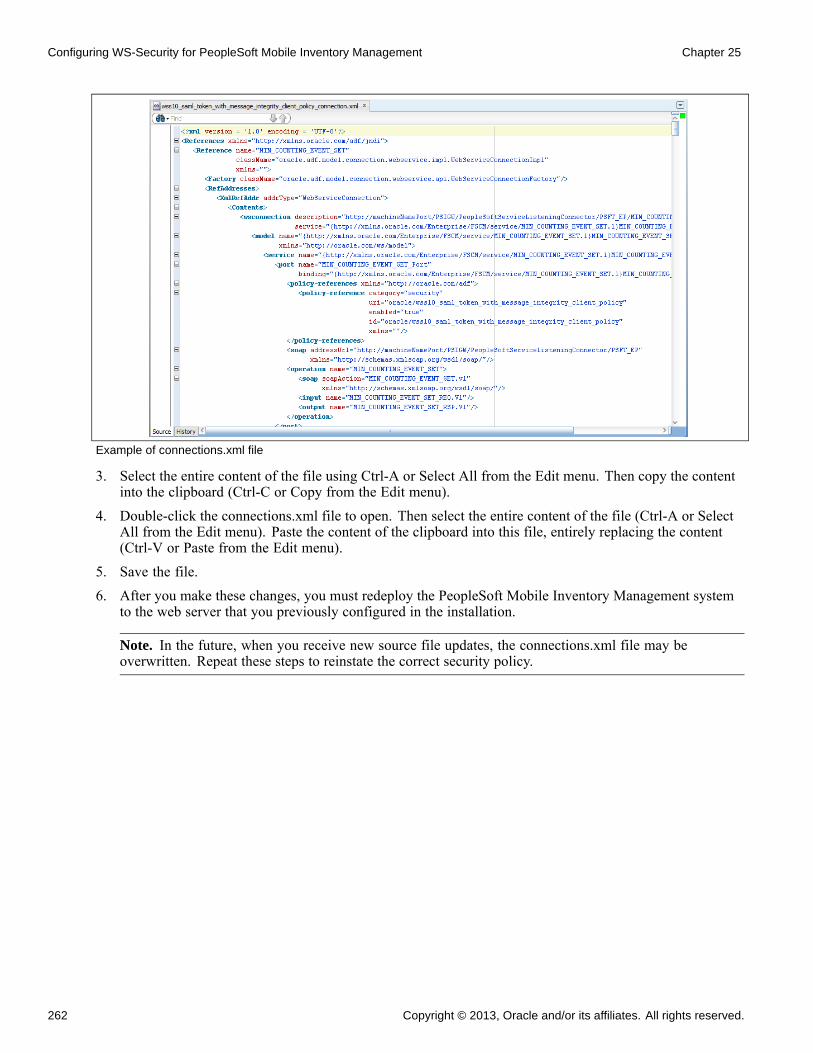
Configuring WS-Security for PeopleSoft Mobile Inventory Management Chapter 25
Example of connections.xml file
3. Select the entire content of the file using Ctrl-A or Select All from the Edit menu. Then copy the contentinto the clipboard (Ctrl-C or Copy from the Edit menu).
4. Double-click the connections.xml file to open. Then select the entire content of the file (Ctrl-A or SelectAll from the Edit menu). Paste the content of the clipboard into this file, entirely replacing the content(Ctrl-V or Paste from the Edit menu).
5. Save the file.6. After you make these changes, you must redeploy the PeopleSoft Mobile Inventory Management system
to the web server that you previously configured in the installation.
Note. In the future, when you receive new source file updates, the connections.xml file may beoverwritten. Repeat these steps to reinstate the correct security policy.
262 Copyright © 2013, Oracle and/or its affiliates. All rights reserved.
CHAPTER 26
Creating and Deploying a CustomizationEnvironment for PeopleSoft MobileInventory Management
This chapter discusses:
• Understanding the Customization Environment for PeopleSoft Mobile Inventory Management
• Prerequisites
• Creating a Customization Environment for PeopleSoft Mobile Inventory Management
Understanding the Customization Environment forPeopleSoft Mobile Inventory Management
The PeopleSoft Mobile Inventory Management application is built using Oracle Application DevelopmentFramework (ADF). Oracle ADF uses a customization methodology that you should follow when makingcustomizations to the PeopleSoft Mobile Inventory Management application. Oracle’s methodologyimplements customizations in a way that does not change the source files. Therefore, Oracle can deliver futureupdates to the original source files without requiring you to reapply the customizations.
PrerequisitesBefore you begin, ensure that you meet the following requirements:
• You have access to the source files that Oracle delivers. These source files are in the filePsftMobileInvCustom.zip.This file is in the directory PS_APP_HOME\setup\oracle\adf\MobileInventory.
• You have access to the latest version of Oracle JDeveloper 11gR1 (11.1.1.4 or higher, 11gR2 is notyet supported.)
Copyright © 2013, Oracle and/or its affiliates. All rights reserved. 263
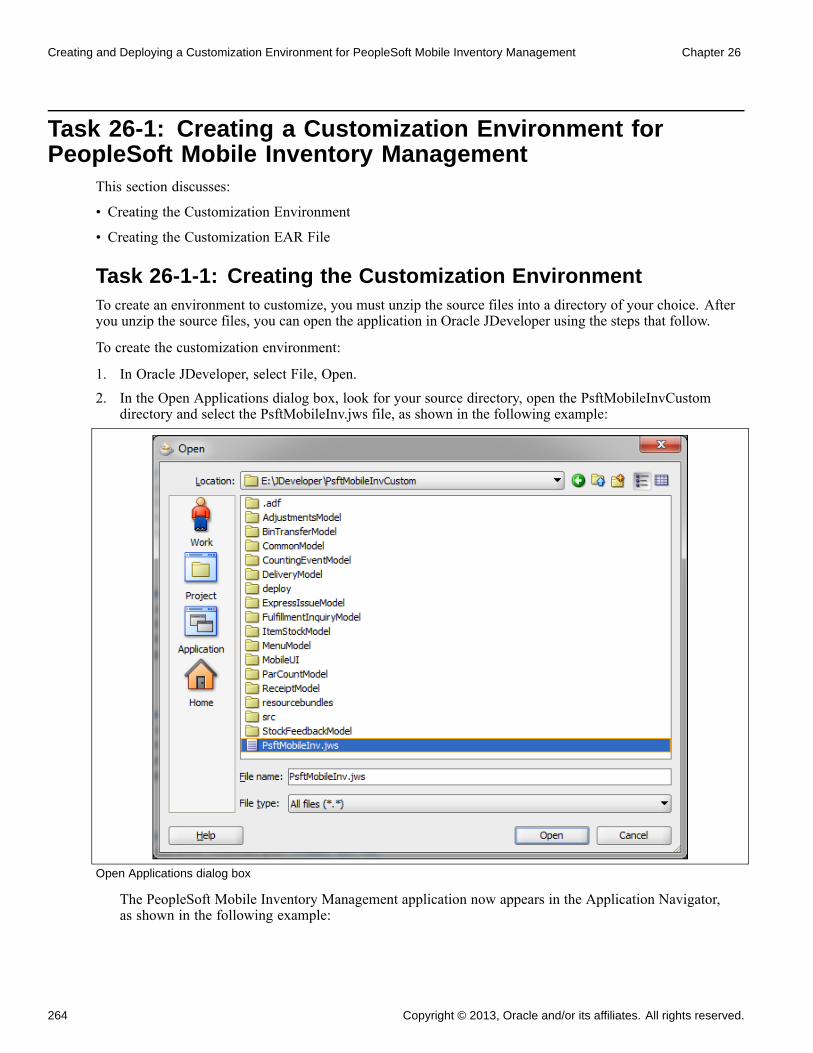
Creating and Deploying a Customization Environment for PeopleSoft Mobile Inventory Management Chapter 26
Task 26-1: Creating a Customization Environment forPeopleSoft Mobile Inventory Management
This section discusses:
• Creating the Customization Environment
• Creating the Customization EAR File
Task 26-1-1: Creating the Customization EnvironmentTo create an environment to customize, you must unzip the source files into a directory of your choice. Afteryou unzip the source files, you can open the application in Oracle JDeveloper using the steps that follow.
To create the customization environment:
1. In Oracle JDeveloper, select File, Open.2. In the Open Applications dialog box, look for your source directory, open the PsftMobileInvCustom
directory and select the PsftMobileInv.jws file, as shown in the following example:
Open Applications dialog box
The PeopleSoft Mobile Inventory Management application now appears in the Application Navigator,as shown in the following example:
264 Copyright © 2013, Oracle and/or its affiliates. All rights reserved.
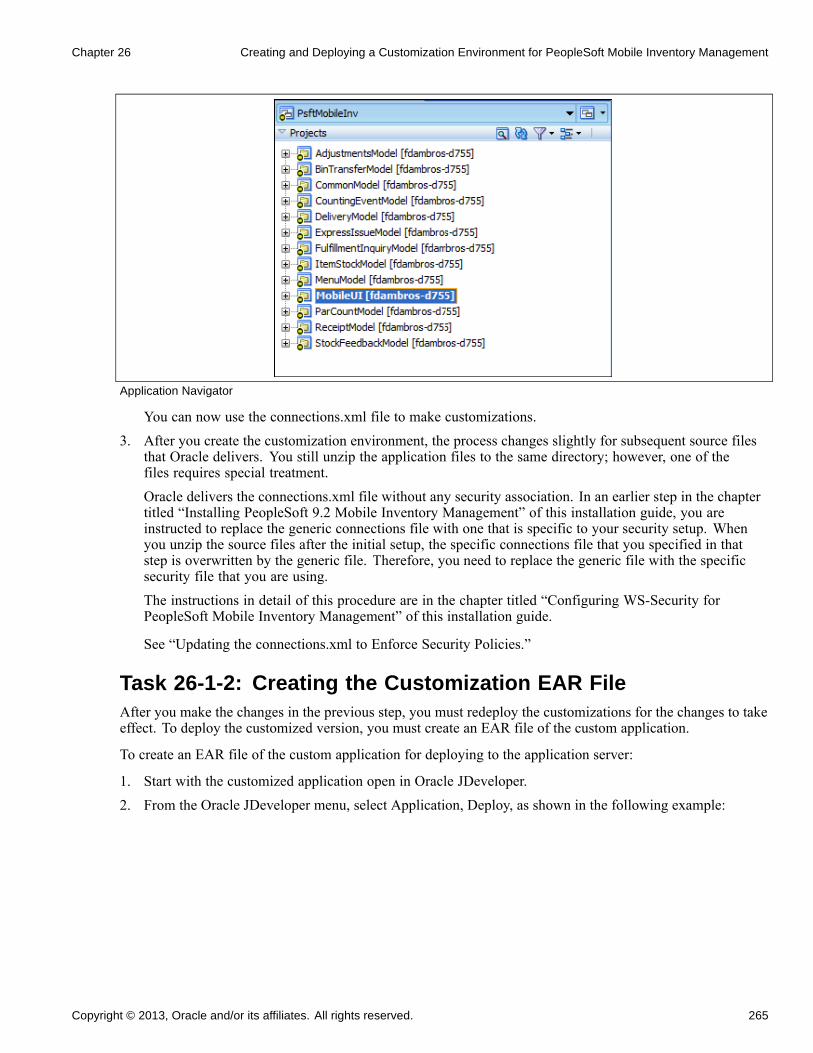
Chapter 26 Creating and Deploying a Customization Environment for PeopleSoft Mobile Inventory Management
Application Navigator
You can now use the connections.xml file to make customizations.3. After you create the customization environment, the process changes slightly for subsequent source files
that Oracle delivers. You still unzip the application files to the same directory; however, one of thefiles requires special treatment.Oracle delivers the connections.xml file without any security association. In an earlier step in the chaptertitled “Installing PeopleSoft 9.2 Mobile Inventory Management” of this installation guide, you areinstructed to replace the generic connections file with one that is specific to your security setup. Whenyou unzip the source files after the initial setup, the specific connections file that you specified in thatstep is overwritten by the generic file. Therefore, you need to replace the generic file with the specificsecurity file that you are using.The instructions in detail of this procedure are in the chapter titled “Configuring WS-Security forPeopleSoft Mobile Inventory Management” of this installation guide.
See “Updating the connections.xml to Enforce Security Policies.”
Task 26-1-2: Creating the Customization EAR FileAfter you make the changes in the previous step, you must redeploy the customizations for the changes to takeeffect. To deploy the customized version, you must create an EAR file of the custom application.
To create an EAR file of the custom application for deploying to the application server:
1. Start with the customized application open in Oracle JDeveloper.
2. From the Oracle JDeveloper menu, select Application, Deploy, as shown in the following example:
Copyright © 2013, Oracle and/or its affiliates. All rights reserved. 265

Creating and Deploying a Customization Environment for PeopleSoft Mobile Inventory Management Chapter 26
Oracle JDeveloper menu
The Deployment Action page opens, as shown in the following example:
Oracle JDeveloper - Deployment Action page
3. On the Deployment Action page, select Deploy to EAR and then click Next.The Summary page appears, as shown in the following example:
266 Copyright © 2013, Oracle and/or its affiliates. All rights reserved.
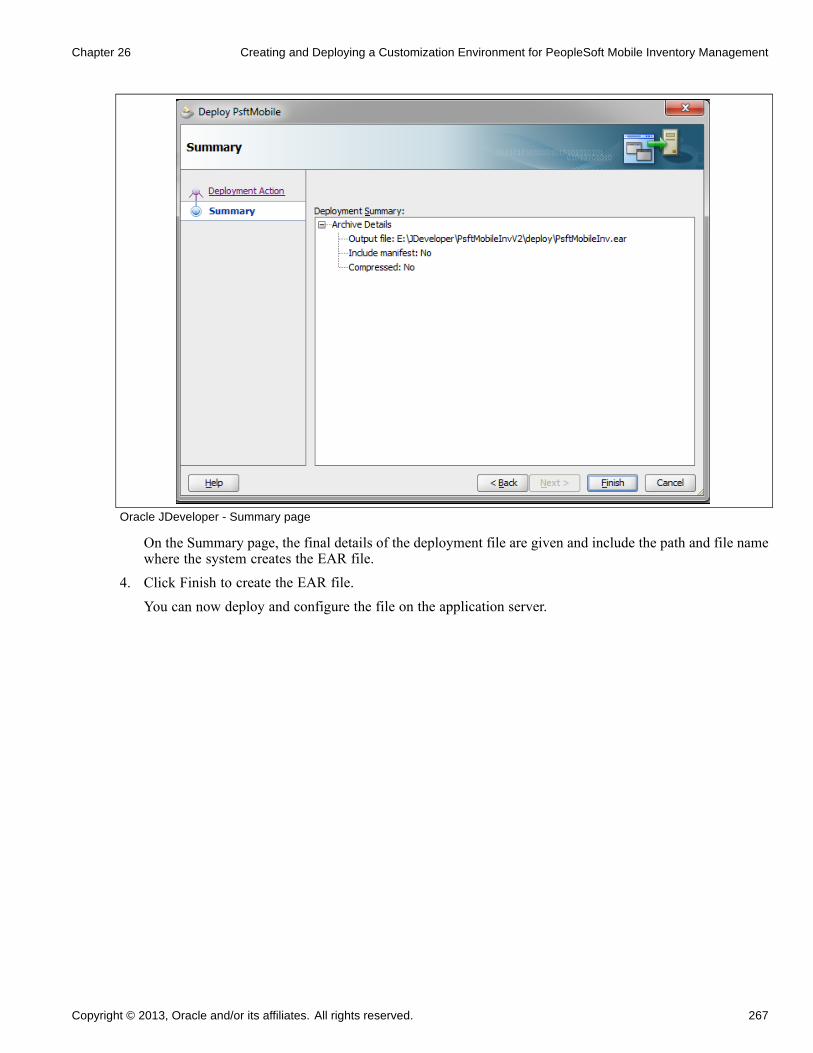
Chapter 26 Creating and Deploying a Customization Environment for PeopleSoft Mobile Inventory Management
Oracle JDeveloper - Summary page
On the Summary page, the final details of the deployment file are given and include the path and file namewhere the system creates the EAR file.
4. Click Finish to create the EAR file.
You can now deploy and configure the file on the application server.
Copyright © 2013, Oracle and/or its affiliates. All rights reserved. 267

Creating and Deploying a Customization Environment for PeopleSoft Mobile Inventory Management Chapter 26
268 Copyright © 2013, Oracle and/or its affiliates. All rights reserved.
CHAPTER 27
Configuring eMail URLS in PeopleSoftSCM Applications
This chapter discusses:
• Understanding eMail Configuration in PeopleSoft SCM Applications
• Configuring eMail URLs for Item Loader Exceptions
• Configuring eMail URLs for Supplier Facing Applications
• Configuring eMail URLs for PeopleSoft eBill Payment
Understanding eMail Configuration in PeopleSoftSCM Applications
Some products in PeopleSoft Supply Chain Management (SCM) can send out email notifications containingweb addresses (URLs) that enable your employees and external parties to link back to your website. For emailsto contain the correct embedded URLs to PeopleSoft Inventory, PeopleSoft Purchasing, and PeopleSofteProcurement pages, you must edit the URL as discussed in this section.
Task 27-1: Configuring eMail URLs for Item Loader ExceptionsYou must modify SCM_SERVLET_INT to point to an internal server that you use to access the PeopleSoftSCM database. This URL creates standard PeopleSoft Internet Architecture links for internal users, such asemployees, to access pertinent components and pages.
To set up the URL:
1. Select PeopleTools, Utilities, Administration, URLs to access the PeopleTools URL Maintenance page.2. On the URL search page, search for the URL identifier SCM_SERVLET_INT.3. On the URL Maintenance page, in the URL field, edit the URL to point to an internal server to access the
PeopleSoft Supply Chain Management database, as shown in the following example:
Copyright © 2013, Oracle and/or its affiliates. All rights reserved. 269
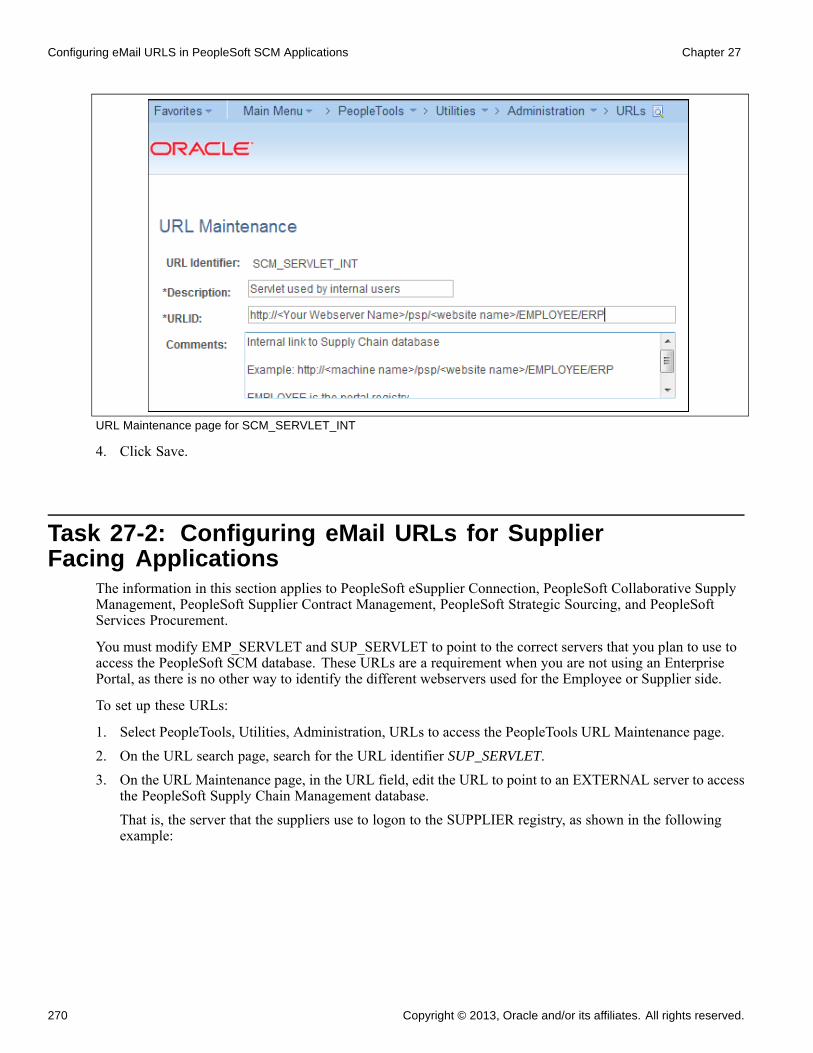
Configuring eMail URLS in PeopleSoft SCM Applications Chapter 27
URL Maintenance page for SCM_SERVLET_INT
4. Click Save.
Task 27-2: Configuring eMail URLs for SupplierFacing Applications
The information in this section applies to PeopleSoft eSupplier Connection, PeopleSoft Collaborative SupplyManagement, PeopleSoft Supplier Contract Management, PeopleSoft Strategic Sourcing, and PeopleSoftServices Procurement.
You must modify EMP_SERVLET and SUP_SERVLET to point to the correct servers that you plan to use toaccess the PeopleSoft SCM database. These URLs are a requirement when you are not using an EnterprisePortal, as there is no other way to identify the different webservers used for the Employee or Supplier side.
To set up these URLs:
1. Select PeopleTools, Utilities, Administration, URLs to access the PeopleTools URL Maintenance page.2. On the URL search page, search for the URL identifier SUP_SERVLET.3. On the URL Maintenance page, in the URL field, edit the URL to point to an EXTERNAL server to access
the PeopleSoft Supply Chain Management database.That is, the server that the suppliers use to logon to the SUPPLIER registry, as shown in the followingexample:
270 Copyright © 2013, Oracle and/or its affiliates. All rights reserved.
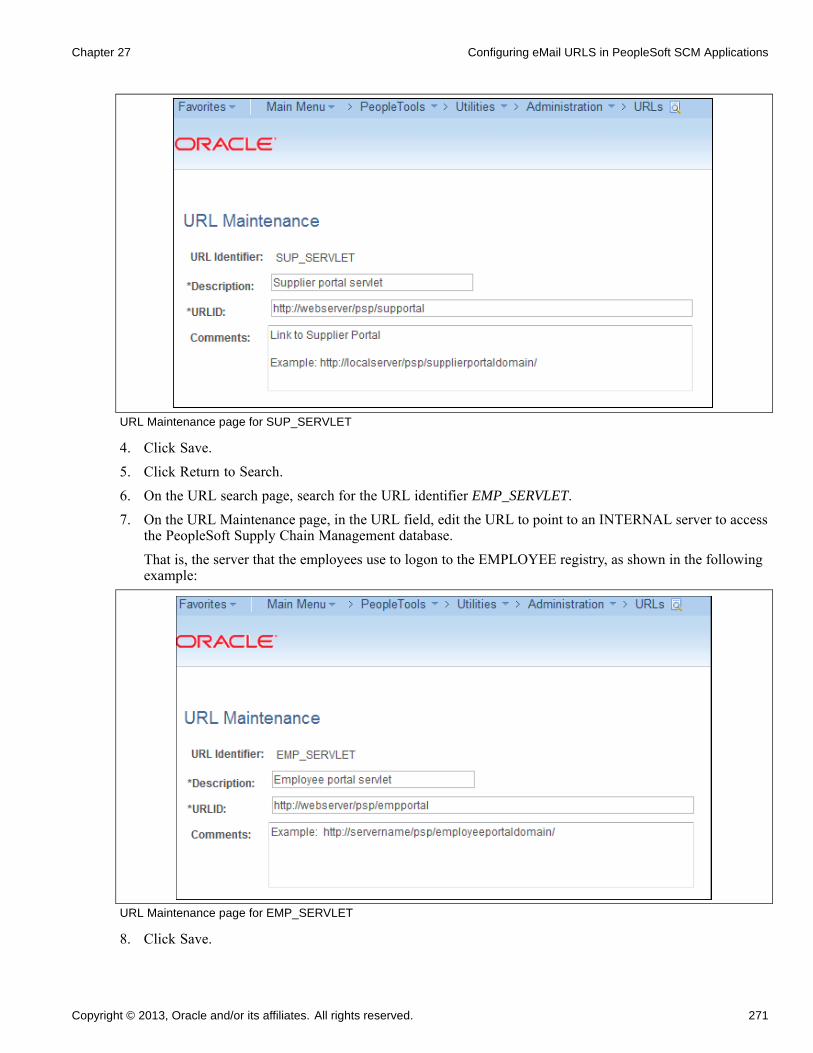
Chapter 27 Configuring eMail URLS in PeopleSoft SCM Applications
URL Maintenance page for SUP_SERVLET
4. Click Save.
5. Click Return to Search.
6. On the URL search page, search for the URL identifier EMP_SERVLET.
7. On the URL Maintenance page, in the URL field, edit the URL to point to an INTERNAL server to accessthe PeopleSoft Supply Chain Management database.
That is, the server that the employees use to logon to the EMPLOYEE registry, as shown in the followingexample:
URL Maintenance page for EMP_SERVLET
8. Click Save.
Copyright © 2013, Oracle and/or its affiliates. All rights reserved. 271
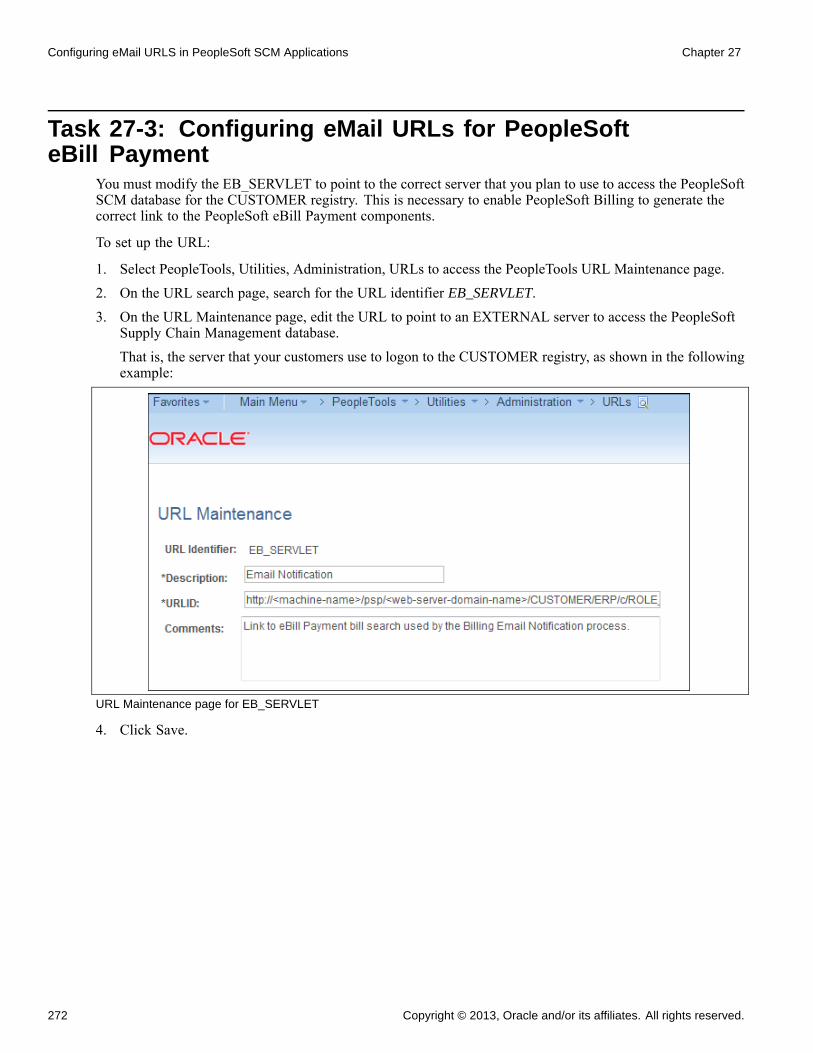
Configuring eMail URLS in PeopleSoft SCM Applications Chapter 27
Task 27-3: Configuring eMail URLs for PeopleSofteBill Payment
You must modify the EB_SERVLET to point to the correct server that you plan to use to access the PeopleSoftSCM database for the CUSTOMER registry. This is necessary to enable PeopleSoft Billing to generate thecorrect link to the PeopleSoft eBill Payment components.
To set up the URL:
1. Select PeopleTools, Utilities, Administration, URLs to access the PeopleTools URL Maintenance page.
2. On the URL search page, search for the URL identifier EB_SERVLET.
3. On the URL Maintenance page, edit the URL to point to an EXTERNAL server to access the PeopleSoftSupply Chain Management database.
That is, the server that your customers use to logon to the CUSTOMER registry, as shown in the followingexample:
URL Maintenance page for EB_SERVLET
4. Click Save.
272 Copyright © 2013, Oracle and/or its affiliates. All rights reserved.
CHAPTER 28
Setting Up PeopleSoft 9.2 SupplierContract Management
Understanding the PeopleSoft 9.2 Supplier ContractManagement Setup
Only perform this task if you use PeopleSoft Supplier Contract Management. For complete installation ofSupplier Contracts, refer to the PeopleSoft FSCM: Supplier Contract Management.
To use PeopleSoft Supplier Contract Management, you must set up a database or FTP file attachment server,and have Microsoft Word 2007 or higher installed.
For more information on setting up a database or FTP file attachment server, see PeopleSoft FSCM: SupplierContract Management,, “Setting Up PeopleSoft Supplier Contract Management”.
You can access further setup details in the same chapter of the PeopleSoft FSCM: Supplier ContractManagement for the following:
• Setup of a Microsoft Word template.
See Defining Document Templates and Styles.• Optional setup for individual clients to allow certain users to look up clauses and bind variables in the
PeopleSoft database from within Microsoft Word using Microsoft Research task pane functionality.
See Setting Up PeopleSoft Integration Broker and Microsoft Word Configuration Files, Installing andConfiguring Microsoft Word Components on Workstations.
• Optional setup to allow users to perform server side compares of Microsoft Word documents, and optionaldispatch of contracts to suppliers in a .doc or .pdf format (versus the default .xml format).
See Defining Installation Options for PeopleSoft Supplier Contract Management.
• Optional installation setup for Oracle Secure Enterprise Search.
• Optional installation setup for workflow.
See Defining Installation Options for PeopleSoft Supplier Contract Management.
• Optional installation setup for Syndication
• Optional setup that enables documents to use digital signatures like Adobe or Microsoft Word 2007 orhigher versions.
See Defining Installation Options for PeopleSoft Supplier Contract Management.
Copyright © 2013, Oracle and/or its affiliates. All rights reserved. 273

Setting Up PeopleSoft 9.2 Supplier Contract Management Chapter 28
274 Copyright © 2013, Oracle and/or its affiliates. All rights reserved.
CHAPTER 29
Setting Up PeopleSoft SCM Pagelets
This chapter discusses:
• Accessing Pagelets
• Enabling Pagelet Creation and Access with Portal Utilities
Task 29-1: Accessing PageletsYou can access pagelets within the PeopleSoft 9.2 Supply Chain Management application databases. You mustapply scripts to your database to allow access to the pagelet configuration homepage.
Note. You must complete the following steps for both the System and Demo databases, unless otherwiseindicated.
To add, remove, or change the layout of the homepage, you must grant the homepage personalization securityaccess to all non-guest users. To update the homepage personalization permission list, use PeopleSoftData Mover to run the PORTAL_HP_PERS.DMS script. To add the Portal User role to the user IDs,use PeopleSoft Data Mover to run the PORTAL_ADD_ROLE.DMS script. You can find both scripts in<PS_APP_HOME>\scripts.
Note. You should grant the PAPP_USER role to all new user IDs for access to the homepage personalization.After you run this script, you should manually remove the role PAPP_USER from any GUEST User ID, sincethe GUEST user should not be personalizing the common homepage.
Task 29-2: Enabling Pagelet Creation and Accesswith Portal Utilities
Use PeopleSoft Data Mover to run the EOPP_PORTAL_PACK.DMS script in <PS_APP_HOME>\scripts.This script enables the creation and viewing of pagelets using the Enterprise Components Portal Utilities.
Note. Only perform this task if you are licensed for the PeopleSoft Supply Chain Portal Pack or EnterprisePortal.
Copyright © 2013, Oracle and/or its affiliates. All rights reserved. 275

Setting Up PeopleSoft SCM Pagelets Chapter 29
276 Copyright © 2013, Oracle and/or its affiliates. All rights reserved.
CHAPTER 30
Granting Access to Navigation Pagesin PeopleSoft SCM
Task 30-1: Adding User Roles to All User IDsTo access the navigation pages, you must grant security to the Navigation Page IScripts to all users. To addthe EOPP_USER role to all users, use PeopleSoft Data Mover to run the EOPP_ADD_ROLE.DMS scriptin <PS_APP_HOME>\scripts.
Note. When you create a new user ID, you should add the EOPP_USER role to the new user ID.
Copyright © 2013, Oracle and/or its affiliates. All rights reserved. 277

Granting Access to Navigation Pages in PeopleSoft SCM Chapter 30
278 Copyright © 2013, Oracle and/or its affiliates. All rights reserved.
CHAPTER 31
Accessing PeopleSoft Financials, ESA, and SCMApplications in PeopleSoft Portal Solutions
Task 31-1: Accessing ApplicationsOnly perform this task if you use the PeopleSoft Portal product and want to access your application fromwithin the Enterprise Portal database.
The installation phase of your PeopleSoft application should only entail setting up a single link to thePeopleSoft application content provider. To set up the single link and the single sign on, see the PeopleSoftPortal Solutions 9.1 Revision 2 Installation documentation on My Oracle Support. Chapter 3 discusses settingup single sign on to your application database. Chapter 4 discusses accessing the PeopleSoft content providers.Appendices H and I discuss additional product-specific steps you may need to perform for fully functionalnavigation within the Enterprise Portal database.
See PeopleSoft Portal Solutions Installation
Copyright © 2013, Oracle and/or its affiliates. All rights reserved. 279

Accessing PeopleSoft Financials, ESA, and SCM Applications in PeopleSoft Portal Solutions Chapter 31
280 Copyright © 2013, Oracle and/or its affiliates. All rights reserved.
APPENDIX A
Configuring PeopleSoft 9.2 IT Asset Managementwith Network Discovery Systems
Use these values when integrating PeopleSoft 9.2 IT Asset Management with additional component (third-party)Network Discovery Systems.
The following table lists the HTTPTARGET Connector Properties:
*Property ID *Property Name Required Value Default
HEADER sendUncompressed Y Y YHTTPPROPERTY Method Y Post YPRIMARYURL URL Y http://<LocalHost>
/<DiscoveredInventorySystem>/<ConnectorName>
N
The following table lists the routing definitions for the PSFT_EP node that Oracle delivers:
Routing Type Request Message Request Message Version
Async GET_DISCOVERYDATA VERSION_1Async GET_DISCOVERYDATA_LCL VERSION_1Async GET_DISCOVERYDATA_ACK VERSION_1Async GET_DISCOVERYDATA_STATUS_ACK VERSION_1
Copyright © 2013, Oracle and/or its affiliates. All rights reserved. 281

Configuring PeopleSoft 9.2 IT Asset Management with Network Discovery Systems Appendix A
282 Copyright © 2013, Oracle and/or its affiliates. All rights reserved.
Index
AActiveX controls, installing forPeopleSoft-Microsoft projectintegrator 77ADF 263administration serverstarting on MS Windows OS 188starting on UNIX OS 188
alternate holding directory 123ANONYMOUS node 209application server 214asset managementintegrates, physical inventory 125
asynchronous messagingactivate domain 134, 144
attachment print directory 123authentication provider 189adding to security realm 191applying 189prerequisites 189reordering 195
BBundle 16 189
CChartField configuration processdatabase requirements 11
COBOL, configuring for DB2 z/OS 7configuration wizardconfiguring components 181defining a new domain 162
configurecomponents 181Employee Portal Servlet URL 44inbound nodes 126integration broker 37local gateway, Network InventoryDiscovery Systems 137Microsoft Project IntegrationProcess 118PeopleSoft Microsoft ProjectIntegrator 78SES 15
connections.xml, updating forsecurity 260contract transaction service 112CONTRACT_TXN 112creating and configuring keystore andcredential store 252CRMtransaction billing processor 105
CUP Item Export, installing 149customization EAR file, creating 265customization environment 263creating 264prerequisites 263
Ddatabase size 4DB2 z/OS 5DDDAUDIT result 5demo databasesizing information 4
directoryattachment print directory 123download holding 123
domain, activateasynchronous messaging 134
EeBill Paymentconfiguring email URLs 272
EDM pool size 5emailconfiguring for eBill Payment 272
email URLconfiguring for item loaderexceptions 269
Employee Portal Servlet URL,configuring 44eProcurementemployees, buyers, suppliers 149
expensesconfiguring Employee Portal ServletURL 44configuring integration broker 37installing 37
Copyright © 2013, Oracle and/or its affiliates. All rights reserved. 283
Index
Ffile attachment storageproject costing 81
file attachmentsfile server 81
file attachments storagedatabase 81
file importgeneral ledger, running on DB2z/OS 28general ledger, URL definition 27
formsdownloading, from sponsorwebsites 29grants 29printing 32URL maintenance area 30
forms processinggrants 29
FTP server 81setting up for staffing front office 83
Fusion Middleware ConfigurationWizard 162, 181
Ggateways 37general ledgerfile import 27installing 27
GETWSDL, activating 207granting security, custom roles andpermissions lists 214grantsavailable forms 29setting up forms processing 29
Iinbound nodes 138installapplication files, PS_APP_HOME 4defaults script 5eProcurement CUP Item Export 149ESA, FSCM Portal packs 75expenses 37Microsoft Project 2007 118Microsoft Project 2010 118mobile inventory management 155notification framework, purchasing 71
Oracle Application DevelopmentRuntime Installer 172Oracle WebLogic Server 156pay/bill management 47PeopleSoft-Microsoft ProjectIntegrator 77process scheduler, Microsoft Windowsmachine 117
installation optionsmobile inventory management 215
integration brokerconfiguring for expenses 37configuring the domain 207configuring the gateway 203configuring web services 205resume parsing 87reviewing set up for mobileinventory 209web services 214
integration pointsactivating local domains 63activating queue definitions 64setting up integration gateways 57setting up node definitions, singlesignon 48setting up portal nodes 52setting up single signon 56system-delivered service operations 68
integration queues 105integration routings 106integration services 106
JJCL shells 9
KKeytool utilitycopying encryption and rootcertificates 251exporting encryption and root nodecertificates 251exporting mobileserv public keycertificate 250generating encryption keypair in interopkeystore 250generating or importing certificates intodefault-keystore 249importing keypair to createdefault-keystore.jks 248
284 Copyright © 2013, Oracle and/or its affiliates. All rights reserved.
Index
importing mobileserv certificate tointerop keystore 250importing, exporting certificate 248
Llocal domain 39local gateway 125Network Inventory DiscoverySystems 137
Mmappingdynamic 94static 94
mapping setupsstaffing front office 102
mapping valuesstaffing front office 103
MBeansOracle WebLogic, directory 189
message channel 133message channel status 43Microsoft Project 2007, integrating withPeopleSoft 77Microsoft Project 2007/2010installing with PeopleSoft MaintenanceManagement 117
Microsoft Project 2010, integrating withPeopleSoft 77mobile applicationdeploying 216Oracle Application Developer 216Oracle WebLogic server 216undeploying 224
mobile approvalsconfiguring 13granting security 13
mobile inventory managementactivating service operations 209applying authentication provider 189configuring WS-Security 229creating custom EAR file 265creating custom environment 264customizing environment 263granting security to objects 214installing 155installing Oracle WebLogic 156Oracle WebLogic 156prerequisites
Java 154Oracle application developer 154peopletools 154
reviewing set up in integrationbroker 209WS-Security 231
Nnavigation page IScripts 75navigation pages 277navigation pages for Portal Packs, grantingaccess 75Network Inventory Discovery Systemsasynchronous messaging 144inbound nodes 138integrating with IT assetmanagement 137message channel 143queue status 143service operations 140
notifications frameworkinstalling 71
OOracle Application Developer 172mobile inventory management 172
Oracle Application DevelopmentFramework 263Oracle Application Development RuntimeInstaller 172Oracle Fusion Middleware 155Oracle Secure Enterprise Search 15Oracle Technology Network (OTN) 155accessing Fusion Middleware 155accessing installationdocumentation 155
Oracle Web Service Manager(OWSM) 239configuring WS-Security 231running Repository Creation Utility(RCU) 231
Oracle WebLogicstarting administration server 188
Oracle WebLogic Serverinstalling for mobile 156installing for mobile inventorymanagement 156mobile inventory management 156
OWSM
Copyright © 2013, Oracle and/or its affiliates. All rights reserved. 285
Index
WS-Security 230
Ppagelet creation 75pageletsaccessing portal utilities 275creating 275SCM, accessing 275
partitioned data setsOS/390 7
pay/bill managementinstalling 47integration points 47verifying installation table forHCM,FSCM 68
pdf templates 31PeopleSoft databaseinstalling 202
PeopleSoft Maintenance Managementinstalling with Microsoft Project2007/2010 117
PeopleSoft system, setting upintegration 203PeopleSoft-Microsoft project integratorconfiguring 78installing 77
PeopleSoft-Microsoft Project Integratorinstall, run 77
PeopleToolsinstalling 3version for installation 4
permission lists and roles, delivered 214physical inventoryintegrates, asset management 125
Portal homepagepersonalizing 75
portal packs navigation pagesgranting access 75
Portal solutionsaccessing 279
Portal user role, adding to user ID 75portal utilities 75prerequisitesauthentication provider 189customization environment 263WS-Security 229
Print Attachments featureenable, Work Order Task Detail ReportOptions page 123
process scheduler
Microsoft Windows machine 117process scheduler serverdefining environmental variable 28
project costingfile attachment storage 81file attachment storage, database 81file attachment storage, file server 81
PS_APP_HOME 4psjoa.jar, copying 190purchasingemployee portal servlet 71local domain 71message channel status 71
Pure Internet Architecture 172
Qqueue definitions 40
RRepository Creation Utility (RCU) 231resume parsingactivating domain 87adding proxy settings 91assigning mapping setups 102configuring integration broker 87defining mapping values 103encrypting password 93setting up integration gateways 88setting up mapping 94staffing front office 85
roles and permission lists, delivered 214
SSAML 229SAML definition information, adding 256scriptEOPP_ ADD_ROLE.DMS 75EOPP_ADD_ROLE.DMS 277EOPP_PORTAL_PACK.DMS 75, 275PORTAL_ADD_ROLE.DMS 75, 275PORTAL_HP_PERS.DMS 75, 275
search definitionsattachments 18deploy 20index 20
secured enterprise search enginestaffing front office 85
securitysetting up audit log (optional) 200
286 Copyright © 2013, Oracle and/or its affiliates. All rights reserved.
Index
security realmadding authentication provider 191
service and handlers 41service operation routingactivating GETWSDL 207
service operations 128, 140, 209SES 15attachments, FSCM searchdefinitions 18deploy, index search definitions 20new roles 16search group display 17setup Portal Node 18upgrade file attachments 21
SHELCBL.JCT 9SHELSQRF.JCT 9SHELSQRP.JCT 9SQR, configuring for DB2 z/OS 7staffing front officeintegrating resume parsing 85secured enterprise search engine 85setting up document attachments 83
summary tree,delete 5
supplier contract management 273supplier facing applications 270collaborative supply management 270eSupplier connection 270services procurement 270strategic sourcing 270supplier contract management 270
Ttransaction billing processoractivating integration queues 105activating integration services,routings 106integrating, CRM 105
UupdateURL, Work Order Attachment Printfeature 122
URLPIA links 269temporary downloads 123
URL Maintenance 122
Vverifyinstallation location 122
viewreports 33
Wweb serviceenabling for FSCM database 214
web services 125wlPSFTSecurityProviders.jar,copying 189WS-Secuirty, prerequisitesadding SAML definitions 230configuring certificates 230creating keystore and credentialstore 230installing OWSM for WS-Security 230RCU 230updating connections.xml 230
WS-Securityadding SAML definition 256configuring 229–231configuring certificates 248configuring, web services 229copying encryption and rootcertificates 251creating and configuring keystore andcredential store 252creating default-keystore.jks 248exporting encryption and root nodecertificates 251exporting mobileserv public keycertificate 250generating encryption keypair in interopkeystore 250generating or importing certificates intodefault-keystore 249importing mobileserv certificate tointerop keystore 250installing Oracle Web Service Manager(OWSM) 239Oracle Web Service Manager(OWSM) 230prerequisites 229Repository Creation Utility (RCU) 231updating connections.xml forsecurity 260
Copyright © 2013, Oracle and/or its affiliates. All rights reserved. 287

Index
288 Copyright © 2013, Oracle and/or its affiliates. All rights reserved.