Embed Size (px)
Citation preview
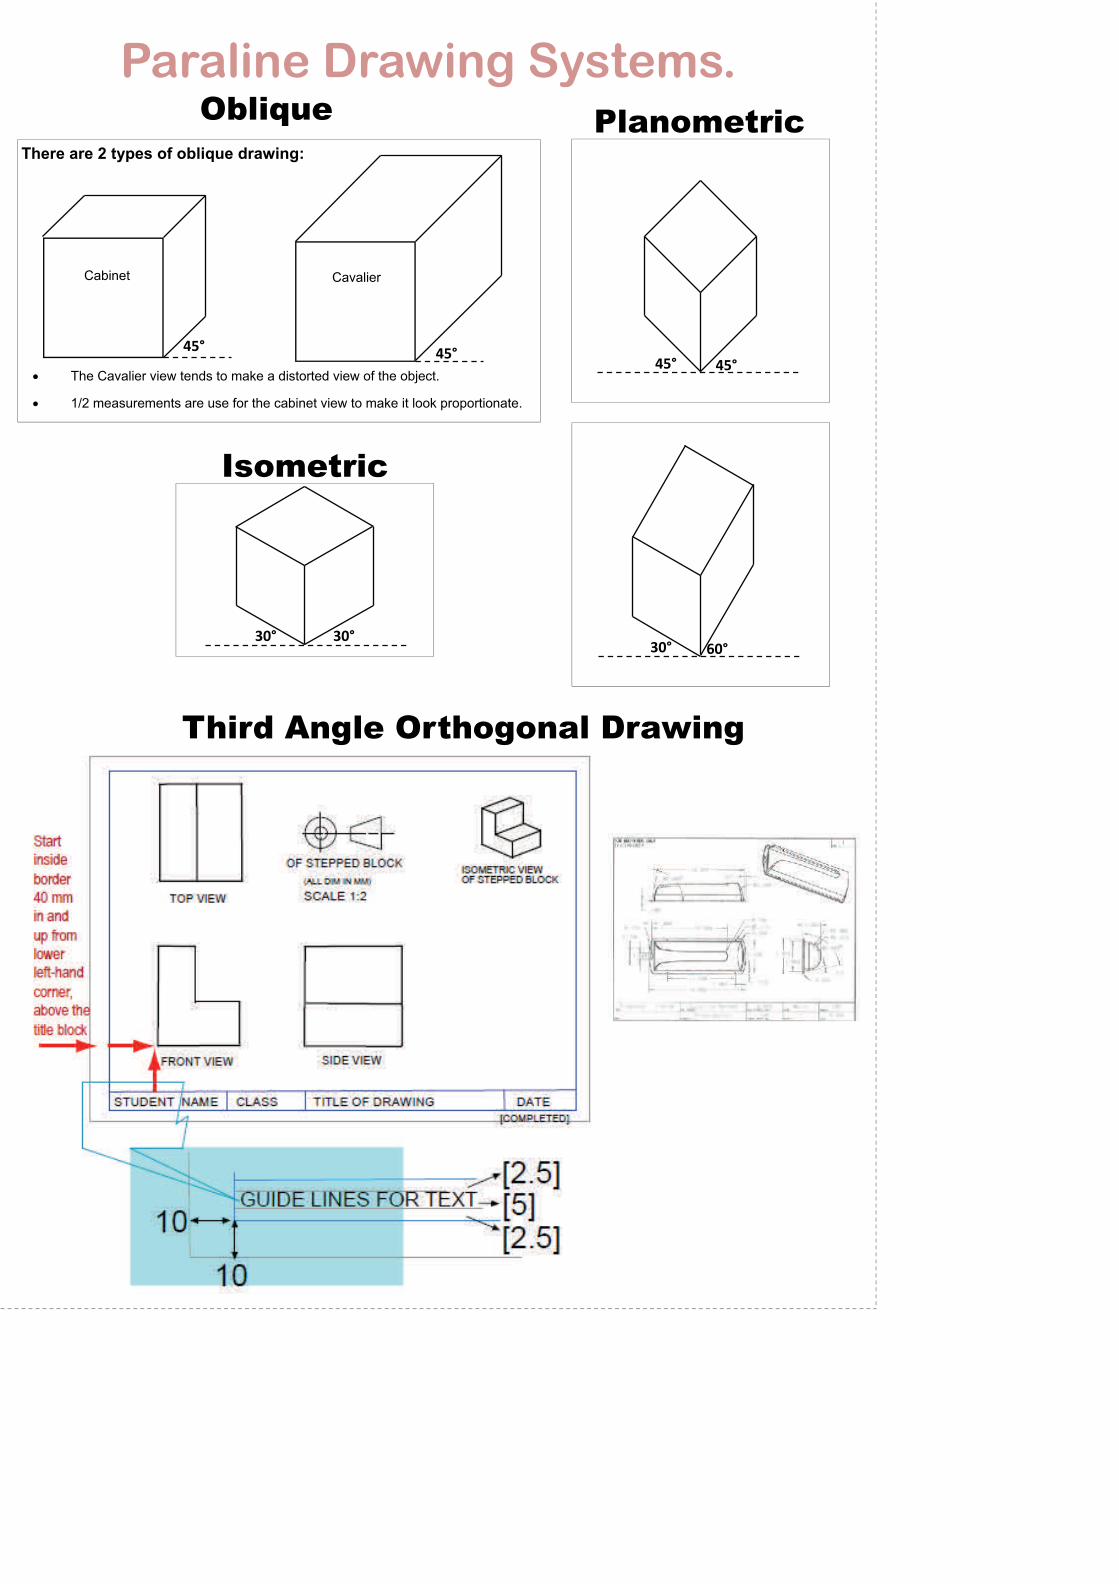
Isometric
30° 30°
Oblique
There are 2 types of oblique drawing:
Cabinet Cavalier
45° 45°
The Cavalier view tends to make a distorted view of the object.
1/2 measurements are use for the cabinet view to make it look proportionate.
Planometric
45° 45°
60° 30°
Paraline Drawing Systems.
Third Angle Orthogonal Drawing

90
90
45
60
30
45
Set Squares
T-Square
Drawing board
Tape
HB pencil
Eraser
Fineliner
2B, 4B & 6B pencils
Tasks to be completed:
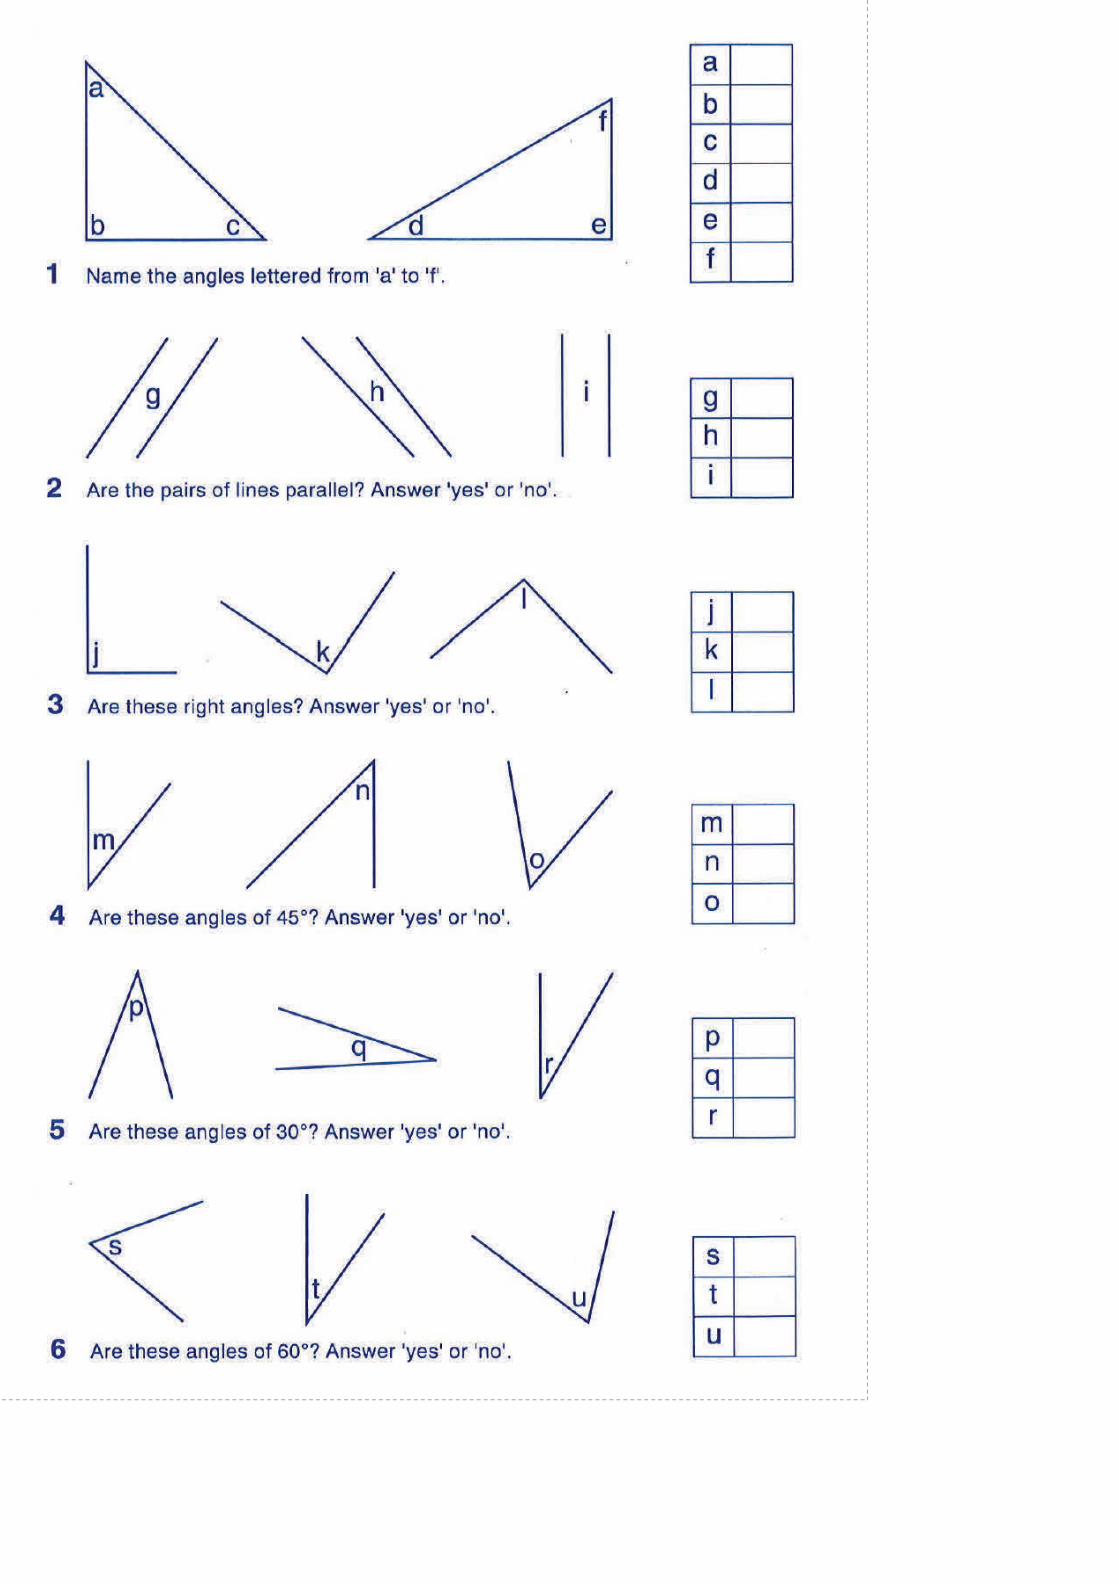
1. Angles and parallel lines handout. In book with border. Write Yes/No.
2. Trial page with border, title box. 40mm in from bottom edge and left edge measure and rule a 100mm square using T-square, set square and HB pencil followed by fineliner. Then using equipment, draw a 100mm x 80mm rectangle and a 90mm equilateral triangle. Think about placement.
Page landscape, 3 pieces tape. 10mm border. HB pencil then fineliner. Use of T-Square, set squares and measuring. Correct placement and measuring of title box.
2. Landscape page demonstrating 40mm Oblique, Isometric and Planometric drawing systems.
Correct use of T-square and set squares. HB pencil then fineliner. Placement on the page. PLANNING! Border and title box.
3. Landscape page presenting a 100mm Isometric cut out cube in greylead pencil demonstrating no evidence of erasing, careful rendering using the grades of pencil. Presentation. 40mm from bottom border and 150mm from left border is starting point.
NO FINELINER ON CUBE! ONLY BORDER & TITLE BOX.
Extension: Provided worksheets—please ask for extra practice worksheets!
Draw a lego block in the various drawing methods.
NOTE: There are still typography and perspective exercises to be done in Photoshop elements so that you develop skills in layers and rendering. Most
tasks listed here should take no more than 2 or 3 sessions each if you use class time wisely!

Isometric Drawings Oblique Drawings
63
Planometric Drawing
45° 45°
Tasks to be completed on computer:
1. Landscape A3 page demonstrating 40mm Oblique, Isometric and Planometric drawings in Publisher.
Pay attention to placement on page. Label each view—capital lettering, sans serif. Border and title box.
2. A4 page-6 oblique drawings
3. A4 page—6 isometric drawings
4. A4 page—demonstrate 2 types of planometric drawings
5. Landscape A3 page presenting a 120mm Isometric cut out cube using Publisher.
6. Transfer 1. to Photoshop elements and use correct shading techniques and layers.
7. Transfer 5. to Photoshop elements and use correct shading techniques and layers.
Extension:
Provided worksheets—please ask for extra practice worksheets to be put into your network folder.
Complete a series of liquorice allsorts in the various drawing methods.
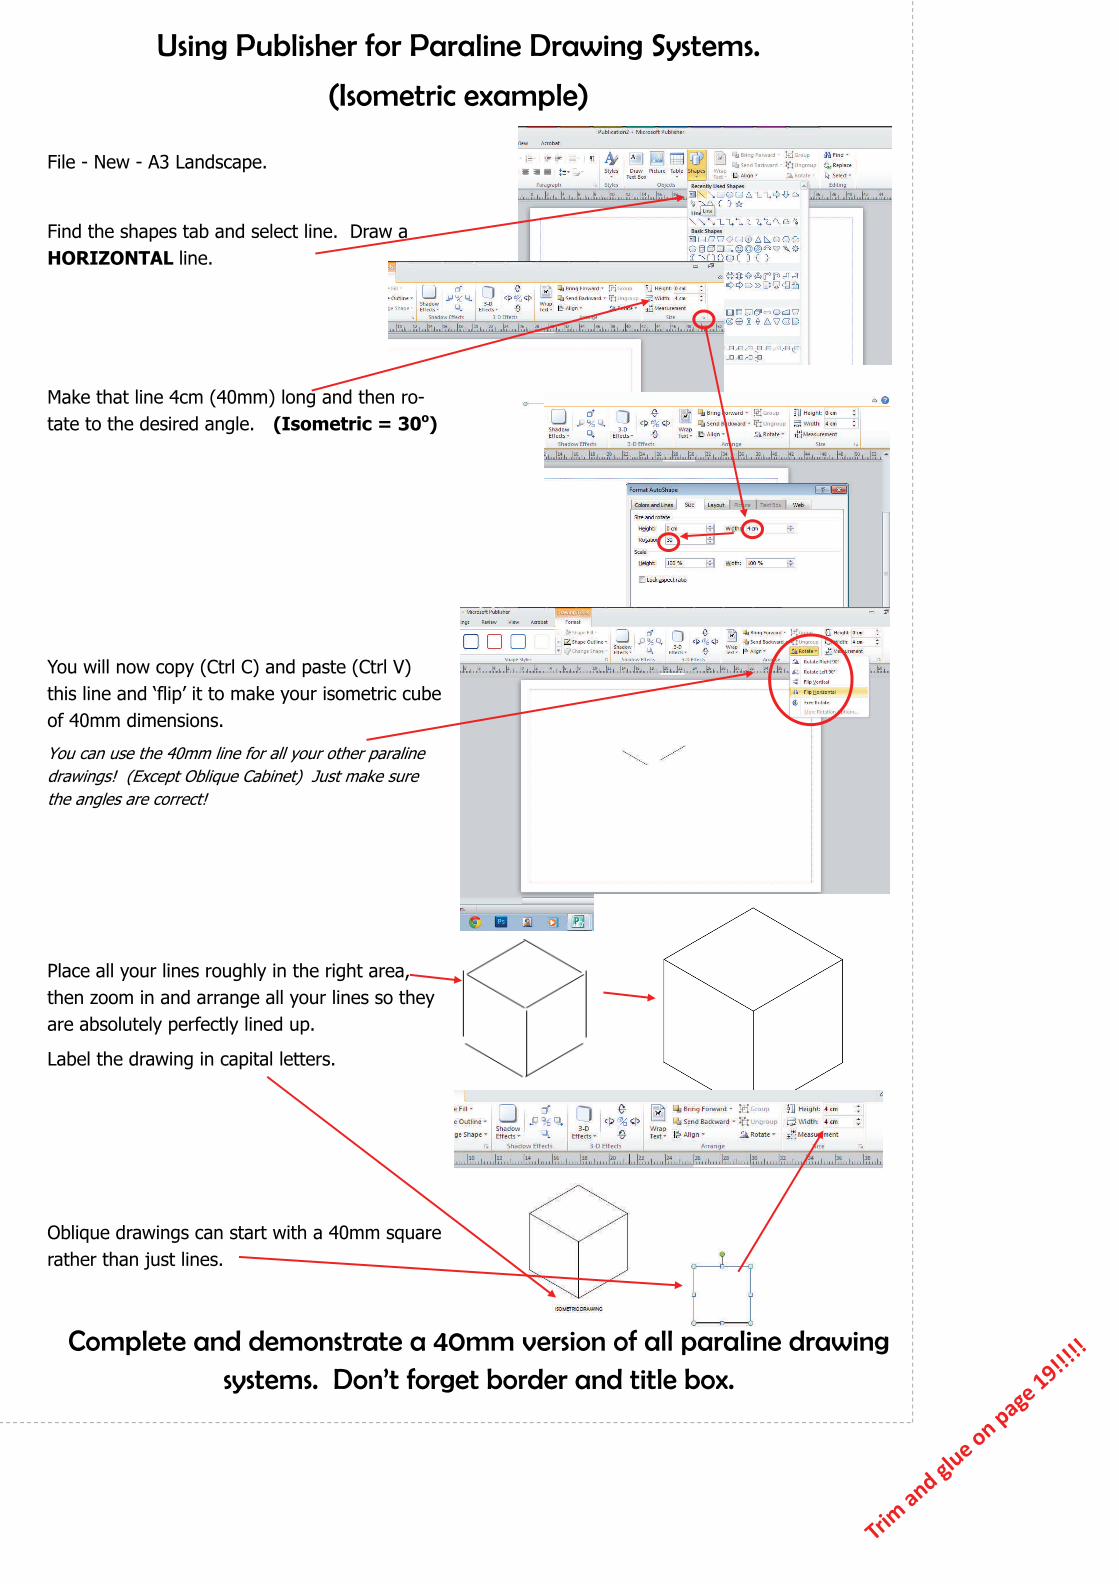
Using Publisher for Paraline Drawing Systems.
(Isometric example)
File - New - A3 Landscape.
Find the shapes tab and select line. Draw a HORIZONTAL line.
Make that line 4cm (40mm) long and then ro-tate to the desired angle. (Isometric = 30o)
You will now copy (Ctrl C) and paste (Ctrl V) this line and ‘flip’ it to make your isometric cube of 40mm dimensions.
You can use the 40mm line for all your other paraline drawings! (Except Oblique Cabinet) Just make sure the angles are correct!
Place all your lines roughly in the right area, then zoom in and arrange all your lines so they are absolutely perfectly lined up.
Label the drawing in capital letters.
Oblique drawings can start with a 40mm square rather than just lines.
Complete and demonstrate a 40mm version of all paraline drawing systems. Don’t forget border and title box.
Trim and glue on page 19!!!!!