Embed Size (px)
Citation preview

Code: 572000
d-COLOR MF652/d-COLOR MF752

PUBLICATION ISSUED BY: Olivetti S.p.A. Gruppo Telecom Italia
Via Jervis, 77 - 10015 Ivrea (ITALY) www.olivetti.com
Copyright © 2012, Olivetti The manufacturer reserves the right to carry out modifications to the product described in this manual at any time and without any notice.
ENERGY STAR is a U.S. registered mark.
The ENERGY STAR program is an energy reduction plan introduced by theUnited States Environmental Protection Agency in response to environmental issues and for the purpose of advancing the development and utilization of more energy efficient office equipment.
Your attention is drawn to the following actions which could compromise the conformity attested to above, as well as the characteristics of the product:
• incorrect electrical power supply;
• incorrect installation, incorrect or improper use or use not in compliance with the warnings provided in the User’s Manual supplied with the product;
• replacement of original components or accessories with others of a type not approved by the manufacturer, or performed by unauthorised personnel.
All rights reserved. No part of this material may be reproduced or transmitted in any form or by any means, electronic or mechanical, including photocopying, recording or by any information storage and retrieval system, without permission in writing from the Publisher.
The mark affixed to the product certifies that theproduct satisfies the basic quality requirements.
All rights reserved

Table of contents
1 Network Fax Functions
1.1 Available operations with Network function ................................................................................ 1-3Internet Fax ........................................................................................................................................ 1-3IP Address Fax................................................................................................................................... 1-3
1.2 How To Send A Fax......................................................................................................................... 1-4
1.2.1 Sending (basic operation flow)........................................................................................................... 1-41.2.2 Checking the finish before sending ................................................................................................... 1-61.2.3 Sending a fax by recalling a program ................................................................................................ 1-8
Fax/Scan Program ............................................................................................................................. 1-8Registering a Fax/Scan program ....................................................................................................... 1-8Sending a fax by recalling a Fax/Scan program.............................................................................. 1-11
1.3 Specifying a destination ............................................................................................................... 1-13Selecting from address book........................................................................................................... 1-13Specifying a group destination ........................................................................................................ 1-14Searching for destinations ............................................................................................................... 1-15Direct input....................................................................................................................................... 1-16Selecting from the history ................................................................................................................ 1-16Searching for an E-mail address from the LDAP server .................................................................. 1-17
1.4 Option settings for fax transmission........................................................................................... 1-18
1.4.1 Basic options such as color and original size.................................................................................. 1-18Scanning a 2-sided original ([Simplex/Duplex]) ............................................................................... 1-18Specifying the resolution of original for scanning ([Resolution]) ...................................................... 1-18Selecting the color mode to scan the original ([Color]) .................................................................... 1-18Specifying the original size for scanning ([Scan Size])..................................................................... 1-18Changing a file name ([E-mail Settings]) .......................................................................................... 1-19Changing a subject and text of the successful reception E-mail message ([E-mail Settings])........ 1-19
1.4.2 Settings to scan various types of originals (Application settings).................................................... 1-20Scanning originals of varying sizes in a batch ([Mixed Original]) ..................................................... 1-20Scanning a thinner original than plain paper ([Thin Paper Original]) ................................................ 1-20Scan originals with folds ([Z-Folded Original]) ................................................................................. 1-20Scanning a long original ([Long Original]) ........................................................................................ 1-21Specifying the original loading direction ([Original Direction]) ......................................................... 1-21Specifying the original binding position ([Binding Position]) ............................................................ 1-21Scanning while removing dust from the slit glass ([Despeckle]) ...................................................... 1-21Skipping blank pages ([Blank Page Removal]) ................................................................................ 1-22Splitting the left and right pages of a book and catalog ([Book Original]) ....................................... 1-22Scanning a number of originals in several batches ([Separate Scan])............................................. 1-22
1.4.3 Adjusting image quality level/density (Application settings) ............................................................ 1-24Selecting the appropriate image quality level for the original ([Original Type]) ................................ 1-24Selecting the scanning density of the original ([Density]) ................................................................ 1-24Adjusting the background density of the original ([Bkgd. Removal]) ............................................... 1-24
1.4.4 Adding a stamp/page number (Application settings)....................................................................... 1-25Adding a date and time ([Date/Time]) .............................................................................................. 1-25Adding the page number ([Page Number]) ...................................................................................... 1-25Adding a stamp ([Stamp]) ................................................................................................................ 1-26Adding the header/footer ([Header/Footer])..................................................................................... 1-26Printing TX Stamp on scanned originals ([TX Stamp]) ..................................................................... 1-27
1.4.5 Other option settings (Application settings)..................................................................................... 1-27Scanning after erasing text and shadows in the margins of an original ([Frame Erase]) ................. 1-27Sharpening the border between text etc. ([Sharpness]) .................................................................. 1-28Sending and printing at the same time ([Save & Print]) ................................................................... 1-28Changing the sender name before sending a fax ([Fax Header Settings]) ...................................... 1-28
d-Color MF 752/652 Contents-1

2 Sending and receiving an Internet fax
2.1 Internet Fax Functions.................................................................................................................... 2-3
2.2 Setting up for Internet fax (for the administrator)........................................................................ 2-4
2.2.1 Preparation flow................................................................................................................................. 2-42.2.2 Operations required to use this function ........................................................................................... 2-5
Checking the LAN cable connection ................................................................................................. 2-5Checking the network settings .......................................................................................................... 2-5Configuring the Internet fax environment .......................................................................................... 2-5Registering Header Position .............................................................................................................. 2-5Setting the date and time for the machine......................................................................................... 2-5
2.2.3 Option settings................................................................................................................................... 2-6Registering a frequently used destination ......................................................................................... 2-6Using an LDAP server to specify addresses...................................................................................... 2-6Registering a subject and text of the successful reception E-mail message .................................... 2-6Registering prefixes and suffixes for destination............................................................................... 2-6Using the SMTP authentication ......................................................................................................... 2-6Using the POP before SMTP authentication ..................................................................................... 2-6SSL/TLS communication ................................................................................................................... 2-6Checking a fax reception ................................................................................................................... 2-7
2.3 How To Send A Fax......................................................................................................................... 2-8
2.4 How To Receive A Fax.................................................................................................................. 2-10Auto reception.................................................................................................................................. 2-10Manual reception ............................................................................................................................. 2-10
2.5 Receiving Options......................................................................................................................... 2-11
2.5.1 Printing by adding the date and time received ([Footer Position]) ................................................... 2-11Footer Position................................................................................................................................. 2-11Operations required to use this function (for the administrator) ...................................................... 2-11
2.5.2 Saving a fax which cannot be printed (In-memory proxy reception) ............................................... 2-112.5.3 Forcibly saving a received fax in a User Box (Memory RX) ............................................................. 2-12
Memory RX ...................................................................................................................................... 2-12Operations required to use this function (for the administrator) ...................................................... 2-12Printing a received fax ..................................................................................................................... 2-12
2.5.4 Forwarding a received fax to another destination (Forward TX) ...................................................... 2-13Forward TX....................................................................................................................................... 2-13Operations required to use this function (for the administrator) ...................................................... 2-13
2.5.5 Stopping the fax print during lunch breaks and at night ................................................................. 2-132.5.6 Printing a fax on both sides of sheets of paper ([Duplex Print (RX)]) ............................................... 2-14
Duplex Print (RX) .............................................................................................................................. 2-14Operations required to use this function (for the administrator) ...................................................... 2-14
2.5.7 Configuring the fax print settings (for the administrator) ................................................................. 2-14Default print settings ([Print Paper Selection]/[Min. Reduction for RX Print]) .................................. 2-14Fixing the print paper size ([Print Paper Size]) ................................................................................. 2-15Fixing the print paper tray ([Tray Selection for RX Print])................................................................. 2-15Splitting a custom size (portrait) fax for printing ([Print Separate Fax Pages]) ................................ 2-16
2.6 Printing a report/list...................................................................................................................... 2-17
3 Sending and receiving an IP address fax
3.1 IP Address Fax function ................................................................................................................. 3-3
3.2 Setting up for IP address fax (for the administrator) ................................................................... 3-4
3.2.1 Preparation flow................................................................................................................................. 3-43.2.2 Operations required to use this function ........................................................................................... 3-5
Checking the LAN cable connection ................................................................................................. 3-5Checking the network settings .......................................................................................................... 3-5Configuring the IP address fax environment ..................................................................................... 3-5Registering Header Position .............................................................................................................. 3-5Setting the date and time for the machine......................................................................................... 3-5
3.2.3 Option settings................................................................................................................................... 3-53.3 How To Send A Fax......................................................................................................................... 3-6
Contents-2 d-Color MF 752/652

3.4 Sending Options.............................................................................................................................. 3-8
3.4.1 Resending a fax ................................................................................................................................. 3-8Auto resending (Auto redial)............................................................................................................... 3-8Manual resending............................................................................................................................... 3-8
3.5 How To Receive A Fax.................................................................................................................. 3-10
3.6 Receiving Options......................................................................................................................... 3-11
3.6.1 Printing by adding the date and time received ([Footer Position]) ................................................... 3-11Footer Position................................................................................................................................. 3-11Operations required to use this function (for the administrator) ...................................................... 3-11
3.6.2 Saving a fax which cannot be printed (In-memory proxy reception) ............................................... 3-113.6.3 Forcibly saving a received fax in a User Box (Memory RX) ............................................................. 3-12
Memory RX ...................................................................................................................................... 3-12Operations required to use this function (for the administrator) ...................................................... 3-12Printing a received fax ..................................................................................................................... 3-12
3.6.4 Forwarding a received fax to another destination (Forward TX) ...................................................... 3-13Forward TX....................................................................................................................................... 3-13Operations required to use this function (for the administrator) ...................................................... 3-13
3.6.5 Stopping the fax print during lunch breaks and at night ................................................................. 3-133.6.6 Printing a fax on both sides of sheets of paper ([Duplex Print (RX)]) ............................................... 3-14
Duplex Print (RX) .............................................................................................................................. 3-14Operations required to use this function (for the administrator) ...................................................... 3-14
3.6.7 Configuring the fax print settings (for the administrator) ................................................................. 3-14Default print settings ([Print Paper Selection]/[Min. Reduction for RX Print]) .................................. 3-14Fixing the print paper size ([Print Paper Size]) ................................................................................. 3-15Fixing the print paper tray ([Tray Selection for RX Print])................................................................. 3-15Splitting a custom size fax for printing ([Print Separate Fax Pages]) ............................................... 3-16
3.7 Printing a report/list...................................................................................................................... 3-17
4 Managing Destinations
4.1 Registering frequently used destinations (Address Book).......................................................... 4-3Address Book .................................................................................................................................... 4-3Registering an Internet fax destination .............................................................................................. 4-3Registering an IP address fax destination ......................................................................................... 4-4
4.2 Registering multiple destinations as a group (Create Group) .................................................... 4-6Create Group ..................................................................................................................................... 4-6Registering a group............................................................................................................................ 4-6
4.3 Registering directly entered destinations in Address Book ....................................................... 4-8
4.4 Exporting/importing destination information (for the administrator) ...................................... 4-10Exporting destination information.................................................................................................... 4-10Importing destination information .................................................................................................... 4-10
4.5 Printing the list of destination information (for the administrator)........................................... 4-11Printing a destination list.................................................................................................................. 4-11Printing a group list .......................................................................................................................... 4-12Printing a program list...................................................................................................................... 4-13
5 Description of setup buttons
[Address Book]................................................................................................................................... 5-3[Direct Input]....................................................................................................................................... 5-4[Internet Fax] ...................................................................................................................................... 5-5[IP Address Fax] ................................................................................................................................. 5-6[Job History] ....................................................................................................................................... 5-7[Addr. Search] .................................................................................................................................... 5-7[Name Search] ................................................................................................................................... 5-8[Address Search]................................................................................................................................ 5-8[LDAP Search].................................................................................................................................... 5-9[Adv. Search (LDAP)].......................................................................................................................... 5-9[Address Reg.].................................................................................................................................. 5-10[Simplex/Duplex] .............................................................................................................................. 5-10[Resolution] ...................................................................................................................................... 5-11
d-Color MF 752/652 Contents-3
[Color]............................................................................................................................................... 5-12[Scan Size] ....................................................................................................................................... 5-13[E-mail Settings] ............................................................................................................................... 5-14[Application] ..................................................................................................................................... 5-15[Original Settings]............................................................................................................................. 5-16[Book Original].................................................................................................................................. 5-17[Separate Scan]................................................................................................................................ 5-18[Original Type] .................................................................................................................................. 5-18[Density] ........................................................................................................................................... 5-19[Bkgd. Removal]............................................................................................................................... 5-20[Date/Time]....................................................................................................................................... 5-21[Page Number] ................................................................................................................................. 5-22[Stamp]............................................................................................................................................. 5-23[Header/Footer] ................................................................................................................................ 5-24[TX Stamp] ....................................................................................................................................... 5-25[Frame Erase] ................................................................................................................................... 5-25[Sharpness] ...................................................................................................................................... 5-26[Save & Print].................................................................................................................................... 5-26[Fax Header Settings]....................................................................................................................... 5-27
6 Description Of Setup Buttons (User Settings)
[Utility] ................................................................................................................................................ 6-3[One-Touch/User Box Registration]................................................................................................... 6-3[Create One-Touch Destination] ........................................................................................................ 6-3[Address Book (Public)]...................................................................................................................... 6-4[IP Address Fax] ................................................................................................................................. 6-4[Internet Fax] ...................................................................................................................................... 6-5[Group] ............................................................................................................................................... 6-6[E-Mail Settings] ................................................................................................................................. 6-6[E-Mail Subject].................................................................................................................................. 6-7[E-mail Body]...................................................................................................................................... 6-7[Limiting Access to Destinations]....................................................................................................... 6-7[User Settings].................................................................................................................................... 6-8[System Settings] ............................................................................................................................... 6-8[Auto Color Level Adjust.] .................................................................................................................. 6-9[Blank Sheet Detection Level] ............................................................................................................ 6-9[Separate Scan from Platen] .............................................................................................................. 6-9[Custom Display Settings].................................................................................................................. 6-9[Scan/Fax Settings] ([Custom Display Settings]).............................................................................. 6-10[Function Display Key(Send/Save)] .................................................................................................. 6-10[Search Option Settings] .................................................................................................................. 6-10[Scan/Fax Settings] .......................................................................................................................... 6-11[JPEG Compression Level] .............................................................................................................. 6-11[Black Compression Level] .............................................................................................................. 6-11[Default Scan/Fax Settings] ............................................................................................................. 6-11[Default Enlarge Display Settings].................................................................................................... 6-12[Color TIFF Type].............................................................................................................................. 6-12
7 Description Of Setup Buttons (Administrator Settings)
[Administrator Settings]...................................................................................................................... 7-3[System Settings] ............................................................................................................................... 7-4[Output Settings] ................................................................................................................................ 7-5[Print/Fax Output Settings] ................................................................................................................ 7-5[Output Tray Settings] ........................................................................................................................ 7-5[Shift Output Each Job]...................................................................................................................... 7-5[Date/Time Settings]........................................................................................................................... 7-6[Weekly Timer Settings] ..................................................................................................................... 7-6[Restrict User Access]........................................................................................................................ 7-7[Restrict Access to Job Settings]....................................................................................................... 7-7[Restrict Operation] ............................................................................................................................ 7-8[Reset Settings].................................................................................................................................. 7-8[Job Reset] ......................................................................................................................................... 7-9[Stamp Settings]................................................................................................................................. 7-9
Contents-4 d-Color MF 752/652

[Header/Footer Settings].................................................................................................................. 7-10[Fax TX Settings] .............................................................................................................................. 7-10[Job Priority Operation Settings]...................................................................................................... 7-10[Preview Settings] ............................................................................................................................ 7-11[Scan File Name Settings]................................................................................................................ 7-11[One-Touch/User Box Registration]................................................................................................. 7-12[Create One-Touch Destination] ...................................................................................................... 7-12[Address Book (Public)].................................................................................................................... 7-12[IP Address Fax] ............................................................................................................................... 7-13[Internet Fax] .................................................................................................................................... 7-14[Group] ............................................................................................................................................. 7-15[E-Mail Settings] ............................................................................................................................... 7-15[E-Mail Subject]................................................................................................................................ 7-16[E-mail Body].................................................................................................................................... 7-16[One-Touch/User Box Registration List] .......................................................................................... 7-16[Address Book List].......................................................................................................................... 7-17[Group List] ...................................................................................................................................... 7-17[Program List]................................................................................................................................... 7-17[E-Mail Subject/Text List] ................................................................................................................. 7-18[Network Settings]............................................................................................................................ 7-18[Detail Settings] ................................................................................................................................ 7-19[Prefix/Suffix Setting] ....................................................................................................................... 7-19[Fax Settings] ................................................................................................................................... 7-20[Header Information] ........................................................................................................................ 7-20[Header/Footer Position] .................................................................................................................. 7-21[Header Position].............................................................................................................................. 7-21[TTI Print Position and Character Size] ............................................................................................ 7-21[Footer Position] ............................................................................................................................... 7-22[Line Parameter Setting]................................................................................................................... 7-22[Number of Redials] ......................................................................................................................... 7-22[Redial Interval]................................................................................................................................. 7-22[TX/RX Settings] ............................................................................................................................... 7-23[Duplex Print (RX)] ............................................................................................................................ 7-23[Letter/Ledger over A4/A3]............................................................................................................... 7-23[Print Paper Selection] ..................................................................................................................... 7-23[Print Paper Size].............................................................................................................................. 7-24[Tray Selection for RX Print] ............................................................................................................. 7-24[Min. Reduction for RX Print] ........................................................................................................... 7-24[Print Separate Fax Pages] .............................................................................................................. 7-24[No. of Sets (RX)].............................................................................................................................. 7-24[RX Document Print Settings] .......................................................................................................... 7-24[Function Settings] ........................................................................................................................... 7-25[Function ON/OFF Setting]............................................................................................................... 7-25[Destination Check Display Function] .............................................................................................. 7-25[Memory RX Setting] ........................................................................................................................ 7-26[Forward TX Setting] ........................................................................................................................ 7-26[Report Settings] .............................................................................................................................. 7-26[Job Settings List] ............................................................................................................................ 7-28[Network Fax Settings]..................................................................................................................... 7-28[Black Compression Level] .............................................................................................................. 7-28[Color/Grayscale Multi-Value Compression Method] ...................................................................... 7-28[Internet Fax Self RX Ability]............................................................................................................. 7-29[Internet Fax Advanced Settings]..................................................................................................... 7-29[IP Address Fax Operation Setting].................................................................................................. 7-30[Security Settings] ............................................................................................................................ 7-30[Security Details] .............................................................................................................................. 7-31[Manual Destination Input] ............................................................................................................... 7-32[Restrict Fax TX]............................................................................................................................... 7-32
8 Index
8.1 Index by item ................................................................................................................................... 8-3
8.2 Index by button................................................................................................................................ 8-4
d-Color MF 752/652 Contents-5

Contents-6 d-Color MF 752/652

1 Network Fax Functions


1.1 Available operations with Network function 1
1 Network Fax Functions
1.1 Available operations with Network function
Internet Fax
Internet fax is a function used to send and receive fax via enterprise network and Internet.
The same network as the one used by the computers is used to transmit faxes. Therefore, you can send and receive faxes to/from distant locations without having to worry about high communication costs or sending a large number of pages.
The following describes the precautions for using the Internet Fax.- Internet Fax must be configured by your service representative. For details, contact your service repre-
sentative.- Internet fax is sent or received via E-mail. Prepare a dedicated Internet fax E-mail address for this ma-
chine.- Connect this machine to a network that is capable of sending and receiving E-mail massages.
IP Address Fax
IP Address Fax is a function used to send and receive faxes within a limited network such as an enterprise network.
Specify an IP address for the destination. The same network as the one used by the computers is used to transmit faxes. Therefore, communication costs are not charged as they are for normal faxes.
In addition to IP address, you can also use a host name and E-mail address to specify the destination.
The following describes the precautions for using the IP Address Fax.- IP Address Fax must be configured by your service representative. For details, contact your service rep-
resentative.- To use the IP Address Fax function, the optional Fax Kit is required.
d-Color MF 752/652 1-3

How To Send A Fax1 1.2
1.2 How To Send A Fax
1.2.1 Sending (basic operation flow)
1 Load the original.
2 Tap [Scan/Fax].
3 Specify the destination.
% For details on how to specify a destination, refer to page 1-13.% Specifying multiple destinations carries out computer sending and fax transmission simultaneously.
% If necessary, you can change the display of the main screen in fax/scan mode (default: [Address Book]). For details, refer to page 6-10([Default Tab]).
1-4 d-Color MF 752/652

1.2 How To Send A Fax 1
4 Configure the option settings for fax transmission as necessary.
% For details on configuring option settings, refer to the respective columns of the following table.
5 Press the Start key.
% Tap [Check Setting] before sending, and check the destination and settings as necessary.% To redo operations for specifying destinations or option settings, press Reset.
Transmission begins.% If you press the Stop key while scanning an original, the scanning stops, and a list of stopped jobs
appears. To cancel scanning of the original, delete the job from the list of inactive jobs.
Related setting- You can change the default options for scan transmission to suit your environment. For details, refer to
page 6-11.
Purpose Reference
To configure basic options such as color and original size page 1-18
To configure options to scan various types of originals such as various sizes and books
page 1-20
To adjust the image quality level of the original such as colored background (newspaper, etc.) or light printing original
page 1-24
To print date/time and page number page 1-25
Other option settings page 1-27
d-Color MF 752/652 1-5

How To Send A Fax1 1.2
1.2.2 Checking the finish before sending
1 Load the original.
2 Tap [Scan/Fax].
3 Specify the destination.
4 Configure the option settings for fax transmission as necessary.
5 Press Preview.
1-6 d-Color MF 752/652

1.2 How To Send A Fax 1
6 Select the original direction.
7 Tap [Start] or press the Start key.
The original is scanned, and the Preview screen appears.
8 Tap .The screen used to change the preview display appears.
% To continue to scan originals, load the original, and tap [Start Scan].% To start sending, tap [Send Now] or press the Start key.
9 Check the preview display, and rotate the image or change settings as needed.
% To continue to scan originals, load the original, and tap [Start Scan].
d-Color MF 752/652 1-7

How To Send A Fax1 1.2
10 After all originals are scanned, tap [Send Now] or press the Start key.
Transmission begins.
Related setting (for the administrator)- Normally, preview images are displayed after all the original data has been scanned. When necessary,
you can use the real-time preview to display preview images on a page basis while scanning the origi-nals (default:[OFF]). For details, refer to page 7-11 ([Realtime Preview]).
- You can select whether to display the screen for selecting the original loading direction after pressing the Preview key (default: [ON]). For details, refer to page 7-11([Original Direction Confirmation Screen]).
- You can select conditions to display a preview image (default: [Preview Settings Screen]). For details, refer to page 7-11 ([Preview Display Conditions (Registered Application)]).
1.2.3 Sending a fax by recalling a program
Fax/Scan Program
Program is a function to register a combination of frequently used option settings as a recall key. The program to be registered in Fax/Scan mode is called Fax/Scan program.
When you register a Fax/Scan program, you can recall the combination of option settings from the main screen with a single key action. You can also include a destination in program registration.
Registering a Fax/Scan program
You can register up to 400 Fax/Scan programs.
If 400 Fax/Scan programs are already registered, delete unnecessary Fax/Scan programs before registering a new program.
1 Tap [Scan/Fax].
1-8 d-Color MF 752/652

1.2 How To Send A Fax 1
2 Configure the option settings for fax transmission.
% The settings configured here are registered as a program.
3 Tap the [Program] key.
4 Select one of the keys that has not been registered then tap [New].
d-Color MF 752/652 1-9

How To Send A Fax1 1.2
5 Enter the program name, then tap [OK].
% Specify the destination in [Address] as necessary.
Tips- For Fax/Scan program, in addition to normal program, temporary program for temporary use is also
available. Temporary program is registered using Web Connection. By specifying a sending setting in advance, you can simplify the operation when sending data on this machine. Temporary programs are deleted once data is sent to the registered destination or when the machine is turned OFF.
- Up to 10 temporary programs can be registered. If 10 temporary programs are already registered, de-lete unnecessary temporary programs before registering a new program.
d Reference
You can also register Fax/Scan programs using Web Connection. For details, refer to [User's Guide: Web Management Tool].
Settings Description
[Name] Enter the program name (using up to 24 characters).
[Address] Specify if you want to include a destination for the program.Specify either by direct input or by selecting among the destinations regis-tered on this machine. Only one destination can be specified.
[URL Notification] You can send the E-mail message that contains the save location of the original data to the specified E-mail address. You can use this function for SMB Send, FTP TX, WebDAV Send, and data saved in a User Box.To notify the save location of the original data, select [URL Notification], tap the keyboard icon or list icon, and specify the E-mail address to which you want to send the E-mail message.
1-10 d-Color MF 752/652

1.2 How To Send A Fax 1
Sending a fax by recalling a Fax/Scan program
1 Load the original.
2 Tap [Scan/Fax].
3 Tap the [Program] key.
d-Color MF 752/652 1-11

How To Send A Fax1 1.2
4 Select the program you want to recall, then tap [Recall].
The registered content of a program is applied.
% If necessary, you can change the page to be displayed on the main screen of the program (default: [PAGE1]). For details, refer to page 6-10([Program Default]).
5 Specify the destination if no destination is registered for a program.
6 Press the Start key.
% Tap [Check Setting] before sending, and check the destination and settings as necessary.% To redo operations for specifying destinations or option settings, press Reset.
Transmission begins.% If you press the Stop key while scanning an original, the scanning stops, and a list of stopped jobs
appears. To cancel scanning of the original, delete the job from the list of inactive jobs.
1-12 d-Color MF 752/652

1.3 Specifying a destination 1
1.3 Specifying a destination
Selecting from address book
In [Address Book], select the destination registered on this machine.
You can send data by broadcast transmission if you select multiple destinations. You can also use broadcast transmission by combining different sending modes such as network fax and SMB Send.
For details on how to register a destination, refer to page 4-3.
No. Description
1 Narrow down destinations with the index specified for the registered destination. Also using [Address Type] further narrows down destinations. The following keys can be used to narrow down destinations:• [All]: All address book entries registered on this machine are displayed.• [Favorite]: The destinations specified with [Favorites] as search text are displayed.• [etc]: Displays destinations for which a character other than an alphabet character is spec-
ified as the initial character of a registered name and no index is specified.
2 Switches the display of the registered destinations to the button or list view mode.If the list view mode is selected, you can sort destinations by registration number, destination type, or registered name.
3 Narrow down destinations by the type of the registered destination. Using also search text fur-ther narrows down destinations.
12
3
d-Color MF 752/652 1-13

Specifying a destination1 1.3
Related setting- You can select the index or destination type to be displayed at the top when [Address Book] is dis-
played (default: [Favorites]/[All]). For details, refer to page 6-10([Address Book Index Default]).- You can select the sorting order of destinations to be displayed in [Address Book] by registration
number or by registered name (default: [Number Order]). For details, refer to page 6-10([Default Ad-dress Sort Method]).
- You can select the button or list view mode as the default display of the [Address Book] (default: [One-Touch Button Layout]). For details, refer to page 6-10([Default Address Display Method]).
Related setting (for the administrator)- You can specify whether to prohibit users from specifying multiple destinations (broadcasting) (default:
[OFF]). For details, refer to page 7-8.
Specifying a group destination
When you frequently send data by broadcast transmission, it is convenient to use a group destination that groups multiple destinations.
When a group destination is selected in [Address Book], select the destinations you want send data among the destinations registered in the group. If there is certain destination that you want to delete from sending data among the destinations registered in the group, tap [Select All], then tap the target destination to dese-lect.
For details on how to register a group destination, refer to page 4-6.
1-14 d-Color MF 752/652

1.3 Specifying a destination 1
Searching for destinations
If a large number of destinations is registered, search for a destination by registration name or destination (E-mail address or computer name).
1 Tap [Addr. Search] - [Search] - [Name Search] or [Address Search].
% When searching for a destination by registration name, tap [Name Search].% When you search for a destination by E-mail address or computer name, tap [Address Search].
2 Enter the text you want to search for, then tap [Search].
% Using [Name Search]
% Using [Address Search]
3 Select the destination from the search result.
Related setting- You can select whether to differentiate between upper case and lower case characters when searching
for a destination (default: [Differentiate]). You can also specify whether to display the check box for switching between case-sensitive and case-indifferent search modes on the search screen (default: [OFF]). For details, refer to page 6-10.
d-Color MF 752/652 1-15

Specifying a destination1 1.3
Direct input
In[Direct Input], press the corresponding key of the destination type to which you want to save or send, then enter the destination information.
d Reference
You can register the destination that you have entered directly into the address book. For details, refer to page 4-8.
Related setting (for the administrator)- You can specify whether to allow the user to directly enter destinations (default: [Allow All]). For details,
refer to page 7-32.
Selecting from the history
In [Job History], select a destination from the history of scan transmission destinations or saved destinations.
The history shows the latest five fax destinations. When necessary, multiple destinations can be selected from the history.
Tips- If a registered destination or a User Box is edited or if the Main Power Switch is turned off or on, infor-
mation of the history is deleted.
Purpose Reference
To send Internet fax page 5-5
To send IP Address fax page 5-6
1-16 d-Color MF 752/652

1.3 Specifying a destination 1
Searching for an E-mail address from the LDAP server
When the LDAP server or Windows Server Active Directory is used, you can search for and select an E-mail address from the server.
With [LDAP search], search is performed using a single keyword, and with [Adv. Search (LDAP)], combina-tions of keywords in different categories are used for search.
0 To use the LDAP server or Active Directory to specify the destination, you must register the server on this machine. How to register is explained using Web Connection. For details, refer to [User's Guide: Web Management Tool].
1 Tap [Addr. Search] - [Search] - [LDAP Search] or [Adv. Search (LDAP)].
2 Enter the keyword, then tap [Search].
% Using [LDAP Search]
% Using [Adv. Search (LDAP)]
3 Select the destination from the search result.
d-Color MF 752/652 1-17

Option settings for fax transmission1 1.4
1.4 Option settings for fax transmission
1.4.1 Basic options such as color and original size
Scanning a 2-sided original ([Simplex/Duplex])
Using ADF, you can automatically scan the front face and back face of an original. Also, you can scan only one side of the first page, then scan both sides for the remaining pages.
For details, refer to page 5-10.
Specifying the resolution of original for scanning ([Resolution])
Select the resolution of the original for scanning.
For details, refer to page 5-11.
Selecting the color mode to scan the original ([Color])
The original is scanned using the selected color mode.
There are four color modes: [Auto Color] that fits the original color, [Full Color], [Gray Scale], and [Black].
For details, refer to page 5-12.
Specifying the original size for scanning ([Scan Size])
Select the size of the original to be scanned.
There are [Auto] to match the original size, [Inches], [Metric Sizes], [Photo Size], etc. for scan size.
For details, refer to page 5-13.
1-18 d-Color MF 752/652

1.4 Option settings for fax transmission 1
Changing a file name ([E-mail Settings])
If necessary, change the file name of the scanned original. For details, refer to page 5-14.
When you do not change the file name, the file name is automatically assigned according to the rule of "Initial of the function" + "Device Name" + "Date" + "sequential number" + "Page Number" + "File extension". A file name consists of the following information:
Tips- You cannot specify the file name for IP Address fax.
Related setting (for the administrator)- You can change the default file name. You can specify whether to add an initial of the function or wheth-
er to specify an arbitrary text instead of the device name. For details, refer to page 7-11.
Changing a subject and text of the successful reception E-mail message ([E-
mail Settings])
When the recipient machine receives an Internet fax, first the fax is printed, then the document that notifies the successful reception of the E-mail message (successful reception E-mail) is printed. This document con-tains the subject and text that are specified when the fax is sent from this machine.
If desired, you can change the subject and text that is printed in the message signifying successful receipt of the E-mail. By registering multiple fixed phrases for the fixed subject and text, you can use different phrases depending on the destination.
For details, refer to page 5-14.
Related setting- You can register a fixed phrase for the subject and text to be printed in the case of successful receipt
of an E-mail message. For details, refer to page 6-6.
Related setting (for the administrator)- Select whether to allow the user to change the From address of the Internet fax sender (default: [Allow]).
For details, refer to page 7-7([Change the "From" Address]).
Item Description
Initial of the function Indicates the mode used for scanning data.• C: Copy• S: Fax/Scan, User Box• P: Print• R: Received fax
Device Name The name of this machine registered in [Utility] - [Administrator Settings] - [Administrator/Machine Settings] - [Input Machine Address] - [Device Name].
Date Indicates the year, month, date, time, and minute that the original is scanned. For example "11050115230" means that the file was scanned on May 1, 2011, 15:23.The last digit (0) indicates the order when file conversion is performed mul-tiple times within a particular minute.If file conversion is performed twice between 15:23 and 24, the last digit appears as 231 and 232.
Sequential number A sequential number is given when a multi-page original is converted by page, and the number indicates the page number of the original.Page numbers are automatically included in the file name when the file is saved or sent. Consider this part for FTP or other transmission when a FTP server has restriction regarding file names.
File extension Extension of the file to be saved.An extension is automatically included in the file name when the file is saved or sent.
d-Color MF 752/652 1-19

Option settings for fax transmission1 1.4
1.4.2 Settings to scan various types of originals (Application settings)
Scanning originals of varying sizes in a batch ([Mixed Original])
Even for an original with pages of different sizes, by using ADF, you can scan data while detecting the size for each page.
For details, refer to page 5-16.
NOTICELoad all of the original pages into the ADF so that the tops of the pages are at the back and left side of the machine.
Scanning a thinner original than plain paper ([Thin Paper Original])
Reduce the original feed speed of the ADF to prevent thin paper from getting caught.
For details, refer to page 5-16.
Scan originals with folds ([Z-Folded Original])
Even the original sizes of folded originals can be detected accurately.
If a folded original is loaded into ADF, the original size may not be able to be detected accurately. To scan a folded original through the ADF, use [Z-Fold Original].
For details, refer to page 5-16.
NOTICEUnfold folded originals before loading them into the ADF. If a folded original is not unfolded before scanning, a paper jam may occur or the size may not be correctly detected.
1-20 d-Color MF 752/652
1.4 Option settings for fax transmission 1
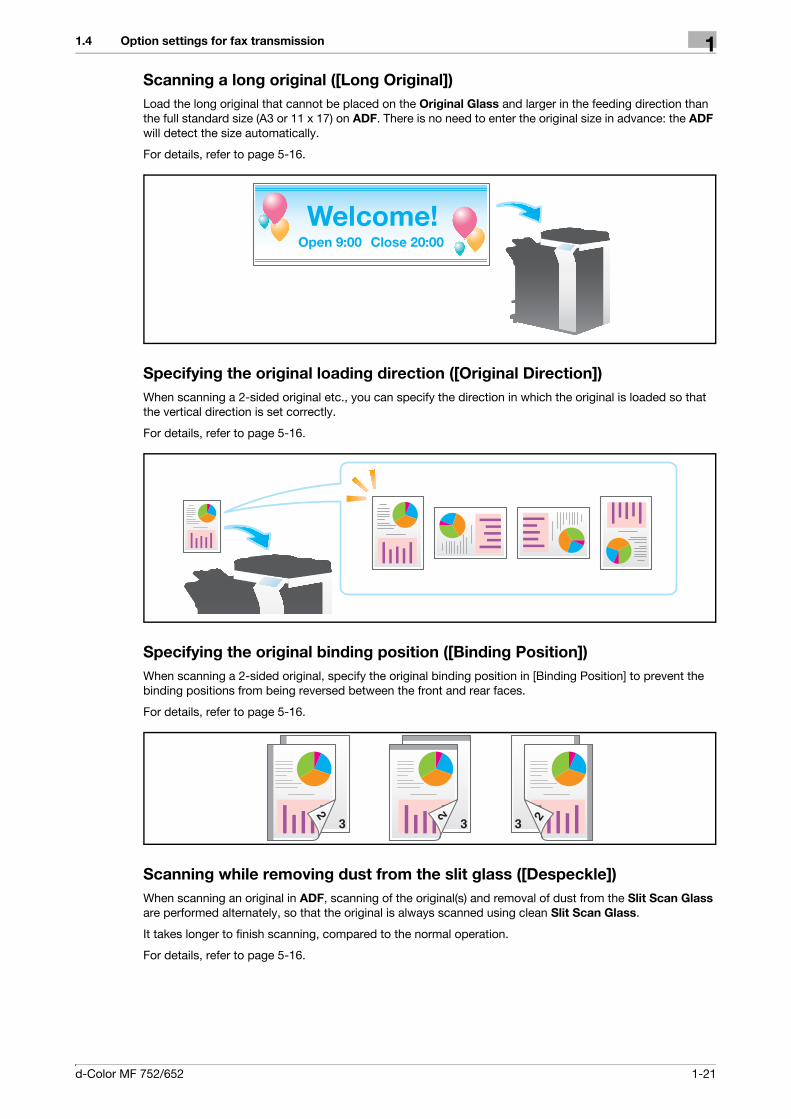
Scanning a long original ([Long Original])
Load the long original that cannot be placed on the Original Glass and larger in the feeding direction than the full standard size (A3 or 11 x 17) on ADF. There is no need to enter the original size in advance: the ADF will detect the size automatically.
For details, refer to page 5-16.
Specifying the original loading direction ([Original Direction])
When scanning a 2-sided original etc., you can specify the direction in which the original is loaded so that the vertical direction is set correctly.
For details, refer to page 5-16.
Specifying the original binding position ([Binding Position])
When scanning a 2-sided original, specify the original binding position in [Binding Position] to prevent the binding positions from being reversed between the front and rear faces.
For details, refer to page 5-16.
Scanning while removing dust from the slit glass ([Despeckle])
When scanning an original in ADF, scanning of the original(s) and removal of dust from the Slit Scan Glass are performed alternately, so that the original is always scanned using clean Slit Scan Glass.
It takes longer to finish scanning, compared to the normal operation.
For details, refer to page 5-16.
d-Color MF 752/652 1-21

Option settings for fax transmission1 1.4
Skipping blank pages ([Blank Page Removal])
Blank pages contained in the original loaded into the ADF are skipped when the original is scanned.
For details, refer to page 5-16.
Splitting the left and right pages of a book and catalog ([Book Original])
You can scan two-page spreads such as books and catalogs separately into the left and right pages, or scan them as one page. If you place a book or catalog on the Original Glass, you do not need to close the ADF to scan it.
For details, refer to page 5-17.
Scanning a number of originals in several batches ([Separate Scan])
If the number of original sheets is so large that they cannot be loaded into the ADF at the same time, you can load them in several batches and handle them as one job.
In [Separate Scan], you can switch between ADF and Original Glass to scan the originals.
1-22 d-Color MF 752/652

1.4 Option settings for fax transmission 1
1 Load the original.
NOTICEDo not load more than 150 sheets at a time into the original tray, and do not load the sheets up to the point where the top of the stack is higher than the , mark. Doing so may cause an original paper jam, damage the originals, and/or cause an ADF failure.
2 Tap [Application] - [No.of Originals] - [Separate Scan], and set to [ON].
3 Press the Start key.
The original is scanned.
4 Load the next original, then press the Start key.
% If desired, tap [Change Setting] to change the option settings according to the new original.
5 Repeat Step 4 until all originals are scanned.
6 After all originals have been scanned, tap [Finish], and press the Start key.
Transmission begins.
Related setting- Select whether to always scan originals continuously without specifying [Separate Scan] when scan-
ning originals using the Original Glass (default: [No]). For details, refer to page 6-9.
d-Color MF 752/652 1-23
Option settings for fax transmission1 1.4
1.4.3 Adjusting image quality level/density (Application settings)
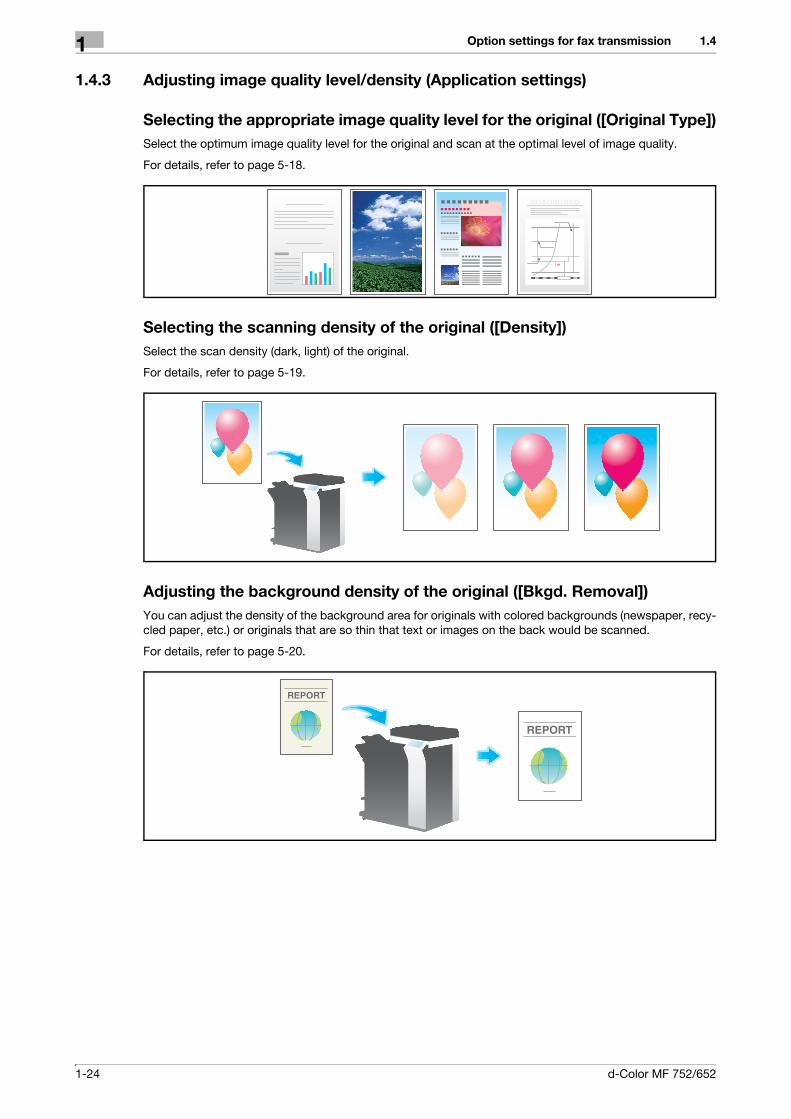
Selecting the appropriate image quality level for the original ([Original Type])
Select the optimum image quality level for the original and scan at the optimal level of image quality.
For details, refer to page 5-18.
Selecting the scanning density of the original ([Density])
Select the scan density (dark, light) of the original.
For details, refer to page 5-19.
Adjusting the background density of the original ([Bkgd. Removal])
You can adjust the density of the background area for originals with colored backgrounds (newspaper, recy-cled paper, etc.) or originals that are so thin that text or images on the back would be scanned.
For details, refer to page 5-20.
1-24 d-Color MF 752/652

1.4 Option settings for fax transmission 1
1.4.4 Adding a stamp/page number (Application settings)
Adding a date and time ([Date/Time])
Select the stamping position and representation, and add the date and time the original is scanned.
The date and time can be printed either on all pages or only on the first page.
For details, refer to page 5-21.
Related setting (for the administrator)- You can specify whether to cancel the settings of [Date/Time] when sending a fax (default: [Cancel]).
For details, refer to page 7-10.
Adding the page number ([Page Number])
Select the stamping position and format, and add page and chapter numbers.
Page and chapter numbers are printed on all pages.
For details, refer to page 5-22.
Related setting (for the administrator)- You can specify whether to cancel the settings of [Page Number] when sending a fax (default: [Cancel]).
For details, refer to page 7-10.
d-Color MF 752/652 1-25

Option settings for fax transmission1 1.4
Adding a stamp ([Stamp])
Text such as "PLEASE REPLY" and "DO NOT COPY" are printed on the first page or all pages. You can select the text to be added from the registered fix stamps and arbitrary registered stamps.
Since text is added without modifying the original, it is convenient to handle important documents on which addition or modification is not permitted.
For details, refer to page 5-23.
Related setting (for the administrator)- You can specify whether to cancel the settings of [Stamp] when sending a fax (default: [Cancel]). For
details, refer to page 7-10.
Adding the header/footer ([Header/Footer])
Add the date and time, and an arbitrary text in the top and bottom margins (header/footer) of the specified page. You must register the information to be added for header and footer in advance on this machine.
For details, refer to page 5-24.
Related setting (for the administrator)- For details on how to register the information to be added for header and footer, refer to page 7-10.- You can specify whether to cancel the settings of [Header/Footer] when sending a fax (default: [Can-
cel]). For details, refer to page 7-10.
1-26 d-Color MF 752/652

1.4 Option settings for fax transmission 1
Printing TX Stamp on scanned originals ([TX Stamp])
When scanning originals using ADF, a TX Stamp is printed on a scanned original to certify that the original has been scanned.
For details, refer to page 5-25.
NOTICEThis function is not available for originals that must be kept clean.
Tips- The optional Stamp Unit is required to print TX Stamps.- The ink used for stamping is consumables. If the ink becomes faint, contact your service representative.
1.4.5 Other option settings (Application settings)
Scanning after erasing text and shadows in the margins of an original
([Frame Erase])
Erases an area of an identical specified width along the four sides of an original. You can specify the width to be erased for each side.
This is convenient when you want to erase the reception record of the header and footer of a fax, or shadow of punch holes on the original.
For details, refer to page 5-25.
d-Color MF 752/652 1-27

Option settings for fax transmission1 1.4
Sharpening the border between text etc. ([Sharpness])
Sharpen the edges of the image such as text in the table and graphic, to improve legibility.
Smoothen rough contours of an image or sharpen blurred images.
For details, refer to page 5-26.
Sending and printing at the same time ([Save & Print])
You can print at the same time when sending an Internet fax or IP address fax.
For details, refer to page 5-26.
Changing the sender name before sending a fax ([Fax Header Settings])
Add the sender information to the scanned original data such as machine name, company name (sender name), and E-mail address.
The sender name, which is specified by default, is automatically added to a fax. If multiple sender names are registered, you can change the default sender name.
For details, refer to page 5-27.
Related setting (for the administrator)- By registering multiple sender names, you can use different sender names depending on the destina-
tion. For details on the registration procedure, refer to page 7-20 ([Sender]).- You can specify the position where to print sender information (default: [Outside Body Text]). When
necessary, you can disable printing of the sender information. For details, refer to page 7-21.
1-28 d-Color MF 752/652

2 Sending and receiving an
Internet fax


2.1 Internet Fax Functions 2
2 Sending and receiving an Internet fax
2.1 Internet Fax Functions
Internet fax is a function used to send and receive fax via enterprise network and Internet.
The same network as the one used by the computers is used to transmit faxes. Therefore, you can send and receive faxes to/from distant locations without having to worry about high communication costs or sending a large number of pages.
The following describes the precautions for using the Internet Fax.- Internet Fax must be configured by your service representative. For details, contact your service repre-
sentative.- Internet fax is sent or received via E-mail. Prepare a dedicated Internet fax E-mail address for this ma-
chine.- Connect this machine to a network that is capable of sending and receiving E-mail massages.
d-Color MF 752/652 2-3

Setting up for Internet fax (for the administrator)2 2.2
2.2 Setting up for Internet fax (for the administrator)
2.2.1 Preparation flow
1 Connecting this machine to the network
% Checking the LAN cable connection% Checking the network settingsCheck that an IP address is assigned to this machine.
2 Setting up the environment to send and receive Internet fax
% Configuring the Internet fax environmentEnable the Internet fax function. In addition, specify the information of this machine and settings re-quired to send and receive E-mail.% Registering Header PositionRegister the machine name, company name, etc. to be printed on faxes.% Setting the date and time for the machineSet the date and time on this machine to be printed on sent and received faxes.
3 Configuring the machine to your environment
% Registering a frequently used destinationThis will save you the trouble of entering a destination each time you send a fax.% Using an LDAP server to specify addressesWhen the LDAP server or Active Directory is used, you can search for a destination on the server.% Registering a subject and text for the message signifying successful receipt of the E-mailRegistering a subject and text of an E-mail message will save you the trouble of entering this information each time you send a fax.% Registering prefixes and suffixes for destinationBy registering E-mail address prefixes and suffixes, you can simplify enter E-mail address.% Using the SMTP authenticationThis machine supports the SMTP authentication. Configure the setting if your environment requires the SMTP authentication.% Using the POP before SMTP authenticationThis machine supports the POP before SMTP authentication. Configure the setting if your environment requires the POP before SMTP authentication.% SSL/TLS communicationThis machine supports the SMTP over SSL and Start TLS. Configure the setting if your environment requires SSL encryption communication with the mail server.% Checking a fax receptionYou can check that the fax is received by the recipient machine with message. (In normal circumstanc-es, you can use this function by default.)
4 Preparation finished
2-4 d-Color MF 752/652

2.2 Setting up for Internet fax (for the administrator) 2
2.2.2 Operations required to use this function
Checking the LAN cable connection
Check that a LAN cable connected to the network is connected to the LAN port of this machine.
Checking the network settings
Check that an IP address is assigned to this machine. Tap [Utility] - [Device Information], and check that an IP address is displayed.
d Reference
If no IP address is displayed, you will need to configure the network. For details, refer to [User's Guide: Web Management Tool].
Configuring the Internet fax environment
Enable the Internet fax function. In addition, specify the information of this machine and settings required to send and receive E-mail.
How to configure the setting is explained using Web Connection. For details, refer to [User's Guide: Web Management Tool].
Registering Header Position
Register the machine name, company name, etc. to be printed on faxes.
For details on how to configure the settings, refer to page 7-20.
Setting the date and time for the machine
Set the date and time on this machine to be printed on sent and received faxes.
For details on how to configure the settings, refer to page 7-6.
d Reference
If an NTP (Network Time Protocol) is used to set the time, the date and time on this machine can be auto-matically adjusted. How to configure the setting is explained using Web Connection. For details, refer to [Us-er's Guide: Web Management Tool].
d-Color MF 752/652 2-5
Setting up for Internet fax (for the administrator)2 2.2
2.2.3 Option settings
Registering a frequently used destination
Registering a frequently-used E-mail address to this machine as destination will save you the trouble of en-tering each time you send a fax.
For details on how to register, refer to page 4-3.
Using an LDAP server to specify addresses
When the LDAP server or Active Directory is used for user management, you can search for or specify E-mail address on the server. To use the LDAP server to specify a destination, you must register the server on this machine.
How to register is explained using Web Connection. For details, refer to [User's Guide: Web Management Tool].
d Reference
For details on how to search using the LDAP server, refer to page 1-17.
Registering a subject and text of the successful reception E-mail message
When the recipient machine receives an Internet fax, first the fax is printed, then the document that notifies the successful reception of the E-mail message (successful reception E-mail) is printed. This document con-tains the subject and text that are specified when the fax is sent from this machine.
By registering multiple fixed phrases of subject and text, you can use different phrases depending on the des-tination.
For details on how to register, refer to page 6-6.
Registering prefixes and suffixes for destination
Register a prefix and suffix of an E-mail address.
If you frequently send E-mail to the addresses belonging to the same organization, register the text after the @ symbol (domain name). By registering a domain name, you can recall the registered domain name to com-plement E-mail address entry.
This will help to prevent input errors of E-mail addresses with long domain names.
For details on how to register, refer to page 7-19.
Using the SMTP authentication
This machine supports the SMTP authentication. Configure the setting if your environment requires the SMTP authentication.
How to configure the setting is explained using Web Connection. For details, refer to [User's Guide: Web Management Tool].
Using the POP before SMTP authentication
This machine supports the POP before SMTP authentication. Configure the setting if your environment re-quires the POP before SMTP authentication.
How to configure the setting is explained using Web Connection. For details, refer to [User's Guide: Web Management Tool].
SSL/TLS communication
This machine supports the SMTP over SSL and Start TLS. Configure the setting if your environment requires SSL encryption communication with the mail server.
How to configure the setting is explained using Web Connection. For details, refer to [User's Guide: Web Management Tool].
2-6 d-Color MF 752/652

2.2 Setting up for Internet fax (for the administrator) 2
Checking a fax reception
Configure the settings for requesting or responding to the result of sent and received Internet fax, and the setting regarding the exchange of capability information between machines. (In normal circumstances, you can use this function by default.)
How to configure the setting is explained using Web Connection. For details, refer to [User's Guide: Web Management Tool].
d-Color MF 752/652 2-7
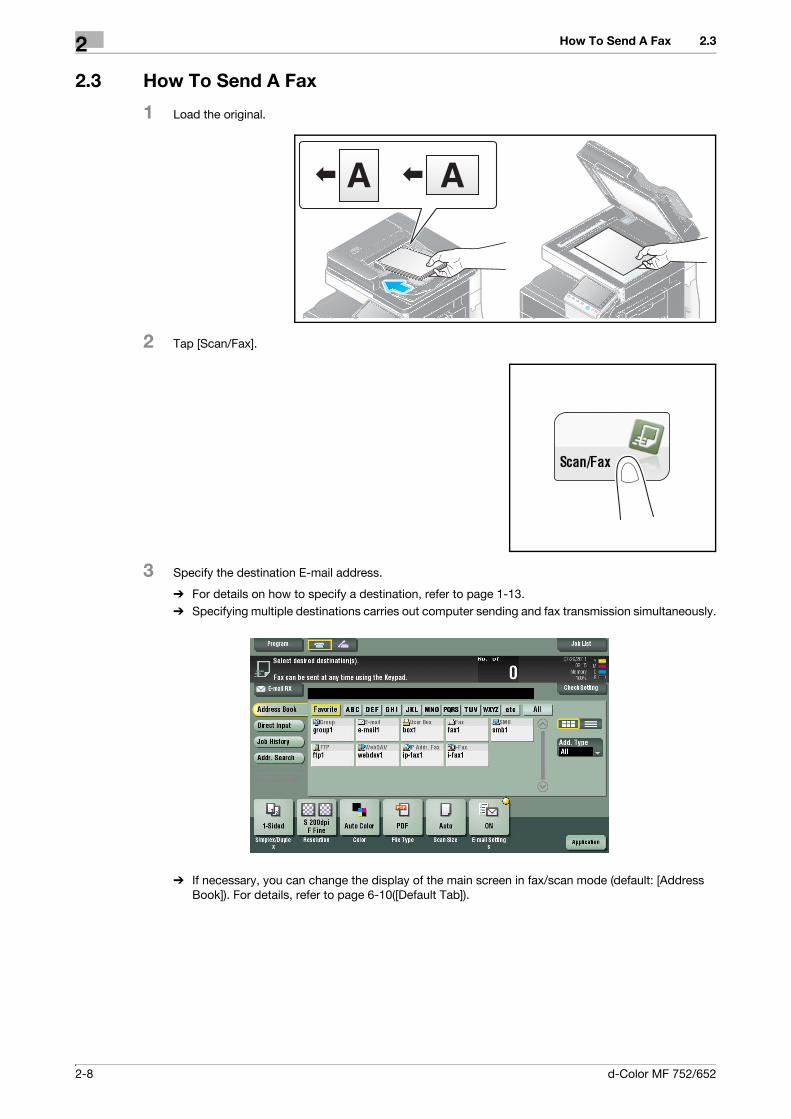
How To Send A Fax2 2.3
2.3 How To Send A Fax
1 Load the original.
2 Tap [Scan/Fax].
3 Specify the destination E-mail address.
% For details on how to specify a destination, refer to page 1-13.% Specifying multiple destinations carries out computer sending and fax transmission simultaneously.
% If necessary, you can change the display of the main screen in fax/scan mode (default: [Address Book]). For details, refer to page 6-10([Default Tab]).
2-8 d-Color MF 752/652

2.3 How To Send A Fax 2
4 Configure the option settings for fax transmission as necessary.
% For details on configuring option settings, refer to the respective columns of the following table.
5 Press the Start key.
% Tap [Check Setting] before sending, and check the destination and settings as necessary.% To redo operations for specifying destinations or option settings, press Reset.
Transmission begins.% If you press the Stop key while scanning an original, the scanning stops, and a list of stopped jobs
appears. To cancel scanning of the original, delete the job from the list of inactive jobs.
Tips- When an Internet fax is sent, the TX result report is printed. With the TX result report, you can check for
successful fax transmission.- When the recipient machine receives an Internet fax, an MDN message that provides notification of suc-
cessful reception is printed on this machine. You can check whether the fax has been successfully re-ceived by reading the MDN message.
Related setting- You can change the default options for scan transmission to suit your environment. For details, refer to
page 6-11.
Purpose Reference
To configure basic options such as color and original size page 1-18
To configure options to scan various types of originals such as various sizes and books
page 1-20
To adjust the image quality level of the original such as colored background (newspaper, etc.) or light printing original
page 1-24
To print date/time and page number page 1-25
Other option settings page 1-27
d-Color MF 752/652 2-9
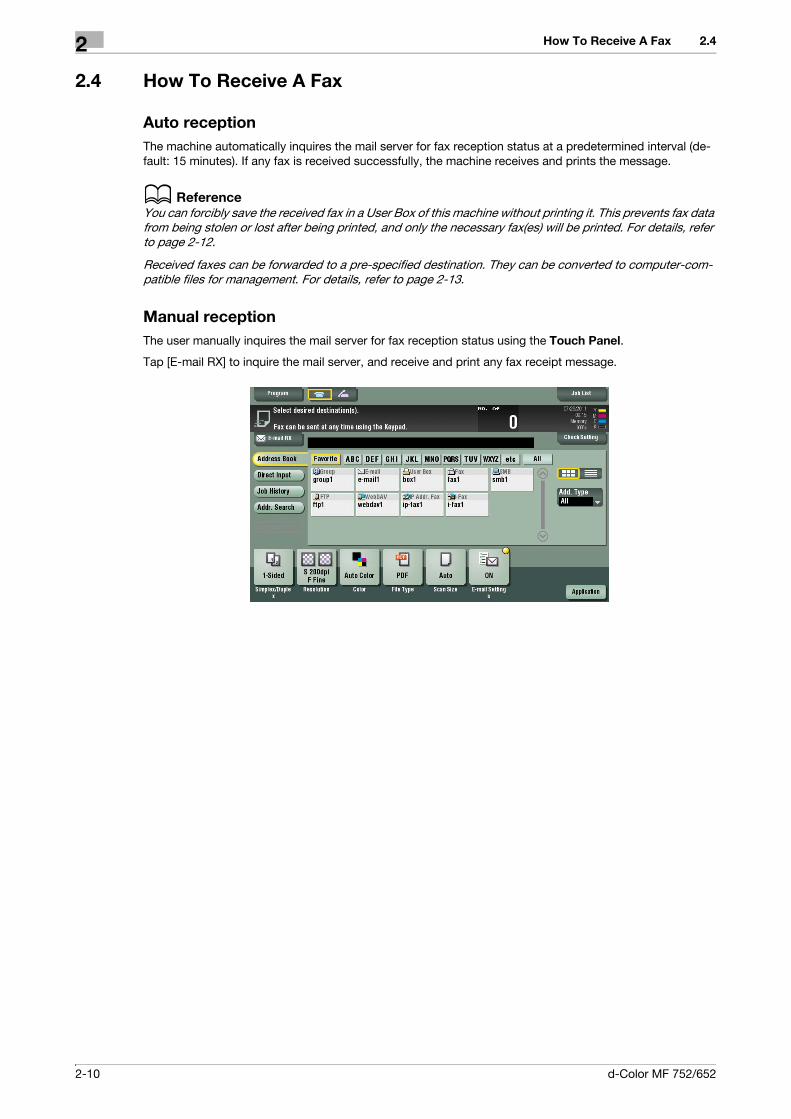
How To Receive A Fax2 2.4
2.4 How To Receive A Fax
Auto reception
The machine automatically inquires the mail server for fax reception status at a predetermined interval (de-fault: 15 minutes). If any fax is received successfully, the machine receives and prints the message.
d Reference
You can forcibly save the received fax in a User Box of this machine without printing it. This prevents fax data from being stolen or lost after being printed, and only the necessary fax(es) will be printed. For details, refer to page 2-12.
Received faxes can be forwarded to a pre-specified destination. They can be converted to computer-com-patible files for management. For details, refer to page 2-13.
Manual reception
The user manually inquires the mail server for fax reception status using the Touch Panel.
Tap [E-mail RX] to inquire the mail server, and receive and print any fax receipt message.
2-10 d-Color MF 752/652

2.5 Receiving Options 2
2.5 Receiving Options
2.5.1 Printing by adding the date and time received ([Footer Position])
Footer Position
Footer Position contains the date and time of fax reception, the number assigned according to the order of reception (reception number), and page number.
Footer Position is added as necessary when a document is printed. You can also select the printing position.
Operations required to use this function (for the administrator)
To enable printing of Footer Position, select the location where to print Footer Position.
For details on how to configure the settings, refer to page 7-22.
2.5.2 Saving a fax which cannot be printed (In-memory proxy reception)
When the machine cannot print a received document due to paper jam or exhaustion of consumables, the received document is stored in the memory until this machine is ready to print.
In-memory proxy reception functions automatically.
Tips- In-memory proxy reception is disabled when the memory is full.- When the troubleshooting is complete for paper jam etc., the machine starts printing a saved fax.
OK!
d-Color MF 752/652 2-11
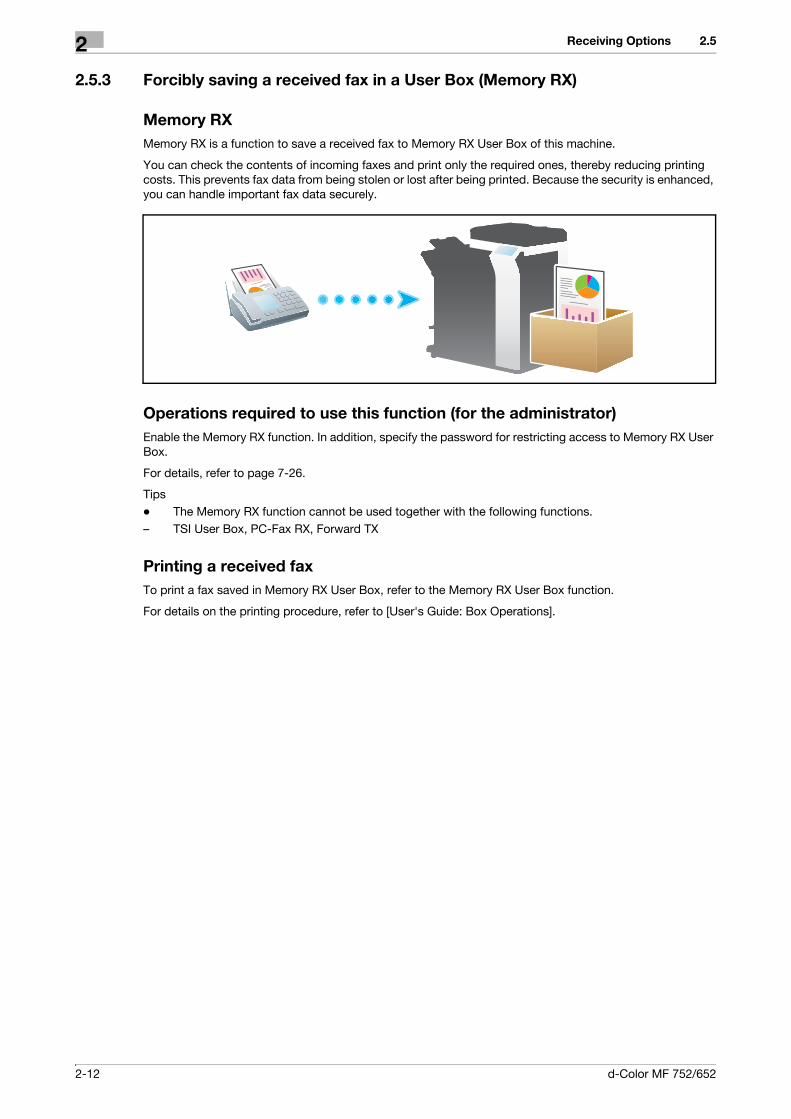
Receiving Options2 2.5
2.5.3 Forcibly saving a received fax in a User Box (Memory RX)
Memory RX
Memory RX is a function to save a received fax to Memory RX User Box of this machine.
You can check the contents of incoming faxes and print only the required ones, thereby reducing printing costs. This prevents fax data from being stolen or lost after being printed. Because the security is enhanced, you can handle important fax data securely.
Operations required to use this function (for the administrator)
Enable the Memory RX function. In addition, specify the password for restricting access to Memory RX User Box.
For details, refer to page 7-26.
Tips- The Memory RX function cannot be used together with the following functions.– TSI User Box, PC-Fax RX, Forward TX
Printing a received fax
To print a fax saved in Memory RX User Box, refer to the Memory RX User Box function.
For details on the printing procedure, refer to [User's Guide: Box Operations].
2-12 d-Color MF 752/652

2.5 Receiving Options 2
2.5.4 Forwarding a received fax to another destination (Forward TX)
Forward TX
Forward TX is a function that transfers a received fax to a pre-specified destination.
A received fax can be forwarded to an individual E-mail address or saved in a shared folder on a computer. It can be handled as a file on a computer, thereby reducing printing costs.
Tips- If Forward TX is enabled, this function cannot be used together with the following functions.– Memory RX, PC-Fax RX, TSI Routing
Operations required to use this function (for the administrator)
Enable the Forward TX function. Also, register forward destinations of received faxes.
For details on how to configure the settings, refer to page 7-26.
2.5.5 Stopping the fax print during lunch breaks and at night
While this machine is inactive, for example, during breaks or night hours on working days, press the Power key to set the Sub Power Switch OFF mode, reducing the power consumption. It is impossible to print faxes received in Sub Power OFF mode. To print them, press the Power key to release the Sub Power OFF mode.
d Reference
Pressing the Power key switches to the Sub Power OFF mode (when [Utility] - [Administrator Settings] - [Sys-tem Settings] - [Power Supply/Power Save Settings] - [Power Key Setting] is set to [Sub Power OFF] (default)). For details on the procedure to switch to the Sub Power OFF status, refer to [User's Guide: Intro-duction (Trademark Licenses)].
You can use the weekly timer to automatically switch the normal and power save modes. For details on how to configure the settings, refer to page 7-6.
d-Color MF 752/652 2-13

Receiving Options2 2.5
2.5.6 Printing a fax on both sides of sheets of paper ([Duplex Print (RX)])
Duplex Print (RX)
A fax that contains multiple pages is printed on both sides of sheets of paper to save the number of sheets.
Operations required to use this function (for the administrator)
Enable the 2-Sided Print function.
For details on how to configure the settings, refer to page 7-23.
2.5.7 Configuring the fax print settings (for the administrator)
Default print settings ([Print Paper Selection]/[Min. Reduction for RX Print])
A received fax is printed according to the following conditions depending on the page size of the fax.
A standard-size fax, such as A4, is printed on the same standard size paper as the received fax while being slightly reduced in size (default: 96%).
For example, an A3 fax is printed on A3 paper, and a B4 fax on B4 paper, while reducing the print size to 96% respectively.
For details on the fax print settings, refer to page 7-23.
Tips- For faxes that are longer in the longitudinal direction than the standard size, the optimal paper size is
determined based on the width and length of the fax, and printed on paper of the same size. If the op-timal size paper is not available, the fax is printed on paper of a similar size.
2-14 d-Color MF 752/652

2.5 Receiving Options 2
Fixing the print paper size ([Print Paper Size])
You can always print on the specified size of paper irrespective of the paper size of the received fax.
If the size of the received fax is different from the specified print paper size, the fax is printed while increasing or reducing the size according to the print paper size.
For details on how to configure the settings, refer to page 7-24.
Fixing the print paper tray ([Tray Selection for RX Print])
You can always print on the paper loaded into the specified tray irrespective of the paper size of the received fax.
If the size of the received fax is different from the size of the paper in the specified tray, the fax is printed while increasing or reducing according to the paper size of the tray.
For details on how to configure the settings, refer to page 7-24.
Tips- If the tray is specified in [Tray Selection for RX Print], the setting for [Print Paper Size] is ignored ([Print
Paper Selection] is automatically switched to [Auto Select]).- If [Min. Reduction for RX Print] is set to [Full Size], [Tray Selection for RX Print] is compulsory switched
to [Auto].
d-Color MF 752/652 2-15

Receiving Options2 2.5
Splitting a custom size (portrait) fax for printing ([Print Separate Fax Pages])
For faxes that are longer in the longitudinal direction than the standard size, the print size is not reduced, how-ever the area that cannot be fitted to a standard size is printed on the subsequent page.
For details on how to configure the settings, refer to page 7-24.
Tips- If [Min. Reduction for RX Print] is set to [Full Size], [Print Separate Fax Pages] is compulsory switched
to [OFF], and the area that cannot be fitted on a standard size sheet is not printed at all.- If [Duplex Print (RX)] is [ON], you cannot use [Print Separate Fax Pages].
2-16 d-Color MF 752/652

2.6 Printing a report/list 2
2.6 Printing a report/list
The report and list functions are provided for this machine to list the machine settings and operation results.
There are reports and lists that are printed automatically and that are printed as necessary. For reports that are printed automatically, you can select the print conditions. The following types of reports and lists are available.
d Reference
You can also print activity reports in the [Job List] screen. For details on the [Job List] screen, refer to [User's Guide: Control Panel].
Report name Description
[Activity Report] This report contains results of sent and received faxes.A total of 700 jobs are recorded on separate pages for transmission and re-ception.The activity report is automatically printed. Records containing only trans-mission or reception jobs can be printed as required.By default, the report is automatically printed every 100 communications.• You can change printing conditions as necessary. For details, refer to
page 7-26([Activity Report]).
[TX Result Report] This report contains the results of fax transmission. By default, the report is automatically printed when a transmission failure occurs.• You can change the print timings if necessary. For details, refer to
page 7-26([TX Result Report]).
[Broadcast Report] This report contains results of broadcast transmissions. By default, reports are automatically printed for every broadcast transmission.• You can select whether to print a broadcast report. For details, refer to
page 7-26([Sequential TX Report]).• You can change a method to print destinations to be described in a re-
port. For details, refer to page 7-26([Broadcast Result Report]).
[Network Fax RX Error Report]
This report contains the results of Network Fax reception. By default, reports are automatically printed when a reception failure occurs.• You can select whether to print an error report. For details, refer to
page 7-26([Network Fax RX Error Report]).
[Print MDN Message] A report that notifies of an Internet fax reception by the recipient machine. By default, reports are automatically printed when an MDN (Message Disposi-tion Notifications) message is received.• Select whether to print an MDN message. For details, refer to
page 7-26([MDN Message]).
[Print DSN Message] A report that notifies of an Internet fax reception by the recipient mail server. Reports are automatically printed when a DSN (Delivery Status Notifications) message is received. By default, reports are not printed automatically.• Select whether to print a DSN message. For details, refer to
page 7-26([DSN Message]).
[E-mail Message Body] A report that notifies of successful receipt of an Internet fax by the recipient machine, which is printed subsequent to reception. Reports are printed if the message (subject/text) is attached to the Internet fax. By default, reports are automatically printed.• Select whether to print a successfully received E-mail. For details, refer
to page 7-26([Print E-mail Message Body]).
[E-Mail Subject/Text List] A list that contains the subject and text of Internet faxes or E-mail messages that are registered as fixed phrases.• For details on how to print, refer to page 7-18.
[Job Settings List] This list contains the details of [Fax Settings].• For details on how to print, refer to page 7-28.
d-Color MF 752/652 2-17

Printing a report/list2 2.6
2-18 d-Color MF 752/652

3 Sending and receiving an IP
address fax


3.1 IP Address Fax function 3
3 Sending and receiving an IP address fax
3.1 IP Address Fax function
IP Address Fax is a function used to send and receive faxes within a limited network such as an enterprise network.
Specify an IP address for the destination. The same network as the one used by the computers is used to transmit faxes. Therefore, communication costs are not charged as they are for normal faxes.
In addition to IP address, you can also use a host name and E-mail address to specify the destination.
The following describes the precautions for using the IP Address Fax.- IP Address Fax must be configured by your service representative. For details, contact your service rep-
resentative.- To use the IP Address Fax function, the optional Fax Kit is required.
d-Color MF 752/652 3-3

Setting up for IP address fax (for the administrator)3 3.2
3.2 Setting up for IP address fax (for the administrator)
3.2.1 Preparation flow
1 Connecting this machine to the network
% Checking the LAN cable connection% Checking the network settingsCheck that an IP address is assigned to this machine.
2 Setting up the environment for IP address fax
% Configuring the IP address fax environmentEnable the IP address fax function. In addition, configure the sending and receiving functions of this machine (SMTP) and the operation mode for IP address fax.% Registering Header PositionRegister the machine name, department name, etc. to be printed on faxes.% Setting the date and time for the machineSet the date and time on this machine to be printed on sent and received faxes.
3 Configuring the machine to your environment
% Registering a frequently used destinationThis will save you the trouble of entering a destination each time you send a fax.
4 Preparation finished
3-4 d-Color MF 752/652

3.2 Setting up for IP address fax (for the administrator) 3
3.2.2 Operations required to use this function
Checking the LAN cable connection
Check that a LAN cable connected to the network is connected to the LAN port of this machine.
Checking the network settings
Check that an IP address is assigned to this machine. Tap [Utility] - [Device Information], and check that an IP address is displayed.
d Reference
If no IP address is displayed, you will need to configure the network. For details, refer to [User's Guide: Web Management Tool].
Configuring the IP address fax environment
Enable the IP address fax function. In addition, configure the sending and receiving functions of this machine (SMTP) and the operation mode for IP address fax.
How to configure the setting is explained using Web Connection. For details, refer to [User's Guide: Web Management Tool].
Registering Header Position
Register the machine name, company name, etc. to be printed on faxes.
For details on how to configure the settings, refer to page 7-20.
Setting the date and time for the machine
Set the date and time on this machine to be printed on sent and received faxes.
For details on how to configure the settings, refer to page 7-6.
d Reference
If an NTP (Network Time Protocol) is used to set the time, the date and time on this machine can be auto-matically adjusted. How to configure the setting is explained using Web Connection. For details, refer to [Us-er's Guide: Web Management Tool].
3.2.3 Option settings
Registering a frequently-used IP address to this machine as destination will save you the trouble of entering each time you send a fax.
For details on how to register, refer to page 4-4.
d-Color MF 752/652 3-5

How To Send A Fax3 3.3
3.3 How To Send A Fax
1 Load the original.
2 Tap [Scan/Fax].
3 Specify the destination IP address.
% For details on how to specify a destination, refer to page 1-13.% Specifying multiple destinations carries out computer sending and fax transmission simultaneously.
% If necessary, you can change the display of the main screen in fax/scan mode (default: [Address Book]). For details, refer to page 6-10([Default Tab]).
3-6 d-Color MF 752/652

3.3 How To Send A Fax 3
4 Configure the option settings for fax transmission as necessary.
% For details on configuring option settings, refer to the respective columns of the following table.
5 Press the Start key.
% Tap [Check Setting] before sending, and check the destination and settings as necessary.% To redo operations for specifying destinations or option settings, press Reset.
Transmission begins.% If you press the Stop key while scanning an original, the scanning stops, and a list of stopped jobs
appears.To cancel scanning of the original, delete the job from the list of inactive jobs.
Related setting- You can change the default options for scan transmission to suit your environment. For details, refer to
page 6-11.
Purpose Reference
To configure basic options such as color and original size page 1-18
To configure options to scan various types of originals such as various sizes and books
page 1-20
To adjust the image quality level of the original such as colored background (newspaper, etc.) or light printing original
page 1-24
To print date/time and page number page 1-25
Other option settings page 1-27
d-Color MF 752/652 3-7

Sending Options3 3.4
3.4 Sending Options
3.4.1 Resending a fax
Auto resending (Auto redial)
If a fax transmission fails due to a network or recipient machine problem, the machine automatically resends (redials) the fax after a certain period of time has elapsed. By default, the machine redials up to three times at three-minute intervals.
Related setting (for the administrator)- You can change the number of redials to take place in auto reading. For details, refer to page 7-22.- You can change the automatic redial interval (default: [3 min.]). For details, refer to page 7-22.
Manual resending
A failed fax transmission is handled as reserved job pending for resending (redial).
Pending jobs for resending are resent automatically after a certain period of time has elapsed using the auto redial function. However, you can manually resend the fax.
1 Tap [Job List].
STOP
3-8 d-Color MF 752/652

3.4 Sending Options 3
2 Select a job you wish to resend then tap [Redial].
3 Press the Start key.
Transmission begins.
d-Color MF 752/652 3-9

How To Receive A Fax3 3.5
3.5 How To Receive A Fax
IP address faxes are sent and received directly between machines. This machine prints data automatically when a fax is received.
d Reference
You can forcibly save the received fax in a User Box of this machine without printing it. This prevents fax data from being stolen or lost after being printed, and only the necessary fax(es) will be printed. For details, refer to page 3-12.
Received faxes can be forwarded to a pre-specified destination. They can be converted to computer-com-patible files for management. For details, refer to page 3-13.
3-10 d-Color MF 752/652

3.6 Receiving Options 3
3.6 Receiving Options
3.6.1 Printing by adding the date and time received ([Footer Position])
Footer Position
Footer Position contains the date and time of fax reception, the number assigned according to the order of reception (reception number), and page number.
Footer Position is added as necessary when a document is printed.
Operations required to use this function (for the administrator)
To enable printing of Footer Position, select the location where to print Footer Position.
For details on how to configure the settings, refer to page 7-22.
Tips- For IP address fax, the reception information is printed within a original.
3.6.2 Saving a fax which cannot be printed (In-memory proxy reception)
When the machine cannot print a received document due to paper jam or exhaustion of consumables, the received document is stored in the memory until this machine is ready to print.
In-memory proxy reception functions automatically.
Tips- In-memory proxy reception is disabled when the memory is full.- When the troubleshooting is complete for paper jam etc., the machine starts printing a saved fax.
d-Color MF 752/652 3-11

Receiving Options3 3.6
3.6.3 Forcibly saving a received fax in a User Box (Memory RX)
Memory RX
Memory RX is a function to save a received fax to Memory RX User Box of this machine.
You can check the contents of incoming faxes and print only the required ones, thereby reducing printing costs. This prevents fax data from being stolen or lost after being printed. Because the security is enhanced, you can handle important fax data securely.
Operations required to use this function (for the administrator)
Enable the Memory RX function. In addition, specify the password for restricting access to Memory RX User Box.
For details, refer to page 7-26.
Tips- The Memory RX function cannot be used together with the following functions.– TSI User Box, PC-Fax RX, Forward TX
Printing a received fax
To print a fax saved in Memory RX User Box, refer to the Memory RX User Box function.
For details on the printing procedure, refer to [User's Guide: Box Operations].
3-12 d-Color MF 752/652
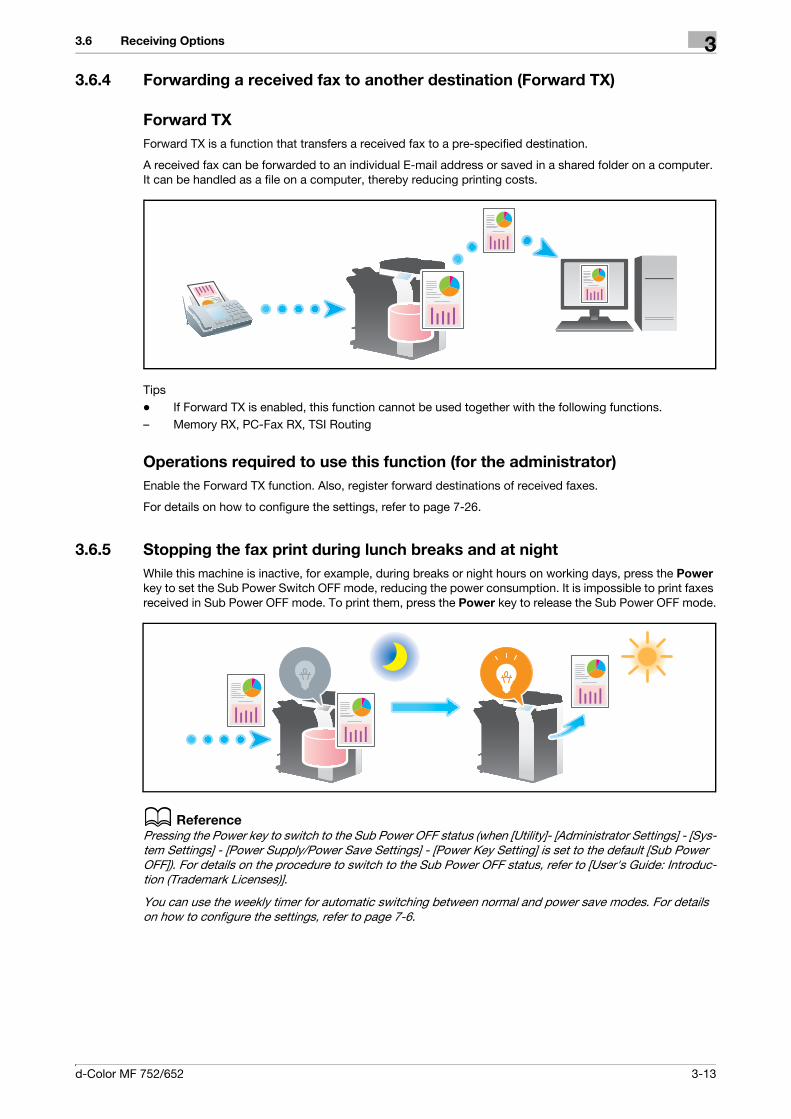
3.6 Receiving Options 3
3.6.4 Forwarding a received fax to another destination (Forward TX)
Forward TX
Forward TX is a function that transfers a received fax to a pre-specified destination.
A received fax can be forwarded to an individual E-mail address or saved in a shared folder on a computer. It can be handled as a file on a computer, thereby reducing printing costs.
Tips- If Forward TX is enabled, this function cannot be used together with the following functions.– Memory RX, PC-Fax RX, TSI Routing
Operations required to use this function (for the administrator)
Enable the Forward TX function. Also, register forward destinations of received faxes.
For details on how to configure the settings, refer to page 7-26.
3.6.5 Stopping the fax print during lunch breaks and at night
While this machine is inactive, for example, during breaks or night hours on working days, press the Power key to set the Sub Power Switch OFF mode, reducing the power consumption. It is impossible to print faxes received in Sub Power OFF mode. To print them, press the Power key to release the Sub Power OFF mode.
d Reference
Pressing the Power key to switch to the Sub Power OFF status (when [Utility]- [Administrator Settings] - [Sys-tem Settings] - [Power Supply/Power Save Settings] - [Power Key Setting] is set to the default [Sub Power OFF]). For details on the procedure to switch to the Sub Power OFF status, refer to [User's Guide: Introduc-tion (Trademark Licenses)].
You can use the weekly timer for automatic switching between normal and power save modes. For details on how to configure the settings, refer to page 7-6.
d-Color MF 752/652 3-13

Receiving Options3 3.6
3.6.6 Printing a fax on both sides of sheets of paper ([Duplex Print (RX)])
Duplex Print (RX)
A fax that contains multiple pages is printed on both sides of sheets of paper to save the number of sheets.
Operations required to use this function (for the administrator)
Enable the 2-Sided Print function.
For details on how to configure the settings, refer to page 7-23.
3.6.7 Configuring the fax print settings (for the administrator)
Default print settings ([Print Paper Selection]/[Min. Reduction for RX Print])
A received fax is printed according to the following conditions depending on the page size of the fax.
A standard-size fax, such as A4, is printed on the same standard size paper as the received fax while being slightly reduced in size (default: 96%).
For example, an A3 fax is printed on A3 paper, and a B4 fax on B4 paper, while reducing the print size to 96% respectively.
For details on the fax print settings, refer to page 7-23.
Tips- For faxes that are longer in the longitudinal direction than the standard size, the optimal paper size is
determined based on the width and length of the fax, and printed on paper of the same size. If the op-timal size paper is not available, the fax is printed on paper of a similar size.
3-14 d-Color MF 752/652

3.6 Receiving Options 3
Fixing the print paper size ([Print Paper Size])
You can always print on the specified size of paper irrespective of the paper size of the received fax.
If the size of the received fax is different from the specified print paper size, the fax is printed while increasing or reducing the size according to the print paper size.
For details on how to configure the settings, refer to page 7-24.
Fixing the print paper tray ([Tray Selection for RX Print])
You can always print on the paper loaded into the specified tray irrespective of the paper size of the received fax.
If the size of the received fax is different from the size of the paper in the specified tray, the fax is printed while increasing or reducing according to the paper size of the tray.
For details on how to configure the settings, refer to page 7-24.
Tips- If the tray is specified in [Tray Selection for RX Print], the setting for [Print Paper Size] is ignored ([Print
Paper Selection] is automatically switched to [Auto]).- If [Min. Reduction for RX Print] is set to [Full Size], [Tray Selection for RX Print] is compulsory switched
to [Auto].
d-Color MF 752/652 3-15

Receiving Options3 3.6
Splitting a custom size fax for printing ([Print Separate Fax Pages])
For faxes that are longer in the longitudinal direction than the standard size, the print size is not reduced, how-ever the area that cannot be fitted to a standard size is printed on the subsequent page.
For details on how to configure the settings, refer to page 7-24.
Tips- If [Min. Reduction for RX Print] is set to [Full Size], [Print Separate Fax Pages] is compulsory switched
to [OFF], and the area that cannot be fitted on a standard size sheet is not printed at all.- If [Duplex Print (RX)] is [ON], you cannot use [Print Separate Fax Pages].
3-16 d-Color MF 752/652

3.7 Printing a report/list 3
3.7 Printing a report/list
The report and list functions are provided for this machine to list the machine settings and operation results.
There are reports and lists that are printed automatically and that are printed as necessary. For reports that are printed automatically, you can select the print conditions. The following types of reports and lists are available.
d Reference
You can also print activity reports in the [Job List] screen. For details on the [Job List] screen, refer to [User's Guide: Control Panel].
Report name Description
[Activity Report] This report contains results of sent and received faxes.A total of 700 jobs are recorded on separate pages for transmission and re-ception.The activity report is automatically printed. Records containing only trans-mission or reception jobs can be printed as required.By default, the report is automatically printed every 100 communications.• You can change printing conditions as necessary. For details, refer to
page 7-26([Activity Report]).
[TX Result Report] This report contains the results of fax transmission. By default, the report is automatically printed when a transmission failure occurs.• You can change the print timings if necessary. For details, refer to
page 7-26([TX Result Report]).
[Broadcast Report] This report contains results of broadcast transmissions. By default, reports are automatically printed for every broadcast transmission.• You can select whether to print a broadcast report. For details, refer to
page 7-26([Sequential TX Report]).• You can change a method to print destinations to be described in a re-
port. For details, refer to page 7-26([Broadcast Result Report]).
[Network Fax RX Error Report]
This report contains the results of Network Fax reception. By default, reports are automatically printed when a reception failure occurs.• You can select whether to print an error report. For details, refer to
page 7-26([Network Fax RX Error Report]).
[Job Settings List] This list contains the details of [Fax Settings].• For details on how to print, refer to page 7-28.
d-Color MF 752/652 3-17

Printing a report/list3 3.7
3-18 d-Color MF 752/652

4 Managing Destinations


4.1 Registering frequently used destinations (Address Book) 4
4 Managing Destinations
4.1 Registering frequently used destinations (Address Book)
Address Book
Registering a frequently used destination on this machine will save you the trouble of having to enter it each time you send a fax. A destination registered on this machine is called an "Address Book".
You can register up to 2000 address books. The destination types which can be registered are E-mail ad-dress, computer name, etc. depending on the transmission mode.
Related setting (for the administrator)- You can specify whether to allow the user to register or change destinations (default: [Allow]). For de-
tails, refer to page 7-7([Registering and Changing Addresses]).
Registering an Internet fax destination
Register destination E-mail addresses.
1 Tap [Utility] - [One-Touch/User Box Registration] - [Create One-Touch Destination] - [Address Book (Public)] - [Internet Fax] - [New].
% The administrator can perform the same actions by selecting [Administrator Settings] - [One-Touch/User Box Registration].
2 Enter destination information, then tap [OK].
% For details on registration information, refer to page 6-5.
d-Color MF 752/652 4-3
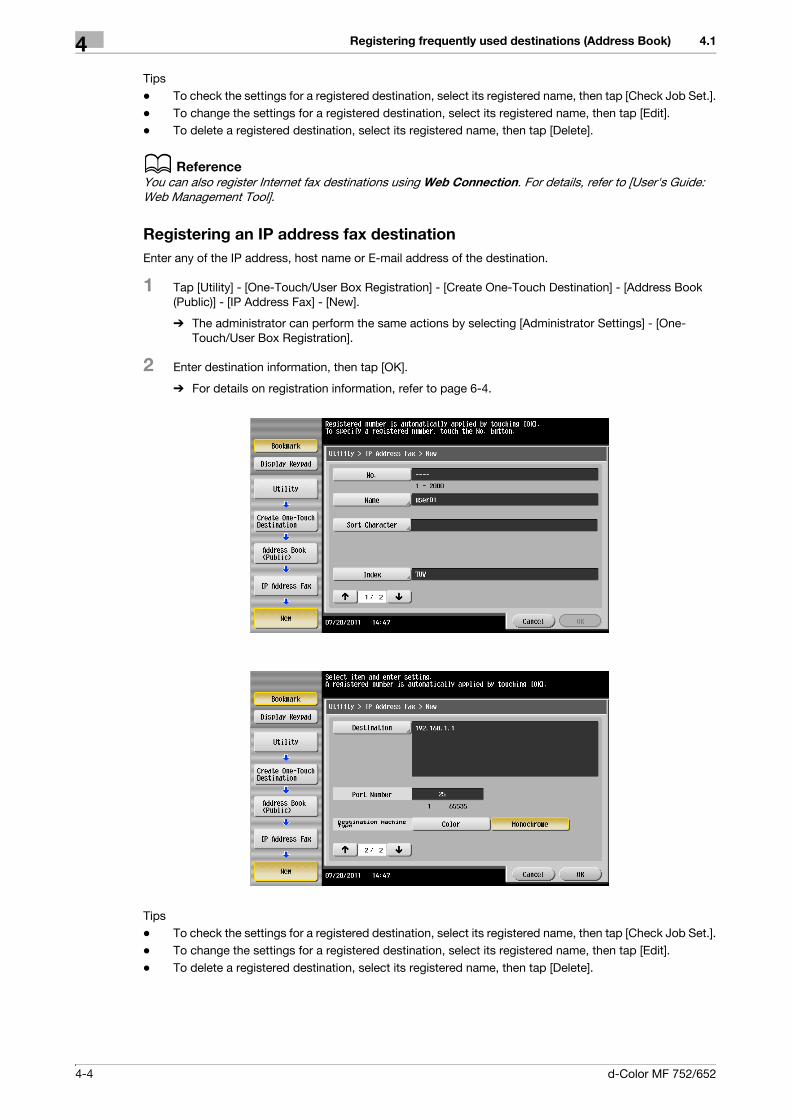
Registering frequently used destinations (Address Book)4 4.1
Tips- To check the settings for a registered destination, select its registered name, then tap [Check Job Set.].- To change the settings for a registered destination, select its registered name, then tap [Edit].- To delete a registered destination, select its registered name, then tap [Delete].
d Reference
You can also register Internet fax destinations using Web Connection. For details, refer to [User's Guide: Web Management Tool].
Registering an IP address fax destination
Enter any of the IP address, host name or E-mail address of the destination.
1 Tap [Utility] - [One-Touch/User Box Registration] - [Create One-Touch Destination] - [Address Book (Public)] - [IP Address Fax] - [New].
% The administrator can perform the same actions by selecting [Administrator Settings] - [One-Touch/User Box Registration].
2 Enter destination information, then tap [OK].
% For details on registration information, refer to page 6-4.
Tips- To check the settings for a registered destination, select its registered name, then tap [Check Job Set.].- To change the settings for a registered destination, select its registered name, then tap [Edit].- To delete a registered destination, select its registered name, then tap [Delete].
4-4 d-Color MF 752/652

4.1 Registering frequently used destinations (Address Book) 4
d Reference
You can also register IP address fax destinations using Web Connection. For details, refer to [User's Guide: Web Management Tool].
d-Color MF 752/652 4-5

Registering multiple destinations as a group (Create Group)4 4.2
4.2 Registering multiple destinations as a group (Create Group)
Create Group
Register multiple destinations as a group. Create Group is a convenient way to broadcast a fax.
Up to 100 groups can be registered for Group.
Related setting (for the administrator)- You can specify whether to allow the user to register or change destinations (default: [Allow]). For de-
tails, refer to page 7-7([Registering and Changing Addresses]).
Registering a group
0 To register a group, you must register the one-touch destinations to be added to the group in advance.
1 Tap [Utility] - [One-Touch/User Box Registration] - [Create One-Touch Destination] - [Group] - [New].
% The administrator can perform the same actions by selecting [Administrator Settings] - [One-Touch/User Box Registration].
2 Enter destination information, then tap [OK].
% For details on registration information, refer to page 6-6.
Tips- To check the settings for a registered group, select its registered name, then tap [Check Job Set.].- To change the settings for a registered group, select its registered name, then tap [Edit].- To delete a registered group, select its registered name, then tap [Delete].
4-6 d-Color MF 752/652
4.2 Registering multiple destinations as a group (Create Group) 4
d Reference
You can also register groups using Web Connection. For details, refer to [User's Guide: Web Management Tool].
d-Color MF 752/652 4-7

Registering directly entered destinations in Address Book4 4.3
4.3 Registering directly entered destinations in Address Book
1 Tap [Scan/Fax].
2 Tap [Direct Input], select the destination type, then enter a destination.
3 Tap [Address Reg.].
4-8 d-Color MF 752/652

4.3 Registering directly entered destinations in Address Book 4
4 Select a destination you want to register with the address book, then tap [New].
5 Tap the keyboard icon for [Name], and enter the registered name of the destination.
% Add an index key or enter a sort Character as necessary.
6 Tap [Register] then [Close].
When a fax transmission to the destination which is specified by direct input is complete, tap [Address Book] and check that the destination is registered.
Settings Description
[Address Type] The destination type selected in the [Direct Input] are displayed.
[Index] Select a corresponding character so that the destination can be index-searched by registration name.• For a frequently used destination, select also [Favorites]. If [Favorites]
is selected, the destination will appear on the main screen in fax/scan mode, enabling the user to easily specify an address.
[Name] Enter the destination name to be displayed on the Touch Panel (using up to 24 characters).Assign a name that helps you easily identify the destination.
[Sort Character] Enter the same one as the registered name (using up to 24 characters).You can sort destinations by registration name.
[Address] The destination which is specified by direct input is displayed.
d-Color MF 752/652 4-9

Exporting/importing destination information (for the administrator)4 4.4
4.4 Exporting/importing destination information (for the administra-
tor)
Exporting destination information
You can save (export) destinations registered on this machine to a computer for backup. You can add new destinations to or edit exported destinations as necessary.
To export information, use Web Connection. For details, refer to [User's Guide: Web Management Tool].
Importing destination information
You can write (import) destination information, which is exported from this machine, from a computer to this machine. You can also import destination information to other MFP of the same model.
To import information, use Web Connection. For details, refer to [User's Guide: Web Management Tool].
4-10 d-Color MF 752/652
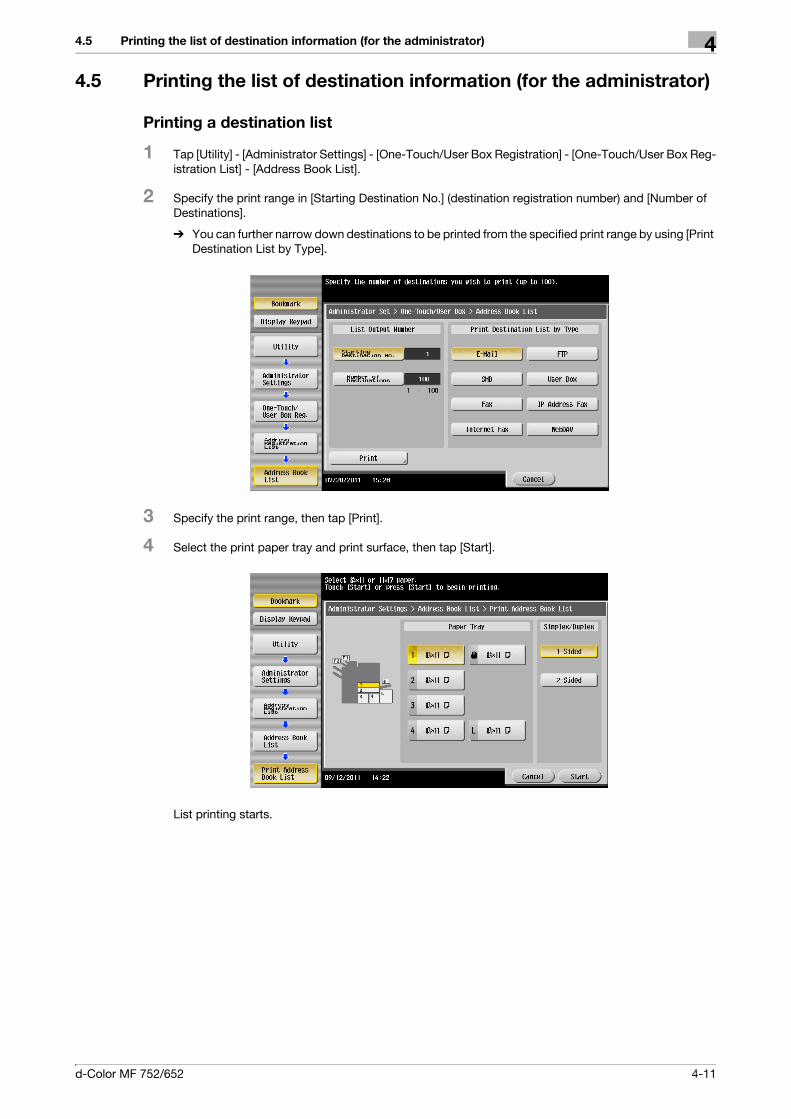
4.5 Printing the list of destination information (for the administrator) 4
4.5 Printing the list of destination information (for the administrator)
Printing a destination list
1 Tap [Utility] - [Administrator Settings] - [One-Touch/User Box Registration] - [One-Touch/User Box Reg-istration List] - [Address Book List].
2 Specify the print range in [Starting Destination No.] (destination registration number) and [Number of Destinations].
% You can further narrow down destinations to be printed from the specified print range by using [Print Destination List by Type].
3 Specify the print range, then tap [Print].
4 Select the print paper tray and print surface, then tap [Start].
List printing starts.
d-Color MF 752/652 4-11

Printing the list of destination information (for the administrator)4 4.5
Printing a group list
1 Tap [Utility] - [Administrator Settings] - [One-Touch/User Box Registration] - [One-Touch/User Box Reg-istration List] - [Group List].
2 Specify the print range in [Starting Destination No.] (destination registration number) and [Number of Destinations].
3 Specify the print range, then tap [Print].
4 Select the print paper tray and print surface, then tap [Start].
List printing starts.
4-12 d-Color MF 752/652

4.5 Printing the list of destination information (for the administrator) 4
Printing a program list
Program list contains a list of programs and destinations included in the respective programs.
1 Tap [Utility] - [Administrator Settings] - [One-Touch/User Box Registration] - [One-Touch/User Box Reg-istration List] - [Program List].
2 Specify the print range in [Starting Destination No.] (program registration number) and [Number of Des-tinations].
% You can further narrow down destinations by group and destination types from the specified print range by using [Print Destination List by Type].
3 Specify the print range, then tap [Print].
4 Select the print paper tray and print surface, then tap [Start].
List printing starts.
d-Color MF 752/652 4-13

Printing the list of destination information (for the administrator)4 4.5
4-14 d-Color MF 752/652

5 Description of setup buttons


5
5 Description of setup buttons
[Address Book]
To display: [Scan/Fax] - [Address Book]
Select a destination registered on this machine. You can send data by broadcast transmission if you select multiple destinations.
You can also search for a destination by destination type and index key.
d-Color MF 752/652 5-3

5
[Direct Input]
To display: [Scan/Fax] - [Direct Input]
Enter destination information according to the saving and transmission mode.
Related setting (for the administrator)- You can specify whether to allow the user to directly enter destinations (default: [Allow All]). For details,
refer to page 7-32.
d Reference
You can register the destination that you have entered directly into the address book. For details on how to register, refer to page 4-8.
Settings Description
[Fax] Enter a destination fax number when scanned original data is sent by fax.
[E-mail] Enter a destination E-mail address when scanned original data is sent by E-mail attachment.
[User Box] Select a user box to save scanned original data in the user box of this ma-chine.
[Internet Fax] Enter a destination E-mail address when scanned original data is sent by Internet fax.
[IP Address Fax] Enter a destination IP address or E-mail address when scanned original data is sent by IP address fax.
[PC (SMB)] Enter a destination computer name (host name) or IP address when scanned original data is sent to a share folder of a computer on the net-work.
[FTP] Enter a destination FTP server host name or IP address when scanned original data is sent to a FTP server.
[WebDAV] Enter a destination WebDAV server host name or IP address when scanned original data is sent to a WebDAV server.
[DPWS] Select a destination computer when scanned original data is sent to a computer detected by the Web service.
[Scan Server] Scanned original data is forwarded to another location (secondary delivery) via a scan server.When selecting a destination, select an arbitrary PSP (Post-Scan-Process). In PSP, destinations for secondary delivery etc. are registered.
5-4 d-Color MF 752/652

5
[Internet Fax]
To display: [Scan/Fax] - [Direct Input] - [Internet Fax]
Enter a destination E-mail address when scanned original data is sent by Internet fax. Also, select the spec-ification of original data that the recipient machine can receive.
Tap [Next Dest.] to add a destination.
If E-mail address prefixes and suffixes are registered, you can recall a registered domain name etc. to com-plement entry.
Related setting (for the administrator)- By registering E-mail address prefixes and suffixes, you can complement E-mail address entry. For de-
tails, refer to page 7-19.
Settings Description
[Address] Enter a destination E-mail address.
[Receiver RX Ability ] Select the specifications of original data that the recipient machine can re-ceive in [Compression Method], [Paper Size] and [Resolution].
d-Color MF 752/652 5-5

5
[IP Address Fax]
To display: [Scan/Fax] - [Direct Input] - [IP Address Fax]
Enter a destination IP address or E-mail address when scanned original data is sent by IP address fax. Also, select whether the recipient machine supports color printing.
When specifying multiple destinations, tap [Next Dest.] to add a destination.
Settings Description
[Address] Enter a destination IP address or host name.• Example of IP address (IPv4) entry: "192.168.1.1"• Example of IP address (IPv6) entry: "fe80::220:6bff:fe10:2f16"• Example of host name entry: "host.example.com" (Including a domain
name.)
You can also specify a destination by E-mail address. To specify a desti-nation by E-mail address, enter the destination IP address or host name following "ipaddrfax@".To enter an IP address following the @ symbol, put the IP address in brack-ets "[ ]".• Example of IP address (IPv4) entry: "ipaddrfax@[192.168.1.1]"To use an IP address (IPv6), enter "IPv6:" following the left bracket "[ ".• Example of IP address (IPv6) entry: "ipaddr-
fax@[IPv6:fe80::220:6bff:fe10:2f16]"To enter a host name following the @ symbol, brackets "[ ]" are unneces-sary.• Example of host name entry: "[email protected]"
[Port Number] If necessary, change the port number.In normal circumstances, you can use the original port number.
[Machine Type ] Select either of [Color] or [Black&White] according to the recipient ma-chine.
5-6 d-Color MF 752/652

5
[Job History]
To display: [Scan/Fax] - [Job History]
In [Job History], select a destination from the fax, scan or saved job history. The history shows the latest five fax destinations. When necessary, multiple destinations can be selected from the history.
Tips- If a registered destination or a User Box is edited or if the Main Power Switch is turned off or on, infor-
mation of the history is deleted.
[Addr. Search]
To display: [Scan/Fax] - [Addr. Search]
Press [Search] to display the search results. Select a destination from the list.
d-Color MF 752/652 5-7

5
[Name Search]
To display: [Scan/Fax] - [Addr. Search] - [Search] - [Name Search]
Performs a prefix search for registered destination name (displayed in the search results if the beginning part matches the search word).
[Address Search]
To display: [Scan/Fax] - [Addr. Search] - [Search] - [Address Search]
Performs a prefix search by text or numeral in a destination (displayed in the search results if the beginning part matches the search word).
5-8 d-Color MF 752/652

5
[LDAP Search]
To display: [Scan/Fax] - [Addr. Search] - [Search] - [LDAP Search]
In the LDAP server or Windows Server Active Directory is used, specify a single keyword to search for an E-mail address or fax number.
[Adv. Search (LDAP)]
To display: [Scan/Fax] - [Addr. Search] - [Search] - [Adv. Search (LDAP)]
In the LDAP server or Windows Server Active Directory is used, specify a combination of keywords from dif-ferent categories to search for an E-mail address or fax number.
d-Color MF 752/652 5-9

5
[Address Reg.]
To display: [Scan/Fax] - [Direct Input] - Enter Destination - [Address Reg.]
Register the destination that you have entered directly into the address book. For details, refer to page 4-8.
[Simplex/Duplex]
To display: [Scan/Fax] - [Simplex/Duplex]
Select the surface of the original to be scanned.
Settings Description
[1-Sided] Press this button to scan one side of an original.
[2-Sided] Press this button to scan both sides of an original.
[Cover + 2-sided] Press this button to scan only one side for the first page in the original, and scan both sides for the remaining pages.
5-10 d-Color MF 752/652

5
[Resolution]
To display: [Scan/Fax] - [Resolution]
Select the resolution of the original for scanning.
Tips- The finer the scan resolution is, the larger the data volume becomes, resulting in longer transmission
time. When you are using E-mail TX or Internet Fax, check that the data capacity is not restricted.
Settings Description
[Scan Resolution] Select the resolution of the original for scan transmission.To use E-mail TX, SMB Send, FTP TX, WebDAV Send, or Save in User Box, the following resolution is selected to scan the original.• [200 e 200 dpi]: Select this option to scan a standard original.• [300 e 300 dpi]: Select this option to scan a standard original with the
higher resolution.• [400 e 400 dpi]: Select this option to scan an original containing small
characters and drawings.• [600 e 600 dpi]: Select this option to convert an original to a file of the
maximum size. This option is available when scanning an original such as a full-color photo, which requires a fine level of image quality.
[Fax Resolution] Select the resolution of the original for sending a fax.To use Fax TX, Internet Fax, or IP Address Fax, the following resolution is selected to scan the original.• [Normal]: Select this option to scan originals that do not require a fine
level of image quality, or when you want to send a large number of orig-inals quickly.
• [Fine]: Select this option to scan a standard original.• [Super Fine]: Select this option to scan originals containing small char-
acters or drawings.• [Ultra Fine]: Select this option to scan originals that require a fine level
of image quality.
d-Color MF 752/652 5-11

5
[Color]
To display: [Scan/Fax] - [Color]
Select the color mode to scan originals.
Related setting- If the original is not correctly scanned to fit its color although you have selected [Auto Color], adjust the
color judgment level. For details, refer to page 6-9.
Settings Description
[Auto Color] Scan by automatically selecting either [Full Color] or [Gray Scale] accord-ing to the original color.
[Full Color] Scan in full color, regardless of whether the original is in color or in black and white.Select this option to scan originals of other than black and white, and color photos.
[Gray Scale] Scan in gray scale, regardless of whether the original is in color or in black and white. Select this option to scan the original having many halftone im-ages such as black and white photos.
[Black] Scan originals in white and black, no shades of gray. Select this option to scan originals with distinct black and white areas, such as line drawings.
5-12 d-Color MF 752/652

5
[Scan Size]
To display: [Scan/Fax] - [Scan Size]
Select the size of the original to be scanned.
Settings Description
[Auto] Scan by automatically selecting the size according to the original size.
[Inches] Select this option to scan an inch-size original. Tap [Inches], and select a standard inch size.
[Metric Sizes] Select this option to scan a metric-size original. Tap [Metric Sizes], and se-lect the standard metric size respectively.
[Other] Select this option to scan a postcard or an original other than a inch- or metric-size original. Tap [Other], and select each standard size.
[Photo Size] Select this option to scan photos or originals in photo size. Tap [Photo Size], and select a standard size.
[Custom Size] Select this option to scan originals in custom size. Enter vertical and hori-zontal values.
d-Color MF 752/652 5-13

5
[E-mail Settings]
To display: [Scan/Fax] - [E-mail Settings]
Change the file name of the scanned original.
When sending by E-mail, you can specify the subject and text of the E-mail message and change the sender E-mail address ("From" address).
Related setting- You can register fixed subject and text phrases of the E-mail message. For details, refer to page 6-6.
Related setting (for the administrator)- You can change the default file name. You can specify whether to add an initial of the function or wheth-
er to specify an arbitrary text instead of the device name. For details, refer to page 7-11.- Select whether to allow the user to change the From address of the E-mail sender (default: [Allow]). For
details, refer to page 7-7([Change the "From" Address]).
Settings Description
[File Name] If necessary, change the file name of the scanned original.
[Subject] If necessary, change the subject of the E-mail. If fixed subject phrases are registered, you can select a subject from those registered.
[From] If necessary, change the sender E-mail address.In normal circumstances, the E-mail address of the administrator is used as sender E-mail address.If user authentication is installed on this machine, the E-mail address of the login user is used as sender E-mail address.
[Body] If necessary, change the message text of the E-mail. If fixed text phrases are registered, you can select a text from those registered.
5-14 d-Color MF 752/652

5
[Application]
To display: [Scan/Fax] - [Application]
Configure the application option settings for the fax/scan mode.
Settings Description
[No. of Originals] Specify the scanning method for various originals.
[Quality/Density] Adjust the image quality level and density according to the original.
[Stamp/Composition] Add the page number or a stamp to the original.
[App] Configure the application option settings, such as notifying the save loca-tion of the original data by E-mail, and changing Header Position of the fax.
[Fax Setting] Configure the fax transmission settings, such as specifying the transmis-sion time, and sending by confidential communication.
d-Color MF 752/652 5-15

5
[Original Settings]
To display: [Scan/Fax] - [Application] - [No. of Originals] - [Original Settings]
Configure the setting so as to scan originals accurately according to the properties of the originals to be load-ed.
Related setting- If blank pages are not detected correctly although [Blank Page Removal] is enabled to scan an original,
adjust the level to detect blank pages. For details, refer to page 6-9.
Settings Description
[Original Setting] Configure the setting so as to scan originals accurately according to the properties of the originals to be loaded.• [Mixed Original]: Even for an original with pages of different sizes, by
using ADF, you can scan data while detecting the size for each page. If the widths of the originals are the same, select [Same Width]. If the widths of the originals are different, select [Different Width].
• [Thin Paper Original]: Reduce the original feed speed of the ADF to pre-vent the original from getting caught.
• [Z-Folded Original]: Even the original sizes of folded originals can be detected accurately.
• [Long Original]: Select this option to load an original that has the longer feeding direction than the standard size (11 e 17 or A3).
[Despeckle] Scan originals using the ADF while removing dust from the Slit Scan Glass.It takes longer to finish scanning, compared to the normal operation.
[Blank Page Removal] Blank pages contained in the original loaded into the ADF are skipped when the original is scanned.Select this check box when scanning an original that contains blank pages. Any blank pages that are detected are not counted as original pages.
[Binding Position] When scanning a 2-sided original, select the original binding position to prevent the binding positions being reversed between the front and rear faces.• [Auto]: The binding position is automatically set. A page binding posi-
tion along the long side of the paper is selected if the original length is 11-11/16 inches (297 mm) or less. A page binding along the short side of the paper is selected if the original length exceeds 11-11/16 inches (297 mm).
• [Left Bind]: Select this option when the binding position is set to the left of the original.
• [Top Bind]: Select this option when the binding position is set to the top of the original.
[Original Direction] Specify the orientation of the loaded original.
5-16 d-Color MF 752/652

5
[Book Original]
To display: [Scan/Fax] - [Application] - [No. of Originals] - [Book Original]
You can scan two-page spreads such as books and catalogs separately into left and right pages, or scan them as one page. If you place a book or catalog on the Original Glass, you do not need to close the ADF to scan it.
Settings Description
[ON]/[OFF] Select [ON] to specify Book Original.
[Output Method] Specify the method to scan two-page spreads.• [Book Spread]: Scan a two-page spread as one page.• [Separation]: Scan the left and right pages of two-page spreads sepa-
rately in page number order.• [Front Cover]: Scan the front cover and two-page spreads according to
the page order of the original (scan in the order of front cover and two-page spreads).
• [Front & Back Covers]: Scan the front and back covers and two-page spreads according to the page order of the original (scan in the order of front cover, back cover, and two-page spreads).
[Binding Position] If [Separation], [Front Cover] or [Front & Back Covers] is selected for [Out-put Method], select the spreading direction of a two-page spread to be scanned.Select [Left Bind] for two-page spreads of pages bound on the left, and [Right Bind] for two-page spreads of pages bound on the right.Note that if the binding position is incorrectly specified, the page order of the two-page spread will be reversed between the left and right pages.
[Frame Erase] Erases the shadow of the surrounding that is created when the original cover cannot be closed properly due to the thickness of the original.You can erase the four sides of the original to the same width. Additionally, you can erase the four sides of the original to different widths.• [Frame]: Select this option to erase the four sides of the original by an
area of the same width. In [Erase Amount], tap [+]/[-] for the inch area, or tap [+]/[-] or press the Keypad for the centimeter area to specify the width of the area to be erased.
• [Individual]: Select this option to erase the four sides of the original to different widths. Select a side ([Top], [Bottom], [Left] or [Right]) and specify the width of the area in [Erase Amount] by tapping [+]/[-] for an inch area and by tapping [+]/[-] or pressing the Keypad for a centimeter area. Likewise, specify the width for all the other sides one by one.If you do not want to erase the side, cancel the setting for [Erase].
[Center Erase] Erases the shadow created in the center when the original cover cannot be closed properly due to the thickness of the original.Specify the width of the area to erase by tapping [+]/[-] for the inch area, or by tapping [+]/[-] or pressing the Keypad for the centimeter area.
d-Color MF 752/652 5-17

5
[Separate Scan]
To display: [Scan/Fax] - [Application] - [No. of Originals] - [Separate Scan]
If the number of original sheets is so large that they cannot be loaded into the ADF at the same time, you can load them in several batches and handle them as one job.
You can also scan the original using both ADF and Original Glass alternately.
d Reference
For details on the operation procedure of Serial Scan, refer to page 1-22.
[Original Type]
To display: [Scan/Fax] - [Application] - [Quality/Density] - [Original Type]
Select the optimum image quality level for the original and scan at the optimal level of image quality.
Settings Description
[Text] Press this button to scan an original, which consists mostly of text, at the optimum level of image quality.Sharpen the edges of text to improve legibility.
[Text/Photo Printed] Press this button to scan an original containing of text and photos at the optimum level of image quality.Sharpen the edges of text, and smoothen photos.Select this option to scan printed originals such as brochures and catalogs.
[Text/Photo PhotoPaper] Press this button to scan an original containing of text and photos at the optimum level of image quality.Sharpen the edges of text, and smoothen photos.Select this option to scan an original in which photos are printed on pho-tographic paper.
5-18 d-Color MF 752/652
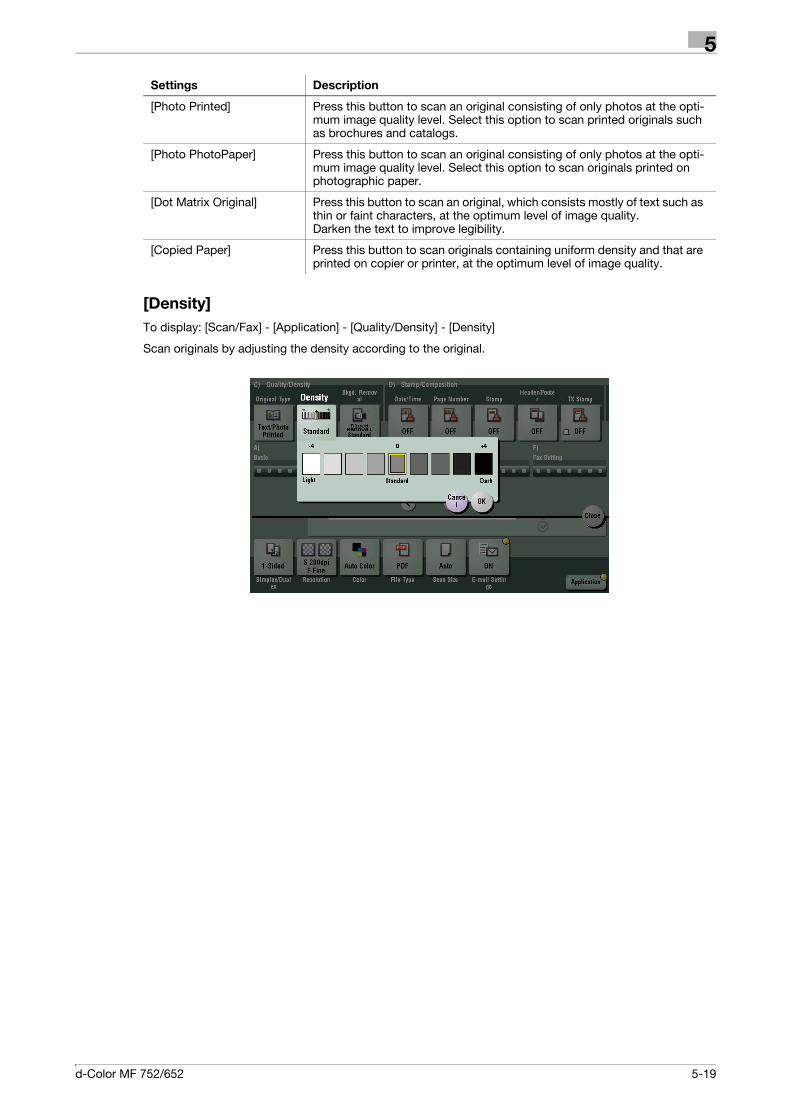
5
[Density]
To display: [Scan/Fax] - [Application] - [Quality/Density] - [Density]
Scan originals by adjusting the density according to the original.
[Photo Printed] Press this button to scan an original consisting of only photos at the opti-mum image quality level. Select this option to scan printed originals such as brochures and catalogs.
[Photo PhotoPaper] Press this button to scan an original consisting of only photos at the opti-mum image quality level. Select this option to scan originals printed on photographic paper.
[Dot Matrix Original] Press this button to scan an original, which consists mostly of text such as thin or faint characters, at the optimum level of image quality.Darken the text to improve legibility.
[Copied Paper] Press this button to scan originals containing uniform density and that are printed on copier or printer, at the optimum level of image quality.
Settings Description
d-Color MF 752/652 5-19

5
[Bkgd. Removal]
To display: [Scan/Fax] - [Application] - [Quality/Density] - [Bkgd. Removal]
Adjust the density of the original with the colored background (newsprints, recycle paper, etc.) or the back-ground of an original that is so thin that text or images on the back would be scanned.
Settings Description
[Background Removal] Press this button to scan a thin 2-sided original or an original with a colored background at the optimal level of image quality.• [Bleed Removal]: Select this option to prevent bleeding of the back of
the paper when printing a 2-sided original that is so thin that the con-tents of the back side would be scanned.
• [Paper Discoloration Adjustment]: Select this option to scan an original with a colored background such as a map.
[Background Removal Lev-el]
Press this button to adjust the density of the background color for an orig-inal with a colored background. Selecting [Auto] automatically determines the density of the background color, and scans an original at the optimum background density.
5-20 d-Color MF 752/652

5
[Date/Time]
To display: [Scan/Fax] - [Application] - [Stamp/Composition] - [Date/Time]
Select the stamping position and representation, and add the date and time the original is scanned. The date and time can be printed either on all pages or only on the first page.
Settings Description
[ON]/[OFF] Select [ON] to print the date/time.
[Date Format] Select the date/time format.
[Time Format] Select the time format. When you do not want to print time, select [OFF].
[Pages] Select the range of pages to print.
[Text Details] If necessary, select the print size, font, and text color.
[Print Position] If necessary, select the print position of the text. You can adjust the print position in [Adjust Position] more finely.
d-Color MF 752/652 5-21

5
[Page Number]
To display: [Scan/Fax] - [Application] - [Stamp/Composition] - [Page Number]
Select the stamping position and format, and add page and chapter numbers. Page and chapter numbers are printed on all pages.
Settings Description
[ON]/[OFF] Select [ON] to print page numbers.
[Page Number Type] Select the format of the page number.
[Starting Page Number] Enter the starting page number to be printed on the first page. For exam-ple, to print page numbers from the third page of the original, enter "-1". The first page of the original as "-1", the second page as "0", and the third page is counted as "1". In [Starting Page Number], a page number is print-ed on pages 1 and later. If "2" is entered, a page number is printed from the first page of the original as "2, 3" in order. "-" (minus sign) changes to + each time you press *.
[Starting Chapter Number] Enter the starting chapter number if an original is divided into chapters, and you want to print chapter numbers from the second chapter. You can specify chapter numbers only when you have selected [Chapter Page] in [Page Number Type].
[Text Details] If necessary, select the print size, font, and text color.
[Print Position] If necessary, select the print position of the text. You can adjust the print position in [Adjust Position] more finely.
5-22 d-Color MF 752/652
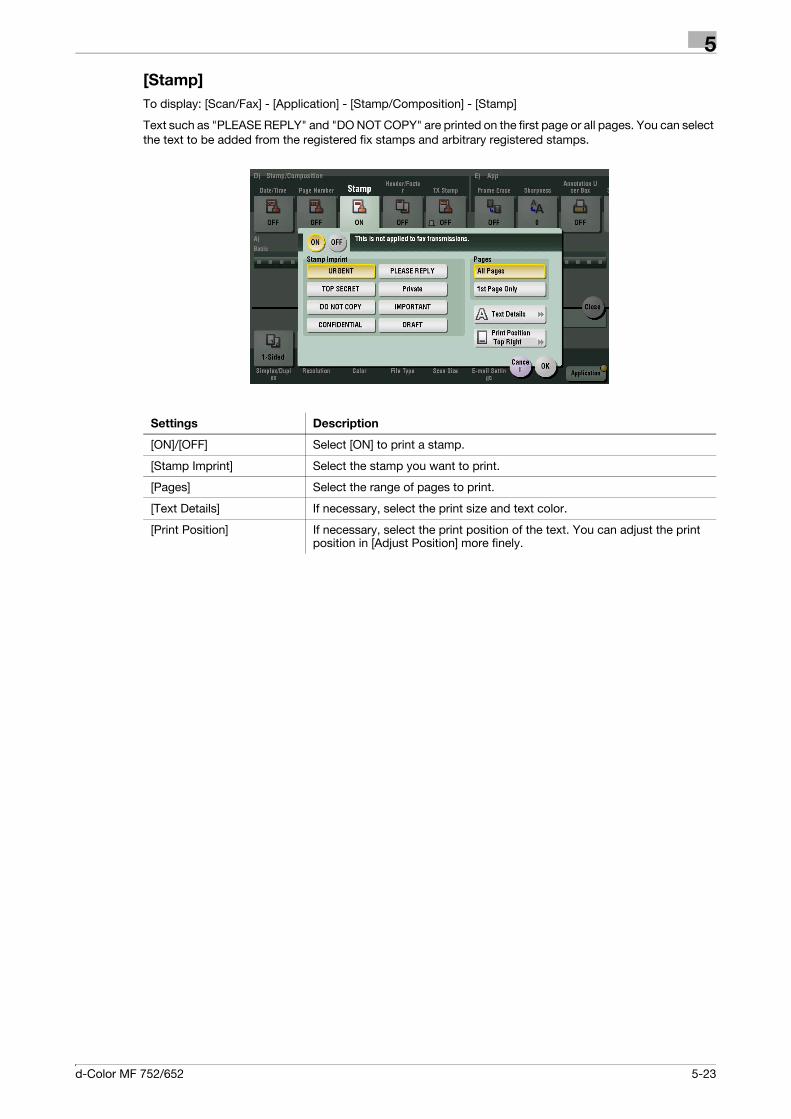
5
[Stamp]
To display: [Scan/Fax] - [Application] - [Stamp/Composition] - [Stamp]
Text such as "PLEASE REPLY" and "DO NOT COPY" are printed on the first page or all pages. You can select the text to be added from the registered fix stamps and arbitrary registered stamps.
Settings Description
[ON]/[OFF] Select [ON] to print a stamp.
[Stamp Imprint] Select the stamp you want to print.
[Pages] Select the range of pages to print.
[Text Details] If necessary, select the print size and text color.
[Print Position] If necessary, select the print position of the text. You can adjust the print position in [Adjust Position] more finely.
d-Color MF 752/652 5-23
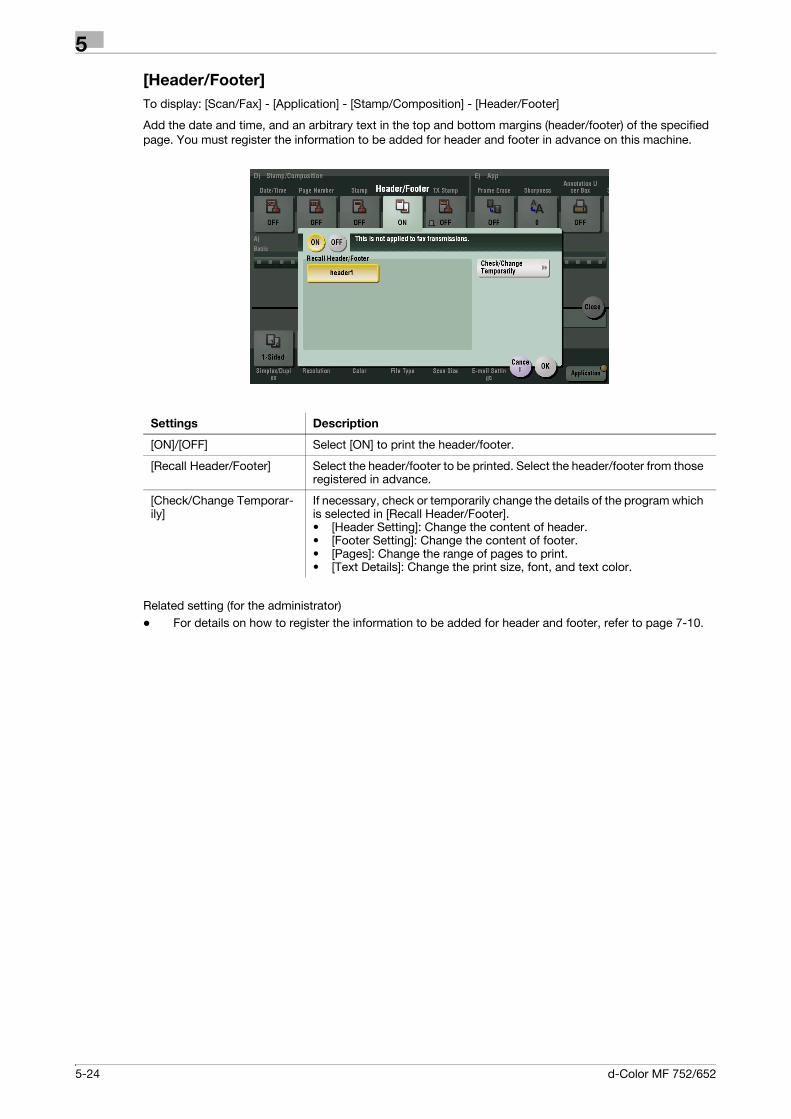
5
[Header/Footer]
To display: [Scan/Fax] - [Application] - [Stamp/Composition] - [Header/Footer]
Add the date and time, and an arbitrary text in the top and bottom margins (header/footer) of the specified page. You must register the information to be added for header and footer in advance on this machine.
Related setting (for the administrator)- For details on how to register the information to be added for header and footer, refer to page 7-10.
Settings Description
[ON]/[OFF] Select [ON] to print the header/footer.
[Recall Header/Footer] Select the header/footer to be printed. Select the header/footer from those registered in advance.
[Check/Change Temporar-ily]
If necessary, check or temporarily change the details of the program which is selected in [Recall Header/Footer].• [Header Setting]: Change the content of header.• [Footer Setting]: Change the content of footer.• [Pages]: Change the range of pages to print.• [Text Details]: Change the print size, font, and text color.
5-24 d-Color MF 752/652

5
[TX Stamp]
To display: [Scan/Fax] - [Application] - [Stamp/Composition] - [TX Stamp]
When scanning originals using ADF, a TX Stamp is printed on a scanned original to certify that the original has been scanned. It is used when sending a fax.
Tips- To print TX Stamps, the optional Stamp Unit is required.- The ink used for stamping is consumables. If the ink becomes faint, contact your service representative.- If [Mixed Original] is specified to scan originals, TX Stamp may not be printed on the specified position.
[Frame Erase]
To display: [Scan/Fax] - [Application] - [App] - [Frame Erase]
Erases the four sides of the original to the same width. You can also erase the four sides of the original to different widths.
Settings Description
[ON]/[OFF] Select [ON] to specify Frame Erase.
[Frame] Select this option to erase the four sides of the original to the same width.In [Erase Amount], tap [+]/[-] for the inch area, or tap [+]/[-] or press the key-pad for the centimeter area to specify the width of the area to be erased.
[Individual] Select this option to erase the four sides of the original to different widths.Select a side ([Top], [Bottom], [Left] or [Right]) and specify the width of the area in [Erase Amount] by tapping [+]/[-] for an inch area and by tapping [+]/[-] or pressing the keypad for a centimeter area. Likewise, specify the width for all the other sides one by one.If you do not want to erase the side, cancel the setting for [Erase].
d-Color MF 752/652 5-25

5
[Sharpness]
To display: [Scan/Fax] - [Application] - [App] - [Sharpness]
Sharpen the edges of the image to improve legibility. Smoothen rough contours of an image or sharpen blurred image.
[Save & Print]
To display: [Scan/Fax] - [Application] - [App] - [Save & Print]
You can print data simultaneously using Scan or Fax TX.
Settings Description
[ON]/[OFF] Select [ON] to sand and print at the same time.
[No. of Sets] If necessary, enter the number of copies to print.
[Simplex/Duplex] Select [2-Sided] to print on both sides of sheets of paper.
[Staple] Select the binding positions for stapling the sheets.• [Corner]: Each set of printed sheets is stapled in the upper-left or -right
corner before it is output.• [2 Position]: Each set of printed sheets is stapled at two positions (in the
top, left, or right) before it is output.• [Position Setting]: Select the binding position. If [Auto] is specified for
the binding position, the binding position is determined automatically.
5-26 d-Color MF 752/652

5
[Fax Header Settings]
To display: [Scan/Fax] - [Application] - [App] - [Fax Header Settings]
Normally, the default sender name is added. However, you can use different sender names depending as necessary.
If you want to use a different sender name than the default name, select a sender name you want to change to, then tap [OK].
Related setting (for the administrator)- By registering multiple sender names, you can use different sender names depending on the destina-
tion. For details on the registration procedure, refer to page 7-20 ([Sender]).
d-Color MF 752/652 5-27

5
5-28 d-Color MF 752/652

6 Description Of Setup Buttons
(User Settings)


6
6 Description Of Setup Buttons (User Settings)
[Utility]
To display: [Utility]
Used to check the various settings and usage of this machine.
[One-Touch/User Box Registration]
To display: [Utility] - [One-Touch/User Box Registration]
Register destinations or User Boxes.
[Create One-Touch Destination]
To display: [Utility] - [One-Touch/User Box Registration] - [Create One-Touch Destination]
Register frequently used destinations and fixed subject and text phrases of the E-mail. You can select regis-tered information before sending.
Settings Description
[One-Touch/User Box Registration]
Register destinations or User Boxes.
[User Settings] Press this button to enable users to change settings.You can change the defaults or screen displays of the copy, scan/fax, or print function in a user-friendly manner to suit your environment.
[Administrator Settings] Press this button to display settings that can only be configured by the ad-ministrator. To configure settings, you need to enter the administrator password of this machine.You can specify the initial operations of the copy, print, fax, or User Box function, power saving function, and network function to suit your environ-ment. Also, you can manage the use status of this machine or inhibit an in-formation leakage by specifying the authentication or security function.
[Check Consumable Life] Press this button to check the status of consumables (consumption level) on this machine. When necessary, print the status of consumables in list form.
[Banner Printing] Press this button to select whether to permit banner printing of the print function.
[Device Information] Press this button to display the function version or IP address (IPv4/IPv6) of this machine.
[Remote Panel Operation] Press this button to start remote operation of the Control Panel of this ma-chine.
Settings Description
[Create One-Touch Desti-nation]
Register frequently used destinations and fixed subject and text phrases of the E-mail. You can select registered information before sending.
[Create User Box] Register various user boxes such as shared user box and exclusive user box.
[Limiting Access to Desti-nations]
Limit the access to destinations for each user.
Settings Description
[Address Book (Public)] Register destinations for each transmission mode, such as E-Mail TX and Fax TX.
[Group] Register multiple destinations as a group. You can register different types of destinations for a group, such as E-Mail TX, SMB Send and Fax TX.
[E-Mail Settings] Register fixed subject and text phrases of the E-mail. You can select a reg-istered subject and message text before sending.
d-Color MF 752/652 6-3

6
[Address Book (Public)]
To display: [Utility] - [One-Touch/User Box Registration] - [Create One-Touch Destination] - [Address Book (Public)]
Register destinations for each transmission mode, such as E-Mail TX and Fax TX.
[IP Address Fax]
To display: [Utility] - [One-Touch/User Box Registration] - [Create One-Touch Destination] - [Address Book (Public)] - [IP Address Fax] - [New]
Enter any of the IP address, host name or E-mail address of the destination.
Settings Description
[E-Mail] Register destination E-mail addresses.
[User Box] Register user boxes to save.
[Fax] Register destination fax numbers.
[PC (SMB)] Register destination computer names (host name) or IP addresses.
[FTP] Register destination FTP server host names or IP addresses.
[WebDAV] Register destination WebDAV server host names or IP addresses.
[IP Address Fax] Enter any of the IP address, host name or E-mail address of the destina-tion.
[Internet Fax] Register destination E-mail addresses.
Settings Description
[No.] Destination registration number. [No.] is automatically registered from a lower number that is not used. If you want to specify a number, tap [No.] and enter the number within the range of 1 to 2000.
[Name] Enter the destination name to be displayed on the Touch Panel (using up to 24 characters).Assign a name that helps you easily identify the destination.
[Sort Character] Enter the same one as the registered name (using up to 24 characters).You can sort destinations by registration name.
[Index] Select a corresponding character so that the destination can be index-searched by registration name.• If an alphabet character is specified for the initial of a registration name,
search text is automatically specified with the alphabet character. If an-ything other than alphabet character is specified for the initial of a reg-istration name, [etc] is specified by default.
• For a frequently used destination, also select [Favorites]. If [Favorites] is selected, the destination will appear in the main screen in fax/scan mode, enabling the user to easily select a destination.
[Destination] Enter a destination IP address or host name.• Example of IP address (IPv4) entry: "192.168.1.1"• Example of IP address (IPv6) entry: "fe80::220:6bff:fe10:2f16"• Example of host name entry: "host.example.com" (Including a domain
name.)
You can also specify a destination by E-mail address. To specify a desti-nation by E-mail address, enter the destination IP address or host name following "ipaddrfax@".To enter an IP address following the @ symbol, put the IP address in brack-ets "[ ]".• Example of IP address (IPv4) entry: "ipaddrfax@[192.168.1.1]"To use an IP address (IPv6), enter "IPv6:" following the left bracket "[ ".• Example of IP address (IPv6) entry: "ipaddr-
fax@[IPv6:fe80::220:6bff:fe10:2f16]"To enter a host name following the @ symbol, brackets "[ ]" are unneces-sary.• Example of host name entry: "[email protected]"
6-4 d-Color MF 752/652

6
Tips- To check the settings for a registered destination, select its registered name, then tap [Check Job Set.].- To change the settings for a registered destination, select its registered name, then tap [Edit].- To delete a registered destination, select its registered name, then tap [Delete].
[Internet Fax]
To display: [Utility] - [One-Touch/User Box Registration] - [Create One-Touch Destination] - [Address Book (Public)] - [Internet Fax] - [New]
Register destination E-mail addresses.
Tips- To check the settings for a registered destination, select its registered name, then tap [Check Job Set.].- To change the settings for a registered destination, select its registered name, then tap [Edit].- To delete a registered destination, select its registered name, then tap [Delete].
Related setting (for the administrator)- By registering E-mail address prefixes and suffixes, you can complement E-mail address entry. For de-
tails, refer to page 7-19.
[Port Number] If necessary, change the port number.In normal circumstances, you can use the original port number.[25] is specified by default.
[Destination Machine Type] Select whether the recipient machine supports color printing. [Monochrome] is specified by default.
Settings Description
Settings Description
[No.] Destination registration number. [No.] is automatically registered from a lower number that is not used. If you want to specify a number, tap [No.] and enter the number within the range of 1 to 2000.
[Name] Enter the destination name to be displayed on the Touch Panel (using up to 24 characters).Assign a name that helps you easily identify the destination.
[Sort Character] Enter the same one as the registered name (using up to 24 characters).You can sort destinations by registration name.
[Index] Select a corresponding character so that the destination can be index-searched by registration name.• If an alphabet character is specified for the initial of a registration name,
search text is automatically specified with the alphabet character. If an-ything other than alphabet character is specified for the initial of a reg-istration name, [etc] is specified by default.
• For a frequently used destination, also select [Favorites]. If [Favorites] is selected, the destination will appear in the main screen in fax/scan mode, enabling the user to easily select a destination.
[E-Mail Address] Enter a destination E-mail address.If prefixes and suffixes are registered, you can recall a registered domain name etc. to complement entry.
[RX Ability (Destination)] Select the specifications of original data that the recipient machine can re-ceive in [Compression Type], [Paper Size] and [Resolution].
d-Color MF 752/652 6-5

6
[Group]
To display: [Utility] - [One-Touch/User Box Registration] - [Create One-Touch Destination] - [Group] - [New]
Register multiple destinations as a group. You can register different types of destinations for a group, such as E-Mail TX, SMB Send and Fax TX.
Tips- To check the settings for a registered group, select its registered name, then tap [Check Job Set.].- To change the settings for a registered group, select its registered name, then tap [Edit].- To delete a registered group, select its registered name, then tap [Delete].
[E-Mail Settings]
To display: [Utility] - [One-Touch/User Box Registration] - [Create One-Touch Destination] - [E-Mail Settings]
Register fixed subject and text phrases of the E-mail. You can select a registered subject and message text before sending.
Settings Description
[Name] Enter the group name to be displayed on the Touch Panel (using up to 24 characters).Assign a name that helps you easily identify the destination.
[Sort Character] Enter the same one as the registered name (using up to 24 characters).You can sort destinations by registration name.
[Index] Select a corresponding character so that the destination can be index-searched by registration name.• If an alphabet character is specified for the initial of a registration name,
search text is automatically specified with the alphabet character. If an-ything other than alphabet character is specified for the initial of a reg-istration name, [etc] is specified by default.
• For a frequently used destination, also select [Favorites]. If [Favorites] is selected, the destination will appear in the main screen in fax/scan mode, enabling the user to easily select a destination.
[Select Group] Select destinations to be included in a group. To narrow down destina-tions, tap [Index] or [Registration Number], and enter an index or registra-tion number.You can register up to 500 destinations for a group. You can also register different types of destinations, such as E-mail address and fax number, in a group.
[Check Program Settings] If necessary, check the destinations registered for the group.
Settings Description
[E-Mail Subject] Register a fixed subject phrase of the E-mail message. You can register up to 10 subject phrases.Tapping [E-Mail Subject] displays a list of subjects registered on this ma-chine.The subject appears as [Default] is automatically inserted as the subject when sending E-mail. To change the subject to be automatically inserted, select a subject you wish to change to, and then tap [Set as Default].
[E-mail Body] Register a fixed text phrase of the E-mail message. You can register up to 10 text phrases.Pressing [E-mail Body] displays a list of bodies registered on this machine.The message text appears as [Default] is automatically inserted as the message text when sending E-mail. To change the text to be automatically inserted, select a text you wish to change to, then Tap [Set as Default].
6-6 d-Color MF 752/652
6
[E-Mail Subject]
To display: [Utility] - [One-Touch/User Box Registration] - [Create One-Touch Destination] - [E-Mail Settings] - [E-Mail Subject] - [New]
Register a fixed subject phrase of the E-mail message. You can register up to 10 subject phrases.
Tips- To check the registered fixed subject phrase, select the subject, then tap [Check Job Settings].- To change the registered fixed subject phrase, select the subject, then tap [Edit].- To delete the registered fixed subject phrase, select the subject, then tap [Delete].
[E-mail Body]
To display: [Utility] - [One-Touch/User Box Registration] - [Create One-Touch Destination] - [E-Mail Settings] - [E-mail Body] - [New]
Register a fixed text phrase of the E-mail message. You can register up to 10 text phrases.
Tips- To check the registered fixed text phrase, select the text, then tap [Check Job Settings].- To change the registered fixed text phrase, select the text, then tap [Edit].- To delete the registered fixed text phrase, select the text, then tap [Delete].
[Limiting Access to Destinations]
To display: [Utility] - [One-Touch/User Box Registration] - [Limiting Access to Destinations]
Limit the access to destinations for each user.
Tips- You can specify [Apply Levels/Groups to Destinations] within the access allowed level for the respective
users. For details, contact your administrator.- To specify a reference allowed group, the administrator must register the group in advance. For details,
contact your administrator.
d Reference
How to configure the setting for limiting the access to destinations for each user is explained using Web Con-
nection. For details, refer to [User's Guide: Web Management Tool].
Settings Description
[Subject] Enter a fixed subject phrase (using up to 64 characters).
Settings Description
[Body] Enter a fixed text phrase (using up to 256 characters).
Settings Description
[Apply Levels/Groups to Destinations]
To limit access to a destination by users, assign a permissible access level or reference allowed group to the destination.After selecting a destination from [Address Book], [Group] or [Program], tap [Apply Level] or [Apply Group], then assign an access allowed level or reference allowed group to the destination.
d-Color MF 752/652 6-7

6
[User Settings]
To display: [Utility] - [User Settings]
Press this button to enable users to change settings. You can change the defaults or screen displays of the copy, scan/fax, or print function in a user-friendly manner to suit your environment.
[System Settings]
To display: [Utility] - [User Settings] - [System Settings]
Configure the operating environment of this machine.
Settings Description
[System Settings] Configure the operating environment of this machine.
[Custom Display Settings] Change the Touch Panel display to the convenience of the user.
[Copier Settings] Configure settings for copy operations.
[Scan/Fax Settings] Configure setting for fax and scan operations.
[Printer Settings] Configure settings for printer operations.
[Change Password] Change the password of the user who is logged in through user authenti-cation.
[Change E-Mail Address] Change the E-mail address of the user who is logged in through user au-thentication.
[Register Authentication In-formation]
Register the biometric authentication information or Card authentication information of the user who is logged in through user authentication.
[Synchronize User Auth. and Account Track]
When user authentication and account track are both employed, specify whether to synchronize user authentication and account track setting for the login user.
[Cellular Phone/PDA Set-ting]
Configure the settings for printing from a Bluetooth-compatible mobile phone, smartphone, tablet PC or others.
Settings Description
[Language Selection] Specify the language to be displayed on the Touch Panel and the lan-guage used to enter data using the keyboard.
[Select Keyboard] Select a type of the keyboard to be displayed on the Touch Panel.
[Measurement Unit Set-tings]
Select a measurement unit for numeric values displayed on the Touch Panel.
[Paper Tray Settings] Configure the settings related to selection and switching of paper trays.
[Auto Color Level Adjust.] When setting the color mode to [Auto Color] to scan an original, adjust the standard to judge whether the original is in color or black and white.
[Power Supply/Power Save Settings]
This option is available when a user's change is permitted by the adminis-trator.
[Output Settings] This option is available when a user's change is permitted by the adminis-trator.
[AE Level Adjustment] This option is available when a user's change is permitted by the adminis-trator.
[Auto Paper Select for Small Original]
Specify whether to copy an original when an original that is so small that the machine cannot detect the size automatically is placed on the Original Glass.
[Blank Page Print Settings] This option is available when a user's change is permitted by the adminis-trator.
[Page Number Print Posi-tion]
This option is available when a user's change is permitted by the adminis-trator.
[Blank Sheet Detection Level]
Adjust the level to detect blank pages when [Blank Page Removal] is spec-ified for [Original Settings] in copy or fax/scan mode.
[Separate Scan from Plat-en]
Select whether to always scan originals continuously without specifying [Separate Scan] when scanning originals using the Original Glass.
6-8 d-Color MF 752/652

6
[Auto Color Level Adjust.]
To display: [Utility] - [User Settings] - [System Settings] - [Auto Color Level Adjust.]
When setting the color mode to [Auto Color] to scan an original, adjust the standard to judge whether the original is in color or black and white.
Tap [Black] or [Full Color] to adjust to one of the five levels.
[3] is specified by default.
[Blank Sheet Detection Level]
To display: [Utility] - [User Settings] - [System Settings] - [Blank Sheet Detection Level]
Adjust the level to detect blank pages when [Blank Page Removal] is specified for [Original Settings].
Tap [Do not detect] or [Detect] to adjust to one of the five levels.
[0] is specified by default.
[Separate Scan from Platen]
To display: [Utility] - [User Settings] - [System Settings] - [Separate Scan from Platen]
Select whether to always scan originals continuously without specifying [Separate Scan] when scanning orig-inals using the Original Glass.
[No] is specified by default.
[Custom Display Settings]
To display: [Utility] - [User Settings] - [Custom Display Settings]
Change the Touch Panel display to the convenience of the user.
Settings Description
[Copier Settings] Change the default main screen in copy mode.
[Scan/Fax Settings] Change the default main screen in fax/scan mode.
[User Box Settings] Change the default main screen in user box mode.
[Function Display Key(Copy/Print)]
Change the function key to be displayed on the main screen in copy mode and the print settings screen in the User Box mode.
[Function Display Key(Send/Save)]
Change the function key to be displayed on the main screen in fax/scan mode and the send or save settings screen in the User Box mode.
[Copy Screen] Configure settings for the screen displayed in copy operations.
[FAX Active Screen] Select whether to display the screen indicating the machine status during fax transmission.
[Search Option Settings] Configure the contents of the search screen when performing an detail search for registered destinations.
d-Color MF 752/652 6-9

6
[Scan/Fax Settings] ([Custom Display Settings])
To display: [Utility] - [User Settings] - [Custom Display Settings] - [Scan/Fax Settings]
Change the default main screen in fax/scan mode.
[Function Display Key(Send/Save)]
To display: [Utility] - [User Settings] - [Custom Display Settings] - [Function Display Key(Send/Save)]
Change the function key to be displayed on the main screen in fax/scan mode and the send or save settings screen in the User Box mode.
Select a function key number, and specify the function to assign.
The following shows the default functions.- [Function Key 1]: [Simplex/Duplex]- [Function Key 2]: [Resolution]- [Function Key 3]: [Color]- [Function Key 4]: [File Type]- [Function Key 5]: [Scan Size]- [Function Key 6]: [E-mail Settings]- [Function Key 7]: [OFF]
Tips- The above functions can be configured when you are allowed to change a function key by the admin-
istrator.
[Search Option Settings]
To display: [Utility] - [User Settings] - [Custom Display Settings] - [Search Option Settings]
Configure the contents of the search screen when performing an detail search for registered destinations.
Settings Description
[Default Tab] Select the main screen in fax/scan mode from [Address Search/LDAP Search], [Job History], [Address Book], and [Direct Input].[Address Book] is specified by default.
[Program Default] Select a page to be displayed on the main screen of [Program].[PAGE1] is specified by default.
[Address Book Index De-fault]
Select the index and destination type that are initially shown when [Ad-dress Book] is displayed.• [Index]: Select the index search text that has been selected when the
destination was registered. [Favorites] is specified by default.
• [Address Type]: Select a destination type to be displayed such as E-mail, fax and user box. [All] is specified by default.
[Default Address Method] Select the list order of destinations to be displayed in [Address Book] be-tween registration number and registration name. If you select the registration name, destinations are sorted according to [Sort Character] specified for the destinations.[Number Order] is specified by default.
[Default Address Display Method]
Select the display in [Address Book] between button and list.[One-touch Button Layout] is specified by default.
Settings Description
[Uppercase and Lower-case Letters]
Select whether to distinguish between upper and lower case alphabet characters when searching for a registered destination.[Differentiate] is specified by default.
[Search Option Screen] If you want to change the setting of [Uppercase and Lowercase Letters] when searching for a destination, select [ON].If you select [ON], the check box for switching the setting is displayed in the [Name Search] and [Address Search] screen respectively.[OFF] is specified by default.
6-10 d-Color MF 752/652

6
[Scan/Fax Settings]
To display: [Utility] - [User Settings] - [Scan/Fax Settings]
Configure setting for fax and scan operations.
[JPEG Compression Level]
To display: [Utility] - [User Settings] - [Scan/Fax Settings] - [JPEG Compression Level]
Select the default compression method for color fax from [High Quality], [Standard] and [High Compression].
Data size is the largest in [High Quality] and the lowest in [High Compression].
[Standard] is specified by default.
[Black Compression Level]
To display: [Utility] - [User Settings] - [Scan/Fax Settings] - [Black Compression Level]
Select the default compression method for black-and-white fax from [MH] and [MMR].
Data size of [MH] is larger than [MMR]. If you cannot open the file saved in [MMR], save data in [MH].
[MMR] is specified by default.
[Default Scan/Fax Settings]
To display: [Utility] - [User Settings] - [Scan/Fax Settings] - [Default Scan/Fax Settings]
Change the default settings (settings when the power is turned on, and the Reset is pressed) in fax/scan mode.
You can change the setting by selecting [Current Setting] after the option settings in fax/scan mode are changed.
[Factory Default] is specified by default.
Settings Description
[JPEG Compression Level] Select the default compression method for color fax from [High Quality], [Standard] and [High Compression].
[Black Compression Level] Select the default compression method for black-and-white fax from [MH] and [MMR].
[TWAIN Lock Time] If you scan data from a computer using TWAIN-compatible application software, the Control Panel of this machine is locked.If necessary, change the time until the operation panel is unlocked auto-matically.
[Default Scan/Fax Settings] Change the default settings (settings when the power is turned on, and the Reset is pressed) in fax/scan mode.
[Default Enlarge Display Settings]
Change the default settings (settings when the power is turned on, and the Reset is pressed) in fax/scan mode, when using in enlarge display mode.
[Compact PDF/XPS Com-pression Level]
Select the default compression method for saving data in the compact PDF or compact XPS format from [High Quality], [Standard] and [High Compression].
[Color TIFF Type] Select the default compression method for saving original data in the TIFF format from [TIFF(TTN2)] and [TIFF(modified TAG)].
[Graphic Outlining] Select the outline processing accuracy of images (graphics) when saving data in the Outline PDF format.
[Auto Rename Function] To avoid duplicate file name be created in the destination when the file name is specified by the user, select whether to automatically add text to the file name.
d-Color MF 752/652 6-11

6
[Default Enlarge Display Settings]
To display: [Utility] - [User Settings] - [Scan/Fax Settings] - [Default Enlarge Display Settings]
Change the default settings (settings when the power is turned on, and the Reset is pressed) in fax/scan mode, when using in enlarge display mode.
You can change the setting by selecting [Current Setting] after the option settings in fax/scan mode are changed.
[Factory Default] is specified by default.
[Color TIFF Type]
To display: [Utility] - [User Settings] - [Scan/Fax Settings] - [Color TIFF Type]
Select the default compression method for saving original data in the TIFF format from [TIFF(TTN2)] and [TIFF(modified TAG)].
If you cannot open the file saved in [TIFF(TTN2)], save data in [TIFF(modified TAG)].
[TIFF(TTN2)] is specified by default.
6-12 d-Color MF 752/652

7 Description Of Setup Buttons
(Administrator Settings)


7
7 Description Of Setup Buttons (Administrator Set-tings)
[Administrator Settings]
To display: [Utility] - [Administrator Settings]
Press this button to display settings that can only be configured by the administrator. To configure settings, you need to enter the administrator password of this machine.
You can specify the initial operations of the copy, print, fax, or User Box function, power saving function, and network function to suit your environment. Also, you can manage the use status of this machine or inhibit an information leakage by specifying the authentication or security function.
For the administrator password, refer to the [Quick Assist Guide] booklet manual.
Settings Description
[System Settings] Configure the operating environment of this machine such as the date and time of this machine, power saving function, functional operations, and screen displays.
[Administrator/Machine Settings]
Register information on the administrator and this machine.
[One-Touch/User Box Registration]
Register destinations or User Boxes. Also, print an address list, or specify the maximum number of User Boxes that can be created.
[User Authentication/Ac-count Track]
Configure user authentication and account track.You can restrict users who can use this machine or manage the use status of this machine. Specify the authentication method, or register user infor-mation or account track information.
[Network Settings] Configure the network function such as TCP/IP settings or the Scan-to-Send function operating environment.
[Copier Settings] Configure each function used in copy mode.
[Printer Settings] Specify the time-out time to limit a communication between this machine and a computer, or configure settings of a communication with the printer driver.
[Fax Settings] Configure the operating environment of the fax or network fax function.
[System Connection] Configure settings to establish the association of this machine and other system.
[Security Settings] Configure the security functions of this machine, such as password and data management method.
[License Settings] Issue a request code required to use an advanced function, or enable an advanced function.
[OpenAPI Certification Management Setting]
Specify a restriction code to prevent an OpenAPI connection application from being registered on this machine.
[Remote Access Setting] Specify whether to remotely rewrite user data (import or export) such as address information using the remote diagnosis system.
d-Color MF 752/652 7-3

7
[System Settings]
To display: [Utility] - [Administrator Settings] - [System Settings]
Configure the operating environment of this machine such as the date and time of this machine, power saving function, functional operations, and screen displays.
Settings Description
[Power Supply/Power Save Settings]
Configure the settings on how to use the Power key and the machine ac-tion in power save mode.
[Output Settings] Configure the output settings of this machine, such as the print setting of print and received fax data, and changing of primary output tray.
[Date/Time Settings] Specify the current date and time and time zone of this machine.
[Daylight Saving Time] Select whether to apply daylight saving time settings. To apply daylight saving time, specify the daylight saving time, and the start and end dates.
[Weekly Timer Settings] Use the weekly timer to configure settings for enabling automatic switching between normal and power save modes.To use the weekly timer, specify the schedule for switching between power save and normal modes. Optionally, you can use a learning function that automatically sets a schedule to fit your office usage.
[Restrict User Access] You can restrict change and delete operations for each user. Also, you can delete registered copy programs.
[Expert Adjustment] Specify this setting if the color tone of print image, staple, hole-punch, and folding positions are changed. You can adjust various settings such as cor-rection of printed image, staple, hole-punch, and folding positions.
[List/Counter] Print the list that includes the machine settings and manage the counter.
[Reset Settings] Select whether to reset the functions and settings that are currently dis-played when this machine has not been operated for a certain period of time.
[User Box Settings] Specify the user box settings, such as deletion of unnecessary user boxes and files, and the time until the file saved in each user box is automatically deleted.
[Standard Size Setting] Specify the detection capability setting of original size in the Original Glass and the Foolscap paper size setting.
[Stamp Settings] Register header/footer programs and specify the stamp setting when sending a fax.
[Blank Page Print Settings] Select whether to print date/time and stamp on blank pages inserted by the cover seat and inter sheet functions.
[Registered Key Settings] Change the function to be assigned to Register Key 1 to Register Key 3 in the Control Panel.
[Job Priority Operation Set-tings]
Specify the printing priority order and whether to skip a job when you can-not perform a printing job immediately.
[Default Bypass Paper Type Setting]
Specify the default paper type used in the Bypass Tray.
[Page Number Print Posi-tion]
Select the printing position on the back side of the paper relative to the printing position of the page number in the front side for printing on both sides and when specifying both the booklet format and page number print-ing at the same time.
[Preview Settings] Specify the preview function settings, such as the display mode of preview images that appear when Preview is pressed on the Control Panel.
[Enlarge Display Settings] Select whether to use Enlarge Display mode as the initial display of the Touch Panel. Also, select whether to inherit the settings configured in the normal screen display when switching the screen from Normal to Enlarge Display.
[Scan File Name Settings] Press this button to change the default file name of scanned original data when saving it.
[Set Paper Name by User] Select whether to use custom paper with which a given paper name and type have been registered. To use custom paper, register paper name and type to be assigned to it.
7-4 d-Color MF 752/652

7
[Output Settings]
To display: [Utility] - [Administrator Settings] - [System Settings] - [Output Settings]
Configure the output settings of this machine, such as the print setting of print and received fax data, and changing of primary output tray.
[Print/Fax Output Settings]
To display: [Utility] - [Administrator Settings] - [System Settings] - [Output Settings] - [Print/Fax Output Set-tings]
Select when to start printing received print/fax data.
[Output Tray Settings]
To display: [Utility] - [Administrator Settings] - [System Settings] - [Output Settings] - [Output Tray Settings]
Select the tray to which paper is ejected first in Copy, Print, Fax, or Print Report.
Different default values are available for different options installed on this machine.
Tips- This item is available when the optional Finisher is installed.
[Shift Output Each Job]
To display: [Utility] - [Administrator Settings] - [System Settings] - [Output Settings] - [Shift Output Each Job]
Select whether to shift paper for each job before ejection.
[Yes] is specified by default.
Tips- This item is available when the optional Finisher is installed.
[Custom Display Settings] Change the view of the main screen for the main menu and each mode in a user-friendly manner.
Settings Description
Settings Description
[Print/Fax Output Settings] Select when to start printing received print/fax data.
[Output Tray Settings] Select the tray to which paper is ejected first in Copy, Print, Fax, or Print Report.This item is available when the optional Finisher is installed.
[Shift Output Each Job] Select whether to shift paper for each job before ejection.This item is available when the optional Finisher is installed.
Settings Description
[Print] Select when to start printing received print data.• [Batch Print]: Printing is started after all pages are received.• [Page Print]: Printing is started as the first page is received.[Page Print] is specified by default.
[Fax] Select when to start printing received fax data.• [Batch Print]: Printing is started after all pages are received.• [Page Print]: Printing is started as the first page is received.For Internet Fax, Batch Print is always selected.[Batch Print] is specified by default.
d-Color MF 752/652 7-5

7
[Date/Time Settings]
To display: [Utility] - [Administrator Settings] - [System Settings] - [Date/Time Settings]
Specify the current date and time and time zone of this machine.
[Weekly Timer Settings]
To display: [Utility] - [Administrator Settings] - [System Settings] - [Weekly Timer Settings]
Select whether to automatically switch between power save and normal mode using the weekly timer.
To use the weekly timer, specify the schedule for switching between power save and normal modes. Option-ally, you can use the tracking function that automatically sets a schedule to fit your office usage.
Settings Description
[Current Time] Enter the current date and time.• [Set Date]: Automatically adjust the date and time of this machine using
an NTP server. To perform time adjustment, set the time difference be-tween UTC and your local time in [Time Zone] and tap [Set Date]. This button is available if an NTP server has been registered by selecting [Administrator Settings] - [Network Settings] - [Detail Settings] - [Time Adjustment Setting].
[Time Zone] To automatically adjust the time of this machine using an NTP server, set the time difference between UTC and your local area in multiples of 30 min-utes.
Settings Description
[Weekly Timer ON/OFF Settings]
Specify whether to use the weekly timer. Then, select a power save mode for the machine to enter according to the weekly timer.
[Yes]/[No] Specify whether to use the weekly timer.[Yes] is specified by default.
[Power Save Mode Setting]
Select a power save mode for the machine to enter according to the weekly timer.• [ErP Auto Power OFF]: A mode that provides a higher power saving ef-
fect. In this mode, no job can be received.• [Sleep]: This mode has a lower power saving effect than the [ErP Auto
Power OFF] mode; however, it allows you to receive print jobs from a fax machine or computer. The received jobs are printed when the ma-chine returns to the normal mode.
[Sleep] is specified by default.
[Time Settings] Specify the time for switching to the power save mode ([OFF Time]) and the time for returning to the normal mode ([ON Time]) for each day of the week.• [Set All]: Select days of the week and specify times for [ON Time] and
[OFF Time] for all the selected days.• [Delete]: Deletes the time you have selected by using[ ][ ]
[Date Settings] Configure the day to which the weekly timer is applied.Select the day to which the weekly timer is applied by switching the calen-dar by [Year] and [Monthly]. Optionally, you can collectively configure the appropriate days for each day of the week with [Daily Setting].
[Select Time for Power Save]
Specify whether to set a time zone for switching the machine in the normal mode with the weekly timer enabled temporarily to the sleep mode during lunch time, for example.If you select [Yes], specify the time zone for switching to the sleep mode.• [Power Save Start Time]: Specify the time for the machine to enter the
sleep mode.• [Power Save End Time]: Specify the time for the machine to return to
the normal mode.[No] is specified by default.
[Password for Non-Busi-ness Hours]
Specify whether to restrict the use of this machine in the Power Save mode by requesting a password.To request a password in order to restrict operation, enter the password for a user to enter (using up to eight characters).[No] is specified by default.
7-6 d-Color MF 752/652

7
[Restrict User Access]
To display: [Utility] - [Administrator Settings] - [System Settings] - [Restrict User Access]
You can restrict change and delete operations for each user. Also, you can delete registered copy programs.
[Restrict Access to Job Settings]
To display: [Utility] - [Administrator Settings] - [System Settings] - [Restrict User Access] - [Restrict Access to Job Settings]
Select whether to allow the user to change information, such as destinations and senders' E-mail addresses.
[Tracking Function Set-tings]
Specify whether to use the tracking (learning) function that automatically sets the weekly timer schedule to fit the operating status of your office.To use the tracking function, select [Auto Standby Adjustment Level] to specify the level at which it is judged that this machine is inactive. The high-er the level is, the more easily this machine is judged as inactive, resulting in setting of a longer OFF time.[ON] is specified by default.
[Display ON/OFF Time] Displays the switching times to enter the power save mode ([OFF Time]) and to the normal mode ([ON Time]) set by the tracking function.Tap [Clear Usage Data] to delete data related to the usage status of this machine and reset the values for [OFF Time] and [ON Time] that have been automatically set.
Settings Description
Settings Description
[Copy Program Lock Set-tings]
Restricts a change or deletion of the registered copy or image quality ad-justment program name. This option can be specified for each program.
[Delete Saved Copy Pro-gram]
Deletes a registered copy or image quality adjustment program.
[Restrict Access to Job Settings]
Select whether to allow the user to change information, such as destina-tions and senders' E-mail addresses.
[Restrict Operation] Specify items for which access is restricted.
Settings Description
[Changing Job Priority] Select whether to allow the user to change the priority of print jobs.If [Restrict] is selected, [Increase Priority] does not appear in [Job List] screen.[Allow] is specified by default.
[Delete Other User Jobs] Select whether to allow the user to delete other user jobs if user authenti-cation is used on this machine.If [Allow] is selected, you can delete other user jobs in [Job List] screen.[Restrict] is specified by default.
[Registering and Changing Addresses]
Select whether to allow the user to register or change destinations.[Allow] is specified by default.
[Changing Zoom Ratio] Select whether to allow the user to change the zoom ratio.[Allow] is specified by default.
[Change the "From" Ad-dress]
Select whether to allow the user to change sender E-mail address ("From" address).• [Allow]: Allow the user to change From address.• [Administrator E-Mail Address]: Prohibit the change of From address
and use administrator's E-mail address.• [Login User Address]: Prohibit the change of From address and use us-
er's E-mail address. Administrator's E-mail address is used if user's E-mail address has not been registered.
The default is [Allow] (without user authentication) or [Login User Address] (with user authentication).
[Change Registered Over-lay]
Select whether to allow the user to overwrite or delete a registered overlay image.[Allow] is specified by default.
d-Color MF 752/652 7-7

7
[Restrict Operation]
To display: [Utility] - [Administrator Settings] - [System Settings] - [Restrict User Access] - [Restrict Operation]
Specify items for which access is restricted.
[Reset Settings]
To display: [Utility] - [Administrator Settings] - [System Settings] - [Reset Settings]
Select whether to reset the functions and settings that are currently displayed when this machine has not been operated for a certain period of time.
[Biometric/IC Card Info. Registration]
Select whether to allow the user to register or change user's biometric or Card authentication information.[Restrict] is specified by default.
[Synchronize User Authen-tication & Account Track]
Specify whether to allow users to change the settings for synchronizing user authentication and account track when user authentication and ac-count track are enabled.This option is available when [Synchronize by user ] is selected in [Admin-istrator Settings] - [User Authentication/Account Track] - [General Settings] - [Synchronize User Authentication & Account Track].[Allow] is specified by default.
Settings Description
Settings Description
[Restrict Broadcasting] Select whether to prohibit the user from sending faxes to multiple destina-tions. To prohibit broadcast, select [ON].[OFF] is specified by default.
Settings Description
[System Auto Reset] Select whether to reset all settings (except registered settings) when this machine has not been operated for a certain period of time.
[Auto Reset] Select whether to reset all settings (except registered settings) for each of Copy, Fax/Scan, User Box functions when this machine has not been op-erated for a certain period of time.
[Job Reset] Select whether to reset settings for the conditions that are applied when changing users or loading document to ADF.
7-8 d-Color MF 752/652

7
[Job Reset]
To display: [Utility] - [Administrator Settings] - [System Settings] - [Reset Settings] - [Job Reset]
Select whether to reset settings for the conditions that are applied when changing users or loading document to ADF.
[Stamp Settings]
To display: [Utility] - [Administrator Settings] - [System Settings] - [Stamp Settings]
Register header/footer programs and specify the stamp setting when sending a fax.
Settings Description
[When Account is changed] Select whether to initialize all settings (except registered settings) when the key counter or management card is removed.[Reset] is specified by default.
[When original is set on ADF]
Select whether to reset all settings (except registered settings) when doc-ument is loaded into the ADF.[Do Not Reset] is specified by default.
[Next Job] Select whether to reset Staple Setting, Original Set/Bind Direction settings, and TX Settings for each job.• [Staple Setting]: Select whether or not to take over the settings upon
completion of a job for which Staple has been specified.[OFF] is specified by default.
• [Original Set/Bind Direction]:Select whether or not to take over the set-tings upon completion of a job for which Original Set and Bind Direction have been specified.[OFF] is specified by default.
• [Reset Data After Job]: Select whether to clear all settings or only des-tinations when resetting for each job in Scan/Fax TX Settings. If you se-lect [Confirm with User], a confirmation screen appears to ask whether you want to clear settings or destinations. [Reset All] is specified by default.
[Default Basic/Enlarge Dis-play Common Setting]
Select whether to configure the initial values for Normal and Enlarge Dis-play mode at the same time.If [Apply to All] is selected, [Default Enlarge Display Settings] does not ap-pear. Initial values for each mode that are changed in [Default Copy Set-tings] or [Default Scan/Fax Settings] are applied to both Normal and Enlarge Display modes.[Do not Apply] is specified by default.
Settings Description
[Header/Footer Settings] You can register header/footer programs, and change or delete registered programs.
[Fax TX Settings] Select whether to cancel stamp setting when sending a fax.
d-Color MF 752/652 7-9

7
[Header/Footer Settings]
To display: [Utility] - [Administrator Settings] - [System Settings] - [Stamp Settings] - [Header/Footer Settings] - [New]
You can register header/footer programs, and change or delete registered programs.
Tips- To check or edit a header/footer program you registered, select it, then tap [Check/Edit].- To delete a header/footer program you registered, select it, then tap [Delete].
[Fax TX Settings]
To display: [Utility] - [Administrator Settings] - [System Settings] - [Stamp Settings] - [Fax TX Settings]
Select whether to cancel stamp setting when sending a fax. Normally, cancel the stamp setting to prevent image becoming unreadable when a stamp is printed.
[Cancel] is specified by default.
[Job Priority Operation Settings]
To display: [Utility] - [Administrator Settings] - [System Settings] - [Job Priority Operation Settings]
Specify the printing priority order and whether to skip a job when you cannot perform a printing job immedi-ately.
Settings Description
[Name] Enter the name of header/footer program (using up to 16 characters).When selecting a header or footer, give it a name that helps you easily identify it.
[Header Settings] Select whether to print a header. To print it, specify what to print.• [Text]: Characters you entered are printed.• [Date/Time]: Select whether to print date and time. To print it, select the
appropriate display format.• [Other]: Select whether to print information, such as job number, ma-
chine's serial number, and distribution control number.[Do Not Print] is specified by default.
[Footer Settings] Select whether to print a footer. To print it, specify what to print.• [Text]: Characters you entered are printed.• [Date/Time]: Select whether to print date and time. To print it, select the
appropriate display format.• [Other]: Select whether to print information, such as job number, ma-
chine's serial number, and distribution control number.[Do Not Print] is specified by default.
[Pages] Select to print the header/footer on all pages or only on the first page.[All Pages] is selected by default.
[Text Details] Select the size, font, and color of the text to be printed.
Settings Description
[Fax RX Job Priority] Select whether to give priority to the printing of a fax if it is received during copying or printing.[No] is specified by default.
[Skip Job (Fax)] Select whether or not to handle the subsequent job as long as it is a print-ing job for the received fax when printing has stopped because, for exam-ple, there is no paper.[Yes] is specified by default.
[Skip Job (Copy, Print)] Select whether or not to handle the subsequent job as long as it is not a printing job for the received fax when printing has stopped because, for ex-ample, there is no paper.[Yes] is specified by default.
7-10 d-Color MF 752/652

7
[Preview Settings]
To display: [Utility] - [Administrator Settings] - [System Settings] - [Preview Settings]
Specify the preview function settings, such as the display mode of preview images that appear when Preview is pressed on the Control Panel.
[Scan File Name Settings]
To display: [Utility] - [Administrator Settings] - [System Settings] - [Scan File Name Settings]
Press this button to change the default file name of scanned original data when saving it.
The file name is:"initial of the function" + "text to be added" + "date" + "sequential number" + "page number" + "file extension".
Settings Description
[Original Direction Confir-mation Screen]
Select whether or not to display the screen to select the direction in which the original is loaded after pressing Preview.[ON] is specified by default.
[Realtime Preview] Select whether or not to display a preview image for each page when scan-ning an original in Scan/Fax mode.Each preview image shows the scanned original as is.[OFF] is specified by default.
[Preview Display Condi-tions (Standard Applica-tion)]
Select the conditions for displaying preview images.• [Jobs Excuted]: Shows a preview image when pressing Start to exe-
cute a job as well as when pressing Preview.• [Preview Settings Screen]: Shows a preview image only when Preview
is pressed.[Preview Settings Screen] is specified by default.
[Preview Display Condi-tions (Registered Applica-tion)]
Select conditions to display preview images when using an OpenAPI ap-plication.• [Jobs Excuted]: Shows a preview image when pressing Start to exe-
cute a job as well as when pressing Preview.• [Preview Settings Screen]: Shows a preview image only when Preview
is pressed.• [Use Standard App. Settings]: Follows the setting of [Preview Display
Conditions (Standard Application)].[Preview Settings Screen] is specified by default.
Settings Description
[Function Mode Initial] Select whether to use an initial of the relevant function as a prefix for the file name. The following letters are used as prefixes for file name.C: CopyS: Fax/Scan, User BoxP: Print[Attach] is selected by default.
[Supplementary File Name] Select whether to add a device name or desired text to the file name. To add desired text, enter it.For the device name, use the name you specified by selecting [Administra-tor/Machine Settings] - [Input Machine Address] - [Device Name].[Device Name] is set by default.
d-Color MF 752/652 7-11

7
[One-Touch/User Box Registration]
To display: [Utility] - [Administrator Settings] - [One-Touch/User Box Registration]
Register destinations or User Boxes. Also, print an address list, or specify the maximum number of User Box-es that can be created.
[Create One-Touch Destination]
To display: [Utility] - [Administrator Settings] - [One-Touch/User Box Registration] - [Create One-Touch Des-tination]
Register frequently used destinations and fixed subject and text phrases of the E-mail. You can select regis-tered information before sending.
[Address Book (Public)]
To display: [Utility] - [Administrator Settings] - [One-Touch/User Box Registration] - [Create One-Touch Des-tination] - [Address Book (Public)]
Register destinations for each transmission mode, such as E-Mail TX and Fax TX.
Settings Description
[Create One-Touch Desti-nation]
Register frequently used destinations and fixed subject and text phrases of the E-mail. You can select registered information before sending.
[Create User Box] Register various user boxes such as shared user box and exclusive user box.
[One-Touch/User Box Registration List]
Print the list of destination registration information.
[Maximum Number of User Boxes]
Specify the maximum number of user boxes that can be created for each user.
Settings Description
[Address Book (Public)] Register destinations for each transmission mode, such as E-Mail TX and Fax TX.
[Group] Register multiple destinations as a group. You can register different types of destinations for a group, such as E-Mail TX, SMB Send and Fax TX.
[E-Mail Settings] Register fixed subject and text phrases of the E-mail. You can select a reg-istered subject and message text before sending.
Settings Description
[E-Mail] Register destination E-mail addresses.
[User Box] Register user boxes to save.
[Fax] Register destination fax numbers.
[PC (SMB)] Register destination computer names (host name) or IP addresses.
[FTP] Register destination FTP server host names or IP addresses.
[WebDAV] Register destination WebDAV server host names or IP addresses.
[IP Address Fax] Enter any of the IP address, host name or E-mail address of the destina-tion.
[Internet Fax] Register destination E-mail addresses.
7-12 d-Color MF 752/652

7
[IP Address Fax]
To display: [Utility] - [Administrator Settings] - [One-Touch/User Box Registration] - [Create One-Touch Des-tination] - [Address Book (Public)] - [IP Address Fax] - [New]
Enter any of the IP address, host name or E-mail address of the destination.
Tips- To check the settings for a registered destination, select its registered name, then tap [Check Job Set.].- To change the settings for a registered destination, select its registered name, then tap [Edit].- To delete a registered destination, select its registered name, then tap [Delete].
Settings Description
[No.] Destination registration number. [No.] is automatically registered from a lower number that is not used. If you want to specify a number, tap [No.] and enter the number within the range of 1 to 2000.
[Name] Enter the destination name to be displayed on the Touch Panel (using up to 24 characters).Assign a name that helps you easily identify the destination.
[Sort Character] Enter the same one as the registered name (using up to 24 characters).You can sort destinations by registration name.
[Index] Select a corresponding character so that the destination can be index-searched by registration name.• If an alphabet character is specified for the initial of a registration name,
search text is automatically specified with the alphabet character. If an-ything other than alphabet character is specified for the initial of a reg-istration name, [etc] is specified by default.
• For a frequently used destination, also select [Favorites]. If [Favorites] is selected, the destination will appear in the main screen in fax/scan mode, enabling the user to easily select a destination.
[Destination] Enter a destination IP address or host name.• Example of IP address (IPv4) entry: "192.168.1.1"• Example of IP address (IPv6) entry: "fe80::220:6bff:fe10:2f16"• Example of host name entry: "host.example.com" (Including a domain
name.)
You can also specify a destination by E-mail address. To specify a desti-nation by E-mail address, enter the destination IP address or host name following "ipaddrfax@".To enter an IP address following the @ symbol, put the IP address in brack-ets "[ ]".• Example of IP address (IPv4) entry: "ipaddrfax@[192.168.1.1]"To use an IP address (IPv6), enter "IPv6:" following the left bracket "[ ".• Example of IP address (IPv6) entry: "ipaddr-
fax@[IPv6:fe80::220:6bff:fe10:2f16]"To enter a host name following the @ symbol, brackets "[ ]" are unneces-sary.• Example of host name entry: "[email protected]"
[Port Number] If necessary, change the port number.In normal circumstances, you can use the original port number.[25] is specified by default.
[Destination Machine Type] Select whether the recipient machine supports color printing. [Monochrome] is specified by default.
d-Color MF 752/652 7-13

7
[Internet Fax]
To display: [Utility] - [Administrator Settings] - [One-Touch/User Box Registration] - [Create One-Touch Des-tination] - [Address Book (Public)] - [Internet Fax] - [New]
Register destination E-mail addresses.
Tips- To check the settings for a registered destination, select its registered name, then tap [Check Job Set.].- To change the settings for a registered destination, select its registered name, then tap [Edit].- To delete a registered destination, select its registered name, then tap [Delete].
Related setting (for the administrator)- By registering E-mail address prefixes and suffixes, you can complement E-mail address entry. For de-
tails, refer to page 7-19.
Settings Description
[No.] Destination registration number. [No.] is automatically registered from a lower number that is not used. If you want to specify a number, tap [No.] and enter the number within the range of 1 to 2000.
[Name] Enter the destination name to be displayed on the Touch Panel (using up to 24 characters).Assign a name that helps you easily identify the destination.
[Sort Character] Enter the same one as the registered name (using up to 24 characters).You can sort destinations by registration name.
[Index] Select a corresponding character so that the destination can be index-searched by registration name.• If an alphabet character is specified for the initial of a registration name,
search text is automatically specified with the alphabet character. If an-ything other than alphabet character is specified for the initial of a reg-istration name, [etc] is specified by default.
• For a frequently used destination, also select [Favorites]. If [Favorites] is selected, the destination will appear in the main screen in fax/scan mode, enabling the user to easily select a destination.
[E-Mail Address] Enter a destination E-mail address.If prefixes and suffixes are registered, you can recall a registered domain name etc. to complement entry.
[RX Ability (Destination)] Select the specifications of original data that the recipient machine can re-ceive in [Compression Type], [Paper Size] and [Resolution].
7-14 d-Color MF 752/652

7
[Group]
To display: [Utility] - [Administrator Settings] - [One-Touch/User Box Registration] - [Create One-Touch Des-tination] - [Group] - [New]
Register multiple destinations as a group. You can register different types of destinations for a group, such as E-Mail TX, SMB Send and Fax TX.
Tips- To check the settings for a registered group, select its registered name, then tap [Check Job Set.].- To change the settings for a registered group, select its registered name, then tap [Edit].- To delete a registered group, select its registered name, then tap [Delete].
[E-Mail Settings]
To display: [Utility] - [Administrator Settings] - [One-Touch/User Box Registration] - [Create One-Touch Des-tination] - [E-Mail Settings]
Register fixed subject and text phrases of the E-mail. You can select a registered subject and message text before sending.
Settings Description
[Name] Enter the group name to be displayed on the Touch Panel (using up to 24 characters).Assign a name that helps you easily identify the destination.
[Sort Character] Enter the same one as the registered name (using up to 24 characters).You can sort destinations by registration name.
[Index] Select a corresponding character so that the destination can be index-searched by registration name.• If an alphabet character is specified for the initial of a registration name,
search text is automatically specified with the alphabet character. If an-ything other than alphabet character is specified for the initial of a reg-istration name, [etc] is specified by default.
• For a frequently used destination, also select [Favorites]. If [Favorites] is selected, the destination will appear in the main screen in fax/scan mode, enabling the user to easily select a destination.
[Select Group] Select destinations to be included in a group. To narrow down destina-tions, tap [Index] or [Registration Number], and enter an index or registra-tion number.You can register up to 500 destinations for a group. You can also register different types of destinations, such as E-mail address and fax number, in a group.
[Check Program Settings] If necessary, check the destinations registered for the group.
Settings Description
[E-Mail Subject] Register a fixed subject phrase of the E-mail message. You can register up to 10 subject phrases.Tapping [E-Mail Subject] displays a list of subjects registered on this ma-chine.The subject appears as [Default] is automatically inserted as the subject when sending E-mail. To change the subject to be automatically inserted, select a subject you wish to change to, then tap [Set as Default].
[E-mail Body] Register a fixed text phrase of the E-mail message. You can register up to 10 text phrases.Tapping [E-mail Body] displays a list of bodies registered on this machine.The message text appears as [Default] is automatically inserted as the message text when sending E-mail. To change the text to be automatically inserted, select a text you wish to change to, then tap [Set as Default].
d-Color MF 752/652 7-15
7
[E-Mail Subject]
To display: [Utility] - [Administrator Settings] - [One-Touch/User Box Registration] - [Create One-Touch Des-tination] - [E-Mail Settings] - [E-Mail Subject] - [New]
Register a fixed subject phrase of the E-mail message. You can register up to 10 subject phrases.
Tips- To check the registered fixed subject phrase, select the subject, then tap [Check Job Settings].- To change the registered fixed subject phrase, select the subject, then tap [Edit].- To delete the registered fixed subject phrase, select the subject, then tap [Delete].
[E-mail Body]
To display: [Utility] - [Administrator Settings] - [One-Touch/User Box Registration] - [Create One-Touch Des-tination] - [E-Mail Settings] - [E-mail Body] - [New]
Register a fixed text phrase of the E-mail message. You can register up to 10 text phrases.
Tips- To check the registered fixed text phrase, select the text, then tap [Check Job Settings].- To change the registered fixed text phrase, select the text, then tap [Edit].- To delete the registered fixed text phrase, select the text, then tap [Delete].
[One-Touch/User Box Registration List]
To display: [Utility] - [Administrator Settings] - [One-Touch/User Box Registration] - [One-Touch/User Box Registration List]
Print the list of destination registration information.
Settings Description
[Subject] Enter a fixed subject phrase (using up to 64 characters).
Settings Description
[Body] Enter a fixed text phrase (using up to 256 characters).
Settings Description
[Address Book List] Print the list of address books registered on this machine.
[Group List] Print the list of groups registered on this machine.
[Program List] Print the list of programs registered on this machine.
[E-Mail Subject/Text List] Print the list of E-mail subjects and message text registered on this ma-chine.
7-16 d-Color MF 752/652

7
[Address Book List]
To display: [Utility] - [Administrator Settings] - [One-Touch/User Box Registration] - [One-Touch/User Box Registration List] - [Address Book List]
Print the list of address books registered on this machine.
[Group List]
To display: [Utility] - [Administrator Settings] - [One-Touch/User Box Registration] - [One-Touch/User Box Registration List] - [Group List]
Print the list of groups registered on this machine.
[Program List]
To display: [Utility] - [Administrator Settings] - [One-Touch/User Box Registration] - [One-Touch/User Box Registration List] - [Program List]
Print the list of programs registered on this machine.
Settings Description
[List Output Number] Specify the range of destinations you want to print.• [Starting Destination No.]: Specify the registration number of the desti-
nation from which to start printing.• [Number of Destinations]: Specify the number of destinations you want
to print.
[Print Destination List by Type]
Select the type of destinations you want to print. You can further narrow down destinations to be printed from the print range you specified in [List Output Number].
[Print] Moves to a screen for configuring print settings.Change print settings as required, then tap [Start] to start printing.
Settings Description
[List Output Number] Specify the range of destinations you want to print.• [Starting Destination No.]: Specify the registration number of the desti-
nation from which to start printing.• [Number of Destinations]: Specify the number of destinations you want
to print.
[Print] Moves to a screen for configuring print settings.Change print settings as required, then tap [Start] to start printing.
Settings Description
[List Output Number] Specify the range of destinations you want to print.• [Starting Destination No.]: Specify the registration number of the pro-
gram from which to start printing.• [Number of Destinations]: Specify the number of programs you want to
print.
[Print Destination List by Type]
Select the type of destinations you want to print. You can further narrow down destinations to be printed from the print range you specified in [List Output Number].
[Print] Moves to a screen for configuring print settings.Change print settings as required, then tap [Start] to start printing.
d-Color MF 752/652 7-17

7
[E-Mail Subject/Text List]
To display: [Utility] - [Administrator Settings] - [One-Touch/User Box Registration] - [One-Touch/User Box Registration List] - [E-Mail Subject/Text List]
Print the list of E-mail subjects and message text registered on this machine.
Change print settings as required, then tap [Start] to start printing.
[Network Settings]
To display: [Utility] - [Administrator Settings] - [Network Settings]
Configure the network function such as TCP/IP settings or the Scan-to-Send function operating environment.
Settings Description
[TCP/IP Settings] Configure the settings for using this machine in a TCP/IP environment.
[NetWare Settings] Configure the settings for using this machine in a NetWare environment.
[HTTP Server Settings] Select whether to restrict the use of Web Connection, and configure the IPP operating environment.
[FTP Settings] Configure the FTP transmission environment and the FTP server function setting of this machine.
[SMB Settings] Configure the SMB transmission environment.
[LDAP Settings] Configure the settings to search for destinations from the LDAP server or Active Directory.
[E-Mail Settings] Configure the settings for sending and receiving E-mail with this machine.
[SNMP Settings] Configure the settings for obtaining the machine information and monitor-ing the machine using SNMP (Simple Network Management Protocol).
[AppleTalk Settings] When using the Mac operating system, set up the AppleTalk operating en-vironment.
[Bonjour Setting] When using the Mac operating system, set up the Bonjour operating envi-ronment.
[TCP Socket Settings] Configure the TCP Socket operating environment.
[Network Fax Settings] Select whether to use Internet fax and IP address fax respectively. To use IP address fax, configure the SMTP transmission environment.
[WebDAV Settings] Configure the WebDAV Send environment and the WebDAV server func-tion setting of this machine.
[DPWS Settings] Configure the settings to print or scan data using the Web service (DPWS: Devices Profile for Web Services).
[Distributed Scan Settings] Select whether to use the Distributed Scan Management with this ma-chine.
[SSDP Settings] Select whether to use the SSDP (Simple Service Discovery Protocol). To use SSDP, change the multicast TTL as necessary.
[Detail Settings] Configure the detailed network settings.
[IEEE802.1x Authentication Settings]
Select whether to use IEEE802.1x authentication. To use IEEE802.1x au-thentication, check the authentication status and configure the certification verification items.
[Web Browser Setting] Select whether to enable a Web Browser.
[Bluetooth Setting] Select whether to enable Bluetooth.
[Single Sign-On Setting] Join this machine to the Active Directory domain, and configure settings to build the single sing-on environment.
[IWS Settings] Configure the IWS (Internal Web Server) operating environment.
[Remote Panel Settings] Configure the settings for remote control of the Control Panel of this ma-chine from another computer.
[Internet ISW Settings] Download the firmware of this machine via the Internet, and configure set-tings to update the firmware.
7-18 d-Color MF 752/652

7
[Detail Settings]
To display: [Utility] - [Administrator Settings] - [Network Settings] - [Detail Settings]
Configure the detailed network settings.
[Prefix/Suffix Setting]
To display: [Utility] - [Administrator Settings] - [Network Settings] - [Detail Settings] - [Prefix/Suffix Setting]
Register a prefix and suffix of an E-mail address. Also, configure the setting for recalling the registered prefix and suffix when entering an E-mail address.
Settings Description
[Device Setting] Check the MAC address of this machine, enable or disable LLTD (Link Lay-er Topology Discovery), and specify the network speed setting.
[Time Adjustment Setting] Configure the setting for automatically adjusting the date and time on this machine using the NTP (Network Time Protocol) server.
[Status Notification Setting] Configure the setting for notifying to the registered E-mail address when a warning such as for toner replacement or a paper jam occurs on this ma-chine.
[Total Counter Notification Settings]
Configure the setting for sending counter information managed by this ma-chine to a registered E-mail address.
[PING Confirmation] Send a ping to the device communicating with this machine, to check for proper connection.
[SLP Setting] Select whether to enable SLP (Service Location Protocol).
[LPD Setting] Select whether to enable LPD (Line Printer Daemon).
[Prefix/Suffix Setting] Register a prefix and suffix of an E-mail address. Also, configure the setting for recalling the registered prefix and suffix when entering an E-mail ad-dress.
[Error Code Display Set-ting]
Select whether to display network error code on the Touch Panel.
Settings Description
[ON/OFF Setting] Select whether to use Prefix/Suffix Setting.If you select [ON], you can recall the registered prefix and suffix which are registered in [Prefix/Suffix Setting] when entering an E-mail address.[OFF] is selected by default.
[Prefix/Suffix Setting] Register a prefix and suffix to complement E-mail address entry. You can register up to 8 prefixes and suffixes.• [Prefix]: Enter a prefix (using up to 20 characters).• [Suffix]: Enter a suffix (using up to 64 characters).
d-Color MF 752/652 7-19

7
[Fax Settings]
To display: [Utility] - [Administrator Settings] - [Fax Settings]
Configure the operating environment of the fax or network fax function.
[Header Information]
To display: [Utility] - [Administrator Settings] - [Fax Settings] - [Header Information]
Register the machine name, your company name (sender name), and the fax number that are to be printed as Header Position when faxes are transmitted.
Settings Description
[Header Information] Register the machine name, your company name (sender name), and the fax number that are to be printed as Header Position when faxes are trans-mitted.
[Header/Footer Position] Specify the format of Header Position to be printed on a fax. Select wheth-er to print Footer Position (date, time, and reception number) on faxes re-ceived by this machine.
[Line Parameter Setting] Configure the environment to use fax functions on this machine, such as the types of telephone lines (dialing method) and fax receive mode.
[TX/RX Settings] Specify how to print faxes received and how to handle files in a polling transmission.
[Function Settings] Configure the settings for using various fax transmission and reception functions.
[PBX Connection Setting] Configure the settings for using this machine in a Private Branch Exchange (PBX) environment.
[Report Settings] Specify the conditions for printing fax-related reports.
[Job Settings List] Print the list of settings associated with faxes.
[Multi Line Settings] Set how you want to use a second line, if any.
[Network Fax Settings] Change default settings on Internet Fax or IP Address Fax environment and compression type of send data.
[Fax Print Quality Settings] When printing a received fax, select whether to give priority to the image quality or to the printing speed, to fit the resolution of the received fax.
Settings Description
[Sender] Register machine name, company name (sender name), and others that is to be printed as Header Position. Up to 20 sender names can be regis-tered. You can use different names for different purposes.Tapping [Sender] displays a list of sender names registered on this ma-chine.• To register a new sender name, select a blank column, tap [New], and
enter the sender name (using up to 30 characters).• The name appears as [Default] is automatically inserted when a fax is
sent. To change the name to be automatically inserted, select a desired name, then tap [Set as Default].
[Sender Fax No.] Enter the fax number of this machine with up to 20 digits, including #, *, +, and space.The fax number you entered is printed as Header Position.
7-20 d-Color MF 752/652

7
[Header/Footer Position]
To display: [Utility] - [Administrator Settings] - [Fax Settings] - [Header/Footer Position]
Specify the format of Header Position to be printed on a fax. Select whether to print Footer Position (date, time, and reception number) on faxes received by this machine.
Tips- In the North American and Hong Kong models, [Print Receiver's Name] is hidden.
[Header Position]
To display: [Utility] - [Administrator Settings] - [Fax Settings] - [Header/Footer Position] - [Header Position]
Specify the position at which a Header Position is printed on a fax.
[TTI Print Position and Character Size]
To display: [Utility] - [Administrator Settings] - [Fax Settings] - [Header/Footer Position] - [TTI Print Position and Character Size]
Select the size of characters to print a Header Position.
Tips- If [Normal] is selected for the scanning resolution for sending a fax, it is converted into [Normal] to pre-
vent characters from becoming corrupted and unreadable.
Settings Description
[Header Position] Specify the position at which a Header Position is printed on a fax.
[TTI Print Position and Character Size]
Select the size of characters to print a Header Position.
[Print Receiver's Name] Select whether to print a destination fax number as Header Position.
[Footer Position] Select whether to print Footer Position (date, time, and reception number) on faxes received by this machine.
Settings Description
[Inside Body Text] Prints the sender information inside the original image. Part of the original image may be cut off.
[Outside Body Text] Prints the sender information outside the original image.[Outside Body Text] is selected by default.
[OFF] Prints nothing for sender information.
Settings Description
[Normal] Prints the sender information in the normal text size.
[Minimal] Reduces the text height by half of the size set with [Normal]. It is recom-mended that you select [Minimal] to prevent a fax image from being cut off or to prevent a page from being divided when pages are printed at a receiv-ing machine.[Minimal] is selected by default.
d-Color MF 752/652 7-21

7
[Footer Position]
To display: [Utility] - [Administrator Settings] - [Fax Settings] - [Header/Footer Position] - [Footer Position]
Select whether to print Footer Position (date, time, and reception number) on faxes received by this machine. To print them, select the position to print the Footer Position.
[Line Parameter Setting]
To display: [Utility] - [Administrator Settings] - [Fax Settings] - [Line Parameter Setting]
Configure the environment to use fax functions on this machine, such as the types of telephone lines (dialing method) and fax receive mode.
[Number of Redials]
To display: [Utility] - [Administrator Settings] - [Fax Settings] - [Line Parameter Setting] - [Number of Redials]
If the machine fails to send a fax successfully, it automatically redials the same destination after the elapse of a certain period of time. If necessary, change the number of redials.
(The setting range varies according to the local standards.)
[Redial Interval]
To display: [Utility] - [Administrator Settings] - [Fax Settings] - [Line Parameter Setting] - [Redial Interval]
If necessary, change the redial intervals when you specified a value in [Number of Redials].
[3 min.] minutes is selected by default.
Settings Description
[Inside Body Text] Prints Footer Position inside the original image. Part of the original image may be cut off.
[Outside Body Text] Prints Footer Position outside the original image.
[OFF] Prints no Footer Position.[OFF] is specified by default.
Settings Description
[Dialing Method] Select the line type according to your environment.
[Receive Mode] Select a receive mode.
[Number of RX Call Rings] If necessary, change the number of times the phone rings before automat-ically receiving a fax.
[Number of Redials] If the machine fails to send a fax successfully, it automatically redials the same destination after the elapse of a certain period of time. If necessary, change the number of redials. (The setting range varies depending on the local standards.)
[Redial Interval] If necessary, change the redial intervals when you specified a value in [Number of Redials].
[Line Monitor Sound] Select whether to play sounds on the telephone line from speakers during fax communication.
[Line Monitor Sound Vol-ume (Send)]
If necessary, adjust the speaker volume for sending when [Line Monitor Sound] is set to [ON].
[Line Monitor Sound Vol-ume (Receive)]
If necessary, adjust the speaker volume for receiving when [Line Monitor Sound] is set to [ON].
7-22 d-Color MF 752/652

7
[TX/RX Settings]
To display: [Utility] - [Administrator Settings] - [Fax Settings] - [TX/RX Settings]
Specify how to print faxes received and how to handle files in a polling transmission.
[Duplex Print (RX)]
To display: [Utility] - [Administrator Settings] - [Fax Settings] - [TX/RX Settings] - [Duplex Print (RX)]
Select whether to print an original on both sides of sheets of paper when a fax having multiple pages is re-ceived.
This option is not available if [Print Separate Fax Pages] is set to [ON].
[OFF] is specified by default.
[Letter/Ledger over A4/A3]
To display: [Utility] - [Administrator Settings] - [Fax Settings] - [TX/RX Settings] - [Letter/Ledger over A4/A3]
Select whether to preferentially print an original on inch-sized paper when a fax is received.
The default value depends on the country the machine is used in.
[Print Paper Selection]
To display: [Utility] - [Administrator Settings] - [Fax Settings] - [TX/RX Settings] - [Print Paper Selection]
Select the criterion of selecting paper for printing a fax.
Settings Description
[Duplex Print (RX)] Select whether to print an original on both sides of sheets of paper when a fax having multiple pages is received.
[Letter/Ledger over A4/A3] Select whether to preferentially print an original on inch-sized paper when a fax is received.
[Print Paper Selection] Select the criterion of selecting paper for printing a fax.
[Print Paper Size] Select the paper size to print received faxes on.
[Incorrect User Box No. En-try]
Select the action taken by the machine if an unregistered user box is spec-ified for receiving a fax using the machine's box.
[Tray Selection for RX Print] Specify a paper tray if you want to fix the paper tray used to print a fax.
[Min. Reduction for RX Print]
If necessary, change the reduction ratio that is used when printing a fax.
[Print Separate Fax Pages] Select whether to print a fax longer than the standard size on separate pag-es.
[File After Polling TX] Select whether to delete a file after it is sent in response to a polling request if the Polling TX function is used to register files for polling.
[No. of Sets (RX)] If necessary, change the number of copies to print a fax.
[Individual Receiving Line Setup]
Specify whether to receive faxes via respective lines separately in the two-line mode.In receiving faxes per line, you can use reception functions, such as TSI Routing and Forward TX.
[Individual Sender Line Setup]
Specify whether to use different sender names for the respective lines in the two-line mode.
[RX Document Print Set-tings]
Select whether to print a received network fax in color or black-and-white.
Settings Description
[Auto Select] Print a fax on paper that is automatically selected to the fax received.[Auto Select] is specified by default.
[Fixed Size] Print a fax on paper specified in [Print Paper Size].
[Priority Size] Prints a fax on paper specified in [Print Paper Size], If the machine runs out of specified paper, paper of the next closest size is used for printing.
d-Color MF 752/652 7-23

7
[Print Paper Size]
To display: [Utility] - [Administrator Settings] - [Fax Settings] - [TX/RX Settings] - [Print Paper Size]
Select the paper size to print received faxes on.
The initial value varies depending on the setting for [Letter/Ledger over A4/A3].
Tips- To enable the setting for [Print Paper Size], set [Tray Selection for RX Print] to [Auto].
[Tray Selection for RX Print]
To display: [Utility] - [Administrator Settings] - [Fax Settings] - [TX/RX Settings] - [Tray Selection for RX Print]
Specify a paper tray if you want to fix the paper tray used to print a fax.
[Auto] is specified by default.
[Min. Reduction for RX Print]
To display: [Utility] - [Administrator Settings] - [Fax Settings] - [TX/RX Settings] - [Min. Reduction for RX Print]
If necessary, change the reduction ratio that is used when printing a fax.
[96]% is selected by default.
Tips- If [Min. Reduction for RX Print] is set to [Full Size], [Print Paper Selection] is set to [Auto Select], [Tray
Selection for RX Print] to [Auto] and [Print Separate Fax Pages] to [OFF].
[Print Separate Fax Pages]
To display: [Utility] - [Administrator Settings] - [Fax Settings] - [TX/RX Settings] - [Print Separate Fax Pages]
Select whether to print a fax longer than the standard size on separate pages.
This option is not available if [Duplex Print (RX)] is set to [ON].
[OFF] is specified by default.
[No. of Sets (RX)]
To display: [Utility] - [Administrator Settings] - [Fax Settings] - [TX/RX Settings] - [No. of Sets (RX)]
If necessary, change the number of copies to print a fax.
[1] is selected by default.
[RX Document Print Settings]
To display: [Utility] - [Administrator Settings] - [Fax Settings] - [TX/RX Settings] - [RX Document Print Settings]
Select whether to print a received network fax in color or black-and-white. To restrict the print to only black-and-white print, select [Black Only].
[Allow Color and Black] is specified by default.
7-24 d-Color MF 752/652

7
[Function Settings]
To display: [Utility] - [Administrator Settings] - [Fax Settings] - [Function Settings]
Configure the settings for using various fax transmission and reception functions.
[Function ON/OFF Setting]
To display: [Utility] - [Administrator Settings] - [Fax Settings] - [Function Settings] - [Function ON/OFF Setting]
Enable or disable fax transmission and reception functions, such as Confirm Address that prevents wrong fax transmission, F-Code TX, and Relay RX.
[Destination Check Display Function]
To display: [Utility] - [Administrator Settings] - [Fax Settings] - [Function Settings] - [Function ON/OFF Setting] - [Destination Check Display Function]
Select whether to show a list of specified destinations before sending a fax.
Select [ON] if you want to check destinations before sending a fax. Using this function helps to prevent in-correct transmission and failure to send faxes.
[OFF] is specified by default.
Settings Description
[Function ON/OFF Setting] Enable or disable fax transmission and reception functions, such as Con-firm Address that prevents wrong fax transmission, F-Code TX, and Relay RX.
[Dial-In Settings] Configure the settings for using the Dial In function.
[Memory RX Setting] Configure the settings for using the Memory RX function.
[Closed Network RX] Configure the settings for using the Closed Network RX function.
[Forward TX Setting] Configure the settings for using the Forward TX function.
[Remote RX] Configure the settings for using the Remote RX function.
[Incomplete TX Hold] Configure the settings for using the Fax Retransmit function.
[PC-Fax Permission Set-ting]
Select whether to allow PC-Fax TX using the fax driver.
[PC-Fax RX Setting] Configure the settings for using the PC-Fax RX function.
[TSI User Box Setting] Configure the settings for using the TSI Routing function.
Settings Description
[F-Code TX] Select whether to use the F-Code TX function.F-Code TX is a function that send documents to a destination by entering a SUB address and a password (communication password) of a specific user box. The remote machine must support the F-Code TX/RX.
[Relay RX] Select whether to use this machine as a fax relaying station.If this machine is used as a relaying station, it is possible to receive a fax from a remote machine and automatically relay it to multiple programmed destinations.
[Relay Printing] Select whether to distribute and print a received fax when this machine is used as a fax relaying station.
[Destination Check Display Function]
Select whether to show a list of specified destinations before sending a fax.
[Confirm Address (TX)] Select whether to require the user to enter a fax number twice to send a fax by directly entering the fax number.
[Confirm Address (Regis-ter)]
Select whether to require the user enter a fax number twice to register it when, for example, registering a destination or forwarding destination.
d-Color MF 752/652 7-25

7
[Memory RX Setting]
To display: [Utility] - [Administrator Settings] - [Fax Settings] - [Function Settings] - [Memory RX Setting]
Configure the settings for using the Memory RX function.
Memory RX is a function to save a received fax to Memory RX User Box of this machine.
[Forward TX Setting]
To display: [Utility] - [Administrator Settings] - [Fax Settings] - [Function Settings] - [Forward TX Setting]
Configure the settings for using the Forward TX function.
Forward TX is a function that transfers a received fax to a pre-specified destination.
[Report Settings]
To display: [Utility] - [Administrator Settings] - [Fax Settings] - [Report Settings]
Specify the conditions for printing fax-related reports.
Settings Description
[Memory RX User Box Password]
To use the Memory RX function, tap [No] to deselect it. In addition, specify the password to restrict an access to the Memory RX User Box with up to eight digits.[No] is specified by default.
Settings Description
[Yes]/[No] Select whether to use Forward TX.[No] is specified by default.
[Output Method] Select whether to print a received fax on this machine when forwarding it.• [Forward & Print]: Prints a received fax on this machine when forward-
ing it.• [Forward & Print (If TX Fails)]: Prints a received fax on this machine only
when forwarding has failed.[Forward & Print (If TX Fails)] is specified by default.
[Forward Dest.] Specify a destination where to forward a received fax.Directly enter the appropriate fax number using the Keypad, or tap [Select from Address Book] and select one of the destinations registered on this machine.You can specify [File Type] and convert a fax into a file except when the destination is a fax machine.
[Select Line] If two lines are used, select the line used to send a fax. If [No Selection] is selected, either line, whichever is not busy, is used for transmission.[No Selection] is selected by default.
Settings Description
[Activity Report] Set the printing conditions for a report containing results of faxes sent and received.
[ON]/[OFF] Specify whether to print an activity report.[ON] is selected by default.
[Output Setting] To print it, select when to print it.• [Daily]: Prints an activity report at the time specified in [Output Time
Settings] every day.• [Every 100 Comm.]: Prints an activity report every 100 communica-
tions.• [100/ Daily]: Prints an activity report at the time specified in [Output
Time Settings] every day. In addition, a report is printed for every 100 communications.
[Every 100 Comm.] is specified by default.
7-26 d-Color MF 752/652

7
[Remark Column Print Setup]
Specify whether to print user or account name in the remarks column of the activity report if user authentication or account track is enabled on this machine.• [Normal Printing]: Prints the line status or sending settings.• [User Name Printing]: Prints the user name for user authentication.• [Account Name Printing]: Prints the account name for account track.[Normal Printing] is specified by default.
[TX Result Report] Select when to print a report containing the results of fax transmission.• [ON]: The report is printed every time a fax has been transmitted.• [If TX Fails]: The report is printed if a fax transmission has failed.• [OFF]: The report is not printed.[If TX Fails] is specified by default.
[Sequential TX Report] Select whether to print a report containing results of faxes sent by polling and broadcast.[ON] is selected by default.
[Timer Reservation TX Re-port]
Select whether to print a report when transmission is reserved using the Timer TX function.[ON] is selected by default.
[Confidential Rx Report] Select whether to print a report containing the results of confidential faxes received.[ON] is selected by default.
[Bulletin TX Report] Select whether to print a report containing records of faxes registered with the bulletin for being received by polling.[ON] is selected by default.
[Relay TX Result Report] Select whether to print a report containing results of faxes sent by relay distribution.[ON] is selected by default.
[Relay Request Report] Select whether to print the report when the machine has received a fax (Re-lay RX) as a relaying station.[ON] is selected by default.
[PC-Fax TX Error Report] Select whether to print a report if PC-Fax TX using the fax driver has failed.[OFF] is specified by default.
[Broadcast Result Report] Select whether to combine results of broadcast on all destinations involved or list them for each destination. [All Destinations] is specified by default.
[TX Result Report Check] Select whether to display a screen that asks whether you want to print a TX Result Report each time a fax is sent.[OFF] is specified by default.
[Network Fax RX Error Re-port]
Select whether to print a report if the machine has failed to receive an In-ternet fax or IP address fax.[ON] is selected by default.
[MDN Message] Select whether to print a report notifying that an Internet fax has been sent to the recipient machine.[ON] is selected by default.
[DSN Message] Select whether to print a report notifying that an Internet fax has been sent to the mail server of the recipient machine.[OFF] is specified by default.
[Print E-mail Message Body]
Select whether to print a report notifying that an Internet fax has been suc-cessfully received after it was received. The report has the subject and message text of an Internet fax.[ON] is selected by default.
Settings Description
d-Color MF 752/652 7-27

7
[Job Settings List]
To display: [Utility] - [Administrator Settings] - [Fax Settings] - [Job Settings List]
Print the list of settings associated with faxes.
Change print settings as required, then tap [Start] to start printing.
[Network Fax Settings]
To display: [Utility] - [Administrator Settings] - [Fax Settings] - [Network Fax Settings]
Change default settings on Internet Fax or IP Address Fax environment and compression type of send data.
[Black Compression Level]
To display: [Utility] - [Administrator Settings] - [Fax Settings] - [Network Fax Settings] - [Black Compression Level]
Change default settings on the compression type for sending data in black and white if you are using the In-ternet Fax or IP Address Fax function.
[Color/Grayscale Multi-Value Compression Method]
To display: [Utility] - [Administrator Settings] - [Fax Settings] - [Network Fax Settings] - [Color/Grayscale Mul-ti-Value Compression Method]
Change default settings on the compression type for sending data in full color or gray scale if you are using the Internet Fax or IP Address Fax function.
Tips- Data is converted to the compact PDF format using the technique unique to this machine.
Settings Description
[Black Compression Level] Change default settings on the compression type for sending data in black and white if you are using the Internet Fax or IP Address Fax function.
[Color/Grayscale Multi-Val-ue Compression Method]
Change default settings on the compression type for sending data in full color or gray scale if you are using the Internet Fax or IP Address Fax func-tion.
[Internet Fax Self RX Abili-ty]
This machine notifies its reception capability when returning a MDN mes-sage if you are using the Internet Fax function. Change the reception ca-pability of this machine which is notified upon returning a MDN message as necessary.
[Internet Fax Advanced Settings]
Configure settings for fax reception confirmation (MDN/DSN) to be sent by this machine if you are using the Internet fax function.
[IP Address Fax Operation Settings]
Select the operation mode of this machine if you are using the IP Address Fax function.
Settings Description
[MMR] The data size is the smallest.[MMR] is specified by default.
[MR] The data size is intermediate between [MH] and [MMR].
[MH] The data size is larger than [MMR].
Settings Description
[JPEG (Color)] Compress image data in color JPEG format.[JPEG (Color)] is specified by default.
[JPEG (Gray Scale)] Compress image data in black-and-white JPEG format.
[Not Set] Compress data according to the compression type specified in [Black Compression Level]. You cannot send data in color or gray scale.Whichever file format you specify, data is converted to the TIFF format.
7-28 d-Color MF 752/652

7
[Internet Fax Self RX Ability]
To display: [Utility] - [Administrator Settings] - [Fax Settings] - [Network Fax Settings] - [Internet Fax Self RX Ability]
This machine notifies its reception capability when returning a MDN message if you are using the Internet Fax function. Change the reception capability of this machine which is notified upon returning a MDN message as necessary.
[Internet Fax Advanced Settings]
To display: [Utility] - [Administrator Settings] - [Fax Settings] - [Network Fax Settings] - [Internet Fax Advanced Settings]
Configure settings for fax reception confirmation (MDN/DSN) to be sent by this machine if you are using the Internet fax function.
Settings Description
[Compression Type] Change the compression type of a fax job the machine can receive.
[Paper Size] Change the paper size for a fax job the machine can receive.
[Resolution] Change the resolution of a fax job the machine can receive.
Settings Description
[MDN Request] Select whether to request for fax reception result (MDN request) to the des-tination.If a MDN request is sent, the recipient machine returns a response mes-sage when a fax is received, so that you can check that the fax is success-fully received by the destination.Also, by receiving a response message from the destination, you can ob-tain the reception capability information of the destination. When new re-sponse message is received from a destination registered in the address book, the capability information is overwritten with new one.[Yes] is specified by default.
[DSN Request] Select whether to request for fax reception result (DSN request) to the des-tination mail server.If you select [Yes] for [MDN Request], priority is given to the MDN request.[Do Not Send] is specified by default.
[MDN Response] Select whether to return a response message when a sender requests for fax reception result (MDN request) to this machine.[Yes] is specified by default.
[MDN/DSN Response Monitoring Time]
If necessary, change the waiting time for a response from the destination after a MDN request or DSN request is sent by this machine.If a response message is received after the specified wait period has elapsed, the machine ignores the message.[24 hours] is specified by default.
[Maximum Resolution] If necessary, switch the maximum resolution that this machine can sup-port.[Ultra Fine] is specified by default.
[Add Content-Type Infor-mation]
Specify whether to add Content-Type information to an Internet fax when sending it.If [Yes] is selected, "application=faxbw" is added to the Content-Type header of MIME as a sub type.[Do Not Send] is specified by default.
d-Color MF 752/652 7-29

7
[IP Address Fax Operation Setting]
To display: [Utility] - [Administrator Settings] - [Fax Settings] - [Network Fax Settings] - [IP Address Fax Op-eration Setting]
Specify the operation mode of the IP address fax when using the IP Address Fax function.
[Security Settings]
To display: [Utility] - [Administrator Settings] - [Security Settings]
Configure the security functions of this machine, such as password and data management method.
Settings Description
[Operating Mode] Select an operation mode of IP address fax according to your environment.• [Mode 1]: This mode allows communication between Olivetti models
capable of transmitting IP address faxes, and between models com-patible with the Direct SMTP standard defined by CIAJ (Communica-tions and Information Network Association of Japan). However, because a unique method developed by Olivetti is used to send a color fax, only the Olivetti models can receive such a color fax.
• [Mode 2]: This mode allows communication between Olivetti models capable of transmitting IP address faxes, and between models com-patible with the Direct SMTP standard defined by CIAJ (Communica-tions and Information Network Association of Japan). The method compatible with the Direct SMTP standard (Profile-C format) is used to send a color fax.
[Mode 1] is specified by default.
[Sending Colored Docu-ments]
Select whether or not to accept sending of colored originals when select-ing [Mode 2] for [Operation Mode].To send a fax to a machine that does not support color reception based on the Direct SMTP standard, select [Restrict].[Allow] is specified by default.
Settings Description
[Administrator Password] If necessary, change the administrator password of this machine.
[User Box Administrator Setting]
If necessary, assign a user box administrator if the user authentication has been adopted into this machine.The user box administrator can create or delete a user box for all users as well as use files in the boxes.If the administrator of this machine wishes to delegate only the manage-ment of files in the boxes to someone, assign a user box administrator.
[Administrator Security Levels]
From those items that are set up by the administrator, select levels at which users are authorized to change settings.
[Security Details] Restricts functions that are related to authentication operations and data management to enhance security.
[Enhanced Security Mode] Select whether to enable the Enhanced Security Mode.If Enhanced Security Mode is enabled, various security functions are con-figured to allow you to ensure higher-level security of data management. For details, contact your service representative.
[HDD Settings] Manages the hard disk of this machine. Prevents the leakage of personal and corporate information by protecting data in the hard disk against eras-ure and protecting the hard disk with password and encryption.
[Function Management Settings]
Select whether to use network functions that are difficult to count.
[Stamp Settings] Select whether to force application of stamps to original data when printing or sending fax. It is also used to delete registered stamps.
[Driver Password Encryp-tion Setting]
Used to change the encryption passphrase to encrypt authentication pass-words (such as user and account passwords) when printing data using a printer driver.The same encryption passphrase must be set for the machine and the printer driver.
7-30 d-Color MF 752/652

7
[Security Details]
To display: [Utility] - [Administrator Settings] - [Security Settings] - [Security Details]
Restricts functions that are related to authentication operations and data management to enhance security.
[FIPS Settings] Select whether to enable the FIPS (Federal Information Processing Stand-ardization) Mode.FIPS defines security requirements for cryptographic modules. These standards are adopted by many organizations, including U.S. federal gov-ernment agencies. Enabling the FIPS Mode makes the functions of the ma-chine conforms to the FIPS.
Settings Description
Settings Description
[Password Rules] Configure whether to enable the password rules. Once you enable it, the number of characters and text types that are available for passwords are restricted. If necessary, change the minimum number of password charac-ters.
[Prohibited Functions When Authentication Error]
Define the severity of penalties applied if a wrong password is entered in the authentication process.
[Confidential Document Access Method]
Specify how to enter an ID and a password when accessing a file in the Se-cure Print User Box. The method is forcedly determined in conjunction with [Prohibited Functions When Authentication Error].
[Manual Destination Input] Select whether to allow the user to directly enter destinations.
[Print Data Capture] Select whether to allow capturing of print data received by this machine to analyze a printer-related failure.
[Job Log Settings] Select whether to obtain a job log. After you have changed these settings, the job log is obtained when you restart this machine.You can check usage, paper usage, operations and job history for each user or account in the job log. For details on how to view the output job logs, contact your service representative.
[Restrict Fax TX] Select whether to restrict fax transmissions.
[Personal Data Security Settings]
Specify whether to hide personal information, such as destination and file name, in [In Progress] and [Log] on the [Job List] screen.
[Hide Personal Information (MIB)]
Select whether to display the file name, destination, and User Box name, or User Box number for the MIB information.
[Display Activity Log] Select whether to show the activity log on Scan, Fax TX and RX.
[Initialize] Initializes the settings in [Job History], [Copy Program], [Network Settings], and [Address Registration]. Select items you want to initialize, then tap [OK].
[Job History Thumbnail Display]
Select whether to show thumbnail images of a job in [Log] on the [Job List] screen.
[Secure Print Only] Specify whether the printing from the computer should be limited only to the security document.
[Copy Guard] Select whether to use the Copy Guard function.To use the Copy Guard function, optional Security Kit is required.
[Password Copy] Select whether to use the Password Copy function.To use the Password Copy function, optional Security Kit is required.
[Web browser contents ac-cess]
Select whether to allow an access to the Web page contents saved on the hard disk of this machine.
[TX Operation Log] Select whether to obtain an operation log on the Control Panel when scanning or sending a fax as a send operation log. This helps to analyze a security issue if it occurs.
d-Color MF 752/652 7-31

7
[Manual Destination Input]
To display: [Utility] - [Administrator Settings] - [Security Settings] - [Security Details] - [Manual Destination In-put]
Select whether to allow the user to directly enter destinations.
[Restrict Fax TX]
To display: [Utility] - [Administrator Settings] - [Security Settings] - [Security Details] - [Restrict Fax TX]
Select whether to restrict fax transmissions.
If [ON] (Restrict) is selected, the fax functions no longer appear in fax/scan mode.
[OFF] (Allow) is specified by default.
Settings Description
[Allow All] Allows the direct input of destinations.[Allow All] is specified by default.
[Individual Allowance] Select whether to allow direct input for each function.
[Restrict] Prohibits the direct input of destinations. Hides [Direct Input] on the main screen in scan/fax mode.
7-32 d-Color MF 752/652

8 Index


8.1 Index by item 8
8 Index
8.1 Index by item
A
Address book 1-13, 4-3Address book list 4-11Address search 1-15
B
Binding position 1-21Bkgd. removal 1-24Blank page removal 1-22Body 1-19Book original 1-22
C
Color 1-18Create group 4-6
D
Date/time 1-25Density 1-24Despeckle 1-21Direct input 1-16Duplex print (RX) 2-14, 3-14
E
Export 4-10
F
Fax header settings 1-28File name 1-19Footer position 2-11, 3-11Forward TX 2-13, 3-13Frame erase 1-27
G
Group 1-14Group list 4-12
H
Header/footer 1-26How to receive a fax 2-10, 3-10How to send a fax 1-4, 2-8, 3-6
I
Import 4-10In-memory proxy reception 2-11, 3-11Internet fax 1-3, 2-3, 4-3IP address fax 1-3, 3-3, 4-4
J
Job history 1-16
L
LDAP search 1-17List 2-17, 3-17Long original 1-21
M
Memory RX 2-12, 3-12Min. reduction for RX print 2-14, 3-14Mixed original 1-20
O
Original direction 1-21Original type 1-24
P
Page number 1-25Preview 1-6Print paper selection 2-14, 3-14Print paper size 2-15, 3-15Print separate fax pages 2-16, 3-16Program 1-8Program list 4-13
R
Report 2-17, 3-17Resending 3-8Resolution 1-18
S
Save & print 1-28Scan size 1-18Separate scan 1-22Setting up for internet fax 2-4Setting up for IP address fax 3-4Sharpness 1-28Simplex/duplex 1-18Stamp 1-26Subject 1-19
T
Thin paper original 1-20Tray selection for RX print 2-15, 3-15TX stamp 1-27
Z
Z-folded original 1-20
d-Color MF 752/652 8-3

Index by button8 8.2
8.2 Index by button
A
Addr. Search 5-7Address Book 5-3Address Book (Public) 6-4, 7-12Address Book List 7-17Address Reg. 5-10Address Search 5-8Administrator Settings 7-3Adv. Search (LDAP) 5-9Application 5-15Auto Color Level Adjust. 6-9
B
Bkgd. Removal 5-20Black Compression Level 6-11, 7-28Blank Sheet Detection Level 6-9Book Original 5-17
C
Color 5-12Color TIFF Type 6-12Color/Grayscale Multi-Value Compression Method 7-28Create One-Touch Destination 6-3, 7-12Custom Display Settings 6-9
D
Date/Time 5-21Date/Time Settings 7-6Default Enlarge Display Settings 6-12Default Scan/Fax Settings 6-11Density 5-19Destination Check Display Function 7-25Detail Settings 7-19Direct Input 5-4Duplex Print (RX) 7-23
E
E-mail Body 6-7, 7-16E-Mail Settings 6-6, 7-15E-mail Settings 5-14E-Mail Subject 6-7, 7-16E-Mail Subject/Text List 7-18
F
Fax Header Settings 5-27Fax Settings 7-20Fax TX Settings 7-10Footer Position 7-22Forward TX Setting 7-26Frame Erase 5-25Function Display Key(Send/Save) 6-10Function ON/OFF Setting 7-25Function Settings 7-25
G
Group 6-6, 7-15Group List 7-17
H
Header Information 7-20Header Position 7-21Header/Footer 5-24Header/Footer Position 7-21Header/Footer Settings 7-10
I
Internet Fax 5-5, 6-5, 7-14Internet Fax Advanced Settings 7-29Internet Fax Self RX Ability 7-29IP Address Fax 5-6, 6-4, 7-13IP Address Fax Operation Setting 7-30
J
Job History 5-7Job Priority Operation Settings 7-10Job Reset 7-9Job Settings List 7-28JPEG Compression Level 6-11
L
LDAP Search 5-9Letter/Ledger over A4/A3 7-23Limiting Access to Destinations 6-7Line Parameter Setting 7-22
M
Manual Destination Input 7-32Memory RX Setting 7-26Min. Reduction for RX Print 7-24
N
Name Search 5-8Network Fax Settings 7-28Network Settings 7-18No. of Sets (RX) 7-24Number of Redials 7-22
O
One-Touch/User Box Registration 6-3, 7-12One-Touch/User Box Registration List 7-16Original Settings 5-16Original Type 5-18Output Settings 7-5Output Tray Settings 7-5
P
Page Number 5-22Prefix/Suffix Setting 7-19Preview Settings 7-11Print Paper Selection 7-23Print Paper Size 7-24
8-4 d-Color MF 752/652

8.2 Index by button 8
Print Separate Fax Pages 7-24Print/Fax Output Settings 7-5Program List 7-17
R
Redial Interval 7-22Report Settings 7-26Reset Settings 7-8Resolution 5-11Restrict Access to Job Settings 7-7Restrict Fax TX 7-32Restrict Operation 7-8Restrict User Access 7-7RX Document Print Settings 7-24
S
Save & Print 5-26Scan File Name Settings 7-11Scan Size 5-13Scan/Fax Settings 6-10, 6-11Search Option Settings 6-10Security Details 7-31Security Settings 7-30Separate Scan 5-18Separate Scan from Platen 6-9Sharpness 5-26Shift Output Each Job 7-5Simplex/Duplex 5-10Stamp 5-23Stamp Settings 7-9System Settings 6-8, 7-4
T
Tray Selection for RX Print 7-24TTI Print Position and Character Size 7-21TX Stamp 5-25TX/RX Settings 7-23
U
User Settings 6-8Utility 6-3
W
Weekly Timer Settings 7-6
d-Color MF 752/652 8-5

Index by button8 8.2
8-6 d-Color MF 752/652

DIRECTIVE 2002/96/EC ON THE TREATMENT, COLLECTION, RECYCLING ANDDISPOSAL OF ELECTRIC AND ELECTRONIC DEVICES AND THEIR COMPONENTS
INFORMATION
1. FOR COUNTRIES IN THE EUROPEAN UNION (EU)
The disposal of electric and electronic devices as solid urban waste is strictly prohibited: it must be collected separately.
The dumping of these devices at unequipped and unauthorized places may have hazardous effects on health and theenvironment.Offenders will be subjected to the penalties and measures laid down by the law.
TO DISPOSE OF OUR DEVICES CORRECTLY:
a) Contact the Local Authorities, who will give you the practical information you need and the instructions for handling thewaste correctly, for example: location and times of the waste collection centres, etc.
b) When you purchase a new device of ours, give a used device similar to the one purchased to our dealer for disposal.
The crossed dustbin symbol on the device means that:
- when it to be disposed of, the device is to be taken to the equipped waste collection centres and is to behandled separately from urban waste;
- The producer guarantees the activation of the treatment, collection, recycling and disposal procedures in accordance with Directive 2002/96/EC (and subsequent amendments).
2. FOR OTHER COUNTRIES (NOT IN THE EU)
The treatment, collection, recycling and disposal of electric and electronic devices will be carried out in accordance with thelaws in force in the country in question.

N ° 12-101
DICHIARAZIONE CE DI CONFORMITA' del COSTRUTTORE secondo ISO/IEC 17050 MANUFACTURER’S CE DECLARATION of CONFORMITY according to ISO/IEC 17050
OLIVETTI S.p.A Via Jervis, 77 - IVREA (TO) - ITALY
Dichiara sotto la sua responsabilita' che i prodotti:
Declares under its sole responsibility that the products: Categoria generale: Apparecchiature per la Tecnologia dell' Informazione
Equipment category: Information Technology Equipment
Tipo di apparecchiatura: Copiatrice Laser digitale Multifunzionale
Product type: Multifunctional Digital Laser Copier
Modello/Product name: d-Color MF752, d-Color MF652
Opzioni/Options: WT-506, OT-503, LU-301, FS-534, PK-521, LU-204, MK-715, AU-201
FK-511(2set max), SP-501, SC-508(2set max), EK-604, SD-512, AU-
102, VI-506, IC-414, EK-605, UK-204, Key Counter Mount Kit 1, Key
Counter, Key Counter Mount Kit CF, KH-102, ZU-606, PI-505, JS-
602, FS-535, SD-511, PK-520, WT-509, MK-735, HT-508 sono CONFORMI alla Direttiva 1999/5/CE del 9 marzo 1999 are in compliance with directive 99/5/EC dated 9
th march 1999
e soddisfano i requisiti essenziali di Compatibilità Elettromagnetica, Consumo Energetico e Sicurezza previsti
dalle Direttive: and fulfill the essential requirements of Electromagnetic Compatibility, Electrical Power Consumption and Electrical Safety as prescribed by the Directives:
2004/108/CE del 15 Dicembre 2004; (EMC) 2004/108/EC dated 15th December 2004;
2009/125/CE del 21 Ottobre 2009; (ErP) 2009/125/EC dated 21st October 2009;
2006/95/CE del 12 Dicembre 2006; (LVD)
2006/95/EC dated 12th December 2006;
in quanto progettati e costruiti in conformità alle seguenti Norme Armonizzate: since designed and manufactured in compliance with the following European Harmonized Standards:
EN 55022:2010 (Limits and methods of measurements of radio interference characteristics of Information
Technology Equipment) / Class B
EN 61000-3-2:2006 + A1:2009 + A2:2009 (Electromagnetic Compatibility (EMC) - Part 3: Limits - Section 2:
Limits for harmonic current emissions (equipment input current 16 A per phase)
EN 61000-3-3:2008 (Electromagnetic Compatibility (EMC) - Part 3: Limits - Section 3: Limitation of voltage
fluctuations and flicker in low voltage supply systems for equipment with rated current up to and including
16A)
EN 55024:2010 (Electromagnetic Compatibility – Information technology equipment – Immunity characteristics
– Limits and methods of measurement)
EN 62311:2008 (Assessment of electronic and electrical equipment related to human exposure restrictions for
electromagnetic fields (0 Hz - 300 GHz))
EN 60950-1:2006 + A11:2009 + A1:2010 + A12:2011 (Safety of Information Technology Equipment,
including electrical business equipment)
EN 60825-1:2007 (Radiation Safety of laser products, equipment classification, requirements and user's guide)
ES 203 021-1: V 2.1.1, ES 203 021-2: V 2.1.2, ES 203 021-3: V 2.1.2 (Referred Voluntary Requirements)
EG 201 120: V 1.1.1, EG 201 121: V 1.1.3 (Referred Voluntary Requirements)
1275/2008/EC La conformità ai suddetti requisiti essenziali viene attestata mediante l'apposizione della Marcatura CE sul prodotto. Compliance with the above mentioned essential requirements is shown by affixing the CE marking on the product. Ivrea, 1 Marzo 2012 Ivrea, 1st March 2012 Walter Fontani
Quality V.P.
Olivetti S.p.A. Note: 1) La Marcatura CE è stata apposta nel 2012 Notes: 1) CE Marking has been affixed in 2012 2) Il Sistema della Qualità è conforme alle norme serie UNI EN ISO 9000. 2) The Quality System is in compliance with the UNI EN ISO 9000 series of Standards
Olivetti S.p.A. - Via Jervis, 77 - 10015 Ivrea (To) - Italy - Tel +39 0125 7751 - Cap. Soc. € 43.000.000 R.E.A. 547040 - Cod. Fisc./P.IVA e iscriz. al Reg. Imp. Di Torino 02298700010 Società con unico azionista, Gruppo Telecom Italia - Direzione e coordinamento di Telecom Italia S.p.A.