Embed Size (px)
Citation preview
0175081en 004 0410
0 1 7 5 0 8 1 E N
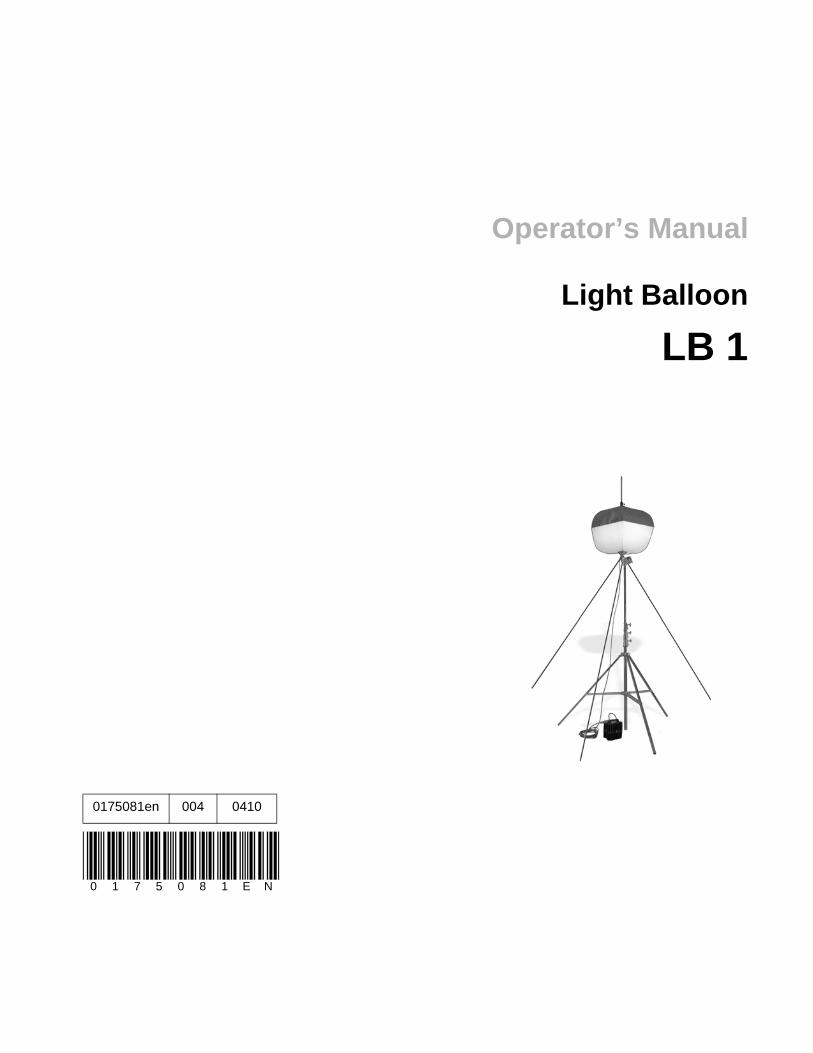
Operator’s Manual
Light Balloon
LB 1
Copyright notice
© Copyright 2010 by Wacker Neuson Corporation.All rights, including copying and distribution rights, are reserved.This publication may be photocopied by the original purchaser of the machine. Any other type of reproduction is prohibited without express written permission from Wacker Neuson Corporation.Any type of reproduction or distribution not authorized by Wacker Neuson Corporation represents an infringement of valid copyrights. Violators will be prosecuted.
Trademarks All trademarks referenced in this manual are the property of their respective owners.
Manufacturer Wacker Neuson CorporationN92W15000 Anthony AvenueMenomonee Falls, WI 53051 U.S.A.Tel: (262) 255-0500 · Fax: (262) 255-0550 · Tel: (800) 770-0957www.wackerneuson.com
Original instructions
This Operator’s Manual presents the original instructions. The original language of this Operator’s Manual is American English.
LB 1 Foreword
ForewordMachines covered by this manual;
Machine documentation
Keep a copy of the Operator’s Manual with the machine at all times. Use the separate Parts Book supplied with the machine to order replacement parts. Refer to the separate Repair Manual for detailed instructions on servicing and repairing the machine.If you are missing any of these documents, please contact Wacker Neuson Corporation to order a replacement or visit www.wackerneuson.com. When ordering parts or requesting service information, be prepared to provide the machine model number, item number, revision number, and serial number.
Expectations for information in this manual
This manual provides information and procedures to safely operate and main-tain the above Wacker Neuson model(s). For your own safety and to reduce the risk of injury, carefully read, understand, and observe all instructions described in this manual. Wacker Neuson Corporation expressly reserves the right to make technical modifications, even without notice, which improve the performance or safety standards of its machines.The information contained in this manual is based on machines manufactured up until the time of publication. Wacker Neuson Corporation reserves the right to change any portion of this information without notice.
Manufacturer’s approval
This manual contains references to approved parts, attachments, and modifica-tions. The following definitions apply:
Approved parts or attachments are those either manufactured or provided by Wacker Neuson. Approved modifications are those performed by an authorized Wacker Neu-son service center according to written instructions published by Wacker Neu-son.Unapproved parts, attachments, and modifications are those that do not meet the approved criteria.
Unapproved parts, attachments, or modifications may have the following conse-quences:
Serious injury hazards to the operator and persons in the work areaPermanent damage to the machine which will not be covered under warranty
Contact your Wacker Neuson dealer immediately if you have questions about approved or unapproved parts, attachments, or modifications.
Machine Item NumberLB1, 120V 60 Hz 0620405
wc_tx001534gb.fm 3

Foreword LB 1
wc_tx001534gb.fm 4
LB 1 Table of Contents
Foreword 31 Safety Information 7
1.1 Signal Words Found in this Manual ...................................................... 71.2 Machine Description and Intended Use ............................................... 81.3 Safety Guidelines for Operating the Machine ....................................... 91.4 Guidelines for Service Safety ............................................................. 10
2 Operation 15
2.1 Preparing the Machine for First Use ................................................... 152.2 Setting up the Balloon ........................................................................ 162.3 Setting up the Tripod (if equipped) ..................................................... 172.4 Assembling the Balloon to the Tripod (if equipped) ............................ 182.5 Installing the Equipment Mount (if equipped) ..................................... 202.6 Turning ON/OFF the Light .................................................................. 222.7 Emergency Shutdown Procedure ....................................................... 232.8 Inspecting and Cleaning ..................................................................... 242.9 Changing the Bulb .............................................................................. 252.10 Troubleshooting .................................................................................. 272.11 Electrical Schematic ........................................................................... 28
3 Technical Data 29
wc_bo0175081en_004TOC.fm 5

Table of Contents LB 1
6 wc_bo0175081en_004TOC.fm

LB 1 Safety Information
1 Safety Information1.1 Signal Words Found in this ManualThis manual contains DANGER, WARNING, CAUTION, NOTICE, and NOTE signal words which must be followed to reduce the possibility of personal injury, damage to the equipment, or improper service.
NOTICE: Used without the safety alert symbol, NOTICE indicates a situation which, if not avoided, could result in property damage.
Note: Contains additional information important to a procedure.
This is the safety alert symbol. It is used to alert you to potential personal hazards.Obey all safety messages that follow this symbol.
DANGER indicates a hazardous situation which, if not avoided, will result in death or serious injury.
Obey all safety messages that follow this symbol to avoid injury or death.
WARNING indicates a hazardous situation which, if not avoided, could result in death or serious injury.
Obey all safety messages that follow this symbol to avoid possible injury or death.
CAUTION indicates a situation which, if not avoided, could result in minor or mod-erate injury.
Obey all safety messages that follow this symbol to avoid possible minor or moderate injury.
wc_si000511gb.fm 7
Safety Information LB 1
1.2 Machine Description and Intended UseThis machine is an electrically-powered source of illumination. The Wacker Neuson Light Balloon consists of an adjustable tripod or adjustable equipment mount which supports a metal halide lamp enclosed inside a collapsible translucent covering (balloon). Also included are a power cord and a ballast unit. Electric power is supplied to the ballast by a generator or by utility power (not included with the machine). The operator connects the ballast to the Light Balloon and the power source, and adjusts the tripod or equipment mount as needed.
The machine is intended for the illumination of outdoor areas.
This machine has been designed and built strictly for the intended use described above. Using the machine for any other purpose could permanently damage the machine or seriously injure the operator or other persons in the area. Machine damage caused by misuse is not covered under warranty.
The following are some examples of misuse:Using the machine as a ladder, support, or work surfaceUsing the machine as a hoist or hanging items from the towerOperating the machine with the balloon suspended from the power cordOperating the machine outside of factory specificationsOperating the machine in a manner inconsistent with all warnings found on the machine and in the Operator’s Manual
This machine has been designed and built in accordance with the latest global safety standards. It has been carefully engineered to eliminate hazards as far as practicable and to increase operator safety through protective guards and labeling. However, some risks may remain even after protective measures have been taken. They are called residual risks. On this machine, they may include exposure to:
Ultraviolet radiation from the lightsElectric shock and arc flashGlare from lights (lights may blind drivers of nearby motor vehicles if the lights are incorrectly positioned)Personal injury from improper lifting techniques
To protect yourself and others, make sure you thoroughly read and understand the safety information presented in this manual before operating the machine.
8 wc_si000511gb.fm
LB 1 Safety Information
1.3 Safety Guidelines for Operating the Machine
Operator training
Before operating the machine:Read and understand the operating instructions contained in all manuals delivered with the machine.Familiarize yourself with the location and proper use of all controls and safety devices. Contact Wacker Neuson Corporation for additional training if necessary.
When operating this machine:Do not allow improperly trained people to operate the machine. People operating the machine must be familiar with the potential risks and hazards associated with it.
Work area When setting up the machine:Keep the area immediately surrounding the machine clean, neat, and free of debris.When lighting traffic routes, always place one of the three support ropes at a right angle to the traffic route to ensure that the machine does not fall into the traffic route.Cordon off the area around the tripod in areas with crowds of people.Clearly mark support ropes so that the support ropes do not pose a hazard for passersby.Keep plugs and receptacles dry.Keep a distance of at least one meter (3 feet) between the balloon and any flammable material such as wood or plastic.Keep the machine at least 5.5 m (16 ft.) from pools and spas.Be sure the machine is on a firm, level surface and will not tip, roll, slide, or fall.Make sure the area above the balloon is open and clear of overhead wires and obstructions. High voltage cables should be at least 50 meters (160 feet) linear distance away from the tripod. Overhead electric lines should be kept at least 2.5 meters (8 feet) away from the balloon.
When operating this machine:Do not allow water to accumulate around the base of the machine. If water is present, move the machine.Do not operate the machine in areas where leaks of combustible substances such as gasoline and natural gas may occur.Do not use with extension cord near water or where water may accumulate.
Guidelines for operating
When operating this machine:Use on GFCI-protected circuits only.Replace a damaged balloon cover before use.Lower the tripod and collapse the balloon after use.
wc_si000511gb.fm 9
Safety Information LB 1
Do not start a machine in need of repair.Do not use the machine if the insulation on the electrical cord is cut or worn through.Do not operate the light without the balloon.
1.4 Guidelines for Service Safety
Precautions When maintaining this machine:Read and understand the service procedures before performing any service to the machine.All adjustments and repairs shall be completed before operating the machine. All adjustments and repairs shall be done by a qualified technician. Turn the machine off before performing maintenance or making repairs.
When maintaining this machine:Never allow a machine with a known problem or deficiency to be operated.Repair or maintain the machine immediately after detecting a problem.
Accessories, safety devices and modifications
When maintaining this machine:Use only accessories or attachments that are recommended by Wacker Neuson.
When maintaining this machine:Do not defeat safety devices. Do not modify the machine without the express written approval of the manufacturer.
Replacing parts and labels
When maintaining this machine:Use only spare parts recommended by Wacker Neuson.Replace all missing and hard-to-read labels.
When operating this machine:
10 wc_si000511gb.fm
LB 1 Safety Information
Noteswc_si000511gb.fm 11
Labels LB 1
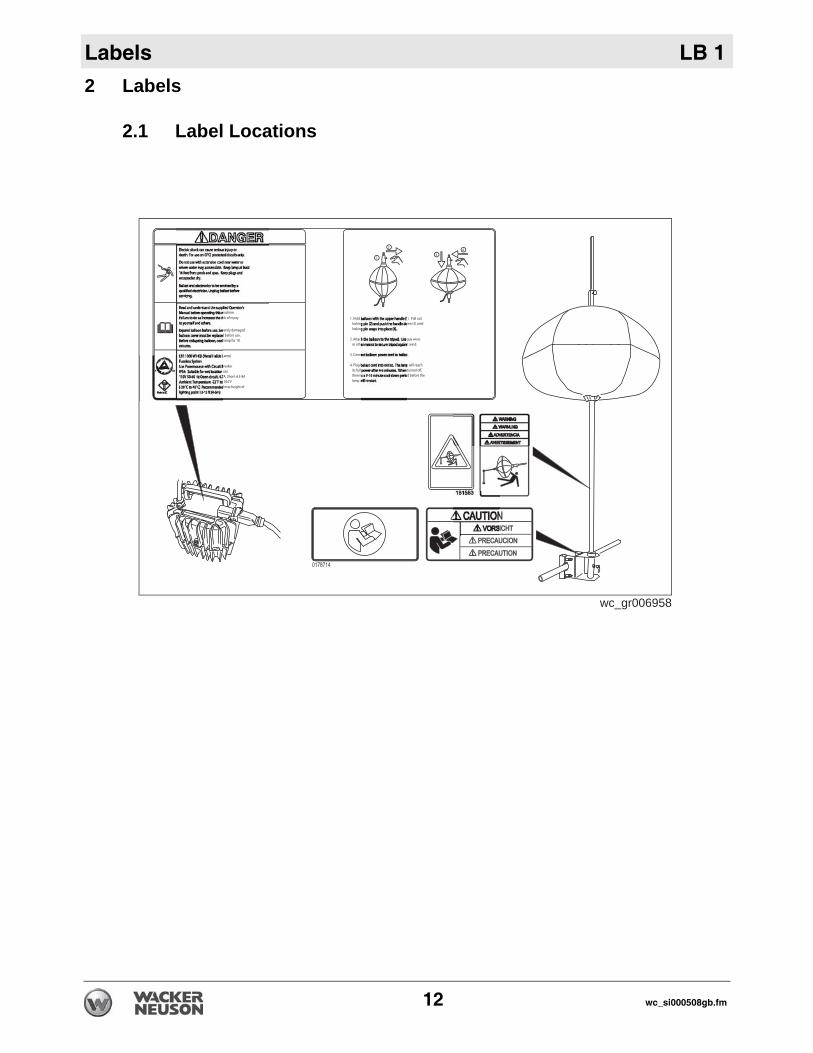
2 Labels2.1 Label Locations
wc_gr006958
12 wc_si000508gb.fm
LB 1 Labels
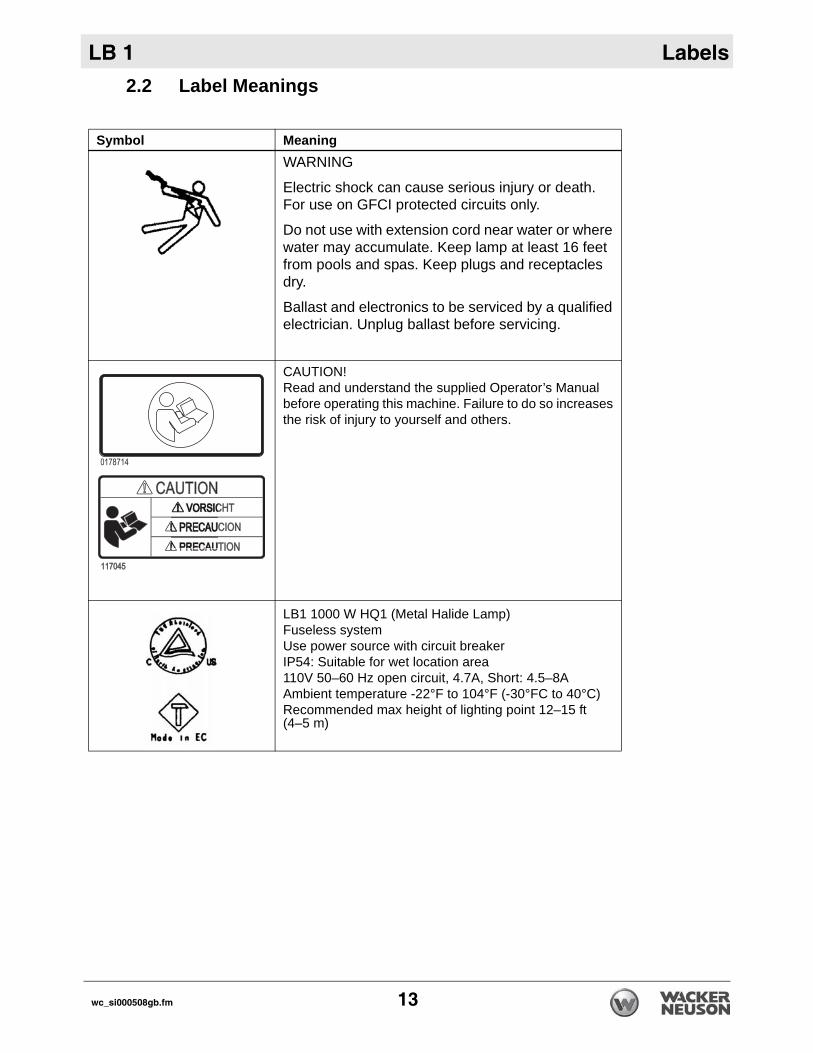
2.2 Label MeaningsSymbol MeaningWARNING
Electric shock can cause serious injury or death. For use on GFCI protected circuits only.
Do not use with extension cord near water or where water may accumulate. Keep lamp at least 16 feet from pools and spas. Keep plugs and receptacles dry.
Ballast and electronics to be serviced by a qualified electrician. Unplug ballast before servicing.
CAUTION!Read and understand the supplied Operator’s Manual before operating this machine. Failure to do so increases the risk of injury to yourself and others.
LB1 1000 W HQ1 (Metal Halide Lamp)Fuseless systemUse power source with circuit breakerIP54: Suitable for wet location area110V 50–60 Hz open circuit, 4.7A, Short: 4.5–8AAmbient temperature -22°F to 104°F (-30°FC to 40°C)Recommended max height of lighting point 12–15 ft (4–5 m)
wc_si000508gb.fm 13
Labels LB 1
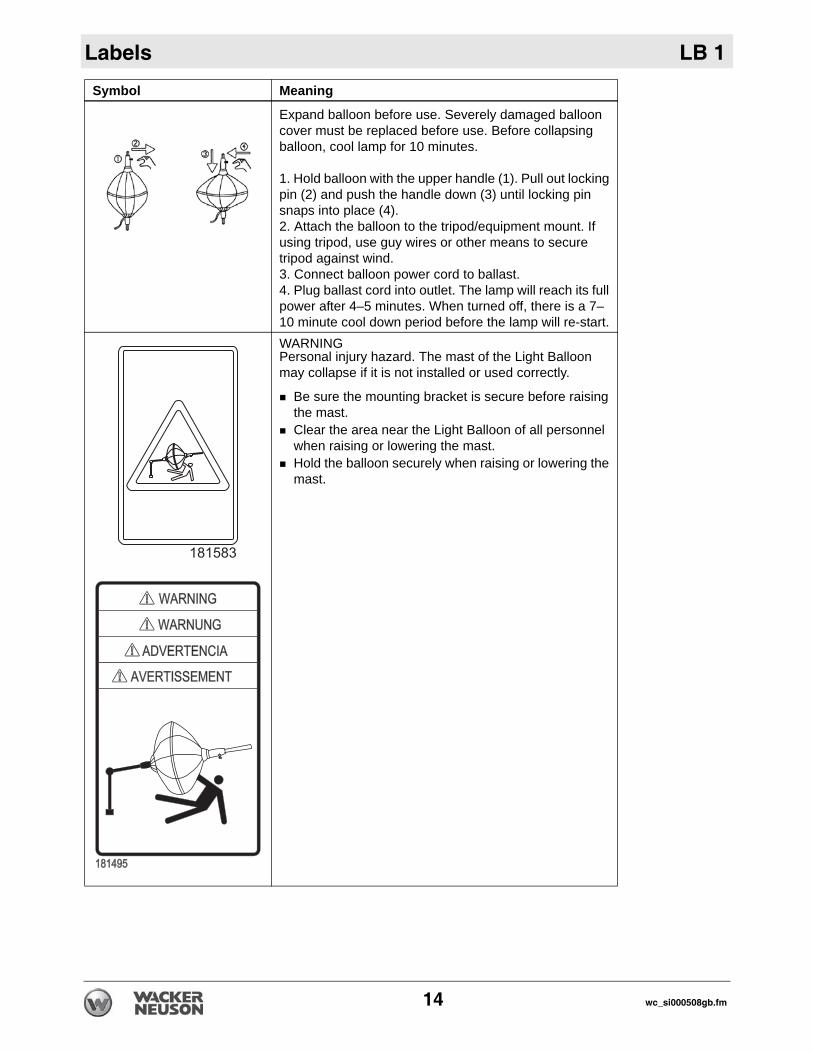
Expand balloon before use. Severely damaged balloon cover must be replaced before use. Before collapsing balloon, cool lamp for 10 minutes.
1. Hold balloon with the upper handle (1). Pull out locking pin (2) and push the handle down (3) until locking pin snaps into place (4).2. Attach the balloon to the tripod/equipment mount. If using tripod, use guy wires or other means to secure tripod against wind.3. Connect balloon power cord to ballast.4. Plug ballast cord into outlet. The lamp will reach its full power after 4–5 minutes. When turned off, there is a 7–10 minute cool down period before the lamp will re-start.WARNINGPersonal injury hazard. The mast of the Light Balloon may collapse if it is not installed or used correctly.
Be sure the mounting bracket is secure before raising the mast.Clear the area near the Light Balloon of all personnel when raising or lowering the mast. Hold the balloon securely when raising or lowering the mast.
Tighten the mast locking lever as soon as the mast is in the upright position.
Symbol Meaning
14 wc_si000508gb.fm
LB 1 Operation
3 Operation3.1 Preparing the Machine for First UsePreparing for first use
To prepare your machine for first use:
1. Make sure all loose packaging materials have been removed from the machine.
2. Check the machine and its components for damage. If there is visible damage, do not operate the machine! Contact your Wacker Neuson dealer immediately for assistance.
3. Take inventory of all items included with the machine and verify that all loose components and fasteners are accounted for.
4. Attach component parts not already attached.
5. Move the machine to its operating location.
wc_tx001535gb.fm 15
Operation LB 1
3.2 Setting up the BalloonPrerequisites BalloonLight fixture with bulb
Procedure Follow the procedure below to set up the balloon.
1. Remove the light from the transport cylinder.
2. Remove the light from the transport bag.
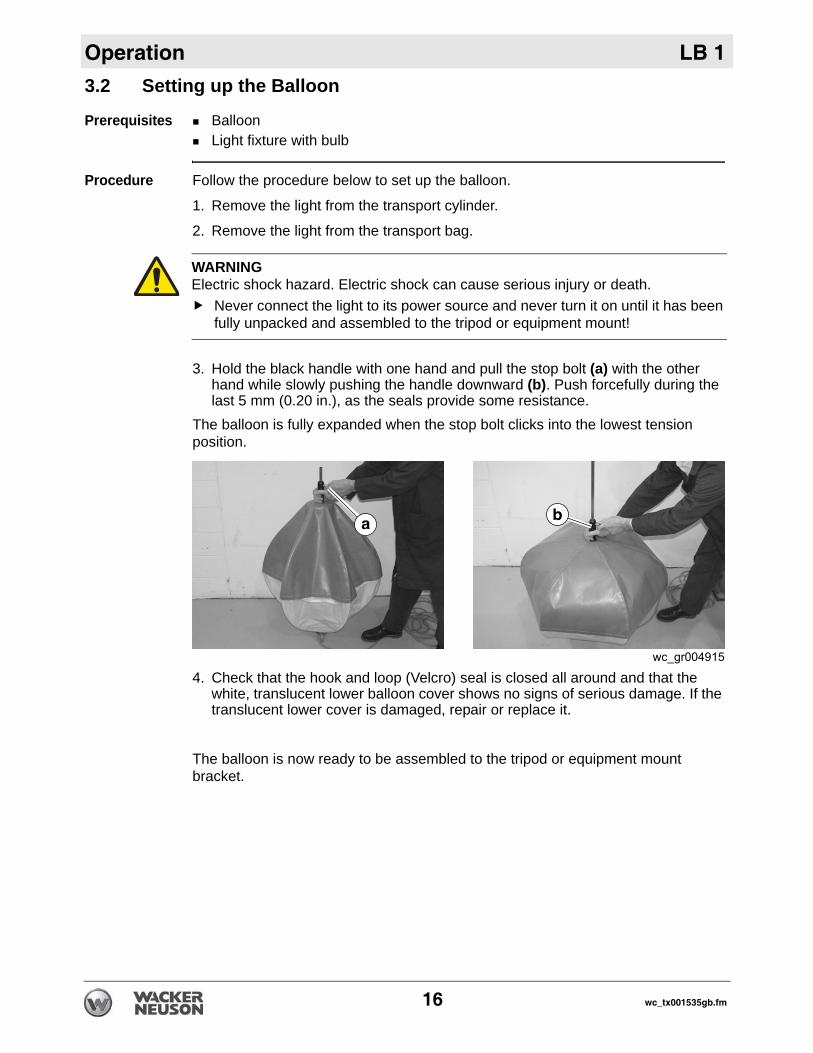
3. Hold the black handle with one hand and pull the stop bolt (a) with the other hand while slowly pushing the handle downward (b). Push forcefully during the last 5 mm (0.20 in.), as the seals provide some resistance.
The balloon is fully expanded when the stop bolt clicks into the lowest tension position.
4. Check that the hook and loop (Velcro) seal is closed all around and that the white, translucent lower balloon cover shows no signs of serious damage. If the translucent lower cover is damaged, repair or replace it.
The balloon is now ready to be assembled to the tripod or equipment mount bracket.
WARNINGElectric shock hazard. Electric shock can cause serious injury or death.
Never connect the light to its power source and never turn it on until it has been fully unpacked and assembled to the tripod or equipment mount!
16 wc_tx001535gb.fm
LB 1 Operation
3.3 Setting up the Tripod (if equipped)Prerequisites Tripod
Procedure Follow the procedure below to set up the tripod.
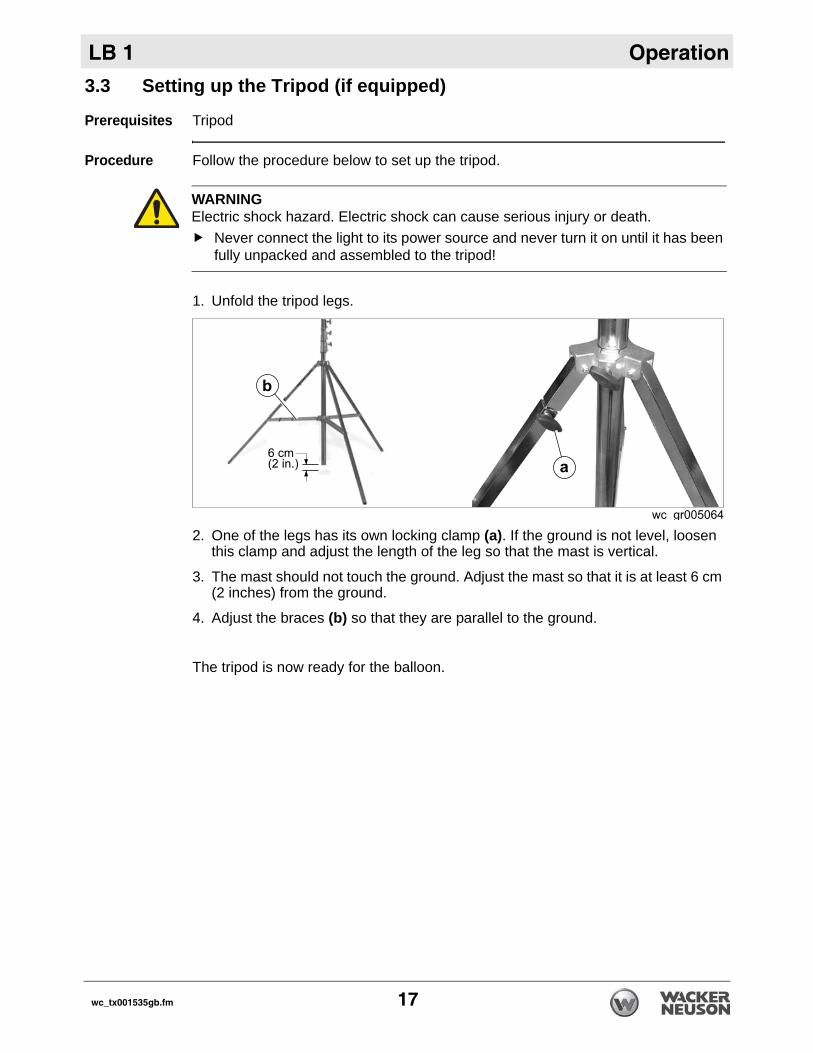
1. Unfold the tripod legs.
2. One of the legs has its own locking clamp (a). If the ground is not level, loosen this clamp and adjust the length of the leg so that the mast is vertical.
3. The mast should not touch the ground. Adjust the mast so that it is at least 6 cm (2 inches) from the ground.
4. Adjust the braces (b) so that they are parallel to the ground.
The tripod is now ready for the balloon.
WARNINGElectric shock hazard. Electric shock can cause serious injury or death.
Never connect the light to its power source and never turn it on until it has been fully unpacked and assembled to the tripod!
wc_tx001535gb.fm 17
Operation LB 1
3.4 Assembling the Balloon to the Tripod (if equipped)Prerequisites Tripod
Procedure Follow the procedure below to assemble the balloon to the tripod.
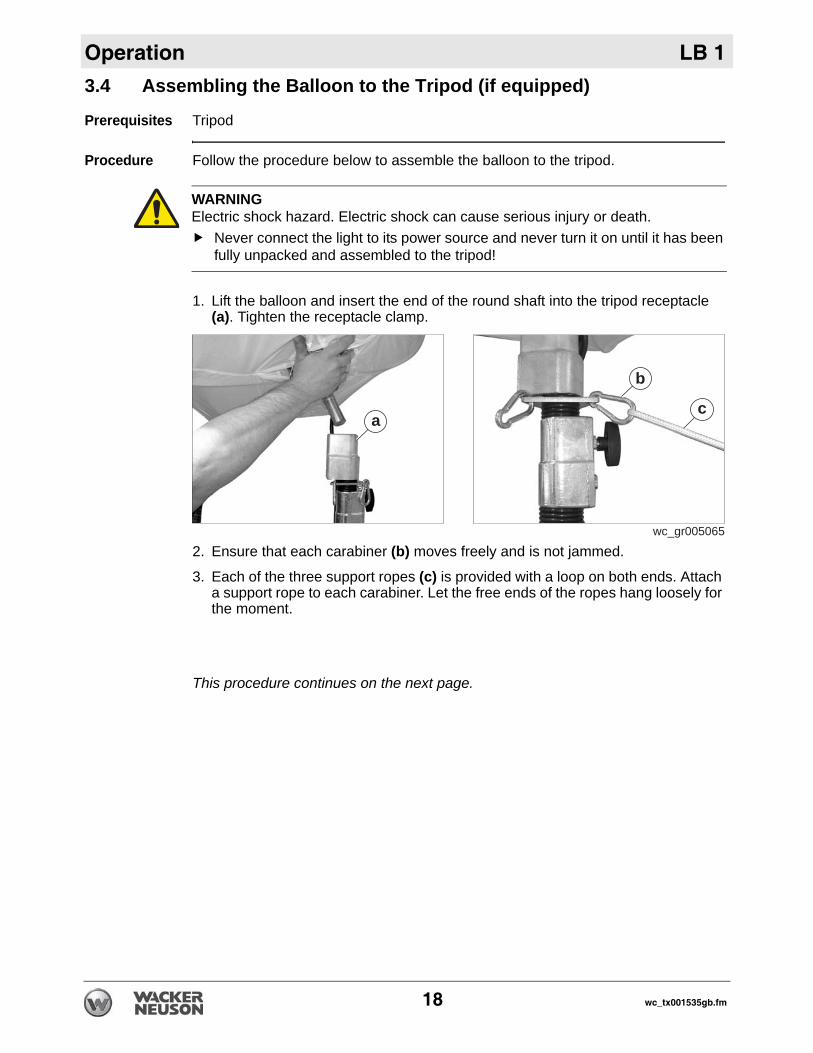
1. Lift the balloon and insert the end of the round shaft into the tripod receptacle (a). Tighten the receptacle clamp.
2. Ensure that each carabiner (b) moves freely and is not jammed.
3. Each of the three support ropes (c) is provided with a loop on both ends. Attach a support rope to each carabiner. Let the free ends of the ropes hang loosely for the moment.
This procedure continues on the next page.
WARNINGElectric shock hazard. Electric shock can cause serious injury or death.
Never connect the light to its power source and never turn it on until it has been fully unpacked and assembled to the tripod!
a
b
c
wc_gr005065
18 wc_tx001535gb.fm
LB 1 Operation
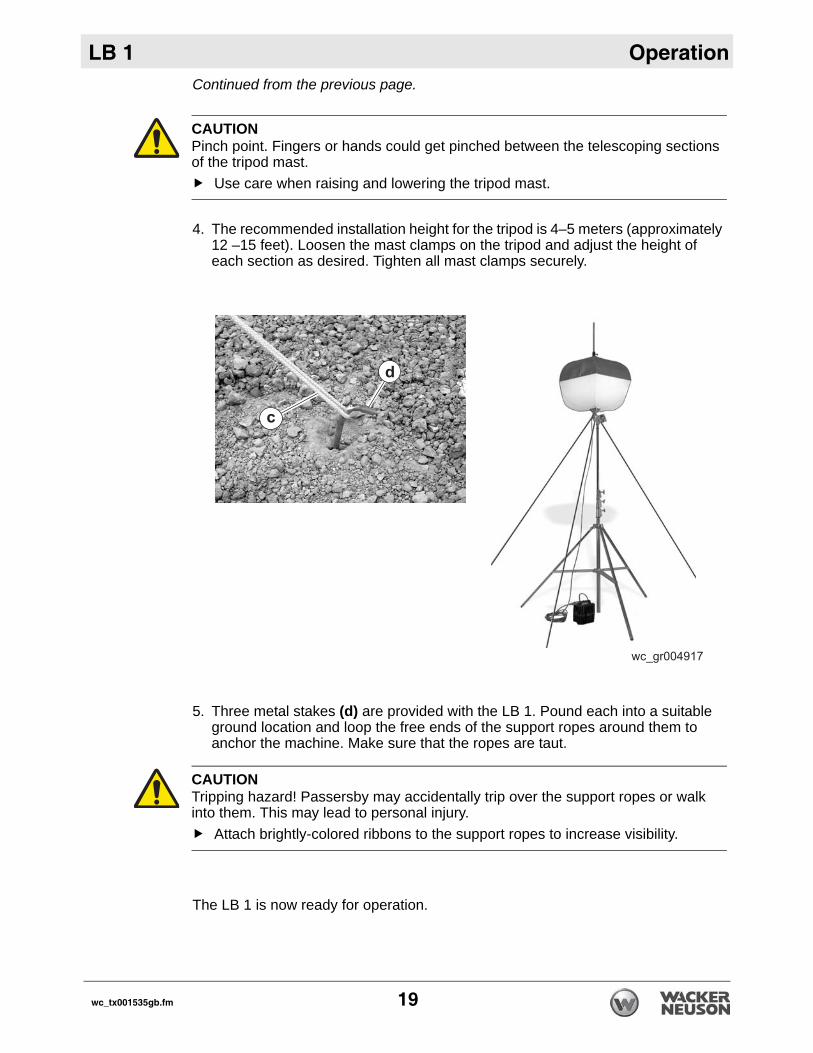
Continued from the previous page.4. The recommended installation height for the tripod is 4–5 meters (approximately 12 –15 feet). Loosen the mast clamps on the tripod and adjust the height of each section as desired. Tighten all mast clamps securely.
5. Three metal stakes (d) are provided with the LB 1. Pound each into a suitable ground location and loop the free ends of the support ropes around them to anchor the machine. Make sure that the ropes are taut.
The LB 1 is now ready for operation.
CAUTIONPinch point. Fingers or hands could get pinched between the telescoping sections of the tripod mast.
Use care when raising and lowering the tripod mast.
CAUTIONTripping hazard! Passersby may accidentally trip over the support ropes or walk into them. This may lead to personal injury.
Attach brightly-colored ribbons to the support ropes to increase visibility.
wc_tx001535gb.fm 19
Operation LB 1
3.5 Installing the Equipment Mount (if equipped)Requirements Equipment mount bracket, pole, and fastenersTorque wrench
Installing the bracket
Follow the procedure below to install the mounting bracket and the Light Balloon.
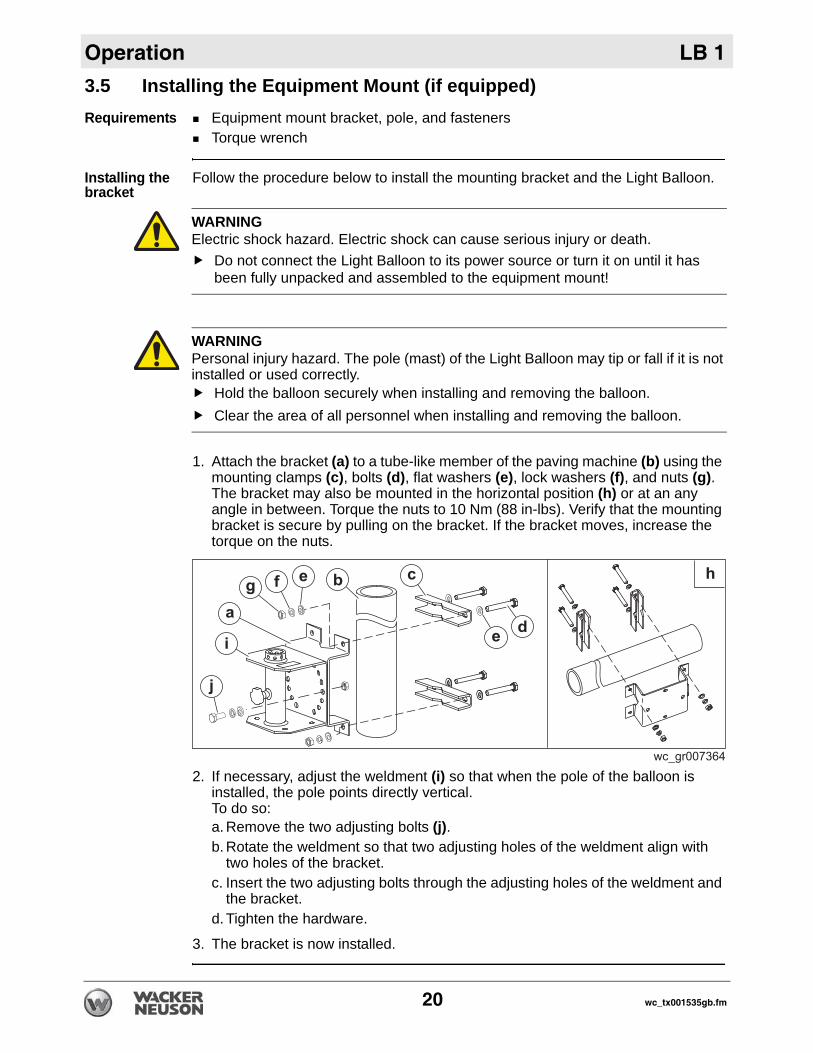
1. Attach the bracket (a) to a tube-like member of the paving machine (b) using the mounting clamps (c), bolts (d), flat washers (e), lock washers (f), and nuts (g). The bracket may also be mounted in the horizontal position (h) or at an any angle in between. Torque the nuts to 10 Nm (88 in-lbs). Verify that the mounting bracket is secure by pulling on the bracket. If the bracket moves, increase the torque on the nuts.
2. If necessary, adjust the weldment (i) so that when the pole of the balloon is installed, the pole points directly vertical. To do so:a. Remove the two adjusting bolts (j).b. Rotate the weldment so that two adjusting holes of the weldment align with
two holes of the bracket. c. Insert the two adjusting bolts through the adjusting holes of the weldment and
the bracket.d. Tighten the hardware.
3. The bracket is now installed.
WARNINGElectric shock hazard. Electric shock can cause serious injury or death.
Do not connect the Light Balloon to its power source or turn it on until it has been fully unpacked and assembled to the equipment mount!
WARNINGPersonal injury hazard. The pole (mast) of the Light Balloon may tip or fall if it is not installed or used correctly.
Hold the balloon securely when installing and removing the balloon.Clear the area of all personnel when installing and removing the balloon.
20 wc_tx001535gb.fm
LB 1 Operation
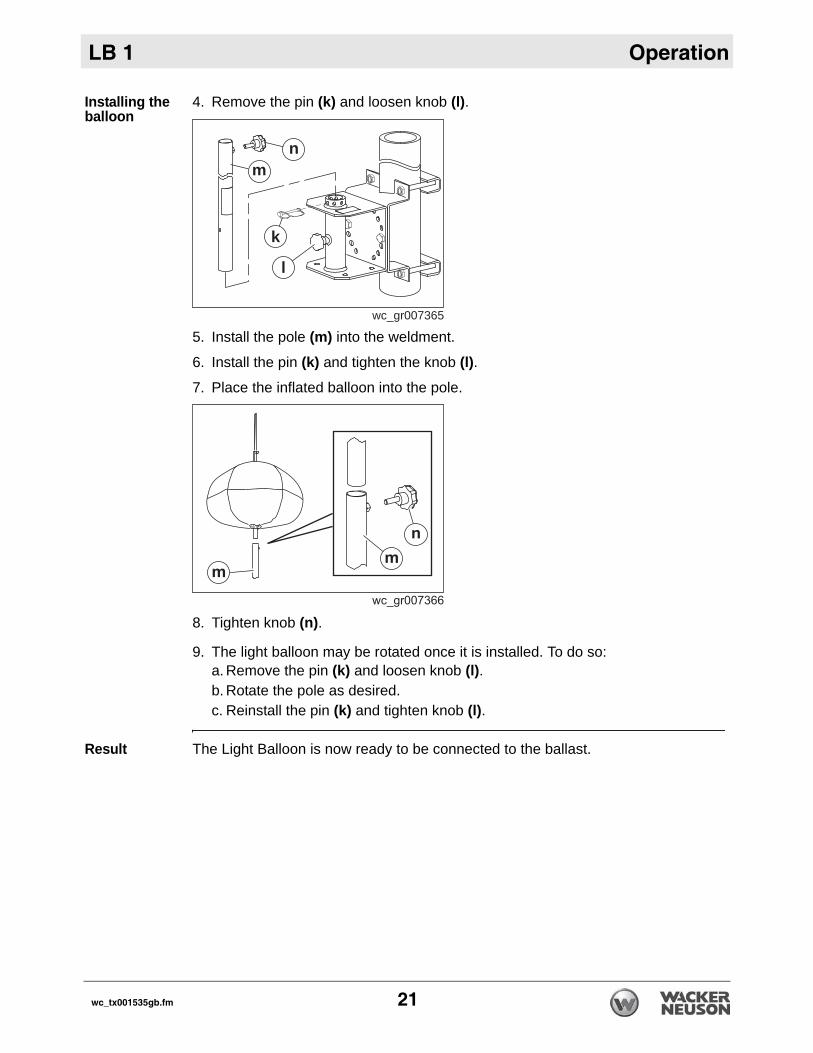
Installing the balloon
4. Remove the pin (k) and loosen knob (l).
5. Install the pole (m) into the weldment.
6. Install the pin (k) and tighten the knob (l).7. Place the inflated balloon into the pole.
8. Tighten knob (n).
9. The light balloon may be rotated once it is installed. To do so:a. Remove the pin (k) and loosen knob (l).b. Rotate the pole as desired.c. Reinstall the pin (k) and tighten knob (l).
Result The Light Balloon is now ready to be connected to the ballast.
wc_gr007365
k
mn
l
wc_tx001535gb.fm 21
Operation LB 1
3.6 Turning ON/OFF the LightPrerequisites Ballast and power sourceLB 1 assembled
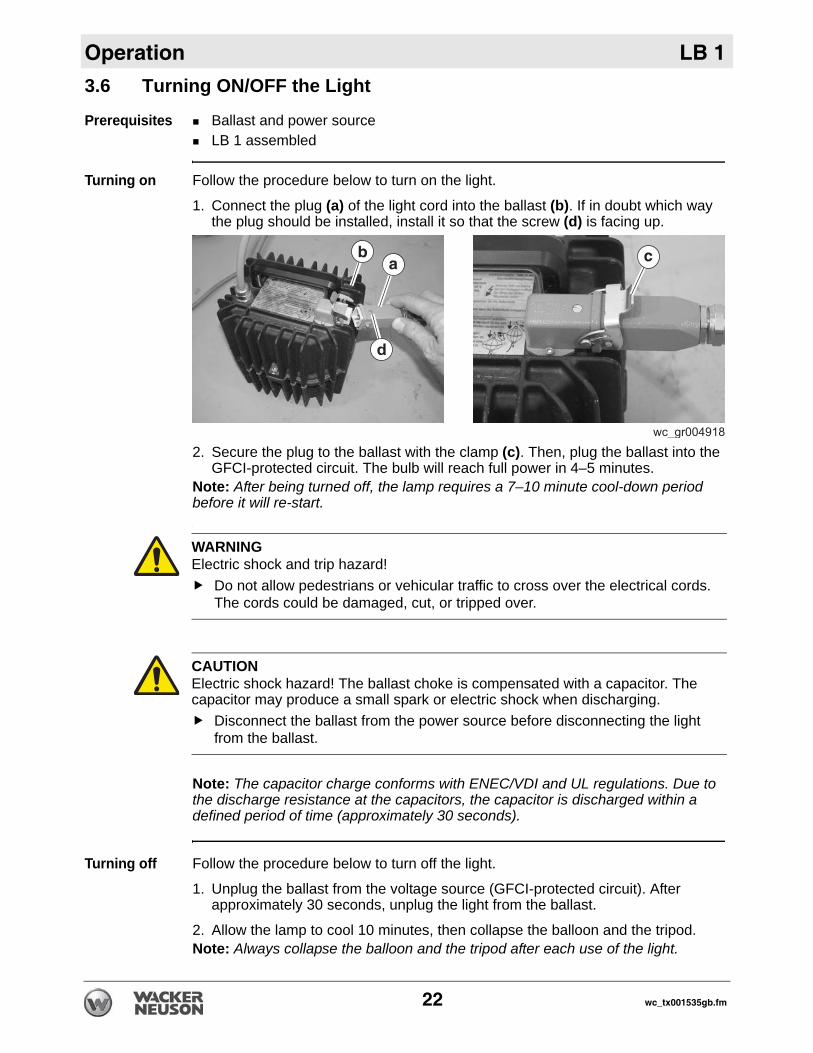
Turning on Follow the procedure below to turn on the light.
1. Connect the plug (a) of the light cord into the ballast (b). If in doubt which way the plug should be installed, install it so that the screw (d) is facing up.
2. Secure the plug to the ballast with the clamp (c). Then, plug the ballast into the GFCI-protected circuit. The bulb will reach full power in 4–5 minutes.
Note: After being turned off, the lamp requires a 7–10 minute cool-down period before it will re-start..
Note: The capacitor charge conforms with ENEC/VDI and UL regulations. Due to the discharge resistance at the capacitors, the capacitor is discharged within a defined period of time (approximately 30 seconds).
Turning off Follow the procedure below to turn off the light.
1. Unplug the ballast from the voltage source (GFCI-protected circuit). After approximately 30 seconds, unplug the light from the ballast.
2. Allow the lamp to cool 10 minutes, then collapse the balloon and the tripod.Note: Always collapse the balloon and the tripod after each use of the light.
WARNINGElectric shock and trip hazard!
Do not allow pedestrians or vehicular traffic to cross over the electrical cords. The cords could be damaged, cut, or tripped over.
CAUTIONElectric shock hazard! The ballast choke is compensated with a capacitor. The capacitor may produce a small spark or electric shock when discharging.
Disconnect the ballast from the power source before disconnecting the light from the ballast.
22 wc_tx001535gb.fm
LB 1 Operation
3.7 Emergency Shutdown ProcedureProcedure If a breakdown or accident occurs while the machine is operating, follow theprocedure below:
1. Stop the generator engine.
2. Turn off the generator fuel supply.
3. Unplug the machine from the power source.
4. Lower the balloon.
5. Contact the rental yard or machine owner for further instructions.
wc_tx001535gb.fm 23
Operation LB 1
3.8 Inspecting and CleaningInspecting Inspect the following components each time you unpack the LB 1:Make sure that no electrical cords are damaged. If any electrical cords are defective or damaged or if the grounding plug is broken or shorted-out, have a specialist repair it.Inspect the bulb for cracked glass.Make sure the bulb is properly screwed into the socket.Inspect the lower and upper covers for damage. Do not operate the balloon with a defective cover.
Cleaning Follow the instructions below for cleaning the machine:If the balloon should become damp during use, let it dry thoroughly before returning the balloon to its transport cylinder. Otherwise, it will become musty in storage.If the cover (upper/lower) is dirty, wipe it with a weak solution of liquid dish soap and water.
NOTICE: Do not use solvents to clean the balloon cover!
NOTICE: Never use a pressure washer to clean the machine.
24 wc_tx001535gb.fm
LB 1 Operation
3.9 Changing the BulbPrerequisites Leather gloves and eye protectionNew lamp
Removal Follow the procedure below to remove the lamp.
Note: Yellow-brown condensing particles with free or enclosed metal drops inside the lamp are normal. The lamp is damaged and in need of replacing if the inner part of the lamp is deformed by heat or if the inner or outer lamps show cracks or cuts.
Removal:
1. Turn off the generator, unplug the light, and allow the lamp to cool at least 15 minutes.
2. Remove the balloon from the tripod.
3. Expand (open) the balloon. See section Setting up the Balloon.
4. Mount the balloon in a bench-top vise or other similar location that can hold the balloon securely and provide accessibility.
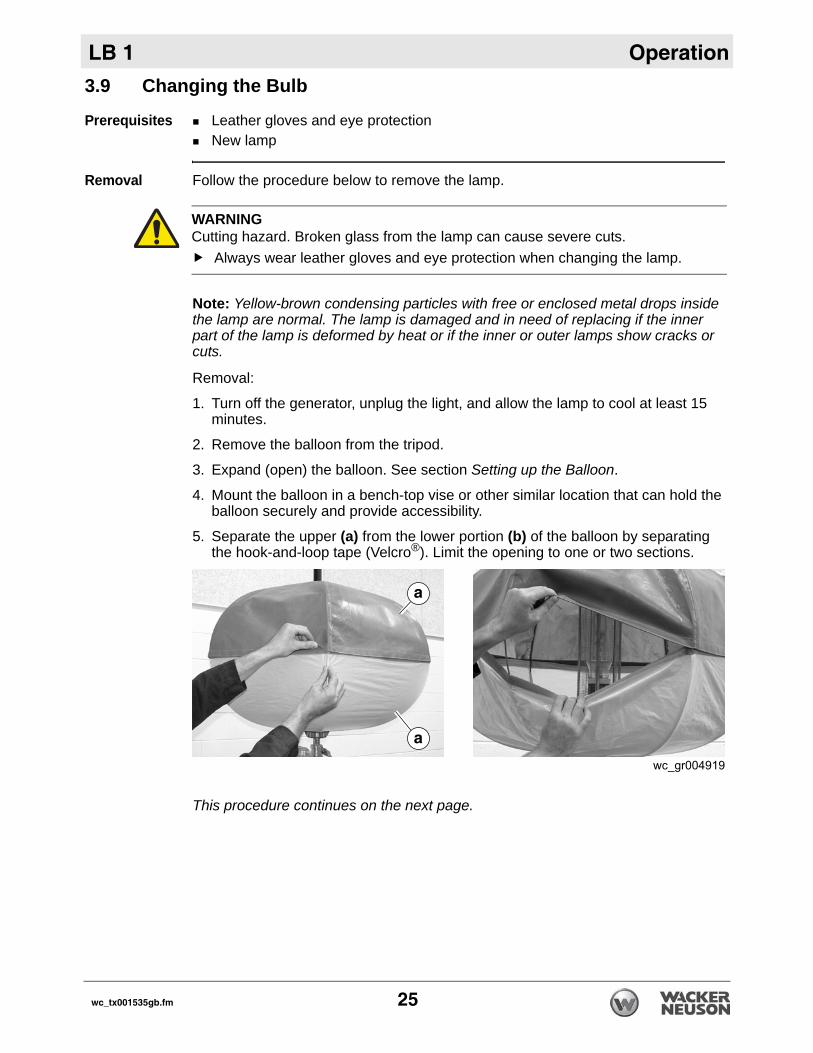
5. Separate the upper (a) from the lower portion (b) of the balloon by separating the hook-and-loop tape (Velcro®). Limit the opening to one or two sections.
This procedure continues on the next page.
WARNINGCutting hazard. Broken glass from the lamp can cause severe cuts.
Always wear leather gloves and eye protection when changing the lamp.
wc_tx001535gb.fm 25
Operation LB 1
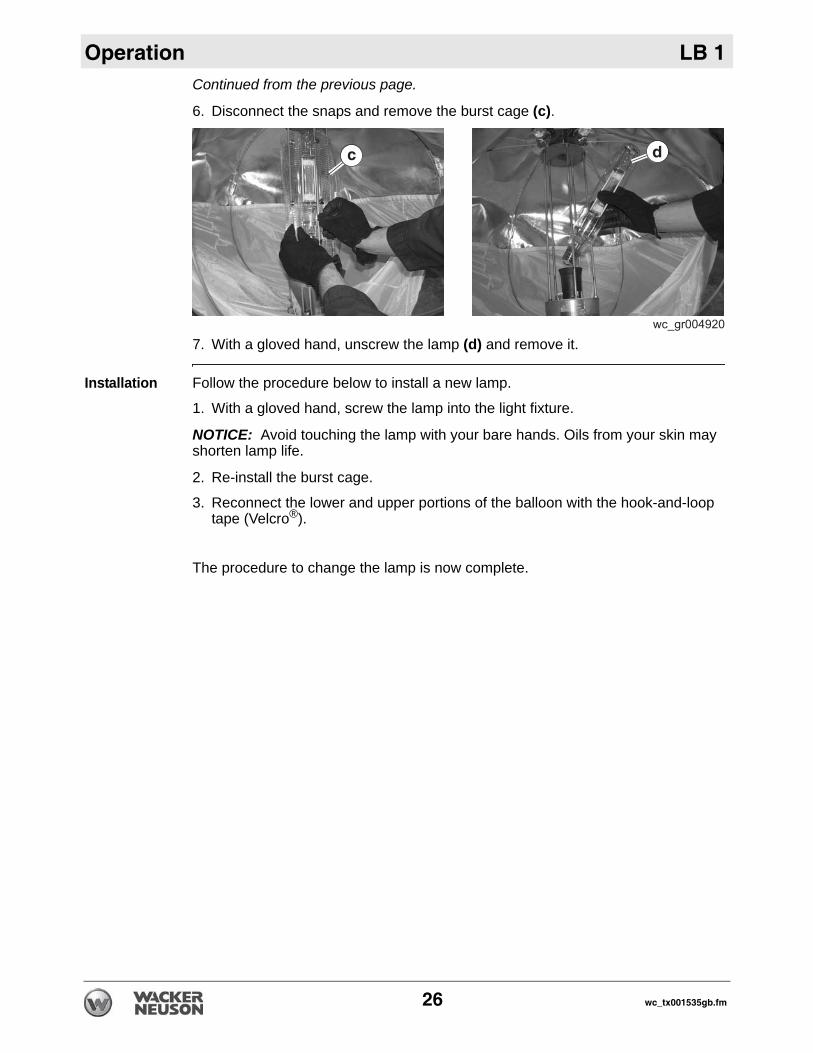
Continued from the previous page.6. Disconnect the snaps and remove the burst cage (c).
7. With a gloved hand, unscrew the lamp (d) and remove it.
Installation Follow the procedure below to install a new lamp.
1. With a gloved hand, screw the lamp into the light fixture.
NOTICE: Avoid touching the lamp with your bare hands. Oils from your skin may shorten lamp life.
2. Re-install the burst cage.
3. Reconnect the lower and upper portions of the balloon with the hook-and-loop tape (Velcro®).
The procedure to change the lamp is now complete.
26 wc_tx001535gb.fm
LB 1 Operation
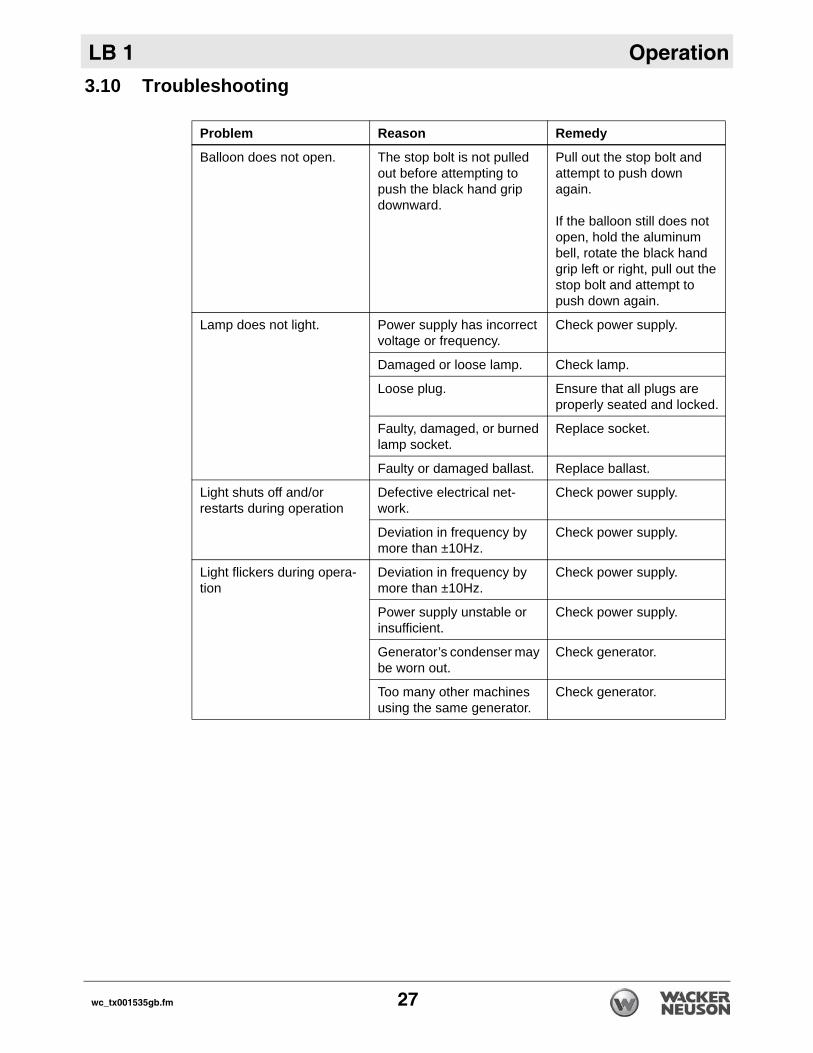
3.10 TroubleshootingProblem Reason Remedy
Balloon does not open. The stop bolt is not pulled out before attempting to push the black hand grip downward.
Pull out the stop bolt and attempt to push down again.
If the balloon still does not open, hold the aluminum bell, rotate the black hand grip left or right, pull out the stop bolt and attempt to push down again.
Lamp does not light. Power supply has incorrect voltage or frequency.
Check power supply.
Damaged or loose lamp. Check lamp.
Loose plug. Ensure that all plugs are properly seated and locked.
Faulty, damaged, or burned lamp socket.
Replace socket.
Faulty or damaged ballast. Replace ballast.
Light shuts off and/or restarts during operation
Defective electrical net-work.
Check power supply.
Deviation in frequency by more than ±10Hz.
Check power supply.
Light flickers during opera-tion
Deviation in frequency by more than ±10Hz.
Check power supply.
Power supply unstable or insufficient.
Check power supply.
Generator’s condenser may be worn out.
Check generator.
Too many other machines using the same generator.
Check generator.
wc_tx001535gb.fm 27
Operation LB 1
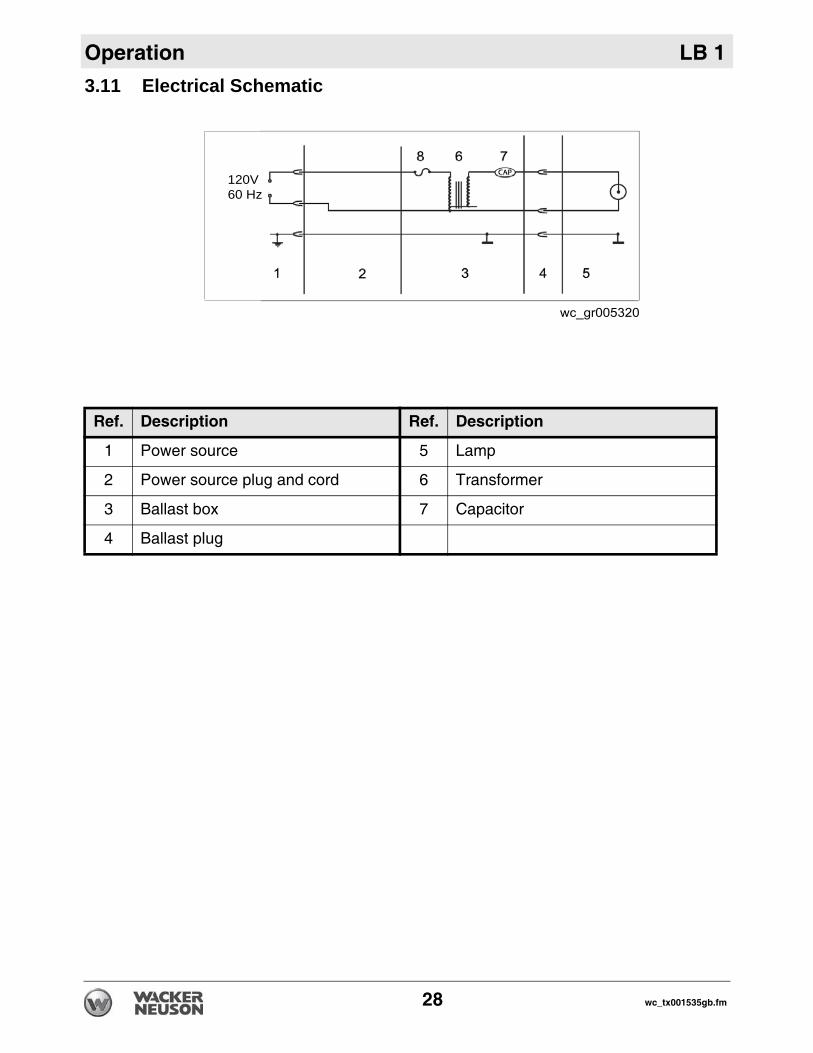
3.11 Electrical Schematic120V60 Hz
Ref. Description Ref. Description
1 Power source 5 Lamp
2 Power source plug and cord 6 Transformer
3 Ballast box 7 Capacitor
4 Ballast plug
28 wc_tx001535gb.fm
LB 1 Technical Data
wc_td000261gb.fm 29
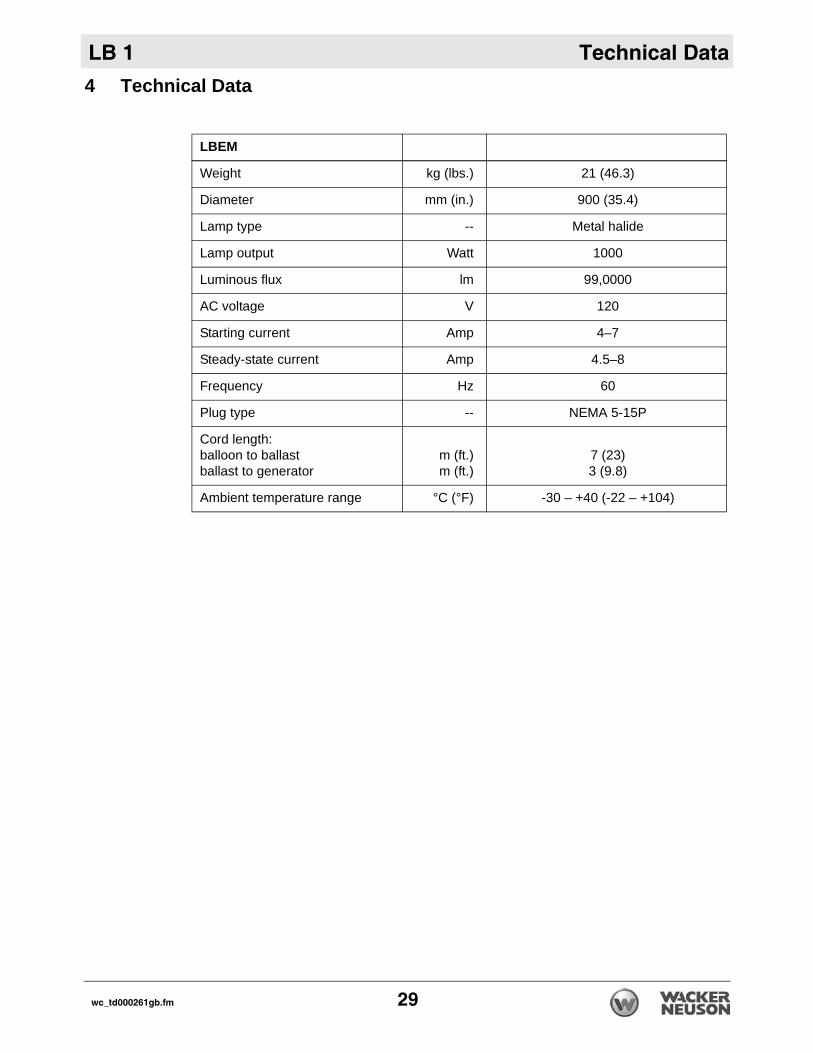
4 Technical Data
LBEM
Weight kg (lbs.) 21 (46.3)
Diameter mm (in.) 900 (35.4)
Lamp type -- Metal halide
Lamp output Watt 1000
Luminous flux lm 99,0000
AC voltage V 120
Starting current Amp 4–7
Steady-state current Amp 4.5–8
Frequency Hz 60
Plug type -- NEMA 5-15P
Cord length:balloon to ballastballast to generator
m (ft.)m (ft.)
7 (23)3 (9.8)
Ambient temperature range °C (°F) -30 – +40 (-22 – +104)

Wacker Neuson SE · Preußenstraße 41 · D-80809 München · Tel.: +49-(0)89-3 54 02-0 · Fax: +49 - (0)89-3 54 02-390Wacker Neuson Corporation · N92W15000 Anthony Ave. · Menomonee Falls, WI 53051 · Tel. : (262) 255-0500 · Fax: (262) 255-0550 ·Tel. : (800) 770-0957Wacker Neuson Limited - Room 1701–03 & 1717–20, 17/F. Tower 1, Grand Century Place, 193 Prince Edward Road West, Mongkok, Kowloon, Hongkong.Tel: (852) 3605 5360, Fax: (852) 2758 0032