Embed Size (px)
Citation preview
For safe and correct use, be sure to read the Safety Information in Read This First before using the machine.
Appendix
Maintenance
Troubleshooting
Changing the Projector Settings
Using the Projector via a Network
Projecting Images from a USB Memory Device or Digital Camera
Projecting an Image
Preparations for Using the ProjectorOperating Instructions

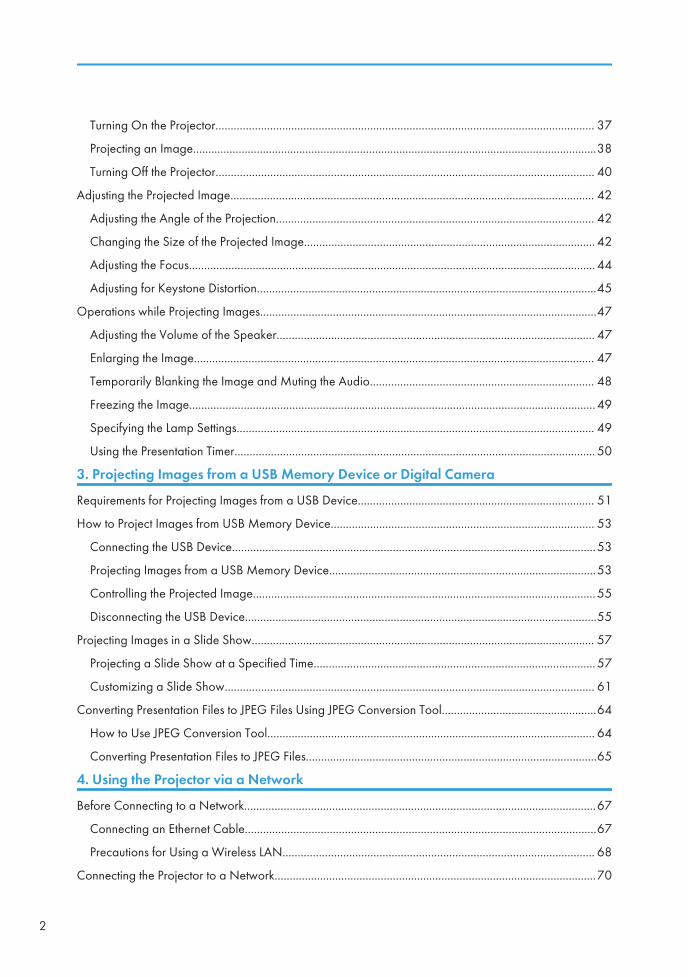
TABLE OF CONTENTSIntroduction......................................................................................................................................................... 6
Copyrights to Images..................................................................................................................................... 6
Important.........................................................................................................................................................6
Notes to Users Viewing 3D Images..............................................................................................................6
Manuals Provided with the Projector................................................................................................................ 8
How to Read This Manual................................................................................................................................. 9
Symbols...........................................................................................................................................................9
Notes...............................................................................................................................................................9
Model-Specific Information.............................................................................................................................10
1. Preparations for Using the Projector
Precautions for Using the Projector................................................................................................................. 11
Main Functions................................................................................................................................................. 13
Checking the Accessories................................................................................................................................15
Projector Parts and Their Functions................................................................................................................. 17
Exterior..........................................................................................................................................................17
Ports on the Projector................................................................................................................................... 18
Control Panel................................................................................................................................................19
Remote Control Parts and Their Functions......................................................................................................21
How to Use the Remote Control......................................................................................................................23
Effective Range of the Remote Control.......................................................................................................23
Loading Batteries into the Remote Control.................................................................................................24
Inputting Text................................................................................................................................................ 25
Operating Multiple Projectors with the Remote Control...........................................................................25
Positioning the Projector...................................................................................................................................28
Projection Mode.......................................................................................................................................... 28
Relationship Between the Projection Distance and the Screen Size........................................................ 29
Connecting Equipment to the Projector.......................................................................................................... 32
Connecting a Computer.............................................................................................................................. 32
Connecting AV Equipment.......................................................................................................................... 34
Connecting an External Display Device.....................................................................................................35
Connecting an External Speaker................................................................................................................35
2. Projecting an Image
Basic Operations for Using the Projector....................................................................................................... 37
1
Turning On the Projector............................................................................................................................. 37
Projecting an Image.....................................................................................................................................38
Turning Off the Projector............................................................................................................................. 40
Adjusting the Projected Image........................................................................................................................ 42
Adjusting the Angle of the Projection......................................................................................................... 42
Changing the Size of the Projected Image................................................................................................ 42
Adjusting the Focus...................................................................................................................................... 44
Adjusting for Keystone Distortion................................................................................................................45
Operations while Projecting Images...............................................................................................................47
Adjusting the Volume of the Speaker......................................................................................................... 47
Enlarging the Image.................................................................................................................................... 47
Temporarily Blanking the Image and Muting the Audio.......................................................................... 48
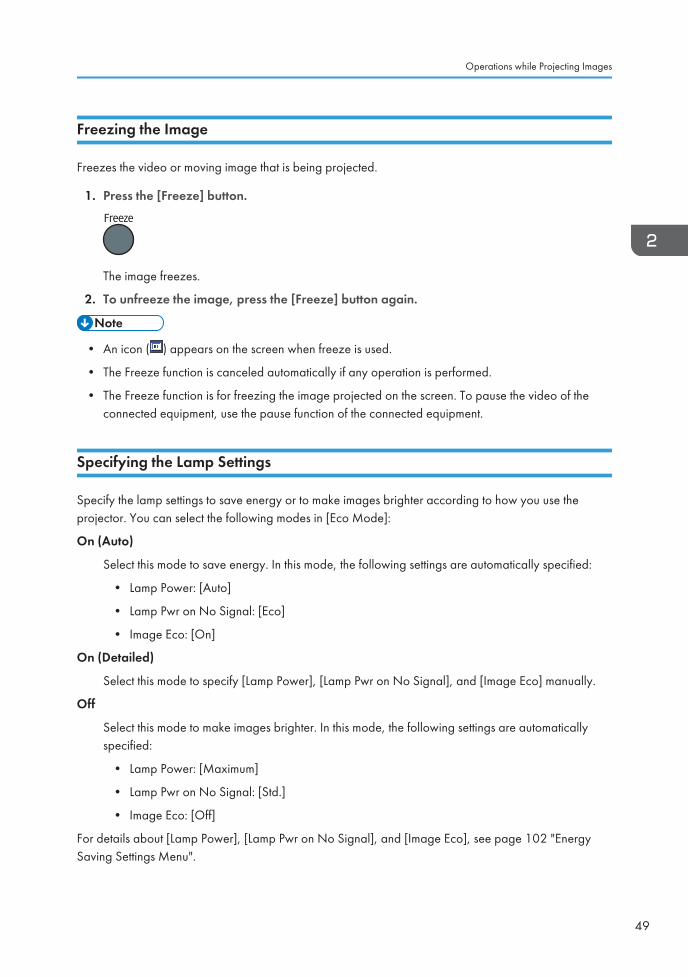
Freezing the Image...................................................................................................................................... 49
Specifying the Lamp Settings...................................................................................................................... 49
Using the Presentation Timer....................................................................................................................... 50
3. Projecting Images from a USB Memory Device or Digital Camera
Requirements for Projecting Images from a USB Device.............................................................................. 51
How to Project Images from USB Memory Device....................................................................................... 53
Connecting the USB Device........................................................................................................................53
Projecting Images from a USB Memory Device........................................................................................53
Controlling the Projected Image.................................................................................................................55
Disconnecting the USB Device....................................................................................................................55
Projecting Images in a Slide Show................................................................................................................. 57
Projecting a Slide Show at a Specified Time.............................................................................................57
Customizing a Slide Show.......................................................................................................................... 61
Converting Presentation Files to JPEG Files Using JPEG Conversion Tool...................................................64
How to Use JPEG Conversion Tool............................................................................................................ 64
Converting Presentation Files to JPEG Files................................................................................................65
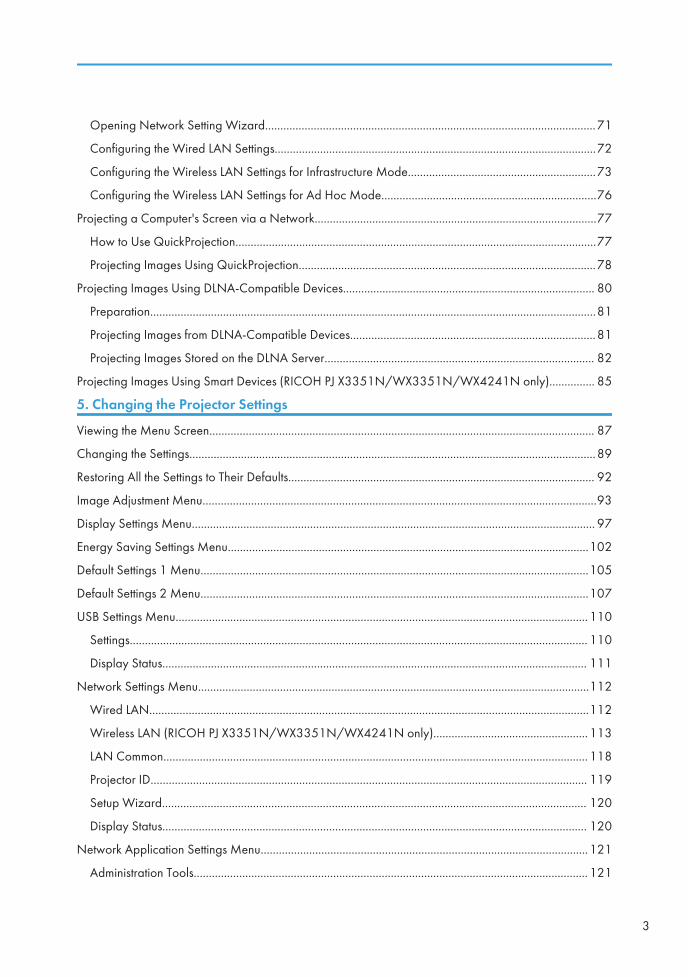
4. Using the Projector via a Network
Before Connecting to a Network....................................................................................................................67
Connecting an Ethernet Cable....................................................................................................................67
Precautions for Using a Wireless LAN....................................................................................................... 68
Connecting the Projector to a Network..........................................................................................................70
2
Opening Network Setting Wizard.............................................................................................................71
Configuring the Wired LAN Settings..........................................................................................................72
Configuring the Wireless LAN Settings for Infrastructure Mode..............................................................73
Configuring the Wireless LAN Settings for Ad Hoc Mode.......................................................................76
Projecting a Computer's Screen via a Network.............................................................................................77
How to Use QuickProjection.......................................................................................................................77
Projecting Images Using QuickProjection..................................................................................................78
Projecting Images Using DLNA-Compatible Devices................................................................................... 80
Preparation...................................................................................................................................................81
Projecting Images from DLNA-Compatible Devices.................................................................................81
Projecting Images Stored on the DLNA Server......................................................................................... 82
Projecting Images Using Smart Devices (RICOH PJ X3351N/WX3351N/WX4241N only)............... 85
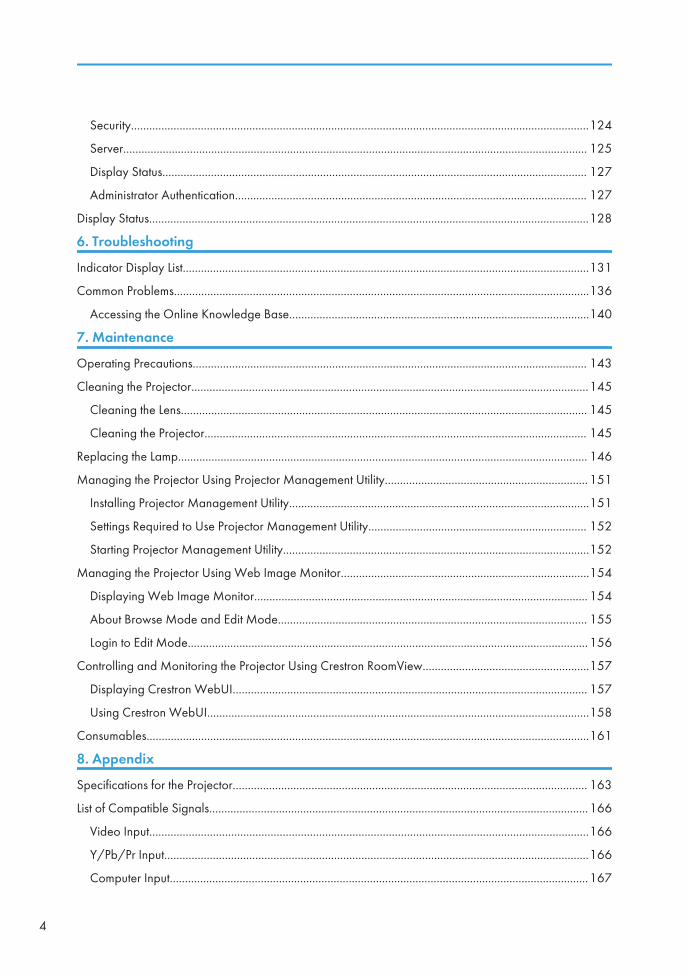
5. Changing the Projector Settings
Viewing the Menu Screen............................................................................................................................... 87
Changing the Settings......................................................................................................................................89
Restoring All the Settings to Their Defaults..................................................................................................... 92
Image Adjustment Menu..................................................................................................................................93
Display Settings Menu..................................................................................................................................... 97
Energy Saving Settings Menu.......................................................................................................................102
Default Settings 1 Menu................................................................................................................................105
Default Settings 2 Menu................................................................................................................................107
USB Settings Menu........................................................................................................................................ 110
Settings....................................................................................................................................................... 110
Display Status............................................................................................................................................ 111
Network Settings Menu.................................................................................................................................112
Wired LAN.................................................................................................................................................112
Wireless LAN (RICOH PJ X3351N/WX3351N/WX4241N only)................................................... 113
LAN Common............................................................................................................................................ 118
Projector ID................................................................................................................................................ 119
Setup Wizard............................................................................................................................................ 120
Display Status............................................................................................................................................ 120
Network Application Settings Menu............................................................................................................121
Administration Tools.................................................................................................................................. 121
3
Security.......................................................................................................................................................124
Server......................................................................................................................................................... 125
Display Status............................................................................................................................................ 127
Administrator Authentication.................................................................................................................... 127
Display Status.................................................................................................................................................128
6. Troubleshooting
Indicator Display List......................................................................................................................................131
Common Problems.........................................................................................................................................136
Accessing the Online Knowledge Base...................................................................................................140
7. Maintenance
Operating Precautions.................................................................................................................................. 143
Cleaning the Projector...................................................................................................................................145
Cleaning the Lens...................................................................................................................................... 145
Cleaning the Projector.............................................................................................................................. 145
Replacing the Lamp....................................................................................................................................... 146
Managing the Projector Using Projector Management Utility................................................................... 151
Installing Projector Management Utility...................................................................................................151
Settings Required to Use Projector Management Utility........................................................................ 152
Starting Projector Management Utility.....................................................................................................152
Managing the Projector Using Web Image Monitor..................................................................................154
Displaying Web Image Monitor.............................................................................................................. 154
About Browse Mode and Edit Mode...................................................................................................... 155
Login to Edit Mode....................................................................................................................................156
Controlling and Monitoring the Projector Using Crestron RoomView.......................................................157
Displaying Crestron WebUI..................................................................................................................... 157
Using Crestron WebUI..............................................................................................................................158
Consumables..................................................................................................................................................161
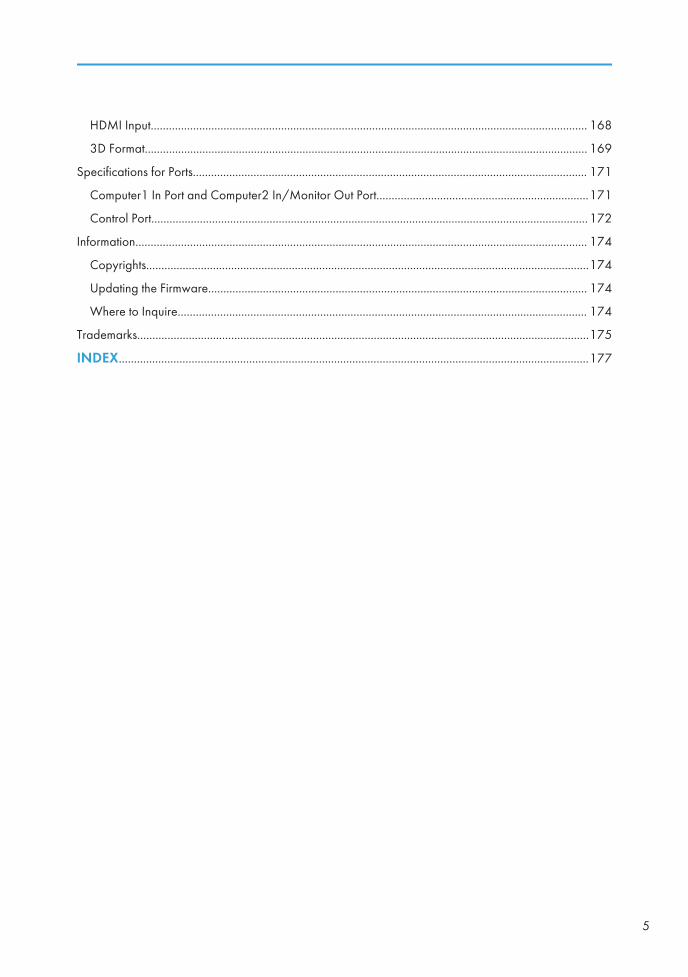
8. Appendix
Specifications for the Projector..................................................................................................................... 163
List of Compatible Signals.............................................................................................................................166
Video Input.................................................................................................................................................166
Y/Pb/Pr Input............................................................................................................................................166
Computer Input..........................................................................................................................................167
4
HDMI Input................................................................................................................................................ 168
3D Format.................................................................................................................................................. 169
Specifications for Ports.................................................................................................................................. 171
Computer1 In Port and Computer2 In/Monitor Out Port......................................................................171
Control Port................................................................................................................................................ 172
Information..................................................................................................................................................... 174
Copyrights..................................................................................................................................................174
Updating the Firmware............................................................................................................................. 174
Where to Inquire....................................................................................................................................... 174
Trademarks.....................................................................................................................................................175
INDEX...........................................................................................................................................................177
5
Introduction
Copyrights to Images
When projecting images using the projector, be careful not to infringe the copyright of protectedmaterials.
The following are examples that may infringe the copyright of protected materials.
• Broadcasting images or movies for commercial purposes
• Modifying images or movies using functions such as freeze, magnify, or zoom to broadcast imagesfor commercial purposes or public viewing
• Varying the aspect ratio of images or movies using a function that changes the screen size tobroadcast images for commercial purposes or public viewing
Important
In no event will the company be liable for direct, indirect, special, incidental, or consequential damagesas a result of handling or operating the machine.
The manufacturer shall not be responsible for any damage or expense that might result from the use ofparts other than genuine parts from the manufacturer with your office products.
Notes to Users Viewing 3D Images
Pay attention to the following points when viewing images using 3D glasses with the projector:
• You need 3D glasses to view 3D images. The projector uses DLP Link technology to synchronizewith 3D glasses. You need to use the optional 3D glasses that support DLP Link (RICOH PJ 3DGlasses Type 2).
• How 3D images are viewed may vary according to the individual.
• Do not use 3D glasses for viewing any material other than 3D images.
• Before viewing 3D images, make sure to read the manuals provided with your 3D glasses and 3Dcompatible content.
• Avoid viewing 3D images for a long period of time. Take a break of 15 minutes or longer afterevery hour of viewing.
• If you feel sick while viewing 3D images, stop viewing them. If you continue to feel sick, consult adoctor.
6

• When viewing 3D images in a room where an LED lighting system or fluorescent lights are used,you may feel that the light in the room flickers. If this is the case, dim the lights until you do notnotice any flickers, or turn off the lights.
• If you or any member of your family has a history of light-sensitive seizures, consult a doctor beforeviewing 3D images.
• To view 3D images, sit in front of the screen so that your eyes are parallel and level with the screen.
• Viewing 3D images from a place that is too close to the screen may result in eye strain. Thedistance between the screen and you should be at least three times the height of the screen.
• Adult supervision is required for children using 3D glasses.
• Viewing 3D images is not recommended for children under 6 years old. It may negatively affectdevelopment of their vision. Consult a doctor before using 3D glasses.
7
Manuals Provided with the ProjectorRead this manual carefully before you use the projector.
Refer to the manuals that are relevant to what you want to do with the projector.
• The manuals are provided in various formats.
• Adobe® Acrobat® Reader®/Adobe Reader must be installed in order to view the manuals as PDFfiles.
Read This First
Provides information about safe usage of the projector.
To avoid injury and prevent damage to the projector, be sure to read the section of this manualentitled Safety Information.
Start Guide
Provides basic information about how to install the projector and how to project images. Since thecontents of this manual are a summary of Operating Instructions, see Operating Instructions fordetailed information.
Operating Instructions
Provide information about how to install the projector, how to project images using the projector,and how to configure the projector. It also provides information about troubleshooting andmaintenance.
The CD-ROM includes only the English manual. For other languages, download the latest versionfrom the website.
• The following software products are referred to using general names:
Product name General name
RICOH JPEG Conversion Tool Type A JPEG Conversion Tool
8
How to Read This Manual
Symbols
This manual uses the following symbols:
Indicates points to pay attention to when using the projector.
Indicates supplementary explanations of the projector’s functions, and instructions on resolving usererrors.
[ ]Indicates the names of buttons on the control panel and remote control. It also indicates items displayedon the menu screens.
(mainly Europe and Asia)
(mainly North America)
Differences in the functions of Region A and Region B models are indicated by two symbols. Read theinformation indicated by the symbol that corresponds to the region of the model you are using. Fordetails about which symbol corresponds to the model you are using, see page 10 "Model-SpecificInformation".
Notes
Contents of this manual are subject to change without prior notice.
Two kinds of size notation are employed in this manual.
Some illustrations in this manual might be slightly different from the machine.
Certain options might not be available in some countries. For details, please contact your local dealer.
Depending on which country you are in, certain units may be optional. For details, please contact yourlocal dealer.
9
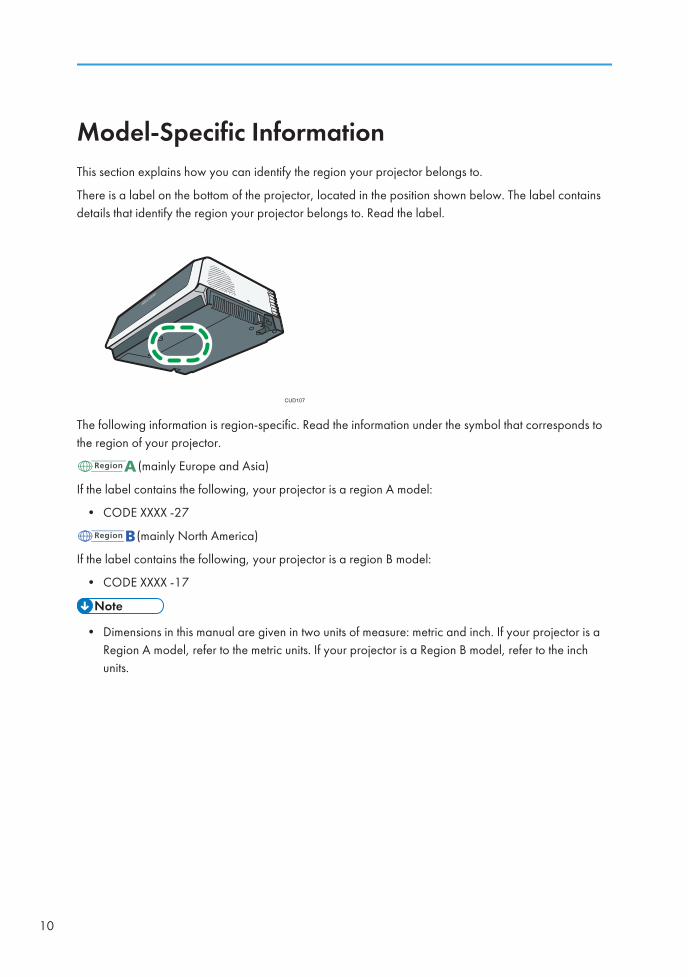
Model-Specific InformationThis section explains how you can identify the region your projector belongs to.
There is a label on the bottom of the projector, located in the position shown below. The label containsdetails that identify the region your projector belongs to. Read the label.
CUD107
The following information is region-specific. Read the information under the symbol that corresponds tothe region of your projector.
(mainly Europe and Asia)
If the label contains the following, your projector is a region A model:
• CODE XXXX -27
(mainly North America)
If the label contains the following, your projector is a region B model:
• CODE XXXX -17
• Dimensions in this manual are given in two units of measure: metric and inch. If your projector is aRegion A model, refer to the metric units. If your projector is a Region B model, refer to the inchunits.
10
1. Preparations for Using the ProjectorThis chapter explains the names and functions of the different parts of the projector and remote control,and how to use them. It also explains how to position the projector and how to connect it to otherequipment.
Precautions for Using the Projector
• If metal objects, or water or other fluids fall inside this machine, you must turn off its powerimmediately. After turning off the power, be sure to disconnect the power cord plug from the walloutlet. Then contact your service representative and report the problem. Do not use the machine.Doing so could result in fire or electric shock.
• Do not use any power sources other than those that match the specifications shown. Doing socould result in fire or electric shock.
• The supplied power cord is for use with this machine only. Do not use it with other appliances.Doing so could result in fire or electric shock.
• It is dangerous to handle the power cord plug with wet hands. Doing so could result in electricshock.
• Do not place the power cord and connection cable in front of the lens or exhaust vents when theproduct is turned on. Doing so may result in fire.
• Be sure to locate the machine as close as possible to a wall outlet. This will allow easydisconnection of the power cord in the event of an emergency.
• Do not look into the lens or vent when the machine is on. The bright light may damage your eyes.Be especially careful in an environment with children.
• Do not use flammable sprays or solvents in the vicinity of this machine. Also, avoid placing theseitems in the vicinity of this machine. Doing so could result in fire or electric shock.
• Do not place low heat resistant material near the exhaust vents. Hot air may come from theexhaust vents, resulting in damage to the machine or an accident.
• Do not place the power cord and connection cable in a way that might cause someone to tripand fall. The machine might fall over and cause an injury.
11
• Push the power plug all the way into the power outlet. Do not use a power outlet with a looseconnection. Doing so may result in heat buildup. Plug the power cord in the correct direction intothe base. If they are not plugged in correctly, it could result in smoke, fire, or electric shock.
• When disconnecting the power cord from the wall outlet, always pull the plug, not the cord.Pulling the cord can damage the power cord. Use of damaged power cords could result in fireor electric shock.
• Do not block the projection light when it is on. If you do so, the part that is blocking the projectionlight may get quite hot and deform, deteriorate or cause a burn or fire. The reflected light maymake the lens hot and cause a machine failure. To temporarily suspend projection, select the AVmute function. To suspend longer, turn off the machine.
• Do not increase the volume unless you are listening while increasing the volume. Also, lower thevolume before turning off the power, because a loud sound may be emitted when the power isturned on and cause hearing damage.
• Do not tilt the machine horizontally more than ±20 degrees. Doing so may cause the entrance offoreign objects in the housing of the machine which could result in fire or electric shock.
• Power Source
• (mainly Europe and Asia)
220–240 V, 1.7 A or more, 50/60Hz
• (mainly North America)
120 V, 3.1 A or more, 60Hz
Please be sure to connect the power cord to a power source as above.
1. Preparations for Using the Projector
12
Main FunctionsThe projector features the following functions that you can use.
360-degree installation angle
The 360-degree installation angle enables tilt-free vertical projection.
Auto eco function
The projector switches the lamp power automatically by detecting the brightness of the projectinglocation and image signals. This function is useful for energy saving.
Quick on
The projector starts projection automatically if it detects a device that is connected.
Horizontal keystone distortion adjustment
You can adjust for horizontal keystone distortion which occurs when the projector is tilted to theright or left.
Auto keystone function
The projector automatically adjusts for the vertical distortion of the projected image according tothe angle at which the projector is positioned.
Automatic focus function (RICOH PJ X3351N/WX3351N only)
The projector automatically adjusts the focus when you turn on the projector and reposition it.
AV Mute/Freeze
Pressing the [AV Mute] button mutes the sound and blanks the screen. Pressing the [Freeze] buttonfreezes the image temporarily.
Magnify/Zoom
Pressing the [Magnify] button enlarges the projected image. Pressing the [Zoom] button reduces theprojected image.
Presentation timer function
Pressing the [Timer] button displays the countdown timer on the projection screen. You can checkthe elapsed time on the projection screen.
Wall color mode
You can adjust the hue of the image in accordance with the color of the wall on which it isprojected.
Password setting/Key lock
You can specify a password for the projector to limit the people that can use it. The buttons on thecontrol panel can be disabled with the key lock setting to prevent misoperation.
Main Functions
13
Administrator authentication
Enable administrator authentication so that only the administrator can change the security settings.This improves the security of the projector because general users cannot change the settings.
User logo function
The projector can project a registered logo or image when there is no signal or when it is startingup.
Presentations without a computer
The projector can project JPEG and MPEG files stored on a USB memory device or a digitalcamera.
It is possible to convert PowerPoint materials to JPEG format using JPEG Conversion Tool and thenproject them using the projector.
QuickProjection
QuickProjection is an application that is provided with the projector and is used for connecting theprojector and a computer to project images.
Miracast (RICOH PJ X3351N/WX3351N/WX4241N only)
The projector is compatible with Miracast, which allows you to duplicate the screen of your smartdevice on the projection screen.
1. Preparations for Using the Projector
14
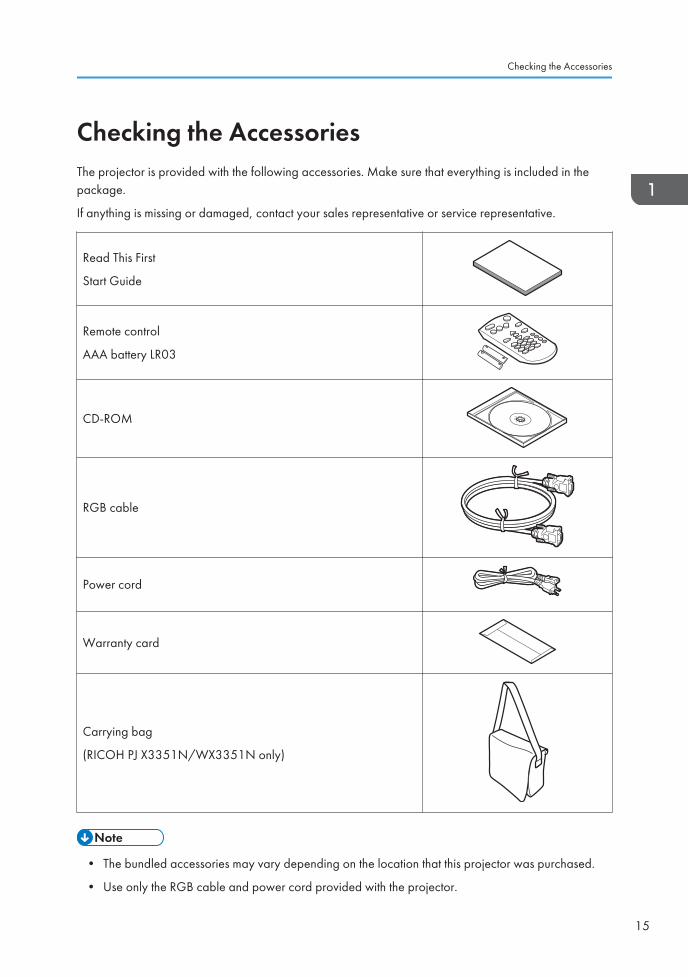
Checking the AccessoriesThe projector is provided with the following accessories. Make sure that everything is included in thepackage.
If anything is missing or damaged, contact your sales representative or service representative.
Read This First
Start Guide
Remote control
AAA battery LR03
CD-ROM
RGB cable
Power cord
Warranty card
Carrying bag
(RICOH PJ X3351N/WX3351N only)
• The bundled accessories may vary depending on the location that this projector was purchased.
• Use only the RGB cable and power cord provided with the projector.
Checking the Accessories
15

• The various applications are on the provided CD-ROM. For instructions about using theapplications, see page 64 "How to Use JPEG Conversion Tool", page 77 "How to UseQuickProjection", and page 151 "Managing the Projector Using Projector Management Utility".
1. Preparations for Using the Projector
16
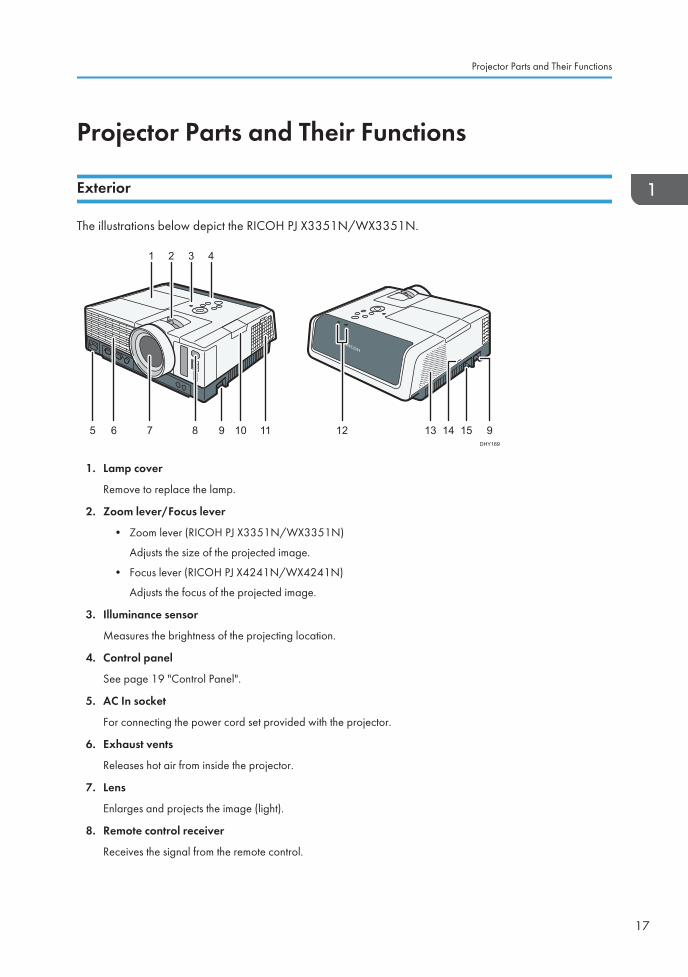
Projector Parts and Their Functions
Exterior
The illustrations below depict the RICOH PJ X3351N/WX3351N.
8 9 1110 125 6 7DHY169
1 42 3
14 91513
1. Lamp cover
Remove to replace the lamp.
2. Zoom lever/Focus lever
• Zoom lever (RICOH PJ X3351N/WX3351N)
Adjusts the size of the projected image.
• Focus lever (RICOH PJ X4241N/WX4241N)
Adjusts the focus of the projected image.
3. Illuminance sensor
Measures the brightness of the projecting location.
4. Control panel
See page 19 "Control Panel".
5. AC In socket
For connecting the power cord set provided with the projector.
6. Exhaust vents
Releases hot air from inside the projector.
7. Lens
Enlarges and projects the image (light).
8. Remote control receiver
Receives the signal from the remote control.
Projector Parts and Their Functions
17
9. Adjustable feet
Adjusts the angle of the projection. Adjustable feet are located on the left and right sides on the projector.
10. Interactive kit attachment cover
Remove this cover when attaching the adapter for the optional interactive kit. Be sure to disconnect the powercord before attaching or detaching the adapter. Also, be sure to attach the cover before turning on theprojector. For detail, see the manual for the interactive kit.
11. Intake vents
For circulating air from the outside to cool the projector. Be sure to use the projector with the intake vents coverattached.
12. LED indicators
You can confirm the status of the projector by referring to the LED indicators. The left LED shows the status ofthe lamp, and the right LED shows the temperature inside the projector. For details, see page 131 "IndicatorDisplay List".
13. Speaker
Outputs the audio input from an external device.
14. Security slot
For connecting an anti-theft cable.
15. Security bar
For connecting an anti-theft cable or chain.
• The top of the projector is covered with a protective film when it is shipped. Remove the film beforeusing the projector.
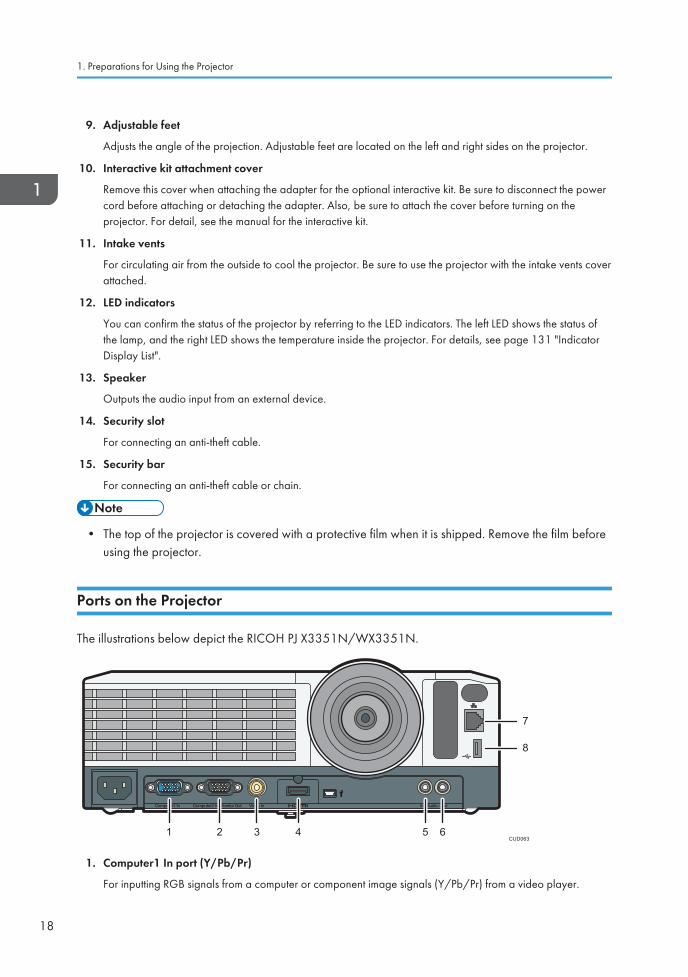
Ports on the Projector
The illustrations below depict the RICOH PJ X3351N/WX3351N.
CUD0631 2 3 4 5 6
7
8
1. Computer1 In port (Y/Pb/Pr)
For inputting RGB signals from a computer or component image signals (Y/Pb/Pr) from a video player.
1. Preparations for Using the Projector
18
2. Computer2 In/Monitor Out port
For inputting RGB signals, or outputting the image signals input into the "Computer1 In port" to an externaldisplay device. You can switch the purpose of this port in [Computer 2 Terminal] under [Default Settings 1].
3. Video In port
For inputting image signals from a video player.
4. HDMI port
For inputting HDMI signals from a computer or video player.
5. Audio In port
For inputting audio signals from a computer or video player.
6. Audio Out port
For outputting audio signals to an external speaker.
7. LAN port
For connecting an Ethernet cable.
8. USB port
For connecting a USB memory device or USB device cable.
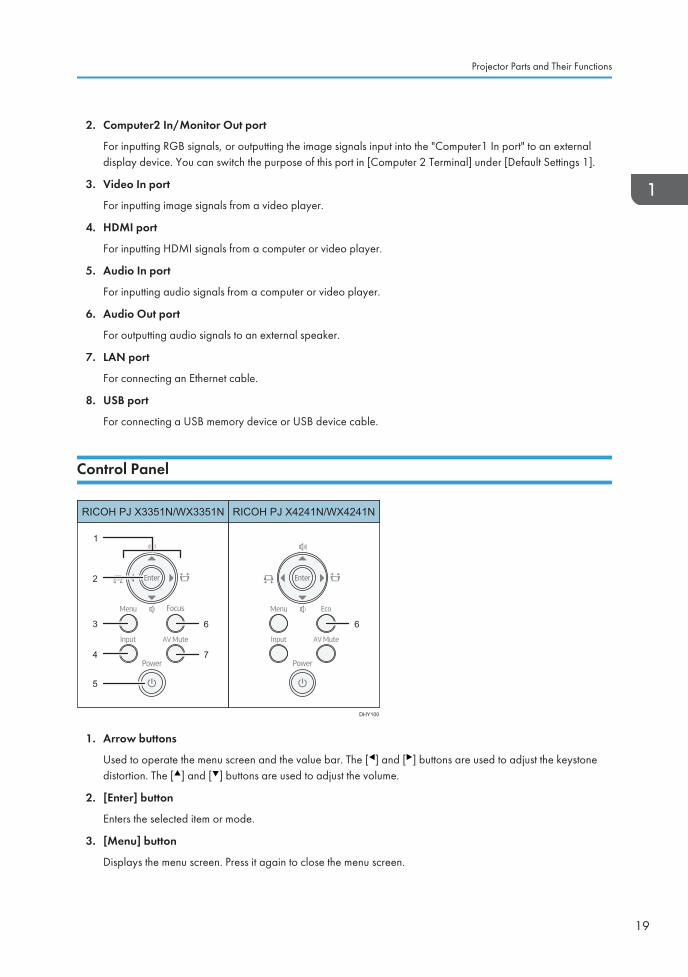
Control Panel
RICOH PJ X3351N/WX3351N RICOH PJ X4241N/WX4241N
1
2
3
4
5
6
7
DHY100
6
1. Arrow buttons
Used to operate the menu screen and the value bar. The [ ] and [ ] buttons are used to adjust the keystonedistortion. The [ ] and [ ] buttons are used to adjust the volume.
2. [Enter] button
Enters the selected item or mode.
3. [Menu] button
Displays the menu screen. Press it again to close the menu screen.
Projector Parts and Their Functions
19
4. [Input] button
Switches the signal input. For details about how to switch the input signal, see page 38 "Projecting anImage".
5. [Power] button
Turns the projector on and off. You can confirm the status of the projector with the indicator.
• On: Power is on.
• Off: Power is off.
• Flashing at 1 or 3 second intervals: Standby.
• Flashing at short intervals: Starting up or cooling.
6. [Focus] button/[Eco] button
• [Focus] button (RICOH PJ X3351N/WX3351N)
Adjusts the focus manually. Press it, and then adjust the focus using the [ ] and [ ] buttons.
• [Eco] button (RICOH PJ X4241N/WX4241N)
Displays the [Energy Saving Settings] screen. On the [Energy Saving Settings] screen, you can specifythe energy saving settings for the lamp.
7. [AV Mute] button
Temporarily blanks the screen and mutes the audio. The button lights up blue when the projector is muted.
1. Preparations for Using the Projector
20

Remote Control Parts and Their Functions
61
2
3
4
7
9
8
16
18
12
13
1711
10
14
155
CUD050
1. [Menu] button
Displays the menu screen. Press it again to close the menu screen.
2. [Input] button
Switches the signal input. For details about how to switch the input signal, see page 38 "Projecting anImage".
3. [AV Mute] button
Temporarily blanks the screen and mutes the audio. For details, see page 48 "Temporarily Blanking theImage and Muting the Audio".
4. Arrow buttons
Used to operate the menu screen and the value bar.
5. Number buttons
Used to enter numbers.
6. [Power] button
Turns the projector on and off.
7. [Freeze] button
Temporarily freezes the image. For details, see page 49 "Freezing the Image".
8. [Magnify] button
Displays the magnification ratio bar. Press it, and then specify the magnification ratio using the [ ] and [ ]buttons. For details, see page 47 "Enlarging the Image".
Remote Control Parts and Their Functions
21
9. [Enter] button
Enters the selected item or mode.
10. [Zoom] button
Displays the digital zoom bar. Press it, and then adjust the size of the projected image using the [ ] and [ ]buttons. For details, see page 43 "Reducing the size of the projected image".
11. [Focus] button
• RICOH PJ X3351N/WX3351N
Adjusts the focus manually. Press it, and then adjust the focus using the [ ] and [ ] buttons. For details,see page 44 "Adjusting the focus of RICOH PJ X3351N/WX3351N".
• RICOH PJ X4241N/WX4241N
This button is not used.
12. [Keystone] button
Displays the keystone adjustment bars. Press this, select [Keystone (Vertical)] or [Keystone (Horizontal)] usingthe [ ] and [ ] buttons, and then adjust the keystone distortion using the [ ] and [ ] buttons. For details, seepage 45 "Adjusting for Keystone Distortion".
13. [Volume] button
Displays the volume control bar. Press it, and then adjust the volume of the speaker using the [ ] and [ ]buttons. For details, see page 47 "Adjusting the Volume of the Speaker".
14. [Timer] button
Displays the presentation timer. For details, see page 50 "Using the Presentation Timer".
15. [ID] button
Registers the remote control ID. For details, see page 25 "Operating Multiple Projectors with the RemoteControl".
16. [R-Click] button
This button is not used.
17. [Page] buttons
Changes the image while projecting images from a USB device. Press [ ] to go to the next page. Press [ ] togo to the previous page.
18. [Eco] button
Displays the [Energy Saving Settings] screen. On the [Energy Saving Settings] screen, you can specify theenergy saving settings for the lamp. For details, see page 49 "Specifying the Lamp Settings".
1. Preparations for Using the Projector
22
How to Use the Remote ControlYou can use the remote control to turn the projector on and off, and to change the signal of the imagebeing input and projected. You can also enlarge or reduce the image and mute the audio.
Note the following precautions when using the remote control:
• Do not drop or hit the remote control.
• Do not place the remote control in a place that is very hot or very humid.
• Do not get the remote control wet. Also, do not place it on anything that is wet.
• Do not dismantle the remote control.
Effective Range of the Remote Control
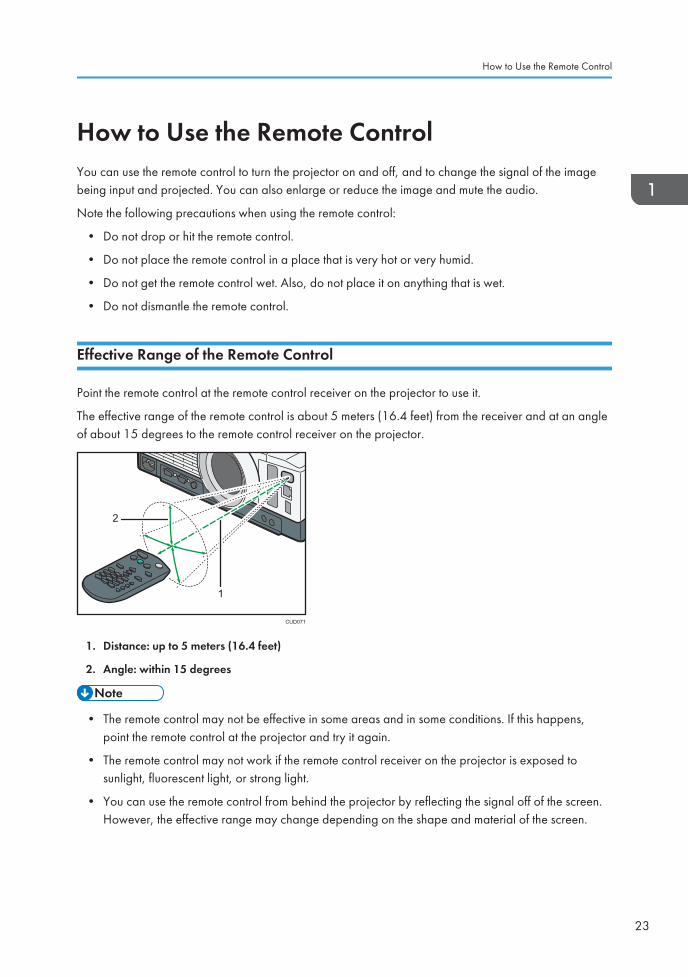
Point the remote control at the remote control receiver on the projector to use it.
The effective range of the remote control is about 5 meters (16.4 feet) from the receiver and at an angleof about 15 degrees to the remote control receiver on the projector.
CUD071
2
1
1. Distance: up to 5 meters (16.4 feet)
2. Angle: within 15 degrees
• The remote control may not be effective in some areas and in some conditions. If this happens,point the remote control at the projector and try it again.
• The remote control may not work if the remote control receiver on the projector is exposed tosunlight, fluorescent light, or strong light.
• You can use the remote control from behind the projector by reflecting the signal off of the screen.However, the effective range may change depending on the shape and material of the screen.
How to Use the Remote Control
23
Loading Batteries into the Remote Control
• For safe operation, follow the warnings below regarding the batteries. If you use the batteriesincorrectly, it may result in fire or injury due to batteries leaking or exploding.
• Do not use batteries other than the ones specified.
• Do not mix and use batteries that are different types or that are new and old.
• Correctly insert batteries according to the polarity ( / ).
• Do not charge non-rechargeable batteries.
• Do not heat or throw the batteries into fire or water.
• Do not connect the positive and negative terminals on a battery with a wire.
• Remove the batteries that are past their suggested use period or that are depleted.
• Remove the batteries when they will not be used for extended periods.
• Keep the batteries out of the reach of children. Children may swallow or choke on thebatteries. If this happens, contact a doctor immediately.
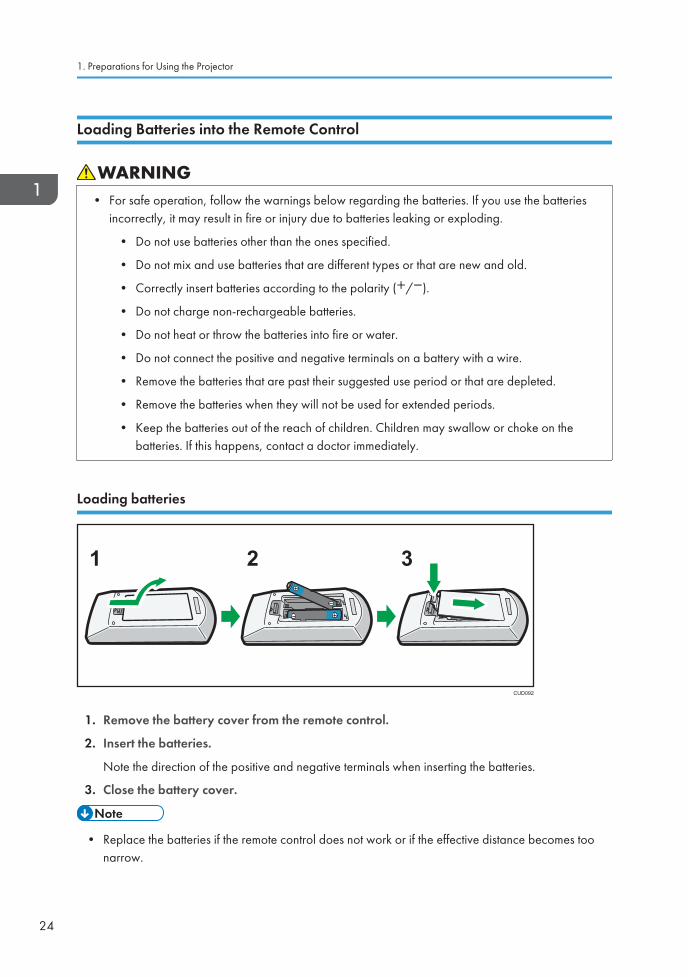
Loading batteries
CUD092
1 2 3
1. Remove the battery cover from the remote control.
2. Insert the batteries.
Note the direction of the positive and negative terminals when inserting the batteries.
3. Close the battery cover.
• Replace the batteries if the remote control does not work or if the effective distance becomes toonarrow.
1. Preparations for Using the Projector
24
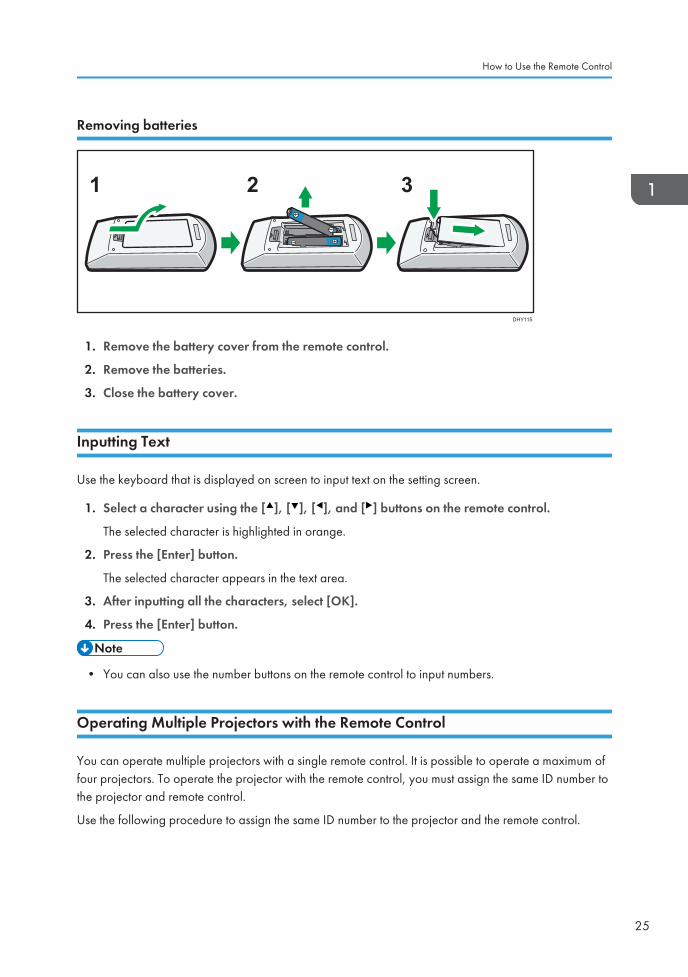
Removing batteries
DHY115
1 2 3
1. Remove the battery cover from the remote control.
2. Remove the batteries.
3. Close the battery cover.
Inputting Text
Use the keyboard that is displayed on screen to input text on the setting screen.
1. Select a character using the [ ], [ ], [ ], and [ ] buttons on the remote control.
The selected character is highlighted in orange.
2. Press the [Enter] button.
The selected character appears in the text area.
3. After inputting all the characters, select [OK].
4. Press the [Enter] button.
• You can also use the number buttons on the remote control to input numbers.
Operating Multiple Projectors with the Remote Control
You can operate multiple projectors with a single remote control. It is possible to operate a maximum offour projectors. To operate the projector with the remote control, you must assign the same ID number tothe projector and remote control.
Use the following procedure to assign the same ID number to the projector and the remote control.
How to Use the Remote Control
25
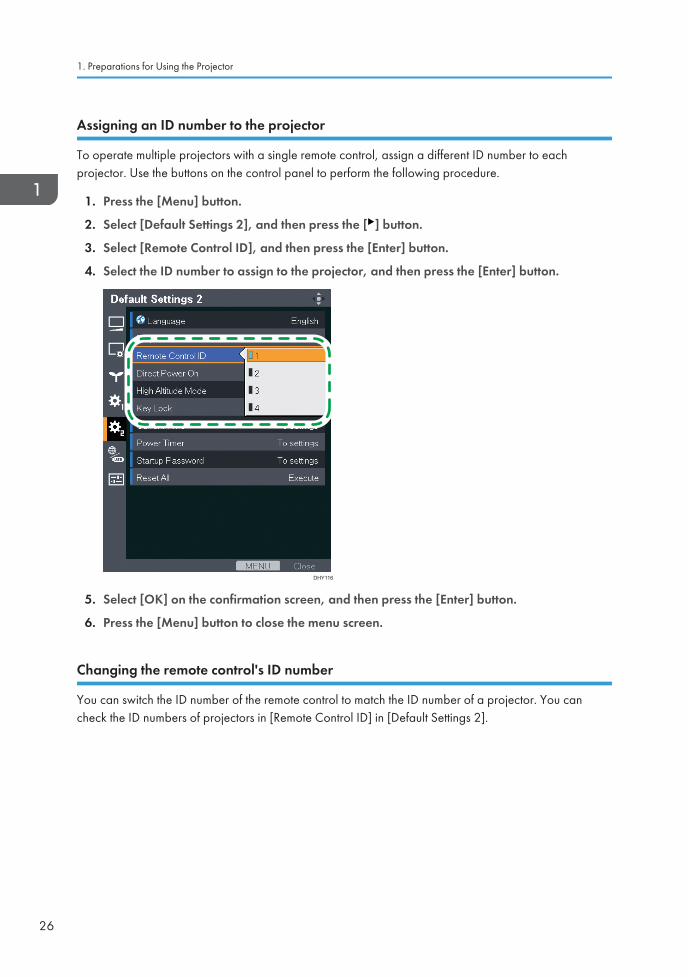
Assigning an ID number to the projector
To operate multiple projectors with a single remote control, assign a different ID number to eachprojector. Use the buttons on the control panel to perform the following procedure.
1. Press the [Menu] button.
2. Select [Default Settings 2], and then press the [ ] button.
3. Select [Remote Control ID], and then press the [Enter] button.
4. Select the ID number to assign to the projector, and then press the [Enter] button.
DHY116
5. Select [OK] on the confirmation screen, and then press the [Enter] button.
6. Press the [Menu] button to close the menu screen.
Changing the remote control's ID number
You can switch the ID number of the remote control to match the ID number of a projector. You cancheck the ID numbers of projectors in [Remote Control ID] in [Default Settings 2].
1. Preparations for Using the Projector
26
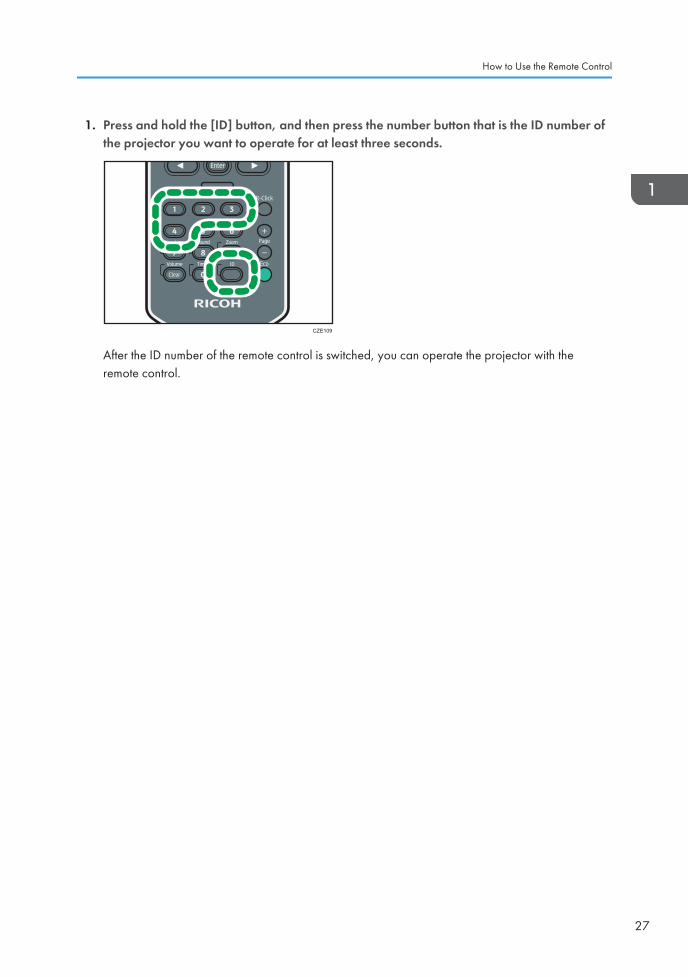
1. Press and hold the [ID] button, and then press the number button that is the ID number ofthe projector you want to operate for at least three seconds.
CZE109
After the ID number of the remote control is switched, you can operate the projector with theremote control.
How to Use the Remote Control
27
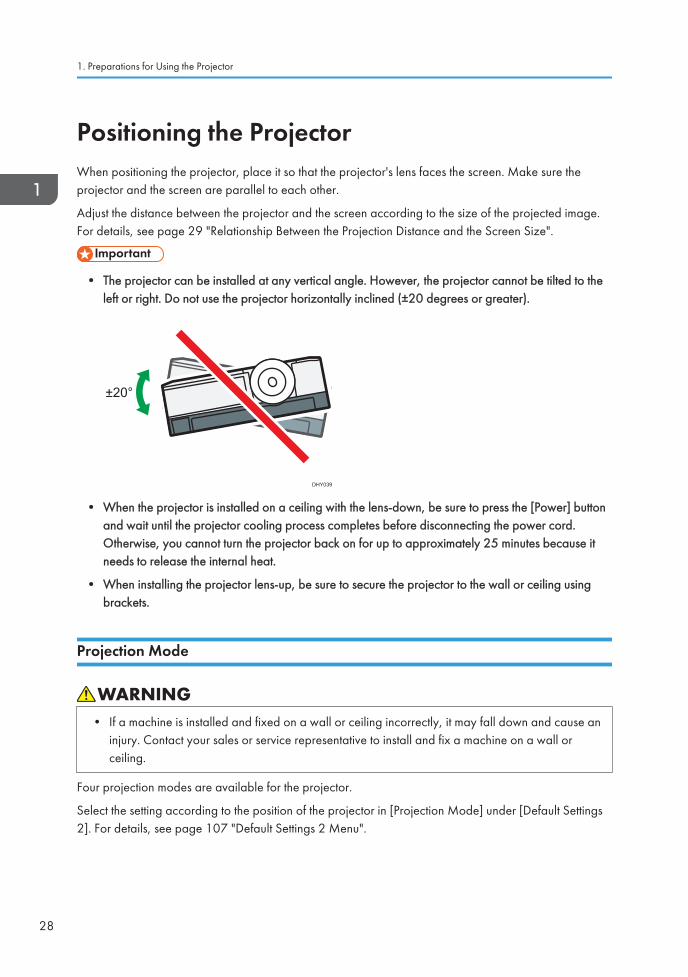
Positioning the ProjectorWhen positioning the projector, place it so that the projector's lens faces the screen. Make sure theprojector and the screen are parallel to each other.
Adjust the distance between the projector and the screen according to the size of the projected image.For details, see page 29 "Relationship Between the Projection Distance and the Screen Size".
• The projector can be installed at any vertical angle. However, the projector cannot be tilted to theleft or right. Do not use the projector horizontally inclined (±20 degrees or greater).
DHY039
• When the projector is installed on a ceiling with the lens-down, be sure to press the [Power] buttonand wait until the projector cooling process completes before disconnecting the power cord.Otherwise, you cannot turn the projector back on for up to approximately 25 minutes because itneeds to release the internal heat.
• When installing the projector lens-up, be sure to secure the projector to the wall or ceiling usingbrackets.
Projection Mode
• If a machine is installed and fixed on a wall or ceiling incorrectly, it may fall down and cause aninjury. Contact your sales or service representative to install and fix a machine on a wall orceiling.
Four projection modes are available for the projector.
Select the setting according to the position of the projector in [Projection Mode] under [Default Settings2]. For details, see page 107 "Default Settings 2 Menu".
1. Preparations for Using the Projector
28

CUD083
1. Standard 2. Rear
4. Rear Ceiling3. Ceiling
1. Standard
The projector is placed in front of a screen onto which the images are projected.
2. Rear
The projector is placed behind a screen onto which the images are projected.
3. Ceiling
The projector is mounted on the ceiling in front of a screen onto which the images are projected.
4. Rear Ceiling
The projector is mounted on the ceiling behind a screen onto which the images are projected.
Relationship Between the Projection Distance and the Screen Size
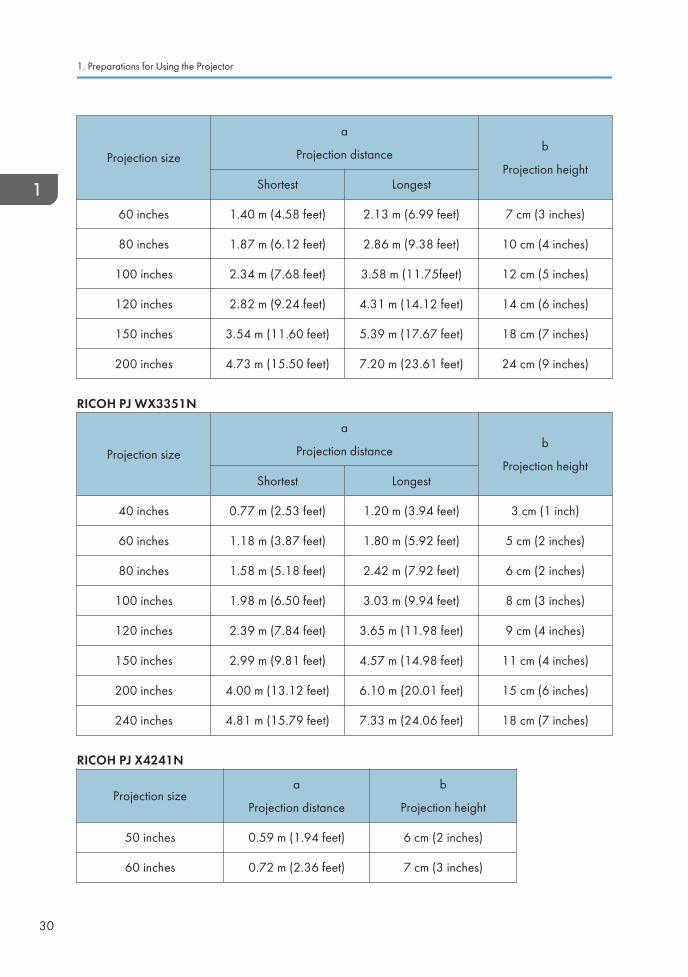
The size of the projected image varies according to the distance from the projector to the screen.
Refer to the following tables to position the projector in a suitable position. The projection sizespresented in tables are for a full size image without keystone adjustment. The projection distancebecomes shortest when the zoom lever is at the end of the wide side, and longest when the zoom lever isat the end of the tele side.
RICOH PJ X3351N
Projection size
a
Projection distanceb
Projection heightShortest Longest
30 inches 0.68 m (2.22 feet) 1.05 m (3.45 feet) 4 cm (1 inch)
40 inches 0.92 m (3.02 feet) 1.41 m (4.64 feet) 5 cm (2 inches)
Positioning the Projector
29
Projection size
a
Projection distanceb
Projection heightShortest Longest
60 inches 1.40 m (4.58 feet) 2.13 m (6.99 feet) 7 cm (3 inches)
80 inches 1.87 m (6.12 feet) 2.86 m (9.38 feet) 10 cm (4 inches)
100 inches 2.34 m (7.68 feet) 3.58 m (11.75feet) 12 cm (5 inches)
120 inches 2.82 m (9.24 feet) 4.31 m (14.12 feet) 14 cm (6 inches)
150 inches 3.54 m (11.60 feet) 5.39 m (17.67 feet) 18 cm (7 inches)
200 inches 4.73 m (15.50 feet) 7.20 m (23.61 feet) 24 cm (9 inches)
RICOH PJ WX3351N
Projection size
a
Projection distanceb
Projection heightShortest Longest
40 inches 0.77 m (2.53 feet) 1.20 m (3.94 feet) 3 cm (1 inch)
60 inches 1.18 m (3.87 feet) 1.80 m (5.92 feet) 5 cm (2 inches)
80 inches 1.58 m (5.18 feet) 2.42 m (7.92 feet) 6 cm (2 inches)
100 inches 1.98 m (6.50 feet) 3.03 m (9.94 feet) 8 cm (3 inches)
120 inches 2.39 m (7.84 feet) 3.65 m (11.98 feet) 9 cm (4 inches)
150 inches 2.99 m (9.81 feet) 4.57 m (14.98 feet) 11 cm (4 inches)
200 inches 4.00 m (13.12 feet) 6.10 m (20.01 feet) 15 cm (6 inches)
240 inches 4.81 m (15.79 feet) 7.33 m (24.06 feet) 18 cm (7 inches)
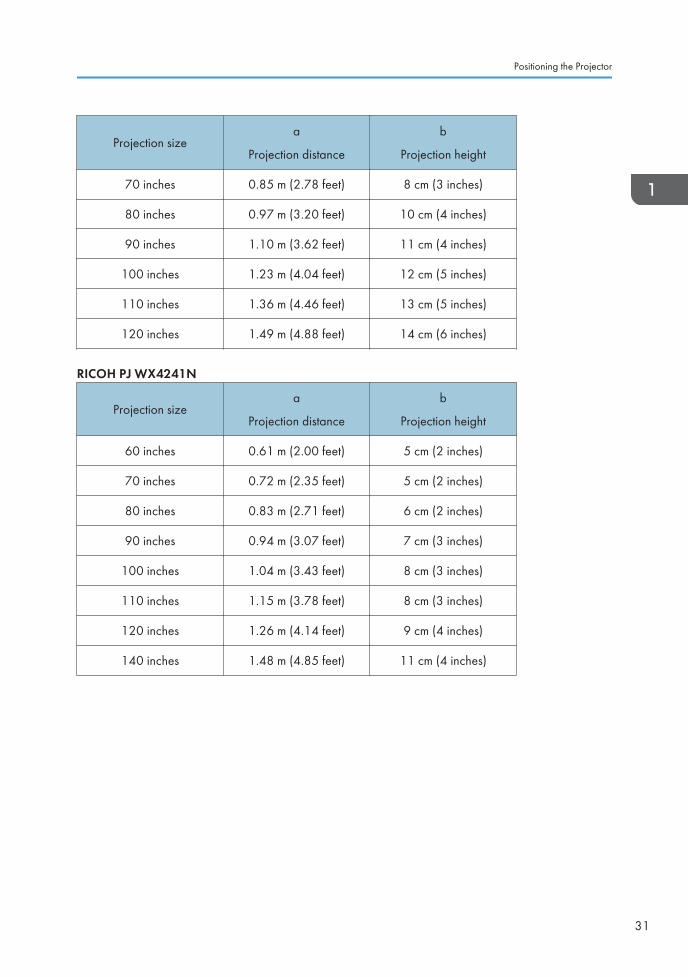
RICOH PJ X4241N
Projection sizea
Projection distance
b
Projection height
50 inches 0.59 m (1.94 feet) 6 cm (2 inches)
60 inches 0.72 m (2.36 feet) 7 cm (3 inches)
1. Preparations for Using the Projector
30
Projection sizea
Projection distance
b
Projection height
70 inches 0.85 m (2.78 feet) 8 cm (3 inches)
80 inches 0.97 m (3.20 feet) 10 cm (4 inches)
90 inches 1.10 m (3.62 feet) 11 cm (4 inches)
100 inches 1.23 m (4.04 feet) 12 cm (5 inches)
110 inches 1.36 m (4.46 feet) 13 cm (5 inches)
120 inches 1.49 m (4.88 feet) 14 cm (6 inches)
RICOH PJ WX4241N
Projection sizea
Projection distance
b
Projection height
60 inches 0.61 m (2.00 feet) 5 cm (2 inches)
70 inches 0.72 m (2.35 feet) 5 cm (2 inches)
80 inches 0.83 m (2.71 feet) 6 cm (2 inches)
90 inches 0.94 m (3.07 feet) 7 cm (3 inches)
100 inches 1.04 m (3.43 feet) 8 cm (3 inches)
110 inches 1.15 m (3.78 feet) 8 cm (3 inches)
120 inches 1.26 m (4.14 feet) 9 cm (4 inches)
140 inches 1.48 m (4.85 feet) 11 cm (4 inches)
Positioning the Projector
31
Connecting Equipment to the Projector
• Do not place the power cord and connection cable in a way that might cause someone to tripand fall. The machine might fall over and cause an injury.
Various equipment can be connected to the projector.
Turn off the power to any equipment before connecting it to the projector. Be sure to read the manual forthe applicable equipment before connecting it to the projector.
Connecting a Computer
• Some computers cannot be connected to the projector. Before connecting a computer to theprojector, check the output terminals and signal compatibility.
Connecting to the RGB out port
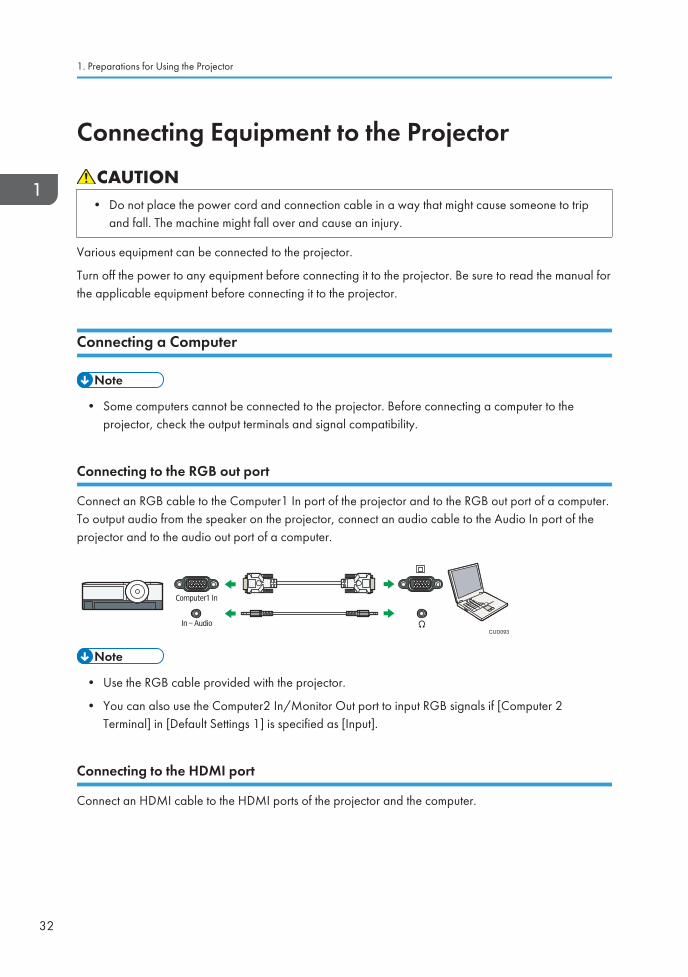
Connect an RGB cable to the Computer1 In port of the projector and to the RGB out port of a computer.To output audio from the speaker on the projector, connect an audio cable to the Audio In port of theprojector and to the audio out port of a computer.
CUD093
• Use the RGB cable provided with the projector.
• You can also use the Computer2 In/Monitor Out port to input RGB signals if [Computer 2Terminal] in [Default Settings 1] is specified as [Input].
Connecting to the HDMI port
Connect an HDMI cable to the HDMI ports of the projector and the computer.
1. Preparations for Using the Projector
32
CUD094
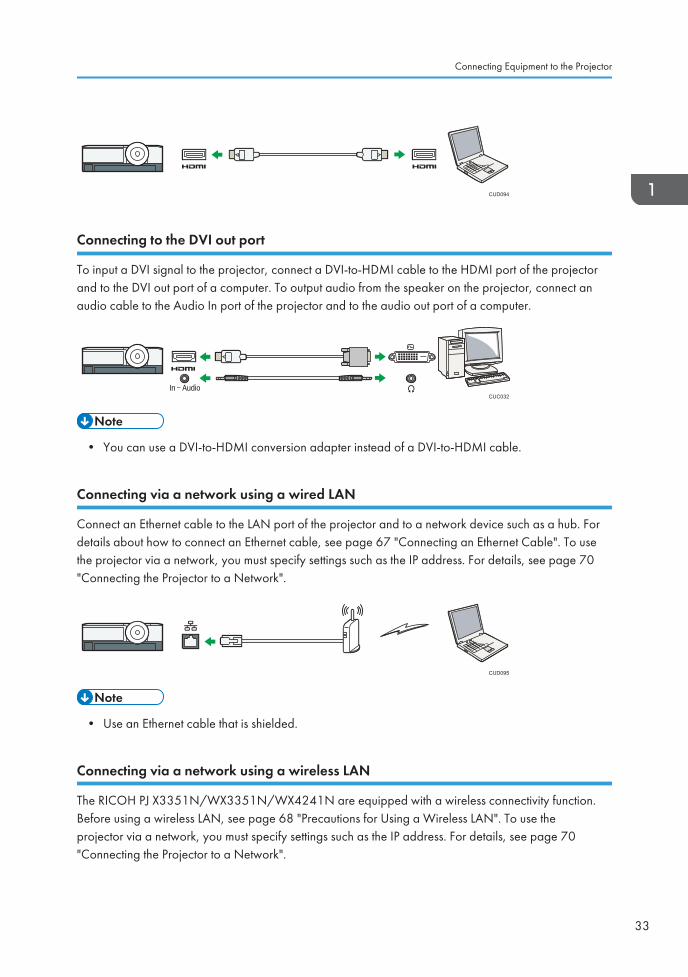
Connecting to the DVI out port
To input a DVI signal to the projector, connect a DVI-to-HDMI cable to the HDMI port of the projectorand to the DVI out port of a computer. To output audio from the speaker on the projector, connect anaudio cable to the Audio In port of the projector and to the audio out port of a computer.
CUC032
• You can use a DVI-to-HDMI conversion adapter instead of a DVI-to-HDMI cable.
Connecting via a network using a wired LAN
Connect an Ethernet cable to the LAN port of the projector and to a network device such as a hub. Fordetails about how to connect an Ethernet cable, see page 67 "Connecting an Ethernet Cable". To usethe projector via a network, you must specify settings such as the IP address. For details, see page 70"Connecting the Projector to a Network".
CUD095
• Use an Ethernet cable that is shielded.
Connecting via a network using a wireless LAN
The RICOH PJ X3351N/WX3351N/WX4241N are equipped with a wireless connectivity function.Before using a wireless LAN, see page 68 "Precautions for Using a Wireless LAN". To use theprojector via a network, you must specify settings such as the IP address. For details, see page 70"Connecting the Projector to a Network".
Connecting Equipment to the Projector
33
CUD097
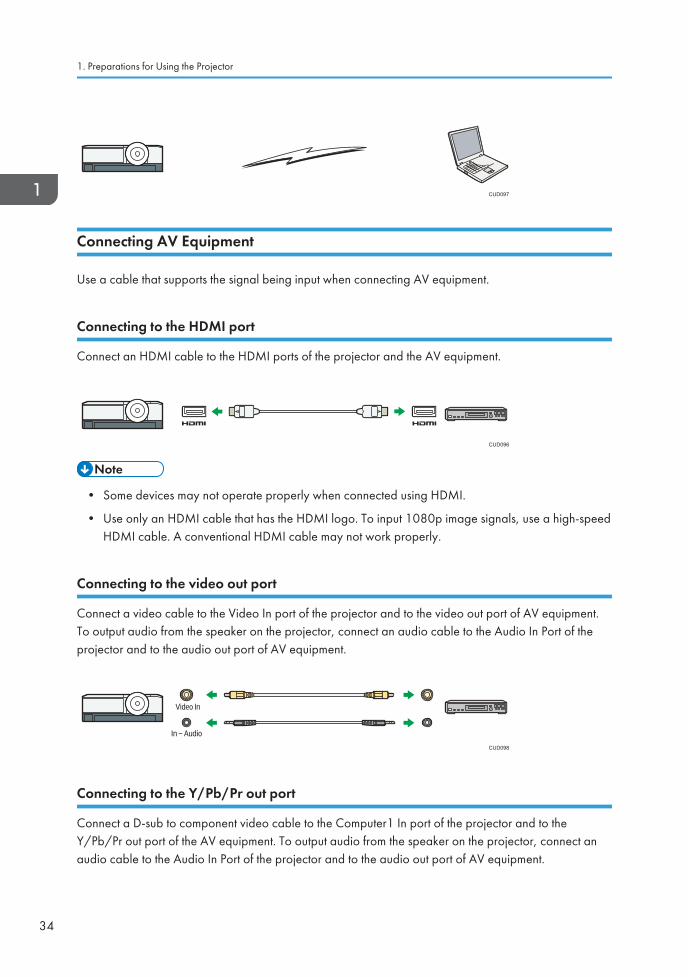
Connecting AV Equipment
Use a cable that supports the signal being input when connecting AV equipment.
Connecting to the HDMI port
Connect an HDMI cable to the HDMI ports of the projector and the AV equipment.
CUD096
• Some devices may not operate properly when connected using HDMI.
• Use only an HDMI cable that has the HDMI logo. To input 1080p image signals, use a high-speedHDMI cable. A conventional HDMI cable may not work properly.
Connecting to the video out port
Connect a video cable to the Video In port of the projector and to the video out port of AV equipment.To output audio from the speaker on the projector, connect an audio cable to the Audio In Port of theprojector and to the audio out port of AV equipment.
CUD098
Connecting to the Y/Pb/Pr out port
Connect a D-sub to component video cable to the Computer1 In port of the projector and to theY/Pb/Pr out port of the AV equipment. To output audio from the speaker on the projector, connect anaudio cable to the Audio In Port of the projector and to the audio out port of AV equipment.
1. Preparations for Using the Projector
34
CUD099
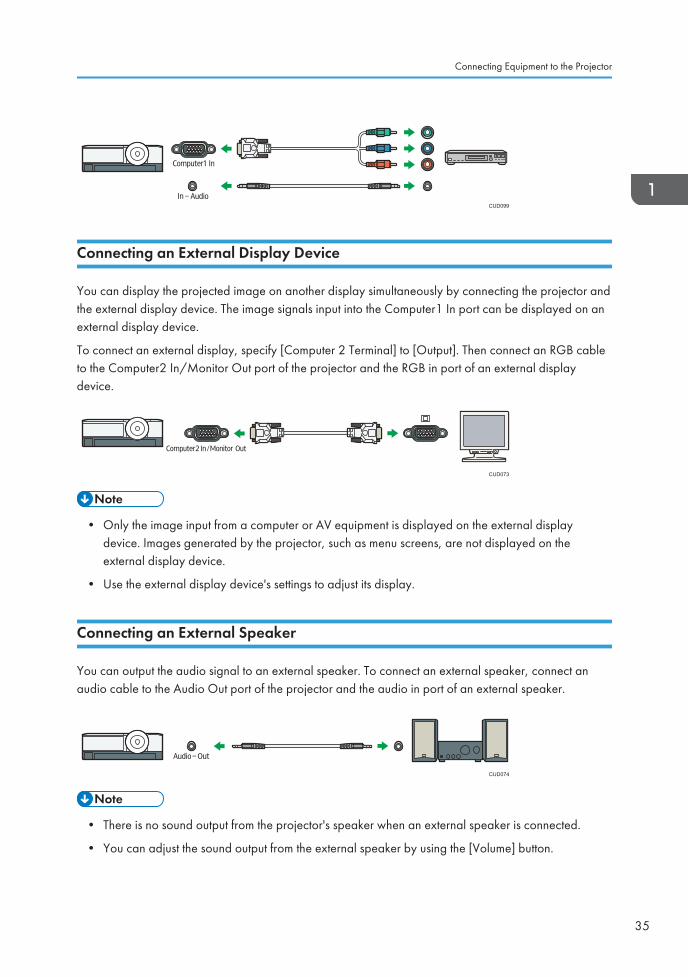
Connecting an External Display Device
You can display the projected image on another display simultaneously by connecting the projector andthe external display device. The image signals input into the Computer1 In port can be displayed on anexternal display device.
To connect an external display, specify [Computer 2 Terminal] to [Output]. Then connect an RGB cableto the Computer2 In/Monitor Out port of the projector and the RGB in port of an external displaydevice.
CUD073
• Only the image input from a computer or AV equipment is displayed on the external displaydevice. Images generated by the projector, such as menu screens, are not displayed on theexternal display device.
• Use the external display device's settings to adjust its display.
Connecting an External Speaker
You can output the audio signal to an external speaker. To connect an external speaker, connect anaudio cable to the Audio Out port of the projector and the audio in port of an external speaker.
CUD074
• There is no sound output from the projector's speaker when an external speaker is connected.
• You can adjust the sound output from the external speaker by using the [Volume] button.
Connecting Equipment to the Projector
35

1. Preparations for Using the Projector
36
2. Projecting an ImageThis chapter explains the procedure for projecting an image.
Basic Operations for Using the Projector
• If [Key Lock] in [Default Settings 2] is specified as [On], you cannot operate the projector from itscontrol panel. Use the remote control.
• If you press a button that is disabled, the projector beeps and the "Invalid operation." or "Thisfunction cannot be used on this product." message appears on the screen.
• If [Beep] in [Default Settings 1] is specified as [Off], the projector does not beep.
Turning On the Projector
• Be sure to locate the machine as close as possible to a wall outlet. This will allow easydisconnection of the power cord in the event of an emergency.
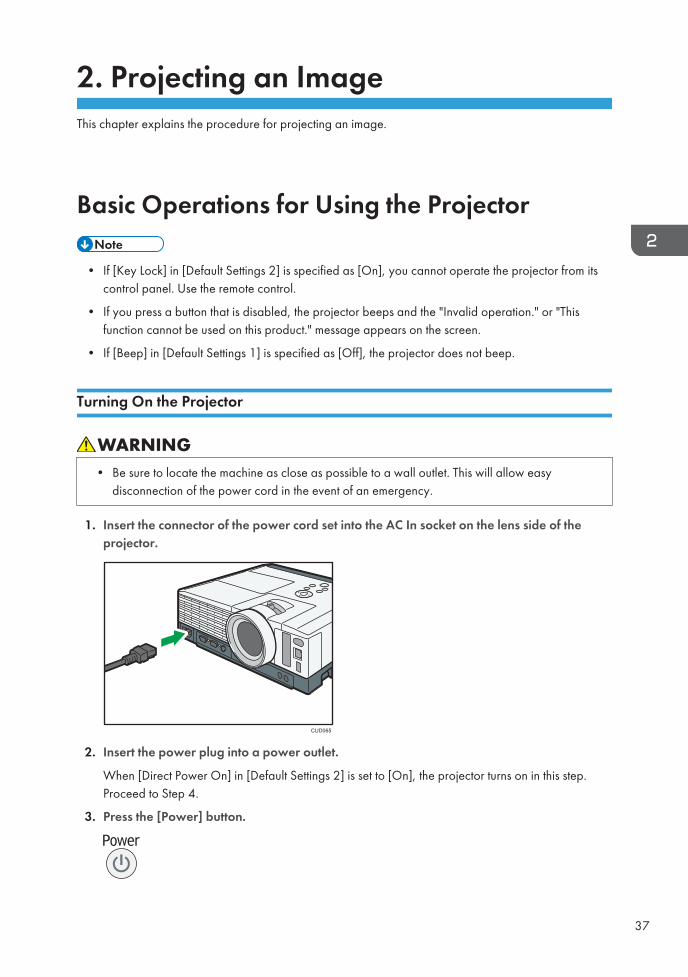
1. Insert the connector of the power cord set into the AC In socket on the lens side of theprojector.
CUD065
2. Insert the power plug into a power outlet.
When [Direct Power On] in [Default Settings 2] is set to [On], the projector turns on in this step.Proceed to Step 4.
3. Press the [Power] button.
37
The projector beeps and the indicator flashes blue.
The start-up screen is displayed.
To project an image from the connected equipment, see page 38 "Projecting an Image".
When the projector is turned on for the first time after it is purchased, the start menu appears.
Specify the display language and network settings. For details, see page 38 "When the startmenu is displayed".
• Do not place anything near the power outlet.
• The password input screen is displayed if a password for the projector is specified in [StartupPassword] under [Default Settings 2]. Enter a password.
• The start-up screen closes shortly after appearing. You can specify that the start-up screen notappear in [Start-up Screen] under [Default Settings 1].
When the start menu is displayed
When the projector is turned on for the first time after it is purchased, specify the display language andnetwork settings. The start menu will also be displayed when [Reset All] in [Default Settings 2] isexecuted.
1. Select the display language, and then press the [Enter] button.
2. Specify the network settings on Network Setting Wizard.
To skip the network settings, select [Cancel]. For details about how to use Network Setting Wizard,see page 70 "Connecting the Projector to a Network".
• The display language can also be changed in the menu screen. For details, see page 107 "DefaultSettings 2 Menu".
• You can also open Network Setting Wizard in the menu screen. For details, see page 112"Network Settings Menu".
Projecting an Image
1. Turn on the equipment that is connected to the projector.
To project the image of an AV equipment, press the play button on the AV equipment.
To project a laptop computer's screen, switch the computer's image output. For details, seepage 39 "When projecting the screen of a laptop computer".
The input signal is detected automatically and the image is projected.
2. If an image is not projected automatically, press the [Input] button.
2. Projecting an Image
38
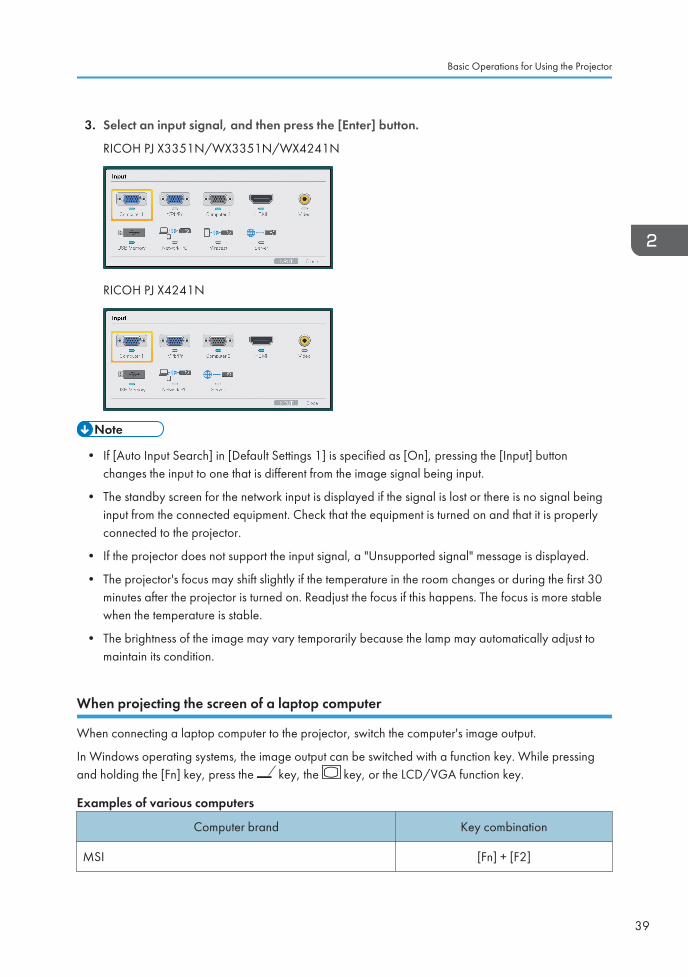
3. Select an input signal, and then press the [Enter] button.
RICOH PJ X3351N/WX3351N/WX4241N
RICOH PJ X4241N
• If [Auto Input Search] in [Default Settings 1] is specified as [On], pressing the [Input] buttonchanges the input to one that is different from the image signal being input.
• The standby screen for the network input is displayed if the signal is lost or there is no signal beinginput from the connected equipment. Check that the equipment is turned on and that it is properlyconnected to the projector.
• If the projector does not support the input signal, a "Unsupported signal" message is displayed.
• The projector's focus may shift slightly if the temperature in the room changes or during the first 30minutes after the projector is turned on. Readjust the focus if this happens. The focus is more stablewhen the temperature is stable.
• The brightness of the image may vary temporarily because the lamp may automatically adjust tomaintain its condition.
When projecting the screen of a laptop computer
When connecting a laptop computer to the projector, switch the computer's image output.
In Windows operating systems, the image output can be switched with a function key. While pressingand holding the [Fn] key, press the key, the key, or the LCD/VGA function key.
Examples of various computers
Computer brand Key combination
MSI [Fn] + [F2]
Basic Operations for Using the Projector
39
Computer brand Key combination
Everex, MITSUBISHI, NEC, Panasonic, SOTEC [Fn] + [F3]
Gateway, HP [Fn] + [F4]
acer, SHARP, SOTEC, TOSHIBA [Fn] + [F5]
HITACHI, IBM, lenovo, SONY [Fn] + [F7]
ASUS, DELL, EPSON, HITACHI [Fn] + [F8]
FUJITSU [Fn] + [F10]
• Depending on the computer, the image may not be projected properly if it is displayed on thecomputer's LCD display while being projected onto the screen by the projector. If this happens, turnoff the computer's LCD display. For details about switching the display, see the manual providedwith the computer.
Turning Off the Projector
• Unplug the power cord if the projector will not be used for an extended period of time.
• After disconnecting the power cord, wait at least 1 second before connecting the power cordagain. Not doing so may result in a malfunction.
1. Press the [Power] button.
The confirmation screen appears.
2. Press the [Power] button.
The projector beeps and enters the standby mode.
3. Disconnect the power cord.
• After turning the lamp off, wait about five minutes for the lamp to cool before turning the lamp onagain. The lamp may not light if it is very hot.
• The projector turns off as soon as the power cord is disconnected (direct power off).
2. Projecting an Image
40

• You can specify the settings for saving energy in standby mode in [Energy Saving Settings]. Fordetails, see page 102 "Energy Saving Settings Menu".
Basic Operations for Using the Projector
41
Adjusting the Projected Image
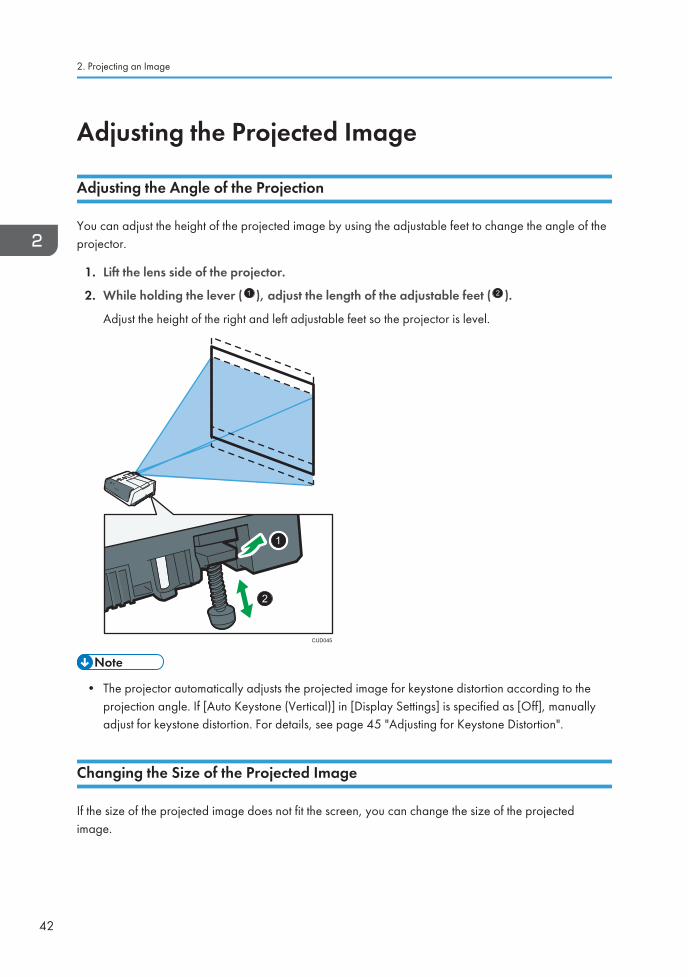
Adjusting the Angle of the Projection
You can adjust the height of the projected image by using the adjustable feet to change the angle of theprojector.
1. Lift the lens side of the projector.
2. While holding the lever ( 1 ), adjust the length of the adjustable feet ( 2 ).
Adjust the height of the right and left adjustable feet so the projector is level.
CUD045
1
2
• The projector automatically adjusts the projected image for keystone distortion according to theprojection angle. If [Auto Keystone (Vertical)] in [Display Settings] is specified as [Off], manuallyadjust for keystone distortion. For details, see page 45 "Adjusting for Keystone Distortion".
Changing the Size of the Projected Image
If the size of the projected image does not fit the screen, you can change the size of the projectedimage.
2. Projecting an Image
42

Reducing the size of the projected image
The image can be reduced by 80 to 100% using the digital zoom function.
1. Press the [Zoom] button.
The value bar appears at the bottom of the screen.
2. Adjust the size of the projected image using the [ ] and [ ] buttons.
CUD046
Press the [ ] button to reduce the size of the projected image. Press the [ ] button to enlarge thesize of the projected image. The image is enlarged until it reaches the original size.
• The image may sometimes be disrupted while it is reduced.
Enlarging the size of the projected image
The image can be enlarged by 100 to 150% using the optical zoom function.
The optical zoom function is available with RICOH PJ X3351N/WX3351N.
1. Move the zoom lever to adjust the size of the projected image.
CUC041
Adjusting the Projected Image
43
Adjusting the Focus
Adjust the focus of the projected image.
Adjusting the focus of RICOH PJ X3351N/WX3351N
The focus is automatically adjusted by the automatic focus function. The automatic focus function workswhen you turn on the projector, move the zoom lever, and reposition the projector.
The effective range of the automatic focus function is the following:
• RICOH PJ X3351N: 0.92 to 5.39 m (3.02 to 17.67 feet)
• RICOH PJ WX3351N: 0.77 to 4.57 m (2.53 to 14.98 feet)
When projecting an image beyond the effective range of the automatic focus function or the focus is notadjusted for some other reason, adjust the focus manually.
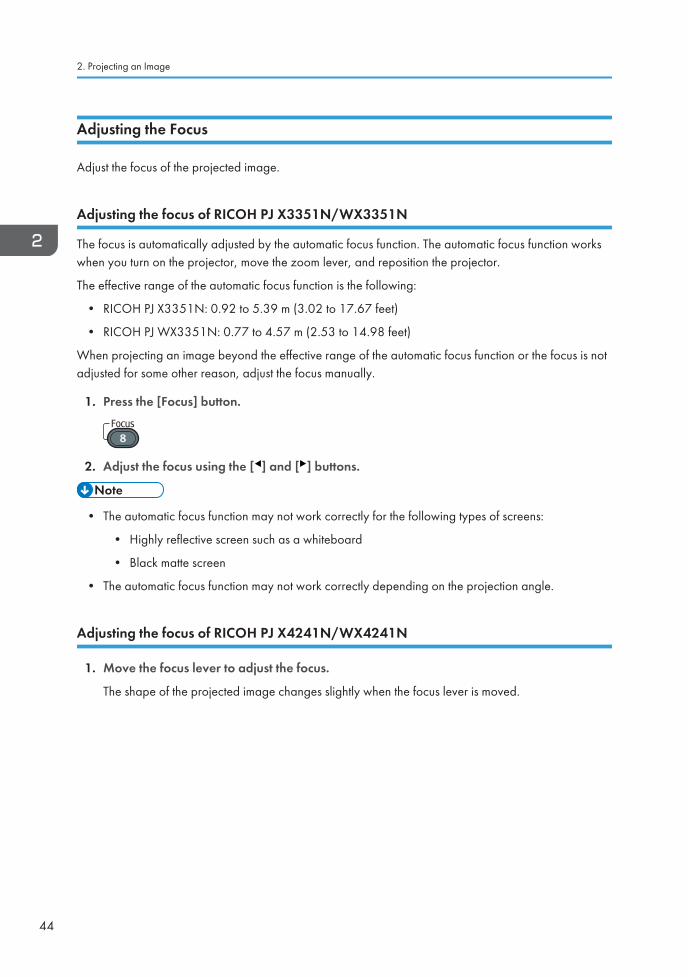
1. Press the [Focus] button.
2. Adjust the focus using the [ ] and [ ] buttons.
• The automatic focus function may not work correctly for the following types of screens:
• Highly reflective screen such as a whiteboard
• Black matte screen
• The automatic focus function may not work correctly depending on the projection angle.
Adjusting the focus of RICOH PJ X4241N/WX4241N
1. Move the focus lever to adjust the focus.
The shape of the projected image changes slightly when the focus lever is moved.
2. Projecting an Image
44
CUD042
Adjusting for Keystone Distortion
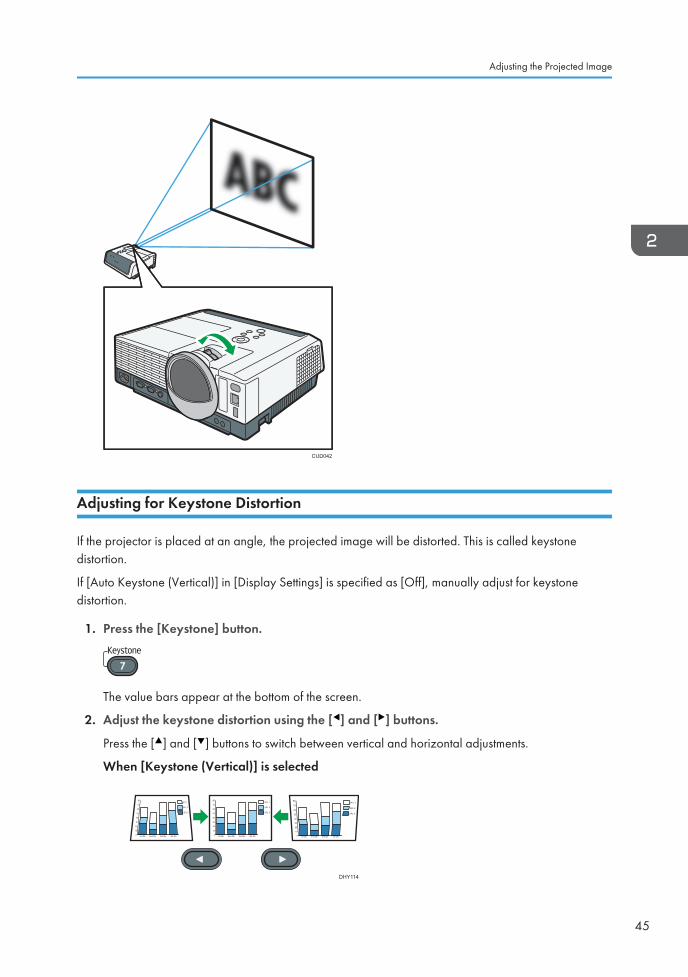
If the projector is placed at an angle, the projected image will be distorted. This is called keystonedistortion.
If [Auto Keystone (Vertical)] in [Display Settings] is specified as [Off], manually adjust for keystonedistortion.
1. Press the [Keystone] button.
The value bars appear at the bottom of the screen.
2. Adjust the keystone distortion using the [ ] and [ ] buttons.
Press the [ ] and [ ] buttons to switch between vertical and horizontal adjustments.
When [Keystone (Vertical)] is selected
DHY114
Adjusting the Projected Image
45
Press the [ ] button to decrease the width of the bottom of the projected image. Press the [ ]button to decrease the width of the top of the projected image.
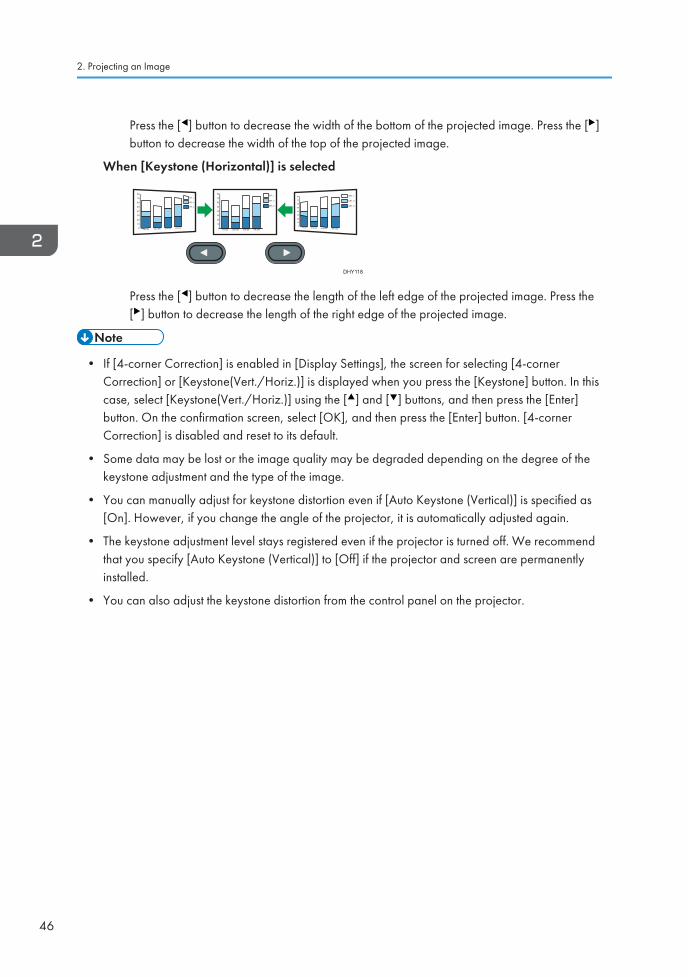
When [Keystone (Horizontal)] is selected
DHY118
Press the [ ] button to decrease the length of the left edge of the projected image. Press the[ ] button to decrease the length of the right edge of the projected image.
• If [4-corner Correction] is enabled in [Display Settings], the screen for selecting [4-cornerCorrection] or [Keystone(Vert./Horiz.)] is displayed when you press the [Keystone] button. In thiscase, select [Keystone(Vert./Horiz.)] using the [ ] and [ ] buttons, and then press the [Enter]button. On the confirmation screen, select [OK], and then press the [Enter] button. [4-cornerCorrection] is disabled and reset to its default.
• Some data may be lost or the image quality may be degraded depending on the degree of thekeystone adjustment and the type of the image.
• You can manually adjust for keystone distortion even if [Auto Keystone (Vertical)] is specified as[On]. However, if you change the angle of the projector, it is automatically adjusted again.
• The keystone adjustment level stays registered even if the projector is turned off. We recommendthat you specify [Auto Keystone (Vertical)] to [Off] if the projector and screen are permanentlyinstalled.
• You can also adjust the keystone distortion from the control panel on the projector.
2. Projecting an Image
46
Operations while Projecting Images
Adjusting the Volume of the Speaker
1. Press the [Volume] button.
The value bar appears at the bottom of the screen.
2. Adjust the volume using the [ ] and [ ] buttons.
CUD047
Press the [ ] button to decrease the volume. Press the [ ] button to increase the volume.
• You can also adjust the volume of the speaker from the control panel on the projector.
Enlarging the Image
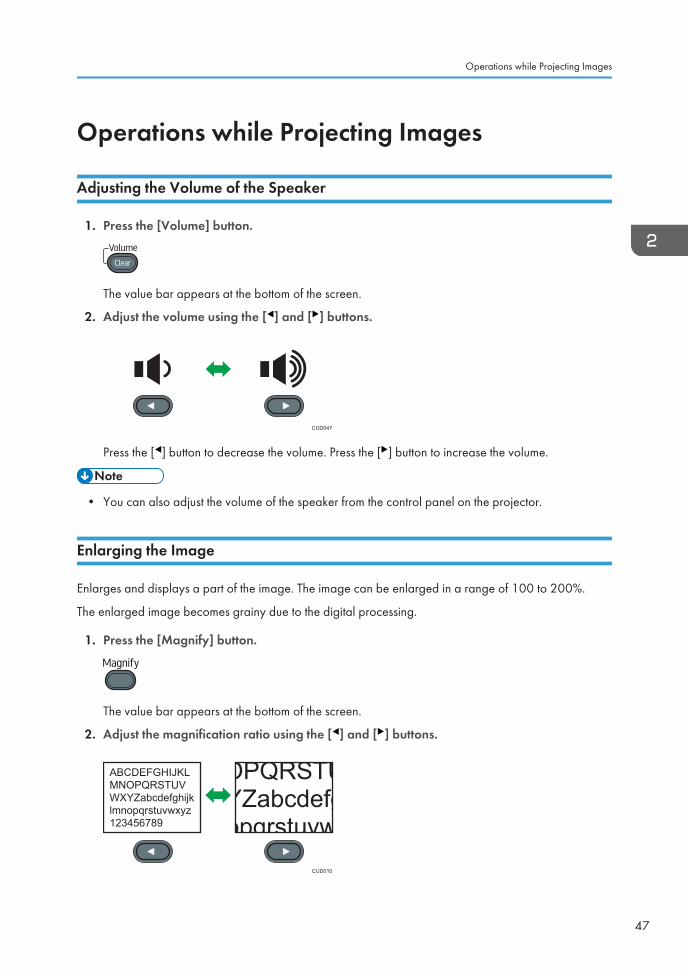
Enlarges and displays a part of the image. The image can be enlarged in a range of 100 to 200%.
The enlarged image becomes grainy due to the digital processing.
1. Press the [Magnify] button.
The value bar appears at the bottom of the screen.
2. Adjust the magnification ratio using the [ ] and [ ] buttons.
ABCDEFGHIJKLMNOPQRSTUVWXYZabcdefghijklmnopqrstuvwxyz123456789
OPQRSTUYZabcdefgopqrstuvw
CUD010
Operations while Projecting Images
47
Press the [ ] button to decrease the magnification ratio. Press the [ ] button to increase themagnification ratio.
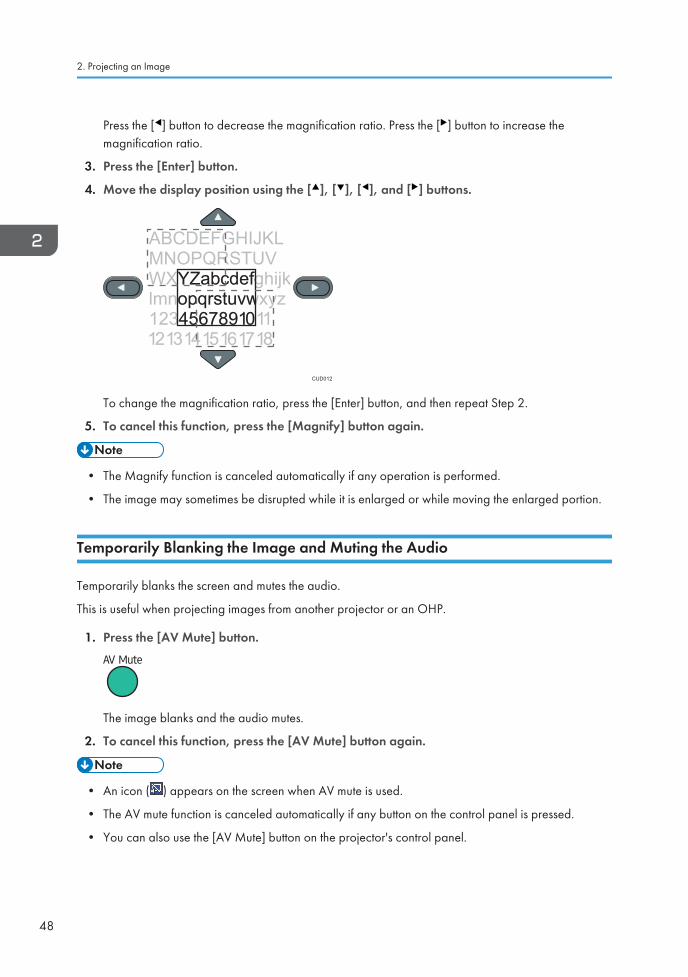
3. Press the [Enter] button.
4. Move the display position using the [ ], [ ], [ ], and [ ] buttons.
ABCDEFGHIJKLMNOPQRSTUVWXYZabcdefghijklmnopqrstuvwxyz123456789 10 1112 13 14 15 16 17 18
YZabcdefgopqrstuvw
3456789 10
CUD012
To change the magnification ratio, press the [Enter] button, and then repeat Step 2.
5. To cancel this function, press the [Magnify] button again.
• The Magnify function is canceled automatically if any operation is performed.
• The image may sometimes be disrupted while it is enlarged or while moving the enlarged portion.
Temporarily Blanking the Image and Muting the Audio
Temporarily blanks the screen and mutes the audio.
This is useful when projecting images from another projector or an OHP.
1. Press the [AV Mute] button.
The image blanks and the audio mutes.
2. To cancel this function, press the [AV Mute] button again.
• An icon ( ) appears on the screen when AV mute is used.
• The AV mute function is canceled automatically if any button on the control panel is pressed.
• You can also use the [AV Mute] button on the projector's control panel.
2. Projecting an Image
48
Freezing the Image
Freezes the video or moving image that is being projected.
1. Press the [Freeze] button.
The image freezes.
2. To unfreeze the image, press the [Freeze] button again.
• An icon ( ) appears on the screen when freeze is used.
• The Freeze function is canceled automatically if any operation is performed.
• The Freeze function is for freezing the image projected on the screen. To pause the video of theconnected equipment, use the pause function of the connected equipment.
Specifying the Lamp Settings
Specify the lamp settings to save energy or to make images brighter according to how you use theprojector. You can select the following modes in [Eco Mode]:
On (Auto)
Select this mode to save energy. In this mode, the following settings are automatically specified:
• Lamp Power: [Auto]
• Lamp Pwr on No Signal: [Eco]
• Image Eco: [On]
On (Detailed)
Select this mode to specify [Lamp Power], [Lamp Pwr on No Signal], and [Image Eco] manually.
Off
Select this mode to make images brighter. In this mode, the following settings are automaticallyspecified:
• Lamp Power: [Maximum]
• Lamp Pwr on No Signal: [Std.]
• Image Eco: [Off]
For details about [Lamp Power], [Lamp Pwr on No Signal], and [Image Eco], see page 102 "EnergySaving Settings Menu".
Operations while Projecting Images
49
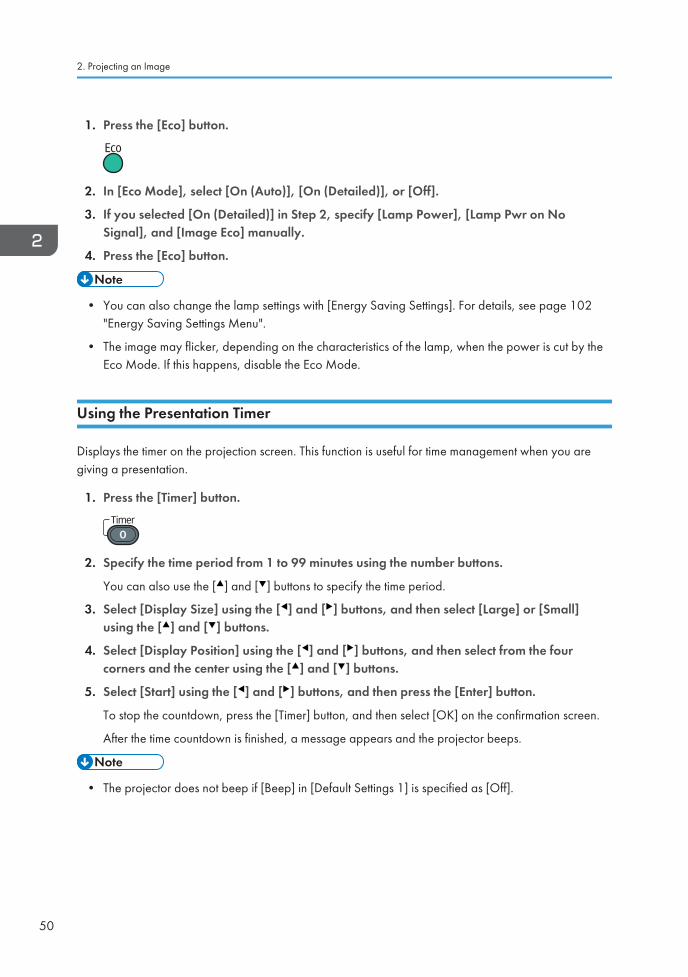
1. Press the [Eco] button.
2. In [Eco Mode], select [On (Auto)], [On (Detailed)], or [Off].
3. If you selected [On (Detailed)] in Step 2, specify [Lamp Power], [Lamp Pwr on NoSignal], and [Image Eco] manually.
4. Press the [Eco] button.
• You can also change the lamp settings with [Energy Saving Settings]. For details, see page 102"Energy Saving Settings Menu".
• The image may flicker, depending on the characteristics of the lamp, when the power is cut by theEco Mode. If this happens, disable the Eco Mode.
Using the Presentation Timer
Displays the timer on the projection screen. This function is useful for time management when you aregiving a presentation.
1. Press the [Timer] button.
2. Specify the time period from 1 to 99 minutes using the number buttons.
You can also use the [ ] and [ ] buttons to specify the time period.
3. Select [Display Size] using the [ ] and [ ] buttons, and then select [Large] or [Small]using the [ ] and [ ] buttons.
4. Select [Display Position] using the [ ] and [ ] buttons, and then select from the fourcorners and the center using the [ ] and [ ] buttons.
5. Select [Start] using the [ ] and [ ] buttons, and then press the [Enter] button.
To stop the countdown, press the [Timer] button, and then select [OK] on the confirmation screen.
After the time countdown is finished, a message appears and the projector beeps.
• The projector does not beep if [Beep] in [Default Settings 1] is specified as [Off].
2. Projecting an Image
50
3. Projecting Images from a USBMemory Device or Digital CameraThis chapter explains how to project images from a USB memory device or digital camera.
Requirements for Projecting Images from aUSB Device
• It is recommended to back up the data saved to a USB device before using it. The manufacturer isnot responsible for any damage due to the loss of data.
• Do not disconnect the power plug while the USB device is being accessed. Doing so may causemalfunction or data loss.
• The USB devices must support USB 2.0.
• The projector supports FAT16 or FAT32 format USB devices. Other forms of USB device are notcompatible.
The projector can project still images and videos stored on a USB memory device or a digital camera.
The following still images and videos are supported by the projector:
Still images
Item Requirements
File extensions jpg, jpeg, JPG, JPEG
File size Less than 10 MB
Number of pixels 2 × 2 to 5120 × 5120 pixels
File format Baseline format
Videos
Item Requirements
File extensionsmpg, mpeg, MPG, MPEG, m2ts, m2t, M2TS, M2T, m2p, M2P,mp4, MP4, mov, MOV
File size Less than 2 GB (FAT16) or 4 GB (FAT32)
Number of pixels 320 × 240 to 1920 × 1080 pixels
51
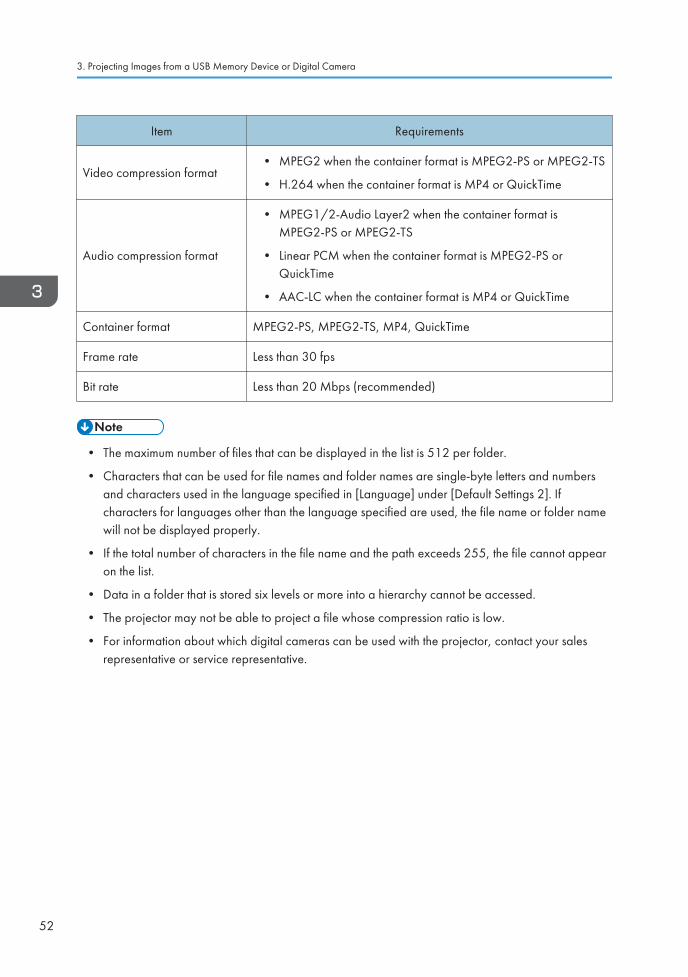
Item Requirements
Video compression format• MPEG2 when the container format is MPEG2-PS or MPEG2-TS
• H.264 when the container format is MP4 or QuickTime
Audio compression format
• MPEG1/2-Audio Layer2 when the container format isMPEG2-PS or MPEG2-TS
• Linear PCM when the container format is MPEG2-PS orQuickTime
• AAC-LC when the container format is MP4 or QuickTime
Container format MPEG2-PS, MPEG2-TS, MP4, QuickTime
Frame rate Less than 30 fps
Bit rate Less than 20 Mbps (recommended)
• The maximum number of files that can be displayed in the list is 512 per folder.
• Characters that can be used for file names and folder names are single-byte letters and numbersand characters used in the language specified in [Language] under [Default Settings 2]. Ifcharacters for languages other than the language specified are used, the file name or folder namewill not be displayed properly.
• If the total number of characters in the file name and the path exceeds 255, the file cannot appearon the list.
• Data in a folder that is stored six levels or more into a hierarchy cannot be accessed.
• The projector may not be able to project a file whose compression ratio is low.
• For information about which digital cameras can be used with the projector, contact your salesrepresentative or service representative.
3. Projecting Images from a USB Memory Device or Digital Camera
52
How to Project Images from USB MemoryDeviceFor basic operations, such as how to turn on the projector or adjust the focus, see page 37 "Projectingan Image".
Connecting the USB Device
Connect the USB memory device or digital camera to the projector.
The USB device can be connected even if the projector is already on.
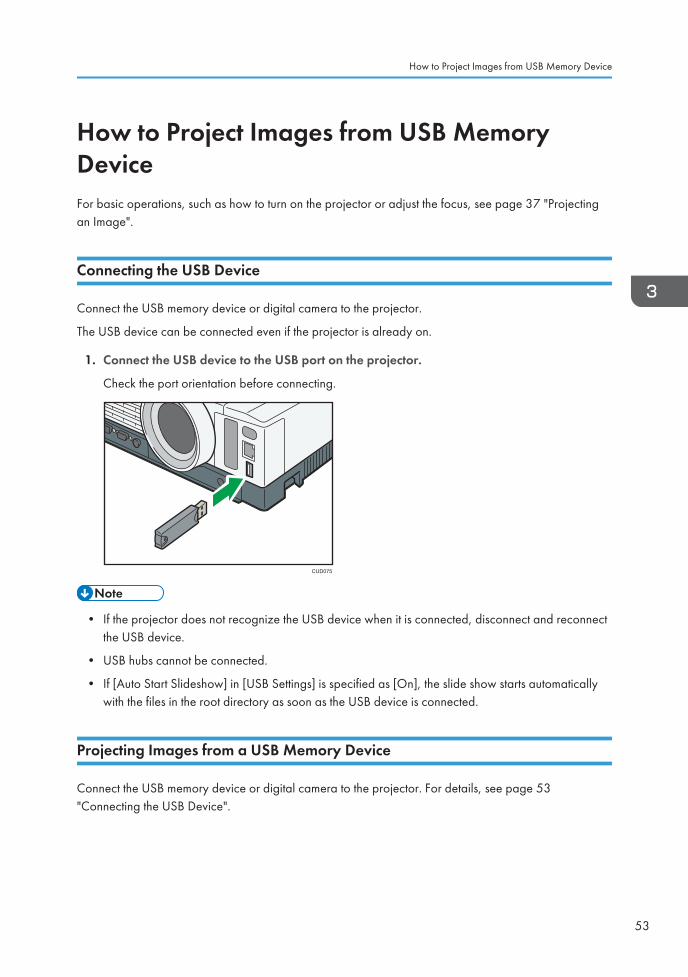
1. Connect the USB device to the USB port on the projector.
Check the port orientation before connecting.
CUD075
• If the projector does not recognize the USB device when it is connected, disconnect and reconnectthe USB device.
• USB hubs cannot be connected.
• If [Auto Start Slideshow] in [USB Settings] is specified as [On], the slide show starts automaticallywith the files in the root directory as soon as the USB device is connected.
Projecting Images from a USB Memory Device
Connect the USB memory device or digital camera to the projector. For details, see page 53"Connecting the USB Device".
How to Project Images from USB Memory Device
53
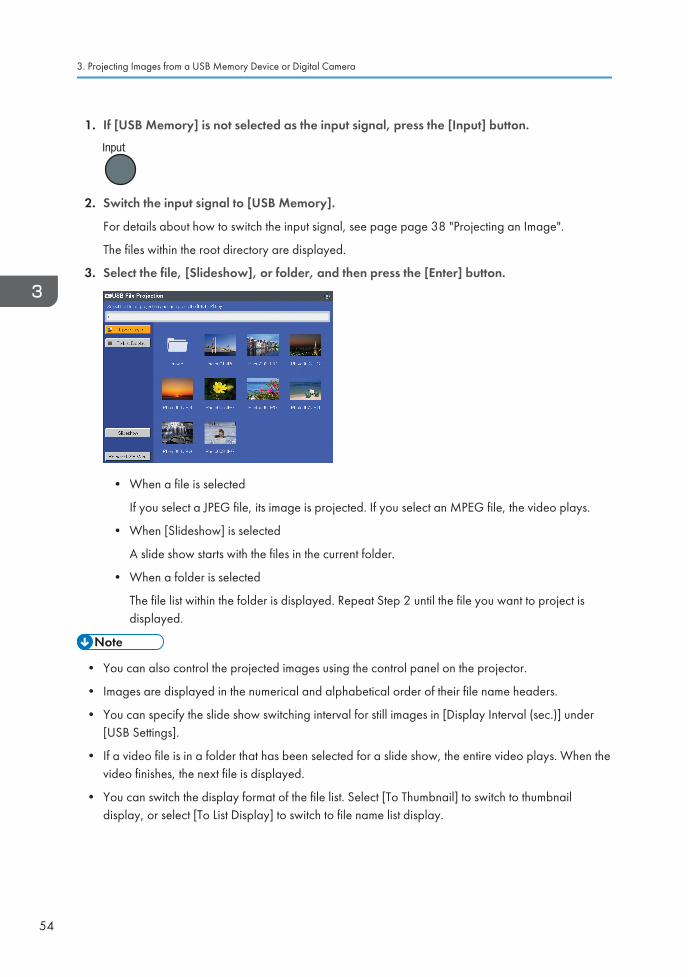
1. If [USB Memory] is not selected as the input signal, press the [Input] button.
2. Switch the input signal to [USB Memory].
For details about how to switch the input signal, see page page 38 "Projecting an Image".
The files within the root directory are displayed.
3. Select the file, [Slideshow], or folder, and then press the [Enter] button.
• When a file is selected
If you select a JPEG file, its image is projected. If you select an MPEG file, the video plays.
• When [Slideshow] is selected
A slide show starts with the files in the current folder.
• When a folder is selected
The file list within the folder is displayed. Repeat Step 2 until the file you want to project isdisplayed.
• You can also control the projected images using the control panel on the projector.
• Images are displayed in the numerical and alphabetical order of their file name headers.
• You can specify the slide show switching interval for still images in [Display Interval (sec.)] under[USB Settings].
• If a video file is in a folder that has been selected for a slide show, the entire video plays. When thevideo finishes, the next file is displayed.
• You can switch the display format of the file list. Select [To Thumbnail] to switch to thumbnaildisplay, or select [To List Display] to switch to file name list display.
3. Projecting Images from a USB Memory Device or Digital Camera
54

Controlling the Projected Image
Use the remote control to control a projected still image or video.
How to control a still image
• [Enter] button: Starts the slide show from the projected image. Stops the slide show that is inprogress.
• [ ] button: Displays the next image.
• [ ] button: Displays the previous image.
• [ ] button: Rotates the image 90° to the right.
• [ ] button: Rotates the image 90° to the left.
• [Menu] button: Returns to the [USB File Projection] screen.
How to control a video
• [Enter] button: Pauses or restarts the video.
• [ ] button: Fast forwards the video. If a video is paused, displays the next image.
• [ ] button: Rewinds the video. If a video is paused, displays the previous image.
• [ ] button: Increases the volume.
• [ ] button: Decreases the volume.
• [Menu] button: Returns to the [USB File Projection] screen.
• You can also control the projected videos from the control panel on the projector.
• The rewind and fast forward speed increases three levels each time the button is pressed. Toreduce the speed to its original, press the [Enter] button.
• If any operation except for volume adjustment is performed during the slide show, the slide showstops.
Disconnecting the USB Device
1. Press the [Menu] button if an image is projected.
The [USB File Projection] screen is displayed.
2. Select [Remove USB Mem.] on the [USB File Projection] screen, and then press the [Enter]button.
The confirmation screen is displayed.
3. Select [OK], and then press the [Enter] button.
4. Disconnect the USB device.
How to Project Images from USB Memory Device
55

• A USB device can also be disconnected by selecting [Remove USB Mem.] in [USB Settings].
3. Projecting Images from a USB Memory Device or Digital Camera
56
Projecting Images in a Slide Show
Projecting a Slide Show at a Specified Time
You can project a slide show of files on a USB device at a specified time.
This function is useful if you want to use the projector to decorate a shop window with projected imagesaccording to the shop's business hours, for example.
Specify the following two settings to use this function:
• Power Timer
Use this setting to specify the day and time to project a slide show.
• Auto Start Slideshow
Enable this setting to automatically start the slide show with the files in the USB device.
This section explains how to set the projector to project the slide show with the files in the USB deviceautomatically from 9:00 to 18:00 every Sunday as an example.
• To use Power Timer, you must set the current time. For details, see page 107 "Default Settings 2Menu".
• This function is not available when [Power on Standby] is set to [Eco] and [NW Settings onStandby] is set to [Do not Use].
Specifying Power Timer
1. Press the [Menu] button.
Projecting Images in a Slide Show
57
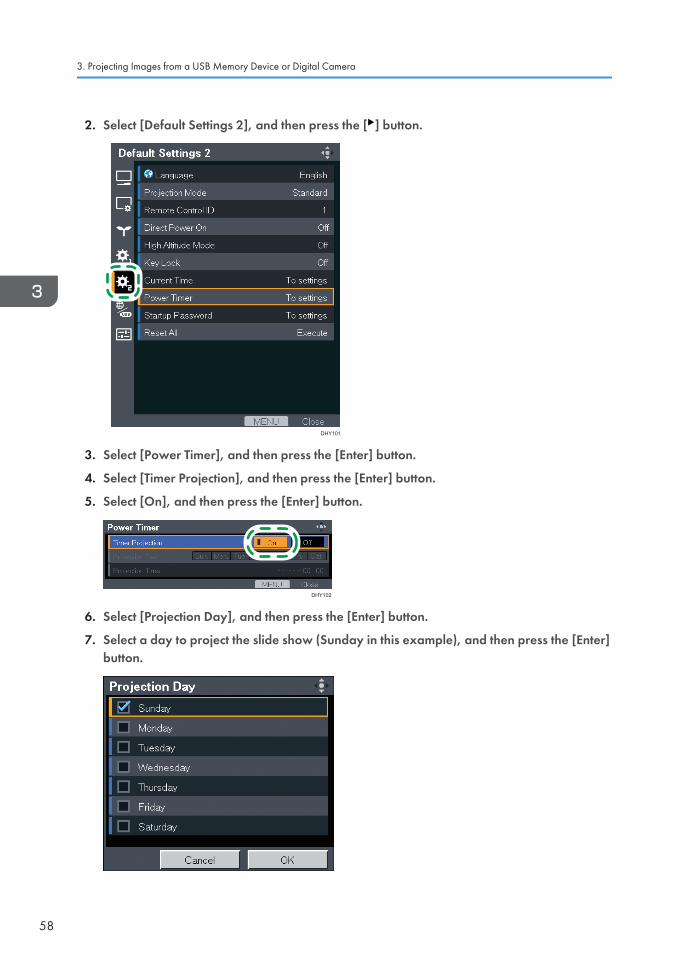
2. Select [Default Settings 2], and then press the [ ] button.
DHY101
3. Select [Power Timer], and then press the [Enter] button.
4. Select [Timer Projection], and then press the [Enter] button.
5. Select [On], and then press the [Enter] button.
DHY102
6. Select [Projection Day], and then press the [Enter] button.
7. Select a day to project the slide show (Sunday in this example), and then press the [Enter]button.
3. Projecting Images from a USB Memory Device or Digital Camera
58
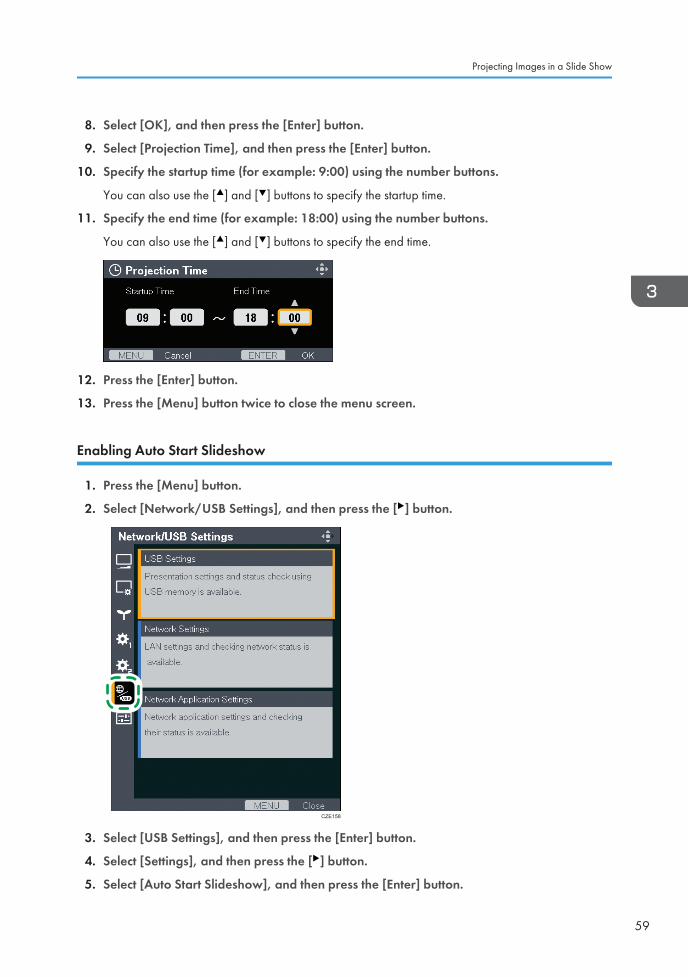
8. Select [OK], and then press the [Enter] button.
9. Select [Projection Time], and then press the [Enter] button.
10. Specify the startup time (for example: 9:00) using the number buttons.
You can also use the [ ] and [ ] buttons to specify the startup time.
11. Specify the end time (for example: 18:00) using the number buttons.
You can also use the [ ] and [ ] buttons to specify the end time.
12. Press the [Enter] button.
13. Press the [Menu] button twice to close the menu screen.
Enabling Auto Start Slideshow
1. Press the [Menu] button.
2. Select [Network/USB Settings], and then press the [ ] button.
CZE158
3. Select [USB Settings], and then press the [Enter] button.
4. Select [Settings], and then press the [ ] button.
5. Select [Auto Start Slideshow], and then press the [Enter] button.
Projecting Images in a Slide Show
59
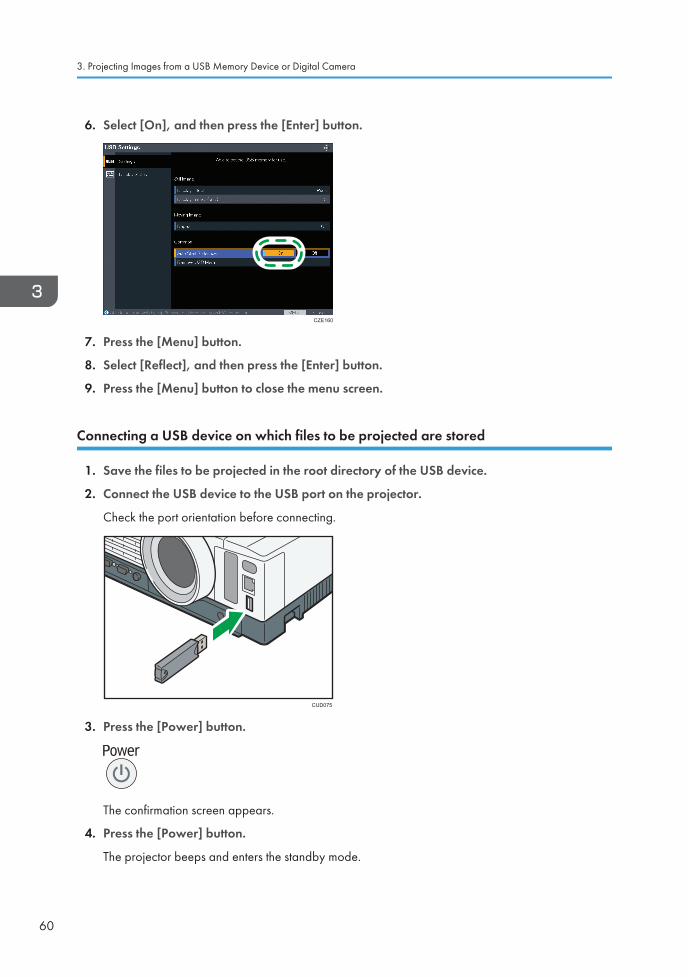
6. Select [On], and then press the [Enter] button.
CZE160
7. Press the [Menu] button.
8. Select [Reflect], and then press the [Enter] button.
9. Press the [Menu] button to close the menu screen.
Connecting a USB device on which files to be projected are stored
1. Save the files to be projected in the root directory of the USB device.
2. Connect the USB device to the USB port on the projector.
Check the port orientation before connecting.
CUD075
3. Press the [Power] button.
The confirmation screen appears.
4. Press the [Power] button.
The projector beeps and enters the standby mode.
3. Projecting Images from a USB Memory Device or Digital Camera
60
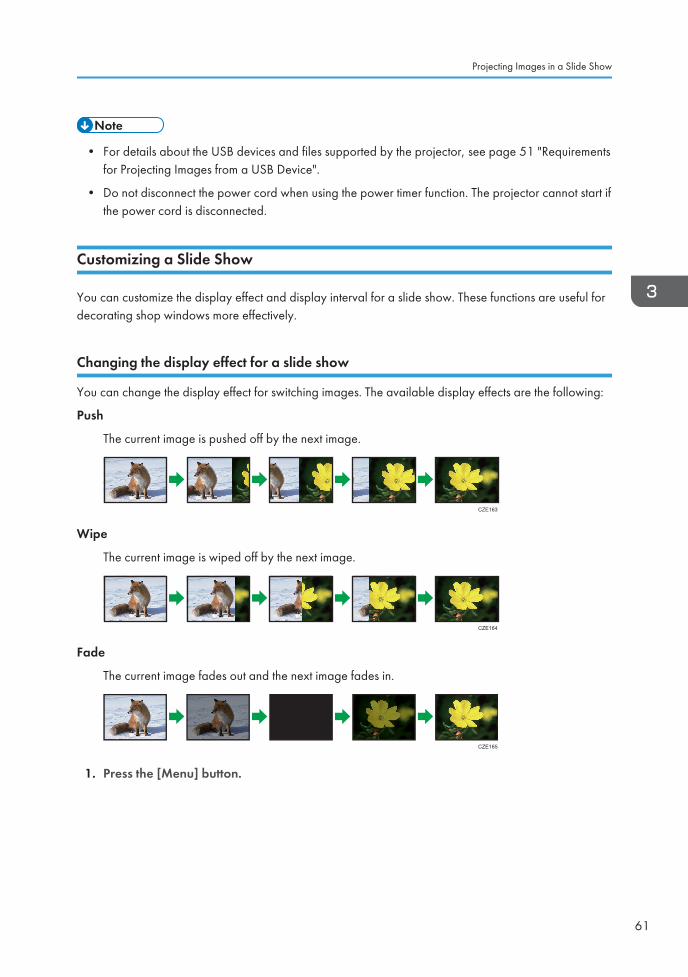
• For details about the USB devices and files supported by the projector, see page 51 "Requirementsfor Projecting Images from a USB Device".
• Do not disconnect the power cord when using the power timer function. The projector cannot start ifthe power cord is disconnected.
Customizing a Slide Show
You can customize the display effect and display interval for a slide show. These functions are useful fordecorating shop windows more effectively.
Changing the display effect for a slide show
You can change the display effect for switching images. The available display effects are the following:
Push
The current image is pushed off by the next image.
CZE163
Wipe
The current image is wiped off by the next image.
CZE164
Fade
The current image fades out and the next image fades in.
CZE165
1. Press the [Menu] button.
Projecting Images in a Slide Show
61
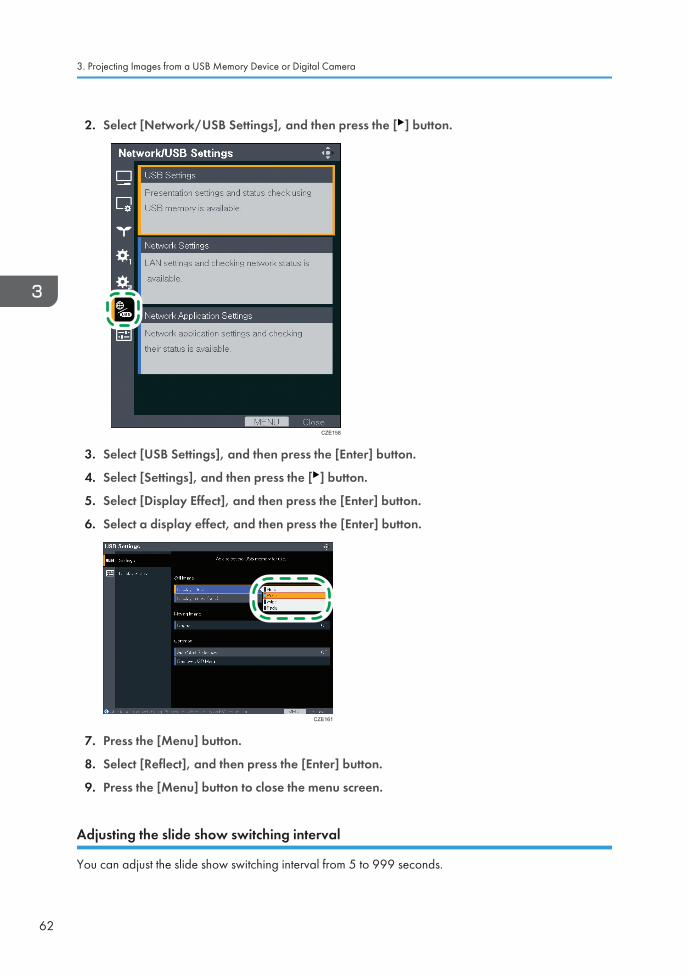
2. Select [Network/USB Settings], and then press the [ ] button.
CZE158
3. Select [USB Settings], and then press the [Enter] button.
4. Select [Settings], and then press the [ ] button.
5. Select [Display Effect], and then press the [Enter] button.
6. Select a display effect, and then press the [Enter] button.
CZE161
7. Press the [Menu] button.
8. Select [Reflect], and then press the [Enter] button.
9. Press the [Menu] button to close the menu screen.
Adjusting the slide show switching interval
You can adjust the slide show switching interval from 5 to 999 seconds.
3. Projecting Images from a USB Memory Device or Digital Camera
62
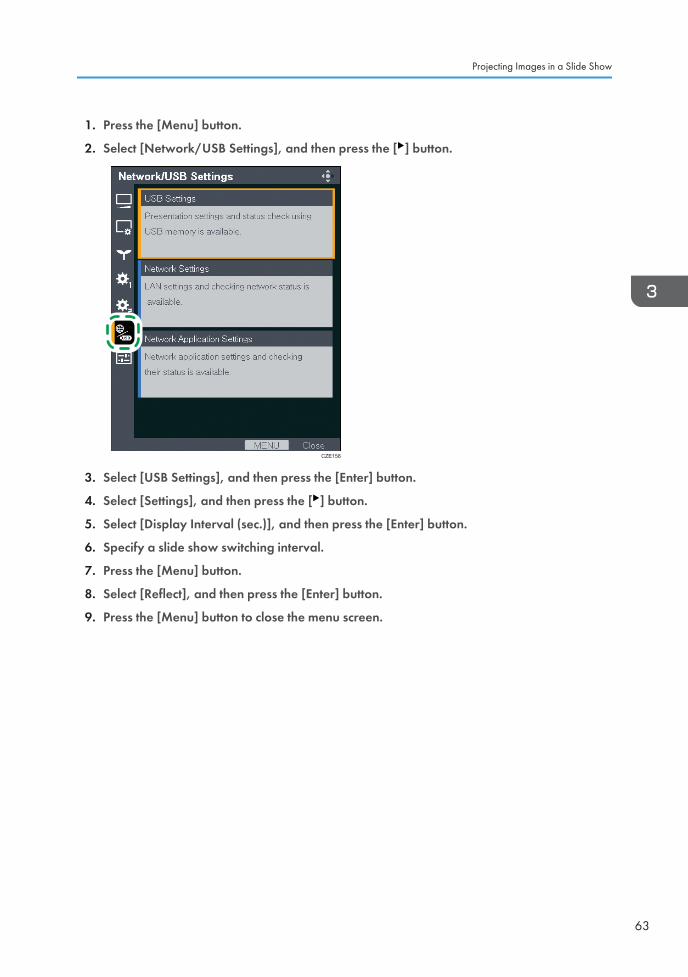
1. Press the [Menu] button.
2. Select [Network/USB Settings], and then press the [ ] button.
CZE158
3. Select [USB Settings], and then press the [Enter] button.
4. Select [Settings], and then press the [ ] button.
5. Select [Display Interval (sec.)], and then press the [Enter] button.
6. Specify a slide show switching interval.
7. Press the [Menu] button.
8. Select [Reflect], and then press the [Enter] button.
9. Press the [Menu] button to close the menu screen.
Projecting Images in a Slide Show
63
Converting Presentation Files to JPEG FilesUsing JPEG Conversion ToolMicrosoft PowerPoint presentation files can be converted to JPEG files, which are compatible with theprojector.
You can do presentations without a computer if you save converted JPEG files to a USB memory deviceand then display the slides using the projector.
The converted files can also be transferred to a server.
How to Use JPEG Conversion Tool
JPEG Conversion Tool is included on the supplied CD-ROM.
JPEG Conversion Tool operating environment is described below.
• Supported operating system
• Windows Vista Ultimate, Business, Home Premium, Home Basic, SP2 or later (32-bit and 64-bit versions)
• Windows 7 Home Premium, Professional, Ultimate, Enterprise, SP1 (32-bit and 64-bitversions)
• Windows 8, Pro, Enterprise (32-bit and 64-bit versions)
• Windows 8.1, Pro, Enterprise (32-bit and 64-bit versions)
1. Insert the CD-ROM in the CD-ROM drive of your computer.
The launcher screen appears.
2. Specify a language and model name, and then click [Select].
3. Click [JPEG Conversion Tool Type A].
4. Specify a destination to save the application.
The "RICOH JPEG Conversion Tool Type A" folder is copied to the computer.
5. To create a shortcut icon on the desktop, click [OK].
6. Close the screen.
To start JPEG Conversion Tool, double-click the shortcut icon on the desktop or "RICOH JPEGConversion Tool TypeA.exe" in the folder.
• You can also use JPEG Conversion Tool by dragging and dropping the "RICOH JPEG ConversionTool Type A" folder that is on the provided CD-ROM to the computer. JPEG Conversion Tool iscopied to the computer.
3. Projecting Images from a USB Memory Device or Digital Camera
64
• To delete JPEG Conversion Tool, delete the JPEG Conversion Tool folder that was copied to thecomputer.
Converting Presentation Files to JPEG Files
1. Double-click the "JPEG Conversion Tool" icon.
JPEG Conversion Tool starts.
2. Drag and drop the PowerPoint file to be converted into the "JPEG Conversion Tool" dialogbox.
To manually specify the file, enter the file name in [File Location:].
3. Select the resolution of the converted file in the [Resolution] drop-down list.
4. To maintain the aspect ratio of the original file, select [Maintain Aspect Ratio ofConversion Source Image].
5. Specify the destination to which you want to save the converted file.
To save to a computer, select [Local PC], and then specify where to save the file.
To save to a server, select [Server], and then select the server to which you want to save the file.
6. Click [Convert&Save].
7. Click [OK].
• To convert PowerPoint files, Microsoft PowerPoint 2007, 2010, or 2013 must be installed on thecomputer to you are using.
• JPEG Conversion Tool is compatible with still images that have a ".ppt" or ".pptx" extension.Animations and audio are not compatible.
• The number of JPEG files created is equivalent to the number of slides. The file name afterconversion is "slide + File Number + .jpg".
• For the settings method when saving converted files to the server, refer to the JPEG Conversion ToolHelp.
Converting Presentation Files to JPEG Files Using JPEG Conversion Tool
65

3. Projecting Images from a USB Memory Device or Digital Camera
66
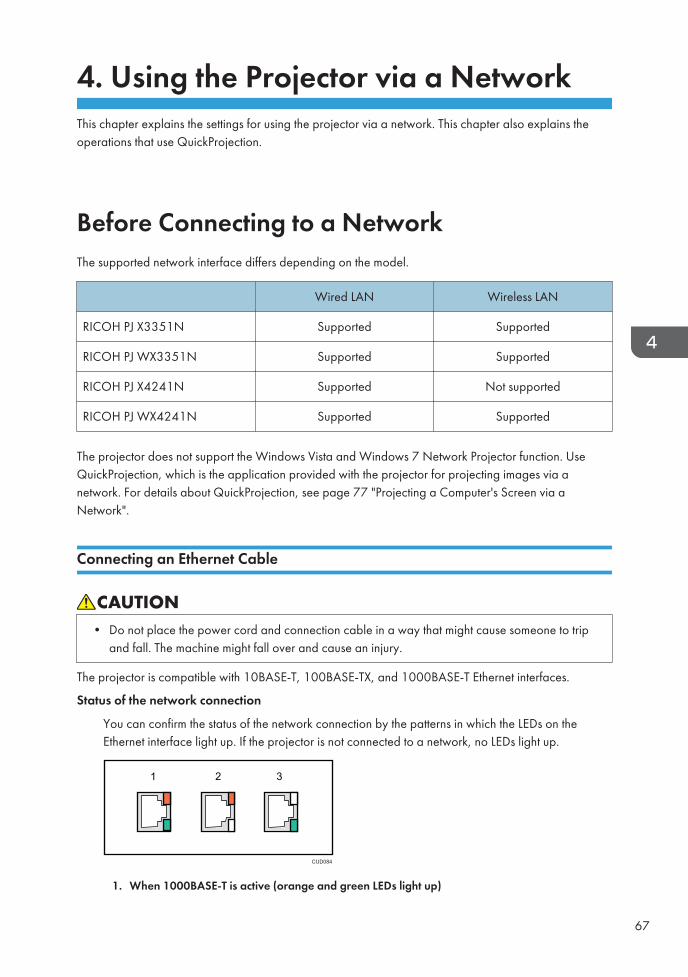
4. Using the Projector via a NetworkThis chapter explains the settings for using the projector via a network. This chapter also explains theoperations that use QuickProjection.
Before Connecting to a NetworkThe supported network interface differs depending on the model.
Wired LAN Wireless LAN
RICOH PJ X3351N Supported Supported
RICOH PJ WX3351N Supported Supported
RICOH PJ X4241N Supported Not supported
RICOH PJ WX4241N Supported Supported
The projector does not support the Windows Vista and Windows 7 Network Projector function. UseQuickProjection, which is the application provided with the projector for projecting images via anetwork. For details about QuickProjection, see page 77 "Projecting a Computer's Screen via aNetwork".
Connecting an Ethernet Cable
• Do not place the power cord and connection cable in a way that might cause someone to tripand fall. The machine might fall over and cause an injury.
The projector is compatible with 10BASE-T, 100BASE-TX, and 1000BASE-T Ethernet interfaces.
Status of the network connection
You can confirm the status of the network connection by the patterns in which the LEDs on theEthernet interface light up. If the projector is not connected to a network, no LEDs light up.
CUD084
1 2 3
1. When 1000BASE-T is active (orange and green LEDs light up)
67
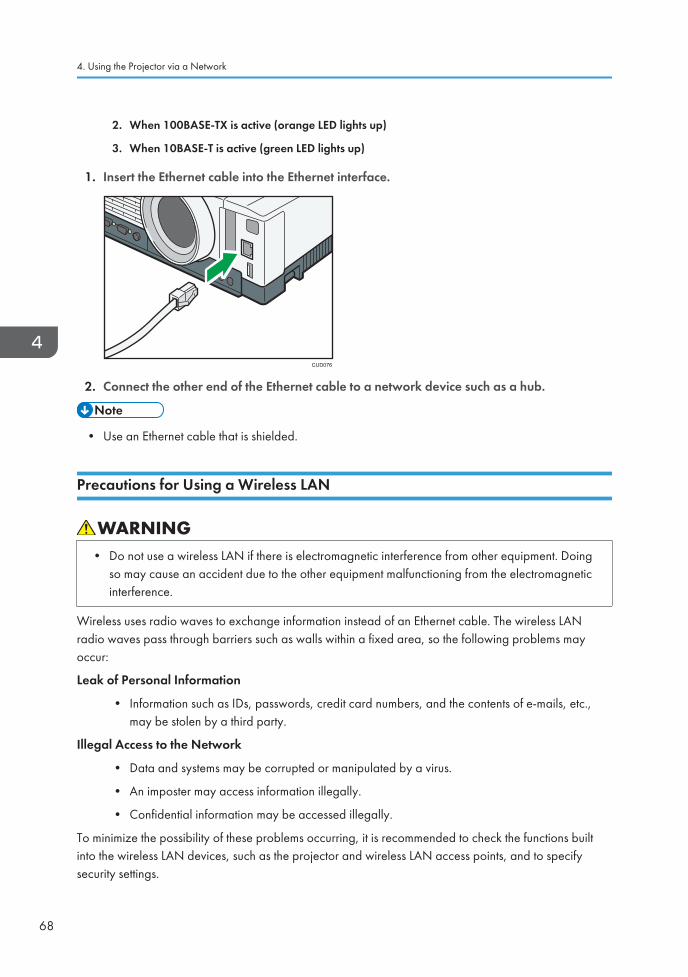
2. When 100BASE-TX is active (orange LED lights up)
3. When 10BASE-T is active (green LED lights up)
1. Insert the Ethernet cable into the Ethernet interface.
CUD076
2. Connect the other end of the Ethernet cable to a network device such as a hub.
• Use an Ethernet cable that is shielded.
Precautions for Using a Wireless LAN
• Do not use a wireless LAN if there is electromagnetic interference from other equipment. Doingso may cause an accident due to the other equipment malfunctioning from the electromagneticinterference.
Wireless uses radio waves to exchange information instead of an Ethernet cable. The wireless LANradio waves pass through barriers such as walls within a fixed area, so the following problems mayoccur:
Leak of Personal Information
• Information such as IDs, passwords, credit card numbers, and the contents of e-mails, etc.,may be stolen by a third party.
Illegal Access to the Network
• Data and systems may be corrupted or manipulated by a virus.
• An imposter may access information illegally.
• Confidential information may be accessed illegally.
To minimize the possibility of these problems occurring, it is recommended to check the functions builtinto the wireless LAN devices, such as the projector and wireless LAN access points, and to specifysecurity settings.
4. Using the Projector via a Network
68

• (mainly Europe and Asia)The projector does not support the 5 GHz band.
• (mainly North America)The projector supports 40 MHz channels only in the 5 GHz band and in the infrastructure mode.
Before Connecting to a Network
69
Connecting the Projector to a NetworkTo connect the projector to a network, you must specify network settings such as an IP address. Therequired settings differ depending on the network environment and how you use the projector.
You can configure the required settings easily by using Network Setting Wizard. For details about howto open Network Setting Wizard, see page 71 "Opening Network Setting Wizard".
To connect to a wired LAN
Connect an Ethernet cable to the projector, and then configure the network settings in [Wired LAN]on Network Setting Wizard. For details about how to configure the wired LAN network settings,see page 72 "Configuring the Wired LAN Settings".
To connect to a wireless LAN in infrastructure mode
In infrastructure mode, the projector can communicate with networks in which both wireless andwired LAN devices are connected via a wireless LAN access terminal. It is necessary to usergreater security since all communication is via a network. Use infrastructure mode in environmentsin which a wireless LAN has already been configured.
Configure the network settings in [Wireless LAN (Infrastructure)] on Network Setting Wizard. Thesetting method differs depending on the network environment.
• Configuring the settings by Simple Wireless LAN Setup
If the access point is compliant with the simple wireless LAN setup function, you can configurethe network settings easily. This function acquires the wireless LAN settings registered in theaccess point, and configures those settings for the projector automatically. You can configurethe settings without entering the SSID and the network key manually. For details, seepage 73 "Configuring the settings by Simple Wireless LAN Setup".
• Configuring the settings manually
You can configure the network settings by selecting the network to connect to from theavailable network list. Up to 10 networks are displayed in the list in radio field intensity order.
If you want to connect to a network that is not displayed in the list or is not broadcasting itsSSID, enter the SSID manually. For details, see page 74 "Configuring the settingsmanually".
To connect to a wireless LAN in ad hoc mode
In ad hoc mode, the projector can communicate with the computer directly, and not via an accesspoint. No other equipment is required, so this mode is suited for locations that have no networkenvironment. As the radio wave range is limited, use an office or conference room with a good lineof sight.
Configure the network settings in [Wireless LAN (Adhoc)] on Network Setting Wizard. For detailsabout how to configure the network settings for a wireless LAN in ad hoc mode, see page 76"Configuring the Wireless LAN Settings for Ad Hoc Mode".
4. Using the Projector via a Network
70
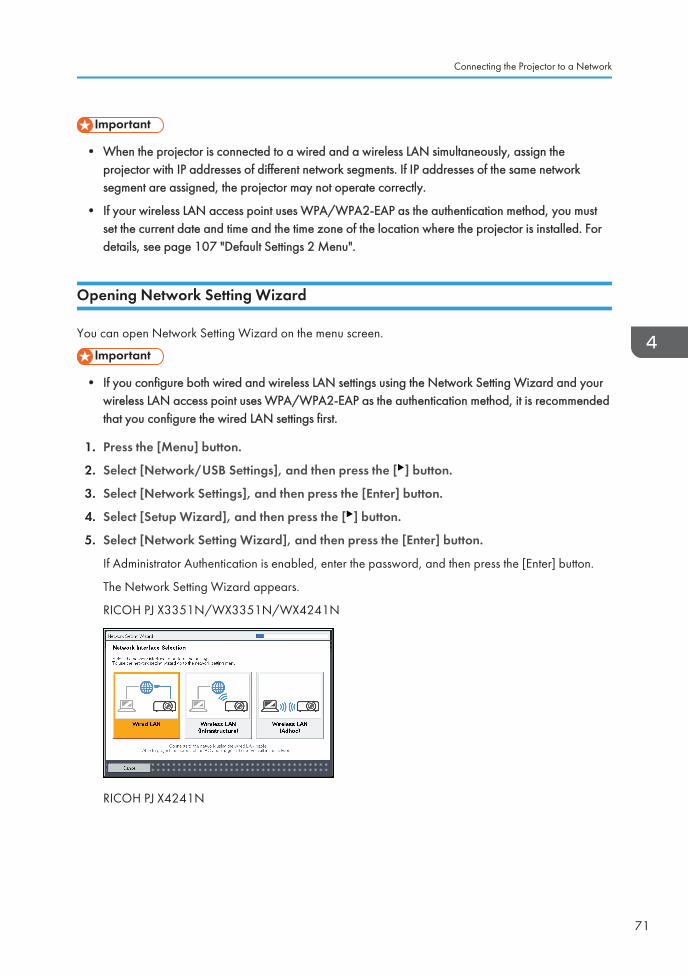
• When the projector is connected to a wired and a wireless LAN simultaneously, assign theprojector with IP addresses of different network segments. If IP addresses of the same networksegment are assigned, the projector may not operate correctly.
• If your wireless LAN access point uses WPA/WPA2-EAP as the authentication method, you mustset the current date and time and the time zone of the location where the projector is installed. Fordetails, see page 107 "Default Settings 2 Menu".
Opening Network Setting Wizard
You can open Network Setting Wizard on the menu screen.
• If you configure both wired and wireless LAN settings using the Network Setting Wizard and yourwireless LAN access point uses WPA/WPA2-EAP as the authentication method, it is recommendedthat you configure the wired LAN settings first.
1. Press the [Menu] button.
2. Select [Network/USB Settings], and then press the [ ] button.
3. Select [Network Settings], and then press the [Enter] button.
4. Select [Setup Wizard], and then press the [ ] button.
5. Select [Network Setting Wizard], and then press the [Enter] button.
If Administrator Authentication is enabled, enter the password, and then press the [Enter] button.
The Network Setting Wizard appears.
RICOH PJ X3351N/WX3351N/WX4241N
RICOH PJ X4241N
Connecting the Projector to a Network
71

Configuring the Wired LAN Settings
Connect an Ethernet cable to the projector before configuring the settings.
Contact your network administrator for the information required for configuring network settings.
1. Select [Wired LAN] on Network Setting Wizard, and then press the [Enter] button.
RICOH PJ X3351N/WX3351N/WX4241N
RICOH PJ X4241N
2. Select [Disable DHCP (Manual Settings)] or [Enable DHCP (Auto Settings)], and then pressthe [Enter] button.
If you select [Enable DHCP (Auto Settings)], proceed to Step 6.
3. Specify the projector's IP address.
4. Specify the subnet mask.
4. Using the Projector via a Network
72
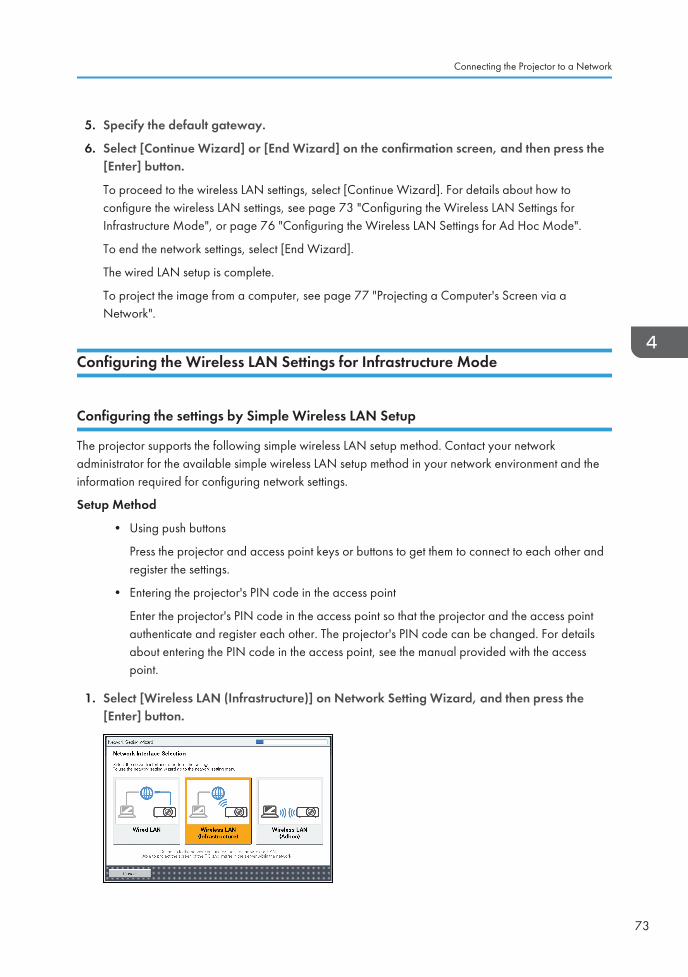
5. Specify the default gateway.
6. Select [Continue Wizard] or [End Wizard] on the confirmation screen, and then press the[Enter] button.
To proceed to the wireless LAN settings, select [Continue Wizard]. For details about how toconfigure the wireless LAN settings, see page 73 "Configuring the Wireless LAN Settings forInfrastructure Mode", or page 76 "Configuring the Wireless LAN Settings for Ad Hoc Mode".
To end the network settings, select [End Wizard].
The wired LAN setup is complete.
To project the image from a computer, see page 77 "Projecting a Computer's Screen via aNetwork".
Configuring the Wireless LAN Settings for Infrastructure Mode
Configuring the settings by Simple Wireless LAN Setup
The projector supports the following simple wireless LAN setup method. Contact your networkadministrator for the available simple wireless LAN setup method in your network environment and theinformation required for configuring network settings.
Setup Method
• Using push buttons
Press the projector and access point keys or buttons to get them to connect to each other andregister the settings.
• Entering the projector's PIN code in the access point
Enter the projector's PIN code in the access point so that the projector and the access pointauthenticate and register each other. The projector's PIN code can be changed. For detailsabout entering the PIN code in the access point, see the manual provided with the accesspoint.
1. Select [Wireless LAN (Infrastructure)] on Network Setting Wizard, and then press the[Enter] button.
Connecting the Projector to a Network
73
2. Select [Perform Simple Wireless LAN Setup], and then press the [Enter] button.
3. Select either [Connect by PIN] or [Connect by Push], and then press the [Enter] button.
4. If [Connect by PIN] is selected, enter the PIN code of the projector displayed on the screeninto the access point, and then proceed to Step 6.
You must preconfigure the access point's simple wireless LAN setup function.
5. If [Connect by Push] is selected, press the access point push button.
6. When the message "Connected to the wireless LAN device." is displayed, press the [Enter]button.
7. Select [Disable DHCP (Manual Settings)] or [Enable DHCP (Auto Settings)], and then pressthe [Enter] button.
If you select [Enable DHCP (Auto Settings)], proceed to Step 11.
8. Specify the projector's IP address.
9. Specify the subnet mask.
10. Specify the default gateway.
11. If the message "To perform connection by WPA/WPA2-EAP, continuous setting onNetwork Setting Menu: Wireless LAN: Security is required." appears, press the [OK]button and continue configuring the wireless LAN settings in the Network Settings menu.Otherwise, proceed to Step 12.
For details about how to set up the wireless LAN connection by WPA/WPA2-EAP, see page 112"Network Settings Menu".
12. Select [Continue Wizard] or [End Wizard] on the confirmation screen, and then press the[Enter] button.
To proceed to the wired LAN settings, select [Continue Wizard]. For details about how to configurethe wired LAN settings, see page 72 "Configuring the Wired LAN Settings".
To end the network settings, select [End Wizard].
The wireless LAN setup is complete.
To project the image from a computer, see page 77 "Projecting a Computer's Screen via aNetwork".
Configuring the settings manually
Contact your network administrator for the information required for configuring network settings, such asthe SSID and the network key.
4. Using the Projector via a Network
74
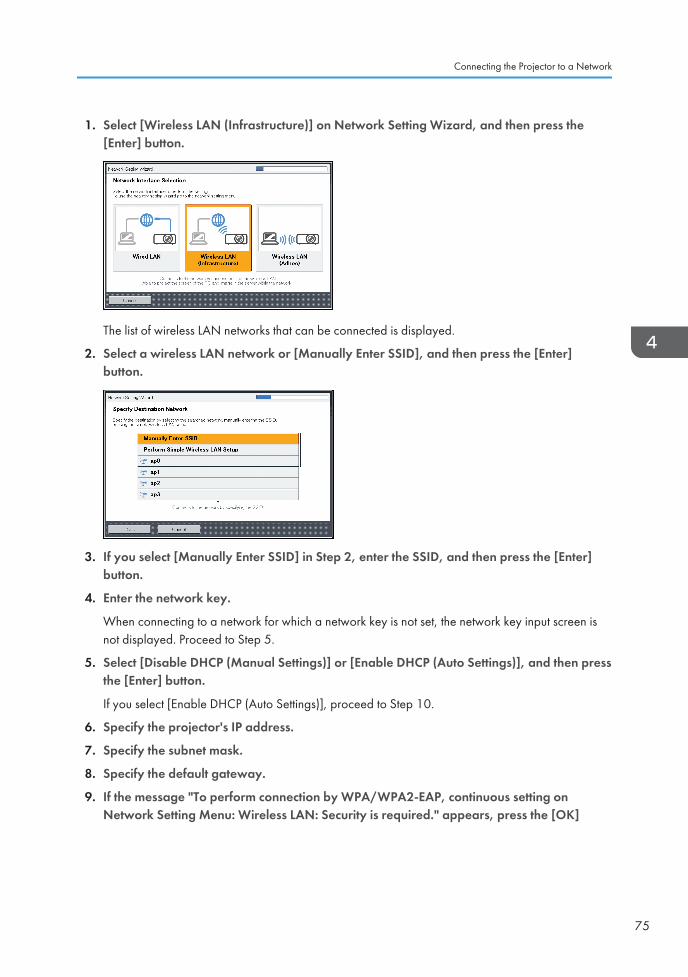
1. Select [Wireless LAN (Infrastructure)] on Network Setting Wizard, and then press the[Enter] button.
The list of wireless LAN networks that can be connected is displayed.
2. Select a wireless LAN network or [Manually Enter SSID], and then press the [Enter]button.
3. If you select [Manually Enter SSID] in Step 2, enter the SSID, and then press the [Enter]button.
4. Enter the network key.
When connecting to a network for which a network key is not set, the network key input screen isnot displayed. Proceed to Step 5.
5. Select [Disable DHCP (Manual Settings)] or [Enable DHCP (Auto Settings)], and then pressthe [Enter] button.
If you select [Enable DHCP (Auto Settings)], proceed to Step 10.
6. Specify the projector's IP address.
7. Specify the subnet mask.
8. Specify the default gateway.
9. If the message "To perform connection by WPA/WPA2-EAP, continuous setting onNetwork Setting Menu: Wireless LAN: Security is required." appears, press the [OK]
Connecting the Projector to a Network
75
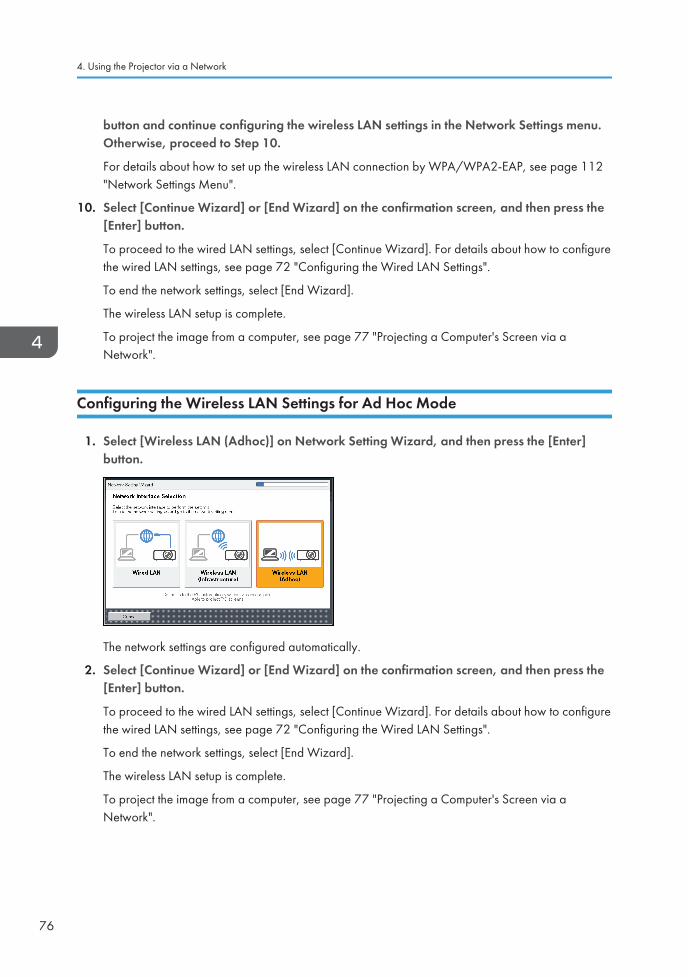
button and continue configuring the wireless LAN settings in the Network Settings menu.Otherwise, proceed to Step 10.
For details about how to set up the wireless LAN connection by WPA/WPA2-EAP, see page 112"Network Settings Menu".
10. Select [Continue Wizard] or [End Wizard] on the confirmation screen, and then press the[Enter] button.
To proceed to the wired LAN settings, select [Continue Wizard]. For details about how to configurethe wired LAN settings, see page 72 "Configuring the Wired LAN Settings".
To end the network settings, select [End Wizard].
The wireless LAN setup is complete.
To project the image from a computer, see page 77 "Projecting a Computer's Screen via aNetwork".
Configuring the Wireless LAN Settings for Ad Hoc Mode
1. Select [Wireless LAN (Adhoc)] on Network Setting Wizard, and then press the [Enter]button.
The network settings are configured automatically.
2. Select [Continue Wizard] or [End Wizard] on the confirmation screen, and then press the[Enter] button.
To proceed to the wired LAN settings, select [Continue Wizard]. For details about how to configurethe wired LAN settings, see page 72 "Configuring the Wired LAN Settings".
To end the network settings, select [End Wizard].
The wireless LAN setup is complete.
To project the image from a computer, see page 77 "Projecting a Computer's Screen via aNetwork".
4. Using the Projector via a Network
76
Projecting a Computer's Screen via a NetworkThe projector does not support the Network Projector function of Windows. Use QuickProjection, whichis the application provided with the projector for projecting a computer's screen via a network.
This section explains how to use QuickProjection in Windows as an example. The basic operation flow isthe same as when a Mac OS is used.
How to Use QuickProjection
QuickProjection is included on the supplied CD-ROM.
QuickProjection operating environment is described below.
• Supported operating system
• Windows Vista Ultimate, Business, Home Premium, Home Basic, SP2 or later (32-bit and 64-bit versions)
• Windows 7 Home Premium, Professional, Ultimate, Enterprise, SP1 (32-bit and 64-bitversions)
• Windows 8, Pro, Enterprise (32-bit and 64-bit versions)
• Windows 8.1, Pro, Enterprise (32-bit and 64-bit versions)
• Mac OS X 10.7-10.9
1. Insert the CD-ROM in the CD-ROM drive of your computer.
The launcher screen appears.
2. Specify a language and model name, and then click [Select].
3. Click [QuickProjection].
4. Specify a destination to save the application.
The "QuickProjection.exe" is copied to the computer.
5. To create a shortcut icon on the desktop, click [OK].
6. Close the screen.
To start QuickProjection, double-click the shortcut icon on the desktop or "QuickProjection.exe".
• Actual flow may vary according to the operating system used. Follow the on-screen instructions touse QuickProjection.
• You can download the latest version of QuickProjection from our website. Access the URLdisplayed on the standby screen for [Network PC] input.
• You can also use QuickProjection by dragging and dropping the "QuickProjection.exe" that is onthe provided CD-ROM into the computer or a USB memory device.
Projecting a Computer's Screen via a Network
77
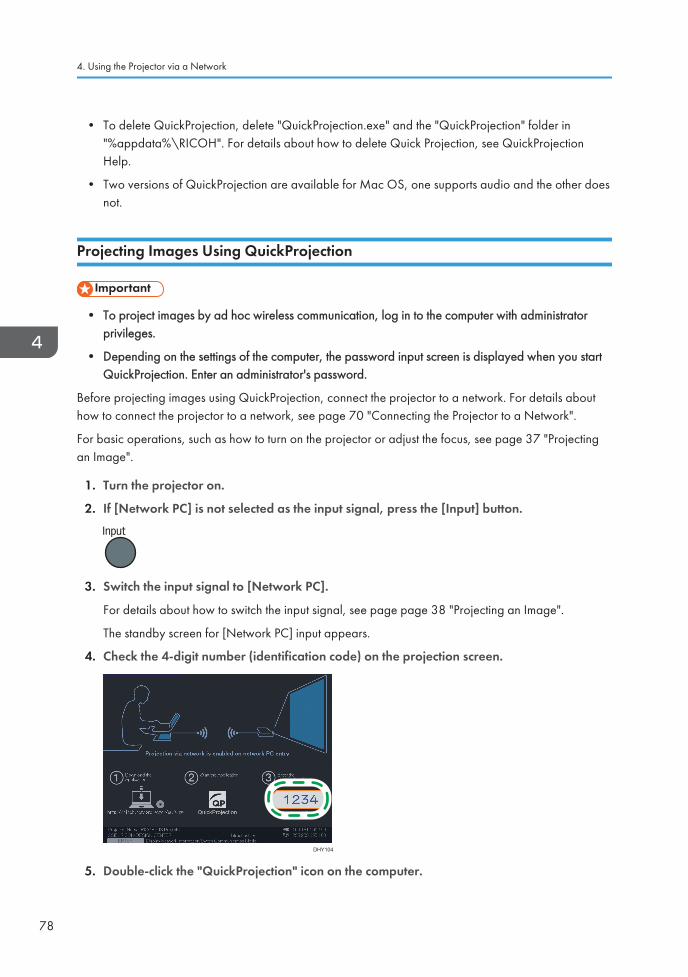
• To delete QuickProjection, delete "QuickProjection.exe" and the "QuickProjection" folder in"%appdata%\RICOH". For details about how to delete Quick Projection, see QuickProjectionHelp.
• Two versions of QuickProjection are available for Mac OS, one supports audio and the other doesnot.
Projecting Images Using QuickProjection
• To project images by ad hoc wireless communication, log in to the computer with administratorprivileges.
• Depending on the settings of the computer, the password input screen is displayed when you startQuickProjection. Enter an administrator's password.
Before projecting images using QuickProjection, connect the projector to a network. For details abouthow to connect the projector to a network, see page 70 "Connecting the Projector to a Network".
For basic operations, such as how to turn on the projector or adjust the focus, see page 37 "Projectingan Image".
1. Turn the projector on.
2. If [Network PC] is not selected as the input signal, press the [Input] button.
3. Switch the input signal to [Network PC].
For details about how to switch the input signal, see page page 38 "Projecting an Image".
The standby screen for [Network PC] input appears.
4. Check the 4-digit number (identification code) on the projection screen.
DHY104
5. Double-click the "QuickProjection" icon on the computer.
4. Using the Projector via a Network
78
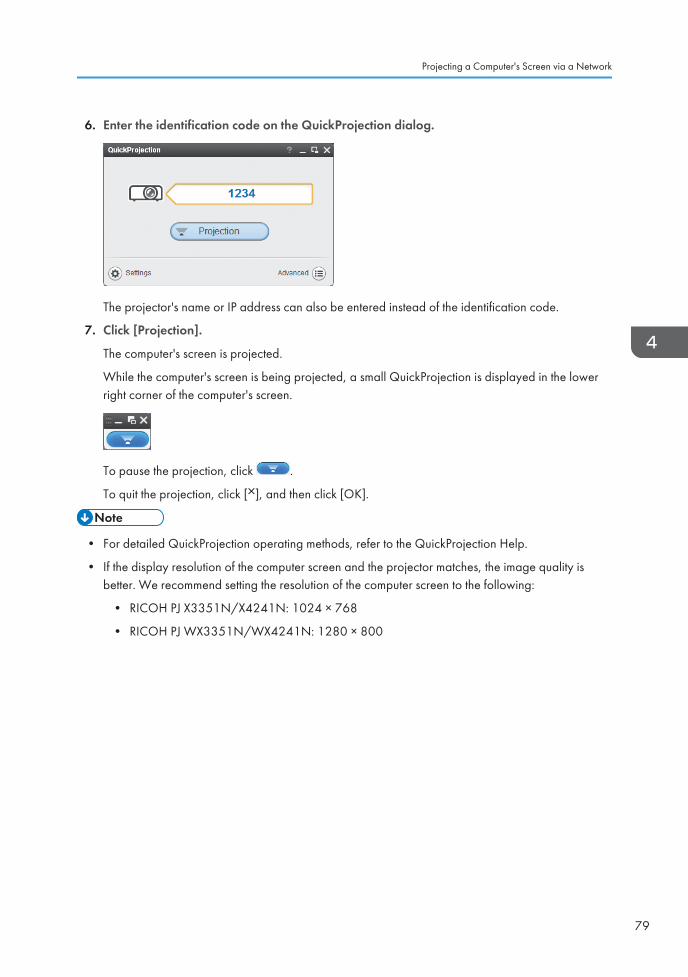
6. Enter the identification code on the QuickProjection dialog.
The projector's name or IP address can also be entered instead of the identification code.
7. Click [Projection].
The computer's screen is projected.
While the computer's screen is being projected, a small QuickProjection is displayed in the lowerright corner of the computer's screen.
To pause the projection, click .
To quit the projection, click [ ], and then click [OK].
• For detailed QuickProjection operating methods, refer to the QuickProjection Help.
• If the display resolution of the computer screen and the projector matches, the image quality isbetter. We recommend setting the resolution of the computer screen to the following:
• RICOH PJ X3351N/X4241N: 1024 × 768
• RICOH PJ WX3351N/WX4241N: 1280 × 800
Projecting a Computer's Screen via a Network
79
Projecting Images Using DLNA-CompatibleDevicesThe projector is compatible with DLNA. DLNA is the guideline for sharing content on a network.
Therefore, the projector can project still images and videos transmitted from DLNA-compatible devices.The projector can also access DLNA-compatible devices such as file servers, tablet computers, orsmartphones and project JPEG files stored on them.
The supported file types for the DLNA-compatible devices are shown below:
Still images
Item Requirements
File extensions jpg, jpeg, JPG, JPEG
File size Less than 10 MB
Number of pixels 2 × 2 to 5120 × 5120 pixels
File format Baseline format
Videos
Item Requirements
File extensionsmpg, mpeg, MPG, MPEG, m2ts, m2t, M2TS, M2T, m2p, M2P,mp4, MP4, mov, MOV
Number of pixels 320 × 240 to 1920 × 1080 pixels
Video compression format• MPEG2 when the container format is MPEG2-PS or MPEG2-TS
• H.264 when the container format is MP4 or QuickTime
Audio compression format
• MPEG1/2-Audio Layer2 when the container format isMPEG2-PS or MPEG2-TS
• Linear PCM when the container format is MPEG2-PS orQuickTime
• AAC-LC when the container format is MP4 or QuickTime
Container format MPEG2-PS, MPEG2-TS, MP4, QuickTime
Frame rate Less than 30 fps
Bit rate Less than 20 Mbps (recommended)
4. Using the Projector via a Network
80
• The supported video file types are compliant with the projector's own specifications. They are notcompliant with the DLNA 1.5 guidelines.
• The maximum number of files that can be displayed in the list is 512 per folder.
• Characters that can be used for file names and folder names are single-byte letters and numbersand characters used in the language specified in [Language] under [Default Settings 2]. Ifcharacters for languages other than the language specified are used, the file name or folder namewill not be displayed properly.
• If the total number of characters in the file name and the path exceeds 255, the file cannot appearon the list.
• Data in a folder that is stored six levels or more into a hierarchy cannot be accessed.
Preparation
To project files transmitted from DLNA-compatible devices or access DLNA-compatible devices from theprojector, the projector and the DLNA-compatible devices must be connected to a network. For detailsabout how to connect the projector to a network, see page 70 "Connecting the Projector to a Network".For details about how to use DLNA-compatible devices, see the manuals provided with the DLNA-compatible devices.
In addition, following settings are necessary:
• To project files transmitted from DLNA-compatible devices, select [Enable] in [Remote ProjectionControl] under [Network Application Settings]. For details, see page 121 "Network ApplicationSettings Menu".
• To project files stored on the DLNA-compatible device, you must configure the file sharing settingson the device. For details about how to use DLNA-compatible devices, see the manuals providedwith the DLNA-compatible devices.
• The projector is certified to DLNA 1.5 guidelines for still images. If [DLNA Certification Mode] in[Network Application Settings] is specified as [Enable], the projector works as a DLNA-certifieddevice and video playback is restricted. If this setting is specified as [Disable], the projector canalso project MPEG files.
• Depending on the device used for this function, you may need to install a DLNA application on thedevice.
Projecting Images from DLNA-Compatible Devices
For basic operations, such as how to turn on the projector or adjust the focus, see page 37 "Projectingan Image".
Projecting Images Using DLNA-Compatible Devices
81
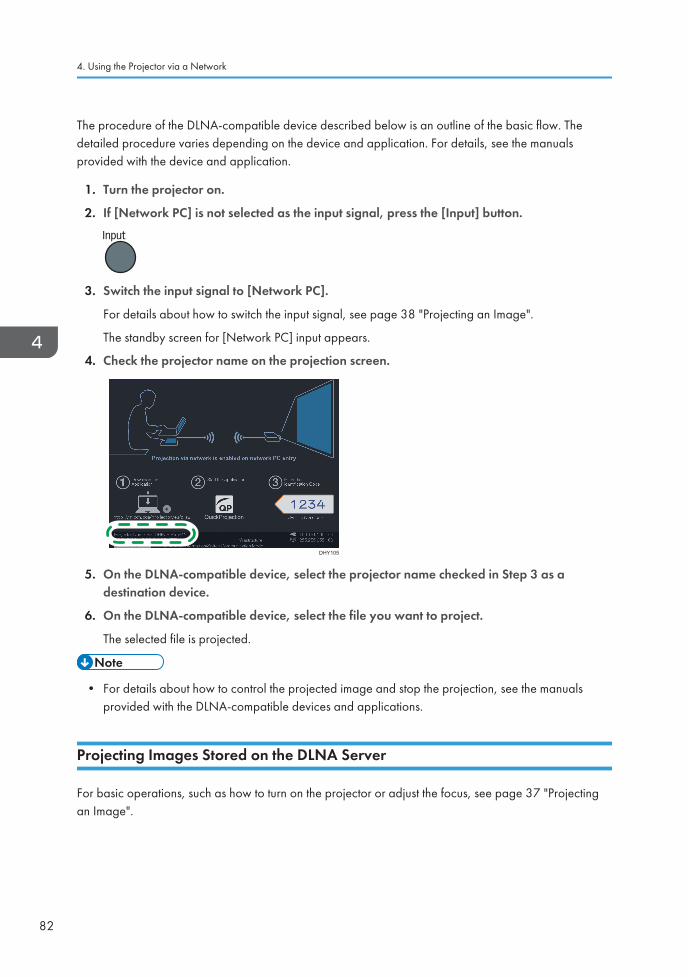
The procedure of the DLNA-compatible device described below is an outline of the basic flow. Thedetailed procedure varies depending on the device and application. For details, see the manualsprovided with the device and application.
1. Turn the projector on.
2. If [Network PC] is not selected as the input signal, press the [Input] button.
3. Switch the input signal to [Network PC].
For details about how to switch the input signal, see page 38 "Projecting an Image".
The standby screen for [Network PC] input appears.
4. Check the projector name on the projection screen.
DHY105
5. On the DLNA-compatible device, select the projector name checked in Step 3 as adestination device.
6. On the DLNA-compatible device, select the file you want to project.
The selected file is projected.
• For details about how to control the projected image and stop the projection, see the manualsprovided with the DLNA-compatible devices and applications.
Projecting Images Stored on the DLNA Server
For basic operations, such as how to turn on the projector or adjust the focus, see page 37 "Projectingan Image".
4. Using the Projector via a Network
82
Projecting files
1. Turn the projector on.
2. Press the [Input] button to switch the input signal to [Server].
For details about how to switch the input signal, see page 38 "Projecting an Image".
The list of DLNA servers is displayed.
3. Select the server that has the files to be projected.
The list of files in the root directory is displayed.
If [DLNA Certification Mode] in [Network Application Settings] is specified as [Enable], somevideo files do not appear in the file list. For details, see page 121 "Network Application SettingsMenu".
4. Select the file, [Slideshow], or folder, and then press the [Enter] button.
• When a file is selected
If you select a JPEG file, its image is projected. If you select an MPEG file, the video plays.
• When [Slideshow] is selected
A slide show starts with the files in the current folder.
• When a folder is selected
The file list within the folder is displayed. Repeat this step until the file you want to project isdisplayed.
• Images are displayed in the numerical and alphabetical order of their file name headers.
• You can specify the slide show switching interval for still images in [Display Interval (sec.)] in[Server] under [Network Application Settings].
• If a video file is in a folder that has been selected for a slide show, the entire video plays. When thevideo finishes, the next file is displayed.
Controlling the projected image
How to control a still image
• [Enter] button: Starts the slide show from the projected image. Stops the slide show that is inprogress.
• [ ] button: Displays the next image.
• [ ] button: Displays the previous image.
Projecting Images Using DLNA-Compatible Devices
83
• [ ] button: Rotates the image 90° to the right.
• [ ] button: Rotates the image 90° to the left.
• [Menu] button: Returns to the file list screen.
How to control a video
• [Enter] button: Pauses or restarts the video.
• [ ] button: Fast forwards the video. If a video is paused, displays the next image.
• [ ] button: Rewinds the video. If a video is paused, displays the previous image.
• [ ] button: Increases the volume.
• [ ] button: Decreases the volume.
• [Menu] button: Returns to the file list screen.
• The rewind and fast forward speed increases three levels each time the button is pressed. Toreduce the speed to its original, press the [Enter] button.
• If any operation except for volume adjustment is performed during the slide show, the slide showstops.
4. Using the Projector via a Network
84
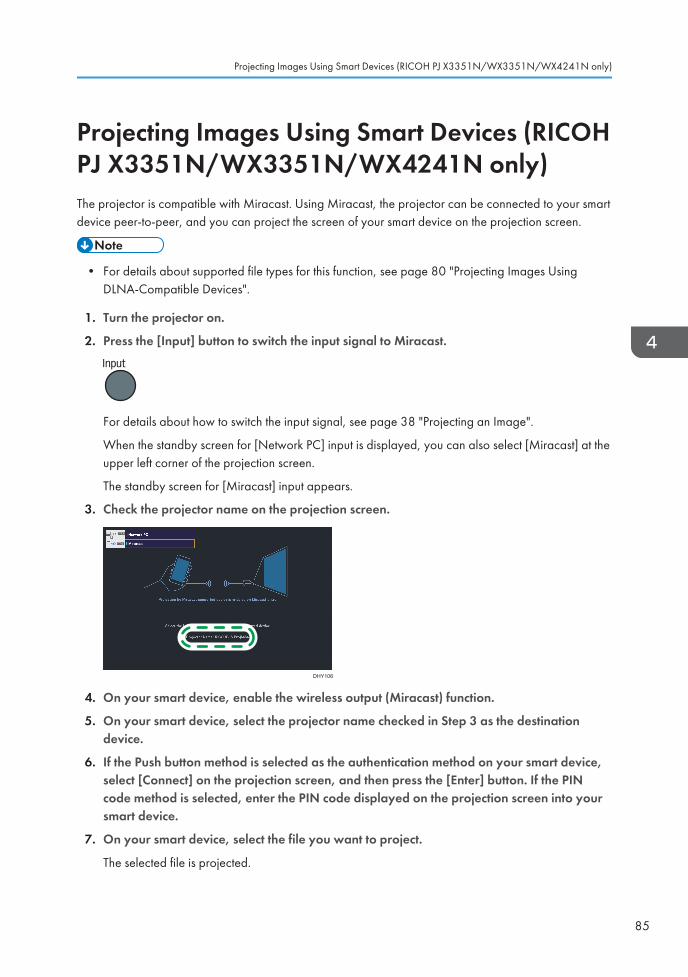
Projecting Images Using Smart Devices (RICOHPJ X3351N/WX3351N/WX4241N only)The projector is compatible with Miracast. Using Miracast, the projector can be connected to your smartdevice peer-to-peer, and you can project the screen of your smart device on the projection screen.
• For details about supported file types for this function, see page 80 "Projecting Images UsingDLNA-Compatible Devices".
1. Turn the projector on.
2. Press the [Input] button to switch the input signal to Miracast.
For details about how to switch the input signal, see page 38 "Projecting an Image".
When the standby screen for [Network PC] input is displayed, you can also select [Miracast] at theupper left corner of the projection screen.
The standby screen for [Miracast] input appears.
3. Check the projector name on the projection screen.
DHY106
4. On your smart device, enable the wireless output (Miracast) function.
5. On your smart device, select the projector name checked in Step 3 as the destinationdevice.
6. If the Push button method is selected as the authentication method on your smart device,select [Connect] on the projection screen, and then press the [Enter] button. If the PINcode method is selected, enter the PIN code displayed on the projection screen into yoursmart device.
7. On your smart device, select the file you want to project.
The selected file is projected.
Projecting Images Using Smart Devices (RICOH PJ X3351N/WX3351N/WX4241N only)
85

• For details about how to control the projected image and stop the projection, see the manualsprovided with your smart device.
4. Using the Projector via a Network
86
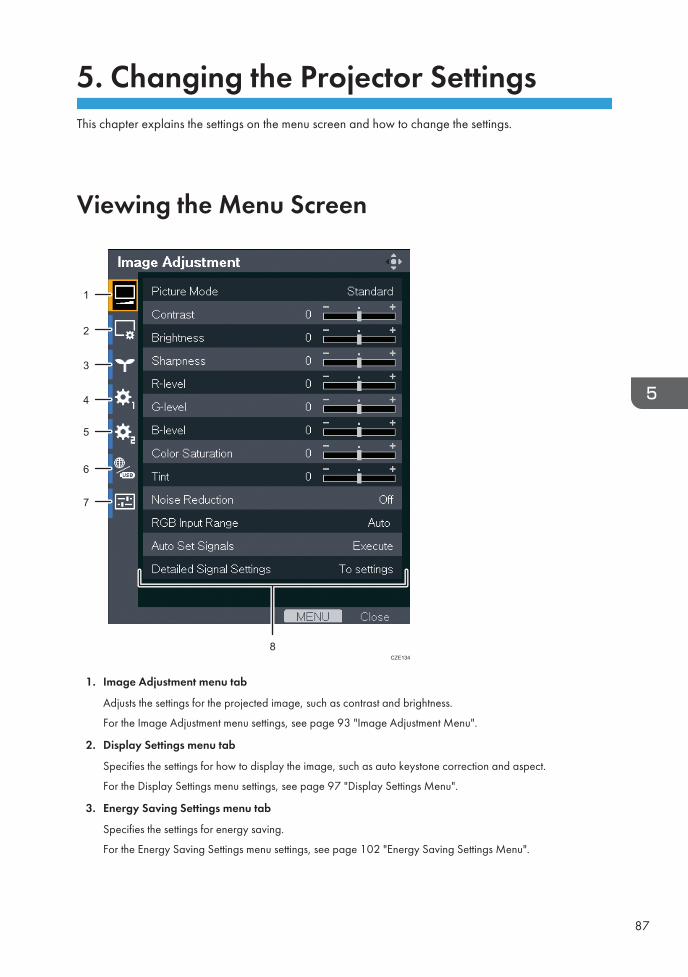
5. Changing the Projector SettingsThis chapter explains the settings on the menu screen and how to change the settings.
Viewing the Menu Screen
4
5
6
7
1
2
3
8CZE134
1. Image Adjustment menu tab
Adjusts the settings for the projected image, such as contrast and brightness.
For the Image Adjustment menu settings, see page 93 "Image Adjustment Menu".
2. Display Settings menu tab
Specifies the settings for how to display the image, such as auto keystone correction and aspect.
For the Display Settings menu settings, see page 97 "Display Settings Menu".
3. Energy Saving Settings menu tab
Specifies the settings for energy saving.
For the Energy Saving Settings menu settings, see page 102 "Energy Saving Settings Menu".
87
4. Default Settings 1 menu tab
Specifies the settings for the beep sound, user logo, etc.
For the Default Settings 1 menu settings, see page 105 "Default Settings 1 Menu".
5. Default Settings 2 menu tab
Specifies the settings for the display language, startup password, etc.
For the Default Settings 2 menu settings, see page 107 "Default Settings 2 Menu".
6. Network/USB Settings menu tab
The Network/USB Settings menu tab includes the USB Settings menu, Network Settings menu, and NetworkApplication Settings menu.
• USB Settings menu
Specify the settings for USB file projection.
For the USB Settings menu settings, see page 110 "USB Settings Menu".
• Network Settings menu
Specify the network settings, such as an IP address.
For the Network Settings menu settings, see page 112 "Network Settings Menu".
• Network Application Settings menu
Specify the settings for Web Image Monitor, PJLink, etc.
For the Network Application Settings menu settings, see page 121 "Network Application SettingsMenu".
7. Display Status tab
Enables information such as input signals and lamp usage time, etc., to be displayed.
For item that can be displayed, see page 128 "Display Status".
8. Settings
The settings and information for each menu can be displayed.
5. Changing the Projector Settings
88
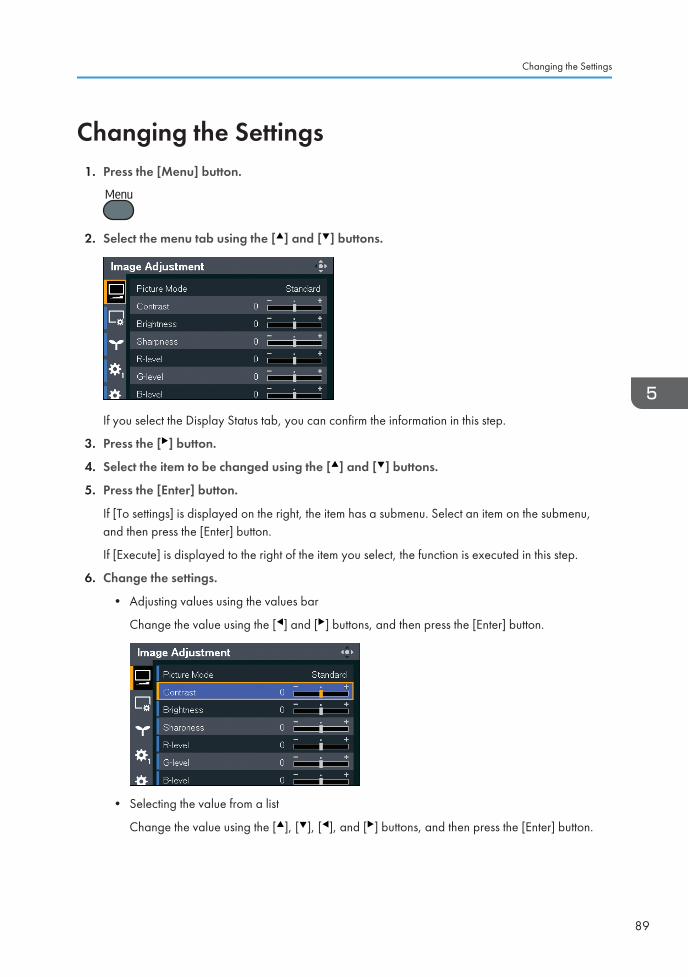
Changing the Settings1. Press the [Menu] button.
2. Select the menu tab using the [ ] and [ ] buttons.
If you select the Display Status tab, you can confirm the information in this step.
3. Press the [ ] button.
4. Select the item to be changed using the [ ] and [ ] buttons.
5. Press the [Enter] button.
If [To settings] is displayed on the right, the item has a submenu. Select an item on the submenu,and then press the [Enter] button.
If [Execute] is displayed to the right of the item you select, the function is executed in this step.
6. Change the settings.
• Adjusting values using the values bar
Change the value using the [ ] and [ ] buttons, and then press the [Enter] button.
• Selecting the value from a list
Change the value using the [ ], [ ], [ ], and [ ] buttons, and then press the [Enter] button.
Changing the Settings
89
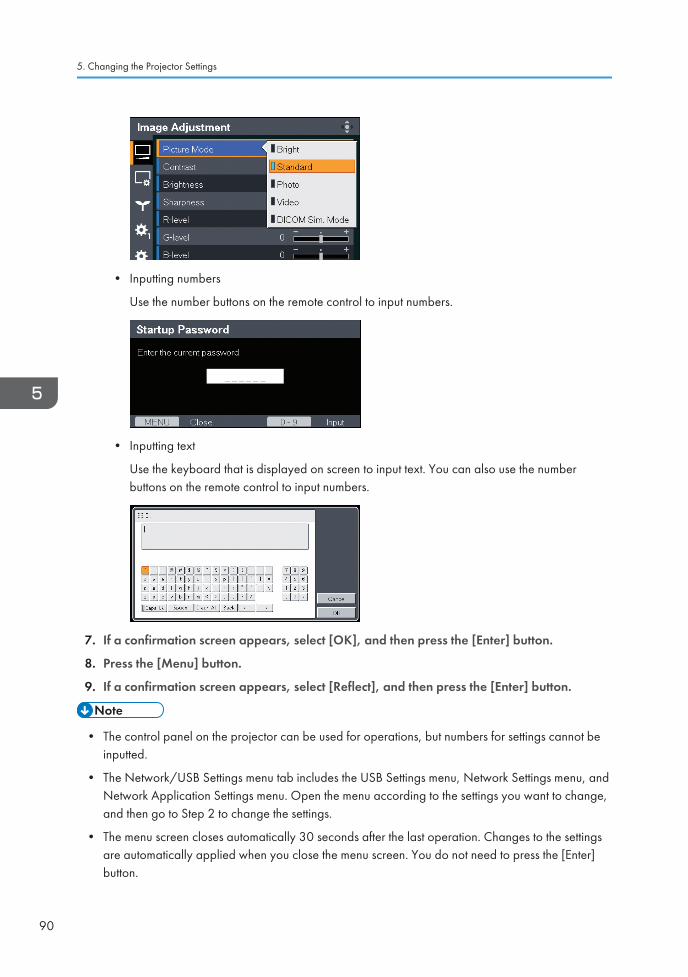
• Inputting numbers
Use the number buttons on the remote control to input numbers.
• Inputting text
Use the keyboard that is displayed on screen to input text. You can also use the numberbuttons on the remote control to input numbers.
7. If a confirmation screen appears, select [OK], and then press the [Enter] button.
8. Press the [Menu] button.
9. If a confirmation screen appears, select [Reflect], and then press the [Enter] button.
• The control panel on the projector can be used for operations, but numbers for settings cannot beinputted.
• The Network/USB Settings menu tab includes the USB Settings menu, Network Settings menu, andNetwork Application Settings menu. Open the menu according to the settings you want to change,and then go to Step 2 to change the settings.
• The menu screen closes automatically 30 seconds after the last operation. Changes to the settingsare automatically applied when you close the menu screen. You do not need to press the [Enter]button.
5. Changing the Projector Settings
90

• Settings in the Network/USB Settings menu are not applied until you select [Reflect] on theconfirmation screen.
• To access the menu screen while projecting images from a USB memory device or server, press the[Menu] button to stop projecting images, and then press the [Menu] button again.
Changing the Settings
91
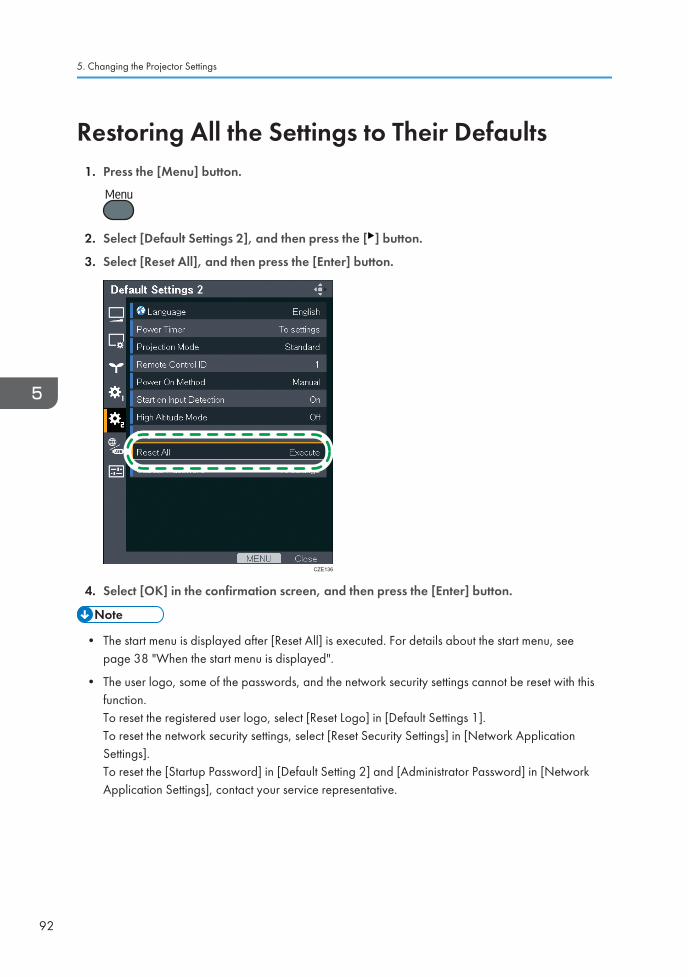
Restoring All the Settings to Their Defaults1. Press the [Menu] button.
2. Select [Default Settings 2], and then press the [ ] button.
3. Select [Reset All], and then press the [Enter] button.
CZE136
4. Select [OK] in the confirmation screen, and then press the [Enter] button.
• The start menu is displayed after [Reset All] is executed. For details about the start menu, seepage 38 "When the start menu is displayed".
• The user logo, some of the passwords, and the network security settings cannot be reset with thisfunction.To reset the registered user logo, select [Reset Logo] in [Default Settings 1].To reset the network security settings, select [Reset Security Settings] in [Network ApplicationSettings].To reset the [Startup Password] in [Default Setting 2] and [Administrator Password] in [NetworkApplication Settings], contact your service representative.
5. Changing the Projector Settings
92
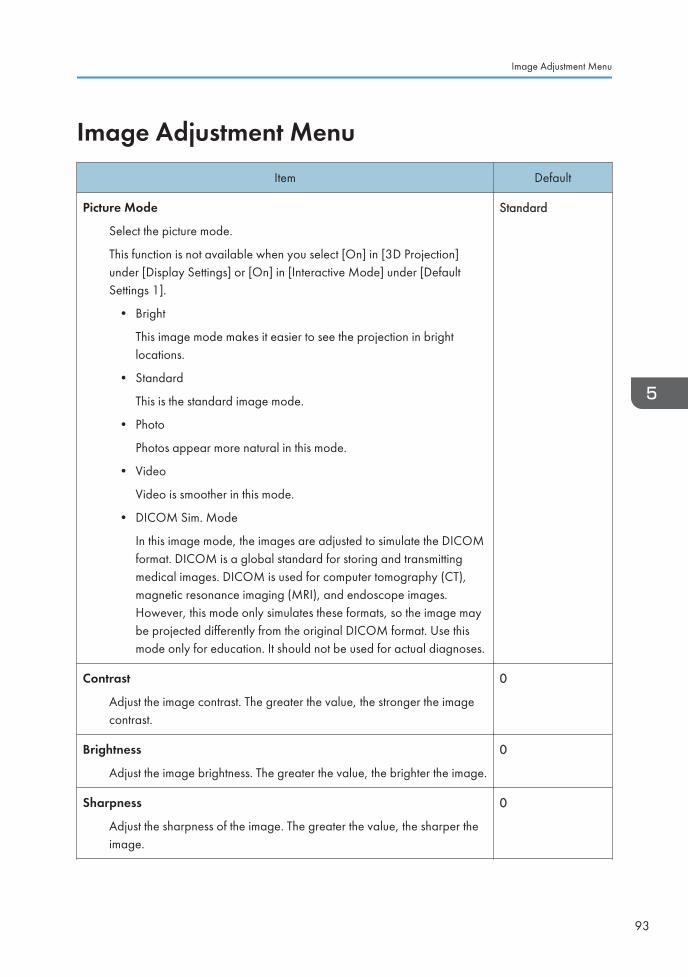
Image Adjustment MenuItem Default
Picture Mode
Select the picture mode.
This function is not available when you select [On] in [3D Projection]under [Display Settings] or [On] in [Interactive Mode] under [DefaultSettings 1].
• Bright
This image mode makes it easier to see the projection in brightlocations.
• Standard
This is the standard image mode.
• Photo
Photos appear more natural in this mode.
• Video
Video is smoother in this mode.
• DICOM Sim. Mode
In this image mode, the images are adjusted to simulate the DICOMformat. DICOM is a global standard for storing and transmittingmedical images. DICOM is used for computer tomography (CT),magnetic resonance imaging (MRI), and endoscope images.However, this mode only simulates these formats, so the image maybe projected differently from the original DICOM format. Use thismode only for education. It should not be used for actual diagnoses.
Standard
Contrast
Adjust the image contrast. The greater the value, the stronger the imagecontrast.
0
Brightness
Adjust the image brightness. The greater the value, the brighter the image.
0
Sharpness
Adjust the sharpness of the image. The greater the value, the sharper theimage.
0
Image Adjustment Menu
93
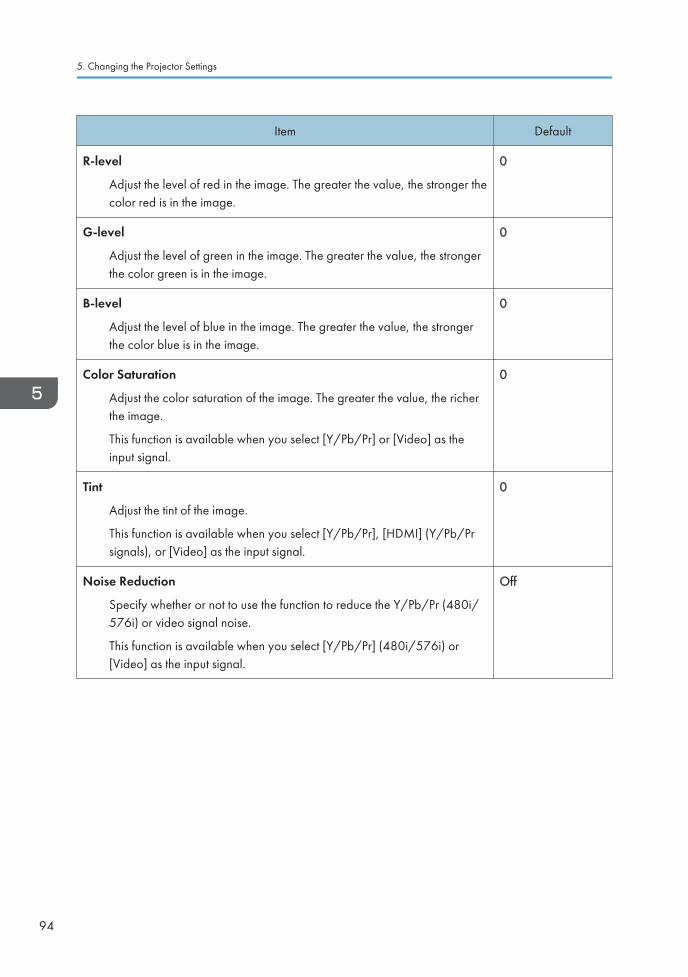
Item Default
R-level
Adjust the level of red in the image. The greater the value, the stronger thecolor red is in the image.
0
G-level
Adjust the level of green in the image. The greater the value, the strongerthe color green is in the image.
0
B-level
Adjust the level of blue in the image. The greater the value, the strongerthe color blue is in the image.
0
Color Saturation
Adjust the color saturation of the image. The greater the value, the richerthe image.
This function is available when you select [Y/Pb/Pr] or [Video] as theinput signal.
0
Tint
Adjust the tint of the image.
This function is available when you select [Y/Pb/Pr], [HDMI] (Y/Pb/Prsignals), or [Video] as the input signal.
0
Noise Reduction
Specify whether or not to use the function to reduce the Y/Pb/Pr (480i/576i) or video signal noise.
This function is available when you select [Y/Pb/Pr] (480i/576i) or[Video] as the input signal.
Off
5. Changing the Projector Settings
94
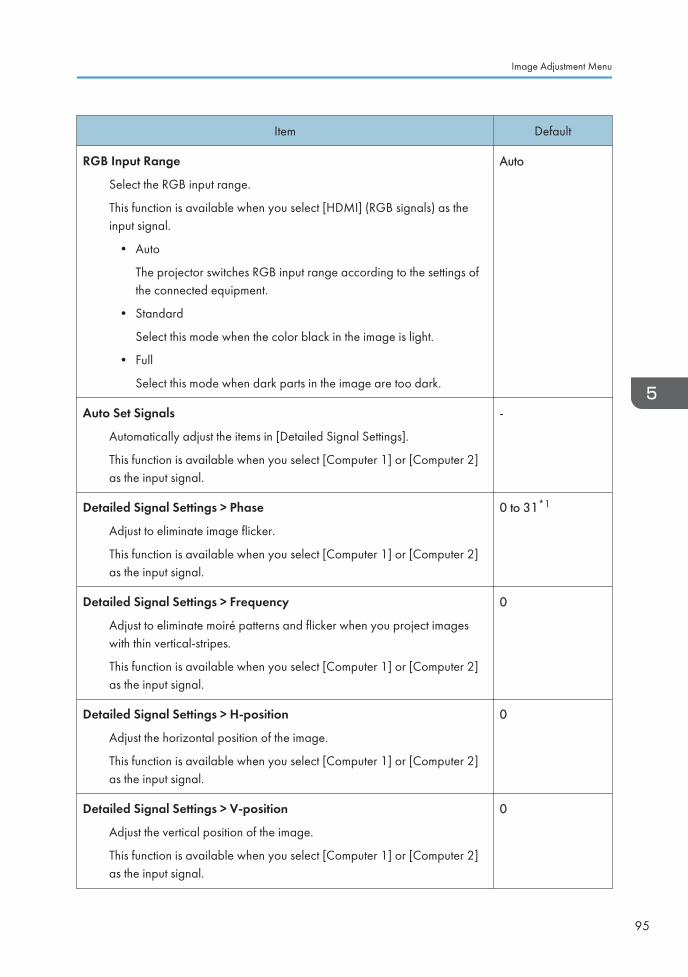
Item Default
RGB Input Range
Select the RGB input range.
This function is available when you select [HDMI] (RGB signals) as theinput signal.
• Auto
The projector switches RGB input range according to the settings ofthe connected equipment.
• Standard
Select this mode when the color black in the image is light.
• Full
Select this mode when dark parts in the image are too dark.
Auto
Auto Set Signals
Automatically adjust the items in [Detailed Signal Settings].
This function is available when you select [Computer 1] or [Computer 2]as the input signal.
-
Detailed Signal Settings > Phase
Adjust to eliminate image flicker.
This function is available when you select [Computer 1] or [Computer 2]as the input signal.
0 to 31*1
Detailed Signal Settings > Frequency
Adjust to eliminate moiré patterns and flicker when you project imageswith thin vertical-stripes.
This function is available when you select [Computer 1] or [Computer 2]as the input signal.
0
Detailed Signal Settings > H-position
Adjust the horizontal position of the image.
This function is available when you select [Computer 1] or [Computer 2]as the input signal.
0
Detailed Signal Settings > V-position
Adjust the vertical position of the image.
This function is available when you select [Computer 1] or [Computer 2]as the input signal.
0
Image Adjustment Menu
95
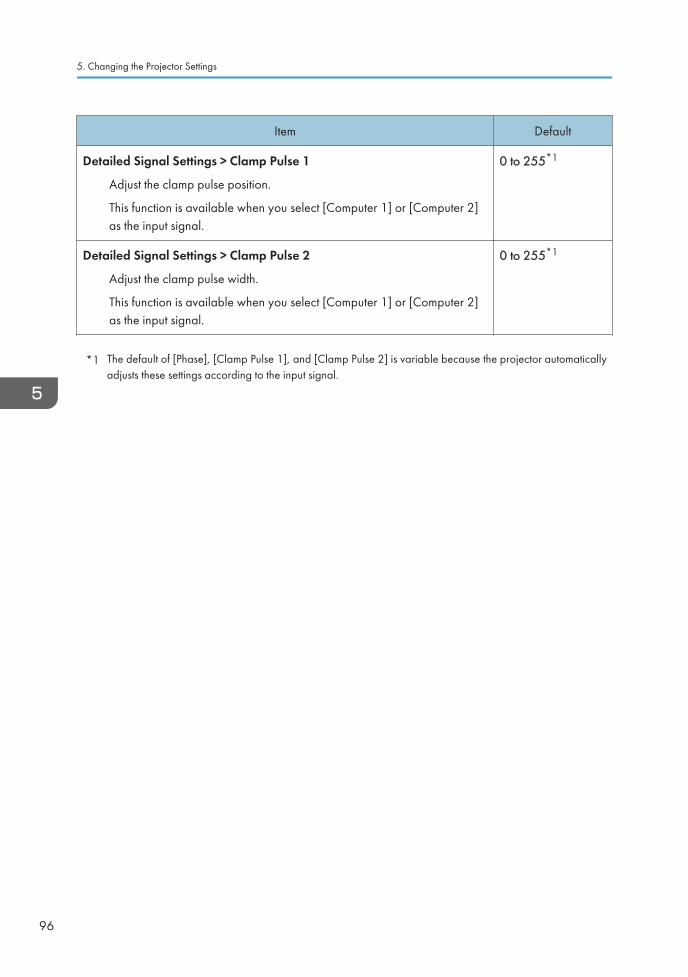
Item Default
Detailed Signal Settings > Clamp Pulse 1
Adjust the clamp pulse position.
This function is available when you select [Computer 1] or [Computer 2]as the input signal.
0 to 255*1
Detailed Signal Settings > Clamp Pulse 2
Adjust the clamp pulse width.
This function is available when you select [Computer 1] or [Computer 2]as the input signal.
0 to 255*1
*1 The default of [Phase], [Clamp Pulse 1], and [Clamp Pulse 2] is variable because the projector automaticallyadjusts these settings according to the input signal.
5. Changing the Projector Settings
96
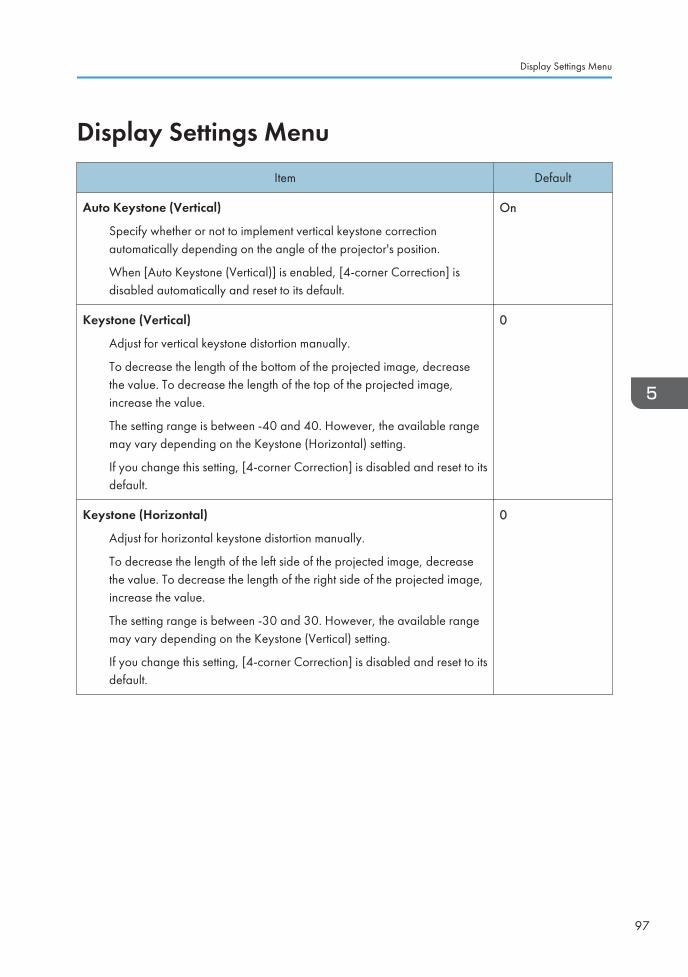
Display Settings MenuItem Default
Auto Keystone (Vertical)
Specify whether or not to implement vertical keystone correctionautomatically depending on the angle of the projector's position.
When [Auto Keystone (Vertical)] is enabled, [4-corner Correction] isdisabled automatically and reset to its default.
On
Keystone (Vertical)
Adjust for vertical keystone distortion manually.
To decrease the length of the bottom of the projected image, decreasethe value. To decrease the length of the top of the projected image,increase the value.
The setting range is between -40 and 40. However, the available rangemay vary depending on the Keystone (Horizontal) setting.
If you change this setting, [4-corner Correction] is disabled and reset to itsdefault.
0
Keystone (Horizontal)
Adjust for horizontal keystone distortion manually.
To decrease the length of the left side of the projected image, decreasethe value. To decrease the length of the right side of the projected image,increase the value.
The setting range is between -30 and 30. However, the available rangemay vary depending on the Keystone (Vertical) setting.
If you change this setting, [4-corner Correction] is disabled and reset to itsdefault.
0
Display Settings Menu
97
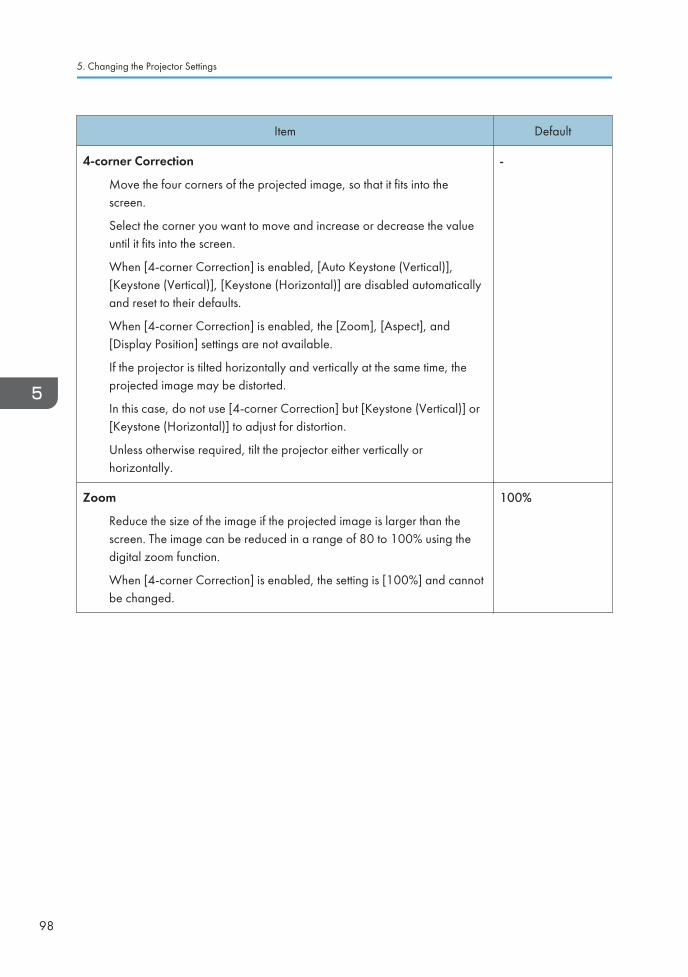
Item Default
4-corner Correction
Move the four corners of the projected image, so that it fits into thescreen.
Select the corner you want to move and increase or decrease the valueuntil it fits into the screen.
When [4-corner Correction] is enabled, [Auto Keystone (Vertical)],[Keystone (Vertical)], [Keystone (Horizontal)] are disabled automaticallyand reset to their defaults.
When [4-corner Correction] is enabled, the [Zoom], [Aspect], and[Display Position] settings are not available.
If the projector is tilted horizontally and vertically at the same time, theprojected image may be distorted.
In this case, do not use [4-corner Correction] but [Keystone (Vertical)] or[Keystone (Horizontal)] to adjust for distortion.
Unless otherwise required, tilt the projector either vertically orhorizontally.
-
Zoom
Reduce the size of the image if the projected image is larger than thescreen. The image can be reduced in a range of 80 to 100% using thedigital zoom function.
When [4-corner Correction] is enabled, the setting is [100%] and cannotbe changed.
100%
5. Changing the Projector Settings
98
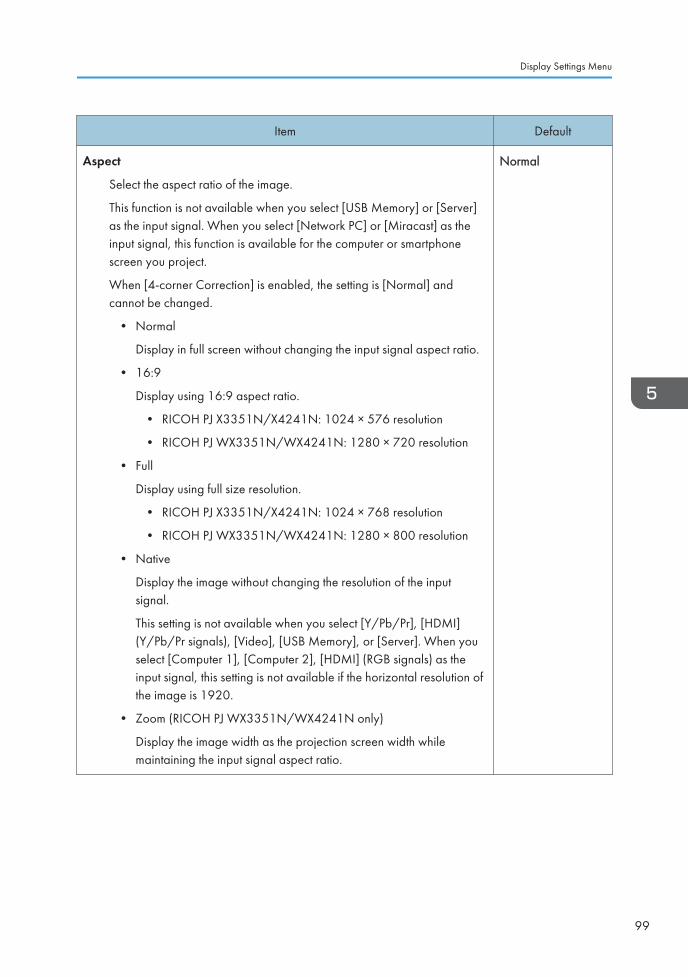
Item Default
Aspect
Select the aspect ratio of the image.
This function is not available when you select [USB Memory] or [Server]as the input signal. When you select [Network PC] or [Miracast] as theinput signal, this function is available for the computer or smartphonescreen you project.
When [4-corner Correction] is enabled, the setting is [Normal] andcannot be changed.
• Normal
Display in full screen without changing the input signal aspect ratio.
• 16:9
Display using 16:9 aspect ratio.
• RICOH PJ X3351N/X4241N: 1024 × 576 resolution
• RICOH PJ WX3351N/WX4241N: 1280 × 720 resolution
• Full
Display using full size resolution.
• RICOH PJ X3351N/X4241N: 1024 × 768 resolution
• RICOH PJ WX3351N/WX4241N: 1280 × 800 resolution
• Native
Display the image without changing the resolution of the inputsignal.
This setting is not available when you select [Y/Pb/Pr], [HDMI](Y/Pb/Pr signals), [Video], [USB Memory], or [Server]. When youselect [Computer 1], [Computer 2], [HDMI] (RGB signals) as theinput signal, this setting is not available if the horizontal resolution ofthe image is 1920.
• Zoom (RICOH PJ WX3351N/WX4241N only)
Display the image width as the projection screen width whilemaintaining the input signal aspect ratio.
Normal
Display Settings Menu
99

Item Default
Display Position
Move the image if the projected image is smaller or larger than thescreen size. You can move the image using the [ ], [ ], [ ], and [ ]buttons.
This function is not available when you select [Network PC], [USBMemory], [Server], or [Miracast] as the input signal.
When [4-corner Correction] is enabled, the display position is initializedand cannot be changed.
-
Wall Color Mode
Select the image hue according to the projection surface when the imageis being projected on something other than a screen.
• Off
• Whiteboard
• Beige
• Gray
• Blackboard (Green)
Off
3D Projection > 3D Projection
Specify whether or not to use 3D projection.
The image will be slightly darker if this is set to [On].
3D projection and interactive mode cannot be enabled simultaneously. Ifyou change this setting to [On], [Interactive Mode] in [Default Settings 1]is switched to [Off], and the projector operates with the lamp powermaximum and Image Eco disabled.
Off
3D Projection > L/R Reverse
Specify whether or not to reverse left and right in a 3D image.
• Normal
• Reverse
Normal
5. Changing the Projector Settings
100
Item Default
3D Projection > 3D Format
Select a 3D format.
Select [Auto] when the 3D signals are input through HDMI. If the imagedoes not project in 3D even if [Auto] is selected, change the setting tomatch the 3D format of the signal being input.
• Auto
• Frame Sequential
• Side by Side
• Top and Bottom
• Frame Packing
Auto
Closed Caption
The projector supports closed captioning, which allows subtitles to bedisplayed at the bottom of the picture. This is pursuant to the regulationsset forth by the US Federal Communications Commission (FCC).
Select [CC-1] to [CC-4] to display the dialogue and narration of TVprograms and videos that are closed captioned.
This function is available when you select [Video] as the input signal.
• Off
• CC-1
• CC-2
• CC-3
• CC-4
Off
Display Settings Menu
101
Energy Saving Settings MenuItem Default
Eco Mode
Specify the lamp settings to save energy or to make images brighter.
• On (Auto)
Select this mode to save energy. In this mode, the following settingsare automatically specified:
• Lamp Power: [Auto]
• Lamp Pwr on No Signal: [Eco]
• Image Eco: [On]
• On (Detailed)
You can specify [Lamp Power], [Lamp Pwr on No Signal], and[Image Eco] manually.
• Off
Select this mode to make images brighter. In this mode, the followingsettings are automatically specified:
• Lamp Power: [Maximum]
• Lamp Pwr on No Signal: [Std.]
• Image Eco: [Off]
On (Auto)
5. Changing the Projector Settings
102
Item Default
Lamp Power
This setting is available when [Eco Mode] is set to [On (Detailed)].
Select the lamp power level.
[Auto] is selectable when you select [Standard] or [Rear] in [ProjectionMode] under [Default Settings 2]. If you select [Auto], the lamp powerlevel switches automatically depending on the brightness of the projectinglocation. Make sure that the illuminance sensor on the top of the projectoris not blocked. This function may not work correctly depending on thepositioning of the projector.
When you select [Maximum], the image is brightest but the powerconsumption is highest. When you select [Low], the power consumption islowest but the image brightness is lowest.
The lamp power reaches maximum regardless of this setting when[DICOM Sim. Mode], [3D Projection], or [Interactive Mode] is enabled.
• Auto
• Maximum
• High
• Medium
• Low
Auto
Lamp Pwr on No Signal
This setting is available when [Eco Mode] is set to [On (Detailed)].
Specify whether or not to lower the lamp power when there is no inputsignal. If you select [Eco], the projector lowers the lamp power 30seconds after the input signal disappears.
• Eco
• Std.
Eco
Image Eco
This setting is available when [Eco Mode] is set to [On (Detailed)].
Specify whether or not to switch the lamp power automaticallydepending on the brightness of the image.
This function does not work when [DICOM Sim. Mode], [3D Projection],or [Interactive Mode] is enabled.
On
Energy Saving Settings Menu
103
Item Default
Power Off on No Signal
Select the amount of time from the last input signal or operation until theprojector enters standby mode.
• Off
• 5 min.
• 10 min.
• 20 min.
• 30 min.
20 min.
Power on Standby
Specify whether or not to save energy while in standby.
• Eco
You can save energy while in standby, but start-up time is slower.
• Q'ck On
You can turn on the projector quickly, and the projector startsprojection automatically if the image signals are input even while instandby. However, the standby energy level is higher.
Eco
NW Settings on Standby
Select a network function to be enabled while in standby. You can saveenergy by disabling the network function.
This function is available when you select [Eco] in [Power on Standby].
• Do not Use
Disable the wired LAN and the wireless LAN while in standby tosave energy. To use the wired LAN or the wireless LAN, press the[Power] button to turn on the projector.
• Wired LAN
You can turn on the projector from standby mode via a wired LAN.
• Wired/Wireless LAN (RICOH PJ X3351N/WX3351N/WX4241N only)
You can turn on the projector from standby mode via a wired LANor wireless LAN.
Wired LAN
5. Changing the Projector Settings
104
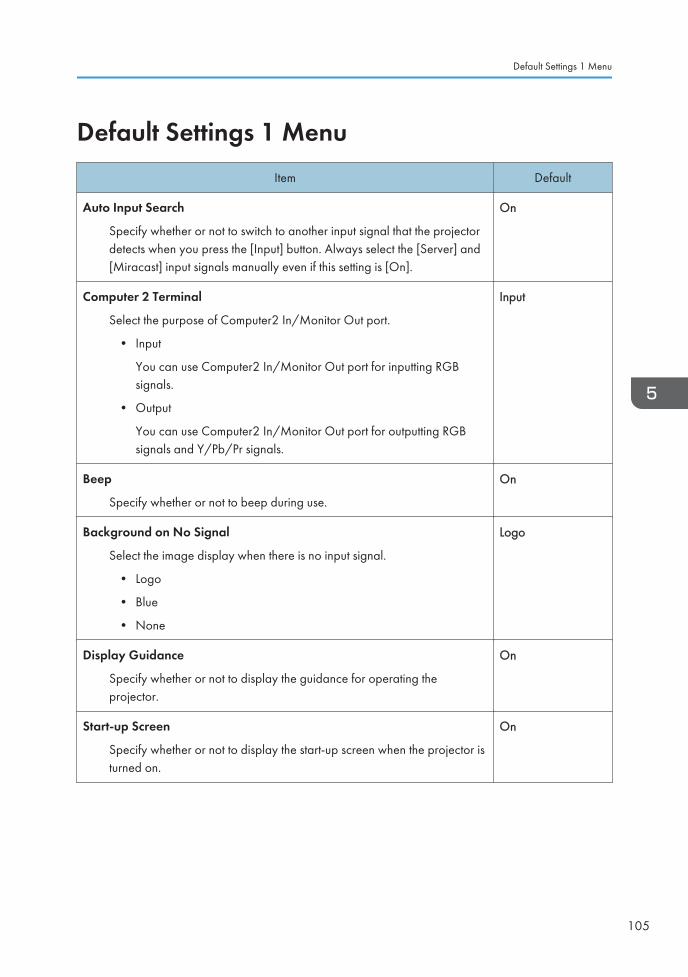
Default Settings 1 MenuItem Default
Auto Input Search
Specify whether or not to switch to another input signal that the projectordetects when you press the [Input] button. Always select the [Server] and[Miracast] input signals manually even if this setting is [On].
On
Computer 2 Terminal
Select the purpose of Computer2 In/Monitor Out port.
• Input
You can use Computer2 In/Monitor Out port for inputting RGBsignals.
• Output
You can use Computer2 In/Monitor Out port for outputting RGBsignals and Y/Pb/Pr signals.
Input
Beep
Specify whether or not to beep during use.
On
Background on No Signal
Select the image display when there is no input signal.
• Logo
• Blue
• None
Logo
Display Guidance
Specify whether or not to display the guidance for operating theprojector.
On
Start-up Screen
Specify whether or not to display the start-up screen when the projector isturned on.
On
Default Settings 1 Menu
105
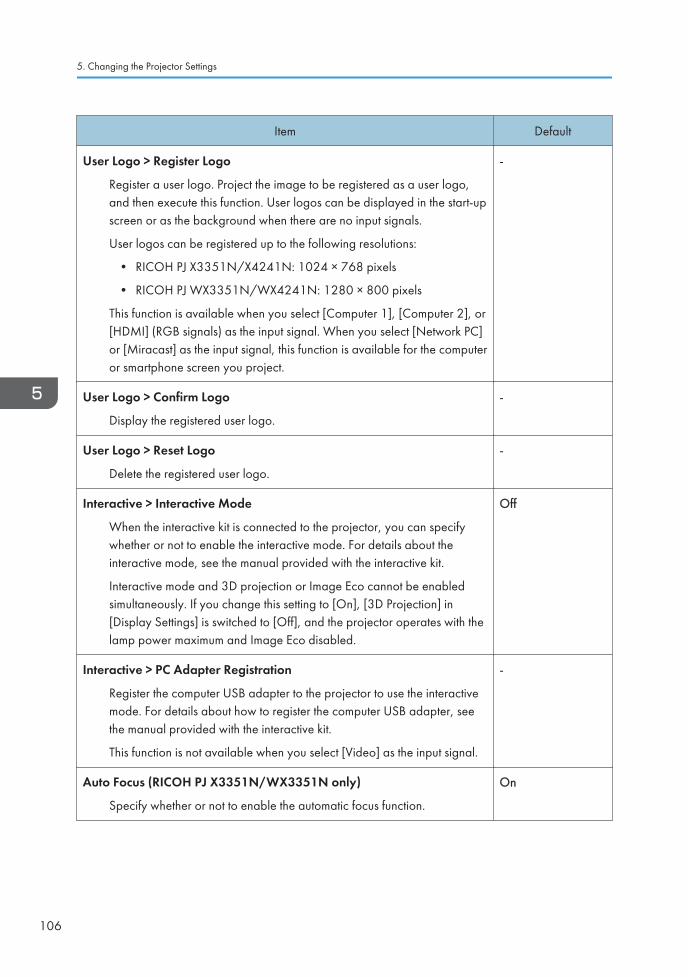
Item Default
User Logo > Register Logo
Register a user logo. Project the image to be registered as a user logo,and then execute this function. User logos can be displayed in the start-upscreen or as the background when there are no input signals.
User logos can be registered up to the following resolutions:
• RICOH PJ X3351N/X4241N: 1024 × 768 pixels
• RICOH PJ WX3351N/WX4241N: 1280 × 800 pixels
This function is available when you select [Computer 1], [Computer 2], or[HDMI] (RGB signals) as the input signal. When you select [Network PC]or [Miracast] as the input signal, this function is available for the computeror smartphone screen you project.
-
User Logo > Confirm Logo
Display the registered user logo.
-
User Logo > Reset Logo
Delete the registered user logo.
-
Interactive > Interactive Mode
When the interactive kit is connected to the projector, you can specifywhether or not to enable the interactive mode. For details about theinteractive mode, see the manual provided with the interactive kit.
Interactive mode and 3D projection or Image Eco cannot be enabledsimultaneously. If you change this setting to [On], [3D Projection] in[Display Settings] is switched to [Off], and the projector operates with thelamp power maximum and Image Eco disabled.
Off
Interactive > PC Adapter Registration
Register the computer USB adapter to the projector to use the interactivemode. For details about how to register the computer USB adapter, seethe manual provided with the interactive kit.
This function is not available when you select [Video] as the input signal.
-
Auto Focus (RICOH PJ X3351N/WX3351N only)
Specify whether or not to enable the automatic focus function.
On
5. Changing the Projector Settings
106
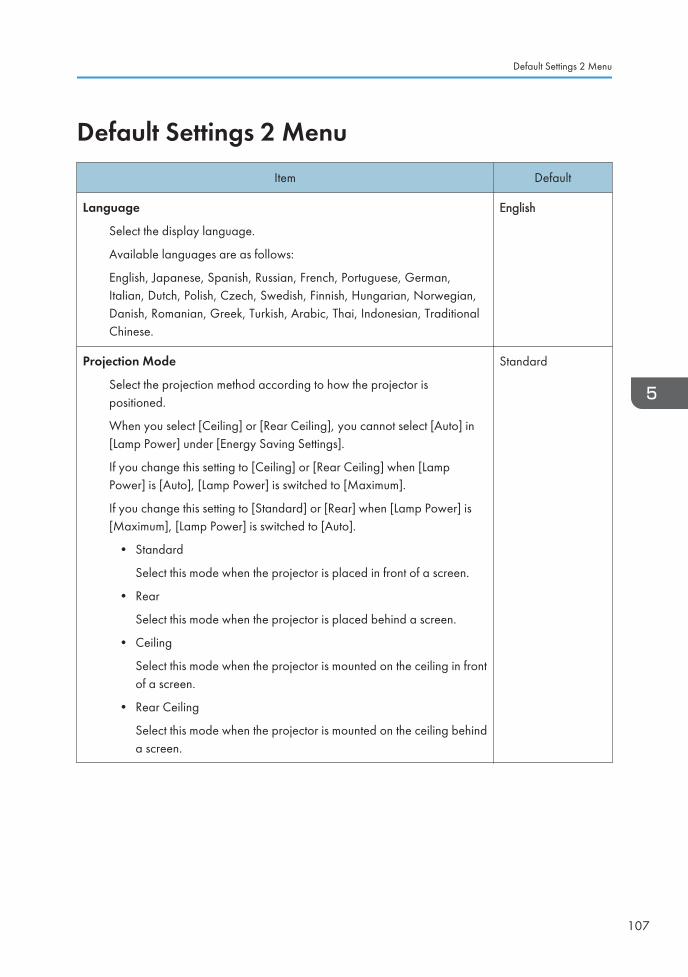
Default Settings 2 MenuItem Default
Language
Select the display language.
Available languages are as follows:
English, Japanese, Spanish, Russian, French, Portuguese, German,Italian, Dutch, Polish, Czech, Swedish, Finnish, Hungarian, Norwegian,Danish, Romanian, Greek, Turkish, Arabic, Thai, Indonesian, TraditionalChinese.
English
Projection Mode
Select the projection method according to how the projector ispositioned.
When you select [Ceiling] or [Rear Ceiling], you cannot select [Auto] in[Lamp Power] under [Energy Saving Settings].
If you change this setting to [Ceiling] or [Rear Ceiling] when [LampPower] is [Auto], [Lamp Power] is switched to [Maximum].
If you change this setting to [Standard] or [Rear] when [Lamp Power] is[Maximum], [Lamp Power] is switched to [Auto].
• Standard
Select this mode when the projector is placed in front of a screen.
• Rear
Select this mode when the projector is placed behind a screen.
• Ceiling
Select this mode when the projector is mounted on the ceiling in frontof a screen.
• Rear Ceiling
Select this mode when the projector is mounted on the ceiling behinda screen.
Standard
Default Settings 2 Menu
107
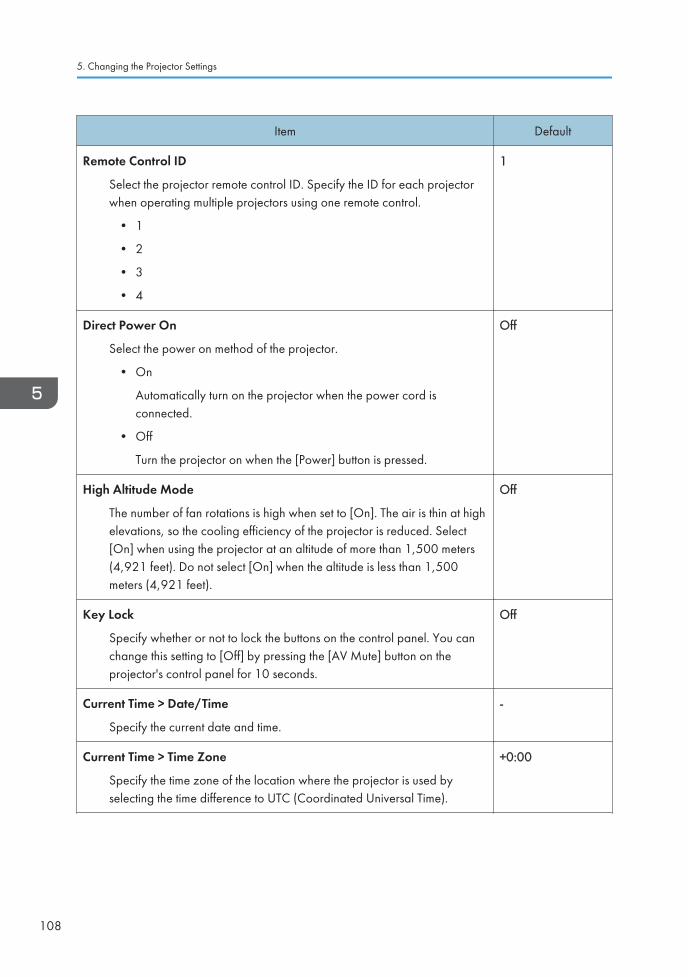
Item Default
Remote Control ID
Select the projector remote control ID. Specify the ID for each projectorwhen operating multiple projectors using one remote control.
• 1
• 2
• 3
• 4
1
Direct Power On
Select the power on method of the projector.
• On
Automatically turn on the projector when the power cord isconnected.
• Off
Turn the projector on when the [Power] button is pressed.
Off
High Altitude Mode
The number of fan rotations is high when set to [On]. The air is thin at highelevations, so the cooling efficiency of the projector is reduced. Select[On] when using the projector at an altitude of more than 1,500 meters(4,921 feet). Do not select [On] when the altitude is less than 1,500meters (4,921 feet).
Off
Key Lock
Specify whether or not to lock the buttons on the control panel. You canchange this setting to [Off] by pressing the [AV Mute] button on theprojector's control panel for 10 seconds.
Off
Current Time > Date/Time
Specify the current date and time.
-
Current Time > Time Zone
Specify the time zone of the location where the projector is used byselecting the time difference to UTC (Coordinated Universal Time).
+0:00
5. Changing the Projector Settings
108
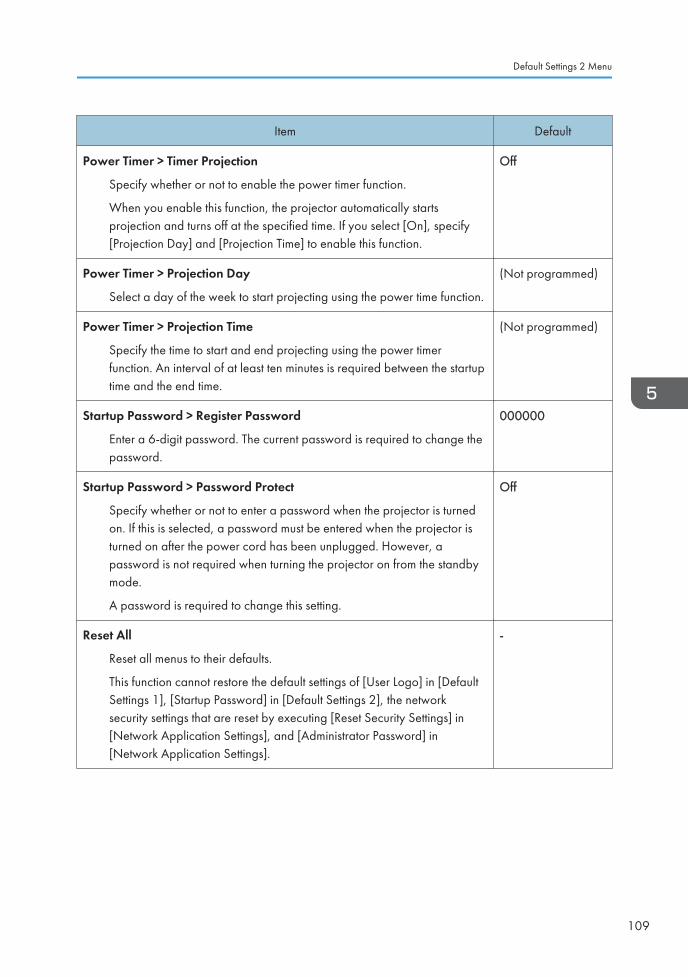
Item Default
Power Timer > Timer Projection
Specify whether or not to enable the power timer function.
When you enable this function, the projector automatically startsprojection and turns off at the specified time. If you select [On], specify[Projection Day] and [Projection Time] to enable this function.
Off
Power Timer > Projection Day
Select a day of the week to start projecting using the power time function.
(Not programmed)
Power Timer > Projection Time
Specify the time to start and end projecting using the power timerfunction. An interval of at least ten minutes is required between the startuptime and the end time.
(Not programmed)
Startup Password > Register Password
Enter a 6-digit password. The current password is required to change thepassword.
000000
Startup Password > Password Protect
Specify whether or not to enter a password when the projector is turnedon. If this is selected, a password must be entered when the projector isturned on after the power cord has been unplugged. However, apassword is not required when turning the projector on from the standbymode.
A password is required to change this setting.
Off
Reset All
Reset all menus to their defaults.
This function cannot restore the default settings of [User Logo] in [DefaultSettings 1], [Startup Password] in [Default Settings 2], the networksecurity settings that are reset by executing [Reset Security Settings] in[Network Application Settings], and [Administrator Password] in[Network Application Settings].
-
Default Settings 2 Menu
109
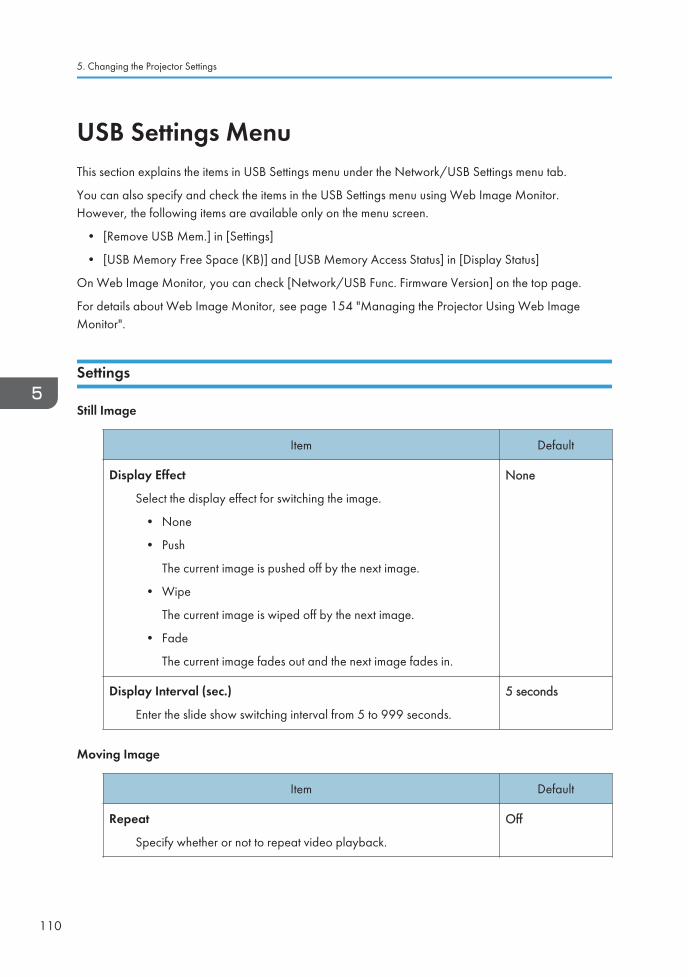
USB Settings MenuThis section explains the items in USB Settings menu under the Network/USB Settings menu tab.
You can also specify and check the items in the USB Settings menu using Web Image Monitor.However, the following items are available only on the menu screen.
• [Remove USB Mem.] in [Settings]
• [USB Memory Free Space (KB)] and [USB Memory Access Status] in [Display Status]
On Web Image Monitor, you can check [Network/USB Func. Firmware Version] on the top page.
For details about Web Image Monitor, see page 154 "Managing the Projector Using Web ImageMonitor".
Settings
Still Image
Item Default
Display Effect
Select the display effect for switching the image.
• None
• Push
The current image is pushed off by the next image.
• Wipe
The current image is wiped off by the next image.
• Fade
The current image fades out and the next image fades in.
None
Display Interval (sec.)
Enter the slide show switching interval from 5 to 999 seconds.
5 seconds
Moving Image
Item Default
Repeat
Specify whether or not to repeat video playback.
Off
5. Changing the Projector Settings
110
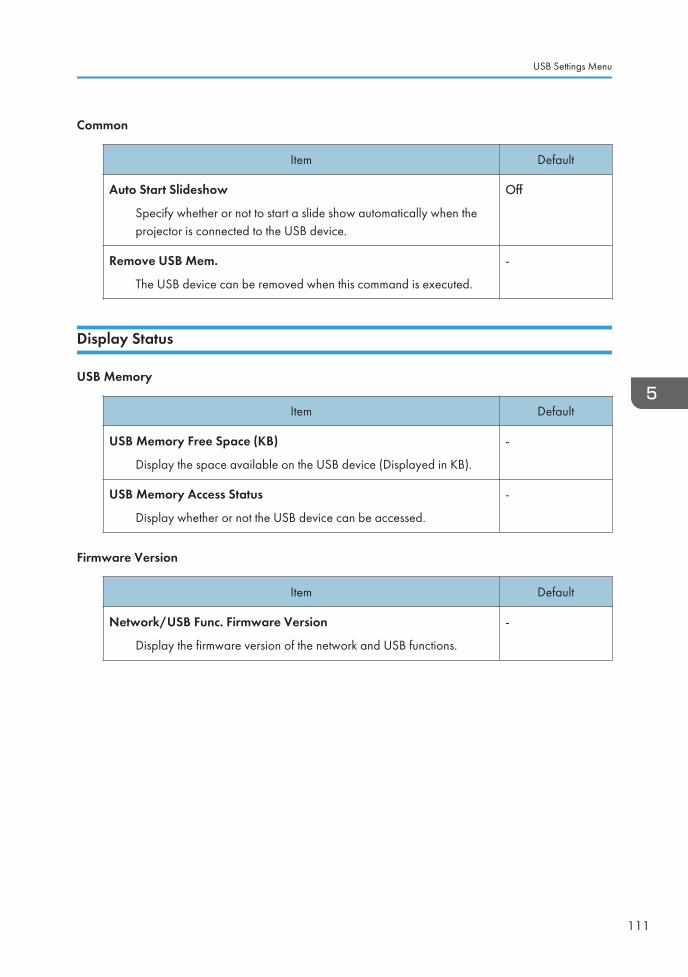
Common
Item Default
Auto Start Slideshow
Specify whether or not to start a slide show automatically when theprojector is connected to the USB device.
Off
Remove USB Mem.
The USB device can be removed when this command is executed.
-
Display Status
USB Memory
Item Default
USB Memory Free Space (KB)
Display the space available on the USB device (Displayed in KB).
-
USB Memory Access Status
Display whether or not the USB device can be accessed.
-
Firmware Version
Item Default
Network/USB Func. Firmware Version
Display the firmware version of the network and USB functions.
-
USB Settings Menu
111
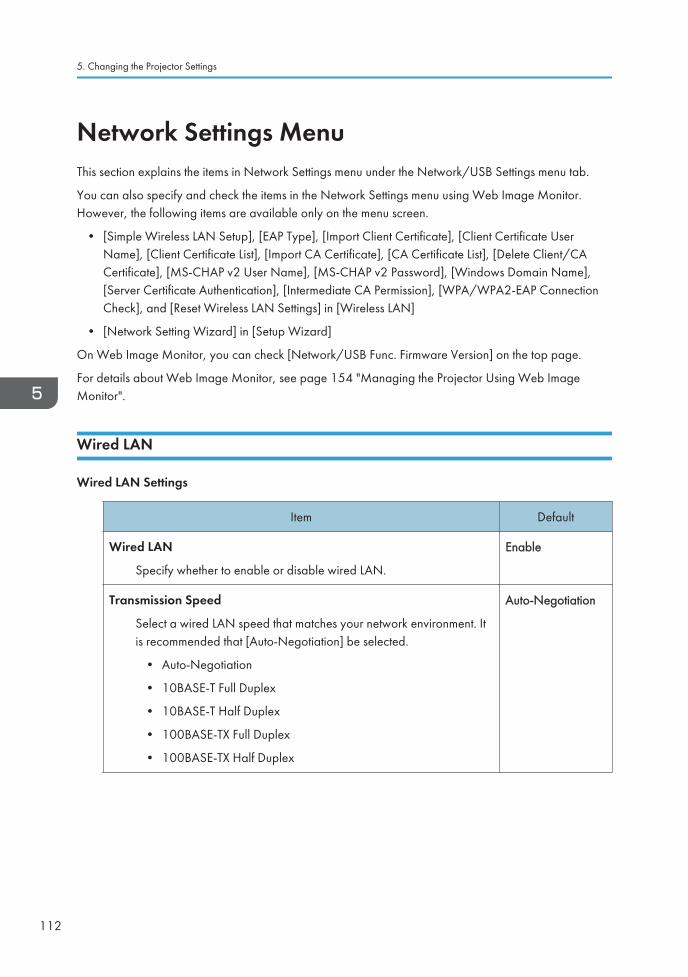
Network Settings MenuThis section explains the items in Network Settings menu under the Network/USB Settings menu tab.
You can also specify and check the items in the Network Settings menu using Web Image Monitor.However, the following items are available only on the menu screen.
• [Simple Wireless LAN Setup], [EAP Type], [Import Client Certificate], [Client Certificate UserName], [Client Certificate List], [Import CA Certificate], [CA Certificate List], [Delete Client/CACertificate], [MS-CHAP v2 User Name], [MS-CHAP v2 Password], [Windows Domain Name],[Server Certificate Authentication], [Intermediate CA Permission], [WPA/WPA2-EAP ConnectionCheck], and [Reset Wireless LAN Settings] in [Wireless LAN]
• [Network Setting Wizard] in [Setup Wizard]
On Web Image Monitor, you can check [Network/USB Func. Firmware Version] on the top page.
For details about Web Image Monitor, see page 154 "Managing the Projector Using Web ImageMonitor".
Wired LAN
Wired LAN Settings
Item Default
Wired LAN
Specify whether to enable or disable wired LAN.
Enable
Transmission Speed
Select a wired LAN speed that matches your network environment. Itis recommended that [Auto-Negotiation] be selected.
• Auto-Negotiation
• 10BASE-T Full Duplex
• 10BASE-T Half Duplex
• 100BASE-TX Full Duplex
• 100BASE-TX Half Duplex
Auto-Negotiation
5. Changing the Projector Settings
112

TCP/IP Settings
Item Default
DHCP
Specify whether to enable or disable DHCP.
The IP address is allocated automatically from the DHCP server when[Enable] is selected. When [Disable] is selected, enter the IP address,subnet mask, and default gateway manually.
Enable
IP Address
Enter the projector's IP address.
0.0.0.0
Subnet Mask
Enter the subnet mask.
0.0.0.0
Default Gateway
Enter the default gateway.
0.0.0.0
Wireless LAN (RICOH PJ X3351N/WX3351N/WX4241N only)
Simple Settings
Item Default
Simple Wireless LAN Setup
Acquire the wireless LAN settings registered in the access point, andspecify infrastructure mode wireless LAN settings for the projectorautomatically.
This function may not work depending on the access point.
-
Wireless LAN Settings
Item Default
Wireless LAN
Specify whether to enable or disable wireless LAN.
Enable
Network Settings Menu
113
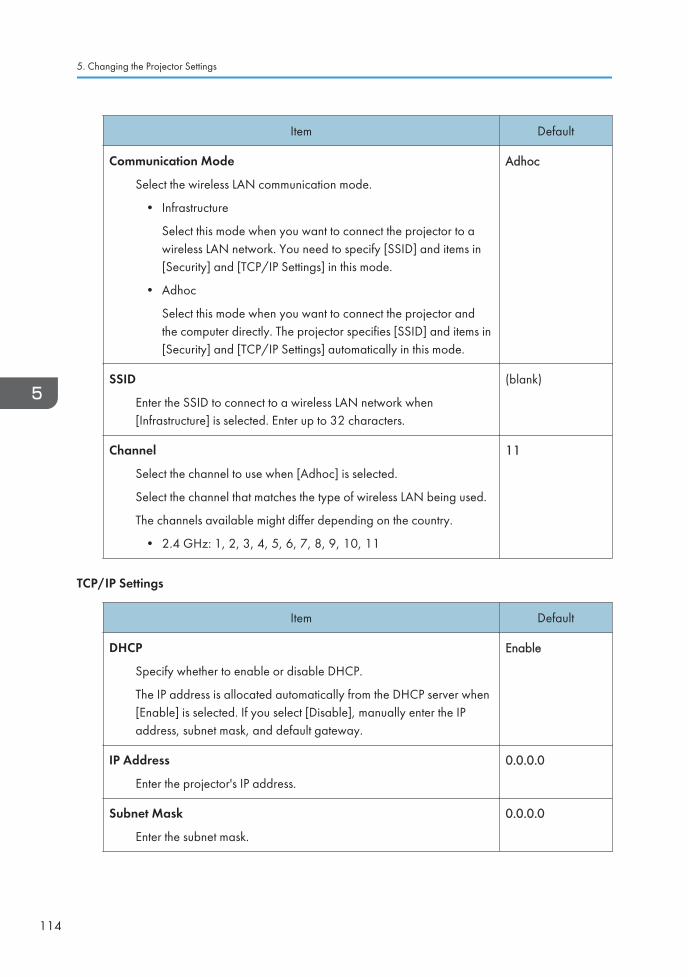
Item Default
Communication Mode
Select the wireless LAN communication mode.
• Infrastructure
Select this mode when you want to connect the projector to awireless LAN network. You need to specify [SSID] and items in[Security] and [TCP/IP Settings] in this mode.
• Adhoc
Select this mode when you want to connect the projector andthe computer directly. The projector specifies [SSID] and items in[Security] and [TCP/IP Settings] automatically in this mode.
Adhoc
SSID
Enter the SSID to connect to a wireless LAN network when[Infrastructure] is selected. Enter up to 32 characters.
(blank)
Channel
Select the channel to use when [Adhoc] is selected.
Select the channel that matches the type of wireless LAN being used.
The channels available might differ depending on the country.
• 2.4 GHz: 1, 2, 3, 4, 5, 6, 7, 8, 9, 10, 11
11
TCP/IP Settings
Item Default
DHCP
Specify whether to enable or disable DHCP.
The IP address is allocated automatically from the DHCP server when[Enable] is selected. If you select [Disable], manually enter the IPaddress, subnet mask, and default gateway.
Enable
IP Address
Enter the projector's IP address.
0.0.0.0
Subnet Mask
Enter the subnet mask.
0.0.0.0
5. Changing the Projector Settings
114
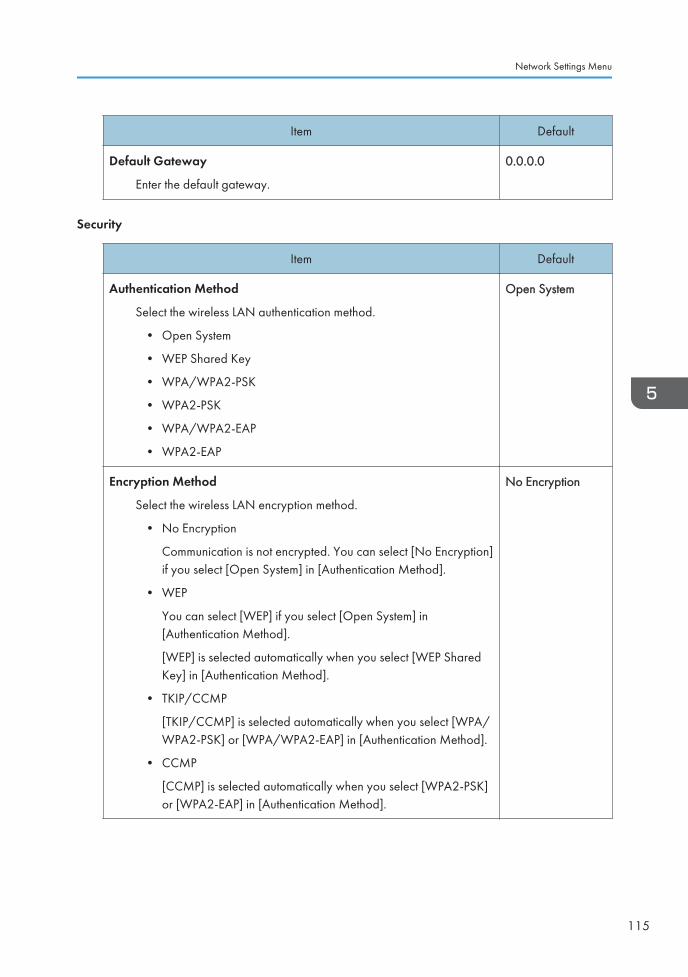
Item Default
Default Gateway
Enter the default gateway.
0.0.0.0
Security
Item Default
Authentication Method
Select the wireless LAN authentication method.
• Open System
• WEP Shared Key
• WPA/WPA2-PSK
• WPA2-PSK
• WPA/WPA2-EAP
• WPA2-EAP
Open System
Encryption Method
Select the wireless LAN encryption method.
• No Encryption
Communication is not encrypted. You can select [No Encryption]if you select [Open System] in [Authentication Method].
• WEP
You can select [WEP] if you select [Open System] in[Authentication Method].
[WEP] is selected automatically when you select [WEP SharedKey] in [Authentication Method].
• TKIP/CCMP
[TKIP/CCMP] is selected automatically when you select [WPA/WPA2-PSK] or [WPA/WPA2-EAP] in [Authentication Method].
• CCMP
[CCMP] is selected automatically when you select [WPA2-PSK]or [WPA2-EAP] in [Authentication Method].
No Encryption
Network Settings Menu
115
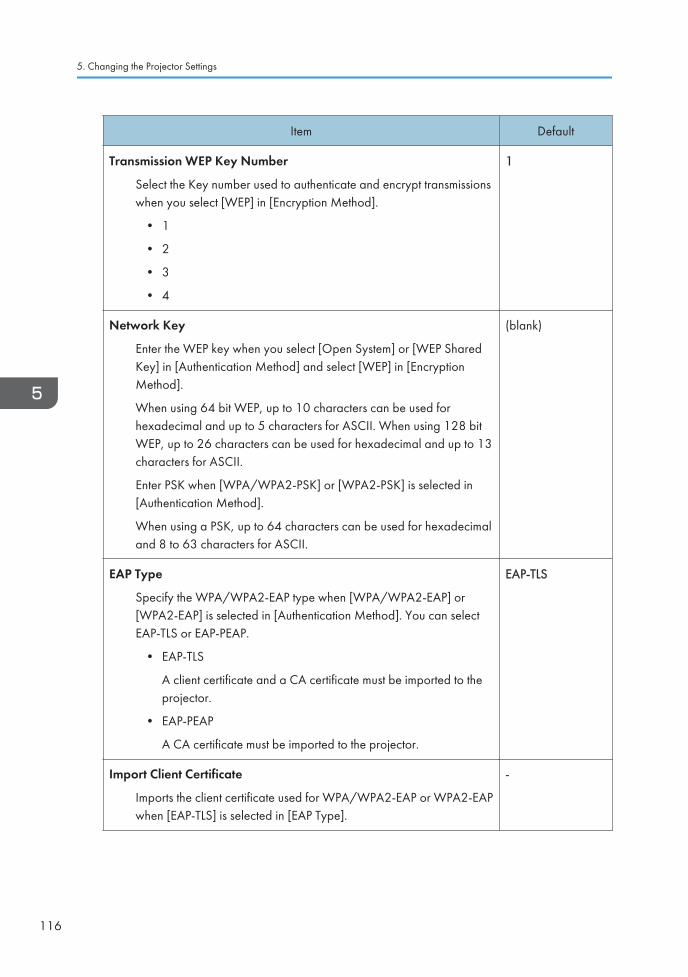
Item Default
Transmission WEP Key Number
Select the Key number used to authenticate and encrypt transmissionswhen you select [WEP] in [Encryption Method].
• 1
• 2
• 3
• 4
1
Network Key
Enter the WEP key when you select [Open System] or [WEP SharedKey] in [Authentication Method] and select [WEP] in [EncryptionMethod].
When using 64 bit WEP, up to 10 characters can be used forhexadecimal and up to 5 characters for ASCII. When using 128 bitWEP, up to 26 characters can be used for hexadecimal and up to 13characters for ASCII.
Enter PSK when [WPA/WPA2-PSK] or [WPA2-PSK] is selected in[Authentication Method].
When using a PSK, up to 64 characters can be used for hexadecimaland 8 to 63 characters for ASCII.
(blank)
EAP Type
Specify the WPA/WPA2-EAP type when [WPA/WPA2-EAP] or[WPA2-EAP] is selected in [Authentication Method]. You can selectEAP-TLS or EAP-PEAP.
• EAP-TLS
A client certificate and a CA certificate must be imported to theprojector.
• EAP-PEAP
A CA certificate must be imported to the projector.
EAP-TLS
Import Client Certificate
Imports the client certificate used for WPA/WPA2-EAP or WPA2-EAPwhen [EAP-TLS] is selected in [EAP Type].
-
5. Changing the Projector Settings
116
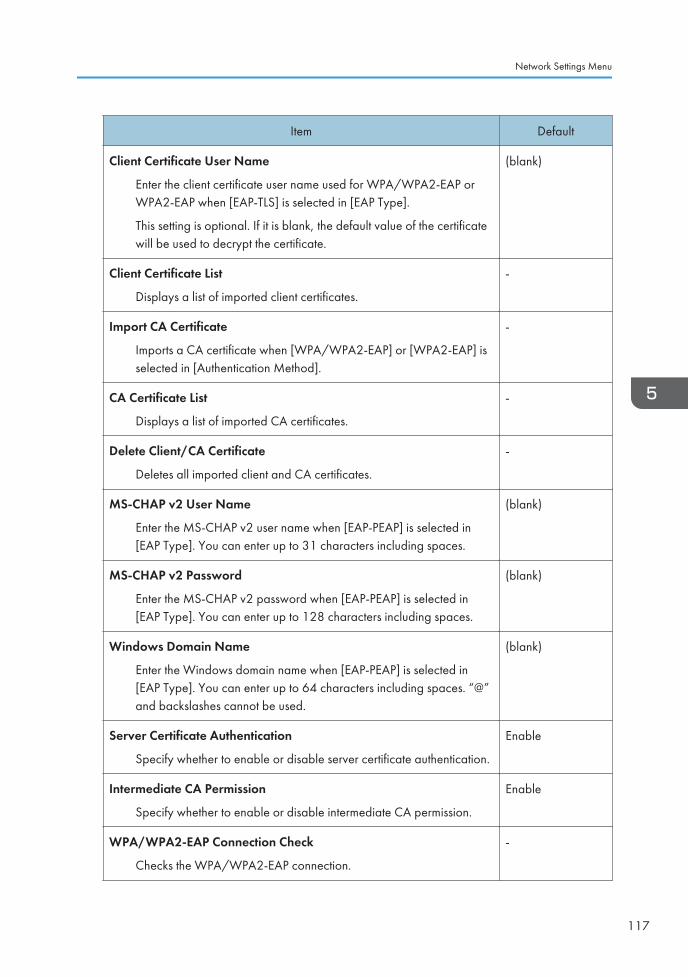
Item Default
Client Certificate User Name
Enter the client certificate user name used for WPA/WPA2-EAP orWPA2-EAP when [EAP-TLS] is selected in [EAP Type].
This setting is optional. If it is blank, the default value of the certificatewill be used to decrypt the certificate.
(blank)
Client Certificate List
Displays a list of imported client certificates.
-
Import CA Certificate
Imports a CA certificate when [WPA/WPA2-EAP] or [WPA2-EAP] isselected in [Authentication Method].
-
CA Certificate List
Displays a list of imported CA certificates.
-
Delete Client/CA Certificate
Deletes all imported client and CA certificates.
-
MS-CHAP v2 User Name
Enter the MS-CHAP v2 user name when [EAP-PEAP] is selected in[EAP Type]. You can enter up to 31 characters including spaces.
(blank)
MS-CHAP v2 Password
Enter the MS-CHAP v2 password when [EAP-PEAP] is selected in[EAP Type]. You can enter up to 128 characters including spaces.
(blank)
Windows Domain Name
Enter the Windows domain name when [EAP-PEAP] is selected in[EAP Type]. You can enter up to 64 characters including spaces. “@”and backslashes cannot be used.
(blank)
Server Certificate Authentication
Specify whether to enable or disable server certificate authentication.
Enable
Intermediate CA Permission
Specify whether to enable or disable intermediate CA permission.
Enable
WPA/WPA2-EAP Connection Check
Checks the WPA/WPA2-EAP connection.
-
Network Settings Menu
117
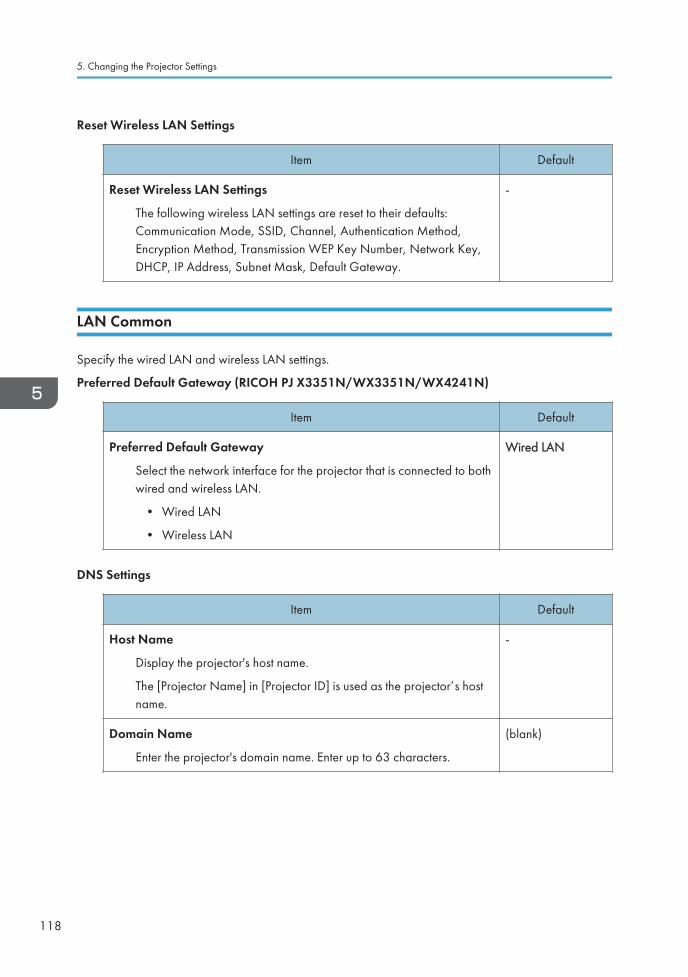
Reset Wireless LAN Settings
Item Default
Reset Wireless LAN Settings
The following wireless LAN settings are reset to their defaults:Communication Mode, SSID, Channel, Authentication Method,Encryption Method, Transmission WEP Key Number, Network Key,DHCP, IP Address, Subnet Mask, Default Gateway.
-
LAN Common
Specify the wired LAN and wireless LAN settings.
Preferred Default Gateway (RICOH PJ X3351N/WX3351N/WX4241N)
Item Default
Preferred Default Gateway
Select the network interface for the projector that is connected to bothwired and wireless LAN.
• Wired LAN
• Wireless LAN
Wired LAN
DNS Settings
Item Default
Host Name
Display the projector's host name.
The [Projector Name] in [Projector ID] is used as the projector’s hostname.
-
Domain Name
Enter the projector's domain name. Enter up to 63 characters.
(blank)
5. Changing the Projector Settings
118
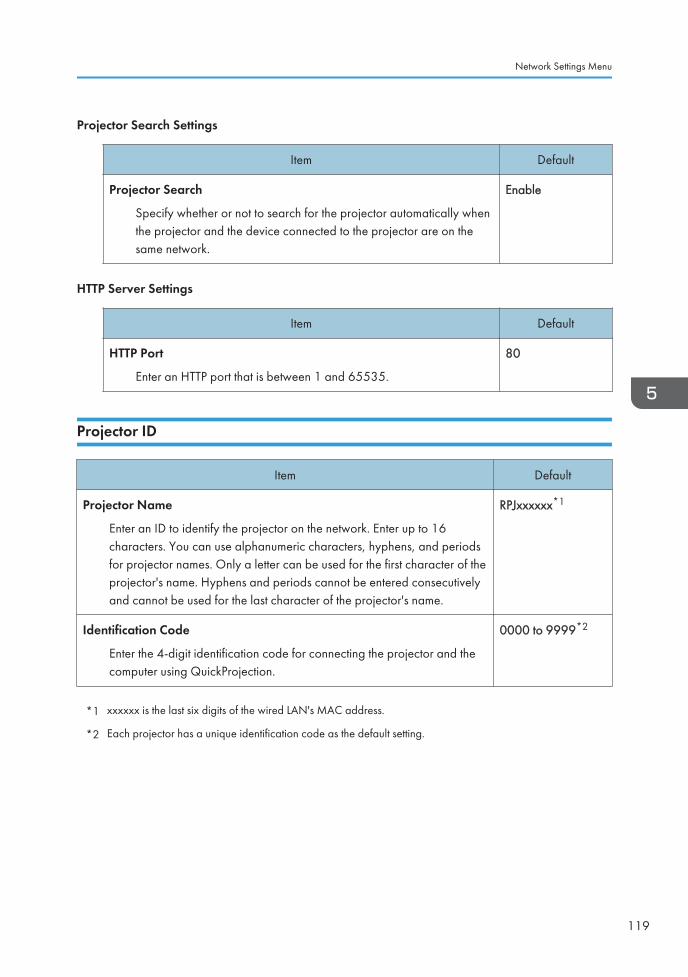
Projector Search Settings
Item Default
Projector Search
Specify whether or not to search for the projector automatically whenthe projector and the device connected to the projector are on thesame network.
Enable
HTTP Server Settings
Item Default
HTTP Port
Enter an HTTP port that is between 1 and 65535.
80
Projector ID
Item Default
Projector Name
Enter an ID to identify the projector on the network. Enter up to 16characters. You can use alphanumeric characters, hyphens, and periodsfor projector names. Only a letter can be used for the first character of theprojector's name. Hyphens and periods cannot be entered consecutivelyand cannot be used for the last character of the projector's name.
RPJxxxxxx*1
Identification Code
Enter the 4-digit identification code for connecting the projector and thecomputer using QuickProjection.
0000 to 9999*2
*1 xxxxxx is the last six digits of the wired LAN's MAC address.
*2 Each projector has a unique identification code as the default setting.
Network Settings Menu
119
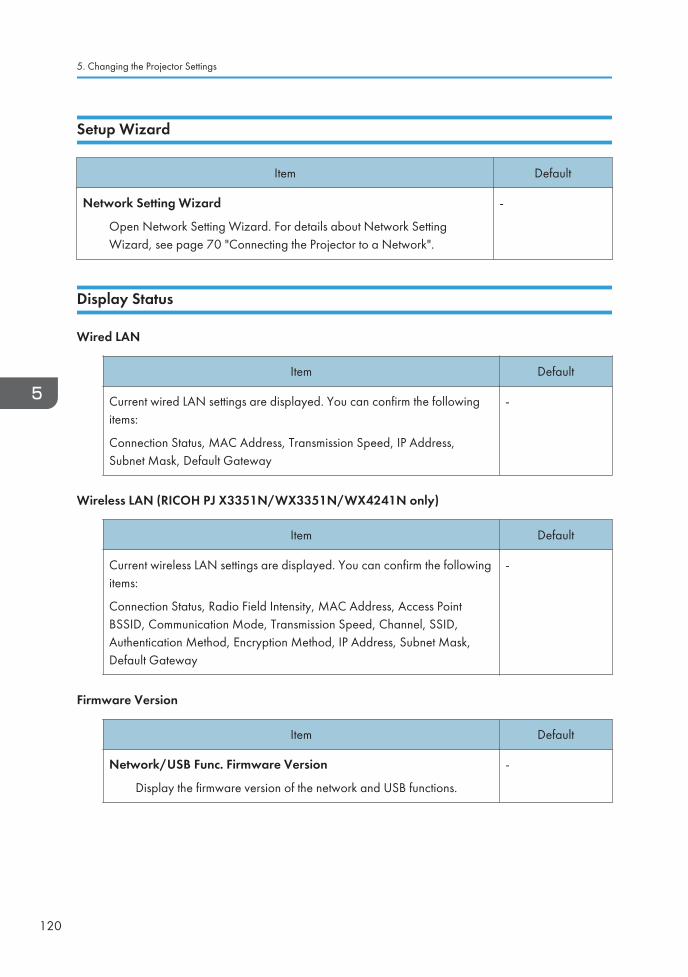
Setup Wizard
Item Default
Network Setting Wizard
Open Network Setting Wizard. For details about Network SettingWizard, see page 70 "Connecting the Projector to a Network".
-
Display Status
Wired LAN
Item Default
Current wired LAN settings are displayed. You can confirm the followingitems:
Connection Status, MAC Address, Transmission Speed, IP Address,Subnet Mask, Default Gateway
-
Wireless LAN (RICOH PJ X3351N/WX3351N/WX4241N only)
Item Default
Current wireless LAN settings are displayed. You can confirm the followingitems:
Connection Status, Radio Field Intensity, MAC Address, Access PointBSSID, Communication Mode, Transmission Speed, Channel, SSID,Authentication Method, Encryption Method, IP Address, Subnet Mask,Default Gateway
-
Firmware Version
Item Default
Network/USB Func. Firmware Version
Display the firmware version of the network and USB functions.
-
5. Changing the Projector Settings
120
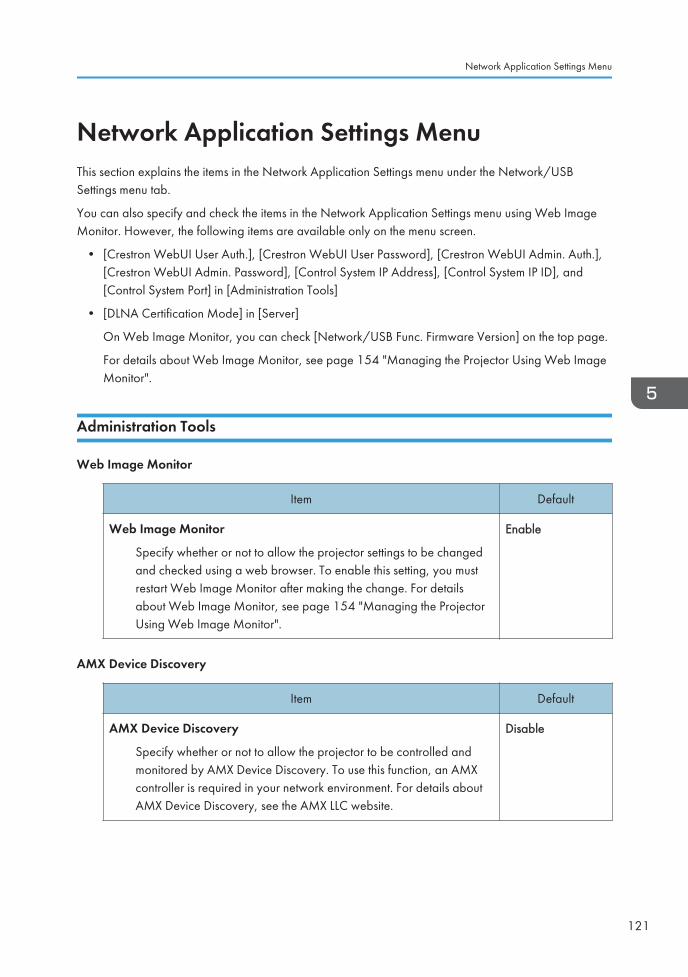
Network Application Settings MenuThis section explains the items in the Network Application Settings menu under the Network/USBSettings menu tab.
You can also specify and check the items in the Network Application Settings menu using Web ImageMonitor. However, the following items are available only on the menu screen.
• [Crestron WebUI User Auth.], [Crestron WebUI User Password], [Crestron WebUI Admin. Auth.],[Crestron WebUI Admin. Password], [Control System IP Address], [Control System IP ID], and[Control System Port] in [Administration Tools]
• [DLNA Certification Mode] in [Server]
On Web Image Monitor, you can check [Network/USB Func. Firmware Version] on the top page.
For details about Web Image Monitor, see page 154 "Managing the Projector Using Web ImageMonitor".
Administration Tools
Web Image Monitor
Item Default
Web Image Monitor
Specify whether or not to allow the projector settings to be changedand checked using a web browser. To enable this setting, you mustrestart Web Image Monitor after making the change. For detailsabout Web Image Monitor, see page 154 "Managing the ProjectorUsing Web Image Monitor".
Enable
AMX Device Discovery
Item Default
AMX Device Discovery
Specify whether or not to allow the projector to be controlled andmonitored by AMX Device Discovery. To use this function, an AMXcontroller is required in your network environment. For details aboutAMX Device Discovery, see the AMX LLC website.
Disable
Network Application Settings Menu
121
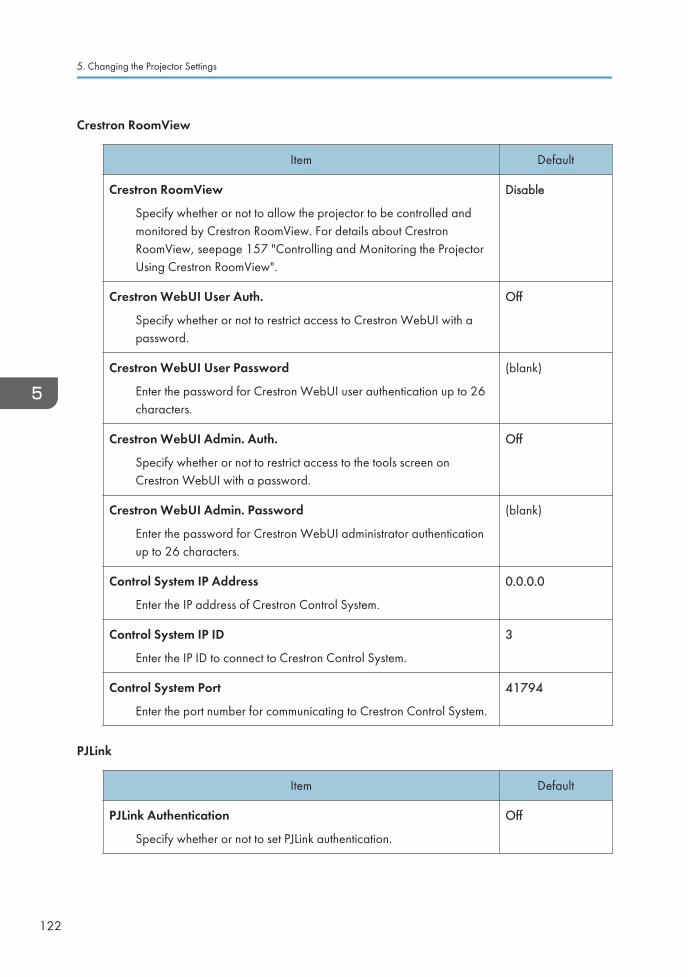
Crestron RoomView
Item Default
Crestron RoomView
Specify whether or not to allow the projector to be controlled andmonitored by Crestron RoomView. For details about CrestronRoomView, seepage 157 "Controlling and Monitoring the ProjectorUsing Crestron RoomView".
Disable
Crestron WebUI User Auth.
Specify whether or not to restrict access to Crestron WebUI with apassword.
Off
Crestron WebUI User Password
Enter the password for Crestron WebUI user authentication up to 26characters.
(blank)
Crestron WebUI Admin. Auth.
Specify whether or not to restrict access to the tools screen onCrestron WebUI with a password.
Off
Crestron WebUI Admin. Password
Enter the password for Crestron WebUI administrator authenticationup to 26 characters.
(blank)
Control System IP Address
Enter the IP address of Crestron Control System.
0.0.0.0
Control System IP ID
Enter the IP ID to connect to Crestron Control System.
3
Control System Port
Enter the port number for communicating to Crestron Control System.
41794
PJLink
Item Default
PJLink Authentication
Specify whether or not to set PJLink authentication.
Off
5. Changing the Projector Settings
122
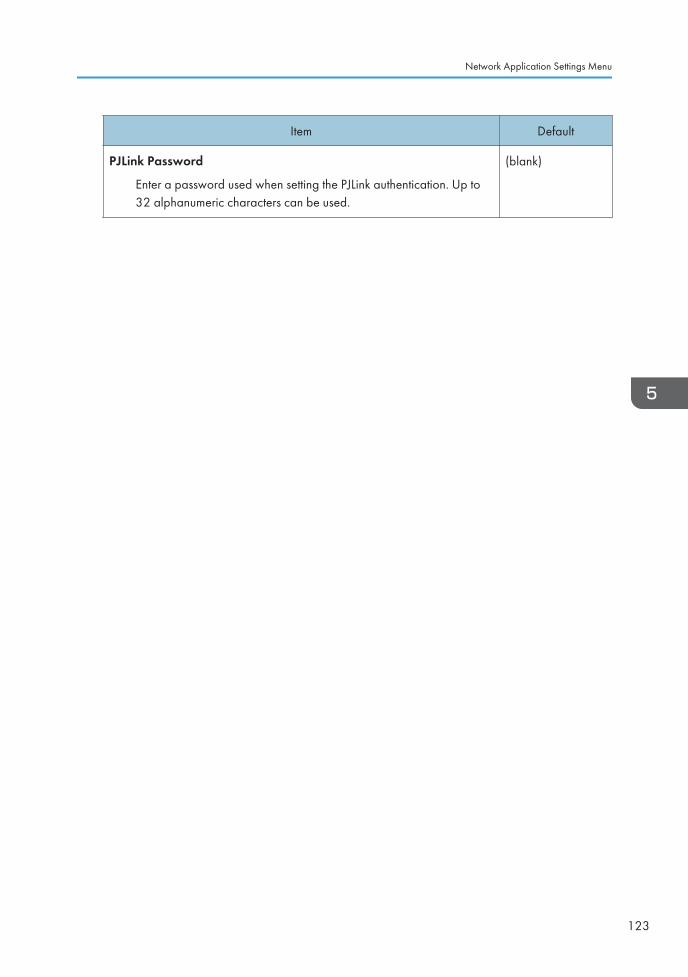
Item Default
PJLink Password
Enter a password used when setting the PJLink authentication. Up to32 alphanumeric characters can be used.
(blank)
Network Application Settings Menu
123
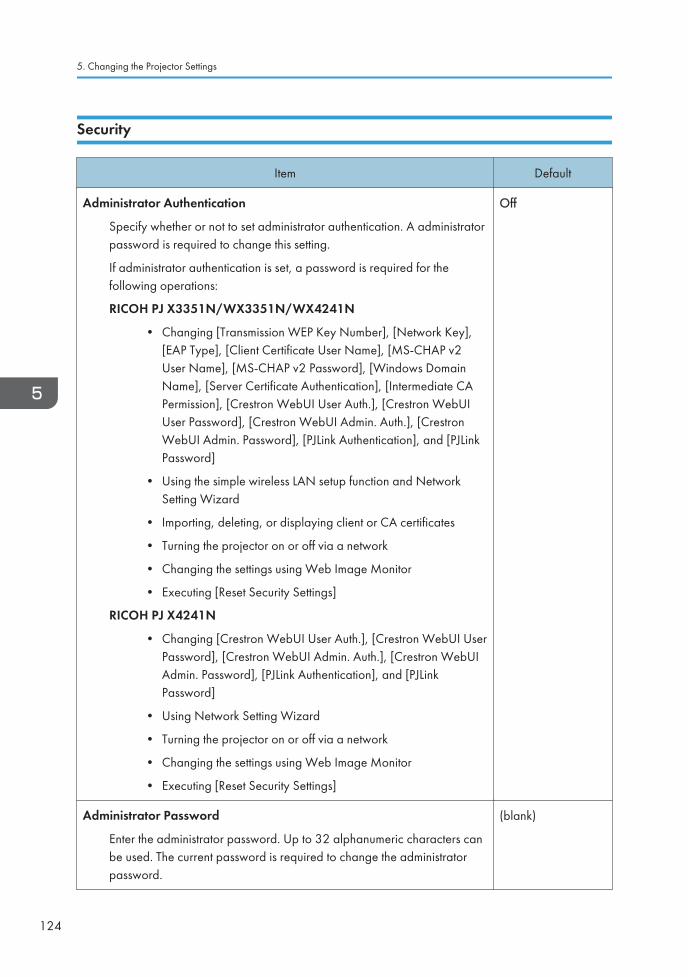
Security
Item Default
Administrator Authentication
Specify whether or not to set administrator authentication. A administratorpassword is required to change this setting.
If administrator authentication is set, a password is required for thefollowing operations:
RICOH PJ X3351N/WX3351N/WX4241N
• Changing [Transmission WEP Key Number], [Network Key],[EAP Type], [Client Certificate User Name], [MS-CHAP v2User Name], [MS-CHAP v2 Password], [Windows DomainName], [Server Certificate Authentication], [Intermediate CAPermission], [Crestron WebUI User Auth.], [Crestron WebUIUser Password], [Crestron WebUI Admin. Auth.], [CrestronWebUI Admin. Password], [PJLink Authentication], and [PJLinkPassword]
• Using the simple wireless LAN setup function and NetworkSetting Wizard
• Importing, deleting, or displaying client or CA certificates
• Turning the projector on or off via a network
• Changing the settings using Web Image Monitor
• Executing [Reset Security Settings]
RICOH PJ X4241N
• Changing [Crestron WebUI User Auth.], [Crestron WebUI UserPassword], [Crestron WebUI Admin. Auth.], [Crestron WebUIAdmin. Password], [PJLink Authentication], and [PJLinkPassword]
• Using Network Setting Wizard
• Turning the projector on or off via a network
• Changing the settings using Web Image Monitor
• Executing [Reset Security Settings]
Off
Administrator Password
Enter the administrator password. Up to 32 alphanumeric characters canbe used. The current password is required to change the administratorpassword.
(blank)
5. Changing the Projector Settings
124
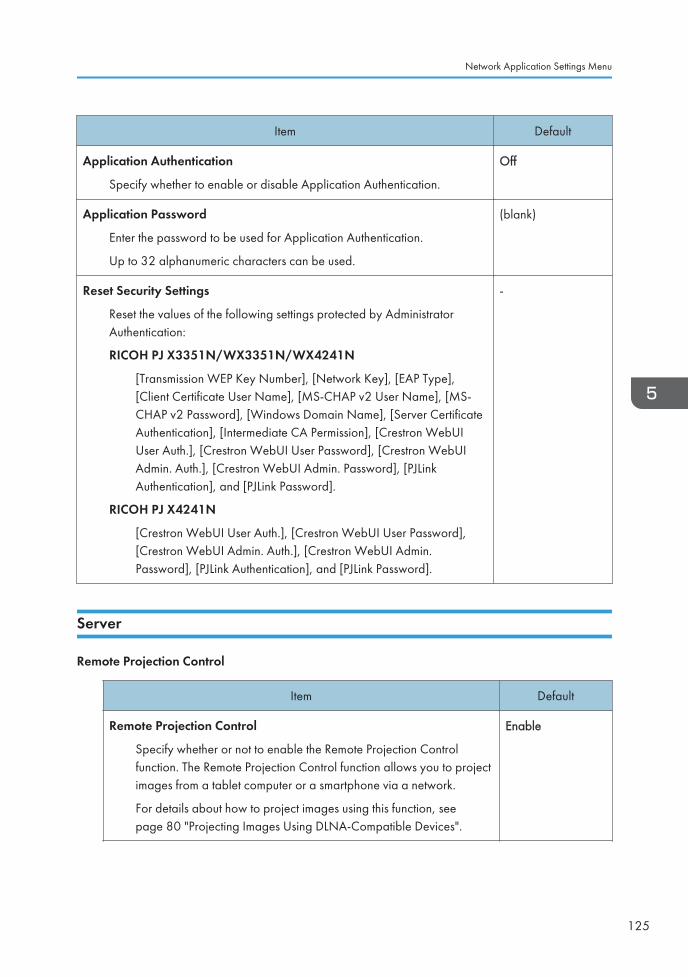
Item Default
Application Authentication
Specify whether to enable or disable Application Authentication.
Off
Application Password
Enter the password to be used for Application Authentication.
Up to 32 alphanumeric characters can be used.
(blank)
Reset Security Settings
Reset the values of the following settings protected by AdministratorAuthentication:
RICOH PJ X3351N/WX3351N/WX4241N
[Transmission WEP Key Number], [Network Key], [EAP Type],[Client Certificate User Name], [MS-CHAP v2 User Name], [MS-CHAP v2 Password], [Windows Domain Name], [Server CertificateAuthentication], [Intermediate CA Permission], [Crestron WebUIUser Auth.], [Crestron WebUI User Password], [Crestron WebUIAdmin. Auth.], [Crestron WebUI Admin. Password], [PJLinkAuthentication], and [PJLink Password].
RICOH PJ X4241N
[Crestron WebUI User Auth.], [Crestron WebUI User Password],[Crestron WebUI Admin. Auth.], [Crestron WebUI Admin.Password], [PJLink Authentication], and [PJLink Password].
-
Server
Remote Projection Control
Item Default
Remote Projection Control
Specify whether or not to enable the Remote Projection Controlfunction. The Remote Projection Control function allows you to projectimages from a tablet computer or a smartphone via a network.
For details about how to project images using this function, seepage 80 "Projecting Images Using DLNA-Compatible Devices".
Enable
Network Application Settings Menu
125
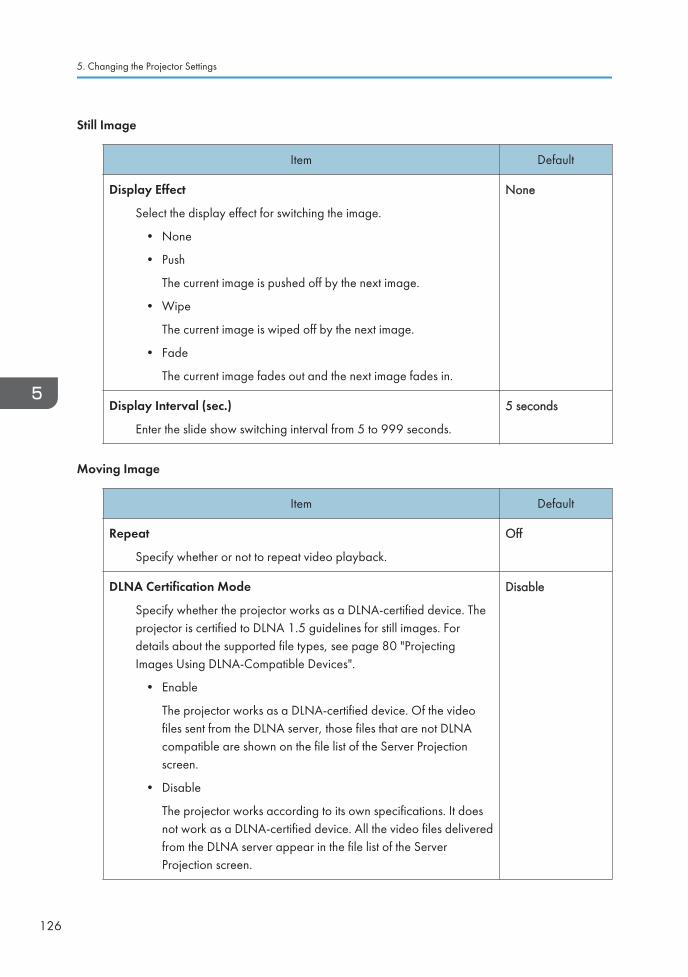
Still Image
Item Default
Display Effect
Select the display effect for switching the image.
• None
• Push
The current image is pushed off by the next image.
• Wipe
The current image is wiped off by the next image.
• Fade
The current image fades out and the next image fades in.
None
Display Interval (sec.)
Enter the slide show switching interval from 5 to 999 seconds.
5 seconds
Moving Image
Item Default
Repeat
Specify whether or not to repeat video playback.
Off
DLNA Certification Mode
Specify whether the projector works as a DLNA-certified device. Theprojector is certified to DLNA 1.5 guidelines for still images. Fordetails about the supported file types, see page 80 "ProjectingImages Using DLNA-Compatible Devices".
• Enable
The projector works as a DLNA-certified device. Of the videofiles sent from the DLNA server, those files that are not DLNAcompatible are shown on the file list of the Server Projectionscreen.
• Disable
The projector works according to its own specifications. It doesnot work as a DLNA-certified device. All the video files deliveredfrom the DLNA server appear in the file list of the ServerProjection screen.
Disable
5. Changing the Projector Settings
126
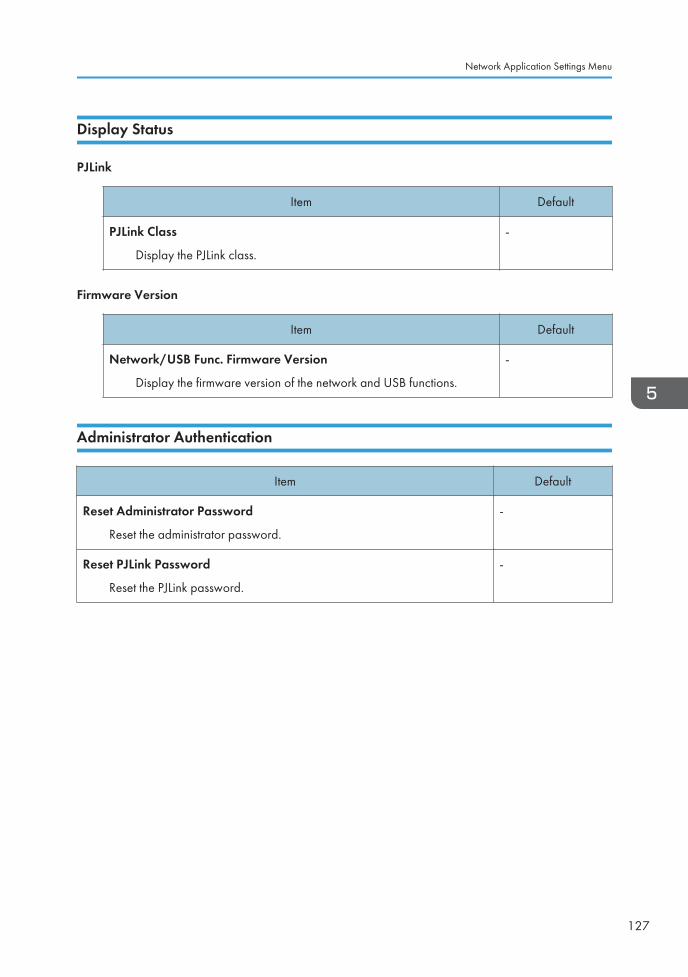
Display Status
PJLink
Item Default
PJLink Class
Display the PJLink class.
-
Firmware Version
Item Default
Network/USB Func. Firmware Version
Display the firmware version of the network and USB functions.
-
Administrator Authentication
Item Default
Reset Administrator Password
Reset the administrator password.
-
Reset PJLink Password
Reset the PJLink password.
-
Network Application Settings Menu
127
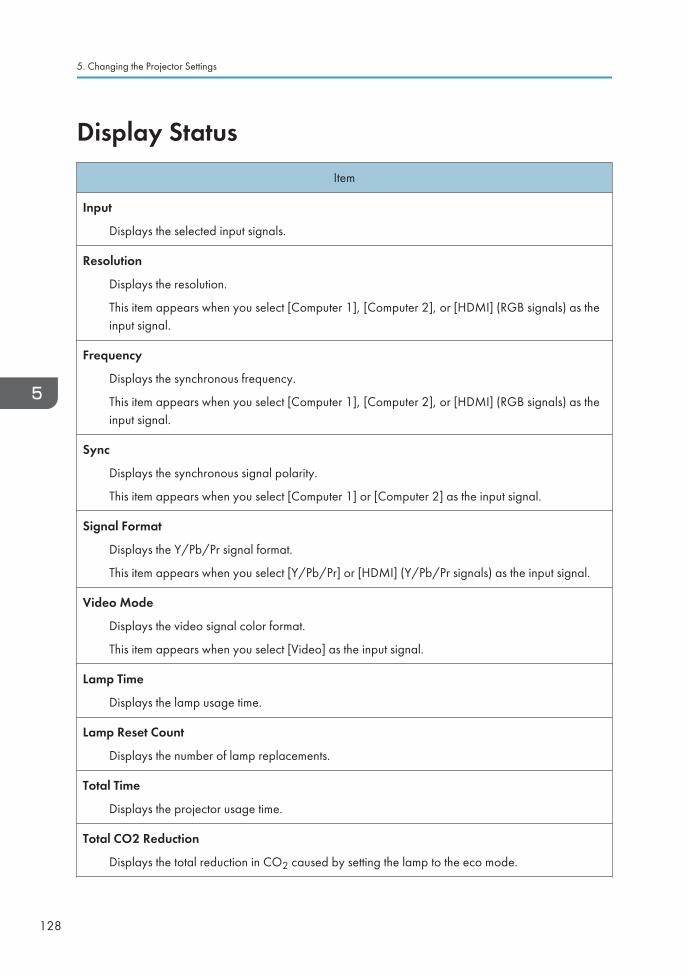
Display StatusItem
Input
Displays the selected input signals.
Resolution
Displays the resolution.
This item appears when you select [Computer 1], [Computer 2], or [HDMI] (RGB signals) as theinput signal.
Frequency
Displays the synchronous frequency.
This item appears when you select [Computer 1], [Computer 2], or [HDMI] (RGB signals) as theinput signal.
Sync
Displays the synchronous signal polarity.
This item appears when you select [Computer 1] or [Computer 2] as the input signal.
Signal Format
Displays the Y/Pb/Pr signal format.
This item appears when you select [Y/Pb/Pr] or [HDMI] (Y/Pb/Pr signals) as the input signal.
Video Mode
Displays the video signal color format.
This item appears when you select [Video] as the input signal.
Lamp Time
Displays the lamp usage time.
Lamp Reset Count
Displays the number of lamp replacements.
Total Time
Displays the projector usage time.
Total CO2 Reduction
Displays the total reduction in CO2 caused by setting the lamp to the eco mode.
5. Changing the Projector Settings
128
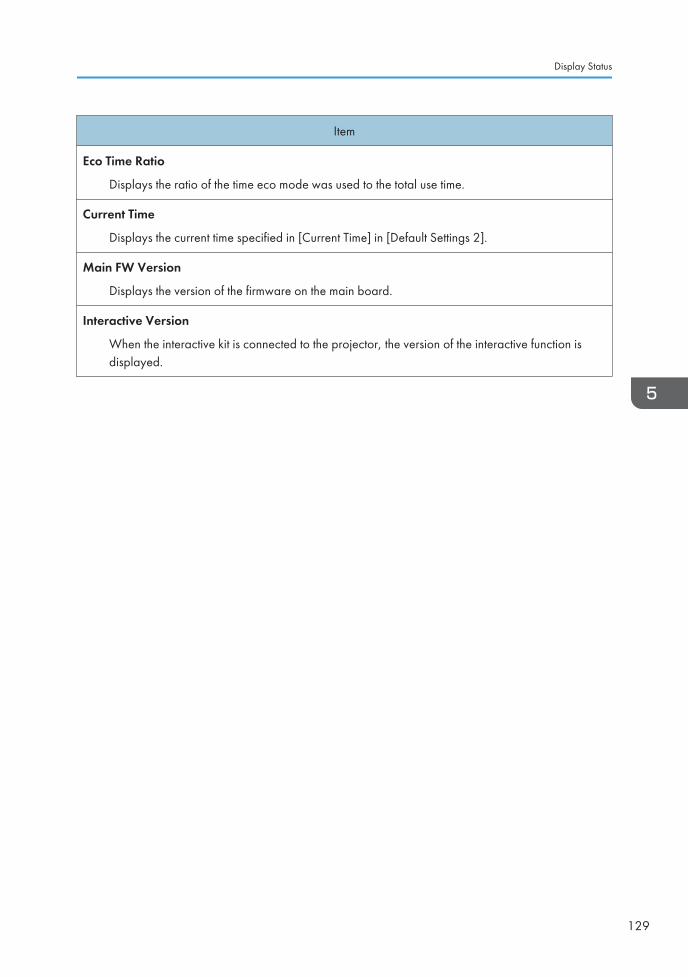
Item
Eco Time Ratio
Displays the ratio of the time eco mode was used to the total use time.
Current Time
Displays the current time specified in [Current Time] in [Default Settings 2].
Main FW Version
Displays the version of the firmware on the main board.
Interactive Version
When the interactive kit is connected to the projector, the version of the interactive function isdisplayed.
Display Status
129

5. Changing the Projector Settings
130
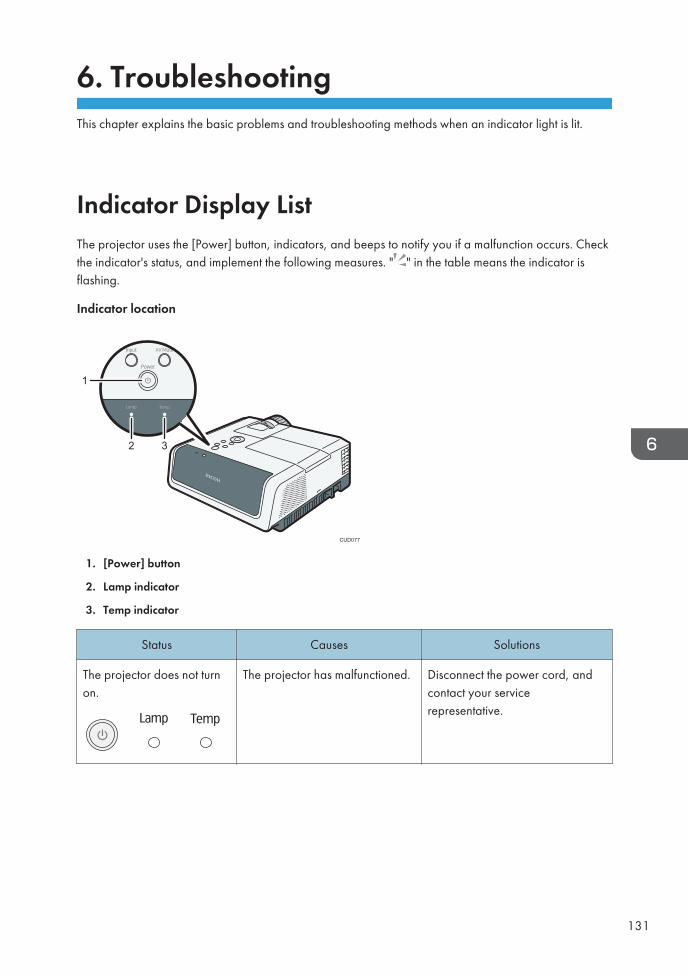
6. TroubleshootingThis chapter explains the basic problems and troubleshooting methods when an indicator light is lit.
Indicator Display ListThe projector uses the [Power] button, indicators, and beeps to notify you if a malfunction occurs. Checkthe indicator's status, and implement the following measures. " " in the table means the indicator isflashing.
Indicator location
1
32
CUD077
1. [Power] button
2. Lamp indicator
3. Temp indicator
Status Causes Solutions
The projector does not turnon.
The projector has malfunctioned. Disconnect the power cord, andcontact your servicerepresentative.
131
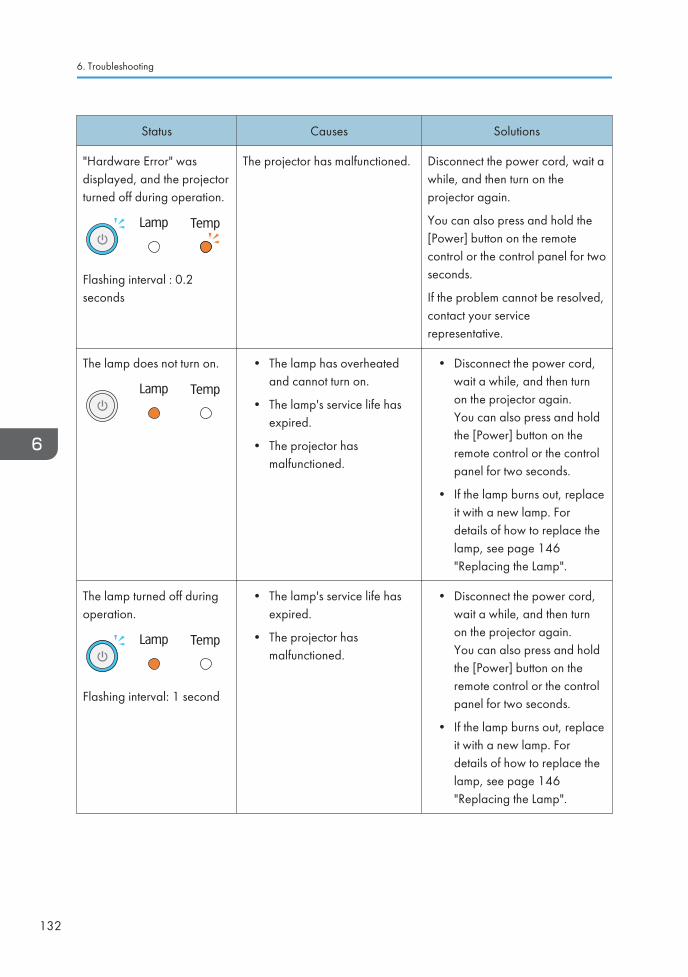
Status Causes Solutions
"Hardware Error" wasdisplayed, and the projectorturned off during operation.
Flashing interval : 0.2seconds
The projector has malfunctioned. Disconnect the power cord, wait awhile, and then turn on theprojector again.
You can also press and hold the[Power] button on the remotecontrol or the control panel for twoseconds.
If the problem cannot be resolved,contact your servicerepresentative.
The lamp does not turn on. • The lamp has overheatedand cannot turn on.
• The lamp's service life hasexpired.
• The projector hasmalfunctioned.
• Disconnect the power cord,wait a while, and then turnon the projector again.You can also press and holdthe [Power] button on theremote control or the controlpanel for two seconds.
• If the lamp burns out, replaceit with a new lamp. Fordetails of how to replace thelamp, see page 146"Replacing the Lamp".
The lamp turned off duringoperation.
Flashing interval: 1 second
• The lamp's service life hasexpired.
• The projector hasmalfunctioned.
• Disconnect the power cord,wait a while, and then turnon the projector again.You can also press and holdthe [Power] button on theremote control or the controlpanel for two seconds.
• If the lamp burns out, replaceit with a new lamp. Fordetails of how to replace thelamp, see page 146"Replacing the Lamp".
6. Troubleshooting
132
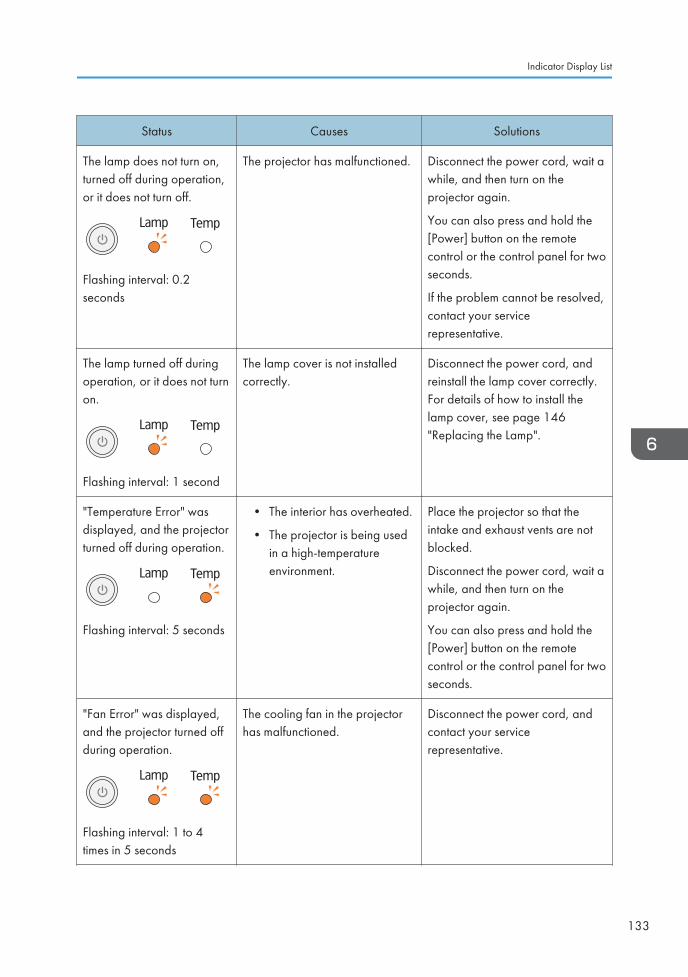
Status Causes Solutions
The lamp does not turn on,turned off during operation,or it does not turn off.
Flashing interval: 0.2seconds
The projector has malfunctioned. Disconnect the power cord, wait awhile, and then turn on theprojector again.
You can also press and hold the[Power] button on the remotecontrol or the control panel for twoseconds.
If the problem cannot be resolved,contact your servicerepresentative.
The lamp turned off duringoperation, or it does not turnon.
Flashing interval: 1 second
The lamp cover is not installedcorrectly.
Disconnect the power cord, andreinstall the lamp cover correctly.For details of how to install thelamp cover, see page 146"Replacing the Lamp".
"Temperature Error" wasdisplayed, and the projectorturned off during operation.
Flashing interval: 5 seconds
• The interior has overheated.
• The projector is being usedin a high-temperatureenvironment.
Place the projector so that theintake and exhaust vents are notblocked.
Disconnect the power cord, wait awhile, and then turn on theprojector again.
You can also press and hold the[Power] button on the remotecontrol or the control panel for twoseconds.
"Fan Error" was displayed,and the projector turned offduring operation.
Flashing interval: 1 to 4times in 5 seconds
The cooling fan in the projectorhas malfunctioned.
Disconnect the power cord, andcontact your servicerepresentative.
Indicator Display List
133
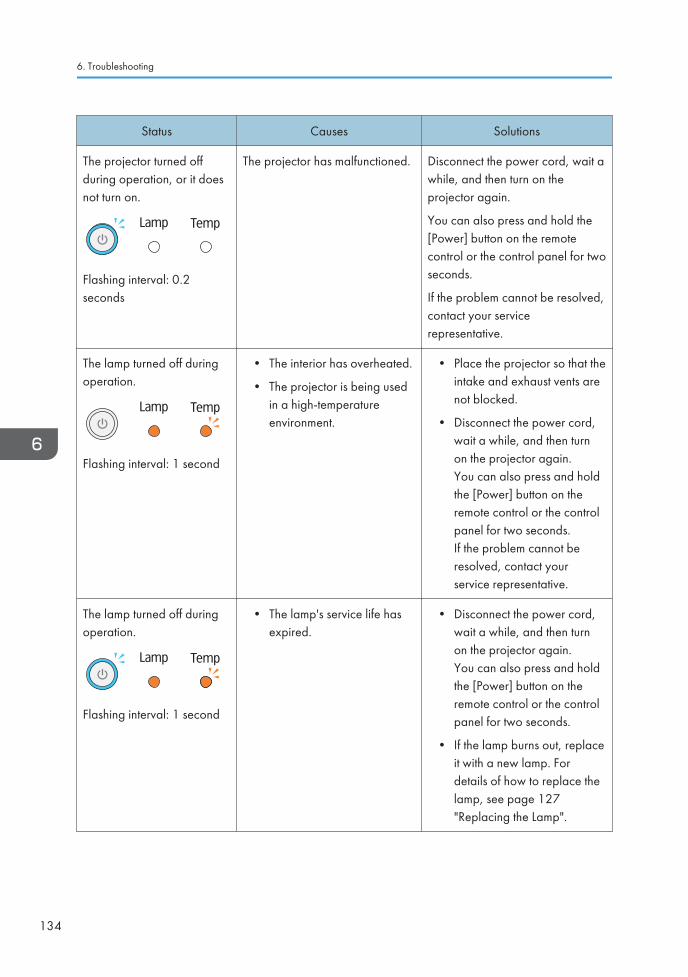
Status Causes Solutions
The projector turned offduring operation, or it doesnot turn on.
Flashing interval: 0.2seconds
The projector has malfunctioned. Disconnect the power cord, wait awhile, and then turn on theprojector again.
You can also press and hold the[Power] button on the remotecontrol or the control panel for twoseconds.
If the problem cannot be resolved,contact your servicerepresentative.
The lamp turned off duringoperation.
Flashing interval: 1 second
• The interior has overheated.
• The projector is being usedin a high-temperatureenvironment.
• Place the projector so that theintake and exhaust vents arenot blocked.
• Disconnect the power cord,wait a while, and then turnon the projector again.You can also press and holdthe [Power] button on theremote control or the controlpanel for two seconds.If the problem cannot beresolved, contact yourservice representative.
The lamp turned off duringoperation.
Flashing interval: 1 second
• The lamp's service life hasexpired.
• Disconnect the power cord,wait a while, and then turnon the projector again.You can also press and holdthe [Power] button on theremote control or the controlpanel for two seconds.
• If the lamp burns out, replaceit with a new lamp. Fordetails of how to replace thelamp, see page 127"Replacing the Lamp".
6. Troubleshooting
134
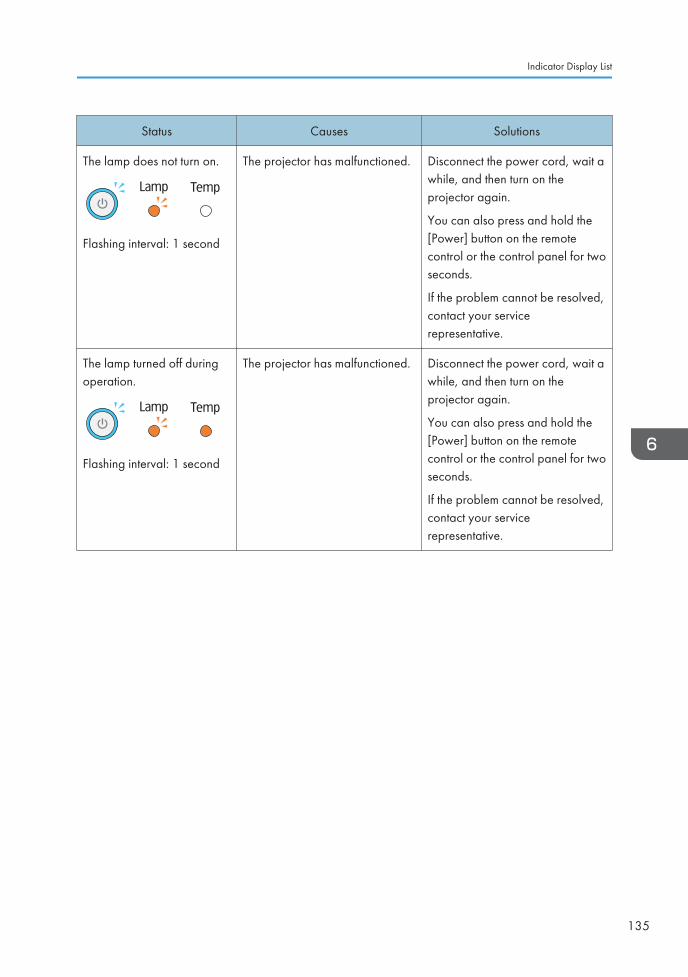
Status Causes Solutions
The lamp does not turn on.
Flashing interval: 1 second
The projector has malfunctioned. Disconnect the power cord, wait awhile, and then turn on theprojector again.
You can also press and hold the[Power] button on the remotecontrol or the control panel for twoseconds.
If the problem cannot be resolved,contact your servicerepresentative.
The lamp turned off duringoperation.
Flashing interval: 1 second
The projector has malfunctioned. Disconnect the power cord, wait awhile, and then turn on theprojector again.
You can also press and hold the[Power] button on the remotecontrol or the control panel for twoseconds.
If the problem cannot be resolved,contact your servicerepresentative.
Indicator Display List
135
Common ProblemsIf you think a malfunction has occurred, check the following before contacting your servicerepresentative.
Problem Solutions
Power does not turn on. • Make sure the power plug or connector is connectedcorrectly.
• Make sure the lamp cover is mounted correctly. Fordetails, see page 146 "Replacing the Lamp".
• When the projector is installed on a ceiling and lens-down, be sure to press the [Power] button and wait untilthe projector cooling process completes beforedisconnecting the power cord.If you disconnect the power cord without pressing the[Power] button or the projector's power is turned offsuddenly due to a power outage, you cannot turn theprojector back on for up to approximately 25 minutesbecause it needs to release the internal heat. Wait untilthe projector cools down.
Power turns off during use. • Make sure the environment in which the projector isbeing used is within the acceptable temperature range.
• Make sure the vents are not blocked.
6. Troubleshooting
136
Problem Solutions
No image. • Make sure the input signal is switched correctly if [AutoInput Search] in [Default Settings 1] is set to [Off]. Fordetails, see page 105 "Default Settings 1 Menu".
• Make sure the AV mute function is not turned on. Fordetails, see page 48 "Temporarily Blanking the Imageand Muting the Audio".
• Check the settings of [Brightness] in [Image Adjustment].For details, see page 93 "Image Adjustment Menu".
• Make sure the computer or AV equipment is connectedto the projector correctly.
For details, see page 32 "Connecting Equipment to theProjector".
• Make sure the computer's image output is switchedcorrectly. For details, see page 39 "When projecting thescreen of a laptop computer".
• Make sure the computer or AV equipment is workingproperly.
No sound. • Make sure the input signal is switched correctly if [AutoInput Search] in [Default Settings 1] is set to [Off]. Fordetails about how to switch the input signal, see page 38"Projecting an Image".
• Make sure the AV mute function is not turned on. Fordetails, see page 48 "Temporarily Blanking the Imageand Muting the Audio".
• Check the speaker's volume adjustment. For details, seepage 47 "Adjusting the Volume of the Speaker".
• Make sure the computer or AV equipment is connectedto the projector correctly. For details, see page 32"Connecting Equipment to the Projector".
• Make sure the computer or AV equipment is workingproperly.
Common Problems
137
Problem Solutions
Image is not projected normally. • Make sure the input signal is compatible with theprojector. For details, see page 166 "List of CompatibleSignals".
• Check the status of the video tape or other video source.
• Execute [Auto Set Signals] in [Image Adjustment]. Fordetails, see page 93 "Image Adjustment Menu".
• Check the settings of the computer's graphics driver. Fordetails, see the manual provided with the computer.
Image is blurred.
Image is partially out of focus.
• Make sure the lens is clean. For details, see page 145"Cleaning the Lens".
• Check the focus adjustment. For details, see page 44"Adjusting the Focus".
• Make sure the projection distance is within the projector'srange. For details, see page 29 "Relationship Betweenthe Projection Distance and the Screen Size".
• Check the installation angles of the projector and screen.For details, see page 42 "Adjusting the Angle of theProjection".
• Check the settings of [Sharpness] and [Phase] in [ImageAdjustment]. For details, see page 93 "Image AdjustmentMenu".
Image is dark. • Check the settings of [Brightness] and [Contrast] in[Image Adjustment]. For details, see page 93 "ImageAdjustment Menu".
• Make sure the lamp is not near the end of its service life.For details, see page 128 "Display Status".
• Check the settings of [RGB Input Range] in [ImageAdjustment]. For details, see page 93 "Image AdjustmentMenu".
• Make sure [3D Projection] in [Display Settings] is set to[Off]. For details, see page 97 "Display Settings Menu".
6. Troubleshooting
138
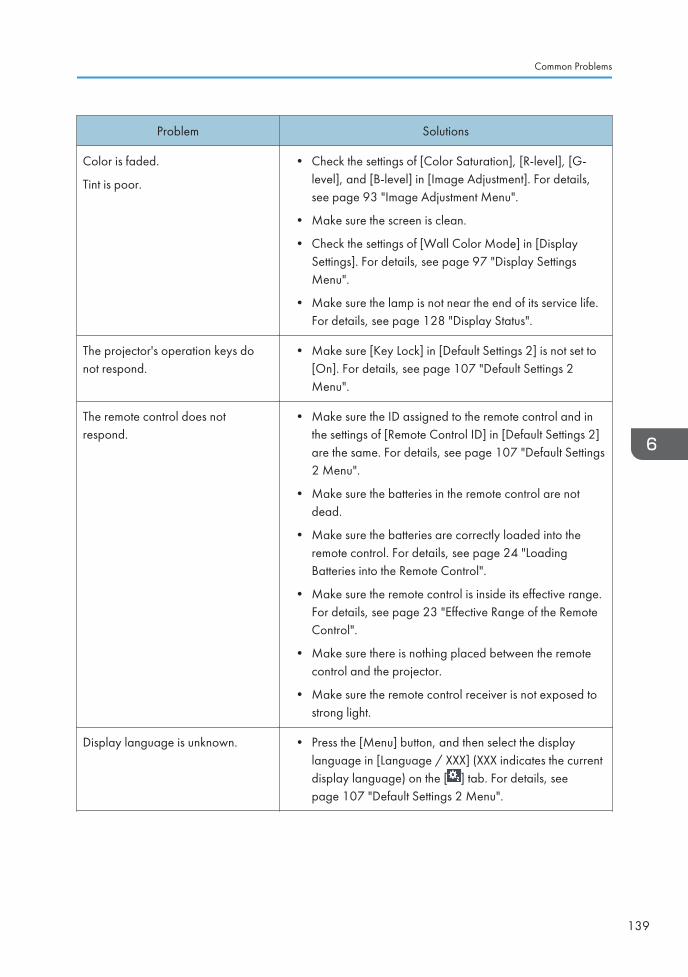
Problem Solutions
Color is faded.
Tint is poor.
• Check the settings of [Color Saturation], [R-level], [G-level], and [B-level] in [Image Adjustment]. For details,see page 93 "Image Adjustment Menu".
• Make sure the screen is clean.
• Check the settings of [Wall Color Mode] in [DisplaySettings]. For details, see page 97 "Display SettingsMenu".
• Make sure the lamp is not near the end of its service life.For details, see page 128 "Display Status".
The projector's operation keys donot respond.
• Make sure [Key Lock] in [Default Settings 2] is not set to[On]. For details, see page 107 "Default Settings 2Menu".
The remote control does notrespond.
• Make sure the ID assigned to the remote control and inthe settings of [Remote Control ID] in [Default Settings 2]are the same. For details, see page 107 "Default Settings2 Menu".
• Make sure the batteries in the remote control are notdead.
• Make sure the batteries are correctly loaded into theremote control. For details, see page 24 "LoadingBatteries into the Remote Control".
• Make sure the remote control is inside its effective range.For details, see page 23 "Effective Range of the RemoteControl".
• Make sure there is nothing placed between the remotecontrol and the projector.
• Make sure the remote control receiver is not exposed tostrong light.
Display language is unknown. • Press the [Menu] button, and then select the displaylanguage in [Language / XXX] (XXX indicates the currentdisplay language) on the [ ] tab. For details, seepage 107 "Default Settings 2 Menu".
Common Problems
139
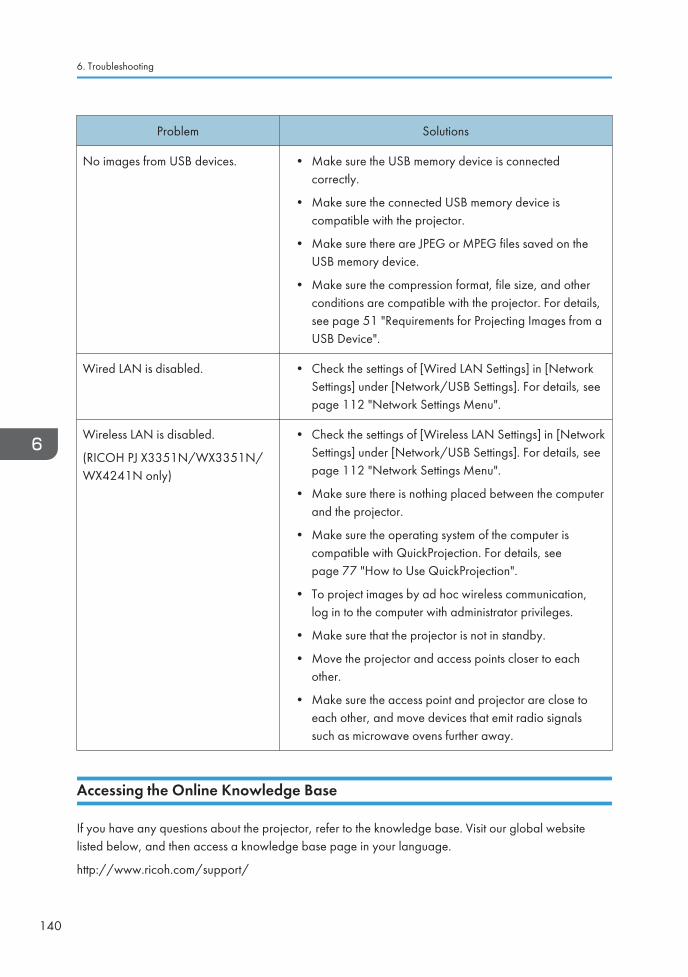
Problem Solutions
No images from USB devices. • Make sure the USB memory device is connectedcorrectly.
• Make sure the connected USB memory device iscompatible with the projector.
• Make sure there are JPEG or MPEG files saved on theUSB memory device.
• Make sure the compression format, file size, and otherconditions are compatible with the projector. For details,see page 51 "Requirements for Projecting Images from aUSB Device".
Wired LAN is disabled. • Check the settings of [Wired LAN Settings] in [NetworkSettings] under [Network/USB Settings]. For details, seepage 112 "Network Settings Menu".
Wireless LAN is disabled.
(RICOH PJ X3351N/WX3351N/WX4241N only)
• Check the settings of [Wireless LAN Settings] in [NetworkSettings] under [Network/USB Settings]. For details, seepage 112 "Network Settings Menu".
• Make sure there is nothing placed between the computerand the projector.
• Make sure the operating system of the computer iscompatible with QuickProjection. For details, seepage 77 "How to Use QuickProjection".
• To project images by ad hoc wireless communication,log in to the computer with administrator privileges.
• Make sure that the projector is not in standby.
• Move the projector and access points closer to eachother.
• Make sure the access point and projector are close toeach other, and move devices that emit radio signalssuch as microwave ovens further away.
Accessing the Online Knowledge Base
If you have any questions about the projector, refer to the knowledge base. Visit our global websitelisted below, and then access a knowledge base page in your language.
http://www.ricoh.com/support/
6. Troubleshooting
140

You can search the knowledge base by product name or keyword.
Common Problems
141

6. Troubleshooting
142
7. MaintenanceThis chapter explains the operating precautions and maintenance for the projector.
Operating Precautions
• The machine's light uses a mercury vapor lamp that becomes high pressure when it is turned on.The lamp has the following characteristics, so be sure to handle it with care after understandingthe contents. If the lamp explodes and either you are injured from broken pieces of glass, thinkyou have gotten glass particles or mercury vapour in your eyes, or have inhaled glass particlesor mercury vapour, contact a doctor immediately.
• Deterioration or shock can cause the lamp's life span to end or the lamp to explode. If thelamp explodes, it may make a big noise.
• The time that it takes for the lamp to reach its life span or explode depends on eachindividual lamp and its operating conditions. It is possible that it might explode the first timeit is used.
• If you use the lamp past its replacement period, the possibility of explosion increases.
• If the lamp explodes, broken glass pieces may be scattered around the inside of themachine and ejected from the vent or other opening.
• If the lamp explodes, a very small amount of mercury vapor in the lamp tube and brokenglass pieces may be ejected from the vents or other opening.
Pay attention to the following points when using the projector:
• What to do if a lamp has exploded
• If the lamp explodes, remove the power cord from the projector, leave the room while makingsure it is thoroughly ventilated.
• If the lamp explodes and you think that you have gotten glass particles or mercury vapor inyour eyes or have inhaled either, contact a doctor immediately.
• Clean up the area around the projector completely while being careful not to get injured fromany broken glass pieces.
• Throw away any food that was near the projector.
• Ask your service representative to replace the lamp and inspect the projector.
• What to do if a battery has leaked
• If leakage from a battery adheres to your skin, rinse it with water immediately, and thencontact a doctor.
• Wipe off the leakage with tissue paper while being careful not to touch it.
143
• Soak the tissue paper that you used in water, and then throw it away as burnable trash.
• When you carry the projector by hand, hold it with both hands and keep it in a horizontal position.If you hold the projector with one hand, its covers may come off or you may drop it.
• If moving the projector under conditions including vibration and shock, use both the packing caseand included carrying bag. Transporting the projector using the carrying bag only may damage itdue to shock or vibration. Further, transporting the projector in a damaged packing case maydamage the projector, so use a packing case that is strong enough to protect the projector fromshock or vibration.
• Do not apply volatile substances such as insecticide to the projector. Also, do not bring theprojector into long-term contact with rubber or vinyl products. Doing so may cause discoloration orthe paint to peel.
• The projector is not intended for long-term continuous operation. Further, do not use the projectorbefore removing it completely from the packing case. If a malfunction occurs when using theprojector under these conditions, a fee is charged for repair even if the warranty is still in effect.
• Do not use locations that may be hot, such as near a heater. Doing so may cause the projector tomalfunction or reduce the service life.
• Avoid locations that may become smoky. Particulates may adhere to the optical parts, reducing theservice life and causing the image to darken.
• Using the projector close to a television or radio may adversely affect the images and sound.
• Do not expose the projector to salt air or corrosive gas. Also, do not place the projector in alaboratory or other location where a chemical reaction might occur. Doing so may cause theprojector to malfunction.
• Moving the projector from a low-temperature location to a high-temperature location may causewater droplets to form on the projector lens and parts due to condensation. Continued use undersuch conditions may cause malfunction, so do not use the projector until the water droplets haveevaporated.
• The air is thin at high elevations, so the cooling efficiency of the projector is reduced. Select [On] in[High Altitude Mode] before using.
• Do not use the projector tilted to either side (20° or greater). Doing so may cause malfunction orreduce the service life.
7. Maintenance
144

Cleaning the Projector
• Do not remove any covers or screws that are not mentioned in this manual. There are highvoltage components inside the machine that may cause electric shock. Contact your servicerepresentative if any of the machine's internal components require maintenance, adjustment, orrepair.
• Do not disassemble or modify the machine. Doing so may cause injury or malfunction.
• Do not attempt to clean or replace parts for a machine that is installed in a high location on awall or ceiling. Doing so may cause it to fall down, resulting in an injury.
• Do not open the lamp cover of a machine that is installed on a wall or ceiling. Doing so maycause the lamp cover to fall down. If the lamp is broken, pieces of glass may fall and cause aninjury.
• Contact your sales or service representative to clean or replace parts for a machine that isinstalled on a wall or ceiling.
• When performing maintenance on the machine, always disconnect the power cord from thewall outlet.
Cleaning the Lens
When cleaning the lens, make sure to do the following:
• Use a commercially available blower or cloth for cleaning glass, cleaning paper, plastic lenscleaner, etc.
• The lens surface scratches easily, so do not rub or tap it with a hard object.
Cleaning the Projector
When cleaning the projector, make sure to do the following:
• Disconnect the power plug before cleaning.
• Gently wipe any dirt from the projector using a soft cloth. Using a damp cloth may cause water toseep inside the projector and cause electric shock or malfunction.
• Do not use benzene or paint thinners. Doing so may cause the projector to warp, discolor, or thepaint to peel. Further, do not use cleaning cloths that contain chemicals.
Cleaning the Projector
145
Replacing the Lamp
• Before replacing the lamp, turn off the power and wait at least one hour to allow the machine tocool completely. If it is not completely cool, you may burn or injure yourself due to the inside ofthe machine and lamp unit being hot. If you replace the lamp without unplugging the power cordfrom the power outlet, electric shock or explosion may occur.
• Be careful when handling the used lamp so that it does not break. If it breaks, it may cause injury.
• Do not attempt to clean or replace parts for a machine that is installed in a high location on awall or ceiling. Doing so may cause it to fall down, resulting in an injury.
• Do not open the lamp cover of a machine that is installed on a wall or ceiling. Doing so maycause the lamp cover to fall down. If the lamp is broken, pieces of glass may fall and cause aninjury.
• Contact your sales or service representative to clean or replace parts for a machine that Iinstalled on a wall or ceiling.
• Be sure to always use a dedicated replacement lamp that is new when replacing the lamp. If youuse a lamp that is not dedicated, it may result in an explosion and injury.
• The machine's light uses a mercury vapor lamp that becomes high pressure when it is turned on.The lamp has the following characteristics, so be sure to handle it with care after understandingthe contents. If the lamp explodes and you are either injured from broken pieces of glass, thinkyou have gotten glass particles or mercury vapour in your eyes, or have inhaled glass particlesor mercury vapour, contact a doctor immediately.
• Deterioration or shock can cause the lamp's life span to end or the lamp to explode. If thelamp explodes, it may make a big noise.
• The time that it takes for the lamp to reach its life span or explode depends on eachindividual lamp and its operating conditions. It is possible that it might explode the first timeit is used.
• If you use the lamp past its replacement period, the possibility of explosion increases.
• If the lamp explodes, broken glass pieces may be scattered around the inside of themachine and ejected from the vent or other opening.
• If the lamp explodes, a very small amount of mercury vapor in the lamp tube and brokenglass pieces may be ejected from the vents or other opening.
7. Maintenance
146
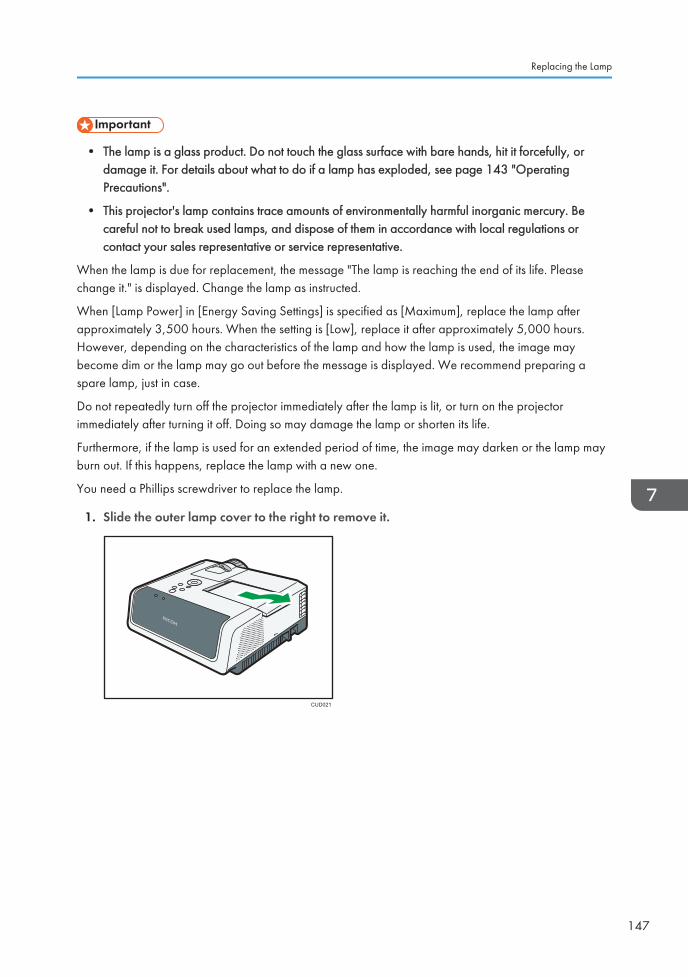
• The lamp is a glass product. Do not touch the glass surface with bare hands, hit it forcefully, ordamage it. For details about what to do if a lamp has exploded, see page 143 "OperatingPrecautions".
• This projector's lamp contains trace amounts of environmentally harmful inorganic mercury. Becareful not to break used lamps, and dispose of them in accordance with local regulations orcontact your sales representative or service representative.
When the lamp is due for replacement, the message "The lamp is reaching the end of its life. Pleasechange it." is displayed. Change the lamp as instructed.
When [Lamp Power] in [Energy Saving Settings] is specified as [Maximum], replace the lamp afterapproximately 3,500 hours. When the setting is [Low], replace it after approximately 5,000 hours.However, depending on the characteristics of the lamp and how the lamp is used, the image maybecome dim or the lamp may go out before the message is displayed. We recommend preparing aspare lamp, just in case.
Do not repeatedly turn off the projector immediately after the lamp is lit, or turn on the projectorimmediately after turning it off. Doing so may damage the lamp or shorten its life.
Furthermore, if the lamp is used for an extended period of time, the image may darken or the lamp mayburn out. If this happens, replace the lamp with a new one.
You need a Phillips screwdriver to replace the lamp.
1. Slide the outer lamp cover to the right to remove it.
CUD021
Replacing the Lamp
147
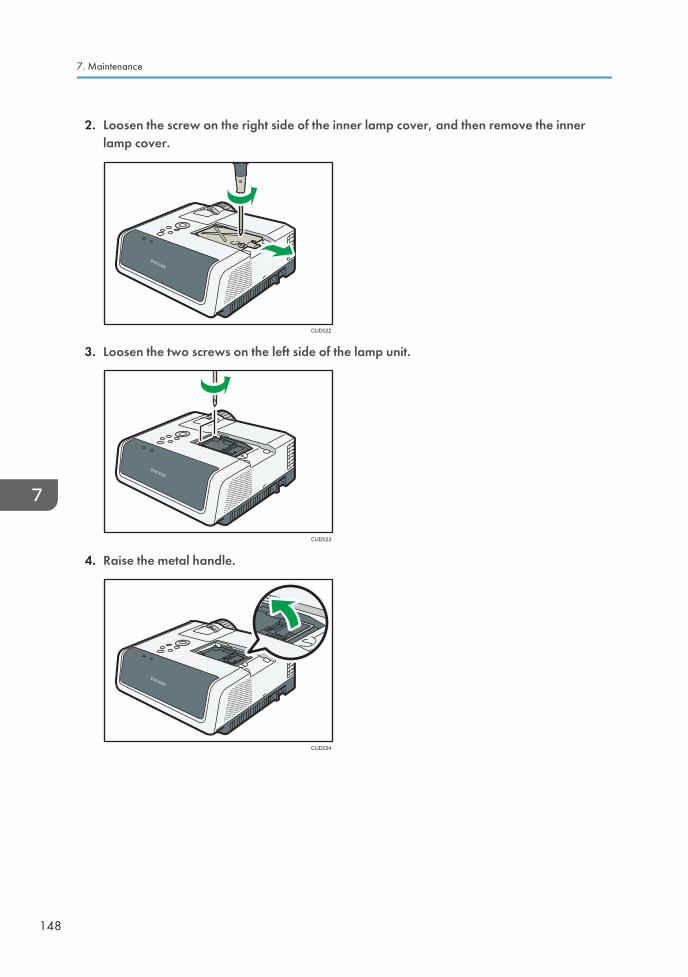
2. Loosen the screw on the right side of the inner lamp cover, and then remove the innerlamp cover.
CUD022
3. Loosen the two screws on the left side of the lamp unit.
CUD023
4. Raise the metal handle.
CUD024
7. Maintenance
148
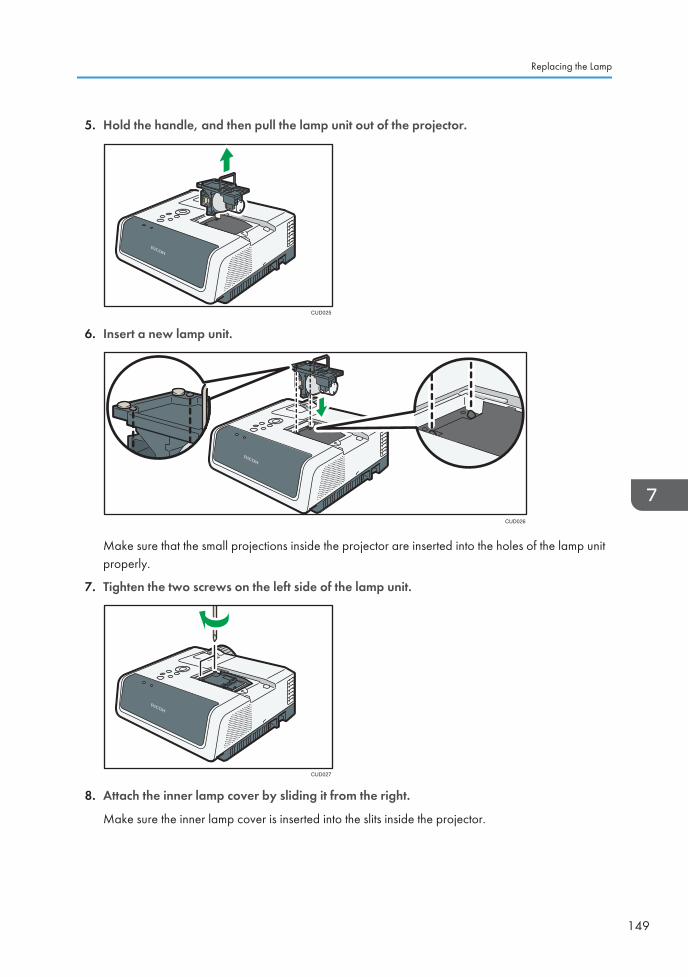
5. Hold the handle, and then pull the lamp unit out of the projector.
CUD025
6. Insert a new lamp unit.
CUD026
Make sure that the small projections inside the projector are inserted into the holes of the lamp unitproperly.
7. Tighten the two screws on the left side of the lamp unit.
CUD027
8. Attach the inner lamp cover by sliding it from the right.
Make sure the inner lamp cover is inserted into the slits inside the projector.
Replacing the Lamp
149
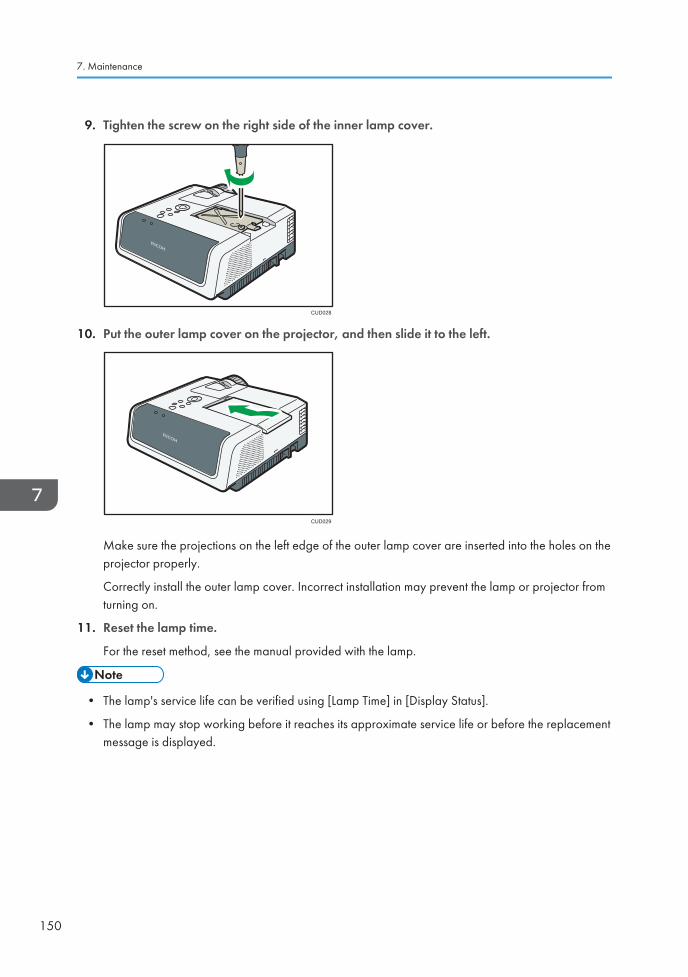
9. Tighten the screw on the right side of the inner lamp cover.
CUD028
10. Put the outer lamp cover on the projector, and then slide it to the left.
CUD029
Make sure the projections on the left edge of the outer lamp cover are inserted into the holes on theprojector properly.
Correctly install the outer lamp cover. Incorrect installation may prevent the lamp or projector fromturning on.
11. Reset the lamp time.
For the reset method, see the manual provided with the lamp.
• The lamp's service life can be verified using [Lamp Time] in [Display Status].
• The lamp may stop working before it reaches its approximate service life or before the replacementmessage is displayed.
7. Maintenance
150
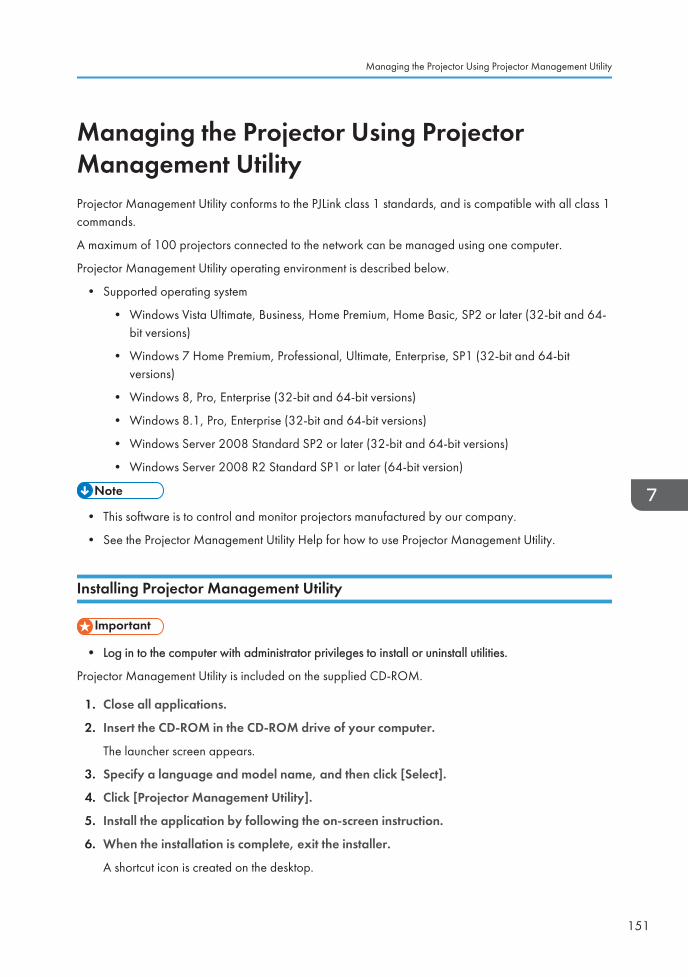
Managing the Projector Using ProjectorManagement UtilityProjector Management Utility conforms to the PJLink class 1 standards, and is compatible with all class 1commands.
A maximum of 100 projectors connected to the network can be managed using one computer.
Projector Management Utility operating environment is described below.
• Supported operating system
• Windows Vista Ultimate, Business, Home Premium, Home Basic, SP2 or later (32-bit and 64-bit versions)
• Windows 7 Home Premium, Professional, Ultimate, Enterprise, SP1 (32-bit and 64-bitversions)
• Windows 8, Pro, Enterprise (32-bit and 64-bit versions)
• Windows 8.1, Pro, Enterprise (32-bit and 64-bit versions)
• Windows Server 2008 Standard SP2 or later (32-bit and 64-bit versions)
• Windows Server 2008 R2 Standard SP1 or later (64-bit version)
• This software is to control and monitor projectors manufactured by our company.
• See the Projector Management Utility Help for how to use Projector Management Utility.
Installing Projector Management Utility
• Log in to the computer with administrator privileges to install or uninstall utilities.
Projector Management Utility is included on the supplied CD-ROM.
1. Close all applications.
2. Insert the CD-ROM in the CD-ROM drive of your computer.
The launcher screen appears.
3. Specify a language and model name, and then click [Select].
4. Click [Projector Management Utility].
5. Install the application by following the on-screen instruction.
6. When the installation is complete, exit the installer.
A shortcut icon is created on the desktop.
Managing the Projector Using Projector Management Utility
151
• To uninstall Projector Management Utility, use the program delete function in [Control Panel] todelete "RICOH Projector Management Utility".
Settings Required to Use Projector Management Utility
Specify the following settings to control the projector using Projector Management Utility:
• Connect the projector to a network using [Network Settings]
• [Projector Name] in [Network Settings]
• [PJLink] items in [Network Application Settings]
For details, see page 112 "Network Settings Menu" and page 121 "Network Application SettingsMenu".
• [PJLink Password] is not specified by factory defaults. It is recommended to register a password assoon as possible. If you forget the password, register a new password. The new password is valid.
Starting Projector Management Utility
The projector must be registered in advance. For details, see the Projector Management Utility Help.
Projector Management Utility acquires the projector registration information from the configuration file,when it is launched.
• To use Projector Management Utility, log on using administrator privileges.
1. Double-click the "Projector Management Utility" icon on the desktop.
The information for the projectors detected by the application is displayed.
The following information can be obtained:
• Projector status (power on and off, input signal, Av mute on and off, lamp status, error status)
• Projector information (projector name, manufacturer, IP address)
The functions that can be operated from Projector Management Utility are power on and off, inputsignal switching, and mute.
• Depending on the setting in [NW Settings on Standby], the projector does not respond even if theprojector is in standby mode. Press the [Power] button, or change the setting in [NW Settings onStandby] to [Wired LAN] or [Wired/Wireless LAN] (RICOH PJ X3351N/WX3351N/
7. Maintenance
152
WX4241N only) so that the projector can be turned on from standby mode via a wired LAN orwireless LAN.
• If a communications error prevents the projector from being detected, "?" is displayed. If theconnection failed due to an incorrect password or other reason, "×" is displayed.
• Mute function is not applied if it is not supported by the projector. The projector supports "Video &Audio" mute. "Video" mute and "Audio" mute are not supported.
• An input signal cannot be switched if you select the input signal that is not supported by theprojector. The following table describes the supported input signal by the projector and thecorresponding input name displayed in Projector Management Utility:
Projector input signal PJLink input name
Computer 1 RGB1
Y/Pb/Pr RGB2
Computer 2 RGB3
HDMI DIGITAL1
Video VIDEO1
Network PC NETWORK1
Server NETWORK2
Miracast (RICOH PJ X3351N/WX3351N/WX4241N only)
NETWORK3
USB Memory STORAGE1
Managing the Projector Using Projector Management Utility
153
Managing the Projector Using Web ImageMonitorUsing Web Image Monitor, you can check the projector status and change settings.
To use this function, specify the following settings:
• Connect the projector to a network using [Network Settings]
• Select [Enable] in [Web Image Monitor] under [Network Application Settings]
To enable this setting after you change it, you must restart Web Image Monitor.
For details, see page 112 "Network Settings Menu" and page 121 "Network Application SettingsMenu".
The following web browsers are recommended for Web Image Monitor:
• Windows:
Internet Explorer 8.0 or higher
• Mac OS
Safari 7.0 or higher
• Display and operation problems can occur if you are using a non-recommended web browser.
• You must enable JavaScript and cookies on your web browser to use Web Image Monitor.
• If you use Internet Explorer, you must enable native XMLHTTP support to use Web Image Monitor.
• You can access Web Image Monitor more quickly by registering the projector's URL as abookmark.
• Depending on the setting in [NW Settings on Standby], the projector does not respond even if theprojector is in standby mode. Press the Power button, or change the setting in [NW Settings onStandby] to [Wired LAN] or [Wired/Wireless LAN] (RICOH PJ X3351N/WX3351N/WX4241N only) so that the projector can be turned on from standby mode via a wired LAN orwireless LAN.
Displaying Web Image Monitor
1. Start your web browser.
2. Enter "http://(projector's IP address)/" in your web browser's URL bar.
Top Page of Web Image Monitor appears.
7. Maintenance
154
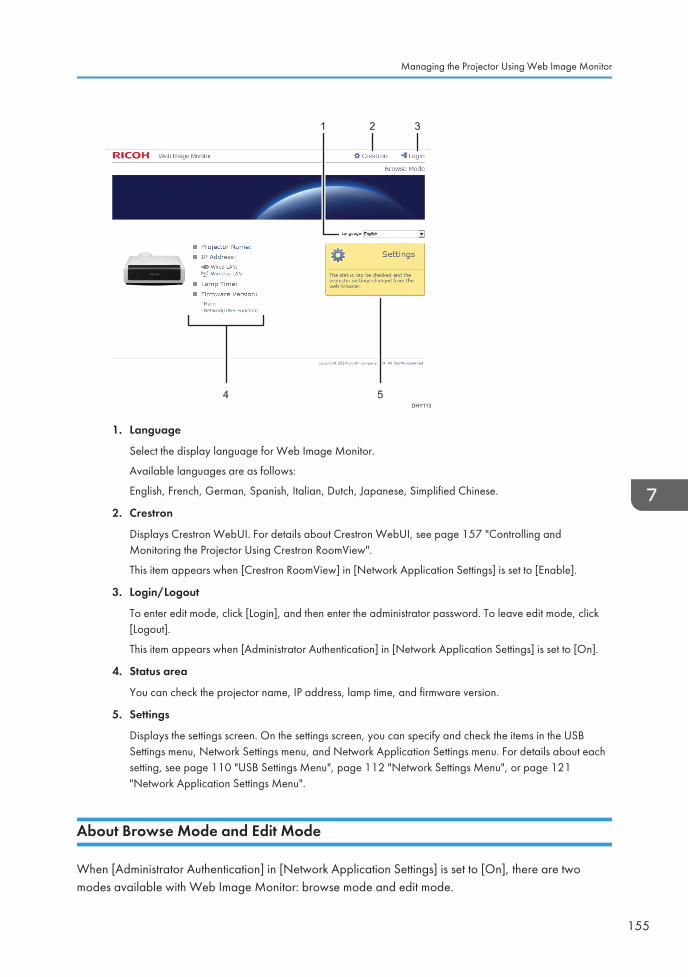
4 5DHY113
21 3
1. Language
Select the display language for Web Image Monitor.
Available languages are as follows:
English, French, German, Spanish, Italian, Dutch, Japanese, Simplified Chinese.
2. Crestron
Displays Crestron WebUI. For details about Crestron WebUI, see page 157 "Controlling andMonitoring the Projector Using Crestron RoomView".
This item appears when [Crestron RoomView] in [Network Application Settings] is set to [Enable].
3. Login/Logout
To enter edit mode, click [Login], and then enter the administrator password. To leave edit mode, click[Logout].
This item appears when [Administrator Authentication] in [Network Application Settings] is set to [On].
4. Status area
You can check the projector name, IP address, lamp time, and firmware version.
5. Settings
Displays the settings screen. On the settings screen, you can specify and check the items in the USBSettings menu, Network Settings menu, and Network Application Settings menu. For details about eachsetting, see page 110 "USB Settings Menu", page 112 "Network Settings Menu", or page 121"Network Application Settings Menu".
About Browse Mode and Edit Mode
When [Administrator Authentication] in [Network Application Settings] is set to [On], there are twomodes available with Web Image Monitor: browse mode and edit mode.
Managing the Projector Using Web Image Monitor
155
Browse Mode
This mode requires no user login.
In browse mode, you can check the projector status and settings, but you cannot change theprojector settings.
Edit Mode
The administrator password is required for the user to log in to the edit mode.
In edit mode, you can check the projector status and settings, and also change the projectorsettings.
• When [Administrator Authentication] in [Network Application Settings] is set to [Off], you can useWeb Image Monitor in edit mode without entering a password.
Login to Edit Mode
1. On Top Page, click [Login].
2. Enter the administrator password, and then click [Login].
Enter the password that is specified in [Administrator Password] under [Network ApplicationSettings].
• Depending on the configuration of your web browser, the password might be saved. If you do notwant to save the password, configure your web browser's settings so that this information is notsaved.
7. Maintenance
156
Controlling and Monitoring the Projector UsingCrestron RoomViewThe projector supports Crestron RoomView. Crestron RoomView is a system developed by CrestronElectronics for controlling and monitoring multiple devices on a network. For more information, see theCrestron Electronics website.
What you can do with Crestron RoomView
• Controlling and monitoring the projector using a web browser
Using Crestron WebUI, you can control and monitor the projector from your computer. Fordetails, see page 157 "Displaying Crestron WebUI" and page 158 "Using CrestronWebUI".
• Controlling and monitoring the projector using Crestron software
Using the Crestron RoomView Express/Crestron RoomView Server Edition, software suppliedby Crestron Electronics, you can monitor the projector, communicate with the help desk, andsend emergency messages. For details, see the Crestron Electronics website.
To use this function, specify the following settings:
• Connect the projector to a network using [Network Settings]
• Select [Enable] in [Crestron RoomView] under [Network Application Settings]
• Specify other items in [Crestron RoomView] as required
For details, see page 112 "Network Settings Menu" and page 121.
• Depending on the setting in [NW Settings on Standby], the projector does not respond even if theprojector is in standby mode. Press the Power button, or change the setting in [NW Settings onStandby] to [Wired LAN] or [Wired/Wireless LAN] (RICOH PJ X3351N/WX3351N/WX4241N only) so that the projector can be turned on from standby mode via a wired LAN orwireless LAN.
Displaying Crestron WebUI
• To use Crestron WebUI, Adobe Flash® Player must be installed on your computer.
1. Start your Web browser.
2. Enter "http://(projector's IP address)/" in your Web browser's URL bar.
The top screen of Web Image Monitor appears.
Controlling and Monitoring the Projector Using Crestron RoomView
157
3. Click [Crestron] at the top right on Web Image Monitor.
The top screen of Crestron WebUI appears.
• If [Crestron WebUI User Auth.] under [Network Application Settings] is enabled, a password isrequired to access Crestron WebUI.
Using Crestron WebUI
Top screen
This screen is displayed when you access Crestron WebUI, or click [Exit] on the tools screen orinformation screen. You can switch the input signal, adjust the image and the volume of thespeaker, and turn off the projector on this screen.
7. Maintenance
158
Tools screen
You can display the tools screen by clicking the [Tools] tab. You can specify the projector's networksettings and Crestron RoomView settings on this screen.
Information screen
You can display the information screen by clicking the [Info] tab. You can check the projector'sinformation, such as the firmware version and lamp status on this screen.
Controlling and Monitoring the Projector Using Crestron RoomView
159
Help desk window
You can display the help desk window by clicking the [Help] tab. You can send and receive amessage to administrators who are using Crestron RoomView Express in this window.
• If [Crestron WebUI Admin. Auth.] under [Network Application Settings] is enabled, a password isrequired to access the tools screen.
7. Maintenance
160
Consumables• Lamp unit
RICOH PJ Replacement Lamp Type17
• Contact your sales or service representative for information about consumables.
Consumables
161

7. Maintenance
162
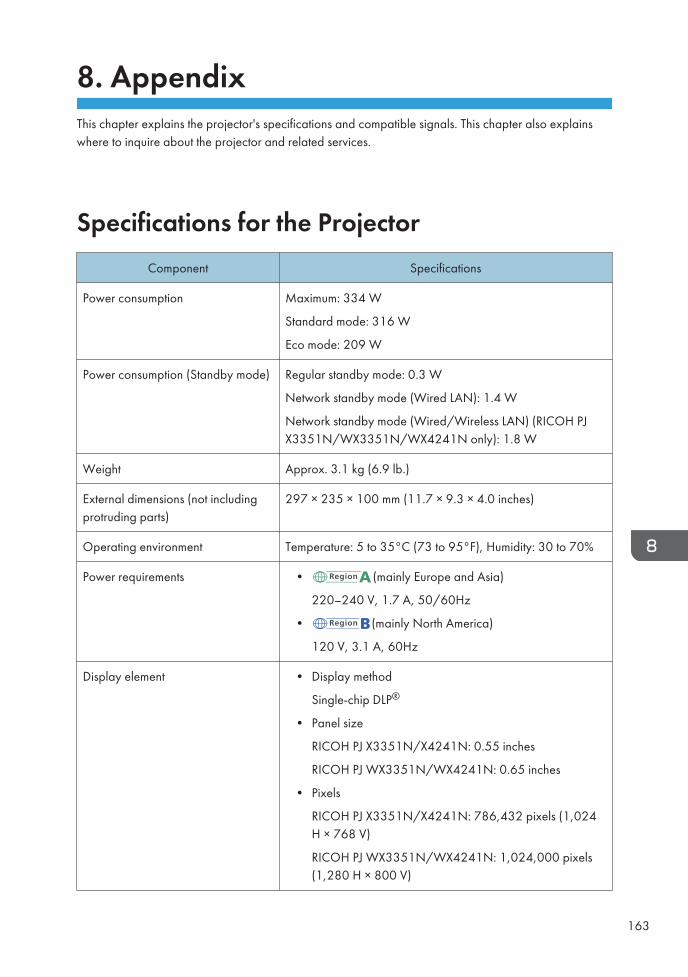
8. AppendixThis chapter explains the projector's specifications and compatible signals. This chapter also explainswhere to inquire about the projector and related services.
Specifications for the ProjectorComponent Specifications
Power consumption Maximum: 334 W
Standard mode: 316 W
Eco mode: 209 W
Power consumption (Standby mode) Regular standby mode: 0.3 W
Network standby mode (Wired LAN): 1.4 W
Network standby mode (Wired/Wireless LAN) (RICOH PJX3351N/WX3351N/WX4241N only): 1.8 W
Weight Approx. 3.1 kg (6.9 lb.)
External dimensions (not includingprotruding parts)
297 × 235 × 100 mm (11.7 × 9.3 × 4.0 inches)
Operating environment Temperature: 5 to 35°C (73 to 95°F), Humidity: 30 to 70%
Power requirements • (mainly Europe and Asia)
220–240 V, 1.7 A, 50/60Hz
• (mainly North America)
120 V, 3.1 A, 60Hz
Display element • Display method
Single-chip DLP®
• Panel size
RICOH PJ X3351N/X4241N: 0.55 inches
RICOH PJ WX3351N/WX4241N: 0.65 inches
• Pixels
RICOH PJ X3351N/X4241N: 786,432 pixels (1,024H × 768 V)
RICOH PJ WX3351N/WX4241N: 1,024,000 pixels(1,280 H × 800 V)
163
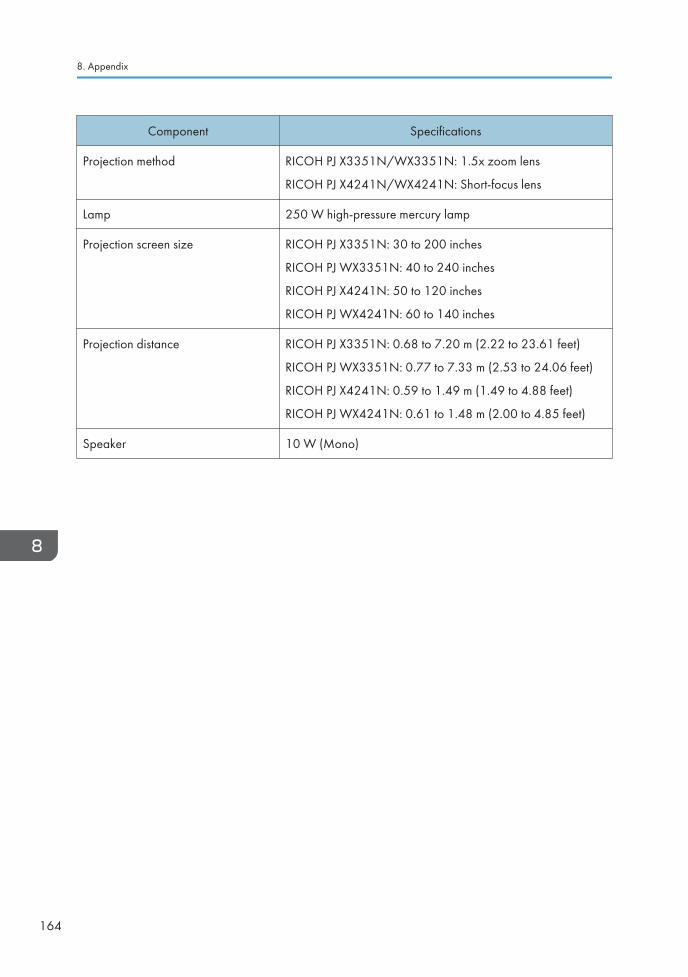
Component Specifications
Projection method RICOH PJ X3351N/WX3351N: 1.5x zoom lens
RICOH PJ X4241N/WX4241N: Short-focus lens
Lamp 250 W high-pressure mercury lamp
Projection screen size RICOH PJ X3351N: 30 to 200 inches
RICOH PJ WX3351N: 40 to 240 inches
RICOH PJ X4241N: 50 to 120 inches
RICOH PJ WX4241N: 60 to 140 inches
Projection distance RICOH PJ X3351N: 0.68 to 7.20 m (2.22 to 23.61 feet)
RICOH PJ WX3351N: 0.77 to 7.33 m (2.53 to 24.06 feet)
RICOH PJ X4241N: 0.59 to 1.49 m (1.49 to 4.88 feet)
RICOH PJ WX4241N: 0.61 to 1.48 m (2.00 to 4.85 feet)
Speaker 10 W (Mono)
8. Appendix
164
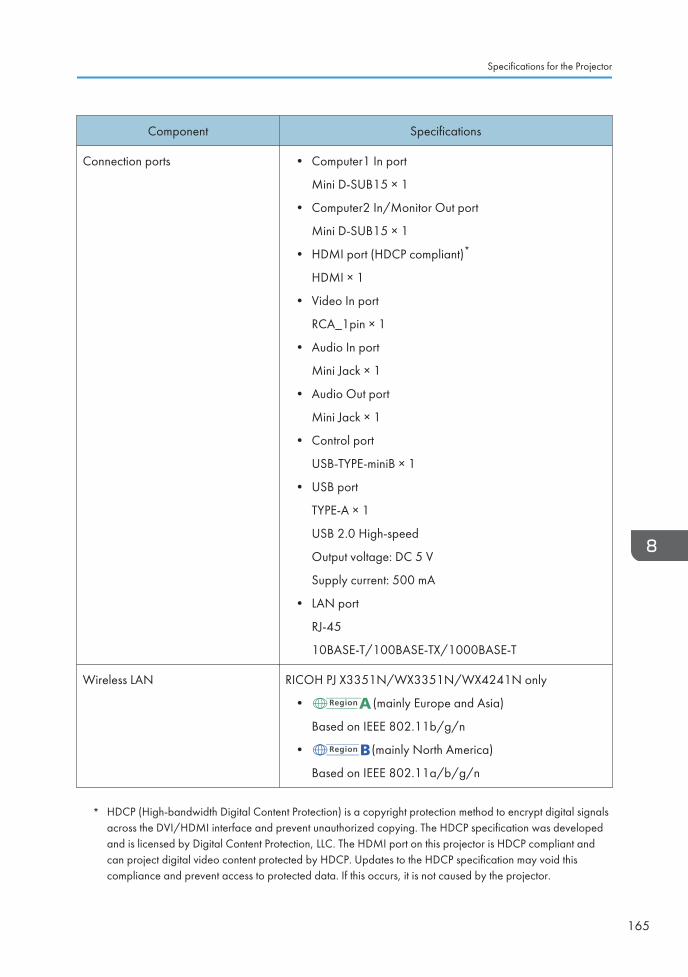
Component Specifications
Connection ports • Computer1 In port
Mini D-SUB15 × 1
• Computer2 In/Monitor Out port
Mini D-SUB15 × 1
• HDMI port (HDCP compliant)*
HDMI × 1
• Video In port
RCA_1pin × 1
• Audio In port
Mini Jack × 1
• Audio Out port
Mini Jack × 1
• Control port
USB-TYPE-miniB × 1
• USB port
TYPE-A × 1
USB 2.0 High-speed
Output voltage: DC 5 V
Supply current: 500 mA
• LAN port
RJ-45
10BASE-T/100BASE-TX/1000BASE-T
Wireless LAN RICOH PJ X3351N/WX3351N/WX4241N only
• (mainly Europe and Asia)
Based on IEEE 802.11b/g/n
• (mainly North America)
Based on IEEE 802.11a/b/g/n
* HDCP (High-bandwidth Digital Content Protection) is a copyright protection method to encrypt digital signalsacross the DVI/HDMI interface and prevent unauthorized copying. The HDCP specification was developedand is licensed by Digital Content Protection, LLC. The HDMI port on this projector is HDCP compliant andcan project digital video content protected by HDCP. Updates to the HDCP specification may void thiscompliance and prevent access to protected data. If this occurs, it is not caused by the projector.
Specifications for the Projector
165
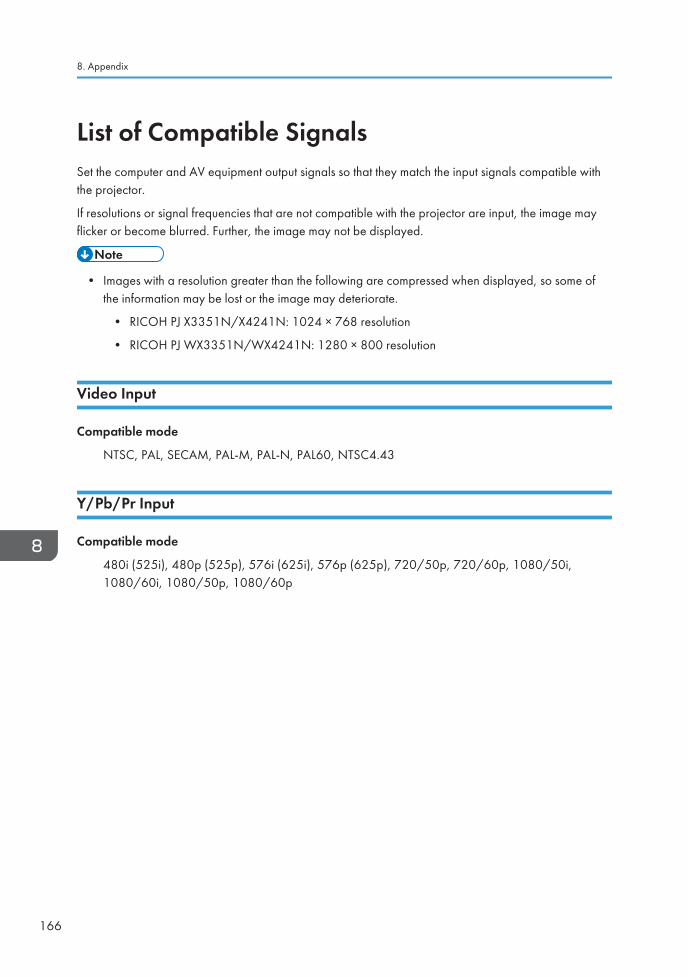
List of Compatible SignalsSet the computer and AV equipment output signals so that they match the input signals compatible withthe projector.
If resolutions or signal frequencies that are not compatible with the projector are input, the image mayflicker or become blurred. Further, the image may not be displayed.
• Images with a resolution greater than the following are compressed when displayed, so some ofthe information may be lost or the image may deteriorate.
• RICOH PJ X3351N/X4241N: 1024 × 768 resolution
• RICOH PJ WX3351N/WX4241N: 1280 × 800 resolution
Video Input
Compatible mode
NTSC, PAL, SECAM, PAL-M, PAL-N, PAL60, NTSC4.43
Y/Pb/Pr Input
Compatible mode
480i (525i), 480p (525p), 576i (625i), 576p (625p), 720/50p, 720/60p, 1080/50i,1080/60i, 1080/50p, 1080/60p
8. Appendix
166
Computer Input
ModeResolution Frequency
Horizontal (pixel) Vertical (pixel) Vertical (Hz) Horizontal (kHz) Clock (MHz)640 × 350 640 350 85.08 37.86 31.50640 × 400 640 400 85.08 37.86 31.50
640 × 480 640 480
59.93 31.46 25.1772.81 37.86 31.5075.00 37.50 31.5085.01 43.27 36.00
720 × 400 720 400 85.04 37.93 35.50
800 × 600 800 600
56.25 35.16 36.0060.32 37.88 40.0072.19 48.08 50.0075.00 46.88 49.5085.06 53.67 56.25
832 × 624 832 624 74.55 49.72 57.28848 × 480 848 480 60.00 31.02 33.75
1024 × 768 1024 768
60.00 48.36 65.0070.07 56.48 75.0075.03 60.02 78.7585.00 68.68 94.50
1152 × 864 1152 864 75.00 67.50 108.001152 × 870 1152 870 75.06 68.68 100.001280 × 720 1280 720 60.00 45.00 74.25
1280 × 768 1280 768
59.99 47.40 68.2559.87 47.78 79.5074.89 60.29 102.2584.84 68.63 117.50
1280 × 800 1280 800
59.91 49.31 71.0059.81 49.70 83.5074.93 62.79 106.5084.88 71.55 122.50
1280 × 960 1280 960 60.00 60.00 108.0085.00 85.94 148.50
1280 × 1024 1280 102460.02 63.98 108.0075.02 79.98 135.0085.02 91.15 157.50
1360 × 768 1360 768 60.02 47.71 85.50
1366 × 768 1366 768 60.00 48.00 72.0059.79 47.71 85.50
1400 × 1050 1400 105059.95 64.74 101.0059.98 65.32 121.7574.87 82.28 156.00
1440 × 900 1440 900
59.90 55.47 88.7559.89 55.93 106.5074.98 70.64 136.7584.84 80.43 157.00
1600 × 900 1600 900 60.00 60.00 108.001600 × 1200 1600 1200 60.00 75.00 162.00
1680 × 1050 1680 1050 59.88 64.67 119.0059.95 65.29 146.25
List of Compatible Signals
167
HDMI Input
ModeResolution Frequency
Horizontal (pixel) Vertical (pixel) Vertical (Hz) Horizontal (kHz) Clock (MHz)480i 720 242.5 59.940 15.734 13.500 576i 720 288 50.000 15.625 13.500 480p 720 483 59.940 31.469 27.000 576p 720 576 50.000 31.250 27.000
720 / 50p 1280 720 50.000 37.500 74.250 720 / 60p 1280 720 60.000 45.000 74.250 1080 / 50i 1920 540 50.000 28.125 74.250 1080 / 60i 1920 540 60.000 33.750 74.250 1080 / 24p 1920 1080 24.000 27.000 74.2501080 / 30p 1920 1080 30.000 33.750 74.2501080 / 50p 1920 1080 50.000 56.250 148.500 1080 / 60p 1920 1080 60.000 67.500 148.500 640 × 350 640 350 85.08 37.86 31.50640 × 400 640 400 85.08 37.86 31.50
640 × 480 640 480
59.93 31.46 25.1772.81 37.86 31.5075.00 37.50 31.5085.01 43.27 36.00
800 × 600 800 600
56.25 35.16 36.0060.32 37.88 40.0072.19 48.08 50.0075.00 46.88 49.5085.06 53.67 56.25
832 × 624 832 624 74.55 49.72 57.28848 × 480 848 480 60.00 31.02 33.75
1024 × 768 1024 768
60.00 48.36 65.0070.07 56.48 75.0075.03 60.02 78.7585.00 68.68 94.50
1152 × 864 1152 864 75.00 67.50 108.001152 × 780 1152 780 75.06 68.68 100.001280 × 720 1280 720 60.00 45.00 74.25
1280 × 768 1280 768
59.99 47.40 68.2559.87 47.78 79.5074.89 60.29 102.2584.84 68.63 117.50
1280 × 800 1280 800
59.91 49.31 71.0059.81 49.70 83.5074.93 62.79 106.5084.88 71.55 122.50
1280 × 960 1280 960 60.00 60.00 108.0085.00 85.94 148.50
1280 × 1024 1280 102460.02 63.98 108.0075.02 79.98 135.0085.02 91.15 157.50
1360 × 768 1360 768 60.02 47.71 85.50
1366 × 768 1366 768 60.00 48.00 72.0059.79 47.71 85.50
1400 × 1050 1400 105059.95 64.74 101.0059.98 65.32 121.7574.87 82.28 156.00
1440 × 900 1440 900
59.90 55.47 88.7559.89 55.93 106.5074.98 70.64 136.7584.84 80.43 157.00
1600 × 900 1600 900 60.00 60.00 108.001600 × 1200 1600 1200 60.00 75.00 162.00
1680 × 1050 1680 1050 59.88 64.67 119.0059.95 65.29 146.25
8. Appendix
168
3D Format
: Supported
: Not Supported
Computer input
ModeFrequency 3D format
Vertical (Hz) Clock (MHz) Frame Sequential Side by Side Top and Bottom
640 × 480 59.93 25.17 ○ ○ ○800 × 600 60.32 40.00 ○ ○ ○
1024 × 768 60.00 65.00 ○ ○ ○1280 × 960 60.00 108.00 ○ ○ ○
1280 × 1024 60.02 108.00 ○ ○ ○1360 × 768 60.02 85.50 ○ ○ ○1366 × 768
60.00 72.00 ○ ○ ○59.79 85.50 ○ ○ ○
1440 × 90059.90 88.75 ○ ○ ○59.89 106.50 ○ ○ ○
1600 × 900 60.00 108.00 ○ ○ ○1600 × 1200 60.00 162.00 ○ ○ ○1680 × 1050
59.88 119.00 ○ ○ ○59.95 146.25 ○ ○ ○
Y/Pb/Pr input
Mode3D format
Frame Sequential Side by Side Top and Bottom
480i ○ ○ ○576i ○ ○ ○480p × ○ ○576p × ○ ○
720 / 60p × ○ ○1080 / 60i × ○ ○1080 / 60p × ○ ○
Video input
Mode3D format
Frame Sequential Side by Side Top and Bottom
NTSC ○ × ×PAL ○ × ×
List of Compatible Signals
169
HDMI input
ModeFrequency 3D format
Vertical (Hz) Clock (MHz) Frame Sequential Side by Side Top and
BottomFrame
Packing
640 × 480 59.93 25.17 ○ ○ ○ ×800 × 600 60.32 40.00 ○ ○ ○ ×
1024 × 768 60.00 65.00 ○ ○ ○ ×1280 × 960 60.00 108.00 ○ ○ ○ ×
1280 × 1024 60.02 108.00 ○ ○ ○ ×1360 × 768 60.02 85.50 ○ ○ ○ ×1366 × 768
60.00 72.00 ○ ○ ○ ×59.79 85.50 ○ ○ ○ ×
1440 × 90059.90 88.75 ○ ○ ○ ×59.89 106.50 ○ ○ ○ ×
1600 × 900 60.00 108.00 ○ ○ ○ ×1600 × 1200 60.00 162.00 ○ ○ ○ ×1680 × 1050
59.88 119.00 ○ ○ ○ ×59.95 146.25 ○ ○ ○ ×
480i 59.940 13.500 ○ ○ ○ ×576i 50.000 13.500 ○ ○ ○ ×480p 59.940 27.000 × ○ ○ ×576p 50.000 27.000 × ○ ○ ×
720 / 60p 60.000 74.250 × ○ ○ ×1080 / 60i 60.000 74.250 × ○ ○ ×1080 / 60p 60.000 148.500 × ○ ○ ×720 / 50p
(Frame Packing) 50.000 148.500 × × × ○720 / 60p
(Frame Packing) 59.940/60.000 148.350/148.500 × × × ○1080 / 24p
(Frame Packing) 23.976/24.000 148.350/148.500 × × × ○1080 / 50i
(Side by Side) 50.000 74.250 × ○ × ×1080 / 60i
(Side by Side) 59.940/60.000 74.176/74.250 × ○ × ×720 / 50p
(Top and Bottom) 50.000 74.250 × × ○ ×720 / 60p
(Top and Bottom) 59.940/60.000 74.176/74.250 × × ○ ×1080 / 24p
(Top and Bottom) 23.976/24.000 74.176/74.250 × × ○ ×
8. Appendix
170
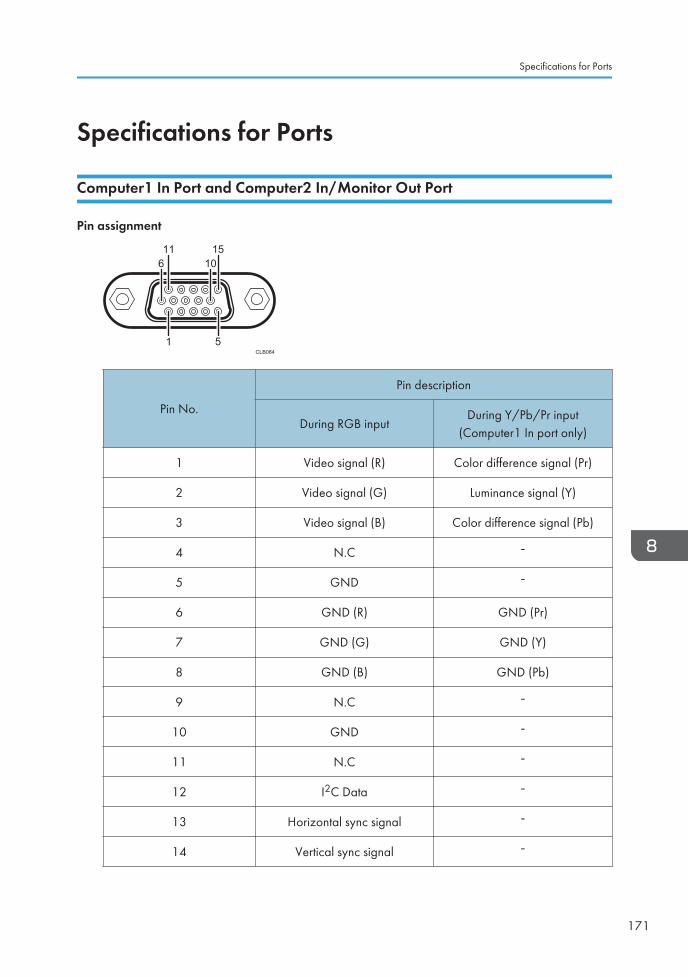
Specifications for Ports
Computer1 In Port and Computer2 In/Monitor Out Port
Pin assignment
51
101511
6
CLB064
Pin No.
Pin description
During RGB inputDuring Y/Pb/Pr input
(Computer1 In port only)
1 Video signal (R) Color difference signal (Pr)
2 Video signal (G) Luminance signal (Y)
3 Video signal (B) Color difference signal (Pb)
4 N.C
5 GND
6 GND (R) GND (Pr)
7 GND (G) GND (Y)
8 GND (B) GND (Pb)
9 N.C
10 GND
11 N.C
12 I2C Data
13 Horizontal sync signal
14 Vertical sync signal
Specifications for Ports
171
Pin No.
Pin description
During RGB inputDuring Y/Pb/Pr input
(Computer1 In port only)
15 I2C CLOCK
Input Signal
• RGB input
RGB signals: 0.7V (p-p), 75
Horizontal sync signal: TTL level (Pos/neg polarity)
Vertical sync signal: TTL level (Pos/neg polarity)
• Y/Pb/Pr input (Computer1 In port only)
Y signal: 1.0V (p-p), 75
Pb/Pr signals: 0.7V (p-p), 75
Control Port
Interface format
Communication method RS-232C, 115,200bps, No Parity, Data Length: 8 bits; Stop BitLength: 1bit
Communication format #(23h)’ + Command + CR (0Dh)
Only 1 command valid per communication.
For the available commands, see "Main commands".
Data format For input commands, only ASCII-compliant all-uppercasealphanumeric characters supported.
Replies • Acknowledge (Aborted)
'=(3Dh)' + Command(3byte) + ':(3Ah)' + 'E(45h)' + 'R(52h)' +'0(30h)' + CR(0Dh)
• No acknowledge
'=(3Dh)' + 'E(45h)' + 'R(52h)' + '0(30h)' + CR(0Dh)
For details of Acknowledge (Normally ended), see "Maincommands".
8. Appendix
172
Main commands
Item CommandAcknowledge
(Normally ended) *
Power on PON =PON:SC0
Power off POF =POF:SC0
Guidance display on ICN:1 =ICN:1
Guidance display off ICN:0 =ICN:0
Auto setting (RGB input) PAT =PAT:SC0
Status display on DON =DON:SC0
Status display off DOF =DOF:SC0
Computer1 input INP:1 =INP:1
HDMI input INP:5 =INP:5
Network PC input INP:12 =INP:12
* CR is added to the end of "Acknowledge (Normally ended)".
• The control port is for service representatives or administrators of the projector.
• A USB driver must be installed to control the projector using the control port. For details, contactyour service representative.
Specifications for Ports
173
Information
Copyrights
This projector uses open source and/or third party software. To check the information about softwarecopyrights, see the documents in the "OSS" folder on the supplied CD-ROM.
You can also view and download the source code from:
http://www.support-download.com/bb/html/dr_ut_e/oss/index.htm
Updating the Firmware
You can download the latest firmware from our website. There are two types of firmware; the RICOH PJX3351N/X4241N firmware and the RICOH PJ WX3351N/WX4241N firmware. Use the firmwarethat is supported by your projector. For details about how to update the firmware, see the manualdownloaded with the firmware.
• You can check the current firmware version on the menu screens of the projector.
• Main FW Version: Display Status menu
• Network/USB Func. Firmware Version: Network/USB Settings menu Network Settings orUSB Settings Display Status
Where to Inquire
Contact your sales or service representative for further information about topics covered in this manualor to inquire about topics not covered in this manual.
8. Appendix
174
TrademarksAdobe, Acrobat, Flash Player, and Reader are either registered trademarks or trademarks of AdobeSystems Incorporated in the United States and/or other countries.
AMX and the AMX logo are registered trademarks of AMX LLC of the United States.
Crestron, the Crestron logo, and RoomView are trademarks or registered trademarks of CrestronElectronics, Inc. in the United States and other countries.
DLNA, the DLNA logo, and DLNA CERTIFIED are trademarks of Digital Living Network Alliance.
DLP is a registered trademark of Texas Instruments. DLP Link is a trademark of Texas Instruments.
HDMI and High-Definition Multimedia Interface are trademarks or registered trademarks of HDMILicensing, LLC.
Macintosh, Mac OS, and Safari are registered trademarks of Apple Inc., registered in the U.S. andother countries.
Microsoft, PowerPoint, Windows, Windows Server, Windows Vista, and Internet Explorer are eitherregistered trademarks or trademarks of Microsoft Corporation in the United States and/or othercountries.
Miracast is a registered trademark of the Wi-Fi Alliance.
PJLink trademark and the PJLink logo are trademarks applied for registration or are already registered inJapan, the United States of America and other countries and areas.
VGA is a trademark of International Business Machines Corporation in the United States, othercountries, or both.
The Wi-Fi CERTIFIED Logo is a registered mark of the Wi-Fi Alliance.
Trademarks
175
The proper name of Internet Explorer 8 is Windows® Internet Explorer® 8.
The proper names of the Windows operating systems are as follows:
• The product names of Windows Vista are as follows:
Microsoft® Windows Vista® Ultimate
Microsoft® Windows Vista® Business
Microsoft® Windows Vista® Home Premium
Microsoft® Windows Vista® Home Basic
• The product names of Windows 7 are as follows:
Microsoft® Windows® 7 Home Premium
Microsoft® Windows® 7 Professional
Microsoft® Windows® 7 Ultimate
Microsoft® Windows® 7 Enterprise
• The product names of Windows 8 are as follows:
Microsoft® Windows® 8
Microsoft® Windows® 8 Pro
Microsoft® Windows® 8 Enterprise
• The product names of Windows 8.1 are as follows:
Microsoft® Windows® 8.1
Microsoft® Windows® 8.1 Pro
Microsoft® Windows® 8.1 Enterprise
• The product names of Windows Server 2003 R2 are as follows:
Microsoft® Windows Server® 2003 R2 Standard Edition
• The product names of Windows Server 2008 are as follows:
Microsoft® Windows Server® 2008 Standard
• The product names of Windows Server 2008 R2 are as follows:
Microsoft® Windows Server® 2008 R2 Standard
Other product names used herein are for identification purposes only and might be trademarks of theirrespective companies. We disclaim any and all rights to those marks.
8. Appendix
176
INDEX
10.Interactive kit attachment cover......................18
3D format.............................................................169
3D Projection.............................................. 100, 101
4-corner Correction.............................................. 98
A
AC In socket...........................................................17
Accessories............................................................ 15
Ad hoc mode......................................................... 76
Adjustable feet................................................ 18, 42
Adjusting for keystone distortion.......................... 45
Adjusting the focus................................................ 44
Adjusting the projected image............................. 42
Adjusting the projection angle............................. 42
Adjusting the volume............................................. 47
Administration Tools............................................121
Administrator Authentication.............................. 127
Angle of the projection......................................... 42
Arrow buttons..................................................19, 21
Aspect.....................................................................99
Audio In port..........................................................19
Audio Out port.......................................................19
Auto Focus........................................................... 106
Auto Input Search............................................... 105
Auto Keystone (Vertical)....................................... 97
Auto Set Signals.................................................... 95
Auto Start Slideshow...................................... 57, 59
Automatic focus function.......................................44
AV Mute button.........................................20, 21, 48
B
B-level.....................................................................94
Background on No Signal................................. 105
Basic operations.................................................... 37
Beep..................................................................... 105
Blanking the image................................................48
Brightness............................................................... 93
Browse mode.......................................................155
C
Changing the settings............................................89
Changing the size of the projected image.......... 42
Cleaning.............................................................. 145
Closed Caption................................................... 101
Color Saturation.................................................... 94
Common problems..............................................136
Compatible signals............................................. 166
Compatible signals (Computer input)................167
Compatible signals (HDMI input)......................168
Compatible signals (Video input)...................... 166
Compatible signals (Y/Pb/Pr input)................. 166
Computer 2 Terminal.......................................... 105
Computer-free presentations................................ 53
Computer1 In port........................................ 18, 171
Computer2 In port........................................ 19, 171
Computer2 In/Monitor Out port................ 19, 171
Connecting a computer..................................32, 33
Connecting an external display device...............35
Connecting an external speaker.......................... 35
Connecting AV equipment....................................34
Connecting equipment..........................................32
Connecting the USB device..................................53
Connecting to a network.......................................70
Consumables.......................................................161
Contrast..................................................................93
Control panel.................................................. 17, 19
Control port......................................................... 172
Copyrights........................................................... 174
Copyrights to Images.............................................. 6
Crestron RoomView............................................ 157
Crestron WebUI......................................... 157, 158
Current Time................................................108, 129
D
D-sub to component video cable.........................34
Default Settings 1 menu......................................105
Default Settings 2 menu......................................107
Detailed Signal Settings................................. 95, 96
Digital camera.................................................51, 53
Digital zoom function............................................ 43
Direct Power On..................................................108
Disconnecting the USB device..............................55
Display Effect......................................................... 61
Display Guidance............................................... 105
Display Interval (sec.)............................................62
177
Display Position................................................... 100
Display Settings menu........................................... 97
Display Status............................111, 120, 127, 128
DLNA............................................................... 80, 81
DLNA server.................................................... 82, 83
DVI-to-HDMI cable...............................................33
E
Eco button................................................. 20, 22, 49
Eco Mode......................................................49, 102
Eco Time Ratio..................................................... 129
Edit mode.................................................... 155, 156
Effective range....................................................... 23
Energy Saving Settings menu.............................102
Enlarging the image.............................................. 47
Enlarging the size of the projected image...........43
Enter button......................................................19, 22
Error......................................................................131
Exhaust vents..........................................................17
Exterior................................................................... 17
External display device.........................................35
External speaker....................................................35
F
Fan Error.............................................................. 131
Firmware.............................................................. 174
Focus...................................................................... 44
Focus button.................................................... 20, 22
Focus lever.......................................................17, 44
Freeze button...................................................21, 49
Freezing the image................................................49
Frequency............................................................ 128
G
G-level....................................................................94
H
Hardware Error................................................... 131
HDMI cable.....................................................32, 34
HDMI port..............................................................19
High Altitude Mode............................................ 108
How to read this manual.........................................9
I
ID button.......................................................... 22, 26
Illuminance sensor.................................................17
Image Adjustment menu........................................93
Image Eco............................................................103
Important.................................................................. 6
Indicator display list............................................ 131
Indicators................................................................18
Infrastructure mode......................................... 73, 74
Input......................................................................128
Input button......................................................20, 21
Inputting text...........................................................25
Inquiry.................................................................. 174
Intake vents............................................................ 18
Interactive............................................................ 106
Interactive Version...............................................129
Introduction.............................................................. 6
J
JPEG Conversion Tool.................................... 64, 65
K
Key Lock...............................................................108
Keystone (Horizontal)........................................... 97
Keystone (Vertical)................................................ 97
Keystone button...............................................22, 45
Knowledge Base................................................. 140
L
Lamp.....................................................................146
Lamp cover............................................................ 17
Lamp Power......................................................... 103
Lamp Pwr on No Signal......................................103
Lamp Reset Count................................................128
Lamp Time............................................................128
LAN Common......................................................118
LAN port.................................................................19
Language...................................................... 38, 107
Laptop computer....................................................39
Lens................................................................ 17, 145
Loading batteries...................................................24
M
Magnify button................................................21, 47
Main functions....................................................... 13
Main FW Version................................................ 129
178
Managing the projector..................................... 151
Manuals................................................................... 8
Menu button.................................................... 19, 21
Menu screen............................................. 87, 89, 92
Miracast................................................................. 85
Model-specific information...................................10
Monitor Out port...........................................19, 171
Muting the audio................................................... 48
N
Network...........................................................67, 70
Network Application Settings menu.................. 121
Network Setting Wizard.............70, 72, 73, 74, 76
Network settings....................................................70
Network Settings menu.......................................112
Network/USB Settings menu........... 110, 112, 121
Noise Reduction.................................................... 94
Notes........................................................................ 9
Number buttons.....................................................21
NW Settings on Standby....................................104
O
Operating Instructions............................................. 8
Operating precautions....................................... 143
Operations while projecting images....................47
Optical zoom function.......................................... 43
P
Page buttons.......................................................... 22
Picture Mode......................................................... 93
PJLink.................................................................... 151
Ports........................................................................ 18
Positioning the projector....................................... 28
Power button...................................... 20, 21, 37, 40
Power Off on No Signal.....................................104
Power on Standby...............................................104
Power Timer...................................................57, 109
Precautions.................................................... 11, 143
Presentation timer.................................................. 50
Projecting an image...........................38, 77, 82, 83
Projecting the computer's screen..........................39
Projection distance................................................ 29
Projection height.................................................... 29
Projection Mode........................................... 28, 107
Projector ID.......................................................... 119
Projector Management Utility....................151, 152
Projector parts........................................................17
Q
QuickProjection...............................................77, 78
R
R-Click button.........................................................22
R-level.....................................................................94
Read This First.......................................................... 8
Reducing the size of the projected image........... 43
Remote control................................... 21, 23, 24, 25
Remote Control ID..................................25, 26, 108
Remote control receiver........................................ 17
Replacing the lamp............................................. 146
Reset All.........................................................92, 109
Resolution.............................................................128
Restoring the settings............................................. 92
RGB cable..............................................................32
RGB Input Range...................................................95
S
Screen size.............................................................29
Security................................................................ 124
Security bar............................................................18
Security slot............................................................18
Server................................................................... 125
Settings.................................................................110
Setup Wizard...................................................... 120
Sharpness...............................................................93
Signal Format...................................................... 128
Simple Wireless LAN Setup..................................73
Slide show....................................................... 57, 61
Speaker..................................................................18
Specifications for ports....................................... 171
Specifications for the projector.......................... 163
Start Giude...............................................................8
Start menu.............................................................. 38
Start-up Screen....................................................105
Startup Password.................................................109
Symbols.................................................................... 9
Sync......................................................................128
179
T
Temperature Error............................................... 131
Timer button.....................................................22, 50
Tint.......................................................................... 94
Total CO2 Reduction..........................................128
Total Time.............................................................128
Trademarks.......................................................... 175
Troubleshooting..........................................131, 136
Turning off the projector........................................40
Turning on the projector........................................37
U
Updating the firmware........................................174
USB file projection.......................................... 51, 53
USB memory device....................................... 51, 53
USB port.................................................................19
USB Settings menu.............................................. 110
User Logo.............................................................106
V
Video cable............................................................34
Video In port.......................................................... 19
Video Mode........................................................ 128
Volume button................................................. 22, 47
W
Wall Color Mode............................................... 100
Web Image Monitor.................................. 154, 156
Where to inquire................................................. 174
Wired LAN............................................. 33, 67, 112
Wired LAN Settings...............................................72
Wireless LAN..........................................33, 68, 113
Wireless LAN Settings..............................73, 74, 76
Z
Zoom...................................................................... 98
Zoom button.................................................... 22, 43
Zoom lever.............................................................17
180 EN GB EN US EN AU Y051-7523B

© 2014, 2015, 2017 Ricoh Co., Ltd.

Y051-7523BAUENUSENGBEN