Embed Size (px)
Citation preview
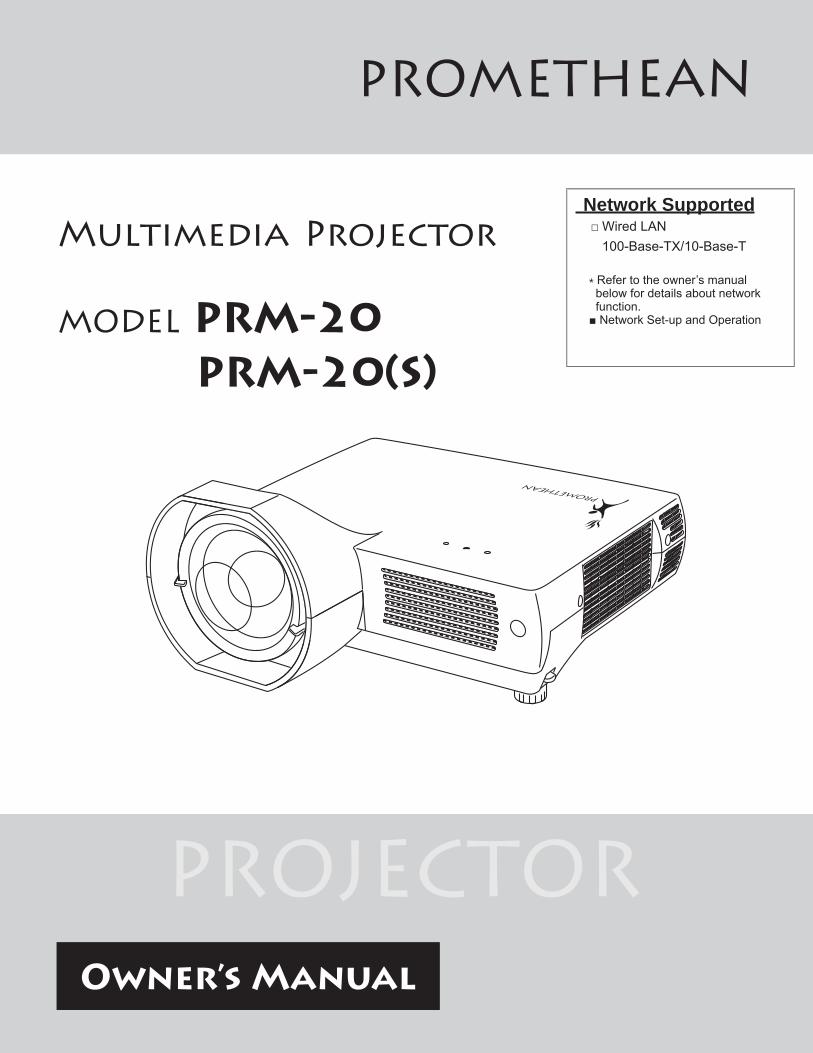
NetworkSupported □WiredLAN 100-Base-TX/10-Base-T
* Refertotheowner’smanualbelowfordetailsaboutnetworkfunction.■NetworkSet-upandOperation
Multimedia Projector
MODEL PRM-20 PRM-20(S)
Owner’s Manual
PROJECTOR
�
ThisMultimediaProjector isdesignedwith themostadvancedtechnology forportability,durability,andeaseofuse.Thisprojectorutilizesbuilt-inmultimedia features, apaletteof 16.77million colors, andmatrix liquid crystal display(LCD)technology.
Note:• The On-Screen Menu and figures in this manual may differ slightly from the product.•The contents of this manual are subject to change without notice.
��r�e S�ree�� ��� ����ted Sp��e��r�eS�ree���������tedSp��eShort focus lens allows you to project large images fromshortdistance.(p.13)
A��t�theftAl�r�Fu���t�o��This projector is equippedwith anAntitheft alarmfunctionwhich soundswhena vibration is detected.(pp.48,51-53)
Se�ur�tyFe�turesThe projector cannot be operated without remotecontrol.Keep the remotecontrolsecurelyathand tominimizetheriskoftheft.
Easilyidentifiableorangecabinetforsecurity.
The PIN code lock guards the projector from anunauthorizeduser.(pp.18,47-48)
�o�oFu���t�o��TheLogofunctionallowsyoutocustomizethescreenlogo. The Logo page identifies the owner of theprojector.(pp.42,43)
ClosedC�pt�o��This is a printed version of the program sound orother information displayed on the screen.You canturnonthefeatureandswitchthechannels.(p.50)
S��pleCo�puterSyste�Sett����TheprojectorhasaMulti-scansystemtoconformtoalmostallcomputeroutputsignalsquickly.(p.26)
Co�p�t�b�l�tyThe projector widely accepts various video andcomputerinputsignalsincluding;Computers,6Colorsystems(PAL,SECAM,NTSC,NTSC4.43,PAL-M,orPAL-N),Componentvideo,S-videoandRGBscart.
�ANNetworkFu���t�o��
Thisprojector is loadedwith theWired function.Youcanmanage the projector via network. For details,refer to the owner’smanual “Network Set-up andOperation.”
Qu��kTer�����t�o��TheACpowercordcanbeunpluggedimmediatelyafterturningofftheprojectorwithoutwaitingfortheprojectortocooldown.(p.19)
D���t�lZoo�(forCo�puter)The digital zoom function allows you to focuson crucial information during a presentation.Youcan expand the images approx. 16 times thescreensizeandcompress them toapproximatelyaquarterofthescreensize.(p.33)
Bl��kbo�rdFu���t�o��Ablackboardcanbeusedasaprojectionscreen.(pp.30,37)
*TheboardcolorislimitedtoGreen.
Colorbo�rdFu���t�o��At the time of simple projection on the coloredwall,youcangettheclosecolorimagetothecolorimageprojectedonawhitescreenbyselectingthesimilarcolor to thewallcolor fromthepreset fourcolors.
Mult�l����u��eMe��uD�spl�yTheOperationmenuisavailablein16languages:English, German, French, Italian, Spanish,Portuguese, Dutch, Swedish, Finnish, Polish,Hungarian,Romanian,Russian,Chinese,Korean,andJapanese.(p.41)
Sw�t�h�bleI��terf��eTer�����lThe projector provides a switchable interfaceterminal.You can use the terminal as computerinputormonitoroutputconveniently.(p.44)
PowerM�����e�e��tThePowermanagement function reduces powerconsumptionandmaintainslamplife.(p.45)
I��putSe�r�hFu���t�o�� Inputsignalcanbesearchedautomatically.(p.44)
You����tur��o��oroper�tetheproje�torON�Yv��there�ote�o��trol.M�kesure��ottolosethere�ote�o��trol.
Fe�tures���dDes����
�
Tr�de��rksEach name of corporations or products in this book is either a registered trademark or a trademark of itsrespectivecorporation.
Fe�tures���dDes���� . . . . . . . . . . . . . . . �T�bleofCo��te��ts . . . . . . . . . . . . . . . . . . �TotheOw��er. . . . . . . . . . . . . . . . . . . . . . 4S�fetyI��stru�t�o��s . . . . . . . . . . . . . . . . . 5
AirCirculation 6InstallingtheProjectorinProperPosition 6MovingtheProjector 6
Co�pl�����e . . . . . . . . . . . . . . . . . . . . . . . 7P�rtN��es���dFu���t�o��s . . . . . . . . . . 8
Front 8Back 8Bottom 8RearTerminal 9TopPanel 10AntitheftAlarmSettingButtons 10RemoteControl 11RemoteControlBatteryInstallation 12OperatingRange 12
I��st�ll�t�o��. . . . . . . . . . . . . . . . . . . . . . . 1�PositioningtheProjector 13AdjustableFeet 13ConnectingtoaComputer 14ConnectingtoVideoEquipment 15ConnectingtoComponentVideoEquipment 16ConnectingtheACPowerCord 17
B�s��Oper�t�o�� . . . . . . . . . . . . . . . . . . 18TurningOntheProjector 18TurningOfftheProjector 19HowtoOperatetheOn-ScreenMenu 20MenuBar 21FocusAdjustment 22KeystoneCorrection 22SoundAdjustment 23RemoteControlOperation 23
Co�puterI��put. . . . . . . . . . . . . . . . . . �5InputSourceSelection 25ComputerSystemSelection 26
AutoPCAdjustment 27ManualPCAdjustment 28ImageLevelSelection 30ImageLevelAdjustment 31ScreenSizeAdjustment 32
V�deoI��put . . . . . . . . . . . . . . . . . . . . . . �4InputSourceSelection(Video,S-video) 34InputSourceSelection(Component,RGBScart21-pin) 35VideoSystemSelection 36ImageLevelSelection 37ImageLevelAdjustment 38ScreenSizeAdjustment 40
Sett���� . . . . . . . . . . . . . . . . . . . . . . . . . . 41Setting 41
A��t�theftAl�r�Fu���t�o�� . . . . . . . . . . . 51HowtoUsetheAntitheftAlarmFunction 51
M����te������e���dCle������� . . . . . . . . . 54WarningIndicator 54CleaningtheAirFilters 55ResettingtheFilterCounter 55AttachingtheLensCover 56CleaningtheProjectionLens 56CleaningtheProjectorCabinet 56LampReplacement 57LampReplacementCounter 58
Appe��d�x . . . . . . . . . . . . . . . . . . . . . . . . 59Troubleshooting 59MenuTree 62IndicatorsandProjectorCondition 64CompatibleComputerSpecifications 65TechnicalSpecifications 66Dimensions 67ConfigurationsofTerminals 68PINCodeNumberMemo 69
T�bleofCo��te��ts
4
CAUTION:TOREDUCETHERISKOFE�ECTRICSHOCK,DONOTREMOVECOVER(ORBACK).NOUSER-SERVICEAB�EPARTSINSIDEEXCEPT�AMPREP�ACEMENT.REFERSERVICINGTOQUA�IFIEDSERVICEPERSONNE�.
THISSYMBOLINDICATESTHATDANGEROUSVOLTAGECONSTITUTINGARISKOFELECTRICSHOCKISPRESENTWITHINTHISUNIT.
THISSYMBOLINDICATESTHATTHEREAREIMPORTANTOPERATINGANDMAINTENANCEINSTRUCTIONSINTHEOWNER'SMANUALWITHTHISUNIT.
CAUTIONRISKOFE�ECTRICSHOCK
DONOTOPEN
S�fetyPre��ut�o��WARNING: ●THISAPPARATUSMUSTBEEARTHED. ●TOREDUCETHERISKOFFIREOR
E�ECTRICSHOCK,DONOTEXPOSETHISAPP�IANCETORAINORMOISTURE.
– This projector produces intense light from theprojection lens.Avoid staring directly into the lens,otherwise eye damage could result. Be especiallycareful that children do not stare directly into thebeam.
– Install theprojector inaproperposition.Otherwise itmayresultinfirehazard.
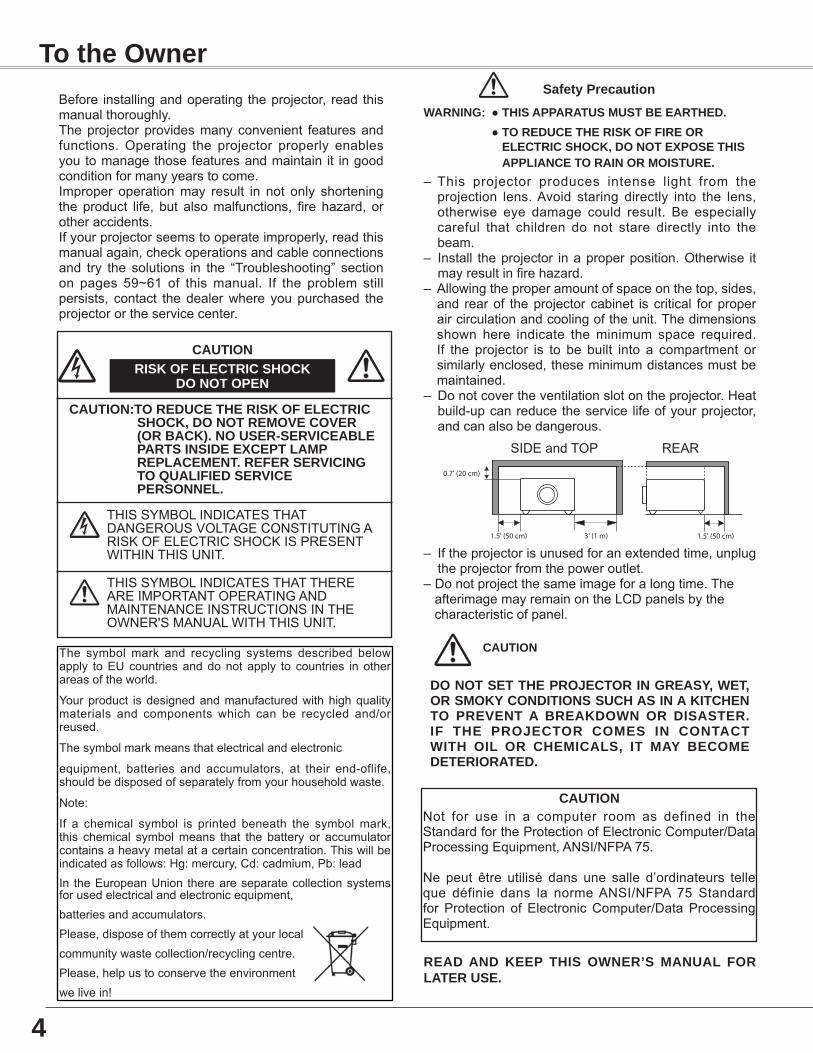
– Allowingtheproperamountofspaceonthetop,sides,and rearof theprojectorcabinet iscritical forproperaircirculationandcoolingoftheunit.Thedimensionsshown here indicate theminimum space required.If the projector is to be built into a compartment orsimilarlyenclosed,theseminimumdistancesmustbemaintained.
– Donotcovertheventilationslotontheprojector.Heatbuild-upcanreducetheservice lifeofyourprojector,andcanalsobedangerous.
– Iftheprojectorisunusedforanextendedtime,unplugtheprojectorfromthepoweroutlet.
–Donotprojectthesameimageforalongtime.TheafterimagemayremainontheLCDpanelsbythecharacteristicofpanel.
The symbolmark and recycling systems described belowapply toEUcountriesanddonotapply to countries inotherareasoftheworld.
Yourproduct isdesignedandmanufacturedwithhighqualitymaterials and components which can be recycled and/orreused.
Thesymbolmarkmeansthatelectricalandelectronic
equipment, batteries and accumulators, at their end-oflife,shouldbedisposedofseparatelyfromyourhouseholdwaste.
Note:
If a chemical symbol is printed beneath the symbolmark,this chemical symbolmeans that the battery or accumulatorcontainsaheavymetalatacertainconcentration.Thiswillbeindicatedasfollows:Hg:mercury,Cd:cadmium,Pb:leadIn theEuropeanUnion thereareseparatecollectionsystemsforusedelectricalandelectronicequipment,batteriesandaccumulators.Please,disposeofthemcorrectlyatyourlocalcommunitywastecollection/recyclingcentre.Please,helpustoconservetheenvironmentwelivein!
CAUTIONNot for use in a computer room as defined in theStandardfortheProtectionofElectronicComputer/DataProcessingEquipment,ANSI/NFPA75.
Ne peut être utilisé dans une salle d’ordinateurs telleque définie dans la normeANSI/NFPA 75 StandardforProtection ofElectronicComputer/DataProcessingEquipment.
READ AND KEEP THIS OWNER’S MANUA� FOR�ATERUSE.
CAUTION
DONOTSETTHEPROJECTORINGREASY,WET,ORSMOKYCONDITIONSSUCHASINAKITCHENTO PREVENT A BREAKDOWN OR DISASTER.IF THE PROJECTOR COMES IN CONTACTWITH OI� OR CHEMICA�S, IT MAY BECOMEDETERIORATED.
Before installingandoperating theprojector, read thismanualthoroughly.Theprojectorprovidesmanyconvenient featuresandfunctions.Operating the projector properly enablesyoutomanagethosefeaturesandmaintain it ingoodconditionformanyyearstocome.Improper operationmay result in not only shorteningtheproduct life, but alsomalfunctions, fire hazard, orotheraccidents.Ifyourprojectorseemstooperateimproperly,readthismanualagain,checkoperationsandcableconnectionsand try the solutions in the “Troubleshooting” sectionon pages 59~61 of thismanual. If the problem stillpersists, contact thedealerwhere youpurchased theprojectorortheservicecenter.
TotheOw��er
SIDEandTOP REAR

5
Allthesafetyandoperatinginstructionsshouldbereadbeforetheproductisoperated.
Read all of the instructions given here and retain them forlateruse.Unplug thisprojector fromACpowersupplybeforecleaning.Donot use liquidor aerosol cleaners.Useadampclothforcleaning.
Followallwarningsandinstructionsmarkedontheprojector.
Foraddedprotectiontotheprojectorduringalightningstorm,orwhen it is left unattendedandunused for longperiods oftime,unplug it from thewall outlet.Thiswill preventdamageduetolightningandpowerlinesurges.
Donotexposethisunittorainorusenearwater...forexample,inawetbasement,nearaswimmingpool,etc...
Donotuseattachmentsnotrecommendedbythemanufacturerastheymaycausehazards.
Do not place this projector on an unstable cart, stand, ortable.Theprojectormayfall,causingseriousinjurytoachildor adult, and seriousdamage to theprojector.Useonlywitha cart or stand recommended by themanufacturer, or soldwith the projector.Wall or shelfmounting should follow themanufacturer's instructions, and should use amounting kitapprovedbythemanufacturers.
An appliance and cart combinationshouldbemovedwithcare.Quickstops,excessive force, and uneven surfacesmay cause the appliance and cartcombinationtooverturn.
Slotsandopeningsinthebackandbottomofthecabinetareprovided for ventilation, to ensure reliable operation of theequipmentandtoprotectitfromoverheating.
The openings should never be coveredwith cloth or othermaterials, and the bottom opening should not be blockedbyplacing theprojector ona bed, sofa, rug, or other similarsurface.Thisprojectorshouldneverbeplacednearoroveraradiatororheatregister.
This projector should not be placed in a built-in installationsuchasabookcaseunlessproperventilationisprovided.
Never push objects of any kind into this projector throughcabinet slots as theymay touch dangerous voltage pointsor short outparts that could result ina fireorelectric shock.Neverspillliquidofanykindontheprojector.
Do not install the projector near the ventilation duct of air-conditioningequipment.
Thisprojectorshouldbeoperatedonlyfromthetypeofpowersource indicatedon themarking label. If youarenot sureofthe typeofpowersupplied,consultyourauthorizeddealerorlocalpowercompany.
Donotoverloadwalloutletsandextensioncordsas thiscanresultinfireorelectricshock.Donotallowanythingtorestonthe power cord.Do not locate this projectorwhere the cordmaybedamagedbypersonswalkingonit.
Do not attempt to service this projector yourself as openingor removing coversmay expose you to dangerous voltageor other hazards. Refer all servicing to qualified servicepersonnel.
Unplug this projector fromwall outlet and refer servicing toqualifiedservicepersonnelunderthefollowingconditions:a.Whenthepowercordorplugisdamagedorfrayed.b.Ifliquidhasbeenspilledintotheprojector.c.Iftheprojectorhasbeenexposedtorainorwater.d.If the projector does not operate normally by followingthe operating instructions.Adjust only those controls thatare covered by the operating instructions as improperadjustmentofothercontrolsmayresult indamageandwilloften require extensivework by a qualified technician torestoretheprojectortonormaloperation.
e.If theprojectorhasbeendroppedor thecabinethasbeendamaged.
f.Whentheprojectorexhibitsadistinctchangeinperformancethisindicatesaneedforservice.
When replacement parts are required, be sure the servicetechnician has used replacement parts specified by themanufacturerthathavethesamecharacteristicsastheoriginalpart. Unauthorized substitutionsmay result in fire, electricshock,orinjurytopersons.
Upon completion of any service or repairs to this projector,asktheservicetechniciantoperformroutinesafetycheckstodeterminethattheprojectorisinsafeoperatingcondition.
TotheOw��er S�fetyI��stru�t�o��s
NOTEFORCUSTOMERSINTHEUSHgLAMP(S)INSIDETHISPRODUCTCONTAINMERCURYANDMUSTBERECYCLEDORDISPOSEDOFACCORDINGTOLOCAL,STATEORFEDERALLAWS.
�
Mov����theProje�torWhenmoving theprojector, replace the lenscoverandretracttheadjustablefeettopreventdamagetothelensand cabinet. When the projector is not in use for anextendedperiod,putitintoasuitablecase.Handle the projector carefully; do not drop, bump,subject it to strong forces, or put other things on thecabinet.
Donotrolltheprojectormorethan20degreesfromsidetoside.
Do not point the projector up toprojectanimage.
Donotpointtheprojectordowntoprojectanimage.
Donotput theprojectoroneithersidetoprojectanimage.
Install the projector properly. Improper Installationmayreducethelamplifeandcausefirehazard.
I��st�ll����theProje�tor���ProperPos�t�o��
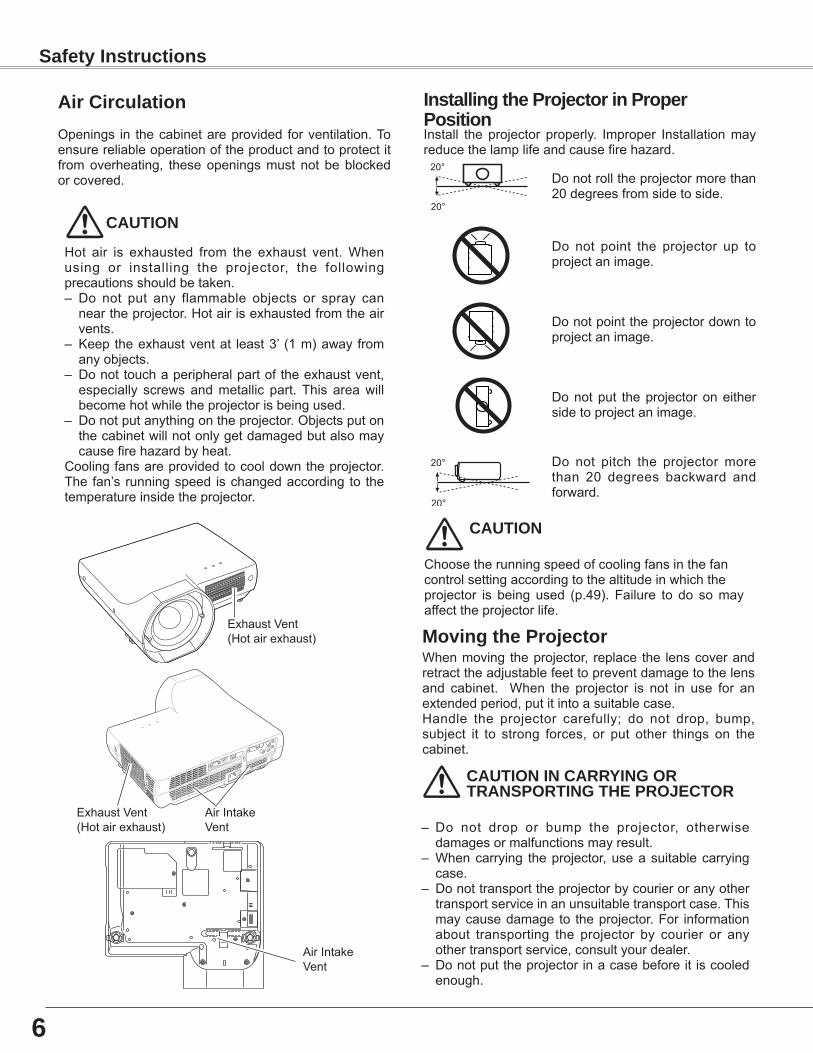
Openings in thecabinetareprovided forventilation.Toensurereliableoperationoftheproductandtoprotectitfromoverheating, theseopeningsmust not beblockedorcovered.
A�rC�r�ul�t�o��
AirIntakeVent
ExhaustVent(Hotairexhaust)
ExhaustVent(Hotairexhaust)
AirIntakeVent
CAUTION
Hot air is exhausted from the exhaust vent.Whenusing or installing the projector, the followingprecautionsshouldbetaken.– Do not put any flammable objects or spray canneartheprojector.Hotairisexhaustedfromtheairvents.
– Keeptheexhaustventat least3’ (1m)awayfromanyobjects.
– Donottouchaperipheralpartoftheexhaustvent,especially screwsandmetallic part.This areawillbecomehotwhiletheprojectorisbeingused.
– Donotputanythingontheprojector.Objectsputonthecabinetwillnotonlygetdamagedbutalsomaycausefirehazardbyheat.
Coolingfansareprovidedtocooldowntheprojector.Thefan’srunningspeed ischangedaccording to thetemperatureinsidetheprojector.
CAUTIONINCARRYINGORTRANSPORTINGTHEPROJECTOR
– Do not drop or bump the projector, otherwisedamagesormalfunctionsmayresult.
– Whencarrying theprojector,useasuitablecarryingcase.
– Donottransporttheprojectorbycourieroranyothertransportserviceinanunsuitabletransportcase.Thismaycausedamageto theprojector.For informationabout transporting the projector by courier or anyothertransportservice,consultyourdealer.
– Donotputtheprojectorinacasebeforeitiscooledenough.
Do not pitch the projectormorethan 20 degrees backward andforward.
S�fetyI��stru�t�o��s
CAUTION
Choosetherunningspeedofcoolingfansinthefancontrolsettingaccordingtothealtitudeinwhichtheprojector is being used (p.49). Failure to do somayaffecttheprojectorlife.
�
Compliance
AC Power Cord for the United Kingdom:This cord is already fitted with a moulded plug incorporating a fuse, the value of which is indicated on the pin face of the plug. Should the fuse need to be replaced, an ASTA approved BS 1362 fuse must be used of the same rating, marked thus ASA . If the fuse cover is detachable, never use the plug with the cover omitted. If a replacement fuse cover is required, ensure it is of the same colour as that visible on the pin face of the plug (i.e. red or orange). Fuse covers are available from the Parts Department indicated in your User Instructions.If the plug supplied is not suitable for your socket outlet, it should be cut off and destroyed.The end of the flexible cord should be suitably prepared and the correct plug fitted.
WARNING: A PLUG WITH BARED FLEXIBLE CORD IS HAZARDOUS IF ENGAGED IN A LIVE SOCKET OUTLET.The Wires in this mains lead are coloured in accordance with the following code:
Green-and-yellow ············ EarthBlue ································· NeutralBrown ······························ Live
As the colours of the wires in the mains lead of this apparatus may not correspond with the coloured markings identifying the terminals in your plug proceed as follows:The wire which is coloured green-and-yellow must be connected to the terminal in the plug which is marked by the letter E or by the safety earth symbol or coloured green or green-and-yellow.The wire which is coloured blue must be connected to the terminal which is marked with the letter N or coloured black.The wire which is coloured brown must be connected to the terminal which is marked with the letter L or coloured red.
WARNING: THIS APPARATUS MUST BE EARTHED.
The AC Power Cord supplied with this projector meets the requirement for use in the country you purchased it.
AC Power Cord for the United States and Canada:AC Power Cord used in the United States and Canada is listed by the Underwriters Laboratories (UL) and certified by the Canadian Standard Association (CSA).AC Power Cord has a grounding-type AC line plug. This is a safety feature to be sure that the plug will fit into the power outlet. Do not try to defeat this safety feature. Should you be unable to insert the plug into the outlet, contact your electrician.
THE SOCKET-OUTLET SHOULD BE INSTALLED NEAR THE EQUIPMENT AND EASILY ACCESSIBLE.
AC Power Cord Requirement
Federal Communications Commission NoticeThis equipment has been tested and found to comply with the limits for a Class B digital device, pursuant to Part 15 of the FCC Rules. These limits are designed to provide reasonable protection against harmful interference in a residential installation. This equipment generates, uses, and can radiate radio frequency energy. If it is not installed and used in accordance with the instructions, it may cause harmful interference to radio communications. However, there is no guarantee that interference will not occur in a particular installation. If this equipment does cause harmful interference to radio or television reception, which can be determined by turning the equipment off and on, the user is encouraged to try to correct the interference by one or more of the following measures:– Reorient or relocate the receiving antenna.– Increase the separation between the equipment and receiver.– Connect the equipment into an outlet on a circuit different from that to which the receiver is connected.– Consult the dealer or an experienced radio/TV technician for help.Use of shielded cable is required to comply with Class B limits in Subpart B of Part 15 of FCC Rules.Do not make any changes or modifications to the equipment unless otherwise specified in the instructions. If such changes or modifications should be made, you could be required to stop operation of the equipment.Model Number : PRM-20, PRM-20(S)Trade Name : PrometheanResponsible party : Promethean Inc.Address : 1165 Sanctuary Parkway, Suite 400, Atlanta, GA 30004 USATelephone No. : 678 762 1500
8
Botto�
B��k
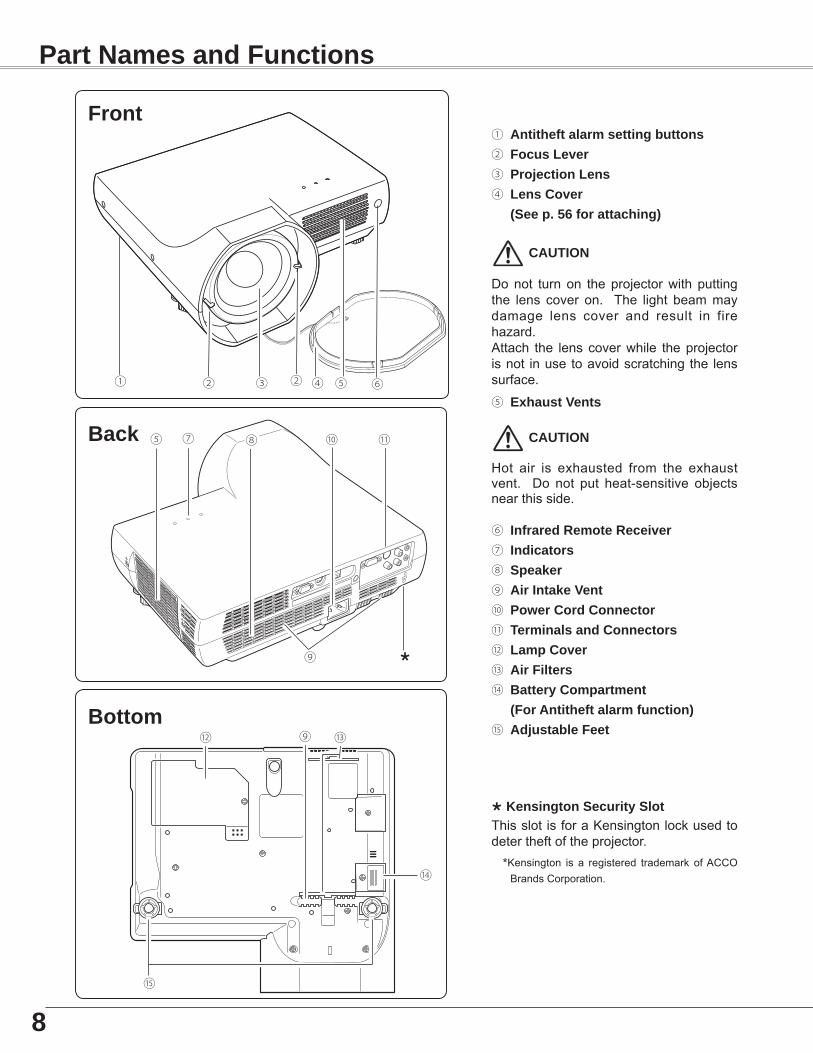
① A��t�theft�l�r�sett����butto��s② Fo�us�ever③ Proje�t�o���e��s④ �e��sCover (Seep.5�for�tt��h����)
⑤ ⑦
⑮
⑫ ⑬
⑩ ⑪ CAUTION
Hot air is exhausted from the exhaustvent. Do not put heat-sensitive objectsnearthisside.
③ ⑥④ ⑤
Fro��t
⑨
⑧
⑭
CAUTION
Donot turnon theprojectorwith puttingthe lens cover on. The light beammaydamage lens cover and result in firehazard.Attach the lenscoverwhile theprojectorisnot inusetoavoidscratchingthe lenssurface.
⑥ I��fr�redRe�oteRe�e�ver⑦ I��d���tors⑧ Spe�ker⑨ A�rI��t�keVe��t⑩ PowerCordCo����e�tor⑪ Ter�����ls���dCo����e�tors⑫ ���pCover⑬ A�rF�lters⑭ B�tteryCo�p�rt�e��t (ForA��t�theft�l�r�fu���t�o��)⑮ Adjust�bleFeet
②①
⑤ Exh�ustVe��ts
Ke��s����to��Se�ur�tySlotThisslotisforaKensingtonlockusedtodetertheftoftheprojector.
*Kensington is a registered trademark ofACCOBrandsCorporation.
⑨
P�rtN��es���dFu���t�o��s
②
9
Re�rTer�����l
S-VIDEO IN
MONITOR OUTCOMPUTER IN 2 /
COMPUTER /COMPONENT
AUDIO IN
R
VIDEO IN L(MONO)
(VARIABLE)
AUDIO OUT
① ② ③ ④ ⑤ ⑥
⑧
⑦
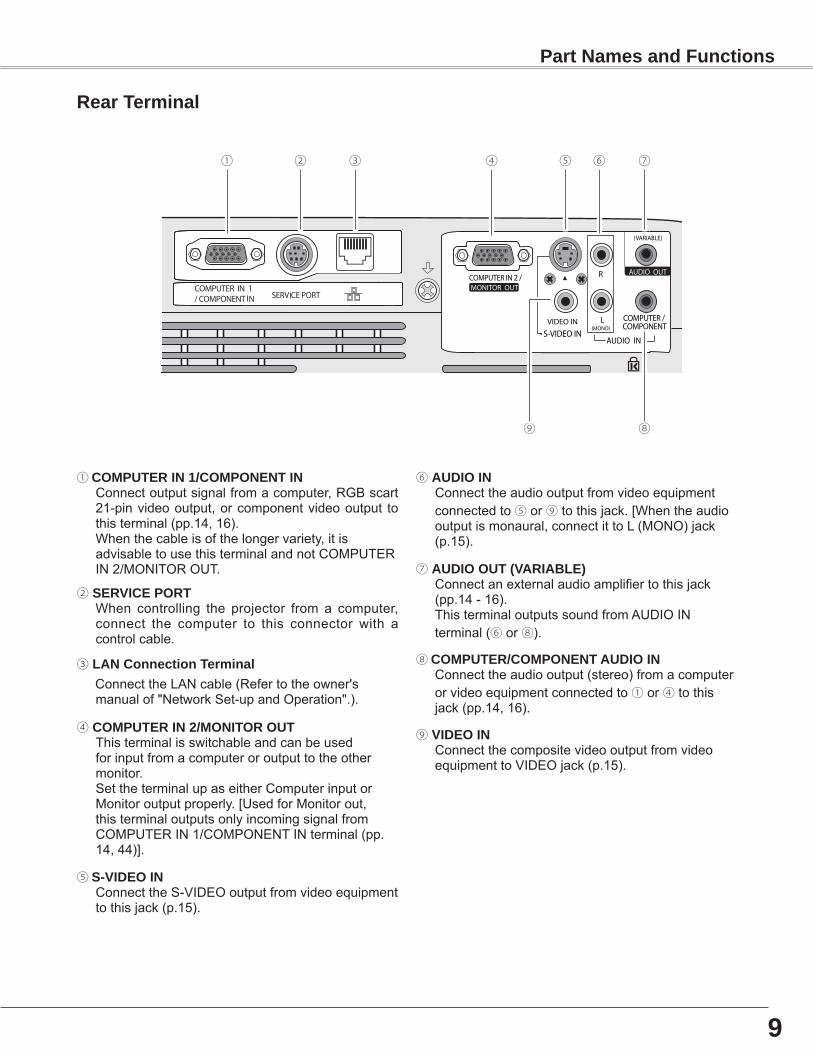
⑤ S-VIDEOINConnecttheS-VIDEOoutputfromvideoequipmenttothisjack(p.15).
⑥ AUDIOINConnecttheaudiooutputfromvideoequipmentconnectedto⑤or⑨tothisjack.[Whentheaudiooutputismonaural,connectittoL(MONO)jack(p.15).
⑧ COMPUTER/COMPONENTAUDIOINConnecttheaudiooutput(stereo)fromacomputerorvideoequipmentconnectedto①or④tothisjack(pp.14,16).
⑨ VIDEOINConnectthecompositevideooutputfromvideoequipmenttoVIDEOjack(p.15).
④ COMPUTERIN�/MONITOROUTThisterminalisswitchableandcanbeusedforinputfromacomputeroroutputtotheothermonitor.SettheterminalupaseitherComputerinputorMonitoroutputproperly.[UsedforMonitorout,thisterminaloutputsonlyincomingsignalfromCOMPUTERIN1/COMPONENTINterminal(pp.14,44)].
⑦ AUDIOOUT(VARIAB�E)Connectanexternalaudioamplifiertothisjack(pp.14-16).ThisterminaloutputssoundfromAUDIOINterminal(⑥or⑧).
② SERVICEPORTWhen controlling the projector from a computer,connect the computer to this connector with acontrolcable.
① COMPUTERIN1/COMPONENTINConnectoutputsignalfromacomputer,RGBscart21-pinvideooutput,orcomponentvideooutput tothisterminal(pp.14,16).Whenthecableisofthelongervariety,itisadvisabletousethisterminalandnotCOMPUTERIN2/MONITOROUT.
⑨
P�rtN��es���dFu���t�o��s
③ �ANCo����e�t�o��Ter�����lConnecttheLANcable(Refertotheowner's
manualof"NetworkSet-upandOperation".).
10
TopP���el
① ② ③
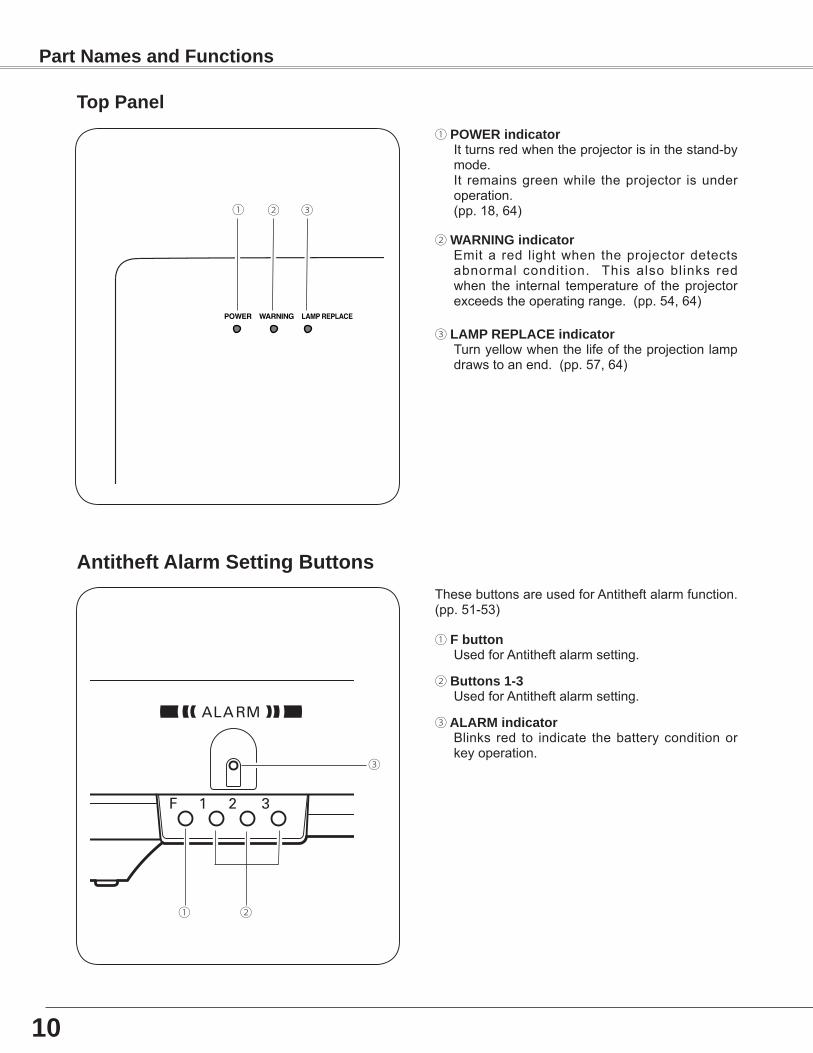
③ �AMPREP�ACE���d���torTurnyellowwhenthelifeoftheprojectionlampdrawstoanend.(pp.57,64)
② WARNING���d���torEmit a red lightwhen the projector detectsabnormal condition. This also blinks redwhen the internal temperature of theprojectorexceedstheoperatingrange.(pp.54,64)
① POWER���d���torItturnsredwhentheprojectorisinthestand-bymode.It remainsgreenwhile theprojector is underoperation.(pp.18,64)
A��t�theftAl�r�Sett����Butto��s
① ②
③
② Butto��s1-�UsedforAntitheftalarmsetting.
③ A�ARM���d���torBlinks red to indicate thebattery conditionorkeyoperation.
① Fbutto��UsedforAntitheftalarmsetting.
ThesebuttonsareusedforAntitheftalarmfunction.(pp.51-53)
P�rtN��es���dFu���t�o��s
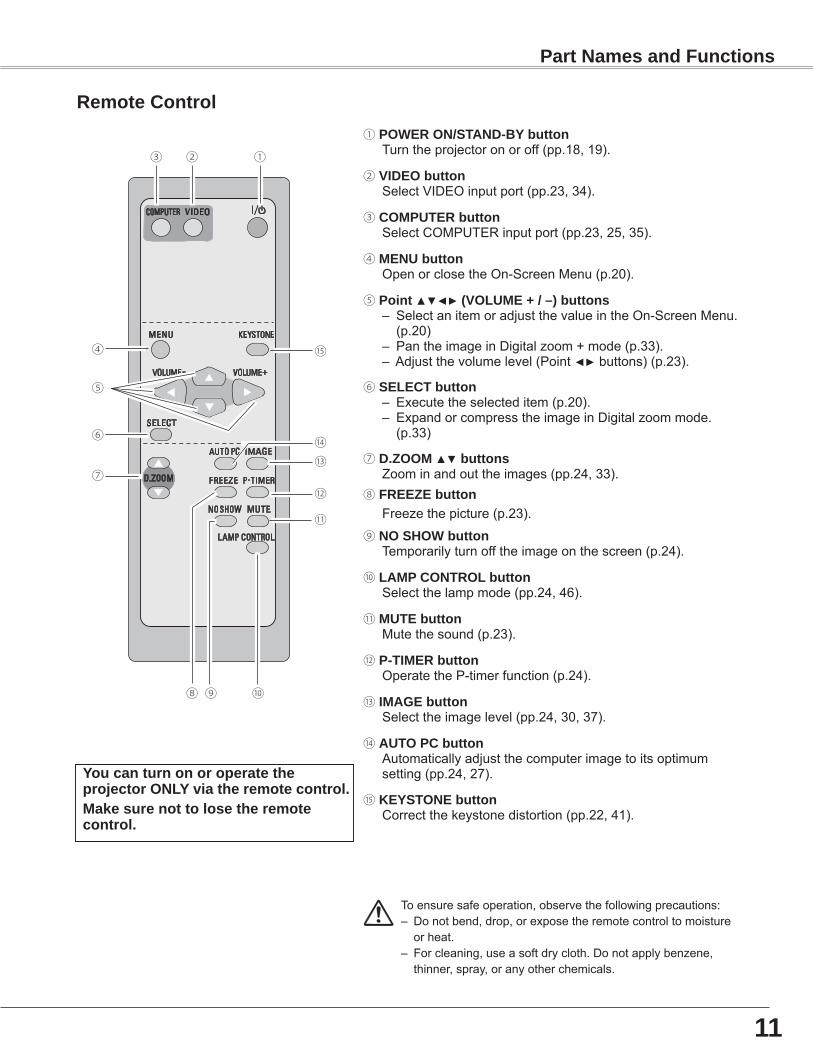
Re�oteCo��trol
Toensuresafeoperation,observethefollowingprecautions:– Donotbend,drop,orexposetheremotecontroltomoistureorheat.
– Forcleaning,useasoftdrycloth.Donotapplybenzene,thinner,spray,oranyotherchemicals.
① POWERON/STAND-BYbutto��Turntheprojectoronoroff(pp.18,19).
② VIDEObutto��SelectVIDEOinputport(pp.23,34).
③ COMPUTERbutto��SelectCOMPUTERinputport(pp.23,25,35).
④MENUbutto��OpenorclosetheOn-ScreenMenu(p.20).
⑦ D.ZOOM▲▼ butto��sZoominandouttheimages(pp.24,33).
⑭ AUTOPCbutto��Automaticallyadjustthecomputerimagetoitsoptimumsetting(pp.24,27).
⑬ IMAGEbutto��Selecttheimagelevel(pp.24,30,37).
⑧ FREEZEbutto��Freezethepicture(p.23).
⑪ MUTEbutto��Mutethesound(p.23).
⑫ P-TIMERbutto��OperatetheP-timerfunction(p.24).
⑨ NOSHOWbutto��Temporarilyturnofftheimageonthescreen(p.24).
⑮ KEYSTONEbutto��Correctthekeystonedistortion(pp.22,41).
⑤ Po���t▲▼◄► (VO�UME+/–)butto��s– SelectanitemoradjustthevalueintheOn-ScreenMenu.(p.20)
– PantheimageinDigitalzoom+mode(p.33).– Adjustthevolumelevel(Point◄►buttons)(p.23).
⑥ SE�ECTbutto��– Executetheselecteditem(p.20).– ExpandorcompresstheimageinDigitalzoommode.(p.33)
⑩ �AMPCONTRO�butto��Selectthelampmode(pp.24,46).
11
You����tur��o��oroper�tetheproje�torON�Yv��there�ote�o��trol.M�kesure��ottolosethere�ote�o��trol.
P�rtN��es���dFu���t�o��s
⑤
③
⑨
⑬
④
⑭
⑫
⑩
①②
⑥
⑦
⑧
⑮
⑪
30º
30º
P�rtN��es���dFu���t�o��s
1 2 3
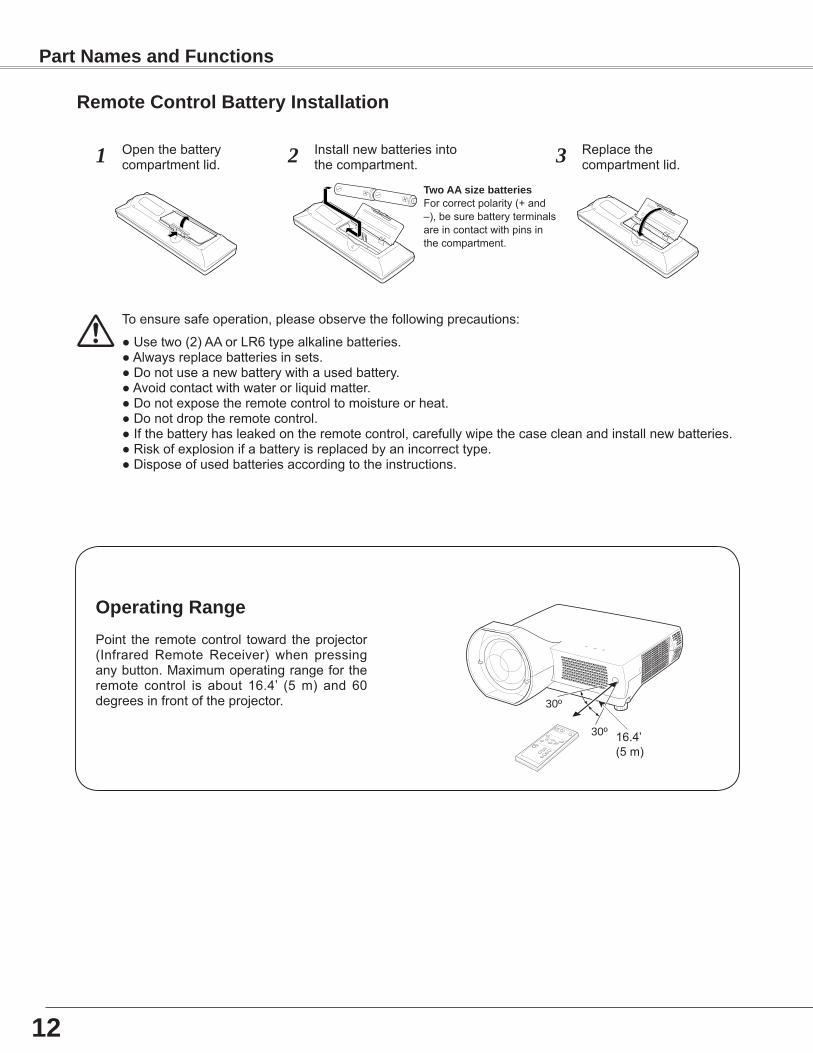
Toensuresafeoperation,pleaseobservethefollowingprecautions:
●Usetwo(2)AAorLR6typealkalinebatteries.●Alwaysreplacebatteriesinsets.●Donotuseanewbatterywithausedbattery.●Avoidcontactwithwaterorliquidmatter.●Donotexposetheremotecontroltomoistureorheat.●Donotdroptheremotecontrol.●Ifthebatteryhasleakedontheremotecontrol,carefullywipethecasecleanandinstallnewbatteries.●Riskofexplosionifabatteryisreplacedbyanincorrecttype.●Disposeofusedbatteriesaccordingtotheinstructions.
Openthebatterycompartmentlid.
Installnewbatteriesintothecompartment.
Replacethecompartmentlid.
TwoAAs�zeb�tter�esForcorrectpolarity(+and–),besurebatteryterminalsareincontactwithpinsinthecompartment.
Point the remotecontrol toward theprojector(InfraredRemoteReceiver) when pressinganybutton.Maximumoperatingrangefortheremote control is about 16.4’ (5m) and 60degreesinfrontoftheprojector.
Oper�t����R����e
Re�oteCo��trolB�tteryI��st�ll�t�o��
16.4’(5m)
1�1�
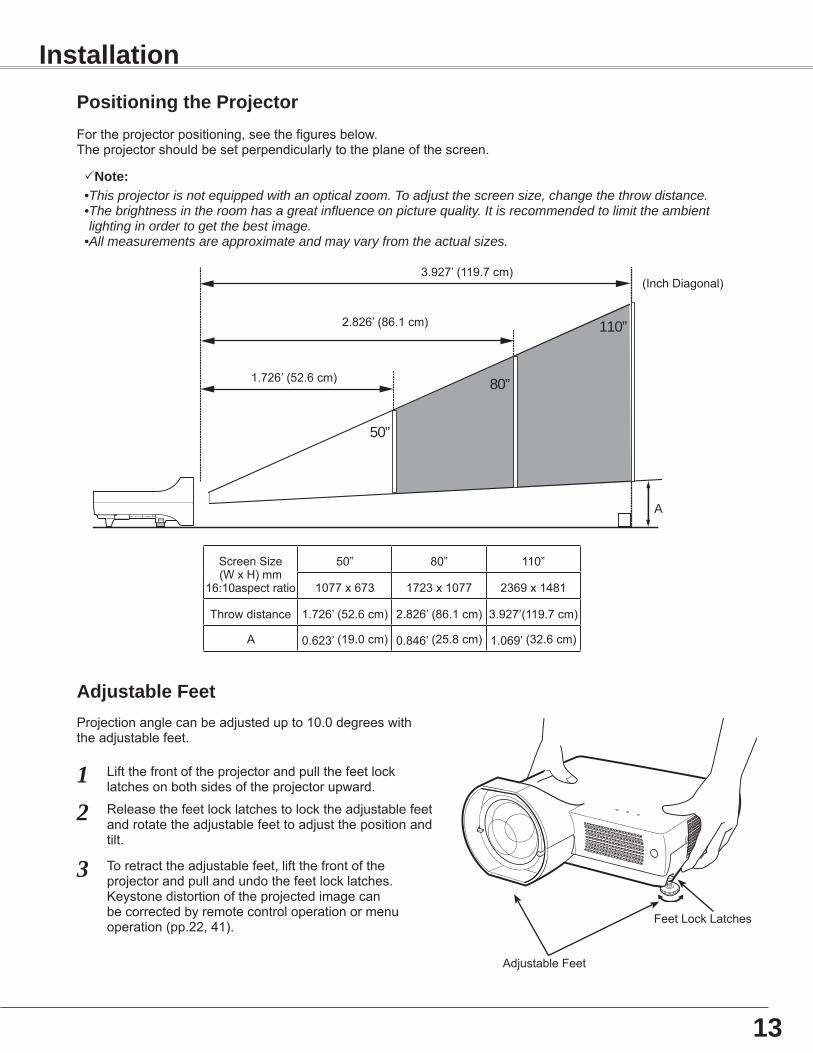
Note:•This projector is not equipped with an optical zoom. To adjust the screen size, change the throw distance.• The brightness in the room has a great influence on picture quality. It is recommended to limit the ambient lighting in order to get the best image.
•All measurements are approximate and may vary from the actual sizes.
50”
80”
110”
A
3.927’(119.7cm)
2.826’(86.1cm)
1.726’(52.6cm)
(InchDiagonal)
Fortheprojectorpositioning,seethefiguresbelow.Theprojectorshouldbesetperpendicularlytotheplaneofthescreen.
Projectionanglecanbeadjustedupto10.0degreeswiththeadjustablefeet.
Liftthefrontoftheprojectorandpullthefeetlocklatchesonbothsidesoftheprojectorupward.1Releasethefeetlocklatchestolocktheadjustablefeetandrotatetheadjustablefeettoadjustthepositionandtilt.
2
Toretracttheadjustablefeet,liftthefrontoftheprojectorandpullandundothefeetlocklatches.Keystonedistortionoftheprojectedimagecanbecorrectedbyremotecontroloperationormenuoperation(pp.22,41).
3
Adjust�bleFeet
Pos�t�o������theProje�tor
I��st�ll�t�o��
1�
ScreenSize(WxH)mm
16:10aspectratio
50” 80” 110”
1077x673 1723x1077 2369x1481
Throwdistance 1.726’(52.6cm) 2.826’(86.1cm) 3.927’(119.7cm)
A 0.623’(19.0cm) 0.846’(25.8cm) 1.069’(32.6cm)
AdjustableFeet
FeetLockLatches
14
Co����e�t����to�Co�puter
S-VIDEOIN
MONITOR OUTCOMPUTERIN2/
COMPUTER/COMPONENT
AUDIO IN
R
VIDEO IN L(MONO)
(VARIABLE)
AUDIO OUT
SERVICE PORT
S-VIDEO IN AUDIO IN
R
VIDEO IN L(MONO)
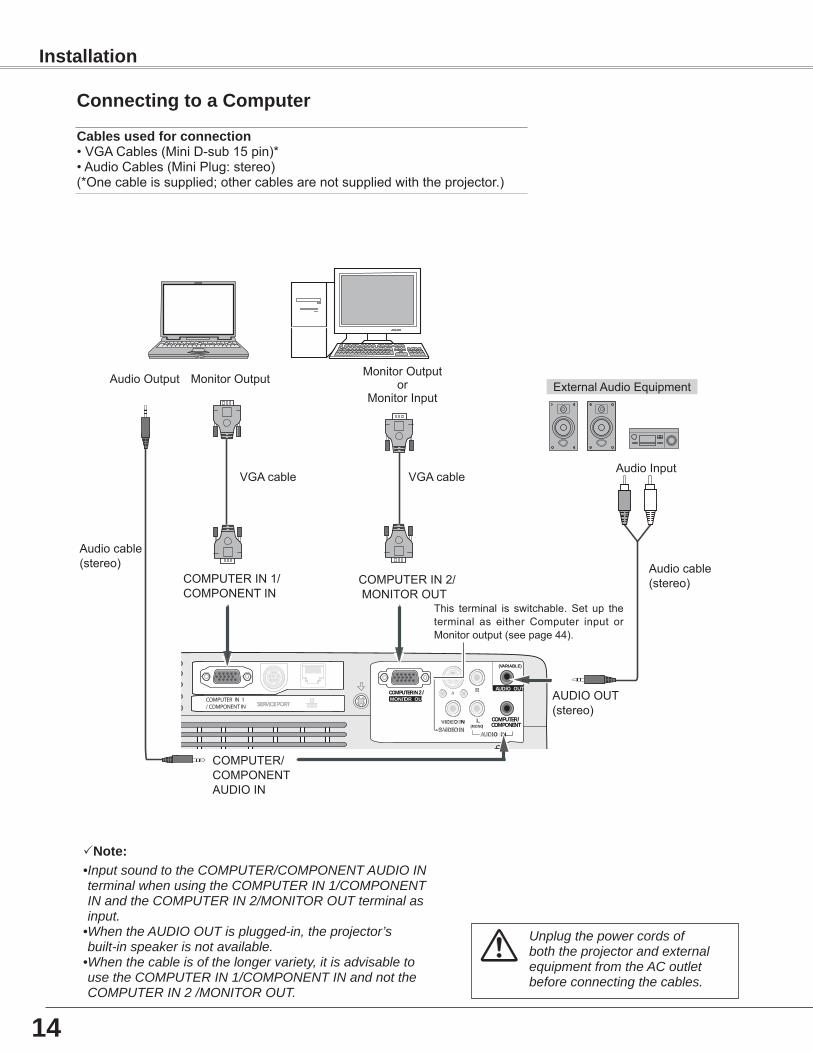
C�blesusedfor�o����e�t�o��•VGACables(MiniD-sub15pin)*•AudioCables(MiniPlug:stereo)(*Onecableissupplied;othercablesarenotsuppliedwiththeprojector.)
ExternalAudioEquipment
VGAcable
Audiocable(stereo) Audiocable
(stereo)
MonitorOutputor
MonitorInputAudioOutput
COMPUTER/COMPONENTAUDIOIN
AUDIOOUT(stereo)
AudioInput
COMPUTERIN2/MONITOROUT
Unplug the power cords of both the projector and external equipment from the AC outlet before connecting the cables.
Note:• Input sound to the COMPUTER/COMPONENT AUDIO IN terminal when using the COMPUTER IN 1/COMPONENT IN and the COMPUTER IN 2/MONITOR OUT terminal as input.
• When the AUDIO OUT is plugged-in, the projector’s built-in speaker is not available.
• When the cable is of the longer variety, it is advisable to use the COMPUTER IN 1/COMPONENT IN and not the COMPUTER IN 2 /MONITOR OUT.
MonitorOutput
COMPUTERIN1/COMPONENTIN
VGAcable
This terminal is switchable.Set up theterminal as either Computer input orMonitoroutput(seepage44).
I��st�ll�t�o��
15
S-VIDEO IN
MONITOR OUTCOMPUTER IN 2 /
COMPUTER /COMPONENT
AUDIO IN
R
VIDEO IN L(MONO)
(VARIABLE)
AUDIO OUT
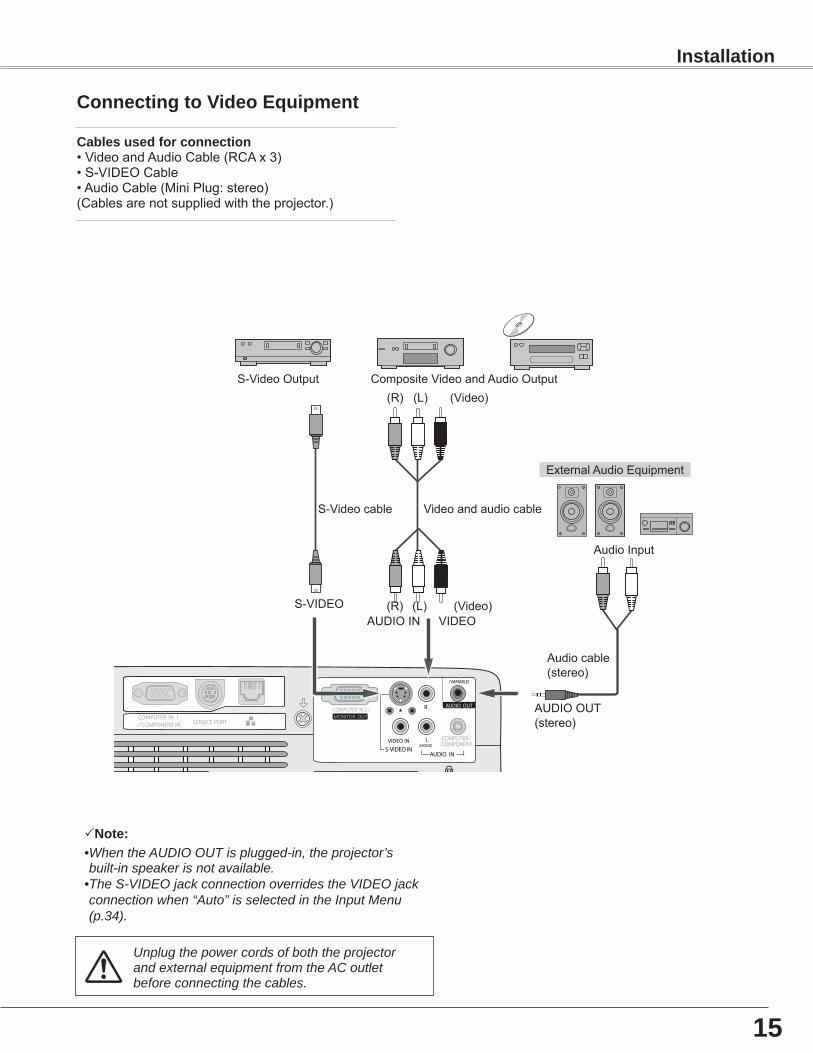
Co����e�t����toV�deoEqu�p�e��t
C�blesusedfor�o����e�t�o��•VideoandAudioCable(RCAx3)•S-VIDEOCable•AudioCable(MiniPlug:stereo)(Cablesarenotsuppliedwiththeprojector.)
Note:• When the AUDIO OUT is plugged-in, the projector’s built-in speaker is not available.
• The S-VIDEO jack connection overrides the VIDEO jack connection when “Auto” is selected in the Input Menu (p.34).
ExternalAudioEquipment
Audiocable (stereo)
VIDEOS-VIDEO
S-Videocable Videoandaudiocable
CompositeVideoandAudioOutputS-VideoOutput
AUDIOIN
AudioInput
AUDIOOUT(stereo)
(R) (L)
(R) (L) (Video)
(Video)
Unplug the power cords of both the projector and external equipment from the AC outlet before connecting the cables.
I��st�ll�t�o��
1�
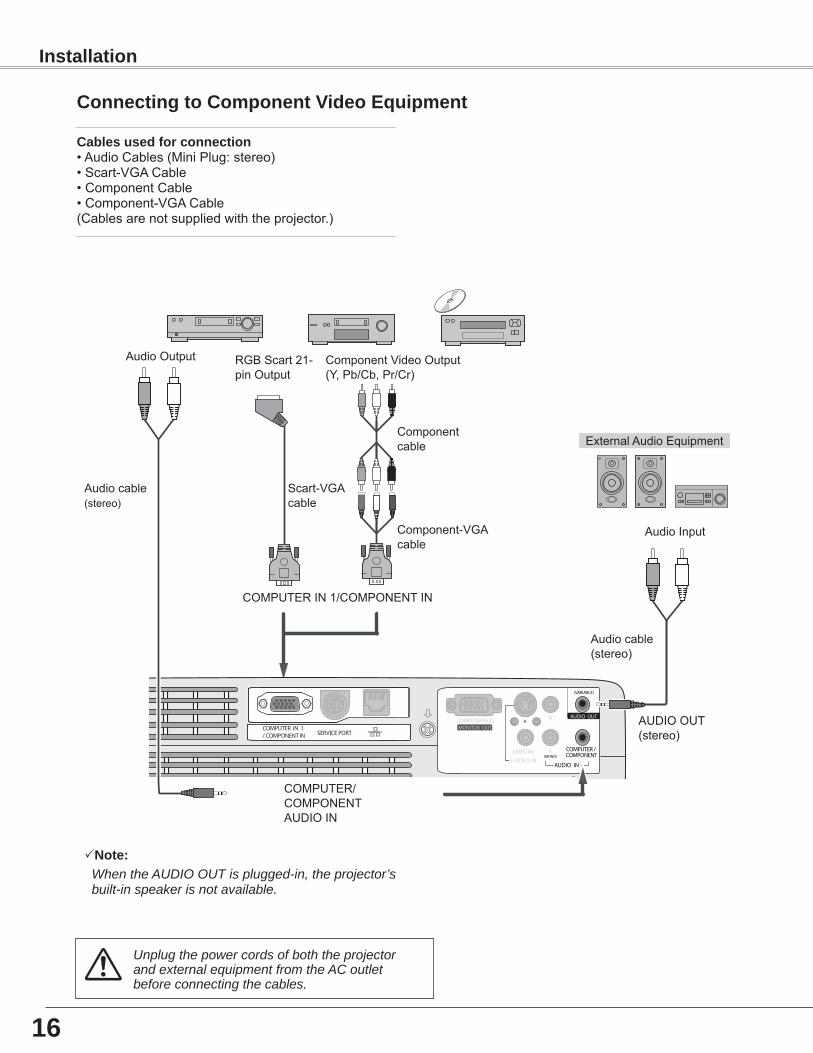
Co����e�t����toCo�po��e��tV�deoEqu�p�e��t
S-VIDEO IN
MONITOR OUTCOMPUTER IN 2 /
COMPUTER /COMPONENT
AUDIO IN
R
VIDEO IN L(MONO)
(VARIABLE)
AUDIO OUT
C�blesusedfor�o����e�t�o�� •AudioCables(MiniPlug:stereo)•Scart-VGACable•ComponentCable•Component-VGACable(Cablesarenotsuppliedwiththeprojector.)
Note: When the AUDIO OUT is plugged-in, the projector’s built-in speaker is not available.
ExternalAudioEquipment
COMPUTERIN1/COMPONENTIN
COMPUTER/COMPONENTAUDIOIN
Audiocable(stereo)
Audiocable(stereo)
AudioInput
ComponentVideoOutput(Y,Pb/Cb,Pr/Cr)
RGBScart21-pinOutput
AudioOutput
Scart-VGAcable
Component-VGAcable
AUDIOOUT(stereo)
Componentcable
Unplug the power cords of both the projector and external equipment from the AC outlet before connecting the cables.
I��st�ll�t�o��
CAUTION
TheACoutletmustbenearthisequipmentandmustbeeasilyaccessible.
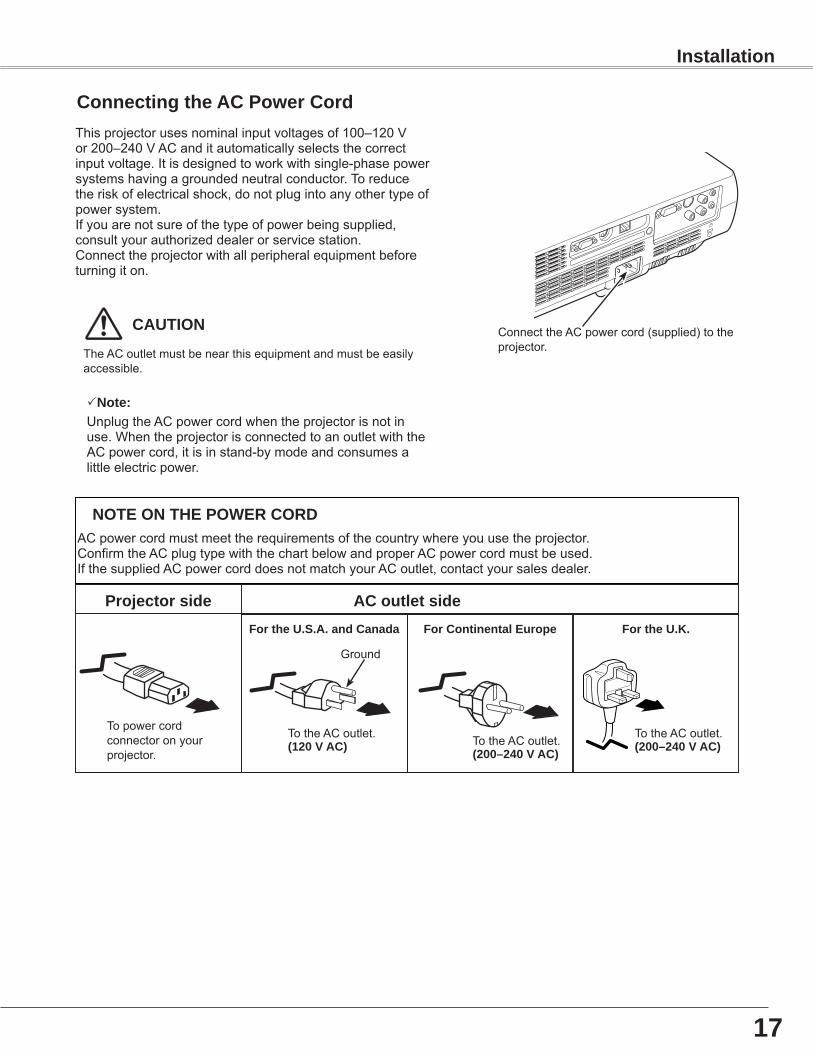
Co����e�t����theACPowerCord
ConnecttheACpowercord(supplied)totheprojector.
17
Note:UnplugtheACpowercordwhentheprojectorisnotinuse.WhentheprojectorisconnectedtoanoutletwiththeACpowercord,itisinstand-bymodeandconsumesalittleelectricpower.
I��st�ll�t�o��
Thisprojectorusesnominalinputvoltagesof100–120Vor200–240VACanditautomaticallyselectsthecorrectinputvoltage.Itisdesignedtoworkwithsingle-phasepowersystemshavingagroundedneutralconductor.Toreducetheriskofelectricalshock,donotplugintoanyothertypeofpowersystem.Ifyouarenotsureofthetypeofpowerbeingsupplied,consultyourauthorizeddealerorservicestation.Connecttheprojectorwithallperipheralequipmentbeforeturningiton.
Topowercordconnectoronyourprojector.
Proje�tors�de ACoutlets�de
Ground
TotheACoutlet.(1�0VAC)
ForCo��t���e��t�lEuropeFortheU.S.A.���dC����d� FortheU.K.
TotheACoutlet.(�00–�40VAC)
TotheACoutlet.(�00–�40VAC)
NOTEONTHEPOWERCORDACpowercordmustmeettherequirementsofthecountrywhereyouusetheprojector.ConfirmtheACplugtypewiththechartbelowandproperACpowercordmustbeused.IfthesuppliedACpowercorddoesnotmatchyourACoutlet,contactyoursalesdealer.
Connecttheprojector’sACpowercordintoanACoutlet.ThePOWERindicatorturnsred.Openthelenscover.
PressthePOWERON/STAND-BYbuttonontheremotecontrol.ThePOWERindicatorbecomesgreenandthecoolingfansstarttooperate.Thepreparationdisplayappearsonthescreenandthecountdownstarts.
2
3
1
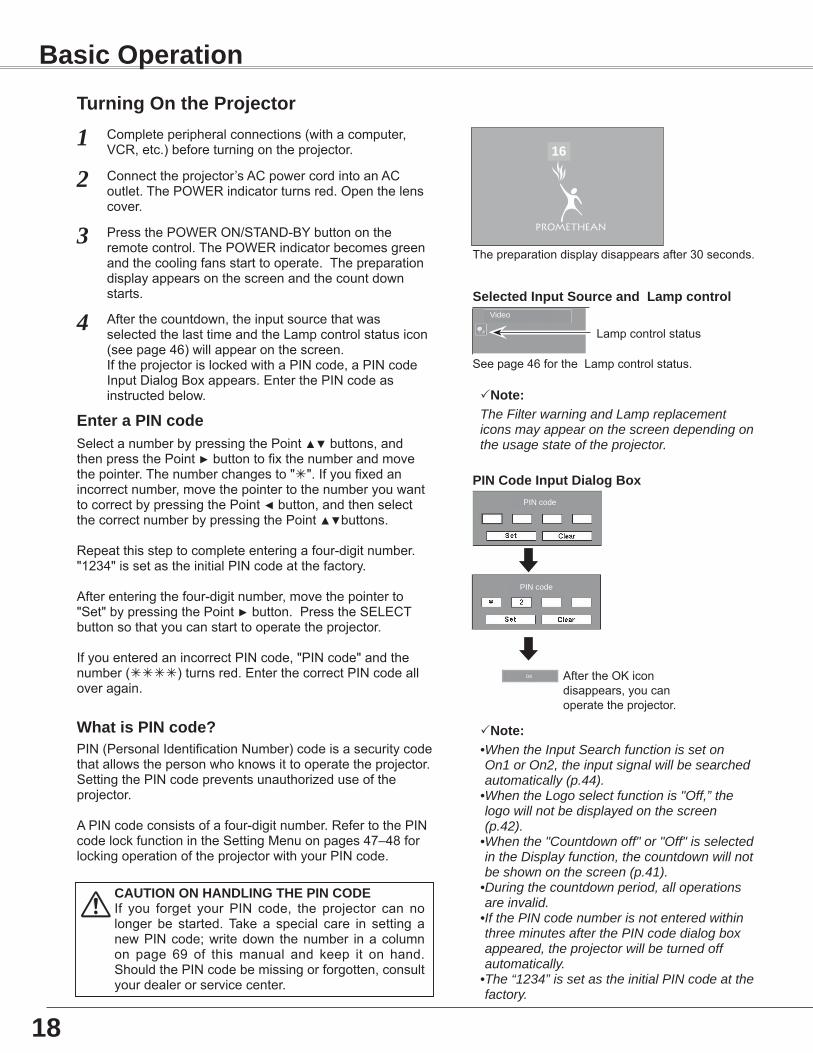
Thepreparationdisplaydisappearsafter30seconds.
4 Afterthecountdown,theinputsourcethatwasselectedthelasttimeandtheLampcontrolstatusicon(seepage46)willappearonthescreen.IftheprojectorislockedwithaPINcode,aPINcodeInputDialogBoxappears.EnterthePINcodeasinstructedbelow.
Seepage46fortheLampcontrolstatus.
Video
Sele�tedI��putSour�e���d���p�o��trol
Completeperipheralconnections(withacomputer,VCR,etc.)beforeturningontheprojector.
Lampcontrolstatus
OK AftertheOKicondisappears,youcanoperatetheprojector.
PINCodeI��putD��lo�Box
Tur������O��theProje�tor
E��ter�PIN�odeSelectanumberbypressingthePoint▲▼buttons,andthenpressthePoint►buttontofixthenumberandmovethepointer.Thenumberchangesto"".Ifyoufixedanincorrectnumber,movethepointertothenumberyouwanttocorrectbypressingthePoint◄button,andthenselectthecorrectnumberbypressingthePoint▲▼buttons.
Repeatthissteptocompleteenteringafour-digitnumber."1234"issetastheinitialPINcodeatthefactory.
Afterenteringthefour-digitnumber,movethepointerto"Set"bypressingthePoint►button.PresstheSELECTbuttonsothatyoucanstarttooperatetheprojector.
IfyouenteredanincorrectPINcode,"PINcode"andthenumber()turnsred.EnterthecorrectPINcodealloveragain.
Wh�t�sPIN�ode?PIN(PersonalIdentificationNumber)codeisasecuritycodethatallowsthepersonwhoknowsittooperatetheprojector.SettingthePINcodepreventsunauthorizeduseoftheprojector.
APINcodeconsistsofafour-digitnumber.RefertothePINcodelockfunctionintheSettingMenuonpages47–48forlockingoperationoftheprojectorwithyourPINcode.
Note:• When the Input Search function is set on On1 or On2, the input signal will be searched automatically (p.44).
• When the Logo select function is "Off,” the logo will not be displayed on the screen (p.42).
• When the "Countdown off" or "Off" is selected in the Display function, the countdown will not be shown on the screen (p.41).
• During the countdown period, all operations are invalid.
• If the PIN code number is not entered within three minutes after the PIN code dialog box appeared, the projector will be turned off automatically.
• The “1234” is set as the initial PIN code at the factory.
CAUTIONONHAND�INGTHEPINCODEIf you forget your PIN code, the projector can nolonger be started.Take a special care in setting anewPINcode;writedown thenumber inacolumnon page 69 of thismanual and keep it on hand.ShouldthePINcodebemissingorforgotten,consultyourdealerorservicecenter.
18
PIN code
PIN code
B�s��Oper�t�o��
Note:The Filter warning and Lamp replacement icons may appear on the screen depending on the usage state of the projector.
1�
PressthePOWERON/STAND-BYbuttonontheremotecontrol,and“Poweroff?”appearsonthescreen.
PressthePOWERON/STAND-BYbuttonagaintoturnofftheprojector.ThePOWERindicatorstartstoblinkred,andthecoolingfanskeeprunning.(Youcanselectthelevelofthefans’quietnessandrunningspeed.Seepage49.)AtthistimeyoucanunplugtheACpowercordevenifthefansarestillrunning.
1
2
TOMAINTAINTHELAMPLIFE,ONCEYOUTURNTHEPROJECTORON,WAITATLEAST5MINUTESBEFORETURNINGITOFF.
3 Whentheprojectorhascooleddownenoughtobeturnedonagain,thePOWERindicatorstopsblinking.
“Poweroff”disappearsafter4seconds.
Power off?
Note:• When the On start function is “On,” this projector is turned on automatically by connecting the AC power cord to an AC outlet (p. 46).
• The running speed of cooling fans is changed according to the temperature inside the projector.
• Do not put the projector in a case before the projector is cooled enough.
• If the WARNING indicator blinks or emits a red light, see “Warning Indicator” on page 54.
• While the POWER indicator is blinking, the lamp is being cooled down and the projector cannot be turned on. Wait until the POWER indicator stops blinking to turn on the projector again.
• The fan rotation will terminate directly if the AC power cord is unplugged immediately after the projector is turned off.
• The projector can be turned on after the POWER indicator turns red. The waiting time to restart will be shortened when the normal power-off processing for fan cooling is completed, compared with the time the AC power cord is immediately unplugged after the power-off.
Tur������OfftheProje�tor
19
DONOTOPERATETHEPROJECTORCONTINUOUSLYWITHOUTREST.CONTINUOUSUSEMAYRESULTINSHORTENINGTHELAMPLIFE.TURNOFFTHEPROJECTORANDLETSTANDFORABOUTANHOURINEVERY24HOURS.
B�s��Oper�t�o��

Me��ub�r Po���ter(redfr��e)
Me��u��o��
Ite�d�t�PressthePoint◄► buttonstoadjustthevalue.
SE�ECTbutto��
Po���ter(redfr��e)PressthePoint▲▼ buttonstomovethepointer.
Ite�
HowtoOper�tetheO��-S�ree��Me��u
O��-S�ree��Me��u
Qu�tExitthismenu.
TheprojectorcanbeadjustedorsetviatheOn-ScreenMenu.Foreachadjustmentandsettingprocedure,refertotherespectivesectionsinthismanual.
UsethePoint◄►buttonstoselectaMenuicon;usethePoint▲▼buttonstoselectanitem.
PresstheSELECTbuttontoshowtheitemdata.Toadjustthedata,usethePoint◄►buttons.Refertotherelevantpagesformoredetailsabouteachadjustment.
ToclosetheOn-ScreenMenu,presstheMENUbuttonagain.
PresstheMENUbuttonontheremotecontroltodisplaytheOn-ScreenMenu.
Note: The selected item is not active until the SELECT button is pressed.
1
2
3SE�ECTbutto��
POINTbutto��s
Re�oteCo��trolMENUbutto��
�0
Press theSELECTbuttonheretodisplaynextitems.
Press theSELECT buttonhere to display previousitems.
B�s��Oper�t�o��
Me��uB�r
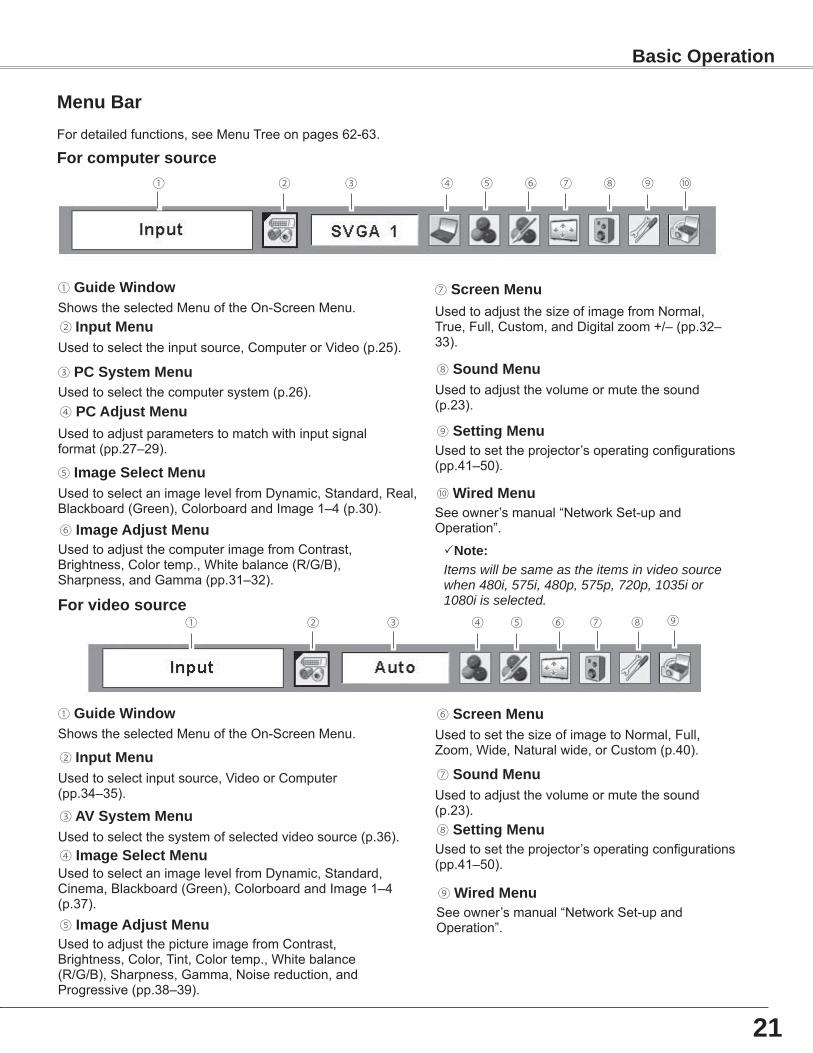
③ PCSyste�Me��uUsedtoselectthecomputersystem(p.26).
⑥ I���eAdjustMe��uUsedtoadjustthecomputerimagefromContrast,Brightness,Colortemp.,Whitebalance(R/G/B),Sharpness,andGamma(pp.31–32).
⑨ Sett����Me��uUsedtosettheprojector’soperatingconfigurations(pp.41–50).
⑧ Sou��dMe��uUsedtoadjustthevolumeormutethesound(p.23).
⑤ I���eSele�tMe��uUsedtoselectanimagelevelfromDynamic,Standard,Real,Blackboard(Green),ColorboardandImage1–4(p.30).
For�o�putersour�e
③ AVSyste�Me��uUsedtoselectthesystemofselectedvideosource(p.36).
⑤ I���eAdjustMe��uUsedtoadjustthepictureimagefromContrast,Brightness,Color,Tint,Colortemp.,Whitebalance(R/G/B),Sharpness,Gamma,Noisereduction,andProgressive(pp.38–39).
Forv�deosour�e
Usedtoselectinputsource,VideoorComputer(pp.34–35).
④ PCAdjustMe��uUsedtoadjustparameterstomatchwithinputsignalformat(pp.27–29).
④ I���eSele�tMe��uUsedtoselectanimagelevelfromDynamic,Standard,Cinema,Blackboard(Green),ColorboardandImage1–4(p.37).
⑥ S�ree��Me��uUsedtosetthesizeofimagetoNormal,Full,Zoom,Wide,Naturalwide,orCustom(p.40).
① Gu�deW���dowShowstheselectedMenuoftheOn-ScreenMenu.② I��putMe��uUsedtoselecttheinputsource,ComputerorVideo(p.25).
⑦ S�ree��Me��uUsedtoadjustthesizeofimagefromNormal,True,Full,Custom,andDigitalzoom+/–(pp.32–33).
Fordetailedfunctions,seeMenuTreeonpages62-63.
① Gu�deW���dowShowstheselectedMenuoftheOn-ScreenMenu.
② I��putMe��u
⑧ Sett����Me��uUsedtosettheprojector’soperatingconfigurations(pp.41–50).
⑦ Sou��dMe��uUsedtoadjustthevolumeormutethesound(p.23).
⑤③ ⑧④① ② ⑥ ⑦ ⑨
① ② ③ ④ ⑤ ⑥ ⑦ ⑧
�1
B�s��Oper�t�o��
⑩
⑩ W�redMe��uSeeowner’smanual“NetworkSet-upandOperation”.
⑨
⑨ W�redMe��uSeeowner’smanual“NetworkSet-upandOperation”.
Note: Items will be same as the items in video sourcewhen 480i, 575i, 480p, 575p, 720p, 1035i or 1080i is selected.
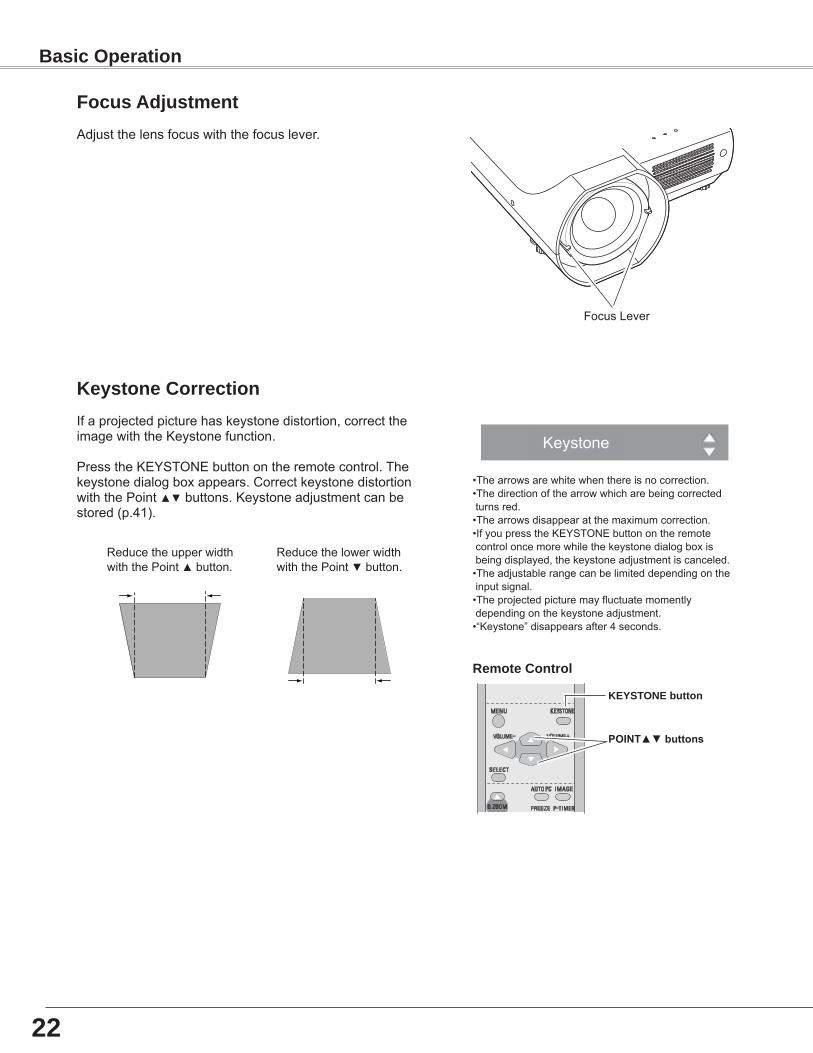
Adjustthelensfocuswiththefocuslever.
FocusLever
•Thearrowsarewhitewhenthereisnocorrection.•Thedirectionofthearrowwhicharebeingcorrectedturnsred.•Thearrowsdisappearatthemaximumcorrection.•IfyoupresstheKEYSTONEbuttonontheremotecontroloncemorewhilethekeystonedialogboxisbeingdisplayed,thekeystoneadjustmentiscanceled.•Theadjustablerangecanbelimiteddependingontheinputsignal.•Theprojectedpicturemayfluctuatemomentlydependingonthekeystoneadjustment.•“Keystone”disappearsafter4seconds.
Ifaprojectedpicturehaskeystonedistortion,correcttheimagewiththeKeystonefunction.
PresstheKEYSTONEbuttonontheremotecontrol.Thekeystonedialogboxappears.CorrectkeystonedistortionwiththePoint▲▼buttons.Keystoneadjustmentcanbestored(p.41).
ReducetheupperwidthwiththePoint▲button.
ReducethelowerwidthwiththePoint▼button.
Keysto��eCorre�t�o��
Re�oteCo��trol
KEYSTONEbutto��
POINT▲▼ buttons
Fo�usAdjust�e��t
��
B�s��Oper�t�o��
Re�oteCo��trol
Re�oteCo��trolOper�t�o��Usingtheremotecontrolforsomefrequentlyusedoperationsisadvisable.JustpressingoneofthebuttonsenablesyoutomakethedesiredoperationquicklywithoutcallinguptheOn-ScreenMenu.
COMPUTER/VIDEObutto��
Note:See the next page for the description of other buttons.
PresstheFREEZEbuttontofreezethepictureonthescreen.TocanceltheFreezefunction,presstheFREEZEbuttonagainorpressanyotherbutton.
FREEZEbutto��
PresstheCOMPUTERorVIDEObuttontoselectaninputsource.Seepages25,34–35formoredetails.
COMPUTER/VIDEObutto��
FREEZEbutto��
1
2
PresstheMENUbuttontodisplaytheOn-ScreenMenu.UsethePoint◄►buttonstomovetheredframepointertotheSoundMenuicon.
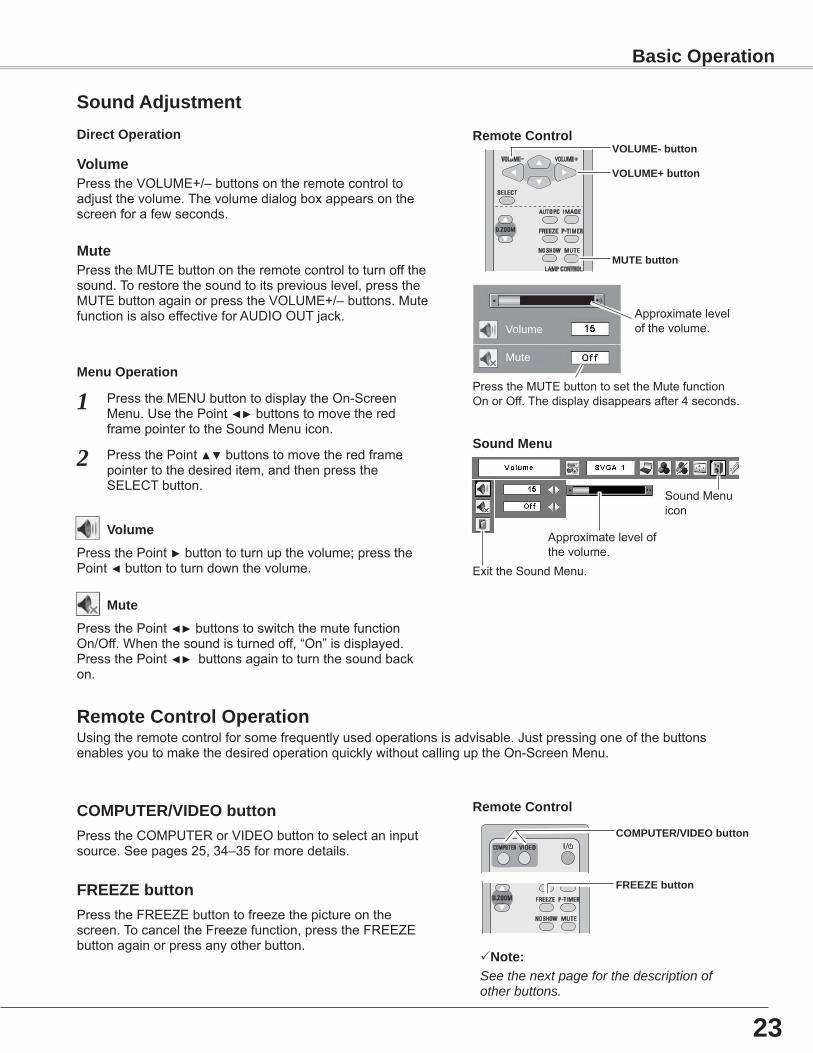
PresstheVOLUME+/–buttonsontheremotecontroltoadjustthevolume.Thevolumedialogboxappearsonthescreenforafewseconds.
PresstheMUTEbuttonontheremotecontroltoturnoffthesound.Torestorethesoundtoitspreviouslevel,presstheMUTEbuttonagainorpresstheVOLUME+/–buttons.MutefunctionisalsoeffectiveforAUDIOOUTjack.
PressthePoint◄►buttonstoswitchthemutefunctionOn/Off.Whenthesoundisturnedoff,“On”isdisplayed.PressthePoint◄►buttonsagaintoturnthesoundbackon.
PressthePoint▲▼buttonstomovetheredframepointertothedesireditem,andthenpresstheSELECTbutton.
Approximatelevelofthevolume.
ExittheSoundMenu.
Volume
Mute
Approximatelevelofthevolume.
PresstheMUTEbuttontosettheMutefunctionOnorOff.Thedisplaydisappearsafter4seconds.
Sou��dMe��u
SoundMenuicon
Volu�e
Re�oteCo��trol
VO�UME+butto��
VO�UME-butto��
MUTEbutto��
Volu�e
Mute
PressthePoint►buttontoturnupthevolume;pressthePoint◄buttontoturndownthevolume.
Mute
D�re�tOper�t�o��
Me��uOper�t�o��
Sou��dAdjust�e��t
��
B�s��Oper�t�o��
Re�oteCo��trol
D.ZOOMbutto��s
NOSHOWbutto��
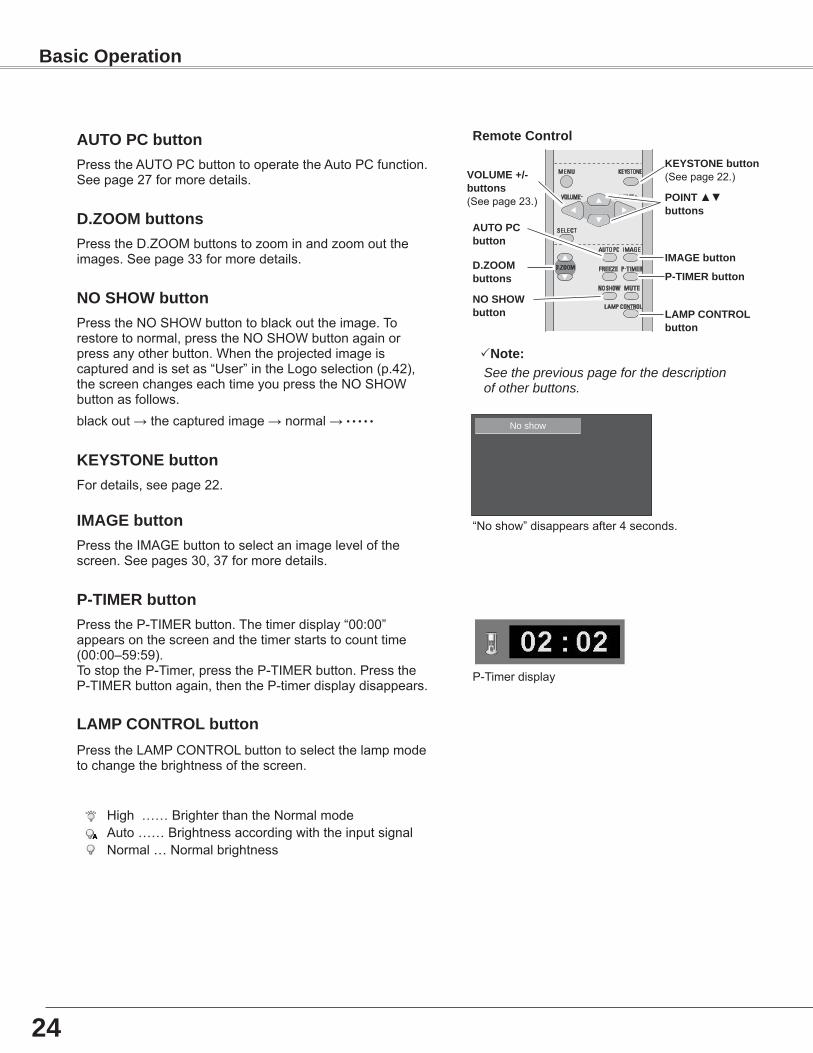
AUTOPCbutto��
Note: See the previous page for the description of other buttons.
KEYSTONEbutto��(Seepage22.)
POINT▲▼butto��s
blackout→thecapturedimage→normal→• • • • •
PresstheNOSHOWbuttontoblackouttheimage.Torestoretonormal,presstheNOSHOWbuttonagainorpressanyotherbutton.Whentheprojectedimageiscapturedandissetas“User”intheLogoselection(p.42),thescreenchangeseachtimeyoupresstheNOSHOWbuttonasfollows.
“Noshow”disappearsafter4seconds.
NOSHOWbutto��
No show
PresstheAUTOPCbuttontooperatetheAutoPCfunction.Seepage27formoredetails.
AUTOPCbutto��
PresstheD.ZOOMbuttonstozoominandzoomouttheimages.Seepage33formoredetails.
D.ZOOMbutto��s
PresstheP-TIMERbutton.Thetimerdisplay“00:00”appearsonthescreenandthetimerstartstocounttime(00:00–59:59).TostoptheP-Timer,presstheP-TIMERbutton.PresstheP-TIMERbuttonagain,thentheP-timerdisplaydisappears.
P-TIMERbutto��
P-Timerdisplay
PresstheIMAGEbuttontoselectanimagelevelofthescreen.Seepages30,37formoredetails.
IMAGEbutto��
�AMPCONTRO�butto��
P-TIMERbutto��
IMAGEbutto��
VO�UME+/-butto��s(Seepage23.)
PresstheLAMPCONTROLbuttontoselectthelampmodetochangethebrightnessofthescreen.
High……BrighterthantheNormalmodeAuto……BrightnessaccordingwiththeinputsignalNormal…Normalbrightness
Fordetails,seepage22.
KEYSTONEbutto��
�4
�AMPCONTRO�butto��
B�s��Oper�t�o��
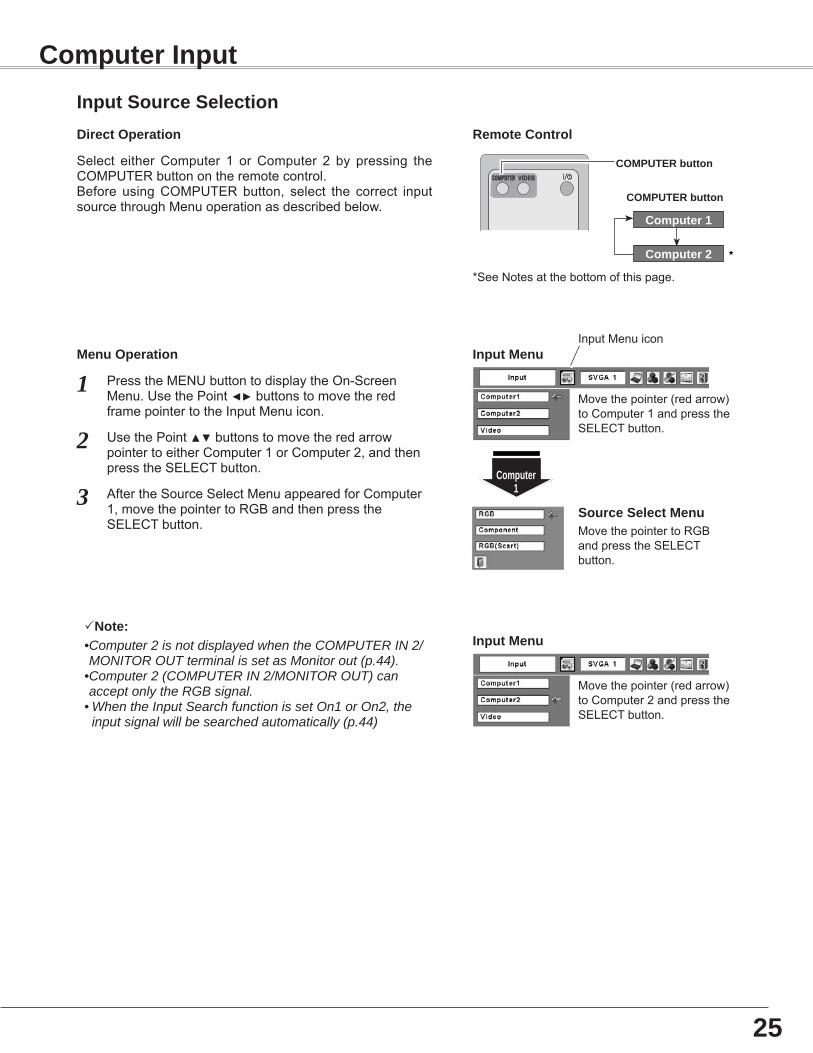
Select eitherComputer 1 orComputer 2 by pressing theCOMPUTERbuttonontheremotecontrol.Before usingCOMPUTERbutton, select the correct inputsourcethroughMenuoperationasdescribedbelow.
PresstheMENUbuttontodisplaytheOn-ScreenMenu.UsethePoint◄►buttonstomovetheredframepointertotheInputMenuicon.
1I��putMe��u
UsethePoint▲▼buttonstomovetheredarrowpointertoeitherComputer1orComputer2,andthenpresstheSELECTbutton.
2
AftertheSourceSelectMenuappearedforComputer1,movethepointertoRGBandthenpresstheSELECTbutton.
3
I��putMe��u
COMPUTERbutto��
Co�puter1
Co�puter�
I��putSour�eSele�t�o��D�re�tOper�t�o��
Me��uOper�t�o��
Movethepointer(redarrow)toComputer1andpresstheSELECTbutton.
InputMenuicon
Movethepointer(redarrow)toComputer2andpresstheSELECTbutton.
MovethepointertoRGBandpresstheSELECTbutton.
Sour�eSele�tMe��u
Re�oteCo��trol
COMPUTERbutto��
Note:• Computer 2 is not displayed when the COMPUTER IN 2/MONITOR OUT terminal is set as Monitor out (p.44).
• Computer 2 (COMPUTER IN 2/MONITOR OUT) can accept only the RGB signal.
• When the Input Search function is set On1 or On2, the input signal will be searched automatically (p.44)
Co�puter1
*SeeNotesatthebottomofthispage.
�5
Co�puterI��put
*
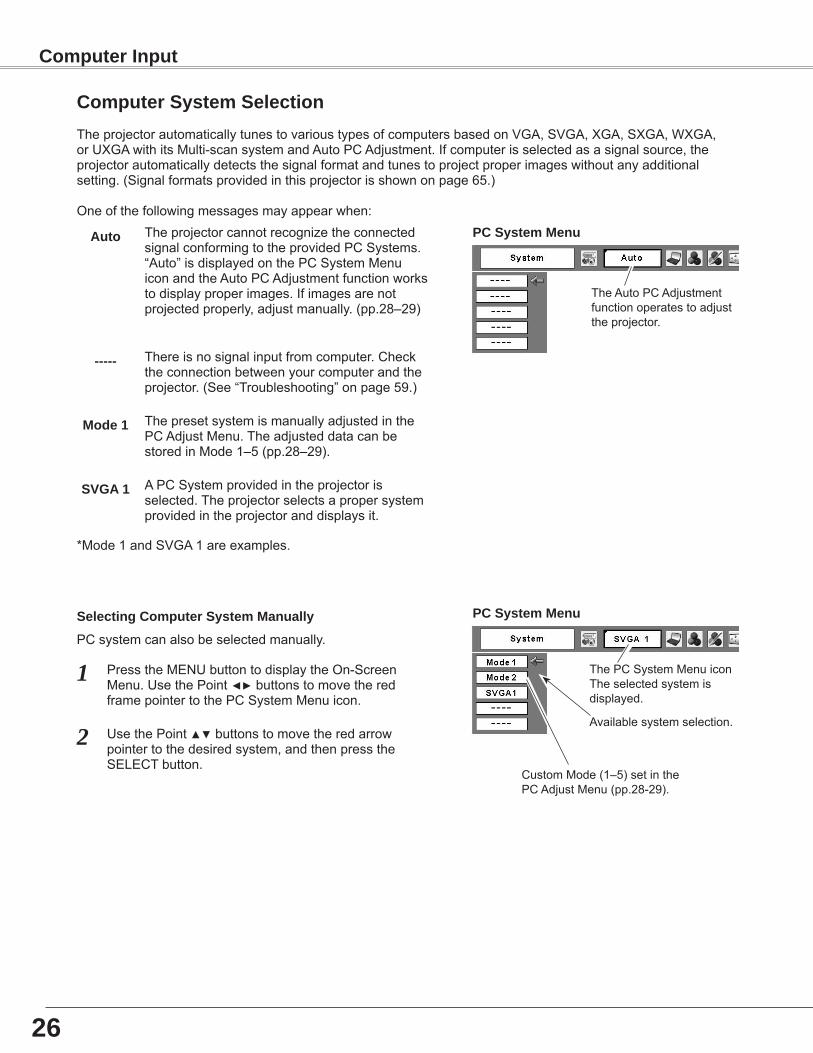
TheAutoPCAdjustmentfunctionoperatestoadjusttheprojector.
PCSyste�Me��u
ThePCSystemMenuiconTheselectedsystemisdisplayed.
Availablesystemselection.
PresstheMENUbuttontodisplaytheOn-ScreenMenu.UsethePoint◄►buttonstomovetheredframepointertothePCSystemMenuicon.
UsethePoint▲▼buttonstomovetheredarrowpointertothedesiredsystem,andthenpresstheSELECTbutton.
1
2
PCSyste�Me��u
CustomMode(1–5)setinthePCAdjustMenu(pp.28-29).
PCsystemcanalsobeselectedmanually.
Co�puterSyste�Sele�t�o��TheprojectorautomaticallytunestovarioustypesofcomputersbasedonVGA,SVGA,XGA,SXGA,WXGA,orUXGAwithitsMulti-scansystemandAutoPCAdjustment.Ifcomputerisselectedasasignalsource,theprojectorautomaticallydetectsthesignalformatandtunestoprojectproperimageswithoutanyadditionalsetting.(Signalformatsprovidedinthisprojectorisshownonpage65.)
Oneofthefollowingmessagesmayappearwhen:TheprojectorcannotrecognizetheconnectedsignalconformingtotheprovidedPCSystems.“Auto”isdisplayedonthePCSystemMenuiconandtheAutoPCAdjustmentfunctionworkstodisplayproperimages.Ifimagesarenotprojectedproperly,adjustmanually.(pp.28–29)
Thereisnosignalinputfromcomputer.Checktheconnectionbetweenyourcomputerandtheprojector.(See“Troubleshooting”onpage59.)
Auto
-----
ThepresetsystemismanuallyadjustedinthePCAdjustMenu.TheadjusteddatacanbestoredinMode1–5(pp.28–29).
Mode1
APCSystemprovidedintheprojectorisselected.Theprojectorselectsapropersystemprovidedintheprojectoranddisplaysit.
SVGA1
Sele�t����Co�puterSyste�M���u�lly
*Mode1andSVGA1areexamples.
��
Co�puterI��put
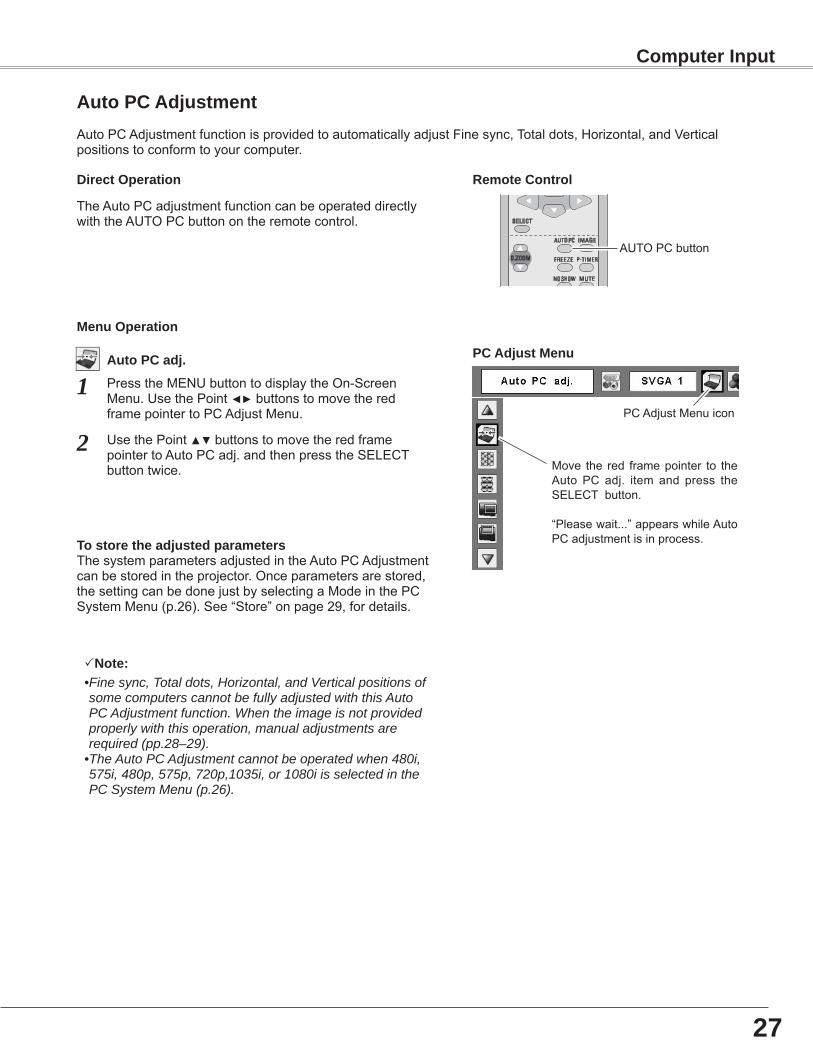
AutoPCAdjustmentfunctionisprovidedtoautomaticallyadjustFinesync,Totaldots,Horizontal,andVerticalpositionstoconformtoyourcomputer.
Move the red framepointer to theAuto PC adj. item and press theSELECTbutton.
“Pleasewait...”appearswhileAutoPCadjustmentisinprocess.
PCAdjustMe��u
PCAdjustMenuicon
Tostorethe�djustedp�r��etersThesystemparametersadjustedintheAutoPCAdjustmentcanbestoredintheprojector.Onceparametersarestored,thesettingcanbedonejustbyselectingaModeinthePCSystemMenu(p.26).See“Store”onpage29,fordetails.
Note:• Fine sync, Total dots, Horizontal, and Vertical positions of some computers cannot be fully adjusted with this Auto PC Adjustment function. When the image is not provided properly with this operation, manual adjustments are required (pp.28–29).
• The Auto PC Adjustment cannot be operated when 480i, 575i, 480p, 575p, 720p,1035i, or 1080i is selected in the PC System Menu (p.26).
AutoPCAdjust�e��t
PresstheMENUbuttontodisplaytheOn-ScreenMenu.UsethePoint◄►buttonstomovetheredframepointertoPCAdjustMenu.
1
2 UsethePoint▲▼ buttonstomovetheredframepointertoAutoPCadj.andthenpresstheSELECTbuttontwice.
AutoPC�dj.
Me��uOper�t�o��
TheAutoPCadjustmentfunctioncanbeoperateddirectlywiththeAUTOPCbuttonontheremotecontrol.
Re�oteCo��trol
AUTOPCbutton
D�re�tOper�t�o��
�7
Co�puterI��put
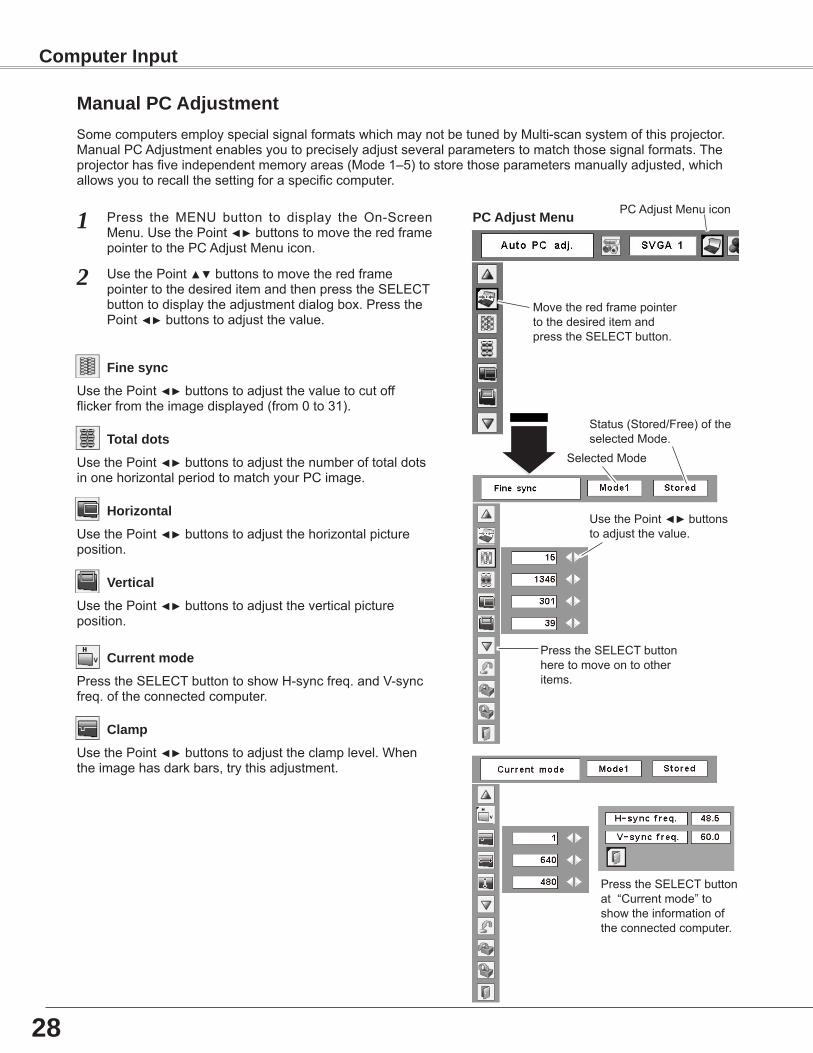
Press theMENU button to display the On-ScreenMenu.UsethePoint◄►buttonstomovetheredframepointertothePCAdjustMenuicon.
1
2 UsethePoint▲▼buttonstomovetheredframepointertothedesireditemandthenpresstheSELECTbuttontodisplaytheadjustmentdialogbox.PressthePoint◄►buttonstoadjustthevalue.
MovetheredframepointertothedesireditemandpresstheSELECTbutton.
PCAdjustMe��u PCAdjustMenuicon
UsethePoint◄►buttonstoadjustthevaluetocutoffflickerfromtheimagedisplayed(from0to31).
F���esy���
UsethePoint◄►buttonstoadjustthenumberoftotaldotsinonehorizontalperiodtomatchyourPCimage.
Tot�ldots
UsethePoint◄►buttonstoadjustthehorizontalpictureposition.
Hor�zo��t�l
UsethePoint◄►buttonstoadjusttheverticalpictureposition.
Vert���l
PresstheSELECTbuttontoshowH-syncfreq.andV-syncfreq.oftheconnectedcomputer.
Curre��t�ode
UsethePoint◄►buttonstoadjusttheclamplevel.Whentheimagehasdarkbars,trythisadjustment.
Cl��p
PresstheSELECTbuttonheretomoveontootheritems.
UsethePoint◄► buttonstoadjustthevalue.
Status(Stored/Free)oftheselectedMode.
SelectedMode
PresstheSELECTbuttonat“Currentmode”toshowtheinformationoftheconnectedcomputer.
M���u�lPCAdjust�e��tSomecomputersemployspecialsignalformatswhichmaynotbetunedbyMulti-scansystemofthisprojector.ManualPCAdjustmentenablesyoutopreciselyadjustseveralparameterstomatchthosesignalformats.Theprojectorhasfiveindependentmemoryareas(Mode1–5)tostorethoseparametersmanuallyadjusted,whichallowsyoutorecallthesettingforaspecificcomputer.
�8
Co�puterI��put
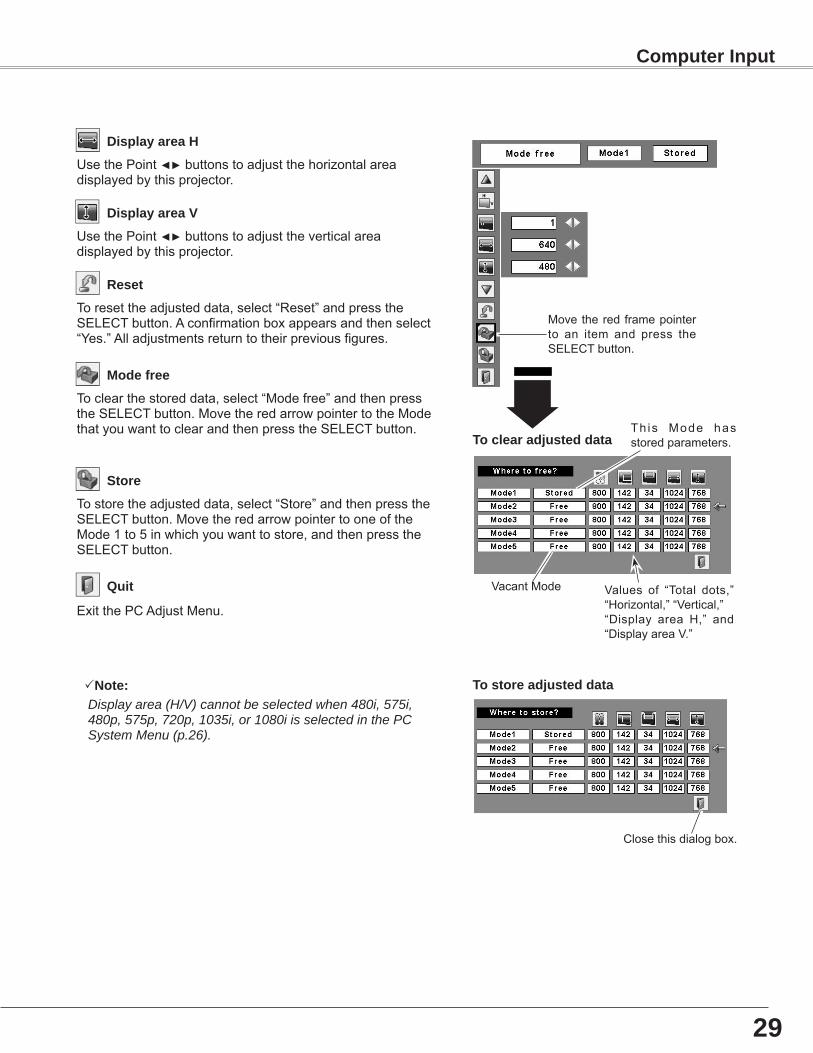
UsethePoint◄►buttonstoadjustthehorizontalareadisplayedbythisprojector.
D�spl�y�re�H
UsethePoint◄►buttonstoadjusttheverticalareadisplayedbythisprojector.
D�spl�y�re�V
Reset
Store
ExitthePCAdjustMenu.
Qu�t
Tostoretheadjusteddata,select“Store”andthenpresstheSELECTbutton.MovetheredarrowpointertooneoftheMode1to5inwhichyouwanttostore,andthenpresstheSELECTbutton.
Toresettheadjusteddata,select“Reset”andpresstheSELECTbutton.Aconfirmationboxappearsandthenselect“Yes.”Alladjustmentsreturntotheirpreviousfigures.
Modefree
VacantMode Values of “Total dots,”“Horizontal,”“Vertical,”“Display area H,” and“DisplayareaV.”
Closethisdialogbox.
Tostore�djustedd�t�
To�le�r�djustedd�t�
Toclearthestoreddata,select“Modefree”andthenpresstheSELECTbutton.MovetheredarrowpointertotheModethatyouwanttoclearandthenpresstheSELECTbutton.
Note: Display area (H/V) cannot be selected when 480i, 575i, 480p, 575p, 720p, 1035i, or 1080i is selected in the PC System Menu (p.26).
Th is Mode hasstoredparameters.
Movetheredframepointerto an item and press theSELECTbutton.
�9
Co�puterI��put
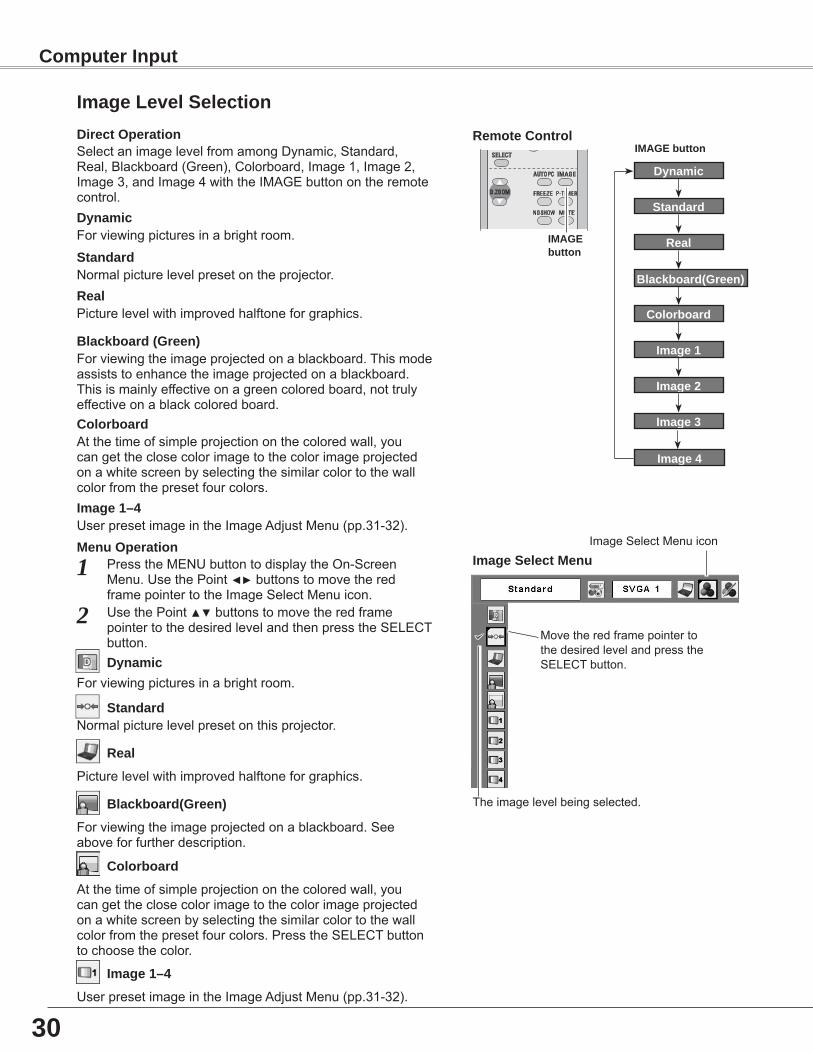
PresstheMENUbuttontodisplaytheOn-ScreenMenu.UsethePoint◄►buttonstomovetheredframepointertotheImageSelectMenuicon.
1
2 UsethePoint▲▼buttonstomovetheredframepointertothedesiredlevelandthenpresstheSELECTbutton.
I���eSele�tMe��u
Normalpicturelevelpresetonthisprojector.St���d�rd
Picturelevelwithimprovedhalftoneforgraphics.
Re�l
Forviewingtheimageprojectedonablackboard.Seeaboveforfurtherdescription.
Bl��kbo�rd(Gree��)
ImageSelectMenuicon
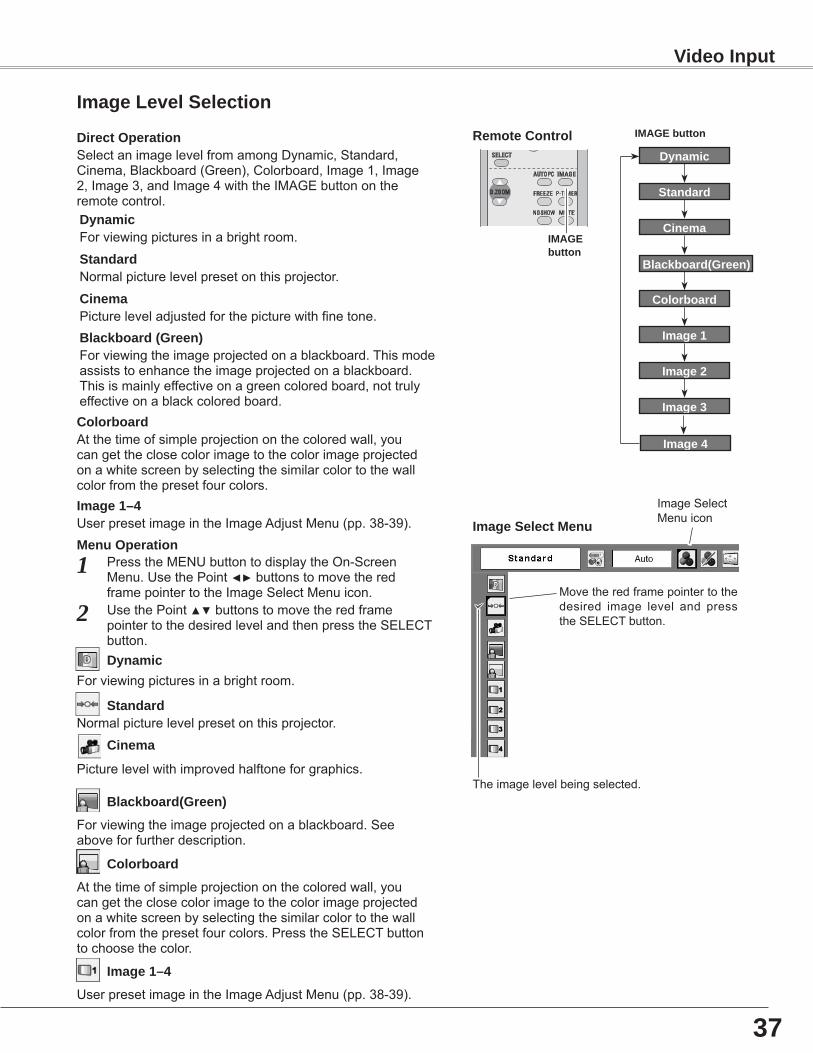
SelectanimagelevelfromamongDynamic,Standard,Real,Blackboard(Green),Colorboard,Image1,Image2,Image3,andImage4withtheIMAGEbuttonontheremotecontrol.
IMAGEbutto��
Dy������
Re�l
Colorbo�rd
I���e1
I���e�
Normalpicturelevelpresetontheprojector.
Picturelevelwithimprovedhalftoneforgraphics.
St���d�rd
Re�l
I���e1–4
I���e�evelSele�t�o��D�re�tOper�t�o��
Me��uOper�t�o��
I���e�
UserpresetimageintheImageAdjustMenu(pp.31-32).
I���e1–4
Bl��kbo�rd(Gree��)Forviewingtheimageprojectedonablackboard.Thismodeassiststoenhancetheimageprojectedonablackboard.Thisismainlyeffectiveonagreencoloredboard,nottrulyeffectiveonablackcoloredboard.
Bl��kbo�rd(Gree��)
Forviewingpicturesinabrightroom.Dy������
Forviewingpicturesinabrightroom.Dy������
UserpresetimageintheImageAdjustMenu(pp.31-32).
St���d�rd
Re�oteCo��trol
IMAGEbutto��
�0
Co�puterI��put
I���e4
Colorbo�rdAtthetimeofsimpleprojectiononthecoloredwall,youcangettheclosecolorimagetothecolorimageprojectedonawhitescreenbyselectingthesimilarcolortothewallcolorfromthepresetfourcolors.
Atthetimeofsimpleprojectiononthecoloredwall,youcangettheclosecolorimagetothecolorimageprojectedonawhitescreenbyselectingthesimilarcolortothewallcolorfromthepresetfourcolors.PresstheSELECTbuttontochoosethecolor.
Colorbo�rd
MovetheredframepointertothedesiredlevelandpresstheSELECTbutton.
Theimagelevelbeingselected.
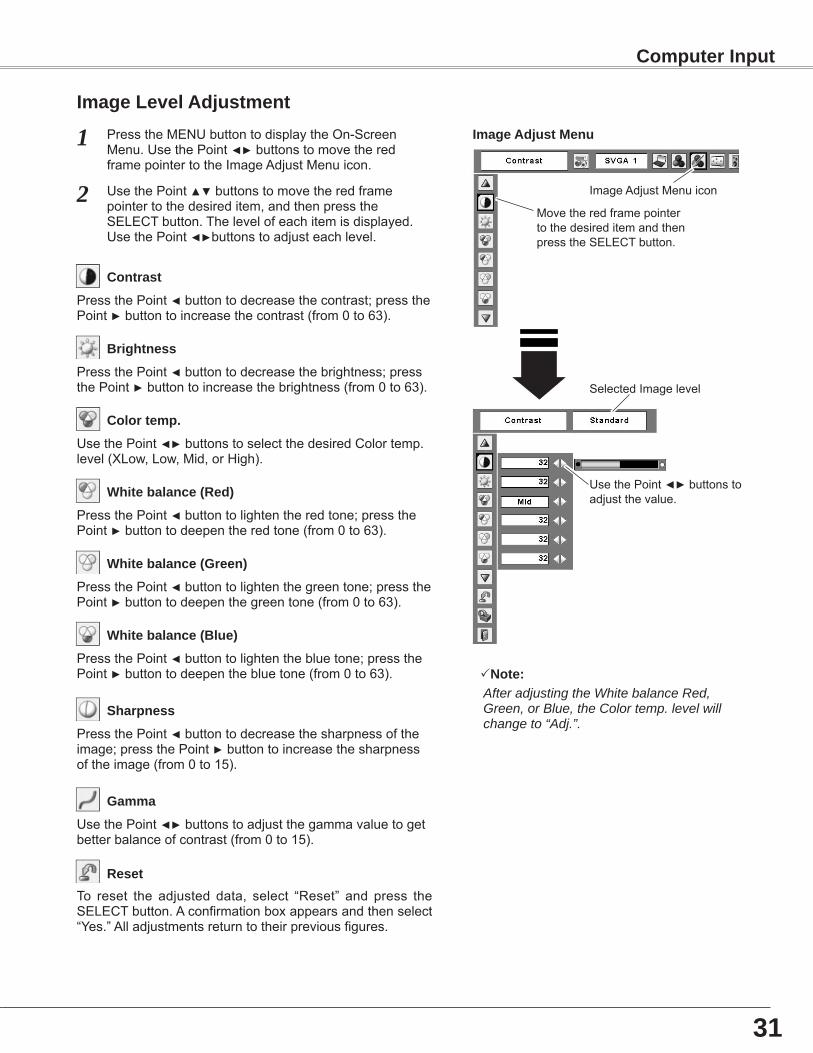
UsethePoint◄►buttonstoadjustthevalue.
PresstheMENUbuttontodisplaytheOn-ScreenMenu.UsethePoint◄►buttonstomovetheredframepointertotheImageAdjustMenuicon.
1
2 UsethePoint▲▼buttonstomovetheredframepointertothedesireditem,andthenpresstheSELECTbutton.Thelevelofeachitemisdisplayed.UsethePoint◄►buttonstoadjusteachlevel.
MovetheredframepointertothedesireditemandthenpresstheSELECTbutton.
I���eAdjustMe��u
PressthePoint◄buttontodecreasethecontrast;pressthePoint►buttontoincreasethecontrast(from0to63).
PressthePoint◄buttontodecreasethebrightness;pressthePoint►buttontoincreasethebrightness(from0to63).
Co��tr�st
Br��ht��ess
ImageAdjustMenuicon
PressthePoint◄buttontolightentheredtone;pressthePoint►buttontodeepentheredtone(from0to63).
Wh�teb�l����e(Red)
PressthePoint◄buttontolightenthegreentone;pressthePoint►buttontodeepenthegreentone(from0to63).
Wh�teb�l����e(Gree��)
PressthePoint◄buttontolightenthebluetone;pressthePoint►buttontodeepenthebluetone(from0to63).
Wh�teb�l����e(Blue)
SelectedImagelevel
UsethePoint◄►buttonstoselectthedesiredColortemp.level(XLow,Low,Mid,orHigh).
Colorte�p.
I���e�evelAdjust�e��t
Note: After adjusting the White balance Red, Green, or Blue, the Color temp. level will change to “Adj.”.
UsethePoint◄►buttonstoadjustthegammavaluetogetbetterbalanceofcontrast(from0to15).
G����
PressthePoint◄buttontodecreasethesharpnessoftheimage;pressthePoint►buttontoincreasethesharpnessoftheimage(from0to15).
Sh�rp��ess
To reset the adjusted data, select “Reset” and press theSELECTbutton.Aconfirmationboxappearsandthenselect“Yes.”Alladjustmentsreturntotheirpreviousfigures.
Reset
�1
Co�puterI��put
Store
ExittheImageAdjustMenu.
Qu�t
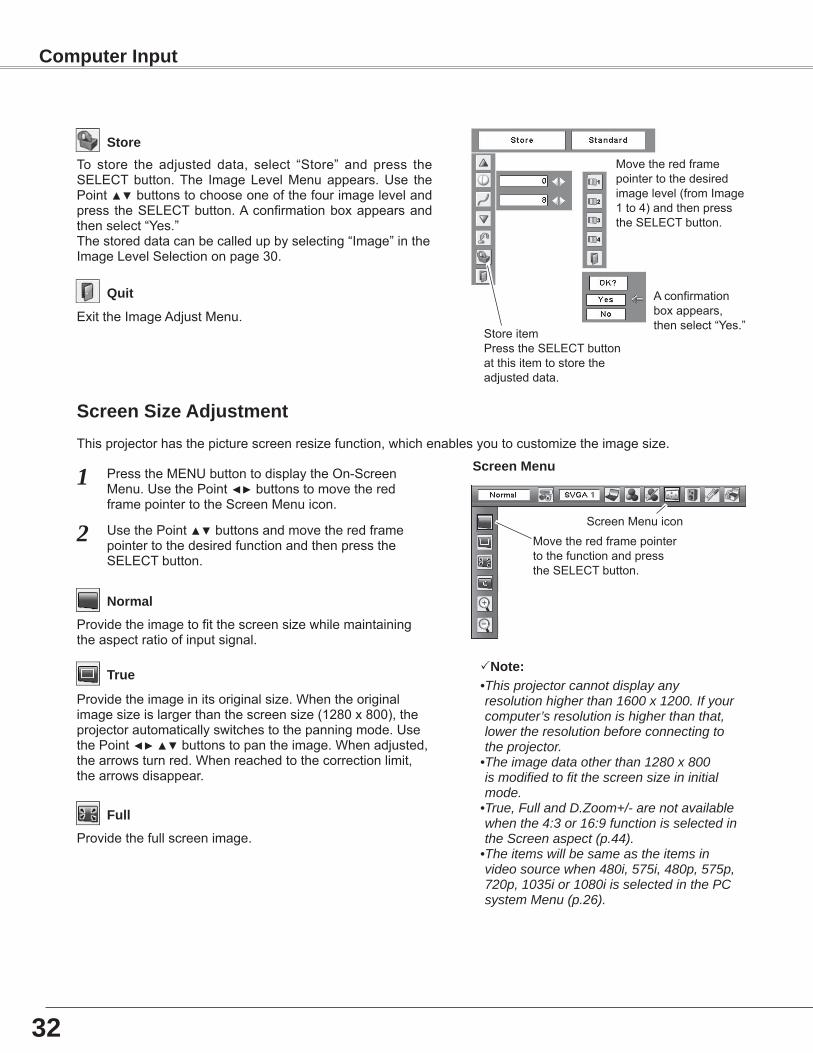
To store the adjusted data, select “Store” and press theSELECTbutton.The ImageLevelMenuappears.Use thePoint▲▼buttonstochooseoneofthefourimagelevelandpress theSELECTbutton.Aconfirmationboxappearsandthenselect“Yes.”Thestoreddatacanbecalledupbyselecting“Image”intheImageLevelSelectiononpage30.
Movetheredframepointertothedesiredimagelevel(fromImage1to4)andthenpresstheSELECTbutton.
Aconfirmationboxappears,thenselect“Yes.”
StoreitemPresstheSELECTbuttonatthisitemtostoretheadjusteddata.
Thisprojectorhasthepicturescreenresizefunction,whichenablesyoutocustomizetheimagesize.
PresstheMENUbuttontodisplaytheOn-ScreenMenu.UsethePoint◄►buttonstomovetheredframepointertotheScreenMenuicon.
1
MovetheredframepointertothefunctionandpresstheSELECTbutton.
UsethePoint▲▼buttonsandmovetheredframepointertothedesiredfunctionandthenpresstheSELECTbutton.
2
S�ree��Me��u
ScreenMenuicon
S�ree��S�zeAdjust�e��t
Providetheimagetofitthescreensizewhilemaintainingtheaspectratioofinputsignal.
Nor��l
True
Providetheimageinitsoriginalsize.Whentheoriginalimagesizeislargerthanthescreensize(1280x800),theprojectorautomaticallyswitchestothepanningmode.UsethePoint◄►▲▼buttonstopantheimage.Whenadjusted,thearrowsturnred.Whenreachedtothecorrectionlimit,thearrowsdisappear.
Full
Providethefullscreenimage.
Note:• This projector cannot display any resolution higher than 1600 x 1200. If your computer’s resolution is higher than that, lower the resolution before connecting to the projector.
• The image data other than 1280 x 800 is modified to fit the screen size in initial mode.
• True, Full and D.Zoom+/- are not available when the 4:3 or 16:9 function is selected in the Screen aspect (p.44).
• The items will be same as the items in video source when 480i, 575i, 480p, 575p, 720p, 1035i or 1080i is selected in the PC system Menu (p.26).
��
Co�puterI��put
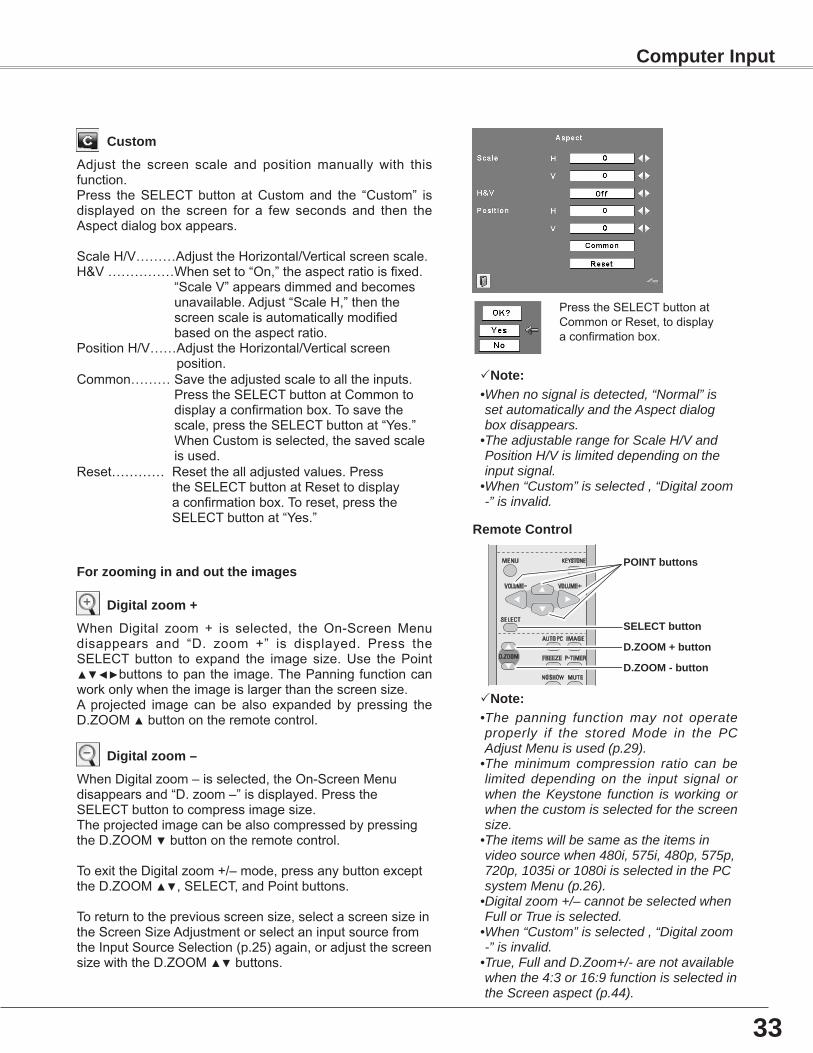
WhenDigital zoom + is selected, theOn-ScreenMenudisappears and “D. zoom +” is displayed. Press theSELECTbutton to expand the image size.Use thePoint▲▼◄►buttonstopantheimage.ThePanningfunctioncanworkonlywhentheimageislargerthanthescreensize.A projected image can be also expandedby pressing theD.ZOOM▲buttonontheremotecontrol.
D���t�lzoo�+
WhenDigitalzoom–isselected,theOn-ScreenMenudisappearsand“D.zoom–”isdisplayed.PresstheSELECTbuttontocompressimagesize.TheprojectedimagecanbealsocompressedbypressingtheD.ZOOM▼buttonontheremotecontrol.
ToexittheDigitalzoom+/–mode,pressanybuttonexcepttheD.ZOOM▲▼,SELECT,andPointbuttons.
Toreturntothepreviousscreensize,selectascreensizeintheScreenSizeAdjustmentorselectaninputsourcefromtheInputSourceSelection(p.25)again,oradjustthescreensizewiththeD.ZOOM▲▼buttons.
D���t�lzoo�–
Re�oteCo��trol
D.ZOOM+butto��
POINTbutto��s
SE�ECTbutto��
D.ZOOM-butto��
Forzoo�����������doutthe����es
Note:• The panning function may not operate properly if the stored Mode in the PC Adjust Menu is used (p.29).
• The minimum compression ratio can be limited depending on the input signal or when the Keystone function is working or when the custom is selected for the screen size.
• The items will be same as the items in video source when 480i, 575i, 480p, 575p, 720p, 1035i or 1080i is selected in the PC system Menu (p.26).
• Digital zoom +/– cannot be selected when Full or True is selected.
• When “Custom” is selected , “Digital zoom -” is invalid.
• True, Full and D.Zoom+/- are not available when the 4:3 or 16:9 function is selected in the Screen aspect (p.44).
Adjust the screen scale and positionmanually with thisfunction.Press theSELECTbutton atCustomand the “Custom” isdisplayed on the screen for a few seconds and then theAspectdialogboxappears.
ScaleH/V………AdjusttheHorizontal/Verticalscreenscale.H&V……………Whensetto“On,”theaspectratioisfixed.
“ScaleV”appearsdimmedandbecomesunavailable.Adjust“ScaleH,”thenthescreenscaleisautomaticallymodifiedbasedontheaspectratio.
PositionH/V……AdjusttheHorizontal/Verticalscreenposition.
Common………Savetheadjustedscaletoalltheinputs. PresstheSELECTbuttonatCommontodisplayaconfirmationbox.Tosavethescale,presstheSELECTbuttonat“Yes.”WhenCustomisselected,thesavedscaleisused.
Reset…………Resetthealladjustedvalues.PresstheSELECTbuttonatResettodisplayaconfirmationbox.Toreset,presstheSELECTbuttonat“Yes.”
Custo�
Note:• When no signal is detected, “Normal” is set automatically and the Aspect dialog box disappears.
• The adjustable range for Scale H/V and Position H/V is limited depending on the input signal.
• When “Custom” is selected , “Digital zoom -” is invalid.
PresstheSELECTbuttonatCommonorReset,todisplayaconfirmationbox.
��
Co�puterI��put
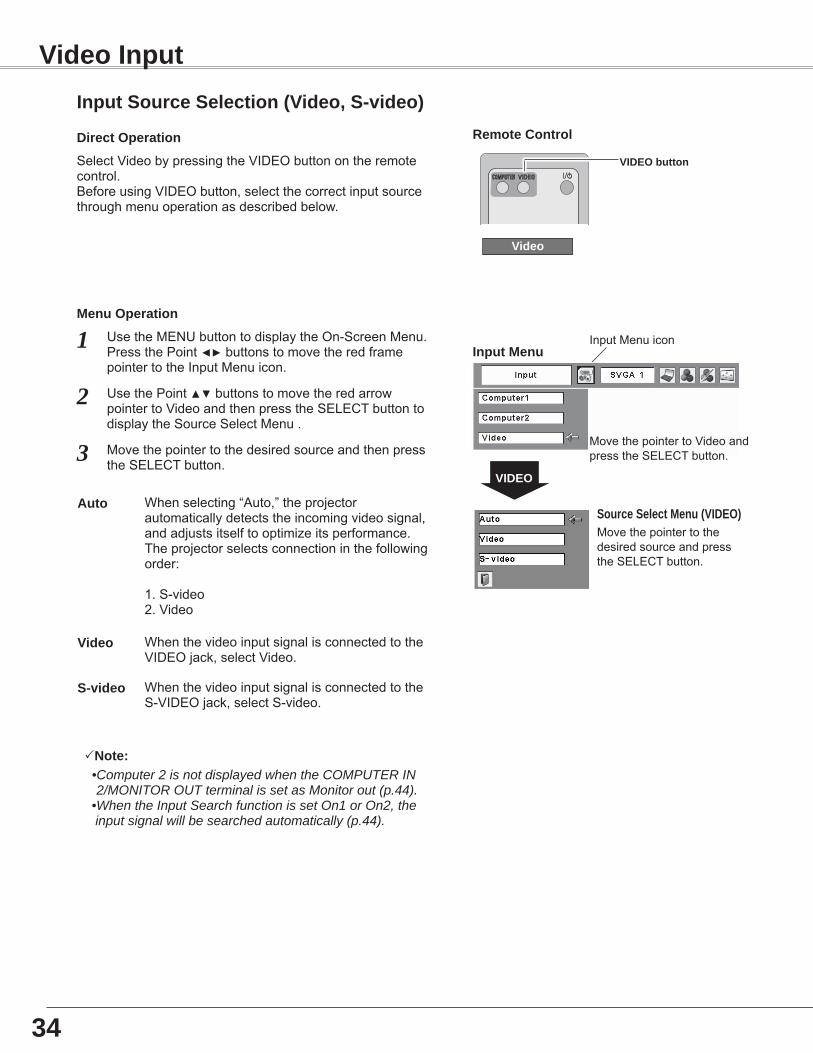
SelectVideobypressingtheVIDEObuttonontheremotecontrol.BeforeusingVIDEObutton,selectthecorrectinputsourcethroughmenuoperationasdescribedbelow.
UsetheMENUbuttontodisplaytheOn-ScreenMenu.PressthePoint◄►buttonstomovetheredframepointertotheInputMenuicon.
UsethePoint▲▼buttonstomovetheredarrowpointertoVideoandthenpresstheSELECTbuttontodisplaytheSourceSelectMenu.
1
2
VIDEO
MovethepointertothedesiredsourceandpresstheSELECTbutton.
Sour�eSele�tMe��u(VIDEO)
I��putMe��u
MovethepointertothedesiredsourceandthenpresstheSELECTbutton.3
Whenselecting“Auto,”theprojectorautomaticallydetectstheincomingvideosignal,andadjustsitselftooptimizeitsperformance.Theprojectorselectsconnectioninthefollowingorder:
1.S-video2.Video
Auto
WhenthevideoinputsignalisconnectedtotheVIDEOjack,selectVideo.
V�deo
WhenthevideoinputsignalisconnectedtotheS-VIDEOjack,selectS-video.
S-v�deo
I��putSour�eSele�t�o��(V�deo,S-v�deo)
D�re�tOper�t�o��
Me��uOper�t�o��
InputMenuicon
Re�oteCo��trol
VIDEObutto��
Note: • Computer 2 is not displayed when the COMPUTER IN
2/MONITOR OUT terminal is set as Monitor out (p.44). •When the Input Search function is set On1 or On2, the input signal will be searched automatically (p.44).
�4
V�deoI��put
MovethepointertoVideoandpresstheSELECTbutton.
V�deo
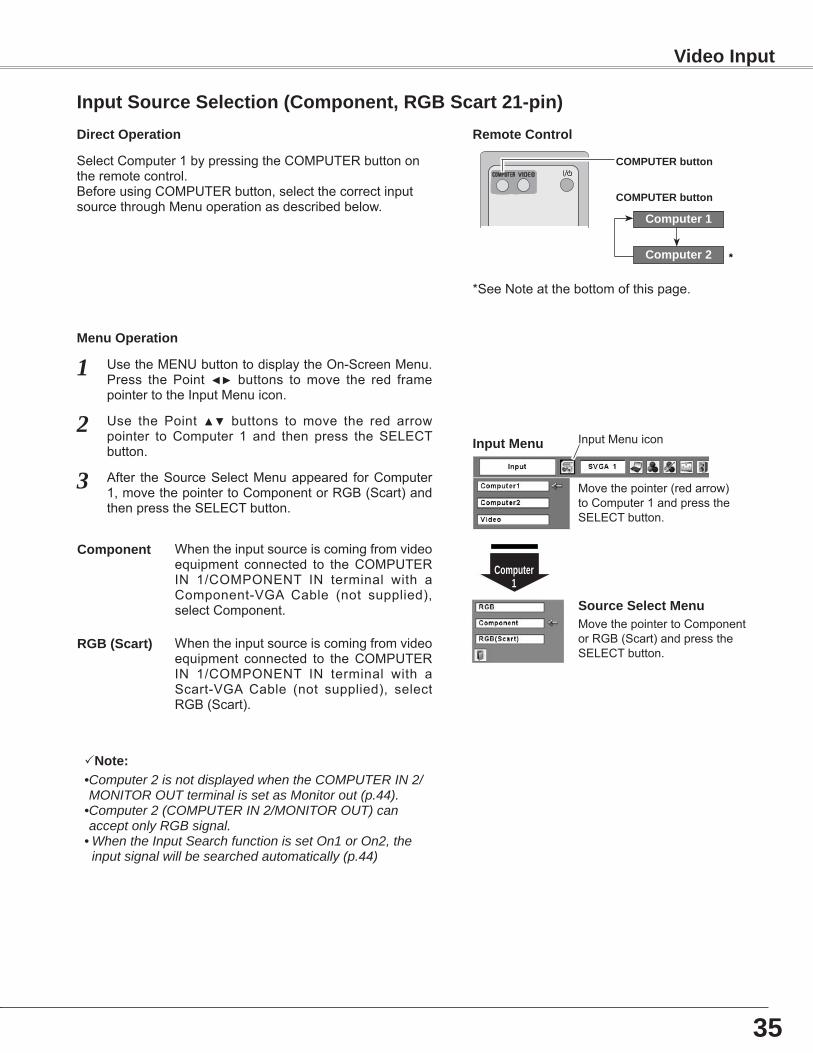
SelectComputer1bypressingtheCOMPUTERbuttonontheremotecontrol.BeforeusingCOMPUTERbutton,selectthecorrectinputsourcethroughMenuoperationasdescribedbelow.
UsetheMENUbuttontodisplaytheOn-ScreenMenu.Press the Point◄► buttons tomove the red framepointertotheInputMenuicon.
1
Co�puter1
I��putMe��uUse the Point ▲▼ buttons tomove the red arrowpointer toComputer 1 and then press the SELECTbutton.
2
After theSourceSelectMenuappeared forComputer1,movethepointertoComponentorRGB(Scart)andthenpresstheSELECTbutton.
3
COMPUTERbutto��
Co�puter1
Co�puter�
I��putSour�eSele�t�o��(Co�po��e��t,RGBS��rt�1-p���)D�re�tOper�t�o��
Me��uOper�t�o��
Movethepointer(redarrow)toComputer1andpresstheSELECTbutton.
InputMenuicon
MovethepointertoComponentorRGB(Scart)andpresstheSELECTbutton.
Sour�eSele�tMe��u
Re�oteCo��trol
COMPUTERbutto��
Whentheinputsourceiscomingfromvideoequipment connected to theCOMPUTERIN 1/COMPONENT IN terminal with aComponent-VGA Cable (not supplied),selectComponent.
Co�po��e��t
Whentheinputsourceiscomingfromvideoequipment connected to theCOMPUTERIN 1/COMPONENT IN terminal with aScart-VGA Cable (not supplied), selectRGB(Scart).
RGB(S��rt)
Note:• Computer 2 is not displayed when the COMPUTER IN 2/MONITOR OUT terminal is set as Monitor out (p.44).
• Computer 2 (COMPUTER IN 2/MONITOR OUT) can accept only RGB signal.
• When the Input Search function is set On1 or On2, the input signal will be searched automatically (p.44)
*SeeNoteatthebottomofthispage.
�5
V�deoI��put
*
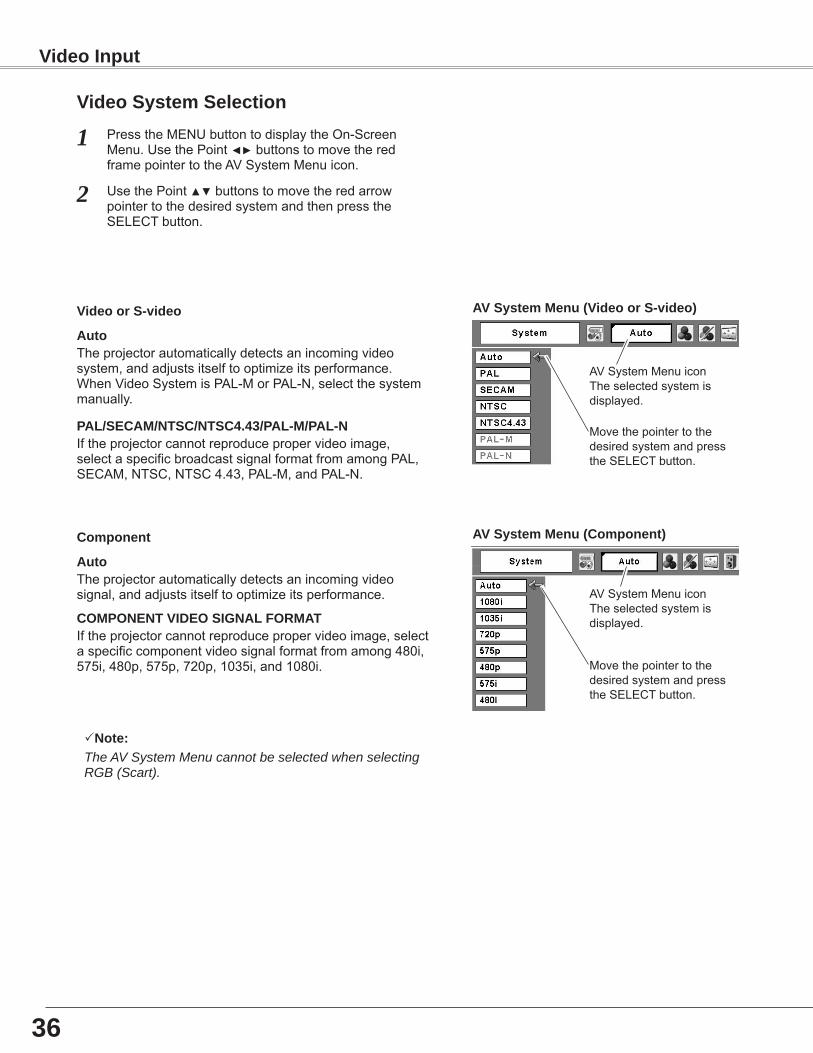
PresstheMENUbuttontodisplaytheOn-ScreenMenu.UsethePoint◄►buttonstomovetheredframepointertotheAVSystemMenuicon.
1V�deoSyste�Sele�t�o��
AVSyste�Me��u(V�deoorS-v�deo)
AVSyste�Me��u(Co�po��e��t)
UsethePoint▲▼buttonstomovetheredarrowpointertothedesiredsystemandthenpresstheSELECTbutton.
2
Iftheprojectorcannotreproducepropervideoimage,selectaspecificbroadcastsignalformatfromamongPAL,SECAM,NTSC,NTSC4.43,PAL-M,andPAL-N.
MovethepointertothedesiredsystemandpresstheSELECTbutton.
PA�/SECAM/NTSC/NTSC4.4�/PA�-M/PA�-N
Theprojectorautomaticallydetectsanincomingvideosignal,andadjustsitselftooptimizeitsperformance.
Iftheprojectorcannotreproducepropervideoimage,selectaspecificcomponentvideosignalformatfromamong480i,575i,480p,575p,720p,1035i,and1080i.
Auto
COMPONENTVIDEOSIGNA�FORMAT
V�deoorS-v�deo
Co�po��e��t
Theprojectorautomaticallydetectsanincomingvideosystem,andadjustsitselftooptimizeitsperformance.WhenVideoSystemisPAL-MorPAL-N,selectthesystemmanually.
Auto
AVSystemMenuiconTheselectedsystemisdisplayed.
MovethepointertothedesiredsystemandpresstheSELECTbutton.
AVSystemMenuiconTheselectedsystemisdisplayed.
Note:The AV System Menu cannot be selected when selecting RGB (Scart).
��
V�deoI��put
I���eSele�tMe��u
ImageSelectMenuicon
SelectanimagelevelfromamongDynamic,Standard,Cinema,Blackboard(Green),Colorboard,Image1,Image2,Image3,andImage4withtheIMAGEbuttonontheremotecontrol.
Normalpicturelevelpresetonthisprojector.St���d�rd
Pictureleveladjustedforthepicturewithfinetone.C���e��
IMAGEbutto��
I���e�evelSele�t�o��
D�re�tOper�t�o��
Forviewingpicturesinabrightroom.Dy������
Re�oteCo��trol
IMAGEbutto��
�7
V�deoI��put
Movetheredframepointertothedesired image level and presstheSELECTbutton.
Theimagelevelbeingselected.
Dy������
C���e��
Colorbo�rd
I���e1
I���e�
I���e�
Bl��kbo�rd(Gree��)
St���d�rd
I���e4
PresstheMENUbuttontodisplaytheOn-ScreenMenu.UsethePoint◄►buttonstomovetheredframepointertotheImageSelectMenuicon.
1
2 UsethePoint▲▼buttonstomovetheredframepointertothedesiredlevelandthenpresstheSELECTbutton.
Normalpicturelevelpresetonthisprojector.St���d�rd
Forviewingtheimageprojectedonablackboard.Seeaboveforfurtherdescription.
Bl��kbo�rd(Gree��)
I���e1–4
Me��uOper�t�o��
UserpresetimageintheImageAdjustMenu(pp.38-39).
I���e1–4
Forviewingpicturesinabrightroom.Dy������
UserpresetimageintheImageAdjustMenu(pp.38-39).
Colorbo�rdAtthetimeofsimpleprojectiononthecoloredwall,youcangettheclosecolorimagetothecolorimageprojectedonawhitescreenbyselectingthesimilarcolortothewallcolorfromthepresetfourcolors.
Atthetimeofsimpleprojectiononthecoloredwall,youcangettheclosecolorimagetothecolorimageprojectedonawhitescreenbyselectingthesimilarcolortothewallcolorfromthepresetfourcolors.PresstheSELECTbuttontochoosethecolor.
Colorbo�rd
Bl��kbo�rd(Gree��)Forviewingtheimageprojectedonablackboard.Thismodeassiststoenhancetheimageprojectedonablackboard.Thisismainlyeffectiveonagreencoloredboard,nottrulyeffectiveonablackcoloredboard.
Picturelevelwithimprovedhalftoneforgraphics.
C���e��
Use thePoint◄►buttonstoadjustthevalue.
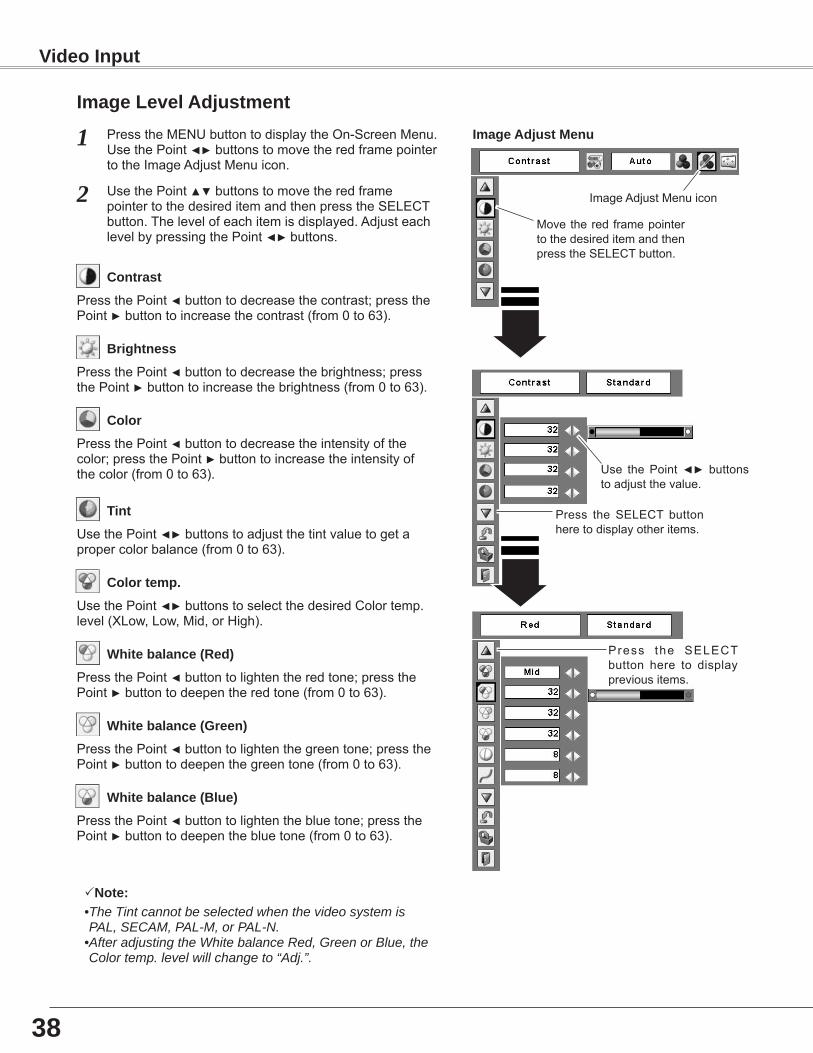
PresstheMENUbuttontodisplaytheOn-ScreenMenu.UsethePoint◄►buttonstomovetheredframepointertotheImageAdjustMenuicon.
1
2 UsethePoint▲▼buttonstomovetheredframepointertothedesireditemandthenpresstheSELECTbutton.Thelevelofeachitemisdisplayed.AdjusteachlevelbypressingthePoint◄► buttons.
MovetheredframepointertothedesireditemandthenpresstheSELECTbutton.
I���eAdjustMe��u
PressthePoint◄buttontodecreasethecontrast;pressthePoint►buttontoincreasethecontrast(from0to63).
PressthePoint◄buttontodecreasethebrightness;pressthePoint►buttontoincreasethebrightness(from0to63).
Co��tr�st
Br��ht��ess
Press the SELECT buttonheretodisplayotheritems.
ImageAdjustMenuicon
PressthePoint◄buttontodecreasetheintensityofthecolor;pressthePoint► buttontoincreasetheintensityofthecolor(from0to63).
UsethePoint◄►buttonstoadjustthetintvaluetogetapropercolorbalance(from0to63).
Color
T���t
PressthePoint◄buttontolightentheredtone;pressthePoint►buttontodeepentheredtone(from0to63).
Wh�teb�l����e(Red)
PressthePoint◄buttontolightenthegreentone;pressthePoint►buttontodeepenthegreentone(from0to63).
Wh�teb�l����e(Gree��)
PressthePoint◄buttontolightenthebluetone;pressthePoint►buttontodeepenthebluetone(from0to63).
Wh�teb�l����e(Blue)
Press the SELECTbutton here to displaypreviousitems.
Note:• The Tint cannot be selected when the video system is PAL, SECAM, PAL-M, or PAL-N.
• After adjusting the White balance Red, Green or Blue, the Color temp. level will change to “Adj.”.
I���e�evelAdjust�e��t
UsethePoint◄►buttonstoselectthedesiredColortemp.level(XLow,Low,Mid,orHigh).
Colorte�p.
�8
V�deoI��put
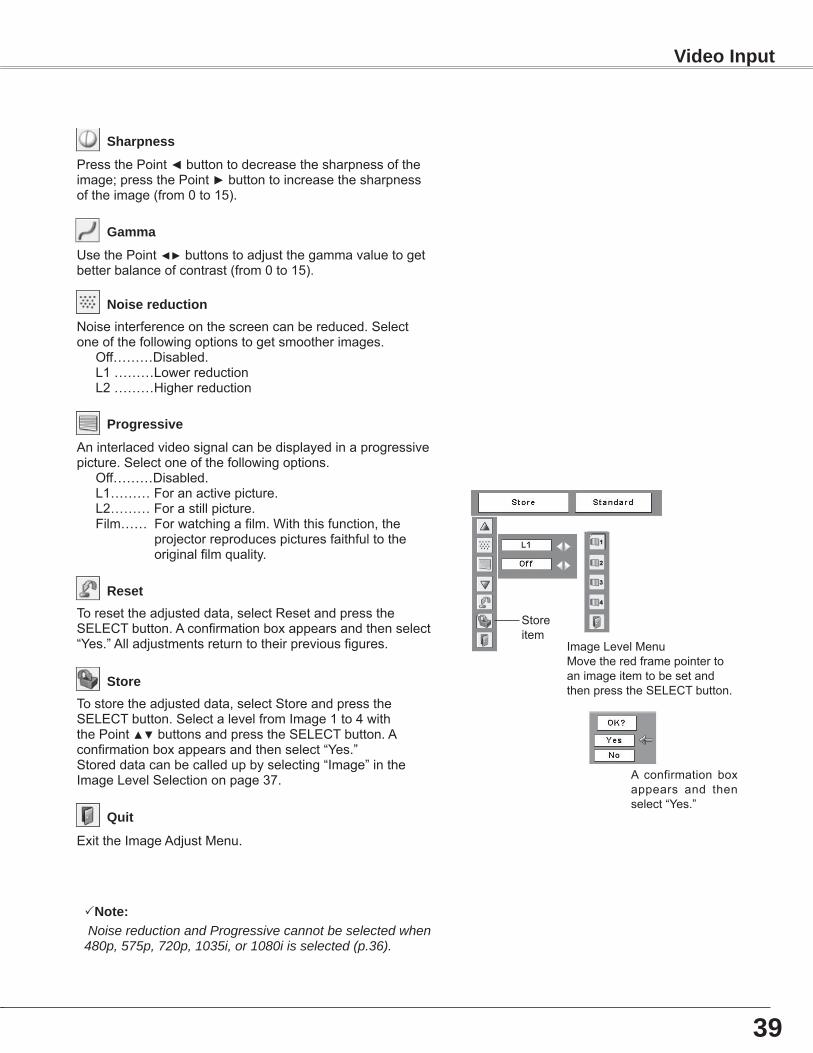
Tostoretheadjusteddata,selectStoreandpresstheSELECTbutton.SelectalevelfromImage1to4withthePoint▲▼buttonsandpresstheSELECTbutton.Aconfirmationboxappearsandthenselect“Yes.”Storeddatacanbecalledupbyselecting“Image”intheImageLevelSelectiononpage37.
ImageLevelMenuMovetheredframepointertoanimageitemtobesetandthenpresstheSELECTbutton.
Toresettheadjusteddata,selectResetandpresstheSELECTbutton.Aconfirmationboxappearsandthenselect“Yes.”Alladjustmentsreturntotheirpreviousfigures.
Reset
Store
ExittheImageAdjustMenu.
Qu�t
Note: Noise reduction and Progressive cannot be selected when 480p, 575p, 720p, 1035i, or 1080i is selected (p.36).
Storeitem
Aninterlacedvideosignalcanbedisplayedinaprogressivepicture.Selectoneofthefollowingoptions.
Off………Disabled.L1………Foranactivepicture.L2………Forastillpicture.Film……Forwatchingafilm.Withthisfunction,the
projectorreproducespicturesfaithfultotheoriginalfilmquality.
Pro�ress�ve
No�seredu�t�o��Noiseinterferenceonthescreencanbereduced.Selectoneofthefollowingoptionstogetsmootherimages.
Off………Disabled.L1………LowerreductionL2………Higherreduction
A confirmation boxappears and thenselect“Yes.”
UsethePoint◄►buttonstoadjustthegammavaluetogetbetterbalanceofcontrast(from0to15).
G����
PressthePoint◄buttontodecreasethesharpnessoftheimage;pressthePoint►buttontoincreasethesharpnessoftheimage(from0to15).
Sh�rp��ess
�9
V�deoI��put
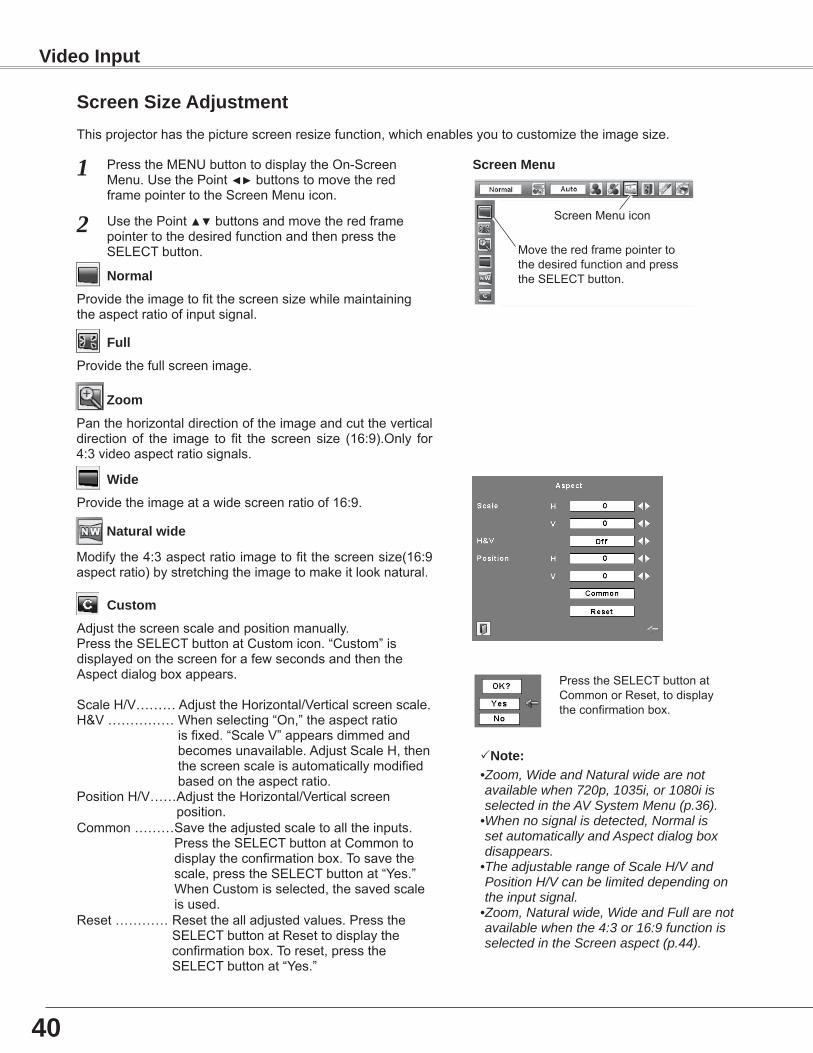
Thisprojectorhasthepicturescreenresizefunction,whichenablesyoutocustomizetheimagesize.
PresstheMENUbuttontodisplaytheOn-ScreenMenu.UsethePoint◄►buttonstomovetheredframepointertotheScreenMenuicon.
UsethePoint▲▼buttonsandmovetheredframepointertothedesiredfunctionandthenpresstheSELECTbutton.
1
2
S�ree��Me��u
Providetheimageatawidescreenratioof16:9.
W�de
Providetheimagetofitthescreensizewhilemaintainingtheaspectratioofinputsignal.
Nor��l
S�ree��S�zeAdjust�e��t
Adjustthescreenscaleandpositionmanually.PresstheSELECTbuttonatCustomicon.“Custom”isdisplayedonthescreenforafewsecondsandthentheAspectdialogboxappears.
ScaleH/V………AdjusttheHorizontal/Verticalscreenscale.H&V……………Whenselecting“On,”theaspectratio
isfixed.“ScaleV”appearsdimmedandbecomesunavailable.AdjustScaleH,thenthescreenscaleisautomaticallymodifiedbasedontheaspectratio.
PositionH/V……AdjusttheHorizontal/Verticalscreenposition.
Common………Savetheadjustedscaletoalltheinputs.PresstheSELECTbuttonatCommontodisplaytheconfirmationbox.Tosavethescale,presstheSELECTbuttonat“Yes.”WhenCustomisselected,thesavedscaleisused.
Reset…………Reset thealladjustedvalues.PresstheSELECTbuttonatResettodisplaytheconfirmationbox.Toreset,presstheSELECTbuttonat“Yes.”
Custo�
Note:• Zoom, Wide and Natural wide are not available when 720p, 1035i, or 1080i is selected in the AV System Menu (p.36).
• When no signal is detected, Normal is set automatically and Aspect dialog box disappears.
• The adjustable range of Scale H/V and Position H/V can be limited depending on the input signal.
• Zoom, Natural wide, Wide and Full are not available when the 4:3 or 16:9 function is selected in the Screen aspect (p.44).
PresstheSELECTbuttonatCommonorReset,todisplaytheconfirmationbox.
40
V�deoI��put
MovetheredframepointertothedesiredfunctionandpresstheSELECTbutton.
ScreenMenuicon
Full
Providethefullscreenimage.
N�tur�lw�de
Modifythe4:3aspectratioimagetofitthescreensize(16:9aspectratio)bystretchingtheimagetomakeitlooknatural.
Zoo�
Panthehorizontaldirectionoftheimageandcuttheverticaldirectionof the image to fit the screen size (16:9).Only for4:3videoaspectratiosignals.
Display
Blue back
Press the Point ◄► buttons to switch on/off. When this function is “On,” a blue image is displayed while the input signal is not detected.
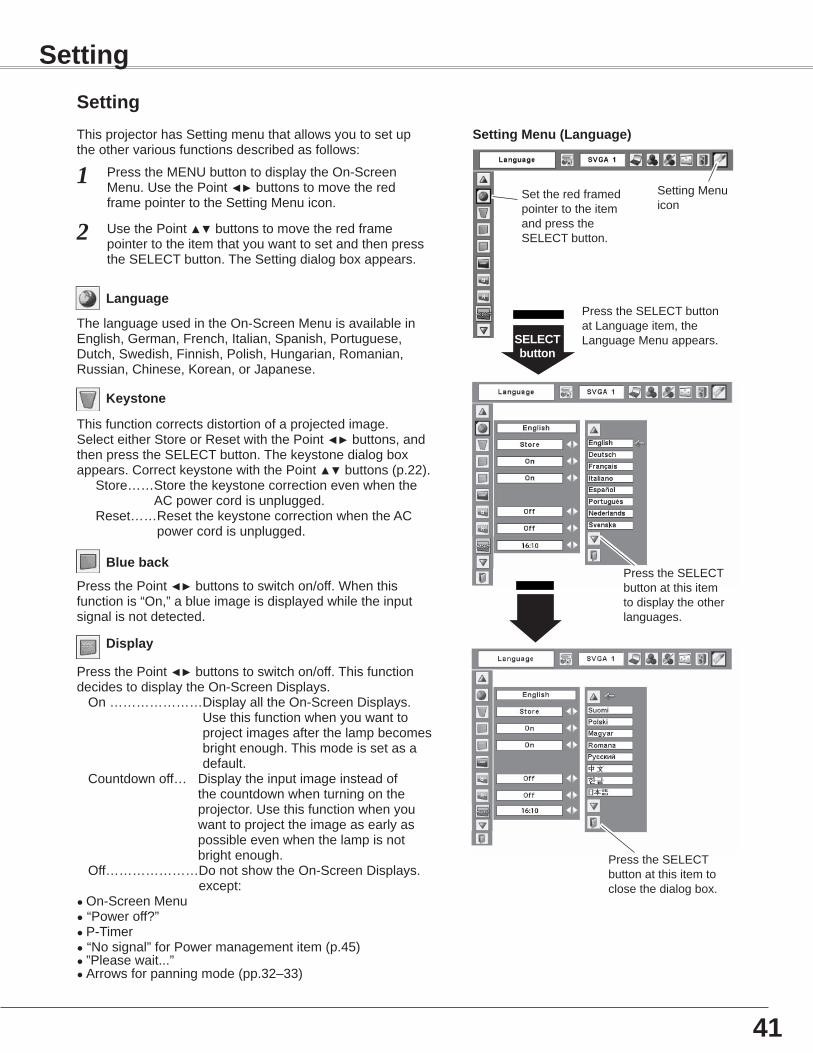
Keystone
Press the MENU button to display the On-Screen Menu. Use the Point ◄► buttons to move the red frame pointer to the Setting Menu icon.
1
2
Language
The language used in the On-Screen Menu is available in English, German, French, Italian, Spanish, Portuguese, Dutch, Swedish, Finnish, Polish, Hungarian, Romanian, Russian, Chinese, Korean, or Japanese.
Use the Point ▲▼ buttons to move the red frame pointer to the item that you want to set and then press the SELECT button. The Setting dialog box appears.
This function corrects distortion of a projected image. Select either Store or Reset with the Point ◄► buttons, and then press the SELECT button. The keystone dialog box appears. Correct keystone with the Point ▲▼ buttons (p.22).
Store…… Store the keystone correction even when the AC power cord is unplugged.
Reset…… Reset the keystone correction when the AC power cord is unplugged.
SettingThis projector has Setting menu that allows you to set up the other various functions described as follows:
Press the Point ◄► buttons to switch on/off. This function decides to display the On-Screen Displays.
On ………………… Display all the On-Screen Displays. Use this function when you want to project images after the lamp becomes bright enough. This mode is set as a default.
Countdown off… Display the input image instead of the countdown when turning on the projector. Use this function when you want to project the image as early as possible even when the lamp is not bright enough.
Off………………… Do not show the On-Screen Displays. except:
● On-Screen Menu ● “Power off?” ● P-Timer ● “No signal” for Power management item (p.45)● ”Please wait...”● Arrows for panning mode (pp.32–33)
41
Setting
Set the red framed pointer to the item and press the SELECT button.
SELECT button
Press the SELECT button at Language item, the Language Menu appears.
Setting Menu (Language)
Setting Menu icon
Press the SELECT button at this item to display the other languages.
Press the SELECT button at this item to close the dialog box.
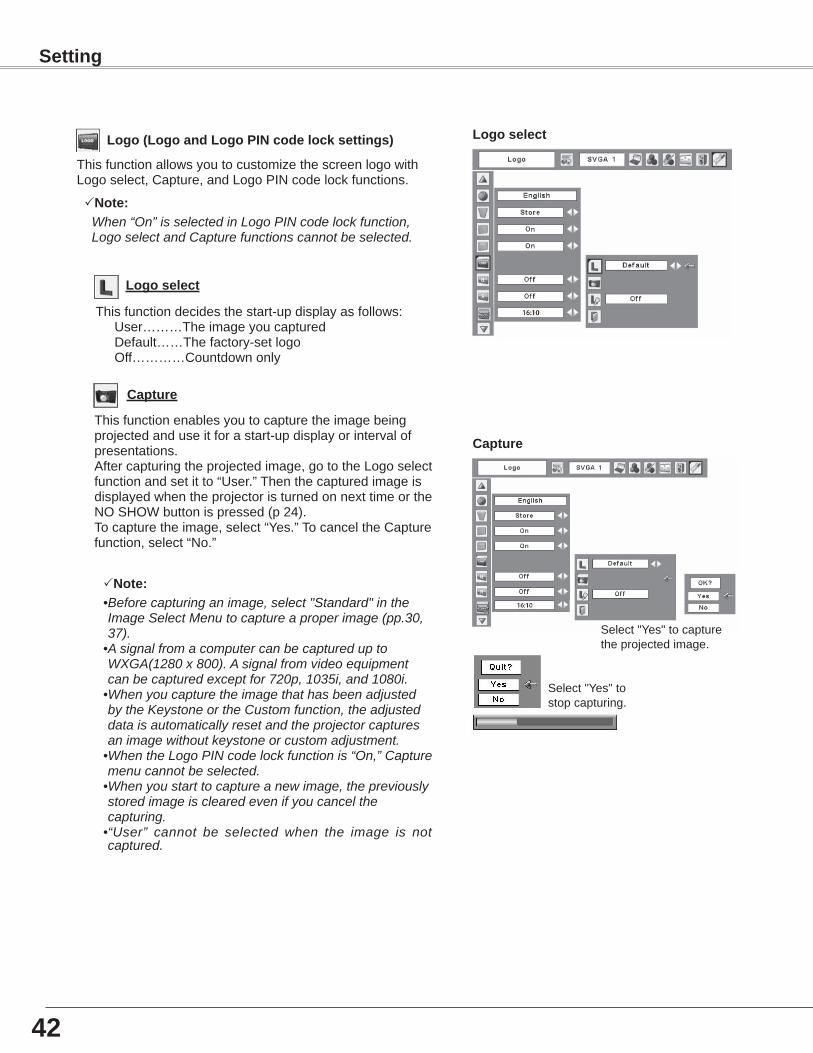
Capture
This function enables you to capture the image being projected and use it for a start-up display or interval of presentations. After capturing the projected image, go to the Logo select function and set it to “User.” Then the captured image is displayed when the projector is turned on next time or the NO SHOW button is pressed (p 24).To capture the image, select “Yes.” To cancel the Capture function, select “No.”
Logo select
This function decides the start-up display as follows:User………The image you capturedDefault……The factory-set logoOff…………Countdown only
Logo (Logo and Logo PIN code lock settings)
This function allows you to customize the screen logo with Logo select, Capture, and Logo PIN code lock functions.
Note: When “On” is selected in Logo PIN code lock function, Logo select and Capture functions cannot be selected.
Note:• Before capturing an image, select "Standard" in the Image Select Menu to capture a proper image (pp.30, 37).
• A signal from a computer can be captured up to WXGA(1280 x 800). A signal from video equipment can be captured except for 720p, 1035i, and 1080i.
• When you capture the image that has been adjusted by the Keystone or the Custom function, the adjusted data is automatically reset and the projector captures an image without keystone or custom adjustment.
• When the Logo PIN code lock function is “On,” Capture menu cannot be selected.
• When you start to capture a new image, the previously stored image is cleared even if you cancel the capturing.
• “User” cannot be selected when the image is not captured.
42
Setting
Select "Yes" to capture the projected image.
Select "Yes" to stop capturing.
Capture
Logo select
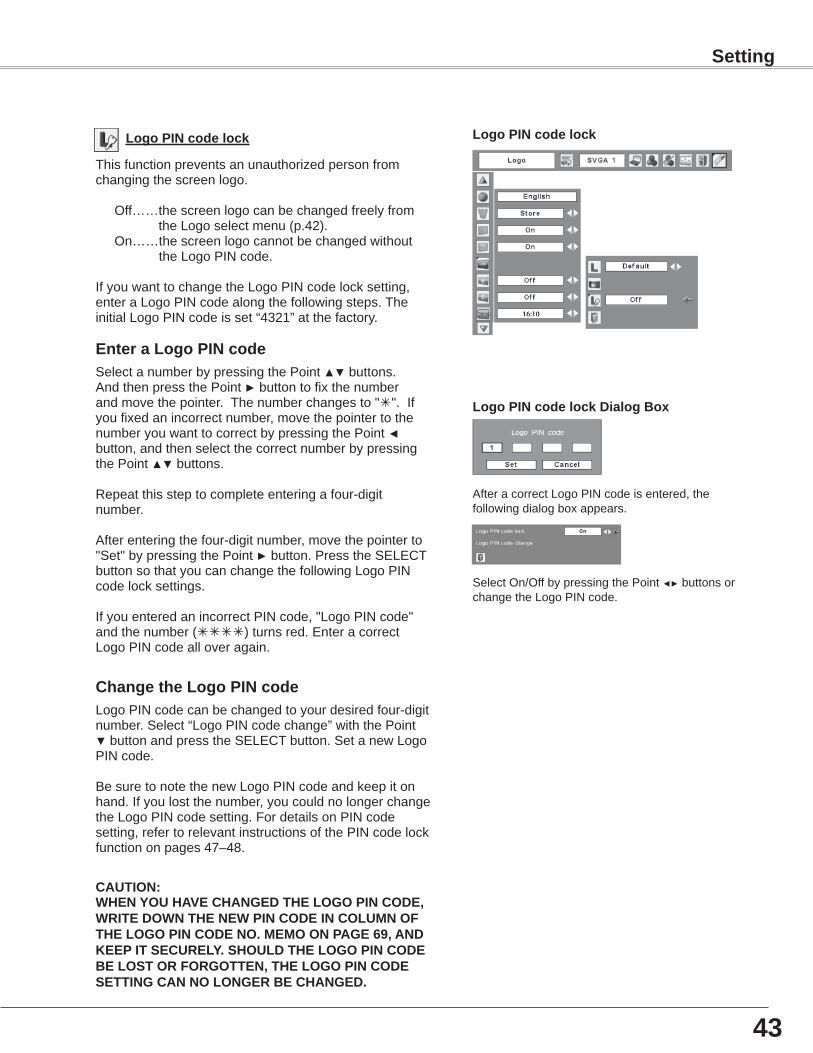
Logo PIN code lock Dialog Box
Enter a Logo PIN codeSelect a number by pressing the Point ▲▼ buttons. And then press the Point ► button to fix the number and move the pointer. The number changes to "". If you fixed an incorrect number, move the pointer to the number you want to correct by pressing the Point ◄ button, and then select the correct number by pressing the Point ▲▼ buttons.
Repeat this step to complete entering a four-digit number.
After entering the four-digit number, move the pointer to "Set" by pressing the Point ► button. Press the SELECT button so that you can change the following Logo PIN code lock settings.
If you entered an incorrect PIN code, "Logo PIN code" and the number () turns red. Enter a correct Logo PIN code all over again.
Change the Logo PIN codeLogo PIN code can be changed to your desired four-digit number. Select “Logo PIN code change” with the Point ▼ button and press the SELECT button. Set a new Logo PIN code.
Be sure to note the new Logo PIN code and keep it on hand. If you lost the number, you could no longer change the Logo PIN code setting. For details on PIN code setting, refer to relevant instructions of the PIN code lock function on pages 47–48.
This function prevents an unauthorized person from changing the screen logo.
Off…… the screen logo can be changed freely from the Logo select menu (p.42).
On…… the screen logo cannot be changed without the Logo PIN code.
If you want to change the Logo PIN code lock setting, enter a Logo PIN code along the following steps. The initial Logo PIN code is set “4321” at the factory.
Logo PIN code lock
CAUTION:whEN yOU hAvE ChANgED ThE LOgO PIN CODE, wrITE DOwN ThE NEw PIN CODE IN COLUmN Of ThE LOgO PIN CODE NO. mEmO ON PAgE 69, AND kEEP IT sECUrELy. shOULD ThE LOgO PIN CODE BE LOsT Or fOrgOTTEN, ThE LOgO PIN CODE sETTINg CAN NO LONgEr BE ChANgED.
After a correct Logo PIN code is entered, the following dialog box appears.
Select On/Off by pressing the Point ◄► buttons or change the Logo PIN code.
43
setting
Logo PIN code lock
44
Setting
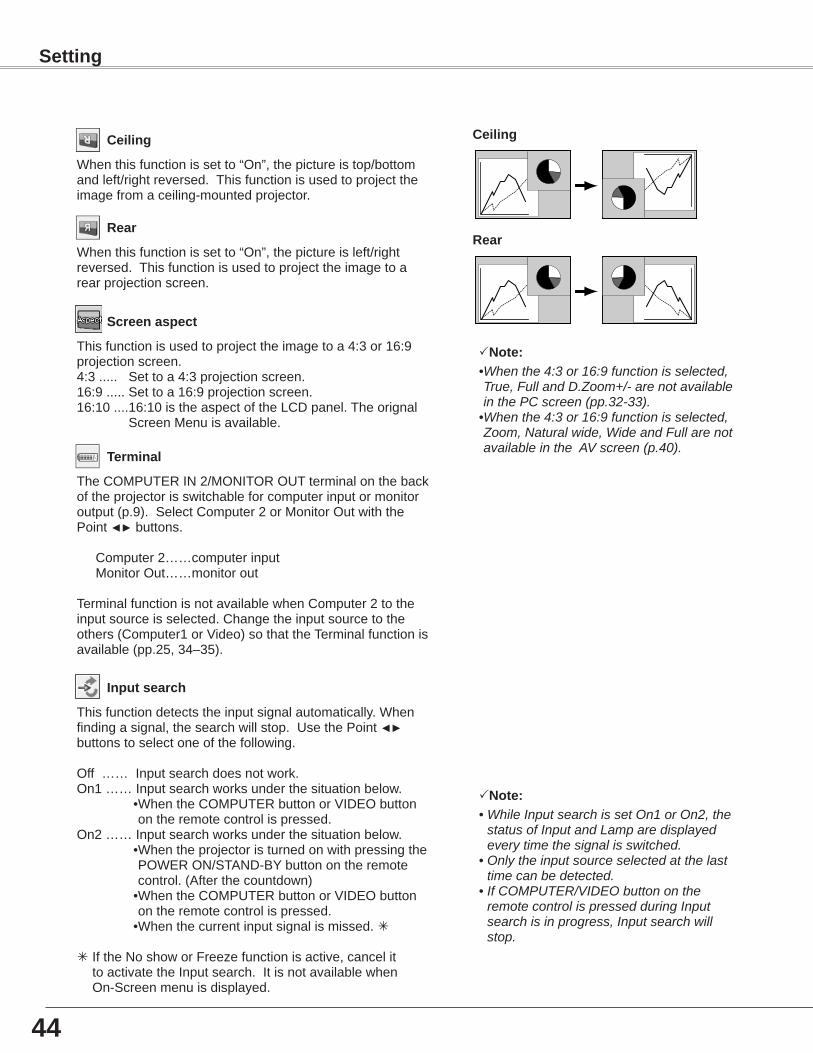
Ceiling
Rear
Ceiling
When this function is set to “On”, the picture is top/bottom and left/right reversed. This function is used to project the image from a ceiling-mounted projector.
Rear
When this function is set to “On”, the picture is left/right reversed. This function is used to project the image to a rear projection screen.
Terminal
The COMPUTER IN 2/MONITOR OUT terminal on the back of the projector is switchable for computer input or monitor output (p.9). Select Computer 2 or Monitor Out with the Point ◄► buttons.
Computer 2……computer inputMonitor Out……monitor out
Terminal function is not available when Computer 2 to the input source is selected. Change the input source to the others (Computer1 or Video) so that the Terminal function is available (pp.25, 34–35).
Input search
This function detects the input signal automatically. When finding a signal, the search will stop. Use the Point ◄► buttons to select one of the following.
Off …… Input search does not work.On1 …… Input search works under the situation below.
• When the COMPUTER button or VIDEO button on the remote control is pressed.
On2 …… Input search works under the situation below.• When the projector is turned on with pressing the POWER ON/STAND-BY button on the remote control. (After the countdown)
• When the COMPUTER button or VIDEO button on the remote control is pressed.
•When the current input signal is missed.
If the No show or Freeze function is active, cancel it to activate the Input search. It is not available when On-Screen menu is displayed.
Note:• While Input search is set On1 or On2, the
status of Input and Lamp are displayed every time the signal is switched.
• Only the input source selected at the last time can be detected.
• If COMPUTER/VIDEO button on the remote control is pressed during Input search is in progress, Input search will stop.
Screen aspect
This function is used to project the image to a 4:3 or 16:9 projection screen.4:3 ..... Set to a 4:3 projection screen.16:9 ..... Set to a 16:9 projection screen.16:10 ....16:10 is the aspect of the LCD panel. The orignal Screen Menu is available.
Note:• When the 4:3 or 16:9 function is selected, True, Full and D.Zoom+/- are not available in the PC screen (pp.32-33).
• When the 4:3 or 16:9 function is selected, Zoom, Natural wide, Wide and Full are not available in the AV screen (p.40).
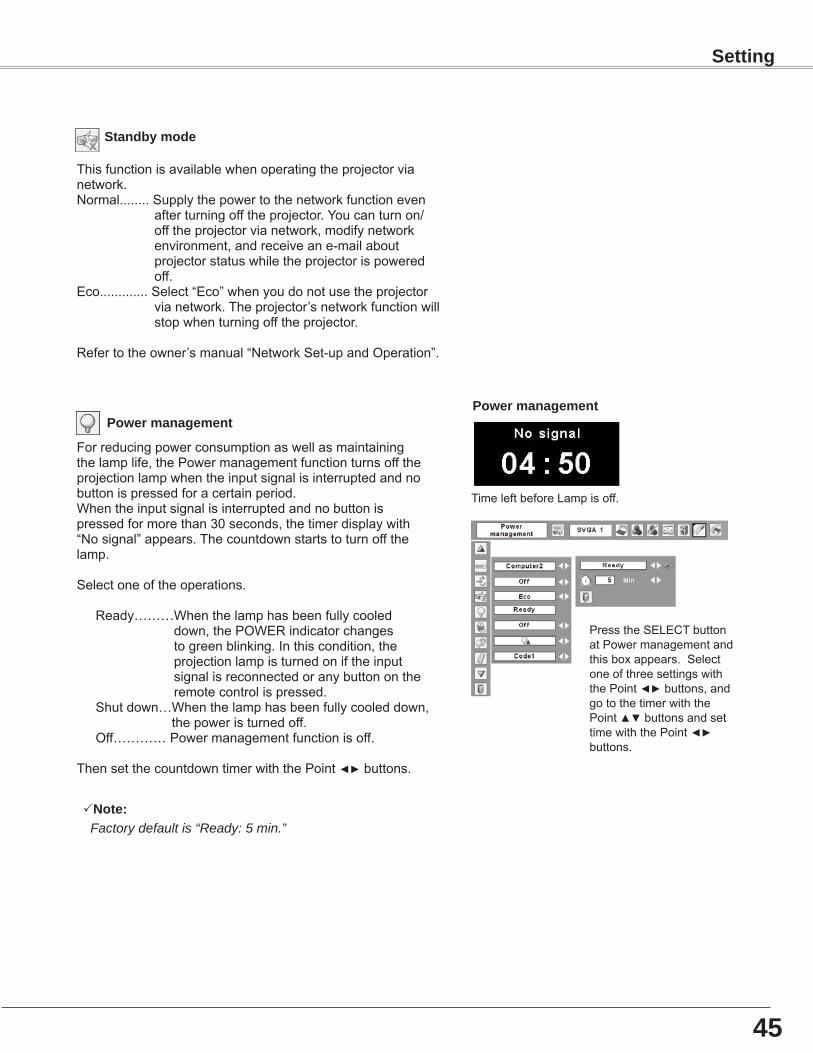
Power������e�e��t
TimeleftbeforeLampisoff.
PresstheSELECTbuttonatPowermanagementandthisboxappears.SelectoneofthreesettingswiththePoint◄►buttons,andgotothetimerwiththePoint▲▼buttonsandsettimewiththePoint◄► buttons.
Power������e�e��t
Forreducingpowerconsumptionaswellasmaintainingthelamplife,thePowermanagementfunctionturnsofftheprojectionlampwhentheinputsignalisinterruptedandnobuttonispressedforacertainperiod.Whentheinputsignalisinterruptedandnobuttonispressedformorethan30seconds,thetimerdisplaywith“Nosignal”appears.Thecountdownstartstoturnoffthelamp.
Selectoneoftheoperations.
Ready………Whenthelamphasbeenfullycooleddown,thePOWERindicatorchangestogreenblinking.Inthiscondition,theprojectionlampisturnedoniftheinputsignalisreconnectedoranybuttonontheremotecontrolispressed.
Shutdown…Whenthelamphasbeenfullycooleddown,thepoweristurnedoff.
Off…………Powermanagementfunctionisoff.
ThensetthecountdowntimerwiththePoint◄►buttons.
45
Note: Factory default is “Ready: 5 min.”
Sett����
St���dby�ode
Thisfunctionisavailablewhenoperatingtheprojectorvianetwork.Normal........Supplythepowertothenetworkfunctionevenafterturningofftheprojector.Youcanturnon/offtheprojectorvianetwork,modifynetworkenvironment,andreceiveane-mailaboutprojectorstatuswhiletheprojectorispoweredoff.Eco.............Select“Eco”whenyoudonotusetheprojectorvianetwork.Theprojector’snetworkfunctionwillstopwhenturningofftheprojector.
Refertotheowner’smanual“NetworkSet-upandOperation”.
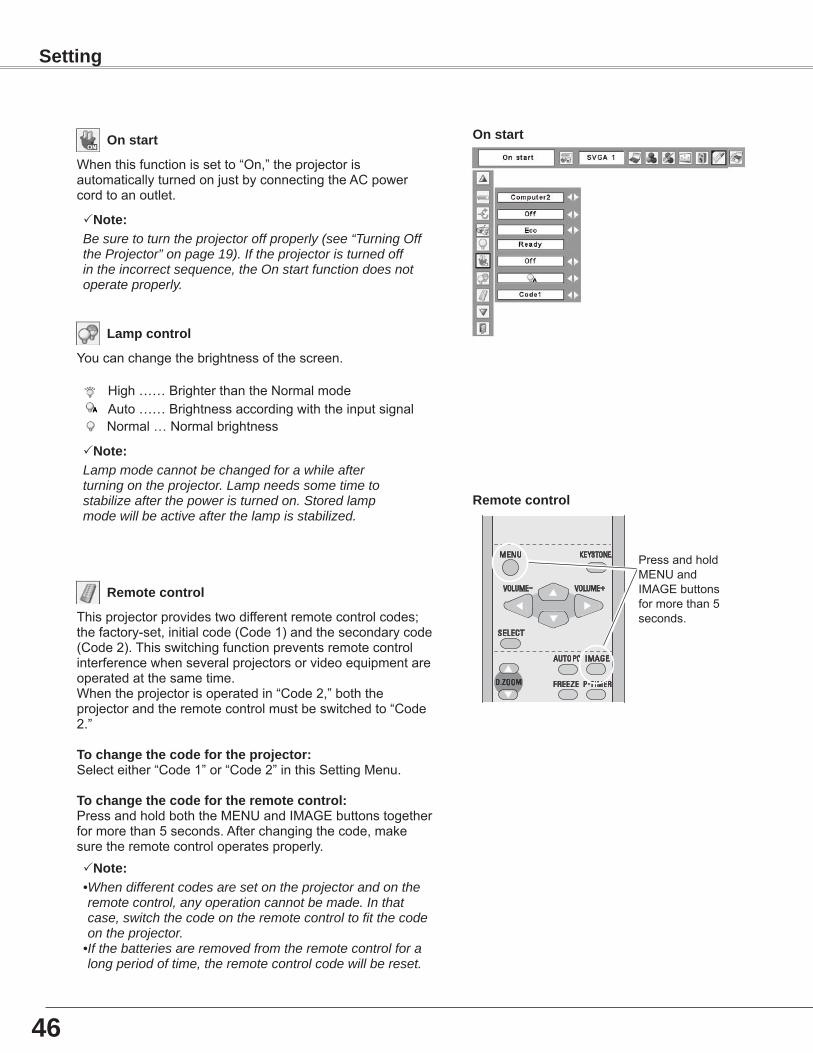
4�
O��st�rt
Whenthisfunctionissetto“On,”theprojectorisautomaticallyturnedonjustbyconnectingtheACpowercordtoanoutlet.
Note:Be sure to turn the projector off properly (see “Turning Off the Projector” on page 19). If the projector is turned off in the incorrect sequence, the On start function does not operate properly.
���p�o��trol
Re�ote�o��trol
Thisprojectorprovidestwodifferentremotecontrolcodes;thefactory-set,initialcode(Code1)andthesecondarycode(Code2).Thisswitchingfunctionpreventsremotecontrolinterferencewhenseveralprojectorsorvideoequipmentareoperatedatthesametime.Whentheprojectorisoperatedin“Code2,”boththeprojectorandtheremotecontrolmustbeswitchedto“Code2.” To�h����ethe�odefortheproje�tor:Selecteither“Code1”or“Code2”inthisSettingMenu.
To�h����ethe�odeforthere�ote�o��trol:PressandholdboththeMENUandIMAGEbuttonstogetherformorethan5seconds.Afterchangingthecode,makesuretheremotecontroloperatesproperly.
Re�ote�o��trol
PressandholdMENUandIMAGEbuttonsformorethan5seconds.
Youcanchangethebrightnessofthescreen.
High……BrighterthantheNormalmodeAuto……BrightnessaccordingwiththeinputsignalNormal …Normalbrightness
O��st�rt
Note:• When different codes are set on the projector and on the remote control, any operation cannot be made. In that case, switch the code on the remote control to fit the code on the projector.
• If the batteries are removed from the remote control for a long period of time, the remote control code will be reset.
Sett����
Note:Lamp mode cannot be changed for a while afterturning on the projector. Lamp needs some time tostabilize after the power is turned on. Stored lampmode will be active after the lamp is stabilized.
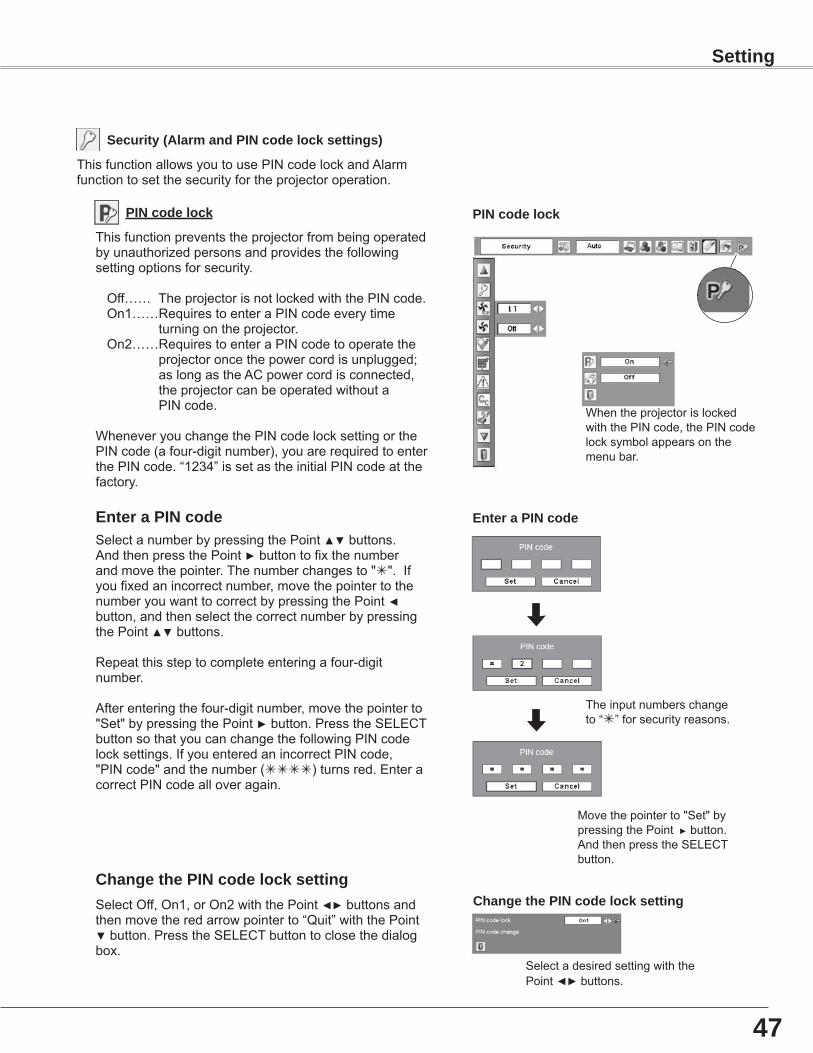
47
Se�ur�ty(Al�r����dPIN�odelo�ksett����s)
ThisfunctionallowsyoutousePINcodelockandAlarmfunctiontosetthesecurityfortheprojectoroperation.
PIN�odelo�k
Thisfunctionpreventstheprojectorfrombeingoperatedbyunauthorizedpersonsandprovidesthefollowingsettingoptionsforsecurity.
Off…… TheprojectorisnotlockedwiththePINcode.On1……RequirestoenteraPINcodeeverytime
turningontheprojector.On2……RequirestoenteraPINcodetooperatethe
projectoroncethepowercordisunplugged;aslongastheACpowercordisconnected,theprojectorcanbeoperatedwithoutaPINcode.
WheneveryouchangethePINcodelocksettingorthePINcode(afour-digitnumber),youarerequiredtoenterthePINcode.“1234”issetastheinitialPINcodeatthefactory.
WhentheprojectorislockedwiththePINcode,thePINcodelocksymbolappearsonthemenubar.
PIN�odelo�k
E��ter�PIN�odeSelectanumberbypressingthePoint▲▼buttons.AndthenpressthePoint►buttontofixthenumberandmovethepointer.Thenumberchangesto"".Ifyoufixedanincorrectnumber,movethepointertothenumberyouwanttocorrectbypressingthePoint◄ button,andthenselectthecorrectnumberbypressingthePoint▲▼buttons.
Repeatthissteptocompleteenteringafour-digitnumber.
Afterenteringthefour-digitnumber,movethepointerto"Set"bypressingthePoint►button.PresstheSELECTbuttonsothatyoucanchangethefollowingPINcodelocksettings.IfyouenteredanincorrectPINcode,"PINcode"andthenumber()turnsred.EnteracorrectPINcodealloveragain.
E��ter�PIN�ode
Theinputnumberschangeto“”forsecurityreasons.
Movethepointerto"Set"bypressingthePoint►button.AndthenpresstheSELECTbutton.
SelectOff,On1,orOn2withthePoint◄►buttonsandthenmovetheredarrowpointerto“Quit”withthePoint▼button.PresstheSELECTbuttontoclosethedialogbox.
Ch����ethePIN�odelo�ksett����Ch����ethePIN�odelo�ksett����
SelectadesiredsettingwiththePoint◄►buttons.
Sett����
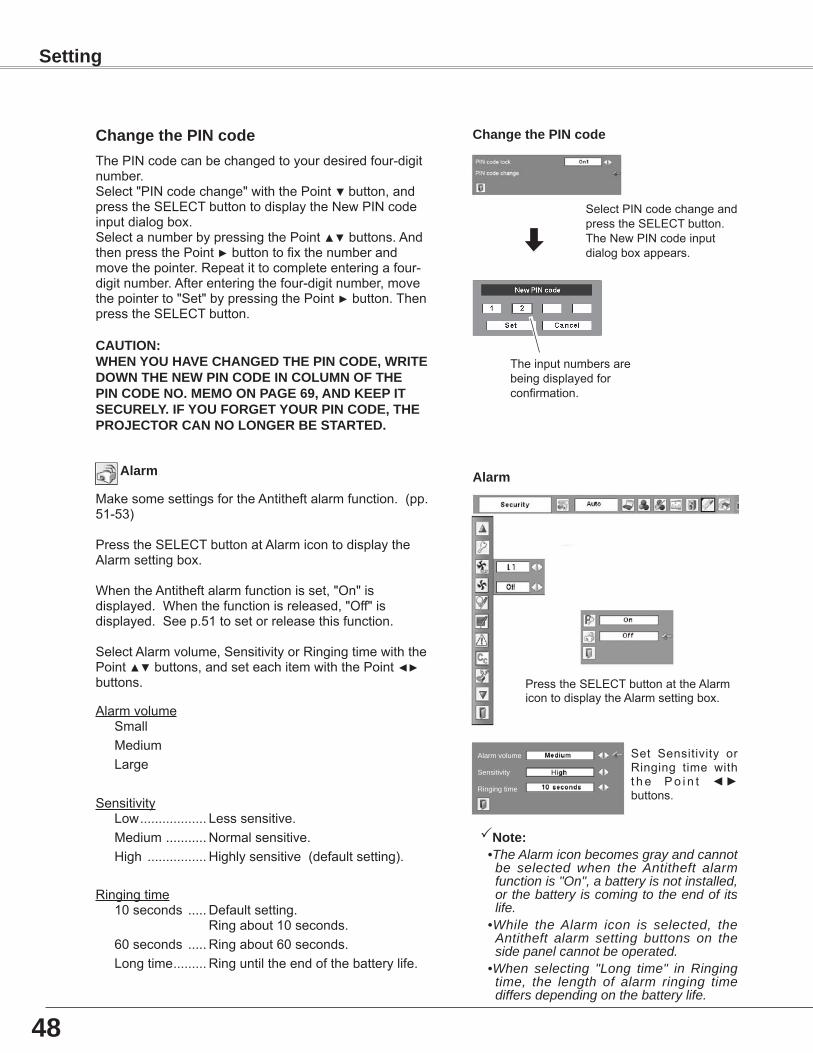
48
ThePINcodecanbechangedtoyourdesiredfour-digitnumber.Select"PINcodechange"withthePoint▼button, andpresstheSELECTbuttontodisplaytheNewPINcodeinputdialogbox.SelectanumberbypressingthePoint▲▼buttons.AndthenpressthePoint►buttontofixthenumberandmovethepointer.Repeatittocompleteenteringafour-digitnumber.Afterenteringthefour-digitnumber,movethepointerto"Set"bypressingthePoint►button.ThenpresstheSELECTbutton.
Ch����ethePIN�ode Ch����ethePIN�ode
SelectPINcodechangeandpresstheSELECTbutton.TheNewPINcodeinputdialogboxappears.
CAUTION:WHENYOUHAVECHANGEDTHEPINCODE,WRITEDOWNTHENEWPINCODEINCO�UMNOFTHEPINCODENO.MEMOONPAGE�9,ANDKEEPITSECURE�Y.IFYOUFORGETYOURPINCODE,THEPROJECTORCANNO�ONGERBESTARTED.
Al�r�
MakesomesettingsfortheAntitheftalarmfunction.(pp.51-53)
PresstheSELECTbuttonatAlarmicontodisplaytheAlarmsettingbox.
WhentheAntitheftalarmfunctionisset,"On"isdisplayed.Whenthefunctionisreleased,"Off"isdisplayed.Seep.51tosetorreleasethisfunction.
SelectAlarmvolume,SensitivityorRingingtimewiththePoint▲▼buttons,andseteachitemwiththePoint◄► buttons.
AlarmvolumeSmallMediumLarge
SensitivityLow.................. Lesssensitive.Medium........... Normalsensitive.High................ Highlysensitive(defaultsetting).
Ringingtime10seconds..... Defaultsetting.
Ringabout10seconds.60seconds..... Ringabout60seconds.Longtime......... Ringuntiltheendofthebatterylife.
Al�r�
Alarm volume
Sensitivity
Ringing time
PresstheSELECTbuttonattheAlarmicontodisplaytheAlarmsettingbox.
Note: •The Alarm icon becomes gray and cannot
be selected when the Antitheft alarm function is "On", a battery is not installed, or the battery is coming to the end of its life.
•While the Alarm icon is selected, the Antitheft alarm setting buttons on the side panel cannot be operated.
•When selecting "Long time" in Ringing time, the length of alarm ringing time differs depending on the battery life.
Set Sensitivity orRinging time witht h e Po i n t ◄►buttons.
Sett����
Theinputnumbersarebeingdisplayedforconfirmation.
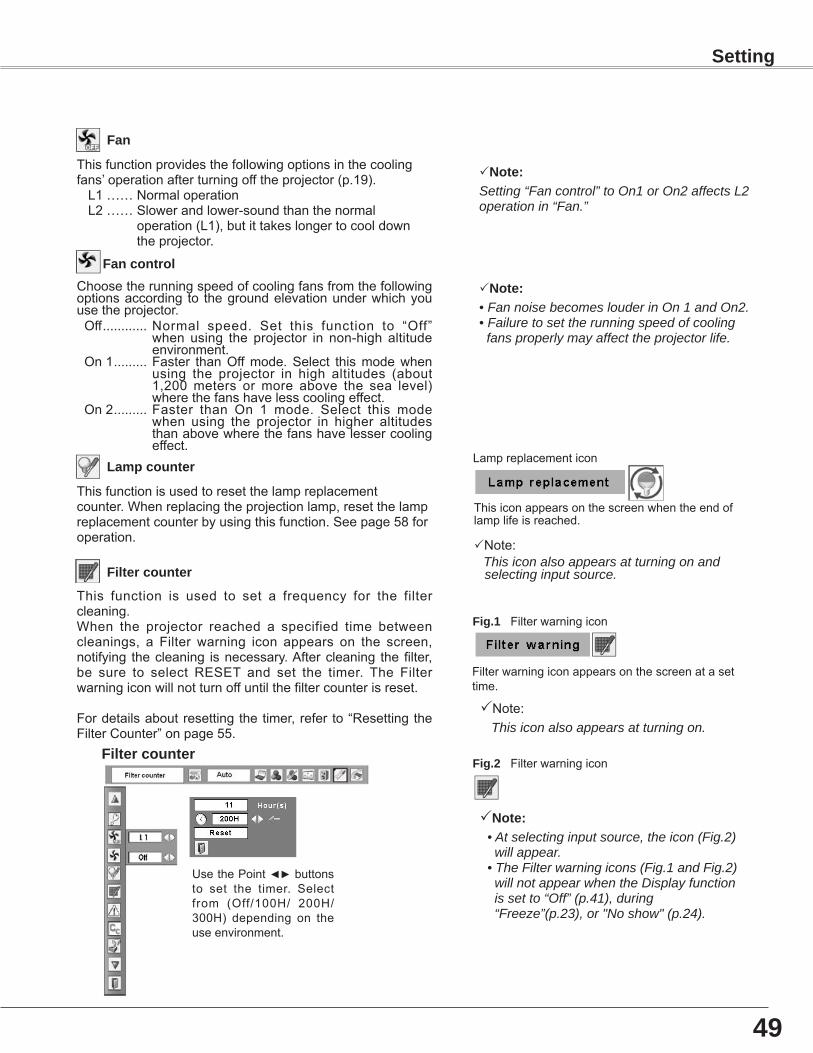
49
Thisfunctionisusedtoresetthelampreplacementcounter.Whenreplacingtheprojectionlamp,resetthelampreplacementcounterbyusingthisfunction.Seepage58foroperation.
���p�ou��ter
Thisfunctionprovidesthefollowingoptionsinthecoolingfans’operationafterturningofftheprojector(p.19).L1……NormaloperationL2……Slowerandlower-soundthanthenormal
operation(L1),butittakeslongertocooldowntheprojector.
F���
Sett����
Choosetherunningspeedofcoolingfansfromthefollowingoptionsaccording to thegroundelevationunderwhichyouusetheprojector. Off............ Normal speed. Set this function to “Off”
when using the projector in non-high altitudeenvironment.
On1......... Faster than Offmode.Select thismodewhenusing the projector in high altitudes (about1,200meters ormore above the sea level)wherethefanshavelesscoolingeffect.
On2......... Faster than On 1 mode. Select this modewhen using the projector in higher altitudesthanabovewherethefanshavelessercoolingeffect.
F����o��trol
Note:• Fan noise becomes louder in On 1 and On2.• Failure to set the running speed of cooling fans properly may affect the projector life.
Note:Setting “Fan control” to On1 or On2 affects L2 operation in “Fan.”
This function is used to set a frequency for the filtercleaning.When the projector reached a specified time betweencleanings, a Filter warning icon appears on the screen,notifying thecleaning isnecessary.Aftercleaning the filter,be sure to select RESET and set the timer. The Filterwarningiconwillnotturnoffuntilthefiltercounterisreset.
Fordetailsaboutresettingthetimer,referto“ResettingtheFilterCounter”onpage55.
F�lter�ou��ter
Filterwarningiconappearsonthescreenatasettime.
F��.�Filterwarningicon
Note: This icon also appears at turning on.
Note: • At selecting input source, the icon (Fig.2) will appear. • The Filter warning icons (Fig.1 and Fig.2) will not appear when the Display function is set to “Off” (p.41), during “Freeze”(p.23), or "No show" (p.24).
F�lter�ou��ter
F��.1Filterwarningicon
UsethePoint◄►buttonsto set the timer. Selectfrom (Off/100H/ 200H/300H) depending on theuseenvironment.
Thisiconappearsonthescreenwhentheendoflamplifeisreached.
Note: This icon also appears at turning on and selecting input source.
Lampreplacementicon
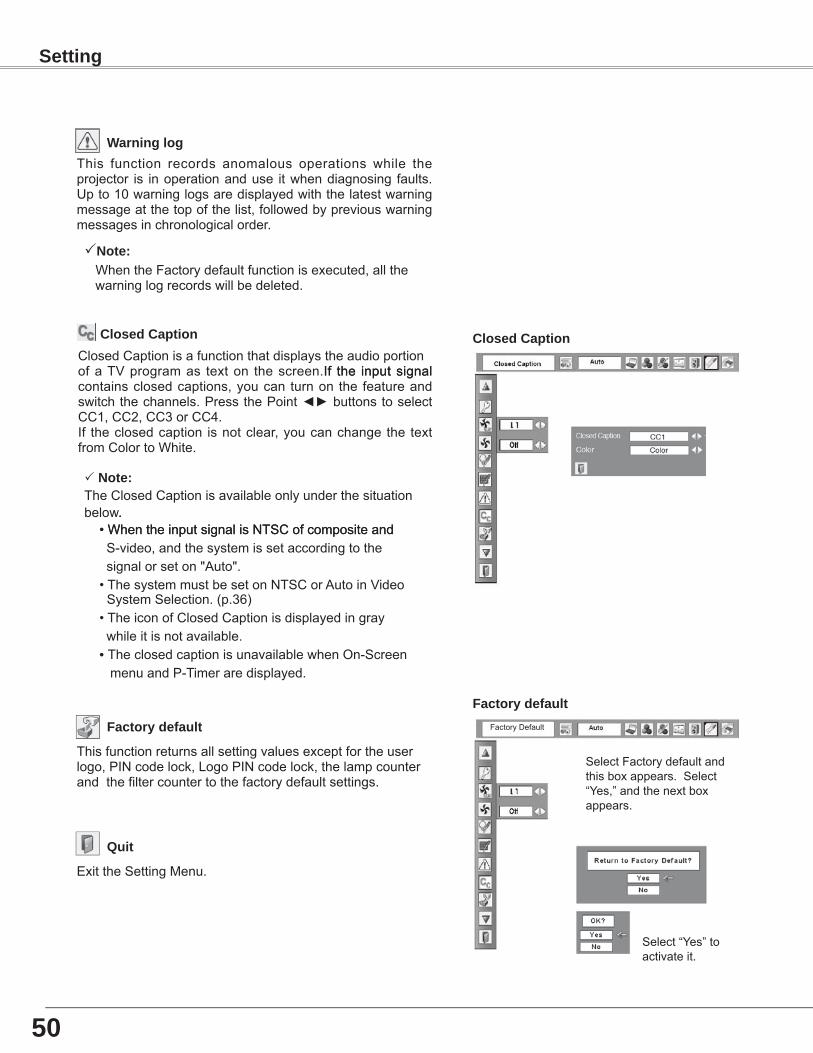
50
Sett����
F��torydef�ult
Thisfunctionreturnsallsettingvaluesexceptfortheuserlogo,PINcodelock,LogoPINcodelock,thelampcounterandthefiltercountertothefactorydefaultsettings.
F��torydef�ult
ExittheSettingMenu.
Qu�t
W�r������lo�This function records anomalous operations while theprojector is inoperationanduse itwhendiagnosing faults.Upto10warninglogsaredisplayedwiththelatestwarningmessageatthetopofthelist,followedbypreviouswarningmessagesinchronologicalorder.
Note: WhentheFactorydefaultfunctionisexecuted,allthewarninglogrecordswillbedeleted.
ClosedC�pt�o��ClosedCaptionisafunctionthatdisplaystheaudioportionofaTVprogramas texton thescreen.If the input signalIf the inputsignalcontainsclosedcaptions,youcanturnonthefeatureandswitchthechannels.PressthePoint◄►buttonstoselectCC1,CC2,CC3orCC4.If theclosedcaption isnotclear,youcanchangethetextfromColortoWhite.
ClosedC�pt�o��
Note:TheClosedCaptionisavailableonlyunderthesituationbelow.. • When the input signal is NTSC of composite and•WhentheinputsignalisNTSCofcompositeand S-video,andthesystemissetaccordingtothe signalorseton"Auto". •ThesystemmustbesetonNTSCorAutoinVideoSystemSelection.(p.36)
•TheiconofClosedCaptionisdisplayedingray whileitisnotavailable. • TheclosedcaptionisunavailablewhenOn-ScreenmenuandP-Timeraredisplayed.
FactoryDefault
SelectFactorydefaultandthisboxappears.Select“Yes,”andthenextboxappears.
Select“Yes”toactivateit.
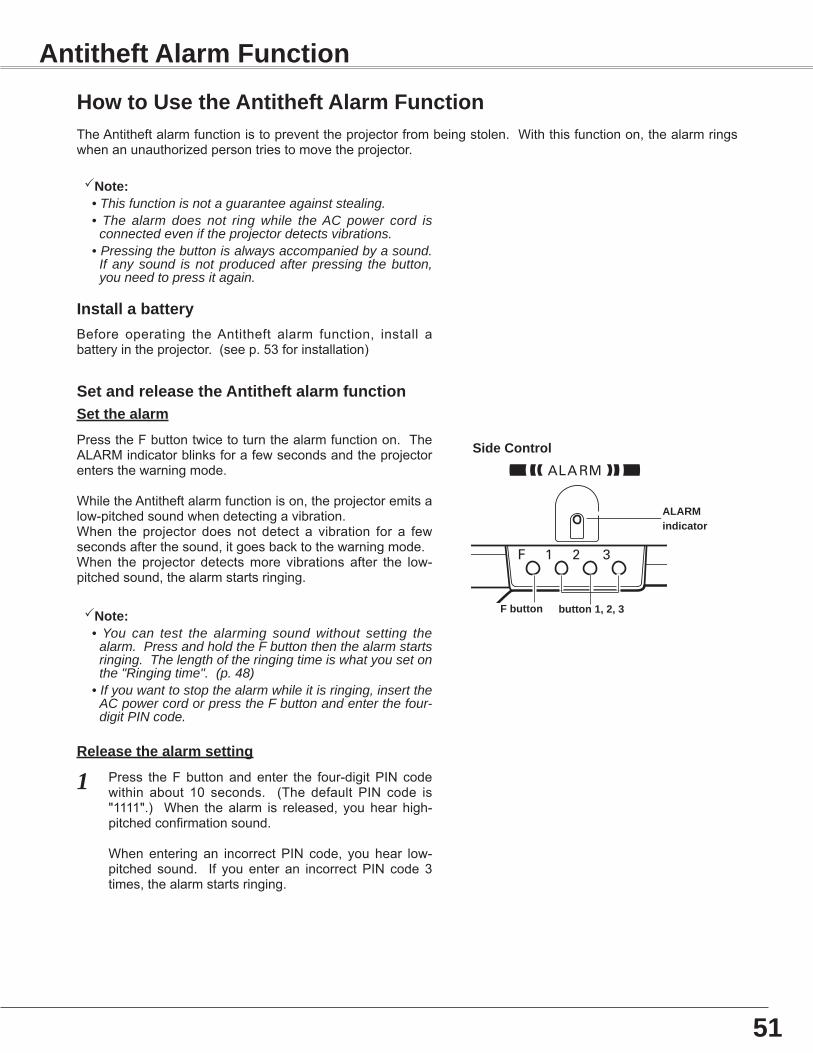
51
HowtoUsetheA��t�theftAl�r�Fu���t�o��TheAntitheftalarmfunctionistopreventtheprojectorfrombeingstolen.Withthisfunctionon,thealarmringswhenanunauthorizedpersontriestomovetheprojector.
PresstheFbuttontwicetoturnthealarmfunctionon.TheALARMindicatorblinksforafewsecondsandtheprojectorentersthewarningmode.
WhiletheAntitheftalarmfunctionison,theprojectoremitsalow-pitchedsoundwhendetectingavibration.When the projector does not detect a vibration for a fewsecondsafterthesound,itgoesbacktothewarningmode.When the projector detectsmore vibrations after the low-pitchedsound,thealarmstartsringing.
Setthe�l�r�
Rele�sethe�l�r�sett����
Note: • This function is not a guarantee against stealing. • The alarm does not ring while the AC power cord is
connected even if the projector detects vibrations. • Pressing the button is always accompanied by a sound.
If any sound is not produced after pressing the button, you need to press it again.
S�deCo��trol
A�ARM���d���tor
Fbutto�� butto��1,�,�
Set���drele�setheA��t�theft�l�r�fu���t�o��
Note: • You can test the alarming sound without setting the
alarm. Press and hold the F button then the alarm starts ringing. The length of the ringing time is what you set on the "Ringing time". (p. 48)
• If you want to stop the alarm while it is ringing, insert the AC power cord or press the F button and enter the four-digit PIN code.
Before operating theAntitheft alarm function, install abatteryintheprojector.(seep.53forinstallation)
I��st�ll�b�ttery
1 Press theF button andenter the four-digitPIN codewithin about 10 seconds. (The default PIN code is"1111".) When thealarm is released, youhear high-pitchedconfirmationsound.
Whenentering an incorrectPIN code, you hear low-pitched sound. If youenter an incorrectPIN code3times,thealarmstartsringing.
A��t�theftAl�r�Fu���t�o��
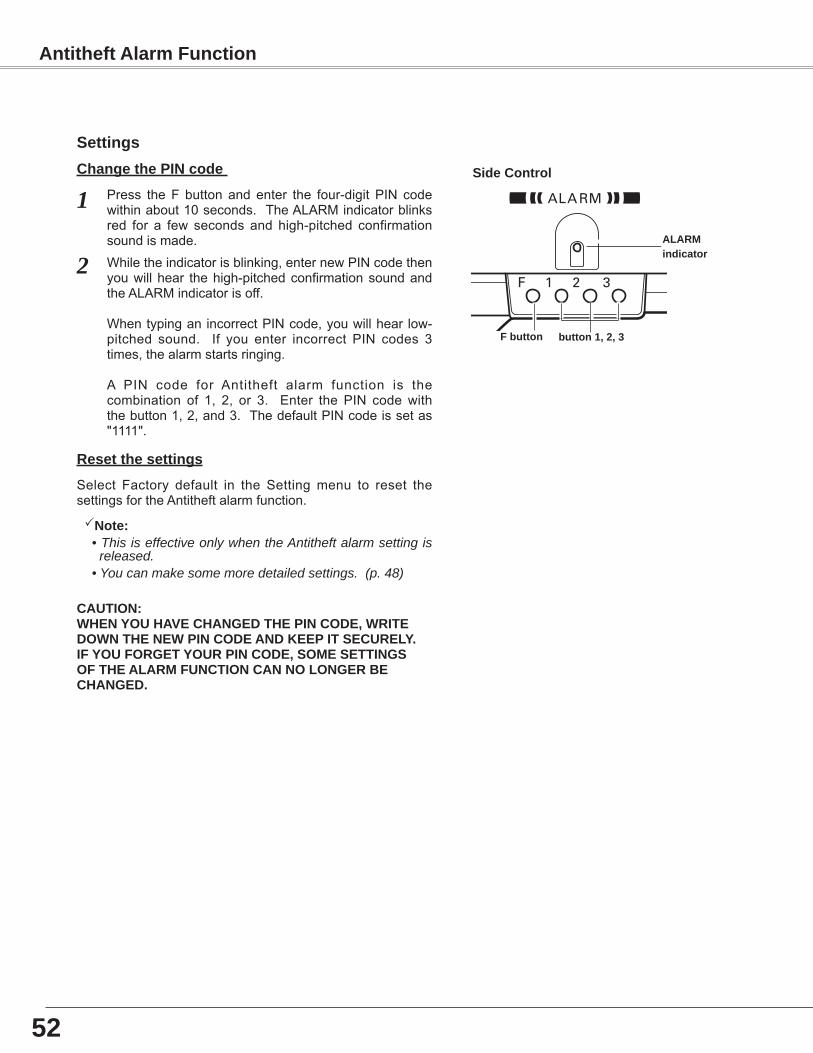
5�
CAUTION:WHENYOUHAVECHANGEDTHEPINCODE,WRITEDOWNTHENEWPINCODEANDKEEPITSECURE�Y.IFYOUFORGETYOURPINCODE,SOMESETTINGSOFTHEA�ARMFUNCTIONCANNO�ONGERBECHANGED.
Ch����ethePIN�ode
Press theF button and enter the four-digit PIN codewithinabout10seconds.TheALARMindicatorblinksred for a few seconds and high-pitched confirmationsoundismade.
Sett����s
Resetthesett����s
Select Factory default in the Settingmenu to reset thesettingsfortheAntitheftalarmfunction.
S�deCo��trol
1
2 Whiletheindicatorisblinking,enternewPINcodethenyouwillhear thehigh-pitchedconfirmationsoundandtheALARMindicatorisoff.
WhentypinganincorrectPINcode,youwillhear low-pitched sound. If you enter incorrect PIN codes 3times,thealarmstartsringing.
A PIN code for Antitheft alarm function is thecombination of 1, 2, or 3. Enter thePIN codewiththebutton1,2,and3.ThedefaultPINcodeissetas"1111".
Note: • This is effective only when the Antitheft alarm setting is
released. • You can make some more detailed settings. (p. 48)
A�ARM���d���tor
Fbutto�� butto��1,�,�
A��t�theftAl�r�Fu���t�o��
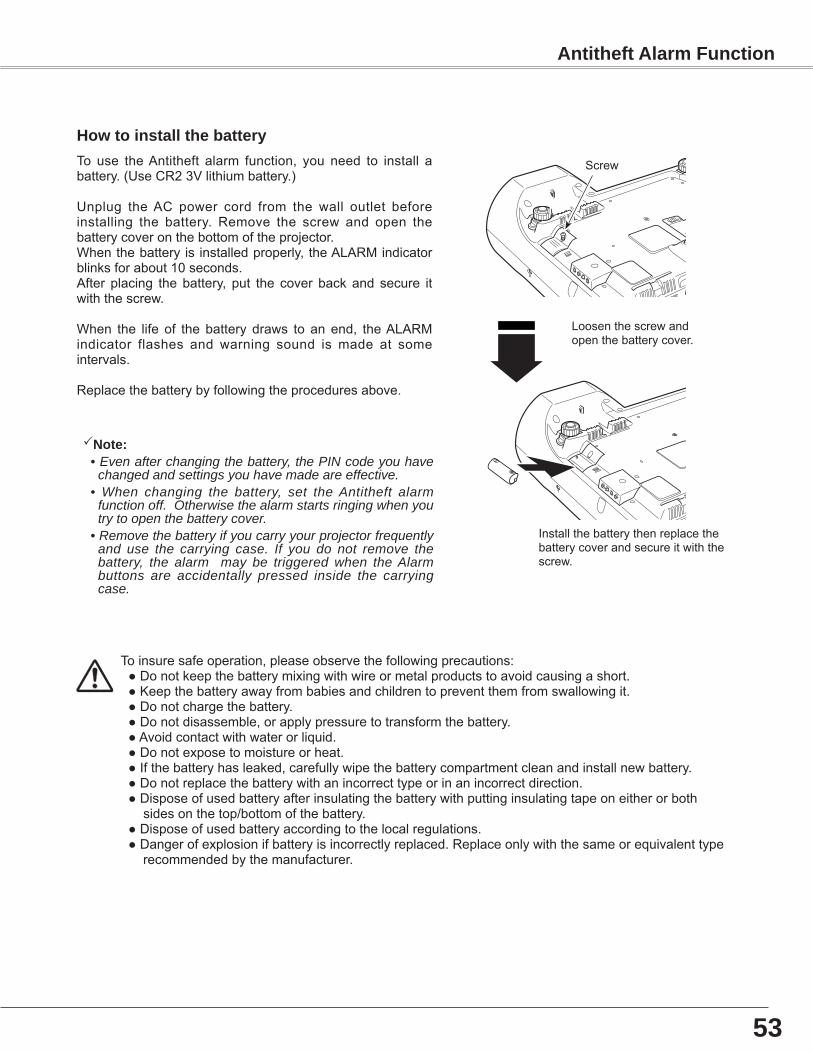
5�
Howto���st�lltheb�tteryTo use theAntitheft alarm function, you need to install abattery.(UseCR23Vlithiumbattery.)
Unplug theAC power cord from the wall outlet beforeinstalling the battery. Remove the screw and open thebatterycoveronthebottomoftheprojector.Whenthebatteryis installedproperly,theALARMindicatorblinksforabout10seconds.After placing thebattery, put the cover backand secure itwiththescrew.
When the life of the battery draws to an end, theALARMindicator flashes and warning sound is made at someintervals.
Replacethebatterybyfollowingtheproceduresabove.
Note: • Even after changing the battery, the PIN code you have
changed and settings you have made are effective. • When changing the battery, set the Antitheft alarm
function off. Otherwise the alarm starts ringing when you try to open the battery cover.
• Remove the battery if you carry your projector frequently and use the carrying case. If you do not remove the battery, the alarm may be triggered when the Alarm buttons are accidentally pressed inside the carrying case.
Loosenthescrewandopenthebatterycover.
Installthebatterythenreplacethebatterycoverandsecureitwiththescrew.
Screw
Toinsuresafeoperation,pleaseobservethefollowingprecautions: ●Donotkeepthebatterymixingwithwireormetalproductstoavoidcausingashort. ●Keepthebatteryawayfrombabiesandchildrentopreventthemfromswallowingit. ●Donotchargethebattery. ●Donotdisassemble,orapplypressuretotransformthebattery. ●Avoidcontactwithwaterorliquid. ●Donotexposetomoistureorheat. ●Ifthebatteryhasleaked,carefullywipethebatterycompartmentcleanandinstallnewbattery. ●Donotreplacethebatterywithanincorrecttypeorinanincorrectdirection. ●Disposeofusedbatteryafterinsulatingthebatterywithputtinginsulatingtapeoneitherorboth
sidesonthetop/bottomofthebattery. ●Disposeofusedbatteryaccordingtothelocalregulations. ●Dangerofexplosionifbatteryisincorrectlyreplaced.Replaceonlywiththesameorequivalenttype recommendedbythemanufacturer.
A��t�theftAl�r�Fu���t�o��
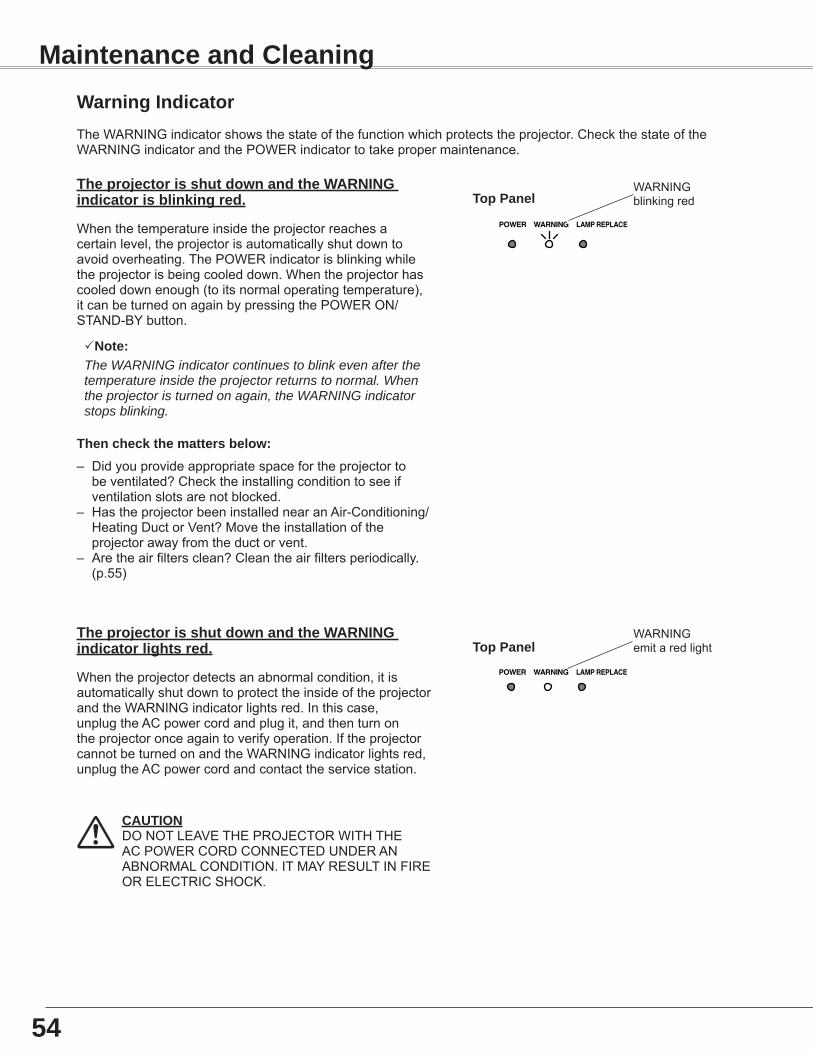
54
TheWARNINGindicatorshowsthestateofthefunctionwhichprotectstheprojector.CheckthestateoftheWARNINGindicatorandthePOWERindicatortotakepropermaintenance.
TopP���el
W�r������I��d���tor
Theproje�tor�sshutdow�����dtheWARNING���d���tor�sbl���k����red.
Whenthetemperatureinsidetheprojectorreachesacertainlevel,theprojectorisautomaticallyshutdowntoavoidoverheating.ThePOWERindicatorisblinkingwhiletheprojectorisbeingcooleddown.Whentheprojectorhascooleddownenough(toitsnormaloperatingtemperature),itcanbeturnedonagainbypressingthePOWERON/STAND-BYbutton.
Note: The WARNING indicator continues to blink even after the temperature inside the projector returns to normal. When the projector is turned on again, the WARNING indicator stops blinking.
The���he�kthe��ttersbelow:– Didyouprovideappropriatespacefortheprojectortobeventilated?Checktheinstallingconditiontoseeifventilationslotsarenotblocked.
– HastheprojectorbeeninstallednearanAir-Conditioning/HeatingDuctorVent?Movetheinstallationoftheprojectorawayfromtheductorvent.
– Aretheairfiltersclean?Cleantheairfiltersperiodically.(p.55)
TopP���elTheproje�tor�sshutdow�����dtheWARNING���d���torl��htsred.
Whentheprojectordetectsanabnormalcondition,itisautomaticallyshutdowntoprotecttheinsideoftheprojectorandtheWARNINGindicatorlightsred.Inthiscase,unplugtheACpowercordandplugit,andthenturnontheprojectoronceagaintoverifyoperation.IftheprojectorcannotbeturnedonandtheWARNINGindicatorlightsred,unplugtheACpowercordandcontacttheservicestation.
CAUTIONDONOTLEAVETHEPROJECTORWITHTHEACPOWERCORDCONNECTEDUNDERANABNORMALCONDITION.ITMAYRESULTINFIREORELECTRICSHOCK.
WARNINGblinkingred
WARNINGemitaredlight
M����te������e���dCle�������
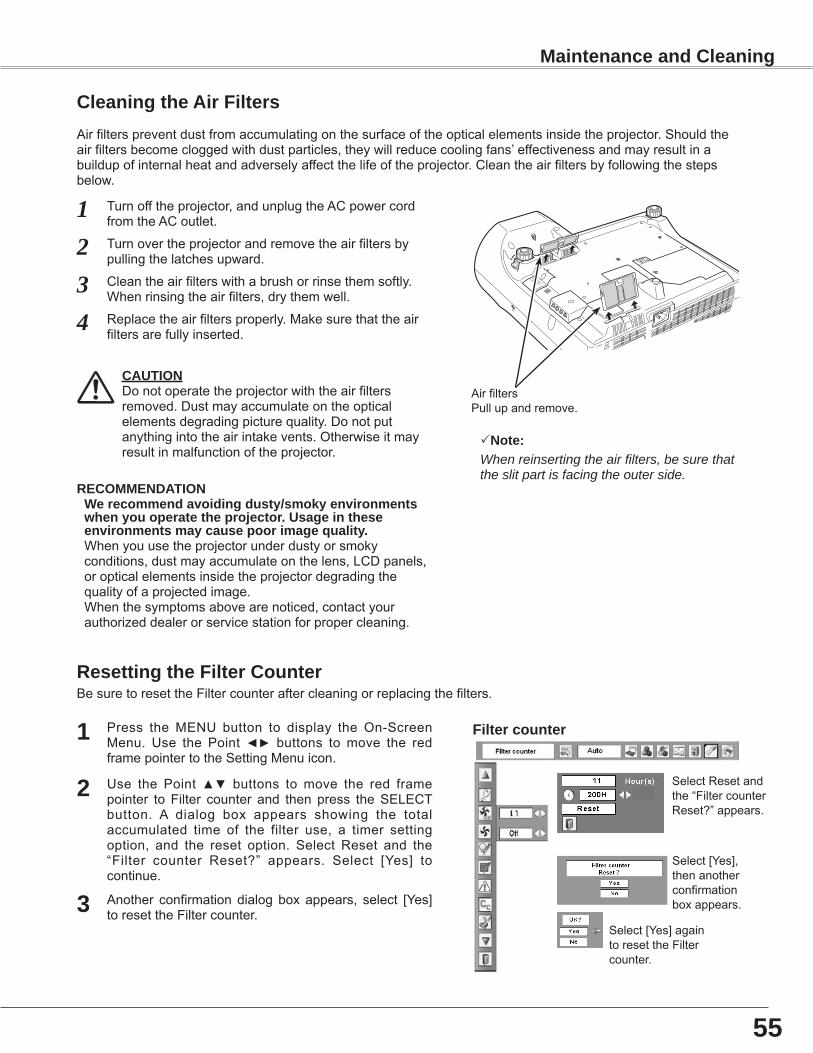
55
Turnofftheprojector,andunplugtheACpowercordfromtheACoutlet.
Turnovertheprojectorandremovetheairfiltersbypullingthelatchesupward.
12
Airfilterspreventdustfromaccumulatingonthesurfaceoftheopticalelementsinsidetheprojector.Shouldtheairfiltersbecomecloggedwithdustparticles,theywillreducecoolingfans’effectivenessandmayresultinabuildupofinternalheatandadverselyaffectthelifeoftheprojector.Cleantheairfiltersbyfollowingthestepsbelow.
Cleantheairfilterswithabrushorrinsethemsoftly.Whenrinsingtheairfilters,drythemwell.3Replacetheairfiltersproperly.Makesurethattheairfiltersarefullyinserted.4
CAUTIONDonotoperatetheprojectorwiththeairfiltersremoved.Dustmayaccumulateontheopticalelementsdegradingpicturequality.Donotputanythingintotheairintakevents.Otherwiseitmayresultinmalfunctionoftheprojector.
RECOMMENDATIONWere�o��e��d�vo�d����dusty/s�okye��v�ro���e��tswhe��youoper�tetheproje�tor.Us��e���thesee��v�ro���e��ts��y��usepoor����equ�l�ty.Whenyouusetheprojectorunderdustyorsmokyconditions,dustmayaccumulateonthelens,LCDpanels,oropticalelementsinsidetheprojectordegradingthequalityofaprojectedimage.Whenthesymptomsabovearenoticed,contactyourauthorizeddealerorservicestationforpropercleaning.
Note:When reinserting the air filters, be sure that the slit part is facing the outer side.
Cle�������theA�rF�lters
M����te������e���dCle�������
BesuretoresettheFiltercounteraftercleaningorreplacingthefilters.
Press theMENU button to display the On-ScreenMenu. Use the Point◄► buttons tomove the redframepointertotheSettingMenuicon.
Use the Point▲▼ buttons tomove the red framepointer to Filter counter and then press theSELECTbutton. A dialog box appears showing the totalaccumulated time of the filter use, a timer settingoption, and the reset option. Select Reset and the“Filter counter Reset?” appears. Select [Yes] tocontinue.
1
�
Resett����theF�lterCou��ter
F�lter�ou��ter
Another confirmationdialogboxappears, select [Yes]toresettheFiltercounter.�
AirfiltersPullupandremove.
SelectResetandthe“FiltercounterReset?”appears.
Select[Yes],thenanotherconfirmationboxappears.
Select[Yes]againtoresettheFiltercounter.
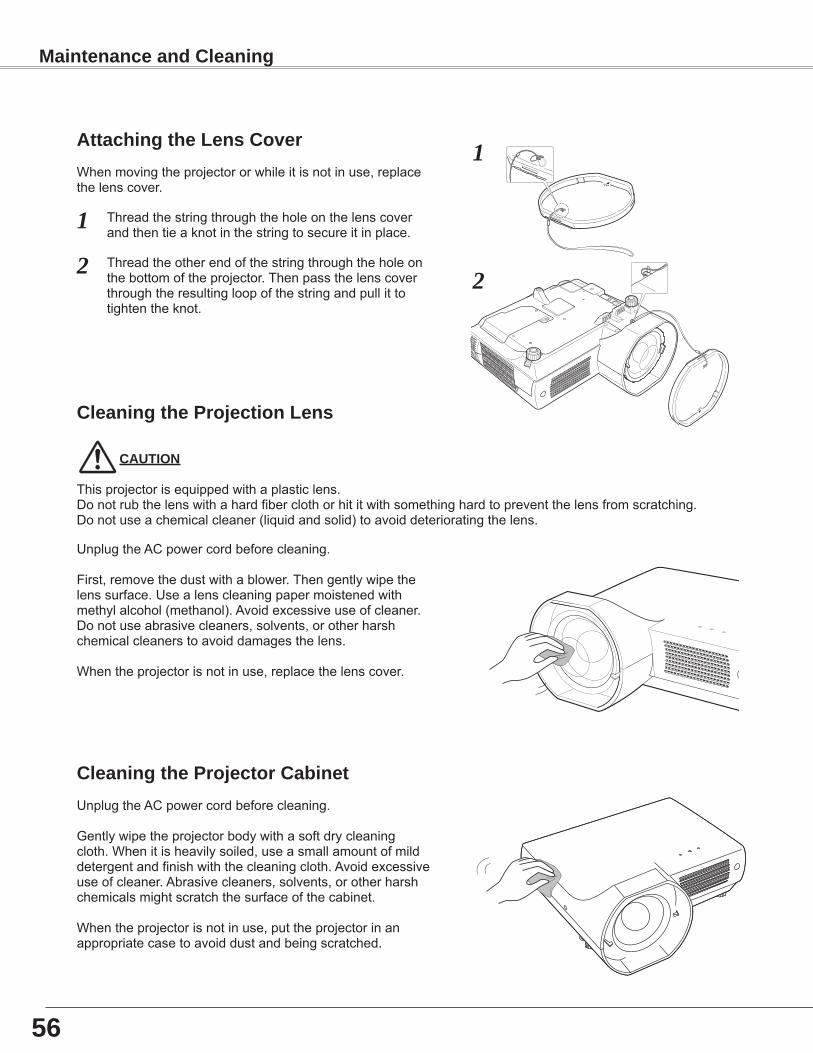
5�
Cle�������theProje�torC�b���etUnplugtheACpowercordbeforecleaning.
Gentlywipetheprojectorbodywithasoftdrycleaningcloth.Whenitisheavilysoiled,useasmallamountofmilddetergentandfinishwiththecleaningcloth.Avoidexcessiveuseofcleaner.Abrasivecleaners,solvents,orotherharshchemicalsmightscratchthesurfaceofthecabinet.
Whentheprojectorisnotinuse,puttheprojectorinanappropriatecasetoavoiddustandbeingscratched.
UnplugtheACpowercordbeforecleaning.
First,removethedustwithablower.Thengentlywipethelenssurface.Usealenscleaningpapermoistenedwithmethylalcohol(methanol).Avoidexcessiveuseofcleaner.Donotuseabrasivecleaners,solvents,orotherharshchemicalcleanerstoavoiddamagesthelens.
Whentheprojectorisnotinuse,replacethelenscover.
Cle�������theProje�t�o���e��s
CAUTION
Thisprojectorisequippedwithaplasticlens.Donotrubthelenswithahardfiberclothorhititwithsomethinghardtopreventthelensfromscratching.Donotuseachemicalcleaner(liquidandsolid)toavoiddeterioratingthelens.
M����te������e���dCle�������
Att��h����the�e��sCoverWhenmovingtheprojectororwhileitisnotinuse,replacethelenscover.
1
2
Threadthestringthroughtheholeonthelenscoverandthentieaknotinthestringtosecureitinplace.
Threadtheotherendofthestringthroughtheholeonthebottomoftheprojector.Thenpassthelenscoverthroughtheresultingloopofthestringandpullittotightentheknot.
2
1
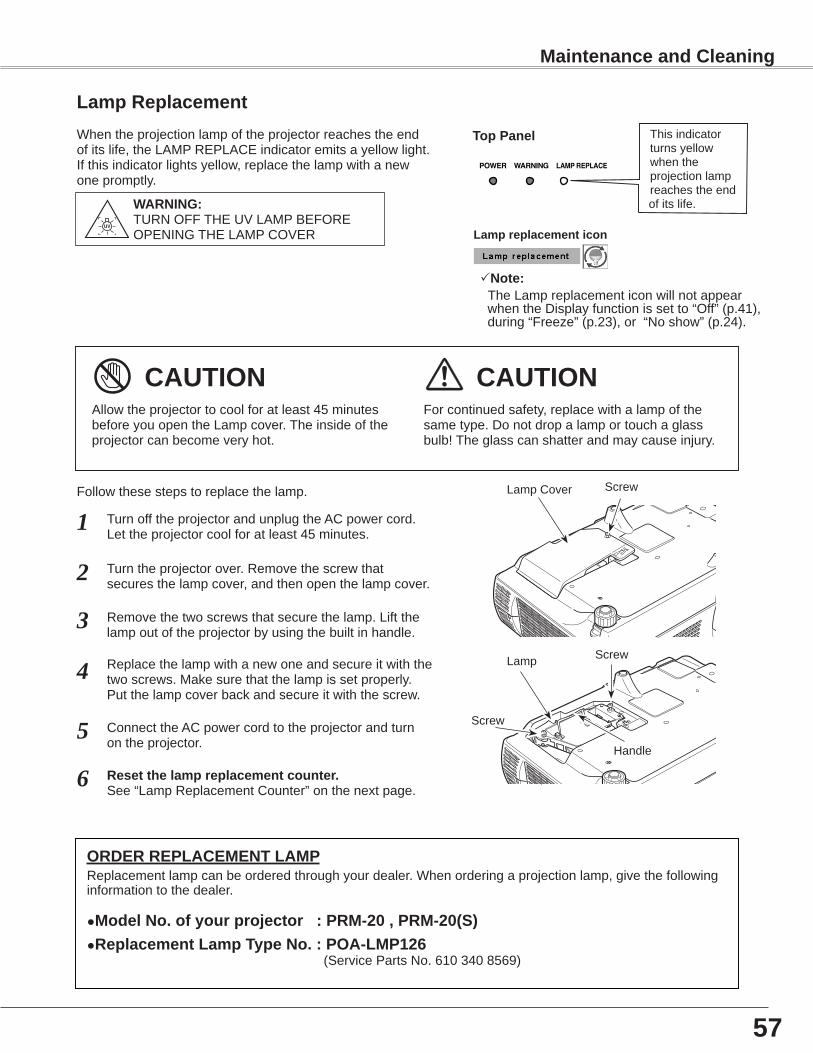
57
Follow these steps to replace the lamp.
Lamp
ORDER REPLACEMENT LAMPReplacement lamp can be ordered through your dealer. When ordering a projection lamp, give the following information to the dealer.
●Model No. of your projector : PRM-20 , PRM-20(S)●Replacement Lamp Type No. : POA-LMP126
(Service Parts No. 610 340 8569)
For continued safety, replace with a lamp of the same type. Do not drop a lamp or touch a glass bulb! The glass can shatter and may cause injury.
Allow the projector to cool for at least 45 minutes before you open the Lamp cover. The inside of the projector can become very hot.
CAUTION
Screw
Turn off the projector and unplug the AC power cord. Let the projector cool for at least 45 minutes.
Remove the two screws that secure the lamp. Lift the lamp out of the projector by using the built in handle.
1
3
Replace the lamp with a new one and secure it with the two screws. Make sure that the lamp is set properly. Put the lamp cover back and secure it with the screw.
4
Turn the projector over. Remove the screw that secures the lamp cover, and then open the lamp cover.2
Connect the AC power cord to the projector and turn on the projector.
6 Reset the lamp replacement counter.See “Lamp Replacement Counter” on the next page.
5Handle
Screw
CAUTION
ScrewLamp Cover
When the projection lamp of the projector reaches the end of its life, the LAMP REPLACE indicator emits a yellow light. If this indicator lights yellow, replace the lamp with a new one promptly.
Top Panel
Lamp Replacement
WARNING: TURN OFF THE UV LAMP BEFORE OPENING THE LAMP COVER
This indicator turns yellow when the projection lamp reaches the end of its life.
Maintenance and Cleaning
Note: The Lamp replacement icon will not appear when the Display function is set to “Off” (p.41), during “Freeze” (p.23), or “No show” (p.24).
Lamp replacement icon
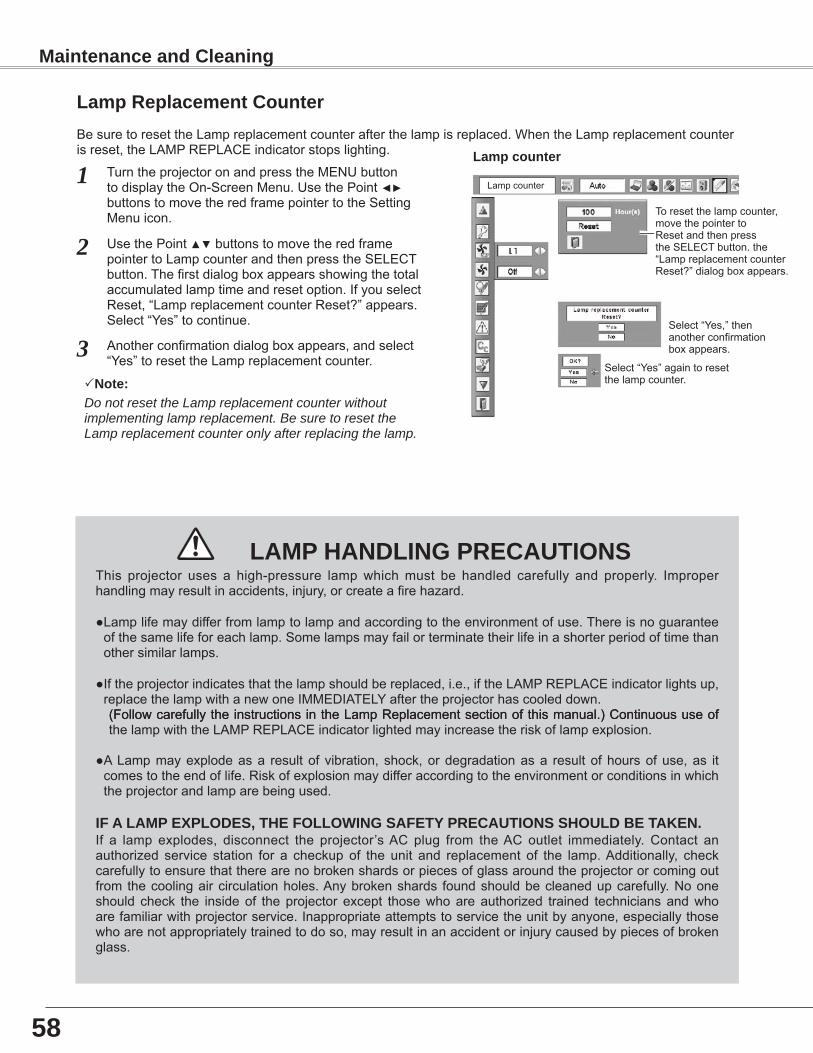
58
BesuretoresettheLampreplacementcounterafterthelampisreplaced.WhentheLampreplacementcounterisreset,theLAMPREPLACEindicatorstopslighting.
TurntheprojectoronandpresstheMENUbuttontodisplaytheOn-ScreenMenu.UsethePoint◄► buttonstomovetheredframepointertotheSettingMenuicon.
UsethePoint▲▼buttonstomovetheredframepointertoLampcounterandthenpresstheSELECTbutton.Thefirstdialogboxappearsshowingthetotalaccumulatedlamptimeandresetoption.IfyouselectReset,“LampreplacementcounterReset?”appears.Select“Yes”tocontinue.
1
2
Anotherconfirmationdialogboxappears,andselect“Yes”toresettheLampreplacementcounter.3
This projector uses a high-pressure lampwhichmust be handled carefully and properly. Improperhandlingmayresultinaccidents,injury,orcreateafirehazard.
●Lamplifemaydifferfromlamptolampandaccordingtotheenvironmentofuse.Thereisnoguaranteeofthesamelifeforeachlamp.Somelampsmayfailorterminatetheirlifeinashorterperiodoftimethanothersimilarlamps.
● Iftheprojectorindicatesthatthelampshouldbereplaced,i.e.,iftheLAMPREPLACEindicatorlightsup,replacethelampwithanewoneIMMEDIATELYaftertheprojectorhascooleddown.
(Follow carefully the instructions in the Lamp Replacement section of this manual.) Continuous use of(FollowcarefullytheinstructionsintheLampReplacementsectionofthismanual.)ContinuoususeofthelampwiththeLAMPREPLACEindicatorlightedmayincreasetheriskoflampexplosion.
● ALampmayexplodeasa resultof vibration, shock,ordegradationasa resultofhoursofuse,as itcomestotheendoflife.Riskofexplosionmaydifferaccordingtotheenvironmentorconditionsinwhichtheprojectorandlamparebeingused.
IFA�AMPEXP�ODES,THEFO��OWINGSAFETYPRECAUTIONSSHOU�DBETAKEN.If a lamp explodes, disconnect the projector’sAC plug from theAC outlet immediately. Contact anauthorized service station for a checkup of the unit and replacement of the lamp.Additionally, checkcarefullytoensurethattherearenobrokenshardsorpiecesofglassaroundtheprojectororcomingoutfrom thecoolingaircirculationholes.Anybrokenshards foundshouldbecleanedupcarefully.Nooneshould check the insideof theprojector except thosewhoareauthorized trained technicians andwhoarefamiliarwithprojectorservice.Inappropriateattemptstoservicetheunitbyanyone,especiallythosewhoarenotappropriatelytrainedtodoso,mayresultinanaccidentorinjurycausedbypiecesofbrokenglass.
�AMPHAND�INGPRECAUTIONS
���pRepl��e�e��tCou��ter
Note:Do not reset the Lamp replacement counter without implementing lamp replacement. Be sure to reset the Lamp replacement counter only after replacing the lamp.
M����te������e���dCle�������
���p�ou��ter
Lampcounter
Toresetthelampcounter,movethepointertoResetandthenpresstheSELECTbutton.the“LampreplacementcounterReset?”dialogboxappears.
Select“Yes,”thenanotherconfirmationboxappears.
Select“Yes”againtoresetthelampcounter.
59
Troubleshoot����Beforecallingyourdealerorservicecenterforassistance,checktheitemsbelowonceagain.– Makesureyouhaveproperlyconnectedtheprojectortoperipheralequipmentasdescribedonpages14-16.– MakesureallequipmentisconnectedtotheACoutletandthepoweristurnedon.– Whenyouoperatetheprojectorwithacomputeranditdoesnotprojectanimage,restartthecomputer.
Proble�: – Solutions
Nopower
– PlugthepowercordoftheprojectorintotheACoutlet.– SeeifthePOWERindicatorlightsred.– Wait until the POWER indicator stops blinking to turn on theprojectoragain.TheprojectorcanbeturnedonafterthePOWERindicatorturnsred(seepage19).
– Check theWARNING indicator. If theWARNING indicator lightsred,theprojectorcannotbeturnedon(seeonpage54).
– Checktheprojectionlamp(seepage57).
PIN�oded��lo�box�ppe�rs�tst�rt-up
– PIN code lock is being set. Enter a PIN code; the “1234” ornumbersyouhaveset(seepages18,47–48).
The����t��ld�spl�y�s��otshow��. – Make sure "Off" or "CountdownOff" are not chosen atDisplayfunction(seepage41).
The����t��ld�spl�y�s��ots��ew�ththedef�ulto��e.
– Make sure "User" or "Off" are not chosenat Logo function (seepage42).
I��puts�����lsw�t�hes�uto��t���lly.(ordoes��otsw�t�h�uto��t���lly)
– Make sure Input search function is adjusted properly (see page44).
No����e
– Checktheconnectionbetweenyourcomputerorvideoequipmentandtheprojector(seepages14-16)
– Seeiftheinputsignaliscorrectlyoutputfromyourcomputer.Somelaptopcomputersmayneedtobechangedthesettingformonitoroutput when connected to the projector. See your computer’sinstructionmanualforthesetting
– Ittakesabout30secondstodisplayanimageafterturningontheprojector.
– Seeiftheselectedsystemiscorrespondingwithyourcomputerorvideoequipment(seepages26,36)
– Select correct input source once again throughmenu operation(seepages25,34–35).
– Make sure the temperature is not out of the specified operatingtemperature(41˚F–95˚F[5˚C–35˚C]).
– When "NoShow" is operating, the image can not be displayed.Press theNOSHOWbutton or any other button on the remotecontrol.
I���e�soutoffo�us.
– Adjustfocusoftheprojector(seepage22).– Provideproperdistancebetween theprojectorand theprojectionscreen(seepage13).
– Checktheprojectionlenstoseeifitneedscleaning(seepage56).– Moving the projector from a cool to warm placemay result inmoisturecondensationontheprojectionlens.Ifthisoccurs,leavetheprojectoroffandwaituntilcondensationevaporates.
– Projectingfromtheexcessiveslantangeltothescreenmaycausekeystonedistortionandpartialimperfectfocus.
Appe��d�x
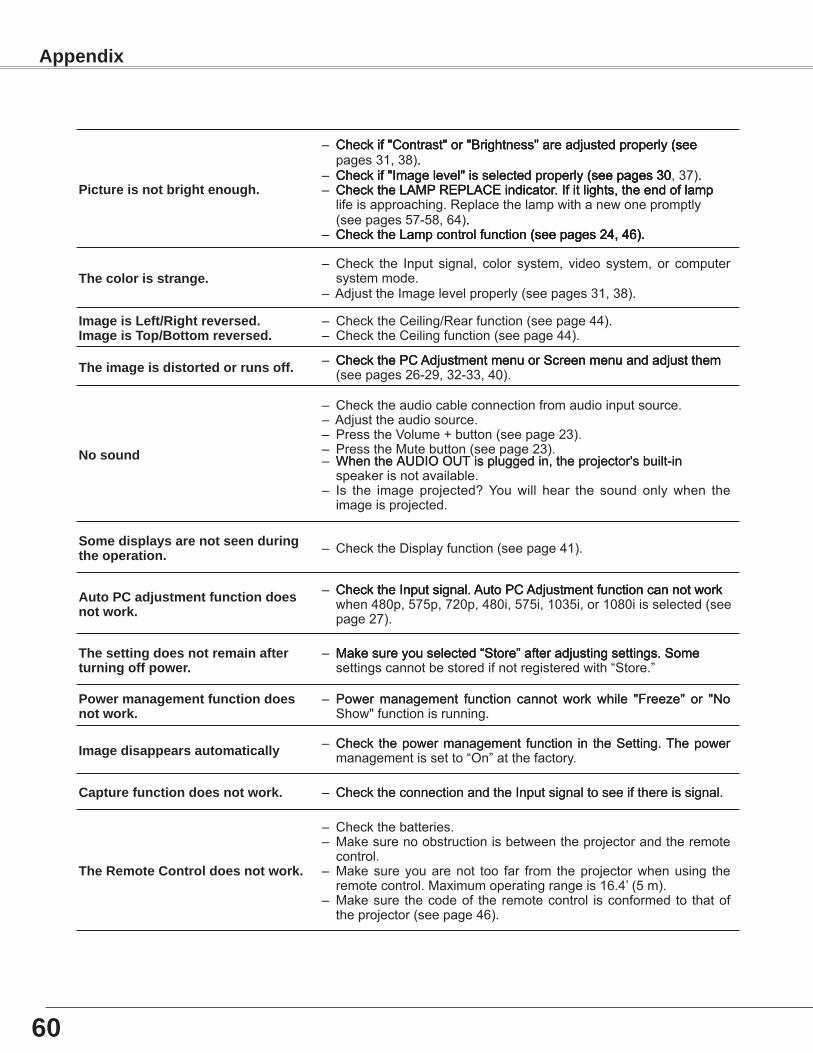
�0
P��ture�s��otbr��hte��ou�h.
– Check if "Contrast" or "Brightness" are adjusted properly (see Check if "Contrast" or "Brightness" are adjusted properly (seeCheckif"Contrast"or"Brightness"areadjustedproperly(see(seepages31,38)..
– Check if "Image level" is selected properly (see pages 30 Check if "Image level" is selected properly (see pages 30Checkif"Imagelevel"isselectedproperly(see pages 30(seepages30,37)..– Check the LAMP REPLACE indicator. If it lights, the end of lamp Check the LAMP REPLACE indicator. If it lights, the end of lampChecktheLAMPREPLACEindicator.Ifitlights,theendoflamplifeisapproaching.Replacethelampwithanewonepromptly(seepages57-58,64)..
– Check the Lamp control function (see pages 24, 46). Check the Lamp control function (see pages 24, 46).ChecktheLampcontrolfunction(see pages 24, 46).(seepages24,46).
The�olor�sstr����e.– Check the Input signal, color system, video system, or computersystemmode.
– AdjusttheImagelevelproperly(seepages31,38).
I���e�s�eft/R��htreversed.I���e�sTop/Botto�reversed.
– ChecktheCeiling/Rearfunction(seepage44).– ChecktheCeilingfunction(seepage44).
The����e�sd�stortedorru��soff. – Check the PC Adjustment menu or Screen menu and adjust them Check the PC Adjustment menu or Screen menu and adjust themCheckthePCAdjustmentmenuorScreenmenuandadjustthem(seepages26-29,32-33,40).
Nosou��d
– Checktheaudiocableconnectionfromaudioinputsource.– Adjusttheaudiosource.– PresstheVolume+button(seepage23).– PresstheMutebutton(seepage23).– When the AUDIO OUT is plugged in, the projector's built-inWhentheAUDIOOUTispluggedin,theprojector'sbuilt-inspeakerisnotavailable.
– Is the image projected?Youwill hear the sound onlywhen theimageisprojected.
So�ed�spl�ys�re��otsee��dur����theoper�t�o��. – ChecktheDisplayfunction(seepage41).
AutoPC�djust�e��tfu���t�o��does��otwork.
– Check the Input signal. Auto PC Adjustment function can not work Check the Input signal. Auto PC Adjustment function can not workChecktheInputsignal.AutoPCAdjustmentfunctioncannotworkwhen480p,575p,720p,480i,575i,1035i,or1080iisselected(seepage27).
Thesett����does��otre������ftertur������offpower.
– Make sure you selected “Store” after adjusting settings. Some Make sure you selected “Store” after adjusting settings. SomeMakesureyouselected“Store”afteradjustingsettings.Somesettingscannotbestoredifnotregisteredwith“Store.”
Power������e�e��tfu���t�o��does��otwork.
– Power management function cannot work while "Freeze" or "NoPowermanagement function cannotworkwhile "Freeze" or "NoShow"functionisrunning..
I���ed�s�ppe�rs�uto��t���lly – Check the power management function in the Setting. The powerCheckthepowermanagement function in theSetting.Thepowermanagementissetto“On”atthefactory.
C�pturefu���t�o��does��otwork. – Check the connection and the Input signal to see if there is signal.ChecktheconnectionandtheInputsignaltoseeifthereissignal.
TheRe�oteCo��troldoes��otwork.
– Checkthebatteries.– Makesurenoobstructionisbetweentheprojectorandtheremotecontrol.
– Makesureyouarenot too far from theprojectorwhenusing theremotecontrol.Maximumoperatingrangeis16.4’(5m).
– Makesure thecodeof theremotecontrol isconformedto thatoftheprojector(seepage46).
Appe��d�x
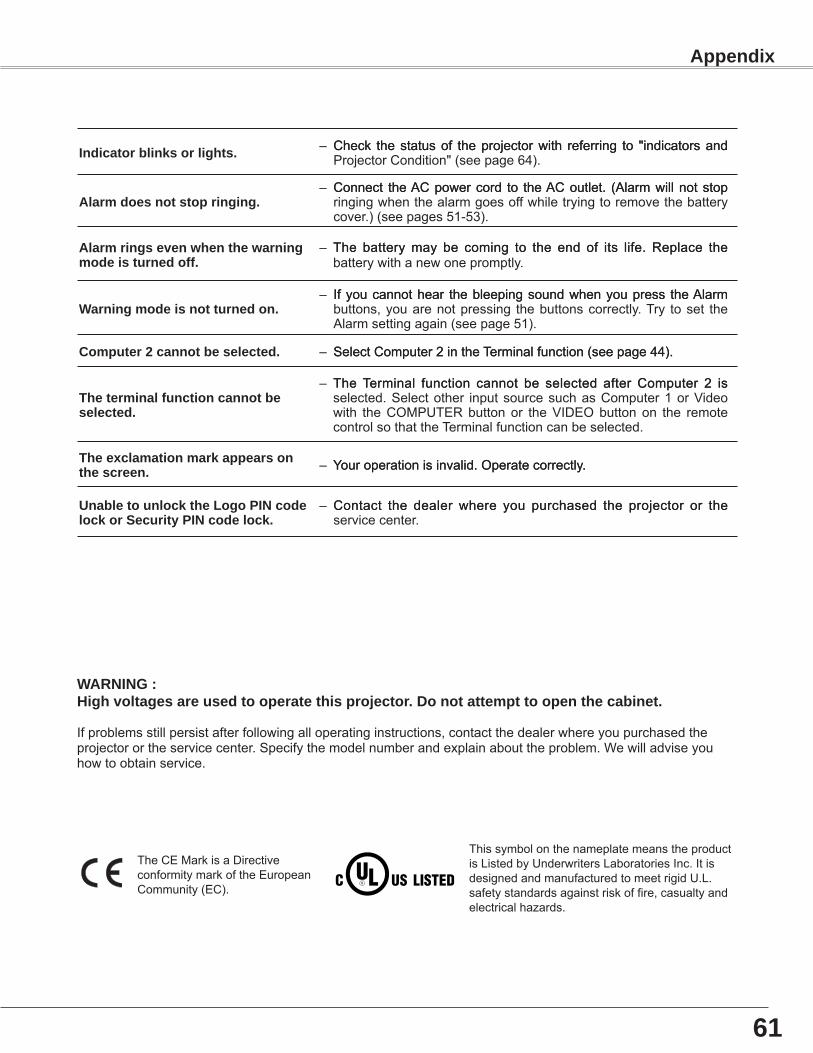
�1
TheCEMarkisaDirectiveconformitymarkoftheEuropeanCommunity(EC).
WARNING:H��hvolt��es�reusedtooper�teth�sproje�tor.Do��ot�tte�pttoope��the��b���et.
Ifproblemsstillpersistafterfollowingalloperatinginstructions,contactthedealerwhereyoupurchasedtheprojectorortheservicecenter.Specifythemodelnumberandexplainabouttheproblem.Wewilladviseyouhowtoobtainservice.
I��d���torbl���ksorl��hts. – Check the status of the projector with referring to "indicators andCheck thestatusof theprojectorwith referring to "indicatorsandProjectorCondition"(seepage64).
Al�r�does��otstopr��������.– Connect the AC power cord to the AC outlet. (Alarm will not stopConnect theACpowercord to theACoutlet. (Alarmwillnotstopringingwhenthealarmgoesoffwhiletryingtoremovethebatterycover.)(seepages51-53).
Al�r�r����seve��whe��thew�r�������ode�stur��edoff.
– The battery may be coming to the end of its life. Replace theThe batterymay be coming to the end of its life. Replace thebatterywithanewonepromptly.
W�r�������ode�s��ottur��edo��.– If you cannot hear the bleeping sound when you press the AlarmIfyoucannothear thebleepingsoundwhenyoupress theAlarmbuttons,youarenotpressing thebuttonscorrectly.Try toset theAlarmsettingagain(seepage51).
Co�puter�������otbesele�ted. – Select Computer 2 in the Terminal function (see page 44).SelectComputer2intheTerminalfunction(seepage44).
Theter�����lfu���t�o��������otbesele�ted.
– The Terminal function cannot be selected after Computer 2 isTheTerminal function cannot be selected after Computer 2 isselected.Selectother inputsourcesuchasComputer1orVideowith theCOMPUTERbuttonor theVIDEObuttonon the remotecontrolsothattheTerminalfunctioncanbeselected.
Theex�l���t�o����rk�ppe�rso��thes�ree��. – Your operation is invalid. Operate correctly.Youroperationisinvalid.Operatecorrectly.
U���bletou��lo�kthe�o�oPIN�odelo�korSe�ur�tyPIN�odelo�k.
– Contact the dealer where you purchased the projector or theContact the dealer where you purchased the projector or theservicecenter.
Appe��d�x
ThissymbolonthenameplatemeanstheproductisListedbyUnderwritersLaboratoriesInc.ItisdesignedandmanufacturedtomeetrigidU.L.safetystandardsagainstriskoffire,casualtyandelectricalhazards.
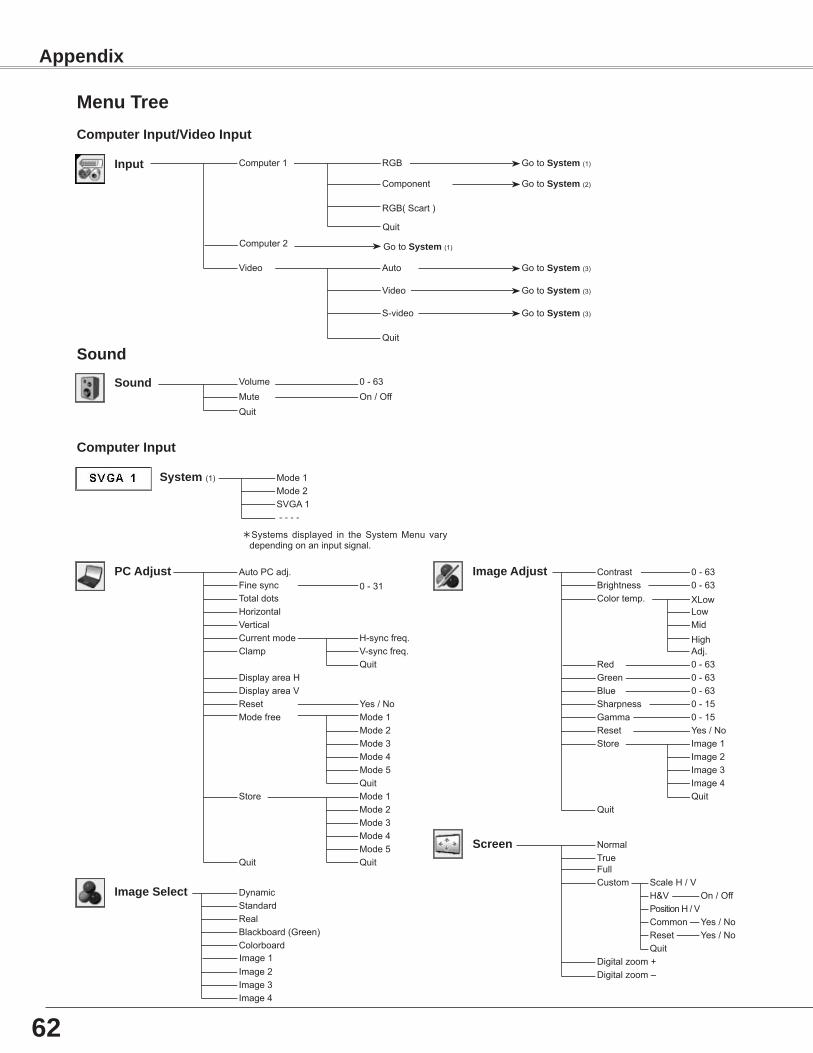
��
Me��uTree
Mode1Mode2SVGA1 - - - -
Co�puterI��put
Systems displayed in theSystemMenu varydependingonaninputsignal.
Co�puterI��put/V�deoI��put
Sou��dVolumeMuteQuit
On/OffSou��d 0-63
I��put
Computer2
Video Auto
GotoSyste� (3)
GotoSyste� (3)
Video
GotoSyste� (3)
GotoSyste� (1)
GotoSyste� (2)
S-video
RGB(Scart)
Quit
Quit
Syste�(1)
RGBComputer1
Component
AutoPCadj.
TotaldotsHorizontalVertical
DisplayareaHDisplayareaVReset
Dynamic
RealBlackboard(Green)Colorboard
Image2Image3
I���eAdjust ContrastBrightnessColortemp.
Red
Gamma
Store
Quit
0-630-63
PCAdjust
Mode1Mode2Mode3Mode4Mode5
I���eSele�t
High
0-63
0-15
Image1Image2Image3Image4
Quit
Yes/No
Reset Yes/No
Sharpness 0-15
Image4
Standard
Mode1Mode2Mode3Mode4Mode5Quit
H-syncfreq.V-syncfreq.Quit
ClampCurrentmode
GreenBlue
0-630-63
Store
Modefree
Quit
MidLowXLow
Quit
Adj.
Finesync 0-31
NormalTrueFull
Digitalzoom+
S�ree��
Digitalzoom–
Custom ScaleH/VH&VPositionH/VCommonResetQuit
Yes/NoYes/No
On/Off
GotoSyste� (1)
Appe��d�x
Image1
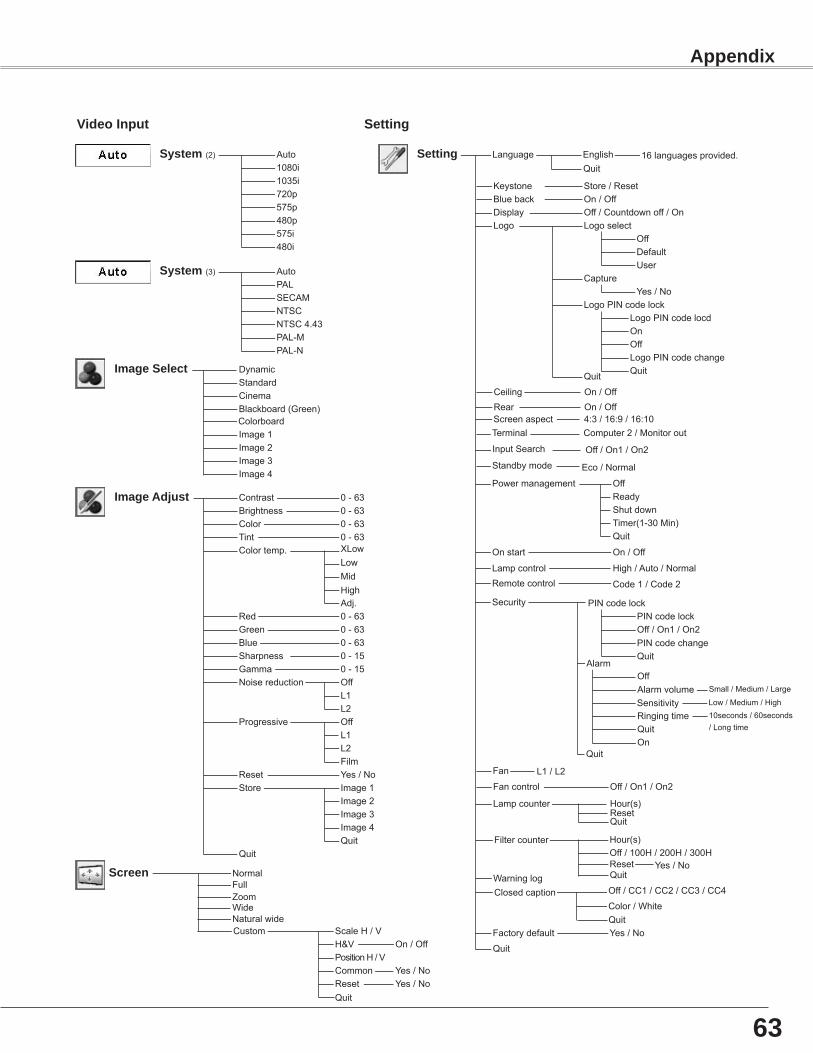
��
AutoPALSECAMNTSCNTSC4.43PAL-MPAL-N
V�deoI��put
Auto1080i1035i720p575p480p575i480i
Dynamic
CinemaBlackboard(Green)
Image1Image2Image3
Sett����
I���eSele�t
Syste�(2)
Syste�(3)
Image4
LanguageSett���� English
On/OffOff/Countdownoff/OnLogoselect
On/OffOn/Off
Off
On/Off
High/Auto/Normal
Code1/Code2
KeystoneBluebackDisplayLogo
CeilingRear
Powermanagement
Onstart
LampcontrolRemotecontrol
Quit
ReadyShutdown
Quit
Timer(1-30Min)Quit
Fan
Standard
Store/Reset
Quit
Off
UserCapture
Yes/No
OnOffLogoPINcodechange
LogoPINcodelockLogoPINcodelocd
Quit
Default
Security
Quit
0-630-63
Off
I���eAdjust ContrastBrightnessColorTint
RedGreenBlueSharpness
ResetStore
Gamma
Progressive
0-630-630-630-150-15
Image1Yes/No
Quit
Colortemp.
OffNoisereductionL1L2
HighMidLowXLow
0-630-63
Image2Image3Image4
L2L1
Adj.
Film
Quit
Off
Off/On1/On2InputSearch
NormalFull
S�ree��
Custom ScaleH/VH&VPositionH/VCommonResetQuit
Yes/NoYes/No
On/Off
Computer2/MonitoroutTerminal
PINcodelockOff/On1/On2PINcodechangeQuit
PINcodelock
Alarm
On
10seconds/60seconds/Longtime
Small/Medium/Large
Low/Medium/High
Ringingtime
AlarmvolumeSensitivity
Appe��d�x
L1/L2
Factorydefault
Off/On1/On2Fancontrol
Quit
Yes/No
ResetQuit
Lampcounter Hour(s)
ZoomWideNaturalwide
Standbymode Eco/Normal
Warninglog
Off/100H/200H/300HReset
Hour(s)Filtercounter
QuitYes/No
Colorboard
16languagesprovided.
Color/White
Off/CC1/CC2/CC3/CC4
Quit
Closedcaption
4:3/16:9/16:10Screenaspect
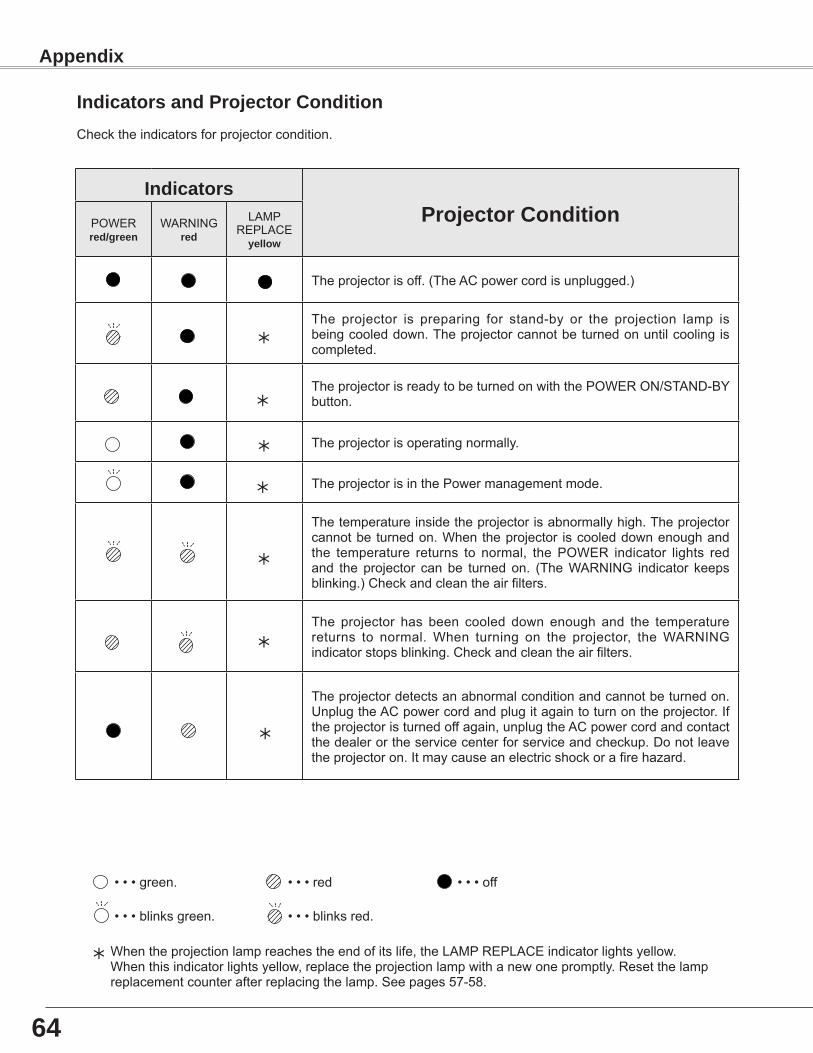
�4
I��d���torsProje�torCo��d�t�o��POWER
red/�ree��WARNING
red
LAMPREPLACE
yellow
Theprojectorisoff.(TheACpowercordisunplugged.)
The projector is preparing for stand-by or the projection lamp isbeingcooleddown.Theprojectorcannotbeturnedonuntilcoolingiscompleted.
TheprojectorisreadytobeturnedonwiththePOWERON/STAND-BYbutton.
Theprojectorisoperatingnormally.
TheprojectorisinthePowermanagementmode.
Thetemperatureinsidetheprojectorisabnormallyhigh.Theprojectorcannotbeturnedon.Whentheprojector iscooleddownenoughandthe temperature returns to normal, thePOWER indicator lights redand theprojector canbe turnedon. (TheWARNING indicator keepsblinking.)Checkandcleantheairfilters.
The projector has been cooled down enough and the temperaturereturns to normal.When turning on the projector, theWARNINGindicatorstopsblinking.Checkandcleantheairfilters.
Theprojectordetectsanabnormalconditionandcannotbeturnedon.UnplugtheACpowercordandplugitagaintoturnontheprojector.Iftheprojectoristurnedoffagain,unplugtheACpowercordandcontactthedealerortheservicecenterforserviceandcheckup.Donotleavetheprojectoron.Itmaycauseanelectricshockorafirehazard.
Checktheindicatorsforprojectorcondition.
•••green. •••red •••off
•••blinksgreen.
Whentheprojectionlampreachestheendofitslife,theLAMPREPLACEindicatorlightsyellow.Whenthisindicatorlightsyellow,replacetheprojectionlampwithanewonepromptly.Resetthelampreplacementcounterafterreplacingthelamp.Seepages57-58.
I��d���tors���dProje�torCo��d�t�o��
•••blinksred.
Appe��d�x
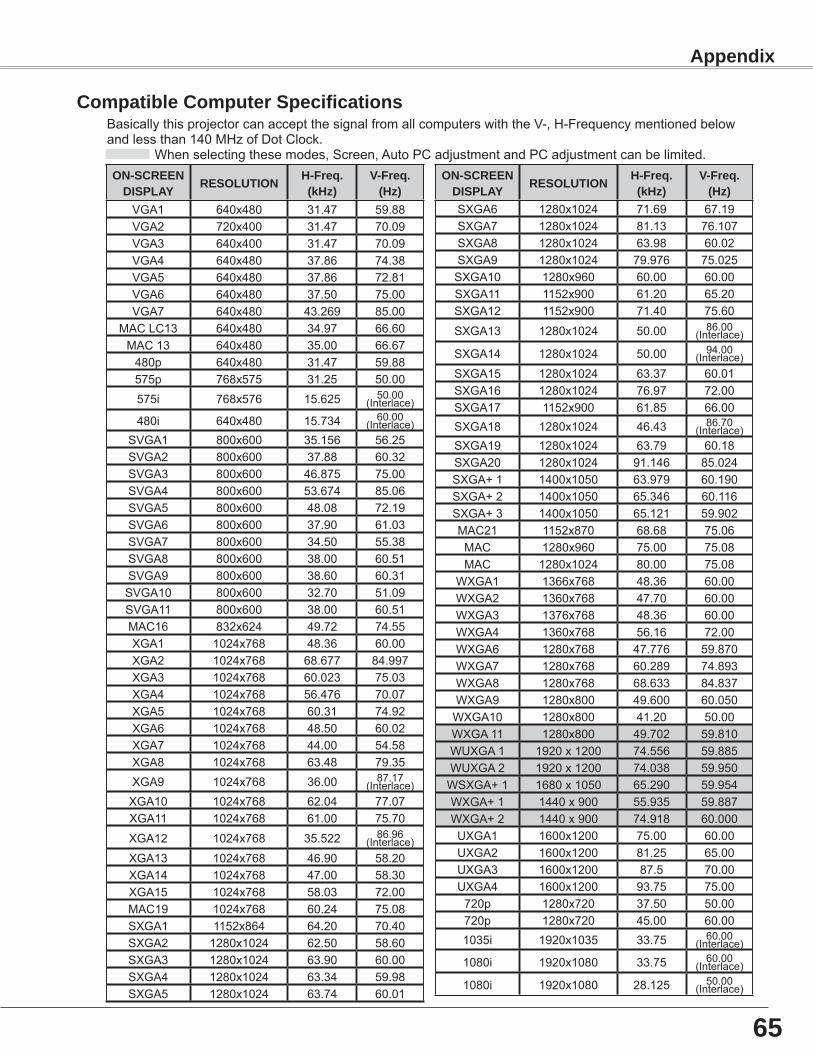
�5
Co�p�t�bleCo�puterSpe��f���t�o��sBasicallythisprojectorcanacceptthesignalfromallcomputerswiththeV-,H-Frequencymentionedbelowandlessthan140MHzofDotClock.
Whenselectingthesemodes,Screen,AutoPCadjustmentandPCadjustmentcanbelimited.ON-SCREEN
DISP�AY RESO�UTION H-Freq.(kHz)
V-Freq.(Hz)
VGA1 640x480 31.47 59.88VGA2 720x400 31.47 70.09VGA3 640x400 31.47 70.09VGA4 640x480 37.86 74.38VGA5 640x480 37.86 72.81VGA6 640x480 37.50 75.00VGA7 640x480 43.269 85.00
MACLC13 640x480 34.97 66.60MAC13 640x480 35.00 66.67480p 640x480 31.47 59.88575p 768x575 31.25 50.00575i 768x576 15.625 50.00
(Interlace)
480i 640x480 15.734 60.00(Interlace)
SVGA1 800x600 35.156 56.25SVGA2 800x600 37.88 60.32SVGA3 800x600 46.875 75.00SVGA4 800x600 53.674 85.06SVGA5 800x600 48.08 72.19SVGA6 800x600 37.90 61.03SVGA7 800x600 34.50 55.38SVGA8 800x600 38.00 60.51SVGA9 800x600 38.60 60.31SVGA10 800x600 32.70 51.09SVGA11 800x600 38.00 60.51MAC16 832x624 49.72 74.55XGA1 1024x768 48.36 60.00XGA2 1024x768 68.677 84.997XGA3 1024x768 60.023 75.03XGA4 1024x768 56.476 70.07XGA5 1024x768 60.31 74.92XGA6 1024x768 48.50 60.02XGA7 1024x768 44.00 54.58XGA8 1024x768 63.48 79.35XGA9 1024x768 36.00 87.17
(Interlace)XGA10 1024x768 62.04 77.07XGA11 1024x768 61.00 75.70XGA12 1024x768 35.522 86.96
(Interlace)XGA13 1024x768 46.90 58.20XGA14 1024x768 47.00 58.30XGA15 1024x768 58.03 72.00MAC19 1024x768 60.24 75.08SXGA1 1152x864 64.20 70.40SXGA2 1280x1024 62.50 58.60SXGA3 1280x1024 63.90 60.00SXGA4 1280x1024 63.34 59.98SXGA5 1280x1024 63.74 60.01
ON-SCREENDISP�AY RESO�UTION H-Freq.
(kHz)V-Freq.
(Hz)SXGA6 1280x1024 71.69 67.19SXGA7 1280x1024 81.13 76.107SXGA8 1280x1024 63.98 60.02SXGA9 1280x1024 79.976 75.025SXGA10 1280x960 60.00 60.00SXGA11 1152x900 61.20 65.20SXGA12 1152x900 71.40 75.60
SXGA13 1280x1024 50.00 86.00(Interlace)
SXGA14 1280x1024 50.00 94.00(Interlace)
SXGA15 1280x1024 63.37 60.01SXGA16 1280x1024 76.97 72.00SXGA17 1152x900 61.85 66.00SXGA18 1280x1024 46.43 86.70
(Interlace)SXGA19 1280x1024 63.79 60.18SXGA20 1280x1024 91.146 85.024SXGA+1 1400x1050 63.979 60.190SXGA+2 1400x1050 65.346 60.116SXGA+3 1400x1050 65.121 59.902MAC21 1152x870 68.68 75.06MAC 1280x960 75.00 75.08MAC 1280x1024 80.00 75.08
WXGA1 1366x768 48.36 60.00WXGA2 1360x768 47.70 60.00WXGA3 1376x768 48.36 60.00WXGA4 1360x768 56.16 72.00WXGA6 1280x768 47.776 59.870WXGA7 1280x768 60.289 74.893WXGA8 1280x768 68.633 84.837WXGA9 1280x800 49.600 60.050WXGA10 1280x800 41.20 50.00WXGA11 1280x800 49.702 59.810WUXGA1 1920x1200 74.556 59.885WUXGA2 1920x1200 74.038 59.950WSXGA+1 1680x1050 65.290 59.954WXGA+1 1440x900 55.935 59.887WXGA+2 1440x900 74.918 60.000UXGA1 1600x1200 75.00 60.00UXGA2 1600x1200 81.25 65.00UXGA3 1600x1200 87.5 70.00UXGA4 1600x1200 93.75 75.00720p 1280x720 37.50 50.00720p 1280x720 45.00 60.001035i 1920x1035 33.75 60.00
(Interlace)
1080i 1920x1080 33.75 60.00(Interlace)
1080i 1920x1080 28.125 50.00(Interlace)
Appe��d�x
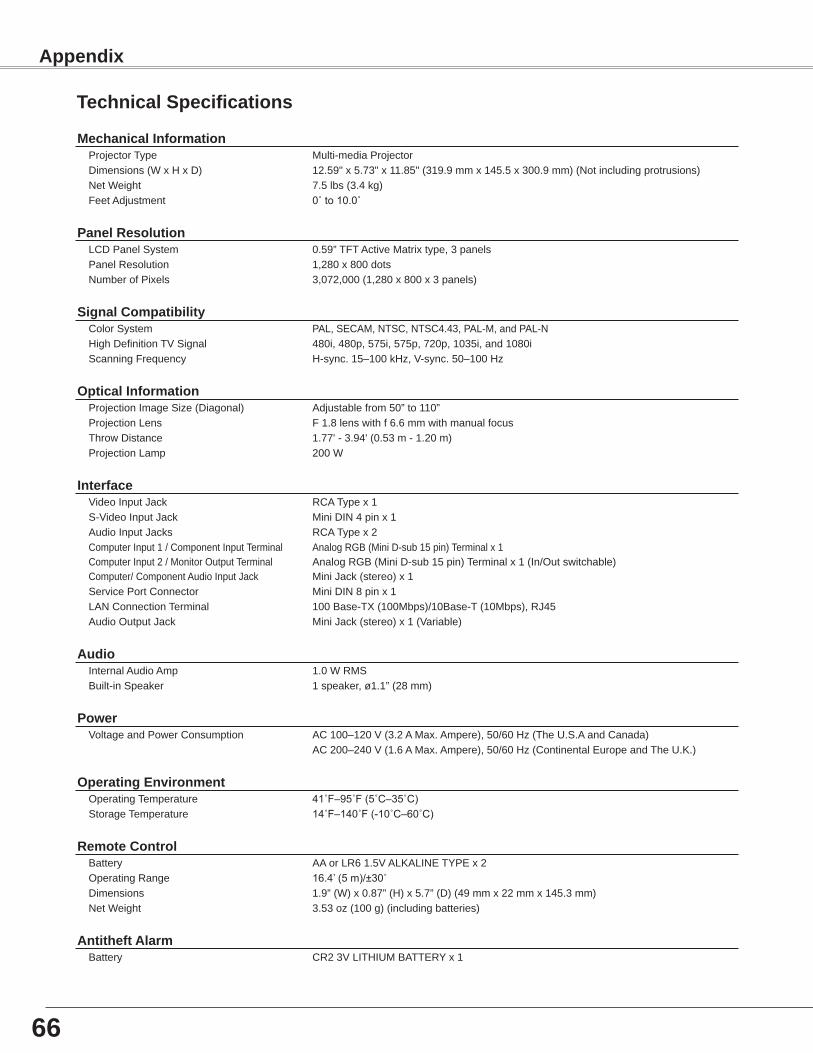
66
Technical Specifications
Mechanical InformationProjector Type Multi-media ProjectorDimensions (W x H x D) 12.59" x 5.73" x 11.85" (319.9 mm x 145.5 x 300.9 mm) (Not including protrusions)Net Weight 7.5 lbs (3.4 kg)Feet Adjustment 0˚ to 10.0˚
Panel ResolutionLCD Panel System 0.59” TFT Active Matrix type, 3 panelsPanel Resolution 1,280 x 800 dotsNumber of Pixels 3,072,000 (1,280 x 800 x 3 panels)
Signal CompatibilityColor System PAL, SECAM, NTSC, NTSC4.43, PAL-M, and PAL-NHigh Definition TV Signal 480i, 480p, 575i, 575p, 720p, 1035i, and 1080iScanning Frequency H-sync. 15–100 kHz, V-sync. 50–100 Hz
Optical InformationProjection Image Size (Diagonal) Adjustable from 50” to 110”Projection Lens F 1.8 lens with f 6.6 mm with manual focusThrow Distance 1.77' - 3.94' (0.53 m - 1.20 m)Projection Lamp 200 W
InterfaceVideo Input Jack RCA Type x 1S-Video Input Jack Mini DIN 4 pin x 1Audio Input Jacks RCA Type x 2Computer Input 1 / Component Input Terminal Analog RGB (Mini D-sub 15 pin) Terminal x 1Computer Input 2 / Monitor Output Terminal Analog RGB (Mini D-sub 15 pin) Terminal x 1 (In/Out switchable)Computer/ Component Audio Input Jack Mini Jack (stereo) x 1Service Port Connector Mini DIN 8 pin x 1LAN Connection Terminal 100 Base-TX (100Mbps)/10Base-T (10Mbps), RJ45Audio Output Jack Mini Jack (stereo) x 1 (Variable)
AudioInternal Audio Amp 1.0 W RMSBuilt-in Speaker 1 speaker, ø1.1” (28 mm)
PowerVoltage and Power Consumption AC 100–120 V (3.2 A Max. Ampere), 50/60 Hz (The U.S.A and Canada)
AC 200–240 V (1.6 A Max. Ampere), 50/60 Hz (Continental Europe and The U.K.)
Operating EnvironmentOperating Temperature 41˚F–95˚F (5˚C–35˚C)Storage Temperature 14˚F–140˚F (-10˚C–60˚C)
Remote ControlBattery AA or LR6 1.5V ALKALINE TYPE x 2Operating Range 16.4’ (5 m)/±30˚Dimensions 1.9” (W) x 0.87” (H) x 5.7” (D) (49 mm x 22 mm x 145.3 mm)Net Weight 3.53 oz (100 g) (including batteries)
Antitheft AlarmBattery CR2 3V LITHIUM BATTERY x 1
Appendix
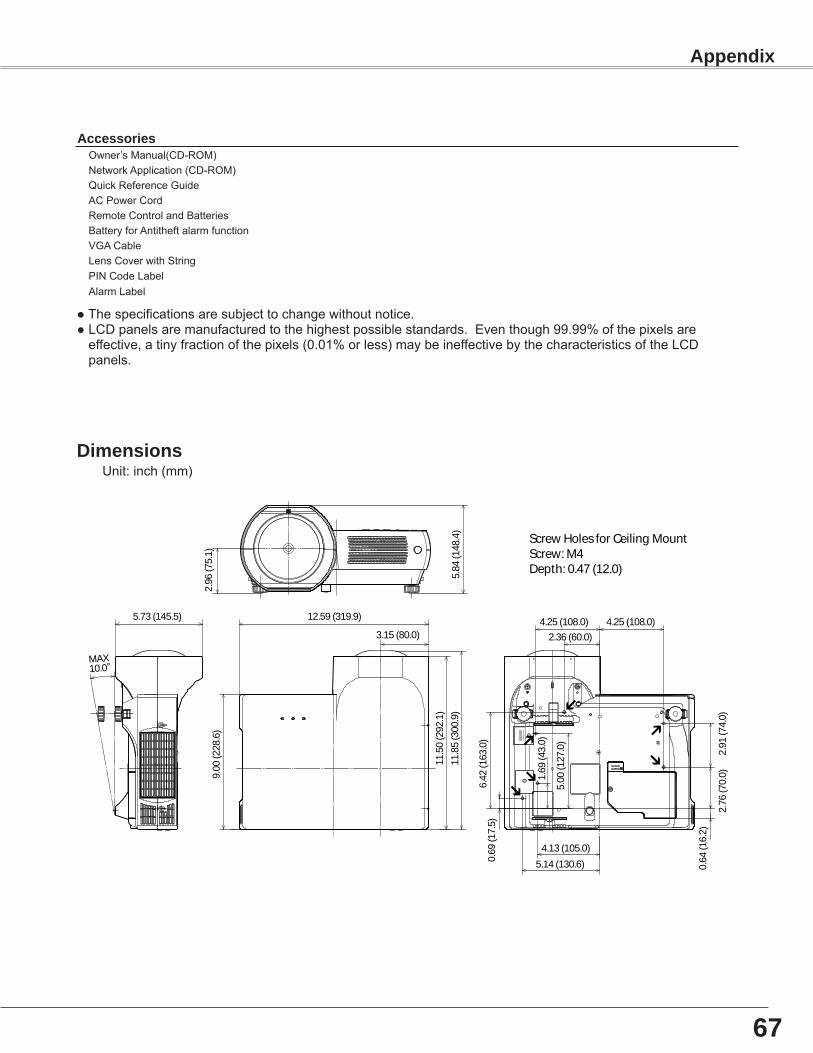
�7
●Thespecificationsaresubjecttochangewithoutnotice.●LCDpanelsaremanufacturedtothehighestpossiblestandards.Eventhough99.99%ofthepixelsareeffective,atinyfractionofthepixels(0.01%orless)maybeineffectivebythecharacteristicsoftheLCDpanels.
A��essor�esOwner’sManual(CD-ROM)NetworkApplication(CD-ROM)QuickReferenceGuideACPowerCordRemoteControlandBatteriesBatteryforAntitheftalarmfunctionVGACableLensCoverwithStringPINCodeLabelAlarmLabel
Appe��d�x
D��e��s�o��sUnit:inch(mm)
2.96
(75.
1)
5.84
(148
.4)
3.15 (80.0)
12.59 (319.9)
MAX10.0°
11.5
0 (2
92.1
)
9.00
(228
.6)
4.25 (108.0) 4.25 (108.0)2.36 (60.0)
4.13 (105.0)
5.14 (130.6)
2.76
(70.
0)2.
91 (7
4.0)
0.69
(17.
5)
1.69
(43.
0)
5.00
(127
.0)
6.42
(163
.0)
0.64
(16.
2)
5.73 (145.5)
Screw Holes for Ceiling MountScrew: M4Depth: 0.47 (12.0)
11.8
5 (3
00.9
)
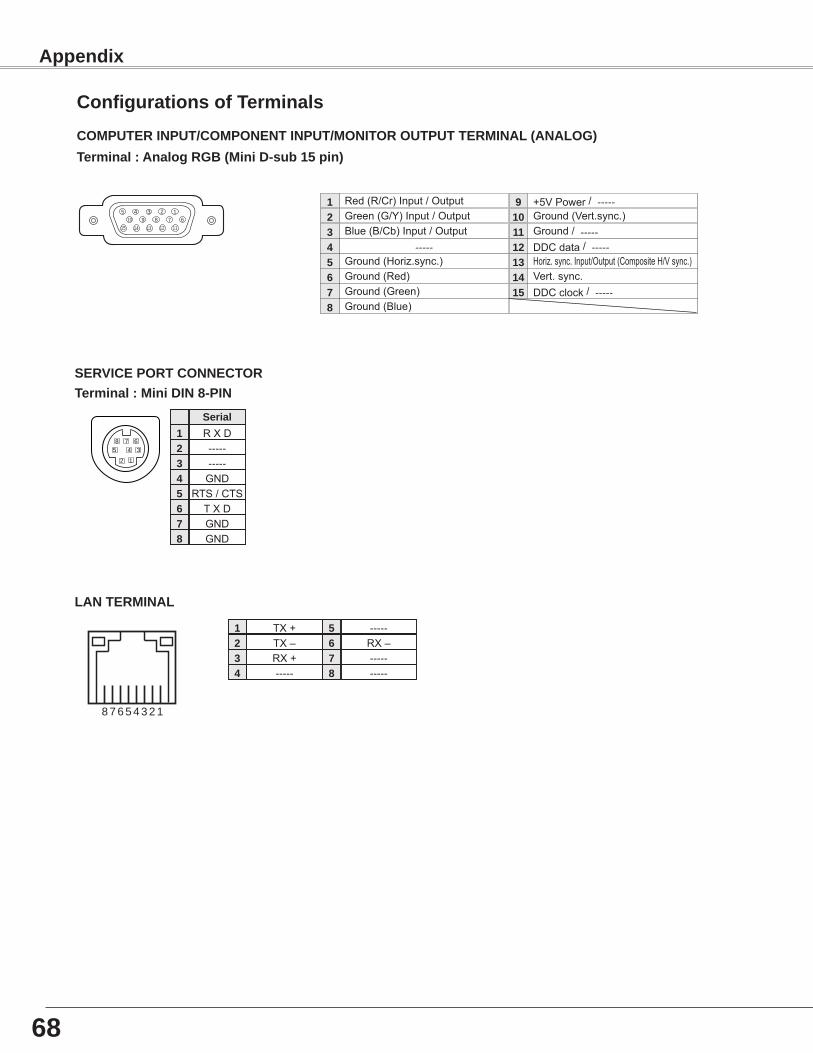
�8
Ter�����l:M����DIN8-PIN
12
3458 7 6
SERVICEPORTCONNECTOR
RXD----------GND
RTS/CTS
GNDGND
Ser��l1��45�78
COMPUTERINPUT/COMPONENTINPUT/MONITOROUTPUTTERMINA�(ANA�OG)Ter�����l:A���lo�RGB(M����D-sub15p���)
5 123410 9 678
15 14 13 1112
Co��f��ur�t�o��sofTer�����ls
Red(R/Cr)Input/Output
Ground(Horiz.sync.)
Green(G/Y)Input/Output
-----Blue(B/Cb)Input/Output
Ground(Red)Ground(Green)Ground(Blue)
1
5
�
4�
�78
+5VPower/-----
Horiz.sync.Input/Output(CompositeH/Vsync.)
Ground(Vert.sync.)
DDCdata/-----Ground/-----
Vert.sync.DDCclock/-----
9
1�
10
1�11
1415
TXD
Appe��d�x
RX–TX+TX–RX+
��4
8 7 6 5 4 3 2 1
5�78
1
�ANTERMINA�
-----
---------------

�9
PINCodeNu�berMe�o
Putthelabelbelow(supplied)toaprominentplaceoftheprojector’sbodywhileitislockedwithaPINcode.
WhiletheprojectorislockedwiththePINcode...
WritedownthePINcodenumberinthecolumnbelowandkeepitwiththismanualsecurely.Ifyouforgotorlostthenumberandunabletooperatetheprojector,contacttheservicestation.
FactorydefaultsetNo:1234*
PINCode�o�kNo.
�o�oPINCode�o�kNo.
FactorydefaultsetNo:4321*
*Shouldthefour-digitnumberbechanged,thefactorysetnumberwillbeinvalid.
FactorydefaultsetNo:1111*
Al�r�PINCodeNo.
Put the label below (supplied) to a prominent placeof theprojector'sbodywhiletheAntitheftalarmfunctionisset.
WhiletheAntitheftalarmfunctionisset...
Appe��d�x

PROJECTORKM5YC-A
www.prometheanworld.com
Promethean Limited, Promethean House, Lower Philips Road,Whitebirk Industrial Estate, Blackburn, LANCS. BB15TH