Embed Size (px)
Citation preview
Creating Online Requisitions In Banner
1
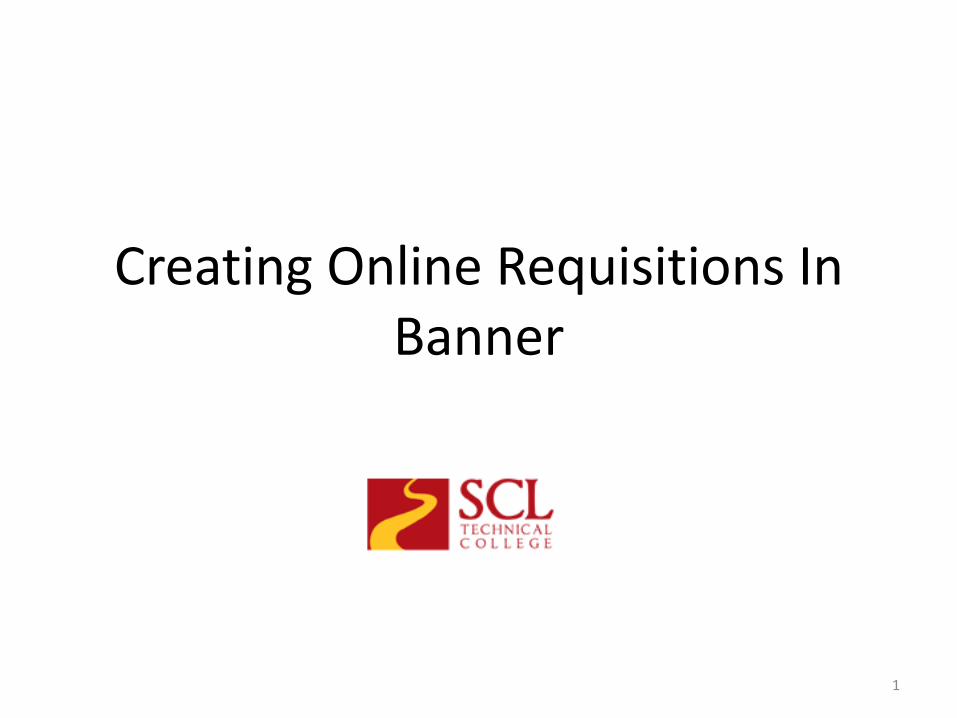
Log into LOLA with your Username and Password. 2

Enter Self-Service by clicking on “South Central Louisiana Technical College”
3

Click on the Finance Tab or the Finance link
4
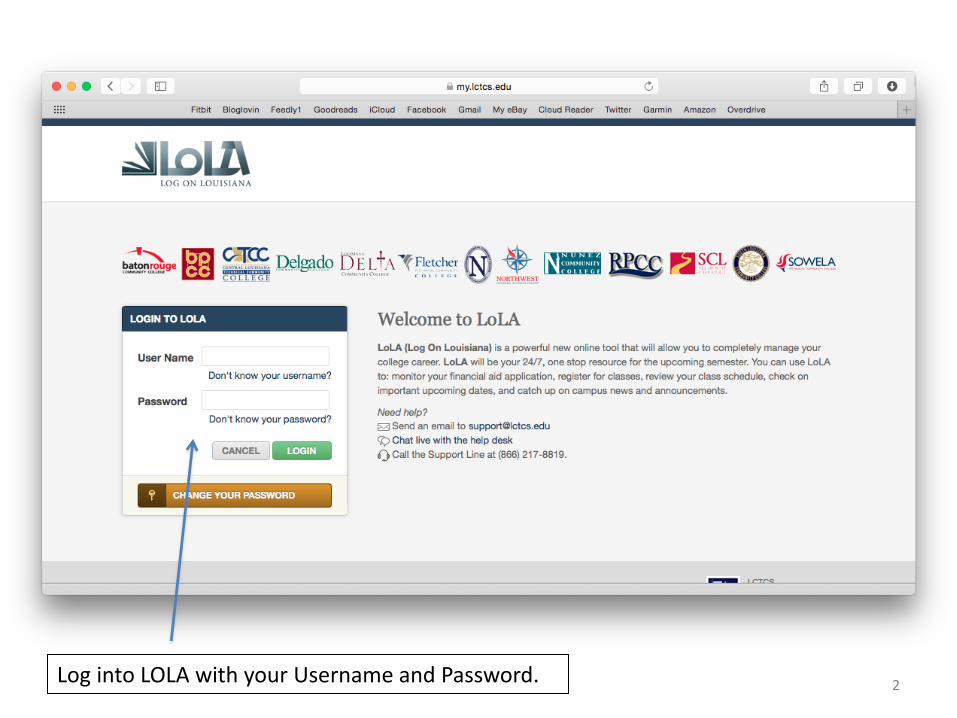
Click on either of the the Requisition Links
5
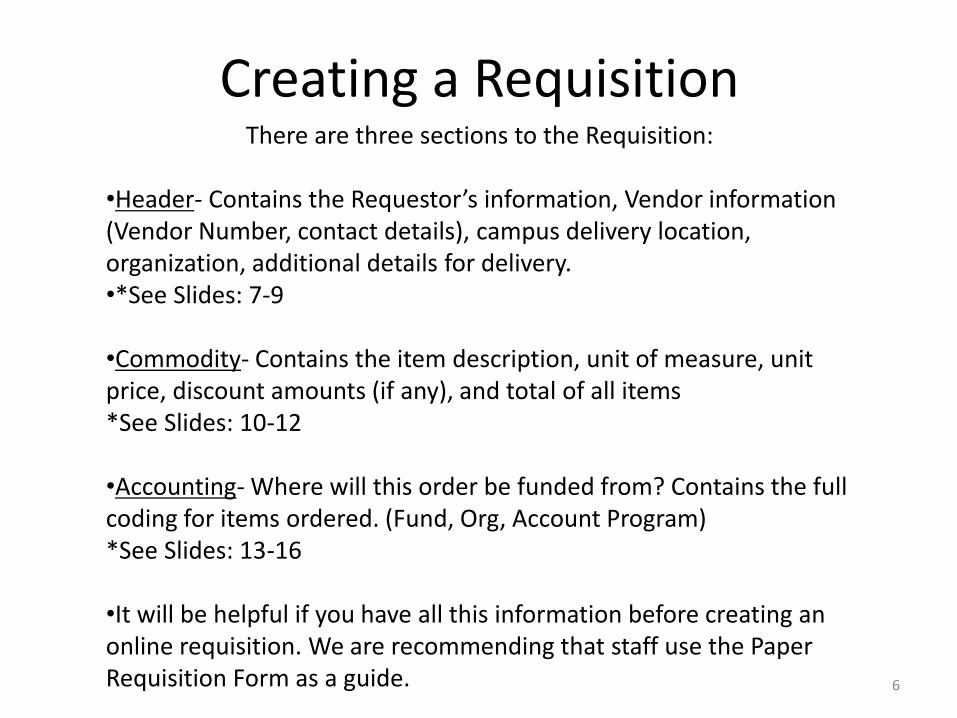
Creating a Requisition There are three sections to the Requisition:
•Header- Contains the Requestor’s information, Vendor information (Vendor Number, contact details), campus delivery location, organization, additional details for delivery. •*See Slides: 7-9 •Commodity- Contains the item description, unit of measure, unit price, discount amounts (if any), and total of all items *See Slides: 10-12 •Accounting- Where will this order be funded from? Contains the full coding for items ordered. (Fund, Org, Account Program) *See Slides: 13-16 •It will be helpful if you have all this information before creating an online requisition. We are recommending that staff use the Paper Requisition Form as a guide. 6

1. Header Section
The Transaction and Delivery date will automatically default to the current date. You can leave it as is.
The Vendor is who you wish to purchase from. You will need the Vendor ID number, which is listed on the Vendor List provided to you. Enter the Vendor ID number and then click Vendor Validate. This will populate the Address Type, Address Sequence, Vendor Contact and Vendor E-mail.
7
Note: The Vendor for all travel will be Bank of America. Refer to the Vendor List for the Vendor Number
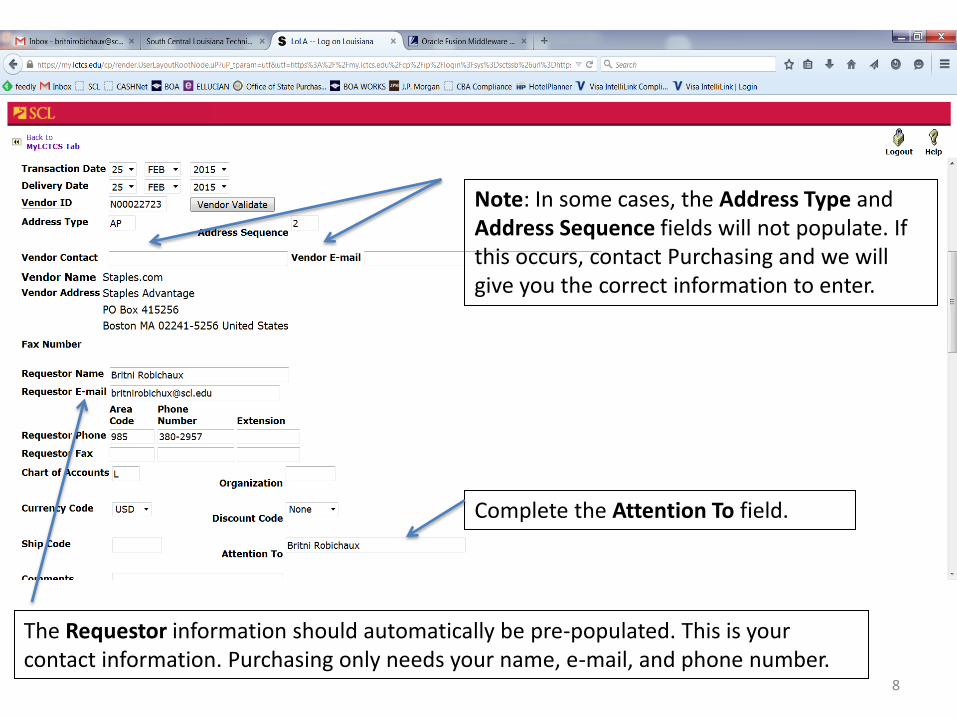
The Requestor information should automatically be pre-populated. This is your contact information. Purchasing only needs your name, e-mail, and phone number.
Complete the Attention To field.
8
Note: In some cases, the Address Type and Address Sequence fields will not populate. If this occurs, contact Purchasing and we will give you the correct information to enter.

Chart of Accounts will always be “L”
You will need to input the Organization Code and Ship Code. This is listed on your Cheat Sheet provided to you.
9

2. Commodity Section
For each item to be purchased, enter any specific information about the item in the Commodity Description field. Be very specific: use item numbers, brand names, colors, sizes, model numbers, edition numbers, etc.
Select the correct U/M (Unit of Measure), Quantity, and Unit Price field.
10
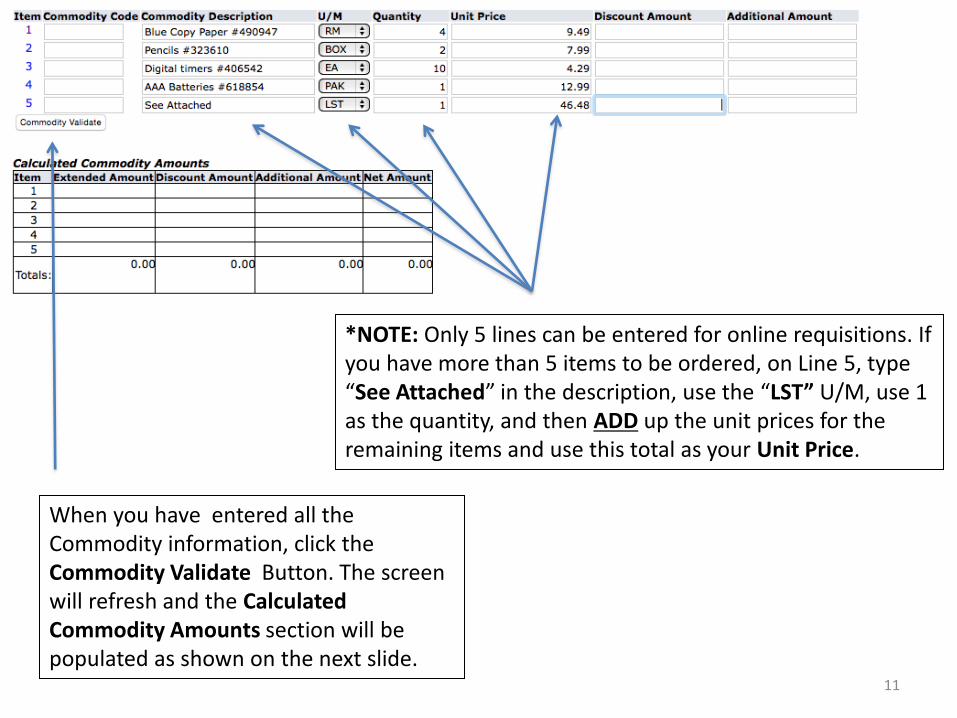
*NOTE: Only 5 lines can be entered for online requisitions. If you have more than 5 items to be ordered, on Line 5, type “See Attached” in the description, use the “LST” U/M, use 1 as the quantity, and then ADD up the unit prices for the remaining items and use this total as your Unit Price.
When you have entered all the Commodity information, click the Commodity Validate Button. The screen will refresh and the Calculated Commodity Amounts section will be populated as shown on the next slide.
11
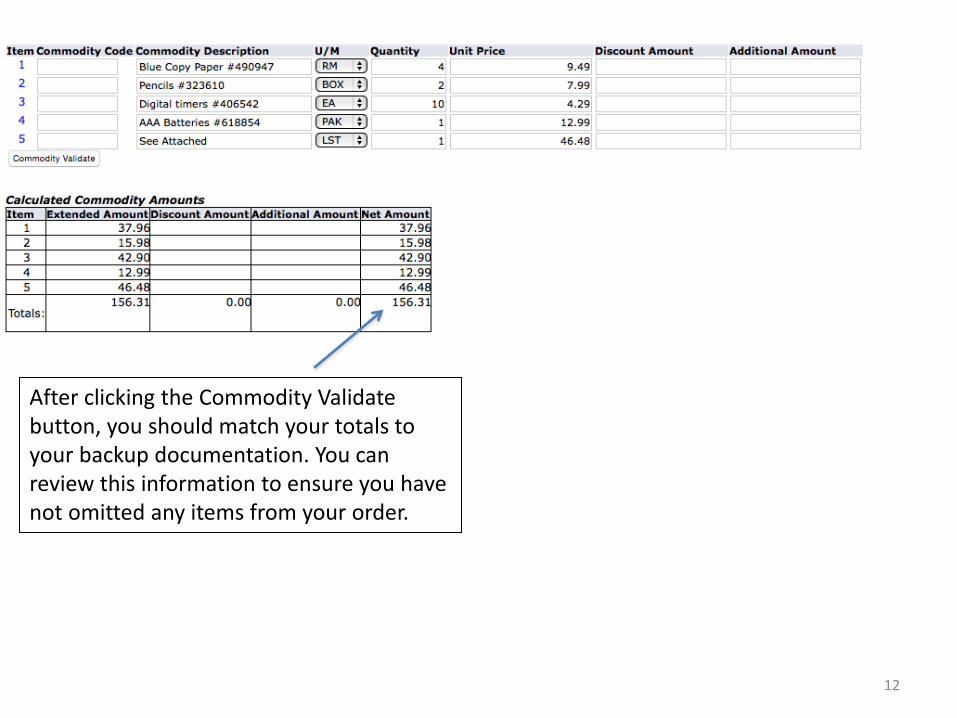
After clicking the Commodity Validate button, you should match your totals to your backup documentation. You can review this information to ensure you have not omitted any items from your order.
12
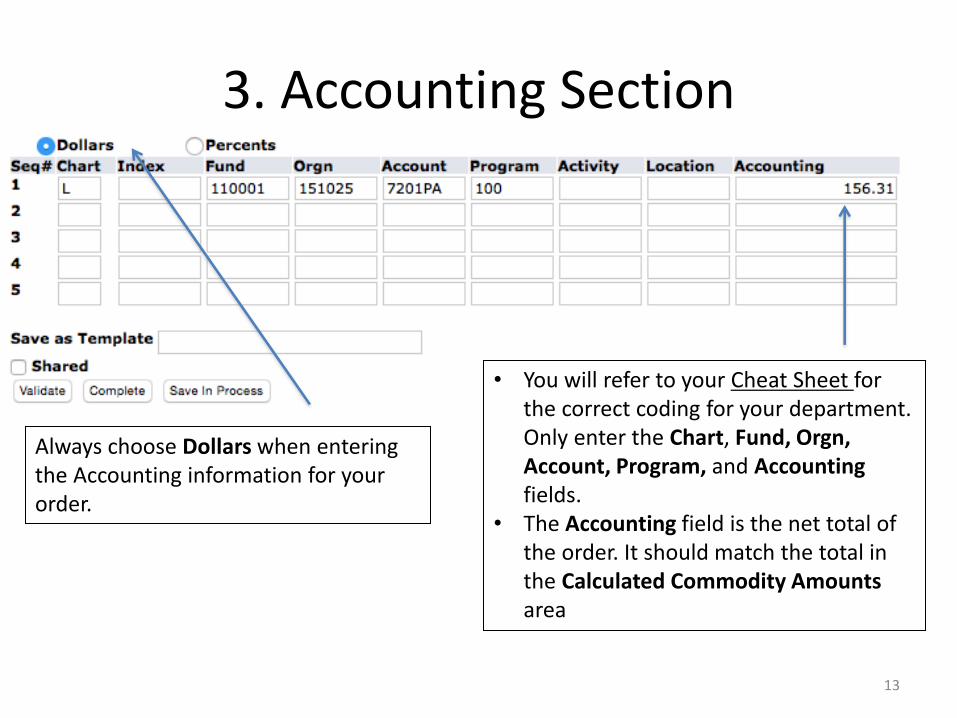
3. Accounting Section
• You will refer to your Cheat Sheet for the correct coding for your department. Only enter the Chart, Fund, Orgn, Account, Program, and Accounting fields.
• The Accounting field is the net total of the order. It should match the total in the Calculated Commodity Amounts area
Always choose Dollars when entering the Accounting information for your order.
13

1. When you have entered all the Accounting information, click the Validate button to verify that there are no errors.
2. If there are no errors, you will receive the following message at the top of the requisition screen:
3. If there are no errors, click Complete to submit the document and send it to your approver.
14

You may receive an error stating that some fields have not been entered or that there is no budget. If there is no budget, then contact your designated approver. Be sure to click the Save in Progress button so you will not lose your work.
*Approvers will be responsible for contacting final approvers to request budget. Final approvers will determine if Finance should be contacted for budget availability.
15

If you find yourself using the same vendor often, you can enter a name in the Save as Template field and then click Complete. Templates do not store commodity item text. NOTE: Do not click Shared, if you do, it will be visible to everyone on campus and it cannot be deleted.
You can retrieve your saved template by selecting it from the Use Template dropdown box at the top of your Requisition screen and clicking Retrieve.
16

After you have clicked Complete and submitted the document, you will see a message at the top of the screen saying: 1. Document validated with no errors 2. Document R0000506 completed and forwarded to the Approval process **Be sure to note this requisition number for future reference. You will then email your supporting documentation to your approver (listed on your Cheat Sheet) and cc our Purchasing Agents: Rayetta Crochet: [email protected] Kim Breaux: [email protected] Put the Requisition Number in the Subject Line of your email and attach all related documentation and any additional information for Purchasing. Examples of supporting documentation: • Price Quotes • Paper requisitions (scanned) • Online prices/checkouts • Delivery is needed by a certain date • Purchase Order needs to be faxed to the vendor • List of bidders (if available) • Any other information that Purchasing staff should be aware of • SCLTC Authorization to Travel Form FA.306 B (Located on SCLTC Website)
17
18
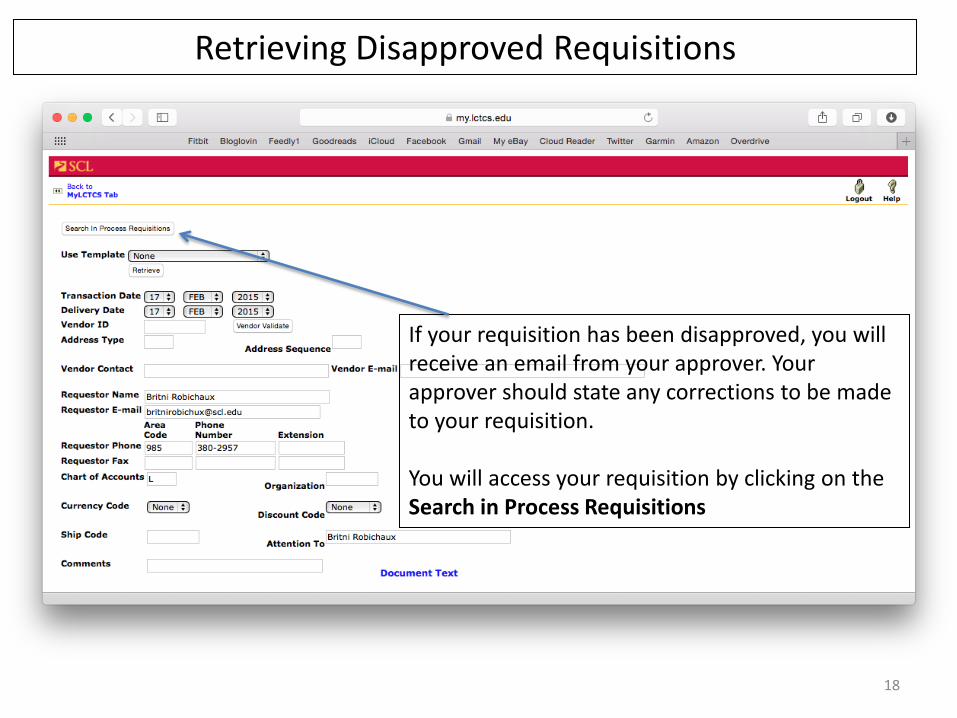
Retrieving Disapproved Requisitions
If your requisition has been disapproved, you will receive an email from your approver. Your approver should state any corrections to be made to your requisition. You will access your requisition by clicking on the Search in Process Requisitions

19
You can access a disapproved document by entering at least ONE of these fields. Click on Execute Query to retrieve documents. NOTE: You can leave everything blank but the User ID field (Your Name) and all In-Process Requisitions will be retrieved.

Approving Documents in Self-Service *For Approvers Only
• Once a requisition has been completed, it is then submitted to the Approval Queue to be approved or disapproved.
• A requisition cannot be accessed by Purchasing until it has been approved by ALL approvers.
• If you realize any mistakes have been made, you can disapprove the requisition. You must email the originating user that you have disapproved the requisition and state the corrections to be made.
• If you do NOT wish this requisition to be made at all, you must disapprove the requisition and inform Britni Robichaux. Britni will then delete the requisition from Self-Service.
• NOTE: Approvers will be responsible for checking their approval queues daily.
20

From the Self Service Finance page, click either of the Approve Documents links
21

On the Approve Documents page, your User ID will automatically populate. If you wish to retrieve a single document for approval, enter it in the Document Number field. To retrieve all documents which are waiting for your specific approval, use Documents for which you are the next approver. To view documents that you are an approver for but are waiting on departmental approval first, use All documents which you may approve 22

Y- Indicates that you are the next Approver in the queue Type- Type of document, REQ for Requisition NSF- This field will show a Y if there are not sufficient funds available for this requisition. Originating User- User ID of the person who created the document Amount- Net total of requisition stated in dollar amounts Document- Click the Document link (Requisition Number) to display the requisition History- Shows the approval history for this document
23

When you click on the Requisition link, you will be able to view all three areas of the requisition. Header, Commodity, and Accounting.
24
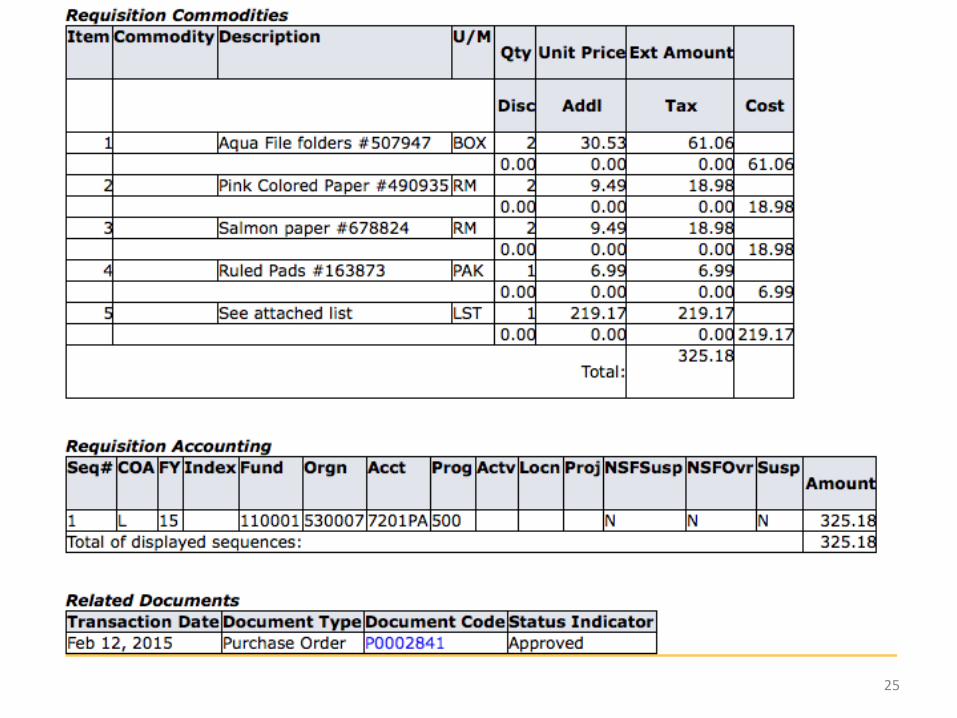
25

After reviewing the Requisition and its supporting documentation, you may choose to Approve or Disapprove the document. If you choose to Approve the document, click the Approve button.
Note: If the requisition has more than 5 lines and says “See Attached”, you will need to review backup documentation sent to you by the originating user. If you are a department head, you will need to forward this information to the Campus Dean of the Originating User’s campus.
Campus Deans Anthony Baham- Young/Marine Anthony Baham- Lafourche/Galiano Cindy Poskey- River
26
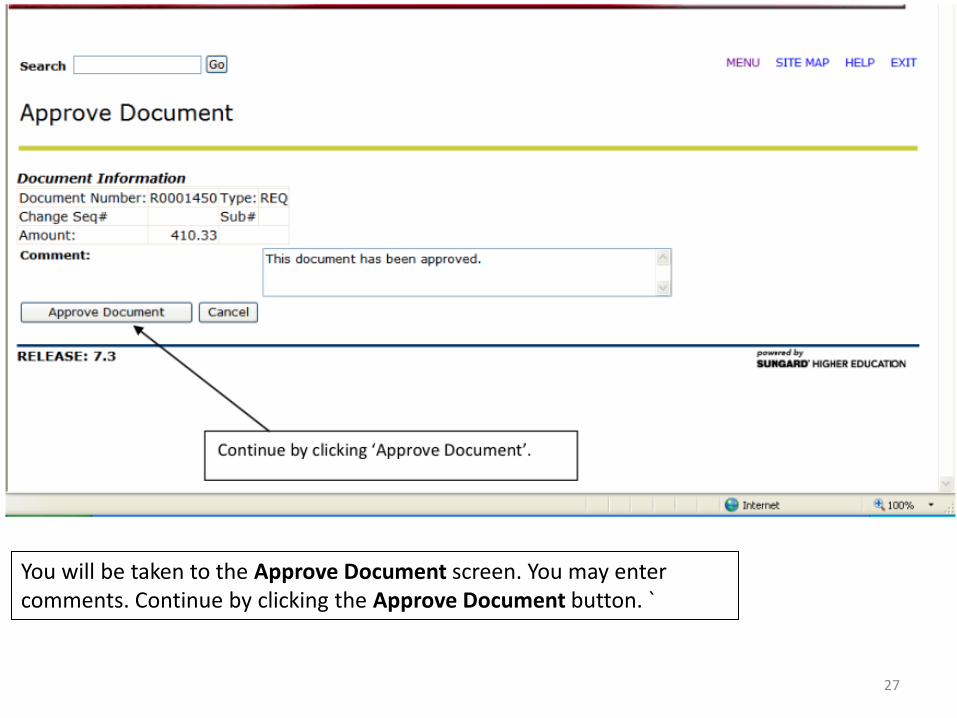
You will be taken to the Approve Document screen. You may enter comments. Continue by clicking the Approve Document button. `
27

28
If you disapprove a document because changes need to be made, you must email the originating user with any corrections to be made. If you would like the requisition to be deleted from the system, email Britni Robichaux.
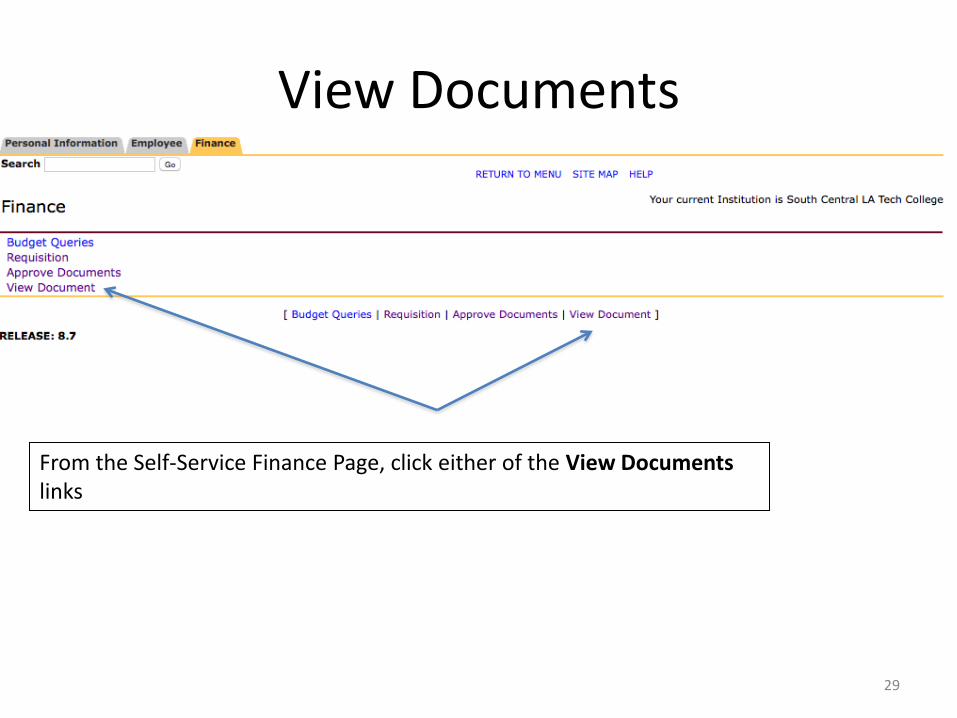
View Documents
From the Self-Service Finance Page, click either of the View Documents links
29

From the dropdown menu, you can choose the type of document to view: requisition, purchase order, invoice, etc.
If you know the document number (which is recommended), enter it in the Document Number field.
When complete, click on View Document to view the entire document or Approval History to see where the document is in the approval queue.
30

When viewing documents, you will be able to view the entire requisition. You can also see if it was approved here.
31
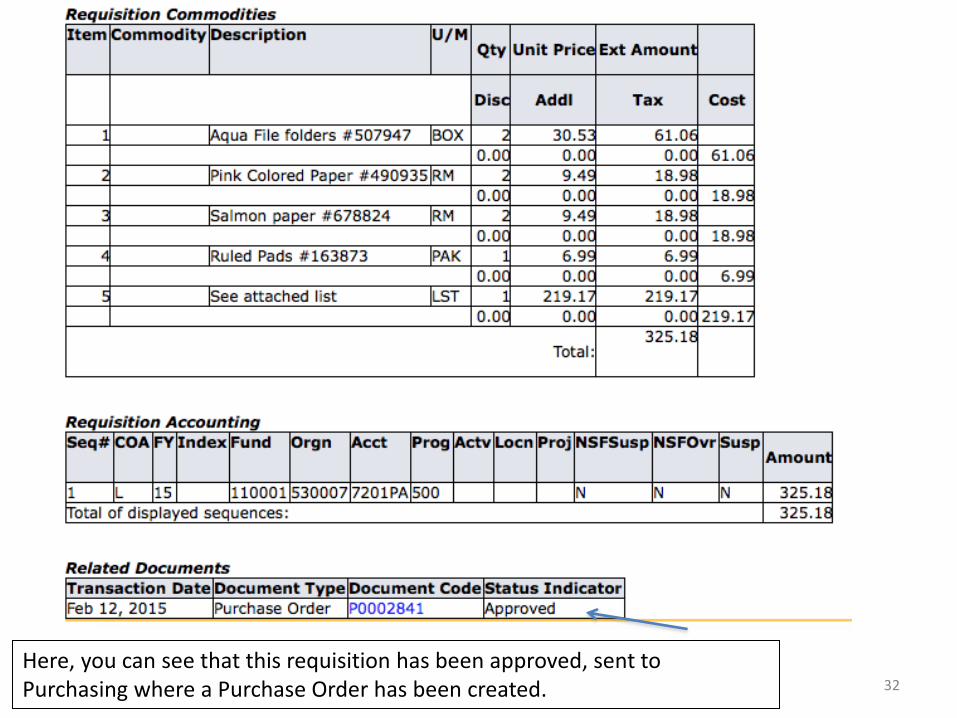
Here, you can see that this requisition has been approved, sent to Purchasing where a Purchase Order has been created. 32

After viewing a document, click the back button on your browser, enter the Requisition Number again (if not there), and click the Approval History button
33
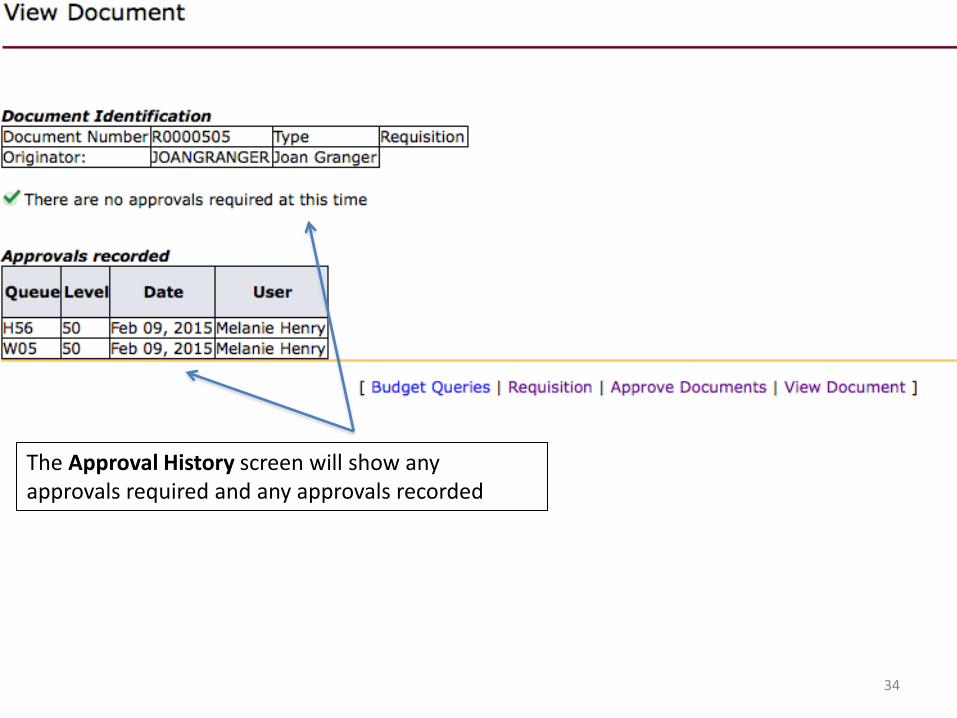
The Approval History screen will show any approvals required and any approvals recorded
34
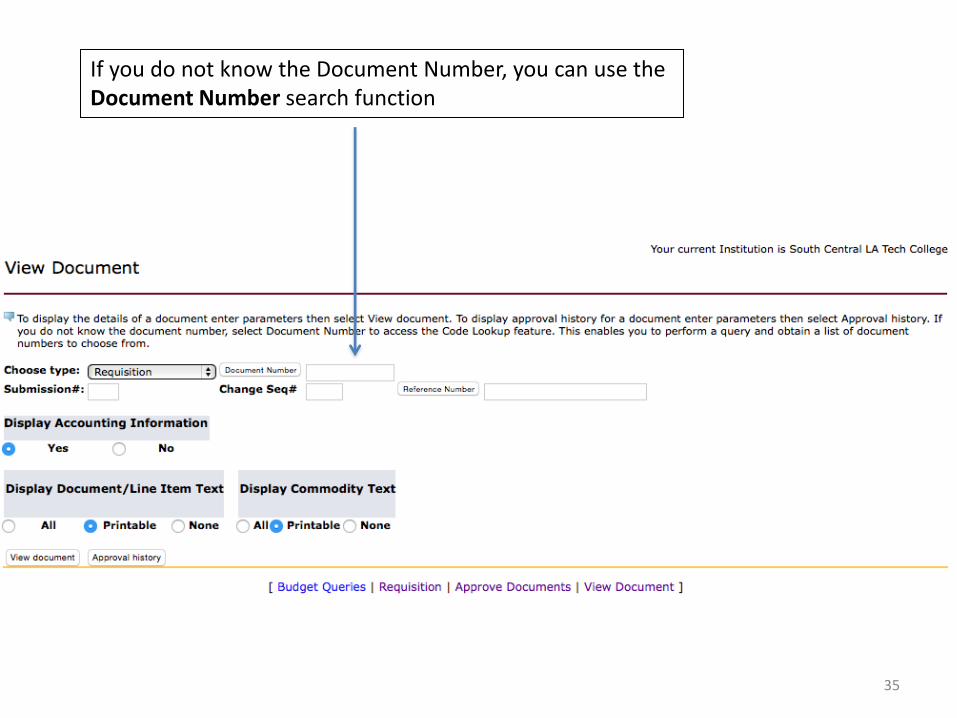
If you do not know the Document Number, you can use the Document Number search function
35

Enter any information you know and then click Execute Query
36
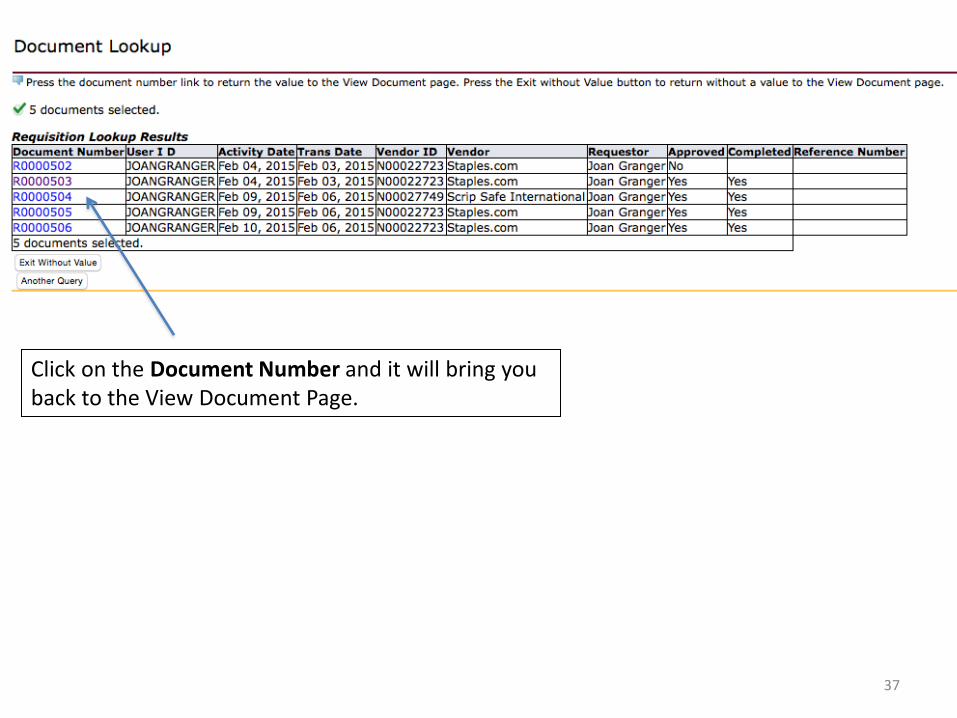
Click on the Document Number and it will bring you back to the View Document Page.
37
Questions?
38