Embed Size (px)
Citation preview

Last Updated: 5/31/2017
Oncology Quick Start Guide Oncology Provider - Beacon
Version Date: 5/31/2017
Table of Contents
Oncology Reports ................................................................................................ 1
Treatment Plan Springboard ................................................................................. 1
Summary Phys Onc ............................................................................................. 1
Summary Nurse Onc ........................................................................................... 2
Scheduler Onc Report .......................................................................................... 2
Oncology Navigators ........................................................................................... 3
Navigator Design Principles .................................................................................. 3
Tool Bar Convenience buttons............................................................................... 3
Navigator Tabs ................................................................................................... 3
Visit and Arrival Tabs ........................................................................................... 4
Therapies and Orders and Treatment Tabs ............................................................. 5
Discharge Tabs ................................................................................................... 5
Oral Chemo Tab .................................................................................................. 5
Staging Cancer .................................................................................................... 6
Staging Activity .................................................................................................. 6
Sending Staging to another User ........................................................................... 6
Managing Oncology Treatment ............................................................................ 7
General Workflow ................................................................................................ 7
Assigning a Treatment Plan .................................................................................. 7
Select the Treatment Plan Properties ..................................................................... 8
Treatment Plan Manager ...................................................................................... 9
Treatment Plan Levels ......................................................................................... 9
Modifying Chemotherapy Plans ......................................................................... 11
Change individual order details ........................................................................... 11
Adjusting a Chemotherapy Medication’s Dose ....................................................... 12
Age Based Treatment Modification Decision Support .............................................. 13
Adding New Treatment Plan Orders ..................................................................... 14
Modifying AUC Dosing ........................................................................................ 16
Override sCR or GFR - Carboplatin ...................................................................... 17

Last Updated: 5/31/2017 Oncology Quick Start Guide
GOG and SWOG calculations for Carboplatin ......................................................... 17
Add a new treatment day to the plan ................................................................... 18
Delete Treatment Plan Orders, Days, or Cycles ..................................................... 19
Signing Chemotherapy Treatment Orders .......................................................... 19
Signing versus Releasing Orders ......................................................................... 19
Sign treatment orders ....................................................................................... 20
Defer, Cancel, Hold or Discontinue Treatments.................................................. 20
Defer a treatment day ....................................................................................... 20
Cancel a treatment day ...................................................................................... 21
Placing a Plan on Hold ....................................................................................... 21
Discontinue a treatment plan .............................................................................. 22
Track Medication Dosing .................................................................................... 22
View cumulative dosing information .................................................................... 22
Document external treatment ............................................................................. 23
Enter dosing information for external treatment .................................................... 23
Administering Chemotherapy Treatment Plans .................................................. 24
Treatment Plan Authorization Status ................................................................... 24
Release Treatment Orders .................................................................................. 24
Manage Start Times .......................................................................................... 25
MAR ................................................................................................................ 26
Supportive Therapy Plans .................................................................................. 27
Select a Supportive Plan Protocol ........................................................................ 27
Therapy Plans (Infusion Therapy) ..................................................................... 28
Select a Therapy Plan Protocol ............................................................................ 28
Review the Therapy Plan .................................................................................... 31
Placing a Therapy Plan on Hold ........................................................................... 31
Discontinue a Therapy Plan ................................................................................ 32
Transfusion Orders ............................................................................................ 32
Ordering Blood Administration ............................................................................ 32
Administering Blood .......................................................................................... 33
Oncology Admission Order Set .......................................................................... 36
Oncology Opioid Pain Management Order Set ....................................................... 36
Oncology History and Survivorship Summary .................................................... 38
Oncology History ............................................................................................... 38
Care Team ....................................................................................................... 39
Survivorship/Treatment Summary Documentation ................................................ 39

Page 1 of 43
Oncology Quick Start Guide Last Updated: 5/31/2017
Oncology Reports
Various Oncology Reports are available that provide a convenient way to review patient information. These are listed on the Report tool bar of the Schedule, Home space, and
Summary tab of a patient’s chart.
Treatment Plan Springboard
Current Cycle, treatment date, goal, plan provider, status. Protocol Name and ref links
Treatment plan hyperlink to Treatment Plan Manager
Related Active Treatment plans
Associated problem, treatment plan wt. and BSA and flow sheet hyperlink
Audit Trail of changes to Chemotherapy plans at bottom of report
Summary Phys Onc
Displays patient Problem list
Recurring Treatments: Chemotherapy, infusion, and supportive plans
Current lab results
Pathology
Radiology reports

Page 2 of 43
Last Updated: 5/31/2017 Oncology Quick Start Guide
Summary Nurse Onc
Recurring Treatments: Chemotherapy, infusion, and supportive plans
Cancer Staging
Protocol Links to access journal/study/article
Oncology Flow sheet report (Vitals, recent Labs)
Scheduler Onc Report
Mainly used to see lines and lab orders placed outside of a plan.
Open standing and future orders
Recurring Treatments: Chemotherapy, infusion, and supportive plans

Page 3 of 43
Oncology Quick Start Guide Last Updated: 5/31/2017
Oncology Navigators
Oncologists will assess patients in their outpatient clinic and use the Oncology Navigator to complete a variety of tasks including staging the cancer and creating a treatment plan.
Oncology nurses and pharmacists have the Oncology Navigator as well. For nurses, this navigator organizes the patient’s oncology treatment documentation into one activity.
Navigator Design Principles
While each navigator may differ slightly by user role, the overall design principles are the
same.
Actionable items within a table of contents Reduction of scrolling within the table of contents and sections, while eliminating
the need to leave the navigator Easy access to clinically relevant data by offering the right tools for the job
Tool Bar Convenience buttons
Toolbar convenience buttons provide quick access to review information.
Cumulative Dose Tracking- contains toxicity report and tracking activity
Reports contain:
o Onc Overview-Oncology Flow-sheet Report
o Results Report
o Onc Snapshot
Calculator-Clinical calculator
Plan Summary- Displays all active plans
Episodes of Care
Request Outside Records-Care Everywhere
Reference
POLST- links to scanned document
Goals of Care
OralChemo Refresh
Navigator Tabs
The navigator tabs for the Provider and the Oncology nurses reflect the tasks they
perform.

Page 4 of 43
Last Updated: 5/31/2017 Oncology Quick Start Guide
Oncology Provider Navigator
Oncology Nursing Navigator
Visit and Arrival Tabs
The Visit tab contains sections for quick overview, Visit diagnosis, Allergies, PMHx and Problem list. From the Notes section, select the specific convenience button to open that
note type in the sidebar.
For an overview of the patient vitals pertinent to chemotherapy, go to the Flow sheet section.
Arrivals tab contains all sections for rooming a patient including vitals, allergy/history/meds review, and oncology specific screens. Communication section
contains Specimen Collect and Links to Care Planning, Education and Lines, Drains and Airways are available.

Page 5 of 43
Oncology Quick Start Guide Last Updated: 5/31/2017
OB/Gyn Status is required documentation.
Therapies and Orders and Treatment Tabs
The Therapies and Orders tab contains all plans and orders that pertain to managing a patient’s care. This includes Chemotherapy Plans, Supportive Plans, Infusion Therapy, and Transfusion Plans. Meds & Orders section allow for ordering outside of plans.
The nurses’ Treatment tab contains links to Onc Pharmacy Verification Checklist and Blood Administration flow sheets
Discharge Tabs
The Discharge Tab contains sections for Discharge Instructions/AVS, Level of Service and
Charge Capture, and Signing the Visit.
For the provider, additional sections include Communication section for letters, Level of
Service, and Meaningful Use Checklist. For nurses, additional sections include MyChart section and links to Care Planning, Education, and LDAs.
Oral Chemo Tab
The Oral Chemo tab is specifically designed to address the complexities of Oral Chemo
management including financial review, shipping and starting dates, adherence, education, and dosing history. Up to three different drugs can be followed. Education
materials to prescribed use for patients are available for each drug as well as information regarding drug specific side effects.

Page 6 of 43
Last Updated: 5/31/2017 Oncology Quick Start Guide
Staging Cancer
Staging Activity
After adding a cancer diagnosis to the Problem List, select the Enter Staging Information hyperlink. The Staging Activity opens in the sidebar and includes Histological grades, Metastatic site/source specimen, and Standard of Care Prognostic indicators for both
Clinical and Pathological staging. Clinical Staging defaults and open the latest AJCCv edition. Pathological staging and other staging forms are available via the caret.
After filling out fields Sign and Accept. Use the Smartphrase .stage to pull this information into a note.
Sending Staging to another User
Use the Send Stage icon to send the Staging information to another Provider or Care
Team member.
Page 7 of 43
Oncology Quick Start Guide Last Updated: 5/31/2017
Managing Oncology Treatment
General Workflow
While oncology workflows differ at each facility, a general workflow is listed below:
1. Oncologist assigns treatment plan to patient.
2. Pharmacist and Nurse reviews orders.
a. Discrepancies or errors amended.
b. Pharmacist completes Pharmacy Checklist.
3. Nurse releases orders.
4. Pharmacist verifies released orders.
Assigning a Treatment Plan
Using a Treatment Plan Protocol to order Chemotherapy saves time. The protocol contains
all the components for administering a chemotherapy treatment including labs and pre-medications. Nursing instructions provide nursing staff with Treatment Decision criteria.
Infusion Reaction orders and Tumor Lysis orders are available for specific protocols.
Once a Protocol is selected and applied to a patient, it becomes a Chemotherapy Treatment plan. At this point, it can be modified to the patient’s specific needs.
1. Open the Chemotherapy Plan section of the Oncology Navigator by clicking on that section.
2. Click Create a New Plan to open the Protocol Selection window.
3. Search for a plan using the body site, cancer type, the title of the protocol (RICE) or a chemotherapy agent (such as "doxorubicin") and press ENTER. A list of matching
protocols appears. 4. Add IP or Oral to further define the search. 5. Select the appropriate protocol and click Accept

Page 8 of 43
Last Updated: 5/31/2017 Oncology Quick Start Guide
Click next to a protocol in the Protocol Selection window to mark it as a favorite.
Protocols marked as favorites appear first in the selection window.
Not sure which protocol to choose? Select one and click to preview it.
Select the Treatment Plan Properties
1. From the Treatment Plan Properties window, select the Overview tab (default tab).
2. Enter the treatment start date, Line of treatment, and treatment goal, such as curative
or palliative.
3. Treatment Plan Provider defaults in and Department may default in.
4. Associate Plan with the correct diagnosis. If it is not on the problem list it can be added using the Add Problem Field.
5. On the Dosing tab, specify which weight or BSA to use to calculate doses.
6. Accept all changes.
7. Once accepted, The Treatment Plan Manager opens.

Page 9 of 43
Oncology Quick Start Guide Last Updated: 5/31/2017
Treatment Plan Manager
View the Chemotherapy plan from the Chemotherapy plan section of the navigator. Edit
and modify the plan from the Treatment Plan Manager.
To access the Treatment Plan Manager from the Chemotherapy section of the navigator,
select the Edit Plan button. A hyperlink to the Treatment Plan Manager is also available from different Oncology Reports. Edits to Chemotherapy plans should only be made from an orders only or visit encounter.
From the main tool bar, options to discontinue a plan, put a plan on hold, send a plan, and add different calendar views are available.
The patient’s weight and BSA are listed at the top of the plan and a link to add multiple pharmacies.
1. To organize how you see the information in the Treatment Plan Manager, click Add/Remove Views.
2. Select check boxes for the following views:
Calendar: View the treatment days in a calendar. Click a treatment day to expand
it in the Treatment Plan Manager, or click or in the month header to move to other months. Note that the treatment days in the calendar don't correspond with
scheduled appointments.
History: View an audit trail of changes made to the treatment plan.
Treatment Plan Levels
The levels of a treatment plan are described below:
Treatment plan: The name and properties of the treatment plan Cycles: A set of one or more treatment days. Cycles appear in green Days: A complete day of care for the patient. Days appear in purple
Order Categories: Groups of orders in a treatment day with a similar purpose. For example, pre-treatment labs appear in a Labs category. Order categories
appear in the order in which they are usually carried out Orders: The actual orders for treatment

Page 10 of 43
Last Updated: 5/31/2017 Oncology Quick Start Guide
Order Categories
Physician Communication
Communicates specific recommendations for managing patients on Chemotherapy
Tumor Lysis Syndrome
INPATIENT protocols for patients at risk for Tumor Lysis Syndrome contain a Physician Communication Order advising of the availability of intermediate and high-risk order
groups.
OUTPATIENT protocols for patients at risk for Tumor Lysis Syndrome contain a Physician
Add’l PLAN Communication Order advising of a specific Tumor Lysis Supportive Plan
Page 11 of 43
Oncology Quick Start Guide Last Updated: 5/31/2017
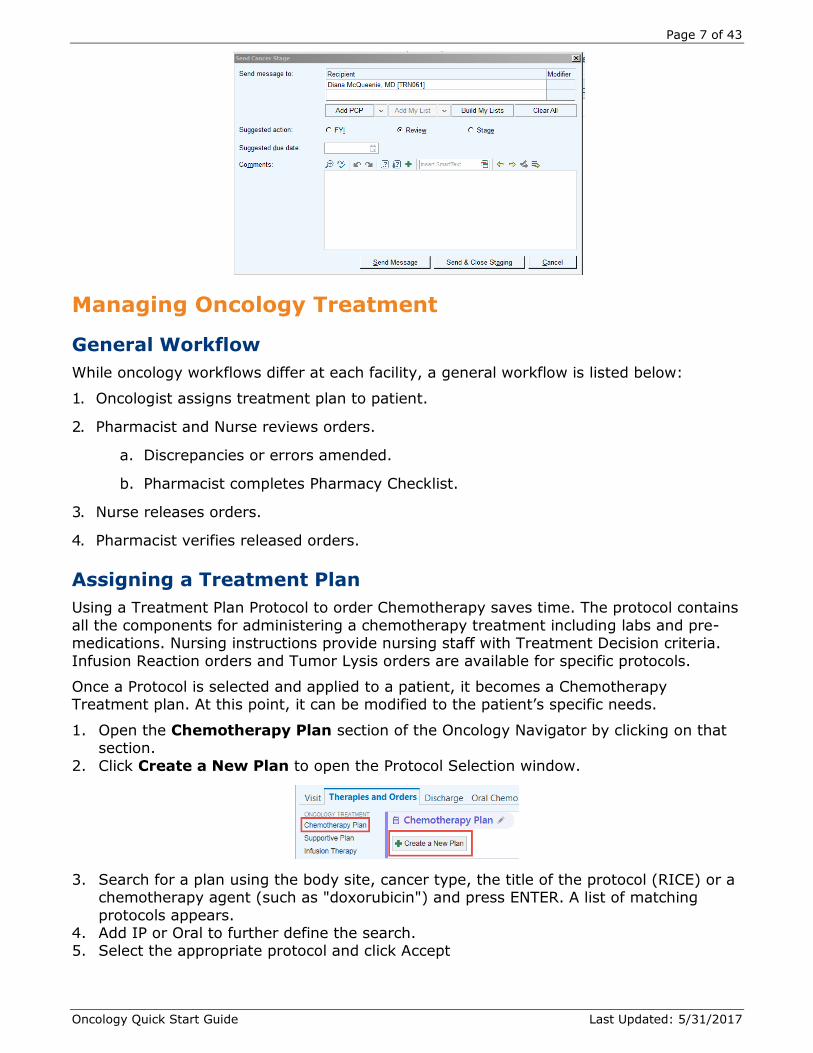
Infusion Reaction Orders
Moderate and High reaction risk protocols contain Infusion Reaction Orders.
Low risk protocols contain an Infusion Reaction Order selection communication that
directs the user to Add Orders from the Action button.
Nursing Communication orders
Provides nurses with criteria for decision-making and recommendations for patient education and support.
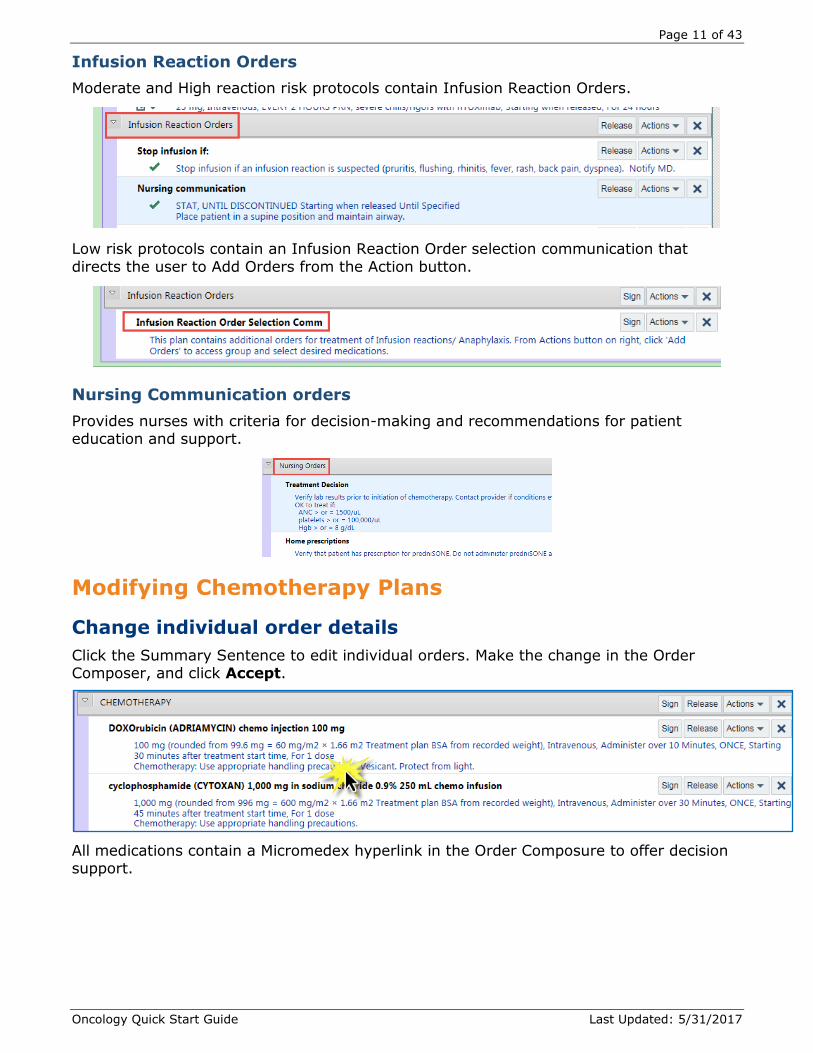
Modifying Chemotherapy Plans
Change individual order details
Click the Summary Sentence to edit individual orders. Make the change in the Order Composer, and click Accept.
All medications contain a Micromedex hyperlink in the Order Composure to offer decision support.

Page 12 of 43
Last Updated: 5/31/2017 Oncology Quick Start Guide
When an order is modified, that appears elsewhere in the plan, the Copy Changes window appears. Here, choose whether to change only this order, or all orders for this medication with selected matches. Propagate change to:
Individual days by selecting the corresponding check box
Entire days or cycles by selecting the row or column header
All days that match the filters selected by clicking Select All
Adjusting a Chemotherapy Medication’s Dose
If a patient is not tolerating or responding to a particular dose, use the Dose Modification window to easily decrease or increase that dosage.
In the Treatment Plan Manager, single click an individual order and select Actions and
Modify Dose. Alternatively, all Chemotherapy orders can be modified at once by selecting the Actions button on the Chemotherapy header.
1. The Dose Modification window appears.
2. Select the desired % button to indicate the percentage by which to decrease the dose, or enter a percentage in the % field on the right.
3. Reason for the modification is required. 4. Apply the change to this order only, or all orders for this medication.

Page 13 of 43
Oncology Quick Start Guide Last Updated: 5/31/2017
5. Copy or Don’t copy to Accept.
The % the dose was modified will appear in the Summary Sentence of the medication
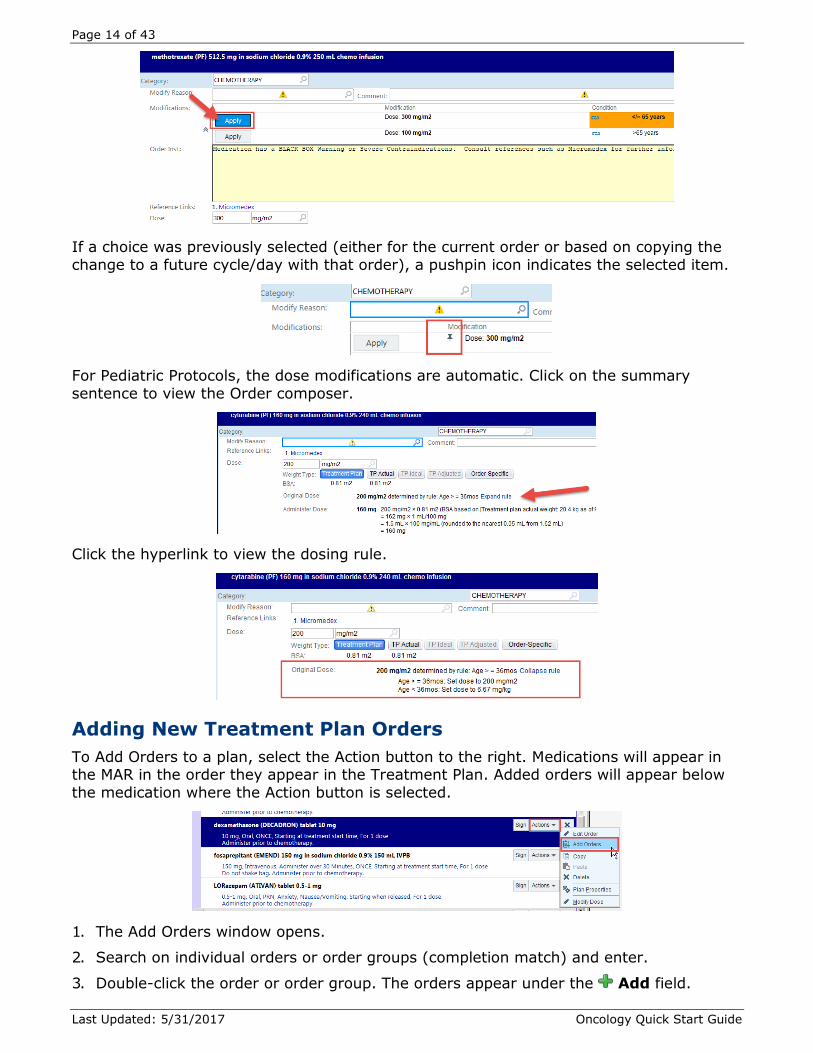
Age Based Treatment Modification Decision Support
Some chemotherapy medications have an age-based treatment modification rule attached that offers decision support for dosing. Based on the patient’s age, the recommended
dose selection is highlighted for the clinician prior to a selection being made.
Select the appropriate ‘Apply’ button to enter the dose and satisfy the hard stop in one click.
Page 14 of 43
Last Updated: 5/31/2017 Oncology Quick Start Guide
If a choice was previously selected (either for the current order or based on copying the
change to a future cycle/day with that order), a pushpin icon indicates the selected item.
For Pediatric Protocols, the dose modifications are automatic. Click on the summary
sentence to view the Order composer.
Click the hyperlink to view the dosing rule.
Adding New Treatment Plan Orders
To Add Orders to a plan, select the Action button to the right. Medications will appear in the MAR in the order they appear in the Treatment Plan. Added orders will appear below
the medication where the Action button is selected.
1. The Add Orders window opens.
2. Search on individual orders or order groups (completion match) and enter.
3. Double-click the order or order group. The orders appear under the Add field.

Page 15 of 43
Oncology Quick Start Guide Last Updated: 5/31/2017
The icon indicates facility-administered medications that are prepared by the pharmacy and appear on the MAR
The icon indicates prescription medications and procedures that will be
performed during or after the visit, such as future or standing lab orders, take home anti-emetics and prescriptions for home-infusion pumps
4. Orders will appear above the dark blue line
5. Select Accept and the Add orders Selected Days window opens to select specific days the order should be added to.
Selecting Suggested Orders in the Add Orders window
Some treatment plans contain suggested protocol orders; these are groups of orders recommended for the plan. If a treatment plan contains suggested protocol orders, they
appear in the Add Orders window under Order Groups.
Select one, some, or all of the suggested protocol orders depending on how they are organized:
Single Select: Select only one order from the group to apply to the patient's treatment plan
Select All: Select either all of the orders in the group, or none
Multi Select: Select as many options from a multi-select group as desired,
including all of the orders, none of them, or any number in between.
AUC Dosing
After a patient's treatment plan is established, use the system to calculate a dose for
carboplatin using a target area under the curve, or AUC.
In order to calculate a dose for carboplatin, the patient must have a recent result, within
the last three days, for a serum creatinine lab.
1. Target AUC dose 2. Micromedex hyperlink for decision support
3. Calculations based on present formula 4. List of different formulas
5. Override field to cap GFR

Page 16 of 43
Last Updated: 5/31/2017 Oncology Quick Start Guide
6. Use AUC button selects the formula and target AUC, it will automatically update the dose based on lab values until released. The mg button will select the specific dose.
If you clicked Use AUC Dose, you are signing for the formula, not the value in the
Dose field. If the patient has a new serum creatinine result, the system will calculate
a new dose automatically, and you will not be prompted to sign for the updated
dose.
Modifying AUC Dosing
Modifying the target AUC requires a Reason. The Dose buttons update with the new
values. Selecting Use AUC automatically updates the dose based on changes in the patient’s weight or lab values.
If the change amount exceeds the recommended maximum, a warning will appear.

Page 17 of 43
Oncology Quick Start Guide Last Updated: 5/31/2017
AUC dose modification cannot be copied; a recent serum creatinine lab is required for dosing.
Override sCR or GFR - Carboplatin
Clinicians can override the latest sCr result and use a different value as well as manually
enter a GFR by selecting the override check box within the order.
GOG and SWOG calculations for Carboplatin
GOG and SWOG carboplatin calculations require use of a different medication record than
the standard record used for carboplatin calculated by AUC.
Gynecologic and research protocols have been updated where applicable, so that the
appropriate carboplatin medication is defaulted, in order to use the new GOG or SWOG calculations.
Order Carboplatin with AUC GOG calculations
GOG Requirements:
Use of Modified Cockcroft-Gault formula for calculating renal function
Calculating Modified Cockcroft-Gault with serum creatinine set to 0.7 mg/dl if actual serum creatinine < 0.7 mg/dl
Maximum GFR is 125 ml/min
Using actual weight if BMI <25 or adjusted weight if BMI ≥25
Order Carboplatin with SWOG calculations
SWOG Requirements:
Use of Cockgroft-Gault formula for calculating renal function
Calculating Cockcroft-Gault formula with serum creatinine set to 0.8 mg/dl if actual serum creatinine < 0.8 mg/dl
Maximum GFR is 125 ml/ min

Page 18 of 43
Last Updated: 5/31/2017 Oncology Quick Start Guide
Limiting weight to 140% of ideal body weight
Add a new treatment day to the plan
Insert a new day into an existing treatment plan from the Treatment Plan Manager.
1. In the Treatment Plan Manager, select the cycle to which to add a day, click the Actions drop down menu, and select Add Blank Day. The Add New Day window
appears. 2. Enter the day on which the treatment is to occur, when accepting, the date will
automatically fill in.
3. Optionally, enter a name in the Treatment Day name field. By default, the new day is
named "Additional Day." 4. Select the Add Orders option from the Action button 5. Search on orders and double click to accept
6. Select the Change Category hyperlink next the order.
7. Select the appropriate Category; this assists the nurse when releasing orders.
Select the desired cycles in the Add Days window. If a change is made to the order, a
Copy Change window will appear.
Existing treatment cycles, days, orders, and order categories can be copied and pasted elsewhere in the treatment plan.
Right Click the row and Select Copy, right click again and select Paste.

Page 19 of 43
Oncology Quick Start Guide Last Updated: 5/31/2017
Delete Treatment Plan Orders, Days, or Cycles
Delete orders, order categories, treatment days, and entire treatment cycles for
treatments that you never intend to give.
1. In the Treatment Plan Manager, click next to the order, order category, day, or
cycle to delete.
2. When removing orders, indicate whether to remove the orders from the current cycle,
additional cycles, or all cycles.
Quickly substitute one medication for another on the treatment plan by deleting one
order and adding another.
Signing Chemotherapy Treatment Orders
Signing versus Releasing Orders
After an order is signed, a clinician must release the order before it can be carried out.
Typically, the nurse releases the orders on the day of treatment. The table below explains the difference between signing and releasing orders.
Signing Releasing
Authorizing: equivalent to writing a
signature on a script in the paper world.
Activate: ready to proceed with the
order.
Can be done far before treatment. The
Sign button is available for unsigned
orders throughout the treatment plan.
Done when the patient is present on the
day of treatment. The Release button is
available only for orders in the current
treatment day.
Can sign an entire cycle at a time. Can release only the current day's
orders.
Most often done by oncologists. Most often done by nurses.

Page 20 of 43
Last Updated: 5/31/2017 Oncology Quick Start Guide
Sign treatment orders
Quickly sign the orders in the first cycle, click Sign next to that cycle. Alternatively, sign
the orders for a single day or even a single order by clicking Sign next to that day or order.
The orders association window opens with diagnosis preselected. Click Accept.
Check marks indicate that orders have been signed.
Defer, Cancel, Hold or Discontinue Treatments
Defer a treatment day
Defer a treatment day if a patient cannot receive treatment for clinical reasons. For example, defer the day if a patient does not meet the treatment parameters, to allow the
patient additional time to recuperate.
1. In the Treatment Plan Manager, click Actions in the appropriate day, and then Defer
Day.
2. Enter the new treatment date.
3. To update future treatment days, select the Adjust future dates check box.
4. Enter a reason for deferring and click Accept. The old treatment day is marked as Deferred, and a new day containing a copy of the deferred orders is added.

Page 21 of 43
Oncology Quick Start Guide Last Updated: 5/31/2017
Cancel a treatment day
Cancel a treatment day entirely if, for example, a patient's outpatient plan will continue in
an inpatient setting. The day remains in the treatment plan for historical purposes but changes to a status of Canceled to indicate that no treatment took place, or will ever take
place.
If you want to remove a treatment day that you never intended to give, as opposed
to a day that was planned but not carried out, delete the day.
1. In the Treatment Plan Manager, select the day.
2. Open the Actions menu and click Cancel Day.
3. Enter a reason and comment for canceling.
4. Accept all changes.
5. Reject and Replace Orders if appropriate.
When working with treatment plan orders, place orders in the Treatment Plan
Manager. If deleted orders are re-ordered in an order entry activity, they will not
appear in the treatment plan.
Placing a Plan on Hold
From the toolbar, select the Place Plan on Hold button.
A reason is required.
When a plan is placed on hold, no orders can be released in the system.
A gold header indicates who put the plan on hold, when and why. The Plan Provider receives a Treatment/Therapy Plan in basket message regarding the plan being placed on
hold.

Page 22 of 43
Last Updated: 5/31/2017 Oncology Quick Start Guide
The tool bar button changes to Release Plan From Hold.
To release a plan from hold, select the Release Plan From Hold button. A reason is
recommended but not required.
Discontinue a treatment plan
Discontinue the treatment plan when treatment is complete, or if you need to permanently stop treatment when, for example, the patient is in remission or the patient
passes away.
1. Select Chemotherapy Plan in the navigator table of contents.
2. Select Actions and click Discontinue Plan.
- Alternately - from the Treatment Plan Manager and click Discontinue Plan in
the treatment plan header
3. Enter a reason and accept all changes.
4. If there are any active orders, select them in the Orders to Review for Discontinuation.
5. Enter a reason and discontinue the orders.
Track Medication Dosing
Track cumulative dosing information for medications with maximum lifetime doses. Doses administered at your organization will be added to Cumulative Dose Tracking
automatically upon administration, but you must document external treatment to keep cumulative dosing information accurate.
View cumulative dosing information
1. In the Treatment Plan Manager, click Cumulative Dose Tracking.
2. To view information about each individual administration of a medication, click the
down arrow next to the medication.
Page 23 of 43
Oncology Quick Start Guide Last Updated: 5/31/2017
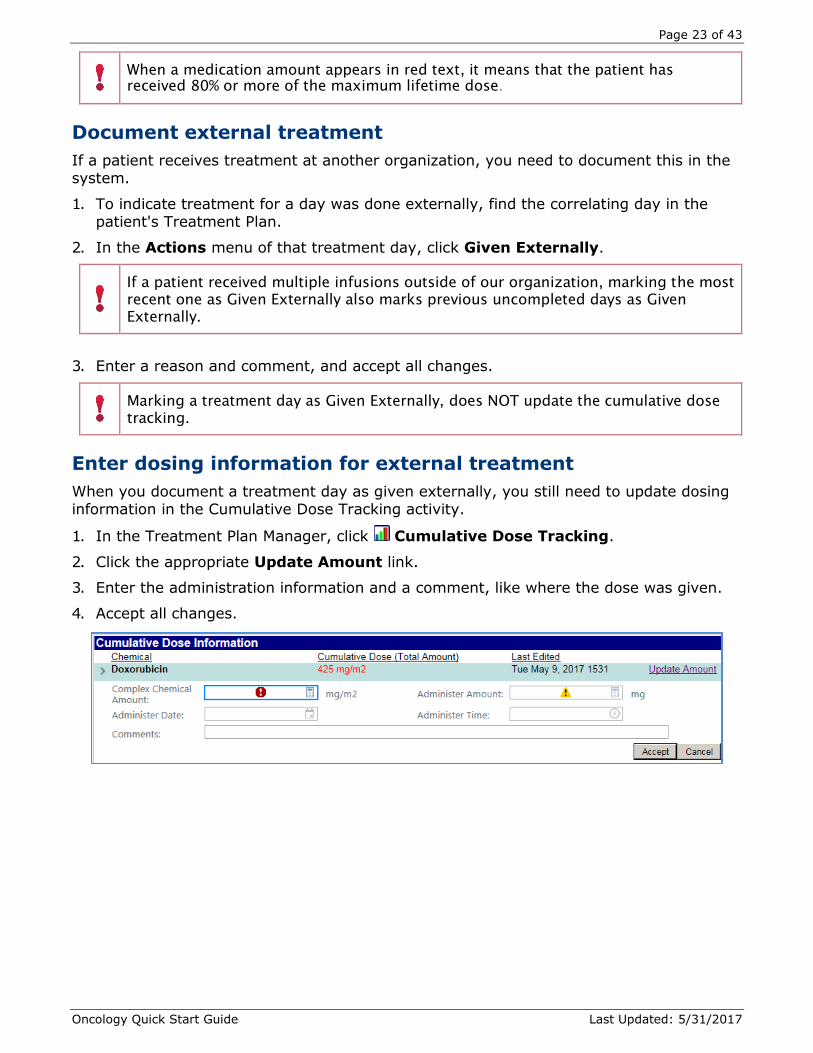
When a medication amount appears in red text, it means that the patient has
received 80% or more of the maximum lifetime dose.
Document external treatment
If a patient receives treatment at another organization, you need to document this in the system.
1. To indicate treatment for a day was done externally, find the correlating day in the patient's Treatment Plan.
2. In the Actions menu of that treatment day, click Given Externally.
If a patient received multiple infusions outside of our organization, marking the most
recent one as Given Externally also marks previous uncompleted days as Given
Externally.
3. Enter a reason and comment, and accept all changes.
Marking a treatment day as Given Externally, does NOT update the cumulative dose
tracking.
Enter dosing information for external treatment
When you document a treatment day as given externally, you still need to update dosing information in the Cumulative Dose Tracking activity.
1. In the Treatment Plan Manager, click Cumulative Dose Tracking.
2. Click the appropriate Update Amount link.
3. Enter the administration information and a comment, like where the dose was given.
4. Accept all changes.

Page 24 of 43
Last Updated: 5/31/2017 Oncology Quick Start Guide
Administering Chemotherapy Treatment Plans
Treatment Plan Authorization Status
To see whether a patient's treatment plan has been Signed/authorized, look for status
icons in the Treatment Plan navigator section, Treatment Plan Manager, and Springboard report.
Icon Authorization Status
Authorized (Signed)
Released
Discontinued
Reviewed by Pharmacy
Unauthorized (unsigned orders) cannot be released. If orders have been modified
and not re-signed they cannot be released.
Release Treatment Orders
Any provider, pharmacist, or nurse, can release the signed treatment plan orders.
Generally this is done by the nurse. They will first release communication and lab orders when appropriate. Once resulted, evaluated, and approved, they will then release the remaining orders.
1. Open the Chemotherapy Plan section of the Oncology Navigator.
2. Select the orders to release.
- Select by Category, Individually, or All by clicking the Check Signed button
3. Click the Release Selected button.
Released orders have a grey background and an arrow over the check mark.

Page 25 of 43
Oncology Quick Start Guide Last Updated: 5/31/2017
Medications are reviewed by pharmacy prior to release and have a clip board icon with a check mark on it.
Check the Onc Pharm Verification Flow-sheet from the Treatment tab of the RN
Oncology/infusion Navigator.
Medications modified after signing/authorizing have a clipboard with lines and a pencil on
it. They require re-authorization before they can be released.
Manage Start Times
Nurses and pharmacists should communicate regarding the desired start time of the
chemotherapy infusion and medication due time. Either clinician has the ability to manage the start times.
The Order Start Times screen automatically opens when medications are released. It is also accessible on the MAR. All of the medication orders are assigned due times coordinating with the beginning of treatment. Adjusting a start time will change all
proceeding start times.

Page 26 of 43
Last Updated: 5/31/2017 Oncology Quick Start Guide
To adjust start times prior to release of medications, select the Actions button.
MAR
All treatment plan orders are organized together on the MAR under a grey header Active
Treatment Plan: “Plan name listed”
Adjust Times
To change the start time of released orders:
1. Click Adjust treatment start times on the MAR to change the cascade of times. Order Start Times window will open
2. Click Adjust Due Times to change individual medication times.
When an individual medication due time is adjusted it does not change the entire cascade of due times.

Page 27 of 43
Oncology Quick Start Guide Last Updated: 5/31/2017
Changing the due times of one medication in a cascade does not change the other
due times and should be communicated with Pharmacy.
Supportive Therapy Plans
Select a Supportive Plan Protocol
In addition to the chemotherapy plan, Providers can assign orders to a supportive plan. These plans contain orders for the supportive treatment of the patient. A patient must
have an active Chemotherapy treatment plan to be assigned a supportive plan.
Examples of Supportive plans include Epogen, IVIG and Iron.
Orders are created in the Treatment Plan Manager and have a similar appearance to Chemotherapy Treatment Plans:
1. Select Supportive Plan from the Oncology Navigator.
2. Click Create a New Plan.
3. Search for a pre-built plan or build a blank plan.
4. Complete the Protocol Selection criteria.
5. Orders are typically signed by the Provider and Released by the RN.

Page 28 of 43
Last Updated: 5/31/2017 Oncology Quick Start Guide
Therapy Plans (Infusion Therapy)
Select a Therapy Plan Protocol
Along with Chemotherapy and Supportive Plans, a patient can be assigned an infusion plan. These can be non-oncologic based.
Examples of Infusion plans include Albumin, Antibiotics, and Remicade.
To create a therapy plan, select a protocol template and modify it into a therapy plan that
fits the needs of the patient.
1. In the Infusion Therapy navigator section, search for the protocol.
2. Infusion orders are arranged by Drug Class.
3. Preview a plan by selecting the magnifying glass.
4. Select the Click next to a protocol to mark it as a favorite.
5. Protocols marked as favorites appear under a Favorites heading at the top of the Therapy Plan navigator section for convenience.
6. Double-click the protocol to set properties, such as a start date and provider.
7. Associate the plan with a diagnosis and assign it to the patient.
8. Use the Add problem field if the diagnosis is not present.

Page 29 of 43
Oncology Quick Start Guide Last Updated: 5/31/2017
9. Modify orders as needed on the Edit Plan tab.
10. On the Edit Plan tab, therapy plan orders appear sorted by order categories, such as
Labs and Infusion.
11. To modify orders, select the Summary Sentence.
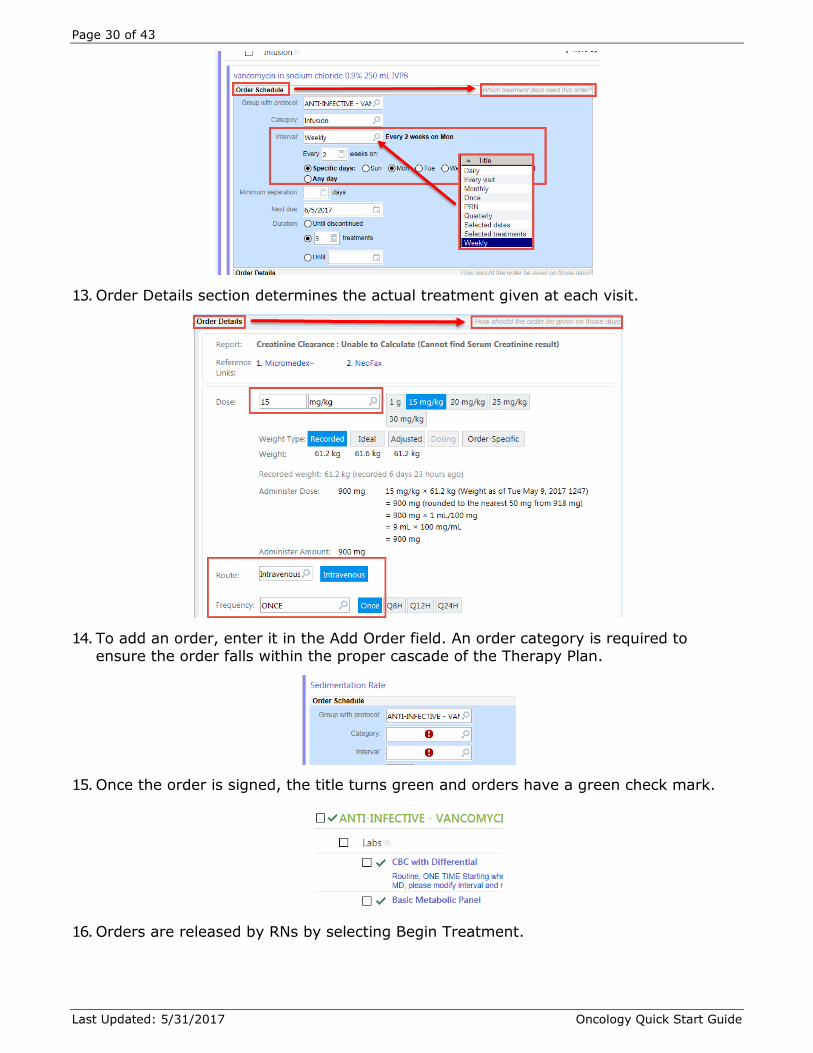
12. The Order Schedule determines on which treatment days to carry out the order.
If no specific interval is required, select Every visit in the Interval field.
Selecting Until discontinued allows the order to be available for a year,
otherwise select Until with an anticipated end date.
The Interval entry of Daily, Weekly or Monthly combined with the Every entry,
determines the schedule of a recurring order.
o Note below, the Interval is Weekly and the addition of 2 in the
Every field designates it as Every 2 weeks.
Page 30 of 43
Last Updated: 5/31/2017 Oncology Quick Start Guide
13. Order Details section determines the actual treatment given at each visit.
14. To add an order, enter it in the Add Order field. An order category is required to ensure the order falls within the proper cascade of the Therapy Plan.
15. Once the order is signed, the title turns green and orders have a green check mark.
16. Orders are released by RNs by selecting Begin Treatment.

Page 31 of 43
Oncology Quick Start Guide Last Updated: 5/31/2017
17. Once released, the orders’ background turns green.
To change the interval after an order has been signed, click Edit Interval.
Review the Therapy Plan
Therapy plans do not expire; review them after a certain period to ensure they are up-to-
date and accurate.
When it is time to review a plan, a warning appears in the Therapy Plan navigator section.
If review for a plan is past due, the nurse cannot act on the orders.
1. In the Edit Plan tab, review and update the plan if necessary.
2. Sign any new or modified orders.
3. When you're done reviewing, click Review Plan and enter your credentials to finish.
Placing a Therapy Plan on Hold
1. Therapy Plans can be placed on Hold using the Actions button.
2. A reason is required to place a Therapy Plan on hold and a gold banner indicates who
put the plan on hold and why.

Page 32 of 43
Last Updated: 5/31/2017 Oncology Quick Start Guide
3. To release a plan from hold select the Release Plan from Hold button.
Discontinue a Therapy Plan
1. In the therapy plan, select Discontinue Plan from the Actions menu.
Enter a reason for discontinuing the plan.
Transfusion Orders
Ordering Blood Administration
Transfusion orders are Therapy Plans for patients receiving blood in an outpatient infusion or hospital based infusion clinic.
Select either the Adult or Pediatric Blood Admin order from the Transfusion section of the navigator.
Complete the Therapy Plan Properties and Assign the Plan.
The Plan contains all aspects of the Blood Administration. Most order categories have multiple options. Select the options desire and delete the other options by clicking the X.
Clarify Treatment Condition in the Nursing Orders

Page 33 of 43
Oncology Quick Start Guide Last Updated: 5/31/2017
Select the desired Blood Products and Delete the unordered blood products. Complete both Order schedule and Order Detail of Blood Product and Transfuse order. Both orders need to match in all similar fields.
Special requirements must be selected one at a time. When complete sign plan.
Administering Blood
To release transfusion, click on the Treatment tab of the Transfusion section of the Navigator and select the Being Treatment button.
All signed orders appear with a check box selected for Release. Deselect orders not
needed at this point. Select the Release button to release.

Page 34 of 43
Last Updated: 5/31/2017 Oncology Quick Start Guide
Once released, orders are highlighted in green and have a green check mark with an
arrow.
Select the Summary Activity and Overview report to acknowledge all orders.
On the MAR administer saline and pre-medications. Return to the Navigator and select the Blood Admin Flow-sheet link.
Complete Vitals/Pre-Transfusion Documentation. Click on the blue Release Transfusion Report to enable Blood Transfusion documentation.
The Transfusion Report opens. Review the report and select the Release hyperlink by the Transfusion Orders. This action releases the Blood group rows into the flow-sheets for documentation and prints out a Blood Transfusion lab requisition. Close window by
selecting the x in the upper right corner.

Page 35 of 43
Oncology Quick Start Guide Last Updated: 5/31/2017
Click into the Action field, a syringe will appear. Select New Bag to start. Clicking into the Rate field opens the Link Line window. Select the correct line and Accept.
MAR window opens for this blood product. Scan patient and then blood. Three areas of blood are scanned in no particular order: Unit, registration and product code.
Green Thumbs Up indicates completed administration window. Complete vitals documentation and sign.
Blood requires Dual Sign off.

Page 36 of 43
Last Updated: 5/31/2017 Oncology Quick Start Guide
In the Blood Administration flow-sheet, the status changes from Ordered to Transfusing.
When complete, add a column to the flow-sheet and click on the Rate field and enter 0. The Action will change to stopped. Complete any other department-required documentation.
Oncology Admission Order Set
Oncology Opioid Pain Management Order Set
The Oncology Admission Order Set contains a BPA for the Oncology Opioid Pain
Management Order Set.
This Oncology specific pain order set is available outside of the admission order set.
Oncology Opioid Pain Management Order Set includes three tiered Opioid dosing
recommendations based on patient daily morphine equivalent for previous 7 days.
First Tier based on <61mg per day of oral morphine equivalent.
Second Tier based on 61-120 mg per day of oral morphine equivalent.

Page 37 of 43
Oncology Quick Start Guide Last Updated: 5/31/2017
Third Tier based on >120 mg per day of oral morphine equivalent.
Note: Bowel care is available in Pain Management Order Set as well as in the Oncology Admission Order Set.
Duplicate medication warning will fire if the same medications are ordered from the
Admission order set and the Opioid order set.
The Narcotic Summary report displays current outpatient medications, hospital narcotic administrations, and pain level. It also includes a hyperlink to Global RPH Narcotic conversion calculator.

Page 38 of 43
Last Updated: 5/31/2017 Oncology Quick Start Guide
Oncology History and Survivorship Summary
Oncology History
The Oncology History activity provides a central location to document information
regarding a patient’s oncology care such as diagnosis/staging, surgeries, chemotherapy plan, radiation, and procedures.
Select the Create Oncology History in the problem list.
The Oncology History Activity opens:
1. Create an Overview of the patient’s cancer history
2. Select the Cancer Stage button to pull in staging information from Staging Activity
3. The Chemotherapy button displays all Chemotherapy plans either Active or complete
4. Other Events add smart tools to assist in documentation
Pull documented information into visit notes using the Smartphrase .onchis
Oncology History hyperlink in the problem list displays how many events have been documented. Select to edit and update.

Page 39 of 43
Oncology Quick Start Guide Last Updated: 5/31/2017
Care Team
Update the patients Care Team from the Snapshot Onc report or from the More button within a patient’s chart.
Search for specific providers or select Add Me to add yourself.
Provider specialty will default; add in Relationship field. Oncology specific entries include
Medical Oncologist, Radiation Oncologist, Surgical Oncologist, and Oncology Navigator.
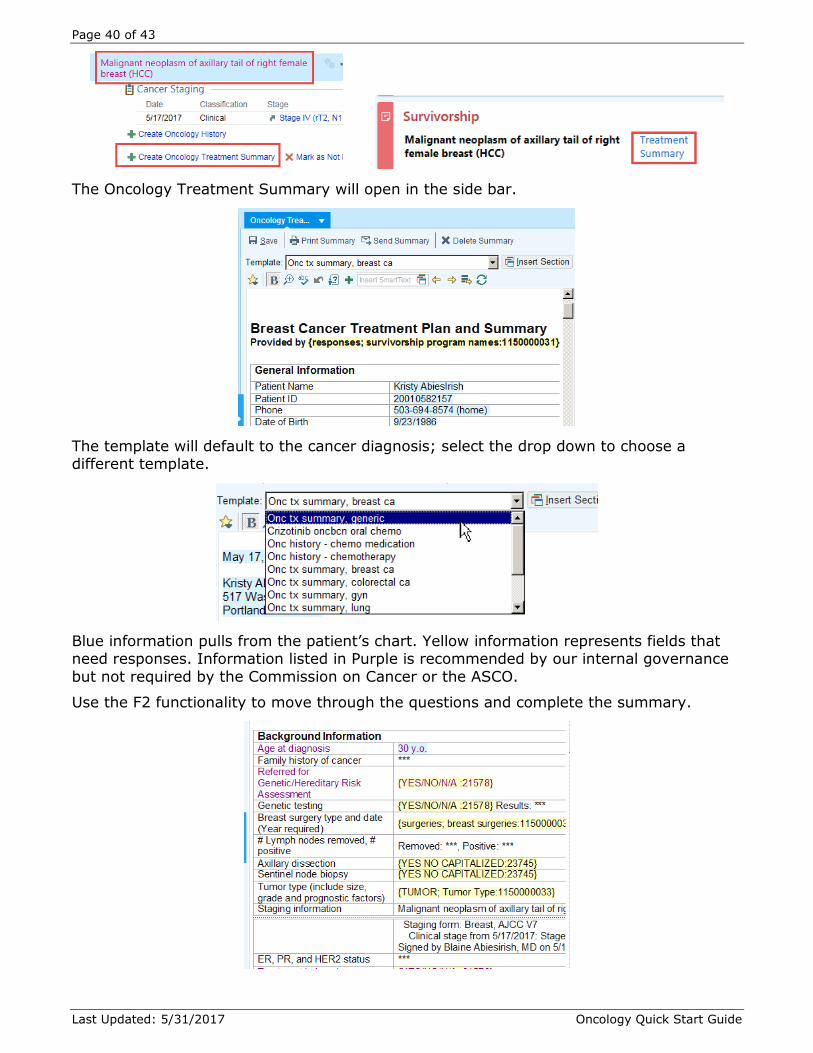
Survivorship/Treatment Summary Documentation
Create an Oncology Treatment Summary either from the problem list or from the
Survivorship section of the Snap Shot report.
Page 40 of 43
Last Updated: 5/31/2017 Oncology Quick Start Guide
The Oncology Treatment Summary will open in the side bar.
The template will default to the cancer diagnosis; select the drop down to choose a different template.
Blue information pulls from the patient’s chart. Yellow information represents fields that need responses. Information listed in Purple is recommended by our internal governance
but not required by the Commission on Cancer or the ASCO.
Use the F2 functionality to move through the questions and complete the summary.

Page 41 of 43
Oncology Quick Start Guide Last Updated: 5/31/2017
Send the Treatment summary to other clinicians via InBasket to request follow up or serve as a reference for ongoing care.
Messages arrive in a Treatment Summaries folder. It can be reviewed, opened, and
edited.
Once Complete, the convenience buttons at the bottom will change to assist in
documenting follow through with patient and provider.
Select Mark as Given to indicate information was provided to the patient and other providers.