Embed Size (px)
Citation preview

*NOTE: THIS IS NOT LCi-SS Installation instructions for ThermalStar LCi are described in the following manual. These instructions can be considered general and for more detailed questions please contact Atlas EPS. General installation and fastening details and instructions must be followed for applicable warranties. Please consult with local building official and or code compliance officers for further compliance questions. ThermalStar LCi is easy to both design with and install. LCi was developed with code compliance in mind and offers the best price and performance combination you can assemble.

SAFETY:
Follow all OSHA regulations, safety guidelines and practices. LCi is to be used as exterior vertical sheathing only and only as prescribed. Keep away from flame sources and intense heat.
PPE (PERSONAL PROTECTIVE EQUIPMENT) RECOMMENDED:
Safety glasses or goggles may be worn to reduce the risk of eye injury or irritation. Cut resistant gloves are available to reduce the risk of injury when using knives to cut LCi. Respiratory protection is not normally required. If dusts are generated up to 10 times above occupational exposure limits, use a NIOSH-approved particulate respirator (disposable filtering dust mask type) with an efficiency rating of N95 or higher (e.g. 3M’s 8210, Moldex 2300). LCi is not known to be abrasive or irritating to skin. However, gloves, long sleeved shirt and long pants may be worn, as needed, to prevent skin contact if desired.
PRODUCT DESCRIPTION AND OVERVIEW:
ThermalStar LCi (Laminated Continuous Insulation) is a continuous insulation product with a polymeric film facer on one side. Standard features include:
1-5/16" (R5), 1-15/16" (R7.5), or 2-1/4" (R10) Expanded polystyrene bonded to polymer film facer. Manufactured with EPSx® technology to provide a wax matrix and 2nd generation termiticide to assure long term perfor-
mance. Meets R5 assembly rating for IRC prescriptive +5 use and is designed to be used in conjunction the IRC designation
of the “13+5” wall design. Qualifies as a water resistant barrier and does not typically need an additional layer of felt paper or housewrap. LCi is to be installed with standard 3/8" head roofing nails, button cap nails, or wide crown staples flush to outer sur-
face. No requirement to tape nail holes. LCi is to be installed with ThermalStar seam tape or equivalent Can be considered continuous insulation (ci), either with the walls braced per code, or over OSB sheathing LCi is available in 4x8, 4x9 and 4x10 sizes. ThermalStar LCi is 3rd party evaluated for code prescribed water resistant barrier and fire code approvals by UL (UL
ER16529.1) and has hygrothermal condensation evaluation by BSCI (2014-05-19 BSCI Atlas LCSS Evaluation CZ 5 Final Report).
LCi has been tested for use in exterior walls of IBC Types I-IV construction.
LIMITATIONS:
For external vertical walls only. Moisture sensitive claddings should be installed with a ventilation gap, best practice for long term cladding durability. LCi is to be installed in dry conditions and taped at temperatures above 0 degrees F. Hygrothermal evaluations advise the following products per climate zones and wall construction:
STORAGE AND HANDLING:
Standard R5 LCi is packaged in 74 piece 4x8, 4x9, or 4x10 units. LCi is factory packaged with a poly shroud and can be stored outside as long as the polymer shroud is intact and leak proof. Store LCi elevated from the ground and moist conditions. Do not stack master bundle.
IRC 2012 Climate Zone
2x4 wall construction 2x6 Wall Construction
LCi Product >
LCi R5 LCi R7.5 LCi R10 LCi R5 LCi R7.5 LCi R10
1, 2, 3, & 4 OK OK OK OK OK OK
5 OK OK OK OK OK
6 OK OK OK
7 & 8 OK

DESIGNING WITH LCi:
Walls built with R13+5 and LCi should “breathe to the inside.” Class III vapor retarder (1-10 perm) should be installed on the interior side of the wall system. This allows any developed water vapor in the cavity to vent to the interior.
A key feature of LCi is the ability to cover the rim joist. LCi is available in 8’, 9’ and 10’ lengths to accommodate this de-tail. An 8’ high room will typically need a 9’ LCi to cover the rim joist.
The developed wall thickness for a 2x4 OSB braced wall built with LCi is 5-3/8” thick when used with a common 2x4 and not including interior gypsum in the calculation
Windows can be installed directly over LCi following the flashing and nailing details shown in Detail 12. Most window manufacturers now accommodate continuously insulated wall thicknesses with return jambs for prescribed widths and homes built with drywall returns simply adjust the drywall at the site.
When using full size brick veneer, an 8” foundation can be used (see Detail 8). Be sure to insulate the interior of the rim joist which will not be covered with LCi with this detail.
With cladding designs that require multiple layers of water resistive barriers such as “3 part” or traditional hard coat stuc-co and adhered stone veneers, LCi may be considered the first layer of two water resistive barriers. Follow all additional flashing directions for the applied exterior cladding.
Construction and Installation of LCi:
Nail guns designed to install fasteners flush with foam sheathing are available, or use hand tools for traditional button cap or roofing nails.
LCi cuts with common circular saws – same as OSB, or more simply with a utility knife. The following areas require ThermalStar seam tape or equivalent:
Vertical and horizontal seams Vertical and horizontal butt joints All corners
Large bruises and field damage (cuts in the exterior water resistant barrier) should be repaired with seam tape. Large field damage can be repaired with the application of loose foam secured with seam tape.
All structural and mechanical connections such as hurricane/uplift straps and connections as well as ledger boards must have the EPS layer removed with a razor and scraper to provide structure to structure connection. Replace the foam if possible and tape or flash as required.
Panels may be installed either vertically or horizontally.

BASIC INSTALLATION OVERVIEW—SEE ILLUSTRATIONS FOR DETAILS WITH SIDING, BRICK, DECKS, STUCCO, AND WINDOWS
THIS PRODUCT DOES NOT REQUIRE A TRAINED OR CERTIFIED INSTALLER.
Step 1. Prepare surface for installation (should be flat / true, dry, clean)
Step 2. Cut LCi to size to fit area to be covered. Cut around penetrations to finish tightly around rough openings.
Step 3. Fasten LCi to structure using 3/8” head galvanized roofing nails, plasticap nails, or wide crown staples long enough to penetrate studs ¾” min when fastener head is flush with LCi surface. Space fasteners 12” OC at the perimeter of LCi, 16” OC in the rest of the product. Stud spacing may be 16” or 24” OC. Fasteners may be attached to OSB pro-vided it is minimum 7/16” thick PS2 rated, otherwise fasteners must penetrate to studs ¾” min depth.
Step 4. Seal edges. Use ThermalStar 007 or equivalent 3” width min solvent acrylic adhesive backed sheathing tape to seal joints, corners, transitions to adjacent walls, floors, ceilings, or foundation as applicable to area being LCi insu-lated.
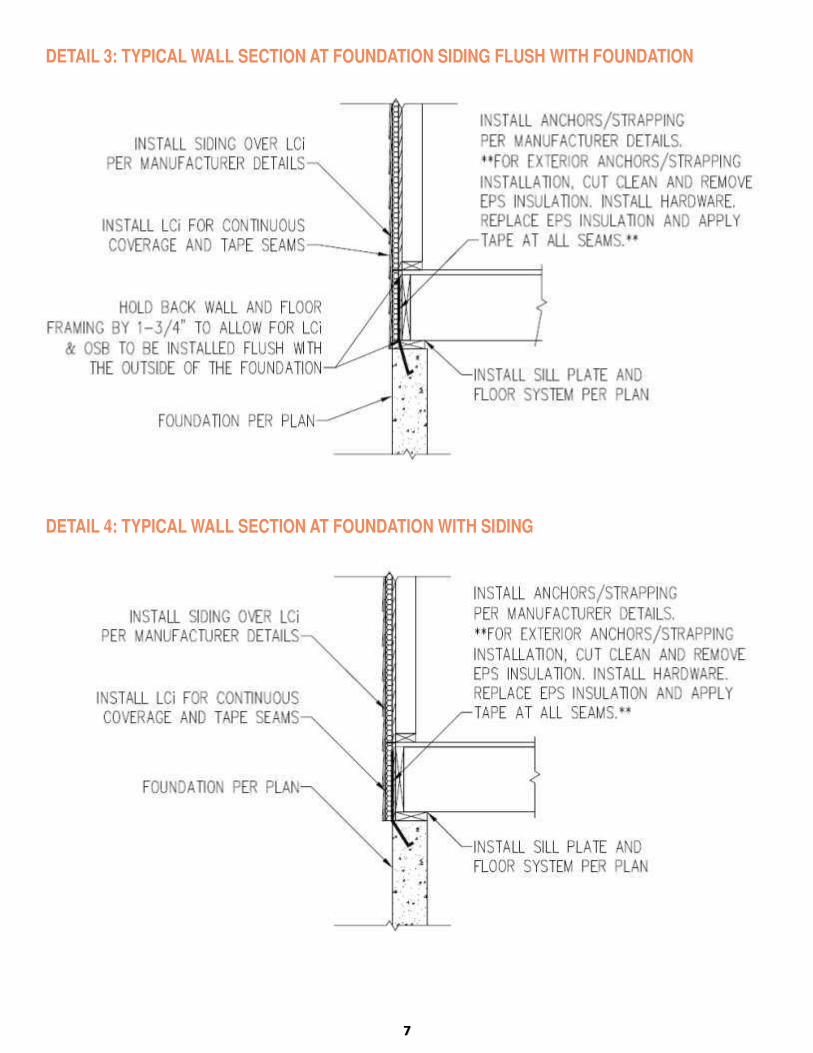
Step 5. Flash penetrations. Use butyl flashing tapes such as Grace Vycor, Protectowrap BTXL20, 3M 8067, etc to flash windows, doorways, pipes, or transitions as needed. Always flash windows by starting with a pan seal of the bottom stud to the outside of LCi, then over window flange side jambs, an finally header flashing over window flange (see illustration in this document). Gravity lap / terminate thick butyl flashing with thin solvent acrylic adhesive backed sheathing tape such as ThermalStar 007, 3M 8087, Dow Weathermate, etc.
Step 6. Inspect for damage. Use scrap LCi and tape to repair and seal damage.
Application Specific Installation Instructions: Always consult local codes, following are best practices applicable to LCi.

BRACED WALL FRAMING DESIGN: LCi is not structural; walls must be braced using other means such as let-in bracing or structural sheathing. LCi can be used with most mechanical bracing and strapping that is often required for high wind zone and seismic zone design, provided that the instructions for those attachments are followed.
BRICK VENEER: Brick veneer can be easily installed with LCi. LCi is a Water Resistive Barrier (WRB), but all other flashing details need to be followed as well as weeps and brick ties. Brick ties to be installed per manufacturers instructions (remove EPS layer for di-rect attachment) or use a brick tie developed specifically for use with a continuous insulation (See Details 6, 7, 8, & 9).
STUCCO, FAUX STONE: Traditional or 3 coat stucco, faux thin set stone veneers and other exterior finishes are typically installed with 2 layers of felt paper. This design prescription should be followed and LCi can be considered the first WRB layer. Install second WRB layer (typically 15# felt paper) and metal lathe layers with prescribed fasteners (see Detail 11).
EXTERIOR INSULATION FINISH SYSTEMS (EIFS, STO, DRYVIT): EIFS cannot be applied directly to LCi. EIFS requires a continuous WRB to be installed behind the EPS layer for their warranty to apply. It is suggested that if EIFS is specified on a home that uses LCi, loose EPS 1-3/16” thick can be ordered as a separate sheet and applied over OSB under the install direction of the EIFS supplier.
TYPICAL STRUCTURAL ATTACHMENTS (Hurricane Straps, Portal Framing, Ledger Boards): All “structural” attachments require direct contact and attachment to the OSB component of LCi. For these details, remove the EPS where the attachment occurs with a razor knife, secure the attachment, replace the EPS if possible, and seal with tape.
FLUSH DETAILS: Not all parts of a structure are insulated, such as exterior garage walls or a gable attic wall (see Detail 5). In these cases, it is not necessary to install LCi, but it is necessary to provide a flush surface for exterior finishes to mate.

DETAIL 1: TYPICAL WALL SECTION AT ROOF TRUSS WITH SIDING DETAIL 2: TYPICAL WALL SECTION AT FLOOR DECK WITH SIDING
DETAIL 3: TYPICAL WALL SECTION AT FOUNDATION SIDING FLUSH WITH FOUNDATION DETAIL 4: TYPICAL WALL SECTION AT FOUNDATION WITH SIDING

DETAIL 5: OPTIONAL WALL SECTIONS GABLE END WALL AT ROOF TRUSS WITH SIDING
DETAIL 6: TYPICAL WALL SECTION AT ROOF TRUSS WITH BRICK

DETAIL 7: TYPICAL WALL SECTION AT FLOOR DECK WITH BRICK DETAIL 8: TYPICAL WALL SECTION AT 8” FOUNDATION WITH BRICK

DETAIL 9: TYPICAL WALL SECTION AT FOUNDATION WITH BRICK DETAIL 10: TYPICAL WALL SECTION AT EXTEIOR DECK

DETAIL 11: TYPICAL WALL SECTION AT FOUNDATION—3 COAT STUCCO
DETAIL 12: TYPICAL TAPING AND WINDOW INSTALLATION DETAILS

WARNING: This product is combustible and will burn. Maximum use temperature is 165F. Care must be taken to maintain separation distance from heat sources, furnace ducts, chimneys, hot water pipes, etc as provided for combustible materials in the building codes. Consult local code requirements for specific restrictions. This product is a foam plastic product and must be separated from the interior occupied space by an ap-proved thermal barrier such as ½” gypsum sheathing, except as specifically permitted without a thermal or ignition barrier as described in Underwriters Laboratories evaluation report ER.16529-01. Local codes and Authorities Having Jurisdiction (AHJ) should be consulted and have ultimate determination of product fit-ness for use and restrictions that may apply.
*EPA registered termiticide. This product is treated to preserve against termite attack of the LCi itself, as a treated article, and is NOT a treatment system for preservation of the adjacent structure. The treatment is Preventol TM-EPS from Lanxess Corporation, registered for use in polystyrene foam plastic, EPA registry number #39967-80.