Embed Size (px)
Citation preview

© 2004 Mystic Tan, Inc. All rights reserved Mystic Tan, Inc. 13800 Senlac Drive Farmers Branch, TX 75234 (877) 668-8826 4/26/2005
MYSTIC TAN®
UV-FREE TANNING BOOTH
EQUIPMENT MANUAL
INNOVATION™ SERIES (MTI-4000 & MTI-5000)
2004 - 2005

© 2004 Mystic Tan, Inc. All rights reserved Mystic Tan, Inc. 13800 Senlac Drive Farmers Branch, TX 75234 (877) 668-8826 4/26/2005
2
Mystic Tan, Inc. Equipment Manual
TABLE OF CONTENTS Equipment Section 1 (Page 3)
• Important Safeguards (Page 4)
• Timer Installation o Remote Display (Page 7) o T-Max Manager Network (Page 8) o Session Counter (Page 9)
• Operating Your Mystic Tan Tanning Booth o MagneTan Technology (Page 10) o Multiple Tanning levels (Page 11) o Multi-Myst System™ (Page 11) o Remote Display (Page 12) o Canceling a Session (Page 14) o T-Max Manager (Page 15) o Door Hold Open Status (Page 18) o Manual Mode (Page 19)
Equipment Maintenance Section 2 (Page 20)
• Periodic Maintenance o Low Fluids (Page 21) o Air Solenoid Regulator (Page 22) o Door Air Cylinder (Page 23) o Mystic Meter Calibration (Page 24) o Speaker Volume Adjustment (Page 25)
• Daily Cleaning o Touch Free Sensors (Page 26) o Interior (Page 26) o Exterior (Page 26)
• Weekly Cleaning o Exhaust Fan Filter (Page 27) o Inline Strainer (Drain Pump Filter) (Page 27)
• Monthly Cleaning o Floor Grates (Page 28) o Floor Pan (Page 28) o Acrylic Roof (Page 28) o Interior Walls (Page 28) o Floats and Sensor Shafts (Page 28) o Condensation Air Filter (Page 29) o Draining Air Compressor Tank / Checking Oil (Page 30) o Spray Nozzle Cones (Page 30) o Spray Nozzle Flow Tubes (Page 31)
Equipment Trouble Shooting Section 3 (Page 32)
• Important Fail-safes (Page 33) • Equipment Trouble Shooting (Page 35)
Consumer Trouble Shooting Section 4 (Page 38)
• Consumer Trouble Shooting (Page 39)

© 2004 Mystic Tan, Inc. All rights reserved Mystic Tan, Inc. 13800 Senlac Drive Farmers Branch, TX 75234 (877) 668-8826 4/26/2005
3
SECTION 1
EQUIPMENT

© 2004 Mystic Tan, Inc. All rights reserved Mystic Tan, Inc. 13800 Senlac Drive Farmers Branch, TX 75234 (877) 668-8826 4/26/2005
4
Important Safeguards
READ AND UNDERSTAND ALL INSTRUCTIONS BEFORE USING THIS PRODUCT
When using electrical appliances, basic safety precautions must always be followed. Failure to follow all instructions listed below may result in fire, electric shock or other serious personal injury.
DANGER - To reduce risk of electrocution:
• To reduce risk of injury, only qualified electrical service personnel should open the electrical control panel.
• Always unplug the electrical cord from the wall socket before opening the control panel or working on or near any electrical component. There is a risk of electrocution if the control panel is opened while the unit is plugged in.
WARNING - To reduce risk of burns, electrocution, fire, or injury to persons:
• Close supervision is necessary when this product is used by, on, or near children or invalids. • Use this product only as intended per the instructions in this manual. Do not use attachments or
solutions not recommended by the manufacturer. • Never operate this product if it has a damaged cord or plug, if it is not working properly, or if any
part has been damaged. • Keep the cord away from heated surfaces. • Connect this product to a properly grounded outlet only. See Grounding Instructions below. • Do not allow water to accumulate on the floor around the spray unit. • Do not allow unauthorized persons to enter the mechanical/electrical room. Keep the door to the
mechanical/electrical room closed and locked. • Do not operate this unit with a person in the mechanical/electrical room unless person is a trained
service personnel. • Do not operate this unit with any protective guards removed. Moving mechanical parts may cause
injury. • Do not allow children access to the mechanical/electrical room.
Save These Instructions GROUNDING INSTRUCTIONS – This product should be grounded. In the event of an electrical short circuit, grounding reduces the risk of electrical shock by providing an escape wire for the electrical current. This product is equipped with a cord having a grounding wire with a grounding plug. The plug must be plugged into an outlet that is properly installed and grounded. DANGER - Improper use of the grounding plug can result in a risk of electrical shock. If repair or replacement of the cord is necessary, do not connect the grounding wire to either flat blade terminal. The wire with insulation having an outer surface that is green, with or without yellow stripes, is the grounding wire. Check with a qualified electrician or serviceperson if the grounding instructions are not completely understood, or if in doubt as to whether the product is properly grounded.
Continued…

© 2004 Mystic Tan, Inc. All rights reserved Mystic Tan, Inc. 13800 Senlac Drive Farmers Branch, TX 75234 (877) 668-8826 4/26/2005
5
Important Safeguards (continued): This product is for use on a nominal 120V circuit, and has a grounding plug as illustrated below (Image A). Make sure the plug is only used with a properly grounded outlet (Image B). Do not modify the plug provided or use an adapter. If the plug will not fit the outlet, have the proper outlet installed by a qualified electrician. If it is necessary to use an extension cord, use only a three-wire extension cord that has a three blade grounding plug (Image A) and a three slot receptacle end that will accept the plug on the product. Damaged cords may cause electrocution or fire. Replace damaged cords immediately.
A three-prong cord and matching GFCI outlet (Ground Fault Circuit Interrupter) with a properly installed ground connection must be used with this product (Image A). In addition, the green wire from the control box (Image B) must remain grounded to the frame at all times [External Green Grounding Wire not applicable on all units].
Continued…
The “Ground Wire” (Green) must remain connected to grounding
post on the Wall Mount Box.
The “Ground Plug” should only plug into an outlet that is properly grounded.
To Control Box
Image A
Image B
(Green) (Amber) (Red)
Clean
Reset Main Power
MA I N
POWER
ON
C L EAN
RE S E T
LOW
F L U I DS
GFCI outlet (Ground Fault Circuit Interrupter)

© 2004 Mystic Tan, Inc. All rights reserved Mystic Tan, Inc. 13800 Senlac Drive Farmers Branch, TX 75234 (877) 668-8826 4/26/2005
6
Important Safeguards (continued):
READ AND UNDERSTAND ALL INSTRUCTIONS BEFORE USING THIS PRODUCT
Important - The water supply to your booth must be turned off at the end of each day! The shutoff value should be easily accessible and located at the end of your in-room water source. Using the shutoff valve located in the Mystic Tan booth will not protect the salon from water damage caused by a failed connecting hose. Mystic Tan is in not responsible for the integrity of supply line hoses. To maintain compliance with city codes, please consult with your plumbing contractor.
Water to Mystic Tan Booth
Main Water shutoff valve
Main Water Supply shutoff
Mystic Tan Booth “Footprint”
18” 78”
Measurements for standard rooms of 96” in length
42”
Plumbing shutoff valve must be accessible at all times. Placement of valve should be no less than 68” from the right side of booth.
12”
18”
68”

© 2004 Mystic Tan, Inc. All rights reserved Mystic Tan, Inc. 13800 Senlac Drive Farmers Branch, TX 75234 (877) 668-8826 4/26/2005
7
Remote Display Installation
Remote Display and Installation Instructions: A Remote Display is included with your Mystic Tan booth. Depending on your model of booth, you will either have a Timer Interface Board or a Timer Interface Box located in the Rooftop Control Box. Both serve the same function in operating your Mystic Tan Booth.
Remote Display and Installation Instructions:
1. Before connecting the Remote Display - turn off the main power to the Mystic Tan booth. 2. Plug the Remote Display cable into the single RJ22 jack located on the Timer Interface box or board, located inside the Rooftop Control Box (see installation above). 3. Turn main power back on. 4. The Remote Display box will power up and read (0). 5. Now the booth is ready for use. (Refer to: Operating your Mystic Tan Tanning Booth - with Remote Display.)
Rooftop Control Box
Remote Display
Start/Stop Mystic Tan Display
Remote
Timer Interface Box (On some Models)
NETWORK REMOTE DISPLAY
Timer Interface
Board
NETWORK
REMOTE RJ22 Jack
The Timer Interface Board or Box is located INSIDE the Roof Control Box.
REMOTE DISPLAYNETWORK
50 – foot cable included

© 2004 Mystic Tan, Inc. All rights reserved Mystic Tan, Inc. 13800 Senlac Drive Farmers Branch, TX 75234 (877) 668-8826 4/26/2005
8
T-Max Manager Network Installation
The Mystic Tan Timer Interface is compatible with T-Max or Intellitan Manager, giving you the ability to activate your Mystic Tan booth through your current timer network. Station Addressing: The station address identifies where your equipment (Mystic Tan booth) is located in your salon. Before following the station addressing instructions, disconnect all other cables to the Timer Interface box. (If using an Intellitan Manager you must first order a program chip from Mystic Tan technical support.) 1. Before connecting the Remote Display - turn off the main power to the Mystic Tan booth. 2. Plug the Remote Display cable into the single RJ22 jack located on the Timer Interface box (Refer to: Remote Display Installation.) 3. Turn the main power to Mystic Tan booth back on (the Remote Display box will power up and read (0). 4. Using the Remote Display box press the Up-Arrow & Start / Stop button at the same time (.1) will appear. 5. Press the Start/Stop button once until the (1) begins flashing. 6. While the (1) is flashing scroll up until you get to the room address you desire then press the Start/Stop button once more to lock in the new address, the display will read a solid (.1). *(Make sure that the dot is solid not flashing for rooms under 100 ) 7. Press and hold the Up & Down-Arrow at the same time until it reads (0) 8. Turn the Main Power off to Mystic Tan booth. 9. Disconnect the Remote Display from the Mystic Tan Timer Interface. 10. Connect your daisy chain or backbone cable(s) into one or both of the double RJ22 jacks. 11. Turn the main power on to Mystic Tan booth. 12. Rescan your T-Max or Intellitan Manager to recognize your Mystic Tan booth. 13. Now the booth is ready for use (Refer to: Operating your Mystic Tan Tanning Booth - with Remote Display.)
Rooftop Control Box
NETWORK REMOTE
“Daisy chain” to next booth.
RJ22 Jack
20 20 20 20 20 20 20 20
T-Max Manager KEY
*Mystic Tan Inc. and their installers provide technical support for the Remote Display application only. Contact your Network Timer representative for T-Max or Intellitan Manager network support.

© 2004 Mystic Tan, Inc. All rights reserved Mystic Tan, Inc. 13800 Senlac Drive Farmers Branch, TX 75234 (877) 668-8826 4/26/2005
9
Viewing your Session Counter with the Remote Display
The Session Counter keeps a running total for each time the booth is activated. Viewing and modifying the Session Counter:
1. If using a Network to operate your booth, you will need to turn off the main power to the Mystic Tan booth and disconnect the Network cables from your Timer Interface Box. Plug the Remote Display cable into the single RJ22 jack located on the Timer Interface box (Refer to: Remote Display Installation). Turn the main power to the Mystic Tan booth back on (the Remote Display box will power up and read (0).
2. Using the Remote Display, press the Start/Stop button and UP Arrow simultaneously until the (.1) appears on the display.
3. Press the Up arrow until it reads (.5) on the display. 4. Press and release the Start/Stop button.
Now a solid decimal point will appear on your display. This will be followed by a sequence of flashing numbers followed by a pause. The first two numbers are the thousands and hundreds digits (Image A). The second sequence of numbers are the tens and one digits (Image B). Example:
5. To reset the session counter back to zero, press the Up and Down-Arrow simultaneously until two flashing zeros (0.0) appear.
6. To modify the session counter, press and hold the Up or Down-Arrow until the desired session count is flashing. (Session counts are generally changed when replacing the timer interface).
7. Press and release the Start/Stop button. A solid five (.5) will appear on the display. 8. To exit hold the UP and Down Arrows simultaneously until the display reads zero (0). 9. If using a Network to operate your booth, you will need to turn off the main power to the Mystic
Tan booth and disconnect the Remote Display cable from the Timer Interface box. Reconnect the network cables to your Timer Interface Box and turn the main power to the Mystic Tan booth back on.
Three thousand eight hundred
(3800)
Forty-Seven (47)
Flashing Flashing
Start/Stop Mystic Tan Display
Remote Display
Start/Stop Mystic Tan Display
Remote Display
Image A Image B

© 2004 Mystic Tan, Inc. All rights reserved Mystic Tan, Inc. 13800 Senlac Drive Farmers Branch, TX 75234 (877) 668-8826 4/26/2005
10
MagneTan Technology
MagneTan™ is our patented process that uses the body's natural magnetic properties to attract Mystic Tan Tanning Myst to every exposed surface of the skin. When our exclusive Mystic Tan Tanning Myst passes through the spray nozzles in a Mystic Tan booth, the micro-myst particles are polarized, taking on the characteristics of "tiny magnets." These particles are attracted evenly to the skin to create a smooth, natural-looking tan.
Basic magnetic and electromagnetic theory:
For Example: Rubbing a balloon with a cloth: Rubbing a balloon with a cloth will build up excess electrons on the balloon. The balloon will then be attracted to the wall.
This basic principle is the foundation for MagneTan technology. Like a balloon induced with excess electrons, the MagneTan nozzle induces excess electrons to the surface of the tanning myst droplets, which are then attracted to the body… like the balloon to the wall.
Like charges repel
Opposite charges attract
MagneTan Nozzle

© 2004 Mystic Tan, Inc. All rights reserved Mystic Tan, Inc. 13800 Senlac Drive Farmers Branch, TX 75234 (877) 668-8826 4/26/2005
11
Multiple Tanning Levels The Mystic Tan booth is equipped with multiple tanning levels. Each level utilizes a specific mixture of time, volume, and spray patterns, allowing the salon owner to offer customized tanning to each individual’s needs.
Level 1: Tanning Duration: 24 seconds (Front) 12 seconds, (Back) 12 seconds. Customer experience: Beginner Skin Type: Light Tanning color: Light to medium.
Level 2: Tanning Duration: 28 seconds (Front) 15 seconds, (Back) 12 seconds. Customer experience: Beginner/Experienced Skin Type: Medium/Dark Tanning color: Medium/Dark
Level 3: Tanning Duration: 36 seconds (Front) 18 seconds, (Back) 18 seconds. Customer experience: Experienced/Advanced Skin Type: Medium/Dark Tanning color: Dark/Very Dark
Due to different skin types, body shapes and desired color, multiple tanning levels are offered. Multi-Myst: Innovation Series MTI- 5000 / MTI- 4000 (optional). This feature allows you the option of offering two different types of tanning myst (with or without bronzer). Tanning Myst selection is controlled at the point of sale by utilizing specific codes or if you are using POS software, convert codes to minutes. Refer to Level information (above) to make the appropriate selection. Example: Sending time of 22 minutes = Code 22 (Level 2 / ClearMyst™)
11 = Level 1 / BronzMyst™
12 = Level 2 / BronzMyst™
13 = Level 3 / BronzMyst™
21 = Level 1 / ClearMyst™
22 = Level 2 / ClearMyst™
23 = Level 3 / ClearMyst™
Multi-Myst Chart

© 2004 Mystic Tan, Inc. All rights reserved Mystic Tan, Inc. 13800 Senlac Drive Farmers Branch, TX 75234 (877) 668-8826 4/26/2005
12
Operating your Mystic Tan booth with Remote Display
The Mystic Tan booth has three (3) different levels of gradient tans:
The Remote Display has only three status modes:
(O) = Ready Status (40.) = Delay Status
(Flashing decimal point)
(40.) = In-Use (on) Status (..) = Dirty Bed Status (Counts down from 40 to 0)
Start/Stop Mystic Tan Display
REMOTE
Start/Stop Mystic Tan Display
REMOTE
Start/Stop Mystic Tan Display
REMOTE
Start/Stop Mystic Tan Display
REMOTE
Level 1 = Display 11 (24 Second Tanning
Session)
Level 2 = Display 12 (27 Second Tanning
Session)
Level 3 = Display 13 (36 Second Tanning
Session)
Level 1 = Display 11(24 Second Tanning
Session)
Level 2 = Display 12(27 Second Tanning
Session)
Level 3 = Display 13(36 Second Tanning
Session)
Tanning Myst (BronzMyst™) Tanning Myst (ClearMyst™)
Start/Stop Mystic Tan Display
REMOTE
Multi-Myst LevelsStandard Levels

© 2004 Mystic Tan, Inc. All rights reserved Mystic Tan, Inc. 13800 Senlac Drive Farmers Branch, TX 75234 (877) 668-8826 4/26/2005
13
Operating your Mystic Tan booth with Remote Display (continued): Important: Read the “Important Fail-safe” before operating your Mystic Tan Booth. Enabling the Mystic Tan booth: To enable the Mystic Tan booth for customer usage, the Remote Display must be in “Ready Status” (solid zero {0}). Scroll “up” using the left arrow key to the desired level. You will have three level choices; Level 1, 2, and 3 (Refer to: Multiple Tanning Levels). After choosing the desired level, press the “Start/Stop” button, now four things will happen in succession: 1. Your Remote Display will show solid forty (40.), with a flashing decimal point in the lower right corner indicating “Delay Status.” 2. Approximately 10 seconds after the level information has been sent to the booth, an automated message will state: MTI - 4000: “Welcome to Mystic Tan. After entering the booth securely close the door, then hold your hand in front of the touch free start sensor to begin your session.” This message will repeat itself every 60 seconds until the door or session is activated. MTI - 5000: “Welcome to Mystic Tan. To enter booth, hold your hand in front of the touch free door sensor. Once inside, use the inner door sensor to close.” This message will repeat itself every 60 seconds until the door or session is activated. 3. The fan will activate at a low speed and then increase during the tanning session. 4. The Touch-Free Start Sensor will “enable” along with an accompanying green ready light (inside booth). Customer Enters the Booth: The customer will be instructed to close the door from inside of the booth using the inner-door sensor. Once the customer responds and the door is closed, the automated voice will state: MTI- 4000: No message (does not apply). MTI- 5000: “Now hold your hand in front of the start sensor.” Note: If for any reason the customer skips closing the door and proceeds to activate the touch-free start sensor. The session will still start and proceed to automatically close the door. Once the Touch-Free Start Sensor has been activated, the automated voice will state: “Session activated. Please stand on the MagneTan plate, the spray will begin in five seconds… four… three… two… one…” Tanning will begin with the front side application. Once the session has been activated, your Remote Display will begin counting down from 40 seconds, changing the Remote Display from “Delay Status” to “In-Use (run) Status”. Once front application is almost completed the automated voice will state: “When spraying stops, please turn around to complete your application.” “The spray will resume in five seconds… four… three… two… one…” Note: The customer will have 10-seconds in between the front & back application.
Continued…

© 2004 Mystic Tan, Inc. All rights reserved Mystic Tan, Inc. 13800 Senlac Drive Farmers Branch, TX 75234 (877) 668-8826 4/26/2005
14
Operating your Mystic Tan booth with Remote Display (continued): Five seconds before the completion of the session the automated voice will state: MTI- 4000: “When spraying stops, please exit the booth. Thank you for choosing Mystic Tan.” MTI- 5000: “When spraying stops, please wait. The door will automatically open. Thank you for choosing Mystic Tan.” The door will automatically open stating: “Door opening”.
Exhaust Fan: Once the session is complete, the Exhaust Fan will continue running for one minute. Dirty Bed Status: Now, the “Clean/Reset Indicator” (middle Amber colored light on the Wall Mount Box) will solidly illuminate indicating that the booth is in “Dirty Bed Status”. Dirty Bed Status is indicated by two solid decimal points on the Remote Display (..). Resetting the Booth: The Timer Display will remain in “Dirty Bed Status” (two decimal points {..}) until the booth has been reset. Once the bed has been properly wiped down, the employee needs to press the “Clean/Reset” button located on the Wall Mount Box. The Amber light will turn off and the Remote Display will return to “Ready Status” with a solid zero (0) enabling use for your next customer. Note:
• (A): “Clean/Reset” button should not be pressed until booth has been manually “wiped down”. This will eliminate “False Starts”.
• (B): If at anytime an additional cleaning cycle is needed, please follow “Automated Wash Down” instructions, followed by the “Resetting the Booth” instructions.
Canceling Session: If customer changes his/her mind on desired level and the booth has not been started, simply press the Set and Start/Stop buttons simultaneously to return to Ready Mode. If using POS/Salon Software, sending time of one-minute will also reset the booth and return the booth to Ready Mode.
(Green) (Amber) (Red)
Clean
Reset Main Power
MA I N
POWER
ON
C L EAN
RE S E T
LOW
FLUIDS
Wall Mount Box
Using the Automated Cleaning Cycle: An employee will need to physically enter the room and manually press the “Clean/Reset” button located on the Wall Mount Box beside the Mystic Tan booth. Once the employee presses the “Clean/Reset” button, the door will automatically close and seal. The automated voice will state: “Cleaning cycle activated”. After the one-minute cleaning cycle, the exhaust fan will immediately activate at a high RPM for approximately 20-seconds. After completion, the Amber light on the Wall Mount Box will continuously flash until the booth has been reset. The booth will not accept another session until the “Clean/Reset” procedures have been completed.

© 2004 Mystic Tan, Inc. All rights reserved Mystic Tan, Inc. 13800 Senlac Drive Farmers Branch, TX 75234 (877) 668-8826 4/26/2005
15
Operating your Mystic Tan booth with T-Max Manager
The Mystic Tan booth has three (3) different levels of gradient tans:
The T- Max Manager has three Status Modes:
(O) = Ready Status (40.) = Delay Status (Flashing decimal point)
(40.) = In-Use (on) Status (..) = Dirty Bed Status (Counts down from 40 to 0)
T-Max ManagerKEY
Level 1 Display 11 Min.
(24 Second Tanning Session)
Level 2 Display 12 Min.
(27 Second Tanning Session)
Level 3 Display 13 Min.
(36 Second Tanning Session)
Level 1 Display 11 Min.
(24 Second Tanning Session)
Level 2 Display 12 Min.
(27 Second Tanning Session)
Level 3 Display 13 Min.
(36 Second Tanning Session)
T-Max Manager
0.
KEY
0 0. 0. 0. 0. 0.
T-Max Manager
0.
KEY
40. 0. 0. 0. 0. 0.
T-Max Manager
0.
KEY
40. 0. 0. 0. 0. 0.
T-Max Manager
0.
KEY
. . 0. 0. 0. 0. 0.
Tanning Myst (BronzMyst™) Tanning Myst (ClearMyst™)

© 2004 Mystic Tan, Inc. All rights reserved Mystic Tan, Inc. 13800 Senlac Drive Farmers Branch, TX 75234 (877) 668-8826 4/26/2005
16
Operating your Mystic Tan booth with T-Max Manager (continued): Important: Read the “Important Fail-safe” before operating your Mystic Tan Booth. Enabling the Mystic Tan booth: To enable the Mystic Tan booth for customer usage, it must be in the “Ready Status Mode” (solid zero {0}). You will have three level choices; Level 1, 2, and 3 (Refer to: Multiple Tanning Levels). After sending the desired “level” information to the booth, four things will happen in succession: 1. Your T-Max Manager will show solid forty (40.), with a flashing decimal point in the lower right corner indicating “Delay Status”. 2. Approximately 10 seconds after level information has been sent to booth, an automated message will state: MTI - 4000: “Welcome to Mystic Tan. After entering the booth securely close the door, then hold your hand in front of the touch free start sensor to begin your session.” This message will repeat itself every 60 seconds until the door or session is activated. MTI-5000: “Welcome to Mystic Tan. To enter booth, hold your hand in front of the touch free door sensor. Once inside, use the inner door sensor to close.” (Message will repeat itself every 60 seconds until the door is activated). 3. The fan will activate at a low speed and then increase during the tanning session. 4. The Touch-Free Start Sensor will “enable” along with an accompanying Green light (inside booth). Customer Enters the Booth: The customer will be instructed to close the door from inside of the booth using the inner-door sensor. Once the customer responds and the door is closed, the automated voice will state: MTI- 4000: No message (does not apply). MTI- 5000: “Now hold your hand in front of the start sensor.” Note: If for any reason the customer skips closing the door and proceeds to activate the touch-free start sensor. The session will still start and proceed to automatically close the door. Once the Touch-Free Start Sensor has been activated, the automated voice will state: “Session activated. Please stand on the MagneTan plate, the spray will begin in five seconds… four… three… two… one…” Tanning will begin with the front side application. Once the session has been activated, your T-Max Manager will begin counting down from 40 seconds, changing the T-Max Manager from “Delay Status” to “In-Use (run) Status”. Once front application is almost completed the automated voice will state: “When spraying stops, please turn around to complete your application.” “The spray will resume in five seconds… four… three… two… one…” Note: The customer will have 10-seconds in between the front & back application.
Continued…

© 2004 Mystic Tan, Inc. All rights reserved Mystic Tan, Inc. 13800 Senlac Drive Farmers Branch, TX 75234 (877) 668-8826 4/26/2005
17
Operating your Mystic Tan booth with T-Max Manager (continued): Five seconds before the completion of the session the automated voice will state: MTI- 4000: “When spraying stops, please exit the booth. Thank you for choosing Mystic Tan.” MTI- 5000: “When spraying stops, please wait. The door will automatically open. Thank you for choosing Mystic Tan.” The door will automatically open stating: “Door opening”. Exhaust Fan: Once the session is complete, the Exhaust Fan will continue running for one minute.
Dirty Bed Status: Now, the “Clean/Reset Indicator” (middle Amber colored light on the Wall Mount Box) will solidly illuminate indicating that the booth is in “Dirty Bed Status”. Dirty Bed Status is indicated by two solid decimal points on the T-Max Manager (..). Resetting the Booth: The Timer Display will remain in “Dirty Bed Status” (two decimal points {..}) until the booth has been reset. Once the bed has been properly wiped down, the employee needs to press the “Clean/Reset” button located on the Wall Mount Box. The Amber light will turn off and the Remote Display will return to “Ready Status” with a solid zero (0) enabling use for your next customer. Note:
• (A): “Clean/Reset” button should not be pressed until booth has been manually “wiped down”. This will eliminate “False Starts”.
• (B): If at anytime an additional cleaning cycle is needed, please follow “Automated Wash Down” instructions, followed by the “Resetting the Booth” instructions.
Canceling Session: If customer changes his/her mind on desired level and the booth has not been started, simply press the Set and Start/Stop buttons simultaneously to return to Ready Mode. If using POS/Salon Software, sending time of one-minute will also reset the booth and return the booth to Ready Mode.
Using the Automated Cleaning Cycle: An employee will need to physically enter the room and manually press the “Clean/Reset” button located on the Wall Mount Box beside the Mystic Tan booth. Once the employee presses the “Clean/Reset” button, the door will automatically close and seal. The automated voice will state: “Cleaning cycle activated”. After the one-minute cleaning cycle, the exhaust fan will immediately activate at a high RPM for approximately 20-seconds. After completion, the Amber light on the Wall Mount Box will continuously flash until the booth has been reset. The booth will not accept another session until the “Clean/Reset” procedures have been completed.
(Green) (Amber) (Red)
Clean
Reset Main Power
MAIN
POWER
ON
C L EAN
RE S E T
LOW
FLUIDS
Wall Mount Box

© 2004 Mystic Tan, Inc. All rights reserved Mystic Tan, Inc. 13800 Senlac Drive Farmers Branch, TX 75234 (877) 668-8826 4/26/2005
18
Door Hold Open Door Hold Open Status: Innovation Series MTI- 5000 ONLY To place the door in open status mode, you must simultaneously hold your hand in front of the booths inside and outside touch-free door sensors (see below). Once completed the automated message will state: “Door held open.” The Door Hold Open Status is commonly used for ventilating the booth overnight and for cleaning purposes. It is also a tool used while showcasing the booth. To “unlock” Door Hold Open Status, repeat simultaneous stimulation of inside and outside door motion sensors. Note: While in Door Hold Open Status the start sensor is deactivated. If the booth is in Door Hold Open Status, and a level is sent, the Door Hold Open Status will automatically disengage.
Mechanical Wall
Outside Wall
Outside Door Sensor
Inside Door Sensor
Outside Door Sensor
Inside Door Sensor
To place the door in door hold open status, you must simultaneously hold
your hand in front of both of the booths inside and outside door motion sensors.

© 2004 Mystic Tan, Inc. All rights reserved Mystic Tan, Inc. 13800 Senlac Drive Farmers Branch, TX 75234 (877) 668-8826 4/26/2005
19
Operating your Mystic Tan Booth Manually Manual Mode: Manual Mode aka “Hot Mode” allows employee to operate the Mystic Tan Tanning booth (in Level 2 mode) without use of the Remote Display or the T-Max Manager timer systems. This mode is often used by technicians to troubleshoot as well as by salon managers to manually circumvent inoperative equipment (i.e. timer networks or computer systems.) Enabling Manual Mode:
1. Turn-off main power located on the Wall Mount Box. 2. Open mechanical wall. 3. Locate Mechanical Rooftop Hatch (directly behind and above mechanical wall). 4. Remove locknut and lower hatch. 5. Use a flathead screwdriver to remove the lid of the gray Roof Control Box. 6. Locate silver toggle switch inside Control Box and flip to “Manual Tan Enable”. 7. Once completed, close control box lid and tighten screws. 8. Close and secure the Mechanical Rooftop Hatch with locknut. 9. Turn main power back on.
Once main power has been turned back on, the Green Power On light will illuminate on the Wall Mount Box along with an automated message response “Door Closing”. The automated message will also state: “Welcome to Mystic Tan. To enter booth, hold your hand in front of the touch free door sensor. Once inside, use the inner door sensor to close.” (This message will not repeat itself every 60 seconds like it would in standard operating mode). From this point the Mystic Tan Tanning Booth will respond as if you had sent a level 2 tanning session. Note:
• (A): During Manual Mode, you are only allowed to use the automated cleaning cycle once after your tanning session is complete. Consecutive wash cycles are not available in manual mode.
• (B): Using the Door Held Open feature after resetting the booth will eliminate false starts (refer to page 15 “Door Hold Status”.
Resetting booth while in Manual Mode: Once the booth has gone through the automated cleaning cycle and has been wiped down, the employee needs to press the “Clean/Reset” button on the Wall Mount Box. Once “Clean/Reset” has been pressed the Amber light will turn-off and the Mystic Tan Tanning Booth will return to “Enable Mode” permitting use for your next customer at level 2 only.
Rooftop Control Box The “Manual Mode Enable” switch is
located in the Rooftop Control
Box.
© 2004 Mystic Tan, Inc. All rights reserved Mystic Tan, Inc. 13800 Senlac Drive Farmers Branch, TX 75234 (877) 668-8826 4/26/2005
20
SECTION 2
EQUIPMENT MAINTENANCE
© 2004 Mystic Tan, Inc. All rights reserved Mystic Tan, Inc. 13800 Senlac Drive Farmers Branch, TX 75234 (877) 668-8826 4/26/2005
21
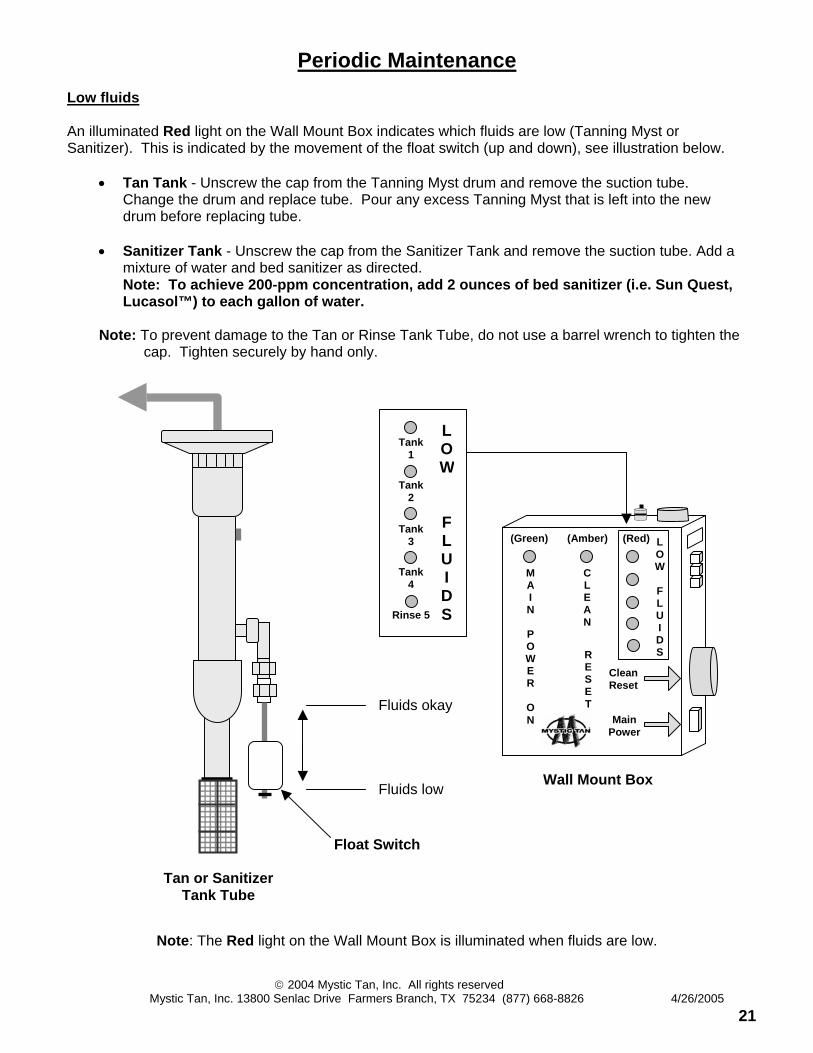
Periodic Maintenance Low fluids An illuminated Red light on the Wall Mount Box indicates which fluids are low (Tanning Myst or Sanitizer). This is indicated by the movement of the float switch (up and down), see illustration below.
• Tan Tank - Unscrew the cap from the Tanning Myst drum and remove the suction tube.
Change the drum and replace tube. Pour any excess Tanning Myst that is left into the new drum before replacing tube.
• Sanitizer Tank - Unscrew the cap from the Sanitizer Tank and remove the suction tube. Add a
mixture of water and bed sanitizer as directed. Note: To achieve 200-ppm concentration, add 2 ounces of bed sanitizer (i.e. Sun Quest, Lucasol™) to each gallon of water.
Note: To prevent damage to the Tan or Rinse Tank Tube, do not use a barrel wrench to tighten the cap. Tighten securely by hand only.
Fluids okay
Fluids low
Note: The Red light on the Wall Mount Box is illuminated when fluids are low.
MAIN
POWER
ON
C L EAN
RE S E T
LOW
FLUIDS
LOW
FLUIDS
Tank 1
Tank 2
Tank 3
Tank 4
Rinse 5
(Green) (Amber) (Red)
Clean Reset
Main Power
Wall Mount Box
Tan or Sanitizer Tank Tube
Float Switch

© 2004 Mystic Tan, Inc. All rights reserved Mystic Tan, Inc. 13800 Senlac Drive Farmers Branch, TX 75234 (877) 668-8826 4/26/2005
22
Periodic Maintenance Air Solenoid Regulator There are two different air pressure readings to monitor - Running Pressure and Sitting Pressure. Running Pressure: The Running Pressure is manually set during the tanning session. The tanning booths Running Air Pressure should not exceed (52 PSI) due to variable tanning results or drop below (48 PSI) which would automatically disable the booth. The Air Solenoid Regulator is mounted behind the mechanical wall on the upper left corner. To set pressure:
1. Make sure your Air Compressor Tank Gauge is reading between 115-120 psi and the air supply hose is open to full capacity.
2. Open mechanical wall. 3. Locate Air Solenoid Regulator mounted on the backside of the mechanical wall. 4. Unlock Air Solenoid Regulator by pulling the adjustment knob outwards. 5. Activate a tanning session. 6. During the tanning session, adjust Air Pressure Setting by turning adjustment knob (clockwise or
counter clockwise). 7. Once the appropriate setting is reached, lock air adjustment knob back in place by pushing knob
inwards. Running Pressure: (48 - 52 PSI) Sitting Pressure: The Sitting Pressure is a result of setting the Running Pressure. It usually runs 8 to 10 PSI more than the Running Pressure depending on the distance from the compressor to the booth). Sitting Pressure: 58 - 62 PSI
Note: If Sitting Pressure drops below 46 PSI, the unit will not accept or activate a tanning session. Instead, the automated voice response will state, “Please contact the attendant.”
Air Adjustment Knob
Air Solenoid Regulator
Air Pressure Tank Gauge

© 2004 Mystic Tan, Inc. All rights reserved Mystic Tan, Inc. 13800 Senlac Drive Farmers Branch, TX 75234 (877) 668-8826 4/26/2005
23
Periodic Maintenance Door Air Cylinder (opening/closing) Innovation Series MTI- 5000 ONLY The customer door is operated by air pressure. To regulate the speed of the door opening and closing, you must set the Door Air Regulator first, and then the door speed. The Door Air Regulator is mounted behind the mechanical wall on the electronics roof hatch. To set the air pressure and door speed:
1. Open mechanical wall. 2. Locate Mechanical Rooftop Hatch (directly behind and above mechanical wall). 3. Remove locknut and lower hatch. 4. Unlock Air Regulator Adjustment Knob by pulling knob outwards, mounted on the bottom side
of the roof hatch. 5. Adjust Air Regulator by turning adjustment knob. 6. Adjust gauge to the appropriate air pressure setting (Door Air Regulator: 20 - 25 PSI). 7. Lock Air Regulator Adjustment Knob by pushing the knob inwards. 8. Locate Door Speed Adjustment Valves located on the side of the block manifold. 9. Activate door sensor. 10. Determine which door function needs to be adjusted (open or close). 11. Opening and closing actions are handled separately. Loosen the appropriate (open/close)
silver locknut. 12. Adjust Door Speed Adjustment Valve by turning clockwise to decrease or counter clockwise
to increase. Door speed is left to the salon’s discretion. 13. Continue to open and close the door until desired speed is determined. 14. Once desired speed is obtained, tighten silver locknut to lock in your setting. 15. Close and secure Mechanical Rooftop Hatch with locknut.
Door speed adjustment valves
Incoming air
Manifold Block
Air Regulator Adjustment Knob
Air Gauge
DOOR AIR CYLINDER CLOSE OPEN

© 2004 Mystic Tan, Inc. All rights reserved Mystic Tan, Inc. 13800 Senlac Drive Farmers Branch, TX 75234 (877) 668-8826 4/26/2005
24
Periodic Maintenance Meter Calibration: The Mystic Meter is designed to dispense a calculated amount of tanning myst based on each tanning level (1, 2 and 3). To maintain the correct spray volume level, the Mystic Meter must be periodically checked and calibrated if needed. It could take several attempts to complete this process. The Mystic Meter is mounted behind the mechanical wall. To check calibration, you will need to follow these steps:
1. Open mechanical wall. 2. Locate Air Solenoid Regulator and disconnect the power cable (Refer to: Air Solenoid Regulator).
This will eliminate air blowing through the Nozzle Cones during the calibration process. 3. Locate the Spray Housing Motor and disconnect it’s power cable. This will eliminate the Spray
Housing from rotating up and down. 4. By hand, rotate the Spray Housing to face downwards. 5. Set the Mystic Tan booth for a Level 2 tanning session. Calibrating Level 2 will automatically
update levels 1 and 3. 6. Using three measuring cups (that measure in milliliters), hold the cups under all three spray
nozzles and start the tanning session (level 2) this may take two people. If only using one measuring cup you will need to run three consecutive tanning sessions (one for each nozzle).
7. After session add all three cups together to get the total volume (Target range 126 to 132 ml.) 8. To adjust spray volume, remove the Mystic Meter from the Mechanical Wall (being careful not to
disconnect any wiring or hoses). With its backside facing you, locate the volume adjustment knob as seen below. To adjust spray volume, turn the adjustment knob counter clockwise to decrease, or turn clockwise to increase. Make only a 1/8th of a turn or less per adjustment.
9. Place the meter back on the wall and repeat steps 5 thru 8 until the proper level is reached.
50 0
100 150 126 to
132 ML. (Level 2)
Mystic Meter Front
Mystic Meter Back
Volume Adjustment
Knob (side view)
42 to 44 ML.
(Level 2)
Spray Housing (Flow Test)

© 2004 Mystic Tan, Inc. All rights reserved Mystic Tan, Inc. 13800 Senlac Drive Farmers Branch, TX 75234 (877) 668-8826 4/26/2005
25
Periodic Maintenance Adjusting Speaker Volume (Internal/External) The speaker volume is solely based on the salon owner’s preference. Please take into consideration that the internal speaker must overcome the noise produced by the spray nozzles. The external speaker should be loud enough so that the customer can comprehend the commands without disturbing the rest of the salon patrons. The internal speaker plays every message and the external speaker is only used for outside commands. The speaker volume adjustment rheostats are mounted on the side of the Rooftop Control Box. They can be accessed by lowering the Control Box Hatch or by using a stepladder.
1. Open mechanical wall. 2. Locate Mechanical Rooftop Hatch (directly behind and above mechanical wall). 3. Remove locknut and lower hatch. 4. Locate volume adjustment rheostats. 5. Hold your hand in front of the outside touch-free door sensor to play both speakers at once.
Or hold you hand in front of the inside door sensor to hear just the inside speaker. 6. Make the appropriate adjustments by turning the rheostat counter clockwise to decrease
volume, or turn clockwise to increase. 7. Close and secure Mechanical Rooftop Hatch with locknut.
The speaker volume adjustment rheostats are
mounted on the side of the Rooftop Control Box.
Rooftop Control Box
Speaker In
Speaker Out
Side view of adjustment rheostats

© 2004 Mystic Tan, Inc. All rights reserved Mystic Tan, Inc. 13800 Senlac Drive Farmers Branch, TX 75234 (877) 668-8826 4/26/2005
26
Daily Cleaning Touch-Free Sensors: Keeping your Motion Sensor(s) clean throughout the day (free of barrier cream) will eliminate false triggering as well as improve response time. Use an ammonia-free glass cleaner or tanning bed sanitizer with a soft cloth. Cleaning the Mystic Tan Tanning Booth: At the end of each day, to protect against harsh odors, harmful bacteria and viruses, strictly adhere to the following procedures.
(Interior)
Floor Grates and Floor Pan:
With the water hose provided in the mechanical room completely rinse-off floor grates and tub allowing the pump to remove the days debris. This will eliminate the build-up that causes odors and potential problems with the drain pump and float sensors.
Customer Door, Walls, Ceiling and Spray Housing:
Using the water hose, completely rinse-off the interior walls, door, ceiling and spray housing. This will remove all excess tanning myst that may have been missed during the automated cleaning cycle. Then disinfect the booths interior using a tanning bed sanitizer with a soft cloth.
After cleaning the interior, use the Door Hold Open Status (MTI- 5000 only). Leave the door open overnight to help dry the booth and keep your booth smelling fresh.
(Exterior)
Customer Door, Roof and (Acrylic Door Sign MTI- 4000 only):
Since these items are made of acrylic, using a tanning bed sanitizer with a soft non-abrasive cloth will safely remove fingerprints and smudges.
Decorative Panels and Light Header Innovation Series MTI- 5000 / MTI- 4000 (optional).
Using either an ammonia-free glass cleaner or tanning bed sanitizer with a soft non-abrasive cloth will safely remove fingerprints and smudges.
Note: Exterior decorative panels and light header are highly reflective surfaces and can show scratches easily. For this reason, cotton towels and paper towels are not recommended for cleaning these items.
The Mystic Tan Manufacturer’s Warranty does not cover damage caused by the use of harsh and abrasive cleaners. Important - The water supply to your booth must be turned off at the end of each day! The shutoff value should be easily accessible and located at the end of your in-room water source. Using the shutoff valve located in the Mystic Tan booth will not protect the salon from water damage caused by a failed connecting hose. Mystic Tan is in not responsible for the integrity of supply line hoses. To maintain compliance with city codes, please consult with your plumbing contractor.

© 2004 Mystic Tan, Inc. All rights reserved Mystic Tan, Inc. 13800 Senlac Drive Farmers Branch, TX 75234 (877) 668-8826 4/26/2005
27
Weekly Cleaning Exhaust Fan Filter Remove wing nut from the top of the shroud. Remove shroud. While the blue filter element is still in place, thoroughly rinse out the filter element using the provided water hose. It is safe to operate your Mystic Tan booth while the filter element is still wet.
Inline Strainer The Inline Strainer is located under the tan tank stand behind the mechanical wall. Before cleaning, turn off the main power to the Mystic Tan booth. Unscrew the cap from the Inline Strainer and remove the screen. Remove all debris from screen and cap by rinsing in tap water. Replace screen and screw cap on securely.
Mechanical Wall Remove wing
nut and lift off shroud hood.
Using the provided spray
hose, thoroughly
rinse out the filter element.
STEP 1 STEP 2
DRAIN PUMP
Inline Strainer
Remove the filter from the Inline
Strainer. Rinse the filter and the cap with water.
DO NOT OPEN PUMP - NO
FILTER INSIDE
Drain Pump: 2.8 GPM @ 10 Ft Head, 60 Ft Max

© 2004 Mystic Tan, Inc. All rights reserved Mystic Tan, Inc. 13800 Senlac Drive Farmers Branch, TX 75234 (877) 668-8826 4/26/2005
28
Monthly Cleaning Floor Grates Use a sponge or a soft rag with a mixture of water and liquid dishwashing soap to clean both sides of the grates. To clean the underside, lift or remove the floor grates and thoroughly rinse. To remove the floor grate with the Magna Tan™ positioning plate, you must detach the ground wire first. The grate in the mechanical room is not to be removed. Floor Pan To clean the Floor Pan, use a sponge or a scrub brush with a mixture of water and liquid dishwashing soap. Thoroughly rinse and remove all of the dirty water that remains by holding the float switch in the “up” position or use a wet-vac. Acrylic Roof:
Using a tanning bed sanitizer with a soft non-abrasive cloth will safely remove dust and dirt from the topside of the acrylic ceiling. Interior Walls:
Use a sponge or a soft rag with a mixture of water and liquid dishwashing soap to thoroughly clean the booths Interior. After cleaning, rinse-off the interior using the provided water hose. This will remove any excess build-up that may have been missed during the daily cleaning process. After cleaning the interior, use the Door Hold Open Status (MTI- 5000 only). Leave the door open overnight to help dry the booth and keep your booth smelling fresh.
Floats and Sensor Shafts During the process of cleaning your floor grates and pan, be sure to always clean the Float and Sensor Shafts. This will eliminate any sticking of the floats in the “on” or “off” position. The sensor shafts must remain clean allowing the float to move freely. Clean the floats and sensor shafts with a mixture of water and liquid dishwashing soap. To have complete access to the Float Assembly, fold the assembly up. After cleaning, be sure to return the Float Assembly back into the “down” position.
DRAIN PUMP FLOAT
ON
FLOAT OFF
SENSOR SHAFT
EMERGANCY SHUT OFF
FLOAT

© 2004 Mystic Tan, Inc. All rights reserved Mystic Tan, Inc. 13800 Senlac Drive Farmers Branch, TX 75234 (877) 668-8826 4/26/2005
29
Condensation Air Filter Disconnect the air supply hose from the Mystic Tan booth. Unscrew the clear plastic filter tube from the bottom of the Air Regulator and remove filter. Wash the filter and the clear plastic tube housing with a mixture of water and liquid dishwashing soap (see illustration below). Replace the filter in the clear plastic housing and screw the housing securely back into place.
Cleaning the Condensation Air Filter
From Air
Compressor
To Air Solenoid
Condensation Air Filter
Monthly Cleaning

© 2004 Mystic Tan, Inc. All rights reserved Mystic Tan, Inc. 13800 Senlac Drive Farmers Branch, TX 75234 (877) 668-8826 4/26/2005
30
Monthly Cleaning
Draining air compressor tank:
To protect against risk of corrosion, you must drain the moisture from the air compressor tank. Before draining, you must first turn off the main power to the Air Compressor, and then reduce air tank pressure below 10 psi (see note below). After pressure has been reduced, unscrew the Drain Valve at the bottom of the Air Compressor slowly, allowing condensation to drain.
Air compressor oil:
It is very important to maintain the proper oil level at all times. Turn the power to the air compressor off, and then remove the dipstick to check the oil level. If the oil level is “low”, add small amounts of oil, secure the dipstick and run the compressor for approximately 1 minute. Repeat the above process until an optimum oil level has been achieved. Spray Nozzle Cones:
Step 1. Before cleaning the cones, turn off the main power to the Mystic Tan booth. The Spray Nozzle Cones may be locked into place with a nylon setscrew, that’s located directly underneath the cone. If so, using a Flathead Screwdriver remove the setscrew by turning it counterclockwise. Then using your hand, remove the cone by unscrewing it counter clockwise. “ Do not reuse the Nylon Setscrews” Continued…
Note: To reduce air tank pressure, pull the “Safety
Valve” located next to the “on-off” switch.
AIR COMPRESSOR
MOTOR
DRAIN VALVE
SAFETY VALVE
Nylon Setscrew
Spray Nozzle Cone

© 2004 Mystic Tan, Inc. All rights reserved Mystic Tan, Inc. 13800 Senlac Drive Farmers Branch, TX 75234 (877) 668-8826 4/26/2005
31
Spray Nozzle Cones (continued): Step 2. Place the Spray Nozzle Cones in a sink with a mixture of hot water and liquid dishwashing soap. Let the cones soak for a few minutes, then using a pipe wick or rolled-up paper towel clean the nozzle cone aperture located in the tip of the cone. Rinse with clean water thoroughly afterwards.
Spray Nozzle Flow Tubes (Only once every 90 days): Step 1. Clean the Spray Nozzle Flow Tubes by inserting the provided cleaning tube brush into the Flow Tube. Using a back and forth motion 2 - 3 times will remove any buildup. Step 2. When replacing the Spray Nozzle Cone, turn the cone clockwise until it begins to feel snug. Align the Spray Nozzle Cone setscrew with the Nylon Mounting Screw located on the spray housing directly underneath the nozzle cone. The setscrew head should be flush against the side of the nozzle cone if properly aligned. Do not over-tighten. Warning: Over cleaning is not suggested and may cause damage to the Spray Nozzle Flow Tubes. Clean only once every 90 days.
Pipe wick
Spray Nozzle Flow Tube
Nylon Mounting Screw Tube Brush

© 2004 Mystic Tan, Inc. All rights reserved Mystic Tan, Inc. 13800 Senlac Drive Farmers Branch, TX 75234 (877) 668-8826 4/26/2005
32
SECTION 3
EQUIPMENT TROUBLE SHOOTING

© 2004 Mystic Tan, Inc. All rights reserved Mystic Tan, Inc. 13800 Senlac Drive Farmers Branch, TX 75234 (877) 668-8826 4/26/2005
33
Important Fail-safes
READ AND UNDERSTAND ALL FAIL-SAFES BEFORE USING THIS PRODUCT
The following fail-safes are designed to prevent equipment problems such as: (equipment damage and customer dissatisfaction). Emergency Shut-Off Fail-safe (Customer can not tan): If the water level in the floor pan exceeds the allowable amount of water, the fail-safe feature will automatically disengage the Water Solenoid that supplies water to the booth (not the water from the wall to the booth). While in Fail-safe mode, you will not be able to send time to the booth or use any of the booths functions. Any attempt to activate the booth or use any of the Touch-free Sensors, will be met with an automated voice response stating: “Please contact the attendant”. The reason for this fail-safe is to eliminate Floor Pan overflow that may damage the salon floor.
• To clear this fault, please refer to Equipment Trouble Shooting. Air Pressure Fail-safe (Customer can not tan): If Sitting Pressure drops below 46 PSI, the fail-safe feature will not allow the booth to accept time or begin a tanning session. While in Fail-safe mode, you will not be able to send time to the booth or use any of the booths functions. Any attempt to activate the booth or use any of the Touch-free Sensors, will be met with an automated voice response stating: “Please contact the attendant”. The reason for this fail-safe is to eliminate tanning at an improper air level (inconsistent tans).
• To clear this fault, please refer to Equipment Trouble Shooting. Drain Pump Fail-safe (Customer can still tan): During the drain pump cycle, if the water level in the floor pan does not decrees below the float level in less than 2 – minutes, the pump will automatically shut-off for 30 seconds. The pump will run again for an additional 2- minutes. If the water level is not decreasing below the float level, the pump will switch to Fail-safe Mode and completely shut-off. While in Fail-safe mode, you will still be able to use the Clean/Reset feature. When using the automated wash down in the Fail-safe mode, the process changes. When you attempt to clean the booth after a session, you will be met with an automated voice response stating: “Please contact the attendant”. The Drain Pump will run again for 2 minutes, pause for 30 seconds, then run again for 2 minutes. If you press the clean/reset button again, the cleaning cycle will activate followed by the pump cycle 2-30-2 again. By pressing the clean/reset button again (3rd time) the booth will reset followed by the pump cycle 2-30-2. The Drain Pump fail-safe mode will continue until the problem has been addressed. The reason for this fail-safe is to eliminate internal damage to the Drain Pump.
• To clear this fault, please refer to Equipment Trouble Shooting. • The pump will continue in Fail-safe Mode until the Fail-safe is cleared.

© 2004 Mystic Tan, Inc. All rights reserved Mystic Tan, Inc. 13800 Senlac Drive Farmers Branch, TX 75234 (877) 668-8826 4/26/2005
34
Important Fail-safes Start Sensor Fail-safe (Customer can not tan): If the Start Sensor malfunctions due to obstruction in room (towel, person) defective eye, or barrier cream build-up (dirty). While in Fail-safe mode, you will not be able to send time to the booth. The wash down cycle is still operational and the customer door is still operational but, everytime the Customer Door opens and closes the automated voice will state: "Please contact the attendant". The reason for this fail-safe is to eliminate false starts. Without this fail-safe, the booth would automatically start due to the obstruction of the lens. To clear this fault, please refer to Equipment Trouble Shooting.
All three of the following fail-safe modes have one thing in common. You cannot set a tanning session (send time) while in these three Fail-safe Modes.
• Step 1: A quick way to identify the “Emergency Shut-off Fail-safe" is to try a wash down cycle. The wash down cycle should not activate while in this mode. If it does activate, proceed to step two.
• Step 2: Try activating the customer door. If the door is still operational (open/close) followed
by the automated voice stating: "Please contact the attendant", you are in "Start Sensor Fail-safe" mode. If the door doesn’t activate (open/close) proceed to step three.
• Step 3: If you can wash down the booth and can not open the door, you are in the "Air Pressure Fail-safe" mode.
Exception: While in “Drain Pump Fail-safe” mode, the booth is still operational for customer use. If the booths water level reaches the Emergency Shut-Off Float, the booth will switch to the “Emergency Shut-off Fail-safe". Note: Mystic Tan strongly advises the salon to address the problem causing the fail-safe rather than continuing to operate the booth in fail-safe mode.
Identifying Failsafe Modes
© 2004 Mystic Tan, Inc. All rights reserved Mystic Tan, Inc. 13800 Senlac Drive Farmers Branch, TX 75234 (877) 668-8826 4/26/2005
35
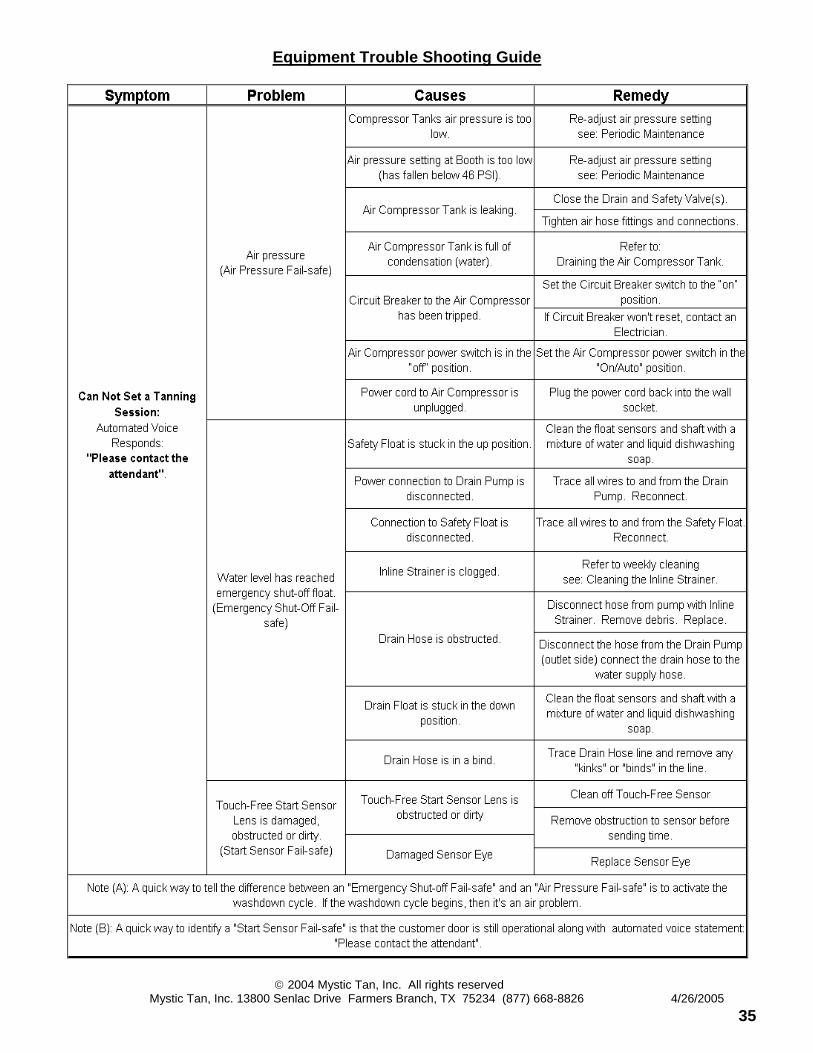
Equipment Trouble Shooting Guide
© 2004 Mystic Tan, Inc. All rights reserved Mystic Tan, Inc. 13800 Senlac Drive Farmers Branch, TX 75234 (877) 668-8826 4/26/2005
36
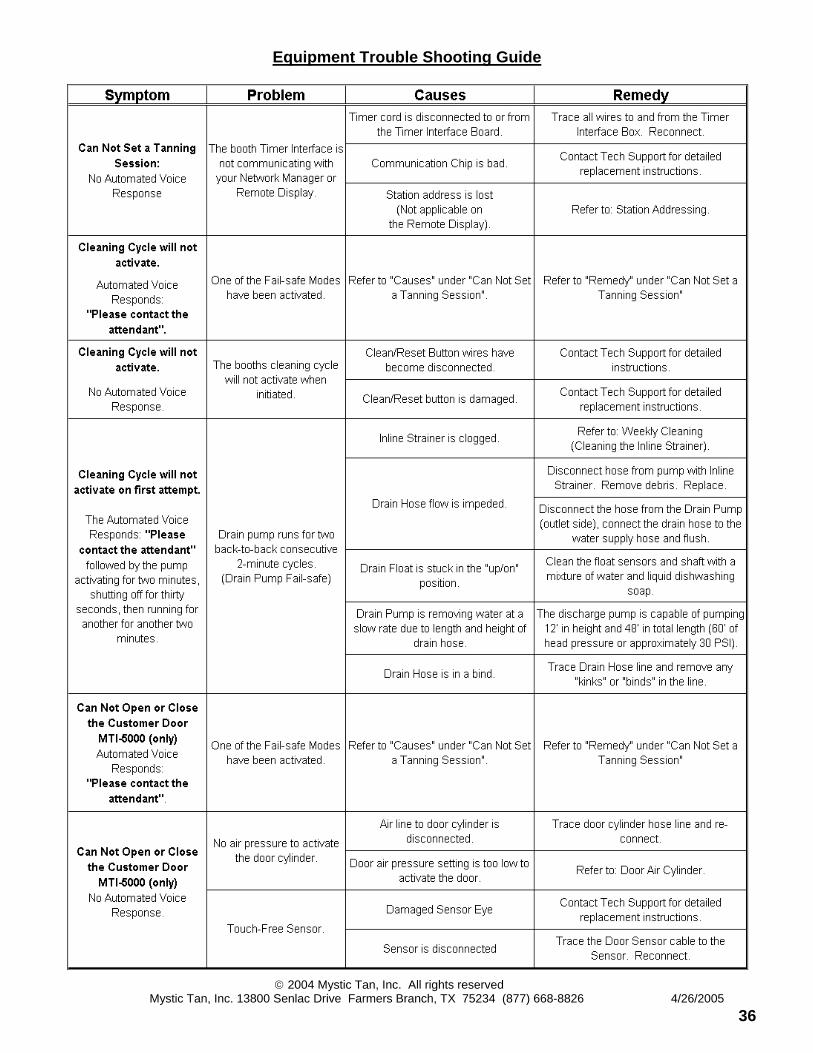
Equipment Trouble Shooting Guide

© 2004 Mystic Tan, Inc. All rights reserved Mystic Tan, Inc. 13800 Senlac Drive Farmers Branch, TX 75234 (877) 668-8826 4/26/2005
37
Equipment Trouble Shooting Guide
© 2004 Mystic Tan, Inc. All rights reserved Mystic Tan, Inc. 13800 Senlac Drive Farmers Branch, TX 75234 (877) 668-8826 4/26/2005
38
SECTION 4
CONSUMER TROUBLE SHOOTING

© 2004 Mystic Tan, Inc. All rights reserved Mystic Tan, Inc. 13800 Senlac Drive Farmers Branch, TX 75234 (877) 668-8826 4/26/2005
39
Consumer Trouble Shooting Guide

© 2004 Mystic Tan, Inc. All rights reserved Mystic Tan, Inc. 13800 Senlac Drive Farmers Branch, TX 75234 (877) 668-8826 4/26/2005
40
Consumer Trouble Shooting Guide

© 2004 Mystic Tan, Inc. All rights reserved Mystic Tan, Inc. 13800 Senlac Drive Farmers Branch, TX 75234 (877) 668-8826 4/26/2005
41
Consumer Trouble Shooting Guide

© 2004 Mystic Tan, Inc. All rights reserved Mystic Tan, Inc. 13800 Senlac Drive Farmers Branch, TX 75234 (877) 668-8826 4/26/2005
42
Consumer Trouble Shooting Guide