Embed Size (px)
Citation preview
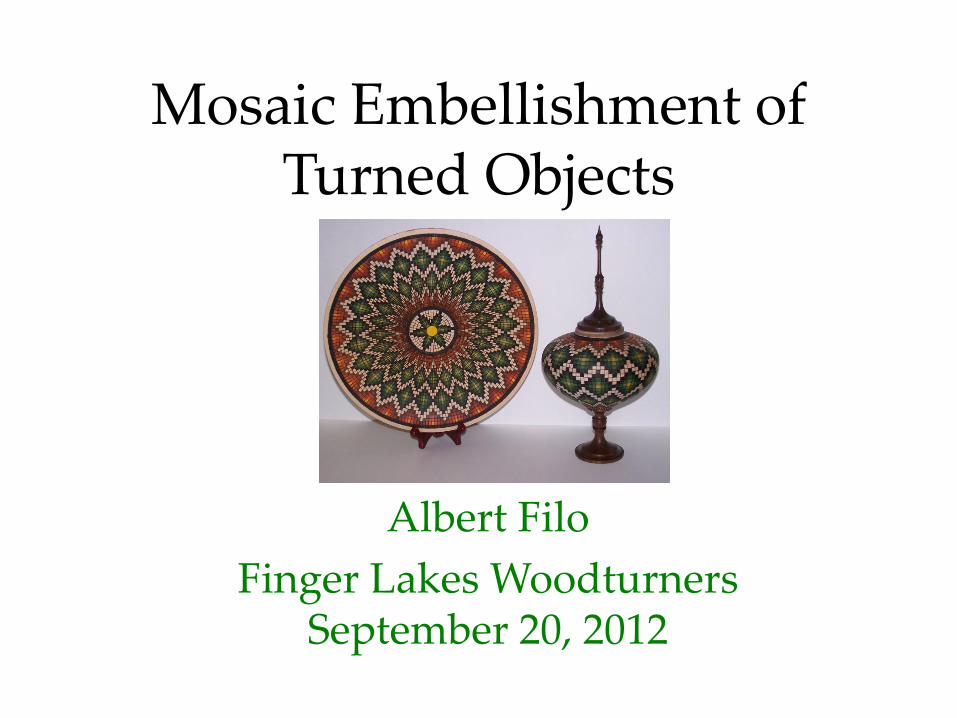
Mosaic Embellishment of Turned Objects
Albert Filo
Finger Lakes Woodturners September 20, 2012

Warning!
• This embellishment process does require a great deal of concentration and patience and therefore requires a suitable amount of down time in order to prevent mistakes, sore thumbs, and tedium.

Introduction - Agenda
• Powerpoint Presentation
– Examples from the Masters
– Definition of Terms / Styles
– Tools and Supplies
– Initial Preparation / Layout
– Examples – 4 Types of Turned Objects with Video
– References
• Brief Demo on laying out lines, burning lines, and Coloring the Pattern
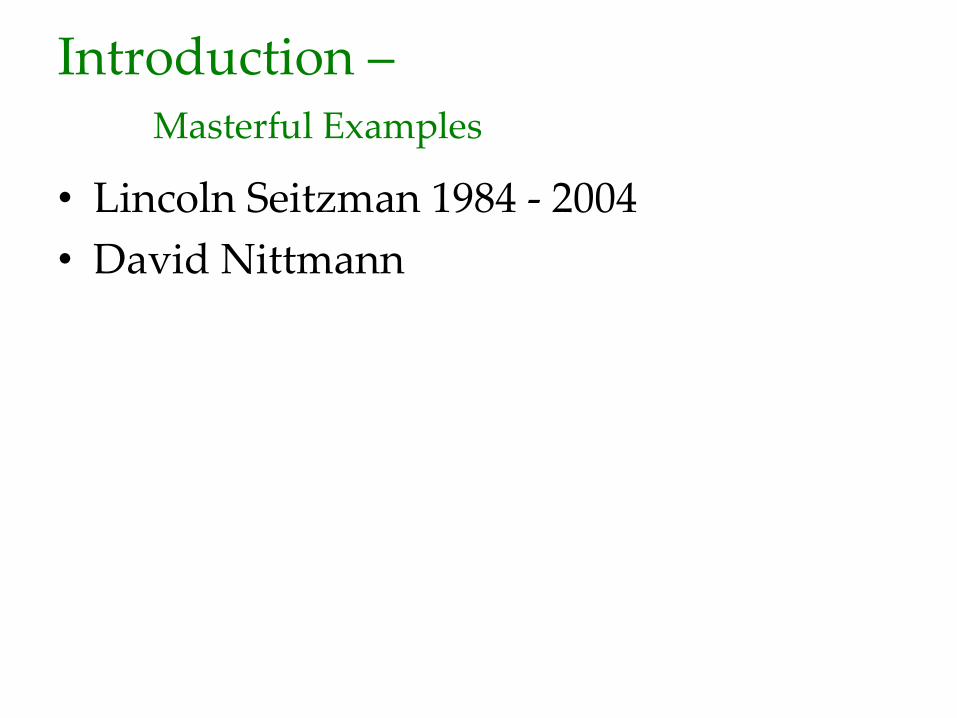
Introduction – Masterful Examples
• Lincoln Seitzman 1984 - 2004
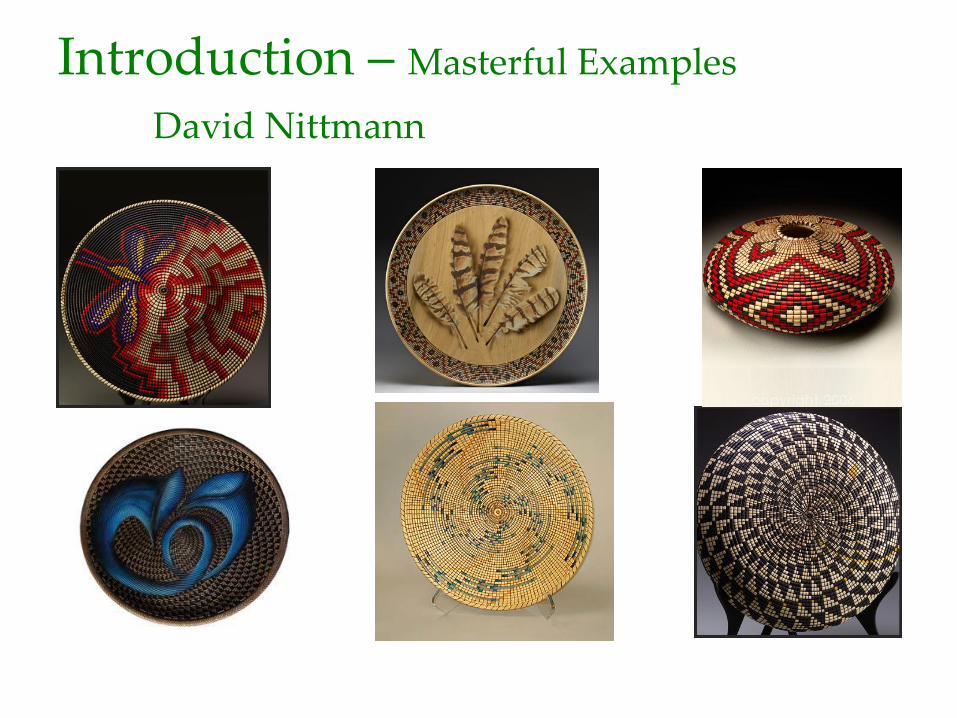
• David Nittmann
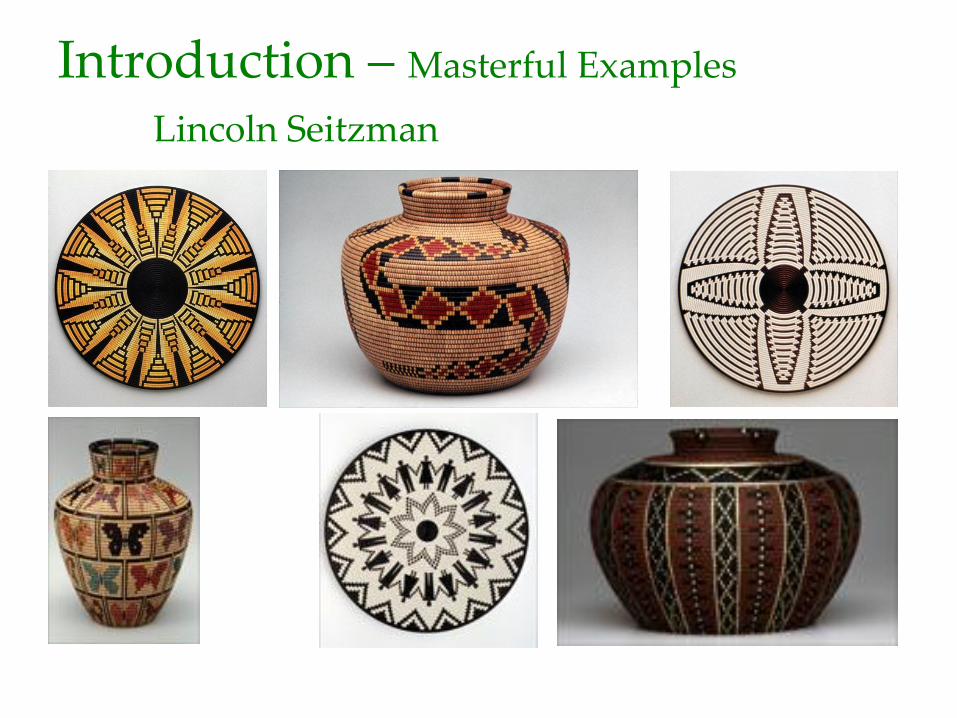
Introduction – Masterful Examples
Lincoln Seitzman
Introduction – Masterful Examples
David Nittmann
Introduction – Style and Terms
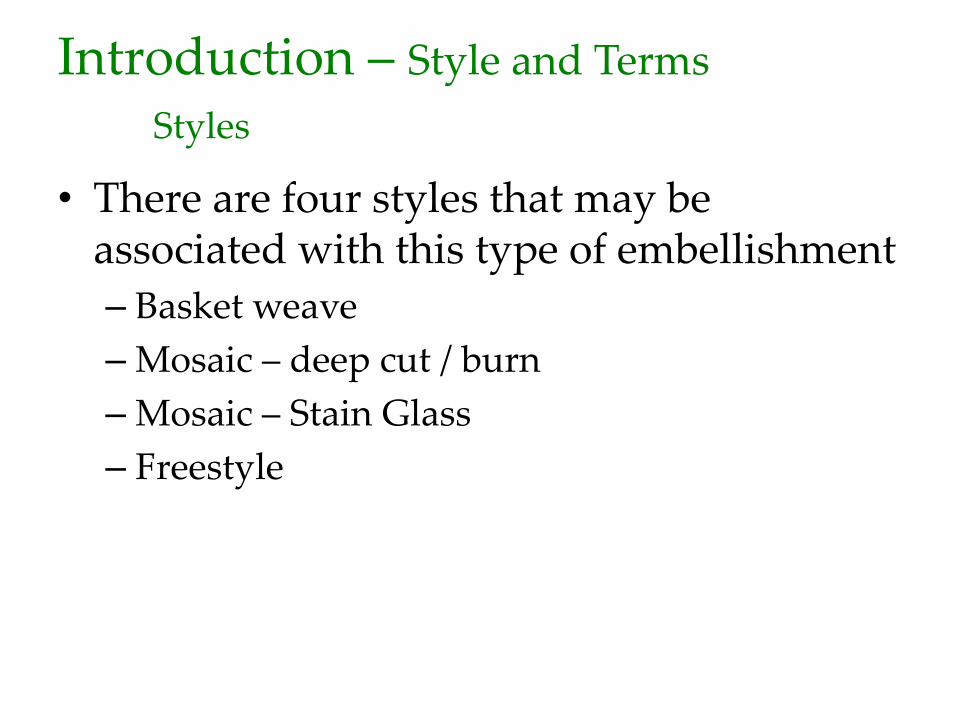
Styles
• There are four styles that may be associated with this type of embellishment
– Basket weave
– Mosaic – deep cut / burn
– Mosaic – Stain Glass
– Freestyle
Introduction – Styles and Terms
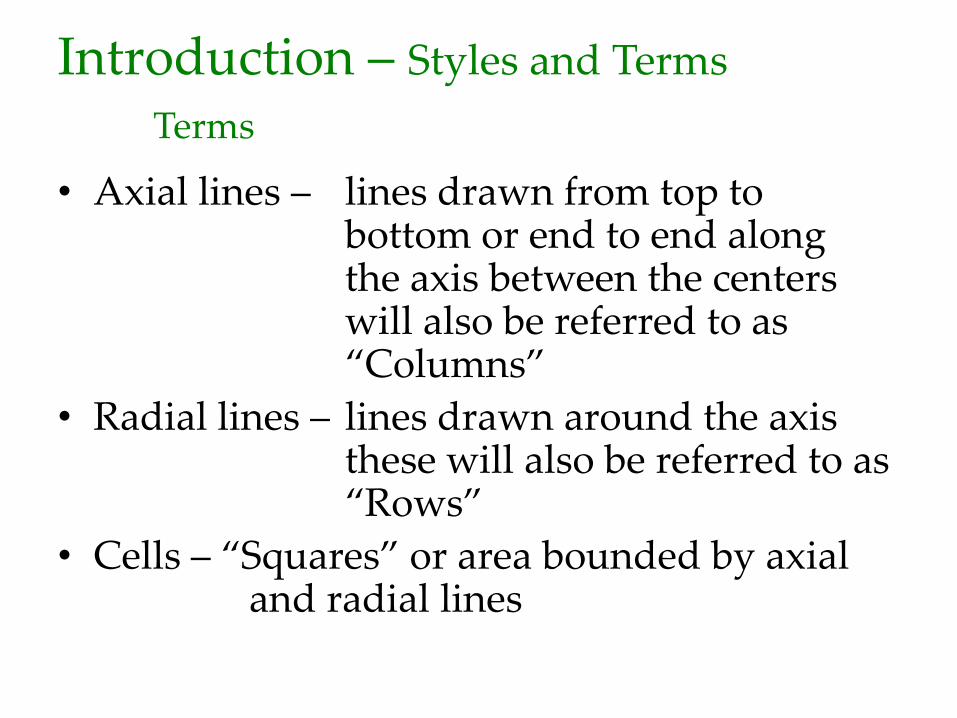
Terms
• Axial lines – lines drawn from top to bottom or end to end along the axis between the centers will also be referred to as “Columns”
• Radial lines – lines drawn around the axis these will also be referred to as “Rows”
• Cells – “Squares” or area bounded by axial and radial lines
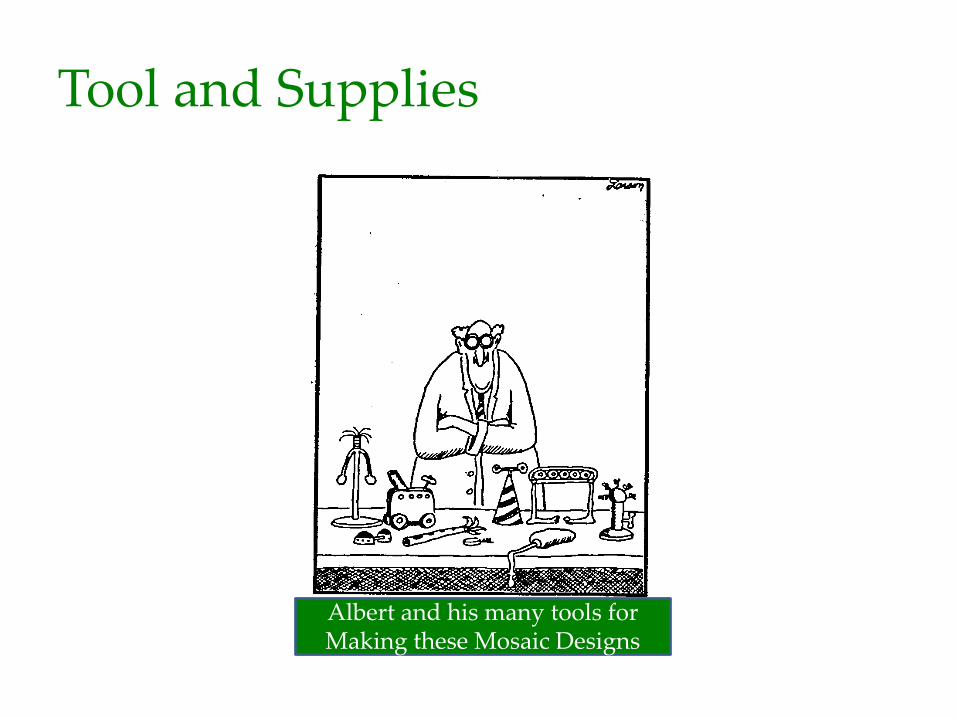
Tool and Supplies
Albert and his many tools for Making these Mosaic Designs
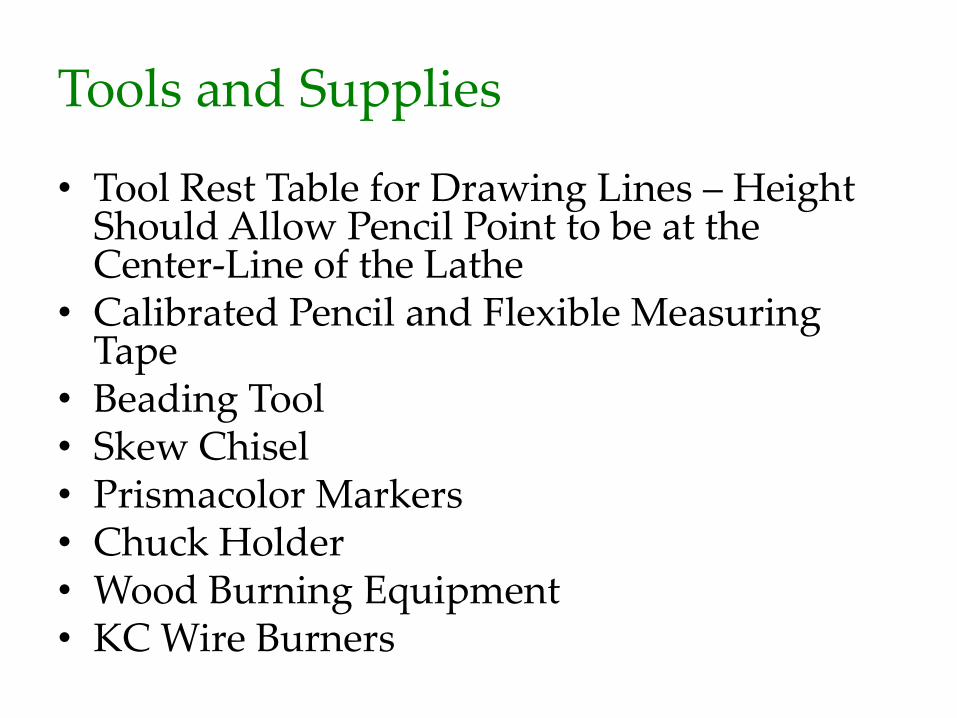
Tools and Supplies
• Tool Rest Table for Drawing Lines – Height Should Allow Pencil Point to be at the Center-Line of the Lathe
• Calibrated Pencil and Flexible Measuring Tape
• Beading Tool • Skew Chisel • Prismacolor Markers • Chuck Holder • Wood Burning Equipment • KC Wire Burners
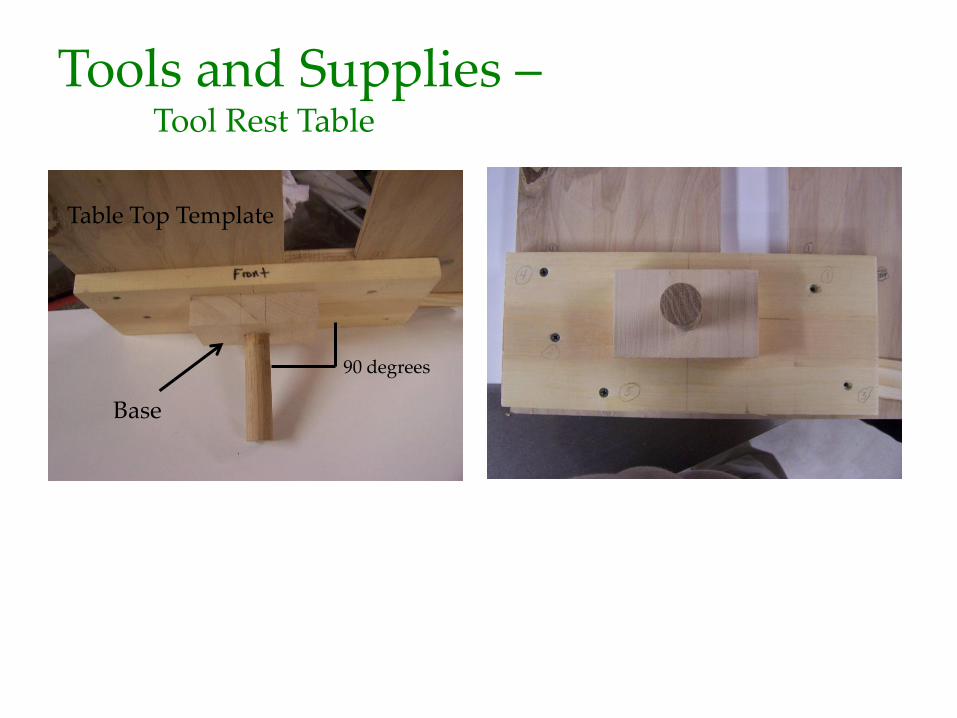
Tools and Supplies – Tool Rest Table
Base
90 degrees
Table Top Template
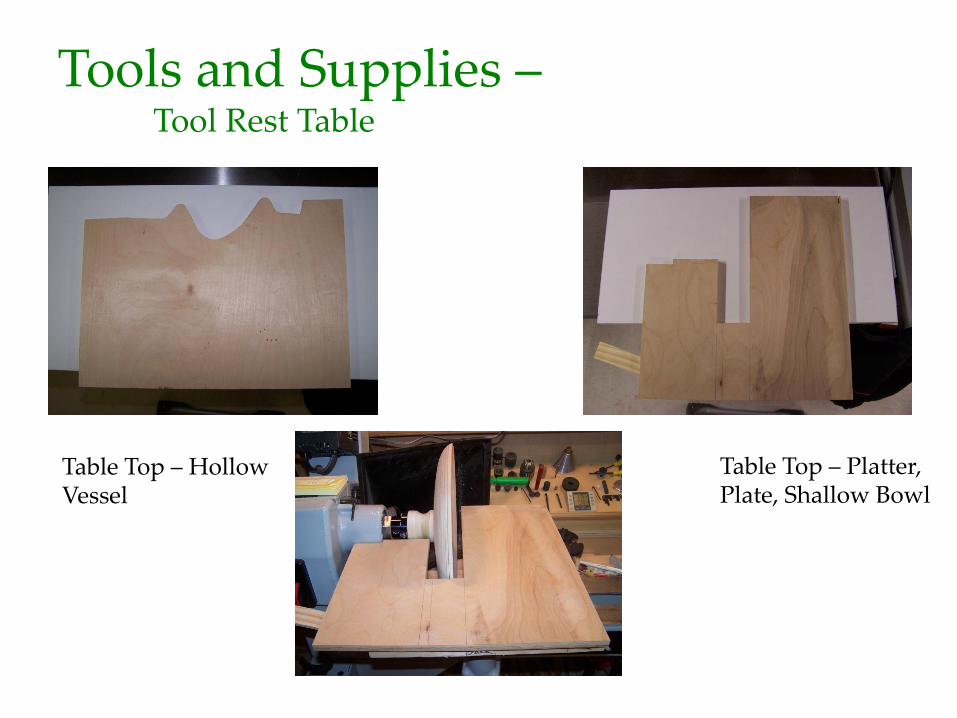
Tools and Supplies – Tool Rest Table
Table Top – Platter, Plate, Shallow Bowl
Table Top – Hollow Vessel
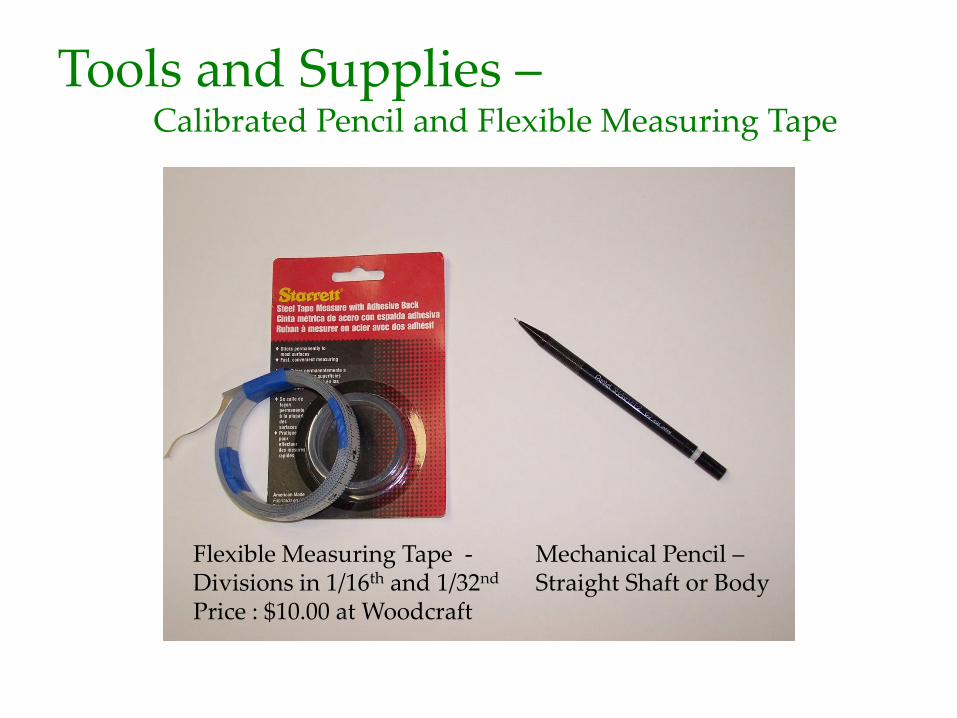
Tools and Supplies –
Calibrated Pencil and Flexible Measuring Tape
Flexible Measuring Tape - Divisions in 1/16th and 1/32nd Price : $10.00 at Woodcraft
Mechanical Pencil – Straight Shaft or Body
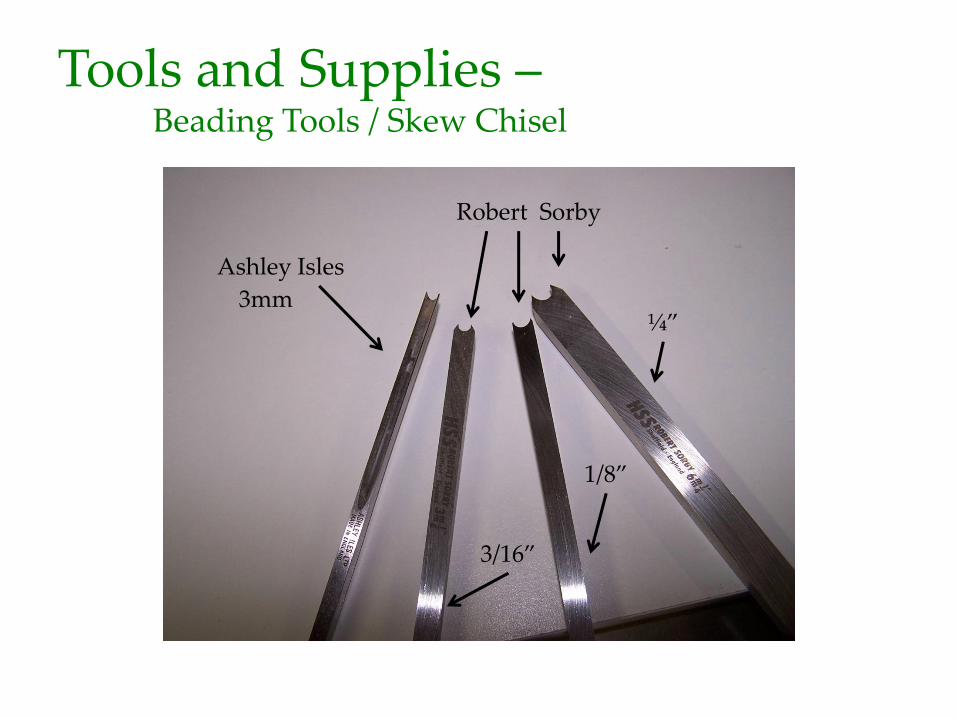
Tools and Supplies – Beading Tools / Skew Chisel
Ashley Isles
Robert Sorby
3mm
3/16”
1/8”
¼”
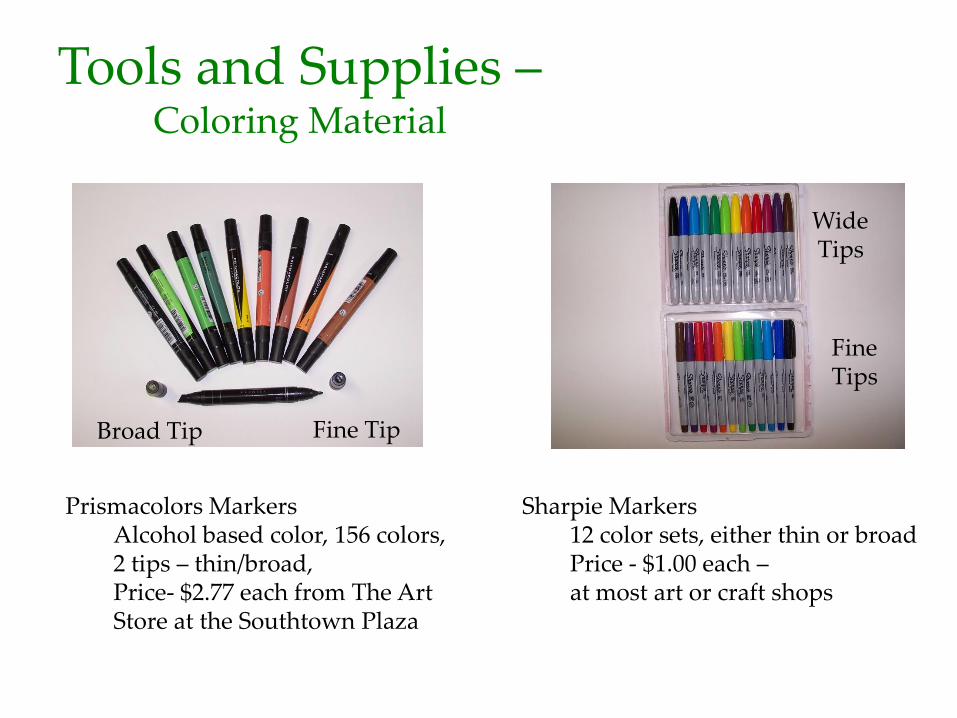
Tools and Supplies – Coloring Material
Prismacolors Markers Alcohol based color, 156 colors, 2 tips – thin/broad, Price- $2.77 each from The Art Store at the Southtown Plaza
Sharpie Markers 12 color sets, either thin or broad Price - $1.00 each – at most art or craft shops
Wide Tips
Fine Tips
Broad Tip Fine Tip
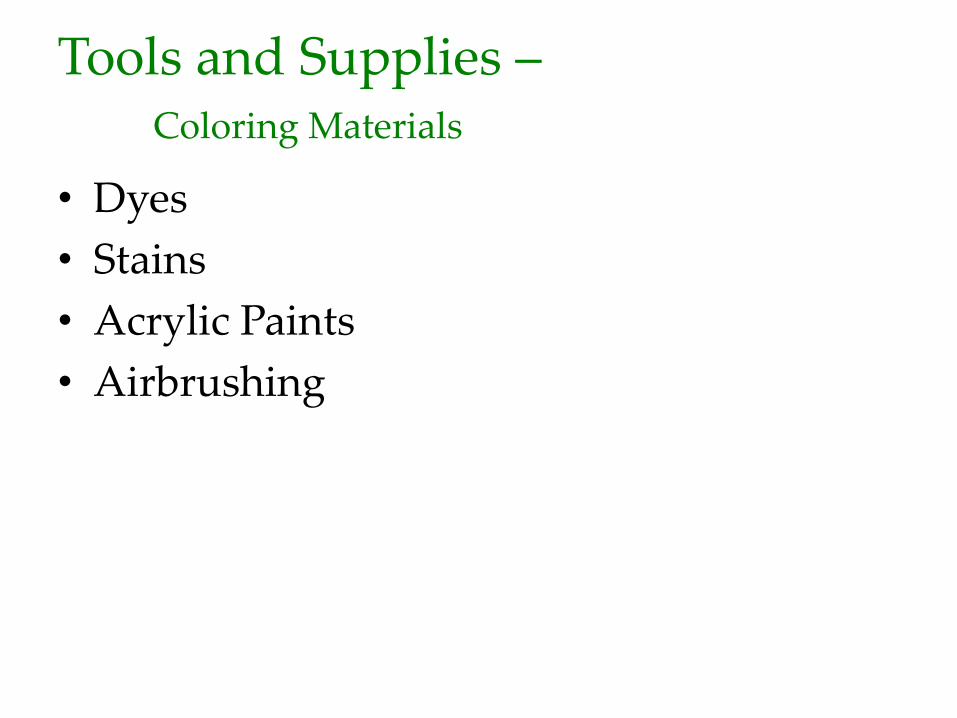
Tools and Supplies – Coloring Materials
• Dyes
• Stains
• Acrylic Paints
• Airbrushing
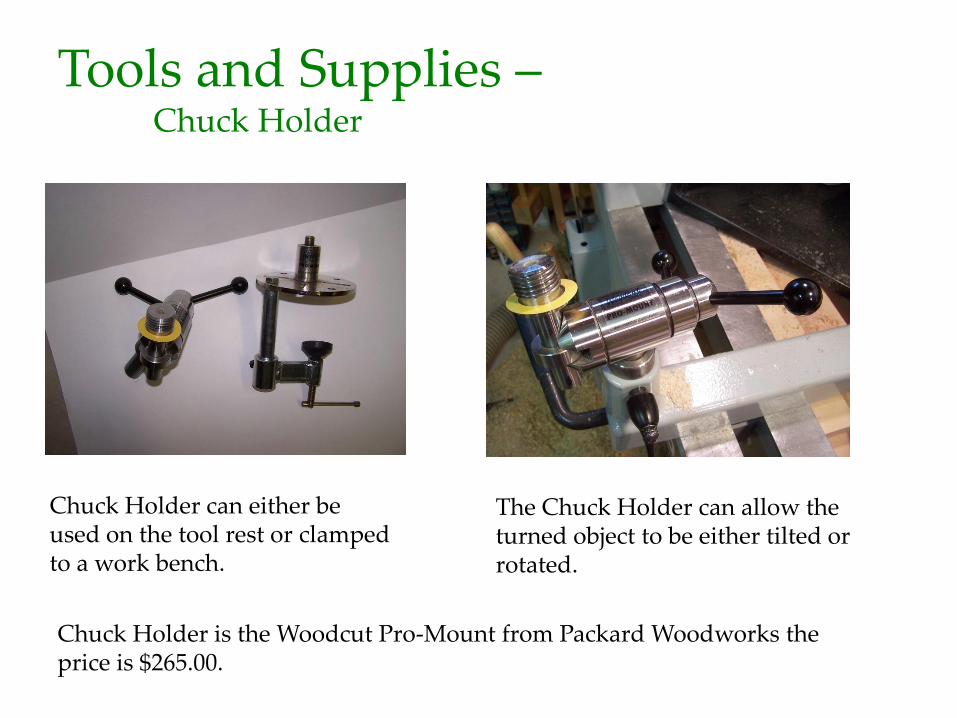
Tools and Supplies – Chuck Holder
Chuck Holder can either be used on the tool rest or clamped to a work bench.
The Chuck Holder can allow the turned object to be either tilted or rotated.
Chuck Holder is the Woodcut Pro-Mount from Packard Woodworks the price is $265.00.
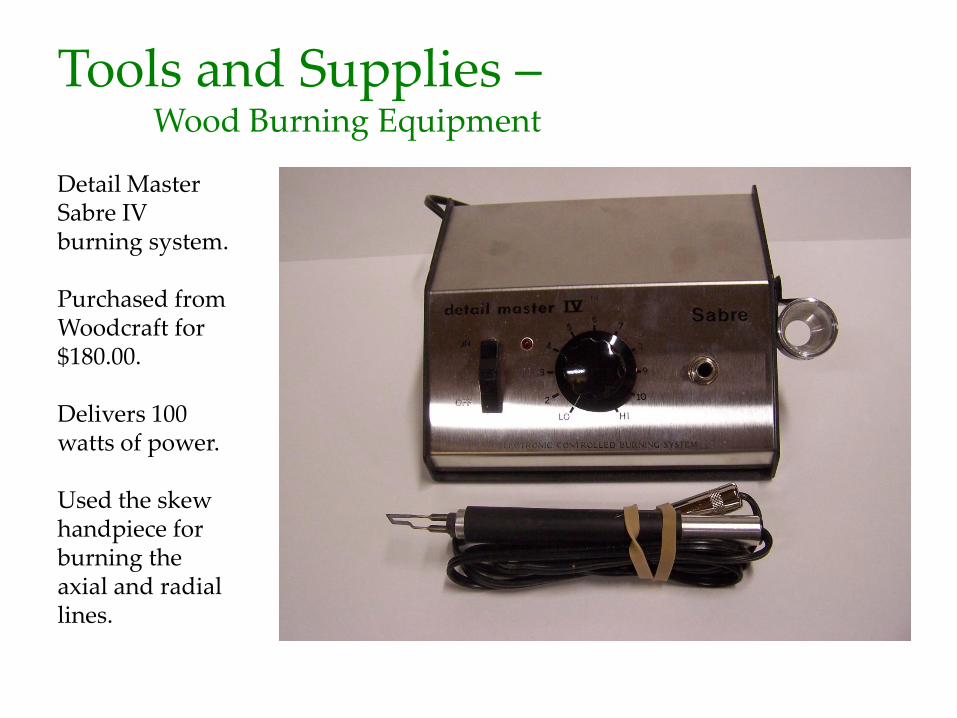
Tools and Supplies – Wood Burning Equipment
Detail Master Sabre IV burning system. Purchased from Woodcraft for $180.00. Delivers 100 watts of power. Used the skew handpiece for burning the axial and radial lines.
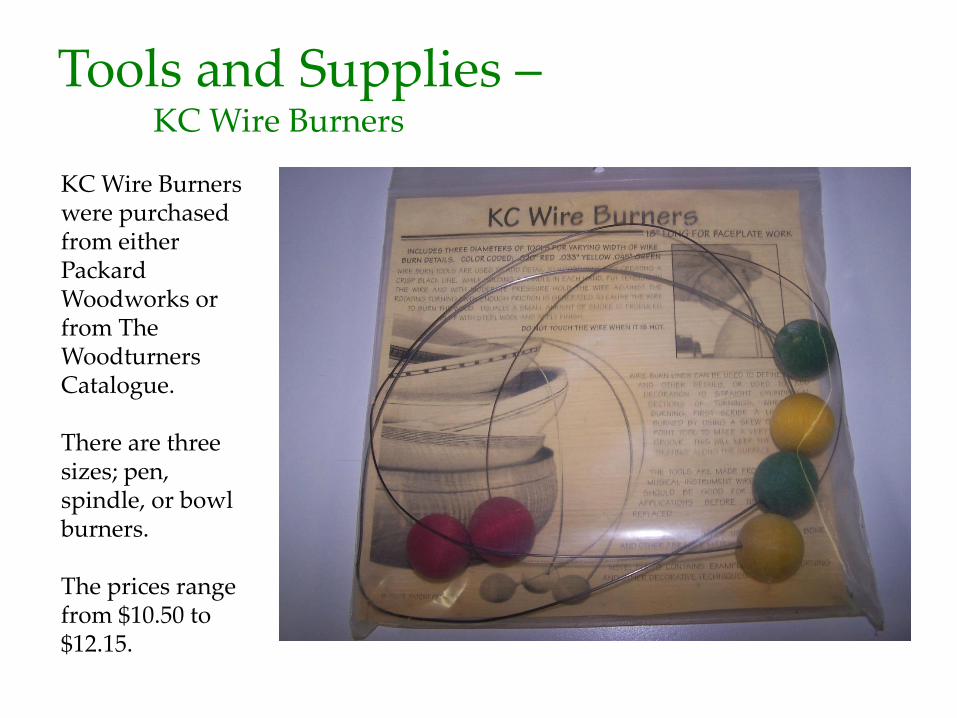
Tools and Supplies – KC Wire Burners
KC Wire Burners were purchased from either Packard Woodworks or from The Woodturners Catalogue. There are three sizes; pen, spindle, or bowl burners. The prices range from $10.50 to $12.15.
Tools and Supplies – Woods
• Basswood
• Poplar
• Maple
• Cherry
• Holly
• Any Light Colored Wood with a Fine Straight Grain (Issues with Drawing Lines)
Initial Preparation – Basics, Style and Symmetry
• Determine the Size and Shape of the Desired Turned Object – Cylinder – Plate – Hollow Form – Vase
• Determine the Wood to be used – Any Light Colored Wood with a Fine Straight Grain
• Once you have completed the turning sand the object to about 320 grit
• Flat Mosaic vs. Basket Weave
Initial Preparation - Basics, Style and Symmetry
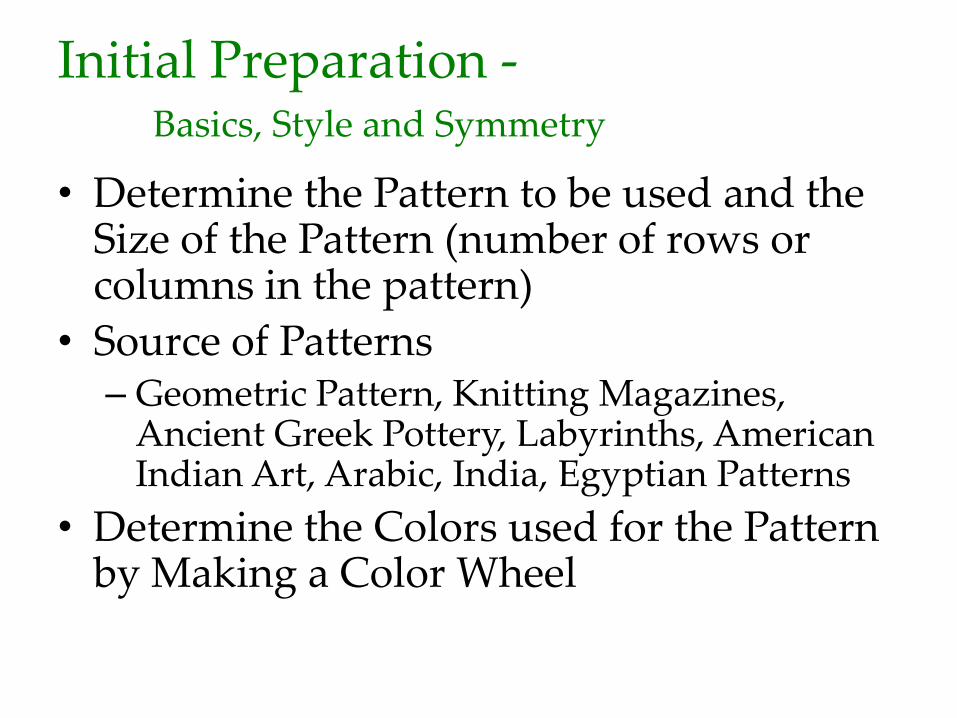
• Determine the Pattern to be used and the Size of the Pattern (number of rows or columns in the pattern)
• Source of Patterns – Geometric Pattern, Knitting Magazines,
Ancient Greek Pottery, Labyrinths, American Indian Art, Arabic, India, Egyptian Patterns
• Determine the Colors used for the Pattern by Making a Color Wheel
Initial Preparation - Basics, Style and Symmetry
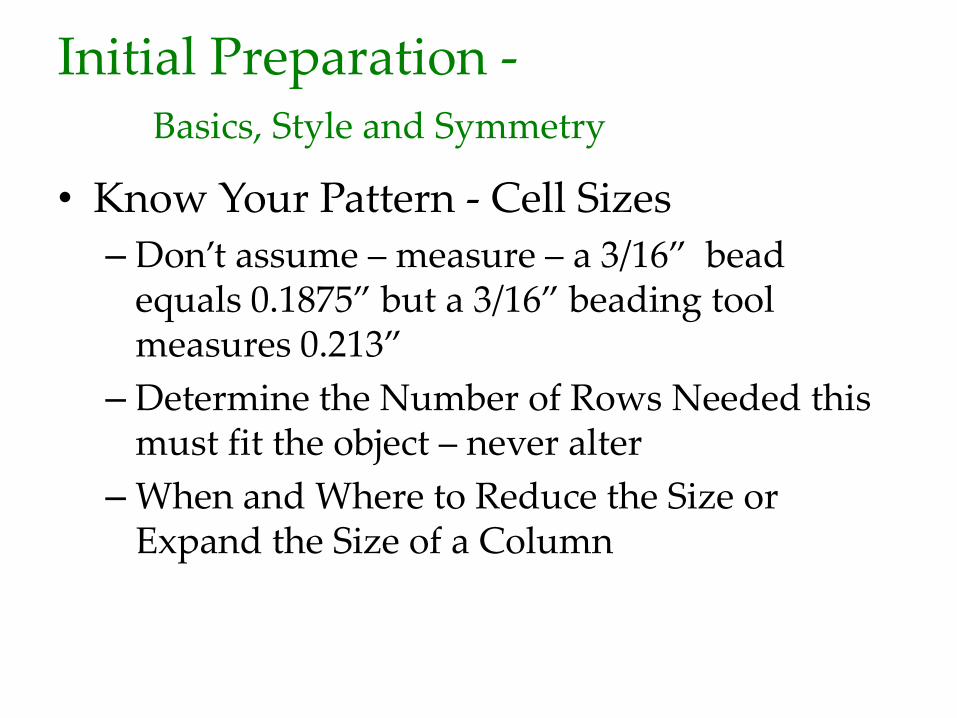
• Know Your Pattern - Cell Sizes
– Don’t assume – measure – a 3/16” bead equals 0.1875” but a 3/16” beading tool measures 0.213”
– Determine the Number of Rows Needed this must fit the object – never alter
– When and Where to Reduce the Size or Expand the Size of a Column
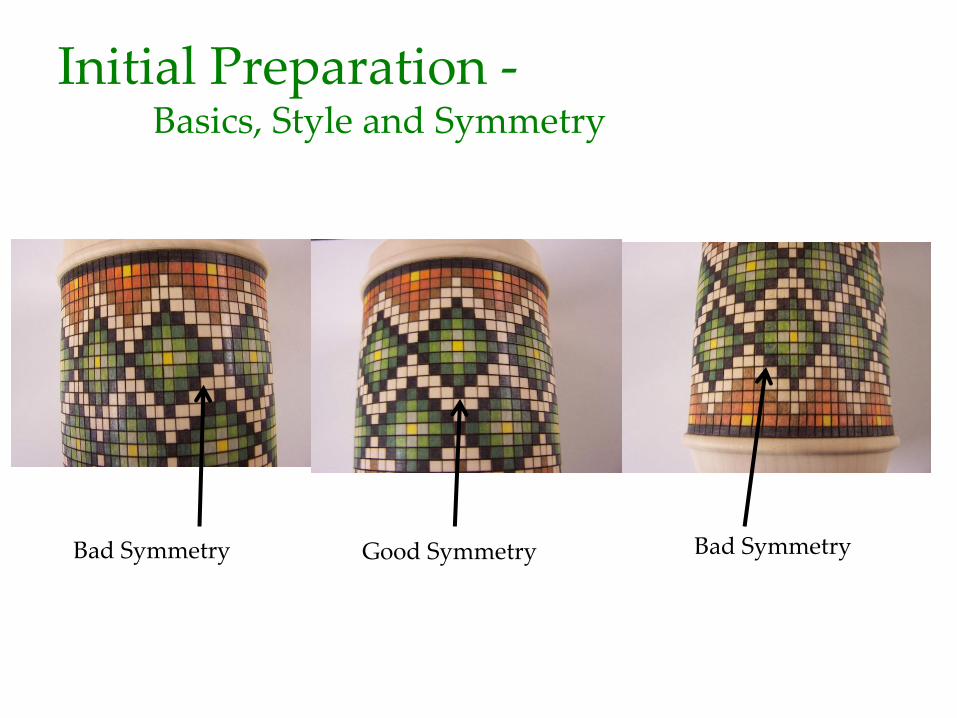
Initial Preparation - Basics, Style and Symmetry
Bad Symmetry Good Symmetry Bad Symmetry
Preparation – Layout on Graph Paper
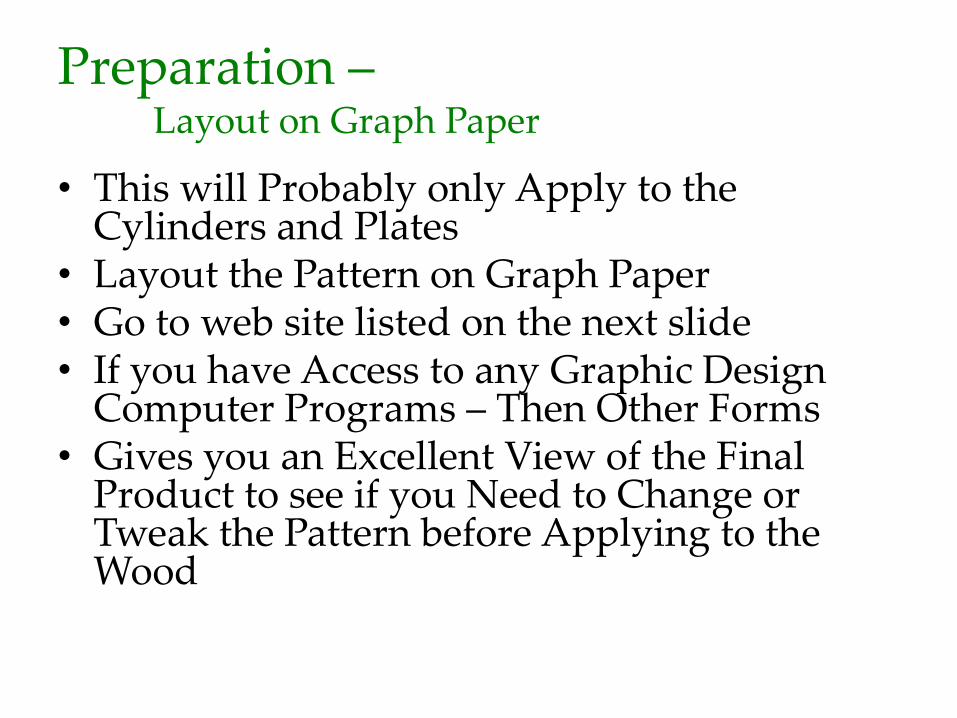
• This will Probably only Apply to the Cylinders and Plates
• Layout the Pattern on Graph Paper • Go to web site listed on the next slide • If you have Access to any Graphic Design
Computer Programs – Then Other Forms • Gives you an Excellent View of the Final
Product to see if you Need to Change or Tweak the Pattern before Applying to the Wood

Preparation - Layout on Graph Paper
Print polar graph paper use the following web site:
http://incompetech.com/graphpaper/polar/
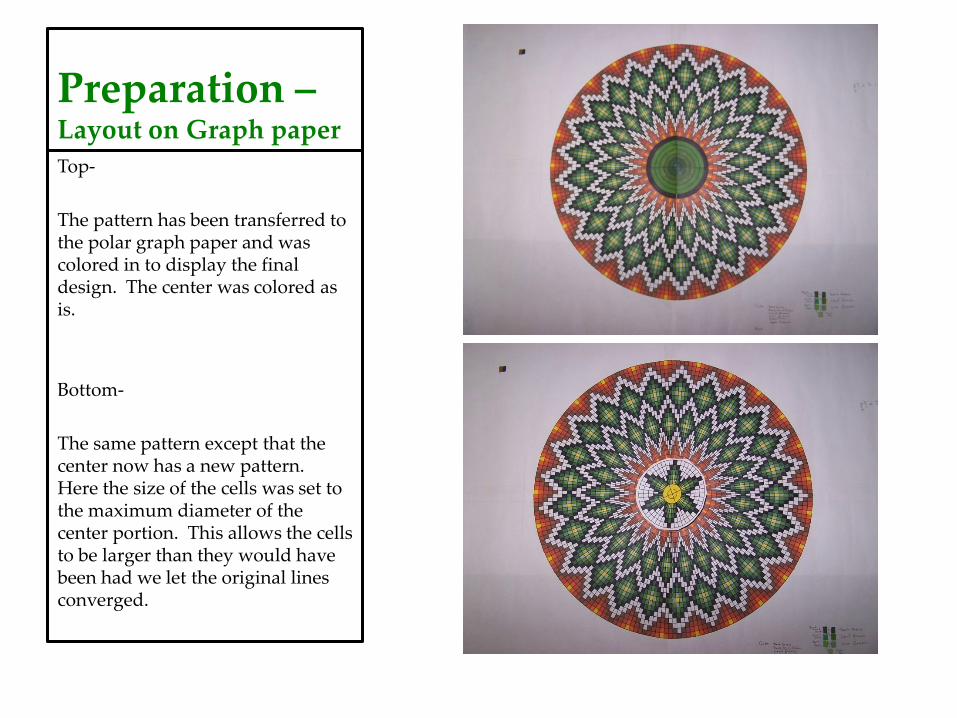
Preparation – Layout on Graph paper
Top-
The pattern has been transferred to the polar graph paper and was colored in to display the final design. The center was colored as is.
Bottom-
The same pattern except that the center now has a new pattern. Here the size of the cells was set to the maximum diameter of the center portion. This allows the cells to be larger than they would have been had we let the original lines converged.

Preparation – Layout on Wood Vessel • Measure circumference, or the maximum
diameter and length with a flexible tape or calipers
• Calculate the circumference from the maximum diameter of the object – Circumference (C) = p d
• p = 3.1416, d = diameter
• This gives the number of columns needed to fill as well as the number of patterns
• Will also use to determine if we need to reduce or enlarge the size of the columns
Preparation – Layout on Wood Vessel
• Adding marks
– Beading tool – for Rows and mark out the location of the Columns
– Draw in marks use flexible tape that is taped to masking tape on the wood object
Examples - Current
• Cylinder
• Plate
• Hollow form
– 1-piece
– 2-piece
Example – Cylinder Radial Lines or Rows – Layout
• Radial Lines or Rows - Layout
– Measure the distance between points where you will locate the pattern
– Determine the size and number of rows needed
– You may need to add or subtract to the size of the measured distance
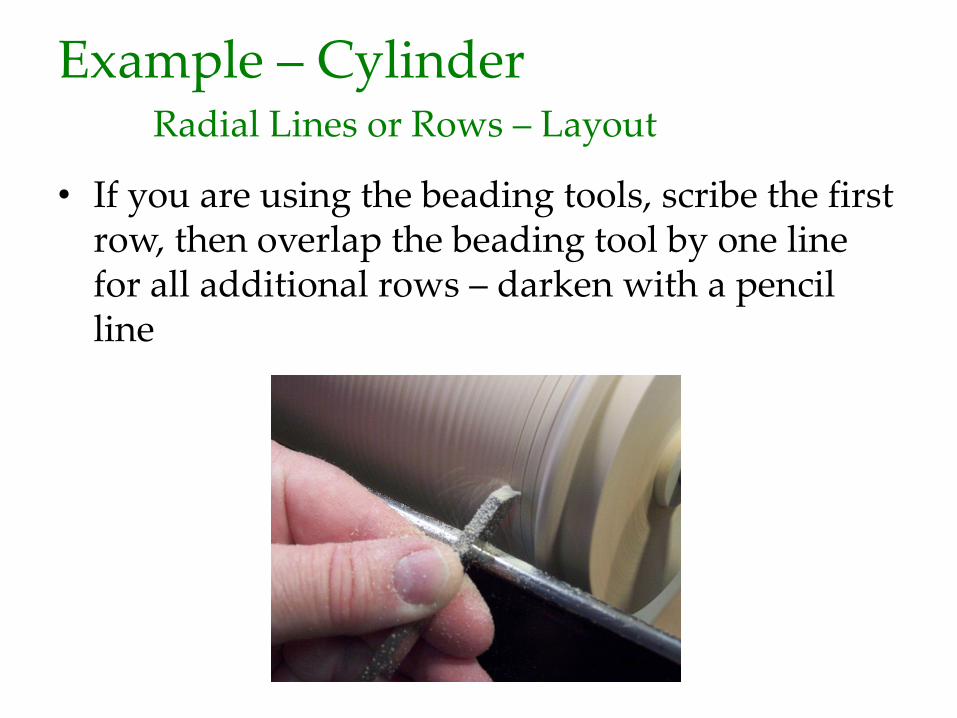
Example – Cylinder Radial Lines or Rows – Layout
• If you are using the beading tools, scribe the first row, then overlap the beading tool by one line for all additional rows – darken with a pencil line
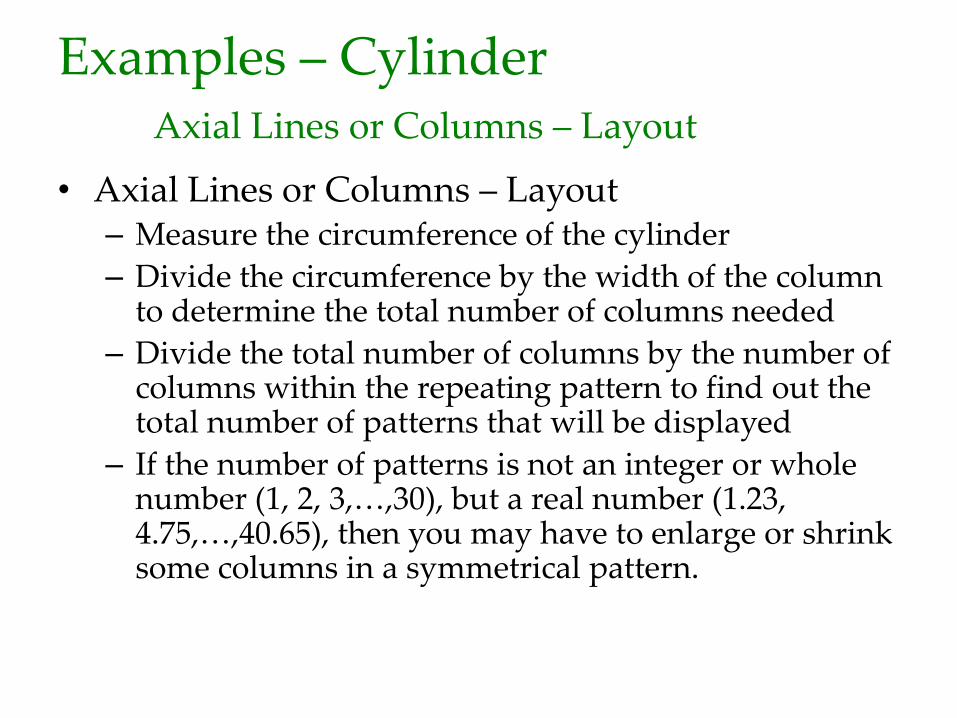
Examples – Cylinder Axial Lines or Columns – Layout
• Axial Lines or Columns – Layout – Measure the circumference of the cylinder
– Divide the circumference by the width of the column to determine the total number of columns needed
– Divide the total number of columns by the number of columns within the repeating pattern to find out the total number of patterns that will be displayed
– If the number of patterns is not an integer or whole number (1, 2, 3,…,30), but a real number (1.23, 4.75,…,40.65), then you may have to enlarge or shrink some columns in a symmetrical pattern.
Examples – Cylinder Axial Lines or Columns – Layout
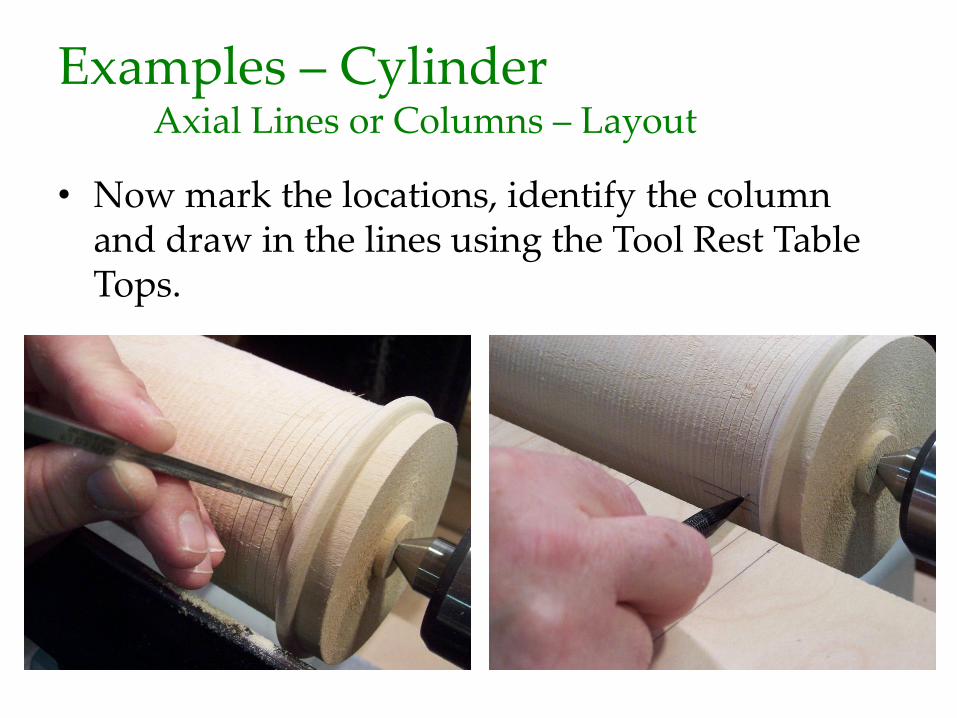
• Now mark the locations, identify the column and draw in the lines using the Tool Rest Table Tops.
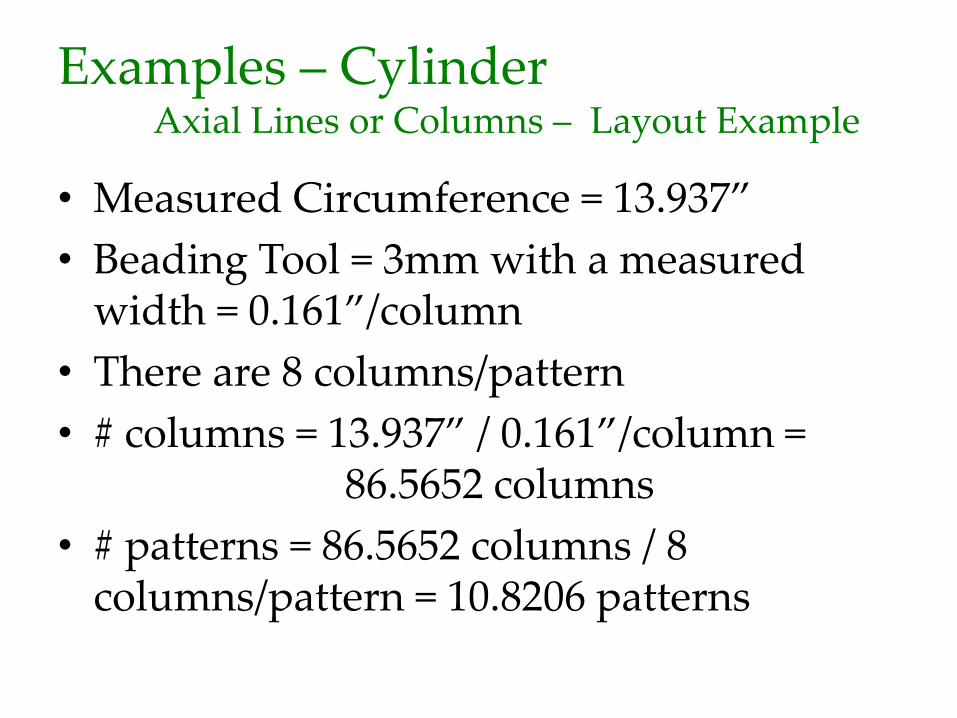
Examples – Cylinder Axial Lines or Columns – Layout Example
• Measured Circumference = 13.937”
• Beading Tool = 3mm with a measured width = 0.161”/column
• There are 8 columns/pattern
• # columns = 13.937” / 0.161”/column = 86.5652 columns
• # patterns = 86.5652 columns / 8 columns/pattern = 10.8206 patterns
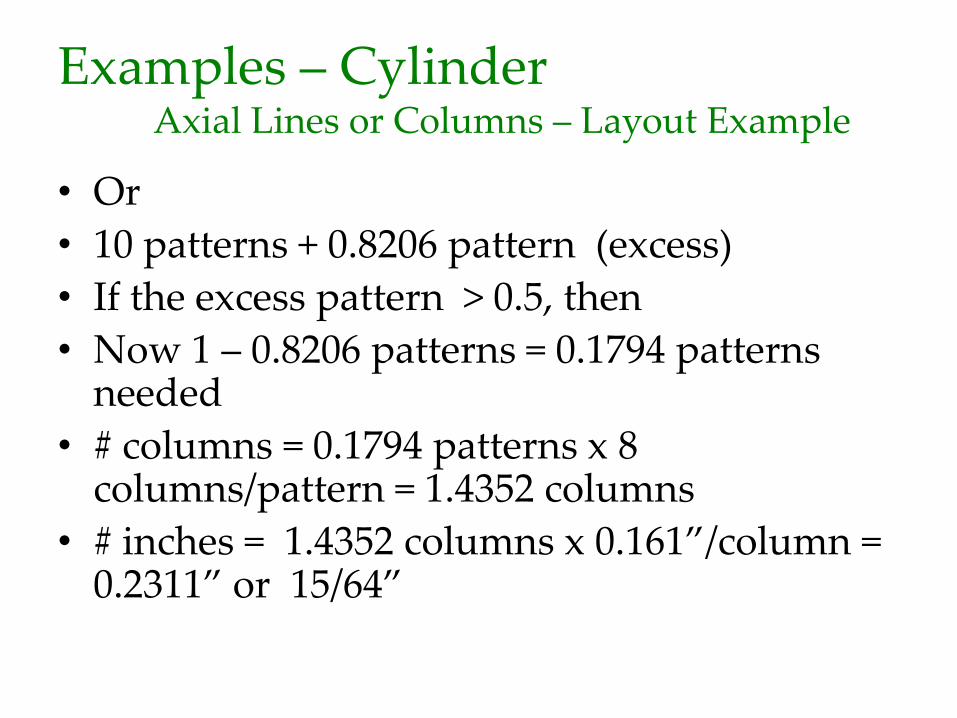
Examples – Cylinder Axial Lines or Columns – Layout Example
• Or
• 10 patterns + 0.8206 pattern (excess)
• If the excess pattern > 0.5, then
• Now 1 – 0.8206 patterns = 0.1794 patterns needed
• # columns = 0.1794 patterns x 8 columns/pattern = 1.4352 columns
• # inches = 1.4352 columns x 0.161”/column = 0.2311” or 15/64”
Examples – Cylinder Axial Lines or Columns – Layout Example
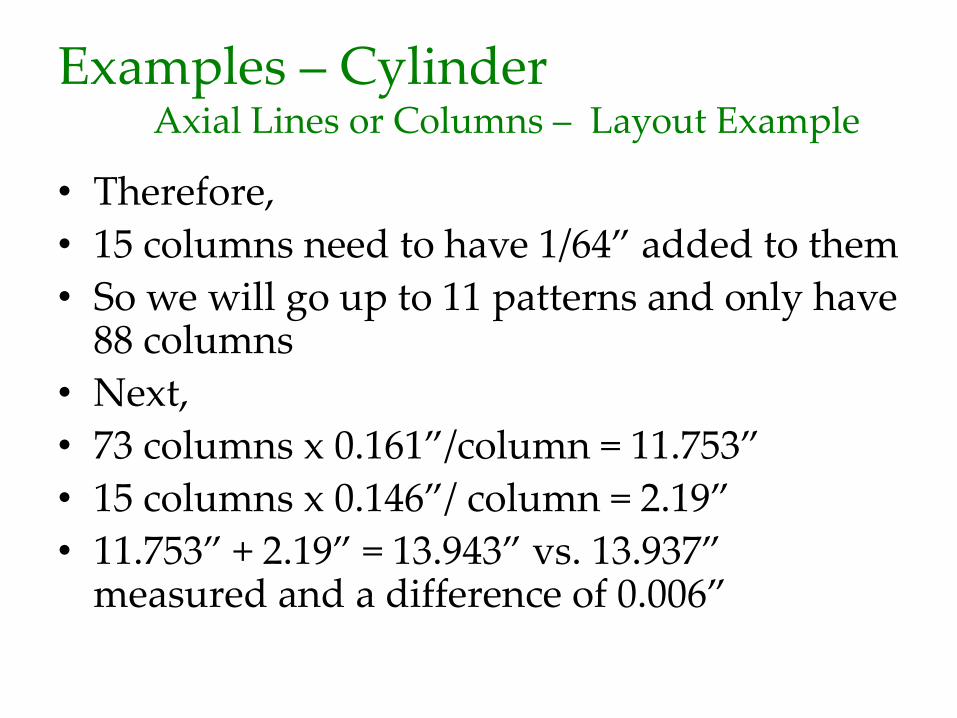
• Therefore,
• 15 columns need to have 1/64” added to them
• So we will go up to 11 patterns and only have 88 columns
• Next,
• 73 columns x 0.161”/column = 11.753”
• 15 columns x 0.146”/ column = 2.19”
• 11.753” + 2.19” = 13.943” vs. 13.937” measured and a difference of 0.006”
Examples – Cylinder Axial Lines or Columns – Layout Example
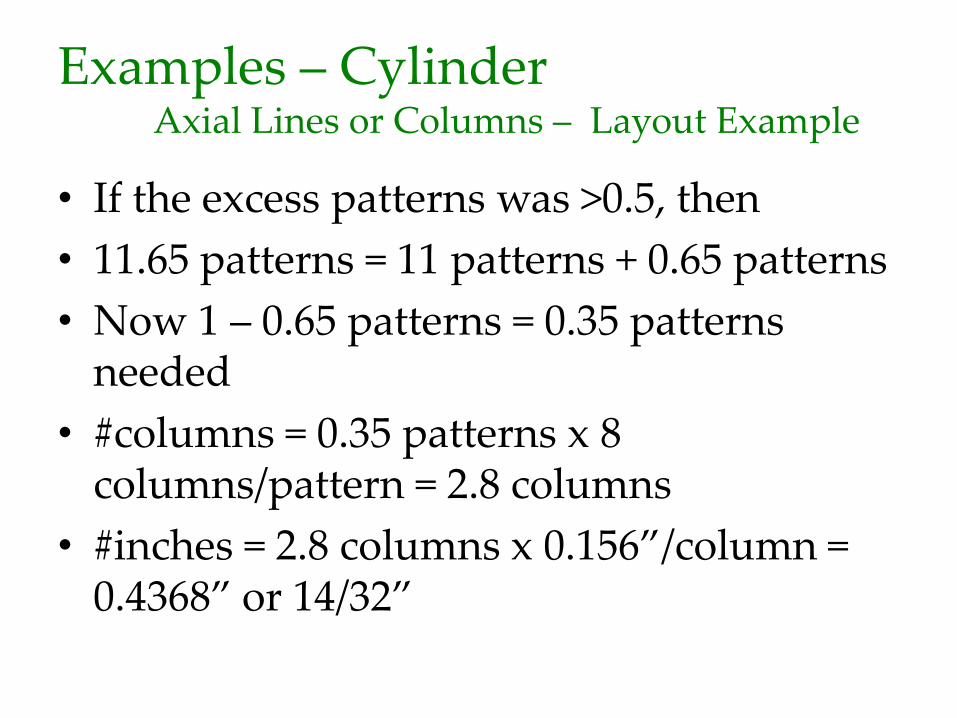
• If the excess patterns was >0.5, then
• 11.65 patterns = 11 patterns + 0.65 patterns
• Now 1 – 0.65 patterns = 0.35 patterns needed
• #columns = 0.35 patterns x 8 columns/pattern = 2.8 columns
• #inches = 2.8 columns x 0.156”/column = 0.4368” or 14/32”
Examples – Cylinder Axial Lines or Columns – Layout Example
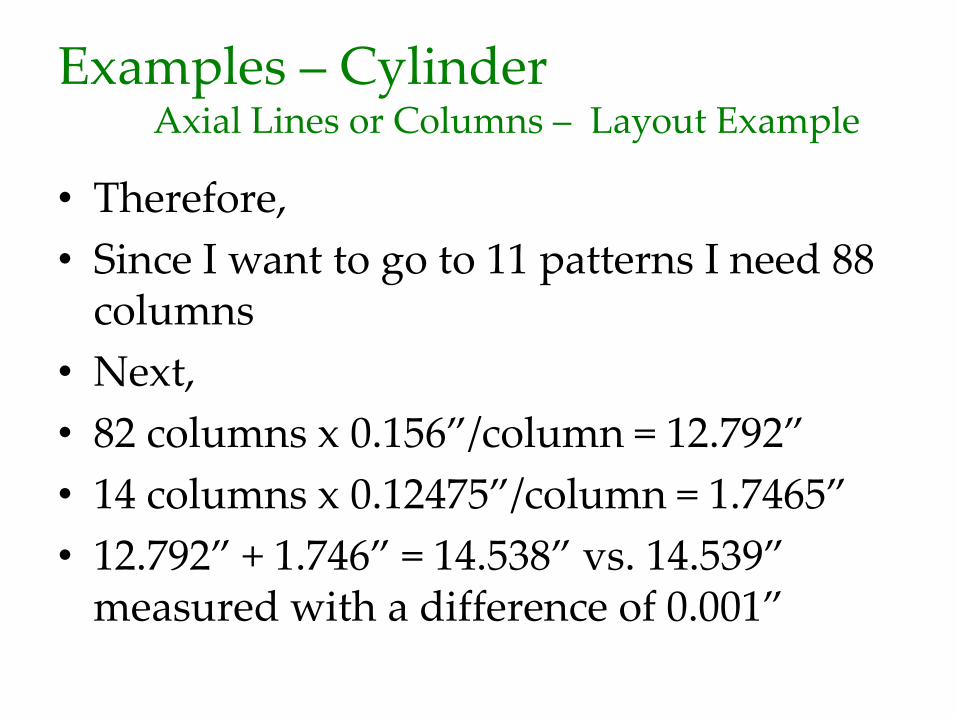
• Therefore,
• Since I want to go to 11 patterns I need 88 columns
• Next,
• 82 columns x 0.156”/column = 12.792”
• 14 columns x 0.12475”/column = 1.7465”
• 12.792” + 1.746” = 14.538” vs. 14.539” measured with a difference of 0.001”
Examples – Cylinder Axial Lines or Columns – Layout Example
• Or, make life easy and do the following:
• Do the previous method to calculate the number of columns and the number of patterns.
• Determine the number of patterns you want and then the number of columns needed.
• Then divide the circumference by the number of columns to get the column spacing.
Examples – Cylinder Axial Lines or Columns – Layout Example
• Use a digital caliper and mark the lines to make the column on the wood use pencil (it will erase). This gives a good approximation, you will probably need to make adjustments.
• This is NOT easy.
• That is why very few are crazy enough to try it. But the final product may be spectacular.
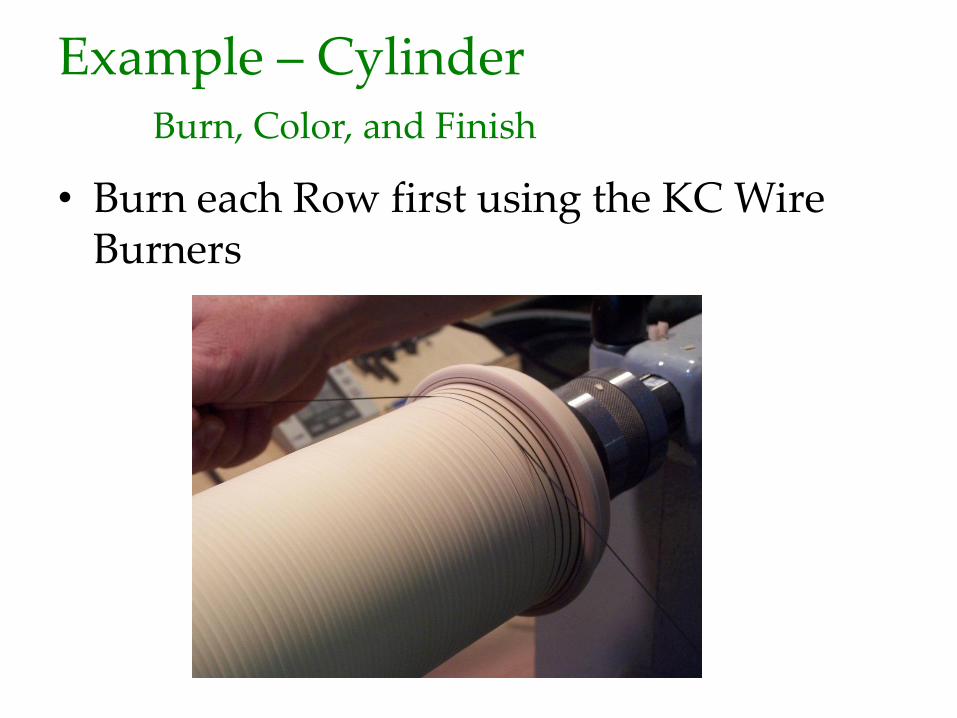
Example – Cylinder Burn, Color, and Finish
• Burn each Row first using the KC Wire Burners
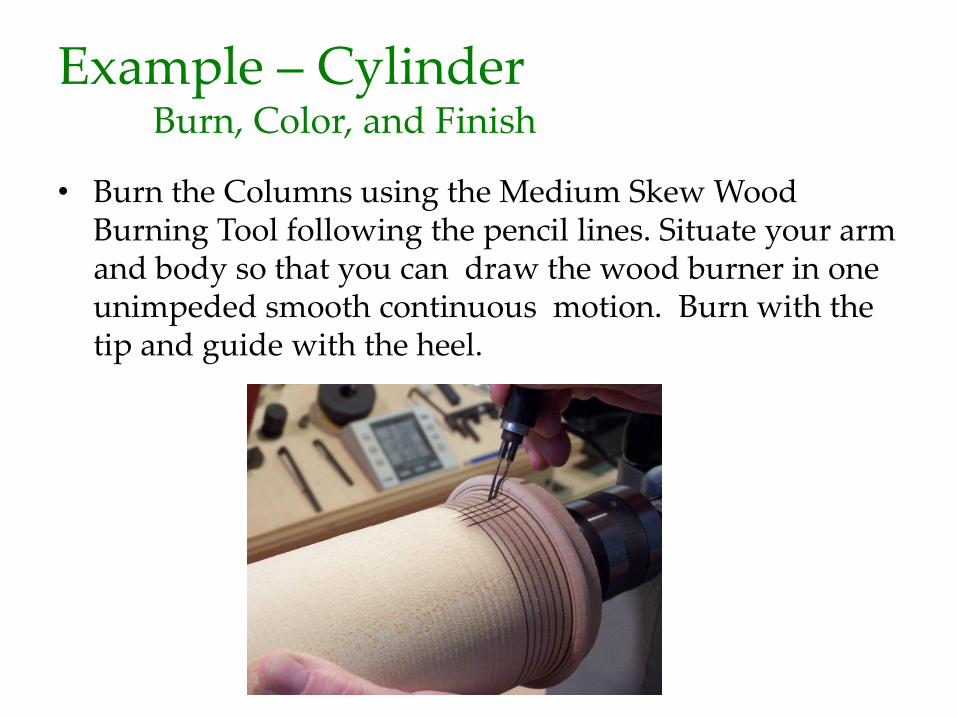
Example – Cylinder Burn, Color, and Finish
• Burn the Columns using the Medium Skew Wood Burning Tool following the pencil lines. Situate your arm and body so that you can draw the wood burner in one unimpeded smooth continuous motion. Burn with the tip and guide with the heel.
Example – Cylinder Burn, Color, and Finish
• Color and Finish
– Color in the pattern on the drawn grid
– I generally do the top most pattern first and do all one color at a time and then fill in the pattern
– Apply the appropriate finish to the turned object or leave as is
Examples – Cylinders Video Demonstration

Example – Plate Inside – Layout
• Everything that was done for the Cylinder will also be applied to the plate with the following exceptions:
• Measure the maximum diameter of the plate where the pattern will be placed
• Do not measure the maximum diameter as edge-to-edge
• But follow the contour of the plate • Not a straight line (more like the hypotenuse
of a right triangle)
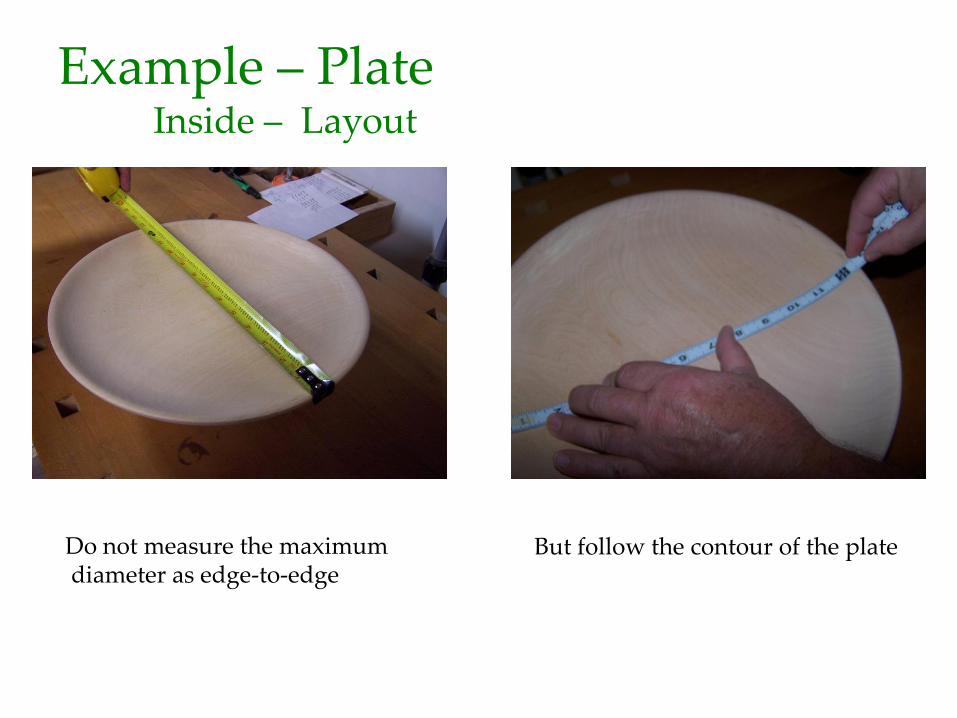
Example – Plate Inside – Layout
Do not measure the maximum diameter as edge-to-edge
But follow the contour of the plate
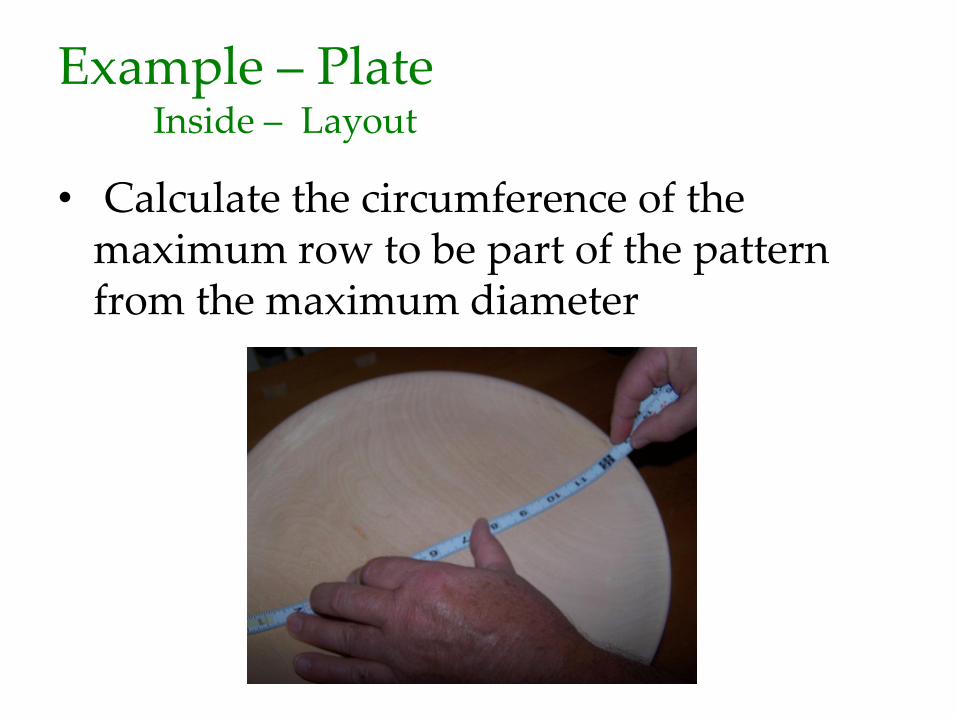
Example – Plate Inside – Layout
• Calculate the circumference of the maximum row to be part of the pattern from the maximum diameter
Example – Plate Inside – Layout
• Determine the Number of Columns from the Circumference
• Determine the Number of Patterns that will Fit on the Plate
Example – Plate Inside – Radial and Axial Lines
• Use the beading tool to form the rows and darken them with a pencil.
• Locate the column lines with the beading tool and mark with a pencil using the Tool Rest Table.
• Also identify any column that is not the standard size (reduced or enlarged)
• Use the medium size skew burning tool to burn in all of the lines to the end of the pattern
Example – Plate Inside – Multiple Patterns
• The lines forming the columns will ultimately converge at some point so that each column may not be determined.
• At this point you can do 1 of 2 things, first just color in the center of the plate, or second, include a second pattern that has wider columns.
Example – Plate Inside – Color and Finish
• Color and Finish
– Color in the pattern on the drawn grid
– Apply the appropriate finish to the turned object or leave as is
Example – Plate Outside – Layout
• There are two options for dealing with the outside of the plate
• The first is to keep the column and row size to be the same as the inside of the plate.
• At this point only have one line on the outside to match the inside.
Example – Plate Outside – Layout
• This is due to the fact that – Inside Diameter edge-to-edge (no contour) = 12.75”
– Inside Diameter edge-to-edge (contour) = 13.062”
– Outside Diameter edge-to-edge(contour) = 13.185”
– There is one more complete pattern on the outside
• Or,
• You Match the Inside and Outside Lines for the columns. The result will be larger columns on the outside than the inside.

Example – Plate Outside – Layout
• Layout the Column lines first
• Then layout the Rows so they match the size of the Columns
• Mark all of the lines for the Rows and Columns
• Burn all of the lines
Example – Plate Outside – Color and Finish
• Color and Finish
– Color in the pattern on the drawn grid
– Apply the appropriate finish to the turned object or leave as is
Example – Hollow Form
• The Hollow Form will follow the Cylinder exactly.
• The only differences are that the 1 Piece or a 2 or more Piece Form have different starting point for the 1st row formed
• Measure the Diameter at the Point of Maximum Size
Example – Hollow Form
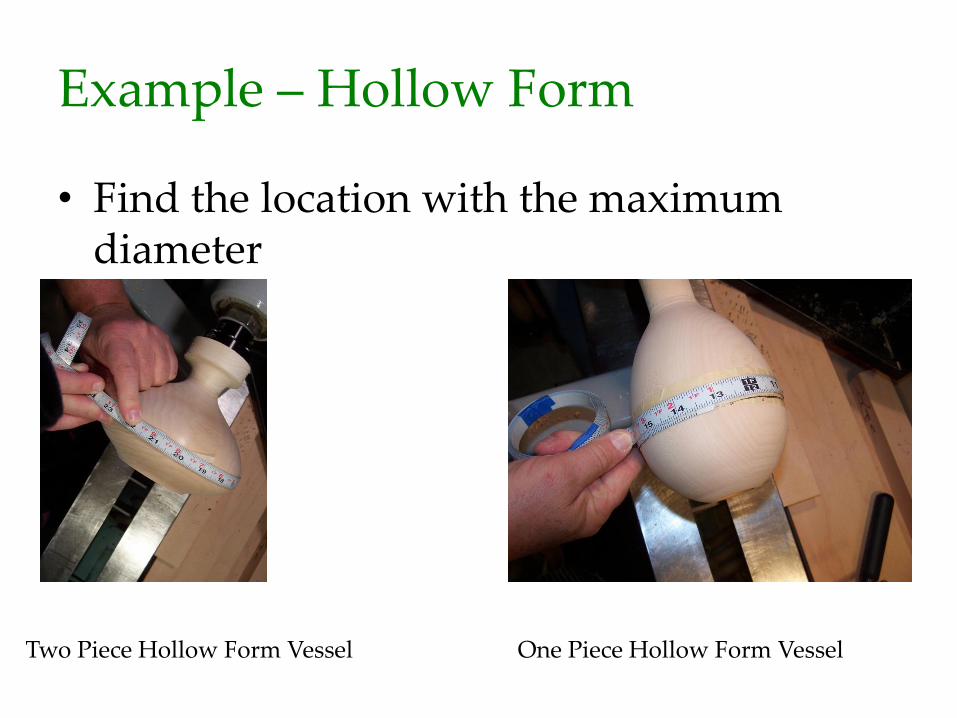
• Find the location with the maximum diameter
One Piece Hollow Form Vessel Two Piece Hollow Form Vessel
Example – Hollow Form
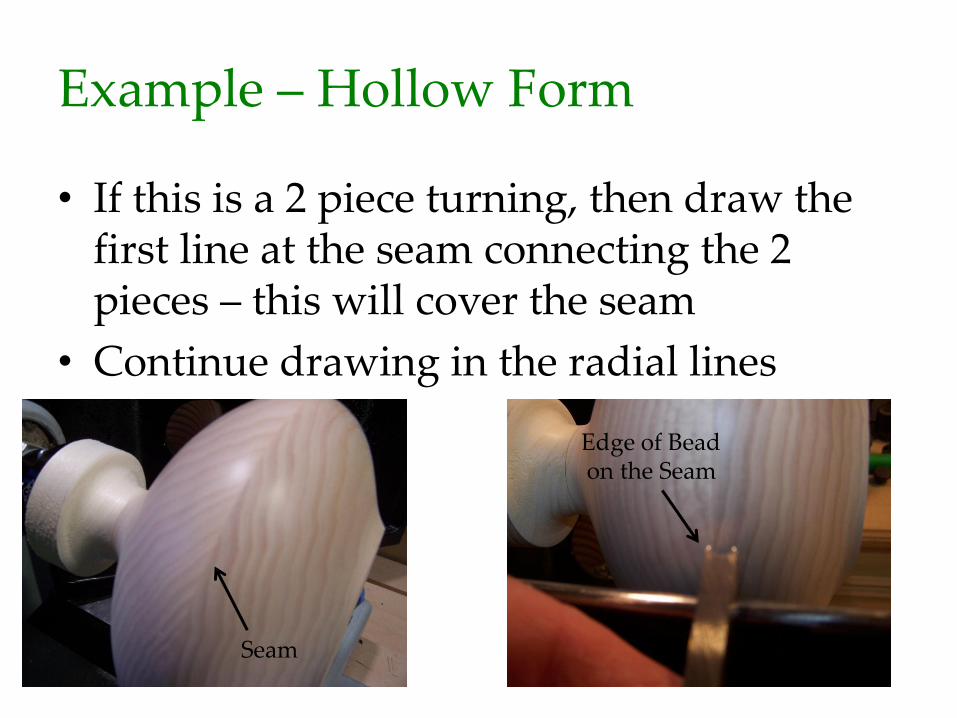
• If this is a 2 piece turning, then draw the first line at the seam connecting the 2 pieces – this will cover the seam
• Continue drawing in the radial lines
Seam
Edge of Bead on the Seam

Example – Hollow Form Special Treatment
• Special Treatment
– Lid or no lid
– Continue with the pattern on the lid and add a finial
– Or use a complimentary wood as the lid with finial
Example – Hollow Form Special Treatment - Lid
• If you are using the same wood and wish to continue the pattern onto the top.
• First turn the top so that it fits and Hollow Form and continues the shape.
• Scribe in the number of rows needed for the pattern.
• Next place on the Hollow Form and place the Hollow Form on the Chuck Holder and continue the column lines onto the Lid.
Example – Hollow Form Special Treatment – Lid
• This next step is VERY IMPORTANT – pick a cell any cell on the top row on the Hollow Vessel and put a dot there.
• Next go to the lib and put a dot on the cell opposite the cell on the Hollow Vessel.
• This will be used to align the top to the body so everything lines up.
• Now make the finial and base as you normally do.
Example – Surprise Design
• Here is another example of a Hollow Form
• Rather than just leaving it with the external surface embellished, how about doing the inside as well -- Your Nuts, Your Crazy -- you’re thinking, it can’t be done, but I say haaa
• Here is how it is done.
• This will only apply to Hollow Forms with 2 or more pieces
Example – Surprise Design Hollow Form - Inside
• Before we do anything to the inside of the Hollow Form we need to understand the concept of Line of Site.
• The Line of Site would be found by viewing the inside of the Hollow Form from viewing the top outside edge opposite the inside wall along the bottom edge of the adjacent edge.
• A diagram showing this is presented on the next slide.
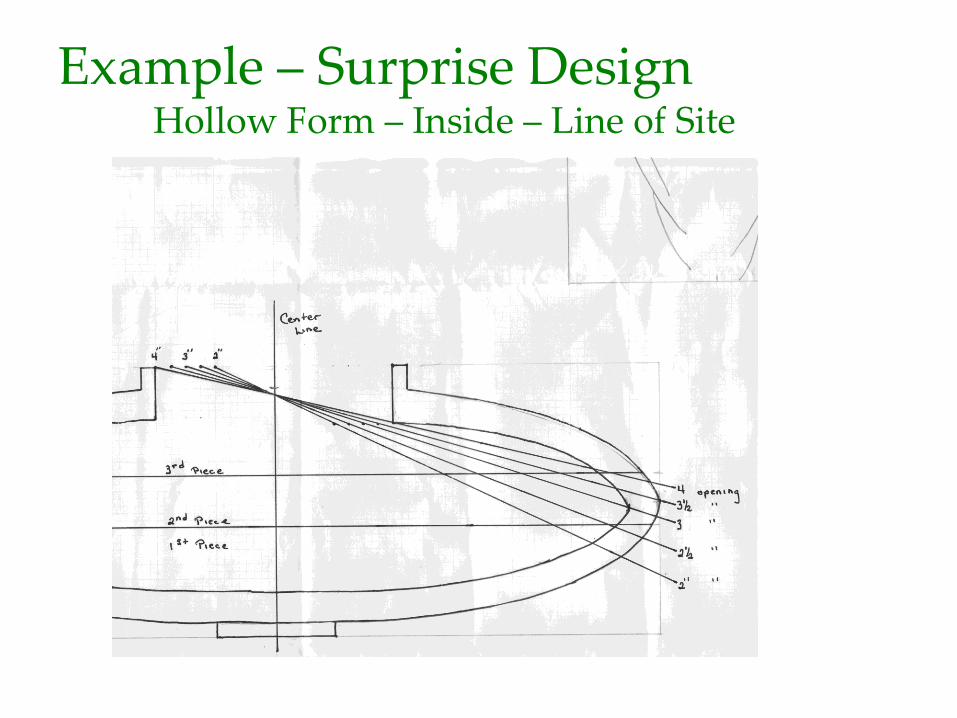
Example – Surprise Design Hollow Form – Inside – Line of Site
Example – Surprise Design Hollow Form – Inside
• The easy part is laying out the rows.
• Start with the glue line and scribe the first line.
• Continue toward the center.
• Next go from the glue line out to the top of the vessel.
• Now the HARD part.
• Lay the flexible tape measure on the inside to measure the maximum diameter.
Example – Surprise Design Hollow Form – Inside
• This will only be approximate.
• Now draw a line on a piece of wood and first try using a beading tool.
• Layout the beading tools along the line to see if the number of columns fits.
• Then make changes as necessary.
Final Comment - Finishes
• Up to this point I have not mentioned finishes for these mosaic embellished vessels.
• The finish will depend on the material used for coloring the individual cells in the pattern
• I have used the Prismacolor Markers for all of my examples because they have a wide selection of colors, which is one less thing to have to figure out.
• They have not recommended any type of finish to use.
Final Comment - Finishes
• Acrylic Paints, have an infinite number of color combinations, but you need to be accurate and exact in making your own shades of color
• Stains and dyes also offer a limited supply of colors
Conclusion
• Thank you for listening and I hope you found the seminar / demo interesting
• Your challenge for next month, if you choose to accept, is to bring in a Mosaic Form
• This presentation will now self destruct in five seconds.

Conclusion

Conclusion
References
• http://woodturningcenter.org/exhibit/Seitzman/gallery1.html • http://www.woodworkersinstitute.com/page.asp?p=1383 • http://www.marymartinart.com/davidnittmann.html • http://www.woodturner.org/resources/bb/a_g_gallery/Nittmann • http://www.google.com/search?q=david+nittmann&num=20&hl=en
&rlz=1R2SKPT_enuss411&prmd=imvnso&bav=on.2,or.r_gc.r_pw.r_qf&fp=f01cf6a2a4822cf8&biw=1189&bih=596
• http://dougmooney.webs.com/ • http://www.davidnittmann.com/ • http://www.americanartco.com/page.aspx?cid=207&id=383&mid=5 • http://www.nrwg.org/index_files/Events/Nitmann2008/Nittmann20
08.html • http://www.frontrangewoodturners.org/gallery/2011February/index.
html

References – continued