Embed Size (px)
Citation preview
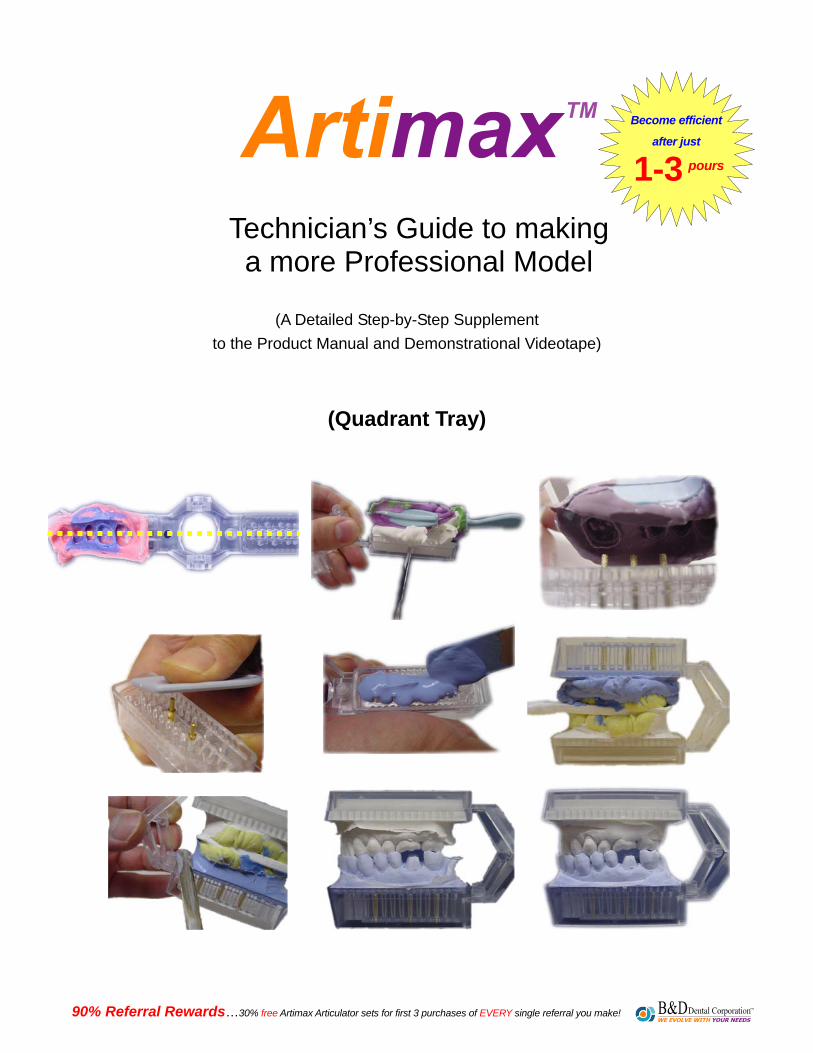
Technician’s Guide to making a more Professional Model
Become efficient
after just
1-3 pours
(A Detailed Step-by-Step Supplement to the Product Manual and Demonstrational Videotape)
(Quadrant Tray)
90% Referral Rewards…30% free Artimax Articulator sets for first 3 purchases of EVERY single referral you make!

Artimax™ The New American Standard in Disposable Dental Articulators
Connection of the trays Connect (or disconnect) the opposing tray and working tray according to the “Artimax™ Hinge
Connection Tips” page that is included in the trial kit. (See picture in flyer.)
Opposing tray (=Upper tray) Working tray (=Lower tray)
Pouring the opposing side 1. Pour the opposing side first We recommend pouring the opposing side first. (See Question & Answer number six for details on the advantage of
pouring the opposing side first in “Technical Advice & Helpful Hints” guide.)
2. Lab stone mixing Our observation shows that the majority of labs use lab stone (or base stone) for the opposing side to
cut down on material costs. One ounce (or 30g) of lab stone per case is enough to fill the Artimax™
quadrant opposing tray. This can easily be measured by using the scoop provided in the Trial Kit.
Just use one scoop for each impression you need to pour. For example, if you pour four cases at a time
use four scoops of stone.
= × 4
4 Cases 4 Scoops
90% Referral Rewards…30% free Artimax Articulator sets for first 3 purchases of EVERY single referral! U.S. and other Int’l Patents Pending 2
Artimax™ The New American Standard in Disposable Dental Articulators
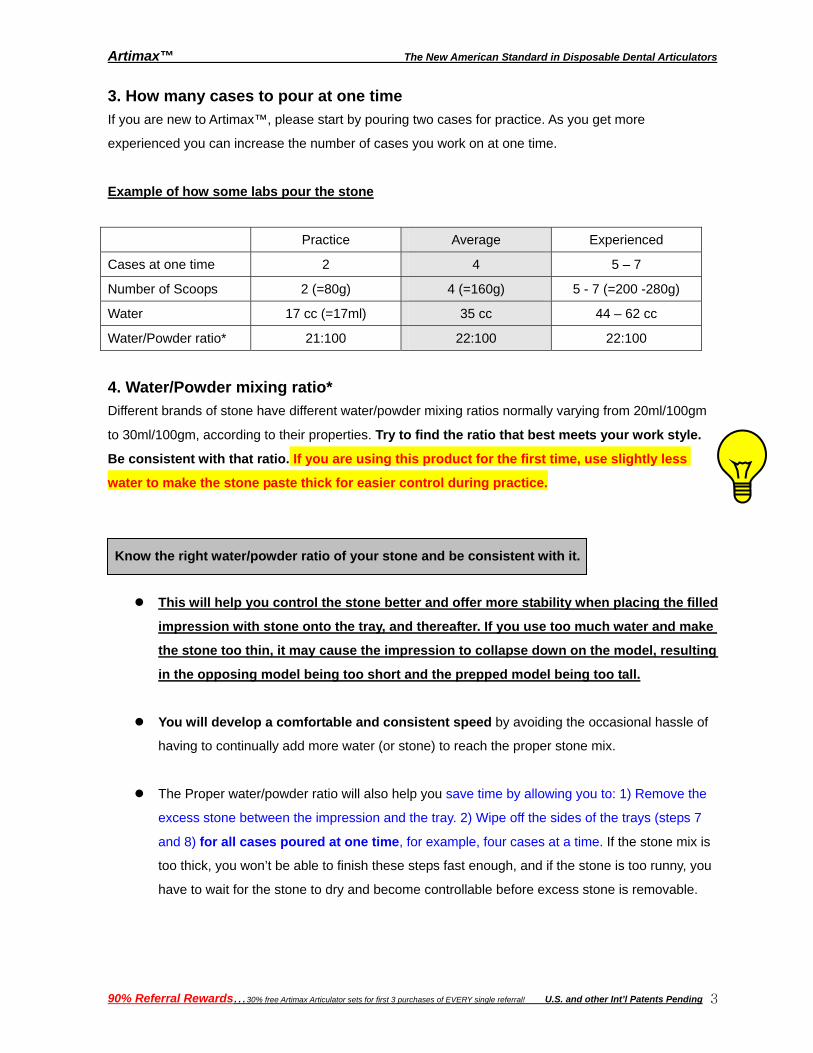
3. How many cases to pour at one time
If you are new to Artimax™, please start by pouring two cases for practice. As you get more
experienced you can increase the number of cases you work on at one time.
Example of how some labs pour the stone
Practice Average Experienced
Cases at one time 2 4 5 – 7
Number of Scoops 2 (=80g) 4 (=160g) 5 - 7 (=200 -280g)
Water 17 cc (=17ml) 35 cc 44 – 62 cc
Water/Powder ratio* 21:100 22:100 22:100
4. Water/Powder mixing ratio*
Different brands of stone have different water/powder mixing ratios normally varying from 20ml/100gm
to 30ml/100gm, according to their properties. Try to find the ratio that best meets your work style.
Be consistent with that ratio. If you are using this product for the first time, use slightly less
water to make the stone paste thick for easier control during practice.
Know the right water/powder ratio of your stone and be consistent with it.
This will help you control the stone better and offer more stability when placing the filled
impression with stone onto the tray, and thereafter. If you use too much water and make
the stone too thin, it may cause the impression to collapse down on the model, resulting
in the opposing model being too short and the prepped model being too tall.
You will develop a comfortable and consistent speed by avoiding the occasional hassle of
having to continually add more water (or stone) to reach the proper stone mix.
The Proper water/powder ratio will also help you save time by allowing you to: 1) Remove the
excess stone between the impression and the tray. 2) Wipe off the sides of the trays (steps 7
and 8) for all cases poured at one time, for example, four cases at a time. If the stone mix is
too thick, you won’t be able to finish these steps fast enough, and if the stone is too runny, you
have to wait for the stone to dry and become controllable before excess stone is removable.
90% Referral Rewards…30% free Artimax Articulator sets for first 3 purchases of EVERY single referral! U.S. and other Int’l Patents Pending 3
Artimax™ The New American Standard in Disposable Dental Articulators
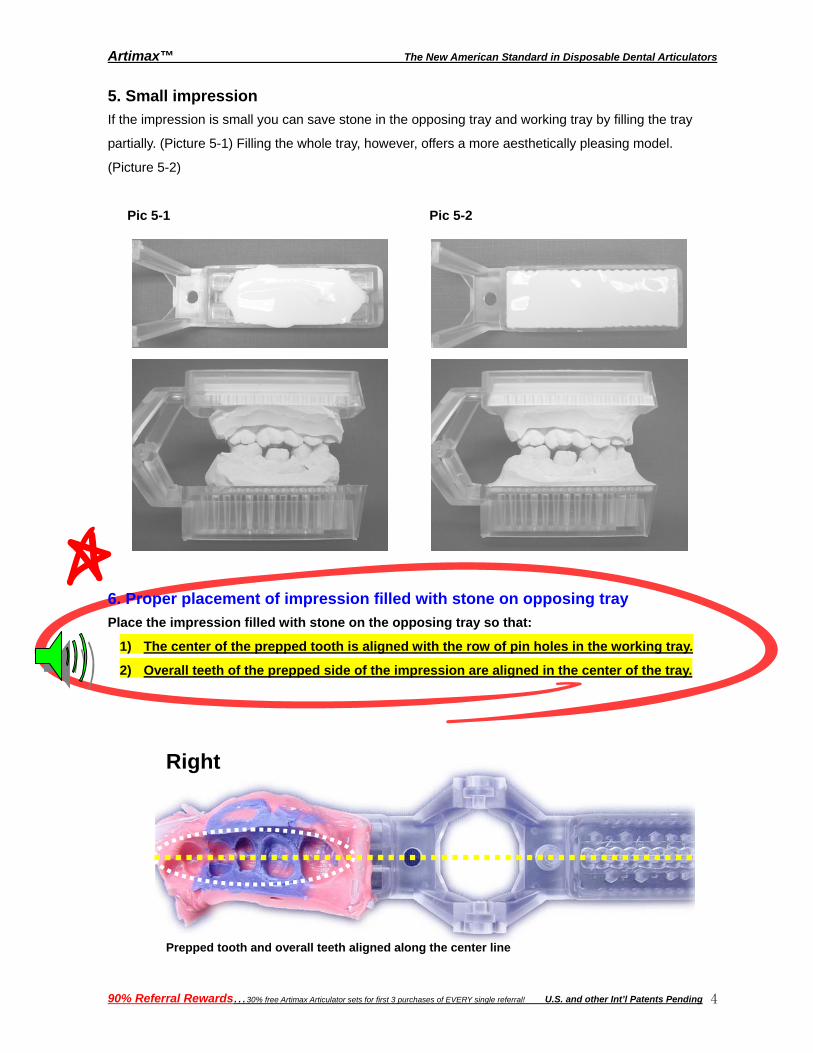
5. Small impression If the impression is small you can save stone in the opposing tray and working tray by filling the tray
partially. (Picture 5-1) Filling the whole tray, however, offers a more aesthetically pleasing model.
(Picture 5-2)
Pic 5-1 Pic 5-2
6. Proper placement of impression filled with stone on opposing tray Place the impression filled with stone on the opposing tray so that:
1) The center of the prepped tooth is aligned with the row of pin holes in the working tray.
2) Overall teeth of the prepped side of the impression are aligned in the center of the tray.
Prepped tooth and overall teeth aligned along the center line
Right
90% Referral Rewards…30% free Artimax Articulator sets for first 3 purchases of EVERY single referral! U.S. and other Int’l Patents Pending 4
Artimax™ The New American Standard in Disposable Dental Articulators
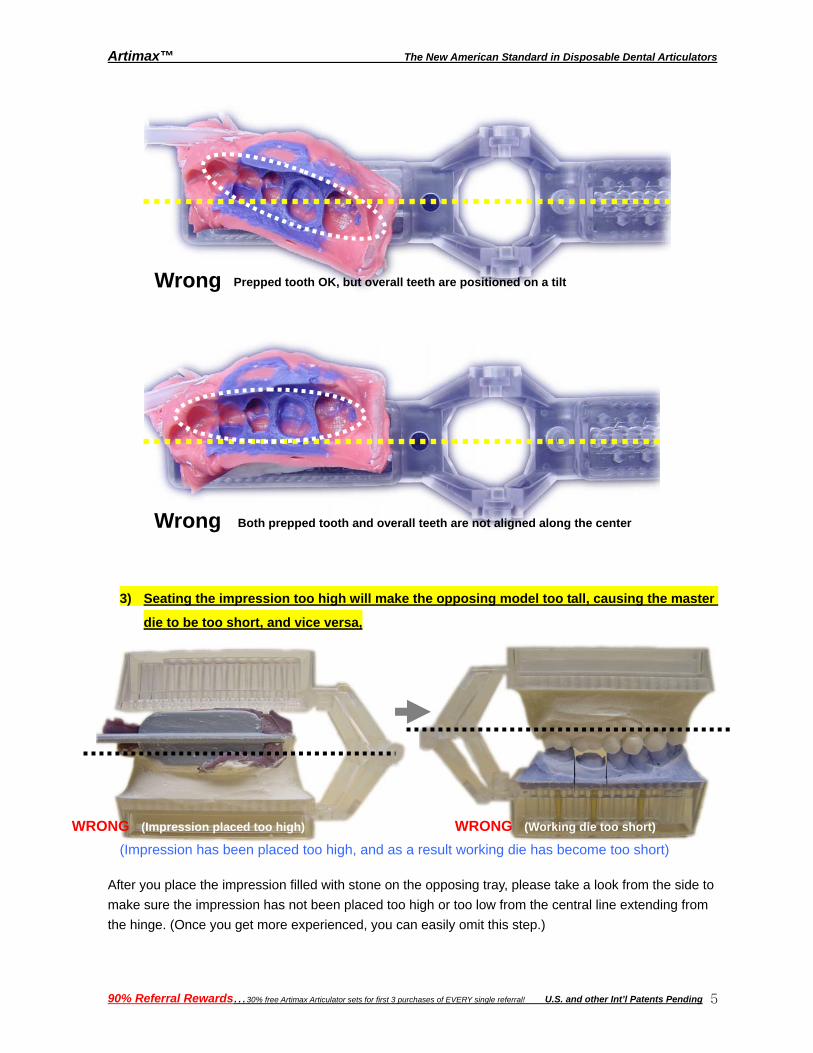
(Prepped tooth OK, but overall teeth are positioned on a tilt Wrong
(Both prepped tooth and overall teeth are not aligned along the center line)Wrong
3) Seating the impression too high will make the opposing model too tall, causing the master
die to be too short, and vice versa,
WRONG (Impression placed too high) WRONG (Working die too short)
(Impression has been placed too high, and as a result working die has become too short) After you place the impression filled with stone on the opposing tray, please take a look from the side to make sure the impression has not been placed too high or too low from the central line extending from the hinge. (Once you get more experienced, you can easily omit this step.)
90% Referral Rewards…30% free Artimax Articulator sets for first 3 purchases of EVERY single referral! U.S. and other Int’l Patents Pending 5
Artimax™ The New American Standard in Disposable Dental Articulators
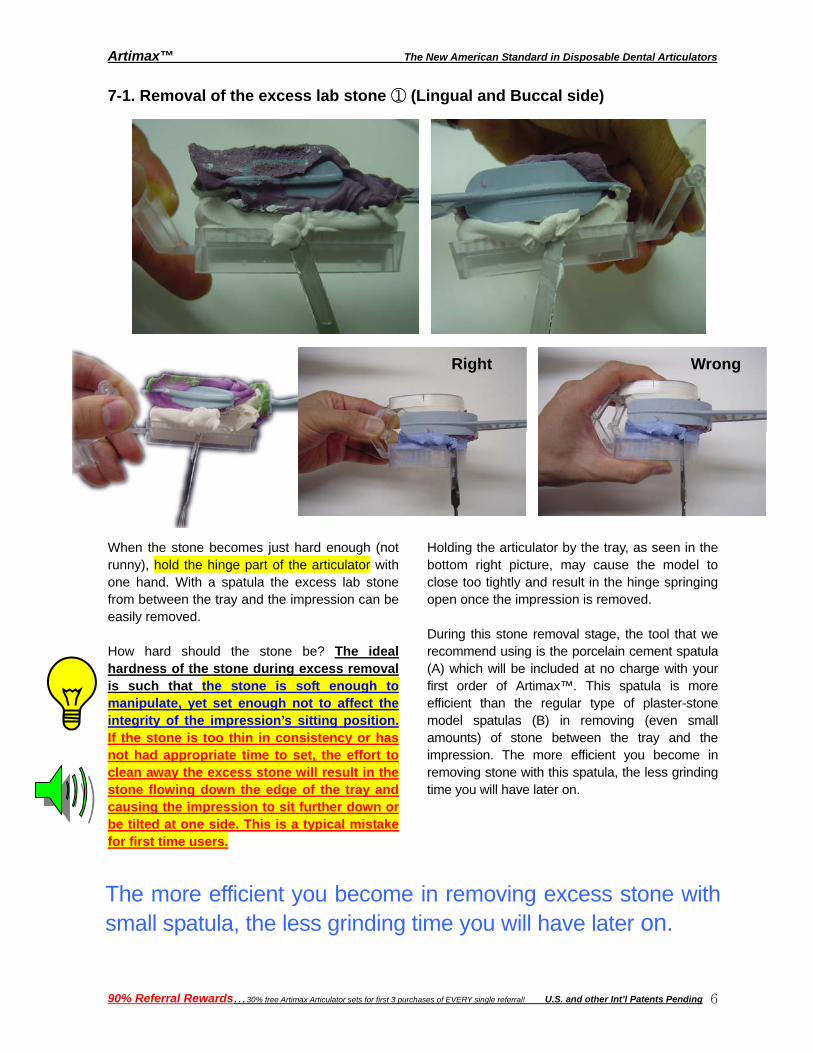
7-1. Removal of the excess lab stone ① (Lingual and Buccal side)
Right Wrong
When the stone becomes just hard enough (not runny), hold the hinge part of the articulator with one hand. With a spatula the excess lab stone from between the tray and the impression can be easily removed. How hard should the stone be? The ideal hardness of the stone during excess removal is such that the stone is soft enough to manipulate, yet set enough not to affect the integrity of the impression’s sitting position. If the stone is too thin in consistency or has not had appropriate time to set, the effort to clean away the excess stone will result in the stone flowing down the edge of the tray and causing the impression to sit further down or be tilted at one side. This is a typical mistake for first time users.
Holding the articulator by the tray, as seen in the bottom right picture, may cause the model to close too tightly and result in the hinge springing open once the impression is removed. During this stone removal stage, the tool that we recommend using is the porcelain cement spatula (A) which will be included at no charge with your first order of Artimax™. This spatula is more efficient than the regular type of plaster-stone model spatulas (B) in removing (even small amounts) of stone between the tray and the impression. The more efficient you become in removing stone with this spatula, the less grinding time you will have later on.
The more efficient you become in removing excess stone with small spatula, the less grinding time you will have later on.
90% Referral Rewards…30% free Artimax Articulator sets for first 3 purchases of EVERY single referral! U.S. and other Int’l Patents Pending 6
Artimax™ The New American Standard in Disposable Dental Articulators
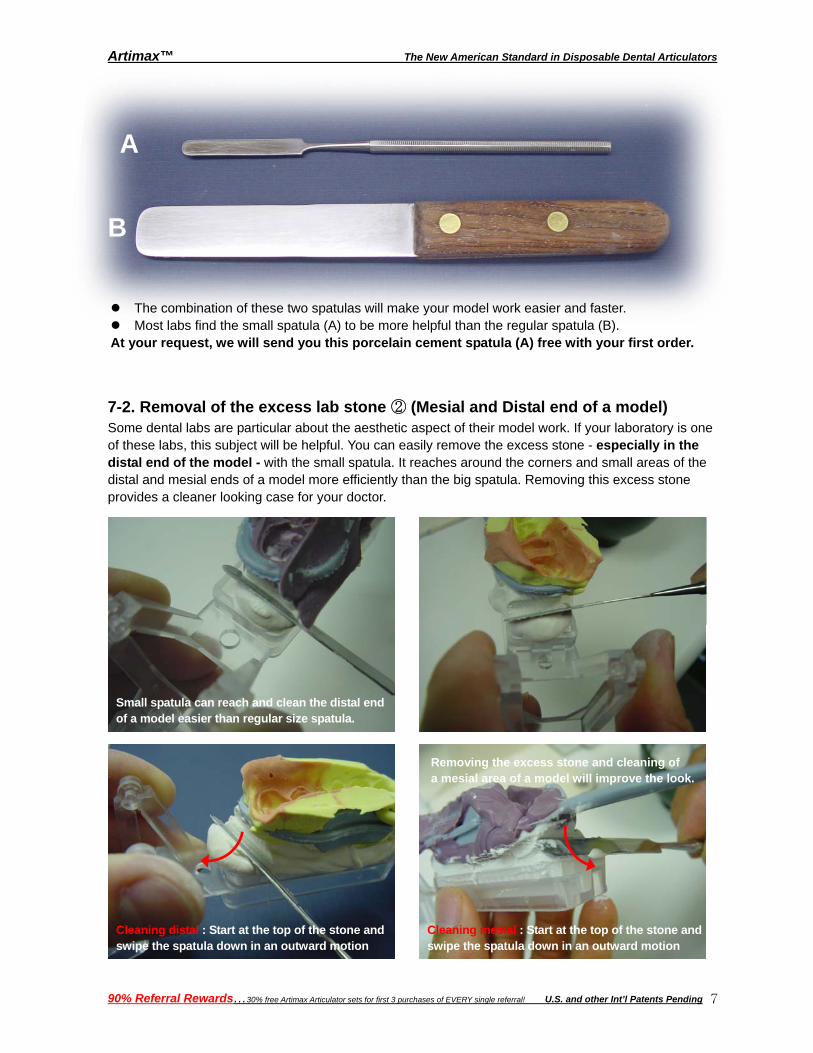
7-2. Removal of the excess lab stone ② (Mesial and Distal end of a model) Some dental labs are particular about the aesthetic aspect of their model work. If your laboratory is one of these labs, this subject will be helpful. You can easily remove the excess stone - especially in the distal end of the model - with the small spatula. It reaches around the corners and small areas of the distal and mesial ends of a model more efficiently than the big spatula. Removing this excess stone provides a cleaner looking case for your doctor.
The combination of these two spatulas will make your model work easier and faster.
A
B
The combination of these two spatulas will make your model work easier and faster. Most labs find the small spatula (A) to be more helpful than the regular spatula (B).
your request, we will send you this porcelain cement spatula (A) free with your first order. At
Small spatula can reach and clean the distal end of a model easier than regular size spatula.
Removing the excess stone and cleaning of a mesial area of a model will improve the look.
Cleaning distal Cleaning mesial : Start at the top of the stone and swipe the spatula down in an outward motion
: Start at the top of the stone and swipe the spatula down in an outward motion
90% Referral Rewards…30% free Artimax Articulator sets for first 3 purchases of EVERY single referral! U.S. and other Int’l Patents Pending 7
Artimax™ The New American Standard in Disposable Dental Articulators
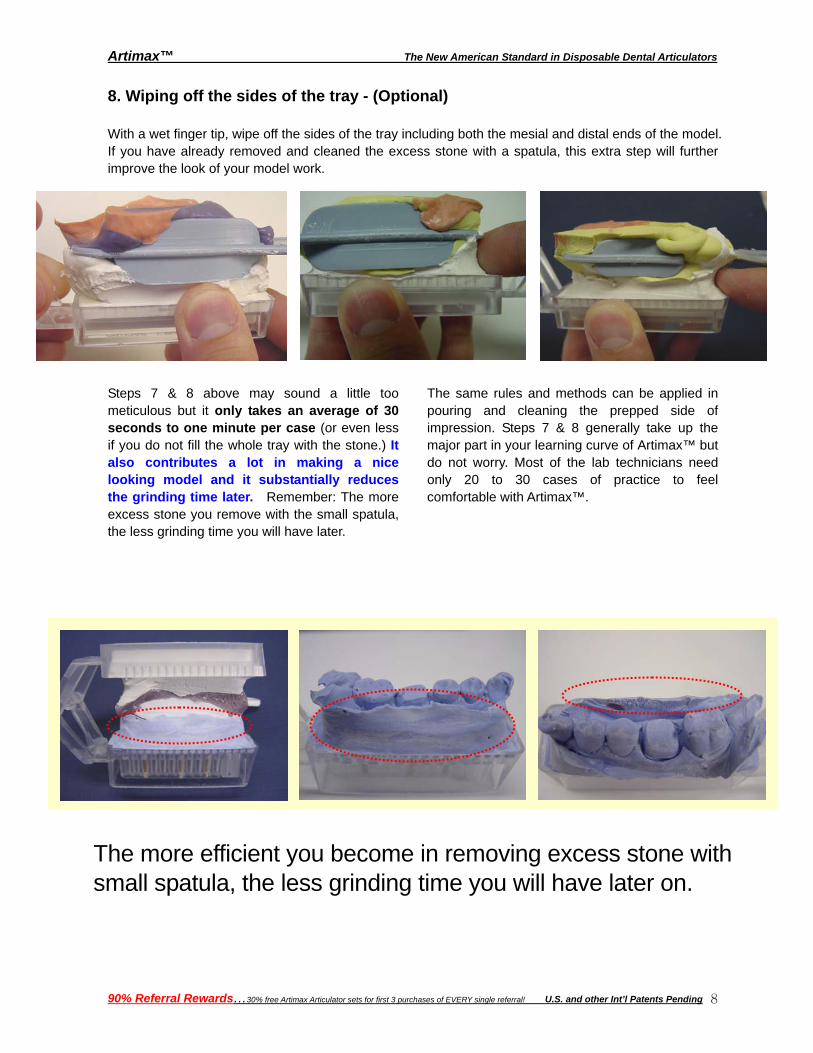
8. Wiping off the sides of the tray - (Optional) With a wet finger tip, wipe off the sides of the tray including both the mesial and distal ends of the model. If you have already removed and cleaned the excess stone with a spatula, this extra step will further improve the look of your model work. Steps 7 & 8 above may sound a little too meticulous but it only takes an average of 30 seconds to one minute per case (or even less if you do not fill the whole tray with the stone.) It also contributes a lot in making a nice looking model and it substantially reduces the grinding time later. Remember: The more excess stone you remove with the small spatula, the less grinding time you will have later.
The same rules and methods can be applied in pouring and cleaning the prepped side of impression. Steps 7 & 8 generally take up the major part in your learning curve of Artimax™ but do not worry. Most of the lab technicians need only 20 to 30 cases of practice to feel comfortable with Artimax™.
The more efficient you become in removing excess stone with small spatula, the less grinding time you will have later on.
90% Referral Rewards…30% free Artimax Articulator sets for first 3 purchases of EVERY single referral! U.S. and other Int’l Patents Pending 8
Artimax™ The New American Standard in Disposable Dental Articulators
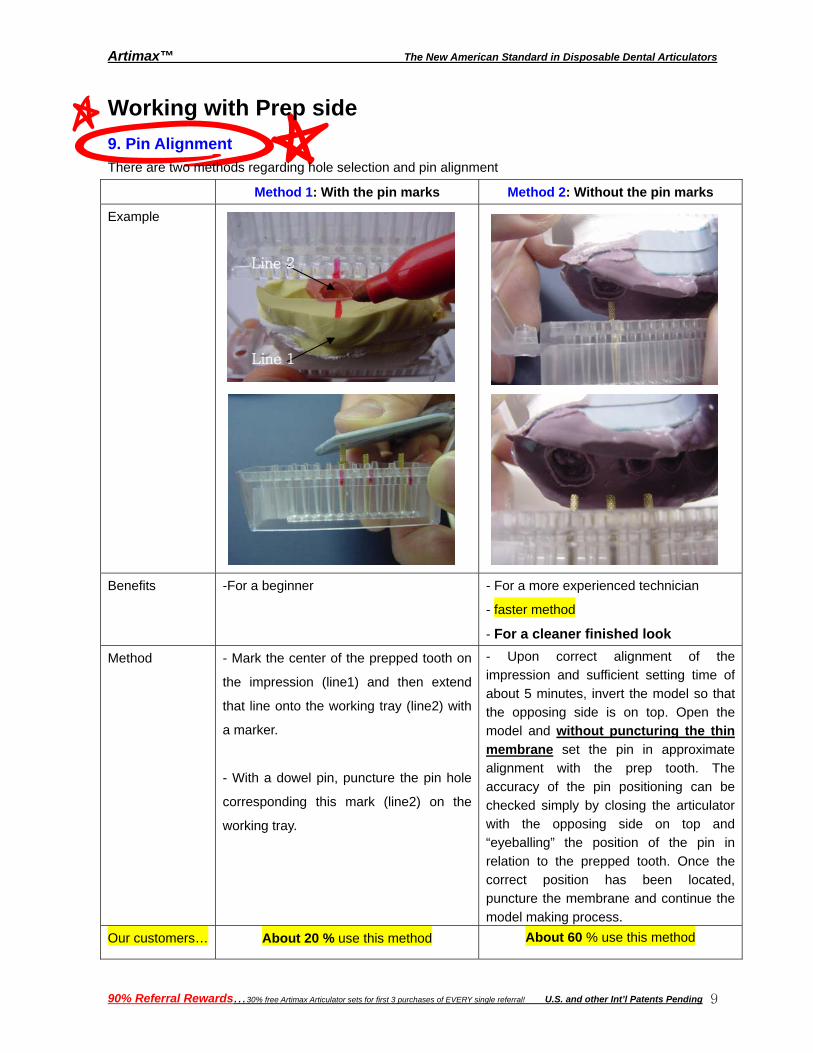
Working with Prep side 9. Pin Alignment There are two methods regarding hole selection and pin alignment
Method 1: With the pin marks Method 2: Without the pin marks
Example
Benefits -For a beginner - For a more experienced technician
- faster method
- For a cleaner finished look
Method - Mark the center of the prepped tooth on
the impression (line1) and then extend
that line onto the working tray (line2) with
a marker.
Line 1
Line 2
- With a dowel pin, puncture the pin hole
corresponding this mark (line2) on the
working tray.
- Upon correct alignment of the impression and sufficient setting time of about 5 minutes, invert the model so that the opposing side is on top. Open the model and without puncturing the thin membrane set the pin in approximate alignment with the prep tooth. The accuracy of the pin positioning can be checked simply by closing the articulator with the opposing side on top and “eyeballing” the position of the pin in relation to the prepped tooth. Once the correct position has been located, puncture the membrane and continue the model making process.
Our customers… About 60 % use this method About 20 % use this method
90% Referral Rewards…30% free Artimax Articulator sets for first 3 purchases of EVERY single referral! U.S. and other Int’l Patents Pending 9
Artimax™ The New American Standard in Disposable Dental Articulators
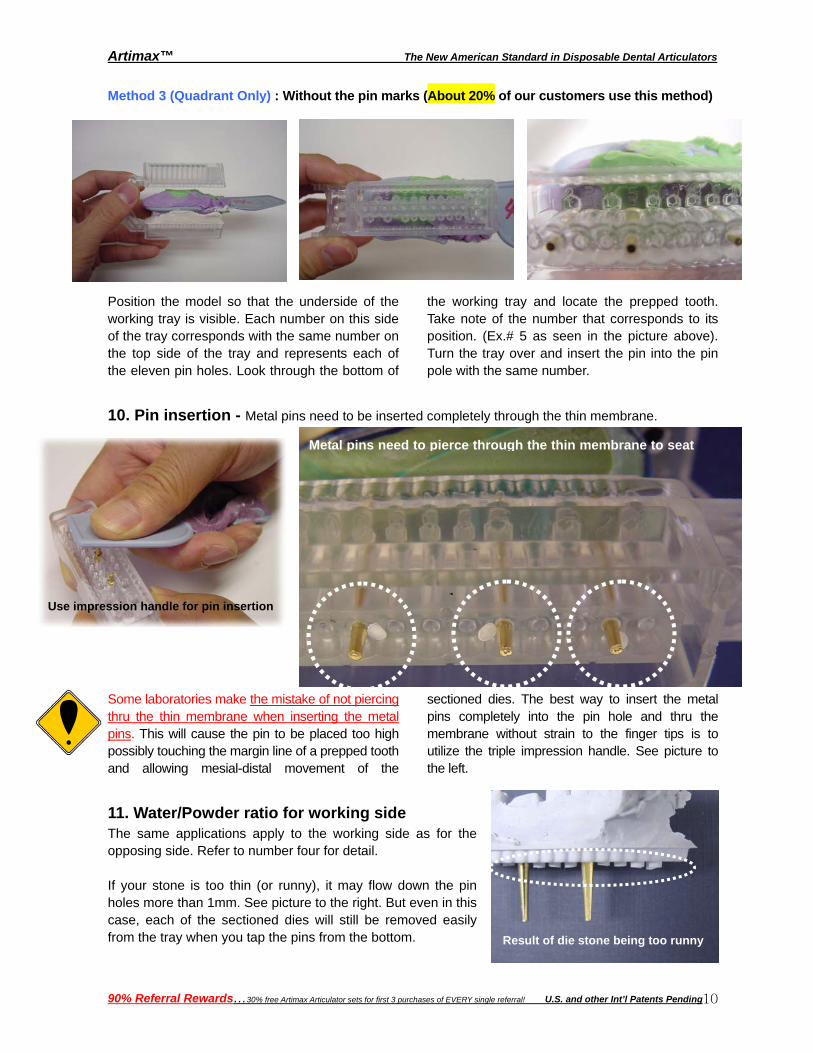
Method 3 (Quadrant Only) : Without the pin marks (About 20% of our customers use this method)
Position the model so that the underside of the working tray is visible. Each number on this side of the tray corresponds with the same number on the top side of the tray and represents each of the eleven pin holes. Look through the bottom of
the working tray and locate the prepped tooth. Take note of the number that corresponds to its position. (Ex.# 5 as seen in the picture above). Turn the tray over and insert the pin into the pin pole with the same number.
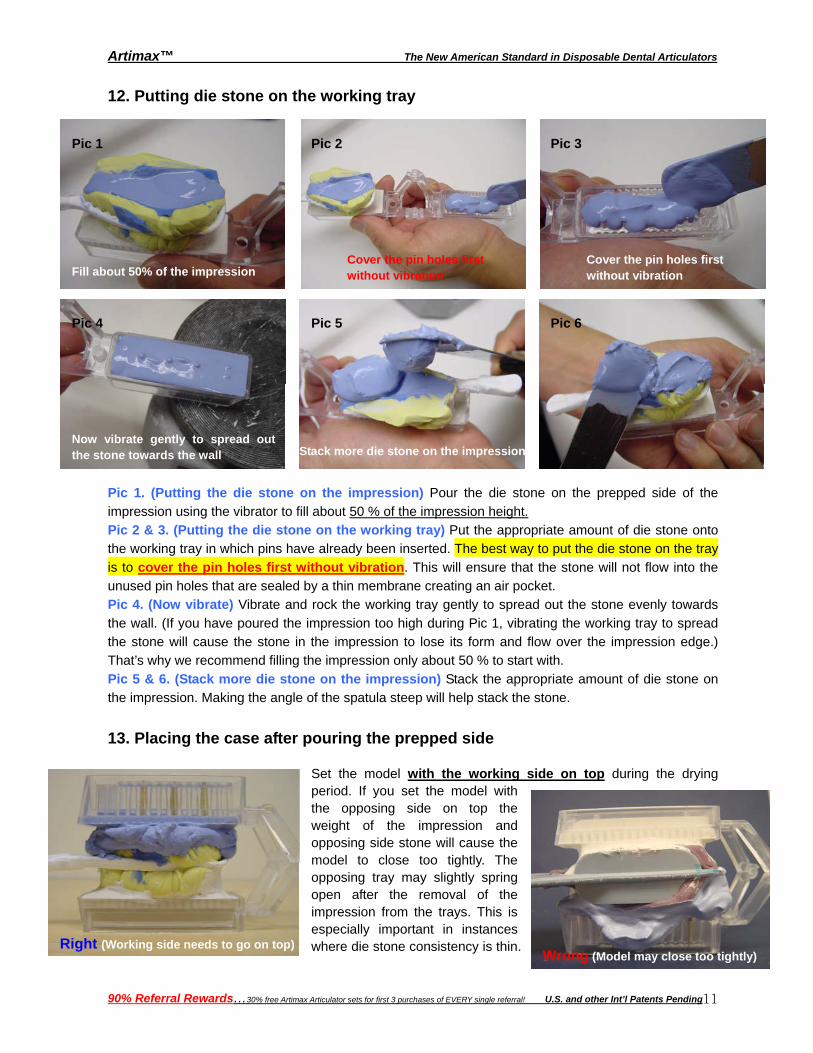
10. Pin insertion - Metal pins need to be inserted completely through the thin membrane.
Result of die stone being too runny
Some laboratories make the mistake of not piercing thru the thin membrane when inserting the metal pins. This will cause the pin to be placed too high possibly touching the margin line of a prepped tooth and allowing mesial-distal movement of the
sectioned dies. The best way to insert the metal pins completely into the pin hole and thru the membrane without strain to the finger tips is to utilize the triple impression handle. See picture to the left.
Metal pins need to pierce through the thin membrane to seat
Use impression handle for pin insertion
11. Water/Powder ratio for working side The same applications apply to the working side as for the opposing side. Refer to number four for detail. If your stone is too thin (or runny), it may flow down the pin holes more than 1mm. See picture to the right. But even in this case, each of the sectioned dies will still be removed easily from the tray when you tap the pins from the bottom.
90% Referral Rewards…30% free Artimax Articulator sets for first 3 purchases of EVERY single referral! U.S. and other Int’l Patents Pending 10
Artimax™ The New American Standard in Disposable Dental Articulators
Wrong
12. Putting die stone on the working tray
(Model may close too tightly)
Pic 1
Pic 6 Pic 5 Pic 4
Pic 3 Pic 2
Fill about 50% of the impression Cover the pin holes first Cover the pin holes firstwithout vibration without vibration
Now vibrate gently to spread outthe stone towards the wall Stack more die stone on the impression
Pic 1. (Putting the die stone on the impression) Pour the die stone on the prepped side of the impression using the vibrator to fill about 50 % of the impression height.Pic 2 & 3. (Putting the die stone on the working tray) Put the appropriate amount of die stone onto the working tray in which pins have already been inserted. The best way to put the die stone on the tray is to cover the pin holes first without vibration. This will ensure that the stone will not flow into the unused pin holes that are sealed by a thin membrane creating an air pocket. Pic 4. (Now vibrate) Vibrate and rock the working tray gently to spread out the stone evenly towards the wall. (If you have poured the impression too high during Pic 1, vibrating the working tray to spread the stone will cause the stone in the impression to lose its form and flow over the impression edge.) That’s why we recommend filling the impression only about 50 % to start with. Pic 5 & 6. (Stack more die stone on the impression) Stack the appropriate amount of die stone on the impression. Making the angle of the spatula steep will help stack the stone. 13. Placing the case after pouring the prepped side
Set the model with the working side on top during the drying period. If you set the model with the opposing side on top the weight of the impression and opposing side stone will cause the model to close too tightly. The opposing tray may slightly spring open after the removal of the impression from the trays. This is especially important in instances where die stone consistency is thin. Right (Working side needs to go on top)
90% Referral Rewards…30% free Artimax Articulator sets for first 3 purchases of EVERY single referral! U.S. and other Int’l Patents Pending 11
Wrong (Model may close too tightly)
Artimax™ The New American Standard in Disposable Dental Articulators
14. Removal of the excess die stone - Same as opposing side
Cleaning mesial & distal :15. Wiping off the sides of the tray - (Optional) Use the small spatula to
easily remove the mesial & distal ends. Start at the top of the stone and swipe the spatula down in an outward motion.
16. Impression removal and drying time
is enough time for stone to dry. 2-3 Hours
A. When is the best time to remove the impression? After about one hour of drying time, the impression can be removed from between the trays. The longer the impression stays in the model, the harder it is to remove. It would be somewhat difficult to separate the impression if it stays overnight. However, with long and narrow tooth preparations like anteriors, it would be safer to wait an extra 2-3 hours since there is an increased chance of stone die fracture; especially when more rigid impression materials are used. B. How long should the drying time be? Every stone is somewhat different in its physical properties like expansion rate and drying time. Drying time varies greatly from lab to lab. Some labs allow two hours of drying time while others
may allow 24 hours. Nearly all die stones expand to some extent and become harder during drying time. This expansion time normally lasts for a maximum of 24 hours. The harder the stone becomes, the harder it is to section the dies. The best time to saw the working model and remove each of the sectioned dies from the Artimax™ tray is about 2-3 hours after the stone is poured. This is done by gently tapping from the bottom. If you pour the stone and try to do the rest of the model work the next day, cutting the model and removing each of the sectioned dies from the tray will be more difficult than it would be 2-3 hours after pouring the stone. In summary, model work does not require the full drying time. (12-24 hours)
Initial Setting Time
(10-15 min)
Die stone Pouring
Drying Time (2 – 3 Hours)
Impression
(1 Hour) (1 – 2 Hours)
Model Sawing Removal & Die Removal
90% Referral Rewards…30% free Artimax Articulator sets for first 3 purchases of EVERY single referral! U.S. and other Int’l Patents Pending 12