Embed Size (px)
Citation preview


- 1 - Miracle-A9
Miracle-A9
User Manual
*Make sure to read the User Manual before using this machine.
*The product appearance and specifications are subject to change for performance and
usability improvement without an announcement, and some parts may be unmatched with the
picture shown in the User Manual.
http://www.miraclekey.com
3F, 1314 GwanPyeong-dong Yuseong-gu
Daejeon, Republic of Korea, 306-801
TEL:+82-70-7011-0905 FAX: +82-42-673-0905
Copyright© 2005-2012 RED TECHNOLOGY.
- 2 - Miracle-A9
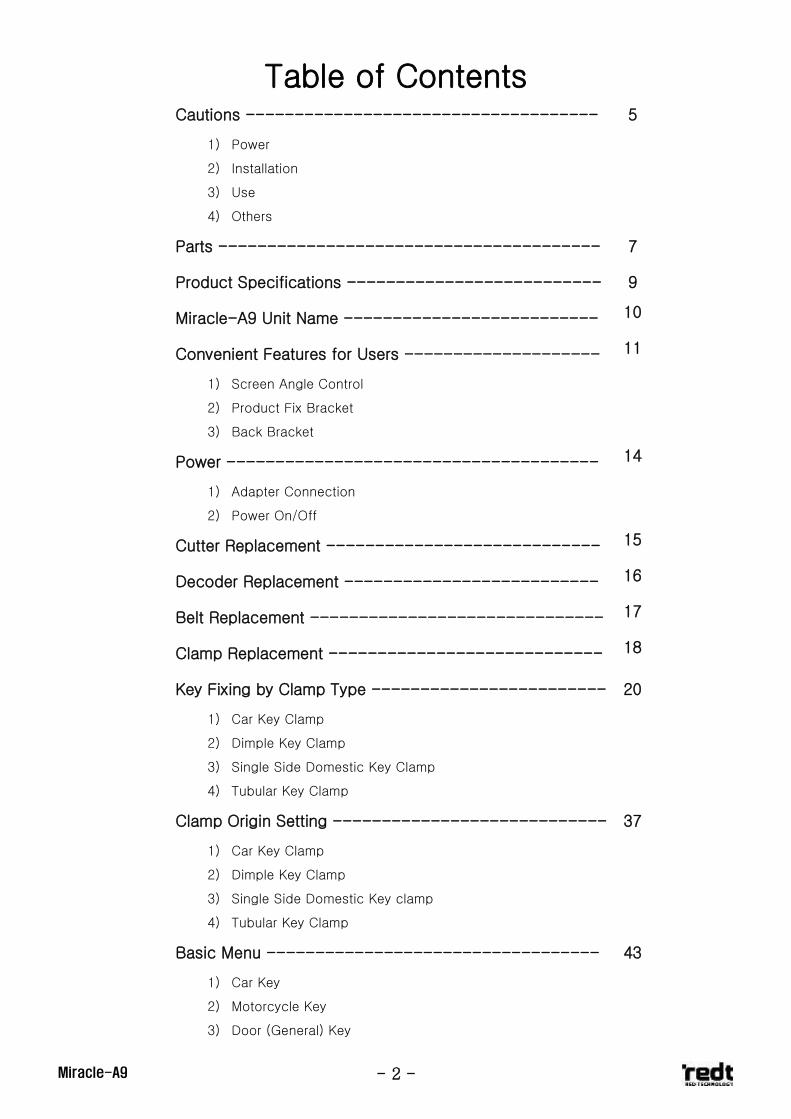
Table of Contents Cautions ------------------------------------
1) Power
2) Installation
3) Use
4) Others
5
Parts --------------------------------------- 7
Product Specifications -------------------------- 9
Miracle-A9 Unit Name -------------------------- 10
Convenient Features for Users --------------------
1) Screen Angle Control
2) Product Fix Bracket
3) Back Bracket
11
Power --------------------------------------
1) Adapter Connection
2) Power On/Off
14
Cutter Replacement ---------------------------- 15
Decoder Replacement -------------------------- 16
Belt Replacement ------------------------------ 17
Clamp Replacement ---------------------------- 18
Key Fixing by Clamp Type ------------------------
1) Car Key Clamp
2) Dimple Key Clamp
3) Single Side Domestic Key Clamp
4) Tubular Key Clamp
20
Clamp Origin Setting ----------------------------
1) Car Key Clamp
2) Dimple Key Clamp
3) Single Side Domestic Key clamp
4) Tubular Key Clamp
37
Basic Menu ----------------------------------
1) Car Key
2) Motorcycle Key
3) Door (General) Key
43

- 3 - Miracle-A9
4) Dimple Key
5) Tubular Key
6) Data Search
Key Cut Procedure ----------------------------- 51
Key Cut Setting Screen --------------------------
1) Speed Setting
2) Auto Key Measure
3) Cutter Setting
4) Cutting Depth Setting
5) Multi-Stage Cutting
6) Trim
7) Stop
8) Clamp Reference Point Change
54
Key Data Load Screen --------------------------
1) Bitting Input
2) Read/Copy Original Key
3) Key Cut
4) Menu
58
Read/Copy Original Key ------------------------- 63
Convenient Features ----------------------------
1) Barcode
2) Previous Key Data View
3) Key Cut List View
4) Favorite
65
Register/Open/Delete Favorite Key ----------------- 69
Setting Menu --------------------------------- 71
Program Installation ---------------------------- 72
Data and Firmware Upgrade ---------------------- 73
- 4 - Miracle-A9
Make sure to comply with the following when you use the machine.
Miracle-A9 is designed to be operated under DC24V. Normal operation is
only made when DC24V is supplied. When other power supply than DC24V
is applied, the machine may not be operated accurately. In particular, under
low voltage (less than 24V), DC motor output decreases, which leads to
slower rotation.
Replace the cutter on a regular basis. Delayed replacement may deteriorate
the cutting force, which leads to failure of accurate key cutting.
Depending on the alloy of the key blank, the cutting force of the end mill
differs. Set the cutting speed and cutting unit by the strength of the key
blank.
Take cautions not to drop the machine or get it get wet by rain or snow when
used outside.
Make sure to check errors on key blank before cutting the key. The error on
key blank itself may produce unexpected results even if the machine cuts
the key with accurate measurement.
This machine is not equipped with a function to sense the clamp contact to
the tools. Therefore, in key cutting, the clamp may be damaged by the tools,
depending on the type of the key or the type of the clamp selected. Take
cautions when operating the key and the clamp. The company is not
responsible for the clamp damaged during the key cutting.
- 5 - Miracle-A9
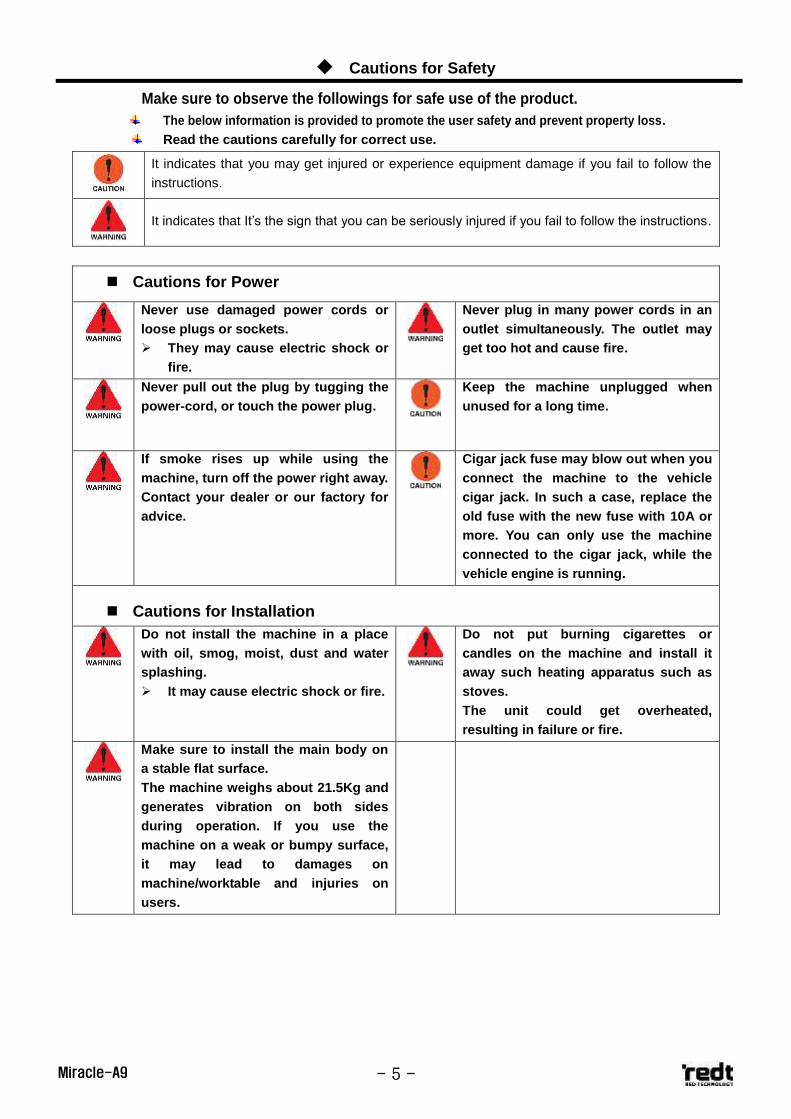
Cautions for Safety
Make sure to observe the followings for safe use of the product.
The below information is provided to promote the user safety and prevent property loss.
Read the cautions carefully for correct use.
It indicates that you may get injured or experience equipment damage if you fail to follow the
instructions.
It indicates that It’s the sign that you can be seriously injured if you fail to follow the instructions.
Cautions for Power
Never use damaged power cords or
loose plugs or sockets.
They may cause electric shock or
fire.
Never plug in many power cords in an
outlet simultaneously. The outlet may
get too hot and cause fire.
Never pull out the plug by tugging the
power-cord, or touch the power plug.
Keep the machine unplugged when
unused for a long time.
If smoke rises up while using the
machine, turn off the power right away.
Contact your dealer or our factory for
advice.
Cigar jack fuse may blow out when you
connect the machine to the vehicle
cigar jack. In such a case, replace the
old fuse with the new fuse with 10A or
more. You can only use the machine
connected to the cigar jack, while the
vehicle engine is running.
Cautions for Installation
Do not install the machine in a place
with oil, smog, moist, dust and water
splashing.
It may cause electric shock or fire.
Do not put burning cigarettes or
candles on the machine and install it
away such heating apparatus such as
stoves.
The unit could get overheated,
resulting in failure or fire.
Make sure to install the main body on
a stable flat surface.
The machine weighs about 21.5Kg and
generates vibration on both sides
during operation. If you use the
machine on a weak or bumpy surface,
it may lead to damages on
machine/worktable and injuries on
users.
- 6 - Miracle-A9
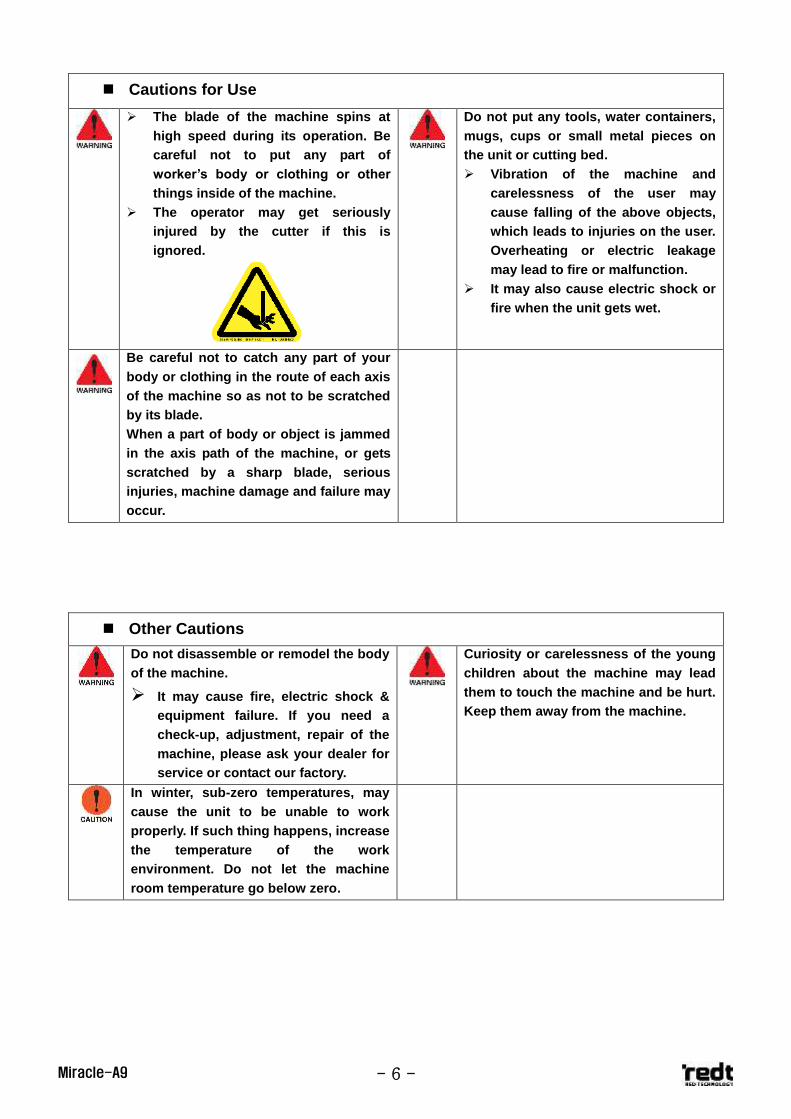
Cautions for Use
The blade of the machine spins at
high speed during its operation. Be
careful not to put any part of
worker’s body or clothing or other
things inside of the machine.
The operator may get seriously
injured by the cutter if this is
ignored.
Do not put any tools, water containers,
mugs, cups or small metal pieces on
the unit or cutting bed.
Vibration of the machine and
carelessness of the user may
cause falling of the above objects,
which leads to injuries on the user.
Overheating or electric leakage
may lead to fire or malfunction.
It may also cause electric shock or
fire when the unit gets wet.
Be careful not to catch any part of your
body or clothing in the route of each axis
of the machine so as not to be scratched
by its blade.
When a part of body or object is jammed
in the axis path of the machine, or gets
scratched by a sharp blade, serious
injuries, machine damage and failure may
occur.
Other Cautions
Do not disassemble or remodel the body
of the machine.
It may cause fire, electric shock &
equipment failure. If you need a
check-up, adjustment, repair of the
machine, please ask your dealer for
service or contact our factory.
Curiosity or carelessness of the young
children about the machine may lead
them to touch the machine and be hurt.
Keep them away from the machine.
In winter, sub-zero temperatures, may
cause the unit to be unable to work
properly. If such thing happens, increase
the temperature of the work
environment. Do not let the machine
room temperature go below zero.
- 7 - Miracle-A9
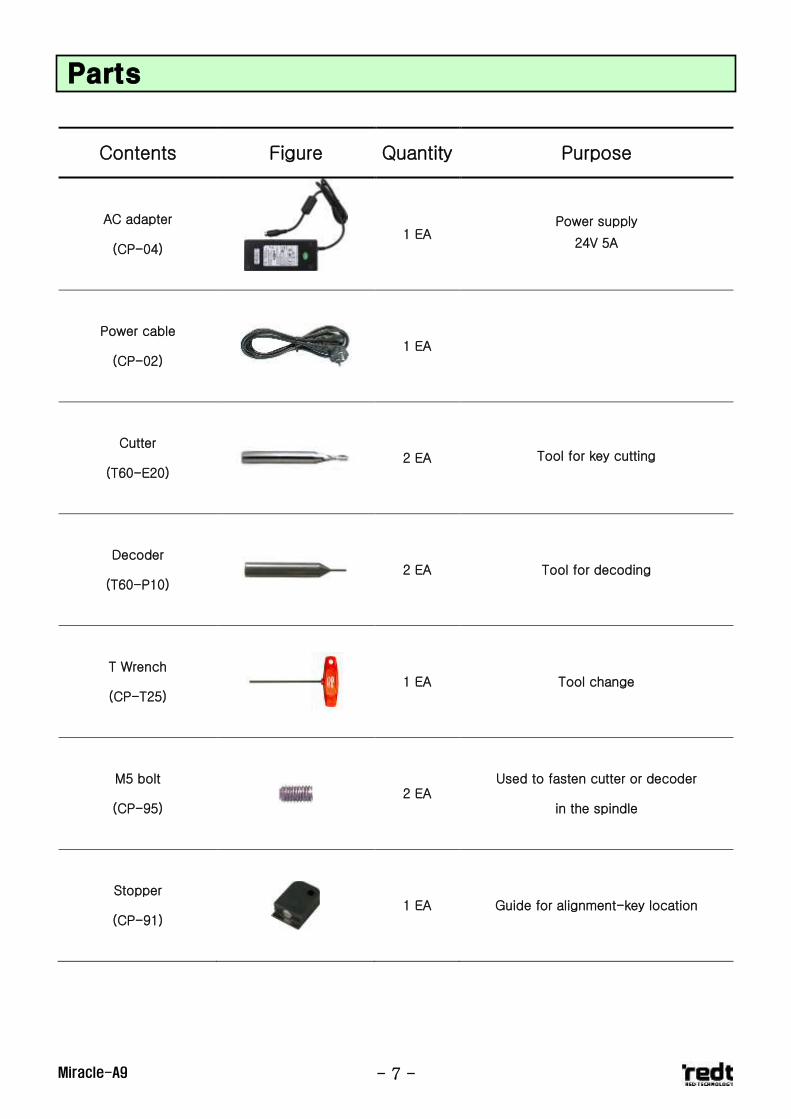
Contents Figure Quantity Purpose
AC adapter
(CP-04)
1 EA Power supply
24V 5A
Power cable
(CP-02) 1 EA
Cutter
(T60-E20)
2 EA Tool for key cutting
Decoder
(T60-P10) 2 EA Tool for decoding
T Wrench
(CP-T25)
1 EA Tool change
M5 bolt
(CP-95) 2 EA
Used to fasten cutter or decoder
in the spindle
Stopper
(CP-91)
1 EA Guide for alignment-key location
Parts
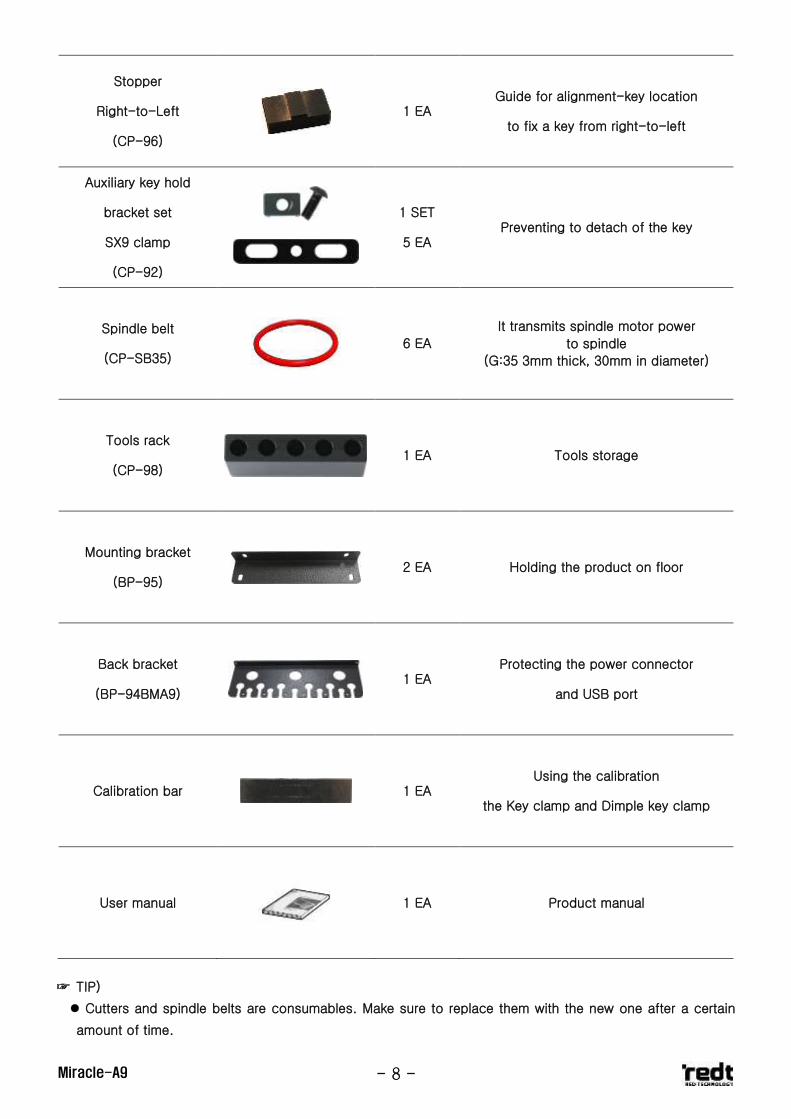
- 8 - Miracle-A9
Stopper
Right-to-Left
(CP-96)
1 EA Guide for alignment-key location
to fix a key from right-to-left
Auxiliary key hold
bracket set
SX9 clamp
(CP-92)
1 SET
5 EA Preventing to detach of the key
Spindle belt
(CP-SB35)
6 EA
It transmits spindle motor power
to spindle
(G:35 3mm thick, 30mm in diameter)
Tools rack
(CP-98)
1 EA Tools storage
Mounting bracket
(BP-95) 2 EA Holding the product on floor
Back bracket
(BP-94BMA9) 1 EA
Protecting the power connector
and USB port
Calibration bar
1 EA Using the calibration
the Key clamp and Dimple key clamp
User manual
1 EA Product manual
☞ TIP)
Cutters and spindle belts are consumables. Make sure to replace them with the new one after a certain
amount of time.
- 9 - Miracle-A9
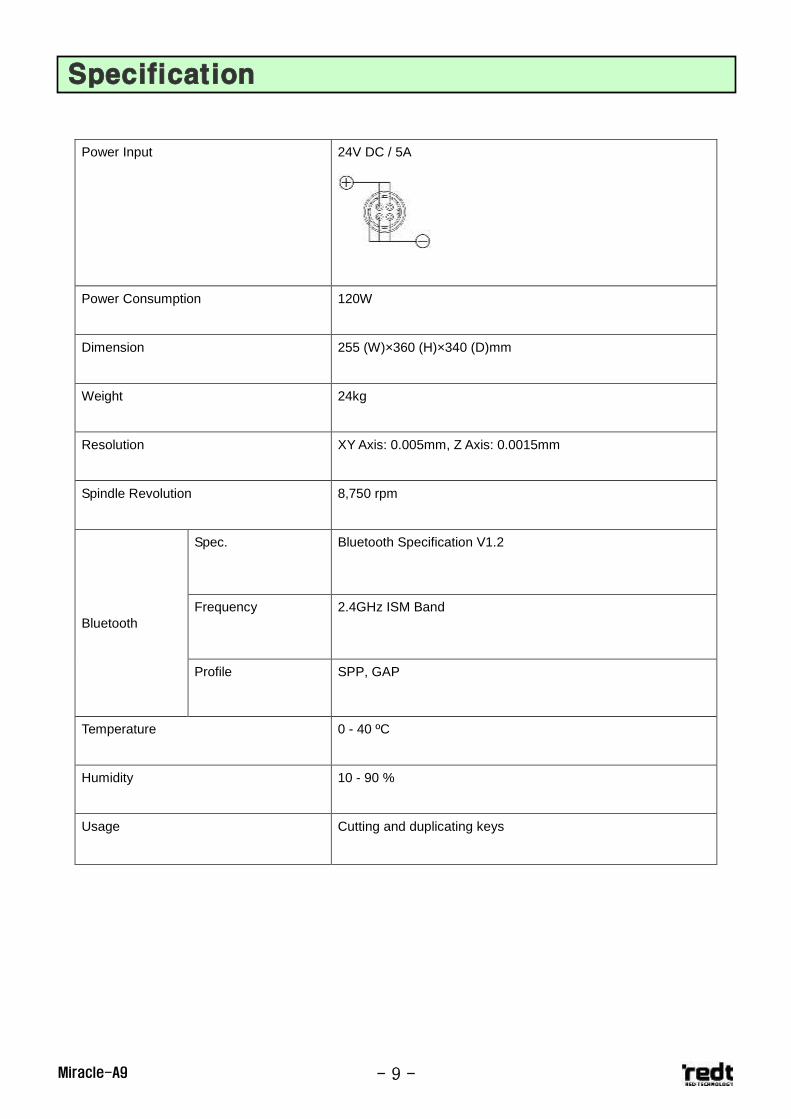
Power Input 24V DC / 5A
Power Consumption 120W
Dimension 255 (W)×360 (H)×340 (D)mm
Weight 24kg
Resolution XY Axis: 0.005mm, Z Axis: 0.0015mm
Spindle Revolution 8,750 rpm
Bluetooth
Spec. Bluetooth Specification V1.2
Frequency 2.4GHz ISM Band
Profile SPP, GAP
Temperature 0 - 40 ºC
Humidity 10 - 90 %
Usage Cutting and duplicating keys
Specification
- 10 - Miracle-A9
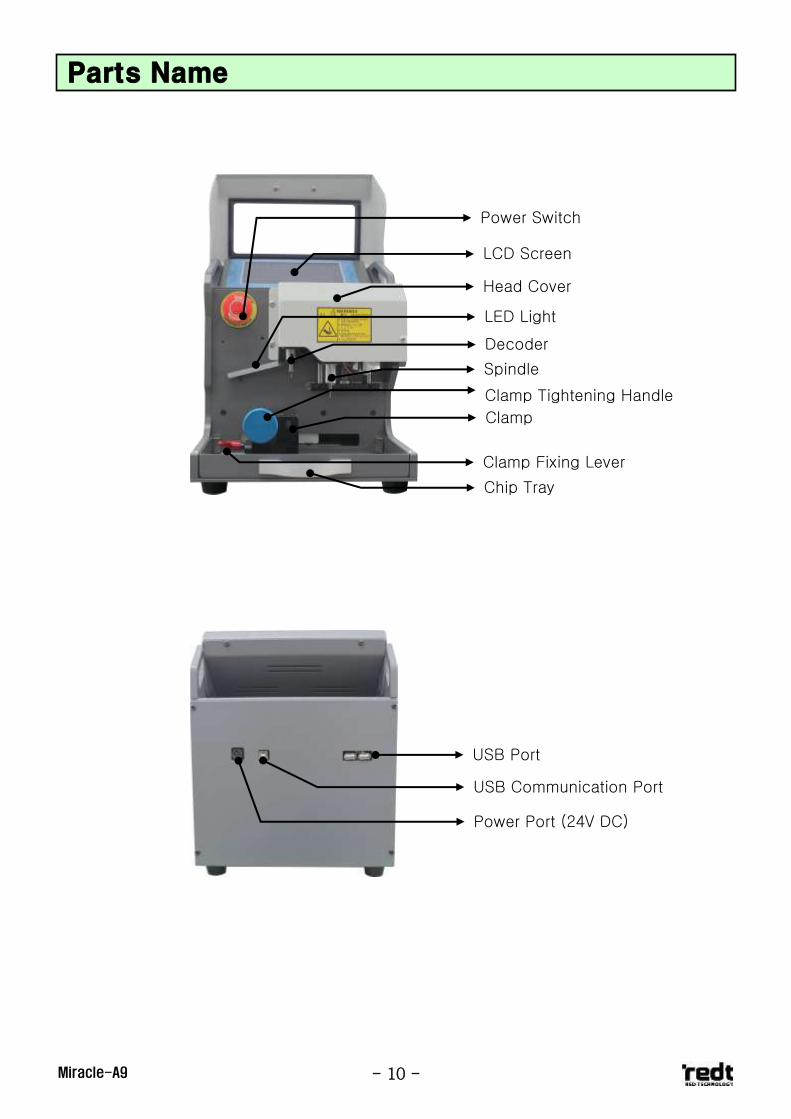
Parts Name
Decoder
Power Switch
Spindle
LED Light
Clamp
Clamp Tightening Handle
LCD Screen
USB Port
Power Port (24V DC)
USB Communication Port
Clamp Fixing Lever
Head Cover
Chip Tray
- 11 - Miracle-A9
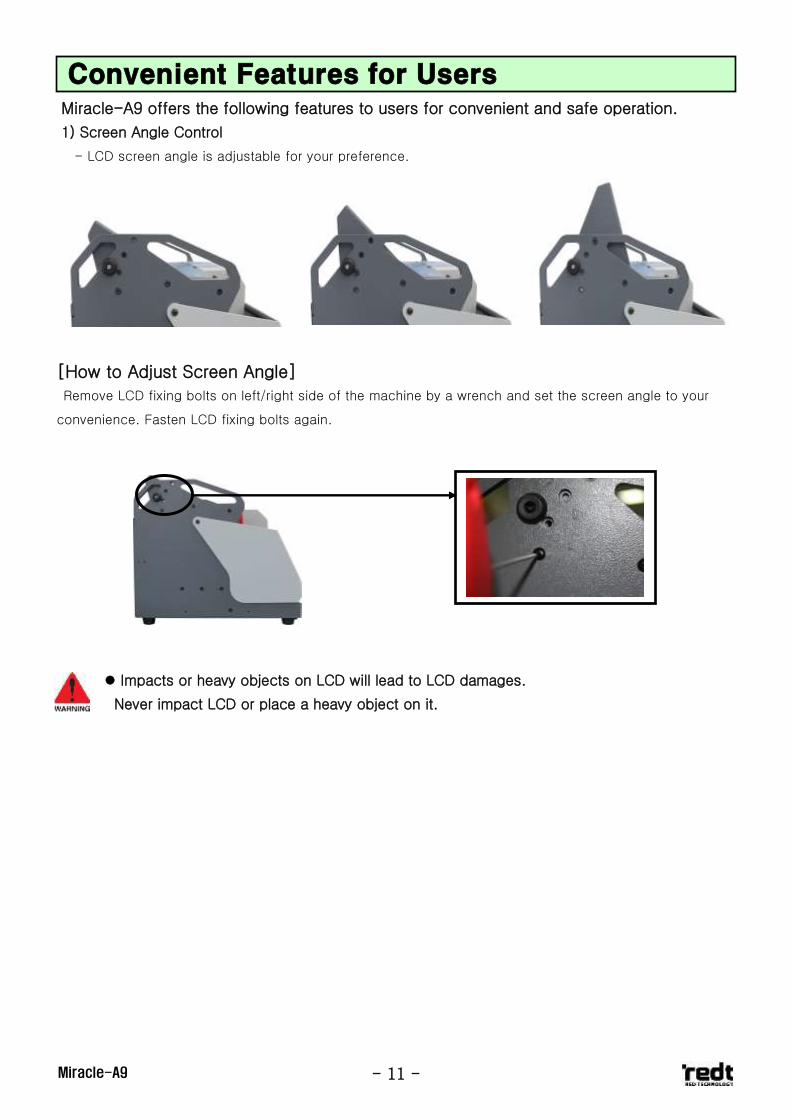
Miracle-A9 offers the following features to users for convenient and safe operation.
1) Screen Angle Control
- LCD screen angle is adjustable for your preference.
[How to Adjust Screen Angle]
Remove LCD fixing bolts on left/right side of the machine by a wrench and set the screen angle to your
convenience. Fasten LCD fixing bolts again.
Impacts or heavy objects on LCD will lead to LCD damages.
Never impact LCD or place a heavy object on it.
Convenient Features for Users
- 12 - Miracle-A9
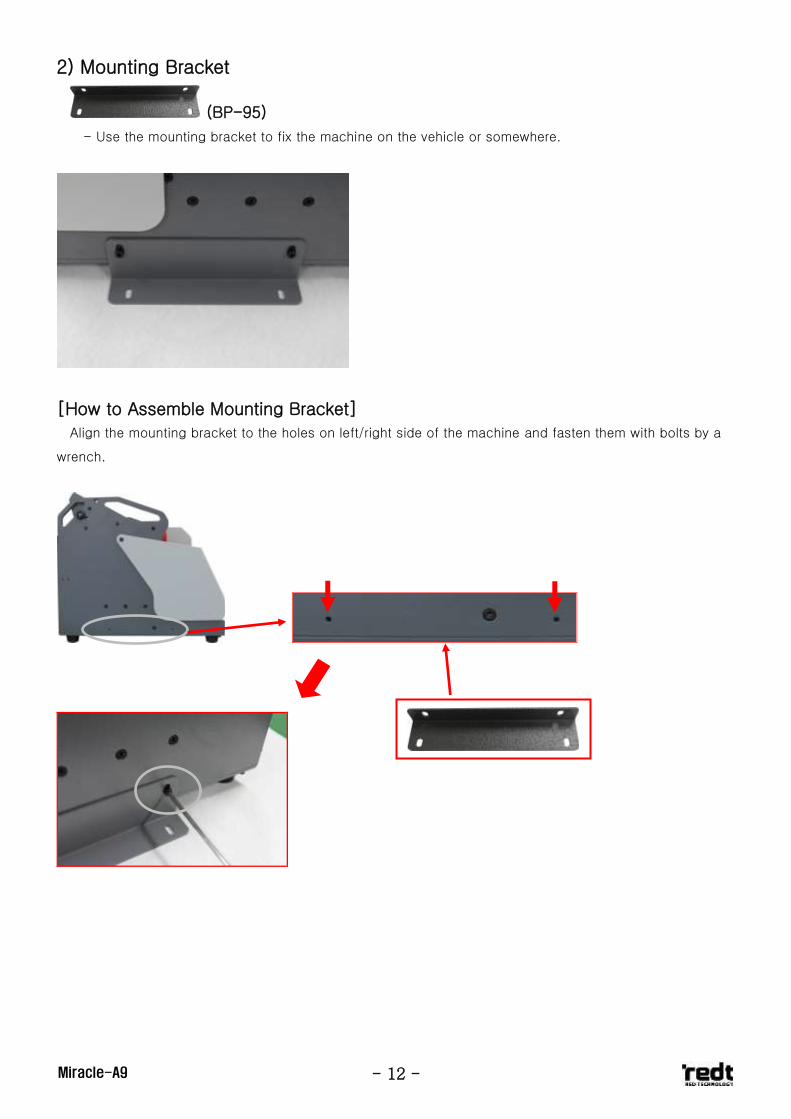
2) Mounting Bracket
(BP-95)
- Use the mounting bracket to fix the machine on the vehicle or somewhere.
[How to Assemble Mounting Bracket]
Align the mounting bracket to the holes on left/right side of the machine and fasten them with bolts by a
wrench.
- 13 - Miracle-A9
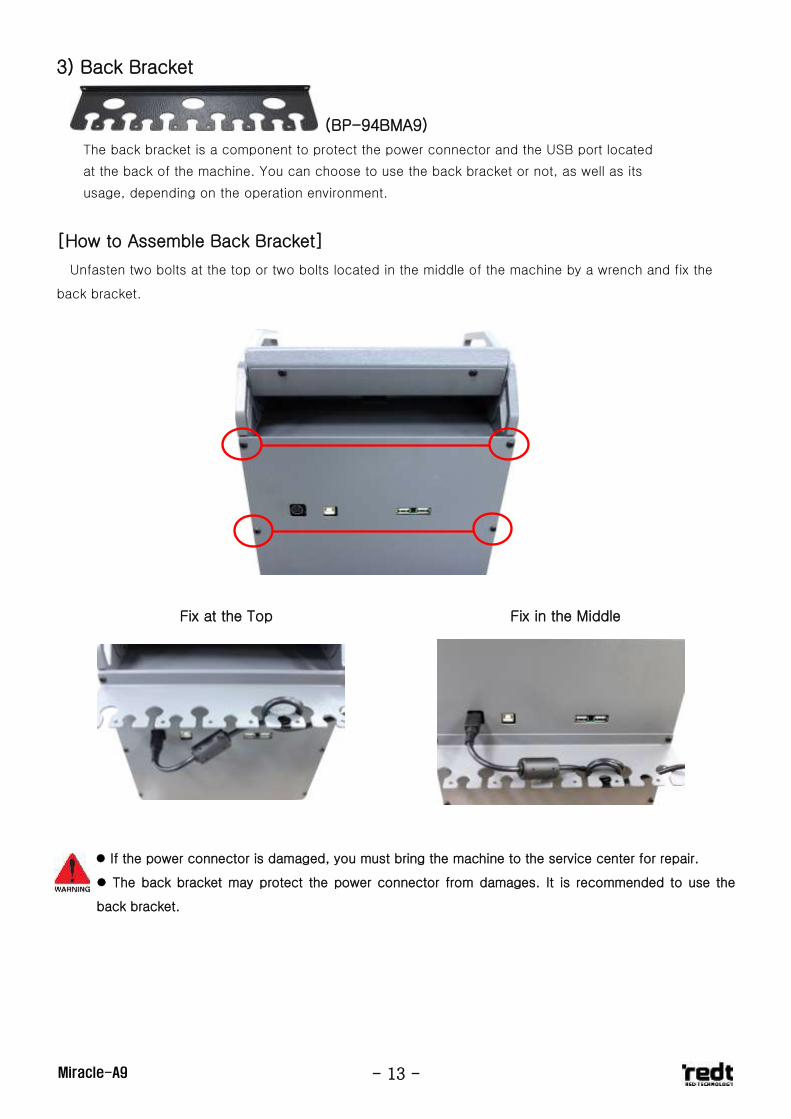
3) Back Bracket
(BP-94BMA9)
The back bracket is a component to protect the power connector and the USB port located
at the back of the machine. You can choose to use the back bracket or not, as well as its
usage, depending on the operation environment.
[How to Assemble Back Bracket]
Unfasten two bolts at the top or two bolts located in the middle of the machine by a wrench and fix the
back bracket.
Fix at the Top Fix in the Middle
If the power connector is damaged, you must bring the machine to the service center for repair.
The back bracket may protect the power connector from damages. It is recommended to use the
back bracket.
- 14 - Miracle-A9
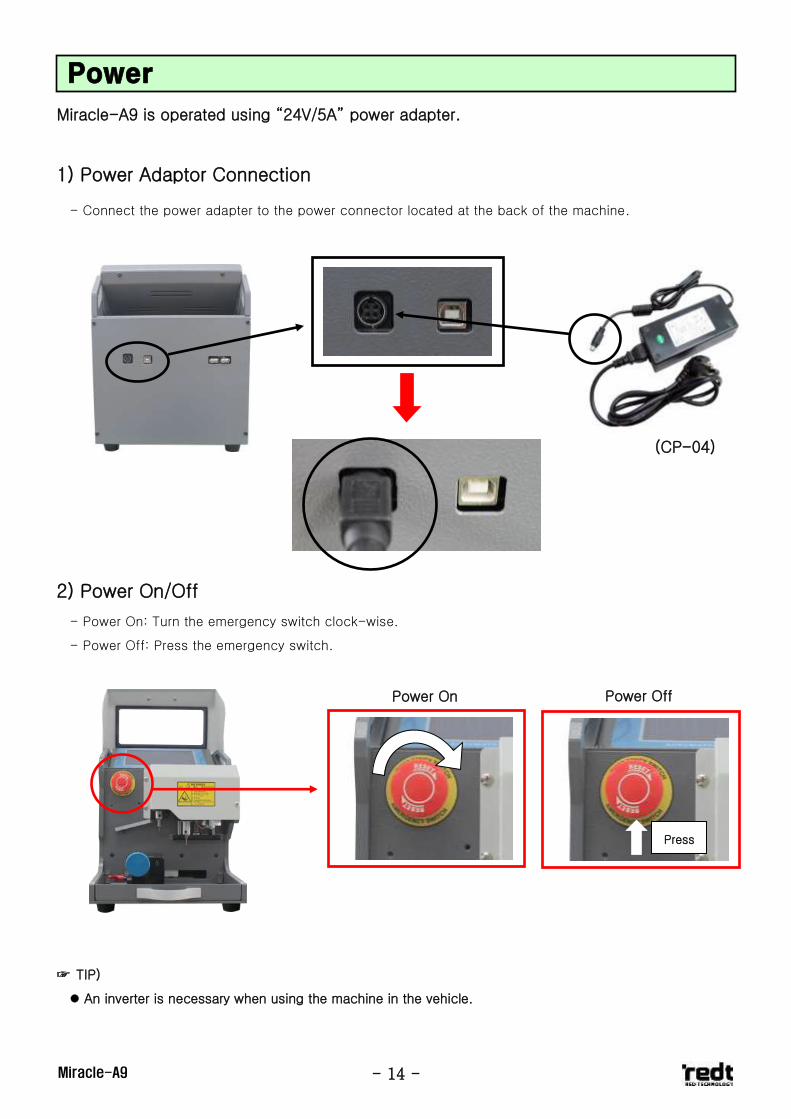
Miracle-A9 is operated using “24V/5A” power adapter.
1) Power Adaptor Connection
- Connect the power adapter to the power connector located at the back of the machine.
2) Power On/Off
- Power On: Turn the emergency switch clock-wise.
- Power Off: Press the emergency switch.
☞ TIP)
An inverter is necessary when using the machine in the vehicle.
Power
Power On Power Off
Press
(CP-04)
- 15 - Miracle-A9
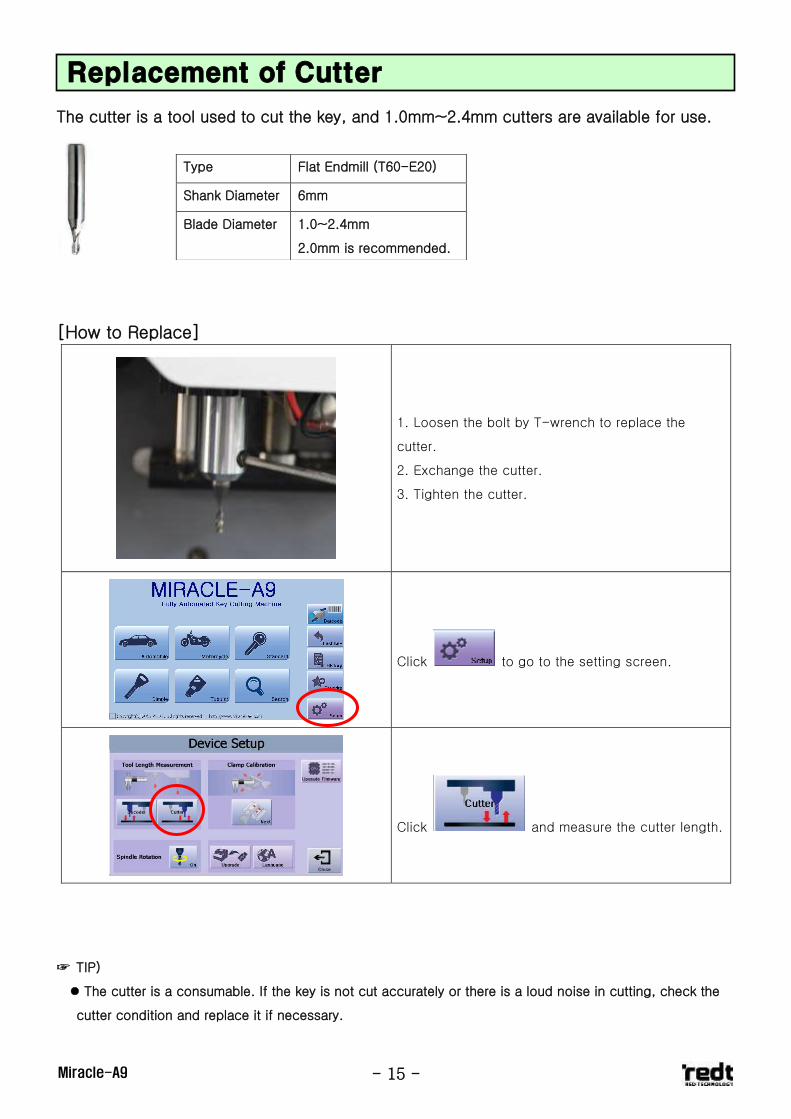
The cutter is a tool used to cut the key, and 1.0mm~2.4mm cutters are available for use.
[How to Replace]
1. Loosen the bolt by T-wrench to replace the
cutter.
2. Exchange the cutter.
3. Tighten the cutter.
Click to go to the setting screen.
Click and measure the cutter length.
☞ TIP)
The cutter is a consumable. If the key is not cut accurately or there is a loud noise in cutting, check the
cutter condition and replace it if necessary.
Type Flat Endmill (T60-E20)
Shank Diameter 6mm
Blade Diameter 1.0~2.4mm
2.0mm is recommended.
Replacement of Cutter
- 16 - Miracle-A9
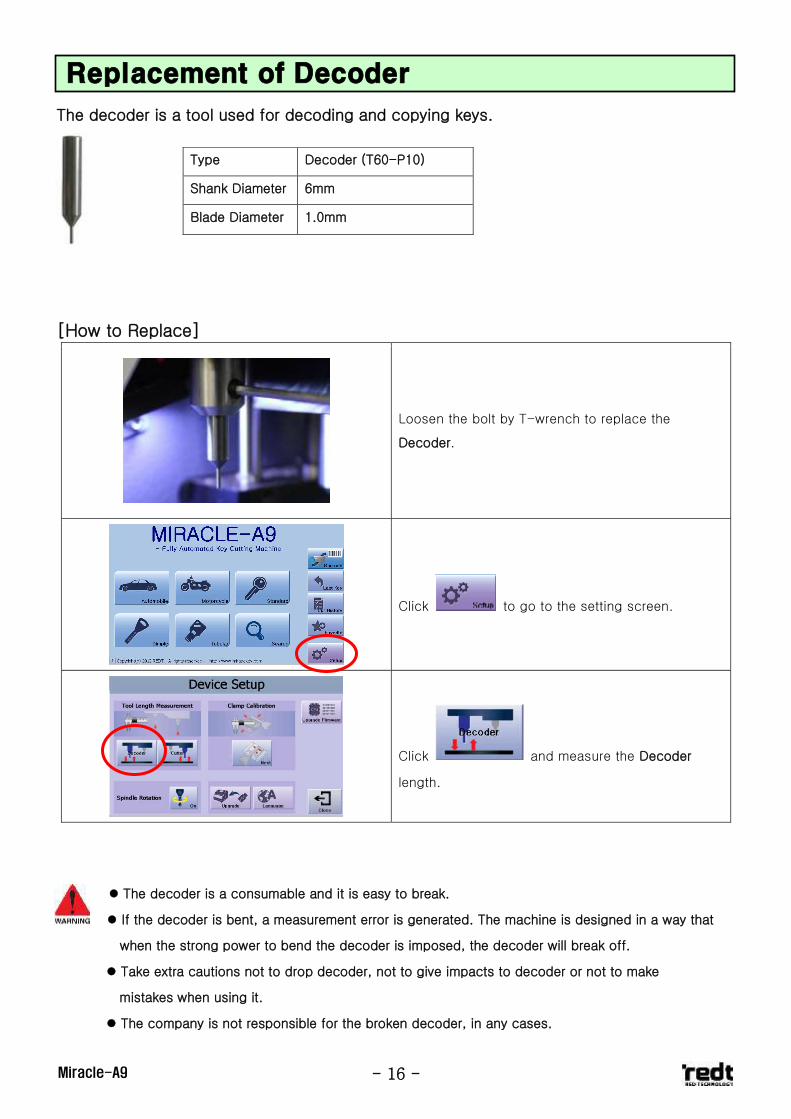
The decoder is a tool used for decoding and copying keys.
[How to Replace]
Loosen the bolt by T-wrench to replace the
Decoder.
Click to go to the setting screen.
Click and measure the Decoder
length.
The decoder is a consumable and it is easy to break.
If the decoder is bent, a measurement error is generated. The machine is designed in a way that
when the strong power to bend the decoder is imposed, the decoder will break off.
Take extra cautions not to drop decoder, not to give impacts to decoder or not to make
mistakes when using it.
The company is not responsible for the broken decoder, in any cases.
Type Decoder (T60-P10)
Shank Diameter 6mm
Blade Diameter 1.0mm
Replacement of Decoder
- 17 - Miracle-A9
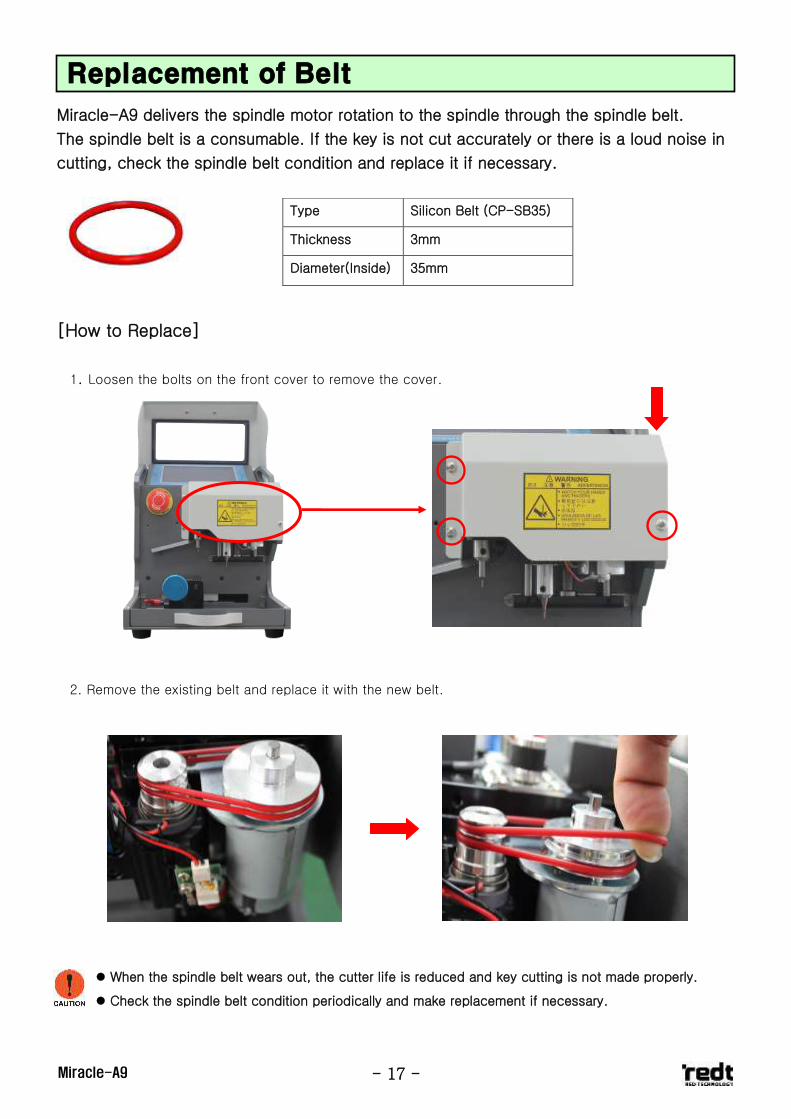
Miracle-A9 delivers the spindle motor rotation to the spindle through the spindle belt.
The spindle belt is a consumable. If the key is not cut accurately or there is a loud noise in
cutting, check the spindle belt condition and replace it if necessary.
[How to Replace]
1. Loosen the bolts on the front cover to remove the cover.
2. Remove the existing belt and replace it with the new belt.
When the spindle belt wears out, the cutter life is reduced and key cutting is not made properly.
Check the spindle belt condition periodically and make replacement if necessary.
Type Silicon Belt (CP-SB35)
Thickness 3mm
Diameter(Inside) 35mm
Replacement of Belt
be Replacement
- 18 - Miracle-A9
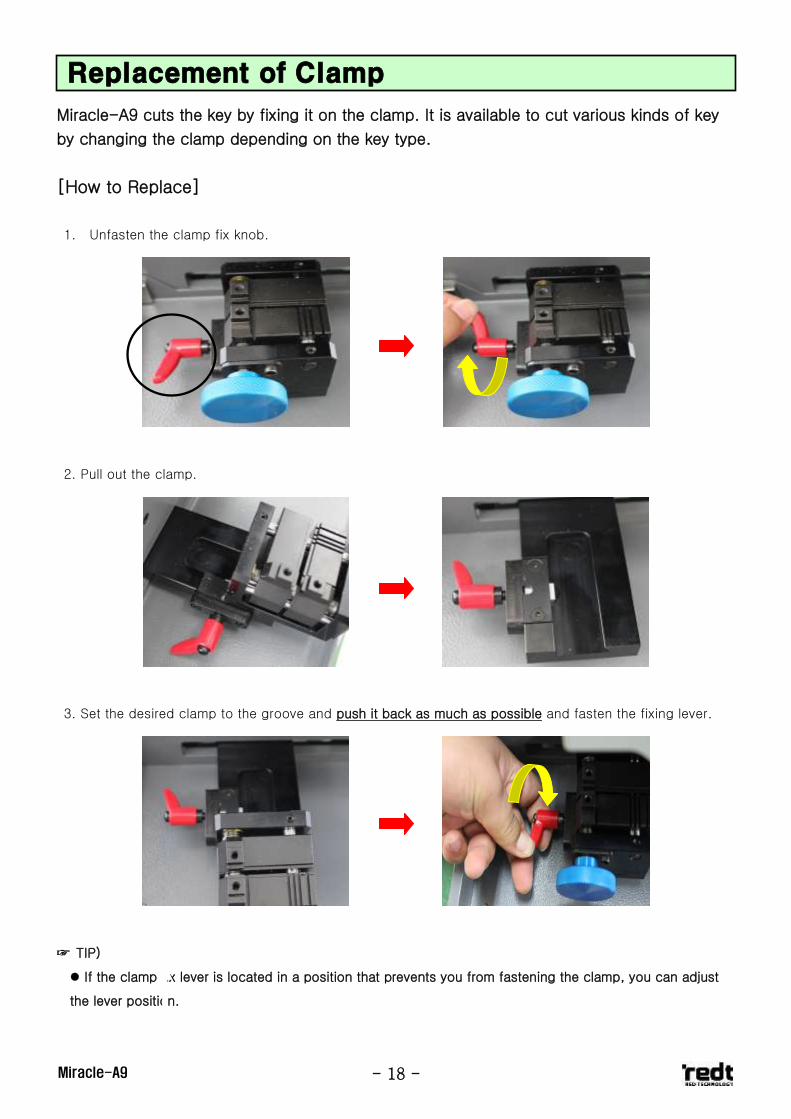
Miracle-A9 cuts the key by fixing it on the clamp. It is available to cut various kinds of key
by changing the clamp depending on the key type.
[How to Replace]
1. Unfasten the clamp fix knob.
2. Pull out the clamp.
3. Set the desired clamp to the groove and push it back as much as possible and fasten the fixing lever.
☞ TIP)
If the clamp fix lever is located in a position that prevents you from fastening the clamp, you can adjust
the lever position.
Replacement of Clamp
- 19 - Miracle-A9
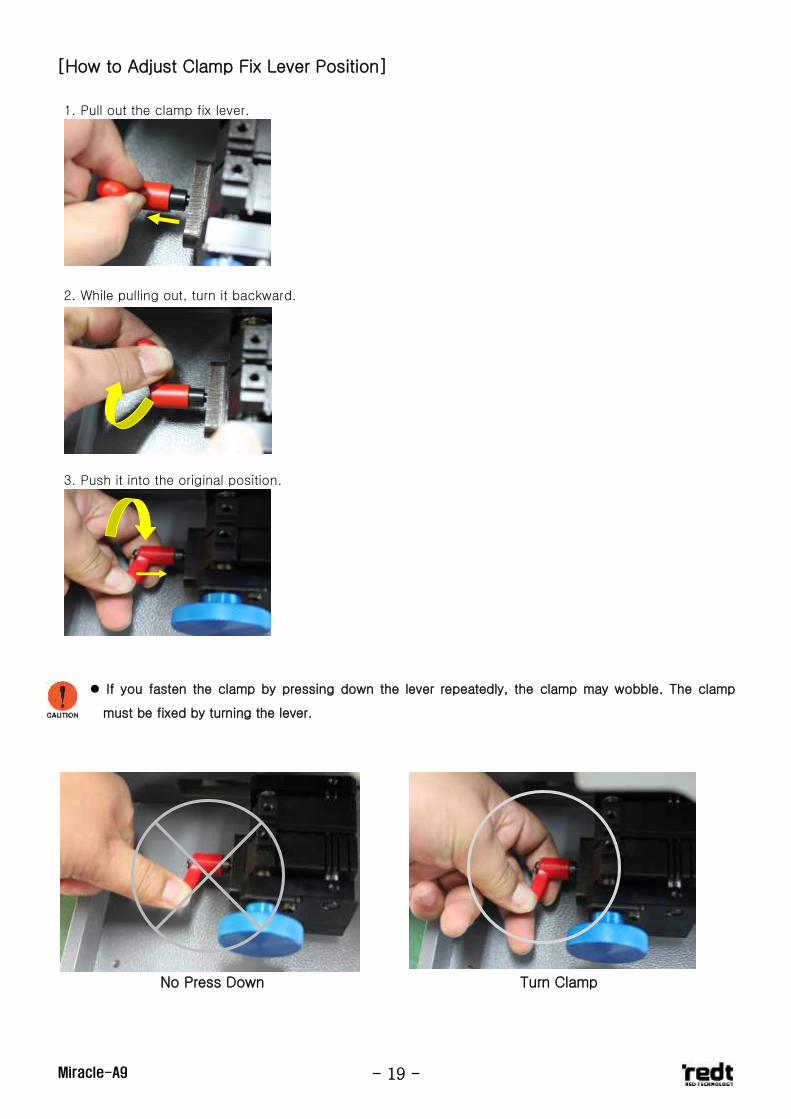
[How to Adjust Clamp Fix Lever Position]
1. Pull out the clamp fix lever.
2. While pulling out, turn it backward.
3. Push it into the original position.
If you fasten the clamp by pressing down the lever repeatedly, the clamp may wobble. The clamp
must be fixed by turning the lever.
No Press Down Turn Clamp
- 20 - Miracle-A9
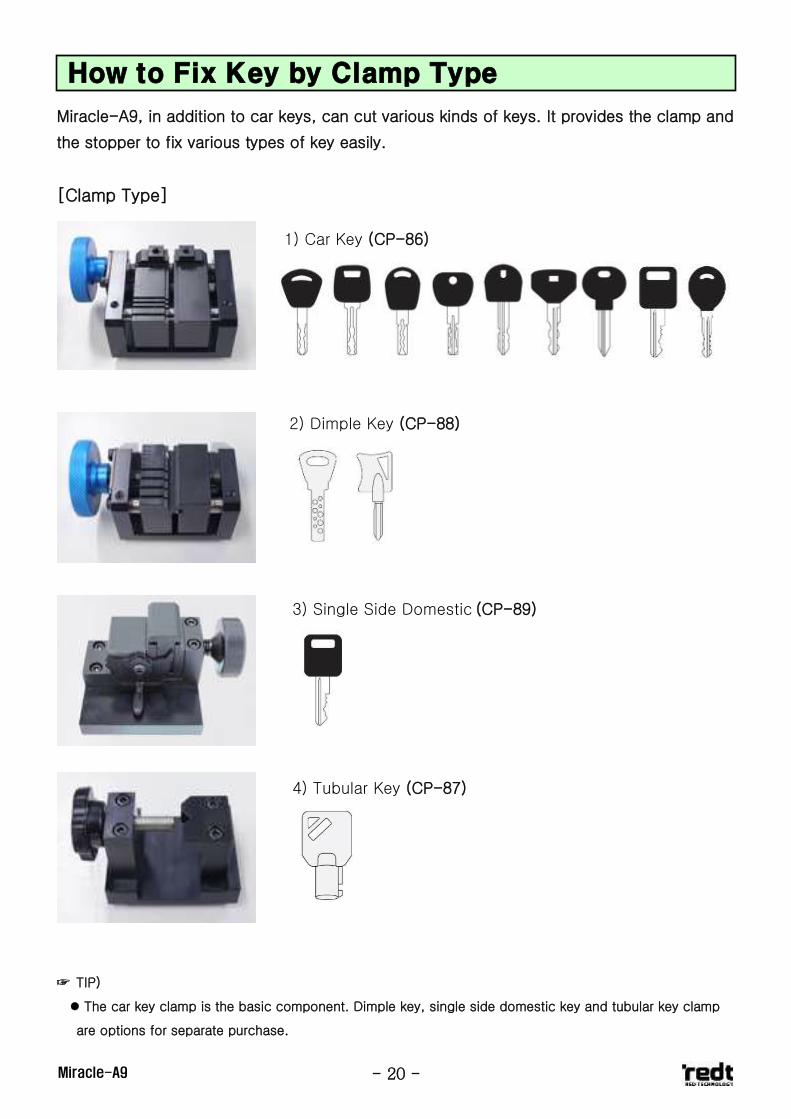
Miracle-A9, in addition to car keys, can cut various kinds of keys. It provides the clamp and
the stopper to fix various types of key easily.
[Clamp Type]
☞ TIP)
The car key clamp is the basic component. Dimple key, single side domestic key and tubular key clamp
are options for separate purchase.
How to Fix Key by Clamp Type
1) Car Key (CP-86)
2) Dimple Key (CP-88)
3) Single Side Domestic (CP-89)
4) Tubular Key (CP-87)
- 21 - Miracle-A9
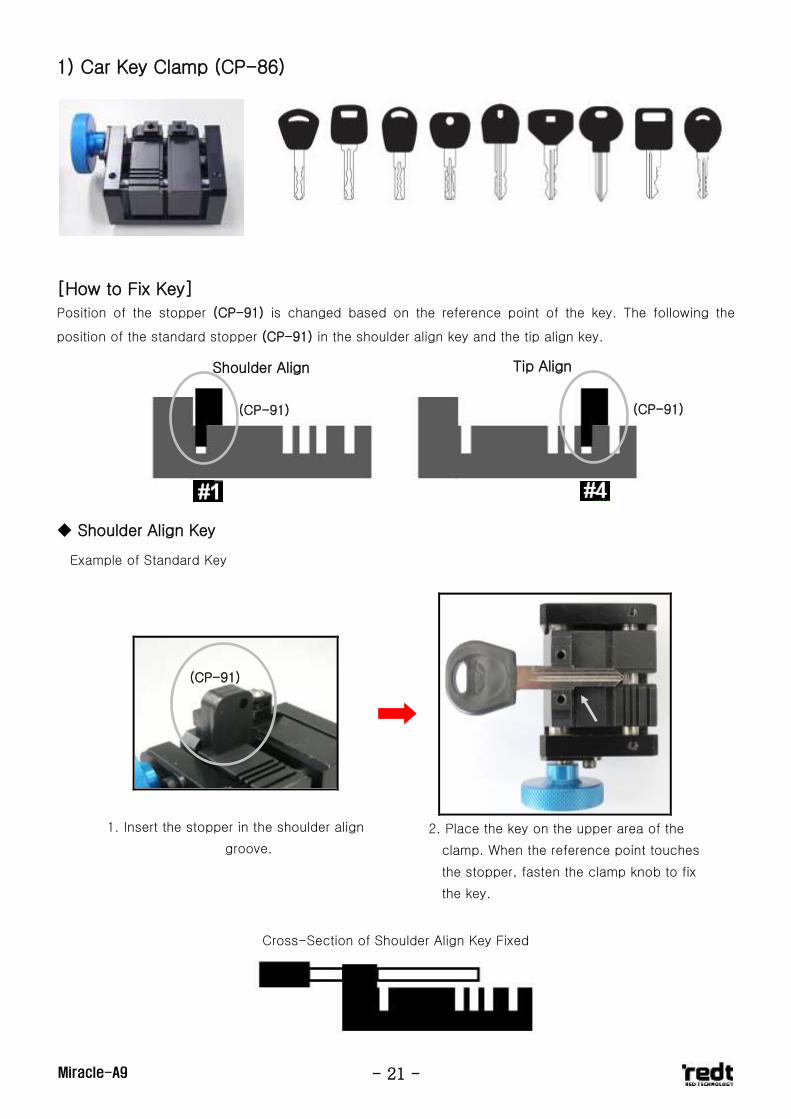
1) Car Key Clamp (CP-86)
[How to Fix Key]
Position of the stopper (CP-91) is changed based on the reference point of the key. The following the
position of the standard stopper (CP-91) in the shoulder align key and the tip align key.
Shoulder Align Key
Example of Standard Key
1. Insert the stopper in the shoulder align
groove.
2. Place the key on the upper area of the
clamp. When the reference point touches
the stopper, fasten the clamp knob to fix
the key.
Cross-Section of Shoulder Align Key Fixed
Shoulder Align Tip Align
(CP-91)
(CP-91)
(CP-91)
- 22 - Miracle-A9
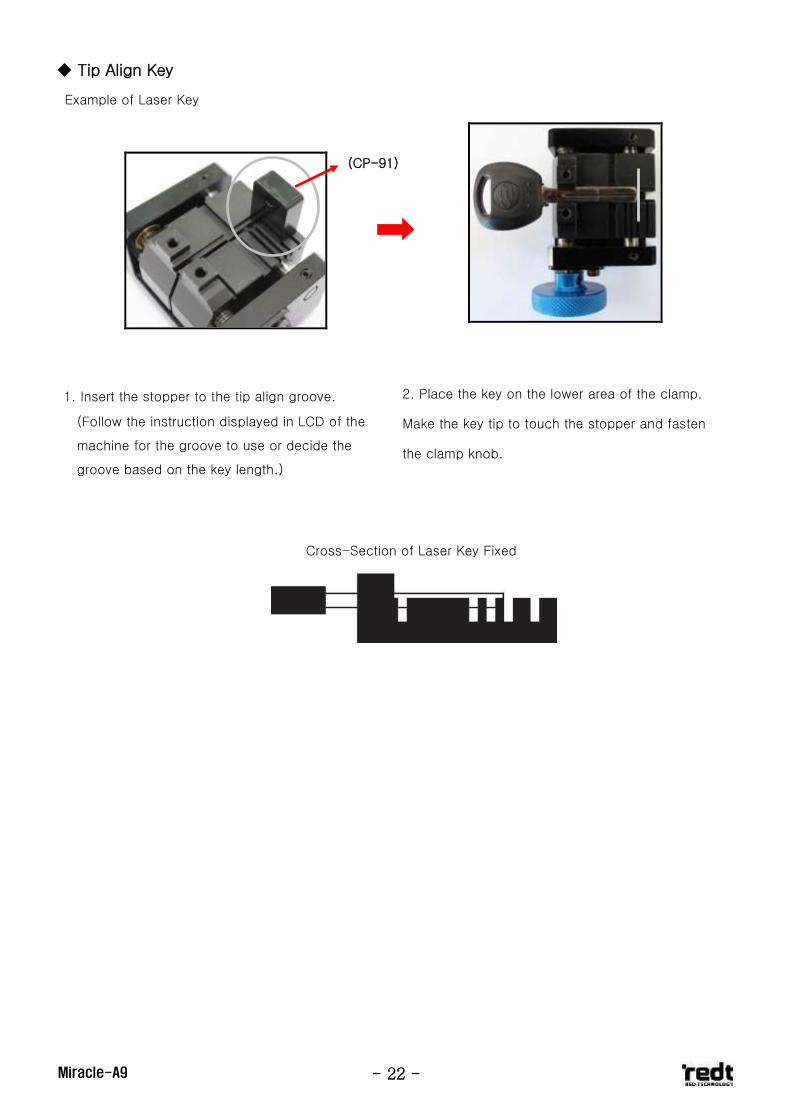
Tip Align Key
Example of Laser Key
1. Insert the stopper to the tip align groove.
(Follow the instruction displayed in LCD of the
machine for the groove to use or decide the
groove based on the key length.)
2. Place the key on the lower area of the clamp.
Make the key tip to touch the stopper and fasten
the clamp knob.
Cross-Section of Laser Key Fixed
(CP-91)
- 23 - Miracle-A9
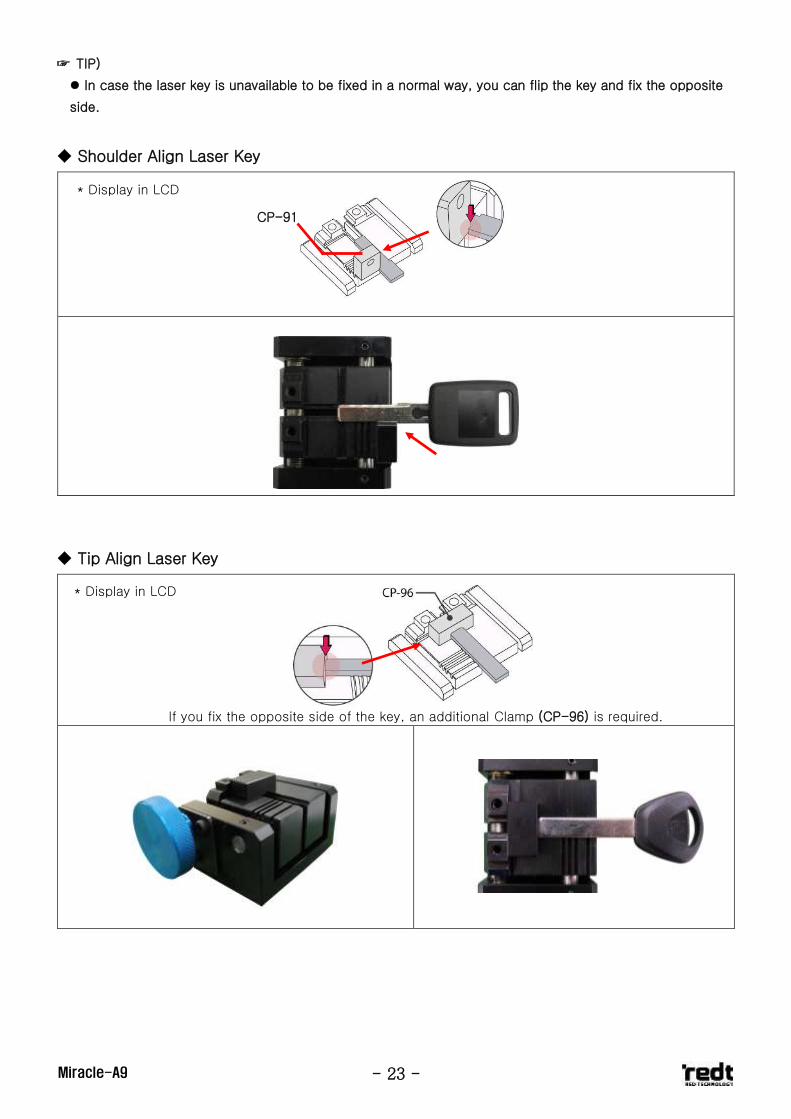
☞ TIP)
In case the laser key is unavailable to be fixed in a normal way, you can flip the key and fix the opposite
side.
Shoulder Align Laser Key
Tip Align Laser Key
If you fix the opposite side of the key, an additional Clamp (CP-96) is required.
* Display in LCD
* Display in LCD
CP-91
- 24 - Miracle-A9
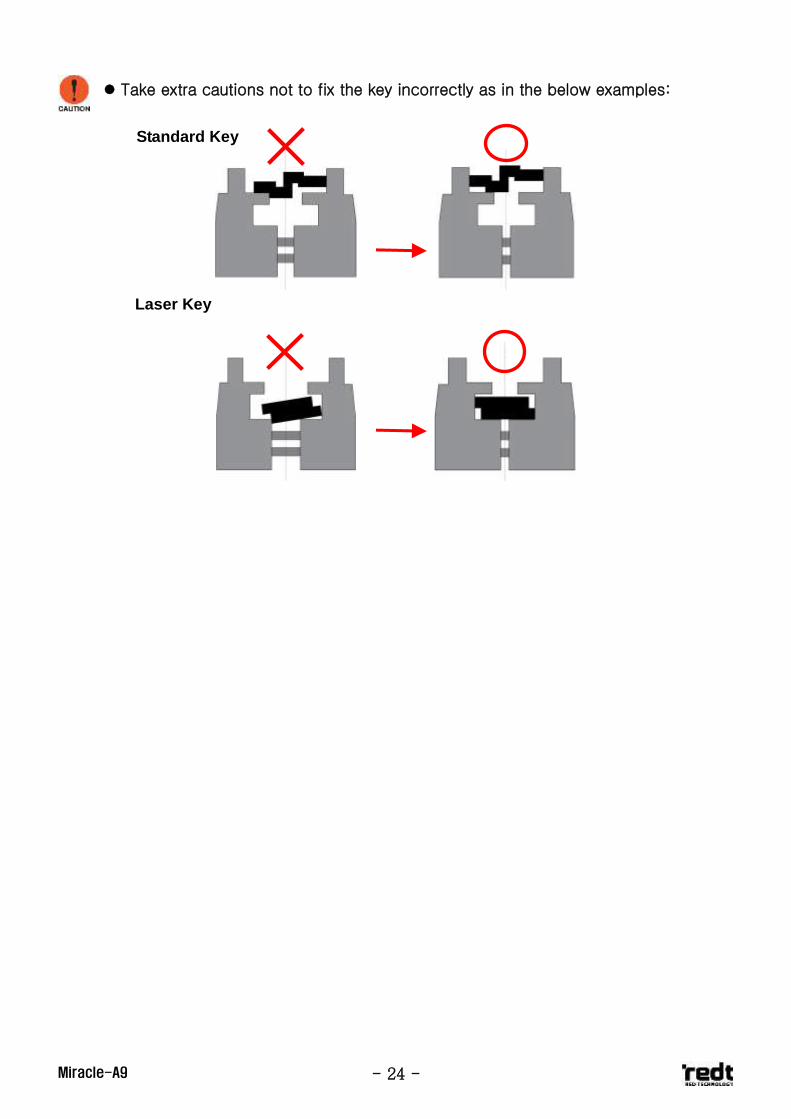
Take extra cautions not to fix the key incorrectly as in the below examples:
Standard Key
Laser Key
- 25 - Miracle-A9
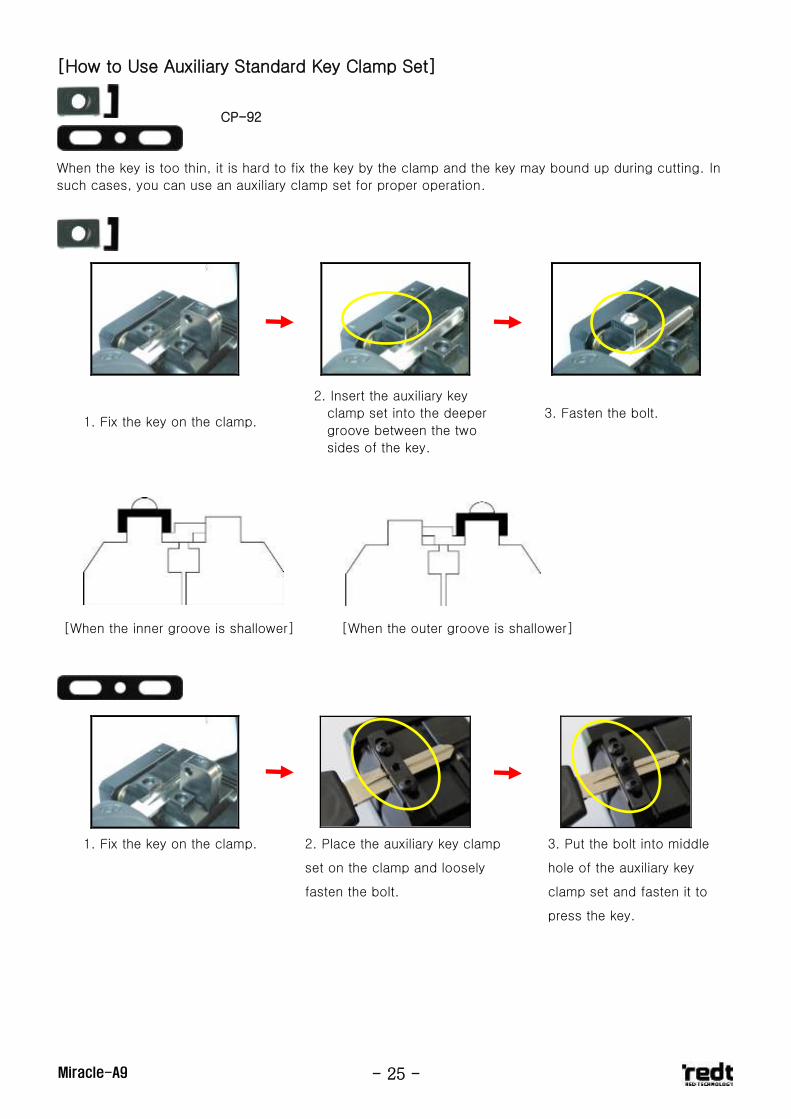
[How to Use Auxiliary Standard Key Clamp Set]
When the key is too thin, it is hard to fix the key by the clamp and the key may bound up during cutting. In
such cases, you can use an auxiliary clamp set for proper operation.
1. Fix the key on the clamp.
2. Insert the auxiliary key
clamp set into the deeper
groove between the two
sides of the key.
3. Fasten the bolt.
[When the inner groove is shallower] [When the outer groove is shallower]
1. Fix the key on the clamp.
2. Place the auxiliary key clamp
set on the clamp and loosely
fasten the bolt.
3. Put the bolt into middle
hole of the auxiliary key
clamp set and fasten it to
press the key.
CP-92
- 26 - Miracle-A9
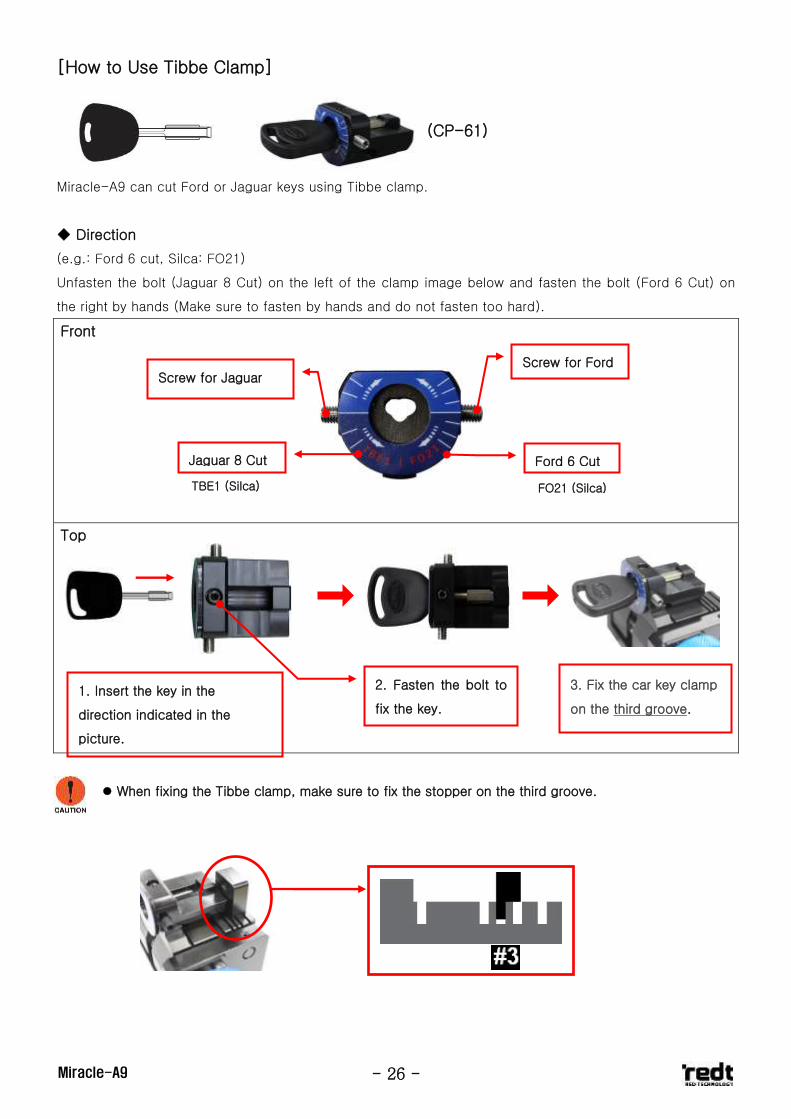
[How to Use Tibbe Clamp]
Miracle-A9 can cut Ford or Jaguar keys using Tibbe clamp.
Direction
(e.g.: Ford 6 cut, Silca: FO21)
Unfasten the bolt (Jaguar 8 Cut) on the left of the clamp image below and fasten the bolt (Ford 6 Cut) on
the right by hands (Make sure to fasten by hands and do not fasten too hard).
Front
Top
When fixing the Tibbe clamp, make sure to fix the stopper on the third groove.
3. Fix the car key clamp
on the third groove.
1. Insert the key in the
direction indicated in the
picture.
2. Fasten the bolt to
fix the key.
Ford 6 Cut Jaguar 8 Cut
Screw for Ford Screw for Jaguar
TBE1 (Silca) FO21 (Silca)
(CP-61)
- 27 - Miracle-A9
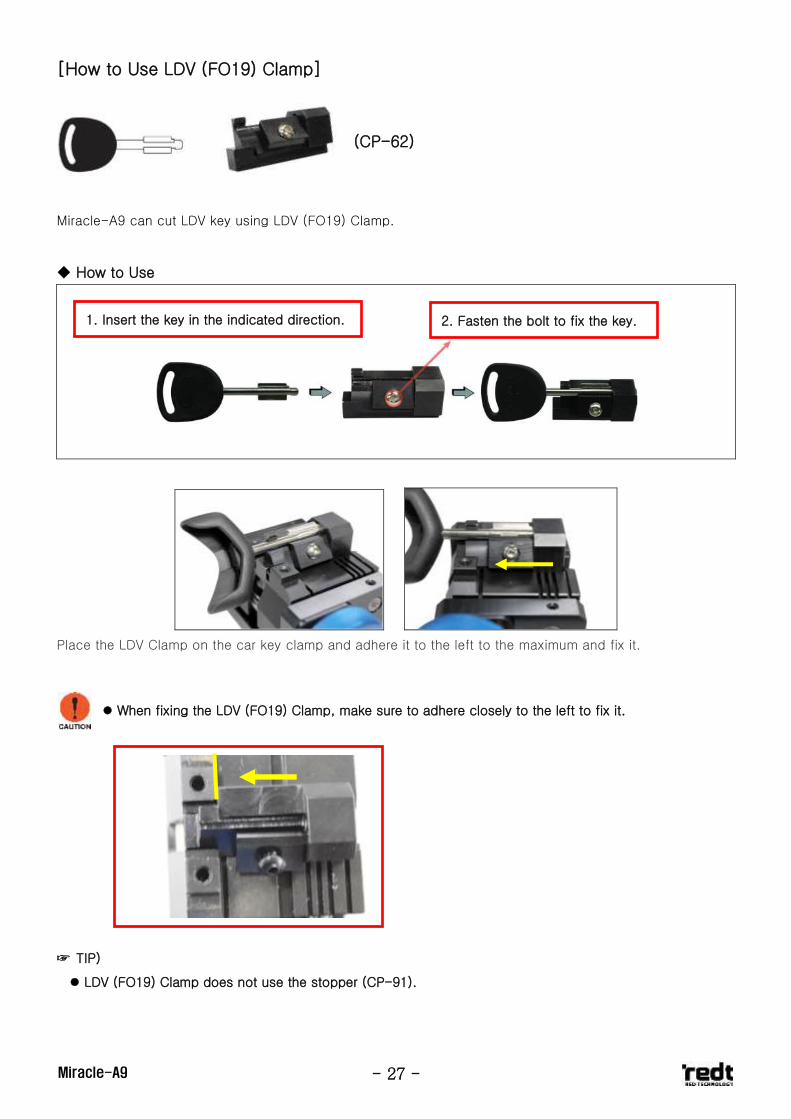
[How to Use LDV (FO19) Clamp]
Miracle-A9 can cut LDV key using LDV (FO19) Clamp.
How to Use
Place the LDV Clamp on the car key clamp and adhere it to the left to the maximum and fix it.
☞ TIP)
LDV (FO19) Clamp does not use the stopper (CP-91).
1. Insert the key in the indicated direction. 2. Fasten the bolt to fix the key.
When fixing the LDV (FO19) Clamp, make sure to adhere closely to the left to fix it.
(CP-62)

- 28 - Miracle-A9
[How to Use SX9 Key Clamp]
Auxiliary clamp enables easy SX9 key (Side A) and thin standard (edge) key holding.
SX9 Key Holding
- 29 - Miracle-A9
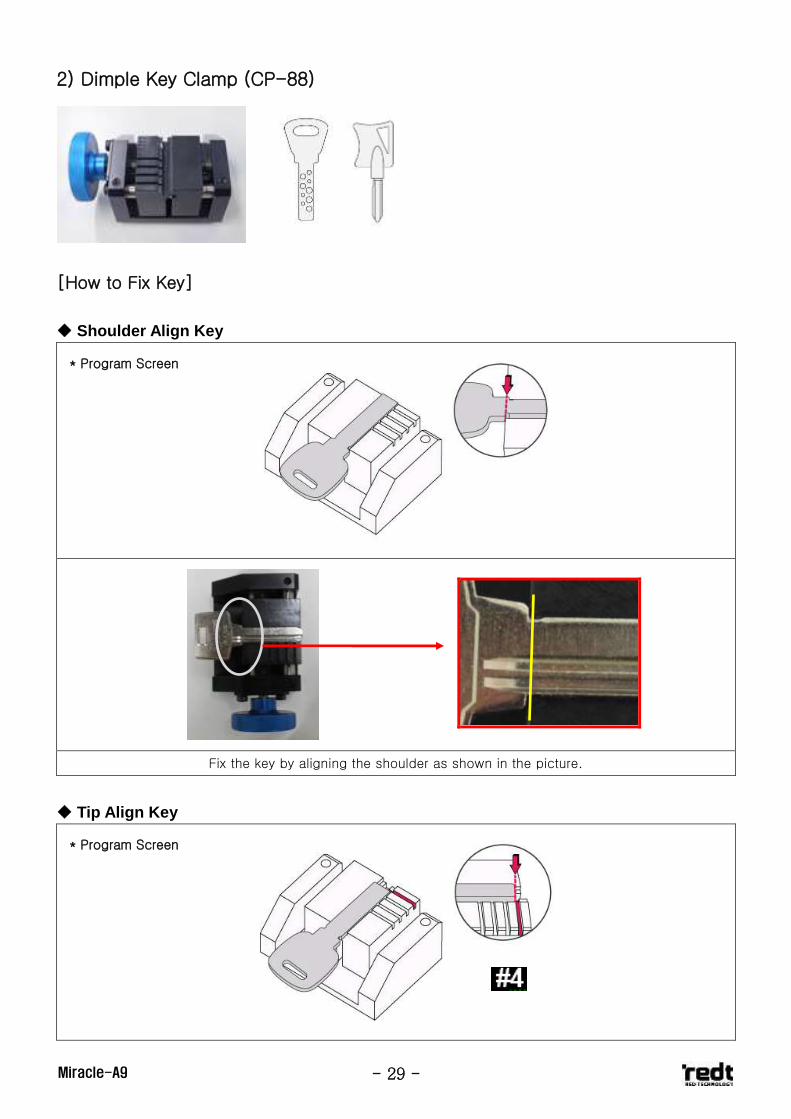
2) Dimple Key Clamp (CP-88)
[How to Fix Key]
Shoulder Align Key
Fix the key by aligning the shoulder as shown in the picture.
Tip Align Key
* Program Screen
* Program Screen
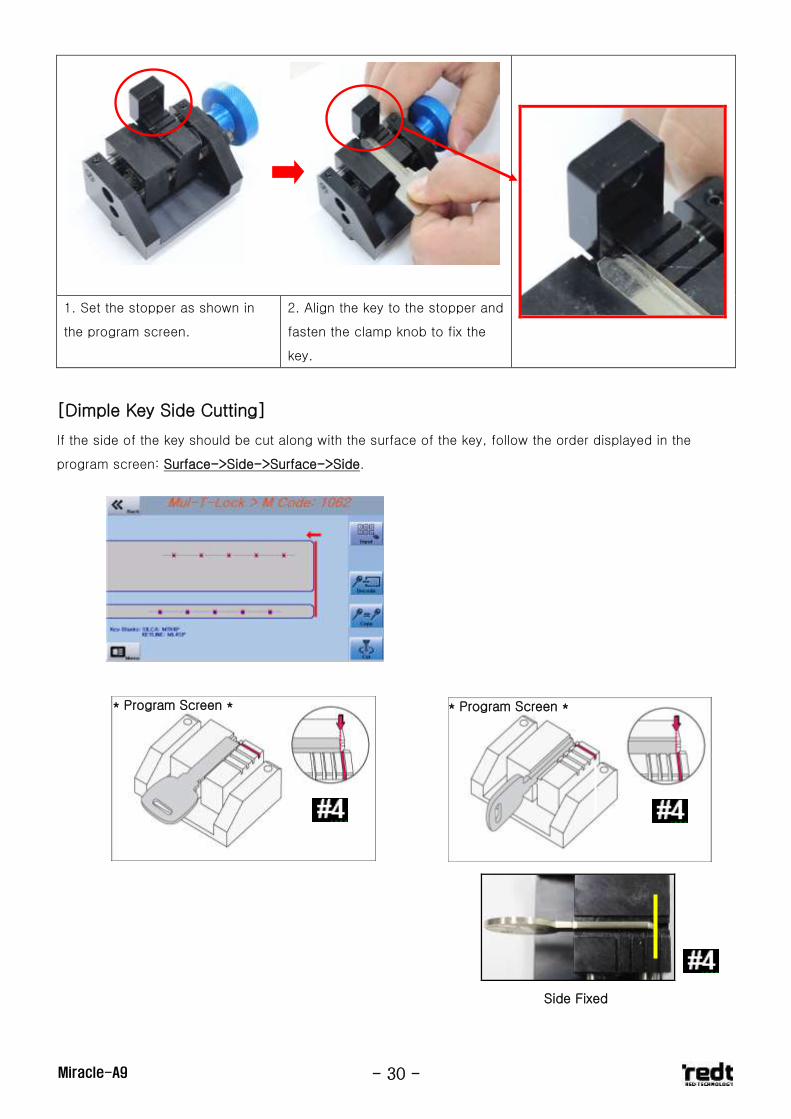
- 30 - Miracle-A9
1. Set the stopper as shown in
the program screen.
2. Align the key to the stopper and
fasten the clamp knob to fix the
key.
[Dimple Key Side Cutting]
If the side of the key should be cut along with the surface of the key, follow the order displayed in the
program screen: Surface->Side->Surface->Side.
* Program Screen * * Program Screen *
Side Fixed
- 31 - Miracle-A9
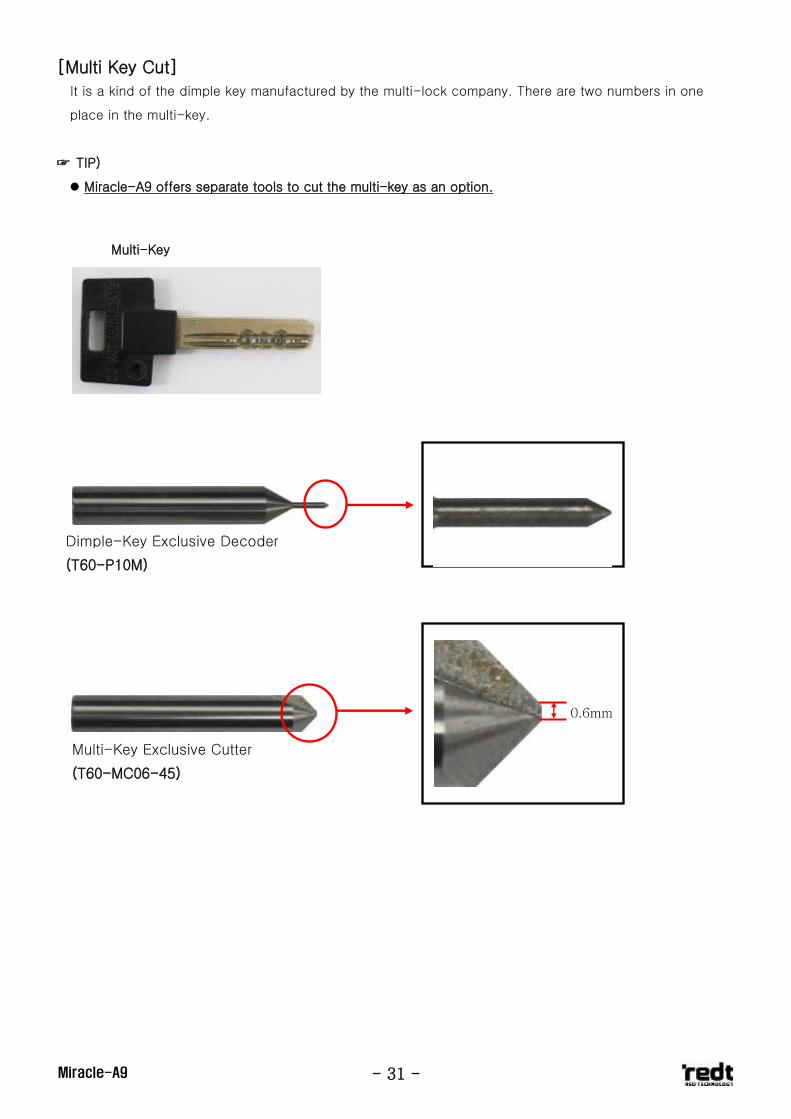
[Multi Key Cut]
It is a kind of the dimple key manufactured by the multi-lock company. There are two numbers in one
place in the multi-key.
☞ TIP)
Miracle-A9 offers separate tools to cut the multi-key as an option.
Dimple-Key Exclusive Decoder
(T60-P10M)
Multi-Key Exclusive Cutter
(T60-MC06-45)
0.6mm
Multi-Key
- 32 - Miracle-A9
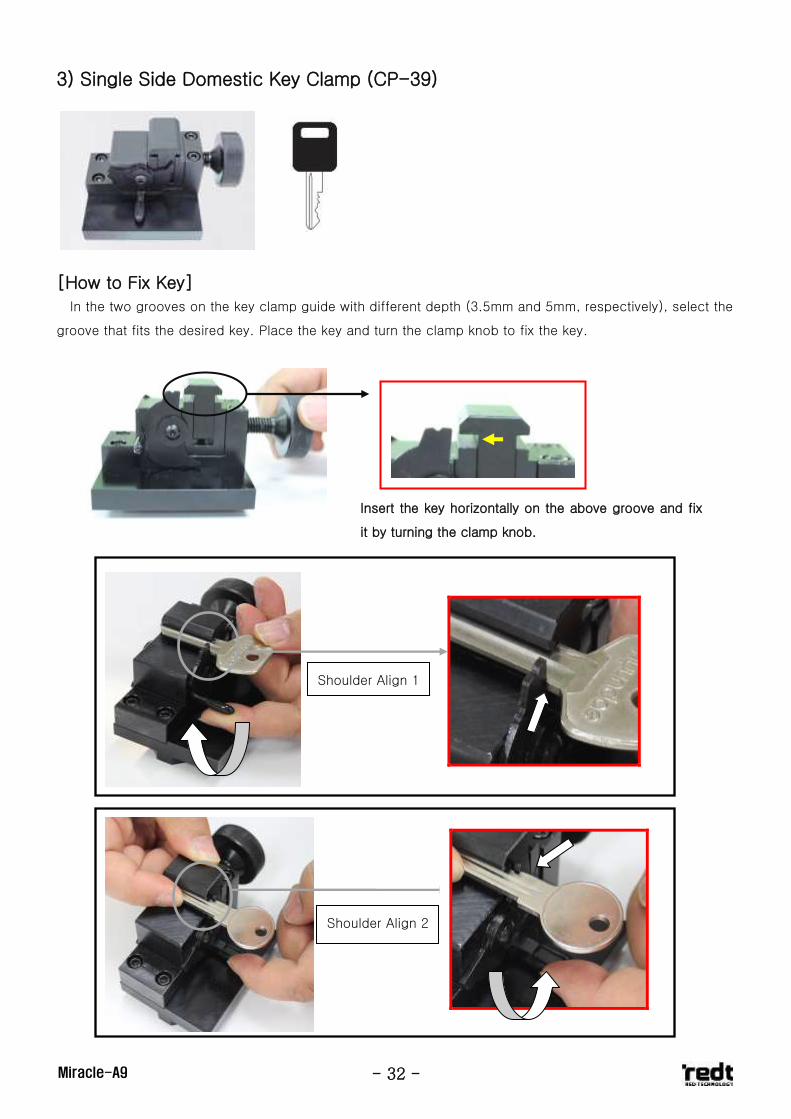
3) Single Side Domestic Key Clamp (CP-39)
[How to Fix Key]
In the two grooves on the key clamp guide with different depth (3.5mm and 5mm, respectively), select the
groove that fits the desired key. Place the key and turn the clamp knob to fix the key.
Shoulder Align 1
Shoulder Align 2
Insert the key horizontally on the above groove and fix
it by turning the clamp knob.

- 33 - Miracle-A9
When fixing the key, place it by horizontally aligning with the clamp as shown in the below.
Tip Align
- 34 - Miracle-A9
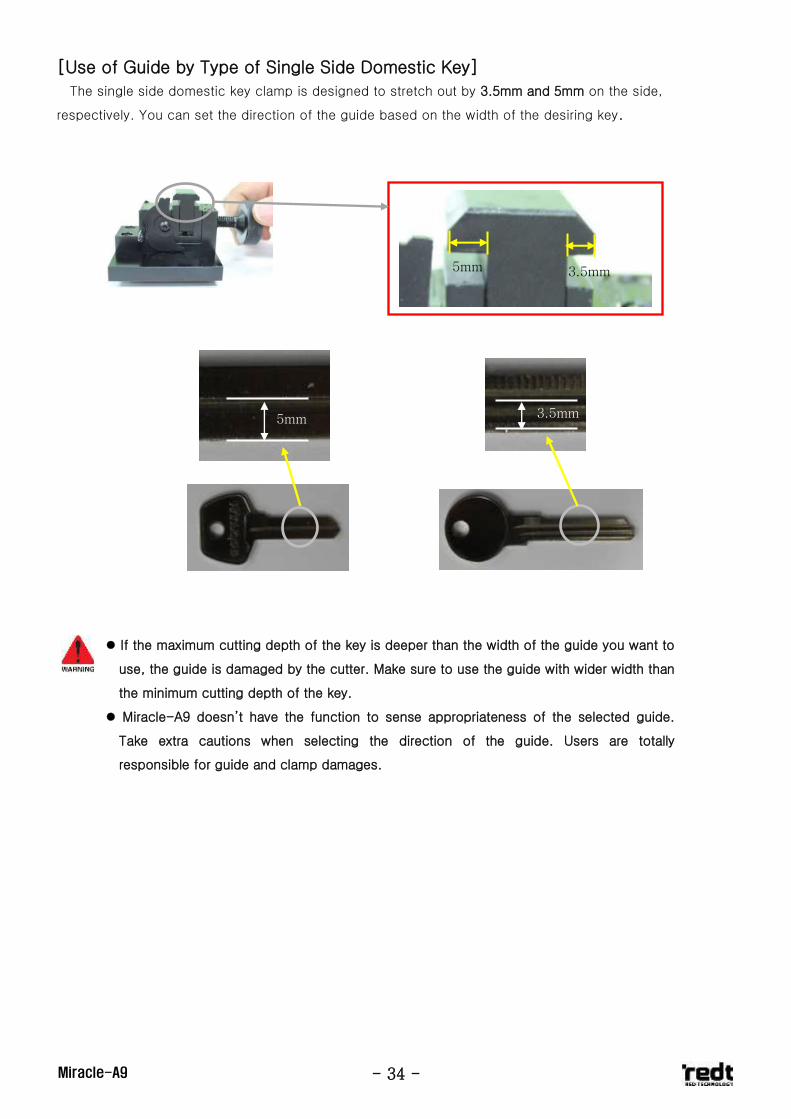
[Use of Guide by Type of Single Side Domestic Key]
The single side domestic key clamp is designed to stretch out by 3.5mm and 5mm on the side,
respectively. You can set the direction of the guide based on the width of the desiring key.
5mm 3.5mm
If the maximum cutting depth of the key is deeper than the width of the guide you want to
use, the guide is damaged by the cutter. Make sure to use the guide with wider width than
the minimum cutting depth of the key.
Miracle-A9 doesn’t have the function to sense appropriateness of the selected guide.
Take extra cautions when selecting the direction of the guide. Users are totally
responsible for guide and clamp damages.
3.5mm
5mm
- 35 - Miracle-A9
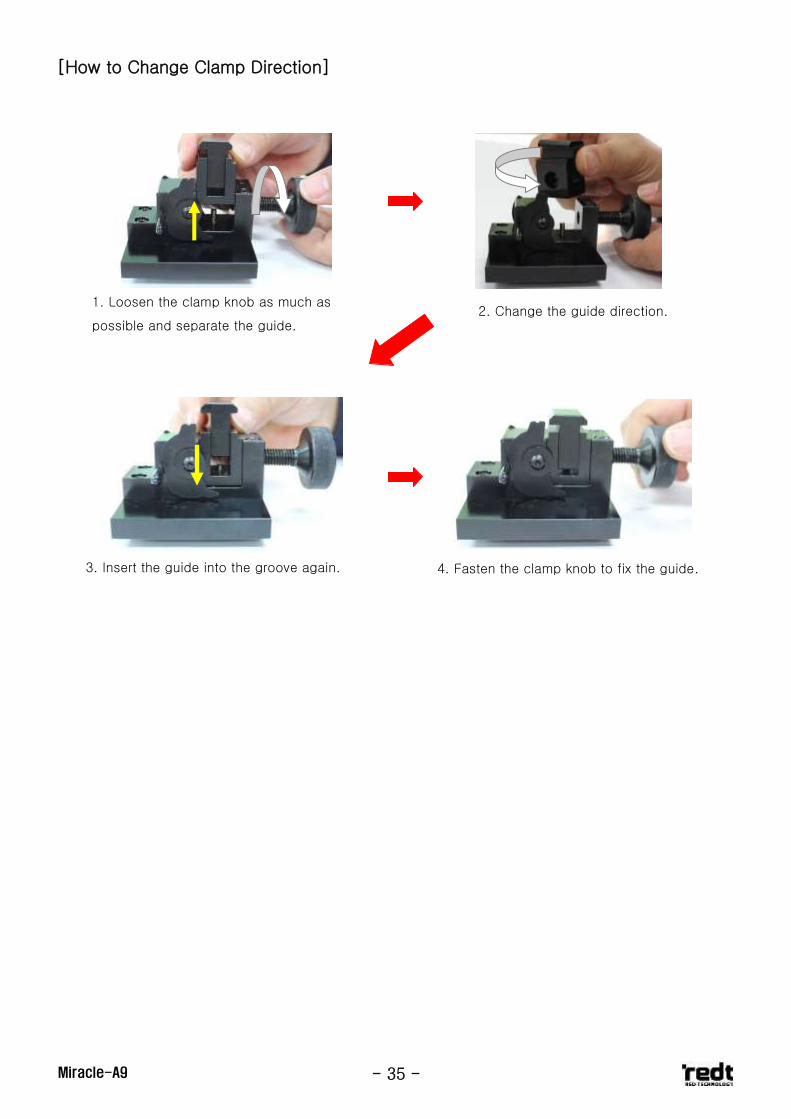
[How to Change Clamp Direction]
1. Loosen the clamp knob as much as
possible and separate the guide. 2. Change the guide direction.
3. Insert the guide into the groove again. 4. Fasten the clamp knob to fix the guide.
- 36 - Miracle-A9
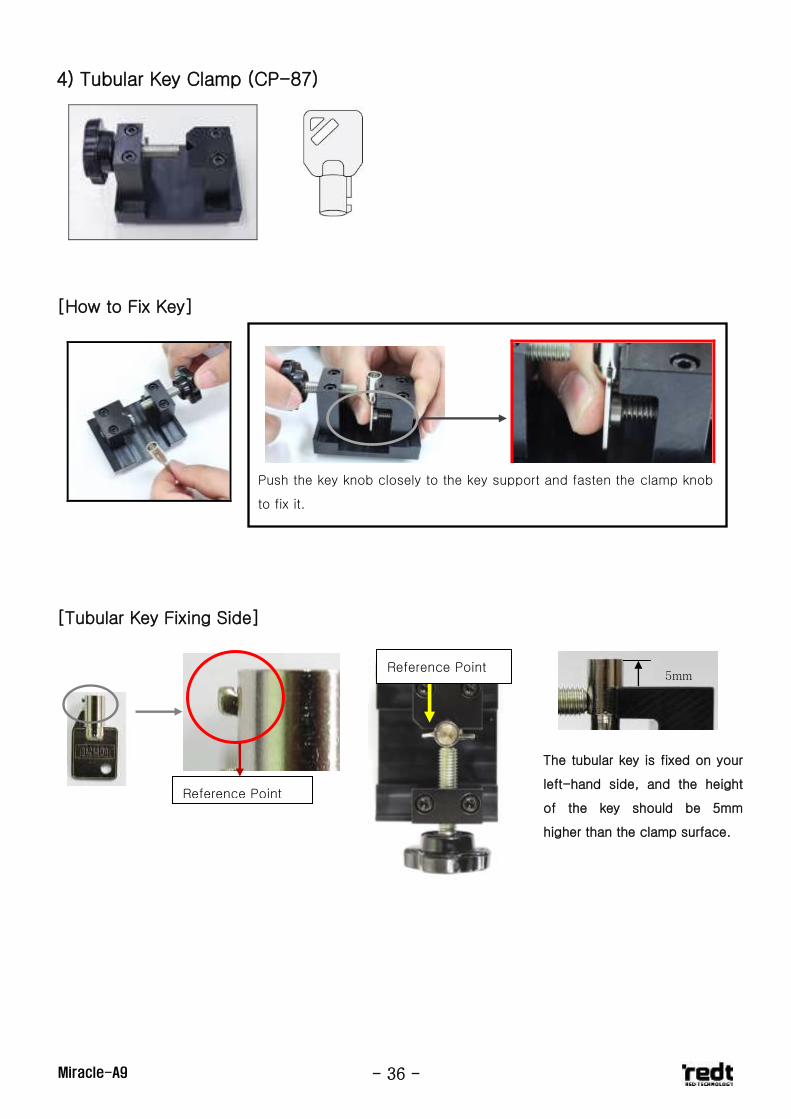
4) Tubular Key Clamp (CP-87)
1.
[How to Fix Key]
[Tubular Key Fixing Side]
Push the key knob closely to the key support and fasten the clamp knob
to fix it.
Reference Point
5mm
The tubular key is fixed on your
left-hand side, and the height
of the key should be 5mm
higher than the clamp surface.
Reference Point
- 37 - Miracle-A9
7
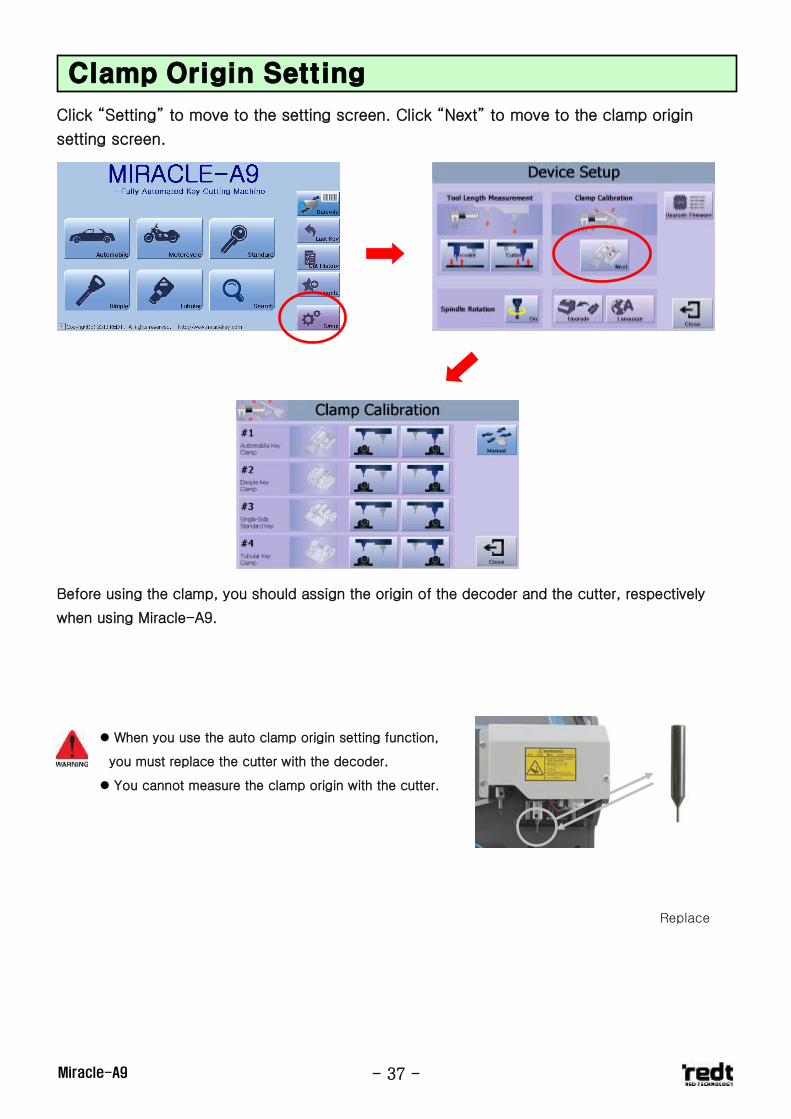
Click “Setting” to move to the setting screen. Click “Next” to move to the clamp origin
setting screen.
Before using the clamp, you should assign the origin of the decoder and the cutter, respectively
when using Miracle-A9.
When you use the auto clamp origin setting function,
you must replace the cutter with the decoder.
You cannot measure the clamp origin with the cutter.
Clamp Origin Setting
Replace
- 38 - Miracle-A9
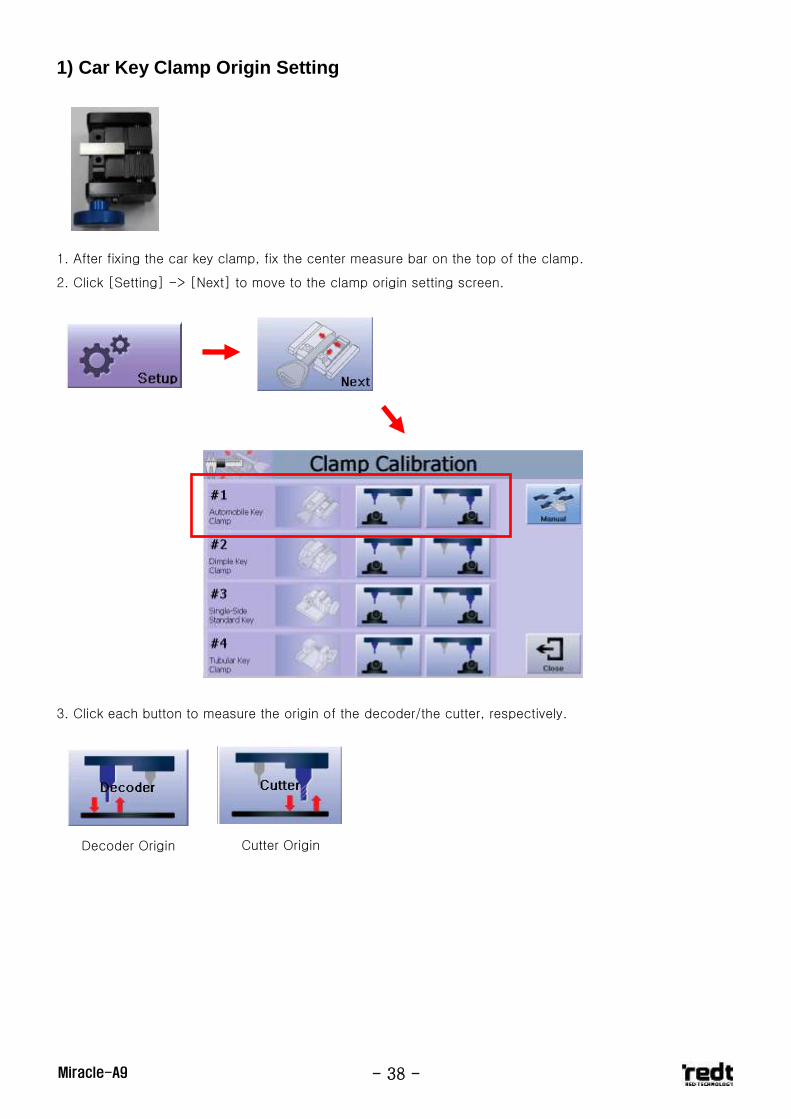
1) Car Key Clamp Origin Setting
1. After fixing the car key clamp, fix the center measure bar on the top of the clamp.
2. Click [Setting] -> [Next] to move to the clamp origin setting screen.
3. Click each button to measure the origin of the decoder/the cutter, respectively.
->
Decoder Origin
Setting
Cutter Origin
Setting
- 39 - Miracle-A9
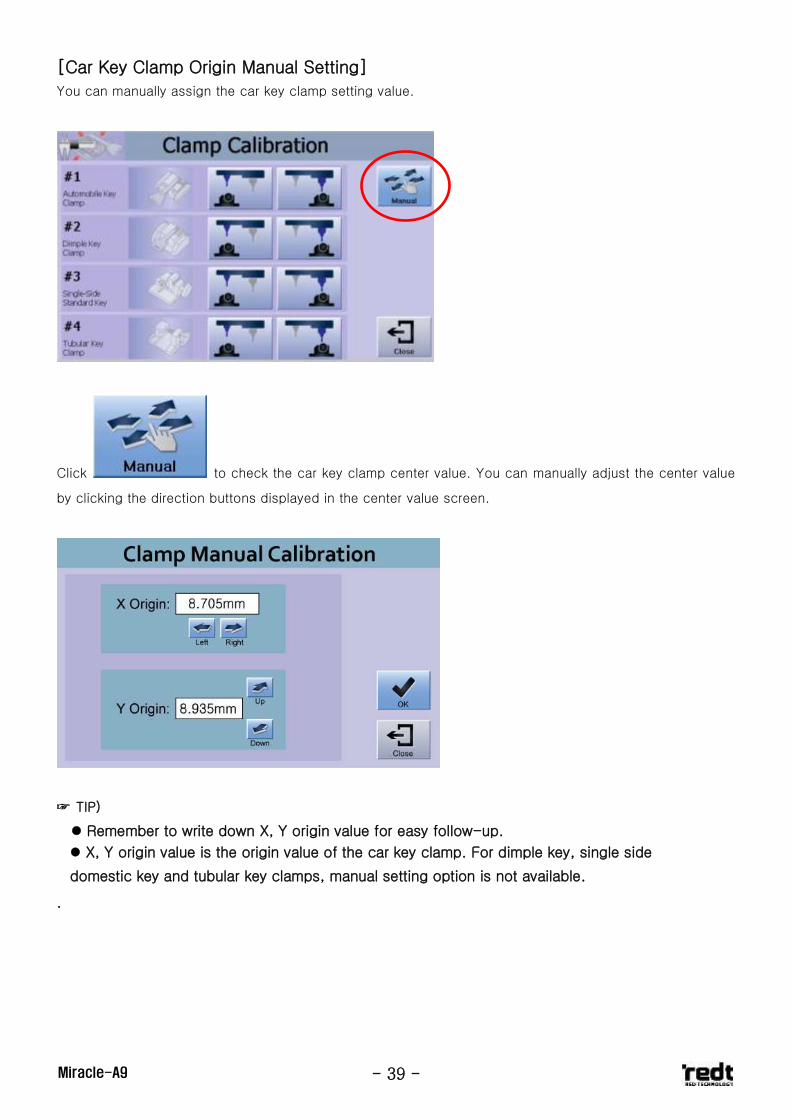
[Car Key Clamp Origin Manual Setting]
You can manually assign the car key clamp setting value.
Click to check the car key clamp center value. You can manually adjust the center value
by clicking the direction buttons displayed in the center value screen.
☞ TIP)
Remember to write down X, Y origin value for easy follow-up.
X, Y origin value is the origin value of the car key clamp. For dimple key, single side
domestic key and tubular key clamps, manual setting option is not available.
.
- 40 - Miracle-A9
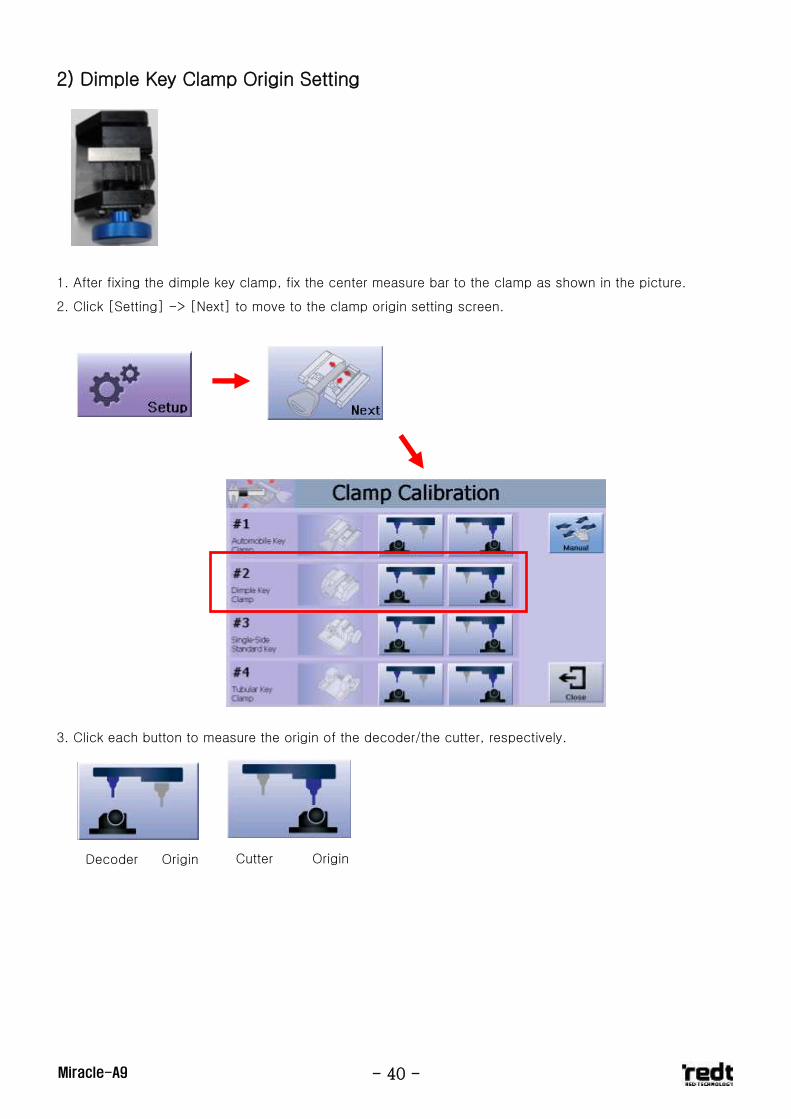
2) Dimple Key Clamp Origin Setting
1. After fixing the dimple key clamp, fix the center measure bar to the clamp as shown in the picture.
2. Click [Setting] -> [Next] to move to the clamp origin setting screen.
3. Click each button to measure the origin of the decoder/the cutter, respectively.
Decoder Origin
Setting
Cutter Origin
Setting
- 41 - Miracle-A9
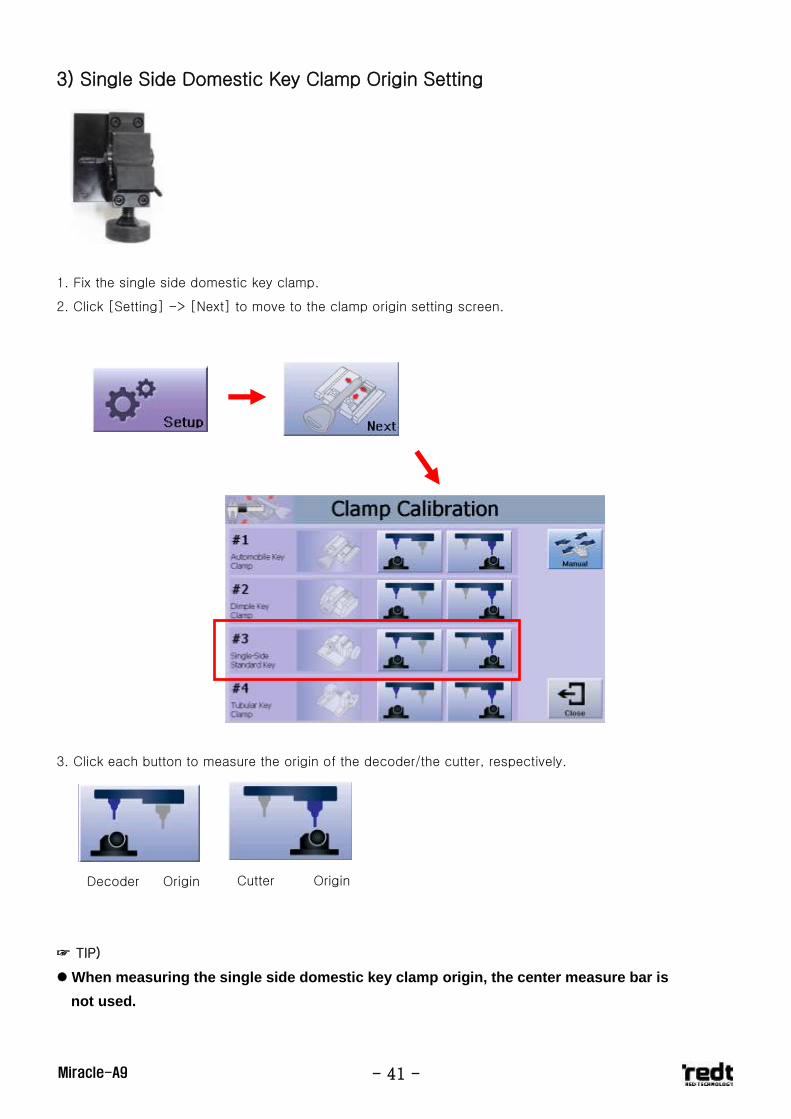
3) Single Side Domestic Key Clamp Origin Setting
1. Fix the single side domestic key clamp.
2. Click [Setting] -> [Next] to move to the clamp origin setting screen.
3. Click each button to measure the origin of the decoder/the cutter, respectively.
☞ TIP)
When measuring the single side domestic key clamp origin, the center measure bar is
not used.
Decoder Origin
Setting
Cutter Origin
Setting
- 42 - Miracle-A9
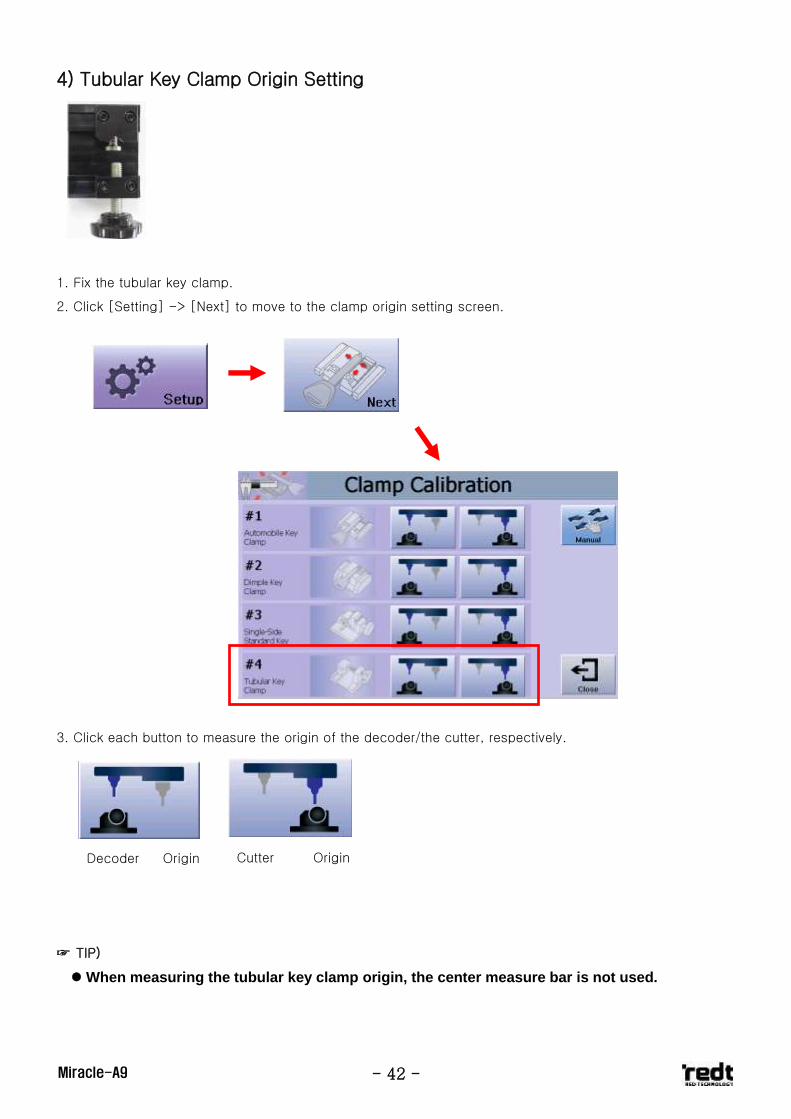
4) Tubular Key Clamp Origin Setting
1. Fix the tubular key clamp.
2. Click [Setting] -> [Next] to move to the clamp origin setting screen.
3. Click each button to measure the origin of the decoder/the cutter, respectively.
☞ TIP)
When measuring the tubular key clamp origin, the center measure bar is not used.
Decoder Origin
Setting
Cutter Origin
Setting
- 43 - Miracle-A9
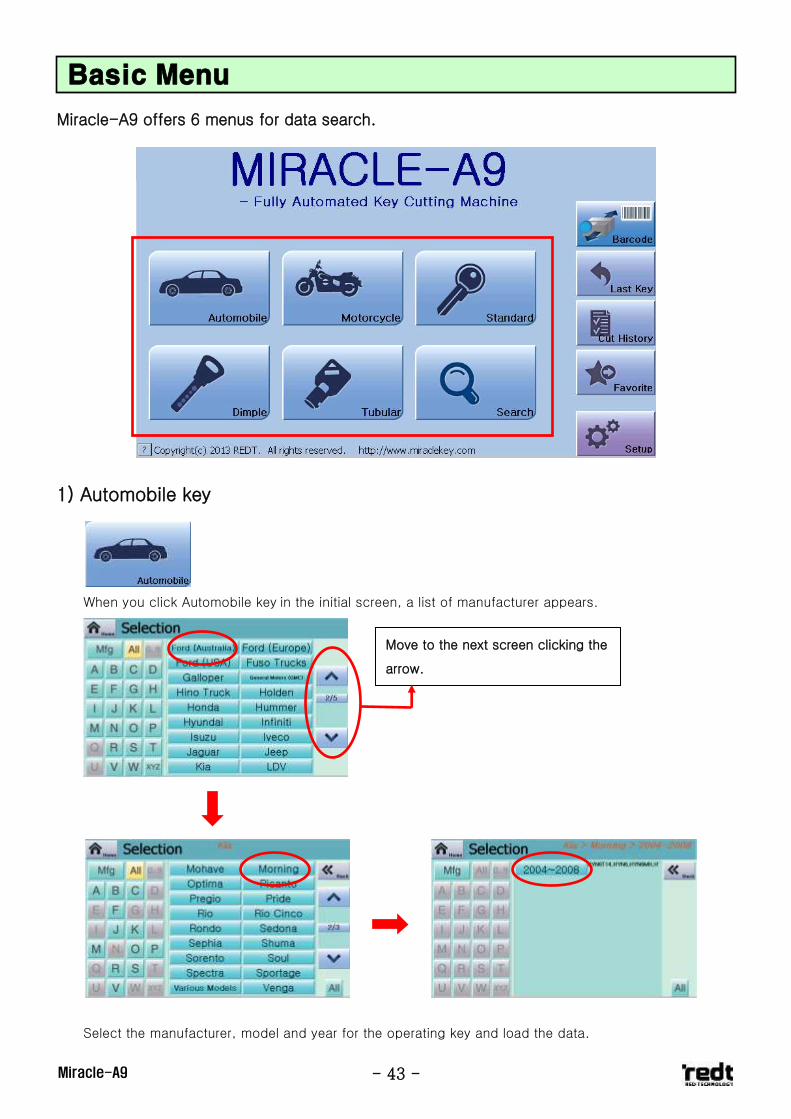
Miracle-A9 offers 6 menus for data search.
1) Automobile key
When you click Automobile key in the initial screen, a list of manufacturer appears.
Select the manufacturer, model and year for the operating key and load the data.
Basic Menu
Move to the next screen clicking the
arrow.
- 44 - Miracle-A9
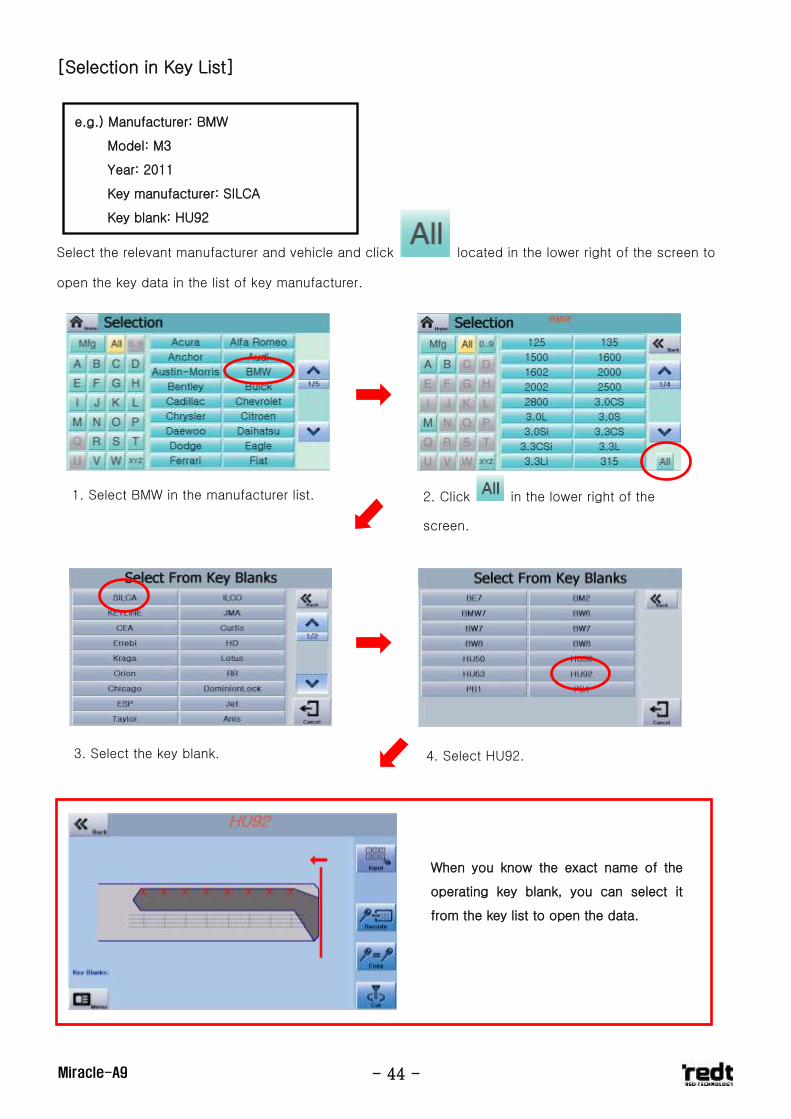
[Selection in Key List]
Select the relevant manufacturer and vehicle and click located in the lower right of the screen to
open the key data in the list of key manufacturer.
1. Select BMW in the manufacturer list.
e.g.) Manufacturer: BMW
Model: M3
Year: 2011
Key manufacturer: SILCA
Key blank: HU92
2. Click in the lower right of the
screen.
3. Select the key blank. 4. Select HU92.
When you know the exact name of the
operating key blank, you can select it
from the key list to open the data.
- 45 - Miracle-A9
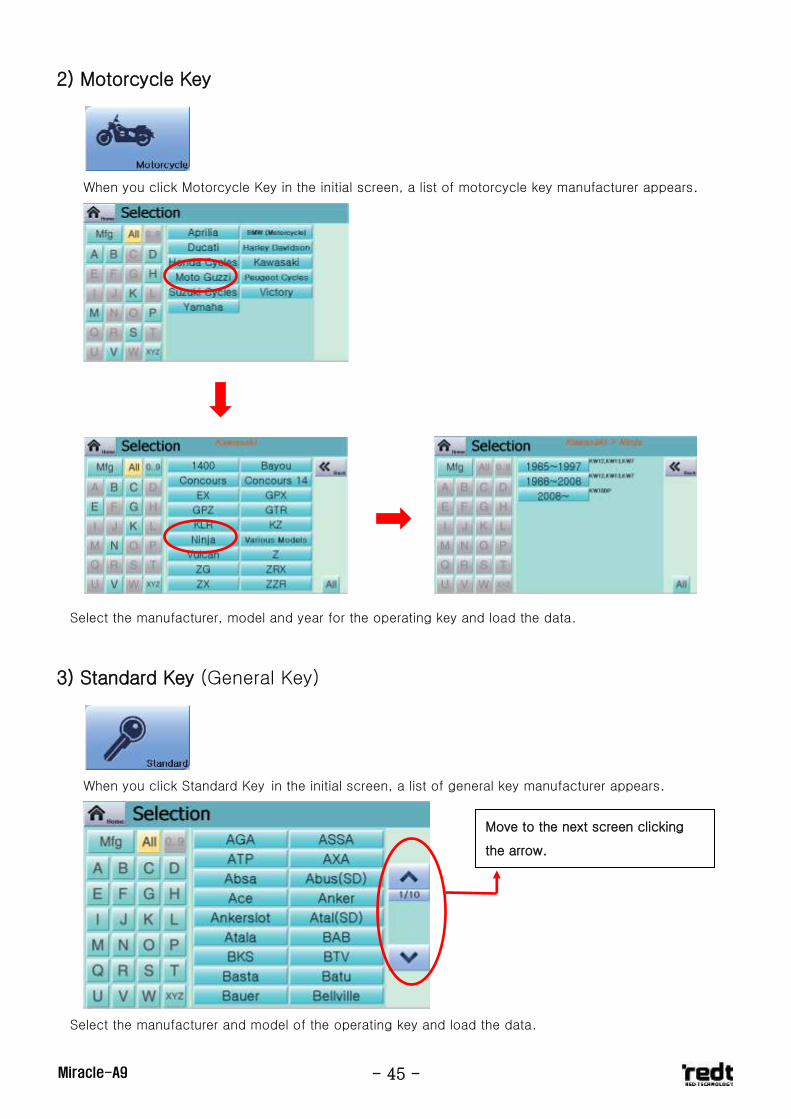
2) Motorcycle Key
When you click Motorcycle Key in the initial screen, a list of motorcycle key manufacturer appears.
Select the manufacturer, model and year for the operating key and load the data.
3) Standard Key (General Key)
When you click Standard Key in the initial screen, a list of general key manufacturer appears.
Select the manufacturer and model of the operating key and load the data.
Move to the next screen clicking
the arrow.
- 46 - Miracle-A9
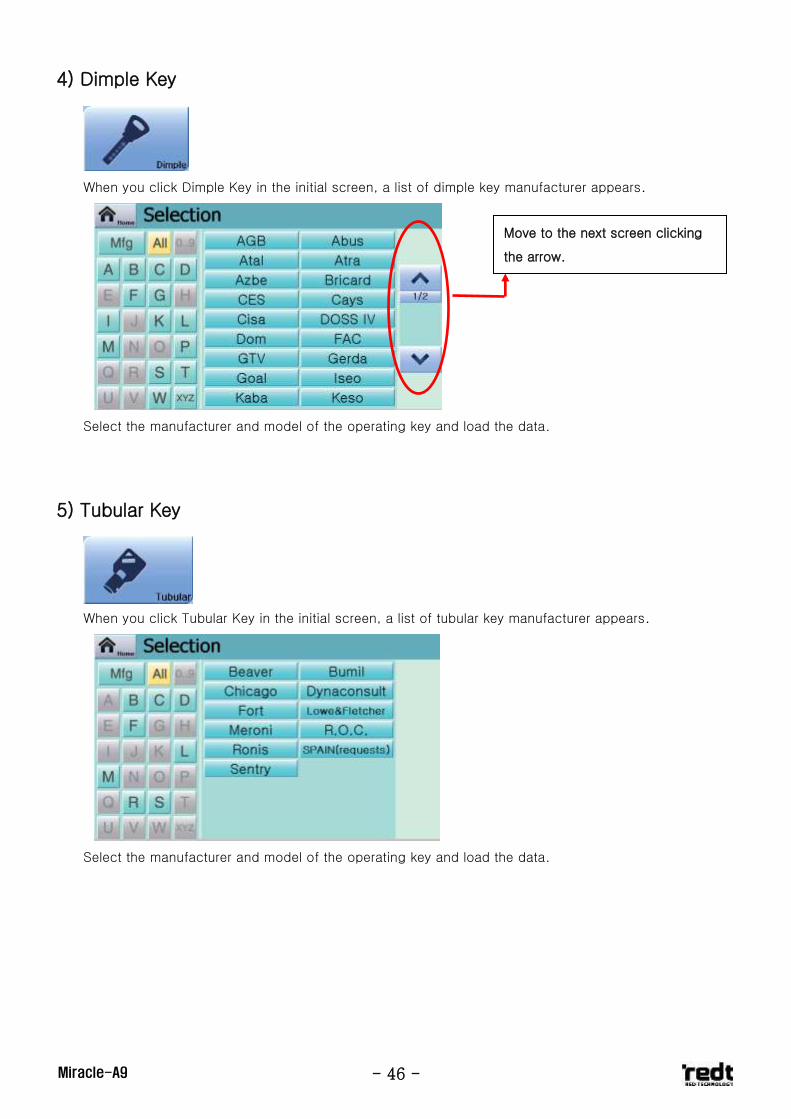
4) Dimple Key
When you click Dimple Key in the initial screen, a list of dimple key manufacturer appears.
Select the manufacturer and model of the operating key and load the data.
5) Tubular Key
When you click Tubular Key in the initial screen, a list of tubular key manufacturer appears.
Select the manufacturer and model of the operating key and load the data.
Move to the next screen clicking
the arrow.
- 47 - Miracle-A9
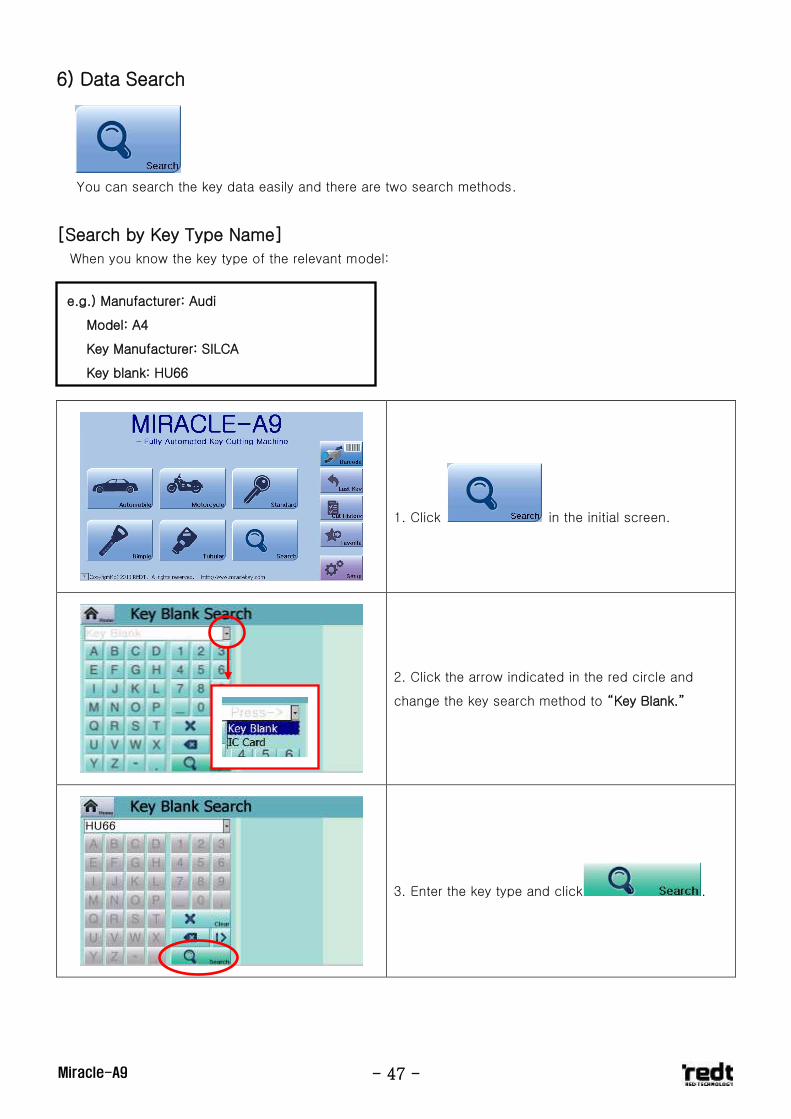
6) Data Search
You can search the key data easily and there are two search methods.
[Search by Key Type Name]
When you know the key type of the relevant model:
1. Click in the initial screen.
2. Click the arrow indicated in the red circle and
change the key search method to “Key Blank.”
3. Enter the key type and click .
e.g.) Manufacturer: Audi
Model: A4
Key Manufacturer: SILCA
Key blank: HU66

- 48 - Miracle-A9
4. Select the key manufacturer and load the data.
- 49 - Miracle-A9
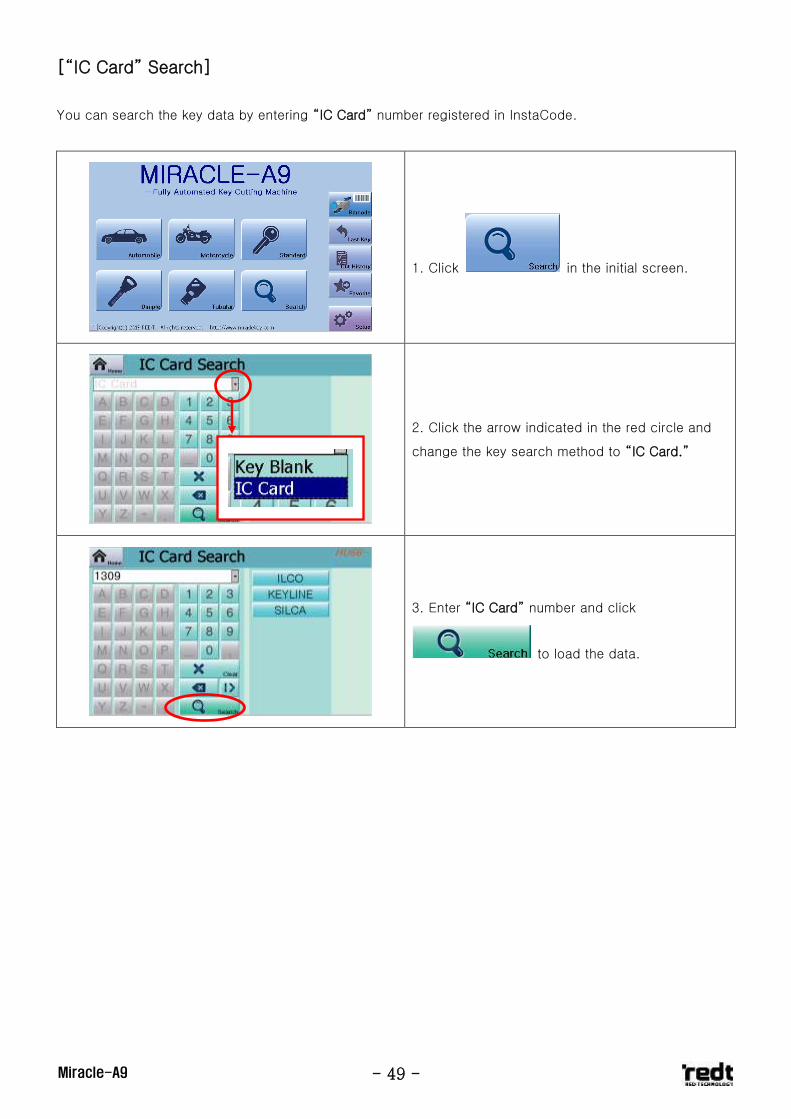
[“IC Card” Search]
You can search the key data by entering “IC Card” number registered in InstaCode.
1. Click in the initial screen.
2. Click the arrow indicated in the red circle and
change the key search method to “IC Card.”
3. Enter “IC Card” number and click
to load the data.
- 50 - Miracle-A9
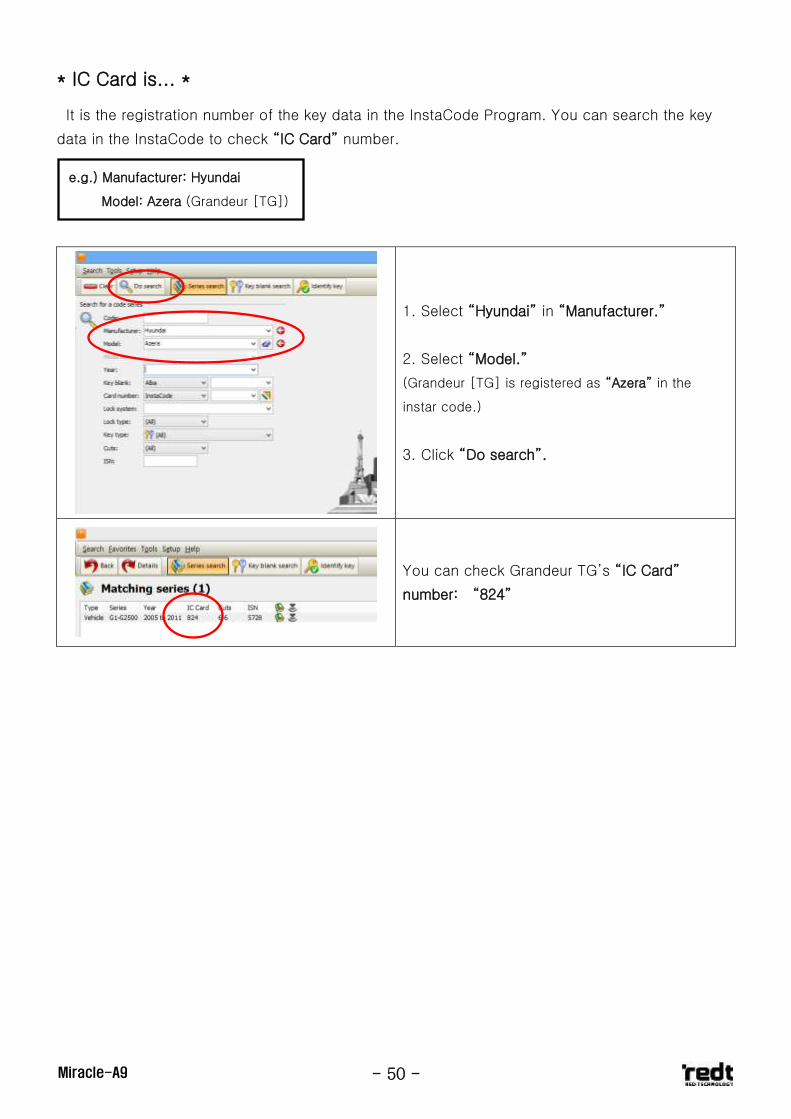
* IC Card is... *
It is the registration number of the key data in the InstaCode Program. You can search the key
data in the InstaCode to check “IC Card” number.
1. Select “Hyundai” in “Manufacturer.”
2. Select “Model.”
(Grandeur [TG] is registered as “Azera” in the
instar code.)
3. Click “Do search”.
You can check Grandeur TG’s “IC Card”
number: “824”
e.g.) Manufacturer: Hyundai
Model: Azera (Grandeur [TG])
- 51 - Miracle-A9
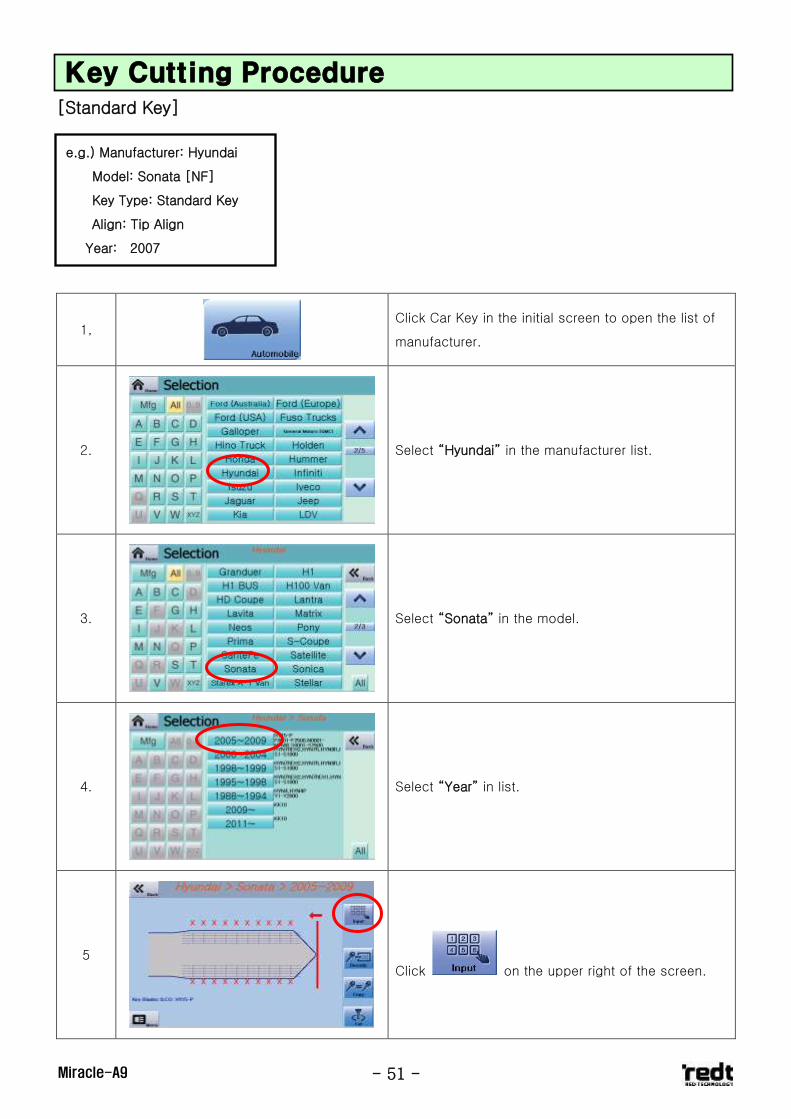
[Standard Key]
1,
Click Car Key in the initial screen to open the list of
manufacturer.
2.
Select “Hyundai” in the manufacturer list.
3.
Select “Sonata” in the model.
4.
Select “Year” in list.
5
Click on the upper right of the screen.
Key Cutting Procedure
e.g.) Manufacturer: Hyundai
Model: Sonata [NF]
Key Type: Standard Key
Align: Tip Align
Year: 2007
- 52 - Miracle-A9
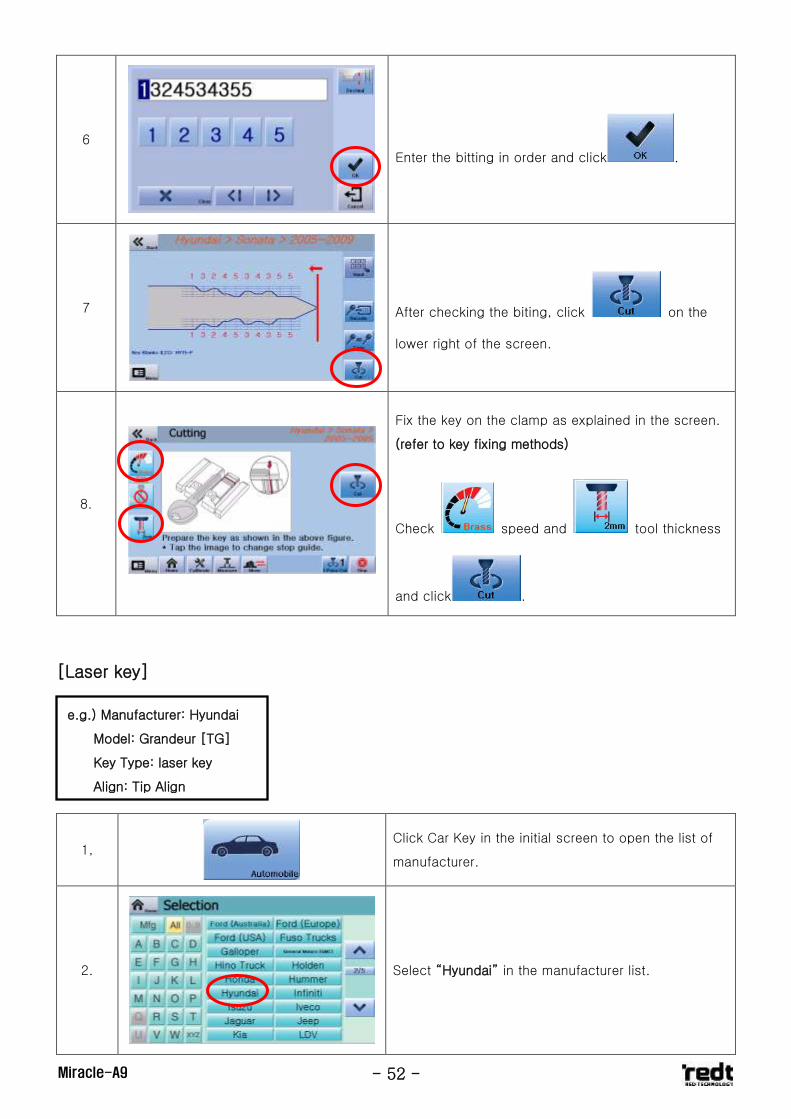
6
Enter the bitting in order and click .
7
After checking the biting, click on the
lower right of the screen.
8.
Fix the key on the clamp as explained in the screen.
(refer to key fixing methods)
Check speed and tool thickness
and click .
[Laser key]
1,
Click Car Key in the initial screen to open the list of
manufacturer.
2.
Select “Hyundai” in the manufacturer list.
e.g.) Manufacturer: Hyundai
Model: Grandeur [TG]
Key Type: laser key
Align: Tip Align
- 53 - Miracle-A9
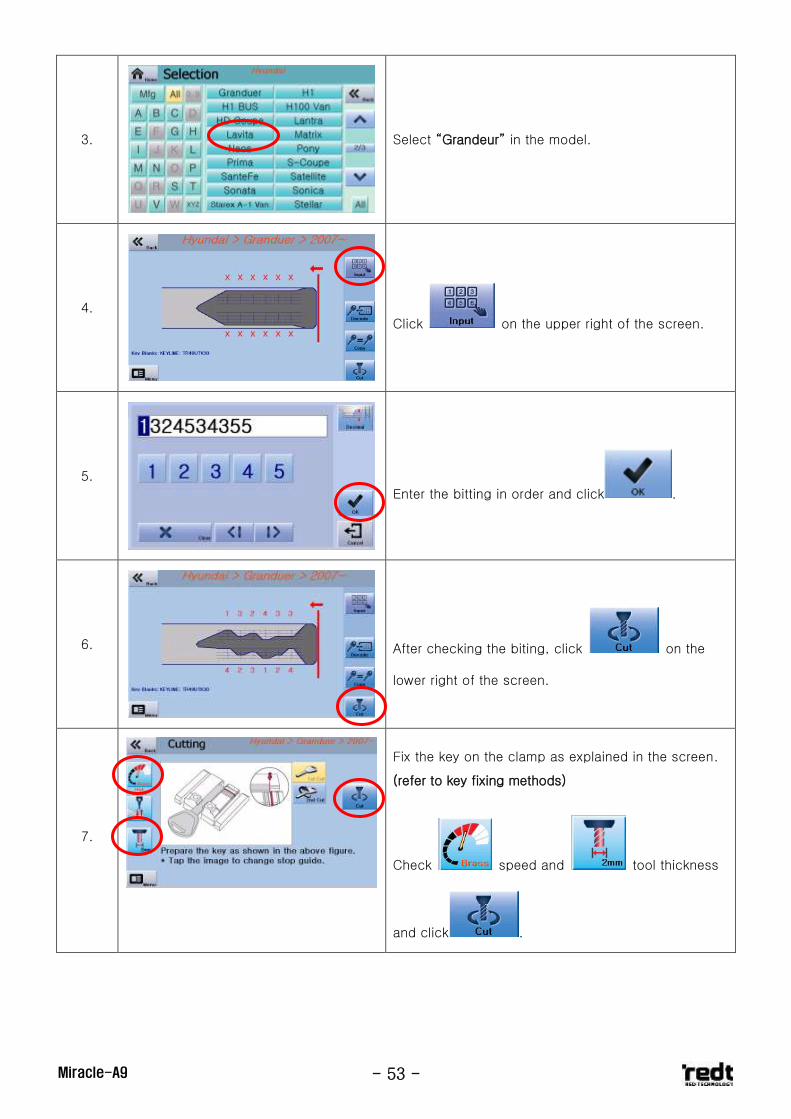
3.
Select “Grandeur” in the model.
4.
Click on the upper right of the screen.
5.
Enter the bitting in order and click .
6.
After checking the biting, click on the
lower right of the screen.
7.
Fix the key on the clamp as explained in the screen.
(refer to key fixing methods)
Check speed and tool thickness
and click .
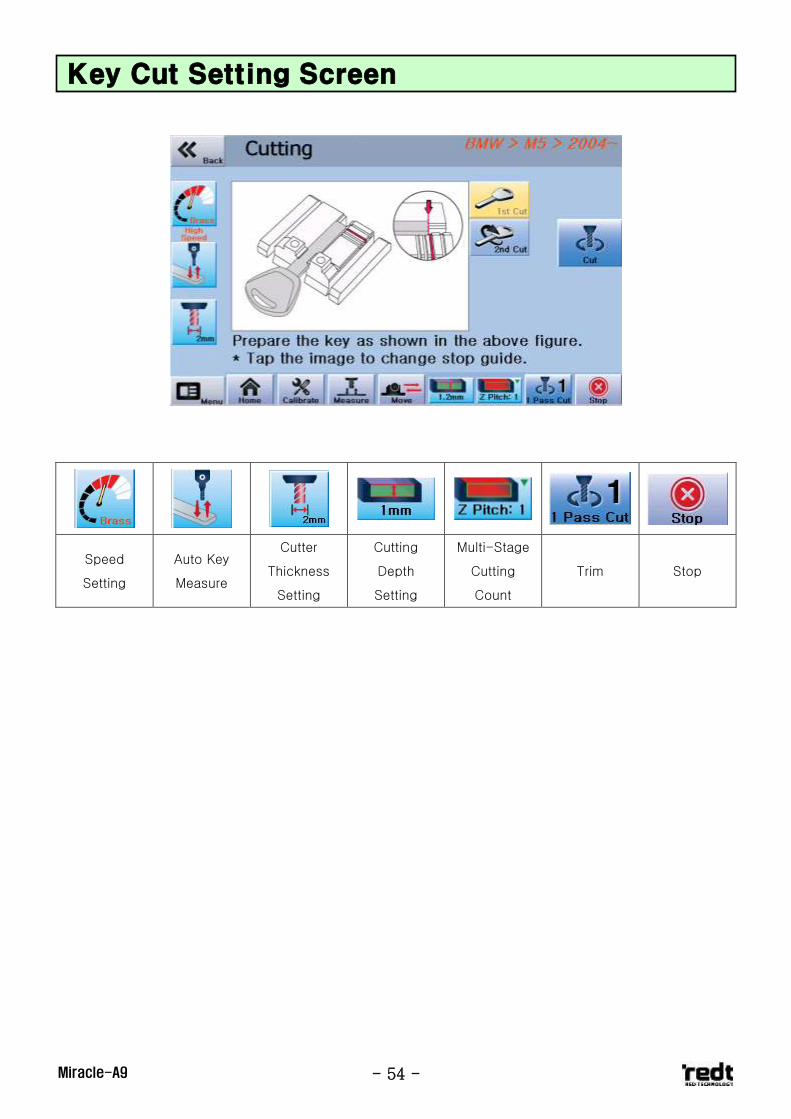
- 54 - Miracle-A9
Speed
Setting
Auto Key
Measure
Cutter
Thickness
Setting
Cutting
Depth
Setting
Multi-Stage
Cutting
Count
Trim Stop
Key Cut Setting Screen

- 55 - Miracle-A9
1) Speed Setting
- You can assign the cutting speed based on intensity of key materials in four stages: Low-Normal-High-
Maximum.
When you click the button, the cutting speed is changed in the following order.
2) Auto Key Measurement
- You can measure thickness, center and length of the key for more accurate key cutting.
When you click the button, the measurement setting is changed in the following order.
No Measure Key Height
Measure
Key Center
Measure
Key Length
Measure
Key Length and
Center Measure
No Measurement
Used in laser key cutting. It automatically measures thickness of the key to
prevent the clamp damage and ensure cutting to accurate depth.
Used regardless of the reference point of the key. It automatically measures
center of the key (this function is used when there is an error in key
materials).
If you cut key materials with high intensity at high speed, the cutter may break off or
cutting may not be done properly.
Make sure to assign proper speed based on the nature of materials.
1. 2. 3. 4. 5.
- 56 - Miracle-A9
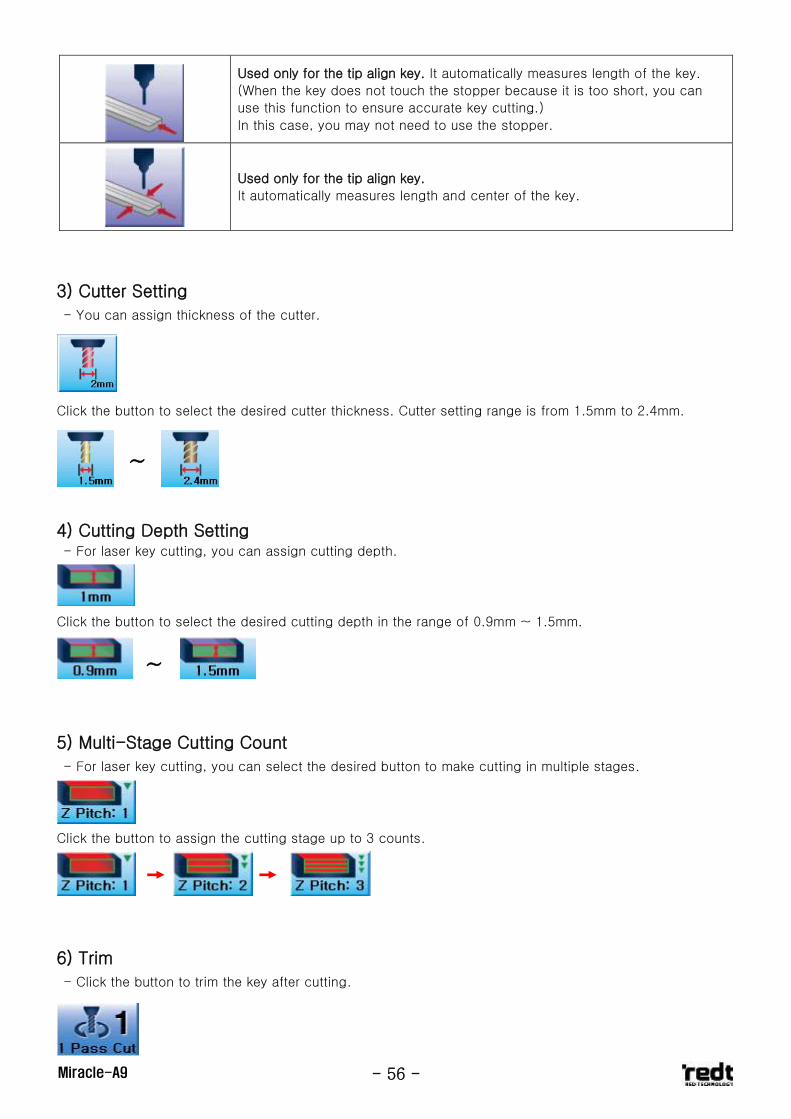
Used only for the tip align key. It automatically measures length of the key.
(When the key does not touch the stopper because it is too short, you can
use this function to ensure accurate key cutting.)
In this case, you may not need to use the stopper.
Used only for the tip align key.
It automatically measures length and center of the key.
3) Cutter Setting
- You can assign thickness of the cutter.
Click the button to select the desired cutter thickness. Cutter setting range is from 1.5mm to 2.4mm.
4) Cutting Depth Setting - For laser key cutting, you can assign cutting depth.
Click the button to select the desired cutting depth in the range of 0.9mm ~ 1.5mm.
5) Multi-Stage Cutting Count
- For laser key cutting, you can select the desired button to make cutting in multiple stages.
Click the button to assign the cutting stage up to 3 counts.
6) Trim
- Click the button to trim the key after cutting.
~
~
- 57 - Miracle-A9
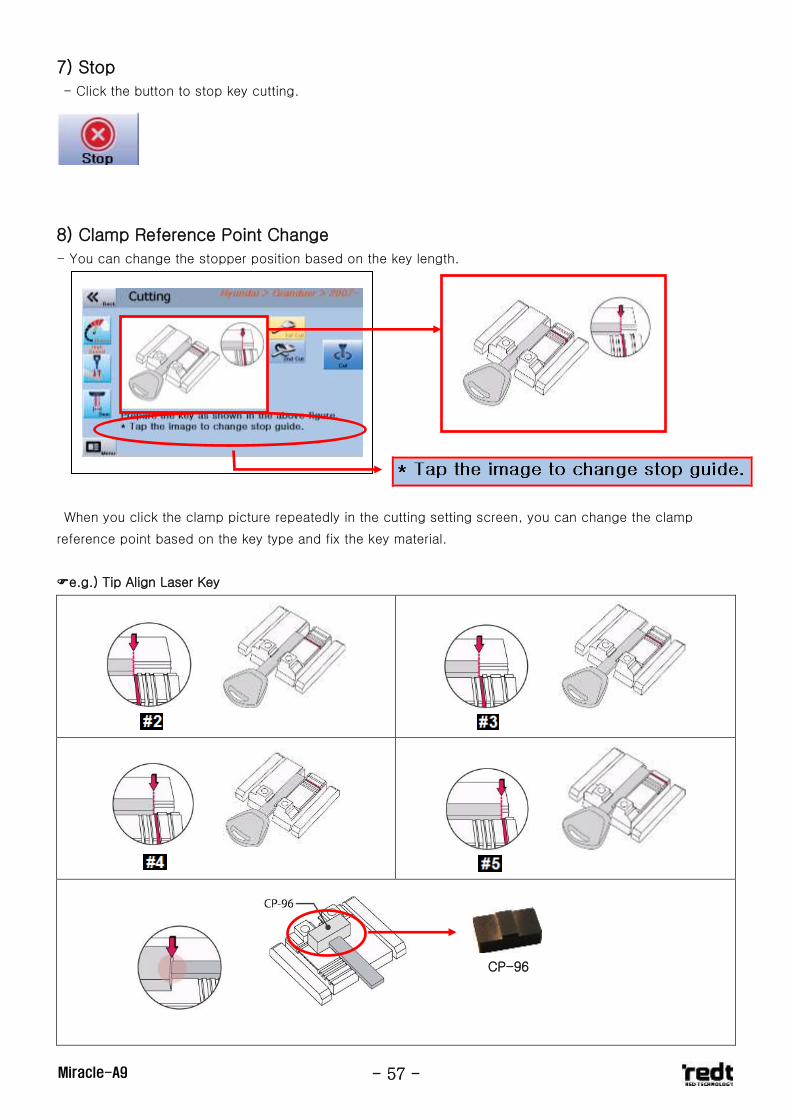
7) Stop
- Click the button to stop key cutting.
8) Clamp Reference Point Change
- You can change the stopper position based on the key length.
When you click the clamp picture repeatedly in the cutting setting screen, you can change the clamp
reference point based on the key type and fix the key material.
e.g.) Tip Align Laser Key
CP-96
- 58 - Miracle-A9
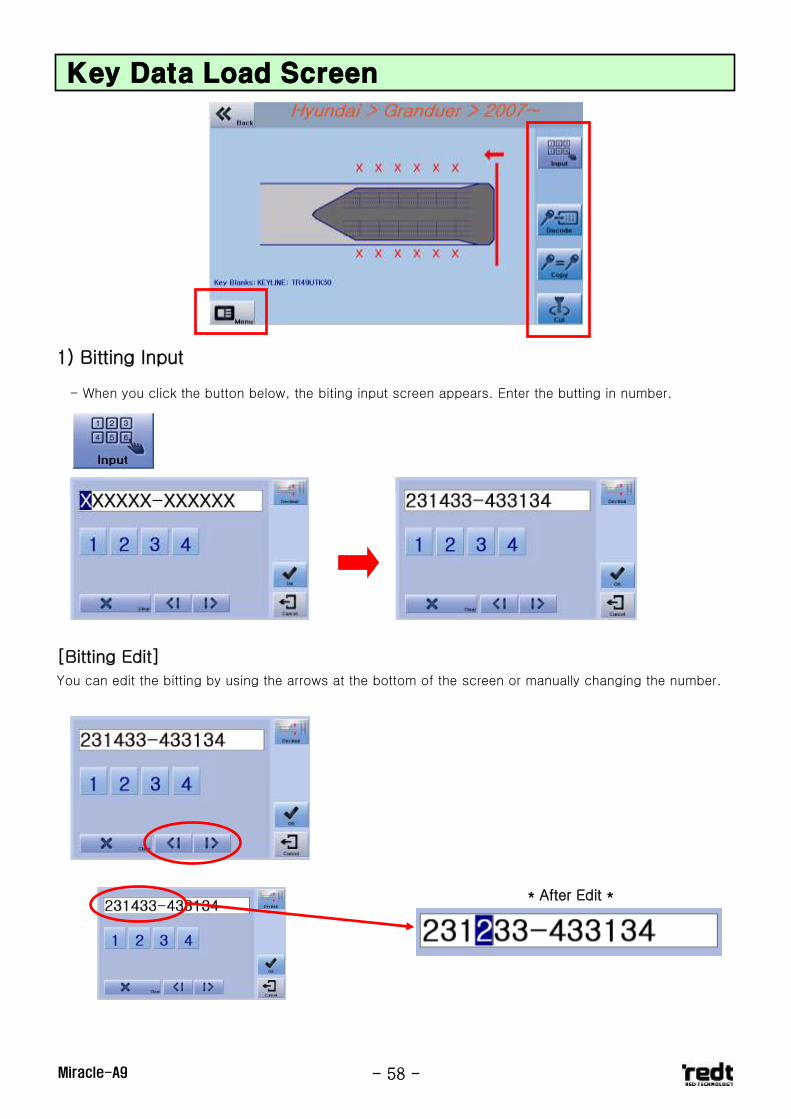
1) Bitting Input
- When you click the button below, the biting input screen appears. Enter the butting in number.
[Bitting Edit] You can edit the bitting by using the arrows at the bottom of the screen or manually changing the number.
Key Data Load Screen
* After Edit *
- 59 - Miracle-A9
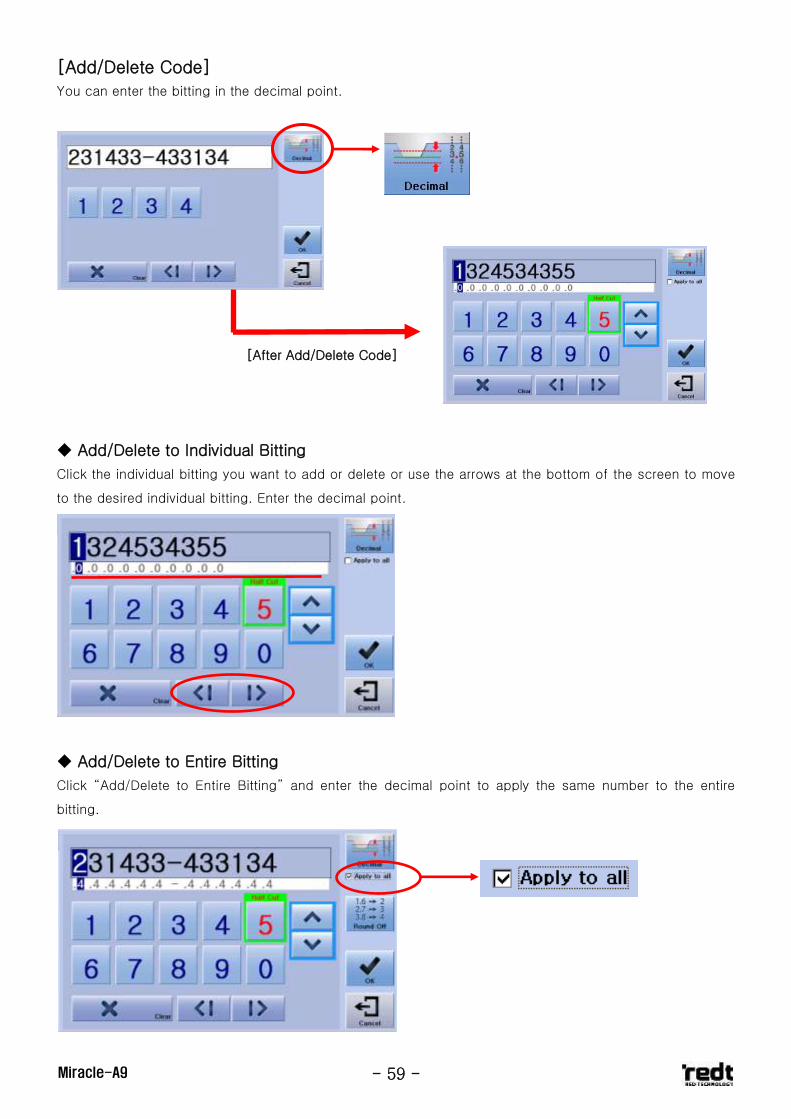
[Add/Delete Code]
You can enter the bitting in the decimal point.
Add/Delete to Individual Bitting
Click the individual bitting you want to add or delete or use the arrows at the bottom of the screen to move
to the desired individual bitting. Enter the decimal point.
Add/Delete to Entire Bitting
Click “Add/Delete to Entire Bitting” and enter the decimal point to apply the same number to the entire
bitting.
[After Add/Delete Code]
- 60 - Miracle-A9
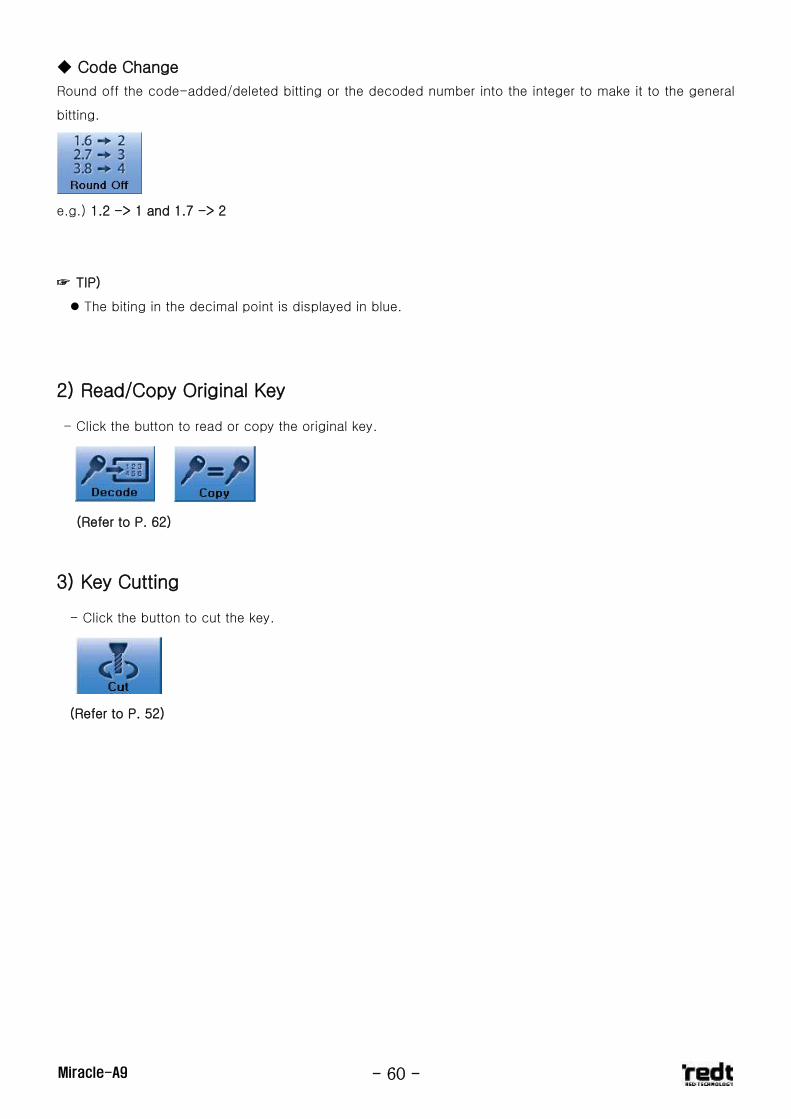
Code Change
Round off the code-added/deleted bitting or the decoded number into the integer to make it to the general
bitting.
e.g.) 1.2 -> 1 and 1.7 -> 2
☞ TIP)
The biting in the decimal point is displayed in blue.
2) Read/Copy Original Key
- Click the button to read or copy the original key.
(Refer to P. 62)
3) Key Cutting
- Click the button to cut the key.
(Refer to P. 52)
- 61 - Miracle-A9
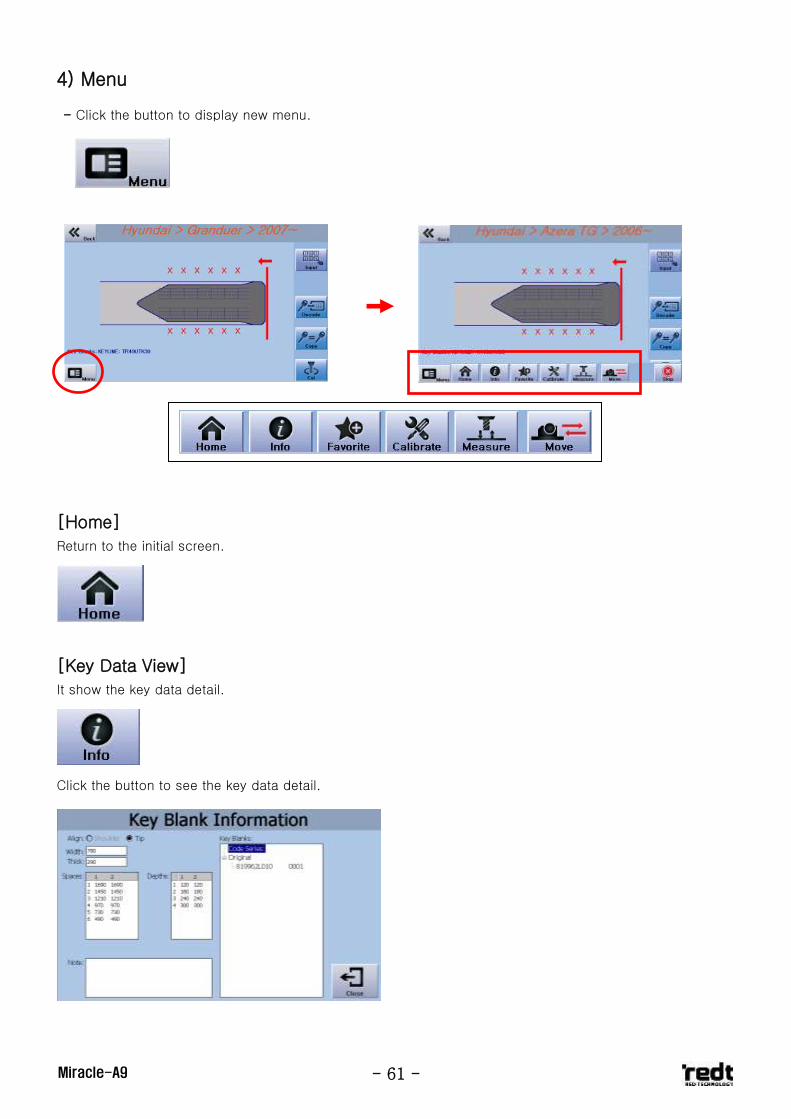
4) Menu
- Click the button to display new menu.
[Home]
Return to the initial screen.
[Key Data View]
It show the key data detail.
Click the button to see the key data detail.
- 62 - Miracle-A9
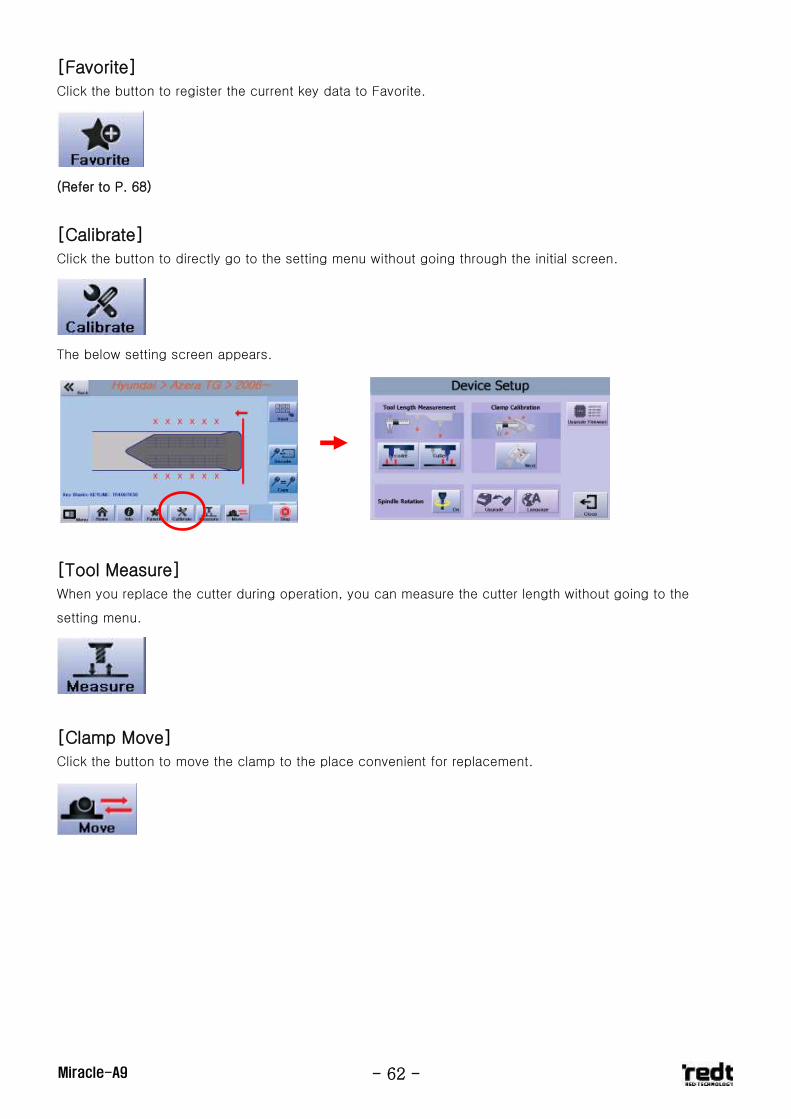
[Favorite]
Click the button to register the current key data to Favorite.
(Refer to P. 68)
[Calibrate]
Click the button to directly go to the setting menu without going through the initial screen.
The below setting screen appears.
[Tool Measure]
When you replace the cutter during operation, you can measure the cutter length without going to the
setting menu.
[Clamp Move]
Click the button to move the clamp to the place convenient for replacement.
- 63 - Miracle-A9
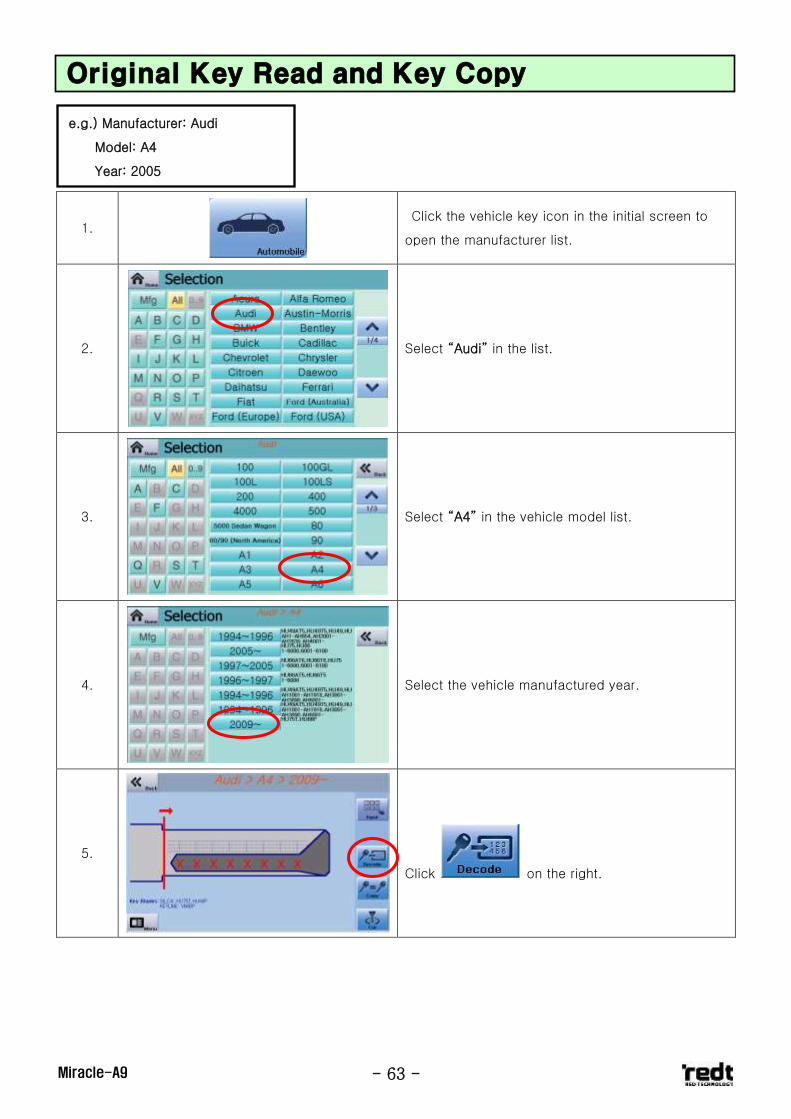
1.
Click the vehicle key icon in the initial screen to
open the manufacturer list.
2.
Select “Audi” in the list.
3.
Select “A4” in the vehicle model list.
4.
Select the vehicle manufactured year.
5.
Click on the right.
Original Key Read and Key Copy
e.g.) Manufacturer: Audi
Model: A4
Year: 2005
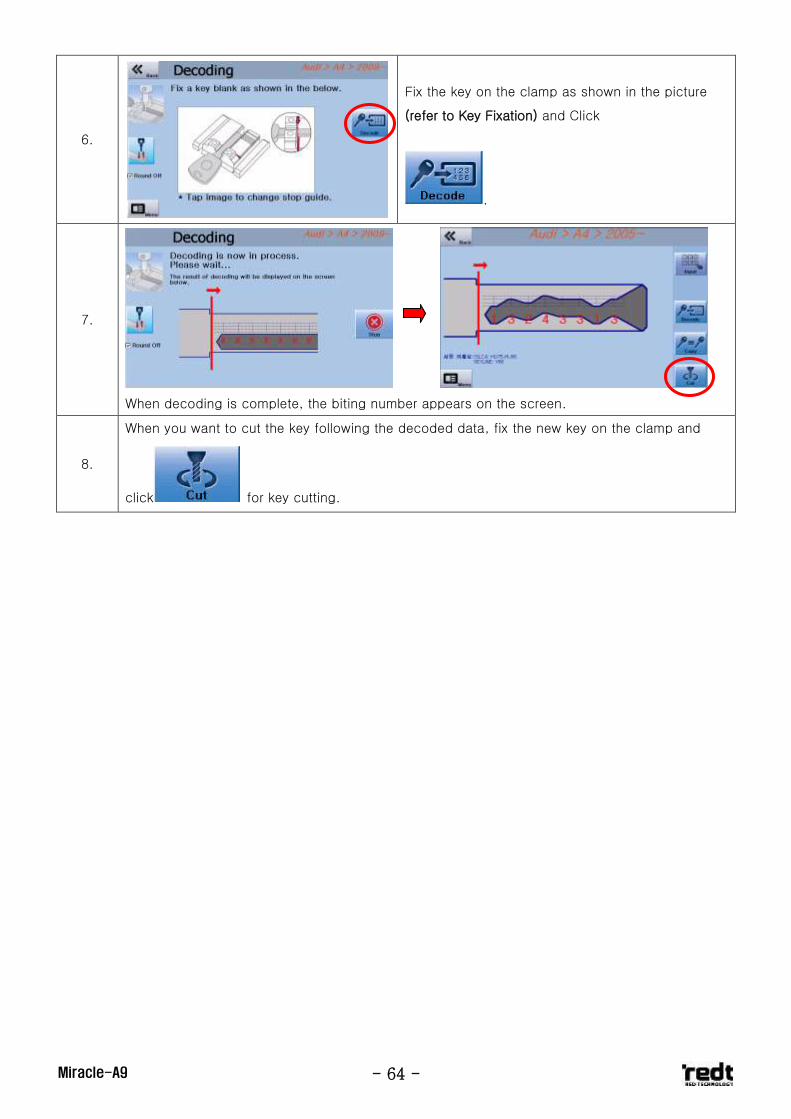
- 64 - Miracle-A9
6.
Fix the key on the clamp as shown in the picture
(refer to Key Fixation) and Click
.
7.
When decoding is complete, the biting number appears on the screen.
8.
When you want to cut the key following the decoded data, fix the new key on the clamp and
click for key cutting.
- 65 - Miracle-A9
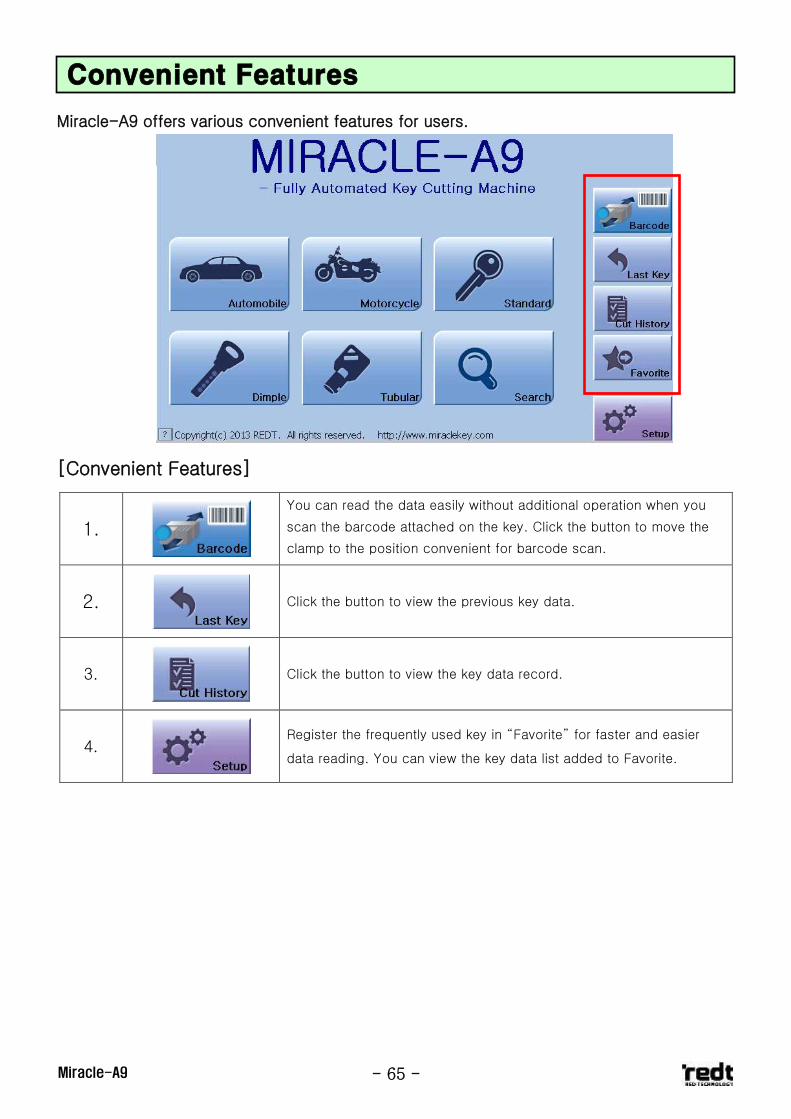
Miracle-A9 offers various convenient features for users.
[Convenient Features]
1.
You can read the data easily without additional operation when you
scan the barcode attached on the key. Click the button to move the
clamp to the position convenient for barcode scan.
2.
Click the button to view the previous key data.
3.
Click the button to view the key data record.
4.
Register the frequently used key in “Favorite” for faster and easier
data reading. You can view the key data list added to Favorite.
Convenient Features
- 66 - Miracle-A9
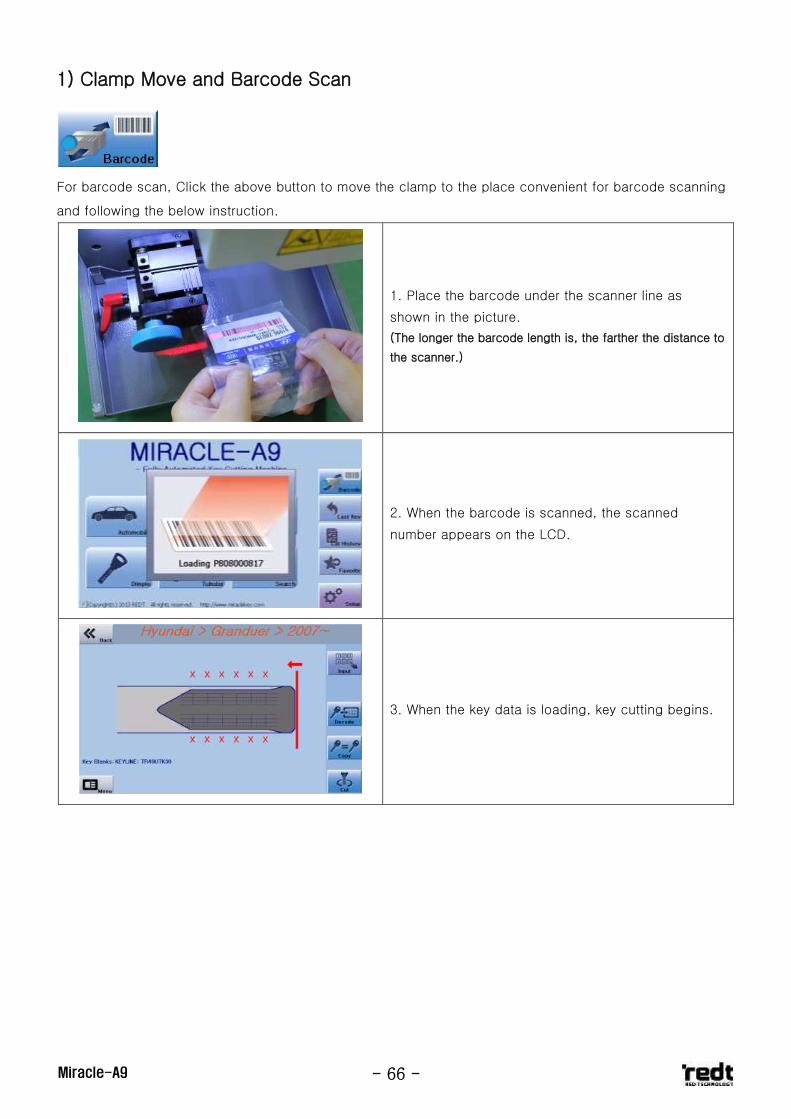
1) Clamp Move and Barcode Scan
For barcode scan, Click the above button to move the clamp to the place convenient for barcode scanning
and following the below instruction.
1. Place the barcode under the scanner line as
shown in the picture.
(The longer the barcode length is, the farther the distance to
the scanner.)
2. When the barcode is scanned, the scanned
number appears on the LCD.
3. When the key data is loading, key cutting begins.
- 67 - Miracle-A9
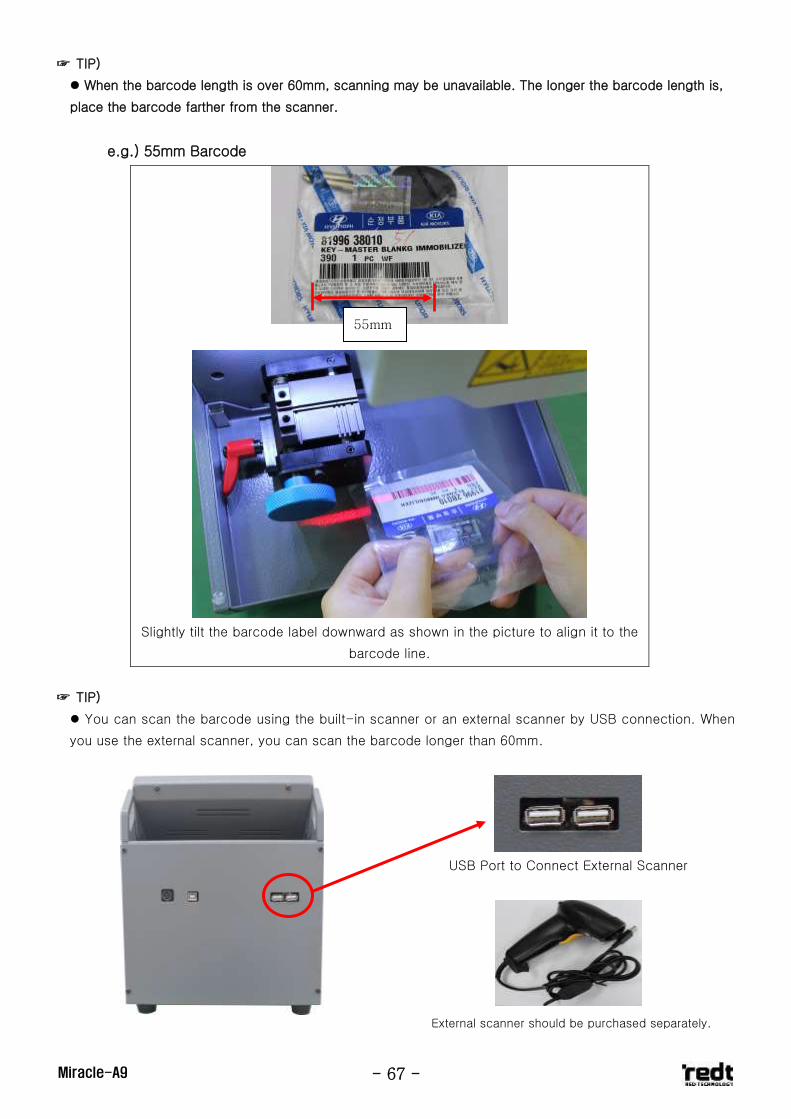
☞ TIP)
When the barcode length is over 60mm, scanning may be unavailable. The longer the barcode length is,
place the barcode farther from the scanner.
e.g.) 55mm Barcode
Slightly tilt the barcode label downward as shown in the picture to align it to the
barcode line.
☞ TIP)
You can scan the barcode using the built-in scanner or an external scanner by USB connection. When
you use the external scanner, you can scan the barcode longer than 60mm.
USB Port to Connect External Scanner
55mm
External scanner should be purchased separately.
- 68 - Miracle-A9
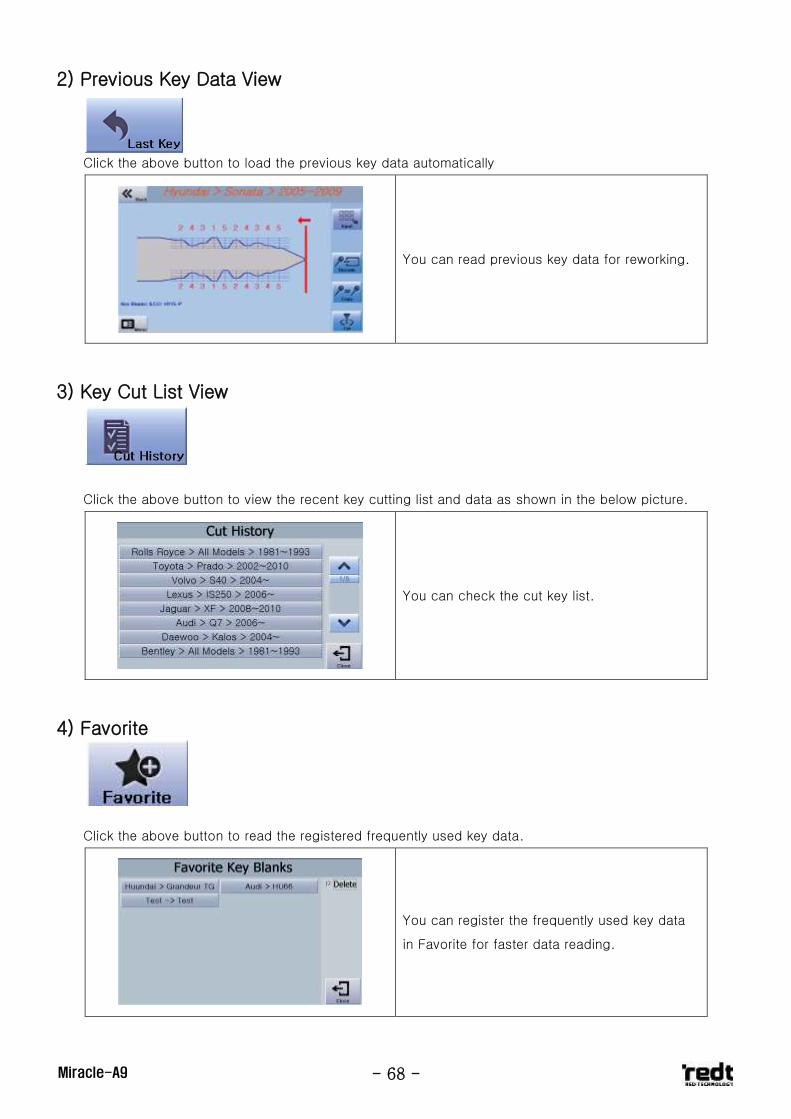
2) Previous Key Data View
Click the above button to load the previous key data automatically
You can read previous key data for reworking.
3) Key Cut List View
Click the above button to view the recent key cutting list and data as shown in the below picture.
You can check the cut key list.
4) Favorite
Click the above button to read the registered frequently used key data.
You can register the frequently used key data
in Favorite for faster data reading.
- 69 - Miracle-A9
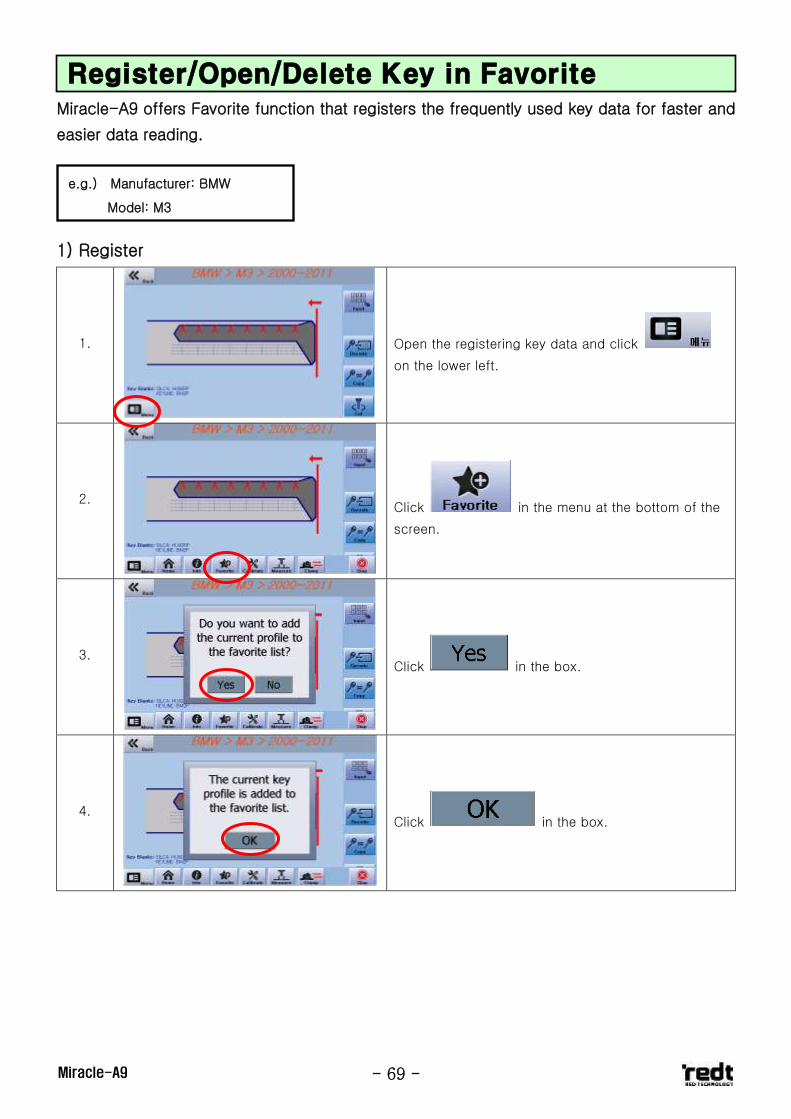
Miracle-A9 offers Favorite function that registers the frequently used key data for faster and
easier data reading.
1) Register
1.
Open the registering key data and click
on the lower left.
2.
Click in the menu at the bottom of the
screen.
3.
Click in the box.
4.
Click in the box.
Register/Open/Delete Key in Favorite
e.g.) Manufacturer: BMW
Model: M3
- 70 - Miracle-A9
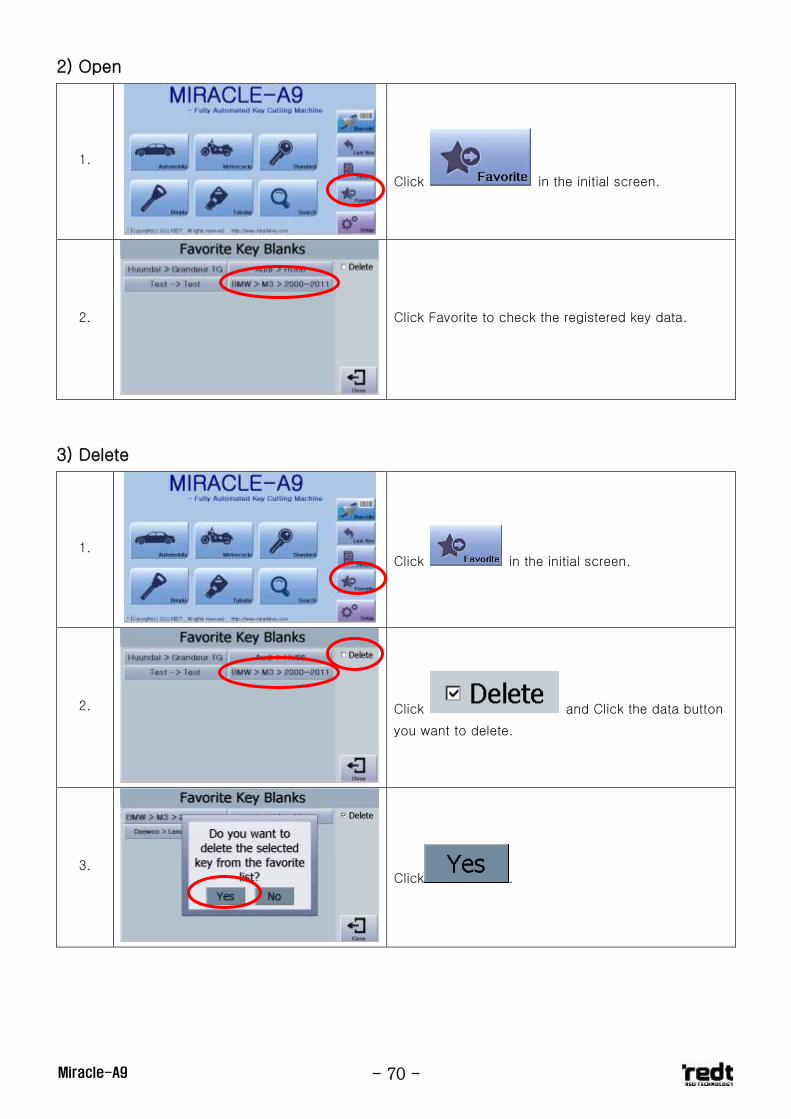
2) Open
1.
Click in the initial screen.
2.
Click Favorite to check the registered key data.
3) Delete
1.
Click in the initial screen.
2.
Click and Click the data button
you want to delete.
3.
Click .
- 71 - Miracle-A9
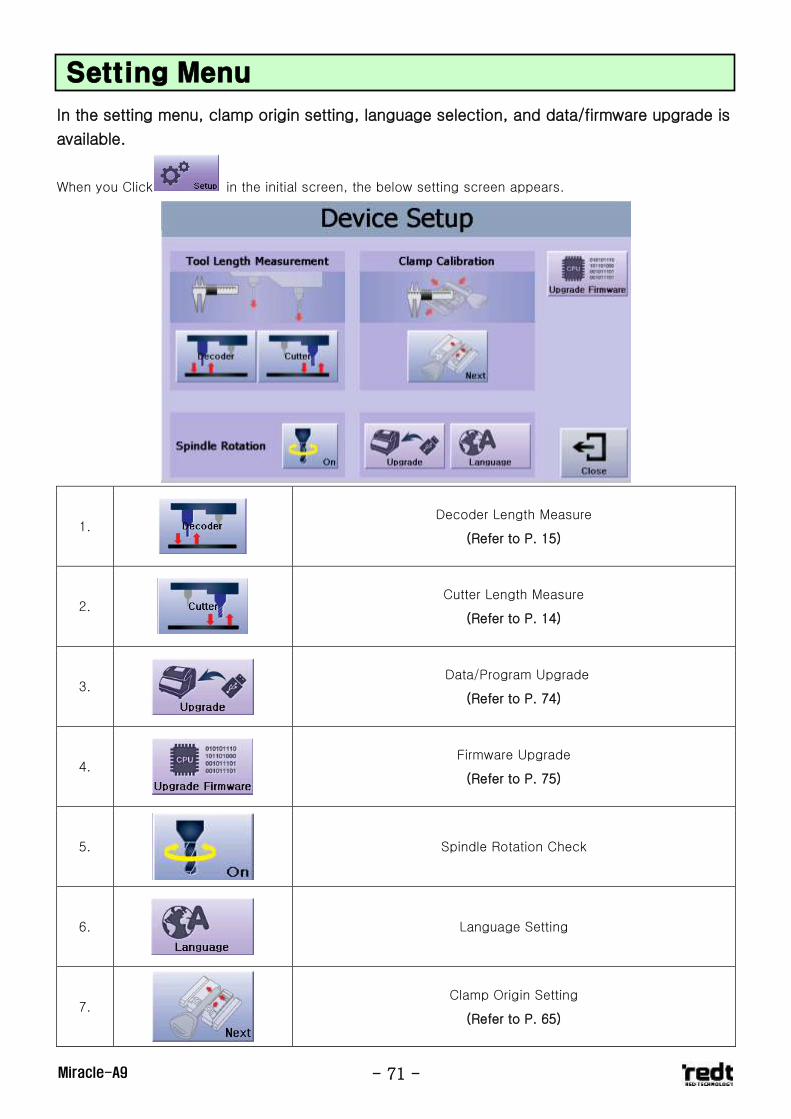
In the setting menu, clamp origin setting, language selection, and data/firmware upgrade is
available.
When you Click in the initial screen, the below setting screen appears.
1.
Decoder Length Measure
(Refer to P. 15)
2.
Cutter Length Measure
(Refer to P. 14)
3.
Data/Program Upgrade
(Refer to P. 74)
4.
Firmware Upgrade
(Refer to P. 75)
5.
Spindle Rotation Check
6.
Language Setting
7.
Clamp Origin Setting
(Refer to P. 65)
Setting Menu
- 72 - Miracle-A9
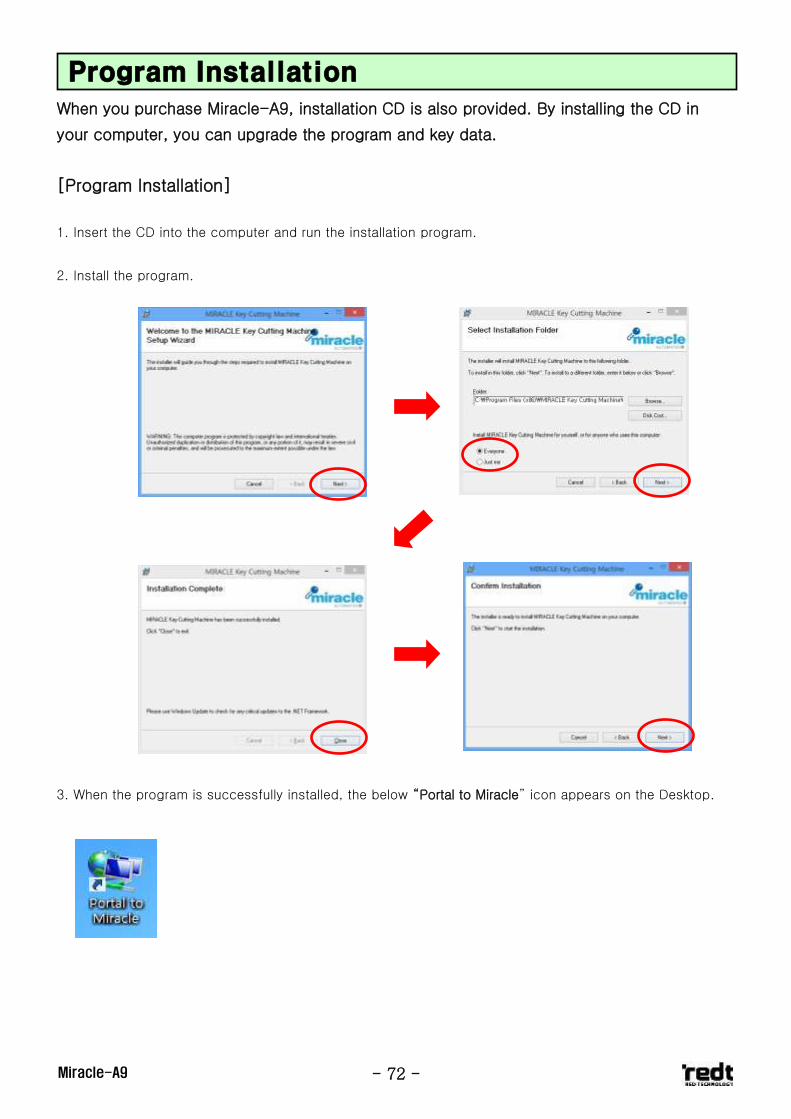
When you purchase Miracle-A9, installation CD is also provided. By installing the CD in
your computer, you can upgrade the program and key data.
[Program Installation]
1. Insert the CD into the computer and run the installation program.
2. Install the program.
3. When the program is successfully installed, the below “Portal to Miracle” icon appears on the Desktop.
Program Installation
- 73 - Miracle-A9
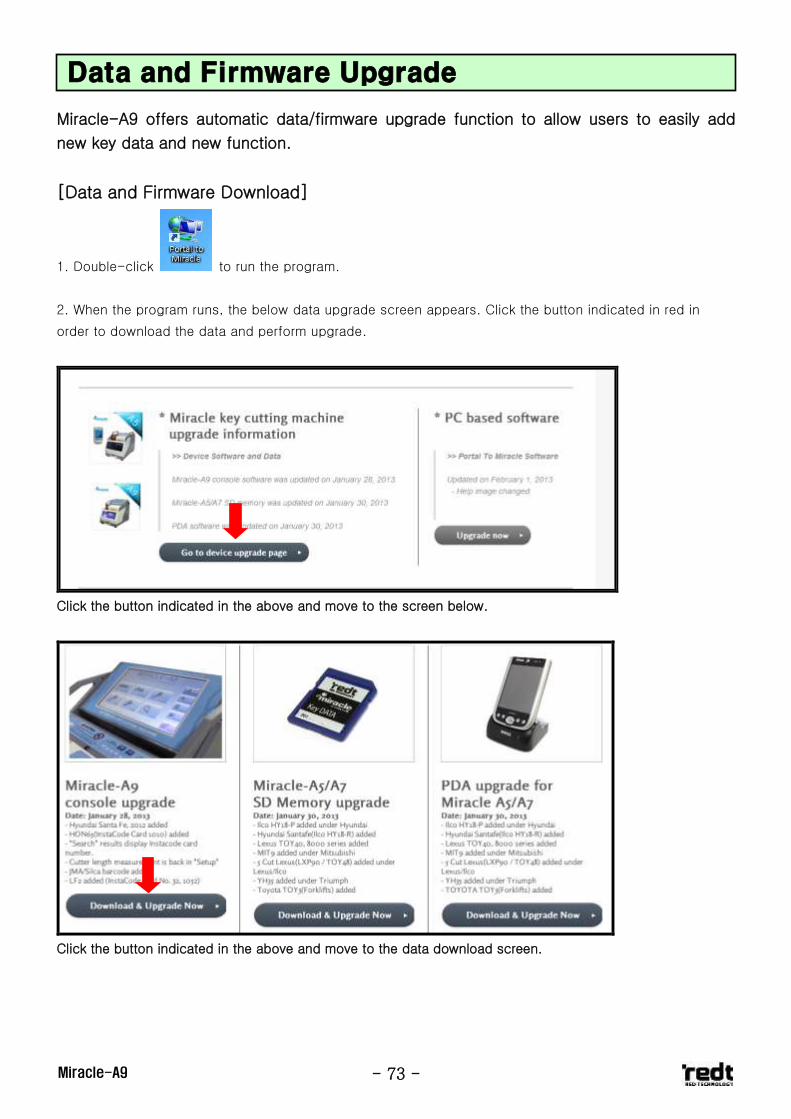
Miracle-A9 offers automatic data/firmware upgrade function to allow users to easily add
new key data and new function.
[Data and Firmware Download]
1. Double-click to run the program.
2. When the program runs, the below data upgrade screen appears. Click the button indicated in red in
order to download the data and perform upgrade.
Click the button indicated in the above and move to the screen below.
Click the button indicated in the above and move to the data download screen.
Data and Firmware Upgrade
- 74 - Miracle-A9
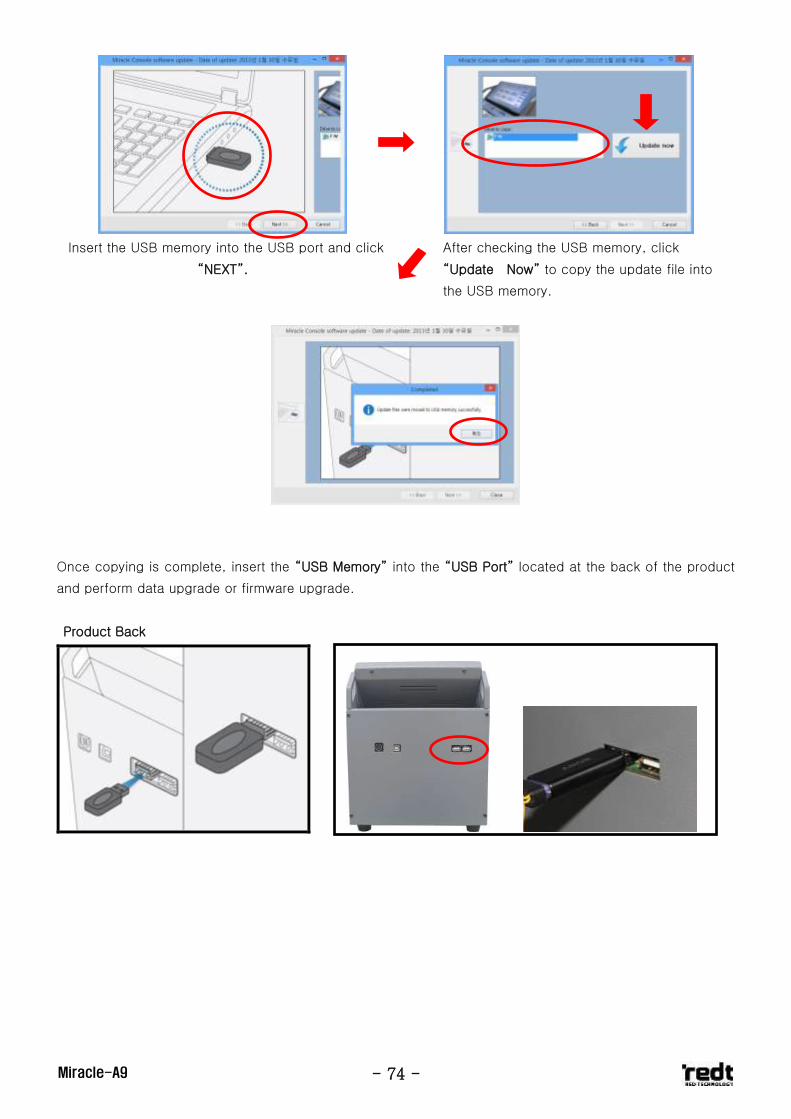
Insert the USB memory into the USB port and click
“NEXT”.
After checking the USB memory, click
“Update Now” to copy the update file into
the USB memory.
Once copying is complete, insert the “USB Memory” into the “USB Port” located at the back of the product
and perform data upgrade or firmware upgrade.
Product Back

- 75 - Miracle-A9
[Key Data Upgrade]
Insert the “USB Memory” into the “USB Port” at the back of the product and wait for about 5 seconds. Or
click “Upgrade” to perform update.
- 76 - Miracle-A9
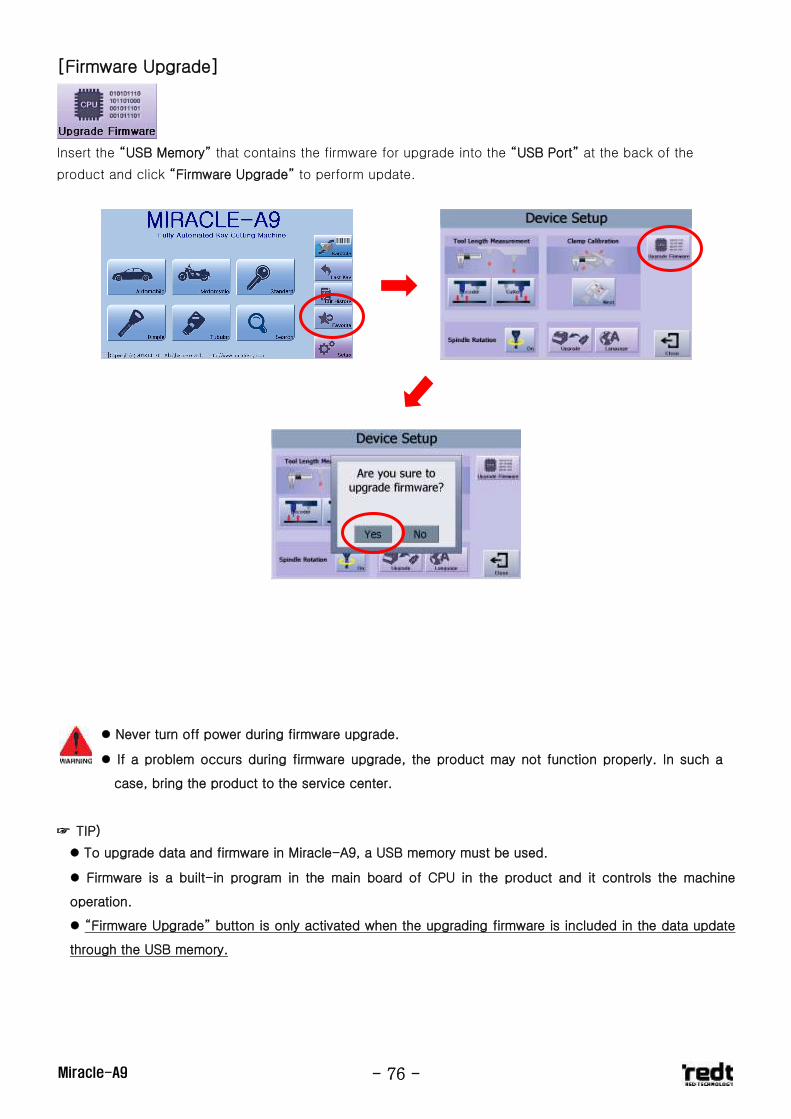
[Firmware Upgrade]
Insert the “USB Memory” that contains the firmware for upgrade into the “USB Port” at the back of the
product and click “Firmware Upgrade” to perform update.
☞ TIP)
To upgrade data and firmware in Miracle-A9, a USB memory must be used.
Firmware is a built-in program in the main board of CPU in the product and it controls the machine
operation.
“Firmware Upgrade” button is only activated when the upgrading firmware is included in the data update
through the USB memory.
Never turn off power during firmware upgrade.
If a problem occurs during firmware upgrade, the product may not function properly. In such a
case, bring the product to the service center.

- 77 - Miracle-A9
\
3F, 1314 GwanPyeong-dong Yuseong-gu
Daejeon, Republic of Korea, 306-801
TEL:+82-70-7011-0905 FAX: +82-42-673-0905
Copyright© 2005-2012 RED TECHNOLOGY.


![A9 re82f[1]](https://img.pdfslide.us/doc/110x75/55490d8fb4c90565458bb540/a9-re82f1.jpg)