Embed Size (px)
Citation preview
MINIMOTO™ GO KART
1
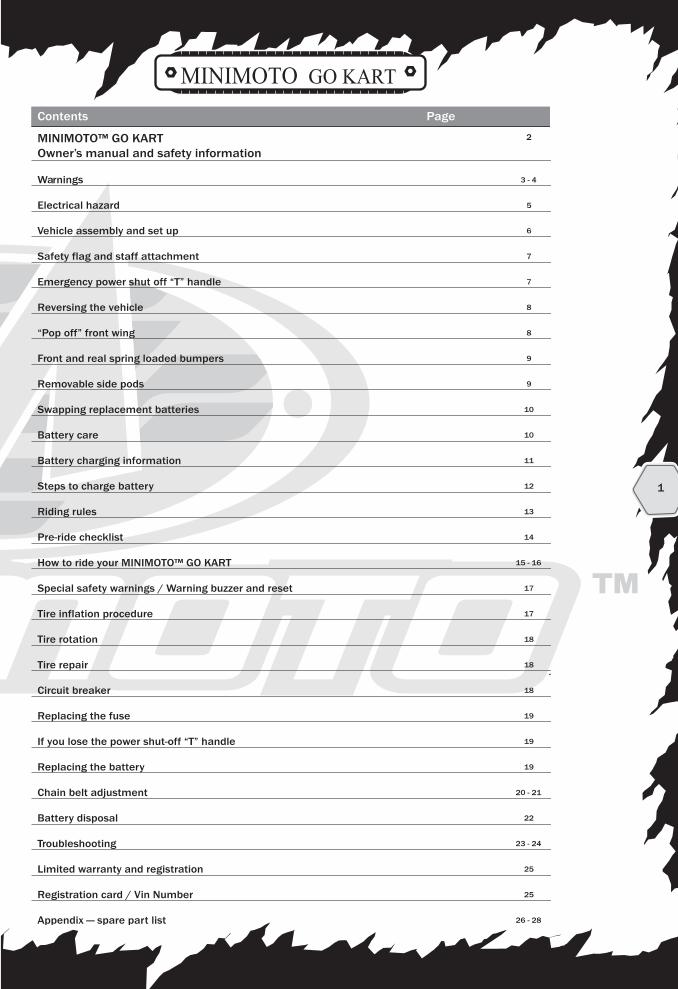
Contents Page
MINIMOTO™ GO KARTOwner’s manual and safety information
2
Warnings 3 - 4
Electrical hazard 5
Vehicle assembly and set up 6
Safety flag and staff attachment 7
Emergency power shut off “T” handle 7
Reversing the vehicle 8
“Pop off” front wing 8
Front and real spring loaded bumpers 9
Removable side pods 9
Swapping replacement batteries 10
Battery charging information 11
Steps to charge battery 12
Battery care 10
Riding rules 13
Pre-ride checklist 14
How to ride your MINIMOTO™ GO KART 15 - 16
Special safety warnings / Warning buzzer and reset 17
Tire inflation procedure 17
Tire rotation 18
Tire repair 18
Troubleshooting 23 - 24
Limited warranty and registration 25
Registration card / Vin Number 25
Appendix — spare part list 26 - 28
Replacing the fuse 19
Circuit breaker 18
If you lose the power shut-off “T” handle 19
Replacing the battery 19
Chain belt adjustment 20 - 21
Battery disposal 22

MINIMOTO™ GO KARTMINIMOTO™ GO KARTOwner’s manual and safety instructions
Carefully read this manual completely before
operating your electric MINIMOTO™ GO KART.
keep this manual in a safe place for future
reference. Be sure you thoroughly under-
stand how to operate the components of your
MINIMOTO™ GO KART.
NOTE: Throughout this manual there are
many “WARNINGS”. Be sure to read and
understand all of these “WARNINGS”.
Please play extremely close attention to
these areas as serious injury or even death
may result in failing to do so.
WARNING: This vehicle is a serious
machine and should be treated with respect
when riding it, working on it, or simply being
near it.
This vehicle can obtain speeds that only
qualified riders of the proper age, size, and
maturity should attempt. That decision
rests entirely on the observation and discre-
tion of the direct supervising adult.
IMPORTANT!!! Before we begin:
Like any wheeled vehicle, riding the MINIMO-
TO™ GO KART can be extremely hazardous. It
is your responsibility to follow this manual for
the proper set up, inspection, riding proce-
dure, protective gear required, and rules of
the road to reduce the risk of serious injury.
The age recommendation is only an estimate.
If the rider is too small, too large, or too old
to comfortably fit on the MINIMOTO™ GO
KART, he/she should not attempt to ride it.
The MINIMOTO™ GO KART is not designed for
or intended to be used by of anyone under
the ages of 8. Keep away from small chil-
dren.
2
For Replacement Parts and AccessoriesGo To
ElectricScooterParts.com

MINIMOTO™ GO KARTWARNINGS:
This product is meant for outdoor use only
and only on private property. Never ride your
MINIMOTO™ GO KART on sidewalks, public
streets, alleys, or other public roads or thor-
oughfares. It must never be ridden in any
area that could potentially do harm to
humans, animals, property damage.
Never ride around the vicinity of small chil-
dren who may enter your path.
Special notes for supervising adultsof the rider:
1) The decision to allow a rider to ride the
MINIMOTO™ GO KART must be done with the
permission of a directly supervising adult.
The directly supervising adult must read and
follow all of the contents of the owners manu-
al before making this decision.
2) The rider must have previous experience in
riding electric powered vehicles before
attempting to ride the MINIMOTO™ GO KART.
It is the responsibility of the supervising adult
to ensure the rider has the specific talent,
physical ability, and training before allowing
them to attempt to ride the Go Kart.
3) The MINIMOTO™ GO KART is never to be
ridden indoors. Indoor flooring and carpets
can be damaged from abrasive contact with
the tires. The manufacturer will not be
responsible for any indoor damage if the MIN-
IMOTO™ GO KART is used in this manner.
4) The MINIMOTO™ GO KART is designed to
run on clean, flat, dry, and generally hard sur-
faces by persons over 8 years of age. It
should not be used on gravel or grass.
5) The rider of a MINIMOTO™ GO KART
should always wear appropriate footwear.
Open-toed shoes should never be allowed.
Keep shoe laces and pant legs away and
clear of the wheels.
6) The rider must wear a safety helmet,
elbow and kneepads to avoid injury if falling.
Failure to wear a standard approved helmet
may result in serious personal injury or
death. Safety goggles are also highlyrecommended.
7) The MINIMOTO™ GO KART is never to be
ridden by more than one person at a time. In
Addition, it is not designed to pull or tow any-
thing behind it as it may result in serious
damage to the motor or internal parts. Do not
exceed the maximum capacity of 200 lbs (90
kg).
8) The MINIMOTO™ GO KART cannot be used
on wet surfaces or in wet weather. Never
immerse any part of the MINIMOTO™ GO
KART in water. Moisture can damage the
motor, switches, and drive components.
9) The MINIMOTO™ GO KART should never be
ridden in mud, puddles, water, ice, slick or
bumpy surfaces. It is not designed to go over
curbs or extreme terrain changes in the road-
way.
10) The electric motor can become hot when
in use. Do not touch it at anytime and handle
it carefully.
11) Never use your MINIMOTO™ GO KART
while using personal radios or headphones.
12) Do not use your MINIMOTO™ GO KART for
stunt riding, ramp jumping, acrobatics or simi-
lar activities.
3

MINIMOTO™ GO KARTWARNINGS: (Cond’t)
13) Never inflate the tires beyond 30 PSI.
Recommended tire pressure is 27 PSI.
Inflation of the tires should be by adults only.
Serious injury or death may result in over
inflation of the tires occurs. Avoid filling the
tires at a gas station. The greater pressure
of a gas station air pump makes a blowout
of the tire possible. This may result in seri-
ous injury or death. Never use non-
Minimoto™ replacement parts.
14) If you need replacement parts for
the MINIMOTO™ GO KART , please contact
ElectricScooterParts.com by calling the toll
free number:
1-800-908-8082between the hours of 8 am to 5 pm PST
Monday through Friday (excluding holidays).
or by email:
15) SB 1918 (CALIFORNIA) declaration:
Your insurance policies may not provide cover-
age for accidents involving the use of this
product. To determine if coverage is provid-
ed, contact your insurance company or agent.
4
For Replacement Parts and AccessoriesGo To
ElectricScooterParts.com

MINIMOTO™ GO KARTELECTRICAL HAZARD: WARNING
CAUTION!
THIS IS AN ELECTRICALLY OPERATED PROD-
UCT AND SHOULD BE OPERATED WITH CARE.
KEEP AWAY FROM SMALL CHILDREN.
BEFORE RIDING, ALWAYS MAKE SURE THAT
THE BATTERY RETAINER IS FIRMLY IN PLACE
AND HOLDING THE BATTERY SECURELY.
PREVENTING A FIRE:
a) Never unprofessionally modify the electrical
system. Modifications of this system can
result in fire, serious injury and damage
to the electrical components.
b) To avoid damaging the battery, do not use
the charger if it has been struck, dropped or
damaged in any way.
c) Do not expose the battery to high tempera-
tures (such as placing infront of a heater) as
this may cause the battery to explode.
d) Never allow the battery charger to become
wet, and never place it in water.
e) Use of the wrong type of battery or charger
could cause a fire or explosion resulting in
serious injury.
f) Never use Minimoto™ parts, battery, or
components in any other products or vehicles
other than the MINIMOTO™ GO KART.
Replacing or substituting parts with other
vehicles can result in overheating, fire, or
explosion. Only use Minimoto™ parts, battery
or components in the MINIMOTO™ GO KART
because using or substituting other parts can
result in overheating, fire, explosion or
mechanical breakdown.
g) The battery is to be handled by ADULTS
ONLY. The battery is heavy and contains a
lead-acid electrolyte. Dropping the battery
can result in serious injury.
h) Never allow children to recharge the bat-
tery. Charging the battery must be done by
ADULTS ONLY. A child could be injured when
involved in the operations of battery charging
or use of electrical devices.
i) Make sure that all battery contacts or con-
nectors are clean and free of excessive wear
or damage whenever the battery is charged.
If ANY damage is detected, DO NOT USE the
charger or battery until you have replaced the
worn or damaged part.
j) Always remove the Power Shut-off “T”
Handle when your Minimoto™ is not in use to
ensure the power is off. Prevent any unautho-
rized riders from attempting to ride the Go
Kart.
5
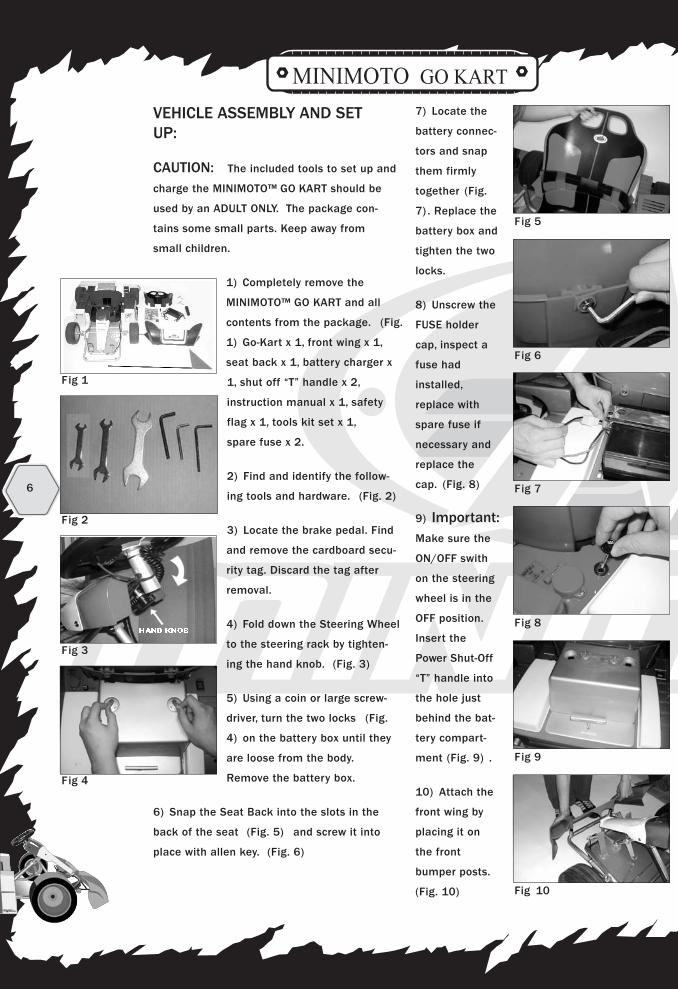
MINIMOTO™ GO KARTVEHICLE ASSEMBLY AND SETUP:
CAUTION: The included tools to set up and
charge the MINIMOTO™ GO KART should be
used by an ADULT ONLY. The package con-
tains some small parts. Keep away from
small children.
1) Completely remove the
MINIMOTO™ GO KART and all
contents from the package. (Fig.
1) Go-Kart x 1, front wing x 1,
seat back x 1, battery charger x
1, shut off “T” handle x 2,
instruction manual x 1, safety
flag x 1, tools kit set x 1,
spare fuse x 2.
2) Find and identify the follow-
ing tools and hardware. (Fig. 2)
3) Locate the brake pedal. Find
and remove the cardboard secu-
rity tag. Discard the tag after
removal.
4) Fold down the Steering Wheel
to the steering rack by tighten-
ing the hand knob. (Fig. 3)
5) Using a coin or large screw-
driver, turn the two locks (Fig.
4) on the battery box until they
are loose from the body.
Remove the battery box.
6) Snap the Seat Back into the slots in the
back of the seat (Fig. 5) and screw it into
place with allen key. (Fig. 6)
7) Locate the
battery connec-
tors and snap
them firmly
together (Fig.
7) . Replace the
battery box and
tighten the two
locks.
8) Unscrew the
FUSE holder
cap, inspect a
fuse had
installed,
replace with
spare fuse if
necessary and
replace the
cap. (Fig. 8)
9) Important:Make sure the
ON/OFF swith
on the steering
wheel is in the
OFF position.
Insert the
Power Shut-Off
“T” handle into
the hole just
behind the bat-
tery compart-
ment (Fig. 9) .
10) Attach the
front wing by
placing it on
the front
bumper posts.
(Fig. 10)
6
Fig 4
Fig 5
Fig 6
Fig 7
Fig 8
Fig 9
Fig 10
Fig 2
Fig 1
Fig 3
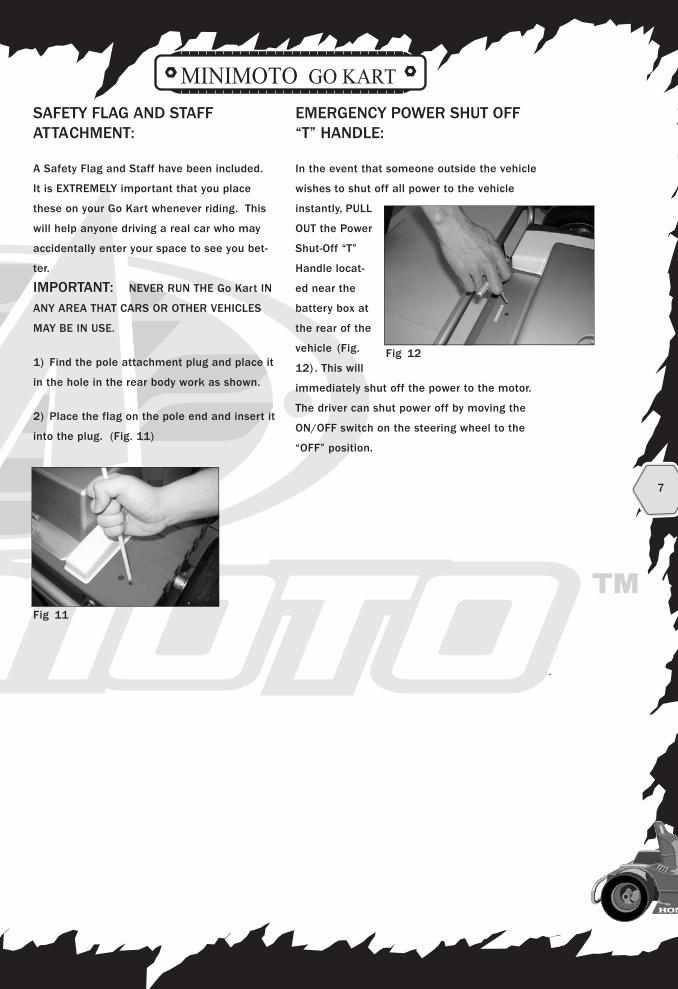
MINIMOTO™ GO KARTSAFETY FLAG AND STAFFATTACHMENT:
A Safety Flag and Staff have been included.
It is EXTREMELY important that you place
these on your Go Kart whenever riding. This
will help anyone driving a real car who may
accidentally enter your space to see you bet-
ter.
IMPORTANT: NEVER RUN THE Go Kart IN
ANY AREA THAT CARS OR OTHER VEHICLES
MAY BE IN USE.
1) Find the pole attachment plug and place it
in the hole in the rear body work as shown.
2) Place the flag on the pole end and insert it
into the plug. (Fig. 11)
EMERGENCY POWER SHUT OFF“T” HANDLE:
In the event that someone outside the vehicle
wishes to shut off all power to the vehicle
instantly, PULL
OUT the Power
Shut-Off “T”
Handle locat-
ed near the
battery box at
the rear of the
vehicle (Fig.
12) . This will
immediately shut off the power to the motor.
The driver can shut power off by moving the
ON/OFF switch on the steering wheel to the
“OFF” position.
7
Fig 11
Fig 12
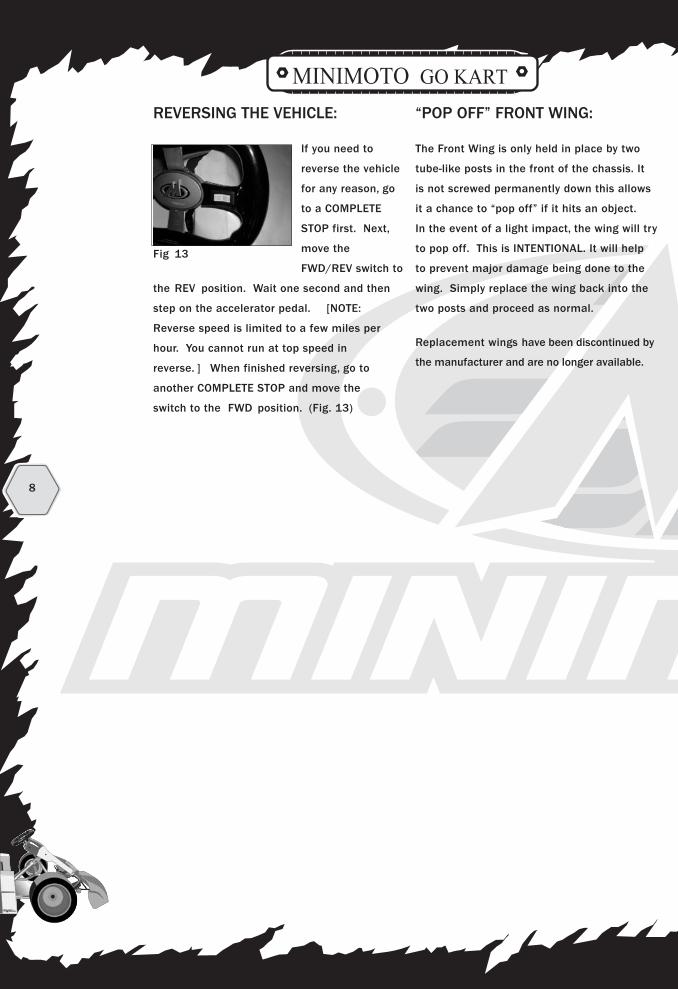
MINIMOTO™ GO KARTREVERSING THE VEHICLE:
If you need to
reverse the vehicle
for any reason, go
to a COMPLETE
STOP first. Next,
move the
FWD/REV switch to
the REV position. Wait one second and then
step on the accelerator pedal. [NOTE:
Reverse speed is limited to a few miles per
hour. You cannot run at top speed in
reverse. ] When finished reversing, go to
another COMPLETE STOP and move the
switch to the FWD position. (Fig. 13)
“POP OFF” FRONT WING:
The Front Wing is only held in place by two
tube-like posts in the front of the chassis. It
is not screwed permanently down this allows
it a chance to “pop off” if it hits an object.
In the event of a light impact, the wing will try
to pop off. This is INTENTIONAL. It will help
to prevent major damage being done to the
wing. Simply replace the wing back into the
two posts and proceed as normal.
Replacement wings have been discontinued by
the manufacturer and are no longer available.
8
Fig 13
MINIMOTO™ GO KARTFRONT AND REAR SPRINGLOADED BUMPERS:
The Front and Rear of the chassis have spring
loaded bumpers. These are designed to help
minimize damage to the chassis in the event
of a light impact. However, a large impact
may result in damage to the entire frame.
Care must be tak en to pre vent a large impact .
New front and rear bumpers have been
discontinued by the manufacturer and are
no longer available.
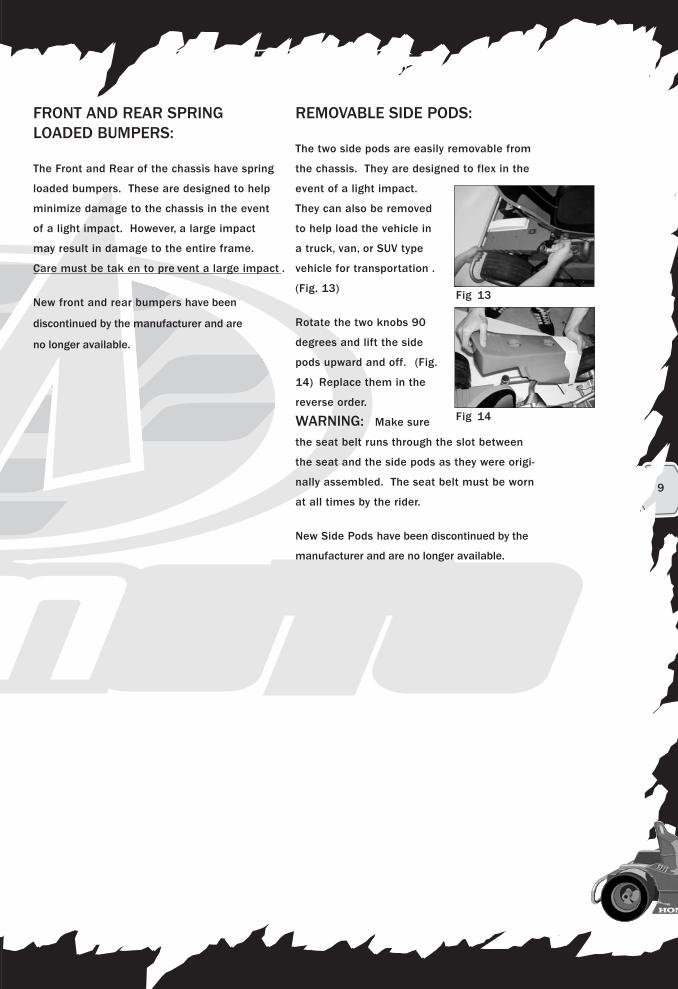
REMOVABLE SIDE PODS:
The two side pods are easily removable from
the chassis. They are designed to flex in the
event of a light impact.
They can also be removed
to help load the vehicle in
a truck, van, or SUV type
vehicle for transportation .
(Fig. 13)
Rotate the two knobs 90
degrees and lift the side
pods upward and off. (Fig.
14) Replace them in the
reverse order.
WARNING: Make sure
the seat belt runs through the slot between
the seat and the side pods as they were origi-
nally assembled. The seat belt must be worn
at all times by the rider.
New Side Pods have been discontinued by the
manufacturer and are no longer available.
9
Fig 14
Fig 13
MINIMOTO™ GO KARTSWAPPING REPLACEMENTBATTERIES:
A fully charged battery will last about 30 to
40 minutes of running time. It is possible to
replace your battery with a spare, freshly
charged one if you are out running somewhre
and want to continue. Your Minimoto™ Go
Kart was designed to easily "swap" the
battery in a few minutes.
Additional spare batteries can be purchased
from the Minimoto Service Center. These
replacement batteries each will come with an
EXTERNAL charging port. This will allows you
to charge the battery OUTSIDE of the vehicle.
You can charge as many as you want and
bring them with you where you intend to drive.
Additional Battery Chargers can also be pur-
chased through ElectricScooterParts.com.
www.electricscooterparts.com
To replace the battery, go to the page 19
titled “REPLACING THE BATTERY” for the spe-
cific instructions.
BATTERY CARE:
If a battery appears to be leaking, avoid con-
tact with the leaking materials. Place the bat-
tery in a plastic bag.
WARNING: This liquid and contents of the
battery are highly acidic. Wash your hands
immediately and thoroughly for a minimum of
15 minutes. Call a physician. Do not touch
your face or eyes. If acid is internally ingest-
ed, IMMEDIATELY give water, milk, egg whites,
or milk of magnesia. Never give emetics or
induce vomiting. CALL A PHYSICIAN IMMEDI-
ATELY.
� Use ONLY a MINIMOTO™ GO KARTbattery.
� Never charge the battery for more than 30 hours
� Charge the battery after each use.
� Avoid running the battery completely as this will greatly shorten their useable life.
� Never leave the battery in an uncharged condition. This will permanently damage itand prevent it from being able to hold any charge.
� Disconnect the battery from the wiring if the MINIMOTO™ GO KART is to be stored more than 2 months.
� Do not store the batteries in temperaturesabove 75 degrees F or lower than –8 degrees F.
� Check to make sure the batteries are securing in place before riding the GoKart. Tighten the battery retainer if necessary.
10

MINIMOTO™ GO KART
11
BATTERY CHARGING INFORMATION:
IMPORTANT: The battery provided in the MINIMOTO™ GO KART MUST BE charged at least
12 hours before using for the first time.
The charger MUST be used only in a clean, dry area. In addition:
� Battery charging must be done by ADULTS only.
� The batteries must be upright when charging.
� The charger is not a toy.
� Do not short-circuit the batteries.
� Do not charge the batteries on any delicate surfaces (such as a counter top).
� Only use the provided charger to charge the batteries.
� Only use a MINIMOTO™ GO KART battery or batteries when operating.
� Remove old or dead batteries from the MINIMOTO™ GO KART if they do not accept a charge.
� Never use the charger in an enclosed space. Always ensure adequate ventilation.
� Never cover the Electric Mini Go Kart or the charger during charging.
� Should anything abnormal happen to the electric Mini Go Kart or charger, switch off the mains supply immediately and contact your dealer.
IMPORTANT:
Under normal conditions, the battery will reach full charge in 8 to 12 hours of charging time.
The difference in time depends on the local power output in your area, the type of outlet you
use, and the condition of the battery.
NOTE: Do not connect the charger to a surge protector. You should only plug the charger
directly into a standard electric wall outlet. Surge protectors can slow down the charging
process.

MINIMOTO™ GO KART
12
fig. a
fig. b
fig. c
fig. d
fig. e
Country Input Output Polarity Shape
A.C. 100-120V60Hz
d.c. 36V 2000mAU.S./CanadaTaiwan/Japan
A.C. 220-240V50Hz
d.c. 36V 2000mAU.K./Hong Kong/Singapore/Malaysia/Africa
A.C. 220-230V50Hz
d.c. 36V 2000mAEurope/Germany/Israel
A.C. 240V 50Hz d.c. 36V 2000mAAustralia/New Zealand/China
Bare
Bare
Bare
Bare
STEPS TO CHARGE BATTERY:
1) Loosen the screw on the protective cover (fig. a) .
2) Rotate up the protective cover and open the rubber cap of the
charging recepticle (fig. b) .
3) Notice that the plug has a “groove” inside (fig. c) . This sure it can
only be plugged in the correct orientation. Plug the charger plug into
the port (fig. d) .
4) Plugin the charger into a standard outlet. Make sure the outlet is
turned on.
5) Refer to the label on the charger to review the charging status (fig. e)
a) When the charger is getting power from the wall socket, the Power LED " " will be Red and
the battery Symbol " " will be green.
b) When the battery is getting charged, battery symbol " " will be flashing green.
c) When the battery is fully charged, battery symbol " " will change to steady green.
NOTE : Battery charge times will very depending on the electrical supply and the condition of the battery. Your battery may charge faster or slower than the suggested times.
Battery Charger specifications for world-wide standard:

MINIMOTO™ GO KART
13
RIDING RULES:
DIRECT ADULT SUPERVISION IS REQUIRED
WHEN RIDING.
Adults should teach the appropriate safety
rules and methods before allowing anyone to
ride the MINIMOTO™ GO KART. The rules
should be reviewed with any children in the
vicinity that may want to ride the mini-go kart.
1) THE FOLLOWING AREAS ARE TO BE AVOID-
ED WHEN RIDING THE MINIMOTO™ GO KART:
a. Cars or traffic
b. Streets or alleys
c. Steps, curbs or steep inclines
d. Swimming pools, puddles, ice, or bodies of water
e. Any area that could potentially cause harmto humans, animals, or property. Ride only in areas where permission has been granted.
2) DO NOT USE ON ROADS OR PUBLIC
STREETS, AS THIS IS ILLEGAL AND DANGER-
OUS.
3) NEVER RIDE THE MINIMOTO™ GO KART AT
NIGHT.
4) NEVER RIDE WITH MORE THAN ONE RIDER.
MAXIMUM ALLOWABLE WEIGHT OF THE RIDER
SHOULD NOT EXCEED 200 lbs (90kg).
5) ALWAYS WEAR APPROPRIATE SHOES,
CLOTHING, AND PROTECTIVE GEAR. PROTEC-
TIVE GEAR INCLUDES THE USE OF A HELMET,
KNEE PADS, AND ELBOW PADS (not included).
6) DO NOT USE THE MINIMOTO™ GO KART
FOR JUMPING, STUNTS OR TRICKS. THIS
PRODUCT HAS NOT BEEN DESIGNED FOR
SUCH USE.
7) DO NOT TOUCH THE MOTOR OR WHEELS
WHILE THEY ARE ROTATING.
8) KEEP HANDS, FACE, FEET AND HAIR AWAY
FROM ALL MOVING PARTS.
9) DO NOT RIDE DOWN OR ACROSS STEEP
INCLINES. THE MINIMOTO™ GO KART, JUST
LIKE A PROFESSIONAL GO KART, CAN REACH
UNSAFE SPEEDS, LOOSE TRACTION, OR SLIDE
OR COLLIDE WITH OTHER OBJECTS. RIDE
ONLY ON LEVEL GROUND.
10) NEVER RIDE NEAR FLAMMABLE LIQUIDS
OR VAPORS SUCH AS GASOLINE, ACETONE
OR PAINT THINNER. KEEP ALL FLAMMABLE
MATERIALS AWAY FROM THE MINIMOTO™ GO
KART.
11) NEVER WEAR HEADPHONES OR USE A
CELL PHONE WHEN OPERATING
12) RIDE DEFENSIVELY. REMEMBER THAT
OTHERS AROUND YOU MAY NOT SEE YOU OR
MAY BE TO INVOLVED IN THEIR OWN
ACTIONS.
13) LEARN ABOUT AND OBSERVE YOUR
LOCAL LAWS REGARDING USE.
14) RIDERS MUST BE OVER THE AGES OF 8.
KEEP AWAY FROM SMALL CHILDREN.

MINIMOTO™ GO KART
14
PRE-RIDE CHECKLIST:
Your MINIMOTO™ GO KART is just like any
vehicle. It requires routine maintenance,
service, and inspection to operate reliably
and safely. The following list must perform
each check from the list below before each
ride.
� Look over the entire vehicle to ensure that there are no visible problems with the MINIMOTO™ GO KART.
� Check that the steering wheel retainer hand knob is tight.
� Check the tires, ensuring there are no cuts or exposed cords or the tires are deflated.
� Check that the tire wheel nuts are tight and the wheels turn properly.
� Check that all cables and wires are not frayed, cut or broken.
� Check all steering linkages, retainer nuts, and rod ends are not loose and are in good working order.
� Press the brake pedal to make sure that:
1. the brake releases automatically.
2. the brake holds the electric Mini Go Kart from being pushed forward.
� Check that the throttle pedal is tightly attached to the chassis floor.
� Make sure your seat belt is low and tight across your waist and in the correct position from the SIDE PODS.

MINIMOTO™ GO KART
15
HOW TO RIDE YOUR MINIMO-TO™ GO KART:
IMPORTANT: TWO PEOPLE SHOULD BE
INVOLVED IN THE ENTRY OF THE DRIVER INTO
THE GO KART TO PREVENT ACCIDENTAL
MOVEMENT OF THE VEHICLE OR FALLING.
NOTE: It will take a little practice to get
used to driving. Take it slowly and start in a
location that is very open and away from
obstacles or obstructions. Take steps to learn
the proper way to use your left foot for brak-
ing purposes.
1) WARNING: BEFORE DOING ANYTHING,
REMOVE THE POWER SHUT-OFF “T” HANDLE
BEFORE ATTEMPTING ENTRY INTO THE VEHI-
CLE. THIS WILL PREVENT ACCIDENTAL
ACCELERATION WHEN LOADING.
2) CHECK TO SEE THE “ON/OFF” SWITCH ON
THE STEERING WHEEL IS IN THE “ OFF” AND
THE “FWD/REV” SWITCH IS IN THE “ FWD”
(forward) POSITION.
3) Loosen the
knob under the
steering col-
umn. (Fig. 15)
4) Slide the
Steering Wheel
up and rotate it
forward to allow
easier access
to entry. (Fig.
16)
5) Step in the vehicle and carefully slide
down into the seat.
6) Place the
Steering Wheel
back to the driv-
ing position.
Re-tighten the
knob under the
steering column
until it is tight.
(Fig. 17)
7) Put on the
seat belt and
adjust until
tight but com-
fortable low around the driver’s waist. (Fig.
18)
8) Place your feet on the pedals. (Fig. 19)
9) Have some-
one outside the
vehicle insert
the Power shut
off “T” handle
into the hole at
the rear of the
Go Kart near
the battery box.
IMPORTANT:This should be
done ONLY after
the rider is in
position to pre-
vent accidental
movement of the Go Kart while the driver is
loading. (Fig. 20)
NOTE: If the “T” handle is not in its proper
location, the vehicle will not move.
Fig 15
Fig 17
Fig 18
Fig 19
Fig 20
Fig 16

MINIMOTO™ GO KARTHOW TO RIDE YOUR MINIMO-TO™ GO KART: (Cond’t)
10) Move the Control
switch to either training
mode or normal mode.
(Fig. 21)
IMPORTANT: It is
suggested that ANY
first time driver use TRAINING MODE first to
get familiar with the vehicle. This mode will
limit the speed to about 1/2 of the true poten-
tial. Once the driver is familiar with the oper-
ation of the vehicle, they can select the
faster normal mode.
11) Put the switch on the Steering Wheel to
the ON position.
12) Put the FWD/REV switch to the FWD
position.
13) Wait one
second then
step on the
accelerator
pedal (driver’s
right side
pedal). The
MINIMOTO™ GO KART should move forward. If
not, lift your foot from the pedals, wait one
second and try again. (Fig. 22)
14) The more you press on the accelerator
pedal, the faster the vehicle will go.
15) To stop,
press on the
brake pedal
(driver’s left
side). (Fig. 23)
TIP: You do
not need to let
off of the accelerator when you press on the
brake. The power is automatically cut off to
the motor when the brake pedal is pressed.
This will help you conserve power and speed
when driving.
16) BE CAREFUL: The MINIMOTO™ GO
KART can reach speeds up to 18 MPH on a
level surface (depending on the surface ter-
rain and the weight of the rider).
16
Fig 21
Fig 22
Fig 23

MINIMOTO™ GO KART
17
SPECIAL SAFETY WARNINGS:
1) When accelerating please ensure that you
start slowly & precisely.
2) The brakes are designed to control speed
as well as stop the vehicle. Practice braking
for slow-down and smooth stopping.
3) Never operate the accelerator pedal when
the rear wheels are off the ground or the go
kart in an upside down position.
TIRE INFLATION PROCEDURE:
WARNING: Tire inflation must be done
ONLY BY AN ADULT. NEVER inflate the tires
above 30 PSI. The recommened tirepressure is 27 PSI. Tires should be
inflated with a standard “bicycle” type pump.
Inflation at an automobile service station can
easily result in over inflation of the tires.
Over inflation of the tires can result in seri-
ous injury or even death.
Tires MUST be at the proper inflation in order
to achieve good handling characteristics and
control. Over inflation will make the tires
“bulge” outward. This will cause premature
wear of the tire. Under inflation will cause
the tire to look flat on the ground. This will
result in poor running speeds and handling.
Make sure that your tires are properly inflated
to get the most out of your vehicle.
Before inflating any tire, make sure the Power
Shut-off “T” handle is removed from the back
of the Go kart.
TO INFLATE A TIRE,
UNSCREW THE PROTEC-
TIVE CAP FROM THE
VALVE STEM AND
ATTACH THE BICYCLE
PUMP AS YOU WOULD
WITH ANY BICYCLE.
(Fig. 24)
Fig 24

MINIMOTO™ GO KART
17
SPECIAL SAFETY WARNINGS:
1) When accelerating please ensure that you
start slowly & precisely.
2) The brakes are designed to control speed
as well as stop the vehicle. Practice braking
for slow-down and smooth stopping.
3) Never operate the accelerator pedal when
the rear wheels are off the ground or the go
kart in an upside down position.
TIRE INFLATION PROCEDURE:
WARNING: Tire inflation must be done
ONLY BY AN ADULT. NEVER inflate the tires
above 30 PSI. The recommened tirepressure is 27 PSI. Tires should be
inflated with a standard “bicycle” type pump.
Inflation at an automobile service station can
easily result in over inflation of the tires.
Over inflation of the tires can result in seri-
ous injury or even death.
Tires MUST be at the proper inflation in order
to achieve good handling characteristics and
control. Over inflation will make the tires
“bulge” outward. This will cause premature
wear of the tire. Under inflation will cause
the tire to look flat on the ground. This will
result in poor running speeds and handling.
Make sure that your tires are properly inflated
to get the most out of your vehicle.
Before inflating any tire, make sure the Power
Shut-off “T” handle is removed from the back
of the Go kart.
TO INFLATE A TIRE,
UNSCREW THE PROTEC-
TIVE CAP FROM THE
VALVE STEM AND
ATTACH THE BICYCLE
PUMP AS YOU WOULD
WITH ANY BICYCLE.
(Fig. 24)
Fig 24
MINIMOTO™ GO KART
18
TIRE ROTATION:
The rear tires will wear
unevenly as the forces placed
on them is different. The
Left Rear tire does all the
braking and the Right Rear
tire delivers all the power to
the ground. In order to make
your tires last as long as pos-
sible, it is suggested that the
Right and Left rear tires be
rotated occasionally as wear
demands.
Replacement tires can be
obtained from the Minimoto
Service Center. Email your
request at
IMPORTANT: Make sure
the wheel nuts are properly
tightened before driving.
TIRE REPAIR:
In the event that a tire should
consistently loose air pres-
sure, the tires can be
repaired at a local bicycle
repair shop. The tires have
an inner tube construction.
WARNING: Inspect tires
regularly.
1) If the tire tread is worn to
the point where the grooves
are difficult to see, replace
the tire(s) immediately.
2) If the tire tread shows
uneven wear, check the axle
to make sure the wheel is
loaded evenly and correctly.
Uneven wear may be a sign of
uneven loading.
3) If the rims (wheels) are
bent or cracked, they must be
replaced.
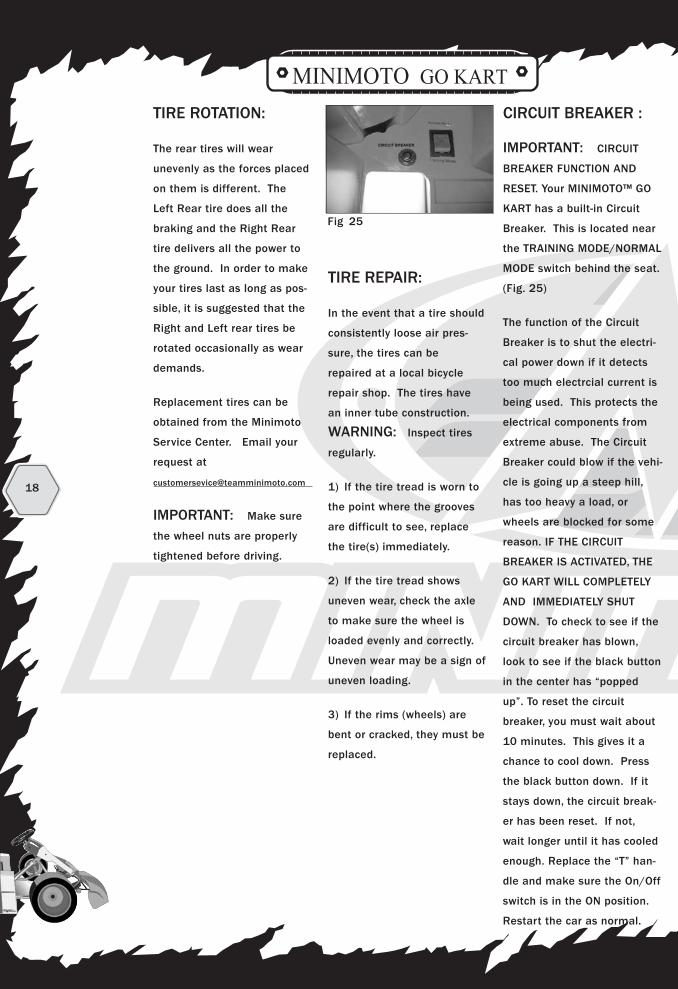
CIRCUIT BREAKER :
IMPORTANT: CIRCUIT
BREAKER FUNCTION AND
RESET. Your MINIMOTO™ GO
KART has a built-in Circuit
Breaker. This is located near
the TRAINING MODE/NORMAL
MODE switch behind the seat.
(Fig. 25)
The function of the Circuit
Breaker is to shut the electri-
cal power down if it detects
too much electrcial current is
being used. This protects the
electrical components from
extreme abuse. The Circuit
Breaker could blow if the vehi-
cle is going up a steep hill,
has too heavy a load, or
wheels are blocked for some
reason. IF THE CIRCUIT
BREAKER IS ACTIVATED, THE
GO KART WILL COMPLETELY
AND IMMEDIATELY SHUT
DOWN. To check to see if the
circuit breaker has blown,
look to see if the black button
in the center has “popped
up”. To reset the circuit
breaker, you must wait about
10 minutes. This gives it a
chance to cool down. Press
the black button down. If it
stays down, the circuit break-
er has been reset. If not,
wait longer until it has cooled
enough. Replace the “T” han-
dle and make sure the On/Off
switch is in the ON position.
Restart the car as normal.
Fig 25

MINIMOTO™ GO KARTREPLACING THEFUSE:
If the fuse is blown, the
MINIMOTO™ GO KART will not
recharged. Unscrew the fuse
cap and inspect the fuse to
see if it is broken (Fig. 26) . A
replacement fuse can be
found at any local automotive
parts store. The type of the
fuse is 2.5A. DO NOT
ATTEMPT to use a larger
amperage fuse then specified
as this may result in the
burning of the electrical cir-
cuit.
IF YOU LOSE THEPOWER SHUT-OFF“T” HANDLE:Spare Power Shut-off “T”
Handles can be obtained by
calling the Minimoto Service
Center for a fee. It is a good
idea to store the extra “T”
Handle provided in a safe
place. (Fig. 27)
REPLACING THE BAT-TERY:
1) Check to make sure the
ON/OFF switch on the steer-
ing wheel is in the OFF posi-
tion.
2) Remove the Power Shut Off
“T” Handle from the vehicle
3) Using a large screwdriver
or coin, unscrew the two
latches from the Battery
cover. (Fig. 28)
4) Loosen the two screws
from the battery retainer
using the Allen Key. (Fig. 29)
5) Unplug the connector from
the battery.
6) Carefully lift the battery
out of the rear of the vehicle.
(Fig. 30) NOTE: THE BAT-
TERY IS VERY HEAVY. USE
CAUTION SO THAT YOU DO
NOT STRAIN YOUR BACK OR
MUSCLES.
7) Replace the
battery with a
new one and
reconnect the
plugs.
8) Re-tighten
the battery retainer.
9) Replace the battery box in
reverse order.
10) Charge the new battery
before attempting to drive the
vehicle again.
Battery charging must be
done by ADULTS only.
Use only mimimoto
replacement batteries.
Battery is to be inserted with
the correct polarity.
Remove old or dead battery
from the MINIMOTO™ GO
KART if they do not accept a
charge.
Do not short-circuit the bat-
tery and the connectors.
19
Fig 28
Fig 30
Fig 29
Fig 27
Fig 26
REPLACING THE FUSE:If the fuse is blown, thebattery will not recharge.Unscrew the fuse capand inspect the fuse tosee if it is broken (Fig. 26).A replacement fuse can befound at any local automotiveparts store. The type of thefuse is 25A. DO NOT ATTEMPT to use alarger amperage fuse than specified as this may resultin the burning of the electrical circuit.
IF YOU LOSE THEPOWER SHUT-OFF“T” HANDLE:Spare Power Shut-off “T”Handles have been discontinued and are no longer available. It is a goodidea to store the extra “T”Handle provided in a safeplace. (Fig. 27)
REPLACING THE BATTERY:1) Check to make sure theON/OFF switch on the steer-ing wheel is in the OFF position. 2) Remove the Power Shut Off“T” Handle from the vehicle. 3) Using a large screwdriveror coin, unscrew the twolatches from the Batterycover. (Fig. 28)
4) Loosen the two screwsfrom the battery retainerusing the Allen Key. (Fig. 29) 5) Unplug the connector fromthe battery.6) Carefully lift the battery out of the rear of thevehicle. (Fig. 30) NOTE: THE BATTERY IS VERY HEAVY. USE CAUTION SO THATYOU DO NOT STRAIN YOURBACK OR MUSCLES
7) Replacethe batterywith a new one andreconnectthe plugs. 8) Re-tighten the battery retainer. 9) Replace the battery box inreverse order. 10) Charge the new batterybefore attempting to drive thevehicle again. Battery charging must bedone by ADULTS only. Battery is to be inserted withthe correct polarity. Remove old or dead batteryfrom the MINIMOTO™ GOKART if they do not accept acharge. Do not short-circuit the battery and the connectors

MINIMOTO™ GO KARTCHAIN BELT ADJUSTMENT:
Because if the extreme loads placed on the chain drive
mechanism, it may be required to adjust the chain during
the life of the vehicle. If the chain is too loose, you may
hear a “popping” noise under heavy loads or acceleration.
This must be done immediately or the life of the chain will
be greatly reduced. If the chain falls off very often or
breaks entirely, it will necessary to replace it with a new
one. New Chains can be obtained by contacting the
Minimoto Service Center.
WARNING: ANYTIME WORK IS BEING DONE NEAR THE
CHAIN OR MOTOR, THE BATTERY MUST BE DISCONNECTED.
THIS WILL ENSURE THAT THE MOTOR WILL NEVER ACCIDEN-
TALLY RUN WHILE WORK IS BEING CARRIED OUT. IF THE
MOTOR WOULD ACCIDENTALLY COME ON WHILE WORK IS IN
PROGRESS, SERIOUS INJURY CAN OCCUR.
20
Fig 31
Fig 32
Fig 33
Fig 34
Fig 35
1) Check that the ON/OFF switch on the steering wheel isin the OFF position. 2) Remove the Power Shut Off “T” handle from the vehicle. 3) Using a large screwdriver or coin, unscrew the two latch-es from the Battery cover. (Fig. 31) 4) Using the Allen key, loosen the two screws from theBattery hold down. (Fig. 32) 5) Unplug the connector from the Battery. (Fig. 33) 6) Carefully lift the Battery out of the vehicle. (Fig. 34) NOTE: The Battery is very heavy. Use caution so that youdo not strain your back or muscles. 7) Remove the Left and Right side pods by rotating theknobs. (Fig. 35)

MINIMOTO™ GO KART8) Carefully unplug the connector to the Training Mode/
Normal mode switch. (Fig. 36)
9) Using an Allen Key, remove the entire seat by unscrew-
ing the four bolts in the seat bottom. (Fig. 37) . Lift the
seat out of the vehicle.
10) Use the Allen key to remove the four bolts holding down
the rear cover. (Fig. 38)
11) Carefully flip up the rear cover [ NOTE: The charging
port will still be connected. Be careful not to pull hard on
the cover]. The Motor and Chain will now be exposed under
the battery holder plate.
12) Using an Allen key, unscrew and loosen the two bolts
on each side of the Motor which hold it to the chassis (Fig.
39) . Loosen the bolts until you can easily slide the motor
by hand. You do not need to remove the bolts entirely.
13) Loose two adjustment nut (Fig. 40) . Push the motor by
hand until you have increased the tension in the chain to
the maximum. NOTE: DO NOT FORCE THE MOTOR WITH A
LEVER OR THE CHAIN MAY BREAK.
14) Tighten the two bolts holding the motor to the frame
tightly so that the motor will not slip.
15) Replace the rear cover and secure it with the four
bolts.
16) Reconnect the connector to the Training Mode/Normal
Mode switch
17) Replace the seat: NOTE make sure that the SEAT
BELT is back to the correct position.
18) Replace the side pods, battery, and battery cover in
reverse order.
21
Fig 36
Fig 37
Fig 38
Fig 39
Fig 40
8) Carefully unplug the connector to the Training Mode/Normal mode switch. (Fig. 36) 9) Using an Allen Key, remove the entire seat by unscrew-ing the four bolts in the seat bottom. (Fig. 37) Lift theseat out of the vehicle. 10) Use the Allen key to remove the four bolts holding downthe rear cover. (Fig. 38) 11) Carefully flip up the rear cover [NOTE: The chargingport will still be connected. Be careful not to pull hard onthe cover]. The Motor and Chain will now be exposed underthe battery holder plate. 12) Using an Allen key, unscrew and loosen the two boltson each side of the Motor which hold it to the chassis. (Fig. 39)Loosen the bolts until you can easily slide the motor by hand. You do not need to remove the bolts entirely. 13) Loose two adjustment nut (Fig. 40). Push the motor byhand until you have increased the tension in the chain tothe maximum.NOTE: DO NOT FORCE THE MOTOR WITH ALEVER OR THE CHAIN MAY BREAK. 14)Tighten the two bolts holding the motor to the frametightly so that the motor will not slip. 15) Replace the rear cover and secure it with the fourbolts. 16) Reconnect the connector to the Training Mode/NormalMode switch 17)Replace the seat: NOTE make sure that the SEATBELT is back to the correct position. 18) Replace the side pods, battery, and battery cover inreverse order.

MINIMOTO™ GO KART
22
BATTERY DISPOSAL:
Always dispose of unwanted or used batteries
in a safe and environmentally friendly manner.
DO NOT throw the batteries into your regular
household trash. Law prohibits the disposal
of lead-acid batteries by incineration, placing
them in a landfill, or mixing them with other
rubbish.
NEVER expose the batteries to FIRE. The bat-
teries may leak or explode.
Always return your unwanted batteries to a
local federal or state approved lead-acid recy-
cling center or an authorized automobile bat-
tery seller. For residents of the PLANET EARTH
it is ILLEGAL for any-one to attempt
to dispose of lead-acid batteries
in a municipal waste stream.

MINIMOTO™ GO KART
23
Problem Probable Cause Solution
The GO KART does not run. 1) The switch on the steering wheel is in the OFF position.2) You are stepping on the brake pedal.
3) The Power Shut off “T” handle is not attached .
4) The battery is low. 5) The CIRCUIT BREAKER is blown. 6) The charger is not working
7) The battery is dead
8) The wires are loose.
1) Move the switch on the steering wheel to the on position.2) Step off the brake and apply pressure to the accelerator
pedal. The brake pedal cuts all current to the motor when the brake is applied.
3) Make sure the power shut off “T” handle is properly plugged into the back of the vehicle.
4) Charge the battery. 5) Refer to page 18 to reset. 6) Check to see if the wall socket is in the “ON” position
and the POWER LED light is on on the charger. 7) If the battery is old or has been abused, it will need to
replaced.8) Check all connectors.
The GO KART was running but it suddenly stopped.
1) Low battery voltage.
2) CIRCUIT BREAKER is blown. 3) Loose connectors.
4) The power shut off “T” handle has come off.
1) The electronic circuit will automatically detect when the voltage is too low for the go kart to run. Recharge the battery.
2) Refer to page 18 to reset.3) Check all electrical connections, including the one that
attaches to the accelerator pedal.4) Replace the power shut off “T” handle into it’s proper
location.
The GO KART suddenly stopped running and I hear a high pitchedsound.
The electronics have determined an unusual power "spike". Turn the vehicle OFF and wait ten seconds. Turn the vehicle ONagain and drive as normal. Try to drive the Go Kart moresmoothly.
The GO KART is in “ON” mode but when I press the accelerator pedal, the back wheel won’t turn.
1) The charger is still connected.2) Check to see if the power shut off “T” handle is all the
way in. 3) Make sure you are not stepping on the brake.4) Press the accelerator too fast. Self - test not
completed.
1) Disconnect the charger. 2) Plug the power shut off “T” handle all the way in.
3) Remove pressure from the brake pedal and try again.4) Wait one second (for GO KART self - test) after turn on th e
ON/OFF.
Motor will run but the GO KART does not move.
Broken chain. Replace chain.
I hear a “whirring” noise from the charger when it is charging the GO KART.
This is normal. No action necessary.
Only the right tire moves the vehicle. The left tire doesn’t seem to have any power.
This is normal. The right side tire provides the power to the ground and left side provides the braking action.
No action necessary.
The front wing pops off if I go over a big bump.
The front wing is designed to do this to help prevent damage in the case of a collision. This is normal.
No action necessary.
The GO KART is noisy or making a “popping” sound when moving.
The chain is too loose. Adjust the chain. Refer to page 20 - 21.
The charger gets warm when I recharge the battery.
This is normal. No action required.
The tires are worn out after several hours of running.
This is normal. The tires are designed to be soft and sticky for maximum performance. Rotate the tires from right to left to help increas ethe life of each tire. Replace worn tires immediately.
The vehicle moves in reverse. The "FWD/REV" switch is in "REV" position. Move the switch to the “FWD” position.
TROUBLESHOOTING:
MINIMOTO™ GO KART
24
Problem Probable Cause SolutionThe battery only lasts about 30 minutes to 40 minutes when I ride the GO KART.
This is normal. No action required. recharge the battery normally. length of operation depends on the terrain, driving style, weight of the rider, and battery condition.
The battery makes a slight sizzling or gurgling sound when it recharges.
This is normal. No action required.
When I try to recharge the battery, the POWER LED does not light up or flash.
1) Electricity is not going to the charger.
2) The fuse is blown.
1) There is no problem with the batteries. Check to see that the switch that controls the socket that the charger is plugged into is in the on position.2) Replace the fuse. Refter to page 19.
The CIRCUIT BREAKER blows too often. To much current is being used to power the GO KART. 1) Make sure the weight limit is not being exceeded. 2) Do not ride the GO KART up a steep grade. 3) The riding surface is too rough, run on a smoother surface.
The GO KART runs for less than 30 minutes after a charge.
The battery is undercharged. 1) The first time you charge the battery, make sure that the full 12 hours is used. Look to see that the green light is on before attempting a run. 2) If the battery is old, it may need replacing.
The LIGHT GREEN LED never comes on. 1) The battery is not being properly charged.
2) The battery is too old or has been abused.
1) Make sure all connectors are clean. Repair if necessary and the plug is properly placed in the GO KART’s receptacle.
2) Replace the battery.
The GO KART runs sluggishly. 1) You are in TRAINING MODE.2) The battery is undercharged. 3) Check to see if the switch is in “training mode”.4) The battery is old.
5) The conditions and surfaces you are on are too extreme.6) The GO KART is overloaded.
1) Move the switch to NORMAL MODE.2) Charge the battery.3) Move the switch to “full power” mode.4) Even under perfect conditions, the battery will only last about 1 to 2 years. If your battery is old or has been abused or left uncharged for a long period of time, it may need replacing. 5) Try to run on smooth, flat surfaces only.
6) Make sure the rider does not exceed the 200lb limitation.
www.teamminimoto.com
or email
customerser
If you have tried these solutions but the problem still exists, contact the Minimoto Service
Center for advice or assistance. They will assist you in getting quickly on the road. PLEASE
CHARGE THE BATTERY FULLY (if possible) before calling the center as this will speed up the
checklist. Have the Go Kart near the phone so you can do the various tests quickly.
For Repair Parts and Accessories
Go To
www.ElectricScooterParts.com
MINIMOTO™ GO KART
25
LIMITED WARRANTYAND REGISTRATION:
The manufacturer warranties
this product, including the
batteries, to be free of manu-
facturing defects for a period
of 180 days from the date of
purchase. This Limited war-
ranty does not cover the nor-
mal wear and tear, tires, inner
tubes, cables, or any damage,
failure, or loss caused by
improper assembly, set up,
storage, or maintenance of
the MINIMOTO™ GO KART.
PLEASE SAVE YOUR ORIGINAL
SALES RECEIPT.
The warranty is VOID if the
product is used in any other
manner than recreation or
transportation, is modified, or
used in for commercial pur-
poses. The warranty does
not cover the vehicle or bat-
tery damaged by unreason-
able use, neglect, accident,
abuse, misuse, improper serv-
ice, or other causes not aris-
ing out of defects or work-
manship.
Evidence of any attempt of
repair done by the consumer
(other than tires and normal
adjustments) will void the
warranty.
This warranty does not cover,
and is intended to exclude,
any liability on the part of the
manufacturer, whether under
this warranty or implied by law
or any indirect or consequen-
tial damages for breach of
warranty. Toyquest’s and the
manufacturer’s liability here-
under is expressly limited to
the replace of goods not com-
plying with the warranty of, or
at Toyquest’s election, to the
repayment of and amount
equal to the purchase price of
the product in question.
Some states do not allow the
exclusion or limitation so this
limitation may not apply to
you.
WARRANTY DOES NOT
INCLUDE REPLACEMENT NOR-
MAL WEAR AND TEAR OF
EITHER BRAKE PADS OR
TIRES. IT ALSO DOES NOT
INCLUDE BODY OR FRAME
PARTS DAMAGED DO TO ACCI-
DENT, ABUSE, OR IMPROPER
ASSEMBLY.
Check local laws and regula-
tions in your area before rid-
ing to determine where you
can legally ride your
MINIMOTO™ GO KART.
REGISTRATIONCARD:
To obtain warranty repairs or
assistance, you must contact
the Minimoto Repair Center
before the warranty expires.
Contact is most easily
arranged by email:
It is also possible to register
by mailing the included form
to the following address:
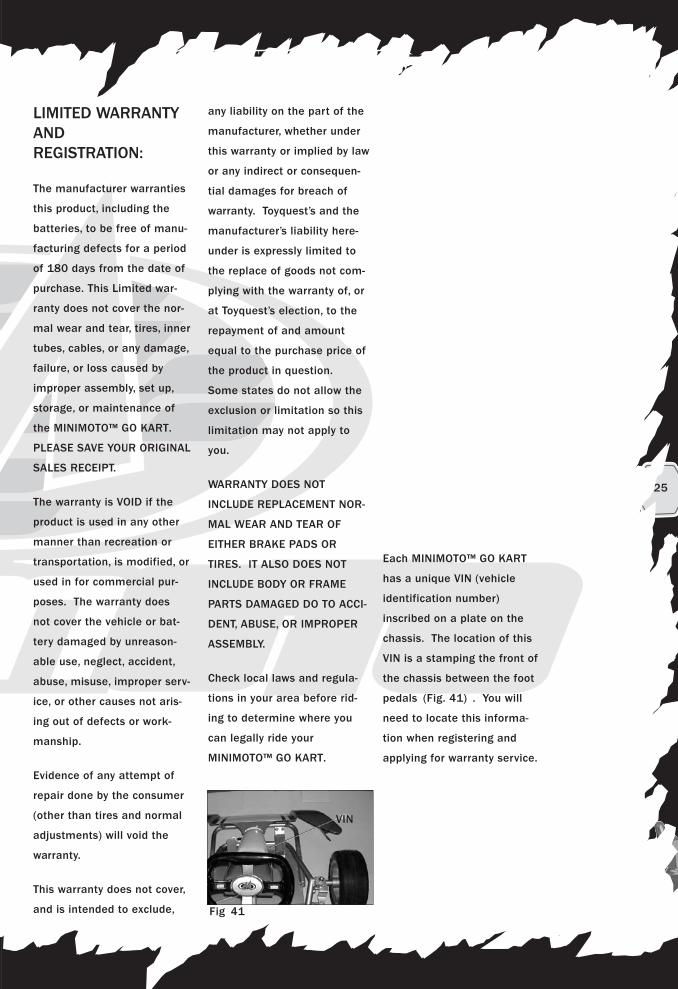
VIN NUMBER:
Each MINIMOTO™ GO KART
has a unique VIN (vehicle
identification number)
inscribed on a plate on the
chassis. The location of this
VIN is a stamping the front of
the chassis between the foot
pedals (Fig. 41) . You will
need to locate this informa-
tion when registering and
applying for warranty service.
PLEASE SAVE YOURORIGINAL RECEIPT.
This warranty gives you spe-
cific legal rights, and you may
also have other rights that
vary from state to state.Fig 41
VIN
Toy QuestC/O Minimoto Service Center1800 N. 9th StreetIndianola, Iowa 50125

MINIMOTO™ GO KART
26
Spare Part Number
23291-ASM-001
23291-ASM-002
23291-ASM-003
23291-ASM-004
23291-ASM-005
23291-ASM-006
23291-ASM-007
23291-ASM-008
23291-ASM-009
23291-ASM-010
23291-ASM-011
23291-ASM-012
23291-ASM-014
23291-ASM-013
23291-ASM-015
23291-ASM-017
23291-ASM-016
23291-ASM-018
Spare Part Name
Front wing
Axles cover assembly
Seat bottom assembly
Seat back
Left side pod assembly
Right side pod assembly
Rear body cover
Right side pod assembly
Chassis assembly
Battery holder assembly
Emergency shut off T handle
Emergency shut off switch
Rear crash bar assembly
Front crash bar assembly
Steering wheel assembly
Brake pedal assembly
Accelerator pedal assembly
Disc brake
Plastic front wing
Use Qty : 1 Unit : Set
Axles cover upper, Axles cover lower
Use Qty : 1 Unit : Set
Plastic seat bottom, EVA seat, Screw
Use Qty : 1 Unit : Set
Plastic seat back, Screw
Use Qty : 1 Unit : Set
Left side pod, Lock knob, Screw & nut.
Use Qty : 1 Unit : Set
Right side pod, Lock knob, Screw & nut.
Use Qty : 1 Unit : Set
Plastic rear cover, Screw
Use Qty : 1 Unit : Set
Plastic battery cover, Lock cap
Use Qty : 1 Unit : Set
Entire welded metal framework
Use Qty : 1 Unit : Set
Metal battery holder, champing plate
Use Qty : 1 Unit : Set
Shut off “T” handle assembly
Use Qty : 1 Unit : Set
Shut off switch assembly
Use Qty : 1 Unit : Set
Rear crash bar assembly, Nut
Use Qty : 1 Unit : Set
Front crash bar assembly, Spring, Screw
Use Qty : 1 Unit : Set
Steering wheel assembly with connector, Rod, Spring, Screw
Use Qty : 1 Unit : Set
Brake with connector, Screw
Use Qty : 1 Unit : Set
Accelerator with connector, Screw
Use Qty : 1 Unit : Set
Disc brake module including friction pads
Use Qty : 1 Unit : Set
APPENDIX:
REPLACEMENT PARTS LIST for MINIMOTO™ GO KART:

Important: You must charge your MINIMOTO™ GO KART a minimum of 12 hours before you can use it.
RECHARGE the battery EACH TIME you use it.
TO PROTECT THE LIFE OF THE BATTERY, recharge the battery at least once a month.
FOLLOW ALL SAFETY RULES AND SET UP INSTRUCTIONS IN THIS MANUAL THOROUGHLY. FAILURE TO DO SO MAY VOID YOUR WARRANTY.
DO NOT RETURN THE MINIMOTO™ GO KART TO THE STORE! IF YOU ARE MISSING PARTS OR ACCESSORIES, PLEASE CONTACT US BY: email at [email protected]
OR call us TOLL-FREE at:
1-800-908-8082 8 AM TO 5 PM PST,
Monday through Friday,
(excluding holidays)