Embed Size (px)
Citation preview
MindSphere
MindConnect IoT Extension Getting Started
Getting Started
02/2020V1801.Feb/2020.1
Document history 1
Introduction to MindSphere 2
Prerequisites 3
Preparations 4
MindConnect IoT Extension 5
Verify Data in Fleet Manager 6

Legal informationWarning notice system
This manual contains notices you have to observe in order to ensure your personal safety, as well as to prevent damage to property. The notices referring to your personal safety are highlighted in the manual by a safety alert symbol, notices referring only to property damage have no safety alert symbol. These notices shown below are graded according to the degree of danger.
DANGERindicates that death or severe personal injury will result if proper precautions are not taken.
WARNINGindicates that death or severe personal injury may result if proper precautions are not taken.
CAUTIONindicates that minor personal injury can result if proper precautions are not taken.
NOTICEindicates that property damage can result if proper precautions are not taken.If more than one degree of danger is present, the warning notice representing the highest degree of danger will be used. A notice warning of injury to persons with a safety alert symbol may also include a warning relating to property damage.
Qualified PersonnelThe product/system described in this documentation may be operated only by personnel qualified for the specific task in accordance with the relevant documentation, in particular its warning notices and safety instructions. Qualified personnel are those who, based on their training and experience, are capable of identifying risks and avoiding potential hazards when working with these products/systems.
Proper use of Siemens productsNote the following:
WARNINGSiemens products may only be used for the applications described in the catalog and in the relevant technical documentation. If products and components from other manufacturers are used, these must be recommended or approved by Siemens. Proper transport, storage, installation, assembly, commissioning, operation and maintenance are required to ensure that the products operate safely and without any problems. The permissible ambient conditions must be complied with. The information in the relevant documentation must be observed.
TrademarksAll names identified by ® are registered trademarks of Siemens AG. The remaining trademarks in this publication may be trademarks whose use by third parties for their own purposes could violate the rights of the owner.
Disclaimer of LiabilityWe have reviewed the contents of this publication to ensure consistency with the hardware and software described. Since variance cannot be precluded entirely, we cannot guarantee full consistency. However, the information in this publication is reviewed regularly and any necessary corrections are included in subsequent editions.
Siemens AGDivision Digital FactoryPostfach 48 4890026 NÜRNBERGGERMANY
V1801.Feb/2020.1Ⓟ 02/2020 Subject to change
Copyright © Siemens AG 2020.All rights reserved
Table of contents
1 Document history..........................................................................................................................................7
2 Introduction to MindSphere ..........................................................................................................................9
3 Prerequisites...............................................................................................................................................11
4 Preparations ...............................................................................................................................................13
4.1 Accessing MindConnect IoT Extension..................................................................................13
4.2 Make IoT Extension available on MindSphere Launchpad ....................................................13
4.3 Asset Management ................................................................................................................144.3.1 Create aspect.........................................................................................................................154.3.2 Create asset type ...................................................................................................................164.3.3 Create asset...........................................................................................................................17
5 MindConnect IoT Extension .......................................................................................................................19
5.1 Assign required roles .............................................................................................................19
5.2 Create Device Simulator ........................................................................................................22
5.3 Device Mapping .....................................................................................................................24
6 Verify Data in Fleet Manager......................................................................................................................29
MindConnect IoT Extension Getting StartedGetting Started, 02/2020, V1801.Feb/2020.1 3

Table of contents
MindConnect IoT Extension Getting Started4 Getting Started, 02/2020, V1801.Feb/2020.1
MindConnect IoT Extension is part of MindSphere, the industrial IoT platform from Siemens. This Getting Started enables you start with IoT Extension. It leads you through the process of activating your account, creating an asset, assigning roles and mapping data.
MindConnect IoT Extension Getting StartedGetting Started, 02/2020, V1801.Feb/2020.1 5

MindConnect IoT Extension Getting Started6 Getting Started, 02/2020, V1801.Feb/2020.1
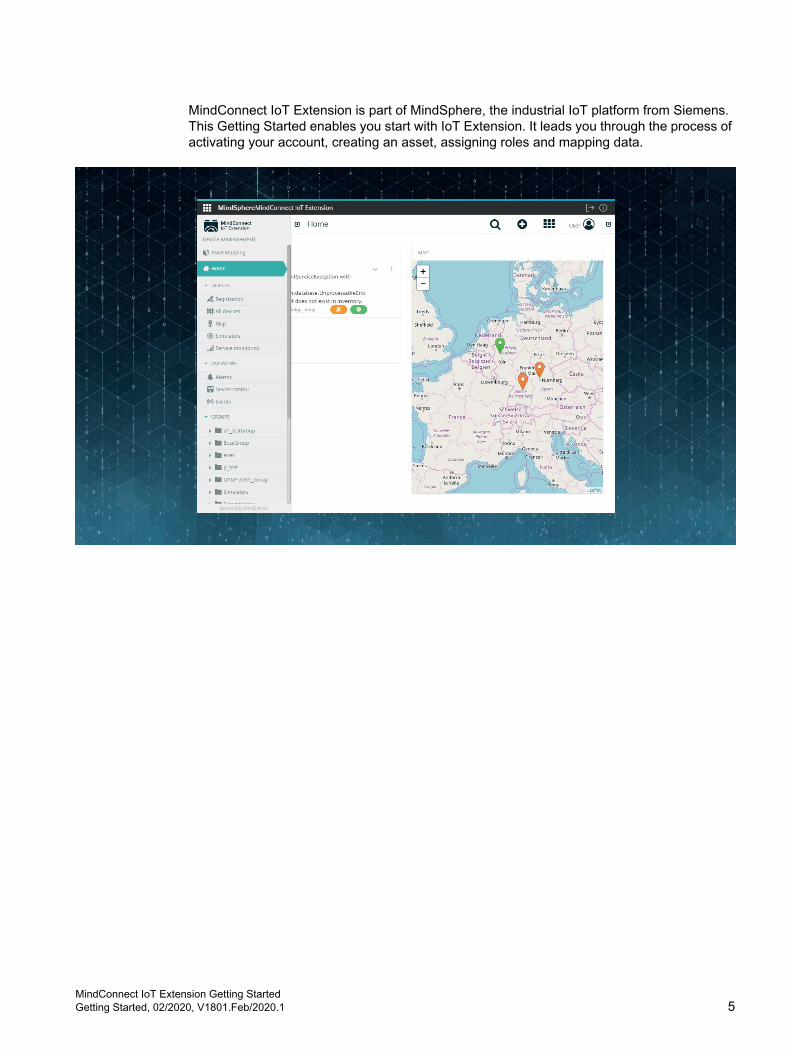
Document history 1Document history
Document version Product version Date Changes LinkV1801.Jan/2020.1 1005.0.7 2020-02-19 Updated screenshots Device Mapping
(Page 24)V1801.Jan/2020.1 1004.6.18 2020-01-07 Updated the Device mapping section Device Mapping
(Page 24)Updated screenshots across the docu‐ment
V1801.Dec/2019.1 2019-12-05 Replaced the user activation procedure with SSO
Accessing Mind‐Connect IoT Ex‐tension (Page 13)
Updated the asset management proce‐dures
Asset Manage‐ment (Page 14)
Updated the Assign required roles pro‐cedure
Assign required roles (Page 19)
Updated the Device Simulator creation procedure
Create Device Simulator (Page 22)
Updated the Device mapping section Device Mapping (Page 24)
Updated screenshots across the docu‐ment
V1801.K0910 2018-09-18 Reviewed documentation, no changes on the software features.
MindConnect IoT Extension Getting StartedGetting Started, 02/2020, V1801.Feb/2020.1 7

Document history
MindConnect IoT Extension Getting Started8 Getting Started, 02/2020, V1801.Feb/2020.1

Introduction to MindSphere 2The following websites provide you with further information on MindSphere:
● MindSphere Documentation Area (https://documentation.mindsphere.io)
● MindSphere Developer Documentation (https://developer.mindsphere.io)
● Cumulocity Developer Center (https://www.cumulocity.com/dev-center)
MindConnect IoT Extension Getting StartedGetting Started, 02/2020, V1801.Feb/2020.1 9

Introduction to MindSphere
MindConnect IoT Extension Getting Started10 Getting Started, 02/2020, V1801.Feb/2020.1
Prerequisites 3To start with MindConnect Extension you need to comply with the following prerequisites:
● You need at least one of the following licenses:
– MindAccess IoT Value Plan (https://www.plm.automation.siemens.com/store/de-de/mindsphere/mindaccess/iot.html)
– MindAccess IoT Developer Plan (https://www.plm.automation.siemens.com/store/de-de/mindsphere/mindaccess/devops-plan.html)
● Modern web browser
– Google Chrome
– Mozilla Firefox
– Apple Safari
MindConnect IoT Extension Getting StartedGetting Started, 02/2020, V1801.Feb/2020.1 11

Prerequisites
MindConnect IoT Extension Getting Started12 Getting Started, 02/2020, V1801.Feb/2020.1
Preparations 4Getting Started with IoT Extension
MindConnect IoT Extension is a component of MindSphere, the industrial IoT platform from Siemens. It enables you to connect different types of devices to MindSphere and to use the software agents and SDKs. MindConnect IoT Extension gives you very fast visibility and control over connected assets, like machines, phones or any other devices that you need to manage. It provides certified hardware kits and software libraries to let you onboard remote assets into the cloud. MindConnect IoT Extension offers various functionalities. Some examples are given below:
● Device management, data visualization and remote control functionality through the web
● Rapid customization of the above through MindConnect IoT Extension
● APIs for extending and automizing the existing functionality or interfacing MindConnect IoT Extension
● MQTT endpoint to enable performance and low latency data connection
MindConnect IoT Extension works with any network architecture, but is specifically designed to work out of the box with mobile networks.
To start with IoT Extension, it is necessary to connect your account with MindSphere. This chapter will enable you to execute the following steps:
● Activating your MindConnect IoT Extension account
● Making it available on MindSphere Launchpad
● Creating an asset for mapping data if not already done yet
For more information about MindConnect IoT Extension, see "https://cumulocity.com/guides/about-doc/intro-documentation/".
4.1 Accessing MindConnect IoT ExtensionMindConnect IoT Extension provides single sign-on functionality, that allows the user to login with a single 3rd-party authorization server. Users are controlled from MindSphere Settings.
4.2 Make IoT Extension available on MindSphere LaunchpadIn order to activate MindConnect Extension and to make it available on MindSphere Launchpad, you need to assign the required role to a user:
● mdsp:core:mcie:admin
● mdsp:core:mcie:user
MindConnect IoT Extension Getting StartedGetting Started, 02/2020, V1801.Feb/2020.1 13
ProcedureTo assign the required role to the user, proceed as follows:
1. Log in to your MindSphere tenant.
2. On the Launchpad, click Settings.
3. Select the user from the list. Alternatively, you can also use the search box to find a user.
4. In the "Edit User" dialog, search for roles "mdsp:core:mcie.user" or "mdsp:core:mcie:admin" and assign it to your user.
5. Close the "Edit User" dialog.
Note
After assigning a new role to a user, it is recommended to log in to your MindSphere Tenant again in order to make sure, that the new role is in an active state.
ResultMindConnect IoT Extension is now activated and available on your MindSphere Launchpad.
4.3 Asset ManagementMindConnect IoT Extension works on the measured data and a connection between MindSphere assets. An asset can have properties that are time series data. To ingest time series data into MindSphere, you need to create an asset.
Note
If the required asset/(s) already exists in MindSphere, skip the steps of creating assets and continue with the rest of the chapters of MindConnect IoT Extension (Page 19),
Note
Asset creation can be done automatically using the "Auto On-boarding" feature. The manual procedure for creating an asset is explained in this section.
Create an asset via MindSphere Asset Manager The process of creating an asset will lead you through the process of creating an asset via MindSphere Asset Manager. Here, consider the process of onboarding a pump as an example scenario.
Preparations4.3 Asset Management
MindConnect IoT Extension Getting Started14 Getting Started, 02/2020, V1801.Feb/2020.1
The creation of an asset consists of three steps:
1. Creating an aspect.
2. Creating an asset type and using the previously defined aspect.
3. Creating an asset based on the asset type.
Note
It is also possible to create an asset via Asset Manager API.
4.3.1 Create aspectThe process of creating aspect is shown by using the example scenario of onboarding a pump. Note that the data shown in the procedure below is related to this example scenario only and must be adapted properly for onboarding other devices.
ProcedureTo create an aspect, proceed as follows:
1. In Asset Manager, click "Aspects".
2. Click "Create aspect".
3. Enter the required data. Use the following data to follow the example scenario of onboarding the pump:
– ID: mcint.Pump
Note
The ID prefix must match your tenant prefix.
– Name: PumpProperties– Description: Pump Aspect (from MindConnect IoT Extension Getting Started)
4. To add a variable, click on "Add variable".
5. Enter data for variable:
– Variable Name: StuffingBoxTemp– Data Type: STRING– Max. Length: 16– Unit: °
6. Confirm the entries with "Save".
Preparations4.3 Asset Management
MindConnect IoT Extension Getting StartedGetting Started, 02/2020, V1801.Feb/2020.1 15
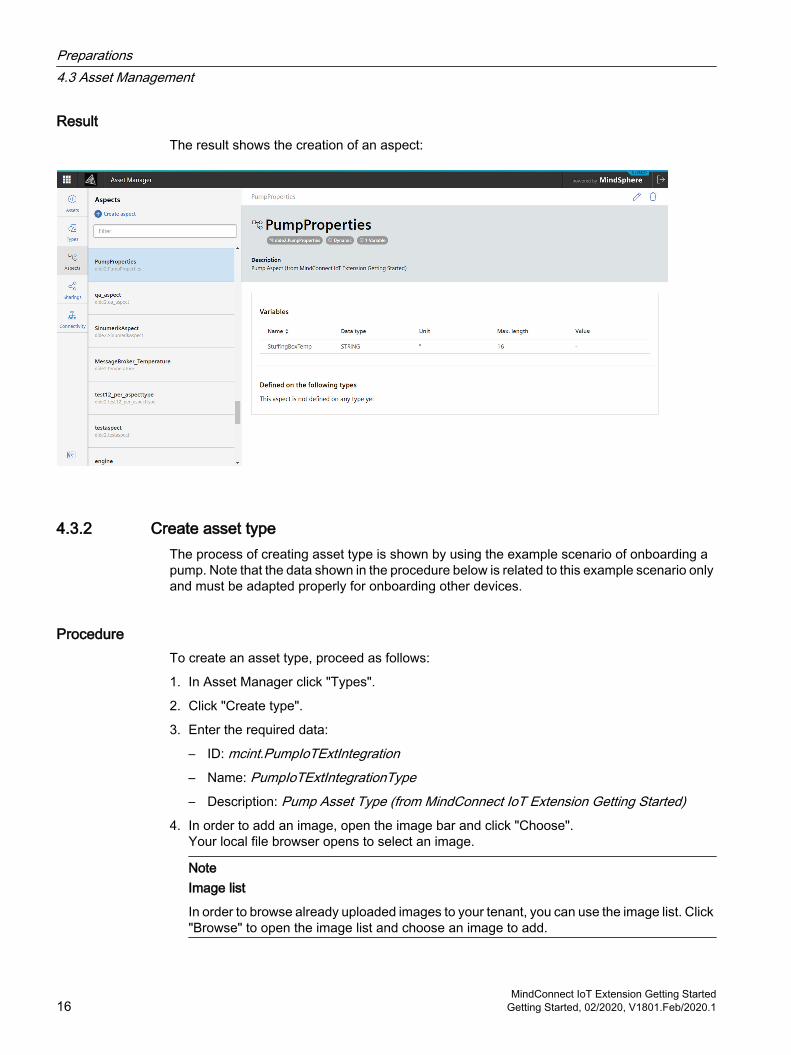
ResultThe result shows the creation of an aspect:
4.3.2 Create asset typeThe process of creating asset type is shown by using the example scenario of onboarding a pump. Note that the data shown in the procedure below is related to this example scenario only and must be adapted properly for onboarding other devices.
ProcedureTo create an asset type, proceed as follows:
1. In Asset Manager click "Types".
2. Click "Create type".
3. Enter the required data:
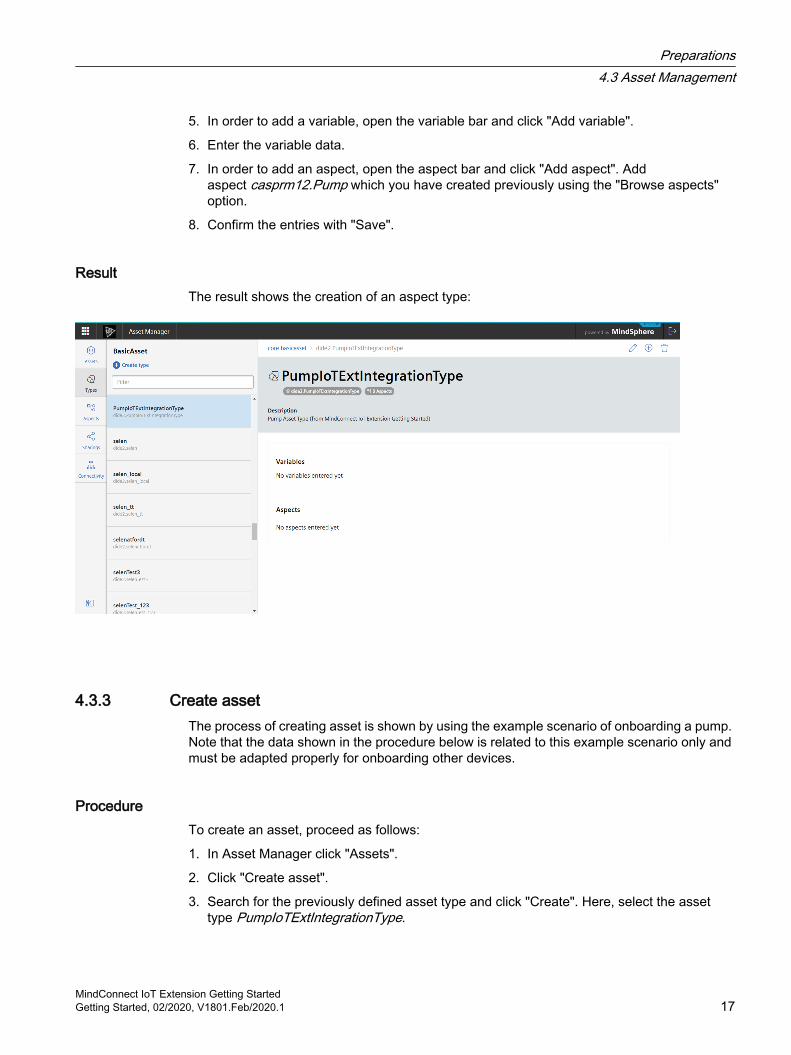
– ID: mcint.PumpIoTExtIntegration– Name: PumpIoTExtIntegrationType– Description: Pump Asset Type (from MindConnect IoT Extension Getting Started)
4. In order to add an image, open the image bar and click "Choose". Your local file browser opens to select an image.
NoteImage list
In order to browse already uploaded images to your tenant, you can use the image list. Click "Browse" to open the image list and choose an image to add.
Preparations4.3 Asset Management
MindConnect IoT Extension Getting Started16 Getting Started, 02/2020, V1801.Feb/2020.1
5. In order to add a variable, open the variable bar and click "Add variable".
6. Enter the variable data.
7. In order to add an aspect, open the aspect bar and click "Add aspect". Add aspect casprm12.Pump which you have created previously using the "Browse aspects" option.
8. Confirm the entries with "Save".
ResultThe result shows the creation of an aspect type:
4.3.3 Create assetThe process of creating asset is shown by using the example scenario of onboarding a pump. Note that the data shown in the procedure below is related to this example scenario only and must be adapted properly for onboarding other devices.
ProcedureTo create an asset, proceed as follows:
1. In Asset Manager click "Assets".
2. Click "Create asset".
3. Search for the previously defined asset type and click "Create". Here, select the asset type PumpIoTExtIntegrationType.
Preparations4.3 Asset Management
MindConnect IoT Extension Getting StartedGetting Started, 02/2020, V1801.Feb/2020.1 17
4. Enter the required data. Use the following data to follow the example scenario:
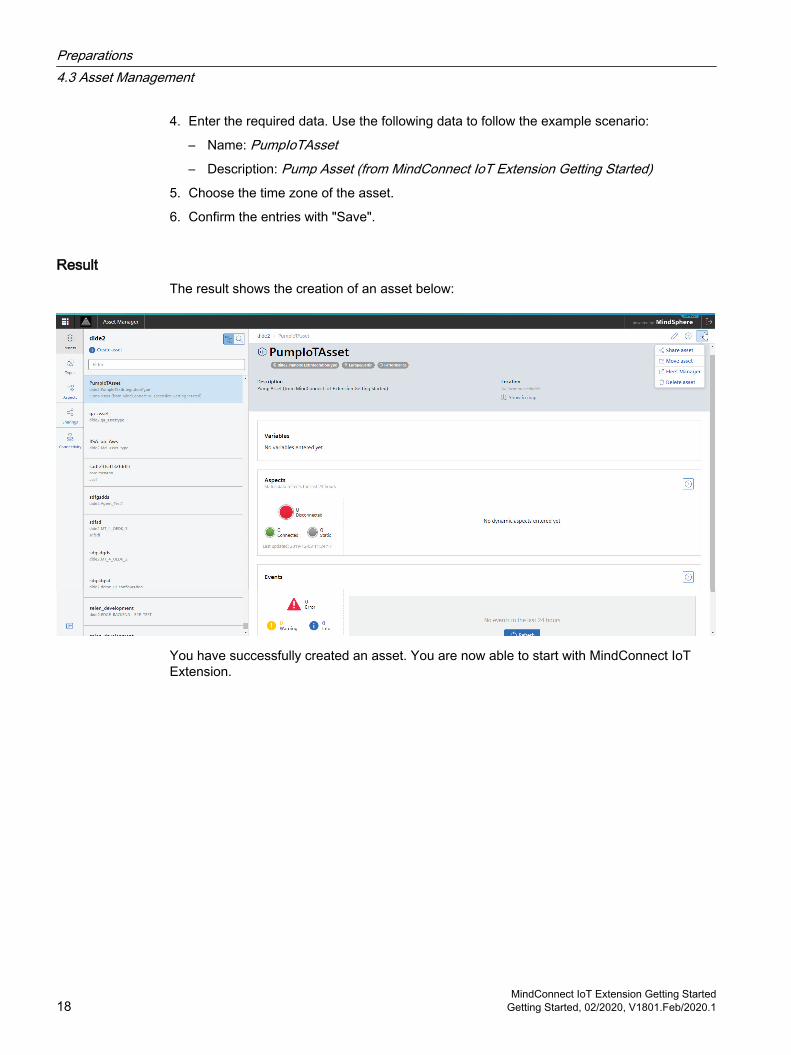
– Name: PumpIoTAsset– Description: Pump Asset (from MindConnect IoT Extension Getting Started)
5. Choose the time zone of the asset.
6. Confirm the entries with "Save".
ResultThe result shows the creation of an asset below:
You have successfully created an asset. You are now able to start with MindConnect IoT Extension.
Preparations4.3 Asset Management
MindConnect IoT Extension Getting Started18 Getting Started, 02/2020, V1801.Feb/2020.1
MindConnect IoT Extension 5By using the example scenario of onboarding of a simulated pump, this chapter enables you to execute the following steps:
● Logging in to MindConnect IoT Extension
● Assigning required roles
● Using a Device Simulator
● Mapping data
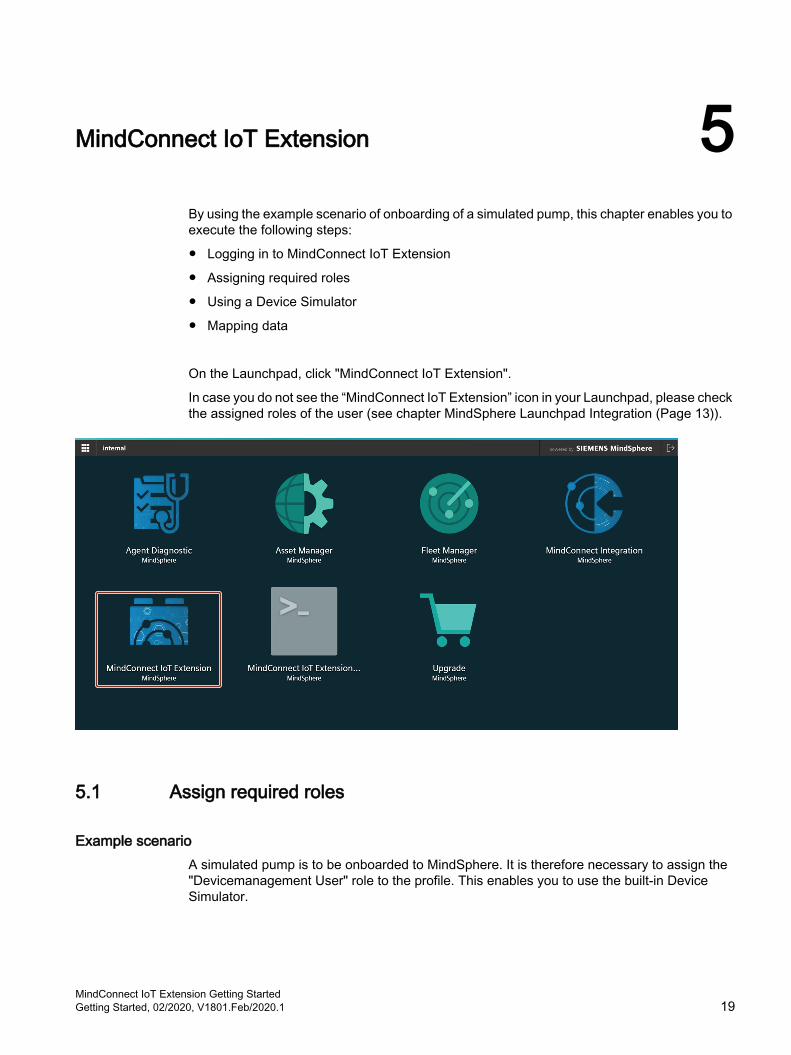
On the Launchpad, click "MindConnect IoT Extension".
In case you do not see the “MindConnect IoT Extension” icon in your Launchpad, please check the assigned roles of the user (see chapter MindSphere Launchpad Integration (Page 13)).
5.1 Assign required roles
Example scenarioA simulated pump is to be onboarded to MindSphere. It is therefore necessary to assign the "Devicemanagement User" role to the profile. This enables you to use the built-in Device Simulator.
MindConnect IoT Extension Getting StartedGetting Started, 02/2020, V1801.Feb/2020.1 19
PrerequisitesThe user must have the role “mdsp:core:mcie:admin” to perform this action.
ObjectiveTo assign the "Devicemanagement User" role for using the built-in Device Simulator.
MindConnect IoT Extension5.1 Assign required roles
MindConnect IoT Extension Getting Started20 Getting Started, 02/2020, V1801.Feb/2020.1
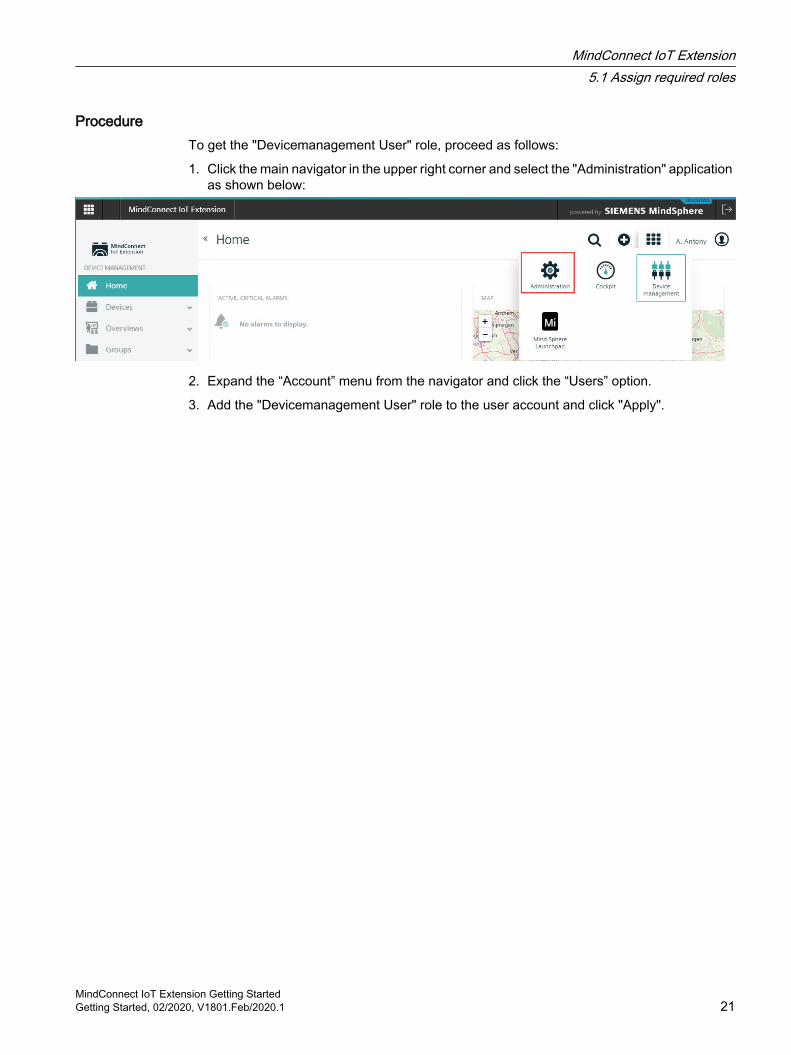
ProcedureTo get the "Devicemanagement User" role, proceed as follows:
1. Click the main navigator in the upper right corner and select the "Administration" application as shown below:
2. Expand the “Account” menu from the navigator and click the “Users” option.
3. Add the "Devicemanagement User" role to the user account and click "Apply".
MindConnect IoT Extension5.1 Assign required roles
MindConnect IoT Extension Getting StartedGetting Started, 02/2020, V1801.Feb/2020.1 21
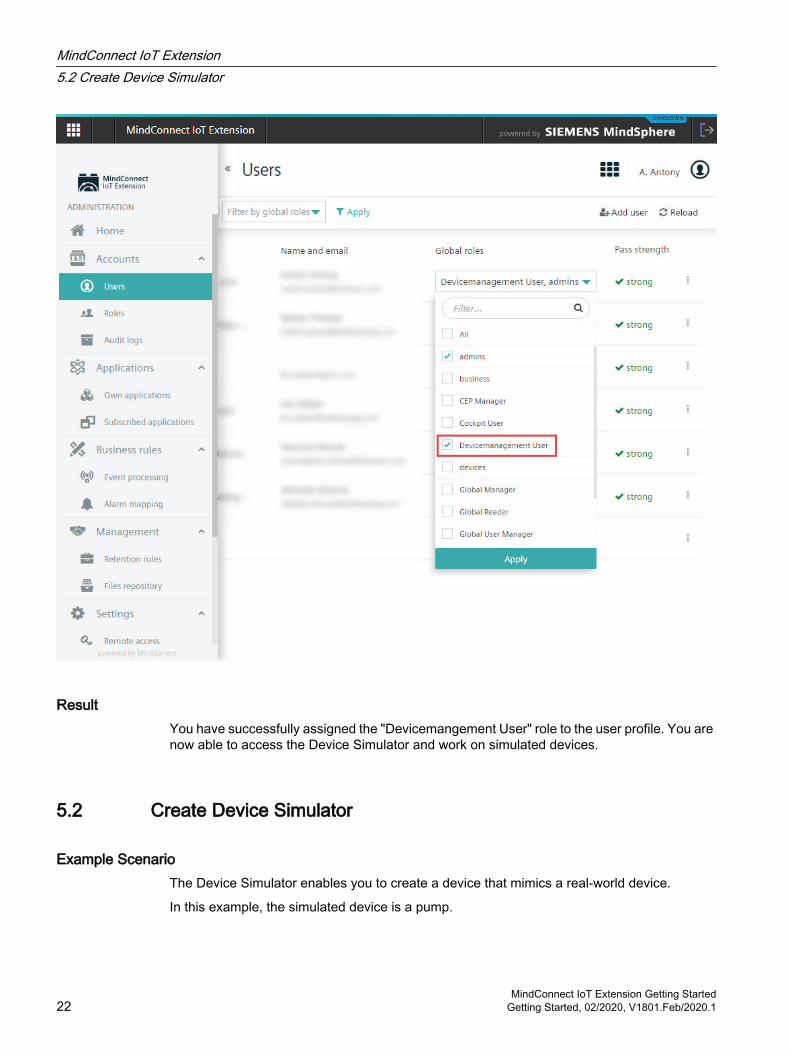
ResultYou have successfully assigned the "Devicemangement User" role to the user profile. You are now able to access the Device Simulator and work on simulated devices.
5.2 Create Device Simulator
Example ScenarioThe Device Simulator enables you to create a device that mimics a real-world device.
In this example, the simulated device is a pump.
MindConnect IoT Extension5.2 Create Device Simulator
MindConnect IoT Extension Getting Started22 Getting Started, 02/2020, V1801.Feb/2020.1
ObjectiveTo create a pump from the simulated device.
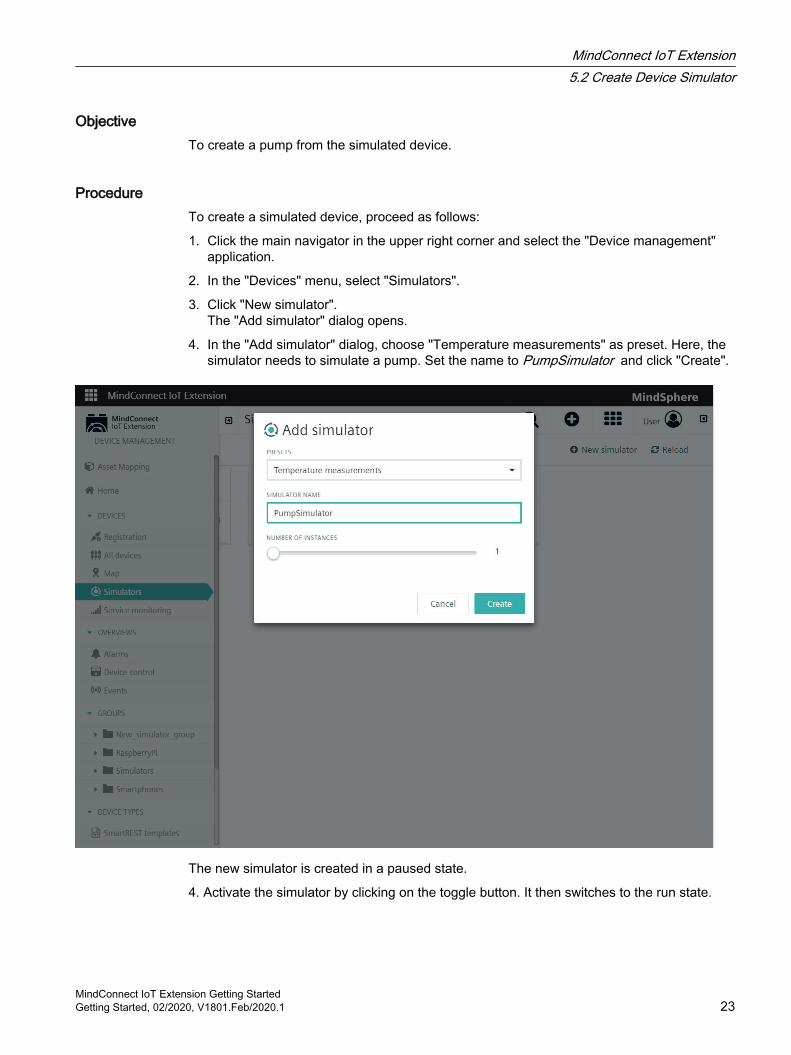
ProcedureTo create a simulated device, proceed as follows:
1. Click the main navigator in the upper right corner and select the "Device management" application.
2. In the "Devices" menu, select "Simulators".
3. Click "New simulator".The "Add simulator" dialog opens.
4. In the "Add simulator" dialog, choose "Temperature measurements" as preset. Here, the simulator needs to simulate a pump. Set the name to PumpSimulator and click "Create".
The new simulator is created in a paused state.
4. Activate the simulator by clicking on the toggle button. It then switches to the run state.
MindConnect IoT Extension5.2 Create Device Simulator
MindConnect IoT Extension Getting StartedGetting Started, 02/2020, V1801.Feb/2020.1 23
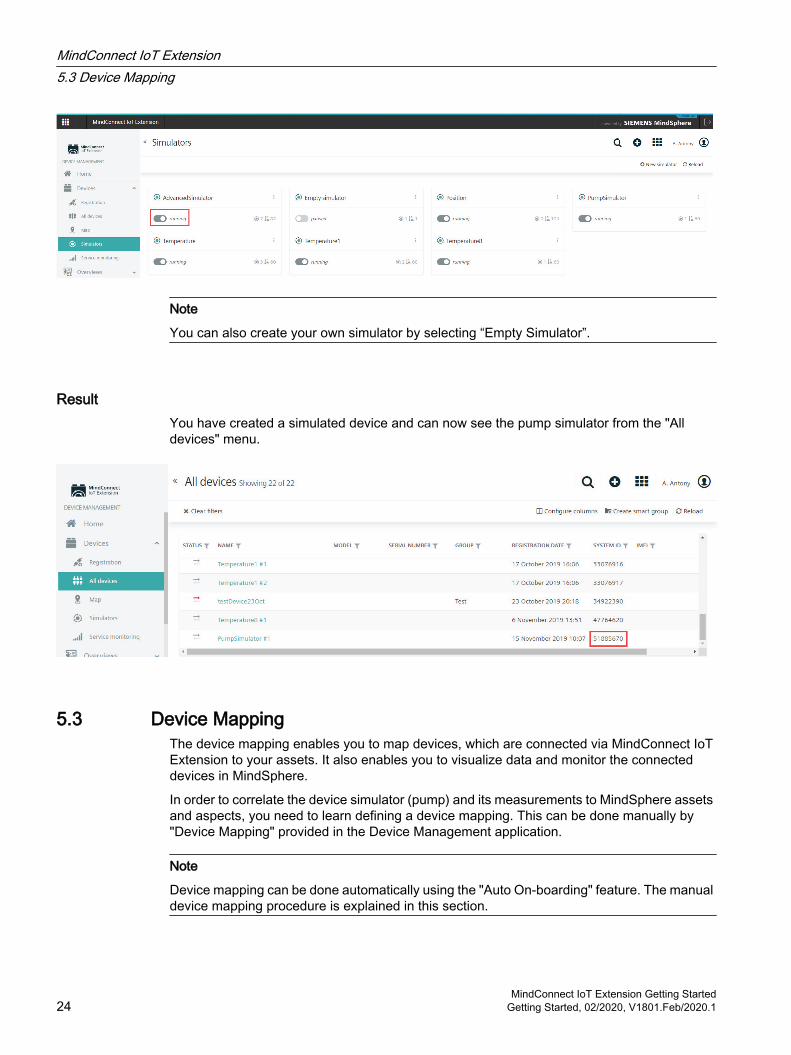
Note
You can also create your own simulator by selecting “Empty Simulator”.
ResultYou have created a simulated device and can now see the pump simulator from the "All devices" menu.
5.3 Device MappingThe device mapping enables you to map devices, which are connected via MindConnect IoT Extension to your assets. It also enables you to visualize data and monitor the connected devices in MindSphere.
In order to correlate the device simulator (pump) and its measurements to MindSphere assets and aspects, you need to learn defining a device mapping. This can be done manually by "Device Mapping" provided in the Device Management application.
Note
Device mapping can be done automatically using the "Auto On-boarding" feature. The manual device mapping procedure is explained in this section.
MindConnect IoT Extension5.3 Device Mapping
MindConnect IoT Extension Getting Started24 Getting Started, 02/2020, V1801.Feb/2020.1
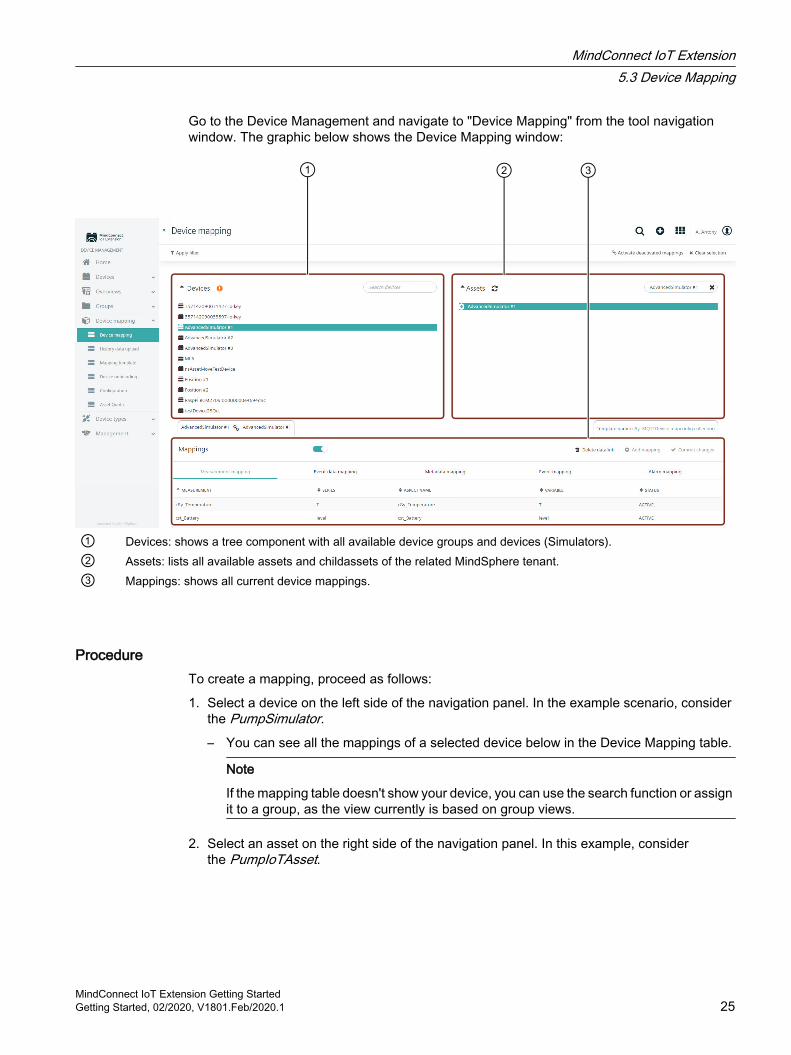
Go to the Device Management and navigate to "Device Mapping" from the tool navigation window. The graphic below shows the Device Mapping window:
① Devices: shows a tree component with all available device groups and devices (Simulators).② Assets: lists all available assets and childassets of the related MindSphere tenant.③ Mappings: shows all current device mappings.
ProcedureTo create a mapping, proceed as follows:
1. Select a device on the left side of the navigation panel. In the example scenario, consider the PumpSimulator.– You can see all the mappings of a selected device below in the Device Mapping table.
Note
If the mapping table doesn't show your device, you can use the search function or assign it to a group, as the view currently is based on group views.
2. Select an asset on the right side of the navigation panel. In this example, consider the PumpIoTAsset.
MindConnect IoT Extension5.3 Device Mapping
MindConnect IoT Extension Getting StartedGetting Started, 02/2020, V1801.Feb/2020.1 25
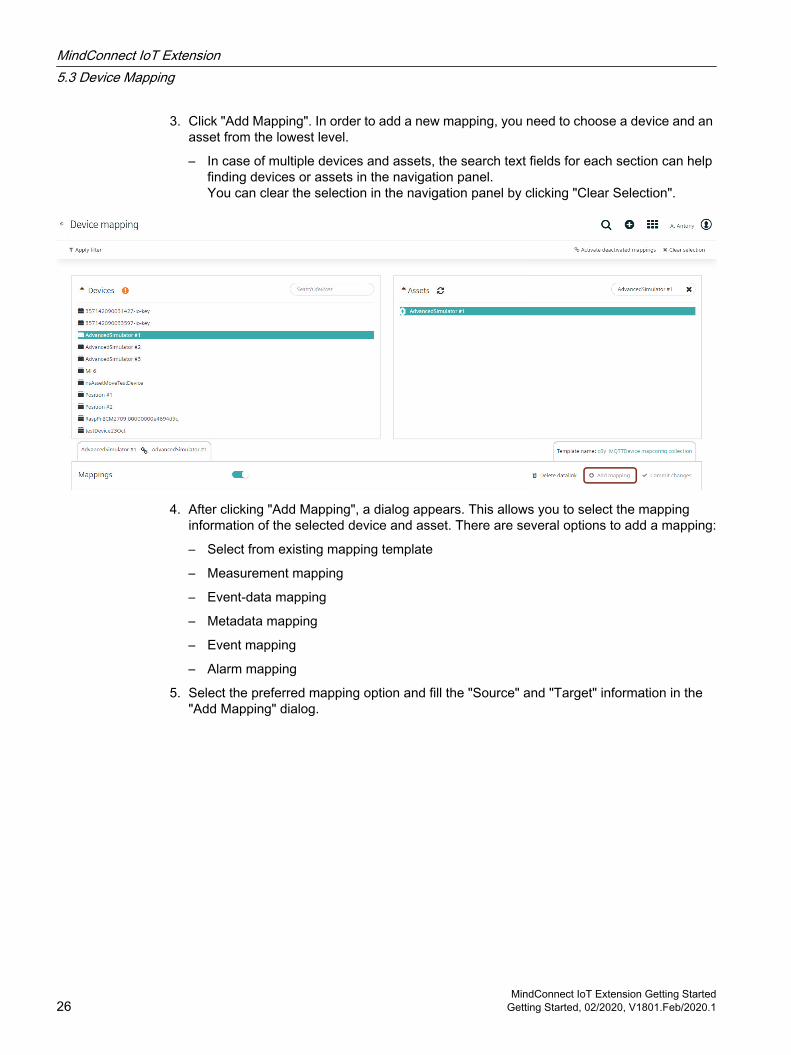
3. Click "Add Mapping". In order to add a new mapping, you need to choose a device and an asset from the lowest level.
– In case of multiple devices and assets, the search text fields for each section can help finding devices or assets in the navigation panel. You can clear the selection in the navigation panel by clicking "Clear Selection".
4. After clicking "Add Mapping", a dialog appears. This allows you to select the mapping information of the selected device and asset. There are several options to add a mapping:
– Select from existing mapping template
– Measurement mapping
– Event-data mapping
– Metadata mapping
– Event mapping
– Alarm mapping
5. Select the preferred mapping option and fill the "Source" and "Target" information in the "Add Mapping" dialog.
MindConnect IoT Extension5.3 Device Mapping
MindConnect IoT Extension Getting Started26 Getting Started, 02/2020, V1801.Feb/2020.1
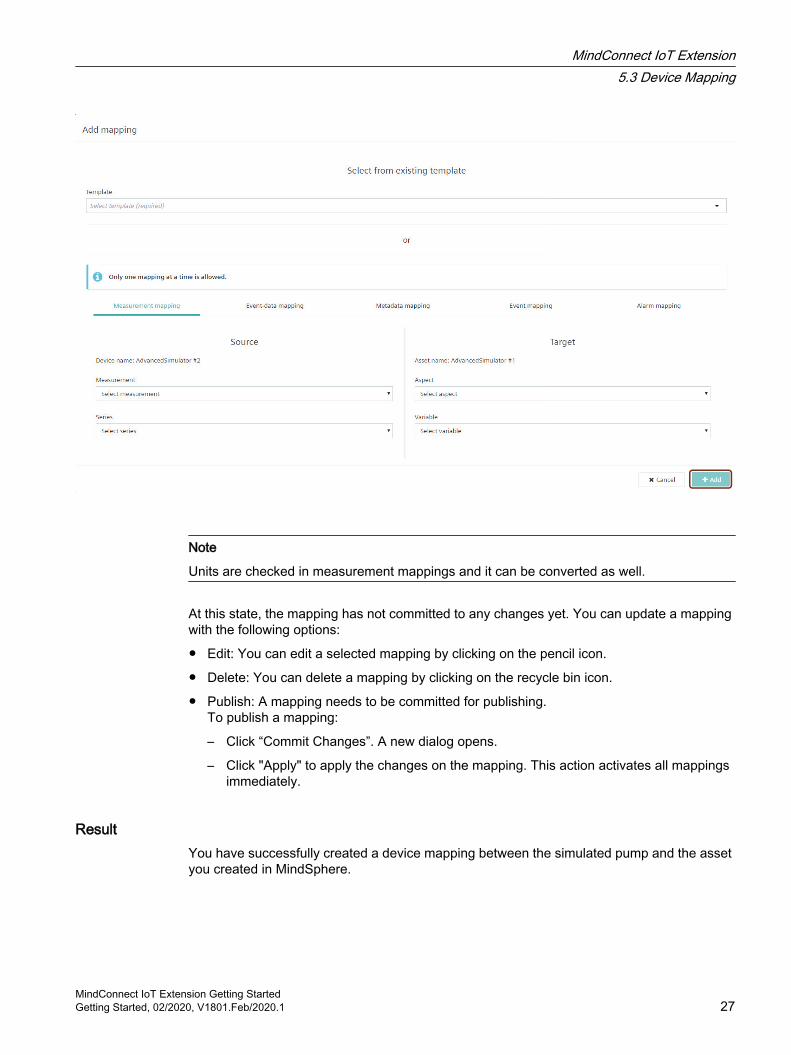
Note
Units are checked in measurement mappings and it can be converted as well.
At this state, the mapping has not committed to any changes yet. You can update a mapping with the following options:
● Edit: You can edit a selected mapping by clicking on the pencil icon.
● Delete: You can delete a mapping by clicking on the recycle bin icon.
● Publish: A mapping needs to be committed for publishing. To publish a mapping:
– Click “Commit Changes”. A new dialog opens.
– Click "Apply" to apply the changes on the mapping. This action activates all mappings immediately.
ResultYou have successfully created a device mapping between the simulated pump and the asset you created in MindSphere.
MindConnect IoT Extension5.3 Device Mapping
MindConnect IoT Extension Getting StartedGetting Started, 02/2020, V1801.Feb/2020.1 27
You are now able to perform the following tasks:
● Monitor the pump in Fleet Manager
● Visualize the pump's data
● Define rules for alarms.
For further information on MindConnect IoT Extension functionalities, for example Firmware Management, please refer to the document MindConnect IoT Extension User Guide. The MindSphere documentation area also provides you with further particulars on all MindSphere components and applications.
MindConnect IoT Extension5.3 Device Mapping
MindConnect IoT Extension Getting Started28 Getting Started, 02/2020, V1801.Feb/2020.1
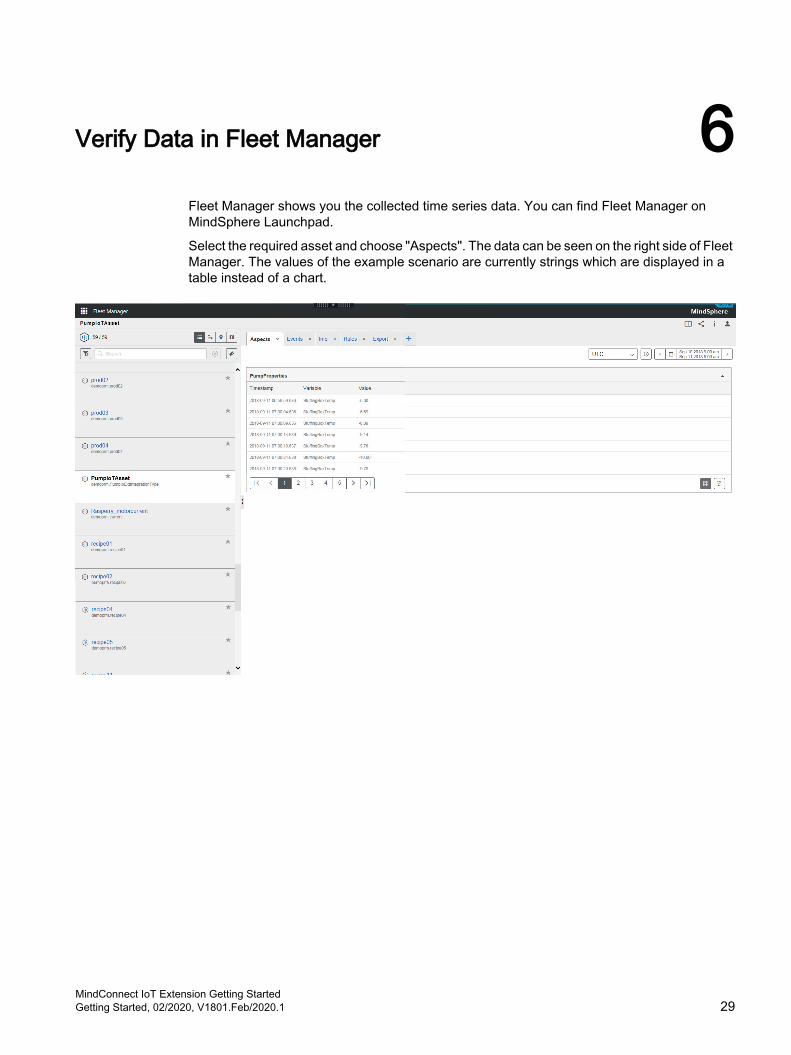
Verify Data in Fleet Manager 6Fleet Manager shows you the collected time series data. You can find Fleet Manager on MindSphere Launchpad.
Select the required asset and choose "Aspects". The data can be seen on the right side of Fleet Manager. The values of the example scenario are currently strings which are displayed in a table instead of a chart.
MindConnect IoT Extension Getting StartedGetting Started, 02/2020, V1801.Feb/2020.1 29

Verify Data in Fleet Manager
MindConnect IoT Extension Getting Started30 Getting Started, 02/2020, V1801.Feb/2020.1