Embed Size (px)
Citation preview
LICENSE MANAGER 8.77USER GUIDE
NOTICES
The Datamine Discover suite is developed and supported by Datamine Corporate Limited.
SUPPORT
support.dataminesoftware.com
LEGAL
Datamine, the Corporate logo, Datamine Discover are [registered] trademarks of Datamine Corporate Limited or a subsidiary. All other trademarks are the property of their respective owners.
© 2017 Datamine Corporate Limited. All rights reserved.
1 - INTRODUCTIONLicense Manager .................................................. 2System requirements............................................ 2License types........................................................ 3
2 - INSTALLATIONStandard installaton.............................................. 5Silent installation................................................... 6
3 - LICENSE ACTIVATIONActivating a local (disk-based) license.................. 8Activating a USB Sentinel dongle license............. 9Activating a network server license .................... 10Connecting and activating a client...................... 11
4 - LICENSE TRANSFERTransferring a local license................................. 14Moving a USB dongle license............................. 15Borrowing a network license............................... 15Returning a borrowed license............................. 16
5 - LICENSE DETAILSDisplaying license details ................................... 19
6 - SERVER MANAGEMENTServer Administration Console ........................... 21Opening the console........................................... 21Admin License List ............................................. 21Max days ............................................................ 22Restricting licenses............................................. 22Revoking concurrent licenses............................. 23Restoring lost licenses........................................ 23Server status ...................................................... 23Usage and error logs .......................................... 23
INDEX
CONTENTS

INTRODUCTION
IN THIS SECTIONLicense Manager 2System requirements 2License types 3
INTRODUCTION 2
LICENSE MANAGER 8.77 USER GUIDE
LICENSE MANAGERInstalling the License Manager on a server allows an organisation to centrally manage its Datamine Discover software licenses (such as Datamine Discover and Discover 3D). All options available for standalone and dongle licenses are supported in server-based licenses. Both concurrent and distributable license types are supported (see below for details) and administrators can control user permissions and other license access details.
Note A server installation of 8.77 is backwards compatible with 8.74 or later of the license manager, or vice versa (8.77 clients can works with 8.74 server). Although backwards compatibly is maintained for this versions, it is highly recommend that all clients and the server is updated with the same version of the license manager software.
SYSTEM REQUIREMENTS
OPERATING SYSTEM
The License Manager (including server) is supported on the following operating systems:
• Windows 7 SP1 (32-bit and 64-bit)
• Windows Server 2008 R2 (32-bit and 64-bit)
• Windows 8 (32-bit and 64-bit)
• Windows 8.1 (32-bit and 64-bit)
• Windows Server 2012 (64-bit)
• Windows 10 (32-bit and 64-bit)• Windows Server 2012 R2 (64bit)
• Windows Server 2016 (64bit) License Manager has also been tested on VMWare/VSphere Hyper Visor virtual machines of the above operating systems.
HARDWARE
The hardware requirements are minimal on the license server. An open TCP/IP port (6150 is opened by default in the Windows firewall during installation) is required for the server to communicate on.
PREREQUISITES
The install wizard checks for the following and prompts if not already on your system. You can choose to have the install wizard install these requirements or cancel the installation if you do not want to proceed:
• Microsoft .NET Framework 4.5
• Microsoft Visual C++ 2015 Update 3 Redistributable Package (x86)
• Microsoft Visual C++ 2015 Update 3 Redistributable Package (x64)
INTRODUCTION 3
LICENSE MANAGER 8.77 USER GUIDE
LICENSE TYPES
LOCAL (DISK-BASED) LICENSE
A standard single computer license. Activation code and serial number can only be used on a single computer at a time.
USB DONGLE (SENTINEL) LICENSE
Note USB Dongle licenses are NOT supported on 64bit software, such as Datamine Discover 64bit.
A USB dongle-based license file. Once activated, it can be swapped and used on any computer with the license software and product installed.
SERVER CONCURRENT LICENSE
A concurrent license is managed by the license server, and clients access seats on demand from a central pool. These license seats are by default only active while the user is connected to the server, and the seat is returned as soon as the application is closed, or after a period of inactivity in the client software program (60 minutes).
A special feature of concurrent licenses is that administrators have the ability to nominate any of their concurrent seats to also be available for borrowing. A borrowed license seat can be used when the computer is not connected to the license server. A borrowed license seat can be returned at any time or is returned automatically when the borrowing time period expires.
This provides extra flexibility to support users who are disconnected from the server for periods of time.
SERVER DISTRIBUTABLE LICENSE
A distributable license is managed by the server and the seats are only available for borrowing. The borrowed license seat can be used when the computer is not connected to the license server.
The distributable license model works by removing a seat from a central pool. The seat is automatically borrowed for a default period of time. This is set by the administrator, and there is the option to make the borrowing period unlimited. A borrowed license seat can be returned at any time or is returned automatically when the borrowing time period expires. The license seat is then available (free) on the server (and deactivated on the client computer, this happens without any connection to the server).
The major difference between a concurrent and a distributable license is that distributable requires the user to manually return the license—that is, to release the license seat back to the pool. On a concurrent server, the licenses are automatically returned when not in use.

INSTALLATION
IN THIS SECTIONStandard installaton 5Silent installation 6
INSTALLATION 5
LICENSE MANAGER 8.77 USER GUIDE
STANDARD INSTALLATONLicense Manager is included in the installation or patch of all Datamine Discover software products. If an older version of the License Manager is installed, it can be updated by downloading and running the installer. The License Manager installer is also needed to configure a USB dongle license or a network server license.
TO INSTALL LICENSE MANAGER:
1. Download the latest version of the License Manager (version 8.77 or above) from the licensing section of:
http://support.dataminesoftware.com/software-downloads/
2. Run the downloaded License Manager installer.
3. Select the License type and continue the installation process.
4. Start the License Manager from within the product. Alternatively, in Windows Explorer, double-click onC:\Program Files (x86)\Encom\CLSECURE32.exe.
5. If it is a new installation, you will be asked to enter your company name
6. You can now activate a license (see License activation).
INSTALLATION 6
LICENSE MANAGER 8.77 USER GUIDE
SILENT INSTALLATIONCommand line options are available for the License Manager installation for silent and automatic configuration. This is particularly useful for client computers that access a server-based license.
Note Similar options are available for the installation of Datamine Discover applications. Refer to the application user guides for more details.
COMMAND SYNTAX
setup.exe /S /v" /qn"
This requires UAC elevation, so it should only be executed from within an elevated command line prompt (known as “Run As Administrator”).
The following additional properties can be specified after /v":
LICENSETYPE=n
Where n is:
1 = local license (default)2 = network client
Example:
setup.exe /S /v" /qn LICENSETYPE=2"
LICENSESERVER=servername LICENSEPORT=port
When LICENSETYPE=2, define the server connection. LICENSEPORT defaults to 6150 if not specified.
Examples:
setup.exe /S /v" /qn LICENSETYPE=2 LICENSESERVER=myserver"
setup.exe /S /v" /qn LICENSETYPE=2 LICENSESERVER=myserver LICENSEPORT=6123"
You can also configure the license parameters when running the installation in non-silent mode (/qf), however the user can override the settings in the installation dialogs.
LICENSEACTIVATION
IN THIS SECTIONActivating a local (disk-based) license 8Activating a USB Sentinel dongle license 9Activating a network server license 10Connecting and activating a client 11
LICENSE ACTIVATION 8
LICENSE MANAGER 8.77 USER GUIDE
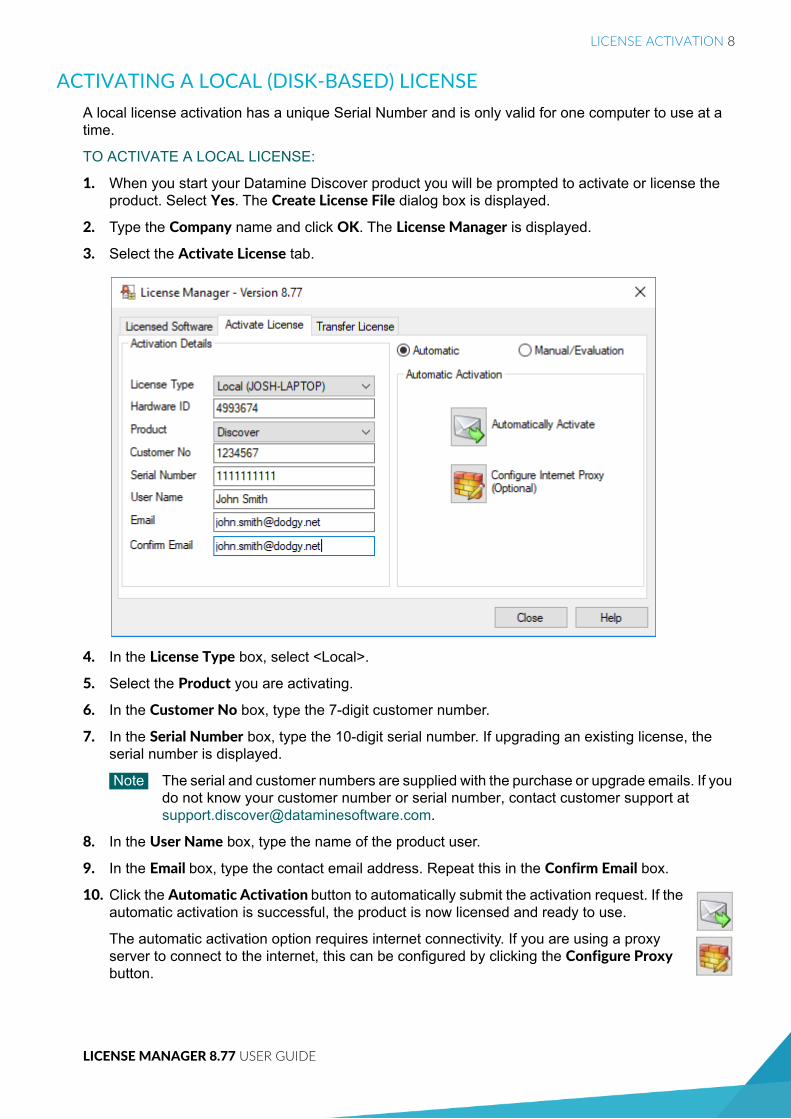
ACTIVATING A LOCAL (DISK-BASED) LICENSEA local license activation has a unique Serial Number and is only valid for one computer to use at a time.
TO ACTIVATE A LOCAL LICENSE:
1. When you start your Datamine Discover product you will be prompted to activate or license the product. Select Yes. The Create License File dialog box is displayed.
2. Type the Company name and click OK. The License Manager is displayed.
3. Select the Activate License tab.
4. In the License Type box, select <Local>.
5. Select the Product you are activating.
6. In the Customer No box, type the 7-digit customer number.
7. In the Serial Number box, type the 10-digit serial number. If upgrading an existing license, the serial number is displayed.
Note The serial and customer numbers are supplied with the purchase or upgrade emails. If you do not know your customer number or serial number, contact customer support at [email protected].
8. In the User Name box, type the name of the product user.
9. In the Email box, type the contact email address. Repeat this in the Confirm Email box.
10. Click the Automatic Activation button to automatically submit the activation request. If the automatic activation is successful, the product is now licensed and ready to use.
The automatic activation option requires internet connectivity. If you are using a proxy server to connect to the internet, this can be configured by clicking the Configure Proxy button.
LICENSE ACTIVATION 9
LICENSE MANAGER 8.77 USER GUIDE
Note The following steps are only required if the automatic activation fails or you are not connected to the Internet:
11. If the automatic activation is unable to process the activation request, or you do not have an Internet connection select the Manual/Evaluation option and save the request file by hitting the Save button.
12. Navigate to the activation rquest saved in C:\ProgramData\Encom and email it to [email protected]
Note This is a hidden folder so you may need to enable the view hidden folder option in File explorer.
13. When you receive the activation code by email from a manual request, copy and paste it into the Activation Code field.
Note The activation code will only be valid for computer that submitted the request, and for a limited time period (~2 weeks).
Click the Activate button. If the activation is successful, the product is now licensed and ready to use.
To display the license details, see License details.
ACTIVATING A USB SENTINEL DONGLE LICENSEYou must manually activate a USB dongle license. Once activated, License Manager and the licensed Datamine Discover applications must be installed on each machine the dongle is plugged into (see Moving a USB dongle license).
Note USB Dongle licenses are NOT supported on 64-bit software, such as Datamine Discover 64bit.
TO ACTIVATE A USB (SENTINEL) DONGLE LICENSE FOR THE FIRST TIME:
1. Download and install the License Manager software and select the USB (Sentinel) dongle installation type (see Installation).
2. Install the Sentinel system drivers by running the program: C:\Program Files(x86)\Encom\SentinelSystemDriverInstaller7.5.8.exe
3. Plug-in the USB Sentinel dongle and ensure it is a recognised device.
4. Start the License Manager from within the product. The Create License File dialog box is displayed.
5. Type the Company name and click OK. The License Manager is displayed.
6. Select the Activate License tab.
7. In the License Type box, select <USB Sentinel dongle>.
8. Select the Product you are activating.
9. In the Customer No box, type the 7-digit customer number.
10. In the Serial Number box, type the 10-digit serial number. If upgrading an existing license, the serial number is displayed.
Note The serial and customer numbers are supplied with the purchase or upgrade emails. If you do not know your customer number or serial number, contact customer support at [email protected]
LICENSE ACTIVATION 10
LICENSE MANAGER 8.77 USER GUIDE
11. In the User Name box, type the name of the product user.
12. In the Email box, type the contact email address. Repeat this in the Confirm Email box.
13. If the automatic activation is unable to process the activation request, or you do not have an Internet connection select the Manual/Evaluation option and save the request file by hitting the Save button.
14. Navigate to the activation rquest saved in C:\ProgramData\Encom and email it to [email protected]
Note This is a hidden folder so you may need to enable the view hidden folder option in File explorer.
15. When you receive the activation code by email from the manual request, copy and paste it into the Activation Code field.
Note The activation code will only be valid for computer that submitted the request, and for a limited time period (~2 weeks).
16. Click the Activate button. If the activation is successful, the product is now licensed and ready to use.
To display the license details, see License details.
ACTIVATING A NETWORK SERVER LICENSEYou must manually activate a network server (concurrent or distributable) license.
TO ACTIVATE A NETWORK SERVER LICENSE:
1. Download and install the License Manager software and select the Network Server installation type (see Installation).
Note The server must be installed on a computer separate to the client computer. You will not be able to run any client software on the computer that has been activated for a server license.
2. Start License Manager from the Windows Start button by selecting All Programs>MapInfo>Encom License Manager. The Create License File dialog box is displayed.
3. Type the Company name and click OK. The License Manager is displayed.
4. Select the Activate License tab.
5. Select the Product you are activating.
6. In the Customer No box, type the 7-digit customer number.
7. In the Serial Number box, type the 10-digit serial number. If upgrading an existing license, the serial number is displayed.
Note The serial and customer numbers are supplied with the purchase or upgrade emails. If you do not know your customer number or serial number, contact customer support at [email protected]
8. In the User Name box, type the name of the product user.
9. In the Email box, type the contact email address. Repeat this in the Confirm Email box.
10. If the automatic activation is unable to process the activation request, or you do not have an Internet connection select the Manual/Evaluation option and save the request file by hitting the Save button.
LICENSE ACTIVATION 11
LICENSE MANAGER 8.77 USER GUIDE
11. Navigate to the activation rquest saved in C:\ProgramData\Encom and email it to [email protected]
Note This is a hidden folder so you may need to enable the view hidden folder option in File explorer.
12. When you receive the activation code by email from the manual request, copy and paste it into the Activation Code field.
Note The activation code will only be valid for computer that submitted the request, and for a limited time period (~2 weeks).
13. Click the Activate button. If the activation is successful, the product is now licensed and ready to use.
Note The default Port used by the EncomLM service is 6150. If this port is already in use in your organisation or is blocked by a firewall, you will need to select another port for the License Manager to communicate on or open the port on the firewall.
To display the license details, see License details.
To configure network server licenses, see:
• Connecting and activating a client
• Server management
CONNECTING AND ACTIVATING A CLIENTWhen installing a Datamine Discover product on the client computer, the license server configuration can be specified in the installation dialogs or in a scripted installation (see Silent installation or the product user guide for details). Alternatively, it can be manually configured after installing the product.
Note You do not generally need to install License Manager on the client computer because it is installed with the product. However, if the client version is lower than the license server version, it will need to be upgraded (see Installation).
1. Start the License Manager from within the product. The Create License File dialog box is displayed.
2. Select the Licensed Software tab.
3. Click the Connect to network server button.
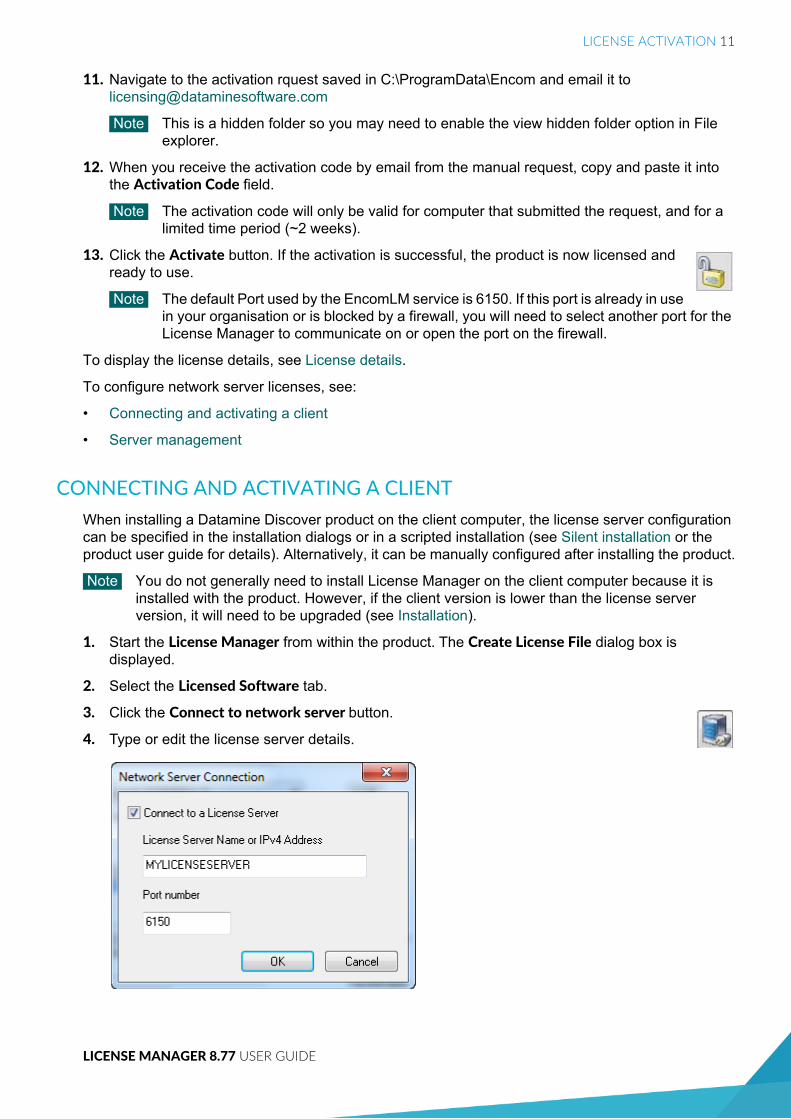
4. Type or edit the license server details.
LICENSE ACTIVATION 12
LICENSE MANAGER 8.77 USER GUIDE
5. Click OK. If the connection is successful, you will now be able to start the Datamine Discover software on the client computer, and it will automatically activate, provided the license is available for the product on the network license server.
LICENSETRANSFER
IN THIS SECTIONTransferring a local license 14Moving a USB dongle license 15Borrowing a network license 15Returning a borrowed license 16
LICENSE TRANSFER 14
LICENSE MANAGER 8.77 USER GUIDE
TRANSFERRING A LOCAL LICENSE Note When you uninstall a licensed product or the License Manager software, the license is not
returned or removed from the computer.
You can transfer a valid license on one computer (the source) to a second computer (the destination). This can be done without contacting Datamine.
On the destination computer:
1. Install the product on the second, destination computer. The License manager is also installed with the application. The version of the software application and License Manager on the source and destination computers must be identical.
2. On the destination computer, start the product. A message is displayed indicating no license was found. Click Yes.
3. The Create License File dialog box is displayed. Type the company name and click OK. The License Manager is displayed.
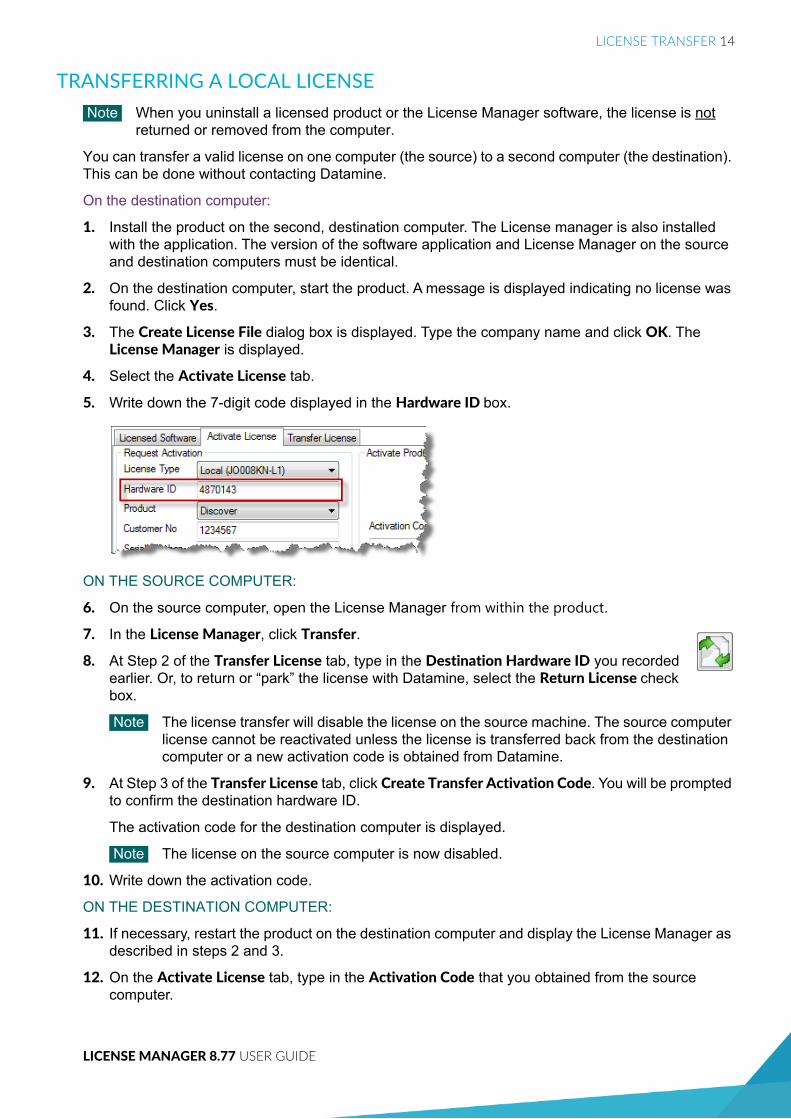
4. Select the Activate License tab.
5. Write down the 7-digit code displayed in the Hardware ID box.
ON THE SOURCE COMPUTER:
6. On the source computer, open the License Manager from within the product.7. In the License Manager, click Transfer.
8. At Step 2 of the Transfer License tab, type in the Destination Hardware ID you recorded earlier. Or, to return or “park” the license with Datamine, select the Return License check box.
Note The license transfer will disable the license on the source machine. The source computer license cannot be reactivated unless the license is transferred back from the destination computer or a new activation code is obtained from Datamine.
9. At Step 3 of the Transfer License tab, click Create Transfer Activation Code. You will be prompted to confirm the destination hardware ID.
The activation code for the destination computer is displayed.
Note The license on the source computer is now disabled.
10. Write down the activation code.
ON THE DESTINATION COMPUTER:
11. If necessary, restart the product on the destination computer and display the License Manager as described in steps 2 and 3.
12. On the Activate License tab, type in the Activation Code that you obtained from the source computer.
LICENSE TRANSFER 15
LICENSE MANAGER 8.77 USER GUIDE
13. Click the Activate button. A message is displayed confirming that the license has been successfully transferred.
14. Click OK.
The application on the destination computer is now licensed and ready to use.
If the transfer was not successful, on the source computer, browse to the C:\ProgramData\Encom folder and open the file Transfer_Log.txt file. This contains a copy of the activation code generated for the license transfer.
Note If you need to transfer the license back to the original machine, you must repeat the transfer procedure.
MOVING A USB DONGLE LICENSEOnce activated, the USB dongle license does not need to be activated again when moved to another computer. The License Manager and the licensed Datamine Discover applications must be installed on each machine the dongle is plugged into
Note USB Dongle licenses are NOT supported on 64-bit software, such as Datamine Discover 64bit.
TO MOVE AN ACTIVATED USB DONGLE LICENSE TO ANOTHER MACHINE:
1. Install the License Manager software and select the USB (Sentinel) dongle installation type (see Installation).
2. Install the Sentinel system drivers by running the program: C:\Program Files(x86)\Encom\SentinelSystemDriverInstaller7.5.8.exe
3. Plug-in the USB Sentinel dongle and ensure it is a recognised device. The corresponding products installed on the machine are ready to use.
BORROWING A NETWORK LICENSEIf distributable licenses are the only license type available and the client computer is configured to point to the license server (see Connecting and activating a client), borrowing a license seat occurs automatically when the application is started (provided there is a free seat for the corresponding program and version available). The license is borrowed for the maximum available borrow time.
TO MANUALLY BORROW A NETWORK LICENSE:
1. Open the License Manager from the Licensing menu option within the product.
2. Select the Transfer License tab.
LICENSE TRANSFER 16
LICENSE MANAGER 8.77 USER GUIDE
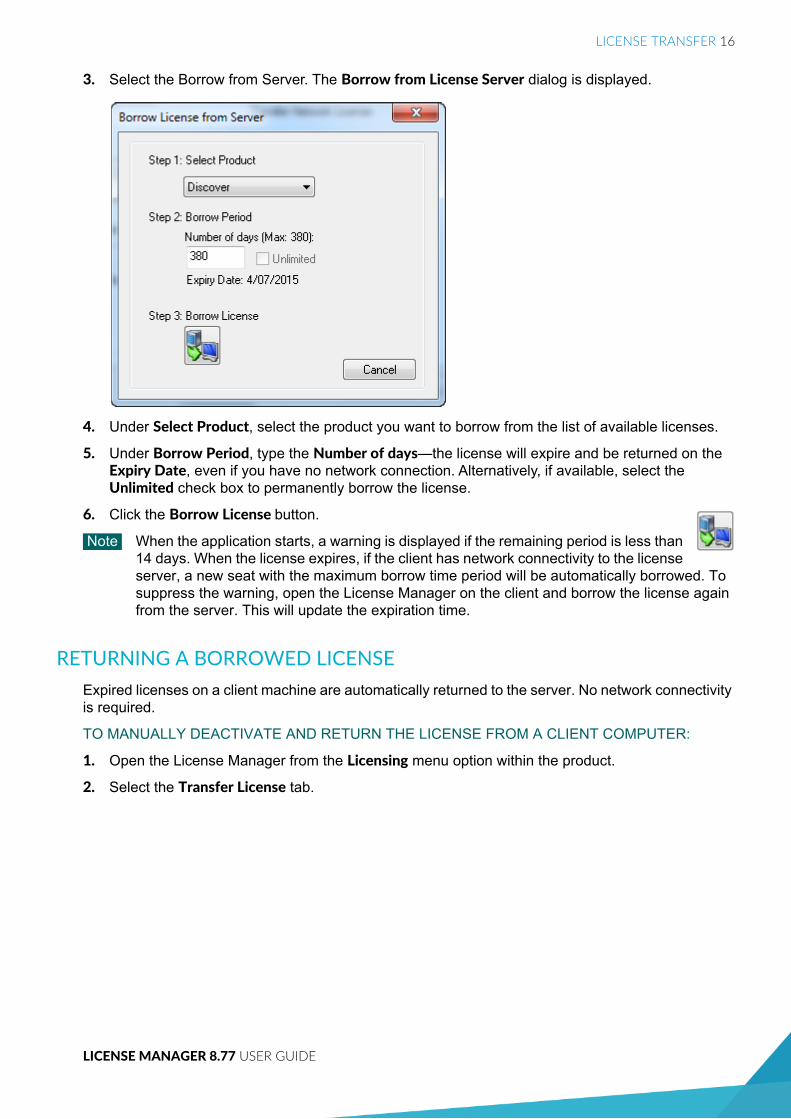
3. Select the Borrow from Server. The Borrow from License Server dialog is displayed.
4. Under Select Product, select the product you want to borrow from the list of available licenses.
5. Under Borrow Period, type the Number of days—the license will expire and be returned on the Expiry Date, even if you have no network connection. Alternatively, if available, select the Unlimited check box to permanently borrow the license.
6. Click the Borrow License button.
Note When the application starts, a warning is displayed if the remaining period is less than 14 days. When the license expires, if the client has network connectivity to the license server, a new seat with the maximum borrow time period will be automatically borrowed. To suppress the warning, open the License Manager on the client and borrow the license again from the server. This will update the expiration time.
RETURNING A BORROWED LICENSEExpired licenses on a client machine are automatically returned to the server. No network connectivity is required.
TO MANUALLY DEACTIVATE AND RETURN THE LICENSE FROM A CLIENT COMPUTER:
1. Open the License Manager from the Licensing menu option within the product.
2. Select the Transfer License tab.
LICENSE TRANSFER 17
LICENSE MANAGER 8.77 USER GUIDE
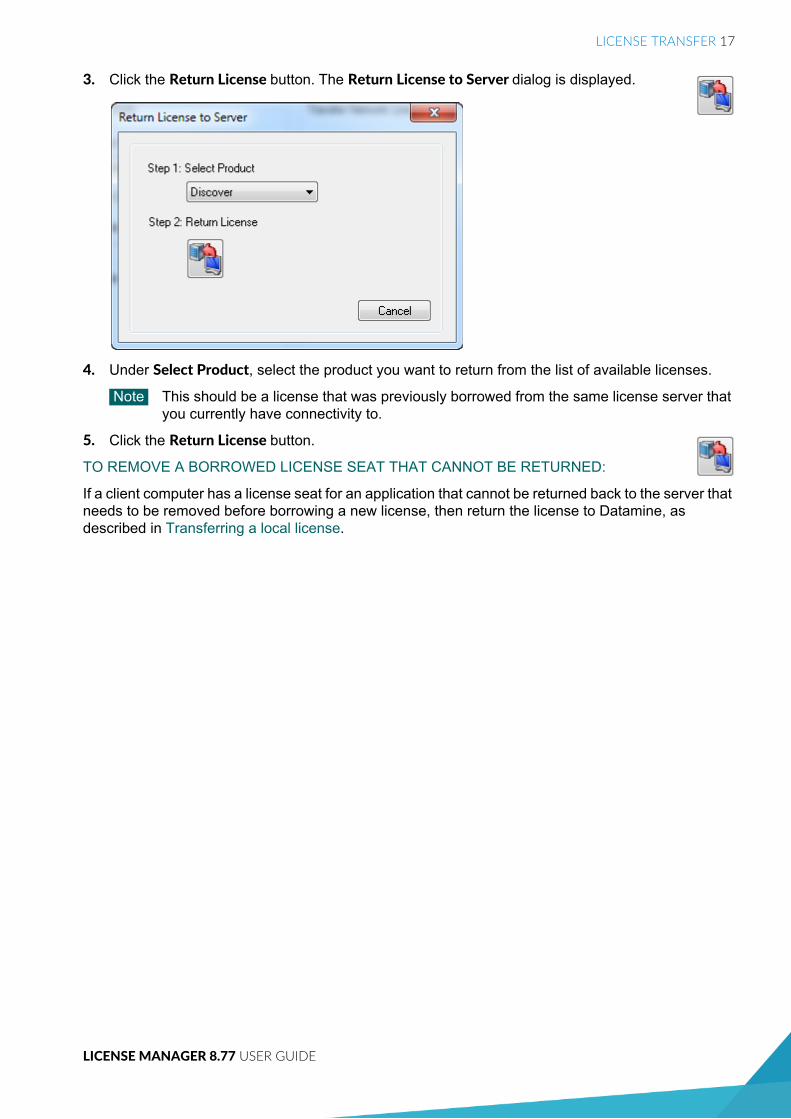
3. Click the Return License button. The Return License to Server dialog is displayed.
4. Under Select Product, select the product you want to return from the list of available licenses.
Note This should be a license that was previously borrowed from the same license server that you currently have connectivity to.
5. Click the Return License button.
TO REMOVE A BORROWED LICENSE SEAT THAT CANNOT BE RETURNED:
If a client computer has a license seat for an application that cannot be returned back to the server that needs to be removed before borrowing a new license, then return the license to Datamine, as described in Transferring a local license.

LICENSEDETAILS
IN THIS SECTIONDisplaying license details 19

LICENSE DETAILS 19
LICENSE MANAGER 8.77 USER GUIDE
DISPLAYING LICENSE DETAILSDetails of local, dongle and network licenses available on a computer can be displayed in License Manager.
TO DISPLAY LICENSE DETAILS:
1. Open the License Manager from the Licensing menu option within the product.
2. Select the Licensed Software tab.
3. Under License Source, in the License Type box, select the license type.
• License Details – Displays details of the available product licenses for the selected license type.
• Licenses in Use – When a network license is selected, displays information about license usage from the server. This is for information purposes only but can help users understand where and to whom licenses are currently deployed (without requiring administrator access to the server).
4. Under License Details, in the Licensed Products box, select a product to display the details of a particular product license:
• Product Options – Displays the options available on the license.
• Serial Number – Displays the license serial number.
• Version – Displays the version number of the licensed product.
• Expires – Displays the expiry date of a borrowed license.
• User Count – If greater than 1, indicates that license is a network server license.
• Is Concurrent – Indicates that license is a server concurrent license.
• Is Borrowed – Indicates that license is a server distributable license.
• Transferrable – Indicates that license can be transferred.
SERVERMANAGEMENT
IN THIS SECTIONServer Administration Console 21Opening the console 21Admin License List 21Max days 22Restricting licenses 22Revoking concurrent licenses 23Restoring lost licenses 23Server status 23Usage and error logs 23
SERVER MANAGEMENT 21
LICENSE MANAGER 8.77 USER GUIDE
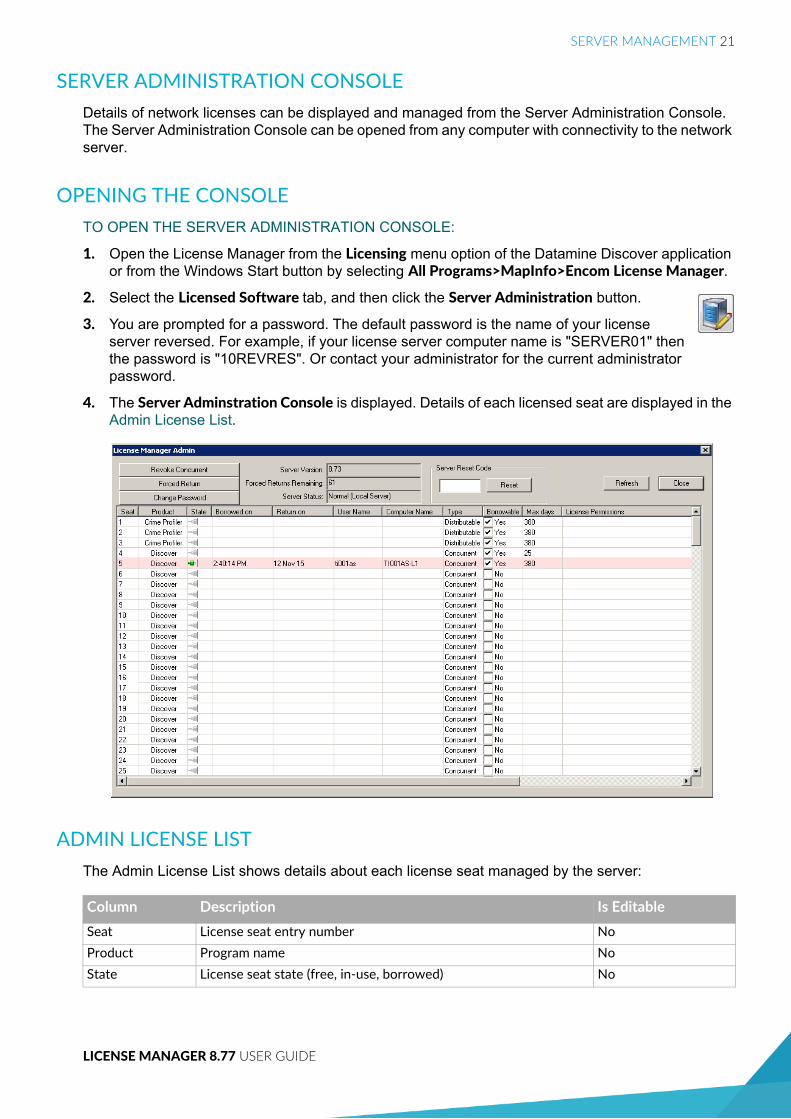
SERVER ADMINISTRATION CONSOLEDetails of network licenses can be displayed and managed from the Server Administration Console. The Server Administration Console can be opened from any computer with connectivity to the network server.
OPENING THE CONSOLETO OPEN THE SERVER ADMINISTRATION CONSOLE:
1. Open the License Manager from the Licensing menu option of the Datamine Discover application or from the Windows Start button by selecting All Programs>MapInfo>Encom License Manager.
2. Select the Licensed Software tab, and then click the Server Administration button.
3. You are prompted for a password. The default password is the name of your license server reversed. For example, if your license server computer name is "SERVER01" then the password is "10REVRES". Or contact your administrator for the current administrator password.
4. The Server Adminstration Console is displayed. Details of each licensed seat are displayed in the Admin License List.
ADMIN LICENSE LISTThe Admin License List shows details about each license seat managed by the server:
Column Description Is Editable
Seat License seat entry number No
Product Program name No
State License seat state (free, in-use, borrowed) No
SERVER MANAGEMENT 22
LICENSE MANAGER 8.77 USER GUIDE
MAX DAYSThis is specified in days and defines the number of days after which the server automatically returns the license seat. The license on the user's computer automatically expires.
The default is 380 days but any number of days may be specified that does not exceed the expiry date (if any) of the actual server license. If no limit is required then enter "U" or "0" for unlimited. The user will then be able to borrow a license seat permanently.
Note When the application starts on the client, a warning is displayed if the remaining period is less than 14 days. When the license expires, if the client has network connectivity to the license server, a new seat with the maximum borrow time period will be automatically borrowed. To suppress the warning, the user can open the License Manager on the client and borrow the license again from the server. This will update the expiration time.
RESTRICTING LICENSESBy default, all license seats are available to all users who are connected on the server. Licenses can be restricted by setting Permissions in the Admin License List as follows:
• To restrict a given license seat to a specific user, enter that user's name, excluding the domain prefix. For example, if the domain is PB and the user name is timb (logon username PB\timb), then enter timb.
• To restrict a specific license seat to one of a group of users, enter multiple users' names separated by semicolons (with OR logic between the names). For example, johnp;maryk;prod.
• You cannot exclude or deny users.
• A named user will still be able to take any unassigned (blank) permissions license, if the license has a longer borrow period specified and the user specifically requests a longer borrow period
• To restrict a license seat to a particular computer, enter the expression “m=computername”. For example, if the computer name is testpc then enter m=testpc.
• You can combine user names and computer names. For example, johnp;m=testpc;sallyn.
• To restrict a license seat to an Active Directory group, enter “cn=groupname”. You cannot combine AD groups with a computer or user names.
Borrowed on Date and time the license seat was borrowed No
Return on Date the Borrowed license seat will be automatically returned No
User Name User name of the current license seat user (or the user who borrowed it)
No
Computer Name Computer name of the current license seat user No
Type Is this license seat a Concurrent or Distributable No
Borrowable Is this license seat available for borrowing. By default concurrent licenses are not available for borrowing, but this may be changed by the administrator.
Yes(concurrent only)
Max days Maximum number of days a license seat can be borrowed (enter U for unlimited). See below for more information.
Yes
License permissions
List of users/groups who have permission to use this license seat. See Restricting licenses.
Yes
Column Description Is Editable
SERVER MANAGEMENT 23
LICENSE MANAGER 8.77 USER GUIDE
REVOKING CONCURRENT LICENSESTo revoke a concurrent license that is in use, select one or more licenses in the Server Administration Console and click the Revoke Concurrent button. Once revoked the user will get a message indicating that their license was revoked.
RESTORING LOST LICENSESThe Admin Console has a very powerful tool for managing distributable licenses that have been lost due to hardware failure, lost computers etc. The system allows a certain percentage (~30%) of licenses to be restored or returned to the available pool.
To restore lost licenses, select the borrowed license seats and click the Forced Return button. A message will be displayed indicating that this operation has been completed and these license seats will immediately become available. The Forced Returns Remaining will decrement.
If you run out of forced returns, contact [email protected].
SERVER STATUSThe Server Administration Console includes an information display showing the status of the license server. The status includes:
• The version number of the License Server
• The number of forced docks remaining
• The operating status of the server
If the operating status of the server is not shown as Normal, the server may not be able to respond to requests for concurrent or distributable licenses. You should contact Datamine support for assistance if this is the case. If a problem is found the Reset button is available but requires a reset code, which can be requested from [email protected].
USAGE AND ERROR LOGSLicense server activity and errors are recorded in the following log files, located in the security folder C:\ProgramData\Encom:
On the license server:
• EncomLMService.log – EncomLM service configuration activity.
• EncomLM.log – General activity and errors.
• EncomLM.lst – Current state of the service.
• EncomLM.xml – Settings file for the Admin console, this can be manually edited to set permissions etc.
On the client:
• EncomLMClient.log – Error log for server communications.
A
about License Manager 2activating 7activating a local license 8activating a USB dongle license 9Admin License List 21automatic activation fails 9
B
borrowing 3borrowing a network license 15
C
command line 6concurrent license 3connecting a client 11
D
distributable license 3downloading 5
H
hardware requirements 2
I
installing 5
L
license details 19license type
local 3server concurrent 3server distributable 3USB dongle 3
local license 3activating 8
returning 14transferring 14
log files 23
M
moving a USB dongle license 15
N
network server license 3borrowing 15configuring 5, 11connecting a client 11logs 23managing 21restoring 23restricting 22returning 16revoking 23status 23
non-silent mode 6
R
restoring network server licenses 23restricting network server licenses 22returning a borrowed network license 16returning a local license 14returning borrowed license 3revoking network server licenses 23
S
Server Administration Console 21server concurrent license 3, 19server distributable license 3, 19silent installation 6silent mode 6system requirements 2
INDEX
T
TCP/IP port 2transferring a local license 14
U
USB dongle license 3activating 9configuring 5moving 15
V
VMWare/VSphere Hyper Visor 2
W
Windows 7 2Windows 8 2Windows 8.1 2Windows Server 2008 2Windows Server 2012 2