Embed Size (px)
Citation preview

GLCD17W2DVD
LCD+DVD Combo

17 "LCD+DVD Combo

IMPORTANT SAFEGUARDS
WARNING: UNDER NO CIRCUMSTANCES MUST THE LIVE OR NEUTRAL
WIRES BE CONNECTED TO THE EARTH TERMINAL INA 3-PIN
MAINS PLUG.
This symbol means that this unit is double insulated.
An earth connection is not required.
IMPORTANTThe wires in the mains lead are coloured inaccordance with the following code:
If your product is fitted with a moulded plugwhich requires replacement please cut off the plug and dispose of safety. The replacementplug should then be rewired as shown in the diagram.
As the colours of the wires in the mains lead of this apparatus may not correspond with the coloured markings identifying the terminals in your plug, proceed as followings.The wire which is coloured green and yellowmust be connected to the terminal which is marked with the letter E, or by the earth symbol( ), or colour green or green and yellow. The wire which is coloured blue must be connected to the terminal which is marked withthe letter N or coloured blue or black.The wire which is coloured brown must be connected to the terminal which is marked withthe letter L or coloured red.This appliance must be earthed.If a 13 AMP (BS 1363) Plug is used, fit an ASTAapproved 3 or 5 AMP Fuse.
BLUE : NEUTRALBROWN : LIVEGREEN & YELLOW : EARTH
GREEN
BLUE(Neutral)
FUSE
BROWN(Live)
&YELLOW(Earth)

Remote Control Buttons............................. 5-6
Location of Controls.................................... 7-8
Front View of TV Set................................... 8 Rear View of TV Set.................................... 8
Installation........................................................ 9 For TV Features.......................................... 9Safety Precautions ................................... 9-10
Before Switching on the TV ................... 10-11
Power Connection .................................... 10
Connections to the Aerial
input socket ............................................... 10
How to connect other devices .................. 10
Inserting batteries in the
remote control handset ........................ 10-11
Switching the TV ON/OFF............................. 11
Operating the TV ...................................... 11-12
Menu menu ............................................... 11
Picture menu ............................................. 11
Sound menu .............................................. 11
Setup menu ............................................... 11
Input Select menu .................................... 12
Tune menu ................................................ 12
PC MODE ...................................................... 12
Installation ................................................. 12
VGA SET menu ................................... 12-13
Teletext Operations ..................................... 13
Peripheral Equipment Connections ........ 14
PC Sound Connection ............................. 14
Via the Scart Sockets ............................... 14
Via Ant Input ............................................. 14
FOR DVD PART
Main Features ........................................... 14
Playback Features .................................... 14
Basic Operation ................................... 14-15
Interactive Function .................................. 15
Other Useful Function Operation ........15-16
Picture Disc Operations ........................... 16
Initial Settings of Setup Menu .............. 17-18
Common Procedures of
Initial Settings ........................................... 17
General Setup Page ................................. 17
Speaker Setup Page ................................ 17
Dolby Digital Setup Page ......................... 17
Preferences Setup Page ......................... 17
Password Change Page ........................... 18
Definition of Terms ......................................... 18
Service Tips(DVD) .......................................... 19
Service Tips(TV).............................................. 20
The Causes of Interference .......................... 21
-4-

2
1
Q.VIEW
PBC
ANGLE
STEP L/R
OSD
EJECT
ZOOM
MIX
AUDIO
PROG
BOOKMARK
SF
POWER
DISPLAY SLEEP
2
5
8
3
6
9
1
4
7TV/AV/DVD
0
MENUVOL VOL
PROG
PROG
SIZE
REP A-B REP RETURN
ENTER
NICAM
RANDOM
SUBTITLE
GO TO
TITLE
INDEX
ROOTMENU
DVDSETUP
10F
CLEAR
SWAP
LANGUAGE
-/---/--
I/II
P.M. OK
MUTE
HOLD SUB.PAGE
REVEAL
Remote Control Buttons
2
4
5
6
7
8
9
11
12
13
14
15
18
19
21
43
42
40
39
37
36
34
32
31
30
29
28
25
24
23
3
10
17
16
20
41
38
35
22
26
1
2
3
8
12
13
14
15
27
28
29
30
37
9
1
1
FOR TV BUTTONS
Power ON/Standby
=Display
=Sleep
0-9=Direct Program
TV/AV/DVD
I/II(option)=Stereo/Bilingual Sound
OK
PROG /
VOL /
SWAP(withDVD Public Button)
MUTE
MENU
P.M.=Picture Mode
Q.VIEW = Quick View
=Programme up/down
=Volume up/down
27
FOR TV TELETEXT BUTTONS(with DVD public buttons)
SUB.PAGE
HOLD
REVEAL
MIX
LANGUAGE
SIZE
INDEX
33
44
33 -/-- = Two or Three Digit
18
19
20
22
23
24
25
**Four Colour Buttons=RED/GREEN /YELLOW/BLUE
-5-

2
1
Q.VIEW
PBC
ANGLE
STEP L/R
OSD
EJECT
ZOOM
MIX
AUDIO
PROG
BOOKMARK
SF
POWER
DISPLAY SLEEP
2
5
8
3
6
9
1
4
7TV/AV/DVD
0
MENUVOL VOL
PROG
PROG
SIZE
REP A-B REP RETURN
ENTER
NICAM
RANDOM
SUBTITLE
GO TO
TITLE
INDEX
ROOTMENU
DVDSETUP
10F
CLEAR
SWAP
LANGUAGE
-/---/--
I/II
P.M. OK
MUTE
HOLD SUB.PAGE
REVEAL
Remote Control Buttons
2
4
5
6
7
8
9
11
12
13
14
15
18
19
21
43
42
40
39
37
36
32
31
30
29
28
25
24
23
3
10
17
16
20
41
38
35
22
26
4
5
6
7
10
16
17
18
19
20
21
22
23
24
25
26
27
31
32
34
35
36
38
39
40
41
1
27
L/R=LEFT/RIGHT
AUDIO
OSD(On Screen Display)
ZOOM
PROG = Programme
A-B REP=A-B Repeat
RETURN
SF=Slow Forward
=Play and Pause
BOOKMARK
=Stop
=Next Button
REP=Repeat
CLEAR
=Direction Buttons
TITLE
10+ =
DVD SETUP
ROOT MENU
ANGLE
42
43
44
FOR DVD BUTTONS
=Previous Button
=Fast Forward
=Fast Reverse
33
34
SUBTITLE
STEP
GO TO
RADOM
PBC
44 EJECT
11 ENTER
-6-

Location of controls
-7-

Location of controls
If you are not going to use this TV set for a long time please disconnect the power plug from the wall outlet.
NOTE
If TV is selected input without signal received and NO operation is performed for about 8 minutes continuously, the TV set will enter standby mode. For any inputs other than TV , the TV set will not enter standby mode automatically without users instruction.
Front View of TV Set
1. EJECT Button(DVD) 2. PLAY/PAUSE Button(DVD) 3. STOP Button(DVD) 4. OK Button(TV) 5. Menu Button 6. PROG.+Button 7. PROG.- Button 8. VOL.+Button 9. VOL.- Button10. Power Switch 11. Power Indicator 12. Speakers
44
55
66
77
88
99
10101212
11
22
33
1212
1111
1*1*
1*The CD contents must be in front.
NOTE
Precautions when connecting to other equipment
When using external equipment with this TV set, please read the instructionmanual of the external
equipment.
Switch off all power supplies to the equipment and TV set before connection.Always ensure that the
input and output terminals are correctly connected.
Rear View of TV Set
1. DC 12V In2. VGA In
PC Audio Right In4. PC Audio Left In5. Antenna Input Socket(75Ohm)6. SCART7. Earphone Socket
3.
33 4455 66 77
Adaptor
ANT INANT IN PHONE PHONE SCARTSCARTLLRR
PC AUDIOPC AUDIO
11
22
L-OUT
R-OUT
COAXIAL
PC INPUT
DC 12V IN
DVD
-8-

Installation
Locate the receiver in the room where direct light
does not strike the screen.
Total darkness or a reflection on the picture screen
can cause eyestrain. Soft and indirect lighting is
recommended for comfortable viewing.
Allow enough space between the receiver and the
wall to permit ventilation.
Avoid excessively warm locations to prevent
possible damage to the cabinet or premature
component failure.
This TV operates on a Dc supply provided by the AC-
DC adaptor. The voltage is as indicated on the label
on the back cover. Only use the AC-DC adaptor
supplied with the TV and never apply an AC mains to
the TV directly. The AC-DC adaptor operates on an
AC mains supply, the voltage is as indicated on the
label of the AC-DC adaptor. Connect the DC plug of
the AC-DC adaptor to the DC 12V socket at the back
of the TV. Connect the AC-DC adaptor and Its mains
cord. Insert the mains plug in the wall socket having
a mains voltage of 100-240V.
Do not install the receiver in a location near heat
sources such as radiator, air ducts, direct sunlight, or
in a place somewhere like close compartment and
close area.
Do not cover the ventilation openings when using the
set.
16:9 Aspect Ratio
System (PAL/SECAM/BG/DK/LL NTSC M)
DVD, CD,CD-R/DIVX 0 0Viewing Angle 176 /176
PC monitor mode (PC/VGA input)
Scart (RGB)
Headphone jack
Sleep Timer
NICAM stereo
Teletext
For TV Features
,
-9-

TV REAL PANEL
100-240V
-10-

Do not use old and new batteries together.
Do not use different types of batteries (for example, Manganese and Alkaline batteries) together.
Note that there are chargeable and non- chargeable batteries. Do not attempt to charge non-chargeable batteries. Remove the batteries from the remote control unit if you do not intend to use the unit for a long time.
Do not drop the remote control unit.
Do not subject the remote control unit to physical shocks.
Keep the remote control unit dry. Wetting it may cause the unit to malfunction.
Replace the batteries with new ones when operation of the unit deteriorates.
Precautions when using batteries
NOTE:
1 2
To turn the TV power OFF
Press the Standby button to switch the TV set to Standby Mode., then disconnect the power plug from the wall outlet.
To turn the TV power ON
connect the DC plug of the AC-DC adaptor to the DC 12V socket at the back of the TV set. Connect the adaptor main cord to the wall outlet, the power indicator turns red and the TV set is in Standby Mode. In Standby Mode, if Standby button is pressed the power indicator will change to green. It takes a few seconds before the picture appears.
Operating the TV
Press MENU button to enter main menu. In the main menu select submenu using PROG+/- buttons and enter the submenu using the OKbutton .To understand the use of the menus,refer to the menu system section.
This TV set allows the adjustment of any settings by selecting from the menu screens.
Press this button to display main menu, including Picture, Sound, Setup, Tune, VGA setup and Exit items. You can select them by pressing the PROG+/- or VOL+/- buttons, and enter the submenu press the OK button.The selected item will change to highlight colour.
Menu button
Picture
MENUVOL VOL
PROG
PROG
P.M. OK
MUTE S.SYS
Picture menu
Picture
Bri
ColShp
48
502
60
PICTURE menu by pressing VOL+/- or OK button.Enter Picture menu, you can select brightness, Contrast, Colour, Sharpness and Hue(in NTSC system) items by pressing PROG+/- buttons. You can adjust the item selected by pressing VOL+/-.
Sound menu
Sound
VolBal
3550
Press MENU button to enter the main menu. In the main menu, select SOUND by using PROG+/- or
VOL+/-buttons,then enter the SOUND menu by pressing OK button.Enter the Sound menu, you can adjust Volume and Balance by pressing VOL+/-.
Enter this menu, you can select Input Select ,Language, Aspect ,Factory Reset, Hpos and Vpos items by pressing PROG+/- buttons. You can adjust the horizontal and vertical position of OSD on the screen by pressing VOL+/- buttons, or enter the submenu including the Input Select menu,
Setup menu
SetupInput select
HposVpos
3250
Factory Reset
Language Aspect
Press MENU button to enter the main menu. In the main menu, select SETUP by using PROG+/- or VOL+/- buttons,then enter the SETUP menu.
Switching the TV ON/OFF
Press MENU button to enter the main menu. In the main menu, select PICTURE by using PROG+/- or VOL+/- buttons, then enter the
-11-

Language menu, Aspect menu and Factory Reset menu by pressing OK button. In Aspect submenu you can select the display mode among 16:9, 4:3 mode 1 and 4:3 mode 2(except for VGA input).
In Input Select submenu you can select the signal source, TV, DVD, SCART or VGA.
Input Select menu
InPut Select
TV
ScartVGA
DVD
In this menu you can complete the tuning function.Select the Sound SYS(for UK this should be set to I), adjust the item to correct sound system, then select the Auto Search item and press OK button to begin channel search. After completing the search, the program will go to Channel NO.0. The picture will appear and sound will be heard.
Tune menu
Tune
Program
MSTSearch
SkipBand
Auto SearchSound SYS
1
49.75MHZ
OFFV-L
I
1. Program In this item, you can store the program number which are watching, and change the number by VOL+/-.2. Skip You can set ON by VOL+/- buttons if you want to skip the channel which you are watching.3. Band You can select V-L, V-H or UHF.4. MST Frequency fine turn. To tune in weak station this item must be used.5. Search Press VOL+/- buttons to start searching. The VOL- button decrease the frequency, the VOL+ button increase the frequency.6. Auto Search Press OK button to start search program automatically from V-L to UFH, the searched program will be stored automatically in order of reception.7. Sound SYS You can select BG, DK, I ,ll or M.I is the default for the UK.
Press MENU button to enter the main menu. In the main menu, select TUNE by using PROG+/- buttons, then enter the TUNE menu.
‘
15 Pin Mini D-Sub Connector
VOL+/- or OK buttons. This menu is only for PC monitor mode (VGA input).1. Auto Config Select auto config to adjust the screen position automatically. It will take a few seconds and during this process the screen will be black.2. Clk Press the VOL+/- to minimize any vertical bars or stripes visible on the screen background.3. Phs When necessary, adjust the pixel phase of the picture to avoid picture interference.4. Hpos/Vpos Press the VOL+/- buttons to adjust the picture Horizontal and Vertical position.
VGA SET menu
Setup
Auto Config
HposVpos
ClkPhs
Press MENU button to enter the main menu. In the main menu, select VGA SET by using PROG+/- buttons, then enter the VGA SET menu by pressing
Monitor Display modes
SVGA
MODE
640X480 31.5KHz 60HzVGA
XGA
ResolutionHorizontalFrequency
VerticalFrequency
800X600 37.9KHz
48.4KHz1024X768
60Hz
60Hz
-12-
This unit can be used as a PC monitor to connect to a PC use a standard 15 pin cable.(Not Supplied)

NOTE:1.If the set is cold, there may be a small "flicker" when the set is switched on. It is normal. There is nothing wrong with the set .2.If possible , use the VESA 1024X768@60HZ video mode to obtain the best image quality for your LCD monitor. Under other resolutions some scaled or processed pictures may appear on the screen. 3. Some dot defects may appear on the screen ,like red. green or blue. Spots, However, this will have no impact or effect on the monitor performance.4. Do not press the LCD screen with your finger for a long time as it may incur some damage to the screen.
Press these buttons to access directly to the
corresponding pages displayed at the lower
part of the Teletext screen.
Press this button to reveal the hidden information
for some Teletext pages (e.g. answers to puzzles
or riddles). Press again to hide the information.
Press this button to change the Teletext screen
display mode among the following:
Teletext Operations
Several languages are supported for teletext by
this TV set, and are divided into three language
groups. Press this button to select the teletext
language.
Press this button to hold the Teletext page on
display to prevent the page from changing.
Some Teletext pages(e.g. P250)may contain
several sub-pages. Press this button once,
"P250/---" will be displayed on screen. Enter
number buttons (0-9) to display the sub-page if
available. Press this button again to exit from
sub-page mode.
Select a TV station on which Teletext is being transmitted.Press mix button, usually the list of contents(index) is displayed on the screen.
TELETEXT PAGE UP / DOWN
buttons
Press these buttons to increase or decrease the Teletext page number.
PROG
PROG
PAGE NUMBER SELECTION buttons
Press the number buttons to select a Teletext
page number.
COLOUR button
INDEX button
Press this button to go to the index page.
LANGUAGE button
REVEAL button
SIZE button
- Upper half screen enlarged
- Lower half screen enlarged
- Normal screen state
HOLD button
Press again to release the hold state.
SUB.PAGE button
-13-

Make sure any connections to the PC Audio in Socket are removed.
If an external device is connected to the. TVvia the scart socket the TV will switch to AV mode automatically.
PC Audio L inPC Audio R in PCAudio Output
FOR DVD PART
Main Features
-Fully compatible with DVD,DIVX,CD,CD-R,CD-
RW, MP3, DVD-RW , DVD+RW, KODAK PICTURE
CD .
-Compatible with full DVD playback functions:
multi-angle, multi-language, multi-story, parental
control, etc.
-Audio output: 2ch mixed, stereo output, Coaxial
digital output, liner PCM decoding output.
-
3-step zoom/smooth scan.
-Skipping ahead and skipping back.
-Multi-speed slow motion playback.
-3-step zooming playback.
-3-way repeat playback
-Numeric selection
24-bit/96kHz audio D/A converter.
-
Playback Features
Basic OperationPress EJECT button to load or eject the disc.
Hold the disc without touching either of its surfaces,
with the printed title side facing to front, and insert it
into the disc slot, then the disc will be automatically
loaded, and the set will automatically read the
disc.In case of interactive DVDs with playback
control, a menu appears on the screen.
Press PLAY button to start playback. Press PAUSE
button to pause playback.
When this button is pressed once, the unit records
the stopped point, from where playback will resume
(resume function) if PLAY is pressed afterwards.
But if STOP button is pressed again instead of PLAY
button, there will be no resume function.
Stop button( )
Play and pause button( )
-14-

FR/FF button( / )
Press these buttons to go to the previous/next
chapter(DVD) When Playing CD disc , press these
buttons twice to select previous song.
Prev/next button( / )
These buttons allow skipping ahead/back at 5
different speeds. Press PLAY button to return to
normal playback.
SF button:
Press this button , you can play the disc slow
Forward.
Step button
You can watch frame by frame by pressing
this button.
" "& Enter buttons
Their functions is to choose the previous or next
song to be displayed.
L/R button
Press this button consecutively and the audio output
will change as follows:
MONO-LEFT MONO-RIGHT STEREO
Interactive Function
Subtitle button
Press this button, to change the subtitle language
from the one selected at the initial settings to a
different language, if available.
Angle button
Some DVDs may contain scenes which have been
shot simultaneously from a number of different
angles. For these discs, the same scene can be
viewed from each of these different angles by using
the ANGLE button.
Audio button
Press this button, to change the audio language
from the one selected at the initial settings to a
different language, if available.
OSD button
Press this button once to show playback information
on the LCD screen and press it again to show
playback time. Press this button for the fifth time,
and then the display will be cancelled.
Zoom button
Press this button during normal, zoom in, zoom out,
slow or still playback mode.
Press this button to magnify
picture and use direction buttons " " to select
the required part of the zoomed picture.
This player can magnify
a picture upto 3 times.
Title button:
DVD disc:
Press TITLE button, then the DVD menu or titles
available on the disc will be displayed. Then you can
use " " and ENTER button to select items.
Root Menu button
If playing some DVD discs , press this button back
to root menu screen . If playing DVDs you can use
the functions of ROOT MENU, PROGRAM and
RANDOM.
Other Useful Function Operation
Repeat button
Using this function you can repeatedly play a title
(DVD) or all tracks(CD) when " ALL " appears on
the LCD screen ,You can repeatedly play a
chapter(DVD) or a single track(CD) when " "
appears on the LCD screen ,The repeat function is
cancelled when no " " appears on the LCD
screen .
A-B repeat button
You can repeatedly play a given portion by operating
as follows:Press this button once to define the
start point press this button again to define the
end point. And then the portion will be played
repeatedly. Press this button again to return to
normal playback.
Program button:
When you want to play only partial tracks/chapters
of a disc(DVDs) or to arrange the tracks/chapters
playback order, to use the Program function:Press
PROGRAM button. Then "PROGRAM" appears on
the screen. Press the track number in the required
order. For example, if the track numbers you want
to play are 1, 3 and 8, just input in the order of
1-3-8.You can press CLEAR button to cancel and
input again if you mis input track numbers.Now
you can press " " and "ENTER" button to select
"START"option and Playback the programmed
tracks.
-15-

Numeric buttons(0-9):
You can select desired titles(DVD) by pressing these
buttons directly only if the title or track number is
less than 10.If the title or track number is over 10.
For instance ,if "28" is wanted, press "10+" twice,
and then press the 2nd-digit number "8".
[DVD only]
TITLE XX/XX CHAPTER [ ]/XXX
[DVD only]
DISC GOTO TRACK GOTO T: XX
[DVD only]
CHAPTER XX/XX TIME
[CD]
Go to button
Press this button to go to desired position. The
player provides 3 search mode.
When the above items are shown on the screen,
you can input numbers to locate a required section
or chapter, then press PLAY to start playback.
Random button
Press this button, to play tracks randomly, and pressing it again will cancel random playback.
Picture Disc Operations
Press OPEN/CLOSE:
Insert a picture CD label side to the front, the system
will search automatically. After searching, the
direction arrows and PLAY button can be used to
choose the option required. Also the numeric
buttons can be used to select directly. Press
NEXT/PREV/STOP buttons to control.
Optional Play Modes:
SINGLE - Play the selected song or JPEG picture once and stop.
REP-ONE - Play the same song or JPEG picture over and over.
FOLDER - Play the contents of the current folder.
FOLDER R - Repeat play contents of the current folder. - Randomly play songs or JPEG pictures in the current directory, forever and ever.
Sixteen slideshow transition modes are provided, use "PROGRAM" button to select:
mode 1: wipe top
mode 2: wipe bottom
mode 3: wipe left
mode 4: wipe right
mode 5: diagonal wipe left top
mode 6: diagonal wipe right top
mode 7: diagonal wipe left bottom
mode 8: diagonal wipe right bottom
mode 9: extend from center h
mode 10: extend from center v
RANDOM
mode 11: compress to center h
mode 12: compress to center v
mode 13: window h
mode 14: window v
mode 15: wipe from edge to center mode 16: random
Image transformation
There are four modes of transformation: "Invert",
"Mirror","Left" and "Right". The arrow keys are used
to select.
Up - Invert/Normal
Down - Mirror/Normal
Left - Turn left
Right - Turn right
Zoom
Press ZOOM button to enter ZOOM mode. Then press"FF"/"REV" button zoom in/out.
Bookmark button:
When playing DVD/CD disc, press this button to
mark a place where required.
BOOK MARK
Press Enter key to mark /play;
Press clear key to cancel.
You can use¡° ¡¡¡±key to select different content to
mark /play.
Note: during ZOOM function, slide show transition and image transformation are disabled.
Stop
The "Stop" key is used to enable PICTURE menu
mode when in stop state. After it is enabled, up to 12
scaled down jpeg pictures will be displayed on the
screen. The " " keys can be used to display
the next/prev twelve pictures. By pressing "direction
and ENTER" key the corresponding picture will be
enlarged to fill screen, and the digest mode will be
cancelled.
Prev & Next
-16-

Setup Menu
DVD DISPLAY
ANGLE MARK
OSD LANGUAGE
SPDIF OUTPUT
DVD CLOSED CAP.
SCREEN SAVER
GENERAL SETUP PAGE
Press DVD SETUP button to open the setup menu.
Use direction buttons " " to select the preferred
item .
To exit the setup menu ,press SETUP again to revert
to the TV display.
The following menu items can changed:
GENERAL SETUP :selects the GENERAL PAGE menu.
SPEAKER SETUP: selects the SPEAKER SETUP PAGE
menu.
DOLBY DIGITAL SETUP :selects the DOLBY DIGITAL
SETUP menu.
PREFERENCE: selects the PREFERENCES PAGE
menu.
GENERAL SETUP PAGE
4 : 3 PAN SCAN4 : 3 LETTERBOX16 : 9
ONOFF
SPDIF OFFALLPCM ONLY
ENGLISHFRENCHITALYSPANISH
ONOFFON
OFF
The following me u items can be changed:
DVD DISPLAY: selects the aspect ratio of the play-
back picture.
4 :3 : pan scan display.
4 :3 : letterbox display.
n
/ PS &
/ LB
16 : 9: widescreen display.
ANGLE MARK: viewing angles change option(if avail-
able). See changing the angles on
page 9.
SPDIF OUTPUT: select audio output :SPDIFOFF, ALL,
PCM ONLY.
DVD CLOSED CAP.: this is to turn on/off captions.
(Subtitles)
SCR SAVER: this is to turn on/off screen saver.
SPEAKER SETUP PAGE
LT / RTSTEREO
SPEAKER SETUP PAGE
DOWNMIX
LT/RT:2 CH output, main channel with surround.
STEREO: 2 CH output, main right channel with right
surround; main left channel with left surround.
The following menu items can be changed:
DUAL MONO: Reproduction mode, used only when
the input consists of two independent audio channels
(1/1 mode). Possible selections are:
STEREO: Reproduce both channels as is.
L-MONO: Reproduce the left channel only.
R-MONO: Reproduce the right channel only.
MIX-MONO: Mix both channels.
The default is STEREO.
DYNAMIC: Dynamic range compression.
DOLBY DIGITALSETUP PAGE
STEREOL-MONOR-MONOMIX-MONO
FULL/4
/2/
OFF
DOLBY DIGITAL SETUP PAGE
3
11 4
DUAL MONO
DYNAMIC
PREFERENCES SETUP PAGE
AUDIO
SUBTITLE
DISC MENU
PARENTAL
PASSWORD
DEFAULT
ENGLISHFRENCHSPANISHITALYCHINESEKOREAN RUSSIANTHAI
ENGLISHFRENCHSPANISHITALYCHINESEKOREAN RUSSIANTHAI
ENGLISHFRENCHSPANISHITALYCHINESEKOREAN RUSSIANTHAI
1 KID SAF2 G 3 PG4 PG 135 PGR6 R7 NC-178 ADULTOFF
CHANGE
PREFERENCES PAGE
RESET
The following menu items can be changed:
AUDIO: Selects a language for audio(if available).
SUBTITLE: Selects a language for subtitles(if avail-
able). no subtitles are display after selecting OFF.
DISC MENU: Selects a language for title menus or
DVD menus(if available).
PARENTAL [DVD only]: This is to disable the playing
of specified DVDs which are unsuitable for children.
Some DVDs are encoded with specific rating level.
If the rating level of the disc is higher than that
preset in the setup operation, playback of the disc
will be prohibited. After selecting one of the
PARENTAL items,the screen will change to the
PASSWORD page, and password is required. The
factory setting is 1369.
PASSWORD[DVD only]: Change the PASSWORD.
-17-

OLD PASSWORD [ XXXX ]
NEW PASSWORD [ YYYY ]
CONFIRM PASSWORD [ YYYY ]
PASSWORD CHANGE PAGE
OK
PASSWORD CHANGE PAGE
OLD PASSWORD: Enter the OLD password, (Factory
setting is 1369), and the cursor will jump autom
atically to NEW PASSWORD.
NEW PASSWORD: Enter the NEW password. Enter
4 digits from the remote control unit numeric
buttons, and the cursor will automatically jump to
CONFIRM PASSWORD.
CONFIRM PASSWORD: Confirm the NEW password
by entering it again. If the confirmation is incorrect,
the cursor will stay in this column. After entering,
the correct new password again ,the cursor will
jump automatically to OK.
OK: When cursor is on this button ,press ENTER key
to confirm setting.
DEFAULT: Back to the factory setting.
Definition of Terms
Recorded onto some DVD discs are scenes which
have been simultaneously shot from a number of
different angles(the same scene is shot from the
front, front the left side, from the right side, etc.).
With such discs, the ANGLE button can be used to
view the scene fromdifferent angles.
ANGLE
This refers to a high-density optical disc on which
high-quality pictures and sound have been recorded
by means of digital signals. Incorporating a new
video compression technology(MPEG II) and high-
density recording technology, DVD enables
esthetically pleasing full-motion video to be recorded
over long periods of time(for instance, a whole movie
can be recorded).DVD has a structure consisting of
two 0.6mm thin discs which are adhered to each
other. Since the thinner the disc, the higher the
density at which the information can be recorded,
a DVD disc has a greater capacity than a single 1.2
mm thick disc. Since the two thin discs are adhered
to each other, there is the potential to achieve
double-sided play sometime in the future for even
longer duration play.
DVD
CHAPTER NUMBER
SUBTITLES
These numbers are recorded on DVD discs. A title is
subdivided into many sections, each of which is
numbered, and specific parts of video presentations
can be searched quickly using these numbers.
These are the printed lines appearing at the bottom
of the screen which translate or transcribe
the dialogue. They are recorded on DVD discs.
TIME NUMBER
TRACK NUMBER
This indicates the play time which has elapsed from
the start of a disc or a title. It can be used to find
a specific scene quickly. (It may not work with some
discs.)
These numbers are assigned to the tracks which are
recorded on Cds. They enable specific tracks to
be ocated quickly.
-18-
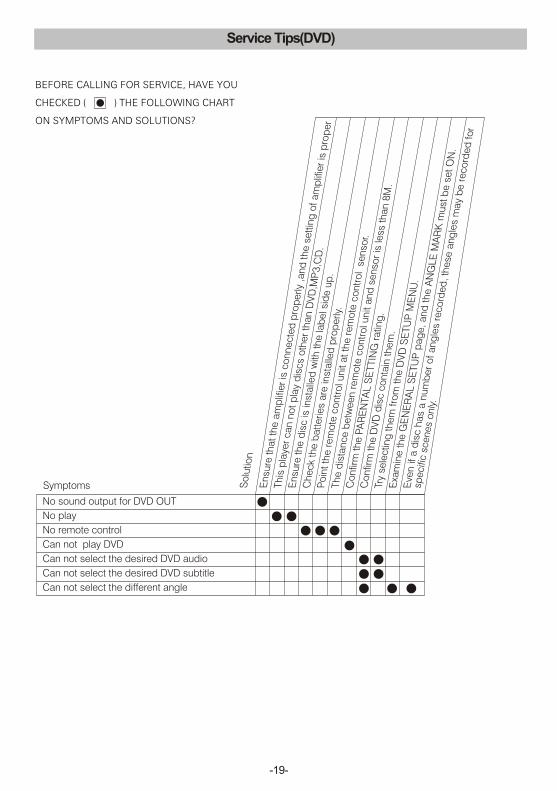
BEFORE CALLING FOR SERVICE, HAVE YOU
CHECKED ( ) THE FOLLOWING CHART
ON SYMPTOMS AND SOLUTIONS?
No sound output for DVD OUT
No play
No remote control
Can not play DVD
Can not select the desired DVD audio
Can not select the desired DVD subtitle
Can not select the different angle
Symptoms Ensu
re th
at th
e a
mp
lifie
r is
co
nnecte
d p
rop
erly
,and
th
e s
ett
ing
of am
plif
ier
is p
rop
er
Th
is p
laye
r can n
ot p
lay
dis
cs
oth
er
than D
VD
,MP
3,C
D.
Ensu
re th
e d
isc is
inst
alle
d w
ith th
e la
bel s
ide u
p.
Ch
eck
the b
att
eries
are
inst
alle
d p
rop
erly.
Po
int th
e r
em
ote
co
ntr
ol u
nit
at th
e r
em
ote
co
ntr
ol
senso
r.
Th
e d
ista
nce b
etw
een r
em
ote
co
ntr
ol u
nit
and
senso
r is
less
th
an 8
M.
Co
nfir
m th
e P
AR
EN
TAL S
ET
TIN
G r
atin
g.
Co
nfir
m th
e D
VD
dis
c c
onta
in th
em
.
Try
sele
ctin
g th
em
fro
m th
e D
VD
SE
TU
P M
EN
U.
Exa
min
e th
e G
EN
ER
AL S
ETU
P p
ag
e, and
th
e A
NG
LE
MA
RK
mu
st b
e s
et O
N.
Eve
n if
a d
isc h
as
a n
um
ber
of ang
les
reco
rded
, th
ese
ang
les
may
be r
eco
rded
fo
r
So
lutio
n
specifi
c s
cenes
only
.
Service Tips(DVD)
-19-

Please make these simple checks asindicated ( ) on the chart for therespective symptoms and their possibleremedies.
No picture, no sound
Poor sound, picture OK
Poor picture, sound OK
Weak picture
Blurred picture
Double image
Lines in picture
Distorted picture
Weak reception on some channels
Horizontal bars
Picture rolls vertically
Poor colour
No colour
Misoperation of Remote control
Remote control unit no operation
On Screen Display Control outside the screen
Try
diff
ere
nt ch
annel,
if O
K, p
rob
ab
ly s
tatio
n tro
ub
le
Ch
eck
aerial c
onnectio
ns
on b
ack
of se
t
Ch
eck
aerial f
or
bro
ken w
ires
Re-o
rient aerial (
if in
do
or
typ
e)
Pro
bab
ly lo
cal i
nte
rfere
nce, su
ch
as
an a
pp
liance
Ad
just
fin
e tu
nin
g c
ontr
ol
Ad
just
brig
htn
ess
co
ntr
ol
Ad
just
co
ntr
ast
co
ntr
ol
Ch
eck
if st
atio
n is
bro
ad
cast
ing
co
lou
r
Ad
just
co
lou
r co
ntr
ol
Ch
eck
if sy
stem
is c
orr
ectly
set
Ch
eck
if o
n/o
ff s
witc
h is
"o
n"
Ch
eck
batt
eries
in r
em
ote
co
ntr
ol u
nit
Po
ssib
le R
em
ed
ies
Symptoms
Service Tips(TV)
-20-

Incorporated in your TV receiver are the most up-to-date devices to eliminate interference.
Local radiation however, can create disturbances which visibly affect your picture. Proper
installation, a good aerial are your best safe-guards against these disturbances.
RF INTERFERENCE
Moving ripples across the screen are caused by nearby transmitting or receiving-short-wave
radio equipment.
DIATHERMY
Herringbone pattern and partial picture loss can result from the operation of diathermy
equipment from a nearby doctor's surgery or hospital.
SNOW
Weak TV signals from long distant stations result in an instead picture and give the effect of
falling snow. An antenna adjustment or antenna amplifier may be needed.
GHOST
Multiple image caused by TV signals reflected back from surrounding buildings, hills, aircraft,
etc. is minimized by correct aerial positioning.
CAR IGNITION
Nearby cars and electrical motors can cause small streaks across the picture or make the
picture roll.
The Causes of Interference
-21-