Embed Size (px)
Citation preview
Zendesk® User's GuideLast update: January 31, 2012
Anton de Young, Zendesk Inc.

2 | Zendesk User's Guide | Introduction
Notice
Copyright and trademark notice© Copyright 2009–2012 Zendesk, Inc. All rights reserved.
Zendesk® User's Guide
The information in this document is furnished for informational use only, is subject to changewithout notice, and should not be construed as a commitment by Zendesk, Inc. Zendesk, Inc.assumes no responsibility or liability for any errors or inaccuracies that may appear in thisdocument. The software described in this document is furnished under license and may only be usedor copied in accordance with the terms of such license.
Zendesk is a registered trademark of Zendesk, Inc. All other trademarks are the property of theirrespective owners.
Zendesk - 989 Market St, Ste 300 - San Francisco - CA 94103 - USA
www.zendesk.com

4 | Zendesk User's Guide | Copyright and trademark notice
Zendesk User's Guide | TOC | 5
Contents
Preface: Welcome to the Zendesk User's Guide................................xiii
Chapter 1: Zendesk glossary................................................................ 15
Chapter 2: Help desk basics..................................................................27Understanding help desk user roles............................................................................................ 28
End-users, or customers.................................................................................................. 28Agents, admins, account owner...................................................................................... 28User references in business rules.................................................................................... 30
About organizations and groups................................................................................................. 31Organizations and groups defined.................................................................................. 31End-users and organizations........................................................................................... 31Agents and groups...........................................................................................................32How groups support organizations................................................................................. 33How to use your organizations and groups.....................................................................33Admin and agent roles for users, groups, and organizations.......................................... 34
Streamlining the help desk workflow......................................................................................... 35Ticket handling shortcuts................................................................................................35Triggering actions when tickets are created or updated..................................................36Using time to streamline workflow.................................................................................38Using ticket events to notify external targets..................................................................39Using tags to manage workflow..................................................................................... 39
About searching the help desk.................................................................................................... 40Security best practices.................................................................................................................43
1. Increase password security......................................................................................... 432. Never give out user names, email addresses, or passwords........................................433. Limit the number of agents with administrator access............................................... 444. Routinely audit your Zendesk account....................................................................... 445. Remotely authenticate users with single sign-on........................................................446. Restrict access to your help desk using IP restrictions............................................... 457. Turn SSL on for your account.................................................................................... 45
Chapter 3: Managing people................................................................ 47Adding and managing users........................................................................................................48
Adding end-users............................................................................................................ 48Adding agents................................................................................................................. 48Adding admins................................................................................................................ 49Promoting an agent to the admin role............................................................................. 50Assigning an admin to account owner............................................................................ 50How end-users add themselves to the help desk.............................................................50Editing and deleting users...............................................................................................51Multiple email addresses for user accounts.................................................................... 51Merging a user's duplicate account................................................................................. 51Assuming a user..............................................................................................................52
6 | Zendesk User's Guide | TOC
Suspending a user........................................................................................................... 53Bulk importing users and organizations..................................................................................... 54
Limitations of bulk importing users and organizations.................................................. 54Creating the CSV organization data file......................................................................... 54Importing the CSV organization data file.......................................................................55Creating the CSV user data file...................................................................................... 55Importing the CSV user data file.................................................................................... 57
Creating, managing, and using groups........................................................................................59Editing and deleting groups............................................................................................ 59Adding agents to groups................................................................................................. 59Assigning tickets to groups.............................................................................................60Using groups in business rules........................................................................................60Creating views and reports by group.............................................................................. 63
Creating, managing, and using organizations............................................................................. 65Automatically adding users to organizations based on their email domain....................65Mapping a group to an organization............................................................................... 65Shared organization for end-users.................................................................................. 66Editing and deleting organizations..................................................................................66Manually adding users to organizations......................................................................... 66Restricting an agent to one organization.........................................................................67Creating views and reports by organization....................................................................67
Adding tags to users and organizations...................................................................................... 69Enabling user and organization tagging..........................................................................70Adding tags..................................................................................................................... 70Managing user and organization tags............................................................................. 71User and organization tags in business rules.................................................................. 71User and organization tag placeholders.......................................................................... 72Limiting access to forums with user and organization tags............................................72Searching for user and organization tags........................................................................ 73
Creating agent display names..................................................................................................... 74
Chapter 4: Tickets and channels.......................................................... 75About ticket fields.......................................................................................................................76Adding and using custom ticket fields........................................................................................80
Organizing drop-down list options................................................................................. 82Custom fields and tags.................................................................................................... 83
Sharing tickets between Zendesk help desks.............................................................................. 85Setting up a ticket sharing agreement............................................................................. 86Sharing a ticket............................................................................................................... 87Unsharing a ticket........................................................................................................... 88Opting out of all sharing invites......................................................................................89Deactivating a sharing agreement...................................................................................89Referring to shared tickets in business rules...................................................................89
Setting up Zendesk Voice........................................................................................................... 91Voice trial, subscription, and billing...............................................................................91Getting started, selecting a telephone number................................................................ 91Enabling the voice channel and configuring the general settings...................................93Selecting voice greetings................................................................................................ 94Using the call activity dashboard....................................................................................95Reviewing call history.................................................................................................... 96Testing your voice channel............................................................................................. 97Setting up business rules to track and manage voice tickets.......................................... 98Agents allowed to accept phone calls............................................................................. 99
Zendesk User's Guide | TOC | 7
Using Zendesk Voice................................................................................................................100The incoming call workflow: how live calls and voicemails become tickets...............100Merging tickets when a new call is about an existing ticket.........................................105Searching for voice tickets............................................................................................106
Chapter 5: Streamlining the help desk workflow............................. 107Creating ticket handling shortcuts with macros........................................................................108
Zendesk macros to get you started................................................................................108Creating macros............................................................................................................ 108Creating macros from existing tickets.......................................................................... 110Applying macros to tickets........................................................................................... 111Editing and cloning macros.......................................................................................... 111Deleting and deactivating macros.................................................................................112
Organizing your macros............................................................................................................113Reordering the list of macros........................................................................................113
Streamlining workflow with ticket updates and triggers.......................................................... 114Zendesk triggers to get you started............................................................................... 115Creating triggers............................................................................................................116Reordering triggers....................................................................................................... 122Editing and cloning triggers..........................................................................................122Deleting and deactivating triggers................................................................................ 123
Streamlining workflow with time-based events and automations............................................ 124Creating automations.................................................................................................... 125Editing and cloning automations.................................................................................. 130Reordering your automations........................................................................................131Deleting and deactivating automations.........................................................................131
Using placeholders....................................................................................................................132Placeholders for custom fields...................................................................................... 132
Using tags..................................................................................................................................134Automatic ticket tagging...............................................................................................134Setting tagging options................................................................................................. 135Manually adding tags to tickets and forum topics........................................................ 135Deleting tags................................................................................................................. 136Analyzing tag activity................................................................................................... 136Creating views based on tags and tag sets.................................................................... 136Searching for tickets by tags......................................................................................... 137Using tags in macros, triggers, and automations.......................................................... 137
Filtering business rules............................................................................................................. 139Sorting shared macros and views..................................................................................139Sorting macros by category.......................................................................................... 140
Notifying external targets......................................................................................................... 141Setting up a target......................................................................................................... 141Managing your targets.................................................................................................. 142Using targets in automations and triggers.....................................................................143
Chapter 6: Views, reporting, and performance................................ 145Using views to manage ticket workflow...................................................................................146
Adding views................................................................................................................ 149Editing and cloning views.............................................................................................153Deleting and deactivating views................................................................................... 153Reordering views.......................................................................................................... 153Adding the Ticket Views widget.................................................................................. 154
8 | Zendesk User's Guide | TOC
Monitoring ticket activity and agent performance with reports................................................155Zendesk reports to get you started................................................................................ 156Creating reports.............................................................................................................157Exporting reports.......................................................................................................... 159Editing and cloning reports...........................................................................................161Deleting reports.............................................................................................................161
Using customer satisfaction ratings.......................................................................................... 162Logging in not required to rate tickets..........................................................................162Agents cannot rate tickets............................................................................................. 163Sending the survey request........................................................................................... 163Use a trigger instead of the automation........................................................................ 163How agents receive the satisfaction rating feedback.................................................... 164Enabling customer satisfaction rating...........................................................................165Request customer satisfaction rating automation......................................................... 165Customer satisfaction rating placeholders.................................................................... 166Creating customer satisfaction reports..........................................................................167
Analyzing forum activity.......................................................................................................... 170How statistics are calculated.........................................................................................171How you can use forum activity statistics.................................................................... 172
Chapter 7: Configuring and using your email channel....................173Getting started with email in Zendesk...................................................................................... 174
Forward email to Zendesk from external email addresses............................................174Use your own email domain for incoming and outgoing email....................................175Change the email addresses used in outgoing email notifications................................175Customize your email templates...................................................................................178System generated registration and welcome email messages.......................................178Email messages generated by business rules................................................................ 179Agent email settings......................................................................................................179Use email domains to control access to your help desk................................................179Use email to manage users............................................................................................179Multiple email address support.....................................................................................180Suspended tickets and spam email................................................................................180
Forwarding email from other email providers.......................................................................... 181Check your suspended view for forwarding verification email....................................181
Using an external email domain............................................................................................... 182Forward your incoming support mail to Zendesk.........................................................182Allow Zendesk to send outgoing mail on behalf of your email domain.......................182Update the default reply email address in Zendesk...................................................... 183Personalized email replies with external default email reply addresses....................... 184
Changing the default reply email address.................................................................................185Setting up email pass through................................................................................................... 187Enabling personalized email replies......................................................................................... 189Using the whitelist and blacklist to control access to your help desk.......................................191
Whitelist and blacklist usage examples........................................................................ 192Marking tickets as spam and suspending users.............................................................193
Managing suspended tickets..................................................................................................... 194Reasons why tickets get suspended.............................................................................. 194Viewing suspended tickets............................................................................................195Deleting or recovering suspended tickets..................................................................... 196Setting up suspended ticket notifications......................................................................196
Customizing your email templates............................................................................................198Before............................................................................................................................198
Zendesk User's Guide | TOC | 9
After.............................................................................................................................. 199Editing the HTML template..........................................................................................199Editing the text email template..................................................................................... 202Editing the text in the mail delimiter and supporting other languages......................... 203
Setting up an email-only help desk...........................................................................................206Updating end-user settings to create an open help desk............................................... 207Modifying the email HTML template...........................................................................208Removing help desk URLs from notification triggers..................................................209Hiding end-user access links in the Web portal............................................................209
Chapter 8: Searching the help desk................................................... 211Zendesk search reference..........................................................................................................212
AND / OR searches.......................................................................................................212Search operators............................................................................................................213Searching for properties that have no data....................................................................214Using the type keyword................................................................................................ 214Searching by date..........................................................................................................215Searchable ticket property keywords............................................................................ 215Searchable user property keywords.............................................................................. 217Searchable organization property keywords.................................................................218Searchable group property keywords............................................................................219
Searching users, groups, and organizations.............................................................................. 220The user and type keywords......................................................................................... 220Searching users............................................................................................................. 221Searching for users by email domain............................................................................222Searching groups...........................................................................................................222Searching organizations................................................................................................ 223
Searching tickets....................................................................................................................... 224Searching ticket user roles............................................................................................ 226Searching custom fields................................................................................................ 227Ordering and sorting ticket search results.....................................................................227
Chapter 9: Customizing and extending your help desk................... 229Using Liquid markup to customize comments and email notifications....................................230
A brief introduction to Liquid markup..........................................................................230Using Liquid markup in Zendesk................................................................................. 231
Zendesk data object (placeholders) reference...........................................................................234User data....................................................................................................................... 234Organization data.......................................................................................................... 235Ticket data.....................................................................................................................236Comment data............................................................................................................... 237Satisfaction rating data..................................................................................................238
Setting up anonymous ticket submissions with Zendesk for Wordpress..................................239Setting up remote authentication for WordPress...................................................................... 241Setting up and using the Zendesk for Wordpress plugin.......................................................... 243
Installing the Zendesk for Wordpress plugin................................................................243Configuring the plugin settings.....................................................................................243Submitting a request from the dashboard..................................................................... 246Using the ticket widget................................................................................................. 246Converting a blog post comment into a ticket.............................................................. 248
10 | Zendesk User's Guide | TOC
Chapter 10: Supporting multiple languages..................................... 249Configuring your help desk for your locale and language........................................................250
Setting your help desk time zone and format................................................................250Translating system-generated new user email notifications......................................... 251Adding translated text to the agent signature................................................................251Translating the text in the default automations, macros, triggers................................. 252Configuring your Web portal to support your language...............................................252Creating a Feedback Tab in a different language......................................................... 254Disabling keyboard shortcuts........................................................................................256
Configuring your help desk to support multiple languages...................................................... 258Selecting the languages you want to support................................................................258Setting and detecting a user's language.........................................................................260Setting your business hours.......................................................................................... 260Displaying forum content based on language...............................................................261Using a requester's language in your business rules..................................................... 262
Providing multiple language support with dynamic content.................................................... 266Creating dynamic content............................................................................................. 267Managing the translation of your dynamic content...................................................... 273Using your dynamic content......................................................................................... 273
Exporting and importing dynamic content............................................................................... 275Exporting dynamic content for translation................................................................... 275Importing the translated CSV files............................................................................... 276
Chapter 11: Zendesk Enterprise........................................................ 277Advanced ticket sharing with Zendesk Enterprise....................................................................278Custom agent roles....................................................................................................................280
Creating agent roles...................................................................................................... 280Assigning Enterprise agent roles.................................................................................. 283
Archiving email notifications................................................................................................... 285Restricting access to your help desk......................................................................................... 286Setting up to manage multiple brand help desks...................................................................... 287
Step 1: Contact Zendesk to set up help desk accounts..................................................288Step 2: Set up the ticket sharing agreements................................................................ 288Step 3: Create the ticket sharing triggers for each branded help desk.......................... 289Step 4: Disable business rules in the branded help desk that notify agents..................290Step 5: Create business rules for tracking and managing shared tickets...................... 291How the user experience and workflow are affected....................................................292
Analyzing your business rules.................................................................................................. 293
Chapter 12: CSS Cookbook................................................................ 295How to customize the help desk using CSS..............................................................................296
Adding a global CSS widget.........................................................................................296Inspecting the help desk page elements........................................................................ 297Next steps......................................................................................................................298
Setting the page width and removing the page border..............................................................299Before............................................................................................................................299After.............................................................................................................................. 299CSS code.......................................................................................................................299
Replacing the header logo and title...........................................................................................301

Zendesk User's Guide | TOC | 11
Before............................................................................................................................301After.............................................................................................................................. 301CSS code.......................................................................................................................301
Customizing the page footer..................................................................................................... 304Before............................................................................................................................304After.............................................................................................................................. 304CSS code.......................................................................................................................304
Customizing the top menu bar.................................................................................................. 306Anatomy of the menu bar............................................................................................. 306Before............................................................................................................................307After.............................................................................................................................. 307CSS code.......................................................................................................................307
Changing the content area background color............................................................................310Before............................................................................................................................310After.............................................................................................................................. 311CSS code.......................................................................................................................311
Changing the font settings of the main content area.................................................................312Before............................................................................................................................312After.............................................................................................................................. 312CSS code.......................................................................................................................312
Formatting the forum content headings.................................................................................... 314Before............................................................................................................................314After.............................................................................................................................. 314CSS code.......................................................................................................................314
Customizing the tickets table.................................................................................................... 316Before............................................................................................................................316After.............................................................................................................................. 317CSS code.......................................................................................................................317
Customizing the sidebar............................................................................................................318Before............................................................................................................................318After.............................................................................................................................. 319CSS code.......................................................................................................................319
Customizing the alert message bar........................................................................................... 321Before............................................................................................................................321After.............................................................................................................................. 321CSS code.......................................................................................................................321
Change the color of the views drop-down menu...................................................................... 322Before............................................................................................................................322After.............................................................................................................................. 322CSS code.......................................................................................................................323
Source code for CSS customization examples..........................................................................324

12 | Zendesk User's Guide | TOC
Preface
Welcome to the Zendesk User's GuideThe Zendesk User's Guide describes how to set up, manage, and customize your help desk. It isintended for Zendesk account owners and administrators, and also agents with access permissions tothe administrative features of Zendesk.
Note: This guide does not yet contain descriptions of all of the Zendesk features. It is a work inprogress. If you can't find the information you're looking for, search the Zendesk Support forums.
• Zendesk glossary• Help desk basics• Managing people• Tickets and channels• Steamlining the help desk workflow• Views, reporting, and performance• Configuring and using your email channel• Searching the help desk• Customizing and extending your help desk• Supporting multiple languages• Zendesk Enterprise• CSS Cookbook

xiv | Zendesk User's Guide | Introduction
Chapter
1
Zendesk glossaryThe glossary describes the key concepts and terminology used throughout Zendesk and is a goodplace to get started learning how to use the help desk.
Administrator
Administrators are agents with additional privileges to manage and customize the help desk.Administrators can be assigned tickets like agents but they may also do the following:
• Access all tickets (not just the tickets they are assigned to)• Create new business rules (automations, macros, SLA service targets, triggers, views)• Access and edit all help desk business rules (automations, macros, SLA service targets,
triggers, views)• Access and edit all help desk extensions (widgets, targets, etc.)• Create reports• Edit all reports• Access settings pages (account, security, channels, etc.)• Access all forums with moderator privileges• Add and manage end-users, agents, and admins• Promote agents to the admin role• Create groups and organizations• Assume another user's identity
Advisor
This is a Zendesk Enterprise agent role. Advisors manage the workflow and configure the helpdesk. They create or manage shared automations, macros, triggers, and views. They also set upthe service level agreements, channels, and extensions. Advisors don't solve tickets, they canonly make private comments. For more information, see Custom agent roles.
Agent
Agents are the bulk of the help desk support staff. They are assigned tickets and interact withcustomers as needed to resolve support issues. The agent's role and privileges in the help deskare defined by administrators and may include the following:
• May be added to more than one group (must be added to at least one)• Add end-users• Add public or private comments or both to tickets• Create and edit their own macros• Moderate and manage articles in the forums
16 | Zendesk User's Guide | Zendesk glossary
• Access tickets in one of the following ways:
• All tickets in the help desk• Only tickets assigned to the group or groups to which they belong• Only tickets received from the organization to which they belong• Only tickets that they are assigned to
Agent collision
Agent collision is a feature that alerts your agents when another agent is viewing and possiblyupdating the same ticket. When this happens, an alert is displayed at the top of the ticket (thisalert is also displayed in views that are formatted as tables). This helps prevent agents fromtrying to make updates to the same ticket at the same time.
Agent signature
An agent signature is a standard text signature that can be appended to all public commentsmade by agents. An administrator can choose to include the placeholder {{agent.signature}} inthe template (Settings > Agents) to enable agents to add their own signatures. Agents cancustomize their signature on their profile page.
Assignee
Assignee is the agent assigned to a ticket. Assignee is used throughout the help desk (includingmacros, views, automations, triggers, and reports) to refer to or set the assigned agent.
Assignee stations
This is the number of agents who have successively been assigned to a ticket. This is used as acondition in triggers.
Assume a user
Agents can log in to the help desk as another user. This is referred to as assuming a user. Thisallows agents to troubleshoot help desk issues (for example, why a trigger or automation isn'tworking). Agents can then easily revert back to their own identity. See Assuming a user.
Automation
Automations are similar to triggers because both define conditions and actions that modifyticket properties and optionally send email notifications to customers and the support staff.Where they differ is that automations run when a time event occurs (from one hour to 28 days)after a ticket property was set or updated, rather than immediately after a ticket is createdor updated. For more information, see Streamlining workflow with time-based events andautomations.
Blacklist
The blacklist is used to suspend email received from domains and addresses that you specify.It can be used along with the whitelist to, for example, suspend an email domain while alsoallowing one or more specific email addresses from the same domain to be accepted into thehelp desk. For more information, see Using the whitelist and blacklist to control access to yourhelp desk.
Zendesk User's Guide | Zendesk glossary | 17
Bulk import
Rather than add users manually one at a time, you can add many users in a bulk import. To dothis, you create a CSV (comma separated values) file that contains the user's data. You can alsoimport organization data. For more information, see Bulk importing users and organizations.
Business hours
Business hours are the days of the week and times of day that your help desk is available torespond to requests. By enabling business hours for your help desk, you can include businesshours in triggers.
Business rules
Business rules is used to refer to the help desk features that enable you to customize andmanage the support workflow: automations, macros, SLA service targets. triggers, and views.More information about business rules can be found here: Streamlining the help desk workflow.
Business rules analysis
In the Enterprise version of Zendesk, you can view and analyze all of your business rules to seehow they are being used. For more information, see Analyzing your business rules.
Category
Categories are used to organize forums into groups. They are the top level organizing elementin the forums. Categories contain forums and forums contain articles. You can create anunlimited number of categories and order them on the forums page as needed.
Channels
Channels are the ways that you can engage with your customers (how they create supportrequests and how you communicate with them). All channel communication is recorded ontickets. You choose and configure the channels you want your help desk to support. Channelsinclude:
• Email• Web portal• Twitter• Chat• Voice• Zendesk Feedback Tab• Zendesk API
To set up channels, select Settings > Channels.
Chat
Similar to MSN Messenger, AIM, Google Talk, or Facebook Chat, your customers can textchat with your agents. Zendesk Chat is available when submitting a support request via theFeedback Tab or when an end-user is logged into the Web portal and viewing a ticket. The textof the chat session is added to the ticket.
Comment

18 | Zendesk User's Guide | Zendesk glossary
When a ticket request is submitted it contains a subject and a description. All follow-upcommunication on the ticket is contained in comments. Agents add comments, macros andtriggers and automation can add comments, and the requester can add comments. There aretwo types of comment: public and private. Everyone, including those CC'd on a ticket, can seepublic comments but only support staff can see private comments.
CSS customization
To more closely match the look of your company's web site, you can modify the defaultelements and styles in your help desk using CSS (cascading style sheets) code. Zendesk allowsyou to modify your help desk using CSS widgets, which can be added by an administrator. Formore information, see How to customize the help desk using CSS.
Current user
Current user is a reference to the last person who updated the ticket, which is not necessarilythe same person who is assigned to the ticket. The current user (whoever updated the ticketlast) changes whenever the ticket is updated. And, the update may have been made by theassignee, the requester, or someone who was CC'd on the ticket.
Custom agent roles
In the Enterprise version of Zendesk, you can define your own agent roles and assign thoseroles to any agent in your help desk. This allows you to define agent roles that suit your ownorganizational structure and workflow. For more information, see Custom agent roles.
Custom ticket fields
You can add custom fields to tickets and they can be visible to agents only or to both agentsand end-users. Your visible custom fields appear on your support request form in the Webportal and in the Feedback Tab. Custom fields are typically used to gather more informationabout the support issue or product or service. You can add the following types of custom fields:drop-down list, text, multi-line text, numeric, decimal, checkbox, regular expression. For moreinformation, see Adding and using custom ticket fields.
Customer
This is often used interchangeably with end-user. See End-user.
Customer satisfaction rating
Your end-users (customers) can provide feedback about their experience with your help deskand support team by rating their solved tickets. For more information, see Using customersatisfaction rating.
Dashboard
A dashboard is an area of the help desk that displays summary information and vital statisticsfor the user. For example, the agent dashboard is displayed at the top of the home page whenan agent logs in and it contains vital statistics such as the number of open tickets assigned bothto the agent and the agent's groups.
Dynamic content
In the Plus+ and Enterprise versions of Zendesk, you can create dynamic content that can thenbe referenced via a placeholder in automations, macros, triggers and by many of the system
Zendesk User's Guide | Zendesk glossary | 19
generated messages such as those sent in email notifications when a user creates an account.Dynamic content is a powerful tool for streamlining your multiple language support becausethe appropriate version of content is automatically displayed to users based on their language.For more information, see Using dynamic content to provide multiple language support.
Email forwarding
When you set up a Zendesk account, your help desk is given a default email address thatcustomers can use to submit support requests. Many accounts prefer to use their own emailaddresses rather than use the Zendesk provided address. You can use email forwarding toaccept email at your own address (for example, [email protected]) and then forward it toyour Zendesk address ([email protected]). You can also forward any prefixto @mycompany.zendesk.com and then set up triggers and automations from there.
Email notifications
Email notifications can be generated via a trigger or automation when a ticket is updated.Common notifications include a new public comment added to the ticket or a change to theticket status.
Email-only help desk
Many help desks prefer to not require their end-users to log in to the Web portal. They providethe same level of service, but their end-users don't have access to the Web portal to view ortrack their requests. Instead, all communication between agents and end-users occurs usingchannels such as email, and voice, and chat. For more information, see Setting up an email-only help desk.
Email pass through
When forwarding email from external email addresses or using an external email domain foroutgoing email, the Reply From address (the address that end-users see in email responses totheir support requests) can be configured to use the same email address that was used to submitthe request. For more information, see Setting up email pass through.
End-user
End-user refers to people who generate support requests from any of the available supportchannels (Web portal, email, Twitter, etc.). End-users do not have access to any of theadministrator and agent features of the help desk. They can only submit and track ticketsand communicate with agents publicly (meaning their comments can never be private).End-users may also be referred to as customers. For more information about user roles, seeUnderstanding help desk user roles.
Extensions
Extensions are tools that extend the functionality of the help desk. For example, you can addCSS and JavaScript widgets to customize the look or functionality of your help desk or youcan enable integrations with cloud-based software applications and services such as Salesforce,Google Analytics, and Constant Contact - just to name a few. Extensions can be configured byagents with administrator permissions (Settings > Extensions).
External email domain
20 | Zendesk User's Guide | Zendesk glossary
You can change your email address to an email domain other than myaccount.zendesk.com,making it appear that it originated from your own email address ([email protected]). Formore information, see Using an external email domain.
Feedback Tab
The Feedback Tab provides quick access for your end-users to search your knowledge base,submit a support request, or chat with an agent. It's displayed as a tab placed along the edgeof the Web browser. The Feedback Tab can be added to your help desk or any other web site(such as your company web site). This feature used to be referred to as the Zendesk Dropbox.
Forums
Forums, when not used in the general sense, refers to the second level of organization aftercategories. Forums contain articles. Each forum can be assigned to only one category. You canassign viewing permissions to forums. For example, forums can be viewable by everyone, onlylogged in users, only agents, or only specified organizations. You can also control moderation,forum content types (articles, ideas, and questions), and who can contribute content.
Forum analytics
In the Plus+ and Enterprise versions of Zendesk, you can closely monitor how active yourknowledge base and forums are using the Stats dashboard. For each category and forum,you see activity data for the last 30 days. This includes the number of new topics created,how many users have viewed the topics, and the total number of votes, subscriptions, andcomments. For more information, see Analyzing forum activity.
Group
Groups are used to create collections of agents. How you define groups is entirely up to you.You might create groups by skill (software vs hardware) or to reflect the organizations theyserve (for example, a support group might serve only customers in a certain region or timezone). Agents can belong to more than one group. End-users cannot be added to groups, onlyorganizations. For more information, see About organizations and groups and Creating,managing, and using groups.
Group stations
This refers to the number of groups that have successively been assigned to a ticket. This isused as a condition in triggers.
Host mapping
Host mapping (also referred to as domain mapping) is the ability to map your defaultZendesk domain URL to a different URL. For example, rather than using http://support.mycompany.zendesk.com you may want your help desk URL to contain yourcompany's name, like this: http://support.mycompany.com. You need to configure this withyour domain provider.
Knowledge base
Knowledge base is often used interchangeably with forums (see Forums). The Zendesk forumsallow you to create topics and arrange them into forums and categories. You can use theforums to create a knowledge base of support information for your products and services. Yourend-users may be allowed to comment on topics or new create new topics themselves.

Zendesk User's Guide | Zendesk glossary | 21
Legacy agent
This is a Zendesk Enterprise agent role. If you upgrade your account to the Enterprise version,this role is used for all agents who have not been assigned to one of the other Enterprise roles.Each agent's permissions are the same as they had previously on the plan you upgraded from. Ifyou assign all your agents to Enterprise agent roles, this role will disappear. You cannot selectthis agent role, it's only used to designate agents not yet assigned Enterprise roles. For moreinformation, see Custom agent roles.
Light agent
This is a Zendesk Enterprise agent role. Zendesk Enterprise provides you with unlimitedinternal usage in the form of light agents. Light agents can be CC'd on and view tickets,add private comments to tickets within their groups, view reports, access and create topicsin private, agent-only forums. They cannot be assigned to or edit tickets. You can add anunlimited number of light agents at no charge. For more information, see Custom agent roles.
Liquid markup
Liquid markup is the templating language we use to enable placeholders (Using placeholders).You can also use Liquid markup to customize how this data is selected and displayed as outputin ticket comments and email notifications. For more information, see Using Liquid markup tocustomize comments and email notifications.
Macro
A macro is a prepared response or action that agents can use to quickly respond to supportrequests that can be answered with a standard response or to modify a ticket. Macros containactions, which can be updates to ticket properties. Agents manually apply macros when theyare creating or updating tickets. Macros can also be organized into categories to help agentsquickly locate them. For more information, see Creating ticket handling shortcuts with macros.
Multiple brand help desk
In the Enterprise version of Zendesk, you can manage support for multiple brands by linkingseparate branded help desks to a central help desk. Support requests are received by thebranded help desks and are automatically shared to the central help desk, which contains thesupport agents who resolve the requests. One team of agents supports all of your brands. Formore information, see Setting up to manage multiple brand help desks.
Non-restricted agent
A non-restricted agent is an agent who has access to all tickets. In other words, they have notbeen restricted to only the group or groups to which they belong, the organization they belongto, or to the tickets they have been assigned to. The ability to refer to these agents may beuseful when creating triggers.
Organization
Organizations are collections of users (agents and end-users). How you set up yourorganizations is entirely up to you. Agents and end-users can be added to only oneorganization. Once you create them, you can use organizations throughout the help desk todefine views, as criteria for assigning tickets, as conditions in automations and triggers, to
22 | Zendesk User's Guide | Zendesk glossary
define access to forums, and in your reports. For more information, see About organizationsand groups and Creating, managing, and using organizations.
Owner
The account owner is a type of administrator. The account name is associated with this person'sname, usually the person who created the account. There can only be one account owner;however, account ownership can be reassigned by the account owner to another administratorif needed. The account owner has access to areas of the help desk that other administratorsdo not, such as invoicing, payment options, and benchmarking for the account. For moreinformation about user roles, see Understanding help desk user roles.
Personalized email replies
The email address used in replies to end-users can be configured to show the agent'sname as the friendly name rather than your help desk name. For example, "Claire Grenier<[email protected]>" instead of "MondoCam Support Center<[email protected]>". For more information, see Enablingpersonalized email replies.
Placeholders
Placeholders are references to ticket and user data that you include in the subject and textof email notifications. Without placeholders it would be impossible to create automaticnotifications. You'd have to manually enter this data for each ticket. Placeholders are containedin double curly brackets, like this: {{ticket.assignee.name}}. You can view the list of availablesystem placeholders in the help desk when creating macros (for example). Custom fields canalso be referenced as placeholders. For more information, see Using placeholders.
Priority
Each ticket is assigned a priority. There are four values for priority: Low, Normal, High, andUrgent. The ticket priority is used throughout the help desk to generate views and reports andit's also used as conditions and actions in automations and triggers and as actions in macros.
Remote authentication
Remote authentication is one of the two Single Sign-On services available in Zendesk. Theother is SAML. See Single Sign-On.
Reports
Reports are detailed snapshots of collections of tickets within a time period. You can use manyof the ticket properties to define the types of tickets that you want to monitor with a report. Formore information, see Using reports to monitor ticket activity and agent performance.
Requester
Requester refers to the person who made the support request. Requester is used throughout thehelp desk (including macros, views, automations, triggers, and reports) to refer to the personwho generated the support request.
Restricted agent
Zendesk User's Guide | Zendesk glossary | 23
The term restricted agent is used for agents whose ticket access has been limited to one of thefollowing:
• All tickets (can also add, modify and assume end-users)• Tickets requested by users in this agent's organization (also can't see forums restricted
to other organizations)• Tickets assigned to this agent only
An agent's access can be restricted via their user profile.
SAML
Secure Assertion Markup Language (SAML) is one of the two Single Sign-On servicesavailable for remotely authenticating users, the other is Remote Authentication. SAML allowsyou to provide Single Sign-on (SSO) for your help desk using enterprise identity types such asActive Directory and LDAP.
Shared organization
A shared organization refers to allowing all users within an organization to see all of theorganization's tickets and, optionally, allowing those users to comment on each other's tickets.An administrator can set up shared organizations (it's an option available when creating orediting an organization). You also have the option of granting this privilege to select end-usersinstead. You set this up in the user's profile. See Shared organization for end-users.
Single Sign-On
Single Sign-On refers to a security option in Zendesk that allows you to authenticateusers remotely, which means that it is handled outside of Zendesk. You can use remoteauthentication or SAML authentication. When users attempt to log in to Zendesk their loginrequest is routed to a remote authentication or SAML service to authenticate the user'scredentials. When verified, users are redirected back to Zendesk and logged in.
SLA (Service Level Agreement) service targets
Service Level Agreements, or SLA’s are typically an agreed upon measurement of the averageresponse and resolution times that your support delivers to your customers. Providing supportbased on service levels ensures that you are delivering measured and predictable service,and have greater visibility when there are problems. SLA Service Targets in Zendesk can bedefined so you and your agents can better monitor your service level performance and meetyour service level goals.
Staff agent
This is a Zendesk Enterprise agent role. A Staff agent's primary role is to solve tickets. Theycan edit tickets within their groups, view reports, and add or edit personal views and macros.For more information, see Custom agent roles.
Status
Each ticket is assigned a status. There are five values for status: New, Open, Pending, Solved,Closed. The ticket status is used throughout the help desk to generate views and reports and it'salso used as a condition in automations, macros, and triggers. The status can only be changedto closed via automations and triggers (not manually).
24 | Zendesk User's Guide | Zendesk glossary
Support request
This term is used to describe what end-users create, via the Web portal or any of the otherchannels such as email and Twitter, when they request support. Support requests becometickets in the help desk. To end-users, a ticket is a support request and this is the term used inthe Web portal (for example, Submit a request and Check your existing requests).
Suspend a user
Users can be suspended, which means that they are no longer able to log in to the help desk andany new support requests you receive from the user are sent to the suspended tickets queue. Formore information, see Suspending a user.
Suspended ticket
Based on a number of factors (such as an email being flagged as spam) some of the emailcoming into your help desk may be suspended or even rejected. Email messages that aresuspended are added to the suspended tickets queue from where they can be recovered ordeleted. For more information, see Managing suspended tickets.
Tag
To help you categorize, act on, or search for tickets and forum articles, you can add tags. Tagscan be added to tickets automatically based on the words in the request, manually by agents,or via triggers, automations, and macros. Once added, you can create views by tags, search fortags and the tickets in which they are included, and use tags in your triggers, automations, andmacros. For more information, see Using tags.
Target
There may be times when you want to notify an external system about a new ticket or animportant state change to a ticket (for example, send a message when a high priority tickethas not been resolved after a specified amount of time). By setting up external targets you cancommunicate with many cloud-based applications and services (such as Twitter and Twilio) aswell as HTTP and email. For more information, see Notifying external targets.
Team leader
This is a Zendesk Enterprise agent role. Team leaders have greater access to the help desk thanstaff agents. They can read and edit all tickets, moderate forums, and create and edit end-users,groups, and organizations. For more information, see Custom agent roles.
Ticket
Support requests received from any of the help desk channels (see Channels) become tickets.Each ticket is assigned to an agent to solve and all activity related to solving the supportrequest is captured as details within the ticket. The entire help desk is built around receiving,managing, and solving tickets. Ticket data includes Subject, Email, Description, Status, Type,Priority, Group, Assignee, Tags, and any other custom fields you create. Each ticket requires asubject, email address, and description.
Ticket sharing
Tickets can be shared between help desks so that you collaborate only solving tickets. Youestablish sharing agreements with other help desks and specify the terms under which sharing
Zendesk User's Guide | Zendesk glossary | 25
can occur, and how shared tickets are managed between help desks. For more information, seeSharing tickets between help desks.
Trigger
Creating or updating tickets in Zendesk generates events. You can use these events toautomatically modify tickets and send email notifications. For example, when a new ticketis created Zendesk sends an email confirmation to the person who generated the ticket (therequester). The mechanism that enables this is called a trigger. Using triggers, you can alsoautomatically assign a ticket to a specific support agent or support group based on the emailaddress it was sent to, the organization to which the requester belongs, or keywords containedin the request message. For more information, see Streamlining workflow with ticket updatesand triggers.
Type
Each ticket is assigned a type. There are four values for type: Question, Incident, Problem,Task. The ticket type is used throughout the help desk to generate views and reports and it'salso used as a condition in automations, macros, and triggers.
User tagging
Tags can be added to users and organizations and these tags can then be used in business rulesto manage the ticket workflow and to restrict access to forums. For more information, seeAdding tags to users and organizations.
View
Views define a collection of tickets based on a set of criteria (expressed as conditions).Views can be formatted to be displayed as lists or tables and you can specify who can accessthem. You create and use views to define collections of tickets such as "My open tickets" or"Recently solved tickets" for example. For more information, see Using views to manage ticketworkflow.
Voice
The Zendesk Voice channel integrates live telephone support into your help desk. Agentsmake themselves available to receive calls and their conversations with customers are recordedand added to tickets. When agents are unavailable, customers leave voicemail messages thatautomatically become tickets containing the voicemail recording and a transcription. For moreinformation, see Setting up Zendesk Voice.
Web portal
This refers to the parts of the help desk application that are available to end-users to submittickets, track their support requests, and access your knowledge base and forums.
Whitelist
The whitelist is used to allow email to be received from specific email domains and addresses.It is used along with the blacklist to, for example, allow email from a specific addressin a blacklisted domain to be accepted into the help desk (and not suspended). For moreinformation, see Using the whitelist and blacklist to control access to your help desk.
Widget
26 | Zendesk User's Guide | Zendesk glossary
A widget is a small application that extends the functionality of the help desk. You can addwidgets into the help desk (they are displayed in the right side of your help desk pages) fora number of popular cloud-based applications and services such as Salesforce and GoogleAnalytics or you can create your own custom widgets.
Chapter
2
Help desk basics• Understanding help desk user roles• About organizations and groups• Streamlining the help desk workflow• About searching the help desk• Security best practices
28 | Zendesk User's Guide | Help desk basics
Understanding help desk user rolesThe help desk defines a number of user roles that are key to managing the people who generatesupport requests, those who resolve them, and the tickets themselves.
Users and people are essentially equivalent terms; it's the broadest definition for all people whouse the help desk. When you need to manage people in the help desk, your starting point is almostalways Manage > People. This is where you add new users, define their roles and privileges,and then organize them using groups and organizations. You'll usually only see the word users indocumentation like this.
Each user's role is defined when they are added to the help desk. And, when users log in, they areonly shown the parts of the help desk that they are allowed to see and use.
End-users, or customersEnd-users are also sometimes referred to as customers. These are the people who generate supportrequests from any of the available support channels (Web portal, email, Twitter, etc.). They don'thave access to any of the admin and agent features of the help desk. They can only submit and tracktickets and communicate with agents publicly (meaning their ticket comments can never be private).
How end-users interact with your help desk depends first on the support channels they haveavailable to them and then by how you've defined public access. You can run an open or closed helpdesk. Open means that anyone can submit tickets. Closed means the opposite, and as you mightimagine, it's how you'd set up a help desk for an internal support operation for a corporation, forexample. In a closed help desk, you add the end-users. In an open help desk, you can add usersyourself and end-users can add themselves by submitting tickets.
You can either require end-users of an open help desk to register, or not. In a closed help desk, allend-users must be registered of course.
You can also control if and how your end-users access the help desk Web portal. This is theend-user's view of the help desk and includes the submit request page, the knowledge base andcommunity forums, and a view of their tickets. However, if your end-users aren't registered,they don't have access to that view of tickets (they must be logged in). For these end-users, allcommunication with the support team is via email. For more information, see Setting up an email-only help desk.
You also have the option of adding your end-users to an organization, which is a collection of users(both end-users and agents) that can be used in many ways throughout the help desk workflow. Formore information, see About organizations and groups.
Agents, admins, account ownerThe people who resolve support requests, you, play different roles in setting up and managing thehelp desk workflow.
Zendesk User's Guide | Help desk basics | 29
AgentsAgents are the bulk of the help desk support staff. They are assigned tickets and interact withcustomers as needed to resolve support issues. The agent's role and privileges in the help desk aredefined by admins and may include the following:
• May be added to more than one group (must be added to at least one)• Add end-users• Add public or private comments or both to tickets• Create and edit their own macros• Moderate and manage articles in the forums• Access tickets in one of the following ways:
• All tickets in the help desk• Only tickets assigned to the group or groups to which they belong• Only tickets received from the organization to which they belong• Only tickets that they are assigned to
Admins can add new agents to the help desk either manually one at a time or as a bulk importoperation (you can set the user role in the CSV data file used in a bulk import). Agents can bepromoted to the admin role by an admin.
Agents are added to groups. Each agent must be added to at least one group. For more informationabout groups, see About organizations and groups.
As noted above, there are a number of ways to limit the access agents have to tickets in the helpdesk. These are explained in Creating, managing, and using groups.
AdminsAdmins are agents with additional privileges to manage and customize the help desk. Admins can beassigned tickets like agents but they may also do the following:
• Access all tickets (not just the tickets they are assigned to)• Create new business rules (automations, macros, SLA service targets, triggers, views)• Access and edit all help desk business rules (automations, macros, SLA service targets,
triggers, views)• Access and edit all help desk extensions (widgets, targets, etc.)• Create reports• Edit all reports• Access settings pages (account, security, channels, etc.)• Access all forums with moderator privileges• Add and manage end-users, agents, and admins• Promote agents to the admin role• Create groups and organizations• Assume another user's identity
Admins are responsible for designing and implementing the help desk workflow. They add end-users, agents, and other admins; define the business rules (automations, triggers, views, etc.); andcustomize and extend the help desk. Where an agent's primary function is to interact with end-usersand resolve support requests, admins may do that as well as set up and manage the workflow.
30 | Zendesk User's Guide | Help desk basics
Note: You may find general references in the documentation or the user interface to agents beingable to do something in the help desk. It's important to remember that if an agent can do somethingso can an admin. It's not the other way round. So, the shorthand of 'agent' may be used at times whenthe exact implication is 'agent and admin'.
Account ownerThe account owner is a type of admin. The account name is associated with this person's name,usually the person who created the account. There can only be one account owner; however, accountownership can be reassigned by the account owner to another admin if needed. The account ownerhas access to areas of the help desk that other admins do not, such as invoicing, payment options,and benchmarking for the account.
User references in business rulesBusiness rules need to refer to some types of users in more abstract ways to define conditions andactions; therefore, you'll see references in the help desk to requester, submitter, assignee, currentuser, and non-restricted agent.
RequesterRequester refers to the person who made the support request. Requester is used throughout thehelp desk (including macros, views, automations, triggers, and reports) to refer to the person whogenerated the support request.
SubmitterThe ticket submitter is either the user who submitted the request or the agent that opened the ticketon behalf of the requester.
AssigneeAssignee is the agent assigned to a ticket. Assignee is used throughout the help desk (includingmacros, views, automations, triggers, and reports) to refer to or set the assigned agent.
Current userCurrent user is a reference to the last person who updated the ticket, which is not necessarily thesame person who is assigned to the ticket. The current user (whoever updated the ticket last) changeswhenever the ticket is updated. And, the update may have been made by the assignee, the requester,or someone who was CC'd on the ticket.
Non-restricted agentA non-restricted agent is an agent who has access to all tickets. In other words, they have not beenrestricted to only the group or groups to which they belong, the organization they belong to, or to thetickets they have been assigned to. The ability to refer to these agents may be useful when creatingtriggers.
Zendesk User's Guide | Help desk basics | 31
About organizations and groupsOrganizations and groups are used to manage your help desk users and the ticket handling workflow.
Organizations and groups definedEach collection of users is defined as follows:
Organizations
Organizations are collections of your users (both end-users and agents). Each user can be addedto only one organization. The use of organizations is optional, but by arranging your end-usersinto organizations you can keep track of what those organizations are requesting. You can alsoenable users within an organization to see each other’s tickets. This expands visibility of theorganization's support issues and should reduce the number of duplicate tickets.
Groups
Groups can only contain agents. Agents must be assigned to at least one group, but they can bemembers of more than one. Groups can be used to support organizations.
End-users and organizationsAlthough you don't have to add your end-users to organizations, it can be extremely helpful inmanaging the workflow. First, let's define that we mean by end-user. These are the people thatgenerate support requests. They are your customers in a retail setting and the employees that aresupported by an internal help desk in a corporate setting (to name two common types of end-users).How you organize your end-users is entirely up to you; however, here are a few examples of howorganizations can be used:
To support service level agreements
You can create organizations that mirror the service level agreements that you've establishedwith your customers. For example, your paying customers are guaranteed a faster responsethan those who use your free services and you want to distinguish between the two. Or, perhapsyou've set up levels of support based on which version of your products and service levelsyour customers have purchased (for example: basic, professional, enterprise or silver, gold,platinum). You can create organizations for each set of customers and route them through thehelp desk workflow accordingly. You can then create business rules and reports to escalatetickets as needed and to track performance against your service level agreements.
To track and manage tickets by company
Perhaps you sell your products to other businesses. You can create organizations for each ofthose companies to manage and track their ticket activity.
To manage requests based on email domains
You can automatically add end-users to organizations based on their email domain. Forexample, you might have both internal and external end-users. You can create an organizationfor your internal end-users and automatically add them to the organization, based on their
32 | Zendesk User's Guide | Help desk basics
email domain, the first time they submit a request. The new request is then picked up in theworkflow rules you've set up for that organization.
To support customers by location and language
If you support organizations or individual customers across the globe, you can createorganizations for locations and languages and then route those requests to agents that are co-located and speak the same languages.
To define access to forums
You can use organizations to define who can see what in your forums. You might want most ofyour forums to be viewable by all your end-users but also create several just for certain groupsof users (customers with premium service plans perhaps). Organizations allow you to do this.When you create a forum, it is by default viewable by everyone. If you want to restrict accessto it, you simply select the one organization that you will allow to see it.
You can create organizations and add end-users to them manually, one at a time, or automate theprocess by adding users and their organizations in a bulk import operation.
Agents can also be added to an organization. You might do this as part of organizing the users inyour help desk or to restrict an agent's access to only the organization they belong to (this is anoption when setting the agent's privileges).
Once you've gotten organizations set up, they can be used in many ways in the help desk to managethe workflow. See How to use your organizations and groups below.
Agents and groupsGroups are only for agents and every agent must belong to at least one group. Like organizations,how you set up groups depends on your business needs and the help desk workflow you prefer. Hereare some of the common ways that groups are used:
To escalate tickets based on complexity
You can manage escalation by setting up a tiered support group structure. For example, youcan create groups for levels of support based on factors such as urgency and complexity. Bydefault, you could assign all tickets to the Level 1 group and then escalate them to Level 2manually based on the technical complexity of the issue. The Level 2 agents (who may also bemembers of the Level 1 group) have the advanced technical skills needed to resolve the issue.For an example of this, see Escalating your tickets with groups.
To support service level agreements
As in the example for organizations above, you can set up corresponding groups to supportorganizations defined by service levels.
To provide support by expertise
You can create groups based on expertise. For example, a company that develops both softwareand hardware might place the agents who support the software into one group and those agentswho support the hardware in another. A custom field could be added to the support requestform prompting end-users to specify the product they're seeking support for and this could beused to route the ticket to the appropriate group.
Zendesk User's Guide | Help desk basics | 33
To support customers by location and language
As noted above, you can set up organizations by location and language and then assign agents(or groups) to their tickets. Even if you didn't set up organizations for this, you can route totickets to these groups based on the end-user's email domain (somecompany.fr, for example) ortheir language preference.
When you create groups, you can add existing agents to them. You can add new agents to one ormore groups when you're adding them to the help desk. You can also bulk import new users anddefine their role as agent; you then manually add them to groups.
How groups support organizationsSo how do groups support organizations? In the broadest sense, simply by becoming hubs of supportfor the tickets that are received from the end-users in your organizations. What group is assignedto an organization's tickets can be based on the many considerations outlined above (help deskescalation processes, security, co-location and language, and so on).
You can take a loose approach to this and just allow agents to triage and assign requests to groupsbased on their reading of the support request or you can create business rules to handle thatautomatically. See How to use your organizations and groups below.
You can also more tightly manage the workflow and create security boundaries by funneling ticketsdirectly to agents who have restricted access. This means that they can only see the tickets thatthey are allowed to see. You can do this in two ways. The first is to add the agents to groups andthen restrict their access to only those groups. You can also add an agent to an organization, whichrestricts their access to only those tickets that are submitted by end-users in that organization.
Note: In Zendesk, you'll see references to non-restricted agents. These are agents who have notbeen restricted in these ways and can access all tickets.
How to use your organizations and groupsOnce you've got an organization and group structure in place, you can use it to manage the ticketworkflow and monitor your help desk activity.
Here are some of the ways you can use organizations and groups in your workflow [this section willcontain links to more detail]:
• Automatically assign tickets received from users in an organization to a specific group(referred to as group mapping)
• Map incoming new users to an organization based on their email domain (referred to as usermapping)
• Allow users within an organization to see all the tickets in their organization (referred to as ashared organization)
• Assign agents to support only one organization• Use organization as a condition in a trigger to automatically assign requests to a group or
agent• Use a trigger condition to test for tags and then automatically assign requests to a group or
agent based on those tags• Create macros that assign new requests to a group or agent• Create automations that escalate tickets to a group or agent
34 | Zendesk User's Guide | Help desk basics
• Create views by organizations or groups• Create reports by organizations or groups
Admin and agent roles for users, groups, and organizationsHere's a quick overview of who can do what in the help desk to manage users, groups, andorganizations.
Admins
• Add end-users manually (one at a time) or add many end-users at a time in a bulk import• Create and edit organizations and groups• Add end-users to organizations• Create new agents and add them to one or more groups and one organization• Limit an agent's access to one or more groups• Limit an agent's access to requests received from the organization that an agent belongs to• Set up email mapping (automatically map end-users from specific email domains to an
organization)• Set up group mapping (assigning incoming requests from users in an organization to a
specific agent group)• Set up a shared organization (allow all end-users in an organization to view tickets from all
users in the same organization)• Create both shared and personal views by users, groups, and organizations• Create business rules (automations, macros, and triggers) that include groups• Create business rules (automations and triggers) that include organizations• Create reports that include groups and organizations
Agents
• Add end-users• Add end-users to organizations• Allow end-users to view all the tickets in their organization (if the user belongs to a shared
organization, then the user always has access to tickets in the organization)• Add themselves to an organization• Create personal views by users, groups, and organizations• Create macros to assign tickets to a group
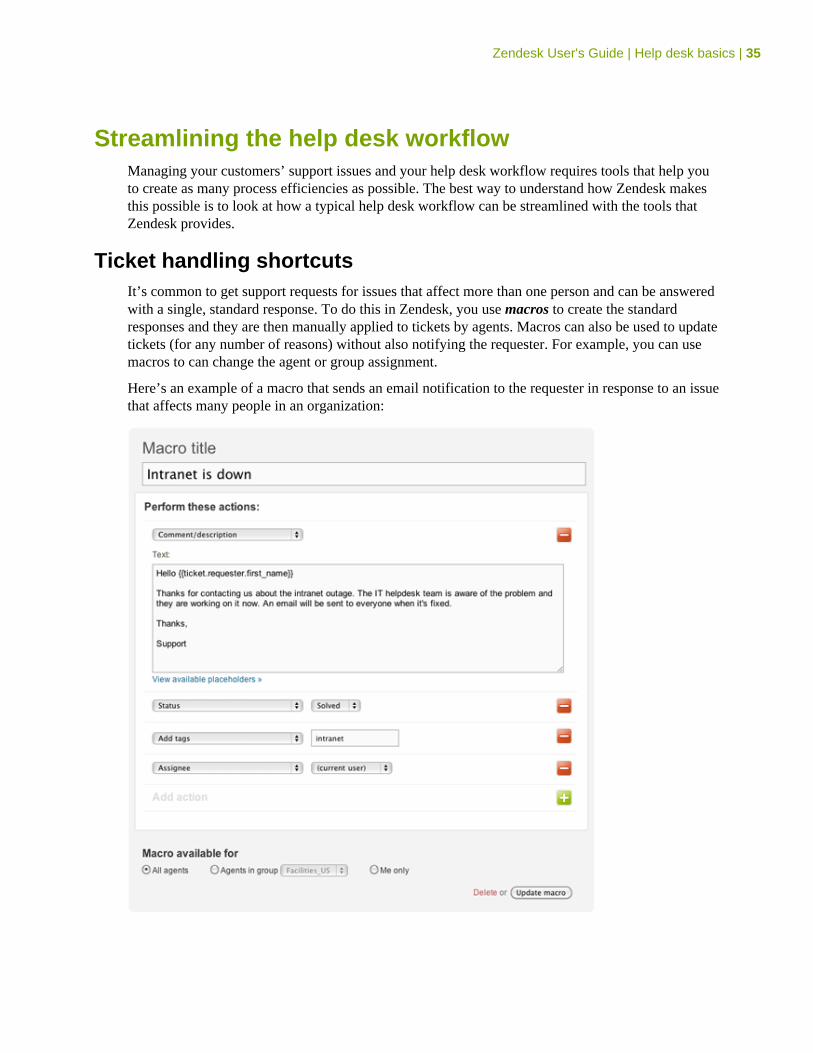
Zendesk User's Guide | Help desk basics | 35
Streamlining the help desk workflowManaging your customers’ support issues and your help desk workflow requires tools that help youto create as many process efficiencies as possible. The best way to understand how Zendesk makesthis possible is to look at how a typical help desk workflow can be streamlined with the tools thatZendesk provides.
Ticket handling shortcutsIt’s common to get support requests for issues that affect more than one person and can be answeredwith a single, standard response. To do this in Zendesk, you use macros to create the standardresponses and they are then manually applied to tickets by agents. Macros can also be used to updatetickets (for any number of reasons) without also notifying the requester. For example, you can usemacros to can change the agent or group assignment.
Here’s an example of a macro that sends an email notification to the requester in response to an issuethat affects many people in an organization:
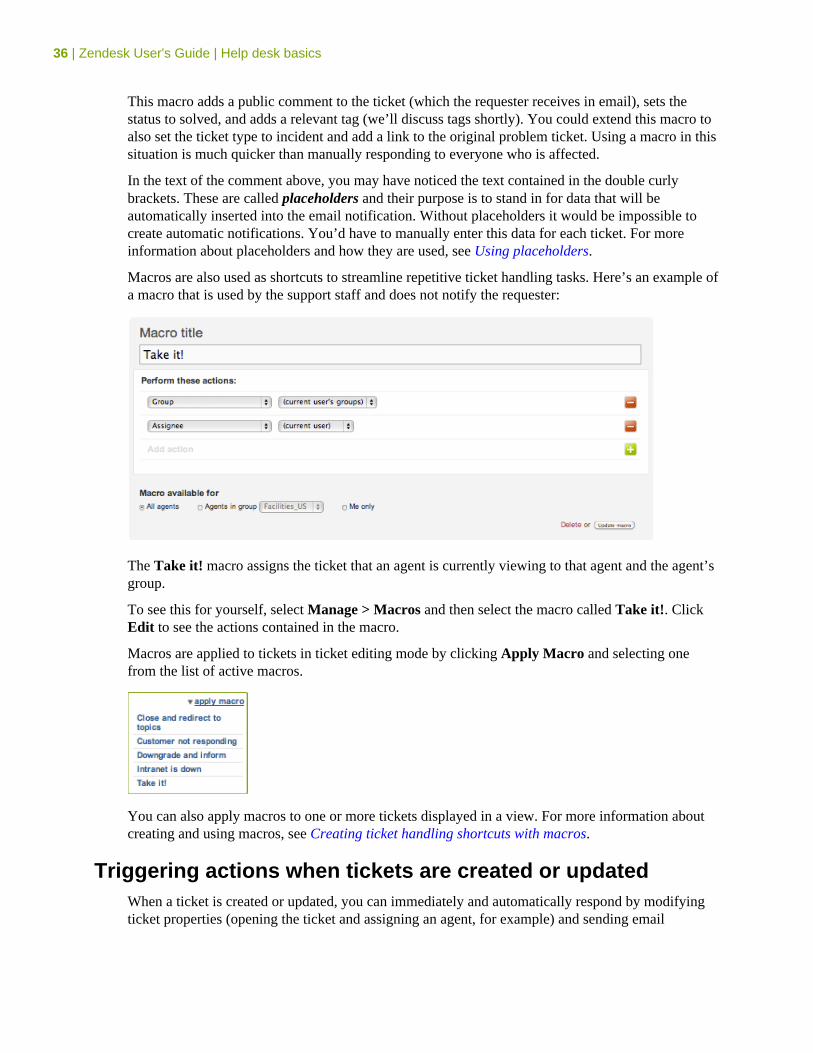
36 | Zendesk User's Guide | Help desk basics
This macro adds a public comment to the ticket (which the requester receives in email), sets thestatus to solved, and adds a relevant tag (we’ll discuss tags shortly). You could extend this macro toalso set the ticket type to incident and add a link to the original problem ticket. Using a macro in thissituation is much quicker than manually responding to everyone who is affected.
In the text of the comment above, you may have noticed the text contained in the double curlybrackets. These are called placeholders and their purpose is to stand in for data that will beautomatically inserted into the email notification. Without placeholders it would be impossible tocreate automatic notifications. You’d have to manually enter this data for each ticket. For moreinformation about placeholders and how they are used, see Using placeholders.
Macros are also used as shortcuts to streamline repetitive ticket handling tasks. Here’s an example ofa macro that is used by the support staff and does not notify the requester:
The Take it! macro assigns the ticket that an agent is currently viewing to that agent and the agent’sgroup.
To see this for yourself, select Manage > Macros and then select the macro called Take it!. ClickEdit to see the actions contained in the macro.
Macros are applied to tickets in ticket editing mode by clicking Apply Macro and selecting onefrom the list of active macros.
You can also apply macros to one or more tickets displayed in a view. For more information aboutcreating and using macros, see Creating ticket handling shortcuts with macros.
Triggering actions when tickets are created or updatedWhen a ticket is created or updated, you can immediately and automatically respond by modifyingticket properties (opening the ticket and assigning an agent, for example) and sending email
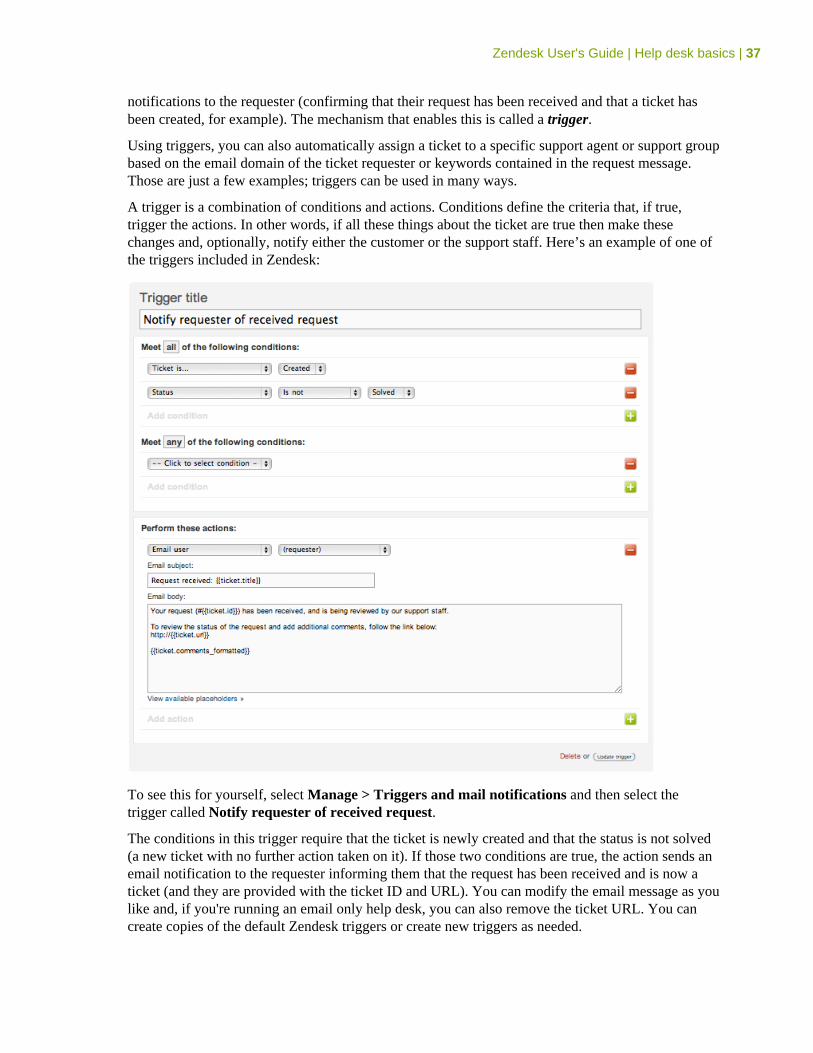
Zendesk User's Guide | Help desk basics | 37
notifications to the requester (confirming that their request has been received and that a ticket hasbeen created, for example). The mechanism that enables this is called a trigger.
Using triggers, you can also automatically assign a ticket to a specific support agent or support groupbased on the email domain of the ticket requester or keywords contained in the request message.Those are just a few examples; triggers can be used in many ways.
A trigger is a combination of conditions and actions. Conditions define the criteria that, if true,trigger the actions. In other words, if all these things about the ticket are true then make thesechanges and, optionally, notify either the customer or the support staff. Here’s an example of one ofthe triggers included in Zendesk:
To see this for yourself, select Manage > Triggers and mail notifications and then select thetrigger called Notify requester of received request.
The conditions in this trigger require that the ticket is newly created and that the status is not solved(a new ticket with no further action taken on it). If those two conditions are true, the action sends anemail notification to the requester informing them that the request has been received and is now aticket (and they are provided with the ticket ID and URL). You can modify the email message as youlike and, if you're running an email only help desk, you can also remove the ticket URL. You cancreate copies of the default Zendesk triggers or create new triggers as needed.
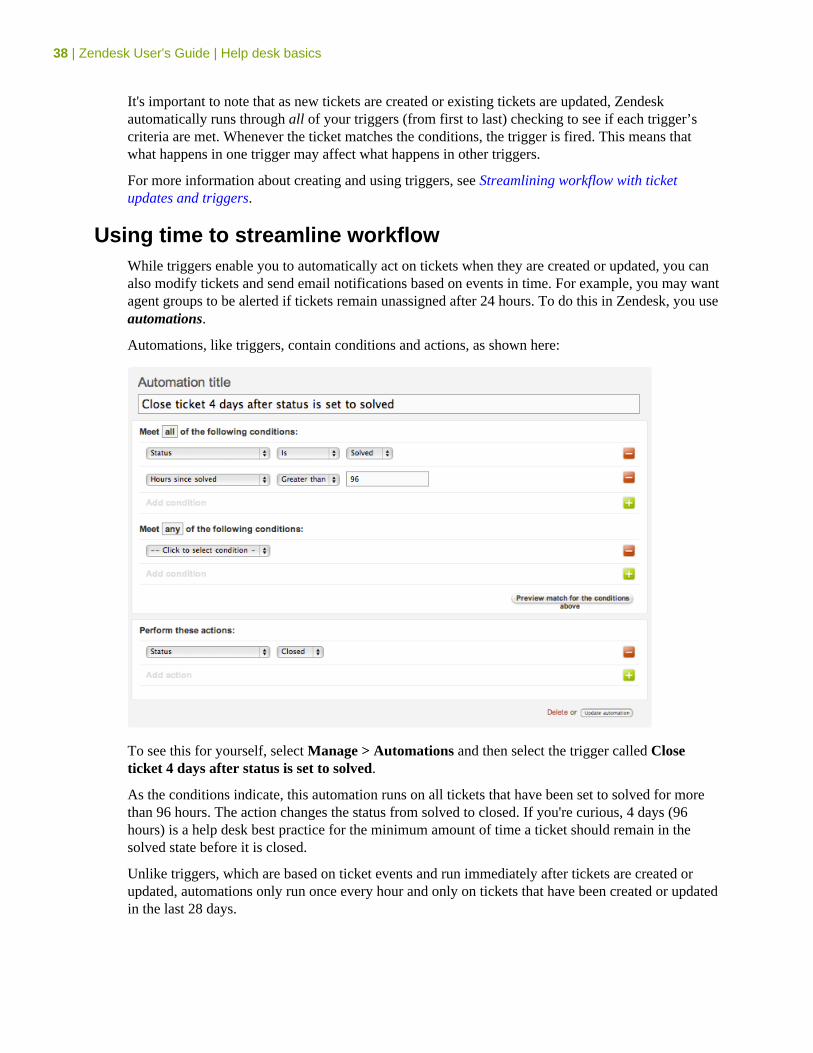
38 | Zendesk User's Guide | Help desk basics
It's important to note that as new tickets are created or existing tickets are updated, Zendeskautomatically runs through all of your triggers (from first to last) checking to see if each trigger’scriteria are met. Whenever the ticket matches the conditions, the trigger is fired. This means thatwhat happens in one trigger may affect what happens in other triggers.
For more information about creating and using triggers, see Streamlining workflow with ticketupdates and triggers.
Using time to streamline workflowWhile triggers enable you to automatically act on tickets when they are created or updated, you canalso modify tickets and send email notifications based on events in time. For example, you may wantagent groups to be alerted if tickets remain unassigned after 24 hours. To do this in Zendesk, you useautomations.
Automations, like triggers, contain conditions and actions, as shown here:
To see this for yourself, select Manage > Automations and then select the trigger called Closeticket 4 days after status is set to solved.
As the conditions indicate, this automation runs on all tickets that have been set to solved for morethan 96 hours. The action changes the status from solved to closed. If you're curious, 4 days (96hours) is a help desk best practice for the minimum amount of time a ticket should remain in thesolved state before it is closed.
Unlike triggers, which are based on ticket events and run immediately after tickets are created orupdated, automations only run once every hour and only on tickets that have been created or updatedin the last 28 days.
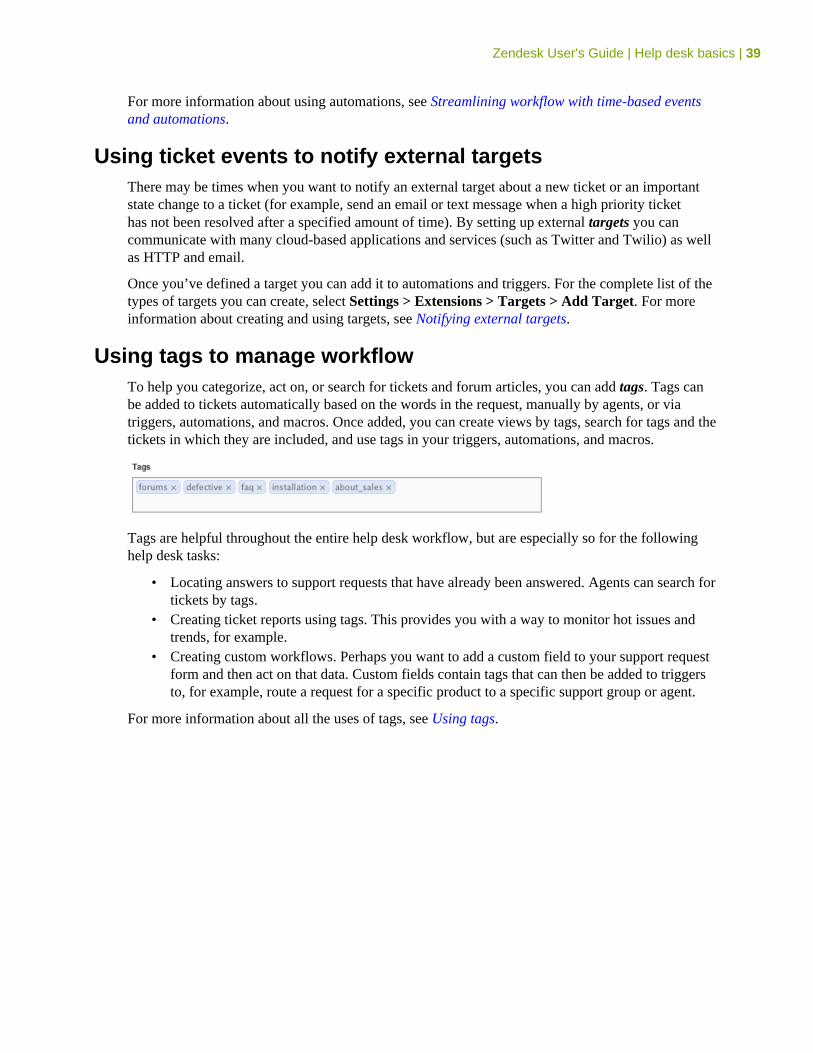
Zendesk User's Guide | Help desk basics | 39
For more information about using automations, see Streamlining workflow with time-based eventsand automations.
Using ticket events to notify external targetsThere may be times when you want to notify an external target about a new ticket or an importantstate change to a ticket (for example, send an email or text message when a high priority tickethas not been resolved after a specified amount of time). By setting up external targets you cancommunicate with many cloud-based applications and services (such as Twitter and Twilio) as wellas HTTP and email.
Once you’ve defined a target you can add it to automations and triggers. For the complete list of thetypes of targets you can create, select Settings > Extensions > Targets > Add Target. For moreinformation about creating and using targets, see Notifying external targets.
Using tags to manage workflowTo help you categorize, act on, or search for tickets and forum articles, you can add tags. Tags canbe added to tickets automatically based on the words in the request, manually by agents, or viatriggers, automations, and macros. Once added, you can create views by tags, search for tags and thetickets in which they are included, and use tags in your triggers, automations, and macros.
Tags are helpful throughout the entire help desk workflow, but are especially so for the followinghelp desk tasks:
• Locating answers to support requests that have already been answered. Agents can search fortickets by tags.
• Creating ticket reports using tags. This provides you with a way to monitor hot issues andtrends, for example.
• Creating custom workflows. Perhaps you want to add a custom field to your support requestform and then act on that data. Custom fields contain tags that can then be added to triggersto, for example, route a request for a specific product to a specific support group or agent.
For more information about all the uses of tags, see Using tags.
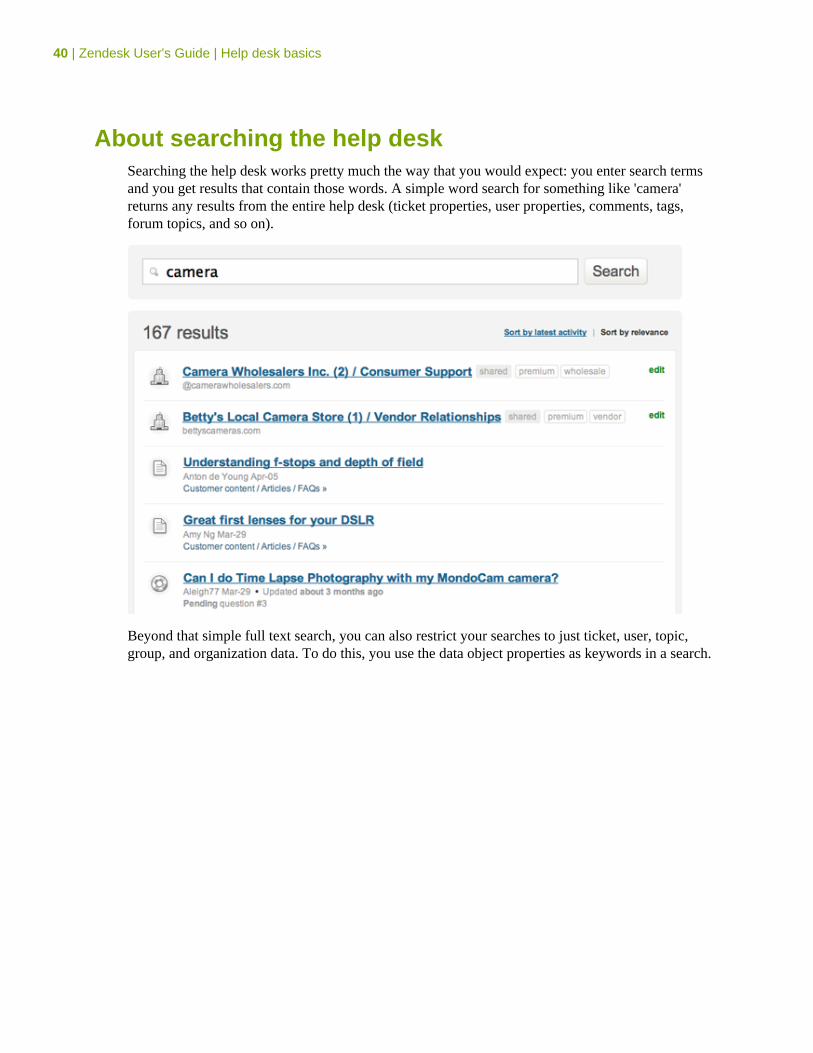
40 | Zendesk User's Guide | Help desk basics
About searching the help deskSearching the help desk works pretty much the way that you would expect: you enter search termsand you get results that contain those words. A simple word search for something like 'camera'returns any results from the entire help desk (ticket properties, user properties, comments, tags,forum topics, and so on).
Beyond that simple full text search, you can also restrict your searches to just ticket, user, topic,group, and organization data. To do this, you use the data object properties as keywords in a search.
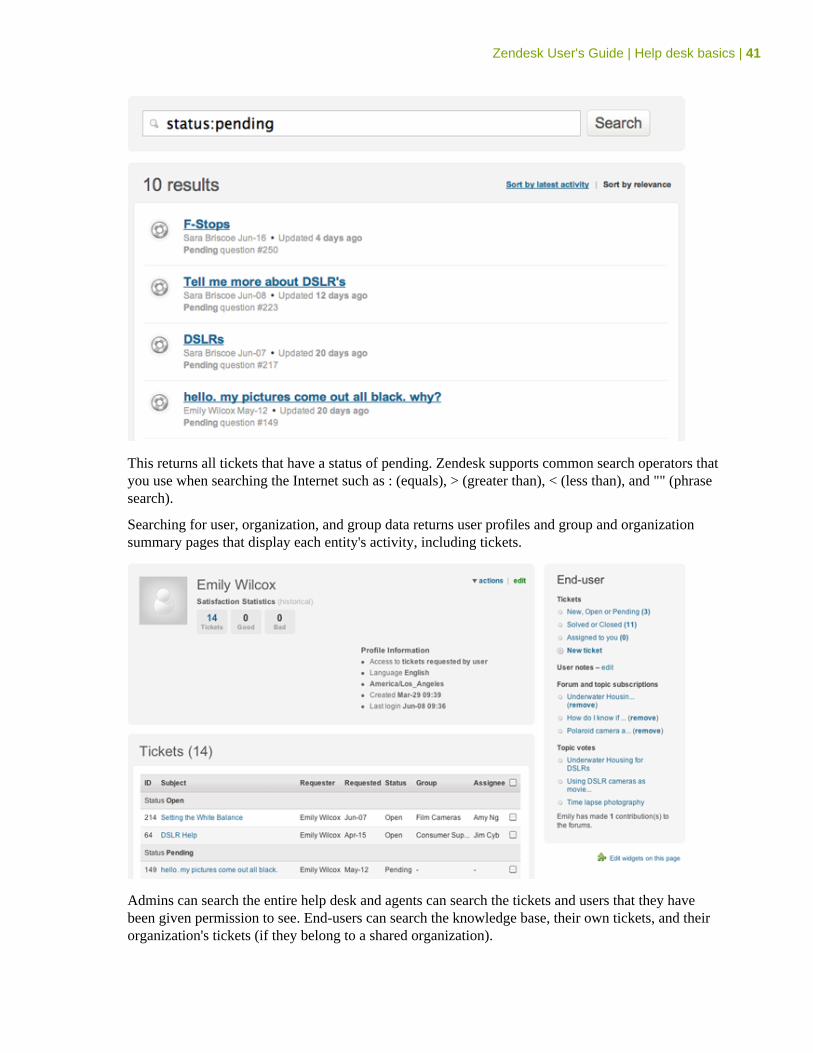
Zendesk User's Guide | Help desk basics | 41
This returns all tickets that have a status of pending. Zendesk supports common search operators thatyou use when searching the Internet such as : (equals), > (greater than), < (less than), and "" (phrasesearch).
Searching for user, organization, and group data returns user profiles and group and organizationsummary pages that display each entity's activity, including tickets.
Admins can search the entire help desk and agents can search the tickets and users that they havebeen given permission to see. End-users can search the knowledge base, their own tickets, and theirorganization's tickets (if they belong to a shared organization).
42 | Zendesk User's Guide | Help desk basics
For all of the details about searching the help desk, see the following:
• Zendesk search reference• Searching users. groups, and organizations• Searching tickets
Zendesk User's Guide | Help desk basics | 43
Security best practicesMore than 10,000 customers use Zendesk as a customer service and support system worldwide.Zendesk prides itself on providing a range of security options that you can use to ensure that privateinformation is protected and secure. By following these seven best practices, you can increase thesecurity of your Zendesk.
Note: If you are ever in doubt about the security of your Zendesk system, feel free to contactZendesk directly. In the event of a suspected security breach, you should submit a ticketwith the subject “Security” along with the details. Alternatively, you can send email [email protected] or call the customer support line at 415-418-7506 (Americas, US), +44 203355 7960 (Europe, UK), +61 3 9008 6775 (Asia-Pacific, Australia).
1. Increase password securityZendesk provides three levels of password security: low, medium, and high. An administrator canset password security by selecting Settings > Security > Password Security.
Increasing your password security can help to prevent unauthorized users from guessing youragent’s passwords. At the highest level of security, your users are required to choose a newpassword every 90 days.
You should also require your administrators and agents to select unique passwords for their Zendeskaccount. In other words, they should use a password that they are not also using for external systemssuch as Salesforce, GoodData, and so on. If one account is hacked and a password is discovered, thehacker’s access will be limited to just that one account – not all accounts.
2. Never give out user names, email addresses, or passwordsWhile there is a fine line between meeting the needs of your users and maintaining security, bestpractices are that Zendesk agents and administrators should never give out user names, emailaddresses or passwords.
If you’re using standard Zendesk login authentication, the only secure way to reset a password isfor the user to click the link to create a new password (Help! I don't know what to enter here!) fromthe login screen of your help desk. This prompts the user to enter a valid email address (one alreadyverified as a legitimate user in your account) and they receive an email at that address promptingthem to reset their password themselves.
If you’re using a third party single sign-on authentication system such as ActiveDirectory,OpenDirectory, LDAP or SAML, passwords can be reset in a similar fashion through those services.
Be aware that hackers sometimes use social engineering techniques to pressure people into helpingthem out by giving them a password for an account. In some cases, they do this by contactingcustomer service personnel during evenings or weekends when they suspect there are fewer seniorstaff working. They may even claim that there’s been a security breach and that the password needsto be reset immediately to some new text that they provide.
Some hackers have tools that enable them to spoof email addresses to impersonate users fromlegitimate email domains. As a result, even what appears to be a legitimate email request from auser may not be from that actual address. If someone who claims to be an administrator or user of an
44 | Zendesk User's Guide | Help desk basics
account contacts you, you should note the IP address (this is shown in the events and notificationsview in tickets), and independently verify his or her identity (for example, by calling them at thephone number in their user profile). If in doubt, never provide any sensitive information or makeaccount changes on someone else’s behalf. Legitimate users should be able to change their accountsettings using the methods described above.
We recommend that you educate your agents about these types of security risks and also create asecurity policy that everyone knows and can refer to when these incidents occur.
3. Limit the number of agents with administrator accessAdministrators have access to parts of the help desk that regular agents do not. For example, all ofthe security features described in this document are only available to administrators. By limitingthe number of agents who have administrator access, you reduce your security risk. The agent roleprovides the access that typical agents need to manage and solve tickets.
In the Enterprise version of Zendesk, you can select pre-defined agent roles that grant additionalpermissions to agents. You can also create your own custom agent roles and decide what parts of thehelp desk that the agent role can access. These permissions however are limited to the user, ticket,forum, and workflow management parts of the help desk. Only account owners and administratorshave access, for example, to security settings. For more information, see Custom agent roles.
4. Routinely audit your Zendesk accountIf you follow all of the above techniques, your Zendesk account should always be private andsecure. However, it is still considered best practice to routinely check for suspicious activity. Wesuggest that you use the following checklist once a month (or more frequently) to ensure that nomistakes have been made that may leave your system vulnerable.
• Review agent access and roles from the Manage > People menu to look for unknownagents, administrators, or unusual email addresses not in your company domain.
• If you are using the email archiving feature in the Enterprise version of Zendesk (Settings >Tickets > Email Archiving), make sure that email address is legitimate. See Archiving emailnotifications.
• Make sure that the URL to your help desk logo (Settings > Account > Branding) is correctand has not been changed.
• Verify that all targets you use (Settings > Extensions > Targets) are valid and point toknown and correct addresses. See Notifying external targets.
• Review all targets and automations that send notifications and check that they are notifyingthe correct people.
5. Remotely authenticate users with single sign-onThe Plus+ and Enterprise versions of Zendesk support login credential validation using eitherRemote Authentication or Secure Assertion Markup Language (SAML). When either is enabled,users logging in to help desk are redirected to an external server for authentication and are thenseamlessly redirected back to the help desk.
The advantage of using single sign-on is that you have complete control over user management andauthentication.

Zendesk User's Guide | Help desk basics | 45
An administrator can set up single sign-on by selecting Settings > Security > Authentication> Single Sign-on. For more information about Zendesk Remote Authentication, see RemoteAuthentication. For more information about using SAML, see Introducing SAML for Zendesk.
6. Restrict access to your help desk using IP restrictionsIn the Enterprise version of Zendesk, access to your help desk can be restricted to specific IPaddresses. This means that only users from the IP addresses that you manually add to your accountare allowed to log in to the help desk.
This can be applied to all users or just to agents. If you select agents only, this means that agentaccess is restricted and end-user access is not.
An administrator can set IP restrictions by selecting Settings > Security > Access Restriction. Formore information about this feature, see Restricting access to your help desk.
7. Turn SSL on for your accountZendesk can be configured to use Secure Socket Layer (SSL), a cryptographic protocol that providessecure communications over the Internet. By using SSL, all sessions to your help desk are encryptedand customers are directed to a secure HTTPS site, e.g. https://youraccount.zendesk.com.
By default, SSL is on for new accounts. If you're not currently using SSL and want to, anadministrator can enable SSL by selecting Settings > Security > SSL. You can use either RegularSSL or a Hosted SSL for your custom domain. How you set up SSL depends on how your accountis configured. You should contact a Zendesk support agent for more information and assistance withsetting this up.
By following the best practices listed in this document, you will reduce the risk of a security breach.However, even the best security policies will fall short if they are not followed. Zendesk stronglyrecommends that agents and administrators be trained to follow the best practices and ensure asecure environment.

46 | Zendesk User's Guide | Help desk basics
Chapter
3
Managing people• Adding and managing users• Bulk importing users and organizations• Creating, managing, and using groups• Creating, managing, and using organizations• Adding tags to users and organizations• Creating agent display names
48 | Zendesk User's Guide | Managing people
Adding and managing usersUsers can be added to the help desk manually one at a time, through a bulk import of users, throughthe Zendesk API, and also as new users submit requests for the first time.
Once users have been added to the help desk, you can organize them and manage the workflowusing groups and organizations. See About organizations and groups.
For more information about adding users with the Zendesk API, see Zendesk REST API:Introduction.
Adding end-usersAdmins can add other admins, agents, and end-users. Agents can only add end-users.
To add an end-user1. Select Manage > People > Add User.2. Enter the end-user's profile information (email address, phone number, etc.).3. If you use organizations and want to add this end-user to one, select the organization from
the drop-down list. If you've set up email mapping, which automatically adds new users to anorganization based on their email domain, you can leave this blank.
4. Optionally, enter tags. For more information about user tags, see Adding tags to users andorganizations.
5. In the Role - privileges granted to this user section, select End-user.6. Set the end-user's access to one of the following:
• Tickets requested by user only• Tickets from user's organization (see Shared organization for end-users in Creating,
managing, and using organizations).7. Click Create.
Immediately after you've added the new end-user, they receive a welcome email that contains averification link that prompts them to choose a password and log in to the help desk for the firsttime.
Users can also be added in a bulk import. See Bulk importing users and organizations.
Adding agentsAdmins can add agents. For information about the agent's role in the help desk, see Understandinghelp desk user roles.
To add an agent1. Select Manage > People > Add User.2. Enter the agent's profile information (email address, phone number, etc.).3. Optionally, add the agent to an organization.4. In the Role - privileges granted to this user section, select Agent.5. Set the agents groups and privileges (described below).6. Click Create.
The new agent receives the welcome email and verification link and can choose a password and login for the first time.
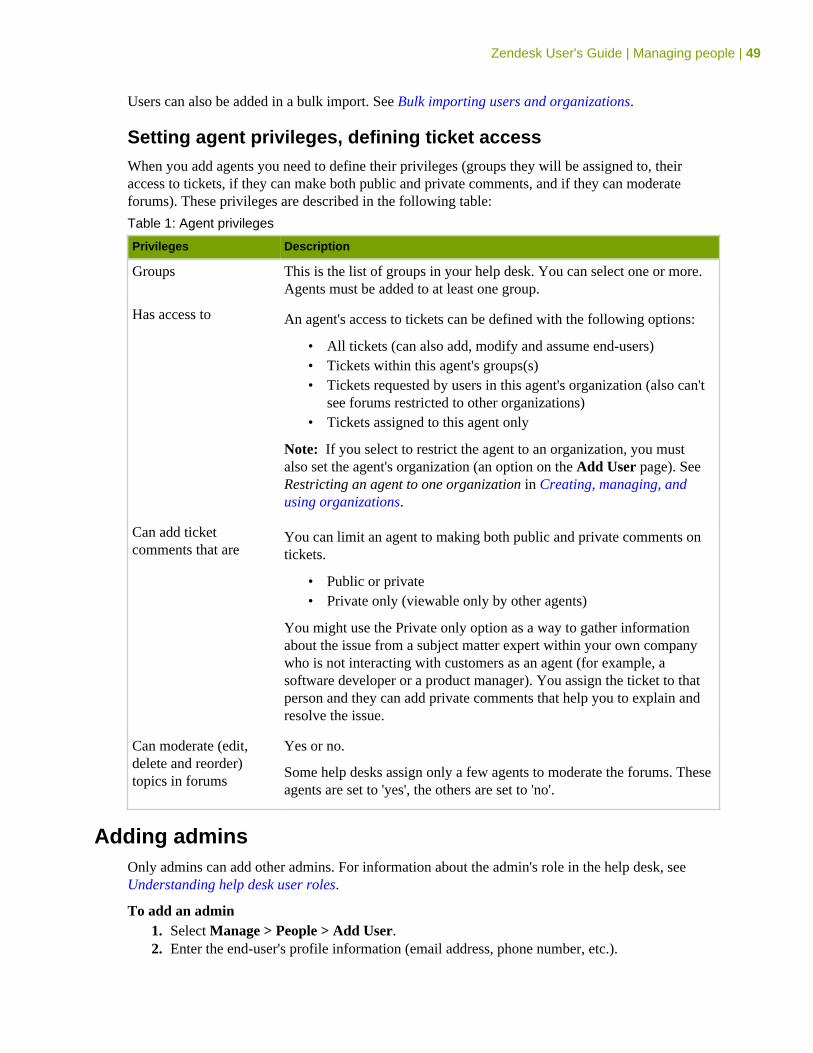
Zendesk User's Guide | Managing people | 49
Users can also be added in a bulk import. See Bulk importing users and organizations.
Setting agent privileges, defining ticket accessWhen you add agents you need to define their privileges (groups they will be assigned to, theiraccess to tickets, if they can make both public and private comments, and if they can moderateforums). These privileges are described in the following table:
Table 1: Agent privileges
Privileges Description
Groups This is the list of groups in your help desk. You can select one or more.Agents must be added to at least one group.
Has access to An agent's access to tickets can be defined with the following options:
• All tickets (can also add, modify and assume end-users)• Tickets within this agent's groups(s)• Tickets requested by users in this agent's organization (also can't
see forums restricted to other organizations)• Tickets assigned to this agent only
Note: If you select to restrict the agent to an organization, you mustalso set the agent's organization (an option on the Add User page). SeeRestricting an agent to one organization in Creating, managing, andusing organizations.
Can add ticketcomments that are
You can limit an agent to making both public and private comments ontickets.
• Public or private• Private only (viewable only by other agents)
You might use the Private only option as a way to gather informationabout the issue from a subject matter expert within your own companywho is not interacting with customers as an agent (for example, asoftware developer or a product manager). You assign the ticket to thatperson and they can add private comments that help you to explain andresolve the issue.
Can moderate (edit,delete and reorder)topics in forums
Yes or no.
Some help desks assign only a few agents to moderate the forums. Theseagents are set to 'yes', the others are set to 'no'.
Adding adminsOnly admins can add other admins. For information about the admin's role in the help desk, seeUnderstanding help desk user roles.
To add an admin1. Select Manage > People > Add User.2. Enter the end-user's profile information (email address, phone number, etc.).
50 | Zendesk User's Guide | Managing people
3. Optionally, add the admin to an organization.4. In the Role - privileges granted to this user section, select Admin.5. Set the admin's groups.6. Click Create.
Admins can do just about everything in the help desk (they don't have the privileges the accountowner does) so there's no need to set their privileges as you would for an agent.
Users can also be added in a bulk import. See Bulk importing users and organizations.
Promoting an agent to the admin roleAdmins can also promote agents to the admin role.
To promote an agent to the admin role
1. Select Manage > People > Agents.2. Select an agent and click Edit.3. Change their role to admin by selecting Admin.4. Click Update.
The agent's existing group assignments remain; you can add or remove them from groups as needed.
Assigning an admin to account ownerOnly the account owner can promote an admin to the account owner role. For information about theaccount owner's role in the help desk, see Understanding help desk user roles.
To promote an admin to account owner
1. Select Settings > Account > Invoices.2. Select an admin from the Account Owner drop-down list. You must have at least one other
admin in your help desk to see the list.3. Click Save Tab.
By setting another admin to the account owner role, the previous account owner loses access to allsubscription related pages such as this Invoices tab and the Benchmark tab.
How end-users add themselves to the help deskUsers can be added to the help desk simply by submitting a request. The request becomes a ticketand they are added as new end-users and are identified by their email address.
If your help desk requires end-users to register, a first time requester receives a welcome email witha verification link that prompts them to enter a password and log in. Doing this verifies them asend-users in your help desk. They get full use of the Web portal (Home page, knowledge base andcommunity forums, new request page, and a view of their tickets).
If your help desk does not require end-users to log in (for example, if you run an email only helpdesk), they won't receive the welcome email. These end-users track their requests and communicatewith agents using email. For more information about supporting unregistered end-users, see Settingup an email-only help desk.
Users can also submit requests using Twitter, which also adds them to the help desk. The user'sTwitter ID is the account identifier. Any other relevant help desk user profile information that can bepulled from their Twitter profile, such as their name, is added to the user's profile.
Zendesk User's Guide | Managing people | 51
If the Twitter requester is already registered in the help desk and their Twitter account has beenadded to their help desk profile, they are recognized as a registered user. If their Twitter accounthas not been added to their profile, a duplicate user account is created. The duplicate account can bemerged into their original account. See Merging a user's duplicate account.
Editing and deleting usersAll registered users can update their own profiles. Restrictions are only placed on the role andprivileges settings. End-users cannot change their role or the organization they belong to. Agentscan change their organization but not their group assignments. Admins can change everything foreveryone except the account owner.
Deleting users can be done by agents and admins. Agents can delete end-users and admins can deleteall users (except for the account owner). You cannot delete end-users that have tickets that are notclosed. This also applies to admins and agents. If they are requesters on tickets that aren't closed, youcan't delete them. When you delete an admin or agent, all of the tickets they are assigned to becomeunassigned.
Multiple email addresses for user accountsA user account can contain multiple email addresses. You can add them in the user's profile (selectthe Identities tab).
One email address is set as the primary, which means that notifications are sent to that address. Youcan change the primary email address to any of the other email addresses.
Each time you add an email address, a verification email is sent to that address and must beconfirmed before the email address is valid.
Merging a user's duplicate accountSince end-users can submit requests using different email addresses and via Twitter, duplicate end-user accounts can be created in the help desk.
The user profile allows you to enter multiple email addresses for a user and then set one as primary,which means that regardless of the email address they use to submit a request, they are properlyidentified by the help desk and a new user account is not created.
A duplicate user account can also be created if the end-user submits a request via Twitter and theirTwitter account has not been added to their user profile.
To handle multiple accounts for the same end-user, you can merge one end-user account intoanother end-user account. You can only merge registered (verified) end-users. Admin and agent useraccounts cannot be merged.
Note: If your account uses single sign-on and handles user authentication with RemoteAuthentication or SAML, the merge users option is not available. This is because the user accountsare managed outside of Zendesk.
To merge a user's duplicate account
1. Select Manage > People and select a user.2. On the user's dashboard page select Merge. The merge tool appears.
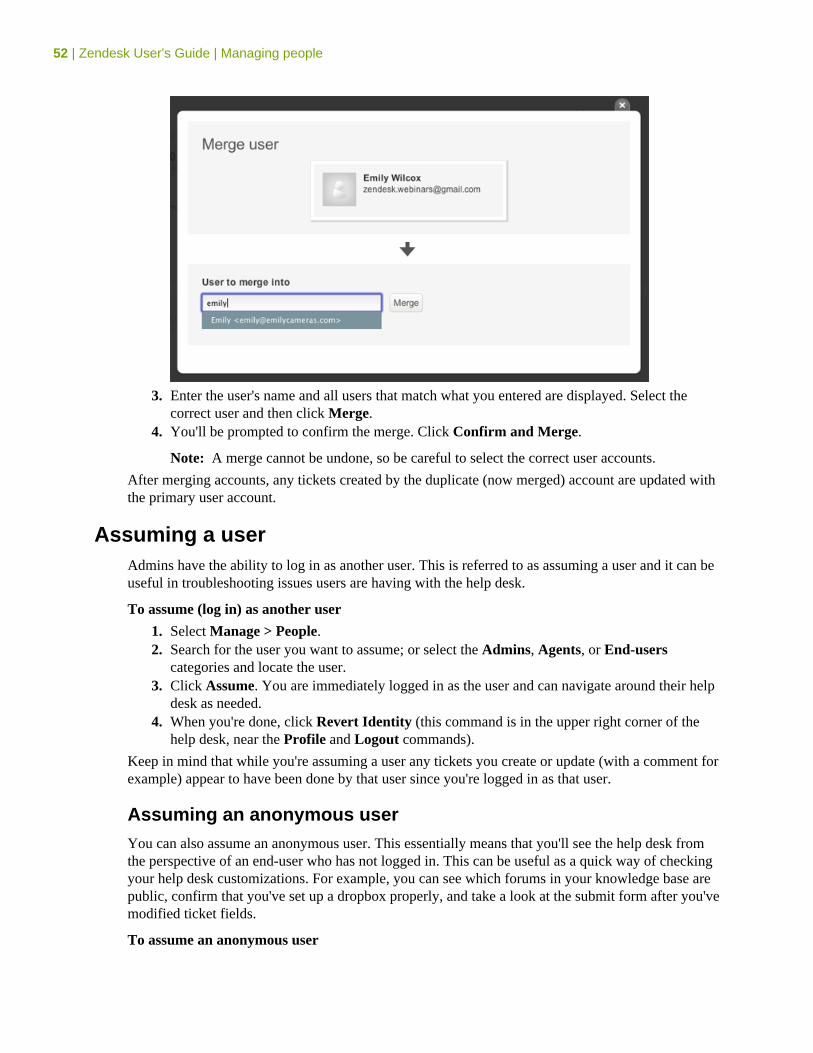
52 | Zendesk User's Guide | Managing people
3. Enter the user's name and all users that match what you entered are displayed. Select thecorrect user and then click Merge.
4. You'll be prompted to confirm the merge. Click Confirm and Merge.
Note: A merge cannot be undone, so be careful to select the correct user accounts.
After merging accounts, any tickets created by the duplicate (now merged) account are updated withthe primary user account.
Assuming a userAdmins have the ability to log in as another user. This is referred to as assuming a user and it can beuseful in troubleshooting issues users are having with the help desk.
To assume (log in) as another user
1. Select Manage > People.2. Search for the user you want to assume; or select the Admins, Agents, or End-users
categories and locate the user.3. Click Assume. You are immediately logged in as the user and can navigate around their help
desk as needed.4. When you're done, click Revert Identity (this command is in the upper right corner of the
help desk, near the Profile and Logout commands).
Keep in mind that while you're assuming a user any tickets you create or update (with a comment forexample) appear to have been done by that user since you're logged in as that user.
Assuming an anonymous userYou can also assume an anonymous user. This essentially means that you'll see the help desk fromthe perspective of an end-user who has not logged in. This can be useful as a quick way of checkingyour help desk customizations. For example, you can see which forums in your knowledge base arepublic, confirm that you've set up a dropbox properly, and take a look at the submit form after you'vemodified ticket fields.
To assume an anonymous user
Zendesk User's Guide | Managing people | 53
1. Select Manage > People.2. Click Anonymous user (in the right side column).3. When you're done, click Revert Identity (this command is in the upper right corner of the
help desk, near the Login and Sign up commands).
Suspending a userUsers can be suspended, which means that they are no longer able to log in to the help desk and anynew support requests you receive from the user are sent to the suspended tickets queue. This can bedone by either marking tickets as spam, which deletes the ticket and suspends the user at the sametime, or by marking the user as suspended in their user profile. Agents can suspend end-users andadmins can suspend both end-users and agents.
Users are not notified that they have been suspended, they simply cannot log in to the help desk.
You can unsuspend users, which restores their previous log in credentials and access to the helpdesk.
To mark a ticket as spam and suspend the requester
1. Select the ticket you want to mark as spam.2. Update the ticket by selecting Mark as spam and suspend requester.3. Click Submit.
Note: Remember that doing this deletes the ticket. You cannot retrieve it. The suspended requester'sother tickets, if any, are unaffected. They remain in your ticket queue and you can also mark them asspam or manually delete them.
To suspend a user
1. Select Manage > People and locate the user you want to suspend.2. Click the user's name.3. Select Actions > Suspend Access.
The user is now suspended and flagged as such in the help desk. They can no longer log in to thehelp desk. Any new support requests received from the user's registered identities (email addresses,Twitter, etc.) are added to the suspended tickets queue. You can manually release or delete theirsuspended tickets.
To unsuspend a user, follow the steps above and select Actions > Unsuspend Access.
54 | Zendesk User's Guide | Managing people
Bulk importing users and organizationsRather than add users manually one at a time, you can add many users in a bulk import. To dothis, you create a CSV (comma separated values) file that contains the user's data. Aside from theessential user data, such as email address and phone number, you can set user roles, define an agent'sprivileges, and add users to an organization.
You can use bulk import to add new users, replace existing user information data, add organizations,or replace existing organization data.
Only admins can bulk import users and organizations, not agents.
Limitations of bulk importing users and organizationsYou can import a core set of data about users and organizations. For example, using bulk import,you can import the user data described in the table below (Creating the CSV user import data file);however you cannot import the user's time zone, or photo, or language preference, etc. To importthat data, you need to use the Zendesk REST API instead (see Zendesk REST API: Introduction).
There are also the following limitations to bulk importing:• The import CSV data file must contain no more than 2000 rows of data (one row for the
header and the rest for the user or organization data).• You can only import one CSV file of 2000 or less rows of data per hour. Imports are queued
and run once an hour. Therefore, if you've got more than 1999 users to import, you need tocreate separate files for each batch and import them hours apart.
Creating the CSV organization data fileIf you use organizations in your help desk, you can bulk import a list of organizations using a CSVfile. You must import the organizations before you import the users that will be added to them.
The first row of the file is the header row and contains the fields listed in the table below. You mustinclude the header row, using all the fields and in the order they are listed below, even if you're notimporting that data into the help desk. In other words, you can have empty columns of data, but youmust include all the header row fields.
The file must be properly formatted CSV and saved using UTF-8 character encoding.
The following table lists the fields that you can include in the file.
Table 2: Organization import data
Field Description
name Required. The organization name.
notes Notes about the organization. Notes are visible to agents only, not to end-users.
details Detailed information about the organization, such as the address. Thisinformation is visible to agents only, not to end-users.
default This is for mapping users to an organization. Enter one or more emaildomains, separated with spaces.
Zendesk User's Guide | Managing people | 55
Field Description
See Automatically adding users to organizations based on their emaildomain in Creating, managing, and using organizations.
shared True or False. Sets the organization as a shared organization.
See Shared organization for end-users in Creating, managing, and usingorganizations.
shared_comments True or False. Allows all users in the organization to add comments toeach other's tickets. The shared field must also be set to true.
See Shared organization for end-users in Creating, managing, and usingorganizations.
group Enter a default group for the organization. See Mapping a group to anorganization in Creating, managing, and using organizations.
tags When user and organization tagging has been enabled for your help desk(see Adding tags to users and organizations), you can add tags to theorganization. Separate each tag with the comma.
Importing the CSV organization data fileYou can import new organizations or update information for existing organizations.
To import the CSV organization data
1. Select Manage > People.2. Select Bulk Organization Import (located in the right column).3. Choose the type of import you want:
• Create new organizations• Update existing organizations
Note: Warning! Currently, update actually means replace. In other words, if youselect Update existing organizations, it replaces the existing data in your helpdesk. If you want to add some additional organization data after you've added theorganizations to your help desk, your CSV file must also contain all the original datafrom the initial bulk import plus the new data.
4. Either click Choose File or the Let me paste in data instead link.5. Click Import.
Your import is added to the queue and the organizations are added to the help desk when the importprocess is complete. See Limitations of bulk importing users and organizations. You'll receive anemail when the import is complete.
Creating the CSV user data fileWhen you create a list of users to add to the help desk, you'll probably generate this list from someother user management system such as an Employee database. Most of these systems have somefacility for creating a CSV export file. If you need to create the list from scratch you can use aprogram like Microsoft Excel or OpenOffice.org Calc.
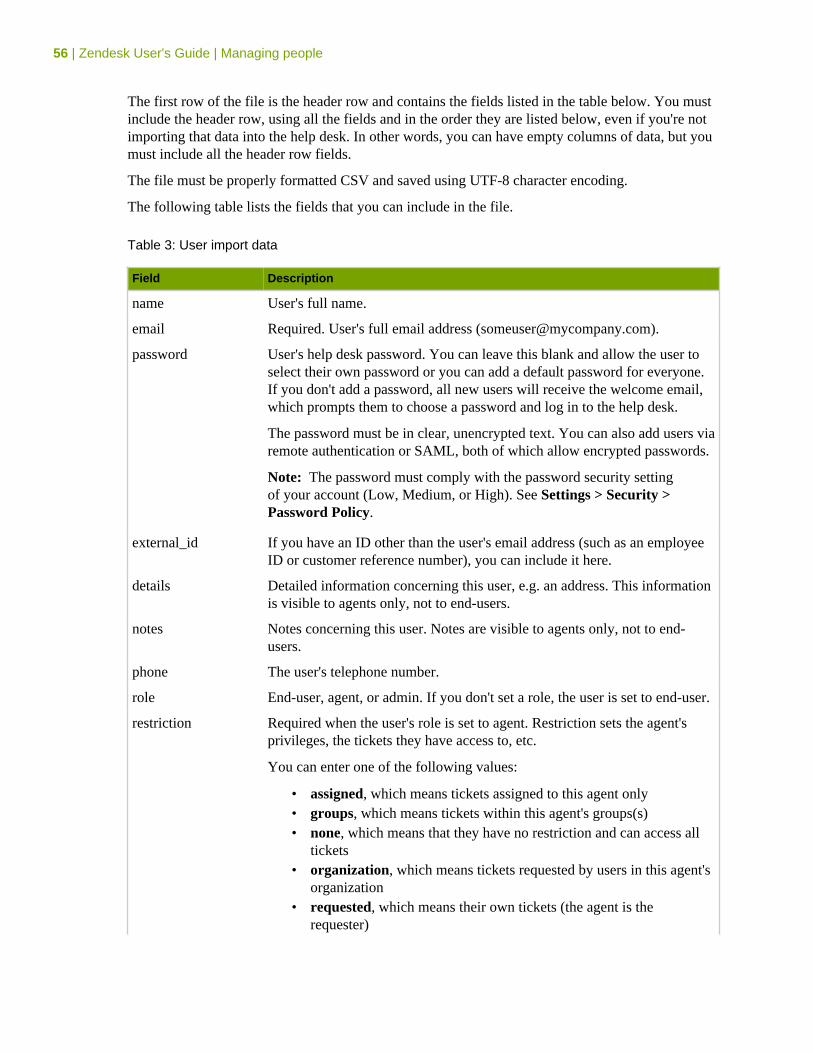
56 | Zendesk User's Guide | Managing people
The first row of the file is the header row and contains the fields listed in the table below. You mustinclude the header row, using all the fields and in the order they are listed below, even if you're notimporting that data into the help desk. In other words, you can have empty columns of data, but youmust include all the header row fields.
The file must be properly formatted CSV and saved using UTF-8 character encoding.
The following table lists the fields that you can include in the file.
Table 3: User import data
Field Description
name User's full name.
email Required. User's full email address ([email protected]).
password User's help desk password. You can leave this blank and allow the user toselect their own password or you can add a default password for everyone.If you don't add a password, all new users will receive the welcome email,which prompts them to choose a password and log in to the help desk.
The password must be in clear, unencrypted text. You can also add users viaremote authentication or SAML, both of which allow encrypted passwords.
Note: The password must comply with the password security settingof your account (Low, Medium, or High). See Settings > Security >Password Policy.
external_id If you have an ID other than the user's email address (such as an employeeID or customer reference number), you can include it here.
details Detailed information concerning this user, e.g. an address. This informationis visible to agents only, not to end-users.
notes Notes concerning this user. Notes are visible to agents only, not to end-users.
phone The user's telephone number.
role End-user, agent, or admin. If you don't set a role, the user is set to end-user.
restriction Required when the user's role is set to agent. Restriction sets the agent'sprivileges, the tickets they have access to, etc.
You can enter one of the following values:
• assigned, which means tickets assigned to this agent only• groups, which means tickets within this agent's groups(s)• none, which means that they have no restriction and can access all
tickets• organization, which means tickets requested by users in this agent's
organization• requested, which means their own tickets (the agent is the
requester)
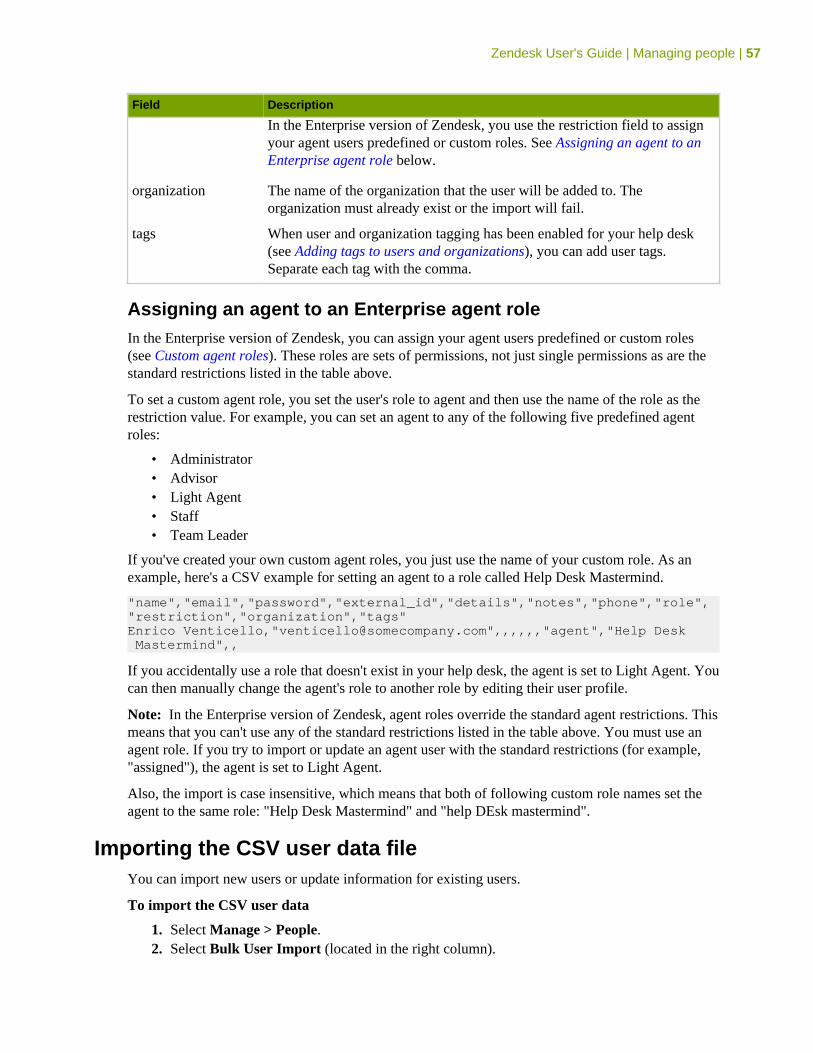
Zendesk User's Guide | Managing people | 57
Field Description
In the Enterprise version of Zendesk, you use the restriction field to assignyour agent users predefined or custom roles. See Assigning an agent to anEnterprise agent role below.
organization The name of the organization that the user will be added to. Theorganization must already exist or the import will fail.
tags When user and organization tagging has been enabled for your help desk(see Adding tags to users and organizations), you can add user tags.Separate each tag with the comma.
Assigning an agent to an Enterprise agent roleIn the Enterprise version of Zendesk, you can assign your agent users predefined or custom roles(see Custom agent roles). These roles are sets of permissions, not just single permissions as are thestandard restrictions listed in the table above.
To set a custom agent role, you set the user's role to agent and then use the name of the role as therestriction value. For example, you can set an agent to any of the following five predefined agentroles:
• Administrator• Advisor• Light Agent• Staff• Team Leader
If you've created your own custom agent roles, you just use the name of your custom role. As anexample, here's a CSV example for setting an agent to a role called Help Desk Mastermind.
"name","email","password","external_id","details","notes","phone","role","restriction","organization","tags"Enrico Venticello,"[email protected]",,,,,,"agent","Help Desk Mastermind",,
If you accidentally use a role that doesn't exist in your help desk, the agent is set to Light Agent. Youcan then manually change the agent's role to another role by editing their user profile.
Note: In the Enterprise version of Zendesk, agent roles override the standard agent restrictions. Thismeans that you can't use any of the standard restrictions listed in the table above. You must use anagent role. If you try to import or update an agent user with the standard restrictions (for example,"assigned"), the agent is set to Light Agent.
Also, the import is case insensitive, which means that both of following custom role names set theagent to the same role: "Help Desk Mastermind" and "help DEsk mastermind".
Importing the CSV user data fileYou can import new users or update information for existing users.
To import the CSV user data
1. Select Manage > People.2. Select Bulk User Import (located in the right column).
58 | Zendesk User's Guide | Managing people
3. Choose the type of import you want:
• Create new users• Update existing users
Note: Warning! Currently, update actually means replace. In other words, if youselect Update existing users, it replaces the existing data in your help desk. If youwant to add some additional user data after you've added the users to your help desk,your CSV file must also contain all the original data from the initial bulk import plusthe new data.
4. Either click Choose File or the Let me paste in data instead link.5. Click Import.
Note: Unless you added passwords in the CSV file, a welcome email is sent to every new user,which prompts them to choose a password and log in to the help desk.
Your import is added to the queue and the users are added to the help desk when the import processis complete. See Limitations of bulk importing users and organizations. You'll receive an emailwhen the import is complete.
Zendesk User's Guide | Managing people | 59
Creating, managing, and using groupsAs described in About organizations and groups, how you set up your groups depends on how youwant to define your workflow and organize your agents. All agents must be added to at least onegroup. Admins can add and edit groups, agents cannot.
To create a group1. Select Manage > People > Add Group.2. Enter a group name.3. Select the agents you want to add to the group.4. Click Create Group.
Admins can view and manage all groups by selecting Manage > People > Groups and can add andremove agents as needed.
Editing and deleting groupsEditing a group means simply adding or removing agents from it.
Groups can also be deleted (the delete command is available when editing a group). Deleting a grouphas implications of course. The agents you assigned to it will no longer be (since it doesn't existanymore) and the group will be removed from any tickets it was assigned to. Any business rules orreports you set up using the group you deleted will no longer function properly.
Adding agents to groupsYou can add agents to groups at the time you create the group. You can also add new agents to oneor more groups when you add them to your help desk. Only admins can add new agents.
To add a new agent to a group1. Select Manage > People > Add User.2. Enter information about the new user.3. In the section called Role - privileges granted to this user, select Agent.4. All of your groups are displayed. Select one or more.5. Set the agent's other privileges (described below).6. Click Create.
You can change the agent's group assignments at any time by editing their profile. Agents cannotchange their own group assignments.
Setting agent privileges, defining ticket accessWhen you add agents you need to define their privileges (groups they will be assigned to, theiraccess to tickets, if they can make both public and private comments, and if they can moderateforums). These privileges are described in the following table:Table 4: Agent privileges
Privileges Description
Groups This is the list of groups in your help desk. You can select one or more.Agents must be added to at least one group.
Has access to An agent's access to tickets can be defined with the following options:
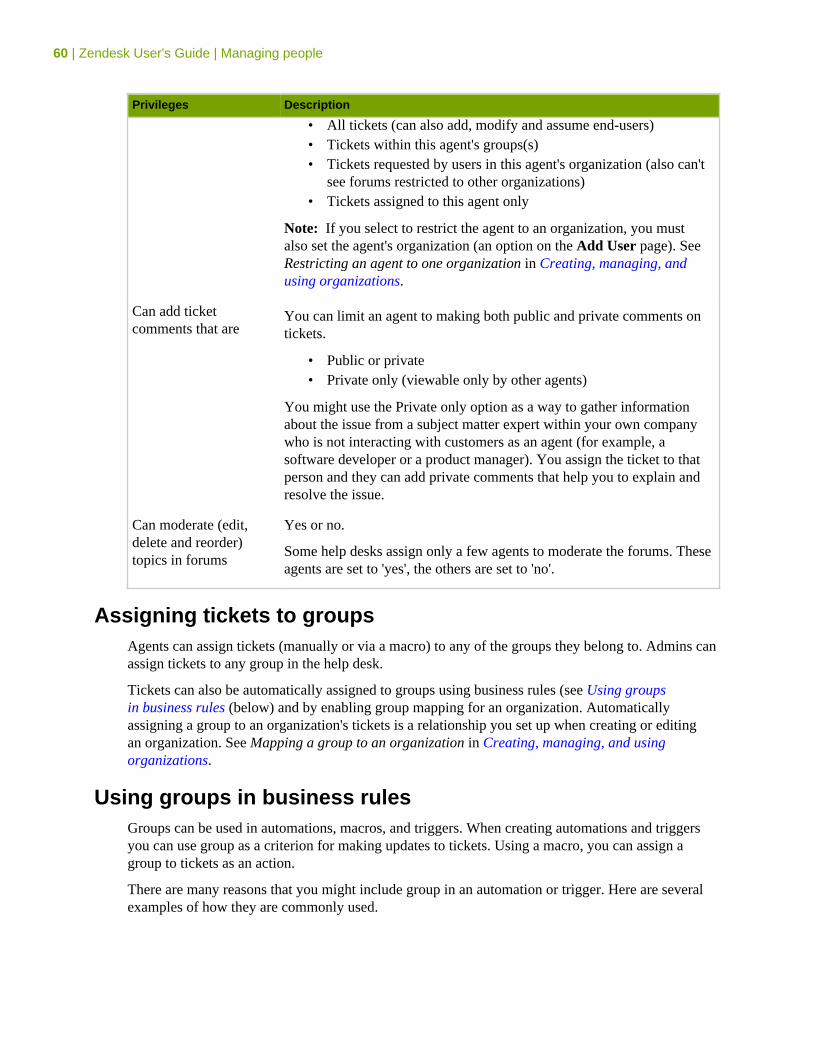
60 | Zendesk User's Guide | Managing people
Privileges Description
• All tickets (can also add, modify and assume end-users)• Tickets within this agent's groups(s)• Tickets requested by users in this agent's organization (also can't
see forums restricted to other organizations)• Tickets assigned to this agent only
Note: If you select to restrict the agent to an organization, you mustalso set the agent's organization (an option on the Add User page). SeeRestricting an agent to one organization in Creating, managing, andusing organizations.
Can add ticketcomments that are
You can limit an agent to making both public and private comments ontickets.
• Public or private• Private only (viewable only by other agents)
You might use the Private only option as a way to gather informationabout the issue from a subject matter expert within your own companywho is not interacting with customers as an agent (for example, asoftware developer or a product manager). You assign the ticket to thatperson and they can add private comments that help you to explain andresolve the issue.
Can moderate (edit,delete and reorder)topics in forums
Yes or no.
Some help desks assign only a few agents to moderate the forums. Theseagents are set to 'yes', the others are set to 'no'.
Assigning tickets to groupsAgents can assign tickets (manually or via a macro) to any of the groups they belong to. Admins canassign tickets to any group in the help desk.
Tickets can also be automatically assigned to groups using business rules (see Using groupsin business rules (below) and by enabling group mapping for an organization. Automaticallyassigning a group to an organization's tickets is a relationship you set up when creating or editingan organization. See Mapping a group to an organization in Creating, managing, and usingorganizations.
Using groups in business rulesGroups can be used in automations, macros, and triggers. When creating automations and triggersyou can use group as a criterion for making updates to tickets. Using a macro, you can assign agroup to tickets as an action.
There are many reasons that you might include group in an automation or trigger. Here are severalexamples of how they are commonly used.
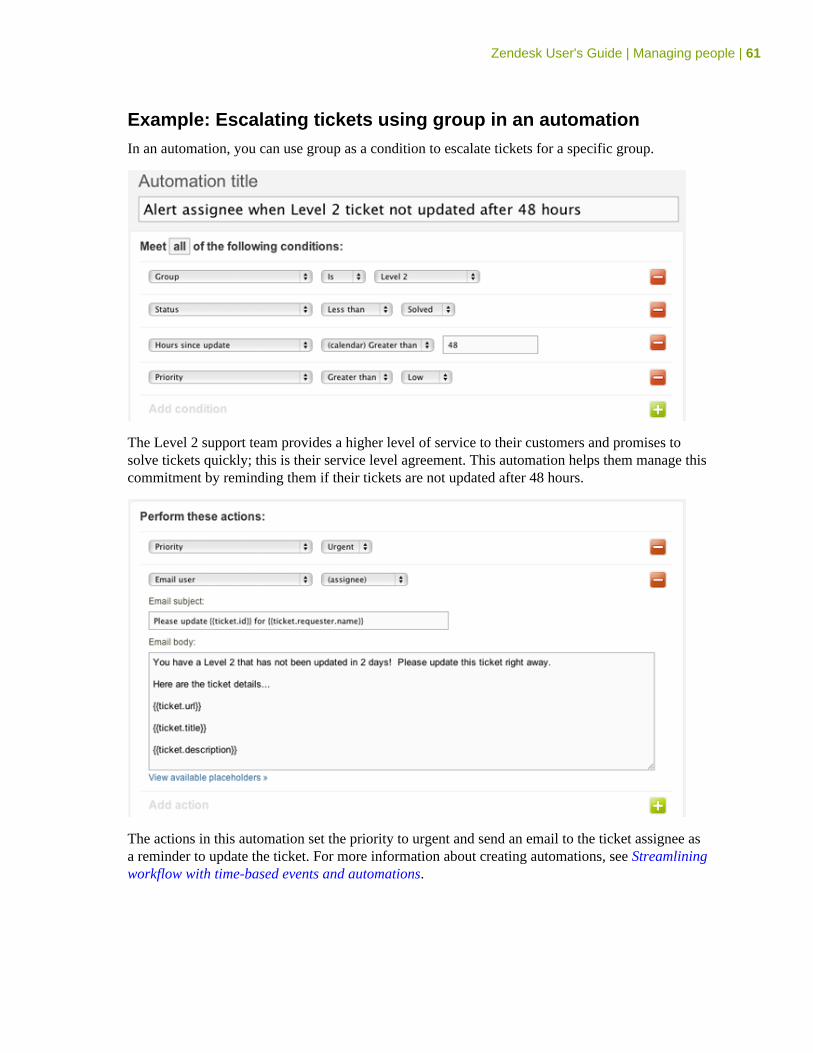
Zendesk User's Guide | Managing people | 61
Example: Escalating tickets using group in an automationIn an automation, you can use group as a condition to escalate tickets for a specific group.
The Level 2 support team provides a higher level of service to their customers and promises tosolve tickets quickly; this is their service level agreement. This automation helps them manage thiscommitment by reminding them if their tickets are not updated after 48 hours.
The actions in this automation set the priority to urgent and send an email to the ticket assignee asa reminder to update the ticket. For more information about creating automations, see Streamliningworkflow with time-based events and automations.
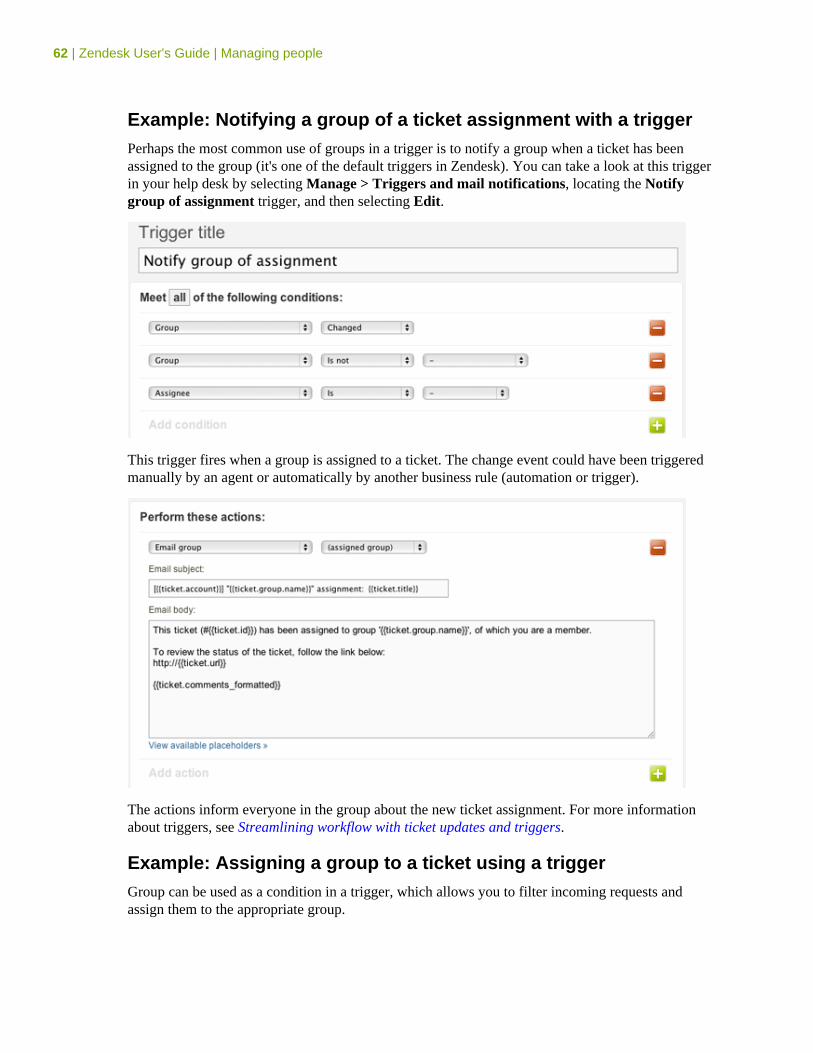
62 | Zendesk User's Guide | Managing people
Example: Notifying a group of a ticket assignment with a triggerPerhaps the most common use of groups in a trigger is to notify a group when a ticket has beenassigned to the group (it's one of the default triggers in Zendesk). You can take a look at this triggerin your help desk by selecting Manage > Triggers and mail notifications, locating the Notifygroup of assignment trigger, and then selecting Edit.
This trigger fires when a group is assigned to a ticket. The change event could have been triggeredmanually by an agent or automatically by another business rule (automation or trigger).
The actions inform everyone in the group about the new ticket assignment. For more informationabout triggers, see Streamlining workflow with ticket updates and triggers.
Example: Assigning a group to a ticket using a triggerGroup can be used as a condition in a trigger, which allows you to filter incoming requests andassign them to the appropriate group.
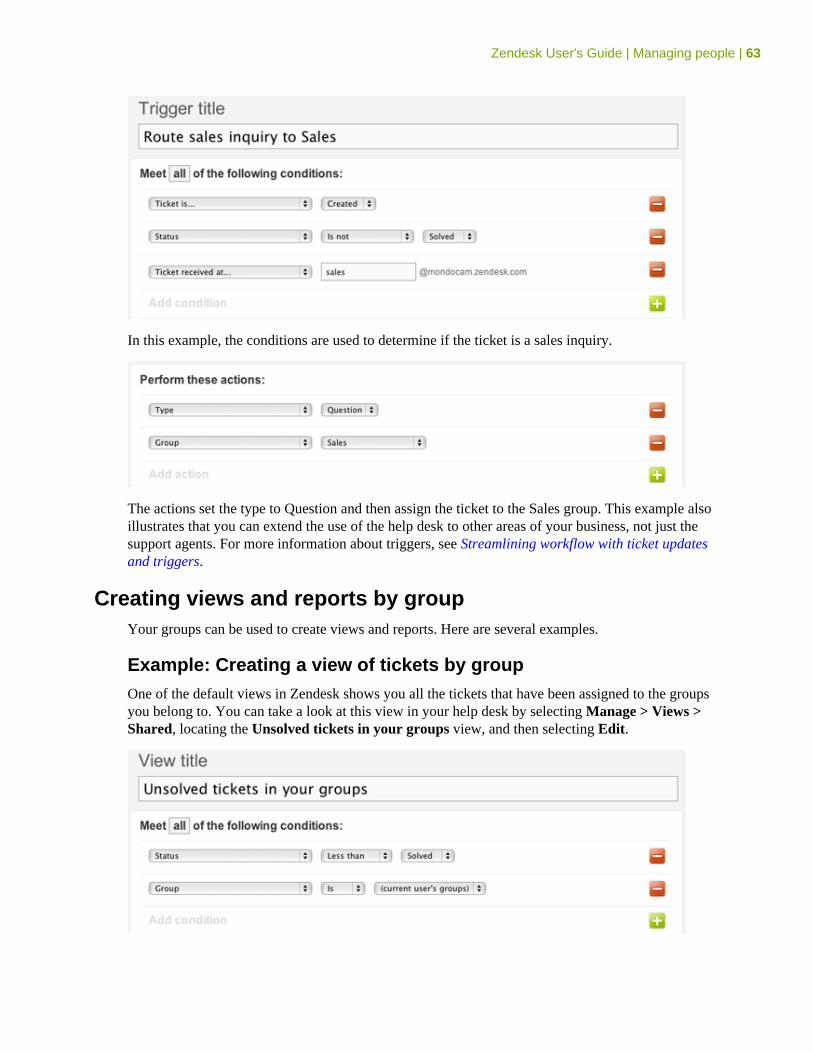
Zendesk User's Guide | Managing people | 63
In this example, the conditions are used to determine if the ticket is a sales inquiry.
The actions set the type to Question and then assign the ticket to the Sales group. This example alsoillustrates that you can extend the use of the help desk to other areas of your business, not just thesupport agents. For more information about triggers, see Streamlining workflow with ticket updatesand triggers.
Creating views and reports by groupYour groups can be used to create views and reports. Here are several examples.
Example: Creating a view of tickets by groupOne of the default views in Zendesk shows you all the tickets that have been assigned to the groupsyou belong to. You can take a look at this view in your help desk by selecting Manage > Views >Shared, locating the Unsolved tickets in your groups view, and then selecting Edit.
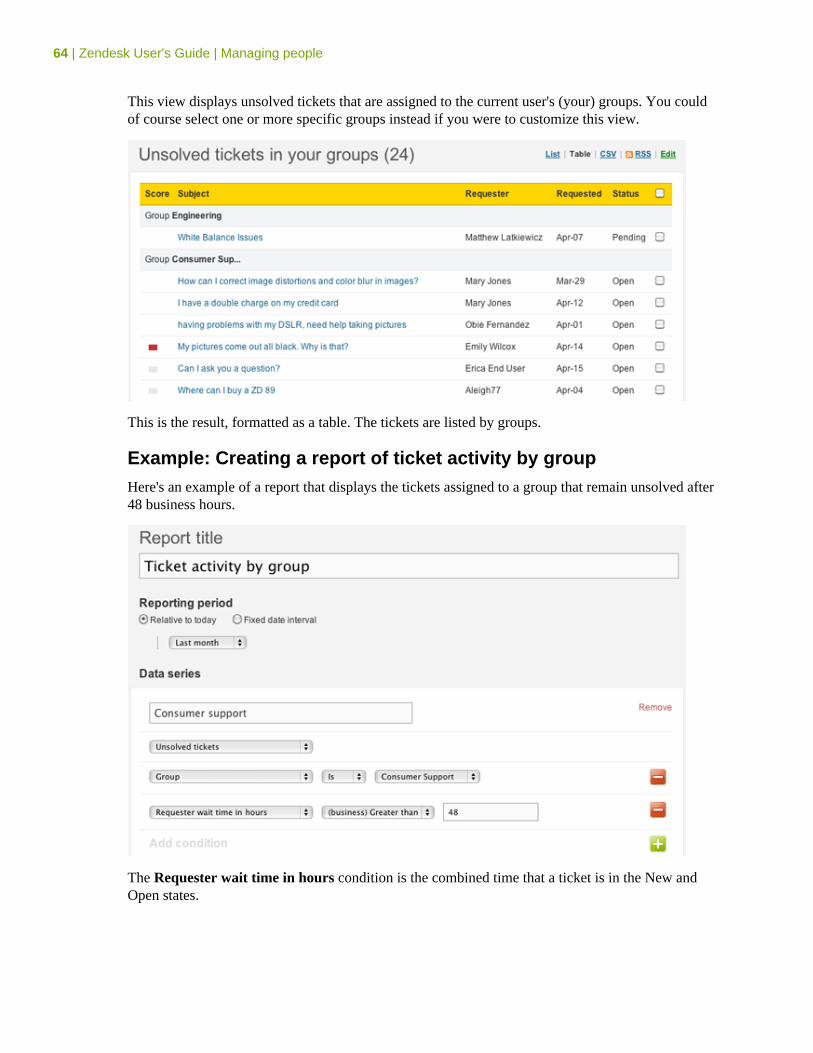
64 | Zendesk User's Guide | Managing people
This view displays unsolved tickets that are assigned to the current user's (your) groups. You couldof course select one or more specific groups instead if you were to customize this view.
This is the result, formatted as a table. The tickets are listed by groups.
Example: Creating a report of ticket activity by groupHere's an example of a report that displays the tickets assigned to a group that remain unsolved after48 business hours.
The Requester wait time in hours condition is the combined time that a ticket is in the New andOpen states.
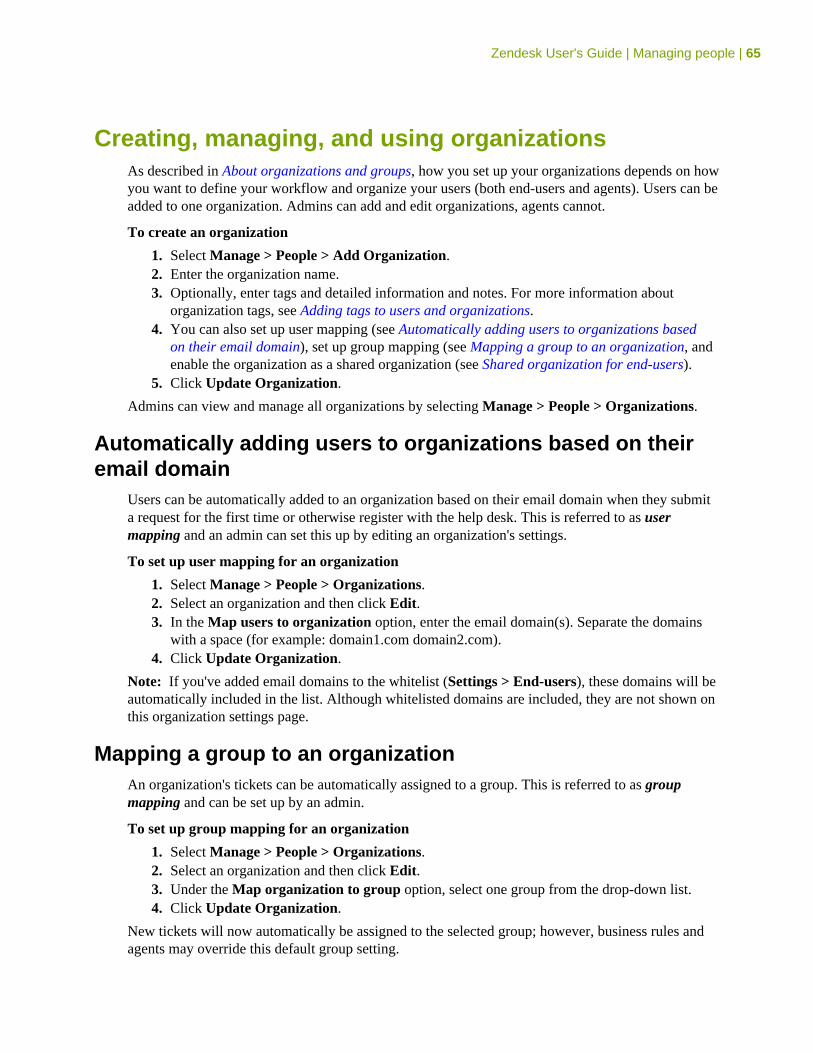
Zendesk User's Guide | Managing people | 65
Creating, managing, and using organizationsAs described in About organizations and groups, how you set up your organizations depends on howyou want to define your workflow and organize your users (both end-users and agents). Users can beadded to one organization. Admins can add and edit organizations, agents cannot.
To create an organization
1. Select Manage > People > Add Organization.2. Enter the organization name.3. Optionally, enter tags and detailed information and notes. For more information about
organization tags, see Adding tags to users and organizations.4. You can also set up user mapping (see Automatically adding users to organizations based
on their email domain), set up group mapping (see Mapping a group to an organization, andenable the organization as a shared organization (see Shared organization for end-users).
5. Click Update Organization.
Admins can view and manage all organizations by selecting Manage > People > Organizations.
Automatically adding users to organizations based on theiremail domain
Users can be automatically added to an organization based on their email domain when they submita request for the first time or otherwise register with the help desk. This is referred to as usermapping and an admin can set this up by editing an organization's settings.
To set up user mapping for an organization
1. Select Manage > People > Organizations.2. Select an organization and then click Edit.3. In the Map users to organization option, enter the email domain(s). Separate the domains
with a space (for example: domain1.com domain2.com).4. Click Update Organization.
Note: If you've added email domains to the whitelist (Settings > End-users), these domains will beautomatically included in the list. Although whitelisted domains are included, they are not shown onthis organization settings page.
Mapping a group to an organizationAn organization's tickets can be automatically assigned to a group. This is referred to as groupmapping and can be set up by an admin.
To set up group mapping for an organization
1. Select Manage > People > Organizations.2. Select an organization and then click Edit.3. Under the Map organization to group option, select one group from the drop-down list.4. Click Update Organization.
New tickets will now automatically be assigned to the selected group; however, business rules andagents may override this default group setting.
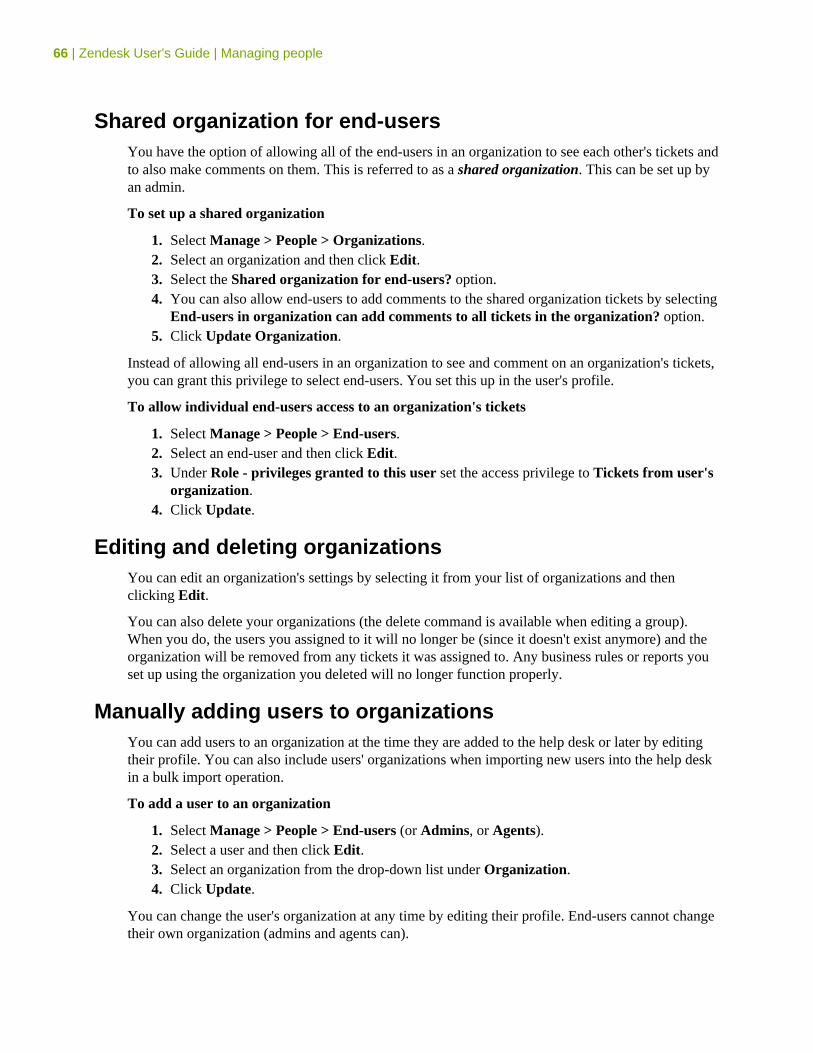
66 | Zendesk User's Guide | Managing people
Shared organization for end-usersYou have the option of allowing all of the end-users in an organization to see each other's tickets andto also make comments on them. This is referred to as a shared organization. This can be set up byan admin.
To set up a shared organization
1. Select Manage > People > Organizations.2. Select an organization and then click Edit.3. Select the Shared organization for end-users? option.4. You can also allow end-users to add comments to the shared organization tickets by selecting
End-users in organization can add comments to all tickets in the organization? option.5. Click Update Organization.
Instead of allowing all end-users in an organization to see and comment on an organization's tickets,you can grant this privilege to select end-users. You set this up in the user's profile.
To allow individual end-users access to an organization's tickets
1. Select Manage > People > End-users.2. Select an end-user and then click Edit.3. Under Role - privileges granted to this user set the access privilege to Tickets from user's
organization.4. Click Update.
Editing and deleting organizationsYou can edit an organization's settings by selecting it from your list of organizations and thenclicking Edit.
You can also delete your organizations (the delete command is available when editing a group).When you do, the users you assigned to it will no longer be (since it doesn't exist anymore) and theorganization will be removed from any tickets it was assigned to. Any business rules or reports youset up using the organization you deleted will no longer function properly.
Manually adding users to organizationsYou can add users to an organization at the time they are added to the help desk or later by editingtheir profile. You can also include users' organizations when importing new users into the help deskin a bulk import operation.
To add a user to an organization
1. Select Manage > People > End-users (or Admins, or Agents).2. Select a user and then click Edit.3. Select an organization from the drop-down list under Organization.4. Click Update.
You can change the user's organization at any time by editing their profile. End-users cannot changetheir own organization (admins and agents can).
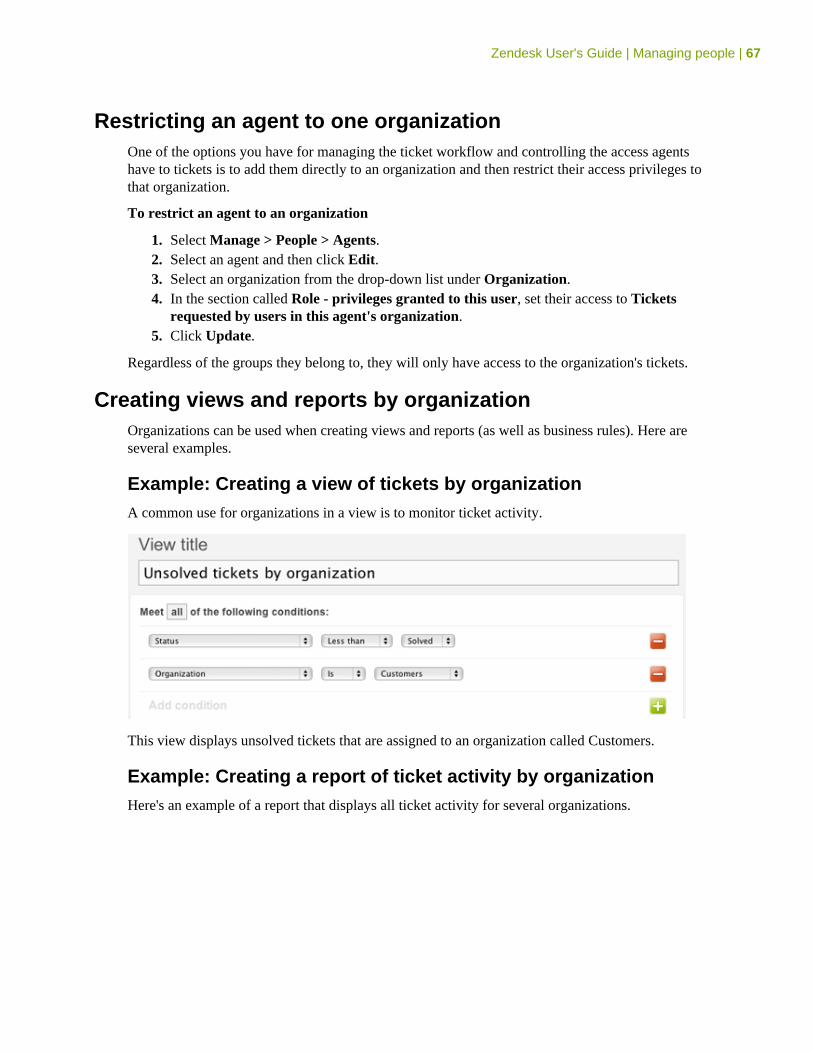
Zendesk User's Guide | Managing people | 67
Restricting an agent to one organizationOne of the options you have for managing the ticket workflow and controlling the access agentshave to tickets is to add them directly to an organization and then restrict their access privileges tothat organization.
To restrict an agent to an organization
1. Select Manage > People > Agents.2. Select an agent and then click Edit.3. Select an organization from the drop-down list under Organization.4. In the section called Role - privileges granted to this user, set their access to Tickets
requested by users in this agent's organization.5. Click Update.
Regardless of the groups they belong to, they will only have access to the organization's tickets.
Creating views and reports by organizationOrganizations can be used when creating views and reports (as well as business rules). Here areseveral examples.
Example: Creating a view of tickets by organizationA common use for organizations in a view is to monitor ticket activity.
This view displays unsolved tickets that are assigned to an organization called Customers.
Example: Creating a report of ticket activity by organizationHere's an example of a report that displays all ticket activity for several organizations.
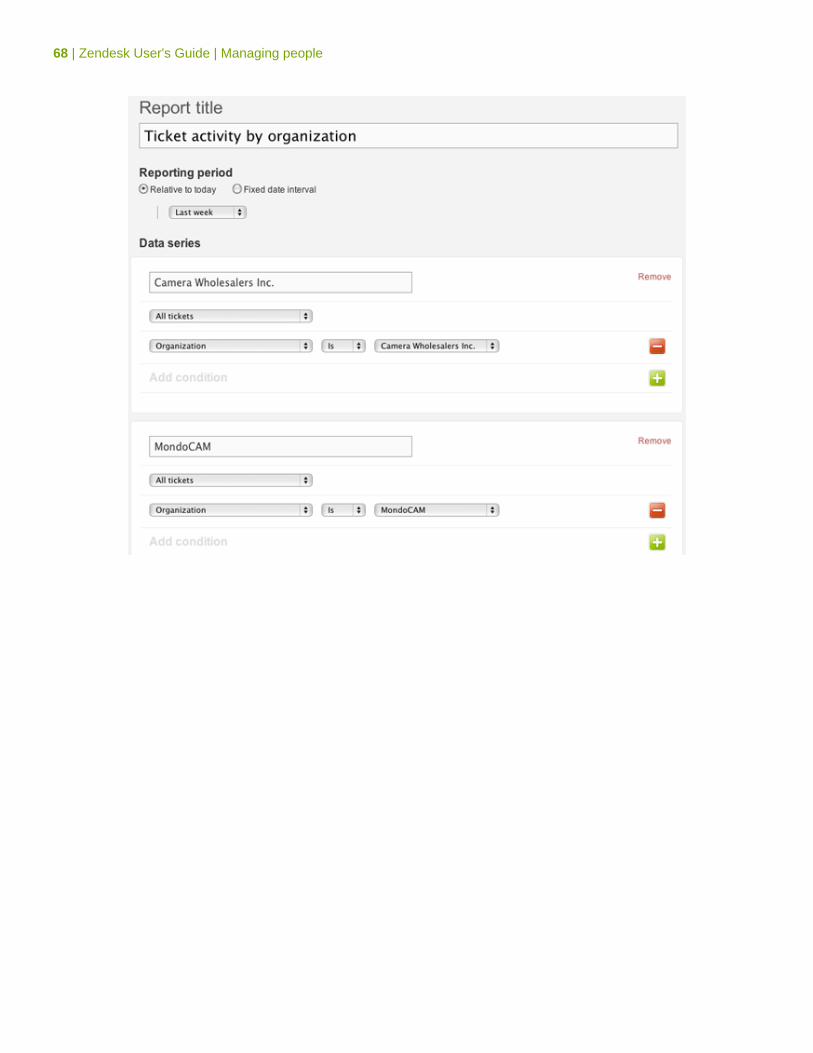
68 | Zendesk User's Guide | Managing people
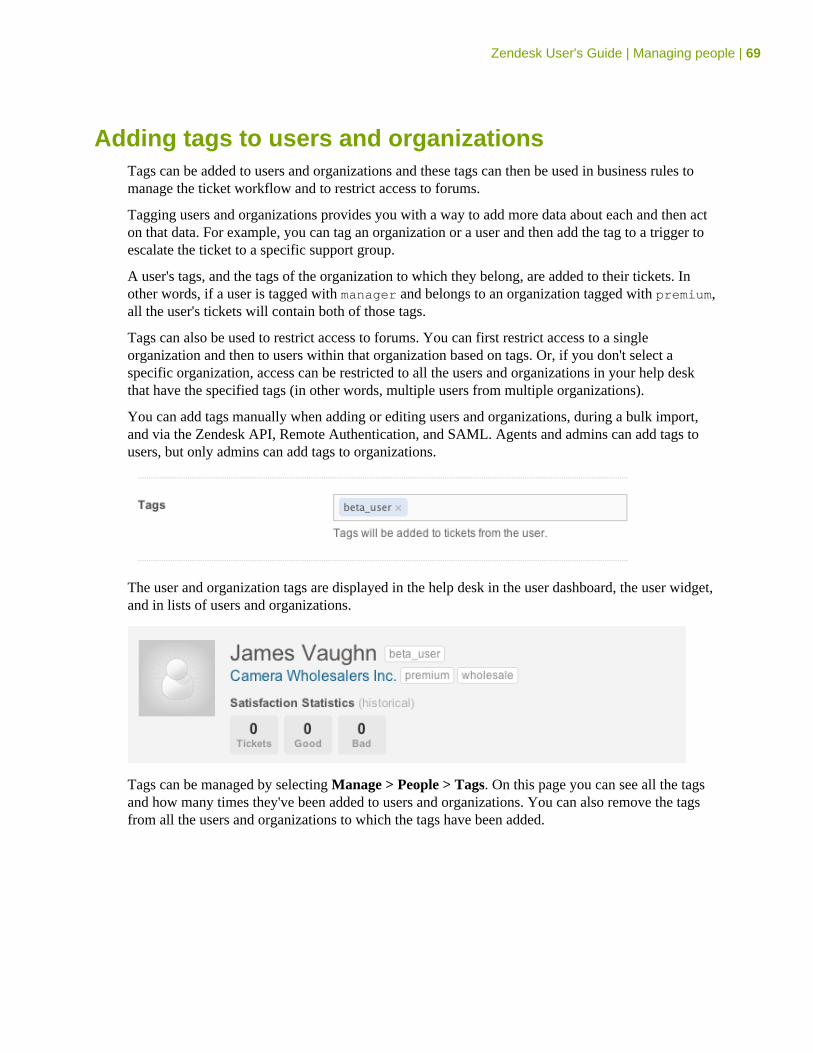
Zendesk User's Guide | Managing people | 69
Adding tags to users and organizationsTags can be added to users and organizations and these tags can then be used in business rules tomanage the ticket workflow and to restrict access to forums.
Tagging users and organizations provides you with a way to add more data about each and then acton that data. For example, you can tag an organization or a user and then add the tag to a trigger toescalate the ticket to a specific support group.
A user's tags, and the tags of the organization to which they belong, are added to their tickets. Inother words, if a user is tagged with manager and belongs to an organization tagged with premium,all the user's tickets will contain both of those tags.
Tags can also be used to restrict access to forums. You can first restrict access to a singleorganization and then to users within that organization based on tags. Or, if you don't select aspecific organization, access can be restricted to all the users and organizations in your help deskthat have the specified tags (in other words, multiple users from multiple organizations).
You can add tags manually when adding or editing users and organizations, during a bulk import,and via the Zendesk API, Remote Authentication, and SAML. Agents and admins can add tags tousers, but only admins can add tags to organizations.
The user and organization tags are displayed in the help desk in the user dashboard, the user widget,and in lists of users and organizations.
Tags can be managed by selecting Manage > People > Tags. On this page you can see all the tagsand how many times they've been added to users and organizations. You can also remove the tagsfrom all the users and organizations to which the tags have been added.
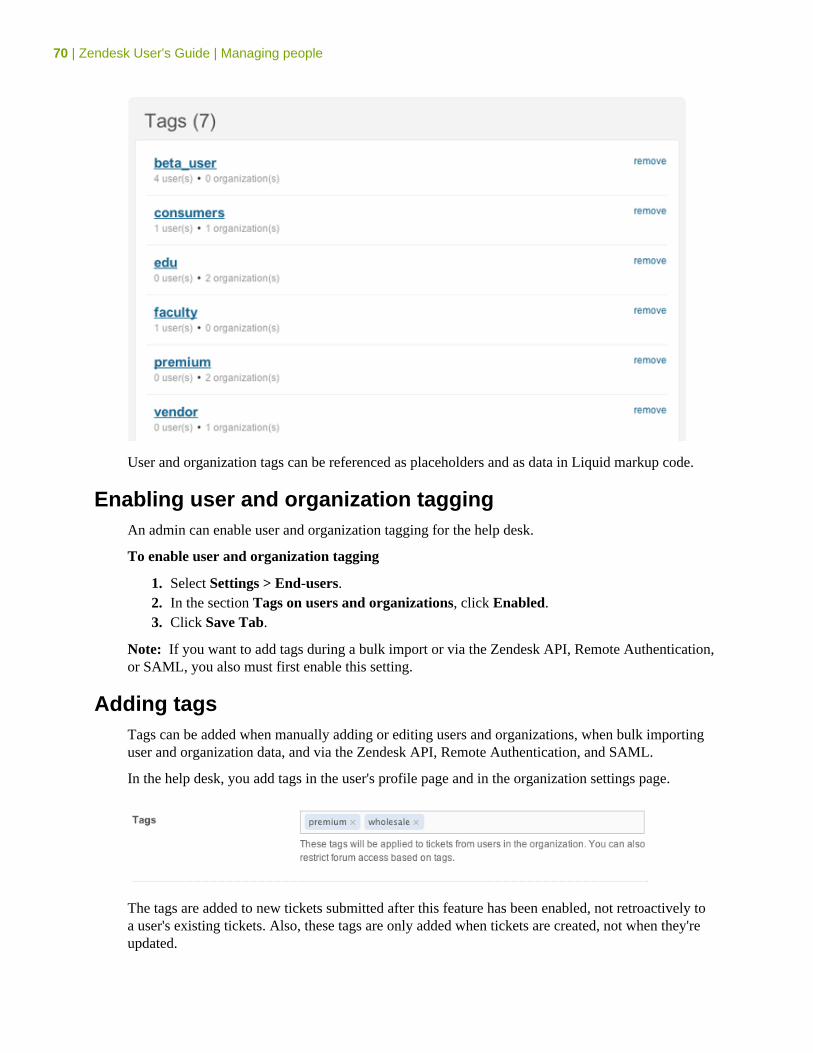
70 | Zendesk User's Guide | Managing people
User and organization tags can be referenced as placeholders and as data in Liquid markup code.
Enabling user and organization taggingAn admin can enable user and organization tagging for the help desk.
To enable user and organization tagging
1. Select Settings > End-users.2. In the section Tags on users and organizations, click Enabled.3. Click Save Tab.
Note: If you want to add tags during a bulk import or via the Zendesk API, Remote Authentication,or SAML, you also must first enable this setting.
Adding tagsTags can be added when manually adding or editing users and organizations, when bulk importinguser and organization data, and via the Zendesk API, Remote Authentication, and SAML.
In the help desk, you add tags in the user's profile page and in the organization settings page.
The tags are added to new tickets submitted after this feature has been enabled, not retroactively toa user's existing tickets. Also, these tags are only added when tickets are created, not when they'reupdated.
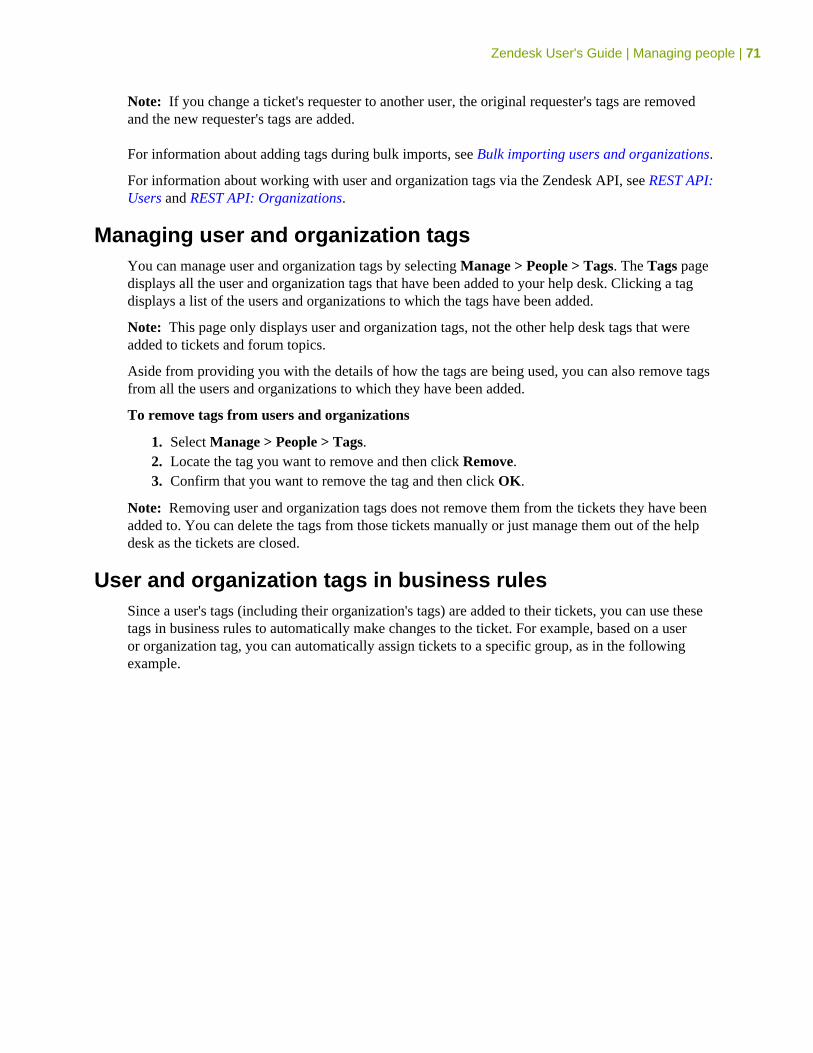
Zendesk User's Guide | Managing people | 71
Note: If you change a ticket's requester to another user, the original requester's tags are removedand the new requester's tags are added.
For information about adding tags during bulk imports, see Bulk importing users and organizations.
For information about working with user and organization tags via the Zendesk API, see REST API:Users and REST API: Organizations.
Managing user and organization tagsYou can manage user and organization tags by selecting Manage > People > Tags. The Tags pagedisplays all the user and organization tags that have been added to your help desk. Clicking a tagdisplays a list of the users and organizations to which the tags have been added.
Note: This page only displays user and organization tags, not the other help desk tags that wereadded to tickets and forum topics.
Aside from providing you with the details of how the tags are being used, you can also remove tagsfrom all the users and organizations to which they have been added.
To remove tags from users and organizations
1. Select Manage > People > Tags.2. Locate the tag you want to remove and then click Remove.3. Confirm that you want to remove the tag and then click OK.
Note: Removing user and organization tags does not remove them from the tickets they have beenadded to. You can delete the tags from those tickets manually or just manage them out of the helpdesk as the tickets are closed.
User and organization tags in business rulesSince a user's tags (including their organization's tags) are added to their tickets, you can use thesetags in business rules to automatically make changes to the ticket. For example, based on a useror organization tag, you can automatically assign tickets to a specific group, as in the followingexample.
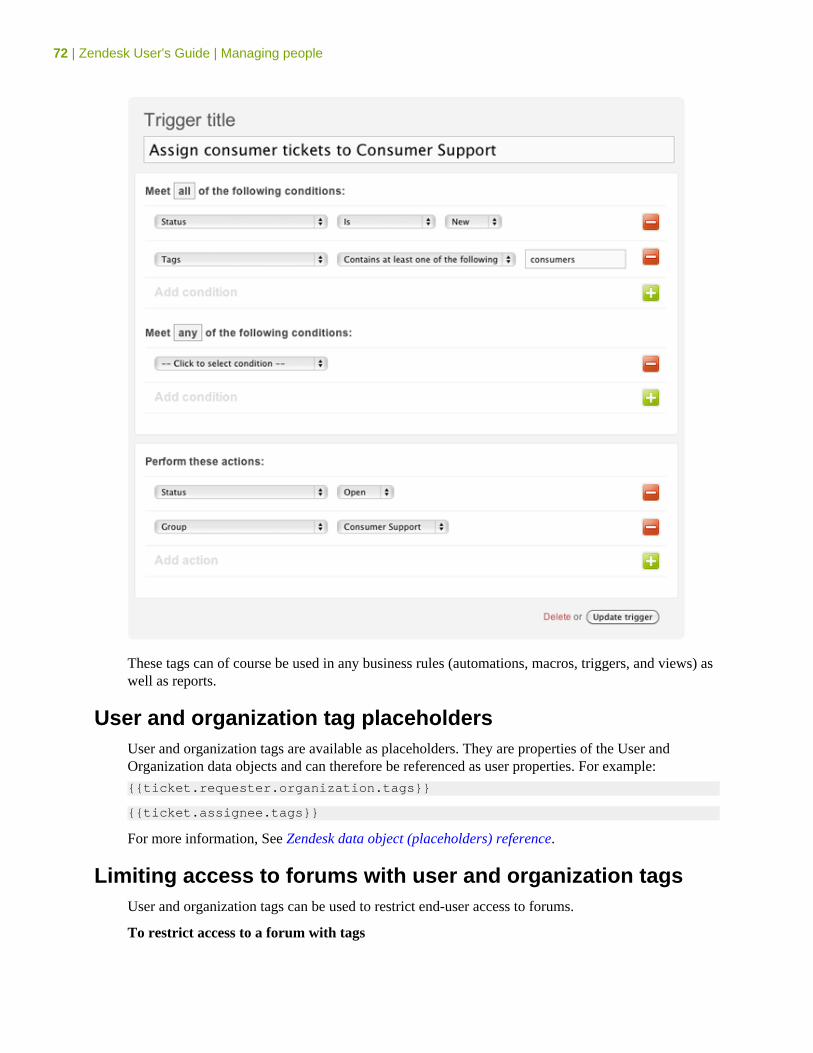
72 | Zendesk User's Guide | Managing people
These tags can of course be used in any business rules (automations, macros, triggers, and views) aswell as reports.
User and organization tag placeholdersUser and organization tags are available as placeholders. They are properties of the User andOrganization data objects and can therefore be referenced as user properties. For example:
{{ticket.requester.organization.tags}}
{{ticket.assignee.tags}}
For more information, See Zendesk data object (placeholders) reference.
Limiting access to forums with user and organization tagsUser and organization tags can be used to restrict end-user access to forums.
To restrict access to a forum with tags
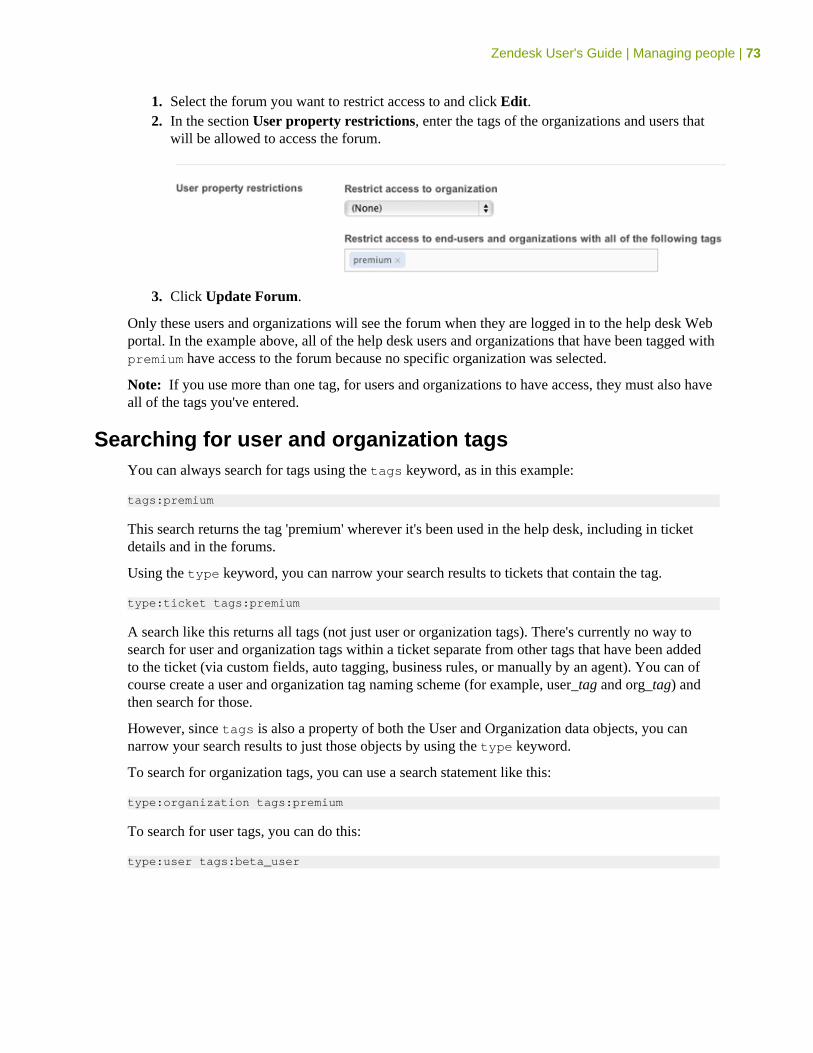
Zendesk User's Guide | Managing people | 73
1. Select the forum you want to restrict access to and click Edit.2. In the section User property restrictions, enter the tags of the organizations and users that
will be allowed to access the forum.
3. Click Update Forum.
Only these users and organizations will see the forum when they are logged in to the help desk Webportal. In the example above, all of the help desk users and organizations that have been tagged withpremium have access to the forum because no specific organization was selected.
Note: If you use more than one tag, for users and organizations to have access, they must also haveall of the tags you've entered.
Searching for user and organization tagsYou can always search for tags using the tags keyword, as in this example:
tags:premium
This search returns the tag 'premium' wherever it's been used in the help desk, including in ticketdetails and in the forums.
Using the type keyword, you can narrow your search results to tickets that contain the tag.
type:ticket tags:premium
A search like this returns all tags (not just user or organization tags). There's currently no way tosearch for user and organization tags within a ticket separate from other tags that have been addedto the ticket (via custom fields, auto tagging, business rules, or manually by an agent). You can ofcourse create a user and organization tag naming scheme (for example, user_tag and org_tag) andthen search for those.
However, since tags is also a property of both the User and Organization data objects, you cannarrow your search results to just those objects by using the type keyword.
To search for organization tags, you can use a search statement like this:
type:organization tags:premium
To search for user tags, you can do this:
type:user tags:beta_user
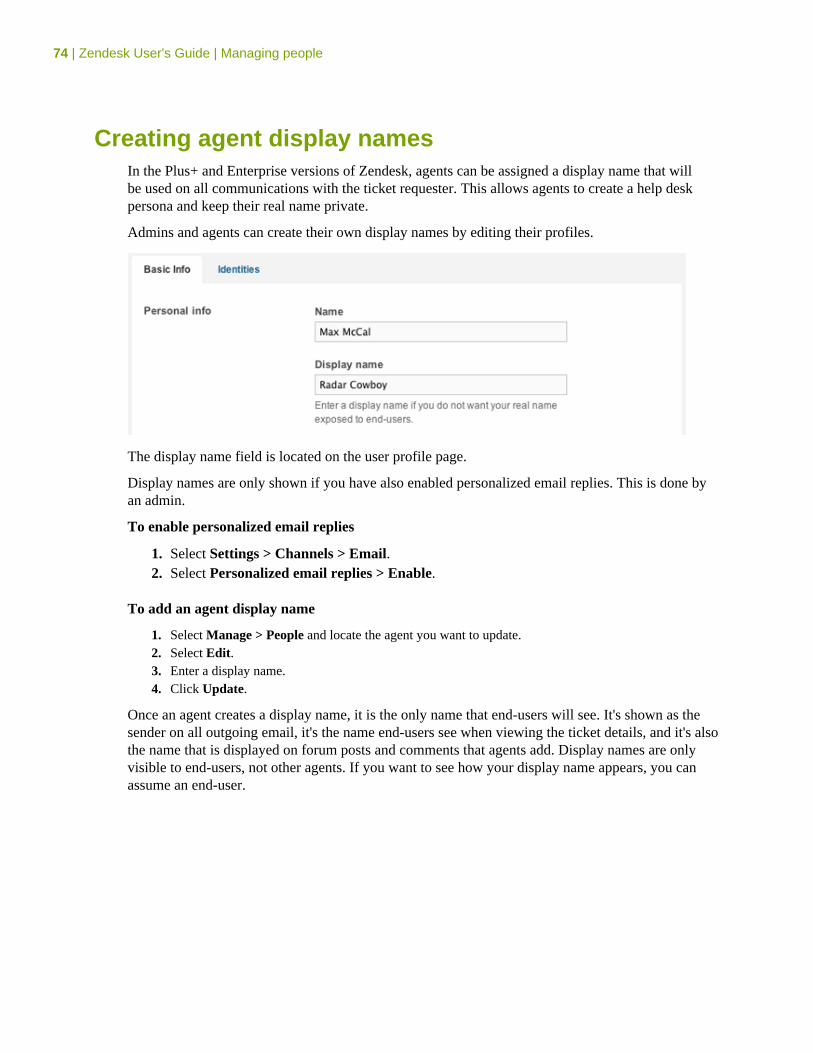
74 | Zendesk User's Guide | Managing people
Creating agent display namesIn the Plus+ and Enterprise versions of Zendesk, agents can be assigned a display name that willbe used on all communications with the ticket requester. This allows agents to create a help deskpersona and keep their real name private.
Admins and agents can create their own display names by editing their profiles.
The display name field is located on the user profile page.
Display names are only shown if you have also enabled personalized email replies. This is done byan admin.
To enable personalized email replies
1. Select Settings > Channels > Email.2. Select Personalized email replies > Enable.
To add an agent display name
1. Select Manage > People and locate the agent you want to update.2. Select Edit.3. Enter a display name.4. Click Update.
Once an agent creates a display name, it is the only name that end-users will see. It's shown as thesender on all outgoing email, it's the name end-users see when viewing the ticket details, and it's alsothe name that is displayed on forum posts and comments that agents add. Display names are onlyvisible to end-users, not other agents. If you want to see how your display name appears, you canassume an end-user.
Chapter
4
Tickets and channels• About ticket fields• Adding and using custom ticket fields• Sharing tickets between Zendesk help desks• Setting up Zendesk Voice• Using Zendesk Voice
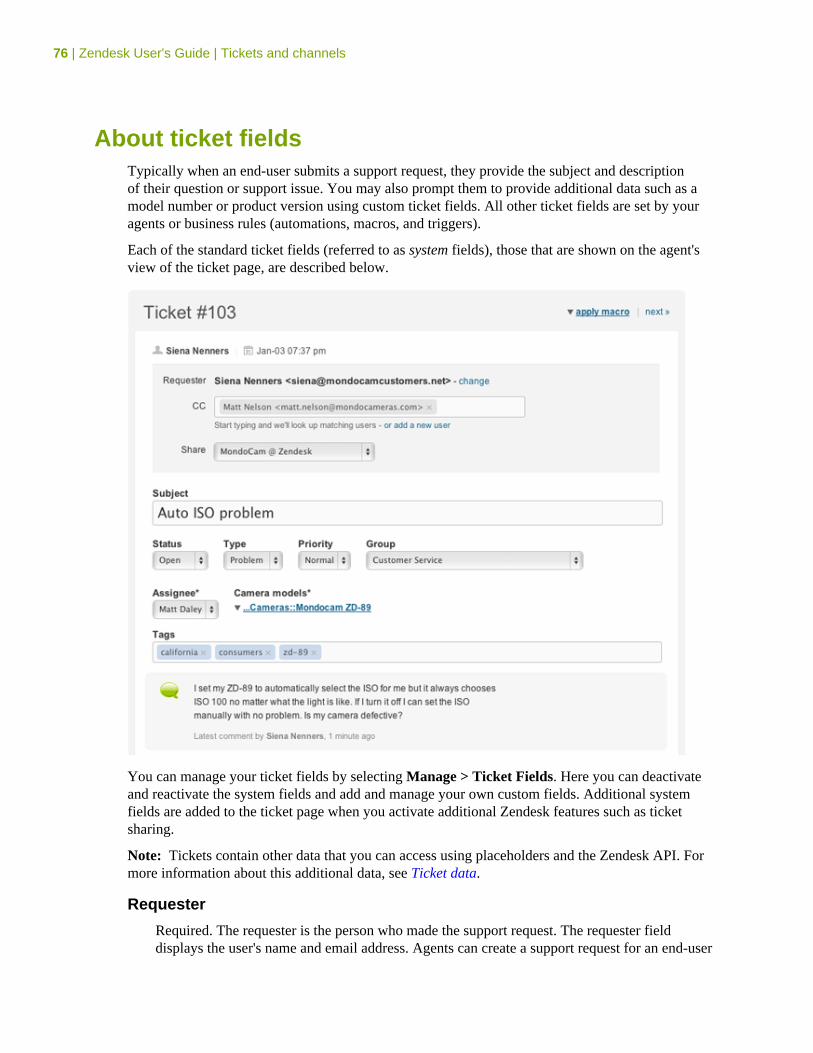
76 | Zendesk User's Guide | Tickets and channels
About ticket fieldsTypically when an end-user submits a support request, they provide the subject and descriptionof their question or support issue. You may also prompt them to provide additional data such as amodel number or product version using custom ticket fields. All other ticket fields are set by youragents or business rules (automations, macros, and triggers).
Each of the standard ticket fields (referred to as system fields), those that are shown on the agent'sview of the ticket page, are described below.
You can manage your ticket fields by selecting Manage > Ticket Fields. Here you can deactivateand reactivate the system fields and add and manage your own custom fields. Additional systemfields are added to the ticket page when you activate additional Zendesk features such as ticketsharing.
Note: Tickets contain other data that you can access using placeholders and the Zendesk API. Formore information about this additional data, see Ticket data.
Requester
Required. The requester is the person who made the support request. The requester fielddisplays the user's name and email address. Agents can create a support request for an end-user
Zendesk User's Guide | Tickets and channels | 77
and select the end-user's identity to enter into the requester field (for example, an agent mightopen a new ticket for the requester while speaking to them on the phone).
CC
If you allow it, by enabling tickets CCs (Settings > Tickets > CCs), other people can be CC'edon tickets. End-users and agents can add CCs. End-users can add CCs when they create email-based support requests. Agents can add CCs using the CC field when updating the ticket.
Share
As described in Sharing tickets between Zendesk help desks, you can share tickets with otherhelp desks. You must first establish sharing agreements with other help desks. Once you have,you can select a help desk to share the ticket with. This field is only displayed if you've enabledticket sharing by selecting Settings > Tickets > Ticket Sharing.
Subject
Required. A short description of the support request. When an end-user submits a supportrequest via email, the subject line of the email is used as the ticket's subject.
Description
Required. This is the description of the support request. When an end-user submits a supportrequest via email, the body of the email request is used as the description. The descriptionbecomes the first comment in the ticket.
Status
There are five values for status: New, Open, Pending, Solved, Closed. A ticket's status canbe set and updated either manually by an agent or via an action in an automation, macro, ortrigger. The status can only be changed to Closed via automations and triggers (not manually).
New means that the request was received but that it has not been opened and has probably notbeen assigned to an agent. The New status can indicate that the support team is evaluating it todetermine who should be assigned to resolve it.
Open means that the request has been assigned to an agent who is working to resolve it.
Pending means that the assigned agent has a follow-up question for the requester. The agentmay need more information about the support issue. Requests that are set to Pending typicallyremain that way until the requester responds and provides the information the agent needs tocontinue resolving the request.
Solved means that the agent has resolved the support issue. Solved tickets are closed, typically,a number of days after they have been set to Solved (you can control when your tickets areclosed by modifying the automation that is used to close tickets). Until a ticket is closed, therequester can reopen the ticket. For example, the requester may not agree with the agent thatthe support issue is resolved.
Closed means that the ticket is complete and can't be reopened. Requesters however can createfollow-up requests for closed requests.
Type
There are four values for type: Question, Incident, Problem, and Task. You can also setthe type to none, if you wish; it is not a required ticket field. Setting the type helps you to
78 | Zendesk User's Guide | Tickets and channels
categorize your tickets, which you can then use in your workflow. For example, you can createviews for tickets by their type.
Question is used to indicate that the requester's issue is a question rather than a problem thatneeds to be solved.
Incident is used for occurrences of a problem that affects more than one person. For example,in a corporate setting, if no one was able to print a document, this is a problem that wouldprobably result in many support requests. Instead of handling each ticket separately, you setone of the tickets to Problem and all the other tickets about the same issue to Incident. Whenthe problem ticket is solved, all of the associated incident tickets are also solved.
Problem is used to indicate that the requester is having an issue with your product or servicethat needs to be resolved.
Task is used when you want to assign the ticket as a task to a specific agent. When you selectTask, you also set the Task Due Date.
Note: If you deactivate the Type field, all of your tickets will default to Incident.
Priority
There are four values for priority: Low, Normal, High, and Urgent. You can also set the type tonone, if you wish; it is not a required ticket field. How you weight the priority of your ticketsis up to you. For example, you might assign a ticket to Urgent based on the customer whosubmitted the request or based on how many hours have passed since the ticket was created.
Group
A support group can be assigned to a ticket. By selecting a group, you also determine which ofyour agents can be assigned to the ticket. For example, if you select the Level 2 support group,you can then only assign an agent that is a member of that group.
Assignee
Required. The assignee is the agent assigned to the ticket. The assigned agent can be changedat any time. If you also assign a group to the ticket, this determines what agents can beassigned to the ticket.
Tags
Tags are used throughout the help desk to add additional information to tickets, which can thenbe used in your workflow (seeUsing tags). Tags can be added to tickets in the following ways:
• Agents can manually add tags to tickets. See Manually adding tags to tickets and forumtopics.
• Tags can be added (and removed) by automations, macros, and triggers using the addtags, set tags, and remove tags actions. See Using tags in macros, triggers, andautomations.
• Tags can be added automatically based on words in the subject and description. SeeAutomatic ticket tagging.
• Tags can be added to users and organizations and these tags are automatically added totickets. See Adding tags to users and organizations.
You can also prevent tags from being added to tickets. See Setting tagging options.
Zendesk User's Guide | Tickets and channels | 79
In addition to these system ticket fields, you can also create your own custom ticket fields. For moreinformation, see Adding and using custom ticket fields.
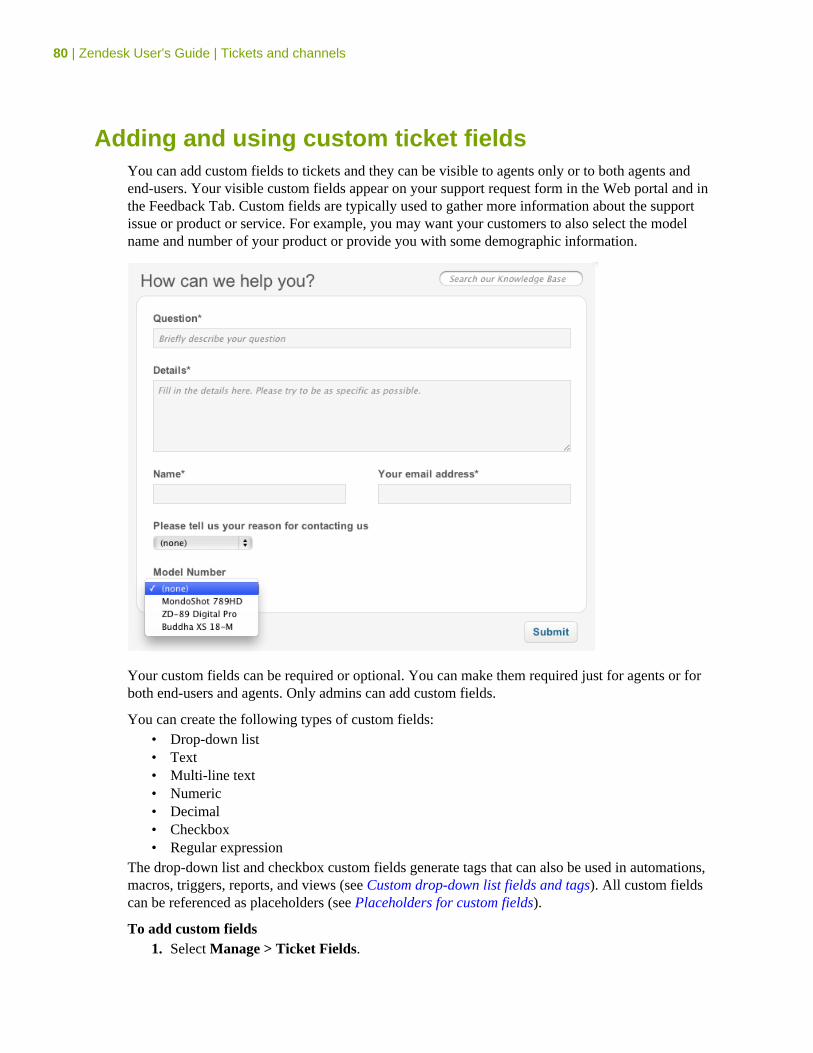
80 | Zendesk User's Guide | Tickets and channels
Adding and using custom ticket fieldsYou can add custom fields to tickets and they can be visible to agents only or to both agents andend-users. Your visible custom fields appear on your support request form in the Web portal and inthe Feedback Tab. Custom fields are typically used to gather more information about the supportissue or product or service. For example, you may want your customers to also select the modelname and number of your product or provide you with some demographic information.
Your custom fields can be required or optional. You can make them required just for agents or forboth end-users and agents. Only admins can add custom fields.
You can create the following types of custom fields:• Drop-down list• Text• Multi-line text• Numeric• Decimal• Checkbox• Regular expression
The drop-down list and checkbox custom fields generate tags that can also be used in automations,macros, triggers, reports, and views (see Custom drop-down list fields and tags). All custom fieldscan be referenced as placeholders (see Placeholders for custom fields).
To add custom fields1. Select Manage > Ticket Fields.
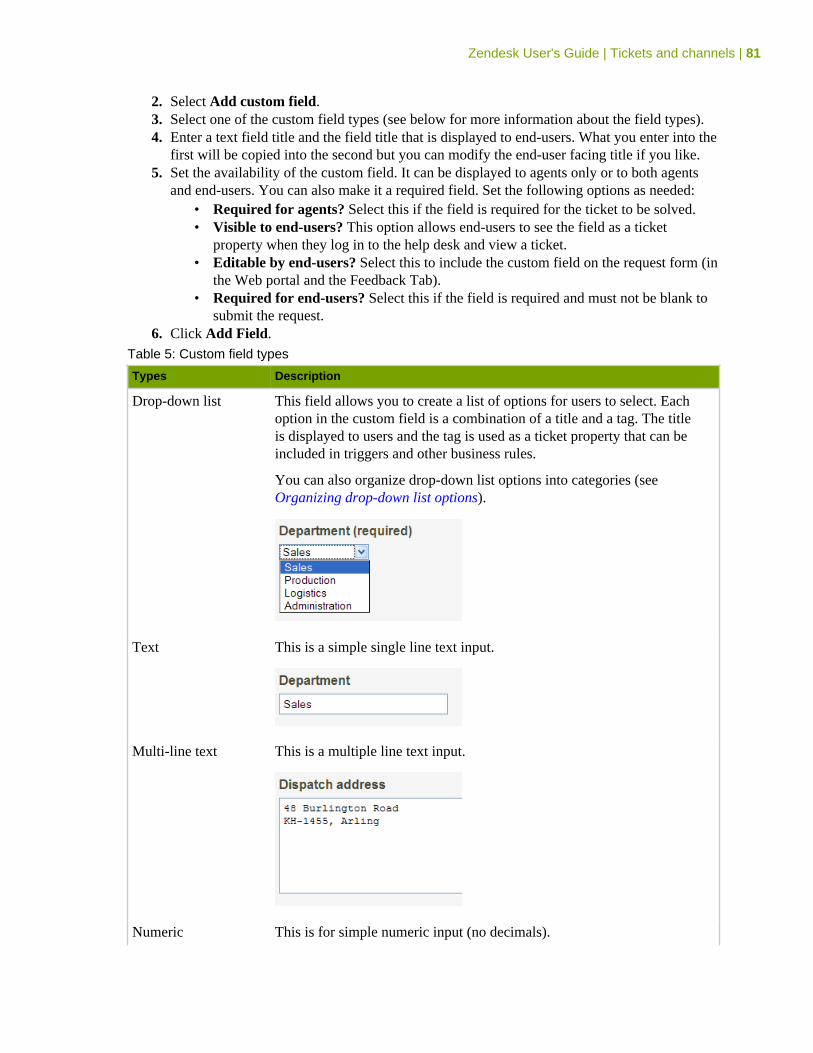
Zendesk User's Guide | Tickets and channels | 81
2. Select Add custom field.3. Select one of the custom field types (see below for more information about the field types).4. Enter a text field title and the field title that is displayed to end-users. What you enter into the
first will be copied into the second but you can modify the end-user facing title if you like.5. Set the availability of the custom field. It can be displayed to agents only or to both agents
and end-users. You can also make it a required field. Set the following options as needed:• Required for agents? Select this if the field is required for the ticket to be solved.• Visible to end-users? This option allows end-users to see the field as a ticket
property when they log in to the help desk and view a ticket.• Editable by end-users? Select this to include the custom field on the request form (in
the Web portal and the Feedback Tab).• Required for end-users? Select this if the field is required and must not be blank to
submit the request.6. Click Add Field.
Table 5: Custom field types
Types Description
Drop-down list This field allows you to create a list of options for users to select. Eachoption in the custom field is a combination of a title and a tag. The titleis displayed to users and the tag is used as a ticket property that can beincluded in triggers and other business rules.
You can also organize drop-down list options into categories (seeOrganizing drop-down list options).
Text This is a simple single line text input.
Multi-line text This is a multiple line text input.
Numeric This is for simple numeric input (no decimals).
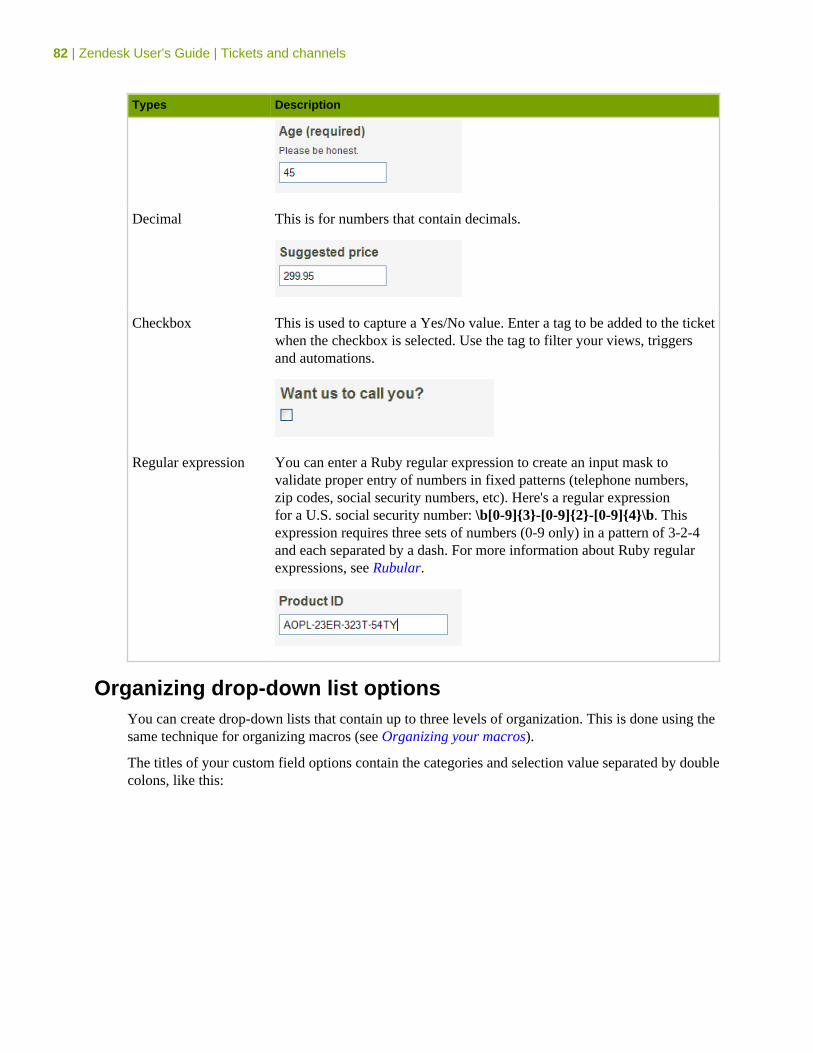
82 | Zendesk User's Guide | Tickets and channels
Types Description
Decimal This is for numbers that contain decimals.
Checkbox This is used to capture a Yes/No value. Enter a tag to be added to the ticketwhen the checkbox is selected. Use the tag to filter your views, triggersand automations.
Regular expression You can enter a Ruby regular expression to create an input mask tovalidate proper entry of numbers in fixed patterns (telephone numbers,zip codes, social security numbers, etc). Here's a regular expressionfor a U.S. social security number: \b[0-9]{3}-[0-9]{2}-[0-9]{4}\b. Thisexpression requires three sets of numbers (0-9 only) in a pattern of 3-2-4and each separated by a dash. For more information about Ruby regularexpressions, see Rubular.
Organizing drop-down list optionsYou can create drop-down lists that contain up to three levels of organization. This is done using thesame technique for organizing macros (see Organizing your macros).
The titles of your custom field options contain the categories and selection value separated by doublecolons, like this:
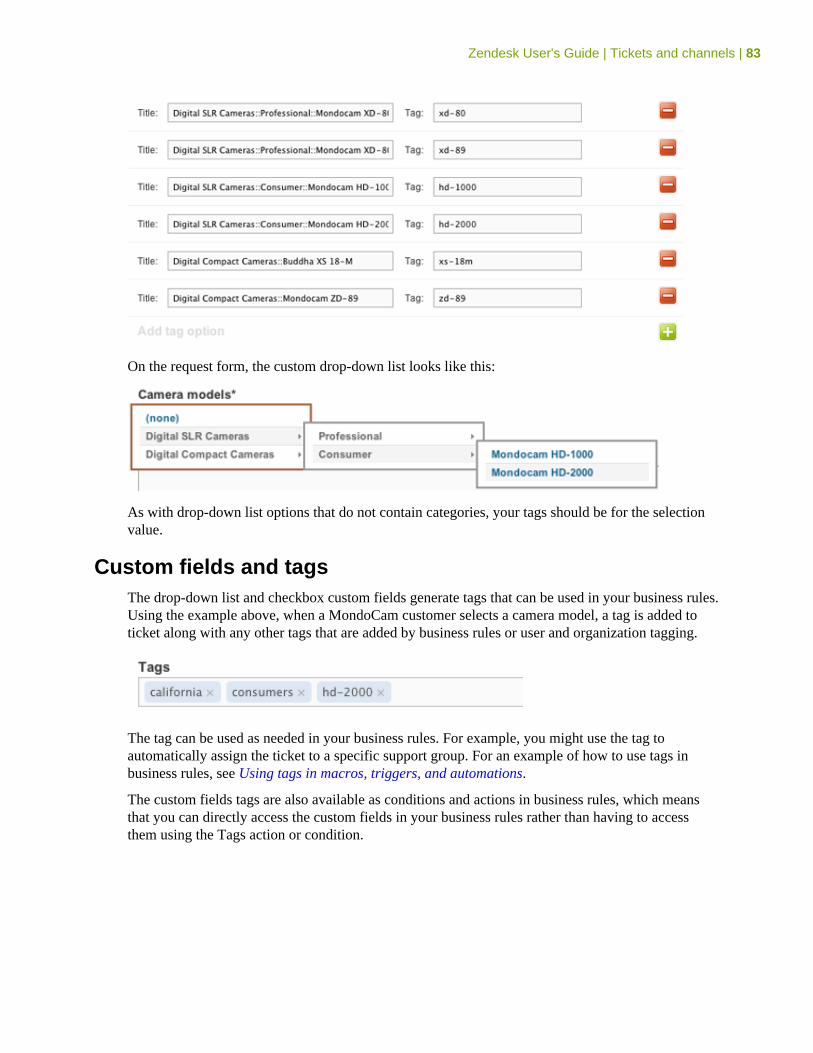
Zendesk User's Guide | Tickets and channels | 83
On the request form, the custom drop-down list looks like this:
As with drop-down list options that do not contain categories, your tags should be for the selectionvalue.
Custom fields and tagsThe drop-down list and checkbox custom fields generate tags that can be used in your business rules.Using the example above, when a MondoCam customer selects a camera model, a tag is added toticket along with any other tags that are added by business rules or user and organization tagging.
The tag can be used as needed in your business rules. For example, you might use the tag toautomatically assign the ticket to a specific support group. For an example of how to use tags inbusiness rules, see Using tags in macros, triggers, and automations.
The custom fields tags are also available as conditions and actions in business rules, which meansthat you can directly access the custom fields in your business rules rather than having to accessthem using the Tags action or condition.
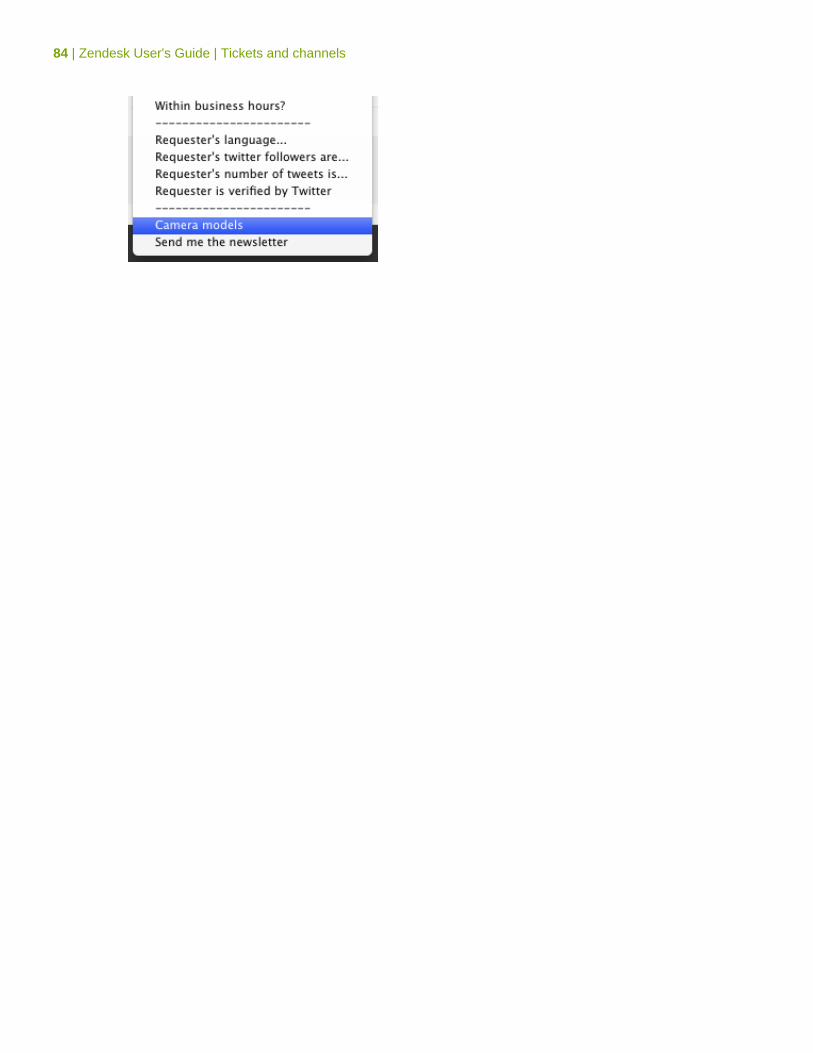
84 | Zendesk User's Guide | Tickets and channels
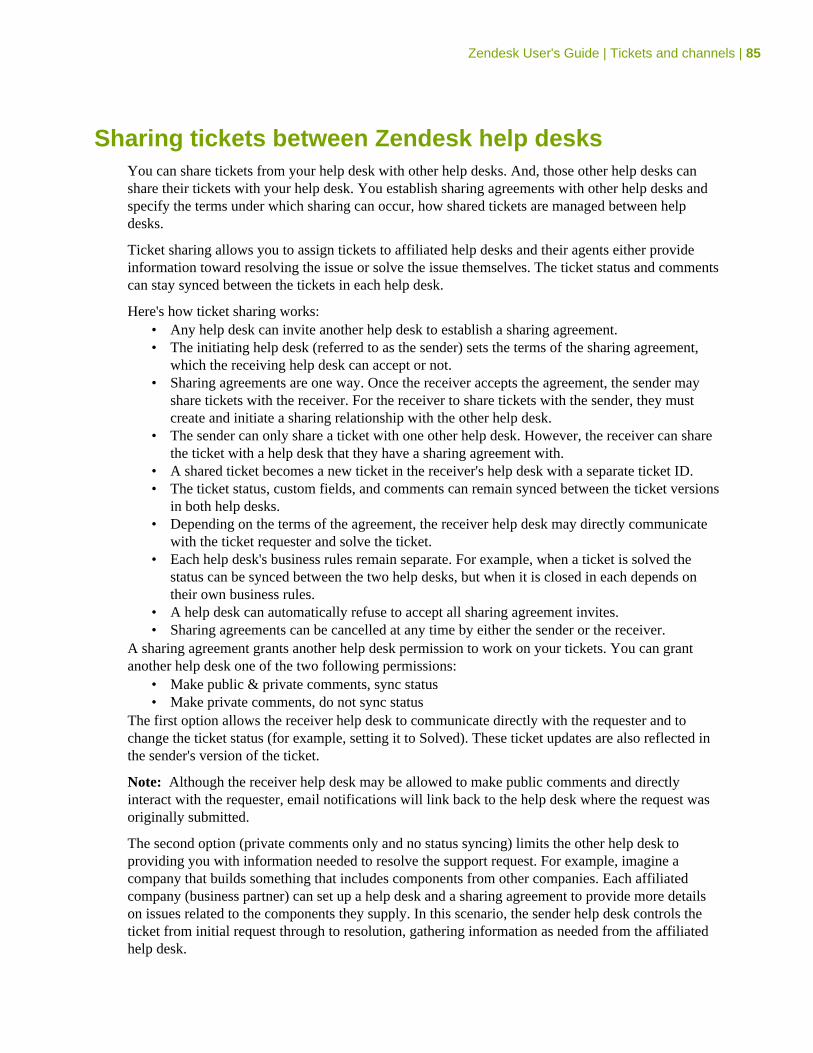
Zendesk User's Guide | Tickets and channels | 85
Sharing tickets between Zendesk help desksYou can share tickets from your help desk with other help desks. And, those other help desks canshare their tickets with your help desk. You establish sharing agreements with other help desks andspecify the terms under which sharing can occur, how shared tickets are managed between helpdesks.
Ticket sharing allows you to assign tickets to affiliated help desks and their agents either provideinformation toward resolving the issue or solve the issue themselves. The ticket status and commentscan stay synced between the tickets in each help desk.
Here's how ticket sharing works:• Any help desk can invite another help desk to establish a sharing agreement.• The initiating help desk (referred to as the sender) sets the terms of the sharing agreement,
which the receiving help desk can accept or not.• Sharing agreements are one way. Once the receiver accepts the agreement, the sender may
share tickets with the receiver. For the receiver to share tickets with the sender, they mustcreate and initiate a sharing relationship with the other help desk.
• The sender can only share a ticket with one other help desk. However, the receiver can sharethe ticket with a help desk that they have a sharing agreement with.
• A shared ticket becomes a new ticket in the receiver's help desk with a separate ticket ID.• The ticket status, custom fields, and comments can remain synced between the ticket versions
in both help desks.• Depending on the terms of the agreement, the receiver help desk may directly communicate
with the ticket requester and solve the ticket.• Each help desk's business rules remain separate. For example, when a ticket is solved the
status can be synced between the two help desks, but when it is closed in each depends ontheir own business rules.
• A help desk can automatically refuse to accept all sharing agreement invites.• Sharing agreements can be cancelled at any time by either the sender or the receiver.
A sharing agreement grants another help desk permission to work on your tickets. You can grantanother help desk one of the two following permissions:
• Make public & private comments, sync status• Make private comments, do not sync status
The first option allows the receiver help desk to communicate directly with the requester and tochange the ticket status (for example, setting it to Solved). These ticket updates are also reflected inthe sender's version of the ticket.
Note: Although the receiver help desk may be allowed to make public comments and directlyinteract with the requester, email notifications will link back to the help desk where the request wasoriginally submitted.
The second option (private comments only and no status syncing) limits the other help desk toproviding you with information needed to resolve the support request. For example, imagine acompany that builds something that includes components from other companies. Each affiliatedcompany (business partner) can set up a help desk and a sharing agreement to provide more detailson issues related to the components they supply. In this scenario, the sender help desk controls theticket from initial request through to resolution, gathering information as needed from the affiliatedhelp desk.
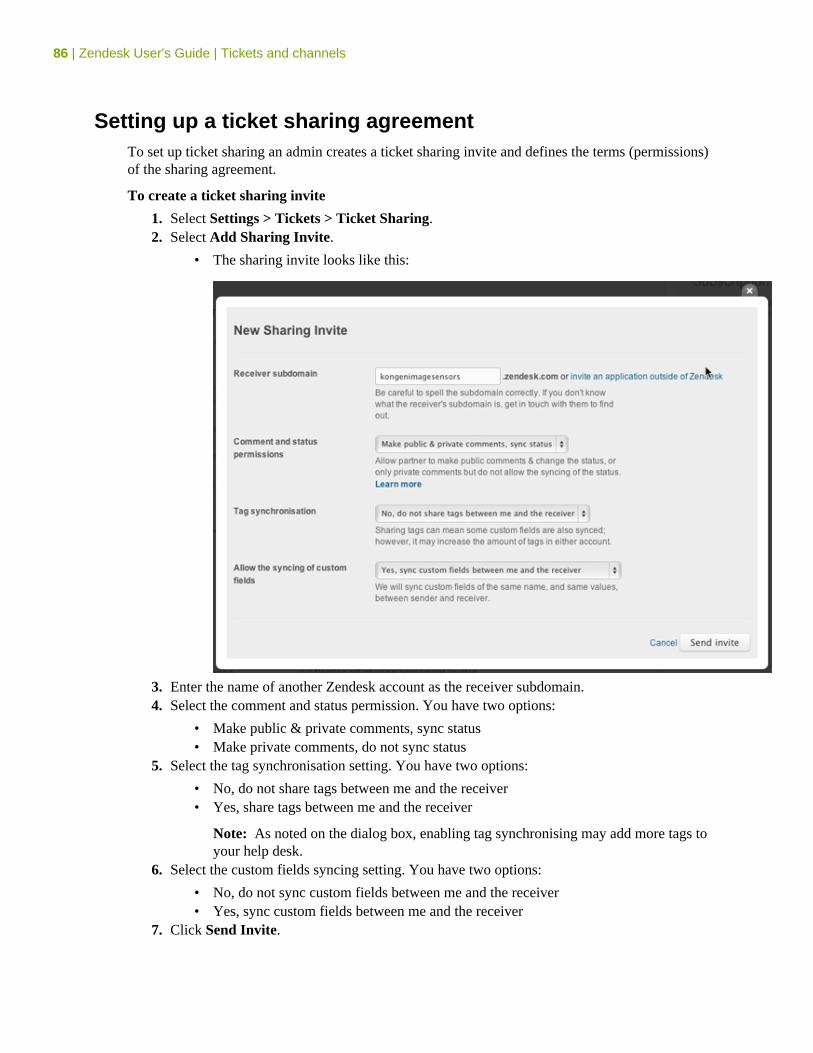
86 | Zendesk User's Guide | Tickets and channels
Setting up a ticket sharing agreementTo set up ticket sharing an admin creates a ticket sharing invite and defines the terms (permissions)of the sharing agreement.
To create a ticket sharing invite
1. Select Settings > Tickets > Ticket Sharing.2. Select Add Sharing Invite.
• The sharing invite looks like this:
3. Enter the name of another Zendesk account as the receiver subdomain.4. Select the comment and status permission. You have two options:
• Make public & private comments, sync status• Make private comments, do not sync status
5. Select the tag synchronisation setting. You have two options:
• No, do not share tags between me and the receiver• Yes, share tags between me and the receiver
Note: As noted on the dialog box, enabling tag synchronising may add more tags toyour help desk.
6. Select the custom fields syncing setting. You have two options:
• No, do not sync custom fields between me and the receiver• Yes, sync custom fields between me and the receiver
7. Click Send Invite.
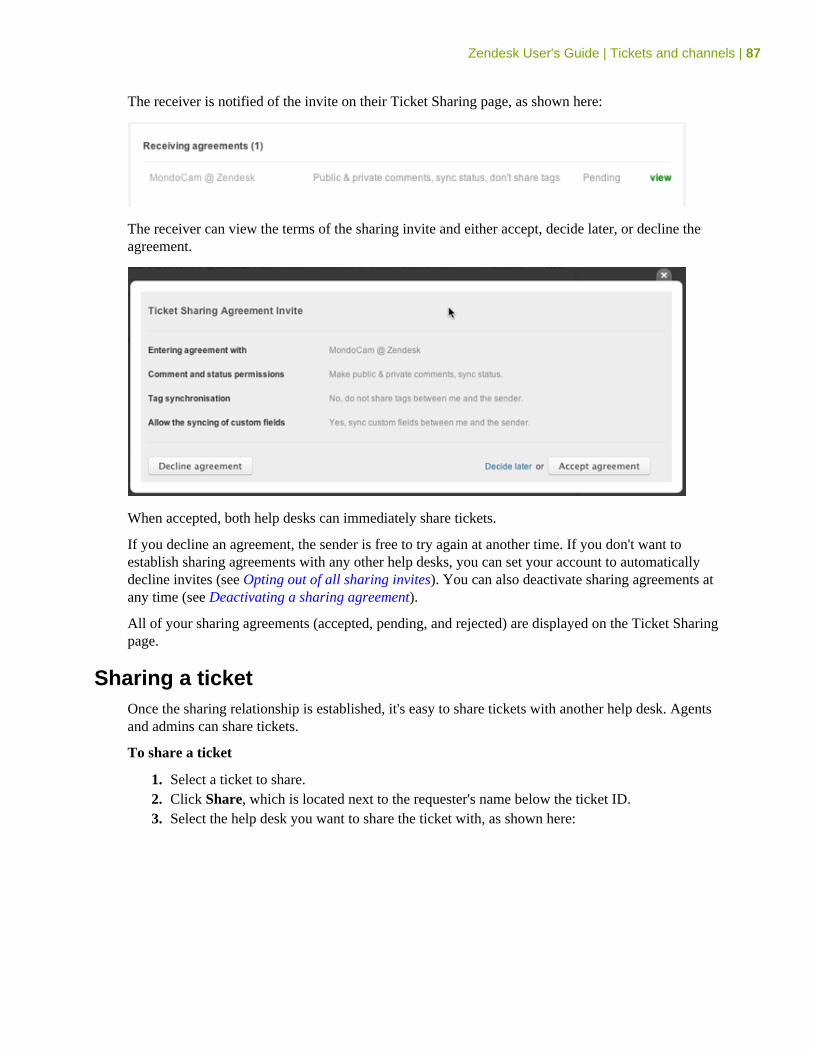
Zendesk User's Guide | Tickets and channels | 87
The receiver is notified of the invite on their Ticket Sharing page, as shown here:
The receiver can view the terms of the sharing invite and either accept, decide later, or decline theagreement.
When accepted, both help desks can immediately share tickets.
If you decline an agreement, the sender is free to try again at another time. If you don't want toestablish sharing agreements with any other help desks, you can set your account to automaticallydecline invites (see Opting out of all sharing invites). You can also deactivate sharing agreements atany time (see Deactivating a sharing agreement).
All of your sharing agreements (accepted, pending, and rejected) are displayed on the Ticket Sharingpage.
Sharing a ticketOnce the sharing relationship is established, it's easy to share tickets with another help desk. Agentsand admins can share tickets.
To share a ticket
1. Select a ticket to share.2. Click Share, which is located next to the requester's name below the ticket ID.3. Select the help desk you want to share the ticket with, as shown here:
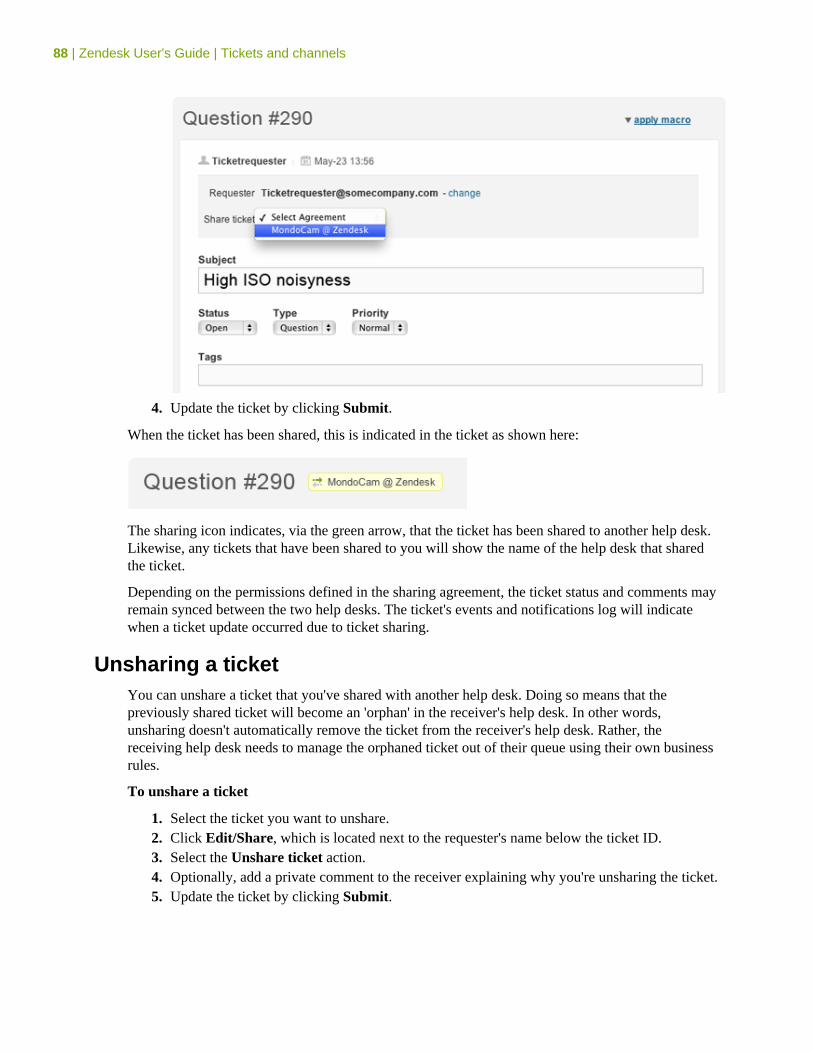
88 | Zendesk User's Guide | Tickets and channels
4. Update the ticket by clicking Submit.
When the ticket has been shared, this is indicated in the ticket as shown here:
The sharing icon indicates, via the green arrow, that the ticket has been shared to another help desk.Likewise, any tickets that have been shared to you will show the name of the help desk that sharedthe ticket.
Depending on the permissions defined in the sharing agreement, the ticket status and comments mayremain synced between the two help desks. The ticket's events and notifications log will indicatewhen a ticket update occurred due to ticket sharing.
Unsharing a ticketYou can unshare a ticket that you've shared with another help desk. Doing so means that thepreviously shared ticket will become an 'orphan' in the receiver's help desk. In other words,unsharing doesn't automatically remove the ticket from the receiver's help desk. Rather, thereceiving help desk needs to manage the orphaned ticket out of their queue using their own businessrules.
To unshare a ticket
1. Select the ticket you want to unshare.2. Click Edit/Share, which is located next to the requester's name below the ticket ID.3. Select the Unshare ticket action.4. Optionally, add a private comment to the receiver explaining why you're unsharing the ticket.5. Update the ticket by clicking Submit.
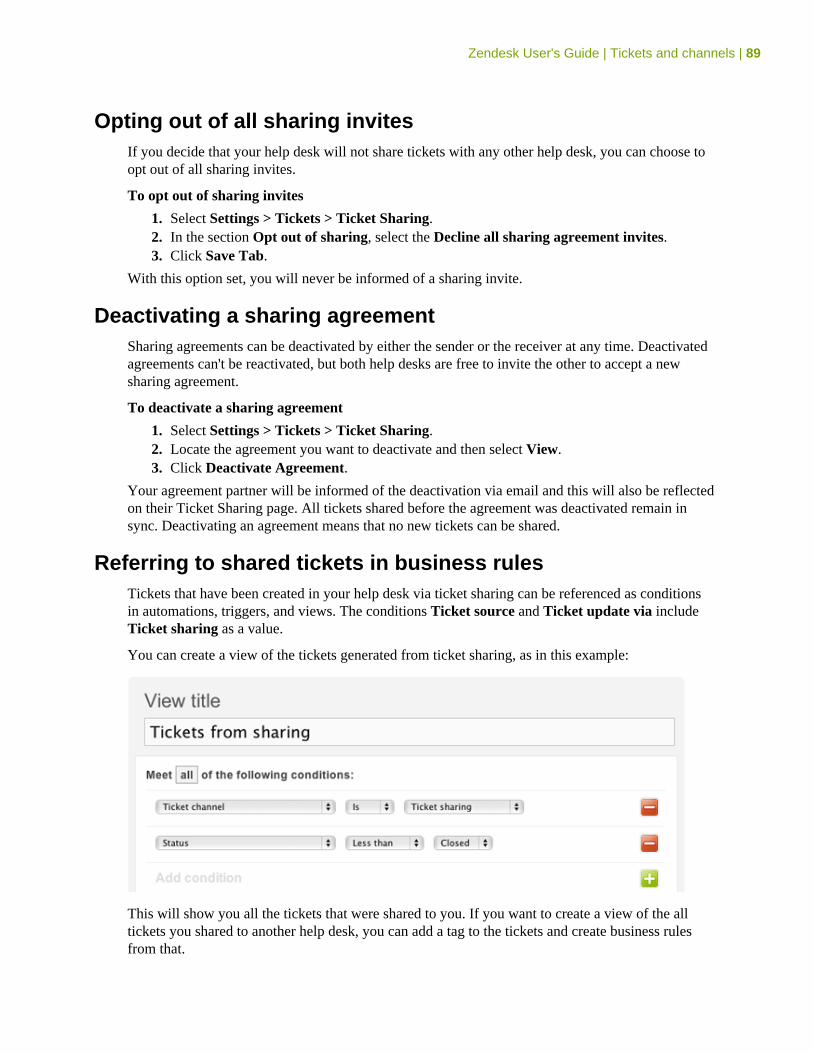
Zendesk User's Guide | Tickets and channels | 89
Opting out of all sharing invitesIf you decide that your help desk will not share tickets with any other help desk, you can choose toopt out of all sharing invites.
To opt out of sharing invites
1. Select Settings > Tickets > Ticket Sharing.2. In the section Opt out of sharing, select the Decline all sharing agreement invites.3. Click Save Tab.
With this option set, you will never be informed of a sharing invite.
Deactivating a sharing agreementSharing agreements can be deactivated by either the sender or the receiver at any time. Deactivatedagreements can't be reactivated, but both help desks are free to invite the other to accept a newsharing agreement.
To deactivate a sharing agreement
1. Select Settings > Tickets > Ticket Sharing.2. Locate the agreement you want to deactivate and then select View.3. Click Deactivate Agreement.
Your agreement partner will be informed of the deactivation via email and this will also be reflectedon their Ticket Sharing page. All tickets shared before the agreement was deactivated remain insync. Deactivating an agreement means that no new tickets can be shared.
Referring to shared tickets in business rulesTickets that have been created in your help desk via ticket sharing can be referenced as conditionsin automations, triggers, and views. The conditions Ticket source and Ticket update via includeTicket sharing as a value.
You can create a view of the tickets generated from ticket sharing, as in this example:
This will show you all the tickets that were shared to you. If you want to create a view of the alltickets you shared to another help desk, you can add a tag to the tickets and create business rulesfrom that.
90 | Zendesk User's Guide | Tickets and channels
You can create automations or triggers that include the ticket sharing conditions. Again, usingTicket source is Ticket sharing or Ticket update via Ticket sharing as a condition you can createa trigger to escalate the shared ticket to a specific support group, to add tags, and so on.
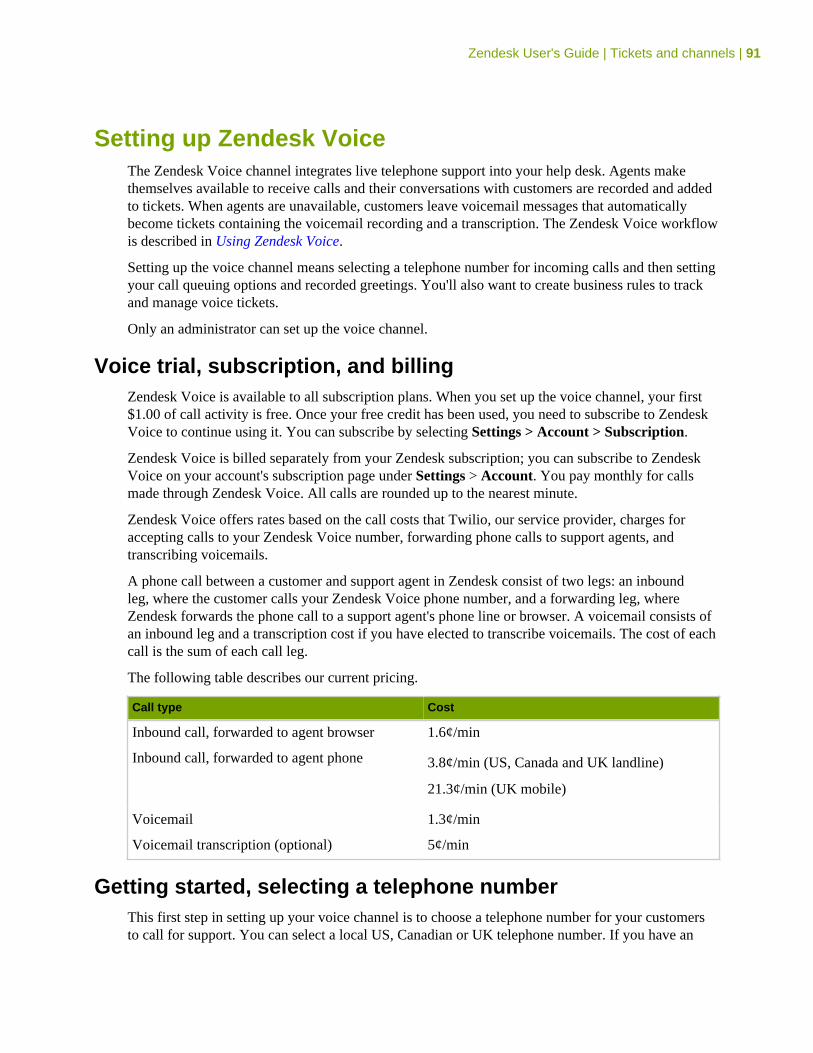
Zendesk User's Guide | Tickets and channels | 91
Setting up Zendesk VoiceThe Zendesk Voice channel integrates live telephone support into your help desk. Agents makethemselves available to receive calls and their conversations with customers are recorded and addedto tickets. When agents are unavailable, customers leave voicemail messages that automaticallybecome tickets containing the voicemail recording and a transcription. The Zendesk Voice workflowis described in Using Zendesk Voice.
Setting up the voice channel means selecting a telephone number for incoming calls and then settingyour call queuing options and recorded greetings. You'll also want to create business rules to trackand manage voice tickets.
Only an administrator can set up the voice channel.
Voice trial, subscription, and billingZendesk Voice is available to all subscription plans. When you set up the voice channel, your first$1.00 of call activity is free. Once your free credit has been used, you need to subscribe to ZendeskVoice to continue using it. You can subscribe by selecting Settings > Account > Subscription.
Zendesk Voice is billed separately from your Zendesk subscription; you can subscribe to ZendeskVoice on your account's subscription page under Settings > Account. You pay monthly for callsmade through Zendesk Voice. All calls are rounded up to the nearest minute.
Zendesk Voice offers rates based on the call costs that Twilio, our service provider, charges foraccepting calls to your Zendesk Voice number, forwarding phone calls to support agents, andtranscribing voicemails.
A phone call between a customer and support agent in Zendesk consist of two legs: an inboundleg, where the customer calls your Zendesk Voice phone number, and a forwarding leg, whereZendesk forwards the phone call to a support agent's phone line or browser. A voicemail consists ofan inbound leg and a transcription cost if you have elected to transcribe voicemails. The cost of eachcall is the sum of each call leg.
The following table describes our current pricing.
Call type Cost
Inbound call, forwarded to agent browser 1.6¢/min
Inbound call, forwarded to agent phone 3.8¢/min (US, Canada and UK landline)
21.3¢/min (UK mobile)
Voicemail 1.3¢/min
Voicemail transcription (optional) 5¢/min
Getting started, selecting a telephone numberThis first step in setting up your voice channel is to choose a telephone number for your customersto call for support. You can select a local US, Canadian or UK telephone number. If you have an
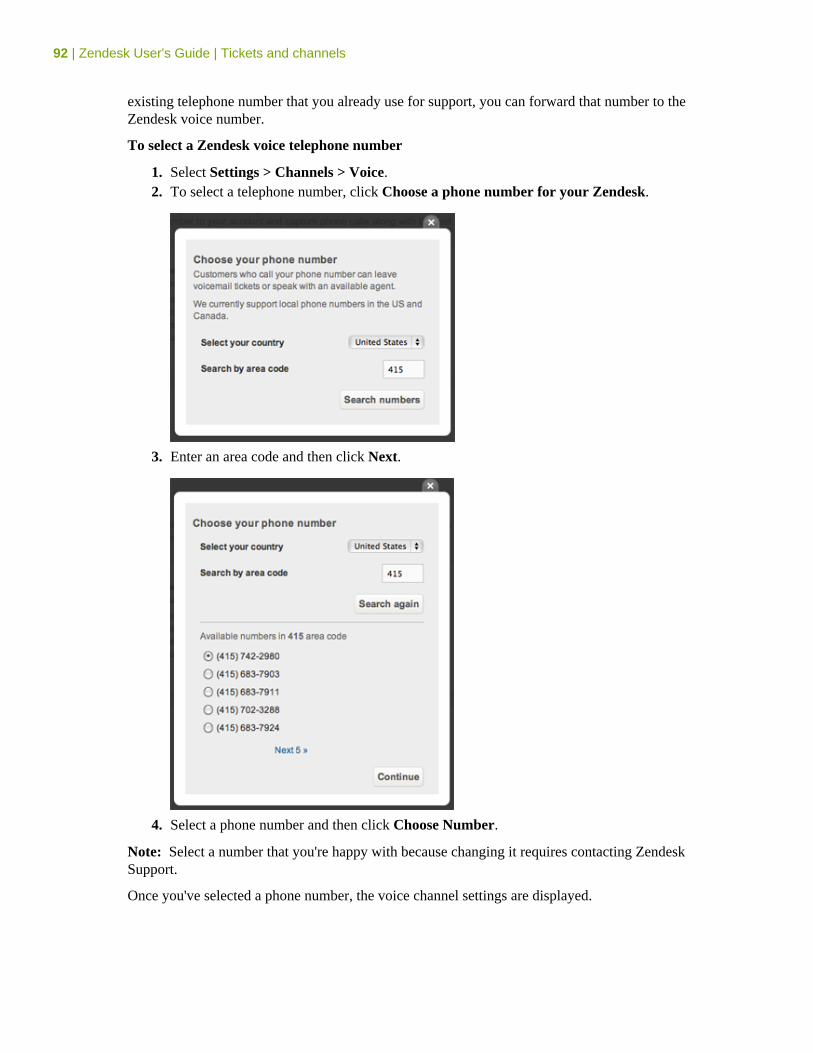
92 | Zendesk User's Guide | Tickets and channels
existing telephone number that you already use for support, you can forward that number to theZendesk voice number.
To select a Zendesk voice telephone number
1. Select Settings > Channels > Voice.2. To select a telephone number, click Choose a phone number for your Zendesk.
3. Enter an area code and then click Next.
4. Select a phone number and then click Choose Number.
Note: Select a number that you're happy with because changing it requires contacting ZendeskSupport.
Once you've selected a phone number, the voice channel settings are displayed.
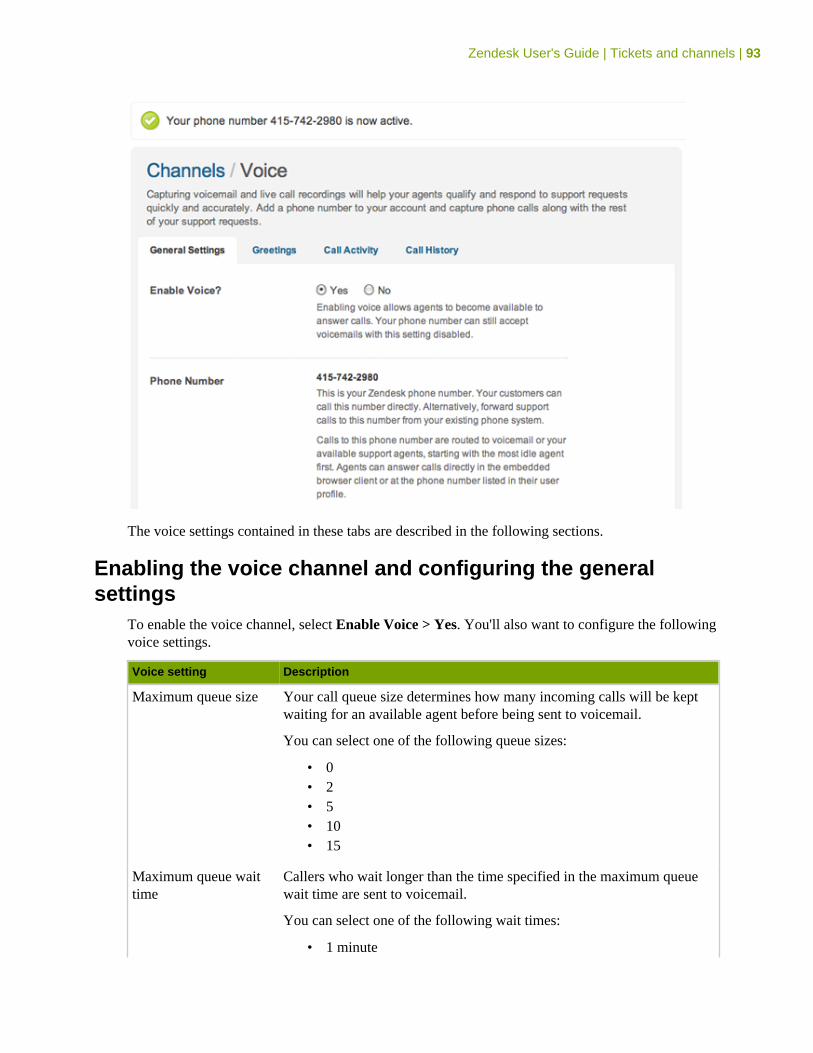
Zendesk User's Guide | Tickets and channels | 93
The voice settings contained in these tabs are described in the following sections.
Enabling the voice channel and configuring the generalsettings
To enable the voice channel, select Enable Voice > Yes. You'll also want to configure the followingvoice settings.
Voice setting Description
Maximum queue size Your call queue size determines how many incoming calls will be keptwaiting for an available agent before being sent to voicemail.
You can select one of the following queue sizes:
• 0• 2• 5• 10• 15
Maximum queue waittime
Callers who wait longer than the time specified in the maximum queuewait time are sent to voicemail.
You can select one of the following wait times:
• 1 minute
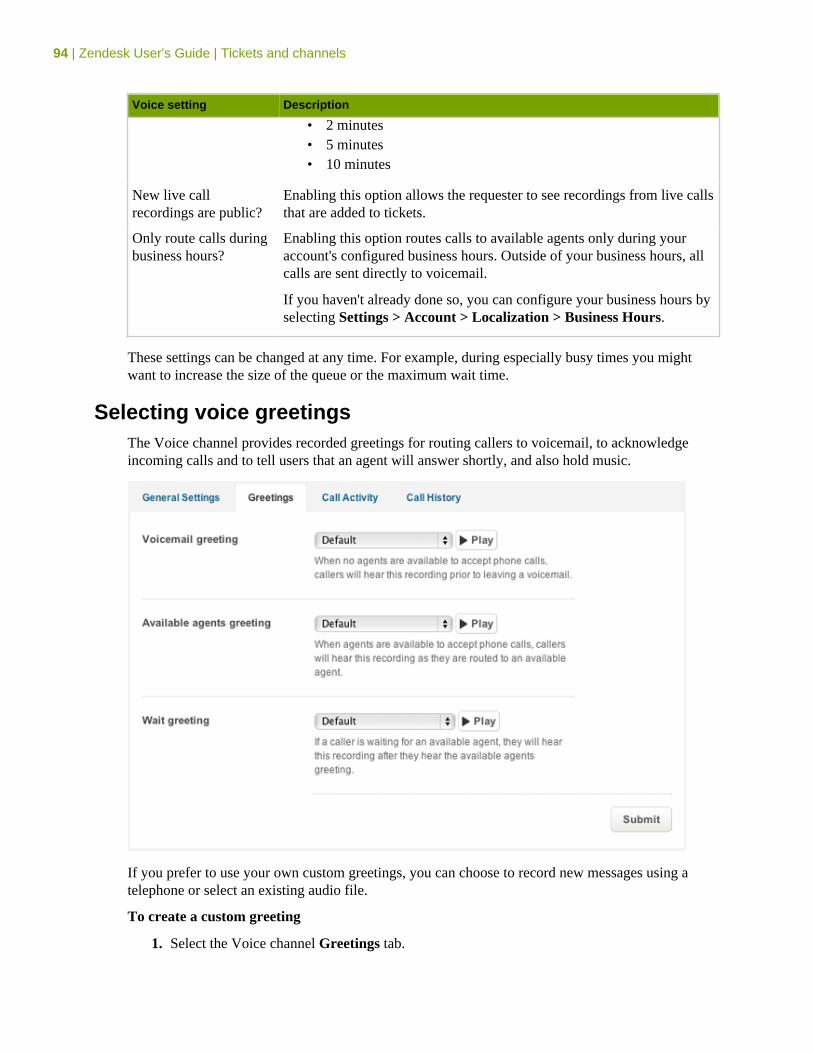
94 | Zendesk User's Guide | Tickets and channels
Voice setting Description
• 2 minutes• 5 minutes• 10 minutes
New live callrecordings are public?
Enabling this option allows the requester to see recordings from live callsthat are added to tickets.
Only route calls duringbusiness hours?
Enabling this option routes calls to available agents only during youraccount's configured business hours. Outside of your business hours, allcalls are sent directly to voicemail.
If you haven't already done so, you can configure your business hours byselecting Settings > Account > Localization > Business Hours.
These settings can be changed at any time. For example, during especially busy times you mightwant to increase the size of the queue or the maximum wait time.
Selecting voice greetingsThe Voice channel provides recorded greetings for routing callers to voicemail, to acknowledgeincoming calls and to tell users that an agent will answer shortly, and also hold music.
If you prefer to use your own custom greetings, you can choose to record new messages using atelephone or select an existing audio file.
To create a custom greeting
1. Select the Voice channel Greetings tab.
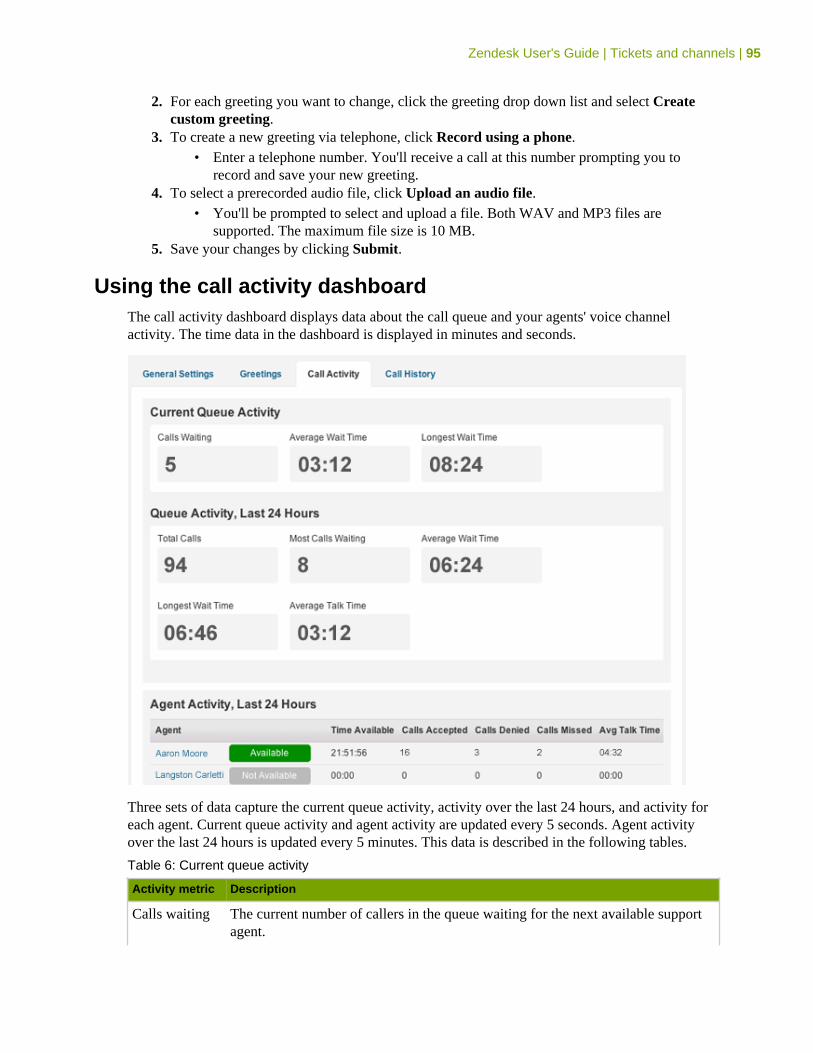
Zendesk User's Guide | Tickets and channels | 95
2. For each greeting you want to change, click the greeting drop down list and select Createcustom greeting.
3. To create a new greeting via telephone, click Record using a phone.• Enter a telephone number. You'll receive a call at this number prompting you to
record and save your new greeting.4. To select a prerecorded audio file, click Upload an audio file.
• You'll be prompted to select and upload a file. Both WAV and MP3 files aresupported. The maximum file size is 10 MB.
5. Save your changes by clicking Submit.
Using the call activity dashboardThe call activity dashboard displays data about the call queue and your agents' voice channelactivity. The time data in the dashboard is displayed in minutes and seconds.
Three sets of data capture the current queue activity, activity over the last 24 hours, and activity foreach agent. Current queue activity and agent activity are updated every 5 seconds. Agent activityover the last 24 hours is updated every 5 minutes. This data is described in the following tables.
Table 6: Current queue activity
Activity metric Description
Calls waiting The current number of callers in the queue waiting for the next available supportagent.

96 | Zendesk User's Guide | Tickets and channels
Activity metric Description
Average waittime
The average wait time for all callers who are waiting for an available agent.
Longest waittime
The longest wait time for any caller in the queue.
Table 7: Queue activity, last 24 hours
Activity metric Description
Total calls The total number of phone calls to your Zendesk phone number in the last 24hours.
Most callswaiting
The largest the call queue has been in the last 24 hours.
Average waittime
The average wait time in the call queue, across all calls, in the last 24 hours.
Longest waittime
The longest any caller has waited in the call queue in the last 24 hours.
Average talktime
The average length of live phone call conversations in the last 24 hours.
Table 8: Agent activity, last 24 hours
Activity metric Description
Agent The agent's name and status. An agent can be in one of the following four states:
Not Available means that the agent is not available to take phone calls.
Available means that the agent is available to take calls.
On Call means that the agent is unavailable because they are on another call.
Wrap Up indicates that the agent has completed the last call but are busyupdating the ticket and are therefore currently unavailable to take another call.
Time available The total time the agent has been Available, On Call, and in Wrap Up in the last24 hours.
Calls accepted The total number of phone calls the agent has accepted in the last 24 hours.
Calls declined The total number of times the agent has declined an incoming call in the last 24hours.
Calls missed The total number of times an agent has not answered their phone and the call wasrouted to the next available agent in the last 24 hours.
Average talktime
The average length of all live phone calls answered by this agent in the last 24hours.
Reviewing call historyThe Call History Tab lists all call activity and the billing for your help desk. The history will bedisplayed by billing period (a billing period is 30 days) with a total of one year of billing data alwaysavailable for your reference. All calls are rounded up to the nearest minute.
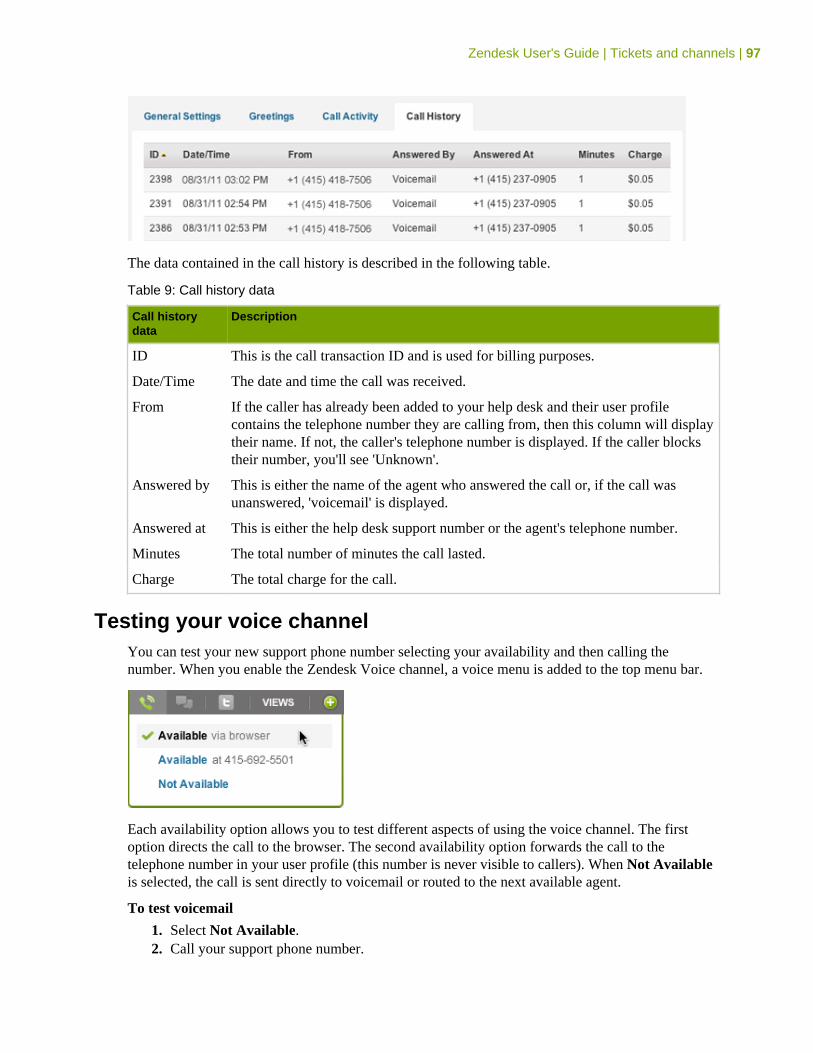
Zendesk User's Guide | Tickets and channels | 97
The data contained in the call history is described in the following table.
Table 9: Call history data
Call historydata
Description
ID This is the call transaction ID and is used for billing purposes.
Date/Time The date and time the call was received.
From If the caller has already been added to your help desk and their user profilecontains the telephone number they are calling from, then this column will displaytheir name. If not, the caller's telephone number is displayed. If the caller blockstheir number, you'll see 'Unknown'.
Answered by This is either the name of the agent who answered the call or, if the call wasunanswered, 'voicemail' is displayed.
Answered at This is either the help desk support number or the agent's telephone number.
Minutes The total number of minutes the call lasted.
Charge The total charge for the call.
Testing your voice channelYou can test your new support phone number selecting your availability and then calling thenumber. When you enable the Zendesk Voice channel, a voice menu is added to the top menu bar.
Each availability option allows you to test different aspects of using the voice channel. The firstoption directs the call to the browser. The second availability option forwards the call to thetelephone number in your user profile (this number is never visible to callers). When Not Availableis selected, the call is sent directly to voicemail or routed to the next available agent.
To test voicemail
1. Select Not Available.2. Call your support phone number.
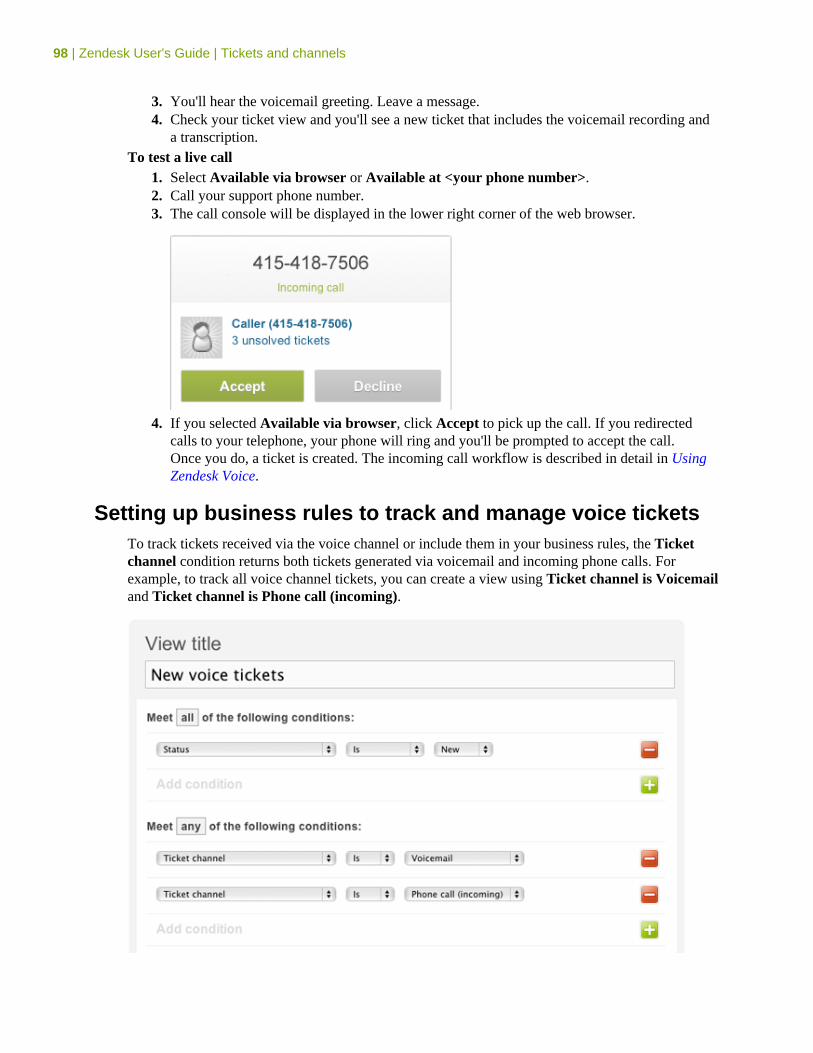
98 | Zendesk User's Guide | Tickets and channels
3. You'll hear the voicemail greeting. Leave a message.4. Check your ticket view and you'll see a new ticket that includes the voicemail recording and
a transcription.To test a live call
1. Select Available via browser or Available at <your phone number>.2. Call your support phone number.3. The call console will be displayed in the lower right corner of the web browser.
4. If you selected Available via browser, click Accept to pick up the call. If you redirectedcalls to your telephone, your phone will ring and you'll be prompted to accept the call.Once you do, a ticket is created. The incoming call workflow is described in detail in UsingZendesk Voice.
Setting up business rules to track and manage voice ticketsTo track tickets received via the voice channel or include them in your business rules, the Ticketchannel condition returns both tickets generated via voicemail and incoming phone calls. Forexample, to track all voice channel tickets, you can create a view using Ticket channel is Voicemailand Ticket channel is Phone call (incoming).
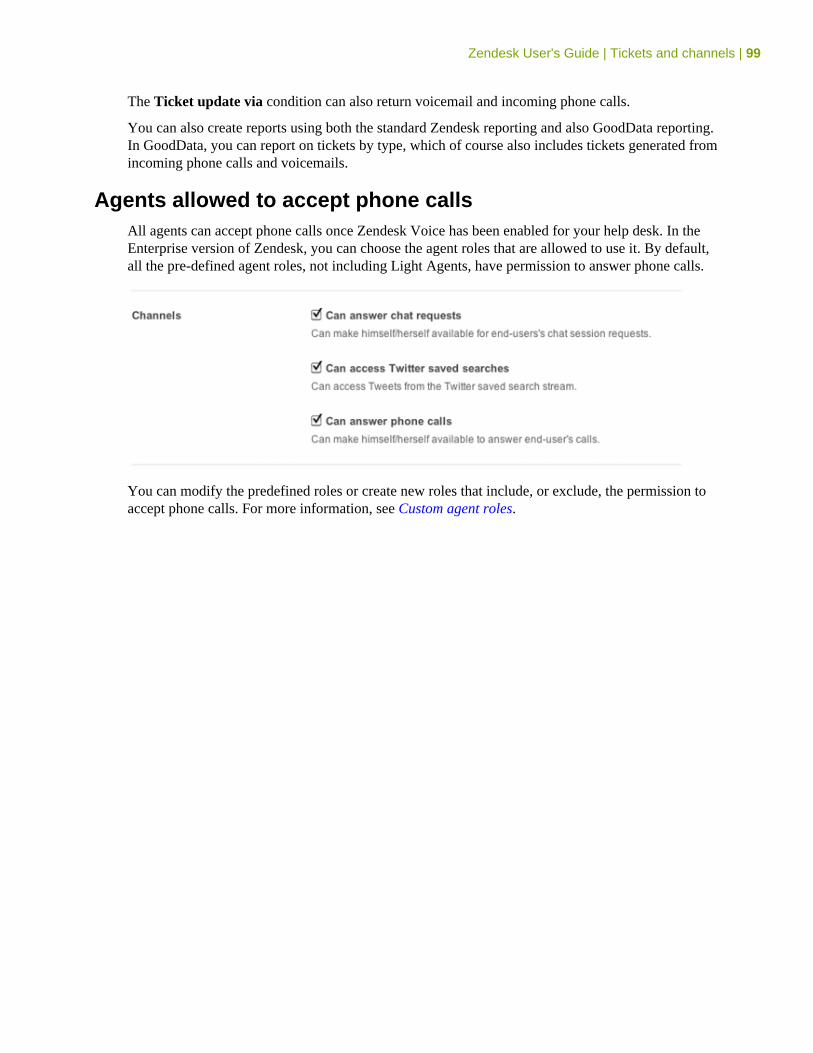
Zendesk User's Guide | Tickets and channels | 99
The Ticket update via condition can also return voicemail and incoming phone calls.
You can also create reports using both the standard Zendesk reporting and also GoodData reporting.In GoodData, you can report on tickets by type, which of course also includes tickets generated fromincoming phone calls and voicemails.
Agents allowed to accept phone callsAll agents can accept phone calls once Zendesk Voice has been enabled for your help desk. In theEnterprise version of Zendesk, you can choose the agent roles that are allowed to use it. By default,all the pre-defined agent roles, not including Light Agents, have permission to answer phone calls.
You can modify the predefined roles or create new roles that include, or exclude, the permission toaccept phone calls. For more information, see Custom agent roles.
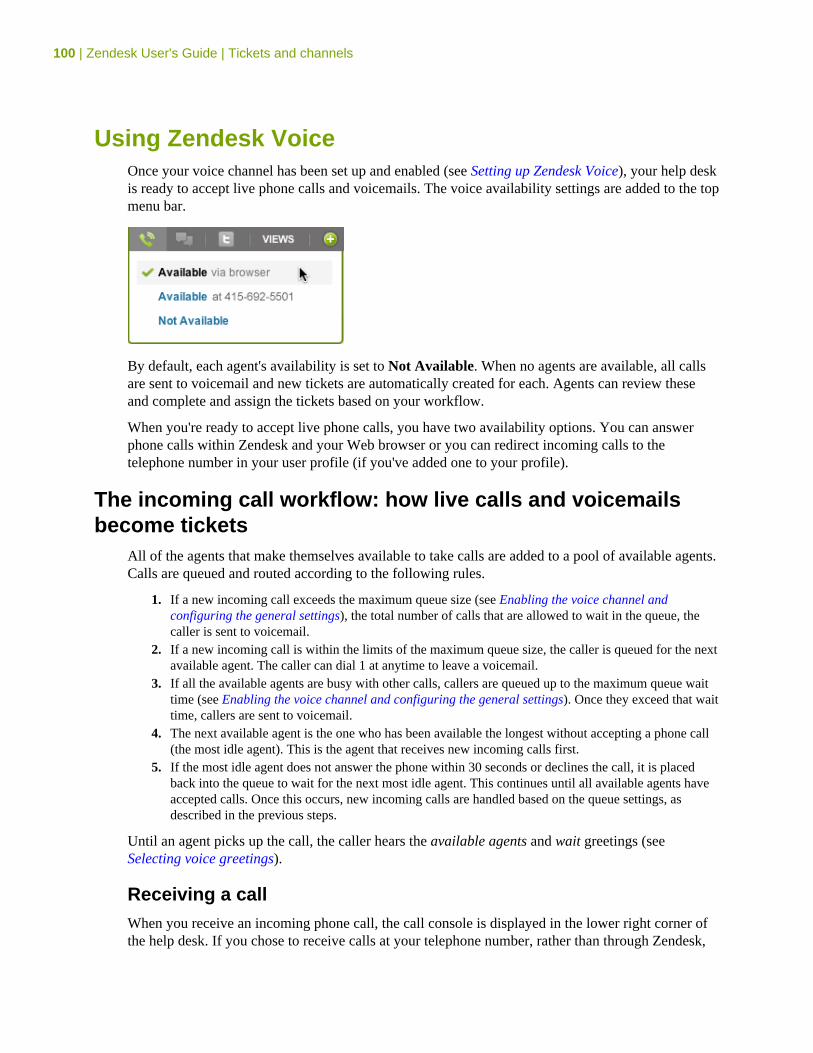
100 | Zendesk User's Guide | Tickets and channels
Using Zendesk VoiceOnce your voice channel has been set up and enabled (see Setting up Zendesk Voice), your help deskis ready to accept live phone calls and voicemails. The voice availability settings are added to the topmenu bar.
By default, each agent's availability is set to Not Available. When no agents are available, all callsare sent to voicemail and new tickets are automatically created for each. Agents can review theseand complete and assign the tickets based on your workflow.
When you're ready to accept live phone calls, you have two availability options. You can answerphone calls within Zendesk and your Web browser or you can redirect incoming calls to thetelephone number in your user profile (if you've added one to your profile).
The incoming call workflow: how live calls and voicemailsbecome tickets
All of the agents that make themselves available to take calls are added to a pool of available agents.Calls are queued and routed according to the following rules.
1. If a new incoming call exceeds the maximum queue size (see Enabling the voice channel andconfiguring the general settings), the total number of calls that are allowed to wait in the queue, thecaller is sent to voicemail.
2. If a new incoming call is within the limits of the maximum queue size, the caller is queued for the nextavailable agent. The caller can dial 1 at anytime to leave a voicemail.
3. If all the available agents are busy with other calls, callers are queued up to the maximum queue waittime (see Enabling the voice channel and configuring the general settings). Once they exceed that waittime, callers are sent to voicemail.
4. The next available agent is the one who has been available the longest without accepting a phone call(the most idle agent). This is the agent that receives new incoming calls first.
5. If the most idle agent does not answer the phone within 30 seconds or declines the call, it is placedback into the queue to wait for the next most idle agent. This continues until all available agents haveaccepted calls. Once this occurs, new incoming calls are handled based on the queue settings, asdescribed in the previous steps.
Until an agent picks up the call, the caller hears the available agents and wait greetings (seeSelecting voice greetings).
Receiving a callWhen you receive an incoming phone call, the call console is displayed in the lower right corner ofthe help desk. If you chose to receive calls at your telephone number, rather than through Zendesk,
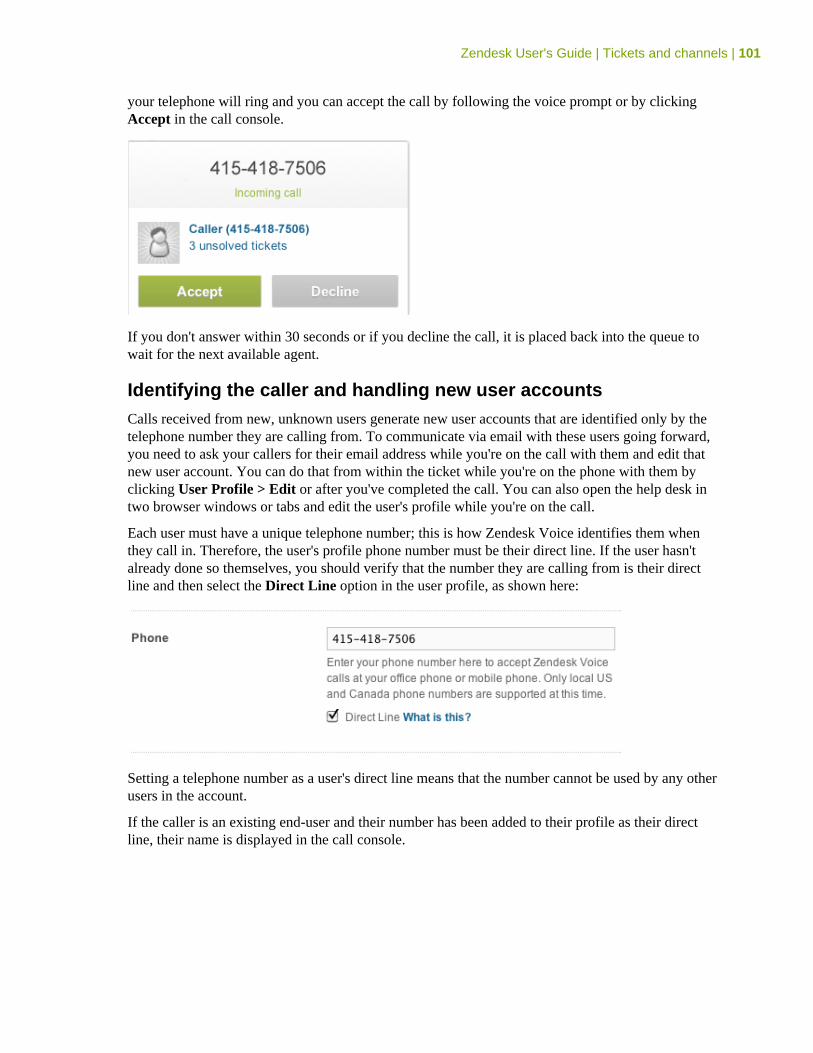
Zendesk User's Guide | Tickets and channels | 101
your telephone will ring and you can accept the call by following the voice prompt or by clickingAccept in the call console.
If you don't answer within 30 seconds or if you decline the call, it is placed back into the queue towait for the next available agent.
Identifying the caller and handling new user accountsCalls received from new, unknown users generate new user accounts that are identified only by thetelephone number they are calling from. To communicate via email with these users going forward,you need to ask your callers for their email address while you're on the call with them and edit thatnew user account. You can do that from within the ticket while you're on the phone with them byclicking User Profile > Edit or after you've completed the call. You can also open the help desk intwo browser windows or tabs and edit the user's profile while you're on the call.
Each user must have a unique telephone number; this is how Zendesk Voice identifies them whenthey call in. Therefore, the user's profile phone number must be their direct line. If the user hasn'talready done so themselves, you should verify that the number they are calling from is their directline and then select the Direct Line option in the user profile, as shown here:
Setting a telephone number as a user's direct line means that the number cannot be used by any otherusers in the account.
If the caller is an existing end-user and their number has been added to their profile as their directline, their name is displayed in the call console.
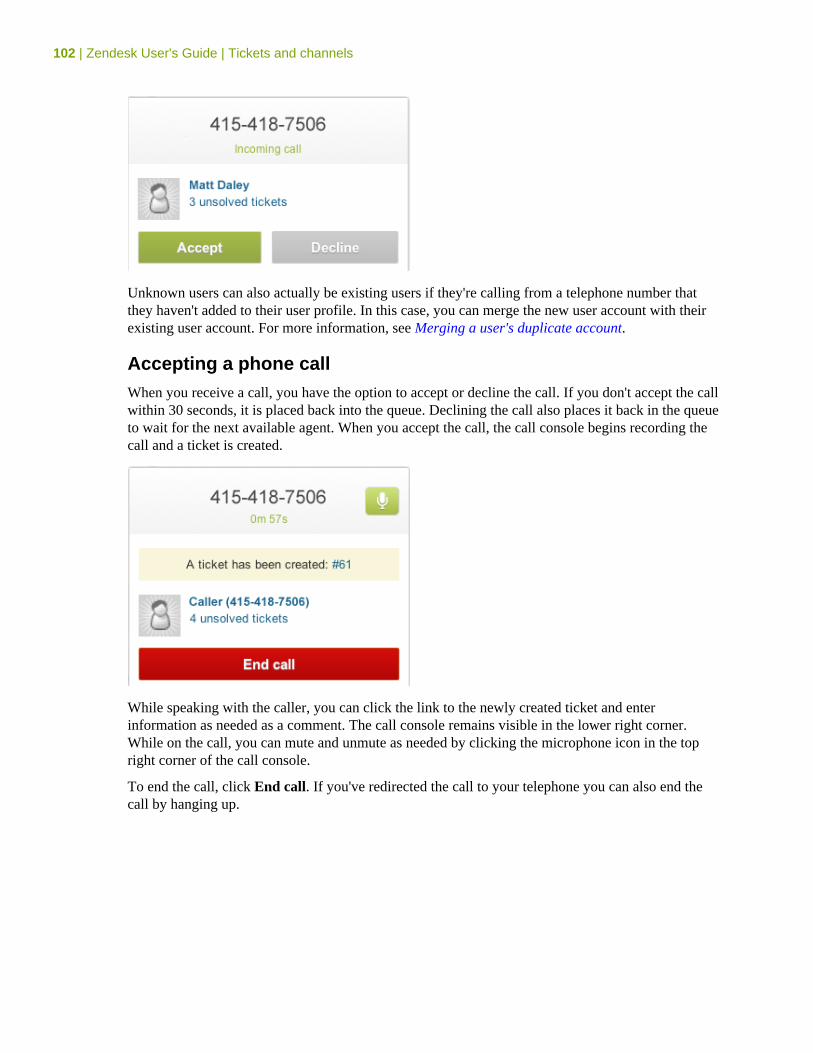
102 | Zendesk User's Guide | Tickets and channels
Unknown users can also actually be existing users if they're calling from a telephone number thatthey haven't added to their user profile. In this case, you can merge the new user account with theirexisting user account. For more information, see Merging a user's duplicate account.
Accepting a phone callWhen you receive a call, you have the option to accept or decline the call. If you don't accept the callwithin 30 seconds, it is placed back into the queue. Declining the call also places it back in the queueto wait for the next available agent. When you accept the call, the call console begins recording thecall and a ticket is created.
While speaking with the caller, you can click the link to the newly created ticket and enterinformation as needed as a comment. The call console remains visible in the lower right corner.While on the call, you can mute and unmute as needed by clicking the microphone icon in the topright corner of the call console.
To end the call, click End call. If you've redirected the call to your telephone you can also end thecall by hanging up.
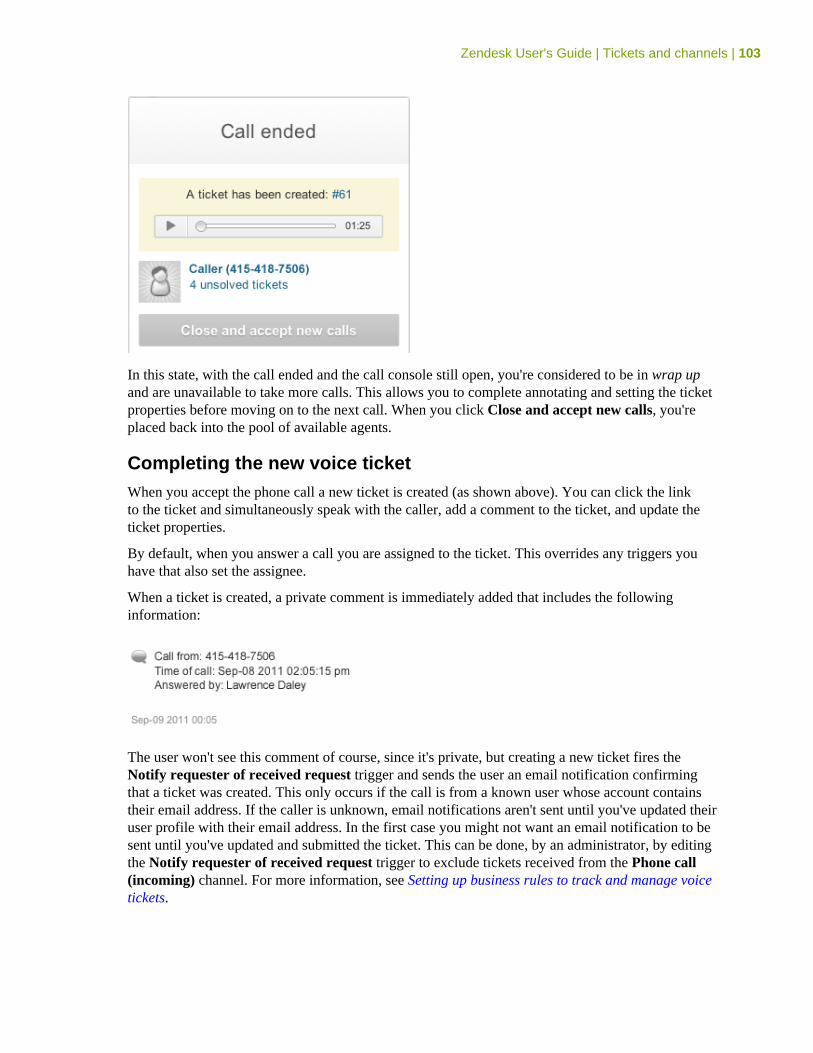
Zendesk User's Guide | Tickets and channels | 103
In this state, with the call ended and the call console still open, you're considered to be in wrap upand are unavailable to take more calls. This allows you to complete annotating and setting the ticketproperties before moving on to the next call. When you click Close and accept new calls, you'replaced back into the pool of available agents.
Completing the new voice ticketWhen you accept the phone call a new ticket is created (as shown above). You can click the linkto the ticket and simultaneously speak with the caller, add a comment to the ticket, and update theticket properties.
By default, when you answer a call you are assigned to the ticket. This overrides any triggers youhave that also set the assignee.
When a ticket is created, a private comment is immediately added that includes the followinginformation:
The user won't see this comment of course, since it's private, but creating a new ticket fires theNotify requester of received request trigger and sends the user an email notification confirmingthat a ticket was created. This only occurs if the call is from a known user whose account containstheir email address. If the caller is unknown, email notifications aren't sent until you've updated theiruser profile with their email address. In the first case you might not want an email notification to besent until you've updated and submitted the ticket. This can be done, by an administrator, by editingthe Notify requester of received request trigger to exclude tickets received from the Phone call(incoming) channel. For more information, see Setting up business rules to track and manage voicetickets.
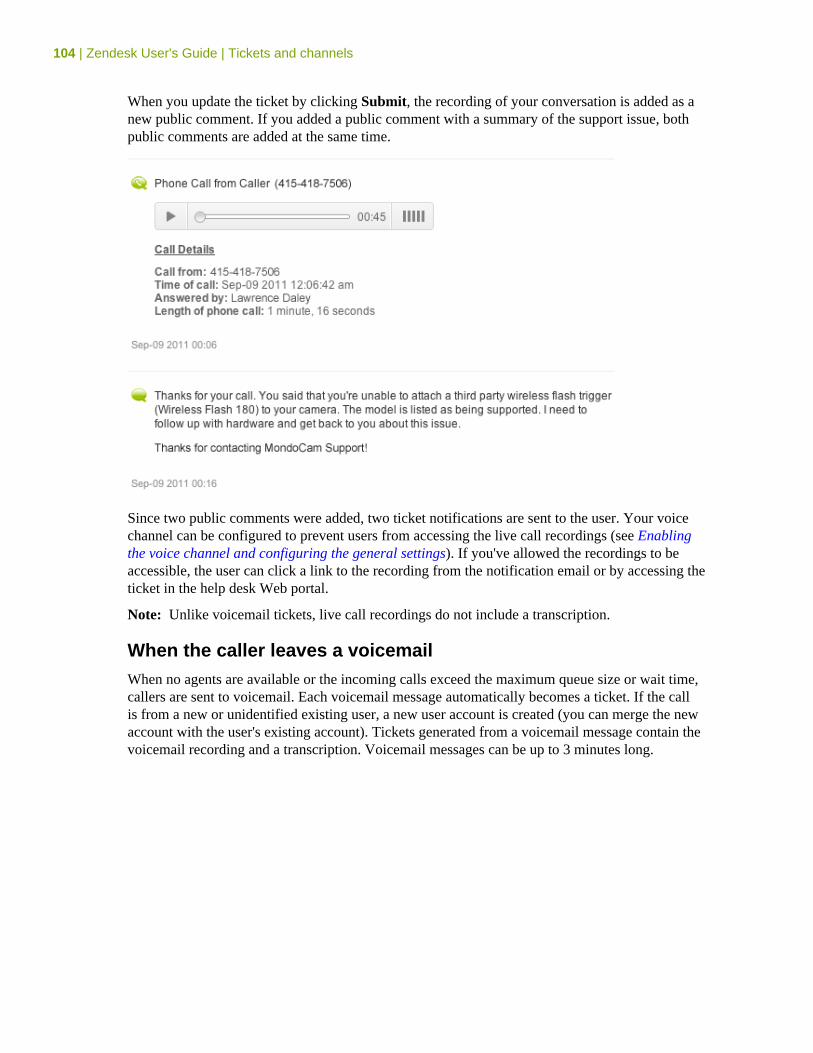
104 | Zendesk User's Guide | Tickets and channels
When you update the ticket by clicking Submit, the recording of your conversation is added as anew public comment. If you added a public comment with a summary of the support issue, bothpublic comments are added at the same time.
Since two public comments were added, two ticket notifications are sent to the user. Your voicechannel can be configured to prevent users from accessing the live call recordings (see Enablingthe voice channel and configuring the general settings). If you've allowed the recordings to beaccessible, the user can click a link to the recording from the notification email or by accessing theticket in the help desk Web portal.
Note: Unlike voicemail tickets, live call recordings do not include a transcription.
When the caller leaves a voicemailWhen no agents are available or the incoming calls exceed the maximum queue size or wait time,callers are sent to voicemail. Each voicemail message automatically becomes a ticket. If the callis from a new or unidentified existing user, a new user account is created (you can merge the newaccount with the user's existing account). Tickets generated from a voicemail message contain thevoicemail recording and a transcription. Voicemail messages can be up to 3 minutes long.

Zendesk User's Guide | Tickets and channels | 105
In this example the caller is unknown and only identified by their telephone number; therefore theywill not receive the received request email notification since the new user account doesn't containtheir email address. Existing users who leave voicemails receive a notification just as if they hadsubmitted a supported request via the other ticket channels.
To track all calls that have resulted in voicemails, you can set up a view (see Setting up businessrules to track and manage voice tickets).
You can either manually, or using business rules, update voicemail tickets as needed and thenrespond to the caller.
Note: Zendesk Voice does not support making outbound calls.
Merging tickets when a new call is about an existing ticketYou may often find that callers are contacting you about an issue for which a ticket has already beencreated. To handle this situation, just conduct the call and add comments as needed to the new ticket.You can then merge the new ticket with the existing ticket.
To merge two tickets
1. Select and open the ticket you want to merge into another ticket.2. Near the Submit button, where the ticket update options are available, click the drop down
list and select Merge into another ticket.3. You can search by ticket number for the ticket you want to merge this one into. Or, you can
select a ticket from the list of the user's other tickets.4. After you've selected the ticket, click Confirm and Merge.
106 | Zendesk User's Guide | Tickets and channels
Searching for voice ticketsYou can search for tickets that were generated from phone calls and voicemails. You can also searchfor a user's tickets using their phone number.
Using the via keyword in a search you can search for either phone call or voicemail tickets, as inthe following examples.
via:voicemail
via:phone_call_inbound
If you want to search for a user's ticket using their telephone number, you can use a search statementlike this:
requester:+14154187506 status:new
For more information about searching the help desk, see Zendesk search reference.
Chapter
5
Streamlining the help desk workflow• Creating ticket handling shortcuts with macros• Organizing your macros• Streamlining workflow with ticket updates and triggers• Streamlining workflow with time-based events and automations• Using placeholders• Using tags• Filtering business rules• Notifying external targets
108 | Zendesk User's Guide | Streamlining the help desk workflow
Creating ticket handling shortcuts with macrosA simple and effective way to streamline your help desk workflow is to create macros for supportrequests that can be answered with a single, standard response. This saves your agents the time andeffort of crafting a separate response to each customer that has the same issue.
Macros can be created from scratch or you can base them on existing tickets. Macros containactions, which can be updates to ticket properties and comments to both customers and the supportstaff. Macros are manually applied to tickets by agents.
There are two types of macros: personal macros (created by an agent or admin for their own use) andshared macros (created by an admin for everyone's use). A personal macro is only visible to and canonly be used or modified by the agent or admin who created it. Admins can create shared macrosand also modify all shared macros, regardless of who created them.
Macros can also be organized into categories to help the support staff quickly locate and apply them.For more information, see Organizing your macros.
Zendesk macros to get you startedZendesk provides a number of macros to get you started. You can view these macros by selectingManage > Macros.
Close and redirect to topics
This sets the ticket status to closed if it is an incident of a known problem, informs therequester via a comment that the ticket has been closed and recommends that they visit theforums for more information about the incident.
Customer not responding
This is a reminder that can be sent to the requester if they have not responded to a request formore information on a pending ticket.
Downgrade and inform
This tells the requester that the priority of their request has been downgraded to low and thatthere may be some delay in resolving their request.
Take it!
This macro is a shortcut for agents to assign a new request to themselves.
You can use these macros as is, edit them, or clone them to make copies that you can modify andrepurpose.
Creating macrosUnlike triggers and automations, macros only contain actions, not conditions. Conditions aren'tused because nothing is automatically evaluating tickets to determine if a macro should be applied.Agents evaluate tickets and apply macros manually as needed.
To add a personal macro (agents and admins)
Zendesk User's Guide | Streamlining the help desk workflow | 109
1. Select Manage > Macros.2. Select Add Macro.3. Enter the title and add actions for your macro (described below in Building macro action statements).4. Click Add Macro.
To add a shared macro (admins only)1. Select Manage > Macros.2. Select Add Macro.3. Enter the title and add actions for your macro (described below in Building macro action
statements).4. If you're an admin, you can set the macro availability to the following:
• All agents• Agents in group (and then select a group by name). This option is only available in
the Zendesk Plus+ plan.• Me only
5. Click Add Macro (or Update Macro, if you’re editing the macro).
Building macro action statementsUsing macros you can set ticket properties, add or modify tags, and add comments.
Table 10: Actions
Actions Description
Status The ticket status can be set to the following:
Open indicates that the ticket has been assigned to an agent.
Pending indicates that the requester has been asked for informationand the ticket is therefore is on hold until that information has beenreceived.
Solved indicates that the customer’s issue has been resolved.Tickets remain solved until they are closed.
Priority The priority can be set to Low, Normal, High or Urgent.
Type The type can be set to the following:
Question
Incident indicates that there is more than one occurrence of thesame problem. When this occurs, one ticket is set to Problem andthe other tickets that are reporting the same problem are set toIncident and linked to the problem ticket.
Problem is a support issue that needs to be resolved.
Task is used by the support agents to track various tasks.
Note: It's currently not possible to link incident tickets to problemtickets or set task due dates using the task action in macros.
Group You can set groups to any of the following:
(—) is used to unassign a group (if one has already been assigned)

110 | Zendesk User's Guide | Streamlining the help desk workflow
Actions Description
(current user’s groups) is all the groups to which the agent who isupdating the ticket belongs.
Group name is the actual name of the group that is assigned to theticket.
Assignee You can set assignee to any of the following:
(—) is used to set assignee to no one (unassigned)
(current user) is the last person to have updated the ticket,which is not necessarily the same person who is assigned to theticket. The current user (whoever updated the ticket last) changeswhenever the ticket is updated.
Assignee name is the actual name of the person assigned to theticket.
Set tags The tags you want to insert into the ticket. The set tag actionreplaces the current tags. Tags must be separated with spaces.Multi-word tags must be joined with an underscore (for example,about_sales).
Add tags The tags you want to add to the existing list of tags (if any). Tagsmust be separated with spaces. Multi-word tags must be joinedwith an underscore (for example, about_sales).
Remove tags The tags that you want removed from the existing list of tagscontained in the ticket (if any). Tags must be separated with spaces.
Comment/description The text of the email notification.
Comment mode Public or Private. Only agents can view private comments.
Custom fields Custom fields that set tags (drop-down list and checkbox) areavailable as actions. You can select the drop-down list values andYes or No for checkboxes.
Creating macros from existing ticketsYou can create a macro from an existing ticket, which enables you to, for example, create a standardresponse to an issue that has already been addressed. Agents can only create personal macros fromtickets. Admins can create shared macros from tickets.
To create a macro from an existing ticket
1. Select the ticket you want to base the new macro on.2. Select the ticket update option called Update ticket and add as macro.3. Click Submit.4. Enter a title for the new macro and then modify the actions as needed. You might want to
rewrite the comment to be less specific to the original request and more appropriate for reuse.5. Select Add Macro.
Zendesk User's Guide | Streamlining the help desk workflow | 111
Applying macros to ticketsYou manually apply macros to tickets. Typically, you apply one macro to one ticket. However, youcan also apply a macro to more than one ticket at a time and you can also apply more than one macroto a single ticket.
To apply a macro to a ticket
1. Select a ticket.2. Select a macro from the Apply Macro menu. The ticket properties will be updated.3. Edit the macro if needed (for example, personalizing the comment if one has been added).4. Click Update Ticket.
To apply a macro to more than one ticket at a time
1. Select a view that contains the tickets you want to apply the macro to.2. Select the table view of the tickets.3. The table view contains a selection checkbox (on the right side). Select tickets from the list or
select them all using the selection checkbox in the table header.4. Select a macro from the Apply Macro menu. Ticket properties for all selected tickets will be
updated.5. Click Update Selected Tickets.
To apply more than one macro at a time to a ticket
1. Select a ticket.2. Select a macro from the Apply Macro menu. The ticket properties will be updated.3. Select a second macro from the Apply Macro menu. The ticket properties will be updated
again.4. Click Update Ticket.
Note: Keep in mind that what one macro does to the ticket can easily be undone by another macro.So why would you apply more than one macro to a ticket? A typical use case is a ticket that containsmore than one question or issue, let's say two in this example. You might have set up two macrosthat both insert a comment into a ticket to answer each issue separately. By applying each macro tothe ticket you add two comments and address both issues in a single response.
Editing and cloning macrosYou can edit and clone macros. Cloning a macro creates a copy that you can modify and repurpose.Agents can only edit and clone their personal macros. Admins can edit and clone their personalmacros and all shared macros.
To edit a macro
1. Select Manage > Macros.2. Locate the macro you want to edit and select Edit.3. Modify the title and actions as needed.4. Click Update Macro.
To clone a macro
1. Select Manage > Macros.
112 | Zendesk User's Guide | Streamlining the help desk workflow
2. Locate the macro you want to clone and select Clone. This command appears when youmove your mouse over a macro in the list.
3. Enter a new title for your macro and modify the actions as needed.4. Click Add Macro.
Deleting and deactivating macrosIf you decide that you no longer need a macro you can either delete it or deactivate it. Deleting it ofcourse means that it’s gone and can’t be retrieved. You can instead deactivate a macro so that it doesnot appear in the Apply Macro menu and therefore cannot be used. Deactivated macros are listedin a separate table on Manage > Macros and can be reactivated if needed. Agents can only deleteand deactivate their personal macros. Admins can delete and deactivate their personal macros and allshared macros.
To delete a macro
1. Select Manage > Macros.2. Locate the macro you want to delete and select Edit.3. Click Delete.
To deactivate/reactivate a macro
1. Select Manage > Macros.2. Locate the macro you want to deactivate and select Deactivate. This command appears when
you move your mouse over the macro in the list of macro. The macro is deactivated anddisplayed in the list of inactive macros.
3. To reactivate the macro, select it from the list of inactive macros and select Activate.
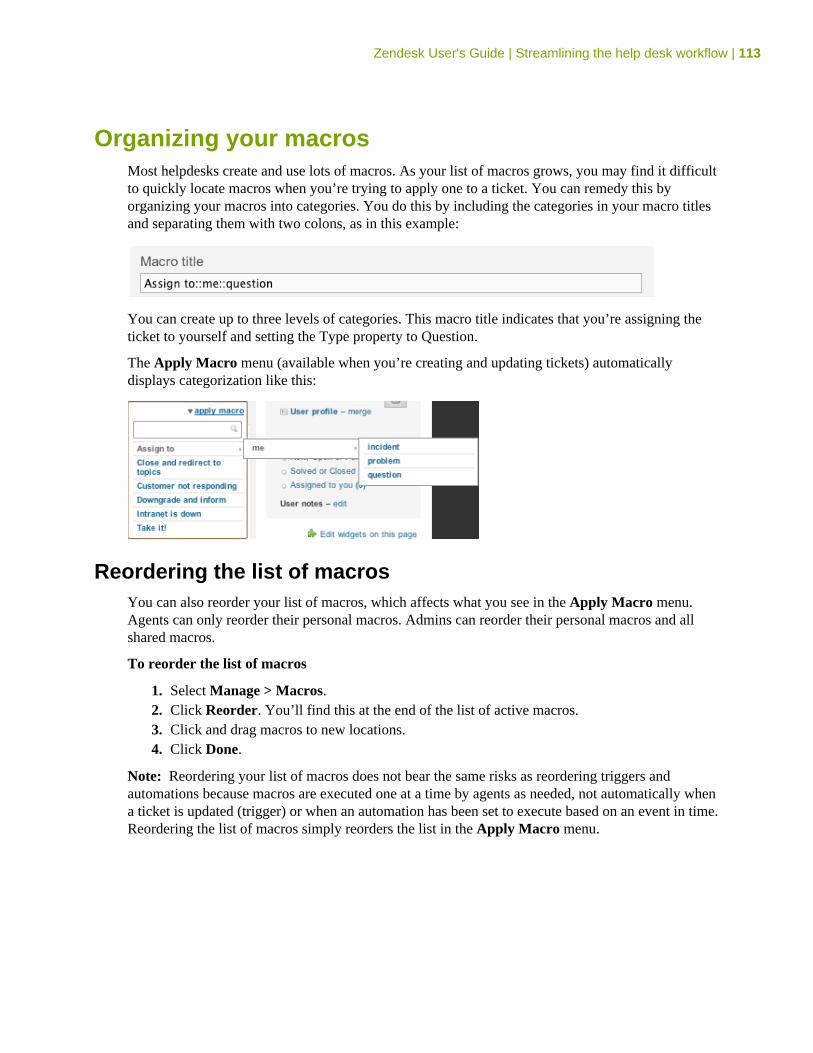
Zendesk User's Guide | Streamlining the help desk workflow | 113
Organizing your macrosMost helpdesks create and use lots of macros. As your list of macros grows, you may find it difficultto quickly locate macros when you’re trying to apply one to a ticket. You can remedy this byorganizing your macros into categories. You do this by including the categories in your macro titlesand separating them with two colons, as in this example:
You can create up to three levels of categories. This macro title indicates that you’re assigning theticket to yourself and setting the Type property to Question.
The Apply Macro menu (available when you’re creating and updating tickets) automaticallydisplays categorization like this:
Reordering the list of macrosYou can also reorder your list of macros, which affects what you see in the Apply Macro menu.Agents can only reorder their personal macros. Admins can reorder their personal macros and allshared macros.
To reorder the list of macros
1. Select Manage > Macros.2. Click Reorder. You’ll find this at the end of the list of active macros.3. Click and drag macros to new locations.4. Click Done.
Note: Reordering your list of macros does not bear the same risks as reordering triggers andautomations because macros are executed one at a time by agents as needed, not automatically whena ticket is updated (trigger) or when an automation has been set to execute based on an event in time.Reordering the list of macros simply reorders the list in the Apply Macro menu.
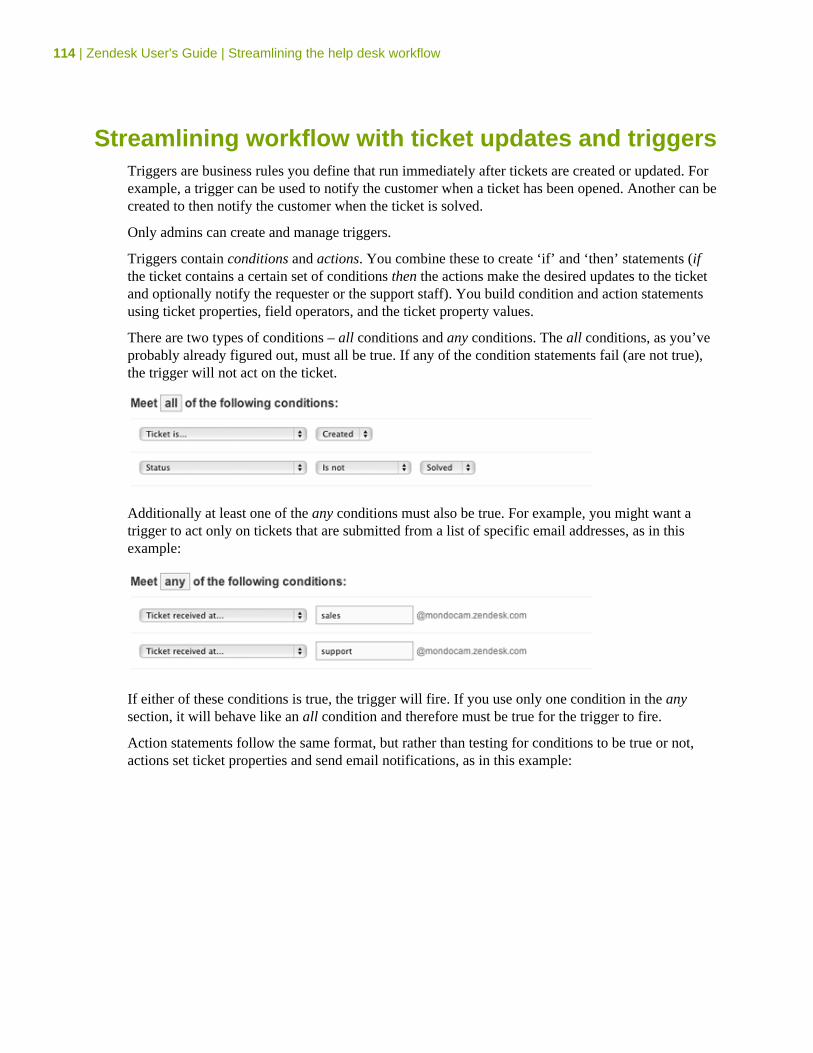
114 | Zendesk User's Guide | Streamlining the help desk workflow
Streamlining workflow with ticket updates and triggersTriggers are business rules you define that run immediately after tickets are created or updated. Forexample, a trigger can be used to notify the customer when a ticket has been opened. Another can becreated to then notify the customer when the ticket is solved.
Only admins can create and manage triggers.
Triggers contain conditions and actions. You combine these to create ‘if’ and ‘then’ statements (ifthe ticket contains a certain set of conditions then the actions make the desired updates to the ticketand optionally notify the requester or the support staff). You build condition and action statementsusing ticket properties, field operators, and the ticket property values.
There are two types of conditions – all conditions and any conditions. The all conditions, as you’veprobably already figured out, must all be true. If any of the condition statements fail (are not true),the trigger will not act on the ticket.
Additionally at least one of the any conditions must also be true. For example, you might want atrigger to act only on tickets that are submitted from a list of specific email addresses, as in thisexample:
If either of these conditions is true, the trigger will fire. If you use only one condition in the anysection, it will behave like an all condition and therefore must be true for the trigger to fire.
Action statements follow the same format, but rather than testing for conditions to be true or not,actions set ticket properties and send email notifications, as in this example:
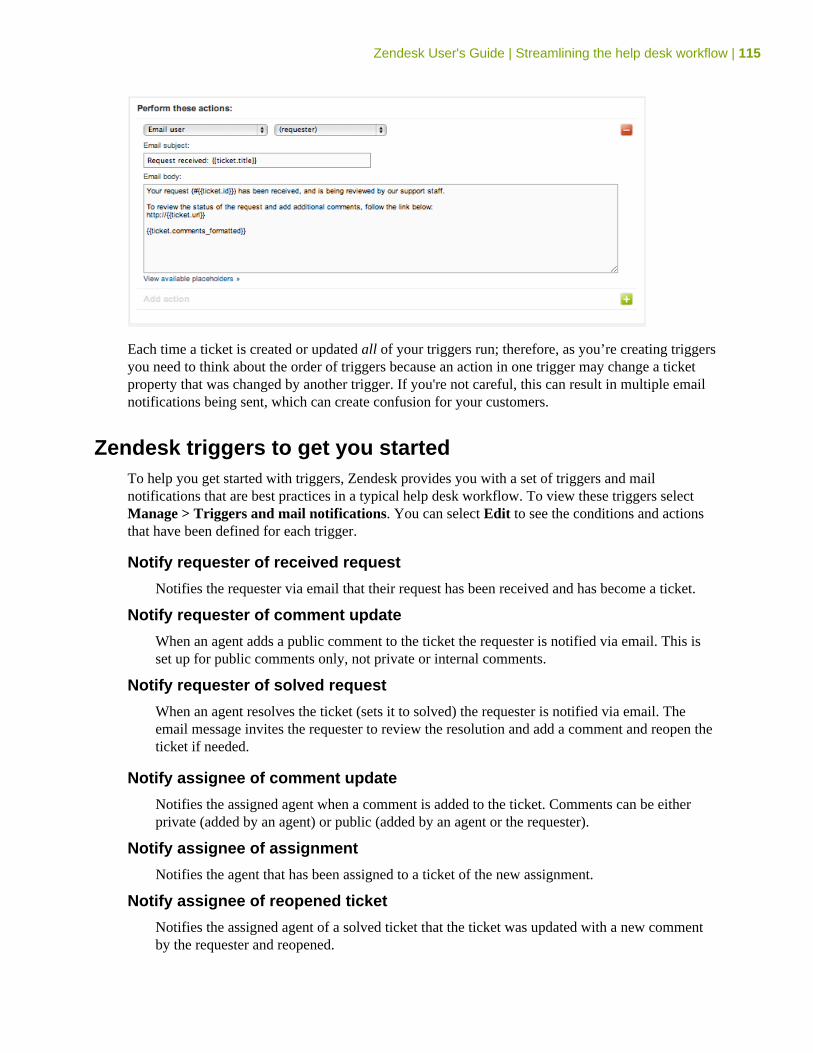
Zendesk User's Guide | Streamlining the help desk workflow | 115
Each time a ticket is created or updated all of your triggers run; therefore, as you’re creating triggersyou need to think about the order of triggers because an action in one trigger may change a ticketproperty that was changed by another trigger. If you're not careful, this can result in multiple emailnotifications being sent, which can create confusion for your customers.
Zendesk triggers to get you startedTo help you get started with triggers, Zendesk provides you with a set of triggers and mailnotifications that are best practices in a typical help desk workflow. To view these triggers selectManage > Triggers and mail notifications. You can select Edit to see the conditions and actionsthat have been defined for each trigger.
Notify requester of received request
Notifies the requester via email that their request has been received and has become a ticket.
Notify requester of comment update
When an agent adds a public comment to the ticket the requester is notified via email. This isset up for public comments only, not private or internal comments.
Notify requester of solved request
When an agent resolves the ticket (sets it to solved) the requester is notified via email. Theemail message invites the requester to review the resolution and add a comment and reopen theticket if needed.
Notify assignee of comment update
Notifies the assigned agent when a comment is added to the ticket. Comments can be eitherprivate (added by an agent) or public (added by an agent or the requester).
Notify assignee of assignment
Notifies the agent that has been assigned to a ticket of the new assignment.
Notify assignee of reopened ticket
Notifies the assigned agent of a solved ticket that the ticket was updated with a new commentby the requester and reopened.
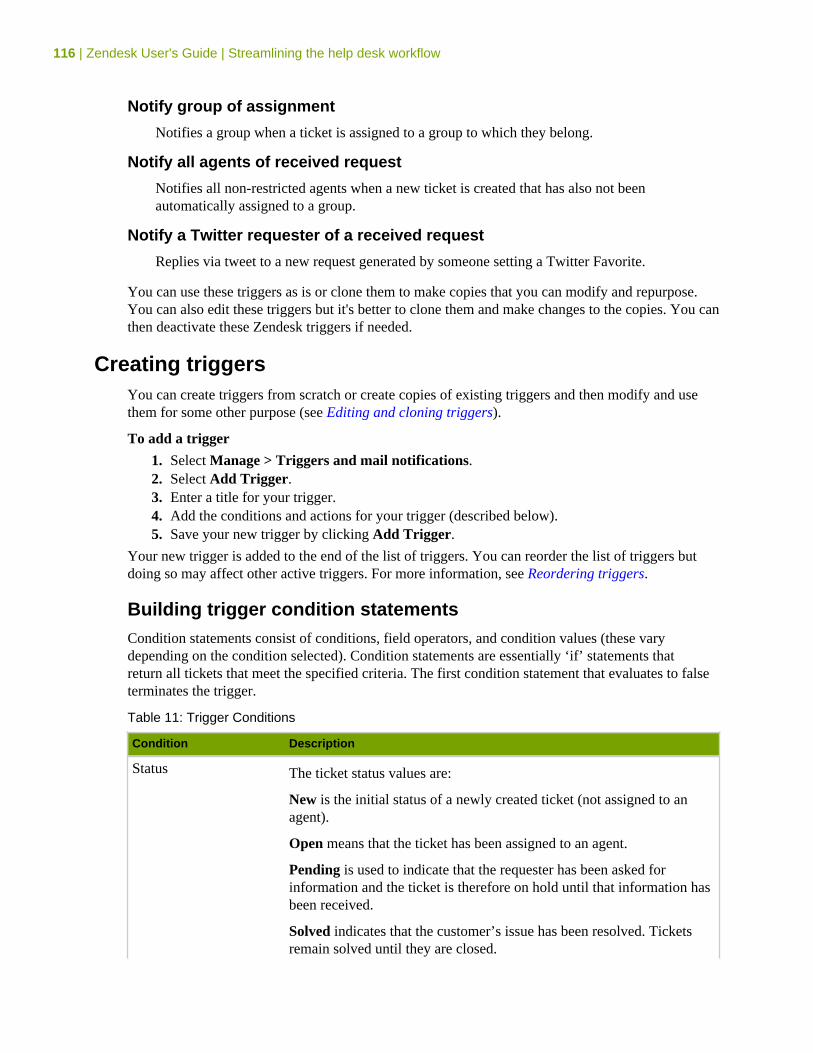
116 | Zendesk User's Guide | Streamlining the help desk workflow
Notify group of assignment
Notifies a group when a ticket is assigned to a group to which they belong.
Notify all agents of received request
Notifies all non-restricted agents when a new ticket is created that has also not beenautomatically assigned to a group.
Notify a Twitter requester of a received request
Replies via tweet to a new request generated by someone setting a Twitter Favorite.
You can use these triggers as is or clone them to make copies that you can modify and repurpose.You can also edit these triggers but it's better to clone them and make changes to the copies. You canthen deactivate these Zendesk triggers if needed.
Creating triggersYou can create triggers from scratch or create copies of existing triggers and then modify and usethem for some other purpose (see Editing and cloning triggers).
To add a trigger
1. Select Manage > Triggers and mail notifications.2. Select Add Trigger.3. Enter a title for your trigger.4. Add the conditions and actions for your trigger (described below).5. Save your new trigger by clicking Add Trigger.
Your new trigger is added to the end of the list of triggers. You can reorder the list of triggers butdoing so may affect other active triggers. For more information, see Reordering triggers.
Building trigger condition statementsCondition statements consist of conditions, field operators, and condition values (these varydepending on the condition selected). Condition statements are essentially ‘if’ statements thatreturn all tickets that meet the specified criteria. The first condition statement that evaluates to falseterminates the trigger.
Table 11: Trigger Conditions
Condition Description
Status The ticket status values are:
New is the initial status of a newly created ticket (not assigned to anagent).
Open means that the ticket has been assigned to an agent.
Pending is used to indicate that the requester has been asked forinformation and the ticket is therefore on hold until that information hasbeen received.
Solved indicates that the customer’s issue has been resolved. Ticketsremain solved until they are closed.
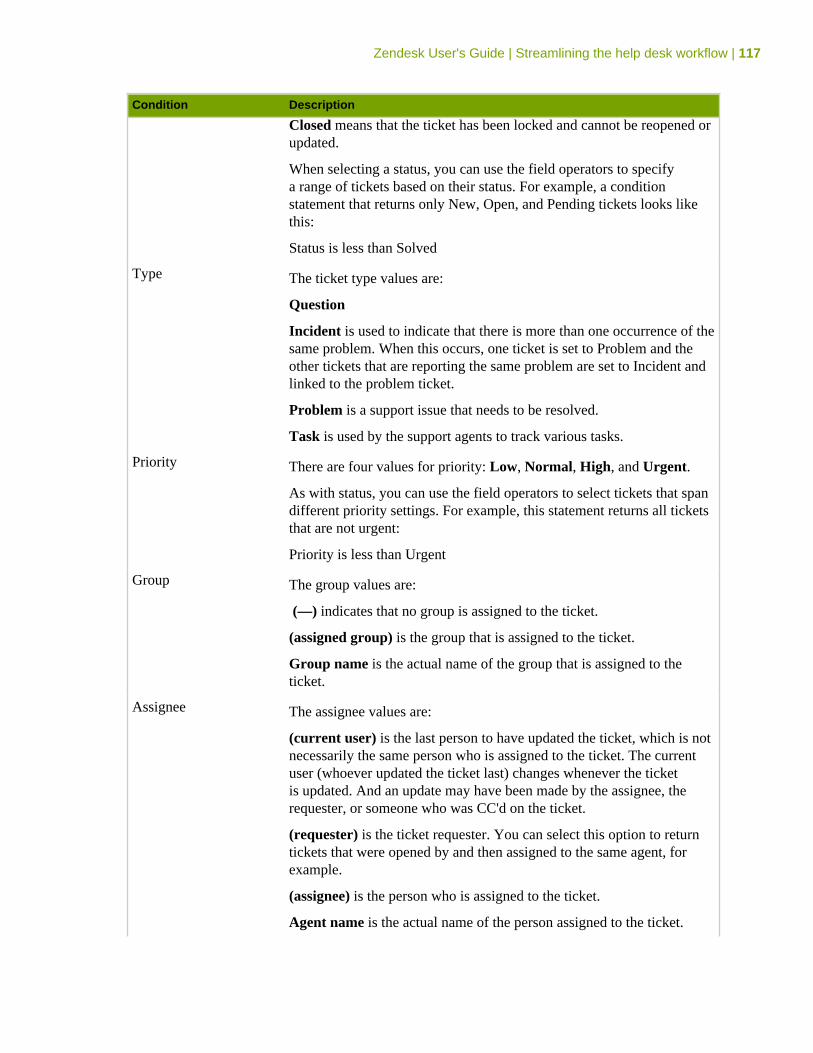
Zendesk User's Guide | Streamlining the help desk workflow | 117
Condition Description
Closed means that the ticket has been locked and cannot be reopened orupdated.
When selecting a status, you can use the field operators to specifya range of tickets based on their status. For example, a conditionstatement that returns only New, Open, and Pending tickets looks likethis:
Status is less than Solved
Type The ticket type values are:
Question
Incident is used to indicate that there is more than one occurrence of thesame problem. When this occurs, one ticket is set to Problem and theother tickets that are reporting the same problem are set to Incident andlinked to the problem ticket.
Problem is a support issue that needs to be resolved.
Task is used by the support agents to track various tasks.
Priority There are four values for priority: Low, Normal, High, and Urgent.
As with status, you can use the field operators to select tickets that spandifferent priority settings. For example, this statement returns all ticketsthat are not urgent:
Priority is less than Urgent
Group The group values are:
(—) indicates that no group is assigned to the ticket.
(assigned group) is the group that is assigned to the ticket.
Group name is the actual name of the group that is assigned to theticket.
Assignee The assignee values are:
(current user) is the last person to have updated the ticket, which is notnecessarily the same person who is assigned to the ticket. The currentuser (whoever updated the ticket last) changes whenever the ticketis updated. And an update may have been made by the assignee, therequester, or someone who was CC'd on the ticket.
(requester) is the ticket requester. You can select this option to returntickets that were opened by and then assigned to the same agent, forexample.
(assignee) is the person who is assigned to the ticket.
Agent name is the actual name of the person assigned to the ticket.
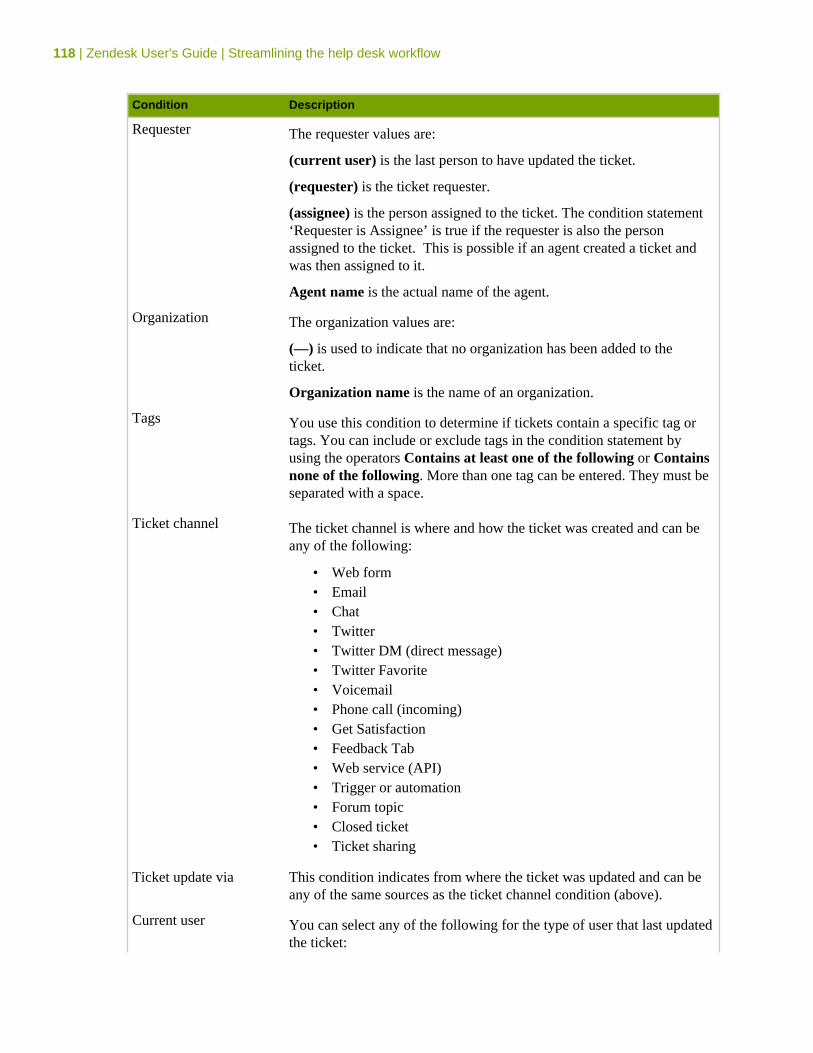
118 | Zendesk User's Guide | Streamlining the help desk workflow
Condition Description
Requester The requester values are:
(current user) is the last person to have updated the ticket.
(requester) is the ticket requester.
(assignee) is the person assigned to the ticket. The condition statement‘Requester is Assignee’ is true if the requester is also the personassigned to the ticket. This is possible if an agent created a ticket andwas then assigned to it.
Agent name is the actual name of the agent.
Organization The organization values are:
(—) is used to indicate that no organization has been added to theticket.
Organization name is the name of an organization.
Tags You use this condition to determine if tickets contain a specific tag ortags. You can include or exclude tags in the condition statement byusing the operators Contains at least one of the following or Containsnone of the following. More than one tag can be entered. They must beseparated with a space.
Ticket channel The ticket channel is where and how the ticket was created and can beany of the following:
• Web form• Email• Chat• Twitter• Twitter DM (direct message)• Twitter Favorite• Voicemail• Phone call (incoming)• Get Satisfaction• Feedback Tab• Web service (API)• Trigger or automation• Forum topic• Closed ticket• Ticket sharing
Ticket update via This condition indicates from where the ticket was updated and can beany of the same sources as the ticket channel condition (above).
Current user You can select any of the following for the type of user that last updatedthe ticket:
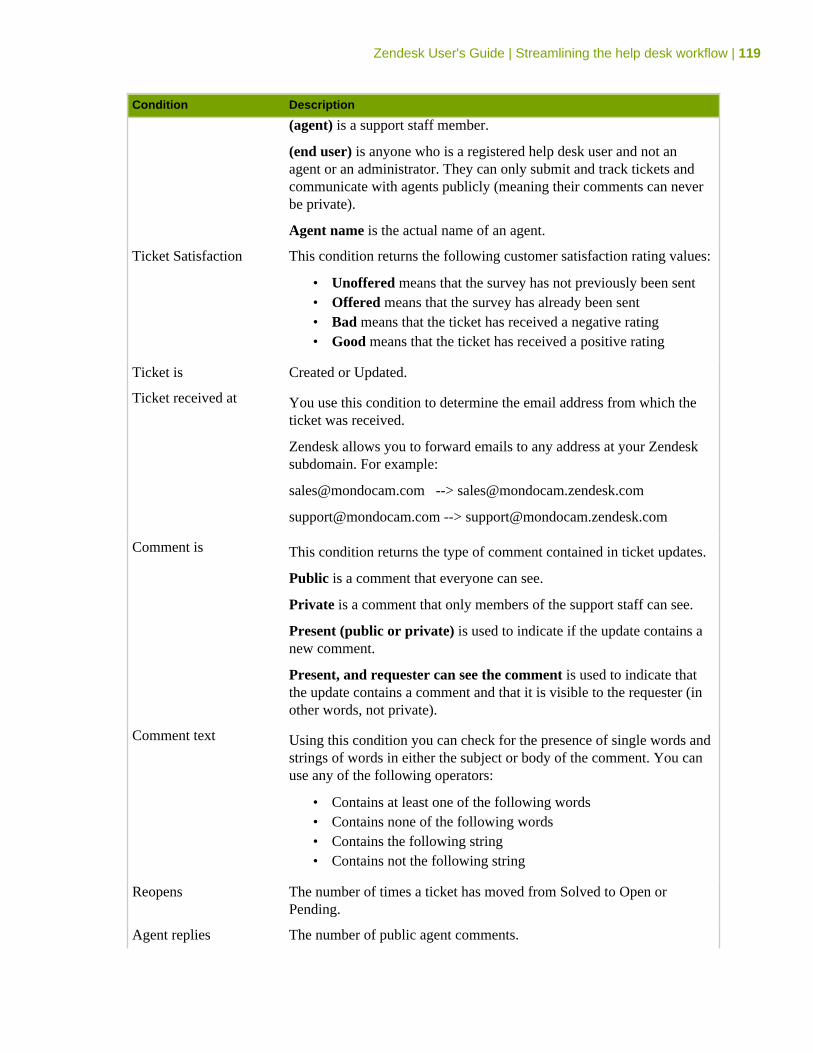
Zendesk User's Guide | Streamlining the help desk workflow | 119
Condition Description
(agent) is a support staff member.
(end user) is anyone who is a registered help desk user and not anagent or an administrator. They can only submit and track tickets andcommunicate with agents publicly (meaning their comments can neverbe private).
Agent name is the actual name of an agent.
Ticket Satisfaction This condition returns the following customer satisfaction rating values:
• Unoffered means that the survey has not previously been sent• Offered means that the survey has already been sent• Bad means that the ticket has received a negative rating• Good means that the ticket has received a positive rating
Ticket is Created or Updated.
Ticket received at You use this condition to determine the email address from which theticket was received.
Zendesk allows you to forward emails to any address at your Zendesksubdomain. For example:
[email protected] --> [email protected]
[email protected] --> [email protected]
Comment is This condition returns the type of comment contained in ticket updates.
Public is a comment that everyone can see.
Private is a comment that only members of the support staff can see.
Present (public or private) is used to indicate if the update contains anew comment.
Present, and requester can see the comment is used to indicate thatthe update contains a comment and that it is visible to the requester (inother words, not private).
Comment text Using this condition you can check for the presence of single words andstrings of words in either the subject or body of the comment. You canuse any of the following operators:
• Contains at least one of the following words• Contains none of the following words• Contains the following string• Contains not the following string
Reopens The number of times a ticket has moved from Solved to Open orPending.
Agent replies The number of public agent comments.
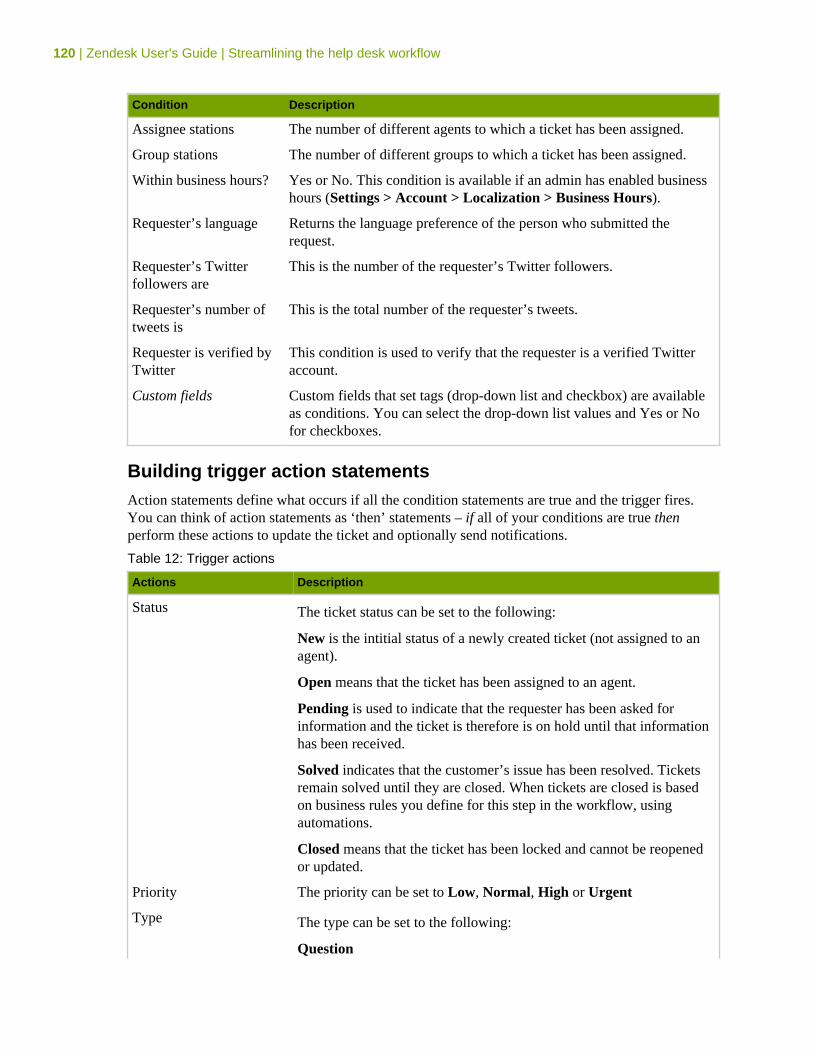
120 | Zendesk User's Guide | Streamlining the help desk workflow
Condition Description
Assignee stations The number of different agents to which a ticket has been assigned.
Group stations The number of different groups to which a ticket has been assigned.
Within business hours? Yes or No. This condition is available if an admin has enabled businesshours (Settings > Account > Localization > Business Hours).
Requester’s language Returns the language preference of the person who submitted therequest.
Requester’s Twitterfollowers are
This is the number of the requester’s Twitter followers.
Requester’s number oftweets is
This is the total number of the requester’s tweets.
Requester is verified byTwitter
This condition is used to verify that the requester is a verified Twitteraccount.
Custom fields Custom fields that set tags (drop-down list and checkbox) are availableas conditions. You can select the drop-down list values and Yes or Nofor checkboxes.
Building trigger action statementsAction statements define what occurs if all the condition statements are true and the trigger fires.You can think of action statements as ‘then’ statements – if all of your conditions are true thenperform these actions to update the ticket and optionally send notifications.
Table 12: Trigger actions
Actions Description
Status The ticket status can be set to the following:
New is the intitial status of a newly created ticket (not assigned to anagent).
Open means that the ticket has been assigned to an agent.
Pending is used to indicate that the requester has been asked forinformation and the ticket is therefore is on hold until that informationhas been received.
Solved indicates that the customer’s issue has been resolved. Ticketsremain solved until they are closed. When tickets are closed is basedon business rules you define for this step in the workflow, usingautomations.
Closed means that the ticket has been locked and cannot be reopenedor updated.
Priority The priority can be set to Low, Normal, High or Urgent
Type The type can be set to the following:
Question
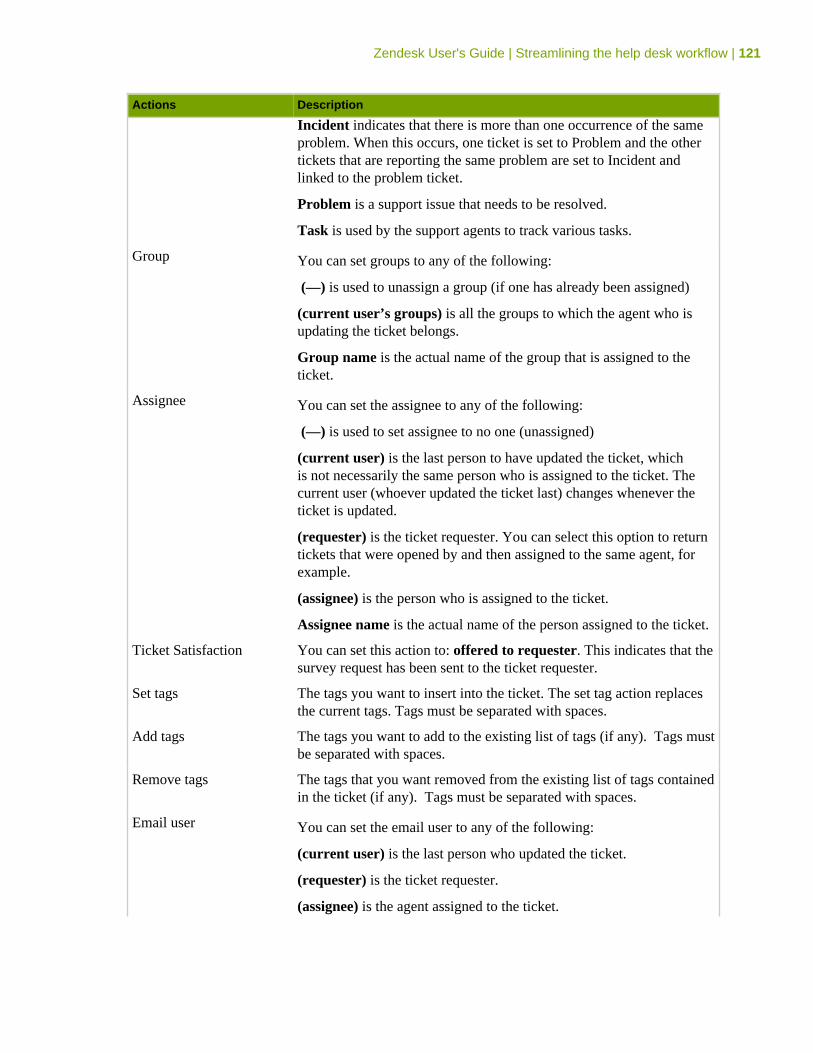
Zendesk User's Guide | Streamlining the help desk workflow | 121
Actions Description
Incident indicates that there is more than one occurrence of the sameproblem. When this occurs, one ticket is set to Problem and the othertickets that are reporting the same problem are set to Incident andlinked to the problem ticket.
Problem is a support issue that needs to be resolved.
Task is used by the support agents to track various tasks.
Group You can set groups to any of the following:
(—) is used to unassign a group (if one has already been assigned)
(current user’s groups) is all the groups to which the agent who isupdating the ticket belongs.
Group name is the actual name of the group that is assigned to theticket.
Assignee You can set the assignee to any of the following:
(—) is used to set assignee to no one (unassigned)
(current user) is the last person to have updated the ticket, whichis not necessarily the same person who is assigned to the ticket. Thecurrent user (whoever updated the ticket last) changes whenever theticket is updated.
(requester) is the ticket requester. You can select this option to returntickets that were opened by and then assigned to the same agent, forexample.
(assignee) is the person who is assigned to the ticket.
Assignee name is the actual name of the person assigned to the ticket.
Ticket Satisfaction You can set this action to: offered to requester. This indicates that thesurvey request has been sent to the ticket requester.
Set tags The tags you want to insert into the ticket. The set tag action replacesthe current tags. Tags must be separated with spaces.
Add tags The tags you want to add to the existing list of tags (if any). Tags mustbe separated with spaces.
Remove tags The tags that you want removed from the existing list of tags containedin the ticket (if any). Tags must be separated with spaces.
Email user You can set the email user to any of the following:
(current user) is the last person who updated the ticket.
(requester) is the ticket requester.
(assignee) is the agent assigned to the ticket.
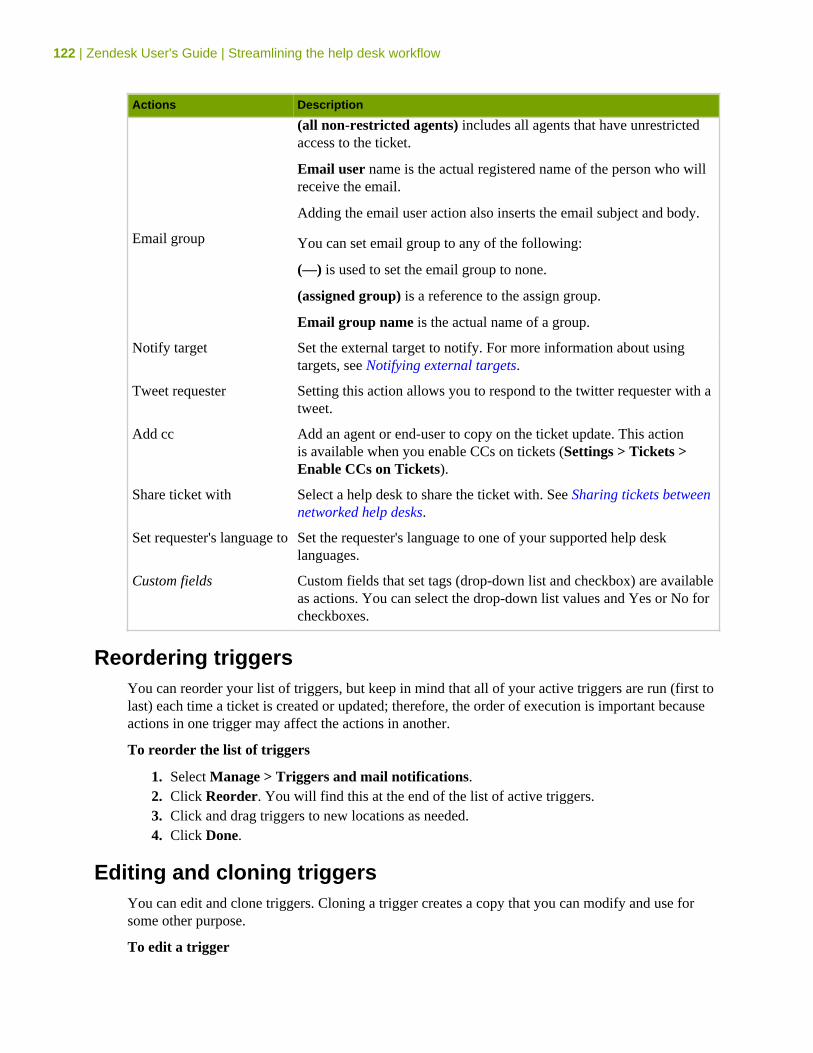
122 | Zendesk User's Guide | Streamlining the help desk workflow
Actions Description
(all non-restricted agents) includes all agents that have unrestrictedaccess to the ticket.
Email user name is the actual registered name of the person who willreceive the email.
Adding the email user action also inserts the email subject and body.
Email group You can set email group to any of the following:
(—) is used to set the email group to none.
(assigned group) is a reference to the assign group.
Email group name is the actual name of a group.
Notify target Set the external target to notify. For more information about usingtargets, see Notifying external targets.
Tweet requester Setting this action allows you to respond to the twitter requester with atweet.
Add cc Add an agent or end-user to copy on the ticket update. This actionis available when you enable CCs on tickets (Settings > Tickets >Enable CCs on Tickets).
Share ticket with Select a help desk to share the ticket with. See Sharing tickets betweennetworked help desks.
Set requester's language to Set the requester's language to one of your supported help desklanguages.
Custom fields Custom fields that set tags (drop-down list and checkbox) are availableas actions. You can select the drop-down list values and Yes or No forcheckboxes.
Reordering triggersYou can reorder your list of triggers, but keep in mind that all of your active triggers are run (first tolast) each time a ticket is created or updated; therefore, the order of execution is important becauseactions in one trigger may affect the actions in another.
To reorder the list of triggers
1. Select Manage > Triggers and mail notifications.2. Click Reorder. You will find this at the end of the list of active triggers.3. Click and drag triggers to new locations as needed.4. Click Done.
Editing and cloning triggersYou can edit and clone triggers. Cloning a trigger creates a copy that you can modify and use forsome other purpose.
To edit a trigger
Zendesk User's Guide | Streamlining the help desk workflow | 123
1. Select Manage > Triggers and mail notifications.2. Locate the trigger you want to edit and select Edit.3. Modify the title, conditions, and actions as needed.4. Click Update Trigger.
To clone a trigger
1. Select Manage > Triggers and mail notifications.2. Locate the trigger you want to clone and select Clone. This command appears when you
move your mouse over the trigger in the list of triggers.3. Enter a new name for your trigger and modify the conditions and actions as needed.4. Click Add Trigger.
Deleting and deactivating triggersIf you decide that you no longer need a trigger you can either delete it or deactivate it. Deleting it ofcourse means that it's gone and can't be retrieved. You can instead deactivate triggers. Deactivatedtriggers are listed in a separate table on Manage > Triggers and email notifications and can bereactivated if needed.
To delete a trigger
1. Select Manage > Triggers and mail notifications.2. Locate the trigger you want to delete and select Edit.3. Click Delete.
To deactivate/activate a trigger
1. Select Manage > Triggers and mail notifications.2. Locate the trigger you want to deactivate and select Deactivate. This command appears when
you move your mouse over the trigger in the list of triggers. The trigger is deactivated anddisplayed in the list of inactive triggers.
3. To reactivate the trigger, select it from the list of inactive triggers and select Activate.
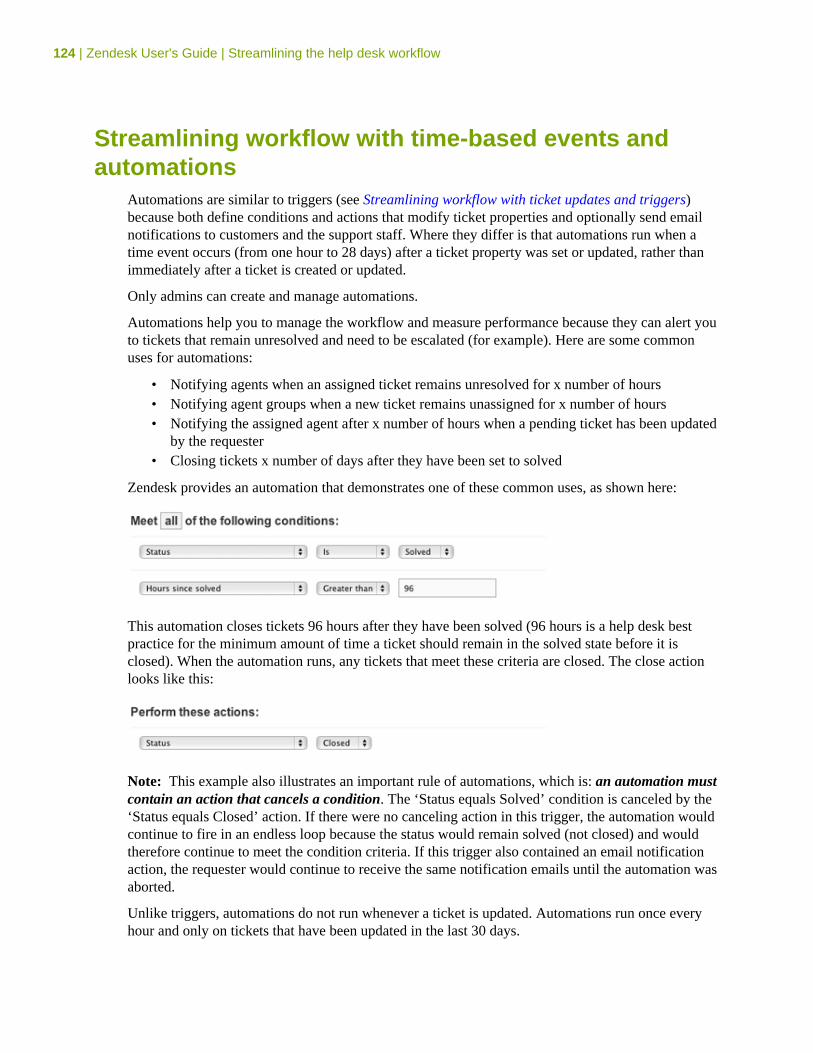
124 | Zendesk User's Guide | Streamlining the help desk workflow
Streamlining workflow with time-based events andautomations
Automations are similar to triggers (see Streamlining workflow with ticket updates and triggers)because both define conditions and actions that modify ticket properties and optionally send emailnotifications to customers and the support staff. Where they differ is that automations run when atime event occurs (from one hour to 28 days) after a ticket property was set or updated, rather thanimmediately after a ticket is created or updated.
Only admins can create and manage automations.
Automations help you to manage the workflow and measure performance because they can alert youto tickets that remain unresolved and need to be escalated (for example). Here are some commonuses for automations:
• Notifying agents when an assigned ticket remains unresolved for x number of hours• Notifying agent groups when a new ticket remains unassigned for x number of hours• Notifying the assigned agent after x number of hours when a pending ticket has been updated
by the requester• Closing tickets x number of days after they have been set to solved
Zendesk provides an automation that demonstrates one of these common uses, as shown here:
This automation closes tickets 96 hours after they have been solved (96 hours is a help desk bestpractice for the minimum amount of time a ticket should remain in the solved state before it isclosed). When the automation runs, any tickets that meet these criteria are closed. The close actionlooks like this:
Note: This example also illustrates an important rule of automations, which is: an automation mustcontain an action that cancels a condition. The ‘Status equals Solved’ condition is canceled by the‘Status equals Closed’ action. If there were no canceling action in this trigger, the automation wouldcontinue to fire in an endless loop because the status would remain solved (not closed) and wouldtherefore continue to meet the condition criteria. If this trigger also contained an email notificationaction, the requester would continue to receive the same notification emails until the automation wasaborted.
Unlike triggers, automations do not run whenever a ticket is updated. Automations run once everyhour and only on tickets that have been updated in the last 30 days.

Zendesk User's Guide | Streamlining the help desk workflow | 125
Note: All automations are run at the top of the hour in batches for all Zendesk customers. Whenexactly your automations run depends on how many automations and tickets there are to process.For example, if a ticket was updated at 10am and your automation is set to run an hour later, it mightbe slightly longer than that (11:04 or 11:10, etc.). Automations don't run exactly x number of hoursafter the conditions are met.
The order of your automations is important as well because all automations run (first to last) everyhour. When you create an automation, it is by default added to the end of the list of automations.You can reorder the list of automations but you should only do so if you understand how the otherautomations work and what actions they contain, because an action in an automation can change theresult of an action in another automation or cause a trigger to be fired. For more information, seeReordering your automations.
Creating automationsAdmins can create automations from scratch, as shown here, or create copies of existing automationsand then modify and use them for some other purpose (see Editing and cloning automations).
To add an automation
1. Select Manage > Automations.2. Select Add Automation.3. Enter a title for your automation.4. Add the conditions and actions for your automation (described below).5. You can test your automation by previewing the tickets that match the conditions that you
have specified by selecting Preview match for the conditions.6. Save your new trigger by clicking Add Automation.
Building automation condition statementsAs with triggers, the condition statements you create for automations contain conditions, operators,and values. These include conditions you’d expect such as priority, status, assignee and so on.Because automations are based on the hours that have elapsed since a ticket update was made,Zendesk provides the following time-based conditions:
• Hours since created• Hours since opened• Hours since pending• Hours since solved• Hours since closed• Hours since assigned• Hours since update• Hours since requester update• Hours since assignee update• Hours since due date (for tickets with the type set to Task)
Only whole numbers can be used as the value for these conditions. For example, Hours since created= (calendar) is = 1, is valid. Decimals aren't supported. If you set the hours since variable to 1.5, itwill be interpreted as 1, which means that it was rounded down to the whole number.
The other conditions you can use in your automations are described in the following table.
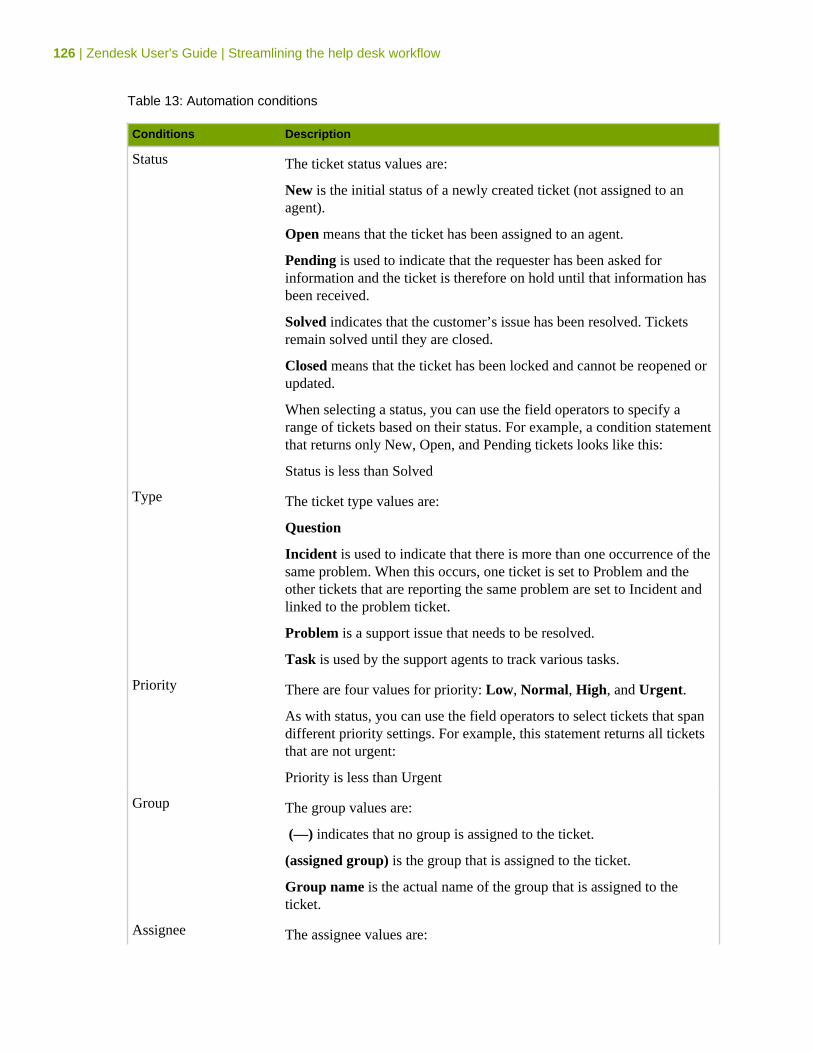
126 | Zendesk User's Guide | Streamlining the help desk workflow
Table 13: Automation conditions
Conditions Description
Status The ticket status values are:
New is the initial status of a newly created ticket (not assigned to anagent).
Open means that the ticket has been assigned to an agent.
Pending is used to indicate that the requester has been asked forinformation and the ticket is therefore on hold until that information hasbeen received.
Solved indicates that the customer’s issue has been resolved. Ticketsremain solved until they are closed.
Closed means that the ticket has been locked and cannot be reopened orupdated.
When selecting a status, you can use the field operators to specify arange of tickets based on their status. For example, a condition statementthat returns only New, Open, and Pending tickets looks like this:
Status is less than Solved
Type The ticket type values are:
Question
Incident is used to indicate that there is more than one occurrence of thesame problem. When this occurs, one ticket is set to Problem and theother tickets that are reporting the same problem are set to Incident andlinked to the problem ticket.
Problem is a support issue that needs to be resolved.
Task is used by the support agents to track various tasks.
Priority There are four values for priority: Low, Normal, High, and Urgent.
As with status, you can use the field operators to select tickets that spandifferent priority settings. For example, this statement returns all ticketsthat are not urgent:
Priority is less than Urgent
Group The group values are:
(—) indicates that no group is assigned to the ticket.
(assigned group) is the group that is assigned to the ticket.
Group name is the actual name of the group that is assigned to theticket.
Assignee The assignee values are:
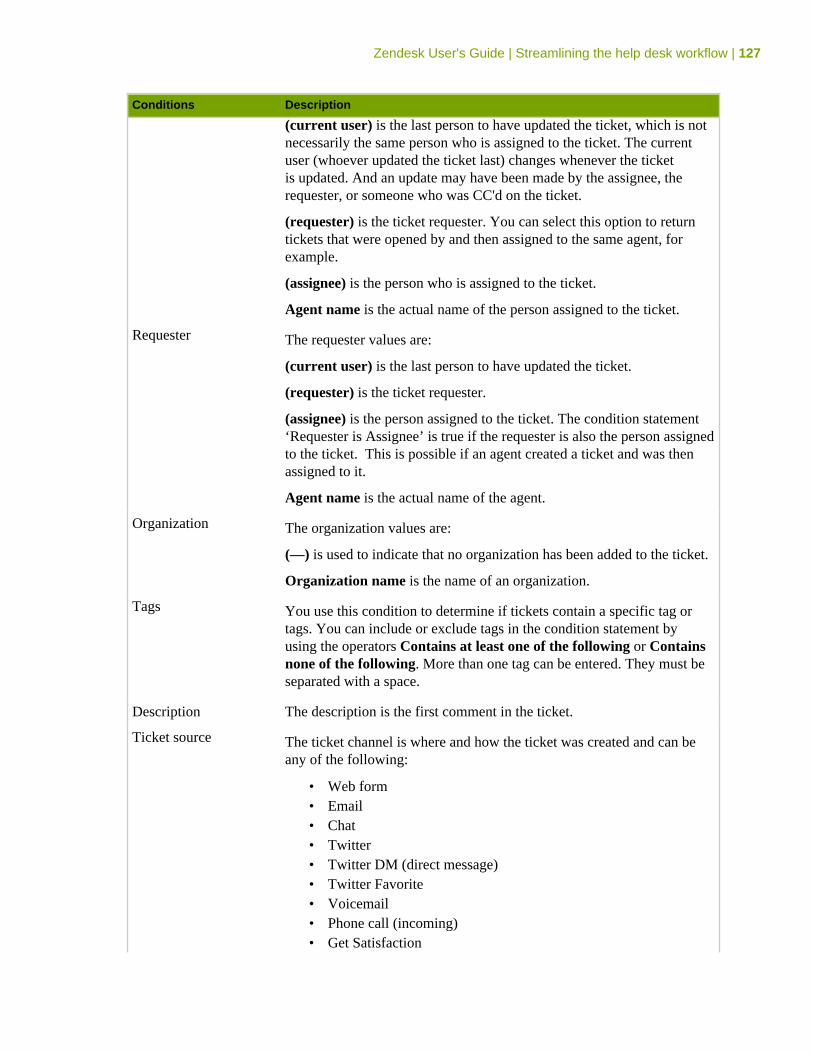
Zendesk User's Guide | Streamlining the help desk workflow | 127
Conditions Description
(current user) is the last person to have updated the ticket, which is notnecessarily the same person who is assigned to the ticket. The currentuser (whoever updated the ticket last) changes whenever the ticketis updated. And an update may have been made by the assignee, therequester, or someone who was CC'd on the ticket.
(requester) is the ticket requester. You can select this option to returntickets that were opened by and then assigned to the same agent, forexample.
(assignee) is the person who is assigned to the ticket.
Agent name is the actual name of the person assigned to the ticket.
Requester The requester values are:
(current user) is the last person to have updated the ticket.
(requester) is the ticket requester.
(assignee) is the person assigned to the ticket. The condition statement‘Requester is Assignee’ is true if the requester is also the person assignedto the ticket. This is possible if an agent created a ticket and was thenassigned to it.
Agent name is the actual name of the agent.
Organization The organization values are:
(—) is used to indicate that no organization has been added to the ticket.
Organization name is the name of an organization.
Tags You use this condition to determine if tickets contain a specific tag ortags. You can include or exclude tags in the condition statement byusing the operators Contains at least one of the following or Containsnone of the following. More than one tag can be entered. They must beseparated with a space.
Description The description is the first comment in the ticket.
Ticket source The ticket channel is where and how the ticket was created and can beany of the following:
• Web form• Email• Chat• Twitter• Twitter DM (direct message)• Twitter Favorite• Voicemail• Phone call (incoming)• Get Satisfaction
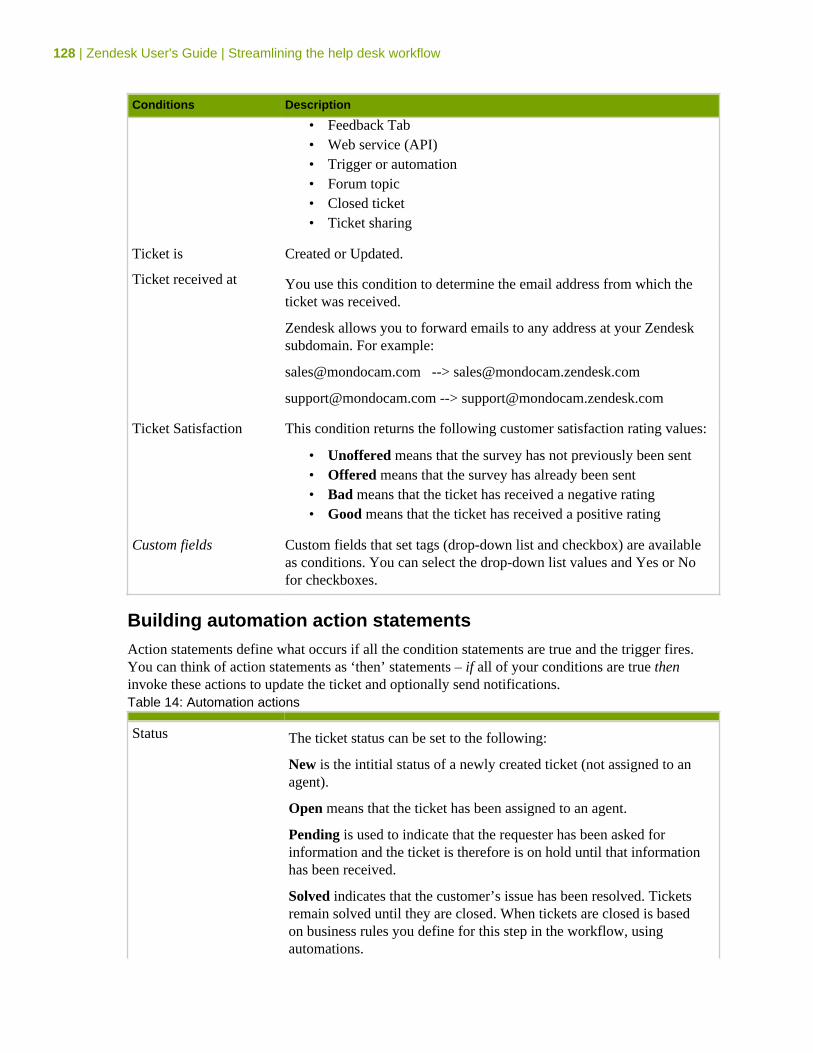
128 | Zendesk User's Guide | Streamlining the help desk workflow
Conditions Description
• Feedback Tab• Web service (API)• Trigger or automation• Forum topic• Closed ticket• Ticket sharing
Ticket is Created or Updated.
Ticket received at You use this condition to determine the email address from which theticket was received.
Zendesk allows you to forward emails to any address at your Zendesksubdomain. For example:
[email protected] --> [email protected]
[email protected] --> [email protected]
Ticket Satisfaction This condition returns the following customer satisfaction rating values:
• Unoffered means that the survey has not previously been sent• Offered means that the survey has already been sent• Bad means that the ticket has received a negative rating• Good means that the ticket has received a positive rating
Custom fields Custom fields that set tags (drop-down list and checkbox) are availableas conditions. You can select the drop-down list values and Yes or Nofor checkboxes.
Building automation action statementsAction statements define what occurs if all the condition statements are true and the trigger fires.You can think of action statements as ‘then’ statements – if all of your conditions are true theninvoke these actions to update the ticket and optionally send notifications.Table 14: Automation actions
Status The ticket status can be set to the following:
New is the intitial status of a newly created ticket (not assigned to anagent).
Open means that the ticket has been assigned to an agent.
Pending is used to indicate that the requester has been asked forinformation and the ticket is therefore is on hold until that informationhas been received.
Solved indicates that the customer’s issue has been resolved. Ticketsremain solved until they are closed. When tickets are closed is basedon business rules you define for this step in the workflow, usingautomations.
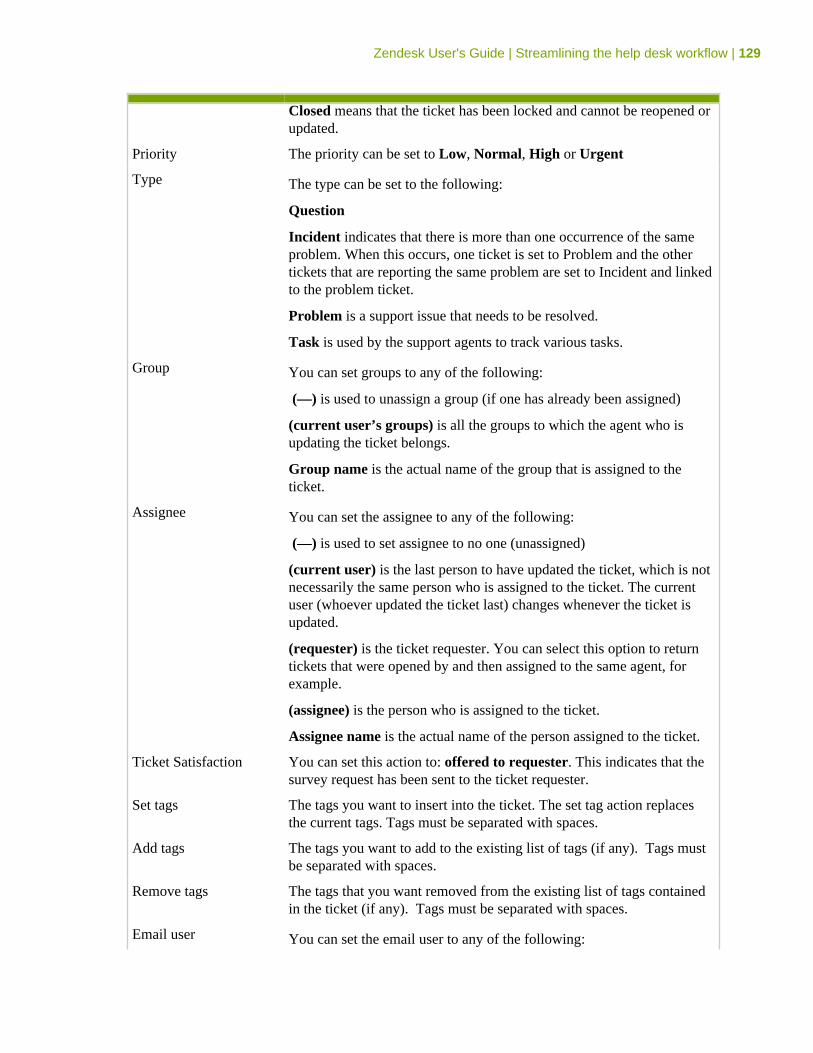
Zendesk User's Guide | Streamlining the help desk workflow | 129
Closed means that the ticket has been locked and cannot be reopened orupdated.
Priority The priority can be set to Low, Normal, High or Urgent
Type The type can be set to the following:
Question
Incident indicates that there is more than one occurrence of the sameproblem. When this occurs, one ticket is set to Problem and the othertickets that are reporting the same problem are set to Incident and linkedto the problem ticket.
Problem is a support issue that needs to be resolved.
Task is used by the support agents to track various tasks.
Group You can set groups to any of the following:
(—) is used to unassign a group (if one has already been assigned)
(current user’s groups) is all the groups to which the agent who isupdating the ticket belongs.
Group name is the actual name of the group that is assigned to theticket.
Assignee You can set the assignee to any of the following:
(—) is used to set assignee to no one (unassigned)
(current user) is the last person to have updated the ticket, which is notnecessarily the same person who is assigned to the ticket. The currentuser (whoever updated the ticket last) changes whenever the ticket isupdated.
(requester) is the ticket requester. You can select this option to returntickets that were opened by and then assigned to the same agent, forexample.
(assignee) is the person who is assigned to the ticket.
Assignee name is the actual name of the person assigned to the ticket.
Ticket Satisfaction You can set this action to: offered to requester. This indicates that thesurvey request has been sent to the ticket requester.
Set tags The tags you want to insert into the ticket. The set tag action replacesthe current tags. Tags must be separated with spaces.
Add tags The tags you want to add to the existing list of tags (if any). Tags mustbe separated with spaces.
Remove tags The tags that you want removed from the existing list of tags containedin the ticket (if any). Tags must be separated with spaces.
Email user You can set the email user to any of the following:
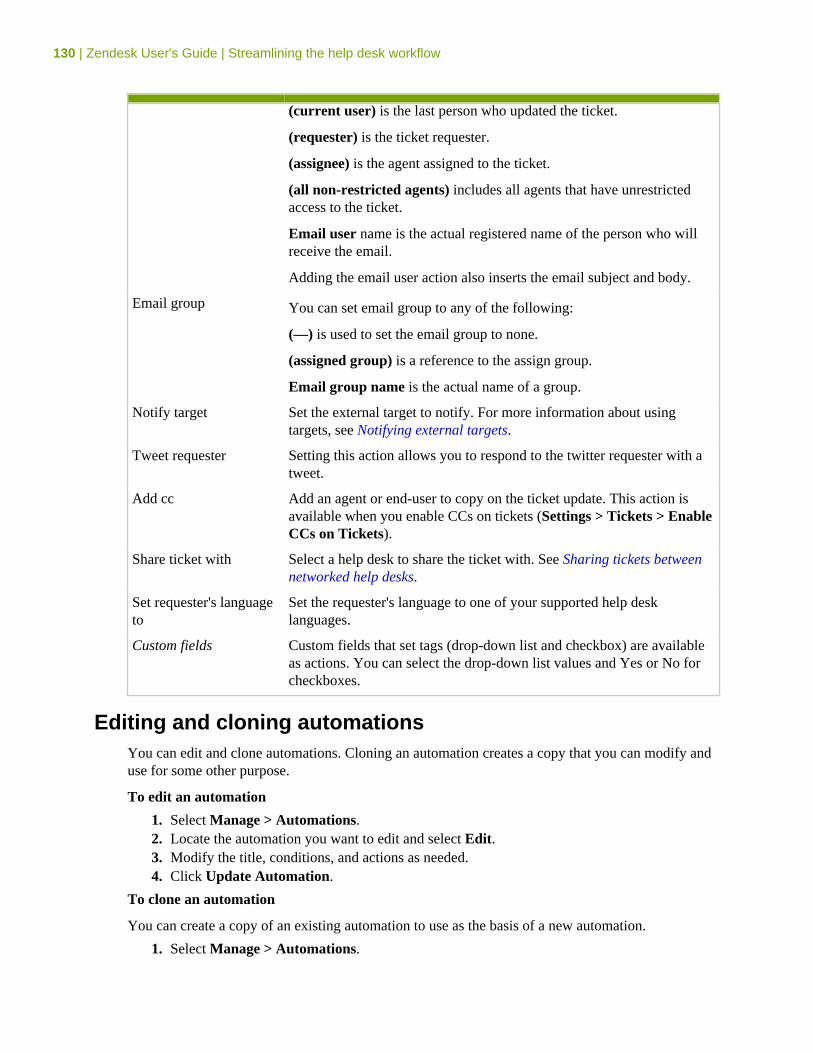
130 | Zendesk User's Guide | Streamlining the help desk workflow
(current user) is the last person who updated the ticket.
(requester) is the ticket requester.
(assignee) is the agent assigned to the ticket.
(all non-restricted agents) includes all agents that have unrestrictedaccess to the ticket.
Email user name is the actual registered name of the person who willreceive the email.
Adding the email user action also inserts the email subject and body.
Email group You can set email group to any of the following:
(—) is used to set the email group to none.
(assigned group) is a reference to the assign group.
Email group name is the actual name of a group.
Notify target Set the external target to notify. For more information about usingtargets, see Notifying external targets.
Tweet requester Setting this action allows you to respond to the twitter requester with atweet.
Add cc Add an agent or end-user to copy on the ticket update. This action isavailable when you enable CCs on tickets (Settings > Tickets > EnableCCs on Tickets).
Share ticket with Select a help desk to share the ticket with. See Sharing tickets betweennetworked help desks.
Set requester's languageto
Set the requester's language to one of your supported help desklanguages.
Custom fields Custom fields that set tags (drop-down list and checkbox) are availableas actions. You can select the drop-down list values and Yes or No forcheckboxes.
Editing and cloning automationsYou can edit and clone automations. Cloning an automation creates a copy that you can modify anduse for some other purpose.
To edit an automation
1. Select Manage > Automations.2. Locate the automation you want to edit and select Edit.3. Modify the title, conditions, and actions as needed.4. Click Update Automation.
To clone an automation
You can create a copy of an existing automation to use as the basis of a new automation.
1. Select Manage > Automations.
Zendesk User's Guide | Streamlining the help desk workflow | 131
2. Locate the automation you want to clone and select Clone. This command appears when youmove your mouse over the automation in the list of automation.
3. Enter a new name for your automation and modify the conditions and actions as needed.4. Click Add Automation.
Reordering your automationsYou can reorder your automations, but keep in mind that the order of your automations is importantbecause all automations run (first to last) every hour. Actions in one automation may affect theactions in another.
To reorder the list of automations
1. Select Manage > Automations.2. Click Reorder. You’ll find this at the end of the list of active automations.3. Click and drag automations to new locations as needed.4. Click Done.
Deleting and deactivating automationsIf you decide that you no longer need an automation you can either delete it or deactivate it. Deletingit of course means that it’s gone and can’t be retrieved. You can instead deactivate automations.Deactivated automations are listed in a separate table on Manage > Automations and can bereactivated if needed.
To delete an automation
1. Select Manage > Automations.2. Locate the automation you want to delete and select Edit.3. Click Delete.
To deactivate/activate an automation
1. Select Manage > Automations.2. Locate the automation you want to deactivate and select Deactivate. This command appears
when you move your mouse over the automation in the list of automations. The automation isdeactivated and displayed in the list of inactive automations.
3. To reactivate the automation, select it from the list of inactive automations and selectActivate.
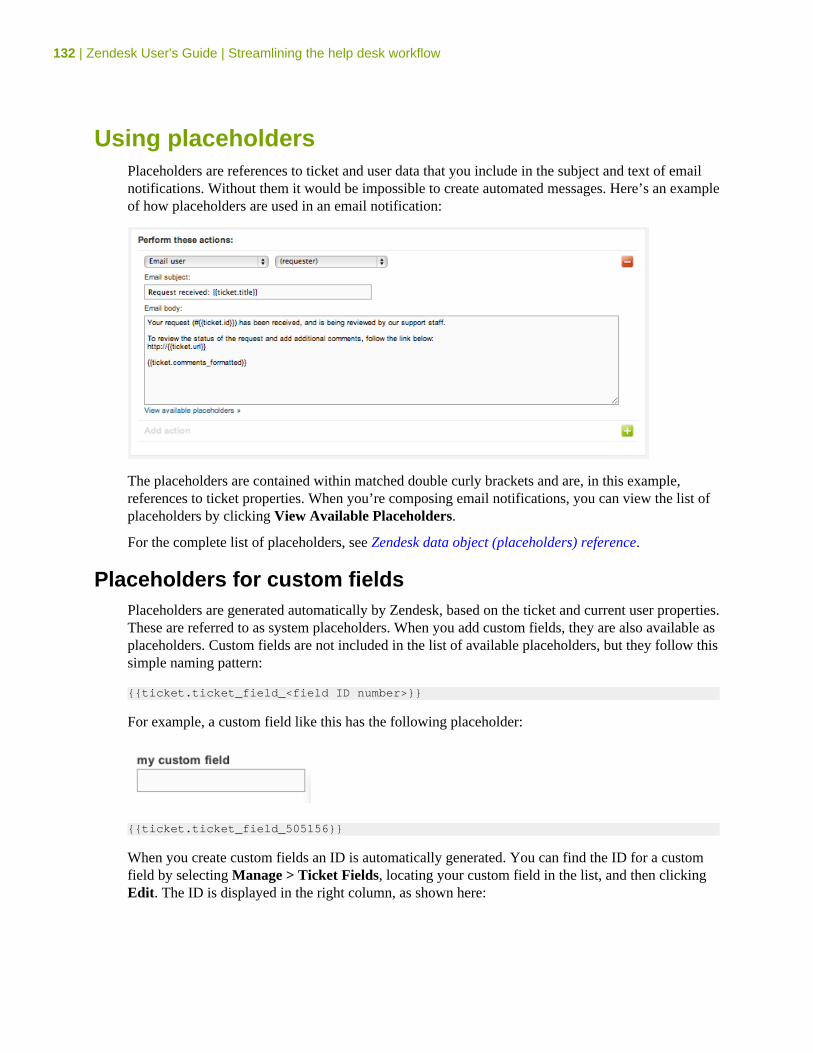
132 | Zendesk User's Guide | Streamlining the help desk workflow
Using placeholdersPlaceholders are references to ticket and user data that you include in the subject and text of emailnotifications. Without them it would be impossible to create automated messages. Here’s an exampleof how placeholders are used in an email notification:
The placeholders are contained within matched double curly brackets and are, in this example,references to ticket properties. When you’re composing email notifications, you can view the list ofplaceholders by clicking View Available Placeholders.
For the complete list of placeholders, see Zendesk data object (placeholders) reference.
Placeholders for custom fieldsPlaceholders are generated automatically by Zendesk, based on the ticket and current user properties.These are referred to as system placeholders. When you add custom fields, they are also available asplaceholders. Custom fields are not included in the list of available placeholders, but they follow thissimple naming pattern:
{{ticket.ticket_field_<field ID number>}}
For example, a custom field like this has the following placeholder:
{{ticket.ticket_field_505156}}
When you create custom fields an ID is automatically generated. You can find the ID for a customfield by selecting Manage > Ticket Fields, locating your custom field in the list, and then clickingEdit. The ID is displayed in the right column, as shown here:
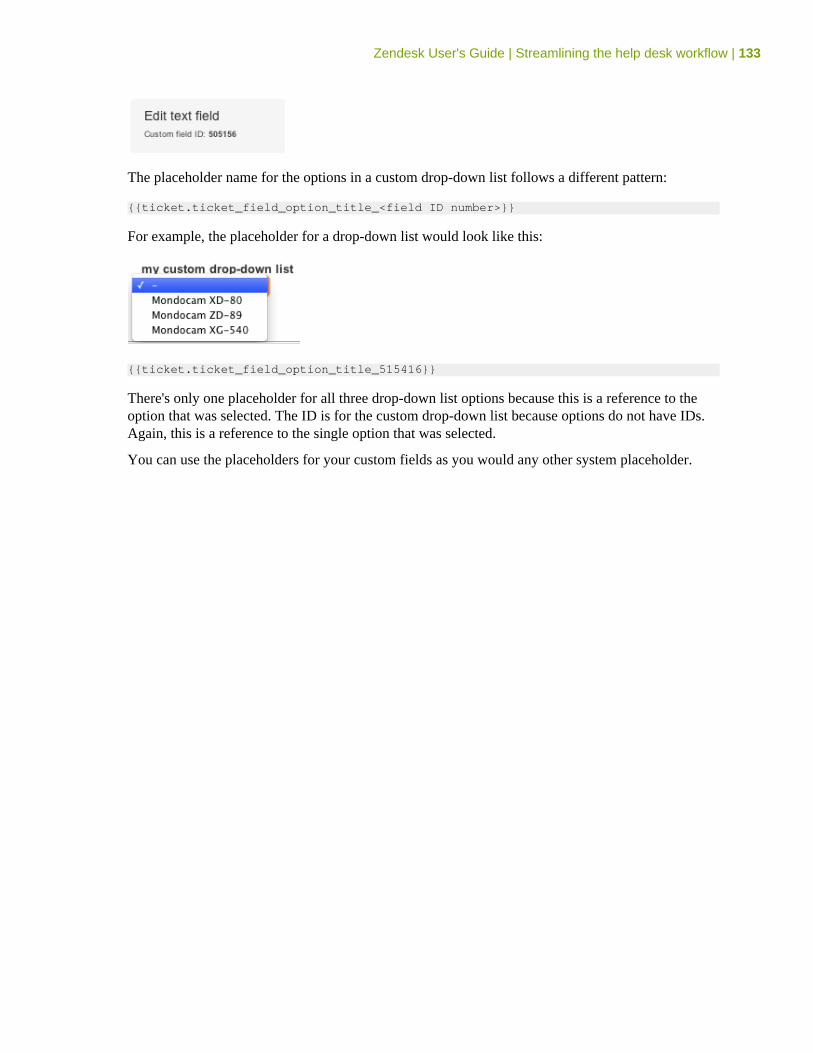
Zendesk User's Guide | Streamlining the help desk workflow | 133
The placeholder name for the options in a custom drop-down list follows a different pattern:
{{ticket.ticket_field_option_title_<field ID number>}}
For example, the placeholder for a drop-down list would look like this:
{{ticket.ticket_field_option_title_515416}}
There's only one placeholder for all three drop-down list options because this is a reference to theoption that was selected. The ID is for the custom drop-down list because options do not have IDs.Again, this is a reference to the single option that was selected.
You can use the placeholders for your custom fields as you would any other system placeholder.
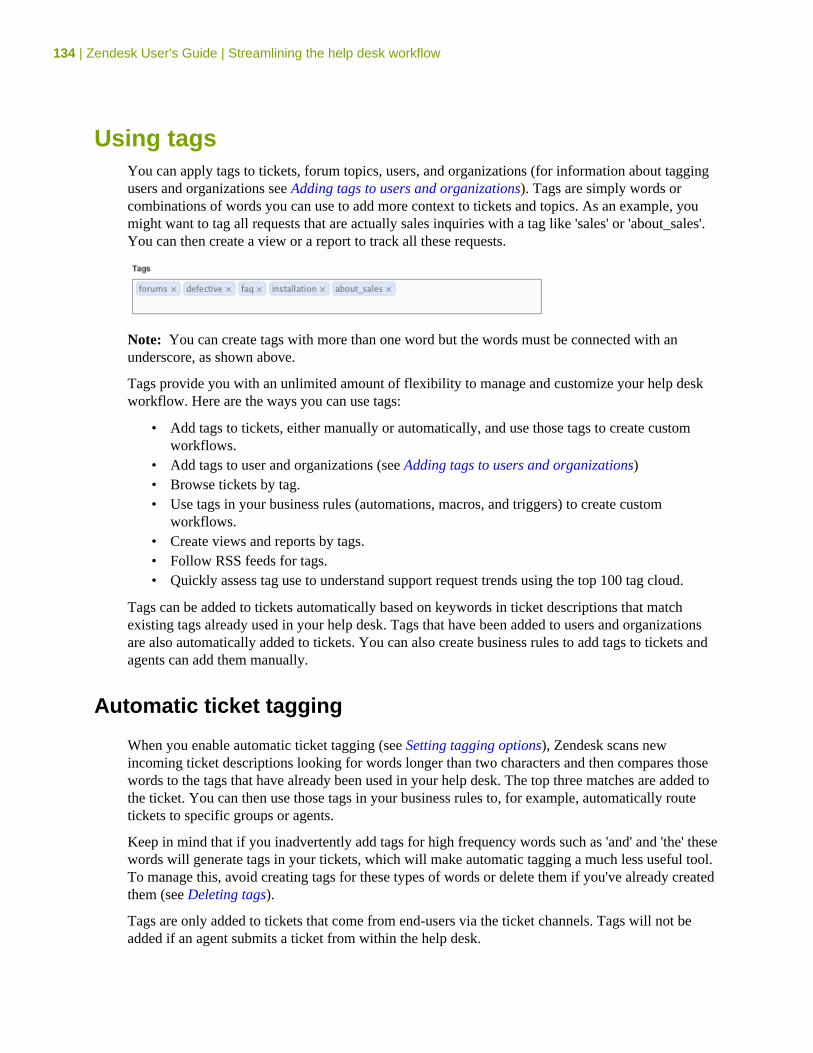
134 | Zendesk User's Guide | Streamlining the help desk workflow
Using tagsYou can apply tags to tickets, forum topics, users, and organizations (for information about taggingusers and organizations see Adding tags to users and organizations). Tags are simply words orcombinations of words you can use to add more context to tickets and topics. As an example, youmight want to tag all requests that are actually sales inquiries with a tag like 'sales' or 'about_sales'.You can then create a view or a report to track all these requests.
Note: You can create tags with more than one word but the words must be connected with anunderscore, as shown above.
Tags provide you with an unlimited amount of flexibility to manage and customize your help deskworkflow. Here are the ways you can use tags:
• Add tags to tickets, either manually or automatically, and use those tags to create customworkflows.
• Add tags to user and organizations (see Adding tags to users and organizations)• Browse tickets by tag.• Use tags in your business rules (automations, macros, and triggers) to create custom
workflows.• Create views and reports by tags.• Follow RSS feeds for tags.• Quickly assess tag use to understand support request trends using the top 100 tag cloud.
Tags can be added to tickets automatically based on keywords in ticket descriptions that matchexisting tags already used in your help desk. Tags that have been added to users and organizationsare also automatically added to tickets. You can also create business rules to add tags to tickets andagents can add them manually.
Automatic ticket tagging
When you enable automatic ticket tagging (see Setting tagging options), Zendesk scans newincoming ticket descriptions looking for words longer than two characters and then compares thosewords to the tags that have already been used in your help desk. The top three matches are added tothe ticket. You can then use those tags in your business rules to, for example, automatically routetickets to specific groups or agents.
Keep in mind that if you inadvertently add tags for high frequency words such as 'and' and 'the' thesewords will generate tags in your tickets, which will make automatic tagging a much less useful tool.To manage this, avoid creating tags for these types of words or delete them if you've already createdthem (see Deleting tags).
Tags are only added to tickets that come from end-users via the ticket channels. Tags will not beadded if an agent submits a ticket from within the help desk.
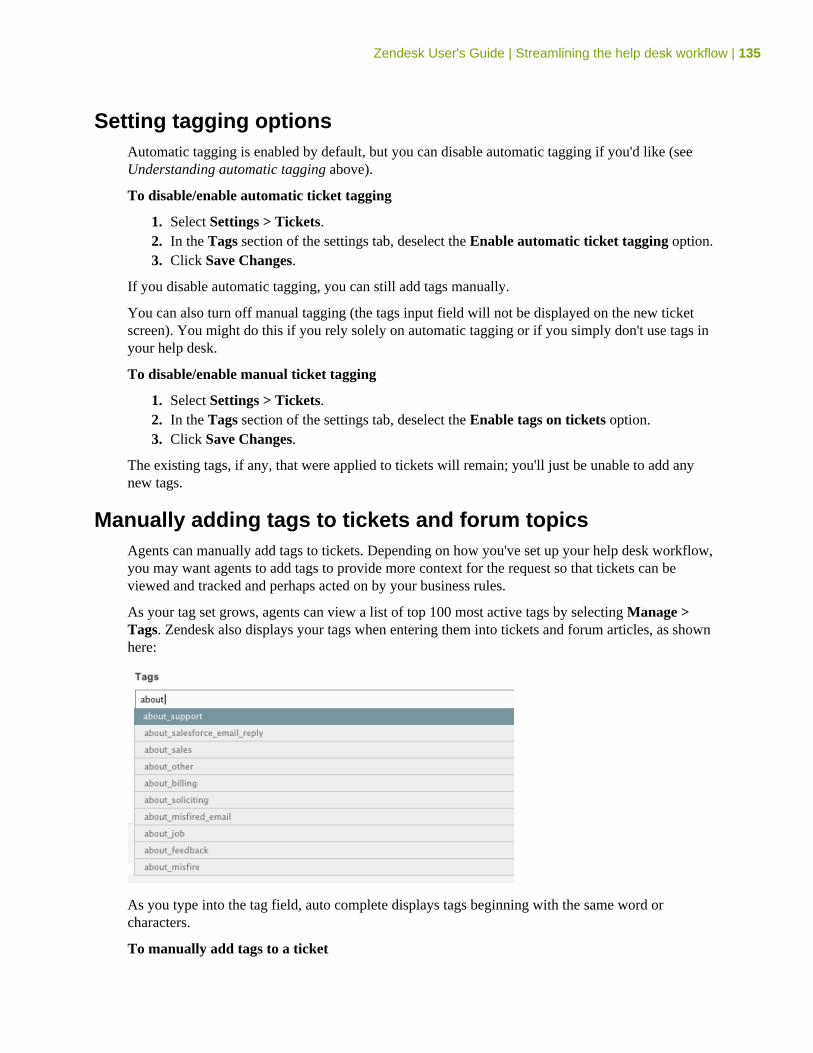
Zendesk User's Guide | Streamlining the help desk workflow | 135
Setting tagging optionsAutomatic tagging is enabled by default, but you can disable automatic tagging if you'd like (seeUnderstanding automatic tagging above).
To disable/enable automatic ticket tagging
1. Select Settings > Tickets.2. In the Tags section of the settings tab, deselect the Enable automatic ticket tagging option.3. Click Save Changes.
If you disable automatic tagging, you can still add tags manually.
You can also turn off manual tagging (the tags input field will not be displayed on the new ticketscreen). You might do this if you rely solely on automatic tagging or if you simply don't use tags inyour help desk.
To disable/enable manual ticket tagging
1. Select Settings > Tickets.2. In the Tags section of the settings tab, deselect the Enable tags on tickets option.3. Click Save Changes.
The existing tags, if any, that were applied to tickets will remain; you'll just be unable to add anynew tags.
Manually adding tags to tickets and forum topicsAgents can manually add tags to tickets. Depending on how you've set up your help desk workflow,you may want agents to add tags to provide more context for the request so that tickets can beviewed and tracked and perhaps acted on by your business rules.
As your tag set grows, agents can view a list of top 100 most active tags by selecting Manage >Tags. Zendesk also displays your tags when entering them into tickets and forum articles, as shownhere:
As you type into the tag field, auto complete displays tags beginning with the same word orcharacters.
To manually add tags to a ticket
136 | Zendesk User's Guide | Streamlining the help desk workflow
1. Create or edit a ticket.2. Enter new tags into the tag field as needed. Enter a space after each tag.3. Click Add Ticket or Update Ticket (if editing a ticket).
It's the same procedure for adding tags to forum topics; enter them and then add or update the topic.
Deleting tagsYou can edit tickets and forum articles to manually delete tags. If you want to remove tags that havebeen applied to many tickets and topics, you can do this in a batch operation.
To delete a tag from all tickets and forum topics
1. Select Manage > Tags to view the top 100 tag cloud.2. Click on the tag that you want to delete.3. On the tag activity detail screen, click Remove tag [tag name] from all topics and open
tickets.4. Click OK to confirm that you want to proceed.
Tags cannot be deleted from closed tickets, which also means that a tag you deleted may still appearin the tag cloud until the closed tickets that contain the tag are retired out of the list. Also, deletingtags does not remove references to them in automations, macros, and triggers.
Note: The tag cloud displays the 100 most used tags during the past two months. This means thatyour less actively used tags will not be displayed in the top 100 tag cloud. If you want to delete thesetags, you can search for the tags (see Searching for tickets by tag) and delete them manually from thetickets and topics that you have access to.
Analyzing tag activityZendesk provides you with a view into the tags that have been applied to your tickets. You can viewa top 100 tag cloud of the most active tags over the last two months. This list is updated once a day.
To view the top 100 tag cloud
• Select Manage > Tags.
You can click a tag in the cloud to display the list of tickets that it has been added to. You can alsoview all the forum topics that the tag has been used in.
Creating views based on tags and tag setsYou can add tags as conditions in views, which enables you to quickly view all tickets that containspecific tags.
To create views by tags
1. Select Manage > Views.2. Select the tags condition.3. Choose the condition operator Contains at least one of the following.4. Enter one or more tags (separated with a space).5. Add any other conditions that you'd like (for example, adding a condition for open tickets).6. Set the view formatting options as needed.7. Click Add View.
Your new view is listed in the Views menu in Zendesk.
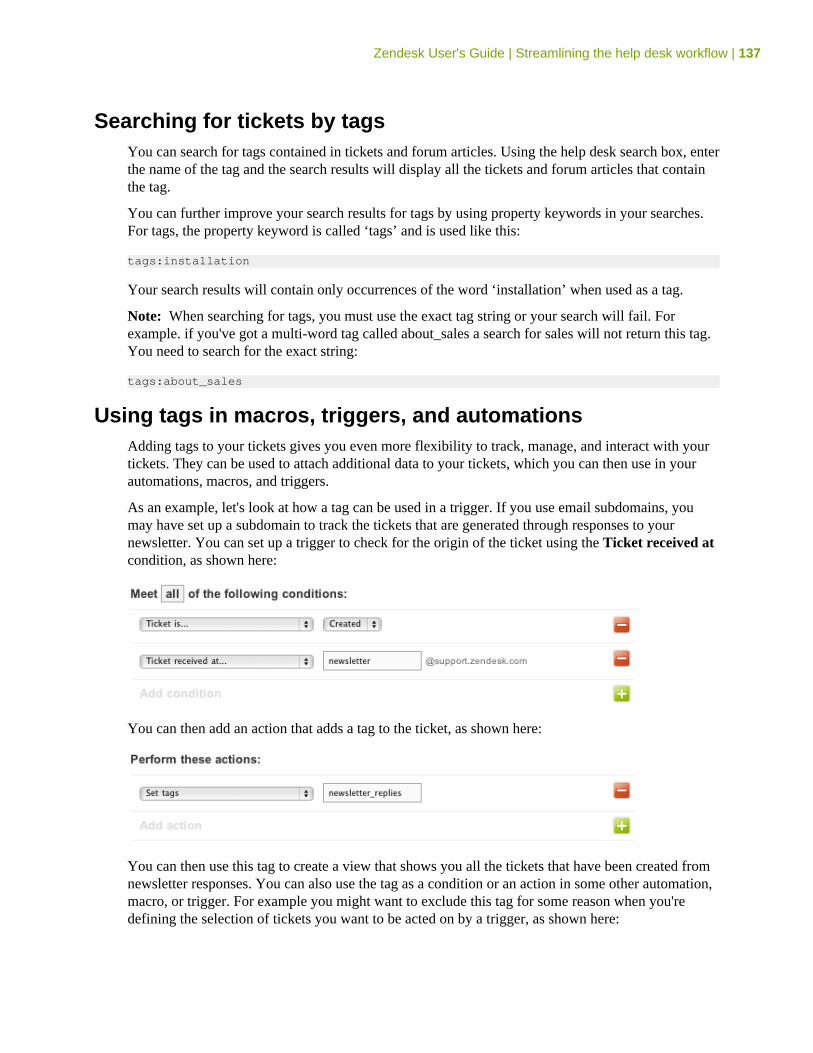
Zendesk User's Guide | Streamlining the help desk workflow | 137
Searching for tickets by tagsYou can search for tags contained in tickets and forum articles. Using the help desk search box, enterthe name of the tag and the search results will display all the tickets and forum articles that containthe tag.
You can further improve your search results for tags by using property keywords in your searches.For tags, the property keyword is called ‘tags’ and is used like this:
tags:installation
Your search results will contain only occurrences of the word ‘installation’ when used as a tag.
Note: When searching for tags, you must use the exact tag string or your search will fail. Forexample. if you've got a multi-word tag called about_sales a search for sales will not return this tag.You need to search for the exact string:
tags:about_sales
Using tags in macros, triggers, and automationsAdding tags to your tickets gives you even more flexibility to track, manage, and interact with yourtickets. They can be used to attach additional data to your tickets, which you can then use in yourautomations, macros, and triggers.
As an example, let's look at how a tag can be used in a trigger. If you use email subdomains, youmay have set up a subdomain to track the tickets that are generated through responses to yournewsletter. You can set up a trigger to check for the origin of the ticket using the Ticket received atcondition, as shown here:
You can then add an action that adds a tag to the ticket, as shown here:
You can then use this tag to create a view that shows you all the tickets that have been created fromnewsletter responses. You can also use the tag as a condition or an action in some other automation,macro, or trigger. For example you might want to exclude this tag for some reason when you'redefining the selection of tickets you want to be acted on by a trigger, as shown here:
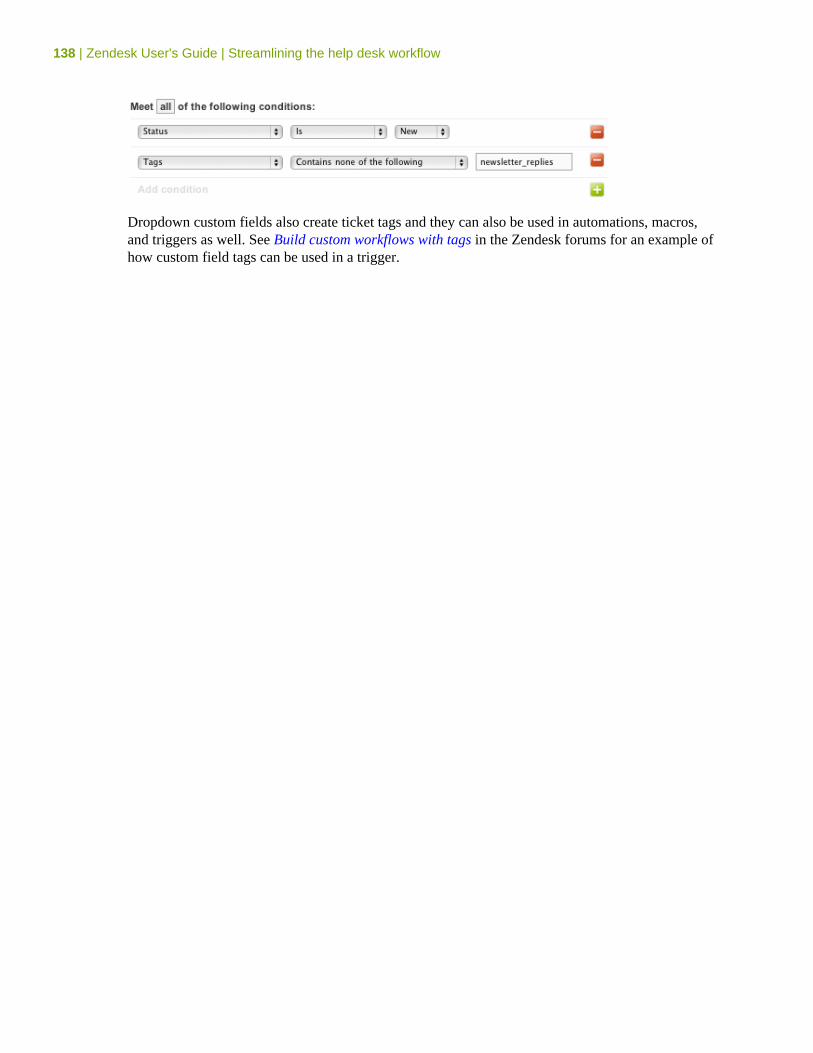
138 | Zendesk User's Guide | Streamlining the help desk workflow
Dropdown custom fields also create ticket tags and they can also be used in automations, macros,and triggers as well. See Build custom workflows with tags in the Zendesk forums for an example ofhow custom field tags can be used in a trigger.
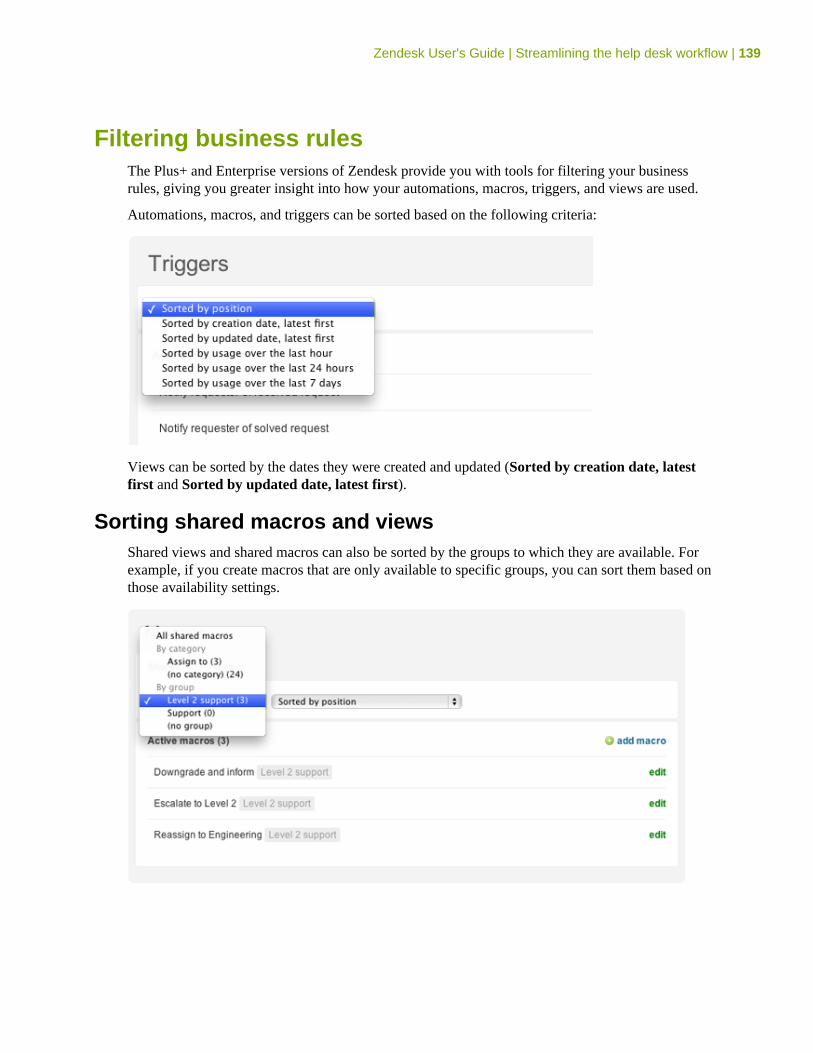
Zendesk User's Guide | Streamlining the help desk workflow | 139
Filtering business rulesThe Plus+ and Enterprise versions of Zendesk provide you with tools for filtering your businessrules, giving you greater insight into how your automations, macros, triggers, and views are used.
Automations, macros, and triggers can be sorted based on the following criteria:
Views can be sorted by the dates they were created and updated (Sorted by creation date, latestfirst and Sorted by updated date, latest first).
Sorting shared macros and viewsShared views and shared macros can also be sorted by the groups to which they are available. Forexample, if you create macros that are only available to specific groups, you can sort them based onthose availability settings.
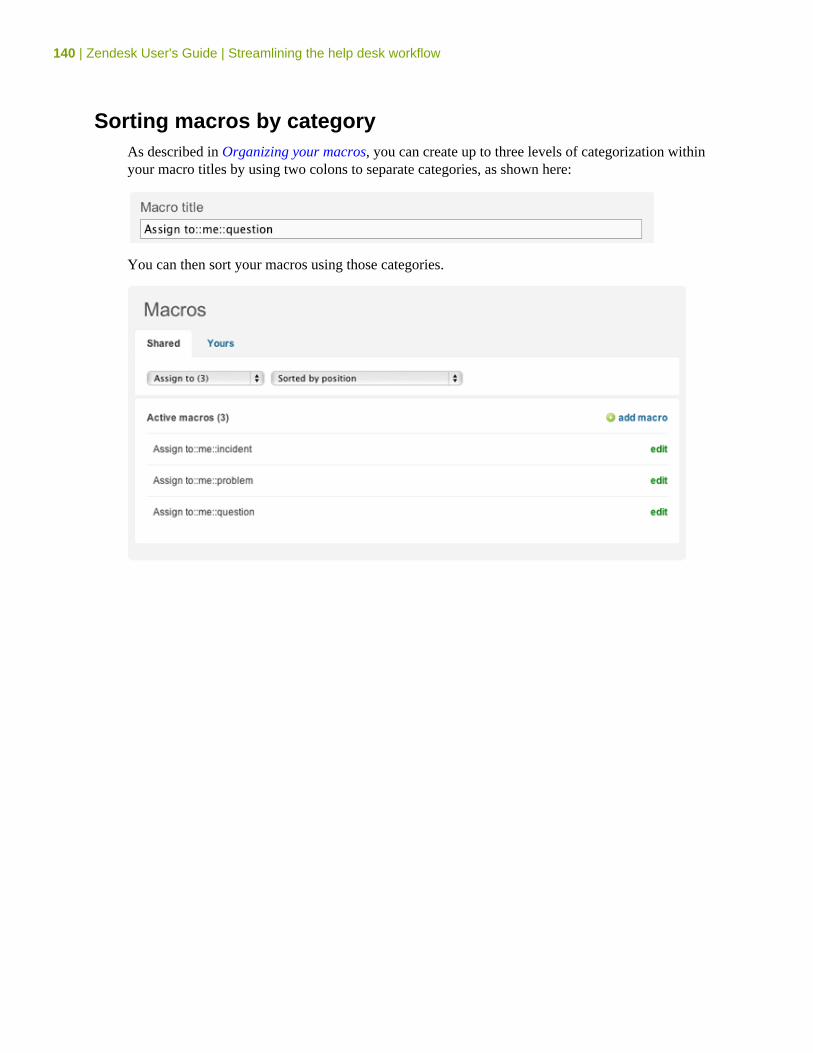
140 | Zendesk User's Guide | Streamlining the help desk workflow
Sorting macros by categoryAs described in Organizing your macros, you can create up to three levels of categorization withinyour macro titles by using two colons to separate categories, as shown here:
You can then sort your macros using those categories.
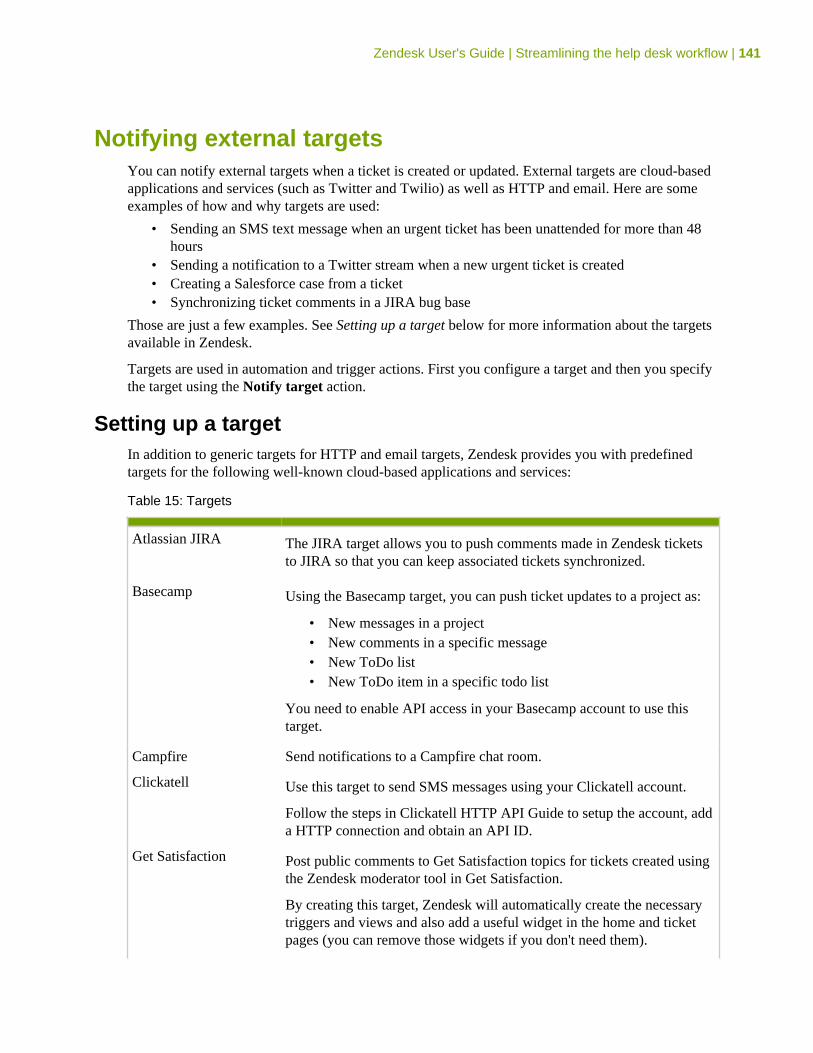
Zendesk User's Guide | Streamlining the help desk workflow | 141
Notifying external targetsYou can notify external targets when a ticket is created or updated. External targets are cloud-basedapplications and services (such as Twitter and Twilio) as well as HTTP and email. Here are someexamples of how and why targets are used:
• Sending an SMS text message when an urgent ticket has been unattended for more than 48hours
• Sending a notification to a Twitter stream when a new urgent ticket is created• Creating a Salesforce case from a ticket• Synchronizing ticket comments in a JIRA bug base
Those are just a few examples. See Setting up a target below for more information about the targetsavailable in Zendesk.
Targets are used in automation and trigger actions. First you configure a target and then you specifythe target using the Notify target action.
Setting up a targetIn addition to generic targets for HTTP and email targets, Zendesk provides you with predefinedtargets for the following well-known cloud-based applications and services:
Table 15: Targets
Atlassian JIRA The JIRA target allows you to push comments made in Zendesk ticketsto JIRA so that you can keep associated tickets synchronized.
Basecamp Using the Basecamp target, you can push ticket updates to a project as:
• New messages in a project• New comments in a specific message• New ToDo list• New ToDo item in a specific todo list
You need to enable API access in your Basecamp account to use thistarget.
Campfire Send notifications to a Campfire chat room.
Clickatell Use this target to send SMS messages using your Clickatell account.
Follow the steps in Clickatell HTTP API Guide to setup the account, adda HTTP connection and obtain an API ID.
Get Satisfaction Post public comments to Get Satisfaction topics for tickets created usingthe Zendesk moderator tool in Get Satisfaction.
By creating this target, Zendesk will automatically create the necessarytriggers and views and also add a useful widget in the home and ticketpages (you can remove those widgets if you don't need them).
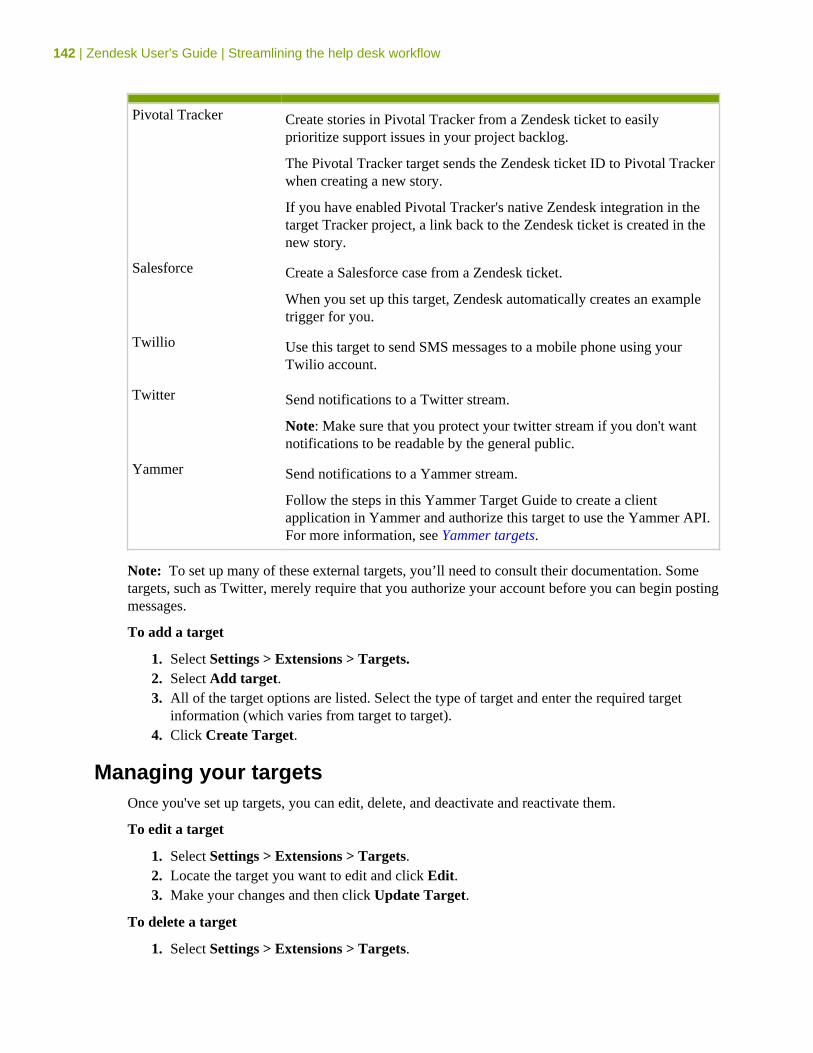
142 | Zendesk User's Guide | Streamlining the help desk workflow
Pivotal Tracker Create stories in Pivotal Tracker from a Zendesk ticket to easilyprioritize support issues in your project backlog.
The Pivotal Tracker target sends the Zendesk ticket ID to Pivotal Trackerwhen creating a new story.
If you have enabled Pivotal Tracker's native Zendesk integration in thetarget Tracker project, a link back to the Zendesk ticket is created in thenew story.
Salesforce Create a Salesforce case from a Zendesk ticket.
When you set up this target, Zendesk automatically creates an exampletrigger for you.
Twillio Use this target to send SMS messages to a mobile phone using yourTwilio account.
Twitter Send notifications to a Twitter stream.
Note: Make sure that you protect your twitter stream if you don't wantnotifications to be readable by the general public.
Yammer Send notifications to a Yammer stream.
Follow the steps in this Yammer Target Guide to create a clientapplication in Yammer and authorize this target to use the Yammer API.For more information, see Yammer targets.
Note: To set up many of these external targets, you’ll need to consult their documentation. Sometargets, such as Twitter, merely require that you authorize your account before you can begin postingmessages.
To add a target
1. Select Settings > Extensions > Targets.2. Select Add target.3. All of the target options are listed. Select the type of target and enter the required target
information (which varies from target to target).4. Click Create Target.
Managing your targetsOnce you've set up targets, you can edit, delete, and deactivate and reactivate them.
To edit a target
1. Select Settings > Extensions > Targets.2. Locate the target you want to edit and click Edit.3. Make your changes and then click Update Target.
To delete a target
1. Select Settings > Extensions > Targets.
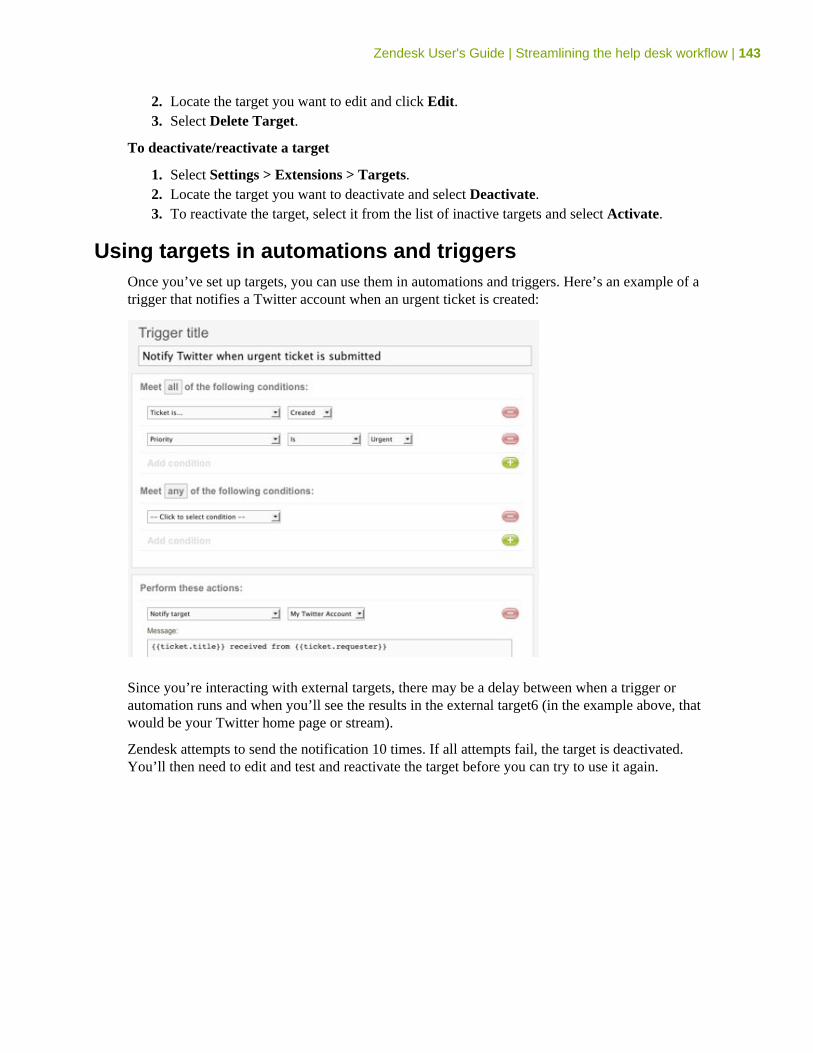
Zendesk User's Guide | Streamlining the help desk workflow | 143
2. Locate the target you want to edit and click Edit.3. Select Delete Target.
To deactivate/reactivate a target
1. Select Settings > Extensions > Targets.2. Locate the target you want to deactivate and select Deactivate.3. To reactivate the target, select it from the list of inactive targets and select Activate.
Using targets in automations and triggersOnce you’ve set up targets, you can use them in automations and triggers. Here’s an example of atrigger that notifies a Twitter account when an urgent ticket is created:
Since you’re interacting with external targets, there may be a delay between when a trigger orautomation runs and when you’ll see the results in the external target6 (in the example above, thatwould be your Twitter home page or stream).
Zendesk attempts to send the notification 10 times. If all attempts fail, the target is deactivated.You’ll then need to edit and test and reactivate the target before you can try to use it again.

144 | Zendesk User's Guide | Streamlining the help desk workflow
Chapter
6
Views, reporting, and performance• Using views to manage ticket workflow• Monitoring ticket activity and performance with reports• Using customer satisfaction ratings
146 | Zendesk User's Guide | Views, reporting, and performance
Using views to manage ticket workflowViews define a collection of tickets based on a set of criteria that convey various ticket states suchas open and unassigned, pending (awaiting response from the requester), and unsolved. Views areessential for managing the ticket workflow because they allow you to create meaningful groupingsof tickets as they come in to the help desk and as they are managed through to resolution.
Many help desks use views to guide the workflow by requiring agents to address tickets in one viewfirst and then others in a specific order. Views can also mirror the support structure you've created.For example, if you provide different levels of service for different customers or manage escalationusing a tiered support group structure (Level 1, Level 2), you can create views for every one of thesescenarios.
Zendesk provides you with a set of views for the essential day-to-day running of your help desk.These include:
• My unsolved tickets• Unassigned tickets• All unsolved tickets• Recently updated tickets• Unsolved tickets in your groups• New tickets in your groups• Pending tickets• Recently solved tickets
You can use these views as is, modify them, or deactivate them.
Views, like other business rules such as triggers and automations, use conditions to define a set oftickets. Once you've created a view based on conditions, you've got a list of tickets that meets thatcriteria.
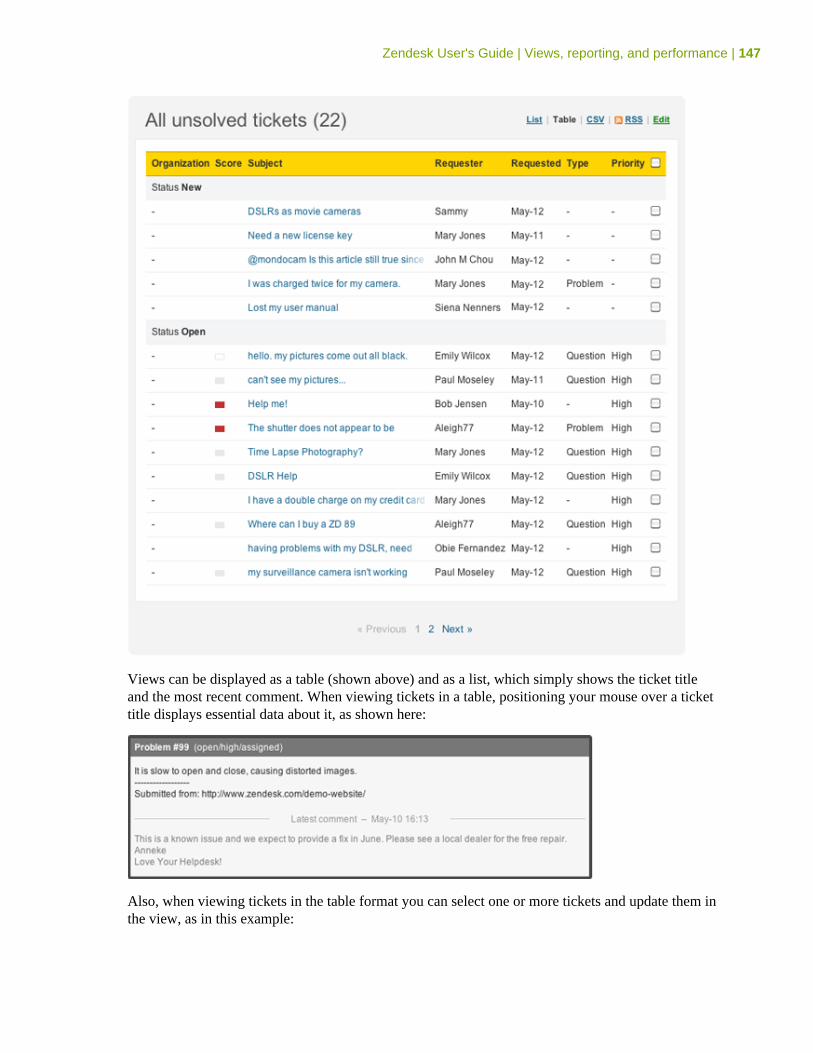
Zendesk User's Guide | Views, reporting, and performance | 147
Views can be displayed as a table (shown above) and as a list, which simply shows the ticket titleand the most recent comment. When viewing tickets in a table, positioning your mouse over a tickettitle displays essential data about it, as shown here:
Also, when viewing tickets in the table format you can select one or more tickets and update them inthe view, as in this example:
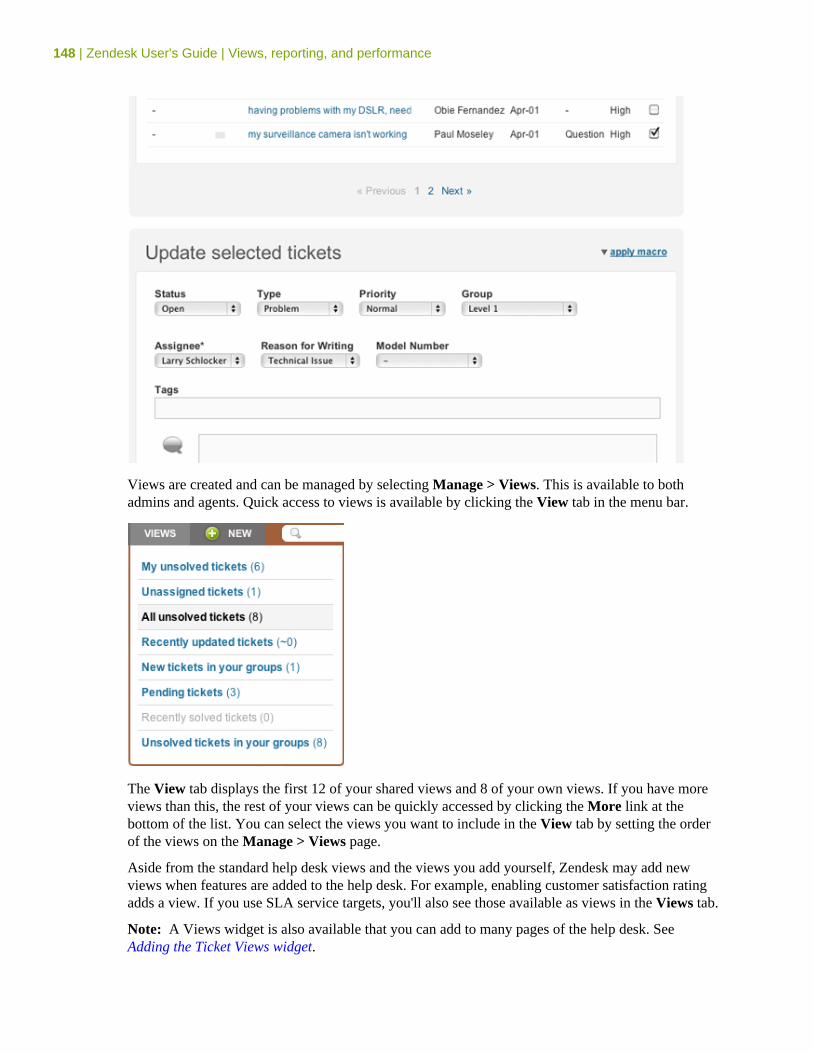
148 | Zendesk User's Guide | Views, reporting, and performance
Views are created and can be managed by selecting Manage > Views. This is available to bothadmins and agents. Quick access to views is available by clicking the View tab in the menu bar.
The View tab displays the first 12 of your shared views and 8 of your own views. If you have moreviews than this, the rest of your views can be quickly accessed by clicking the More link at thebottom of the list. You can select the views you want to include in the View tab by setting the orderof the views on the Manage > Views page.
Aside from the standard help desk views and the views you add yourself, Zendesk may add newviews when features are added to the help desk. For example, enabling customer satisfaction ratingadds a view. If you use SLA service targets, you'll also see those available as views in the Views tab.
Note: A Views widget is also available that you can add to many pages of the help desk. SeeAdding the Ticket Views widget.
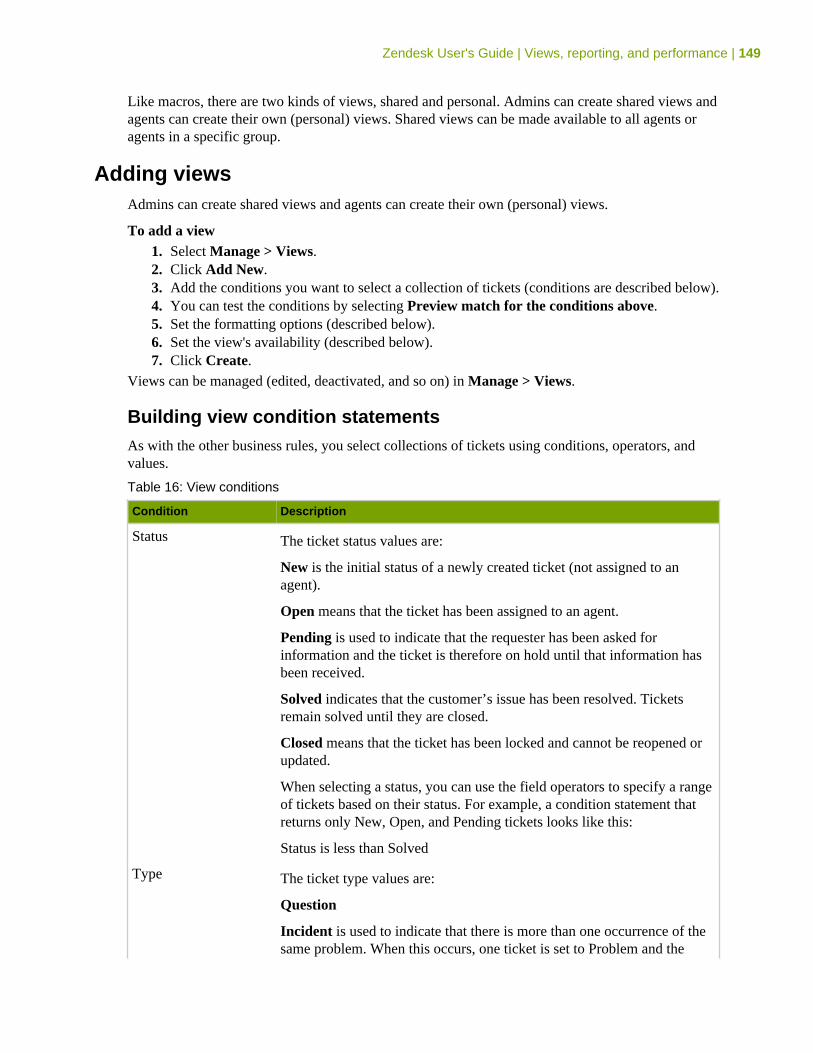
Zendesk User's Guide | Views, reporting, and performance | 149
Like macros, there are two kinds of views, shared and personal. Admins can create shared views andagents can create their own (personal) views. Shared views can be made available to all agents oragents in a specific group.
Adding viewsAdmins can create shared views and agents can create their own (personal) views.
To add a view1. Select Manage > Views.2. Click Add New.3. Add the conditions you want to select a collection of tickets (conditions are described below).4. You can test the conditions by selecting Preview match for the conditions above.5. Set the formatting options (described below).6. Set the view's availability (described below).7. Click Create.
Views can be managed (edited, deactivated, and so on) in Manage > Views.
Building view condition statementsAs with the other business rules, you select collections of tickets using conditions, operators, andvalues.
Table 16: View conditions
Condition Description
Status The ticket status values are:
New is the initial status of a newly created ticket (not assigned to anagent).
Open means that the ticket has been assigned to an agent.
Pending is used to indicate that the requester has been asked forinformation and the ticket is therefore on hold until that information hasbeen received.
Solved indicates that the customer’s issue has been resolved. Ticketsremain solved until they are closed.
Closed means that the ticket has been locked and cannot be reopened orupdated.
When selecting a status, you can use the field operators to specify a rangeof tickets based on their status. For example, a condition statement thatreturns only New, Open, and Pending tickets looks like this:
Status is less than Solved
Type The ticket type values are:
Question
Incident is used to indicate that there is more than one occurrence of thesame problem. When this occurs, one ticket is set to Problem and the
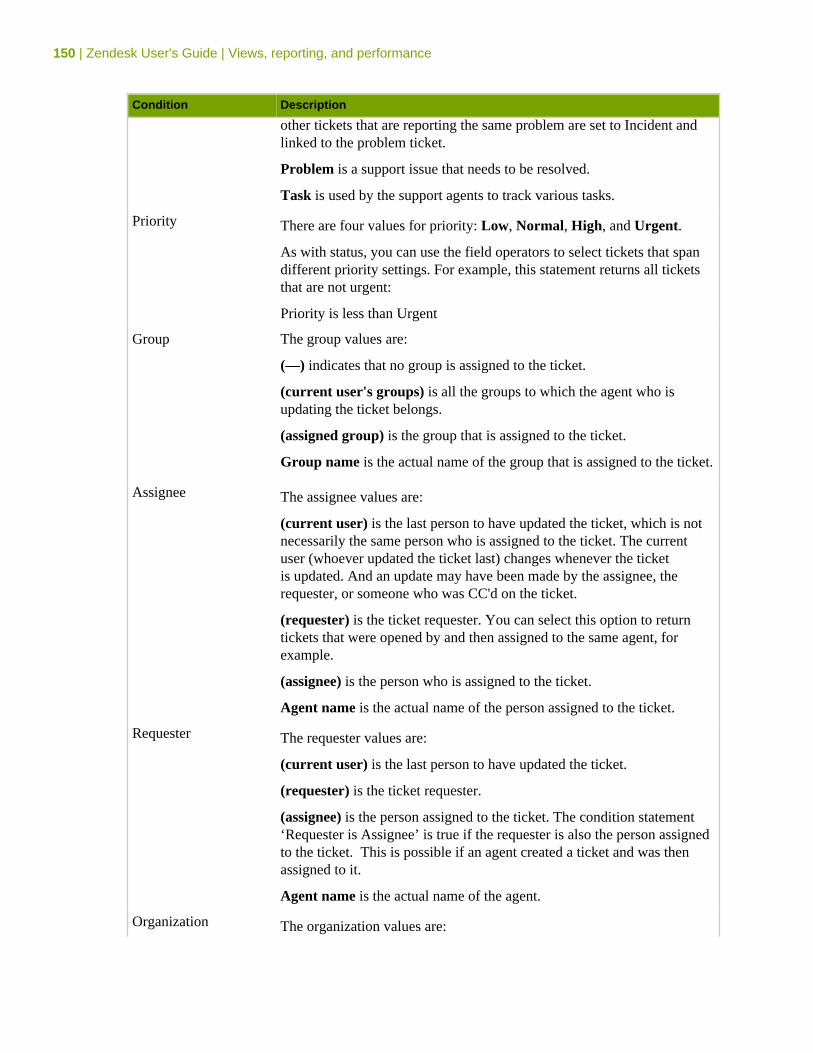
150 | Zendesk User's Guide | Views, reporting, and performance
Condition Description
other tickets that are reporting the same problem are set to Incident andlinked to the problem ticket.
Problem is a support issue that needs to be resolved.
Task is used by the support agents to track various tasks.
Priority There are four values for priority: Low, Normal, High, and Urgent.
As with status, you can use the field operators to select tickets that spandifferent priority settings. For example, this statement returns all ticketsthat are not urgent:
Priority is less than Urgent
Group The group values are:
(—) indicates that no group is assigned to the ticket.
(current user's groups) is all the groups to which the agent who isupdating the ticket belongs.
(assigned group) is the group that is assigned to the ticket.
Group name is the actual name of the group that is assigned to the ticket.
Assignee The assignee values are:
(current user) is the last person to have updated the ticket, which is notnecessarily the same person who is assigned to the ticket. The currentuser (whoever updated the ticket last) changes whenever the ticketis updated. And an update may have been made by the assignee, therequester, or someone who was CC'd on the ticket.
(requester) is the ticket requester. You can select this option to returntickets that were opened by and then assigned to the same agent, forexample.
(assignee) is the person who is assigned to the ticket.
Agent name is the actual name of the person assigned to the ticket.
Requester The requester values are:
(current user) is the last person to have updated the ticket.
(requester) is the ticket requester.
(assignee) is the person assigned to the ticket. The condition statement‘Requester is Assignee’ is true if the requester is also the person assignedto the ticket. This is possible if an agent created a ticket and was thenassigned to it.
Agent name is the actual name of the agent.
Organization The organization values are:

Zendesk User's Guide | Views, reporting, and performance | 151
Condition Description
(—) is used to indicate that no organization has been added to the ticket.
Organization name is the name of an organization.
Tags You use this condition to determine if tickets contain a specific tag ortags. You can include or exclude tags in the condition statement byusing the operators Contains at least one of the following or Containsnone of the following. More than one tag can be entered. They must beseparated with a space.
Description The description is the first comment in the ticket.
Ticket channel The ticket channel is where and how the ticket was created and can beany of the following:
• Web form• Email• Chat• Twitter• Twitter DM (direct message)• Twitter Favorite• Voicemail• Phone call (incoming)• Get Satisfaction• Feedback Tab• Web service (API)• Trigger or automation• Forum topic• Closed ticket• Ticket sharing
Ticket received at... You use this condition to determine the email address from which theticket was received.
Zendesk allows you to forward emails to any address at your Zendesksubdomain. For example:
[email protected] --> [email protected]
[email protected] --> [email protected]
Ticket Satisfaction This condition returns the following customer satisfaction rating values:
• Unoffered means that the survey has not previously been sent• Offered means that the survey has already been sent• Bad means that the ticket has received a negative rating• Good means that the ticket has received a positive rating
Hours since... This condition allows you to select tickets based on the hours that havepassed since the ticket was updated in the following ways:
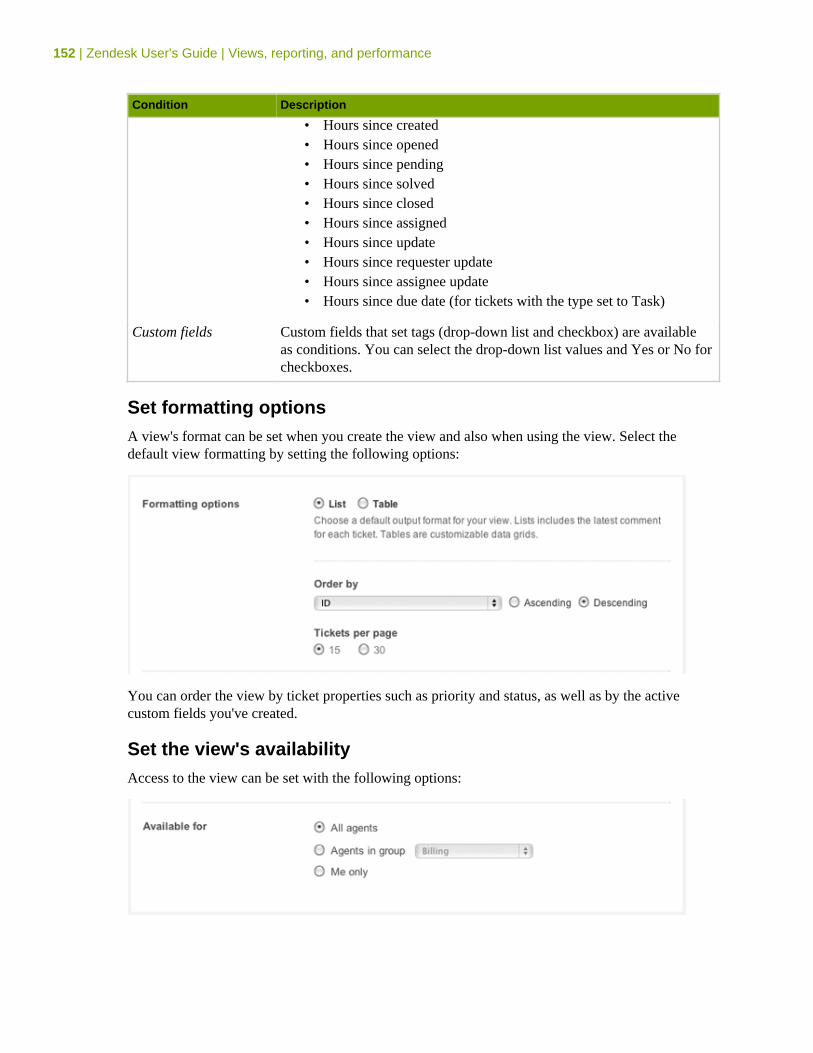
152 | Zendesk User's Guide | Views, reporting, and performance
Condition Description
• Hours since created• Hours since opened• Hours since pending• Hours since solved• Hours since closed• Hours since assigned• Hours since update• Hours since requester update• Hours since assignee update• Hours since due date (for tickets with the type set to Task)
Custom fields Custom fields that set tags (drop-down list and checkbox) are availableas conditions. You can select the drop-down list values and Yes or No forcheckboxes.
Set formatting optionsA view's format can be set when you create the view and also when using the view. Select thedefault view formatting by setting the following options:
You can order the view by ticket properties such as priority and status, as well as by the activecustom fields you've created.
Set the view's availabilityAccess to the view can be set with the following options:
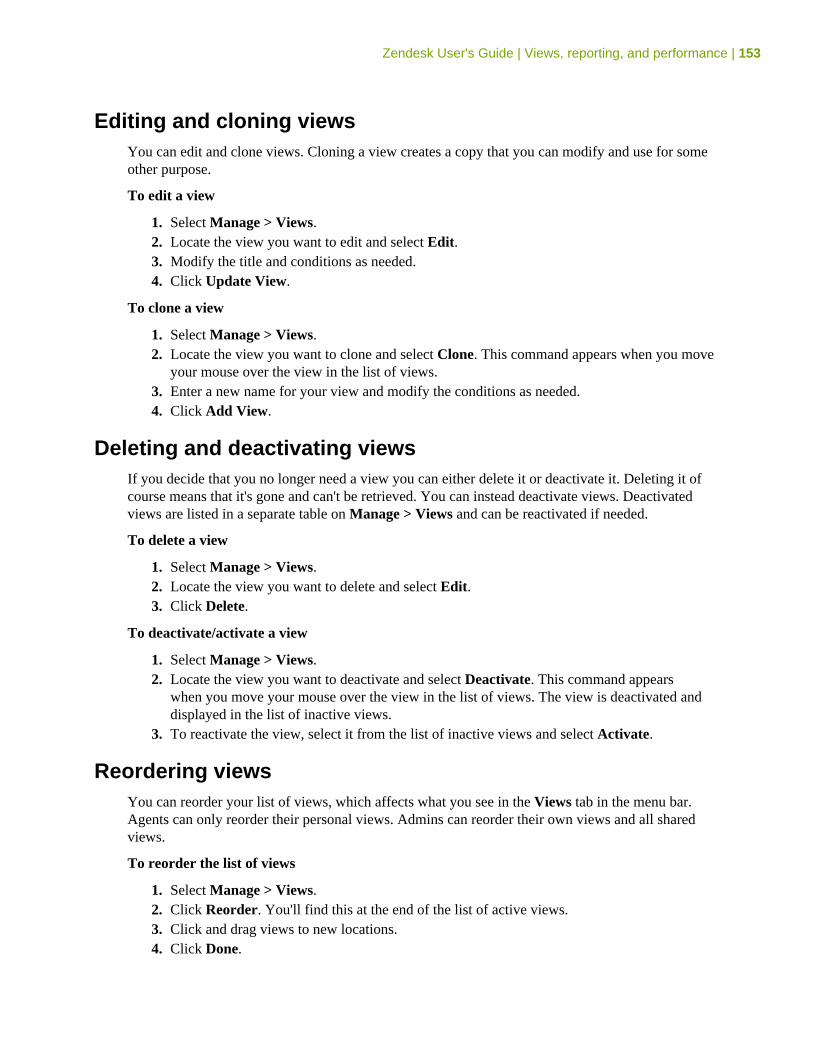
Zendesk User's Guide | Views, reporting, and performance | 153
Editing and cloning viewsYou can edit and clone views. Cloning a view creates a copy that you can modify and use for someother purpose.
To edit a view
1. Select Manage > Views.2. Locate the view you want to edit and select Edit.3. Modify the title and conditions as needed.4. Click Update View.
To clone a view
1. Select Manage > Views.2. Locate the view you want to clone and select Clone. This command appears when you move
your mouse over the view in the list of views.3. Enter a new name for your view and modify the conditions as needed.4. Click Add View.
Deleting and deactivating viewsIf you decide that you no longer need a view you can either delete it or deactivate it. Deleting it ofcourse means that it's gone and can't be retrieved. You can instead deactivate views. Deactivatedviews are listed in a separate table on Manage > Views and can be reactivated if needed.
To delete a view
1. Select Manage > Views.2. Locate the view you want to delete and select Edit.3. Click Delete.
To deactivate/activate a view
1. Select Manage > Views.2. Locate the view you want to deactivate and select Deactivate. This command appears
when you move your mouse over the view in the list of views. The view is deactivated anddisplayed in the list of inactive views.
3. To reactivate the view, select it from the list of inactive views and select Activate.
Reordering viewsYou can reorder your list of views, which affects what you see in the Views tab in the menu bar.Agents can only reorder their personal views. Admins can reorder their own views and all sharedviews.
To reorder the list of views
1. Select Manage > Views.2. Click Reorder. You'll find this at the end of the list of active views.3. Click and drag views to new locations.4. Click Done.
154 | Zendesk User's Guide | Views, reporting, and performance
Adding the Ticket Views widgetYour views can be displayed in a widget, which can be placed on any page in the help desk. Adminscan add widgets.
To add the Views widget
1. Select Settings > Extensions > Widgets.2. Click Add Widget.3. Select the Ticket Views widget.4. Enter a title for the widget.5. Select the Display option to make it active.6. Set the widget availability:
• Anyone, incl. users who are not logged in• Agents• Logged in end-users
7. You can preview the widget by selecting Preview Widget and clicking Submit.8. When you're finished, select Create Widget and click Submit.
You can add the Views widget to many pages in the help desk by selecting the Edit widgets on thispage.
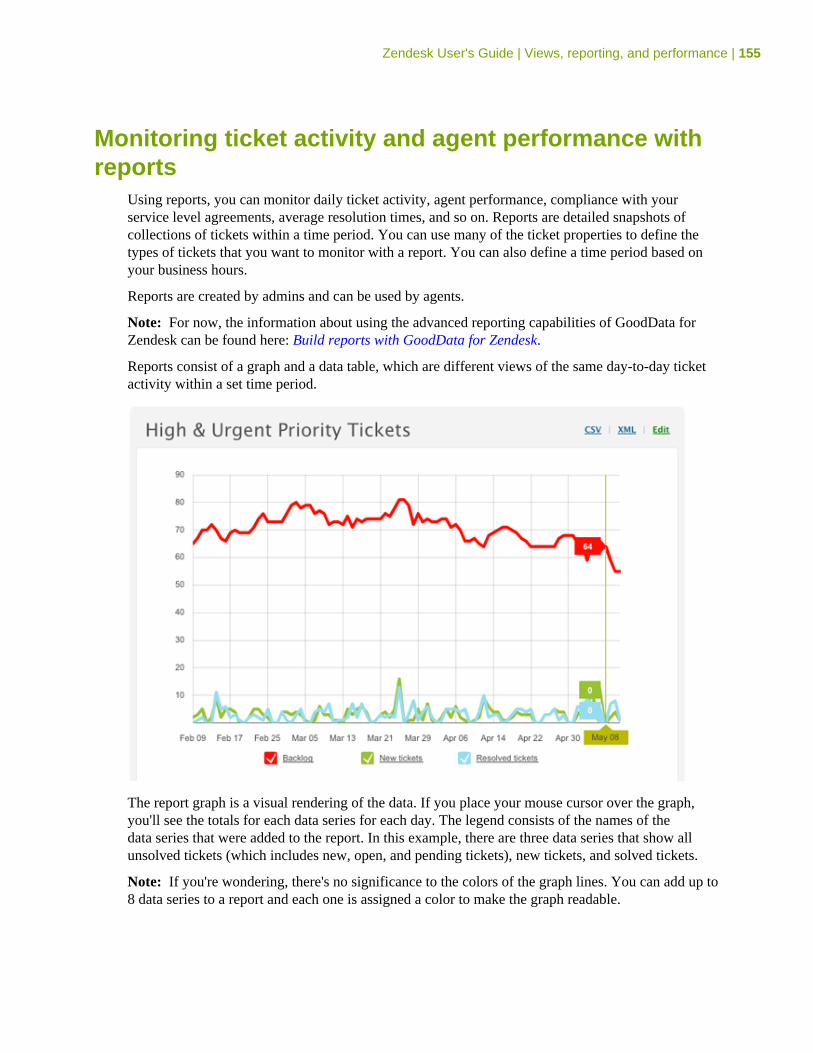
Zendesk User's Guide | Views, reporting, and performance | 155
Monitoring ticket activity and agent performance withreports
Using reports, you can monitor daily ticket activity, agent performance, compliance with yourservice level agreements, average resolution times, and so on. Reports are detailed snapshots ofcollections of tickets within a time period. You can use many of the ticket properties to define thetypes of tickets that you want to monitor with a report. You can also define a time period based onyour business hours.
Reports are created by admins and can be used by agents.
Note: For now, the information about using the advanced reporting capabilities of GoodData forZendesk can be found here: Build reports with GoodData for Zendesk.
Reports consist of a graph and a data table, which are different views of the same day-to-day ticketactivity within a set time period.
The report graph is a visual rendering of the data. If you place your mouse cursor over the graph,you'll see the totals for each data series for each day. The legend consists of the names of thedata series that were added to the report. In this example, there are three data series that show allunsolved tickets (which includes new, open, and pending tickets), new tickets, and solved tickets.
Note: If you're wondering, there's no significance to the colors of the graph lines. You can add up to8 data series to a report and each one is assigned a color to make the graph readable.
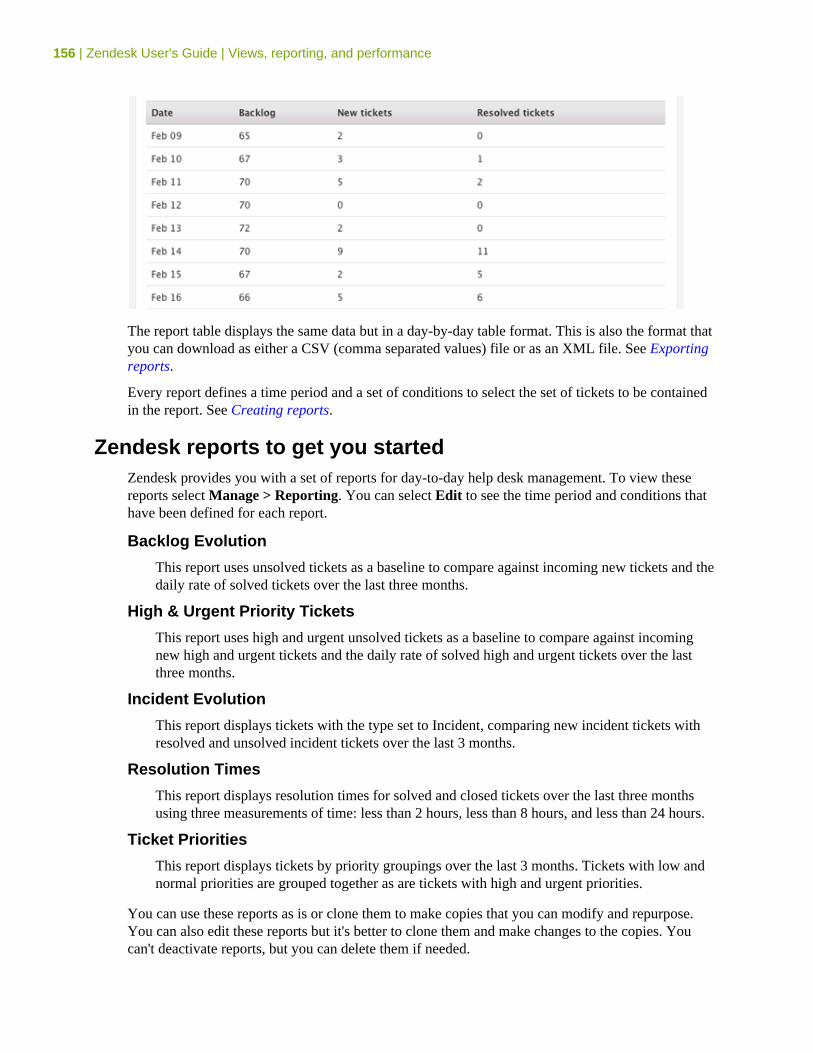
156 | Zendesk User's Guide | Views, reporting, and performance
The report table displays the same data but in a day-by-day table format. This is also the format thatyou can download as either a CSV (comma separated values) file or as an XML file. See Exportingreports.
Every report defines a time period and a set of conditions to select the set of tickets to be containedin the report. See Creating reports.
Zendesk reports to get you startedZendesk provides you with a set of reports for day-to-day help desk management. To view thesereports select Manage > Reporting. You can select Edit to see the time period and conditions thathave been defined for each report.
Backlog Evolution
This report uses unsolved tickets as a baseline to compare against incoming new tickets and thedaily rate of solved tickets over the last three months.
High & Urgent Priority Tickets
This report uses high and urgent unsolved tickets as a baseline to compare against incomingnew high and urgent tickets and the daily rate of solved high and urgent tickets over the lastthree months.
Incident Evolution
This report displays tickets with the type set to Incident, comparing new incident tickets withresolved and unsolved incident tickets over the last 3 months.
Resolution Times
This report displays resolution times for solved and closed tickets over the last three monthsusing three measurements of time: less than 2 hours, less than 8 hours, and less than 24 hours.
Ticket Priorities
This report displays tickets by priority groupings over the last 3 months. Tickets with low andnormal priorities are grouped together as are tickets with high and urgent priorities.
You can use these reports as is or clone them to make copies that you can modify and repurpose.You can also edit these reports but it's better to clone them and make changes to the copies. Youcan't deactivate reports, but you can delete them if needed.
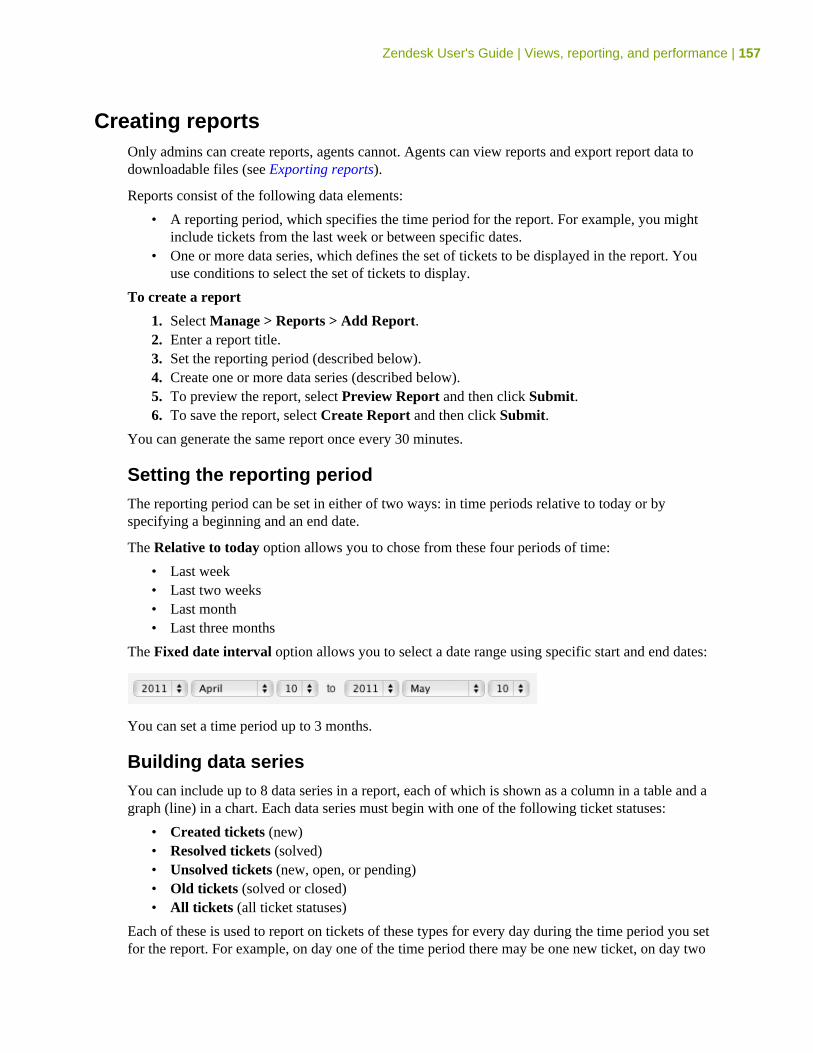
Zendesk User's Guide | Views, reporting, and performance | 157
Creating reportsOnly admins can create reports, agents cannot. Agents can view reports and export report data todownloadable files (see Exporting reports).
Reports consist of the following data elements:
• A reporting period, which specifies the time period for the report. For example, you mightinclude tickets from the last week or between specific dates.
• One or more data series, which defines the set of tickets to be displayed in the report. Youuse conditions to select the set of tickets to display.
To create a report
1. Select Manage > Reports > Add Report.2. Enter a report title.3. Set the reporting period (described below).4. Create one or more data series (described below).5. To preview the report, select Preview Report and then click Submit.6. To save the report, select Create Report and then click Submit.
You can generate the same report once every 30 minutes.
Setting the reporting periodThe reporting period can be set in either of two ways: in time periods relative to today or byspecifying a beginning and an end date.
The Relative to today option allows you to chose from these four periods of time:
• Last week• Last two weeks• Last month• Last three months
The Fixed date interval option allows you to select a date range using specific start and end dates:
You can set a time period up to 3 months.
Building data seriesYou can include up to 8 data series in a report, each of which is shown as a column in a table and agraph (line) in a chart. Each data series must begin with one of the following ticket statuses:
• Created tickets (new)• Resolved tickets (solved)• Unsolved tickets (new, open, or pending)• Old tickets (solved or closed)• All tickets (all ticket statuses)
Each of these is used to report on tickets of these types for every day during the time period you setfor the report. For example, on day one of the time period there may be one new ticket, on day two
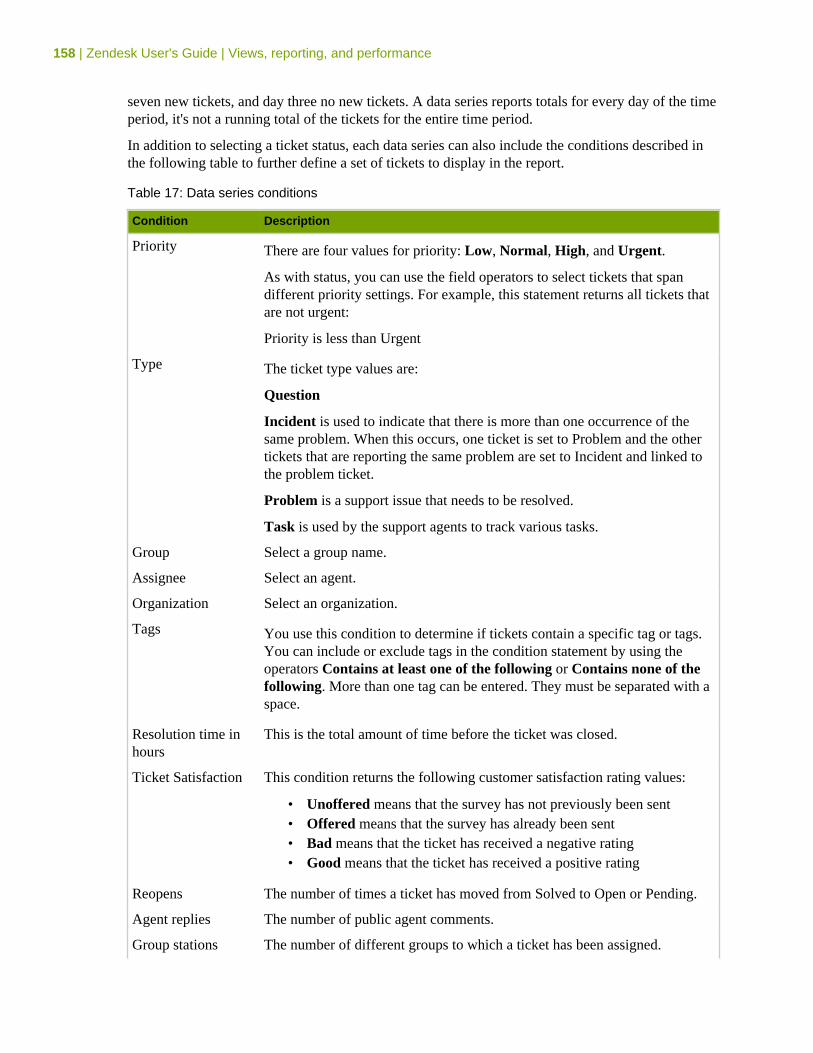
158 | Zendesk User's Guide | Views, reporting, and performance
seven new tickets, and day three no new tickets. A data series reports totals for every day of the timeperiod, it's not a running total of the tickets for the entire time period.
In addition to selecting a ticket status, each data series can also include the conditions described inthe following table to further define a set of tickets to display in the report.
Table 17: Data series conditions
Condition Description
Priority There are four values for priority: Low, Normal, High, and Urgent.
As with status, you can use the field operators to select tickets that spandifferent priority settings. For example, this statement returns all tickets thatare not urgent:
Priority is less than Urgent
Type The ticket type values are:
Question
Incident is used to indicate that there is more than one occurrence of thesame problem. When this occurs, one ticket is set to Problem and the othertickets that are reporting the same problem are set to Incident and linked tothe problem ticket.
Problem is a support issue that needs to be resolved.
Task is used by the support agents to track various tasks.
Group Select a group name.
Assignee Select an agent.
Organization Select an organization.
Tags You use this condition to determine if tickets contain a specific tag or tags.You can include or exclude tags in the condition statement by using theoperators Contains at least one of the following or Contains none of thefollowing. More than one tag can be entered. They must be separated with aspace.
Resolution time inhours
This is the total amount of time before the ticket was closed.
Ticket Satisfaction This condition returns the following customer satisfaction rating values:
• Unoffered means that the survey has not previously been sent• Offered means that the survey has already been sent• Bad means that the ticket has received a negative rating• Good means that the ticket has received a positive rating
Reopens The number of times a ticket has moved from Solved to Open or Pending.
Agent replies The number of public agent comments.
Group stations The number of different groups to which a ticket has been assigned.
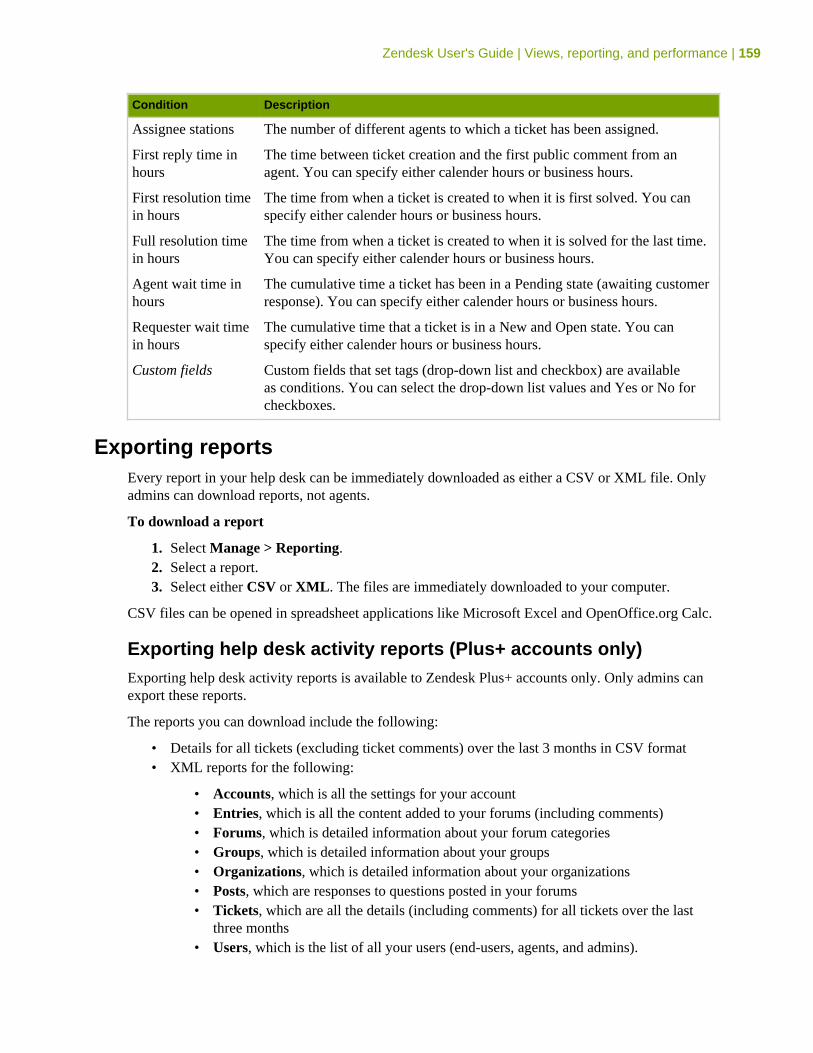
Zendesk User's Guide | Views, reporting, and performance | 159
Condition Description
Assignee stations The number of different agents to which a ticket has been assigned.
First reply time inhours
The time between ticket creation and the first public comment from anagent. You can specify either calender hours or business hours.
First resolution timein hours
The time from when a ticket is created to when it is first solved. You canspecify either calender hours or business hours.
Full resolution timein hours
The time from when a ticket is created to when it is solved for the last time.You can specify either calender hours or business hours.
Agent wait time inhours
The cumulative time a ticket has been in a Pending state (awaiting customerresponse). You can specify either calender hours or business hours.
Requester wait timein hours
The cumulative time that a ticket is in a New and Open state. You canspecify either calender hours or business hours.
Custom fields Custom fields that set tags (drop-down list and checkbox) are availableas conditions. You can select the drop-down list values and Yes or No forcheckboxes.
Exporting reportsEvery report in your help desk can be immediately downloaded as either a CSV or XML file. Onlyadmins can download reports, not agents.
To download a report
1. Select Manage > Reporting.2. Select a report.3. Select either CSV or XML. The files are immediately downloaded to your computer.
CSV files can be opened in spreadsheet applications like Microsoft Excel and OpenOffice.org Calc.
Exporting help desk activity reports (Plus+ accounts only)Exporting help desk activity reports is available to Zendesk Plus+ accounts only. Only admins canexport these reports.
The reports you can download include the following:
• Details for all tickets (excluding ticket comments) over the last 3 months in CSV format• XML reports for the following:
• Accounts, which is all the settings for your account• Entries, which is all the content added to your forums (including comments)• Forums, which is detailed information about your forum categories• Groups, which is detailed information about your groups• Organizations, which is detailed information about your organizations• Posts, which are responses to questions posted in your forums• Tickets, which are all the details (including comments) for all tickets over the last
three months• Users, which is the list of all your users (end-users, agents, and admins).
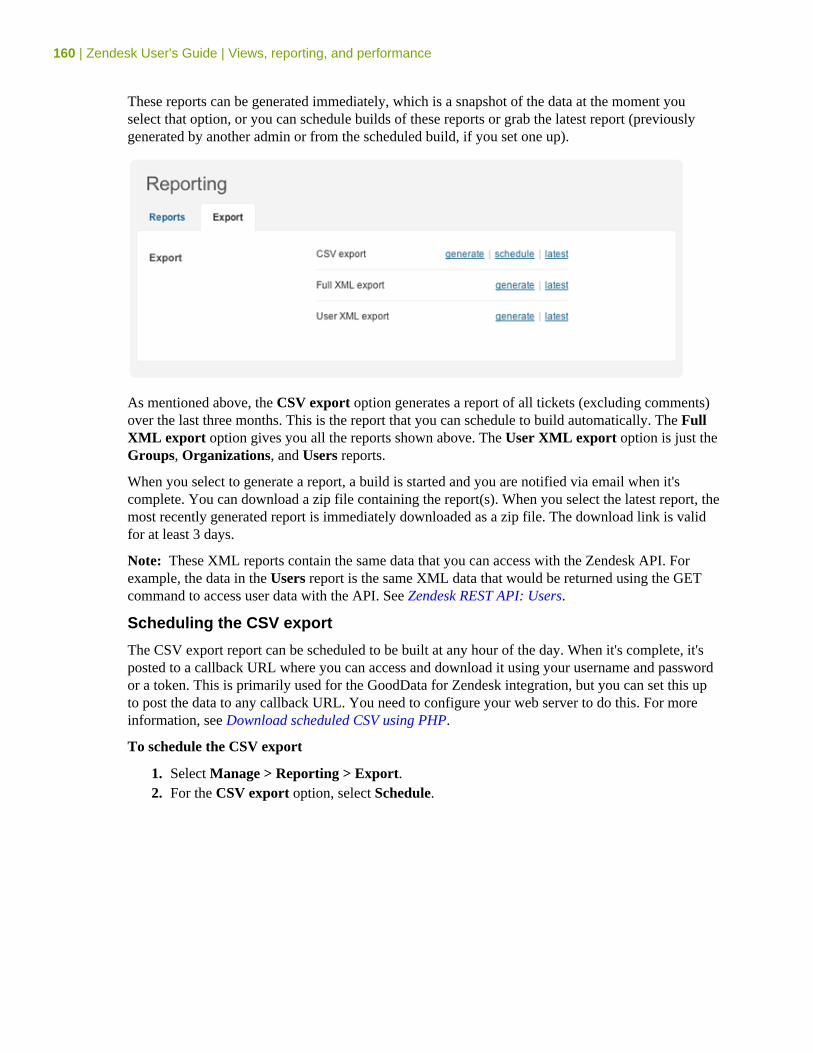
160 | Zendesk User's Guide | Views, reporting, and performance
These reports can be generated immediately, which is a snapshot of the data at the moment youselect that option, or you can schedule builds of these reports or grab the latest report (previouslygenerated by another admin or from the scheduled build, if you set one up).
As mentioned above, the CSV export option generates a report of all tickets (excluding comments)over the last three months. This is the report that you can schedule to build automatically. The FullXML export option gives you all the reports shown above. The User XML export option is just theGroups, Organizations, and Users reports.
When you select to generate a report, a build is started and you are notified via email when it'scomplete. You can download a zip file containing the report(s). When you select the latest report, themost recently generated report is immediately downloaded as a zip file. The download link is validfor at least 3 days.
Note: These XML reports contain the same data that you can access with the Zendesk API. Forexample, the data in the Users report is the same XML data that would be returned using the GETcommand to access user data with the API. See Zendesk REST API: Users.
Scheduling the CSV export
The CSV export report can be scheduled to be built at any hour of the day. When it's complete, it'sposted to a callback URL where you can access and download it using your username and passwordor a token. This is primarily used for the GoodData for Zendesk integration, but you can set this upto post the data to any callback URL. You need to configure your web server to do this. For moreinformation, see Download scheduled CSV using PHP.
To schedule the CSV export
1. Select Manage > Reporting > Export.2. For the CSV export option, select Schedule.

Zendesk User's Guide | Views, reporting, and performance | 161
3. Select the hour of the day you want the report to be generated, enter the callback URL, andselect the authentication method.
4. Click Submit.
Editing and cloning reportsAdmins can edit and clone reports. Cloning a report creates a copy that can be modified and used forsome other purpose.
To edit a report
1. Select Manage > Reporting.2. Locate the report you want to edit and select Edit.3. Modify the title, time period, and data series as needed.4. Click Update Report.
To clone a view
1. Select Manage > Reporting.2. Locate the report you want to clone and select Clone. This command appears when you
move your mouse over the report in the list of reports.3. Enter a new name for your report and modify the title, time period, and data series as needed.4. Click Create Report.
Deleting reportsReports can be deleted. Only admins can delete reports.
To delete a report
1. Select Manage > Reporting.2. Locate the report you want to delete and select Edit.3. Select Delete Report and then click Submit.
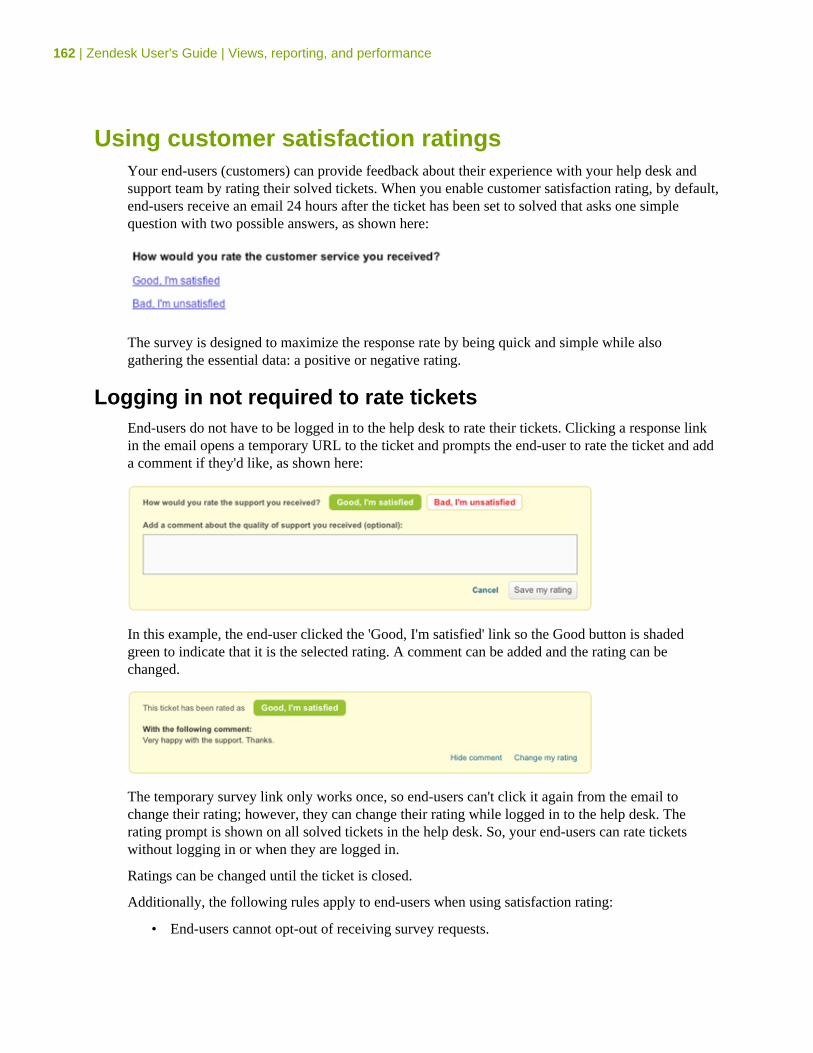
162 | Zendesk User's Guide | Views, reporting, and performance
Using customer satisfaction ratingsYour end-users (customers) can provide feedback about their experience with your help desk andsupport team by rating their solved tickets. When you enable customer satisfaction rating, by default,end-users receive an email 24 hours after the ticket has been set to solved that asks one simplequestion with two possible answers, as shown here:
The survey is designed to maximize the response rate by being quick and simple while alsogathering the essential data: a positive or negative rating.
Logging in not required to rate ticketsEnd-users do not have to be logged in to the help desk to rate their tickets. Clicking a response linkin the email opens a temporary URL to the ticket and prompts the end-user to rate the ticket and adda comment if they'd like, as shown here:
In this example, the end-user clicked the 'Good, I'm satisfied' link so the Good button is shadedgreen to indicate that it is the selected rating. A comment can be added and the rating can bechanged.
The temporary survey link only works once, so end-users can't click it again from the email tochange their rating; however, they can change their rating while logged in to the help desk. Therating prompt is shown on all solved tickets in the help desk. So, your end-users can rate ticketswithout logging in or when they are logged in.
Ratings can be changed until the ticket is closed.
Additionally, the following rules apply to end-users when using satisfaction rating:
• End-users cannot opt-out of receiving survey requests.
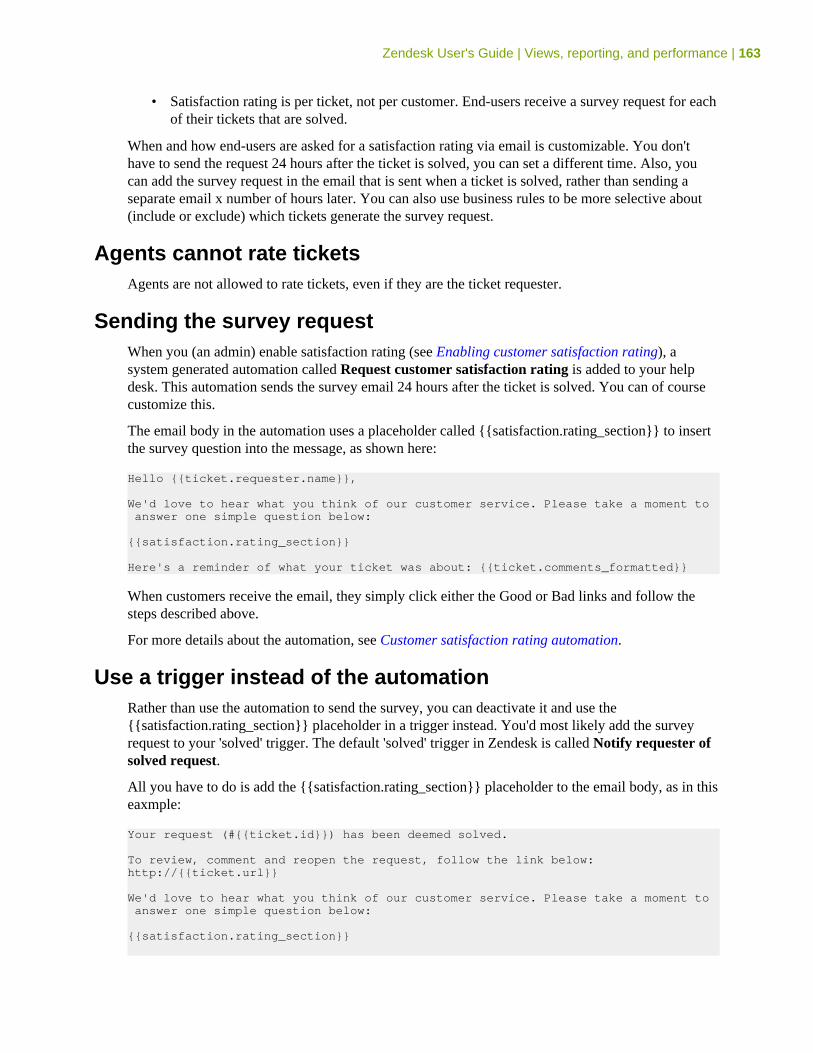
Zendesk User's Guide | Views, reporting, and performance | 163
• Satisfaction rating is per ticket, not per customer. End-users receive a survey request for eachof their tickets that are solved.
When and how end-users are asked for a satisfaction rating via email is customizable. You don'thave to send the request 24 hours after the ticket is solved, you can set a different time. Also, youcan add the survey request in the email that is sent when a ticket is solved, rather than sending aseparate email x number of hours later. You can also use business rules to be more selective about(include or exclude) which tickets generate the survey request.
Agents cannot rate ticketsAgents are not allowed to rate tickets, even if they are the ticket requester.
Sending the survey requestWhen you (an admin) enable satisfaction rating (see Enabling customer satisfaction rating), asystem generated automation called Request customer satisfaction rating is added to your helpdesk. This automation sends the survey email 24 hours after the ticket is solved. You can of coursecustomize this.
The email body in the automation uses a placeholder called {{satisfaction.rating_section}} to insertthe survey question into the message, as shown here:
Hello {{ticket.requester.name}},
We'd love to hear what you think of our customer service. Please take a moment to answer one simple question below: {{satisfaction.rating_section}}
Here's a reminder of what your ticket was about: {{ticket.comments_formatted}}
When customers receive the email, they simply click either the Good or Bad links and follow thesteps described above.
For more details about the automation, see Customer satisfaction rating automation.
Use a trigger instead of the automationRather than use the automation to send the survey, you can deactivate it and use the{{satisfaction.rating_section}} placeholder in a trigger instead. You'd most likely add the surveyrequest to your 'solved' trigger. The default 'solved' trigger in Zendesk is called Notify requester ofsolved request.
All you have to do is add the {{satisfaction.rating_section}} placeholder to the email body, as in thiseaxmple:
Your request (#{{ticket.id}}) has been deemed solved.
To review, comment and reopen the request, follow the link below:http://{{ticket.url}}
We'd love to hear what you think of our customer service. Please take a moment to answer one simple question below: {{satisfaction.rating_section}}
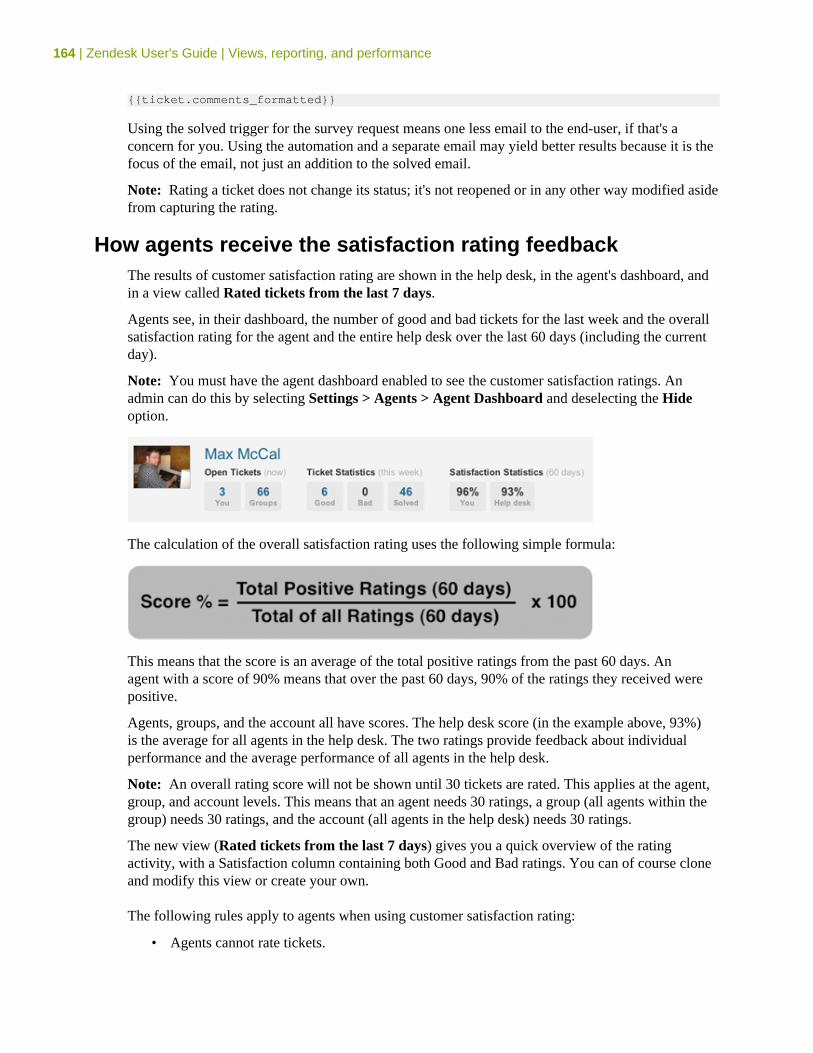
164 | Zendesk User's Guide | Views, reporting, and performance
{{ticket.comments_formatted}}
Using the solved trigger for the survey request means one less email to the end-user, if that's aconcern for you. Using the automation and a separate email may yield better results because it is thefocus of the email, not just an addition to the solved email.
Note: Rating a ticket does not change its status; it's not reopened or in any other way modified asidefrom capturing the rating.
How agents receive the satisfaction rating feedbackThe results of customer satisfaction rating are shown in the help desk, in the agent's dashboard, andin a view called Rated tickets from the last 7 days.
Agents see, in their dashboard, the number of good and bad tickets for the last week and the overallsatisfaction rating for the agent and the entire help desk over the last 60 days (including the currentday).
Note: You must have the agent dashboard enabled to see the customer satisfaction ratings. Anadmin can do this by selecting Settings > Agents > Agent Dashboard and deselecting the Hideoption.
The calculation of the overall satisfaction rating uses the following simple formula:
This means that the score is an average of the total positive ratings from the past 60 days. Anagent with a score of 90% means that over the past 60 days, 90% of the ratings they received werepositive.
Agents, groups, and the account all have scores. The help desk score (in the example above, 93%)is the average for all agents in the help desk. The two ratings provide feedback about individualperformance and the average performance of all agents in the help desk.
Note: An overall rating score will not be shown until 30 tickets are rated. This applies at the agent,group, and account levels. This means that an agent needs 30 ratings, a group (all agents within thegroup) needs 30 ratings, and the account (all agents in the help desk) needs 30 ratings.
The new view (Rated tickets from the last 7 days) gives you a quick overview of the ratingactivity, with a Satisfaction column containing both Good and Bad ratings. You can of course cloneand modify this view or create your own.
The following rules apply to agents when using customer satisfaction rating:
• Agents cannot rate tickets.
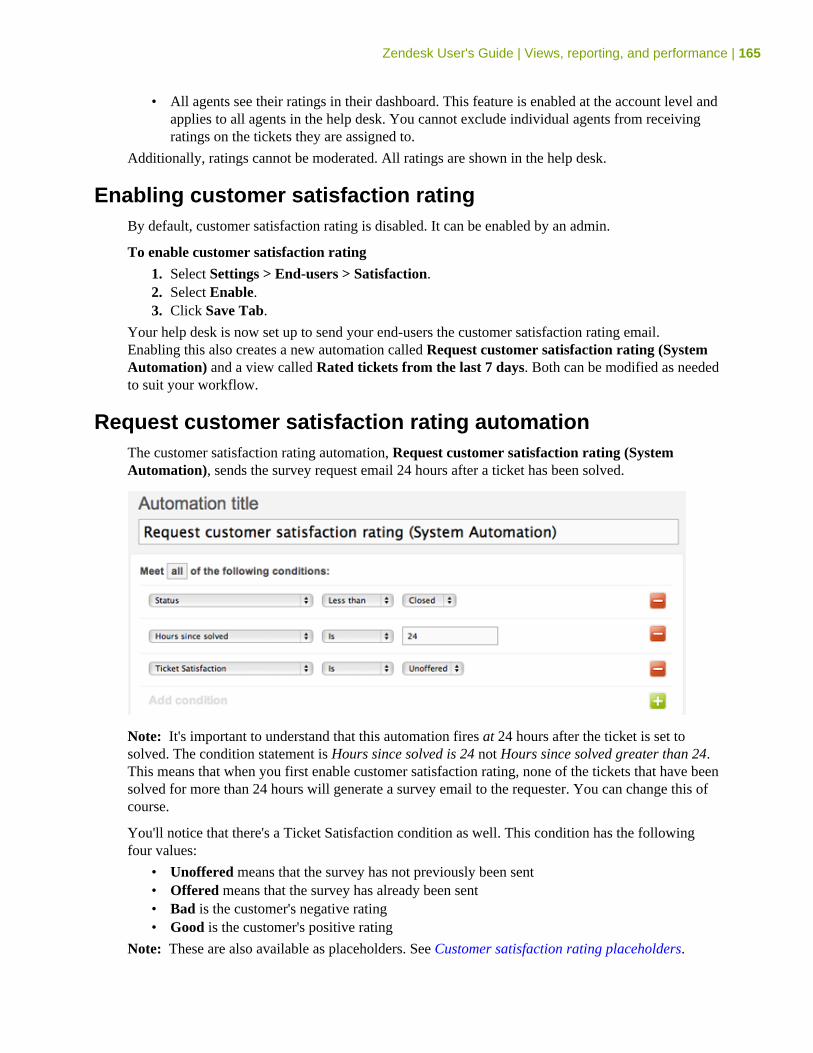
Zendesk User's Guide | Views, reporting, and performance | 165
• All agents see their ratings in their dashboard. This feature is enabled at the account level andapplies to all agents in the help desk. You cannot exclude individual agents from receivingratings on the tickets they are assigned to.
Additionally, ratings cannot be moderated. All ratings are shown in the help desk.
Enabling customer satisfaction ratingBy default, customer satisfaction rating is disabled. It can be enabled by an admin.
To enable customer satisfaction rating
1. Select Settings > End-users > Satisfaction.2. Select Enable.3. Click Save Tab.
Your help desk is now set up to send your end-users the customer satisfaction rating email.Enabling this also creates a new automation called Request customer satisfaction rating (SystemAutomation) and a view called Rated tickets from the last 7 days. Both can be modified as neededto suit your workflow.
Request customer satisfaction rating automationThe customer satisfaction rating automation, Request customer satisfaction rating (SystemAutomation), sends the survey request email 24 hours after a ticket has been solved.
Note: It's important to understand that this automation fires at 24 hours after the ticket is set tosolved. The condition statement is Hours since solved is 24 not Hours since solved greater than 24.This means that when you first enable customer satisfaction rating, none of the tickets that have beensolved for more than 24 hours will generate a survey email to the requester. You can change this ofcourse.
You'll notice that there's a Ticket Satisfaction condition as well. This condition has the followingfour values:
• Unoffered means that the survey has not previously been sent• Offered means that the survey has already been sent• Bad is the customer's negative rating• Good is the customer's positive rating
Note: These are also available as placeholders. See Customer satisfaction rating placeholders.
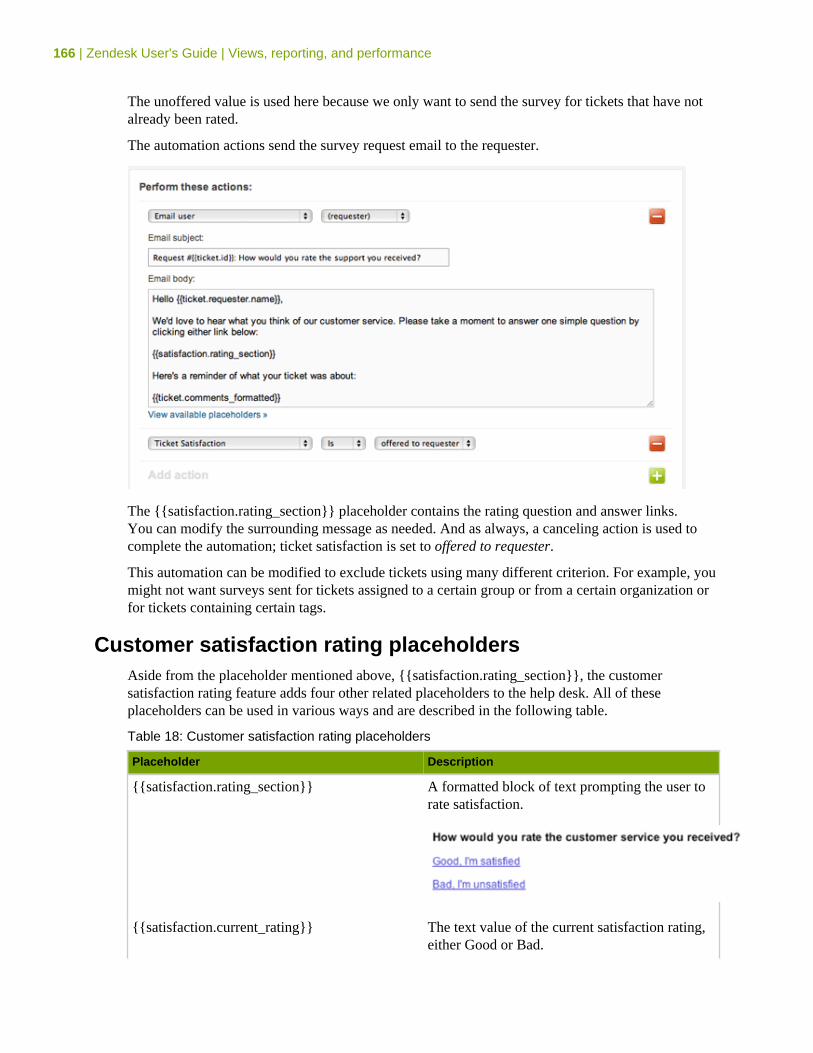
166 | Zendesk User's Guide | Views, reporting, and performance
The unoffered value is used here because we only want to send the survey for tickets that have notalready been rated.
The automation actions send the survey request email to the requester.
The {{satisfaction.rating_section}} placeholder contains the rating question and answer links.You can modify the surrounding message as needed. And as always, a canceling action is used tocomplete the automation; ticket satisfaction is set to offered to requester.
This automation can be modified to exclude tickets using many different criterion. For example, youmight not want surveys sent for tickets assigned to a certain group or from a certain organization orfor tickets containing certain tags.
Customer satisfaction rating placeholdersAside from the placeholder mentioned above, {{satisfaction.rating_section}}, the customersatisfaction rating feature adds four other related placeholders to the help desk. All of theseplaceholders can be used in various ways and are described in the following table.
Table 18: Customer satisfaction rating placeholders
Placeholder Description
{{satisfaction.rating_section}} A formatted block of text prompting the user torate satisfaction.
{{satisfaction.current_rating}} The text value of the current satisfaction rating,either Good or Bad.
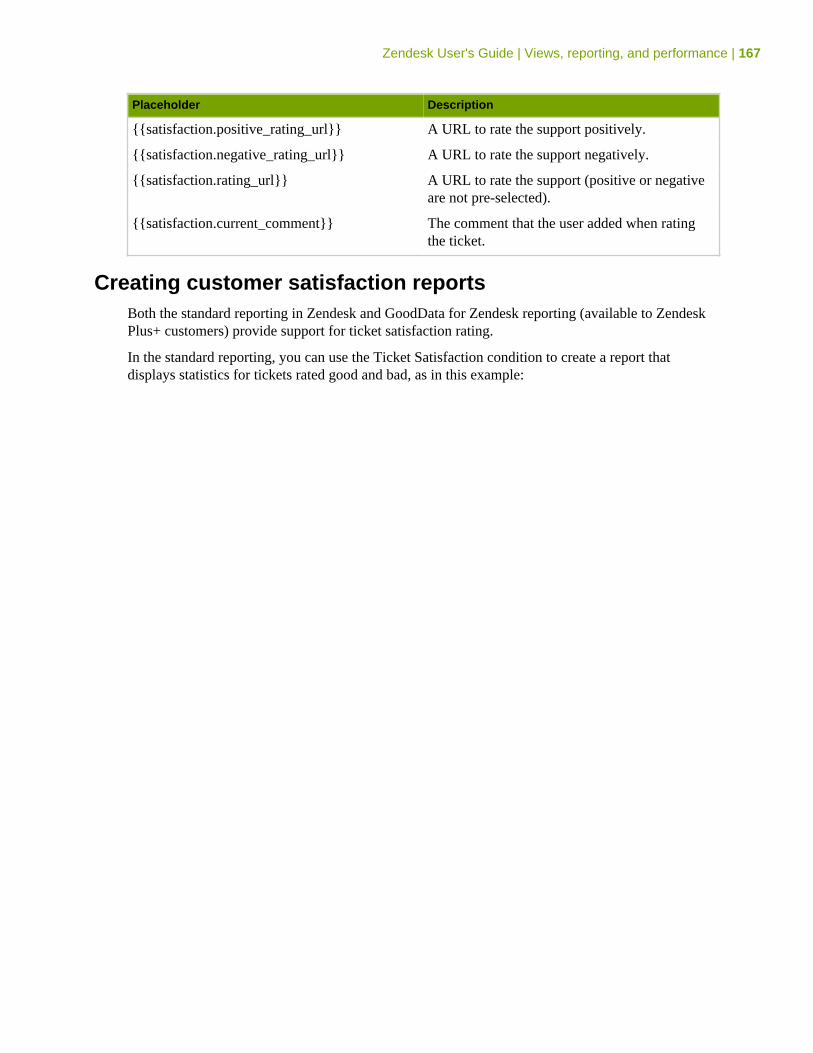
Zendesk User's Guide | Views, reporting, and performance | 167
Placeholder Description
{{satisfaction.positive_rating_url}} A URL to rate the support positively.
{{satisfaction.negative_rating_url}} A URL to rate the support negatively.
{{satisfaction.rating_url}} A URL to rate the support (positive or negativeare not pre-selected).
{{satisfaction.current_comment}} The comment that the user added when ratingthe ticket.
Creating customer satisfaction reportsBoth the standard reporting in Zendesk and GoodData for Zendesk reporting (available to ZendeskPlus+ customers) provide support for ticket satisfaction rating.
In the standard reporting, you can use the Ticket Satisfaction condition to create a report thatdisplays statistics for tickets rated good and bad, as in this example:
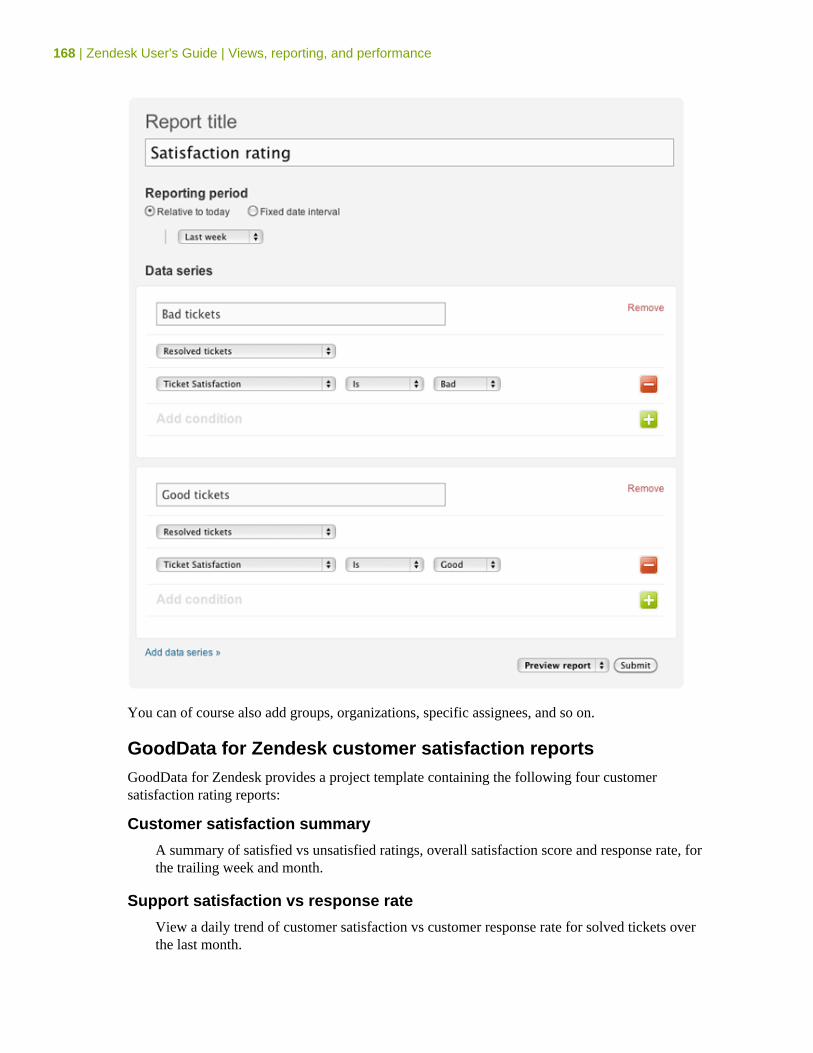
168 | Zendesk User's Guide | Views, reporting, and performance
You can of course also add groups, organizations, specific assignees, and so on.
GoodData for Zendesk customer satisfaction reportsGoodData for Zendesk provides a project template containing the following four customersatisfaction rating reports:
Customer satisfaction summary
A summary of satisfied vs unsatisfied ratings, overall satisfaction score and response rate, forthe trailing week and month.
Support satisfaction vs response rate
View a daily trend of customer satisfaction vs customer response rate for solved tickets overthe last month.
Zendesk User's Guide | Views, reporting, and performance | 169
Top performers and laggards
Show highest and lowest performing agents by satisfaction score. By default, agents will onlyshow in this report once they have been rated on 30 or more tickets in the last 60 days; this isconfigurable.
Customer satisfaction watchlist
Immediately surface customers with the lowest satisfaction score. Use this information topinpoint important customers who may need extra support attention.
Setting up customer satisfaction reports in GoodData
GoodData provides instructions for creating a new project template that includes the customersatisfaction rating reports. Or, you can update your existing template to add the reports without alsolosing the customizations you've made to the GoodData reporting dashboard.
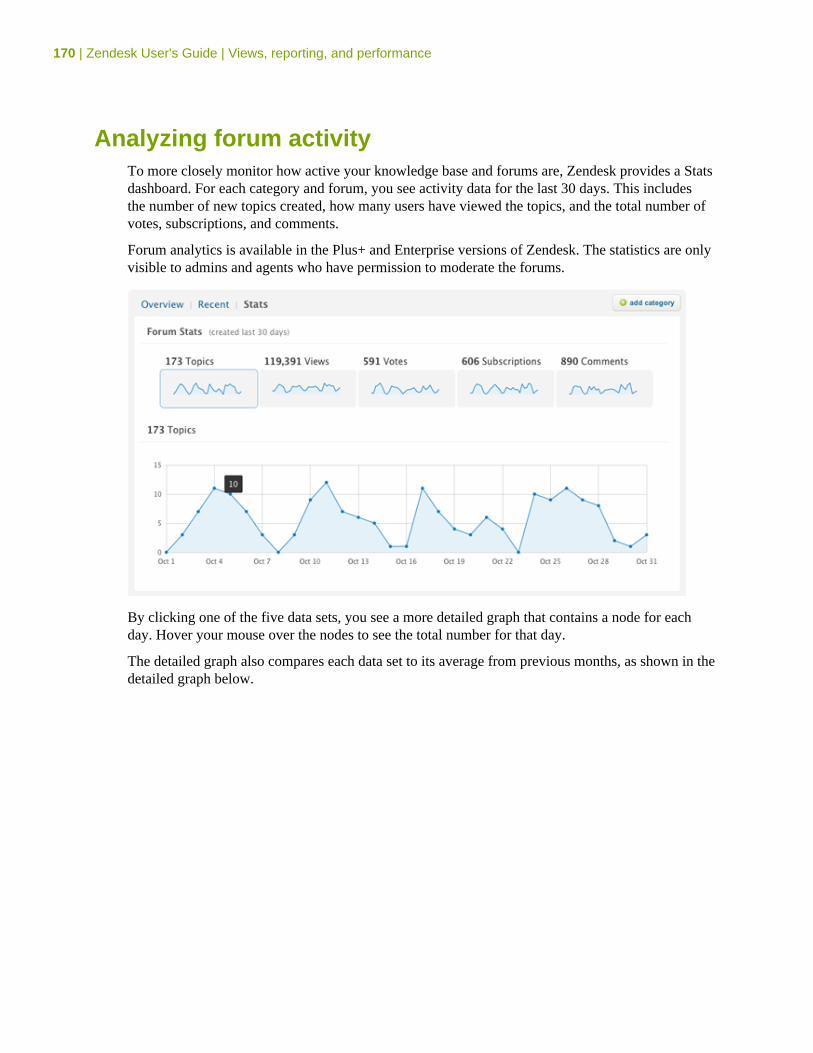
170 | Zendesk User's Guide | Views, reporting, and performance
Analyzing forum activityTo more closely monitor how active your knowledge base and forums are, Zendesk provides a Statsdashboard. For each category and forum, you see activity data for the last 30 days. This includesthe number of new topics created, how many users have viewed the topics, and the total number ofvotes, subscriptions, and comments.
Forum analytics is available in the Plus+ and Enterprise versions of Zendesk. The statistics are onlyvisible to admins and agents who have permission to moderate the forums.
By clicking one of the five data sets, you see a more detailed graph that contains a node for eachday. Hover your mouse over the nodes to see the total number for that day.
The detailed graph also compares each data set to its average from previous months, as shown in thedetailed graph below.
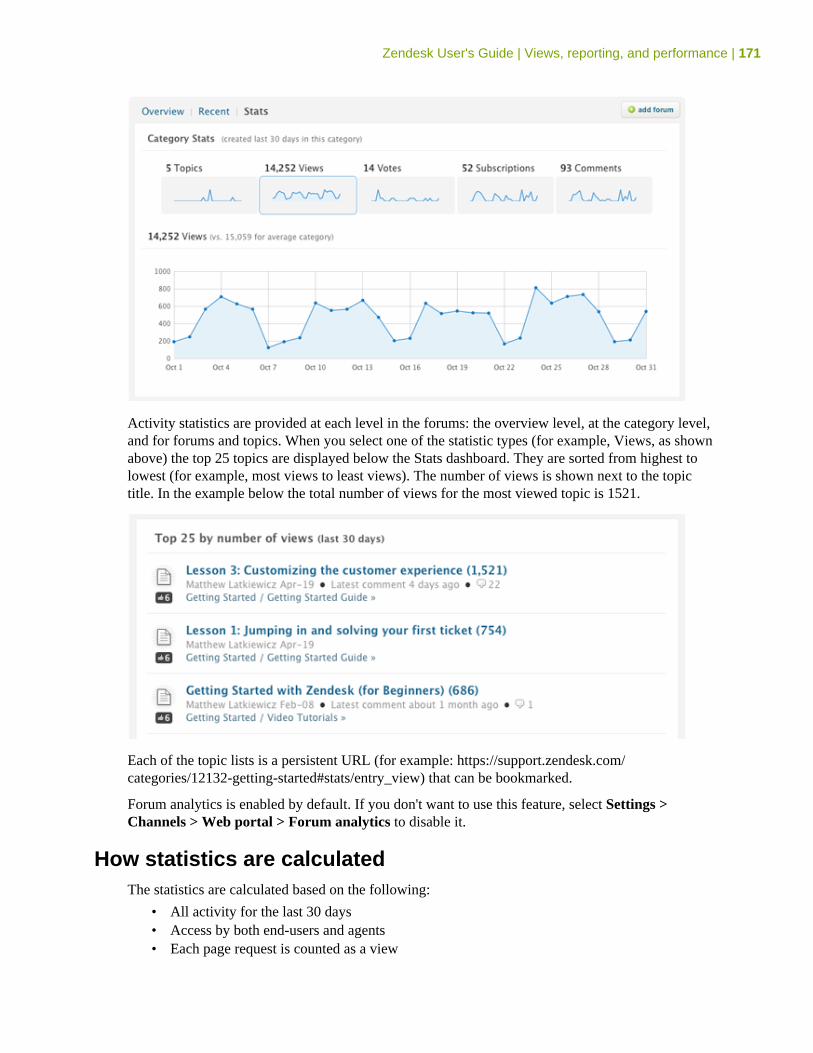
Zendesk User's Guide | Views, reporting, and performance | 171
Activity statistics are provided at each level in the forums: the overview level, at the category level,and for forums and topics. When you select one of the statistic types (for example, Views, as shownabove) the top 25 topics are displayed below the Stats dashboard. They are sorted from highest tolowest (for example, most views to least views). The number of views is shown next to the topictitle. In the example below the total number of views for the most viewed topic is 1521.
Each of the topic lists is a persistent URL (for example: https://support.zendesk.com/categories/12132-getting-started#stats/entry_view) that can be bookmarked.
Forum analytics is enabled by default. If you don't want to use this feature, select Settings >Channels > Web portal > Forum analytics to disable it.
How statistics are calculatedThe statistics are calculated based on the following:
• All activity for the last 30 days• Access by both end-users and agents• Each page request is counted as a view
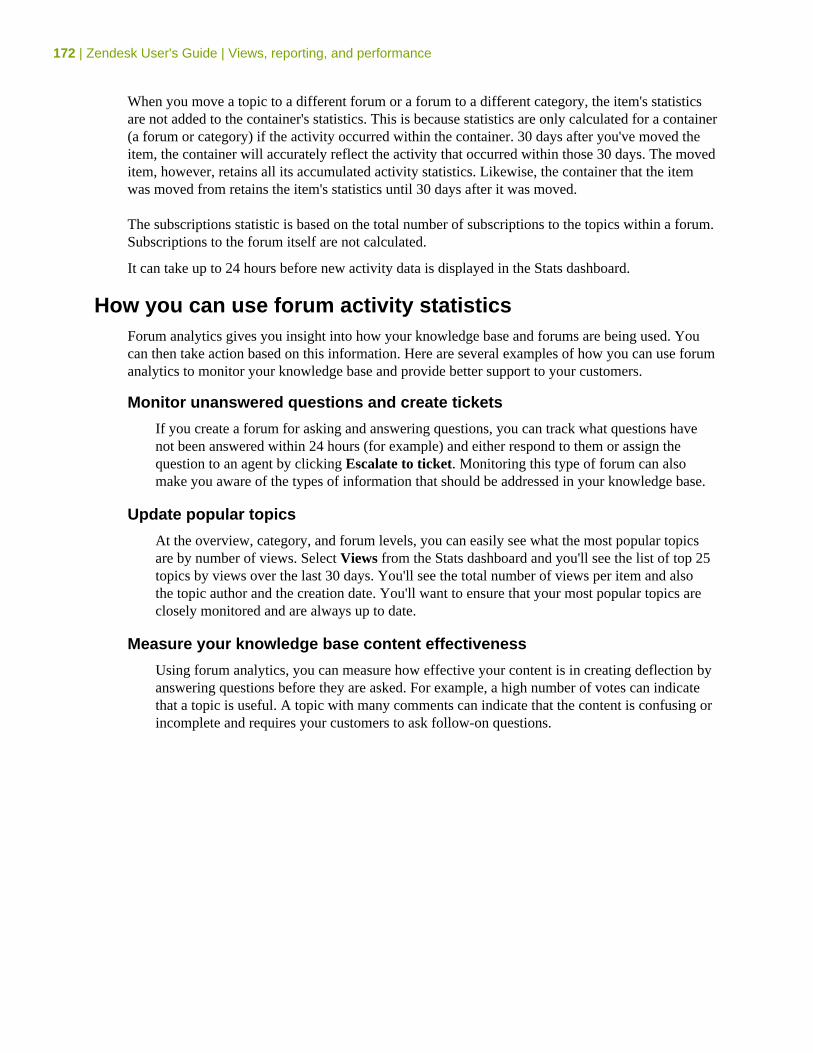
172 | Zendesk User's Guide | Views, reporting, and performance
When you move a topic to a different forum or a forum to a different category, the item's statisticsare not added to the container's statistics. This is because statistics are only calculated for a container(a forum or category) if the activity occurred within the container. 30 days after you've moved theitem, the container will accurately reflect the activity that occurred within those 30 days. The moveditem, however, retains all its accumulated activity statistics. Likewise, the container that the itemwas moved from retains the item's statistics until 30 days after it was moved.
The subscriptions statistic is based on the total number of subscriptions to the topics within a forum.Subscriptions to the forum itself are not calculated.
It can take up to 24 hours before new activity data is displayed in the Stats dashboard.
How you can use forum activity statisticsForum analytics gives you insight into how your knowledge base and forums are being used. Youcan then take action based on this information. Here are several examples of how you can use forumanalytics to monitor your knowledge base and provide better support to your customers.
Monitor unanswered questions and create tickets
If you create a forum for asking and answering questions, you can track what questions havenot been answered within 24 hours (for example) and either respond to them or assign thequestion to an agent by clicking Escalate to ticket. Monitoring this type of forum can alsomake you aware of the types of information that should be addressed in your knowledge base.
Update popular topics
At the overview, category, and forum levels, you can easily see what the most popular topicsare by number of views. Select Views from the Stats dashboard and you'll see the list of top 25topics by views over the last 30 days. You'll see the total number of views per item and alsothe topic author and the creation date. You'll want to ensure that your most popular topics areclosely monitored and are always up to date.
Measure your knowledge base content effectiveness
Using forum analytics, you can measure how effective your content is in creating deflection byanswering questions before they are asked. For example, a high number of votes can indicatethat a topic is useful. A topic with many comments can indicate that the content is confusing orincomplete and requires your customers to ask follow-on questions.
Chapter
7
Configuring and using your emailchannel
• Getting started with email in Zendesk• Forwarding email from other email providers• Using an external email domain• Changing the default email reply address• Setting up email pass through• Enabling personalized email replies• Using the whitelist and blacklist to control access to your help desk• Managing suspended tickets• Customizing your email templates• Setting up an email-only help desk
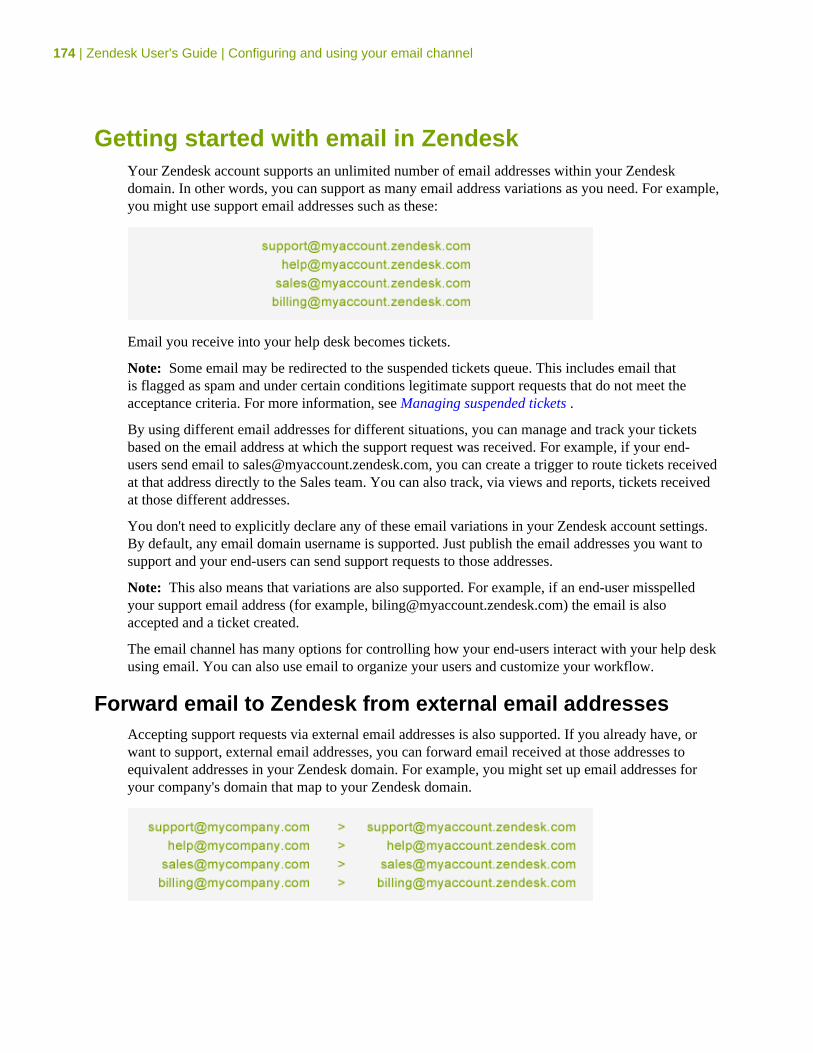
174 | Zendesk User's Guide | Configuring and using your email channel
Getting started with email in ZendeskYour Zendesk account supports an unlimited number of email addresses within your Zendeskdomain. In other words, you can support as many email address variations as you need. For example,you might use support email addresses such as these:
Email you receive into your help desk becomes tickets.
Note: Some email may be redirected to the suspended tickets queue. This includes email thatis flagged as spam and under certain conditions legitimate support requests that do not meet theacceptance criteria. For more information, see Managing suspended tickets .
By using different email addresses for different situations, you can manage and track your ticketsbased on the email address at which the support request was received. For example, if your end-users send email to [email protected], you can create a trigger to route tickets receivedat that address directly to the Sales team. You can also track, via views and reports, tickets receivedat those different addresses.
You don't need to explicitly declare any of these email variations in your Zendesk account settings.By default, any email domain username is supported. Just publish the email addresses you want tosupport and your end-users can send support requests to those addresses.
Note: This also means that variations are also supported. For example, if an end-user misspelledyour support email address (for example, [email protected]) the email is alsoaccepted and a ticket created.
The email channel has many options for controlling how your end-users interact with your help deskusing email. You can also use email to organize your users and customize your workflow.
Forward email to Zendesk from external email addressesAccepting support requests via external email addresses is also supported. If you already have, orwant to support, external email addresses, you can forward email received at those addresses toequivalent addresses in your Zendesk domain. For example, you might set up email addresses foryour company's domain that map to your Zendesk domain.
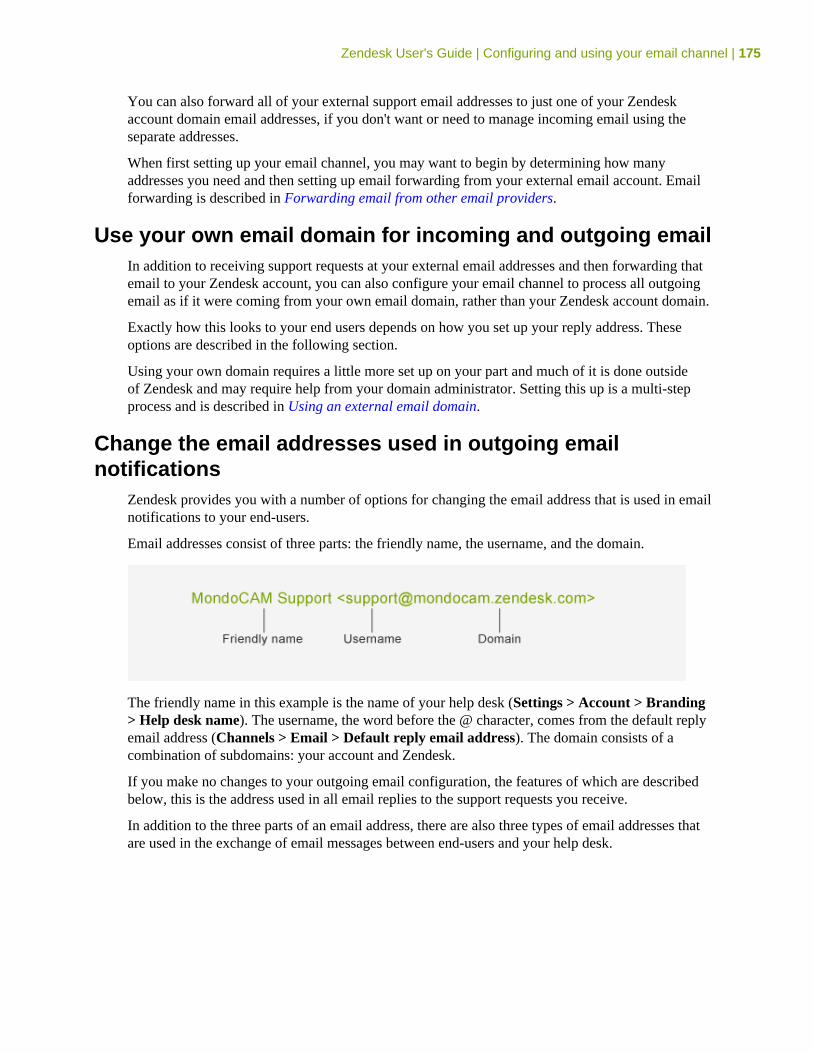
Zendesk User's Guide | Configuring and using your email channel | 175
You can also forward all of your external support email addresses to just one of your Zendeskaccount domain email addresses, if you don't want or need to manage incoming email using theseparate addresses.
When first setting up your email channel, you may want to begin by determining how manyaddresses you need and then setting up email forwarding from your external email account. Emailforwarding is described in Forwarding email from other email providers.
Use your own email domain for incoming and outgoing emailIn addition to receiving support requests at your external email addresses and then forwarding thatemail to your Zendesk account, you can also configure your email channel to process all outgoingemail as if it were coming from your own email domain, rather than your Zendesk account domain.
Exactly how this looks to your end users depends on how you set up your reply address. Theseoptions are described in the following section.
Using your own domain requires a little more set up on your part and much of it is done outsideof Zendesk and may require help from your domain administrator. Setting this up is a multi-stepprocess and is described in Using an external email domain.
Change the email addresses used in outgoing emailnotifications
Zendesk provides you with a number of options for changing the email address that is used in emailnotifications to your end-users.
Email addresses consist of three parts: the friendly name, the username, and the domain.
The friendly name in this example is the name of your help desk (Settings > Account > Branding> Help desk name). The username, the word before the @ character, comes from the default replyemail address (Channels > Email > Default reply email address). The domain consists of acombination of subdomains: your account and Zendesk.
If you make no changes to your outgoing email configuration, the features of which are describedbelow, this is the address used in all email replies to the support requests you receive.
In addition to the three parts of an email address, there are also three types of email addresses thatare used in the exchange of email messages between end-users and your help desk.
176 | Zendesk User's Guide | Configuring and using your email channel
Emailaddress
Description
Sent To This is the email address that supports requests are sent to. The Sent To emailaddress can be any of your supported email help desk email addresses (for example,[email protected]).
Reply From This is the email address that end-users see as the From address in the replies theyreceive from your help desk. There are a number of options for changing what thislooks like (described below).
The default reply address is My help desk name<[email protected]>.
Reply To This is the email address that end-users see when they reply back to the email theyreceived from your help desk. Replies back from the end-user include the ticketnumber, as in this example:
My help desk name <support+id#@myaccount.zendesk.com>
Note: The ticket ID is handled differently when using your own email domain. SeeAbout the Reply To addresses.
When you enable the Zendesk outgoing email configuration options, they affect the Reply From andReply To email addresses in slightly different ways for accounts using the default help desk domain(myaccount.zendesk.com) and those using an external domain (mycompany.com).
Default reply email address
The default reply email address is used as the Reply From address in all outgoing email unlessyou enable one of the other options described below. See Default reply email address.
Reply From address Reply To address
My help desk name<[email protected]>
My help desk name <support+id#@myaccount.zendesk.com>
My help desk name<[email protected]>
My help desk name<[email protected]>
You can change the default reply username to any of the other email addresses that yousupport.
Personalized email replies
Enabling personalized email replies adds the agent's name to the Reply From address,overriding the default reply email address. See Personalized email replies.
Reply From address Reply To address
Claire Grenier <[email protected]>
My help desk name <support+id#@myaccount.zendesk.com>
Claire Grenier <[email protected]>
My help desk name<[email protected]>
Zendesk User's Guide | Configuring and using your email channel | 177
Agent display names
In the Plus+ and Enterprise versions of Zendesk, agents can create display names that are usedin all communications with end-users. When personalized email replies is enabled, the agent'sdisplay name overrides their real name. See Agent display names.
Reply From Address Reply To address
Senhora Claire <[email protected]>
My help desk name <support+id#@myaccount.zendesk.com>
Senhora Claire <[email protected]>
My help desk name<[email protected]>
Email pass through addresses
Enabling email pass through addresses means that the same email address that was used asthe Sent To address is also used as the Reply From address. This only works when forwardingemail from external email addresses or using an external email domain for outgoing email. SeeEmail pass through addresses.
Reply From address Reply To address
[email protected] My help desk name<[email protected]>
The email username does not pass through in the Reply To address. Instead, the default replyemail address is used.
About the Reply To addressesWhen your end-users reply back to an email notification, the base of the Reply To address is yourdefault reply email address. However, replies back from the end-user must also include the ticket IDso that the incoming email can be matched to the ticket in your help desk. This is implemented intwo different ways. When using the myaccount.zendesk.com domain, the ticket ID is included in theReply To address, as in this example:
MondoCam Support <[email protected]>
The ticket ID is also added as a token in the email header. The only control you have over the ReplyTo address is to change the default reply email address. For example, if MondoCam used 'help'instead of 'support' as the username in the default reply address, the Reply To email address wouldlook like this:
MondoCam Support <[email protected]>
If you're using an external domain for email, the ticket ID is added to the email header but is notincluded in the Reply To address. Also, as noted above, the default reply address is used.
MondoCam Support <[email protected]>
The difference between these two implementations has to do with how email is processed whenusing an external domain.
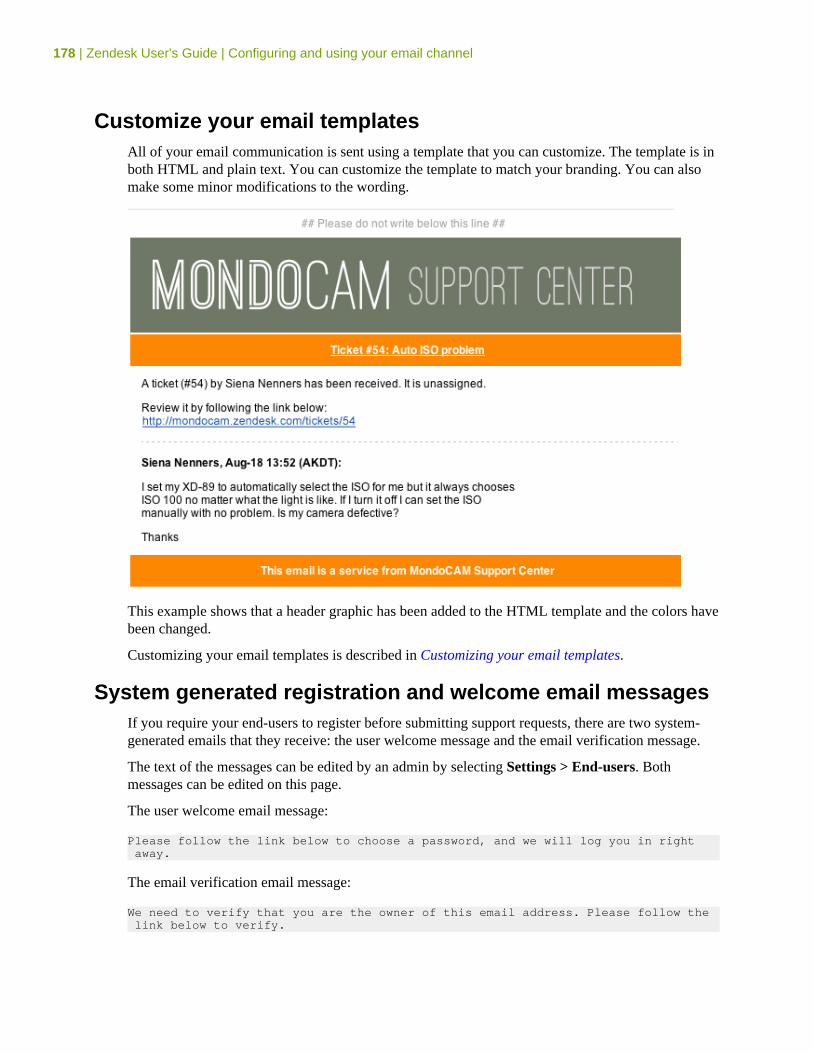
178 | Zendesk User's Guide | Configuring and using your email channel
Customize your email templatesAll of your email communication is sent using a template that you can customize. The template is inboth HTML and plain text. You can customize the template to match your branding. You can alsomake some minor modifications to the wording.
This example shows that a header graphic has been added to the HTML template and the colors havebeen changed.
Customizing your email templates is described in Customizing your email templates.
System generated registration and welcome email messagesIf you require your end-users to register before submitting support requests, there are two system-generated emails that they receive: the user welcome message and the email verification message.
The text of the messages can be edited by an admin by selecting Settings > End-users. Bothmessages can be edited on this page.
The user welcome email message:
Please follow the link below to choose a password, and we will log you in right away.
The email verification email message:
We need to verify that you are the owner of this email address. Please follow the link below to verify.
Zendesk User's Guide | Configuring and using your email channel | 179
If you run an open help desk and therefore don't require your end-users to register and log in, theywill not receive either of these messages. See Updating end-user settings to create an open helpdesk.
Email messages generated by business rulesAny business rules you set up to notify users contain text that will be included in email notifications.Zendesk provides you with several notification triggers the generate email notifications when a newsupport request is received via the ticket channels you support.
The default notification triggers include:
• Notify requester of received request• Notify all agents of received request• Notify twitter requester of received request
Email notifications are usually generated at each stage in the workflow, such as updating the ticket,solving the ticket, and so on. Your help desk business rules will contain many email notifications.
Agent email settingsYou have a number of options for customizing an agent's outgoing email. As mentioned in Changethe email addresses used in outgoing email notifications above, you can configure your help desk toinclude the agent's real name or display name in outgoing email.
Each agent's signature can also be added to ticket comments and outgoing email notifications. Thisis the default setting (Settings > Agents). A placeholder is used to insert the signature that agentsadd to their own profiles. An agent's signature can include any text, such as their name, the name oftheir support group, contact information, and so on.
You can also create a signature template for your help desk if, you example, you want all agentsignatures to include a standard wording and format for the company address. See the agent settingspage Settings > Agents for more information.
Use email domains to control access to your help deskYou can control access to your help desk based on your end-users' email address using the whitelistand blacklist. You add email domains or specific email addresses in the whitelist to allow those usersto submit email. Domains and email addresses added to the blacklist can be immediately routed intothe suspended email queue or completely rejected, preventing tickets from being created.
For more information, see Using the whitelist and blacklist to control access to your help desk.
Use email to manage usersUsers can be automatically added to an organization based on their email domain when they submita request for the first time or otherwise register with the help desk. This is referred to as usermapping and an admin can set this up by editing an organization's settings.
For more information, see Automatically adding users to organizations based on their email domain.
180 | Zendesk User's Guide | Configuring and using your email channel
Multiple email address supportEach user's account can contain multiple email address identities. One is the primary address and isused for all email notifications. Other email addresses are supported so that support requests that auser sends from one of their other emails accounts (either inadvertently or on purpose) are matchedto the same user account.
If an alternate email address is not included in the user's profile, a new and separate user accountis created. Should this happen, you can merge the new account into the old account. For moreinformation, see Merging a user's duplicate account.
Suspended tickets and spam emailZendesk uses a spam filter to prevent your help desk from getting cluttered with bogus tickets. Spamemail is caught and may be held in the suspended tickets queue or completely rejected (this dependson a percentage of probability that the email is spam). The suspended tickets queue is a system-generated view that appears in your list of views when email has been added to it.
However, there are other conditions under which legitimate tickets can be sent to the suspendedticket queue. See Managing suspended tickets for more details.
Email can also be suspended or rejected by using the whitelist and blacklist (Using the whitelist andblacklist to control access to your help desk) and you can manually delete a ticket and suspend theticket requester if it makes is past the spam filter.
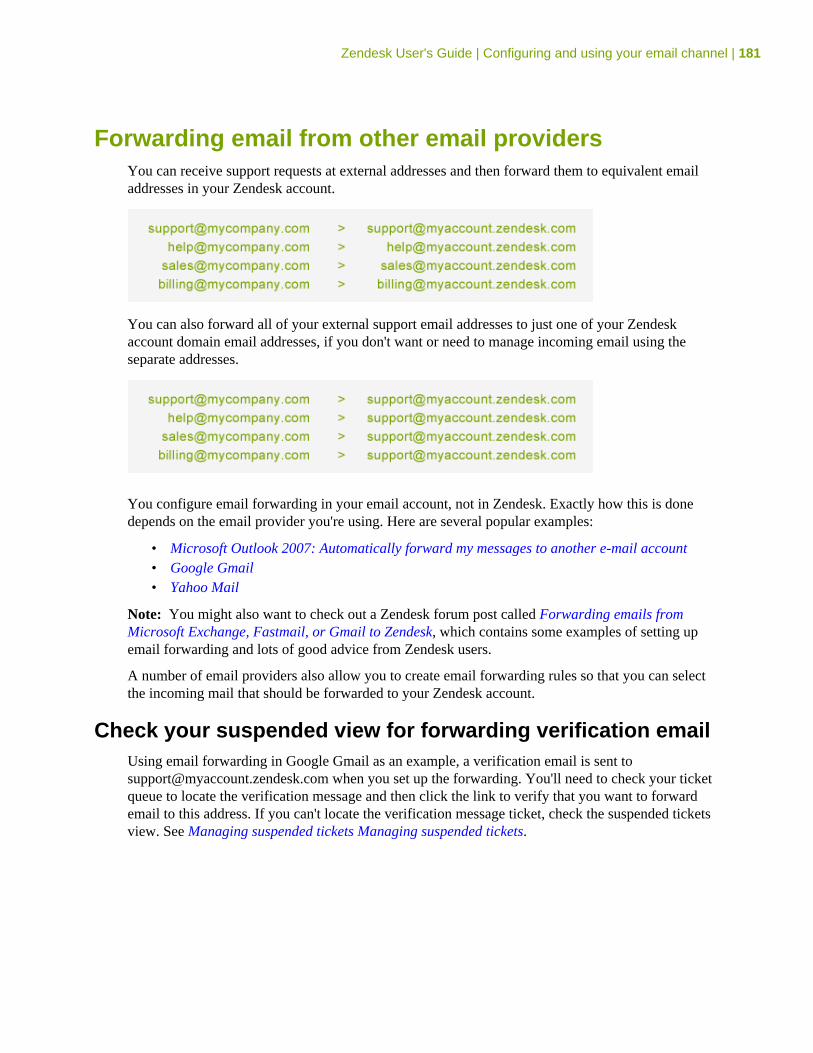
Zendesk User's Guide | Configuring and using your email channel | 181
Forwarding email from other email providersYou can receive support requests at external addresses and then forward them to equivalent emailaddresses in your Zendesk account.
You can also forward all of your external support email addresses to just one of your Zendeskaccount domain email addresses, if you don't want or need to manage incoming email using theseparate addresses.
You configure email forwarding in your email account, not in Zendesk. Exactly how this is donedepends on the email provider you're using. Here are several popular examples:
• Microsoft Outlook 2007: Automatically forward my messages to another e-mail account• Google Gmail• Yahoo Mail
Note: You might also want to check out a Zendesk forum post called Forwarding emails fromMicrosoft Exchange, Fastmail, or Gmail to Zendesk, which contains some examples of setting upemail forwarding and lots of good advice from Zendesk users.
A number of email providers also allow you to create email forwarding rules so that you can selectthe incoming mail that should be forwarded to your Zendesk account.
Check your suspended view for forwarding verification emailUsing email forwarding in Google Gmail as an example, a verification email is sent [email protected] when you set up the forwarding. You'll need to check your ticketqueue to locate the verification message and then click the link to verify that you want to forwardemail to this address. If you can't locate the verification message ticket, check the suspended ticketsview. See Managing suspended tickets Managing suspended tickets.
182 | Zendesk User's Guide | Configuring and using your email channel
Using an external email domainTo change your email address to an email domain other than myaccount.zendesk.com, you need tomake changes to your domain DNS settings. All but one of the steps involved are done outside ofZendesk and require knowledge of and access to edit your web site's domain settings.
There are three steps required to make this change:
1. To receive support requests at an email address other than the Zendesk default email address(for example, [email protected]), you need to forward mail received at that address toyour Zendesk account ([email protected]).
2. Create an SPF record to allow Zendesk to send email on behalf of your email server.In other words, outgoing mail will appear to be from [email protected], [email protected].
3. Update the default reply email address in Settings > Channels > Email to your externalsupport address ([email protected]).
4. If you also want to use personalized email replies, create an alias for the reply address.
Forward your incoming support mail to ZendeskThe first step is to forward the email that is received at your external email addresses to equivalentaddresses in your Zendesk account. See Forwarding email from other email providers.
Allow Zendesk to send outgoing mail on behalf of your emaildomain
The only way that you can send outgoing email from your Zendesk account and make it appearthat it originated from your own email address ([email protected]), is to create or edit (ifyou already have one set up) an SPF (Sender Policy Framework) record to include a reference toZendesk. The SPF record declares what SMTP servers other than your own are allowed to send mailas if it originated from your domain, which prevents spammers from sending email appearing tocome from your domain.
To create or edit an SPF record, you need to edit your domain's DNS settings. The steps in this partof the process are going to vary depending on the hosting service you use.
To begin, it'll be helpful to understand more about SPF records and what you need to include inyours. We recommend using either of the following SPF records.
Option 1:
v=spf1 include:support.zendesk.com ~all
Option 2:
v=spf1 include:support.zendesk.com ?all
This is an example of a new SPF record. If you already have an SPF record, you addsupport.zendesk.com to it.
Zendesk User's Guide | Configuring and using your email channel | 183
Note: Some Zendesk users have reported that they also needed to include smtp.zendesk.com to theirSPF record. This may be due to a configuration issue with the external domain. You include it as inthe following example:
v=spf1 include:support.zendesk.com include:smtp.zendesk.com ~all
The only difference between the two is ~all and ?all. These differences will be explained afterdescribing the other elements contained in the record statements.
The first element in the record is v=spf1, which sets the SPF version to 1. The include directive isthen used to declare that support.zendesk.com has permission to send outgoing mail from yourZendesk account as if it came from your domain.
Finally, the all directive determines how mail received from a domain not included in the SPFrecord is handled. To reject all mail not coming from a domain listed in the SPF record, you woulduse -all. However, Zendesk and many other customers who have already set this up, recommendusing either ~all or ?all. Here's what each means:
• ~all - This is considered a 'soft fail' in that the mail did not originate from a domain listedin the SPF record. However, it's not immediately rejected and may be evaluated further todetermine if it will be accepted. In other words, the mail might be rejected as spam.
• ?all - This is a declaration that you have no policy about mail received from domains notlisted in the SPF record. Using this minimizes the chances of the mail being rejected as spam.
Which of these you choose is up to you and your domain administrator. Some Zendesk users havenoted that using the more lenient setting (?all) helps to offset poorly configured mail servers thatmight otherwise over zealously reject the mail.
Note: If you're curious, you can read more about SPF records at www.openspf.org.
Creating an SPF recordThis is a step that you'd ideally have your domain administrator take care of. If that's not possible,or if you're the de facto domain administrator, here are some examples of how add an SPF record toyour domain.
SPF records are a single line of text and follow the format described above. If you have alreadyset up an SPF record for another purpose, you can simply add a reference to the Zendesk supportdomain to it. For example, users of both Google Apps and Zendesk have created SPF records thatlook like this:
v=spf1 include:_spf.google.com include:support.zendesk.com ?all
How you add an SPF record to your DNS configuration depends on how and by who your domain isbeing hosted. As an example, here are the instructions provided by GoDaddy.com: Managing DNSfor your domain names.
Update the default reply email address in ZendeskThe final step is to select Settings > Channels > Email and set the default reply email address toyour external email address.
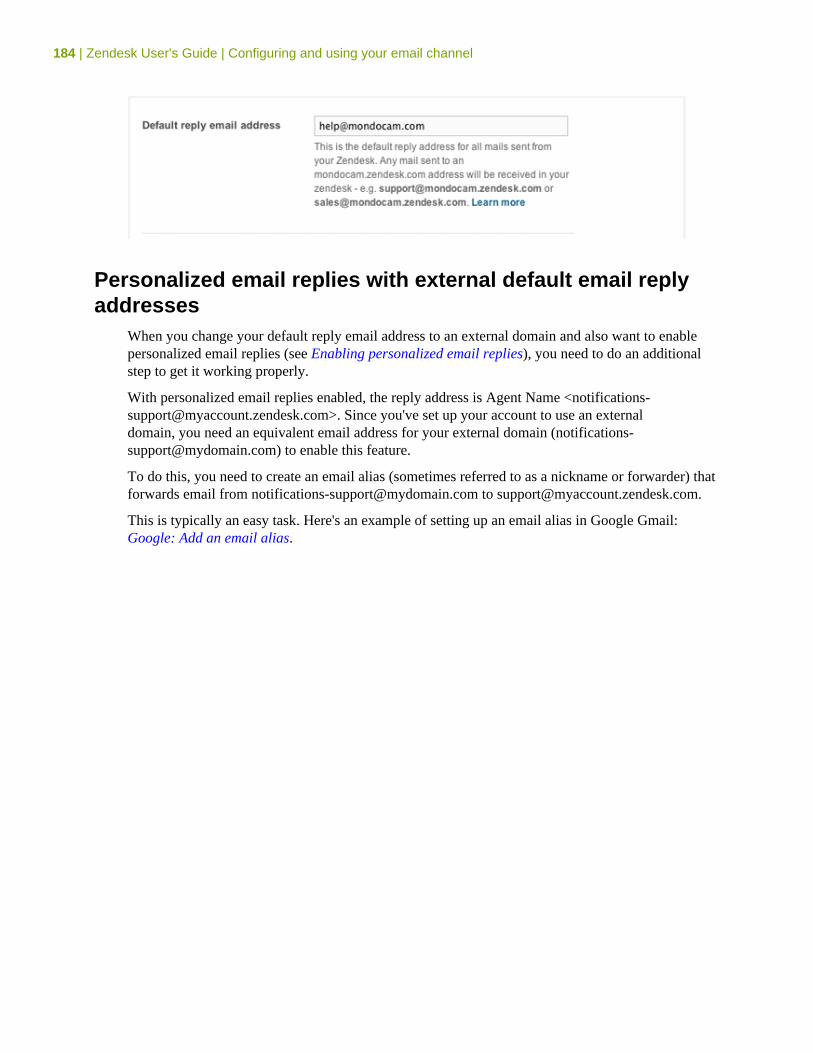
184 | Zendesk User's Guide | Configuring and using your email channel
Personalized email replies with external default email replyaddresses
When you change your default reply email address to an external domain and also want to enablepersonalized email replies (see Enabling personalized email replies), you need to do an additionalstep to get it working properly.
With personalized email replies enabled, the reply address is Agent Name <[email protected]>. Since you've set up your account to use an externaldomain, you need an equivalent email address for your external domain ([email protected]) to enable this feature.
To do this, you need to create an email alias (sometimes referred to as a nickname or forwarder) thatforwards email from [email protected] to [email protected].
This is typically an easy task. Here's an example of setting up an email alias in Google Gmail:Google: Add an email alias.
Zendesk User's Guide | Configuring and using your email channel | 185
Changing the default reply email addressWhen you create a Zendesk account, by default, your default reply email address [email protected] (email received at this address become tickets). This address isused as the Reply From address in all email notifications unless you do one of the following:
• Enable personalized email replies• Use agent display names• Enable email pass through
The part of the address that you can change with this option is the email username, which is theword preceding the @ symbol. The friendly name is the title of your help desk (Settings > Account> Branding > Help desk name).
Your default reply email address is used as the reply address no matter which of your supportedemail addresses is used.
Sent To Reply From
[email protected] My help desk name<[email protected]>
[email protected] My help desk name<[email protected]>
[email protected] My help desk name<[email protected]>
[email protected] My help desk name<[email protected]>
If you forward email from external email accounts (see Forwarding email from other emailproviders), the result is the same.
Sent To Reply From
[email protected] My help desk name<[email protected]>
[email protected] My help desk name<[email protected]>
[email protected] My help desk name<[email protected]>
[email protected] My help desk name<[email protected]>
If you've set up to use an external email domain for outgoing email (see Using an external emaildomain), you also set an external default reply address.
Sent To Reply From
[email protected] My help desk name<[email protected]>
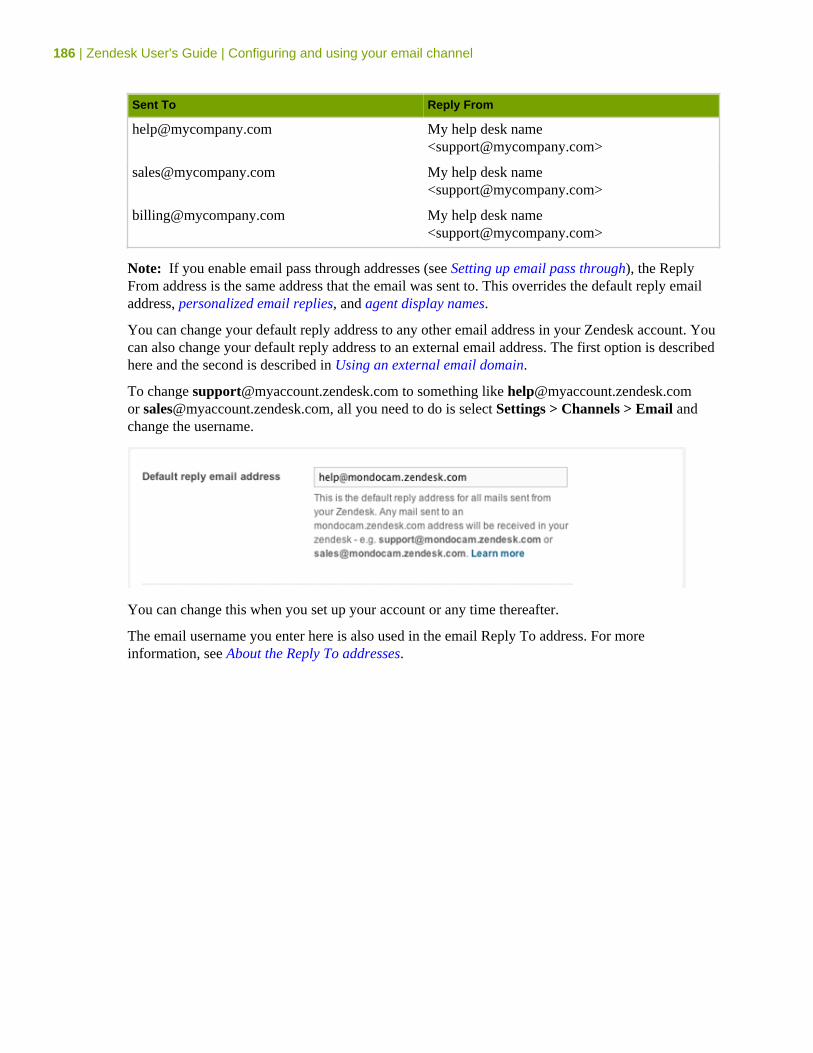
186 | Zendesk User's Guide | Configuring and using your email channel
Sent To Reply From
[email protected] My help desk name<[email protected]>
[email protected] My help desk name<[email protected]>
[email protected] My help desk name<[email protected]>
Note: If you enable email pass through addresses (see Setting up email pass through), the ReplyFrom address is the same address that the email was sent to. This overrides the default reply emailaddress, personalized email replies, and agent display names.
You can change your default reply address to any other email address in your Zendesk account. Youcan also change your default reply address to an external email address. The first option is describedhere and the second is described in Using an external email domain.
To change [email protected] to something like [email protected] [email protected], all you need to do is select Settings > Channels > Email andchange the username.
You can change this when you set up your account or any time thereafter.
The email username you enter here is also used in the email Reply To address. For moreinformation, see About the Reply To addresses.
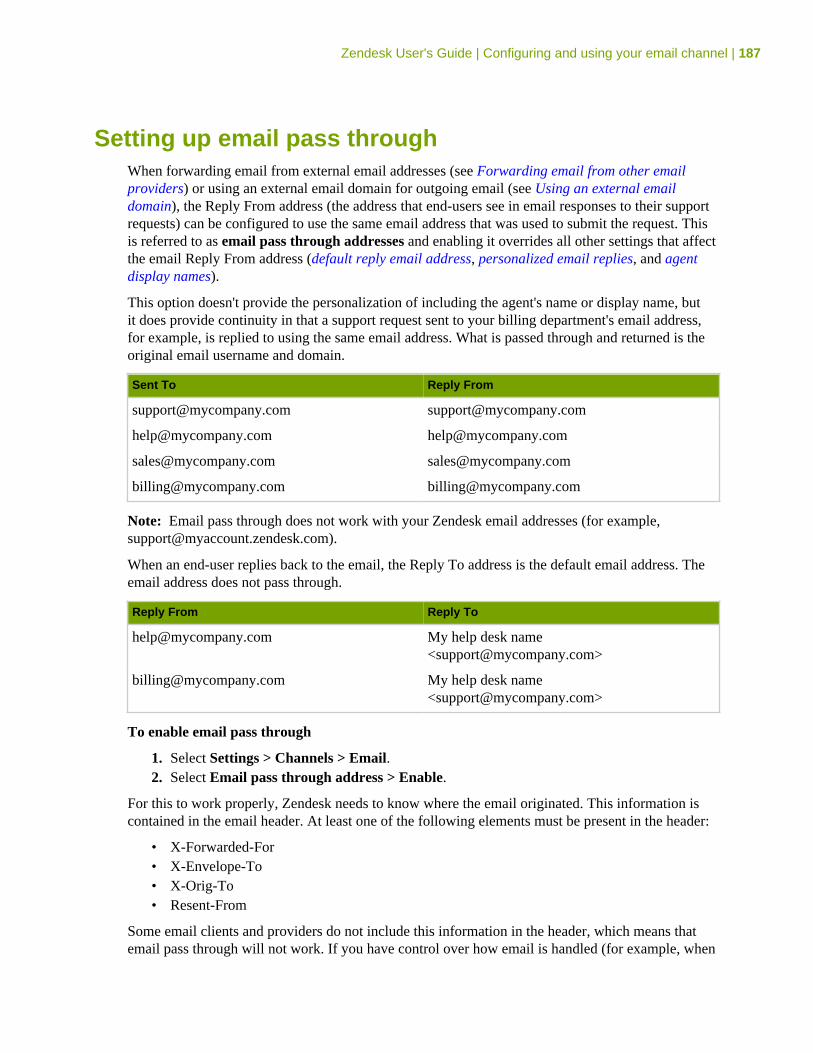
Zendesk User's Guide | Configuring and using your email channel | 187
Setting up email pass throughWhen forwarding email from external email addresses (see Forwarding email from other emailproviders) or using an external email domain for outgoing email (see Using an external emaildomain), the Reply From address (the address that end-users see in email responses to their supportrequests) can be configured to use the same email address that was used to submit the request. Thisis referred to as email pass through addresses and enabling it overrides all other settings that affectthe email Reply From address (default reply email address, personalized email replies, and agentdisplay names).
This option doesn't provide the personalization of including the agent's name or display name, butit does provide continuity in that a support request sent to your billing department's email address,for example, is replied to using the same email address. What is passed through and returned is theoriginal email username and domain.
Sent To Reply From
[email protected] [email protected]
[email protected] [email protected]
[email protected] [email protected]
[email protected] [email protected]
Note: Email pass through does not work with your Zendesk email addresses (for example,[email protected]).
When an end-user replies back to the email, the Reply To address is the default email address. Theemail address does not pass through.
Reply From Reply To
[email protected] My help desk name<[email protected]>
[email protected] My help desk name<[email protected]>
To enable email pass through
1. Select Settings > Channels > Email.2. Select Email pass through address > Enable.
For this to work properly, Zendesk needs to know where the email originated. This information iscontained in the email header. At least one of the following elements must be present in the header:
• X-Forwarded-For• X-Envelope-To• X-Orig-To• Resent-From
Some email clients and providers do not include this information in the header, which means thatemail pass through will not work. If you have control over how email is handled (for example, when

188 | Zendesk User's Guide | Configuring and using your email channel
forwarding email through your own domain or in a corporate setting), you can ensure that passthrough will work by adding this information to the email header.

Zendesk User's Guide | Configuring and using your email channel | 189
Enabling personalized email repliesWhen configuring your email channel, you have the option of adding the agent's name to the ReplyFrom address in all email replies to the end-user. In other words, you're changing the email friendlyname from the help desk name to the agent name. This is referred to as personalized email replies.
This example shows how email notifications look to end-users if you have not enabled personalizedemail replies.
The help desk name and default reply email address is used. The agent's name does not appear in theReply From address, but it is included in comments that the agent adds to the ticket.
With personalized email replies enabled, end-users see the agent's name in the Reply From address.This overrides the default reply email address.
Personalized email replies works with all of your email addresses.
Sent To Reply From
[email protected] Claire Grenier <[email protected]>
[email protected] Ben Gunther <[email protected]>
[email protected] Donna Rohrs <[email protected]>
[email protected] Mike Weeden <[email protected]>
When forwarding email from external email addresses (see Forwarding email from other emailproviders), you get the same result.
Sent To Reply From
[email protected] Claire Grenier <[email protected]>
[email protected] Ben Gunther <[email protected]>
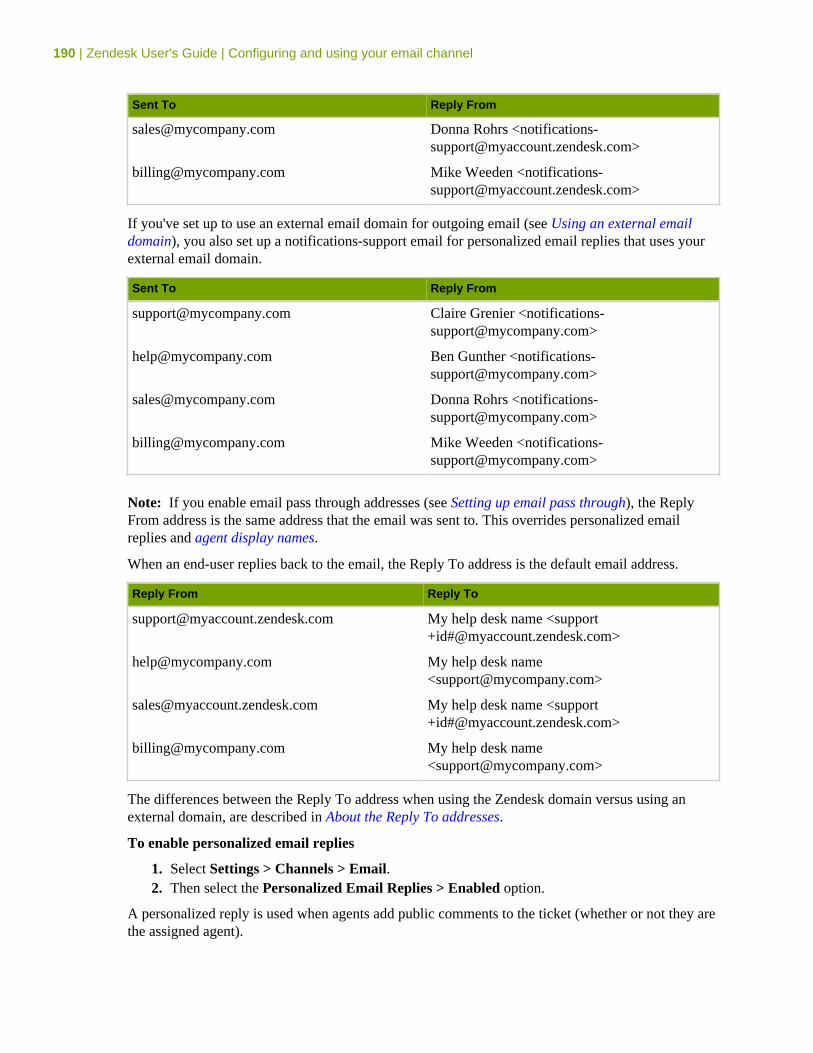
190 | Zendesk User's Guide | Configuring and using your email channel
Sent To Reply From
[email protected] Donna Rohrs <[email protected]>
[email protected] Mike Weeden <[email protected]>
If you've set up to use an external email domain for outgoing email (see Using an external emaildomain), you also set up a notifications-support email for personalized email replies that uses yourexternal email domain.
Sent To Reply From
[email protected] Claire Grenier <[email protected]>
[email protected] Ben Gunther <[email protected]>
[email protected] Donna Rohrs <[email protected]>
[email protected] Mike Weeden <[email protected]>
Note: If you enable email pass through addresses (see Setting up email pass through), the ReplyFrom address is the same address that the email was sent to. This overrides personalized emailreplies and agent display names.
When an end-user replies back to the email, the Reply To address is the default email address.
Reply From Reply To
[email protected] My help desk name <support+id#@myaccount.zendesk.com>
[email protected] My help desk name<[email protected]>
[email protected] My help desk name <support+id#@myaccount.zendesk.com>
[email protected] My help desk name<[email protected]>
The differences between the Reply To address when using the Zendesk domain versus using anexternal domain, are described in About the Reply To addresses.
To enable personalized email replies
1. Select Settings > Channels > Email.2. Then select the Personalized Email Replies > Enabled option.
A personalized reply is used when agents add public comments to the ticket (whether or not they arethe assigned agent).
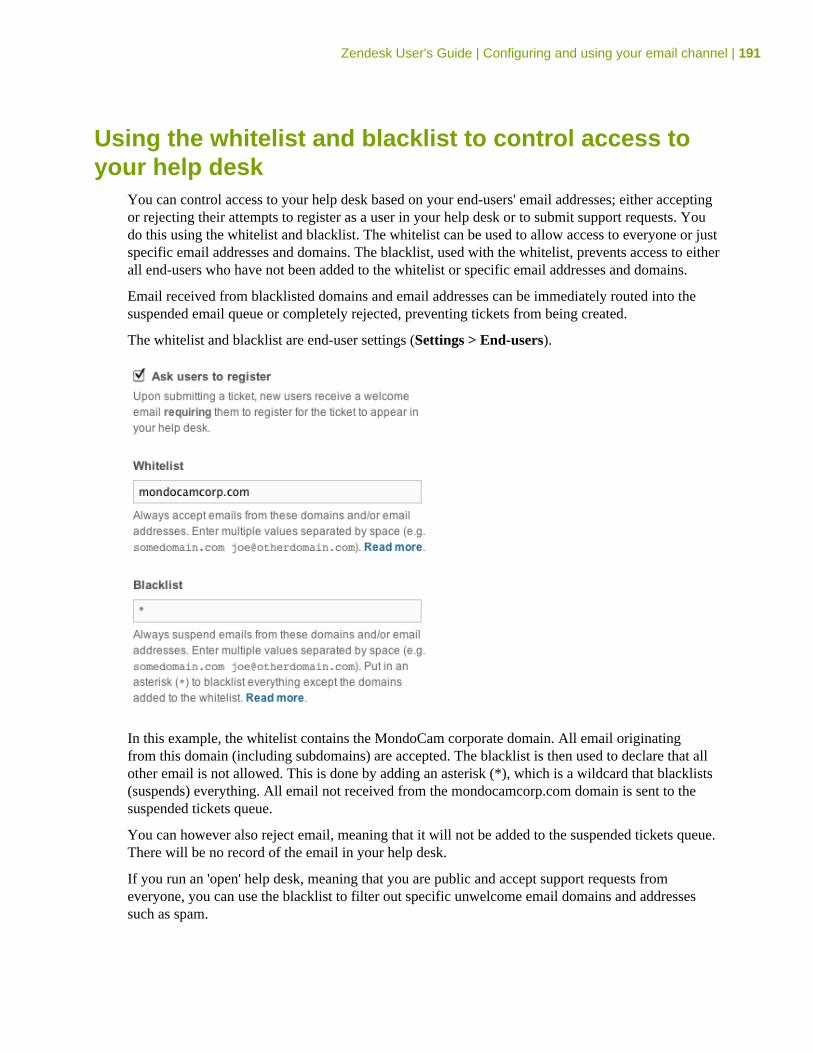
Zendesk User's Guide | Configuring and using your email channel | 191
Using the whitelist and blacklist to control access toyour help desk
You can control access to your help desk based on your end-users' email addresses; either acceptingor rejecting their attempts to register as a user in your help desk or to submit support requests. Youdo this using the whitelist and blacklist. The whitelist can be used to allow access to everyone or justspecific email addresses and domains. The blacklist, used with the whitelist, prevents access to eitherall end-users who have not been added to the whitelist or specific email addresses and domains.
Email received from blacklisted domains and email addresses can be immediately routed into thesuspended email queue or completely rejected, preventing tickets from being created.
The whitelist and blacklist are end-user settings (Settings > End-users).
In this example, the whitelist contains the MondoCam corporate domain. All email originatingfrom this domain (including subdomains) are accepted. The blacklist is then used to declare that allother email is not allowed. This is done by adding an asterisk (*), which is a wildcard that blacklists(suspends) everything. All email not received from the mondocamcorp.com domain is sent to thesuspended tickets queue.
You can however also reject email, meaning that it will not be added to the suspended tickets queue.There will be no record of the email in your help desk.
If you run an 'open' help desk, meaning that you are public and accept support requests fromeveryone, you can use the blacklist to filter out specific unwelcome email domains and addressessuch as spam.
192 | Zendesk User's Guide | Configuring and using your email channel
Email that has been suspended as a result of having been blacklisted is added to the suspended ticketqueue and flagged as blacklisted.
Whitelist and blacklist usage examplesThe whitelist and blacklist are used together to create rules for accepting, suspending, and rejectingemail. Aside from the asterisk, which suspends email, there are two other keywords that you canuse to build rules. The suspend keyword explicitly declares that a specific domain or email addresswill be sent to the suspended tickets queue. The reject keyword completely rejects the email, whichmeans that it is not added to the suspended tickets queue. All three of these keywords can be usedtogether to define your rules.
Approve a domain, suspend all othersThis example whitelists one domain and suspends all others.
whitelist: mondocamcorp.comblacklist: *
You can also add more than one domain or email address to the whitelist. Separate each with aspace.
whitelist: mondocamcorp.com mondocam.com mondostore.comblacklist: *
Approve a domain, but suspend specific email addresses within itIn this example, an entire domain is approved in the whitelist, all other email is rejected by using anasterisk in the blacklist, and then a specific email address within the approved domain is suspendedusing the suspend keyword.
whitelist: gmail.comblacklist: * suspend:[email protected]
Using this method, you can suspend specific email addresses from a domain that you have approvedin the whitelist.
Approve a domain, but reject specific email addresses anddomains within itSimilar to the previous example, a domain is approved in the whitelist and then exceptions to thatapproval are made in the blacklist. Instead of suspending a specific email address, it is insteadrejected.
whitelist: gmail.comblacklist: * reject:[email protected]
This example also shows that you can add multiple email addresses and domains to the blacklist.
Approve all, but reject specific email addresses and domainsYou can also leave the whitelist empty, meaning that all email is accepted, and then make exceptionsfor specific email addresses and domains.
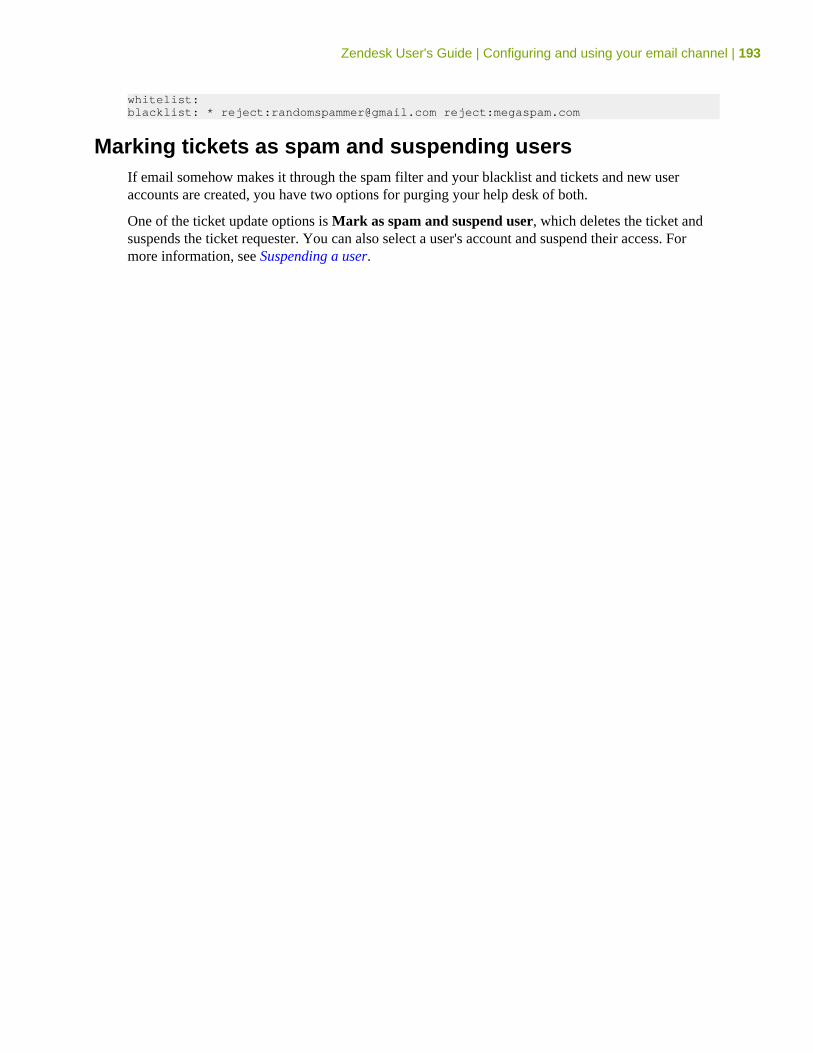
Zendesk User's Guide | Configuring and using your email channel | 193
whitelist: blacklist: * reject:[email protected] reject:megaspam.com
Marking tickets as spam and suspending usersIf email somehow makes it through the spam filter and your blacklist and tickets and new useraccounts are created, you have two options for purging your help desk of both.
One of the ticket update options is Mark as spam and suspend user, which deletes the ticket andsuspends the ticket requester. You can also select a user's account and suspend their access. Formore information, see Suspending a user.
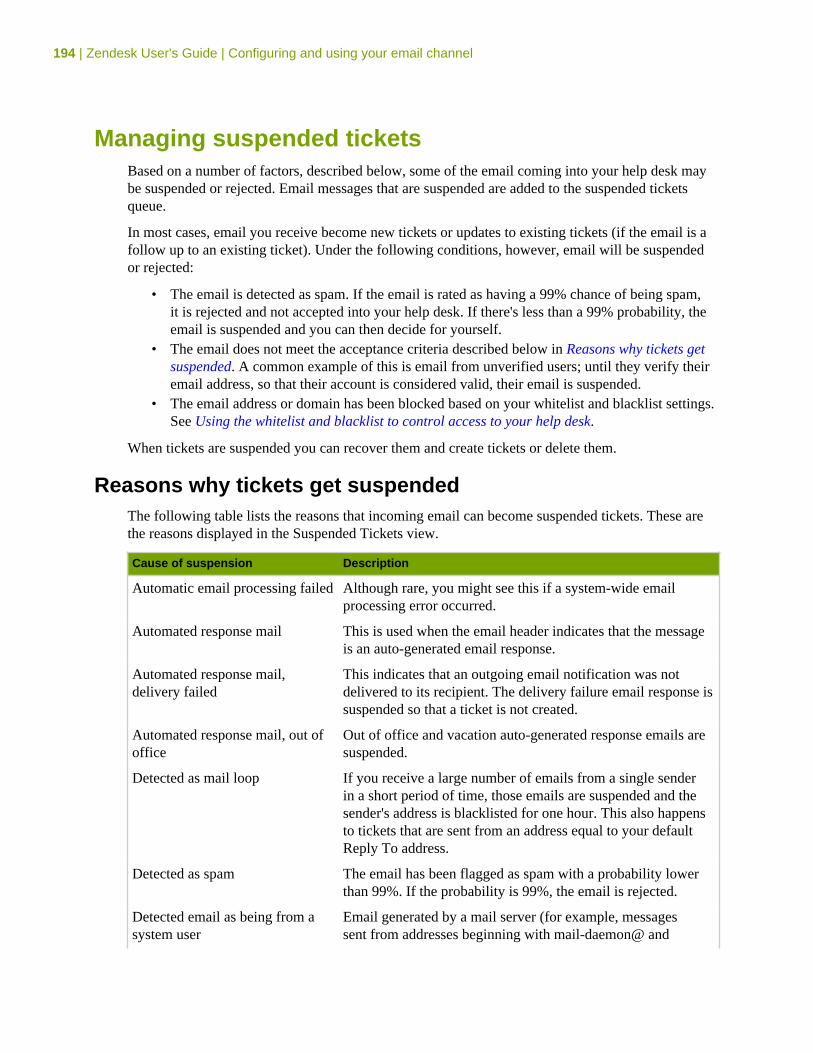
194 | Zendesk User's Guide | Configuring and using your email channel
Managing suspended ticketsBased on a number of factors, described below, some of the email coming into your help desk maybe suspended or rejected. Email messages that are suspended are added to the suspended ticketsqueue.
In most cases, email you receive become new tickets or updates to existing tickets (if the email is afollow up to an existing ticket). Under the following conditions, however, email will be suspendedor rejected:
• The email is detected as spam. If the email is rated as having a 99% chance of being spam,it is rejected and not accepted into your help desk. If there's less than a 99% probability, theemail is suspended and you can then decide for yourself.
• The email does not meet the acceptance criteria described below in Reasons why tickets getsuspended. A common example of this is email from unverified users; until they verify theiremail address, so that their account is considered valid, their email is suspended.
• The email address or domain has been blocked based on your whitelist and blacklist settings.See Using the whitelist and blacklist to control access to your help desk.
When tickets are suspended you can recover them and create tickets or delete them.
Reasons why tickets get suspendedThe following table lists the reasons that incoming email can become suspended tickets. These arethe reasons displayed in the Suspended Tickets view.
Cause of suspension Description
Automatic email processing failed Although rare, you might see this if a system-wide emailprocessing error occurred.
Automated response mail This is used when the email header indicates that the messageis an auto-generated email response.
Automated response mail,delivery failed
This indicates that an outgoing email notification was notdelivered to its recipient. The delivery failure email response issuspended so that a ticket is not created.
Automated response mail, out ofoffice
Out of office and vacation auto-generated response emails aresuspended.
Detected as mail loop If you receive a large number of emails from a single senderin a short period of time, those emails are suspended and thesender's address is blacklisted for one hour. This also happensto tickets that are sent from an address equal to your defaultReply To address.
Detected as spam The email has been flagged as spam with a probability lowerthan 99%. If the probability is 99%, the email is rejected.
Detected email as being from asystem user
Email generated by a mail server (for example, messagessent from addresses beginning with mail-daemon@ and

Zendesk User's Guide | Configuring and using your email channel | 195
Cause of suspension Description
postmaster@) are suspended because it is assumed that theyare not intended to be support requests.
Email for 'noreply" address The email address is a "no reply" email address, meaning thatit is not intended to receive email.
End user only allowed to updatetheir own tickets
This indicates that an email response (ticket update) wasreceived from a user (email address) that is different from theoriginal submitter's email address. This might happen if thesubmitter forwarded the email to a different email account andthen attempted to reply back to the help desk. Multiple emailaddresses per user are supported but they must be added to theuser's profile.
Permission denied due tounauthenticated email update
This indicates that the email header doesn't contain the ticketID token. This can happen if an email client strips out emailheader information.
Permission denied for unknownemail submitter
When you require your help desk users to register and createan account, email received from unregistered (unknown) usersis suspended.
Sender domain not on whitelist When your account is configured to only allow emails from agiven set of domains (using the whitelist), this indicates thatthe sender's email address or domain is not within that set.
Submitted by unverified user This indicates that the user is known in your help desk but hasnot yet verified their email address.
Unknown user tried to updateexisting ticket
An unknown user has attempted to update an existing ticket.This can happen if an email is forwarded and then replied to(using the Reply To email address) from an unknown useraccount. A user's account can include multiple email addressesbut they must be added to their user profile.
User must sign up to submitemail, user notified
This is used when an account requires end-users to register andtherefore verify their email address before submitting tickets.Once their email address/user account is verified, they cansubmit tickets.
Troubleshooting spam email and suspended ticketsZendesk uses spam detection software to rate, suspend, and sometimes reject incoming email. Ifyou find that you're still receiving more spam than you'd like, you can use the blacklist to suspendor reject specific email addresses and domains. If on the other hand email that you expect not to besuspended is, you can use the whitelist to explicitly approve email addresses and domains. See Usingthe whitelist and blacklist to control access to your help desk.
Viewing suspended ticketsSuspended tickets appear in a system-generated view. If you have no suspended tickets, you will notsee a view. If you do, a Suspended Tickets view is added to your list of views, as shown here:
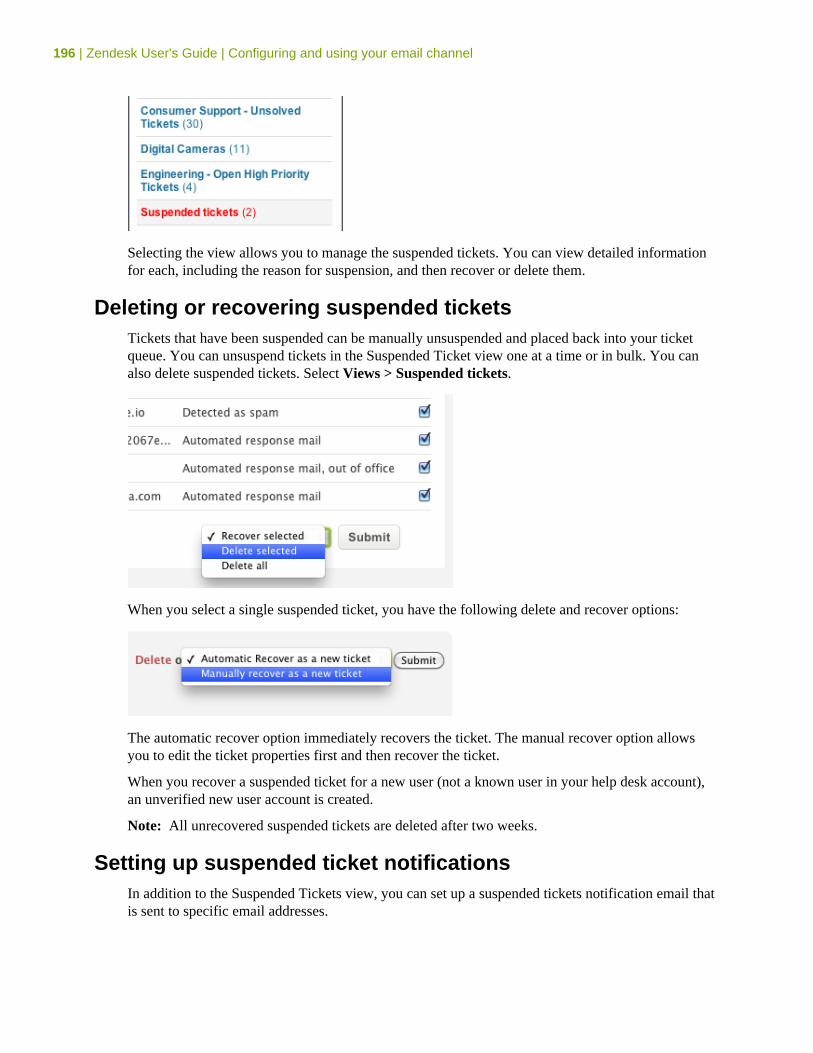
196 | Zendesk User's Guide | Configuring and using your email channel
Selecting the view allows you to manage the suspended tickets. You can view detailed informationfor each, including the reason for suspension, and then recover or delete them.
Deleting or recovering suspended ticketsTickets that have been suspended can be manually unsuspended and placed back into your ticketqueue. You can unsuspend tickets in the Suspended Ticket view one at a time or in bulk. You canalso delete suspended tickets. Select Views > Suspended tickets.
When you select a single suspended ticket, you have the following delete and recover options:
The automatic recover option immediately recovers the ticket. The manual recover option allowsyou to edit the ticket properties first and then recover the ticket.
When you recover a suspended ticket for a new user (not a known user in your help desk account),an unverified new user account is created.
Note: All unrecovered suspended tickets are deleted after two weeks.
Setting up suspended ticket notificationsIn addition to the Suspended Tickets view, you can set up a suspended tickets notification email thatis sent to specific email addresses.
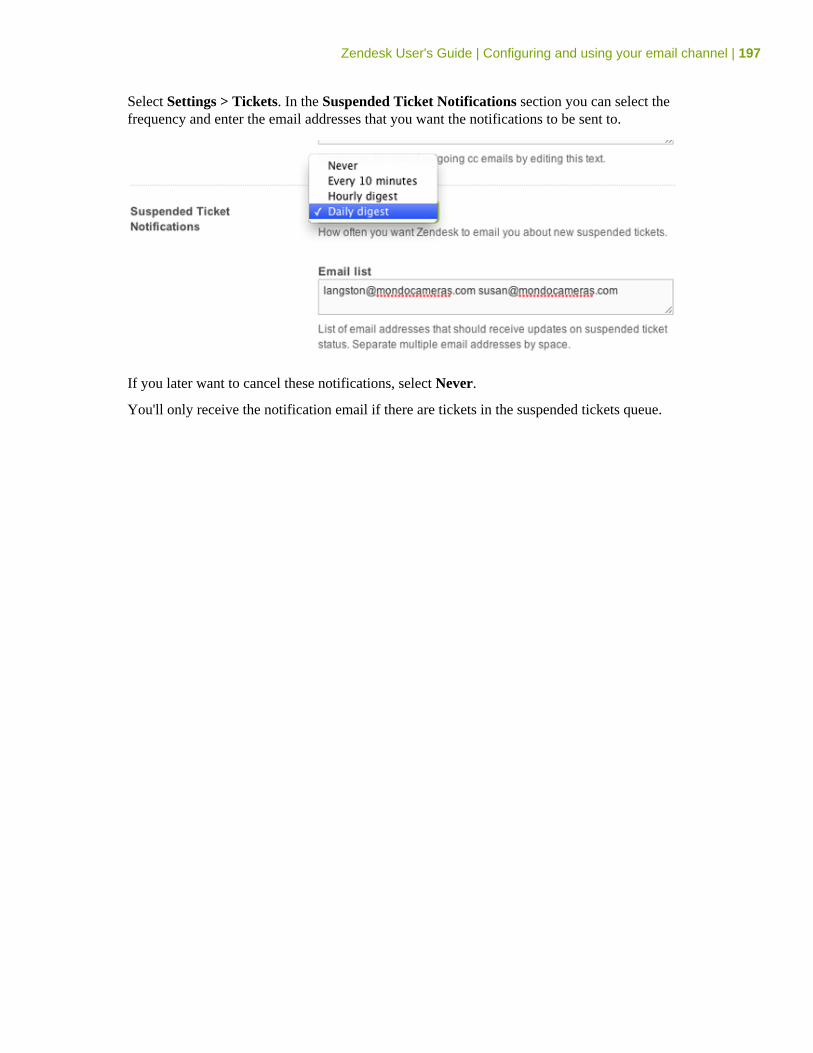
Zendesk User's Guide | Configuring and using your email channel | 197
Select Settings > Tickets. In the Suspended Ticket Notifications section you can select thefrequency and enter the email addresses that you want the notifications to be sent to.
If you later want to cancel these notifications, select Never.
You'll only receive the notification email if there are tickets in the suspended tickets queue.
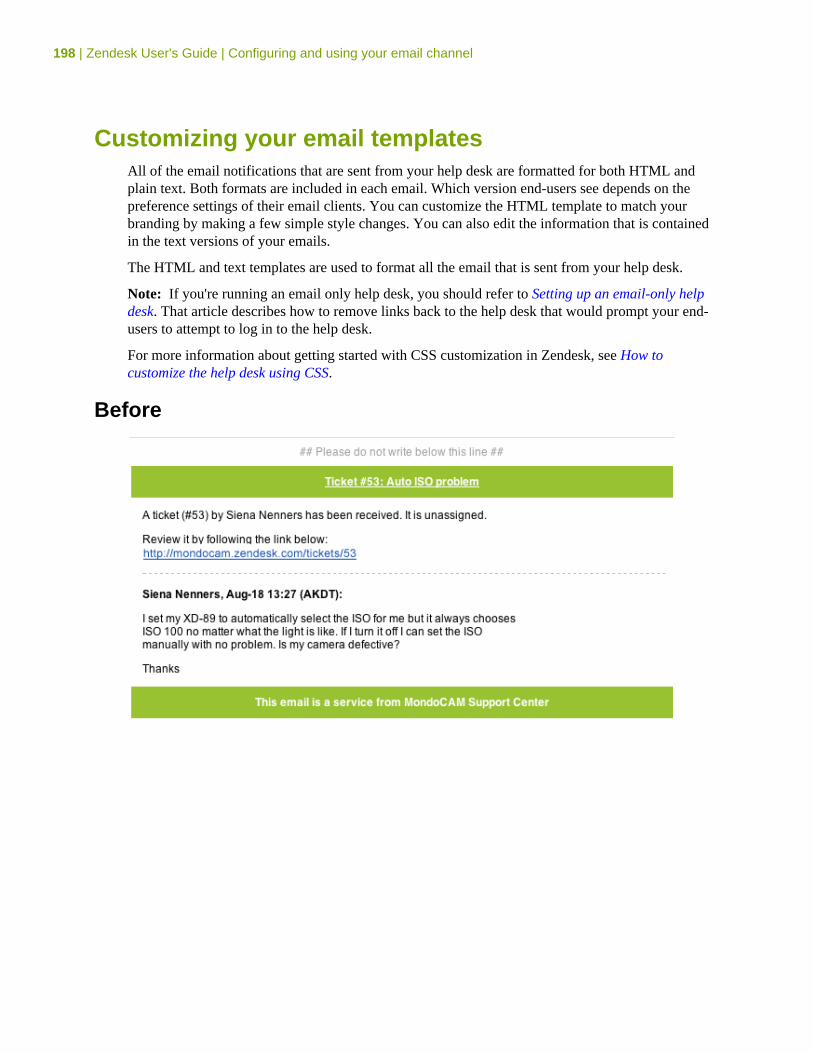
198 | Zendesk User's Guide | Configuring and using your email channel
Customizing your email templatesAll of the email notifications that are sent from your help desk are formatted for both HTML andplain text. Both formats are included in each email. Which version end-users see depends on thepreference settings of their email clients. You can customize the HTML template to match yourbranding by making a few simple style changes. You can also edit the information that is containedin the text versions of your emails.
The HTML and text templates are used to format all the email that is sent from your help desk.
Note: If you're running an email only help desk, you should refer to Setting up an email-only helpdesk. That article describes how to remove links back to the help desk that would prompt your end-users to attempt to log in to the help desk.
For more information about getting started with CSS customization in Zendesk, see How tocustomize the help desk using CSS.
Before
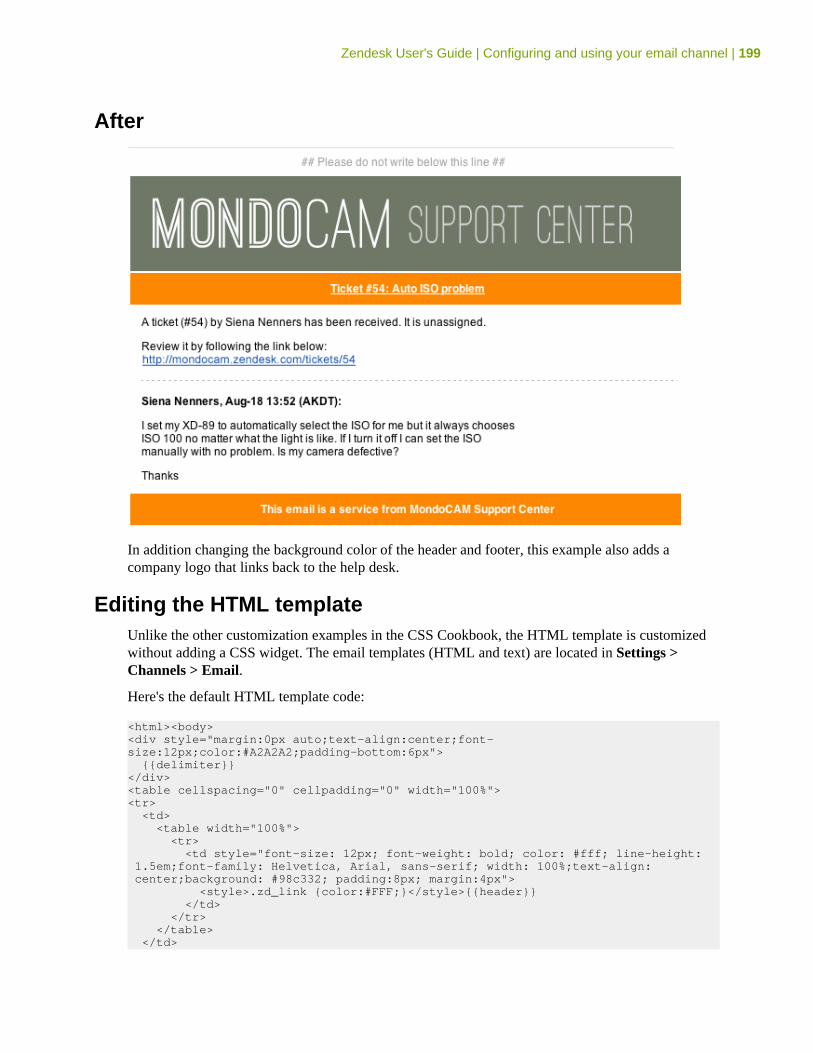
Zendesk User's Guide | Configuring and using your email channel | 199
After
In addition changing the background color of the header and footer, this example also adds acompany logo that links back to the help desk.
Editing the HTML templateUnlike the other customization examples in the CSS Cookbook, the HTML template is customizedwithout adding a CSS widget. The email templates (HTML and text) are located in Settings >Channels > Email.
Here's the default HTML template code:
<html><body><div style="margin:0px auto;text-align:center;font-size:12px;color:#A2A2A2;padding-bottom:6px"> {{delimiter}}</div><table cellspacing="0" cellpadding="0" width="100%"><tr> <td> <table width="100%"> <tr> <td style="font-size: 12px; font-weight: bold; color: #fff; line-height: 1.5em;font-family: Helvetica, Arial, sans-serif; width: 100%;text-align: center;background: #98c332; padding:8px; margin:4px"> <style>.zd_link {color:#FFF;}</style>{{header}} </td> </tr> </table> </td>
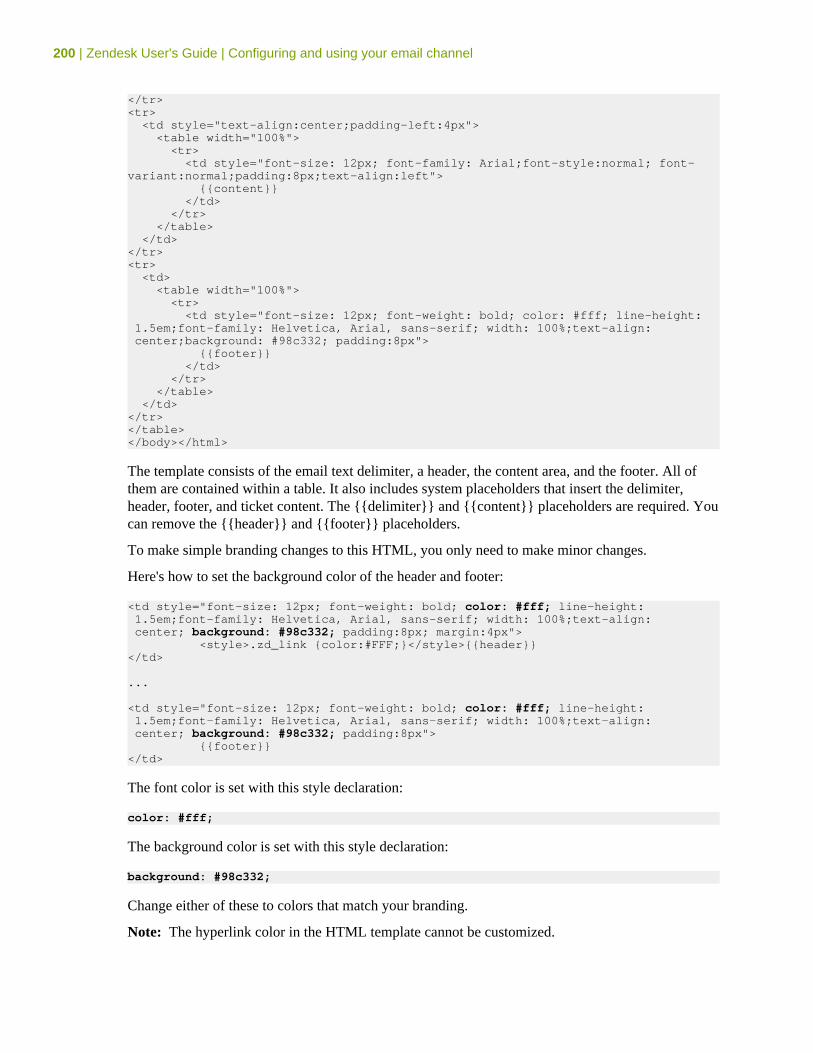
200 | Zendesk User's Guide | Configuring and using your email channel
</tr><tr> <td style="text-align:center;padding-left:4px"> <table width="100%"> <tr> <td style="font-size: 12px; font-family: Arial;font-style:normal; font-variant:normal;padding:8px;text-align:left"> {{content}} </td> </tr> </table> </td></tr><tr> <td> <table width="100%"> <tr> <td style="font-size: 12px; font-weight: bold; color: #fff; line-height: 1.5em;font-family: Helvetica, Arial, sans-serif; width: 100%;text-align: center;background: #98c332; padding:8px"> {{footer}} </td> </tr> </table> </td></tr></table></body></html>
The template consists of the email text delimiter, a header, the content area, and the footer. All ofthem are contained within a table. It also includes system placeholders that insert the delimiter,header, footer, and ticket content. The {{delimiter}} and {{content}} placeholders are required. Youcan remove the {{header}} and {{footer}} placeholders.
To make simple branding changes to this HTML, you only need to make minor changes.
Here's how to set the background color of the header and footer:
<td style="font-size: 12px; font-weight: bold; color: #fff; line-height: 1.5em;font-family: Helvetica, Arial, sans-serif; width: 100%;text-align: center; background: #98c332; padding:8px; margin:4px"> <style>.zd_link {color:#FFF;}</style>{{header}}</td>
...
<td style="font-size: 12px; font-weight: bold; color: #fff; line-height: 1.5em;font-family: Helvetica, Arial, sans-serif; width: 100%;text-align: center; background: #98c332; padding:8px"> {{footer}}</td>
The font color is set with this style declaration:
color: #fff;
The background color is set with this style declaration:
background: #98c332;
Change either of these to colors that match your branding.
Note: The hyperlink color in the HTML template cannot be customized.
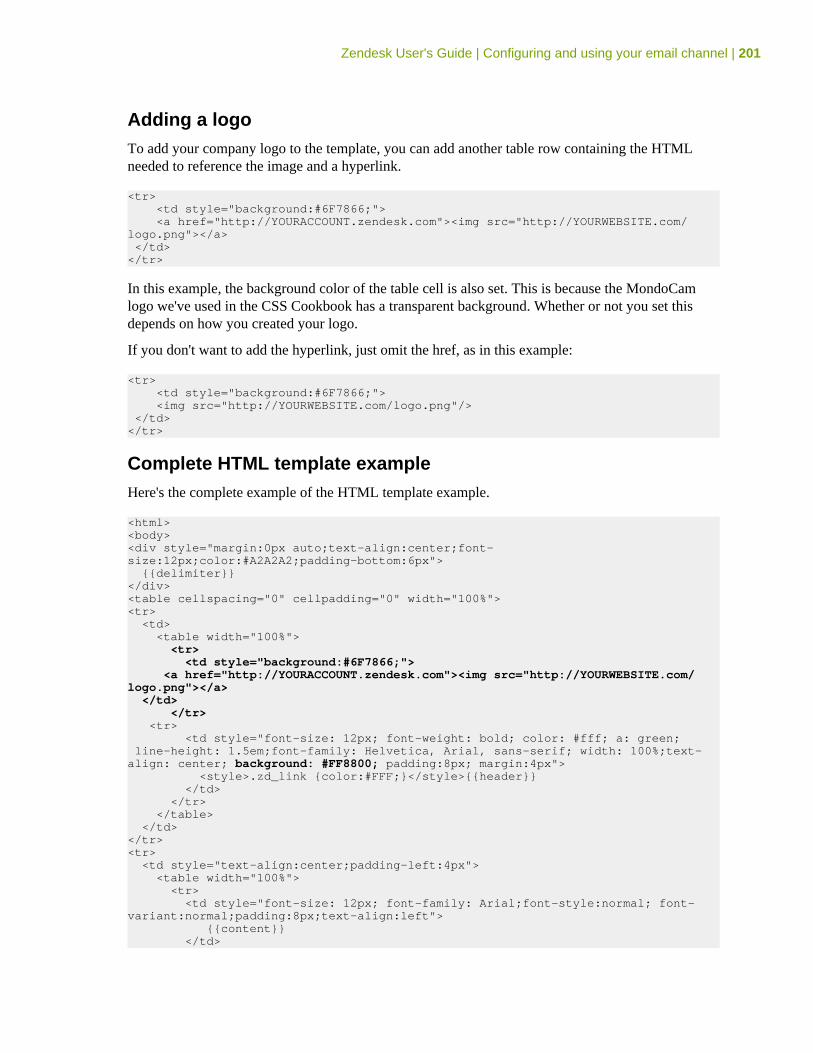
Zendesk User's Guide | Configuring and using your email channel | 201
Adding a logoTo add your company logo to the template, you can add another table row containing the HTMLneeded to reference the image and a hyperlink.
<tr> <td style="background:#6F7866;"> <a href="http://YOURACCOUNT.zendesk.com"><img src="http://YOURWEBSITE.com/logo.png"></a> </td></tr>
In this example, the background color of the table cell is also set. This is because the MondoCamlogo we've used in the CSS Cookbook has a transparent background. Whether or not you set thisdepends on how you created your logo.
If you don't want to add the hyperlink, just omit the href, as in this example:
<tr> <td style="background:#6F7866;"> <img src="http://YOURWEBSITE.com/logo.png"/> </td></tr>
Complete HTML template exampleHere's the complete example of the HTML template example.
<html><body><div style="margin:0px auto;text-align:center;font-size:12px;color:#A2A2A2;padding-bottom:6px"> {{delimiter}}</div><table cellspacing="0" cellpadding="0" width="100%"><tr> <td> <table width="100%"> <tr> <td style="background:#6F7866;"> <a href="http://YOURACCOUNT.zendesk.com"><img src="http://YOURWEBSITE.com/logo.png"></a> </td> </tr> <tr> <td style="font-size: 12px; font-weight: bold; color: #fff; a: green; line-height: 1.5em;font-family: Helvetica, Arial, sans-serif; width: 100%;text-align: center; background: #FF8800; padding:8px; margin:4px"> <style>.zd_link {color:#FFF;}</style>{{header}} </td> </tr> </table> </td></tr><tr> <td style="text-align:center;padding-left:4px"> <table width="100%"> <tr> <td style="font-size: 12px; font-family: Arial;font-style:normal; font-variant:normal;padding:8px;text-align:left"> {{content}} </td>
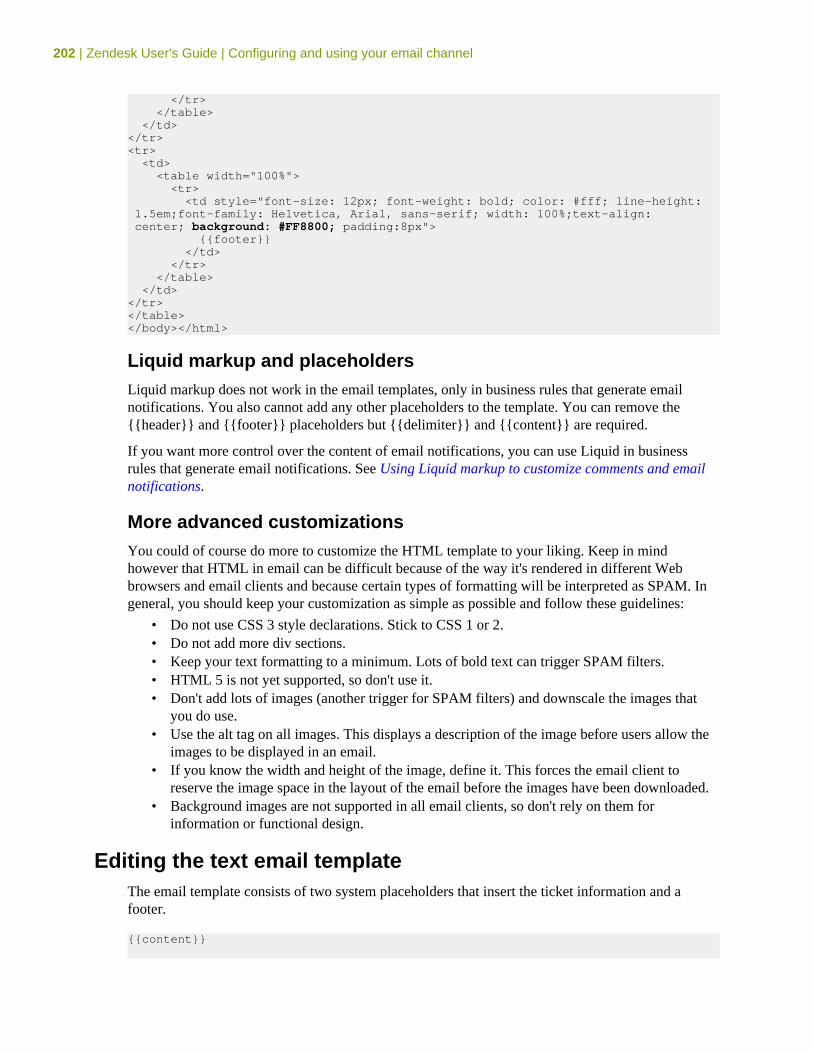
202 | Zendesk User's Guide | Configuring and using your email channel
</tr> </table> </td></tr><tr> <td> <table width="100%"> <tr> <td style="font-size: 12px; font-weight: bold; color: #fff; line-height: 1.5em;font-family: Helvetica, Arial, sans-serif; width: 100%;text-align: center; background: #FF8800; padding:8px"> {{footer}} </td> </tr> </table> </td></tr></table></body></html>
Liquid markup and placeholdersLiquid markup does not work in the email templates, only in business rules that generate emailnotifications. You also cannot add any other placeholders to the template. You can remove the{{header}} and {{footer}} placeholders but {{delimiter}} and {{content}} are required.
If you want more control over the content of email notifications, you can use Liquid in businessrules that generate email notifications. See Using Liquid markup to customize comments and emailnotifications.
More advanced customizationsYou could of course do more to customize the HTML template to your liking. Keep in mindhowever that HTML in email can be difficult because of the way it's rendered in different Webbrowsers and email clients and because certain types of formatting will be interpreted as SPAM. Ingeneral, you should keep your customization as simple as possible and follow these guidelines:
• Do not use CSS 3 style declarations. Stick to CSS 1 or 2.• Do not add more div sections.• Keep your text formatting to a minimum. Lots of bold text can trigger SPAM filters.• HTML 5 is not yet supported, so don't use it.• Don't add lots of images (another trigger for SPAM filters) and downscale the images that
you do use.• Use the alt tag on all images. This displays a description of the image before users allow the
images to be displayed in an email.• If you know the width and height of the image, define it. This forces the email client to
reserve the image space in the layout of the email before the images have been downloaded.• Background images are not supported in all email clients, so don't rely on them for
information or functional design.
Editing the text email templateThe email template consists of two system placeholders that insert the ticket information and afooter.
{{content}}

Zendesk User's Guide | Configuring and using your email channel | 203
{{footer}}
Here's what our example ticket looks like in plain text:
## Please do not write below this line ##
[MondoCam Support Center] Auto ISO problem
A ticket (#54) by Siena Nenners has been received. It is unassigned.
Review it by following the link below:http://mondocam.zendesk.com/tickets/54
----------------------------------------------Siena Nenners, Aug-18 13:52 (AKDT):
I set my XD-89 to automatically select the ISO for me but it always choosesISO 100 no matter what the light is like. If I turn it off I can set the ISOmanually with no problem. Is my camera defective?
Thanks
--------------------------------This email is a service from MondoCam Support Center
The {{content}} placeholder contains the text delimiter, the ticket title, text that is generated frombusiness rules (automations, macros, or triggers) and the ticket comments. You can easily removethe footer placeholder. If however you want to edit the text contained in the {{content}} placeholderto remove the link to the help desk, you need to edit your notification triggers and any other businessrules that generate email notifications.
Editing notification triggers to remove the help desk links is described in Removing help desk URLsfrom notification triggers.
If you'd like to add more text to this template, you're free to do so. Simply add it to the template.
Thanks for contacting MondoCam Support!
{{content}}
{{footer}}
Editing the text in the mail delimiter and supporting otherlanguages
The text in the mail delimiter is used to inform the email recipient that any text entered into a replymust be above a certain line in the email.
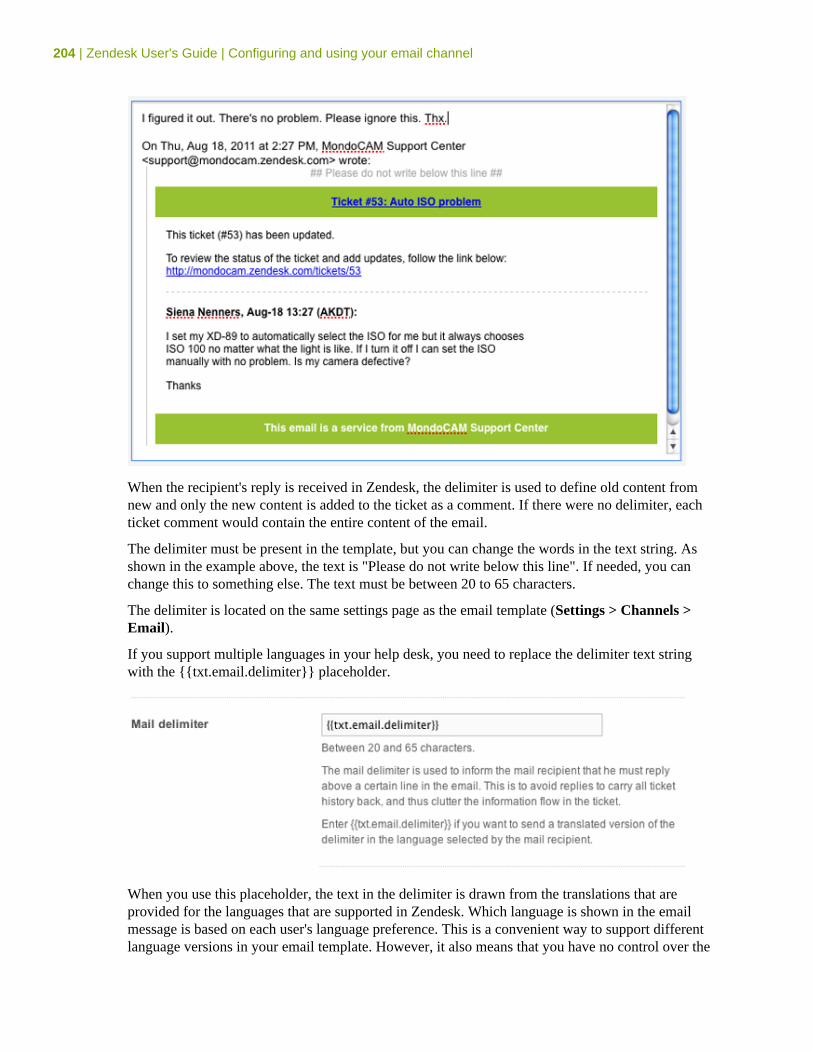
204 | Zendesk User's Guide | Configuring and using your email channel
When the recipient's reply is received in Zendesk, the delimiter is used to define old content fromnew and only the new content is added to the ticket as a comment. If there were no delimiter, eachticket comment would contain the entire content of the email.
The delimiter must be present in the template, but you can change the words in the text string. Asshown in the example above, the text is "Please do not write below this line". If needed, you canchange this to something else. The text must be between 20 to 65 characters.
The delimiter is located on the same settings page as the email template (Settings > Channels >Email).
If you support multiple languages in your help desk, you need to replace the delimiter text stringwith the {{txt.email.delimiter}} placeholder.
When you use this placeholder, the text in the delimiter is drawn from the translations that areprovided for the languages that are supported in Zendesk. Which language is shown in the emailmessage is based on each user's language preference. This is a convenient way to support differentlanguage versions in your email template. However, it also means that you have no control over the
Zendesk User's Guide | Configuring and using your email channel | 205
words in the translated versions of the delimiter. Although, the default text string and the translatedversions should suffice.
Note: If your users don't have a language preference selected, as is the case with unverified users inan email-only help desk (see Setting up an email-only help desk), the text in the delimiter will be inyour help desk's primary (default) language.
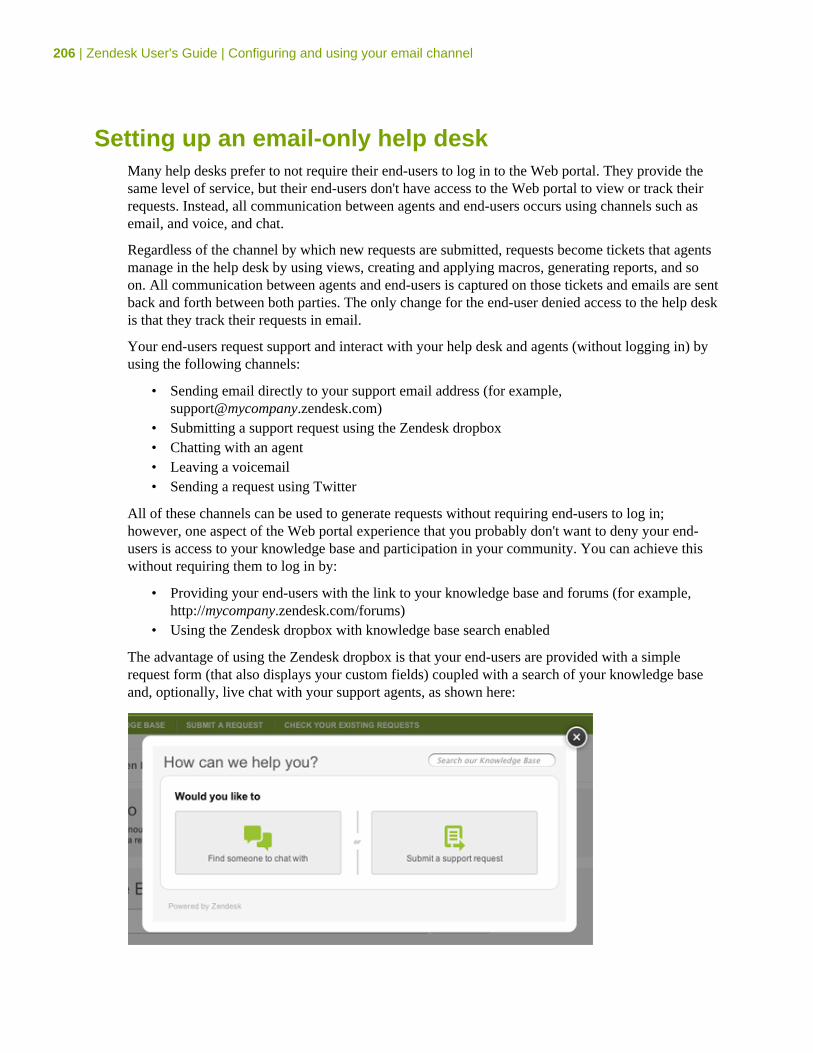
206 | Zendesk User's Guide | Configuring and using your email channel
Setting up an email-only help deskMany help desks prefer to not require their end-users to log in to the Web portal. They provide thesame level of service, but their end-users don't have access to the Web portal to view or track theirrequests. Instead, all communication between agents and end-users occurs using channels such asemail, and voice, and chat.
Regardless of the channel by which new requests are submitted, requests become tickets that agentsmanage in the help desk by using views, creating and applying macros, generating reports, and soon. All communication between agents and end-users is captured on those tickets and emails are sentback and forth between both parties. The only change for the end-user denied access to the help deskis that they track their requests in email.
Your end-users request support and interact with your help desk and agents (without logging in) byusing the following channels:
• Sending email directly to your support email address (for example,[email protected])
• Submitting a support request using the Zendesk dropbox• Chatting with an agent• Leaving a voicemail• Sending a request using Twitter
All of these channels can be used to generate requests without requiring end-users to log in;however, one aspect of the Web portal experience that you probably don't want to deny your end-users is access to your knowledge base and participation in your community. You can achieve thiswithout requiring them to log in by:
• Providing your end-users with the link to your knowledge base and forums (for example,http://mycompany.zendesk.com/forums)
• Using the Zendesk dropbox with knowledge base search enabled
The advantage of using the Zendesk dropbox is that your end-users are provided with a simplerequest form (that also displays your custom fields) coupled with a search of your knowledge baseand, optionally, live chat with your support agents, as shown here:
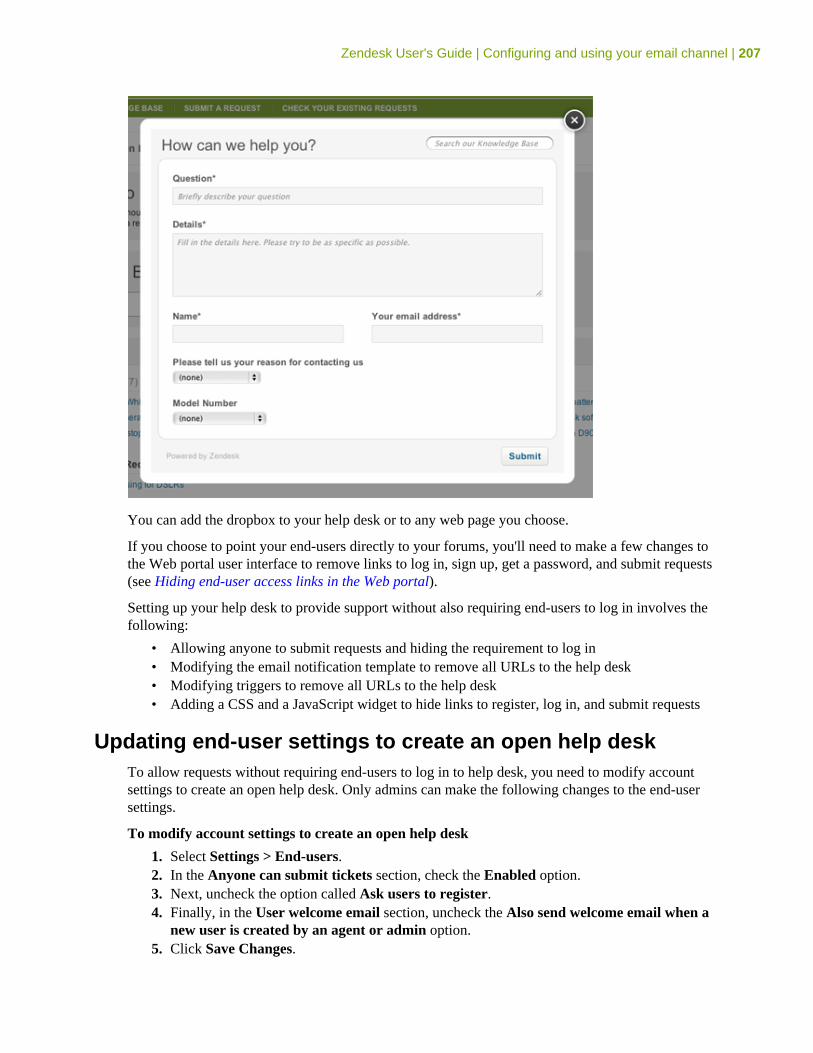
Zendesk User's Guide | Configuring and using your email channel | 207
You can add the dropbox to your help desk or to any web page you choose.
If you choose to point your end-users directly to your forums, you'll need to make a few changes tothe Web portal user interface to remove links to log in, sign up, get a password, and submit requests(see Hiding end-user access links in the Web portal).
Setting up your help desk to provide support without also requiring end-users to log in involves thefollowing:
• Allowing anyone to submit requests and hiding the requirement to log in• Modifying the email notification template to remove all URLs to the help desk• Modifying triggers to remove all URLs to the help desk• Adding a CSS and a JavaScript widget to hide links to register, log in, and submit requests
Updating end-user settings to create an open help deskTo allow requests without requiring end-users to log in to help desk, you need to modify accountsettings to create an open help desk. Only admins can make the following changes to the end-usersettings.
To modify account settings to create an open help desk
1. Select Settings > End-users.2. In the Anyone can submit tickets section, check the Enabled option.3. Next, uncheck the option called Ask users to register.4. Finally, in the User welcome email section, uncheck the Also send welcome email when a
new user is created by an agent or admin option.5. Click Save Changes.
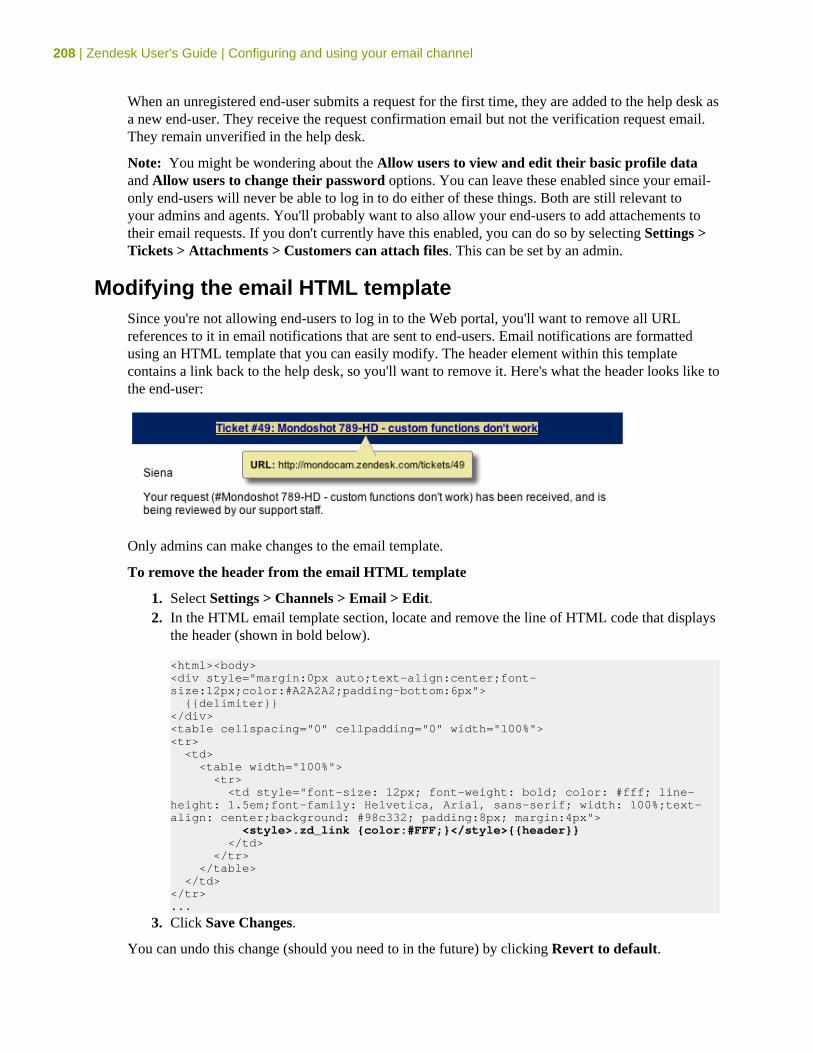
208 | Zendesk User's Guide | Configuring and using your email channel
When an unregistered end-user submits a request for the first time, they are added to the help desk asa new end-user. They receive the request confirmation email but not the verification request email.They remain unverified in the help desk.
Note: You might be wondering about the Allow users to view and edit their basic profile dataand Allow users to change their password options. You can leave these enabled since your email-only end-users will never be able to log in to do either of these things. Both are still relevant toyour admins and agents. You'll probably want to also allow your end-users to add attachements totheir email requests. If you don't currently have this enabled, you can do so by selecting Settings >Tickets > Attachments > Customers can attach files. This can be set by an admin.
Modifying the email HTML templateSince you're not allowing end-users to log in to the Web portal, you'll want to remove all URLreferences to it in email notifications that are sent to end-users. Email notifications are formattedusing an HTML template that you can easily modify. The header element within this templatecontains a link back to the help desk, so you'll want to remove it. Here's what the header looks like tothe end-user:
Only admins can make changes to the email template.
To remove the header from the email HTML template
1. Select Settings > Channels > Email > Edit.2. In the HTML email template section, locate and remove the line of HTML code that displays
the header (shown in bold below).
<html><body><div style="margin:0px auto;text-align:center;font-size:12px;color:#A2A2A2;padding-bottom:6px"> {{delimiter}}</div><table cellspacing="0" cellpadding="0" width="100%"><tr> <td> <table width="100%"> <tr> <td style="font-size: 12px; font-weight: bold; color: #fff; line-height: 1.5em;font-family: Helvetica, Arial, sans-serif; width: 100%;text-align: center;background: #98c332; padding:8px; margin:4px"> <style>.zd_link {color:#FFF;}</style>{{header}} </td> </tr> </table> </td></tr>...
3. Click Save Changes.
You can undo this change (should you need to in the future) by clicking Revert to default.
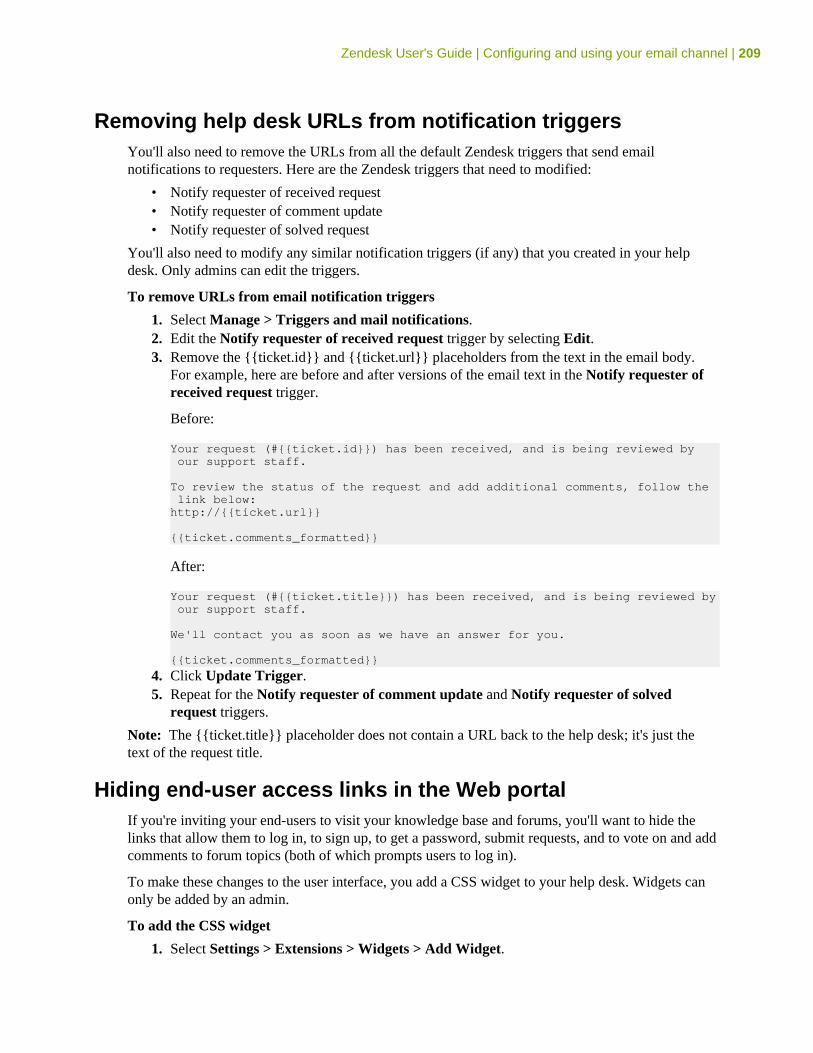
Zendesk User's Guide | Configuring and using your email channel | 209
Removing help desk URLs from notification triggersYou'll also need to remove the URLs from all the default Zendesk triggers that send emailnotifications to requesters. Here are the Zendesk triggers that need to modified:
• Notify requester of received request• Notify requester of comment update• Notify requester of solved request
You'll also need to modify any similar notification triggers (if any) that you created in your helpdesk. Only admins can edit the triggers.
To remove URLs from email notification triggers
1. Select Manage > Triggers and mail notifications.2. Edit the Notify requester of received request trigger by selecting Edit.3. Remove the {{ticket.id}} and {{ticket.url}} placeholders from the text in the email body.
For example, here are before and after versions of the email text in the Notify requester ofreceived request trigger.
Before:
Your request (#{{ticket.id}}) has been received, and is being reviewed by our support staff.
To review the status of the request and add additional comments, follow the link below:http://{{ticket.url}}
{{ticket.comments_formatted}}
After:
Your request (#{{ticket.title}}) has been received, and is being reviewed by our support staff.
We'll contact you as soon as we have an answer for you.
{{ticket.comments_formatted}}
4. Click Update Trigger.5. Repeat for the Notify requester of comment update and Notify requester of solved
request triggers.
Note: The {{ticket.title}} placeholder does not contain a URL back to the help desk; it's just thetext of the request title.
Hiding end-user access links in the Web portalIf you're inviting your end-users to visit your knowledge base and forums, you'll want to hide thelinks that allow them to log in, to sign up, to get a password, submit requests, and to vote on and addcomments to forum topics (both of which prompts users to log in).
To make these changes to the user interface, you add a CSS widget to your help desk. Widgets canonly be added by an admin.
To add the CSS widget
1. Select Settings > Extensions > Widgets > Add Widget.
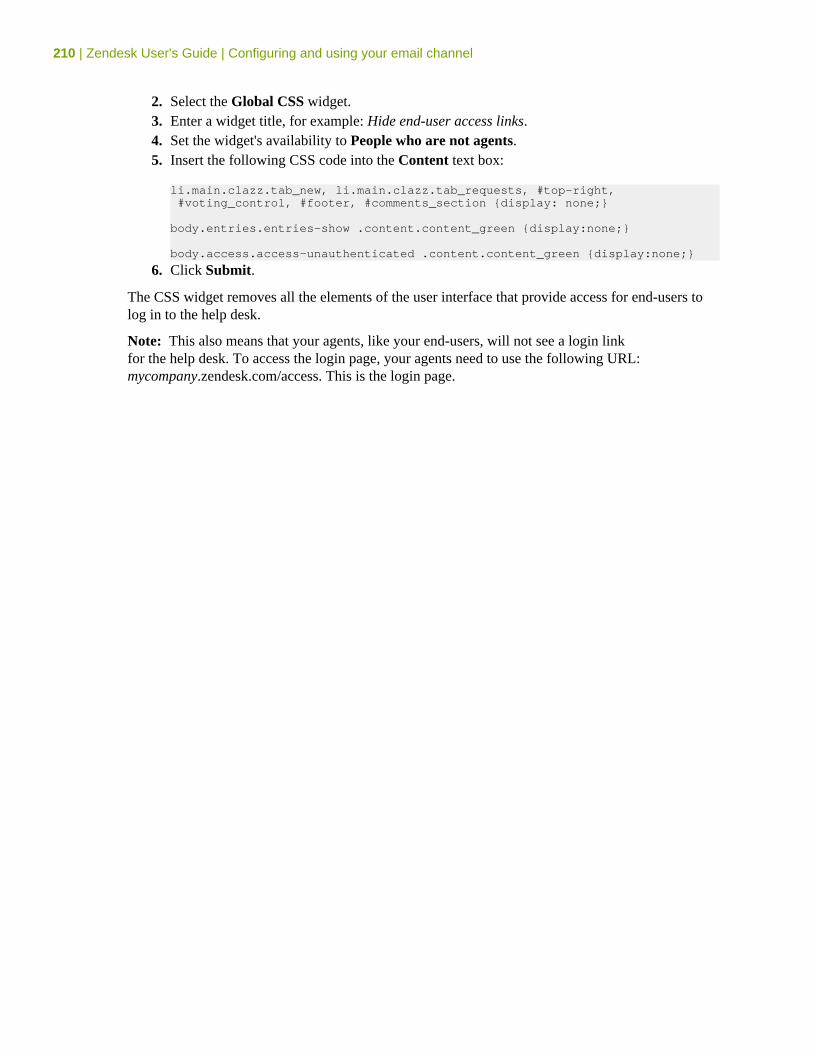
210 | Zendesk User's Guide | Configuring and using your email channel
2. Select the Global CSS widget.3. Enter a widget title, for example: Hide end-user access links.4. Set the widget's availability to People who are not agents.5. Insert the following CSS code into the Content text box:
li.main.clazz.tab_new, li.main.clazz.tab_requests, #top-right, #voting_control, #footer, #comments_section {display: none;}
body.entries.entries-show .content.content_green {display:none;}
body.access.access-unauthenticated .content.content_green {display:none;}
6. Click Submit.
The CSS widget removes all the elements of the user interface that provide access for end-users tolog in to the help desk.
Note: This also means that your agents, like your end-users, will not see a login linkfor the help desk. To access the login page, your agents need to use the following URL:mycompany.zendesk.com/access. This is the login page.
Chapter
8
Searching the help desk• Zendesk search reference• Searching users, groups. and organizations• Searching tickets• Zendesk for Twitter: Advanced search operators

212 | Zendesk User's Guide | Searching the help desk
Zendesk search referenceIn addition to full text search, you can search the help desk data objects using common searchoperators combined with data property keywords and values to narrow your search results. This isa quick reference of the search tools available in the help desk as well as the types of data that besearched.
First, essential facts about searching the help desk:
How soon can new data be searched?
When you add new data to the help desk, it typically takes about 2 to 3 minutes before it'sindexed and can be searched.
How do titles and tags affect search?
Both the ticket or forum article title and any tags added to either help to improve search results.The title is weighted more heavily than tags.
Are there limitations to wildcard searches?
You can only do wildcard searches when combined with property keywords(subject:photo*).
Who can search what?
Admins can search the entire help desk. Agents can search the help desk data they've beengranted access to. End-users can do full text searches of the knowledge base.
AND / OR searchesTo do an AND search, meaning that you want to return all the words in your search statement, youneed to use the plus (+) operator (described below in Search operators).
Note: Doing an AND search for tags is different, however. If you want to search for two (or more)at the same time, you can use a search statement like this:
tags:"first_tag second_tag"
Searches for text strings that are not contained within double quotes are treated as an implicit ORsearch. For example, searching for the following phrase return results if most of the words arepresent.
Please upgrade my account
Since it's not a phrase search (contained within double quotes), the order of the words doesn't matter.Zendesk is currently configured to return results if 66% of the words in a search like the one aboveare present.
Note: When using search keywords for data properties, you can do an OR search by declaringmultiple instances of the same keyword, as in this example:
tags:first_tag tags:second_tag
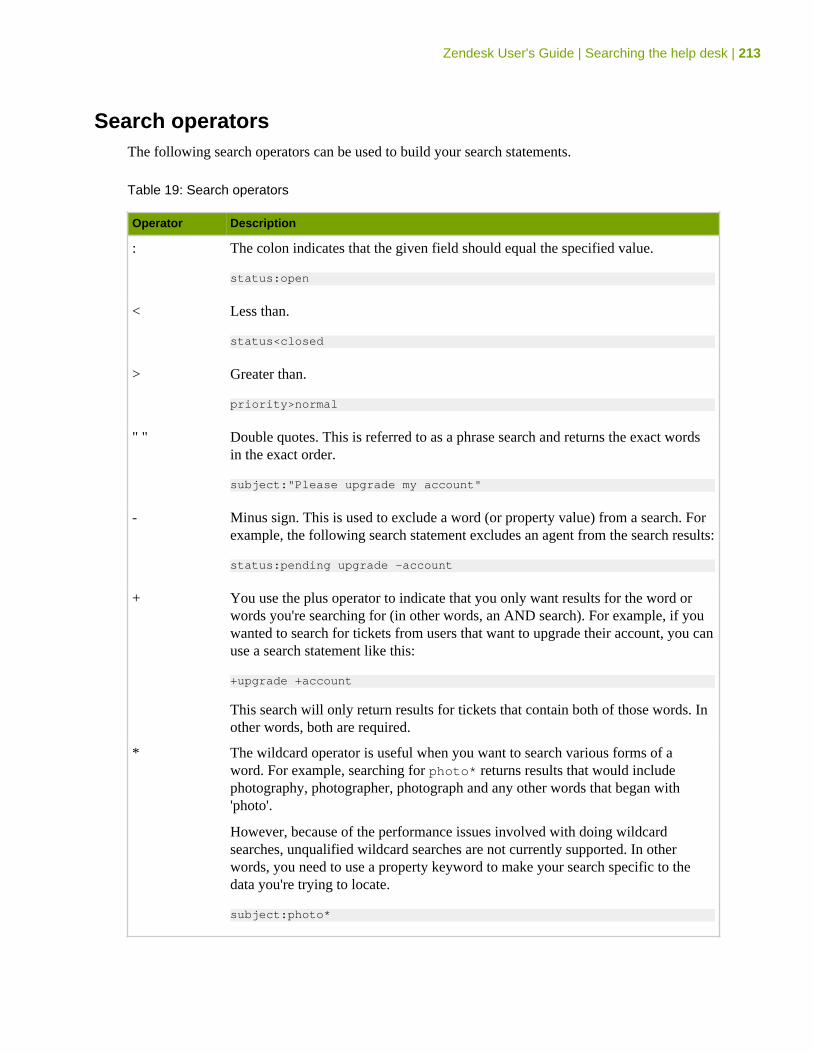
Zendesk User's Guide | Searching the help desk | 213
Search operatorsThe following search operators can be used to build your search statements.
Table 19: Search operators
Operator Description
: The colon indicates that the given field should equal the specified value.
status:open
< Less than.
status<closed
> Greater than.
priority>normal
" " Double quotes. This is referred to as a phrase search and returns the exact wordsin the exact order.
subject:"Please upgrade my account"
- Minus sign. This is used to exclude a word (or property value) from a search. Forexample, the following search statement excludes an agent from the search results:
status:pending upgrade -account
+ You use the plus operator to indicate that you only want results for the word orwords you're searching for (in other words, an AND search). For example, if youwanted to search for tickets from users that want to upgrade their account, you canuse a search statement like this:
+upgrade +account
This search will only return results for tickets that contain both of those words. Inother words, both are required.
* The wildcard operator is useful when you want to search various forms of aword. For example, searching for photo* returns results that would includephotography, photographer, photograph and any other words that began with'photo'.
However, because of the performance issues involved with doing wildcardsearches, unqualified wildcard searches are not currently supported. In otherwords, you need to use a property keyword to make your search specific to thedata you're trying to locate.
subject:photo*
214 | Zendesk User's Guide | Searching the help desk
Searching for properties that have no dataProperties that contain no data can be searched for using none as the value of a keyword, as in thisexample:
assignee:none
This returns all unassigned tickets.
You can use the none keyword value to search any of the data object properties.
type:user organization:none
This returns the users who have not been added to an organization.
Using the type keywordOne of the tools you have available for narrowing your search results is the type keyword. It's usedto explicitly declare that you want to search the following help desk data objects:
• ticket• comment• user• organization• group• entry or topic (forums)
Using the type keyword means that you are explicitly searching on the object you specify. Forexample, you can search for all the users that belong to the Customers organization using this searchstatement:
type:user organization:customers
If you instead searched for organization:customers you'd get all the tickets that haverequesters who belong to this organization. This is because by default searches that do not explicitlydeclare an object return results for tickets (and organization is a ticket property).
Using type:user, your search returns all user profiles for users that belong to the Customersorganization. So, you're narrowing your search to the user object and excluding tickets.
Note: The quickest way to understand the difference between searching for ticket and userdata is to select one of your users who has submitted tickets and then do both of these searches:type:ticket "user name" and type:user "user name".
While organizations and groups are properties of the user object, they have their own propertiesthat can be searched as well. The following query allows you search only for organization tags,excluding tags of the same name that may be used in other elements of the help desk such as ticketsand forum topics.
type:organization tags:premium
Similar to that, suppose that you've used the same tag in tickets and forum topics. To search for theoccurrence of your tag in forum topics only, you can use the following search statement.
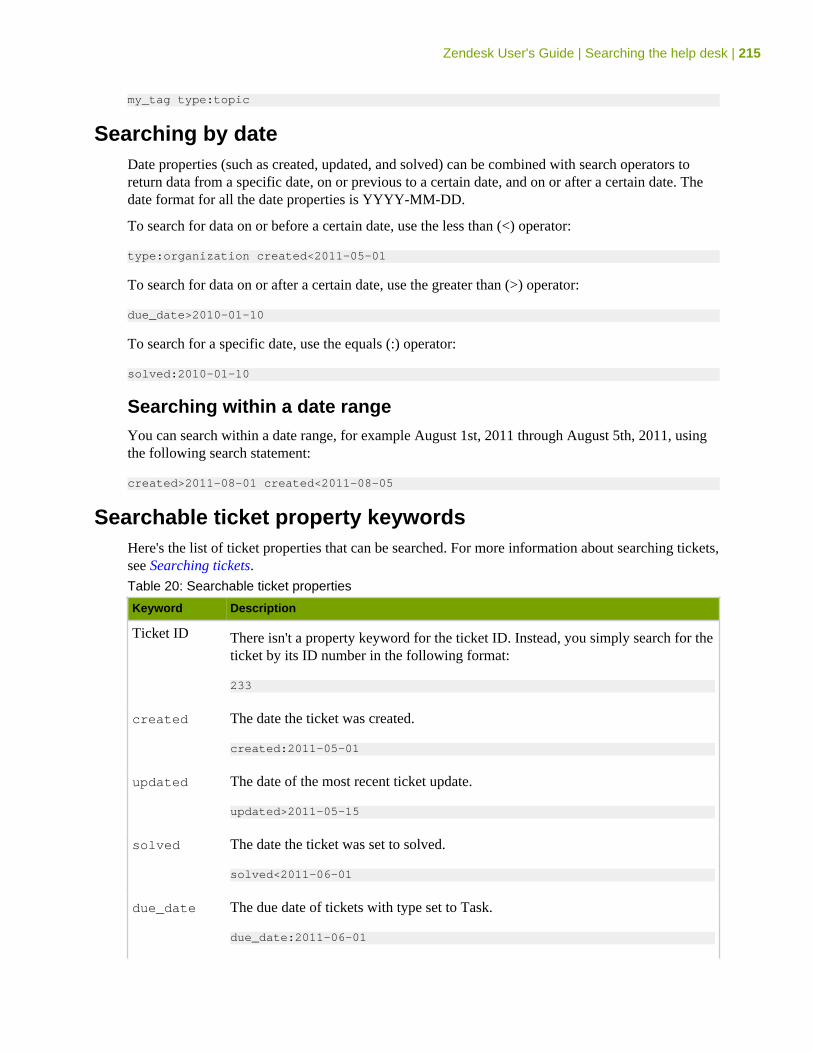
Zendesk User's Guide | Searching the help desk | 215
my_tag type:topic
Searching by dateDate properties (such as created, updated, and solved) can be combined with search operators toreturn data from a specific date, on or previous to a certain date, and on or after a certain date. Thedate format for all the date properties is YYYY-MM-DD.
To search for data on or before a certain date, use the less than (<) operator:
type:organization created<2011-05-01
To search for data on or after a certain date, use the greater than (>) operator:
due_date>2010-01-10
To search for a specific date, use the equals (:) operator:
solved:2010-01-10
Searching within a date rangeYou can search within a date range, for example August 1st, 2011 through August 5th, 2011, usingthe following search statement:
created>2011-08-01 created<2011-08-05
Searchable ticket property keywordsHere's the list of ticket properties that can be searched. For more information about searching tickets,see Searching tickets.Table 20: Searchable ticket properties
Keyword Description
Ticket ID There isn't a property keyword for the ticket ID. Instead, you simply search for theticket by its ID number in the following format:
233
created The date the ticket was created.
created:2011-05-01
updated The date of the most recent ticket update.
updated>2011-05-15
solved The date the ticket was set to solved.
solved<2011-06-01
due_date The due date of tickets with type set to Task.
due_date:2011-06-01
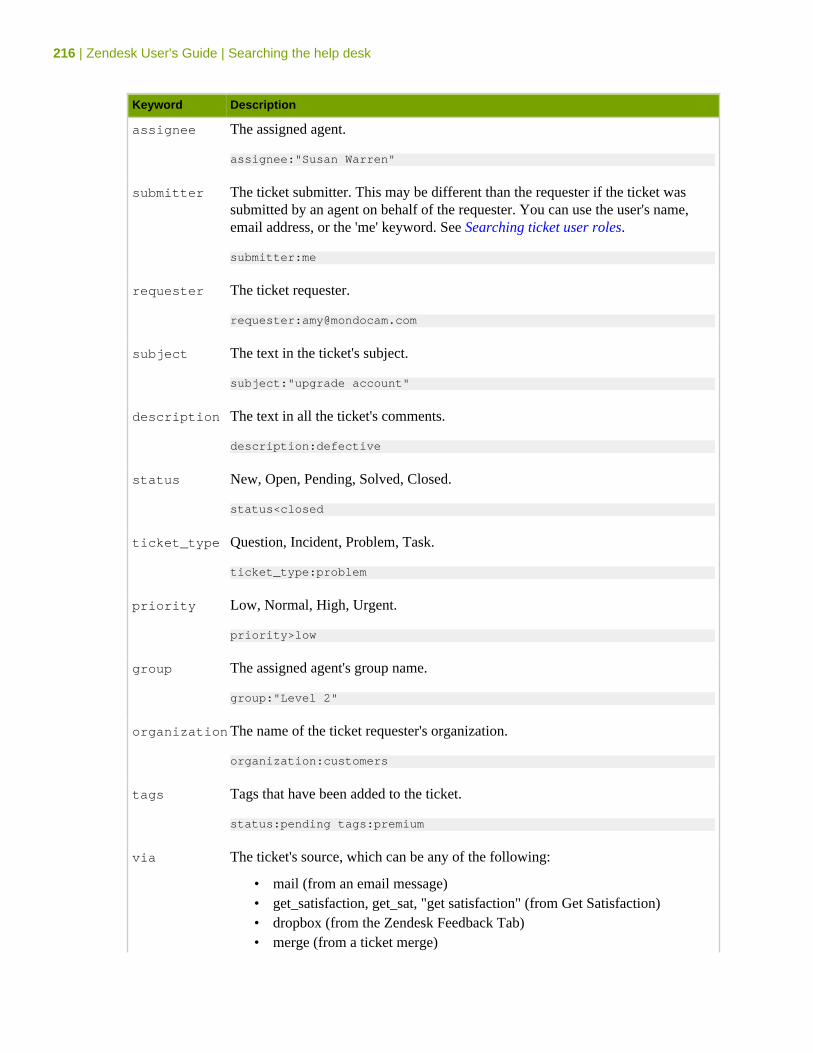
216 | Zendesk User's Guide | Searching the help desk
Keyword Description
assignee The assigned agent.
assignee:"Susan Warren"
submitter The ticket submitter. This may be different than the requester if the ticket wassubmitted by an agent on behalf of the requester. You can use the user's name,email address, or the 'me' keyword. See Searching ticket user roles.
submitter:me
requester The ticket requester.
requester:[email protected]
subject The text in the ticket's subject.
subject:"upgrade account"
description The text in all the ticket's comments.
description:defective
status New, Open, Pending, Solved, Closed.
status<closed
ticket_type Question, Incident, Problem, Task.
ticket_type:problem
priority Low, Normal, High, Urgent.
priority>low
group The assigned agent's group name.
group:"Level 2"
organizationThe name of the ticket requester's organization.
organization:customers
tags Tags that have been added to the ticket.
status:pending tags:premium
via The ticket's source, which can be any of the following:
• mail (from an email message)• get_satisfaction, get_sat, "get satisfaction" (from Get Satisfaction)• dropbox (from the Zendesk Feedback Tab)• merge (from a ticket merge)
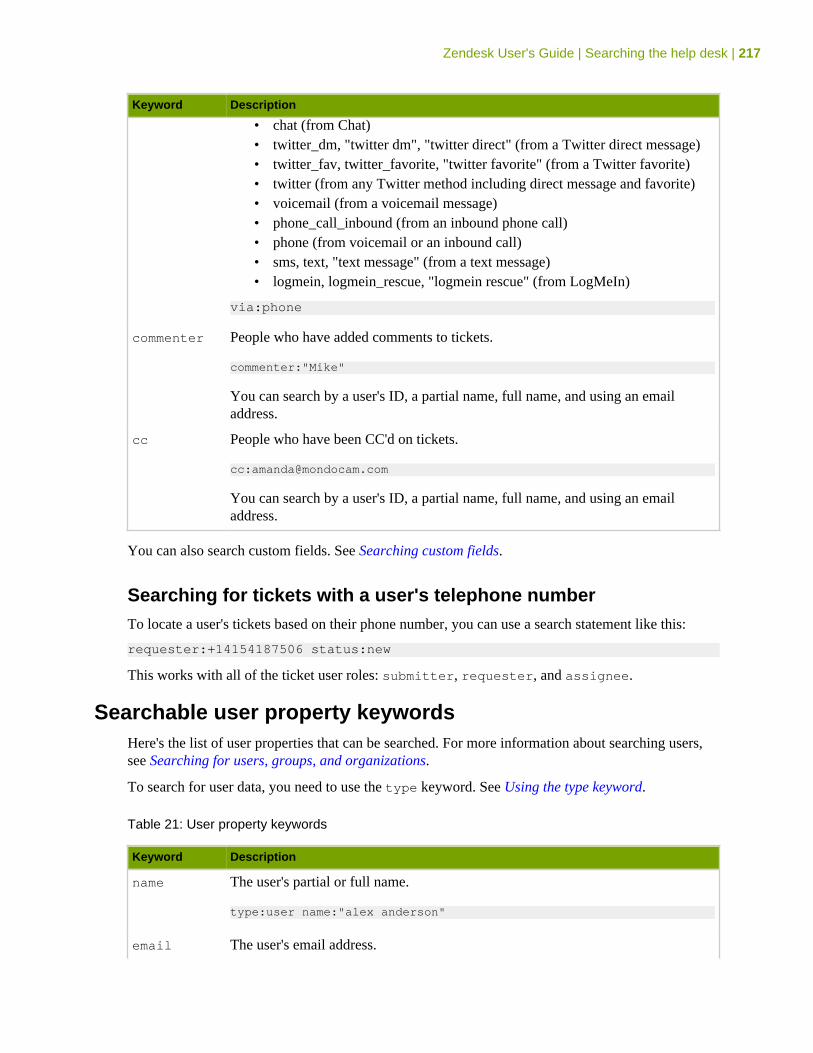
Zendesk User's Guide | Searching the help desk | 217
Keyword Description
• chat (from Chat)• twitter_dm, "twitter dm", "twitter direct" (from a Twitter direct message)• twitter_fav, twitter_favorite, "twitter favorite" (from a Twitter favorite)• twitter (from any Twitter method including direct message and favorite)• voicemail (from a voicemail message)• phone_call_inbound (from an inbound phone call)• phone (from voicemail or an inbound call)• sms, text, "text message" (from a text message)• logmein, logmein_rescue, "logmein rescue" (from LogMeIn)
via:phone
commenter People who have added comments to tickets.
commenter:"Mike"
You can search by a user's ID, a partial name, full name, and using an emailaddress.
cc People who have been CC'd on tickets.
You can search by a user's ID, a partial name, full name, and using an emailaddress.
You can also search custom fields. See Searching custom fields.
Searching for tickets with a user's telephone numberTo locate a user's tickets based on their phone number, you can use a search statement like this:
requester:+14154187506 status:new
This works with all of the ticket user roles: submitter, requester, and assignee.
Searchable user property keywordsHere's the list of user properties that can be searched. For more information about searching users,see Searching for users, groups, and organizations.
To search for user data, you need to use the type keyword. See Using the type keyword.
Table 21: User property keywords
Keyword Description
name The user's partial or full name.
type:user name:"alex anderson"
email The user's email address.
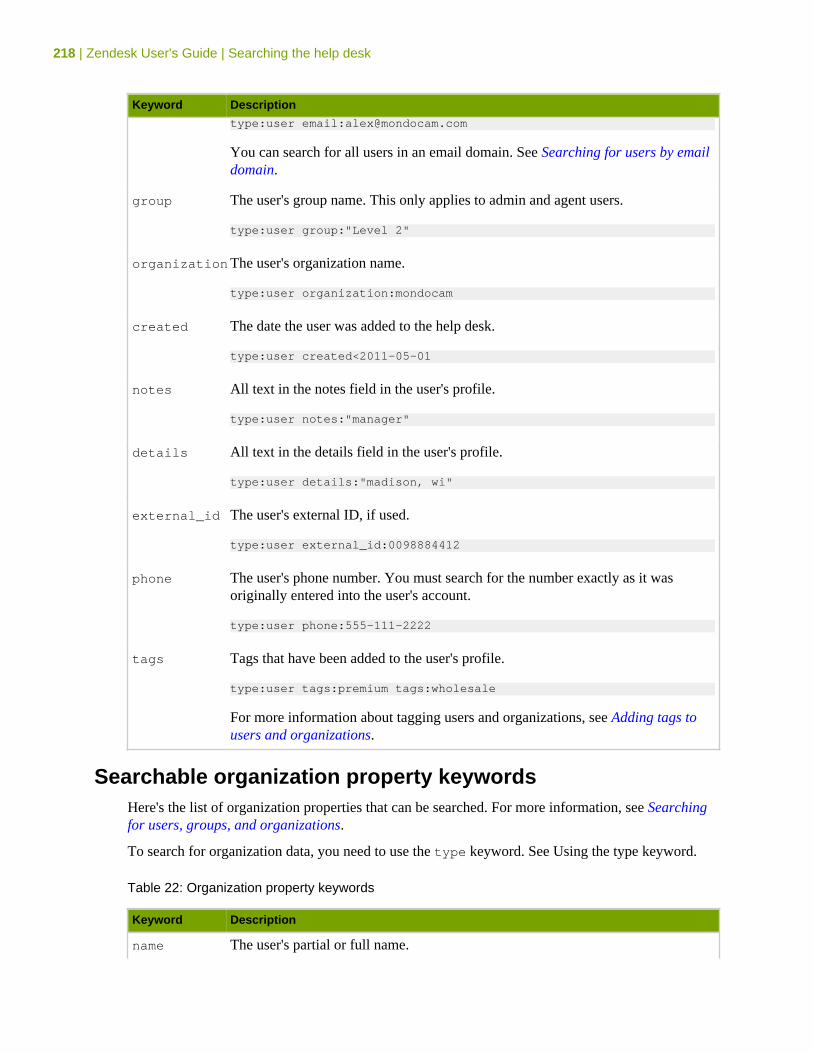
218 | Zendesk User's Guide | Searching the help desk
Keyword Description
type:user email:[email protected]
You can search for all users in an email domain. See Searching for users by emaildomain.
group The user's group name. This only applies to admin and agent users.
type:user group:"Level 2"
organizationThe user's organization name.
type:user organization:mondocam
created The date the user was added to the help desk.
type:user created<2011-05-01
notes All text in the notes field in the user's profile.
type:user notes:"manager"
details All text in the details field in the user's profile.
type:user details:"madison, wi"
external_id The user's external ID, if used.
type:user external_id:0098884412
phone The user's phone number. You must search for the number exactly as it wasoriginally entered into the user's account.
type:user phone:555-111-2222
tags Tags that have been added to the user's profile.
type:user tags:premium tags:wholesale
For more information about tagging users and organizations, see Adding tags tousers and organizations.
Searchable organization property keywordsHere's the list of organization properties that can be searched. For more information, see Searchingfor users, groups, and organizations.
To search for organization data, you need to use the type keyword. See Using the type keyword.
Table 22: Organization property keywords
Keyword Description
name The user's partial or full name.
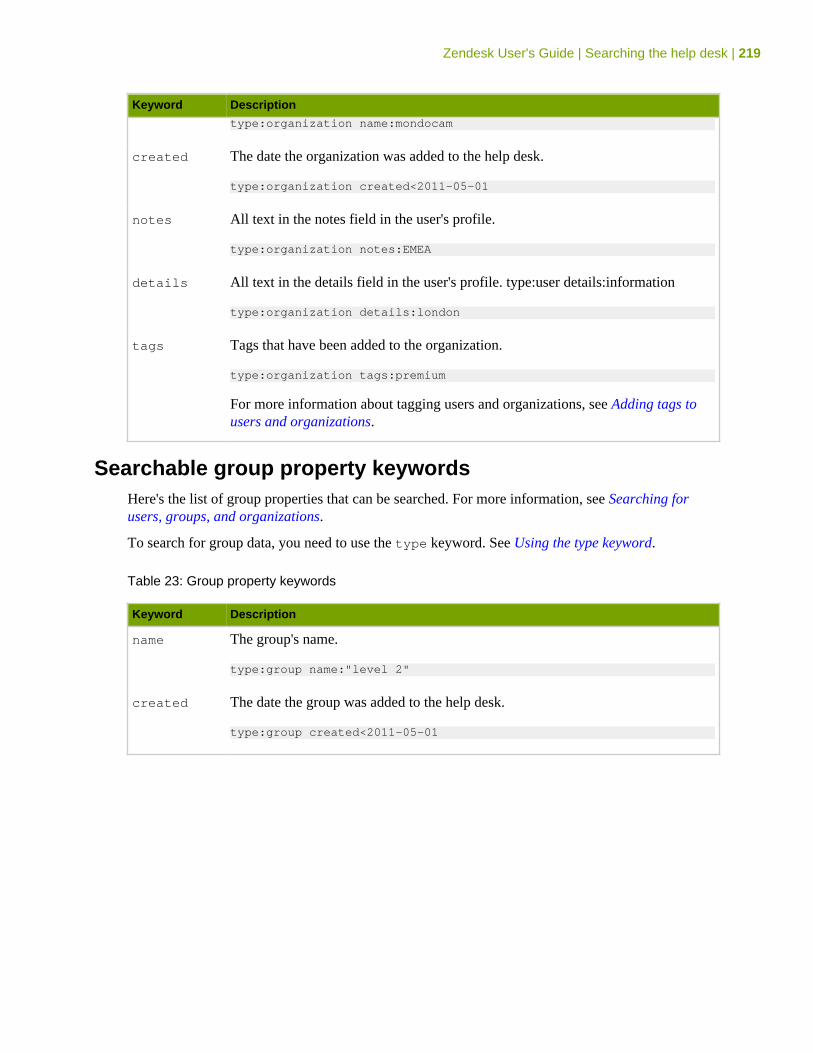
Zendesk User's Guide | Searching the help desk | 219
Keyword Description
type:organization name:mondocam
created The date the organization was added to the help desk.
type:organization created<2011-05-01
notes All text in the notes field in the user's profile.
type:organization notes:EMEA
details All text in the details field in the user's profile. type:user details:information
type:organization details:london
tags Tags that have been added to the organization.
type:organization tags:premium
For more information about tagging users and organizations, see Adding tags tousers and organizations.
Searchable group property keywordsHere's the list of group properties that can be searched. For more information, see Searching forusers, groups, and organizations.
To search for group data, you need to use the type keyword. See Using the type keyword.
Table 23: Group property keywords
Keyword Description
name The group's name.
type:group name:"level 2"
created The date the group was added to the help desk.
type:group created<2011-05-01
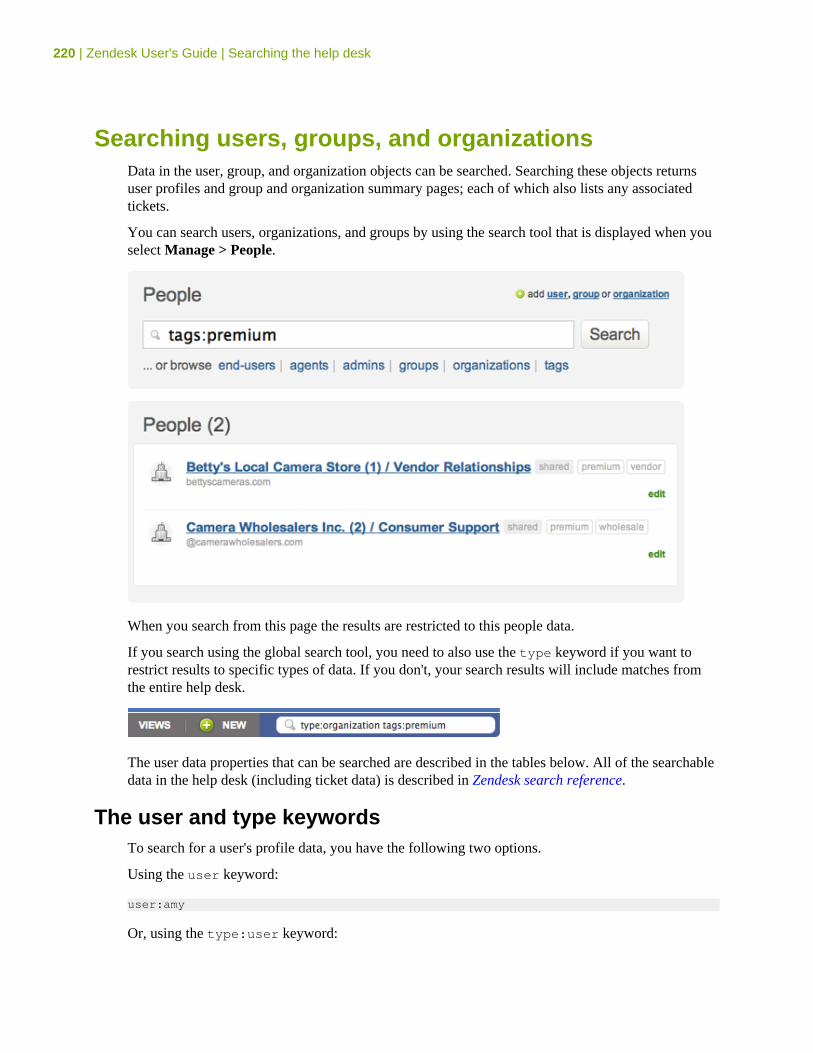
220 | Zendesk User's Guide | Searching the help desk
Searching users, groups, and organizationsData in the user, group, and organization objects can be searched. Searching these objects returnsuser profiles and group and organization summary pages; each of which also lists any associatedtickets.
You can search users, organizations, and groups by using the search tool that is displayed when youselect Manage > People.
When you search from this page the results are restricted to this people data.
If you search using the global search tool, you need to also use the type keyword if you want torestrict results to specific types of data. If you don't, your search results will include matches fromthe entire help desk.
The user data properties that can be searched are described in the tables below. All of the searchabledata in the help desk (including ticket data) is described in Zendesk search reference.
The user and type keywordsTo search for a user's profile data, you have the following two options.
Using the user keyword:
user:amy
Or, using the type:user keyword:
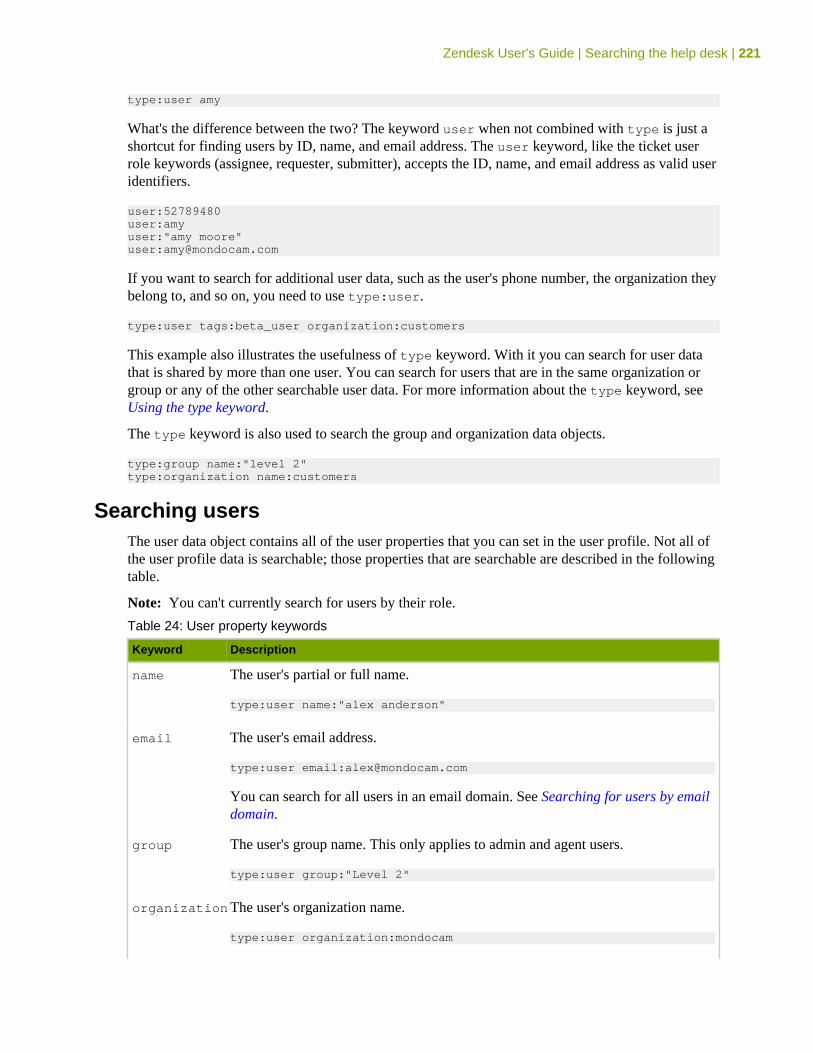
Zendesk User's Guide | Searching the help desk | 221
type:user amy
What's the difference between the two? The keyword user when not combined with type is just ashortcut for finding users by ID, name, and email address. The user keyword, like the ticket userrole keywords (assignee, requester, submitter), accepts the ID, name, and email address as valid useridentifiers.
user:52789480user:amyuser:"amy moore"user:[email protected]
If you want to search for additional user data, such as the user's phone number, the organization theybelong to, and so on, you need to use type:user.
type:user tags:beta_user organization:customers
This example also illustrates the usefulness of type keyword. With it you can search for user datathat is shared by more than one user. You can search for users that are in the same organization orgroup or any of the other searchable user data. For more information about the type keyword, seeUsing the type keyword.
The type keyword is also used to search the group and organization data objects.
type:group name:"level 2"type:organization name:customers
Searching usersThe user data object contains all of the user properties that you can set in the user profile. Not all ofthe user profile data is searchable; those properties that are searchable are described in the followingtable.
Note: You can't currently search for users by their role.
Table 24: User property keywords
Keyword Description
name The user's partial or full name.
type:user name:"alex anderson"
email The user's email address.
type:user email:[email protected]
You can search for all users in an email domain. See Searching for users by emaildomain.
group The user's group name. This only applies to admin and agent users.
type:user group:"Level 2"
organizationThe user's organization name.
type:user organization:mondocam
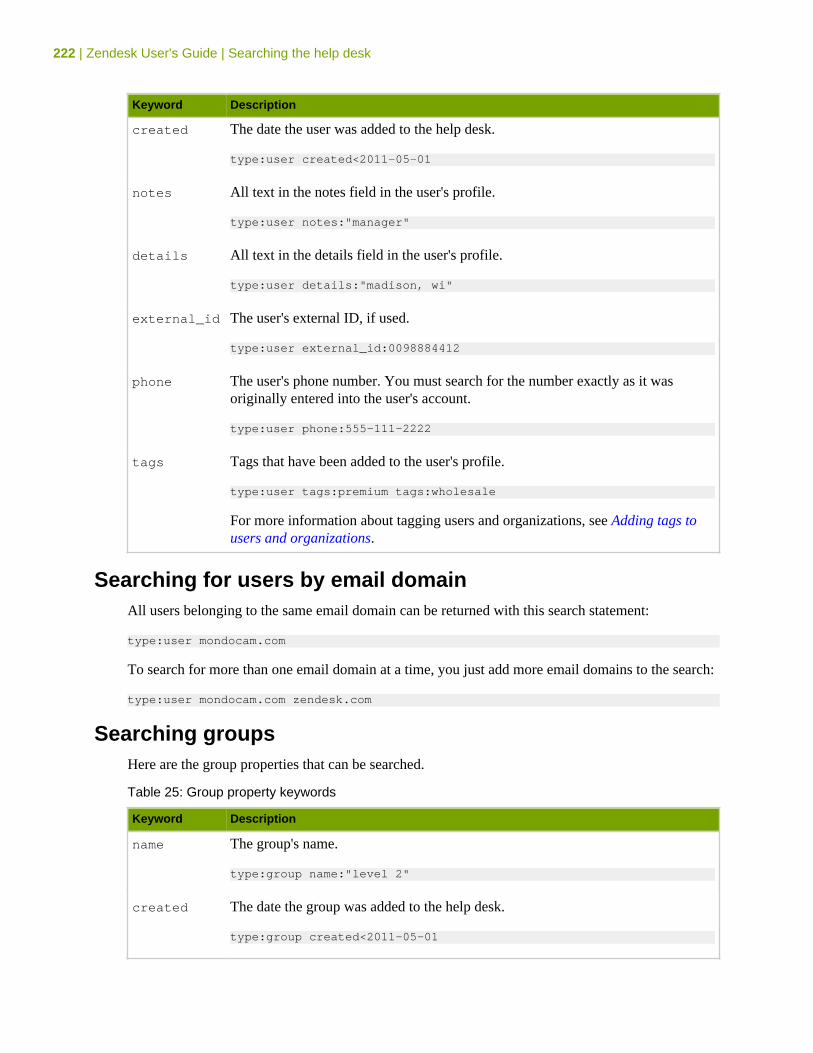
222 | Zendesk User's Guide | Searching the help desk
Keyword Description
created The date the user was added to the help desk.
type:user created<2011-05-01
notes All text in the notes field in the user's profile.
type:user notes:"manager"
details All text in the details field in the user's profile.
type:user details:"madison, wi"
external_id The user's external ID, if used.
type:user external_id:0098884412
phone The user's phone number. You must search for the number exactly as it wasoriginally entered into the user's account.
type:user phone:555-111-2222
tags Tags that have been added to the user's profile.
type:user tags:premium tags:wholesale
For more information about tagging users and organizations, see Adding tags tousers and organizations.
Searching for users by email domainAll users belonging to the same email domain can be returned with this search statement:
type:user mondocam.com
To search for more than one email domain at a time, you just add more email domains to the search:
type:user mondocam.com zendesk.com
Searching groupsHere are the group properties that can be searched.
Table 25: Group property keywords
Keyword Description
name The group's name.
type:group name:"level 2"
created The date the group was added to the help desk.
type:group created<2011-05-01
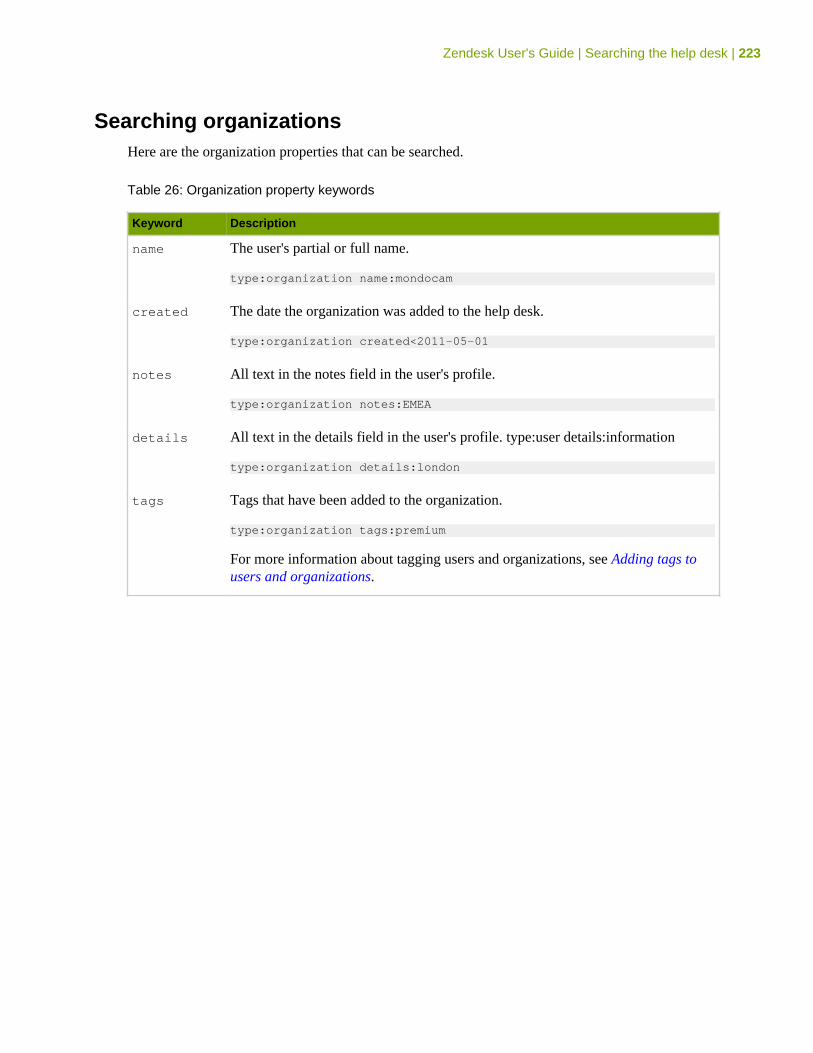
Zendesk User's Guide | Searching the help desk | 223
Searching organizationsHere are the organization properties that can be searched.
Table 26: Organization property keywords
Keyword Description
name The user's partial or full name.
type:organization name:mondocam
created The date the organization was added to the help desk.
type:organization created<2011-05-01
notes All text in the notes field in the user's profile.
type:organization notes:EMEA
details All text in the details field in the user's profile. type:user details:information
type:organization details:london
tags Tags that have been added to the organization.
type:organization tags:premium
For more information about tagging users and organizations, see Adding tags tousers and organizations.
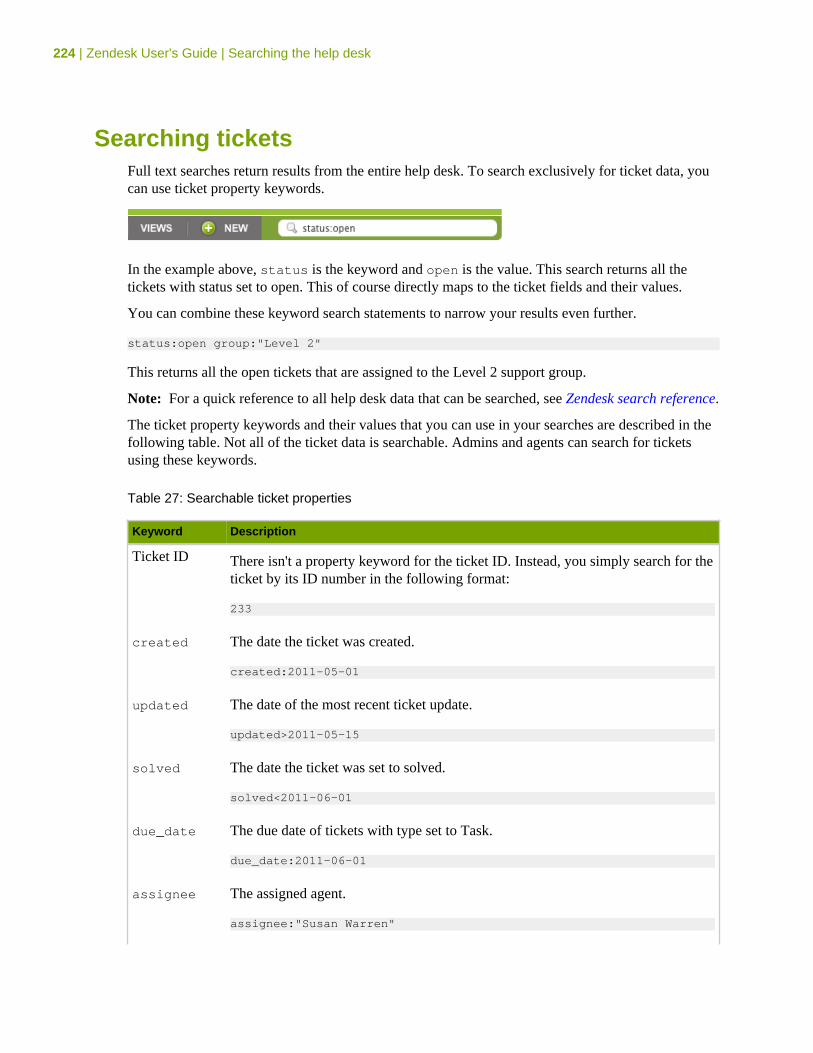
224 | Zendesk User's Guide | Searching the help desk
Searching ticketsFull text searches return results from the entire help desk. To search exclusively for ticket data, youcan use ticket property keywords.
In the example above, status is the keyword and open is the value. This search returns all thetickets with status set to open. This of course directly maps to the ticket fields and their values.
You can combine these keyword search statements to narrow your results even further.
status:open group:"Level 2"
This returns all the open tickets that are assigned to the Level 2 support group.
Note: For a quick reference to all help desk data that can be searched, see Zendesk search reference.
The ticket property keywords and their values that you can use in your searches are described in thefollowing table. Not all of the ticket data is searchable. Admins and agents can search for ticketsusing these keywords.
Table 27: Searchable ticket properties
Keyword Description
Ticket ID There isn't a property keyword for the ticket ID. Instead, you simply search for theticket by its ID number in the following format:
233
created The date the ticket was created.
created:2011-05-01
updated The date of the most recent ticket update.
updated>2011-05-15
solved The date the ticket was set to solved.
solved<2011-06-01
due_date The due date of tickets with type set to Task.
due_date:2011-06-01
assignee The assigned agent.
assignee:"Susan Warren"
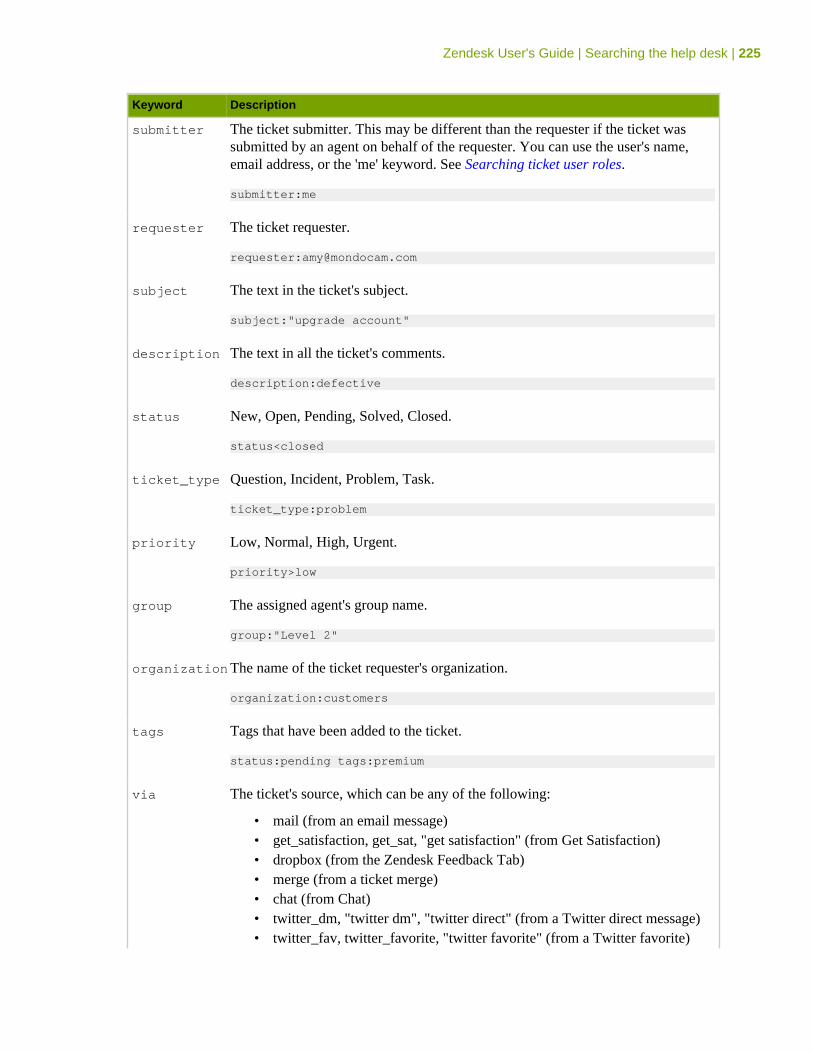
Zendesk User's Guide | Searching the help desk | 225
Keyword Description
submitter The ticket submitter. This may be different than the requester if the ticket wassubmitted by an agent on behalf of the requester. You can use the user's name,email address, or the 'me' keyword. See Searching ticket user roles.
submitter:me
requester The ticket requester.
requester:[email protected]
subject The text in the ticket's subject.
subject:"upgrade account"
description The text in all the ticket's comments.
description:defective
status New, Open, Pending, Solved, Closed.
status<closed
ticket_type Question, Incident, Problem, Task.
ticket_type:problem
priority Low, Normal, High, Urgent.
priority>low
group The assigned agent's group name.
group:"Level 2"
organizationThe name of the ticket requester's organization.
organization:customers
tags Tags that have been added to the ticket.
status:pending tags:premium
via The ticket's source, which can be any of the following:
• mail (from an email message)• get_satisfaction, get_sat, "get satisfaction" (from Get Satisfaction)• dropbox (from the Zendesk Feedback Tab)• merge (from a ticket merge)• chat (from Chat)• twitter_dm, "twitter dm", "twitter direct" (from a Twitter direct message)• twitter_fav, twitter_favorite, "twitter favorite" (from a Twitter favorite)
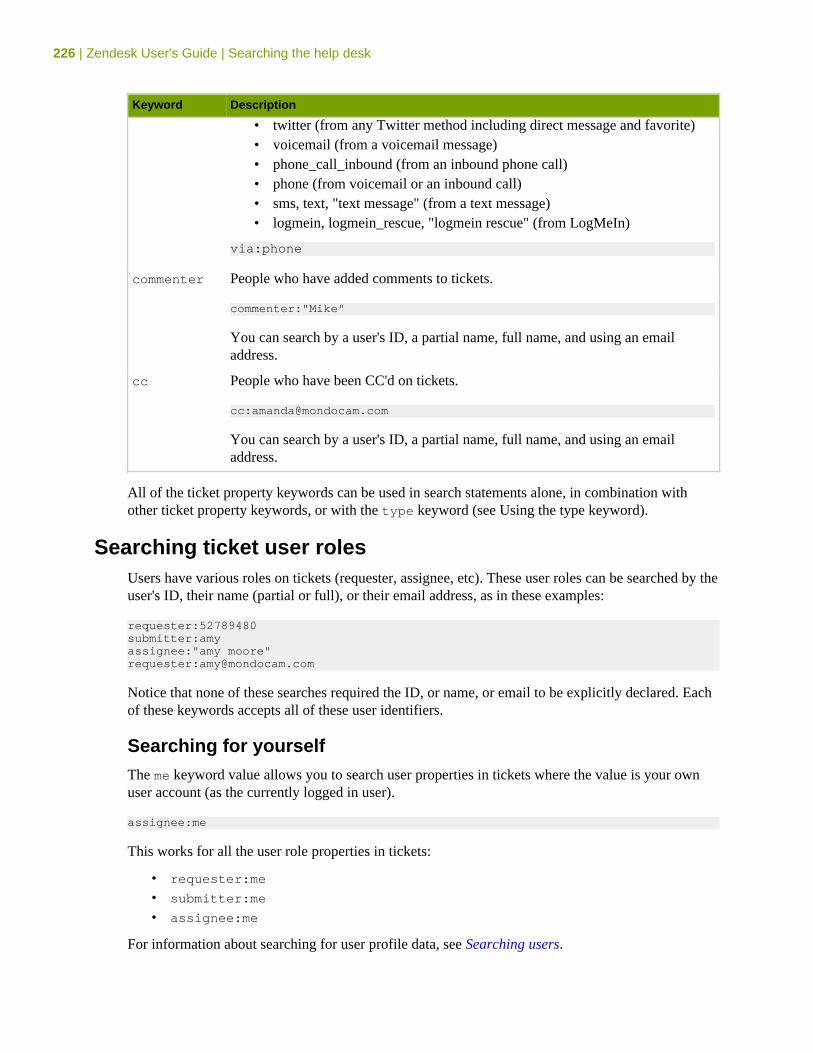
226 | Zendesk User's Guide | Searching the help desk
Keyword Description
• twitter (from any Twitter method including direct message and favorite)• voicemail (from a voicemail message)• phone_call_inbound (from an inbound phone call)• phone (from voicemail or an inbound call)• sms, text, "text message" (from a text message)• logmein, logmein_rescue, "logmein rescue" (from LogMeIn)
via:phone
commenter People who have added comments to tickets.
commenter:"Mike"
You can search by a user's ID, a partial name, full name, and using an emailaddress.
cc People who have been CC'd on tickets.
You can search by a user's ID, a partial name, full name, and using an emailaddress.
All of the ticket property keywords can be used in search statements alone, in combination withother ticket property keywords, or with the type keyword (see Using the type keyword).
Searching ticket user rolesUsers have various roles on tickets (requester, assignee, etc). These user roles can be searched by theuser's ID, their name (partial or full), or their email address, as in these examples:
requester:52789480submitter:amyassignee:"amy moore"requester:[email protected]
Notice that none of these searches required the ID, or name, or email to be explicitly declared. Eachof these keywords accepts all of these user identifiers.
Searching for yourselfThe me keyword value allows you to search user properties in tickets where the value is your ownuser account (as the currently logged in user).
assignee:me
This works for all the user role properties in tickets:
• requester:me
• submitter:me
• assignee:me
For information about searching for user profile data, see Searching users.
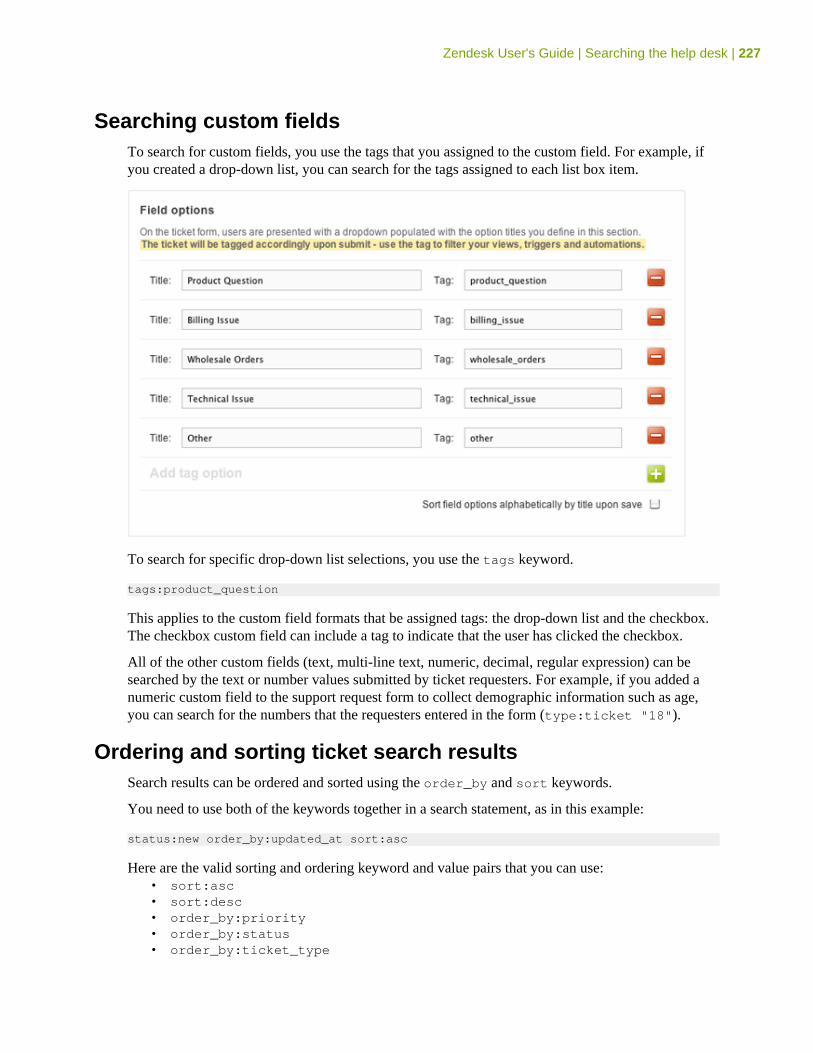
Zendesk User's Guide | Searching the help desk | 227
Searching custom fieldsTo search for custom fields, you use the tags that you assigned to the custom field. For example, ifyou created a drop-down list, you can search for the tags assigned to each list box item.
To search for specific drop-down list selections, you use the tags keyword.
tags:product_question
This applies to the custom field formats that be assigned tags: the drop-down list and the checkbox.The checkbox custom field can include a tag to indicate that the user has clicked the checkbox.
All of the other custom fields (text, multi-line text, numeric, decimal, regular expression) can besearched by the text or number values submitted by ticket requesters. For example, if you added anumeric custom field to the support request form to collect demographic information such as age,you can search for the numbers that the requesters entered in the form (type:ticket "18").
Ordering and sorting ticket search resultsSearch results can be ordered and sorted using the order_by and sort keywords.
You need to use both of the keywords together in a search statement, as in this example:
status:new order_by:updated_at sort:asc
Here are the valid sorting and ordering keyword and value pairs that you can use:• sort:asc• sort:desc• order_by:priority• order_by:status• order_by:ticket_type

228 | Zendesk User's Guide | Searching the help desk
• order_by:updated_at
• order_by:created_at
All of the order_by and sort keyword/values pairs can be used when searching ticket data.
Chapter
9
Customizing and extending your helpdesk
• Using Liquid markup to customize comments and email notifications• Zendesk data object (placeholders) reference• Setting up anonymous ticket submissions with Zendesk for Wordpress• Setting up remote authentication for Wordpress• Setting up and using the Zendesk for Wordpress plugin• Displaying latest satisfaction ratings in the ratings box widget• Displaying your last 100 satisfaction ratings using JSON• Setting up single sign on with Remote Authentication
230 | Zendesk User's Guide | Customizing and extending your help desk
Using Liquid markup to customize comments andemail notifications
If you're familiar with placeholders in Zendesk, then you already know something about Liquidmarkup. It's the templating language we use to enable them. Placeholders are used throughoutthe help desk (automations, macros, targets, triggers, and widgets) as containers for dynamicallygenerated ticket and user data. What you may not know about Liquid markup is that you can also useit to customize how this data is selected and displayed as output. This is because Liquid also allowsyou to create simple programming logic such as case statements, if statements, for loops, and so on.
By writing simple control statements directly in the comment/description action in macros and theemail user action in automations and triggers, you can accomplish in one automation, macro, ortrigger what you used to have to do in multiple automations, macros, and triggers. You can alsocustomize how comment text is presented.
A brief introduction to Liquid markupYou can find the Liquid documentation at Liquid for Designers. All of the elements of the languageare described in detail. Here, however, is a brief introduction to how it works.
Liquid is a templating language for rendering email and HTML. In Zendesk, Liquid is themechanism that enables the automated placement of data in comments and email notifications usingplaceholders.
There are two types of markup in Liquid:
• Output, which is text output contained in double curly brackets.• Tags, which contain the programming logic that determines how the data is expressed with
placeholders.
If you simply equate output with placeholder, you're about half way to understanding what Liquidis and how it's used in Zendesk. What you may not know about Liquid output however is that inaddition to expressing ticket and user data, there are also methods available to manipulate textstrings and arrays. In Liquid, these methods are referred to as filters. Using a filter you can transformtext to uppercase characters, for example. But that's one of the simplest examples of what filters canbe used for. See the Liquid documentation for more information.
The other half of understanding of how Liquid can be used in Zendesk comes from knowing whattags are and how they are used. Tags provide the programming logic that you can use to select andpresent data.
Using Liquid tags you can create:
• if else statements• case statements• for loops• cycles• variable assignments
As an example, based on ticket properties you can create different responses in your business rules.This example shows how you can modify the Notify requester of received request trigger (or anyother trigger that serves the same purpose) to return a response based on your business hours.
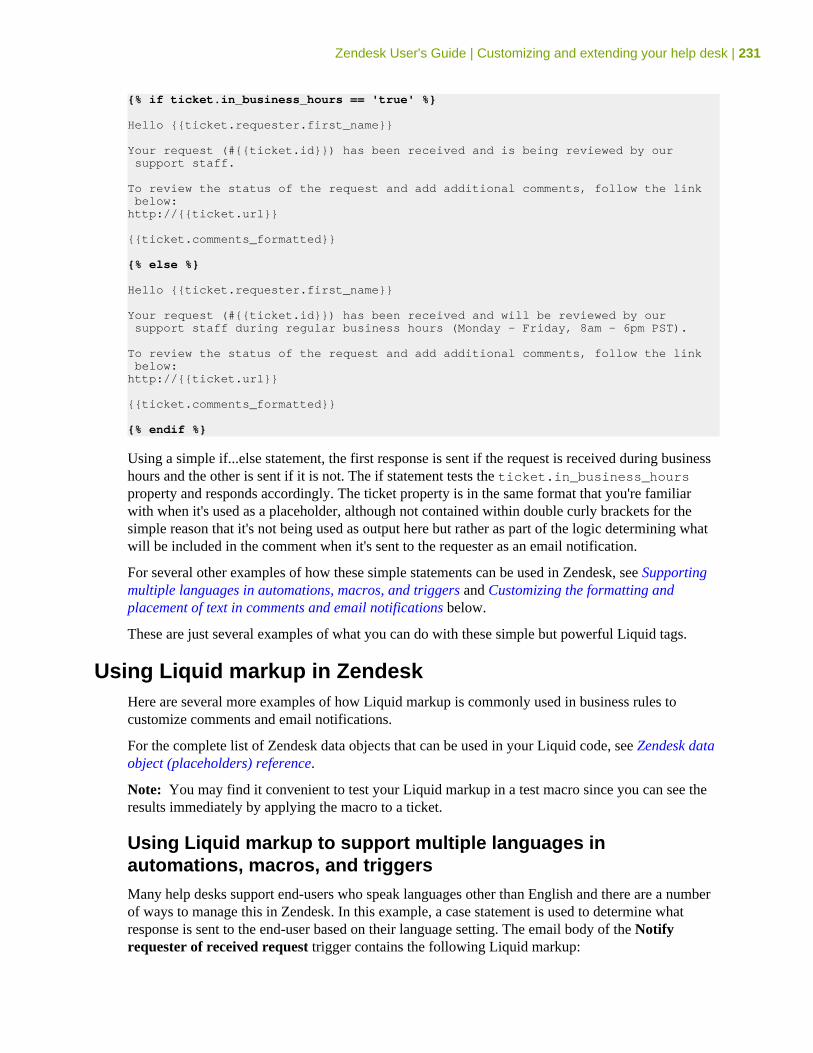
Zendesk User's Guide | Customizing and extending your help desk | 231
{% if ticket.in_business_hours == 'true' %}
Hello {{ticket.requester.first_name}}
Your request (#{{ticket.id}}) has been received and is being reviewed by our support staff.
To review the status of the request and add additional comments, follow the link below:http://{{ticket.url}}
{{ticket.comments_formatted}}
{% else %}
Hello {{ticket.requester.first_name}}
Your request (#{{ticket.id}}) has been received and will be reviewed by our support staff during regular business hours (Monday - Friday, 8am - 6pm PST).
To review the status of the request and add additional comments, follow the link below:http://{{ticket.url}}
{{ticket.comments_formatted}}
{% endif %}
Using a simple if...else statement, the first response is sent if the request is received during businesshours and the other is sent if it is not. The if statement tests the ticket.in_business_hoursproperty and responds accordingly. The ticket property is in the same format that you're familiarwith when it's used as a placeholder, although not contained within double curly brackets for thesimple reason that it's not being used as output here but rather as part of the logic determining whatwill be included in the comment when it's sent to the requester as an email notification.
For several other examples of how these simple statements can be used in Zendesk, see Supportingmultiple languages in automations, macros, and triggers and Customizing the formatting andplacement of text in comments and email notifications below.
These are just several examples of what you can do with these simple but powerful Liquid tags.
Using Liquid markup in ZendeskHere are several more examples of how Liquid markup is commonly used in business rules tocustomize comments and email notifications.
For the complete list of Zendesk data objects that can be used in your Liquid code, see Zendesk dataobject (placeholders) reference.
Note: You may find it convenient to test your Liquid markup in a test macro since you can see theresults immediately by applying the macro to a ticket.
Using Liquid markup to support multiple languages inautomations, macros, and triggersMany help desks support end-users who speak languages other than English and there are a numberof ways to manage this in Zendesk. In this example, a case statement is used to determine whatresponse is sent to the end-user based on their language setting. The email body of the Notifyrequester of received request trigger contains the following Liquid markup:
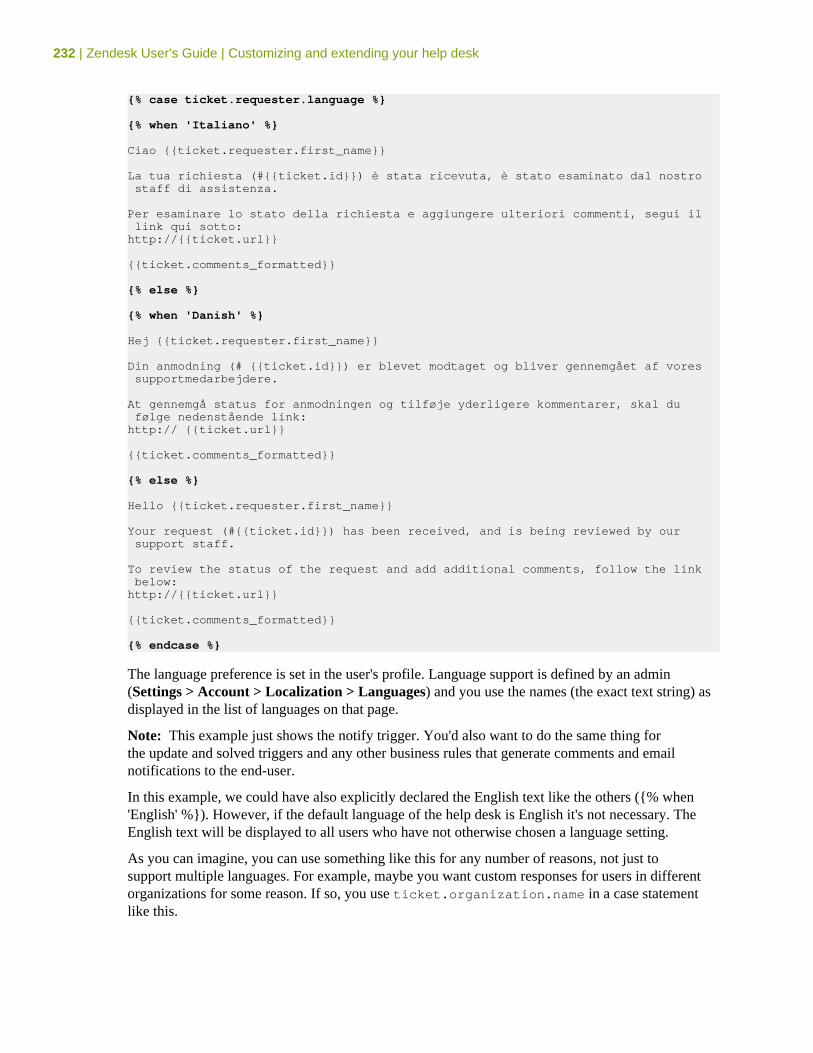
232 | Zendesk User's Guide | Customizing and extending your help desk
{% case ticket.requester.language %}
{% when 'Italiano' %}
Ciao {{ticket.requester.first_name}}
La tua richiesta (#{{ticket.id}}) è stata ricevuta, è stato esaminato dal nostro staff di assistenza.
Per esaminare lo stato della richiesta e aggiungere ulteriori commenti, segui il link qui sotto:http://{{ticket.url}}
{{ticket.comments_formatted}}
{% else %}
{% when 'Danish' %}
Hej {{ticket.requester.first_name}}
Din anmodning (# {{ticket.id}}) er blevet modtaget og bliver gennemgået af vores supportmedarbejdere.
At gennemgå status for anmodningen og tilføje yderligere kommentarer, skal du følge nedenstående link:http:// {{ticket.url}}
{{ticket.comments_formatted}}
{% else %}
Hello {{ticket.requester.first_name}}
Your request (#{{ticket.id}}) has been received, and is being reviewed by our support staff.
To review the status of the request and add additional comments, follow the link below:http://{{ticket.url}}
{{ticket.comments_formatted}}
{% endcase %}
The language preference is set in the user's profile. Language support is defined by an admin(Settings > Account > Localization > Languages) and you use the names (the exact text string) asdisplayed in the list of languages on that page.
Note: This example just shows the notify trigger. You'd also want to do the same thing forthe update and solved triggers and any other business rules that generate comments and emailnotifications to the end-user.
In this example, we could have also explicitly declared the English text like the others ({% when'English' %}). However, if the default language of the help desk is English it's not necessary. TheEnglish text will be displayed to all users who have not otherwise chosen a language setting.
As you can imagine, you can use something like this for any number of reasons, not just tosupport multiple languages. For example, maybe you want custom responses for users in differentorganizations for some reason. If so, you use ticket.organization.name in a case statementlike this.
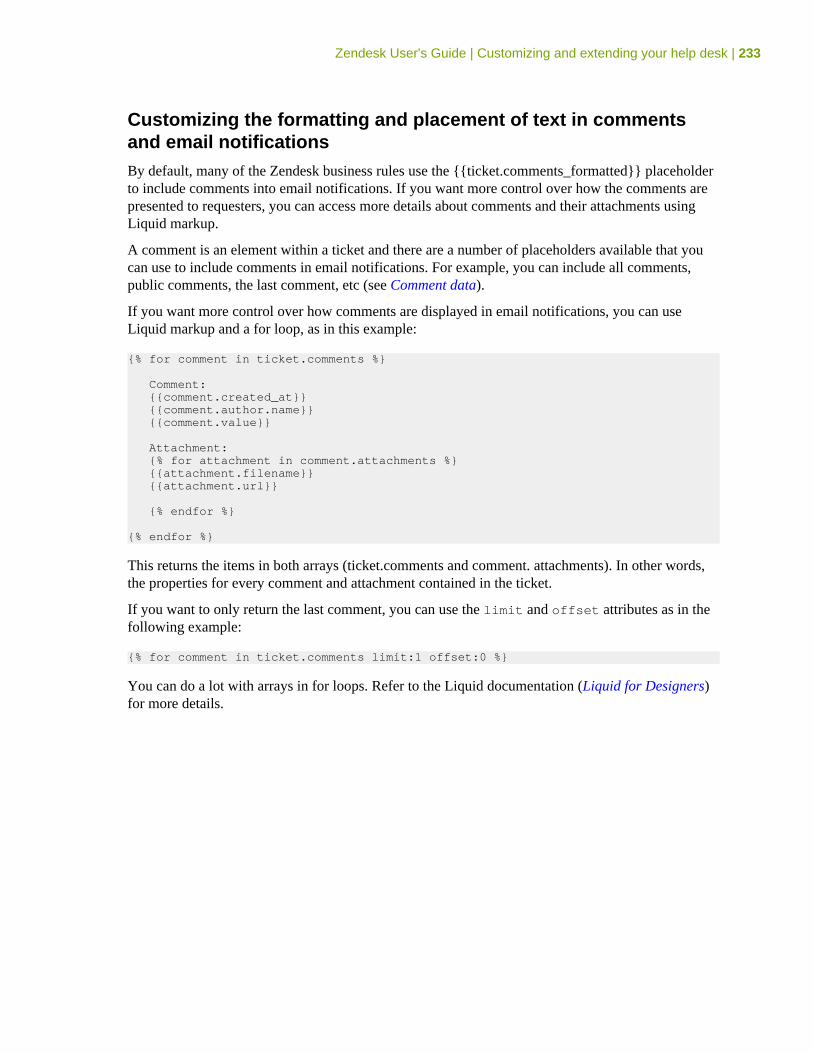
Zendesk User's Guide | Customizing and extending your help desk | 233
Customizing the formatting and placement of text in commentsand email notificationsBy default, many of the Zendesk business rules use the {{ticket.comments_formatted}} placeholderto include comments into email notifications. If you want more control over how the comments arepresented to requesters, you can access more details about comments and their attachments usingLiquid markup.
A comment is an element within a ticket and there are a number of placeholders available that youcan use to include comments in email notifications. For example, you can include all comments,public comments, the last comment, etc (see Comment data).
If you want more control over how comments are displayed in email notifications, you can useLiquid markup and a for loop, as in this example:
{% for comment in ticket.comments %}
Comment: {{comment.created_at}} {{comment.author.name}} {{comment.value}}
Attachment: {% for attachment in comment.attachments %} {{attachment.filename}} {{attachment.url}}
{% endfor %}
{% endfor %}
This returns the items in both arrays (ticket.comments and comment. attachments). In other words,the properties for every comment and attachment contained in the ticket.
If you want to only return the last comment, you can use the limit and offset attributes as in thefollowing example:
{% for comment in ticket.comments limit:1 offset:0 %}
You can do a lot with arrays in for loops. Refer to the Liquid documentation (Liquid for Designers)for more details.
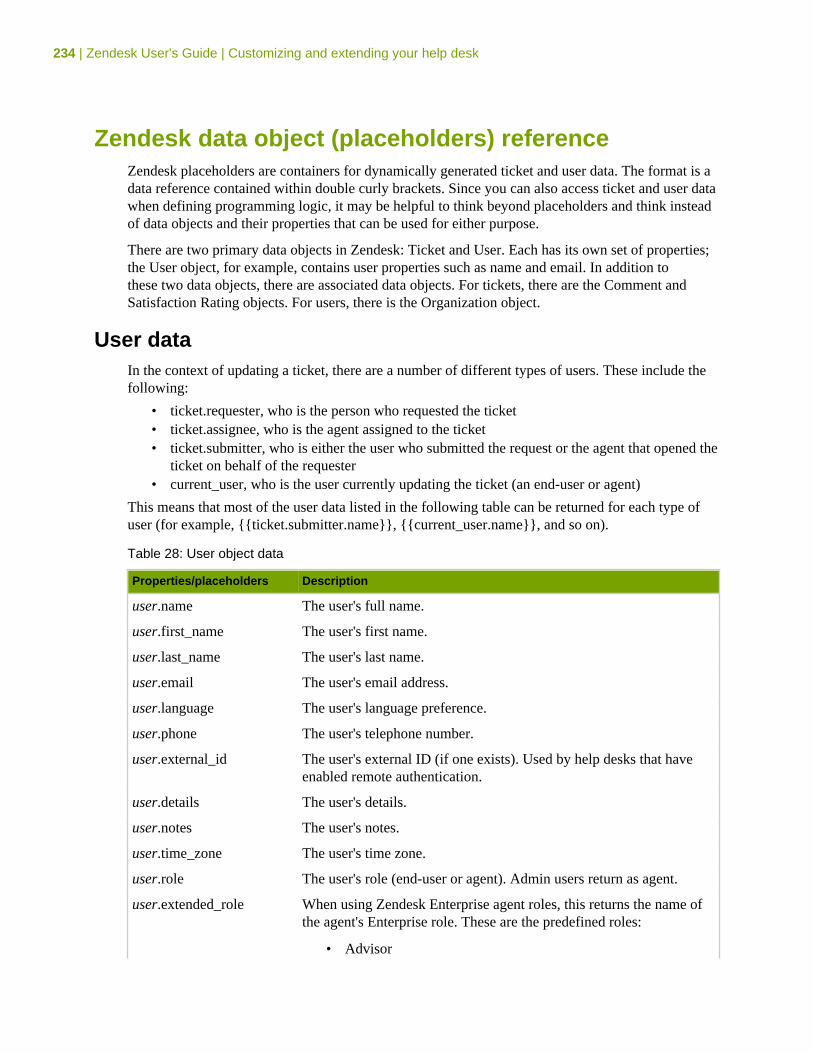
234 | Zendesk User's Guide | Customizing and extending your help desk
Zendesk data object (placeholders) referenceZendesk placeholders are containers for dynamically generated ticket and user data. The format is adata reference contained within double curly brackets. Since you can also access ticket and user datawhen defining programming logic, it may be helpful to think beyond placeholders and think insteadof data objects and their properties that can be used for either purpose.
There are two primary data objects in Zendesk: Ticket and User. Each has its own set of properties;the User object, for example, contains user properties such as name and email. In addition tothese two data objects, there are associated data objects. For tickets, there are the Comment andSatisfaction Rating objects. For users, there is the Organization object.
User dataIn the context of updating a ticket, there are a number of different types of users. These include thefollowing:
• ticket.requester, who is the person who requested the ticket• ticket.assignee, who is the agent assigned to the ticket• ticket.submitter, who is either the user who submitted the request or the agent that opened the
ticket on behalf of the requester• current_user, who is the user currently updating the ticket (an end-user or agent)
This means that most of the user data listed in the following table can be returned for each type ofuser (for example, {{ticket.submitter.name}}, {{current_user.name}}, and so on).
Table 28: User object data
Properties/placeholders Description
user.name The user's full name.
user.first_name The user's first name.
user.last_name The user's last name.
user.email The user's email address.
user.language The user's language preference.
user.phone The user's telephone number.
user.external_id The user's external ID (if one exists). Used by help desks that haveenabled remote authentication.
user.details The user's details.
user.notes The user's notes.
user.time_zone The user's time zone.
user.role The user's role (end-user or agent). Admin users return as agent.
user.extended_role When using Zendesk Enterprise agent roles, this returns the name ofthe agent's Enterprise role. These are the predefined roles:
• Advisor
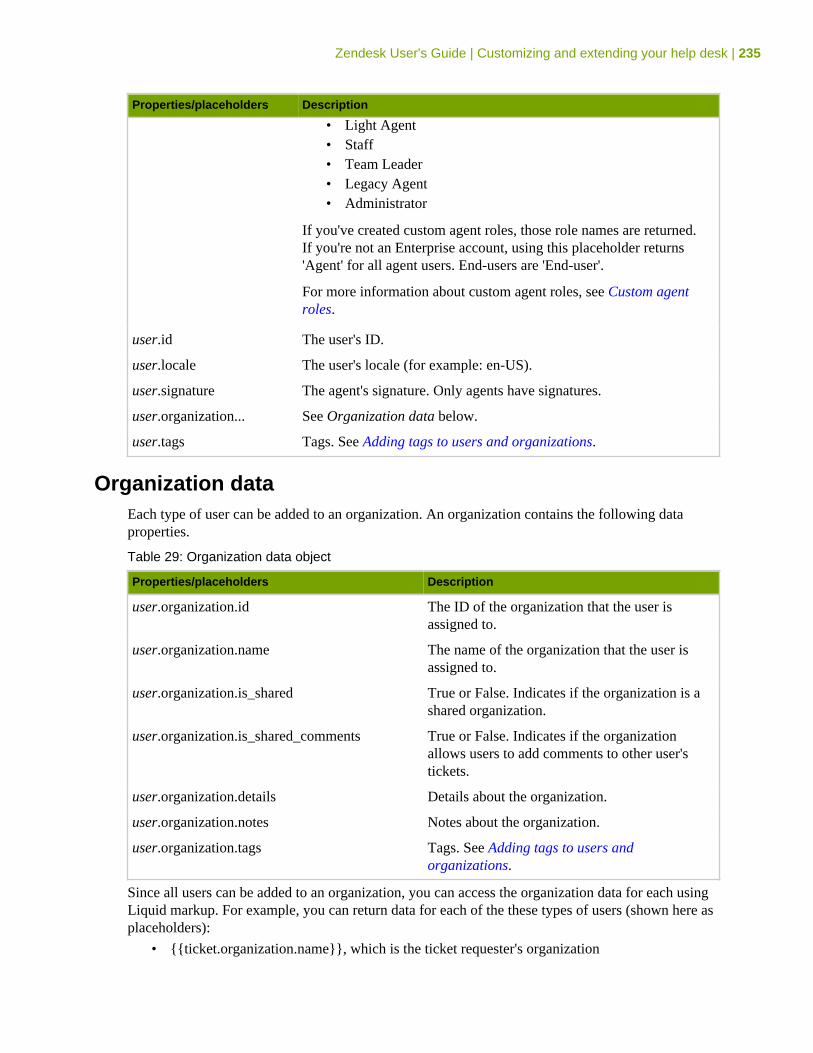
Zendesk User's Guide | Customizing and extending your help desk | 235
Properties/placeholders Description
• Light Agent• Staff• Team Leader• Legacy Agent• Administrator
If you've created custom agent roles, those role names are returned.If you're not an Enterprise account, using this placeholder returns'Agent' for all agent users. End-users are 'End-user'.
For more information about custom agent roles, see Custom agentroles.
user.id The user's ID.
user.locale The user's locale (for example: en-US).
user.signature The agent's signature. Only agents have signatures.
user.organization... See Organization data below.
user.tags Tags. See Adding tags to users and organizations.
Organization dataEach type of user can be added to an organization. An organization contains the following dataproperties.
Table 29: Organization data object
Properties/placeholders Description
user.organization.id The ID of the organization that the user isassigned to.
user.organization.name The name of the organization that the user isassigned to.
user.organization.is_shared True or False. Indicates if the organization is ashared organization.
user.organization.is_shared_comments True or False. Indicates if the organizationallows users to add comments to other user'stickets.
user.organization.details Details about the organization.
user.organization.notes Notes about the organization.
user.organization.tags Tags. See Adding tags to users andorganizations.
Since all users can be added to an organization, you can access the organization data for each usingLiquid markup. For example, you can return data for each of the these types of users (shown here asplaceholders):
• {{ticket.organization.name}}, which is the ticket requester's organization
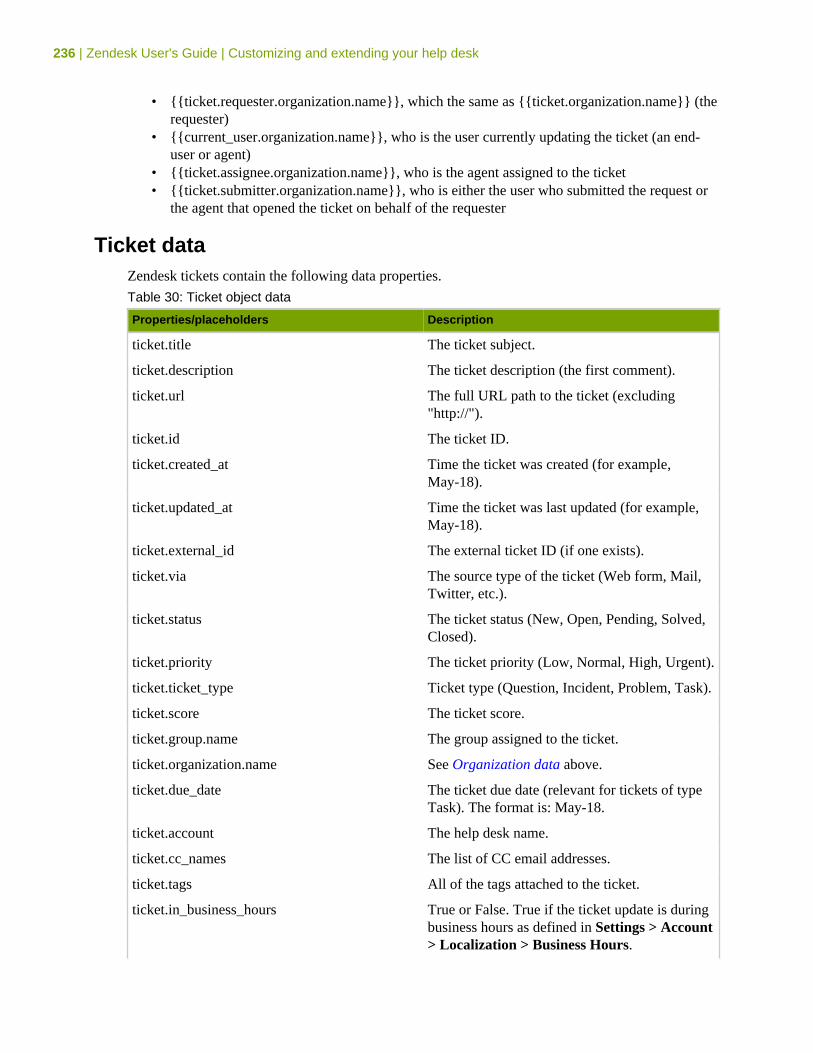
236 | Zendesk User's Guide | Customizing and extending your help desk
• {{ticket.requester.organization.name}}, which the same as {{ticket.organization.name}} (therequester)
• {{current_user.organization.name}}, who is the user currently updating the ticket (an end-user or agent)
• {{ticket.assignee.organization.name}}, who is the agent assigned to the ticket• {{ticket.submitter.organization.name}}, who is either the user who submitted the request or
the agent that opened the ticket on behalf of the requester
Ticket dataZendesk tickets contain the following data properties.
Table 30: Ticket object data
Properties/placeholders Description
ticket.title The ticket subject.
ticket.description The ticket description (the first comment).
ticket.url The full URL path to the ticket (excluding"http://").
ticket.id The ticket ID.
ticket.created_at Time the ticket was created (for example,May-18).
ticket.updated_at Time the ticket was last updated (for example,May-18).
ticket.external_id The external ticket ID (if one exists).
ticket.via The source type of the ticket (Web form, Mail,Twitter, etc.).
ticket.status The ticket status (New, Open, Pending, Solved,Closed).
ticket.priority The ticket priority (Low, Normal, High, Urgent).
ticket.ticket_type Ticket type (Question, Incident, Problem, Task).
ticket.score The ticket score.
ticket.group.name The group assigned to the ticket.
ticket.organization.name See Organization data above.
ticket.due_date The ticket due date (relevant for tickets of typeTask). The format is: May-18.
ticket.account The help desk name.
ticket.cc_names The list of CC email addresses.
ticket.tags All of the tags attached to the ticket.
ticket.in_business_hours True or False. True if the ticket update is duringbusiness hours as defined in Settings > Account> Localization > Business Hours.
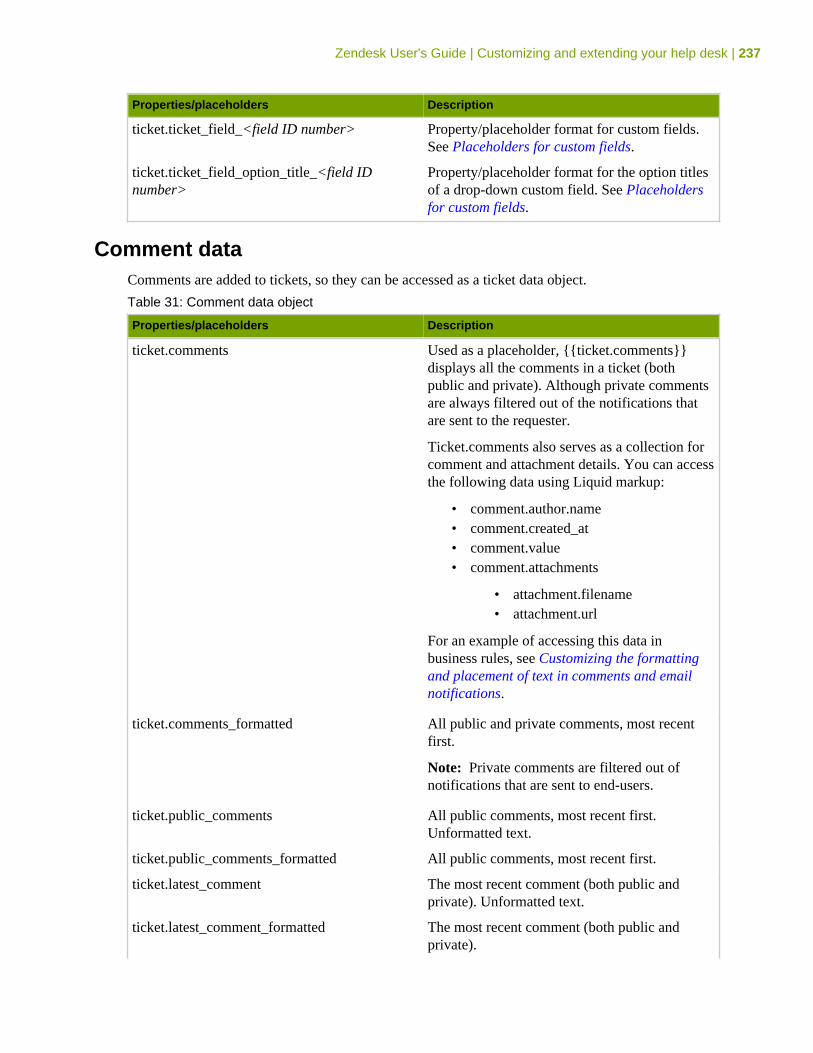
Zendesk User's Guide | Customizing and extending your help desk | 237
Properties/placeholders Description
ticket.ticket_field_<field ID number> Property/placeholder format for custom fields.See Placeholders for custom fields.
ticket.ticket_field_option_title_<field IDnumber>
Property/placeholder format for the option titlesof a drop-down custom field. See Placeholdersfor custom fields.
Comment dataComments are added to tickets, so they can be accessed as a ticket data object.
Table 31: Comment data object
Properties/placeholders Description
ticket.comments Used as a placeholder, {{ticket.comments}}displays all the comments in a ticket (bothpublic and private). Although private commentsare always filtered out of the notifications thatare sent to the requester.
Ticket.comments also serves as a collection forcomment and attachment details. You can accessthe following data using Liquid markup:
• comment.author.name• comment.created_at• comment.value• comment.attachments
• attachment.filename• attachment.url
For an example of accessing this data inbusiness rules, see Customizing the formattingand placement of text in comments and emailnotifications.
ticket.comments_formatted All public and private comments, most recentfirst.
Note: Private comments are filtered out ofnotifications that are sent to end-users.
ticket.public_comments All public comments, most recent first.Unformatted text.
ticket.public_comments_formatted All public comments, most recent first.
ticket.latest_comment The most recent comment (both public andprivate). Unformatted text.
ticket.latest_comment_formatted The most recent comment (both public andprivate).
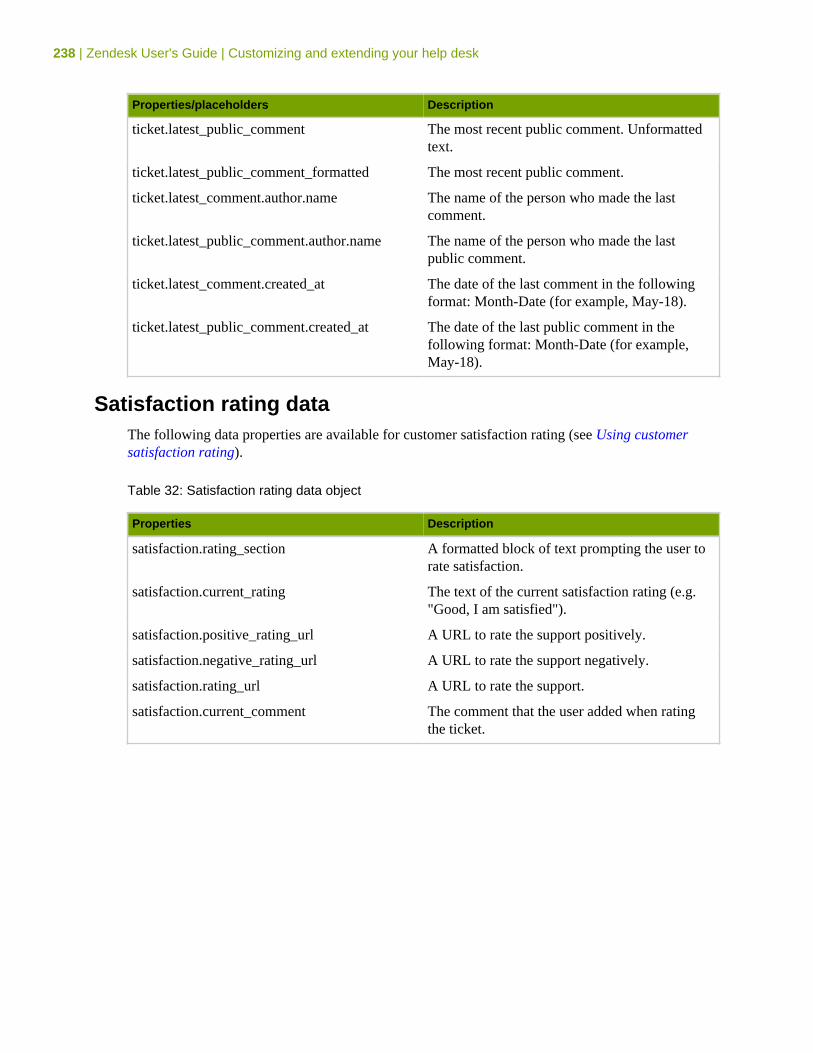
238 | Zendesk User's Guide | Customizing and extending your help desk
Properties/placeholders Description
ticket.latest_public_comment The most recent public comment. Unformattedtext.
ticket.latest_public_comment_formatted The most recent public comment.
ticket.latest_comment.author.name The name of the person who made the lastcomment.
ticket.latest_public_comment.author.name The name of the person who made the lastpublic comment.
ticket.latest_comment.created_at The date of the last comment in the followingformat: Month-Date (for example, May-18).
ticket.latest_public_comment.created_at The date of the last public comment in thefollowing format: Month-Date (for example,May-18).
Satisfaction rating dataThe following data properties are available for customer satisfaction rating (see Using customersatisfaction rating).
Table 32: Satisfaction rating data object
Properties Description
satisfaction.rating_section A formatted block of text prompting the user torate satisfaction.
satisfaction.current_rating The text of the current satisfaction rating (e.g."Good, I am satisfied").
satisfaction.positive_rating_url A URL to rate the support positively.
satisfaction.negative_rating_url A URL to rate the support negatively.
satisfaction.rating_url A URL to rate the support.
satisfaction.current_comment The comment that the user added when ratingthe ticket.
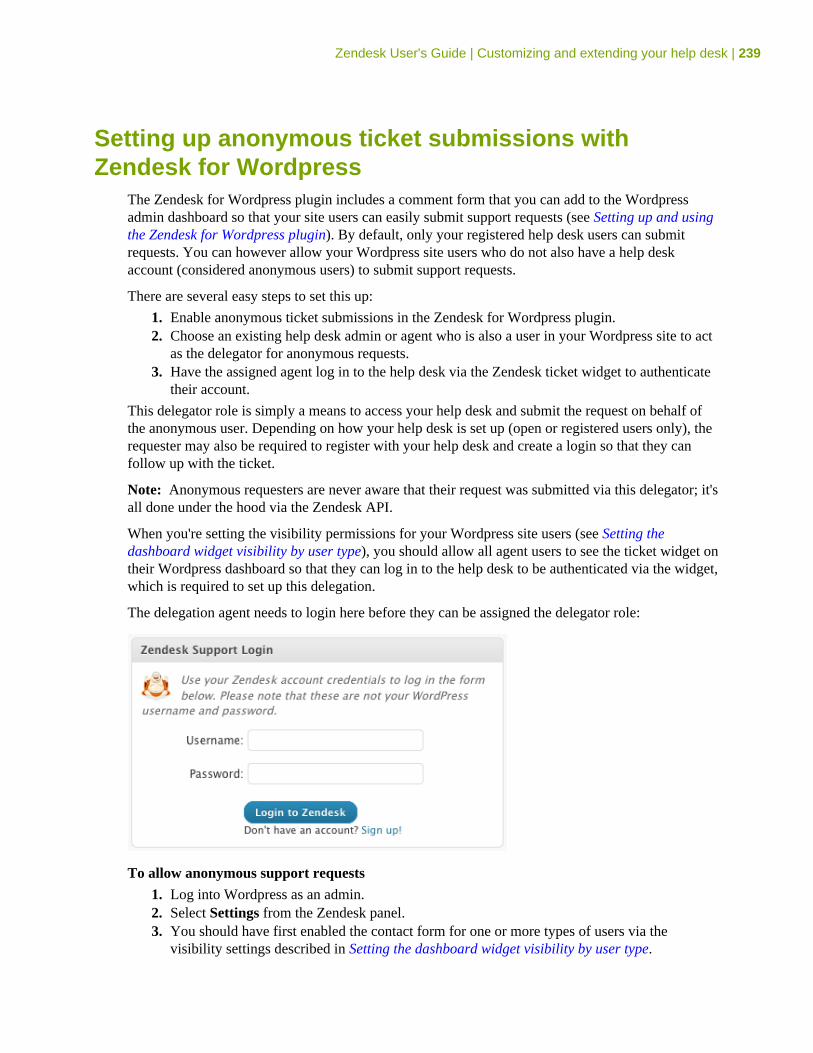
Zendesk User's Guide | Customizing and extending your help desk | 239
Setting up anonymous ticket submissions withZendesk for Wordpress
The Zendesk for Wordpress plugin includes a comment form that you can add to the Wordpressadmin dashboard so that your site users can easily submit support requests (see Setting up and usingthe Zendesk for Wordpress plugin). By default, only your registered help desk users can submitrequests. You can however allow your Wordpress site users who do not also have a help deskaccount (considered anonymous users) to submit support requests.
There are several easy steps to set this up:
1. Enable anonymous ticket submissions in the Zendesk for Wordpress plugin.2. Choose an existing help desk admin or agent who is also a user in your Wordpress site to act
as the delegator for anonymous requests.3. Have the assigned agent log in to the help desk via the Zendesk ticket widget to authenticate
their account.
This delegator role is simply a means to access your help desk and submit the request on behalf ofthe anonymous user. Depending on how your help desk is set up (open or registered users only), therequester may also be required to register with your help desk and create a login so that they canfollow up with the ticket.
Note: Anonymous requesters are never aware that their request was submitted via this delegator; it'sall done under the hood via the Zendesk API.
When you're setting the visibility permissions for your Wordpress site users (see Setting thedashboard widget visibility by user type), you should allow all agent users to see the ticket widget ontheir Wordpress dashboard so that they can log in to the help desk to be authenticated via the widget,which is required to set up this delegation.
The delegation agent needs to login here before they can be assigned the delegator role:
To allow anonymous support requests
1. Log into Wordpress as an admin.2. Select Settings from the Zendesk panel.3. You should have first enabled the contact form for one or more types of users via the
visibility settings described in Setting the dashboard widget visibility by user type.
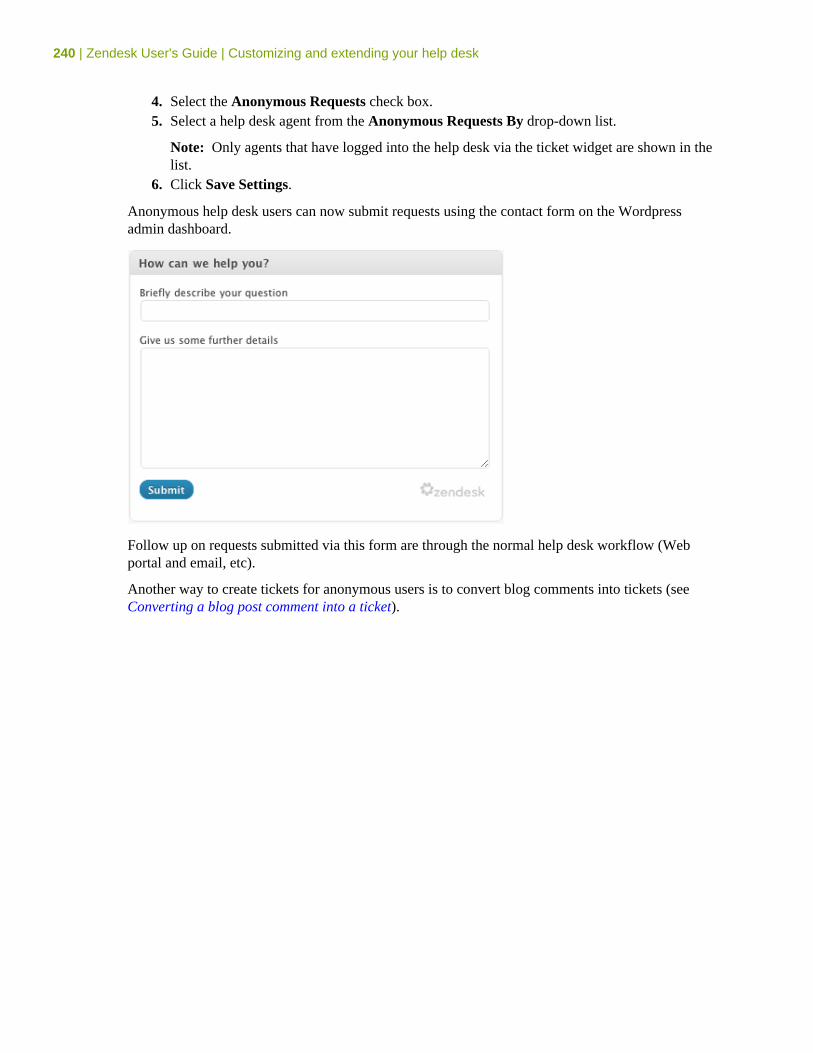
240 | Zendesk User's Guide | Customizing and extending your help desk
4. Select the Anonymous Requests check box.5. Select a help desk agent from the Anonymous Requests By drop-down list.
Note: Only agents that have logged into the help desk via the ticket widget are shown in thelist.
6. Click Save Settings.
Anonymous help desk users can now submit requests using the contact form on the Wordpressadmin dashboard.
Follow up on requests submitted via this form are through the normal help desk workflow (Webportal and email, etc).
Another way to create tickets for anonymous users is to convert blog comments into tickets (seeConverting a blog post comment into a ticket).
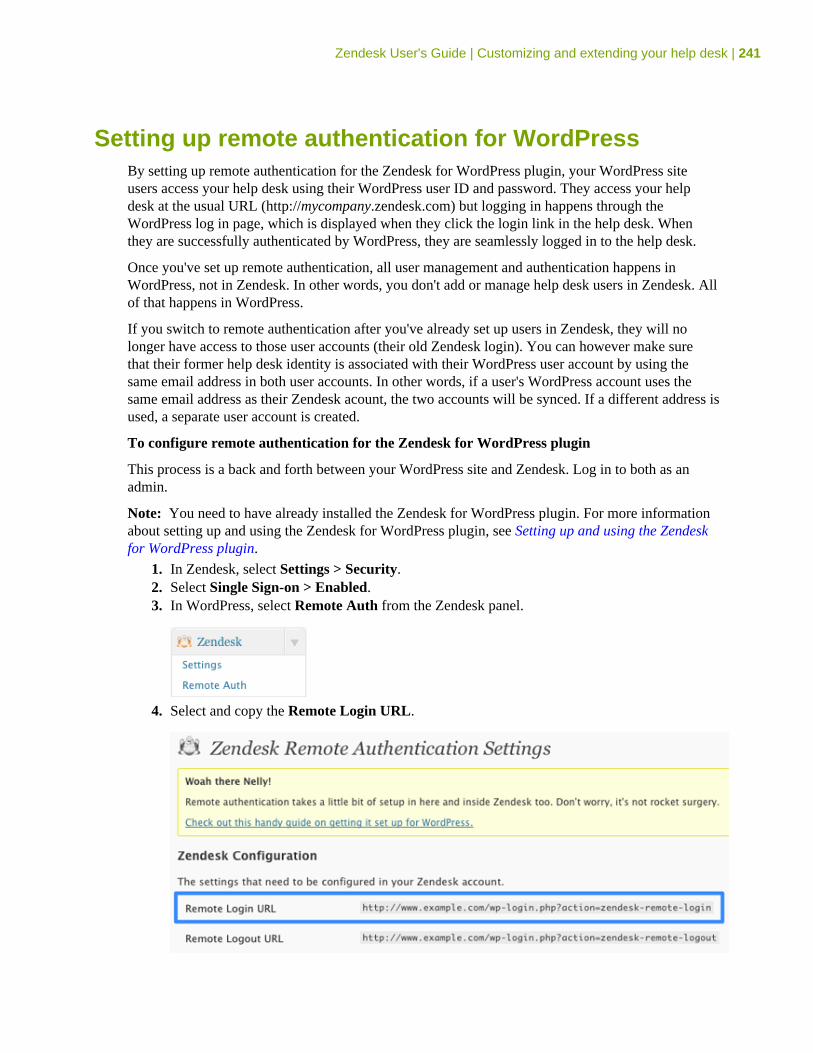
Zendesk User's Guide | Customizing and extending your help desk | 241
Setting up remote authentication for WordPressBy setting up remote authentication for the Zendesk for WordPress plugin, your WordPress siteusers access your help desk using their WordPress user ID and password. They access your helpdesk at the usual URL (http://mycompany.zendesk.com) but logging in happens through theWordPress log in page, which is displayed when they click the login link in the help desk. Whenthey are successfully authenticated by WordPress, they are seamlessly logged in to the help desk.
Once you've set up remote authentication, all user management and authentication happens inWordPress, not in Zendesk. In other words, you don't add or manage help desk users in Zendesk. Allof that happens in WordPress.
If you switch to remote authentication after you've already set up users in Zendesk, they will nolonger have access to those user accounts (their old Zendesk login). You can however make surethat their former help desk identity is associated with their WordPress user account by using thesame email address in both user accounts. In other words, if a user's WordPress account uses thesame email address as their Zendesk acount, the two accounts will be synced. If a different address isused, a separate user account is created.
To configure remote authentication for the Zendesk for WordPress plugin
This process is a back and forth between your WordPress site and Zendesk. Log in to both as anadmin.
Note: You need to have already installed the Zendesk for WordPress plugin. For more informationabout setting up and using the Zendesk for WordPress plugin, see Setting up and using the Zendeskfor WordPress plugin.
1. In Zendesk, select Settings > Security.2. Select Single Sign-on > Enabled.3. In WordPress, select Remote Auth from the Zendesk panel.
4. Select and copy the Remote Login URL.
242 | Zendesk User's Guide | Customizing and extending your help desk
5. In Zendesk, copy the URL into the Remote Login URL input box.6. If you want your users to return to your WordPress site after logging out of the help desk,
copy the Remote Logout URL in WordPress and paste it into the Remote Logout URL inZendesk.
7. In Zendesk, select the Allow update of external ids? option.8. In Zendesk, select Shared secret > Generate a new token. Select and copy the token.
Note: It's a long number and may exceed the length of the text control that it's displayed inso double-click the number to make sure you've selected it all.
9. In Zendesk, click Save Tab. You've finished the Zendesk part of this set up.10.In Wordpress, copy the shared secret into Remote Auth Shared Token.11.Click Save Changes.
Now all help desk users, including yourself, will be authenticated through your WordPress site whenlogging in to the help desk.
Note: If you, as a help desk admin, need to log in to Zendesk with your Zendesk user account, youcan do so at the following URL: http://mycompany.zendesk.com/access/normal.
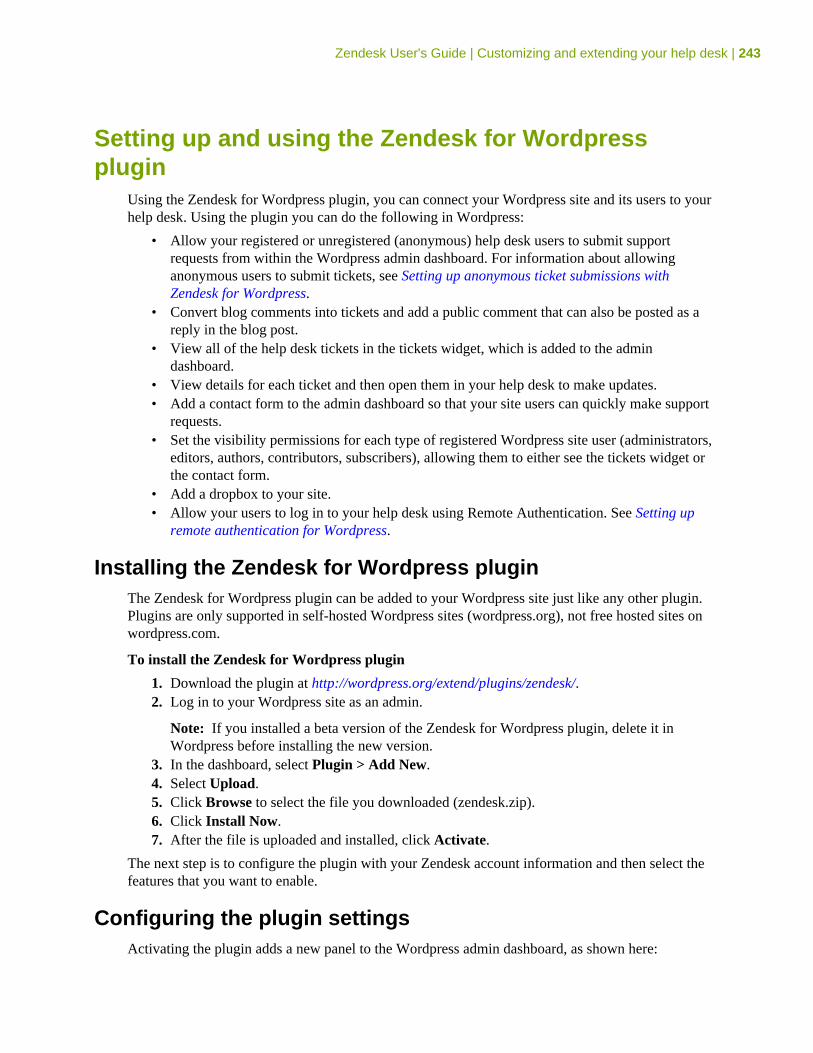
Zendesk User's Guide | Customizing and extending your help desk | 243
Setting up and using the Zendesk for Wordpressplugin
Using the Zendesk for Wordpress plugin, you can connect your Wordpress site and its users to yourhelp desk. Using the plugin you can do the following in Wordpress:
• Allow your registered or unregistered (anonymous) help desk users to submit supportrequests from within the Wordpress admin dashboard. For information about allowinganonymous users to submit tickets, see Setting up anonymous ticket submissions withZendesk for Wordpress.
• Convert blog comments into tickets and add a public comment that can also be posted as areply in the blog post.
• View all of the help desk tickets in the tickets widget, which is added to the admindashboard.
• View details for each ticket and then open them in your help desk to make updates.• Add a contact form to the admin dashboard so that your site users can quickly make support
requests.• Set the visibility permissions for each type of registered Wordpress site user (administrators,
editors, authors, contributors, subscribers), allowing them to either see the tickets widget orthe contact form.
• Add a dropbox to your site.• Allow your users to log in to your help desk using Remote Authentication. See Setting up
remote authentication for Wordpress.
Installing the Zendesk for Wordpress pluginThe Zendesk for Wordpress plugin can be added to your Wordpress site just like any other plugin.Plugins are only supported in self-hosted Wordpress sites (wordpress.org), not free hosted sites onwordpress.com.
To install the Zendesk for Wordpress plugin
1. Download the plugin at http://wordpress.org/extend/plugins/zendesk/.2. Log in to your Wordpress site as an admin.
Note: If you installed a beta version of the Zendesk for Wordpress plugin, delete it inWordpress before installing the new version.
3. In the dashboard, select Plugin > Add New.4. Select Upload.5. Click Browse to select the file you downloaded (zendesk.zip).6. Click Install Now.7. After the file is uploaded and installed, click Activate.
The next step is to configure the plugin with your Zendesk account information and then select thefeatures that you want to enable.
Configuring the plugin settingsActivating the plugin adds a new panel to the Wordpress admin dashboard, as shown here:
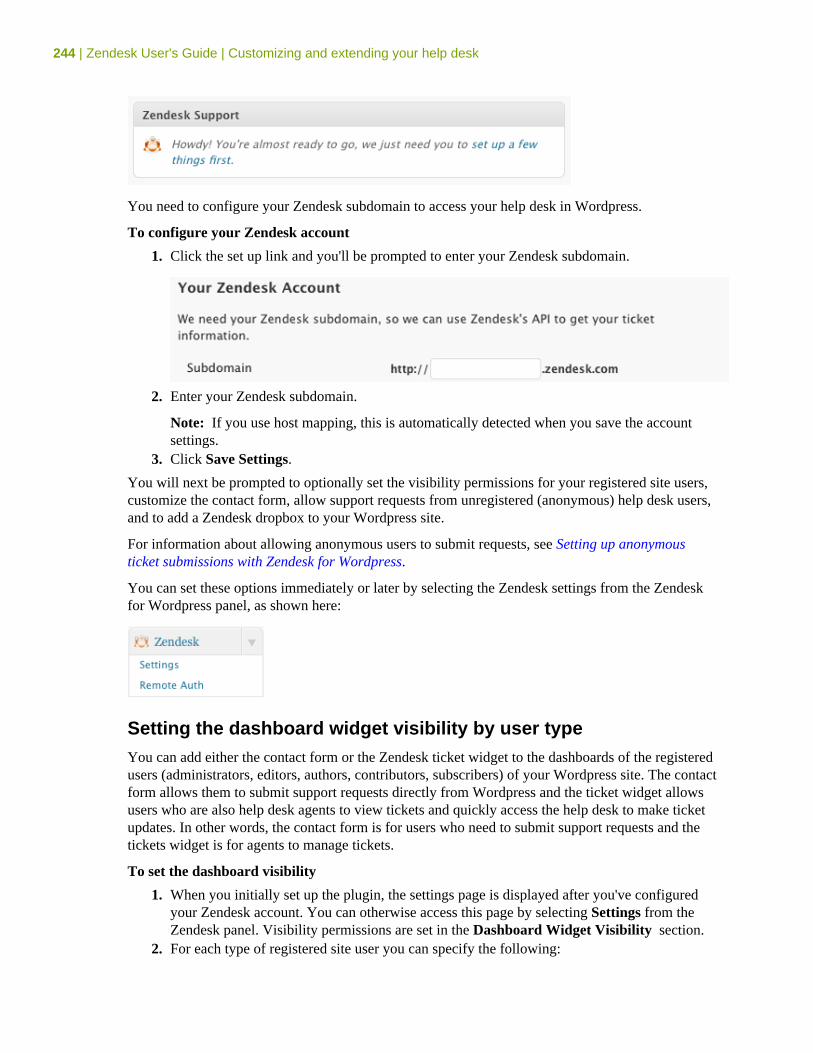
244 | Zendesk User's Guide | Customizing and extending your help desk
You need to configure your Zendesk subdomain to access your help desk in Wordpress.
To configure your Zendesk account
1. Click the set up link and you'll be prompted to enter your Zendesk subdomain.
2. Enter your Zendesk subdomain.
Note: If you use host mapping, this is automatically detected when you save the accountsettings.
3. Click Save Settings.
You will next be prompted to optionally set the visibility permissions for your registered site users,customize the contact form, allow support requests from unregistered (anonymous) help desk users,and to add a Zendesk dropbox to your Wordpress site.
For information about allowing anonymous users to submit requests, see Setting up anonymousticket submissions with Zendesk for Wordpress.
You can set these options immediately or later by selecting the Zendesk settings from the Zendeskfor Wordpress panel, as shown here:
Setting the dashboard widget visibility by user typeYou can add either the contact form or the Zendesk ticket widget to the dashboards of the registeredusers (administrators, editors, authors, contributors, subscribers) of your Wordpress site. The contactform allows them to submit support requests directly from Wordpress and the ticket widget allowsusers who are also help desk agents to view tickets and quickly access the help desk to make ticketupdates. In other words, the contact form is for users who need to submit support requests and thetickets widget is for agents to manage tickets.
To set the dashboard visibility
1. When you initially set up the plugin, the settings page is displayed after you've configuredyour Zendesk account. You can otherwise access this page by selecting Settings from theZendesk panel. Visibility permissions are set in the Dashboard Widget Visibility section.
2. For each type of registered site user you can specify the following:

Zendesk User's Guide | Customizing and extending your help desk | 245
• Don't display anything• Show a contact form• Show the tickets widget
3. Choose a visibility setting for all user types:
• Administrators• Editors• Authors• Contributors• Subscribers
4. Click Save Changes.
Customizing the contact formUsing the contact form, your registered site users can submit support requests.
The contact form is added to the Wordpress dashboard when enabled for the types of users describedabove. You can modify the wording of each element of the form (title, summary, description, andthe button label) on the Settings page.
Note: You cannot currently add custom fields or otherwise modify this form.
To customize the contact form
1. Select Settings from the Zendesk panel.2. In the Contact Form Settings section, enter text for the form title, summary label, details
label, and submit button label.3. Click Save Settings.
Adding a dropbox to your Wordpress siteUsing the Zendesk for Wordpress plugin, you can also easily add a dropbox to your Wordpress site.You use the dropbox code generated by the help desk in Settings > Channels > Zendesk Dropbox.
To add a dropbox to your Wordpress site
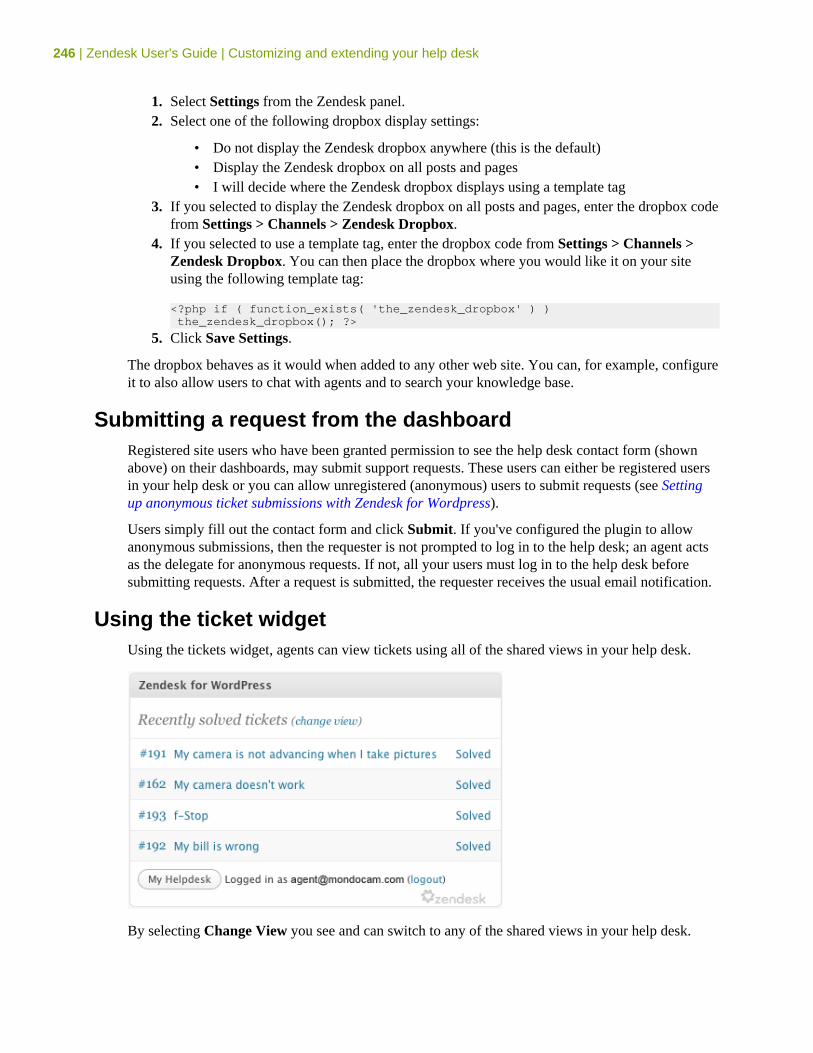
246 | Zendesk User's Guide | Customizing and extending your help desk
1. Select Settings from the Zendesk panel.2. Select one of the following dropbox display settings:
• Do not display the Zendesk dropbox anywhere (this is the default)• Display the Zendesk dropbox on all posts and pages• I will decide where the Zendesk dropbox displays using a template tag
3. If you selected to display the Zendesk dropbox on all posts and pages, enter the dropbox codefrom Settings > Channels > Zendesk Dropbox.
4. If you selected to use a template tag, enter the dropbox code from Settings > Channels >Zendesk Dropbox. You can then place the dropbox where you would like it on your siteusing the following template tag:
<?php if ( function_exists( 'the_zendesk_dropbox' ) ) the_zendesk_dropbox(); ?>
5. Click Save Settings.
The dropbox behaves as it would when added to any other web site. You can, for example, configureit to also allow users to chat with agents and to search your knowledge base.
Submitting a request from the dashboardRegistered site users who have been granted permission to see the help desk contact form (shownabove) on their dashboards, may submit support requests. These users can either be registered usersin your help desk or you can allow unregistered (anonymous) users to submit requests (see Settingup anonymous ticket submissions with Zendesk for Wordpress).
Users simply fill out the contact form and click Submit. If you've configured the plugin to allowanonymous submissions, then the requester is not prompted to log in to the help desk; an agent actsas the delegate for anonymous requests. If not, all your users must log in to the help desk beforesubmitting requests. After a request is submitted, the requester receives the usual email notification.
Using the ticket widgetUsing the tickets widget, agents can view tickets using all of the shared views in your help desk.
By selecting Change View you see and can switch to any of the shared views in your help desk.
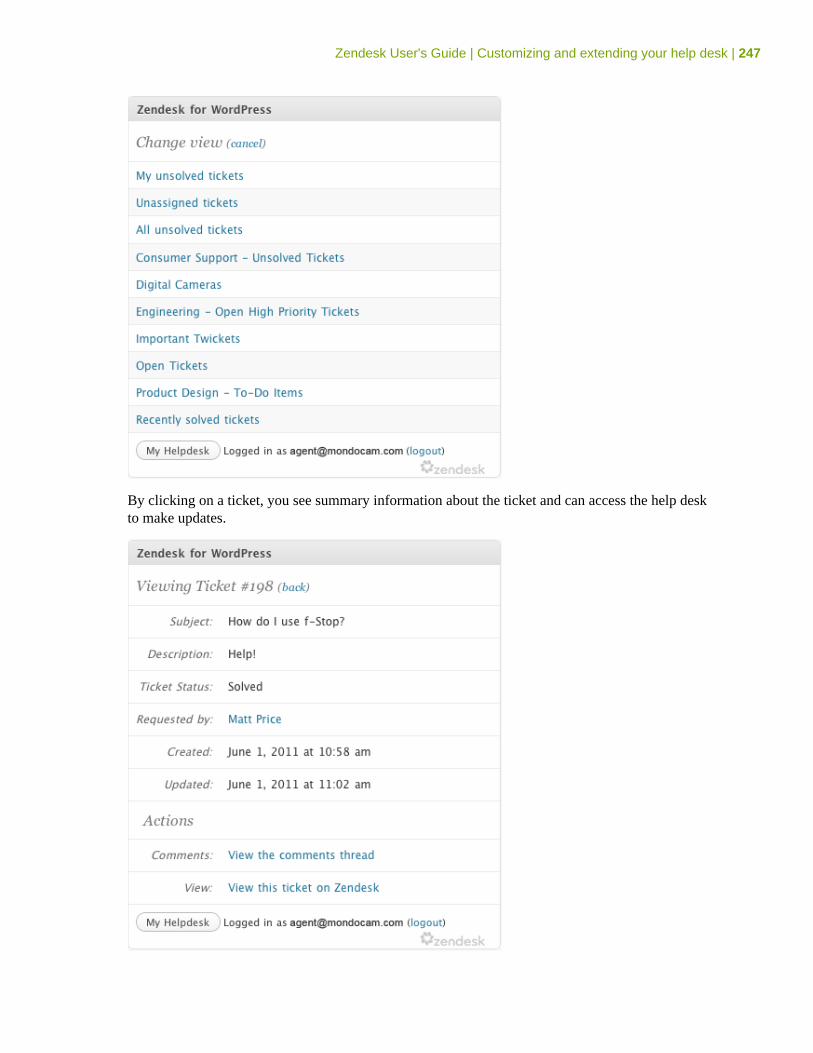
Zendesk User's Guide | Customizing and extending your help desk | 247
By clicking on a ticket, you see summary information about the ticket and can access the help deskto make updates.
248 | Zendesk User's Guide | Customizing and extending your help desk
Converting a blog post comment into a ticketYou can convert blog comments into tickets in the dashboard. Only comments that have beensubmitted along with an email address can be converted into a ticket. The commenter's email addressis used to add them to the help desk and enable follow up communication about the ticket.
To convert a comment into a ticket
1. In the Wordpress admin dashboard, select the Comments.2. Locate the comment you want to convert to a ticket and click Convert to Zendesk Ticket.3. You'll be prompted to enter a comment, which can be posted as a response in the post. Enter
your comment and then optionally select either or both of these two options:
• Make this a public comment in the ticket• Post as a reply on this blog post
4. Click Create Ticket.
All follow up on the ticket occurs within the help desk.
Chapter
10
Supporting multiple languages• Configuring your help desk for your locale and language• Configuring your help desk to support multiple languages• Providing multiple language support with dynamic content• Exporting and importing dynamic content
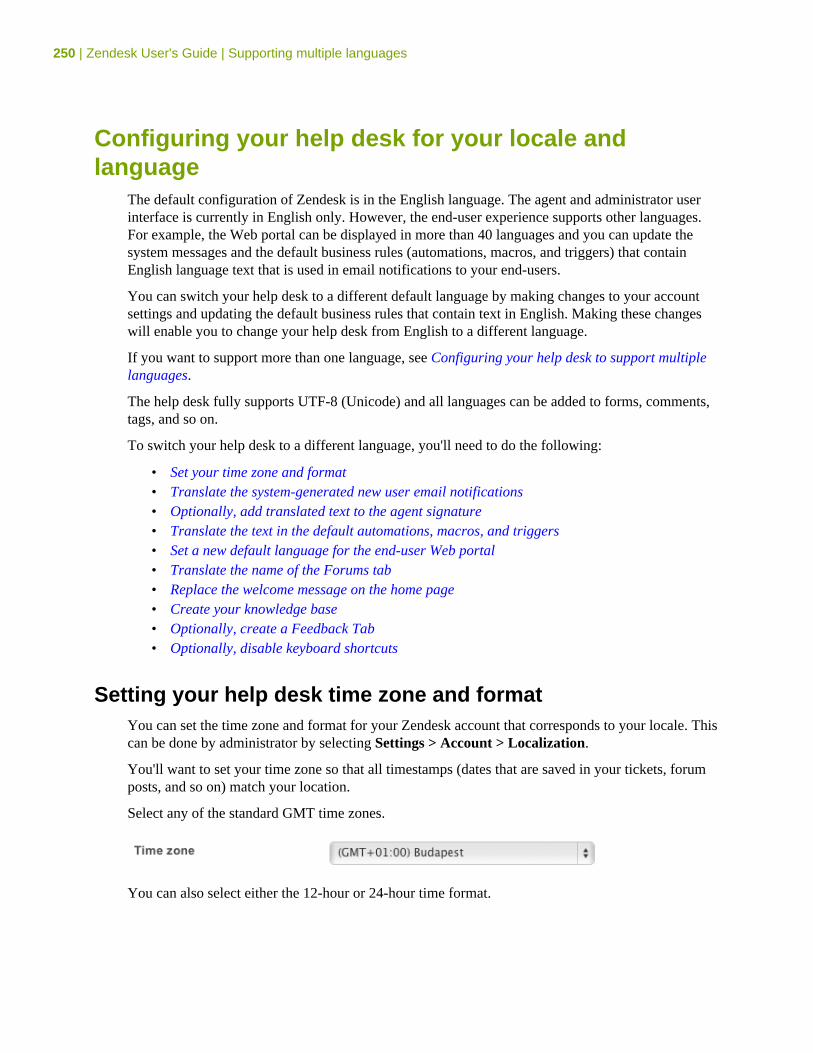
250 | Zendesk User's Guide | Supporting multiple languages
Configuring your help desk for your locale andlanguage
The default configuration of Zendesk is in the English language. The agent and administrator userinterface is currently in English only. However, the end-user experience supports other languages.For example, the Web portal can be displayed in more than 40 languages and you can update thesystem messages and the default business rules (automations, macros, and triggers) that containEnglish language text that is used in email notifications to your end-users.
You can switch your help desk to a different default language by making changes to your accountsettings and updating the default business rules that contain text in English. Making these changeswill enable you to change your help desk from English to a different language.
If you want to support more than one language, see Configuring your help desk to support multiplelanguages.
The help desk fully supports UTF-8 (Unicode) and all languages can be added to forms, comments,tags, and so on.
To switch your help desk to a different language, you'll need to do the following:
• Set your time zone and format• Translate the system-generated new user email notifications• Optionally, add translated text to the agent signature• Translate the text in the default automations, macros, and triggers• Set a new default language for the end-user Web portal• Translate the name of the Forums tab• Replace the welcome message on the home page• Create your knowledge base• Optionally, create a Feedback Tab• Optionally, disable keyboard shortcuts
Setting your help desk time zone and formatYou can set the time zone and format for your Zendesk account that corresponds to your locale. Thiscan be done by administrator by selecting Settings > Account > Localization.
You'll want to set your time zone so that all timestamps (dates that are saved in your tickets, forumposts, and so on) match your location.
Select any of the standard GMT time zones.
You can also select either the 12-hour or 24-hour time format.
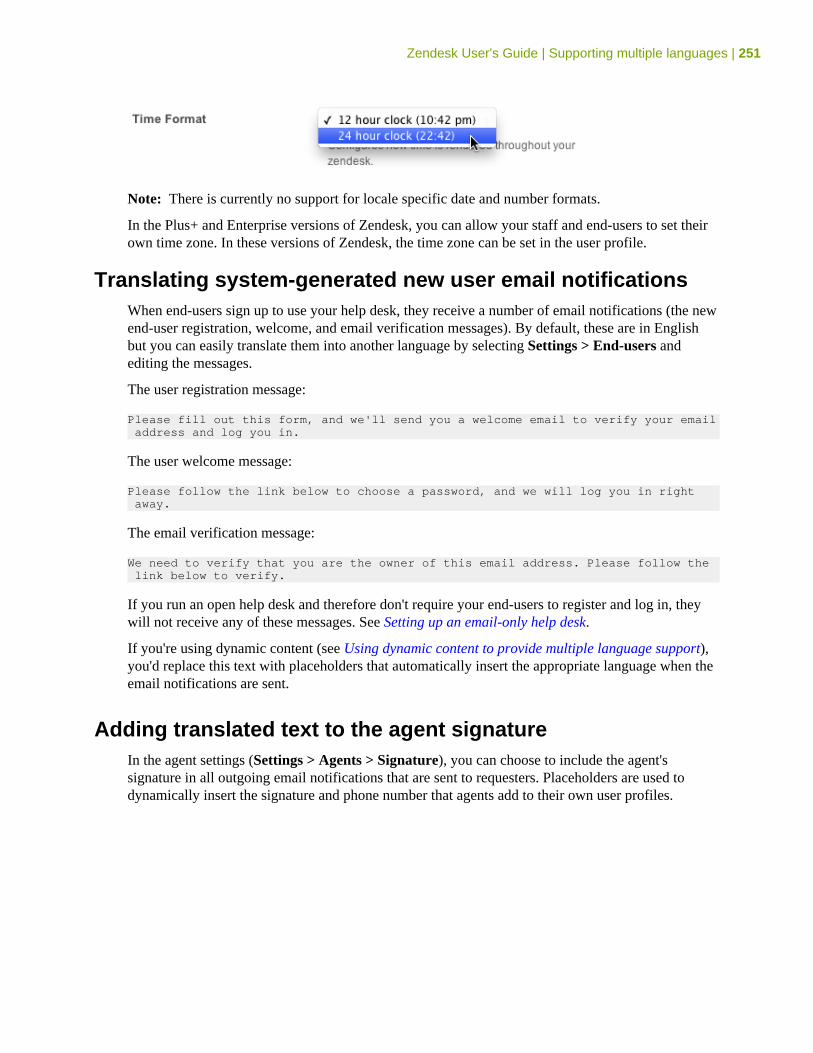
Zendesk User's Guide | Supporting multiple languages | 251
Note: There is currently no support for locale specific date and number formats.
In the Plus+ and Enterprise versions of Zendesk, you can allow your staff and end-users to set theirown time zone. In these versions of Zendesk, the time zone can be set in the user profile.
Translating system-generated new user email notificationsWhen end-users sign up to use your help desk, they receive a number of email notifications (the newend-user registration, welcome, and email verification messages). By default, these are in Englishbut you can easily translate them into another language by selecting Settings > End-users andediting the messages.
The user registration message:
Please fill out this form, and we'll send you a welcome email to verify your email address and log you in.
The user welcome message:
Please follow the link below to choose a password, and we will log you in right away.
The email verification message:
We need to verify that you are the owner of this email address. Please follow the link below to verify.
If you run an open help desk and therefore don't require your end-users to register and log in, theywill not receive any of these messages. See Setting up an email-only help desk.
If you're using dynamic content (see Using dynamic content to provide multiple language support),you'd replace this text with placeholders that automatically insert the appropriate language when theemail notifications are sent.
Adding translated text to the agent signatureIn the agent settings (Settings > Agents > Signature), you can choose to include the agent'ssignature in all outgoing email notifications that are sent to requesters. Placeholders are used todynamically insert the signature and phone number that agents add to their own user profiles.
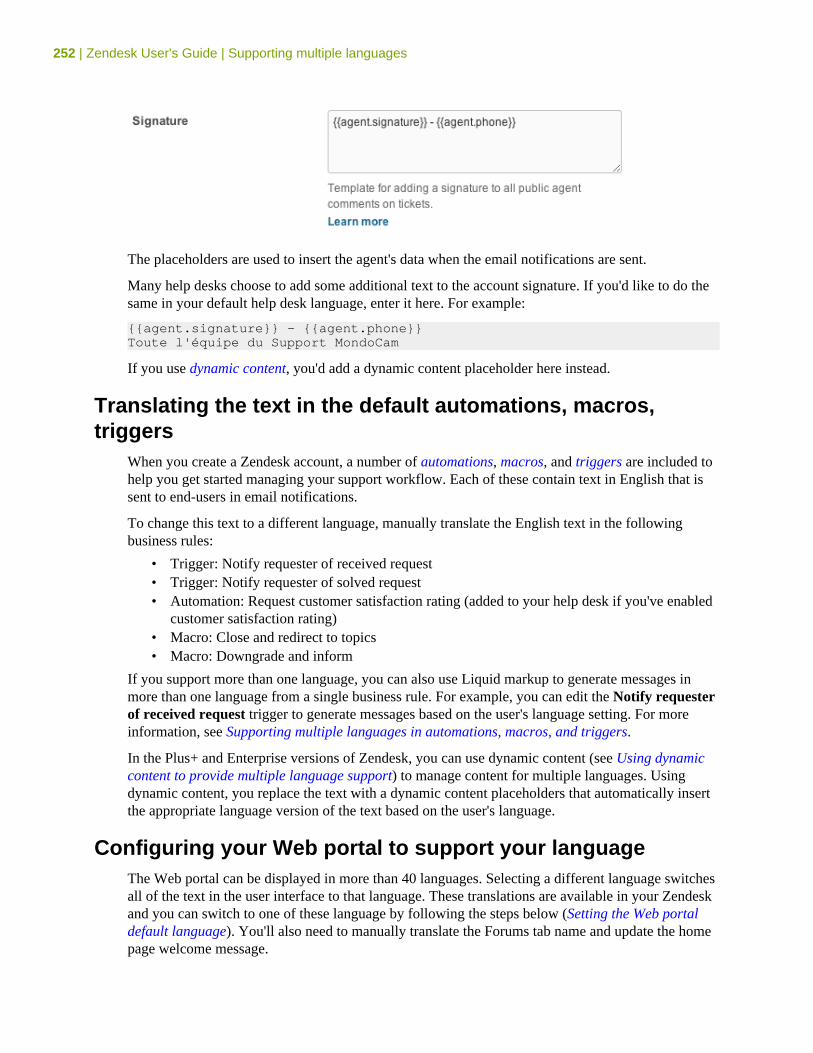
252 | Zendesk User's Guide | Supporting multiple languages
The placeholders are used to insert the agent's data when the email notifications are sent.
Many help desks choose to add some additional text to the account signature. If you'd like to do thesame in your default help desk language, enter it here. For example:
{{agent.signature}} - {{agent.phone}}Toute l'équipe du Support MondoCam
If you use dynamic content, you'd add a dynamic content placeholder here instead.
Translating the text in the default automations, macros,triggers
When you create a Zendesk account, a number of automations, macros, and triggers are included tohelp you get started managing your support workflow. Each of these contain text in English that issent to end-users in email notifications.
To change this text to a different language, manually translate the English text in the followingbusiness rules:
• Trigger: Notify requester of received request• Trigger: Notify requester of solved request• Automation: Request customer satisfaction rating (added to your help desk if you've enabled
customer satisfaction rating)• Macro: Close and redirect to topics• Macro: Downgrade and inform
If you support more than one language, you can also use Liquid markup to generate messages inmore than one language from a single business rule. For example, you can edit the Notify requesterof received request trigger to generate messages based on the user's language setting. For moreinformation, see Supporting multiple languages in automations, macros, and triggers.
In the Plus+ and Enterprise versions of Zendesk, you can use dynamic content (see Using dynamiccontent to provide multiple language support) to manage content for multiple languages. Usingdynamic content, you replace the text with a dynamic content placeholders that automatically insertthe appropriate language version of the text based on the user's language.
Configuring your Web portal to support your languageThe Web portal can be displayed in more than 40 languages. Selecting a different language switchesall of the text in the user interface to that language. These translations are available in your Zendeskand you can switch to one of these language by following the steps below (Setting the Web portaldefault language). You'll also need to manually translate the Forums tab name and update the homepage welcome message.

Zendesk User's Guide | Supporting multiple languages | 253
Once you've fully translated the user interface text in the Web portal, you can create a knowledgebase in your supported language.
Setting the Web portal default languageAll Zendesk accounts can change the default language for the Web portal to something other thanEnglish. This affects the following pages: submit request, track requests, the home page, and theknowledge base.
To set the default language for the Web portal
1. Log in as an administrator.2. Select Settings > Account > Localization.3. In the Languages section, select one of the more than 40 supported languages.4. Click Save Tab.
Your Web portal is now displayed in the new default language.
The agent's view of the forums does not change, it is still displayed in English.
If you support users in multiple languages, you can also allow your end-users to select the languagethat is displayed in the Web portal (see Selecting the languages you want to support).
Translating the name of the forums tabWhen you select a default language for the Web portal, the text in the user interface is displayed inthe language you selected. There is one exception however. The Forums tab title is set in Settings> Channels > Web Portal > Forums Name. The Forums tab title is not included in the Webportal translations because it is customizable and is often changed to 'Knowledge Base' or 'Help'.Therefore, you must set it yourself.
If you use dynamic content, you'd enter the placeholder here instead of text.

254 | Zendesk User's Guide | Supporting multiple languages
Changing the welcome message on the home pageAt the top of your help desk home page is a welcome message in English.
You can easily change this text by logging into the help desk, choosing the home page, and thenselecting the Edit link in the welcome message container.
Like the Forums tab name, the title and description text can be replaced with dynamic contentplaceholders.
Creating knowledge base content in your help desk languageYou can add any language as content in the forums. Therefore, if you set your default help desklanguage to something other than English and want to create a knowledge base in that language,adding content in another language is as simple as it would be in English. Just create categories,forums, and topics and add your content as needed.
If you want to support multiple languages in your forums, you can choose to display forums basedon the end-user's language. See Displaying forum content based on language.
Creating a Feedback Tab in a different languageAs with the Web portal, you can display the Feedback Tab (Settings > Channels > Feedback Tab)in a language other than English. For example, if you want to include the Feedback Tab in your Webportal, you select the language when setting the Feedback Tab options and generating the JavaScriptcode that you include in a Global JavaScript widget.
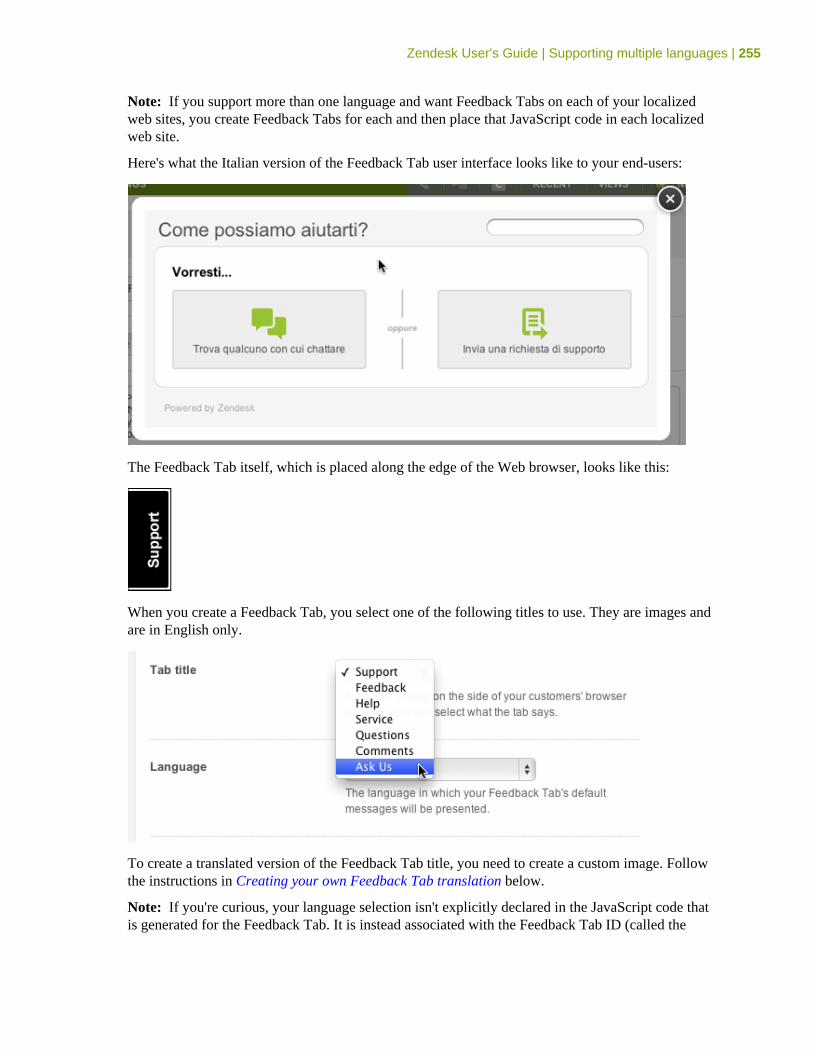
Zendesk User's Guide | Supporting multiple languages | 255
Note: If you support more than one language and want Feedback Tabs on each of your localizedweb sites, you create Feedback Tabs for each and then place that JavaScript code in each localizedweb site.
Here's what the Italian version of the Feedback Tab user interface looks like to your end-users:
The Feedback Tab itself, which is placed along the edge of the Web browser, looks like this:
When you create a Feedback Tab, you select one of the following titles to use. They are images andare in English only.
To create a translated version of the Feedback Tab title, you need to create a custom image. Followthe instructions in Creating your own Feedback Tab translation below.
Note: If you're curious, your language selection isn't explicitly declared in the JavaScript code thatis generated for the Feedback Tab. It is instead associated with the Feedback Tab ID (called the
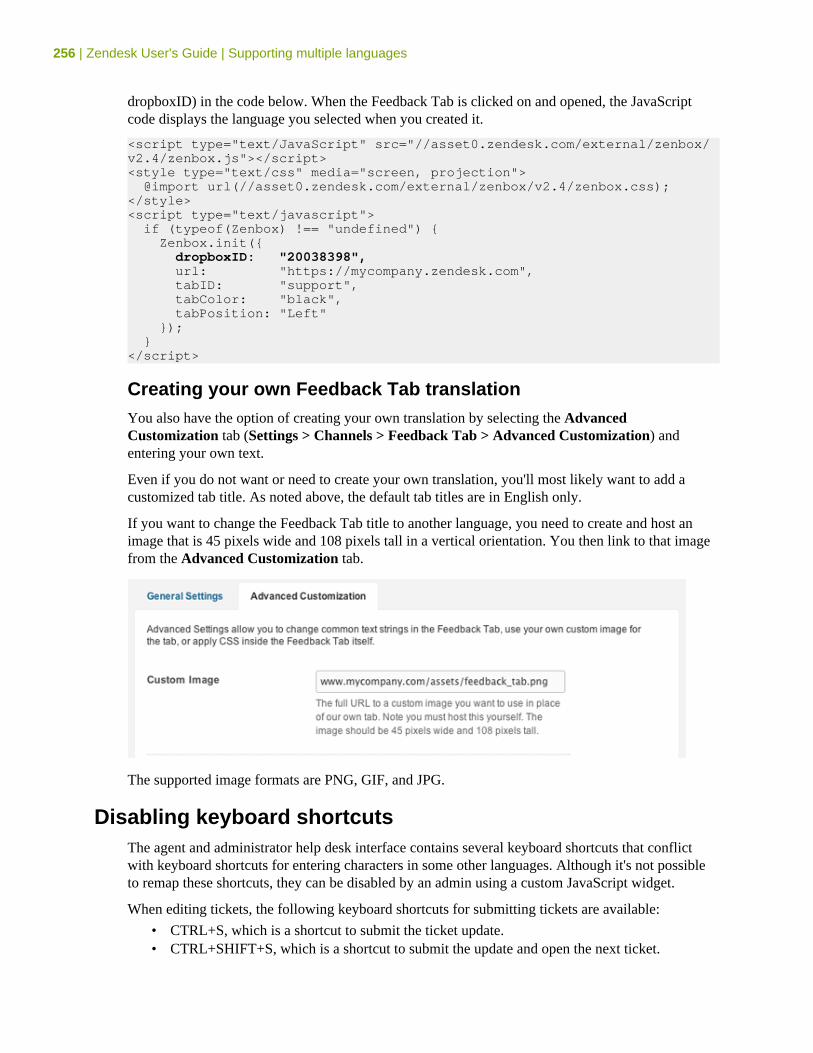
256 | Zendesk User's Guide | Supporting multiple languages
dropboxID) in the code below. When the Feedback Tab is clicked on and opened, the JavaScriptcode displays the language you selected when you created it.
<script type="text/JavaScript" src="//asset0.zendesk.com/external/zenbox/v2.4/zenbox.js"></script><style type="text/css" media="screen, projection"> @import url(//asset0.zendesk.com/external/zenbox/v2.4/zenbox.css);</style><script type="text/javascript"> if (typeof(Zenbox) !== "undefined") { Zenbox.init({ dropboxID: "20038398", url: "https://mycompany.zendesk.com", tabID: "support", tabColor: "black", tabPosition: "Left" }); }</script>
Creating your own Feedback Tab translationYou also have the option of creating your own translation by selecting the AdvancedCustomization tab (Settings > Channels > Feedback Tab > Advanced Customization) andentering your own text.
Even if you do not want or need to create your own translation, you'll most likely want to add acustomized tab title. As noted above, the default tab titles are in English only.
If you want to change the Feedback Tab title to another language, you need to create and host animage that is 45 pixels wide and 108 pixels tall in a vertical orientation. You then link to that imagefrom the Advanced Customization tab.
The supported image formats are PNG, GIF, and JPG.
Disabling keyboard shortcutsThe agent and administrator help desk interface contains several keyboard shortcuts that conflictwith keyboard shortcuts for entering characters in some other languages. Although it's not possibleto remap these shortcuts, they can be disabled by an admin using a custom JavaScript widget.
When editing tickets, the following keyboard shortcuts for submitting tickets are available:
• CTRL+S, which is a shortcut to submit the ticket update.• CTRL+SHIFT+S, which is a shortcut to submit the update and open the next ticket.
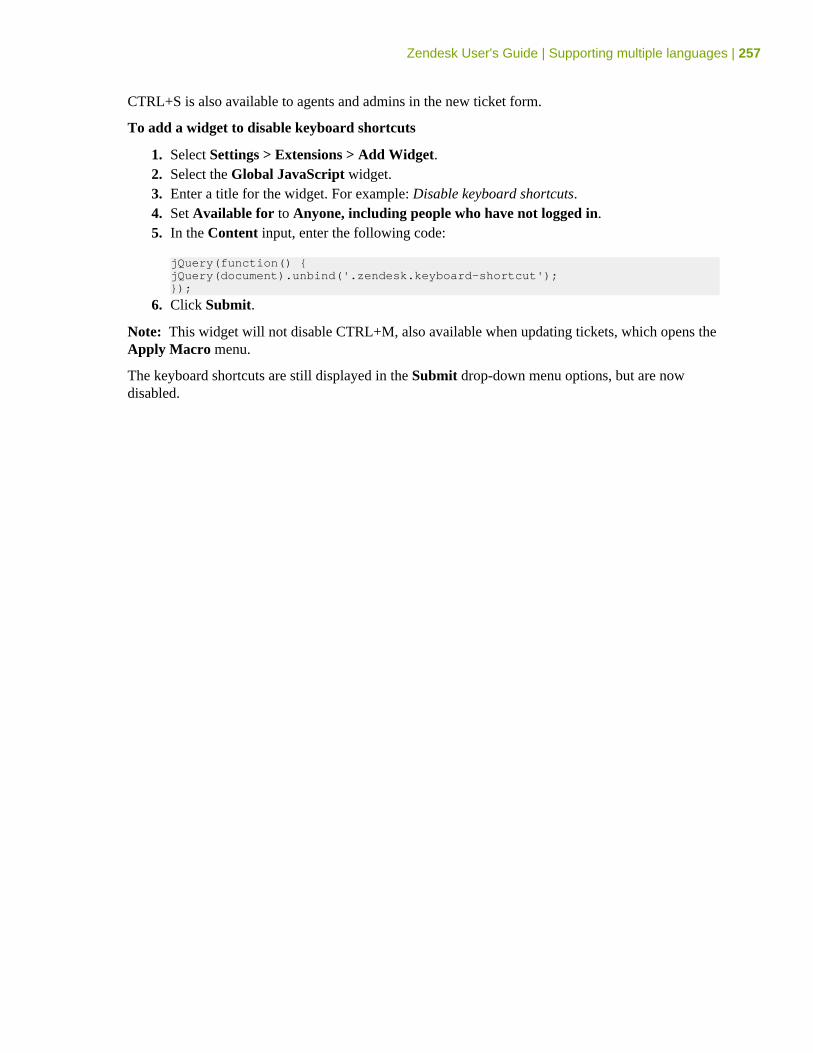
Zendesk User's Guide | Supporting multiple languages | 257
CTRL+S is also available to agents and admins in the new ticket form.
To add a widget to disable keyboard shortcuts
1. Select Settings > Extensions > Add Widget.2. Select the Global JavaScript widget.3. Enter a title for the widget. For example: Disable keyboard shortcuts.4. Set Available for to Anyone, including people who have not logged in.5. In the Content input, enter the following code:
jQuery(function() { jQuery(document).unbind('.zendesk.keyboard-shortcut'); });
6. Click Submit.
Note: This widget will not disable CTRL+M, also available when updating tickets, which opens theApply Macro menu.
The keyboard shortcuts are still displayed in the Submit drop-down menu options, but are nowdisabled.
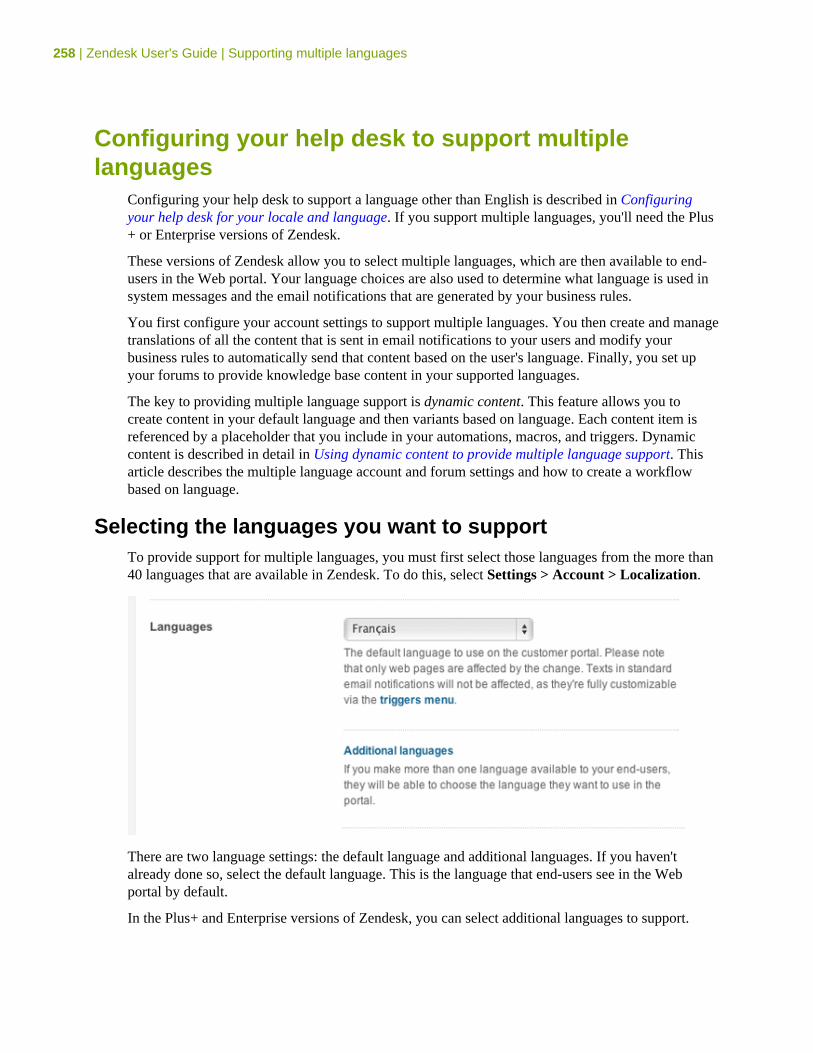
258 | Zendesk User's Guide | Supporting multiple languages
Configuring your help desk to support multiplelanguages
Configuring your help desk to support a language other than English is described in Configuringyour help desk for your locale and language. If you support multiple languages, you'll need the Plus+ or Enterprise versions of Zendesk.
These versions of Zendesk allow you to select multiple languages, which are then available to end-users in the Web portal. Your language choices are also used to determine what language is used insystem messages and the email notifications that are generated by your business rules.
You first configure your account settings to support multiple languages. You then create and managetranslations of all the content that is sent in email notifications to your users and modify yourbusiness rules to automatically send that content based on the user's language. Finally, you set upyour forums to provide knowledge base content in your supported languages.
The key to providing multiple language support is dynamic content. This feature allows you tocreate content in your default language and then variants based on language. Each content item isreferenced by a placeholder that you include in your automations, macros, and triggers. Dynamiccontent is described in detail in Using dynamic content to provide multiple language support. Thisarticle describes the multiple language account and forum settings and how to create a workflowbased on language.
Selecting the languages you want to supportTo provide support for multiple languages, you must first select those languages from the more than40 languages that are available in Zendesk. To do this, select Settings > Account > Localization.
There are two language settings: the default language and additional languages. If you haven'talready done so, select the default language. This is the language that end-users see in the Webportal by default.
In the Plus+ and Enterprise versions of Zendesk, you can select additional languages to support.
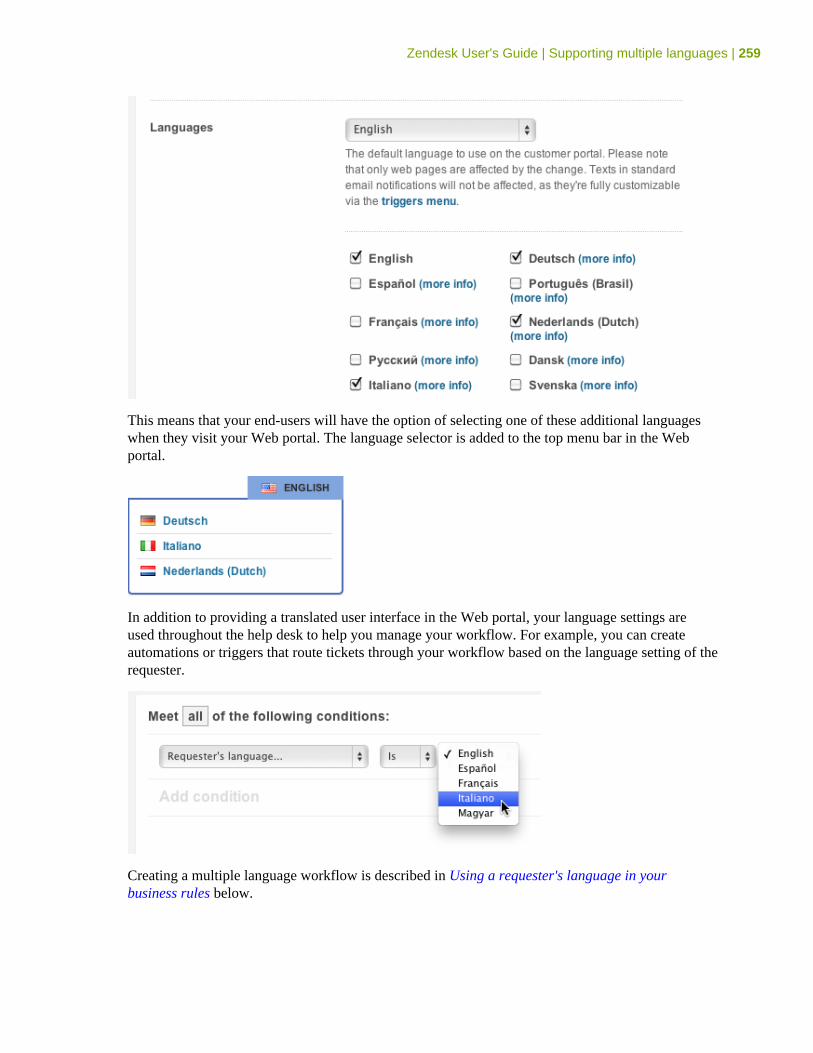
Zendesk User's Guide | Supporting multiple languages | 259
This means that your end-users will have the option of selecting one of these additional languageswhen they visit your Web portal. The language selector is added to the top menu bar in the Webportal.
In addition to providing a translated user interface in the Web portal, your language settings areused throughout the help desk to help you manage your workflow. For example, you can createautomations or triggers that route tickets through your workflow based on the language setting of therequester.
Creating a multiple language workflow is described in Using a requester's language in yourbusiness rules below.
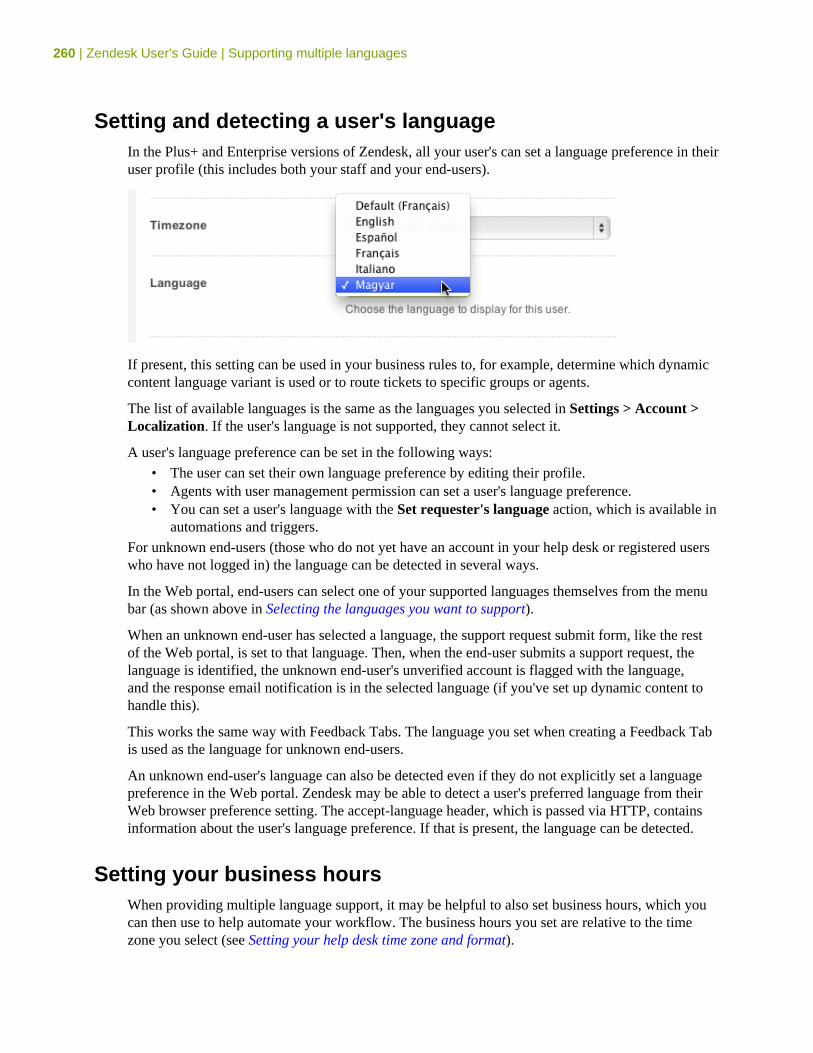
260 | Zendesk User's Guide | Supporting multiple languages
Setting and detecting a user's languageIn the Plus+ and Enterprise versions of Zendesk, all your user's can set a language preference in theiruser profile (this includes both your staff and your end-users).
If present, this setting can be used in your business rules to, for example, determine which dynamiccontent language variant is used or to route tickets to specific groups or agents.
The list of available languages is the same as the languages you selected in Settings > Account >Localization. If the user's language is not supported, they cannot select it.
A user's language preference can be set in the following ways:
• The user can set their own language preference by editing their profile.• Agents with user management permission can set a user's language preference.• You can set a user's language with the Set requester's language action, which is available in
automations and triggers.
For unknown end-users (those who do not yet have an account in your help desk or registered userswho have not logged in) the language can be detected in several ways.
In the Web portal, end-users can select one of your supported languages themselves from the menubar (as shown above in Selecting the languages you want to support).
When an unknown end-user has selected a language, the support request submit form, like the restof the Web portal, is set to that language. Then, when the end-user submits a support request, thelanguage is identified, the unknown end-user's unverified account is flagged with the language,and the response email notification is in the selected language (if you've set up dynamic content tohandle this).
This works the same way with Feedback Tabs. The language you set when creating a Feedback Tabis used as the language for unknown end-users.
An unknown end-user's language can also be detected even if they do not explicitly set a languagepreference in the Web portal. Zendesk may be able to detect a user's preferred language from theirWeb browser preference setting. The accept-language header, which is passed via HTTP, containsinformation about the user's language preference. If that is present, the language can be detected.
Setting your business hoursWhen providing multiple language support, it may be helpful to also set business hours, which youcan then use to help automate your workflow. The business hours you set are relative to the timezone you select (see Setting your help desk time zone and format).
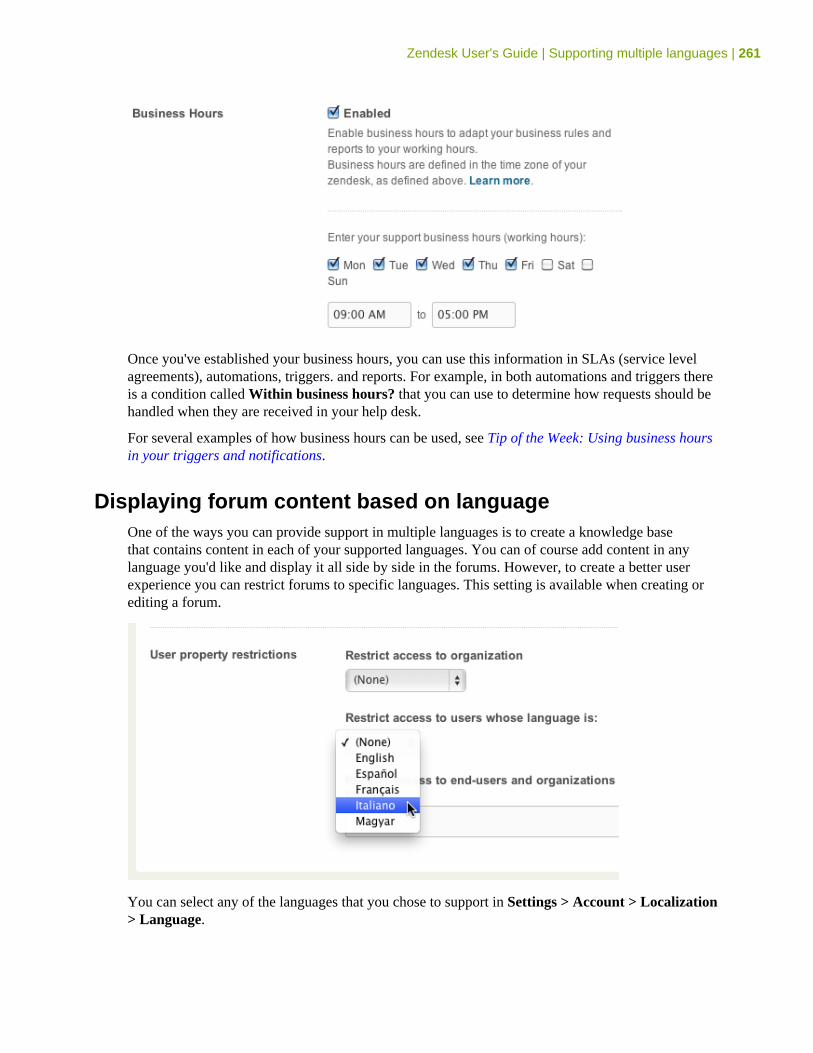
Zendesk User's Guide | Supporting multiple languages | 261
Once you've established your business hours, you can use this information in SLAs (service levelagreements), automations, triggers. and reports. For example, in both automations and triggers thereis a condition called Within business hours? that you can use to determine how requests should behandled when they are received in your help desk.
For several examples of how business hours can be used, see Tip of the Week: Using business hoursin your triggers and notifications.
Displaying forum content based on languageOne of the ways you can provide support in multiple languages is to create a knowledge basethat contains content in each of your supported languages. You can of course add content in anylanguage you'd like and display it all side by side in the forums. However, to create a better userexperience you can restrict forums to specific languages. This setting is available when creating orediting a forum.
You can select any of the languages that you chose to support in Settings > Account > Localization> Language.
262 | Zendesk User's Guide | Supporting multiple languages
The language restricted content is visible to logged-in users who have that language preference set intheir user profile, when a user selects the language from the language menu in the Web portal, and ifan unknown user's language can be automatically detected.
Note: Only forums, not categories or individual topics, can be restricted by language.
Using a requester's language in your business rulesKnowing your user's language means that you can use that information to determine how to respondto your users and how to move tickets through your workflow. As described above in Setting anddetecting a user's language, there are a number of ways that a user's language can be set or detected.
Regardless of how the user's language is identified, it is accessible in automations, reports, triggers,and views via the Requester's language condition. Using this condition, you can, for example,assign incoming tickets to specific groups or agents based on language. You can also create viewsand reports to track tickets by language.
The Requester's language condition allows you to test for a specific language and then act onthat information. You also have the option of explicitly setting the user's language with the Setrequester's language to action, which is available in automations and triggers.
Here are some examples that describe how to use the Requester's language condition and Setrequester's language to action to build a workflow based on language.
Using dynamic content to communicate in multiple languagesAlthough it's possible to create a multiple language response within the email body of, for example,a trigger using Liquid markup (described here Using Liquid markup to support multiple languages inautomations, macros, and triggers), you should instead use dynamic content. One of the advantagesof doing so is that language detection is handled automatically, you don't need to write Liquidmarkup for each of the languages you support.
As described in Using your dynamic content, dynamic content and its language variants can bereferenced in many places in your help desk using a placeholder. In the example in that article, amessage describing how end-users can reset their passwords is added to a macro by simply addingthe placeholder as the text in a macro action. Based on the user's language, the correct languagevariant of the dynamic content is used.
All of your help desk content (from the welcome message to automated responses in your businessrules) should be managed with dynamic content.
Assigning a ticket to a group or agent based on language
As you receive support tickets in the different languages you support, you can use automations andtriggers to automatically route them through your workflow. As an example, imagine that your helpdesk supports three languages (English as the primary and default language and also French andGerman). You've structured your organization to support this by creating groups of agents that arefluent in French and German. When you receive support requests in either French or German youuse a trigger to automatically assign those requests to the appropriate group.
This is easily done using the Requester's language condition, which is available in automations,reports, triggers, and views.
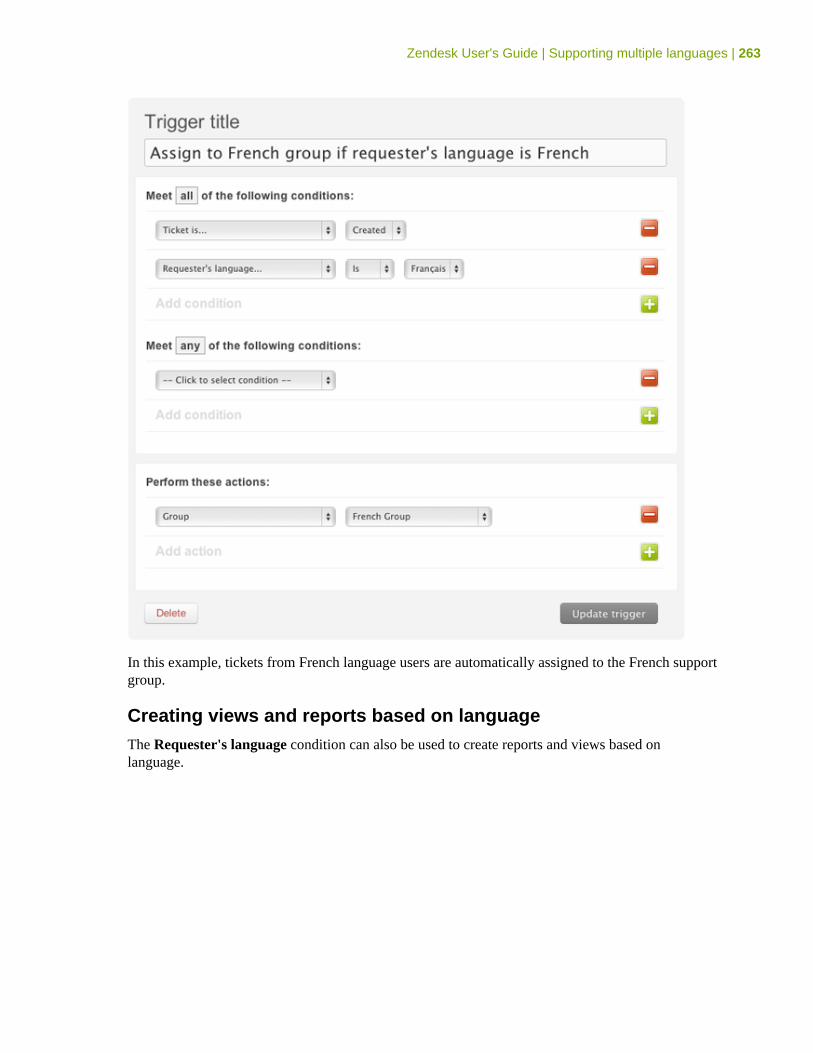
Zendesk User's Guide | Supporting multiple languages | 263
In this example, tickets from French language users are automatically assigned to the French supportgroup.
Creating views and reports based on languageThe Requester's language condition can also be used to create reports and views based onlanguage.
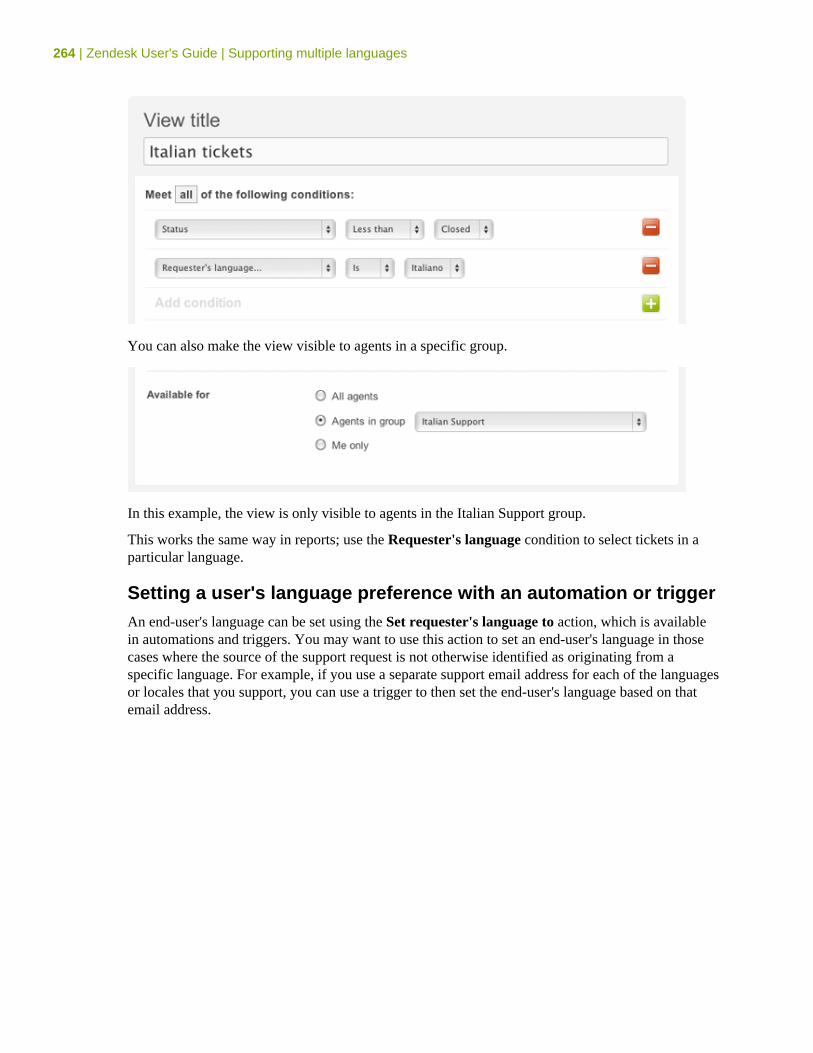
264 | Zendesk User's Guide | Supporting multiple languages
You can also make the view visible to agents in a specific group.
In this example, the view is only visible to agents in the Italian Support group.
This works the same way in reports; use the Requester's language condition to select tickets in aparticular language.
Setting a user's language preference with an automation or triggerAn end-user's language can be set using the Set requester's language to action, which is availablein automations and triggers. You may want to use this action to set an end-user's language in thosecases where the source of the support request is not otherwise identified as originating from aspecific language. For example, if you use a separate support email address for each of the languagesor locales that you support, you can use a trigger to then set the end-user's language based on thatemail address.
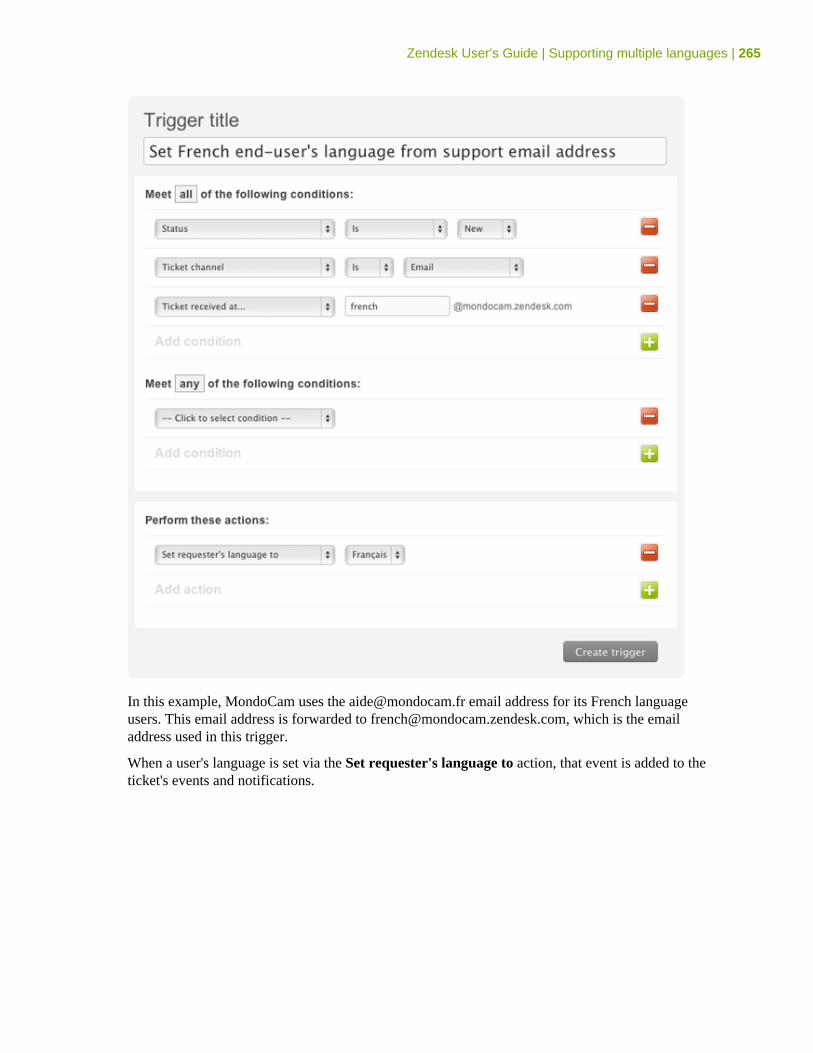
Zendesk User's Guide | Supporting multiple languages | 265
In this example, MondoCam uses the [email protected] email address for its French languageusers. This email address is forwarded to [email protected], which is the emailaddress used in this trigger.
When a user's language is set via the Set requester's language to action, that event is added to theticket's events and notifications.
266 | Zendesk User's Guide | Supporting multiple languages
Providing multiple language support with dynamiccontent
In the Plus+ and Enterprise versions of Zendesk, you can create dynamic content that can then bereferenced via a placeholder in automations, macros, triggers and by many of the system generatedmessages such as those sent in email notifications when a user creates an account.
As an example of how dynamic content is used, the text of a message that you currently add to amacro can be replaced by a dynamic content placeholder.
This text:
If you forget your password, just click the login link in the upper right corner of the help desk and then select the "Help! I don't know what to enter here!" link.
Thanks and have a great day!
The MondoCam Support Team
Is replaced with this placeholder:
{{dc.password_help}}
When the macro is applied to a ticket, the content is inserted into the ticket. If you're alreadyusing Zendesk placeholders in your help desk, you're already familiar with how this works. Thedifference between the Zendesk placeholders and dynamic content is that you define the content thatis dynamically inserted into your business rules and communications with your customers.
Dynamic content is a combination of a default version of the text (typically in the same languageas your help desk's default language) and variants for every other language that you support. In theexample above, the default variant is in English. If your help desk also supports French and German,for example, you create variants for each of those languages. Then, based on the end-user's language,the appropriate variant is automatically used when the dynamic content is referenced and displayedto the end-user.
If the end-user's language is not one of your supported languages, the default variant is used.
Dynamic content provides you with a way to streamline support for multiple languages. Youreference one placeholder and the appropriate language is displayed based on the end-user'slanguage preference. How an end-user's language is detected is described in How a user's languageis set and detected.
Of course when you support multiple languages, you must translate your content into the languagesyou support in your help desk. There are a number of ways to manage the translation of your defaultcontent. You create and edit all your language variants directly in the help desk or you can export allyour dynamic content and send it off to a translation agency. You then import the dynamic contentback into your help desk and all language variants are added.
If you later update the default content, the variants are flagged as being potentially out of date withthe default content. Meaning that if you update the default content you probably need to also update
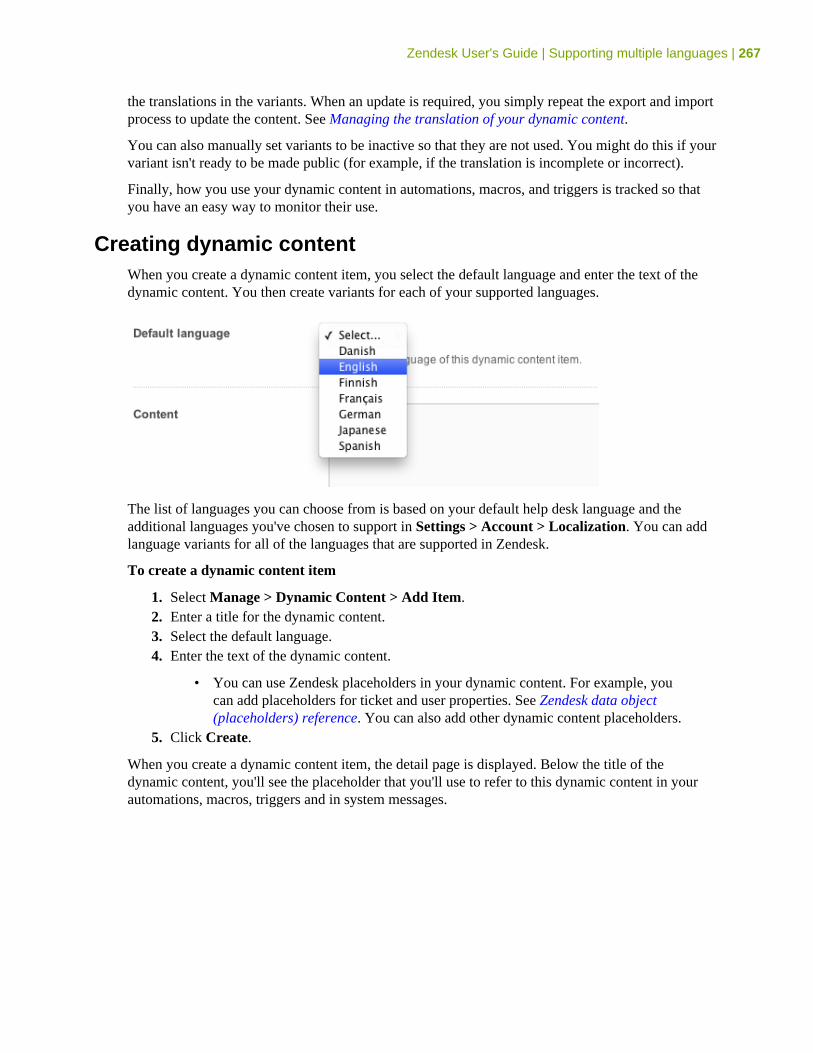
Zendesk User's Guide | Supporting multiple languages | 267
the translations in the variants. When an update is required, you simply repeat the export and importprocess to update the content. See Managing the translation of your dynamic content.
You can also manually set variants to be inactive so that they are not used. You might do this if yourvariant isn't ready to be made public (for example, if the translation is incomplete or incorrect).
Finally, how you use your dynamic content in automations, macros, and triggers is tracked so thatyou have an easy way to monitor their use.
Creating dynamic contentWhen you create a dynamic content item, you select the default language and enter the text of thedynamic content. You then create variants for each of your supported languages.
The list of languages you can choose from is based on your default help desk language and theadditional languages you've chosen to support in Settings > Account > Localization. You can addlanguage variants for all of the languages that are supported in Zendesk.
To create a dynamic content item
1. Select Manage > Dynamic Content > Add Item.2. Enter a title for the dynamic content.3. Select the default language.4. Enter the text of the dynamic content.
• You can use Zendesk placeholders in your dynamic content. For example, youcan add placeholders for ticket and user properties. See Zendesk data object(placeholders) reference. You can also add other dynamic content placeholders.
5. Click Create.
When you create a dynamic content item, the detail page is displayed. Below the title of thedynamic content, you'll see the placeholder that you'll use to refer to this dynamic content in yourautomations, macros, triggers and in system messages.
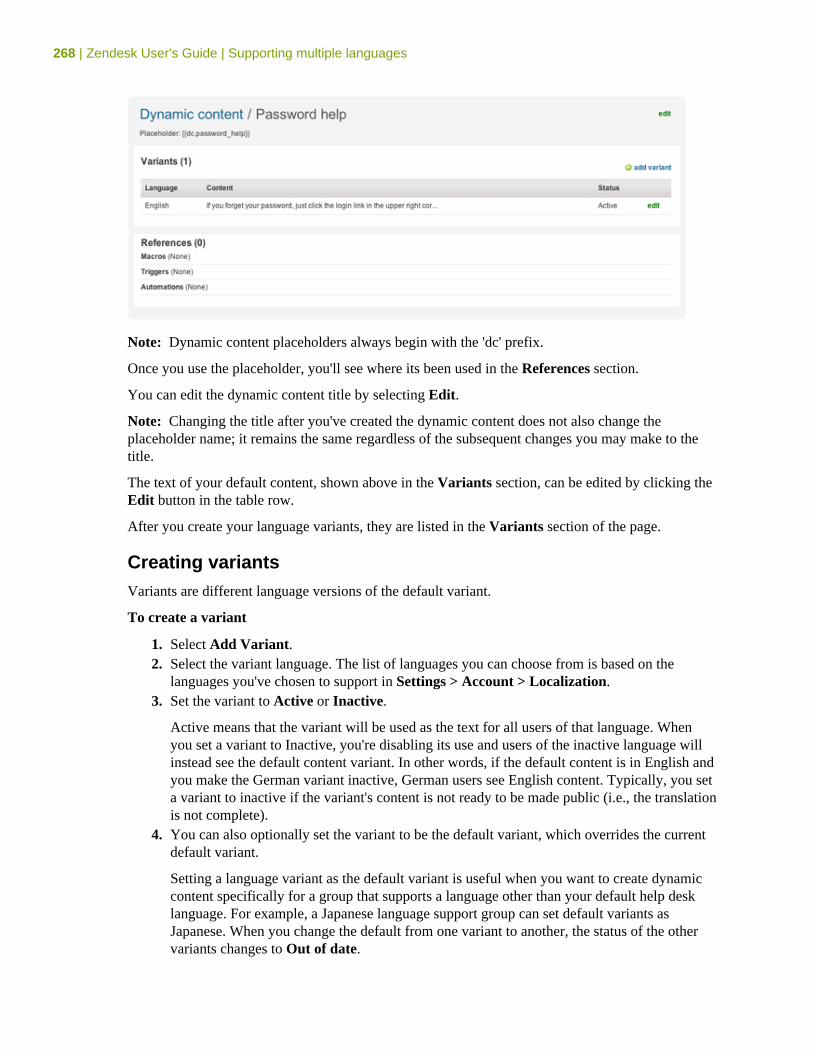
268 | Zendesk User's Guide | Supporting multiple languages
Note: Dynamic content placeholders always begin with the 'dc' prefix.
Once you use the placeholder, you'll see where its been used in the References section.
You can edit the dynamic content title by selecting Edit.
Note: Changing the title after you've created the dynamic content does not also change theplaceholder name; it remains the same regardless of the subsequent changes you may make to thetitle.
The text of your default content, shown above in the Variants section, can be edited by clicking theEdit button in the table row.
After you create your language variants, they are listed in the Variants section of the page.
Creating variantsVariants are different language versions of the default variant.
To create a variant
1. Select Add Variant.2. Select the variant language. The list of languages you can choose from is based on the
languages you've chosen to support in Settings > Account > Localization.3. Set the variant to Active or Inactive.
Active means that the variant will be used as the text for all users of that language. Whenyou set a variant to Inactive, you're disabling its use and users of the inactive language willinstead see the default content variant. In other words, if the default content is in English andyou make the German variant inactive, German users see English content. Typically, you seta variant to inactive if the variant's content is not ready to be made public (i.e., the translationis not complete).
4. You can also optionally set the variant to be the default variant, which overrides the currentdefault variant.
Setting a language variant as the default variant is useful when you want to create dynamiccontent specifically for a group that supports a language other than your default help desklanguage. For example, a Japanese language support group can set default variants asJapanese. When you change the default from one variant to another, the status of the othervariants changes to Out of date.
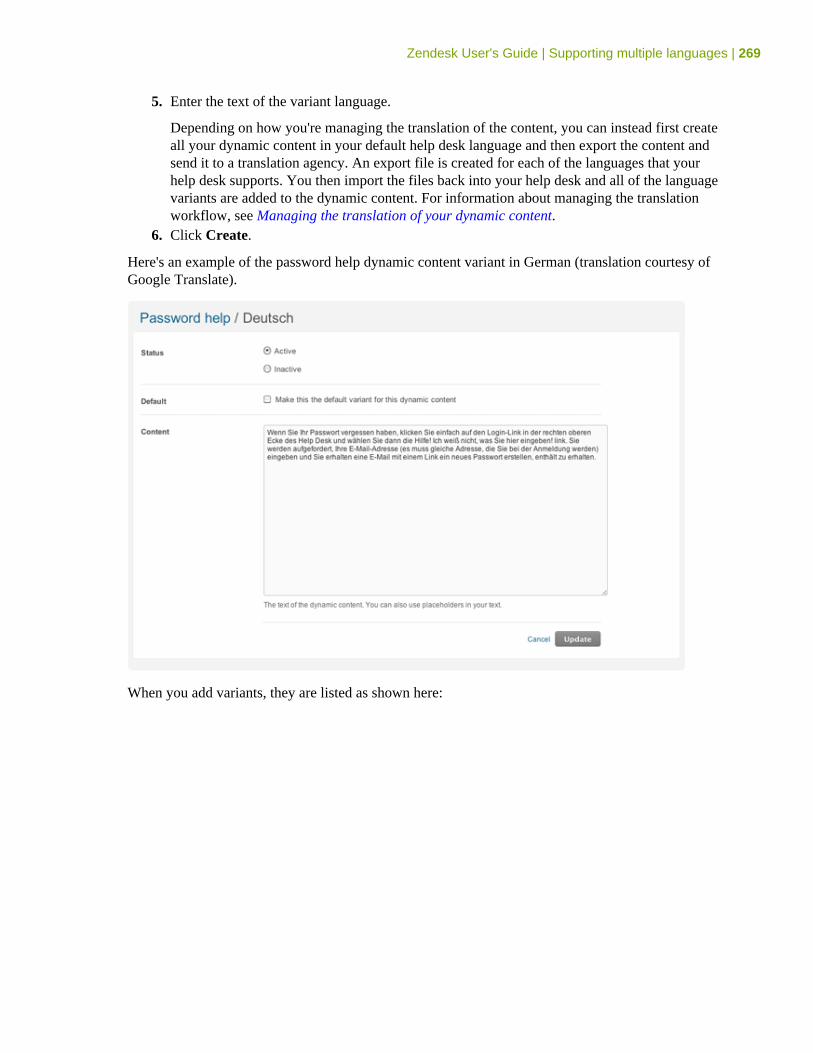
Zendesk User's Guide | Supporting multiple languages | 269
5. Enter the text of the variant language.
Depending on how you're managing the translation of the content, you can instead first createall your dynamic content in your default help desk language and then export the content andsend it to a translation agency. An export file is created for each of the languages that yourhelp desk supports. You then import the files back into your help desk and all of the languagevariants are added to the dynamic content. For information about managing the translationworkflow, see Managing the translation of your dynamic content.
6. Click Create.
Here's an example of the password help dynamic content variant in German (translation courtesy ofGoogle Translate).
When you add variants, they are listed as shown here:

270 | Zendesk User's Guide | Supporting multiple languages
In the list of variants, you'll see that the default content is flagged as the default. You can edit eachvariant by clicking Edit. You can also delete all the variants that are not the default. To delete thedefault variant you need to either set a different variant as the default or delete the entire dynamiccontent item. See Deleting dynamic content.
The status column in the list shows if the variant is active or inactive; the selections you made whencreating or updating the variant. Status also conveys the state of variants relative to the defaultvariant. When the default variant is updated and the other variants are not, the other variants areconsidered to be out of date with the default variant. In other words, it is assumed that if the defaultvariant's text was updated then the other variants text should also be updated. To give you anindication that the text in the variants may be out of sync with the default variant, they are flagged asbeing out of date. Therefore, you may see the following statuses for your variants:
• Active• Inactive• Active (Out of date)
As described below (Filtering the dynamic content list by status), you can quickly view the dynamiccontent items that contain variants that are out of date.
Managing dynamic contentYou can view all of your dynamic content by selecting Manage > Dynamic Content. To addvariants to a dynamic content item, or to edit an item, click the item's title.
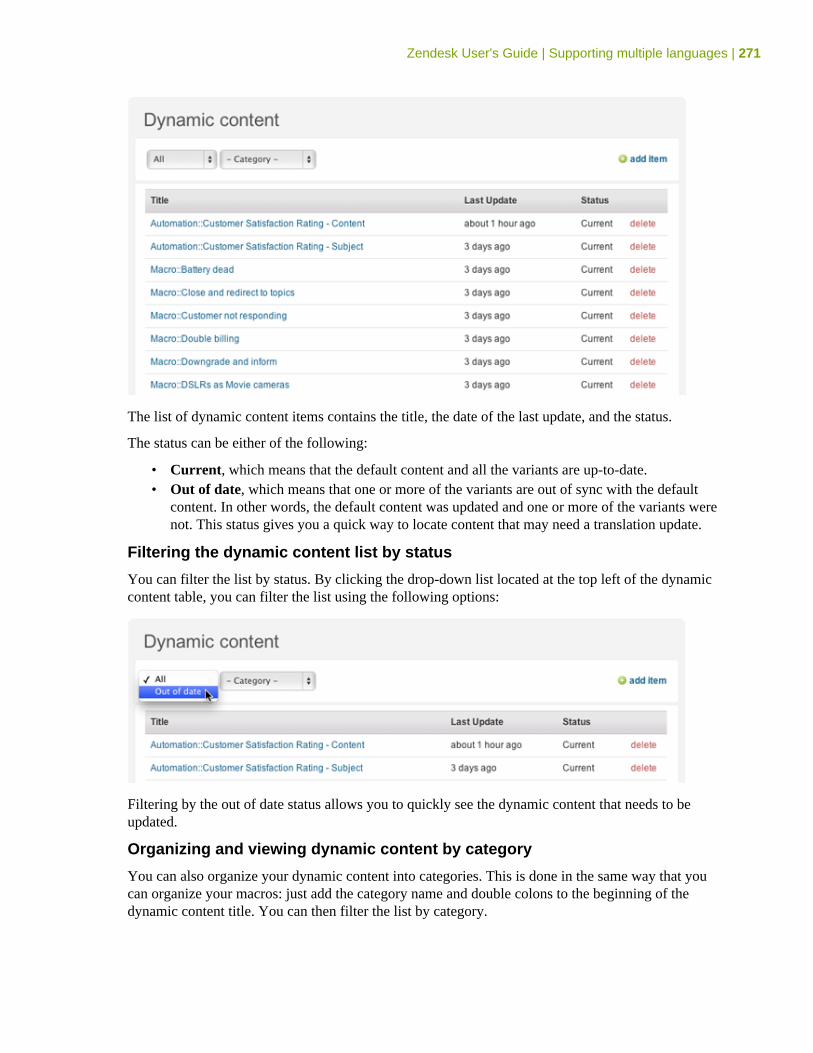
Zendesk User's Guide | Supporting multiple languages | 271
The list of dynamic content items contains the title, the date of the last update, and the status.
The status can be either of the following:
• Current, which means that the default content and all the variants are up-to-date.• Out of date, which means that one or more of the variants are out of sync with the default
content. In other words, the default content was updated and one or more of the variants werenot. This status gives you a quick way to locate content that may need a translation update.
Filtering the dynamic content list by status
You can filter the list by status. By clicking the drop-down list located at the top left of the dynamiccontent table, you can filter the list using the following options:
Filtering by the out of date status allows you to quickly see the dynamic content that needs to beupdated.
Organizing and viewing dynamic content by category
You can also organize your dynamic content into categories. This is done in the same way that youcan organize your macros: just add the category name and double colons to the beginning of thedynamic content title. You can then filter the list by category.
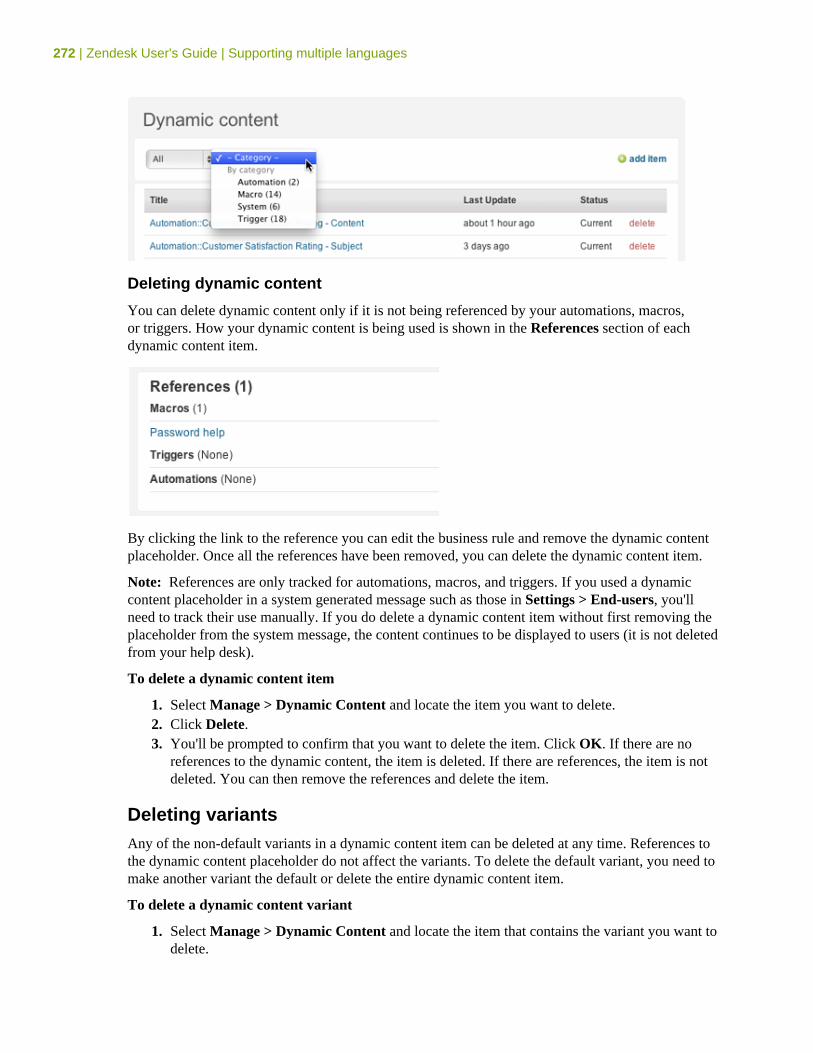
272 | Zendesk User's Guide | Supporting multiple languages
Deleting dynamic content
You can delete dynamic content only if it is not being referenced by your automations, macros,or triggers. How your dynamic content is being used is shown in the References section of eachdynamic content item.
By clicking the link to the reference you can edit the business rule and remove the dynamic contentplaceholder. Once all the references have been removed, you can delete the dynamic content item.
Note: References are only tracked for automations, macros, and triggers. If you used a dynamiccontent placeholder in a system generated message such as those in Settings > End-users, you'llneed to track their use manually. If you do delete a dynamic content item without first removing theplaceholder from the system message, the content continues to be displayed to users (it is not deletedfrom your help desk).
To delete a dynamic content item
1. Select Manage > Dynamic Content and locate the item you want to delete.2. Click Delete.3. You'll be prompted to confirm that you want to delete the item. Click OK. If there are no
references to the dynamic content, the item is deleted. If there are references, the item is notdeleted. You can then remove the references and delete the item.
Deleting variantsAny of the non-default variants in a dynamic content item can be deleted at any time. References tothe dynamic content placeholder do not affect the variants. To delete the default variant, you need tomake another variant the default or delete the entire dynamic content item.
To delete a dynamic content variant
1. Select Manage > Dynamic Content and locate the item that contains the variant you want todelete.
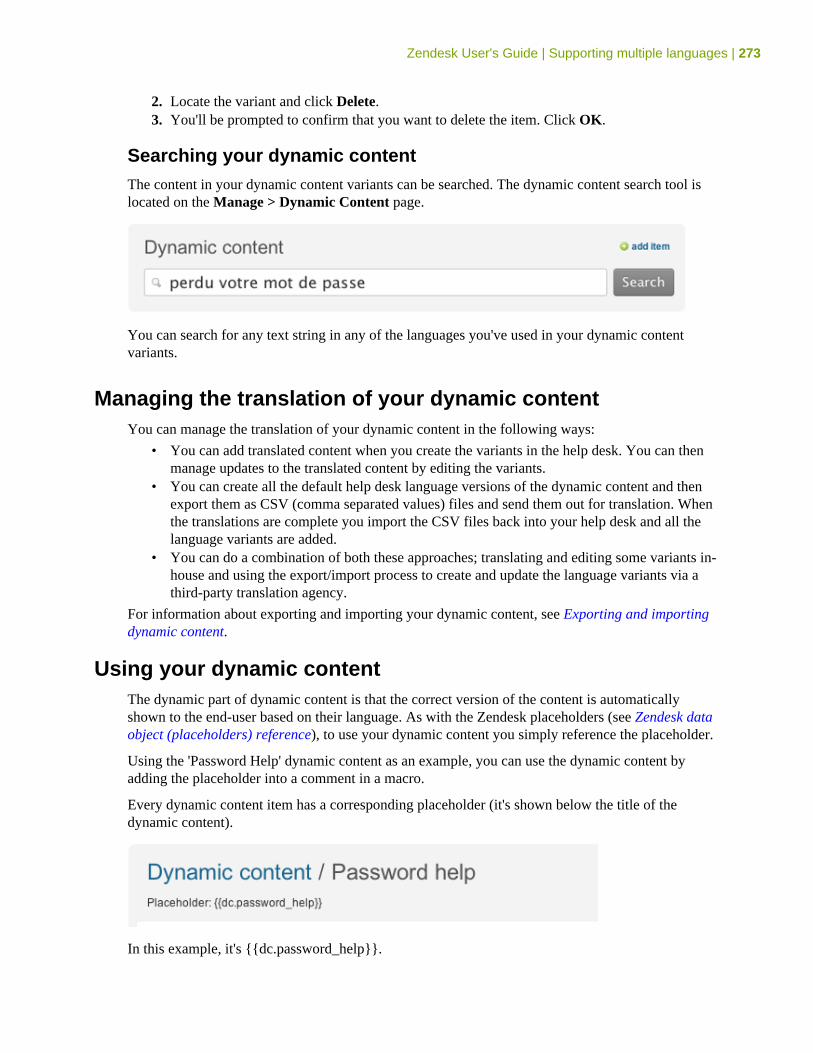
Zendesk User's Guide | Supporting multiple languages | 273
2. Locate the variant and click Delete.3. You'll be prompted to confirm that you want to delete the item. Click OK.
Searching your dynamic contentThe content in your dynamic content variants can be searched. The dynamic content search tool islocated on the Manage > Dynamic Content page.
You can search for any text string in any of the languages you've used in your dynamic contentvariants.
Managing the translation of your dynamic contentYou can manage the translation of your dynamic content in the following ways:
• You can add translated content when you create the variants in the help desk. You can thenmanage updates to the translated content by editing the variants.
• You can create all the default help desk language versions of the dynamic content and thenexport them as CSV (comma separated values) files and send them out for translation. Whenthe translations are complete you import the CSV files back into your help desk and all thelanguage variants are added.
• You can do a combination of both these approaches; translating and editing some variants in-house and using the export/import process to create and update the language variants via athird-party translation agency.
For information about exporting and importing your dynamic content, see Exporting and importingdynamic content.
Using your dynamic contentThe dynamic part of dynamic content is that the correct version of the content is automaticallyshown to the end-user based on their language. As with the Zendesk placeholders (see Zendesk dataobject (placeholders) reference), to use your dynamic content you simply reference the placeholder.
Using the 'Password Help' dynamic content as an example, you can use the dynamic content byadding the placeholder into a comment in a macro.
Every dynamic content item has a corresponding placeholder (it's shown below the title of thedynamic content).
In this example, it's {{dc.password_help}}.
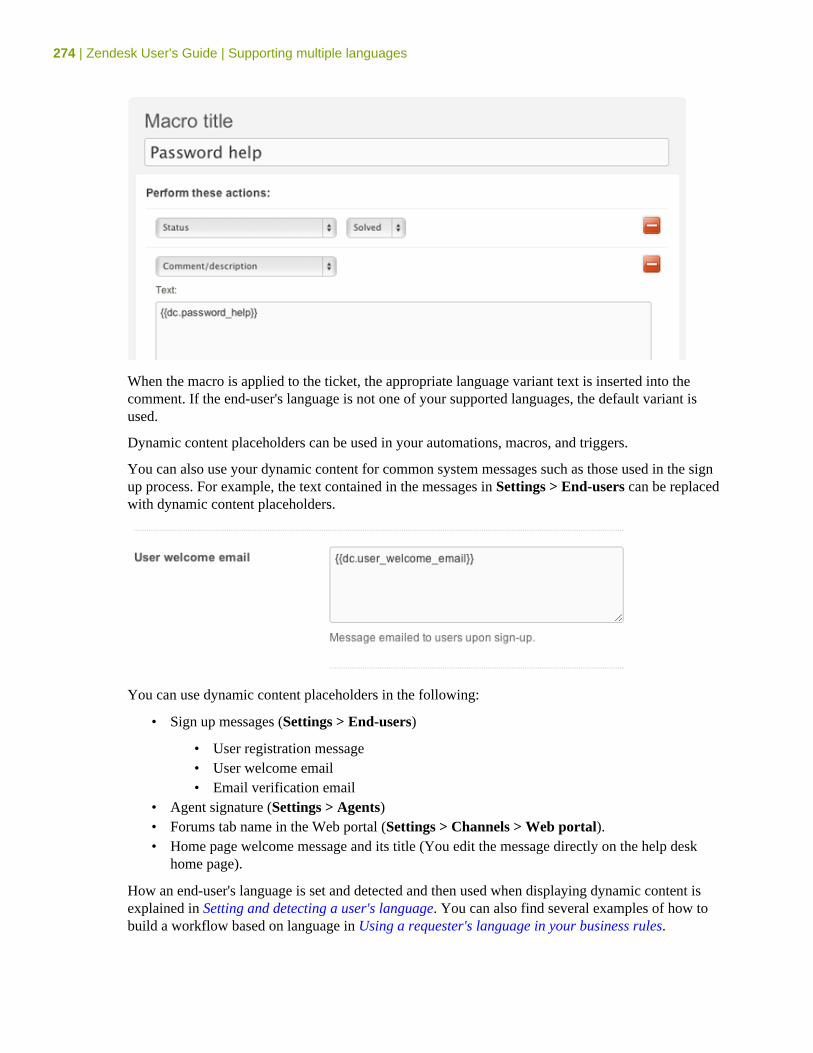
274 | Zendesk User's Guide | Supporting multiple languages
When the macro is applied to the ticket, the appropriate language variant text is inserted into thecomment. If the end-user's language is not one of your supported languages, the default variant isused.
Dynamic content placeholders can be used in your automations, macros, and triggers.
You can also use your dynamic content for common system messages such as those used in the signup process. For example, the text contained in the messages in Settings > End-users can be replacedwith dynamic content placeholders.
You can use dynamic content placeholders in the following:
• Sign up messages (Settings > End-users)
• User registration message• User welcome email• Email verification email
• Agent signature (Settings > Agents)• Forums tab name in the Web portal (Settings > Channels > Web portal).• Home page welcome message and its title (You edit the message directly on the help desk
home page).
How an end-user's language is set and detected and then used when displaying dynamic content isexplained in Setting and detecting a user's language. You can also find several examples of how tobuild a workflow based on language in Using a requester's language in your business rules.
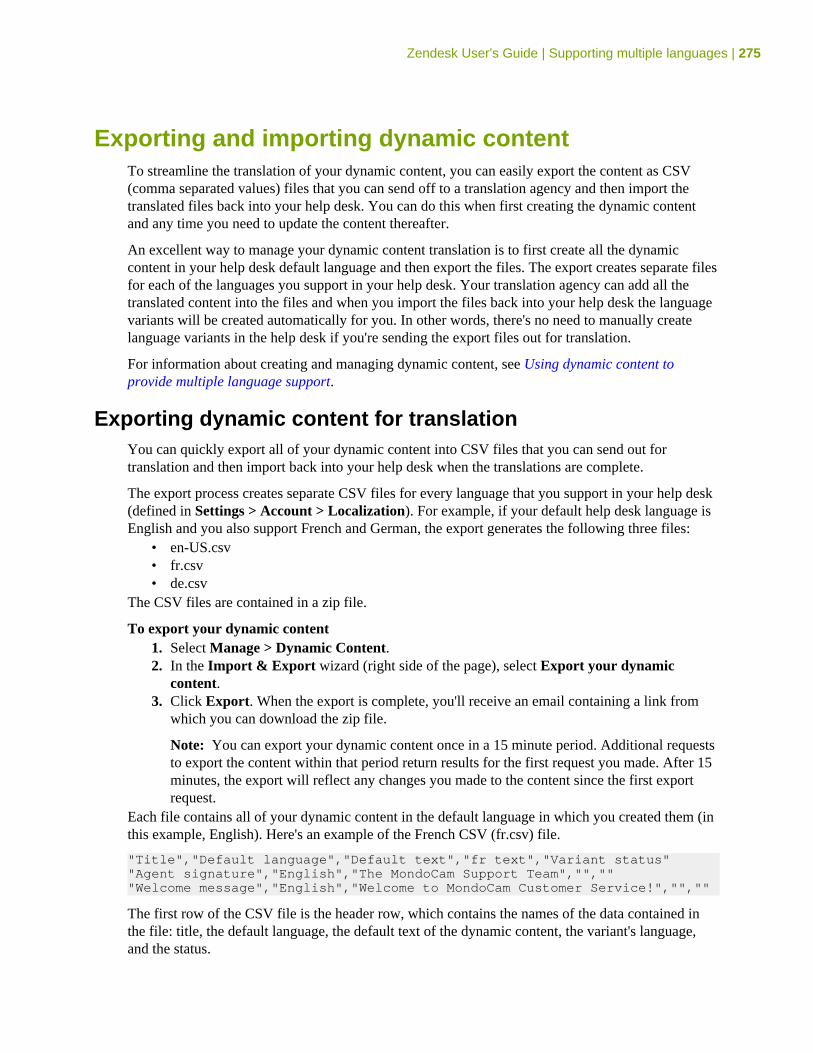
Zendesk User's Guide | Supporting multiple languages | 275
Exporting and importing dynamic contentTo streamline the translation of your dynamic content, you can easily export the content as CSV(comma separated values) files that you can send off to a translation agency and then import thetranslated files back into your help desk. You can do this when first creating the dynamic contentand any time you need to update the content thereafter.
An excellent way to manage your dynamic content translation is to first create all the dynamiccontent in your help desk default language and then export the files. The export creates separate filesfor each of the languages you support in your help desk. Your translation agency can add all thetranslated content into the files and when you import the files back into your help desk the languagevariants will be created automatically for you. In other words, there's no need to manually createlanguage variants in the help desk if you're sending the export files out for translation.
For information about creating and managing dynamic content, see Using dynamic content toprovide multiple language support.
Exporting dynamic content for translationYou can quickly export all of your dynamic content into CSV files that you can send out fortranslation and then import back into your help desk when the translations are complete.
The export process creates separate CSV files for every language that you support in your help desk(defined in Settings > Account > Localization). For example, if your default help desk language isEnglish and you also support French and German, the export generates the following three files:
• en-US.csv• fr.csv• de.csv
The CSV files are contained in a zip file.
To export your dynamic content1. Select Manage > Dynamic Content.2. In the Import & Export wizard (right side of the page), select Export your dynamic
content.3. Click Export. When the export is complete, you'll receive an email containing a link from
which you can download the zip file.
Note: You can export your dynamic content once in a 15 minute period. Additional requeststo export the content within that period return results for the first request you made. After 15minutes, the export will reflect any changes you made to the content since the first exportrequest.
Each file contains all of your dynamic content in the default language in which you created them (inthis example, English). Here's an example of the French CSV (fr.csv) file.
"Title","Default language","Default text","fr text","Variant status""Agent signature","English","The MondoCam Support Team","","""Welcome message","English","Welcome to MondoCam Customer Service!","",""
The first row of the CSV file is the header row, which contains the names of the data contained inthe file: title, the default language, the default text of the dynamic content, the variant's language,and the status.
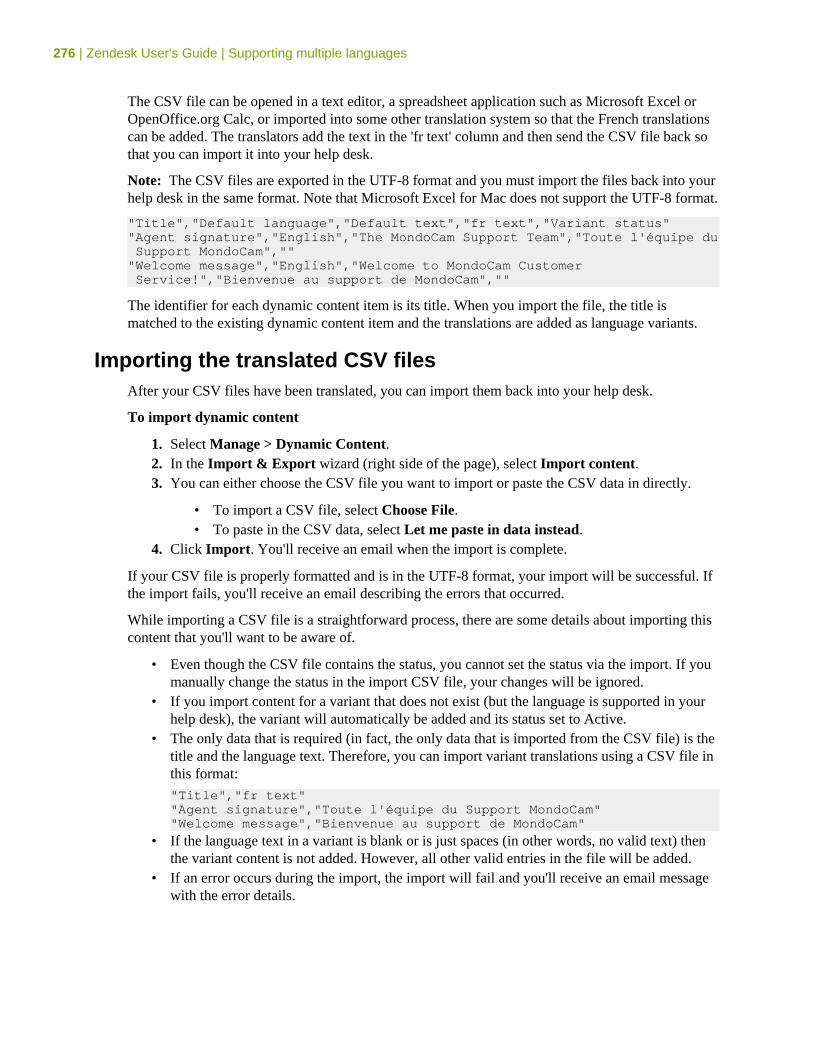
276 | Zendesk User's Guide | Supporting multiple languages
The CSV file can be opened in a text editor, a spreadsheet application such as Microsoft Excel orOpenOffice.org Calc, or imported into some other translation system so that the French translationscan be added. The translators add the text in the 'fr text' column and then send the CSV file back sothat you can import it into your help desk.
Note: The CSV files are exported in the UTF-8 format and you must import the files back into yourhelp desk in the same format. Note that Microsoft Excel for Mac does not support the UTF-8 format.
"Title","Default language","Default text","fr text","Variant status""Agent signature","English","The MondoCam Support Team","Toute l'équipe du Support MondoCam","""Welcome message","English","Welcome to MondoCam Customer Service!","Bienvenue au support de MondoCam",""
The identifier for each dynamic content item is its title. When you import the file, the title ismatched to the existing dynamic content item and the translations are added as language variants.
Importing the translated CSV filesAfter your CSV files have been translated, you can import them back into your help desk.
To import dynamic content
1. Select Manage > Dynamic Content.2. In the Import & Export wizard (right side of the page), select Import content.3. You can either choose the CSV file you want to import or paste the CSV data in directly.
• To import a CSV file, select Choose File.• To paste in the CSV data, select Let me paste in data instead.
4. Click Import. You'll receive an email when the import is complete.
If your CSV file is properly formatted and is in the UTF-8 format, your import will be successful. Ifthe import fails, you'll receive an email describing the errors that occurred.
While importing a CSV file is a straightforward process, there are some details about importing thiscontent that you'll want to be aware of.
• Even though the CSV file contains the status, you cannot set the status via the import. If youmanually change the status in the import CSV file, your changes will be ignored.
• If you import content for a variant that does not exist (but the language is supported in yourhelp desk), the variant will automatically be added and its status set to Active.
• The only data that is required (in fact, the only data that is imported from the CSV file) is thetitle and the language text. Therefore, you can import variant translations using a CSV file inthis format:
"Title","fr text""Agent signature","Toute l'équipe du Support MondoCam""Welcome message","Bienvenue au support de MondoCam"
• If the language text in a variant is blank or is just spaces (in other words, no valid text) thenthe variant content is not added. However, all other valid entries in the file will be added.
• If an error occurs during the import, the import will fail and you'll receive an email messagewith the error details.

Chapter
11
Zendesk Enterprise• Advanced ticket sharing with Zendesk Enterprise• Custom agent roles• Archiving email notifications• Restricting access to your help desk• Setting up to manage multiple brand help desks• Using chat when managing multiple brands• Tracking customer satisfaction ratings when managing multiple brand help desks• Using custom fields in a multi-brand help desk• Analyzing your business rules
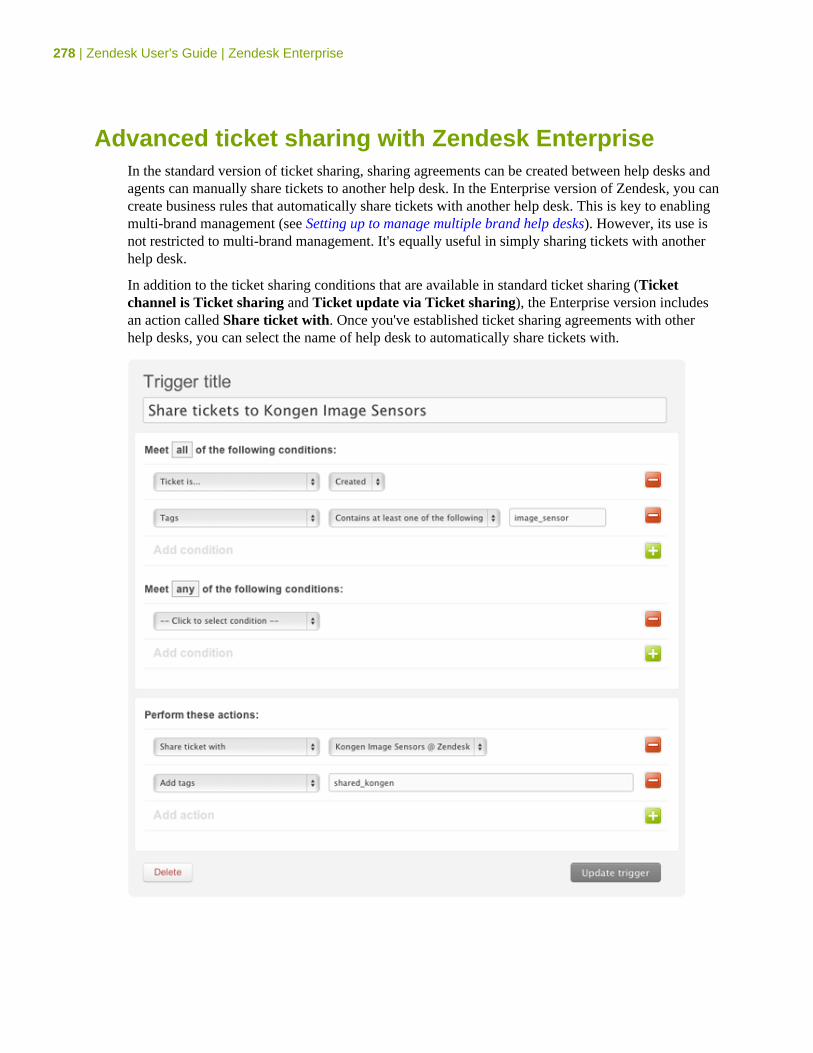
278 | Zendesk User's Guide | Zendesk Enterprise
Advanced ticket sharing with Zendesk EnterpriseIn the standard version of ticket sharing, sharing agreements can be created between help desks andagents can manually share tickets to another help desk. In the Enterprise version of Zendesk, you cancreate business rules that automatically share tickets with another help desk. This is key to enablingmulti-brand management (see Setting up to manage multiple brand help desks). However, its use isnot restricted to multi-brand management. It's equally useful in simply sharing tickets with anotherhelp desk.
In addition to the ticket sharing conditions that are available in standard ticket sharing (Ticketchannel is Ticket sharing and Ticket update via Ticket sharing), the Enterprise version includesan action called Share ticket with. Once you've established ticket sharing agreements with otherhelp desks, you can select the name of help desk to automatically share tickets with.
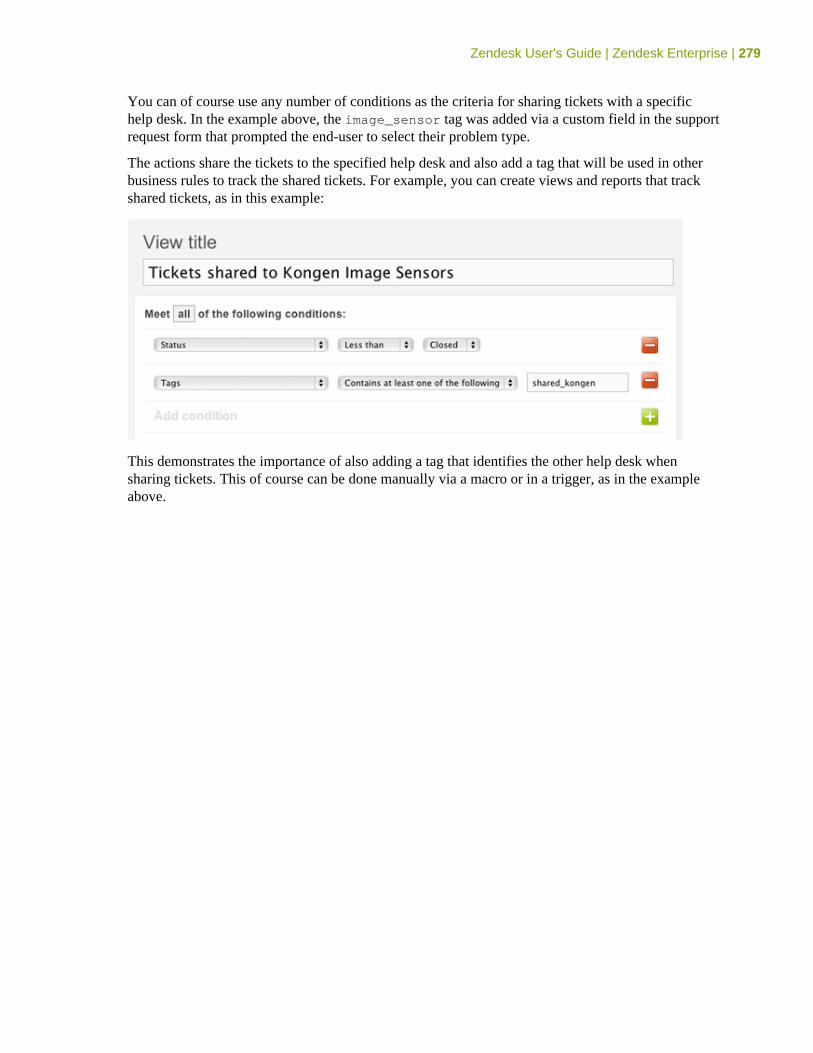
Zendesk User's Guide | Zendesk Enterprise | 279
You can of course use any number of conditions as the criteria for sharing tickets with a specifichelp desk. In the example above, the image_sensor tag was added via a custom field in the supportrequest form that prompted the end-user to select their problem type.
The actions share the tickets to the specified help desk and also add a tag that will be used in otherbusiness rules to track the shared tickets. For example, you can create views and reports that trackshared tickets, as in this example:
This demonstrates the importance of also adding a tag that identifies the other help desk whensharing tickets. This of course can be done manually via a macro or in a trigger, as in the exampleabove.
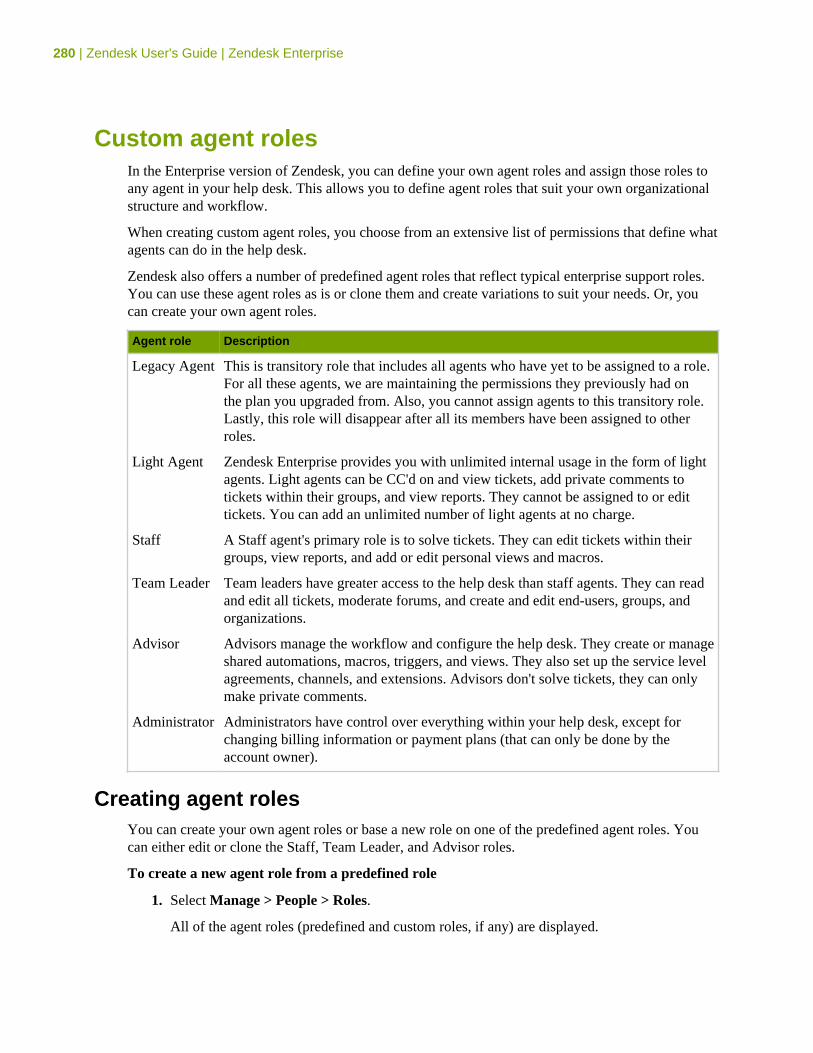
280 | Zendesk User's Guide | Zendesk Enterprise
Custom agent rolesIn the Enterprise version of Zendesk, you can define your own agent roles and assign those roles toany agent in your help desk. This allows you to define agent roles that suit your own organizationalstructure and workflow.
When creating custom agent roles, you choose from an extensive list of permissions that define whatagents can do in the help desk.
Zendesk also offers a number of predefined agent roles that reflect typical enterprise support roles.You can use these agent roles as is or clone them and create variations to suit your needs. Or, youcan create your own agent roles.
Agent role Description
Legacy Agent This is transitory role that includes all agents who have yet to be assigned to a role.For all these agents, we are maintaining the permissions they previously had onthe plan you upgraded from. Also, you cannot assign agents to this transitory role.Lastly, this role will disappear after all its members have been assigned to otherroles.
Light Agent Zendesk Enterprise provides you with unlimited internal usage in the form of lightagents. Light agents can be CC'd on and view tickets, add private comments totickets within their groups, and view reports. They cannot be assigned to or edittickets. You can add an unlimited number of light agents at no charge.
Staff A Staff agent's primary role is to solve tickets. They can edit tickets within theirgroups, view reports, and add or edit personal views and macros.
Team Leader Team leaders have greater access to the help desk than staff agents. They can readand edit all tickets, moderate forums, and create and edit end-users, groups, andorganizations.
Advisor Advisors manage the workflow and configure the help desk. They create or manageshared automations, macros, triggers, and views. They also set up the service levelagreements, channels, and extensions. Advisors don't solve tickets, they can onlymake private comments.
Administrator Administrators have control over everything within your help desk, except forchanging billing information or payment plans (that can only be done by theaccount owner).
Creating agent rolesYou can create your own agent roles or base a new role on one of the predefined agent roles. Youcan either edit or clone the Staff, Team Leader, and Advisor roles.
To create a new agent role from a predefined role
1. Select Manage > People > Roles.
All of the agent roles (predefined and custom roles, if any) are displayed.

Zendesk User's Guide | Zendesk Enterprise | 281
2. Locate the role you want to edit or clone. Select Edit or Clone (this command appears whenyou move your mouse over the role in the list of roles).
3. Define and create the agent role as described below in Agent permissions.4. When you've finished defining the new role, click Create Role.
To add a new custom agent role1. Select Manage > People > Add Role.2. Enter a role name and description and then select the permissions for the role (described
below).3. Click Create Role.
Agent permissionsYou create agent roles by choosing the permissions described in the following table.
Permissions Description
Tickets You can define an agent's access to tickets, the types of comments they can make,and their editing permissions.
An agent may access tickets in one of the following ways:
• Assigned to this agent only• Requested by users in this agent's organization
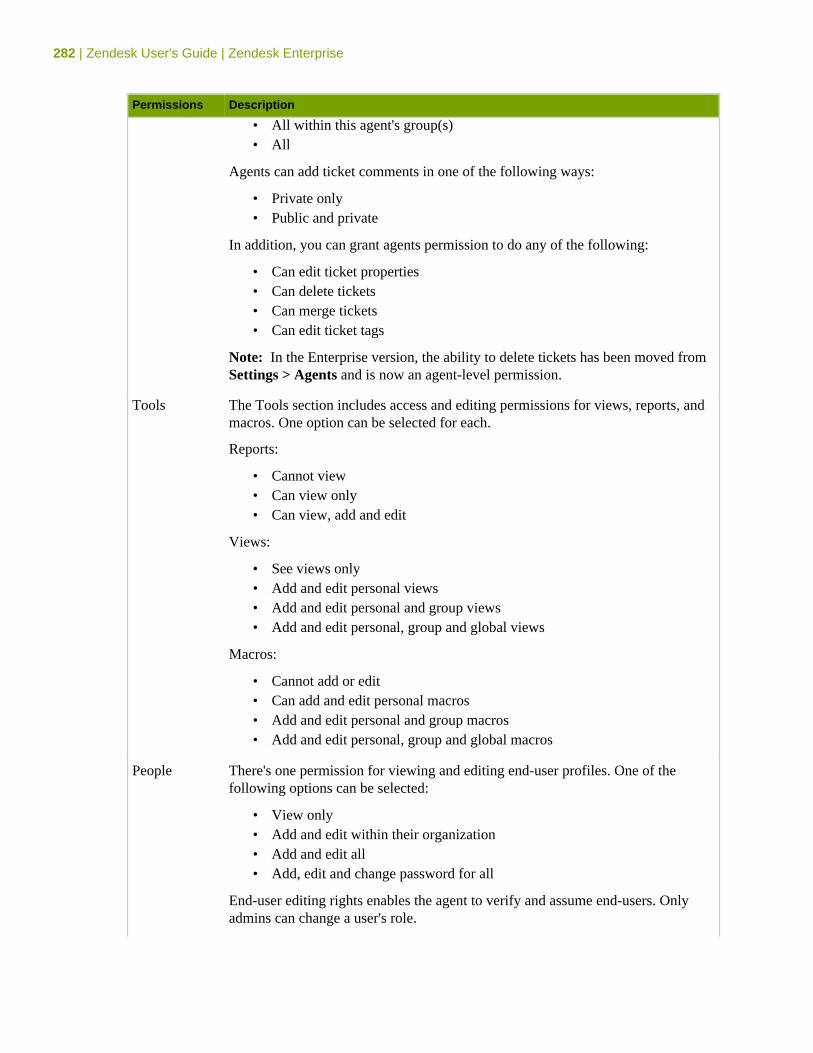
282 | Zendesk User's Guide | Zendesk Enterprise
Permissions Description
• All within this agent's group(s)• All
Agents can add ticket comments in one of the following ways:
• Private only• Public and private
In addition, you can grant agents permission to do any of the following:
• Can edit ticket properties• Can delete tickets• Can merge tickets• Can edit ticket tags
Note: In the Enterprise version, the ability to delete tickets has been moved fromSettings > Agents and is now an agent-level permission.
Tools The Tools section includes access and editing permissions for views, reports, andmacros. One option can be selected for each.
Reports:
• Cannot view• Can view only• Can view, add and edit
Views:
• See views only• Add and edit personal views• Add and edit personal and group views• Add and edit personal, group and global views
Macros:
• Cannot add or edit• Can add and edit personal macros• Add and edit personal and group macros• Add and edit personal, group and global macros
People There's one permission for viewing and editing end-user profiles. One of thefollowing options can be selected:
• View only• Add and edit within their organization• Add and edit all• Add, edit and change password for all
End-user editing rights enables the agent to verify and assume end-users. Onlyadmins can change a user's role.
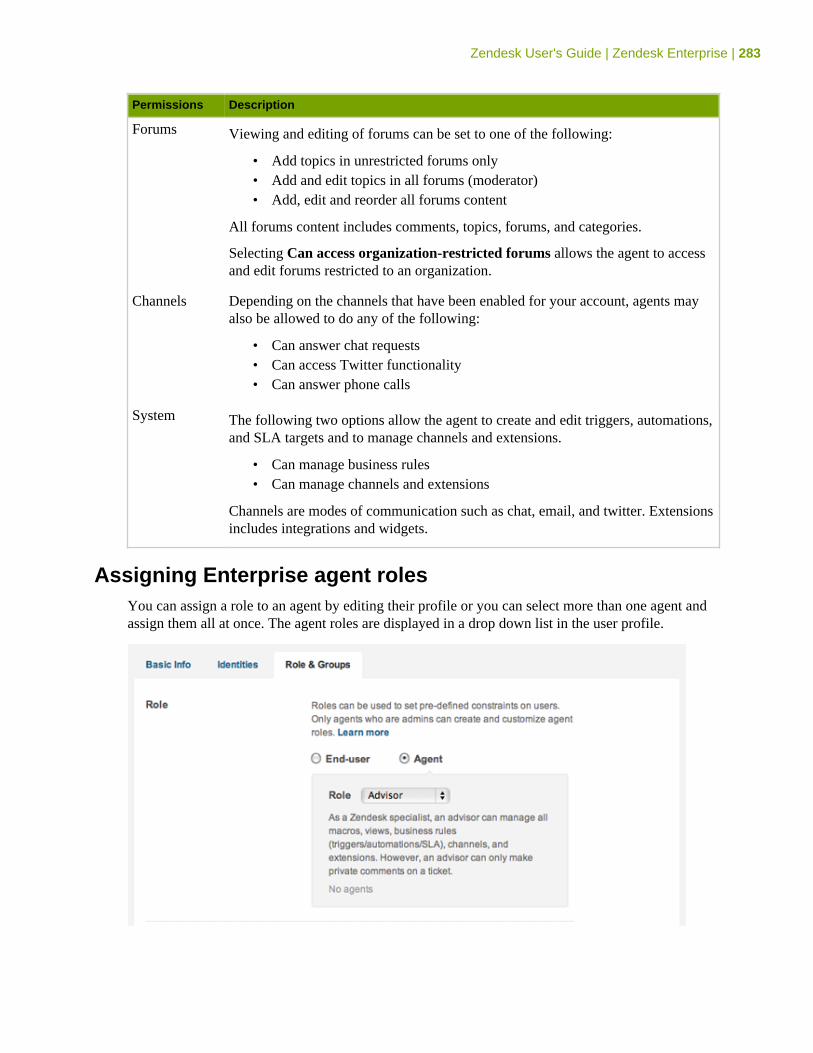
Zendesk User's Guide | Zendesk Enterprise | 283
Permissions Description
Forums Viewing and editing of forums can be set to one of the following:
• Add topics in unrestricted forums only• Add and edit topics in all forums (moderator)• Add, edit and reorder all forums content
All forums content includes comments, topics, forums, and categories.
Selecting Can access organization-restricted forums allows the agent to accessand edit forums restricted to an organization.
Channels Depending on the channels that have been enabled for your account, agents mayalso be allowed to do any of the following:
• Can answer chat requests• Can access Twitter functionality• Can answer phone calls
System The following two options allow the agent to create and edit triggers, automations,and SLA targets and to manage channels and extensions.
• Can manage business rules• Can manage channels and extensions
Channels are modes of communication such as chat, email, and twitter. Extensionsincludes integrations and widgets.
Assigning Enterprise agent rolesYou can assign a role to an agent by editing their profile or you can select more than one agent andassign them all at once. The agent roles are displayed in a drop down list in the user profile.
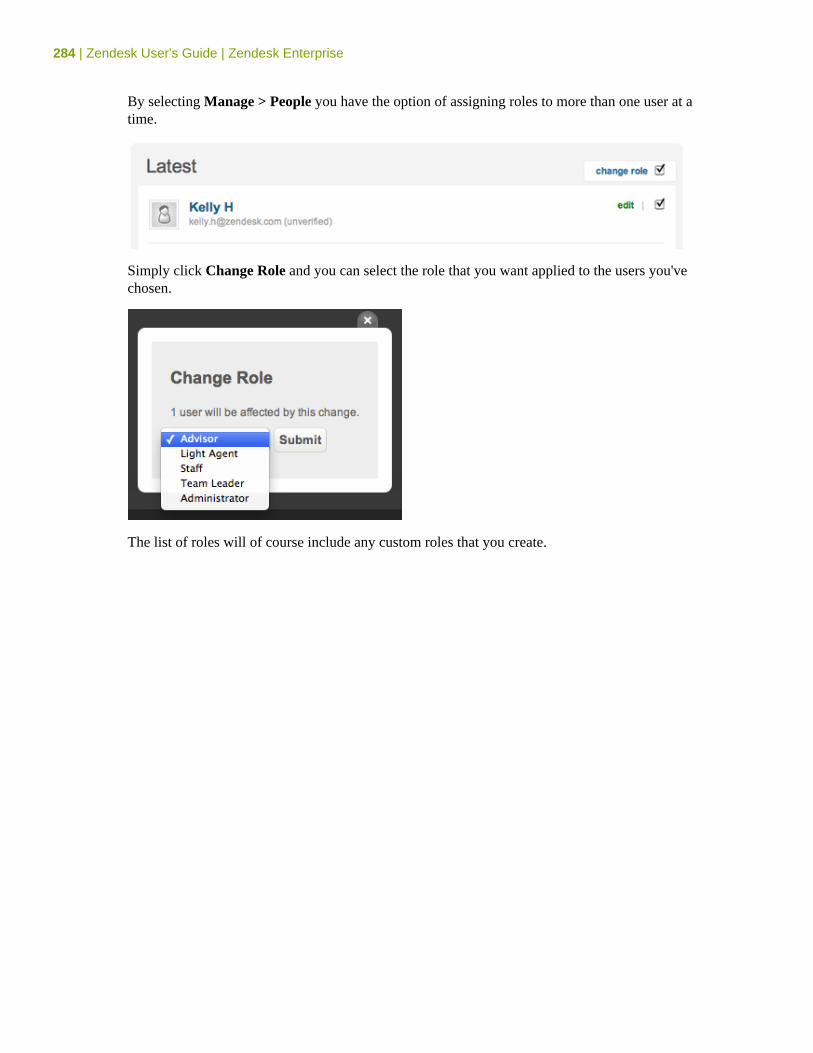
284 | Zendesk User's Guide | Zendesk Enterprise
By selecting Manage > People you have the option of assigning roles to more than one user at atime.
Simply click Change Role and you can select the role that you want applied to the users you'vechosen.
The list of roles will of course include any custom roles that you create.
Zendesk User's Guide | Zendesk Enterprise | 285
Archiving email notificationsMany businesses maintain archives of their customer communications as a standard practice or forlegal purposes. In the Enterprise version of Zendesk, you can enable automatic email archiving,which will send a copy of every outbound email notification to a BCC address. The BCC address isto an external email account so that the archive is maintained outside of the help desk. This can beset up by an admin.
To set up email archiving
1. Select Settings > Tickets.2. In the section Email Archiving, enter an external email address.3. Click Save Tab.
All ticket email communication will now also be sent to the BCC address for archiving.
286 | Zendesk User's Guide | Zendesk Enterprise
Restricting access to your help deskIn the Enterprise version of Zendesk, access to your help desk can be restricted to specific IPaddresses. This means that users from these IP addresses are the only users allowed to log in to thehelp desk. This includes all help desk users.
You also have the option of restricting access to just the agent login (agents must log in from theapproved IP addresses), while allowing the end-user Web Portal to remain unrestricted.
With IP restrictions enabled, you can still allow your agents to log in to your help desk via theZendesk mobile applications for Android smart phones, the Apple iPhone, and the iPad. Enablingmobile access via the Zendesk mobile applications allows agents to bypass the IP restrictions sothere is some security risk involved.
An IP range is in the format n.n.n.n, where n is a number or an asterisk (*) wild card. Separatemultiple IP ranges with a space.
To set IP restrictions
1. Select Settings > Security > IP Restriction.2. Select Enable.3. Enter the IP addresses that are allowed access to your help desk.4. Optionally, restrict access only to the agent login, not the end-user Web portal, by selecting
Restrict only the agent portal.5. Optionally, allow agents to access your help desk from the Zendesk mobile apps by selecting
Enable mobile access.6. Click Save Tab.
Note: Enabling IP based access restrictions can break third party integrations. Be sure to include allexternal IPs that need access to your account via the Zendesk API.
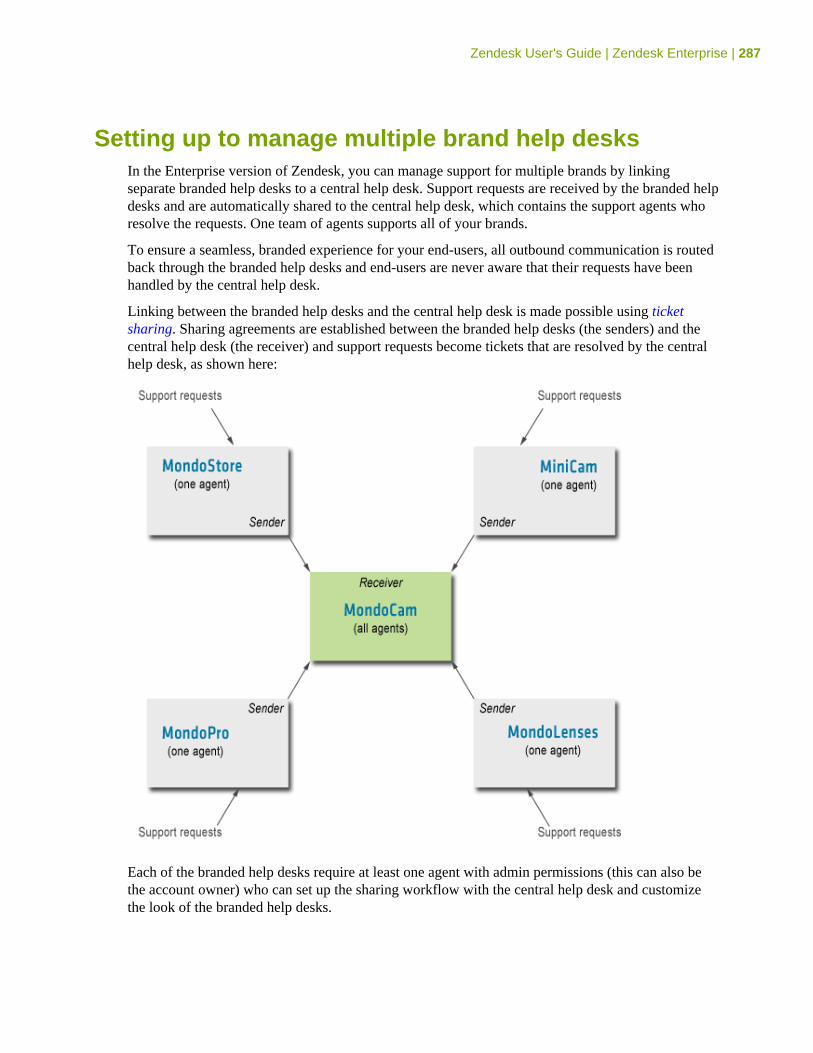
Zendesk User's Guide | Zendesk Enterprise | 287
Setting up to manage multiple brand help desksIn the Enterprise version of Zendesk, you can manage support for multiple brands by linkingseparate branded help desks to a central help desk. Support requests are received by the branded helpdesks and are automatically shared to the central help desk, which contains the support agents whoresolve the requests. One team of agents supports all of your brands.
To ensure a seamless, branded experience for your end-users, all outbound communication is routedback through the branded help desks and end-users are never aware that their requests have beenhandled by the central help desk.
Linking between the branded help desks and the central help desk is made possible using ticketsharing. Sharing agreements are established between the branded help desks (the senders) and thecentral help desk (the receiver) and support requests become tickets that are resolved by the centralhelp desk, as shown here:
Each of the branded help desks require at least one agent with admin permissions (this can also bethe account owner) who can set up the sharing workflow with the central help desk and customizethe look of the branded help desks.
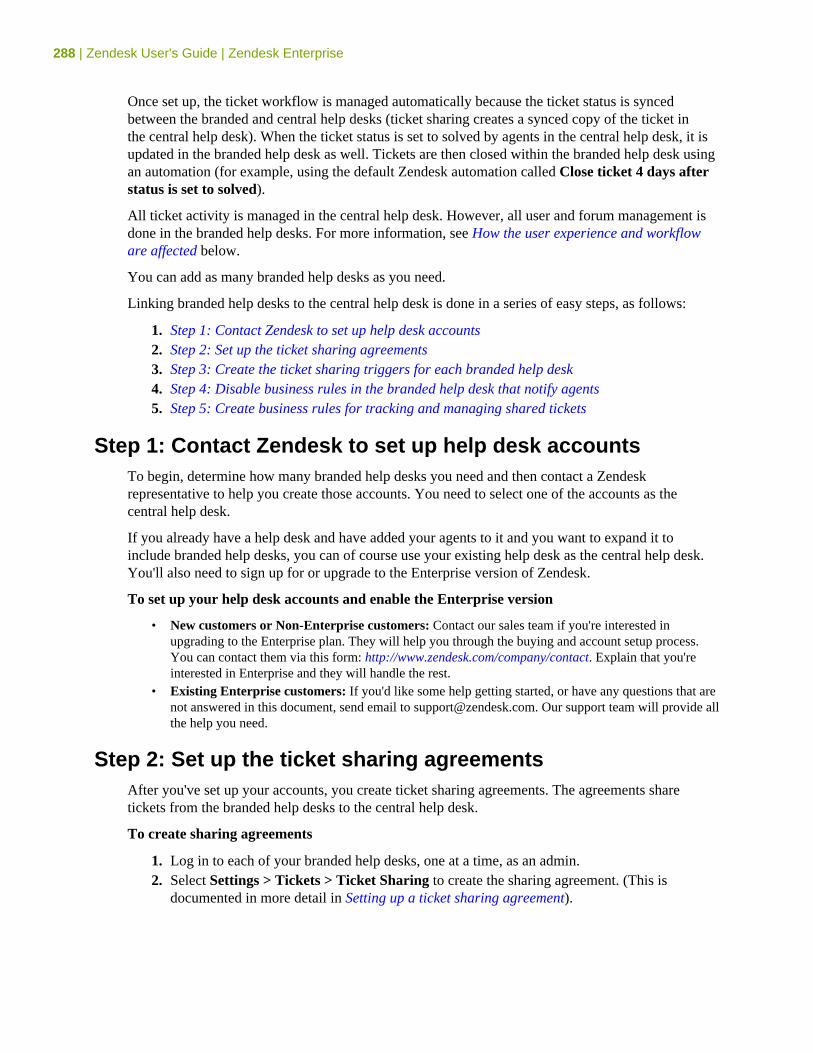
288 | Zendesk User's Guide | Zendesk Enterprise
Once set up, the ticket workflow is managed automatically because the ticket status is syncedbetween the branded and central help desks (ticket sharing creates a synced copy of the ticket inthe central help desk). When the ticket status is set to solved by agents in the central help desk, it isupdated in the branded help desk as well. Tickets are then closed within the branded help desk usingan automation (for example, using the default Zendesk automation called Close ticket 4 days afterstatus is set to solved).
All ticket activity is managed in the central help desk. However, all user and forum management isdone in the branded help desks. For more information, see How the user experience and workfloware affected below.
You can add as many branded help desks as you need.
Linking branded help desks to the central help desk is done in a series of easy steps, as follows:
1. Step 1: Contact Zendesk to set up help desk accounts2. Step 2: Set up the ticket sharing agreements3. Step 3: Create the ticket sharing triggers for each branded help desk4. Step 4: Disable business rules in the branded help desk that notify agents5. Step 5: Create business rules for tracking and managing shared tickets
Step 1: Contact Zendesk to set up help desk accountsTo begin, determine how many branded help desks you need and then contact a Zendeskrepresentative to help you create those accounts. You need to select one of the accounts as thecentral help desk.
If you already have a help desk and have added your agents to it and you want to expand it toinclude branded help desks, you can of course use your existing help desk as the central help desk.You'll also need to sign up for or upgrade to the Enterprise version of Zendesk.
To set up your help desk accounts and enable the Enterprise version
• New customers or Non-Enterprise customers: Contact our sales team if you're interested inupgrading to the Enterprise plan. They will help you through the buying and account setup process.You can contact them via this form: http://www.zendesk.com/company/contact. Explain that you'reinterested in Enterprise and they will handle the rest.
• Existing Enterprise customers: If you'd like some help getting started, or have any questions that arenot answered in this document, send email to [email protected]. Our support team will provide allthe help you need.
Step 2: Set up the ticket sharing agreementsAfter you've set up your accounts, you create ticket sharing agreements. The agreements sharetickets from the branded help desks to the central help desk.
To create sharing agreements
1. Log in to each of your branded help desks, one at a time, as an admin.2. Select Settings > Tickets > Ticket Sharing to create the sharing agreement. (This is
documented in more detail in Setting up a ticket sharing agreement).
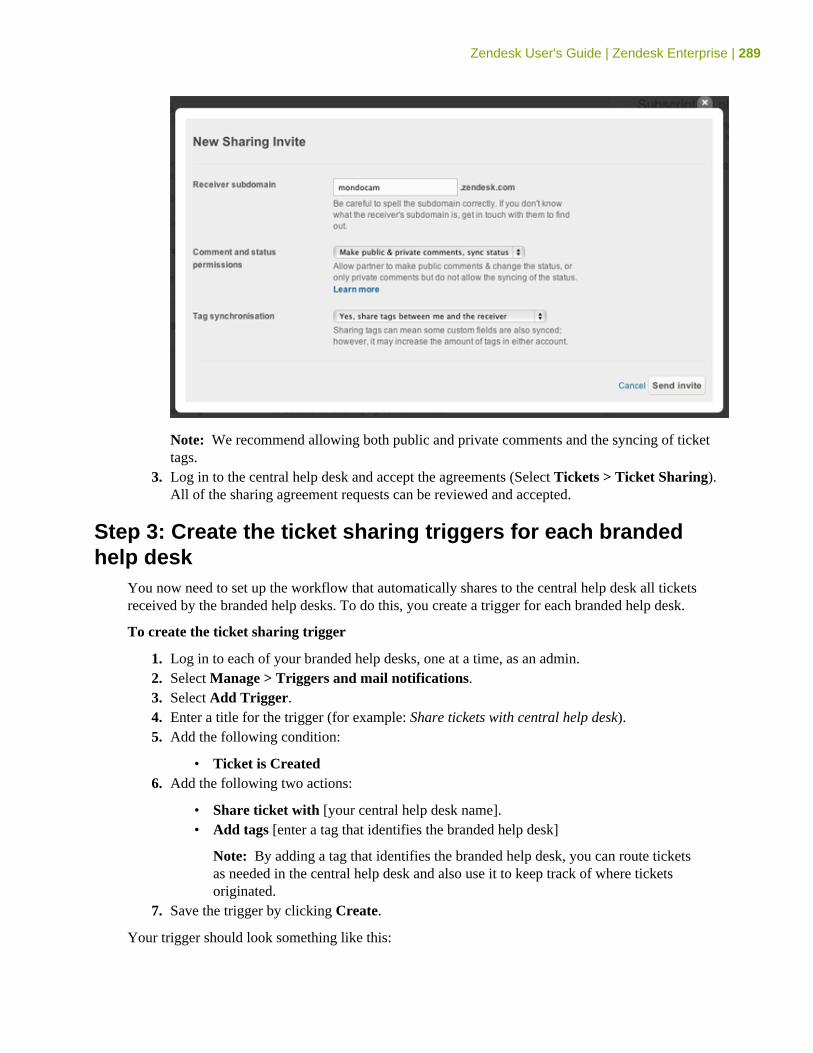
Zendesk User's Guide | Zendesk Enterprise | 289
Note: We recommend allowing both public and private comments and the syncing of tickettags.
3. Log in to the central help desk and accept the agreements (Select Tickets > Ticket Sharing).All of the sharing agreement requests can be reviewed and accepted.
Step 3: Create the ticket sharing triggers for each brandedhelp desk
You now need to set up the workflow that automatically shares to the central help desk all ticketsreceived by the branded help desks. To do this, you create a trigger for each branded help desk.
To create the ticket sharing trigger
1. Log in to each of your branded help desks, one at a time, as an admin.2. Select Manage > Triggers and mail notifications.3. Select Add Trigger.4. Enter a title for the trigger (for example: Share tickets with central help desk).5. Add the following condition:
• Ticket is Created6. Add the following two actions:
• Share ticket with [your central help desk name].• Add tags [enter a tag that identifies the branded help desk]
Note: By adding a tag that identifies the branded help desk, you can route ticketsas needed in the central help desk and also use it to keep track of where ticketsoriginated.
7. Save the trigger by clicking Create.
Your trigger should look something like this:
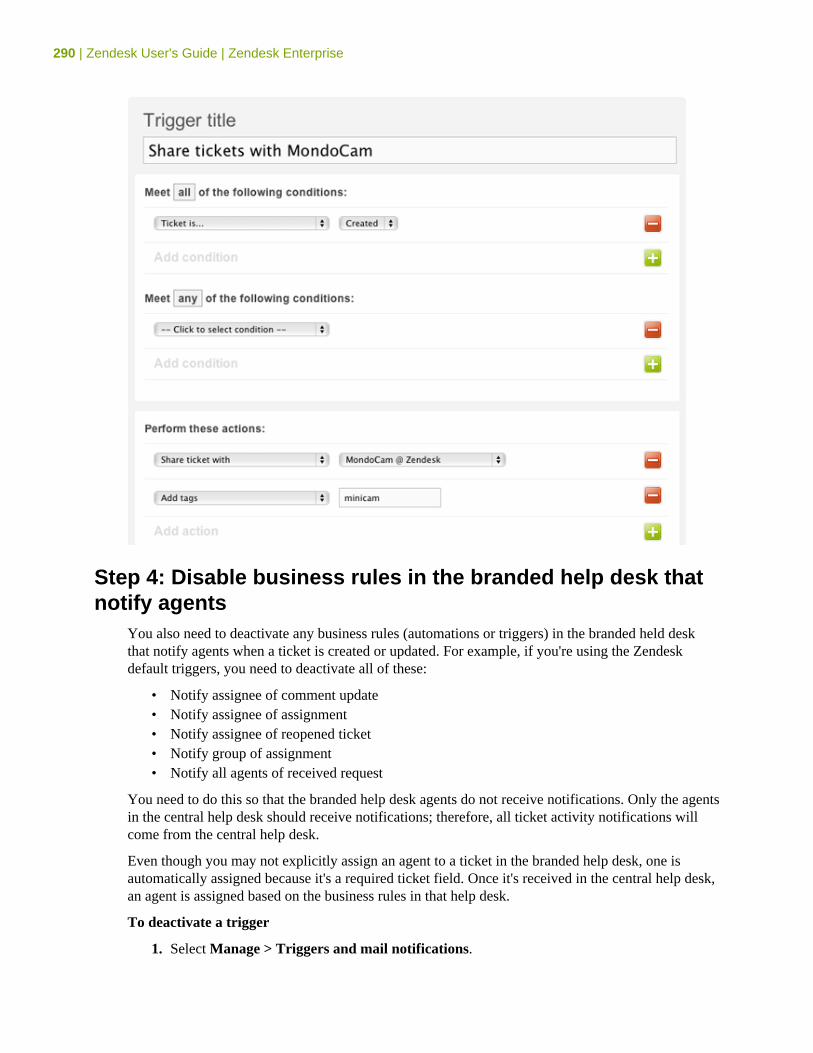
290 | Zendesk User's Guide | Zendesk Enterprise
Step 4: Disable business rules in the branded help desk thatnotify agents
You also need to deactivate any business rules (automations or triggers) in the branded held deskthat notify agents when a ticket is created or updated. For example, if you're using the Zendeskdefault triggers, you need to deactivate all of these:
• Notify assignee of comment update• Notify assignee of assignment• Notify assignee of reopened ticket• Notify group of assignment• Notify all agents of received request
You need to do this so that the branded help desk agents do not receive notifications. Only the agentsin the central help desk should receive notifications; therefore, all ticket activity notifications willcome from the central help desk.
Even though you may not explicitly assign an agent to a ticket in the branded help desk, one isautomatically assigned because it's a required ticket field. Once it's received in the central help desk,an agent is assigned based on the business rules in that help desk.
To deactivate a trigger
1. Select Manage > Triggers and mail notifications.
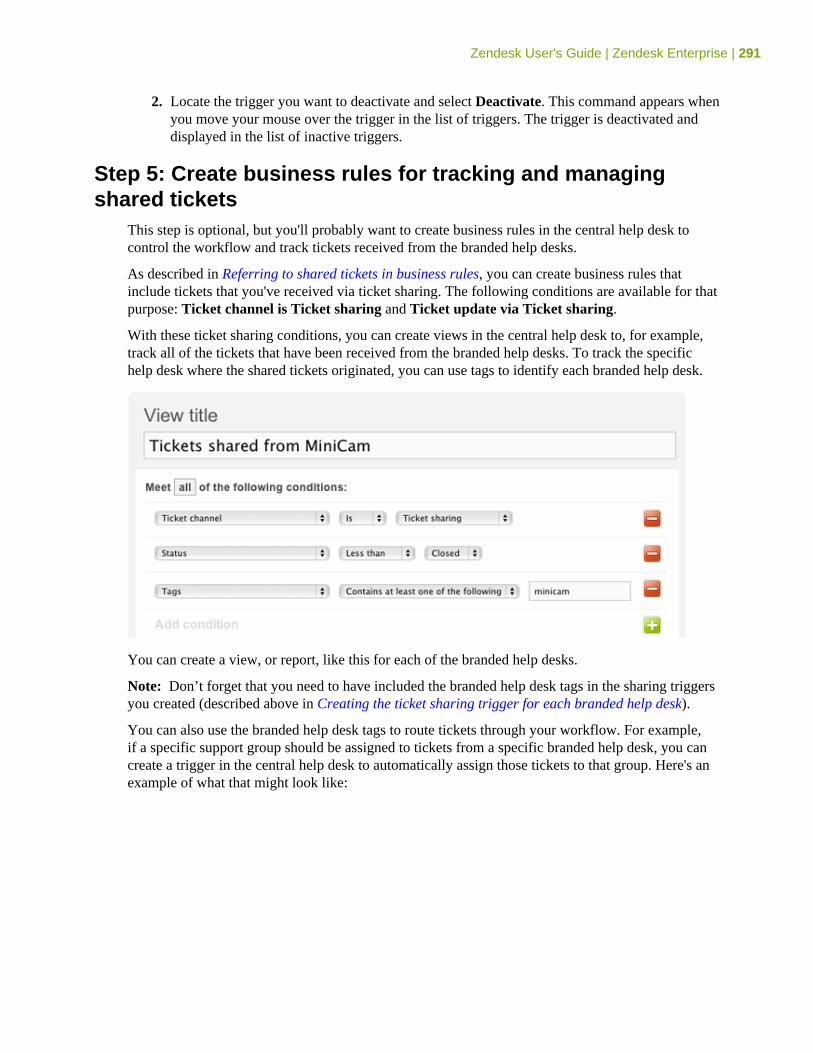
Zendesk User's Guide | Zendesk Enterprise | 291
2. Locate the trigger you want to deactivate and select Deactivate. This command appears whenyou move your mouse over the trigger in the list of triggers. The trigger is deactivated anddisplayed in the list of inactive triggers.
Step 5: Create business rules for tracking and managingshared tickets
This step is optional, but you'll probably want to create business rules in the central help desk tocontrol the workflow and track tickets received from the branded help desks.
As described in Referring to shared tickets in business rules, you can create business rules thatinclude tickets that you've received via ticket sharing. The following conditions are available for thatpurpose: Ticket channel is Ticket sharing and Ticket update via Ticket sharing.
With these ticket sharing conditions, you can create views in the central help desk to, for example,track all of the tickets that have been received from the branded help desks. To track the specifichelp desk where the shared tickets originated, you can use tags to identify each branded help desk.
You can create a view, or report, like this for each of the branded help desks.
Note: Don’t forget that you need to have included the branded help desk tags in the sharing triggersyou created (described above in Creating the ticket sharing trigger for each branded help desk).
You can also use the branded help desk tags to route tickets through your workflow. For example,if a specific support group should be assigned to tickets from a specific branded help desk, you cancreate a trigger in the central help desk to automatically assign those tickets to that group. Here's anexample of what that might look like:
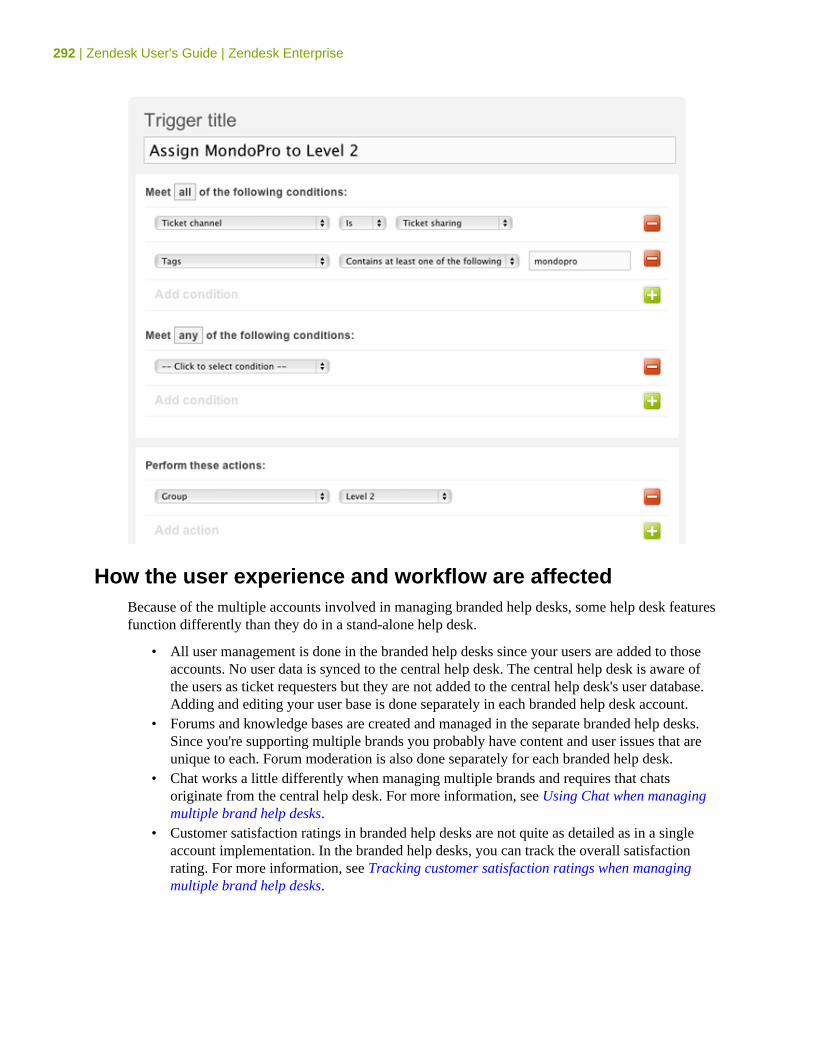
292 | Zendesk User's Guide | Zendesk Enterprise
How the user experience and workflow are affectedBecause of the multiple accounts involved in managing branded help desks, some help desk featuresfunction differently than they do in a stand-alone help desk.
• All user management is done in the branded help desks since your users are added to thoseaccounts. No user data is synced to the central help desk. The central help desk is aware ofthe users as ticket requesters but they are not added to the central help desk's user database.Adding and editing your user base is done separately in each branded help desk account.
• Forums and knowledge bases are created and managed in the separate branded help desks.Since you're supporting multiple brands you probably have content and user issues that areunique to each. Forum moderation is also done separately for each branded help desk.
• Chat works a little differently when managing multiple brands and requires that chatsoriginate from the central help desk. For more information, see Using Chat when managingmultiple brand help desks.
• Customer satisfaction ratings in branded help desks are not quite as detailed as in a singleaccount implementation. In the branded help desks, you can track the overall satisfactionrating. For more information, see Tracking customer satisfaction ratings when managingmultiple brand help desks.
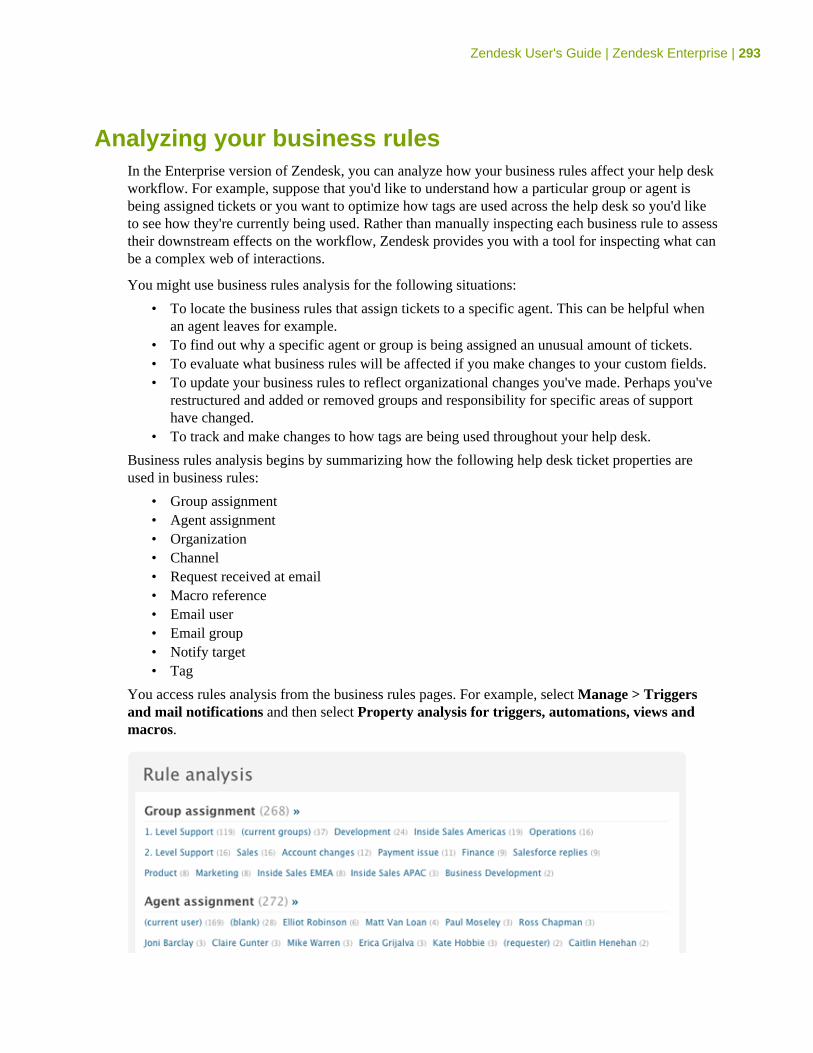
Zendesk User's Guide | Zendesk Enterprise | 293
Analyzing your business rulesIn the Enterprise version of Zendesk, you can analyze how your business rules affect your help deskworkflow. For example, suppose that you'd like to understand how a particular group or agent isbeing assigned tickets or you want to optimize how tags are used across the help desk so you'd liketo see how they're currently being used. Rather than manually inspecting each business rule to assesstheir downstream effects on the workflow, Zendesk provides you with a tool for inspecting what canbe a complex web of interactions.
You might use business rules analysis for the following situations:
• To locate the business rules that assign tickets to a specific agent. This can be helpful whenan agent leaves for example.
• To find out why a specific agent or group is being assigned an unusual amount of tickets.• To evaluate what business rules will be affected if you make changes to your custom fields.• To update your business rules to reflect organizational changes you've made. Perhaps you've
restructured and added or removed groups and responsibility for specific areas of supporthave changed.
• To track and make changes to how tags are being used throughout your help desk.
Business rules analysis begins by summarizing how the following help desk ticket properties areused in business rules:
• Group assignment• Agent assignment• Organization• Channel• Request received at email• Macro reference• Email user• Email group• Notify target• Tag
You access rules analysis from the business rules pages. For example, select Manage > Triggersand mail notifications and then select Property analysis for triggers, automations, views andmacros.
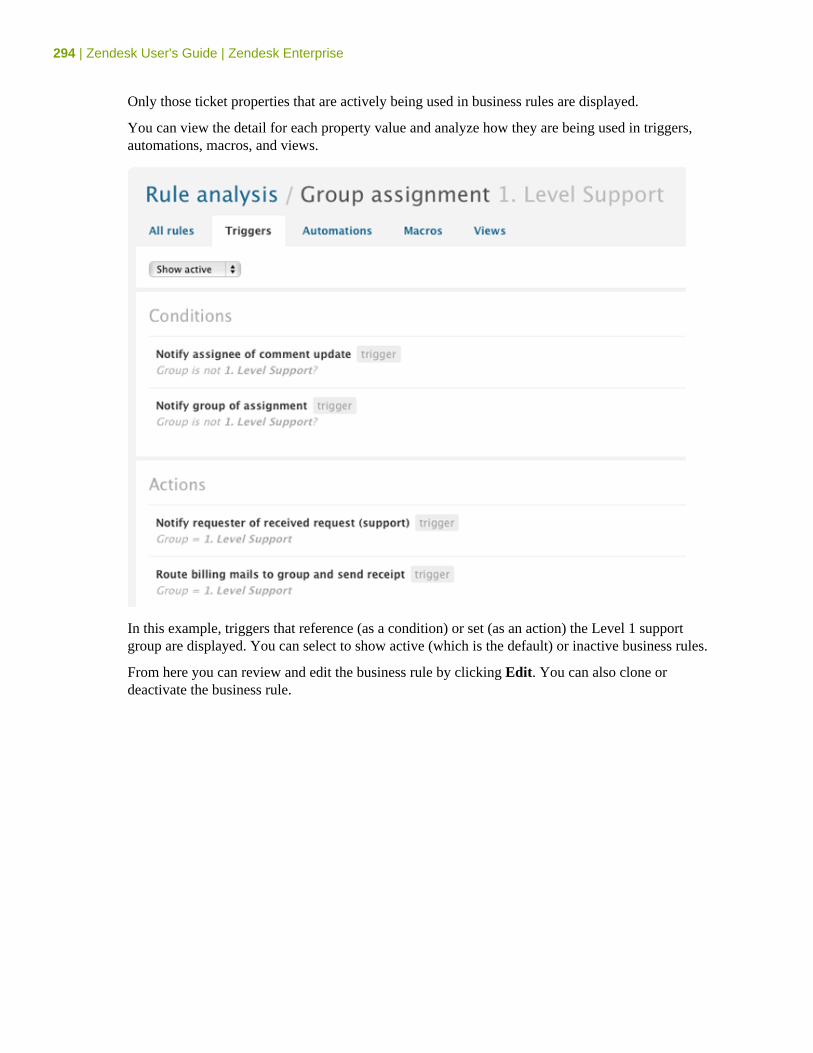
294 | Zendesk User's Guide | Zendesk Enterprise
Only those ticket properties that are actively being used in business rules are displayed.
You can view the detail for each property value and analyze how they are being used in triggers,automations, macros, and views.
In this example, triggers that reference (as a condition) or set (as an action) the Level 1 supportgroup are displayed. You can select to show active (which is the default) or inactive business rules.
From here you can review and edit the business rule by clicking Edit. You can also clone ordeactivate the business rule.
Chapter
12
CSS Cookbook• How to customize the help desk using CSS• Setting the page width and removing the page border• Replacing the header logo and title• Customizing the page footer• Customizing the top menu bar• Changing the content area background color• Changing the font settings of the main content area• Formatting the forum content headings• Customizing the tickets table• Customizing the sidebar• Customizing the alert message bar• Change the color of the views drop-down menu• Source code for CSS customization examples

296 | Zendesk User's Guide | CSS Cookbook
How to customize the help desk using CSSIf you want your help desk to more closely match the look of your company's web site, you canmodify the default elements and styles using CSS (cascading style sheets) code. This is easier todo if you're already familiar with CSS, but it's possible if you're not. Zendesk allows you to modifyyour help desk using CSS widgets, which can be added by an admin.
If you're not familiar with CSS, you may want to spend a little time learning about it first. However,if you have some knowledge of HTML, it shouldn't be difficult for you to understand the purposeand use of CSS. At it's simplest, it's a tool for applying style definitions to elements of an HTMLpage. You use it to set background and text colors; add, remove, or style borders; set the sizes andcontrol placement of elements on a page, and so on.
A typical CSS statement refers to a page element and then sets properties that affect that element.
#footer { width:1000px; background-color:#333333;}
The properties are contained within curly brackets and each property setting is terminated with asemi-colon. The code above is formatted for easy readability but it could also have been written likethis:
#footer {width:1000px;background-color:#333333;}
When you're setting lots of properties, breaking code statements to multiple lines is much morereadable.
The properties that can be modified depend on the type of element. For example, there are propertiesfor positioning tables and other containers and properties for formatting text. Refer to the W3C CSSReference for a complete list of CSS properties.
You can use the customization examples contained in the CSS Cookbook as the basis for your designand not worry too much about the underlying low-level detail. You might just change colors of textand backgrounds or shift an element to be aligned center rather than to the right. If you want to knowmore about the page elements and how they've been styled with CSS, you can use browser tools toinspect the structure of a web page. See Inspecting the help desk page elements below.
Note: There is no guarantee that page elements won't change in the future. However, these changesare infrequent and you'll be notified before they're made so that you can update your code.
Adding a global CSS widgetTo get started customizing your help desk, you need to add a Global CSS widget. Only admins canadd widgets to the help desk.
To add a CSS widget
1. Select Settings > Extensions > Add widget.2. Locate and click the Global CSS widget.3. Enter a name for the widget.4. Select one of the following availability options:
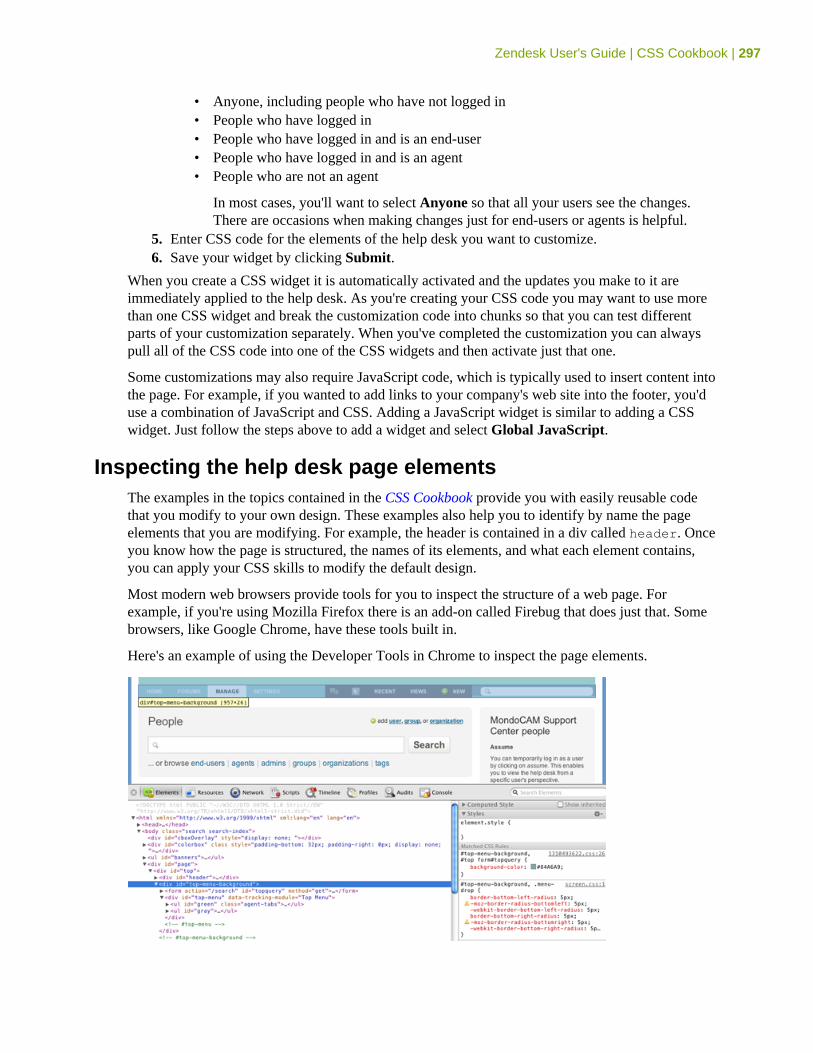
Zendesk User's Guide | CSS Cookbook | 297
• Anyone, including people who have not logged in• People who have logged in• People who have logged in and is an end-user• People who have logged in and is an agent• People who are not an agent
In most cases, you'll want to select Anyone so that all your users see the changes.There are occasions when making changes just for end-users or agents is helpful.
5. Enter CSS code for the elements of the help desk you want to customize.6. Save your widget by clicking Submit.
When you create a CSS widget it is automatically activated and the updates you make to it areimmediately applied to the help desk. As you're creating your CSS code you may want to use morethan one CSS widget and break the customization code into chunks so that you can test differentparts of your customization separately. When you've completed the customization you can alwayspull all of the CSS code into one of the CSS widgets and then activate just that one.
Some customizations may also require JavaScript code, which is typically used to insert content intothe page. For example, if you wanted to add links to your company's web site into the footer, you'duse a combination of JavaScript and CSS. Adding a JavaScript widget is similar to adding a CSSwidget. Just follow the steps above to add a widget and select Global JavaScript.
Inspecting the help desk page elementsThe examples in the topics contained in the CSS Cookbook provide you with easily reusable codethat you modify to your own design. These examples also help you to identify by name the pageelements that you are modifying. For example, the header is contained in a div called header. Onceyou know how the page is structured, the names of its elements, and what each element contains,you can apply your CSS skills to modify the default design.
Most modern web browsers provide tools for you to inspect the structure of a web page. Forexample, if you're using Mozilla Firefox there is an add-on called Firebug that does just that. Somebrowsers, like Google Chrome, have these tools built in.
Here's an example of using the Developer Tools in Chrome to inspect the page elements.
298 | Zendesk User's Guide | CSS Cookbook
As you select elements of the code, the corresponding section of the user interface is highlighted.In this example, the top menu background is selected. You can also see that this tool displays theunderlying CSS so that you can see exactly how an element has been formatted. Taking theseCSS style definitions as a starting point, you can modify to look of the help desk to match yourcompany's branding.
Next stepsThe CSS customization examples in the CSS Cookbook describe a number of typical customizations.Add a CSS widget to your help desk and try out some of the code to get started.
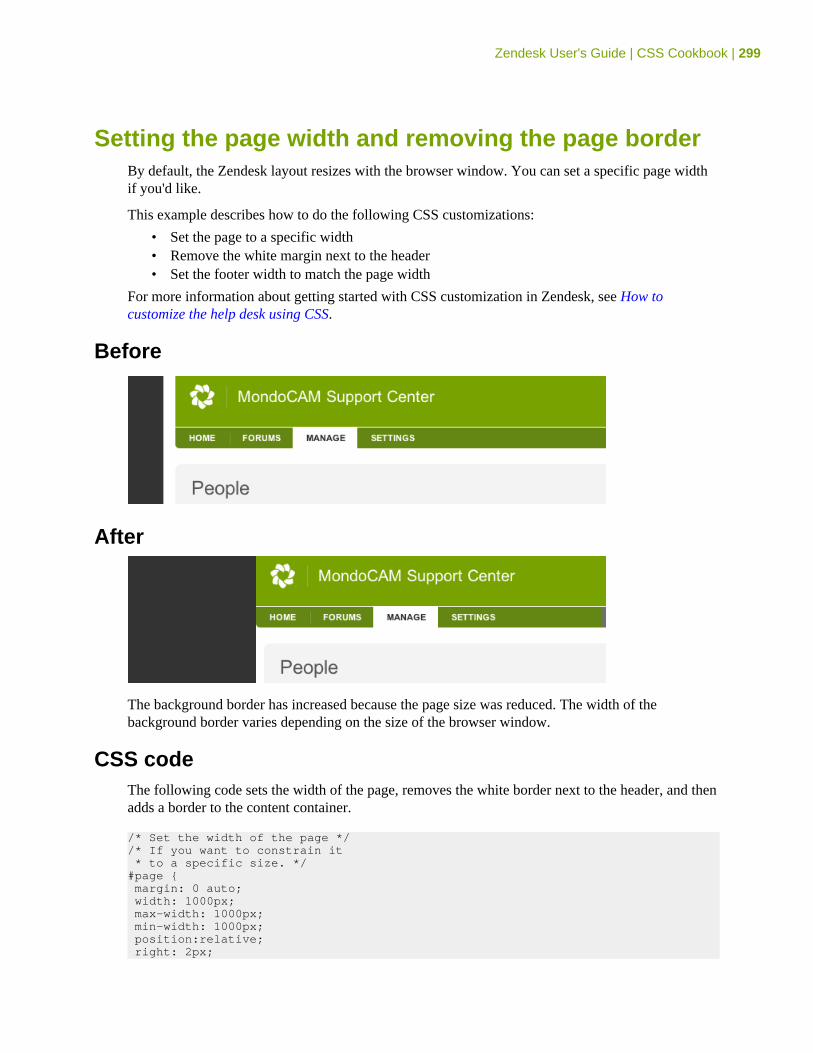
Zendesk User's Guide | CSS Cookbook | 299
Setting the page width and removing the page borderBy default, the Zendesk layout resizes with the browser window. You can set a specific page widthif you'd like.
This example describes how to do the following CSS customizations:
• Set the page to a specific width• Remove the white margin next to the header• Set the footer width to match the page width
For more information about getting started with CSS customization in Zendesk, see How tocustomize the help desk using CSS.
Before
After
The background border has increased because the page size was reduced. The width of thebackground border varies depending on the size of the browser window.
CSS codeThe following code sets the width of the page, removes the white border next to the header, and thenadds a border to the content container.
/* Set the width of the page *//* If you want to constrain it * to a specific size. */#page { margin: 0 auto; width: 1000px; max-width: 1000px; min-width: 1000px; position:relative; right: 2px;
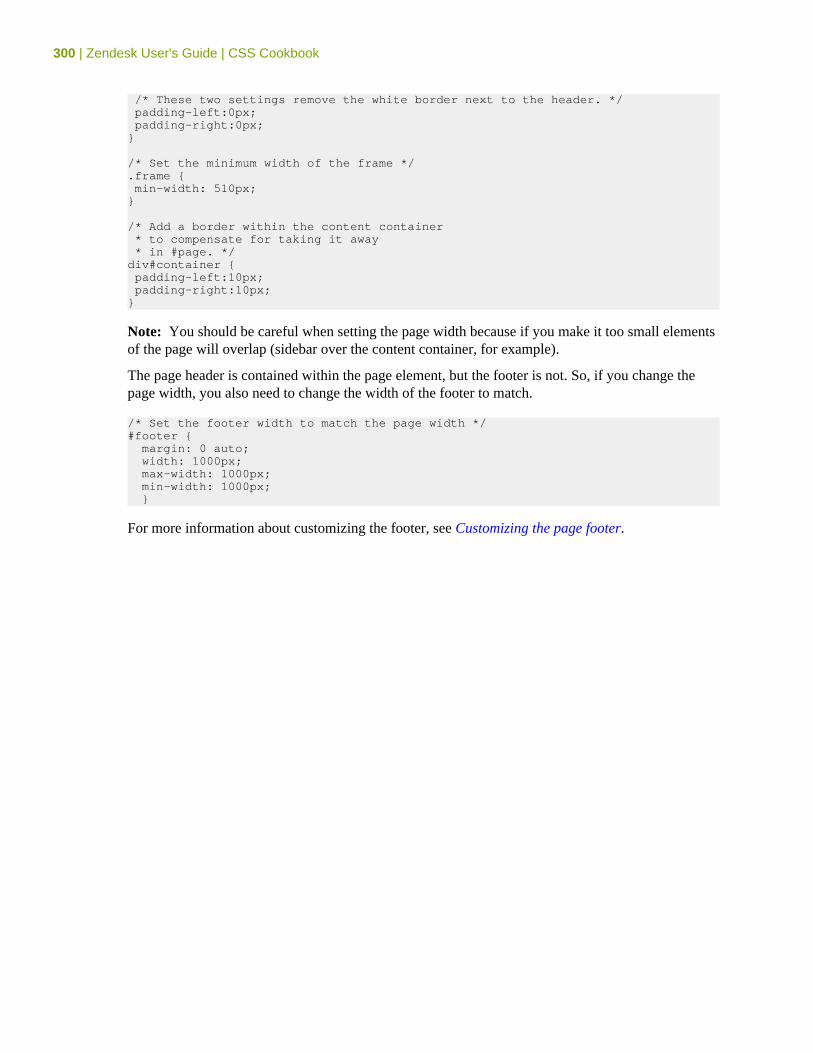
300 | Zendesk User's Guide | CSS Cookbook
/* These two settings remove the white border next to the header. */ padding-left:0px; padding-right:0px;}
/* Set the minimum width of the frame */.frame { min-width: 510px;}
/* Add a border within the content container * to compensate for taking it away * in #page. */div#container { padding-left:10px; padding-right:10px;}
Note: You should be careful when setting the page width because if you make it too small elementsof the page will overlap (sidebar over the content container, for example).
The page header is contained within the page element, but the footer is not. So, if you change thepage width, you also need to change the width of the footer to match.
/* Set the footer width to match the page width */#footer { margin: 0 auto; width: 1000px; max-width: 1000px; min-width: 1000px; }
For more information about customizing the footer, see Customizing the page footer.
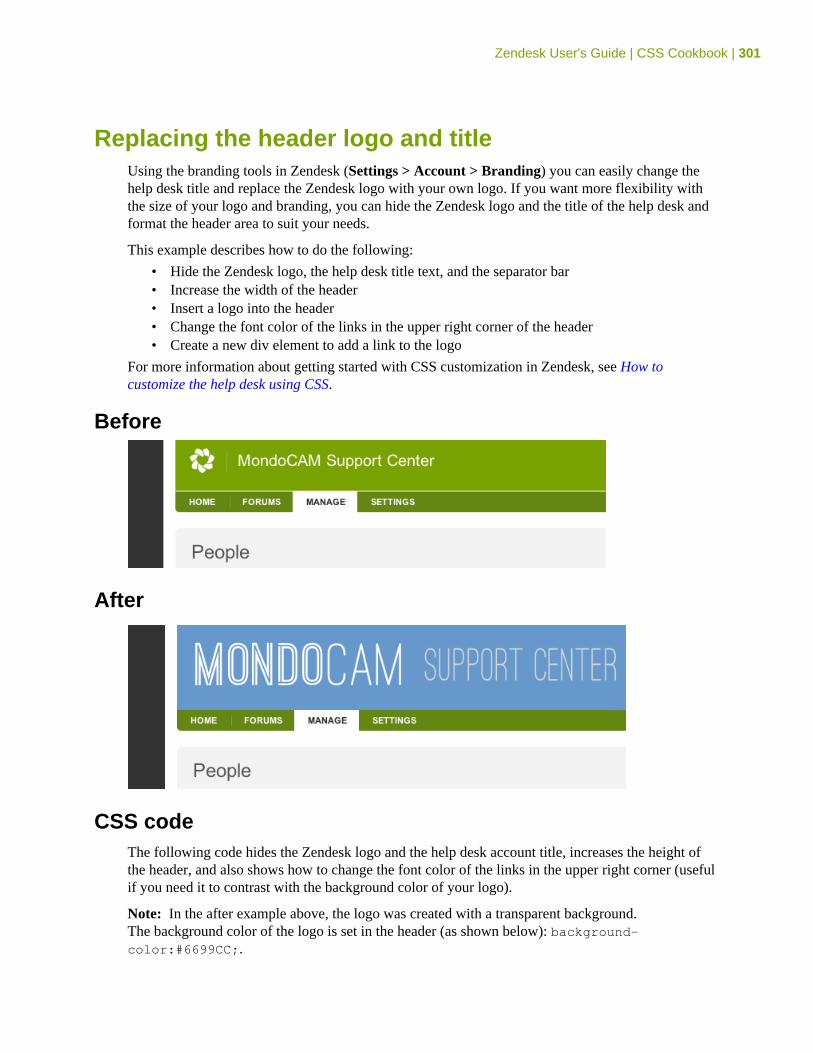
Zendesk User's Guide | CSS Cookbook | 301
Replacing the header logo and titleUsing the branding tools in Zendesk (Settings > Account > Branding) you can easily change thehelp desk title and replace the Zendesk logo with your own logo. If you want more flexibility withthe size of your logo and branding, you can hide the Zendesk logo and the title of the help desk andformat the header area to suit your needs.
This example describes how to do the following:
• Hide the Zendesk logo, the help desk title text, and the separator bar• Increase the width of the header• Insert a logo into the header• Change the font color of the links in the upper right corner of the header• Create a new div element to add a link to the logo
For more information about getting started with CSS customization in Zendesk, see How tocustomize the help desk using CSS.
Before
After
CSS codeThe following code hides the Zendesk logo and the help desk account title, increases the height ofthe header, and also shows how to change the font color of the links in the upper right corner (usefulif you need it to contrast with the background color of your logo).
Note: In the after example above, the logo was created with a transparent background.The background color of the logo is set in the header (as shown below): background-color:#6699CC;.
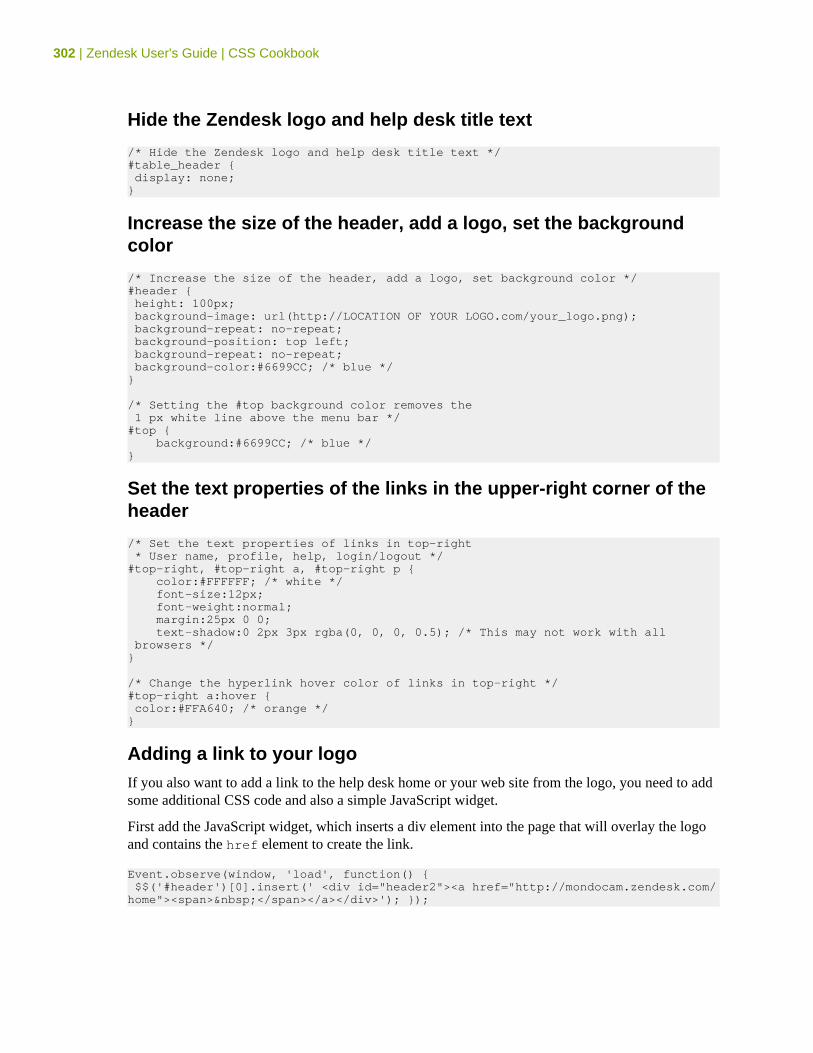
302 | Zendesk User's Guide | CSS Cookbook
Hide the Zendesk logo and help desk title text
/* Hide the Zendesk logo and help desk title text */#table_header { display: none;}
Increase the size of the header, add a logo, set the backgroundcolor
/* Increase the size of the header, add a logo, set background color */#header { height: 100px; background-image: url(http://LOCATION OF YOUR LOGO.com/your_logo.png); background-repeat: no-repeat; background-position: top left; background-repeat: no-repeat; background-color:#6699CC; /* blue */}
/* Setting the #top background color removes the 1 px white line above the menu bar */#top { background:#6699CC; /* blue */}
Set the text properties of the links in the upper-right corner of theheader
/* Set the text properties of links in top-right * User name, profile, help, login/logout */#top-right, #top-right a, #top-right p { color:#FFFFFF; /* white */ font-size:12px; font-weight:normal; margin:25px 0 0; text-shadow:0 2px 3px rgba(0, 0, 0, 0.5); /* This may not work with all browsers */}
/* Change the hyperlink hover color of links in top-right */#top-right a:hover { color:#FFA640; /* orange */}
Adding a link to your logoIf you also want to add a link to the help desk home or your web site from the logo, you need to addsome additional CSS code and also a simple JavaScript widget.
First add the JavaScript widget, which inserts a div element into the page that will overlay the logoand contains the href element to create the link.
Event.observe(window, 'load', function() { $$('#header')[0].insert(' <div id="header2"><a href="http://mondocam.zendesk.com/home"><span> </span></a></div>'); });
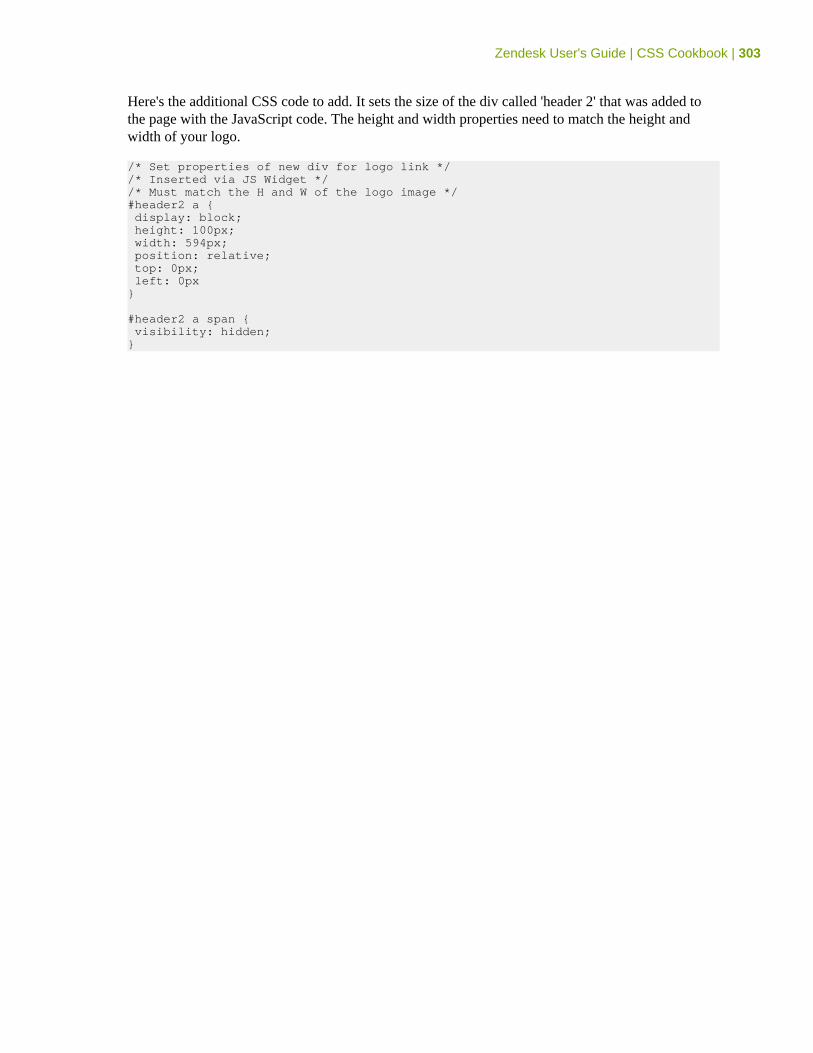
Zendesk User's Guide | CSS Cookbook | 303
Here's the additional CSS code to add. It sets the size of the div called 'header 2' that was added tothe page with the JavaScript code. The height and width properties need to match the height andwidth of your logo.
/* Set properties of new div for logo link *//* Inserted via JS Widget *//* Must match the H and W of the logo image */#header2 a { display: block; height: 100px; width: 594px; position: relative; top: 0px; left: 0px }
#header2 a span { visibility: hidden; }
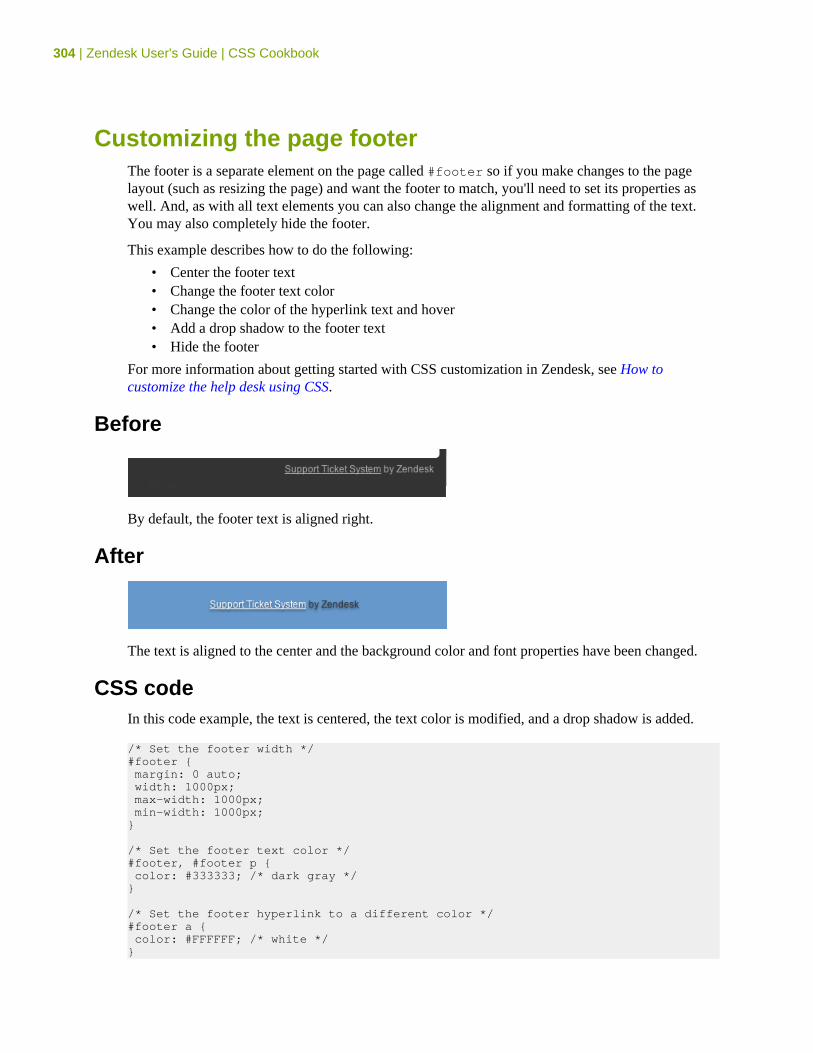
304 | Zendesk User's Guide | CSS Cookbook
Customizing the page footerThe footer is a separate element on the page called #footer so if you make changes to the pagelayout (such as resizing the page) and want the footer to match, you'll need to set its properties aswell. And, as with all text elements you can also change the alignment and formatting of the text.You may also completely hide the footer.
This example describes how to do the following:
• Center the footer text• Change the footer text color• Change the color of the hyperlink text and hover• Add a drop shadow to the footer text• Hide the footer
For more information about getting started with CSS customization in Zendesk, see How tocustomize the help desk using CSS.
Before
By default, the footer text is aligned right.
After
The text is aligned to the center and the background color and font properties have been changed.
CSS codeIn this code example, the text is centered, the text color is modified, and a drop shadow is added.
/* Set the footer width */#footer { margin: 0 auto; width: 1000px; max-width: 1000px; min-width: 1000px;}
/* Set the footer text color */#footer, #footer p { color: #333333; /* dark gray */}
/* Set the footer hyperlink to a different color */#footer a { color: #FFFFFF; /* white */}
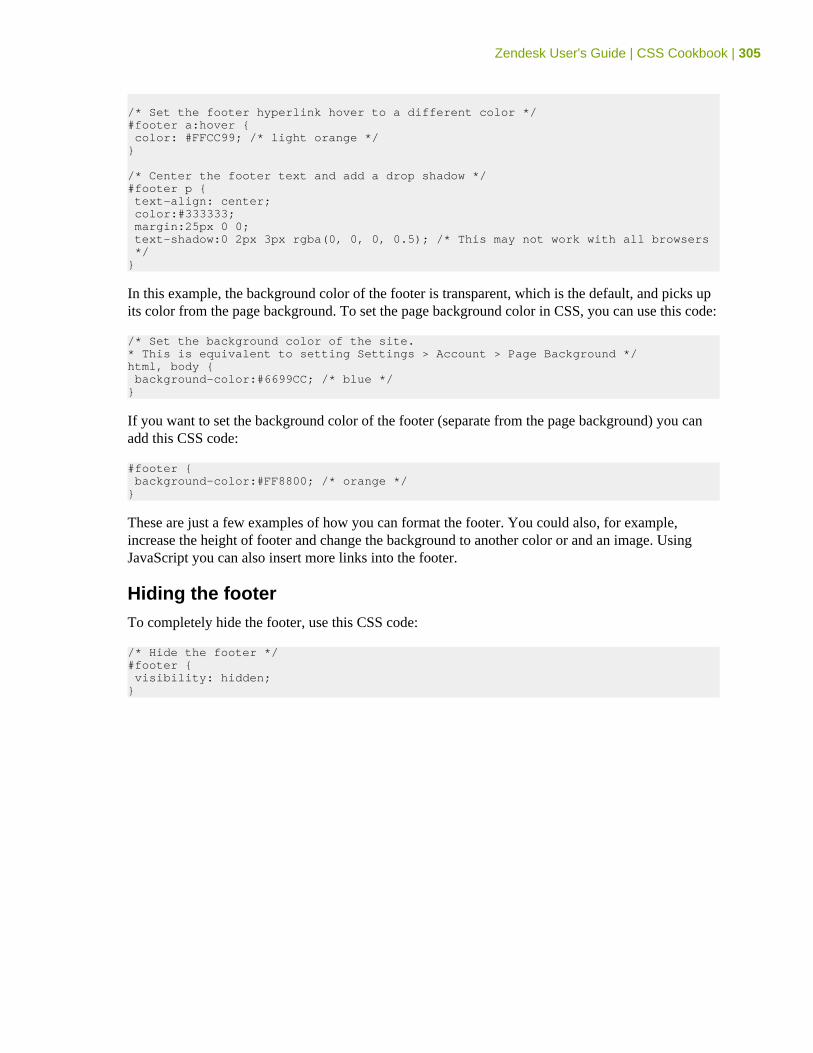
Zendesk User's Guide | CSS Cookbook | 305
/* Set the footer hyperlink hover to a different color */#footer a:hover { color: #FFCC99; /* light orange */}
/* Center the footer text and add a drop shadow */#footer p { text-align: center; color:#333333; margin:25px 0 0; text-shadow:0 2px 3px rgba(0, 0, 0, 0.5); /* This may not work with all browsers */}
In this example, the background color of the footer is transparent, which is the default, and picks upits color from the page background. To set the page background color in CSS, you can use this code:
/* Set the background color of the site. * This is equivalent to setting Settings > Account > Page Background */html, body { background-color:#6699CC; /* blue */}
If you want to set the background color of the footer (separate from the page background) you canadd this CSS code:
#footer { background-color:#FF8800; /* orange */}
These are just a few examples of how you can format the footer. You could also, for example,increase the height of footer and change the background to another color or and an image. UsingJavaScript you can also insert more links into the footer.
Hiding the footerTo completely hide the footer, use this CSS code:
/* Hide the footer */#footer { visibility: hidden;}
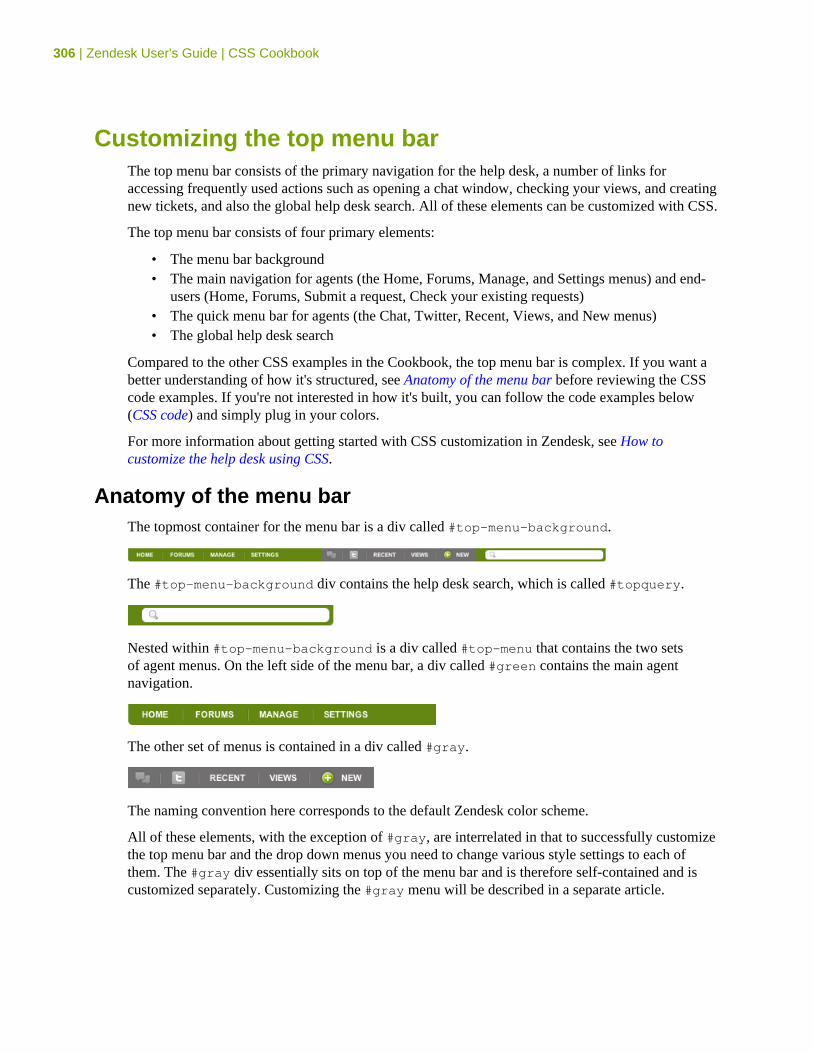
306 | Zendesk User's Guide | CSS Cookbook
Customizing the top menu barThe top menu bar consists of the primary navigation for the help desk, a number of links foraccessing frequently used actions such as opening a chat window, checking your views, and creatingnew tickets, and also the global help desk search. All of these elements can be customized with CSS.
The top menu bar consists of four primary elements:
• The menu bar background• The main navigation for agents (the Home, Forums, Manage, and Settings menus) and end-
users (Home, Forums, Submit a request, Check your existing requests)• The quick menu bar for agents (the Chat, Twitter, Recent, Views, and New menus)• The global help desk search
Compared to the other CSS examples in the Cookbook, the top menu bar is complex. If you want abetter understanding of how it's structured, see Anatomy of the menu bar before reviewing the CSScode examples. If you're not interested in how it's built, you can follow the code examples below(CSS code) and simply plug in your colors.
For more information about getting started with CSS customization in Zendesk, see How tocustomize the help desk using CSS.
Anatomy of the menu barThe topmost container for the menu bar is a div called #top-menu-background.
The #top-menu-background div contains the help desk search, which is called #topquery.
Nested within #top-menu-background is a div called #top-menu that contains the two setsof agent menus. On the left side of the menu bar, a div called #green contains the main agentnavigation.
The other set of menus is contained in a div called #gray.
The naming convention here corresponds to the default Zendesk color scheme.
All of these elements, with the exception of #gray, are interrelated in that to successfully customizethe top menu bar and the drop down menus you need to change various style settings to each ofthem. The #gray div essentially sits on top of the menu bar and is therefore self-contained and iscustomized separately. Customizing the #gray menu will be described in a separate article.
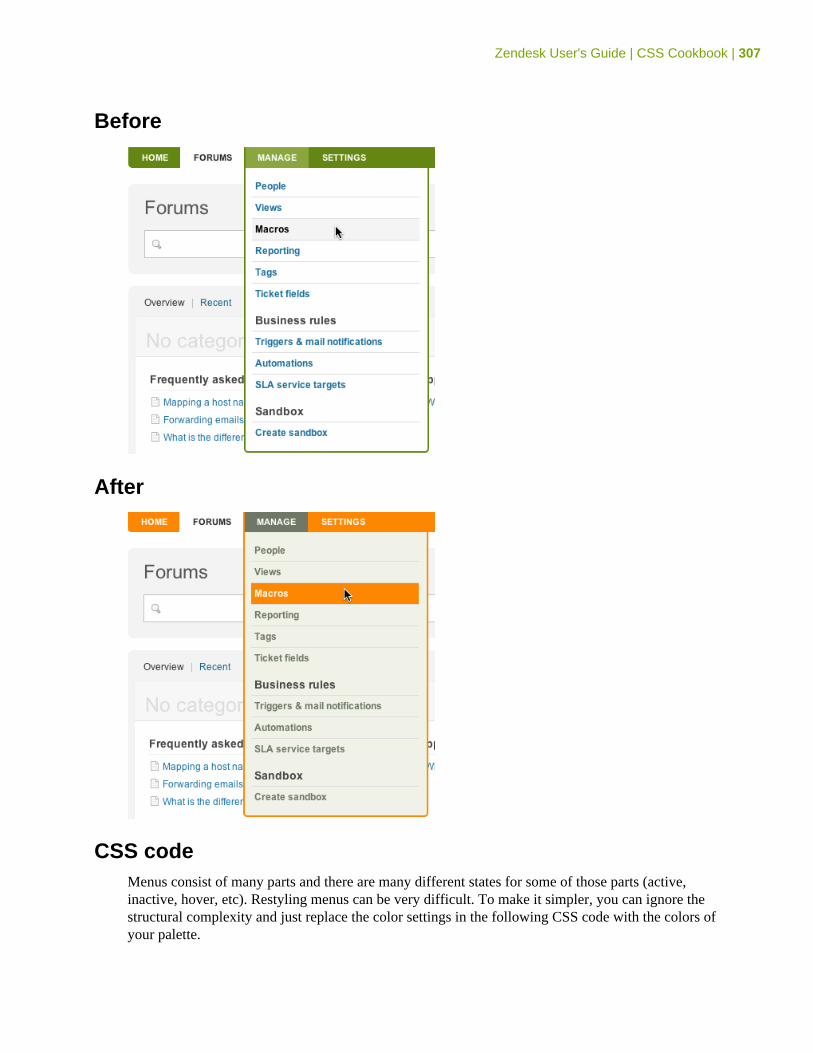
Zendesk User's Guide | CSS Cookbook | 307
Before
After
CSS codeMenus consist of many parts and there are many different states for some of those parts (active,inactive, hover, etc). Restyling menus can be very difficult. To make it simpler, you can ignore thestructural complexity and just replace the color settings in the following CSS code with the colors ofyour palette.
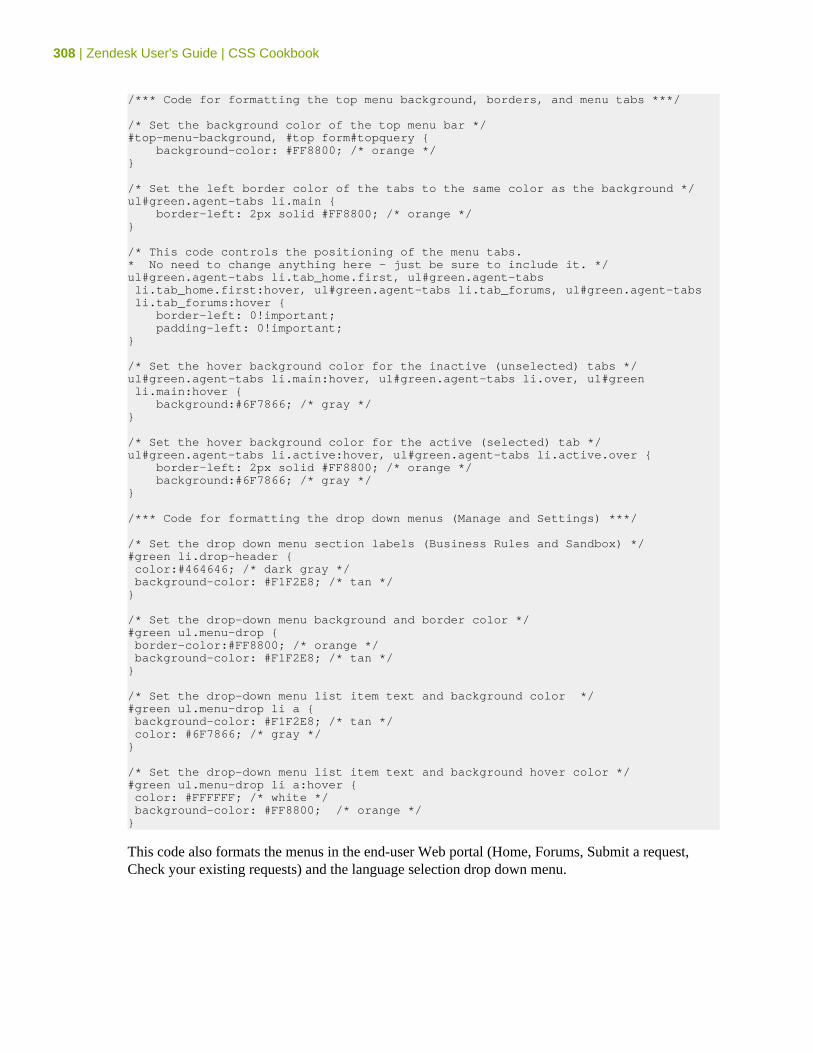
308 | Zendesk User's Guide | CSS Cookbook
/*** Code for formatting the top menu background, borders, and menu tabs ***/
/* Set the background color of the top menu bar */#top-menu-background, #top form#topquery { background-color: #FF8800; /* orange */}
/* Set the left border color of the tabs to the same color as the background */ul#green.agent-tabs li.main { border-left: 2px solid #FF8800; /* orange */}
/* This code controls the positioning of the menu tabs.* No need to change anything here - just be sure to include it. */ul#green.agent-tabs li.tab_home.first, ul#green.agent-tabs li.tab_home.first:hover, ul#green.agent-tabs li.tab_forums, ul#green.agent-tabs li.tab_forums:hover { border-left: 0!important; padding-left: 0!important;}
/* Set the hover background color for the inactive (unselected) tabs */ul#green.agent-tabs li.main:hover, ul#green.agent-tabs li.over, ul#green li.main:hover { background:#6F7866; /* gray */}
/* Set the hover background color for the active (selected) tab */ul#green.agent-tabs li.active:hover, ul#green.agent-tabs li.active.over { border-left: 2px solid #FF8800; /* orange */ background:#6F7866; /* gray */}
/*** Code for formatting the drop down menus (Manage and Settings) ***/
/* Set the drop down menu section labels (Business Rules and Sandbox) */#green li.drop-header { color:#464646; /* dark gray */ background-color: #F1F2E8; /* tan */}
/* Set the drop-down menu background and border color */#green ul.menu-drop { border-color:#FF8800; /* orange */ background-color: #F1F2E8; /* tan */}
/* Set the drop-down menu list item text and background color */#green ul.menu-drop li a { background-color: #F1F2E8; /* tan */ color: #6F7866; /* gray */}
/* Set the drop-down menu list item text and background hover color */#green ul.menu-drop li a:hover { color: #FFFFFF; /* white */ background-color: #FF8800; /* orange */}
This code also formats the menus in the end-user Web portal (Home, Forums, Submit a request,Check your existing requests) and the language selection drop down menu.
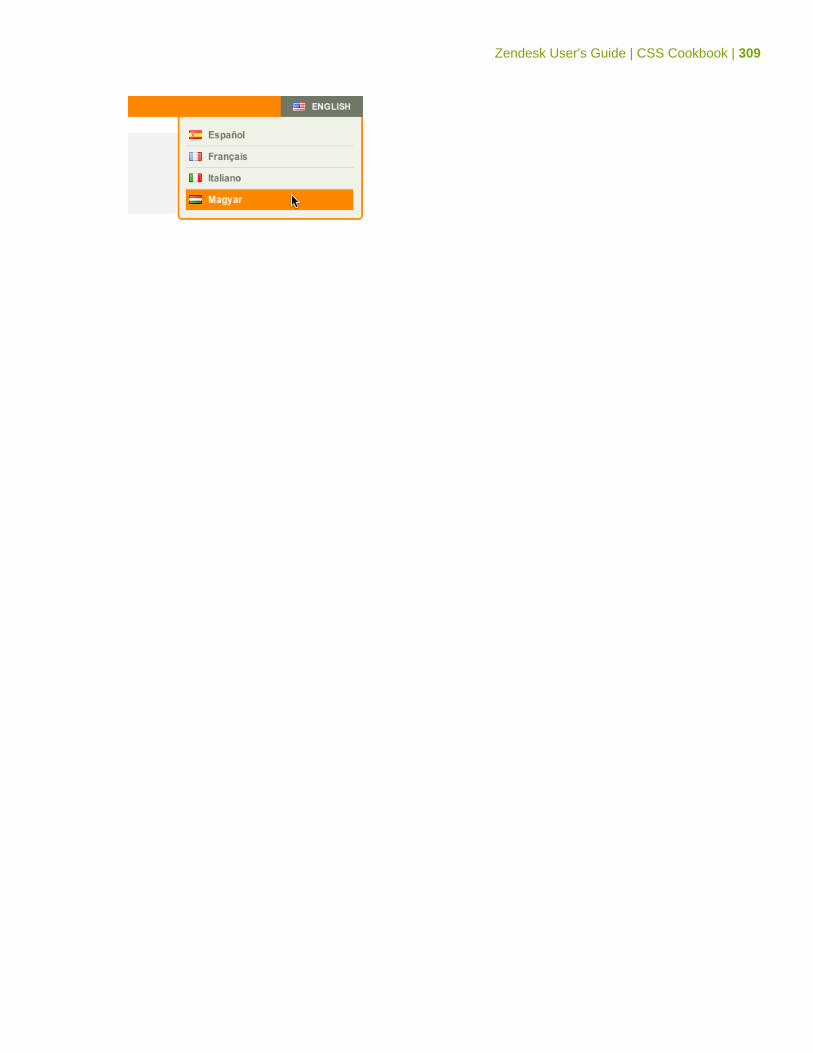
Zendesk User's Guide | CSS Cookbook | 309
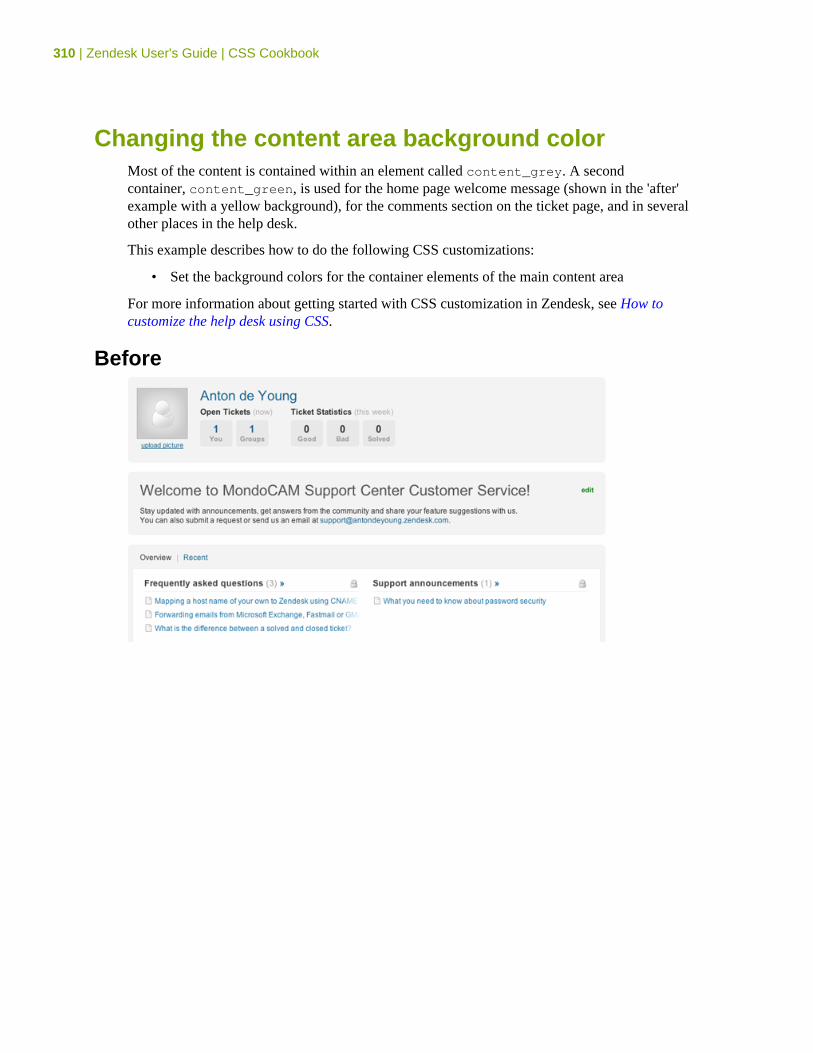
310 | Zendesk User's Guide | CSS Cookbook
Changing the content area background colorMost of the content is contained within an element called content_grey. A secondcontainer, content_green, is used for the home page welcome message (shown in the 'after'example with a yellow background), for the comments section on the ticket page, and in severalother places in the help desk.
This example describes how to do the following CSS customizations:
• Set the background colors for the container elements of the main content area
For more information about getting started with CSS customization in Zendesk, see How tocustomize the help desk using CSS.
Before
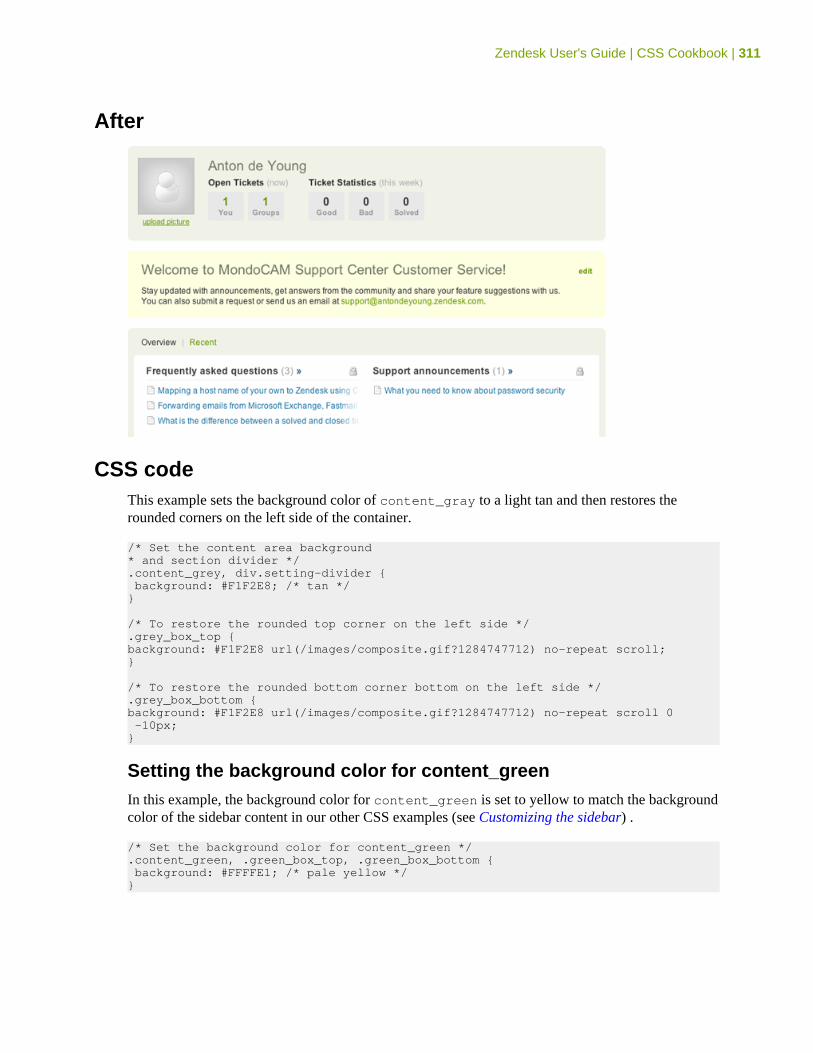
Zendesk User's Guide | CSS Cookbook | 311
After
CSS codeThis example sets the background color of content_gray to a light tan and then restores therounded corners on the left side of the container.
/* Set the content area background * and section divider */.content_grey, div.setting-divider { background: #F1F2E8; /* tan */}
/* To restore the rounded top corner on the left side */.grey_box_top {background: #F1F2E8 url(/images/composite.gif?1284747712) no-repeat scroll; }
/* To restore the rounded bottom corner bottom on the left side */.grey_box_bottom {background: #F1F2E8 url(/images/composite.gif?1284747712) no-repeat scroll 0 -10px;}
Setting the background color for content_greenIn this example, the background color for content_green is set to yellow to match the backgroundcolor of the sidebar content in our other CSS examples (see Customizing the sidebar) .
/* Set the background color for content_green */.content_green, .green_box_top, .green_box_bottom { background: #FFFFE1; /* pale yellow */}
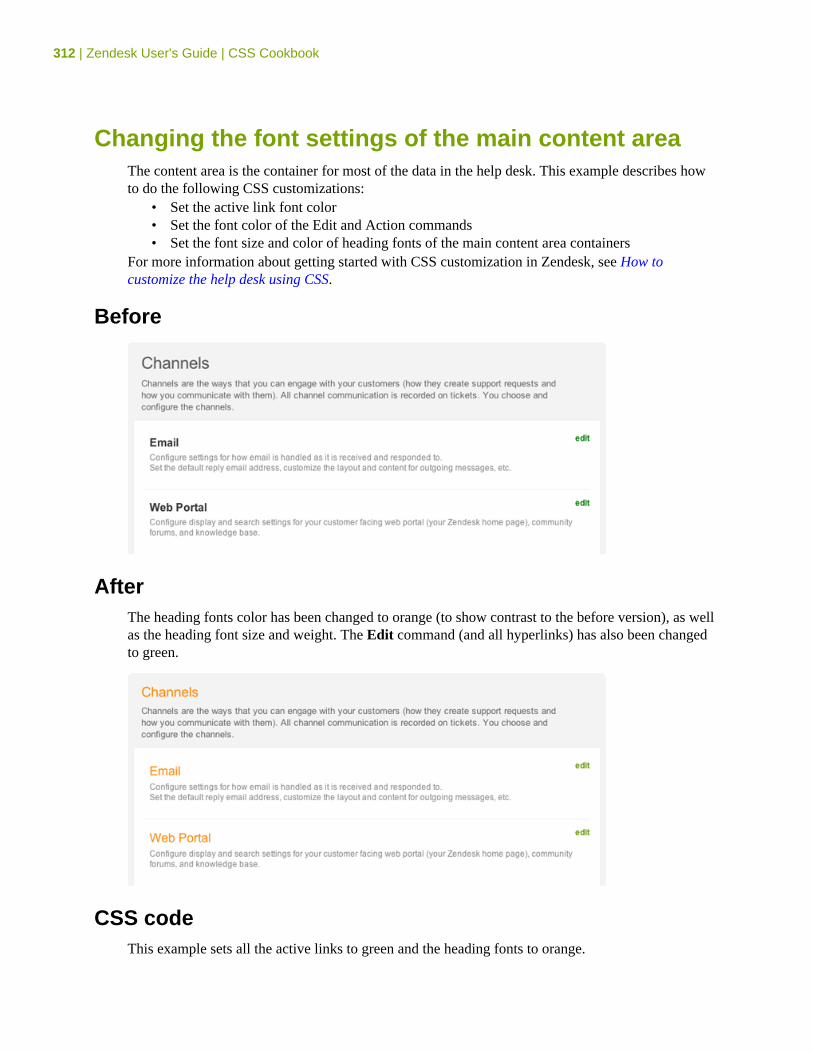
312 | Zendesk User's Guide | CSS Cookbook
Changing the font settings of the main content areaThe content area is the container for most of the data in the help desk. This example describes howto do the following CSS customizations:
• Set the active link font color• Set the font color of the Edit and Action commands• Set the font size and color of heading fonts of the main content area containers
For more information about getting started with CSS customization in Zendesk, see How tocustomize the help desk using CSS.
Before
AfterThe heading fonts color has been changed to orange (to show contrast to the before version), as wellas the heading font size and weight. The Edit command (and all hyperlinks) has also been changedto green.
CSS codeThis example sets all the active links to green and the heading fonts to orange.
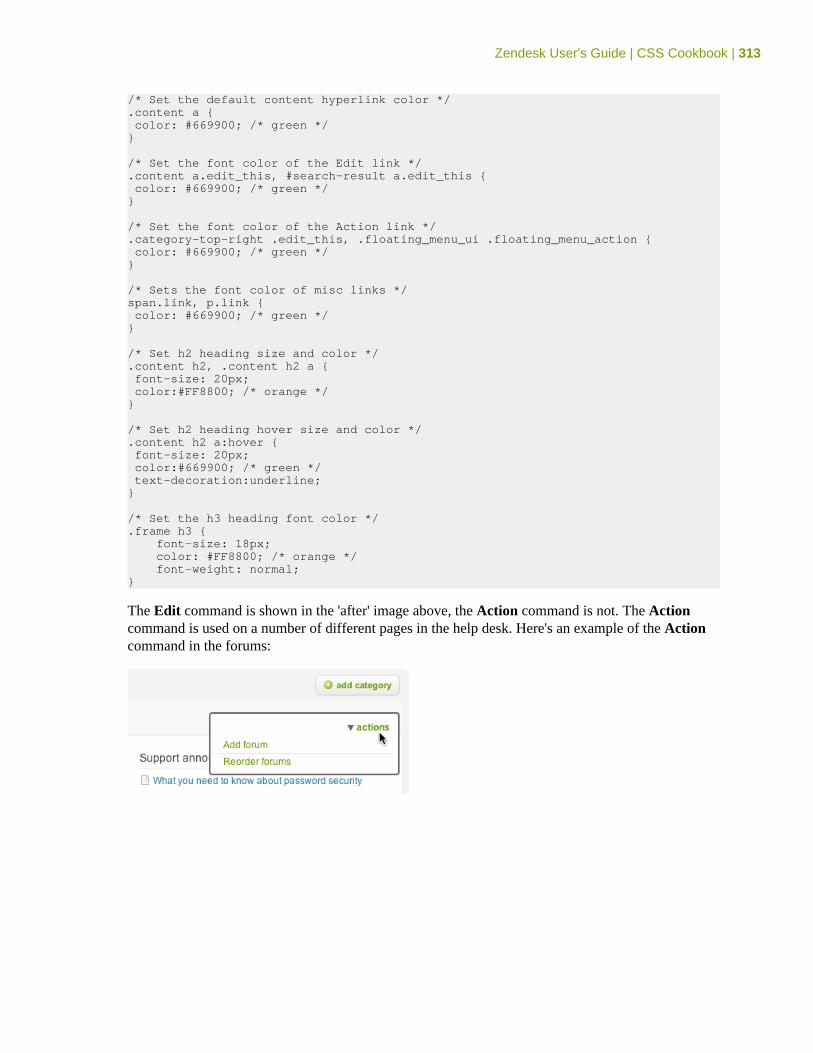
Zendesk User's Guide | CSS Cookbook | 313
/* Set the default content hyperlink color */.content a { color: #669900; /* green */}
/* Set the font color of the Edit link */.content a.edit_this, #search-result a.edit_this { color: #669900; /* green */}
/* Set the font color of the Action link */.category-top-right .edit_this, .floating_menu_ui .floating_menu_action { color: #669900; /* green */}
/* Sets the font color of misc links */span.link, p.link { color: #669900; /* green */}
/* Set h2 heading size and color */.content h2, .content h2 a { font-size: 20px; color:#FF8800; /* orange */}
/* Set h2 heading hover size and color */.content h2 a:hover { font-size: 20px; color:#669900; /* green */ text-decoration:underline;}
/* Set the h3 heading font color */.frame h3 { font-size: 18px; color: #FF8800; /* orange */ font-weight: normal;}
The Edit command is shown in the 'after' image above, the Action command is not. The Actioncommand is used on a number of different pages in the help desk. Here's an example of the Actioncommand in the forums:
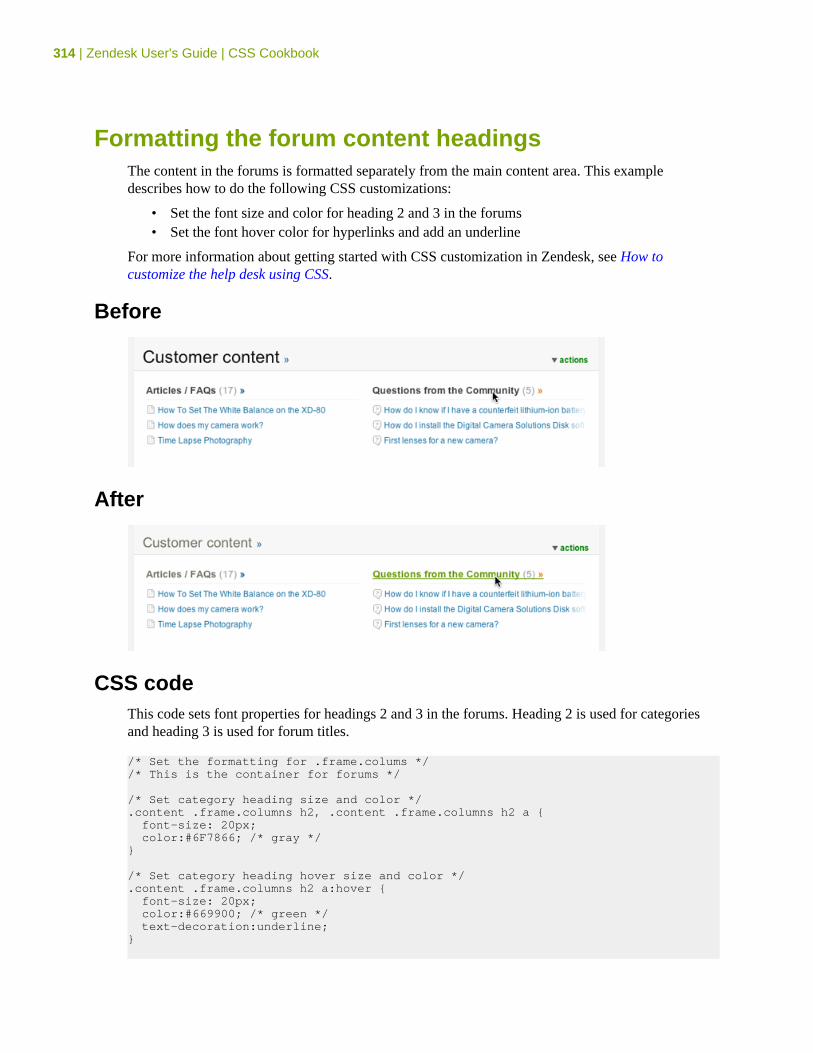
314 | Zendesk User's Guide | CSS Cookbook
Formatting the forum content headingsThe content in the forums is formatted separately from the main content area. This exampledescribes how to do the following CSS customizations:
• Set the font size and color for heading 2 and 3 in the forums• Set the font hover color for hyperlinks and add an underline
For more information about getting started with CSS customization in Zendesk, see How tocustomize the help desk using CSS.
Before
After
CSS codeThis code sets font properties for headings 2 and 3 in the forums. Heading 2 is used for categoriesand heading 3 is used for forum titles.
/* Set the formatting for .frame.colums *//* This is the container for forums */
/* Set category heading size and color */.content .frame.columns h2, .content .frame.columns h2 a { font-size: 20px; color:#6F7866; /* gray */}
/* Set category heading hover size and color */.content .frame.columns h2 a:hover { font-size: 20px; color:#669900; /* green */ text-decoration:underline;}
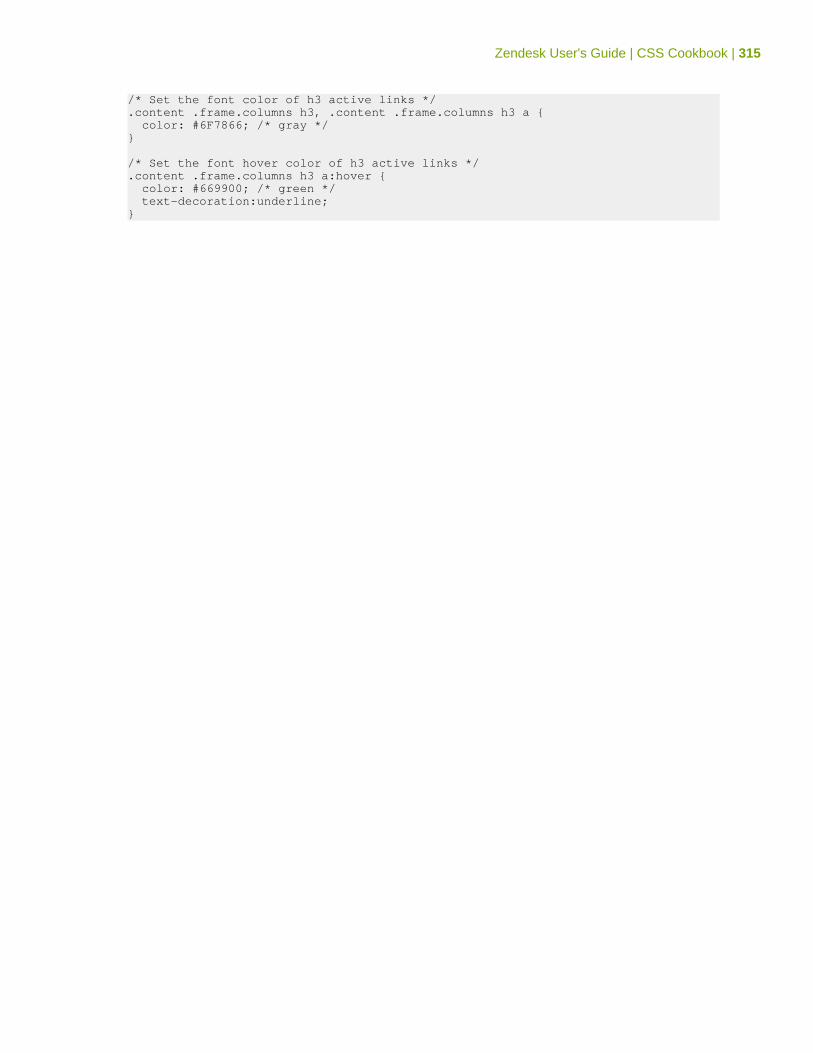
Zendesk User's Guide | CSS Cookbook | 315
/* Set the font color of h3 active links */.content .frame.columns h3, .content .frame.columns h3 a { color: #6F7866; /* gray */}
/* Set the font hover color of h3 active links */.content .frame.columns h3 a:hover { color: #669900; /* green */ text-decoration:underline;}
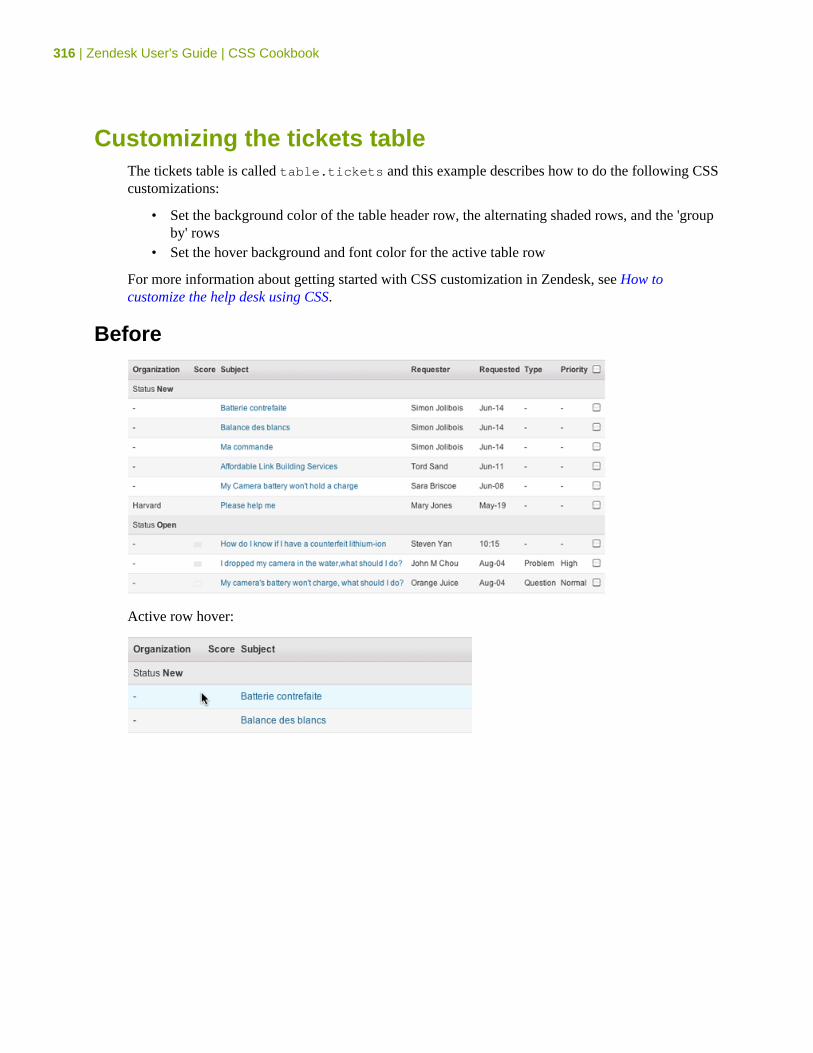
316 | Zendesk User's Guide | CSS Cookbook
Customizing the tickets tableThe tickets table is called table.tickets and this example describes how to do the following CSScustomizations:
• Set the background color of the table header row, the alternating shaded rows, and the 'groupby' rows
• Set the hover background and font color for the active table row
For more information about getting started with CSS customization in Zendesk, see How tocustomize the help desk using CSS.
Before
Active row hover:
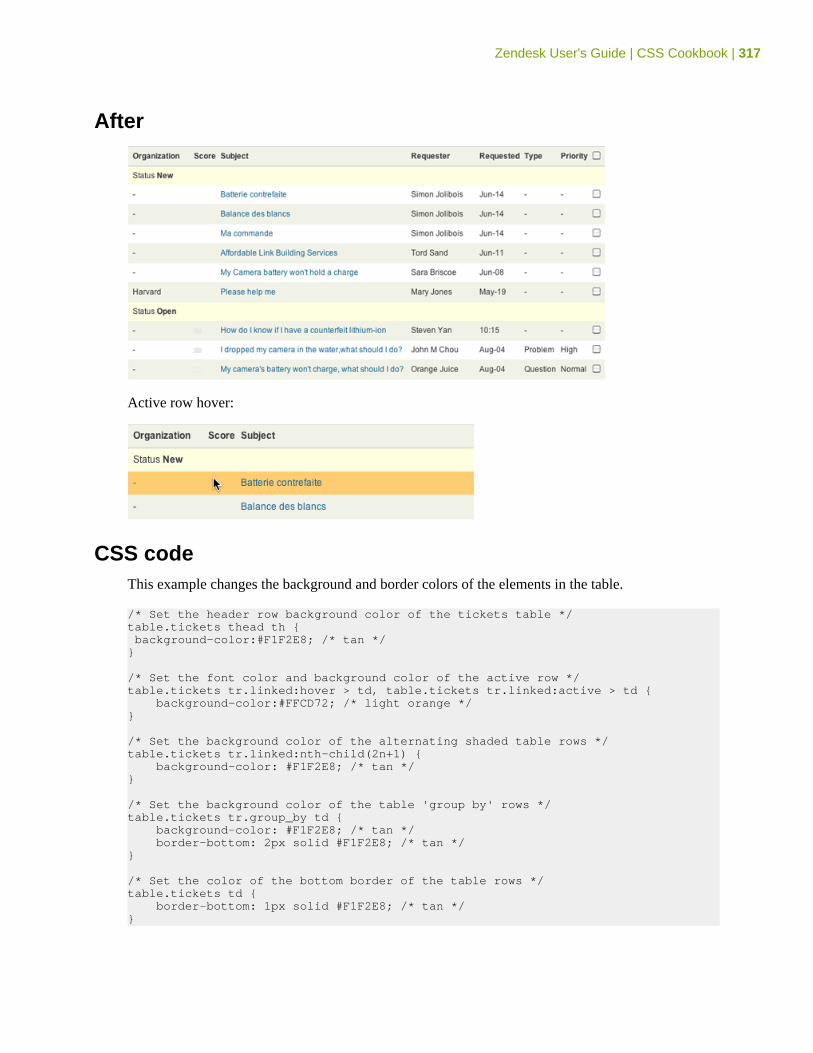
Zendesk User's Guide | CSS Cookbook | 317
After
Active row hover:
CSS codeThis example changes the background and border colors of the elements in the table.
/* Set the header row background color of the tickets table */table.tickets thead th { background-color:#F1F2E8; /* tan */}
/* Set the font color and background color of the active row */table.tickets tr.linked:hover > td, table.tickets tr.linked:active > td { background-color:#FFCD72; /* light orange */}
/* Set the background color of the alternating shaded table rows */table.tickets tr.linked:nth-child(2n+1) { background-color: #F1F2E8; /* tan */}
/* Set the background color of the table 'group by' rows */table.tickets tr.group_by td { background-color: #F1F2E8; /* tan */ border-bottom: 2px solid #F1F2E8; /* tan */}
/* Set the color of the bottom border of the table rows */table.tickets td { border-bottom: 1px solid #F1F2E8; /* tan */}
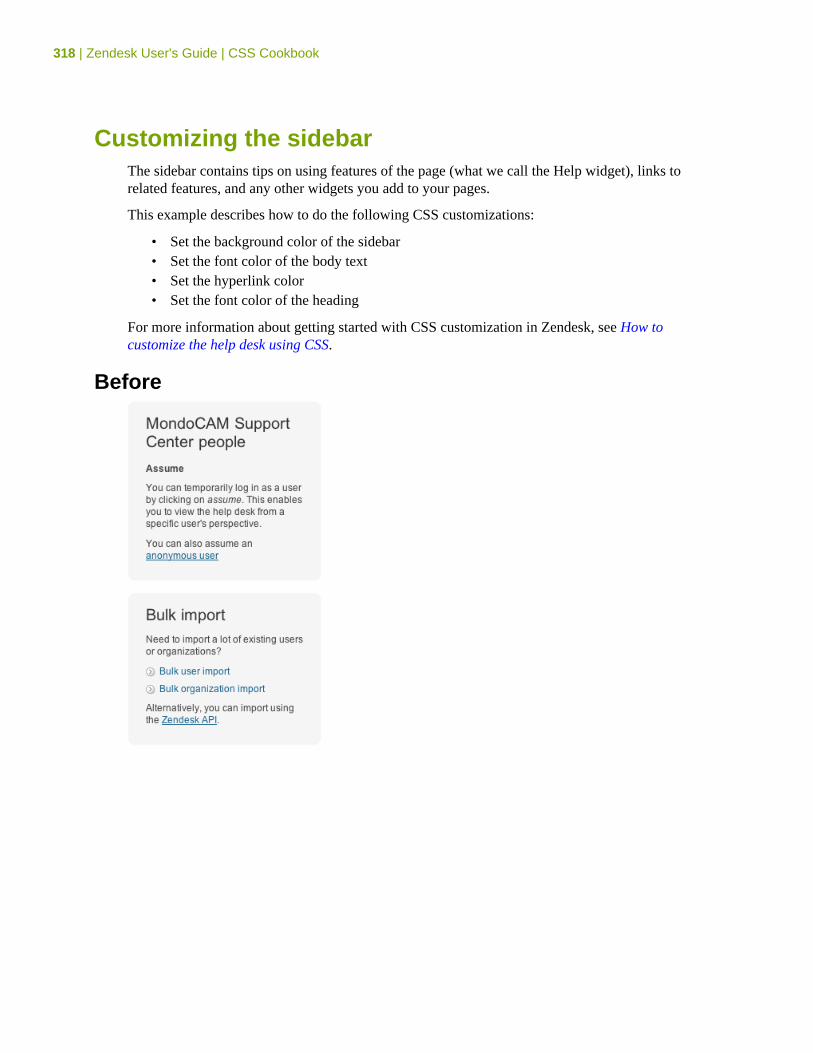
318 | Zendesk User's Guide | CSS Cookbook
Customizing the sidebarThe sidebar contains tips on using features of the page (what we call the Help widget), links torelated features, and any other widgets you add to your pages.
This example describes how to do the following CSS customizations:
• Set the background color of the sidebar• Set the font color of the body text• Set the hyperlink color• Set the font color of the heading
For more information about getting started with CSS customization in Zendesk, see How tocustomize the help desk using CSS.
Before
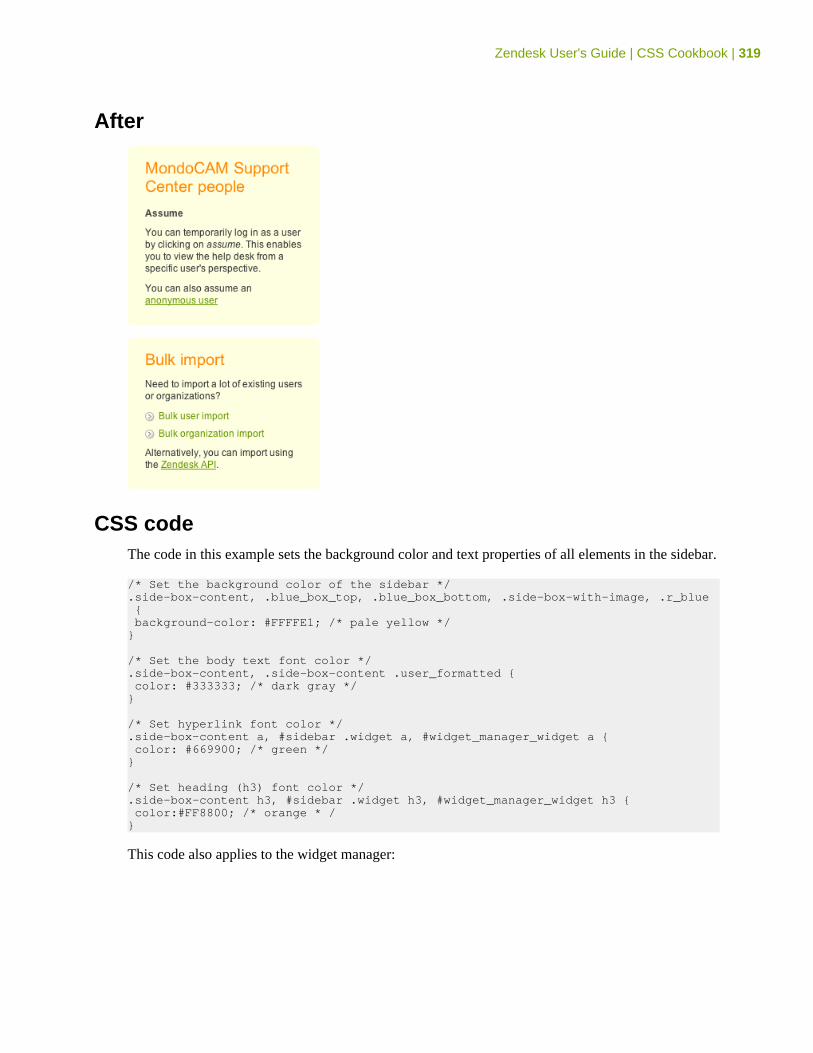
Zendesk User's Guide | CSS Cookbook | 319
After
CSS codeThe code in this example sets the background color and text properties of all elements in the sidebar.
/* Set the background color of the sidebar */.side-box-content, .blue_box_top, .blue_box_bottom, .side-box-with-image, .r_blue { background-color: #FFFFE1; /* pale yellow */}
/* Set the body text font color */.side-box-content, .side-box-content .user_formatted { color: #333333; /* dark gray */}
/* Set hyperlink font color */.side-box-content a, #sidebar .widget a, #widget_manager_widget a { color: #669900; /* green */}
/* Set heading (h3) font color */.side-box-content h3, #sidebar .widget h3, #widget_manager_widget h3 { color:#FF8800; /* orange * /}
This code also applies to the widget manager:
320 | Zendesk User's Guide | CSS Cookbook
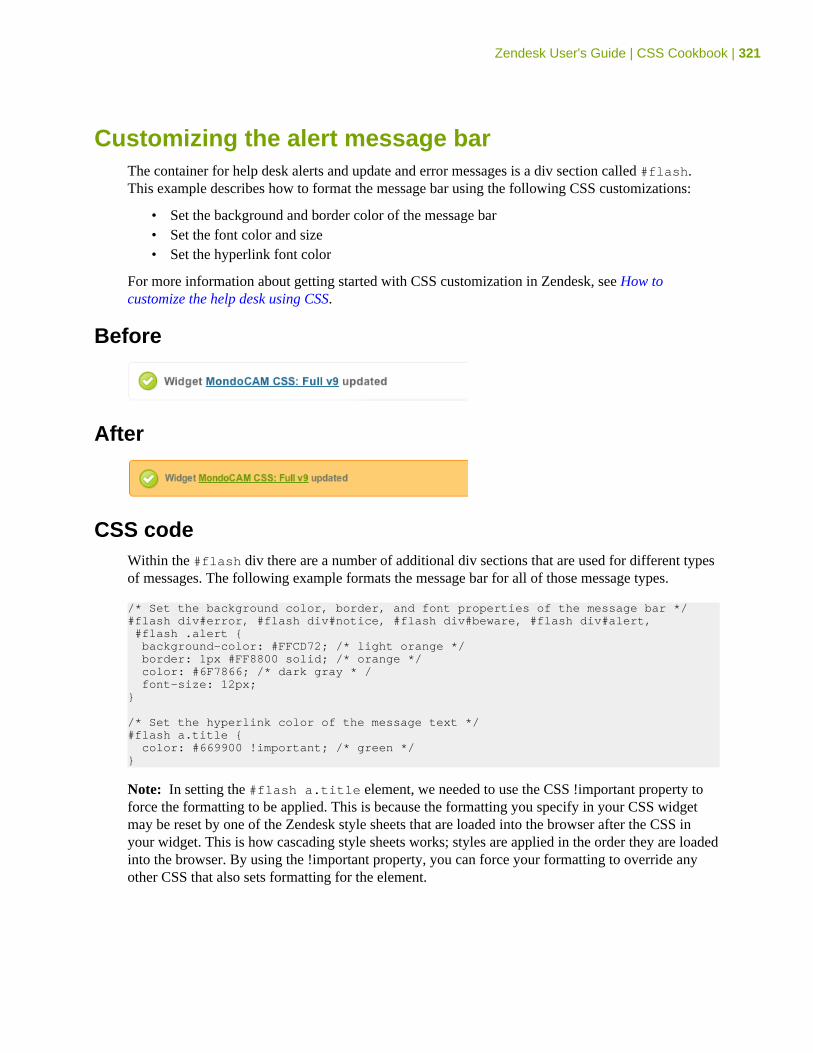
Zendesk User's Guide | CSS Cookbook | 321
Customizing the alert message barThe container for help desk alerts and update and error messages is a div section called #flash.This example describes how to format the message bar using the following CSS customizations:
• Set the background and border color of the message bar• Set the font color and size• Set the hyperlink font color
For more information about getting started with CSS customization in Zendesk, see How tocustomize the help desk using CSS.
Before
After
CSS codeWithin the #flash div there are a number of additional div sections that are used for different typesof messages. The following example formats the message bar for all of those message types.
/* Set the background color, border, and font properties of the message bar */#flash div#error, #flash div#notice, #flash div#beware, #flash div#alert, #flash .alert { background-color: #FFCD72; /* light orange */ border: 1px #FF8800 solid; /* orange */ color: #6F7866; /* dark gray * / font-size: 12px;}
/* Set the hyperlink color of the message text */#flash a.title { color: #669900 !important; /* green */}
Note: In setting the #flash a.title element, we needed to use the CSS !important property toforce the formatting to be applied. This is because the formatting you specify in your CSS widgetmay be reset by one of the Zendesk style sheets that are loaded into the browser after the CSS inyour widget. This is how cascading style sheets works; styles are applied in the order they are loadedinto the browser. By using the !important property, you can force your formatting to override anyother CSS that also sets formatting for the element.
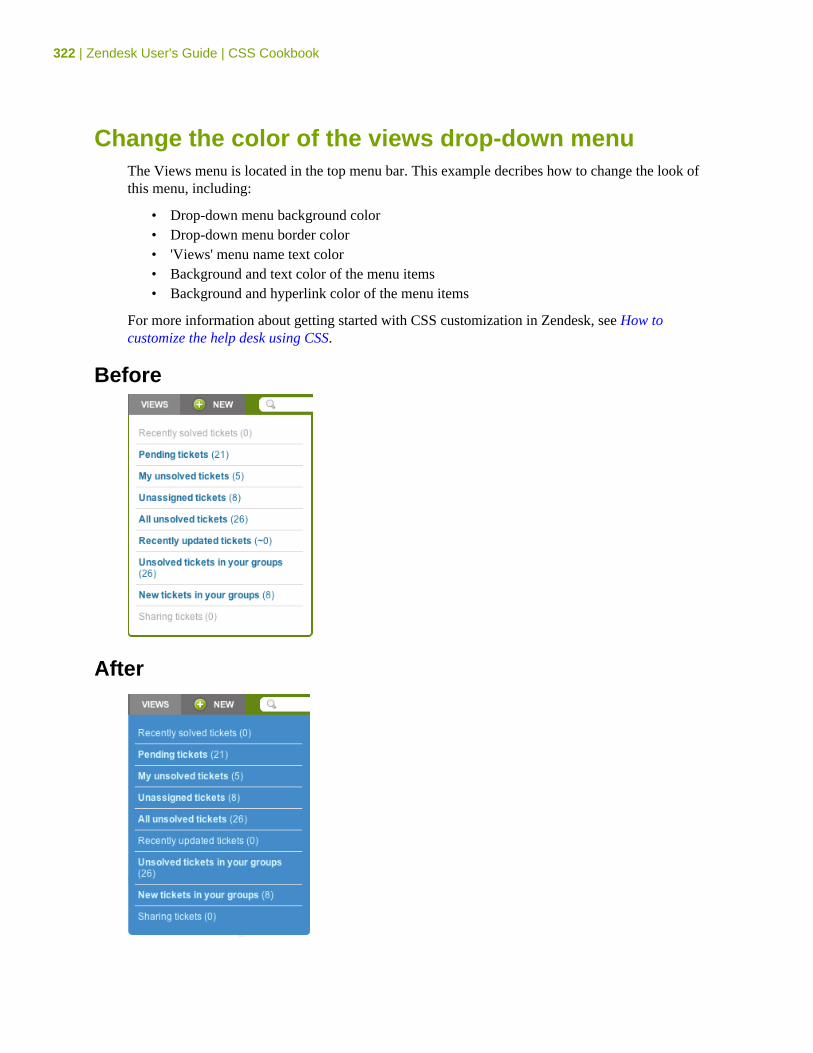
322 | Zendesk User's Guide | CSS Cookbook
Change the color of the views drop-down menuThe Views menu is located in the top menu bar. This example decribes how to change the look ofthis menu, including:
• Drop-down menu background color• Drop-down menu border color• 'Views' menu name text color• Background and text color of the menu items• Background and hyperlink color of the menu items
For more information about getting started with CSS customization in Zendesk, see How tocustomize the help desk using CSS.
Before
After
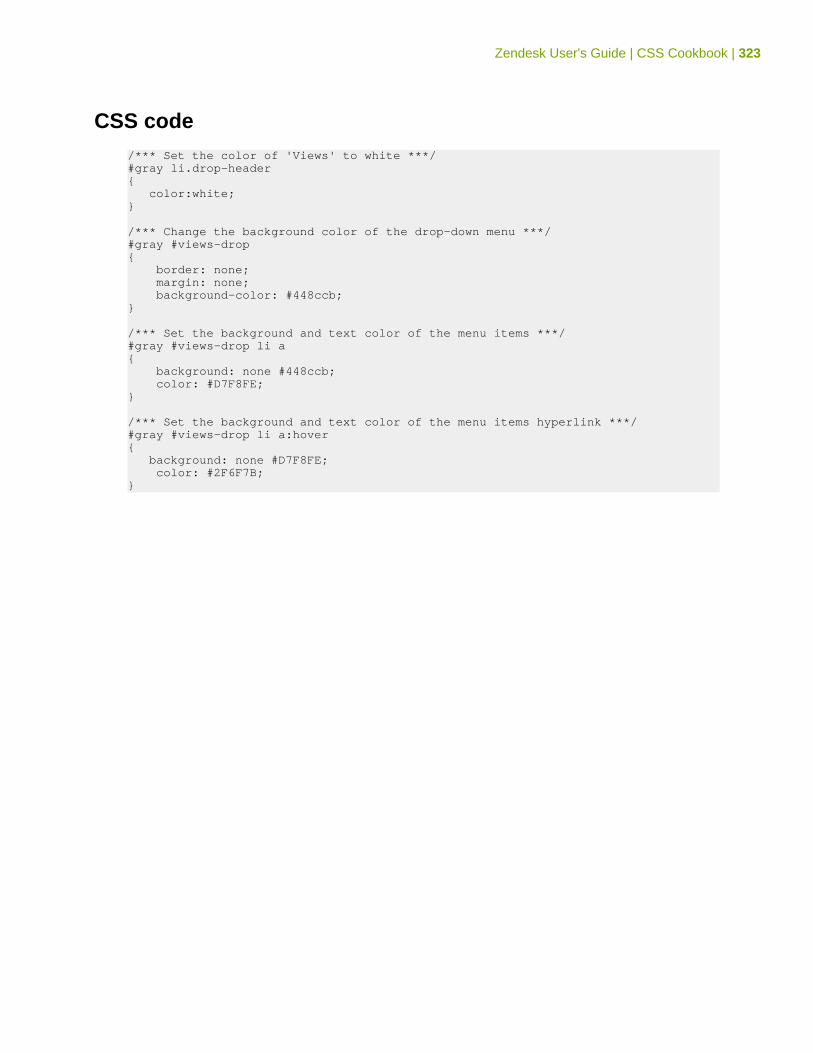
Zendesk User's Guide | CSS Cookbook | 323
CSS code/*** Set the color of 'Views' to white ***/#gray li.drop-header{ color:white;}
/*** Change the background color of the drop-down menu ***/#gray #views-drop{ border: none; margin: none; background-color: #448ccb;}
/*** Set the background and text color of the menu items ***/#gray #views-drop li a{ background: none #448ccb; color: #D7F8FE;}
/*** Set the background and text color of the menu items hyperlink ***/#gray #views-drop li a:hover{ background: none #D7F8FE; color: #2F6F7B;}
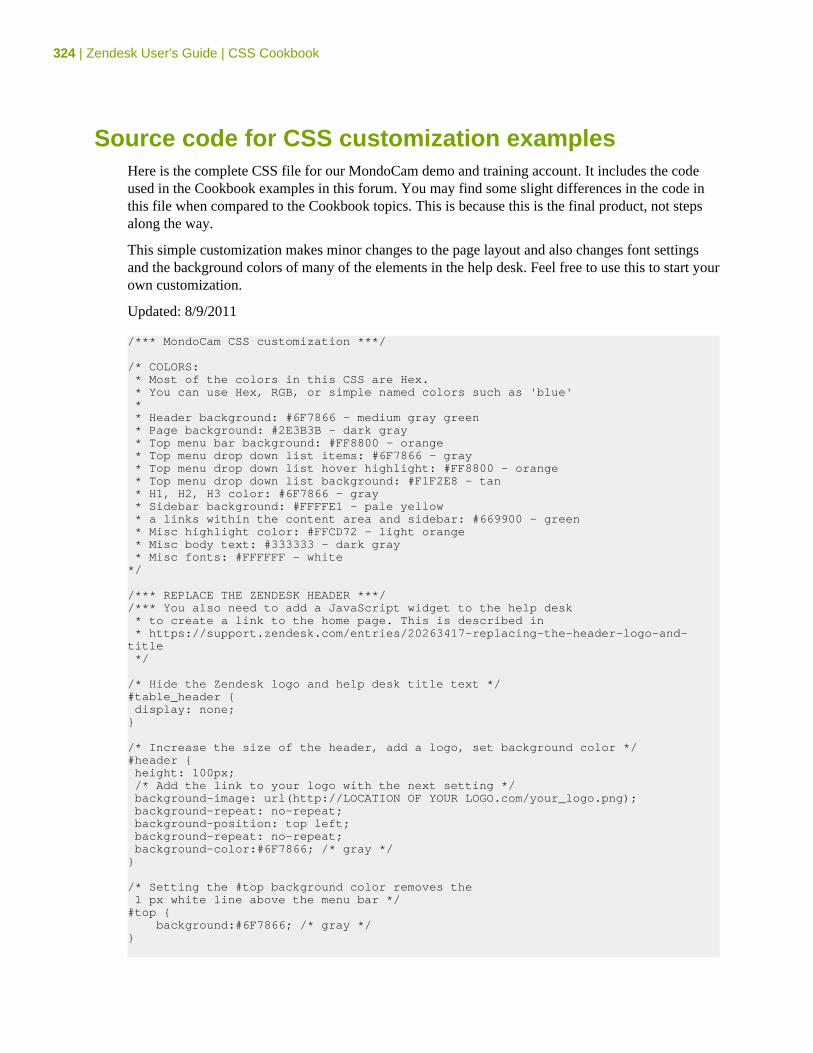
324 | Zendesk User's Guide | CSS Cookbook
Source code for CSS customization examplesHere is the complete CSS file for our MondoCam demo and training account. It includes the codeused in the Cookbook examples in this forum. You may find some slight differences in the code inthis file when compared to the Cookbook topics. This is because this is the final product, not stepsalong the way.
This simple customization makes minor changes to the page layout and also changes font settingsand the background colors of many of the elements in the help desk. Feel free to use this to start yourown customization.
Updated: 8/9/2011
/*** MondoCam CSS customization ***/
/* COLORS: * Most of the colors in this CSS are Hex. * You can use Hex, RGB, or simple named colors such as 'blue' * * Header background: #6F7866 - medium gray green * Page background: #2E3B3B - dark gray * Top menu bar background: #FF8800 - orange * Top menu drop down list items: #6F7866 - gray * Top menu drop down list hover highlight: #FF8800 - orange * Top menu drop down list background: #F1F2E8 - tan * H1, H2, H3 color: #6F7866 - gray * Sidebar background: #FFFFE1 - pale yellow * a links within the content area and sidebar: #669900 - green * Misc highlight color: #FFCD72 - light orange * Misc body text: #333333 - dark gray * Misc fonts: #FFFFFF - white*/
/*** REPLACE THE ZENDESK HEADER ***//*** You also need to add a JavaScript widget to the help desk * to create a link to the home page. This is described in * https://support.zendesk.com/entries/20263417-replacing-the-header-logo-and-title */
/* Hide the Zendesk logo and help desk title text */#table_header { display: none;}
/* Increase the size of the header, add a logo, set background color */#header { height: 100px; /* Add the link to your logo with the next setting */ background-image: url(http://LOCATION OF YOUR LOGO.com/your_logo.png); background-repeat: no-repeat; background-position: top left; background-repeat: no-repeat; background-color:#6F7866; /* gray */}
/* Setting the #top background color removes the 1 px white line above the menu bar */#top { background:#6F7866; /* gray */}
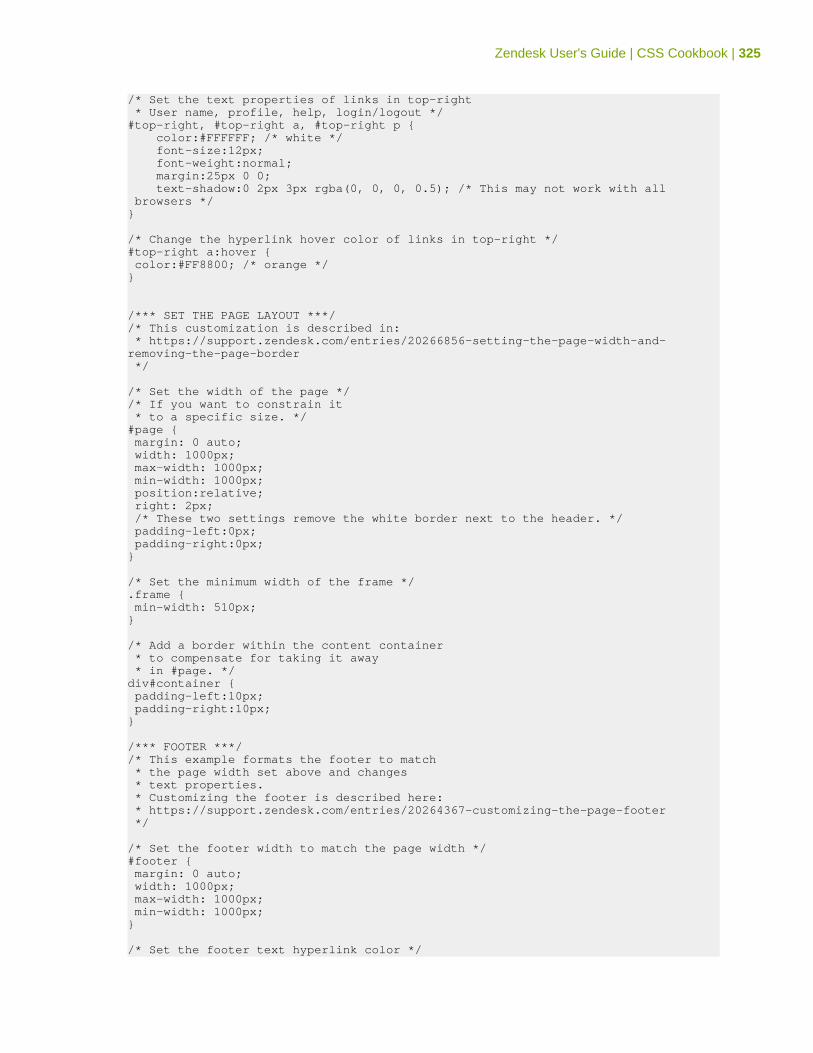
Zendesk User's Guide | CSS Cookbook | 325
/* Set the text properties of links in top-right * User name, profile, help, login/logout */#top-right, #top-right a, #top-right p { color:#FFFFFF; /* white */ font-size:12px; font-weight:normal; margin:25px 0 0; text-shadow:0 2px 3px rgba(0, 0, 0, 0.5); /* This may not work with all browsers */}
/* Change the hyperlink hover color of links in top-right */#top-right a:hover { color:#FF8800; /* orange */}
/*** SET THE PAGE LAYOUT ***//* This customization is described in: * https://support.zendesk.com/entries/20266856-setting-the-page-width-and-removing-the-page-border */
/* Set the width of the page *//* If you want to constrain it * to a specific size. */#page { margin: 0 auto; width: 1000px; max-width: 1000px; min-width: 1000px; position:relative; right: 2px; /* These two settings remove the white border next to the header. */ padding-left:0px; padding-right:0px;}
/* Set the minimum width of the frame */.frame { min-width: 510px;}
/* Add a border within the content container * to compensate for taking it away * in #page. */div#container { padding-left:10px; padding-right:10px;}
/*** FOOTER ***//* This example formats the footer to match * the page width set above and changes * text properties. * Customizing the footer is described here: * https://support.zendesk.com/entries/20264367-customizing-the-page-footer */
/* Set the footer width to match the page width */#footer { margin: 0 auto; width: 1000px; max-width: 1000px; min-width: 1000px;}
/* Set the footer text hyperlink color */
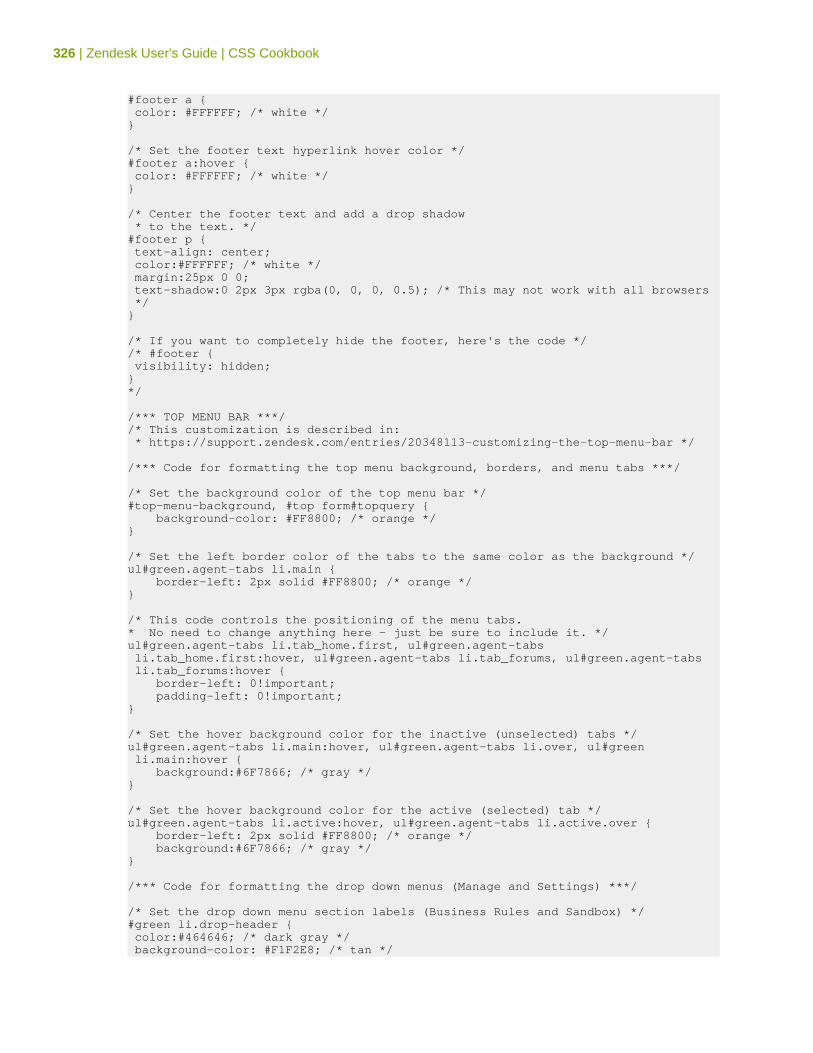
326 | Zendesk User's Guide | CSS Cookbook
#footer a { color: #FFFFFF; /* white */}
/* Set the footer text hyperlink hover color */#footer a:hover { color: #FFFFFF; /* white */}
/* Center the footer text and add a drop shadow * to the text. */#footer p { text-align: center; color:#FFFFFF; /* white */ margin:25px 0 0; text-shadow:0 2px 3px rgba(0, 0, 0, 0.5); /* This may not work with all browsers */}
/* If you want to completely hide the footer, here's the code */ /* #footer { visibility: hidden;}*/
/*** TOP MENU BAR ***//* This customization is described in: * https://support.zendesk.com/entries/20348113-customizing-the-top-menu-bar */
/*** Code for formatting the top menu background, borders, and menu tabs ***/
/* Set the background color of the top menu bar */#top-menu-background, #top form#topquery { background-color: #FF8800; /* orange */}
/* Set the left border color of the tabs to the same color as the background */ul#green.agent-tabs li.main { border-left: 2px solid #FF8800; /* orange */}
/* This code controls the positioning of the menu tabs.* No need to change anything here - just be sure to include it. */ul#green.agent-tabs li.tab_home.first, ul#green.agent-tabs li.tab_home.first:hover, ul#green.agent-tabs li.tab_forums, ul#green.agent-tabs li.tab_forums:hover { border-left: 0!important; padding-left: 0!important;}
/* Set the hover background color for the inactive (unselected) tabs */ul#green.agent-tabs li.main:hover, ul#green.agent-tabs li.over, ul#green li.main:hover { background:#6F7866; /* gray */}
/* Set the hover background color for the active (selected) tab */ul#green.agent-tabs li.active:hover, ul#green.agent-tabs li.active.over { border-left: 2px solid #FF8800; /* orange */ background:#6F7866; /* gray */}
/*** Code for formatting the drop down menus (Manage and Settings) ***/
/* Set the drop down menu section labels (Business Rules and Sandbox) */#green li.drop-header { color:#464646; /* dark gray */ background-color: #F1F2E8; /* tan */
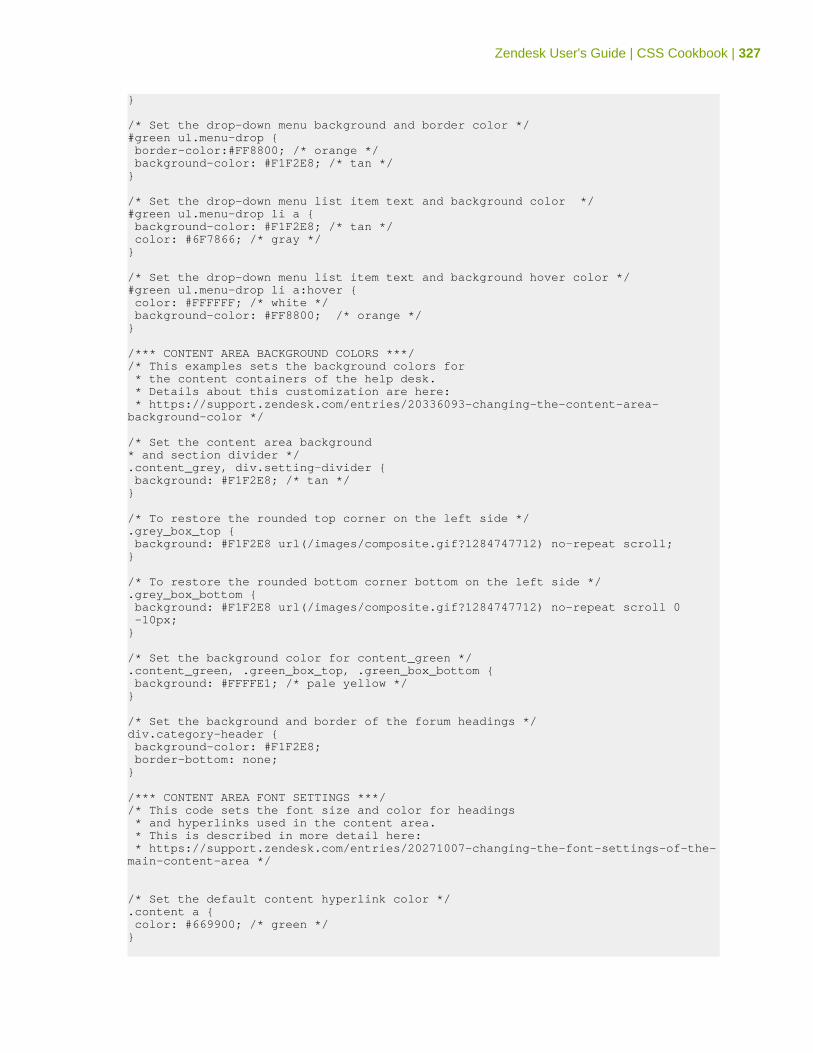
Zendesk User's Guide | CSS Cookbook | 327
}
/* Set the drop-down menu background and border color */#green ul.menu-drop { border-color:#FF8800; /* orange */ background-color: #F1F2E8; /* tan */}
/* Set the drop-down menu list item text and background color */#green ul.menu-drop li a { background-color: #F1F2E8; /* tan */ color: #6F7866; /* gray */}
/* Set the drop-down menu list item text and background hover color */#green ul.menu-drop li a:hover { color: #FFFFFF; /* white */ background-color: #FF8800; /* orange */}
/*** CONTENT AREA BACKGROUND COLORS ***//* This examples sets the background colors for * the content containers of the help desk. * Details about this customization are here: * https://support.zendesk.com/entries/20336093-changing-the-content-area-background-color */
/* Set the content area background * and section divider */.content_grey, div.setting-divider { background: #F1F2E8; /* tan */}
/* To restore the rounded top corner on the left side */.grey_box_top { background: #F1F2E8 url(/images/composite.gif?1284747712) no-repeat scroll; }
/* To restore the rounded bottom corner bottom on the left side */.grey_box_bottom { background: #F1F2E8 url(/images/composite.gif?1284747712) no-repeat scroll 0 -10px;}
/* Set the background color for content_green */.content_green, .green_box_top, .green_box_bottom { background: #FFFFE1; /* pale yellow */}
/* Set the background and border of the forum headings */div.category-header { background-color: #F1F2E8; border-bottom: none;}
/*** CONTENT AREA FONT SETTINGS ***//* This code sets the font size and color for headings * and hyperlinks used in the content area. * This is described in more detail here: * https://support.zendesk.com/entries/20271007-changing-the-font-settings-of-the-main-content-area */
/* Set the default content hyperlink color */.content a { color: #669900; /* green */}

328 | Zendesk User's Guide | CSS Cookbook
/* Set the font color of the Edit link */.content a.edit_this, #search-result a.edit_this { color: #669900; /* green */}
/* Set the font color of the Action link */.category-top-right .edit_this, .floating_menu_ui .floating_menu_action { color: #669900; /* green */}
/* Sets the font color of misc links */span.link, p.link { color: #669900; /* green */}
/* Set h2 heading size and color */.content h2, .content h2 a { font-size: 20px; color:#6F7866; /* gray */}
/* Set h2 heading hover size and color */.content h2 a:hover { font-size: 20px; color:#669900; /* green */ text-decoration:underline;}
/* Set the h3 heading font color */.frame h3 { font-size: 18px; color: #6F7866; /* gray */ font-weight: normal;}
/*** FORUMS ****//* This code formats the headings and hyperlinks * in the forums content. This customization is described * here: https://support.zendesk.com/entries/20345373-formatting-the-forum-content-headings */
/* Set the formatting for .frame.colums *//* This is the container for forums */
/* Set category heading size and color */.content .frame.columns h2, .content .frame.columns h2 a { font-size: 20px; color:#6F7866; /* gray */}
/* Set category heading hover size and color */.content .frame.columns h2 a:hover { font-size: 20px; color:#669900; /* green */ text-decoration:underline;}
/* Set the font color of h3 active links */.content .frame.columns h3, .content .frame.columns h3 a { color: #6F7866; /* gray */}
/* Set the font hover color of h3 active links */.content .frame.columns h3 a:hover { color: #669900; /* green */ text-decoration:underline;}
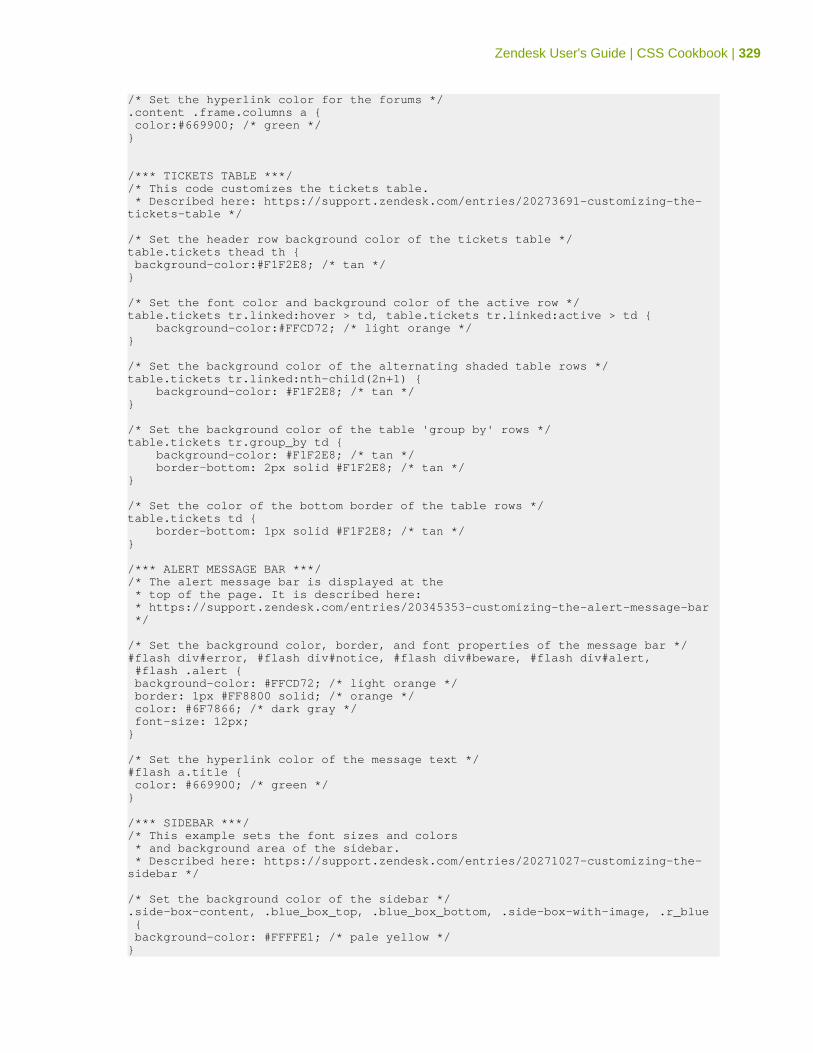
Zendesk User's Guide | CSS Cookbook | 329
/* Set the hyperlink color for the forums */.content .frame.columns a { color:#669900; /* green */}
/*** TICKETS TABLE ***//* This code customizes the tickets table. * Described here: https://support.zendesk.com/entries/20273691-customizing-the-tickets-table */
/* Set the header row background color of the tickets table */table.tickets thead th { background-color:#F1F2E8; /* tan */}
/* Set the font color and background color of the active row */table.tickets tr.linked:hover > td, table.tickets tr.linked:active > td { background-color:#FFCD72; /* light orange */}
/* Set the background color of the alternating shaded table rows */table.tickets tr.linked:nth-child(2n+1) { background-color: #F1F2E8; /* tan */}
/* Set the background color of the table 'group by' rows */table.tickets tr.group_by td { background-color: #F1F2E8; /* tan */ border-bottom: 2px solid #F1F2E8; /* tan */}
/* Set the color of the bottom border of the table rows */table.tickets td { border-bottom: 1px solid #F1F2E8; /* tan */}
/*** ALERT MESSAGE BAR ***//* The alert message bar is displayed at the * top of the page. It is described here: * https://support.zendesk.com/entries/20345353-customizing-the-alert-message-bar */
/* Set the background color, border, and font properties of the message bar */#flash div#error, #flash div#notice, #flash div#beware, #flash div#alert, #flash .alert { background-color: #FFCD72; /* light orange */ border: 1px #FF8800 solid; /* orange */ color: #6F7866; /* dark gray */ font-size: 12px;}
/* Set the hyperlink color of the message text */#flash a.title { color: #669900; /* green */}
/*** SIDEBAR ***//* This example sets the font sizes and colors * and background area of the sidebar. * Described here: https://support.zendesk.com/entries/20271027-customizing-the-sidebar */
/* Set the background color of the sidebar */.side-box-content, .blue_box_top, .blue_box_bottom, .side-box-with-image, .r_blue { background-color: #FFFFE1; /* pale yellow */}
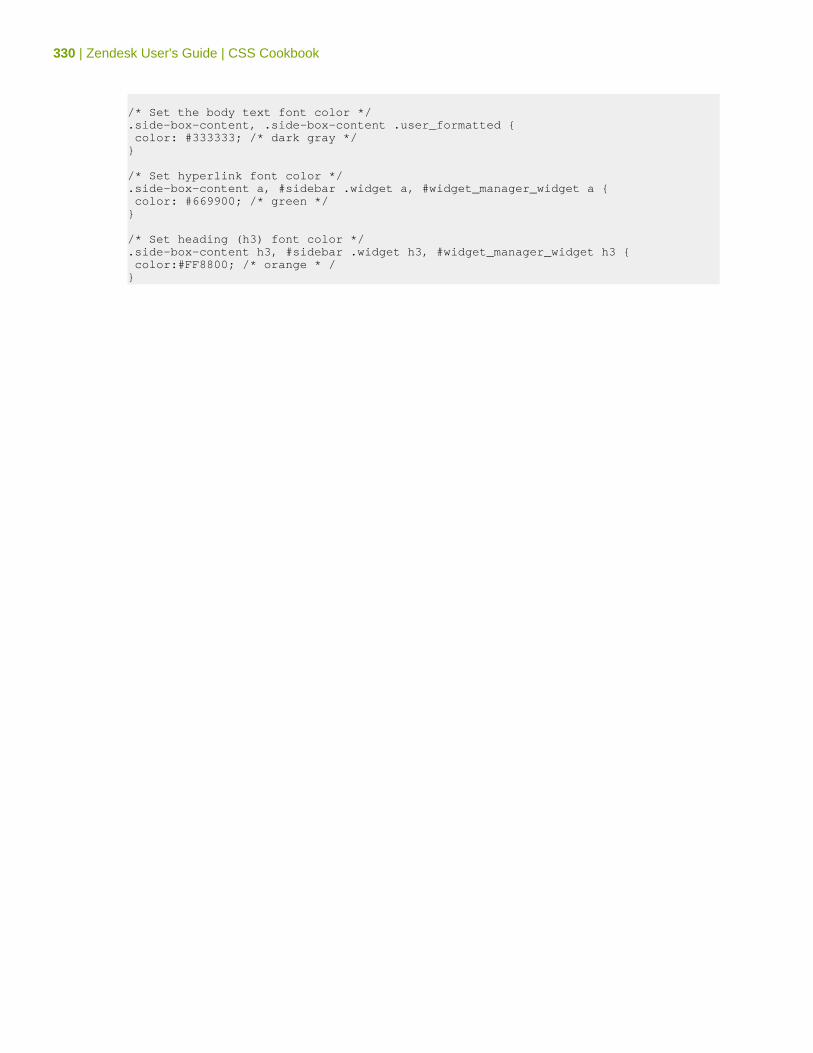
330 | Zendesk User's Guide | CSS Cookbook
/* Set the body text font color */.side-box-content, .side-box-content .user_formatted { color: #333333; /* dark gray */}
/* Set hyperlink font color */.side-box-content a, #sidebar .widget a, #widget_manager_widget a { color: #669900; /* green */}
/* Set heading (h3) font color */.side-box-content h3, #sidebar .widget h3, #widget_manager_widget h3 { color:#FF8800; /* orange * /}