Embed Size (px)
Citation preview
10
1
28
9
3
5
4
6
7
Paper guide surface
1
12
11
13
5
6
11
1 12
13
14
15
17
16
2
3
4
7
8
10
9
18
19
20
21
1
2
3
4
2
3
4
AC Power cord
Power cord slot
USB portUSB cable
AC Power cord
Power cord slot
USB portUSB cable
IntroductionThank you for purchasing the QL-1050/1050N.This guide briefly describes the steps to start using your QL-1050/1050N.Refer to the Software User's Guide for more detailed information. The Software User's Guide can be found in the Manuals folder of the CD-ROM included with the QL-1050/1050N.
Federal Communications Commission (FCC) Declaration of Conformity (For USA Only)Responsible Party: Brother International Corporation
100 Somerset Corporate BoulevardBridgewater, NJ 08807-0911 USATEL: (908) 704-1700
declares that the productProduct Name: Label Printer QL-1050Model Number: QL-1050
This device complies with Part 15 of the FCC Rules. Operation is subject to the following two conditions: (1) this device may not cause harmful interference, and (2) this device must accept any interference received, including interference that may cause undesired operation.
This equipment has been tested and found to comply with the limits for a Class B digital device, pursuant to Part 15 of the FCC Rules. These limits are designed to provide reasonable protection against harmful interference in a residential installation. This equipment generates, uses and can radiate radio frequency energy and, if not installed and used in accordance with the instructions, may cause harmful interference to radio communications. However, there is no guarantee that interference will not occur in a particular installation. If this equipment does cause harmful interference to radio or television reception, which can be determined by turning the equipment off and on, the user is encouraged to try to correct the interference by one or more of the following measures:
• Reorient or relocate the receiving antenna.• Increase the separation between the equipment and receiver.• Connect the equipment into an outlet on a circuit different from that to which the receiver is connected.• Consult the dealer or an experienced radio/TV technician for help.• The enclosed interface cable should be used in order to ensure compliance with the limits for a Class B digital device.• A shielded interface cable should be used in order to ensure compliance with the limits for a Class B digital device.• Changes or modifications not expressly approved by Brother Industries, Ltd. could void the user's authority to operate the equipment.
Close the head cover until it clicks right and left side.
Connect the AC power cord to the QL-1050/1050N and then plug the power supply cord into a standard electrical outlet.
• Check that the electrical outlet is 120V AC before inserting the plug.• Remove the power supply cord from the electrical outlet after you have finished using the QL-1050/1050N.• Do not pull the cord when removing it from the electrical outlet. The wire in the cord may become damaged.
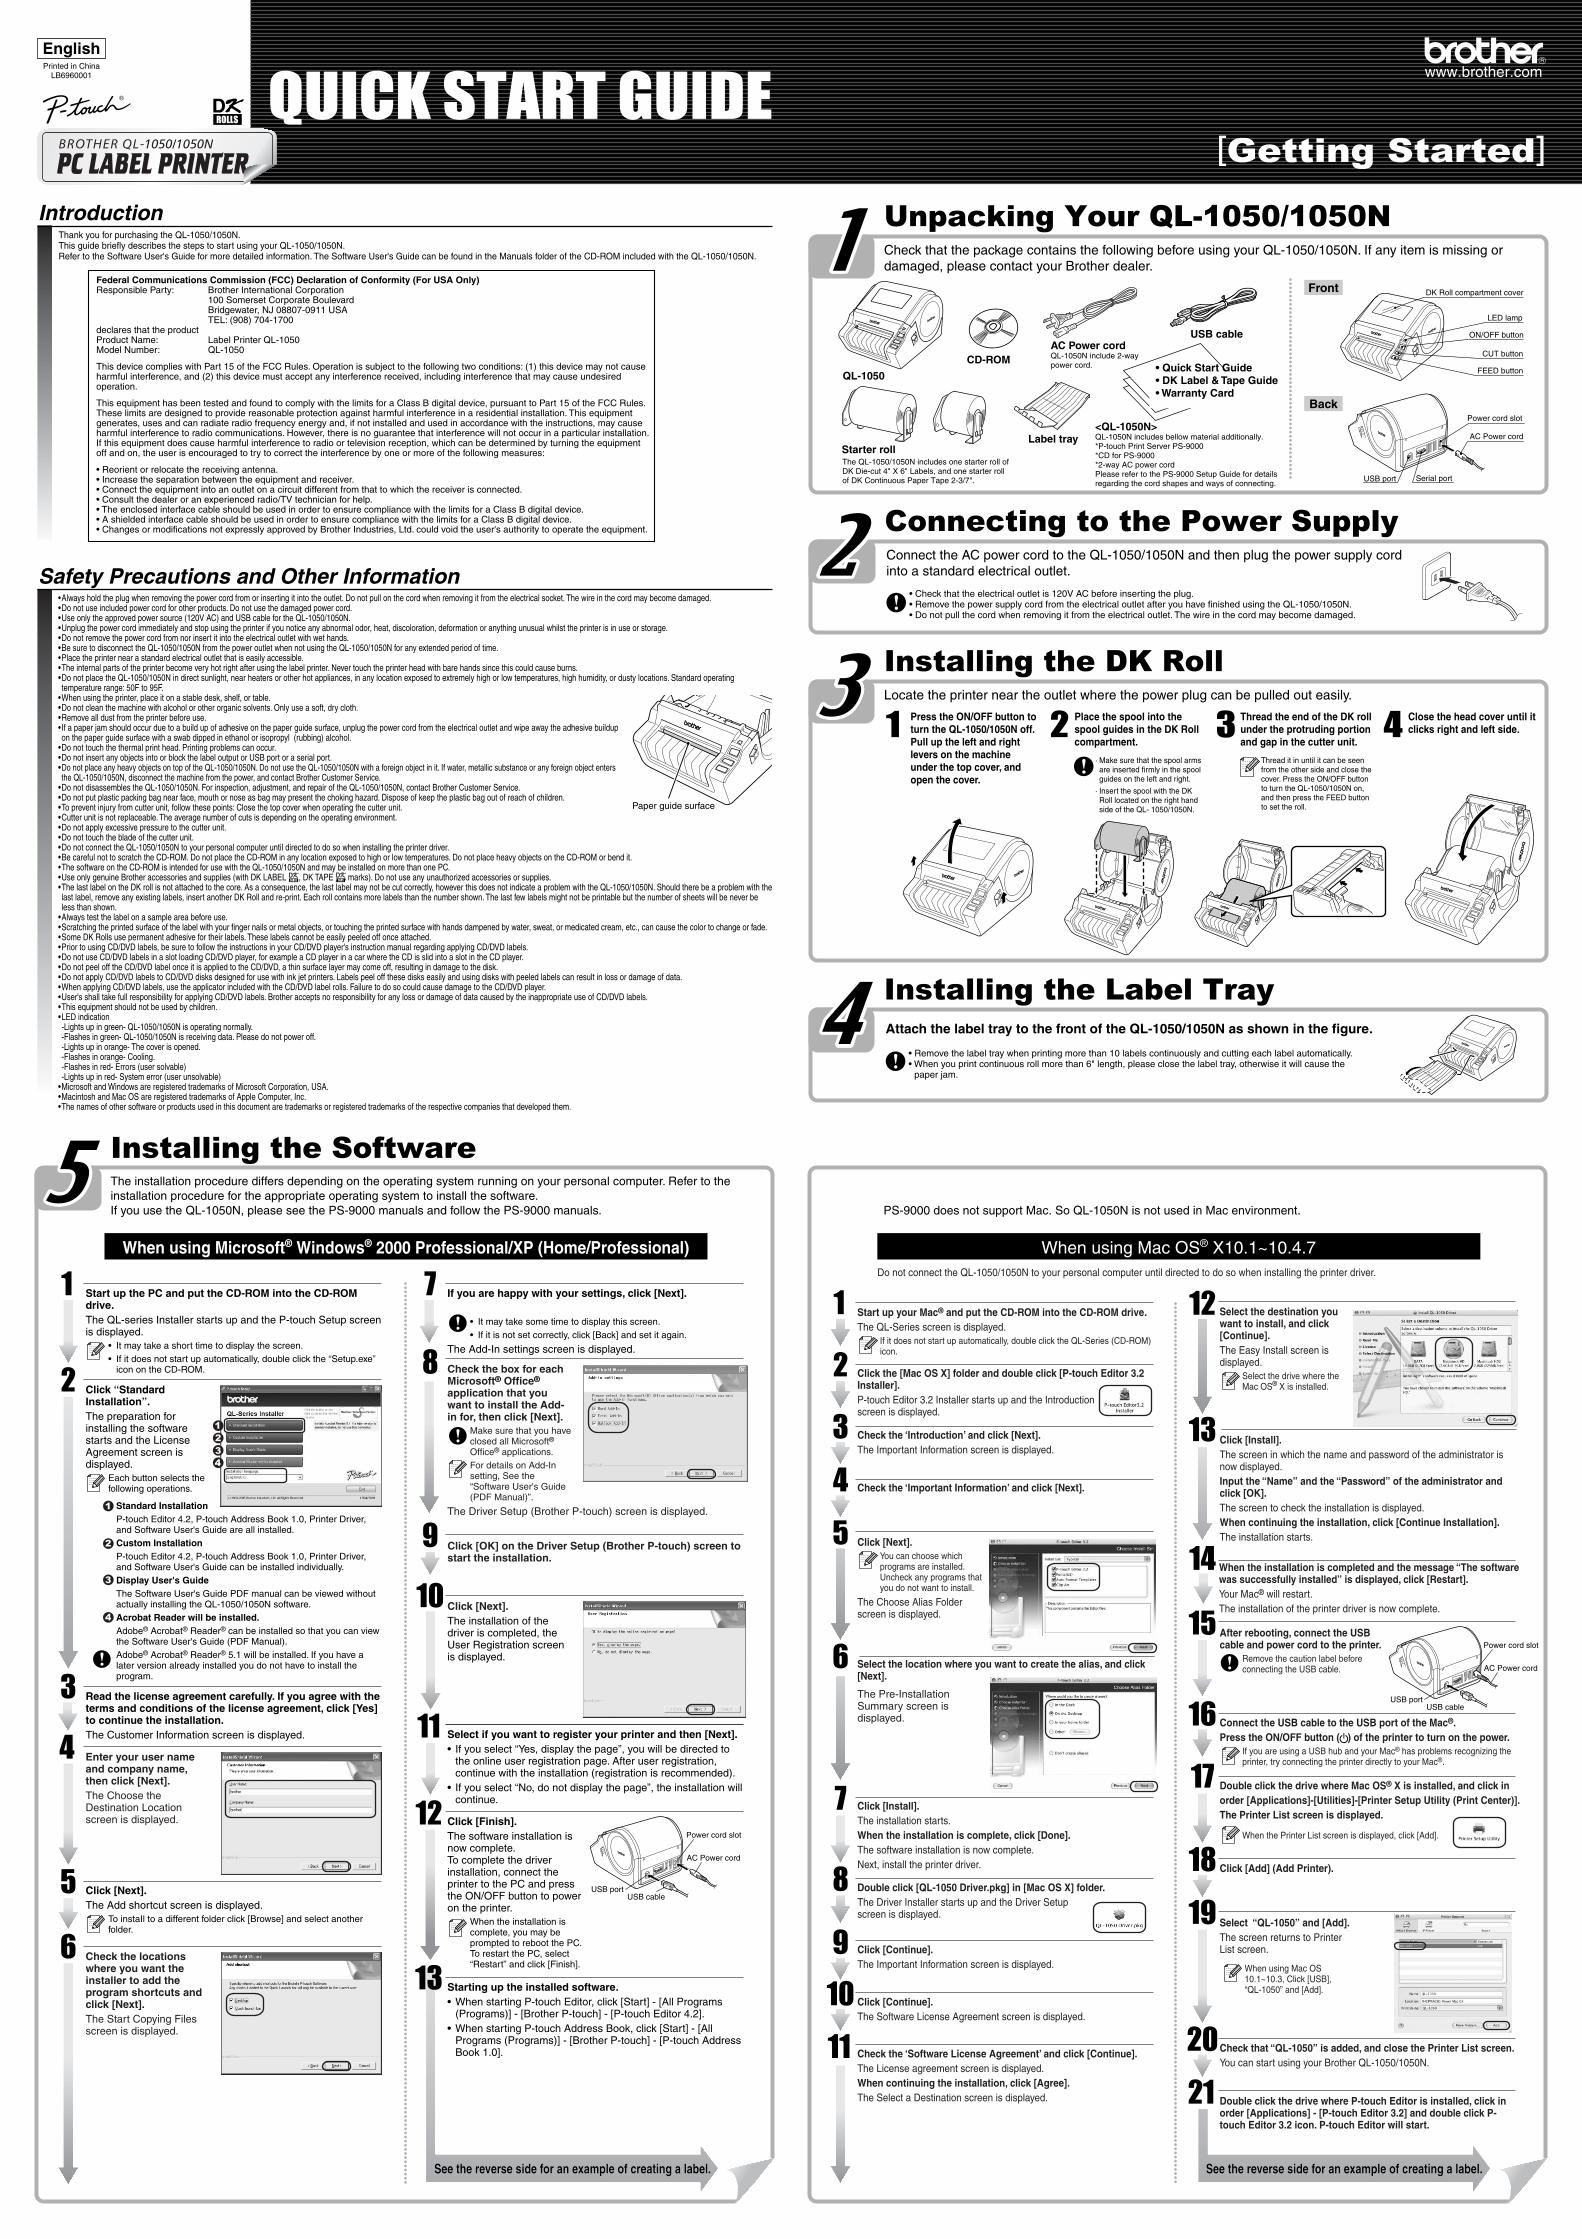
Check that the package contains the following before using your QL-1050/1050N. If any item is missing or damaged, please contact your Brother dealer.
Locate the printer near the outlet where the power plug can be pulled out easily.
Unpacking Your QL-1050/1050N
The installation procedure differs depending on the operating system running on your personal computer. Refer to the installation procedure for the appropriate operating system to install the software.If you use the QL-1050N, please see the PS-9000 manuals and follow the PS-9000 manuals.
Installing the Software
Connecting to the Power Supply
Attach the label tray to the front of the QL-1050/1050N as shown in the figure.
• Remove the label tray when printing more than 10 labels continuously and cutting each label automatically.• When you print continuous roll more than 6" length, please close the label tray, otherwise it will cause the
paper jam.
Installing the Label Tray
Installing the DK Roll
When using Microsoft® Windows® 2000 Professional/XP (Home/Professional)
Start up the PC and put the CD-ROM into the CD-ROM drive.The QL-series Installer starts up and the P-touch Setup screen is displayed.
• It may take a short time to display the screen.• If it does not start up automatically, double click the “Setup.exe”
icon on the CD-ROM.
If you are happy with your settings, click [Next].
• It may take some time to display this screen.• If it is not set correctly, click [Back] and set it again.
The Add-In settings screen is displayed.
Read the license agreement carefully. If you agree with the terms and conditions of the license agreement, click [Yes] to continue the installation.The Customer Information screen is displayed.
Click [Next].The Add shortcut screen is displayed.
To instaIl to a different folder click [Browse] and select another folder.
USB cable
CD-ROM
Starter roll
Front
Back
FEED button
LED lamp
ON/OFF button
CUT button
DK Roll compartment cover
AC Power cord
Power cord slot
USB port Serial port
· Make sure that the spool arms are inserted firmly in the spool guides on the left and right.
· Insert the spool with the DK Roll located on the right hand side of the QL- 1050/1050N.
See the reverse side for an example of creating a label.See the reverse side for an example of creating a label.
Label tray
QL-1050
The QL-1050/1050N includes one starter roll of DK Die-cut 4" X 6" Labels, and one starter roll of DK Continuous Paper Tape 2-3/7".
<QL-1050N>QL-1050N includes bellow material additionally.*P-touch Print Server PS-9000*CD for PS-9000*2-way AC power cordPlease refer to the PS-9000 Setup Guide for details regarding the cord shapes and ways of connecting.
• Quick Start Guide• DK Label & Tape Guide• Warranty Card
Safety Precautions and Other Information•Always hold the plug when removing the power cord from or inserting it into the outlet. Do not pull on the cord when removing it from the electrical socket. The wire in the cord may become damaged.•Do not use included power cord for other products. Do not use the damaged power cord.•Use only the approved power source (120V AC) and USB cable for the QL-1050/1050N.•Unplug the power cord immediately and stop using the printer if you notice any abnormal odor, heat, discoloration, deformation or anything unusual whilst the printer is in use or storage.•Do not remove the power cord from nor insert it into the electrical outlet with wet hands.•Be sure to disconnect the QL-1050/1050N from the power outlet when not using the QL-1050/1050N for any extended period of time.•Place the printer near a standard electrical outlet that is easily accessible.•The internal parts of the printer become very hot right after using the label printer. Never touch the printer head with bare hands since this could cause burns.•Do not place the QL-1050/1050N in direct sunlight, near heaters or other hot appliances, in any location exposed to extremely high or low temperatures, high humidity, or dusty locations. Standard operating temperature range: 50F to 95F.
•When using the printer, place it on a stable desk, shelf, or table.•Do not clean the machine with alcohol or other organic solvents. Only use a soft, dry cloth.•Remove all dust from the printer before use.•If a paper jam should occur due to a build up of adhesive on the paper guide surface, unplug the power cord from the electrical outlet and wipe away the adhesive buildup on the paper guide surface with a swab dipped in ethanol or isopropyl (rubbing) alcohol.
•Do not touch the thermal print head. Printing problems can occur.•Do not insert any objects into or block the label output or USB port or a serial port.•Do not place any heavy objects on top of the QL-1050/1050N. Do not use the QL-1050/1050N with a foreign object in it. If water, metallic substance or any foreign object enters the QL-1050/1050N, disconnect the machine from the power, and contact Brother Customer Service.
•Do not disassembles the QL-1050/1050N. For inspection, adjustment, and repair of the QL-1050/1050N, contact Brother Customer Service.•Do not put plastic packing bag near face, mouth or nose as bag may present the choking hazard. Dispose of keep the plastic bag out of reach of children.•To prevent injury from cutter unit, follow these points: Close the top cover when operating the cutter unit.•Cutter unit is not replaceable. The average number of cuts is depending on the operating environment.•Do not apply excessive pressure to the cutter unit.•Do not touch the blade of the cutter unit.•Do not connect the QL-1050/1050N to your personal computer until directed to do so when installing the printer driver.•Be careful not to scratch the CD-ROM. Do not place the CD-ROM in any location exposed to high or low temperatures. Do not place heavy objects on the CD-ROM or bend it.•The software on the CD-ROM is intended for use with the QL-1050/1050N and may be installed on more than one PC.•Use only genuine Brother accessories and supplies (with DK LABEL , DK TAPE marks). Do not use any unauthorized accessories or supplies.•The last label on the DK roll is not attached to the core. As a consequence, the last label may not be cut correctly, however this does not indicate a problem with the QL-1050/1050N. Should there be a problem with the last label, remove any existing labels, insert another DK Roll and re-print. Each roll contains more labels than the number shown. The last few labels might not be printable but the number of sheets will be never be less than shown.
•Always test the label on a sample area before use.•Scratching the printed surface of the label with your finger nails or metal objects, or touching the printed surface with hands dampened by water, sweat, or medicated cream, etc., can cause the color to change or fade.•Some DK Rolls use permanent adhesive for their labels. These labels cannot be easily peeled off once attached.•Prior to using CD/DVD labels, be sure to follow the instructions in your CD/DVD player's instruction manual regarding applying CD/DVD labels.•Do not use CD/DVD labels in a slot loading CD/DVD player, for example a CD player in a car where the CD is slid into a slot in the CD player.•Do not peel off the CD/DVD label once it is applied to the CD/DVD, a thin surface layer may come off, resulting in damage to the disk.•Do not apply CD/DVD labels to CD/DVD disks designed for use with ink jet printers. Labels peel off these disks easily and using disks with peeled labels can result in loss or damage of data.•When applying CD/DVD labels, use the applicator included with the CD/DVD label rolls. Failure to do so could cause damage to the CD/DVD player.•User's shall take full responsibility for applying CD/DVD labels. Brother accepts no responsibility for any loss or damage of data caused by the inappropriate use of CD/DVD labels.•This equipment should not be used by children.•LED indication-Lights up in green- QL-1050/1050N is operating normally.-Flashes in green- QL-1050/1050N is receiving data. Please do not power off.-Lights up in orange- The cover is opened.-Flashes in orange- Cooling.-Flashes in red- Errors (user solvable)-Lights up in red- System error (user unsolvable)
•Microsoft and Windows are registered trademarks of Microsoft Corporation, USA.•Macintosh and Mac OS are registered trademarks of Apple Computer, Inc.•The names of other software or products used in this document are trademarks or registered trademarks of the respective companies that developed them.
Click “Standard Installation”.The preparation for installing the software starts and the License Agreement screen is displayed.
Each button selects the following operations.
Standard InstallationP-touch Editor 4.2, P-touch Address Book 1.0, Printer Driver, and Software User's Guide are all installed.Custom InstallationP-touch Editor 4.2, P-touch Address Book 1.0, Printer Driver, and Software User's Guide can be installed individually.Display User's GuideThe Software User's Guide PDF manual can be viewed without actually installing the QL-1050/1050N software.Acrobat Reader will be installed.Adobe® Acrobat® Reader® can be installed so that you can view the Software User's Guide (PDF Manual).Adobe® Acrobat® Reader® 5.1 will be installed. If you have a later version already installed you do not have to install the program.
Click [Finish].The software installation is now complete.To complete the driver installation, connect the printer to the PC and press the ON/OFF button to power on the printer.
When the installation is complete, you may be prompted to reboot the PC. To restart the PC, select “Restart” and click [Finish].
Select if you want to register your printer and then [Next].• If you select “Yes, display the page”, you will be directed to
the online user registration page. After user registration, continue with the installation (registration is recommended).
• If you select “No, do not display the page”, the installation will continue.
Starting up the installed software.• When starting P-touch Editor, click [Start] - [All Programs
(Programs)] - [Brother P-touch] - [P-touch Editor 4.2].• When starting P-touch Address Book, click [Start] - [All
Programs (Programs)] - [Brother P-touch] - [P-touch Address Book 1.0].
Check the box for each Microsoft® Office® application that you want to install the Add-in for, then click [Next].
Make sure that you have closed all Microsoft® Office® applications.For details on Add-In setting, See the “Software User's Guide (PDF Manual)”.
The Driver Setup (Brother P-touch) screen is displayed.
When using Mac OS® X10.1~10.4.7
The Pre-Installation Summary screen is displayed.
Click [Next].You can choose which programs are installed. Uncheck any programs that you do not want to install.
The Choose Alias Folder screen is displayed.
Check the ‘Software License Agreement’ and click [Continue].The License agreement screen is displayed.When continuing the installation, click [Agree].The Select a Destination screen is displayed.
Start up your Mac® and put the CD-ROM into the CD-ROM drive.The QL-Series screen is displayed.
If it does not start up automatically, double click the QL-Series (CD-ROM) icon.
Click [Install].The screen in which the name and password of the administrator is now displayed.Input the “Name” and the “Password” of the administrator and click [OK].The screen to check the installation is displayed.When continuing the installation, click [Continue Installation].The installation starts.
Select the destination you want to install, and click [Continue].The Easy Install screen is displayed.
Select the drive where the Mac OS® X is installed.
When the installation is completed and the message “The software was successfully installed” is displayed, click [Restart].Your Mac® will restart.The installation of the printer driver is now complete.
Connect the USB cable to the USB port of the Mac®.Press the ON/OFF button ( ) of the printer to turn on the power.
If you are using a USB hub and your Mac® has problems recognizing the printer, try connecting the printer directly to your Mac®.
Double click the drive where Mac OS® X is installed, and click inorder [Applications]-[Utilities]-[Printer Setup Utility (Print Center)].The Printer List screen is displayed.
When the Printer List screen is displayed, click [Add].
After rebooting, connect the USB cable and power cord to the printer.
Remove the caution label before connecting the USB cable.
Select “QL-1050” and [Add].The screen returns to Printer List screen.
Click [Add] (Add Printer).
Check that “QL-1050” is added, and close the Printer List screen.You can start using your Brother QL-1050/1050N.
Double click the drive where P-touch Editor is installed, click in order [Applications] - [P-touch Editor 3.2] and double click P-touch Editor 3.2 icon. P-touch Editor will start.
Check the ‘Introduction’ and click [Next].The Important Information screen is displayed.
Do not connect the QL-1050/1050N to your personal computer until directed to do so when installing the printer driver.
Check the ‘Important Information’ and click [Next].
Click [Install].The installation starts.When the installation is complete, click [Done].The software installation is now complete.Next, install the printer driver.
Click [Continue].The Important Information screen is displayed.
Click [Continue].The Software License Agreement screen is displayed.
Select the location where you want to create the alias, and click [Next].
See the reverse side for an example of creating a label.See the reverse side for an example of creating a label.
Click the [Mac OS X] folder and double click [P-touch Editor 3.2 Installer].P-touch Editor 3.2 Installer starts up and the Introduction screen is displayed.
Double click [QL-1050 Driver.pkg] in [Mac OS X] folder.The Driver Installer starts up and the Driver Setup screen is displayed.
Enter your user name and company name, then click [Next].The Choose the Destination Location screen is displayed.
Check the locations where you want the installer to add the program shortcuts and click [Next].The Start Copying Files screen is displayed.
Click [Next].The installation of the driver is completed, the User Registration screen is displayed.
Click [OK] on the Driver Setup (Brother P-touch) screen to start the installation.
QUICK START GUIDEEnglish
[Getting Started]
www.brother.comPrinted in ChinaLB6960001
4Press the ON/OFF button to turn the QL-1050/1050N off. Pull up the left and right levers on the machine under the top cover, and open the cover.
1Place the spool into the spool guides in the DK Roll compartment.
2Thread the end of the DK roll under the protruding portion and gap in the cutter unit.
3Thread it in until it can be seen from the other side and close the cover. Press the ON/OFF button to turn the QL-1050/1050N on, and then press the FEED button to set the roll.
AC Power cordQL-1050N include 2-way power cord.
When using Mac OS 10.1~10.3, Click [USB], “QL-1050” and [Add].
PS-9000 does not support Mac. So QL-1050N is not used in Mac environment.
QUICK START GUIDE[Creating Labels]
www.brother.com
DK Continuous Paper Tape 2-3/7"
Click on to print your label.
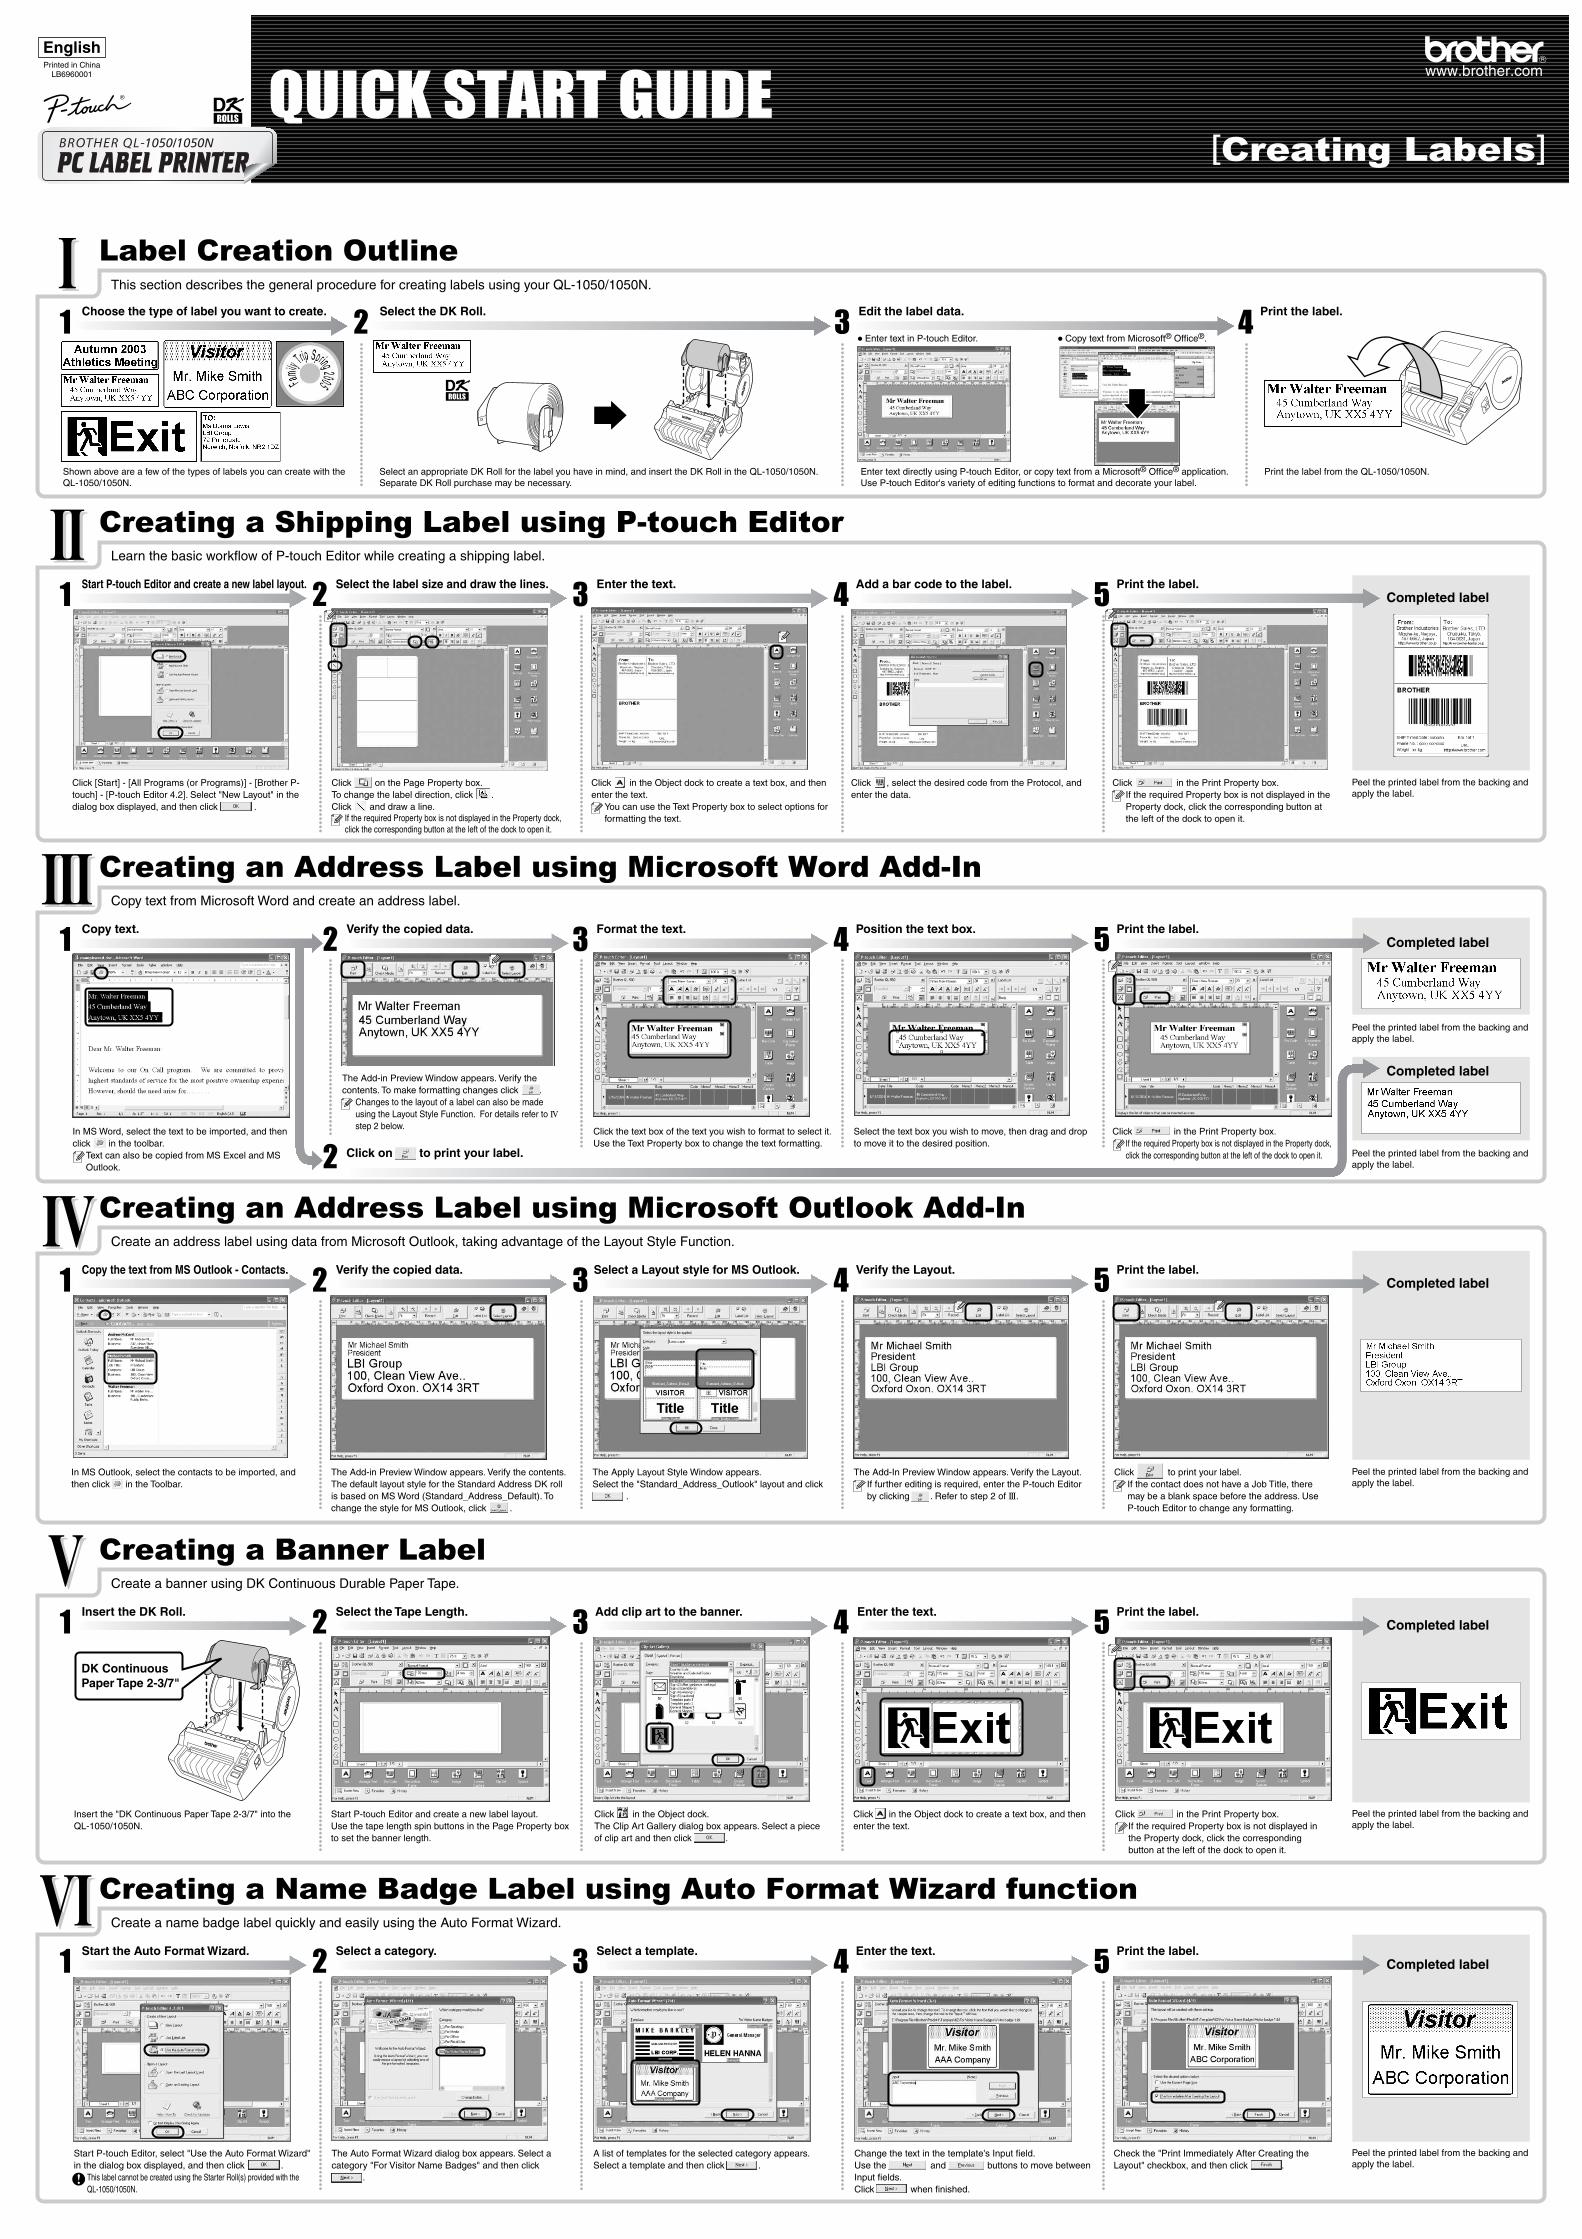
This section describes the general procedure for creating labels using your QL-1050/1050N.
1 42 3
Shown above are a few of the types of labels you can create with the QL-1050/1050N.
Select an appropriate DK Roll for the label you have in mind, and insert the DK Roll in the QL-1050/1050N. Separate DK Roll purchase may be necessary.
Enter text directly using P-touch Editor, or copy text from a Microsoft® Office® application.Use P-touch Editor's variety of editing functions to format and decorate your label.
Print the label from the QL-1050/1050N.
Learn the basic workflow of P-touch Editor while creating a shipping label.
Creating a Shipping Label using P-touch Editor
Label Creation Outline
1 2 3 4 5
Click [Start] - [All Programs (or Programs)] - [Brother P-touch] - [P-touch Editor 4.2]. Select "New Layout" in the dialog box displayed, and then click .
Click on the Page Property box.To change the label direction, click .Click and draw a line.
If the required Property box is not displayed in the Property dock, click the corresponding button at the left of the dock to open it.
Click in the Object dock to create a text box, and then enter the text.
You can use the Text Property box to select options for formatting the text.
Click , select the desired code from the Protocol, and enter the data.
Click in the Print Property box.If the required Property box is not displayed in the Property dock, click the corresponding button at the left of the dock to open it.
Peel the printed label from the backing and apply the label.
Choose the type of label you want to create.
Start P-touch Editor and create a new label layout. Select the label size and draw the lines. Enter the text. Add a bar code to the label. Print the label.Completed label
Select the DK Roll. Edit the label data. Print the label.
Copy text from Microsoft Word and create an address label.
Creating an Address Label using Microsoft Word Add-In
1 2 3 4 5
In MS Word, select the text to be imported, and then click in the toolbar.
Text can also be copied from MS Excel and MS Outlook.
The Add-in Preview Window appears. Verify the contents. To make formatting changes click .
Changes to the layout of a label can also be made using the Layout Style Function. For details refer to IV step 2 below.
Click the text box of the text you wish to format to select it.Use the Text Property box to change the text formatting.
Select the text box you wish to move, then drag and drop to move it to the desired position.
Click in the Print Property box.If the required Property box is not displayed in the Property dock, click the corresponding button at the left of the dock to open it.
Peel the printed label from the backing and apply the label.
Copy text. Verify the copied data.
2
Format the text. Position the text box. Print the label.Completed label
Peel the printed label from the backing and apply the label.
Completed label
Create a banner using DK Continuous Durable Paper Tape.
Creating a Banner Label
1 2 3 4 5
Insert the "DK Continuous Paper Tape 2-3/7" into the QL-1050/1050N.
Start P-touch Editor and create a new label layout.Use the tape length spin buttons in the Page Property box to set the banner length.
Click in the Object dock to create a text box, and then enter the text.
Click in the Object dock.The Clip Art Gallery dialog box appears. Select a piece of clip art and then click .
Click in the Print Property box.If the required Property box is not displayed in the Property dock, click the corresponding button at the left of the dock to open it.
Peel the printed label from the backing and apply the label.
Insert the DK Roll. Select the Tape Length. Enter the text.Add clip art to the banner. Print the label.Completed label
Create a name badge label quickly and easily using the Auto Format Wizard.
Creating a Name Badge Label using Auto Format Wizard function
1 2 3 4 5
Start P-touch Editor, select "Use the Auto Format Wizard" in the dialog box displayed, and then click .
This label cannot be created using the Starter Roll(s) provided with the QL-1050/1050N.
The Auto Format Wizard dialog box appears. Select a category "For Visitor Name Badges" and then click .
A list of templates for the selected category appears. Select a template and then click .
Change the text in the template's Input field.Use the and buttons to move between Input fields.Click when finished.
Check the "Print Immediately After Creating the Layout" checkbox, and then click .
Peel the printed label from the backing and apply the label.
Start the Auto Format Wizard. Select a category. Select a template. Enter the text. Print the label.Completed label
Create an address label using data from Microsoft Outlook, taking advantage of the Layout Style Function.
Creating an Address Label using Microsoft Outlook Add-In
1 2 3 4 5
The Add-in Preview Window appears. Verify the contents. The default layout style for the Standard Address DK roll is based on MS Word (Standard_Address_Default). To change the style for MS Outlook, click .
In MS Outlook, select the contacts to be imported, and then click in the Toolbar.
The Add-In Preview Window appears. Verify the Layout.If further editing is required, enter the P-touch Editor by clicking . Refer to step 2 of III.
Click to print your label.If the contact does not have a Job Title, there may be a blank space before the address. Use P-touch Editor to change any formatting.
Peel the printed label from the backing and apply the label.
Select a Layout style for MS Outlook.Verify the copied data.Copy the text from MS Outlook - Contacts. Verify the Layout. Print the label.Completed label
• Enter text in P-touch Editor. • Copy text from Microsoft® Office®.
The Apply Layout Style Window appears.Select the "Standard_Address_Outlook" layout and click .
EnglishPrinted in China
LB6960001