Embed Size (px)
Citation preview

1
RUSHCLIFFE DISTRICT SCOUTS
LASHINGS
Compiled by D. Howard ©
Rushcliffe District Scout Council Registered as a Charity, Number 522469
January 2016

2
Page
Diagonal Lashing 7
Filipino Diagonal Lashing 8
Japanese Square Lashing 6
Materials 3
Pole Bundle Hitch (or Scaffold Hitch) 15
Rubber Band Lashing 4
Sailmaker’s Whipping 16
Sheer Lashing - Extending spars 9
Sheer Lashing - Sheer Legs 10
Snake Lashing 14
Square Lashing 5
Stretching Rope 4
Tripod Lashing - Figure of Eight 11
Tripod Lashing -Sailmaker’s 13
3
MATERIALS Cordage or Rope
The term cord is used in the instructions to denote any type of string, paracord or rope.
The type of cordage or rope used will depend on the size of the spars being lashed together.
Sisal or other natural fibre cordage tends to grip better than most synthetic materials. Rope of all
materials and larger sisal cordage needs to be well stretched before use.
Mini Pioneering
When the spars being lashed are garden canes or thin sticks and a quick construction is needed
strong rubber bands, good quality parcel string and paracord are all suitable.
General Pioneering
When spars up to 50 mm. are being lashed good quality parcel string, 2 or three strand sisal string
or paracord can be used.
For lashing spars over 50 mm. 4 strand sisal (5mm. or 6mm. diam.) or 6mm. rope is needed, thicker
rope is more difficult to pull tight. A larger diameter rope should be used foot ropes.
Length of cordage
A rough guide to the minimum length of cord required. When longer cord is used any excess can be
neatly tucked away. Avoid cutting cord to length unless absolutely necessary.
Total diameter of spars in metres X 36
e.g. to lash together two spars each 100mm in diameter the length of lashing required
= (100+100)/1000 x 36 = 0.2 x 36 = 7.2m
Total spar diam. in mm Length of lashing in m
75 (3 inch) 2.7 say 3
100 (4 inch) 3.6 say 4
150 (6 inch) 5.4 say 6
200 (8 inch) 7.2 say 7.5
250 (10 inch) 9
300 (12 inch) 10.8 say 11
Spars
Spars can range from garden canes for mini pioneering, 25mm dowel or broom handles or Scout
staves for mini/midi projects to larger diameter poles for bigger constructions, all referred to as
spars in the instructions.
Spars of a suitable length and diameter are required to suite the size of project being built.
Gaffer tape.
A wrap of gaffer tape on smooth spars (like dowel or broom handles) gives the cord a securer grip
on the spars, reducing the risk of the cord slipping.
Frapping turns
For most lashings frapping turns are used to tighten the lashing.
When the spars have been bound together with the appropriate number of wraps the cord is wrapped
round the lashing turns between the spars before finishing with the appropriate knot.

4
STRETCHING ROPE
New or nearly new rope needs to be stretched before use so that the lashings can be pulled tight and
remain tight.
Tie each end of the rope to fixed anchors (a solidly fixed post or mature tree) as far apart as possible
and about waist height. Put some form of protection between the rope and the anchor to prevent
damage to both. Old carpet or sacking is suitable. When the rope is fixed push the middle of the
rope as far as possible at right angles to the rope. Relax the rope and repeat a couple of times.
RUBBER BAND LASHING Use for lashings in light, quick constructions. For example when using garden canes.
Loop the rubber band over
the end of one of the canes.
Wrap the band tightly around the
canes being lashed and loop the end
of the band over one of the canes.

5
SQUARE LASHING The square lashing is the most commonly used lashing in pioneering and is used where the spars are
liable to slide over one another.
Start with a clove hitch on
the non-load bearing spar.
Wrap the loose end round the working
cord to keep it out of the way.
Pass the working end over
the other spar and round the
first spar pulling tight all the
time.
Bring the working end over the other
spar and then behind the first spar
below the clove hitch. Take the end
over second spar on the first spar
side of the existing turn. Continue
round behind the first spar with cord
above the first wrap. Follow round
twice more. Keep the cord tight.
Make two frapping turns by
taking the cord between the
spars and round the lashing
turns. Keep the cord tight.
Finish off with a clove hitch
on the second spar.

6
JAPANESE SQUARE LASHING The Japanese square lashing is an alternative to the standard square lashing for use in light
pioneering.
Apply turns as for a normal
square lashing, but using
both parts of the cord.
Middle the cord round one spar
and then work with both ends.
Finish off with a reef knot
Separate the cords and bring one
cord across so frapping turns can
be applied in opposite directions.
Apply two frapping turns.

7
DIAGONAL LASHING
The diagonal lashing is used to stop spars springing apart.
This way of applying the lashing stops the timber hitch from sliping round the spars.
The other method sees the first turns put on parallel with the timber hitch and the second set put on
at right angles.
Make three turns round both
spars at right angles to the
timber hitch. Each turn must
be pulled tight
Start with a timber
hitch round both spars.
Pull tight
Apply two tight frapping
turns round the lashing.
Make three more turns
parallel to the timber
hitch and across the
first three turns. Pull
each turn tight
Finish with a clove hitch
on one of the spars.

8
FILIPINO DIAGONAL LASHING The Filipino Diagonal Lashing can be used as an alternative to the original diagonal lashing in light
pioneering. It can be quicker to tie and is finished with a reef knot.
\
Double the cord and make
a slip knot (Larks Head
knot) round both spars.
At right angles to the first
turns make three more turns.
Keep the turns tight.
Separate the cords and put
on two frapping turns.
Keep the turns tight.
Finish with reef knot.
Working with both ends make
three turns round the spars at
right angles to the slip knot.
Keep the turns tight.

9
SHEER LASHING Shear is sometimes used as an alternative spelling in some sources.
There are two types of sheer lashing; one is used to extend a spar to make it longer and the other to
make sheer legs.
1 Extending spars
Note: Two small wedges are needed for each lashing.
Overlap the spars by a quarter of their length.
To strengthen the overlap put a lashing on each end of the overlap. If only one lashing is used the
spars will twist.
Start with a Timber Hitch or Clove Hitch
round both spars close to one end
of the overlap.
Finish with a clove
hitch round both spars.
To tighten the lashing drive the wedges
between the spars close to each end the
lashings.
Put on 8 to 10 turns round both spars.
10
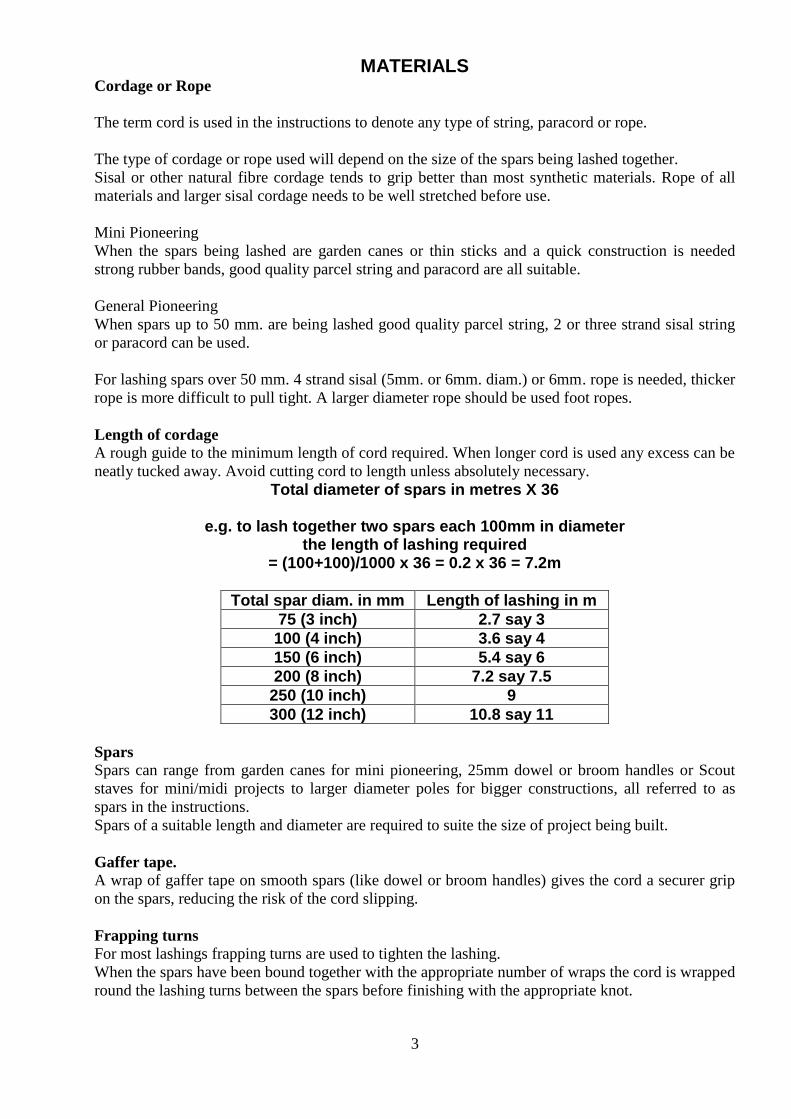
2 Sheer Legs
The position of the lashing will depend on what the Sheer legs are being used for.
The legs are then opened out to the required distance apart and, usually, a spar is square lashed
between the legs near the base to keep them in position.
Start with a Clove Hitch
on one of the spars.
Finish with a Clove Hitch
on one of the spars.
Make 8 to10 turns round both spars.
The turns need to be fairly tight, but
with enough slack to allow the
frapping turns to be put on. It may
help to put a couple of narrow
wedges between the poles.
Ease the spars slightly apart. Put on 2 frapping turns.
11
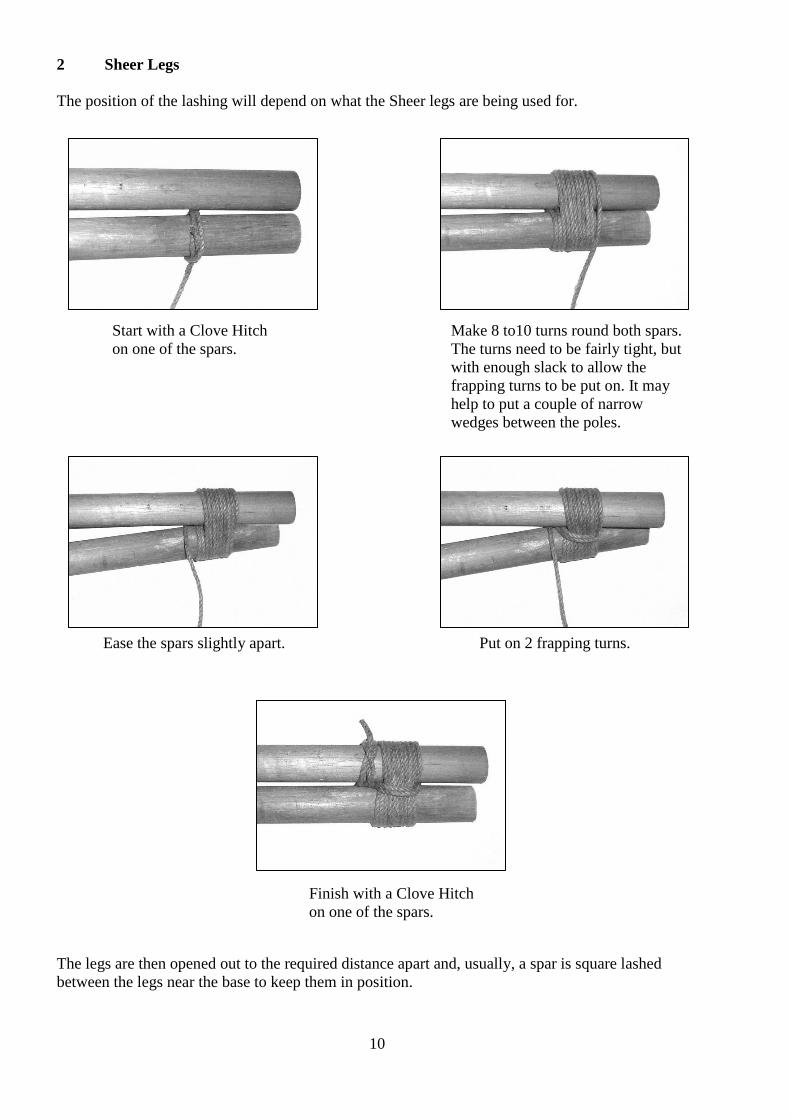
TRIPOD LASHINGS
Tripod lashings are used to join three spars to make a tripod. The lashing used and position of the
lashing on the spars will depend on the purpose of the tripod.
Figure of Eight Tripod Lashing
Although usually called a Figure of Eight the lashing it is only based on the figure 8.
Lay the three spars side by side with either the three ends next to each other or with the centre spar
in the opposite direction to the other two. Both layouts will work. Try both and decide which works
best for the project being built.
Wrapping of the cord
Trapping the short end from the clove hitch
pass the cord round the first spar, over the
middle spar and under and round the third
spar.
Pass the cord over the centre
spar, under the third spar and up
round it, under the middle spar
and then over the first spar
Start with a clove hitch on one of the spars

12
Put on 2 frapping turns
between two of the spars.
Continue the weave for
8 to 10 turns.
The turns should not be
too tight as when the
tripod is opened out the
lashing will tighten up.
Finish with a Clove Hitch
on one of the spars.
Carefully open out the legs. Usually
spars will be square lashed between the
legs to stabilise the tripod.
Put on 2 more frapping
turns between the other two
spars.

13
Sailmaker’s Lashing
This lashing is based on the sailmaker’s whipping ( see page 16) and is used for making smaller
tripods which might be used to support a washing up bowl, a bed roll as supports for a rack.
.
Make a loop in the cord and put it round one of the spars
as shown with both ends together coming out between the
other two spars.
Make 6 to 8 turns round
all three spars.
Pull the loop up and
place it over the end of
the spar it was originally
round. Pull tight.
With the two ends make a reef knot to lie in the
middle of the spars.
Open out the tripod. Additional spars can
be square lashed between the legs to
stabilise it or the legs can be heeled in to
the ground.

14
SNAKE LASHING
Used to make a table top, plate rack, screen, platform or similar construction.
Only one side of the frame is shown.
Middle the cord and attach it to the bearer
where the first cross piece is to be placed.
Put the first cross piece in position
and cross the cords over the top.
Take the strings under the bearer crossing
them underneath. Put the second cross piece
in position and cross the cords over it. Cross
the cords under the bearer.
Add as many cross pieces as needed
crossing the cords over the cross
piece then under the bearer.
Finish off with a Reef Knot. Then
repeat the sequence at the other end
of the cross pieces
15
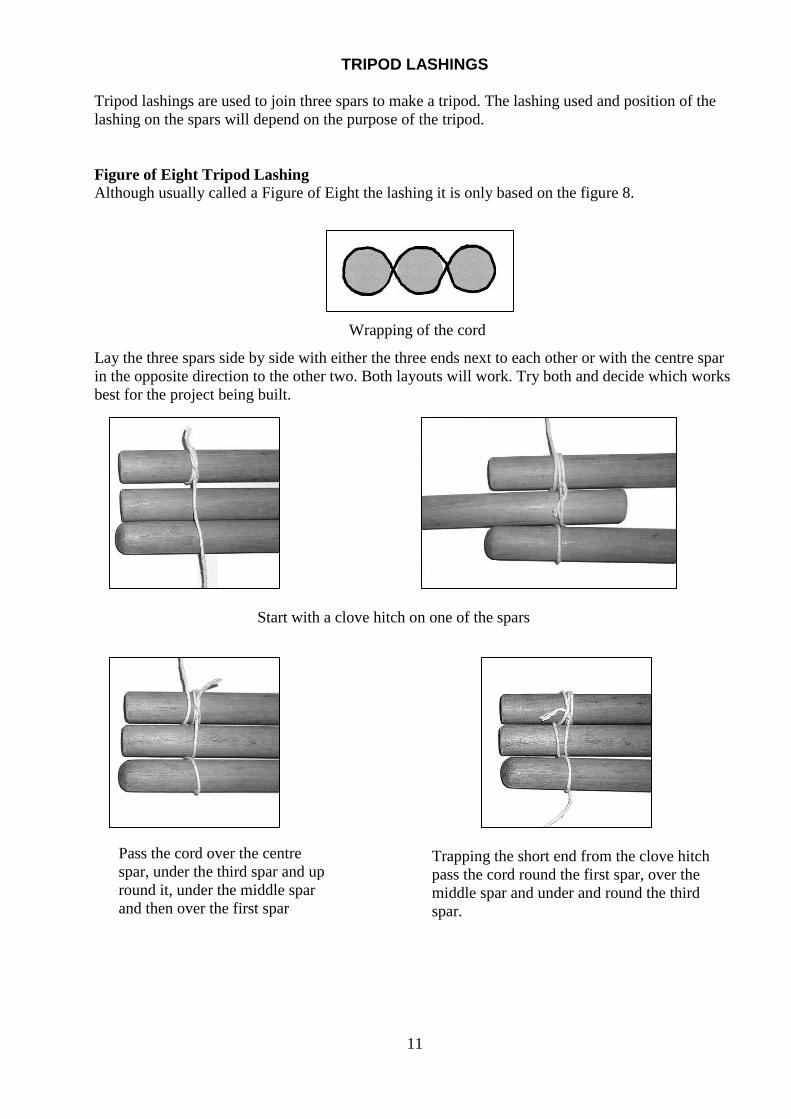
POLE BUNDLE HITCH
Pole Bundle Hitch, for want of a better name, is sometimes called a scaffold hitch.
This hitch is used for securing a number of poles or spars into a secure bundle.
Tie a second lashing at the other end of the bundle to make the bundle secure.
Make an ‘S’ shape with
a length of cord
Pull the free ends to
gather up the poles
making sure the
loops are kept apart.
Put the poles on the cord
and put the free ends of
the cord through the
opposite loop.
Finish off the lashing
with a Slip Reef knot,
a Surgeon’s knot or an
ordinary Reef knot.

16
SAILMAKER’S WHIPPING
A Sailmaker’s Whipping can be put on to the end of a 3 strand rope and is one of the most secur
Whippings.
Untwist the rope for a short distance.
Place a loop of twine round one
strand and the ends between the other
two strands.
Re-lay the rope end.
Put on 8 to 10 turns.
Put the loop over its own strand and pull tight.
Finish off with a reef knot on top
of the whipping and between the
rope strands. Trim the ends.
Bring the end up to
meet the working end.
Pull to tighten loop.