Embed Size (px)
Citation preview

1
Lab 0

2
Overview
• Learn how to use the command line to navigate and manipulate files as well as compile and run your embedded programs
• Install the Arduino compiler and other software
– We have the software on some USB drives you can grab if the network connection is slow
• Test your connection by modifying a pre-defined program and flashing it to the Arduino to see it execute
– Only grab an Arduino near the end when you need to 'make flash' your code.

3
Using the Command line
• Startup Windows Command Prompt
OR
• Startup Mac Terminal

4
Navigating the File System
• A file system has – Folders (directories)
– Files
• They are organized in a hierarchy
• Everything we can do with a GUI we can do at the command line

5
Some Basic Commands
• Here are some helpful commands to use at the command prompt
Command
ls (Mac)dir (Win)
List (see) all files in the current folder
pwd (Mac) Print working directory shows the current folder location of the terminal
cd dirname Change directory to a new folder
cp srcfiles dest (Mac)copy srcfiles dest (Win)
Copy file(s) to a new location
mv srcfile dest (Mac)move srcfile dest (Win)
Move/rename files to a new name/location
rm srcfiles (Mac)del srcfiles (Win)
Remove files from the current folder
mkdir dirname Make directory / create a new folder

6
Directory Structure Ex. 1• Each circle is a
directory/folder
• Each name in the box is a file
• Starting from your home (e.g. 'mark') directory/folder…
• Use 'cd' to change directories (folders)– cd Desktop
– cd ee109
– cd lab0
• Or go multiple folders at a time– cd Desktop/ee109/lab0 (Mac)
– cd Desktop\ee109\lab0 (Win)
mark
Desktop
lab0
Documents
other src
Makefile
lab0.c
test2.h
test2.cpp
Users
ee109
you start here

7
Directory Structure Ex. 1• To go up a level use
– cd ..
• To go up 2 levels use – cd ../.. (Mac)
– cd ..\.. (Win)
• Let's make a 'lab1' directory (folder) under the 'ee109' folder using the 'mkdir' command (assuming you are in the lab0 folder)– cd ..
– mkdir lab1
mark
Desktop
lab0
Documents
other src
Makefile
lab0.c
test2.h
test2.cpp
Users
ee109
you start here
lab1Shortcuts:. = Current directory.. = Parent directory (up one) * = Wildcard to match filenamesUnix commands:pwd = Print current working dir
8
Directory Structure Ex. 1• To go up a level use
– cd ..
• To go up 2 levels use – cd ../.. (Mac)
– cd ..\.. (Win)
• Let's make a 'lab1' directory (folder) under the 'ee109' folder using the 'mkdir' command (assuming you are in the lab0 folder)– cd ..
– mkdir lab1
mark
Desktop
lab0
Documents
other src
Makefile
lab0.c
test2.h
test2.cpp
Users
ee109
you start here
lab1

9
Directory Structure Ex. 1• To go up a level use
– cd ..
• To go up 2 levels use – cd ../.. (Mac)
– cd ..\.. (Win)
• Let's make a 'lab1' directory (folder) under the 'ee109' folder using the 'mkdir' command (assuming you are in the lab0 folder)– cd ..
– mkdir lab1
• Let's say we want to start a new lab with a copy of our old work and just modify it. Let's copy our work– Recall I'm in ee109 folder currently
– cp lab0/* lab1/ (Mac)
– copy lab0\* lab1\ (Win)
mark
Desktop
lab0
Documents
other src
Makefile
lab0.c
test2.h
test2.cpp
Users
ee109
you start here
test

10
Directory Structure Ex. 1• Let's now go into the test
folder– cd test
• Now rename the lab0.c– mv lab0.c lab1.c (Mac)
– rename lab0.c lab1.c (Win)mark
Desktop
lab0
Documents
other src
Makefile
lab0.c
test2.h
test2.cpp
Users
ee109
you start here
lab1
Makefile
lab1.c

11
Tips
• Use up-arrow to cycle through commands
• Start a folder or filename and hit tab
– cd Desk [TAB] will complete the command to be
– cd Desktop

12
COMPILING AND RUNNING A PROJECT

13
Compilers
• Windows requires 2 installs
– The first (WinAVR) is the compiler & tools
– The second is the Arduino IDE that is only used to managing your USB connection
• Mac only requires 1 download (CrossPack)
– On occasion some Mac OS'es raise a security violation when you try to install it.
– Look for the solution in the lab writeup

14
Editors
• You need a text editor to write your code and edit the'Makefile'
– Windows Notepad++
– Mac BBEdit

15
Source Code & Makefiles
• Download a sample C-file and a 'Makefile'
– Makefiles are scripts for how your program should be compiled and how it should be downloaded
– With a correct Makefile you will only need to run 2 commands to compile and download your program:
• make (will compile your code)
• make flash (will download your code)
– Actually just running 'make flash' will do both but doing them separately gives you the chance to see if the compilation ('make') step completed successfully
• Note 1: For each new assignment/project, you will need to edit the Makefile to point it to the correct filenames for compilation and for the right USB connection
• Note 2: There should be no extension on the filename 'Makefile'. Some editors add .txt (Makefile.txt). In the lab writeup we describe some commands to rename it back to 'Makefile' if that happens
16
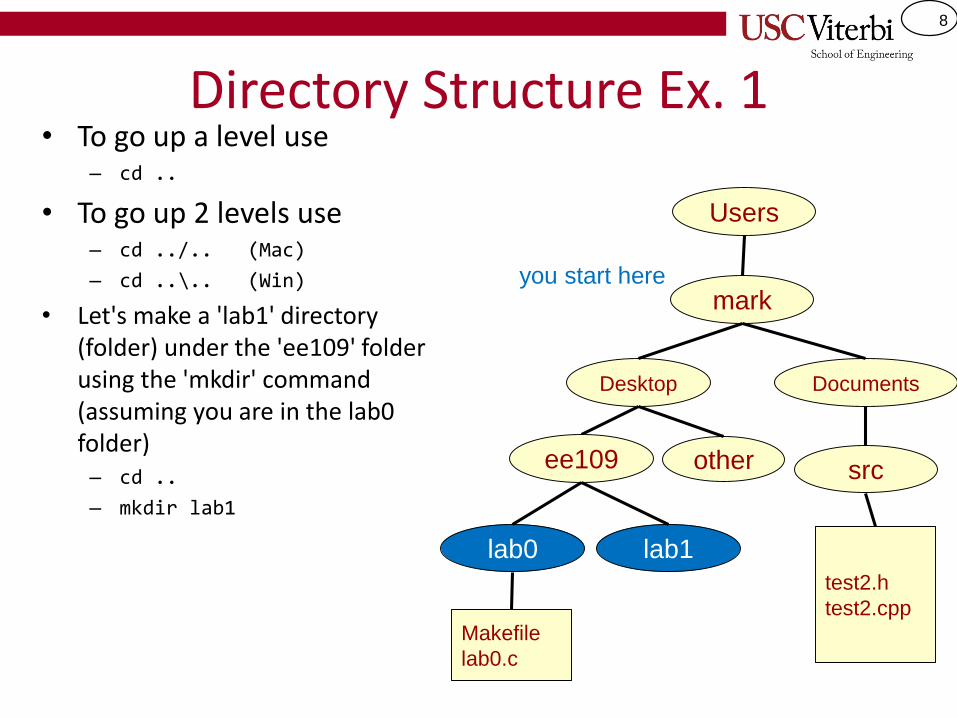
Testing Your Installation
• Once you've edited the source code and Makefile you can ask for an Arduino and connect it to your laptop
• When run the first time you should see a small, yellow LED blinking at a rate of 1 second
• If you like change the values of 500 in your code to 100, then rerun 'make' and 'make flash'. You should see the LED blinking at a much faster rate

17
OTHER IMPORTANT NOTES

18
Academic Integrity
• Labs should be done INDIVIDUALLY except for the first 2 hardware based labs where we explicitly allow teams
• You should NOT show or discuss your actual code with your neighbors/friends but instead talk at the conceptual level or refer them to a TA/CP
• Important: You should not post your lab code publicly (e.g. on Github, etc.) nor attempt to find nor use code available online

19
WHEN YOU ARRIVE

20
When You Arrive…
• We will have the software available on a few USB thumb drives if the network connection is slow
• We will only have 6-8 loaner Arduinos available for you to test your install. Please do NOT grab one until you have modified the lab0.c file and reached the "From a C Program to Bits" section of the lab. Please return it once you have gotten the LED to flash quickly.
– We also have a few USB-C adapters if you need one, but you will need to buy your own


![Using the EE 109 Toolsbytes.usc.edu/files/ee109/old/slides/EE109_ToolChain.pdf5 Emacs Quick Reference [Mac/Linux] • Emacs uses the keyboard for all editing commands. • Easiest](https://img.pdfslide.us/doc/110x75/5e0aff06c2158a79e1524245/using-the-ee-109-emacs-quick-reference-maclinux-a-emacs-uses-the-keyboard-for.jpg)


![Stacks and Queues - University of Southern Californiabytes.usc.edu › cs455 › curr › lectures › notes › stackQueue.pdf · Stacks & Queues [Bono] 5 Stacks for method call/return](https://img.pdfslide.us/doc/110x75/5f13edb099d5d270ee7b65cf/stacks-and-queues-university-of-southern-a-cs455-a-curr-a-lectures-a-notes.jpg)