Embed Size (px)
Citation preview
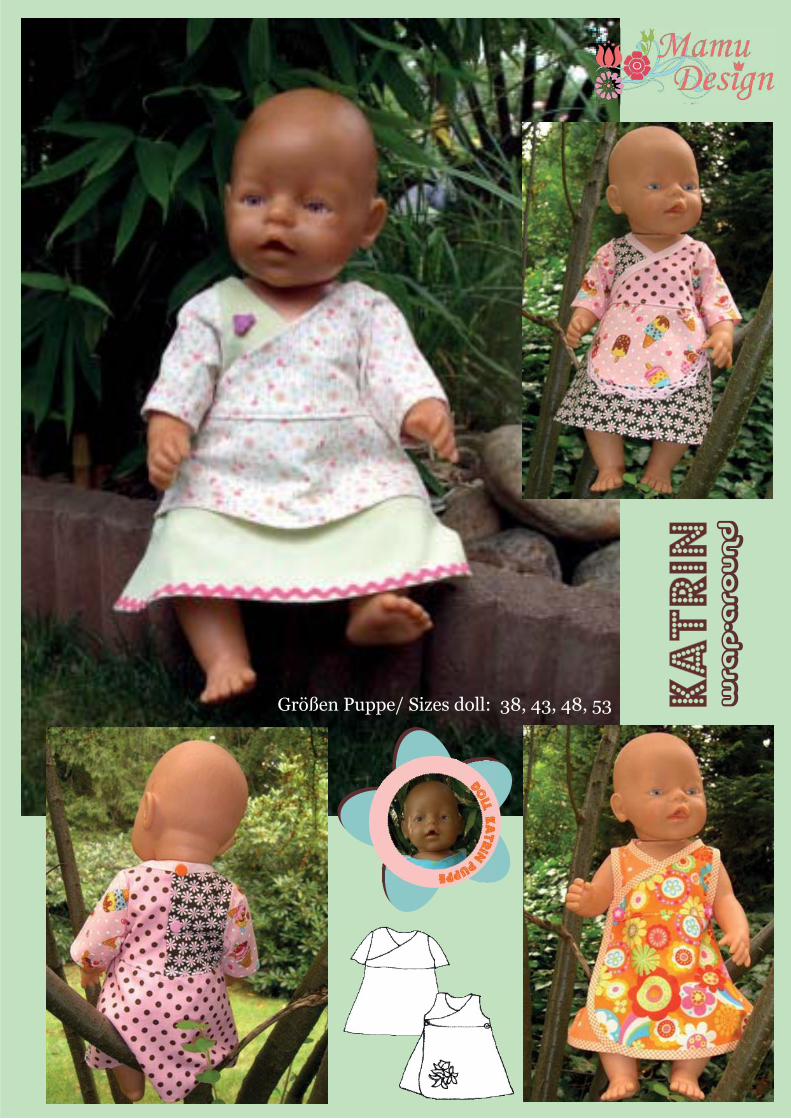
Katrin Puppe/ Doll
______________________________________________________________________________________________ (c) 2008 Mariya Muschard Design, www.mamu-design.info, eMail: [email protected], Layout & Satz: (c) 2006-2008 Katalina Grohman. 1/6
Modell Nr. 1 Kleid model No. 1 dress
Alle Teile zuschneiden. Cut out all pieces.
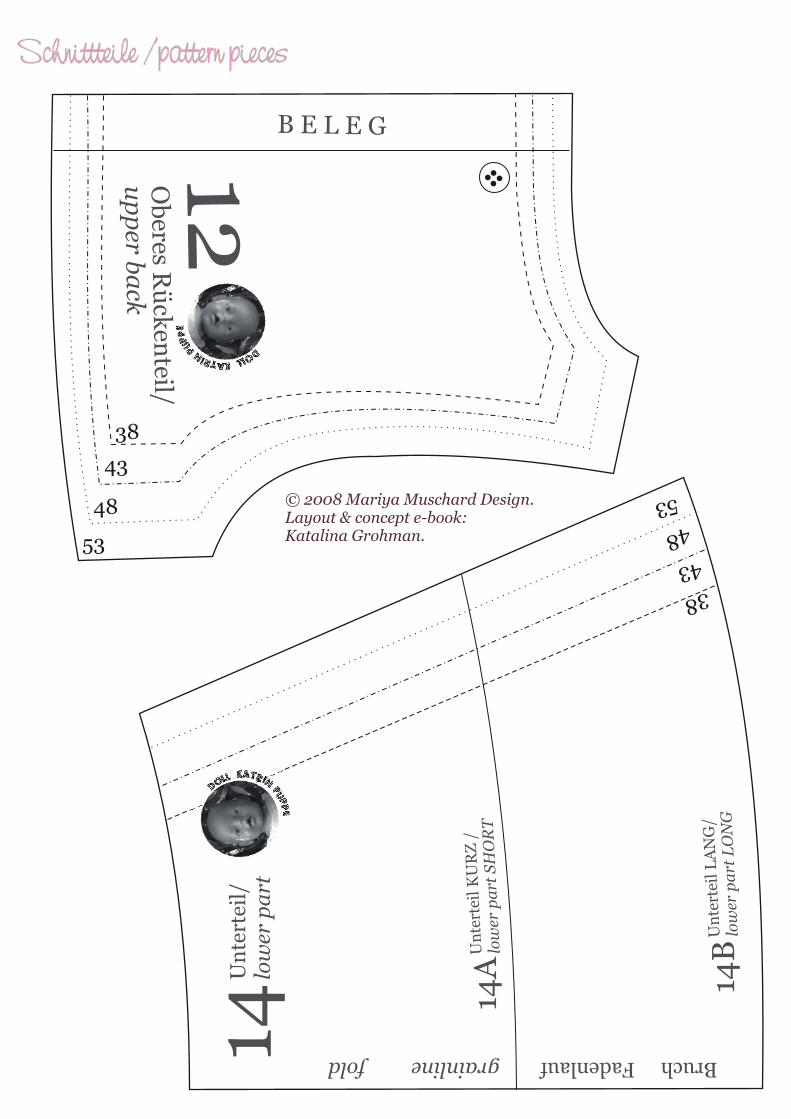
11 – Oberes Vorderteil (2x) 11 – upper front (cut two)12 – Oberes Rückenteil (2x) 12 – upper back (cut two)
13 – Ärmel (2x) (falls Ärmel gewünscht – ohne Ärmel siehe Anleitung Modell 2) 13 – sleeve (cut two sleeves) (if sleeves are desired – without sleeves see model 2)
14 – Unterteil (2x im Bruch) (in Doppeloptik – 2x im Bruch (kurz), 2x im Bruch (lang) 14 – lower front & back (cut two on the fold) ( in double look – cut two on the fold (short), cut two on the fold (long)
Wenn nicht anders angegeben, ist bei allen Schnittteilen eine Nahtzugabe von 0,5 cm bereits enthalten. The pattern includes a seam allowance of 0,5 cm, unless otherwise indicated.
Modell Nr. 2 Wickel-Kleid ärmellos oder mit Ärmeln/ wrap-around dress without or with sleeves
Alle Teile zuschneiden. Cut out all pieces.
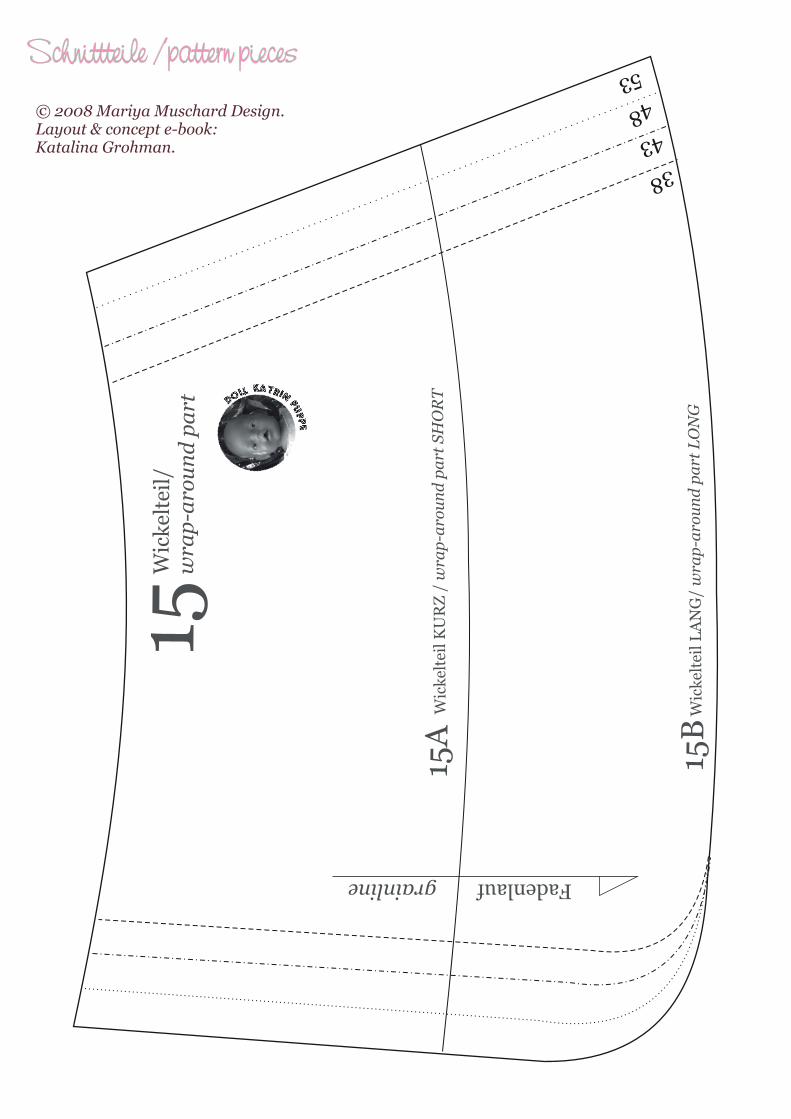
11 – Oberes Vorderteil (2x) 11 – upper front (cut two) 12a – Oberes Rückenteil (1x im Bruch) 12a – upper back (cut one back on the fold) 14 – Unterteil (1x im Bruch) 14 – lower part (cut one on the fold)15 – Wickelteil (2x) 15 –wrap-around part (cut two)
Für Shirt/ Kleid mit Ärmeln: For shirt/ dress with sleeves:13 – Ärmel (2x) ( Siehe Anleitung Modell 1) 13 – sleeves (cut two) (see model 1)
Wenn nicht anders angegeben, ist bei allen Schnittteilen eine Nahtzugabe von 0,5 cm bereits enthalten. The pattern includes a seam allowance of 0,5 cm, unless otherwise indicated.
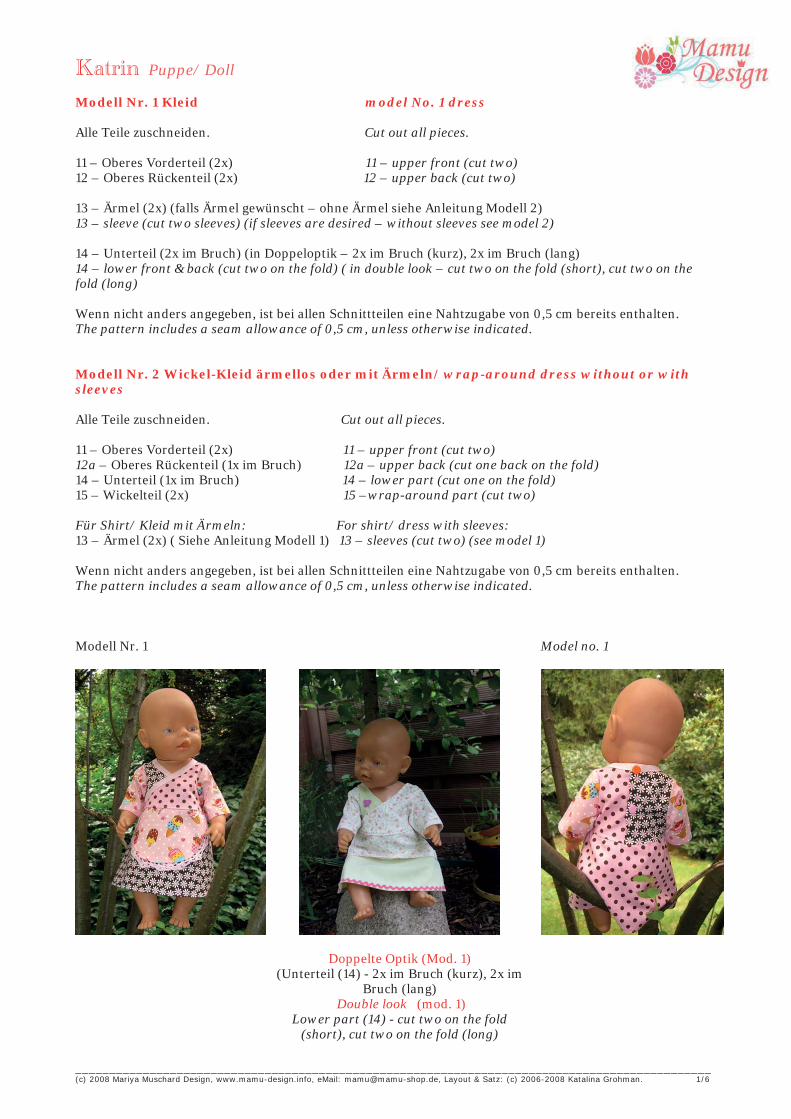
Modell Nr. 1
Doppelte Optik (Mod. 1)(Unterteil (14) - 2x im Bruch (kurz), 2x im
Bruch (lang) Double look (mod. 1)
Lower part (14) - cut two on the fold (short), cut two on the fold (long)
Model no. 1
Katrin Puppe/ Doll
______________________________________________________________________________________________ (c) 2008 Mariya Muschard Design, www.mamu-design.info, eMail: [email protected], Layout & Satz: (c) 2006-2008 Katalina Grohman. 2/6
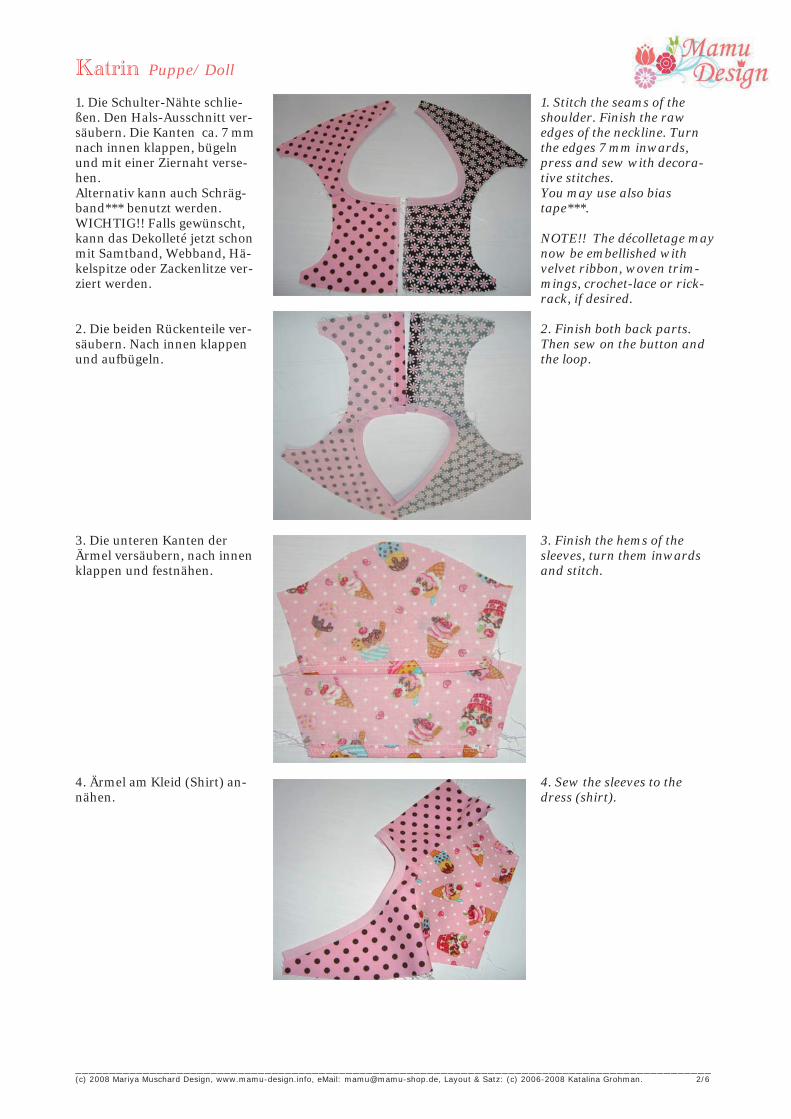
1. Die Schulter-Nähte schlie-ßen. Den Hals-Ausschnitt ver-säubern. Die Kanten ca. 7 mm nach innen klappen, bügeln und mit einer Ziernaht verse-hen. Alternativ kann auch Schräg-band*** benutzt werden. WICHTIG!! Falls gewünscht, kann das Dekolleté jetzt schon mit Samtband, Webband, Hä-kelspitze oder Zackenlitze ver-ziert werden.
2. Die beiden Rückenteile ver-säubern. Nach innen klappen und aufbügeln.
3. Die unteren Kanten der Ärmel versäubern, nach innen klappen und festnähen.
4. Ärmel am Kleid (Shirt) an-nähen.
1. Stitch the seams of the shoulder. Finish the raw edges of the neckline. Turn the edges 7 mm inwards, press and sew with decora-tive stitches. You may use also bias tape***.
NOTE!! The décolletage may now be embellished with velvet ribbon, woven trim-mings, crochet-lace or rick-rack, if desired.
2. Finish both back parts. Then sew on the button and the loop.
3. Finish the hems of the sleeves, turn them inwards and stitch.
4. Sew the sleeves to the dress (shirt).

Katrin Puppe/ Doll
______________________________________________________________________________________________ (c) 2008 Mariya Muschard Design, www.mamu-design.info, eMail: [email protected], Layout & Satz: (c) 2006-2008 Katalina Grohman. 3/6
5. Die Seitennähte schließen.
6. Applikationen können nach Wunsch angebracht werden.
.
7. Die oberen Vorderteile und das Rückenteil mit den Unter-teilen zusammennähen.
Saum versäubern, nach innen klappen und festnähen. Mit Bändern verzieren, falls ge-wünscht.
8. Das äußere Rückenteil mit Knopflöchern versehen. Das innere Rückenteil mit Knöpfen versehen. Anstelle von Knöpfen und Knopflöchern können auch Druckknöpfe verwendet wer-den.
5. Stitch the side seams.
6. Appliqués may be sewn in place, if desired.
7. Sew the upper parts and the lower parts together.
Finish the hem, turn it in-wards and stitch. You may embellish it with ribbons, if desired.
8. Provide the outer part of the back part with button-holes. Provide the inner part of the back part with buttons. Instead of buttons and but-tonholes you may also use snap fasteners.

Katrin Puppe/ Doll
______________________________________________________________________________________________ (c) 2008 Mariya Muschard Design, www.mamu-design.info, eMail: [email protected], Layout & Satz: (c) 2006-2008 Katalina Grohman. 4/6
Modell Nr. 2
1. Die vorderen Oberteile und die vorderen Unterteile zu-sammennähen. Applikationen können nach Wunsch angebracht werden.
2. Das Rückenoberteil und Rückenunterteil zusammen-nähen. Applikationen können nach Wunsch angebracht werden.
3. Die vorderen und das hinte-re Teil des Kleides zusammen-nähen.
Model no. 2
1. Sew the upper front parts and the lower front parts together. Appliqués may be sewn in place, if desired.
2. Sew the upper back part and the lower back part to-gether.Appliqués may be sewn in place, if desired.
3. Sew the front parts and the back part of the dress together.

Katrin Puppe/ Doll
______________________________________________________________________________________________ (c) 2008 Mariya Muschard Design, www.mamu-design.info, eMail: [email protected], Layout & Satz: (c) 2006-2008 Katalina Grohman. 5/6
4. Die Schulter-Nähte schlie-ßen.
5. Das ganze Kleid (inklusive Armausschnitt) rundherum mit Schrägband*** versehen oder alle Kanten versäubern, nach innen klappen und fest-nähen. !!! Fangen Sie mit dem Nähen des Schrägbands*** von der Seitenkante und nähen Sie ununterbrochen rundherum.
6. Das äußere Wickelteil mit zwei Knopflöchern versehen. Das innere Wickelteil mit zwei Knöpfen versehen.
WICHTIG!!! Anstelle von Knöpfen und Knopflöchern können auch Druckknöpfe verwendet werden.
4. Stitch the seams of the shoulder.
5. Provide all edges of the dress (inclusive the arm opening) with bias tape*** or finish them, turn them inwards and sew.
!!! Start sewing the bias tape from the side seam of the dress and sew continuously all the way round.
6. Provide the outer part of the wrap-around part with two buttonholes. Provide the inner part of the wrap-around part with two buttons.
IMPORTANT!!! Instead of buttons and buttonholes you may also use snap fasteners.

Katrin Puppe/ Doll
______________________________________________________________________________________________ (c) 2008 Mariya Muschard Design, www.mamu-design.info, eMail: [email protected], Layout & Satz: (c) 2006-2008 Katalina Grohman. 6/6
*** Schrägband
1. Das Schrägband längs in der Mitte falten und bügeln.
2. Den Stoff zwischen die bei-den Kanten des Schrägbands bis zum Anschlag schieben und von außen knappkantig step-pen.
- Anstelle eines geraden Sti-ches können Sie auch Zick-Zack benutzen (es ist einfa-cher).
- Sie können das Schrägband zuerst mit der Hand festheften und erst dann mit der Maschi-ne nähen.
- Am Ende angekommen, das Schrägband abschneiden, da-bei ist 0,5 mm Nahtzugabe zu lassen. Die Nahtzugabe nach innen klappen und festnähen.
*** Bias tape
1. Fold the bias tape length-wise in half and iron.
2. Place the fabric between both edges of the bias tape all the way and then sew it in place close by way of edge-stitching from the right side.
- You may also use a zigzag stitch instead of a straight stitch (that is easier).
- You may first baste the bias tape in place manually and then machine-sew it.
- When you reach the end, cut the bias tape leaving a seam allowance of 0.5 mm (0.19"). Fold the seam allow-ance inward and sew in place.


![Tanja Kolm [mm121011] | Katrin Detter [mm121038] |](https://img.pdfslide.us/doc/110x75/5681458d550346895db279a0/tanja-kolm-mm121011-katrin-detter-mm121038-.jpg)

![Katrin Dispenser Brochure Uk 1003 Low[1]](https://img.pdfslide.us/doc/110x75/5571fe1f49795991699aac29/katrin-dispenser-brochure-uk-1003-low1.jpg)