Embed Size (px)
Citation preview

Joram 5.2User’s Guide
Last modified 03/03/2009 by ScalAgent D.T. release 5.2.1
Joram 5.2.1 User's Guide
ContentsContents................................................................................................2
Figures .................................................................................................8
1.Installation........................................................................................10
1.1.Requirements....................................................................................................................10
1.2.Getting Joram binary distribution...................................................................................10
1.2.1.Directory structure and description.........................................................................11
2.Using samples..................................................................................12
2.1.Compiling JORAM samples.............................................................................................12
2.2.Running Joram samples..................................................................................................12
2.2.1.The classic samples..................................................................................................12
2.2.2.The chat sample........................................................................................................14
2.2.3.The distributed sample.............................................................................................15
2.2.4.The dotcom demo.....................................................................................................16
2.2.5.The perfs samples.....................................................................................................18
2.3.Using scripts.....................................................................................................................19
2.3.1.First step....................................................................................................................19
2.3.2.Launching a JORAM platform..................................................................................19
2.3.3.Launching the JORAM administration and monitoring tool..................................19
2.3.4.Launching a JORAM client.......................................................................................19
2.3.5.Running the classic samples using script files......................................................20
2.4.Administration through XML scripts...............................................................................21
2.4.1.Classic sample administration using XML script...................................................21
3.Administration Guide........................................................................22
3.1.Introduction.......................................................................................................................22
3.2.Administration concepts..................................................................................................22
3.2.1.Overall view...............................................................................................................22
3.2.2.User............................................................................................................................23
3.2.3.Destinations...............................................................................................................24
3.3.Platform configuration.....................................................................................................25
3.3.1.Centralized configuration.........................................................................................26
3.3.2.Distributed configuration.........................................................................................27
- 2 -
Joram 5.2.1 User's Guide
3.3.3.Stopping a server......................................................................................................28
3.3.4.Dynamic configuration.............................................................................................28
3.3.5.Logging configuration..............................................................................................31
3.4.High level administration.................................................................................................31
3.4.1.Administration “session”.........................................................................................32
3.4.2.Managing a user........................................................................................................33
3.4.3.User connectivity......................................................................................................33
3.4.4.Managing a destination.............................................................................................35
3.4.5.Managing a Queue....................................................................................................37
3.4.6.Managing a Topic......................................................................................................38
3.4.7.Managing the platform..............................................................................................38
3.5.JMX administration of Joram...........................................................................................39
3.6.ScriptsXML .......................................................................................................................40
3.6.1.Administrator connection.........................................................................................40
3.6.2.Naming.......................................................................................................................41
3.6.3.User and connectivity...............................................................................................41
3.6.4.Destination.................................................................................................................41
3.6.5.Destination security and naming.............................................................................42
3.6.6.Example.....................................................................................................................42
4.Specialized destinations.................................................................44
4.1.Dead Message Queue.......................................................................................................44
4.1.1.Dead message queue................................................................................................44
4.1.2.Managing a Dead Message Queue...........................................................................47
4.1.3.Running the “Dead Message Queue” sample.........................................................48
4.2.Hierarchical Topic.............................................................................................................49
4.2.1.Hierarchical topic......................................................................................................49
4.2.2.Managing a Hierarchical Topic.................................................................................50
4.2.3.Running the topic tree sample.................................................................................51
4.3.Clustered Topic................................................................................................................52
4.3.1.Introduction...............................................................................................................52
4.3.2.Managing a clustered topic......................................................................................53
4.3.3.Running the “Clustered Topic” Sample..................................................................55
4.3.4.Using XML Scripts.....................................................................................................56
4.4.Clustered Queue...............................................................................................................57
4.4.1.Introduction...............................................................................................................57
4.4.2.Managing a clustered queue....................................................................................59
4.4.3.Running the “Clustered Queue” Sample................................................................60
4.4.4.Using XML Scripts.....................................................................................................62
- 3 -

Joram 5.2.1 User's Guide
4.5.SchedulerQueue...............................................................................................................63
4.5.1.Introduction...............................................................................................................63
4.5.2.Managing a SchedulerQueue...................................................................................63
4.5.3.Using a schedulerQueue..........................................................................................64
4.6.Mail queue and topic........................................................................................................64
4.6.1.Introduction...............................................................................................................64
4.6.2.Managing a mail queue or topic...............................................................................65
4.6.3.Using a mail queue or topic......................................................................................66
4.6.4.Running the sample..................................................................................................66
4.7.MonitoringTopic...............................................................................................................68
4.7.1.Introduction...............................................................................................................68
4.7.2.Managing a MonitoringTopic....................................................................................69
4.7.3.Running the sample..................................................................................................70
4.8.Collector queue and topic................................................................................................70
4.8.1.Introduction...............................................................................................................70
4.8.2.Managing a Collector destination............................................................................70
4.8.3.Using a collector destination...................................................................................71
4.8.4.Running the sample..................................................................................................72
4.9.FTPQueue..........................................................................................................................72
4.9.1.Introduction...............................................................................................................72
4.9.2.Managing a FTPQueue..............................................................................................73
4.9.3.Using a FTPQueue destination................................................................................74
4.9.4.Running the sample..................................................................................................74
5.Using SOAP.......................................................................................76
5.1.Platform configuration ....................................................................................................77
5.1.1.Configuration.............................................................................................................77
5.1.2.Running the platform................................................................................................77
5.2.Administering...................................................................................................................78
5.2.1.Introduction...............................................................................................................78
5.2.2.Setting a user.............................................................................................................78
5.2.3.SOAP ConnectionFactory object.............................................................................78
5.2.4.SOAP administrator..................................................................................................79
5.2.5.Accessing JNDI through SOAP................................................................................79
5.3.Configuring Tomcat.........................................................................................................80
5.3.1.Getting Tomcat..........................................................................................................80
5.3.2.Needed resources.....................................................................................................80
5.3.3.Configuring Tomcat..................................................................................................80
5.4.Running the Soap Sample...............................................................................................81
- 4 -
Joram 5.2.1 User's Guide
5.5.Running kJoram sample..................................................................................................82
5.5.1.Environment..............................................................................................................82
5.5.2.Compiling the samples files.....................................................................................83
5.5.3.Installing the samples on the Pocket PC.................................................................83
5.5.4.Starting and administering the JORAM platform....................................................84
6.Using a collocated server................................................................85
6.1.Introduction.......................................................................................................................85
6.2.Configure a collocated server.........................................................................................85
6.3.Start a collocated server..................................................................................................85
6.4.Connect to the collocated server....................................................................................86
6.4.1.Create local connections..........................................................................................86
6.4.2.Connect the administration module........................................................................86
6.5.Stop the collocated server...............................................................................................86
6.6.Start the embedding Java application............................................................................86
7.High-Availability...............................................................................87
7.1.Platform Configuration.....................................................................................................87
7.1.1.Clustered ScalAgent server configuration..............................................................87
7.1.2.Group communication..............................................................................................88
7.1.3.Joram server configuration......................................................................................88
7.2.Platform startup................................................................................................................89
7.2.1.Host clock synchronization......................................................................................89
7.3.Programming an external HA Joram client....................................................................89
7.3.1.Joram administration................................................................................................90
7.3.2.JMS programming.....................................................................................................90
7.4.Programming a collocated Joram client.........................................................................90
7.4.1.Joram administration................................................................................................90
7.4.2.Collocated client process.........................................................................................91
7.4.3.JMS programming.....................................................................................................91
7.5.Running the “Joram H.A.” Sample..................................................................................91
8.JNDI..................................................................................................93
8.1.Overview............................................................................................................................93
8.2.Replication........................................................................................................................93
8.2.1.Master ownership strategy.......................................................................................93
8.2.2.Lazy propagation strategy........................................................................................94
8.2.3.Replicas synchronization.........................................................................................94
8.3.Distribution of the naming servers.................................................................................95
8.4.Distribution of the naming contexts...............................................................................96
- 5 -
Joram 5.2.1 User's Guide
8.4.1.Context creation........................................................................................................96
8.4.2.Context name resolution..........................................................................................96
8.5.Configuration....................................................................................................................96
8.6.Loose coupling configuration.........................................................................................98
9.Joram in JBoss.................................................................................99
9.1.Joram installation.............................................................................................................99
9.1.1.Libraries Joram JARs...............................................................................................99
9.1.2.Connector Joram RAR..............................................................................................99
9.2.MDB activation..................................................................................................................99
9.2.1.JMSContainerInvoker..............................................................................................100
9.2.2.Joram ActivationSpec.............................................................................................102
9.2.3.Jboss ActivationSpec.............................................................................................104
9.3.Send and receive JMS messages..................................................................................104
9.3.1.Jboss managing Joram connections....................................................................105
9.3.2.Joram managed connection factory......................................................................105
9.3.3.Resolving the connection factory..........................................................................106
9.3.4.Resolving the destinations.....................................................................................106
10.Using Joram in WebLogic.............................................................107
10.1.Integrating WebLogic server with Joram....................................................................107
10.1.1.Installation.............................................................................................................107
10.1.2.Administration and Deployment..........................................................................110
10.1.3.JMS Module / Foreign Server...............................................................................114
10.1.4.JNDI view...............................................................................................................118
10.1.5.Patch WSL92..........................................................................................................119
10.2.Test with a simple MDB................................................................................................119
10.2.1.Build the Message-Driven Bean...........................................................................120
10.2.2.Deploy SimpleMDB................................................................................................122
10.2.3.Results...................................................................................................................123
11.Using JMS Bridge.........................................................................125
11.1.Bridging Joram 5 and XMQ..........................................................................................125
11.2.Concepts and implementation....................................................................................126
11.2.1.Message exchange................................................................................................126
11.2.2.Acknowledgment policy.......................................................................................127
11.2.3.Message selection.................................................................................................129
11.2.4.Connection failure handling.................................................................................130
11.3.User manual..................................................................................................................130
11.3.1.Configuring the foreign platform.........................................................................131
- 6 -
Joram 5.2.1 User's Guide
11.3.2.Configuring JORAM..............................................................................................131
11.3.3.Steps......................................................................................................................132
11.3.4.Failures..................................................................................................................132
11.4.WebSphere-MQ example..............................................................................................132
11.4.1.Configuring and starting JORAM.........................................................................133
11.4.2.WebSphere MQ setup...........................................................................................133
11.4.3.Administering JORAM..........................................................................................134
11.4.4.The JORAM subscriber.........................................................................................134
11.4.5.The WebSphere MQ sender..................................................................................135
11.5.Running the bridge sample.........................................................................................136
11.6.JORAM – XMQ JORAM example..................................................................................137
11.6.1.Configuring and starting JORAM.........................................................................137
11.6.2.Administering JORAM..........................................................................................138
11.6.3.The XMQ JORAM producer...................................................................................139
11.6.4.The JORAM consumer..........................................................................................140
12.Working with sources distribution...............................................142
12.1.Getting Joram sources.................................................................................................142
12.1.1.Getting a packaged version of Joram..................................................................142
12.1.2.Getting Joram from SVN.......................................................................................142
12.1.3.Directory structure and description.....................................................................142
12.2.Compiling and shipping Joram...................................................................................143
12.2.1.Compiling Joram...................................................................................................144
12.2.2.Compiling kJoram ................................................................................................146
12.2.3.Compiling the administration tool.......................................................................146
12.2.4.Generating the javadoc.........................................................................................146
12.2.5.Generating a distribution......................................................................................146
12.2.6.Cleaning.................................................................................................................147
- 7 -
Joram 5.2.1 User's Guide
Figures
Figure 1 - Classic samples configuration............................................13
Figure 2 - Chat sample configuration..................................................14
Figure 3 - Distributed sample configuration.......................................15
Figure 4 - Dotcom sample configuration.............................................16
Figure 5 - Web Server's interface........................................................17
Figure 6 - Inventory Server's and Control Server's interfaces............17
Figure 7 - Customer Server's interfaces.............................................18
Figure 8 - Delivery Server's interface..................................................18
Figure 9 - Applications exchanging data through messaging............22
Figure 10 - Joram platform and clients...............................................23
Figure 11 - A client connected to a server “through” a standard ConnectionFactory..............................................................................24
Figure 12 - A client accessing a server destination”through” a standard Destination...........................................................................25
Figure 13 - Messages on a queue sent to a DMQ................................45
Figure 14 - Dead message queue sample...........................................48
Figure 15 - A Hierarchical topic..........................................................49
Figure 16 - A distributed Hierarchical topic.......................................50
Figure 17 - Topic tree sample.............................................................52
Figure 18 - A clustered topic...............................................................53
Figure 19 - Cluster sample configuration............................................55
Figure 20 - A cluster of queues balancing heavy deliveries...............58
Figure 21 - The mail sample................................................................68
- 8 -
Joram 5.2.1 User's Guide
Figure 22 - A Joram platform providing a SOAP access.....................76
Figure 23 - SOAP sample configuration..............................................82
Figure 24 - kSOAP sample configuration............................................83
Figure 25 - JNDI replication................................................................93
Figure 26 - Lazy propagation...............................................................94
Figure 27 - Replicas synchronization..................................................94
Figure 28 - Distributed configuration..................................................95
Figure 29 - Adding a new server..........................................................96
Figure 30 - A 3 servers configuration..................................................97
Figure 31 - The 3 servers configuration replicas................................98
Figure 32 - A JORAM client communicating with a XMQ client.......125
Figure 33 - Bridge communication diagram......................................126
Figure 34 - Delivery rolled back by the JORAM bridge destination..128
Figure 35 - Delivery rolled back by the JORAM client application...129
Figure 36 - How selectors operate....................................................130
Figure 37 - Bridge sample..................................................................136
Figure 38: Bridge Joram-Joram sample............................................137
- 9 -
Joram 5.2.1 User's Guide
1. Installation
Joram 5.0 includes:
A messaging server (or MOM), providing the messaging functionalities: basically hosting and routing the messages exchanged by the client applications.
A JNDI compliant naming server, distributed (since release 4.1) persistent and reliable.
Client classes allowing applications to access the MOM functionalities. Those interfaces are defined by the JMS 1.1 specifications.
A graphical administration and monitoring tool, allowing to modify and visualise the state of a JORAM platform (made of one or many interconnected servers).
A specific set of classes usable by client applications running on a J2ME environment. This set of classes is JMS 1.1 like, and is called kJoram.
Samples illustrating the various features provided by Joram.
JCA 1.5 connector allowing deployment in J2EE 1.4 platform.
1.1. RequirementsJoram can run on a wide variety of platform, a typical hardware and software platform is:
Hardware requirements
Year 2000 compliant 32-bit Intel based PC hardware (or equivalent)
256 Mb RAM, 5 Gb disk,
Communication hardware supporting TCP/IP
Software requirements
Operating system: Linux, Windows 2000 and XP, etc.
Connectivity: TCP/IP.
Java environment: JDK 1.4 and later.
1.2. Getting Joram binary distributionThe packages are downloadable from the following location:
http://forge.objectweb.org/project/showfiles.php?group_id=4 .
For release x.y.z, the following tar file is provided:
joram-x.y.z.tgz, including the client and server libraries, as well as the graphical tool library, the J2ME client library, the javadoc and the samples sources.
A package is expanded by UNIX users with the gunzip and tar commands; Windows developers can use the Winzip utility.
- 10 -
Joram 5.2.1 User's Guide
1.2.1. Directory structure and description
Joram binary distribution
The distribution is expanded in a joram-x.y.z/ directory. It includes the following directories:
apidoc/ samples/
o bin/…o config/…o src/
joram/… kjoram/…
ship/lib/ ship/licenses/
- 11 -
Joram 5.2.1 User's Guide
2. Using samples
This chapter describes the samples provided with JORAM and for each, the architecture of the underlying platform. The samples are provided with the JORAM distributions under the samples/ directory. It’s a good way to verify the correctness of Joram installation.
The samples/src/joram directory includes the samples codes of JORAM clients. Compiling and launching are done with the ant command.
Configuration files are located in the samples/config directory. They might be edited and adapted to your environment. For more information, please refer to the administration part of this document (chapter 3). This directory contains:
a3config.dtd, the DTD for server configuration; a3debug.cfg, a default logger configuration file; centralized_a3servers.xml, a configuration file for a centralized server architecture; distributed_a3servers.xml, a configuration file for a distributed servers architecture; soap_a3servers.xml, the configuration file for the SOAP samples server architecture; jndi.properties, a default configuration file for JNDI’s clients. soap_jndi.properties, the configuration file for JNDI’s SOAP clients;
The samples/bin directory provides Unix and Windows script files for launching JORAM servers and clients if you don’t want to use ant targets.
All examples creates a samples/run where logging files and the persistence root (if any) are created. Current configuration files are copied in this directory. When starting a platform with a new configuration, or when a clean platform is expected, this directory should be removed.
The samples/src/kjoram directory includes the samples codes of kJORAM clients. Compiling is done with the ant command, utility files are provided to Pocket PC users.
2.1. Compiling JORAM samplesThe Joram samples need to be compiled. Under the samples/src/joram directory, simply type:
ant clean compile
This creates a samples/classes/joram/ directory holding the compiled classes. For removing this directory, type:
ant clean
2.2. Running Joram samples
2.2.1. The classic samples
The JMS API provides a separate domain for each messaging approach, point-to-point or publish/subscribe:
The point-to-point domain is built around the concept of queues, senders and receivers.
- 12 -
Joram 5.2.1 User's Guide
The publish/subscribe domain is built around the concept of topic, publisher and subscriber
Additionally it provides an unified domain with common interfaces that enable the use of queue and topic. This domain is defines the concept of producers and consumers.
This sample demonstrates the different messaging domains of JMS, point-to-point with a sender, a receiver and a queue browser, publish/subscribe with a subscriber and a publisher, and unified with messages producers and consumers.
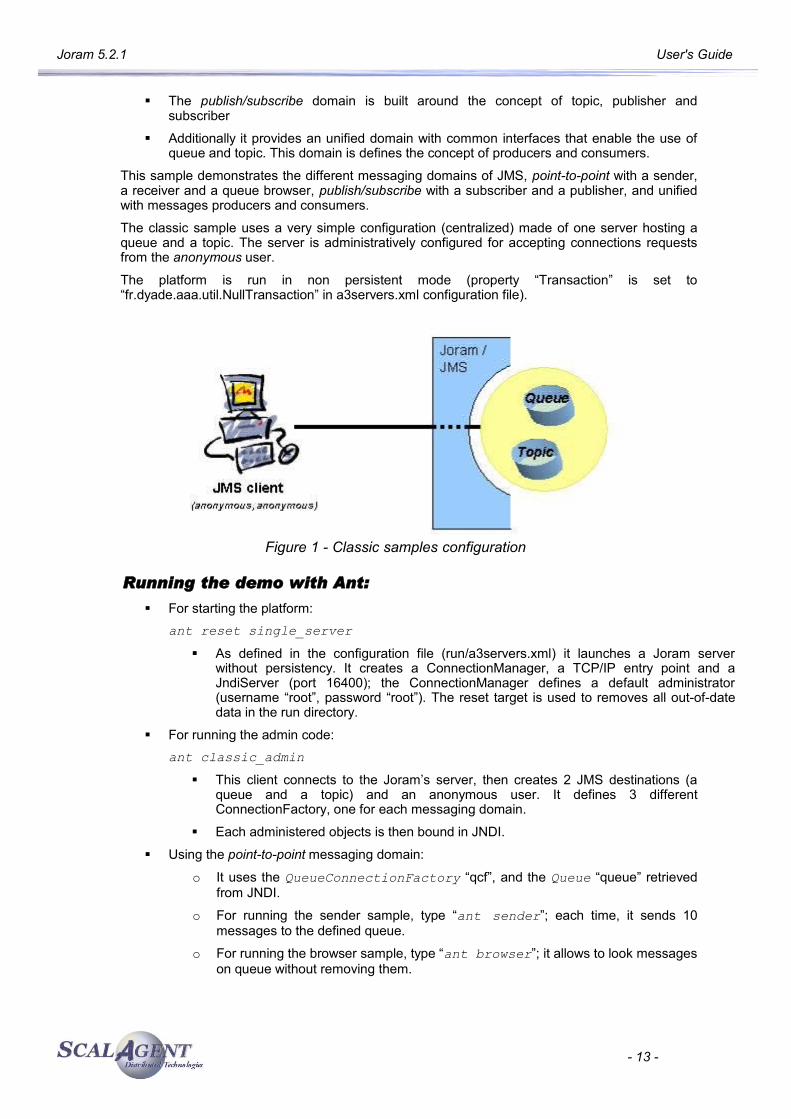
The classic sample uses a very simple configuration (centralized) made of one server hosting a queue and a topic. The server is administratively configured for accepting connections requests from the anonymous user.
The platform is run in non persistent mode (property “Transaction” is set to “fr.dyade.aaa.util.NullTransaction” in a3servers.xml configuration file).
Figure 1 - Classic samples configuration
Running the demo with Ant:
For starting the platform:ant reset single_server
As defined in the configuration file (run/a3servers.xml) it launches a Joram server without persistency. It creates a ConnectionManager, a TCP/IP entry point and a JndiServer (port 16400); the ConnectionManager defines a default administrator (username “root”, password “root”). The reset target is used to removes all out-of-date data in the run directory.
For running the admin code:ant classic_admin
This client connects to the Joram’s server, then creates 2 JMS destinations (a queue and a topic) and an anonymous user. It defines 3 different ConnectionFactory, one for each messaging domain.
Each administered objects is then bound in JNDI.
Using the point-to-point messaging domain:
o It uses the QueueConnectionFactory “qcf”, and the Queue “queue” retrieved from JNDI.
o For running the sender sample, type “ant sender”; each time, it sends 10 messages to the defined queue.
o For running the browser sample, type “ant browser”; it allows to look messages on queue without removing them.
- 13 -
Joram 5.2.1 User's Guide
o For running the receiver sample, type “ant receiver”; each time, it consumes 10 messages from the queue. If there is not enough messages, it stops until new messages are produced.
Using the publish/subscribe messaging domain:
o It uses the TopicConnectionFactory “tcf”, and the Topic “topic” retrieved from JNDI.
o For running the subscriber sample, type “ant subscriber”. It subscribes to the defined topic, and then receives all messages later published on this topic.
o For running the publisher sample, type “ant publisher”. It publishes 10 messages on the topic.
Using the unified messaging domain:
o It uses the common ConnectionFactory “cf”, and the Destination “queue” and “topic” retrieved from JNDI.
o For running the consumer sample, type ”ant consumer”. It continuously reads messages sent to the queue or the topic.
o For running the producer sample, type “ant producer”. It sends 10 messages to the queue, and 10 messages to the topic.
2.2.2. The chat sample
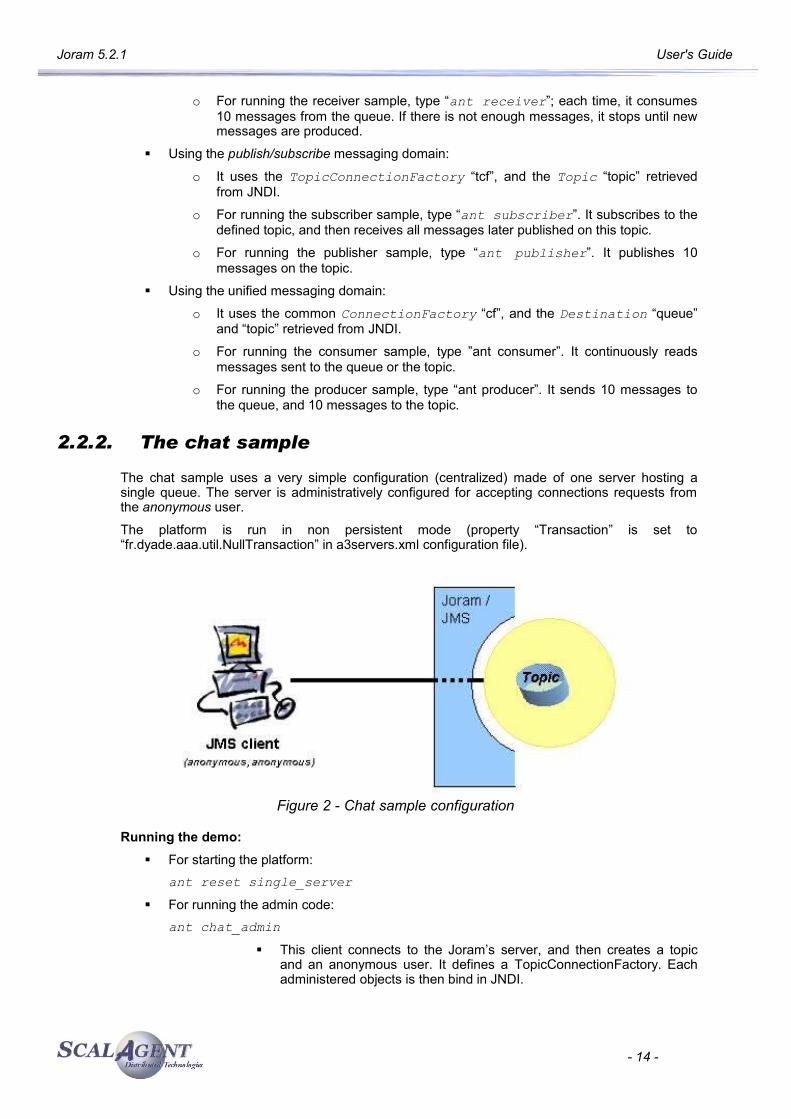
The chat sample uses a very simple configuration (centralized) made of one server hosting a single queue. The server is administratively configured for accepting connections requests from the anonymous user.
The platform is run in non persistent mode (property “Transaction” is set to “fr.dyade.aaa.util.NullTransaction” in a3servers.xml configuration file).
Figure 2 - Chat sample configuration
Running the demo: For starting the platform:
ant reset single_server
For running the admin code:ant chat_admin
This client connects to the Joram’s server, and then creates a topic and an anonymous user. It defines a TopicConnectionFactory. Each administered objects is then bind in JNDI.
- 14 -
Joram 5.2.1 User's Guide
To start a chat client, type “ant chat1”. It launches a chat client with user1 speudo, then each message typed at console is sent to the topic, and each message published on the topic is written to the console.
To start a second chat client, type “ant chat2”. It simply launches a chat client with user2 speudo.
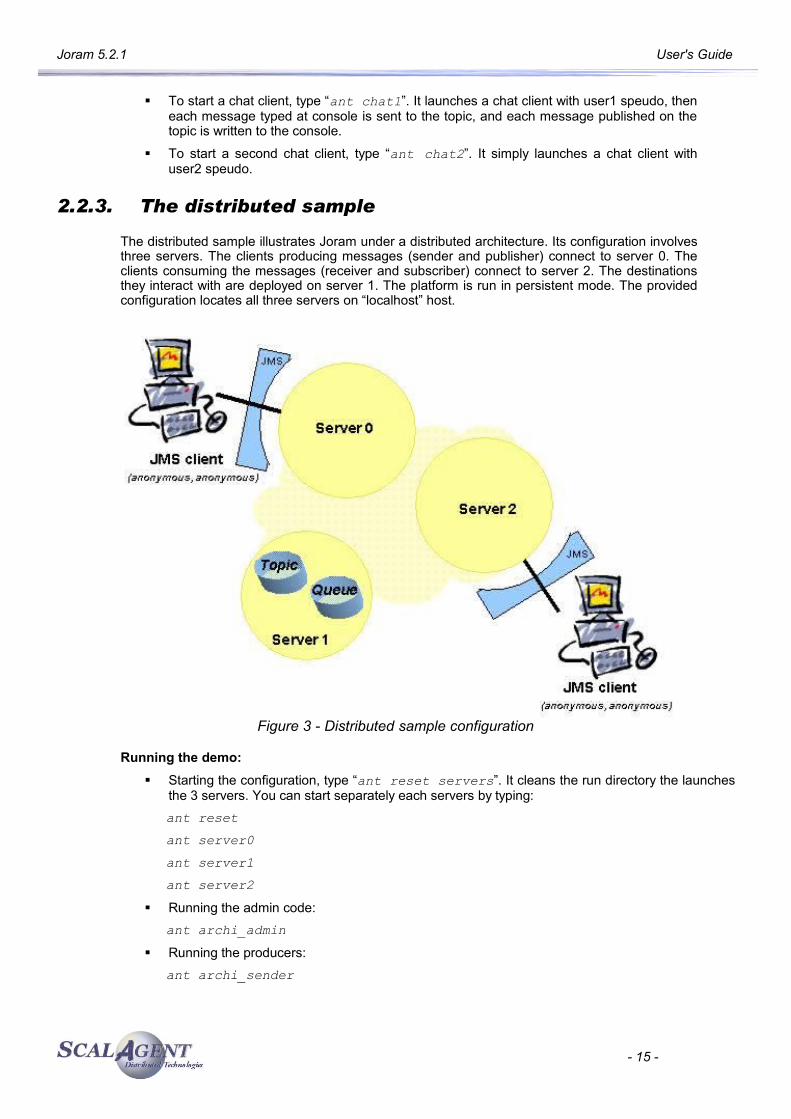
2.2.3. The distributed sample
The distributed sample illustrates Joram under a distributed architecture. Its configuration involves three servers. The clients producing messages (sender and publisher) connect to server 0. The clients consuming the messages (receiver and subscriber) connect to server 2. The destinations they interact with are deployed on server 1. The platform is run in persistent mode. The provided configuration locates all three servers on “localhost” host.
Figure 3 - Distributed sample configuration
Running the demo: Starting the configuration, type “ant reset servers”. It cleans the run directory the launches
the 3 servers. You can start separately each servers by typing:ant reset
ant server0
ant server1
ant server2
Running the admin code:ant archi_admin
Running the producers:ant archi_sender
- 15 -
Joram 5.2.1 User's Guide
ant archi_pub
Running the consumers:ant archi_receiver
ant archi_sub
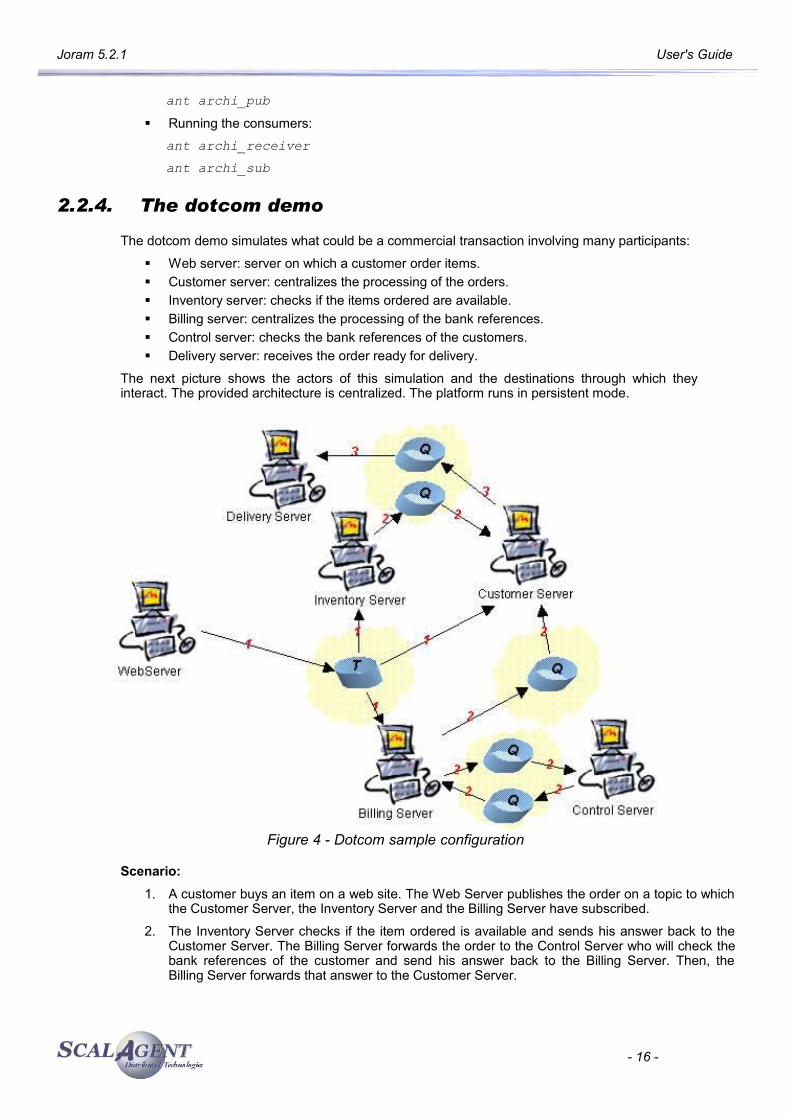
2.2.4. The dotcom demo
The dotcom demo simulates what could be a commercial transaction involving many participants:
Web server: server on which a customer order items. Customer server: centralizes the processing of the orders. Inventory server: checks if the items ordered are available. Billing server: centralizes the processing of the bank references. Control server: checks the bank references of the customers. Delivery server: receives the order ready for delivery.
The next picture shows the actors of this simulation and the destinations through which they interact. The provided architecture is centralized. The platform runs in persistent mode.
Figure 4 - Dotcom sample configuration
Scenario:1. A customer buys an item on a web site. The Web Server publishes the order on a topic to which
the Customer Server, the Inventory Server and the Billing Server have subscribed.
2. The Inventory Server checks if the item ordered is available and sends his answer back to the Customer Server. The Billing Server forwards the order to the Control Server who will check the bank references of the customer and send his answer back to the Billing Server. Then, the Billing Server forwards that answer to the Customer Server.
- 16 -
Joram 5.2.1 User's Guide
3. If the order has been validated by both Inventory Server and Billing Server, the Customer Server forwards it to the Delivery Server for delivery.
Running the demo: Starting the configuration:
ant reset single_server
Running the admin:ant dotcom_admin
Running the servers:ant webServers
Running the client:ant webClient
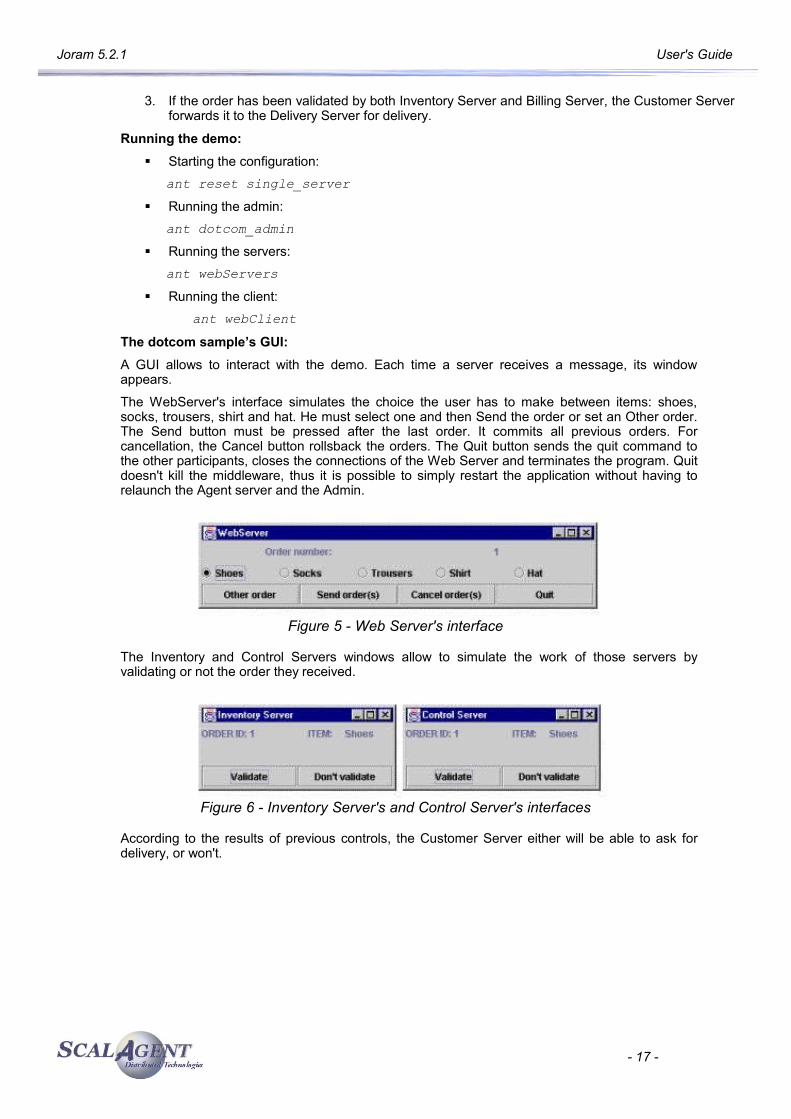
The dotcom sample’s GUI:A GUI allows to interact with the demo. Each time a server receives a message, its window appears.
The WebServer's interface simulates the choice the user has to make between items: shoes, socks, trousers, shirt and hat. He must select one and then Send the order or set an Other order. The Send button must be pressed after the last order. It commits all previous orders. For cancellation, the Cancel button rollsback the orders. The Quit button sends the quit command to the other participants, closes the connections of the Web Server and terminates the program. Quit doesn't kill the middleware, thus it is possible to simply restart the application without having to relaunch the Agent server and the Admin.
Figure 5 - Web Server's interface
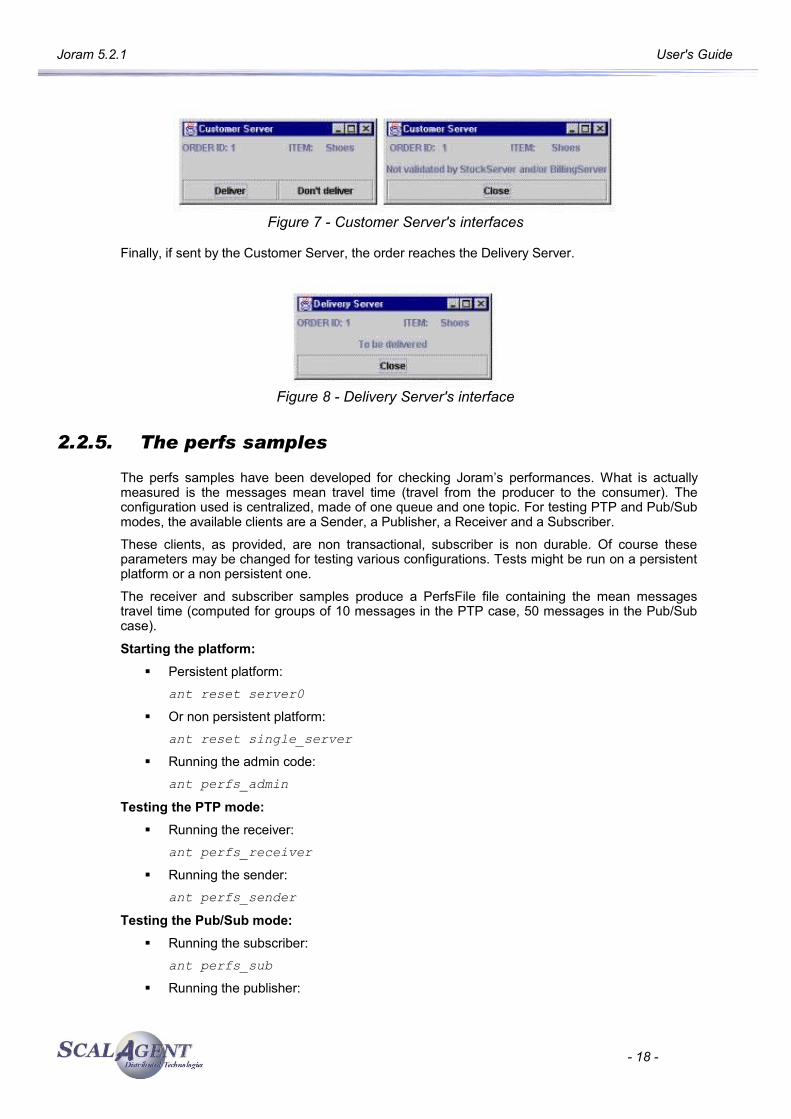
The Inventory and Control Servers windows allow to simulate the work of those servers by validating or not the order they received.
Figure 6 - Inventory Server's and Control Server's interfaces
According to the results of previous controls, the Customer Server either will be able to ask for delivery, or won't.
- 17 -
Joram 5.2.1 User's Guide
Figure 7 - Customer Server's interfaces
Finally, if sent by the Customer Server, the order reaches the Delivery Server.
Figure 8 - Delivery Server's interface
2.2.5. The perfs samples
The perfs samples have been developed for checking Joram’s performances. What is actually measured is the messages mean travel time (travel from the producer to the consumer). The configuration used is centralized, made of one queue and one topic. For testing PTP and Pub/Sub modes, the available clients are a Sender, a Publisher, a Receiver and a Subscriber.
These clients, as provided, are non transactional, subscriber is non durable. Of course these parameters may be changed for testing various configurations. Tests might be run on a persistent platform or a non persistent one.
The receiver and subscriber samples produce a PerfsFile file containing the mean messages travel time (computed for groups of 10 messages in the PTP case, 50 messages in the Pub/Sub case).
Starting the platform: Persistent platform:
ant reset server0
Or non persistent platform:ant reset single_server
Running the admin code:ant perfs_admin
Testing the PTP mode: Running the receiver:
ant perfs_receiver
Running the sender:ant perfs_sender
Testing the Pub/Sub mode: Running the subscriber:
ant perfs_sub
Running the publisher:
- 18 -
Joram 5.2.1 User's Guide
ant perfs_pub
2.3. Using scriptsIn the previous sections, it has been explained how to launch the provided samples through Ant targets. It is also possible to use the script files located in the samples/bin directory. This section explains how to use those scripts.
2.3.1. First step
The first step consists in fixing the JAVA_HOME and the JORAM_HOME environment variables. The JAVA_HOME property value must point to your Java installation directory. The JORAM_HOME value must point to your JORAM directory (the directory actually containing the samples/ sub-directories).
2.3.2. Launching a JORAM platform
Launching a JORAM platform with the scripts has the same effects as using the Ant targets.
Depending on the script, it will set the appropriate configuration: copy the rigth a3servers.xml and jndi.properties from config/ directory in the created run/ directory, etc.
Those scripts are:
single_server.[sh/bat] : copies the config/centralized_a3servers.xml file as a3servers.xml and config/jndi.properties in run directory. If not already done, creates the run/ directory. Then launches the non persistent server 0.
server.[sh/bat] x : copies distributed_a3servers.xml as a3servers.xml and jndi.properties as jndi.properties if not already done, creates the run/ directory if it does not exist, and launches the persistent server x.
clean.[sh/bat] : deletes the a3servers.xml and jndi.properties files, deletes the run/ directory.
When starting a new persistent server, the clean script must be executed in order to remove any existing persistence root which may alter the way the server starts. When re-starting a stopped or crashed persistent server, the clean script should not be called in order to keep the needed persistence root.
2.3.3. Launching the JORAM administration and monitoring tool
Launching the graphical admin and monitoring tool is simply done by executing the admin.[sh/bat] script. The tool may be launched before or after starting the JORAM platform.
This supposes that the administration tool has been compiled (by the CVS and sources package users), and that the joramgui.jar library is available in the ship/lib/ directory. Also, the admin GUI tool requires to use a 1.4 jdk.
The JORAM platform may be administered either directly through the tool, or still by launching the appropriate administration client. Nothing prevent you from running an admin code and watching in the tool the configuration of the platform.
2.3.4. Launching a JORAM client
The jmsclient script may be used for launching a client. It takes as argument the class of the client to execute. For example, for launching the classic sender class:
jmsClient classic.ClassicSender
- 19 -
Joram 5.2.1 User's Guide
Of course, this supposes that the samples have been compiled (and that the JORAM platform has been administered for the classic samples, either by running the ClassicAdmin client, or by using the administration graphical tool).
2.3.5. Running the classic samples using script files
The example below use '.sh' scripts on a Linux platform; if you use a Windows™ platform you may use the corresponding '.bat' scripts. All theses scripts need the definition of JAVA_HOME and JORAM_HOME environment variable:
• Set JAVA_HOME to the directory where JDK is installed.
• Set JORAM_HOME to the directory that you installed Joram (the directory containing the ship and samples directories.
First cleans the persistence directory and configuration settings, then launches the server.
$> cd $JORAM_HOME/bin$> ./clean.sh== Cleaning the persistence directories and configuration settings ==
$> ./single_server.sh== Launching a non persistent server#0 ==AgentServer#0 started: OK
You can create all needed administered objects through the ClassicAdmin class.
$> ./jmsclient.sh classic.ClassicAdmin== Launching the classic.ClassicAdmin client ==
Classic administration...Admin closed.
Then you can send or receive messages using the Sender/Receiver or Publisher/Subscriber classes; for example:
$> ./jmsclient.sh classic.Sender== Launching the classic.Sender client ==
Sends messages on the queue...10 messages sent.
$> ./jmsclient.sh classic.Receiver== Launching the classic.Receiver client ==
Requests to receive messages...Msg received: Test number 0Msg received: Test number 1Msg received: Test number 2Msg received: Test number 3Msg received: Test number 4Msg received: Test number 5Msg received: Test number 6Msg received: Test number 7Msg received: Test number 8Msg received: Test number 9
- 20 -
Joram 5.2.1 User's Guide
10 messages received.You can launch the administration GUI JAMT using the admin.sh (respectively admin.bat) script:
$> ./admin.sh== Launching the graphical administration tool ==
2.4. Administration through XML scriptsThere is three way to deploy Joram's administered objects: the administration API, the graphical administration tool (JAMT) and now the XML scripting capability.
This feature use the AdminModule to execute the corresponding XML script. The script allows describing the administration connection, creating and binding administered objects (see chapter 3.6).
2.4.1. Classic sample administration using XML script
The ant target classic_adminxml uses the AdminModule main static method to execute the administration script, this script is equivalent to the ClassicAdmin code.
$> ant classic_adminxmlBuildfile: build.xml
init:
classic_adminxml: [copy] Copying 1 file to C:\cygwin\home\freyssin\owjoram\joram\samples\run
BUILD SUCCESSFULTotal time: 3 seconds
In the script (see file samples/src/joram/classic/joramAdmin.xml) we described:
• The connection to Joram's configuration: a default TCP connection with hostname, port, username and password.
• The connection factory and the JNDI binding:
• an unified TCPConnectionFactory named “cf”,
• a QueueTCPConnectionFactory named “qcf”
• and TopicTCPConnectionFactory named “tcf”.
• The anonymous user.
• The destinations with their JNDI binding and security settings: a queue and a topic with freereader and freewriter settings.
- 21 -
Joram 5.2.1 User's Guide
3. Administration Guide
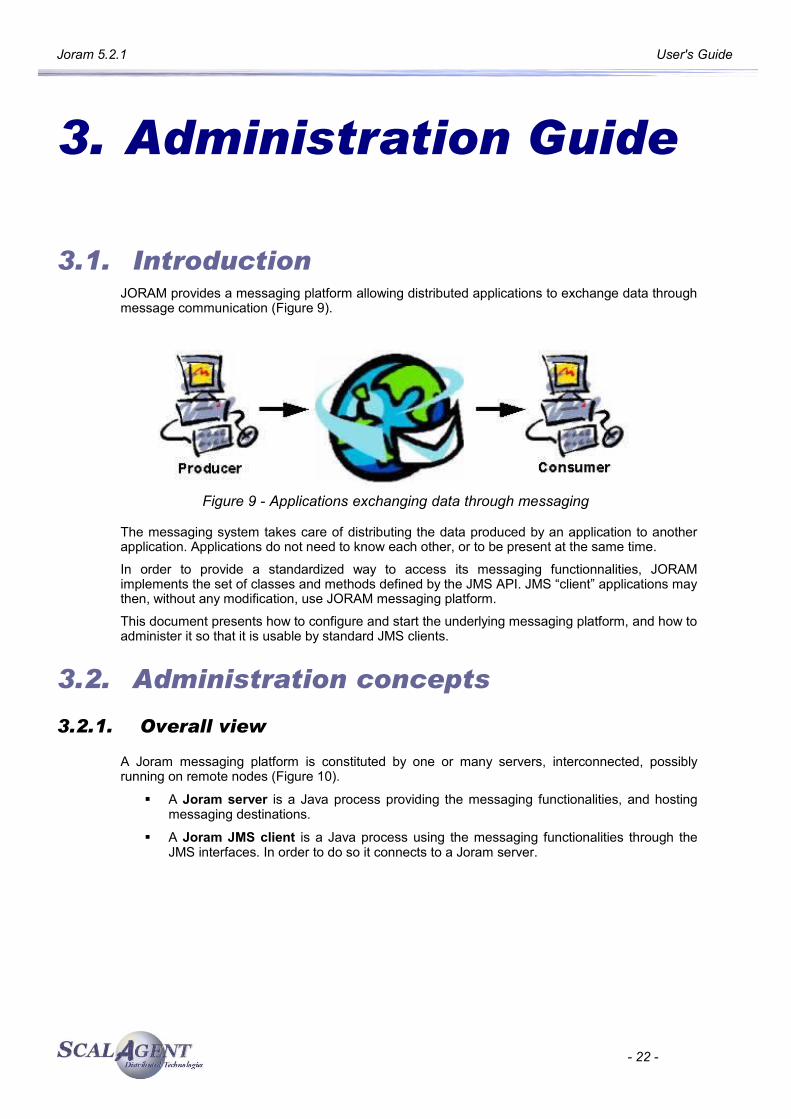
3.1. IntroductionJORAM provides a messaging platform allowing distributed applications to exchange data through message communication (Figure 9).
Figure 9 - Applications exchanging data through messaging
The messaging system takes care of distributing the data produced by an application to another application. Applications do not need to know each other, or to be present at the same time.
In order to provide a standardized way to access its messaging functionnalities, JORAM implements the set of classes and methods defined by the JMS API. JMS “client” applications may then, without any modification, use JORAM messaging platform.
This document presents how to configure and start the underlying messaging platform, and how to administer it so that it is usable by standard JMS clients.
3.2. Administration concepts
3.2.1. Overall view
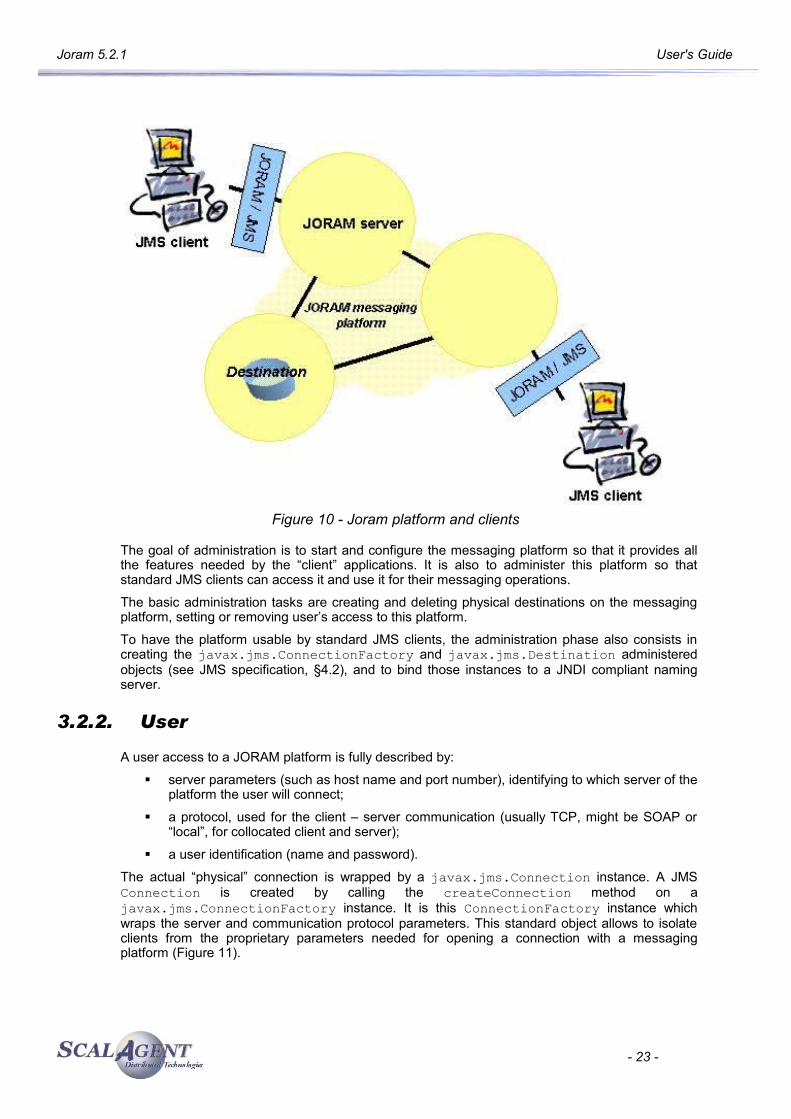
A Joram messaging platform is constituted by one or many servers, interconnected, possibly running on remote nodes (Figure 10).
A Joram server is a Java process providing the messaging functionalities, and hosting messaging destinations.
A Joram JMS client is a Java process using the messaging functionalities through the JMS interfaces. In order to do so it connects to a Joram server.
- 22 -
Joram 5.2.1 User's Guide
Figure 10 - Joram platform and clients
The goal of administration is to start and configure the messaging platform so that it provides all the features needed by the “client” applications. It is also to administer this platform so that standard JMS clients can access it and use it for their messaging operations.
The basic administration tasks are creating and deleting physical destinations on the messaging platform, setting or removing user’s access to this platform.
To have the platform usable by standard JMS clients, the administration phase also consists in creating the javax.jms.ConnectionFactory and javax.jms.Destination administered objects (see JMS specification, §4.2), and to bind those instances to a JNDI compliant naming server.
3.2.2. User
A user access to a JORAM platform is fully described by:
server parameters (such as host name and port number), identifying to which server of the platform the user will connect;
a protocol, used for the client – server communication (usually TCP, might be SOAP or “local”, for collocated client and server);
a user identification (name and password).
The actual “physical” connection is wrapped by a javax.jms.Connection instance. A JMS Connection is created by calling the createConnection method on a javax.jms.ConnectionFactory instance. It is this ConnectionFactory instance which wraps the server and communication protocol parameters. This standard object allows to isolate clients from the proprietary parameters needed for opening a connection with a messaging platform (Figure 11).
- 23 -
Joram 5.2.1 User's Guide
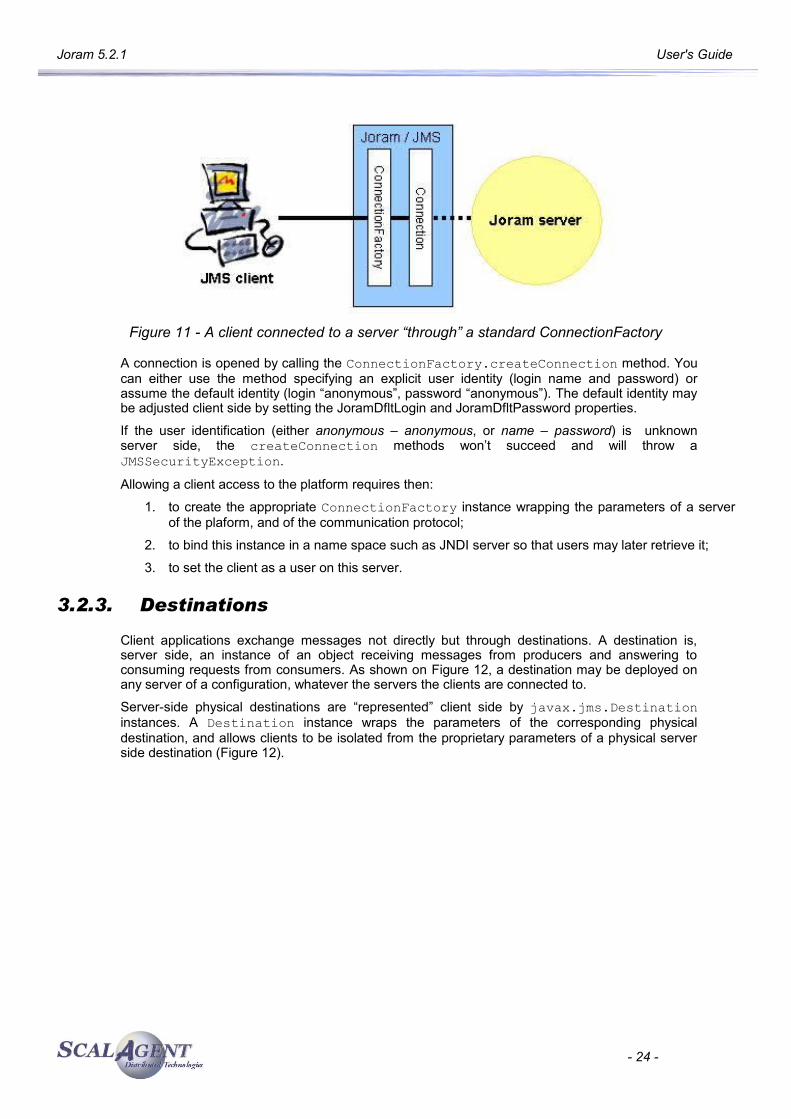
Figure 11 - A client connected to a server “through” a standard ConnectionFactory
A connection is opened by calling the ConnectionFactory.createConnection method. You can either use the method specifying an explicit user identity (login name and password) or assume the default identity (login “anonymous”, password “anonymous”). The default identity may be adjusted client side by setting the JoramDfltLogin and JoramDfltPassword properties.
If the user identification (either anonymous – anonymous, or name – password) is unknown server side, the createConnection methods won’t succeed and will throw a JMSSecurityException.
Allowing a client access to the platform requires then:
1. to create the appropriate ConnectionFactory instance wrapping the parameters of a server of the plaform, and of the communication protocol;
2. to bind this instance in a name space such as JNDI server so that users may later retrieve it;
3. to set the client as a user on this server.
3.2.3. Destinations
Client applications exchange messages not directly but through destinations. A destination is, server side, an instance of an object receiving messages from producers and answering to consuming requests from consumers. As shown on Figure 12, a destination may be deployed on any server of a configuration, whatever the servers the clients are connected to.
Server-side physical destinations are “represented” client side by javax.jms.Destination instances. A Destination instance wraps the parameters of the corresponding physical destination, and allows clients to be isolated from the proprietary parameters of a physical server side destination (Figure 12).
- 24 -
Joram 5.2.1 User's Guide
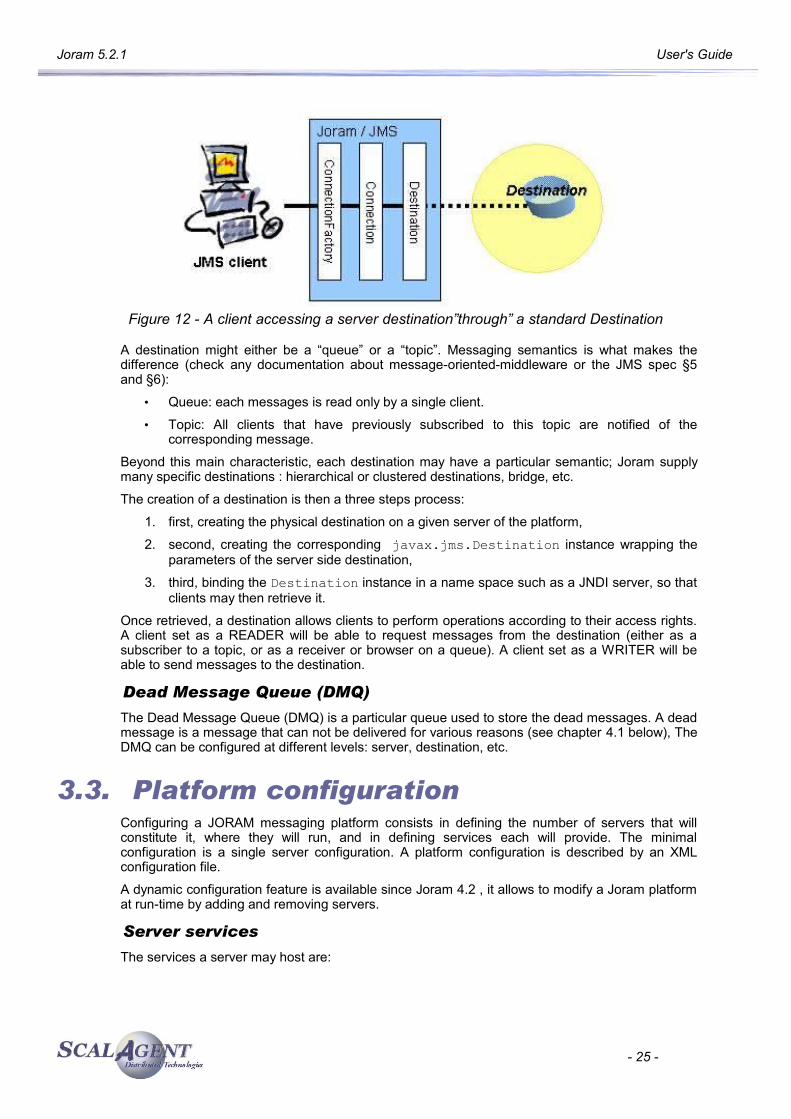
Figure 12 - A client accessing a server destination”through” a standard Destination
A destination might either be a “queue” or a “topic”. Messaging semantics is what makes the difference (check any documentation about message-oriented-middleware or the JMS spec §5 and §6):
• Queue: each messages is read only by a single client.
• Topic: All clients that have previously subscribed to this topic are notified of the corresponding message.
Beyond this main characteristic, each destination may have a particular semantic; Joram supply many specific destinations : hierarchical or clustered destinations, bridge, etc.
The creation of a destination is then a three steps process:
1. first, creating the physical destination on a given server of the platform,
2. second, creating the corresponding javax.jms.Destination instance wrapping the parameters of the server side destination,
3. third, binding the Destination instance in a name space such as a JNDI server, so that clients may then retrieve it.
Once retrieved, a destination allows clients to perform operations according to their access rights. A client set as a READER will be able to request messages from the destination (either as a subscriber to a topic, or as a receiver or browser on a queue). A client set as a WRITER will be able to send messages to the destination.
Dead Message Queue (DMQ)
The Dead Message Queue (DMQ) is a particular queue used to store the dead messages. A dead message is a message that can not be delivered for various reasons (see chapter 4.1 below), The DMQ can be configured at different levels: server, destination, etc.
3.3. Platform configurationConfiguring a JORAM messaging platform consists in defining the number of servers that will constitute it, where they will run, and in defining services each will provide. The minimal configuration is a single server configuration. A platform configuration is described by an XML configuration file.
A dynamic configuration feature is available since Joram 4.2 , it allows to modify a Joram platform at run-time by adding and removing servers.
Server services
The services a server may host are:
- 25 -
Joram 5.2.1 User's Guide
A connection manager service, managing the connection requests from “external” clients. This service may also authorize the connection of an administrator client, authenticated by a name and a password. It is required on any server accepting at least a client connection. At the platform level at least one server must accept an administrator connection, meaning that at least one server must host a connection manager service authorizing an administrator connection.
A TCP proxy service, allowing TCP clients to connect to the server. This service takes as argument a port number, defining on which port the TCP connection requests should be made.
A JNDI service, listening to a given port, providing a naming server to clients for binding and retrieving administered objects. It is required on one of the platform servers if clients and administrators intend to use JORAM’s naming server. If this service is provided by none of the platform’s servers, that means that clients and administrators do not intend to use JNDI, or that they will use an other JNDI implementation than the one provided by JORAM.
3.3.1. Centralized configuration
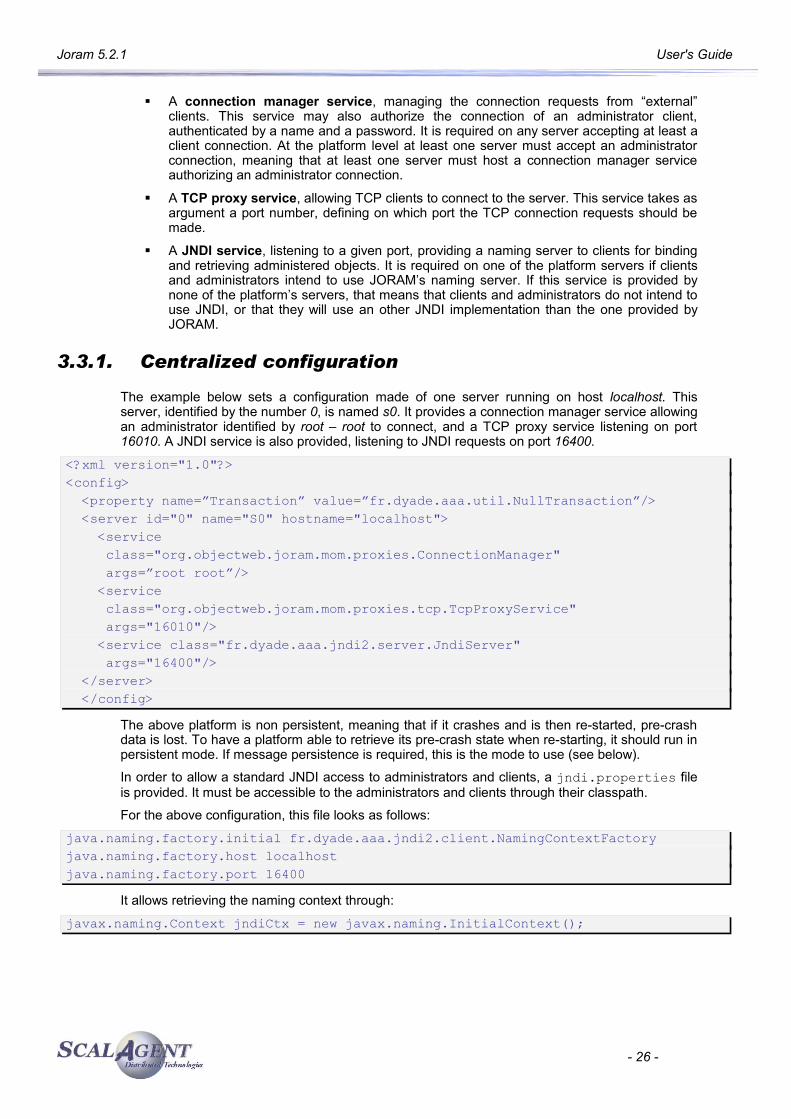
The example below sets a configuration made of one server running on host localhost. This server, identified by the number 0, is named s0. It provides a connection manager service allowing an administrator identified by root – root to connect, and a TCP proxy service listening on port 16010. A JNDI service is also provided, listening to JNDI requests on port 16400.
<?xml version="1.0"?><config> <property name=”Transaction” value=”fr.dyade.aaa.util.NullTransaction”/> <server id="0" name="S0" hostname="localhost"> <service class="org.objectweb.joram.mom.proxies.ConnectionManager" args=”root root”/> <service class="org.objectweb.joram.mom.proxies.tcp.TcpProxyService" args="16010"/> <service class="fr.dyade.aaa.jndi2.server.JndiServer" args="16400"/> </server> </config>
The above platform is non persistent, meaning that if it crashes and is then re-started, pre-crash data is lost. To have a platform able to retrieve its pre-crash state when re-starting, it should run in persistent mode. If message persistence is required, this is the mode to use (see below).
In order to allow a standard JNDI access to administrators and clients, a jndi.properties file is provided. It must be accessible to the administrators and clients through their classpath.
For the above configuration, this file looks as follows:
java.naming.factory.initial fr.dyade.aaa.jndi2.client.NamingContextFactoryjava.naming.factory.host localhostjava.naming.factory.port 16400
It allows retrieving the naming context through:
javax.naming.Context jndiCtx = new javax.naming.InitialContext();
- 26 -
Joram 5.2.1 User's Guide
Running a platform
The configuration file is named a3servers.xml, and it must be accessible through the classpath. Then, the server is launched by typing:
java fr.dyade.aaa.agent.AgentServer 0 ./s0
Configuring a persistent server
In order to configure a persistent server you have to change the Transaction property in a3servers.xml configuration file. For example you may use fr.dyade.aaa.util.NTransaction class.
When such a persistent server is stopped or crashes, there are two options when re-starting it:
Either it is expected to resume the operations it was involved in before the crash, in which case the persistence directory s0 should not be deleted; it may happen that a Lock file in this directory remains and should be removed.
Or it is a bright new server that is expected to start, in which case the persistence directory s0 should be totally removed.
3.3.2. Distributed configuration
A distributed configuration made of three persistent server (as on figure 2) looks as follows:
<?xml version="1.0"?><config> <property name=”Transaction” value=”fr.dyade.aaa.util.NTransaction”/> <domain name="D1"/> <server id="0" name="S0" hostname="localhost"> <network domain="D1" port="16301"/> <service class="org.objectweb.joram.mom.proxies.ConnectionManager" args="root root"/> <service class="org.objectweb.joram.mom.proxies.tcp.TcpProxyService" args="16010"/> <service class="fr.dyade.aaa.jndi2.server.JndiServer" args="16400"/> </server> <server id="1" name="S1" hostname="host1"> <network domain="D1" port="16301"/> <service class="org.objectweb.joram.mom.proxies.ConnectionManager"/> <service class="org.objectweb.joram.mom.proxies.tcp.TcpProxyService" args="16010"/> </server> <server id="2" name="S2" hostname="host2"> <network domain="D1" port="16301"/> <service class="org.objectweb.joram.mom.proxies.ConnectionManager"/> </server></config>
This configuration is made of 3 persistent servers, each running on a given node (host0, host1 and host2). All are part of the same domain (multiple domains might be needed for very large configurations). The server 0 of the configuration provides the same services as server 0 of the previous centralized configuration. Server 1 allows TCP connection on its local 16010 port, no administrator access, and no JNDI server. Server 2 allows client connections (thanks to the
- 27 -
Joram 5.2.1 User's Guide
connection manager service) but the TCP protocol is not supported (the protocol might then be SOAP or “local”).
The jndi.properties file needed by administrators and clients should look as follows:
java.naming.factory.initial fr.dyade.aaa.jndi2.client.NamingContextFactoryjava.naming.factory.host host0java.naming.factory.port 16400
Running a platform
Each host on which a server of the configuration will run must have a copy of the a3servers.xml file, and this copy must be accessible through the classpath.
Then, the servers of the configuration are launched one by one:
On node 0:java fr.dyade.aaa.agent.AgentServer 0 ./s0
On node 1:java fr.dyade.aaa.agent.AgentServer 1 ./s1
On node 2:java fr.dyade.aaa.agent.AgentServer 2 ./s2
Warning: Be careful, removing the persistence directory of one server in a distributed configuration may cause damages.
3.3.3. Stopping a server
A method is provided for stopping a given server of the administered JORAM platform. If the server to stop is the server to which the administrator is connected, the admin session is automatically terminated and closed.
Stopping server 0:
AdminModule.stopServer(0);
3.3.4. Dynamic configuration
The dynamic configuration feature is available from the Joram version 4.2. It allows to modify a Joram platform at run-time by adding and removing servers. As the servers can be gathered into several domains you can also add and remove domains.
Adding a new server
You can dynamically configure your Joram platform by adding new Joram servers. This is a two steps operation:
1. define the new server in the platform configuration using the Joram administration API
2. start the new server
Let's take an example in order to illustrate how it works. This simple scenario starts from a very simple Joram platform configuration that contains only one server called S0. This configuration is defined in Joram user guide (chapter 3.3.1).
<?xml version="1.0"?> <config> <property name="Transaction" value="fr.dyade.aaa.util.NullTransaction"/> <server id="0" name="S0" hostname="localhost">
- 28 -
Joram 5.2.1 User's Guide
<service class="org.objectweb.joram.mom.proxies.ConnectionManager" args="root root"/> <service class="org.objectweb.joram.mom.proxies.tcp.TcpProxyService" args="16010"/> <service class="fr.dyade.aaa.jndi2.server.JndiServer" args="16400"/> </server> </config>
Server definitionThe definition of a new server is programmatically done using the class AdminModule from Joram's administration API (package org.objectweb.joram.jms.admin).
import org.objectweb.joram.client.jms.admin.AdminModule;First you need to connect the AdminModule to the Joram server S0:
AdminModule.connect("localhost", 16010, "root", "root", 60);In order to define a new server you must specify in which domain the server is added. As the initial configuration doesn't define any domain, you have to add a first domain to the platform configuration.
A domain is defined by three parameters:
1. its name (unique inside a platform)
2. the name of an existing server that will be the first server belonging to this domain. When this server already belongs to a domain, it becomes the router between this domain and the new domain.
3. the port used by the first server to communicate with the other servers from this domain (none at the beginning)
The following code adds the domain D0 that contains the server S0. The port used by S0 to communicate inside D0 is 17770.
AdminModule.addDomain("D0", "S0", 17770);Once the domain D0 is added you can add a new server S1 into this domain. A server is defined by five parameters:
1. the identifier of the server (unique inside a platform)
2. the address or name of the host where the server is running
3. the name of the domain where the server is added
4. the port used by the server to communicate with other servers inside the domain
5. its name (may be not unique)
AdminModule.addServer("localhost", 1, "D0", 17771, "S1");Now the server S1 has been added you need to get the overall configuration of the platform in order to start S1.
String platformConfig = AdminModule.getConfiguration();The configuration is returned as a String which content is:
<?xml version="1.0"?><!DOCTYPE config SYSTEM "a3config.dtd">
<config>
<domain name="D0" network="fr.dyade.aaa.agent.SimpleNetwork"/>
- 29 -
Joram 5.2.1 User's Guide
<server hostname="localhost" id="1" name="S1"> <network domain="D0" port="17771"/> <service class="org.objectweb.joram.mom.proxies.ConnectionManager" args="root root"/> </server>
<server hostname="localhost" id="0" name="S0"> <network domain="D0" port="17770"/> <service class="org.objectweb.joram.mom.proxies.ConnectionManager" args="root root"/> <service class="org.objectweb.joram.mom.proxies.tcp.TcpProxyService" args="16010"/> <service class="fr.dyade.aaa.jndi2.server.JndiServer" args="16400"/> </server>
</config>As you can see, the initial platform configuration has been extended with the definition of a new domain D0 and a new server S1.
Store this configuration into a file a3servers_updated.xml. This file is necessary to start the new server S1.
File platformConfigFile = new File("a3servers_updated.xml");FileOutputStream fos = new FileOutputStream(platformConfigFile);PrintWriter pw = new PrintWriter(fos);pw.println(platformConfig);pw.flush();pw.close();fos.close();
Server startThe server S1 is started in the same way as described in Joram user guide (see 3.3.2, running a platform):
1. copy the file a3servers_updated.xml in the directory where you want to start S1 and rename it to a3servers.xml. You also need to put the DTD file a3config.dtd in the same directory.
1. customize the configuration of S1 by modifying the file a3servers.xml. For example, you can add services (e.g. distributed JndiServer).
2. start the server with the following commands: cd <S1_Running_Dir>
java fr.dyade.aaa.AgentServer 1 ./s1
Removing a server
This is a two steps operation:
1. stop the server
2. remove the server from the platform configuration using the Joram administration API
Notice that you can also remove it first from the configuration and then stop it.
- 30 -
Joram 5.2.1 User's Guide
Server stopTo stop a server you need to specify the identifier of the server. Notice that this operation is not synchronous, i.e. the server is asynchronously stopped. The server may still be running a while after the method stopServer returned.
AdminModule.stopServer(1);Server removalTo remove a server from the platform configuration, you need to give the identifier of the server. This operation destroys all the pending messages sent to the removed server through the whole platform.
AdminModule.removeServer(1);You can also remove a domain even if it is not empty. In this last case, the servers inside this domain are also removed. So you have to stop them.
AdminModule.removeDomain("D0");This last operation removes the domain D0 but not the server S0 because it is used to make the dynamic configuration.
When you manipulate configurations with multiple domains by removing servers and/or domains, be careful not to split your platform into several parts.
3.3.5. Logging configuration
JORAM uses Monolog (see http://www.objectweb.org/monolog/) for logging. Monolog is an API which abstracts log operations from their implementation.
Logging is configured in an a3debug.cfg file. It has to be in the classpath of the client and of the server (the server’s process as well as the client’s might be logged).
The a3debug.cfg configuration file defines the appenders used to log. By defaults, it logs on the standard output but a file is usable instead.
This file also defines all the categories which are available for logging. These categories are:
Agent logs (categories starting with fr.dyade.aaa.agent): these categories log what happens in the low level messaging platform.
MOM logs (categories starting with org.objectweb.joram.mom): these categories log what happens in a JORAM server, more particularly:
in the server’s proxies (org.objectweb.joram.mom.Proxy),
in the server’s destinations (org.objectweb.joram.mom.Destination).
JORAM logs (org.objectweb.joram.client.jms.Client category): this category logs JMS client operations.
JNDI logs (fr.dyade.aaa.jndi2): this category logs all JNDI operations, more particularly:
in JNDI’s server side (fr.dyade.aaa.jndi2.server),
in JNDI’s client side (fr.dyade.aaa.jndi2.client).
3.4. High level administrationWhen the messaging platform has been configured and started, the situation looks as follows:
one or many interconnected servers run;
each server may provide services for connecting and administering.
- 31 -
Joram 5.2.1 User's Guide
At that point an administrator client needs to connect to the platform and further configure it for allowing JMS clients to access and use it.
This administrator works either through a Java application using proprietary JORAM administration methods (described in this section), or through a graphical interface provided since release 3.7 and documented separately (Erreur : source de la référence non trouvée).
When the administration process is performed by a Java application, it uses JORAM’s proprietary administration methods and objects. Those objects are:
org.objectweb.joram.client.jms.admin.AdminModule org.objectweb.joram.client.jms.admin.AdminHelper org.objectweb.joram.client.jms.admin.User org.objectweb.joram.client.jms.Queue org.objectweb.joram.client.jms.Topic
And the various connection factory objects located in:
org.objectweb.joram.client.jms.local org.objectweb.joram.client.jms.soap org.objectweb.joram.client.jms.tcp
Exceptions describing failing administration requests are of this class:
org.objectweb.joram.client.jms.admin.AdminException
3.4.1. Administration “session”
Administration operations (calls to administration methods) may be performed within an administration “session”. Such a session is started when an administration connection is established with the JORAM platform to administer.
The utility class for managing administrator sessions is org.objectweb.joram.client.jms.admin.AdminModule.
TCP administrator connection
Such a connection is opened as follows:
AdminModule.connect(“host1”, 16010, “root”, “root”, 60);This connects an application to a JORAM server running on “host1” and listening to port 16010 through the TCP protocol. It will work if the target server on “host1” provides the following services:
<service class="org.objectweb.joram.mom.proxies.ConnectionManager" args="root root"/> <service class="org.objectweb.joram.mom.proxies.tcp.TcpProxyService" args="16010"/>
The last parameter of the connecting method (60), is the timer in seconds during which connecting to the server is attempted. This timer will be useful is the server is not yet started when the administration code is launched.
It is also possible to establish a “default” TCP connection to the server running on “localhost” and listening to port 16010 as follows:
AdminModule.connect(“root”, “root”, 60);If the connecting request finally fails because the server is not reachable, the methods throw a ConnectException. If the administrator identification is incorrect, the methods throw an AdminException.
Disconnecting the administrator
The administration session ends by calling:
- 32 -
Joram 5.2.1 User's Guide
AdminModule.disconnect();Any call to any administration method outside the AdminModule.connect() and AdminModule.disconnect() boundaries will fail (a ConnectException will be thrown).
3.4.2. Managing a user
User identity
Users are manipulated through the helper class User from package org.objectweb.joram.jms.admin. An instance of this class represents a given user and provides methods for administering it.
Creating a user
User.create(String name, String password, int server) is a static method setting a user with a given identification on a given server, and creating the corresponding User instance.
User.create(String name, String password) is similar to the previous method, except that it creates the user on the server the administrator is connected to (local server).
User user = User.create(“name”, “pass”, 0); An AdminException is thrown if the user creation fails server side or
if the server is not part of the platform. A ConnectException is thrown if the admin connection with the server is closed or lost.
Updating a user identity
User.update(String newName, String newPass): updates the user identification.
user.update(“newName”, “newPass”); An AdminException is thrown if the user has been deleted server
side, or if its new identification is already taken on its server. A ConnectException is thrown if the admin connection with the server is closed or lost.
Deleting a user
User.delete(): unsets the user.
user.delete(); The request is not effective if the user has already been deleted server
side. A ConnectException is thrown if the admin connection with the server is closed or lost.
3.4.3. User connectivity
A given user accesses the JORAM platform by connecting to a given server (set when actually creating the user, last section). The connection might be of different kinds:
either a TCP connection;
or a SOAP connection (documented in Using SOAP specific documentation);
or “collocated” (documented in Using a collocated server specific documentation).
The javax.jms.ConnectionFactory class is meant to determine to which server and through which protocol a client application will connect when calling the createConnection method.
- 33 -
Joram 5.2.1 User's Guide
Creating a ConnectionFactory instance for the TCP protocol
TcpConnectionFactory.create(String host, int port): static method creating a ConnectionFactory instance for accessing a server running on a given host and listening to a given port.
TcpConnectionFactory.create(): static method creating a ConnectionFactory instance for accessing the server the administrator is connected to.
ConnectionFactory cnxFact = TcpConnectionFactory.create(“localhost”, 16010); QueueTcpConnectionFactory.create(String host, int port): static method
creating a QueueConnectionFactory instance for accessing a server running on a given host and listening to a given port.
QueueTcpConnectionFactory.create(): static method creating a QueueConnectionFactory instance for accessing the server the administrator is connected to.
TopicTcpConnectionFactory.create(String host, int port): static method creating a TopicConnectionFactory instance for accessing a server running on a given host and listening to a given port.
TopicTcpConnectionFactory.create(): static method creating a TopicConnectionFactory instance for accessing the server the administrator is connected to.
XATcpConnectionFactory.create(String host, int port): static method creating a XAConnectionFactory instance for accessing a server running on a given host and listening to a given port.
XATcpConnectionFactory.create(): static method creating a XAConnectionFactory instance for accessing the server the administrator is connected to.
XAQueueTcpConnectionFactory.create(String host, int port): static method creating a XAQueueConnectionFactory instance for accessing a server running on a given host and listening to a given port.
XAQueueTcpConnectionFactory.create(): static method creating a XAQueueConnectionFactory instance for accessing the server the administrator is connected to.
XATopicTcpConnectionFactory.create(String host, int port): static method creating a XATopicConnectionFactory instance for accessing a server running on a given host and listening to a given port.
XATopicTcpConnectionFactory.create(): static method creating a XATopicConnectionFactory instance for accessing the server the administrator is connected to.
Setting the factory parameters
The following parameters may be set on a factory:
Connecting timer: time (in seconds) during which connecting is attempted in case of failures.
Transaction pending timer: time (in seconds) during which a transacted JMS session might be inactive before being automatically rolled back.
Connection pending timer: time (in milliseconds) between two “ping” requests sent by the connection to the server; a connection is kept alive server side during twice the value of this parameter.
- 34 -
Joram 5.2.1 User's Guide
Those parameters are accessible through a FactoryParameters object (class FactoryParameters in package org.objectweb.joram.client.jms), obtainable by calling the getParameters() method on the factories.
When a client detects a connection failure, it automatically tries to reconnect every 2 seconds, during the period defined by the connecting timer parameter.
3.4.4. Managing a destination
Destinations are manipulated through the classes org.objectweb.joram.jms.Queue and org.objectweb.joram.jms.Topic. An instance of one of these classes represents a given destination and provides methods for administering it. Specialized destination management requires additional classes (see specific documentation: 4).
Creating a destination: Queue or Topic
Queue.create(int server): static method creating a queue on a given server, and creating the corresponding Queue instance.
Queue.create()is similar to the previous method, except that it creates the queue on the server the administrator is connected to (local server).
Topic.create(int server): static method creating a topic on a given server, and creating the corresponding Topic instance.
Topic.create()is similar to the previous method, except that it creates the topic on the server the administrator is connected to (local server).
Queue queue = Queue.create();Topic topic = Topic.create();
An AdminException is thrown if the destination deployment fails server side, or if the server is not part of the platform. A ConnectException is thrown if the admin connection with the server is closed or lost.
Creating a destination with a specified name
When creating a destination, queue or topic, you can specify an internal name1; if a destination exists with the specified name it is returned to the user, in the contrary case it is created and registered in the internal naming service.
Queue.create(int server, String name)Queue.create(String name): creates a queue on the given or default server with the specified name. If the named queue already exists it is simply returned.
Topic.create(int server, String name)Topic.create(String name): creates a topic on the given or default server with the specified name. If the named topic already exists it is simply returned.
Setting the configuration parameters
Options can be set using properties at queue/topic creation time, by sending a message to the collector queue/topic or by Mbean queue/topic component. The following options are available:
"period": defines the time in millisecond to run tasks at regular interval: cleaning of out-of-date messages, etc.
Setting free access on a destination
Destination.setFreeReading(): grants the READ right to all on the destination.
1 Not a JNDI's name.
- 35 -
Joram 5.2.1 User's Guide
dest.setFreeReading(); Destination.setFreeWriting(): grants the WRITE right to all on the destination.
dest.setFreeWriting(); An AdminException is thrown if the destination has been deleted
server side. A ConnectException is thrown if the admin connection with the server is closed or lost.
Unsetting free access on a destination
Destination.unsetFreeReading(): removes the READ right to all on the destination.
dest.unsetFreeReading(); Destination.unsetFreeWriting(): removes the WRITE right to all on the
destination.
dest.unsetFreeWriting(); An AdminException is thrown if the destination has been deleted
server side. A ConnectException is thrown if the admin connection with the server is closed or lost.
Setting a right for a user on a destination
Destination.setReader(User user): sets a given user as a reader on the destination.
dest.setReader(user); Destination.setWriter(User user): sets a given user as a writer on the
destination.
dest.setWriter(user); An AdminException is thrown if the destination or the user does not
exist server side. A ConnectException is thrown if the admin connection with the server is closed or lost.
Unsetting a right for a user on a destination
Destination.unsetReader(User user): unsets a given user as a reader on the destination.
dest.unsetReader(user); Destination.unsetWriter(User user): unsets a given user as a writer on the
destination.
dest.unsetWriter(user); An AdminException is thrown if the destination does not exist server
side. A ConnectException is thrown if the admin connection with the server is closed or lost.
Getting the access rights
Destination.isFreelyReadable(): returns true if the READ right is granted to all on the destination.
Destination.isFreelyWriteable(): returns true if the WRITE right is granted to all on the destination.
- 36 -
Joram 5.2.1 User's Guide
Destination.getReaders(): returns a List of users granted with the READ right on the destination.
Destination.getWriters(): returns a List of users granted with the WRITE right on the destination.
An AdminException is thrown if the destination does not exist server side. A ConnectException is thrown if the admin connection with the server is closed or lost.
Handling the DMQ setting (see chapter 4.1)
Destination.setDMQ(DeadMQueue): sets the given Dead Message Queue as the default DMQ for the destination.
Destination.getDMQ(): returns the default Dead Message Queue instance set for the destination, null if none.
An AdminException is thrown if the destination does not exist server side. A ConnectException is thrown if the admin connection with the server is closed or lost.
Deleting a destination
Destination.delete(): deletes the destination.
dest.delete (); The request is not effective if the destination does not exist server side.
A ConnectException is thrown if the admin connection with the server is closed or lost.
3.4.5. Managing a Queue
Getting the state
Queue.getPendingMessages(): returns the number of messages on the queue waiting to be delivered.
Queue.getPendingRequests():returns the number of “receive” requests on the queue waiting for matching messages.
An AdminException is thrown if the queue does not exist server side. A ConnectException is thrown if the admin connection with the server is closed or lost.
Handling the queue threshold
The threshold value determine the maximum number of times a message can be denied. It allows to avoid an erroneous message to be delivered infinitely; the guilty message is then forwarded to the Dead Message Queue if any (deleted otherwise).
Queue.setThreshold(int threshold): sets the threshold value for the queue.
Queue.getThreshold(): returns the threshold value set on the queue (-1 for none).
An AdminException is thrown if the queue does not exist server side. A ConnectException is thrown if the admin connection with the server is closed or lost.
Handling the queue limit
A maximum number of undelivered messages can be set for the queue. Additional messages are forwarded to the Dead Message Queue if any (deleted otherwise).
- 37 -

Joram 5.2.1 User's Guide
Queue.setNbMaxMsg(int nbMaxMsg): sets the maximum number of undelivered messages for the queue (-1 for no limit).
Queue.getNbMaxMsg(): returns the maximum number of undelivered messages value set on the queue (-1 for none).
3.4.6. Managing a Topic
A topic manages subsciptions. Subscription can be retrieved from User objects.
Getting the state
Topic.getSubscriptions(): returns the number of active subscriptions on the topic.
Topic.getSubscriberIds(): returns the list of user's proxy ids registered.
An AdminException is thrown if the topic does not exist server side. A ConnectException is thrown if the admin connection with the server is closed or lost.
3.4.7. Managing the platform
Methods are also provided for getting information about how the platform has been configured. Data is available at the platform, server, destination and user levels.
Getting the servers of the platform
AdminModule.getServersIds(): returns a List containing the identifiers of all the servers involved in the monitored JORAM platform.
A ConnectException is thrown if the admin connection to the server is closed or lost.
Handling default DMQ settings
AdminModule.getDefaultDMQ(int serverId): returns the DeadMQueue instance representing the default DMQ of a given server, null if none.
An AdminException is thrown if the target server does not belong to the platform. A ConnectException is thrown if the admin connection to the server is closed or lost.
AdminModule.getDefaultDMQ() is similar to the previous method, except that it returns the default DMQ of the server the administrator is connected to.
A ConnectException is thrown if the admin connection to the server is closed or lost.
AdminModule.getDefaultThreshold(int serverId): returns the default threshold value of a given server.
An AdminException is thrown if the target server does not belong to the platform. A ConnectException is thrown if the admin connection to the server is closed or lost.
AdminModule.getDefaultThreshold() is similar to the previous method, except that it returns the default threshold of the server the administrator is connected to.
A ConnectException is thrown if the admin connection to the server is closed or lost.
Getting the destinations
AdminModule.getDestinations(int serverId): returns a List containing Destination instances representing all the destinations deployed on a given server.
- 38 -
Joram 5.2.1 User's Guide
An AdminException is thrown if the target server does not belong to the platform. A ConnectException is thrown if the admin connection to the server is closed or lost.
AdminModule.getDestinations() is similar to the previous method, except that it returns the destinations of the server the administrator is connected to.
A ConnectException is thrown if the admin connection to the server is closed or lost.
Getting the users
AdminModule.getUsers(int serverId): returns a List containing User instances representing all the users set on a given server.
An AdminException is thrown if the target server does not belong to the platform. A ConnectException is thrown if the admin connection to the server is closed or lost.
AdminModule.getUsers() is similar to the previous method, except that it returns the users of the server the administrator is connected to.
A ConnectException is thrown if the admin connection to the server is closed or lost.
3.5. JMX administration of JoramYou can configure your Joram server to export some MXBean, so you can monitor and handle it through a JMX console. This example is designed in a JDK 1.5 environment with the integrated JMX 1.2 implementation.
To launch a Joram server with JMX capabilities enabled, you just have to fix the environment variable MXServer; for example typing -DMXServer=com.scalagent.jmx.JMXServer in the command line.
In order to allow a remote access to theses beans, you may either declare the JMXRIHttpService (com.scalagent.jmx.JMXRIHttpService class) in a3servers.xml configuration file or use a standard adapter. For example, if using JDK1.5, you can declare -Dcom.sun.management.jmxremote in the command line and then use the jconsole graphical tool to browse the beans:
- 39 -
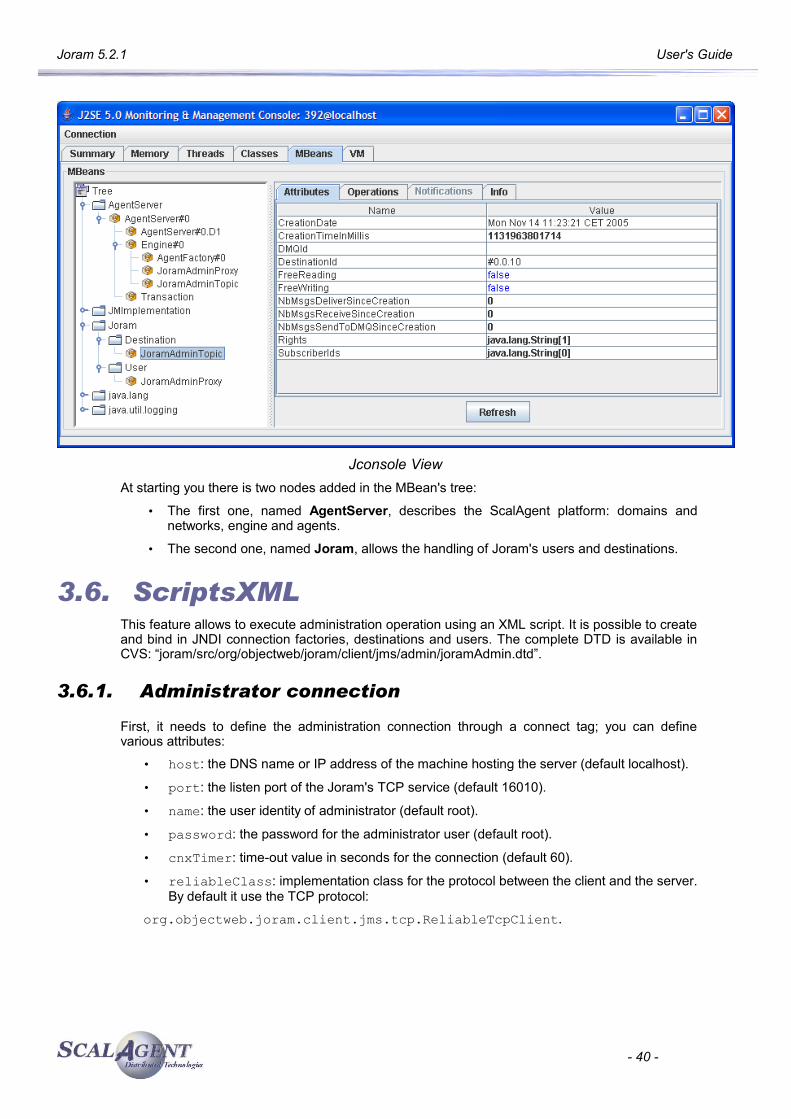
Joram 5.2.1 User's Guide
Jconsole ViewAt starting you there is two nodes added in the MBean's tree:
• The first one, named AgentServer, describes the ScalAgent platform: domains and networks, engine and agents.
• The second one, named Joram, allows the handling of Joram's users and destinations.
3.6. ScriptsXML This feature allows to execute administration operation using an XML script. It is possible to create and bind in JNDI connection factories, destinations and users. The complete DTD is available in CVS: “joram/src/org/objectweb/joram/client/jms/admin/joramAdmin.dtd”.
3.6.1. Administrator connection
First, it needs to define the administration connection through a connect tag; you can define various attributes:
• host: the DNS name or IP address of the machine hosting the server (default localhost).
• port: the listen port of the Joram's TCP service (default 16010).
• name: the user identity of administrator (default root).
• password: the password for the administrator user (default root).
• cnxTimer: time-out value in seconds for the connection (default 60).
• reliableClass: implementation class for the protocol between the client and the server. By default it use the TCP protocol:
org.objectweb.joram.client.jms.tcp.ReliableTcpClient.
- 40 -
Joram 5.2.1 User's Guide
3.6.2. Naming
If you want to register all created objects in a JNDI's repository you have to declare an InitiallContext element defining properties java.naming.factory.initial, java.naming.factory.host and java.naming.factory.host.
3.6.3. User and connectivity
ConnectionFactory
Each ConnectionFactory is defined by an element with an attribute class specifying the classname of the implementation:
• name: the name of the ConnectionFactory needed for later use in the script (building of clustered destination's for example).
• classname: the implementation class, by default a TcpConnectionFactory.
The ConnectionFactory is completed by a protocol element (local, tcp or soap for example) and usually a jndi binding:
• local: empty element defining a colocated connection.
• tcp: define the tcp settings for a TCPConnectionFactory:
• host and port: host address and listen port for server, by default localhost:16010.
• reliableClass: the class implementation.
• soap: define the protocol settings for a SoapConnectionFactory.
• host and port: host address and listen port for server, by default localhost:8080.
User
A user definition is a simple XML element, you must at least define name and password properties:
• name: the name of the user needed for later use in the script (handling of destination's rights for example).
• login, password: login and password for user, if the login is not fixed the name is used by default.
• serverId: unique identifier of location server. If not set the user is created on the server the administrator is connected.
• dmq, threshold: Dead Message Queue settings for the user.
3.6.4. Destination
The syntax allows to create queue, topic and Dead Message Queue, specialized destinations can be deployed specifying the MOM's implementation class of the destination:
Queue
A queue definition defines some optional properties, it can be completed by JNDI or security elements:
• name: the Joram's internal name for the queue.
• serverId: unique identifier of location server. If not set the queue is created on the server the administrator is connected.
- 41 -
Joram 5.2.1 User's Guide
• dmq, threshold: Dead Message Queue settings for the queue.
• NbMaxMsg:
• className: the real class name of the MOM's destination. By default a simple queue, org.objectweb.joram.mom.dest.Queue.
Topic
A topic definition defines some optional properties, it can be completed by JNDI or security elements:
• name: the Joram's internal name for the topic.
• serverId: unique identifier of location server. If not set the topic is created on the server the administrator is connected.
• parent: the internal name of the hierarchical parent of this topic.
• className: the real class name of the MOM's destination. By default a simple topic, org.objectweb.joram.mom.dest.Topic.
DMQueue
• name: the Joram's internal name for the Dead Message Queue.
• serverId: unique identifier of location server. If not set the DMQ is created on the server the administrator is connected.
3.6.5. Destination security and naming
Destination element can be completed by security or naming settings:
freeReader
Grants the read right to all on this destination.
freeWriter
Grants the write right to all on this destination.
reader
Sets a user as a potential reader on the destination, the user name is given in the attribute user.
writer
Sets a user as a potential writer on the destination, the user name is given in the attribute user.
jndi
Registers the destination in JNDI context. The symbolic name is given in the attribute name.
property
Additional properties can be defined for destinations. Each property is an element with two attributes: name and value.
3.6.6. Example
In the example below (from the classic sample) we first define an administration connection through TCP to the local host on port 16010. The administrator's login is “root” and the password is “root”.
Remark: as their values are the default ones, these parameter's definitions can be omitted.
- 42 -
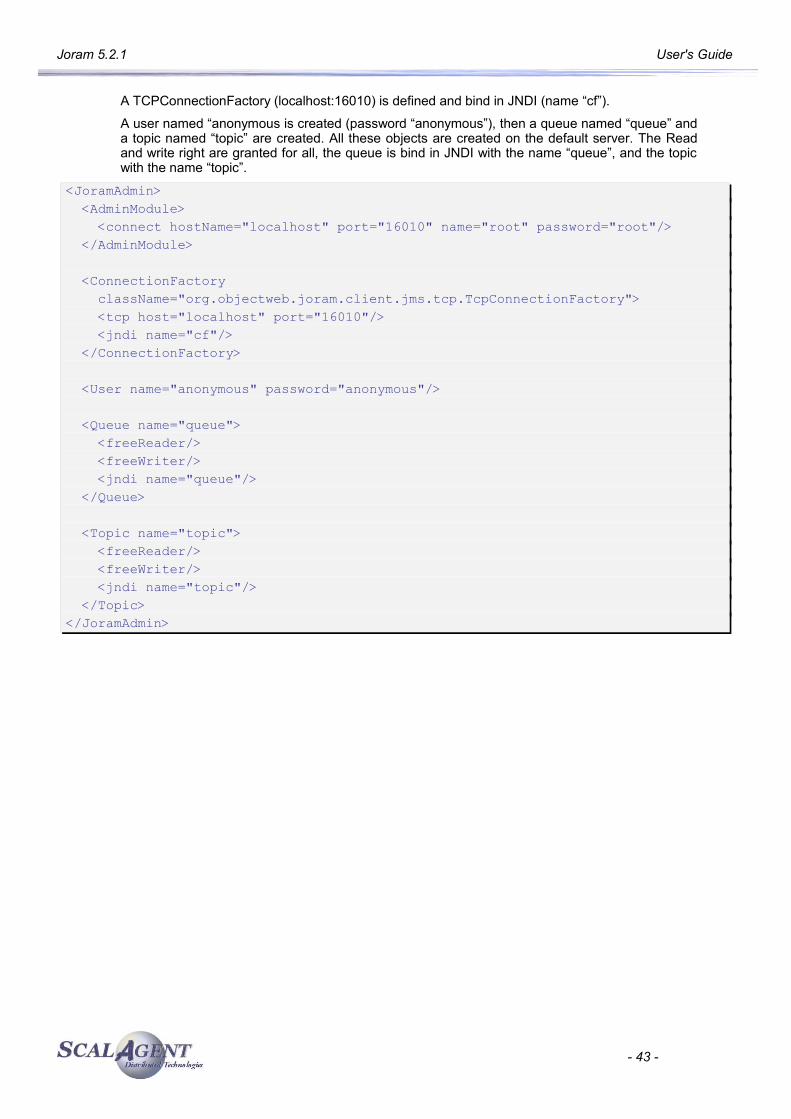
Joram 5.2.1 User's Guide
A TCPConnectionFactory (localhost:16010) is defined and bind in JNDI (name “cf”).
A user named “anonymous is created (password “anonymous”), then a queue named “queue” and a topic named “topic” are created. All these objects are created on the default server. The Read and write right are granted for all, the queue is bind in JNDI with the name “queue”, and the topic with the name “topic”.
<JoramAdmin> <AdminModule> <connect hostName="localhost" port="16010" name="root" password="root"/> </AdminModule> <ConnectionFactory className="org.objectweb.joram.client.jms.tcp.TcpConnectionFactory"> <tcp host="localhost" port="16010"/> <jndi name="cf"/> </ConnectionFactory> <User name="anonymous" password="anonymous"/> <Queue name="queue"> <freeReader/> <freeWriter/> <jndi name="queue"/> </Queue> <Topic name="topic"> <freeReader/> <freeWriter/> <jndi name="topic"/> </Topic></JoramAdmin>
- 43 -
Joram 5.2.1 User's Guide
4. Specialized destinations
4.1. Dead Message Queue
4.1.1. Dead message queue
Introduction
A dead message queue is a destination where dead messages are sent. A dead message is a message located server side and considered as undeliverable for various reasons. Those reasons are:
the target destination does not exist,
the sender does not have the writing right on the target destination,
the message expires before it is delivered,
the message is constantly denied by the consuming client,
the maximum number of messages in the queue has been reached,
the message has been deleted on the queue.
An application may also consider a message it got as to be sent to the DMQ. This “manual” sending is allowed to any application.
The Figure 13Erreur : source de la référence non trouvée shows an example of DMQ usage. A DMQ has been set as the DMQ of a given queue. This queue receives a message from a producer and tries to deliver it to a consumer. This consumer keeps denying the received message. When the number of delivery attempts overtakes a given threshold value, the message is removed from the queue and sent to the DMQ.
- 44 -
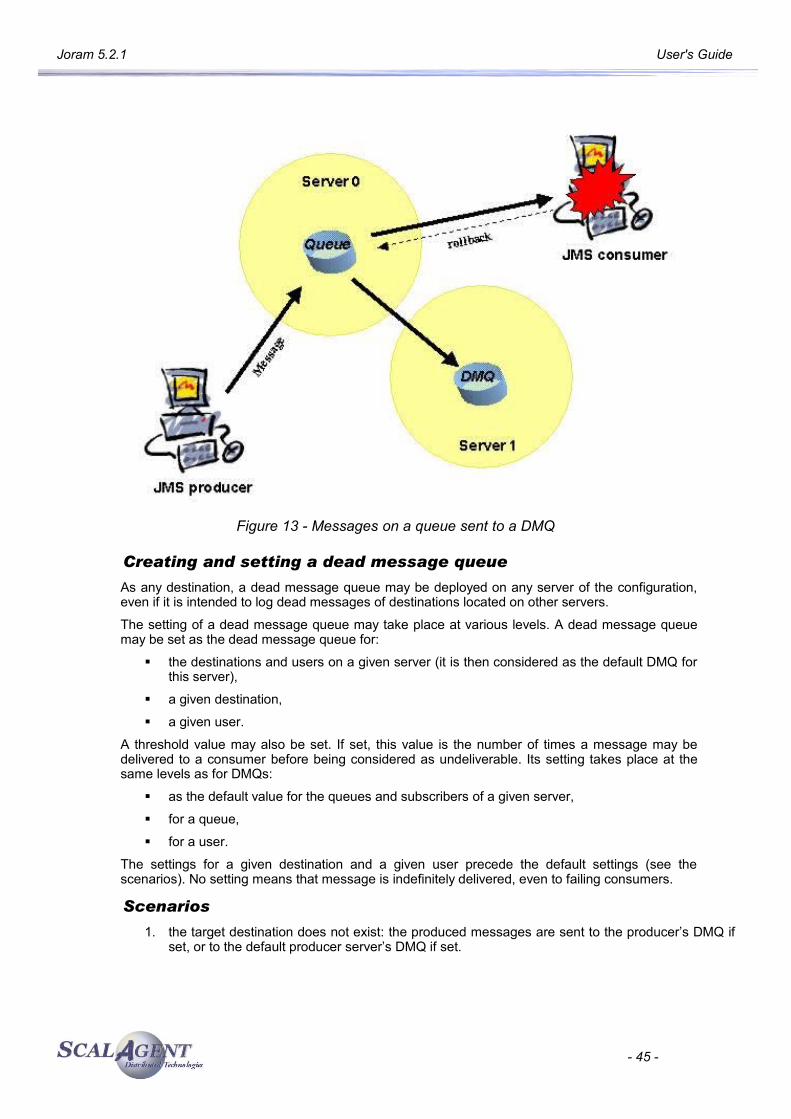
Joram 5.2.1 User's Guide
Figure 13 - Messages on a queue sent to a DMQ
Creating and setting a dead message queue
As any destination, a dead message queue may be deployed on any server of the configuration, even if it is intended to log dead messages of destinations located on other servers.
The setting of a dead message queue may take place at various levels. A dead message queue may be set as the dead message queue for:
the destinations and users on a given server (it is then considered as the default DMQ for this server),
a given destination,
a given user.
A threshold value may also be set. If set, this value is the number of times a message may be delivered to a consumer before being considered as undeliverable. Its setting takes place at the same levels as for DMQs:
as the default value for the queues and subscribers of a given server,
for a queue,
for a user.
The settings for a given destination and a given user precede the default settings (see the scenarios). No setting means that message is indefinitely delivered, even to failing consumers.
Scenarios
1. the target destination does not exist: the produced messages are sent to the producer’s DMQ if set, or to the default producer server’s DMQ if set.
- 45 -
Joram 5.2.1 User's Guide
2. the target destination is not writable: the produced messages are sent to the producer’s DMQ if set, or to the default producer’s server’s DMQ if set, or to the destination’s DMQ if set, or to the default destination’s server’s DMQ if set.
3. a message expires on a queue: it is sent to the queue’s DMQ if set or to the queue’s server’s default DMQ if set.
4. a message on a queue reaches the maximum delivery attempts: it is sent to the queue’s DMQ if set, or to the queue’s server’s default DMQ if set; the threshold value is the queue’s one if set, or the queue’s server’s default one if set.
5. a message for a given subscriber expires: it is sent to the subscriber’s DMQ if set, or to the subscriber’s server’s default DMQ if set.
6. a message for a given subscriber reaches the maximum delivery attempts: it is sent to the subscriber’s DMQ if set, or to the subscriber’s server’s default DMQ if set; the threshold value is the subscriber’s one if set, or the subscriber’s server’s default one if set.
Watching a dead message queue
Accessing a dead message queue through a JMS client means that the DMQ has preliminary been bound in a name space like JNDI, as any “normal” destination. Also, watching a dead message queue requires a JMS client granted with a READ access on it.
The client may consume or browse the queue. A DMQ behaves exactly as a “normal” queue. It can even log its own messages as dead messages on other DMQs.
Dead messages carry special properties describing why they were considered as “dead”. Those properties are:
JMS_JORAM_ERRORCOUNT, this property is mapped to an integer telling the number of consecutive errors which happened.
JMS_JORAM_ERRORCODE_X, with 1 ≤ X ≤ ERRORCOUNT returns the error code of the error number X.
JMS_JORAM_ERRORCAUSE_X, with 1 ≤ X ≤ ERRORCOUNT is mapped to a string detailing the error. This can be one of the following:
Deleted destination, if the target destination of the message could not be found,
Destination is not writable, if the target destination of the message did not accept the sender as a WRITER,
Expired at XXX, if the message expired before delivery. The XXX stands for a long number holding the date when the message expired.
Undeliverable after X tries, if the number of delivery attempts of the message overtook the threshold. The X is replaced by the threshold value.
Message deleted by an admin, if the message being dead is the result of an admin deletion with queue.deleteMessage(String msgId) or queue.clear() methods.
Queue full, if the queue has reached its maximum number of messages.
Unexpected error, if there was an unexpected error, for example a connection problem while using a mail queue.
The JMSXDeliveryCount property is also available for getting the number of delivery attempts of the message, including the delivery to the DMQ consumer. All those properties are available trough the dedicated Message methods. A typical check can be as following:
- 46 -
Joram 5.2.1 User's Guide
// Getting a dead message through a DMQ consumer:Message deadM = (Message) deadMconsumer.receive();
int errorCount = deadM.getIntProperty("JMS_JORAM_ERRORCOUNT");for (int i = 1; i <= errorCount; i++) { System.out.println(deadM.getIntProperty("JMS_JORAM_ERRORCODE_" + i)); System.out.println(deadM.getIntProperty("JMS_JORAM_ERRORCAUSE_" + i));
// Do specific things if the message has expired. if(deadM.getIntProperty("JMS_JORAM_ERRORCODE_" + i) ==
MessageErrorConstants.EXPIRED) { ... }}
4.1.2. Managing a Dead Message Queue
Creating a dead message queue
DeadMQueue.create(int server): creates a DMQ on a given server, and instantiates the corresponding DeadMQueue object.
DeadMQueue.create() is similar to the previous method, except that it creates the dead message queue on the server the administrator is connected to.
DeadMQueue dmq = DeadMQueue.create(0); An AdminException is thrown if the destination deployment fails
server side, or if the server is not part of the platform. A ConnectException is thrown if the admin connection with the server is closed or lost.
Setting a dead message queue
AdminModule.setDefaultDMQ(int serverId, DeadMQueue dmq): sets a given DMQ as the default DMQ for the destinations and users on a given server (set DMQ as null for unsetting it).
AdminModule.setDefaultDMQ(DeadMQueue dmq) is similar to the previous method except that it sets the DMQ on the server the administrator is connected to.
AdminModule.setDefaultDMQ(0, dmq); A ConnectException is thrown if the admin connection to the server
is closed or lost. An AdminException is thrown if the server is not known in the platform, or if the DMQ has been deleted server side.
Destination.setDMQ(DeadMQueue dmq): sets a given DMQ as the DMQ for the destination (set DMQ as null for unsetting it).
User.setDMQ(DeadMQueue dmq): sets a given DMQ as the DMQ for the user (set DMQ as null for unsetting it).
topic.setDMQ(dmq);user.setDMQ(null);
An AdminException is thrown if the destination or the user has been deleted server side. A ConnectException is thrown if the admin connection to the server is closed or lost.
- 47 -
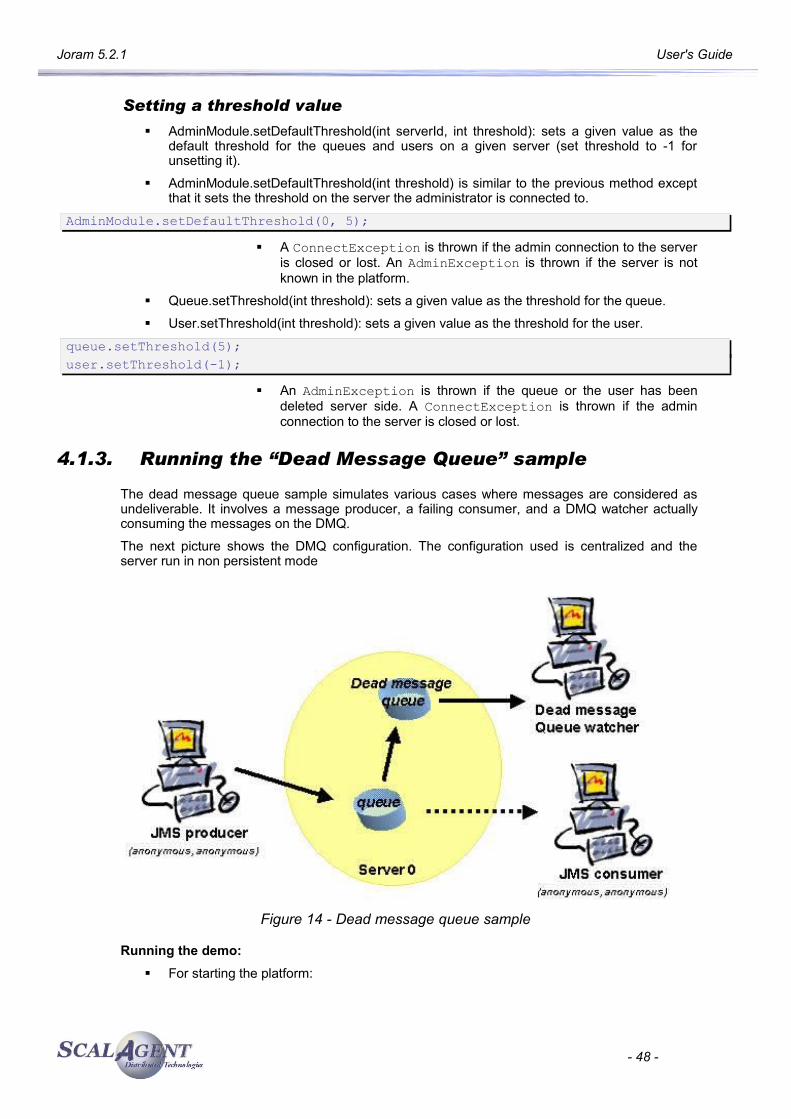
Joram 5.2.1 User's Guide
Setting a threshold value
AdminModule.setDefaultThreshold(int serverId, int threshold): sets a given value as the default threshold for the queues and users on a given server (set threshold to -1 for unsetting it).
AdminModule.setDefaultThreshold(int threshold) is similar to the previous method except that it sets the threshold on the server the administrator is connected to.
AdminModule.setDefaultThreshold(0, 5); A ConnectException is thrown if the admin connection to the server
is closed or lost. An AdminException is thrown if the server is not known in the platform.
Queue.setThreshold(int threshold): sets a given value as the threshold for the queue.
User.setThreshold(int threshold): sets a given value as the threshold for the user.
queue.setThreshold(5);user.setThreshold(-1);
An AdminException is thrown if the queue or the user has been deleted server side. A ConnectException is thrown if the admin connection to the server is closed or lost.
4.1.3. Running the “Dead Message Queue” sample
The dead message queue sample simulates various cases where messages are considered as undeliverable. It involves a message producer, a failing consumer, and a DMQ watcher actually consuming the messages on the DMQ.
The next picture shows the DMQ configuration. The configuration used is centralized and the server run in non persistent mode
Figure 14 - Dead message queue sample
Running the demo: For starting the platform:
- 48 -

Joram 5.2.1 User's Guide
ant reset single_server
For running the admin code:ant dmq_admin
For launching the watcher:ant dmq_watcher
For launching the producer and the consumer:ant dmq_client
4.2. Hierarchical Topic
4.2.1. Hierarchical topic
Introduction
The JMS specification allows topics to have a hierarchical structure such as the one shown in Erreur : source de la référence non trouvée. The interest of such a structure is to allow a subscriber to specifically choose the type of information it is interested in, by allowing it to subscribe to the corresponding subtopic. To the contrary, a subscriber may want to get all the sub information by subscribing to the topic root or father.
Figure 15 - A Hierarchical topic
ExampleThe example of Figure 15 shows a hierarchy of news. A subscriber to the Tennis topic would only get the news concerning tennis, whereas a subscriber to the Sports topic would get the news concerning tennis and soccer and sports in general. Also, a subscriber to the Business topic would get business information only, whereas a subscriber to the News topic will get the business related news, the sports related news, and news in general.
CreationCreating such a hierarchy requires first to create the topics that will constitute it, then to notify each topic of the hierarchy it is part of.
Each topic of the hierarchy may be bound in a name space such as JNDI, so that clients may then retrieve them. Access rights are managed individually, on each topic of the hierarchy.
- 49 -
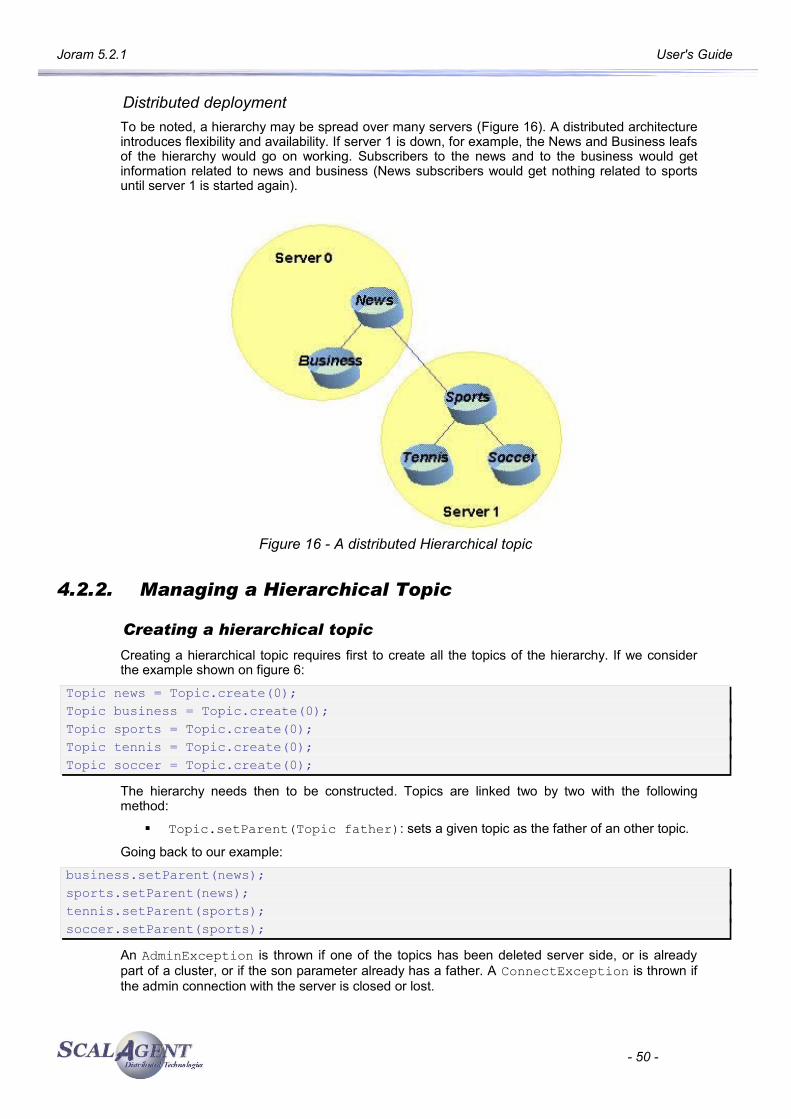
Joram 5.2.1 User's Guide
Distributed deploymentTo be noted, a hierarchy may be spread over many servers (Figure 16). A distributed architecture introduces flexibility and availability. If server 1 is down, for example, the News and Business leafs of the hierarchy would go on working. Subscribers to the news and to the business would get information related to news and business (News subscribers would get nothing related to sports until server 1 is started again).
Figure 16 - A distributed Hierarchical topic
4.2.2. Managing a Hierarchical Topic
Creating a hierarchical topic
Creating a hierarchical topic requires first to create all the topics of the hierarchy. If we consider the example shown on figure 6:
Topic news = Topic.create(0);Topic business = Topic.create(0);Topic sports = Topic.create(0);Topic tennis = Topic.create(0);Topic soccer = Topic.create(0);
The hierarchy needs then to be constructed. Topics are linked two by two with the following method:
Topic.setParent(Topic father): sets a given topic as the father of an other topic.
Going back to our example:
business.setParent(news);sports.setParent(news);tennis.setParent(sports);soccer.setParent(sports);
An AdminException is thrown if one of the topics has been deleted server side, or is already part of a cluster, or if the son parameter already has a father. A ConnectException is thrown if the admin connection with the server is closed or lost.
- 50 -
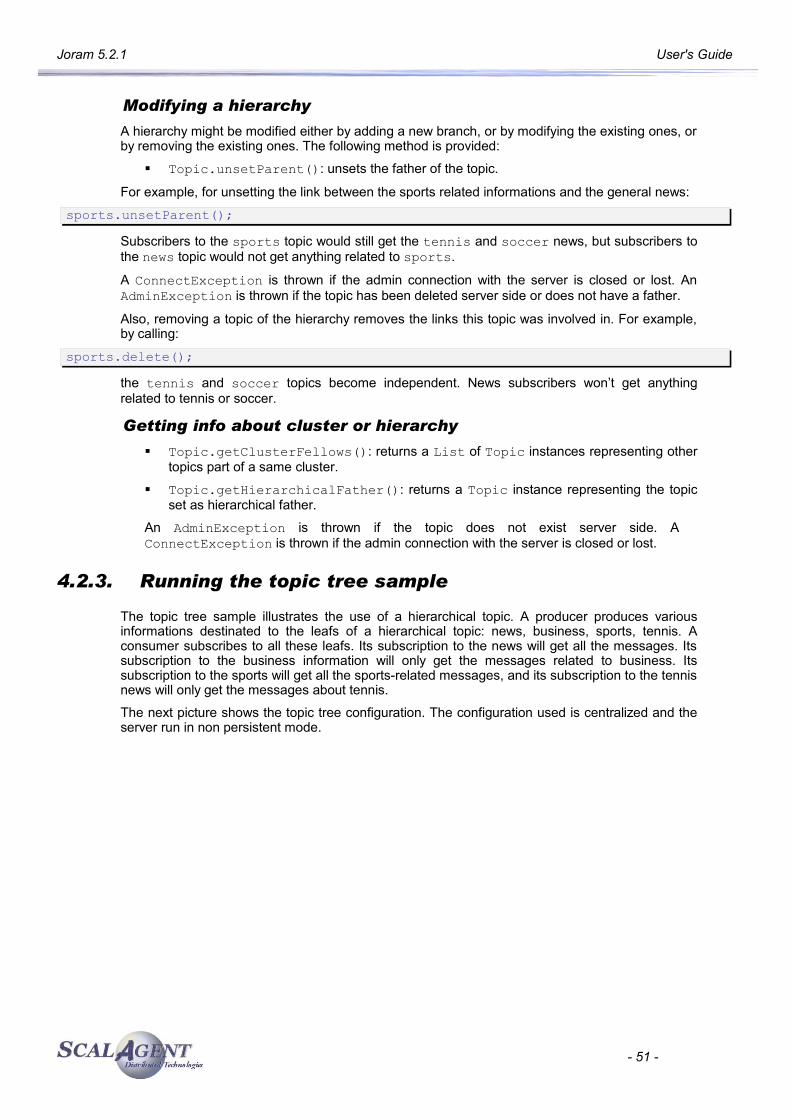
Joram 5.2.1 User's Guide
Modifying a hierarchy
A hierarchy might be modified either by adding a new branch, or by modifying the existing ones, or by removing the existing ones. The following method is provided:
Topic.unsetParent(): unsets the father of the topic.
For example, for unsetting the link between the sports related informations and the general news:
sports.unsetParent();Subscribers to the sports topic would still get the tennis and soccer news, but subscribers to the news topic would not get anything related to sports.
A ConnectException is thrown if the admin connection with the server is closed or lost. An AdminException is thrown if the topic has been deleted server side or does not have a father.
Also, removing a topic of the hierarchy removes the links this topic was involved in. For example, by calling:
sports.delete();the tennis and soccer topics become independent. News subscribers won’t get anything related to tennis or soccer.
Getting info about cluster or hierarchy
Topic.getClusterFellows(): returns a List of Topic instances representing other topics part of a same cluster.
Topic.getHierarchicalFather(): returns a Topic instance representing the topic set as hierarchical father.
An AdminException is thrown if the topic does not exist server side. A ConnectException is thrown if the admin connection with the server is closed or lost.
4.2.3. Running the topic tree sample
The topic tree sample illustrates the use of a hierarchical topic. A producer produces various informations destinated to the leafs of a hierarchical topic: news, business, sports, tennis. A consumer subscribes to all these leafs. Its subscription to the news will get all the messages. Its subscription to the business information will only get the messages related to business. Its subscription to the sports will get all the sports-related messages, and its subscription to the tennis news will only get the messages about tennis.
The next picture shows the topic tree configuration. The configuration used is centralized and the server run in non persistent mode.
- 51 -
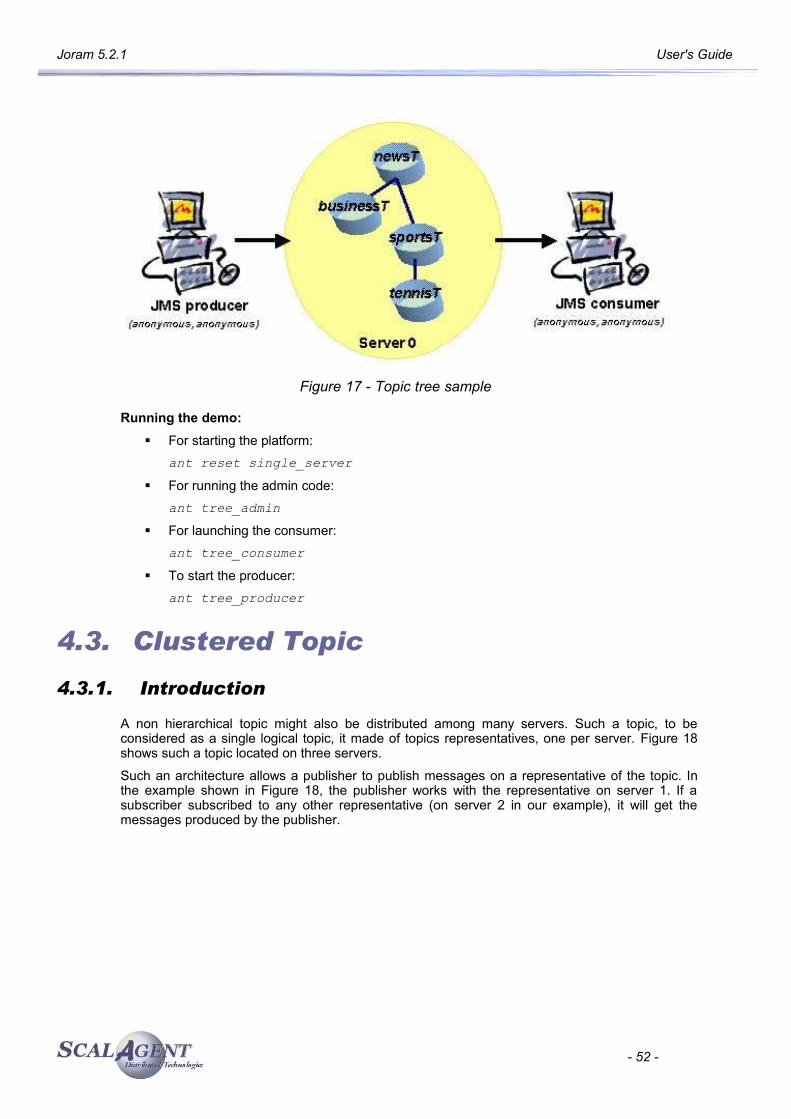
Joram 5.2.1 User's Guide
Figure 17 - Topic tree sample
Running the demo: For starting the platform:
ant reset single_server
For running the admin code:ant tree_admin
For launching the consumer:ant tree_consumer
To start the producer:ant tree_producer
4.3. Clustered Topic
4.3.1. Introduction
A non hierarchical topic might also be distributed among many servers. Such a topic, to be considered as a single logical topic, it made of topics representatives, one per server. Figure 18 shows such a topic located on three servers.
Such an architecture allows a publisher to publish messages on a representative of the topic. In the example shown in Figure 18, the publisher works with the representative on server 1. If a subscriber subscribed to any other representative (on server 2 in our example), it will get the messages produced by the publisher.
- 52 -
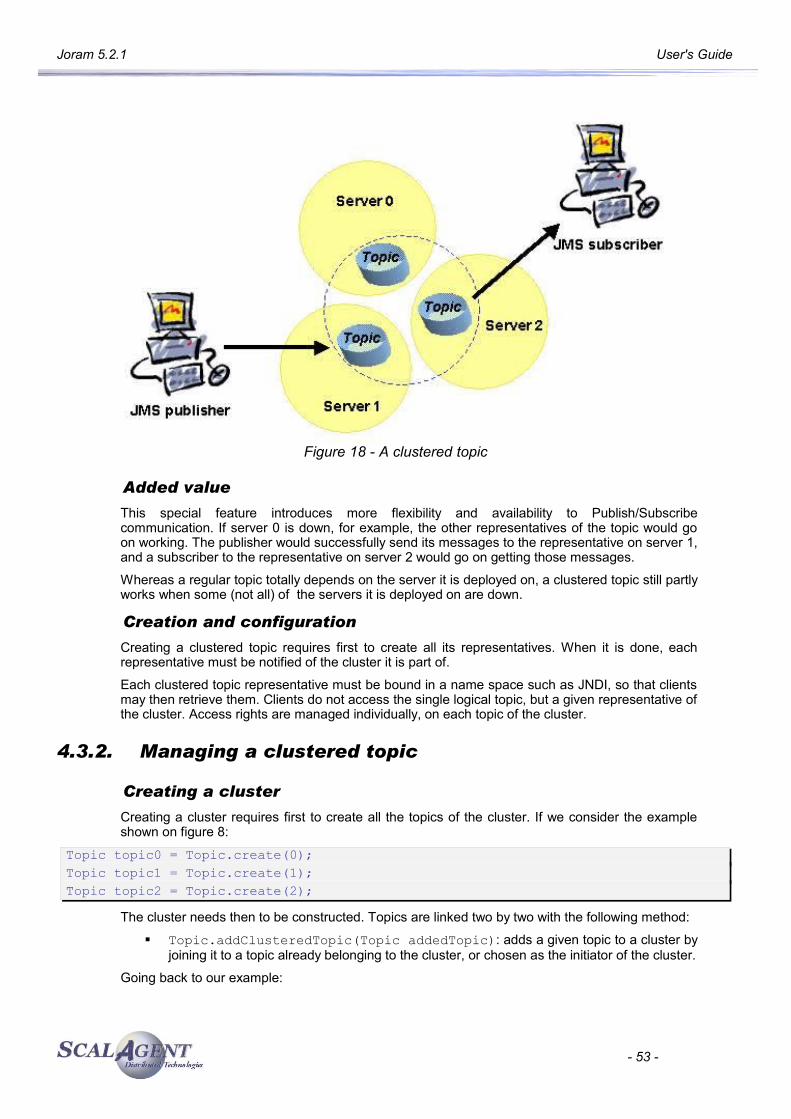
Joram 5.2.1 User's Guide
Figure 18 - A clustered topic
Added value
This special feature introduces more flexibility and availability to Publish/Subscribe communication. If server 0 is down, for example, the other representatives of the topic would go on working. The publisher would successfully send its messages to the representative on server 1, and a subscriber to the representative on server 2 would go on getting those messages.
Whereas a regular topic totally depends on the server it is deployed on, a clustered topic still partly works when some (not all) of the servers it is deployed on are down.
Creation and configuration
Creating a clustered topic requires first to create all its representatives. When it is done, each representative must be notified of the cluster it is part of.
Each clustered topic representative must be bound in a name space such as JNDI, so that clients may then retrieve them. Clients do not access the single logical topic, but a given representative of the cluster. Access rights are managed individually, on each topic of the cluster.
4.3.2. Managing a clustered topic
Creating a cluster
Creating a cluster requires first to create all the topics of the cluster. If we consider the example shown on figure 8:
Topic topic0 = Topic.create(0);Topic topic1 = Topic.create(1);Topic topic2 = Topic.create(2);
The cluster needs then to be constructed. Topics are linked two by two with the following method:
Topic.addClusteredTopic(Topic addedTopic): adds a given topic to a cluster by joining it to a topic already belonging to the cluster, or chosen as the initiator of the cluster.
Going back to our example:
- 53 -
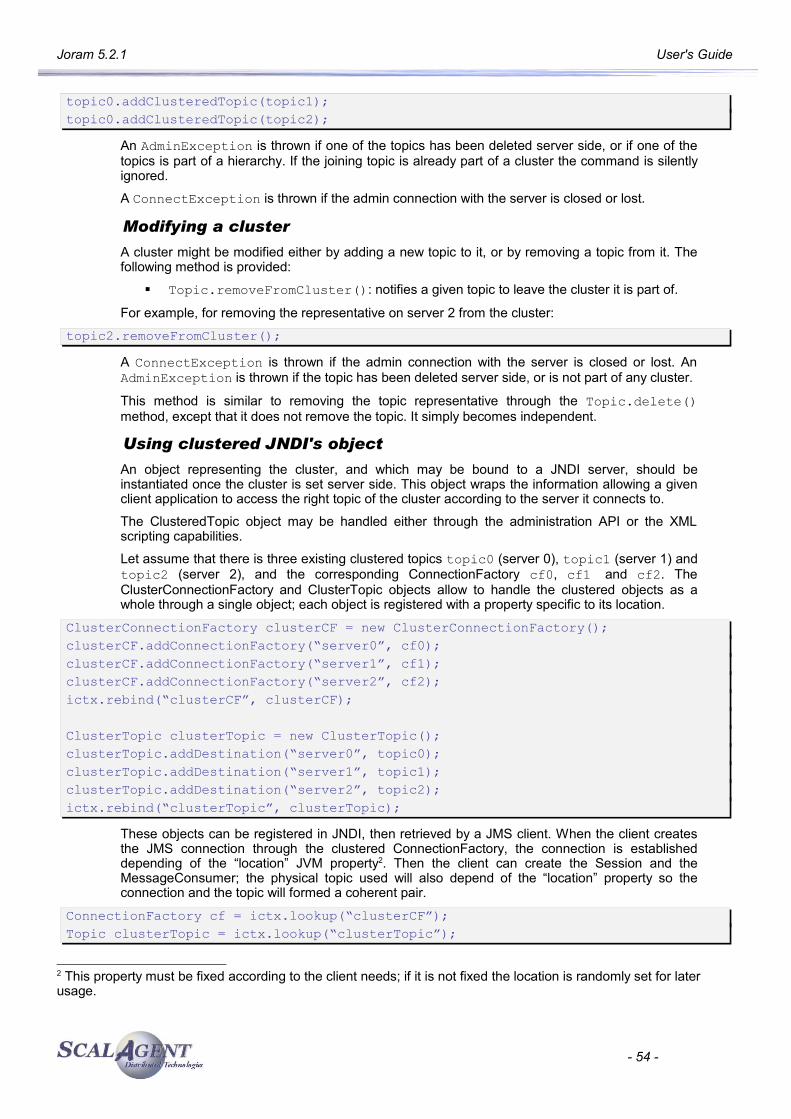
Joram 5.2.1 User's Guide
topic0.addClusteredTopic(topic1);topic0.addClusteredTopic(topic2);
An AdminException is thrown if one of the topics has been deleted server side, or if one of the topics is part of a hierarchy. If the joining topic is already part of a cluster the command is silently ignored.
A ConnectException is thrown if the admin connection with the server is closed or lost.
Modifying a cluster
A cluster might be modified either by adding a new topic to it, or by removing a topic from it. The following method is provided:
Topic.removeFromCluster(): notifies a given topic to leave the cluster it is part of.
For example, for removing the representative on server 2 from the cluster:
topic2.removeFromCluster();A ConnectException is thrown if the admin connection with the server is closed or lost. An AdminException is thrown if the topic has been deleted server side, or is not part of any cluster.
This method is similar to removing the topic representative through the Topic.delete() method, except that it does not remove the topic. It simply becomes independent.
Using clustered JNDI's object
An object representing the cluster, and which may be bound to a JNDI server, should be instantiated once the cluster is set server side. This object wraps the information allowing a given client application to access the right topic of the cluster according to the server it connects to.
The ClusteredTopic object may be handled either through the administration API or the XML scripting capabilities.
Let assume that there is three existing clustered topics topic0 (server 0), topic1 (server 1) and topic2 (server 2), and the corresponding ConnectionFactory cf0, cf1 and cf2. The ClusterConnectionFactory and ClusterTopic objects allow to handle the clustered objects as a whole through a single object; each object is registered with a property specific to its location.
ClusterConnectionFactory clusterCF = new ClusterConnectionFactory();clusterCF.addConnectionFactory(“server0”, cf0);clusterCF.addConnectionFactory(“server1”, cf1);clusterCF.addConnectionFactory(“server2”, cf2);ictx.rebind(“clusterCF”, clusterCF);
ClusterTopic clusterTopic = new ClusterTopic();clusterTopic.addDestination(“server0”, topic0);clusterTopic.addDestination(“server1”, topic1);clusterTopic.addDestination(“server2”, topic2);ictx.rebind(“clusterTopic”, clusterTopic);
These objects can be registered in JNDI, then retrieved by a JMS client. When the client creates the JMS connection through the clustered ConnectionFactory, the connection is established depending of the “location” JVM property2. Then the client can create the Session and the MessageConsumer; the physical topic used will also depend of the “location” property so the connection and the topic will formed a coherent pair.
ConnectionFactory cf = ictx.lookup(“clusterCF”);Topic clusterTopic = ictx.lookup(“clusterTopic”);
2 This property must be fixed according to the client needs; if it is not fixed the location is randomly set for later usage.
- 54 -
Joram 5.2.1 User's Guide
..Connection cnx = cf.createConnection(...);Session session = cnx.createSession(...);MessageConsumer consumer = Session.createConsumer(clusterTopic);
Setting the access rights
Access rights to the cluster may be set individually, for each topic. They may also be set for the whole cluster, using the same methods. Simply, instead of manipulating Topic instances, you have to manipulate the ClusterTopic instance.
clusterTopic.setFreeReading();clusterTopic.setFreeWriting();
4.3.3. Running the “Clustered Topic” Sample
This sample illustrates the use of Joram’s clustered topic. A clustered topic is a group of topics deployed on different servers behaving as a unique “logical” topic. This sample configuration is made of 3 servers, each server hosting a topic part of the cluster. The platform is run in persistent mode. The provided configuration locates all three servers on “localhost” host.
Figure 19 - Cluster sample configuration
This sample code is located in the samples/src/joram/cluster/topic directory. In order to run the demo described below you must go to the samples/src/joram directory.
The publisher connects to a server and publishes messages on the local topic of this server. The subscriber connects to a server and subscribes to the local topic of this server. You can either fix dynamically the server used for the connection (giving its identification 0, 1 or 2 when ant prompt for it) or use a randomly chosen server (using the '-' key at prompt).
- 55 -
JMS
JMS
Server 2Publisher
Subscriber
Server 1
Topic
Server 0
Topic
Topic
Subscriber
JMS
Joram 5.2.1 User's Guide
Running the demo
For compiling the sample code:ant clean compile
For starting the configuration:ant reset servers
For running the administration code:ant topic_cluster_admin
orant topic_cluster_adminxml
For running a subscriber:ant topic_cluster_subscriber
For running a publisherant topic_cluster_publisher
Scenario:When you launch a publisher on any server, all subscribers receives the messages sent.
4.3.4. Using XML Scripts
The XML scripting facility allows to create and bind in JNDI clustered ConnectionFactory and Destination.
ClusterConnectionFactory
A ClusterConnectionFactory is defined through a ClusterCF element. It is made up of a set of predefined ConnectionFactory element pointed out by their names. It can be completed by a JNDI declaration.
First we have to define each ConnectionFactory, one for each server of the cluster. The declaration below defines three ConnectionFactory (TcpConnectionFactory by default), cf0 allows the connection to server #0, cf1 to server #1 and cf2 to server #2. Each ConnectionFactory can be bound individually in JNDI.
<ConnectionFactory name="cf0"> <tcp host="localhost" port="16010"/> <jndi name="cf0"/> </ConnectionFactory> <ConnectionFactory name="cf1"> <tcp host="localhost" port="16011"/> <jndi name="cf1"/> </ConnectionFactory> <ConnectionFactory name="cf2"> <tcp host="localhost" port="16012"/> <jndi name="cf2"/> </ConnectionFactory>
- 56 -
Joram 5.2.1 User's Guide
Second we can define the ClusterConnectionFactory associating each ConnectionFactory with a location property3. The declaration above defines a ClusterConnectionFactory made up of three TcpConnectionFactory named cf0, cf1 and cf2. The resulted ConnectionFactory is bound in JNDI with the name clusterCF.
<ClusterCF> <ClusterElement name="cf0" location="server0"/> <ClusterElement name="cf1" location="server1"/> <ClusterElement name="cf2" location="server2"/> <jndi name="clusterCF"/> </ClusterCF>
ClusterTopic
A clustered topic is made up of a set of Topic elements; each destination needs to be created separately. It can be completed by a JNDI declaration.
<Topic name="topic0" serverId="0"> <jndi name="topic0"/> </Topic> <Topic name="topic1" serverId="1"> <jndi name="topic1"/> </Topic> <Topic name="topic2" serverId="2"> <jndi name="topic2"/> </Topic>
The destinations must be linked in the cluster. The declaration below defines a ClusteredTopic made up of three Topic objects named topic0, topic1 and topic2. The location property allows to associate each Topic object with the corresponding ConnectionFactory of the clusterCF object (see paragraph “Using clustered JNDI's object” above). The resulted queue is bound in JNDI with the name clusterTopic.
<ClusterTopic> <ClusterElement name="topic0" location="server0"/> <ClusterElement name="topic1" location="server1"/> <ClusterElement name="topic2" location="server2"/> <freeReader/> <freeWriter/> <jndi name="clusterTopic"/> </ClusterTopic>
4.4. Clustered Queue
4.4.1. Introduction
The clustered queue feature provides a load balancing mechanism. A clustered queue is a cluster of queues (a given number of queue destinations, knowing each other), exchanging messages depending on their load. The figure 9 shows an example of a cluster made of two queues. An heavy producer accesses its local queue (queue 0) and sends messages. The queue is also accessed by a consumer but requesting few messages. It quickly becomes loaded and decides to forward messages to the other queue (queue 1) of its cluster, which is not under heavy load. Thus,
3 This property allows to choose the right association between the ConnectionFactory and the representative of clustered destinations (see paragraph “Using clustered JNDI's object”).
- 57 -
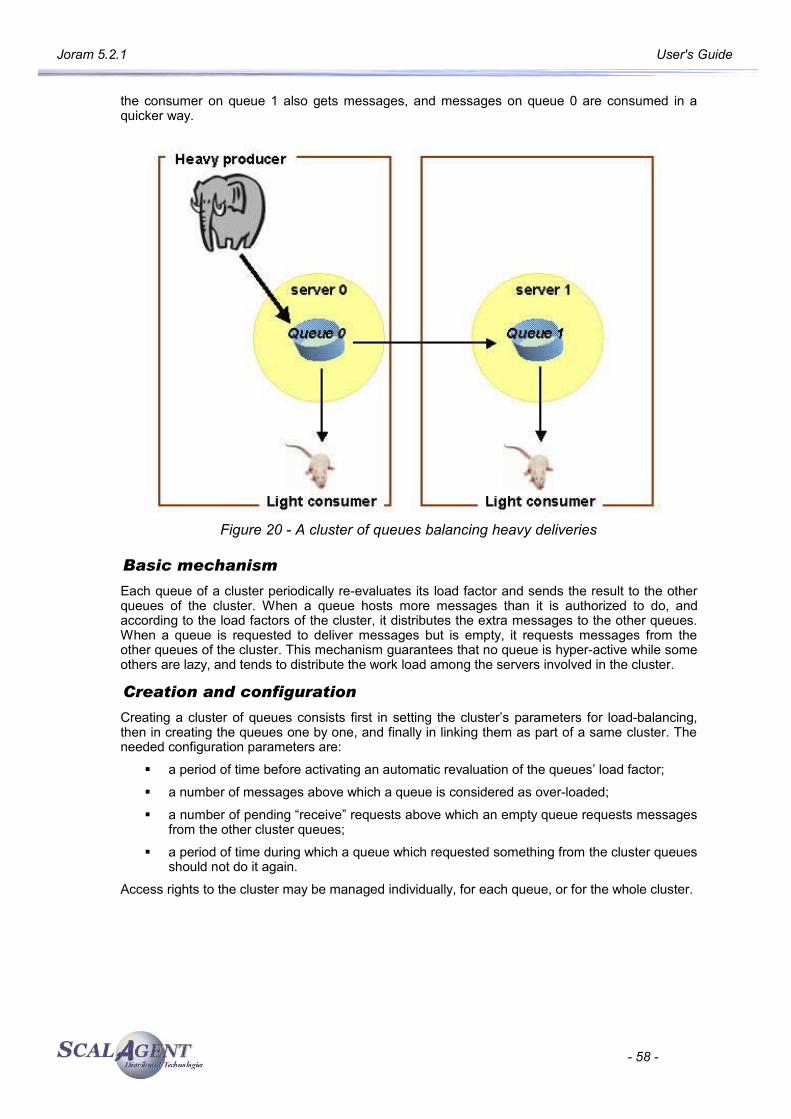
Joram 5.2.1 User's Guide
the consumer on queue 1 also gets messages, and messages on queue 0 are consumed in a quicker way.
Figure 20 - A cluster of queues balancing heavy deliveries
Basic mechanism
Each queue of a cluster periodically re-evaluates its load factor and sends the result to the other queues of the cluster. When a queue hosts more messages than it is authorized to do, and according to the load factors of the cluster, it distributes the extra messages to the other queues. When a queue is requested to deliver messages but is empty, it requests messages from the other queues of the cluster. This mechanism guarantees that no queue is hyper-active while some others are lazy, and tends to distribute the work load among the servers involved in the cluster.
Creation and configuration
Creating a cluster of queues consists first in setting the cluster’s parameters for load-balancing, then in creating the queues one by one, and finally in linking them as part of a same cluster. The needed configuration parameters are:
a period of time before activating an automatic revaluation of the queues’ load factor;
a number of messages above which a queue is considered as over-loaded;
a number of pending “receive” requests above which an empty queue requests messages from the other cluster queues;
a period of time during which a queue which requested something from the cluster queues should not do it again.
Access rights to the cluster may be managed individually, for each queue, or for the whole cluster.
- 58 -
Joram 5.2.1 User's Guide
4.4.2. Managing a clustered queue
Setting the clustered queue parameters
Prior to creating the cluster, the following parameters must be set individually for each queue of the cluster4:
“period”: period in ms between two activations of the load factor evaluation routine for the queue;
“producThreshold”: number of messages above which a queue is considered loaded, a load factor evaluation launched, messages forwarded to other queues of the cluster;
“consumThreshold”: number of pending “receive” requests above which a queue will request messages from the other queues of the cluster;
“autoEvalThreshold”: set to “true” for requesting an automatic revaluation of the queues’ thresholds values according to their activity;
“waitAfterClusterReq”: time (in ms) during which a queue which requested something from the cluster is not authorized to do it again.
Properties are set in a java.util.Properties instance. For example:
java.util.Properties prop = new java.util.Properties();prop.setProperty(“period”, “10000”);prop.setProperty(“producThreshold”, “60”);prop.setProperty(“consumThreshold”, “2”);prop.setProperty(“autoEvalThreshold”, “true”);prop.setProperty(“waitAfterClusterReq”, “500”);
Creating the clustered queues
Creating a clustered queue consists first in creating the queues that will be part of it. For a cluster of three queues, let’s create queue0, queue1 and queue2 and servers 0, 1 and 2 through the Queue.create method.
String className = “org.objectweb.joram.mom.dest.ClusterQueue”;
Queue queue0 = Queue.create(0, “queue0”, className, prop);Queue queue1 = Queue.create(1, “queue1”, className, prop);Queue queue2 = Queue.create(2, “queue2”, className, prop);
The next step consists in clustering the queues. Queues are linked two by two using Queue class with the following method:
addClustered(Queue addedQueue): adds a given queue to a cluster by joining it to a queue already belonging to the cluster, or chosen as the initiator of the cluster.
Going back to our example:queue0.addClusteredQueue(queue1);queue0.addClusteredQueue(queue2);
An IllegalArgumentException is thrown by this latest method if one of the queues parameters is not a valid Joram queue. An AdminException is thrown if one of the queues does not exist server side, or if the joining queue is already part of a cluster. A ConnectException is thrown if the connection with the server is lost.
4 Each queue can have a different configuration depending of the characteristics of the server, or the number of producer/consumer, etc.
- 59 -
Joram 5.2.1 User's Guide
Using clustered JNDI's object
An object representing the cluster, and which may be bound to a JNDI server, should be instantiated once the cluster is set server side. This object wraps the information allowing a given client application to access the right queue of the cluster according to the server it connects to.
The ClusteredQueue object may be handled either through the administration API or the XML scripting capabilities.
Let assume that there is three existing clustered queues queue0 (server 0), queue1 (server 1) and queue2 (server 2), and the corresponding ConnectionFactory cf0, cf1 and cf2. The ClusterConnectionFactory and ClusterQueue objects allow to handle the clustered objects as a whole through a single object; each object is registered in the clustered object with a property specific to its location.
ClusterConnectionFactory clusterCF = new ClusterConnectionFactory();clusterCF.addConnectionFactory("server0", cf0);clusterCF.addConnectionFactory("server1", cf1);clusterCF.addConnectionFactory("server2", cf2);ictx.rebind("clusterCF", clusterCF);
ClusterQueue clusterQueue = new ClusterQueue();clusterQueue.addDestination("server0", queue0);clusterQueue.addDestination("server1", queue1);clusterQueue.addDestination("server2", queue2);
These objects can be registered in JNDI, then retrieved by a JMS client. When the client creates the JMS connection through the clustered ConnectionFactory, the connection is established depending of the “location” JVM property5. Then the client can create the Session and the MessageConsumer; the physical queue used will also depend of the “location” property so the connection and the queue will formed a coherent pair.
ConnectionFactory cf = ictx.lookup(“clusterCF”);Queue queue = ictx.lookup(“clusterQueue”);..Connection cnx = cf.createConnection(...);Session session = cnx.createSession(...);MessageConsumer consumer = Session.createConsumer(queue);
Setting the access rights
Access rights to the cluster may be set individually, for each queue. They may also be set for the whole cluster, using the same methods. Simply, instead of manipulating Queue instances, simply manipulate the ClusterQueue instance. For example:
clusterQueue.setFreeReading();clusterQueue.setFreeWriting();
4.4.3. Running the “Clustered Queue” Sample
This sample illustrates the use of Joram's clustered queues. A cluster queue is a group of queues deployed on different servers and handling the load-balancing.
This sample configuration is made of three servers, each server hosting a queue part of the cluster. The platform is run in persistent mode. The provided configuration locates all three servers on “localhost” host.
5 This property must be fixed according to the client needs; if it is not fixed the location is randomly set for later usage.
- 60 -
Joram 5.2.1 User's Guide
This sample code is located in the samples/src/joram/cluster/queue directory. In order to run the demo described below you must go to the samples/src/joram directory.
Running the demo:
Starting the configuration:ant reset servers
Running the administration code: ant queue_cluster_admin.
o This target creates and configures a cluster with 3 queues as described above.
Running the consumers using the target queue_cluster_consumer.
o This target launches a message consumer connected to one of the server, it indefinitely consumes messages on the corresponding queue.
Running the producers using the target queue_cluster_producer.
o This target launches a message producer connected to one of the server, it sends 1000 messages to the corresponding queue.
Using the queue_cluster_consumer or queue_cluster_producer targets you can either fix dynamically the server used for the connection (giving its identification 0, 1 or 2 when ant prompt for it) or use a randomly chosen server (directly press the return key at prompt).
In order to view the load-balancing mechanism we can run two different scenarios.
Scenario 1:In this scenario there is three message consumers, one for each queue of the cluster. Messages are all sent to queue0, the load-balancing mechanism dispatches them between the queues, then the consumers.
Launching three consumers on queue0, queue1 and queue2:
“ant queue_cluster_consumer” then type '0'.
“ant queue_cluster_consumer” then type '1'.
“ant queue_cluster_consumer” then type '2'.
Launching multiples producers on queue0:
“ant queue_cluster_producer” then type '0'.
“ant queue_cluster_producer” then type '0'.
“ant queue_cluster_producer” then type '0'.
Scenario 2:In this scenario there is only two message consumers listening on queue0 and queue1. Messages are sent on queue1 and queue2, messages produced to queue2 by the second producer are dispatched between the two consumers by the load-balancing mechanism.
Launching two consumers on queue0 and queue1
“ant queue_cluster_consumer” then type '0'.
“ant queue_cluster_consumer” then type '1'.
Launching two producers on queue1 and queue2
“ant queue_cluster_producer” then type '1'.
“ant queue_cluster_producer” then type '2'.
- 61 -
Joram 5.2.1 User's Guide
4.4.4. Using XML Scripts
The XML scripting facility allows to create and bind in JNDI clustered ConnectionFactory and Destination.
ClusterConnectionFactory
A ClusterConnectionFactory is defined through a ClusterCF element. It is made up of a set of predefined ConnectionFactory element pointed out by their names. It can be completed by a JNDI declaration.
<ConnectionFactory name="cf0"> <tcp host="localhost" port="16010"/> <jndi name="cf0"/> </ConnectionFactory> <ConnectionFactory name="cf1"> <tcp host="localhost" port="16011"/> <jndi name="cf1"/> </ConnectionFactory> <ConnectionFactory name="cf2"> <tcp host="localhost" port="16012"/> <jndi name="cf2"/> </ConnectionFactory>
The declaration below defines a ClusterConnectionFactory JNDI's object made up of three TcpConnectionFactory named cf0, cf1 and cf2. Each ConnectionFactory is bound in the cluster with a key depending of its location. The resulted ConnectionFactory is bound in JNDI with the name clusterCF.
<ClusterCF> <ClusterElement name="cf0" location="server0"/> <ClusterElement name="cf1" location="server1"/> <ClusterElement name="cf2" location="server2"/> <jndi name="clusterCF"/> </ClusterCF>
ClusterQueue
A clustered destination is made up of a set of Queue or Topic elements; each destination needs to be created separately then linked. It can be completed by a JNDI declaration.
<Queue name="queue0" serverId="0" className="org.objectweb.joram.mom.dest.ClusterQueue"> <property name="period" value="10000"/> <property name="producThreshold" value="50"/> <property name="consumThreshold" value="2"/> <property name="autoEvalThreshold" value="false"/> <property name="waitAfterClusterReq" value="1000"/> <jndi name="queue0"/> </Queue>
<Queue name="queue1" serverId="1"
- 62 -
Joram 5.2.1 User's Guide
className="org.objectweb.joram.mom.dest.ClusterQueue"> <property name="period" value="10000"/> <property name="producThreshold" value="50"/> <property name="consumThreshold" value="2"/> <property name="autoEvalThreshold" value="false"/> <property name="waitAfterClusterReq" value="1000"/> <jndi name="queue1"/> </Queue>
<Queue name="queue2" serverId="2" className="org.objectweb.joram.mom.dest.ClusterQueue"> <property name="period" value="10000"/> <property name="producThreshold" value="50"/> <property name="consumThreshold" value="2"/> <property name="autoEvalThreshold" value="false"/> <property name="waitAfterClusterReq" value="1000"/> <jndi name="queue2"/> </Queue>
The declaration below defines a ClusteredQueue made up of three Queue objects named queue0, queue1 and queue2. Each queue is bound in the cluster with a key according to its location6. The location property allows to associate each Topic object with the corresponding ConnectionFactory of the clusterCF object (see paragraph “Using clustered JNDI's object” above). The resulted queue is bound in JNDI with the name clusterQueue.
<ClusterQueue> <freeReader/> <freeWriter/> <ClusterElement name="queue0" location="server0"/> <ClusterElement name="queue1" location="server1"/> <ClusterElement name="queue2" location="sserver2"/> <jndi name="clusterQueue"/> </ClusterQueue>
4.5. SchedulerQueue
4.5.1. Introduction
A scheduler queue is a standard JMS queue extended with a timer behaviour. When a scheduler queue receives a message with a property called 'scheduleDate' (typed as a long) then the message is not delivered immediately but at the date specified by the property.
The scheduler queue feature is available since the Joram version 4.3.14.
4.5.2. Managing a SchedulerQueue
Joram server configuration
<?xml version="1.0" encoding="UTF-8"?>
6 This key must be the same that the key used for the corresponding ConnectionFactory.
- 63 -
Joram 5.2.1 User's Guide
<config> <server id="0" name="s0" hostname="localhost"> <service class="org.objectweb.joram.mom.proxies.ConnectionManager" args="root root"/> <service class="org.objectweb.joram.mom.proxies.tcp.TcpProxyService" args="16010"/> <service class="fr.dyade.aaa.jndi2.server.JndiServer" args="16400"/> </server></config>
Create a scheduler queue
A scheduler queue is created by using the Joram administration API, calling the Queue creation method create from the class org.objectweb.joram.client.jms.Queue.
queue = Queue.create(0, "schedulerQ", "com.scalagent.joram.mom.dest.scheduler.SchedulerQueue", null);
4.5.3. Using a schedulerQueue
Schedule a message
Scheduling a message requires to add a property called "scheduleDate" to the message. The value is the message delivery date typed as a long.
The following example shows how to schedule a message for 5 seconds later.
long scheduleDate = System.currentTimeMillis() + 5000L; TextMessage msg = session.createTextMessage("hello"); msg.setLongProperty("scheduleDate", scheduleDate); producer.send(msg);
Cancel a scheduled message
You can cancel a previously scheduled message by removing it from the scheduler queue. This removal operation can be performed through the Joram administration API or the GUI (JAMT).
queue.deleteMessage(msg.getJMSMessageID());
4.6. Mail queue and topic
4.6.1. Introduction
Mail queue and topic are special destinations usable to interconnect Joram and Internet email system. They can be used to:
● forward Joram's messages to an external email account,
● import emails from external account and turn them in Joram's messages.
The mail queue and topic features are available since the Joram version 4.3.23.
- 64 -
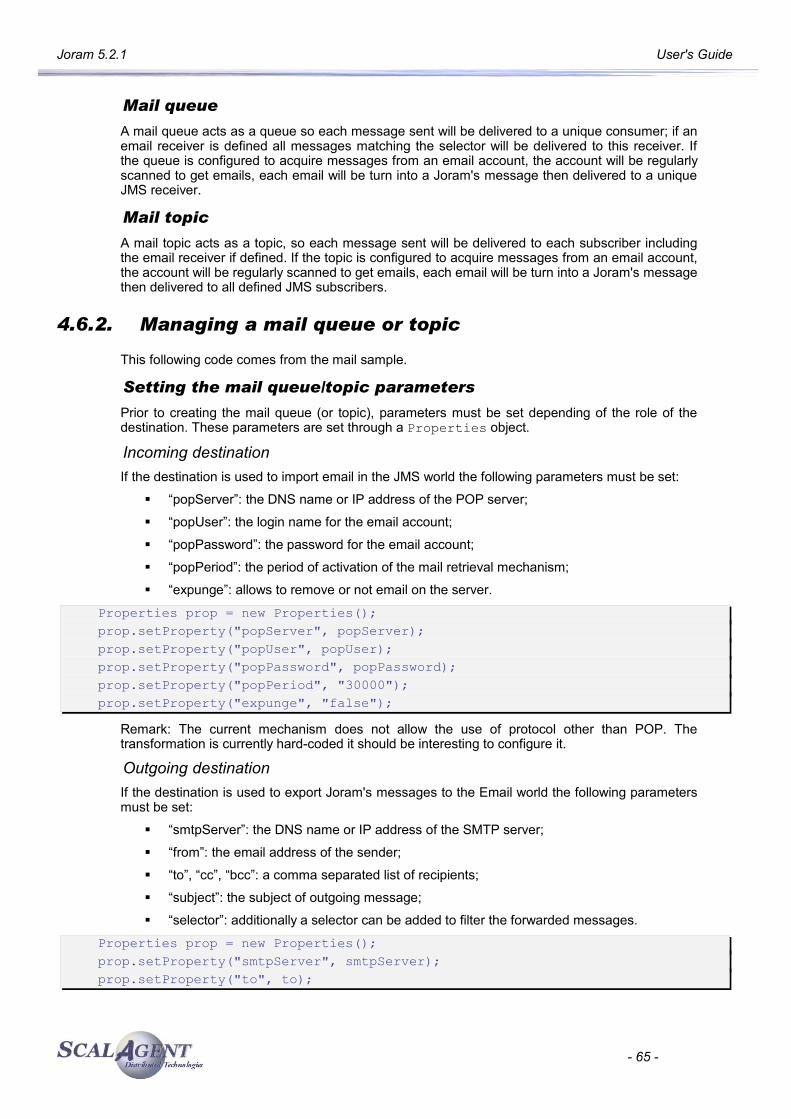
Joram 5.2.1 User's Guide
Mail queue
A mail queue acts as a queue so each message sent will be delivered to a unique consumer; if an email receiver is defined all messages matching the selector will be delivered to this receiver. If the queue is configured to acquire messages from an email account, the account will be regularly scanned to get emails, each email will be turn into a Joram's message then delivered to a unique JMS receiver.
Mail topic
A mail topic acts as a topic, so each message sent will be delivered to each subscriber including the email receiver if defined. If the topic is configured to acquire messages from an email account, the account will be regularly scanned to get emails, each email will be turn into a Joram's message then delivered to all defined JMS subscribers.
4.6.2. Managing a mail queue or topic
This following code comes from the mail sample.
Setting the mail queue/topic parameters
Prior to creating the mail queue (or topic), parameters must be set depending of the role of the destination. These parameters are set through a Properties object.
Incoming destinationIf the destination is used to import email in the JMS world the following parameters must be set:
“popServer”: the DNS name or IP address of the POP server;
“popUser”: the login name for the email account;
“popPassword”: the password for the email account;
“popPeriod”: the period of activation of the mail retrieval mechanism;
“expunge”: allows to remove or not email on the server.
Properties prop = new Properties(); prop.setProperty("popServer", popServer); prop.setProperty("popUser", popUser); prop.setProperty("popPassword", popPassword); prop.setProperty("popPeriod", "30000"); prop.setProperty("expunge", "false");
Remark: The current mechanism does not allow the use of protocol other than POP. The transformation is currently hard-coded it should be interesting to configure it.
Outgoing destinationIf the destination is used to export Joram's messages to the Email world the following parameters must be set:
“smtpServer”: the DNS name or IP address of the SMTP server;
“from”: the email address of the sender;
“to”, “cc”, “bcc”: a comma separated list of recipients;
“subject”: the subject of outgoing message;
“selector”: additionally a selector can be added to filter the forwarded messages.
Properties prop = new Properties(); prop.setProperty("smtpServer", smtpServer); prop.setProperty("to", to);
- 65 -
Joram 5.2.1 User's Guide
prop.setProperty("from", from); prop.setProperty("subject", "JORAM MAIL"); prop.setProperty(“selector”, “”);
Remark: The current mechanism does not allow the use of protocol other than SMTP. It could be interesting to allow the overloading of the default sending parameters by message properties.
Creating the mail queue
A mail queue is created by using the Joram administration API, calling the Queue creation method create from the class org.objectweb.joram.client.jms.Queue.
Queue queue = Queue.create(0, “mailQueue”, "com.scalagent.joram.mom.dest.mail.JavaMailQueue", prop);
This method allow to specify the location server, an internal name, the implementation class and the configuration properties for the new queue.
Creating the mail topic
A mail topic is created by using the Joram administration API, calling the Topic creation method create from the class org.objectweb.joram.client.jms.Topic.
Topic topic = Topic.create(0, “mailTopic”, "com.scalagent.joram.mom.dest.mail.JavaMailTopic", prop);
This method allow to specify the location server, an internal name, the implementation class and the configuration properties for the new topic.
Administering a mail destination
A mail destination can be handled either through JMX or the administration API. The associated MBean allows to watch and change the destination's parameters. Additionally the administration API allows to add/change/remove the destination email account. This API allow to define more than one email account eventually with different selector.
4.6.3. Using a mail queue or topic
Sending a message
When sending a message to a mail destination we can gently configure the produced email; if the showProperties property is defined to true, all properties will be added to the message. Anyway the body of the message will be added (be careful with non text message, it implies the availability server-side of the associated classes.
TextMessage msg = sess.createTextMessage(); msg.setBooleanProperty("showProperties", true); msg.setText("Queue : Test number #" + i); producer.send(msg);
The above code will result in a multi-part email containing a first part with properties and a second part with the associated text. The email's subject, sender and recipients will be fixed by the configuration properties of the destination.
4.6.4. Running the sample
This sample illustrates the use of Joram's Mail destinations. It uses a mail topic to send email to a predefined account, and a mail queue to receive email from this identical account.
- 66 -
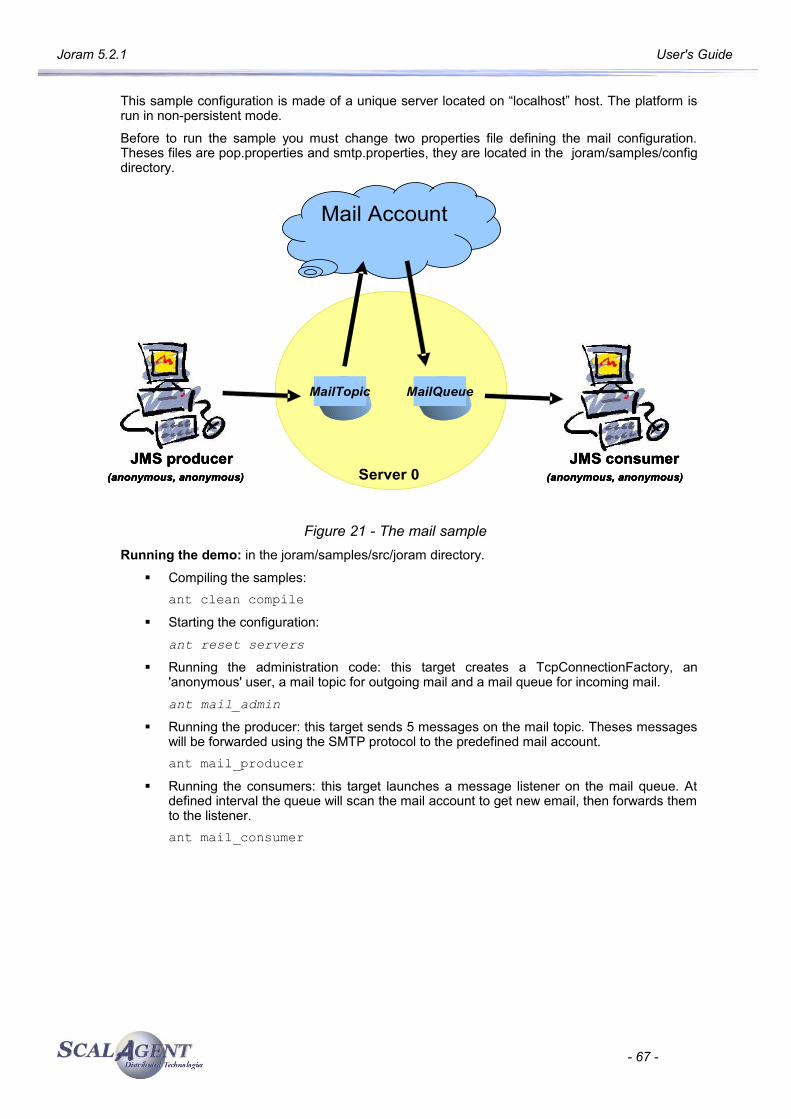
Joram 5.2.1 User's Guide
This sample configuration is made of a unique server located on “localhost” host. The platform is run in non-persistent mode.
Before to run the sample you must change two properties file defining the mail configuration. Theses files are pop.properties and smtp.properties, they are located in the joram/samples/config directory.
Figure 21 - The mail sampleRunning the demo: in the joram/samples/src/joram directory.
Compiling the samples:ant clean compile
Starting the configuration:ant reset servers
Running the administration code: this target creates a TcpConnectionFactory, an 'anonymous' user, a mail topic for outgoing mail and a mail queue for incoming mail.ant mail_admin
Running the producer: this target sends 5 messages on the mail topic. Theses messages will be forwarded using the SMTP protocol to the predefined mail account.ant mail_producer
Running the consumers: this target launches a message listener on the mail queue. At defined interval the queue will scan the mail account to get new email, then forwards them to the listener. ant mail_consumer
- 67 -
Mail Account
JMS producer(anonymous, anonymous)
JMS producer(anonymous, anonymous)
JMS producer(anonymous, anonymous)
JMS consumer(anonymous, anonymous)
JMS consumer(anonymous, anonymous)
JMS consumer(anonymous, anonymous)Server 0
MailQueueMailTopic
Joram 5.2.1 User's Guide
4.7. MonitoringTopic
4.7.1. Introduction
A monitoring topic is a particular topic which periodically sends monitoring information to each subscriber. Every message received by the topic will be analysed for new monitoring options and dropped: it will not be forwarded to subscribers.
This topic is based on JMX monitoring so you must enable JMX monitoring to use it. See JMX administration of Joram in order to do it.
The monitoring topic feature is available since the Joram 5.1.0 version.
4.7.2. Managing a MonitoringTopic
Setting the MonitoringTopic parameters
Topic options are set using properties at topic creation time or by sending a message to the topic. The following options are available:
"period": defines the time in millisecond between two monitoring messages. It is set to one minute by default.
"persistent": tells if produced messages are persistent. Default is false.
"priority": shows the priority of produced messages. Default value is default JMS priority, 4.
"expiration": indicates how long the message will live before being considered as expired.
Additionally, properties are used to indicate what will be monitored. Anything accessible with JMX is available. The property key is the name of the MBean prefixed by "MBeanMonitoring:" and the value is a comma separated list of monitored parameters. The * character is allowed to monitor every parameter.
Accessing multiple MBeans is possible using wildcard characters, as defined in the javax.management.ObjectName class. See here for JDK6 details.
Example at creation time:
Properties topicProps = new Properties();topicProps.put("period", "2000");topicProps.put("MBeanMonitoring:Joram#0:type=Destination,*","NbMsgsDeliverSinceCreation, NbMsgsReceiveSinceCreation, NbMsgsSentToDMQSinceCreation");topicProps.put("MBeanMonitoring:AgentServer:server=AgentServer#0,cons=Transaction", "*");
Example sending a message to the topic:
Message msg = sessionp.createMessage();msg.setStringProperty("MBeanMonitoring:AgentServer:server=AgentServer#0,cons=Transaction", "LogMemorySize, GarbageRatio");msg.setLongProperty("period", 10000);producer.send(msg);
Creating the MonitoringTopic
A monitoring topic is created by using the Joram administration API, calling the Topic creation method create from the class org.objectweb.joram.client.jms.Topic.
Topic topic = Topic.create(0, "MonitoringTopic",
- 68 -
Joram 5.2.1 User's Guide
"org.objectweb.joram.mom.dest.MonitoringTopic", topicProps);
This method allows to specify the location server, an internal name, the implementation class and the configuration properties for the new topic.
The monitoring topic can also be created as a service in a3servers.xml with default monitoring options and a default name JoramMonitoringTopic.
<service class="org.objectweb.joram.mom.dest.MonitoringTopic" />And to get the topic:
Topic topic = Topic.create("JoramMonitoringTopic");
4.7.3. Running the sample
The sample shows how to monitor a single queue.
Running the demo: in the joram/samples/src/joram directory.
Compiling the samples:ant clean compile
Starting the configuration:ant reset single_server
Running the administration code: this target creates a ConnectionFactory, an 'anonymous' user, a queue, and a monitoring topic retrieving data about the queue.ant monitoring_admin
Running the monitor: this target connects to the monitoring topic in order to be notified regularly about the queue parameters.ant monitoring_monitor
Running the producer: this target sends 10 messages on the queue.ant monitoring_producer
Running the consumer: this target tries to read 10 messages on the queue. ant monitoring_consumer
You can launch multiple times the producer and the consumer to see the monitored parameters evolve.
4.8. Collector queue and topic
4.8.1. Introduction
Collector queue and topic are special destinations usable to collect file, object, ....
They can be used to periodically :
● import a file from an URL to a Joram's message and store in this queue.
● import a file from an URL to a Joram's message and forward to each subscribers.
Every message received by the collector destination's will be analysed for new collector options and dropped: it will not be store or forwarded to subscribers.
We provide an URL collector.
- 69 -
Joram 5.2.1 User's Guide
The collector queue and topic features are available since the Joram version 5.1.x (x>0).
4.8.2. Managing a Collector destination
Setting the configuration parameters
The options are set using properties at collector queue/topic creation time or by sending a message to the collector queue/topic or by Mbean collector queue/topic component. The following options are available:
"collector.period": defines the time in millisecond between two wake up the collector. It is set to one minute by default.
"collector.persistentMessage": tells if messages are persistent. Default is true.
"collector.expirationMessage": indicates how long the message will live before being considered as expired.
"collector.type": indicates the type of the generated message. Default is Message.BYTES.
"collector.ClassName": defines the collector class to be instantiated. The default class is "com.scalagent.joram.mom.dest.collector.URLCollector".
"collector.url": defines the file to keep and set as body message.
Additionally, properties can be used to indicate specific behaviour. Anything accessible with JMX is available.
Creating the destination
A collector queue/topic is created by using the Joram administration API, calling the Queue/Topic creation method create from the class org.objectweb.joram.client.jms.Queue/Topic.
Properties props = new Properties();prop.setProperty("collector.expirationMessage", "0");prop.setProperty("collector.persistentMessage", "true");prop.setProperty("collector.period", "300000");prop.setProperty("collector.type", "" + Message.BYTES);prop.setProperty("collector.ClassName",
"com.scalagent.joram.mom.dest.collector.URLCollector");prop.setProperty("collector.url", url);
Queue queue = Queue.create(0, "CollectorQueue", "com.scalagent.joram.mom.dest.CollectorQueue", props);
Topic topic = Topic.create(0, "CollectorTopic", "com.scalagent.joram.mom.dest.CollectorTopic", props);
This method allows to specify the location server, an internal name, the implementation class and the configuration properties for the new collector queue/topic.
- 70 -
Joram 5.2.1 User's Guide
4.8.3. Using a collector destination
Sending a message
Send a message to the collector destination is only used to set new properties.
When destination receive the message, the destination implantation update the properties and immediately run a new task and schedule a new task.
After update, the message is drop.
Message msg = sess.createMessage();
msg.setStringProperty("collector.expirationMessage", "0");msg.setStringProperty("collector.persistentMessage", "true");msg.setStringProperty("collector.period", "30000");msg.setStringProperty("collector.url", url);msg.setStringProperty("collector.type", "" + Message.BYTES);
producer.send(collectorQueue, msg);
Receiving a message
You receive periodically a message containing the file you specify with the URL.
4.8.4. Running the sample
The sample shows how to collect the “http://svn.forge.objectweb.org/cgi-bin/viewcvs.cgi/*checkout*/joram/trunk/joram/history" file and store in the collector queue.
A consumer consume the message and print the file.
A producer send message to the collector queue to update some properties.
Running the demo: in the joram/samples/src/joram directory.
Compiling the samples:ant clean compile
Starting the configuration:ant reset single_server
Running the administration code: this target creates a ConnectionFactory, an 'anonymous' user and a collector queue.ant collector_admin
Running the collector: this target connects to the collector queue in order to be notified regularly about the collected file.ant collector_consumer
Running the producer: this target update some properties on the collector queue.ant collector_producer
- 71 -
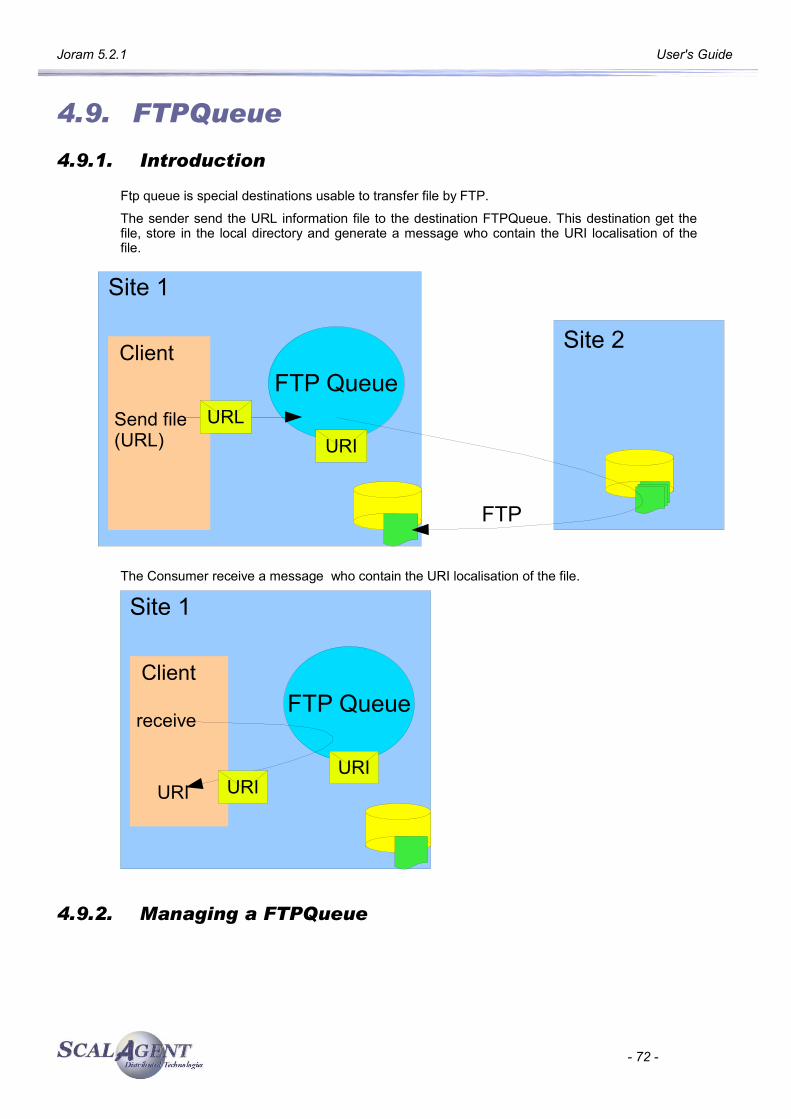
Joram 5.2.1 User's Guide
4.9. FTPQueue
4.9.1. Introduction
Ftp queue is special destinations usable to transfer file by FTP.
The sender send the URL information file to the destination FTPQueue. This destination get the file, store in the local directory and generate a message who contain the URI localisation of the file.
The Consumer receive a message who contain the URI localisation of the file.
4.9.2. Managing a FTPQueue
- 72 -
FTP Queue
URI
Client
Send file(URL)
Site 1
Site 2
FTP
URL
FTP Queue
URI
Client
URI
receive
URI
Site 1
Joram 5.2.1 User's Guide
Setting the FTPQueue parameters
The options are set using properties at FTPQueue creation time.
user: the user name for the FTP.
pass: the user password for FTP.
path: the local directory to store the file transferred. Default is the running directory (path=null).
ftpImplName: The implantation of FTP module. We provide tow implantations the first (default com.scalagent.joram.mom.dest.ftp.TransferImplRef) is the JDK URL and the second is based on JFTP (com.scalagent.joram.mom.dest.ftp.TransferImplJftp).
The user and pass options are optional, because you can set this information in the sender URL request, like this:
msg.setStringProperty("url", "ftp://user:pass@host/file;type=i");
Creating the FTPQueue
A FTPQueue is created by using the Joram administration API, calling the Queue creation method create from the class org.objectweb.joram.client.jms.Queue.
prop = new Properties();prop.setProperty("user", "my_FTP_name"); // optionalprop.setProperty("pass", "my_FTP_pass"); // optionalprop.setProperty("path", "the_local_path"); // optionalQueue queue = Queue.create(0, "ftpQueue", "com.scalagent.joram.mom.dest.ftp.FtpQueue", prop);
This method allows to specify the location server, an internal name, the implementation class and the configuration properties for the new FTPQueue.
4.9.3. Using a FTPQueue destination
Sending a message
Specify the fileName and user / password if the administrator don't set.
TextMessage msg = sess.createTextMessage();msg.setText("transfer " + fileName);if (user != null && pass != null) msg.setStringProperty("url", "ftp://user:pass@host/fileName;type=i");else msg.setStringProperty("url", "ftp://host/fileName;type=i");msg.setLongProperty("crc", new File(fileName).length());msg.setBooleanProperty("ack", false);
When the FTPQueue destination receive the message, it run a task to get the file specify by the URL and store this file in a local directory. The sending message is drop and a new message containing the URI file location is generate and store in the FTPQueue.
4.9.4. Running the sample
The sample shows how to get the “welcome.msg” file from ftp.kernel.org.
- 73 -
Joram 5.2.1 User's Guide
Running the demo: in the joram/samples/src/joram directory.
Compiling the samples:ant clean compile
Starting the configuration:ant reset single_server
Running the administration code: this target creates a ConnectionFactory, an 'anonymous' user and a FTPQueue with user=anonymous and pass=anonymous.ant ftp_admin
Running the producer: this target send a message to the FTPQueue with this URL “ftp://ftp.kernel.org/welcome.msg”.ant ftp_producer
Running the receiver: this target connects to the FTPQueue and consume the message and print the file URL, crc and ack..ant ftp_receiver
- 74 -
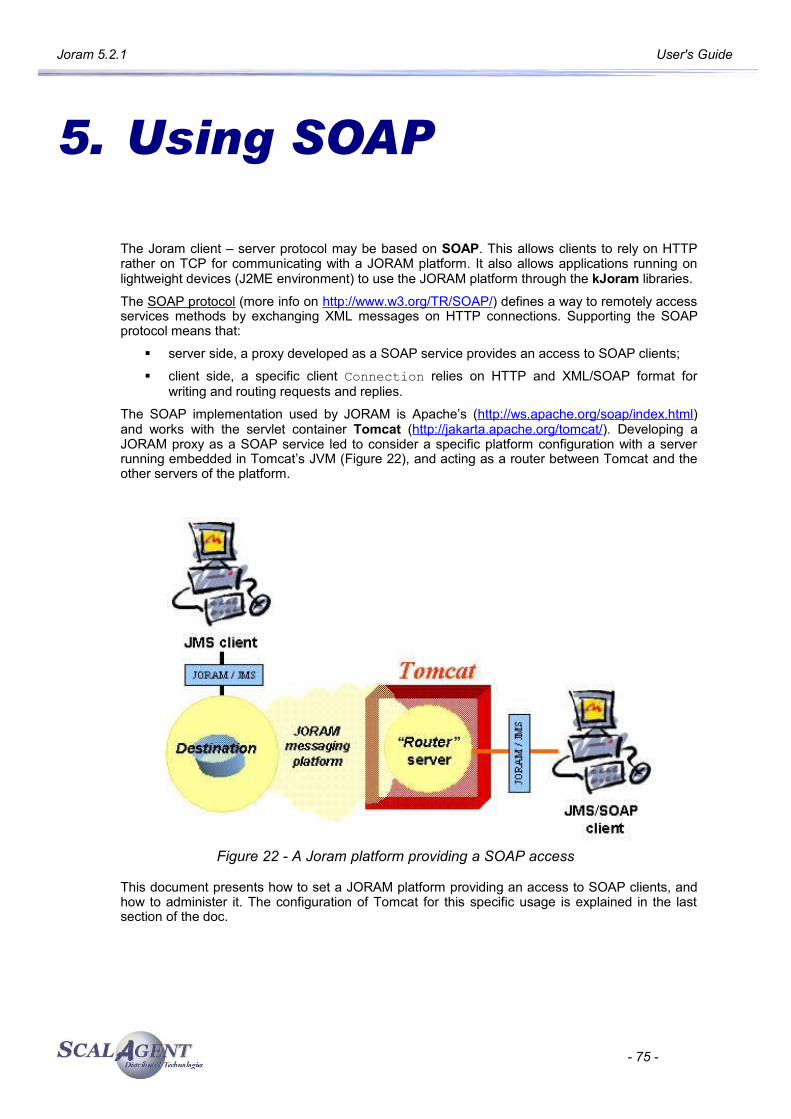
Joram 5.2.1 User's Guide
5. Using SOAP
The Joram client – server protocol may be based on SOAP. This allows clients to rely on HTTP rather on TCP for communicating with a JORAM platform. It also allows applications running on lightweight devices (J2ME environment) to use the JORAM platform through the kJoram libraries.
The SOAP protocol (more info on http://www.w3.org/TR/SOAP/) defines a way to remotely access services methods by exchanging XML messages on HTTP connections. Supporting the SOAP protocol means that:
server side, a proxy developed as a SOAP service provides an access to SOAP clients;
client side, a specific client Connection relies on HTTP and XML/SOAP format for writing and routing requests and replies.
The SOAP implementation used by JORAM is Apache’s (http://ws.apache.org/soap/index.html) and works with the servlet container Tomcat (http://jakarta.apache.org/tomcat/). Developing a JORAM proxy as a SOAP service led to consider a specific platform configuration with a server running embedded in Tomcat’s JVM (Figure 22), and acting as a router between Tomcat and the other servers of the platform.
Figure 22 - A Joram platform providing a SOAP access
This document presents how to set a JORAM platform providing an access to SOAP clients, and how to administer it. The configuration of Tomcat for this specific usage is explained in the last section of the doc.
- 75 -
Joram 5.2.1 User's Guide
5.1. Platform configuration
5.1.1. Configuration
Though it is possible to have a configuration made of a single embedded server, we will describe the configuration shown on figure 1. It is a reasonable situation, with a server embedded in Tomcat’s JVM (server s1), and the s0 server providing a TCP proxy service and hosting a destination.
The following file describes this configuration. Server 0 and server 1 both provide access to external clients through their connection manager service. Server 0 also hosts a TCP proxy service listening on port 16010 and a JNDI service. Server 0 and server 1 accept administrator’s connections with identification root – root.
<?xml version="1.0"?><config> <domain name="D1"/> <server id="0" name="s0" hostname="localhost"> <network domain="D1" port="16301"/> <service class="org.objectweb.joram.mom.proxies.ConnectionManager" args="root root"/> <service class="org.objectweb.joram.mom.proxies.tcp.TcpProxyService" args="16010"/> <service class="fr.dyade.aaa.jndi2.server.JndiServer" args="16400"/> </server>
<server id="1" name="s1" hostname="localhost"> <network domain="D1" port="16302"/> <service class="org.objectweb.joram.mom.proxies.ConnectionManager" args="root root"/> </server></config>
5.1.2. Running the platform
Starting the non embedded server
The non embedded server is started as any normal server (check administration documentation). It should be started in a transaction mode consistent with the embedded server’s, that is persistent.
Starting Tomcat
Tomcat’s bin/ directory contains the start scripts. Use one of them for starting Tomcat once it is correctly configured (check the installation chapter), and once the appropriate a3servers.xml and a3debug.cfg configuration files have been put in Tomcat’s conf/ directory.
Starting the embedded server
The org.objectweb.joram.client.jms.soap.SoapServiceStarter utility class is provided for starting the embedded server. Its main() method takes for parameters the name of the host hosting Tomcat, Tomcat’s HTTP port (generally 8080), the embedded server identifier and its name. It causes the instantiation of JORAM’s SOAP service by Tomcat and requests the
- 76 -
Joram 5.2.1 User's Guide
starting of the embedded server. The embedded server successfully starts if the a3servers.xml platform configuration file has been put in the conf/ directory of Tomcat.
Server 1 of the above configuration would be launched that way:
java fr.dyade.aaa.joram.soap.SoapServiceStarter localhost 8080 1 S1
5.2. Administering
5.2.1. Introduction
Administering a platform providing a SOAP access is similar to administering a non SOAP platform. A user access must be created on the target server, and an appropriate ConnectionFactory object must be created so that the client will access the embedded server through the SOAP protocol.
5.2.2. Setting a user
Setting a user is done as explained in the administration document:
org.objectweb.joram.client.jms.admin.User user; user = org.objectweb.joram.client.jms.admin.User.create(“name”, “pass”, 1);
An AdminException is thrown if the user creation fails server side or if the server is not part of the platform. A ConnectException is thrown if the admin connection with the server is closed or lost.
5.2.3. SOAP ConnectionFactory object
SOAP connection factory objects are located in the org.objectweb.joram.client.jms.soap package.
The following creation methods are static methods:
SoapConnectionFactory.create(String host, int port, int timer):
creates a ConnectionFactory instance for accessing a server embedded in a Tomcat JVM running on a given host and listening to a given port, with a given timer value in seconds for pending SOAP connections.
SoapConnectionFactory.create(int timer):
creates a ConnectionFactory instance for accessing a server embedded in the Tomcat JVM the administrator is connected to, with a given timer value in seconds for pending SOAP connections.
ConnectionFactory cnxFact = SoapConnectionFactory.create(“localhost”, 8080, 60);
QueueSoapConnectionFactory.create(String host, int port, int timer) : creates a QueueConnectionFactory instance for accessing a server embedded in a Tomcat JVM running on a given host and listening to a given port, with a given timer value in seconds for pending SOAP connections.
QueueSoapConnectionFactory.create(int timer):
creates a QueueConnectionFactory instance for accessing a server embedded in the Tomcat JVM the administrator is connected to, with a given timer value in seconds for pending SOAP connections.
- 77 -
Joram 5.2.1 User's Guide
javax.jms.QueueConnectionFactory cnxFact = admin.createQueueSoapConnectionFactory(“localhost”, 8080, 60);
TopicSoapConnectionFactory.create(String host, int port, int timer): creates a TopicConnectionFactory instance for accessing a server embedded in a Tomcat JVM running on a given host and listening to a given port, with a given timer value in seconds for pending SOAP connections.
CreateTopicoapConnectionFactory.create(int timer):
creates a TopicConnectionFactory instance for accessing a server embedded in the Tomcat JVM the administrator is connected to, with a given timer value in seconds for pending SOAP connections.
javax.jms.TopicConnectionFactory cnxFact = admin.createTopicSoapConnectionFactory(“localhost”, 8080, 60);
Pending SOAP connectionsContrary to a TCP connection which is opened by a connecting client (calling the ConnectionFactory.createConnection(…) method), and closed by the closing client (calling the Connection.close() method), the HTTP connection the SOAP connection is based on is opened and closed for each client – platform request / reply exchange. Thus, it is impossible from the server point of view to detect a connection failure. If a given SOAP connection is never closed by the Connection.close() method, its context is kept forever server side, and this could lead to memory leaks.
This is why a timer parameter is set when creating a SOAP ConnectionFactory. It sets the duration in seconds between two “ping” requests sent by the client JMS connection to the server. If the server does not receive any “ping” request during timer * 2 seconds, it acts as it does when detecting a TCP connection failure: the connection’s resources are cleaned, its non acknowledged messages are rolled back, temporary destinations are deleted, temporary subscriptions are removed, etc.
Setting this value to 0 means that no timer is set. Such a factory’s connections never die, this is a dangerous situation.
5.2.4. SOAP administrator
The above administration tasks might be performed by a TCP administrator or a SOAP administrator.
Connecting a TCP administrator to the server 0 of the platform would look like:
AdminModule.connect(“localhost”, 16010, “root”, “root”, 60);Connecting a SOAP administrator to the server 1 of the platform looks like:
TopicSoapConnectionFactory cnxFact = TopicSoapConnectionFactory.create(“localhost”, 8080, 60);
AdminModule.connect(cnxFact, “root”, “root”);
5.2.5. Accessing JNDI through SOAP
SOAP administrators and clients also need to access JNDI through the SOAP protocol. This does not change the way JNDI is set in the a3servers.xml configuration file, but the jndi.properties must be modified as follows:
java.naming.factory.initial fr.dyade.aaa.jndi2.client.SoapExt_NamingContextFactoryjava.naming.factory.soapservice.host localhost
- 78 -
Joram 5.2.1 User's Guide
java.naming.factory.soapservice.port 8080java.naming.factory.host localhostjava.naming.factory.port 16400
This file says that the JNDI server is hosted on localhost and reachable through port 16400, and that SOAP clients access it through the fr.dyade.aaa.jndi2.client.SoapExt_NamingContextFactory class, the servlet container running on localhost and listening on port 8080.
5.3. Configuring TomcatThe JORAM platform includes a SOAP proxy, accepting connection requests from SOAP clients. This proxy requires the installation and the setting of Apache servlet container, Tomcat.JORAM has been successfully tested with tomcat-3-3, tomcat-4-0 and tomcat-4-1 and Tomcat-5.0. This section describes how those versions should be configured.
5.3.1. Getting Tomcat
Tomcat can be downloaded from http://jakarta.apache.org/tomcat/. Documentation is available at the same location.
5.3.2. Needed resources
Libraries and configuration files must be added in the Tomcat environment. The jar and war files must be taken from the lib/ directory of your JORAM installation. The configuration files must be taken from the samples/config directory of your JORAM installation.
5.3.3. Configuring Tomcat
Tomcat 4.1
Files to modify in the bin/ directory:o catalina.bat or catalina.sh: add the conf/ directory in the classpath building.
Libraries to add in the common/lib directory:o jms.jar,o joram-client.jar,o joram-shared.jar,o joram-mom.jar,o ow_monolog.jar.o jakarta-regexp-1.2.jar,o JCup.jar,
Files to add in the conf/ directory :o a3debug.cfg and a3config.dtd,o soap_a3servers.xml renamed a3servers.xml.
File to add in the webapps/ directory:o soap.war.
Tomcat 5.0
Files to modify in the bin/ directory:o catalina.bat or catalina.sh: add the conf/ directory in the classpath building.
- 79 -
Joram 5.2.1 User's Guide
Libraries to add in the common/lib directory:o jms.jar,o joram-client.jar,o joram-shared.jar,o joram-mom.jar,o ow_monolog.jar.o jakarta-regexp-1.2.jar,o JCup.jar,
Libraries to add in the shared/lib directory:o mail.jar,o activation.jar.
Files to add in the conf/ directory :o a3debug.cfg and a3config.dtd,o soap_a3servers.xml renamed a3servers.xml.
File to add in the webapps/ directory:o soap.war.
Tomcat 5.5
Files to modify in the bin/ directory:o catalina.bat or catalina.sh: add the conf/ directory in the classpath building.
Libraries to add in the shared/lib directory:o jms.jar,o joram-client.jar,o joram-shared.jar,o joram-mom.jar,o ow_monolog.jar.o jakarta-regexp-1.2.jar,o JCup.jar,o mail.jar,o activation.jar.
Files to add in the conf/ directory :o a3debug.cfg and a3config.dtd,o soap_a3servers.xml renamed a3servers.xml.
File to add in the webapps/ directory:o soap.war.
5.4. Running the Soap SampleThe SOAP samples are a simple message producer and consumer pair. Their goal is to show that JORAM successfully integrates and supports SOAP as an other communication protocol than TCP. Running these samples requires to have installed and configured Apache’s Tomcat servlet container (check above).
The following picture illustrates the platform architecture. Server 1 is embedded in Tomcat’s JVM and holds the proxy for the SOAP clients. Server 0 runs in an other JVM and hosts the destinations the clients actually interact with.
- 80 -
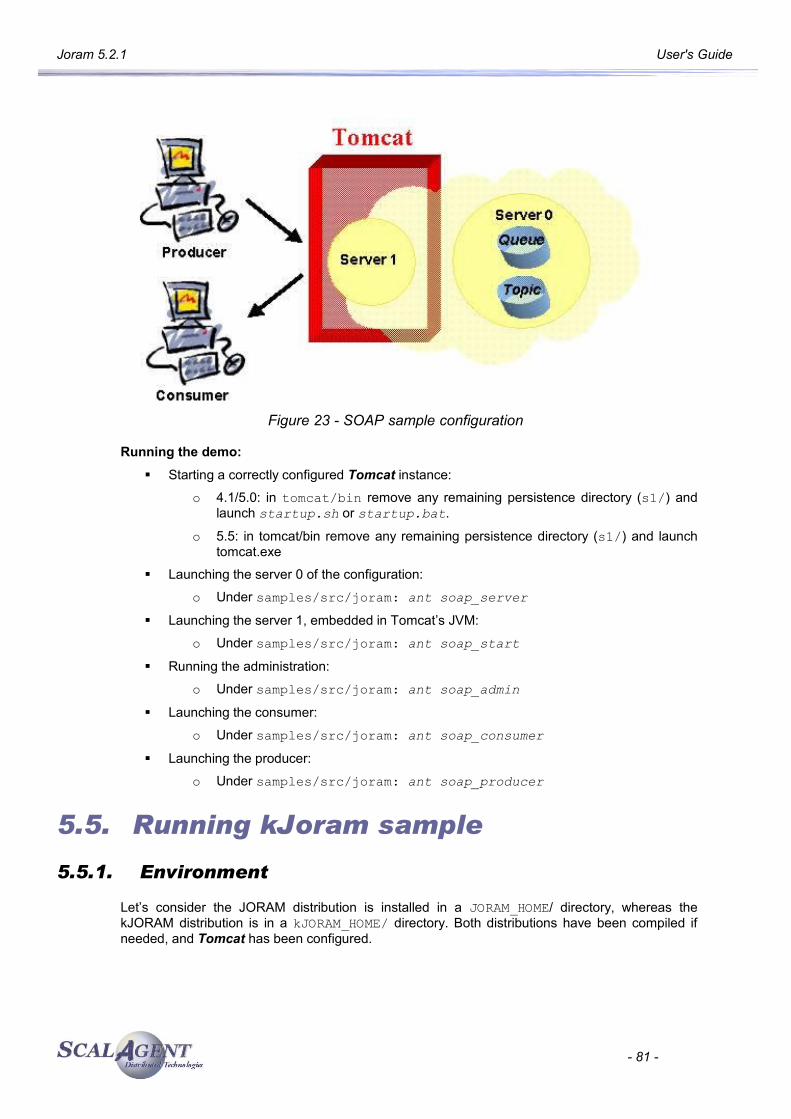
Joram 5.2.1 User's Guide
Figure 23 - SOAP sample configuration
Running the demo: Starting a correctly configured Tomcat instance:
o 4.1/5.0: in tomcat/bin remove any remaining persistence directory (s1/) and launch startup.sh or startup.bat.
o 5.5: in tomcat/bin remove any remaining persistence directory (s1/) and launch tomcat.exe
Launching the server 0 of the configuration:
o Under samples/src/joram: ant soap_server Launching the server 1, embedded in Tomcat’s JVM:
o Under samples/src/joram: ant soap_start Running the administration:
o Under samples/src/joram: ant soap_admin Launching the consumer:
o Under samples/src/joram: ant soap_consumer Launching the producer:
o Under samples/src/joram: ant soap_producer
5.5. Running kJoram sample
5.5.1. Environment
Let’s consider the JORAM distribution is installed in a JORAM_HOME/ directory, whereas the kJORAM distribution is in a kJORAM_HOME/ directory. Both distributions have been compiled if needed, and Tomcat has been configured.
- 81 -
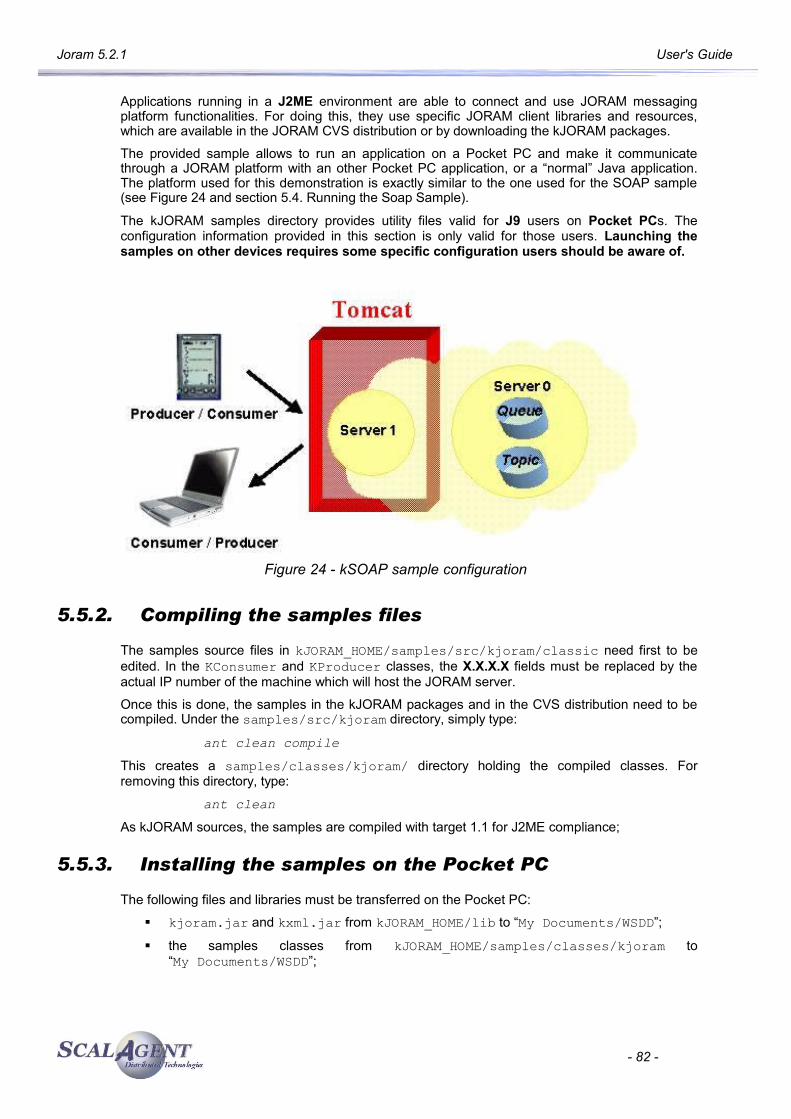
Joram 5.2.1 User's Guide
Applications running in a J2ME environment are able to connect and use JORAM messaging platform functionalities. For doing this, they use specific JORAM client libraries and resources, which are available in the JORAM CVS distribution or by downloading the kJORAM packages.
The provided sample allows to run an application on a Pocket PC and make it communicate through a JORAM platform with an other Pocket PC application, or a “normal” Java application. The platform used for this demonstration is exactly similar to the one used for the SOAP sample (see Figure 24 and section 5.4. Running the Soap Sample).
The kJORAM samples directory provides utility files valid for J9 users on Pocket PCs. The configuration information provided in this section is only valid for those users. Launching the samples on other devices requires some specific configuration users should be aware of.
Figure 24 - kSOAP sample configuration
5.5.2. Compiling the samples files
The samples source files in kJORAM_HOME/samples/src/kjoram/classic need first to be edited. In the KConsumer and KProducer classes, the X.X.X.X fields must be replaced by the actual IP number of the machine which will host the JORAM server.
Once this is done, the samples in the kJORAM packages and in the CVS distribution need to be compiled. Under the samples/src/kjoram directory, simply type:
ant clean compile
This creates a samples/classes/kjoram/ directory holding the compiled classes. For removing this directory, type:
ant clean
As kJORAM sources, the samples are compiled with target 1.1 for J2ME compliance;
5.5.3. Installing the samples on the Pocket PC
The following files and libraries must be transferred on the Pocket PC:
kjoram.jar and kxml.jar from kJORAM_HOME/lib to “My Documents/WSDD”;
the samples classes from kJORAM_HOME/samples/classes/kjoram to “My Documents/WSDD”;
- 82 -
Joram 5.2.1 User's Guide
the “.jad“ files from kJORAM_HOME/samples/src/kjoram/classic to “My Documents/WSDD”;
the “.lnk“ files from kJORAM_HOME/samples/src/kjoram/classic to “Windows/Start Menu”.
5.5.4. Starting and administering the JORAM platform
On the server’s host:
Starting a correctly configured Tomcat instance:
in tomcat/bin remove any remaining persistence directory (s1/) and launch
startup.sh or startup.bat.
Launching the server 0 of the configuration:
Under JORAM_HOME/samples/src/joram: ant soap_server Launching the server 1, embedded in Tomcat’s JVM:
Under JORAM_HOME/samples/src/joram: ant soap_start Running the administration:
Under JORAM_HOME/samples/src/joram: ant soap_admin
Launching the demo between a Pocket PC and a PC
First start the consumer, either on the Pocket PC, or on the PC:
on the Pocket PC, in the Start Menu select kconsumer on the PC, under JORAM_HOME/samples/src/joram, type: ant
soap_consumer
Then start the producer, on the device which is not hosting the consumer:
on the Pocket PC, in the Start Menu select kproducer on the PC, under JORAM_HOME/samples/src/joram, type: ant
soap_producer
Launching the demo between two Pocket PCs
First start the consumer, on Pocket PC 1 for example:
on the Pocket PC, in the Start Menu select kconsumer Then start the producer, on Pocket PC 2:
on the Pocket PC, in the Start Menu select kproducer
- 83 -
Joram 5.2.1 User's Guide
6. Using a collocated server
6.1. IntroductionA collocated Joram server is a standard Joram server running inside the same process (JVM) as one or more Joram clients. If your Java application needs to start such an embedded server you must configure this server, start it inside your application and connect your JMS clients to it.
A collocated Joram server can be part of a distributed configuration of multiples collocated or not servers, it can eventually be reach by other client through the TCP protocol.
6.2. Configure a collocated serverA collocated server is configured exactly like a non-collocated server, i.e. you don't need to declare any extra services to use a collocated server.
A typical configuration would be:
<?xml version="1.0"?><config> <property name=”Transaction” value=”fr.dyade.aaa.util.NullTransaction”/> <server id="0" name="S0" hostname="localhost"> <service class="org.objectweb.joram.mom.proxies.ConnectionManager" args=”root root”/> <service class="org.objectweb.joram.mom.proxies.tcp.TcpProxyService" args="16010"/> </server></config>
Notice that:
• in the above configuration, the collocated server can also be accessed from remote clients through the TCP protocol. If you don't need the TCP access point you can remove the service TcpProxyService.
• you can include a collocated server inside a distributed Joram platform: a collocated server is a server just like any other.
6.3. Start a collocated serverA collocated server must be pro grammatically started inside the same process as your Java client application.
The following code starts the server #0:
fr.dyade.aaa.agent.AgentServer.init((short) 0, "./s0", null);
- 84 -
Joram 5.2.1 User's Guide
fr.dyade.aaa.agent.AgentServer.start();The method init initializes the server with three parameters:
1. its identifier: 0
2. the directory where its persistent state is stored: ./s0
3. the monolog logger factory: leave it to null if you want the server to configure it itself.
The method start actually starts the server.
You can also initialize and start a server by calling the method AgentServer.main which aggregates the initialization and the start into a single operation:
String args[] = {"0", "./s0"};fr.dyade.aaa.agent.AgentServer.main(args);
6.4. Connect to the collocated server
6.4.1. Create local connections
The class LocalConnectionFactory enables you to create local connections to the collocated server:
import org.objectweb.joram.client.jms.local.*;
ConnectionFactory cnxFact = LocalConnectionFactory.create();In the same package you can find several factories that you can use to create more specific connections: <XA><Topic|Queue>LocalConnectionFactory.
6.4.2. Connect the administration module
The class AdminModule provides a method collocatedConnect that must be called before doing administration operations through the collocated server.
import org.objectweb.joram.client.jms.admin.*;
AdminModule.collocatedConnect(“root”, “root”);
6.5. Stop the collocated serverIf you need to stop the collocated server without stopping the entire embedding Java application you must call the method stop provided by the class AgentServer:
fr.dyade.aaa.agent.AgentServer.stop();You can then restart the server with the following code:
fr.dyade.aaa.agent.AgentServer.start();
6.6. Start the embedding Java applicationYou must ensure that the classpath contains:
• the jar files expected by a Joram server: joram-mom.jar, Jcup.jar, etc.
• the directory where the a3servers.xml configuration file is located.
- 85 -
Joram 5.2.1 User's Guide
7. High-Availability
7.1. Platform ConfigurationA HA Joram server is launched on a cluster of ScalAgent servers. So the configuration of a HA Joram server implies to configure a clustered ScalAgent server.
7.1.1. Clustered ScalAgent server configuration
A clustered ScalAgent server is defined by the element “cluster”. A cluster owns an identifier and a name defined by the attributes “id” and “name” (exactly like a standard server). Two properties must be defined:
• “Engine” must be set to “fr.dyade.aaa.agent.HAEngine” which is the class name of the engine that provides high availability (set by default in a next version ?).
• “nbClusterExpected” defines the number of replicas that must be connected to the group communication channel used before this replica starts
<?xml version="1.0"?><config> <domain name="D1"/> <cluster id="0" name="s0"> <property name="Engine" value="fr.dyade.aaa.agent.HAEngine"/> <property name="nbClusterExpected" value="3"/>
For each replica an element “server” must be added. The attribute “id” defines the identifier of the replica inside the cluster. The attribute “hostname” gives the address of the host where the replica is running. A server replica is defined exactly like a standard server. For example this one owns a network and two services. The network is used by the replica to communicate with external agent servers, i.e. servers located outside of the cluster and not replicas.
<server id="0" hostname="localhost"> <network domain="D1" port="16301"/> </server>
Two other replicas are defined in the clustered ScalAgent server s0. Notice that they define their network with a different port value because they work on the same host (localhost).
<server id="1" hostname="localhost"> <network domain="D1" port="16302"/> </server> <server id="2" hostname="localhost"> <network domain="D1" port="16303"/> </server> </cluster></config>
- 86 -
Joram 5.2.1 User's Guide
7.1.2. Group communication
There are two properties to configure the address and the port of the IP multicast used by JGroups: JGroups.MCastAddr and JGroups.McastPort.
The group communication semantic configuration requires to understand exactly how the replication algorithm works. However, you can change the Jgroups protocol stack using the JgroupsProps property; its default value is:
UDP(mcast_addr=224.0.0.35;mcast_port=25566;ip_ttl=32;mcast_send_buf_size=150000;mcast_recv_buf_size=80000):PING(timeout=2000;num_initial_members=3):MERGE2(min_interval=5000;max_interval=10000):FD_SOCK:VERIFY_SUSPECT(timeout=1500):pbcast.NAKACK(gc_lag=50;retransmit_timeout=300,600,1200,2400,4800):UNICAST(timeout=5000):pbcast.STABLE(desired_avg_gossip=20000):FRAG(frag_size=4096;down_thread=false;up_thread=false):pbcast.GMS(join_timeout=5000;join_retry_timeout=2000;shun=false;print_local_addr=true)
7.1.3. Joram server configuration
A Joram server is started by a ScalAgent service called “ConnectionManager” (see Joram documentation).
<service class="org.objectweb.joram.mom.proxies.ConnectionManager" args="root root"/>
This service must be added to all the replicas. Some more services can be added to each replicas according to the entry points needed by the clients: Tcp, Soap and collocated.
TCP entry point
The service “TcpProxyService” starts a TCP entry point to the Joram server.
<service class="org.objectweb.joram.mom.proxies.tcp.TcpProxyService" args="2560"/>
Soap entry point
Not yet available (in HA mode)
Collocated entry point
The service “HALocalConnection” provides a collocated entry point to the replica which is the master. On the other replicas, this service blocks the collocated connections until the local replica becomes the master.
<serviceclass="org.objectweb.joram.client.jms.ha.local.HALocalConnection"/>
Configuration example
The following configuration defines a HA Joram server “s0” that provides two entry points: Tcp and collocated. It is replicated three times on the same host (localhost).
<config> <domain name="D1"/> <cluster id="0" name="s0"> <property name="Engine" value="fr.dyade.aaa.agent.HAEngine"/> <property name="nbClusterExpected" value="3"/> <server id="0" hostname="localhost"> <network domain="D1" port="16301"/> <service class="org.objectweb.joram.mom.proxies.ConnectionManager" args="root root"/>
- 87 -
Joram 5.2.1 User's Guide
<service class="org.objectweb.joram.mom.proxies.tcp.TcpProxyService" args="2560"/> <service class="org.objectweb.joram.client.jms.ha.local.HALocalConnection"/> </server> <server id="1" hostname="localhost"> <network domain="D1" port="16302"/> <service class="org.objectweb.joram.mom.proxies.ConnectionManager" args="root root"/> <service class="org.objectweb.joram.mom.proxies.tcp.TcpProxyService" args="2561"/> <service class="org.objectweb.joram.client.jms.ha.local.HALocalConnection"/> </server> <server id="2" hostname="localhost"> <network domain="D1" port="16303"/> <service class="org.objectweb.joram.mom.proxies.ConnectionManager" args="root root"/> <service class="org.objectweb.joram.mom.proxies.tcp.TcpProxyService" args="2562"/> <service class="org.objectweb.joram.client.jms.ha.local.HALocalConnection"/> </server> </cluster></config>
7.2. Platform startupA server replica is started exactly like a standard agent server. The arguments are:
server id: identifier of the clustered server (not the identifier of the replica)
storage directory path: path of the directory where the persistence files are created
replica id: identifier of the replica inside the clustered server
java fr.dyade.aaa.agent.AgentServer <server id> <storage directory path> <replica id>
The replicas can be started in any order. The first master replica elected is the first replica connected to the group communication channel.
7.2.1. Host clock synchronization
The clocks of the hosts from the cluster should be quite synchronized if the “heart beat” feature is used.
7.3. Programming an external HA Joram client
The only available protocol for an external client is TCP. The protocol Soap is not yet available.
- 88 -
Joram 5.2.1 User's Guide
7.3.1. Joram administration
Create a connection factory
There are several types of HA TCP connection factory depending on the destination reached (generic, queue or topic) and the transactional mode (XA or none):
• <XA|none><Queue|Topic|none>HATcpConnectionFactory
These connection factories belong to the package org.objectweb.joram.client.jms.ha.tcp. To instantiate a connection factory, call the static method create defined in the class of the connection factory to instantiate. A parameter must be given specifying the URL of the HA Joram server. This URL defines the list of the TCP entry points owned by each replicas of the HA Joram server.
For example to create a generic (neither Queue nor Topic, unified JMS1.1) non-transactional (no XA) connection factory you need to call:
ConnectionFactory cf;
cf = org.objectweb.joram.client.jms.ha.tcp.HATcpConnectionFactory.create( "hajoram://localhost:2560,localhost:2561");
Configure the connection factory
It is also necessary to set the connectionTimer of the connection according to the switching time required by the Joram server cluster, i.e. the delay needed to elect a new master replica and to activate it. If the connectionTimer is too short, then the external client may not be able to connect to the new master replica. So the failure of a Joram server replica may break the HA connection between the external client and the HA Joram server.
((org.objectweb.joram.client.jms.ConnectionFactory)cf).GetParameters().connectingTimer = 30;
7.3.2. JMS programming
The JMS programming is completely standard. A HA server behaves exactly the same as a standard server. However there is a slight difference about the naming of the destination. Just like with a standard Joram, you can choose to use JNDI or the internal Joram naming. But if you use JNDI then you have to configure a replicated JNDI server. This operation is available but not documented here as it is simpler to use the Joram internal naming.
7.4. Programming a collocated Joram client
7.4.1. Joram administration
Create a connection factory
There are several types of HA local connection factory depending on the destination reached (generic, queue or topic) and the transactional mode (XA or none):
• <XA|none><Queue|Topic|none>HALocalConnectionFactory
These connection factories belong to the package org.objectweb.joram.client.jms.ha.local. To instantiate a connection factory, call the static method create defined in the class of the connection factory to instantiate.
- 89 -
Joram 5.2.1 User's Guide
For example to create a generic (not Queue either Topic) non-transactional (no XA) connection factory you need to call:
ConnectionFactory cf;
cf = org.objectweb.joram.client.jms.ha.local.HALocalConnectionFactory.create();
7.4.2. Collocated client process
A collocated client must be instantiated inside the same JVM processes as the Joram server replicas. It also must use the same class loader (or a child) as the server’s class loader. A simple way to do this is to write a main class that starts an agent server replica and then creates one or more HA local connections.
In the following code example, an unified non-transactional (not XA) connection is opened. It is important to notice that the connection creation blocks until the server replica becomes master.
public static void main(String[] args) throws Exception { ConnectionFactory cf;
AgentServer.init(args); AgentServer.start(); cf= org.objectweb.joram.client.jms.ha.local.HALocalConnectionFactory().create();
// The next line blocks until the server replica becomes master Connection cnx = cf.createConnection("root", "root");
7.4.3. JMS programming
The JMS programming is completely standard. A HA server behaves exactly the same as a standard server. However there is a slight difference about the naming of the destination. Just like with a standard Joram, you can choose to use JNDI or the internal Joram naming. But if you use JNDI then you have to configure a replicated JNDI server. This operation is available but not documented here as it is simpler to use the Joram internal naming.
7.5. Running the “Joram H.A.” SampleThis sample illustrates the use of a Joram's H.A platform.
This sample configuration is made of a cluster of three servers. The platform is run in non-persistent mode as the reliability is provided by the replication mechanism. The provided configuration locates all three servers on “localhost” host.
Running the demo: Cleans and compiles:
ant clean compile
Resets the run directory, then starts 2 replicas:ant reset
ant ha_server0
ant ha_server1
Runs the administration code: ant ha_admin.
o This target creates a user and a topic.
- 90 -
Joram 5.2.1 User's Guide
Runs the subscriber using the target ha_sub.
o This target launches a message consumer that indefinitely consumes messages on the corresponding topic.
Runs the publisher using the target ha_pub.
o This target launches a message producer that sends 1000 messages to the corresponding topic.
In order to view the high-availability mechanism we can play the scenario below:
Starts the replica #2:ant ha_server2
The replica is initialized from the state of the master, the user and the topic are replicated.
Stops the replica #0 (master), the replica #1 becomes the master, each client automatically reconnects to the new master and the application continue.
Stops the replica #1, the replica #2 can not be elected as the replication degree is not ensured. The application is frozen.
Starts the replica #0ant ha_server0
The server is initialized from the state of the master, the user and the topic are replicated. The application restarts.
- 91 -
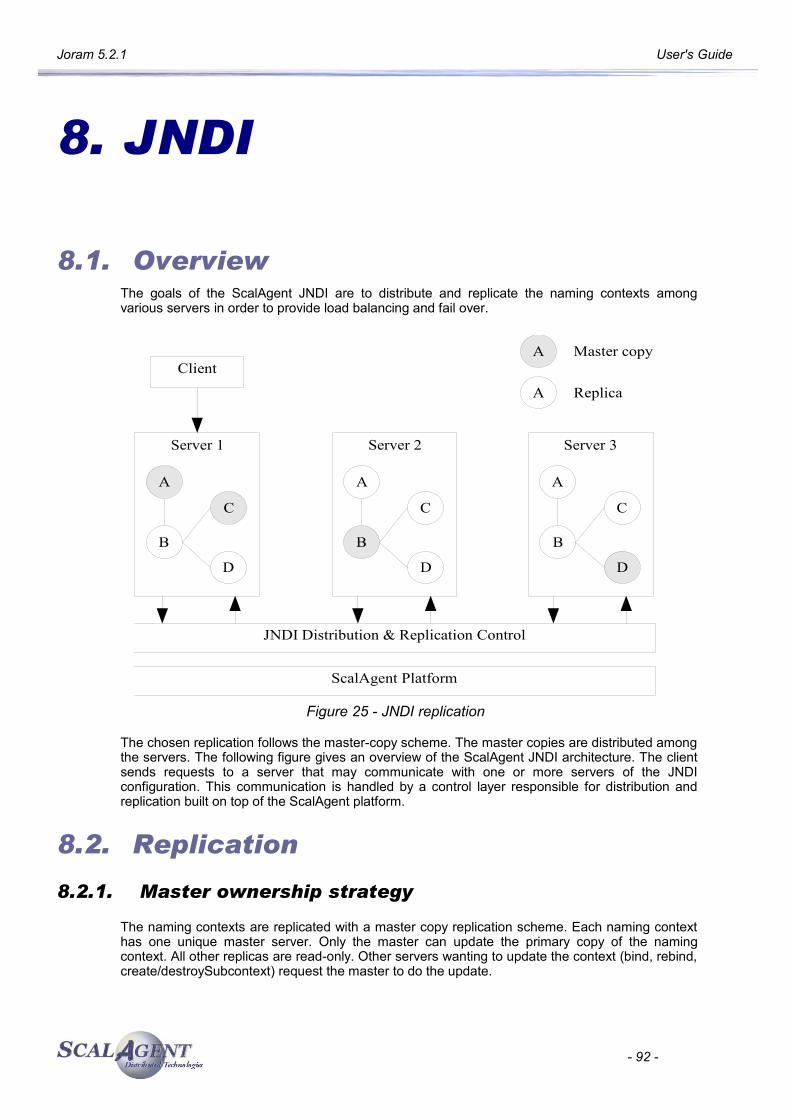
Joram 5.2.1 User's Guide
8. JNDI
8.1. OverviewThe goals of the ScalAgent JNDI are to distribute and replicate the naming contexts among various servers in order to provide load balancing and fail over.
A
A
Master copy
Replica
Client
Server 1
A
C
B
D
Server 2
A
C
B
D
Server 3
A
C
B
D
JNDI Distribution & Replication Control
ScalAgent Platform
Figure 25 - JNDI replication
The chosen replication follows the master-copy scheme. The master copies are distributed among the servers. The following figure gives an overview of the ScalAgent JNDI architecture. The client sends requests to a server that may communicate with one or more servers of the JNDI configuration. This communication is handled by a control layer responsible for distribution and replication built on top of the ScalAgent platform.
8.2. Replication
8.2.1. Master ownership strategy
The naming contexts are replicated with a master copy replication scheme. Each naming context has one unique master server. Only the master can update the primary copy of the naming context. All other replicas are read-only. Other servers wanting to update the context (bind, rebind, create/destroySubcontext) request the master to do the update.
- 92 -
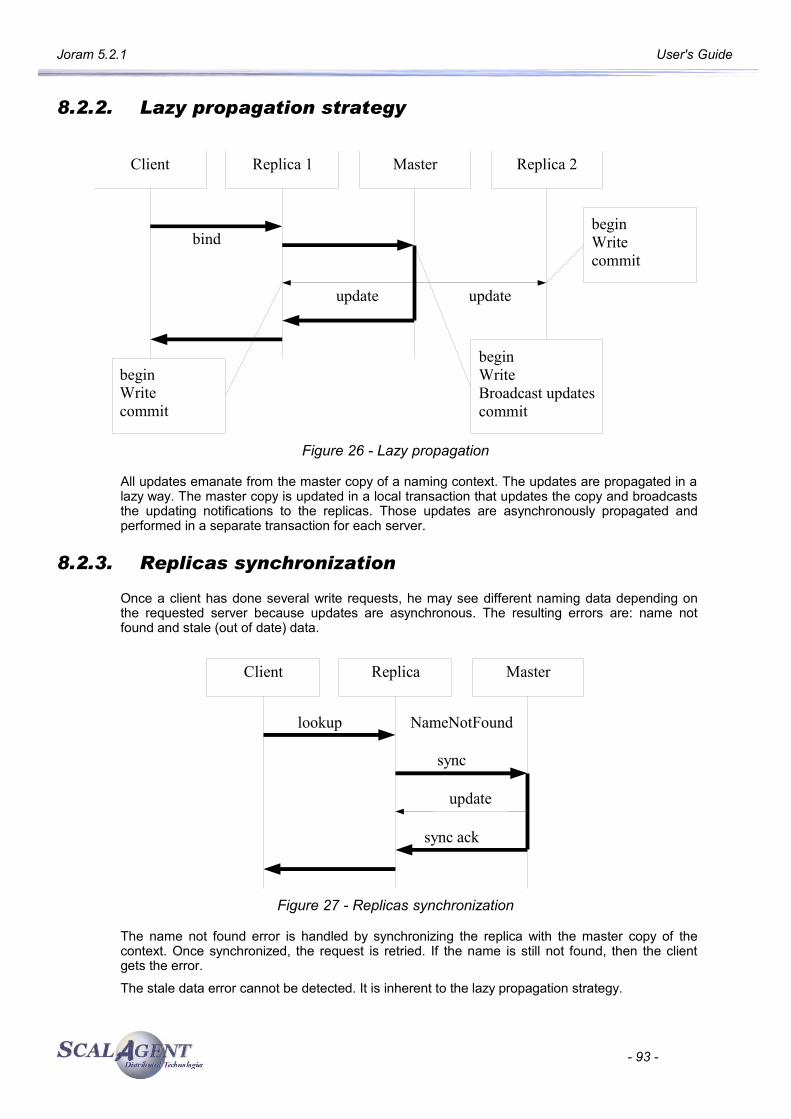
Joram 5.2.1 User's Guide
8.2.2. Lazy propagation strategy
Figure 26 - Lazy propagation
All updates emanate from the master copy of a naming context. The updates are propagated in a lazy way. The master copy is updated in a local transaction that updates the copy and broadcasts the updating notifications to the replicas. Those updates are asynchronously propagated and performed in a separate transaction for each server.
8.2.3. Replicas synchronization
Once a client has done several write requests, he may see different naming data depending on the requested server because updates are asynchronous. The resulting errors are: name not found and stale (out of date) data.
Figure 27 - Replicas synchronization
The name not found error is handled by synchronizing the replica with the master copy of the context. Once synchronized, the request is retried. If the name is still not found, then the client gets the error.
The stale data error cannot be detected. It is inherent to the lazy propagation strategy.
- 93 -
update
bind
Client Replica 1 Master Replica 2
beginWritecommit
beginWritecommit
beginWriteBroadcast updatescommit
update
sync ack
sync
NameNotFoundlookup
Client Replica Master
update
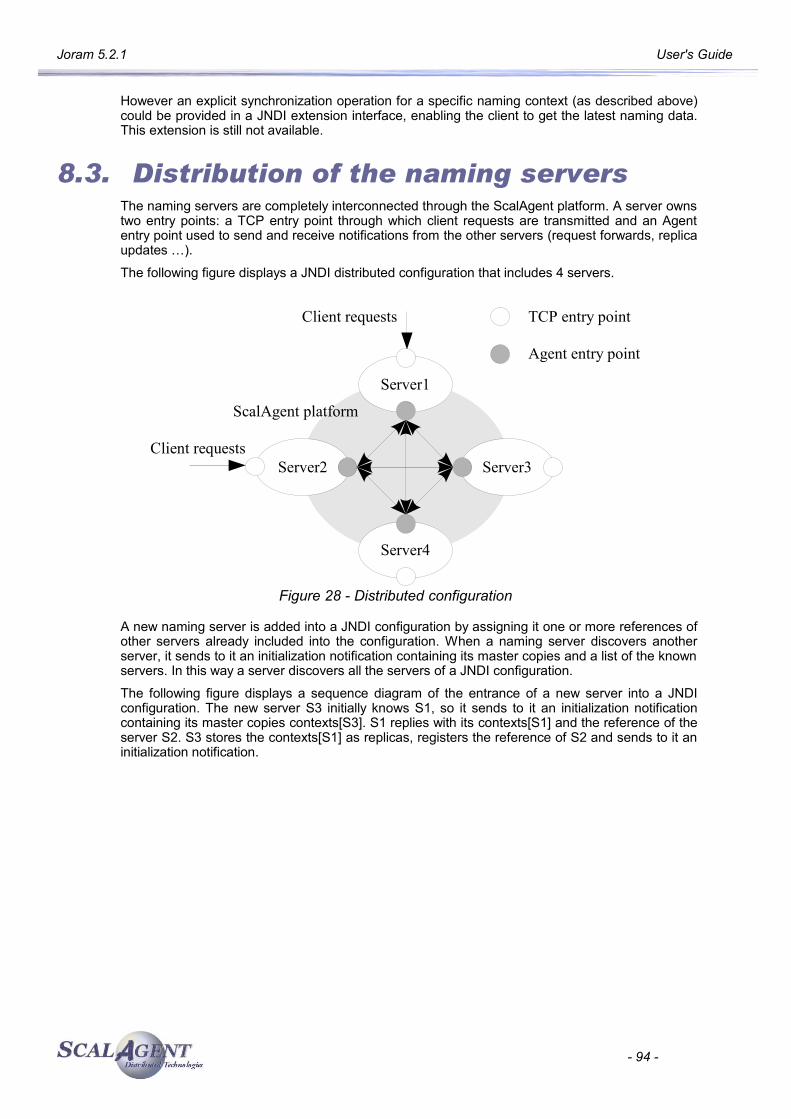
Joram 5.2.1 User's Guide
However an explicit synchronization operation for a specific naming context (as described above) could be provided in a JNDI extension interface, enabling the client to get the latest naming data. This extension is still not available.
8.3. Distribution of the naming serversThe naming servers are completely interconnected through the ScalAgent platform. A server owns two entry points: a TCP entry point through which client requests are transmitted and an Agent entry point used to send and receive notifications from the other servers (request forwards, replica updates …).
The following figure displays a JNDI distributed configuration that includes 4 servers.
Figure 28 - Distributed configuration
A new naming server is added into a JNDI configuration by assigning it one or more references of other servers already included into the configuration. When a naming server discovers another server, it sends to it an initialization notification containing its master copies and a list of the known servers. In this way a server discovers all the servers of a JNDI configuration.
The following figure displays a sequence diagram of the entrance of a new server into a JNDI configuration. The new server S3 initially knows S1, so it sends to it an initialization notification containing its master copies contexts[S3]. S1 replies with its contexts[S1] and the reference of the server S2. S3 stores the contexts[S1] as replicas, registers the reference of S2 and sends to it an initialization notification.
- 94 -
Server1
Server2
Server4
Server3
ScalAgent platform
Client requests
Client requests TCP entry point
Agent entry point
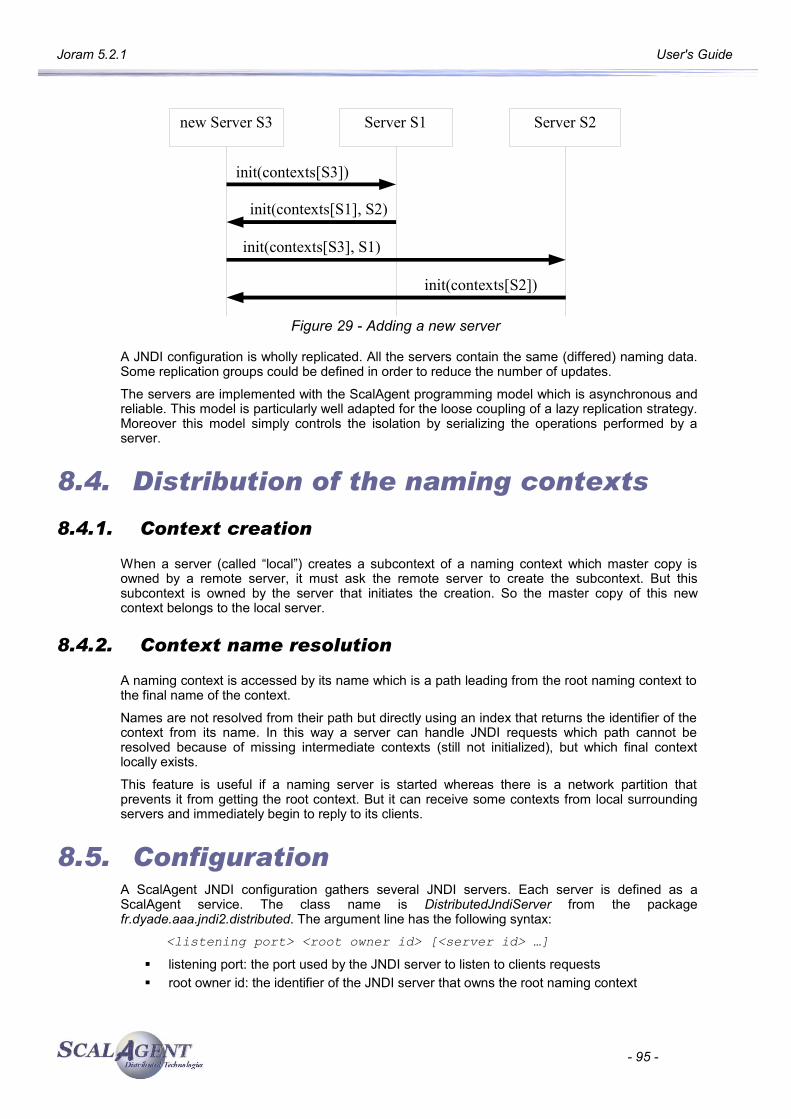
Joram 5.2.1 User's Guide
Figure 29 - Adding a new server
A JNDI configuration is wholly replicated. All the servers contain the same (differed) naming data. Some replication groups could be defined in order to reduce the number of updates.
The servers are implemented with the ScalAgent programming model which is asynchronous and reliable. This model is particularly well adapted for the loose coupling of a lazy replication strategy. Moreover this model simply controls the isolation by serializing the operations performed by a server.
8.4. Distribution of the naming contexts
8.4.1. Context creation
When a server (called “local”) creates a subcontext of a naming context which master copy is owned by a remote server, it must ask the remote server to create the subcontext. But this subcontext is owned by the server that initiates the creation. So the master copy of this new context belongs to the local server.
8.4.2. Context name resolution
A naming context is accessed by its name which is a path leading from the root naming context to the final name of the context.
Names are not resolved from their path but directly using an index that returns the identifier of the context from its name. In this way a server can handle JNDI requests which path cannot be resolved because of missing intermediate contexts (still not initialized), but which final context locally exists.
This feature is useful if a naming server is started whereas there is a network partition that prevents it from getting the root context. But it can receive some contexts from local surrounding servers and immediately begin to reply to its clients.
8.5. ConfigurationA ScalAgent JNDI configuration gathers several JNDI servers. Each server is defined as a ScalAgent service. The class name is DistributedJndiServer from the package fr.dyade.aaa.jndi2.distributed. The argument line has the following syntax:
<listening port> <root owner id> [<server id> …]
listening port: the port used by the JNDI server to listen to clients requests root owner id: the identifier of the JNDI server that owns the root naming context
- 95 -
init(contexts[S2])
init(contexts[S3], S1)
init(contexts[S1], S2)
init(contexts[S3])
new Server S3 Server S1 Server S2
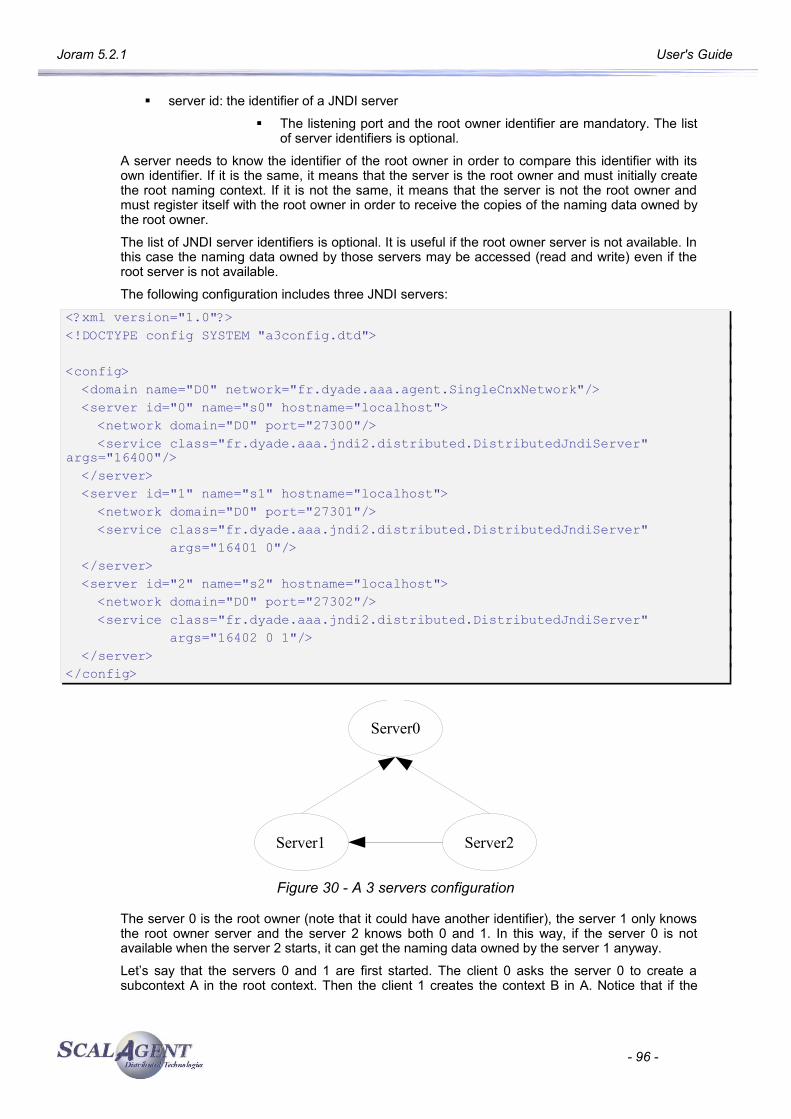
Joram 5.2.1 User's Guide
server id: the identifier of a JNDI server
The listening port and the root owner identifier are mandatory. The list of server identifiers is optional.
A server needs to know the identifier of the root owner in order to compare this identifier with its own identifier. If it is the same, it means that the server is the root owner and must initially create the root naming context. If it is not the same, it means that the server is not the root owner and must register itself with the root owner in order to receive the copies of the naming data owned by the root owner.
The list of JNDI server identifiers is optional. It is useful if the root owner server is not available. In this case the naming data owned by those servers may be accessed (read and write) even if the root server is not available.
The following configuration includes three JNDI servers:
<?xml version="1.0"?><!DOCTYPE config SYSTEM "a3config.dtd">
<config> <domain name="D0" network="fr.dyade.aaa.agent.SingleCnxNetwork"/> <server id="0" name="s0" hostname="localhost"> <network domain="D0" port="27300"/> <service class="fr.dyade.aaa.jndi2.distributed.DistributedJndiServer" args="16400"/> </server> <server id="1" name="s1" hostname="localhost"> <network domain="D0" port="27301"/> <service class="fr.dyade.aaa.jndi2.distributed.DistributedJndiServer" args="16401 0"/> </server> <server id="2" name="s2" hostname="localhost"> <network domain="D0" port="27302"/> <service class="fr.dyade.aaa.jndi2.distributed.DistributedJndiServer" args="16402 0 1"/> </server></config>
Figure 30 - A 3 servers configuration
The server 0 is the root owner (note that it could have another identifier), the server 1 only knows the root owner server and the server 2 knows both 0 and 1. In this way, if the server 0 is not available when the server 2 starts, it can get the naming data owned by the server 1 anyway.
Let’s say that the servers 0 and 1 are first started. The client 0 asks the server 0 to create a subcontext A in the root context. Then the client 1 creates the context B in A. Notice that if the
- 96 -
Server0
Server1 Server2
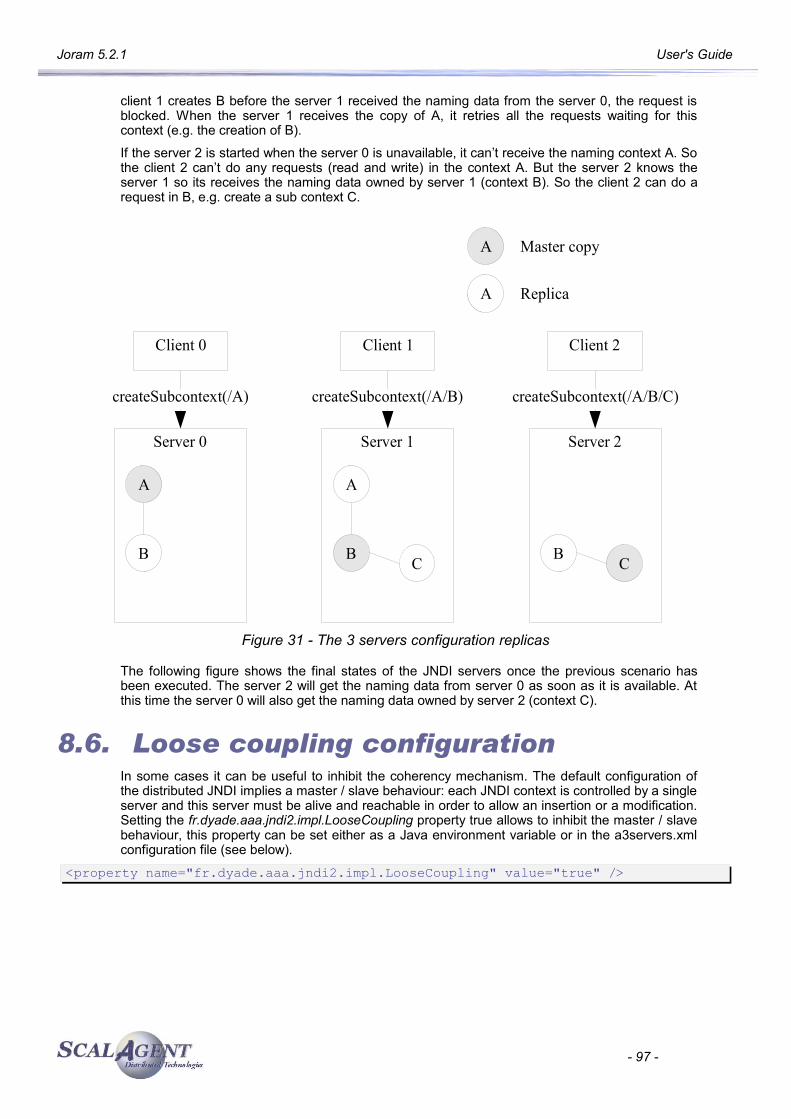
Joram 5.2.1 User's Guide
client 1 creates B before the server 1 received the naming data from the server 0, the request is blocked. When the server 1 receives the copy of A, it retries all the requests waiting for this context (e.g. the creation of B).
If the server 2 is started when the server 0 is unavailable, it can’t receive the naming context A. So the client 2 can’t do any requests (read and write) in the context A. But the server 2 knows the server 1 so its receives the naming data owned by server 1 (context B). So the client 2 can do a request in B, e.g. create a sub context C.
Figure 31 - The 3 servers configuration replicas
The following figure shows the final states of the JNDI servers once the previous scenario has been executed. The server 2 will get the naming data from server 0 as soon as it is available. At this time the server 0 will also get the naming data owned by server 2 (context C).
8.6. Loose coupling configurationIn some cases it can be useful to inhibit the coherency mechanism. The default configuration of the distributed JNDI implies a master / slave behaviour: each JNDI context is controlled by a single server and this server must be alive and reachable in order to allow an insertion or a modification. Setting the fr.dyade.aaa.jndi2.impl.LooseCoupling property true allows to inhibit the master / slave behaviour, this property can be set either as a Java environment variable or in the a3servers.xml configuration file (see below).
<property name="fr.dyade.aaa.jndi2.impl.LooseCoupling" value="true" />
- 97 -
A
A
Master copy
Replica
Client 0
Server 0
A
B
createSubcontext(/A)
Client 1
Server 1
A
CB
createSubcontext(/A/B)
Client 2
Server 2
CB
createSubcontext(/A/B/C)
Joram 5.2.1 User's Guide
9. Joram in JBoss
This chapter describes how to connect JBoss to a Joram server.
This documentation has been tested with JBoss 4.0.1 and Joram 4.3.14.
9.1. Joram installationYou can either install Joram as a set of Jars or as a single RAR.
9.1.1. Libraries Joram JARs
Copy the following JARS into the directory jboss/server/<server name>/lib:
• joram/ship/lib/JCup.jar
• joram/ship/lib/ow_monolog.jar
• joram/ship/lib/joram-shared.jar
• joram/ship/lib/joram-client.jar
• joram/ship/lib/joram-config.jar
These JARs enables JBoss to be a client of a remote Joram server.
If you need to start an embedded Joram server into JBoss then you have to use the RAR.
9.1.2. Connector Joram RAR
If the Joram server is embedded into Jboss choose the exhaustive connector joram.rar (built with the Ant target ship.adapter).
If the Joram server is remote then choose the remote connector joram.rar (built with the Ant target ship.remoteadapter).
Copy the Joram RAR into the directory jboss/server/<server name>/deploy/joram:
• joram/ship/joram.rar
9.2. MDB activationThere are two ways to activate the MDBs:
• JMSContainerInvoker
• JCA ActivationSpec
- 98 -

Joram 5.2.1 User's Guide
9.2.1. JMSContainerInvoker
This container implements the JMS ASF interfaces (ServerSession and ServerSessionPool) in order to activate MDBs. It also provides some more activation features like the reconnection to the JMS server or the maximum delivery number.
First, link the MDB to an invoker called “joram-mdb-invoker” in the deployment descriptor jboss.xml:<message-driven>
<ejb-name>MyMDB</ejb-name> <destination-jndi-name>myDestination</destination-jndi-name> <invoker-bindings> <invoker> <invoker-proxy-binding-name> joram-mdb-invoker </invoker-proxy-binding-name>
</invoker> </invoker-bindings>
</message-driven>Then define the invoker into the JBoss configuration file jboss/server/<server name>/conf/standardjboss.xml.<invoker-proxy-bindings>...<invoker-proxy-binding> <name>joram-mdb-invoker</name> <invoker-mbean>does-not-matter</invoker-mbean> <proxy-factory> org.jboss.ejb.plugins.jms.JMSContainerInvoker </proxy-factory> <proxy-factory-config> <JMSProviderAdapterJNDI>JoramJMSProvider</JMSProviderAdapterJNDI> <ServerSessionPoolFactoryJNDI>StdJMSPool</ServerSessionPoolFactoryJNDI> <MinimumSize>1</MinimumSize> <KeepAliveMillis>30000</KeepAliveMillis> <MaximumSize>15</MaximumSize> <MaxMessages>1</MaxMessages> <MDBConfig> <ReconnectIntervalSec>10</ReconnectIntervalSec> <DLQConfig> <DestinationQueue>collector-converter-queue</DestinationQueue> <MaxTimesRedelivered>10</MaxTimesRedelivered> <TimeToLive>0</TimeToLive> </DLQConfig> </MDBConfig>
- 99 -

Joram 5.2.1 User's Guide
</proxy-factory-config> </invoker-proxy-binding>
The next step is to define the JMS provider “JoramJMSProvider” in the file jboss/server/<server name>/jms/joram-jms-ds.xml<server>...<mbean code="org.jboss.jms.jndi.JMSProviderLoader" name="jboss.mq:service=JoramJMSProviderLoader,name=JoramJMSProvider"> <attribute name="ProviderName">JoramJMSProvider</attribute>
<attribute name="ProviderAdapterClass"> org.jboss.jms.jndi.JNDIProviderAdapter</attribute>
<attribute name="FactoryRef">JoramXAConnectionFactory</attribute> <attribute name="QueueFactoryRef">JoramXAQueueConnectionFactory</attribute> <attribute name="TopicFactoryRef">JoramXATopicConnectionFactory</attribute> <attribute name="Properties"> java.naming.factory.initial=fr.dyade.aaa.jndi2.client.NamingContextFactory java.naming.factory.host=localhost java.naming.factory.port=16400 </attribute></mbean>
It relies on the use of XA connection factories which are resolved through the Joram JNDI. These factories must have been created and bound into Joram JNDI before starting the Jboss server.
You can create and bind these factories either manually with the Joram administration GUI (JAMT) or automatically with the XML file joramAdmin.xml.
JoramAdmin.xml example:<ConnectionFactory className="org.objectweb.joram.client.jms.tcp.XATcpConnectionFactory"> <tcp host="localhost" port="16010"/> <jndi name="JoramXAConnectionFactory"/> </ConnectionFactory> <ConnectionFactory className="org.objectweb.joram.client.jms.tcp.XATopicTcpConnectionFactory"> <tcp host="localhost" port="16010"/> <jndi name="JoramXATopicConnectionFactory"/> </ConnectionFactory> <ConnectionFactory className="org.objectweb.joram.client.jms.tcp.XAQueueTcpConnectionFactory"> <tcp host="localhost"
- 100 -

Joram 5.2.1 User's Guide
port="16010"/> <jndi name="JoramXAQueueConnectionFactory"/> </ConnectionFactory>
Remarks:
• The default user/password is chosen by Joram connection factories: anonymous/anonymous. It seems that the JMSContainerInvoker doesn't allow to modify the user identity.
9.2.2. Joram ActivationSpec
The JCA ActivationSpec is implemented by Joram resource connector (RAR). It provides the same basic functionalities as the JMSContainerInvoker, i.e. threads and sessions pooling. The difference is that the ASF interfaces are implemented by the JCA connector and that the activation mechanisms (and roles) are specified by the JCA API.
It implies that you installed Joram with its RAR (exhaustive or remote) and not with the JARs.
However notice that the Jboss specific features (provided by the JMSContainerInvoker) are not provided by the JCA ActivationSpec. For example the reconnection policy is currently not implemented by Joram connector. The DLQ mechanism is provided by Joram but is configured in another way.
First, link the MDB to an invoker called “joram-mdb-invoker” in the deployment descriptor jboss.xml:<message-driven>
<ejb-name>MyMDB</ejb-name> <destination-jndi-name>myDestination</destination-jndi-name> <resource-adapter-name>joram.rar</resource-adapter-name> <invoker-bindings> <invoker> <invoker-proxy-binding-name> joram-mdb-invoker </invoker-proxy-binding-name>
</invoker> </invoker-bindings> </message-driven>The resource adapter used to activate the MDB is defined in the file jboss.xml.
Then define the invoker into the JBoss configuration file jboss/server/<server name>/conf/standardjboss.xml.<invoker-proxy-binding> <name>joram-mdb-invoker</name> <invoker-mbean>default</invoker-mbean> <proxy-factory> org.jboss.ejb.plugins.inflow.JBossJMSMessageEndpointFactory </proxy-factory> <proxy-factory-config> <activation-config>
- 101 -
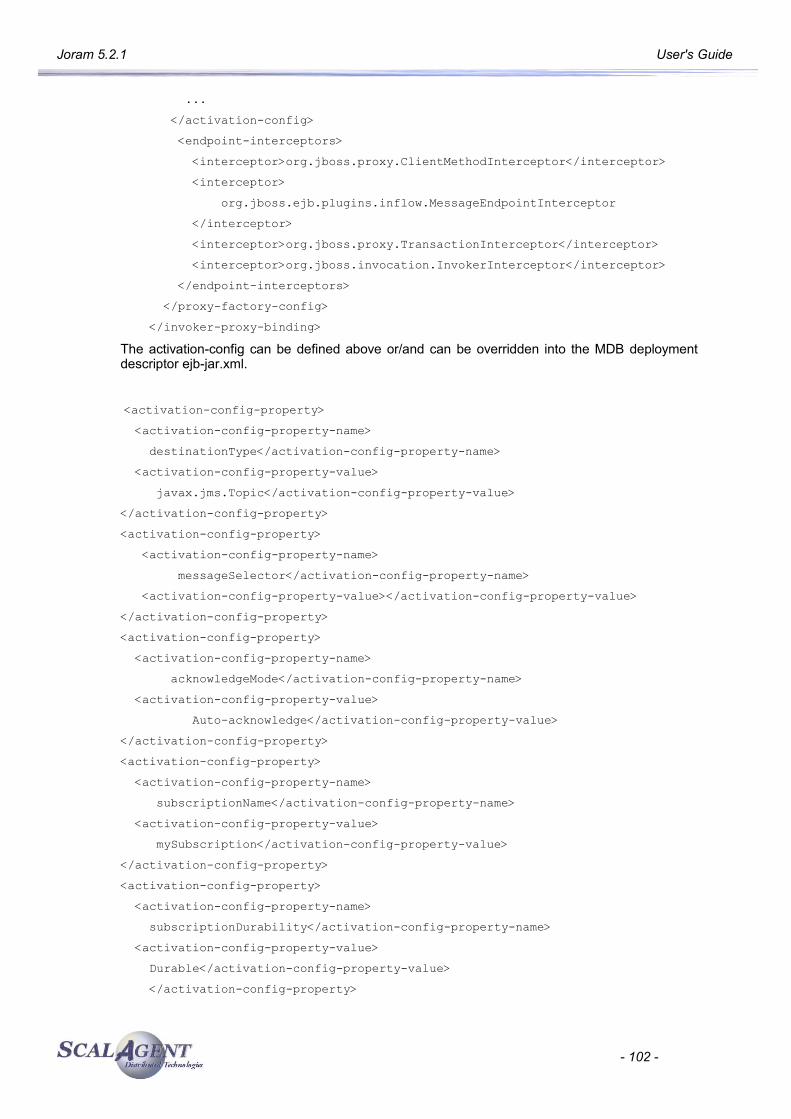
Joram 5.2.1 User's Guide
... </activation-config> <endpoint-interceptors> <interceptor>org.jboss.proxy.ClientMethodInterceptor</interceptor> <interceptor> org.jboss.ejb.plugins.inflow.MessageEndpointInterceptor </interceptor> <interceptor>org.jboss.proxy.TransactionInterceptor</interceptor> <interceptor>org.jboss.invocation.InvokerInterceptor</interceptor> </endpoint-interceptors> </proxy-factory-config> </invoker-proxy-binding>The activation-config can be defined above or/and can be overridden into the MDB deployment descriptor ejb-jar.xml.
<activation-config-property> <activation-config-property-name> destinationType</activation-config-property-name> <activation-config-property-value> javax.jms.Topic</activation-config-property-value></activation-config-property><activation-config-property> <activation-config-property-name> messageSelector</activation-config-property-name> <activation-config-property-value></activation-config-property-value></activation-config-property><activation-config-property> <activation-config-property-name> acknowledgeMode</activation-config-property-name> <activation-config-property-value> Auto-acknowledge</activation-config-property-value></activation-config-property><activation-config-property> <activation-config-property-name> subscriptionName</activation-config-property-name> <activation-config-property-value> mySubscription</activation-config-property-value></activation-config-property><activation-config-property> <activation-config-property-name> subscriptionDurability</activation-config-property-name> <activation-config-property-value> Durable</activation-config-property-value> </activation-config-property>
- 102 -
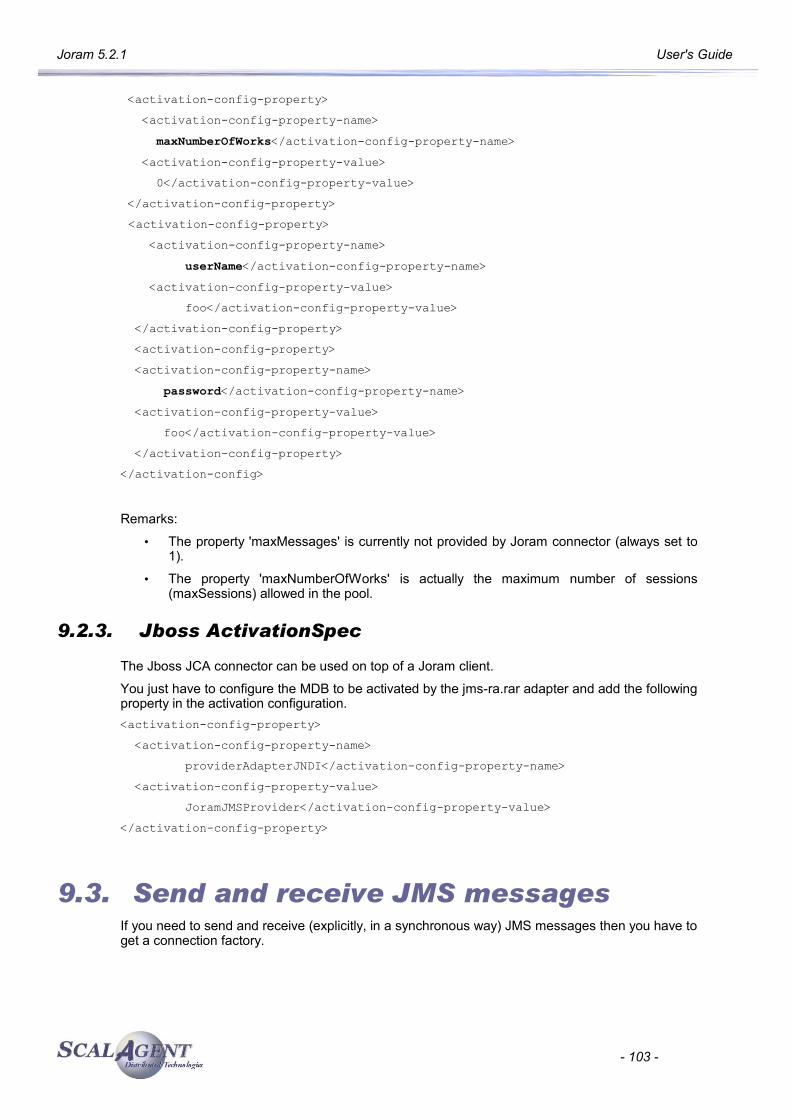
Joram 5.2.1 User's Guide
<activation-config-property> <activation-config-property-name> maxNumberOfWorks</activation-config-property-name> <activation-config-property-value> 0</activation-config-property-value> </activation-config-property>
<activation-config-property> <activation-config-property-name> userName</activation-config-property-name> <activation-config-property-value> foo</activation-config-property-value> </activation-config-property> <activation-config-property> <activation-config-property-name> password</activation-config-property-name> <activation-config-property-value> foo</activation-config-property-value> </activation-config-property></activation-config>
Remarks:
• The property 'maxMessages' is currently not provided by Joram connector (always set to 1).
• The property 'maxNumberOfWorks' is actually the maximum number of sessions (maxSessions) allowed in the pool.
9.2.3. Jboss ActivationSpec
The Jboss JCA connector can be used on top of a Joram client.
You just have to configure the MDB to be activated by the jms-ra.rar adapter and add the following property in the activation configuration.<activation-config-property> <activation-config-property-name> providerAdapterJNDI</activation-config-property-name> <activation-config-property-value> JoramJMSProvider</activation-config-property-value></activation-config-property>
9.3. Send and receive JMS messagesIf you need to send and receive (explicitly, in a synchronous way) JMS messages then you have to get a connection factory.
- 103 -
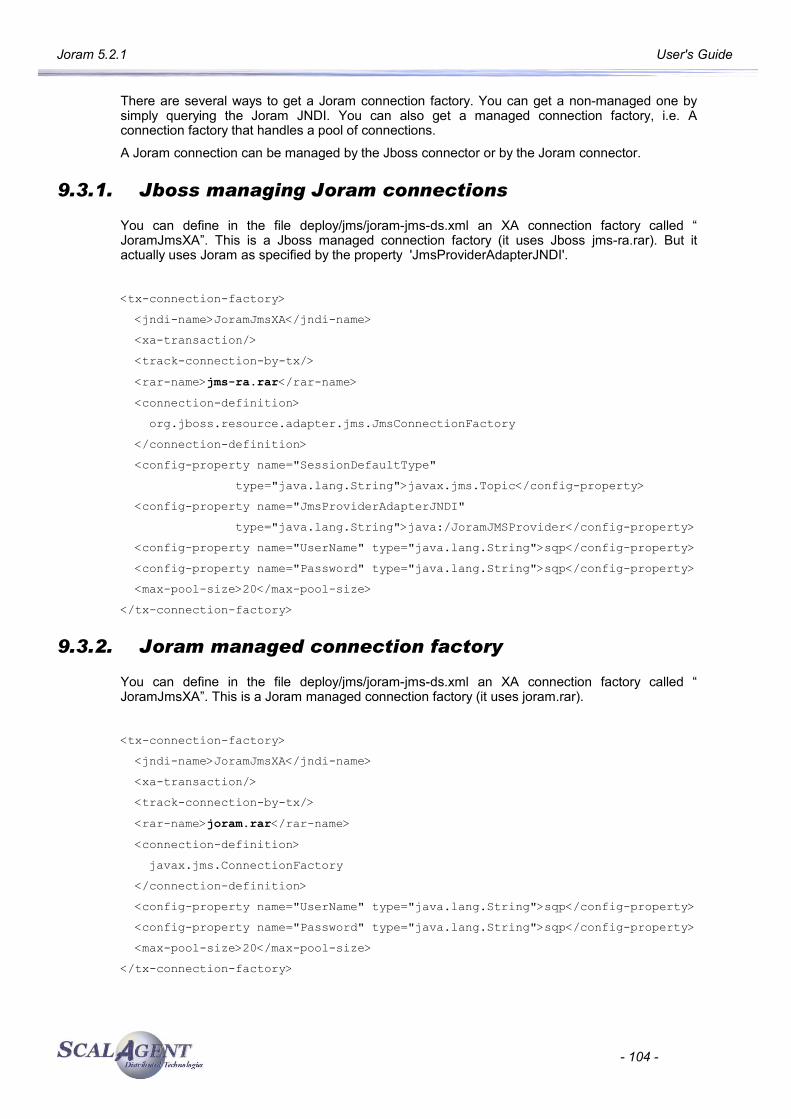
Joram 5.2.1 User's Guide
There are several ways to get a Joram connection factory. You can get a non-managed one by simply querying the Joram JNDI. You can also get a managed connection factory, i.e. A connection factory that handles a pool of connections.
A Joram connection can be managed by the Jboss connector or by the Joram connector.
9.3.1. Jboss managing Joram connections
You can define in the file deploy/jms/joram-jms-ds.xml an XA connection factory called “ JoramJmsXA”. This is a Jboss managed connection factory (it uses Jboss jms-ra.rar). But it actually uses Joram as specified by the property 'JmsProviderAdapterJNDI'.
<tx-connection-factory> <jndi-name>JoramJmsXA</jndi-name> <xa-transaction/> <track-connection-by-tx/> <rar-name>jms-ra.rar</rar-name> <connection-definition> org.jboss.resource.adapter.jms.JmsConnectionFactory </connection-definition> <config-property name="SessionDefaultType" type="java.lang.String">javax.jms.Topic</config-property> <config-property name="JmsProviderAdapterJNDI" type="java.lang.String">java:/JoramJMSProvider</config-property> <config-property name="UserName" type="java.lang.String">sqp</config-property> <config-property name="Password" type="java.lang.String">sqp</config-property> <max-pool-size>20</max-pool-size></tx-connection-factory>
9.3.2. Joram managed connection factory
You can define in the file deploy/jms/joram-jms-ds.xml an XA connection factory called “ JoramJmsXA”. This is a Joram managed connection factory (it uses joram.rar).
<tx-connection-factory> <jndi-name>JoramJmsXA</jndi-name> <xa-transaction/> <track-connection-by-tx/> <rar-name>joram.rar</rar-name> <connection-definition> javax.jms.ConnectionFactory </connection-definition> <config-property name="UserName" type="java.lang.String">sqp</config-property> <config-property name="Password" type="java.lang.String">sqp</config-property> <max-pool-size>20</max-pool-size></tx-connection-factory>
- 104 -
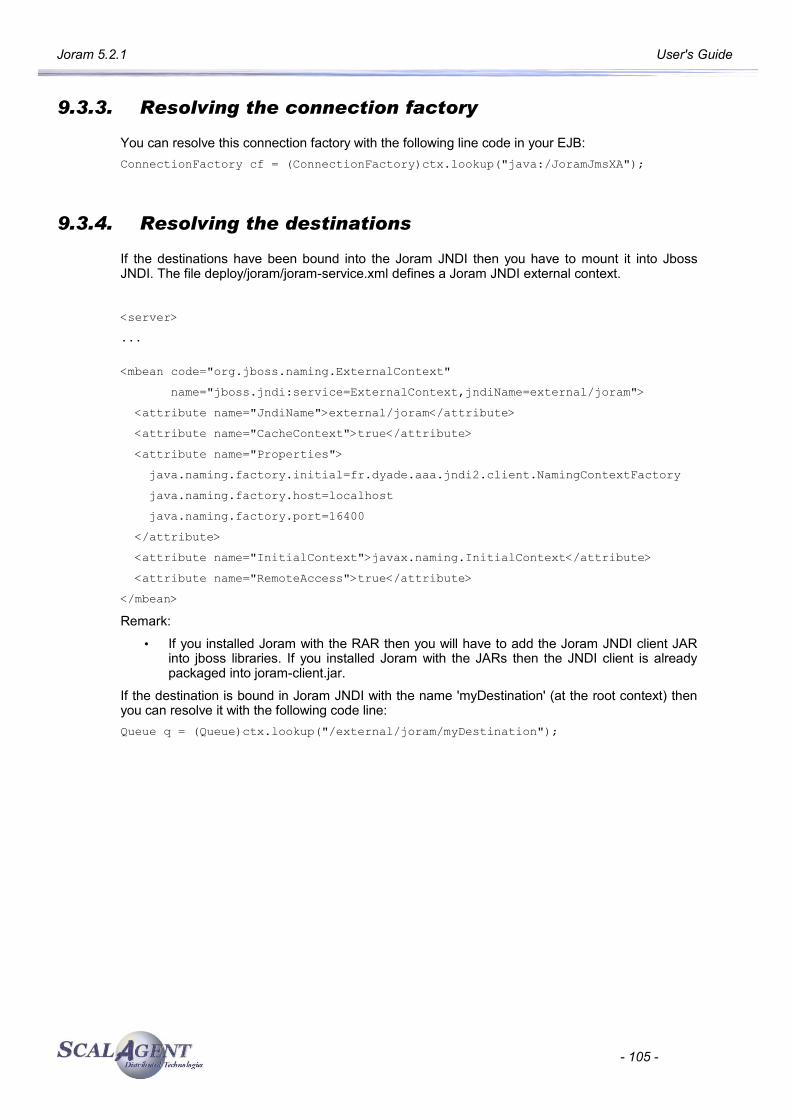
Joram 5.2.1 User's Guide
9.3.3. Resolving the connection factory
You can resolve this connection factory with the following line code in your EJB:ConnectionFactory cf = (ConnectionFactory)ctx.lookup("java:/JoramJmsXA");
9.3.4. Resolving the destinations
If the destinations have been bound into the Joram JNDI then you have to mount it into Jboss JNDI. The file deploy/joram/joram-service.xml defines a Joram JNDI external context.
<server>...
<mbean code="org.jboss.naming.ExternalContext" name="jboss.jndi:service=ExternalContext,jndiName=external/joram"> <attribute name="JndiName">external/joram</attribute> <attribute name="CacheContext">true</attribute> <attribute name="Properties"> java.naming.factory.initial=fr.dyade.aaa.jndi2.client.NamingContextFactory java.naming.factory.host=localhost java.naming.factory.port=16400 </attribute> <attribute name="InitialContext">javax.naming.InitialContext</attribute> <attribute name="RemoteAccess">true</attribute></mbean>Remark:
• If you installed Joram with the RAR then you will have to add the Joram JNDI client JAR into jboss libraries. If you installed Joram with the JARs then the JNDI client is already packaged into joram-client.jar.
If the destination is bound in Joram JNDI with the name 'myDestination' (at the root context) then you can resolve it with the following code line:Queue q = (Queue)ctx.lookup("/external/joram/myDestination");
- 105 -
Joram 5.2.1 User's Guide
10.Using Joram in WebLogic
This chapter describes how to use a Joram server with a BEA WebLogic server, it has been tested with WebLogic 9.2 MP2 and Joram 4.3.32.
10.1. Integrating WebLogic server with Joram
This chapter shows how to create a new WebLogic domain and to connect it to a Joram's JMS provider.
10.1.1. Installation
Create a simple WebLogic domain by using the wizard:
● Click Start > All Programs > BEA Products > tools > Configuration Wizard. ● The first form of the wizard allows to create a new domain or to extend an existing one. Choose Create a
new WebLogic domain (default choice) then click the Next button.● In the next form choose Generate a domain configured automatically to support the following BEA
products, keep all the default options (see figure below) then click the Next button.
- 106 -
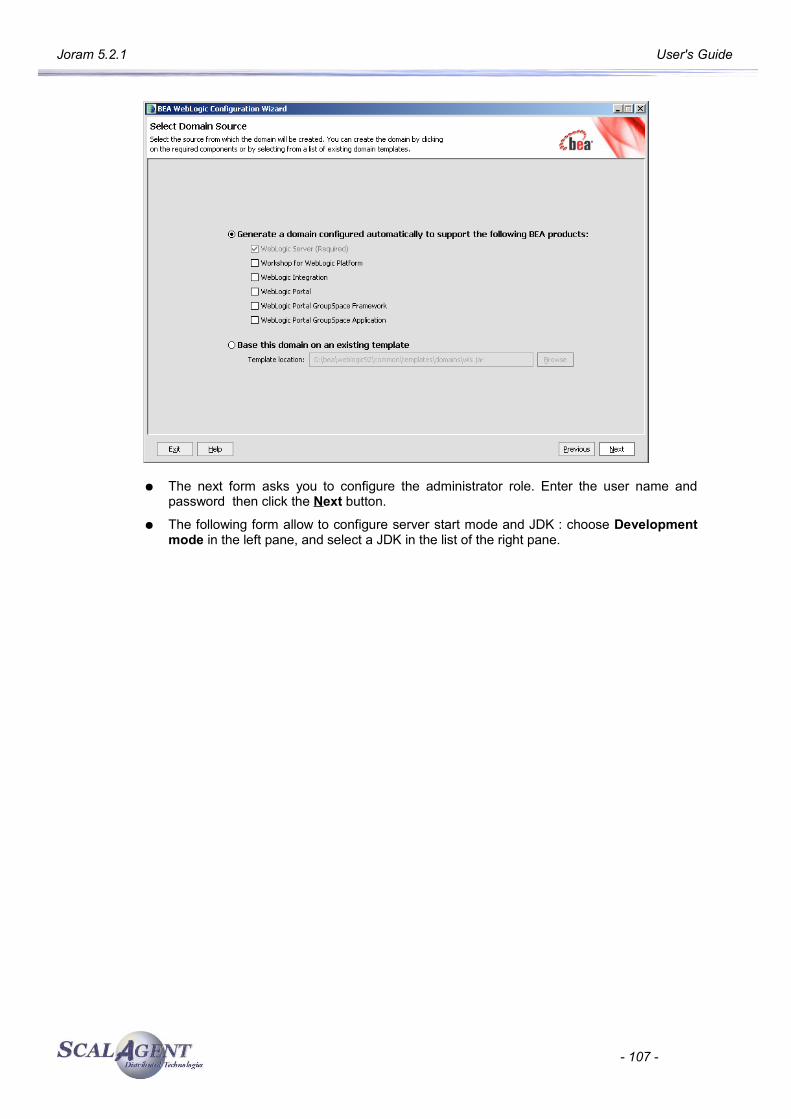
Joram 5.2.1 User's Guide
● The next form asks you to configure the administrator role. Enter the user name and password then click the Next button.
● The following form allow to configure server start mode and JDK : choose Development mode in the left pane, and select a JDK in the list of the right pane.
- 107 -
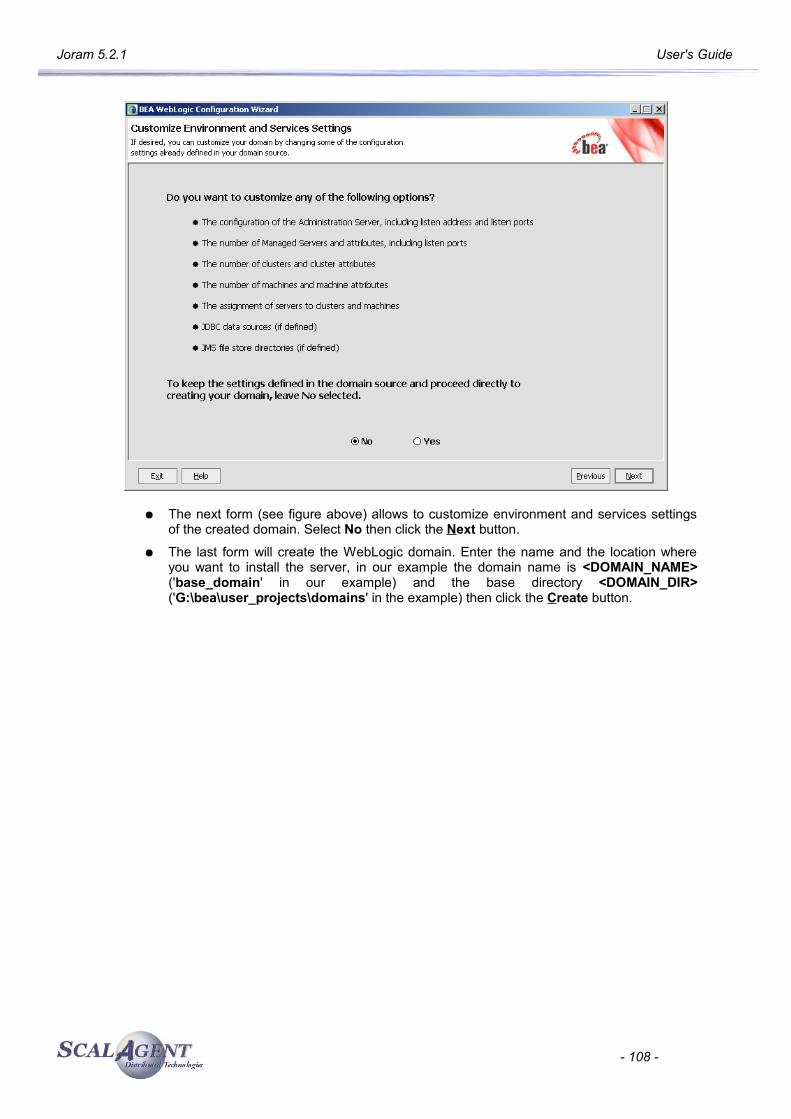
Joram 5.2.1 User's Guide
● The next form (see figure above) allows to customize environment and services settings of the created domain. Select No then click the Next button.
● The last form will create the WebLogic domain. Enter the name and the location where you want to install the server, in our example the domain name is <DOMAIN_NAME> ('base_domain' in our example) and the base directory <DOMAIN_DIR> ('G:\bea\user_projects\domains' in the example) then click the Create button.
- 108 -
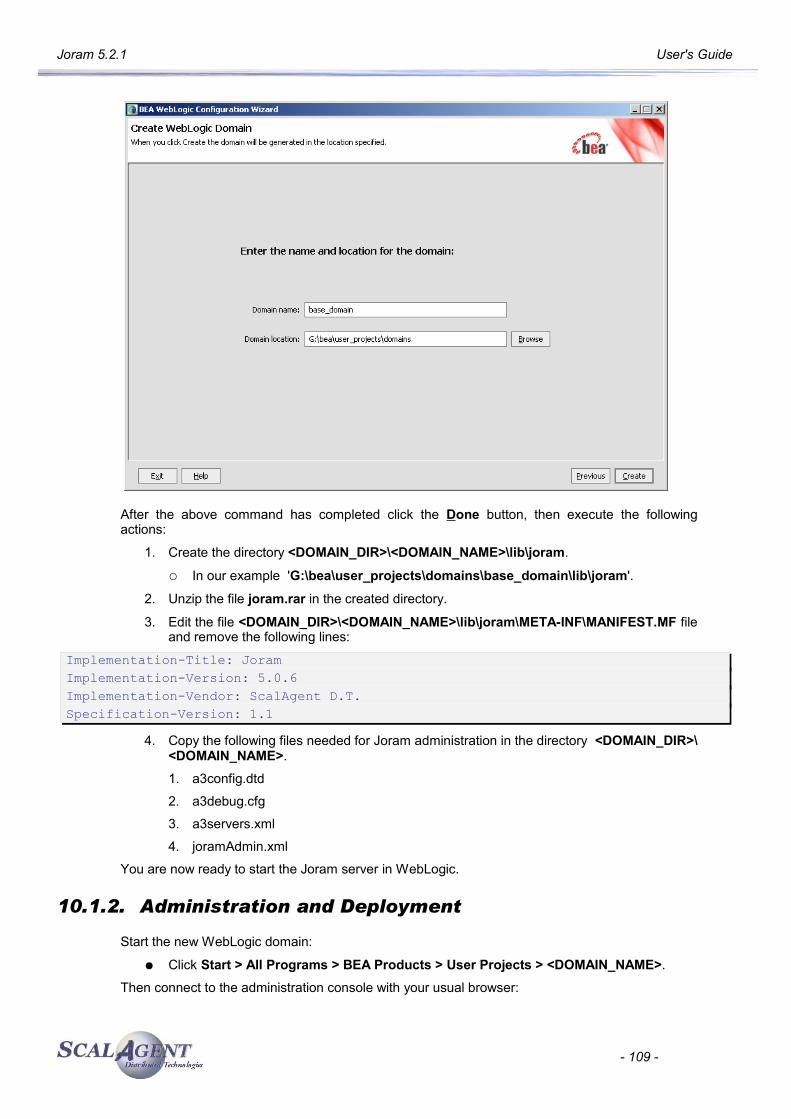
Joram 5.2.1 User's Guide
After the above command has completed click the Done button, then execute the following actions:
1. Create the directory <DOMAIN_DIR>\<DOMAIN_NAME>\lib\joram.
○ In our example 'G:\bea\user_projects\domains\base_domain\lib\joram'.
2. Unzip the file joram.rar in the created directory.
3. Edit the file <DOMAIN_DIR>\<DOMAIN_NAME>\lib\joram\META-INF\MANIFEST.MF file and remove the following lines:
Implementation-Title: JoramImplementation-Version: 5.0.6Implementation-Vendor: ScalAgent D.T.Specification-Version: 1.1
4. Copy the following files needed for Joram administration in the directory <DOMAIN_DIR>\<DOMAIN_NAME>.
1. a3config.dtd
2. a3debug.cfg
3. a3servers.xml
4. joramAdmin.xml
You are now ready to start the Joram server in WebLogic.
10.1.2. Administration and Deployment
Start the new WebLogic domain:
● Click Start > All Programs > BEA Products > User Projects > <DOMAIN_NAME>.
Then connect to the administration console with your usual browser:
- 109 -
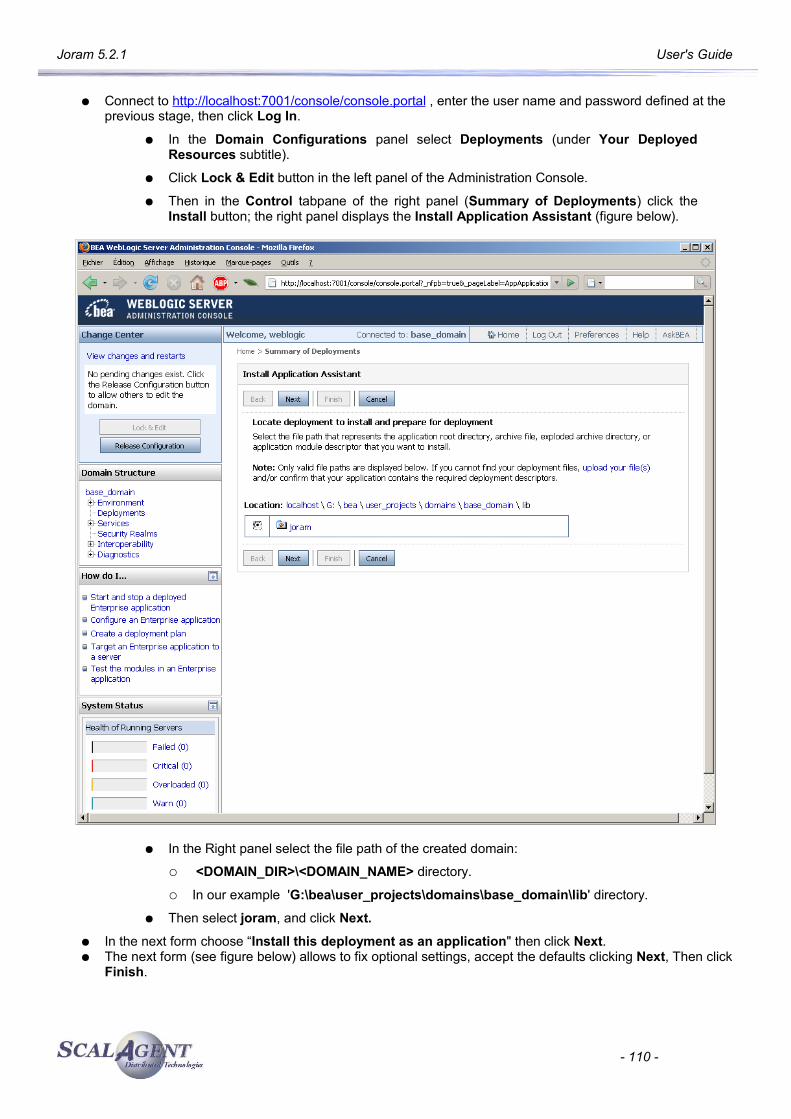
Joram 5.2.1 User's Guide
● Connect to http://localhost:7001/console/console.portal , enter the user name and password defined at the previous stage, then click Log In.
● In the Domain Configurations panel select Deployments (under Your Deployed Resources subtitle).
● Click Lock & Edit button in the left panel of the Administration Console.
● Then in the Control tabpane of the right panel (Summary of Deployments) click the Install button; the right panel displays the Install Application Assistant (figure below).
● In the Right panel select the file path of the created domain:
○ <DOMAIN_DIR>\<DOMAIN_NAME> directory.
○ In our example 'G:\bea\user_projects\domains\base_domain\lib' directory.
● Then select joram, and click Next.
● In the next form choose “Install this deployment as an application" then click Next.● The next form (see figure below) allows to fix optional settings, accept the defaults clicking Next, Then click
Finish.
- 110 -
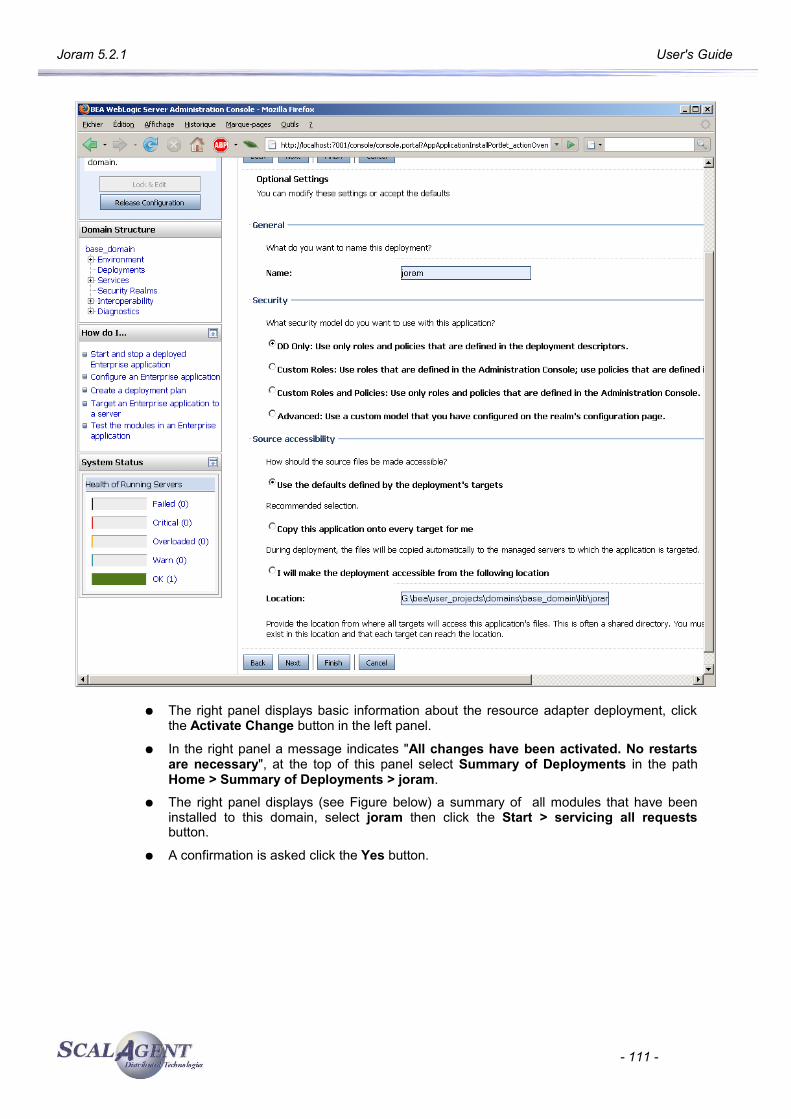
Joram 5.2.1 User's Guide
● The right panel displays basic information about the resource adapter deployment, click the Activate Change button in the left panel.
● In the right panel a message indicates "All changes have been activated. No restarts are necessary", at the top of this panel select Summary of Deployments in the path Home > Summary of Deployments > joram.
● The right panel displays (see Figure below) a summary of all modules that have been installed to this domain, select joram then click the Start > servicing all requests button.
● A confirmation is asked click the Yes button.
- 111 -

Joram 5.2.1 User's Guide
● In the right panel a message indicates "Start requests have been sent to the selected Deployments". The Joram Resource Adapter is now Active, we will try to test it.
● In the control tabpane select select joram.
● The right panel now displays a summary of settings for the joram Deployments, choose the testing tab (see figure below), then select each outbound connection in the list and click the Test button. Normally the 'Test Result' column should display 'Passed' for each outbound connection.
- 112 -
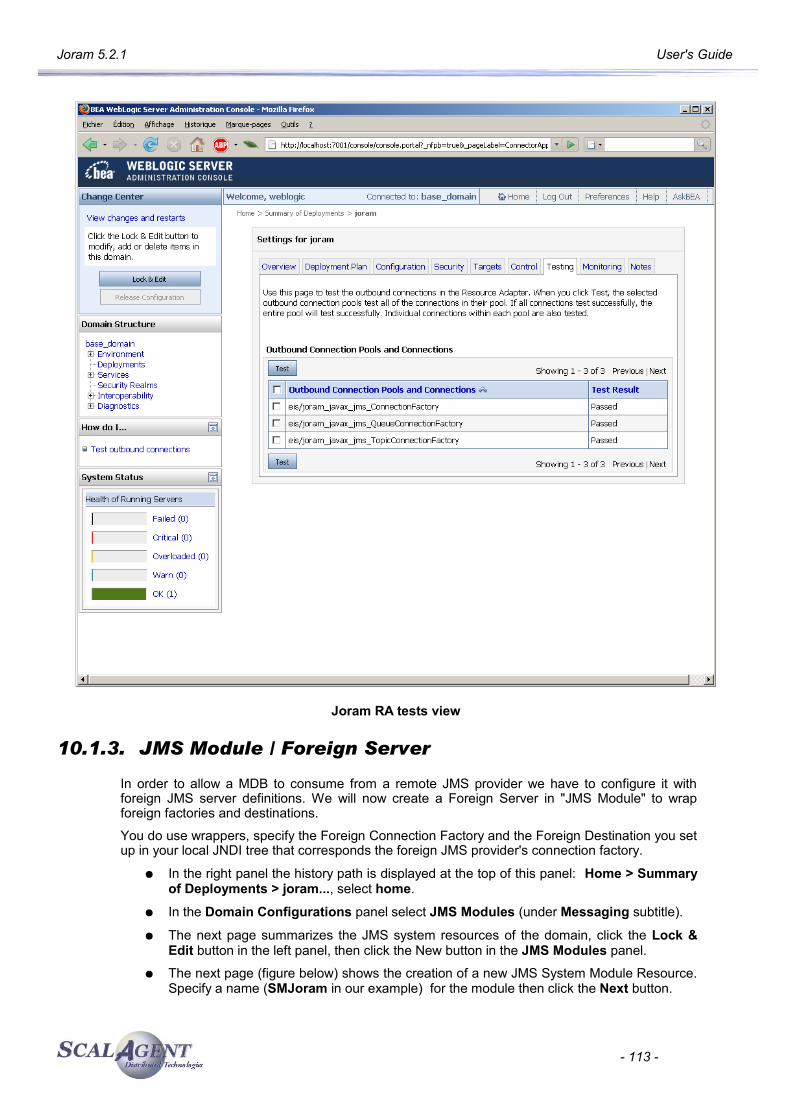
Joram 5.2.1 User's Guide
Joram RA tests view
10.1.3. JMS Module / Foreign Server
In order to allow a MDB to consume from a remote JMS provider we have to configure it with foreign JMS server definitions. We will now create a Foreign Server in "JMS Module" to wrap foreign factories and destinations.
You do use wrappers, specify the Foreign Connection Factory and the Foreign Destination you set up in your local JNDI tree that corresponds the foreign JMS provider's connection factory.
● In the right panel the history path is displayed at the top of this panel: Home > Summary of Deployments > joram..., select home.
● In the Domain Configurations panel select JMS Modules (under Messaging subtitle).
● The next page summarizes the JMS system resources of the domain, click the Lock & Edit button in the left panel, then click the New button in the JMS Modules panel.
● The next page (figure below) shows the creation of a new JMS System Module Resource. Specify a name (SMJoram in our example) for the module then click the Next button.
- 113 -
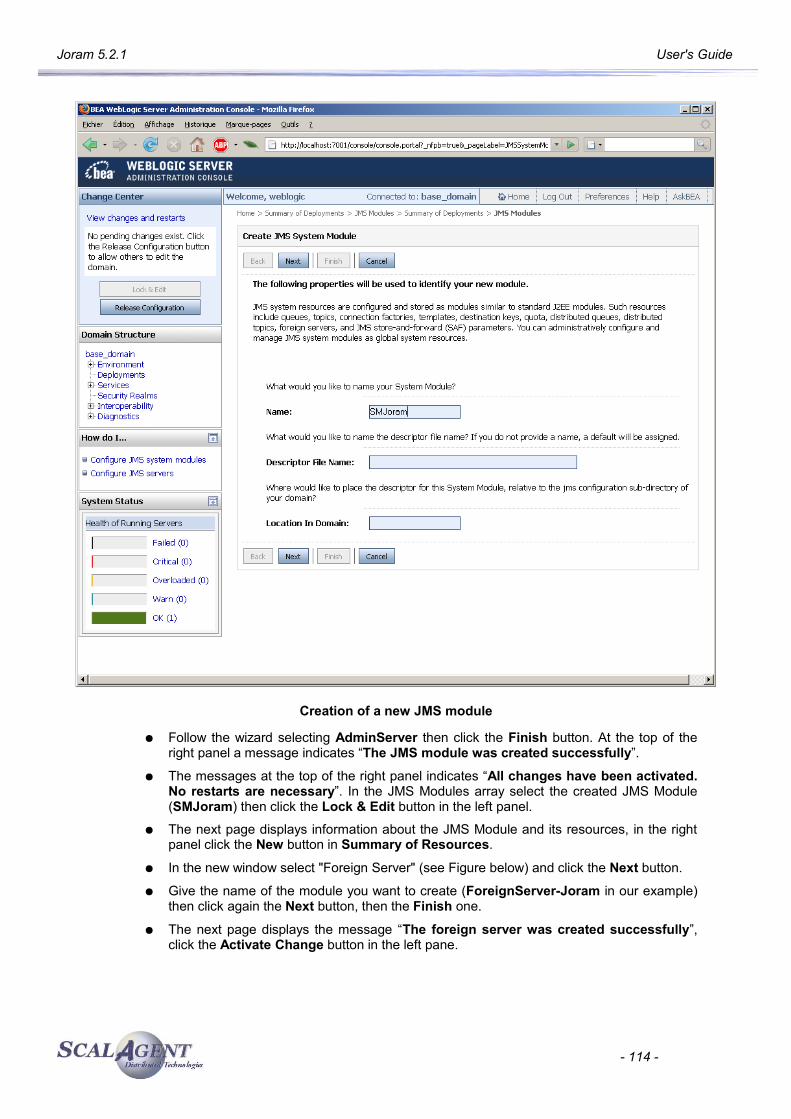
Joram 5.2.1 User's Guide
Creation of a new JMS module
● Follow the wizard selecting AdminServer then click the Finish button. At the top of the right panel a message indicates “The JMS module was created successfully”.
● The messages at the top of the right panel indicates “All changes have been activated. No restarts are necessary”. In the JMS Modules array select the created JMS Module (SMJoram) then click the Lock & Edit button in the left panel.
● The next page displays information about the JMS Module and its resources, in the right panel click the New button in Summary of Resources.
● In the new window select "Foreign Server" (see Figure below) and click the Next button.
● Give the name of the module you want to create (ForeignServer-Joram in our example) then click again the Next button, then the Finish one.
● The next page displays the message “The foreign server was created successfully”, click the Activate Change button in the left pane.
- 114 -
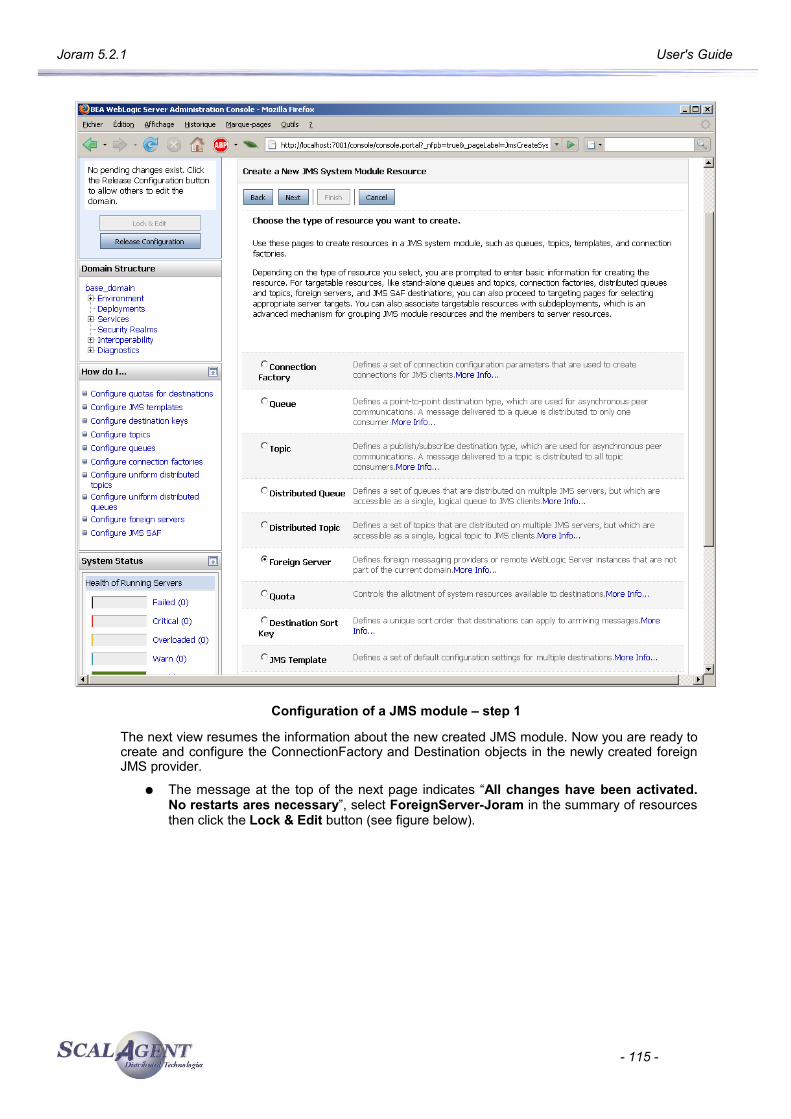
Joram 5.2.1 User's Guide
Configuration of a JMS module – step 1
The next view resumes the information about the new created JMS module. Now you are ready to create and configure the ConnectionFactory and Destination objects in the newly created foreign JMS provider.
● The message at the top of the next page indicates “All changes have been activated. No restarts ares necessary”, select ForeignServer-Joram in the summary of resources then click the Lock & Edit button (see figure below).
- 115 -
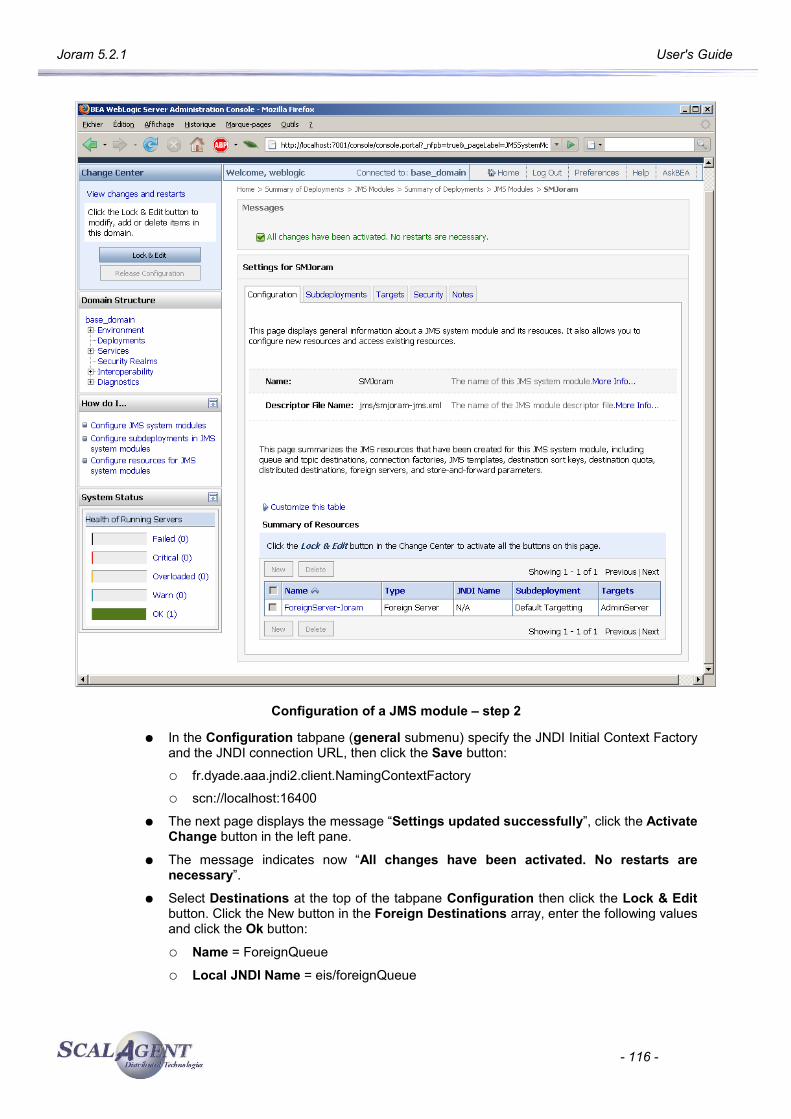
Joram 5.2.1 User's Guide
Configuration of a JMS module – step 2
● In the Configuration tabpane (general submenu) specify the JNDI Initial Context Factory and the JNDI connection URL, then click the Save button:
○ fr.dyade.aaa.jndi2.client.NamingContextFactory
○ scn://localhost:16400
● The next page displays the message “Settings updated successfully”, click the Activate Change button in the left pane.
● The message indicates now “All changes have been activated. No restarts are necessary”.
● Select Destinations at the top of the tabpane Configuration then click the Lock & Edit button. Click the New button in the Foreign Destinations array, enter the following values and click the Ok button:
○ Name = ForeignQueue
○ Local JNDI Name = eis/foreignQueue
- 116 -
Joram 5.2.1 User's Guide
○ Remote JNDI Name = queue
● Select Connection Factories at the top of the tabpane Configuration then click the New button in the Foreign Connection Factories array, enter the following values and click the Ok button :
○ Name = ForeignCF
○ Local JNDI Name = eis/foreignCF
○ Remote JNDI Name = cf
● click the Activate Change button in the left pane. The message indicates now “All changes have been activated. No restarts are necessary”.
10.1.4. JNDI view
You can now see in JNDI the Joram Factories and Destinations (eis context). Use your usual Web browser and connect to the following URL:
● http://localhost:7001/console/consolejndi.portal? _nfpb=true&_pageLabel=JNDIHomePage&server=AdminServer
The figure above shows the administered objects at this step.
- 117 -
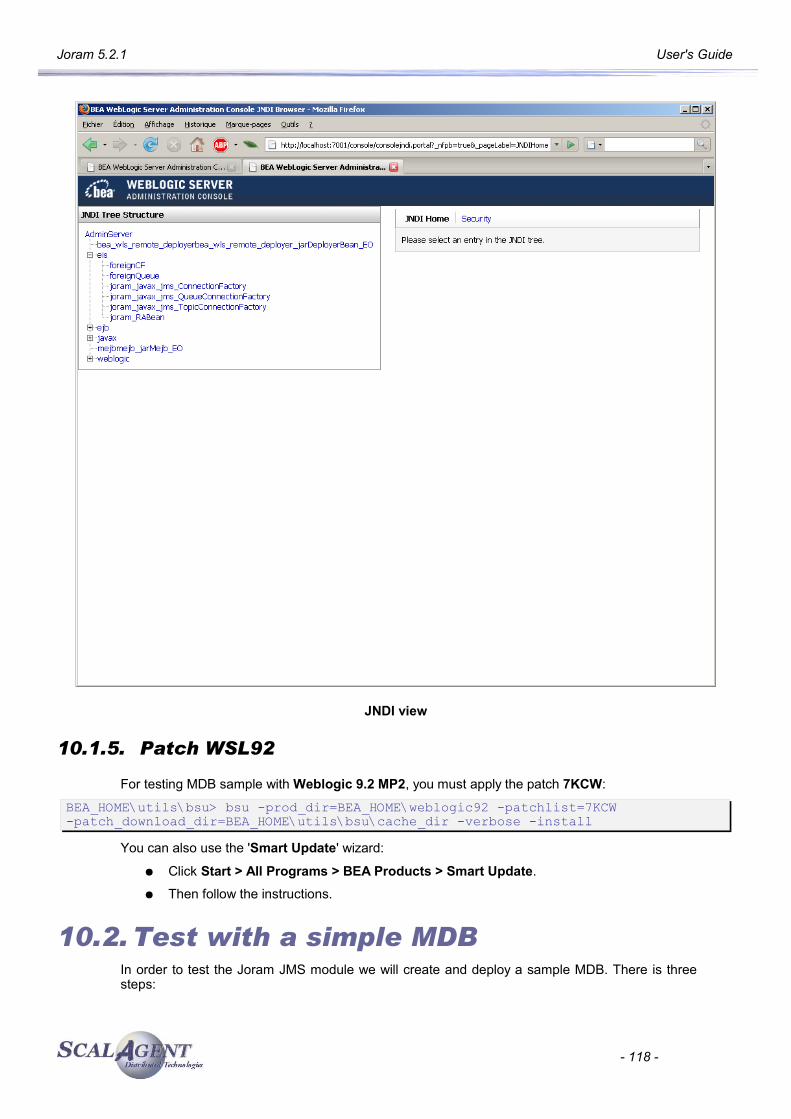
Joram 5.2.1 User's Guide
JNDI view
10.1.5. Patch WSL92
For testing MDB sample with Weblogic 9.2 MP2, you must apply the patch 7KCW:
BEA_HOME\utils\bsu> bsu -prod_dir=BEA_HOME\weblogic92 -patchlist=7KCW -patch_download_dir=BEA_HOME\utils\bsu\cache_dir -verbose -install
You can also use the 'Smart Update' wizard:
● Click Start > All Programs > BEA Products > Smart Update.
● Then follow the instructions.
10.2. Test with a simple MDBIn order to test the Joram JMS module we will create and deploy a sample MDB. There is three steps:
- 118 -
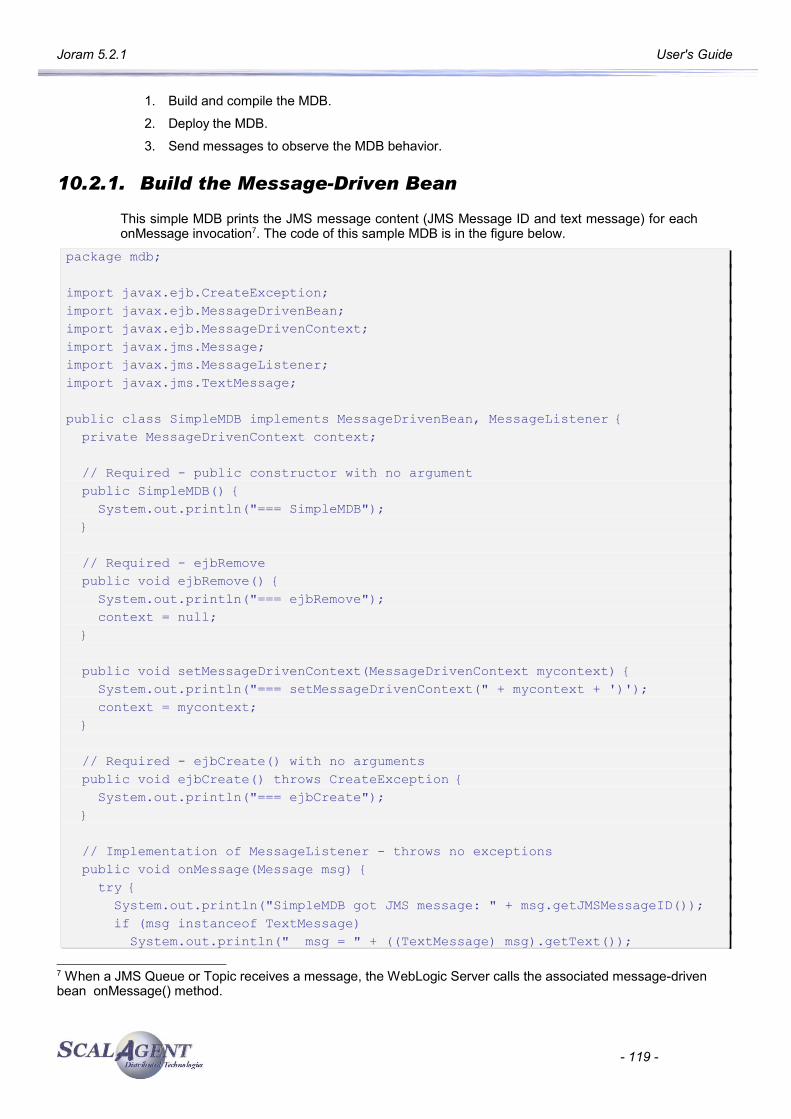
Joram 5.2.1 User's Guide
1. Build and compile the MDB.
2. Deploy the MDB.
3. Send messages to observe the MDB behavior.
10.2.1. Build the Message-Driven Bean
This simple MDB prints the JMS message content (JMS Message ID and text message) for each onMessage invocation7. The code of this sample MDB is in the figure below.
package mdb;
import javax.ejb.CreateException;import javax.ejb.MessageDrivenBean;import javax.ejb.MessageDrivenContext;import javax.jms.Message;import javax.jms.MessageListener;import javax.jms.TextMessage;
public class SimpleMDB implements MessageDrivenBean, MessageListener { private MessageDrivenContext context;
// Required - public constructor with no argument public SimpleMDB() { System.out.println("=== SimpleMDB"); }
// Required - ejbRemove public void ejbRemove() { System.out.println("=== ejbRemove"); context = null; }
public void setMessageDrivenContext(MessageDrivenContext mycontext) { System.out.println("=== setMessageDrivenContext(" + mycontext + ')'); context = mycontext; }
// Required - ejbCreate() with no arguments public void ejbCreate() throws CreateException { System.out.println("=== ejbCreate"); }
// Implementation of MessageListener - throws no exceptions public void onMessage(Message msg) { try { System.out.println("SimpleMDB got JMS message: " + msg.getJMSMessageID()); if (msg instanceof TextMessage) System.out.println(" msg = " + ((TextMessage) msg).getText());
7 When a JMS Queue or Topic receives a message, the WebLogic Server calls the associated message-driven bean onMessage() method.
- 119 -
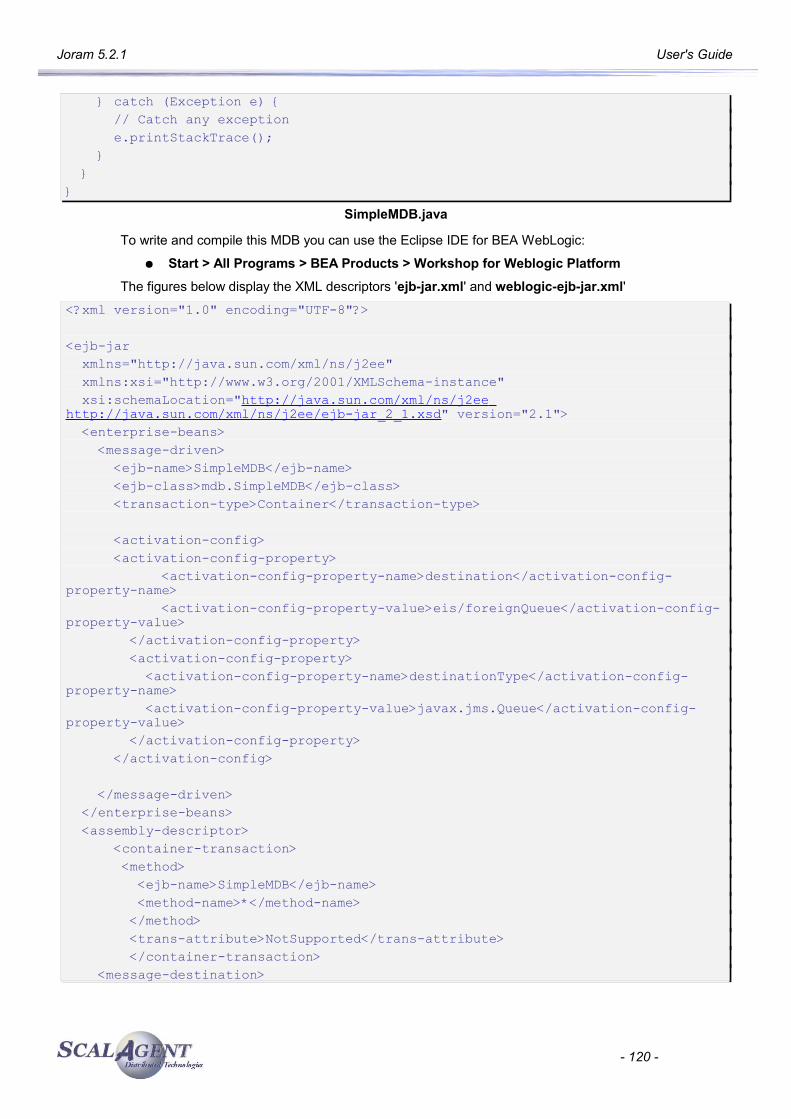
Joram 5.2.1 User's Guide
} catch (Exception e) { // Catch any exception e.printStackTrace(); } }}
SimpleMDB.java
To write and compile this MDB you can use the Eclipse IDE for BEA WebLogic:
● Start > All Programs > BEA Products > Workshop for Weblogic Platform
The figures below display the XML descriptors 'ejb-jar.xml' and weblogic-ejb-jar.xml'<?xml version="1.0" encoding="UTF-8"?>
<ejb-jar xmlns="http://java.sun.com/xml/ns/j2ee" xmlns:xsi="http://www.w3.org/2001/XMLSchema-instance" xsi:schemaLocation="http://java.sun.com/xml/ns/j2ee http://java.sun.com/xml/ns/j2ee/ejb-jar_2_1.xsd" version="2.1"> <enterprise-beans> <message-driven> <ejb-name>SimpleMDB</ejb-name> <ejb-class>mdb.SimpleMDB</ejb-class> <transaction-type>Container</transaction-type>
<activation-config> <activation-config-property> <activation-config-property-name>destination</activation-config-property-name> <activation-config-property-value>eis/foreignQueue</activation-config-property-value> </activation-config-property> <activation-config-property> <activation-config-property-name>destinationType</activation-config-property-name> <activation-config-property-value>javax.jms.Queue</activation-config-property-value> </activation-config-property> </activation-config>
</message-driven> </enterprise-beans> <assembly-descriptor> <container-transaction> <method> <ejb-name>SimpleMDB</ejb-name> <method-name>*</method-name> </method> <trans-attribute>NotSupported</trans-attribute> </container-transaction> <message-destination>
- 120 -
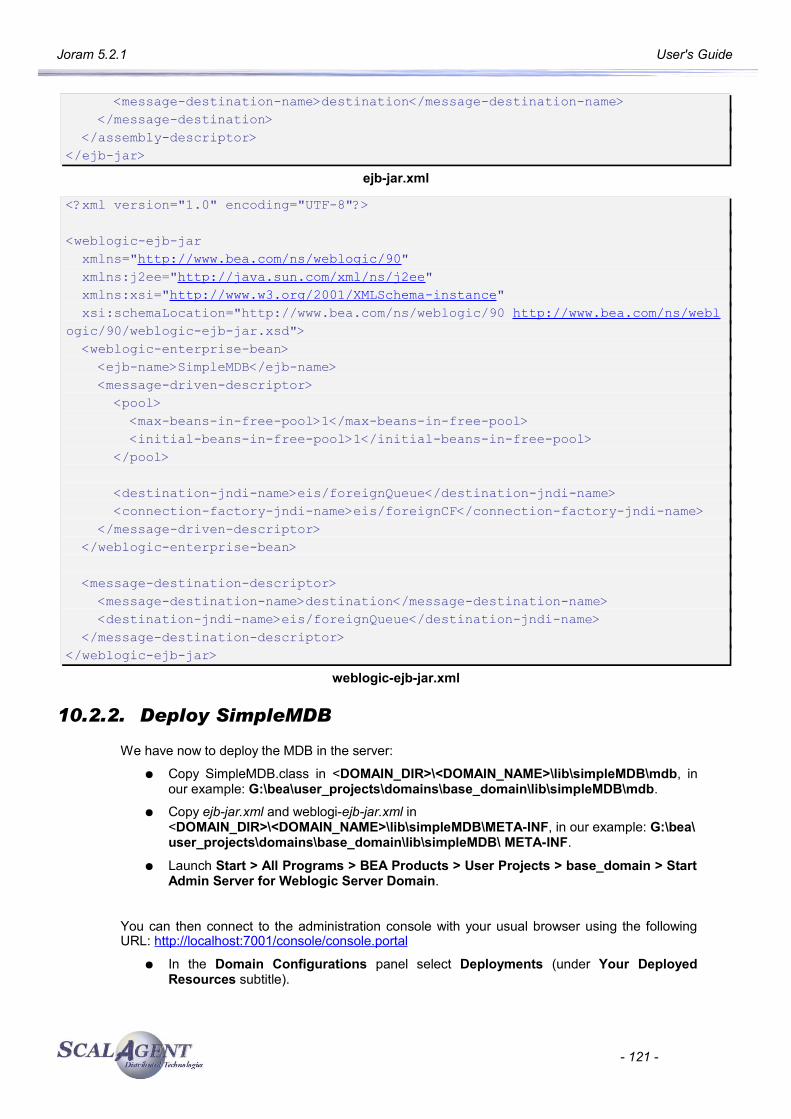
Joram 5.2.1 User's Guide
<message-destination-name>destination</message-destination-name> </message-destination> </assembly-descriptor></ejb-jar>
ejb-jar.xml
<?xml version="1.0" encoding="UTF-8"?>
<weblogic-ejb-jar xmlns="http://www.bea.com/ns/weblogic/90" xmlns:j2ee="http://java.sun.com/xml/ns/j2ee" xmlns:xsi="http://www.w3.org/2001/XMLSchema-instance" xsi:schemaLocation="http://www.bea.com/ns/weblogic/90 http://www.bea.com/ns/weblogic/90/weblogic-ejb-jar.xsd"> <weblogic-enterprise-bean> <ejb-name>SimpleMDB</ejb-name> <message-driven-descriptor> <pool> <max-beans-in-free-pool>1</max-beans-in-free-pool> <initial-beans-in-free-pool>1</initial-beans-in-free-pool> </pool>
<destination-jndi-name>eis/foreignQueue</destination-jndi-name> <connection-factory-jndi-name>eis/foreignCF</connection-factory-jndi-name> </message-driven-descriptor> </weblogic-enterprise-bean>
<message-destination-descriptor> <message-destination-name>destination</message-destination-name> <destination-jndi-name>eis/foreignQueue</destination-jndi-name> </message-destination-descriptor></weblogic-ejb-jar>
weblogic-ejb-jar.xml
10.2.2. Deploy SimpleMDB
We have now to deploy the MDB in the server:
● Copy SimpleMDB.class in <DOMAIN_DIR>\<DOMAIN_NAME>\lib\simpleMDB\mdb, in our example: G:\bea\user_projects\domains\base_domain\lib\simpleMDB\mdb.
● Copy ejb-jar.xml and weblogi-ejb-jar.xml in <DOMAIN_DIR>\<DOMAIN_NAME>\lib\simpleMDB\META-INF, in our example: G:\bea\user_projects\domains\base_domain\lib\simpleMDB\ META-INF.
● Launch Start > All Programs > BEA Products > User Projects > base_domain > Start Admin Server for Weblogic Server Domain.
You can then connect to the administration console with your usual browser using the following URL: http://localhost:7001/console/console.portal
● In the Domain Configurations panel select Deployments (under Your Deployed Resources subtitle).
- 121 -
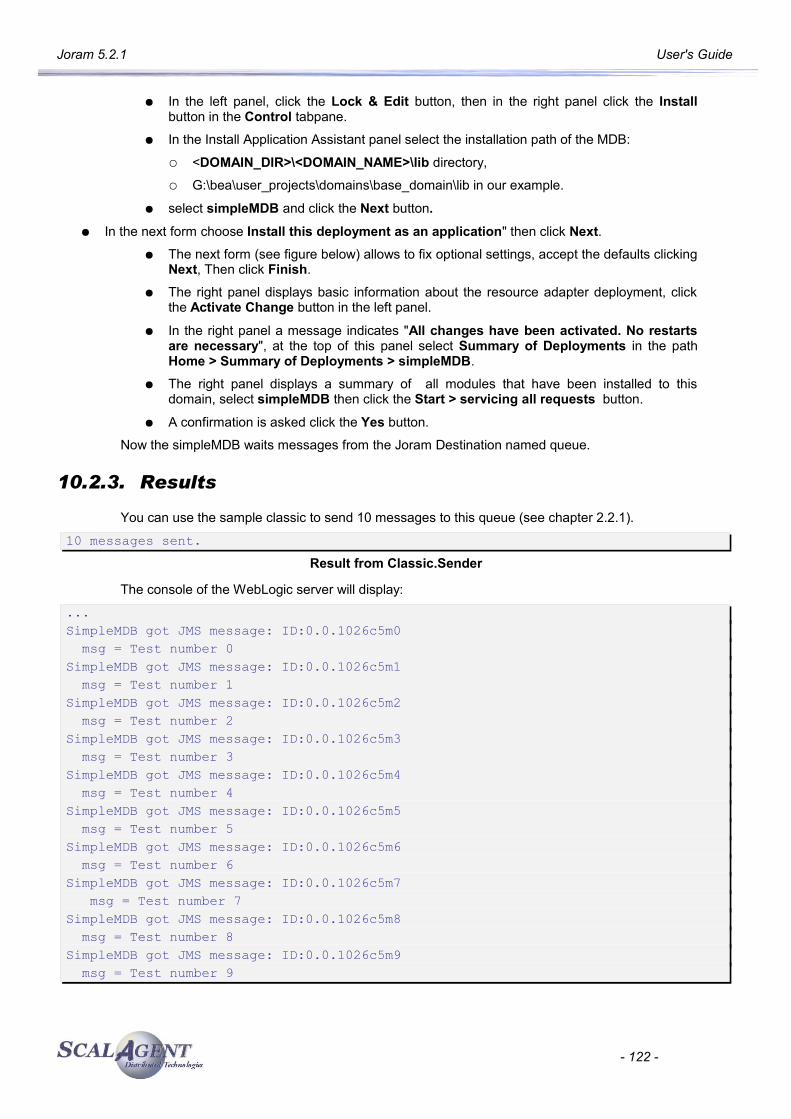
Joram 5.2.1 User's Guide
● In the left panel, click the Lock & Edit button, then in the right panel click the Install button in the Control tabpane.
● In the Install Application Assistant panel select the installation path of the MDB:
○ <DOMAIN_DIR>\<DOMAIN_NAME>\lib directory,
○ G:\bea\user_projects\domains\base_domain\lib in our example.
● select simpleMDB and click the Next button.
● In the next form choose Install this deployment as an application" then click Next.● The next form (see figure below) allows to fix optional settings, accept the defaults clicking
Next, Then click Finish.
● The right panel displays basic information about the resource adapter deployment, click the Activate Change button in the left panel.
● In the right panel a message indicates "All changes have been activated. No restarts are necessary", at the top of this panel select Summary of Deployments in the path Home > Summary of Deployments > simpleMDB.
● The right panel displays a summary of all modules that have been installed to this domain, select simpleMDB then click the Start > servicing all requests button.
● A confirmation is asked click the Yes button.
Now the simpleMDB waits messages from the Joram Destination named queue.
10.2.3. Results
You can use the sample classic to send 10 messages to this queue (see chapter 2.2.1).
10 messages sent.Result from Classic.Sender
The console of the WebLogic server will display:
...SimpleMDB got JMS message: ID:0.0.1026c5m0 msg = Test number 0SimpleMDB got JMS message: ID:0.0.1026c5m1 msg = Test number 1SimpleMDB got JMS message: ID:0.0.1026c5m2 msg = Test number 2SimpleMDB got JMS message: ID:0.0.1026c5m3 msg = Test number 3SimpleMDB got JMS message: ID:0.0.1026c5m4 msg = Test number 4SimpleMDB got JMS message: ID:0.0.1026c5m5 msg = Test number 5SimpleMDB got JMS message: ID:0.0.1026c5m6 msg = Test number 6SimpleMDB got JMS message: ID:0.0.1026c5m7 msg = Test number 7SimpleMDB got JMS message: ID:0.0.1026c5m8 msg = Test number 8SimpleMDB got JMS message: ID:0.0.1026c5m9 msg = Test number 9
- 122 -

Joram 5.2.1 User's Guide
Results from SimpleMDB
- 123 -
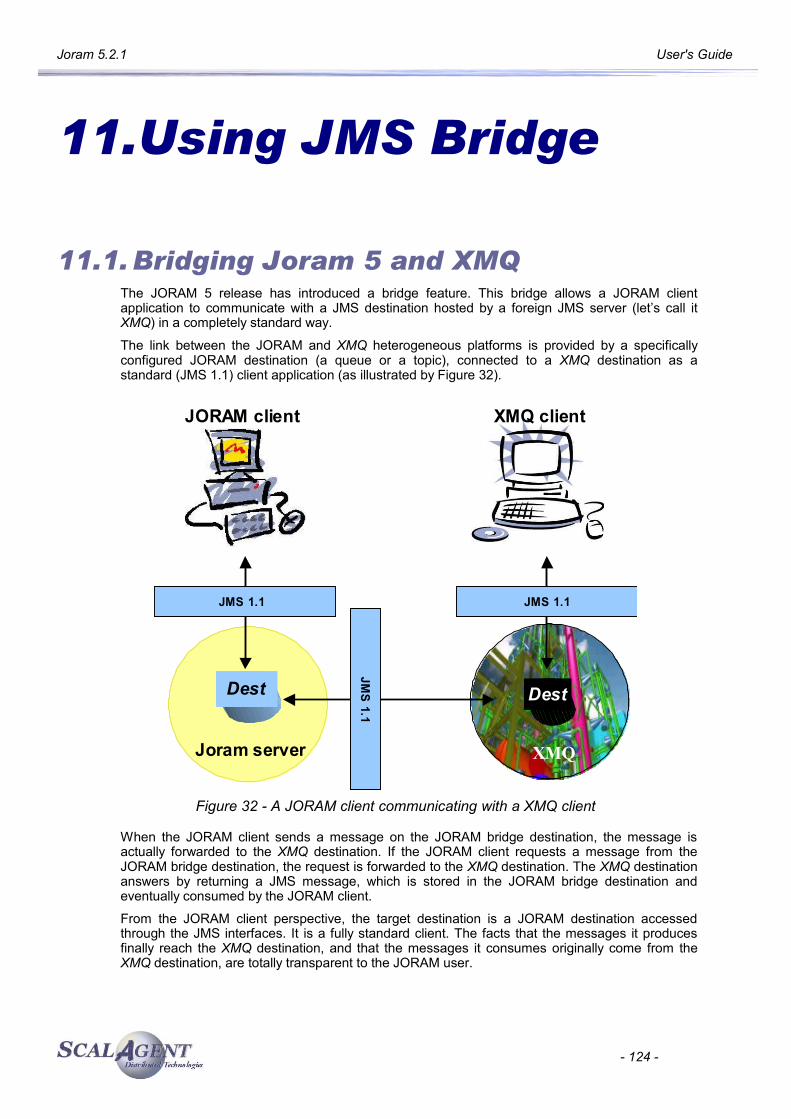
Joram 5.2.1 User's Guide
11.Using JMS Bridge
11.1. Bridging Joram 5 and XMQThe JORAM 5 release has introduced a bridge feature. This bridge allows a JORAM client application to communicate with a JMS destination hosted by a foreign JMS server (let’s call it XMQ) in a completely standard way.
The link between the JORAM and XMQ heterogeneous platforms is provided by a specifically configured JORAM destination (a queue or a topic), connected to a XMQ destination as a standard (JMS 1.1) client application (as illustrated by Figure 32).
Figure 32 - A JORAM client communicating with a XMQ client
When the JORAM client sends a message on the JORAM bridge destination, the message is actually forwarded to the XMQ destination. If the JORAM client requests a message from the JORAM bridge destination, the request is forwarded to the XMQ destination. The XMQ destination answers by returning a JMS message, which is stored in the JORAM bridge destination and eventually consumed by the JORAM client.
From the JORAM client perspective, the target destination is a JORAM destination accessed through the JMS interfaces. It is a fully standard client. The facts that the messages it produces finally reach the XMQ destination, and that the messages it consumes originally come from the XMQ destination, are totally transparent to the JORAM user.
- 124 -
JORAM client
XMQ
Dest
Joram server
Dest
Joram server
Dest
JMS 1.1JMS 1.1JMS 1.1
JMS 1.1
JMS 1.1
XMQ client

Joram 5.2.1 User's Guide
This document presents how the JORAM bridge feature works, how to use it, and finally shows sample codes for bridging JORAM with IBM’s WebSphere MQ platform and an other with JORAM.
11.2. Concepts and implementationAs said in the introduction, the JORAM JMS bridge feature is provided by specialized JORAM destinations. The communication between a JORAM client and a JORAM bridge destination is standard. It is the processing of the client requests within the bridge destination that is specialized.
A bridge destination has 3 main roles:
as a JORAM destination, it receives messages sent by JORAM JMS producers, and requests sent by JORAM JMS consumers;
as a XMQ JMS producer, it forwards the received messages to the XMQ destination; as a XMQ JMS consumer, it requests messages from the XMQ destination;
as a XMQ JMS consumer, it consumes messages coming from the XMQ destination; as a JORAM destination, it delivers those messages to the JORAM JMS consumers.
The JMS resources involved in the JORAM client – XMQ client communication are illustrated by the next picture.
Figure 33 - Bridge communication diagram
11.2.1. Message exchange
Communication modesThe JORAM bridge destination may either be a queue or a topic. And in both cases it may either communicate with a foreign queue or a foreign topic. A JORAM client application may then interact with a XMQ destination normally incompatible with the communication mode. For example, a JORAM client can interact with a XMQ queue in a Publish/Subscribe way.
- 125 -
Joram 5.2.1 User's Guide
Message sendingA message sent by a JORAM client application first reaches the bridge destination. It is then forwarded to the XMQ destination. Once successfully delivered to the XMQ platform, it is removed from the bridge destination. While the message was hosted by the JORAM bridge destination (between its arrival and its delivery to the foreign platform), it has never been available for delivery to a JORAM client. Even if the bridge destination had pending consumers requests, they wouldn’t have been answered with this message. Messages arriving on a bridge destination and coming from a JORAM client application are only deliverable to a foreign JMS destination.
Message consumption A consuming request sent by a JORAM client application first reaches the bridge destination. It is then forwarded to the XMQ destination. When the XMQ target destination is a topic, the JORAM bridge destination, when receiving the first consuming request, durably subscribes to the XMQ topic. This for not loosing messages if the JMS connection between the bridge destination and the XMQ platform fails (connection failures handling is addressed section 2.4). Messages delivered by the XMQ platform are consumed by the JORAM bridge destination. At that point they are converted into JORAM JMS messages (if the conversion fails, the delivery is rolled back, see section 2.2). Finally, those messages are consumed by the JORAM client applications.
Queue browsingThe JMS API allows a client application to browse the messages available for delivery on a queue. When requesting to browse a JORAM queue bridge, the “browse” request is forwarded to the XMQ destination if it is a queue. It eventually returns an enumeration of messages, converted into JORAM JMS messages. The enumeration is finally forwarded to the original requester. If the bridge destination is connected to a XMQ topic, the request is directly answered by an empty enumeration.
11.2.2. Acknowledgment policy
Acknowledgements are managed between the JORAM client and the JORAM bridge destination, and between the JORAM bridge destination and the XMQ destination, independently.
Figure 34 shows a first scenario of message rollback. In fact, it is the only possible case of message denying between the JORAM bridge destination and the XMQ platform. It occurs when the JMS message delivered by the XMQ destination appears not to be readable and thus can not be converted into a JORAM JMS message.
- 126 -
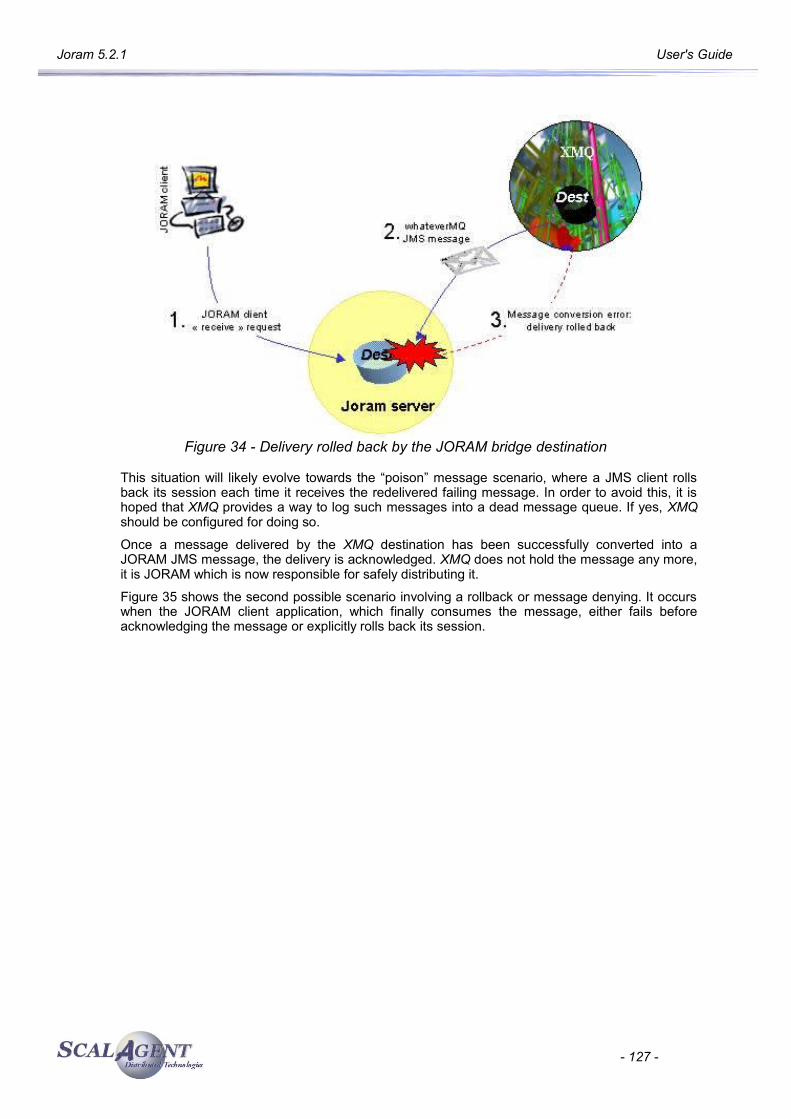
Joram 5.2.1 User's Guide
Figure 34 - Delivery rolled back by the JORAM bridge destination
This situation will likely evolve towards the “poison” message scenario, where a JMS client rolls back its session each time it receives the redelivered failing message. In order to avoid this, it is hoped that XMQ provides a way to log such messages into a dead message queue. If yes, XMQ should be configured for doing so.
Once a message delivered by the XMQ destination has been successfully converted into a JORAM JMS message, the delivery is acknowledged. XMQ does not hold the message any more, it is JORAM which is now responsible for safely distributing it.
Figure 35 shows the second possible scenario involving a rollback or message denying. It occurs when the JORAM client application, which finally consumes the message, either fails before acknowledging the message or explicitly rolls back its session.
- 127 -
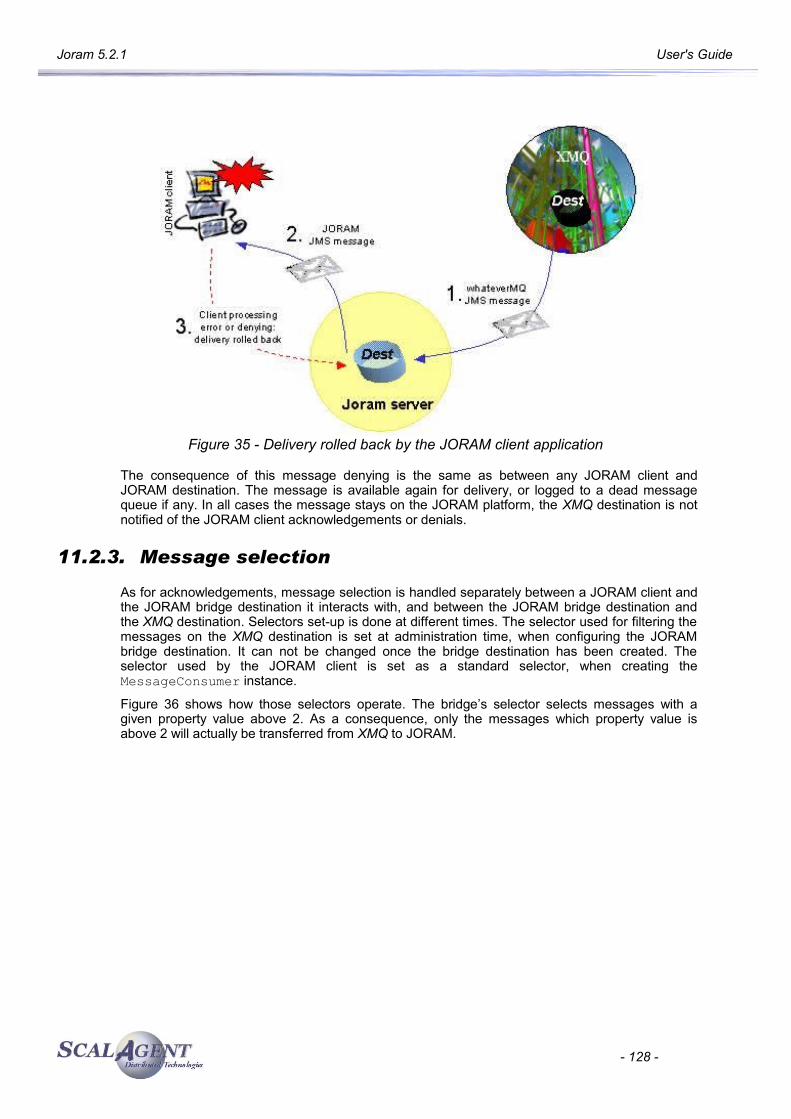
Joram 5.2.1 User's Guide
Figure 35 - Delivery rolled back by the JORAM client application
The consequence of this message denying is the same as between any JORAM client and JORAM destination. The message is available again for delivery, or logged to a dead message queue if any. In all cases the message stays on the JORAM platform, the XMQ destination is not notified of the JORAM client acknowledgements or denials.
11.2.3. Message selection
As for acknowledgements, message selection is handled separately between a JORAM client and the JORAM bridge destination it interacts with, and between the JORAM bridge destination and the XMQ destination. Selectors set-up is done at different times. The selector used for filtering the messages on the XMQ destination is set at administration time, when configuring the JORAM bridge destination. It can not be changed once the bridge destination has been created. The selector used by the JORAM client is set as a standard selector, when creating the MessageConsumer instance.
Figure 36 shows how those selectors operate. The bridge’s selector selects messages with a given property value above 2. As a consequence, only the messages which property value is above 2 will actually be transferred from XMQ to JORAM.
- 128 -
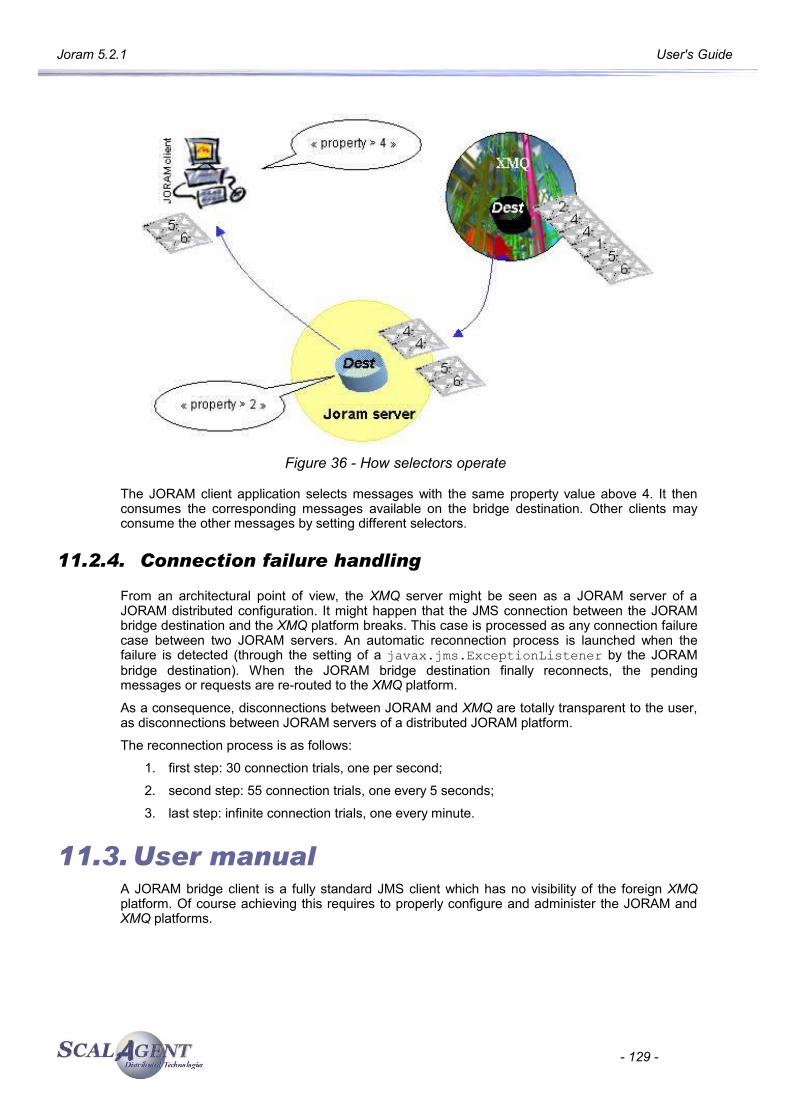
Joram 5.2.1 User's Guide
Figure 36 - How selectors operate
The JORAM client application selects messages with the same property value above 4. It then consumes the corresponding messages available on the bridge destination. Other clients may consume the other messages by setting different selectors.
11.2.4. Connection failure handling
From an architectural point of view, the XMQ server might be seen as a JORAM server of a JORAM distributed configuration. It might happen that the JMS connection between the JORAM bridge destination and the XMQ platform breaks. This case is processed as any connection failure case between two JORAM servers. An automatic reconnection process is launched when the failure is detected (through the setting of a javax.jms.ExceptionListener by the JORAM bridge destination). When the JORAM bridge destination finally reconnects, the pending messages or requests are re-routed to the XMQ platform.
As a consequence, disconnections between JORAM and XMQ are totally transparent to the user, as disconnections between JORAM servers of a distributed JORAM platform.
The reconnection process is as follows:
1. first step: 30 connection trials, one per second;
2. second step: 55 connection trials, one every 5 seconds;
3. last step: infinite connection trials, one every minute.
11.3. User manualA JORAM bridge client is a fully standard JMS client which has no visibility of the foreign XMQ platform. Of course achieving this requires to properly configure and administer the JORAM and XMQ platforms.
- 129 -
Joram 5.2.1 User's Guide
11.3.1. Configuring the foreign platform
Prerequisites
The prerequisites on the foreign JMS server to bridge with JORAM are as follows:
full implementation of the JMS 1.1 API;
particularly, the javax.jms.ExceptionListener must be supported.
Configuration and administration
The foreign XMQ platform should be appropriately configured for hosting a destination, and authorizing the connection of an external client.
JMS administered objects (javax.jms.ConnectionFactory or javax.jms.XAConnectionFactory and javax.jms.Destination) that will be used by the JORAM bridge to connect to the XMQ platform and access the right destination should be created and bound to a JNDI compliant naming server.
11.3.2. Configuring JORAM
Configuration
JORAM’s server classpath must provide access to the following libraries:
all XMQ client jars;
a jms.jar library compatible with the XMQ JMS implementation;
the client jars of the used JNDI server;
a jndi.jar library compatible with the naming server used for binding the XMQ administered objects.
Administration
Creating a JORAM bridge destination is done through the org.objectweb.joram.client.jms.Queue.create and org.objectweb.joram.client.jms.Topic.create static methods.
The parameters of these methods are:
int serverId: identifier of the server on which deploying the destination; String className: name of the bridge’s class:
o “org.objectweb.joram.mom.dest.jmsbridge.JMSBridgeQueue” for a queue,o “org.objectweb.joram.mom.dest.jmsbridge.JMSBridgeTopic” for a topic;
java.util.Properties prop: properties configuring the bridge destination.
The following properties are required for setting the bridge destination:
“connectionFactoryName”: JNDI name used to bound the XMQ JMS ConnectionFactory or XA ConnectionFactory object;
“destinationName”: JNDI name used to bound the XMQ JMS Destination object;
The following properties are optional:
“userName”: user identification that should be used by the bridge destination for opening a connection to XMQ; if not provided, the connection will be opened with no identification.
“password”: user password that should be used by the bridge destination for opening a connection to XMQ; if not provided, the connection will be opened with no identification.
- 130 -
Joram 5.2.1 User's Guide
“jndiFactory”: name of the JNDI initial context factory class (for example “fr.dyade.aaa.jndi2.client.NamingContextFactory”); if not provided, it is expected that environment variables are set or that a jndi.properties file is accessible through the server’s classpath.
“jndiUrl”: URL of the JNDI server (for example “scn://localhost:16400”); if not provided, it is expected that environment variables are set or that a jndi.properties file is accessible through the server’s classpath.
“clientId”: provided if XMQ requires the setting of such an identifier on its client connection.
“selector”: selector expression used for filtering messages on the XMQ destination.
“automaticRequest”: provide an automatic request between XMQ and JORAM. The XMQ messages are automatically forward in JORAM Destination.
11.3.3. Steps
In order to be able to bind the foreign JMS provider administered objects, a naming server is the first thing to start. And in order to be able to successfully deploy a JORAM bridge destination, the foreign JMS administered objects must have been bound. As a consequence, the start-up steps are as follows:
1. starting a JNDI server;
2. creating the foreign JMS administered objects, binding them to the JNDI server;
3. starting and administering JORAM.
If the JNDI server used is hosted by the JORAM server, then the JORAM server is the first thing to start (in order to start the JNDI service). Then the XMQ JMS administered objects should be created and bound. Finally, the JORAM server should be administered, and particularly the bridge destination should be created.
11.3.4. Failures
If one of the mandatory configuration properties is missing, the bridge destination creation will fail (the static create method will throw an AdminException).
If the provided properties do not allow to successfully set a link with the foreign JMS server, the bridge won’t be usable. But as the initialisation process is asynchronous, the administrator won’t get any information about this failure.
Simply, when sending or requesting messages to/from this bridge, ERROR messages will be logged. The possible error cases are:
JNDI server not reachable (due to invalid “jndiFactory” or “jndiUrl” values);
the administered objects could not be retrieved from the JNDI server (invalid “cnxFactoryName” or “destinationName” values);
missing XMQ client libraries in JORAM server’s classpath, preventing the successful re-construction of the retrieved administered objects;
incorrect JMS user identification (“userName and “password” values).
11.4. WebSphere-MQ exampleThis example links JORAM with IBM’s WebSphere MQ platform (formerly MQ Series). It shows a JORAM topic bridge linked to a WebSphere MQ queue.
- 131 -
Joram 5.2.1 User's Guide
11.4.1. Configuring and starting JORAM
Configuring JORAM
We will consider a simple JORAM platform made of one standard server (hosting a JNDI service). It is described by the following a3servers.xml file:
<?xml version="1.0"?><config> <property name=”Transaction” value=”fr.dyade.aaa.util.NTransaction”/> <server id="0" name="S0" hostname="localhost"> <service class="org.objectweb.joram.mom.proxies.ConnectionManager" args="root root"/> <service class="org.objectweb.joram.mom.proxies.tcp.TcpProxyService" args="16010"/> <service class="fr.dyade.aaa.jndi2.server.JndiServer" args="16400"/> </server></config>
The following WebSphere MQ libraries must be added to JORAM’s server lib/ directory:
com.ibm.mqjms.jar com.ibm.mqbind.jar com.ibm.mq.jar connector.jar fscontext.jar
The JORAM distribution already provides the needed jms.jar, jndi.jar and jndi.properties. No need to add those in the lib/ directory.
Starting JORAM
Starting JORAM is required first because the JORAM server provides the JNDI service needed for binding WebSphereMQ’s administered objects.
Launching the JORAM server is done as usual:
java fr.dyade.aaa.agent.AgentServer 0 ./s0
11.4.2. WebSphere MQ setup
The WebSphere MQ administration tool should be used for creating a queue. Let’s call this queue “foreignQueue”.
JMS administered objects should then be created. They will eventually be bound to JORAM’s JNDI. For that, WebSphere MQ JMSAdmin.config file must be edited as follows:
INITIAL_CONTEXT_FACTORY=fr.dyade.aaa.jndi2.client.NamingContextFactoryPROVIDER_URL=scn://localhost:16400
The JMSAdmin command should then be launched and the JMS objects created and bound to JNDI (with names “foreignCF” and “foreignDest”):
InitCtx> DEFINE QCF(foreignCF)
- 132 -
Joram 5.2.1 User's Guide
InitCtx> DEFINE Q(foreignDest) QUEUE(foreignQueue)
11.4.3. Administering JORAM
Administering JORAM consists in creating and configuring the required bridge destination, and authorizing a client access to it. The following code is proposed:
public class AdminSample{ public static void main(String[] args) throws Exception { AdminModule.connect("root", "root", 60);
Properties prop = new Properties(); // Setting the JNDI names of the WebSphere MQ // administered objects prop.setProperty("connectionFactoryName", "foreignCF"); prop.setProperty("destinationName", "foreignDest");
// Creating the bridge topic on JORAM server 0 String className = "org.objectweb.joram.mom.dest.jmsbridge.JMSBridgeTopic"; Topic bridgeTopic = Topic.create(0, className, prop); // Providing free access to it bridgeTopic.setFreeReading(); bridgeTopic.setFreeWriting();
// Creating an anonymous user access on JORAM server 0 javax.jms.ConnectionFactory cf = TcpConnectionFactory.create("localhost", 16010); User user = User.create("anonymous", "anonymous", 0);
// Binding the JORAM administered objects javax.naming.Context jndiCtx = new javax.naming.InitialContext(); jndiCtx.bind("bridgeDest", bridgeDest); jndiCtx.bind("cf", cf); jndiCtx.close();
AdminModule.disconnect(); }}
11.4.4. The JORAM subscriber
The development of the JORAM subscriber is fully standard. The JORAM application is apparently in relationship with a pure JORAM topic destination, but in fact it consumes messages coming from the WebSphere MQ queue destination, in a JMS 1.1 way, through the Publish/Subscribe communication mode.
- 133 -
Joram 5.2.1 User's Guide
The following code is proposed:
public class ConsumerSample{ public static void main(String[] args) throws Exception { // Retrieving the JORAM administered objects javax.naming.Context jndiCtx = new javax.naming.InitialContext(); Destination dest = (Destination) jndiCtx.lookup("bridgeDest"); ConnectionFactory cnxFact = (ConnectionFactory) jndiCtx.lookup("cf"); jndiCtx.close();
Connection cnx = cnxFact.createConnection(); Session sess = cnx.createSession(false, Session.AUTO_ACKNOWLEDGE); MessageConsumer cons = sess.createConsumer(dest); cons.setMessageListener(new MsgListener());
cnx.start(); System.in.read(); cnx.close(); }}
11.4.5. The WebSphere MQ sender
The WebSphere MQ sender is a JMS 1.1 standard sender, sending messages to the WebSphere MQ queue through a MessageProducer resource.
The following code is proposed:
public class SenderSample{ public static void main(String[] args) throws Exception { // Retrieving the WebSphere MQ administered objects javax.naming.Context jndiCtx = new javax.naming.InitialContext(); Queue queue = (Queue) jndiCtx.lookup("foreignDest"); ConnectionFactory cnxFact = (ConnectionFactory) jndiCtx.lookup("foreignCF"); jndiCtx.close();
Connection cnx = cnxFact.createConnection(); Session sess = cnx.createSession(true, 0); MessageProducer sender = sess.createProducer(queue); TextMessage msg = sess.createTextMessage();
// Sending 10 messages to the queue for (int i = 1; i < 11; i++) {
- 134 -
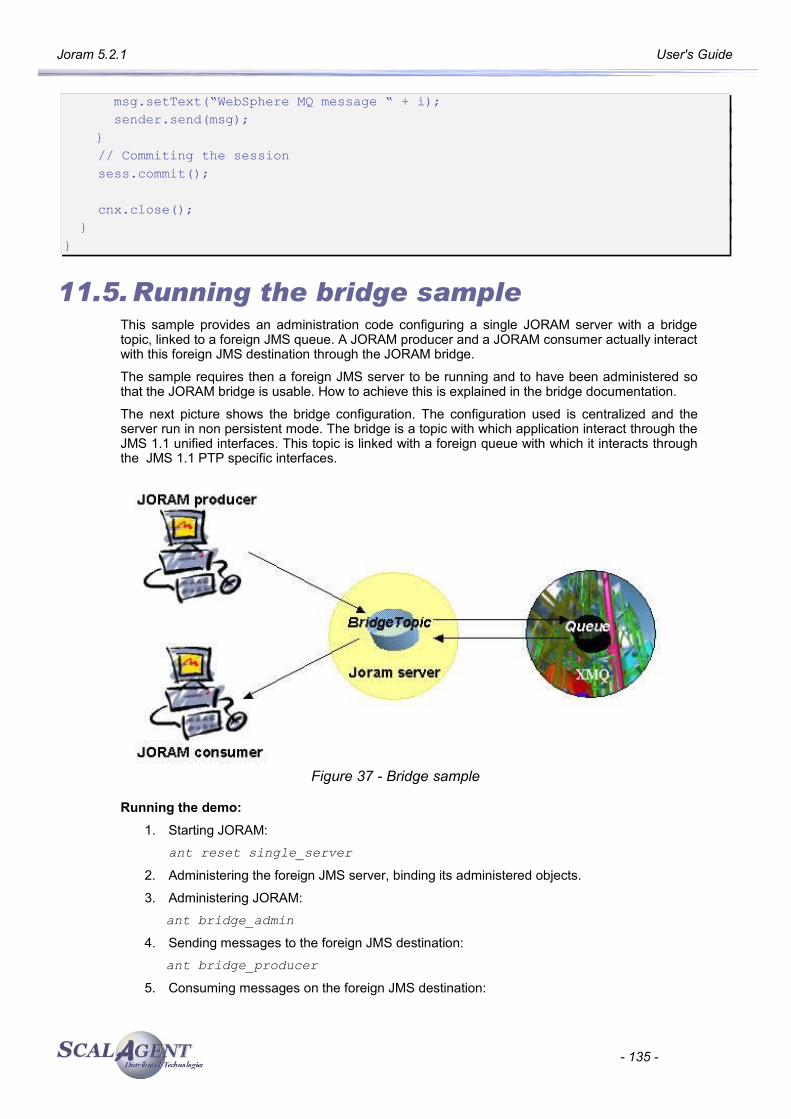
Joram 5.2.1 User's Guide
msg.setText(“WebSphere MQ message “ + i); sender.send(msg); } // Commiting the session sess.commit();
cnx.close(); }}
11.5. Running the bridge sampleThis sample provides an administration code configuring a single JORAM server with a bridge topic, linked to a foreign JMS queue. A JORAM producer and a JORAM consumer actually interact with this foreign JMS destination through the JORAM bridge.
The sample requires then a foreign JMS server to be running and to have been administered so that the JORAM bridge is usable. How to achieve this is explained in the bridge documentation.
The next picture shows the bridge configuration. The configuration used is centralized and the server run in non persistent mode. The bridge is a topic with which application interact through the JMS 1.1 unified interfaces. This topic is linked with a foreign queue with which it interacts through the JMS 1.1 PTP specific interfaces.
Figure 37 - Bridge sample
Running the demo:1. Starting JORAM:
ant reset single_server
2. Administering the foreign JMS server, binding its administered objects.
3. Administering JORAM:ant bridge_admin
4. Sending messages to the foreign JMS destination:ant bridge_producer
5. Consuming messages on the foreign JMS destination:
- 135 -
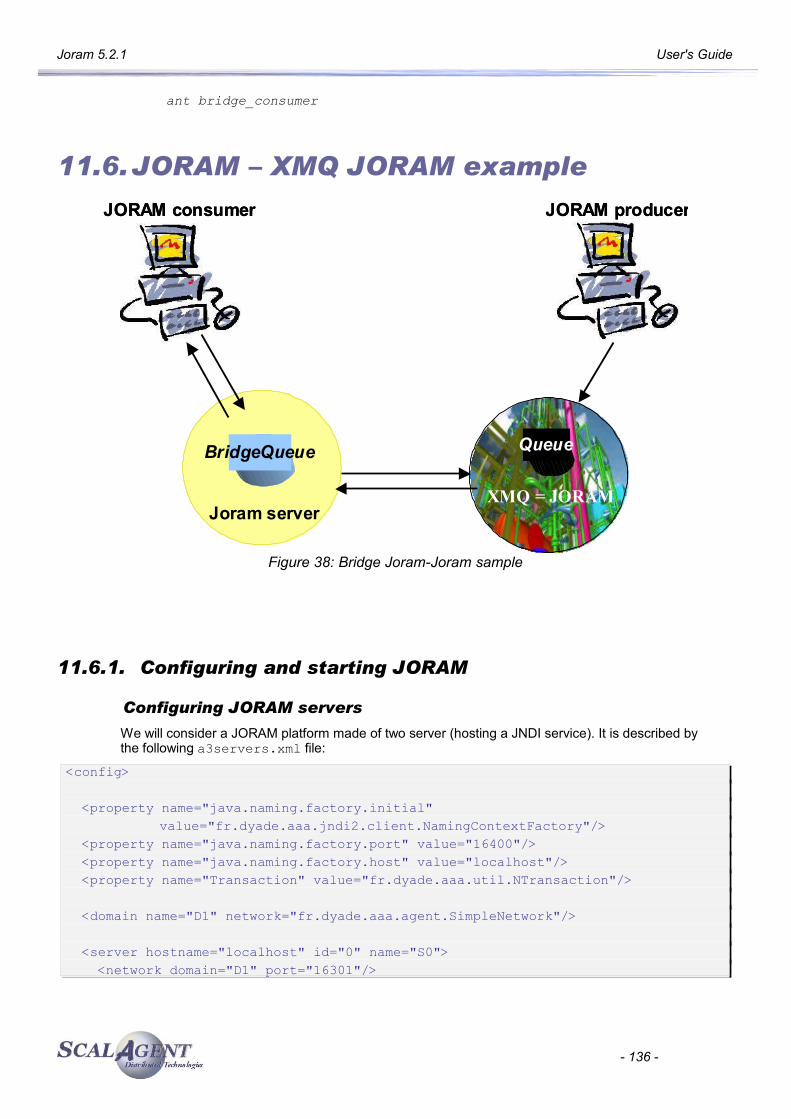
Joram 5.2.1 User's Guide
ant bridge_consumer
11.6. JORAM – XMQ JORAM example
11.6.1. Configuring and starting JORAM
Configuring JORAM servers
We will consider a JORAM platform made of two server (hosting a JNDI service). It is described by the following a3servers.xml file:
<config>
<property name="java.naming.factory.initial" value="fr.dyade.aaa.jndi2.client.NamingContextFactory"/>
<property name="java.naming.factory.port" value="16400"/> <property name="java.naming.factory.host" value="localhost"/> <property name="Transaction" value="fr.dyade.aaa.util.NTransaction"/>
<domain name="D1" network="fr.dyade.aaa.agent.SimpleNetwork"/>
<server hostname="localhost" id="0" name="S0"> <network domain="D1" port="16301"/>
- 136 -
Figure 38: Bridge Joram-Joram sample
XMQ = JORAM
Queue
Joram server
BridgeQueue
Joram server
BridgeQueue
JORAM producerJORAM producerJORAM consumerJORAM consumer
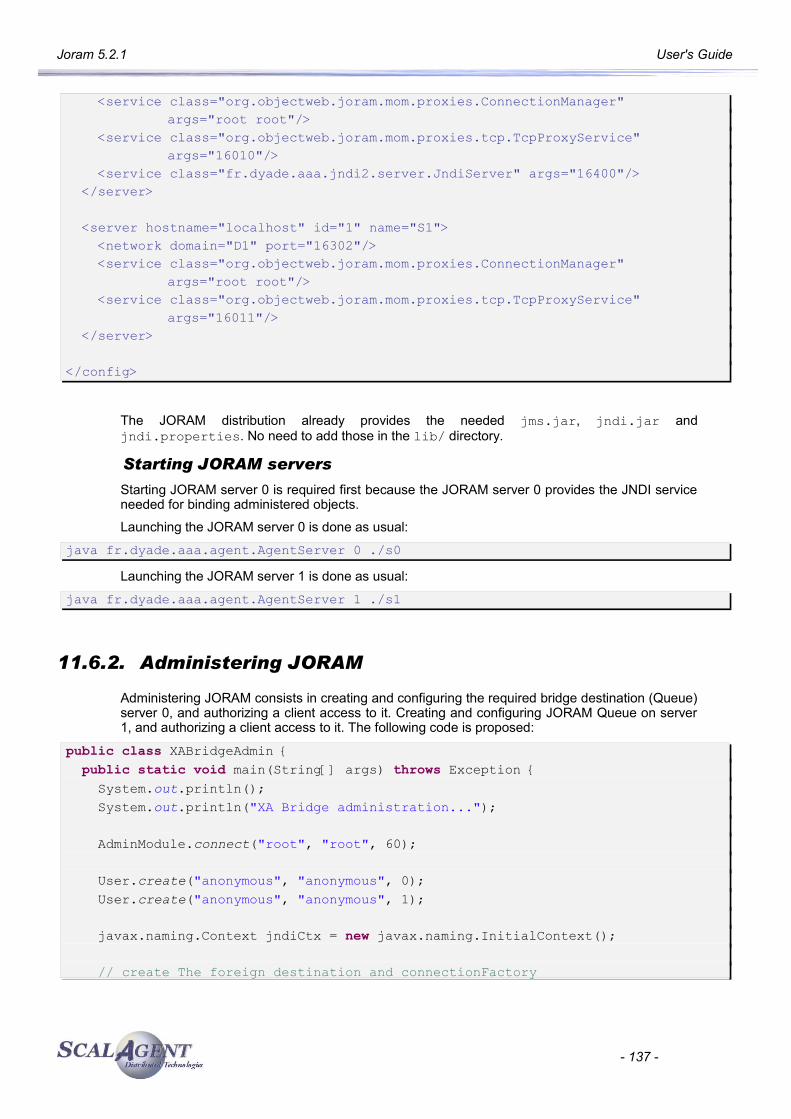
Joram 5.2.1 User's Guide
<service class="org.objectweb.joram.mom.proxies.ConnectionManager" args="root root"/>
<service class="org.objectweb.joram.mom.proxies.tcp.TcpProxyService" args="16010"/>
<service class="fr.dyade.aaa.jndi2.server.JndiServer" args="16400"/> </server>
<server hostname="localhost" id="1" name="S1"> <network domain="D1" port="16302"/> <service class="org.objectweb.joram.mom.proxies.ConnectionManager"
args="root root"/> <service class="org.objectweb.joram.mom.proxies.tcp.TcpProxyService"
args="16011"/> </server>
</config>
The JORAM distribution already provides the needed jms.jar, jndi.jar and jndi.properties. No need to add those in the lib/ directory.
Starting JORAM servers
Starting JORAM server 0 is required first because the JORAM server 0 provides the JNDI service needed for binding administered objects.
Launching the JORAM server 0 is done as usual:
java fr.dyade.aaa.agent.AgentServer 0 ./s0Launching the JORAM server 1 is done as usual:
java fr.dyade.aaa.agent.AgentServer 1 ./s1
11.6.2. Administering JORAM
Administering JORAM consists in creating and configuring the required bridge destination (Queue) server 0, and authorizing a client access to it. Creating and configuring JORAM Queue on server 1, and authorizing a client access to it. The following code is proposed:
public class XABridgeAdmin { public static void main(String[] args) throws Exception { System.out.println(); System.out.println("XA Bridge administration...");
AdminModule.connect("root", "root", 60); User.create("anonymous", "anonymous", 0); User.create("anonymous", "anonymous", 1); javax.naming.Context jndiCtx = new javax.naming.InitialContext(); // create The foreign destination and connectionFactory
- 137 -
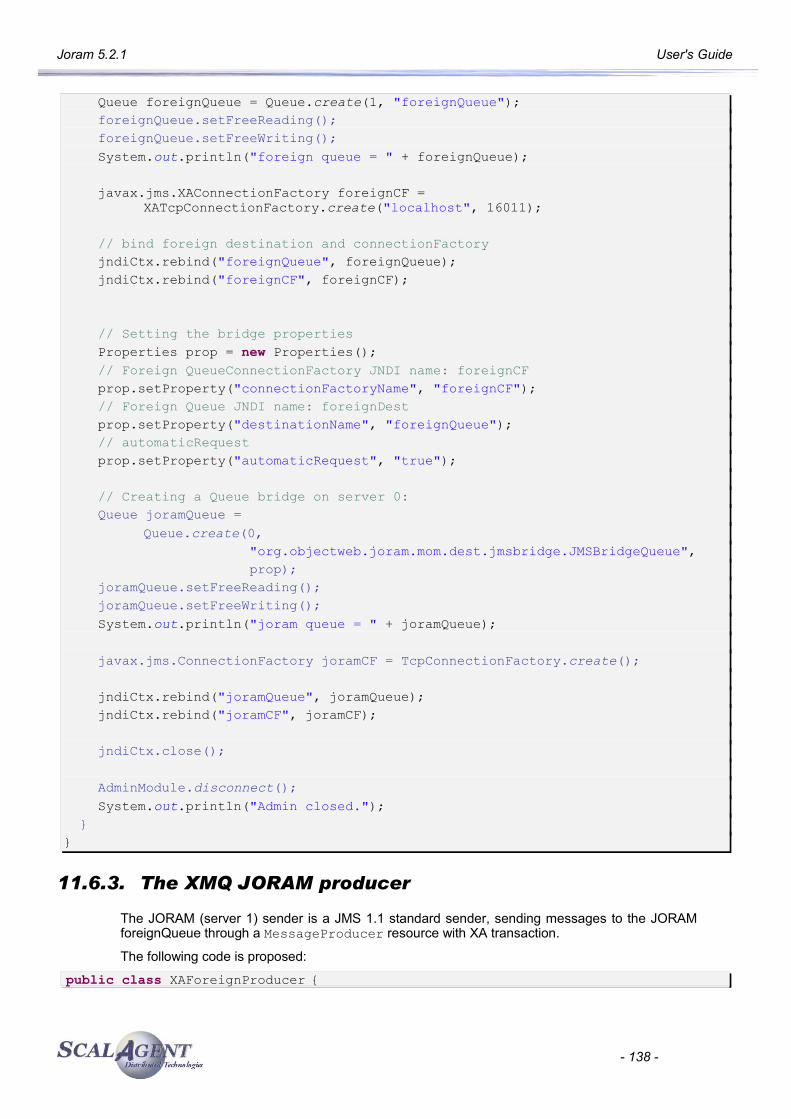
Joram 5.2.1 User's Guide
Queue foreignQueue = Queue.create(1, "foreignQueue"); foreignQueue.setFreeReading(); foreignQueue.setFreeWriting(); System.out.println("foreign queue = " + foreignQueue); javax.jms.XAConnectionFactory foreignCF =
XATcpConnectionFactory.create("localhost", 16011); // bind foreign destination and connectionFactory jndiCtx.rebind("foreignQueue", foreignQueue); jndiCtx.rebind("foreignCF", foreignCF); // Setting the bridge properties Properties prop = new Properties(); // Foreign QueueConnectionFactory JNDI name: foreignCF prop.setProperty("connectionFactoryName", "foreignCF"); // Foreign Queue JNDI name: foreignDest prop.setProperty("destinationName", "foreignQueue"); // automaticRequest prop.setProperty("automaticRequest", "true");
// Creating a Queue bridge on server 0: Queue joramQueue =
Queue.create(0, "org.objectweb.joram.mom.dest.jmsbridge.JMSBridgeQueue", prop); joramQueue.setFreeReading(); joramQueue.setFreeWriting(); System.out.println("joram queue = " + joramQueue);
javax.jms.ConnectionFactory joramCF = TcpConnectionFactory.create();
jndiCtx.rebind("joramQueue", joramQueue); jndiCtx.rebind("joramCF", joramCF); jndiCtx.close();
AdminModule.disconnect(); System.out.println("Admin closed."); }}
11.6.3. The XMQ JORAM producer
The JORAM (server 1) sender is a JMS 1.1 standard sender, sending messages to the JORAM foreignQueue through a MessageProducer resource with XA transaction.
The following code is proposed:
public class XAForeignProducer {
- 138 -
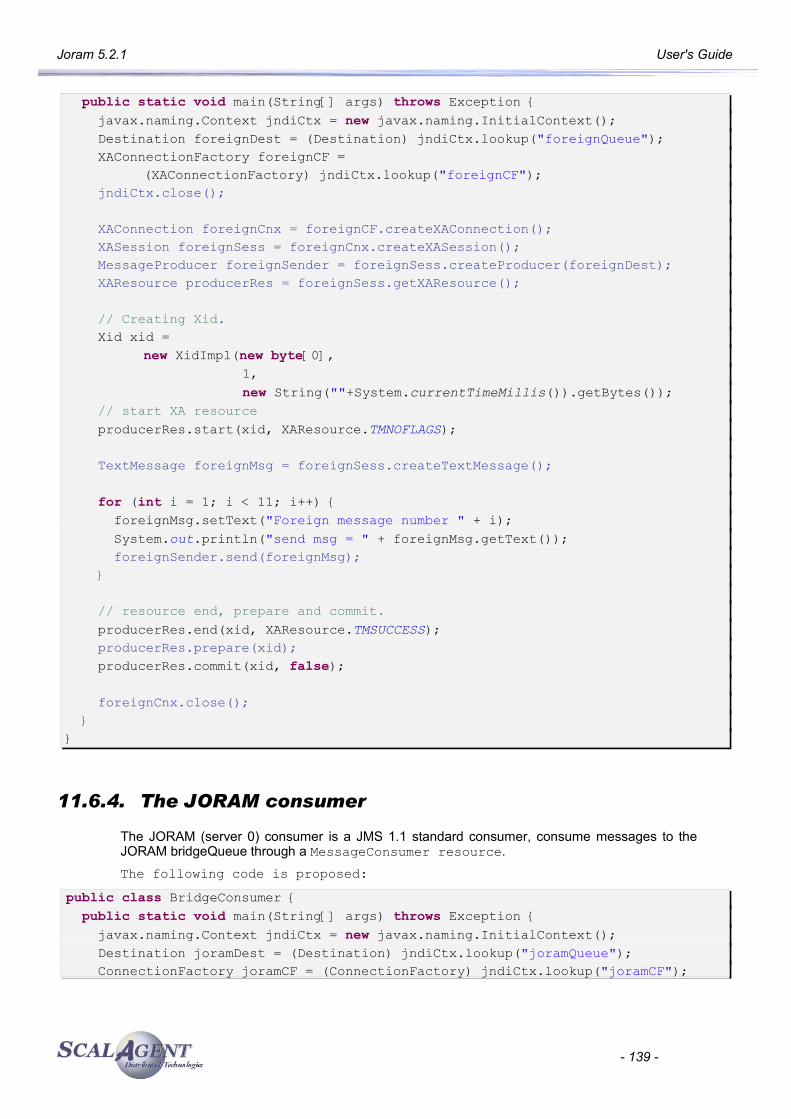
Joram 5.2.1 User's Guide
public static void main(String[] args) throws Exception { javax.naming.Context jndiCtx = new javax.naming.InitialContext(); Destination foreignDest = (Destination) jndiCtx.lookup("foreignQueue"); XAConnectionFactory foreignCF =
(XAConnectionFactory) jndiCtx.lookup("foreignCF"); jndiCtx.close();
XAConnection foreignCnx = foreignCF.createXAConnection(); XASession foreignSess = foreignCnx.createXASession(); MessageProducer foreignSender = foreignSess.createProducer(foreignDest); XAResource producerRes = foreignSess.getXAResource(); // Creating Xid. Xid xid =
new XidImpl(new byte[0], 1, new String(""+System.currentTimeMillis()).getBytes());
// start XA resource producerRes.start(xid, XAResource.TMNOFLAGS);
TextMessage foreignMsg = foreignSess.createTextMessage();
for (int i = 1; i < 11; i++) { foreignMsg.setText("Foreign message number " + i); System.out.println("send msg = " + foreignMsg.getText()); foreignSender.send(foreignMsg); }
// resource end, prepare and commit. producerRes.end(xid, XAResource.TMSUCCESS); producerRes.prepare(xid); producerRes.commit(xid, false);
foreignCnx.close(); }}
11.6.4. The JORAM consumer
The JORAM (server 0) consumer is a JMS 1.1 standard consumer, consume messages to the JORAM bridgeQueue through a MessageConsumer resource.The following code is proposed:
public class BridgeConsumer { public static void main(String[] args) throws Exception { javax.naming.Context jndiCtx = new javax.naming.InitialContext(); Destination joramDest = (Destination) jndiCtx.lookup("joramQueue"); ConnectionFactory joramCF = (ConnectionFactory) jndiCtx.lookup("joramCF");
- 139 -
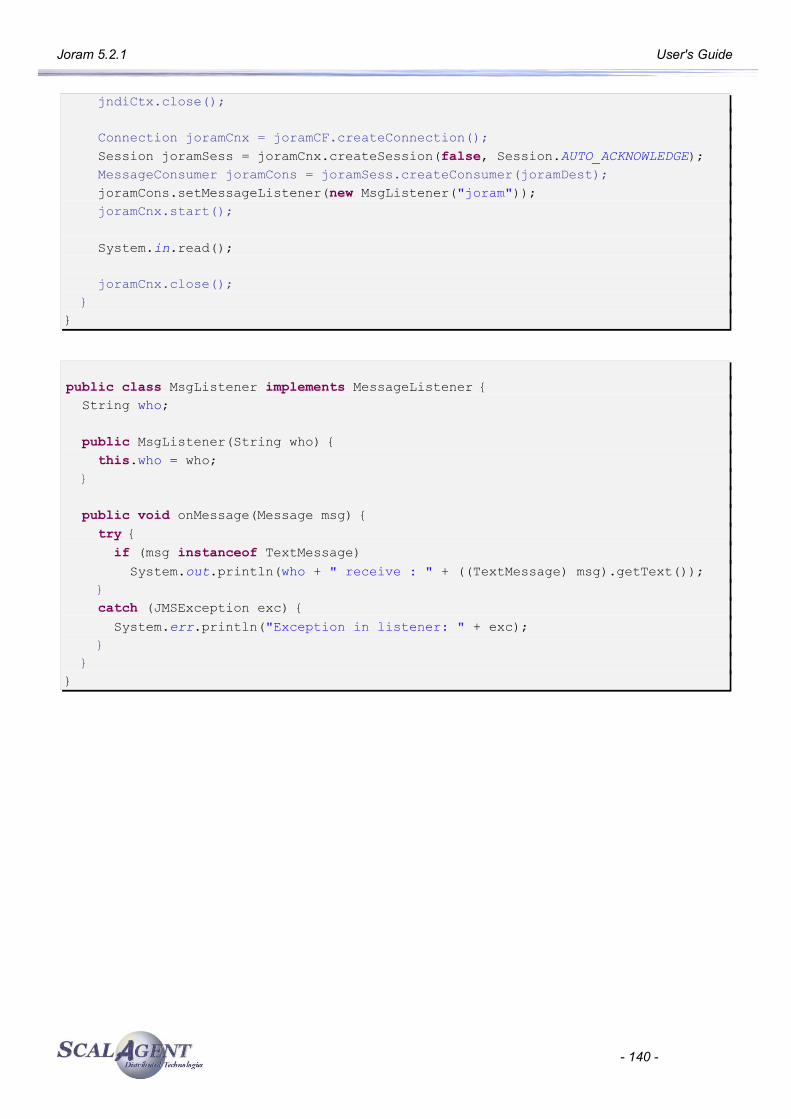
Joram 5.2.1 User's Guide
jndiCtx.close();
Connection joramCnx = joramCF.createConnection(); Session joramSess = joramCnx.createSession(false, Session.AUTO_ACKNOWLEDGE); MessageConsumer joramCons = joramSess.createConsumer(joramDest); joramCons.setMessageListener(new MsgListener("joram")); joramCnx.start(); System.in.read();
joramCnx.close(); }}
public class MsgListener implements MessageListener { String who; public MsgListener(String who) { this.who = who; } public void onMessage(Message msg) { try { if (msg instanceof TextMessage) System.out.println(who + " receive : " + ((TextMessage) msg).getText()); } catch (JMSException exc) { System.err.println("Exception in listener: " + exc); } }}
- 140 -

Joram 5.2.1 User's Guide
12.Working with sources distribution
12.1. Getting Joram sources
12.1.1. Getting a packaged version of Joram
The packages are downloadable from the following location:
http://forge.objectweb.org/project/showfiles.php?group_id=4 .
For release x.y.z, the following tar file is provided:
joram-x.y.z-src.tgz, including the client and server sources, as well as the graphical tool sources, the J2ME client sources and the samples sources.
A package is expanded by UNIX users with the gunzip and tar commands; Windows developers can use the Winzip utility.
12.1.2. Getting Joram from SVN
JORAM SVN page is located at: http://forge.objectweb.org/plugins/scmsvn/index.php?group_id=4. The module to extract is joram. A nightly snapshot is generated each day at 00:00 AM CEST and can be downloaded at ???.
12.1.3. Directory structure and description
Joram sources distribution
The distribution is expanded in a joram-x.y.z-src/ directory. It includes the following directories:
lib/ licenses/ samples/
o bin/…o config/o src/
joram/… kjoram/…
src/o com/scalagent/…o fr/dyade/aaa/…
- 141 -
Joram 5.2.1 User's Guide
o org/objectweb/joram/…
lib/ directory
Contains the libraries needed for compiling the distribution, and running the samples.
activation.jar, JavaBeans activation framework (neede by soap); commons-logging-api.jar, Apache's logger API (used by Jgroups); connector-1_5.jar, the JCA 1.5 API; jakarta-regexp-1.2.jar, Jakarta’s regular expression parser; JCup.jar, javaCup Java parser generator; jgroups-all.jar, JGroups library (used for H.A. Implementation) jms.jar, the JMS API; jmxri.jar, JMX reference implementation (used for JDK prior 1.5); jmxtools.jar, JMX tools (used for JDK prior 1.5); jndi.jar, the JNDI API; jta.jar, the JTA API; kxml.jar, Enhydra’s kXML implementation (needed for kJoram); mail.jar, the JavaMail API; midpapi.jar, Sun’s MIDP API (needed for kJoram). ow_monolog.jar, ObjectWeb’s logger API and its wrappers; soap.jar, Apache’s SOAP implementation; soap.war, Apache’s SOAP web archive file; versions, reference version for libraries.
licenses/ directory
Contains the LGPL header displayed on top of each source file, as well as the licences of the external softwares provided in the distribution.
samples/ directory
Contains the Joram samples sources, configuration files, UNIX and Windows scripts for launching JORAM servers and clients (how to use them is explained in chapter 2).
src/com/scalagent/ directory
Contains the sources of specific ScalAgent component: scheduler queue, kJORAM client, etc.
src/fr/dyade/aaa/ directory
Contains the sources of the agent platform.
src/org/objectweb/joram directory
Contains the sources of JORAM server and client.
12.2. Compiling and shipping JoramJORAM distribution is ready for compiling with Apache Ant utility. Ant can be downloaded from http://jakarta.apache.org/ant/. Documentation is available at the same location.
In the src/ directory the build.xml files provides the main targets for convenience. The available Ant targets can be listed by typing:
$ ant -projecthelpBuildfile: build.xmlMain targets:
- 142 -
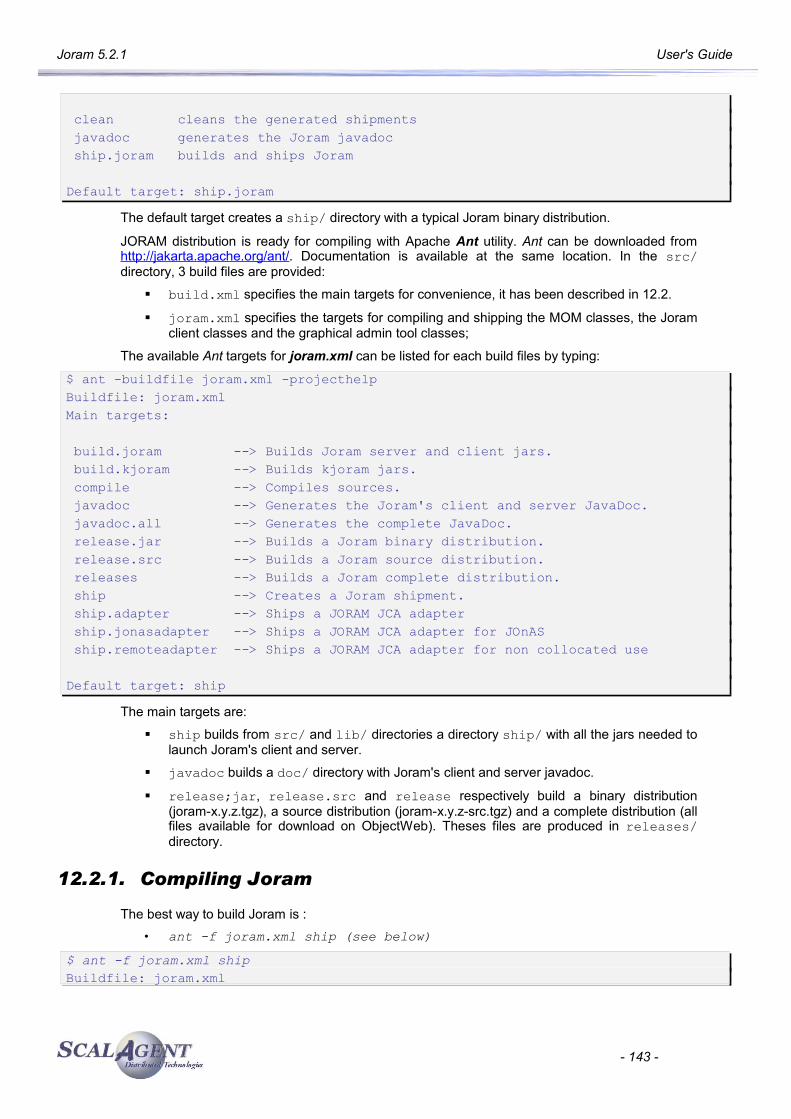
Joram 5.2.1 User's Guide
clean cleans the generated shipments javadoc generates the Joram javadoc ship.joram builds and ships Joram
Default target: ship.joramThe default target creates a ship/ directory with a typical Joram binary distribution.
JORAM distribution is ready for compiling with Apache Ant utility. Ant can be downloaded from http://jakarta.apache.org/ant/. Documentation is available at the same location. In the src/ directory, 3 build files are provided:
build.xml specifies the main targets for convenience, it has been described in 12.2.
joram.xml specifies the targets for compiling and shipping the MOM classes, the Joram client classes and the graphical admin tool classes;
The available Ant targets for joram.xml can be listed for each build files by typing:
$ ant -buildfile joram.xml -projecthelpBuildfile: joram.xmlMain targets:
build.joram --> Builds Joram server and client jars. build.kjoram --> Builds kjoram jars. compile --> Compiles sources. javadoc --> Generates the Joram's client and server JavaDoc. javadoc.all --> Generates the complete JavaDoc. release.jar --> Builds a Joram binary distribution. release.src --> Builds a Joram source distribution. releases --> Builds a Joram complete distribution. ship --> Creates a Joram shipment. ship.adapter --> Ships a JORAM JCA adapter ship.jonasadapter --> Ships a JORAM JCA adapter for JOnAS ship.remoteadapter --> Ships a JORAM JCA adapter for non collocated use
Default target: shipThe main targets are:
ship builds from src/ and lib/ directories a directory ship/ with all the jars needed to launch Joram's client and server.
javadoc builds a doc/ directory with Joram's client and server javadoc.
release;jar, release.src and release respectively build a binary distribution (joram-x.y.z.tgz), a source distribution (joram-x.y.z-src.tgz) and a complete distribution (all files available for download on ObjectWeb). Theses files are produced in releases/ directory.
12.2.1. Compiling Joram
The best way to build Joram is :• ant -f joram.xml ship (see below)
$ ant -f joram.xml shipBuildfile: joram.xml
- 143 -
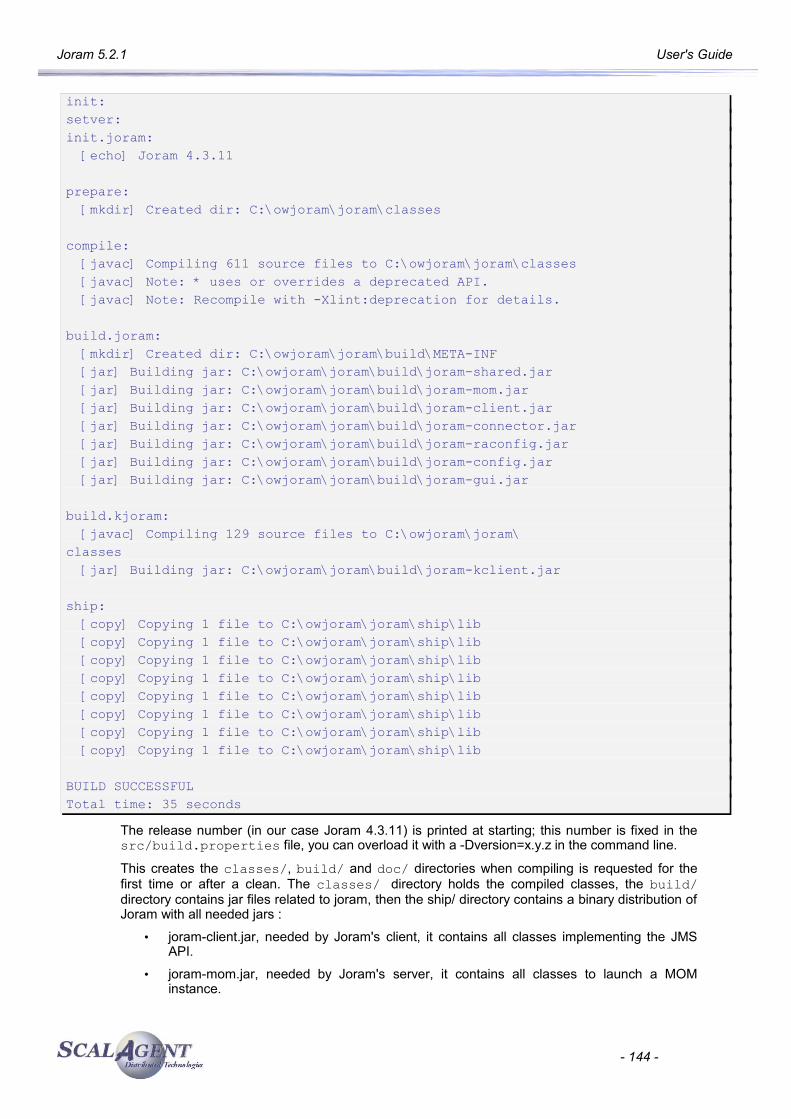
Joram 5.2.1 User's Guide
init:setver:init.joram: [echo] Joram 4.3.11
prepare: [mkdir] Created dir: C:\owjoram\joram\classes
compile: [javac] Compiling 611 source files to C:\owjoram\joram\classes [javac] Note: * uses or overrides a deprecated API. [javac] Note: Recompile with -Xlint:deprecation for details.
build.joram: [mkdir] Created dir: C:\owjoram\joram\build\META-INF [jar] Building jar: C:\owjoram\joram\build\joram-shared.jar [jar] Building jar: C:\owjoram\joram\build\joram-mom.jar [jar] Building jar: C:\owjoram\joram\build\joram-client.jar [jar] Building jar: C:\owjoram\joram\build\joram-connector.jar [jar] Building jar: C:\owjoram\joram\build\joram-raconfig.jar [jar] Building jar: C:\owjoram\joram\build\joram-config.jar [jar] Building jar: C:\owjoram\joram\build\joram-gui.jar
build.kjoram: [javac] Compiling 129 source files to C:\owjoram\joram\classes [jar] Building jar: C:\owjoram\joram\build\joram-kclient.jar
ship: [copy] Copying 1 file to C:\owjoram\joram\ship\lib [copy] Copying 1 file to C:\owjoram\joram\ship\lib [copy] Copying 1 file to C:\owjoram\joram\ship\lib [copy] Copying 1 file to C:\owjoram\joram\ship\lib [copy] Copying 1 file to C:\owjoram\joram\ship\lib [copy] Copying 1 file to C:\owjoram\joram\ship\lib [copy] Copying 1 file to C:\owjoram\joram\ship\lib [copy] Copying 1 file to C:\owjoram\joram\ship\lib
BUILD SUCCESSFULTotal time: 35 seconds
The release number (in our case Joram 4.3.11) is printed at starting; this number is fixed in the src/build.properties file, you can overload it with a -Dversion=x.y.z in the command line.
This creates the classes/, build/ and doc/ directories when compiling is requested for the first time or after a clean. The classes/ directory holds the compiled classes, the build/ directory contains jar files related to joram, then the ship/ directory contains a binary distribution of Joram with all needed jars :
• joram-client.jar, needed by Joram's client, it contains all classes implementing the JMS API.
• joram-mom.jar, needed by Joram's server, it contains all classes to launch a MOM instance.
- 144 -
Joram 5.2.1 User's Guide
• joram-shared.jar, contains classes shared between Joram's client and server. Essentially the classes for communication object between the client and the server.
• joram-kclient.jar, contains all Joram's classes needed for J2ME client.
The classes specific to the administration tool are in a separate jar's file :
• joram-gui.jar
And there is 3 jars related to the JCA adapter :
• joram-config.jar
• joram-connector.jar
• joram-raconfig.jar
It contains also all 'external' jars needed to execute Joram's client or server.
You can also, either choose to build separately each component or directly the release files as available for download (see below).
12.2.2. Compiling kJoram
Building kJoram requires to use a 1.3 or 1.4 JDK, and to generates 1.1 bytecode. Then, type:ant –buildfile kjoram.xml build.kjoram
It creates the classes/, build/ and doc/ directories when compiling is requested for the first time or after a clean. The classes/ directory holds the compiled classes, the joram-kclient.jar library is created in the build/ directory.
12.2.3. Compiling the administration tool
Compiling the administration tool requires to use jdk 1.4. It is done by typing:ant –buildfile joram.xml ship.gui
This creates the classes/ and javadoc/ directories when compiling is requested for the first time or after a clean. The generated joramgui.jar library is created in the lib/ directory, the classes/ directory holds the compiled classes.
12.2.4. Generating the javadoc
Simply type:ant –buildfile joram.xml javadoc
This creates the classes/, build/ and apidoc/ directories when generating the javadoc is requested for the first time or after a clean. The classes/ and build/ directories stays empty, javadoc/ holds the doc.
The javadoc.all target allows to produce the documentation for all classes, not only Joram's client and server (org.objectweb.joram packages), but also the agent platform’s (fr.dyade.aaa packages) or the additional features (com.scalagent packages).
12.2.5. Generating a distribution
You can build source, binary or complete distribution of Joram using release.src, release.jar and release target. The related files are copied in the releases directory, they are equivalent to the one available for download on Joram's web server.
- 145 -

Joram 5.2.1 User's Guide
12.2.6. Cleaning
To remove the generated classes and libraries:ant clean (equivalent to ant –buildfile joram.xml clean and ant
–buildfile kjoram.xml clean)
This removes the classes/ and javadoc/ directories if they exist, the joram.jar, kjoram.jar, joramgui.jar and mom.jar libraries from the lib/ directory if they exist.
- 146 -