Embed Size (px)
Citation preview
Jasco 4700 FTIR
© Laser Spectroscopy Labs, UCI
Jasco 4700 FTIR
Operation instructions
Jasco 4700 FTIR
© Laser Spectroscopy Labs, UCI
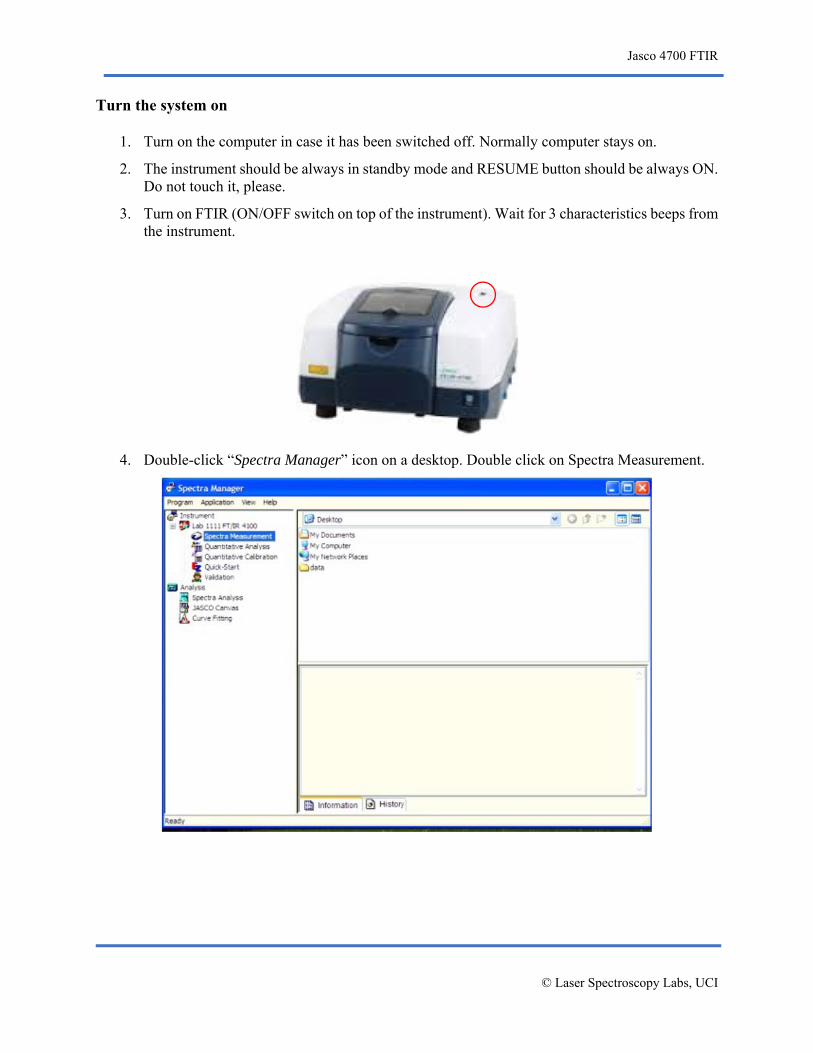
Turn the system on
1. Turn on the computer in case it has been switched off. Normally computer stays on.
2. The instrument should be always in standby mode and RESUME button should be always ON. Do not touch it, please.
3. Turn on FTIR (ON/OFF switch on top of the instrument). Wait for 3 characteristics beeps from the instrument.
4. Double-click “Spectra Manager” icon on a desktop. Double click on Spectra Measurement.
Jasco 4700 FTIR
© Laser Spectroscopy Labs, UCI
Cleaning the ATR module Sometimes it is worth to clean the ATR crystal before your measurments since the previous user may fail to do the proper job. You can skip this step if you are not concerned about previous user or your background spectrum remain only the features of H2O and CO2.
1. Do not use any spatulas or sticks!!!
2. With the remaining solid at the edges, apply some methanol (please, do not use acetone), dab the top with a Kim-wipe paper. Repeat this 4-5 times.
3. With methanol and Kim-wipe scrub the general area in and around the crystal surface. The solvent should not be applied in a way that the setup is soaked since it will leak into the optics as well. Soak the paper only and then apply the paper to the cleaning area.
4. Do not forget to clean the pressing pin.
Sample rules
1. For liquid sample the pH factor has to be from 5 to 9.
2. For solid samples like wafer and single crystals, please, check with Laboratory Director prior to the perform experiments.

Jasco 4700 FTIR
© Laser Spectroscopy Labs, UCI
Acquiring the background spectrum A background measurement must be made prior to each sample measurement.
1. Confirm that the sample chamber is empty, then choose Monitor Background from the Measure menu of the Spectra Measurement program or using the shortcut icon.
2. The Monitor Background window will be promptly displayed. The spectrum is displayed in the Monitor Background window in real time, so measurement parameters may be changed while observing the spectrum change. Note that the spectrum preview is always displayed using an instrument resolution of 16 cm-1, and that changing the wavenumber range may not immediately alter the preview.
Jasco 4700 FTIR
© Laser Spectroscopy Labs, UCI
1.
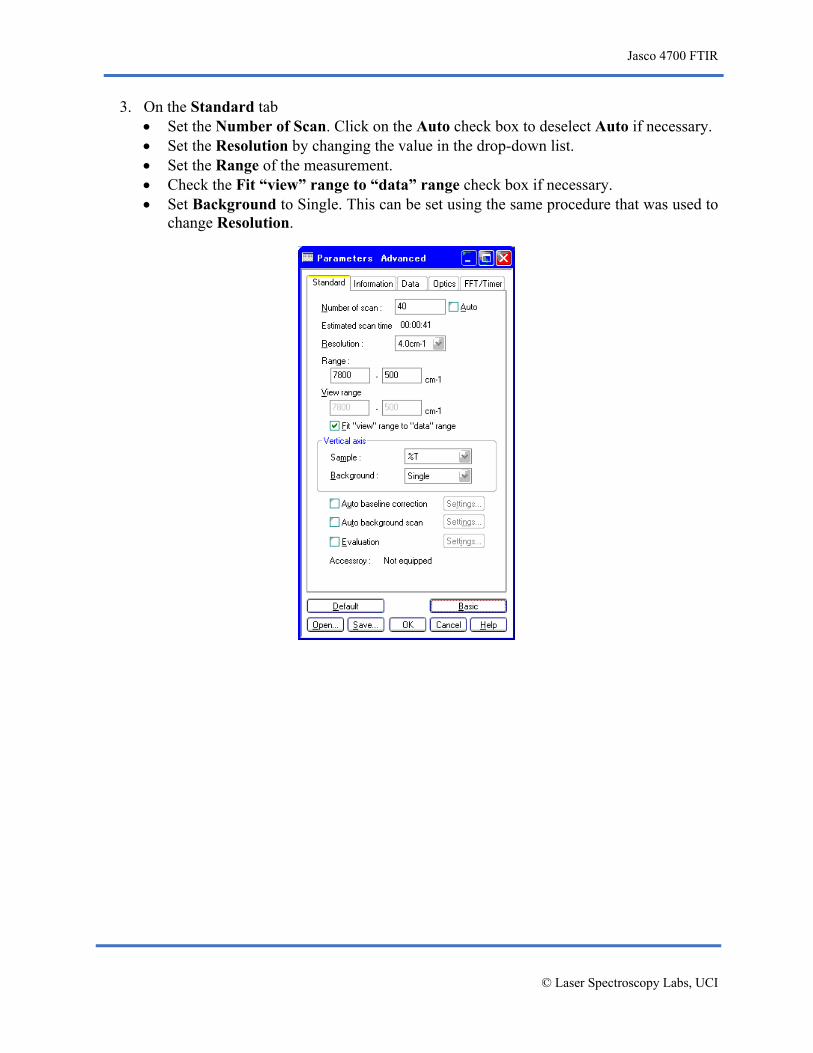
3. On the Standard tab Set the Number of Scan. Click on the Auto check box to deselect Auto if necessary. Set the Resolution by changing the value in the drop-down list. Set the Range of the measurement. Check the Fit “view” range to “data” range check box if necessary. Set Background to Single. This can be set using the same procedure that was used to
change Resolution.
Jasco 4700 FTIR
© Laser Spectroscopy Labs, UCI
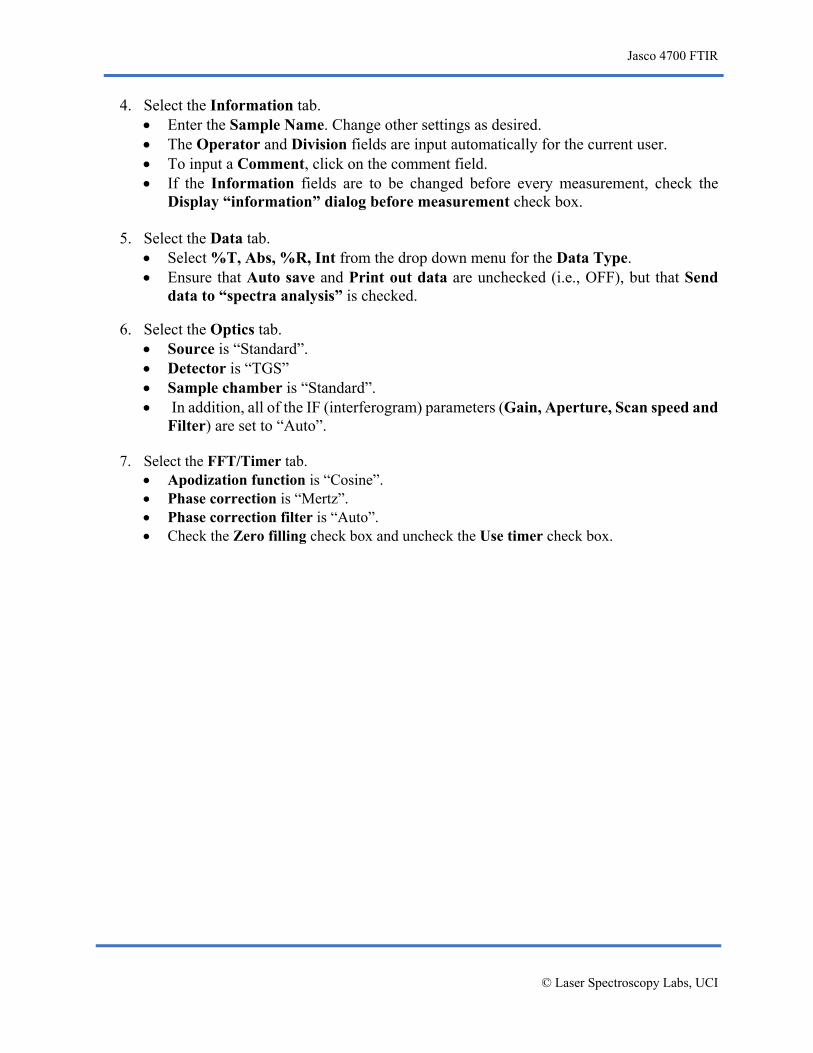
4. Select the Information tab. Enter the Sample Name. Change other settings as desired. The Operator and Division fields are input automatically for the current user. To input a Comment, click on the comment field. If the Information fields are to be changed before every measurement, check the
Display “information” dialog before measurement check box.
5. Select the Data tab. Select %T, Abs, %R, Int from the drop down menu for the Data Type. Ensure that Auto save and Print out data are unchecked (i.e., OFF), but that Send
data to “spectra analysis” is checked.
6. Select the Optics tab. Source is “Standard”. Detector is “TGS” Sample chamber is “Standard”. In addition, all of the IF (interferogram) parameters (Gain, Aperture, Scan speed and
Filter) are set to “Auto”.
7. Select the FFT/Timer tab. Apodization function is “Cosine”. Phase correction is “Mertz”. Phase correction filter is “Auto”. Check the Zero filling check box and uncheck the Use timer check box.
Jasco 4700 FTIR
© Laser Spectroscopy Labs, UCI
Jasco 4700 FTIR
© Laser Spectroscopy Labs, UCI
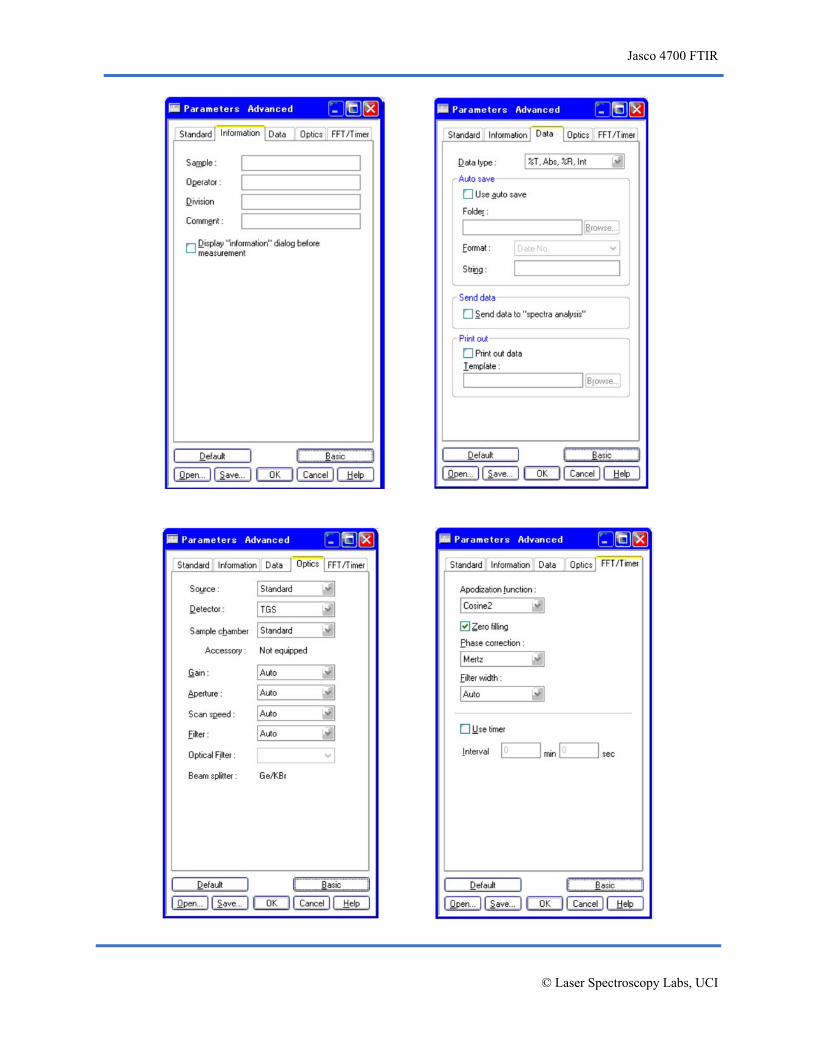
8. Click the OK button to start actual measurement. The following screen is displayed. A progress bar is displayed in the toolbar while data measurement is in progress. When the background measurement is finished, sample measurement may begin.
9. If you would like to re-measure the background spectrum with the same paramters, just click the following icon:
Jasco 4700 FTIR
© Laser Spectroscopy Labs, UCI
Sample setup on the ATR module
1. Apply one drop or a small micro-spatula portion (15-20 mg) to fill the dwell 60-80% full Make sure not to scratch the crystal with the spatula. If possible use the soft material spatulas (wood, rubber). If you use metal spatulas, do not touch the crystal surface.
2. Apply the press to the sample. Use only two fingers to screw the press. Normally once you feel the resistance while screwing by two fingers is when the applied pressure is enough for the measurement.
Sample measurement
The instrument provides a %T, %R or Abs spectrum by measuring a Single spectrum with the sample in the sample compartment, and obtains the ratio to the background already measured (stored in instrument memory). Solvents can also be measured as the background and used as a reference spectrum.
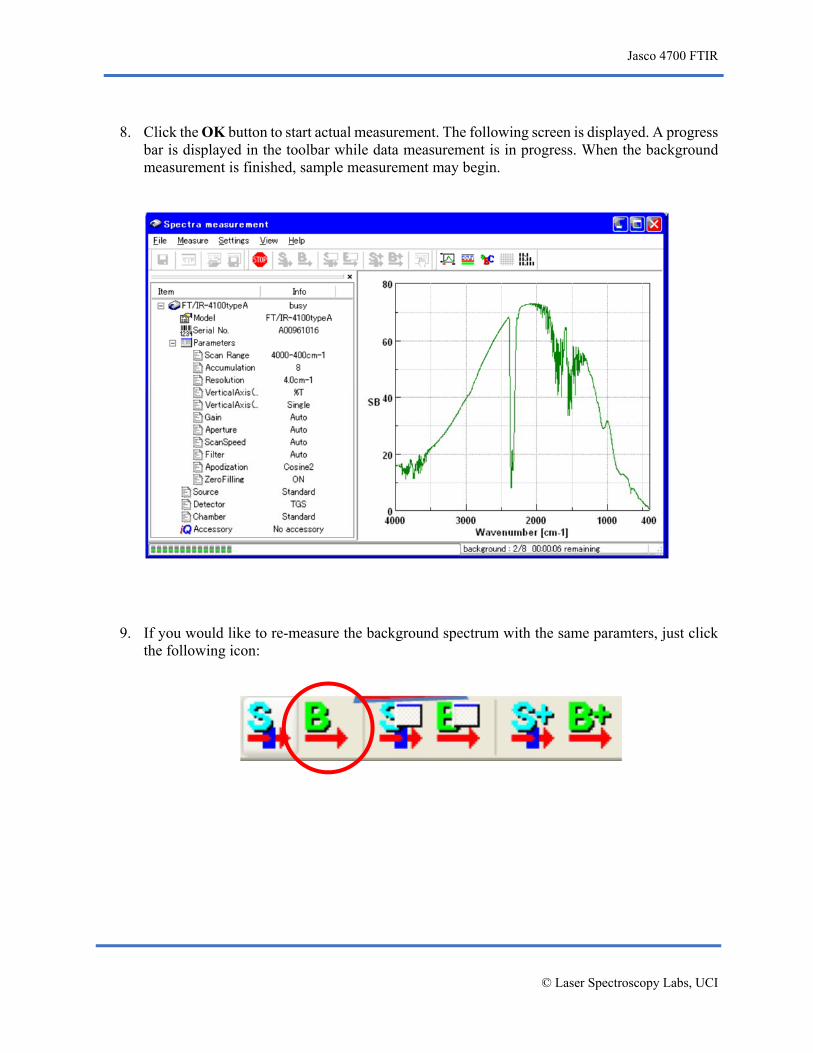
1. Select Monitor Sample from the Measure menu of the Spectra Measurement program or shortcut icon.
Jasco 4700 FTIR
© Laser Spectroscopy Labs, UCI
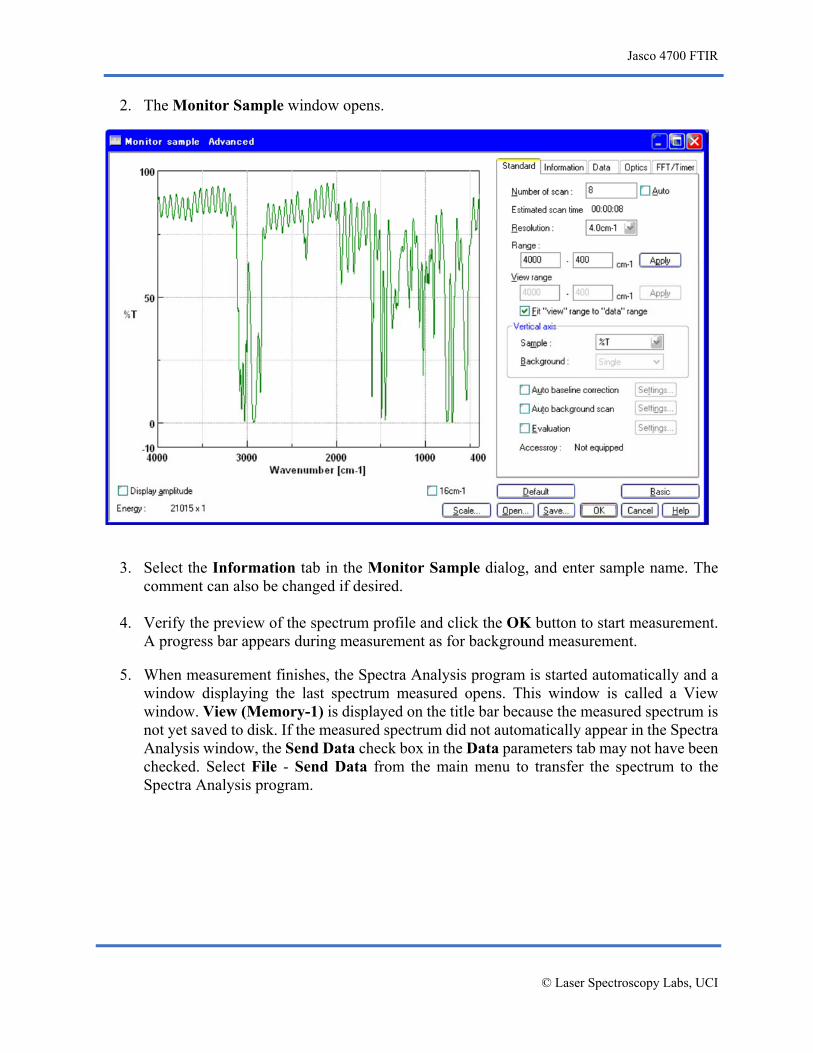
2. The Monitor Sample window opens.
3. Select the Information tab in the Monitor Sample dialog, and enter sample name. The
comment can also be changed if desired.
4. Verify the preview of the spectrum profile and click the OK button to start measurement. A progress bar appears during measurement as for background measurement.
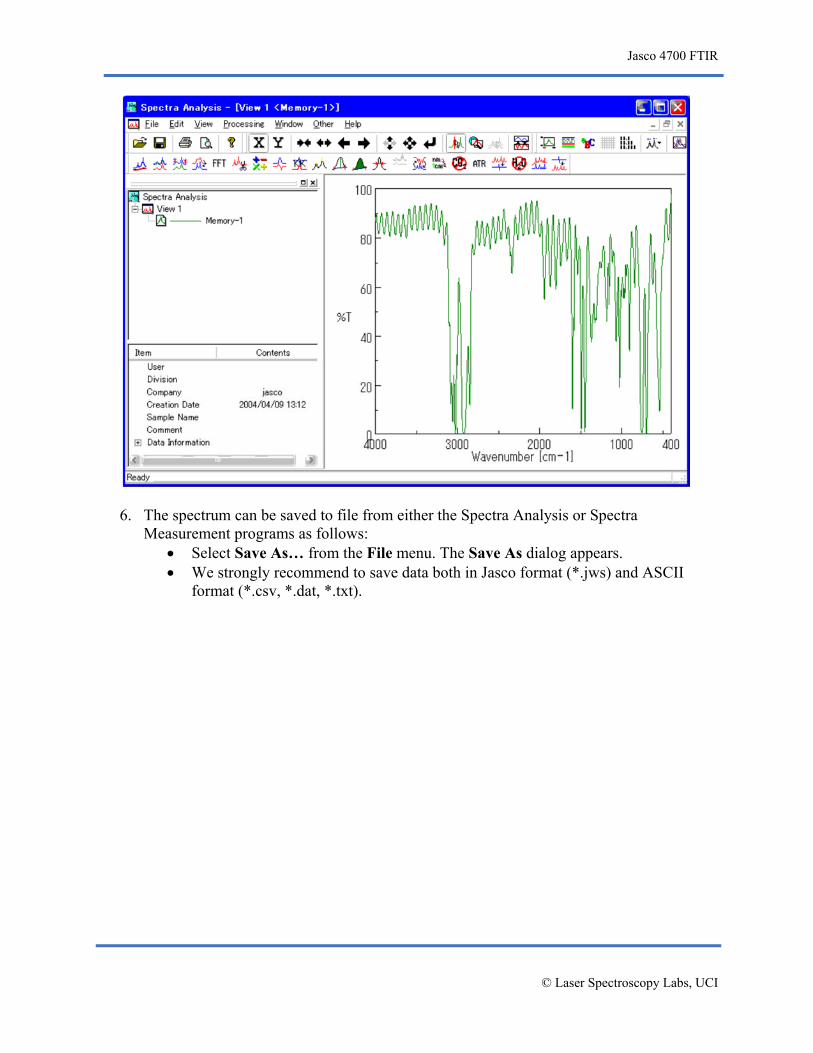
5. When measurement finishes, the Spectra Analysis program is started automatically and a
window displaying the last spectrum measured opens. This window is called a View window. View (Memory-1) is displayed on the title bar because the measured spectrum is not yet saved to disk. If the measured spectrum did not automatically appear in the Spectra Analysis window, the Send Data check box in the Data parameters tab may not have been checked. Select File - Send Data from the main menu to transfer the spectrum to the Spectra Analysis program.
Jasco 4700 FTIR
© Laser Spectroscopy Labs, UCI
6. The spectrum can be saved to file from either the Spectra Analysis or Spectra Measurement programs as follows:
Select Save As… from the File menu. The Save As dialog appears. We strongly recommend to save data both in Jasco format (*.jws) and ASCII
format (*.csv, *.dat, *.txt).
Jasco 4700 FTIR
© Laser Spectroscopy Labs, UCI
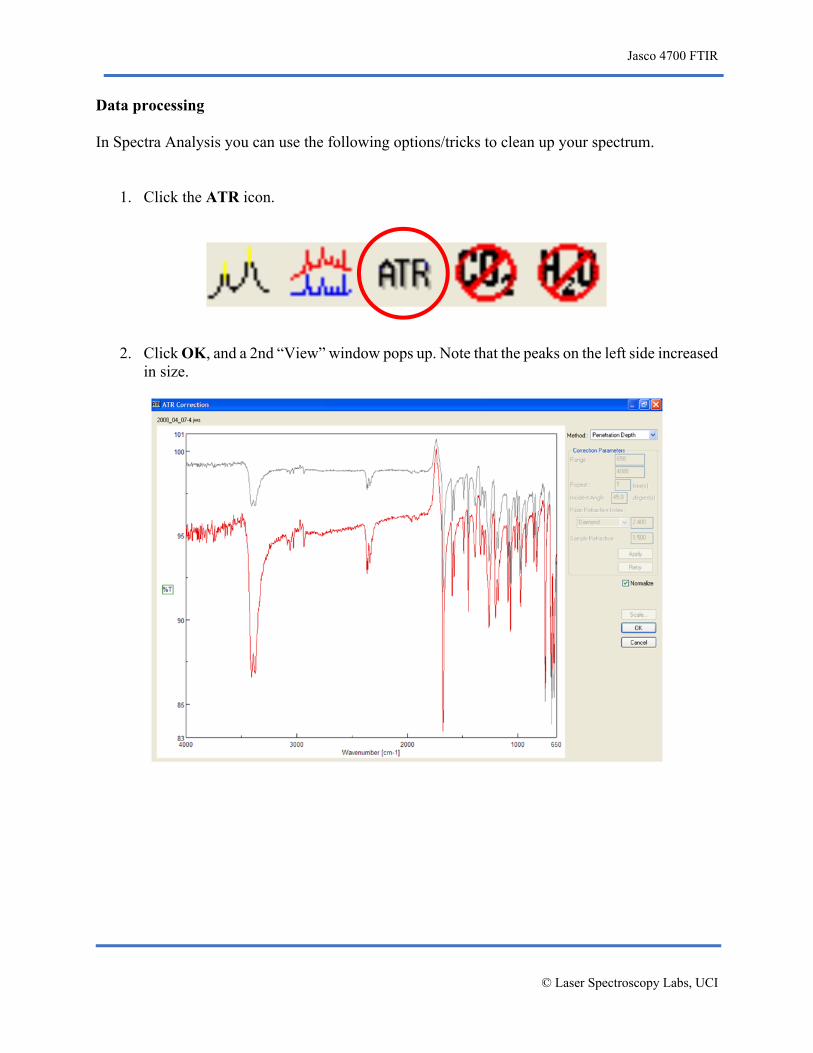
Data processing In Spectra Analysis you can use the following options/tricks to clean up your spectrum.
1. Click the ATR icon.
2. Click OK, and a 2nd “View” window pops up. Note that the peaks on the left side increased
in size.
Jasco 4700 FTIR
© Laser Spectroscopy Labs, UCI
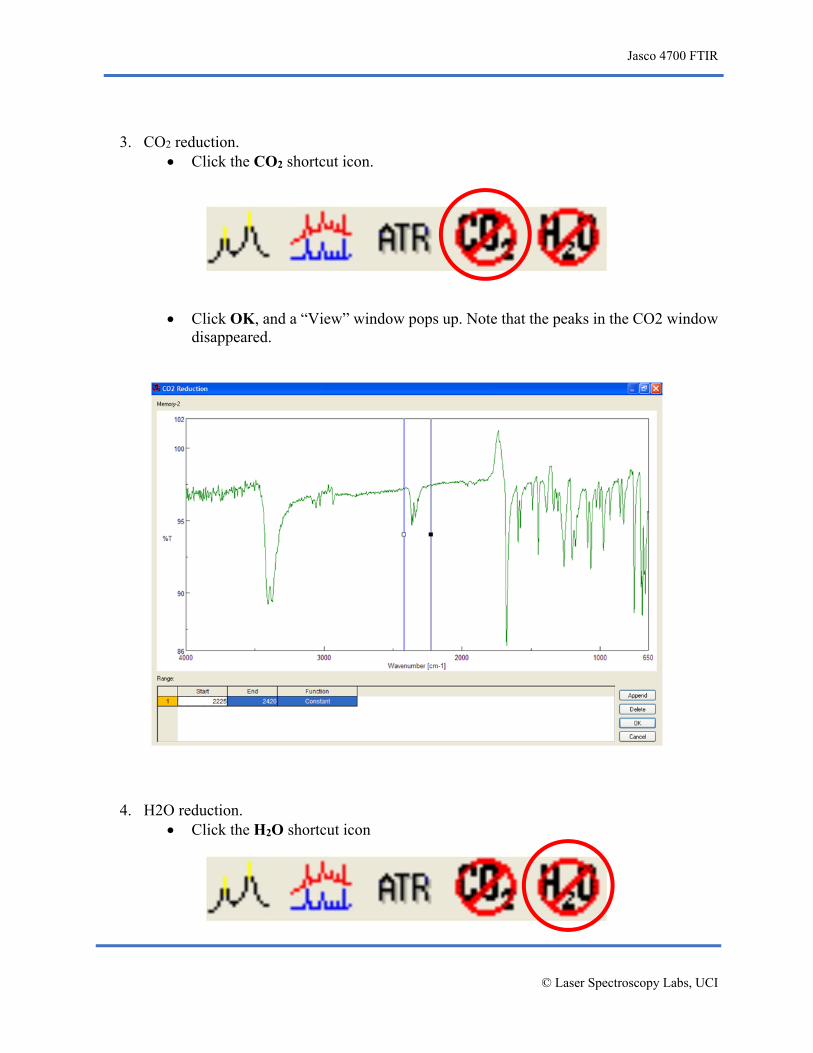
3. CO2 reduction. Click the CO2 shortcut icon.
Click OK, and a “View” window pops up. Note that the peaks in the CO2 window disappeared.
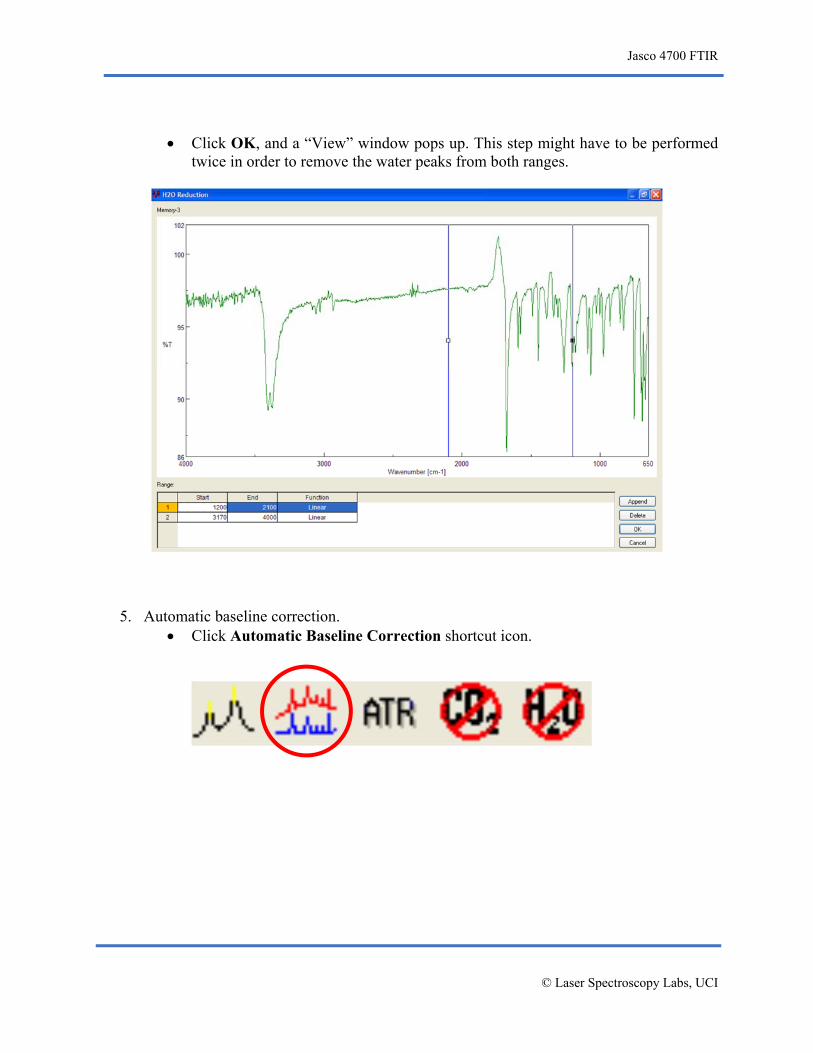
4. H2O reduction. Click the H2O shortcut icon
Jasco 4700 FTIR
© Laser Spectroscopy Labs, UCI
Click OK, and a “View” window pops up. This step might have to be performed twice in order to remove the water peaks from both ranges.
5. Automatic baseline correction. Click Automatic Baseline Correction shortcut icon.
Jasco 4700 FTIR
© Laser Spectroscopy Labs, UCI
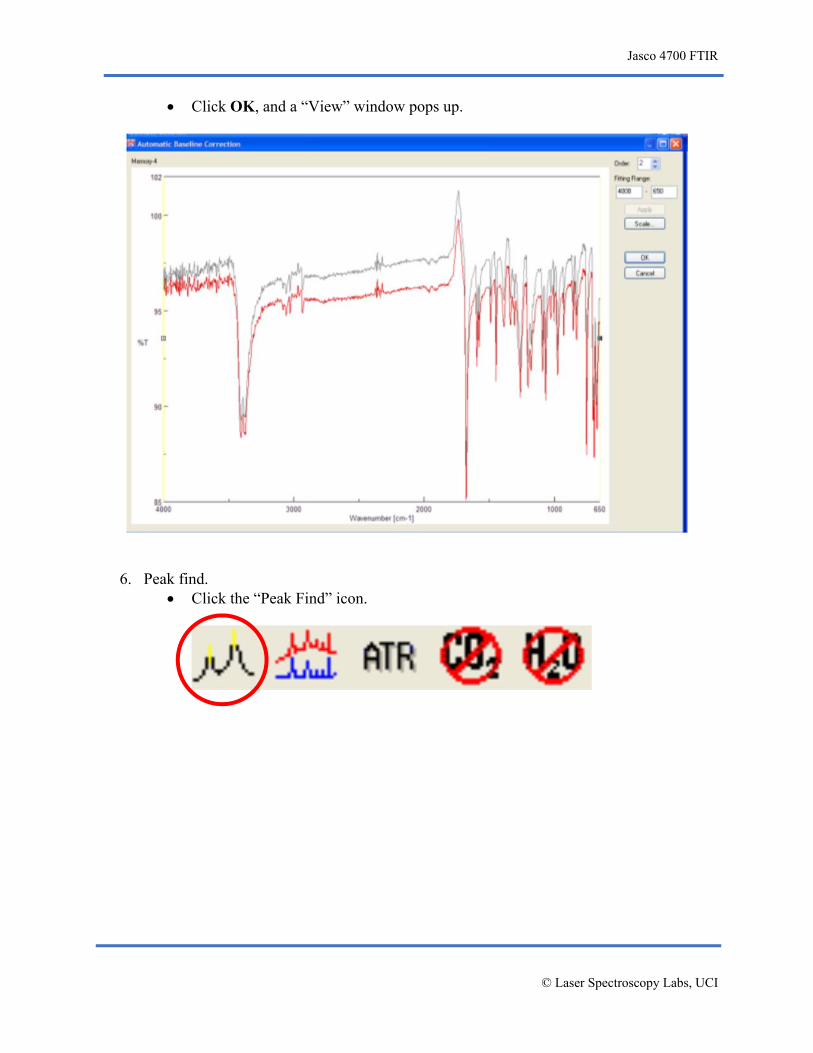
Click OK, and a “View” window pops up.
6. Peak find. Click the “Peak Find” icon.
Jasco 4700 FTIR
© Laser Spectroscopy Labs, UCI
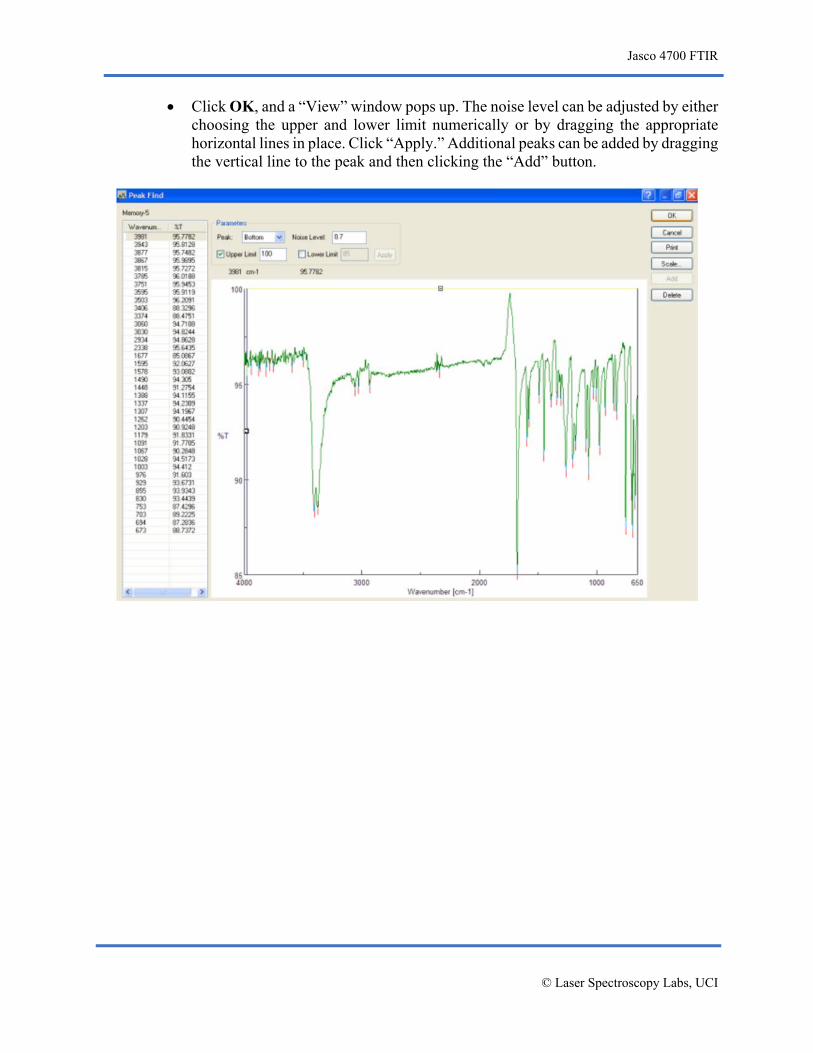
Click OK, and a “View” window pops up. The noise level can be adjusted by either choosing the upper and lower limit numerically or by dragging the appropriate horizontal lines in place. Click “Apply.” Additional peaks can be added by dragging the vertical line to the peak and then clicking the “Add” button.
Jasco 4700 FTIR
© Laser Spectroscopy Labs, UCI
Cleaning the ATR module You have to clean ATR unit upon the end of your experiments.
Scratching the crystal surface must be avoided at all cost!
5. Do not use any spatulas or sticks!!!
6. With the remaining solid at the edges, apply some methanol (please, do not use acetone), dab the top with a Kim-wipe paper. Repeat this 4-5 times.
1. With methanol and Kim-wipe paper scrub the general area in and around the crystal surface. The solvent should not be applied in a way that the setup is soaked since it will leak into the optics as well. Soak the paper only and then apply the paper to the cleaning area.
2. Do not forget to clean the pressing pin.
Switching the instrument off
1. Switch off Spectra Measurement program. 2. Switch off the instrument Power button to OFF position. 3. Make sure you do not touch Resume button and it is ON position.