Embed Size (px)
Citation preview

Windows Edition User GuideJANUARY 2021
CheckMate Windows User Guide | © 2021 ParcelTools Pty Ltd PAGE 2
Introduction 3
Data Capture and Update Methods 3
Data Export Options 4
Communications 4
User Interface 4
Schedule 1 - Installation Guide 5
Schedule 1 - CheckMate Windows Edition Installation 5
Schedule 1 - C190DSK Cradle Setup 6 - 7
Schedule 1 - C190POS Setup 8
Schedule 1 - C190PRO Setup 9
Schedule 2 - Data Item Descriptions 10
Schedule 3 - Communications and Data Format Requirements 11
Schedule 4 - Supported Scales/Indicators 12
Schedule 5 - Status Information 12
Contents
CheckMate Windows User Guide | © 2021 ParcelTools Pty Ltd PAGE 3
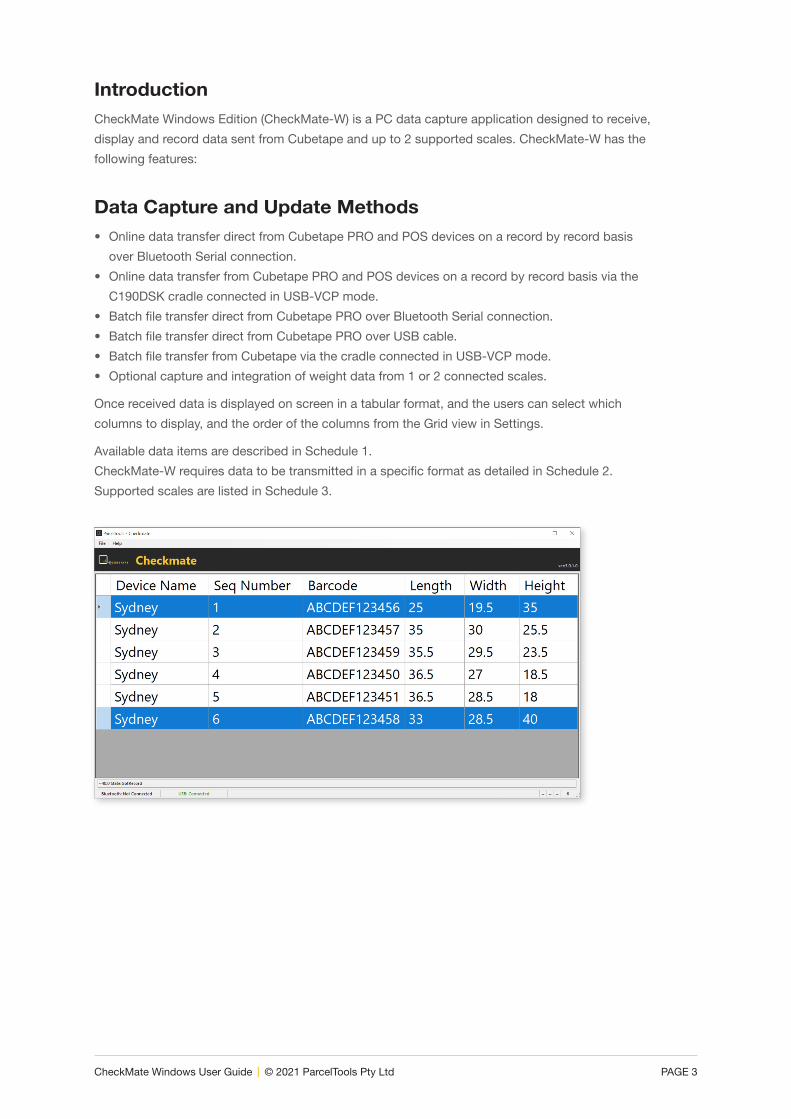
IntroductionCheckMate Windows Edition (CheckMate-W) is a PC data capture application designed to receive,
display and record data sent from Cubetape and up to 2 supported scales. CheckMate-W has the
following features:
Data Capture and Update Methods• Online data transfer direct from Cubetape PRO and POS devices on a record by record basis
over Bluetooth Serial connection.
• Online data transfer from Cubetape PRO and POS devices on a record by record basis via the
C190DSK cradle connected in USB-VCP mode.
• Batch file transfer direct from Cubetape PRO over Bluetooth Serial connection.
• Batch file transfer direct from Cubetape PRO over USB cable.
• Batch file transfer from Cubetape via the cradle connected in USB-VCP mode.
• Optional capture and integration of weight data from 1 or 2 connected scales.
Once received data is displayed on screen in a tabular format, and the users can select which
columns to display, and the order of the columns from the Grid view in Settings.
Available data items are described in Schedule 1.
CheckMate-W requires data to be transmitted in a specific format as detailed in Schedule 2.
Supported scales are listed in Schedule 3.
n
CheckMate Windows User Guide | © 2021 ParcelTools Pty Ltd PAGE 4
Data Export OptionsOnce data has been received in CheckMate-W, it can be saved to an export folder. The export folder
location can be specified in Settings. Export options include:
• Manual export to csv file.
• Automatic export to csv file.
• Automatic export to a new csv file per record.
Communications• Direct Bluetooth connections are persistent, and automatically reconnected if the connection
is broken for any reason.
• CheckMate-W will automatically recognise and setup a connection to a Device or Cradle if
connected over USB.
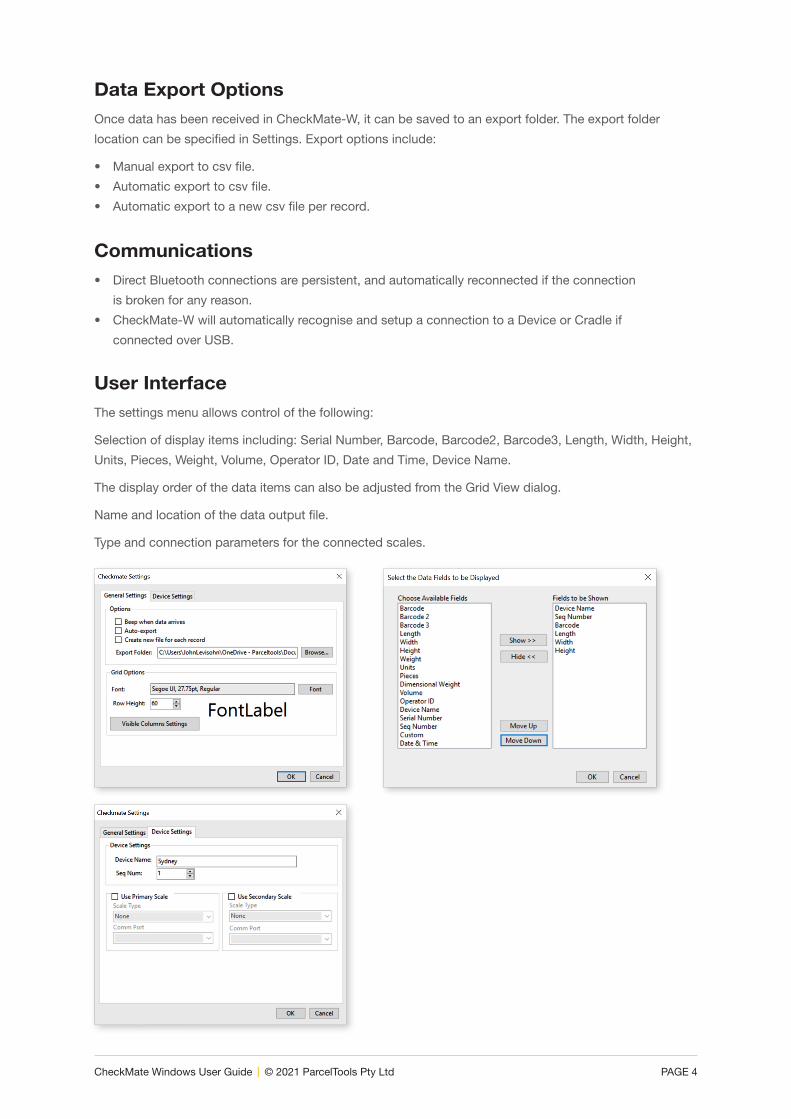
User InterfaceThe settings menu allows control of the following:
Selection of display items including: Serial Number, Barcode, Barcode2, Barcode3, Length, Width, Height,
Units, Pieces, Weight, Volume, Operator ID, Date and Time, Device Name.
The display order of the data items can also be adjusted from the Grid View dialog.
Name and location of the data output file.
Type and connection parameters for the connected scales.
CheckMate Windows User Guide | © 2021 ParcelTools Pty Ltd PAGE 5
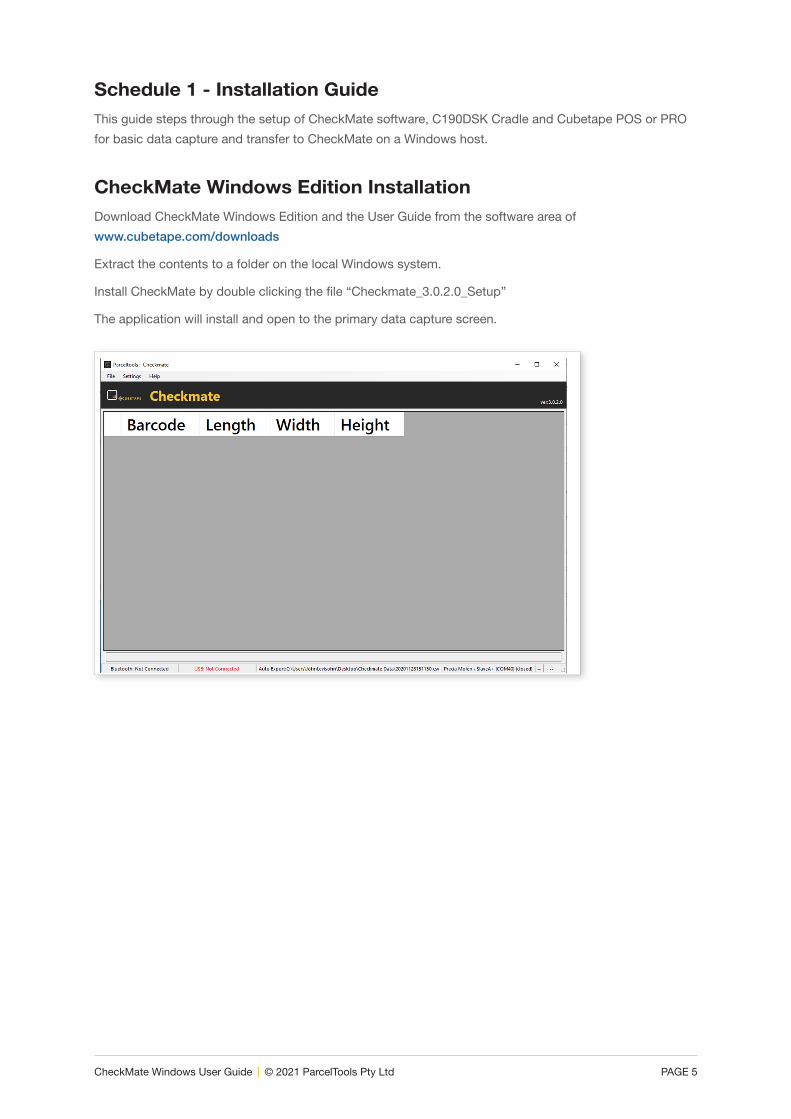
Schedule 1 - Installation GuideThis guide steps through the setup of CheckMate software, C190DSK Cradle and Cubetape POS or PRO
for basic data capture and transfer to CheckMate on a Windows host.
CheckMate Windows Edition InstallationDownload CheckMate Windows Edition and the User Guide from the software area of
www.cubetape.com/downloads
Extract the contents to a folder on the local Windows system.
Install CheckMate by double clicking the file “Checkmate_3.0.2.0_Setup”
The application will install and open to the primary data capture screen.
n
CheckMate Windows User Guide | © 2021 ParcelTools Pty Ltd PAGE 6
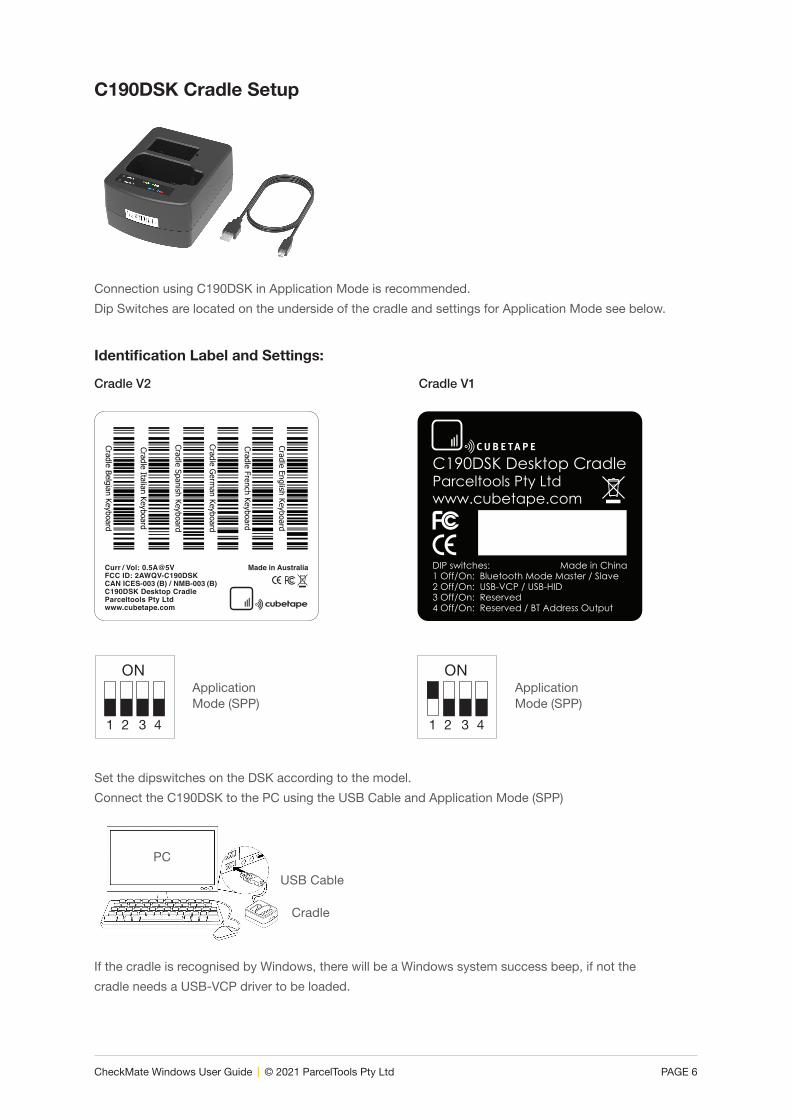
C190DSK Cradle Setup
Connection using C190DSK in Application Mode is recommended.
Dip Switches are located on the underside of the cradle and settings for Application Mode see below.
Identification Label and Settings:
Cradle V2 Cradle V1
Set the dipswitches on the DSK according to the model.
Connect the C190DSK to the PC using the USB Cable and Application Mode (SPP)
If the cradle is recognised by Windows, there will be a Windows system success beep, if not the
cradle needs a USB-VCP driver to be loaded.
1 2 3 4
ON
1 2 3 4
ON
Curr / Vol: 0.5A@5VFCC ID: 2AWQV-C190DSKCAN ICES-003 (B) / NMB-003 (B)C190DSK Desktop CradleParceltools Pty Ltd www.cubetape.com
Cradle Belgian Keyboard
Cradle French Keyboard
Cradle Spanish Keyboard
Cradle Italian Keyboard
Cradle Germ
an KeyboardMade in Australia
Cradle English Keyboard
C190DSK Desktop Cradle
www.cubetape.comParceltools Pty Ltd
Made in ChinaDIP switches:1 Off/On: Bluetooth Mode Master / Slave2 Off/On: USB-VCP / USB-HID3 Off/On: Reserved4 Off/On: Reserved / BT Address Output
Curr / Vol: 0.5A@5VFCC ID: 2AWQV-C190DSKCAN ICES-003 (B) / NMB-003 (B)C190DSK Desktop CradleParceltools Pty Ltd www.cubetape.com
Cradle Belgian Keyboard
Cradle French Keyboard
Cradle Spanish Keyboard
Cradle Italian Keyboard
Cradle Germ
an Keyboard
Made in Australia
Cradle English Keyboard
C190DSK Desktop Cradle
www.cubetape.comParceltools Pty Ltd
Made in ChinaDIP switches:1 Off/On: Bluetooth Mode Master / Slave2 Off/On: USB-VCP / USB-HID3 Off/On: Reserved4 Off/On: Reserved / BT Address Output
Application Mode (SPP)
Application Mode (SPP)
USB Cable
PC
Cradle
CheckMate Windows User Guide | © 2021 ParcelTools Pty Ltd PAGE 7
Installing the Driver
The driver is available in the utilities folder at www.cubetape.com/downloads
Download and unzip the folder and install either:
VCP_V1.5.0_Setup_W7_x64_64bits for 64 bit systems or
VCP_V1.5.0_Setup_W7_x86_32bits for 32 bit systems.
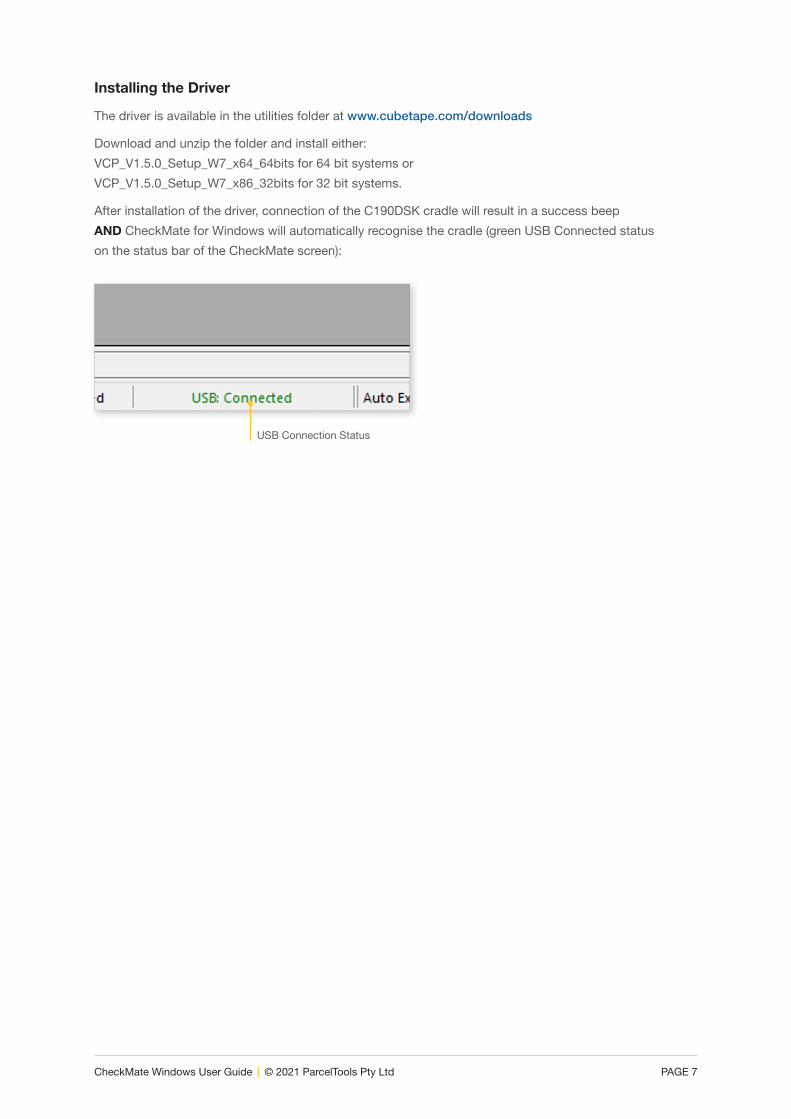
After installation of the driver, connection of the C190DSK cradle will result in a success beep
AND CheckMate for Windows will automatically recognise the cradle (green USB Connected status
on the status bar of the CheckMate screen):
USB Connection Status
CheckMate Windows User Guide | © 2021 ParcelTools Pty Ltd PAGE 8
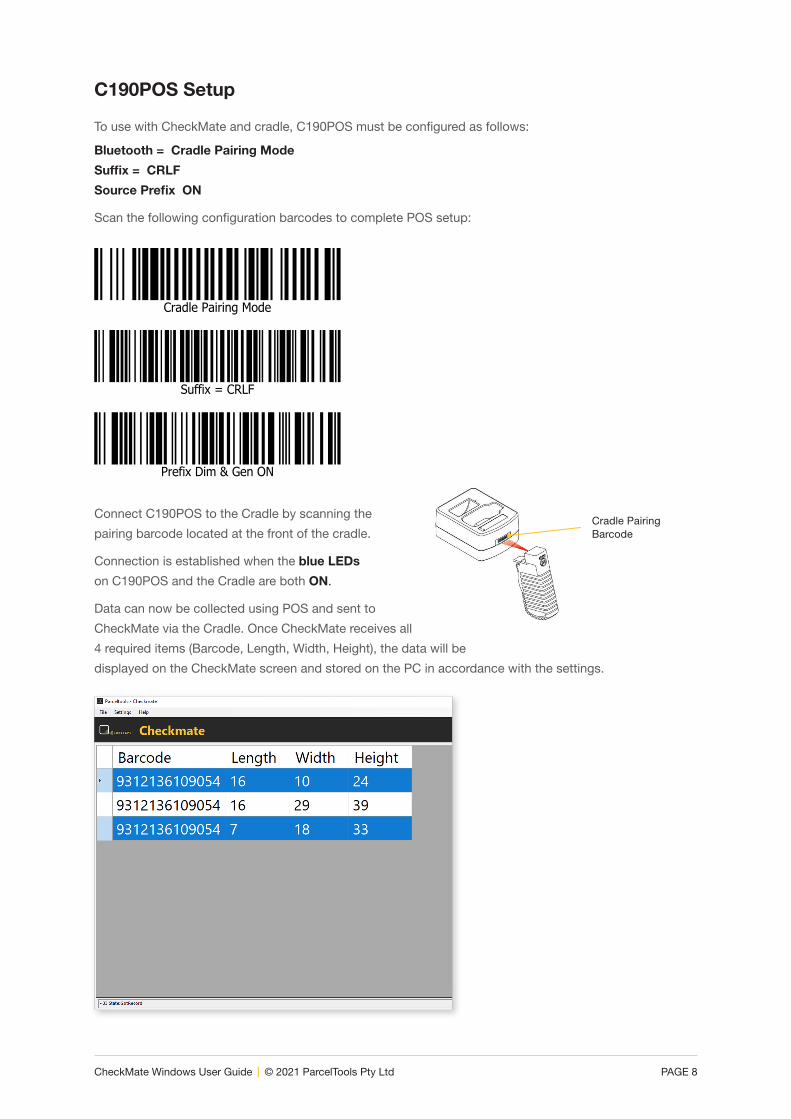
C190POS Setup
To use with CheckMate and cradle, C190POS must be configured as follows:
Bluetooth = Cradle Pairing Mode
Suffix = CRLF
Source Prefix ON
Scan the following configuration barcodes to complete POS setup:
Connect C190POS to the Cradle by scanning the
pairing barcode located at the front of the cradle.
Connection is established when the blue LEDs
on C190POS and the Cradle are both ON.
Data can now be collected using POS and sent to
CheckMate via the Cradle. Once CheckMate receives all
4 required items (Barcode, Length, Width, Height), the data will be
displayed on the CheckMate screen and stored on the PC in accordance with the settings.
Cradle Pairing Mode
Prefix Dim & Gen ON
Suffix = CRLF
Cradle Pairing Barcode
CheckMate Windows User Guide | © 2021 ParcelTools Pty Ltd PAGE 9
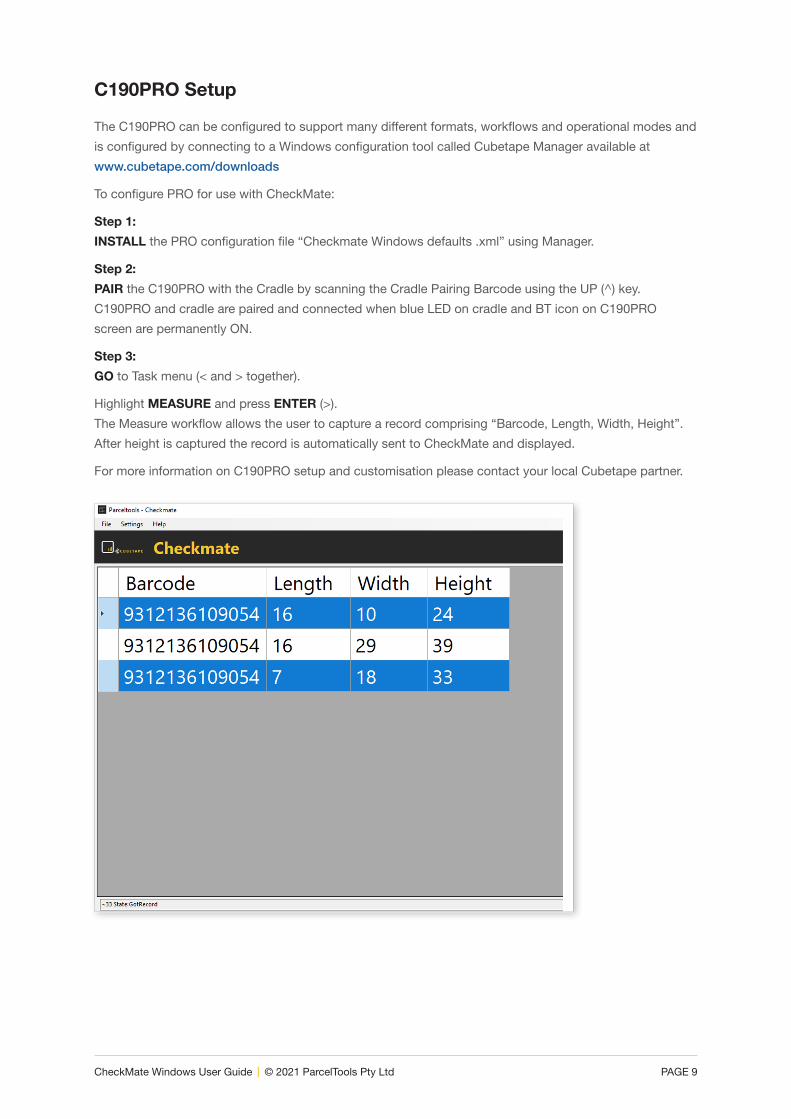
C190PRO Setup
The C190PRO can be configured to support many different formats, workflows and operational modes and
is configured by connecting to a Windows configuration tool called Cubetape Manager available at
www.cubetape.com/downloads
To configure PRO for use with CheckMate:
Step 1:
INSTALL the PRO configuration file “Checkmate Windows defaults .xml” using Manager.
Step 2:
PAIR the C190PRO with the Cradle by scanning the Cradle Pairing Barcode using the UP (^) key.
C190PRO and cradle are paired and connected when blue LED on cradle and BT icon on C190PRO
screen are permanently ON.
Step 3:
GO to Task menu (< and > together).
Highlight MEASURE and press ENTER (>).
The Measure workflow allows the user to capture a record comprising “Barcode, Length, Width, Height”.
After height is captured the record is automatically sent to CheckMate and displayed.
For more information on C190PRO setup and customisation please contact your local Cubetape partner.
CheckMate Windows User Guide | © 2021 ParcelTools Pty Ltd PAGE 10
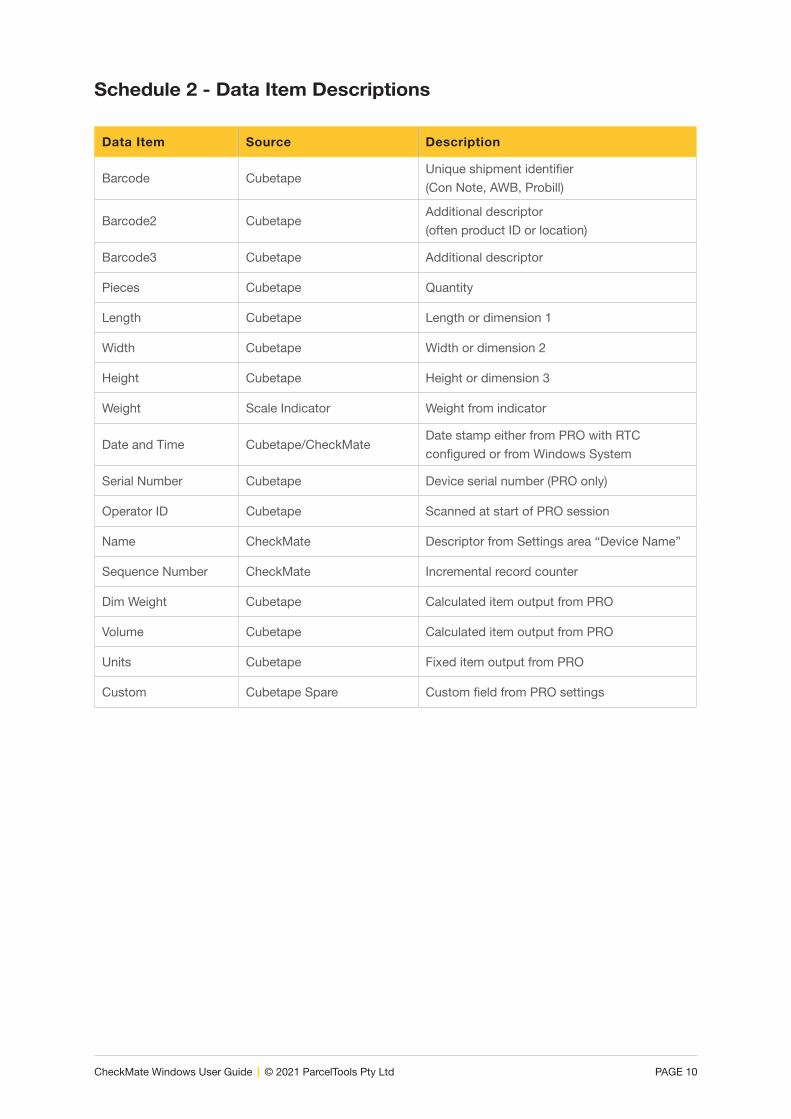
Schedule 2 - Data Item Descriptions
Data Item Source Description
Barcode Cubetape Unique shipment identifier
(Con Note, AWB, Probill)
Barcode2 CubetapeAdditional descriptor
(often product ID or location)
Barcode3 Cubetape Additional descriptor
Pieces Cubetape Quantity
Length Cubetape Length or dimension 1
Width Cubetape Width or dimension 2
Height Cubetape Height or dimension 3
Weight Scale Indicator Weight from indicator
Date and Time Cubetape/CheckMateDate stamp either from PRO with RTC
configured or from Windows System
Serial Number Cubetape Device serial number (PRO only)
Operator ID Cubetape Scanned at start of PRO session
Name CheckMate Descriptor from Settings area “Device Name”
Sequence Number CheckMate Incremental record counter
Dim Weight Cubetape Calculated item output from PRO
Volume Cubetape Calculated item output from PRO
Units Cubetape Fixed item output from PRO
Custom Cubetape Spare Custom field from PRO settings
CheckMate Windows User Guide | © 2021 ParcelTools Pty Ltd PAGE 11
Schedule 3 - Communications and Data Format Requirements
Communications CheckMate for Windows receives data from connected devices using serial communications protocols.
All connected devices must therefore be configured to use serial communications for data to be received.
If the C190DSK cradle is in use, it must be set to USB-VCP mode by setting dipswitch 2 to the
OFF position.
Cubetape POS and PRO devices can either connect directly to the CheckMate application,
or can connect via the C190DSK cradle.
Scales and scale indicators also connect using Serial, USB, or Bluetooth SPP connections.
Cubetape PROData received from Cubetape PRO must be formatted using the default output format:
SN=18120001,ID1=12345678,PC=1,LL=48,WW=40,HH=100<CRLF>
The PRO mandates and controls this format to ensure data integrity.
Cubetape POSCheckMate-W buffers data items received from POS, and on receipt of a valid record displays data items
and saves the record to disc. This process allows data integrity to be managed.
Valid POS formats supported are:
1DIM (where individual items are decoded then transmitted):
^Barcode<CRLF>
~Length<CRLF>
~Width<CRLF>
~Height<CRLF>
3DIM (where dimensional items are grouped in sets of three then transmitted)
^Barcode<CRLF>
~LengthxWidthxHeight<CRLF>
[Source prefixes ^ and ~ are required and identify the source of the data as either
General (^) or Dimensional (~)]
[Suffix CRLF is required to identify the entries]
CheckMate Windows User Guide | © 2021 ParcelTools Pty Ltd PAGE 12
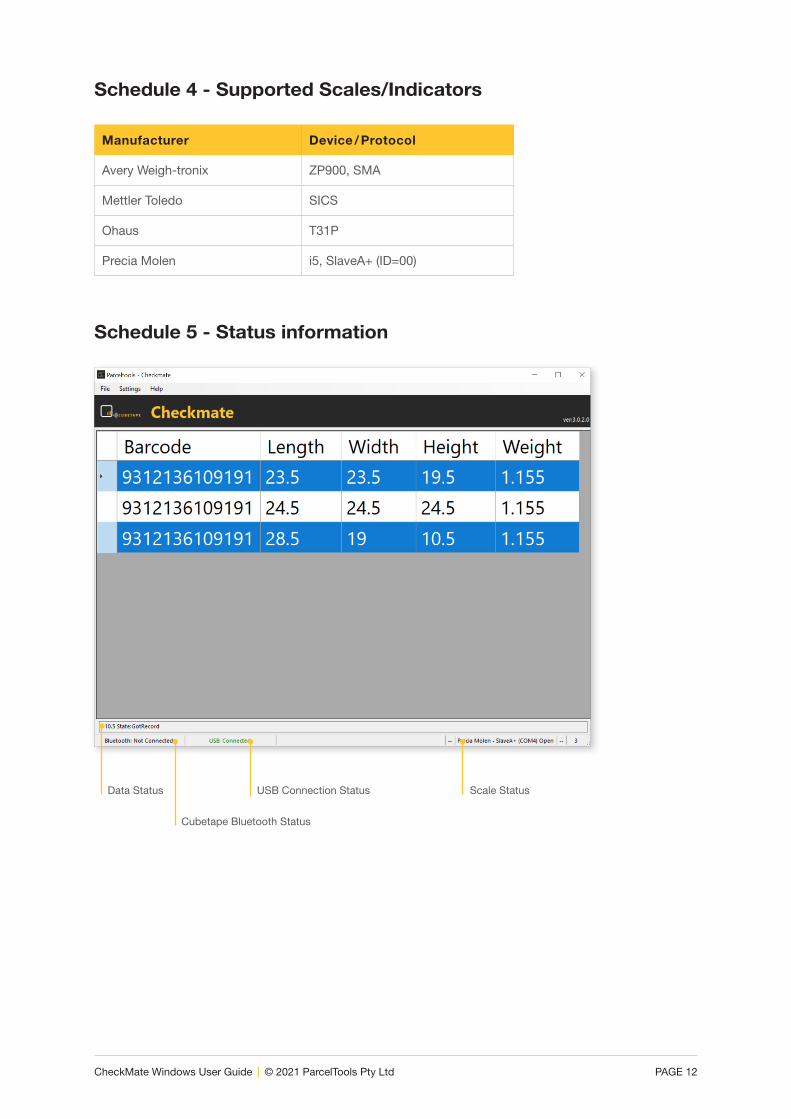
Schedule 4 - Supported Scales/Indicators
Schedule 5 - Status information
Manufacturer Device / Protocol
Avery Weigh-tronix ZP900, SMA
Mettler Toledo SICS
Ohaus T31P
Precia Molen i5, SlaveA+ (ID=00)
Data Status
Cubetape Bluetooth Status
USB Connection Status Scale Status
Disclaimer © 2021
ParcelTools Pty Ltd.
All rights reserved. Please read through the manual
carefully before using the product and operate
it according to the manual. It is advised that you
should keep this manual for future reference.
Do not disassemble the device or remove the
seal label from the device, doing so will void the
product warranty provided by ParcelTools.
All pictures in this manual are for reference only
and actual product may differ. Regarding to the
product modification and update, ParcelTools
have the right to make changes to any software
or hardware to improve reliability, function, or
design at any time without notice. The information
contained herein is subject to change without prior
notice. The products depicted in this manual may
include software copyrighted by ParcelTools or a
third party. The user, corporation or individual, shall
not duplicate, in whole or in part, distribute, modify,
decompile, disassemble, decode, reverse engineer,
rent, transfer or sublicense such software without
prior written consent from the copyright holders.
www.cubetape.com