Embed Size (px)
Citation preview
Genie TZ-50 Part No. 824982
January 2016
ii
Introduction
Copyright © 2004 Terex Corporation
824982 Rev B3 August 2016Second Edition, Second Printing
"Genie" and "TZ" are registered trademarks of Terex South Dakota, Inc. in the USA and many other countries.
Printed on recycled paper
Printed in U.S.A.
INTRODUCTION
Important Read, understand and obey the safety rules and operating instructions in the appropriate operator's manual on your machine before attempting any maintenance or repair procedure.
This manual provides detailed scheduled maintenance information for the machine owner and user. It also provides troubleshooting fault codes and repair procedures for qualifi ed service professionals.
Basic mechanical, hydraulic and electrical skills are required to perform most procedures. However, several procedures require specialized skills, tools, lifting equipment and a suitable workshop. In these instances, we strongly recommend that maintenance and repair be performed at an authorized Genie dealer service center.
ComplianceMachine Classifi cationGroup B/Type 3 as defi ned by ISO 16368
Machine Design LifeUnrestricted with proper operation, inspection and scheduled maintenance.
Technical PublicationsGenie has endeavored to deliver the highest degree of accuracy possible. However, continuous improvement of our products is a Genie policy. Therefore, product specifi cations are subject to change without notice.
Readers are encouraged to notify Genie of errors and send in suggestions for improvement. All communications will be carefully considered for future printings of this and all other manuals.
Contact Us: http://www.genielift.come-mail: [email protected]
Part No. 824982 Genie TZ-50
January 2016
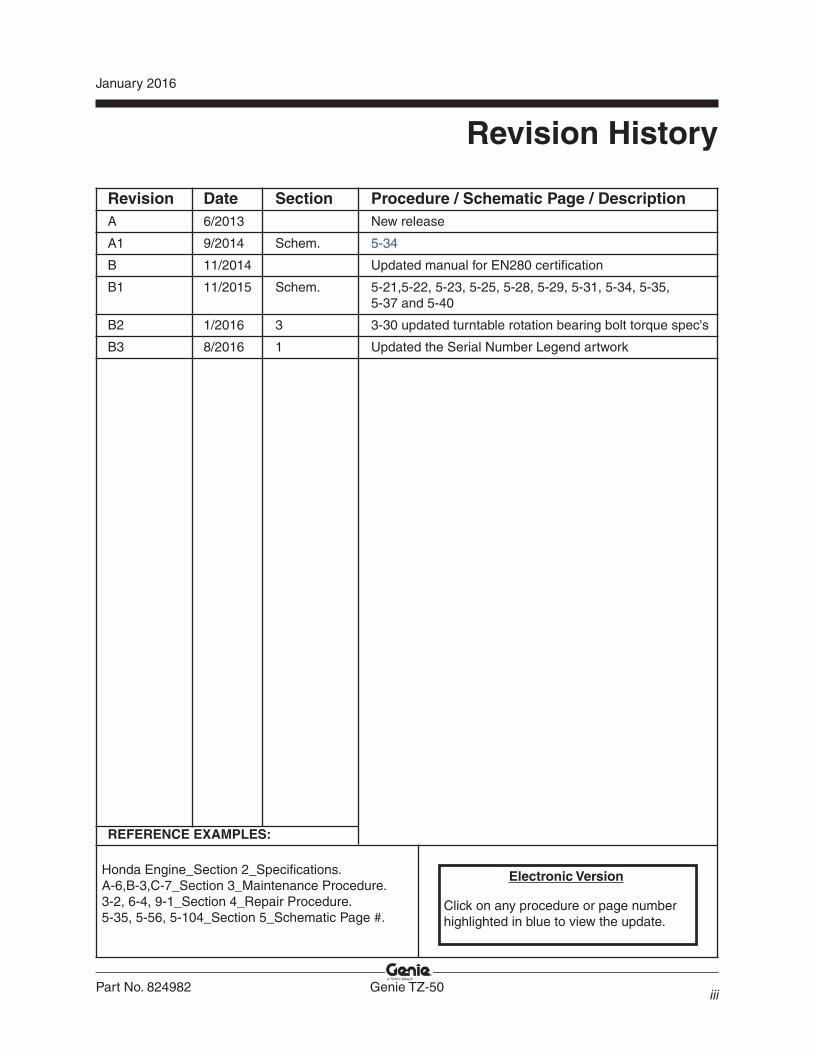
Revision Date Section Procedure / Schematic Page / Description A 6/2013 New release
A1 9/2014 Schem. 5-34
B 11/2014 Updated manual for EN280 certifi cation
B1 11/2015 Schem. 5-21,5-22, 5-23, 5-25, 5-28, 5-29, 5-31, 5-34, 5-35, 5-37 and 5-40
B2 1/2016 3 3-30 updated turntable rotation bearing bolt torque spec's
B3 8/2016 1 Updated the Serial Number Legend artwork
Revision History
iii
REFERENCE EXAMPLES:
Honda Engine_Section 2_Specifi cations. A-6,B-3,C-7_Section 3_Maintenance Procedure. 3-2, 6-4, 9-1_Section 4_Repair Procedure. 5-35, 5-56, 5-104_Section 5_Schematic Page #.
Electronic Version
Click on any procedure or page number highlighted in blue to view the update.
Genie TZ-50 Part No. 824982
January 2016
iv
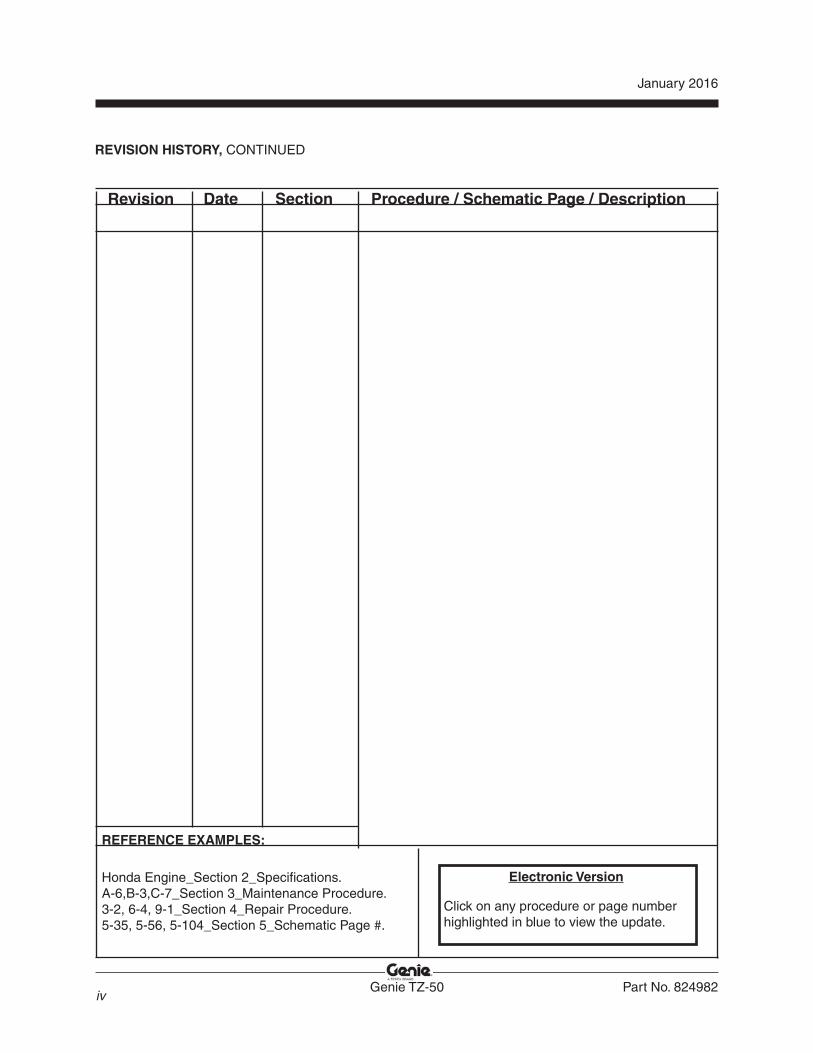
REVISION HISTORY, CONTINUED
Revision Date Section Procedure / Schematic Page / Description
REFERENCE EXAMPLES:
Honda Engine_Section 2_Specifi cations. A-6,B-3,C-7_Section 3_Maintenance Procedure. 3-2, 6-4, 9-1_Section 4_Repair Procedure. 5-35, 5-56, 5-104_Section 5_Schematic Page #.
Electronic Version
Click on any procedure or page number highlighted in blue to view the update.
Part No. 824982 Genie TZ-50
January 2016
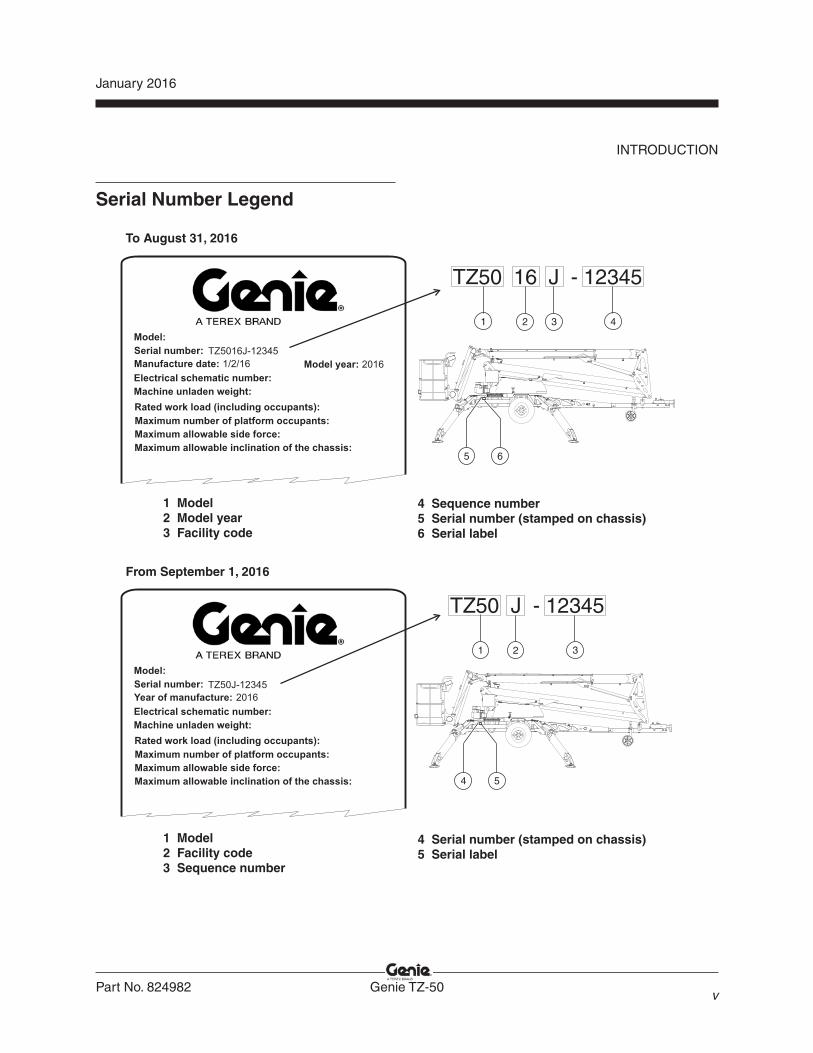
Serial Number Legend
INTRODUCTION
v
Genie TZ-50 Part No. 824982
January 2016
vi
Safety Rules
Section 1 • Safety Rules
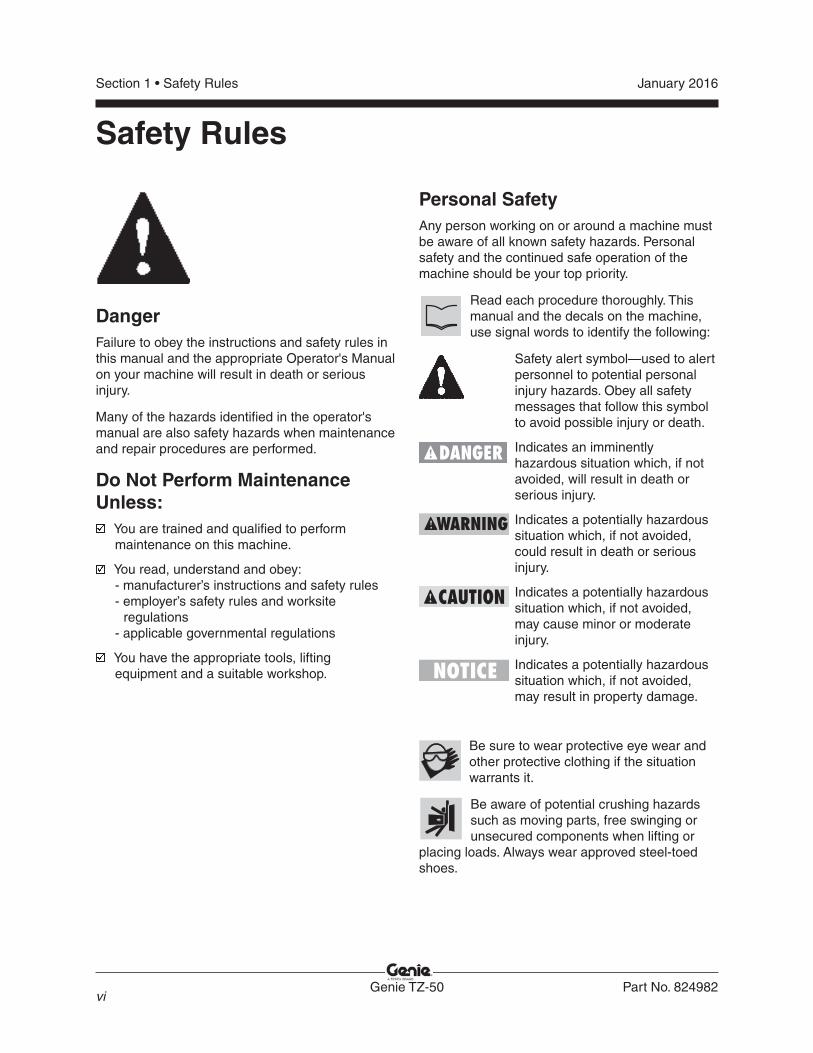
DangerFailure to obey the instructions and safety rules in this manual and the appropriate Operator's Manual on your machine will result in death or serious injury.
Many of the hazards identifi ed in the operator's manual are also safety hazards when maintenance and repair procedures are performed.
Do Not Perform Maintenance Unless:
You are trained and qualifi ed to perform maintenance on this machine.
You read, understand and obey:- manufacturer’s instructions and safety rules- employer’s safety rules and worksite regulations- applicable governmental regulations
You have the appropriate tools, lifting equipment and a suitable workshop.
Personal SafetyAny person working on or around a machine must be aware of all known safety hazards. Personal safety and the continued safe operation of the machine should be your top priority.
Read each procedure thoroughly. This manual and the decals on the machine, use signal words to identify the following:
Safety alert symbol—used to alert personnel to potential personal injury hazards. Obey all safety messages that follow this symbol to avoid possible injury or death.
Indicates an imminently hazardous situation which, if not avoided, will result in death or serious injury.
Indicates a potentially hazardous situation which, if not avoided, could result in death or serious injury.
Indicates a potentially hazardous situation which, if not avoided, may cause minor or moderate injury.
Indicates a potentially hazardous situation which, if not avoided, may result in property damage.
Be sure to wear protective eye wear and other protective clothing if the situation warrants it.
Be aware of potential crushing hazards such as moving parts, free swinging or unsecured components when lifting or
placing loads. Always wear approved steel-toed shoes.
Part No. 824982 Genie TZ-50
January 2016
SAFETY RULES
vii
Section 1 • Safety Rules
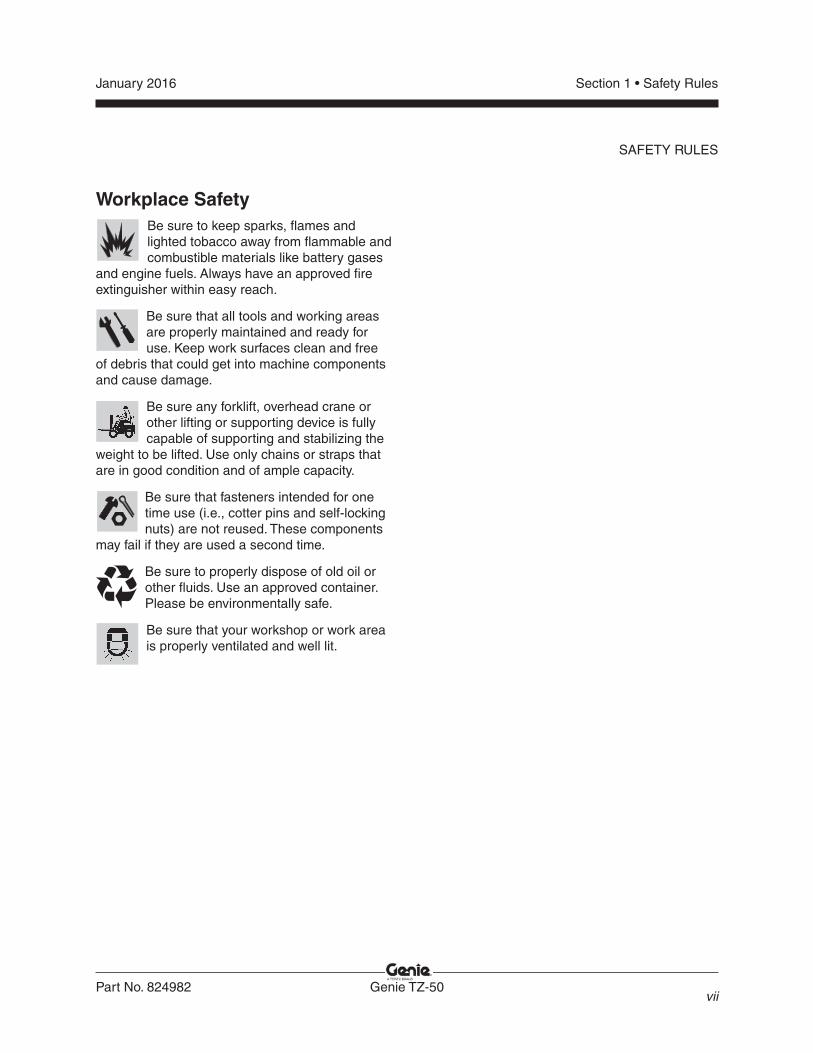
Workplace SafetyBe sure to keep sparks, fl ames and lighted tobacco away from fl ammable and combustible materials like battery gases
and engine fuels. Always have an approved fi re extinguisher within easy reach.
Be sure that all tools and working areas are properly maintained and ready for use. Keep work surfaces clean and free
of debris that could get into machine components and cause damage.
Be sure any forklift, overhead crane or other lifting or supporting device is fully capable of supporting and stabilizing the
weight to be lifted. Use only chains or straps that are in good condition and of ample capacity.
Be sure that fasteners intended for one time use (i.e., cotter pins and self-locking nuts) are not reused. These components
may fail if they are used a second time.
Be sure to properly dispose of old oil or other fl uids. Use an approved container. Please be environmentally safe.
Be sure that your workshop or work area is properly ventilated and well lit.
Genie TZ-50 Part No. 824982
January 2016
Table of Contents
viii
Introduction
Important Information ...................................................................................................... ii
Revision History ............................................................................................................. iii
Serial Number Legend .................................................................................................... v
Section 1 Safety Rules
General Safety Rules ..................................................................................................... vi
Section 2 Specifi cations
Machine Specifi cations ..............................................................................................2 - 1
Performance Specifi cations ........................................................................................2 - 2
Hydraulic Specifi cations .............................................................................................2 - 2
Manifold Component Specifi cations ...........................................................................2 - 3
Machine Torque Specifi cations ...................................................................................2 - 4
Honda GX160K1 Engine Specifi cations .....................................................................2 - 5
Hydraulic Hose and Fitting Torque Specifi cations ......................................................2 - 6
SAE and Metric Fastener Torque Chart ......................................................................2 - 8
Section 3 Scheduled Maintenance Procedures
Introduction .................................................................................................................3 - 1
Pre-delivery Preparation Report .................................................................................3 - 3
Maintenance Inspection Report .................................................................................3 - 5
Checklist A Procedures
A-1 Inspect the Manuals and Decals .......................................................................3 - 6
A-2 Perform Pre-operation Inspection .....................................................................3 - 7
A-3 Perform Function Tests .....................................................................................3 - 7
A-4 Perform Engine Maintenance (if equipped) ......................................................3 - 7
Part No. 824982 Genie TZ-50
January 2016
TABLE OF CONTENTS
ix
Section 3 Scheduled Maintenance Procedures, continued
A-5 Torque the Lug Bolts - Electric and Hydraulic Axles .........................................3 - 8
A-6 Torque the Lug Bolts - Mechanical Axle ...........................................................3 - 8
A-7 Perform Hitch Maintenance - Hydraulic Axle ....................................................3 - 9
A-8 Perform Engine Maintenance (if equipped) ......................................................3 - 9
A-9 Perform 30 Day Service ..................................................................................3 - 10
A-10 Perform Engine Maintenance (if equipped) ....................................................3 - 10
A-11 Grease the Turntable Rotation Bearing and Rotate Gear ...............................3 - 11
A-12 Perform Engine Maintenance (if equipped) ....................................................3 - 11
Checklist B Procedures
B-1 Inspect the Batteries .......................................................................................3 - 12
B-2 Inspect the Electrical Wiring ...........................................................................3 - 13
B-3 Test the Electrical Contactor ...........................................................................3 - 14
B-4 Test the Manual Override ................................................................................3 - 14
B-5 Perform Hydraulic Oil Analysis .......................................................................3 - 16
B-6 Perform Axle Maintenance - Electric and Hydraulic Axles ..............................3 - 17
B-7 Service the Tongue Jack .................................................................................3 - 17
B-8 Inspect the Parking Brake ...............................................................................3 - 18
B-9 Check the Wheel Bearings - Mechanical Axle ................................................3 - 20
B-10 Service the Hitch - Mechanical Axle ...............................................................3 - 20
B-11 Perform Axle Maintenance - Mechanical Axle ................................................3 - 21
B-12 Perform Engine Maintenance (if equipped) ....................................................3 - 22
Genie TZ-50 Part No. 824982
January 2016
TABLE OF CONTENTS
x
Section 3 Scheduled Maintenance Procedures, continued
Checklist C Procedures
C-1 Grease the Platform Overload Mechanism (if equipped) ................................3 - 23
C-2 Test the Platform Overload System (if equipped) ...........................................3 - 23
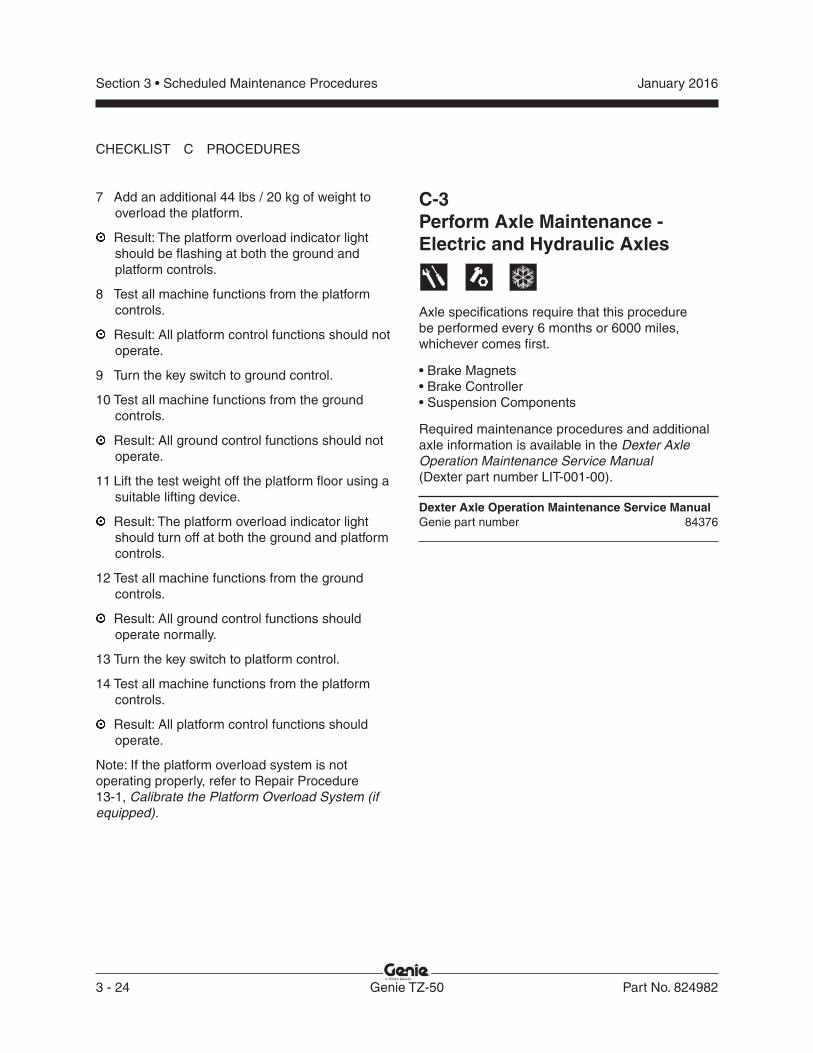
C-3 Perform Axle Maintenance - Electric and Hydraulic Axles ..............................3 - 24
C-4 Replace the Hydraulic Tank Breather Cap - Models with Optional Hydraulic Oil .................................................................3 - 25
C-5 Grease the Axle Wheel Bearings - Mechanical Axle ......................................3 - 25
C-6 Adjust the Brakes - Mechanical Axle ..............................................................3 - 26
Checklist D Procedures
D-1 Perform Axle Maintenance - Electric and Hydraulic Axles ..............................3 - 28
D-2 Check the Boom Wear Pads ...........................................................................3 - 28
D-3 Replace the Hydraulic Tank Return Filter .......................................................3 - 29
D-4 Check the Turntable Rotation Bearing Bolts ...................................................3 - 30
D-5 Inspect for Turntable Bearing Wear .................................................................3 - 31
Checklist E Procedures
E-1 Test or Replace the Hydraulic Oil ...................................................................3 - 32
E-2 Perform Engine Maintenance (if equipped) ....................................................3 - 33
Part No. 824982 Genie TZ-50
January 2016
xi
TABLE OF CONTENTS
Section 4 Repair
Introduction .................................................................................................................4 - 1
Platform Components
1-1 Platform ............................................................................................................4 - 2
1-2 Platform Rotator................................................................................................4 - 2
Jib Boom Components
2-1 Jib Boom ...........................................................................................................4 - 4
2-2 Jib Boom Lift Cylinder .......................................................................................4 - 6
Primary Boom Components
3-1 Cable Track .......................................................................................................4 - 9
3-2 Primary Boom .................................................................................................4 - 11
3-3 Primary Boom Lift Cylinder .............................................................................4 - 14
3-4 Platform Leveling Cylinders ............................................................................4 - 15
Secondary Boom Components
4-1 Secondary Boom ............................................................................................4 - 18
4-2 Secondary Boom Lift Cylinder ........................................................................4 - 21
Engine
5-1 Fuse Replacement..........................................................................................4 - 23
Ground Controls
6-1 Level Sensor ...................................................................................................4 - 24
Hydraulic Pump
7-1 Function Pump ...............................................................................................4 - 28
Manifolds
8-1 Function Manifold Components ......................................................................4 - 30
8-2 Jib Manifold Components ...............................................................................4 - 32
8-3 Drive Manifold Components (if equipped) ......................................................4 - 34
8-4 Valve Adjustments - Function Manifold ...........................................................4 - 36
8-5 Valve Coils ......................................................................................................4 - 38
Genie TZ-50 Part No. 824982
January 2016
xii
TABLE OF CONTENTS
Section 4 Repair, continued
Hydraulic Tank
9-1 Hydraulic Tank ................................................................................................4 - 40
Axle Components
10-1 Axle .................................................................................................................4 - 41
Trailer Components
11-1 Hydraulic and Mechanical Brakes ..................................................................4 - 42
11-2 Parking Brake .................................................................................................4 - 42
Outriggers
12-1 Outrigger Components ...................................................................................4 - 43
12-2 Outrigger Cylinder ..........................................................................................4 - 44
Platform Overload Components
13-1 Platform Overload System ..............................................................................4 - 45
Drive Components
14-1 Drive Motor .....................................................................................................4 - 47
14-2 Drive Control Box ............................................................................................4 - 48
Section 5 Schematics
Introduction .................................................................................................................5 - 1
Electrical Abbreviations Legend .................................................................................5 - 2
Abbreviation Legend - Wire Colors .............................................................................5 - 4
Limit Switch Legend ...................................................................................................5 - 5
Electrical Symbols Legend .........................................................................................5 - 6
Abbreviation Legend - Hydraulic Schematics .............................................................5 - 7

Part No. 824982 Genie TZ-50
January 2016
Section 5 Schematics, continued
Hydraulic Symbols Legend .........................................................................................5 - 8
Honda GX160 Engine Wiring Diagram .......................................................................5 - 9
Trailer Lighting Wiring Diagram - ANSI / CSA ..........................................................5 - 10
Trailer Lighting Wiring Diagram - Mechanical Axle, CE ............................................5 - 11
Trailer Lighting Wiring Diagram - Electric Axle, AS ...................................................5 - 12
Trailer Lighting Wiring Diagram - Hydraulic Axle, AS ................................................5 - 13
Control Box Wiring Diagrams - ANSI/CSA
Ground Control Box Wiring Diagram - ANSI/CSA ....................................................5 - 14
Platform Control Box Wiring Diagram - ANSI/CSA ...................................................5 - 16
Control Box Wiring Diagrams - CE
Ground Control Box Wiring Diagram - CE ................................................................5 - 18
Platform Control Box Wiring Diagram - CE...............................................................5 - 20
Control Box Wiring Diagrams - AS
Platform Control Box Wiring Diagram - AS ...............................................................5 - 21
Electrical Schematics - ANSI/CSA
Electrical Schematic - ANSI/CSA .............................................................................5 - 22
Electrical Schematics - CE
Electrical Schematic - CE ........................................................................................5 - 28
Electrical Schematics - AS
Electrical Schematic - AS .........................................................................................5 -34
Hydraulic Schematics
Hydraulic Schematic ................................................................................................5 - 40
TABLE OF CONTENTS
xiii
Genie TZ-50 Part No. 824982
January 2016
xiv
This page intentionally left blank.
Section 2 • Specifi cationsJanuary 2016
Part No. 824982 Genie TZ-50 2 - 1
Specifi cations
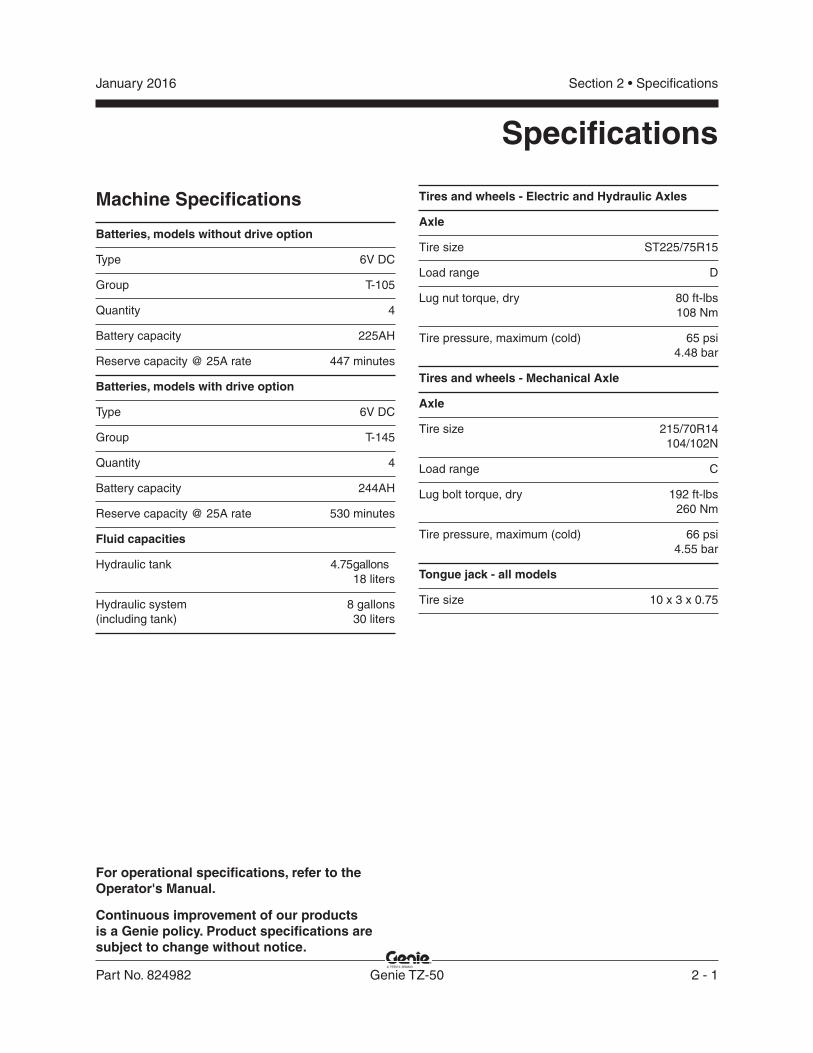
Machine Specifi cations
Batteries, models without drive option
Type 6V DC
Group T-105
Quantity 4
Battery capacity 225AH
Reserve capacity @ 25A rate 447 minutes
Batteries, models with drive option
Type 6V DC
Group T-145
Quantity 4
Battery capacity 244AH
Reserve capacity @ 25A rate 530 minutes
Fluid capacities
Hydraulic tank 4.75 gallons 18 liters
Hydraulic system 8 gallons (including tank) 30 liters
Tires and wheels - Electric and Hydraulic Axles
Axle
Tire size ST225/75R15
Load range D
Lug nut torque, dry 80 ft-lbs 108 Nm
Tire pressure, maximum (cold) 65 psi 4.48 bar
Tires and wheels - Mechanical Axle
Axle
Tire size 215/70R14 104/102N
Load range C
Lug bolt torque, dry 192 ft-lbs 260 Nm
Tire pressure, maximum (cold) 66 psi 4.55 bar
Tongue jack - all models
Tire size 10 x 3 x 0.75
For operational specifi cations, refer to the Operator's Manual.
Continuous improvement of our products is a Genie policy. Product specifi cations are subject to change without notice.
Section 2 • Specifi cations January 2016
2 - 2 Genie TZ-50 Part No. 824982
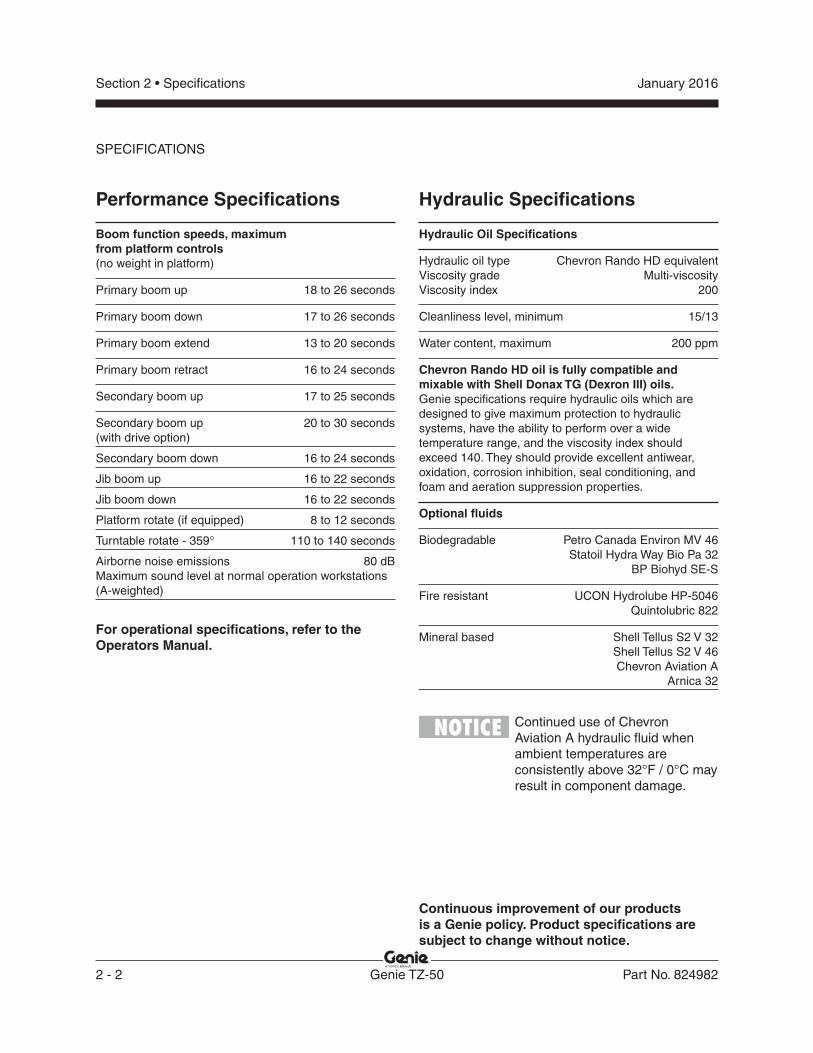
Hydraulic Specifi cations
Hydraulic Oil Specifi cations
Hydraulic oil type Chevron Rando HD equivalentViscosity grade Multi-viscosityViscosity index 200
Cleanliness level, minimum 15/13
Water content, maximum 200 ppm
Chevron Rando HD oil is fully compatible and mixable with Shell Donax TG (Dexron III) oils.Genie specifi cations require hydraulic oils which are designed to give maximum protection to hydraulic systems, have the ability to perform over a wide temperature range, and the viscosity index should exceed 140. They should provide excellent antiwear, oxidation, corrosion inhibition, seal conditioning, and foam and aeration suppression properties.
Optional fl uids
Biodegradable Petro Canada Environ MV 46 Statoil Hydra Way Bio Pa 32 BP Biohyd SE-S
Fire resistant UCON Hydrolube HP-5046 Quintolubric 822
Mineral based Shell Tellus S2 V 32 Shell Tellus S2 V 46 Chevron Aviation A Arnica 32
Continued use of Chevron Aviation A hydraulic fl uid when ambient temperatures are consistently above 32°F / 0°C may result in component damage.
Performance Specifi cations
Boom function speeds, maximumfrom platform controls(no weight in platform)
Primary boom up 18 to 26 seconds
Primary boom down 17 to 26 seconds
Primary boom extend 13 to 20 seconds
Primary boom retract 16 to 24 seconds
Secondary boom up 17 to 25 seconds
Secondary boom up 20 to 30 seconds(with drive option)
Secondary boom down 16 to 24 seconds
Jib boom up 16 to 22 seconds
Jib boom down 16 to 22 seconds
Platform rotate (if equipped) 8 to 12 seconds
Turntable rotate - 359° 110 to 140 seconds
Airborne noise emissions 80 dBMaximum sound level at normal operation workstations (A-weighted)
SPECIFICATIONS
Continuous improvement of our products is a Genie policy. Product specifi cations are subject to change without notice.
For operational specifi cations, refer to the Operators Manual.
Section 2 • Specifi cationsJanuary 2016
Part No. 824982 Genie TZ-50 2 - 3
SPECIFICATIONS
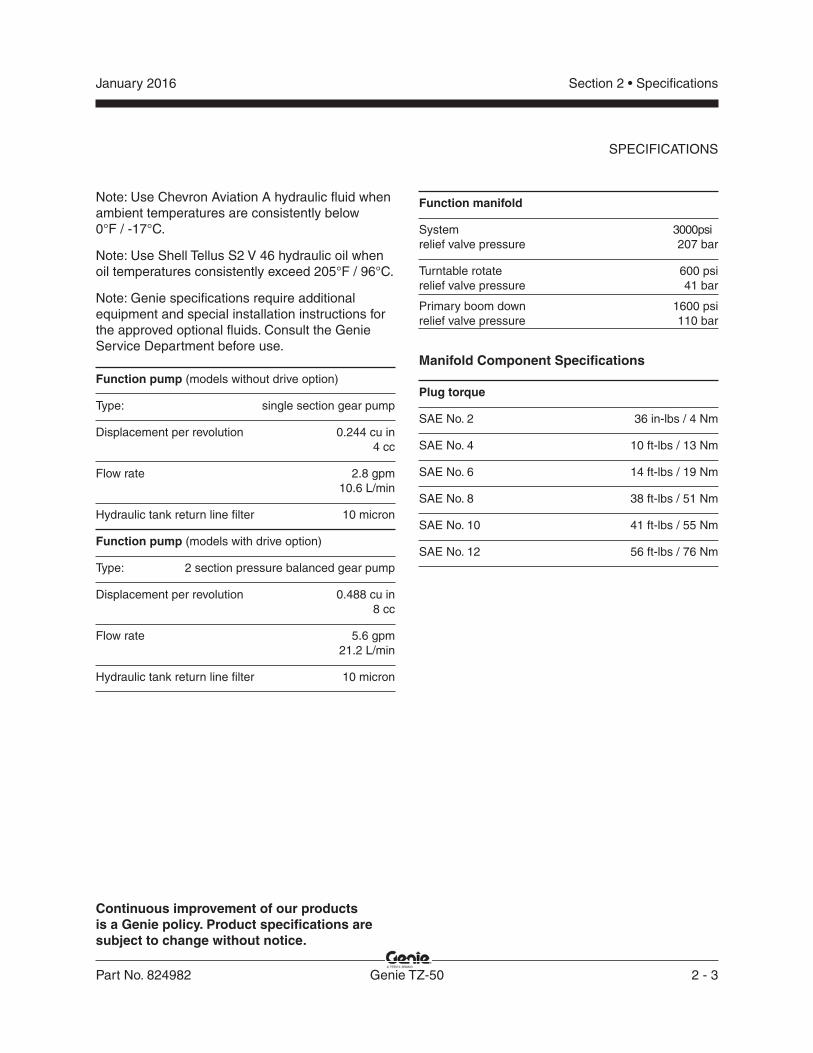
Note: Use Chevron Aviation A hydraulic fl uid when ambient temperatures are consistently below0°F / -17°C.
Note: Use Shell Tellus S2 V 46 hydraulic oil when oil temperatures consistently exceed 205°F / 96°C.
Note: Genie specifi cations require additional equipment and special installation instructions for the approved optional fl uids. Consult the Genie Service Department before use.
Function pump (models without drive option)
Type: single section gear pump
Displacement per revolution 0.244 cu in 4 cc
Flow rate 2.8 gpm 10.6 L/min
Hydraulic tank return line fi lter 10 micron
Function pump (models with drive option)
Type: 2 section pressure balanced gear pump
Displacement per revolution 0.488 cu in 8 cc
Flow rate 5.6 gpm 21.2 L/min
Hydraulic tank return line fi lter 10 micron
Function manifold
System 3000 psi relief valve pressure 207 bar
Turntable rotate 600 psirelief valve pressure 41 bar
Primary boom down 1600 psirelief valve pressure 110 bar
Manifold Component Specifi cations
Plug torque
SAE No. 2 36 in-lbs / 4 Nm
SAE No. 4 10 ft-lbs / 13 Nm
SAE No. 6 14 ft-lbs / 19 Nm
SAE No. 8 38 ft-lbs / 51 Nm
SAE No. 10 41 ft-lbs / 55 Nm
SAE No. 12 56 ft-lbs / 76 Nm
Continuous improvement of our products is a Genie policy. Product specifi cations are subject to change without notice.
Section 2 • Specifi cations January 2016
2 - 4 Genie TZ-50 Part No. 824982
SPECIFICATIONS
Continuous improvement of our products is a Genie policy. Product specifi cations are subject to change without notice.
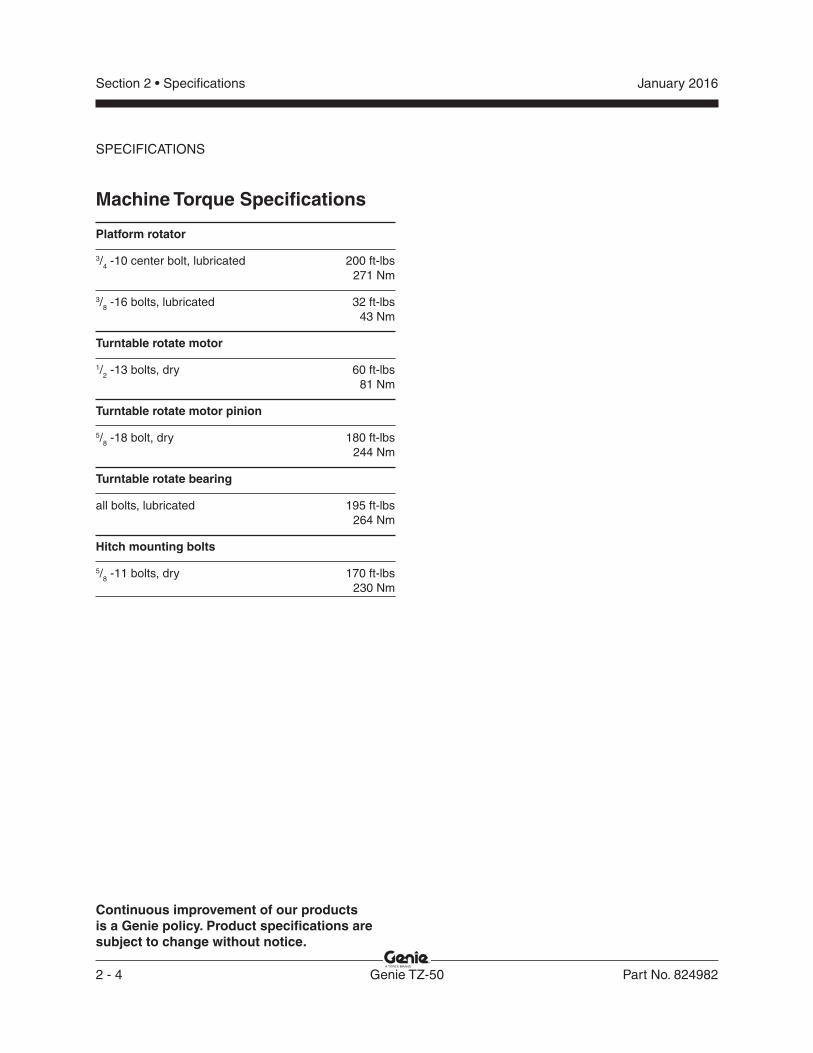
Machine Torque Specifi cations
Platform rotator
3/4 -10 center bolt, lubricated 200 ft-lbs 271 Nm
3/8 -16 bolts, lubricated 32 ft-lbs 43 Nm
Turntable rotate motor
1/2 -13 bolts, dry 60 ft-lbs 81 Nm
Turntable rotate motor pinion
5/8 -18 bolt, dry 180 ft-lbs 244 Nm
Turntable rotate bearing
all bolts, lubricated 195 ft-lbs 264 Nm
Hitch mounting bolts
5/8 -11 bolts, dry 170 ft-lbs 230 Nm
Section 2 • Specifi cationsJanuary 2016
Part No. 824982 Genie TZ-50 2 - 5
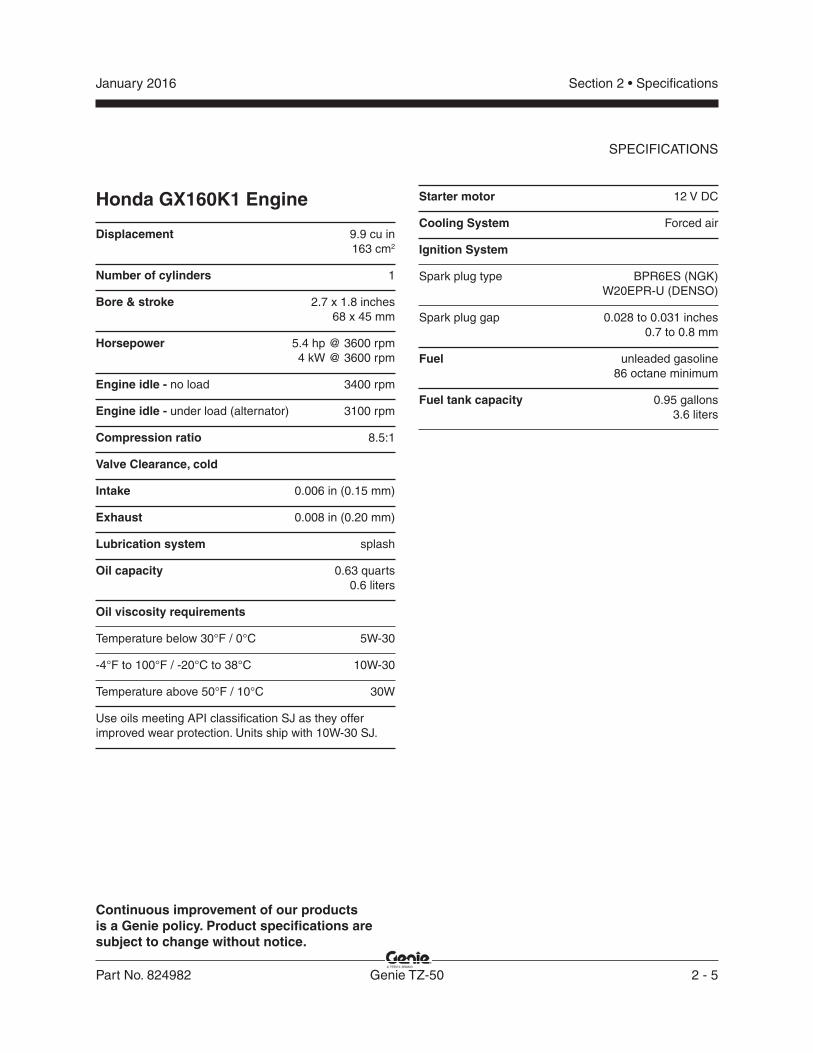
Honda GX160K1 Engine
Displacement 9.9 cu in 163 cm2
Number of cylinders 1
Bore & stroke 2.7 x 1.8 inches 68 x 45 mm
Horsepower 5.4 hp @ 3600 rpm 4 kW @ 3600 rpm
Engine idle - no load 3400 rpm
Engine idle - under load (alternator) 3100 rpm
Compression ratio 8.5:1
Valve Clearance, cold
Intake 0.006 in (0.15 mm)
Exhaust 0.008 in (0.20 mm)
Lubrication system splash
Oil capacity 0.63 quarts 0.6 liters
Oil viscosity requirements
Temperature below 30°F / 0°C 5W-30
-4°F to 100°F / -20°C to 38°C 10W-30
Temperature above 50°F / 10°C 30W
Use oils meeting API classifi cation SJ as they offer improved wear protection. Units ship with 10W-30 SJ.
Starter motor 12 V DC
Cooling System Forced air
Ignition System
Spark plug type BPR6ES (NGK) W20EPR-U (DENSO)
Spark plug gap 0.028 to 0.031 inches 0.7 to 0.8 mm
Fuel unleaded gasoline 86 octane minimum
Fuel tank capacity 0.95 gallons 3.6 liters
SPECIFICATIONS
Continuous improvement of our products is a Genie policy. Product specifi cations are subject to change without notice.
Section 2 • Specifi cations January 2016
2 - 6 Genie TZ-50 Part No. 824982
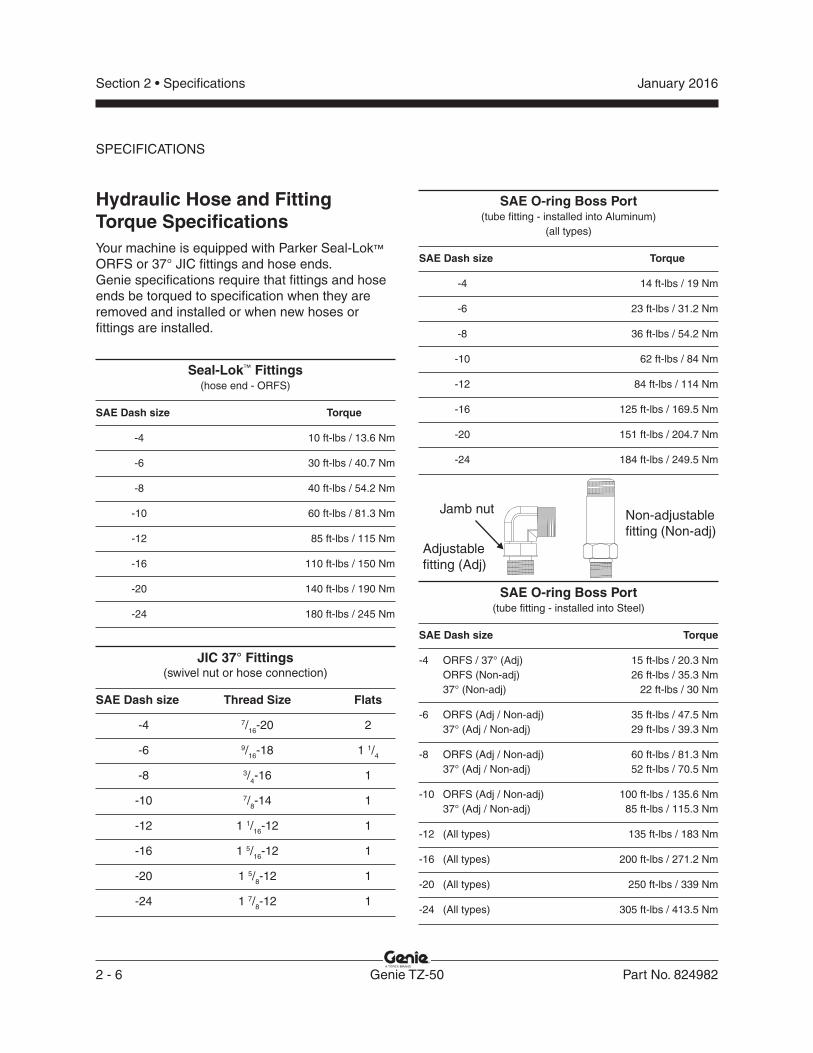
Hydraulic Hose and Fitting Torque Specifi cationsYour machine is equipped with Parker Seal-Lok™ ORFS or 37° JIC fi ttings and hose ends.Genie specifi cations require that fi ttings and hose ends be torqued to specifi cation when they are removed and installed or when new hoses or fi ttings are installed.
Seal-Lok™ Fittings
(hose end - ORFS)
SAE Dash size Torque
-4 10 ft-lbs / 13.6 Nm
-6 30 ft-lbs / 40.7 Nm
-8 40 ft-lbs / 54.2 Nm
-10 60 ft-lbs / 81.3 Nm
-12 85 ft-lbs / 115 Nm
-16 110 ft-lbs / 150 Nm
-20 140 ft-lbs / 190 Nm
-24 180 ft-lbs / 245 Nm
JIC 37° Fittings(swivel nut or hose connection)
SAE Dash size Thread Size Flats
-4 7/16-20 2
-6 9/16-18 1 1/4
-8 3/4-16 1
-10 7/8-14 1
-12 1 1/16-12 1
-16 1 5/16-12 1
-20 1 5/8-12 1
-24 1 7/8-12 1
SAE O-ring Boss Port(tube fi tting - installed into Aluminum)
(all types)
SAE Dash size Torque
-4 14 ft-lbs / 19 Nm
-6 23 ft-lbs / 31.2 Nm
-8 36 ft-lbs / 54.2 Nm
-10 62 ft-lbs / 84 Nm
-12 84 ft-lbs / 114 Nm
-16 125 ft-lbs / 169.5 Nm
-20 151 ft-lbs / 204.7 Nm
-24 184 ft-lbs / 249.5 Nm
SAE O-ring Boss Port(tube fi tting - installed into Steel)
SAE Dash size Torque
-4 ORFS / 37° (Adj) 15 ft-lbs / 20.3 Nm ORFS (Non-adj) 26 ft-lbs / 35.3 Nm 37° (Non-adj) 22 ft-lbs / 30 Nm
-6 ORFS (Adj / Non-adj) 35 ft-lbs / 47.5 Nm 37° (Adj / Non-adj) 29 ft-lbs / 39.3 Nm
-8 ORFS (Adj / Non-adj) 60 ft-lbs / 81.3 Nm 37° (Adj / Non-adj) 52 ft-lbs / 70.5 Nm
-10 ORFS (Adj / Non-adj) 100 ft-lbs / 135.6 Nm 37° (Adj / Non-adj) 85 ft-lbs / 115.3 Nm
-12 (All types) 135 ft-lbs / 183 Nm
-16 (All types) 200 ft-lbs / 271.2 Nm
-20 (All types) 250 ft-lbs / 339 Nm
-24 (All types) 305 ft-lbs / 413.5 Nm
Adjustablefi tting (Adj)
Non-adjustablefi tting (Non-adj)
Jamb nut
SPECIFICATIONS
Section 2 • Specifi cationsJanuary 2016
Part No. 824982 Genie TZ-50 2 - 7
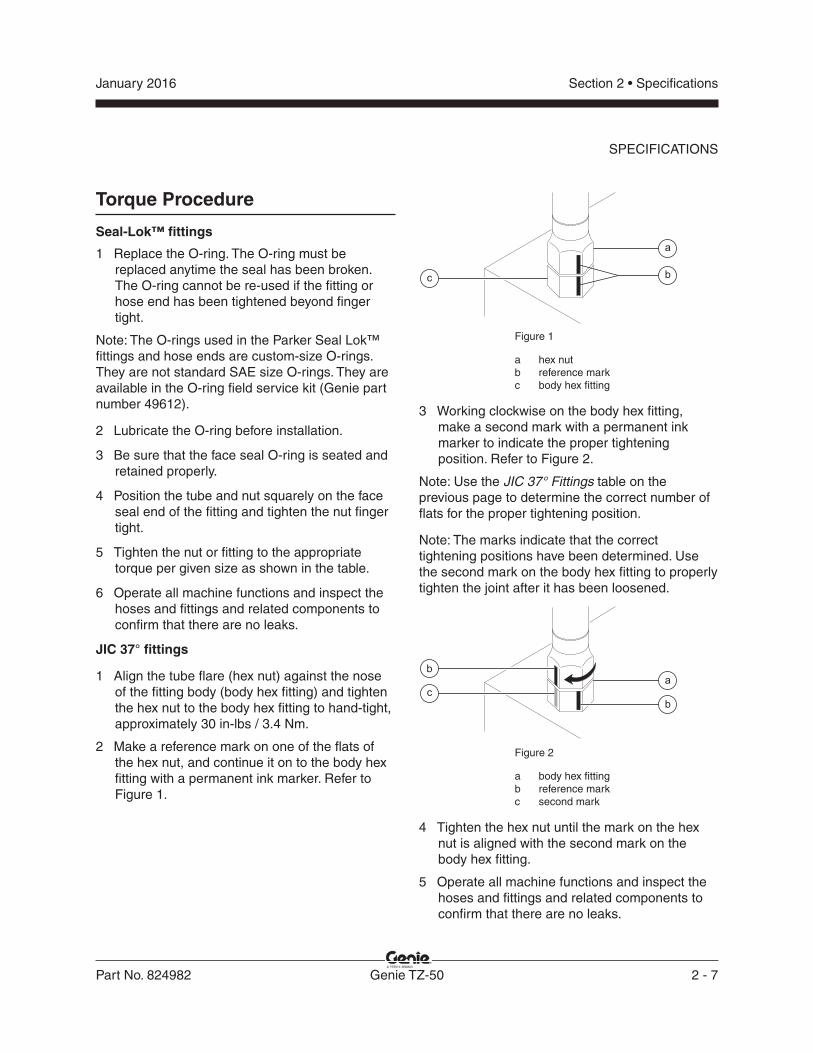
Torque Procedure
Seal-Lok™ fi ttings
1 Replace the O-ring. The O-ring must be replaced anytime the seal has been broken. The O-ring cannot be re-used if the fi tting or hose end has been tightened beyond fi nger tight.
Note: The O-rings used in the Parker Seal Lok™ fi ttings and hose ends are custom-size O-rings. They are not standard SAE size O-rings. They are available in the O-ring fi eld service kit (Genie part number 49612).
2 Lubricate the O-ring before installation.
3 Be sure that the face seal O-ring is seated and retained properly.
4 Position the tube and nut squarely on the face seal end of the fi tting and tighten the nut fi nger tight.
5 Tighten the nut or fi tting to the appropriate torque per given size as shown in the table.
6 Operate all machine functions and inspect the hoses and fi ttings and related components toconfi rm that there are no leaks.
JIC 37° fi ttings
1 Align the tube fl are (hex nut) against the nose of the fi tting body (body hex fi tting) and tighten the hex nut to the body hex fi tting to hand-tight, approximately 30 in-lbs / 3.4 Nm.
2 Make a reference mark on one of the fl ats of the hex nut, and continue it on to the body hex fi tting with a permanent ink marker. Refer to Figure 1.
Figure 1
a hex nutb reference markc body hex fi tting
3 Working clockwise on the body hex fi tting, make a second mark with a permanent ink marker to indicate the proper tightening position. Refer to Figure 2.
Note: Use the JIC 37° Fittings table on the previous page to determine the correct number of fl ats for the proper tightening position.
Note: The marks indicate that the correct tightening positions have been determined. Use the second mark on the body hex fi tting to properly tighten the joint after it has been loosened.
Figure 2
a body hex fi ttingb reference markc second mark
4 Tighten the hex nut until the mark on the hex nut is aligned with the second mark on the body hex fi tting.
5 Operate all machine functions and inspect the hoses and fi ttings and related components toconfi rm that there are no leaks.
a
bc
a
bc
b
SPECIFICATIONS
Section 2 • Specifi cations January 2016
2 - 8 Genie TZ-50 Part No. 824982
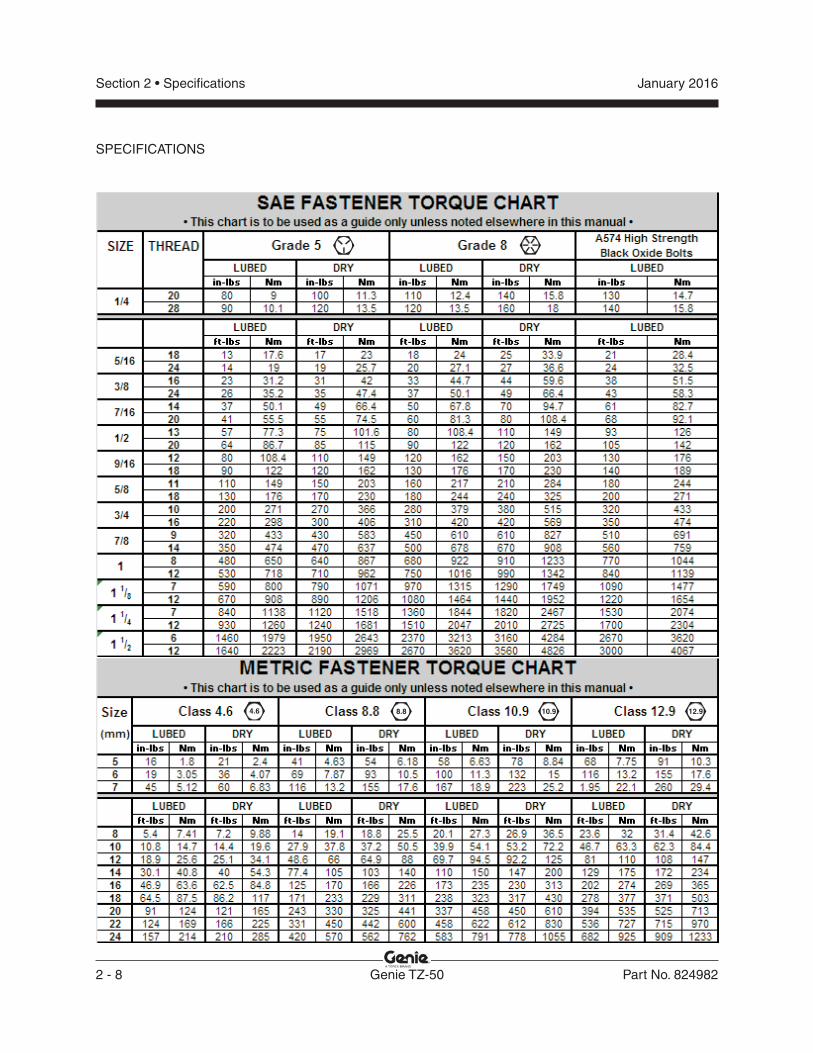
10.9 12.98.84.6
SPECIFICATIONS
Part No. 824982 Genie TZ-50 3 - 1
January 2016 Section 3 • Scheduled Maintenance Procedures
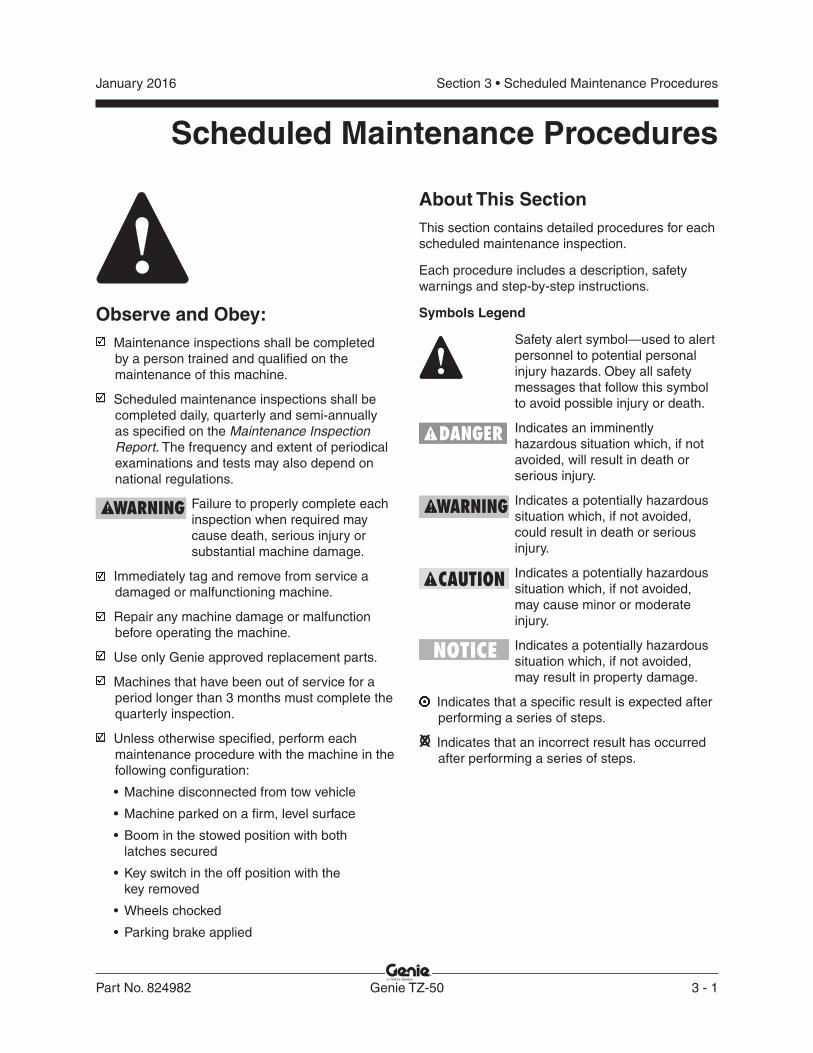
Scheduled Maintenance Procedures
Observe and Obey: Maintenance inspections shall be completed
by a person trained and qualifi ed on the maintenance of this machine.
Scheduled maintenance inspections shall be completed daily, quarterly and semi-annually as specifi ed on the Maintenance Inspection Report. The frequency and extent of periodical examinations and tests may also depend on national regulations.
Failure to properly complete each inspection when required may cause death, serious injury or substantial machine damage.
Immediately tag and remove from service a damaged or malfunctioning machine.
Repair any machine damage or malfunction before operating the machine.
Use only Genie approved replacement parts.
Machines that have been out of service for a period longer than 3 months must complete the quarterly inspection.
Unless otherwise specifi ed, perform each maintenance procedure with the machine in the following confi guration:
• Machine disconnected from tow vehicle
• Machine parked on a fi rm, level surface
• Boom in the stowed position with both latches secured
• Key switch in the off position with the key removed
• Wheels chocked
• Parking brake applied
About This SectionThis section contains detailed procedures for each scheduled maintenance inspection.
Each procedure includes a description, safety warnings and step-by-step instructions.
Symbols Legend
Safety alert symbol—used to alert personnel to potential personal injury hazards. Obey all safety messages that follow this symbol to avoid possible injury or death.
Indicates an imminently hazardous situation which, if not avoided, will result in death or serious injury.
Indicates a potentially hazardous situation which, if not avoided, could result in death or serious injury.
Indicates a potentially hazardous situation which, if not avoided, may cause minor or moderate injury.
Indicates a potentially hazardous situation which, if not avoided, may result in property damage.
Indicates that a specifi c result is expected after performing a series of steps.
Indicates that an incorrect result has occurred after performing a series of steps.

3 - 2 Genie TZ-50 Part No. 824982
January 2016Section 3 • Scheduled Maintenance Procedures
SCHEDULED MAINTENANCE PROCEDURES
Maintenance Symbols Legend
The following symbols have been used in this manual to help communicate the intent of the instructions. When one or more of the symbols appears at the beginning of a maintenance procedure, it conveys the meaning below.
Indicates that tools will be required to perform this procedure.
Indicates that new parts will be required to perform this procedure.
Indicates that a cold engine will be required to perform this procedure.
Indicates that a warm engine will be required to perform this procedure.
Indicates that dealer service is required to perform this procedure.
Pre-delivery Preparation Report
The pre-delivery preparation report contains checklists for each type of scheduled inspection.
Make copies of the Pre-delivery Preparation report to use for each inspection. Store completed forms as required.
Maintenance Schedule
There are fi ve types of maintenance inspections that must be performed according to a schedule—daily, quarterly, semi-annually, annually, and two year. The Scheduled Maintenance Procedures Section and the Maintenance Inspection Report have been divided into fi ve subsections—A, B, C, D, and E. Use the following chart to determine which group(s) of procedures are required to perform a scheduled inspection.
Inspection Checklist
Daily or every 8 hours A
Quarterly or every 250 hours orevery 3000 miles / 4800 km A + B
Semi-annually or every 500 hours orevery 6000 miles / 9600 km A + B + C
Annually or every 1000 hours orevery 12,000 miles / 19,300 km A + B + C + D
Two year or every 2000 hours A + B + C + D + E
Maintenance Inspection Report
The maintenance inspection report contains checklists for each type of scheduled inspection.
Make copies of the Maintenance Inspection Report to use for each inspection. Maintain completed forms for a minimum of 4 years or in compliance with employer, jobsite and governmental regulations and requirements.
Part No. 824982 Genie TZ-50 3 - 3
January 2016 Section 3 • Scheduled Maintenance Procedures
Pre-Delivery Preparation
Pre-Delivery Preparation Y N R
Pre-operation inspection completed
Maintenance items completed
Function tests completed
Model
Serial number
Date
Machine owner
Inspected by (print)
Inspector signature
Inspector title
Inspector company
InstructionsUse the operator’s manual on your machine.
The Pre-delivery Preparation consists of completing the Pre-operation Inspection, the Maintenance items and the Function Tests.
Use this form to record the results. Place a check in the appropriate box after each part is completed. Follow the instructions in the operator’s manual.
If any inspection receives an N, remove the machine from service, repair and re-inspect it. After repair, place a check in the R box.
LegendY = yes, completed N = no, unable to complete R = repaired
Comments
FundamentalsIt is the responsibility of the dealer to perform the Pre-delivery Preparation.
The Pre-delivery Preparation is performed prior to each delivery. The inspection is designed to discover if anything is apparently wrong with a machine before it is put into service.
A damaged or modifi ed machine must never be used. If damage or any variation from factory delivered condition is discovered, the machine must be tagged and removed from service.
Repairs to the machine may only be made by a qualifi ed service technician, according to the manufacturer's specifi cations.
Scheduled maintenance inspections shall be performed by qualifi ed service technicians, according to the manufacturer's specifi cations and the requirements listed in the responsibilities manual.
Terex South Dakota, Inc USA500 Oak Wood Road PO Box 1150Watertown, SD 57201-6150(605) 882-4000
Genie UKThe Maltings, Wharf Road
Grantham, LincolnshireNG31- 6BH England
(44) 1476-584333
3 - 4 Genie TZ-50 Part No. 824982
January 2016Section 3 • Scheduled Maintenance Procedures
This page intentionally left blank.
Part No. 824982 Genie TZ-50 3 - 5
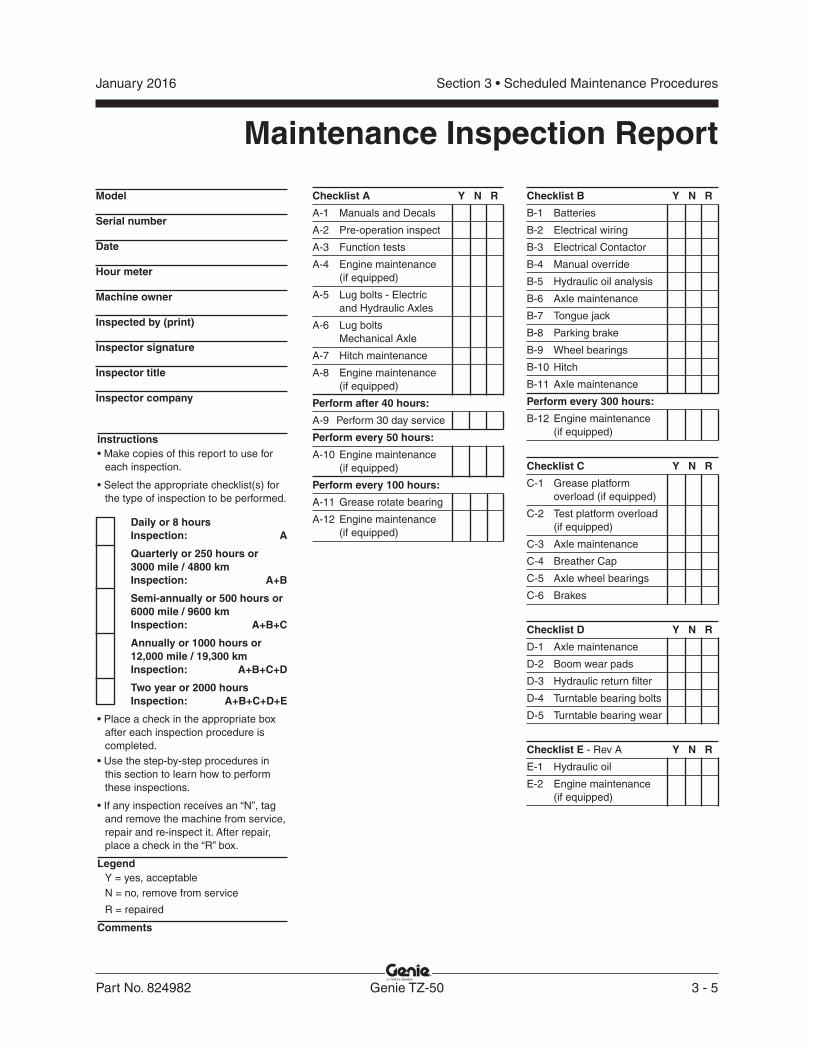
January 2016 Section 3 • Scheduled Maintenance Procedures
Maintenance Inspection Report
Checklist B Y N R
B-1 Batteries
B-2 Electrical wiring
B-3 Electrical Contactor
B-4 Manual override
B-5 Hydraulic oil analysis
B-6 Axle maintenance
B-7 Tongue jack
B-8 Parking brake
B-9 Wheel bearings
B-10 Hitch
B-11 Axle maintenance
Perform every 300 hours:
B-12 Engine maintenance(if equipped)
Checklist C Y N R
C-1 Grease platformoverload (if equipped)
C-2 Test platform overload(if equipped)
C-3 Axle maintenance
C-4 Breather Cap
C-5 Axle wheel bearings
C-6 Brakes
Checklist D Y N R
D-1 Axle maintenance
D-2 Boom wear pads
D-3 Hydraulic return fi lter
D-4 Turntable bearing bolts
D-5 Turntable bearing wear
Checklist E - Rev A Y N R
E-1 Hydraulic oil
E-2 Engine maintenance(if equipped)
Checklist A Y N R
A-1 Manuals and Decals
A-2 Pre-operation inspect
A-3 Function tests
A-4 Engine maintenance(if equipped)
A-5 Lug bolts - Electric and Hydraulic Axles
A-6 Lug boltsMechanical Axle
A-7 Hitch maintenance
A-8 Engine maintenance(if equipped)
Perform after 40 hours:
A-9 Perform 30 day service
Perform every 50 hours:
A-10 Engine maintenance(if equipped)
Perform every 100 hours:
A-11 Grease rotate bearing
A-12 Engine maintenance(if equipped)
Instructions• Make copies of this report to use for
each inspection.
• Select the appropriate checklist(s) for the type of inspection to be performed.
Daily or 8 hoursInspection: A
Quarterly or 250 hours or3000 mile / 4800 kmInspection: A+B
Semi-annually or 500 hours or 6000 mile / 9600 kmInspection: A+B+C
Annually or 1000 hours or12,000 mile / 19,300 kmInspection: A+B+C+D
Two year or 2000 hoursInspection: A+B+C+D+E
• Place a check in the appropriate box after each inspection procedure is completed.
• Use the step-by-step procedures in this section to learn how to perform these inspections.
• If any inspection receives an “N”, tag and remove the machine from service, repair and re-inspect it. After repair, place a check in the “R” box.
LegendY = yes, acceptableN = no, remove from service
R = repaired
Comments
Model
Serial number
Date
Hour meter
Machine owner
Inspected by (print)
Inspector signature
Inspector title
Inspector company

3 - 6 Genie TZ-50 Part No. 824982
January 2016Section 3 • Scheduled Maintenance Procedures
A-1Inspect the Manuals and DecalsGenie specifi cations require that this procedure be performed daily or every 8 hours, whichever comes fi rst.
Maintaining the operator’s and safety manuals in good condition is essential to safe machine operation. Manuals are included with each machine and should be stored in the container provided in the platform. An illegible or missing manual will not provide safety and operational information necessary for a safe operating condition.
In addition, maintaining all of the safety and instructional decals in good condition is mandatory for safe machine operation. Decals alert operators and personnel to the many possible hazards associated with using this machine. They also provide users with operation and maintenance information. An illegible decal will fail to alert personnel of a procedure or hazard and could result in unsafe operating conditions.
1 Check to make sure that the operator's and safety manuals are present and complete in the storage container on the platform.
2 Examine the pages of each manual to be sure that they are legible and in good condition.
Result: The operator's manual is appropriate for the machine and all manuals are legible and in good condition.
Result: The operator's manual is not appropriate for the machine or all manuals are not in good condition or are illegible. Remove the machine from service until the manual is replaced.
Checklist A Procedures
3 Open the operator's manual to the decals inspection section. Carefully and thoroughly inspect all decals on the machine for legibility and damage.
Result: The machine is equipped with all required decals, and all decals are legible and in good condition.
Result: The machine is not equipped with all required decals, or one or more decals are illegible or in poor condition. Remove the machine from service until the decals are replaced.
4 Always return the manuals to the storage container after use.
Note: Contact your authorized Genie distributor or Genie if replacement manuals or decals are needed.
Part No. 824982 Genie TZ-50 3 - 7
January 2016 Section 3 • Scheduled Maintenance Procedures
CHECKLIST A PROCEDURES
A-2Perform Pre-operation InspectionCompleting a Pre-operation Inspection is essential to safe machine operation. The Pre-operation Inspection is a visual inspection performed by the operator prior to each work shift. The inspection is designed to discover if anything is apparently wrong with a machine before the operator performs the function tests. The Pre-operation Inspection also serves to determine if routine maintenance procedures are required.
Complete information to perform this procedure is available in the appropriate operator's manual. Refer to the Operator's Manual on your machine.
A-3Perform Function TestsCompleting the function tests is essential to safe machine operation. Function tests are designed to discover any malfunctions before the machine is put into service. A malfunctioning machine must never be used. If malfunctions are discovered, the machine must be tagged and removed from service.
Complete information to perform this procedure is available in the appropriate operator's manual. Refer to the Operator's Manual on your machine.
A-4Perform Engine Maintenance(if equipped)
Engine specifi cations require that this procedure be performed every 8 hours or daily, whichever comes fi rst.
• Check oil level• Check air cleaner
Required maintenance procedures and additional engine information is available in the Honda GX160 Engine Owner Manual(Honda part number 31ZH7630).
Honda GX160 Owner's ManualGenie part number 97228
3 - 8 Genie TZ-50 Part No. 824982
January 2016Section 3 • Scheduled Maintenance Procedures
CHECKLIST A PROCEDURES
A-6Torque the Lug Bolts -Mechanical Axle
Axle specifi cations require that this procedure be performed initially after 50 km, or 50 km after a wheel change.
Proper axle maintenance, following the axle manufacturer's maintenance schedule, is essential to good axle performance and service life. Failure to perform the maintenance procedures can lead to poor axle performance and component damage.
1 Check each lug bolt for proper torque. Refer to Section 2, Specifi cations.
Required maintenance procedures and additional axle information is available in the KNOTT Axle Service Manual (KNOTT part number P005).
KNOTT Axle Service ManualGenie part number 84443
A-5Torque the Lug Bolts -Electric and Hydraulic Axles
Axle specifi cations require that this procedure be performed initially after 10, 25 and 50 miles.
Proper axle maintenance, following the axle manufacturer's maintenance schedule, is essential to good axle performance and service life. Failure to perform the maintenance procedures can lead to poor axle performance and component damage.
1 Check each lug bolt for proper torque. Refer to Section 2, Specifi cations.
Required maintenance procedures and additional axle information is available in the Dexter Axle Operation Maintenance Service Manual(Dexter part number LIT-001-00).
Dexter Axle Operation Maintenance Service ManualGenie part number 84376
Part No. 824982 Genie TZ-50 3 - 9
January 2016 Section 3 • Scheduled Maintenance Procedures
A-7Perform Hitch Maintenance -Hydraulic Axle
Hitch specifi cations require that this procedure be performed weekly.
• Brake fl uid level• Inspect actuator
Required maintenance procedures and additional hitch information is available in the Demco Model 91 Brake Actuators Owner/Operator Manual(Demco part number BH20023).
Demco Model 91 Owner/Operator ManualGenie part number 84592
A-8Perform Engine Maintenance(if equipped)
Engine specifi cations require that this procedure be performed initially at 20 hours or 30 days, whichever comes fi rst.
• Replace engine oil
Required maintenance procedures and additional engine information is available in the Honda GX160 Engine Owner Manual(Honda part number 31ZH7630).
Honda GX160 Owner's ManualGenie part number 97228
CHECKLIST A PROCEDURES

3 - 10 Genie TZ-50 Part No. 824982
January 2016Section 3 • Scheduled Maintenance Procedures
A-9Perform 30 Day Service
The 30 day maintenance procedure is a onetime procedure to be performed after the fi rst 30 days or 40 hours of usage. After this interval, refer to the maintenance tables for continued scheduled maintenance.
1 Perform the following maintenance procedures:
• A-11 Grease the Turntable Rotation Bearing and Rotate Gear
• B-10 Inspect the Parking Brake
• D-3 Replace the Hydraulic Tank Return Filter
• D-4 Check the Turnable Rotation Bearing Bolts
CHECKLIST A PROCEDURES
A-10Perform Engine Maintenance(if equipped)
Engine specifi cations require that this procedure be performed every 50 hours or quarterly, whichever comes fi rst. Perform this procedure more often if dusty conditions exist.
• Air fi lter
Required maintenance procedures and additional engine information is available in the Honda GX160 Engine Owner Manual(Honda part number 31ZH7630).
Honda GX160 Owner's ManualGenie part number 97228
Part No. 824982 Genie TZ-50 3 - 11
January 2016 Section 3 • Scheduled Maintenance Procedures
A-11Grease the Turntable Rotation Bearing and Rotate Gear
Genie specifi cations require that this procedure be performed every 100 hours of operation.
Regular application of lubrication to the turntable bearing and rotate gear is essential to good machine performance and service life. Continued use of an insuffi ciently greased bearing and gear will result in component damage.
1 Raise the boom enough to access the turntable bearing.
2 Locate the grease fi tting below the ground control box.
3 Pump multipurpose grease into the turntable rotation bearing. Rotate the turntable in increments of 4 to 5 inches / 10 to 13 cm at a time and repeat this step until the entire bearing has been greased.
4 Apply grease to each tooth of the drive gear located under the turntable.
Grease type Multipurpose grease
CHECKLIST A PROCEDURES
A-12Perform Engine Maintenance(if equipped)
Engine specifi cations require that this procedure be performed every 6 months or every 100 hours, whichever comes fi rst. Perform this procedure more often if dusty conditions exist.
• Replace engine oil• Clean fuel sediment cup• Check/clean spark plug
Required maintenance procedures and additional engine information is available in the Honda GX160 Engine Owner Manual(Honda part number 31ZH7630).
Honda GX160 Owner's ManualGenie part number 97228
3 - 12 Genie TZ-50 Part No. 824982
January 2016Section 3 • Scheduled Maintenance Procedures
B-1Inspect the Batteries
Proper battery condition is essential to good machine performance and operational safety. Improper fl uid levels or damaged cables and connections can result in component damage and hazardous conditions.
Electrocution hazard. Contact with electrically charged circuits could result in death or serious injury. Remove all rings, watches and other jewelry.
Bodily injury hazard. Batteries contain acid. Avoid spilling or contacting battery acid. Neutralize battery acid spills with baking soda and water.
Note: Perform this procedure after fully charging the batteries.
Note: For a more accurate determination of battery condition, fully charge the batteries and allow the batteries to rest 24 hours before performing this procedure to allow the battery cells to equalize.
1 Put on protective clothing and eye wear.
2 Be sure that the battery cable connections are free of corrosion.
Checklist B Procedures
3 Be sure that the battery retaining fasteners and cable connections are tight.
4 Remove the battery vent caps from all batteries and check the specifi c gravity of each battery cell with a hydrometer.
Result: If any battery cell displays a specifi c gravity of less than 1.026, the battery must be replaced.
5 Check the battery acid level of each battery. If needed, replenish with distilled water to the bottom of the battery fi ll tube. Do not overfi ll.
6 Install the battery vent caps.
7 Check each battery pack and verify that the batteries are wired correctly.
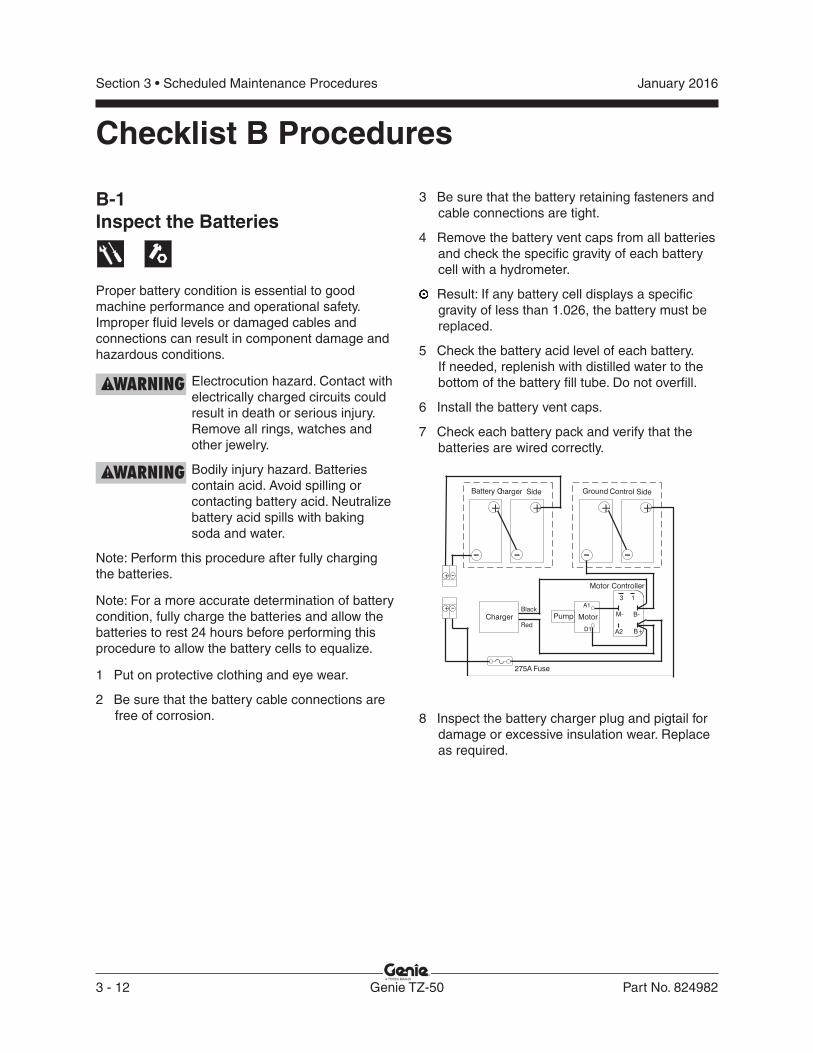
8 Inspect the battery charger plug and pigtail for damage or excessive insulation wear. Replace as required.
+ -
M-
A2
1
B-
B+
3+
+
-
+
-
+
-
+
-
Motor Controller
Battery Charger Side Ground Control Side
Pump
A1
D1
MotorCharger
275A Fuse
Black
Red
-
Part No. 824982 Genie TZ-50 3 - 13
January 2016 Section 3 • Scheduled Maintenance Procedures
CHECKLIST B PROCEDURES
B-2Inspect the Electrical WiringMaintaining electrical wiring in good condition is essential to safe operation and good machine performance. Failure to fi nd and replace burnt, chafed, corroded or pinched wires could result in unsafe operating conditions and may cause component damage.
Electrocution hazard. Contact with hot or live circuits couldresult in death or serious injury. Remove all rings, watches and other jewelry.
1 Inspect the following areas for burnt, chafed, corroded and loose wires:
• Turntable area
• Ground controls
• Power unit wiring
2 Turn the key switch to ground control and pull out the red Emergency Stop button to the on position at both the ground and platform controls.
3 Raise the secondary boom until the platform is approximately 10 feet / 3 m off the ground.
4 Inspect the boom storage area for burnt, chafed and pinched cables.
5 Lower the boom to the stowed position and turn the machine off.
6 Inspect the following areas for burnt, chafed, corroded, pinched and loose wires:
• Boom to platform cable harness
• Primary and secondary booms
9 Connect the battery charger to a properly grounded 115V/60Hz or 230V/60Hz single phase AC power supply.
Result: The charger should operate and begin charging the batteries.
Result: Simultaneously, the charger alarm sounds and the LED's blink one time. Correct the charger connections at the fuse and battery. The charger will then operate correctly and begin charging the batteries.
Result: Simultaneously, the charger alarm sounds and the LED's blink two times. The input voltage is too low or too high. Correct the voltage issue. The charger will then operate correctly and begin charging the batteries.
Result: Simultaneously, the charger alarm sounds and the LED's blink three times. The charger is overheated. Allow the charger to cool. The charger will then operate correctly and begin charging the batteries.
Note: If you have any further questions regarding the battery charger operation, please contact Genie Product Support.
3 - 14 Genie TZ-50 Part No. 824982
January 2016Section 3 • Scheduled Maintenance Procedures
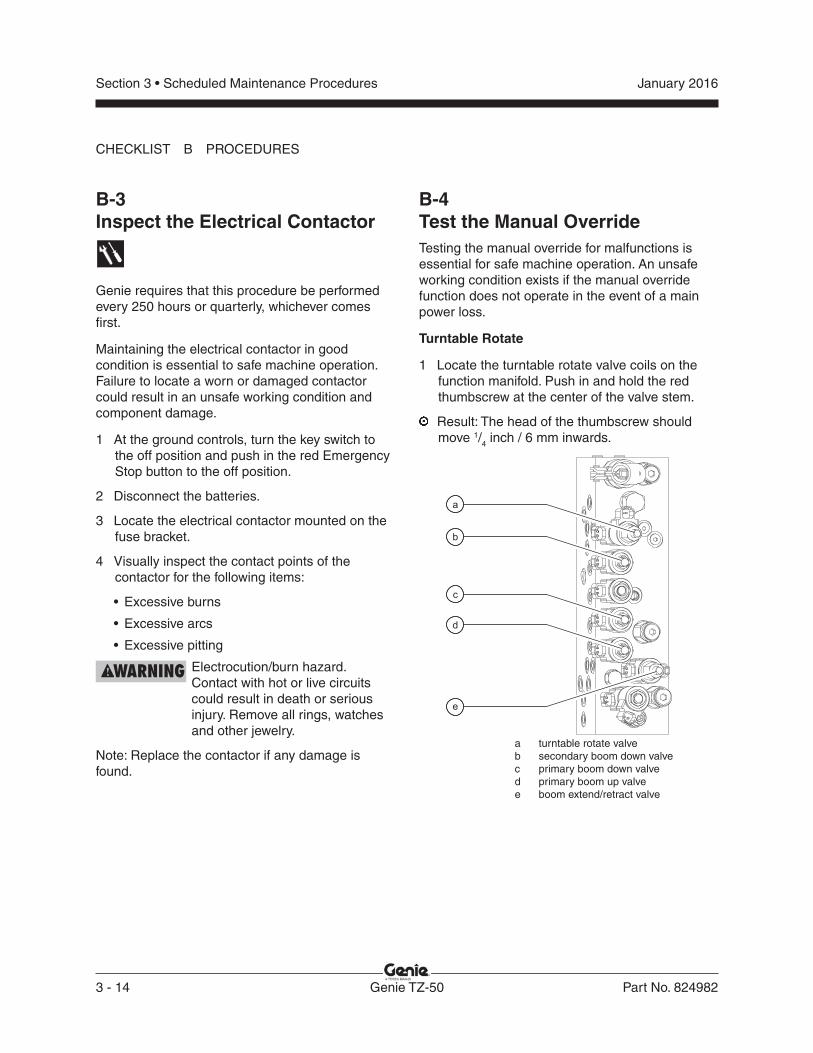
B-4Test the Manual OverrideTesting the manual override for malfunctions is essential for safe machine operation. An unsafe working condition exists if the manual override function does not operate in the event of a main power loss.
Turntable Rotate
1 Locate the turntable rotate valve coils on the function manifold. Push in and hold the red thumbscrew at the center of the valve stem.
Result: The head of the thumbscrew should move 1/4 inch / 6 mm inwards.
a turntable rotate valveb secondary boom down valvec primary boom down valved primary boom up valvee boom extend/retract valve
B-3Inspect the Electrical Contactor
Genie requires that this procedure be performed every 250 hours or quarterly, whichever comes fi rst.
Maintaining the electrical contactor in good condition is essential to safe machine operation. Failure to locate a worn or damaged contactor could result in an unsafe working condition and component damage.
1 At the ground controls, turn the key switch to the off position and push in the red Emergency Stop button to the off position.
2 Disconnect the batteries.
3 Locate the electrical contactor mounted on the fuse bracket.
4 Visually inspect the contact points of the contactor for the following items:
• Excessive burns
• Excessive arcs
• Excessive pitting
Electrocution/burn hazard. Contact with hot or live circuits could result in death or serious injury. Remove all rings, watches and other jewelry.
Note: Replace the contactor if any damage is found.
CHECKLIST B PROCEDURES
a
b
c
d
e
Part No. 824982 Genie TZ-50 3 - 15
January 2016 Section 3 • Scheduled Maintenance Procedures
2 Release the red thumbscrew at the center of the valve stem, to reset the valve.
Note: The valve spool must be reset for the turntable rotate function to operate from the machine controls.
3 Pull out and hold the red thumbscrew at the center of the valve stem.
Result: The head of the thumbscrew should move 1/4 inch / 6 mm outwards.
4 Release the red thumbscrew at the center of the valve stem, to reset the valve.
Note: The valve spool must be reset for the turntable rotate function to operate from the machine controls.
Secondary Boom Down
5 Locate the secondary boom down valve coil on the function manifold. Push in and turn fully in a counter clockwise direction the red thumbscrew at the center of the valve stem.
Result: The head of the thumbscrew should rotate one-quarter turn in a counter clockwise direction.
6 Push in and turn fully in a clockwise direction the red thumbscrew at the center of the valve stem, to reset the valve.
Note: The valve spool must be reset for the secondary boom down function to operate from the machine controls.
CHECKLIST B PROCEDURES
Primary Boom Down
7 Locate the primary boom down valve coil on the function manifold. Push in and turn fully in a counter clockwise direction the red thumbscrew at the center of the valve stem.
Result: The head of the thumbscrew should rotate one-quarter turn in a counter clockwise direction.
8 Push in and turn fully in a clockwise direction the red thumbscrew at the center of the valve stem, to reset the valve.
Note: The valve spool must be reset for the primary boom down function to operate from the machine controls.
Primary Boom Up
9 Locate the primary boom up valve coil on the function manifold. Push in and turn fully in a counter clockwise direction the red thumbscrew at the center of the valve stem.
Result: The head of the thumbscrew should rotate one-quarter turn in a counter clockwise direction.
10 Push in and turn fully in a clockwise direction the red thumbscrew at the center of the valve stem, to reset the valve.
Note: The valve spool must be reset for the primary boom up function to operate from the machine controls.
3 - 16 Genie TZ-50 Part No. 824982
January 2016Section 3 • Scheduled Maintenance Procedures
Boom Extend/Retract
11 Locate the boom extend/retract valve coils on the function manifold. Push in and hold the red thumbscrew at the center of the valve stem.
Result: The head of the thumbscrew should move 1/4 inch / 6 mm inwards.
12 Release the red thumbscrew at the center of the valve stem, to reset the valve.
Note: The valve spool must be reset for the turntable rotate function to operate from the machine controls.
13 Locate the boom extend/retract valve coils on the function manifold. Pull out and hold the red thumbscrew at the center of the valve stem.
Result: The head of the thumbscrew should move 1/4 inch / 6 mm outwards.
14 Release the red thumbscrew at the center of the valve stem, to reset the valve.
Note: The valve spool must be reset for the turntable rotate function to operate from the machine controls.
CHECKLIST B PROCEDURES
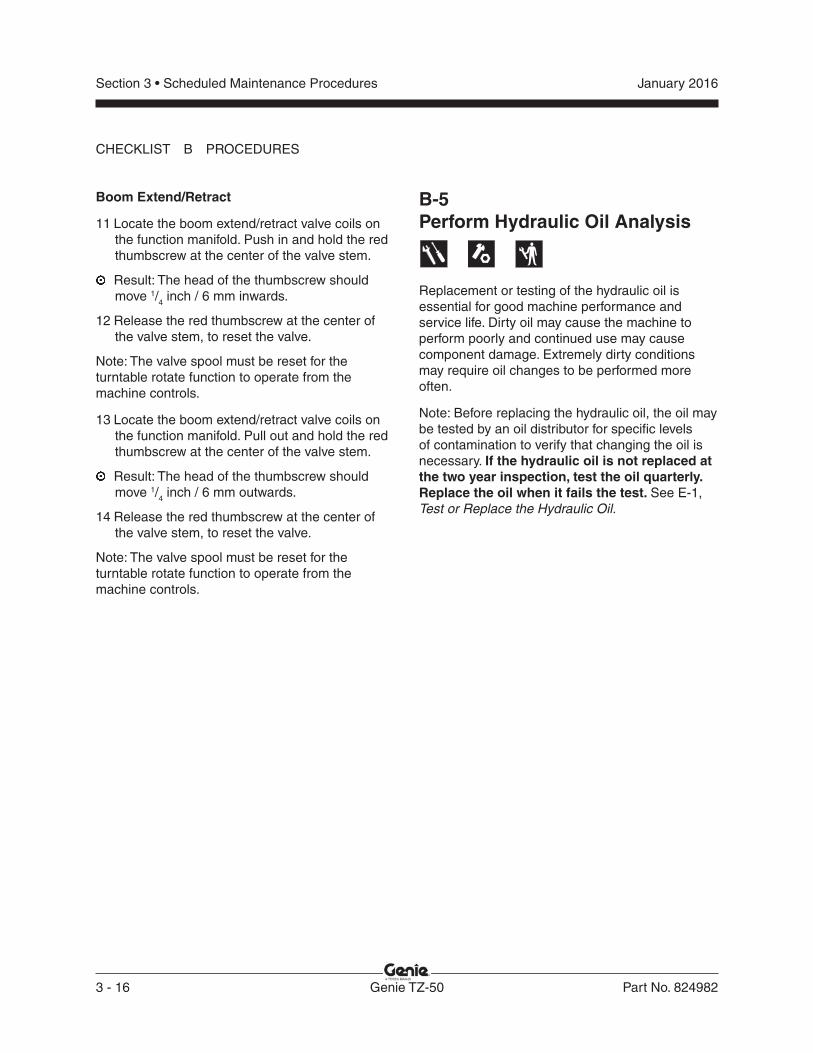
B-5Perform Hydraulic Oil Analysis
Replacement or testing of the hydraulic oil is essential for good machine performance and service life. Dirty oil may cause the machine to perform poorly and continued use may cause component damage. Extremely dirty conditions may require oil changes to be performed more often.
Note: Before replacing the hydraulic oil, the oil may be tested by an oil distributor for specifi c levels of contamination to verify that changing the oil is necessary. If the hydraulic oil is not replaced at the two year inspection, test the oil quarterly. Replace the oil when it fails the test. See E-1, Test or Replace the Hydraulic Oil.
Part No. 824982 Genie TZ-50 3 - 17
January 2016 Section 3 • Scheduled Maintenance Procedures
B-6Perform Axle Maintenance -Electric and Hydraulic Axles
Axle specifi cations require that this procedure be performed quarterly or every 3000 miles, whichever comes fi rst.
• Brake Adjustment
Required maintenance procedures and additional axle information is available in the Dexter Axle Operation Maintenance Service Manual(Dexter part number LIT-001-00).
Dexter Axle Operation Maintenance Service ManualGenie part number 84376
CHECKLIST B PROCEDURES
B-7Service the Tongue Jack
Maintaining the tongue jack in good condition is essential to safe operation and good machine performance. Failure to lubricate the internal gears and bearings of the jack and axle bolt could result in unsafe operating conditions and may cause component damage.
Jack specifi cations require that this procedure be performed quarterly or every 3000 miles, whichever comes fi rst.
1 Remove the cap from the top of the jack housing and, using automotive grease, lightly grease the internal gears. Rotate the handle to evenly distribute the lubricant to the internal gears.
2 Securely install the cap onto the jack.
3 - 18 Genie TZ-50 Part No. 824982
January 2016Section 3 • Scheduled Maintenance Procedures
B-8Inspect the Parking Brake
A properly functioning parking brake is essential to safe machine operation. The parking brake is manually activated. An improperly functioning parking brake will prevent the operator from properly securing the machine when not in use.
Models with Hydraulic or Electric Axles:
1 Visually inspect the parking brake cables and components for damage.
2 Visually inspect the parking brake cables to ensure both are properly secured and installed into the brake backing plate.
3 Set the parking brake.
Note: If the brake cables are too tight the parking brake assembly will be diffi cult to apply. If the brake cables are too loose, the brakes will not activate when the lever is set.
CHECKLIST B PROCEDURES
4 Attempt to manually push the machine.
Result: The machine should not move.
Result: The machine moves. Proceed to step 5.
5 Chock the wheels
6 Release the parking brake.
7 Loosen the set screw at the side of the parking brake handle.
8 Adjust the handle just to the point where it is diffi cult to apply the parking brake, then rotate the top of the parking brake handle counterclockwise one full turn.
9 Tighten the set screw. Do not overtighten.
10 Engage the parking brake. Attempt to move the machine in both directions.
Result: The parking brake should prevent the machine from moving. If the parking brake does not prevent the machine from moving, repeat steps 5 through 8 until the adjustment is correct OR see B-8, Perform Axle Maintenance - Electric and Hydraulic Axles
Part No. 824982 Genie TZ-50 3 - 19
January 2016 Section 3 • Scheduled Maintenance Procedures
Models with Mechanical Axle:
1 Visually inspect the parking brake cables and components for damage.
2 Visually inspect the parking brake cables to ensure both are properly secured and installed into the brake backing plate.
3 Set the parking brake.
Note: If the brake cables are too tight the parking brake assembly will be diffi cult to apply. If the brake cables are too loose, the brakes will not activate when the lever is set.
4 Attempt to manually push the machine.
Result: The machine should not move.
Result: The machine moves. Proceed to step 5.
5 At the ground controls, extend the outriggers until the axle is off the ground and the machine is level.
6 Release the parking brake.
7 Pull out the nose of the hitch as far as it will go.
8 Loosen the lock nuts at the tension equalizer.
9 Turn the wheel in a forward motion, adjusting the wheel brakes until the wheel turns with diffi culty or not at all.
10 Adjust the wheel brakes until the wheel turns freely.
Note: Slight rubbing noises, which do not affect the free turning of the wheel, are permitted.
11 Repeat steps 9 and 10 for the other wheel.
12 Engage and release the parking brake 4 times.
13 Tighten the nuts on the tension equalizer bracket until the bracket is balanced. Securely tighten the lock nuts.
14 Adjust the linkage until it is free of play and without initial tension.
15 Lower the machine and return the outriggers to the stowed position.
16 Engage the parking brake. Attempt to move the machine in both directions.
Result: The parking brake should prevent the machine from moving.
If the parking brake does not prevent the machine from moving, repeat steps 5 through 16 until adjustment is correct OR see B-13, Perform Axle Maintenance - Mechanical Axles.
CHECKLIST B PROCEDURES
3 - 20 Genie TZ-50 Part No. 824982
January 2016Section 3 • Scheduled Maintenance Procedures
B-9Check the Wheel Bearings -Mechanical Axle
Axle specifi cations require that this procedure be performed quarterly or every 5000 km, whichever comes fi rst.
Proper axle maintenance, following the axle manufacturer's maintenance schedule, is essential to good axle performance and service life. Failure to perform the maintenance procedures can lead to poor axle performance and component damage.
1 At the ground controls, extend the outriggers until the axle is off the ground and the machine is level.
2 Check for wheel bearing wear by attempting to move the wheel hub side to side, then up and down.
Result: There should be no side to side or up and down movement.
Result: There is side to side or up and down movement. See C-5, Grease the Axle Wheel Bearings - Mechanical Axle.
Required maintenance procedures and additional axle information is available in the KNOTT Axle Service Manual (KNOTT part number P005).
KNOTT Axle Service ManualGenie part number 84443
CHECKLIST B PROCEDURES
B-10Service the Hitch -Mechanical Axle
Axle specifi cations require that this procedure be performed quarterly or every 5000 km, whichever comes fi rst.
Proper axle maintenance, following the axle manufacturer's maintenance schedule, is essential to good axle performance and service life. Failure to perform the maintenance procedures can lead to poor axle performance and component damage.
1 Clean all visible surfaces of the ball coupler.
2 Lubricate the hitch at both grease fi ttings at the top of the over-run hitch.
3 Lubricate all bolts and articulated points on the hand brake lever using commonly available machine oil or motor oil.
4 Lubricate all bolts and movable parts of the coupler using commonly available machine oil or motor oil.
Part No. 824982 Genie TZ-50 3 - 21
January 2016 Section 3 • Scheduled Maintenance Procedures
5 Lightly grease the ball mount.
6 Confi rm that the brake cable is securely installed into the brake handle linkage.
7 Apply the hand brake.
8 Attempt to manually push the machine.
Result: The machine does not move.
Result: The machine moves. Adjust the brakes. See Maintenance procedure C-6, Adjust the Brakes - Mechanical Axle.
Required maintenance procedures and additional axle information is available in the KNOTT Axle Service Manual (KNOTT part number P005).
KNOTT Axle Service ManualGenie part number 84443
B-11Perform Axle Maintenance -Mechanical Axles
Axle specifi cations require that this procedure be performed annually or every 5000 km, whichever comes fi rst.
• Brake Inspection• Axle Inspection
Required maintenance procedures and additional axle information is available in the KNOTT Axle Service Manual (KNOTT part number P005).
KNOTT Axle Service ManualGenie part number 84443
CHECKLIST B PROCEDURES
3 - 22 Genie TZ-50 Part No. 824982
January 2016Section 3 • Scheduled Maintenance Procedures
CHECKLIST B PROCEDURES
B-12Perform Engine Maintenance(if equipped)
Engine specifi cations require that this procedure be performed every 300 hours or annually, whichever comes fi rst.
• Fuel tank and strainer• Valve clearance
Required maintenance procedures and additional engine information is available in the Honda GX160 Engine Owner Manual (Honda part number 31ZH7630) and the Honda GX160 Engine Shop Manual (Honda part number 61ZH700).
Honda GX160 Owner's ManualGenie part number 97228
Honda GX160 Shop ManualGenie part number 97229
Part No. 824982 Genie TZ-50 3 - 23
January 2016 Section 3 • Scheduled Maintenance Procedures
Checklist C Procedures
C-1Grease the Platform Overload Mechanism (if equipped)
Genie specifi cations require that this procedure be performed every 500 hours or 6 months, whichever comes fi rst. Perform this procedure more often if dusty conditions exist.
Application of lubrication to the platform overload mechanism is essential to safe machine operation. Continued use of an improperly greased platform overload mechanism could result in the system not sensing an overloaded platform condition and will result in component damage.
1 Locate the grease fi ttings on each pivot pin of the platform overload assembly.
2 Thoroughly pump grease into each grease fi tting.
Grease type Multipurpose grease
C-2Test the Platform Overload System (if equipped)
Genie specifi cations require that this procedure be performed every 500 hours or 6 months, whichever comes fi rst.
Testing the platform overload system regularly is essential to safe machine operation. Continued use of an improperly operating platform overload system could result in the system not sensing an overloaded platform condition. Machine stability could be compromised resulting in the machine tipping over.
Note: Perform this procedure with the machine on a fi rm, level surface.
1 At the ground controls, extend the outriggers until the axle is off the ground and the machine is level.
2 Release the boom hold down latch.
3 Turn the key switch to platform control.
4 Level the platform.
5 Determine the maximum platform capacity. Refer to the machine serial plate.
6 Using a suitable lifting device, place an appropriate test weight equal to that of the maximum platform capacity in the center of the platform fl oor.
Result: The platform overload indicator light should be off at both the ground and platform controls.
3 - 24 Genie TZ-50 Part No. 824982
January 2016Section 3 • Scheduled Maintenance Procedures
7 Add an additional 44 lbs / 20 kg of weight to overload the platform.
Result: The platform overload indicator light should be fl ashing at both the ground and platform controls.
8 Test all machine functions from the platform controls.
Result: All platform control functions should not operate.
9 Turn the key switch to ground control.
10 Test all machine functions from the ground controls.
Result: All ground control functions should not operate.
11 Lift the test weight off the platform fl oor using a suitable lifting device.
Result: The platform overload indicator light should turn off at both the ground and platform controls.
12 Test all machine functions from the ground controls.
Result: All ground control functions should operate normally.
13 Turn the key switch to platform control.
14 Test all machine functions from the platform controls.
Result: All platform control functions should operate.
Note: If the platform overload system is not operating properly, refer to Repair Procedure 13-1, Calibrate the Platform Overload System (if equipped).
C-3Perform Axle Maintenance -Electric and Hydraulic Axles
Axle specifi cations require that this procedure be performed every 6 months or 6000 miles, whichever comes fi rst.
• Brake Magnets• Brake Controller• Suspension Components
Required maintenance procedures and additional axle information is available in the Dexter Axle Operation Maintenance Service Manual(Dexter part number LIT-001-00).
Dexter Axle Operation Maintenance Service ManualGenie part number 84376
CHECKLIST C PROCEDURES
Part No. 824982 Genie TZ-50 3 - 25
January 2016 Section 3 • Scheduled Maintenance Procedures
C-4Replace theHydraulic Tank Breather Cap - Models with Optional Hydraulic Oil
The hydraulic tank is a vented-type tank. The breather cap has an internal air fi lter that can become clogged or, over time, can deteriorate. If the breather cap is faulty or improperly installed, impurities can enter the hydraulic system which may cause component damage. Extremely dirty conditions may require that the cap be inspected more often.
1 Remove and discard the hydraulic tank breather cap.
2 Install a new cap onto the tank.
C-5Grease the Axle Wheel Bearings Mechanical Axle
Axle specifi cations require that this procedure be performed every 6 months or 10,000 km, whichever comes fi rst.
Maintaining the axle wheel bearings is essential to safe operation and good machine performance. Towing the machine with loose or worn wheel bearings may cause an unsafe towing condition and continued use may result in component or property damage. Regular steam cleaning and pressure washing of the machine may require that this procedure be performed more often.
1 Loosen the wheel lug bolts. Do not remove them.
2 At the ground controls, extend the outriggers until the axle is off the ground and the machine is level.
3 Remove the lug bolts and remove the tire and wheel assembly from the machine.
4 Remove, wash and inspect the axle wheel bearings and spacer ring.
5 Pack both bearings with clean, fresh grease.
6 Install the bearings and spacer ring onto the axle and reassemble the axle.
CHECKLIST C PROCEDURES
3 - 26 Genie TZ-50 Part No. 824982
January 2016Section 3 • Scheduled Maintenance Procedures
7 Tighten the castle nut until the wheel runs with a little bite.
8 Loosen the castle nut just until the cotter pin fi ts into the next hole. Install a new cotter pin and lock into position. Install the dust cap.
Note: Always replace the cotter pin with a new one when removing the castle nut or when checking the torque of the castle nut.
9 Install the tire and wheel onto the axle. Install and torque the lug bolts to specifi cation. Refer to Section 2, Specifi cations.
10 Perform steps 3 through 9 for the other side of the machine.
11 Return the outriggers to the stowed position.
Required maintenance procedures and additional axle information is available in the KNOTT Axle Service Manual (KNOTT part number P005).
KNOTT Axle Service ManualGenie part number 84443
C-6Adjust the Brakes -Mechanical Axle
Axle specifi cations require that this procedure be performed every 6 months or 10,000 km, whichever comes fi rst.
Proper axle maintenance, following the axle manufacturer's maintenance schedule, is essential to good axle performance and service life. Failure to perform the maintenance procedures can lead to poor axle performance and component damage.
1 At the ground controls, extend the outriggers until the axle is off the ground and the machine is level.
2 Release the parking brake.
3 Working from the exposed inside face of the brake plate, opposite the cable entry, tighten the adjusting screw until the wheel can only be turned with diffi culty or not at all.
Note: When tighten the adjusting screw, turn the wheel only in the direction of travel.
4 Ease off the adjusting screw approximately one-half turn in a counterclockwise direction, until the wheel turns freely.
CHECKLIST C PROCEDURES
Part No. 824982 Genie TZ-50 3 - 27
January 2016 Section 3 • Scheduled Maintenance Procedures
5 Repeat steps 3 through 4 for the other brake.
6 Inspect the balance plate at the control cables.
Result: The balance plate is at a right angle to the direction of towing.
Result: The balance plate is not at a right angle to the direction of towing. Tighten or loosen the brake cable ends coming from the axle until the balance plate is at a right angle to the direction of towing.
Note: The balance plate is located beneath the diamond plate cover in front of the turntable.
7 Return the outriggers to the stowed position.
8 Apply the parking brake.
9 Attempt to manually push the machine.
Result: The machine does not move.
Result: The machine moves. Repeat this procedure beginning with step 1.
Result: One wheel rolls and the other one doesn’t. Repeat step 6 and adjust the balance plate to tighten the brake cable from the wheel which is rolling.
Required maintenance procedures and additional axle information is available in the KNOTT Axle Service Manual (KNOTT part number P005).
KNOTT Axle Service ManualGenie part number 84443
CHECKLIST C PROCEDURES
3 - 28 Genie TZ-50 Part No. 824982
January 2016Section 3 • Scheduled Maintenance Procedures
Checklist D Procedures
D-1Perform Axle Maintenance -Electric and Hydraulic Axles
Axle specifi cations require that this procedure be performed every 12 months or 12,000 miles, whichever comes fi rst.
• Brake lining• Brake cylinders• Brake lines• Trailer brake wiring• Hub/Drum• Wheel bearings• Seals• Springs• Hangers
Required maintenance procedures and additional axle information is available in the Dexter Axle Operation Maintenance Service Manual(Dexter part number LIT-001-00).
Dexter Axle Operation Maintenance Service ManualGenie part number 84376
D-2Check the Boom Wear Pads
Maintaining the boom wear pads in good condition is essential to safe machine operation. Wear pads are placed on boom tube surfaces to provide a low friction, replaceable wear pad between moving parts. Improperly shimmed wear pads or continued use of extremely worn wear pads may result in component damage and unsafe operating conditions.
Note: If the wear pads are within specifi cation, refer to Repair Procedure 3-2, How to Shim the Boom.
1 Extend the boom until the wear pads are accessible.
2 Measure the thickness of the top, side and bottom wear pads. If the wear pad is within specifi cation, shim as necessary to obtain zero clearance and zero drag.
3 Extend and retract the boom through the entire range of motion to check for tight spots that may cause binding or scraping of the boom.
Note: Always maintain squareness between the outer and inner boom tubes.
Boom wear pad specifi cations
Wear pad thickness, minimum 7/16 inch 11 mm
Part No. 824982 Genie TZ-50 3 - 29
January 2016 Section 3 • Scheduled Maintenance Procedures
D-3Replace the Hydraulic Tank Return Filter
Replacement of the hydraulic tank return fi lter element is essential for good machine performance and service life. A dirty or clogged fi lter element may cause the machine to perform poorly and continued use may cause component damage. Extremely dirty conditions may require that the fi lter element be replaced more often.
Burn hazard. Beware of hot oil. Contact with hot oil may cause severe burns.
Note: The hydraulic fi lter is mounted on the bulkhead next to the hydraulic tank.
1 Clean the area around the hydraulic oil fi lter. Remove the fi lter with an oil fi lter wrench.
Bodily injury hazard. Spraying hydraulic oil can penetrate and burn skin. Loosen hydraulic connections very slowly to allow the oil pressure to dissipate gradually. Do not allow oil to squirt or spray.
CHECKLIST D PROCEDURES
2 Apply a thin layer of fresh oil onto the gasket of the new oil fi lter.
3 Install the fi lter and tighten it securely by hand.
4 Use a permanent ink marker to write the date and number of hours from the hour meter on the new fi lter.
5 Clean up any oil that may have spilled during the replacement procedure. Properly discard the used fi lter.
6 Turn the key switch to ground controls and pull out the red Emergency Stop button to the on position at both the ground and platform controls.
7 Raise the platform approximately 3 ft / 1 m.
8 Inspect the fi lter and related components tobe sure that there are no leaks.
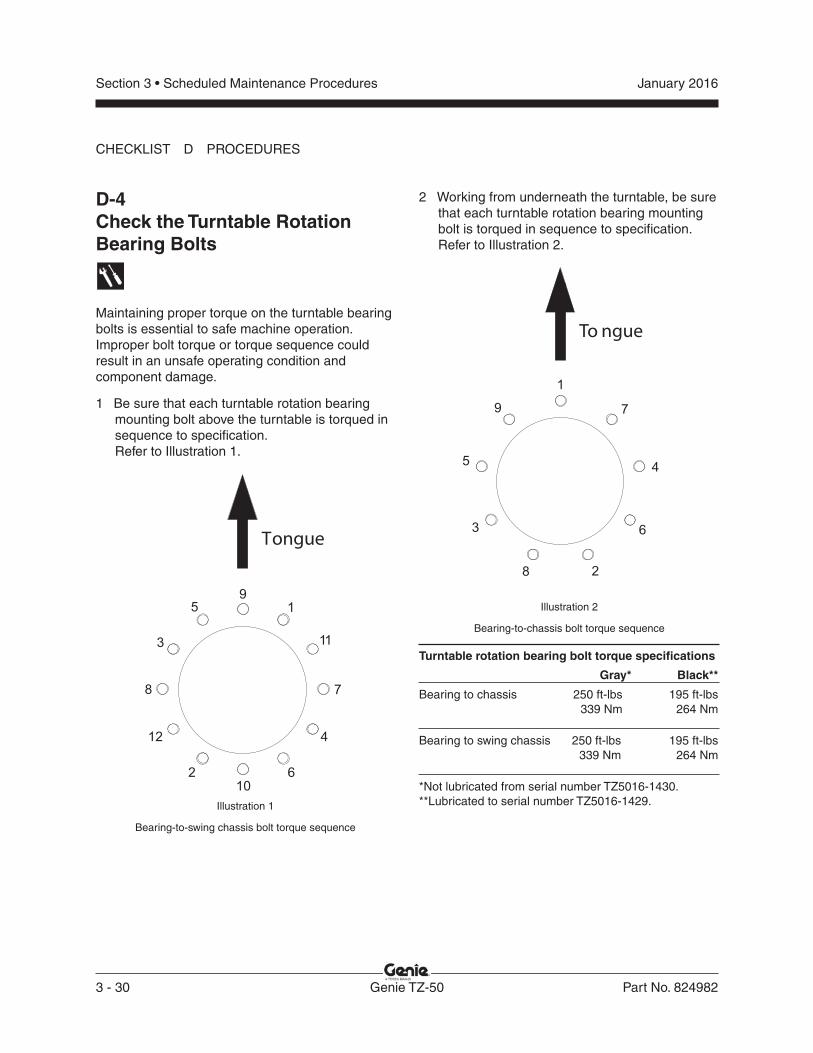
3 - 30 Genie TZ-50 Part No. 824982
January 2016Section 3 • Scheduled Maintenance Procedures
2 Working from underneath the turntable, be sure that each turntable rotation bearing mounting bolt is torqued in sequence to specifi cation. Refer to Illustration 2.
Illustration 2
Bearing-to-chassis bolt torque sequence
Turntable rotation bearing bolt torque specifi cations
Gray* Black**
Bearing to chassis 250 ft-lbs 195 ft-lbs 339 Nm 264 Nm
Bearing to swing chassis 250 ft-lbs 195 ft-lbs 339 Nm 264 Nm
*Not lubricated from serial number TZ5016-1430.**Lubricated to serial number TZ5016-1429.
D-4Check the Turntable Rotation Bearing Bolts
Maintaining proper torque on the turntable bearing bolts is essential to safe machine operation. Improper bolt torque or torque sequence could result in an unsafe operating condition and component damage.
1 Be sure that each turntable rotation bearing mounting bolt above the turntable is torqued in sequence to specifi cation.Refer to Illustration 1.
Illustration 1
Bearing-to-swing chassis bolt torque sequence
To ngue
1
5
3
8 2
6
4
79
Tongue
9
11
1
10
5
3
8
12
2 6
4
7
CHECKLIST D PROCEDURES
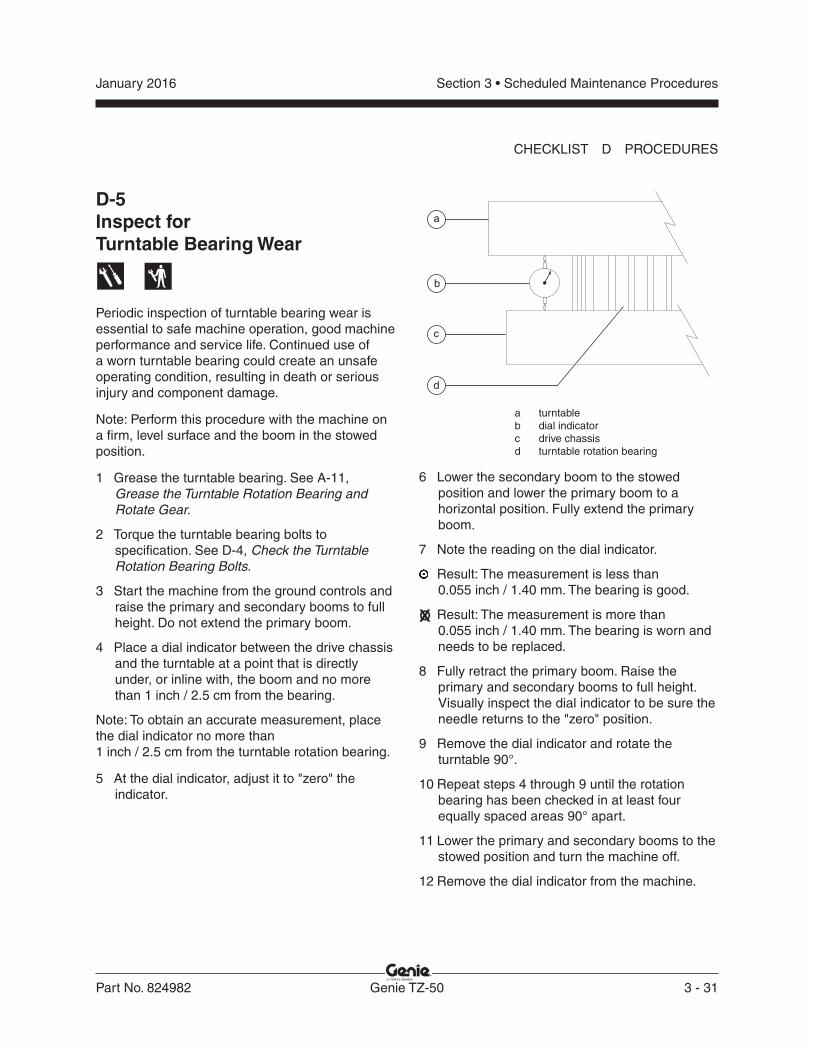
Part No. 824982 Genie TZ-50 3 - 31
January 2016 Section 3 • Scheduled Maintenance Procedures
D-5Inspect forTurntable Bearing Wear
Periodic inspection of turntable bearing wear is essential to safe machine operation, good machine performance and service life. Continued use of a worn turntable bearing could create an unsafe operating condition, resulting in death or serious injury and component damage.
Note: Perform this procedure with the machine on a fi rm, level surface and the boom in the stowed position.
1 Grease the turntable bearing. See A-11, Grease the Turntable Rotation Bearing and Rotate Gear.
2 Torque the turntable bearing bolts to specifi cation. See D-4, Check the Turntable Rotation Bearing Bolts.
3 Start the machine from the ground controls and raise the primary and secondary booms to full height. Do not extend the primary boom.
4 Place a dial indicator between the drive chassis and the turntable at a point that is directly under, or inline with, the boom and no more than 1 inch / 2.5 cm from the bearing.
Note: To obtain an accurate measurement, place the dial indicator no more than1 inch / 2.5 cm from the turntable rotation bearing.
5 At the dial indicator, adjust it to "zero" the indicator.
a turntableb dial indicatorc drive chassisd turntable rotation bearing
6 Lower the secondary boom to the stowed position and lower the primary boom to a horizontal position. Fully extend the primary boom.
7 Note the reading on the dial indicator.
Result: The measurement is less than 0.055 inch / 1.40 mm. The bearing is good.
Result: The measurement is more than 0.055 inch / 1.40 mm. The bearing is worn and needs to be replaced.
8 Fully retract the primary boom. Raise the primary and secondary booms to full height. Visually inspect the dial indicator to be sure the needle returns to the "zero" position.
9 Remove the dial indicator and rotate the turntable 90°.
10 Repeat steps 4 through 9 until the rotation bearing has been checked in at least four equally spaced areas 90° apart.
11 Lower the primary and secondary booms to the stowed position and turn the machine off.
12 Remove the dial indicator from the machine.
a
b
c
d
CHECKLIST D PROCEDURES
3 - 32 Genie TZ-50 Part No. 824982
January 2016Section 3 • Scheduled Maintenance Procedures
E-1Test or Replace the Hydraulic Oil
Replacement or testing of the hydraulic oil is essential for good machine performance and service life. Dirty oil and suction strainers may cause the machine to perform poorly and continued use may cause component damage. Extremely dirty conditions may require oil changes to be performed more often.
Note: Before replacing the hydraulic oil, the oil may be tested by an oil distributor for specifi c levels of contamination to verify that changing the oil is necessary. If the hydraulic oil is not replaced at the two year inspection, test the oil quarterly. Replace the oil when it fails the test.
Note: When removing a hose assembly or fi tting, the O-ring on the fi tting and/or hose end must be replaced and then torqued to specifi cation during installation. Refer to Section 2, Hydraulic Hose and Fitting Torque Specifi cations.
Note: Perform this procedure with the machine in the stowed position.
1 Disconnect the battery pack from the machine.
Electrocution hazard. Contact with hot or live circuits could result in death or serious injury. Remove all rings, watches and other jewelry.
2 Remove the drain plug from the hydraulic tank and completely drain the tank into a suitable container. Refer to Section 2, Specifi cations, for capacity information.
Bodily injury hazard. Spraying hydraulic oil can penetrate and burn skin. Loosen hydraulic connections very slowly to allow the oil pressure to dissipate gradually. Do not allow oil to squirt or spray.
3 Tag and disconnect the hydraulic return line from the fi lter head to tank.
4 Tag and disconnect the hydraulic inlet line to the fi lter head. Cap the fi tting on the line.
5 Remove the fi lter head from the machine.
6 Tag and disconnect the hydraulic line from the tank to the pump. Cap the fi tting on the pump.
7 Remove the hydraulic tank mounting fasteners. Remove the hydraulic tank from the machine.
8 Clean the inside of the hydraulic tank using a mild solvent.
9 Install and tighten the hydraulic tank drain plug using thread sealer on the threads. Torque to specifi cation.
Torque specifi cations
Hydraulic tank drain plug, dry 150 in-lbs 16.9 Nm
Hydraulic tank drain plug, lubricated 112 in-lbs 12.6 Nm
Checklist E Procedures
Part No. 824982 Genie TZ-50 3 - 33
January 2016 Section 3 • Scheduled Maintenance Procedures
CHECKLIST E PROCEDURES
10 Install the hydraulic tank and install and tighten the hydraulic tank mounting fasteners. Torque to specifi cation.
Torque specifi cations
Hydraulic tank mounting fasteners, dry 35 in-lbs 4 Nm
Hydraulic tank mounting fasteners, lubricated 26 in-lbs 2.9 Nm
11 Install the hydraulic line onto the inlet side of the hydraulic pump.
12 Install the hydraulic fi lter head onto the machine and securely tighten the fasteners. Do not over tighten.
13 Install the hydraulic lines into the fi lter head.
14 Connect the battery pack to the machine.
15 Fill the hydraulic tank with hydraulic oil until the fl uid is at the FULL mark on the tank. Do not overfi ll. Refer to Section 2, Specifi cations.
16 Activate the pump to fi ll the hydraulic system with oil and bleed the system of air.
Component damage hazard. The pump can be damaged if operated without oil. Be careful not to empty the hydraulic tank while in the process of fi lling the hydraulic system.
17 Repeat steps 15 through 16 until the hydraulic system and tank are both full. Inspect for leaks.
18 Clean up any oil that may have spilled.
E-2Perform Engine Maintenance(if equipped)
Engine specifi cations requirethat this procedure be performed every two years.
• Fuel line
Required maintenance procedures and additional engine information is available in the Honda GX160 Engine Shop Manual(Honda part number 61ZH700)
Honda GX160 Shop ManualGenie part number 97229
3 - 34 Genie TZ-50 Part No. 824982
January 2016Section 3 • Scheduled Maintenance Procedures
This page intentionally left blank.

Part No. 824982 Genie TZ-50 4 - 1
January 2016 Section 4 • Repair Procedures
Repair Procedures
About This SectionMost of the procedures in this section should only be performed by a trained service professional in a suitably equipped workshop. Select the appropriate repair procedure after troubleshooting the problem.
Perform disassembly procedures to the point where repairs can be completed. Then to re-assemble, perform the disassembly steps in reverse order.
Symbols Legend
Safety alert symbol—used to alert personnel to potential personal injury hazards. Obey all safety messages that follow this symbol to avoid possible injury or death.
Indicates an imminently hazardous situation which, if not avoided, will result in death or serious injury.
Indicates a potentially hazardous situation which, if not avoided, could result in death or serious injury.
Indicates a potentially hazardous situation which, if not avoided, may cause minor or moderate injury.
Indicates a potentially hazardous situation which, if not avoided, may result in property damage.
Indicates that a specifi c result is expected after performing a series of steps.
Indicates that an incorrect result has occurred after performing a series of steps.
Observe and Obey: Repair procedures shall be completed by a
person trained and qualifi ed on the repair of this machine.
Immediately tag and remove from service a damaged or malfunctioning machine.
Repair any machine damage or malfunction before operating the machine.
Before Repairs Start: Read, understand and obey the safety rules
and operating instructions in the appropriate Genie TZ-50 Operator's Manual on your machine.
Be sure that all necessary tools and parts are available and ready for use.
Use only Genie approved replacement parts.
Read each procedure completely and adhereto the instructions. Attempting shortcuts may produce hazardous conditions.
Unless otherwise specifi ed, perform each repair procedure with the machine in the following confi guration:
• Machine disconnected from tow vehicle
• Machine parked on a fi rm, level surface
• Boom in the stowed position with both latches secured
• Key switch in the off position with the key removed
• Wheels chocked
• Parking brake applied
4 - 2 Genie TZ-50 Part No. 824982
January 2016Section 4 • Repair Procedures
1-1Platform
How to Remove the Platform1 Tag and disconnect the taillight control cable at
the front of the platform.
2 Remove the platform control box retaining fasteners. Remove the platform control box from the platform and set it to the side.
Component damage hazard. Cables and hoses can be damaged if they are kinked or pinched.
3 Support and secure the platform to an appropriate lifting device. Do not apply any lifting pressure.
4 Remove the fasteners securing the platform to the lower side of the platform mount.
5 Remove the fasteners and pin securing the platform to the platform mount.
Crushing hazard. The platform could become unbalanced and fall if not properly supported when the pin is removed.
6 Remove the platform from the platform mount.
Platform Components
1-2Platform Rotator
The platform rotator is a hydraulically-operated helical gear assembly used to rotate the platform 160°.
How to Remove the Platform Rotator (if equipped)1 Remove the platform. See 1-1, How to Remove
the Platform.
2 Raise the jib boom 4 to 5 feet / 1.2 to 1.5 m.
3 Lower the jib boom until the platform mount rests on sawhorses or a work table of suffi cient capacity.
4 Remove the wire harness from the platform mount. Set the platform controls and wire harness cables to the side.
5 Tag, disconnect and plug the hydraulic hoses to the platform rotator. Cap the fi ttings on the rotator.
Bodily injury hazard. Spraying hydraulic oil can penetrate and burn skin. Loosen hydraulic connections very slowly to allow the oil pressure to dissipate gradually. Do not allow oil to squirt or spray.
6 Attach a lifting strap of suitable capacity from an overhead crane to the platform mount. Support the mount. Do not apply any lifting pressure.

Part No. 824982 Genie TZ-50 4 - 3
January 2016 Section 4 • Repair Procedures
PLATFORM COMPONENTS
7 Remove the pin retaining fasteners securing the platform mount pivot pins.
8 Using a soft metal drift, remove the platform mount pivot pins. Remove the platform mount from the machine.
Crushing hazard. The platform mount could fall if not properly supported when the pivot pin is removed.
How toBleed the Platform Rotator1 Activate the platform rotate right function and
rotate the platform completely to the right. Continue to activate the rotate right function for 3 seconds.
2 Activate the platform rotate left function and rotate the platform completely to the left. Continue to activate the rotate left function for 3 seconds.
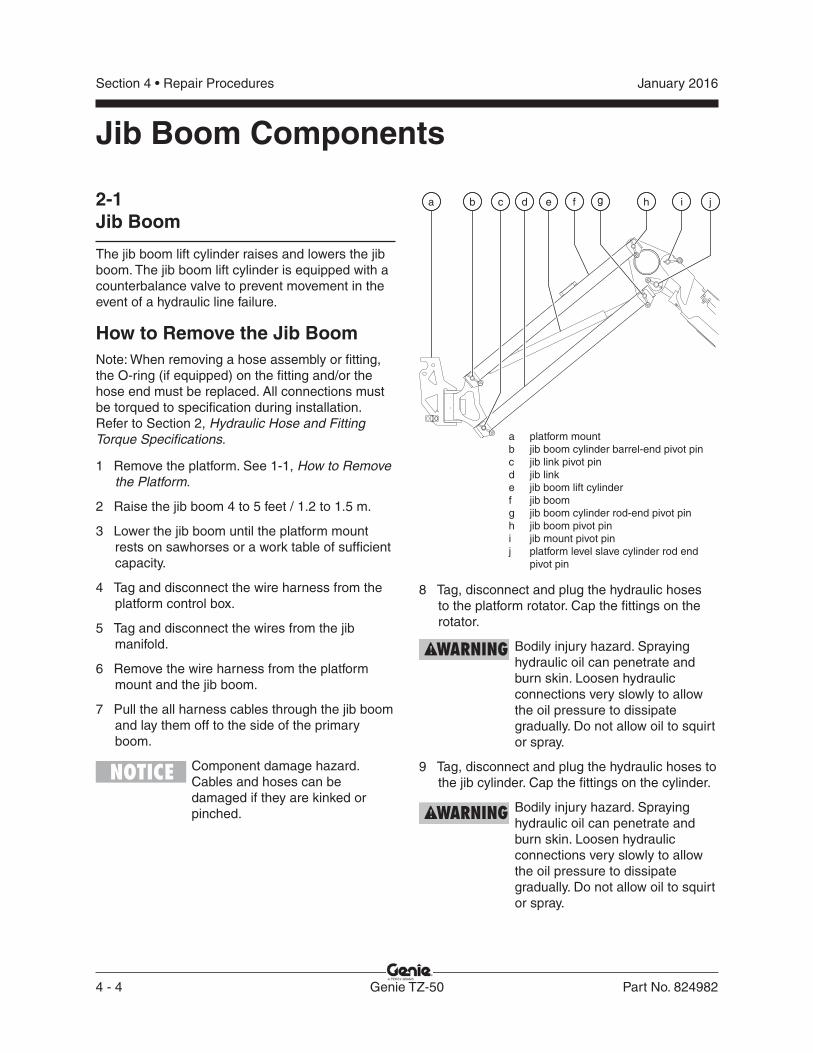
4 - 4 Genie TZ-50 Part No. 824982
January 2016Section 4 • Repair Procedures
Jib Boom Components
2-1Jib Boom
The jib boom lift cylinder raises and lowers the jib boom. The jib boom lift cylinder is equipped with a counterbalance valve to prevent movement in the event of a hydraulic line failure.
How to Remove the Jib BoomNote: When removing a hose assembly or fi tting, the O-ring (if equipped) on the fi tting and/or the hose end must be replaced. All connections must be torqued to specifi cation during installation. Refer to Section 2, Hydraulic Hose and Fitting Torque Specifi cations.
1 Remove the platform. See 1-1, How to Remove the Platform.
2 Raise the jib boom 4 to 5 feet / 1.2 to 1.5 m.
3 Lower the jib boom until the platform mount rests on sawhorses or a work table of suffi cient capacity.
4 Tag and disconnect the wire harness from the platform control box.
5 Tag and disconnect the wires from the jib manifold.
6 Remove the wire harness from the platform mount and the jib boom.
7 Pull the all harness cables through the jib boom and lay them off to the side of the primary boom.
Component damage hazard. Cables and hoses can be damaged if they are kinked or pinched.
a platform mountb jib boom cylinder barrel-end pivot pinc jib link pivot pind jib linke jib boom lift cylinderf jib boomg jib boom cylinder rod-end pivot pinh jib boom pivot pini jib mount pivot pinj platform level slave cylinder rod end pivot pin
8 Tag, disconnect and plug the hydraulic hoses to the platform rotator. Cap the fi ttings on the rotator.
Bodily injury hazard. Spraying hydraulic oil can penetrate and burn skin. Loosen hydraulic connections very slowly to allow the oil pressure to dissipate gradually. Do not allow oil to squirt or spray.
9 Tag, disconnect and plug the hydraulic hoses to the jib cylinder. Cap the fi ttings on the cylinder.
Bodily injury hazard. Spraying hydraulic oil can penetrate and burn skin. Loosen hydraulic connections very slowly to allow the oil pressure to dissipate gradually. Do not allow oil to squirt or spray.
ba fd e g h i jc

Part No. 824982 Genie TZ-50 4 - 5
January 2016 Section 4 • Repair Procedures
JIB BOOM COMPONENTS
10 Attach a lifting strap of suitable capacity from an overhead crane to the platform mount. Support the mount. Do not apply any lifting pressure.
11 Remove the pin retaining fasteners securing the platform mount pivot pins.
12 Using a soft metal drift, remove the platform mount pivot pins. Remove the platform mount from the machine.
Crushing hazard. The platform mount could fall if not properly supported when the pivot pin is removed.
13 Remove the jib manifold retaining fasteners.
Component damage hazard. Cables and hoses can be damaged if they are kinked or pinched.
14 Attach a lifting strap of suitable capacity from an overhead crane to the jib boom. Support the jib boom. Do not apply any lifting pressure.
15 Remove the pin retaining fasteners securing the jib boom pivot pins.
16 Using a soft metal drift, remove the jib boom pivot pins. Remove the jib boom from the machine.
Crushing hazard. The platform mount could fall if not properly supported when the pivot pin is removed.
17 Lay the jib manifold and hoses off to the side of the primary boom.
Component damage hazard. Cables and hoses can be damaged if they are kinked or pinched.
18 Attach a lifting strap of suitable capacity from an overhead crane to the jib link at the ground control side of the machine. Support the jib link. Do not apply any lifting pressure.
19 Working from the ground control side of the machine, use a soft metal drift to tap the jib link pivot pin halfway out. Remove the jib link from the machine.
Crushing hazard. The jib link could fall if not properly supported when the pivot pin is removed.
20 Attach a lifting strap of suitable capacity from an overhead crane to the remaining jib link. Support the jib link. Do not apply any lifting pressure.
21 Working from the side of the machine opposite the ground controls, use a soft metal drift to tap the jib link pivot pin halfway out. Remove the jib link from the machine.
Crushing hazard. The jib link could fall if not properly supported when the pivot pin is removed.
22 Attach a lifting strap of suitable capacity from an overhead crane to the jib cylinder. Support the cylinder. Do not apply any lifting pressure.
23 Using a soft metal drift, remove the jib cylinder pivot pin. Remove the cylinder from the machine.
Crushing hazard. The cylinder could fall if not properly supported when the pivot pin is removed.
24 Attach a lifting strap of suitable capacity from an overhead crane to the jib mount. Support the mount. Do not apply any lifting pressure.
4 - 6 Genie TZ-50 Part No. 824982
January 2016Section 4 • Repair Procedures
JIB BOOM COMPONENTS
25 Remove the pin retaining fasteners securing the jib mount pivot pin and the platform level slave cylinder rod end pivot pin.
26 Place a wooden block between the primary boom and the platform level slave cylinder.
27 Using a soft metal drift, remove the platform level slave cylinder rod end pivot pin. Rest the cylinder on the block.
Crushing hazard. The cylinder could fall if not properly supported when the pivot pin is removed.
28 Using a soft metal drift, remove the jib mount pivot pin. Remove the jib mount from the machine.
Crushing hazard. The jib mount could fall if not properly supported when the pivot pin is removed.
2-2Jib Boom Lift Cylinder
How to Remove theJib Boom Lift CylinderNote: When removing a hose assembly or fi tting, the O-ring (if equipped) on the fi tting and/or the hose end must be replaced. All connections must be torqued to specifi cation during installation. Refer to Section 2, Hydraulic Hose and Fitting Torque Specifi cations.
1 Raise the jib boom 4 to 5 feet / 1.2 to 1.5 m.
2 Lower the jib boom until the platform mount rests on sawhorses or a work table of suffi cient capacity.
3 Tag, disconnect and plug the hydraulic hoses to the jib cylinder. Cap the fi ttings on the cylinder.
Bodily injury hazard. Spraying hydraulic oil can penetrate and burn skin. Loosen hydraulic connections very slowly to allow the oil pressure to dissipate gradually. Do not allow oil to squirt or spray.
4 Attach a lifting strap of suitable capacity from an overhead crane to the platform mount. Support the mount. Do not apply any lifting pressure.
5 Attach a lifting strap of suitable capacity from an overhead crane to the jib boom. Support the jib boom. Do not apply any lifting pressure.
Part No. 824982 Genie TZ-50 4 - 7
January 2016 Section 4 • Repair Procedures
6 Place a wooden block between the jib cylinder and the jib links.
7 Remove the pin retaining fasteners securing the jib boom cylinder barrel end pivot pin.
8 Using a soft metal drift, remove the jib boom cylinder barrel end pivot pin. Lower the cylinder onto the wooden block.
Crushing hazard. The jib cylinder could fall if not properly supported when the pivot pin is removed.
Crushing hazard. The jib boom could fall if not properly supported when the pivot pin is removed.
9 Install the jib boom onto the platform mount. Install the pivot pin securing the jib boom to the platform mount.
10 Attach a lifting strap of suitable capacity from an overhead crane to the jib link at the ground control side of the machine. Support the jib link. Do not apply any lifting pressure.
11 Working from the ground control side of the machine, use a soft metal drift to tap the jib link pivot pin halfway out. Lower the jib link.
Crushing hazard. The jib link could fall if not properly supported when the pivot pin is removed.
12 Working from the ground control side of the machine, use a soft metal drift to tap the jib link pivot pin out just enough to release the jib cylinder. Remove the cylinder from the machine.
Crushing hazard. The jib cylinder could fall if not properly supported when the pivot pin is removed.
JIB BOOM COMPONENTS
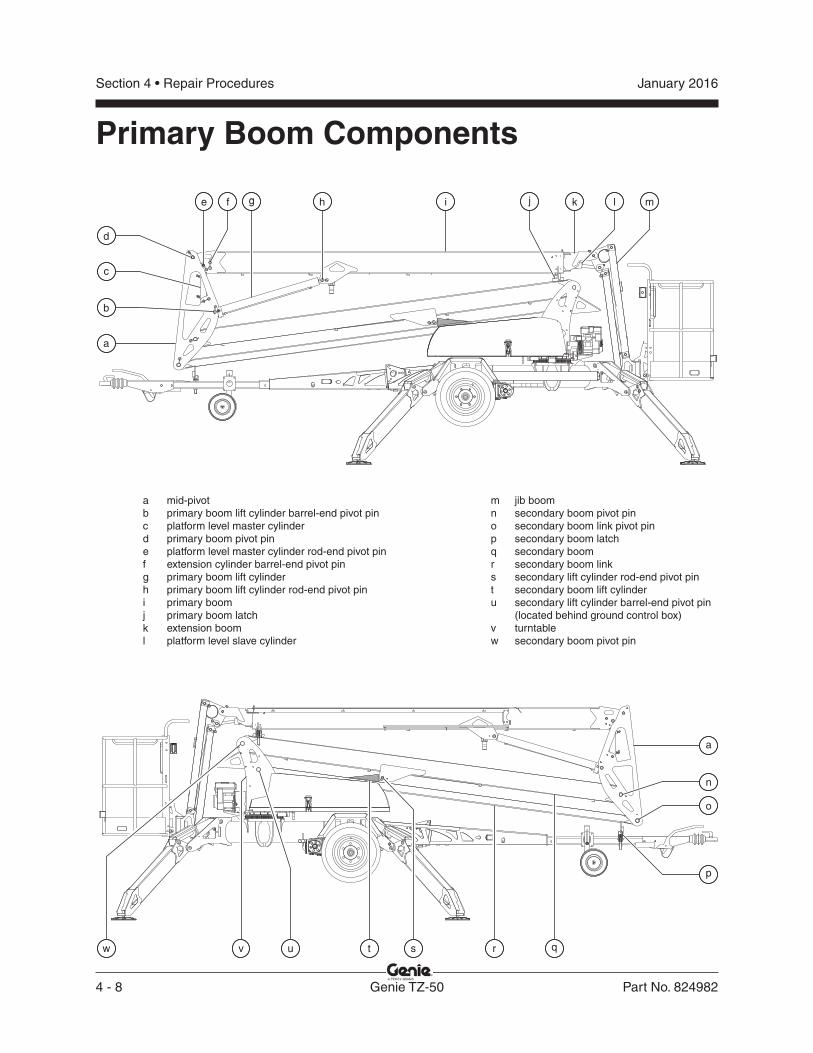
4 - 8 Genie TZ-50 Part No. 824982
January 2016Section 4 • Repair Procedures
Primary Boom Components
l
a
b
d
t
o
n
e g if h k
a
j
p
s r q
m
c
uw v
a mid-pivotb primary boom lift cylinder barrel-end pivot pinc platform level master cylinderd primary boom pivot pine platform level master cylinder rod-end pivot pinf extension cylinder barrel-end pivot ping primary boom lift cylinderh primary boom lift cylinder rod-end pivot pini primary boomj primary boom latchk extension booml platform level slave cylinder
m jib boomn secondary boom pivot pino secondary boom link pivot pinp secondary boom latchq secondary boomr secondary boom links secondary lift cylinder rod-end pivot pint secondary boom lift cylinderu secondary lift cylinder barrel-end pivot pin (located behind ground control box)v turntablew secondary boom pivot pin
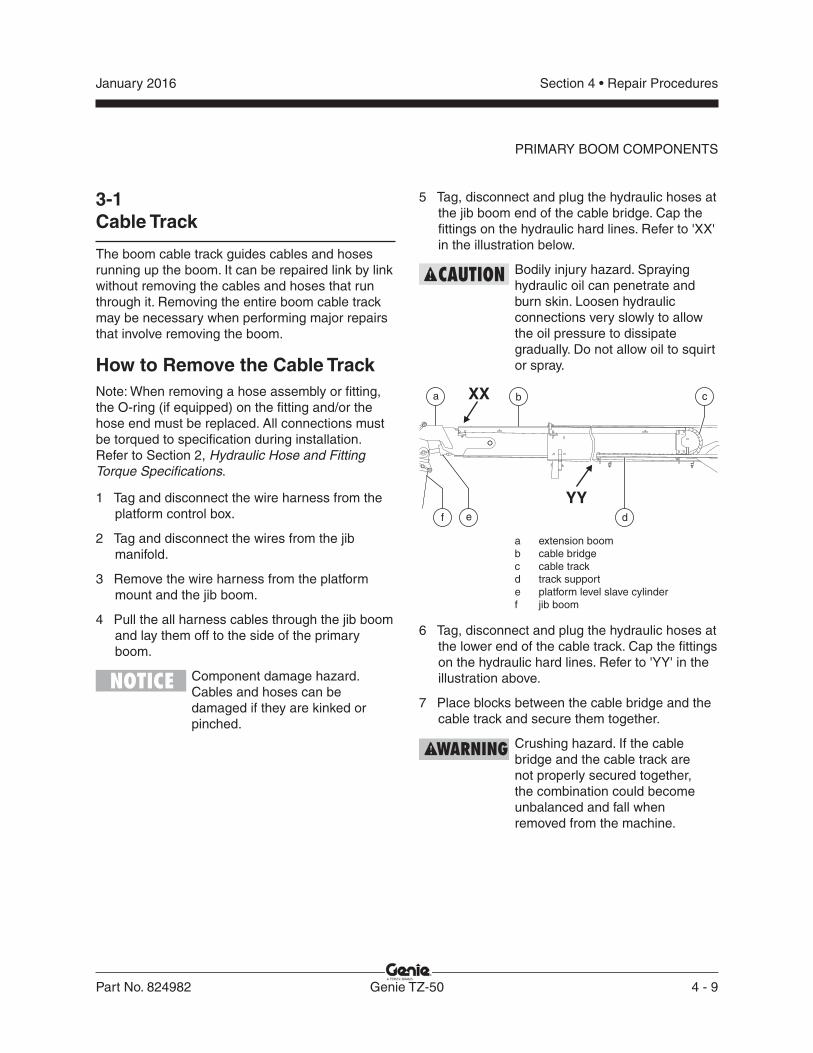
Part No. 824982 Genie TZ-50 4 - 9
January 2016 Section 4 • Repair Procedures
3-1Cable Track
The boom cable track guides cables and hoses running up the boom. It can be repaired link by link without removing the cables and hoses that run through it. Removing the entire boom cable track may be necessary when performing major repairs that involve removing the boom.
How to Remove the Cable TrackNote: When removing a hose assembly or fi tting, the O-ring (if equipped) on the fi tting and/or the hose end must be replaced. All connections must be torqued to specifi cation during installation. Refer to Section 2, Hydraulic Hose and Fitting Torque Specifi cations.
1 Tag and disconnect the wire harness from the platform control box.
2 Tag and disconnect the wires from the jib manifold.
3 Remove the wire harness from the platform mount and the jib boom.
4 Pull the all harness cables through the jib boom and lay them off to the side of the primary boom.
Component damage hazard. Cables and hoses can be damaged if they are kinked or pinched.
5 Tag, disconnect and plug the hydraulic hoses at the jib boom end of the cable bridge. Cap the fi ttings on the hydraulic hard lines. Refer to 'XX' in the illustration below.
Bodily injury hazard. Spraying hydraulic oil can penetrate and burn skin. Loosen hydraulic connections very slowly to allow the oil pressure to dissipate gradually. Do not allow oil to squirt or spray.
a extension boomb cable bridgec cable trackd track supporte platform level slave cylinderf jib boom
6 Tag, disconnect and plug the hydraulic hoses at the lower end of the cable track. Cap the fi ttings on the hydraulic hard lines. Refer to 'YY' in the illustration above.
7 Place blocks between the cable bridge and the cable track and secure them together.
Crushing hazard. If the cable bridge and the cable track are not properly secured together, the combination could become unbalanced and fall when removed from the machine.
f
a
e
b
d
cXX
YY
PRIMARY BOOM COMPONENTS
4 - 10 Genie TZ-50 Part No. 824982
January 2016Section 4 • Repair Procedures
How to Repair the Cable Track Component damage hazard. The cable track can be damaged if it is twisted.
1 Visually inspect the cable track and determine which 7 link section needs to be replaced.
2 Using a fl at blade screwdriver, pry open the hinge bar on each link of the 7 link section, plus one more on each end making a total of 9.
3 Using a fl at blade screwdriver at one side of the link to be replaced, separate the connection and open the joint slightly by sliding the link over the link pivot. Repeat for the other side of the link to separate the link sections.
4 Repeat step 3 for the other end of the section to be replaced.
5 Lift up the hoses and cables and carefully remove the damaged section of cable track.
Component damage hazard. Hoses and cables can be damaged if they are kinked or pinched.
6 Lift up the hoses and cables and carefully insert the new section of cable track.
7 Install the new section of cable track onto the existing track. Be sure the link pivot on both sides of the link are in place and that the track hinges correctly
8 Securely lock the hinge bar for each link.
9 Operate the boom extend/retract function through a full cycle to ensure smooth operation of the new section of cable track.
8 Attach a lifting strap of suitable capacity from an overhead crane to the rod end of the primary lift cylinder. Support the cylinder. Do not apply any lifting pressure.
9 Remove the pin retaining fastener from the primary lift cylinder rod end pivot pin.
10 Using a soft metal drift, remove the primary lift cylinder rod end pivot pin.
Crushing hazard. The cylinder will fall if not properly supported when the pivot pin is removed.
11 Lower the cylinder onto the secondary boom.
12 Remove the wire harness cables from the bottom of the primary boom. Secure the hydraulic hard lines to the boom.
13 Place blocks between the cable bridge and the cable track. Secure the cable bridge and the cable track together.
Crushing hazard. If the cable bridge and the cable track are not properly secured together, the combination could become unbalanced and fall when removed from the machine.
14 Attach a lifting strap from an overhead crane to the cable track.
15 Remove the mounting fasteners that attach the lower cable track to the boom.
16 Remove the cable track from the machine and place it on a structure capable of supporting it.
Crushing hazard. The cable track could become unbalanced and fall if not properly attached to the overhead crane.
PRIMARY BOOM COMPONENTS
Part No. 824982 Genie TZ-50 4 - 11
January 2016 Section 4 • Repair Procedures
PRIMARY BOOM COMPONENTS
3-2Primary Boom
How toShim the Primary Boom1 Extend the boom until the wear pads are
accessible.
2 Loosen the wear pad mounting fasteners.
3 Install the new shims under the wear pad to obtain zero clearance and zero drag.
4 Securely tighten the mounting fasteners. Do not over tighten.
5 Extend and retract the boom through an entire cycle. Check for tight spots that could cause binding or scraping.
Note: Always maintain squareness between the outer and inner boom tubes.
How toRemove the Primary Boom
This procedure requires specifi c repair skills, lifting equipment and a suitable workshop. Attempting this procedure without these skills and tools could result in death or serious injury and signifi cant component damage. Dealer service is required.
Follow the disassembly steps to the point required to complete the repair. Then re-assemble the secondary boom by following the disassembly steps in reverse order.
Note: When removing a hose assembly or fi tting, the O-ring on the fi tting and/or hose end must be replaced and then torqued to specifi cation during installation. Refer to Section 2, Hydraulic Hose and Fitting Torque Specifi cations.
1 Remove the platform. See 1-1, How to Remove the Platform.
2 Remove the jib boom. See 2-1, How to Remove the Jib Boom.
3 Remove the wire harness cables from the bottom of the secondary boom. Secure the hydraulic hard lines to the boom.
4 Tag and disconnect the wire harness cables from the ground controls. Pull the cables to the mid pivot.
Component damage hazard. Cables and hoses can be damaged if they are kinked or pinched.
For ease of assembly, pay close attention to how the cables are routed when pulling the cables to the mid pivot.
4 - 12 Genie TZ-50 Part No. 824982
January 2016Section 4 • Repair Procedures
10 Using a soft metal drift, remove the primary lift cylinder rod end pivot pin.
Crushing hazard. The cylinder will fall if not properly supported when the pivot pin is removed.
11 Lower the cylinder onto the secondary boom.
12 Remove the pin retaining fastener from the platform level master cylinder rod end pivot pin.
13 Using a soft metal drift, remove the platform level master cylinder rod end pivot pin.
14 Attach a lifting strap of suitable capacity from an overhead crane to the primary boom. Support the boom. Do not apply any lifting pressure.
Component damage hazard. The cable track can be damaged if not protected when lifting the boom.
15 Remove the pin retaining fasteners securing the primary boom pivot pin.
16 Using a soft metal drift, remove the primary boom pivot pin.
Crushing hazard. The primary boom could become unbalanced and fall if not properly supported when the pin is removed.
17 Release the latch at the turntable end of the machine.
18 Remove the primary boom from the machine.
Crushing hazard. The primary boom could become unbalanced and fall if not properly supported when removed from the machine.
5 Remove the harness clamps inside the mid pivot. Pull the wire harness cables through the mid pivot and lay them off to the side of the primary boom.
Component damage hazard. Cables and hoses can be damaged if they are kinked or pinched.
6 Tag, disconnect and plug the hoses from the platform level master cylinder. Cap the fi ttings on the cylinder.
Bodily injury hazard. Spraying hydraulic oil can penetrate and burn skin. Loosen hydraulic connections very slowly to allow the oil pressure to dissipate gradually. Do not allow oil to squirt or spray.
7 Tag, disconnect and plug the hoses from the primary boom extension cylinder. Cap the fi ttings on the cylinder.
Bodily injury hazard. Spraying hydraulic oil can penetrate and burn skin. Loosen hydraulic connections very slowly to allow the oil pressure to dissipate gradually. Do not allow oil to squirt or spray.
8 Attach a lifting strap of suitable capacity from an overhead crane to the rod end of the primary lift cylinder. Support the cylinder. Do not apply any lifting pressure.
9 Remove the pin retaining fastener from the primary lift cylinder rod end pivot pin.
PRIMARY BOOM COMPONENTS
Part No. 824982 Genie TZ-50 4 - 13
January 2016 Section 4 • Repair Procedures
How toRemove the Boom Extension
This procedure in this section requires specifi c repair skills, lifting equipment and a suitable workshop. Attempting this procedure without these skills and tools could result in death or serious injury and signifi cant component damage. Dealer service is required.
Follow the disassembly steps to the point required to complete the repair. Then re-assemble the secondary boom by following the disassembly steps in reverse order.
Note: When removing a hose assembly or fi tting, the O-ring (if equipped) on the fi tting and/or the hose end must be replaced. All connections must be torqued to specifi cation during installation. Refer to Section 2, Hydraulic Hose and Fitting Torque Specifi cations.
1 Remove the platform. See 1-1, How to Remove the Platform.
2 Remove the jib boom. See 2-1, How to Remove the Jib Boom.
3 Remove the primary boom. See 3-2, How to Remove the Boom.
4 Set the primary boom assembly on a suitable structure capable of supporting it.
5 Place a block between the platform level slave cylinder and the extension boom.
6 Remove the fasteners and hose clamp securing the platform level slave cylinder hoses to the extension boom.
7 Remove the pin retaining fastener from the platform level slave cylinder barrel-end pivot pin.
8 Using a soft metal drift, remove the platform level slave cylinder barrel-end pivot pin.
9 Tag, disconnect and plug the hoses from the platform level slave cylinder. Cap the fi ttings on the cylinder.
10 Remove the platform level slave cylinder from the boom.
11 Remove the primary boom upper wear pad retaining fasteners. Remove the upper wear pads from the primary boom.
12 Remove the primary boom side wear pad retaining fasteners. Remove the side wear pads and shims from the primary boom.
Note: For ease of assembly, note the quantity and location of shims during disassembly.
13 Remove the primary boom lower wear pad retaining fasteners. Remove the lower wear pads from the primary boom.
14 Remove the pin retaining fastener from the primary boom extension cylinder barrel-end pivot pin.
15 Using a soft metal drift, remove the primary boom extension cylinder barrel-end pivot pin.
16 Remove the boom extension from the primary boom.
17 Remove the pin retaining fasteners from the primary boom extension cylinder rod-end pivot pins.
18 Using a soft metal drift, remove the primary boom extension cylinder rod-end pivot pins.
19 Remove the primary boom extension cylinder from the boom extension.
PRIMARY BOOM COMPONENTS
4 - 14 Genie TZ-50 Part No. 824982
January 2016Section 4 • Repair Procedures
5 Lower the cylinder onto the secondary boom.
6 Remove the pin retaining fastener from the lift cylinder barrel end pivot pin.
7 Using a soft metal drift, remove the lift cylinder barrel end pivot pin.
Crushing hazard. The cylinder could fall if not properly supported when the pivot pin is removed.
8 Carefully remove the cylinder from the machine.
Crushing hazard. The lift cylinder could become unbalanced and fall if not properly supported when removed from the machine.
3-3Primary Boom Lift Cylinder
How to Remove thePrimary Boom Lift CylinderThe primary boom lift cylinder raises and lowers the primary boom. The primary boom lift cylinder is equipped with a counterbalance valve to prevent movement in the event of a hydraulic line failure.
Note: When removing a hose assembly or fi tting, the O-ring (if equipped) on the fi tting and/or the hose end must be replaced. All connections must be torqued to specifi cation during installation. Refer to Section 2, Hydraulic Hose and Fitting Torque Specifi cations.
1 Tag, disconnect and plug the hydraulic hoses on the lift cylinder. Cap the fi ttings on the cylinder.
Bodily injury hazard. Spraying hydraulic oil can penetrate and burn skin. Loosen hydraulic connections very slowly to allow the oil pressure to dissipate gradually. Do not allow oil to squirt or spray.
2 Attach a lifting strap of suitable capacity from an overhead crane to the lift cylinder.
3 Remove the pin retaining fastener from the lift cylinder rod end pivot pin.
4 Using a soft metal drift, remove the lift cylinder rod end pivot pin.
Crushing hazard. The cylinder will fall if not properly supported when the pivot pin is removed.
PRIMARY BOOM COMPONENTS
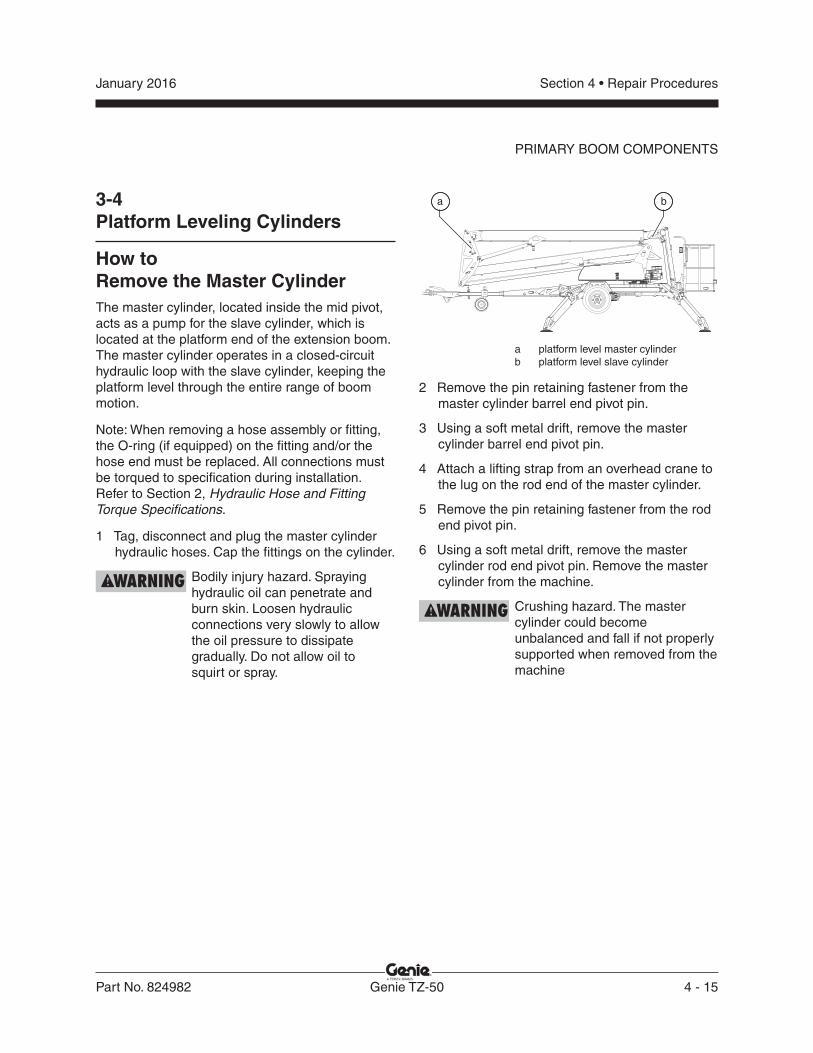
Part No. 824982 Genie TZ-50 4 - 15
January 2016 Section 4 • Repair Procedures
3-4Platform Leveling Cylinders
How toRemove the Master CylinderThe master cylinder, located inside the mid pivot, acts as a pump for the slave cylinder, which is located at the platform end of the extension boom. The master cylinder operates in a closed-circuit hydraulic loop with the slave cylinder, keeping the platform level through the entire range of boom motion.
Note: When removing a hose assembly or fi tting, the O-ring (if equipped) on the fi tting and/or the hose end must be replaced. All connections must be torqued to specifi cation during installation. Refer to Section 2, Hydraulic Hose and Fitting Torque Specifi cations.
1 Tag, disconnect and plug the master cylinder hydraulic hoses. Cap the fi ttings on the cylinder.
Bodily injury hazard. Spraying hydraulic oil can penetrate and burn skin. Loosen hydraulic connections very slowly to allow the oil pressure to dissipate gradually. Do not allow oil tosquirt or spray.
a platform level master cylinderb platform level slave cylinder
2 Remove the pin retaining fastener from the master cylinder barrel end pivot pin.
3 Using a soft metal drift, remove the master cylinder barrel end pivot pin.
4 Attach a lifting strap from an overhead crane to the lug on the rod end of the master cylinder.
5 Remove the pin retaining fastener from the rod end pivot pin.
6 Using a soft metal drift, remove the master cylinder rod end pivot pin. Remove the master cylinder from the machine.
Crushing hazard. The master cylinder could become unbalanced and fall if not properly supported when removed from the machine
a b
PRIMARY BOOM COMPONENTS
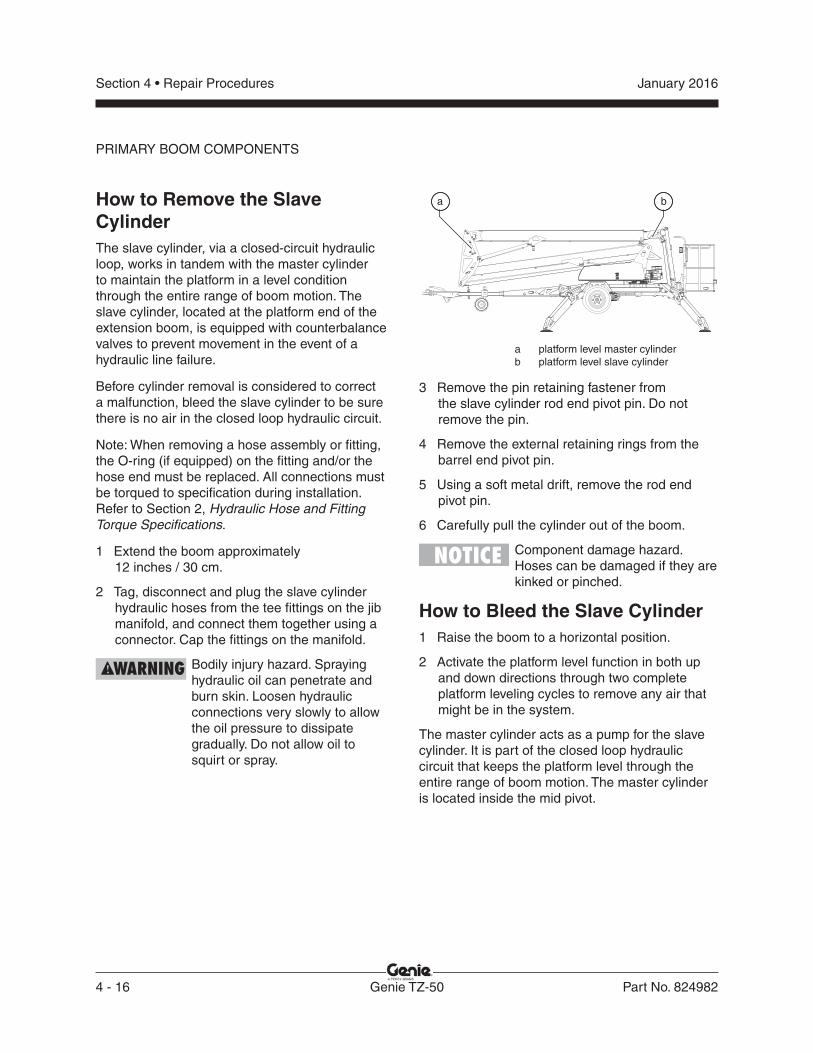
4 - 16 Genie TZ-50 Part No. 824982
January 2016Section 4 • Repair Procedures
PRIMARY BOOM COMPONENTS
a platform level master cylinderb platform level slave cylinder
3 Remove the pin retaining fastener fromthe slave cylinder rod end pivot pin. Do not remove the pin.
4 Remove the external retaining rings from the barrel end pivot pin.
5 Using a soft metal drift, remove the rod end pivot pin.
6 Carefully pull the cylinder out of the boom.
Component damage hazard. Hoses can be damaged if they are kinked or pinched.
How to Bleed the Slave Cylinder1 Raise the boom to a horizontal position.
2 Activate the platform level function in both up and down directions through two complete platform leveling cycles to remove any air that might be in the system.
The master cylinder acts as a pump for the slave cylinder. It is part of the closed loop hydraulic circuit that keeps the platform level through the entire range of boom motion. The master cylinder is located inside the mid pivot.
How to Remove the Slave CylinderThe slave cylinder, via a closed-circuit hydraulic loop, works in tandem with the master cylinder to maintain the platform in a level condition through the entire range of boom motion. The slave cylinder, located at the platform end of the extension boom, is equipped with counterbalance valves to prevent movement in the event of a hydraulic line failure.
Before cylinder removal is considered to correct a malfunction, bleed the slave cylinder to be sure there is no air in the closed loop hydraulic circuit.
Note: When removing a hose assembly or fi tting, the O-ring (if equipped) on the fi tting and/or the hose end must be replaced. All connections must be torqued to specifi cation during installation. Refer to Section 2, Hydraulic Hose and Fitting Torque Specifi cations.
1 Extend the boom approximately12 inches / 30 cm.
2 Tag, disconnect and plug the slave cylinder hydraulic hoses from the tee fi ttings on the jib manifold, and connect them together using a connector. Cap the fi ttings on the manifold.
Bodily injury hazard. Spraying hydraulic oil can penetrate and burn skin. Loosen hydraulic connections very slowly to allow the oil pressure to dissipate gradually. Do not allow oil tosquirt or spray.
a b
Part No. 824982 Genie TZ-50 4 - 17
January 2016 Section 4 • Repair Procedures
This page intentionally left blank.
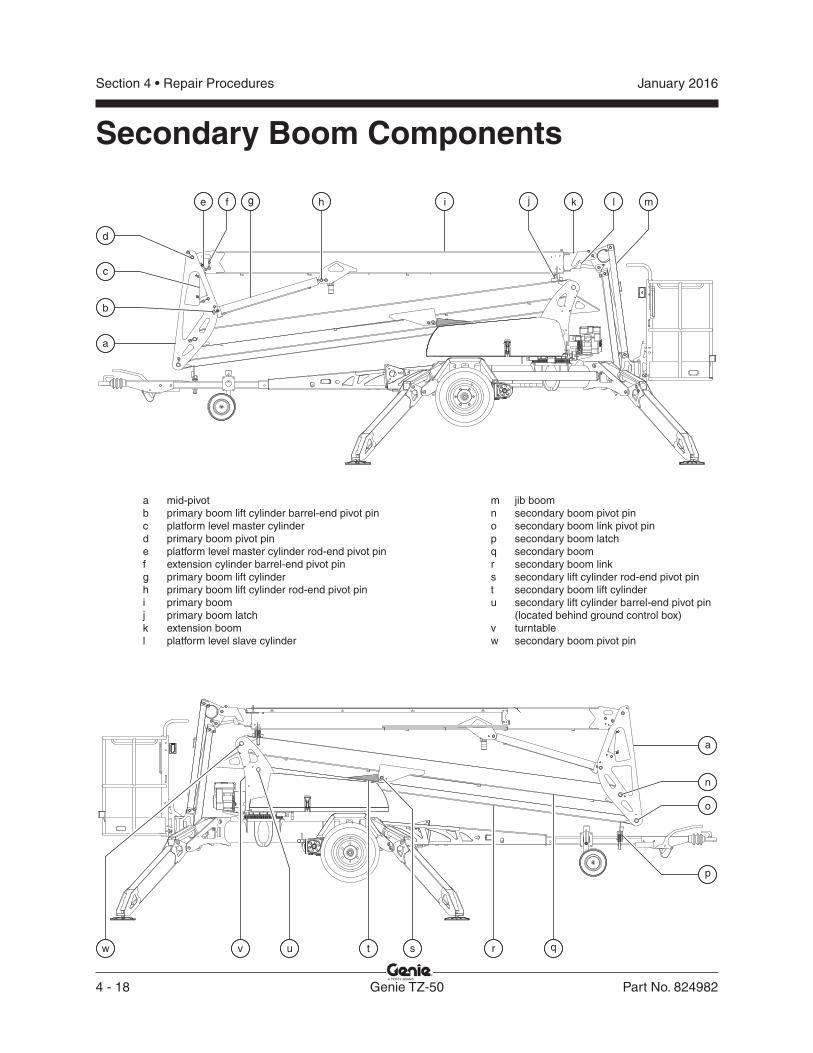
4 - 18 Genie TZ-50 Part No. 824982
January 2016Section 4 • Repair Procedures
Secondary Boom Components
l
a
b
d
t
o
n
e g if h k
a
j
p
s r q
m
c
uw v
a mid-pivotb primary boom lift cylinder barrel-end pivot pinc platform level master cylinderd primary boom pivot pine platform level master cylinder rod-end pivot pinf extension cylinder barrel-end pivot ping primary boom lift cylinderh primary boom lift cylinder rod-end pivot pini primary boomj primary boom latchk extension booml platform level slave cylinder
m jib boomn secondary boom pivot pino secondary boom link pivot pinp secondary boom latchq secondary boomr secondary boom links secondary lift cylinder rod-end pivot pint secondary boom lift cylinderu secondary lift cylinder barrel-end pivot pin (located behind ground control box)v turntablew secondary boom pivot pin
Part No. 824982 Genie TZ-50 4 - 19
January 2016 Section 4 • Repair Procedures
5 Remove the pin retaining fasteners securing the primary lift cylinder barrel end pivot pin.
6 Using a soft metal drift, remove the primary lift cylinder barrel end pivot pin. Remove the cylinder from the machine.
Crushing hazard. The cylinder could fall if not properly supported when the pivot pin is removed.
7 Attach a lifting strap of suitable capacity from an overhead crane to the mid-pivot. Support the mid pivot. Do not apply any lifting pressure.
8 Remove the pin retaining fasteners securing the secondary boom pivot pin at the mid-pivot.
9 Remove the pin retaining fasteners securing the secondary link pivot pin at the mid-pivot.
10 Tag, disconnect and plug the hydraulic hoses to the hydraulic hard lines at the mid-pivot end of the secondary boom. Cap the fi ttings.
Bodily injury hazard. Spraying hydraulic oil can penetrate and burn skin. Loosen hydraulic connections very slowly to allow the oil pressure to dissipate gradually. Do not allow oil to squirt or spray.
Component damage hazard. Cables and hoses can be damaged if they are kinked or pinched.
11 Using a soft metal drift, remove the secondary boom pivot pin at the mid-pivot.
Crushing hazard. The mid-pivot could become unbalanced and fall if not properly supported when the pin is removed.
4-1Secondary Boom
How toRemove the Secondary Boom
This procedure requires specifi c repair skills, lifting equipment and a suitable workshop. Attempting this procedure without these skills and tools could result in death or serious injury and signifi cant component damage. Dealer service is required.
Follow the disassembly steps to the point required to complete the repair. Then re-assemble the secondary boom by following the disassembly steps in reverse order.
Note: When removing a hose assembly or fi tting, the O-ring (if equipped) on the fi tting and/or the hose end must be replaced. All connections must be torqued to specifi cation during installation. Refer to Section 2, Hydraulic Hose and Fitting Torque Specifi cations.
1 Remove the platform. See 1-1, How to Remove the Platform.
2 Remove the jib boom. See 2-1, How toRemove the Jib Boom.
3 Remove the primary boom. See 3-2, How to Remove the Primary Boom.
Remove the mid-pivot
4 Attach a lifting strap of suitable capacity from an overhead crane to the rod end of the primary lift cylinder. Raise the cylinder to a horizontal position.
SECONDARY BOOM COMPONENTS
4 - 20 Genie TZ-50 Part No. 824982
January 2016Section 4 • Repair Procedures
12 Using a soft metal drift, remove the secondary link pivot pin at the mid-pivot.
Crushing hazard. The secondary link could become unbalanced and fall if not properly supported when the pin is removed.
13 Remove the mid-pivot from the machine.
Crushing hazard. The mid-pivot could become unbalanced and fall if not properly supported when removed from the machine.
Remove the secondary boom
14 Attach a lifting strap of suitable capacity from an overhead crane to the secondary boom. Support the secondary boom. Do not apply any lifting pressure.
15 Remove the pin retaining fasteners securing the lift cylinder pivot pin to the secondary boom.
16 Place a wooden block between the secondary link and the secondary lift cylinder.
17 Using a soft metal drift, remove the lift cylinder pivot pin from the secondary boom.
Crushing hazard. The cylinder could fall if not properly supported when the pivot pin is removed.
18 Lower the cylinder onto the wooden block.
19 Raise the secondary boom to a horizontal position.
20 Tag, disconnect and plug the hydraulic hoses to the hydraulic hard lines at the turntable end of the secondary boom. Cap the fi ttings.
Bodily injury hazard. Spraying hydraulic oil can penetrate and burn skin. Loosen hydraulic connections very slowly to allow the oil pressure to dissipate gradually. Do not allow oil to squirt or spray.
Component damage hazard. Cables and hoses can be damaged if they are kinked or pinched.
21 Remove the pin retaining fasteners securing the secondary boom pivot pin to the turntable.
22 Using a soft metal drift, remove the secondary boom pivot pin.
Crushing hazard. The secondary boom could become unbalanced and fall if not properly supported when the pin is removed.
23 Remove the secondary boom from the machine.
Remove the secondary link
24 Working at the ground controls, remove the power to platform wiring from the ground control box.
25 Remove the ground controls from the machine.
26 Rotate the rod end of the secondary boom lift cylinder approximately 90°.
27 Attach a lifting strap of suitable capacity from an overhead crane to the rod end of the lift cylinder. Raise the cylinder slightly, remove the block and lower the cylinder through the secondary link and onto the front bulkhead.
SECONDARY BOOM COMPONENTS
Part No. 824982 Genie TZ-50 4 - 21
January 2016 Section 4 • Repair Procedures
28 Remove the pin retaining fasteners securing the secondary link pivot pin to the turntable.
29 Using a soft metal drift, remove the secondary link pivot pin.
Crushing hazard. The secondary link could become unbalanced and fall if not properly supported when the pin is removed.
30 Release the latch at the tongue end of the machine.
31 Remove the secondary link from the machine.
Crushing hazard. The secondary link could become unbalanced and fall if not properly supported when removed from the machine.
32 Tag, disconnect and plug the hoses from the secondary lift cylinder. Cap the fi ttings on the cylinder.
33 Attach a lifting strap of suitable capacity from an overhead crane to the secondary lift cylinder. Raise the cylinder to a horizontal position.
34 Remove the pin retaining fasteners securing the secondary lift cylinder pivot pin to the mid-pivot.
35 Using a soft metal drift, remove the secondary lift cylinder pivot pin. Remove the cylinder from the machine.
Crushing hazard. The cylinder could fall if not properly supported when the pivot pin is removed.
4-2Secondary Boom Lift Cylinder
The secondary boom lift cylinder raises and lowers the secondary boom. The secondary boom lift cylinder is equipped with a counterbalance valve to prevent movement in the event of a hydraulic line failure.
1 Release the boom latch at both the tongue end and turntable end of the boom.
2 Raise the secondary boom to a horizontal position.
3 Attach a lifting strap of suitable capacity from an overhead crane to the mid-pivot. Support the mid-pivot. Do not apply any lifting pressure.
4 Attach a lifting strap of suitable capacity from an overhead crane to the lift cylinder. Support the cylinder. Do not apply any lifting pressure.
5 Remove the pin retaining fasteners securing the lift cylinder rod end pivot pin.
6 Place a wooden block between the secondary link and the lift cylinder.
7 Using a soft metal drift, remove the lift cylinder pivot pin.
Crushing hazard. The cylinder could fall if not properly supported when the pivot pin is removed.
8 Lower the cylinder onto the wooden block.
9 Rotate the rod end of the secondary boom lift cylinder approximately 90°.
10 Raise the cylinder slightly, remove the block and lower the cylinder through the secondary link and onto the front bulkhead.
SECONDARY BOOM COMPONENTS
4 - 22 Genie TZ-50 Part No. 824982
January 2016Section 4 • Repair Procedures
11 Tag, disconnect and plug the hydraulic hoses on the lift cylinder. Cap the fi ttings on the cylinder.
Bodily injury hazard. Spraying hydraulic oil can penetrate and burn skin. Loosen hydraulic connections very slowly to allow the oil pressure to dissipate gradually. Do not allow oil to squirt or spray.
Note: Place rags beneath the barrel end of the lift cylinder before loosening the hydraulic lines.
Note: It may be helpful to remove the turntable rotate motor.
12 Remove the pin retaining fasteners securing the lift cylinder barrel end pivot pin.
13 Using a soft metal drift, remove the lift cylinder barrel end pivot pin.
Crushing hazard. The cylinder could fall if not properly supported when the pivot pin is removed.
14 Carefully remove the cylinder from the machine.
Crushing hazard. The lift cylinder could become unbalanced and fall if not properly supported when removed from the machine.
SECONDARY BOOM COMPONENTS
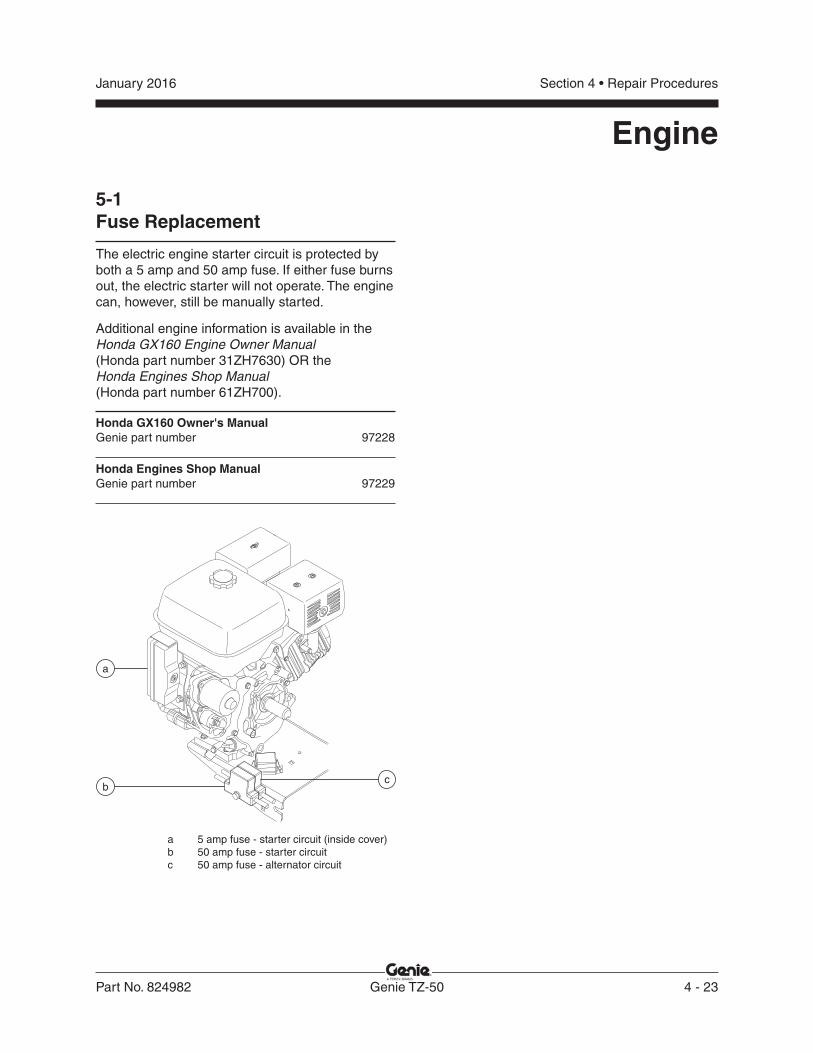
Part No. 824982 Genie TZ-50 4 - 23
January 2016 Section 4 • Repair Procedures
5-1Fuse Replacement
The electric engine starter circuit is protected by both a 5 amp and 50 amp fuse. If either fuse burns out, the electric starter will not operate. The engine can, however, still be manually started.
Additional engine information is available in the Honda GX160 Engine Owner Manual(Honda part number 31ZH7630) OR theHonda Engines Shop Manual(Honda part number 61ZH700).
Honda GX160 Owner's ManualGenie part number 97228
Honda Engines Shop ManualGenie part number 97229
a 5 amp fuse - starter circuit (inside cover)b 50 amp fuse - starter circuitc 50 amp fuse - alternator circuit
a
bc
Engine
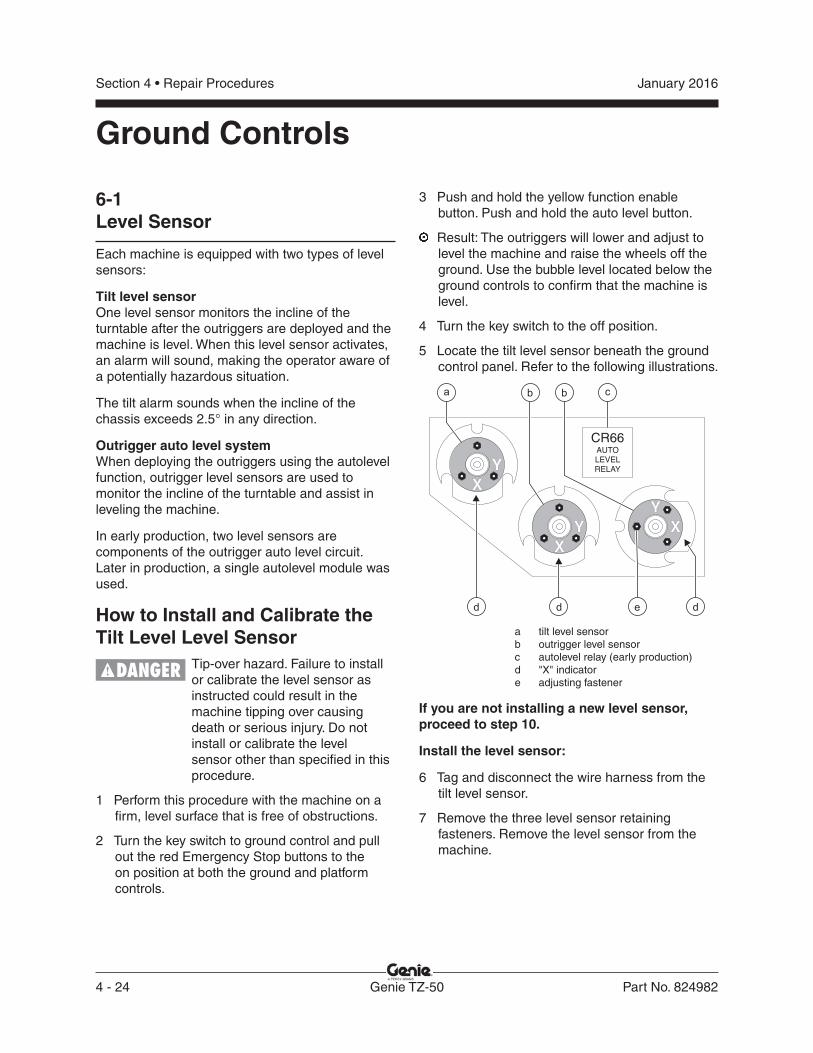
4 - 24 Genie TZ-50 Part No. 824982
January 2016Section 4 • Repair Procedures
3 Push and hold the yellow function enable button. Push and hold the auto level button.
Result: The outriggers will lower and adjust to level the machine and raise the wheels off the ground. Use the bubble level located below the ground controls to confi rm that the machine is level.
4 Turn the key switch to the off position.
5 Locate the tilt level sensor beneath the ground control panel. Refer to the following illustrations.
a tilt level sensorb outrigger level sensorc autolevel relay (early production)d "X" indicatore adjusting fastener
If you are not installing a new level sensor, proceed to step 10.
Install the level sensor:
6 Tag and disconnect the wire harness from the tilt level sensor.
7 Remove the three level sensor retaining fasteners. Remove the level sensor from the machine.
6-1Level Sensor
Each machine is equipped with two types of level sensors:
Tilt level sensorOne level sensor monitors the incline of the turntable after the outriggers are deployed and the machine is level. When this level sensor activates, an alarm will sound, making the operator aware of a potentially hazardous situation.
The tilt alarm sounds when the incline of the chassis exceeds 2.5° in any direction.
Outrigger auto level systemWhen deploying the outriggers using the autolevel function, outrigger level sensors are used to monitor the incline of the turntable and assist in leveling the machine.
In early production, two level sensors are components of the outrigger auto level circuit. Later in production, a single autolevel module was used.
How to Install and Calibrate the Tilt Level Level Sensor
Tip-over hazard. Failure to install or calibrate the level sensor as instructed could result in the machine tipping over causing death or serious injury. Do not install or calibrate the level sensor other than specifi ed in this procedure.
1 Perform this procedure with the machine on a fi rm, level surface that is free of obstructions.
2 Turn the key switch to ground control and pull out the red Emergency Stop buttons to the on position at both the ground and platform controls.
Ground Controls
CR66AUTOLEVELRELAY
c
Y
X
Y
X
Y
X
a b
ddd e
b
Part No. 824982 Genie TZ-50 4 - 25
January 2016 Section 4 • Repair Procedures
8 Install the new level sensor onto the machine with the "X" on the level sensor housing located as shown in the illustrations. Install and tighten the level sensor retaining fasteners.
9 Connect the wire harness to the level sensor.
10 Tighten the level sensor adjusting fasteners until the bubble in the top of the level sensor is centered in the circles.
Note: Be sure there are threads showing through the top of the adjusting fasteners.
11 Turn the key switch to ground control and pull out the red Emergency Stop buttons to the on position at both the ground and platform controls.
12 Raise the secondary boom approximately12 inches / 30 cm.
Result: The tilt sensor alarm should not sound.
13 Using a digital level, lower the tank side of the machine until the turntable is 2.4° out of level.
Result: The tilt sensor alarm should not sound.
Result: The tilt alarm will sound at 180 beeps per minute. The level sensor is faulty and must be replaced. Repeat this procedure beginning with step 6.
14 Continue to lower the tank side of the machine until the turntable is 2.7° out of level.
Result: The tilt alarm will sound at 180 beeps per minute.
Result: The tilt alarm does not sound. The level sensor is faulty and must be replaced. Repeat this procedure beginning with step 6.
15 Push and hold the yellow function enable button. Push and hold the auto level button.
Result: The outriggers will lower and adjust to level the machine and raise the wheels off the ground. Use the bubble level located below the ground controls to confi rm that the machine is level.
16 Using a digital level, lower the ground control side of the machine until the turntable is 2.4° out of level.
Result: The tilt sensor alarm should not sound.
Result: The tilt alarm will sound at 180 beeps per minute. The level sensor is faulty and must be replaced. Repeat this procedure beginning with step 6.
17 Continue to lower the ground control side of the machine until the turntable is 2.7° out of level.
Result: The tilt alarm will sound at 180 beeps per minute.
Result: The tilt alarm does not sound. The level sensor is faulty and must be replaced. Repeat this procedure beginning with step 6.
18 Push and hold the yellow function enable button. Push and hold the auto level button.
Result: The outriggers will lower and adjust to level the machine and raise the wheels off the ground. Use the bubble level located below the ground controls to confi rm that the machine is level.
19 Using a digital level, lower the platform end of the machine until the turntable is 2.4° out of level.
Result: The tilt sensor alarm should not sound.
Result: The tilt alarm will sound at 180 beeps per minute. The level sensor is faulty and must be replaced. Repeat this procedure beginning with step 6.
GROUND CONTROLS
4 - 26 Genie TZ-50 Part No. 824982
January 2016Section 4 • Repair Procedures
20 Continue to lower the platform end of the machine until the turntable is 2.7° out of level.
Result: The tilt alarm will sound at 180 beeps per minute.
Result: The tilt alarm does not sound. The level sensor is faulty and must be replaced. Repeat this procedure beginning with step 6.
21 Push and hold the yellow function enable button. Push and hold the auto level button.
Result: The outriggers will lower and adjust to level the machine and raise the wheels off the ground. Use the bubble level located below the ground controls to confi rm that the machine is level.
22 Using a digital level, lower the tongue end of the machine until the turntable is 2.4° out of level.
Result: The tilt sensor alarm should not sound.
Result: The tilt alarm will sound at 180 beeps per minute. The level sensor is faulty and must be replaced. Repeat this procedure beginning with step 6.
23 Continue to lower the tongue end of the machine until the turntable is 2.7° out of level.
Result: The tilt alarm will sound at 180 beeps per minute.
Result: The tilt alarm does not sound. The level sensor is faulty and must be replaced. Repeat this procedure beginning with step 6.
24 Return the outriggers to the stowed position.
How to Install and Calibrate the Outrigger Level Sensor
Tip-over hazard. Failure to install or calibrate the level sensor as instructed could result in the machine tipping over causing death or serious injury. Do not install or calibrate the level sensor other than specifi ed in this procedure.
1 Perform this procedure with the machine on a fi rm, level surface that is free of obstructions.
2 Turn the key switch to ground control and pull out the red Emergency Stop buttons to the on position at both the ground and platform controls.
3 Lower all four outriggers and raise the machine off the ground. Level the machine. Use the bubble level located below the ground controls to confi rm that the machine is level.
4 Turn the key switch to the off position.
GROUND CONTROLS
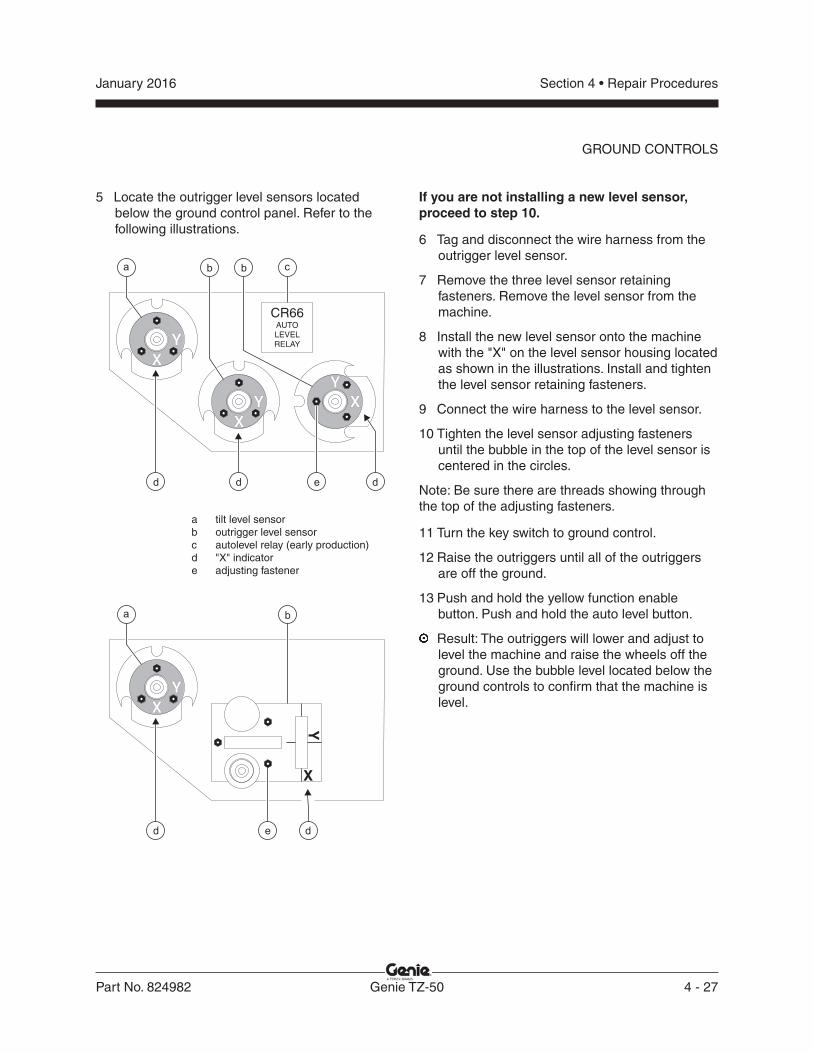
Part No. 824982 Genie TZ-50 4 - 27
January 2016 Section 4 • Repair Procedures
5 Locate the outrigger level sensors located below the ground control panel. Refer to the following illustrations.
a tilt level sensorb outrigger level sensorc autolevel relay (early production)d "X" indicatore adjusting fastener
If you are not installing a new level sensor, proceed to step 10.
6 Tag and disconnect the wire harness from the outrigger level sensor.
7 Remove the three level sensor retaining fasteners. Remove the level sensor from the machine.
8 Install the new level sensor onto the machine with the "X" on the level sensor housing located as shown in the illustrations. Install and tighten the level sensor retaining fasteners.
9 Connect the wire harness to the level sensor.
10 Tighten the level sensor adjusting fasteners until the bubble in the top of the level sensor is centered in the circles.
Note: Be sure there are threads showing through the top of the adjusting fasteners.
11 Turn the key switch to ground control.
12 Raise the outriggers until all of the outriggers are off the ground.
13 Push and hold the yellow function enable button. Push and hold the auto level button.
Result: The outriggers will lower and adjust to level the machine and raise the wheels off the ground. Use the bubble level located below the ground controls to confi rm that the machine is level.
CR66AUTOLEVELRELAY
c
Y
X
Y
X
Y
X
a b
ddd e
b
d
b
Y
X
Y
X
a
d e
GROUND CONTROLS
4 - 28 Genie TZ-50 Part No. 824982
January 2016Section 4 • Repair Procedures
7-1Function Pump
The hydraulic pumps are attached to the motor which makes up the hydraulic power unit.
How to Test the Hydraulic PumpNote: When removing a hose assembly or fi tting, the O-ring (if equipped) on the fi tting and/or the hose end must be replaced. All connections must be torqued to specifi cation during installation. Refer to Section 2, Hydraulic Hose and Fitting Torque Specifi cations.
1 Tag, disconnect and plug the high pressure hydraulic hose from the hydraulic pump.
Bodily injury hazard. Spraying hydraulic oil can penetrate and burn skin. Loosen hydraulic connections very slowly to allow the oil pressure to dissipate gradually. Do not allow oil to squirt or spray.
2 Connect a 0 to 5000 psi / 0 to 350 bar pressure gauge to the high pressure port on the pump.
3 Turn the key switch to ground control and pull out the red Emergency Stop button to the on position at both the ground and platform controls.
4 Activate the platform up function from the ground controls.
Result: If the pressure gauge reads3200 psi / 221 bar, immediately stop. The pump is good.
Result: If pressure fails to reach3200 psi / 221 bar, the pump is bad and will need to be serviced or replaced.
Component damage hazard. There is no relief valve in the hydraulic pump and the pump can be damaged if the pressure is allowed to exceed 3200 psi / 221 bar. When testing the pump, activate the pump in one second intervals until 3200 psi / 221 bar is confi rmed. Do not over-pressurize the pump.
5 Remove the pressure gauge and reconnect the hydraulic hose. Torque to specifi cation.
Bodily injury hazard. Spraying hydraulic oil can penetrate and burn skin. Loosen hydraulic connections very slowly to allow the oil pressure to dissipate gradually. Do not allow oil to squirt or spray.
Hydraulic Pump
Part No. 824982 Genie TZ-50 4 - 29
January 2016 Section 4 • Repair Procedures
How to Remove the Hydraulic Pump Note: When removing a hose assembly or fi tting, the O-ring (if equipped) on the fi tting and/or the hose end must be replaced. All connections must be torqued to specifi cation during installation. Refer to Section 2, Hydraulic Hose and Fitting Torque Specifi cations.
1 Disconnect the battery pack from the machine.
Electrocution hazard. Contact with electrically charged circuits could result in death or serious injury. Remove all rings, watches and other jewelry.
2 Tag and disconnect the hydraulic power unit cables at the motor controller.
3 Remove the hydraulic power unit retaining fasteners.
5 Tag, disconnect and plug the hydraulic hard line at the pump. Cap the fi tting on the pump.
6 Tag, disconnect and plug the high pressure hose at the pump. Cap the fi tting on the pump.
Bodily injury hazard. Spraying hydraulic oil can penetrate and burn skin. Loosen hydraulic connections very slowly to allow the oil pressure to dissipate gradually. Do not allow oil to squirt or spray.
HYDRAULIC PUMP
7 Remove the pump mounting bolts. Carefully remove the pump.
Tip-over hazard. After replacing the hydraulic pump, it is critical to return the function speed settings to original factory specifi cations. Failure to restore the machine to original factory specifi cations could cause the machine to tip over resulting in death or serious injury.
4 - 30 Genie TZ-50 Part No. 824982
January 2016Section 4 • Repair Procedures
Manifolds
8-1Function Manifold ComponentsThe function manifold is located under the turntable cover at the ground controls side of the machine.
Index Schematic No. Description Item Function Torque
— Coil nut (items F, H, J, K, N, P and R) ........................................................................................ 4-5 ft-lbs / 7-9 Nm
1 Hand pump .............................................A ..........Auxiliary down ...................................... 25-27 ft-lbs / 34-36 Nm
2 Relief valve, 600 psi / 41 bar ..................B ..........Turntable rotate circuit .......................... 18-20 ft-lbs / 25-27 Nm
3 Differential sensing valve ........................C ..........Returns extra hydraulic fl uid to tank when operating turntable rotate function....................................... 25-27 ft-lbs / 34-36 Nm
4 Shuttle valve, 2 position 3 way ................D ..........Turntable rotate circuit ......................................4-5 ft-lbs / 6 Nm
5 Orifi ce - plug, 0.040 inch / 1 mm .............E ..........Restricts turntable rotate fl uid fl ow— Port plug ..........................................................................................................................97-117 in-lbs / 11-13 Nm
6 Solenoid valve, 2 position 3 way with manual override ...............................F ..........Secondary boom down ........................ 18-20 ft-lbs / 25-27 Nm
7 Diagnostic nipple ....................................G ..........Testing
8 Solenoid valve, 2 position 3 way with manual override ...............................H ..........Primary boom down ............................. 18-20 ft-lbs / 25-27 Nm
9 Relief valve, 1600 psi / 110 bar ...............I...........Primary boom circuit ............................ 18-20 ft-lbs / 25-27 Nm
10 Solenoid valve, 2 position 3 way with manual override ............................... J ..........Primary boom up .................................. 18-20 ft-lbs / 25-27 Nm
11 Solenoid valve, 3 position 4 way with manual override ...............................K ..........Boom extend/retract ............................. 18-20 ft-lbs / 25-27 Nm
12 Relief valve, 3000 psi / 207 bar .............. L ..........System relief......................................... 18-20 ft-lbs / 25-27 Nm
13 Counterbalance valve .............................M..........Outrigger retract circuit ......................... 30-35 ft-lbs / 41-47 Nm
14 Solenoid valve, 3 position 4 way .............N ..........Outrigger extend/retract ....................... 18-20 ft-lbs / 25-27 Nm
15 Check valve ............................................O ..........Outrigger retract circuit ......................... 25-30 ft-lbs / 34-41 Nm
16 Solenoid valve, 2 position 3 way .............P ..........Secondary boom up ............................. 18-20 ft-lbs / 25-27 Nm
17 Orifi ce - plug, 0.080 inch / 2 mm .............Q ..........Restricts platform down fl uid fl ow— Port plug ..........................................................................................................................97-117 in-lbs / 11-13 Nm
18 Solenoid valve, 3 position 4 way with manual override ...............................R ..........Turntable rotate left/right ...................... 18-20 ft-lbs / 25-27 Nm
19 Red Beaded Security Tie
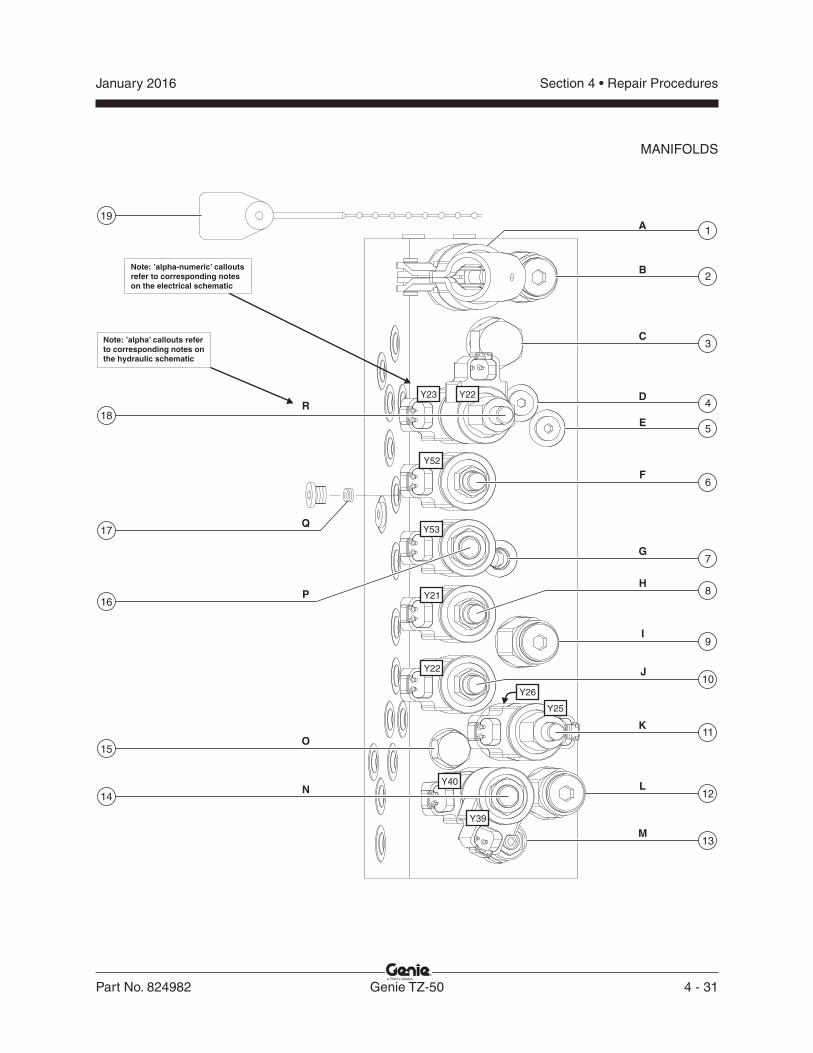
Part No. 824982 Genie TZ-50 4 - 31
January 2016 Section 4 • Repair Procedures
MANIFOLDS
B
A
C
D
E
F
H
I
J
K
L
M
O
P
R
Q
G
N
1
3
2
4
5
6
8
9
11
12
13
14
15
18
19
16
17
7
Y52
Y53
Y21
Y22
Y26
10
Y25
Y40
Y39
Note: 'alpha' callouts refer
to corresponding notes on
the hydraulic schematic
Note: 'alpha-numeric' callouts
refer to corresponding notes
on the electrical schematic
Y22Y23
4 - 32 Genie TZ-50 Part No. 824982
January 2016Section 4 • Repair Procedures
8-2Jib Manifold ComponentsThe jib manifold is located on the jib boom.
Index Schematic No. Description Item Function Torque
— Coil nut (items AA, AB, AD and AE) .......................................................................................... 4-5 ft-lbs / 7-9 Nm
1 Solenoid valve, 2 position 3 way ............AA .........Jib boom up .......................................... 18-20 ft-lbs / 25-27 Nm
2 Solenoid valve, 2 position 3 way ............AB .........Jib boom down ..................................... 18-20 ft-lbs / 25-27 Nm
3 Relief valve, 3000 psi / 207 bar .............AC .........Platform level circuit ............................. 18-20 ft-lbs / 25-27 Nm
4 Solenoid valve, 3 position 4 way ............AD.........Platform rotate left/right ........................ 18-20 ft-lbs / 25-27 Nm
5 Solenoid valve, 3 position 4 way ............AE .........Platform up/down ................................. 18-20 ft-lbs / 25-27 Nm
6 Counterbalance valve ............................AF .........Platform level circuit ............................. 25-30 ft-lbs / 34-41 Nm
7 Differential sensing valve .......................AG ........Maintains fl uid fl ow to jib boom, platform level and platform rotate functions ....................... 25-27 ft-lbs / 34-36 Nm
8 Orifi ce - plug, 0.055 inch / 1.4 mm .........AH.........Platform rotate circuit— Port plug ..........................................................................................................................97-117 in-lbs / 11-13 Nm
9 Orifi ce - plug, 0.055 inch / 1.4 mm ......... AI .........Jib boom up circuit— Port plug ..........................................................................................................................97-117 in-lbs / 11-13 Nm
10 Orifi ce - plug, 0.040 inch / 1 mm ............AJ .........Jib boom down circuit— Port plug ..........................................................................................................................97-117 in-lbs / 11-13 Nm
11 Shuttle valve, 2 position 3 way ...............AK .........Platform level circuit .........................................4-5 ft-lbs / 6 Nm
MANIFOLDS
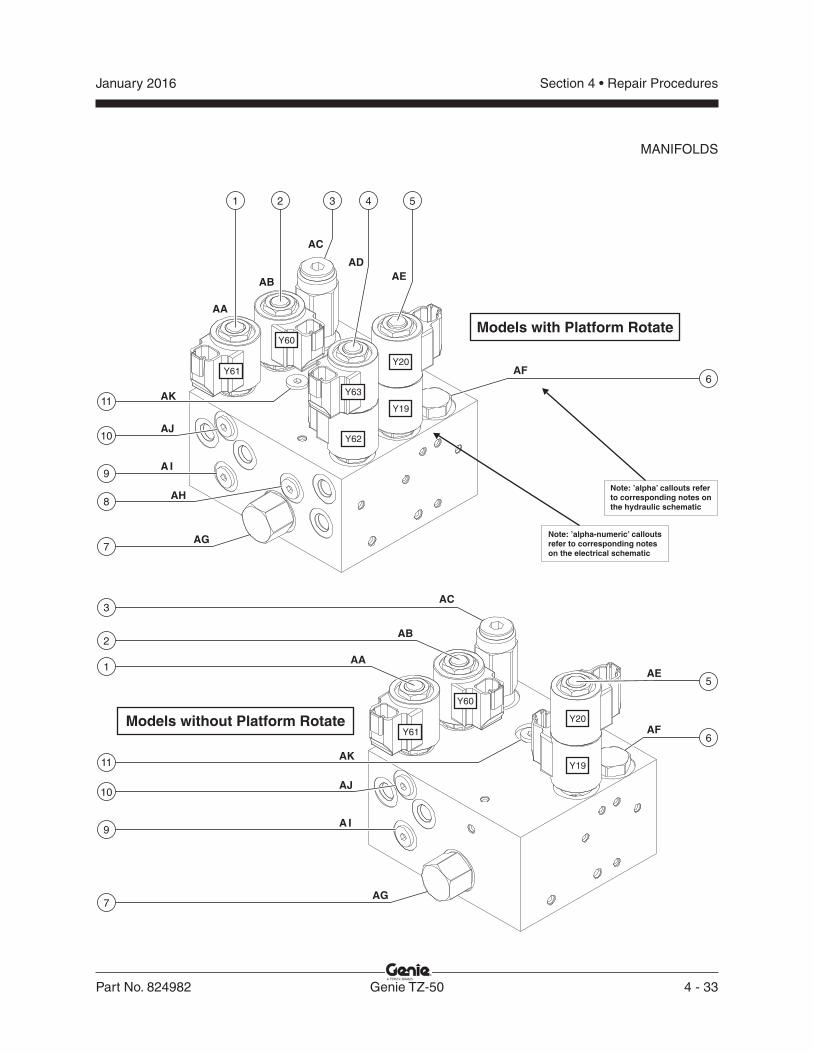
Part No. 824982 Genie TZ-50 4 - 33
January 2016 Section 4 • Repair Procedures
MANIFOLDS
AA
AB
AC
AE
AG
AH
A I
AK
AD
AF
AJ
AA
AB
AC
AE
A I
AK
AF
AJ
31 2 4 5
6
3
7
8
9
10
11
5
AG
6
7
11
10
9
1
2
Models with Platform Rotate
Models without Platform Rotate
Y19
Y61
Y20
Y60
Y19
Y20
Y62
Y63
Note: 'alpha' callouts referto corresponding notes onthe hydraulic schematic
Note: 'alpha-numeric' calloutsrefer to corresponding noteson the electrical schematic
Y61
Y60
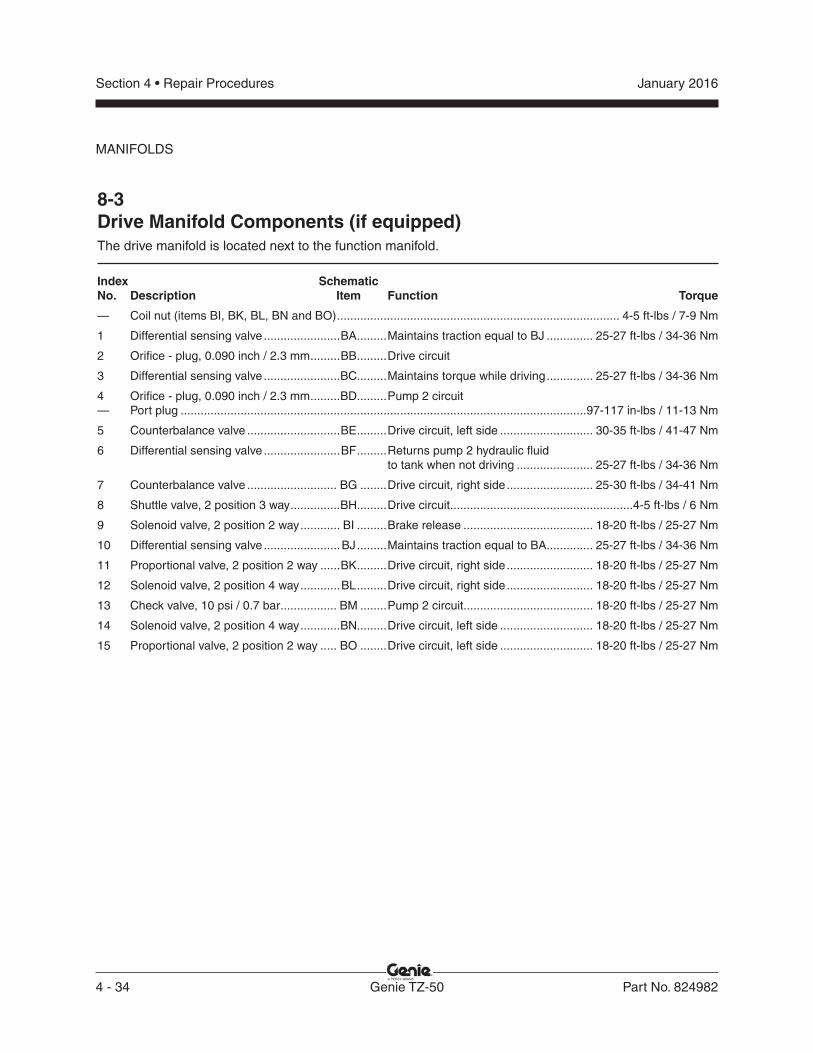
4 - 34 Genie TZ-50 Part No. 824982
January 2016Section 4 • Repair Procedures
8-3Drive Manifold Components (if equipped)The drive manifold is located next to the function manifold.
Index Schematic No. Description Item Function Torque
— Coil nut (items BI, BK, BL, BN and BO) ..................................................................................... 4-5 ft-lbs / 7-9 Nm
1 Differential sensing valve .......................BA .........Maintains traction equal to BJ .............. 25-27 ft-lbs / 34-36 Nm
2 Orifi ce - plug, 0.090 inch / 2.3 mm .........BB .........Drive circuit
3 Differential sensing valve .......................BC.........Maintains torque while driving .............. 25-27 ft-lbs / 34-36 Nm
4 Orifi ce - plug, 0.090 inch / 2.3 mm .........BD.........Pump 2 circuit— Port plug ..........................................................................................................................97-117 in-lbs / 11-13 Nm
5 Counterbalance valve ............................BE .........Drive circuit, left side ............................ 30-35 ft-lbs / 41-47 Nm
6 Differential sensing valve .......................BF .........Returns pump 2 hydraulic fl uid to tank when not driving ....................... 25-27 ft-lbs / 34-36 Nm
7 Counterbalance valve ........................... BG ........Drive circuit, right side .......................... 25-30 ft-lbs / 34-41 Nm
8 Shuttle valve, 2 position 3 way ...............BH.........Drive circuit .......................................................4-5 ft-lbs / 6 Nm
9 Solenoid valve, 2 position 2 way ............ BI .........Brake release ....................................... 18-20 ft-lbs / 25-27 Nm
10 Differential sensing valve .......................BJ .........Maintains traction equal to BA .............. 25-27 ft-lbs / 34-36 Nm
11 Proportional valve, 2 position 2 way ......BK .........Drive circuit, right side .......................... 18-20 ft-lbs / 25-27 Nm
12 Solenoid valve, 2 position 4 way ............BL .........Drive circuit, right side .......................... 18-20 ft-lbs / 25-27 Nm
13 Check valve, 10 psi / 0.7 bar ................. BM ........Pump 2 circuit....................................... 18-20 ft-lbs / 25-27 Nm
14 Solenoid valve, 2 position 4 way ............BN.........Drive circuit, left side ............................ 18-20 ft-lbs / 25-27 Nm
15 Proportional valve, 2 position 2 way ..... BO ........Drive circuit, left side ............................ 18-20 ft-lbs / 25-27 Nm
MANIFOLDS
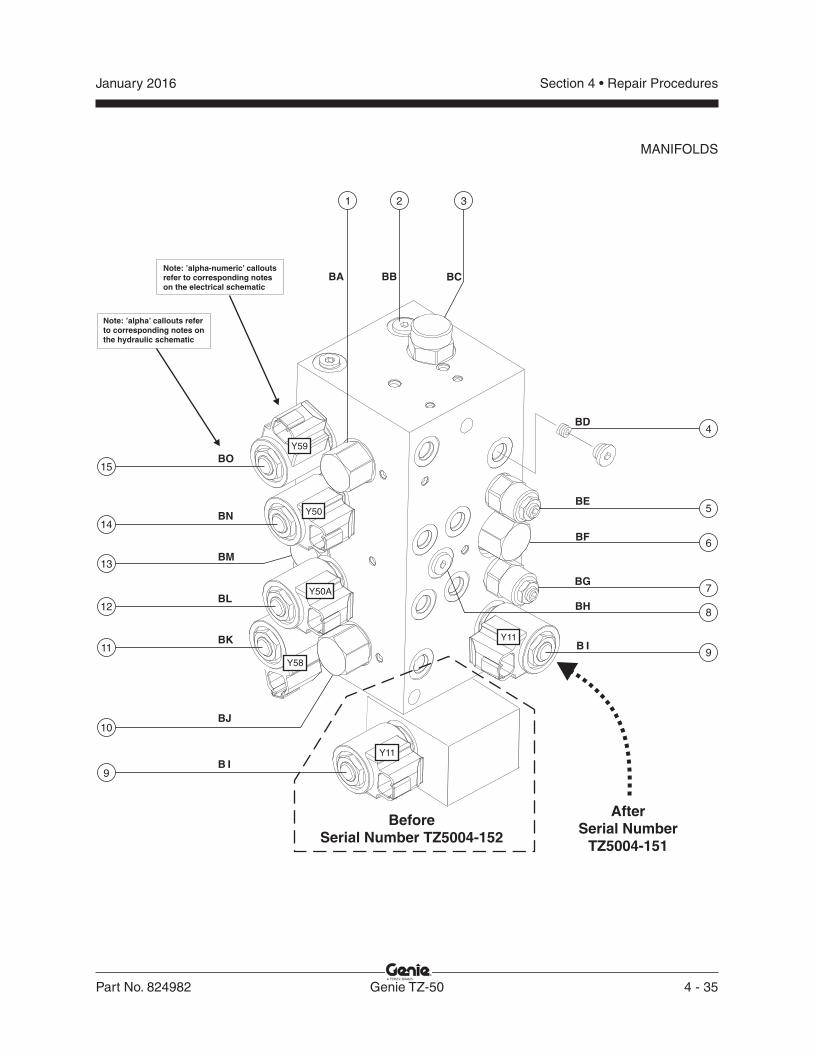
Part No. 824982 Genie TZ-50 4 - 35
January 2016 Section 4 • Repair Procedures
MANIFOLDS
4
3
5
6
7
10
13
1 2
15
14
11
9
9
812
BA BB BC
BE
BD
BF
BG
BJ
BK
BL
BN
BO
B I
BM
BH
B I
BeforeSerial Number TZ5004-152
AfterSerial Number
TZ5004-151
Y11
Y11
Y58
Y50A
Y50
Y59
Note: 'alpha' callouts referto corresponding notes onthe hydraulic schematic
Note: 'alpha-numeric' calloutsrefer to corresponding noteson the electrical schematic
4 - 36 Genie TZ-50 Part No. 824982
January 2016Section 4 • Repair Procedures
8-4Valve Adjustments -Function Manifold
How to Adjust theSystem Relief ValveNote: Perform this procedure with the outriggers in the stowed position.
1 Connect a 0 to 5000 psi / 0 to 350 bar pressure gauge to the test port (item G) on the function manifold.
2 Turn the key switch to ground control and pull out the red Emergency Stop button to the on position at both the ground and platform controls.
3 Push and hold the yellow function enable down button. Observe the pressure reading on the pressure gauge. Refer to Section 2, Specifi cations.
4 Release the button. Use a wrench to hold the relief valve and remove the cap (item L).
5 Adjust the internal hex socket. Turn it clockwise to increase the pressure or counterclockwise to decrease the pressure. Install the relief valve cap.
Tip-over hazard. Do not adjustthe relief valve higher than specifi ed.
6 Repeat step 3 to confi rm the relief valve pressure.
MANIFOLDS
How to Adjust thePrimary Boom Down Relief Valve1 Connect a 0 to 5000 psi / 0 to 350 bar pressure
gauge to the test port (item G) on the function manifold.
2 Turn the key switch to ground control and pull out the red Emergency Stop button to the on position at both the ground and platform controls.
3 Push and hold the yellow function enable button. Push and hold the auto level button.
Result: The outriggers will lower and adjust to level the machine and raise the wheels off the ground.
4 Push and hold the yellow function enable button. Push and hold the primary boom down button. Fully lower the primary boom and continue to hold the buttons while observing the pressure reading on the pressure gauge. Refer to Section 2, Specifi cations.
5 Release the buttons. Use a wrench to hold the relief valve and remove the cap (item I).
6 Adjust the internal hex socket. Turn it clockwise to increase the pressure or counterclockwise to decrease the pressure. Install the relief valve cap.
Tip-over hazard. Do not adjustthe relief valve higher than specifi ed.
7 Repeat step 4 to confi rm the relief valve pressure.
Part No. 824982 Genie TZ-50 4 - 37
January 2016 Section 4 • Repair Procedures
MANIFOLDS
How to Adjust theTurntable Rotate Relief Valve1 Connect a 0 to 5000 psi / 0 to 350 bar pressure
gauge to the test port (item G) on the function manifold.
2 Turn the key switch to ground control and pull out the red Emergency Stop button to the on position at both the ground and platform controls.
3 Push and hold the yellow function enable button. Push and hold the auto level button.
Result: The outriggers will lower and adjust to level the machine and raise the wheels off the ground.
4 Raise the secondary boom approximately12 inches / 30 cm.
5 Push and hold the blue function enable button. Push and hold the turntable rotate button. Fully rotate the turntable and continue to hold the buttons while observing the pressure reading on the pressure gauge. Refer to Section 2, Specifi cations.
6 Release the buttons. Use a wrench to hold the relief valve and remove the cap (item B).
7 Adjust the internal hex socket. Turn it clockwise to increase the pressure or counterclockwise to decrease the pressure. Install the relief valve cap.
Tip-over hazard. Do not adjustthe relief valve higher than specifi ed.
8 Push and hold the yellow function enable button. Push and hold the turntable rotate button and fully rotate the turntable in the opposite direction. Begin timing when the turntable begins to rotate.
9 Continue rotating the turntable and note the time when the machine stops rotating at 359°. Refer to Section 2, Specifi cations.
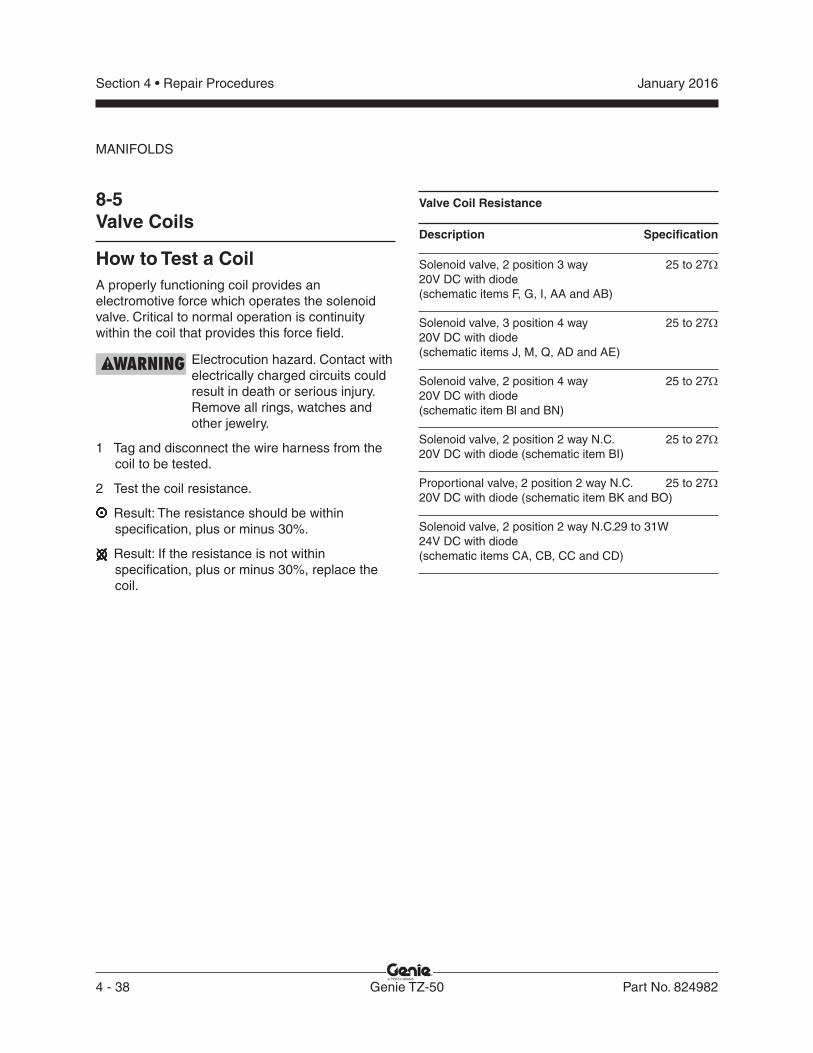
4 - 38 Genie TZ-50 Part No. 824982
January 2016Section 4 • Repair Procedures
8-5Valve Coils
How to Test a CoilA properly functioning coil provides an electromotive force which operates the solenoid valve. Critical to normal operation is continuity within the coil that provides this force fi eld.
Electrocution hazard. Contact with electrically charged circuits could result in death or serious injury. Remove all rings, watches and other jewelry.
1 Tag and disconnect the wire harness from the coil to be tested.
2 Test the coil resistance.
Result: The resistance should be within specifi cation, plus or minus 30%.
Result: If the resistance is not within specifi cation, plus or minus 30%, replace the coil.
Valve Coil Resistance
Description Specifi cation
Solenoid valve, 2 position 3 way 25 to 2720V DC with diode(schematic items F, G, I, AA and AB)
Solenoid valve, 3 position 4 way 25 to 2720V DC with diode(schematic items J, M, Q, AD and AE)
Solenoid valve, 2 position 4 way 25 to 2720V DC with diode(schematic item Bl and BN)
Solenoid valve, 2 position 2 way N.C. 25 to 2720V DC with diode (schematic item BI)
Proportional valve, 2 position 2 way N.C. 25 to 2720V DC with diode (schematic item BK and BO)
Solenoid valve, 2 position 2 way N.C. 29 to 31W24V DC with diode(schematic items CA, CB, CC and CD)
MANIFOLDS
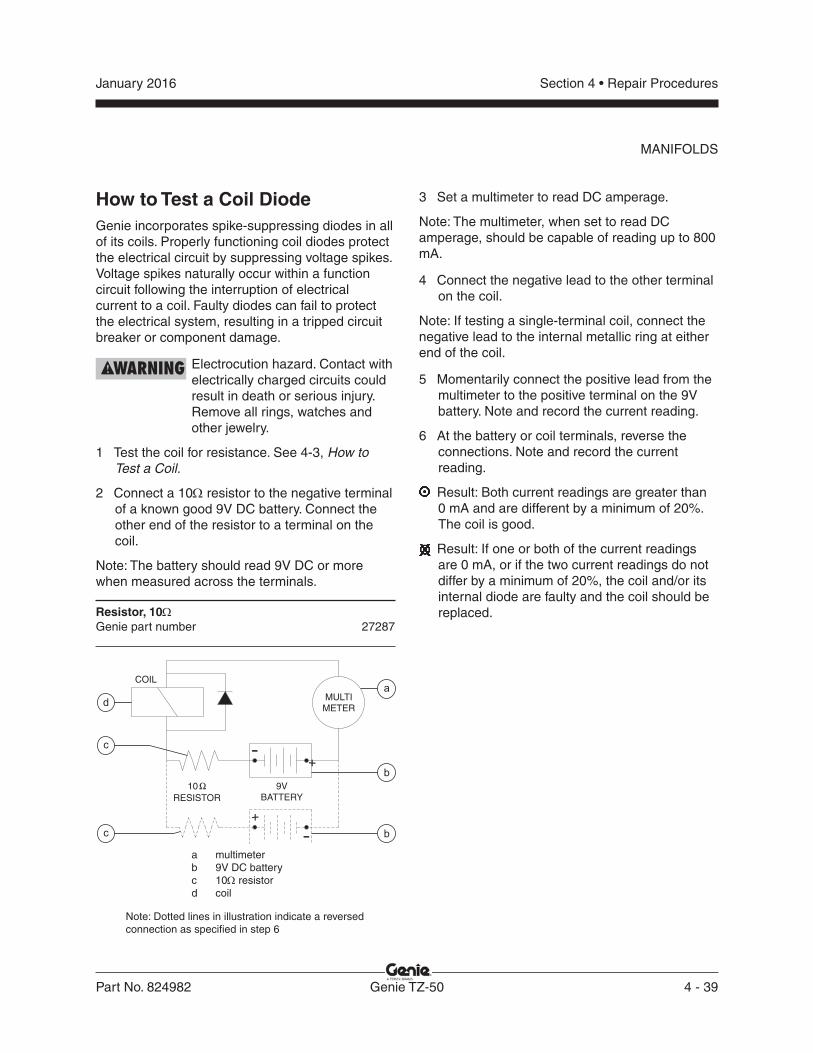
Part No. 824982 Genie TZ-50 4 - 39
January 2016 Section 4 • Repair Procedures
MANIFOLDS
How to Test a Coil DiodeGenie incorporates spike-suppressing diodes in all of its coils. Properly functioning coil diodes protect the electrical circuit by suppressing voltage spikes. Voltage spikes naturally occur within a function circuit following the interruption of electrical current to a coil. Faulty diodes can fail to protect the electrical system, resulting in a tripped circuit breaker or component damage.
Electrocution hazard. Contact with electrically charged circuits could result in death or serious injury. Remove all rings, watches and other jewelry.
1 Test the coil for resistance. See 4-3, How to Test a Coil.
2 Connect a 10 resistor to the negative terminal of a known good 9V DC battery. Connect the other end of the resistor to a terminal on the coil.
Note: The battery should read 9V DC or more when measured across the terminals.
Resistor, 10Genie part number 27287
a multimeterb 9V DC batteryc 10 resistord coil
Note: Dotted lines in illustration indicate a reversed connection as specifi ed in step 6
3 Set a multimeter to read DC amperage.
Note: The multimeter, when set to read DC amperage, should be capable of reading up to 800 mA.
4 Connect the negative lead to the other terminal on the coil.
Note: If testing a single-terminal coil, connect the negative lead to the internal metallic ring at either end of the coil.
5 Momentarily connect the positive lead from the multimeter to the positive terminal on the 9V battery. Note and record the current reading.
6 At the battery or coil terminals, reverse the connections. Note and record the current reading.
Result: Both current readings are greater than0 mA and are different by a minimum of 20%. The coil is good.
Result: If one or both of the current readings are 0 mA, or if the two current readings do not differ by a minimum of 20%, the coil and/or its internal diode are faulty and the coil should be replaced.
9VBATTERY
10
RESISTOR
�
MULTIMETER
COIL
+
-
+
-
d
b
b
a
c
c
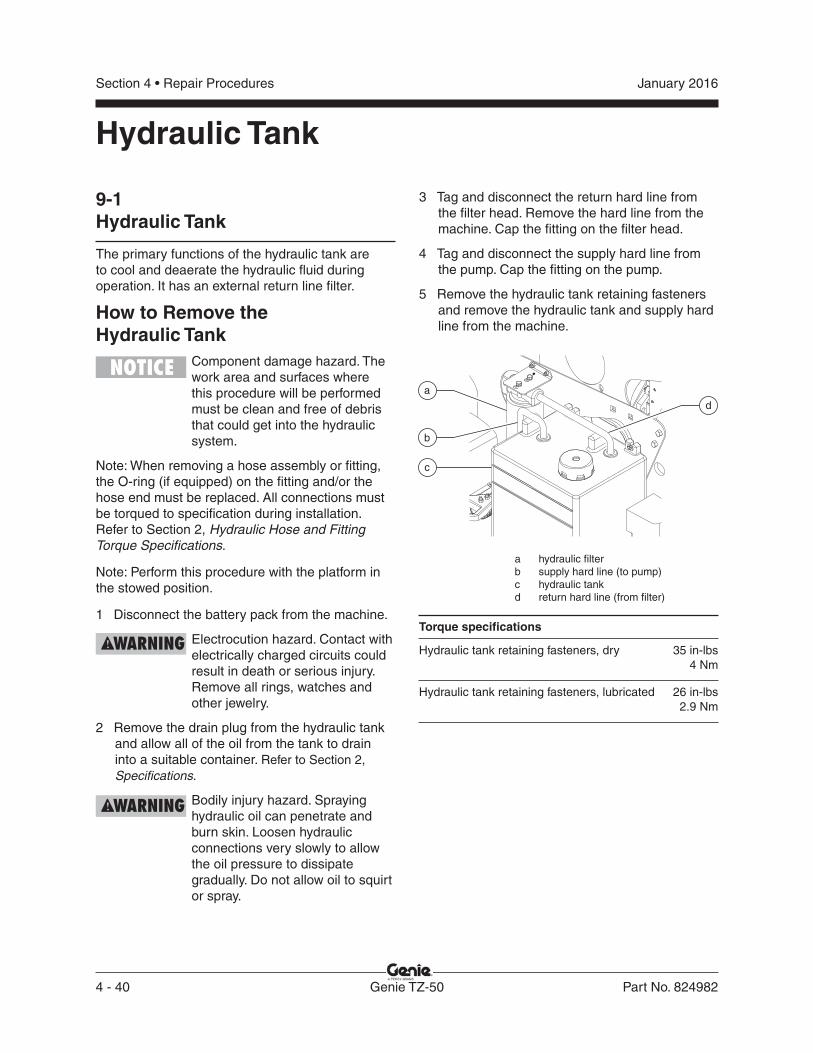
4 - 40 Genie TZ-50 Part No. 824982
January 2016Section 4 • Repair Procedures
3 Tag and disconnect the return hard line from the fi lter head. Remove the hard line from the machine. Cap the fi tting on the fi lter head.
4 Tag and disconnect the supply hard line from the pump. Cap the fi tting on the pump.
5 Remove the hydraulic tank retaining fasteners and remove the hydraulic tank and supply hard line from the machine.
a hydraulic fi lterb supply hard line (to pump)c hydraulic tankd return hard line (from fi lter)
Torque specifi cations
Hydraulic tank retaining fasteners, dry 35 in-lbs 4 Nm
Hydraulic tank retaining fasteners, lubricated 26 in-lbs 2.9 Nm
Hydraulic Tank
c
a
b
d
9-1Hydraulic Tank
The primary functions of the hydraulic tank are to cool and deaerate the hydraulic fl uid during operation. It has an external return line fi lter.
How to Remove theHydraulic Tank
Component damage hazard. The work area and surfaces where this procedure will be performed must be clean and free of debris that could get into the hydraulic system.
Note: When removing a hose assembly or fi tting, the O-ring (if equipped) on the fi tting and/or the hose end must be replaced. All connections must be torqued to specifi cation during installation. Refer to Section 2, Hydraulic Hose and Fitting Torque Specifi cations.
Note: Perform this procedure with the platform in the stowed position.
1 Disconnect the battery pack from the machine.
Electrocution hazard. Contact with electrically charged circuits could result in death or serious injury. Remove all rings, watches and other jewelry.
2 Remove the drain plug from the hydraulic tank and allow all of the oil from the tank to drain into a suitable container. Refer to Section 2, Specifi cations.
Bodily injury hazard. Spraying hydraulic oil can penetrate and burn skin. Loosen hydraulic connections very slowly to allow the oil pressure to dissipate gradually. Do not allow oil to squirt or spray.
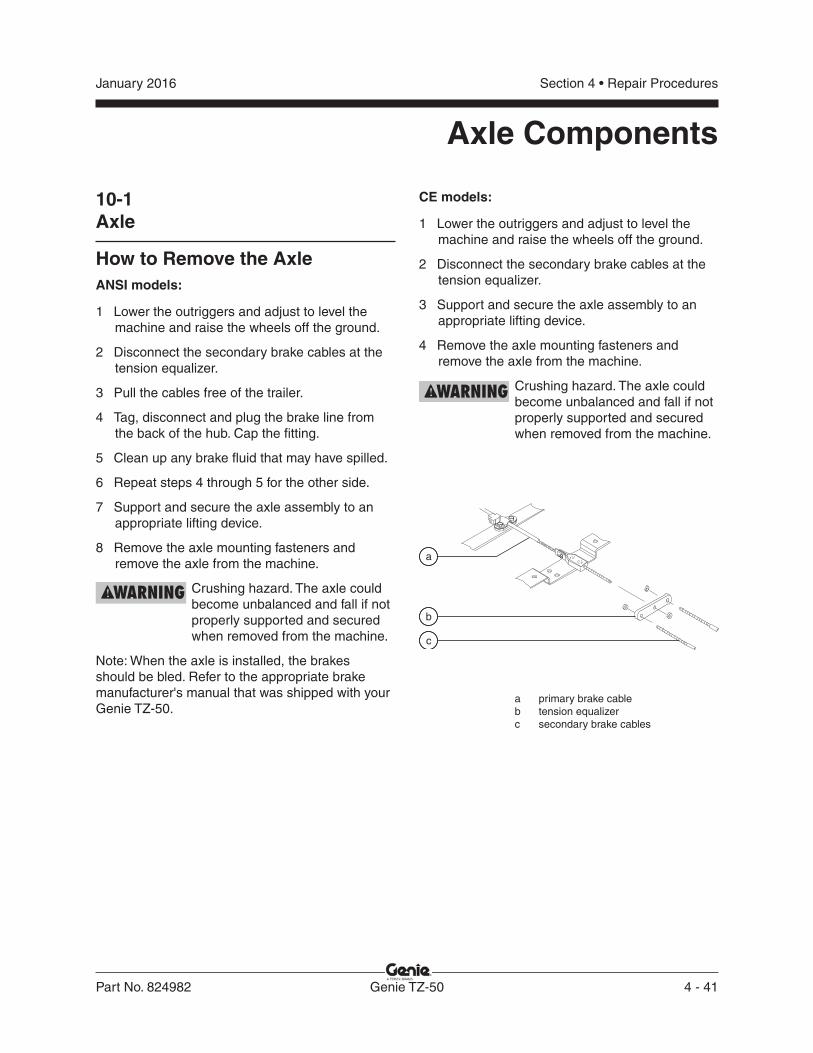
Part No. 824982 Genie TZ-50 4 - 41
January 2016 Section 4 • Repair Procedures
Axle Components
10-1Axle
How to Remove the AxleANSI models:
1 Lower the outriggers and adjust to level the machine and raise the wheels off the ground.
2 Disconnect the secondary brake cables at the tension equalizer.
3 Pull the cables free of the trailer.
4 Tag, disconnect and plug the brake line from the back of the hub. Cap the fi tting.
5 Clean up any brake fl uid that may have spilled.
6 Repeat steps 4 through 5 for the other side.
7 Support and secure the axle assembly to an appropriate lifting device.
8 Remove the axle mounting fasteners and remove the axle from the machine.
Crushing hazard. The axle could become unbalanced and fall if not properly supported and secured when removed from the machine.
Note: When the axle is installed, the brakes should be bled. Refer to the appropriate brake manufacturer's manual that was shipped with your Genie TZ-50.
CE models:
1 Lower the outriggers and adjust to level the machine and raise the wheels off the ground.
2 Disconnect the secondary brake cables at the tension equalizer.
3 Support and secure the axle assembly to an appropriate lifting device.
4 Remove the axle mounting fasteners and remove the axle from the machine.
Crushing hazard. The axle could become unbalanced and fall if not properly supported and secured when removed from the machine.
a primary brake cableb tension equalizerc secondary brake cables
c
b
a
4 - 42 Genie TZ-50 Part No. 824982
January 2016Section 4 • Repair Procedures
11-2Parking Brake
How to Adjust the Parking BrakeANSI models:
1 Adjust the brakes. Refer to the Dexter Axle Operation Maintenance Service Manual(Dexter part number LIT-001-00).
Dexter Axle Operation Maintenance Service ManualGenie part number 84376
2 Chock the wheels.
3 Release the parking brake.
4 Loosen the set screw at the side of the parking brake handle.
5 Adjust the handle just to the point where it is diffi cult to apply the parking brake, then rotate the top of the parking brake handle counterclockwise one full turn.
6 Tighten the set screw. Do not over tighten.
7 Engage the parking brake. Attempt to move the machine.
Result: The parking brake should prevent the machine from moving. If the parking brake does not prevent the machine from moving, repeat this procedure beginning with step 1.
CE models:
Required maintenance procedures and additional axle information is available in the KNOTT Axle Service Manual (KNOTT part number P005).
KNOTT Axle Service ManualGenie part number 84443
Trailer Components
11-1Hydraulic and Mechanical Brakes
Hydraulic Brake System -Hydraulic AxleRepair procedures and additional axle information is available in the Dexter Axle Operation Maintenance Service Manual(Dexter part number LIT-001-00).
Dexter Axle Operation Maintenance Service ManualGenie part number 84376
Mechanical Brake System -Mechanical AxleRepair procedures and additional axle information is available in the KNOTT Axle Service Manual (KNOTT part number P005).
KNOTT Axle Service ManualGenie part number 84443
Part No. 824982 Genie TZ-50 4 - 43
January 2016 Section 4 • Repair Procedures
Outriggers
12-1Outrigger Components
How to Remove an OutriggerOutriggers are essential to safe machine operation and machine stability. Operating a machine with a damaged or improperly operating outrigger will result in death or serious injury.
Note: Perform this procedure with the machine disconnected from the tow vehicle and the parking brake applied.
Note: Perform this procedure with the outriggers in the stowed position.
1 Attach a lifting strap of suitable capacity from an overhead crane to the pad end of the outrigger. Do not apply any lifting pressure.
2 Tag and disconnect the wire harness from the outrigger valve coil.
3 Tag, disconnect and plug the hydraulic hoses at the outrigger cylinder. Cap the fi ttings.
4 Remove the pin retaining fasteners from the outrigger pivot pin. Do not remove the pin.
5 Remove the pin retaining fasteners from the outrigger cylinder rod end pivot pin.
6 Attach a lifting strap of suitable capacity from an overhead crane to the rod end of the outrigger cylinder. Support the cylinder. Do not apply any lifting pressure.
7 Place a wooden block under the cylinder.
8 Lower the outrigger enough to remove the outrigger cylinder rod end pivot pin.
9 Using a soft metal drift, remove the outrigger cylinder rod end pivot pin.
Crushing hazard. The cylinder could fall if not properly supported when the pivot pin is removed from the machine.
10 Using a soft metal drift, remove the outrigger pivot pin. Remove the outrigger from the machine.
Crushing hazard. The outrigger will fall if not properly supported when the pivot pin is removed from the machine.
4 - 44 Genie TZ-50 Part No. 824982
January 2016Section 4 • Repair Procedures
6 Attach a lifting strap from an overhead crane to the lug on the rod end of the cylinder.
7 Remove the pin retaining fasteners from the outrigger cylinder rod-end pivot pin.
8 Using a soft metal drift, remove the outrigger cylinder rod-end pivot pin.
9 Raise the cylinder to a vertical position.
10 Remove the pin retaining fasteners from the outrigger cylinder barrel-end pivot pin.
11 Using a soft metal drift, remove the outrigger cylinder barrel-end pivot pin.
Crushing hazard. The outrigger cylinder could fall if not properly supported when the pivot pin is removed from the machine.
Component damage hazard. The solenoid valve can be damaged. Use caution when removing the cylinder from the machine.
OUTRIGGERS
12-2Outrigger Cylinder
How to Remove an Outrigger CylinderWhen removing a hose assembly or fi tting, the O-ring on the fi tting and/or hose end must be replaced and then torqued to specifi cation during installation. Refer to Section 2, Hydraulic Hose and Fitting Torque Specifi cations.
1 Extend the outrigger until the pad just touches the ground. Do not rest the weight of the machine on the outrigger.
2 Remove the hose guard mounting fasteners from the rod end of the outrigger cylinder and remove the hose guard from the machine.
3 Remove the cover above the barrel end of the outrigger cylinder.
4 Tag and disconnect the wire harness from the outrigger cylinder valve coil.
5 Tag, disconnect and plug the hydraulic hoses from the outrigger cylinder. Cap the fi ttings on the cylinder.
Bodily injury hazard. Spraying hydraulic oil can penetrate and burn skin. Loosen hydraulic connections very slowly to allow the oil pressure to dissipate gradually. Do not allow oil to squirt or spray.
Part No. 824982 Genie TZ-50 4 - 45
January 2016 Section 4 • Repair Procedures
Platform Overload Components
13-1Platform Overload System
Calibrate the Platform Overload System (if equipped)Note: Perform this procedure with the machine on a fi rm, level surface.
1 At the ground controls, extend the outriggers until the axle is off the ground and the machine is level.
2 Release the boom hold down latch and raise the platform approximately 2 feet / 60 cm. Level the platform.
3 Tag and disconnect the wire harness from the load sense limit switch.
Note: The load sense limit switch is located near the platform support.
4 Set a multi-meter to measure continuity. Connect the leads from the multi-meter to the black and red wires disconnected from the limit switch in step 3.
5 Determine the maximum platform capacity. Refer to the machine serial plate.
6 Using a suitable lifting device, place an appropriate test weight equal to that of the maximum platform capacity at the center of the platform fl oor.
Determine the limit switch trigger point:
7 Gently move the platform up and down by hand, so it bounces 1 to 2 inches / 2.5 to 5 cm.
8 Check the continuity between the black and red wires originating from the limit switch of the platform overload assembly.
Result: There is no continuity. Slowly tighten the load spring adjustment nut by turning it clockwise just until the limit switch closes and shows continuity.
Result: There is continuity. Slowly loosen the load spring adjustment nut by turning it counterclockwise just until the limit switch opens and shows no continuity.
Note: The platform will need to be continuously moved up and down while making adjustments.
Fine adjustment of the switch trigger point:
9 Continue moving the platform up and down and adjust the load spring adjustment nut clockwise or counterclockwise just until the limit switch is alternately opening and closing.
Note: When the limit switch is adjusted correctly, there will be continuity slightly longer than no continuity.
10 Remove the continuity tester from the limit switch wires. Securely install the wires onto the limit switch.
4 - 46 Genie TZ-50 Part No. 824982
January 2016Section 4 • Repair Procedures
PLATFORM OVERLOAD COMPONENTS
Confi rm the setting:
11 Turn the key switch to platform control.
12 Lift the test weight off the platform fl oor using a suitable lifting device.
13 Place the test weight back onto the platform fl oor using a suitable lifting device.
Result: The platform overload indicator light should be off at both the ground and platform controls.
14 Add an additional 44 lbs / 20 kg of weight to overload the platform.
Result: The platform overload indicator light should be fl ashing at both the ground and platform controls.
15 Test all machine functions from the platform controls.
Result: All platform control functions should not operate.
16 Turn the key switch to ground control.
17 Test all machine functions from the ground controls.
Result: All ground control functions should not operate.
Part No. 824982 Genie TZ-50 4 - 47
January 2016 Section 4 • Repair Procedures
The TZ-50 drive option allows the operator to move the machine into another position without having to use a tow vehicle to do so. This option package includes drive controls, a brake cylinder, and a drive motor for each axle wheel.
When a drive function is activated at the drive control box, a signal is sent to one or more of the drive manifold valve coils, enabling the machine to move. The drive controls will function only when the machine is in the stowed position, the parking brake is set, and both wheel motors are in place against the axle tires.
To begin, manually move and lock the drive wheels in place against the axles tires. Then, by squeezing the joystick, to activate the drive function enable button, and moving the joystick in the desired direction, the parking brake will release via the parking brake cylinder located under the chassis, and both drive motors will activate which will in turn move the machine.
Returning the joystick to the neutral position will disable the drive and steer function, and set the parking brake.
14-1 Drive Motor How to Remove a Drive Motor
When removing a hose assembly or fi tting, the O-ring on the fi tting and/or hose end must be replaced and then torqued to specifi cation during installation. Refer to Section Two, Hydraulic Hose and Fitting Torque Specifi cations.
1 Remove the drive wheel retaining fasteners.
2 Remove the drive wheel.
3 Tag, disconnect and plug the hydraulic hoses from the drive motor. Cap the fi ttings.
Bodily injury hazard. Spraying hydraulic oil can penetrate and burn skin. Loosen hydraulic connections very slowly to allow the oil pressure to dissipate gradually. Do not allow oil to squirt or spray.
4 Remove the drive motor mounting fasteners and remove the drive motor from the machine.
Drive Components

4 - 48 Genie TZ-50 Part No. 824982
January 2016Section 4 • Repair Procedures
2 Remove the drive control box from the control box mount. Turn the box over and remove the fasteners securing the bottom cover to the box. Remove the cover.
3 Locate the 6-pin Deutsch connector between the circuit board and the 14-wire main cable.
Note: The 6-pin connector and wiring originates from the circuit board nearest the B SIDE potentiometer.
Note: On the circuit board side, seven wires are installed into the 6-pin connector with two red wires installed into terminal 1.
a drive controls circuit boardb 14-wire main cable
4 Tag and disconnect the circuit board from the 14-wire main cable.
Component damage hazard. Electrostatic discharge (ESD) can damage printed circuit board components. Use a grounded wrist strap at all times when handling printed circuit boards.
5 Tag and disconnect the joystick from the circuit board.
6 Remove the circuit board mounting fasteners and remove the circuit board from the box.
14-2 Drive Control Box
Activating the joystick or a button on the box fi rst sends a signal to the drive controls circuit board, then to the ground controls and fi nally the drive manifold valve coils which ultimately activates the drive function. The drive/steer functions can only be operated when the machine is in the stowed position and the parking brake set.
Over time, it may be necessary to recalibrate the drive controls. The drive controls printed circuit board can be adjusted for three different functions: steer left, steer right, and forward/reverse. For each function to operate correctly, two side-by-side potentiometers, Threshold and Hi-range, must be carefully adjusted. When accurately calibrated, the machine should steer and drive smoothly.
The drive control box consists of a printed circuit board, Emergency Stop button, joystick and, for ANSI models, buttons to operate the outriggers. All of the components are replaceable.
Keeping the drive controls clean and defect free is essential to safe machine operation. For further information or assistance, consult the Genie Industries Service Department.
How to Remove the Drive Circuit Board 1 Tag and disconnect the drive control wire
harness from the ground controls.
DRIVE COMPONENTS
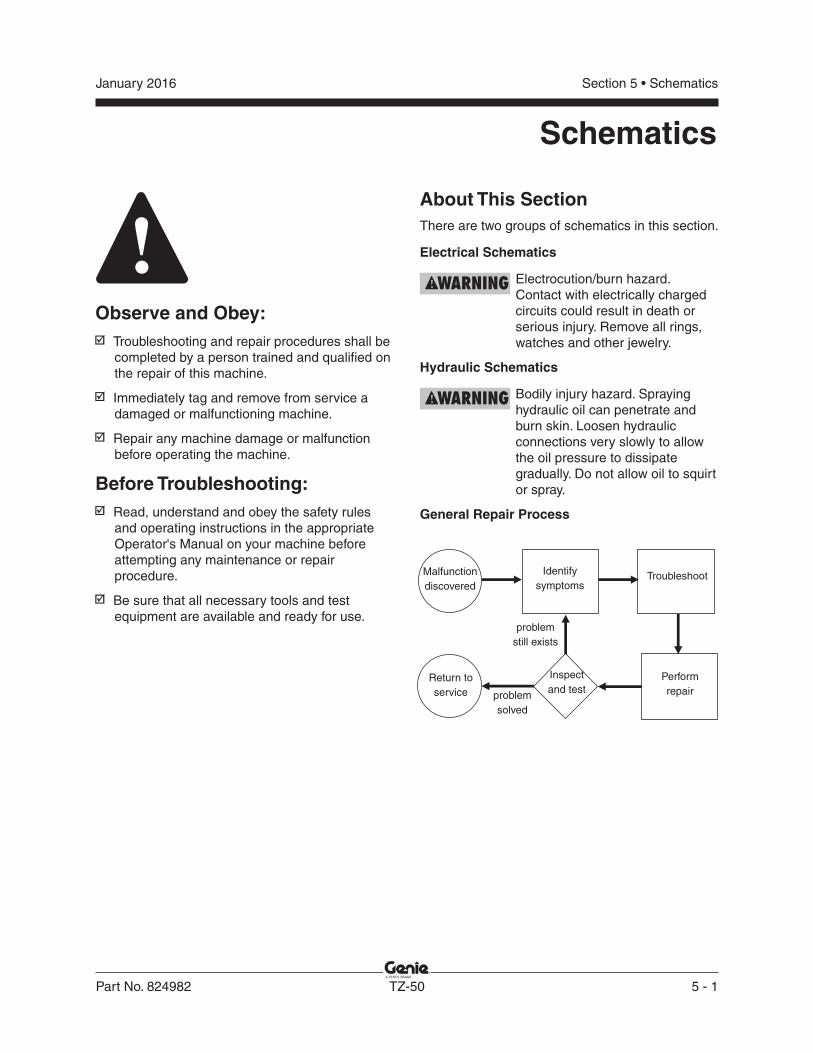
Section 5 • SchematicsJanuary 2016
Part No. 824982 TZ-50 5 - 1
Schematics
Observe and Obey: Troubleshooting and repair procedures shall be
completed by a person trained and qualifi ed on the repair of this machine.
Immediately tag and remove from service a damaged or malfunctioning machine.
Repair any machine damage or malfunction before operating the machine.
Before Troubleshooting: Read, understand and obey the safety rules
and operating instructions in the appropriateOperator's Manual on your machine before attempting any maintenance or repair procedure.
Be sure that all necessary tools and test equipment are available and ready for use.
About This SectionThere are two groups of schematics in this section.
Electrical Schematics
Electrocution/burn hazard. Contact with electrically charged circuits could result in death or serious injury. Remove all rings, watches and other jewelry.
Hydraulic Schematics
Bodily injury hazard. Spraying hydraulic oil can penetrate and burn skin. Loosen hydraulic connections very slowly to allow the oil pressure to dissipate gradually. Do not allow oil to squirt or spray.
General Repair Process
Malfunctiondiscovered
Identifysymptoms
Troubleshoot
Return toservice
problemstill exists
problemsolved
Inspectand test
Performrepair
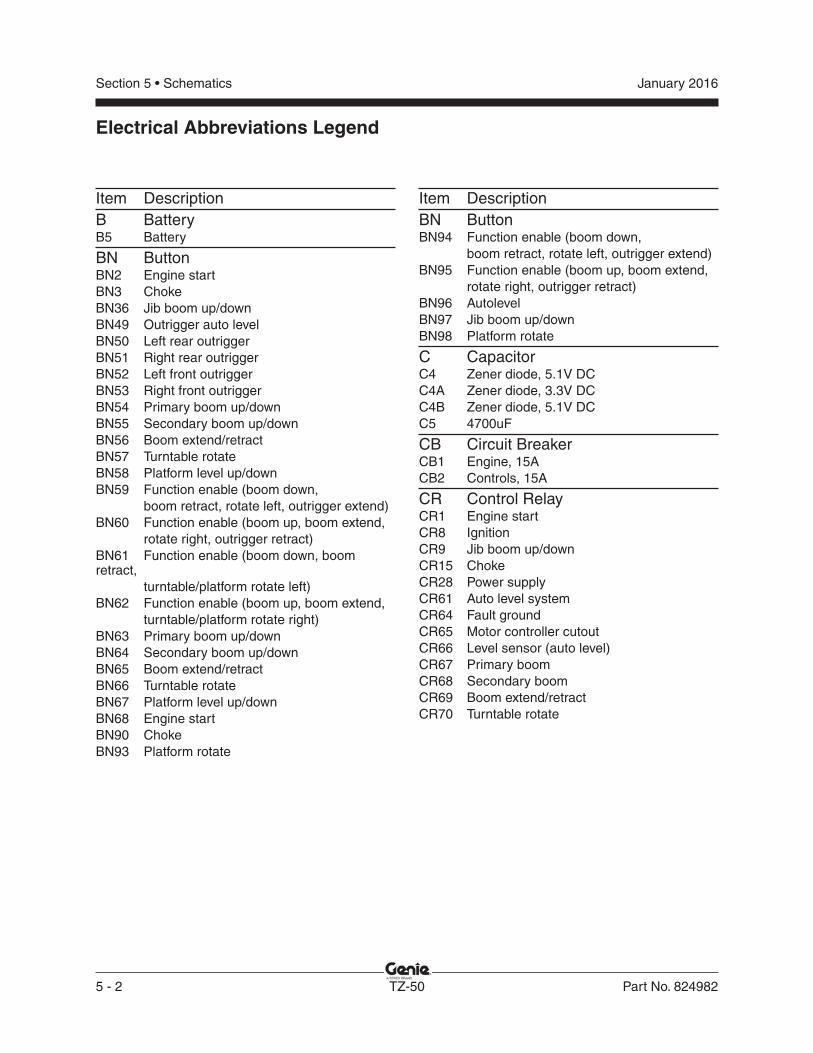
Section 5 • Schematics January 2016
5 - 2 TZ-50 Part No. 824982
Electrical Abbreviations Legend
Item DescriptionB BatteryB5 Battery
BN ButtonBN2 Engine startBN3 ChokeBN36 Jib boom up/downBN49 Outrigger auto levelBN50 Left rear outriggerBN51 Right rear outriggerBN52 Left front outriggerBN53 Right front outriggerBN54 Primary boom up/downBN55 Secondary boom up/downBN56 Boom extend/retractBN57 Turntable rotateBN58 Platform level up/downBN59 Function enable (boom down, boom retract, rotate left, outrigger extend)BN60 Function enable (boom up, boom extend, rotate right, outrigger retract)BN61 Function enable (boom down, boom retract, turntable/platform rotate left)BN62 Function enable (boom up, boom extend, turntable/platform rotate right)BN63 Primary boom up/downBN64 Secondary boom up/downBN65 Boom extend/retractBN66 Turntable rotateBN67 Platform level up/downBN68 Engine startBN90 ChokeBN93 Platform rotate
Item DescriptionBN ButtonBN94 Function enable (boom down, boom retract, rotate left, outrigger extend)BN95 Function enable (boom up, boom extend, rotate right, outrigger retract)BN96 AutolevelBN97 Jib boom up/down BN98 Platform rotate
C CapacitorC4 Zener diode, 5.1V DCC4A Zener diode, 3.3V DCC4B Zener diode, 5.1V DCC5 4700uF
CB Circuit BreakerCB1 Engine, 15ACB2 Controls, 15A
CR Control RelayCR1 Engine startCR8 IgnitionCR9 Jib boom up/downCR15 ChokeCR28 Power supplyCR61 Auto level systemCR64 Fault groundCR65 Motor controller cutoutCR66 Level sensor (auto level)CR67 Primary boomCR68 Secondary boomCR69 Boom extend/retractCR70 Turntable rotate
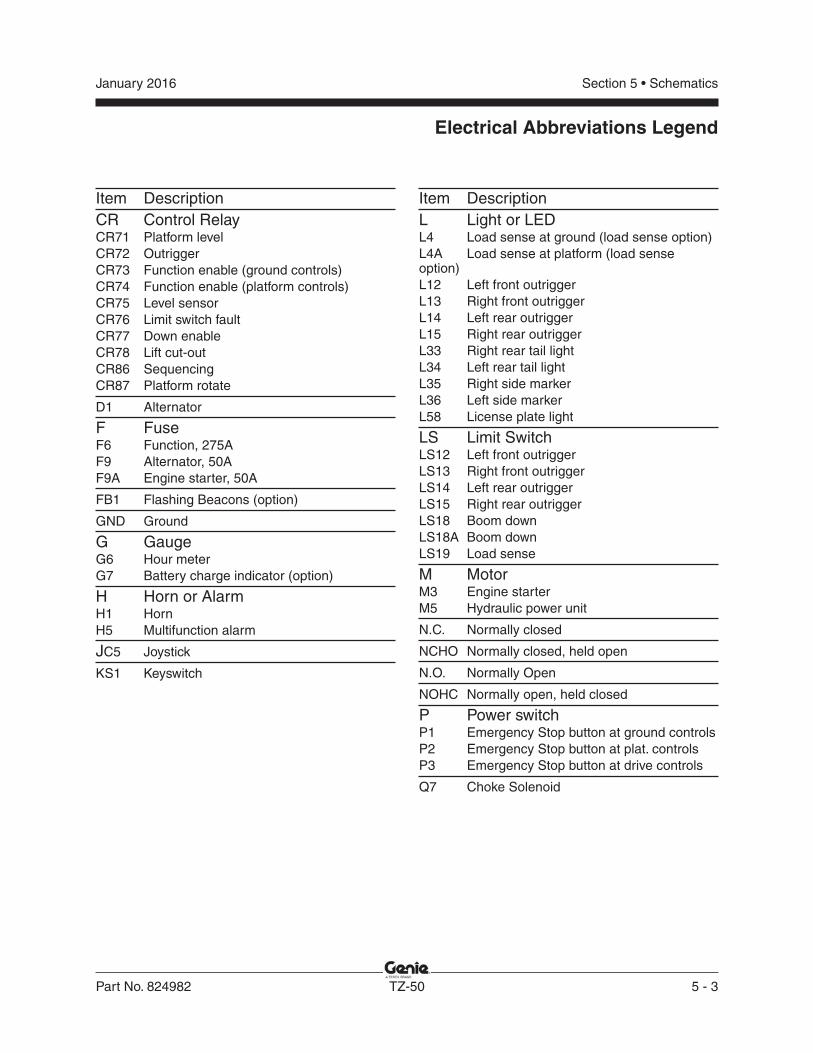
Section 5 • SchematicsJanuary 2016
Part No. 824982 TZ-50 5 - 3
Electrical Abbreviations Legend
Item DescriptionCR Control RelayCR71 Platform levelCR72 OutriggerCR73 Function enable (ground controls)CR74 Function enable (platform controls)CR75 Level sensorCR76 Limit switch faultCR77 Down enableCR78 Lift cut-outCR86 SequencingCR87 Platform rotate
D1 Alternator
F FuseF6 Function, 275A F9 Alternator, 50AF9A Engine starter, 50A
FB1 Flashing Beacons (option)
GND Ground
G GaugeG6 Hour meterG7 Battery charge indicator (option)
H Horn or AlarmH1 HornH5 Multifunction alarm
JC5 Joystick
KS1 Keyswitch
Item DescriptionL Light or LEDL4 Load sense at ground (load sense option)L4A Load sense at platform (load sense option)L12 Left front outriggerL13 Right front outriggerL14 Left rear outriggerL15 Right rear outriggerL33 Right rear tail lightL34 Left rear tail lightL35 Right side markerL36 Left side markerL58 License plate light
LS Limit SwitchLS12 Left front outriggerLS13 Right front outriggerLS14 Left rear outriggerLS15 Right rear outriggerLS18 Boom downLS18A Boom downLS19 Load sense
M MotorM3 Engine starterM5 Hydraulic power unit
N.C. Normally closed
NCHO Normally closed, held open
N.O. Normally Open
NOHC Normally open, held closed
P Power switchP1 Emergency Stop button at ground controlsP2 Emergency Stop button at plat. controlsP3 Emergency Stop button at drive controls
Q7 Choke Solenoid
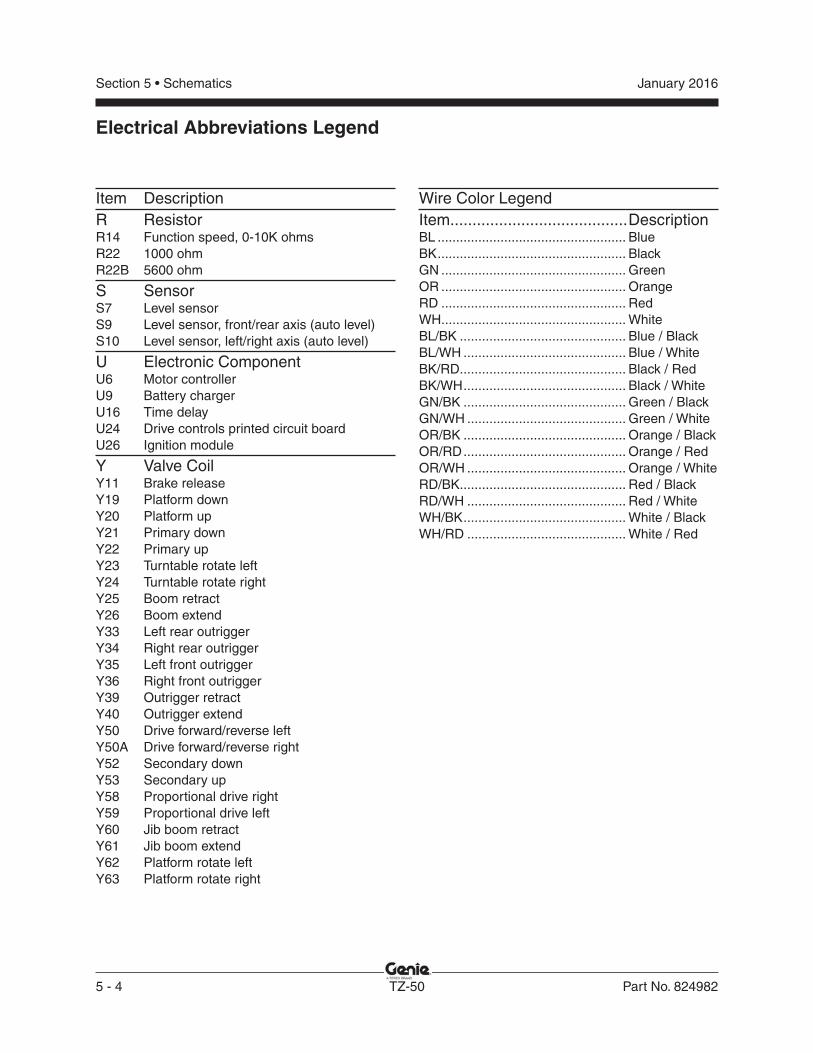
Section 5 • Schematics January 2016
5 - 4 TZ-50 Part No. 824982
Electrical Abbreviations Legend
Item DescriptionR ResistorR14 Function speed, 0-10K ohmsR22 1000 ohmR22B 5600 ohm
S SensorS7 Level sensorS9 Level sensor, front/rear axis (auto level)S10 Level sensor, left/right axis (auto level)
U Electronic ComponentU6 Motor controllerU9 Battery chargerU16 Time delayU24 Drive controls printed circuit boardU26 Ignition module
Y Valve CoilY11 Brake releaseY19 Platform downY20 Platform upY21 Primary downY22 Primary upY23 Turntable rotate leftY24 Turntable rotate rightY25 Boom retractY26 Boom extendY33 Left rear outriggerY34 Right rear outriggerY35 Left front outriggerY36 Right front outriggerY39 Outrigger retractY40 Outrigger extendY50 Drive forward/reverse leftY50A Drive forward/reverse rightY52 Secondary downY53 Secondary upY58 Proportional drive rightY59 Proportional drive leftY60 Jib boom retractY61 Jib boom extendY62 Platform rotate leftY63 Platform rotate right
Wire Color LegendItem ........................................DescriptionBL ................................................... BlueBK ................................................... BlackGN .................................................. GreenOR .................................................. OrangeRD .................................................. RedWH .................................................. WhiteBL/BK ............................................. Blue / BlackBL/WH ............................................ Blue / WhiteBK/RD ............................................. Black / RedBK/WH ............................................ Black / WhiteGN/BK ............................................ Green / BlackGN/WH ........................................... Green / WhiteOR/BK ............................................ Orange / BlackOR/RD ............................................ Orange / RedOR/WH ........................................... Orange / WhiteRD/BK ............................................. Red / BlackRD/WH ........................................... Red / WhiteWH/BK ............................................ White / BlackWH/RD ........................................... White / Red
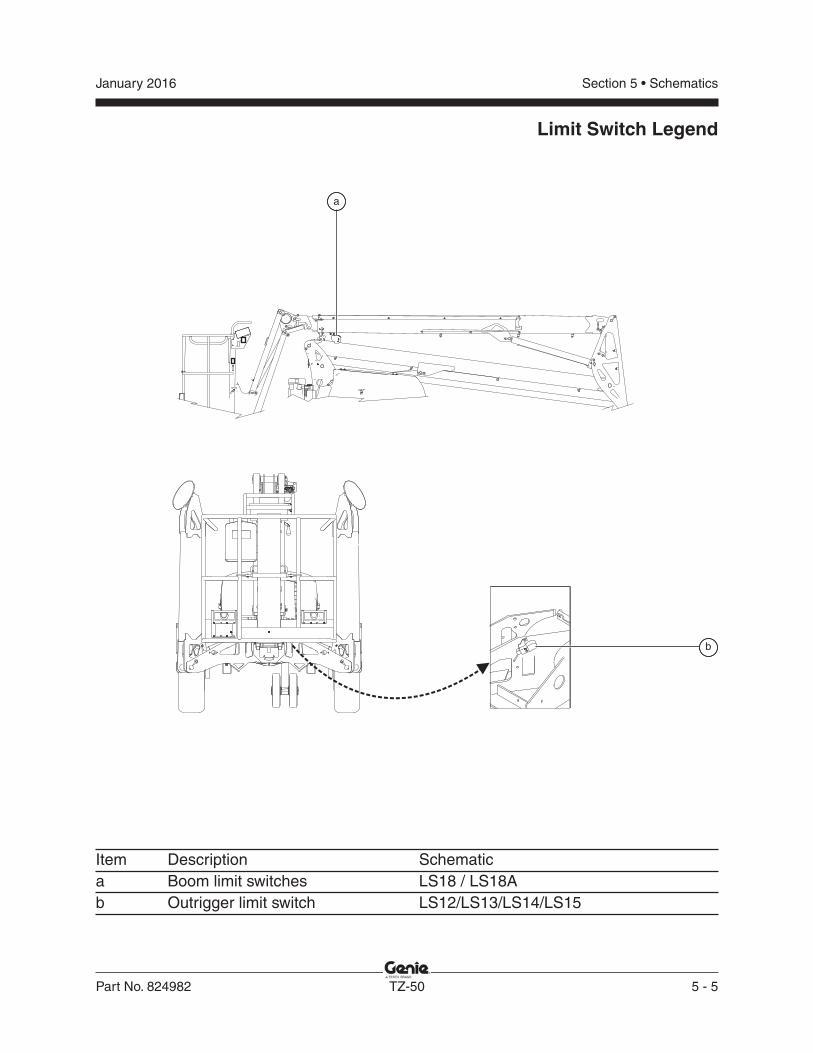
Section 5 • SchematicsJanuary 2016
Part No. 824982 TZ-50 5 - 5
Limit Switch Legend
Item Description Schematica Boom limit switches LS18 / LS18Ab Outrigger limit switch LS12/LS13/LS14/LS15
a
b
Section 5 • Schematics January 2016
5 - 6 TZ-50 Part No. 824982
Electrical Symbols Legend
B+
1
T2
B- 3
S2
A1
M5
TB1
KS1KEY SWITCH
PL
AT
FO
RM
GR
OU
ND
CB215A
P1EMERGENCY
STOP
N.C.N.O.H.C.N.C.H.O.
+
-
87A 87 85
30 86
+
G6
Terminal
Diode
Key switch
Emergency stop button, normally closed
Circuit breaker
Limit switch
Toggle switch
Control relay
Resistor
LED
Alarm
Solenoid valve with diode
Quick disconnect
6V Battery
Fuse
Power unit or motor
Motor controller
Hour meter
Battery charger
Level sensor
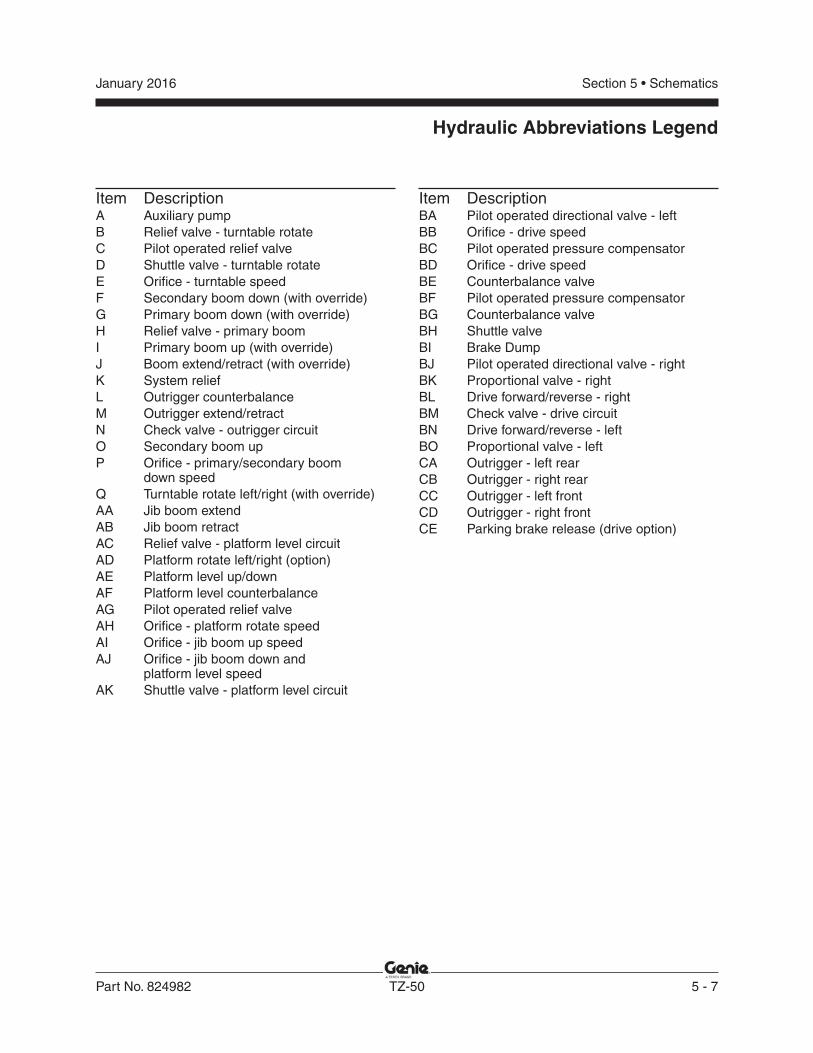
Section 5 • SchematicsJanuary 2016
Part No. 824982 TZ-50 5 - 7
Hydraulic Abbreviations Legend
Item DescriptionA Auxiliary pumpB Relief valve - turntable rotateC Pilot operated relief valveD Shuttle valve - turntable rotateE Orifi ce - turntable speedF Secondary boom down (with override)G Primary boom down (with override)H Relief valve - primary boomI Primary boom up (with override)J Boom extend/retract (with override)K System reliefL Outrigger counterbalanceM Outrigger extend/retract N Check valve - outrigger circuitO Secondary boom upP Orifi ce - primary/secondary boom down speedQ Turntable rotate left/right (with override) AA Jib boom extendAB Jib boom retractAC Relief valve - platform level circuitAD Platform rotate left/right (option)AE Platform level up/downAF Platform level counterbalanceAG Pilot operated relief valveAH Orifi ce - platform rotate speedAI Orifi ce - jib boom up speedAJ Orifi ce - jib boom down and platform level speedAK Shuttle valve - platform level circuit
Item DescriptionBA Pilot operated directional valve - leftBB Orifi ce - drive speedBC Pilot operated pressure compensatorBD Orifi ce - drive speedBE Counterbalance valveBF Pilot operated pressure compensatorBG Counterbalance valveBH Shuttle valveBI Brake DumpBJ Pilot operated directional valve - rightBK Proportional valve - rightBL Drive forward/reverse - rightBM Check valve - drive circuitBN Drive forward/reverse - leftBO Proportional valve - left CA Outrigger - left rearCB Outrigger - right rearCC Outrigger - left frontCD Outrigger - right frontCE Parking brake release (drive option)
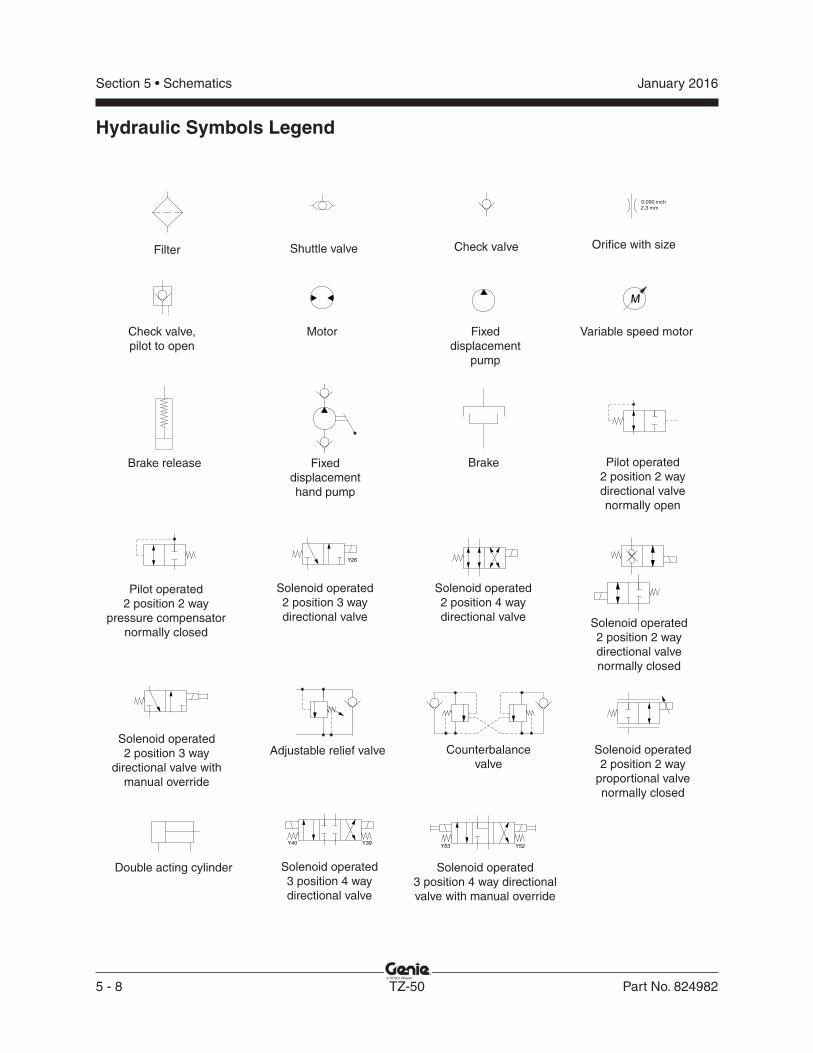
Section 5 • Schematics January 2016
5 - 8 TZ-50 Part No. 824982
0.090 inch2.3 mm
M
Y52Y53Y39Y40
Y26
Filter Shuttle valve Check valve
Motor
Brake release Pilot operated2 position 2 way directional valvenormally open
Solenoid operated2 position 4 way directional valve
Adjustable relief valve
Double acting cylinder
Orifi ce with size
Fixed displacement
pump
Fixed displacementhand pump
Pilot operated2 position 2 way
pressure compensatornormally closed
Solenoid operated2 position 2 way directional valvenormally closed
Counterbalance valve
Solenoid operated3 position 4 way directional valve
Check valve,pilot to open
Variable speed motor
Brake
Solenoid operated2 position 3 way directional valve
Solenoid operated2 position 3 way
directional valve with manual override
Solenoid operated2 position 2 way
proportional valvenormally closed
Solenoid operated3 position 4 way directional valve with manual override
Hydraulic Symbols Legend
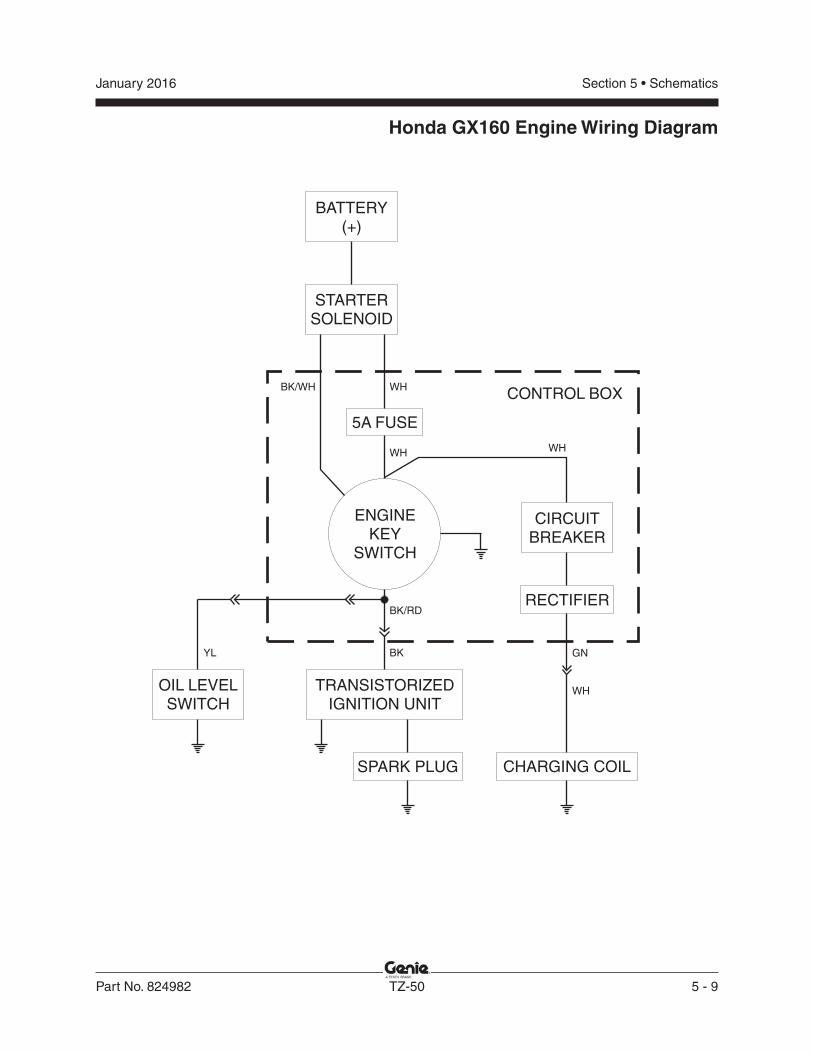
Section 5 • SchematicsJanuary 2016
Part No. 824982 TZ-50 5 - 9
Honda GX160 Engine Wiring Diagram
ENGINEKEY
SWITCH
5A FUSE
RECTIFIER
CIRCUITBREAKER
STARTERSOLENOID
BATTERY(+)
WHBK/WH
WH WH
CHARGING COIL
WH
GN
BK/RD
YL
OIL LEVELSWITCH
SPARK PLUG
TRANSISTORIZEDIGNITION UNIT
BK
CONTROL BOX
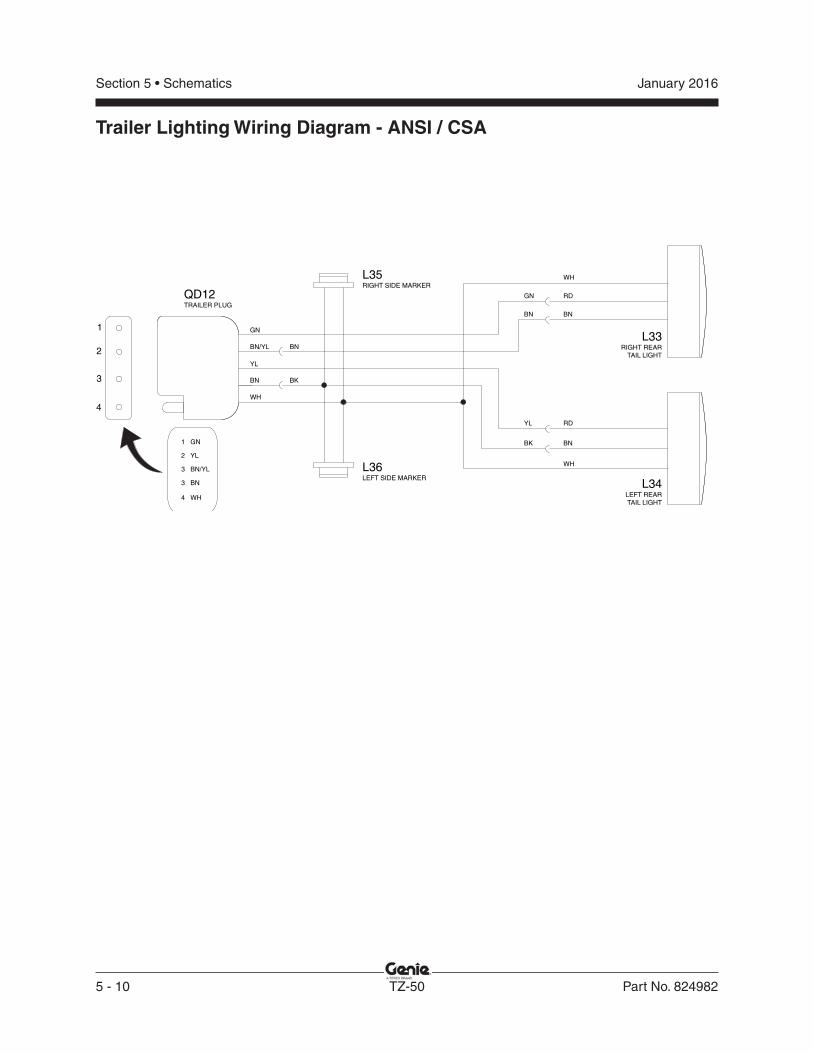
Section 5 • Schematics January 2016
5 - 10 TZ-50 Part No. 824982
Trailer Lighting Wiring Diagram - ANSI / CSA
3
1
2
4
QD12TRAILER PLUG
GN
WH
YL
BN/YL BN
RD
RD
BN
BN
WH
GN
YL
BN
BK
BN BK
WH
2 YL
3 BN/YL
3 BN
1 GN
4 WH
L35RIGHT SIDE MARKER
L36LEFT SIDE MARKER
L33RIGHT REAR
TAIL LIGHT
L34LEFT REARTAIL LIGHT
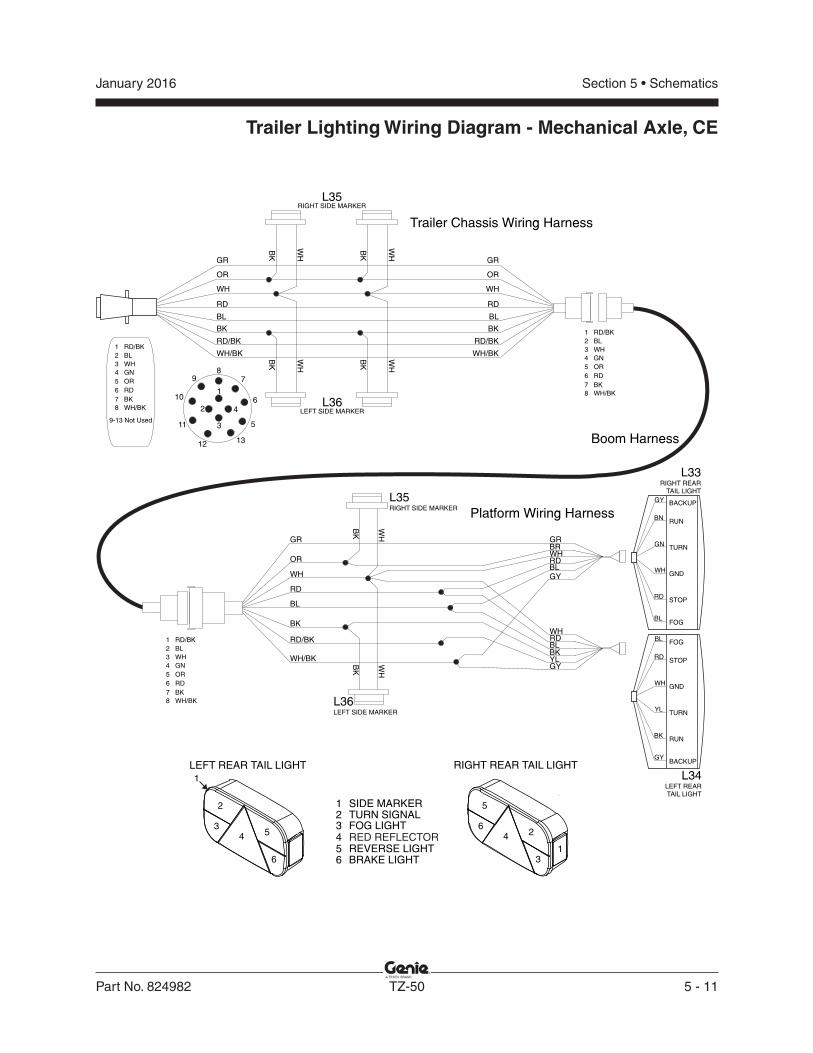
Section 5 • SchematicsJanuary 2016
Part No. 824982 TZ-50 5 - 11
Trailer Lighting Wiring Diagram - Mechanical Axle, CE
RD
BNRUN
TURN
GND
STOP
GN
L33RIGHT REAR
TAIL LIGHT
GY
FOG
L34LEFT REARTAIL LIGHT
BACKUP
BL
L35RIGHT SIDE MARKER
L36LEFT SIDE MARKER
1
2
34 5
6
LEFT REAR TAIL LIGHT
5
64 2
31
RIGHT REAR TAIL LIGHT
123456
SIDE MARKERTURN SIGNALFOG LIGHTRED REFLECTORREVERSE LIGHTBRAKE LIGHT
WH
BK
WH
BK
RDSTOP
GND
TURN
RUN
WH
BL
BACKUP
FOG
GY
YL
Platform Wiring Harness
12
11
1
87
5
6
13
10
9
4
3
2
2 BL
3 WH
1 RD/BK
4 GN
5 OR
6 RD
7 BK
8 WH/BK
9-13 Not Used
LEFT SIDE MARKER
RIGHT SIDE MARKER
Trailer Chassis Wiring Harness
Boom Harness
WH
BK
OR
GR
RD/BK
RD
BL
WH
BK
WH
BK
WH
BK
WH
BK
L35
L36
WH/BK
WH
BK
OR
GR
RD/BK
RD
BL
WH/BK
2 BL
3 WH
1 RD/BK
4 GN
5 OR
6 RD
7 BK
8 WH/BK
WH
BK
OR
GR
RD/BK
RD
BL
WH/BK
2 BL
3 WH
1 RD/BK
4 GN
5 OR
6 RD
7 BK
8 WH/BK
WH
BK
WH
BRGR
RDBL
WH
GY
RDBLBKYLGY
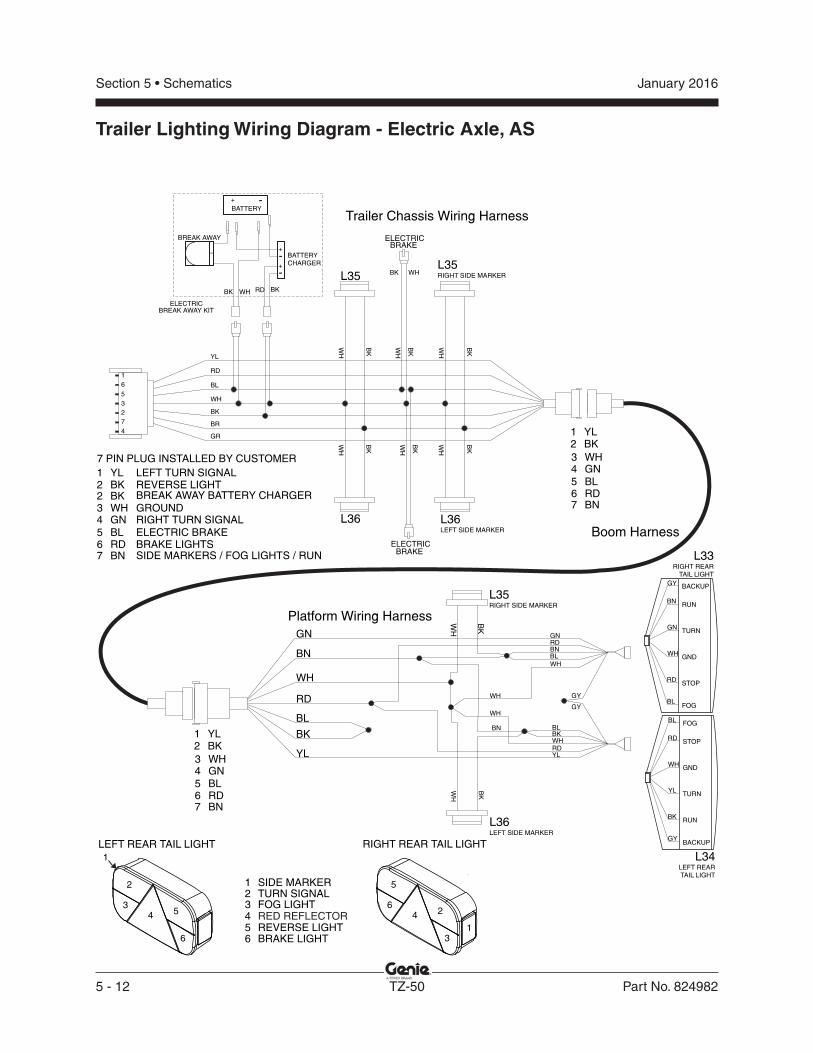
Section 5 • Schematics January 2016
5 - 12 TZ-50 Part No. 824982
Trailer Lighting Wiring Diagram - Electric Axle, AS
RD
BNRUN
TURN
GND
STOP
GN
WH
L33RIGHT REAR
TAIL LIGHT
GY
FOG
L34LEFT REARTAIL LIGHT
BACKUP
BL
L35RIGHT SIDE MARKER
L36LEFT SIDE MARKER
1
2
34 5
6
LEFT REAR TAIL LIGHT
5
64 2
31
RIGHT REAR TAIL LIGHT
123456
SIDE MARKERTURN SIGNALFOG LIGHTRED REFLECTORREVERSE LIGHTBRAKE LIGHT
BN
YL
GN
BK
RD
WH
BL
7
1
4
2
6
3
5
BN
YL
GN
BK
RD
WH
BL
WH
BK
WH
BK
WH
BLBK
WHBNBL
GNRD
WH
BK
RDSTOP
GND
TURN
RUN
WH
BL
BACKUP
FOG
GY
YL
WHRDYL
GY
GY
BN
WH
BK
BR
GR
YL
RD
BL
L35RIGHT SIDE MARKER
L36LEFT SIDE MARKER
BN
YL
GN
BK
RDSIDE MARKERS / FOG LIGHTS / RUN
LEFT TURN SIGNAL
RIGHT TURN SIGNAL
REVERSE LIGHT
BRAKE LIGHTS
BREAK AWAY BATTERY CHARGER
WH GROUND
BL ELECTRIC BRAKE
7 PIN PLUG INSTALLED BY CUSTOMER
7
1
4
2
6
3
5
BK2
1
6
5
3
2
7
4
ELECTRIC
WHBK
ELECTRICBRAKE
ELECTRICBRAKE
L35
L36
WH
BK
WH
BK
WH
BK
WH
BK
WH
BK
WH
BK
BN
YL
GN
BK
RD
WH
BL
7
1
4
2
6
3
5
BATTERYCHARGER
-+
-+
BREAK AWAY
BATTERY
+ -
BK WH RD BK
BREAK AWAY KIT
Trailer Chassis Wiring Harness
Boom Harness
Platform Wiring Harness

Section 5 • SchematicsJanuary 2016
Part No. 824982 TZ-50 5 - 13
Trailer Lighting Wiring Diagram - Hydraulic Axle, AS
RD
BNRUN
TURN
GND
STOP
GN
L33RIGHT REAR
TAIL LIGHT
GY
FOG
L34LEFT REARTAIL LIGHT
BACKUP
BL
L35RIGHT SIDE MARKER
L36LEFT SIDE MARKER
1
2
34 5
6
LEFT REAR TAIL LIGHT
5
64 2
31
RIGHT REAR TAIL LIGHT
123456
SIDE MARKERTURN SIGNALFOG LIGHTRED REFLECTORREVERSE LIGHTBRAKE LIGHT
WH
BK
WH
BK
RDSTOP
GND
TURN
RUN
WH
BL
BACKUP
FOG
GY
YL
Platform Wiring Harness
12
11
1
87
5
6
13
10
9
4
3
2
2 BL
3 WH
1 RD/BK
4 GN
5 OR
6 RD
7 BK
8 WH/BK
9-13 Not Used
LEFT SIDE MARKER
RIGHT SIDE MARKER
Trailer Chassis Wiring Harness
Boom Harness
WH
BK
OR
GR
RD/BK
RD
BL
WH
BK
WH
BK
WH
BK
WH
BK
L35
L36
WH/BK
WH
BK
OR
GR
RD/BK
RD
BL
WH/BK
2 BL
3 WH
1 RD/BK
4 GN
5 OR
6 RD
7 BK
8 WH/BK
WH
BK
OR
GR
RD/BK
RD
BL
WH/BK
2 BL
3 WH
1 RD/BK
4 GN
5 OR
6 RD
7 BK
8 WH/BK
WH
BK
WH
BRGR
RDBL
WH
GY
RDBLBKYLGY

Section 5 • Schematics January 2016
5 - 14 TZ-50 Part No. 824982
Ground Control Box Wiring Diagram - ANSI/CSA
H5 ALARM G6 HOUR METER
++
--
TB3
TB32
TB35
PA3
RD
WH
BK
BL/WH
BL/WH
GN/WH
GN/WH
WH
RD/WH
RD/WH
OR/WH
OR/WH
RD
WH/BK
GN/WH
BL/BK
RD/BK
GN
RD
BK/WH
TB17
TB18
TB35
TB23
PB-7
PB5-9
TB24
TB4A
TB20
P5-3
TB21
P5-5
TB31
TB30
TB25
TB26
TB29
CR78A TERMINAL 87A
TB27
BN36JIBBOOMUP/DOWN
BN56BOOM
EXTEND/RETRACT
BN58PLATFORMLEVELUP/DOWN
BN49AUTO LEVEL
BN50LEFT REAR OUTRIGGER
BN52LEFT FRONT OUTRIGGER
BN51RIGHT REAR OUTRIGGER
BN53RIGHT FRONTOUTRIGGER
L15RR LED
L14LR LED
L13RF LED
L12LF LED
BN57TURNTABLEROTATE
BN55SECONDARYBOOMUP/DOWN
BN54PRIMARYBOOMUP/DOWN
BN93PLATFORMROTATE(OPTION)
RD
WH
RD
BK
TB11
WH
WH
RD
RD
RD
OR/BK
BK/RD
CB115 AMP
CB215 AMP
TB9
TB10
CR6 TERMINAL 30
POWER CABLE PIN 1
CR15 TERMINAL 30
TURNTABLE HARNESSPIN E
TB33
CR15 TERMINAL 86
P1 EMERGENCY STOP
BN59FUNCTION ENABLE(BOOM DOWN,BOOM RETRACT,ROTATE LEFTAND OUTRIGGEREXTEND)
BN60FUNCTION ENABLE(BOOM UP, EXTEND, ROTATERIGHT AND OUTRIGGER RETRACT)
MODELSWITH
ENGINE(OPTION)
BN90CHOKE
BN68ENGINESTART
TB3
RDCR1 TERMINAL 86
RD
RDTURNTABLE HARNESSPIN B
KS1KEY SWITCH
BCI +
RD
ES0440G
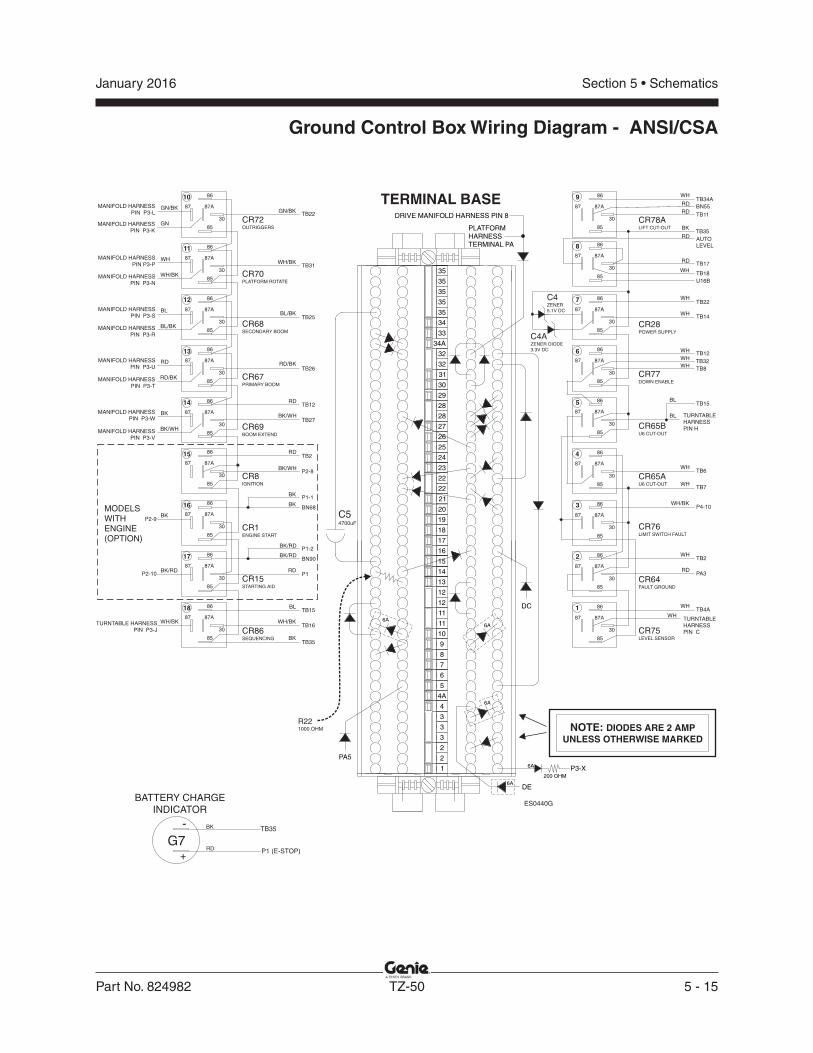
Section 5 • SchematicsJanuary 2016
Part No. 824982 TZ-50 5 - 15
Ground Control Box Wiring Diagram - ANSI/CSA
TERMINAL BASE
BK/WH
GN/BK
WH/BK
BL/BK
RD/BK
BK/WH
WH/BK
BK
P2-8
TB22
TB31
TB25
TB26
TB27
TB16
CR70PLATFORM ROTATE
CR67PRIMARY BOOM
CR86SEQUENCING
CR69BOOM EXTEND
CR72OUTRIGGERS
TURNTABLE HARNESSPIN JP3-
MANIFOLD HARNESSPIN P3-L
MANIFOLD HARNESSPIN KP3-
MANIFOLD HARNESSPIN PP3-
MANIFOLD HARNESSPIN NP3-
MANIFOLD HARNESSPIN SP3-
MANIFOLD HARNESSPIN RP3-
MANIFOLD HARNESSPIN UP3-
MANIFOLD HARNESSPIN TP3-
MANIFOLD HARNESSPIN WP3-
MANIFOLD HARNESSPIN VP3-
P2-9
CR68SECONDARY BOOM
GN
GN/BK
BK/WH
BK
BL/BK
BL
WH/BK
WH
WH/BK
RD/BK
RD
10
11
12
13
14
15
16
17
18
30
86
85
87A87
30
86
85
87A87
30
86
85
87A87
30
86
85
87A87
30
86
85
87A87
30
86
85
87A87
30
86
85
87A87
30
86
85
87A87
30
86
85
87A87
CR8IGNITION
CR1ENGINE START
CR15STARTING AID
TB12RD
TB35
RDTB2
BK
BK
P1-1
BN68
BK
BK/RDP1-2
BN90BK/RD
BK/RDP2-10
TB15BL
MODELSWITHENGINE(OPTION)
RDP1
RD
RD
BL
WH
PA3
TB7
TB6
TB14
TB8
TURNTABLEHARNESSPIN H
CR78ALIFT CUT-OUT
CR76LIMIT SWITCH FAULT
CR75LEVEL SENSOR
30
86
85
87A87
TURNTABLEHARNESSPIN C
WH
9
7
6
5
4
3
2
1
TB34AWH
TB35BK
30
86
85
87A87
30
86
85
87A87
30
86
85
87A87
30
86
85
87A87
30
86
85
87A87
30
86
85
87A87
30
86
85
87A87
TB22WH
WH
TB12WH
WHTB32
WH
TB2WH
P4-10WH/BK
TB4AWH
RDBN55
WH
CR28POWER SUPPLY
CR65BU6 CUT-OUT
CR64FAULT GROUND
CR65AU6 CUT-OUT
CR77DOWN ENABLE
C4ZENER5.1V DC
C4AZENER DIODE3.3V DC
TB11
BLTB15
NOTE: DIODES ARE 2 AMP
UNLESS OTHERWISE MARKED
34A
3
4A
13
23
14
16
22
22
21
20
19
18
17
8
9
10
11
11
12
12
35
35
35
35
35
34
33
32
32
31
30
29
28
28
27
26
25
24
7
6
5
4
3
3
2
2
1
R221000 OHM
15
C54700uF
PA5
PLATFORMHARNESSTERMINAL PA
DRIVE MANIFOLD HARNESS PIN 8
DC
6A6A
DE
6A
6A
30
86
85
87A87
8
RDTB17
U16B
RD
TB18
AUTOLEVEL
WH
+
-TB35
RD
BK
BATTERY CHARGEINDICATOR
G7P1 (E-STOP)
P3-X6A
200 OHM
ES0440G
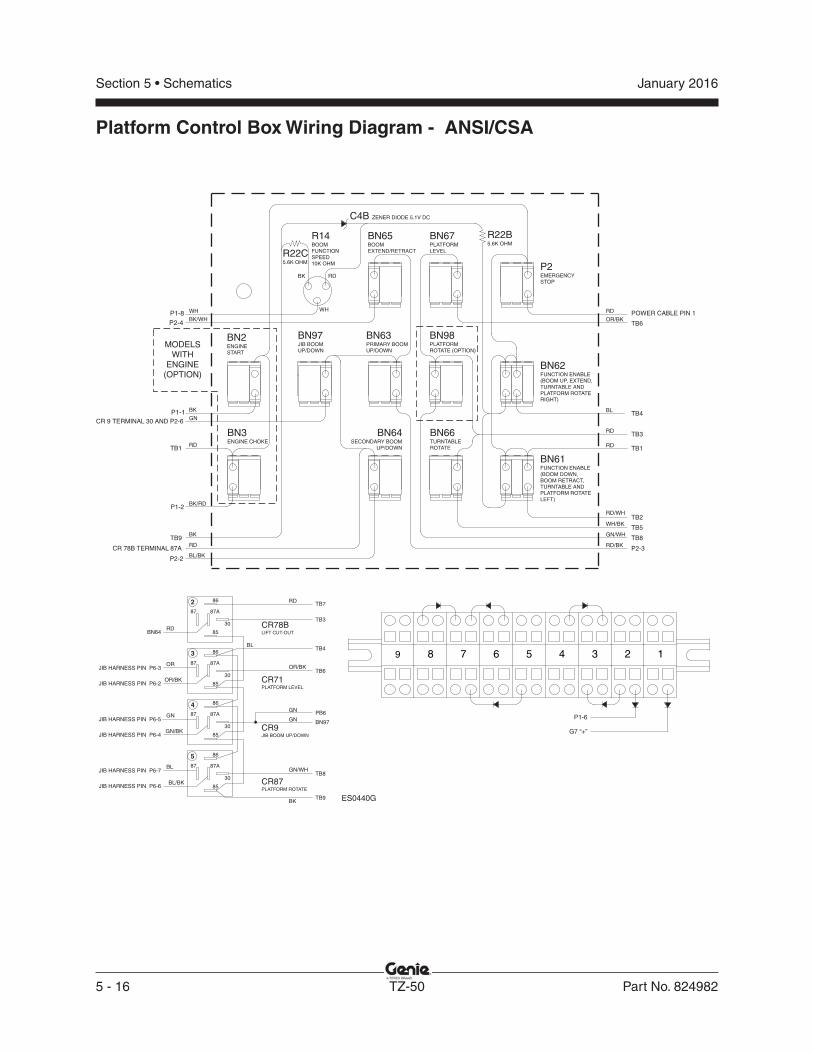
Section 5 • Schematics January 2016
5 - 16 TZ-50 Part No. 824982
Platform Control Box Wiring Diagram - ANSI/CSA
POWER CABLE PIN 1
TB6
TB4
OR/BK
RD
BK/WHP2-4
WHP1-8
RD
BLP1-1
RD/WH
BL/BK
RD
BK
BK/RDP1-2
P2-2
CR 78B TERMINAL 87A
GNCR 9 TERMINAL 30 AND P2-6
TB9BK
RD
WH
BK
TB2
TB5WH/BK
GN/WHTB8
RD/BKP2-3
BN61FUNCTION ENABLE(BOOM DOWN,BOOM RETRACT,
ROTATELEFT)
TURNTABLE ANDPLATFORM
BN62FUNCTION ENABLE(BOOM UP, EXTEND,TURNTABLE ANDPLATFORM ROTATERIGHT)
BN2ENGINESTART
BN3ENGINE CHOKE
BN97JIB BOOMUP/DOWN
BN63PRIMARY BOOMUP/DOWN
BN98PLATFORMROTATE (OPTION)
BN64SECONDARY BOOM
UP/DOWN
BN66TURNTABLEROTATE
P2EMERGENCYSTOP
BN67PLATFORMLEVEL
R14BOOMFUNCTIONSPEED10K OHM
BN65BOOMEXTEND/RETRACT
R22B5.6K OHM
C4B ZENER DIODE 5.1V DC
MODELSWITH
ENGINE(OPTION)
3 2 16 5 49 8 7
P1-6
G7 “+”
CR78BLIFT CUT-OUT
CR9JIB BOOM UP/DOWN
CR87PLATFORM ROTATE
CR71PLATFORM LEVEL
BN64
JIB HARNESS PIN 2P6-
BL/BK
BL
OR/BK
OR
RD
GN/BK
GN
2
3
4
5
30
86
85
87A87
30
86
85
87A87
30
86
85
87A87
30
86
85
87A87
BL
JIB HARNESS PIN P6-3
JIB HARNESS PIN 4P6-
JIB HARNESS PIN 5P6-
JIB HARNESS PIN 6P6-
JIB HARNESS PIN 7P6-
TB9
TB6
TB7
BN97
PB6
RD
BK
OR/BK
GN
GN
TB8GN/WH
TB3
TB4
TB1RD
TB3
RDTB1
R22C5.6K OHM
ES0440G
Section 5 • SchematicsJanuary 2016
Part No. 824982 TZ-50 5 - 17
This page intentionally left blank.
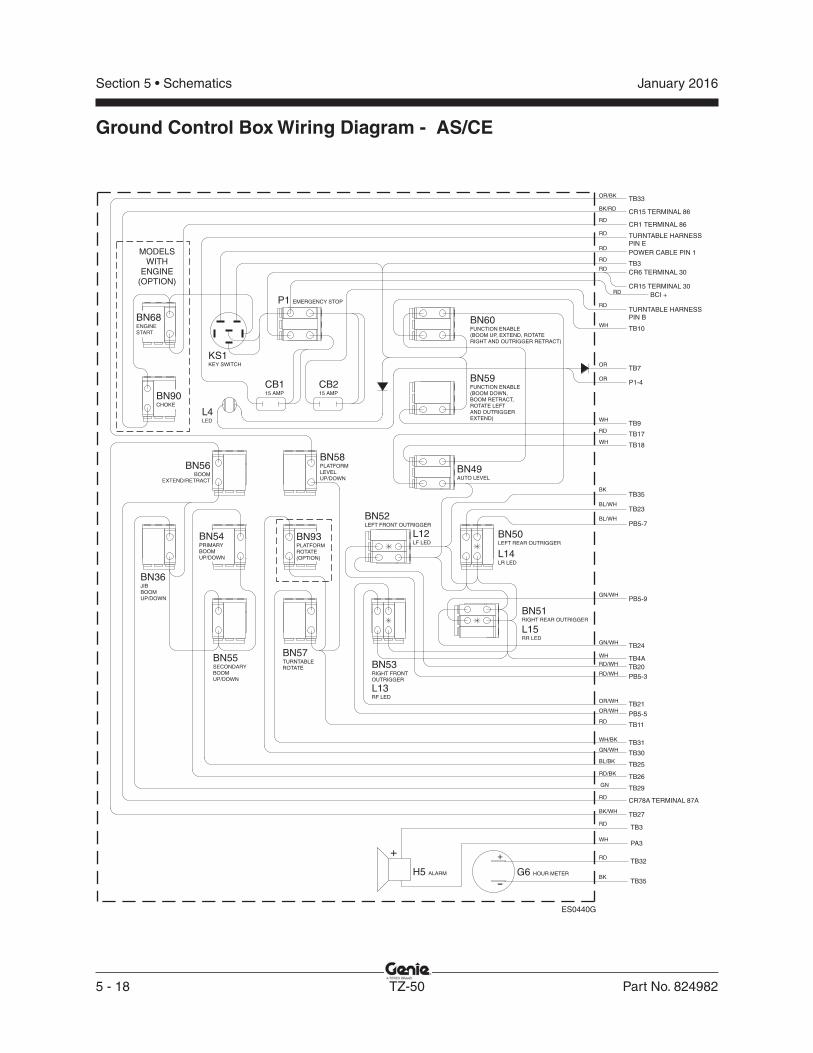
Section 5 • Schematics January 2016
5 - 18 TZ-50 Part No. 824982
Ground Control Box Wiring Diagram - AS/CE
H5 ALARM G6 HOUR METER
++
--
TB3
TB32
TB35
PA3
RD
WH
BK
BL/WH
BL/WH
GN/WH
GN/WH
WH
RD/WH
RD/WH
OR/WH
OR/WH
RD
WH/BK
GN/WH
BL/BK
RD/BK
GN
RD
BK/WH
TB17
TB18
TB35
TB23
PB5-7
PB5-9
TB24
TB4A
TB20
PB5-3
TB21
PB5-5
TB31
TB30
TB25
TB26
TB29
CR78A TERMINAL 87A
TB27
BN36JIBBOOMUP/DOWN
BN56BOOM
EXTEND/RETRACT
BN58PLATFORMLEVELUP/DOWN
BN49AUTO LEVEL
BN50LEFT REAR OUTRIGGER
BN52LEFT FRONT OUTRIGGER
BN51RIGHT REAR OUTRIGGER
BN53RIGHT FRONTOUTRIGGER
L15RR LED
L14LR LED
L13RF LED
L12LF LED
BN57TURNTABLEROTATE
BN55SECONDARYBOOMUP/DOWN
BN54PRIMARYBOOMUP/DOWN
BN93PLATFORMROTATE(OPTION)
RD
WH
RD
BK
TB11
WH
WH
RD
RD
RD
OR/BK
BK/RD
CB115 AMP
CB215 AMP
TB9
TB10
CR6 TERMINAL 30
POWER CABLE PIN 1
CR15 TERMINAL 30
TURNTABLE HARNESSPIN E
TB33
CR15 TERMINAL 86
P1 EMERGENCY STOP
BN59FUNCTION ENABLE(BOOM DOWN,BOOM RETRACT,ROTATE LEFTAND OUTRIGGEREXTEND)
BN60FUNCTION ENABLE(BOOM UP, EXTEND, ROTATERIGHT AND OUTRIGGER RETRACT)
MODELSWITH
ENGINE(OPTION)
BN90CHOKE
BN68ENGINESTART
TB3
L4LED
RDCR1 TERMINAL 86
RD
TB7OR
ORP1-4
RDTURNTABLE HARNESSPIN B
KS1KEY SWITCH
RD BCI +
ES0440G
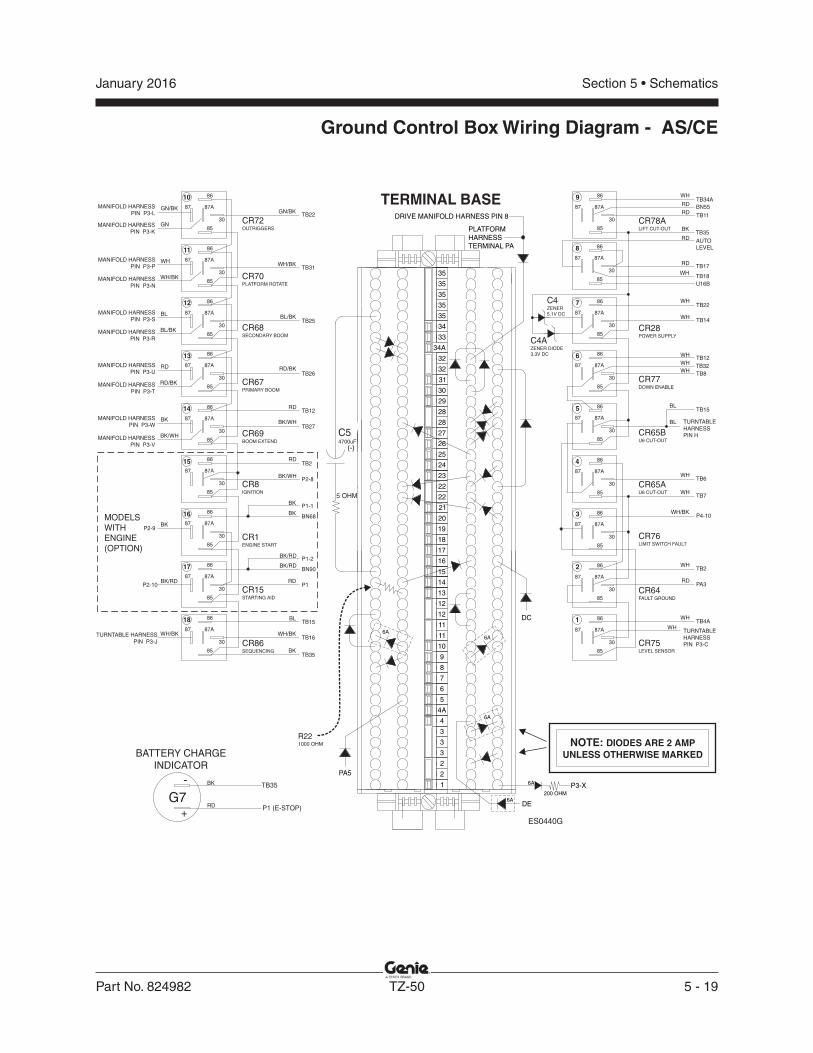
Section 5 • SchematicsJanuary 2016
Part No. 824982 TZ-50 5 - 19
Ground Control Box Wiring Diagram - AS/CE
TERMINAL BASE
BK/WH
GN/BK
WH/BK
BL/BK
RD/BK
BK/WH
WH/BK
BK
P2-8
TB22
TB31
TB25
TB26
TB27
TB16
CR70PLATFORM ROTATE
CR67PRIMARY BOOM
CR86SEQUENCING
CR69BOOM EXTEND
CR72OUTRIGGERS
TURNTABLE HARNESSPIN JP3-
MANIFOLD HARNESSPIN P3-L
MANIFOLD HARNESSPIN KP3-
MANIFOLD HARNESSPIN PP3-
MANIFOLD HARNESSPIN NP3-
MANIFOLD HARNESSPIN SP3-
MANIFOLD HARNESSPIN RP3-
MANIFOLD HARNESSPIN UP3-
MANIFOLD HARNESSPIN TP3-
MANIFOLD HARNESSPIN WP3-
MANIFOLD HARNESSPIN VP3-
P2-9
CR68SECONDARY BOOM
GN
GN/BK
BK/WH
BK
BL/BK
BL
WH/BK
WH
WH/BK
RD/BK
RD
10
11
12
13
14
15
16
17
18
30
86
85
87A87
30
86
85
87A87
30
86
85
87A87
30
86
85
87A87
30
86
85
87A87
30
86
85
87A87
30
86
85
87A87
30
86
85
87A87
30
86
85
87A87
CR8IGNITION
CR1ENGINE START
CR15STARTING AID
TB12RD
TB35
RDTB2
BK
BK
P1-1
BN68
BK
BK/RDP1-2
BN90BK/RD
BK/RDP2-10
TB15BL
MODELSWITHENGINE(OPTION)
RDP1
RD
RD
BL
WH
PA3
TB7
TB6
TB14
TB8
TURNTABLEHARNESSPIN H
CR78ALIFT CUT-OUT
CR76LIMIT SWITCH FAULT
CR75LEVEL SENSOR
30
86
85
87A87
TURNTABLEHARNESSPIN P3-C
WH
9
7
6
5
4
3
2
1
TB34AWH
TB35BK
30
86
85
87A87
30
86
85
87A87
30
86
85
87A87
30
86
85
87A87
30
86
85
87A87
30
86
85
87A87
30
86
85
87A87
TB22WH
WH
TB12WH
WHTB32
WH
TB2WH
P4-10WH/BK
TB4AWH
RDBN55
WH
CR28POWER SUPPLY
CR65BU6 CUT-OUT
CR64FAULT GROUND
CR65AU6 CUT-OUT
CR77DOWN ENABLE
C4ZENER5.1V DC
C4AZENER DIODE3.3V DC
TB11
BLTB15
34A
3
4A
13
23
14
16
22
22
21
20
19
18
17
8
9
10
11
11
12
12
35
35
35
35
35
34
33
32
32
31
30
29
28
28
27
26
25
24
7
6
5
4
3
3
2
2
1
R221000 OHM
15
C54700uF
PA5
PLATFORMHARNESSTERMINAL PA
DRIVE MANIFOLD HARNESS PIN 8
DC
6A6A
DE
6A
6A
NOTE: DIODES ARE 2 AMP
UNLESS OTHERWISE MARKED
30
86
85
87A87
8
RDTB17
U16B
RD
TB18
AUTOLEVEL
WH
(-)
5 OHM
+
-TB35
RD
BK
BATTERY CHARGEINDICATOR
G7P1 (E-STOP)
P3-X6A
200 OHM
ES0440G
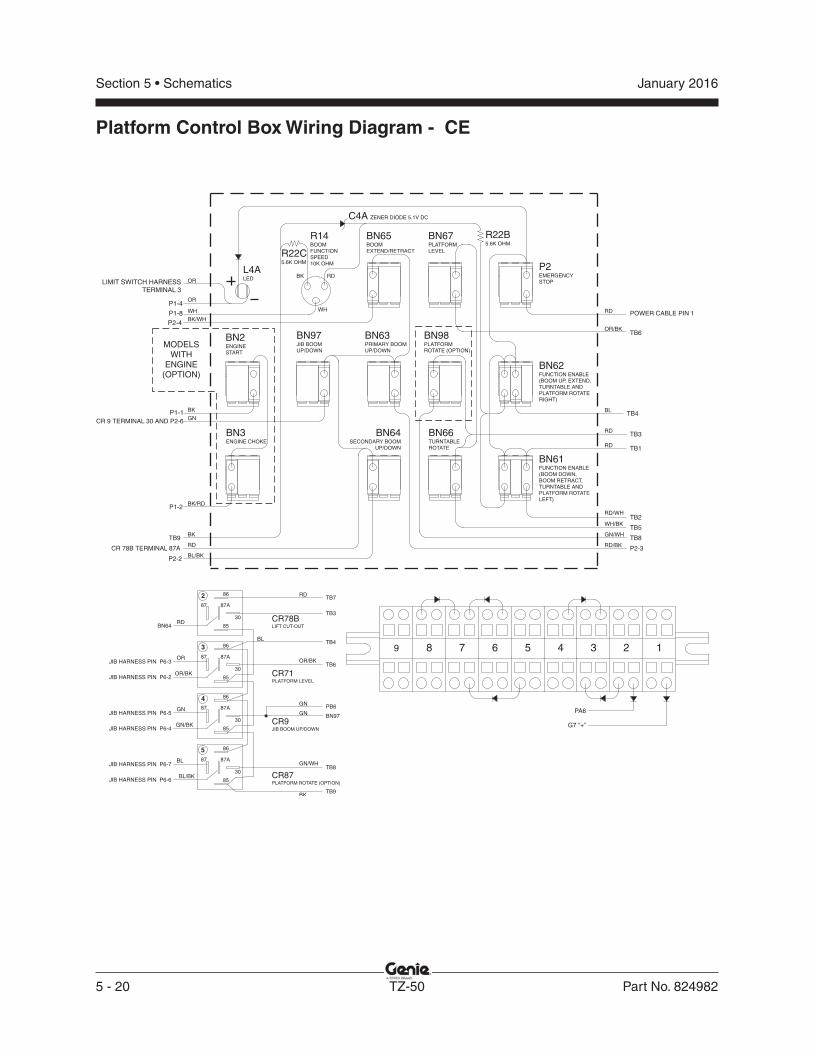
Section 5 • Schematics January 2016
5 - 20 TZ-50 Part No. 824982
Platform Control Box Wiring Diagram - CE
TB6
TB4
OR/BK
RD
BK/WHP2-4
WHP1-8
BLP1-1
BL/BK
RD
BK
BK/RDP1-2
P2-2
CR 78B TERMINAL 87A
GNCR 9 TERMINAL 30 AND P2-6
RD
WH
BK
GN/WHTB8
RD/BKP2-3
BN61FUNCTION ENABLE(BOOM DOWN,BOOM RETRACT,
ROTATELEFT)
TURNTABLE ANDPLATFORM
BN62FUNCTION ENABLE(BOOM UP, EXTEND,TURNTABLE ANDPLATFORM ROTATERIGHT)
L4ALED
BN2ENGINESTART
BN3ENGINE CHOKE
BN97JIB BOOMUP/DOWN
BN63PRIMARY BOOMUP/DOWN
BN64SECONDARY BOOM
UP/DOWN
BN66TURNTABLEROTATE
P2EMERGENCYSTOP
BN67PLATFORMLEVEL
R14BOOMFUNCTIONSPEED10K OHM
BN65BOOMEXTEND/RETRACT
R22B5.6K OHM
C4A ZENER DIODE 5.1V DC
MODELSWITH
ENGINE(OPTION)
3 2 16 5 49 8 7
PA6
G7 “+”
CR78BLIFT CUT-OUT
CR9JIB BOOM UP/DOWN
CR87PLATFORM ROTATE (OPTION)
CR71PLATFORM LEVEL
BN64
JIB HARNESS PIN 2P6-
BL/BK
BL
OR/BK
OR
RD
GN/BK
GN
2
3
4
5
30
86
85
87A87
30
86
85
87A87
30
86
85
87A87
30
86
85
87A87
BL
JIB HARNESS PIN P6-3
JIB HARNESS PIN 4P6-
JIB HARNESS PIN 5P6-
JIB HARNESS PIN 6P6-
JIB HARNESS PIN 7P6-
TB9
TB6
TB7
BN97
PB6
RD
BK
OR/BK
GN
GN
TB8GN/WH
TB3
TB4
TB1RD
POWER CABLE PIN 1
P1-4
OR
OR
LIMIT SWITCH HARNESSTERMINAL 3
TB9BK
BN98PLATFORMROTATE (OPTION)
RDTB3
TB5WH/BK
RD/WHTB2
R22C5.6K OHM

Section 5 • SchematicsJanuary 2016
Part No. 824982 TZ-50 5 - 21
Platform Control Box Wiring Diagram - AS
BLT1 PIN-11
BLT1 PIN-9
TB4
TB
2
TB
3
TB
5
TB
8
P2
-3
P2
-2
P1
-8
P2
-4
TB
6
CR
78
BT
ER
MIN
AL
87
A
CR
9T
ER
MIN
AL
30
B P
2-6
POWER CABLE PIN 1
BLT1 PIN-8
BLT1 PIN-10
RED
BLK TB29 (-)
ORG
1 1
2 2
A2
R101
TO R101-A1
TO TB3
TO L4A
TO BN64
FROM E-STOP PB
AIRTRONICS TGL40010A410
AUSTRALIAN LOAD SENSE BUMP LOAD RECOVERY
DPDT INTERVAL ON TIMERS
BLT1 BLT2
UPPER CONTROL BOX
FROM TB2 (AFTER DIODE)
A1(+)
3 3
10 10
8 811 11
9 912 12
TO BN61
TO BN61
TO BN62
P1-4
BREAK BETWEEN BN61 & BN62
FROM ALARM, RED
RECOVERYENABLE PB
RED
ORG
C4A5.1V ZENER
L4ALED
ORG
ORG
BLU
ORG
ORG
PL
AT
FO
RM
E-S
TO
PP
OW
ER
BC
P1
BL
BL
FROM LOAD SENSE LS19
6 A
MP
6 AMP
U35 LOAD SENSE OPT
TO
LO
AD
SE
NS
E
FR
OM
LO
AD
SE
NS
ERED
RE
D/W
HT
GR
N/W
HT
PLATFORMGROUND
RE
D
WH
T/B
LK
RE
D/B
LK
BL
U/B
LK
GR
N/B
LK
BL
K/W
HT
WH
T
OR
G/B
LK
RE
D
GR
N
P1-1 BK
GNCR 9 TERMINAL 30 AND P2-6
BN2ENGINESTART
BN97JIB BOOMUP/DOWN
BN63PRIMARYBOOMUP/DOWN
BN64SECONDARYBOOMUP/DOWN
BN66TURNTABLEROTATE
BN62FUNCTION ENABLE(BOOM UP EXTENDTURNTABLE ANDPLATFORM ROTATERIGHT)
BN61FUNCTION ENABLE(BOOM DOWNBOOM RETRACTTURNTABLE ANDPLATFORM ROTATELEFT)
BN65BOOMEXTEND/RETRACT
BN67PLATFORMLEVEL
R22B5.6K OHM
R22C5.6K OHM
P2EMERGENCYSTOP
BK/RDP1-2
R101-A1
R101-A2
BN3ENGINECHOKE
MODELSWITH
ENGINE(OPTION)
BN98PLATFORMROTATE(OPTION)
LIMIT SWITCH HARNESSTERMINAL 3
CR78BLIFT CUT-OUT
CR9JIB BOOM UP/DOWN
CR87PLATFORM ROTATE (OPTION)
CR71PLATFORM LEVEL
BN64
JIB HARNESS PIN 2P6-
BL/BK
BL
OR/BK
OR
RD
GN/BK
GN
2
3
4
5
30
86
85
87A87
30
86
85
87A87
30
86
85
87A87
30
86
85
87A87
BL
JIB HARNESS PIN P6-3
JIB HARNESS PIN 4P6-
JIB HARNESS PIN 5P6-
JIB HARNESS PIN 6P6-
JIB HARNESS PIN 7P6-
TB9
TB6
TB7
BN97
PB6
RD
BK
OR/BK
GN
GN
TB8GN/WH
TB3
TB4
January 2016Section 5 • Schematics
5 - 21
Electrical Schematic - ANSI/CSA
5 - 22

1
2
3
4
5
6
7
8
A B C D E F G H I J K L M N
January 2016Section 5 • Schematics
5 - 22 TZ-50 Part No. 824982
Electrical Schematic - ANSI/CSA, 1 of 3
PLATFORM CONTROL BOX
DRIVE CONTROL BOX
GROUND CONTROL BOX
ALT
ER
NA
TO
R
P2
PLAT
GRD
CB2
15AMP.RD
P1
RD
BK
S7
NO
FB
REGULATOR
IND.
+BAT.
STA.
BAT.-
ALTERNATOR
EXCT.
FLA
SH
ING
BE
AC
ON
OP
TIO
N
LE
VE
LS
EN
SO
R
TIL
TA
LA
RM
STA
RT
ER
MO
TO
R
PLATFORM
GROUNDCONTROLS
CONTROLS
RF
OU
TR
IGG
ER
LE
D
LF
OU
TR
IGG
ER
LE
D
LR
OU
TR
IGG
ER
LE
D
RR
OU
TR
IGG
ER
LE
D
LS
FA
ULT
RE
LA
YR
3
LE
VE
LS
EN
SO
RR
ELA
YR
1LOAD -
+
50AMP.
RD
15AMP.
CB1
CH
OK
E C
OIL
STA
RT
ER
RE
LA
YR
1
CH
OK
E R
ELA
YR
17
IGN
ITIO
N R
ELA
YR
1
SP
AR
K P
LU
G
IGN
ITIO
N C
OIL
OIL
LE
VE
LS
WIT
CH
50AMP.
TB3
TB2 TB4
TB4A
TB7
DEDFDA
CHOKE START
CHOKE START
FAULT
ALARM
ALARM
FAULT
LED
SENSELOAD
LED
LIMIT SWITCH
LOAD SENSE
275AMP.
CH
AR
GIN
GR
ELA
YP
R5
TIM
E D
ELA
YU
16B
TB3
TB4A
CR8 CR15 CR1
F9A
CR75
(2)
H5
CR65A
LS18
LS18A
L12
CR75
CR76
CR76
L4
BN68BN90
KS1
U16B
10
TO
30 S
EC
ON
DS
D1
PR5 F9
M3
U26
Q7
FB1
B5
F6
H1
L4ABN2BN3
31
RD
RD
WH
BK
/RD RD
BK
RD
/WH R
D
WH
TW
H
WH
WH
GN
/YE
LLO
W
BK
BK
/RD
WH
OG
GN
BK
/WH
RD
/BK
RD
WH
/BK
WH
BATTERY 24V
BATTERY GROUND
PLATFORM E-STOP POWER
DRIVE E-STOP POWER
MO
TO
R C
ON
TR
OLL
CU
TO
UT
RE
LA
YR
3
CR65A
DRIVE CONTROLSENGINE OPTION
LOAD SENSE OPTION
(15) (17) (16)
CR64
(4)
(1) (1)
(3)
(3)
LS19
43
PLATFORM GROUND
BK
TB9
BK
GCON GROUND
OUTRIGGER
LIMITSWITCHES
RE
D
RE
D/W
HT
OR
G/W
HTRE
D
L13 L15
RE
D
GR
N/W
HT
BLU
/WH
TRE
D
L14
BK
RD
BK
2
P1-1
P1-2
P1
-3
P1
-4
P1-2
P1-1
P1
-4
P1
-3
P4-9
P4-1
0
P4-1
1P
5-2
P5-4
P5-6
P5-8
P5-3
P5-5
P5-7
P5-9
P3-B
P3-E
P3-D
P3-F
P3-C
P3-A
P1-1
0
P1-1
1
P2-1
0
P2-8
P2-9
P2-1
2
P2-1
1
P8-1
P8-2
P8-3
P8-4
P8-5
P10-1
P10-2
P10-3
P10-3
P10-2
P10-1
LOAD SENSE POWER
1 2
LS19
LOAD SENSE POWER
LS19A
LS19A
24V
, 45A
ALT
ER
NA
TO
HORN OPTION
G7BCI
QD1
QD1
CHARGER
10W200 OHM
P3-X
U6-B+
TIMEDELAY
EN
GIN
E G
EN
/MA
G
R101
ES0440N
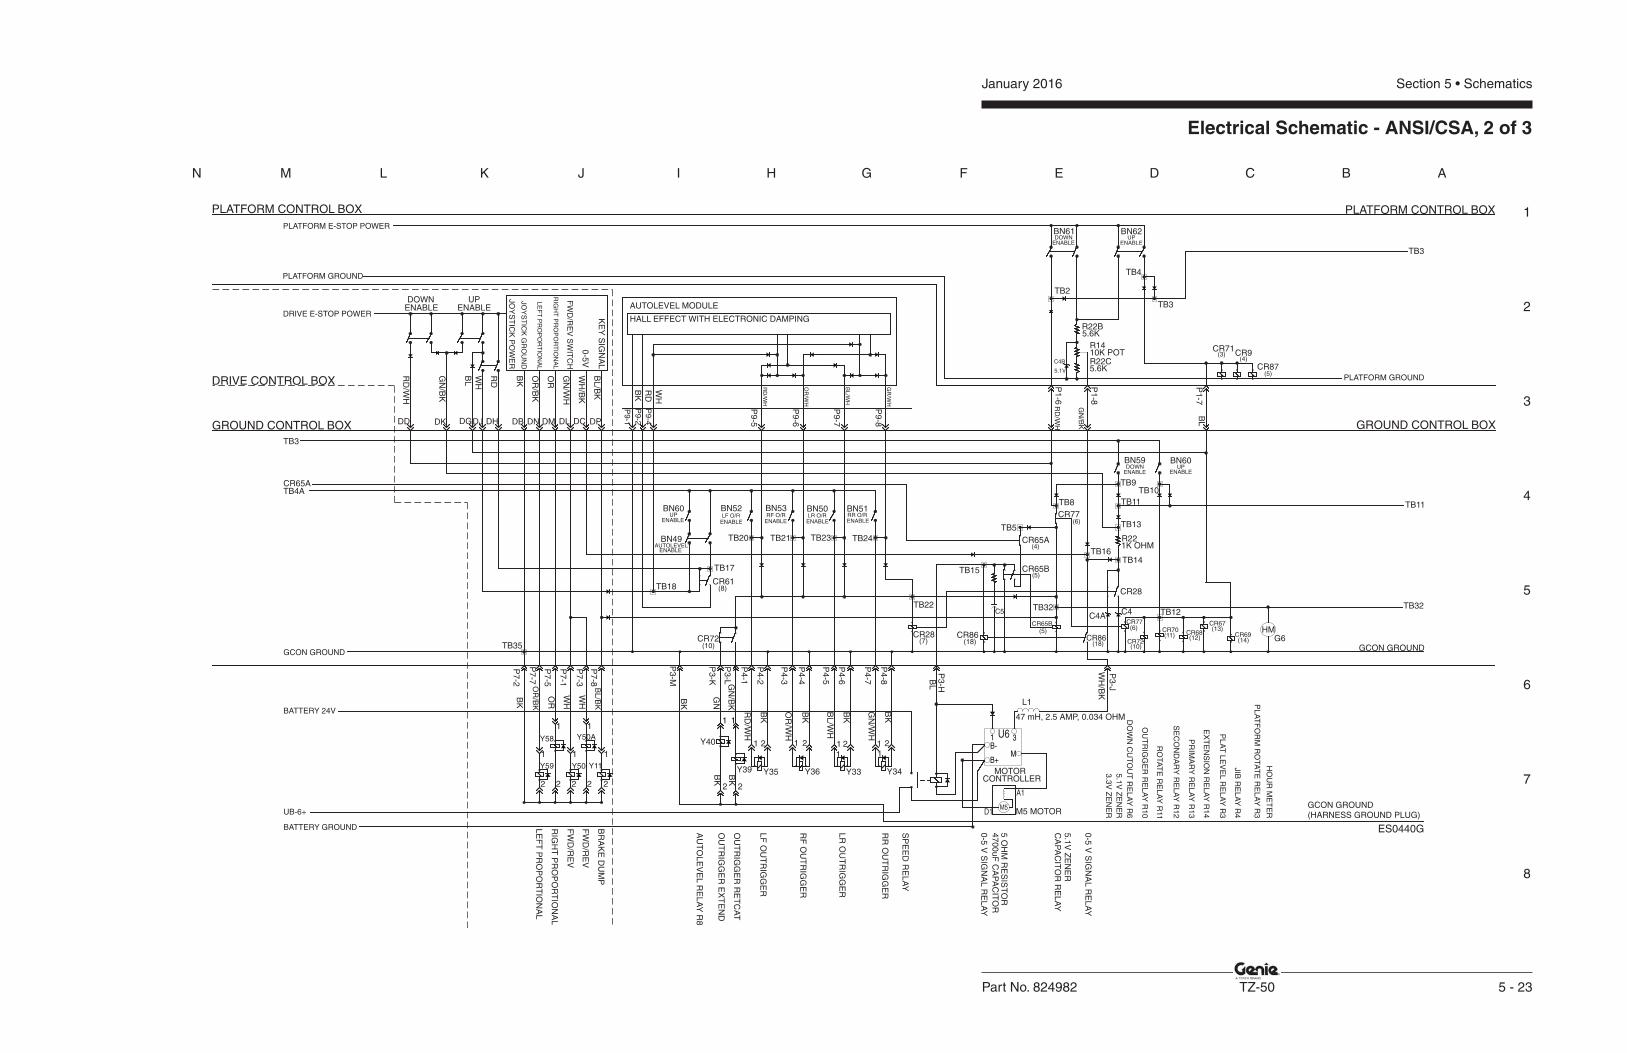
1
2
3
4
5
6
7
8
N M L K J I H G F E D C B A
Part No. 824982 TZ-50 5 - 23
January 2016 Section 5 • Schematics
Electrical Schematic - ANSI/CSA, 2 of 3
TB32
OU
TR
IGG
ER
RE
TC
AT
OU
TR
IGG
ER
EX
TE
ND
RO
TA
TE
RE
LA
YR
11
SE
CO
ND
AR
YR
EL
AY
R1
2
EX
TE
NS
ION
RE
LA
YR
14
PR
IMA
RY
RE
LA
YR
13
PL
AT
FO
RM
RO
TA
TE
RE
LA
YR
3
JIB
RE
LA
YR
4
PL
AT
LE
VE
LR
EL
AY
R3
OU
TR
IGG
ER
RE
LA
YR
10
5.1
V Z
EN
ER
3.3
V Z
EN
ER
DO
WN
CU
TO
UT
RE
LA
YR
6
CA
PA
CIT
OR
RE
LA
Y
47
00
uF
CA
PA
CIT
OR
LF
OU
TR
IGG
ER
RF
OU
TR
IGG
ER
RR
OU
TR
IGG
ER
LR
OU
TR
IGG
ER
SP
EE
D R
EL
AY
TB32
TB9TB10
TB11
TB13
TB14TB16
TB20
DOWNENABLE
UP
TB22
LF O/RUPENABLE
AUTOLEVEL
HO
UR
ME
TE
R
AUTOLEVEL MODULE
GR
/WH
BL
/WH
OR
/WH
RD
/WH
WH
RD
BK
ENABLEUPDOWN
5.1
V Z
EN
ER
Y11
FW
D/R
EV
FW
D/R
EV
LE
FT
PR
OP
OR
TIO
NA
L
RIG
HT
PR
OP
OR
TIO
NA
L
BR
AK
E D
UM
P
DOWN UPENABLE
DPDCDM DLDNDB
0-5
V
KE
YS
IGN
AL
FW
D/R
EV
SW
ITC
H
RIG
HT
PR
OP
OR
TIO
NA
L
LE
FT
PR
OP
OR
TIO
NA
L
JO
YS
TIC
K G
RO
UN
D
JO
YS
TIC
K P
OW
ER
1
DHDJDGDKDD
5.6K
5.6K
10K POT
5.1V
TB12
1
2
3
M
A1
1
B+
B-
D1
MOTORCONTROLLER
TB11
0-5
V S
IGN
AL
RE
LA
Y
CR69
R221K OHM
BN59 BN60
BN51
C4AC4C5
Y40
Y39
BN61 BN62
TB2
TB4
TB3
R22B
R14
R22CC4B
HMG6
RD
/WH
GN
/BK
BL
WH
RD
BK
OR
/BK
OR
GN
/WH
WH
/BK
BL
/BK
RD
/WH
GN
/BK
OR
/BK
OR
WH
BL
/BK
GN
GN
/BK
RD
/WH
OR
/WH
BL
/WH
GN
/WH
BL
WH
/BK
TB3
CR28
TB3
TB4A
BATTERY 24V
BATTERY GROUND
CR65A
AU
TO
LE
VE
LR
EL
AY
R8
HALL EFFECT WITH ELECTRONIC DAMPING
5 O
HM
RE
SIS
TO
R
PLATFORM GROUND
GCON GROUND
BK
Y34
1 2B
K
GCON GROUND
BK
GCON GROUND(HARNESS GROUND PLUG)
BK
TB35
CR71
P1
-7
P4
-8
P7
-8
P3
-L
P3
-H
P3
-J
P9
-1
L1
47 mH, 2.5 AMP, 0.034 OHM
UB-6+
PLATFORM E-STOP POWER
PLATFORM GROUND
DRIVE E-STOP POWERENABLE
WH
P7
-3
P7
-1
P7
-5
P7
-7
P7
-2
2222
Y50Y59
Y58 Y50A
11
11
0-5
V S
IGN
AL
RE
LA
Y
P4
-7
P4
-6
P4
-5
P4
-4
P4
-3
P4
-2
P4
-1
P3
-K
P3
-M
BK
BK
BK
Y33Y36Y35
222 111
22
BK
11
M5 MOTOR
CR86CR72
BN49
BN60 BN52 BN53 BN50
TB21 TB23 TB24
RF O/R LR O/R RR O/R
ENABLE ENABLE ENABLE ENABLE
ENABLE
CR61
TB17
TB18
P9
-2
P9
-4
P9
-5
P9
-6
P9
-7
P9
-8
ENABLE
CR9
P1
-8
P1
-6
BL
ENABLE
CR67
CR68CR70
CR72
CR77
CR86
CR65B
CR28
CR65BTB15
CR65A
TB8
CR77
TB5
CR87
(8)
(10)
1
M5
U6
(5)
(18)
(6)
(10)
(11) (12)
(13)
(14)
(4)
(5)
(18)(7)
(6)
(5)
(3)(4)
PLATFORM CONTROL BOX
DRIVE CONTROL BOX
GROUND CONTROL BOX
PLATFORM CONTROL BOX
GROUND CONTROL BOX
ES0440G

January 2016 Section 5 • Schematics
5 - 24
Electrical Schematic - ANSI/CSA
5 - 23
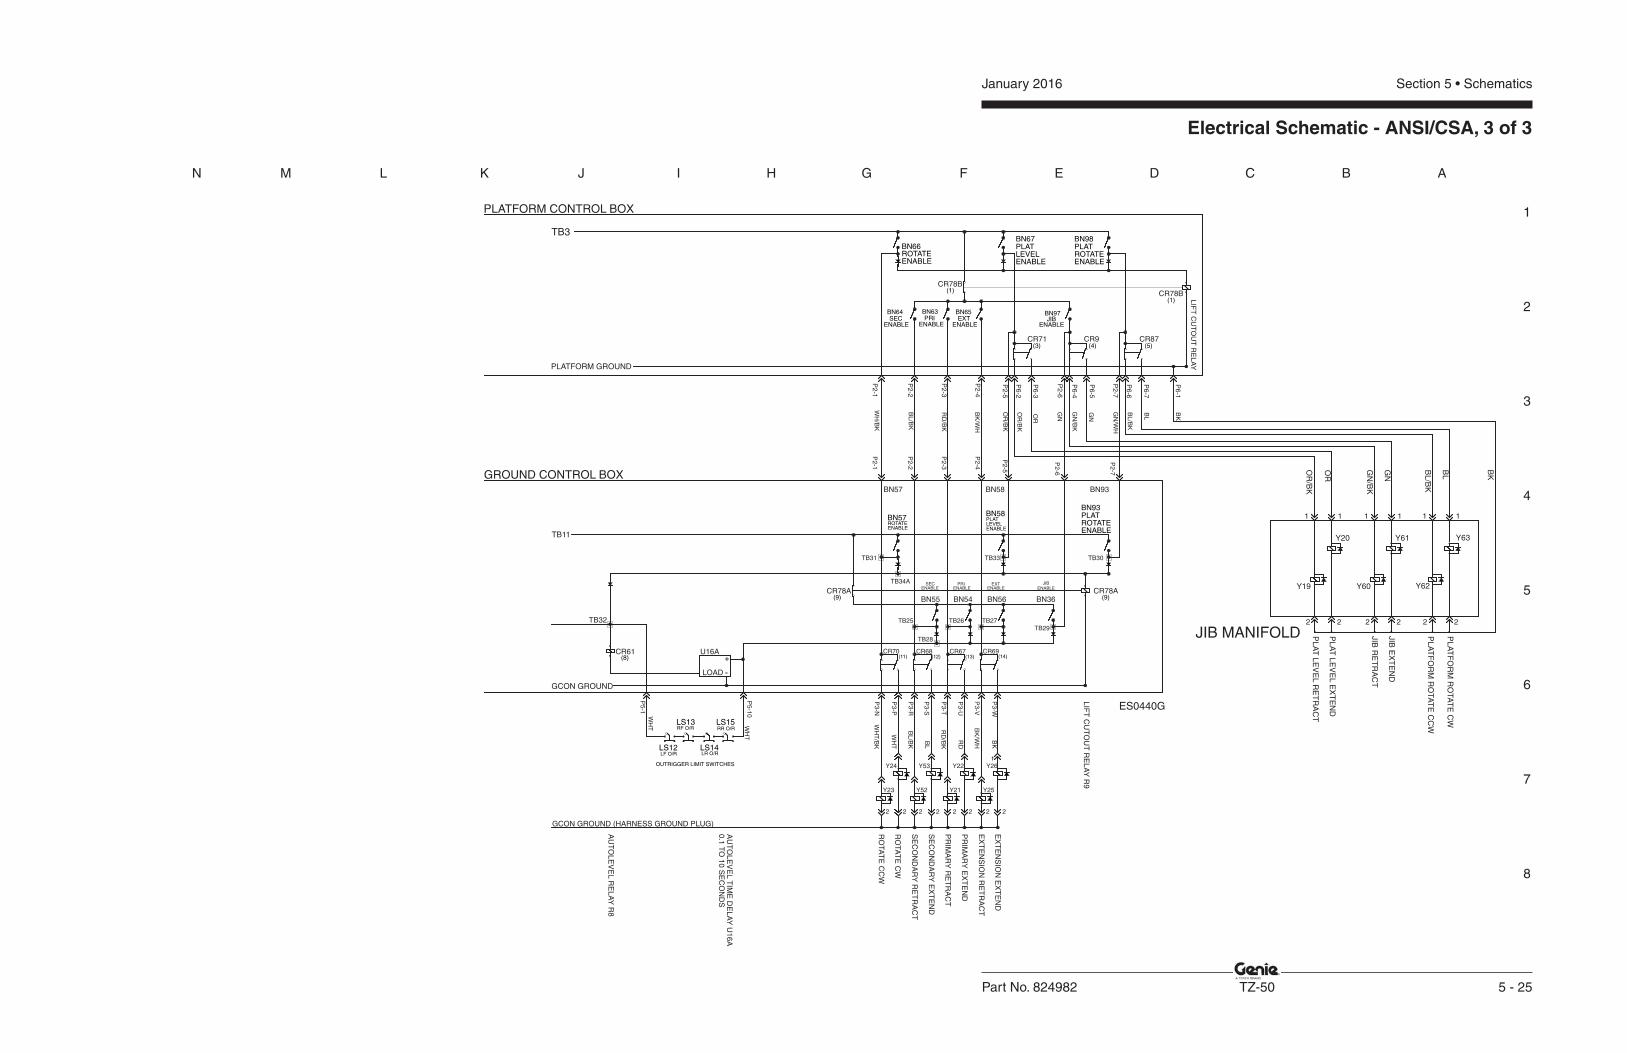
1
2
3
4
5
6
7
8
N M L K J I H G F E D C B A
Part No. 824982 TZ-50 5 - 25
January 2016 Section 5 • Schematics
Electrical Schematic - ANSI/CSA, 3 of 3
Y25
EX
TE
NS
ION
EX
TE
ND
EX
TE
NS
ION
RE
TR
AC
T
SE
CO
ND
AR
YR
ET
RA
CT
SE
CO
ND
AR
YE
XT
EN
D
PR
IMA
RY
EX
TE
ND
PR
IMA
RY
RE
TR
AC
T
RO
TA
TE
CC
W
RO
TA
TE
CW
LIF
TC
UT
OU
TR
EL
AY
R9
LIF
TC
UT
OU
TR
EL
AY
TB28
AU
TO
LE
VE
LT
IME
DE
LA
YU
16
A
CR69
0.1
TO
10
SE
CO
ND
S
BN36CR78A
AU
TO
LE
VE
LR
EL
AY
R8
2
1
WH
/BK
BL
/BK
RD
/BK
BK
/WH
OR
/BK
GN
GN
/WH
BL
/BK
RD
/BK
BK
/WH
BL
RD
TB3
PLATFORM GROUND
OR
OR
/BK
PL
AT
LE
VE
LE
XT
EN
D
PL
AT
LE
VE
LR
ET
RA
CT
GN
GN
/BK
JIB
RE
TR
AC
T
JIB
EX
TE
ND
BL
BL
/BK
1
Y63
PL
AT
FO
RM
RO
TA
TE
CW
OR
/BK
OR
GN
/BK
GN
BL
/BK
BL
BK
BK
JIB MANIFOLD2
LS14
OUTRIGGER LIMIT SWITCHES
+
-LOAD
U16A
GCON GROUND
CR61
WH
T
GCON GROUND (HARNESS GROUND PLUG)
P2
-1
P5
-10
WH
T/B
K
WH
T
P3
-WB
K
PL
AT
FO
RM
RO
TA
TE
CC
W
22222
Y62
Y61
Y60Y19
Y20
11111
2222222
Y21Y52Y23
Y26Y22Y53Y24
P3
-V
P3
-U
P3
-T
P3
-S
P3
-R
P3
-P
P3
-N
CR67CR68CR70
TB25 TB26 TB27
TB29
BN56BN54BN55CR78A
TB30TB33TB31
TB34A
BN58 BN93BN57
P2
-2
P2
-3
P2
-4
P2
-5
P2
-6
P2
-7
P2
-1
P2
-2
P2
-3
P2
-4
P2
-5
P6
-2
P6
-3
P6
-4
P6
-5
P6
-6
P6
-7
P2
-6
P2
-7
P6
-1
CR87CR9CR71
CR78B
CR78B
LS12
LS15LS13
WH
T
P5
-1
TB32
TB11
LF O/R LR O/R
RR O/RRF O/R
BN66ROTATEENABLE
BN67PLATLEVELENABLE
BN98PLATROTATEENABLE
(1)
(5)(4)(3)
(1)
BN64SEC
ENABLE
BN63PRI
ENABLE
BN65EXT
ENABLE
BN97JIB
ENABLE
BN57ROTATEENABLE
BN58PLATLEVELENABLE
BN93PLATROTATEENABLE
JIBENABLE
EXTENABLE
PRIENABLE
SECENABLE
(14)(13)(12)(11)
(9)(9)
(8)
PLATFORM CONTROL BOX
GROUND CONTROL BOX
ES0440G

January 2016 Section 5 • Schematics
5 - 26
Electrical Schematic - ANSI/CSA
5 - 25

January 2016Section 5 • Schematics
5 - 27
Electrical Schematic - CE
5 - 28
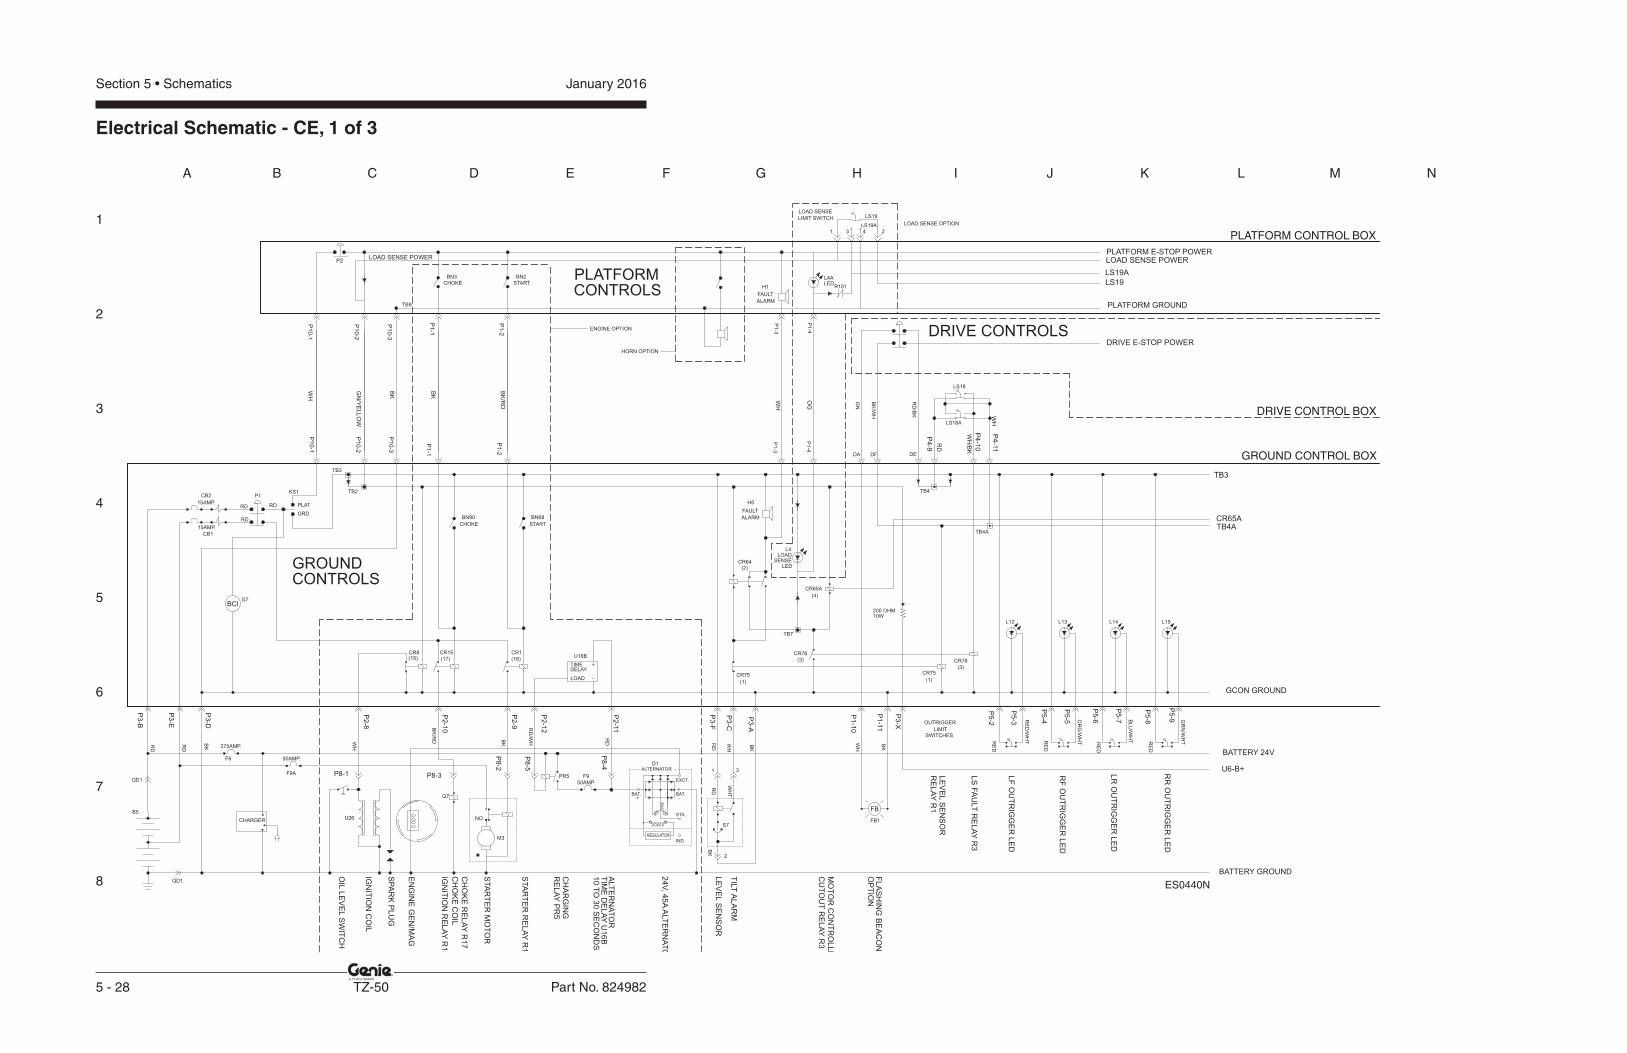
1
2
3
4
5
6
7
8
A B C D E F G H I J K L M N
January 2016Section 5 • Schematics
5 - 28 TZ-50 Part No. 824982
Electrical Schematic - CE, 1 of 3
PLATFORM CONTROL BOX
DRIVE CONTROL BOX
GROUND CONTROL BOX
ALT
ER
NA
TO
R
P2
PLAT
GRD
CB2
15AMP.RD
P1
RD
BK
S7
NO
FB
REGULATOR
IND.
+BAT.
STA.
BAT.-
ALTERNATOR
EXCT.
FLA
SH
ING
BE
AC
ON
OP
TIO
N
LE
VE
LS
EN
SO
R
TIL
TA
LA
RM
STA
RT
ER
MO
TO
R
PLATFORM
GROUNDCONTROLS
CONTROLS
RF
OU
TR
IGG
ER
LE
D
LF
OU
TR
IGG
ER
LE
D
LR
OU
TR
IGG
ER
LE
D
RR
OU
TR
IGG
ER
LE
D
LS
FA
ULT
RE
LA
YR
3
LE
VE
LS
EN
SO
RR
ELA
YR
1
LOAD -
+
50AMP.
RD
15AMP.
CB1
CH
OK
E C
OIL
STA
RT
ER
RE
LA
YR
1
CH
OK
E R
ELA
YR
17
IGN
ITIO
N R
ELA
YR
15
SP
AR
K P
LU
G
IGN
ITIO
N C
OIL
OIL
LE
VE
LS
WIT
CH
50AMP.
TB3
TB2 TB4
TB4A
TB7
DEDFDA
CHOKE START
CHOKE START
FAULT
ALARM
ALARM
FAULT
LED
SENSELOAD
LED
LIMIT SWITCH
LOAD SENSE
275AMP.
CH
AR
GIN
GR
ELA
YP
R5
TIM
E D
ELA
YU
16B
TB3
TB4A
CR8 CR15 CR1
F9A
CR75
(2)
H5
CR65A
LS18
LS18A
L12
CR75
CR76
CR76
L4
BN68BN90
KS1
U16B
10
TO
30 S
EC
ON
DS
D1
PR5 F9
M3
U26
Q7
FB1
B5
F6
H1
L4ABN2BN3
31
RD
RD
WH
BK
/RD RD
BK
RD
/WH R
D
WH
TW
H
WH
WH
GN
/YE
LLO
W
BK
BK
/RD
WH
OG
GN
BK
/WH
RD
/BK
RD
WH
/BK
WH
BATTERY 24V
BATTERY GROUND
PLATFORM E-STOP POWER
DRIVE E-STOP POWER
MO
TO
R C
ON
TR
OLLE
CU
TO
UT
RE
LA
YR
3
CR65A
DRIVE CONTROLSENGINE OPTION
LOAD SENSE OPTION
(15) (17) (16)
CR64
(4)
(1) (1)
(3)
(3)
LS19
43
PLATFORM GROUND
BK
TB9
BK
GCON GROUND
OUTRIGGER
LIMITSWITCHES
RE
D
RE
D/W
HT
OR
G/W
HTRE
D
L13 L15
RE
D
GR
N/W
HT
BLU
/WH
TRE
D
L14
BK
RD
BK
2
P1
-1
P1
-2
P1-3
P1-4
P1
-2
P1
-1
P1-4
P1-3
P4
-9
P4
-10
P4
-11
P5
-2
P5
-4
P5
-6
P5
-8
P5
-3
P5
-5
P5
-7
P5
-9
P3
-B
P3
-E
P3
-D
P3
-F
P3
-C
P3
-A
P1
-10
P1
-11
P2
-10
P2
-8
P2
-9
P2
-12
P2
-11
P8-1
P8
-2
P8-3
P8
-4
P8
-5
P1
0-1
P1
0-2
P1
0-3
P1
0-3
P1
0-2
P1
0-1
LOAD SENSE POWER
1 2
LS19
LOAD SENSE POWER
LS19A
LS19A
24V
, 45A
ALT
ER
NA
TO
HORN OPTION
G7BCI
QD1
QD1
CHARGER
10W200 OHM
P3
-X
U6-B+
TIMEDELAY
EN
GIN
E G
EN
/MA
G
R101
ES0440N
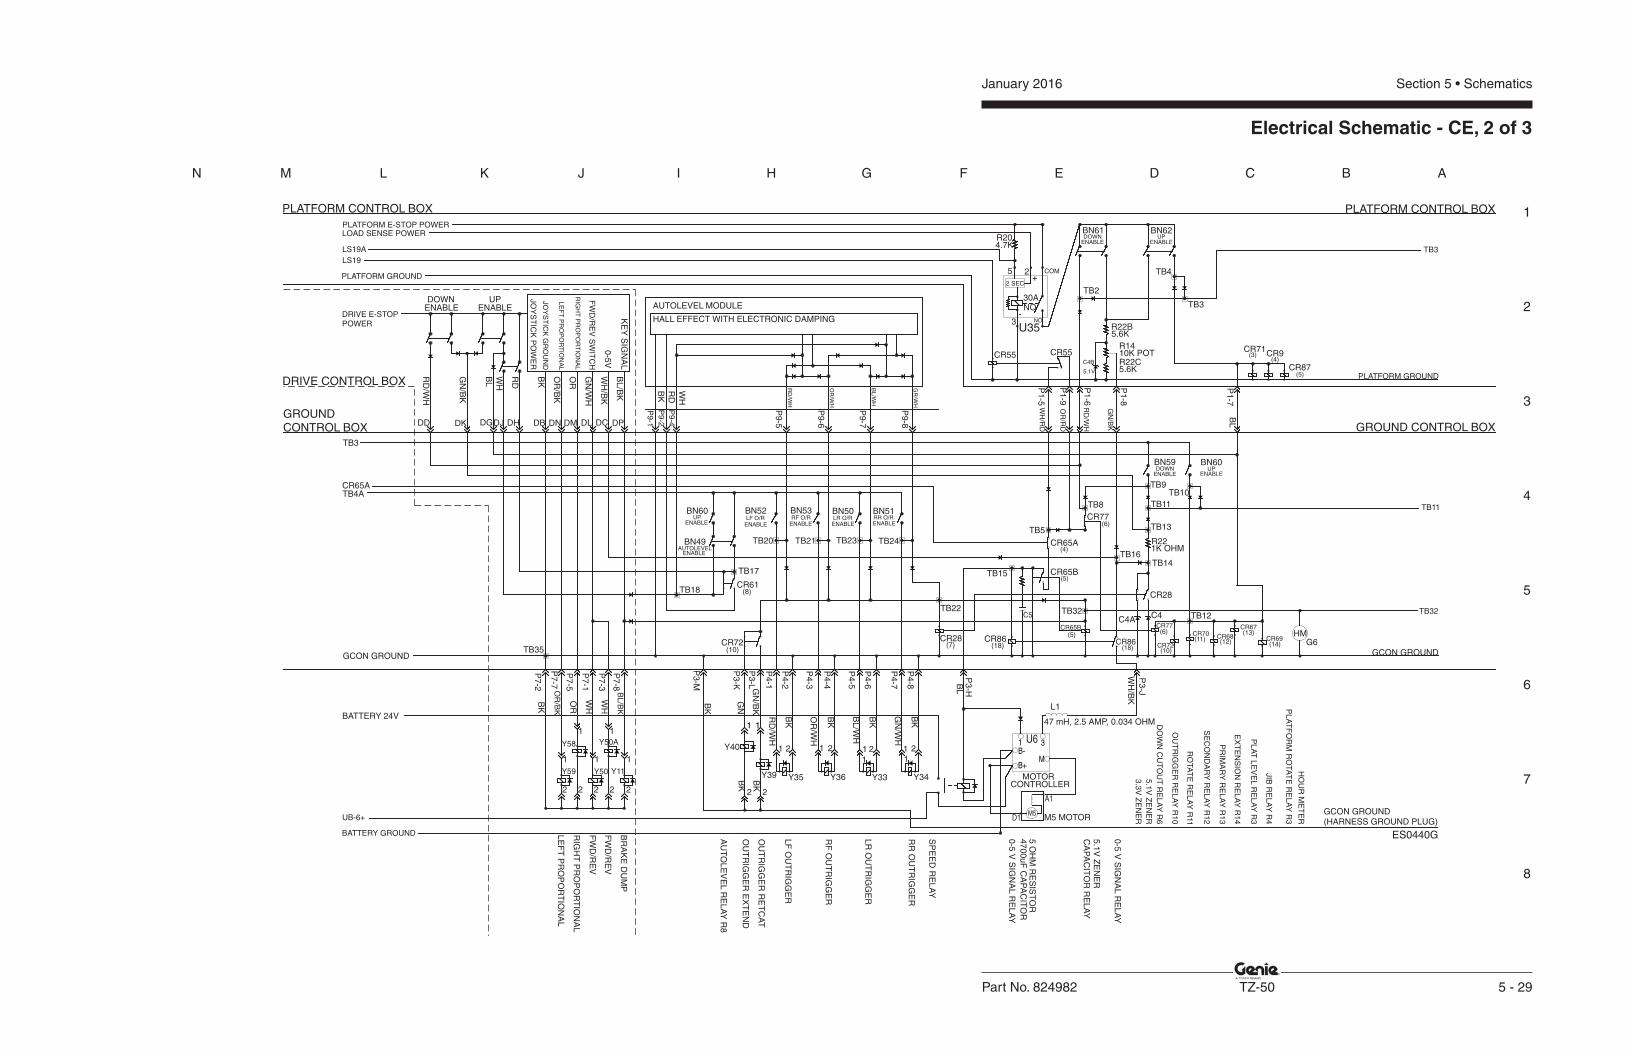
1
2
3
4
5
6
7
8
N M L K J I H G F E D C B A
Part No. 824982 TZ-50 5 - 29
January 2016 Section 5 • Schematics
Electrical Schematic - CE, 2 of 3
TB32
OU
TR
IGG
ER
RE
TC
AT
OU
TR
IGG
ER
EX
TE
ND
RO
TA
TE
RE
LA
YR
11
SE
CO
ND
AR
YR
EL
AY
R1
2
EX
TE
NS
ION
RE
LA
YR
14
PR
IMA
RY
RE
LA
YR
13
PL
AT
FO
RM
RO
TA
TE
RE
LA
YR
3
JIB
RE
LA
YR
4
PL
AT
LE
VE
LR
EL
AY
R3
OU
TR
IGG
ER
RE
LA
YR
10
5.1
V Z
EN
ER
3.3
V Z
EN
ER
DO
WN
CU
TO
UT
RE
LA
YR
6
CA
PA
CIT
OR
RE
LA
Y
47
00
uF
CA
PA
CIT
OR
LF
OU
TR
IGG
ER
RF
OU
TR
IGG
ER
RR
OU
TR
IGG
ER
LR
OU
TR
IGG
ER
SP
EE
D R
EL
AY
TB32
TB9TB10
TB11
TB13
TB14TB16
TB20
DOWNENABLE
UP
TB22
LF O/RUPENABLE
AUTOLEVEL
HO
UR
ME
TE
R
AUTOLEVEL MODULE
GR
/WH
BL
/WH
OR
/WH
RD
/WH
WH
RD
BK
ENABLEUPDOWN
5.1
V Z
EN
ER
Y11
FW
D/R
EV
FW
D/R
EV
LE
FT
PR
OP
OR
TIO
NA
L
RIG
HT
PR
OP
OR
TIO
NA
L
BR
AK
E D
UM
P
DOWN UPENABLE
DPDCDM DLDNDB
0-5
V
KE
YS
IGN
AL
FW
D/R
EV
SW
ITC
H
RIG
HT
PR
OP
OR
TIO
NA
L
LE
FT
PR
OP
OR
TIO
NA
L
JO
YS
TIC
K G
RO
UN
D
JO
YS
TIC
K P
OW
ER
1
DHDJDGDKDD
5.6K
5.6K
10K POT
5.1V
TB12
1
2
3
M
A1
1
B+
B-
D1
MOTORCONTROLLER
TB110
-5 V
SIG
NA
LR
EL
AY
CR69
R221K OHM
BN59 BN60
BN51
C4AC4C5
Y40
Y39
BN61 BN62
TB2
TB4
TB3
R22B
R14
R22CC4B
HMG6
RD
/WH
GN
/BK
BL
WH
RD
BK
OR
/BK
OR
GN
/WH
WH
/BK
BL
/BK
OR
/RD
WH
/RD
RD
/WH
GN
/BK
OR
/BK
OR
WH
BL
/BK
GN
GN
/BK
RD
/WH
OR
/WH
BL
/WH
GN
/WH
BL
WH
/BK
TB3
CR28
TB3
TB4A
BATTERY 24V
BATTERY GROUND
CR65A
AU
TO
LE
VE
LR
EL
AY
R8
HALL EFFECT WITH ELECTRONIC DAMPING
5 O
HM
RE
SIS
TO
R
PLATFORM GROUND
GCON GROUND
BK
Y34
1 2
BK
GCON GROUND
BK
GCON GROUND(HARNESS GROUND PLUG)
BK
TB35
CR71
P1
-7
P4
-8
P7
-8
P3
-L
P3
-H
P3
-J
P9
-1
CR55
R204.7K
NO30A
U35
2 SEC
5 COM
NO3
+
-
2
L1
47 mH, 2.5 AMP, 0.034 OHM
UB-6+
PLATFORM E-STOP POWER
PLATFORM GROUND
LS19
LOAD SENSE POWER
LS19A
DRIVE E-STOPPOWER
ENABLE
WH
P7
-3
P7
-1
P7
-5
P7
-7
P7
-2
2222
Y50Y59
Y58 Y50A
11
11
0-5
V S
IGN
AL
RE
LA
Y
P4
-7
P4
-6
P4
-5
P4
-4
P4
-3
P4
-2
P4
-1
P3
-K
P3
-M
BK
BK
BK
Y33Y36Y35
222 111
22
BK
11
M5 MOTOR
CR86CR72
BN49
BN60 BN52 BN53 BN50
TB21 TB23 TB24
RF O/R LR O/R RR O/R
ENABLE ENABLE ENABLE ENABLE
ENABLE
CR61
TB17
TB18
P9
-2
P9
-4
P9
-5
P9
-6
P9
-7
P9
-8
ENABLE
CR55 CR9
P1
-8
P1
-6
P1
-9
P1
-5
BL
ENABLE
CR67
CR68CR70
CR72
CR77
CR86
CR65B
CR28
CR65BTB15
CR65A
TB8
CR77
TB5
CR87
(8)
(10)
1
M5
U6
(5)
(18)
(6)
(10)
(11) (12)
(13)
(14)
(4)
(5)
(18)(7)
(6)
(5)
(3)(4)
PLATFORM CONTROL BOX
DRIVE CONTROL BOX
GROUNDCONTROL BOX
ES0440G
PLATFORM CONTROL BOX
GROUND CONTROL BOX
January 2016 Section 5 • Schematics
5 - 30
Electrical Schematic - CE
5 - 29

1
2
3
4
5
6
7
8
N M L K J I H G F E D C B A
Part No. 824982 TZ-50 5 - 31
January 2016 Section 5 • Schematics
Electrical Schematic - CE, 3 of 3
Y25
EX
TE
NS
ION
EX
TE
ND
EX
TE
NS
ION
RE
TR
AC
T
SE
CO
ND
AR
YR
ET
RA
CT
SE
CO
ND
AR
YE
XT
EN
D
PR
IMA
RY
EX
TE
ND
PR
IMA
RY
RE
TR
AC
T
RO
TA
TE
CC
W
RO
TA
TE
CW
LIF
TC
UT
OU
TR
EL
AY
R9
LIF
TC
UT
OU
TR
EL
AY
TB28
AU
TO
LE
VE
LT
IME
DE
LA
YU
16
A
CR69
0.1
TO
10
SE
CO
ND
S
BN36CR78A
AU
TO
LE
VE
LR
EL
AY
R8
2
1
WH
/BK
BL
/BK
RD
/BK
BK
/WH
OR
/BK
GN
GN
/WH
BL
/BK
RD
/BK
BK
/WH
BL
RD
TB3
PLATFORM GROUND
OR
OR
/BK
PL
AT
LE
VE
LE
XT
EN
D
PL
AT
LE
VE
LR
ET
RA
CT
GN
GN
/BK
JIB
RE
TR
AC
T
JIB
EX
TE
ND
BL
BL
/BK
1
Y63
PL
AT
FO
RM
RO
TA
TE
CW
OR
/BK
OR
GN
/BK
GN
BL
/BK
BL
BK
BK
JIB MANIFOLD2
LS14
OUTRIGGER LIMIT SWITCHES
+
-LOAD
U16A
GCON GROUND
CR61
WH
T
GCON GROUND (HARNESS GROUND PLUG)
P2
-1
P5
-10
WH
T/B
K
WH
T
P3
-WB
K
PL
AT
FO
RM
RO
TA
TE
CC
W
22222
Y62
Y61
Y60Y19
Y20
11111
2222222
Y21Y52Y23
Y26Y22Y53Y24
P3
-V
P3
-U
P3
-T
P3
-S
P3
-R
P3
-P
P3
-N
CR67CR68CR70
TB25 TB26 TB27
TB29
BN56BN54BN55CR78A
TB30TB33TB31
TB34A
P2
-2
P2
-3
P2
-4
P2
-5
P2
-6
P2
-7
P2
-1
P2
-2
P2
-3
P2
-4
P2
-5
P6
-2
P6
-3
P6
-4
P6
-5
P6
-6
P6
-7
P2
-6
P2
-7
P6
-1
CR87CR9CR71
CR78B
CR78B
CONTROLSGROUND
LS12
LS15LS13
WH
T
P5
-1
TB32
TB11
LF O/R LR O/R
RR O/RRF O/R
BN66ROTATEENABLE
BN67PLATLEVELENABLE
BN98PLATROTATEENABLE
(1)
(5)(4)(3)
(1)
BN64SEC
ENABLE
BN63PRI
ENABLE
BN65EXT
ENABLE
BN97JIB
ENABLE
BN57ROTATEENABLE
BN58PLATLEVELENABLE
BN93PLATROTATEENABLE
JIBENABLE
EXTENABLE
PRIENABLE
SECENABLE
(14)(13)(12)(11)
(9)(9)
(8)
ES0440G
PLATFORM CONTROL BOX
GROUND CONTROL BOX

January 2016 Section 5 • Schematics
5 - 32
Electrical Schematic - CE
5 - 31
January 2016Section 5 • Schematics
5 - 33
Electrical Schematic - AS
5 - 34
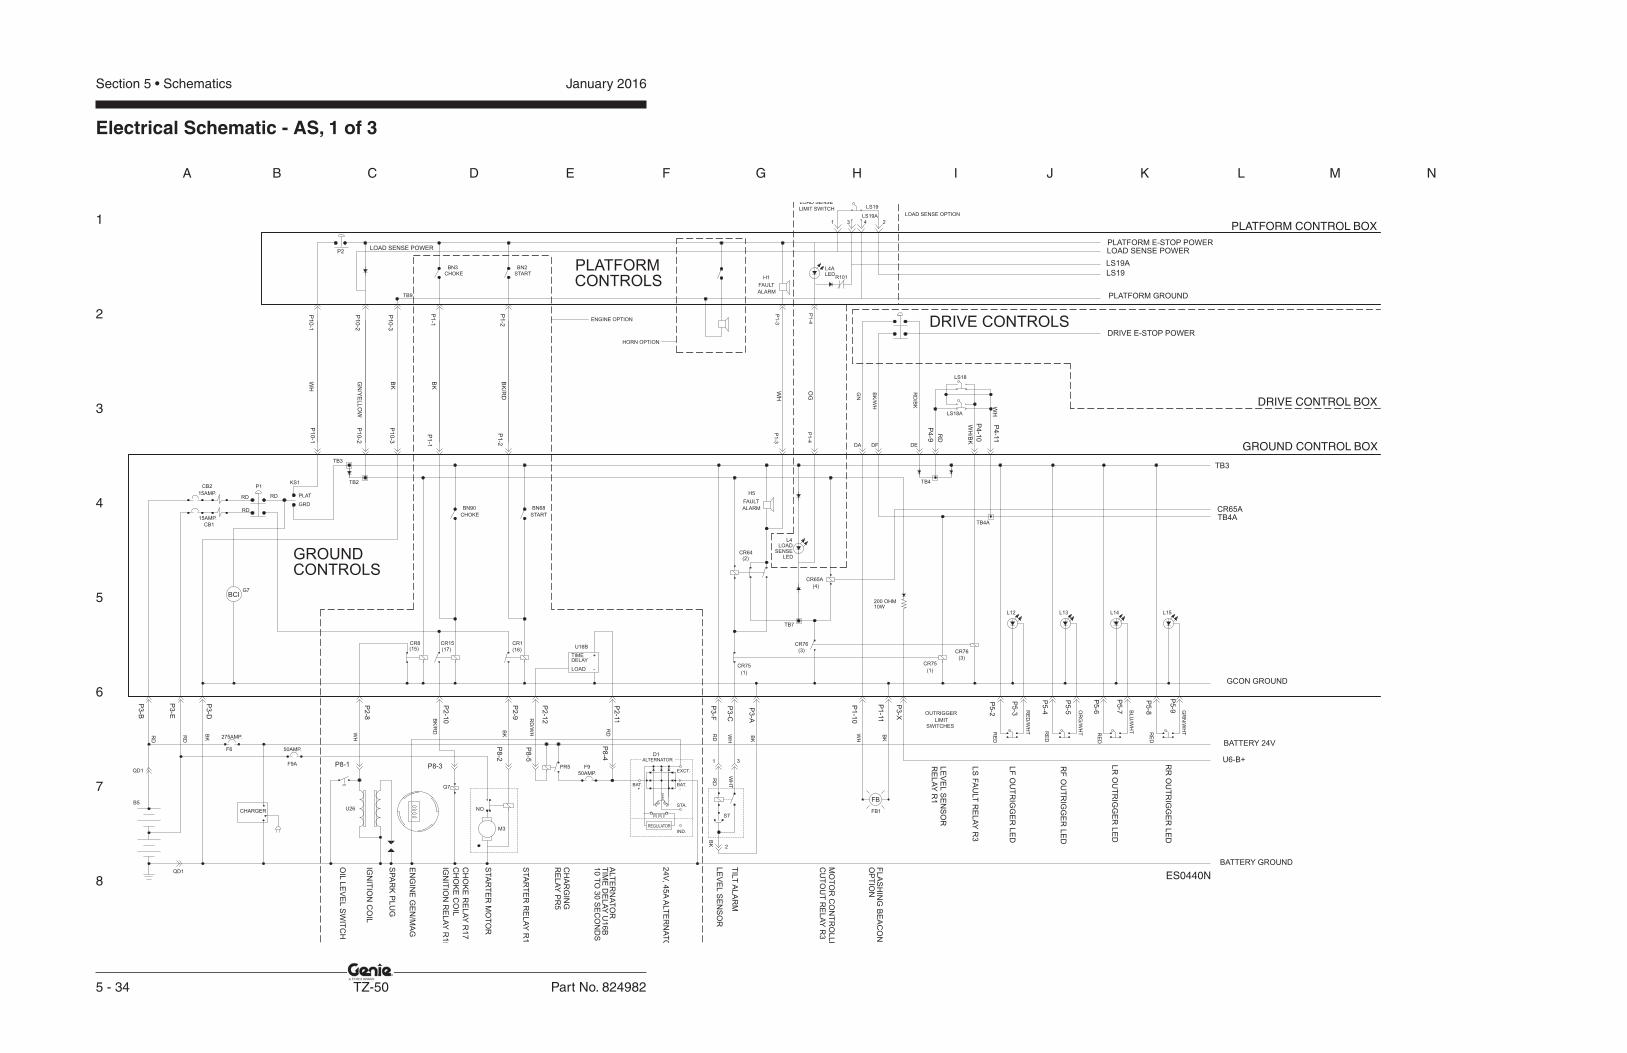
1
2
3
4
5
6
7
8
A B C D E F G H I J K L M N
January 2016Section 5 • Schematics
5 - 34 TZ-50 Part No. 824982
Electrical Schematic - AS, 1 of 3
PLATFORM CONTROL BOX
DRIVE CONTROL BOX
GROUND CONTROL BOX
ALT
ER
NA
TO
R
P2
PLAT
GRD
CB2
15AMP.RD
P1
RD
BK
S7
NO
FB
REGULATOR
IND.
+BAT.
STA.
BAT.-
ALTERNATOR
EXCT.
FLA
SH
ING
BE
AC
ON
OP
TIO
N
LE
VE
LS
EN
SO
R
TIL
TA
LA
RM
STA
RT
ER
MO
TO
R
PLATFORM
GROUNDCONTROLS
CONTROLS
RF
OU
TR
IGG
ER
LE
D
LF
OU
TR
IGG
ER
LE
D
LR
OU
TR
IGG
ER
LE
D
RR
OU
TR
IGG
ER
LE
D
LS
FA
ULT
RE
LA
YR
3
LE
VE
LS
EN
SO
RR
ELA
YR
1
LOAD -
+
50AMP.
RD
15AMP.
CB1
CH
OK
E C
OIL
STA
RT
ER
RE
LA
YR
1
CH
OK
E R
ELA
YR
17
IGN
ITIO
N R
ELA
YR
15
SP
AR
K P
LU
G
IGN
ITIO
N C
OIL
OIL
LE
VE
LS
WIT
CH
50AMP.
TB3
TB2 TB4
TB4A
TB7
DEDFDA
CHOKE START
CHOKE START
FAULT
ALARM
ALARM
FAULT
LED
SENSELOAD
LED
LIMIT SWITCH
LOAD SENSE
275AMP.
CH
AR
GIN
GR
ELA
YP
R5
TIM
E D
ELA
YU
16B
TB3
TB4A
CR8 CR15 CR1
F9A
CR75
(2)
H5
CR65A
LS18
LS18A
L12
CR75
CR76
CR76
L4
BN68BN90
KS1
U16B
10
TO
30 S
EC
ON
DS
D1
PR5 F9
M3
U26
Q7
FB1
B5
F6
H1
L4ABN2BN3
31
RD
RD
WH
BK
/RD RD
BK
RD
/WH R
D
WH
TW
H
WH
WH
GN
/YE
LLO
W
BK
BK
/RD
WH
OG
GN
BK
/WH
RD
/BK
RD
WH
/BK
WH
BATTERY 24V
BATTERY GROUND
PLATFORM E-STOP POWER
DRIVE E-STOP POWER
MO
TO
R C
ON
TR
OLLE
CU
TO
UT
RE
LA
YR
3
CR65A
DRIVE CONTROLSENGINE OPTION
LOAD SENSE OPTION
(15) (17) (16)
CR64
(4)
(1) (1)
(3)
(3)
LS19
43
PLATFORM GROUND
BK
TB9
BK
GCON GROUND
OUTRIGGER
LIMITSWITCHES
RE
D
RE
D/W
HT
OR
G/W
HTRE
D
L13 L15
RE
D
GR
N/W
HT
BLU
/WH
TRE
D
L14
BK
RD
BK
2
P1
-1
P1
-2
P1-3
P1-4
P1
-2
P1
-1
P1-4
P1-3
P4
-9
P4
-10
P4
-11
P5
-2
P5
-4
P5
-6
P5
-8
P5
-3
P5
-5
P5
-7
P5
-9
P3
-B
P3
-E
P3
-D
P3
-F
P3
-C
P3
-A
P1
-10
P1
-11
P2
-10
P2
-8
P2
-9
P2
-12
P2
-11
P8-1
P8
-2
P8-3
P8
-4
P8
-5
P1
0-1
P1
0-2
P1
0-3
P1
0-3
P1
0-2
P1
0-1
LOAD SENSE POWER
1 2
LS19
LOAD SENSE POWER
LS19A
LS19A
24V
, 45A
ALT
ER
NA
TO
HORN OPTION
G7BCI
QD1
QD1
CHARGER
10W200 OHM
P3
-X
U6-B+
TIMEDELAY
EN
GIN
E G
EN
/MA
G
R101
ES0440N
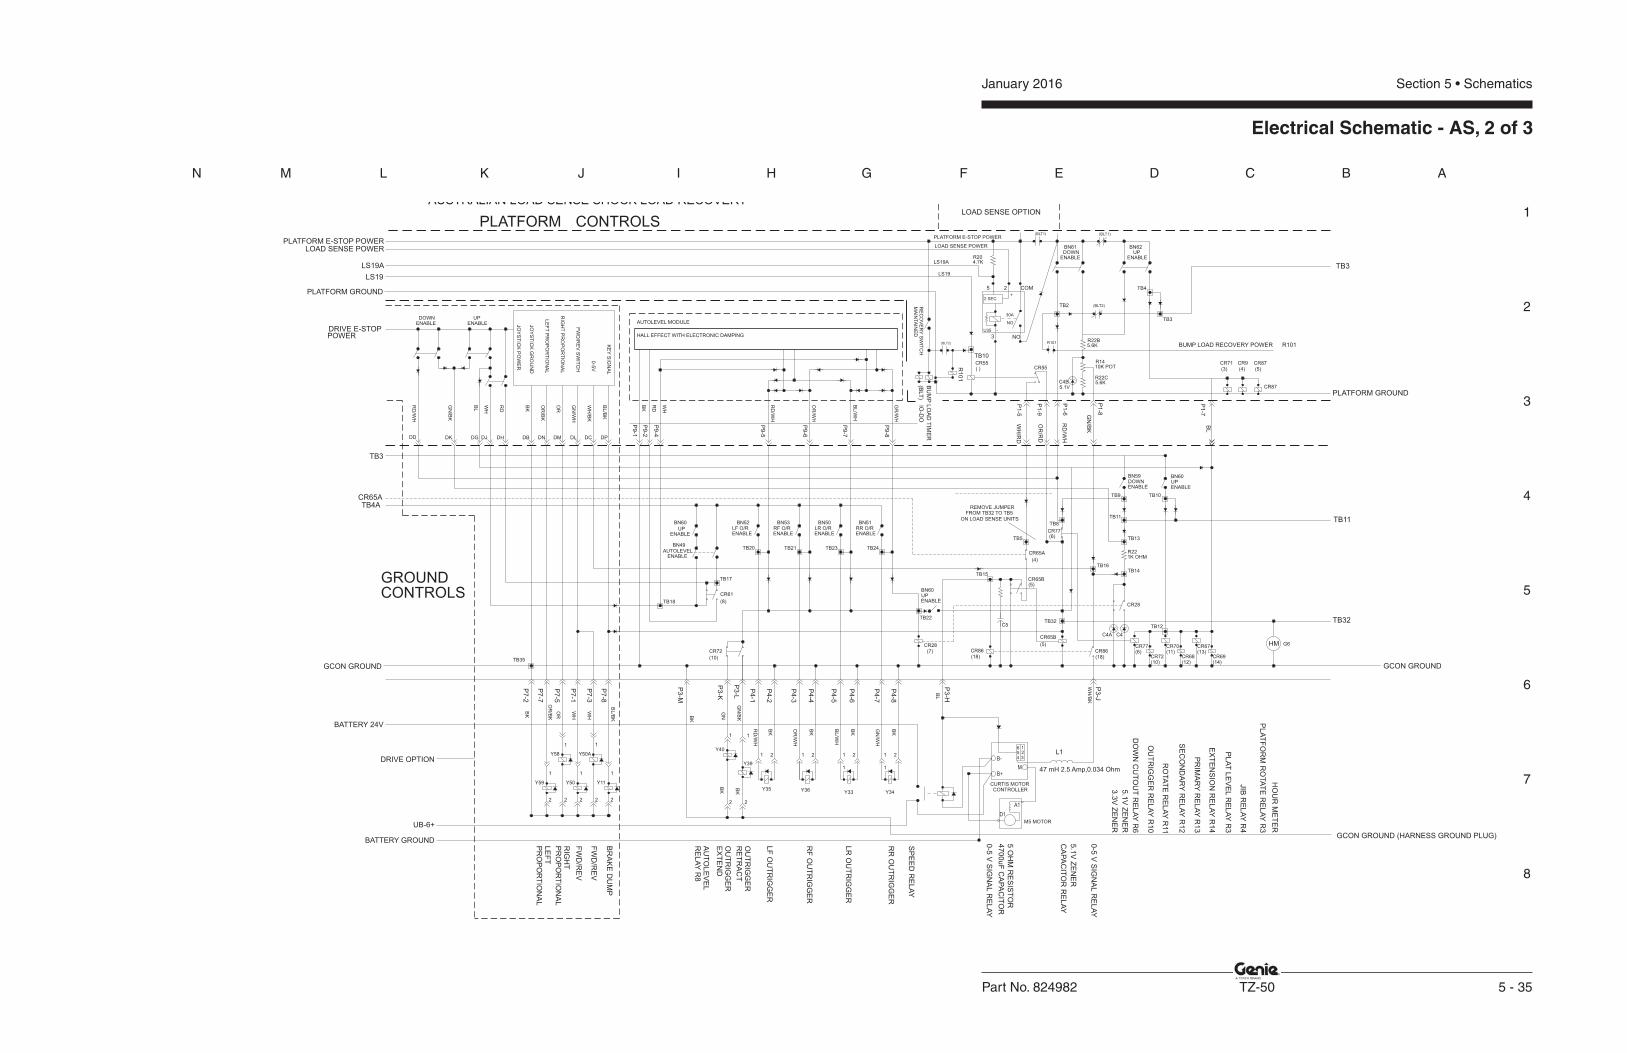
1
2
3
4
5
6
7
8
N M L K J I H G F E D C B A
Part No. 824982 TZ-50 5 - 35
January 2016 Section 5 • Schematics
Electrical Schematic - AS, 2 of 3
CONTROLSGROUND
CONTROLSPLATFORM
TB32
OU
TR
IGG
ER
RE
TR
AC
T
OU
TR
IGG
ER
EX
TE
ND
RO
TA
TE
RE
LA
YR
11
SE
CO
ND
AR
YR
ELA
YR
12
EX
TE
NS
ION
RE
LA
YR
14
PR
IMA
RY
RE
LA
YR
13
PLA
TF
OR
M R
OTA
TE
RE
LA
YR
3
JIB
RE
LA
YR
4
PLA
TLE
VE
LR
ELA
YR
3
OU
TR
IGG
ER
RE
LA
YR
10
5.1
V Z
EN
ER
3.3
V Z
EN
ER
DO
WN
CU
TO
UT
RE
LA
YR
6
CA
PA
CIT
OR
RE
LA
Y
4700uF
CA
PA
CIT
OR
0-5
V S
IGN
AL
RE
LA
Y
LF
OU
TR
IGG
ER
RF
OU
TR
IGG
ER
RR
OU
TR
IGG
ER
LR
OU
TR
IGG
ER
SP
EE
D R
ELA
Y
TB32
TB9
TB5
TB15
TB10
TB11
TB13
TB14TB16
TB20 TB21 TB23 TB24
DOWNENABLE ENABLE
UP
TB22
ENABLELF O/R RF O/R
ENABLE ENABLELR O/R RR O/R
ENABLEUP
ENABLE
ENABLEAUTOLEVEL
HO
UR
ME
TE
R
AUTOLEVEL MODULE
GR
/WH
BL
/WH
OR
/WH
RD
/WH
WH
RD
BK
ENABLEUP
ENABLEDOWN
5.1
V Z
EN
ER
Y11Y50Y59
FW
D/R
EV
FW
D/R
EV
LE
FT
PR
OP
OR
TIO
NA
L
RIG
HT
PR
OP
OR
TIO
NA
L
BR
AK
E D
UM
P
DOWNENABLE
UPENABLE
DPDCDM DLDNDB
0-5
V
KE
YS
IGN
AL
FW
D/R
EV
SW
ITC
H
RIG
HT
PR
OP
OR
TIO
NA
L
LE
FT
PR
OP
OR
TIO
NA
L
JO
YS
TIC
K G
RO
UN
D
JO
YS
TIC
K P
OW
ER
TB8
TB17
TB18
1
1 1
1
2
1
2
DHDJDGDKDD
REMOVE JUMPERFROM TB32 TO TB5
ON LOAD SENSE UNITS
5.6K
5.6K
10K POT
5.1V
TB12
1
2
1
2
1
1
22
1
2
M
A1
B+
B-
D1
M5 MOTOR
TB11
0-5
V S
IGN
AL
RE
LA
Y
CR87
CR69
CR67
CR68
CR70
CR72
CR77
R221K OHM
CR28
CR86
CR65B
CR65B
CR65A
BN59 BN60
BN60
BN49
CR61
BN52 BN53 BN50 BN51
Y35 Y36
C4A C4
CR77
C5
CR86CR72
Y58 Y50AY40
Y39
BN61 BN62
TB2
TB4
TB3
R22B
R14
R22CC4B
HM G6
RD
/WH
GN
/BK
BL
WH
RD
BK
OR
/BK
OR
GN
/WH
WH
/BK
BL
/BK
OR
/RD
WH
/RD
RD
/WH
GN
/BK
BL
OR
/BK
OR
WH
WH
BL/B
K
GN
GN
/BK
RD
/WH
OR
/WH
BL
/WH
GN
/WH
BL
TB3
CR28
TB3
TB4A
BATTERY 24V
BATTERY GROUND
DRIVE E-STOPPOWER
CR65A
AU
TO
LE
VE
LR
ELA
YR
8
HALL EFFECT WITH ELECTRONIC DAMPING
DRIVE OPTION
LOAD SENSE OPTION
5 O
HM
RE
SIS
TO
R
(8)
(10)
(5)
(5)
(18) (18)(6)
(10)
(11)
(12)
(13)
(14)
(6)
(4)
PLATFORM GROUND
PLATFORM GROUND
GCON GROUND
(7)
BK
2
BK
21
BK
Y34Y33
1 2 1 2
BK
BK
GCON GROUND
BK BK
GCON GROUND (HARNESS GROUND PLUG)
BK
TB35
CR71
(3)
CR9
(4)
CR87
(5)
P1-5
P1-6
P1-9
P1-8
P1-7
P4-1
P4-2
P4-3
P4-4
P4-5
P4-6
P4-7
P4-8
P7-1
P7-2
P7-7
P7-5
P7-3
P7-8
P3-K
P3-L
P3-M
P3-H
P9-1
P9-2
P9-4
P9-5
P9-6
P9-7
P9-8
LS19A
LOAD SENSE POWER
LS19
PLATFORM E-STOP POWER
CR55( )CR55
R204.7K
NO
30A
U35
2 SEC
5 COM
NO3
+
-
2
UB-6+
BU
MP
LO
AD
TIM
ER
RE
CO
VE
RY
SW
ITC
HM
AIN
TA
INE
D
R101
TB10
BUMP LOAD RECOVERY POWER
(BLT
)
(BLT2)
(BLT1) (BLT1)
(BLT2)
IO-D
O
LS19
LS19A
LOAD SENSE POWER
PLATFORM E-STOP POWER
R101
AUSTRALIAN LOAD SENSE SHOCK LOAD RECOVERY
R101
6 15 2
34
CURTIS MOTORCONTROLLER
L1
P3-J
WH
/BK
47 mH 2.5 Amp,0.034 Ohm
BN60UPENABLE

January 2016 Section 5 • Schematics
5 - 36
Electrical Schematic - AS
5 - 35
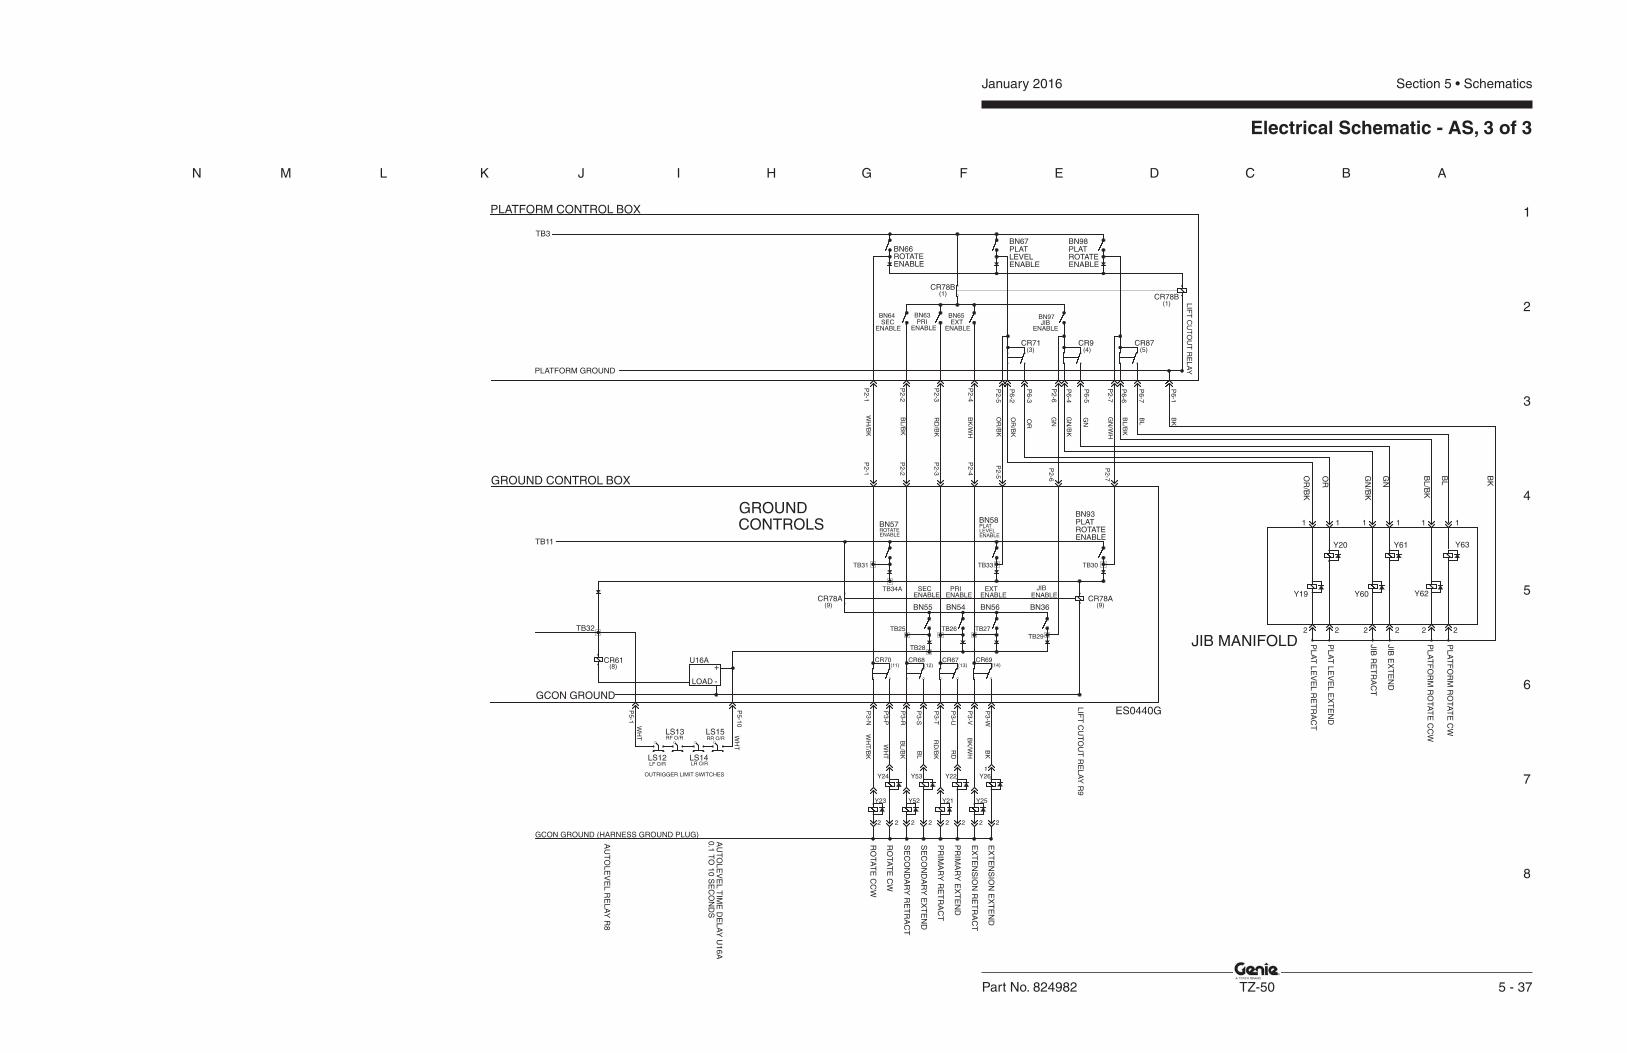
1
2
3
4
5
6
7
8
N M L K J I H G F E D C B A
Part No. 824982 TZ-50 5 - 37
January 2016 Section 5 • Schematics
Electrical Schematic - AS, 3 of 3
Y25
EX
TE
NS
ION
EX
TE
ND
EX
TE
NS
ION
RE
TR
AC
T
SE
CO
ND
AR
YR
ET
RA
CT
SE
CO
ND
AR
YE
XT
EN
D
PR
IMA
RY
EX
TE
ND
PR
IMA
RY
RE
TR
AC
T
RO
TA
TE
CC
W
RO
TA
TE
CW
LIF
TC
UT
OU
TR
EL
AY
R9
LIF
TC
UT
OU
TR
EL
AY
TB28
AU
TO
LE
VE
LT
IME
DE
LA
YU
16
A
CR69
0.1
TO
10
SE
CO
ND
S
BN36CR78A
AU
TO
LE
VE
LR
EL
AY
R8
2
1
WH
/BK
BL
/BK
RD
/BK
BK
/WH
OR
/BK
GN
GN
/WH
BL
/BK
RD
/BK
BK
/WH
BL
RD
TB3
PLATFORM GROUND
OR
OR
/BK
PL
AT
LE
VE
LE
XT
EN
D
PL
AT
LE
VE
LR
ET
RA
CT
GN
GN
/BK
JIB
RE
TR
AC
T
JIB
EX
TE
ND
BL
BL
/BK
1
Y63
PL
AT
FO
RM
RO
TA
TE
CW
OR
/BK
OR
GN
/BK
GN
BL
/BK
BL
BK
BK
JIB MANIFOLD2
LS14
OUTRIGGER LIMIT SWITCHES
+
-LOAD
U16A
GCON GROUND
CR61
WH
T
GCON GROUND (HARNESS GROUND PLUG)
P2
-1
P5
-10
WH
T/B
K
WH
T
P3
-WB
K
PL
AT
FO
RM
RO
TA
TE
CC
W
22222
Y62
Y61
Y60Y19
Y20
11111
2222222
Y21Y52Y23
Y26Y22Y53Y24
P3
-V
P3
-U
P3
-T
P3
-S
P3
-R
P3
-P
P3
-N
CR67CR68CR70
TB25 TB26 TB27
TB29
BN56BN54BN55CR78A
TB30TB33TB31
TB34A
P2
-2
P2
-3
P2
-4
P2
-5
P2
-6
P2
-7
P2
-1
P2
-2
P2
-3
P2
-4
P2
-5
P6
-2
P6
-3
P6
-4
P6
-5
P6
-6
P6
-7
P2
-6
P2
-7
P6
-1
CR87CR9CR71
CR78B
CR78B
CONTROLSGROUND
LS12
LS15LS13
WH
T
P5
-1
TB32
TB11
LF O/R LR O/R
RR O/RRF O/R
BN66ROTATEENABLE
BN67PLATLEVELENABLE
BN98PLATROTATEENABLE
(1)
(5)(4)(3)
(1)
BN64SEC
ENABLE
BN63PRI
ENABLE
BN65EXT
ENABLE
BN97JIB
ENABLE
BN57ROTATEENABLE
BN58PLATLEVELENABLE
BN93PLATROTATEENABLE
JIBENABLE
EXTENABLE
PRIENABLE
SECENABLE
(14)(13)(12)(11)
(9)(9)
(8)
ES0440G
PLATFORM CONTROL BOX
GROUND CONTROL BOX

January 2016 Section 5 • Schematics
5 - 38
Electrical Schematic - AS
5 - 37

January 2016Section 5 • Schematics
5 - 39
Hydraulic Schematic
5 - 40
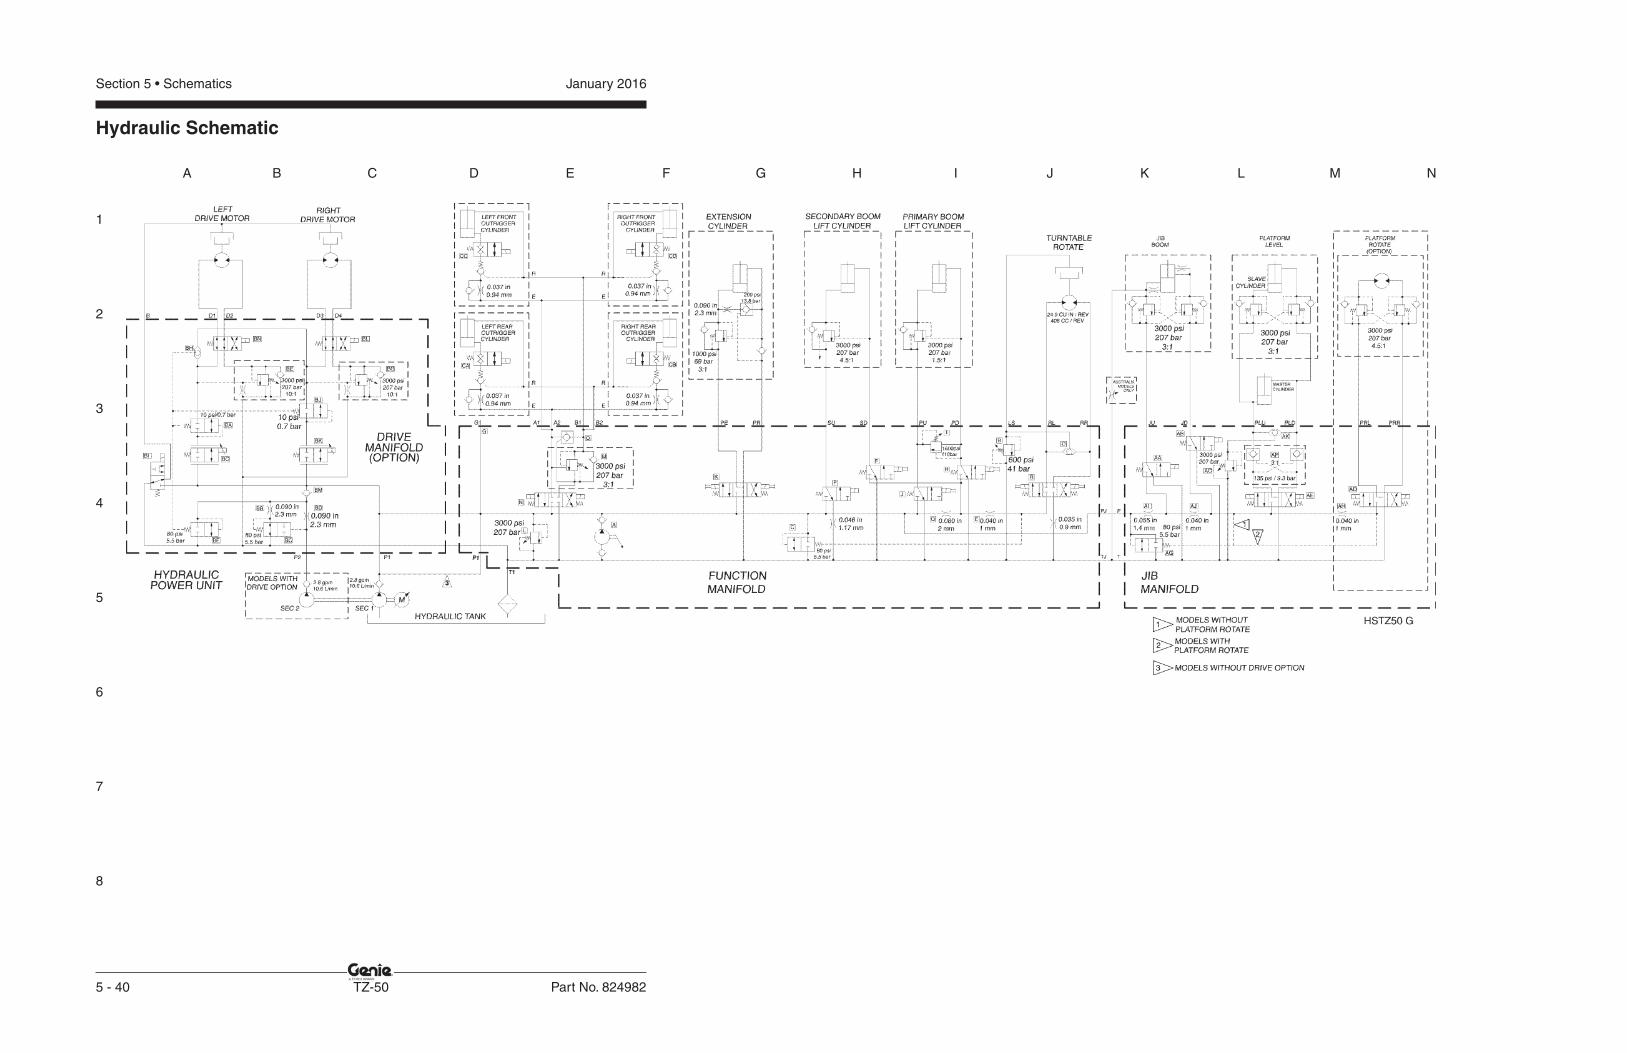
1
2
3
4
5
6
7
8
A B C D E F G H I J K L M N
January 2016Section 5 • Schematics
5 - 40 TZ-50 Part No. 824982
Hydraulic Schematic