Embed Size (px)
Citation preview


IP0011-12 Installation Procedure
Issue Date – 15/01/2013
Confidential
Page 2
Renewable Devices Ltd: www.renewabledevices.com
SWSWSWSWIFTIFTIFTIFT
WIND ENERGY SYSTEM™
Installation Procedure
TO BE INSTALLED BY COMPETENT PERSONNEL ONLY

IP0011-12 Installation Procedure
Issue Date – 15/01/2013
Confidential
Page 3
Renewable Devices Ltd: www.renewabledevices.com
Document Issue Record
Document IP0011-13
Originally
prepared by
Renewable Devices
Version Date Purpose of issue & amendment Released by
01
13
27/11/11
25/01/2013
Initial Issue
General Revision
Renewable Devices Ltd
Renewable Devices Ltd

Table of Contents
1. Definitions and Abbreviations ....................................................................................................... 6
2. Notes to Installers ............................................................................................................................... 7
2.1. Wind loading ................................................................................................................................................ 7
2.2. Installer Training ....................................................................................................................................... 8
2.3. Site Survey / Training ............................................................................................................................... 8
2.4. Documentation............................................................................................................................................ 9
Installation Procedure Overview ....................................................................................................... 10
3. Unpacking and Inspection of System ........................................................................................ 12
3.1. Electrical Component Check – Test E1: ............................................................................................ 12
4. Installation of Wall Mounting System ...................................................................................... 15
4.1. Bracket Positions and Marking Up .................................................................................................... 15
4.2. Hydraulic Pull Test (Test M1) .............................................................................................................. 16
4.3. Installing the Brackets and Mast ........................................................................................................ 17
5. Nacelle Assembly ............................................................................................................................. 18
5.1. Lifting the Nacelle .................................................................................................................................... 18
5.2. Fitting the Nacelle Clamp ....................................................................................................................... 18
5.3. Fitting the Mast Cable Connector Block ........................................................................................... 19
6. Fitting the Fins and Booms ........................................................................................................... 20
7. DC Connections ................................................................................................................................. 21
7.1. Earthing ....................................................................................................................................................... 21
7.2. Connection of Mast and Mast Cable to DC Isolator ....................................................................... 22
7.3. Continuity Testing – DC Wiring (Test E2) ........................................................................................ 23
7.4. DC Installation Test (Test E3) .............................................................................................................. 24
8. Grid Tie Inverter – Mounting and DC Connection ................................................................ 27
8.1. Mounting ..................................................................................................................................................... 27
8.2. Inverter Connections to the DC Isolator .......................................................................................... 27
9. Grid Tie Inverter – AC Connection ............................................................................................. 29
9.1. AC Isolator Installation .......................................................................................................................... 30
9.2. Inverter Test (Test E4) ........................................................................................................................... 31
10. Fitting of Rotor and Nose Cone ............................................................................................... 32
11. Commissioning and Handover ................................................................................................ 33
12. Appendix A Tools and Consumables ..................................................................................... 34
12.1. Appendix B Consumable Items / Spares .......................................................................................... 36
13. Appendix C Swift Inverter ......................................................................................................... 38
13.1. Swift Inverter – Mast Cable Connector ............................................................................................. 38
13.2. Swift Inverter – Brake Release & DC Voltage Test (Test E1) .................................................... 38
13.3. Swift Inverter – Mounting ..................................................................................................................... 39
13.4. Swift Inverter – Continuity Testing – DC (Test E2) ....................................................................... 40

IP0011-12 Installation Procedure
Issue Date – 07/06/2012
Confidential
Page 5
Renewable Devices Ltd: www.renewabledevices.com
13.5. Swift Inverter –DC Isolator Switch Function Test (Test E3) ..................................................... 41
13.6. Swift Inverter – Connections to the DC Isolator ............................................................................ 42
13.7. Swift Inverter – Wireing & Earthing .................................................................................................. 43
13.8. Swift Inverter – Swift Inverter Test (Test E4) ................................................................................ 44
14. Appendix D Wooden Pole Installation ................................................................................. 45
15. The drawing SC0018 within Appendix F Installation Certificate ID0019-01 ......... 46
15.1. Wooden Pole – Mast Cable .................................................................................................................... 51
15.2. Wooden Pole – Nacelle ........................................................................................................................... 51
15.3. Wooden Pole – Cable & Earth ............................................................................................................... 52
15.4. Wooden Pole – Brake Release and DC Voltage Test (Test E1) ................................................. 53
15.5. Wooden Pole – DC Connections ........................................................................................................... 54
16. Appendix E SSEG Commissioning Sheet ............................................................................... 55
SSEG Commissioning Confirmation ................................................................................................... 56
17. Appendix F Installation Certificate ID0019-01 ................................................................. 61
18. Appendix G SC0016, SC0018 & Technical Drawings ....................................................... 66

IP0011-12 Installation Procedure
Issue Date – 07/06/2012
Confidential
Page 6
Renewable Devices Ltd: www.renewabledevices.com
1. Definitions and Abbreviations
AC Alternating Current
CSA Cross Sectional Area
CWS Gland rating that must be used
DC Direct Current
DNO Distribution Network Operator
I+ Inverter positive
I- Inverter negative
Is Inverter signal
MCS Microgeneration Certification Scheme
PSU Power Supply
RD Renewable Devices Ltd
SSEG Small Scale Embedded Generator
SWA Steel Wire Armoured Cable
S Signal line
T+ Turbine positive
T- Turbine negative
TS Turbine signal
IP0011-12 Installation Procedure
Issue Date – 07/06/2012
Confidential
Page 7
Renewable Devices Ltd: www.renewabledevices.com
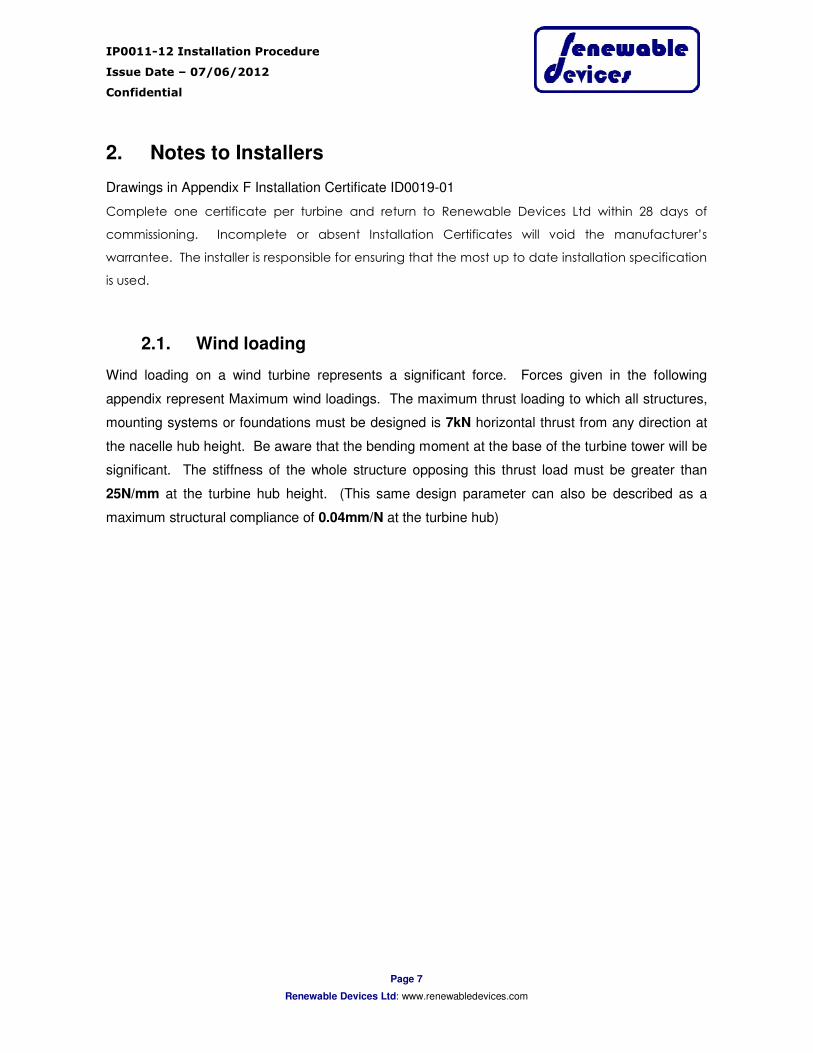
2. Notes to Installers
Drawings in Appendix F Installation Certificate ID0019-01
Complete one certificate per turbine and return to Renewable Devices Ltd within 28 days of
commissioning. Incomplete or absent Installation Certificates will void the manufacturer’s
warrantee. The installer is responsible for ensuring that the most up to date installation specification
is used.
2.1. Wind loading
Wind loading on a wind turbine represents a significant force. Forces given in the following
appendix represent Maximum wind loadings. The maximum thrust loading to which all structures,
mounting systems or foundations must be designed is 7kN horizontal thrust from any direction at
the nacelle hub height. Be aware that the bending moment at the base of the turbine tower will be
significant. The stiffness of the whole structure opposing this thrust load must be greater than
25N/mm at the turbine hub height. (This same design parameter can also be described as a
maximum structural compliance of 0.04mm/N at the turbine hub)

IP0011-12 Installation Procedure
Issue Date – 07/06/2012
Confidential
Page 8
Renewable Devices Ltd: www.renewabledevices.com
• Appendix G SC0016, SC10018 & Technical Drawings give an overview of the components
of the turbine.
• Unless otherwise agreed in writing with Renewable Devices, all aspects of the installation
must conform to these drawings and to this installation procedure.
• The user manual PD0017 describes the operation of an installed Swift Rooftop Wind
Energy System™.
• Before proceeding with the installation, check that your Swift Rooftop Energy System™ has
been shipped with a Kaco Powador 2002 inverter. If this is not the case, consult Appendix
C Swift Inverter installation procedure
• Prior to commencing any work confirm that the documentation used is the current version
for the Swift system to be installed.
• For the warranty to be valid all the documentation specified in a completed Appendix F
Installation Certificate ID0019-01 must be returned within 28 days of commissioning the
turbine.
2.2. Installer Training
• No installation of the Swift Rooftop Energy System should be carried out without prior
accreditation to or similar to those required by the UK MCS accreditation Scheme, Energy
Savings trust or LCBP. Experience in wind turbine resource assessment, Wind turbine
siting and installing and commissioning Grid tie inverters to the 17th edition of the UK IEE
Wiring regulations are essential.
• This installation procedure is intended as guidance for qualified installers only.
2.3. Site Survey / Training
• Prior to installation a site survey including resource assessment and structural assessment
must be carried out.
• RD Energy Solutions, a consultancy division in the Renewable Devices Group of
companies can offer training site surveys and installation if requested.

IP0011-12 Installation Procedure
Issue Date – 07/06/2012
Confidential
Page 9
Renewable Devices Ltd: www.renewabledevices.com
2.4. Documentation
The following documents accompany the installation procedure.
• Owners Manual PD0017
• Appendix E SSEG Commissioning Sheet
• Appendix F Installation Certificate ID0019-01
• Appendix G SC0016, SC0018 & Technical Drawings
The following documents are also required.
• ETA-02/0024 Fischer resin anchor instructions (FIS V 360 resin system)
• Fischer resin data sheet
• Fischer loadings and structure assessment docs
• BS 5080-1:1993 - Structural fixings in concrete and masonry. Method of test for tensile
loading
• Kaco New Energy Powador 2002 User & Installation manual – Wind
• CE72 - Installing small wind-powered electricity generating systems, Guidance for installers
and specifiers
• BS 7671 - IEE Wiring Regulations, 17th Edition or the relevant local regulations
The following forms must be completed and returned to the relevant organisations. Without the
return of these documents the Swift turbine warranty is invalid and the installation bay be illegal.
• Appendix E SSEG Commissioning Sheet to the local DNO
• Appendix F Installation Certificate ID0019-01 to Renewable Devices Ltd

IP0011-12 Installation Procedure
Issue Date – 07/06/2012
Confidential
Page 10
Renewable Devices Ltd: www.renewabledevices.com
Installation Procedure Overview
Notes:
• The table below and on the following pages gives an overview of the installation process
and refers to the documentation that must be completed at each stage in the process.
• Unless otherwise specified all results should be recorded on ID0019.
Section Actions Supporting Docs Record Results
N/A • Perform a Site survey
• Check that the turbine can be
installed as described in the site
survey and this procedure.
SC0016
5 • Check all components are present
and in good condition.
• Test nacelle and power supply.
• Record serial numbers.
SC0016 • Site details
• Serial numbers
• E1 test results
6 • Install mounting studs & wait for
cure - up to 24 hours
(temperature dependant)
SC0016
BS 5080-1
• Carry out hydraulic load test to BS
5080-1 (Test M1).
• M1 test results
• Install brackets and mast SC0016 • Mounting
system
7 • Fit nacelle to mast.
• Fit mast cable.
• Carry out brake release test and
DC voltage test (Test E1).
SC0016 • E1 test results
Continued on next page.

IP0011-12 Installation Procedure
Issue Date – 07/06/2012
Confidential
Page 11
Renewable Devices Ltd: www.renewabledevices.com
Section Actions Supporting Docs Record Results
8 • Fit fins and booms to nacelle. SC0016
9 • Connect SWA from mast to DC
isolator. Test DC wiring (Test E2).
SC0016 • E2 test results
• Test function of DC isolator (Test
E3).
SC0016 • E3 test results
• Test the DC installation (Test E4) • E4 test results
10 • Mount the inverter
• Connect the DC isolator to the
inverter
Kaco Powador 2002
Manual
11 • Install the AC isolator
• Connect and test AC wiring from
distribution board to inverter
(requires qualified electrician).
• Inverter Test (Test E5)
SC0016 • E5 test results
• Electrical
system
12 • Fit rotor.
• Fit nose cone
SC0016 • Rotor
installation
13 • Observe turbine function
• Provide customer with Owners
Manual.
• Return ID0019 & SSEG Sheet to
Renewable Devices
• Send SSEG Sheet to the DNO.
PD0017
ID0019
SSEG Sheet
N/A • Continue to check and monitor
turbine performance.

IP0011-12 Installation Procedure
Issue Date – 07/06/2012
Confidential
Page 12
Renewable Devices Ltd: www.renewabledevices.com
3. Unpacking and Inspection of System
Notes:
• Prior to commencing with the installation, all of the components of the system should be
inspected for signs of shipping damage and the serial numbers recorded on Appendix F
Installation Certificate ID0019-01.
• If a component is damaged in shipping, the warranty will be void.
3.1. Electrical Component Check – Test E1:
Notes:
• This test confirms that the Swift nacelle has not been damaged in transit and the 12V
power supply is functioning correctly.
• Making incorrect connections during this test may result in false positives and irreparable
damage to the on-board-electronics.
• This test should be performed with the nacelle still in its original polystyrene packaging on a
level surface, if performed at an angle the on-board acceleration switch will lock the turbine
brake on, requiring a reset.

IP0011-12 Installation Procedure
Issue Date – 07/06/2012
Confidential
Page 13
Renewable Devices Ltd: www.renewabledevices.com
3.1.1.
PSU 12V test:
• Connect a lead and socket to the 12V PSU but do
NOT connect to the mains.
• Connect leads to the PSU:
• Grey 1.5mm2 to PSU negative
• Yellow 1.5mm2 to PSU positive
• Connect these to a terminal block with appropriate
test points attached as indicated in the photo.
• Connect a multimeter set to read dc voltage
across the –ve and +ve test points from the 12V
PSU (grey and yellow wires respectively)
• Briefly connect the 12V PSU to the mains to
confirm that it outputs 12V.
3.1.2.
Brake test set-up:
• Connect the mast cable to the terminal bock.
• Connect the positive output of the 12V PSU to the signal line [Lead 3], the negative to
the DC negative of the nacelle [Lead 1], and the positive of the nacelle [Lead 2] to the
remaining test point on the terminal block.
• Connect a multimeter set to read DC voltage to the DC negative and positive of the
nacelle at the test points connected to the terminal block.
Yellow (S)
Grey (-)
Brown (+)

IP0011-12 Installation Procedure
Issue Date – 07/06/2012
Confidential
Page 14
Renewable Devices Ltd: www.renewabledevices.com
3.1.3.
Brake release test:
• Confirm that the brake is active by turning the
shaft of the nacelle: a pulsing resistance should
be felt.
• Connect the 12V PSU to the mains.
• Confirm that the brake has been released by
turning the shaft of the nacelle: very little
resistance should be felt.
• Confirm that a voltage is produced across the
DC negative and positive of the nacelle and that
the polarity is as expected while turning the
shaft of the nacelle.
• Disconnect the 12V PSU and confirm that the
brake has been reapplied.
• Record the results on sheet ID0019– Test E1
3.1.4.
Resetting the turbine:
• If the brake is not released disconnect the 12V
PSU from the mains. Reverse the connections
from the PSU at the terminal block, so that the
12V PSU positive is connected to the nacelle
negative (#1) and the PSU negative to the
nacelle signal (#3). This reversal effectively
provides a –ve 12 signal which resets the nacelle
safety systems.
• Connect the 12V PSU to the mains for
approximately 5 seconds.
• Repeat 3.1.2 & 3.1.3, the brake should now
release and reapply. If the break does not
release ensure nacelle is laying flat in its
packaging if the break does not reset return the
turbine to your distributor and repeat the Reset.
Yellow (S)
Grey (-)
Brown (+)
Yellow (S)
Grey (-)
Brown (+)

IP0011-12 Installation Procedure
Issue Date – 07/06/2012
Confidential
Page 15
Renewable Devices Ltd: www.renewabledevices.com
4. Installation of Wall Mounting System
4.1. Bracket Positions and Marking Up
Notes:
• See sheet 3 of SC0016 for the correct bracket positions and for the rotor position relative to
the top bracket and roof ridgeline.
• The brackets are attached to the wall using a Fischer resin anchor system.
• The resin anchors should be installed in accordance with the directions given in the Fischer
documents; these can be found through the Fischer website: www.fischer.co.uk, and
searching for details relating to “injection cartridge FIS V” on their online catalogue.
• The Fischer document ETA-02/0024 should be read in its entirety prior to
commencing an installation.
• The depth and diameter requirements for the holes specified (14 mm diameter x 250 mm
depth) are typical for most masonry but may need to be modified following consultation with
a structural engineer.
• Contact Fischer if there is any doubt over the hole requirements or installation technique.
• If the proposed siting of the turbine is not as described in the structural survey then it
should be re-examined before work proceeds.
4.1.1.
• Mark out the positions of the holes for the resin anchors using a plumb-line, tape
measure and spirit level.
• Pay close attention to sheet 3 of SC0016. It may be necessary to move a bracket
position up or down within the given tolerances to ensure that the anchors are fixed to
solid brick/block/stone and not into mortar.
4.1.2.
• Install the Fischer resin anchors in accordance with the Fisher documentation.

IP0011-12 Installation Procedure
Issue Date – 07/06/2012
Confidential
Page 16
Renewable Devices Ltd: www.renewabledevices.com
4.2. Hydraulic Pull Test (Test M1)
Notes:
• Once the stud has cured, each stud should be tested using a portable tension tester /
hydraulic load tester.
• Tests should be carried out to BS 5080-1:1993 (Structural fixings in concrete and masonry.
Method of test for tensile loading.)
4.2.1.
• Test pull each stud to 13kN
• If a stud fails:
1. Grind the stud off.
2. Reposition the bracket within the tolerances of sheet 3 of SC0016.
3. Test again after curing.
• Record the test results on the commissioning sheet ID0019.

IP0011-12 Installation Procedure
Issue Date – 07/06/2012
Confidential
Page 17
Renewable Devices Ltd: www.renewabledevices.com
4.3. Installing the Brackets and Mast
Notes:
• See sheets 1 and 4 of SC0016 for details of the bracket assembly and tightening torques.
• It is the installer’s responsibility to ensure that all lifting is carried out safely. The mass of
the pole is 40 kg.
• Depending on the lifting method used, it is recommended to assemble 3 of the 4 brackets
to the wall and one to the pole.
4.3.1.
• Fit the rubber bushes to the lower mounting brackets.
• Attach the lower mounting bracket to the spacer bracket.
• Fix three of these part completed assemblies to the bottom three sets of Fischer resin
anchors.
• Fix the entire top bracket assembly to the pole at the position shown in the wall-
mounting diagram on sheet 3 of SC0016.
4.3.2.
• Once the top bracket is secured and the bolts correctly tightened it can be used as a
lifting point.
• Use an appropriate lifting arrangement to lift the pole so that the top bracket assembly
can be fitted to the top pair of Fischer M12 Anchor bolts.
• Fit the M12 Nylock nuts to secure the pole.
4.3.3.
• The mast should now be in position on the remaining 3 clamps.
• Bolt on the front parts of the clamps to secure it to the wall.
• Ensure threadlock is applied and all nuts and bolts are tightened to the correct torque
settings as detailed on sheet 1 of SC0016.
• Sign off the mounting installation section of the commissioning sheet ID0019.

IP0011-12 Installation Procedure
Issue Date – 07/06/2012
Confidential
Page 18
Renewable Devices Ltd: www.renewabledevices.com
5. Nacelle Assembly
Notes:
• See sheets 1 and 5 of SC0016 for details of the nacelle assembly and tightening torques.
5.1. Lifting the Nacelle
Notes:
It is the installer’s responsibility to ensure that all lifting is carried out safely.
The mass of the nacelle is 35Kg.
5.1.1.
• The end of the mast cable should be lowered down the length of the mast.
• Ensure that there is sufficient cable to reach the connector at the bottom of the mast
with approx 300mm spare.
5.1.2.
• Adjust the working platform to a comfortable height before lifting the nacelle onto the
pole.
• Lower the nacelle taking care not to trap wires between the base of the nacelle clamp
and the top of the pole.
• Ensure that no strain is put on the mast cable.
5.2. Fitting the Nacelle Clamp
5.2.1.
• Swivel the base of the nacelle so the pre-drilled hole in the aluminium pole lines up
with the hole provided in the nacelle base for the M10x20 retaining bolt.
• The nacelle clamp is tightened using the 8 M6x40 cap screws.
• Apply thread lock to all the bolts and observe the correct torque sequence as
illustrated on sheet 5 of SC0016.
• Tighten all bolts lightly at first so that there is an even spacing on both sides of the
nacelle clamp.

IP0011-12 Installation Procedure
Issue Date – 07/06/2012
Confidential
Page 19
Renewable Devices Ltd: www.renewabledevices.com
5.3. Fitting the Mast Cable Connector Block
5.3.1.
• At the base of the mast, connect the mast cable to the connector block (Part 150
0016).
• Ensure that there is at least 300mm cable spare below the mast.

IP0011-12 Installation Procedure
Issue Date – 07/06/2012
Confidential
Page 20
Renewable Devices Ltd: www.renewabledevices.com
6. Fitting the Fins and Booms
Notes:
• See sheets 1 and 7 of SC0016 for details of the fin and boom assembly and tightening
torques.
6.1.1.
• Apply thread-lock to all fixings.
• Fit each of the boom clamps with 2 M6x30 cap screws and 1 M6x60 cap screw with
the M6 Staytite flanged nut to the booms.
• Tighten all bolts lightly so that there is an even spacing on both sides of the boom
clamp and then tighten to the required torque.
6.1.2.
• Attach each fin using 4 M6x16 bolts.
• Thread-lock and tighten to the required torque.
6.1.3.
• Fit the boom and fin assembly to the nacelle.
• The boom with the hinged furling mechanism MUST BE placed into the right hand slot
on the nacelle as viewed from behind the nacelle.
• Check that fins are vertical before finally tightening the nacelle clamps to the required
torque.
6.1.4.
• On completion of the nacelle, fin and boom installation, sign off the relevant section of
the commissioning sheet ID0019.

IP0011-12 Installation Procedure
Issue Date – 07/06/2012
Confidential
Page 21
Renewable Devices Ltd: www.renewabledevices.com
7. DC Connections
7.1. Earthing
Notes:
• The correct earthing arrangement for the turbine nacelle and mast is dependant on site specific
factors. See sheet 7 of SC0016 for earthing notes.
• All earthing should be in accordance with BS 5176: 17th Edition.
• The recommendations in CE72 - Installing small wind-powered electricity generating systems,
guidance for installers and specifiers should be followed to comply with the UK MCS
requirements.
• A mast earth must be provided in accordance with CE72 and all applicable local regulations.
• As general guidance, the shielding of the DC SWA should be bonded to the mast.
• If a Lightning Protection System (LPS) is installed or the appropriate earthing arrangement is
ambiguous then advice should be sought from a qualified electrical contractor.
IP0011-12 Installation Procedure
Issue Date – 07/06/2012
Confidential
Page 22
Renewable Devices Ltd: www.renewabledevices.com
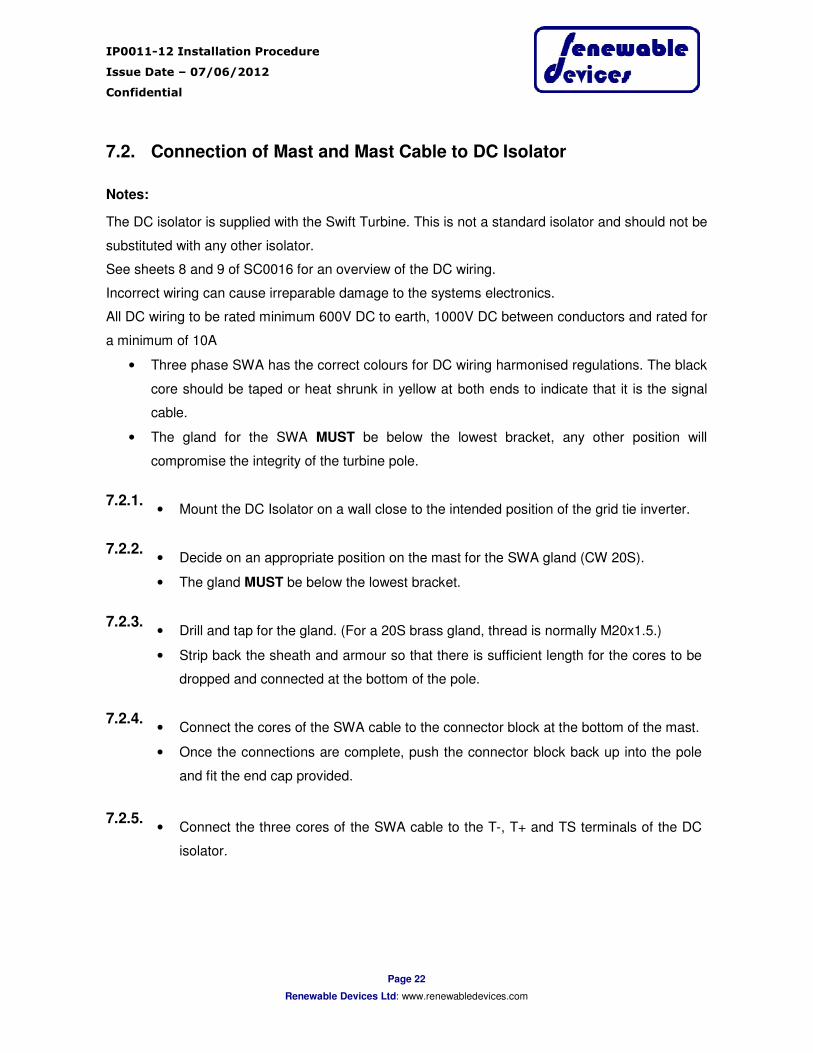
7.2. Connection of Mast and Mast Cable to DC Isolator
Notes:
The DC isolator is supplied with the Swift Turbine. This is not a standard isolator and should not be
substituted with any other isolator.
See sheets 8 and 9 of SC0016 for an overview of the DC wiring.
Incorrect wiring can cause irreparable damage to the systems electronics.
All DC wiring to be rated minimum 600V DC to earth, 1000V DC between conductors and rated for
a minimum of 10A
• Three phase SWA has the correct colours for DC wiring harmonised regulations. The black
core should be taped or heat shrunk in yellow at both ends to indicate that it is the signal
cable.
• The gland for the SWA MUST be below the lowest bracket, any other position will
compromise the integrity of the turbine pole.
7.2.1.
• Mount the DC Isolator on a wall close to the intended position of the grid tie inverter.
7.2.2.
• Decide on an appropriate position on the mast for the SWA gland (CW 20S).
• The gland MUST be below the lowest bracket.
7.2.3.
• Drill and tap for the gland. (For a 20S brass gland, thread is normally M20x1.5.)
• Strip back the sheath and armour so that there is sufficient length for the cores to be
dropped and connected at the bottom of the pole.
7.2.4.
• Connect the cores of the SWA cable to the connector block at the bottom of the mast.
• Once the connections are complete, push the connector block back up into the pole
and fit the end cap provided.
7.2.5.
• Connect the three cores of the SWA cable to the T-, T+ and TS terminals of the DC
isolator.
IP0011-12 Installation Procedure
Issue Date – 07/06/2012
Confidential
Page 23
Renewable Devices Ltd: www.renewabledevices.com
7.3. Continuity Testing – DC Wiring (Test E2)
Notes:
This test MUST be carried out before the connection is made to the inverter. A short circuit in the
DC wires can cause permanent damage to the inverter or electronics in the nacelle.
DO NOT use a megger tester for this test, as it will damage the turbine electronics.
7.3.1.
• Prior to commencing this test the following should be confirmed:
The wiring from the DC isolator to the nacelle is complete
The wiring from the DC isolator to the inverter is not connected
The DC isolator is in the OFF position.
7.3.2.
• Using a multimeter, check the resistance across the three DC wires (T+, T-, TS) on
the turbine side of the DC isolator and between these three wires and the turbine
earth.
• There should be no continuity between any pair of wires or between the wires and the
mast earth.
• The resistance value seen on the multimeter may not be stable, but in all cases
should be greater than 0.7MΩ apart from to earth, which should show a stable open
loop.
7.3.3.
• Additionally check for continuity between the DC wiring and earth using a multimeter.
• There should be no continuity between any of the DC wiring and earth.
7.3.4.
• Record the results of the test (Test E2) on the commissioning certificate ID0019.

IP0011-12 Installation Procedure
Issue Date – 07/06/2012
Confidential
Page 24
Renewable Devices Ltd: www.renewabledevices.com
7.4. DC Installation Test (Test E3)
Notes:
• This test must be carried out with the nacelle and mast cable installed and the SWA is
connected to the connector block.
7.4.1.
Test set-up:
• Connect a connector block via short lengths of correctly
colour-coded wire to the inverter side connections of the
DC isolator:
• Signal (IS) – yellow
• DC positive (I+) – brown
• DC negative (I-) – grey
to nacelle
7.4.2.
Brake confirmation:
• Rotate shaft of the turbine clockwise.
• The shaft should rotate with a pulsed resistance, confirming that the brake is applied.
7.4.3.
Multimeter connection:
• Replace the cover of the DC isolator.
• Set a multimeter to read DC voltage.
• Connect it between the DC positive [I+] and Negative [I-
] lines at the connector block.
Grey (-) Yellow (S)
Brown (+) Grey (-) Yellow (S)
IP0011-12 Installation Procedure
Issue Date – 07/06/2012
Confidential
Page 25
Renewable Devices Ltd: www.renewabledevices.com
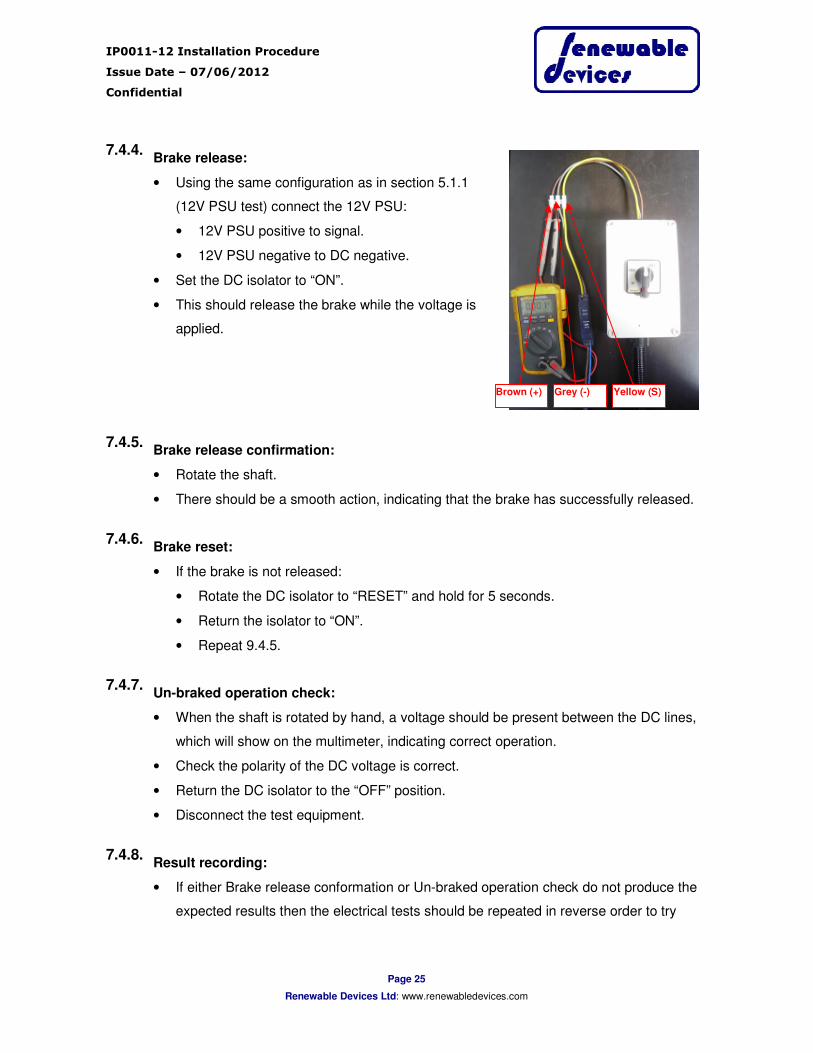
7.4.4.
Brake release:
• Using the same configuration as in section 5.1.1
(12V PSU test) connect the 12V PSU:
• 12V PSU positive to signal.
• 12V PSU negative to DC negative.
• Set the DC isolator to “ON”.
• This should release the brake while the voltage is
applied.
7.4.5.
Brake release confirmation:
• Rotate the shaft.
• There should be a smooth action, indicating that the brake has successfully released.
7.4.6.
Brake reset:
• If the brake is not released:
• Rotate the DC isolator to “RESET” and hold for 5 seconds.
• Return the isolator to “ON”.
• Repeat 9.4.5.
7.4.7.
Un-braked operation check:
• When the shaft is rotated by hand, a voltage should be present between the DC lines,
which will show on the multimeter, indicating correct operation.
• Check the polarity of the DC voltage is correct.
• Return the DC isolator to the “OFF” position.
• Disconnect the test equipment.
7.4.8.
Result recording:
• If either Brake release conformation or Un-braked operation check do not produce the
expected results then the electrical tests should be repeated in reverse order to try
Brown (+) Grey (-) Yellow (S)

IP0011-12 Installation Procedure
Issue Date – 07/06/2012
Confidential
Page 26
Renewable Devices Ltd: www.renewabledevices.com
and determine the location of the installation fault and remedial action taken as
necessary.
• Record the results of the test (Test E3) on the commissioning certificate ID0019.

IP0011-12 Installation Procedure
Issue Date – 07/06/2012
Confidential
Page 27
Renewable Devices Ltd: www.renewabledevices.com
8. Grid Tie Inverter – Mounting and DC Connection
Notes:
• This manual is intended to supplement the Kaco Powador 2002 User & Installation manual
supplied with the inverter only, NOT replace it.
• Read the complete Powador 2002 manual before installing the inverter.
• Mount the inverter in accordance with the Powador 2002 manual.
8.1. Mounting
Notes:
• The procedure to install the inverter is described in section 7 of the Kaco Powador 2002
manual.
• The exact position of the inverter should be discussed with the customer and must comply
with the recommendations made in section 7.1 of the Powador 2002 manual. Consideration
should also be made to accessibility for service.
8.2. Inverter Connections to the DC Isolator
Notes:
• Unless otherwise specified cable used should be of the same CSA as used for the run between
the Turbine and DC isolator as specified in SC0016 sheet 8.
• If the printed markings on the switch are different to those indicated here, contact Renewable
Devices before proceeding.

IP0011-12 Installation Procedure
Issue Date – 07/06/2012
Confidential
Page 28
Renewable Devices Ltd: www.renewabledevices.com
8.2.1.
• Ensure that the top side of the isolator, which has the T+ and I+ terminals, is wired as
indicated:
o T+ (turbine positive) to the turbine DC positive
o TS (turbine signal) to the turbine signal
o T- (turbine negative) to the turbine DC negative
• Make a connection between:
o I+ (inverter positive) and the Kaco’s lower DC + terminal with brown cable
8.2.2.
• On the bottom side of the isolator make connections between:
o IS (inverter signal) to the right “ERR” terminal in the Kaco using 1.5mm² yellow
cable and the supplied connector.
o I- (inverter negative) to the Kaco’s lower “DC –“ terminal with grey cable
IP0011-12 Installation Procedure
Issue Date – 07/06/2012
Confidential
Page 29
Renewable Devices Ltd: www.renewabledevices.com
9. Grid Tie Inverter – AC Connection
Notes:
• Before the AC connections are made, the DC tests described in section 7 must be
completed.
• All connections should be made in accordance with the Kaco Powador 2002 User &
Installation manual with the exception of the AC isolator as specified in section 9.1; this
must be installed in addition to any other connection requirements specified by the
Powador 2002 manual or local wiring regulations.
• The AC connections must be made and tested by a qualified electrician.
• The AC connections must be made as shown in sheets 8 and 9 of SC0016.
AC wiring must be rated for normal 240V AC operation.
AC conductors must be rated for 10A rms and not less than 1.5 mm² CSA.
IMPORTANT!! AC conductors to be sized for maximum 4% voltage drop. Most cable suppliers can
provide look up tables to allow cables to be sized correctly.
Circuit protective conductor to be “high integrity” as per BS7671, section 607-02-04(i) (17th Edition)

IP0011-12 Installation Procedure
Issue Date – 07/06/2012
Confidential
Page 30
Renewable Devices Ltd: www.renewabledevices.com
9.1. AC Isolator Installation
Notes:
• The AC isolator also houses the 12V PSU used during the previous tests.
• Connection from the AC isolator to the grid/distribution board should only be competed
once the DC Connections have been made, and is described in section 10.
9.1.1.
• Mount the AC Isolator on the wall.
9.1.2.
• Mount the 12V PSU on the Din rail to the right of the
isolator.
• Make connections from the inverter side of the isolator
to the PSU according to sheet 9 of SC0016 using
1.5mm2 appropriately coloured cables.
9.1.3.
• Connect the isolator to the AC connections of the
inverter according to sheet 9 of SC0016
• Connect the PSU DC negative to the top inverter DC
Negative terminal using 1.5mm2 grey cable.
• Connect the PSU DC positive to the left Inverter “ERR”
terminal using 1.5mm2 yellow cable and the supplied
connector.

IP0011-12 Installation Procedure
Issue Date – 07/06/2012
Confidential
Page 31
Renewable Devices Ltd: www.renewabledevices.com
9.2. Inverter Test (Test E4)
Notes:
• Ensure that the DC isolator is in the OFF position.
• From powering on the inverter for the first time the installer has ten minutes to change the
country and language settings before these are locked. The Powador 2002 manual must
be referred to and followed to ensure correct inverter installation and configuration.
9.2.1.
• Follow the instructions in section 7.8.2 of the Powador 2002 manual, but with the DC
isolator in the OFF position. .
• Check that the OK light comes on as soon as the inverter is connected to the grid.
9.2.2.
• Enter the country and language settings as described in section 7.8.2 of the the
Powador 2002 manual (default is German).
9.2.3.
• After several minutes, check that the grid connection indicator is green (as shown in
section 7.8.3).
9.2.4.
• Press keys 1 and 2 simultaneously as explained in section 8.3 of the Powador 2002
manual and write down the DSP and MC software versions in ID0019.
• If all of the electrical tests have been passed, the electrical section of the
commissioning sheet can now be signed off.

IP0011-12 Installation Procedure
Issue Date – 07/06/2012
Confidential
Page 32
Renewable Devices Ltd: www.renewabledevices.com
10. Fitting of Rotor and Nose Cone
Notes:
• Lock the DC isolator in the OFF position while installing the rotor and nosecone.
• See sheets 1 and 10 of SC0016 for the assembly method and tightening torques for the
rotor.
• Do not install the rotor and nosecone until all of the electrical connections and tests are
completed and signed off.
With the brake released, the rotor can spin-up freely and may generate up to 400V across the DC
lines. This can present a safety risk during connection as well as a risk of equipment damage if
the lines are shorted.
10.1.1.
• Place the key into the slot on the shaft of the nacelle and tap it into place gently.
• Lift the rotor on to the shaft (make sure the taper of the hole on the shaft adapter
matches the taper of the shaft) and push into place.
• Fit the M30 washer and Staytite nut and tighten to the torque shown on sheet 1 of
SC0016.
• Once the Staytite nut has been tightened to the required torque check that the key
cannot be seen protruding from the nacelle side of the rotor and that the rotor is
securely mounted on the shaft.
10.1.2.
• Fit the nose cone by clipping it over the front of the rotor.
• Excessive force will break the clips; it should be gently pushed over the roots of the
blades.
10.1.3.
• Sign off the rotor installation section of the commissioning sheet ID0019.

IP0011-12 Installation Procedure
Issue Date – 07/06/2012
Confidential
Page 33
Renewable Devices Ltd: www.renewabledevices.com
11. Commissioning and Handover
Notes:
• The warranty for the turbine is not valid unless the commissioning sheet ID0019 has been
completed correctly and returned.
11.1.1.
• Switch the DC isolator to the BRAKE and then the ON position.
11.1.2.
• See the Owners Manual PD0017 for a description of the functioning of the turbine
and inverter.
• If the wind is sufficient for the turbine to generate, check power generation.
11.1.3.
• Explain the functioning of the turbine to the customer.
• Hand over the Owners Manual PD0017 to the customer.
• Hand over the Kaco Powador 2002 User & Installation manual to the customer.
11.1.4.
• Ensure that the commissioning sheet ID0019 is complete.
• Complete the SSEG commissioning sheet and return this to the DNO and Renewable
Devices.
• Return a copy of the commissioning sheet ID0019 to Renewable Devices.

IP0011-12 Installation Procedure
Issue Date – 07/06/2012
Confidential
Page 34
Renewable Devices Ltd: www.renewabledevices.com
12. Appendix A Tools and Consumables
This list is not exhaustive. Common tools found in an electrical and general tool kit will be required.

IP0011-12 Installation Procedure
Issue Date – 07/06/2012
Confidential
Page 35
Renewable Devices Ltd: www.renewabledevices.com
TOOL TASK
General Tools listed in sheet 1 of SC0016. All aspects of turbine
installation
Torque wrenches, range 5-40Nm All aspects of turbine
installation
Slings > 2 tonne, shackles, rope and other
lifting equipment as required Lifting pole and nacelle
Full range of allen hex key and hex socket
adapter for use with torque wrench
All aspects of turbine
installation
Full range of ring spanners All aspects of turbine
installation
Brackets Mobile pull tester rated to 13kN e.g. Hydra –
jaws Pull testing resin anchors
Fischer resin gun Resin anchors
Laser level; chalk line; spirit level Vertical alignment
18.5mm HSS metal drill bit SWA cable gland
M20 x 1.5 hand tap Armoured cable gland
M16 & M14 masonry drill bit and hammer drill
(>300mm) Resin anchors
Electrical Extra long 16 to 20 mm masonry drill bit Armoured cable (15mm
OD) through walls
Electrical screwdrivers; wire strippers; crimping
tools. Electrical installation
2mm, 2.5mm Allen hex key panel on inverter
Fluke multimeter and spare battery Electrical tests
Socket and lead Electrical tests
Rotor & Nose Cone 46mm socket or ring spanner M30 Staytite shaft nut
Torque wrench capable of 250 Nm M30 Staytite shaft nut
2 x padlock Lock off isolators

IP0011-12 Installation Procedure
Issue Date – 07/06/2012
Confidential
Page 36
Renewable Devices Ltd: www.renewabledevices.com
12.1. Appendix B Consumable Items / Spares
PART USE
General Loctite threadlock medium strength: 243
Threadlocking fixings
during external
installation
Brackets and Pole Fischer A4 RGM M12 nominal length 300mm
SS studding anchors x 8 Bracket
M12 A4 SS nuts and washers (usually
provided with anchors) x 8 Bracket
Fischer FIS V 360 S resin Bracket
Nozzle for Fischer resin tubes and nozzle
extenders Bracket
16mm Mesh sleeve for Fischer resin fixing x 8 Bracket
Electrical 1.5 mm2 Brown tri-rated cable L+ in DC wiring
1.5 mm2 Grey tri-rated cable L- in DC wiring
1.5 mm2 Yellow tri-rated cable Signal in DC wiring
2.5 mm2 Brown tri-rated cable T+ in DC wiring
2.5 mm2 Grey tri-rated cable T- in DC wiring
2.5 mm2 Yellow tri-rated cable Signal in DC wiring
4mm2 earth cable All earth wiring
3 core (Brown/Grey/Black) steel wire armour
sized per sheet 5 of SC0016. Use harmonised
3 phase wire
Mounting mast to DC
Isolator wiring
Brown, grey, yellow and green/yellow
Insulation tape. General wiring
Two M20 Steel wire armour glands suitable for
above SWA (CW 20S) Mast wiring
Range of crimps and banjos Earthing connections
(mast & DC isolator.)
M6 nuts and bolts Mast earthing connection

IP0011-12 Installation Procedure
Issue Date – 07/06/2012
Confidential
Page 37
Renewable Devices Ltd: www.renewabledevices.com
White flexible conduit and M20 glands e.g.
Kopex or similar All non-SWA wiring
Appropriate wall fixings (screws and rawl-plugs
etc) Wall fixing of inverter
MCB type C10 AC wiring

IP0011-12 Installation Procedure
Issue Date – 07/06/2012
Confidential
Page 38
Renewable Devices Ltd: www.renewabledevices.com
13. Appendix C Swift Inverter
The Swift inverter uses bespoke efficient control algorithms to enhance the safety and
performance of the turbine. The following Appendix gives an overview of the installation process
for the SWIFT inverter installation which differs slightly from the Kaco installation above. This
appendix is only for the use of turbines supplied with a grey/white inverter marked with the word
with SWIFT written in Bold and provides edits for this inverter type only. Please note that the
SWIFT inverter has a built in 12v signal line removing the need for the external signal power
supply. It is also recommended to install a din mounted timer within the ac isolator box or on the
distribution board in order to switch off the system for between 1 second and 5 minutes daily. This
will reboot the control algorithm and optimise the performance of the turbine. For areas of high
turbulence the daily system reboot will prevent system safety shutdown. All other installation
processes must be used in conjunction with this manual. The drawing SC0016 – Wall Mounted
Installation Drawing gives an overview of the components of the turbine and how it is installed.
Unless otherwise agreed in writing with Renewable Devices , all aspects of the Swift inverter
installation must conform to this appendix first, then to SC0016 and this installation procedure. All
sections and tests in the main body of the install procedure must be completed unless specifically
replaced by a Swift test procedure within this appendix.
13.1. Swift Inverter – Mast Cable Connector
At the base of the mast, connect the mast cable to the connector block (part number 150 0016) as
shown on sheet 9 of SC0016, ensuring that there is at least 300mm cable spare.
13.2. Swift Inverter – Brake Release & DC Voltage Test (Test E1)
This test must be carried out with the nacelle and mast cable installed and before the SWA is
connected to the connector block. See sheet 6 of SC0016 for the test set up. The Swift Inverter
provides its own signal so the additional power supply (PSU) is not necessary for these
installations and the signal line comes directly from the S+ in the inverter.
1. Rotate shaft of the turbine clockwise. The shaft should rotate with a pulsed resistance,
confirming that the brake is applied.
2. Set a multimeter to read DC voltage and connect it between the DC positive 2 [L+] (brown) and
negative 1 [L-] lines (grey) at the connector block as shown in sheet 6 of SC0016. Using a 12V
IP0011-12 Installation Procedure
Issue Date – 07/06/2012
Confidential
Page 39
Renewable Devices Ltd: www.renewabledevices.com
battery or 12V regulated PSU, apply 12V DC using between the DC negative 1 [L-] (grey) and
signal line 3 [S] (Yellow). It is advisable to have short lengths of cable suitably terminated for
connecting the chosen power supply to the terminal block prepared for this test. This should
release the brake while the voltage is applied. Rotate the shaft. There should be a smooth action,
indicating that the brake has successfully released.
3. If the brake is not released, connect the positive power supply terminal to cable 1 [L-] (grey) and
the negative supply terminal to cable 3 [S] (yellow) and then hold for thirty seconds to reset the
brake. Reapply 12V DC between the DC negative 1 [L-] (grey) and signal line 3 [S] (yellow).
4. When the shaft is rotated by hand, a voltage should be present between the DC lines, which will
show on the multimeter, indicating correct operation. Check the polarity of the DC
voltage is in accordance with the wiring numbers/names as shown in drawing SC0016 sheet 6.
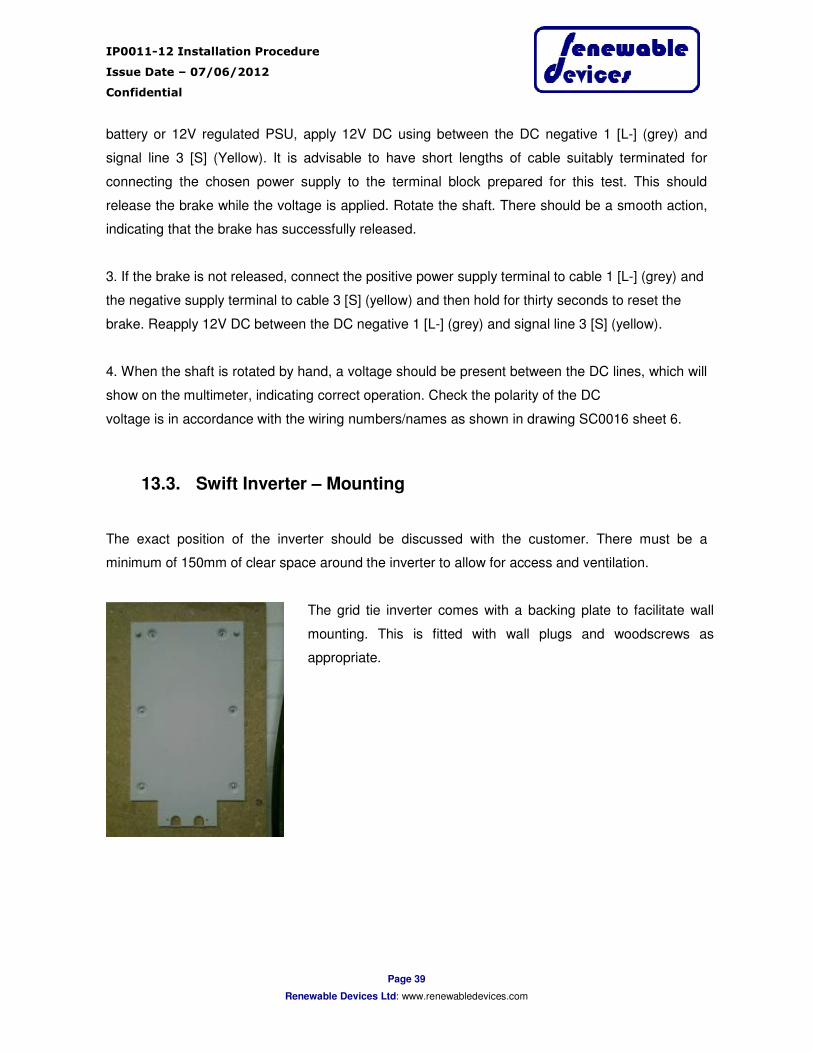
13.3. Swift Inverter – Mounting
The exact position of the inverter should be discussed with the customer. There must be a
minimum of 150mm of clear space around the inverter to allow for access and ventilation.
The grid tie inverter comes with a backing plate to facilitate wall
mounting. This is fitted with wall plugs and woodscrews as
appropriate.

IP0011-12 Installation Procedure
Issue Date – 07/06/2012
Confidential
Page 40
Renewable Devices Ltd: www.renewabledevices.com
Once the backing plate is attached the inverter can be mounted by
fitting the slots in the back face of the casing over the tabs.
Drop out the base plate of the inverter by unscrewing the 5 screws
shown.
With the base plate unscrewed, the terminals are accessible.
13.4. Swift Inverter – Continuity Testing – DC (Test E2)
This test must be carried out
with the wiring from the DC isolator to the nacelle complete
without the wiring to the inverter connected
with the DC isolator in the OFF position.
This test MUST be carried out before the connection is made to the inverter. A short circuit in the
DC wires can cause permanent damage to the inverter or electronics in the nacelle.
DO NOT use a megger tester for this test as it will damage the turbine electronics.

IP0011-12 Installation Procedure
Issue Date – 07/06/2012
Confidential
Page 41
Renewable Devices Ltd: www.renewabledevices.com
Using a multimeter, check the resistance across the four DC wires (L+, L-, Signal and Earth) on
the turbine side of the DC isolator.
There should be no continuity between any pair of wires. The resistance value seen on the
multimeter may not be stable, but in all cases should be greater than 0.7MΩ.
Record the results of the test (Test E2) on the commissioning certificate ID0001.
13.5. Swift Inverter –DC Isolator Switch Function Test (Test E3)
Check the following connections across the DC isolator to ensure that it has been wired correctly.
This test must be carried out before the DC wiring is connected to the inverter.
Position Turbine side Inverter side Requirement
Off
TS Yellow IS Yellow Open Loop
T- Grey I- Grey Open Loop
T+ Brown I+ Brown Open Loop
On
TS Yellow IS Yellow Closed Loop
T- Grey I- Grey Closed Loop
T+ Brown I+ Brown Closed Loop
Brake
TS Yellow IS Yellow Open Loop
T- Grey I- Grey Closed Loop
T+ Brown I+ Brown Closed Loop
Reset
TS Yellow IS Yellow Open Loop
T- Grey I- Grey Open Loop
T+ Brown I+ Brown Open Loop
TS Yellow I- Grey Closed Loop
T- Grey IS Yellow Closed Loop
Enter the results of the test in the commissioning sheet ID0001. Sign off the DC installation section
of the commissioning sheet ID0001.

IP0011-12 Installation Procedure
Issue Date – 07/06/2012
Confidential
Page 42
Renewable Devices Ltd: www.renewabledevices.com
13.6. Swift Inverter – Connections to the DC Isolator
The Swift Inverter provides its own signal so the additional power supply is not necessary for these
installations and the signal line comes directly from the S+ in the inverter. Connect the SWA to the
inverter side of the DC isolator switch as shown. Complete the connection of the earth cable
through the DC isolator switch.
Top side
Ensure that the top side of the switch, which has the T+ and I+
terminals, is wired as shown.
I+ Inverter positive To inverter side
T+ Turbine positive
To turbine side TS Turbine signal
T- Turbine negative
Bottom side
Ensure that the bottom side of the switch is wired as shown.
IS Inverter signal To inverter side
I- Inverter negative
N.B. If the printed markings on the switch are different to those
shown here, contact Renewable Devices before proceeding.
Wire the inverter as shown using appropriate glands and ferrules.
(Ensure that the DC wiring tests E2 and E3 have been completed).
From DC isolator Inverter terminal
Black + yellow sleeve (IS) S+
Earth If applicable
Grey (I-) -
Brown (I+) +
Grey (I-)
Yellow (IS)
Brown (T+)
Grey (T-) Yellow (TS)
Brown (I+)

IP0011-12 Installation Procedure
Issue Date – 07/06/2012
Confidential
Page 43
Renewable Devices Ltd: www.renewabledevices.com
13.7. Swift Inverter – Wireing & Earthing
See sheet 8 of SC0016 for a full earthing schematic.
Connect a 2.5mm² earth cable to the banjo for the SWA cable. Run
this earth to the a secure earth point as shown in sheet 8 of
SC0016.
One of the following earth options must be implemented.
Minimum 10mm² earth from the mast to the building earth.
OR
A 4mm² earth in conduit from the DC isolator to a secure earth
point. (For this option the armour of the SWA or 2 x 4mm² must be
used as the earth connection between the mast and DC isolator).
Before the AC connections are made, the DC tests described in section 7 must be completed. The
Swift Inverter provides its own signal so the additional power supply is not necessary for these
installations and the signal line comes directly from the S+ in the inverter.
The AC connections must be made and tested by a qualified electrician. It is recommended to
install a timer switch to the ac positive to turn the system off daily for a period of at least 1 second.
This power cycle resets the control algorithms and optimises the performance of the turbine. A
DIN mounted timer can be mounted within the AC isolator or on the distribution board.
The AC connections must be made as shown in sheet 8 of SC0016.
AC wiring to be rated for normal 240V AC operation
AC conductors to be rated for 10A rms and not less than 1.5 mm² CSA
IMPORTANT!! AC conductors to be sized for maximum 4% voltage drop. Most cable suppliers can
provide look up tables to allow cables to be sized correctly.
Circuit Protective Conductor to be “high integrity” as per BS7671, section 607-02-04(i) (17th
Edition)
Earth
Grey (-)
Yellow (S)
Brown (+)
IP0011-12 Installation Procedure
Issue Date – 07/06/2012
Confidential
Page 44
Renewable Devices Ltd: www.renewabledevices.com
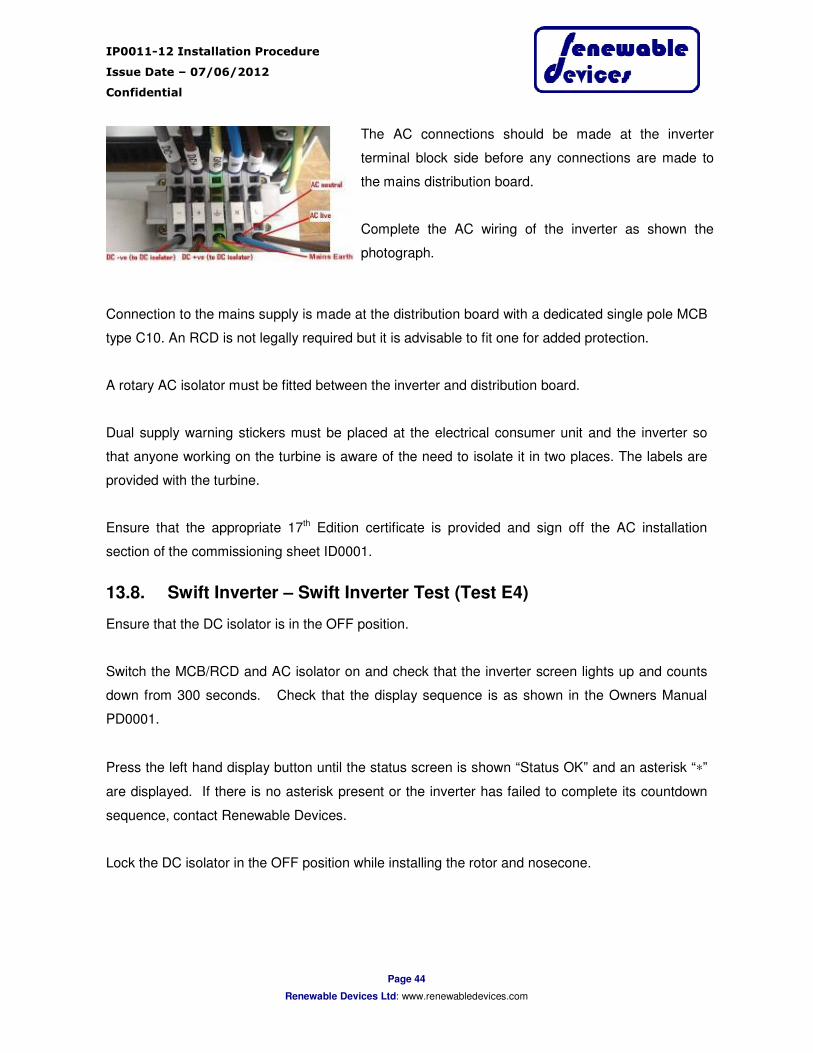
The AC connections should be made at the inverter
terminal block side before any connections are made to
the mains distribution board.
Complete the AC wiring of the inverter as shown the
photograph.
Connection to the mains supply is made at the distribution board with a dedicated single pole MCB
type C10. An RCD is not legally required but it is advisable to fit one for added protection.
A rotary AC isolator must be fitted between the inverter and distribution board.
Dual supply warning stickers must be placed at the electrical consumer unit and the inverter so
that anyone working on the turbine is aware of the need to isolate it in two places. The labels are
provided with the turbine.
Ensure that the appropriate 17th Edition certificate is provided and sign off the AC installation
section of the commissioning sheet ID0001.
13.8. Swift Inverter – Swift Inverter Test (Test E4)
Ensure that the DC isolator is in the OFF position.
Switch the MCB/RCD and AC isolator on and check that the inverter screen lights up and counts
down from 300 seconds. Check that the display sequence is as shown in the Owners Manual
PD0001.
Press the left hand display button until the status screen is shown “Status OK” and an asterisk “∗”
are displayed. If there is no asterisk present or the inverter has failed to complete its countdown
sequence, contact Renewable Devices.
Lock the DC isolator in the OFF position while installing the rotor and nosecone.

IP0011-12 Installation Procedure
Issue Date – 07/06/2012
Confidential
Page 45
Renewable Devices Ltd: www.renewabledevices.com
14. Appendix D Wooden Pole Installation

IP0011-12 Installation Procedure
Issue Date – 07/06/2012
Confidential
Page 46
Renewable Devices Ltd: www.renewabledevices.com
15. The drawing SC0018 within Appendix F Installation
Certificate ID0019-01
Complete one certificate per turbine and return to Renewable Devices Ltd within 28 days of
commissioning. Incomplete or absent Installation Certificates will void the manufacturers
warrantee. The installer is responsible for ensuring that the most up to date installation specification
is used.

IP0011-12 Installation Procedure
Issue Date – 07/06/2012
Confidential
Page 47
Renewable Devices Ltd: www.renewabledevices.com
Install
Manual
Section
Results Signature
INSTALLATION SITE DETAILS
Contact name:
Address:
Phone number:
INSTALLER
Contact name:
Address:
Phone number:
3 SITE SURVEY
Site survey reference number:
Site survey approved by
Renewable Devices? YES / NO
Site survey read and
understood by installer?
Turbine installed as
detailed in site survey?
YES / NO
5 GOODS RECEIVED I confirm that all goods were inspected on arrival
and deemed in good condition.
4 SERIAL NUMBERS
Turbine number
Rotor
Nacelle
Fins and Booms
Inverter
6 MOUNTING SYSTEM Mast / Flat Roof Stand / Stand Alone Mast
6.2
TEST M1
HYDRAULIC LOAD TEST
RESULTS TO BS 5080-1
All studs tested to 13kN ACCEPTABLE / NOT
ACCEPTABLE
6 MOUNTING SYSTEM
I confirm that the mounting system has been
installed and tested according to Renewable
Devices Installation Manual.

IP0011-12 Installation Procedure
Issue Date – 07/06/2012
Confidential
Page 48
Renewable Devices Ltd: www.renewabledevices.com
7,8 NACELLE, FINS, BOOMS
I confirm that the nacelle, fins and booms have
been installed and tested according to Renewable
Devices drawing number SC0016 and the
Installation Manual IP0001.
5.1
TEST E1
ELECTRICAL COMPONENT
CHECK
12V PSU Functioning OK YES / NO
Brake Release OK YES / NO
DC Voltage generated YES / NO
9.1 STEEL WIRE ARMOUR CABLE
DETAILS
SWA length in metres
SWA cable size in mm²
9.2 TEST E2
DC WIRING CHECK
Min
reading L+ L- LS
Earth MΩ MΩ MΩ
LS MΩ MΩ
L- MΩ
Acceptable / Not Acceptable
9.3 TEST E3
DC ISOLATOR CHECK
Turbine
side
Inverter
site
Open/
Closed
Loop
Actual
Off
TS IS O
T- I- O
T+ I+ O
On
TS IS C
T- I- C
T+ I+ C
Brake
TS IS O
T- I- C
T+ I+ C
Reset
TS IS O
T- I- O
T+ I+ O
TS I- C
T- IS C
Acceptable / Not Acceptable
9.4 TEST E4
DC Installation Test
12V PSU Functioning OK YES / NO
Brake Release OK YES / NO
DC Voltage generated YES / NO

IP0011-12 Installation Procedure
Issue Date – 07/06/2012
Confidential
Page 49
Renewable Devices Ltd: www.renewabledevices.com
9.1 DC ISOLATOR LOCATION
8, 9 DC WIRING INSTALLATION
I confirm that Earth and DC wiring have been
installed according to Renewable Devices drawing
number SC0016 and the Installation Manual IP0001.
11 AC WIRING
I attach a copy of the AC wiring test certificate.
I confirm that the AC wiring has been installed
according to Renewable Devices drawing number
SC0016 and the Installation Manual IP0001.
11.1 INVERTER TEST
Switch on and
countdown ok YES / NO
Code version
11 INVERTER INSTALLATION
I confirm that the inverter has been installed
according to Renewable Devices drawing number
SC0016 and the Installation Manual IP0001.
12 ROTOR
I confirm that the rotor has been installed according
to Renewable Devices drawing number SC0016
and the Installation Manual IP0001.
13 TURBINE FUNCTION
NOTE: the turbine is only deemed to have been fully
installed once the total energy generated has been
seen to increase from the initial value.
Was the turbine
observed generating
power on day of install
(depends on wind
availability)?
YES / NO
Initial kWh reading Date
Second kWh reading Date
13 HANDOVER
SSEG sheet sent to DNO,
and copy attached? YES / NO
Owners Manual to
customer? YES / NO
DECLARATION

IP0011-12 Installation Procedure
Issue Date – 07/06/2012
Confidential
Page 50
Renewable Devices Ltd: www.renewabledevices.com
I/we, being the person(s) responsible for the installation of the SWIFT™ Rooftop Wind Energy System(s) noted above,
hereby CERTIFY that I/we have been trained and authorised by Renewable Devices Ltd to carry out this work, and
that the installation and commissioning has been carried out in complete compliance with the most recent SWIFT™
installation specification as issued by Renewable Devices Ltd, and all appropriate Health & Safety legislation.
I hereby CERTIFY that all of the tests detailed in the SWIFT installation specification have been carried out, that the
above tests were carried out by me, and that the results are as shown above.
I hereby CERTIFY that the G83/1 SSEC Installation Commissioning Confirmation has been completed and submitted
to the DNO. Attach a copy of the SSEG Installation Commissioning Confirmation to this document when returning to
Renewable Devices Ltd.
NAME (Please print full name)
SIGNATURE
COMPANY/CONTRACTOR
INSTALLATION DATE
Return to Installer Returns; Renewable Devices Ltd; SAC Bush Estate
Edinburgh EH26 0PH within 28 days of commissioning.
Appendix G SC0016, SC0018 & Technical Drawings – Wooden Pole Mounted Installation Drawing
gives an overview of the components of the turbine and how it is installed. Unless otherwise
agreed in writing with Renewable Devices , all aspects of the installation must conform to this
appendix, SC0018 and then to the installation procedures above. All sections and tests in the
main body of the install procedure must be completed unless specifically replaced by an
alternative test procedure within this appendix
IP0011-12 Installation Procedure
Issue Date – 07/06/2012
Confidential
Page 51
Renewable Devices Ltd: www.renewabledevices.com
The wooden pole should be delivered to site with the steel adaptor in place as shown in SC0018
sheet 2. Two levelling blocks are attached near the base of the pole which are pre-set during
manufacture to be aligned with the metal adapter. Before proceeding with the installation, check
that the metal adaptor is correctly aligned to the wooden pole using these levelling points.
The recommended method of carrying out a wooden pole installation is to assemble and test the
turbine with the pole in the horizontal position and then to lift it into the vertical position. If it is not
possible to carry out the installation in this way, then suitable access and lifting equipment will be
required and the turbine assembled on to the vertical pole.
The pole is planted into a hole to the dimensions shown on drawing SC0018 sheet 11. This hole is
normally made using a truck mounted auger.
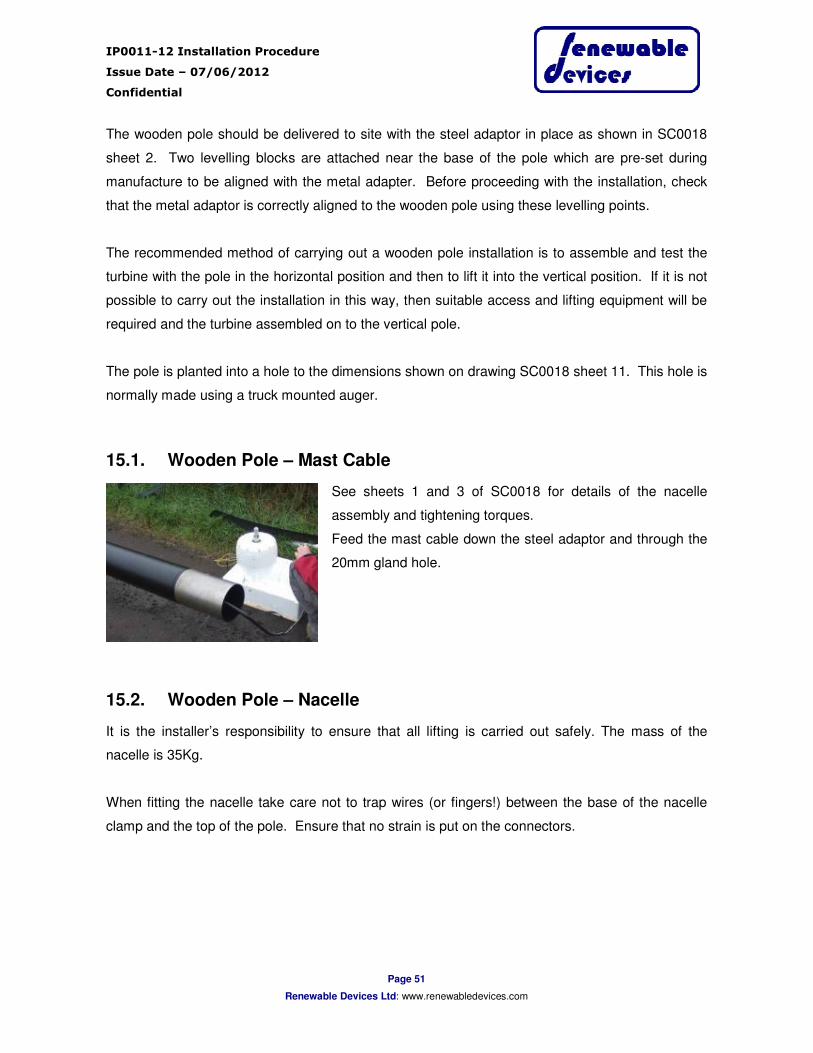
15.1. Wooden Pole – Mast Cable
See sheets 1 and 3 of SC0018 for details of the nacelle
assembly and tightening torques.
Feed the mast cable down the steel adaptor and through the
20mm gland hole.
15.2. Wooden Pole – Nacelle
It is the installer’s responsibility to ensure that all lifting is carried out safely. The mass of the
nacelle is 35Kg.
When fitting the nacelle take care not to trap wires (or fingers!) between the base of the nacelle
clamp and the top of the pole. Ensure that no strain is put on the connectors.

IP0011-12 Installation Procedure
Issue Date – 07/06/2012
Confidential
Page 52
Renewable Devices Ltd: www.renewabledevices.com
Swivel the narrow base of the nacelle so the pre-drilled hole
in the metal pole is visible through the clamp and, using
threadlock, fit the M10x20 retaining bolt.
The nacelle clamp should then be attached using threadlock
and the 8 M6x40 capscrews. Tighten all bolts lightly at first so
that there is an even spacing on both sides of the nacelle
clamp. Remember to apply threadlock to all the bolts and to
observe the correct torque sequence as illustrated on sheet 3
of SC0018.
15.3. Wooden Pole – Cable & Earth
Leave approx 0.5m of cable spare in the steel adaptor. Fit
and tighten the 20mm gland. Use silicon sealant or another
suitable waterproof flange sealant.
Attach a 10mm2 earth to the designated earth point on the
steel adaptor using the nut and bolt as shown on sheet 4 of
drawing SC0018. Cut the earth to 1m longer than the pole.
Run the earth and mast cable down the pole in 20mm PVC
conduit, secured with pipe clamps at 0.5m intervals. Leave
0.5m cable free to loop into the junction box.
Continue the 10mm2 earth down the pole, attaching the cable
with brass staples at 0.5m intervals.

IP0011-12 Installation Procedure
Issue Date – 07/06/2012
Confidential
Page 53
Renewable Devices Ltd: www.renewabledevices.com
Strip back insulation on the bottom 2m of earth cable free of
insulation. Coil the excess cable at the base of the pole and
attach with staples.
Attach the junction box.
Terminate the mast cable using a 20mm IP68 rated gland at
the junction box. Glands must be on the underside of the
junction box.
15.4. Wooden Pole – Brake Release and DC Voltage Test (Test E1)
This test must be carried out with the nacelle and mast cable installed and before the SWA is
connected to the junction box on the wooden pole. See sheet 5 of SC0018 for a diagram of the
test set up.
Rotate the shaft of the turbine clockwise. The shaft should rotate with a pulsed resistance,
confirming that the brake is applied.
Set a multimeter to read DC voltage and connect it between the DC positive 2 [L+] and negative 1
[L-] lines at the junction box. Using a 12V battery or 12V regulated PSU, apply 12V DC between
the DC negative 1 [L-] and signal line 3 [S]. It is advisable to have short lengths of cable suitably
terminated for connecting the chosen power supply to the terminal block prepared for this test.
Check that the brake releases while the voltage is applied. Rotate the shaft. There should be a
smooth action, indicating that the brake has successfully released.
If the brake is not released, connect the positive power supply terminal to cable 1 [L-] and the
negative supply terminal to cable 3 [S] and then hold for thirty seconds to reset the brake. Reapply
12V DC between the DC negative 1 [L-] and signal line 3 [S].

IP0011-12 Installation Procedure
Issue Date – 07/06/2012
Confidential
Page 54
Renewable Devices Ltd: www.renewabledevices.com
When the shaft is rotated by hand, a voltage should be present between the DC lines, which will
show on the multimeter, indicating correct operation. Check polarity of DC voltage is in
accordance with the wiring numbers/names as shown in drawing SC0018 sheet 5.
15.5. Wooden Pole – DC Connections
See sheet 7 of SC0018 for an overview of the DC wiring.
• All DC wiring to be rated minimum 1000V DC to earth and rated minimum 10A
• All DC conductors to be a minimum of 2.5mm² CSA
Due to possible high earth leakage of between 10 and 20 mA, min 4mm2 earth cable must be used
in conduit throughout the installation. (The mast cable supplied does not have a 4mm2 earth as the
nacelle is also earthed mechanically through the clamp to the 10 mm2 mast earth).
Armoured cable should be run between the junction box on the wooden pole and the DC Isolator.
Use 3 core SWA, using the armour as earth. Allow excess cable to allow for manoeuvring the mast
into place after assembly of the turbine. The cable sizing is shown on sheet 7 of SC0018.
Strip back the sheath and armour so that there is sufficient length for the cores to be connected at
the junction box. Fit a CWS gland and connect the armour to the earth from the mast cable using
earth link wire. Connect the cores of the SWA cable to the junction box as shown in sheet 8 of
SC0018. Note SWA has the correct colours for DC wiring harmonised regulations: The black
core should be taped or heat-shrunk in yellow at both ends to indicate that it is the signal cable.
The DC isolator is supplied with the Swift Turbine. This is a specially specified item and should not
be substituted with other isolators.

IP0011-12 Installation Procedure
Issue Date – 07/06/2012
Confidential
Page 55
Renewable Devices Ltd: www.renewabledevices.com
16. Appendix E SSEG Commissioning Sheet
SSEG INSTALLATION COMMISSIONING CONFIRMATION of a SSEG unit connected in parallel
with the public distribution Network – in accordance with Engineering Recommendation G83/1.
One Commissioning Pro-forma per installation is to be submitted to the DNO. A copy to be
retained by the Turbine owner

IP0011-12 Installation Procedure
Issue Date – 07/06/2012
Confidential
Page 56
Renewable Devices Ltd: www.renewabledevices.com
SSEG Commissioning Confirmation
SSEG INSTALLATION COMMISSIONING CONFIRMATION (G83/1 – Appendix 3)
SITE DETAILS Property address (inc. post code)
Telephone number
Customer supply number (MPAN)
Distribution Network Operator (DNO)
Contact Details
SSEG owner
Contact person
Contact telephone number
SSEG DETAILS
Manufacturer and model type Swift Turbine, Renewable Devices Ltd
Type of prime mover and fuel source Wind
Serial number / version numbers of Mark 2
software (where appropriate) Code: DSP 335A
SSEG rating (A) and power factor (under normal running conditions)
Amps 7.2 , Volts 230 and power factor ≥ 0.99 Or 1.65kW
Maximum peak short circuit current (A) 8A
Serial number of SSEG (Turbine Number)
Location of SSEG within the installation
Location of multi pole isolator

IP0011-12 Installation Procedure
Issue Date – 07/06/2012
Confidential
Page 57
Renewable Devices Ltd: www.renewabledevices.com
INSTALLER DETAILS
Installer
Accreditation/Qualification
Address (incl post code)
Contact person
Telephone Number
Fax Number
E-mail address
INFORMATION TO BE ENCLOSED
Final copy of circuit diagram
SSEG Test Report
Computer print out (where possible) or other schedule of protection settings
Electricity meter(s) make and model:
DECLARATION – TO BE COMPLETED BY INSTALLER
The SSEG installation complies with Engineering Recommendation G83/1. Yes/No
Protection settings comply with Engineering Recommendation G83/1. Yes/No
Protection settings are protected from alteration except by prior written agreement between the DNO and the Customer or his agent.
Yes/No
Safety labels have been fitted in accordance with section 6.2 of Engineering Recommendation G83/1.
Yes/No
The SSEG installation complies with BS7671 and an installation test certificate is attached.
Yes/No
Comments (continue on separate sheet if necessary)
Name: Signature: Date:

IP0011-12 Installation Procedure
Issue Date – 07/06/2012
Confidential
Page 58
Renewable Devices Ltd: www.renewabledevices.com

IP0011-12 Installation Procedure
Issue Date – 07/06/2012
Confidential
Page 59
Renewable Devices Ltd: www.renewabledevices.com

IP0011-12 Installation Procedure
Issue Date – 07/06/2012
Confidential
Page 60
Renewable Devices Ltd: www.renewabledevices.com

IP0011-12 Installation Procedure
Issue Date – 07/06/2012
Confidential
Page 61
Renewable Devices Ltd: www.renewabledevices.com
17. Appendix F Installation Certificate ID0019-01
Complete one certificate per turbine and return to Renewable Devices Ltd within 28 days of
commissioning. Incomplete or absent Installation Certificates will void the manufacturers
warrantee. The installer is responsible for ensuring that the most up to date installation specification
is used.

IP0011-12 Installation Procedure
Issue Date – 07/06/2012
Confidential
Page 62
Renewable Devices Ltd: www.renewabledevices.com
Install
Manual
Section
Results Signature
INSTALLATION SITE DETAILS
Contact name:
Address:
Phone number:
INSTALLER
Contact name:
Address:
Phone number:
3 SITE SURVEY
Site survey reference number:
Site survey approved by
Renewable Devices? YES / NO
Site survey read and
understood by installer?
Turbine installed as
detailed in site survey?
YES / NO
5 GOODS RECEIVED I confirm that all goods were inspected on arrival
and deemed in good condition.
4 SERIAL NUMBERS
Turbine number
Rotor
Nacelle
Fins and Booms
Inverter
6 MOUNTING SYSTEM Mast / Flat Roof Stand / Stand Alone Mast
6.2
TEST M1
HYDRAULIC LOAD TEST
RESULTS TO BS 5080-1
All studs tested to 13kN ACCEPTABLE / NOT
ACCEPTABLE
6 MOUNTING SYSTEM
I confirm that the mounting system has been
installed and tested according to Renewable
Devices Installation Manual.

IP0011-12 Installation Procedure
Issue Date – 07/06/2012
Confidential
Page 63
Renewable Devices Ltd: www.renewabledevices.com
7,8 NACELLE, FINS, BOOMS
I confirm that the nacelle, fins and booms have
been installed and tested according to Renewable
Devices drawing number SC0016 and the
Installation Manual IP0001.
5.1
TEST E1
ELECTRICAL COMPONENT
CHECK
12V PSU Functioning OK YES / NO
Brake Release OK YES / NO
DC Voltage generated YES / NO
9.1 STEEL WIRE ARMOUR CABLE
DETAILS
SWA length in metres
SWA cable size in mm²
9.2 TEST E2
DC WIRING CHECK
Min
reading L+ L- LS
Earth MΩ MΩ MΩ
LS MΩ MΩ
L- MΩ
Acceptable / Not Acceptable
9.3 TEST E3
DC ISOLATOR CHECK
Turbine
side
Inverter
site
Open/
Closed
Loop
Actual
Off
TS IS O
T- I- O
T+ I+ O
On
TS IS C
T- I- C
T+ I+ C
Brake
TS IS O
T- I- C
T+ I+ C
Reset
TS IS O
T- I- O
T+ I+ O
TS I- C
T- IS C
Acceptable / Not Acceptable
9.4 TEST E4
DC Installation Test
12V PSU Functioning OK YES / NO
Brake Release OK YES / NO
DC Voltage generated YES / NO
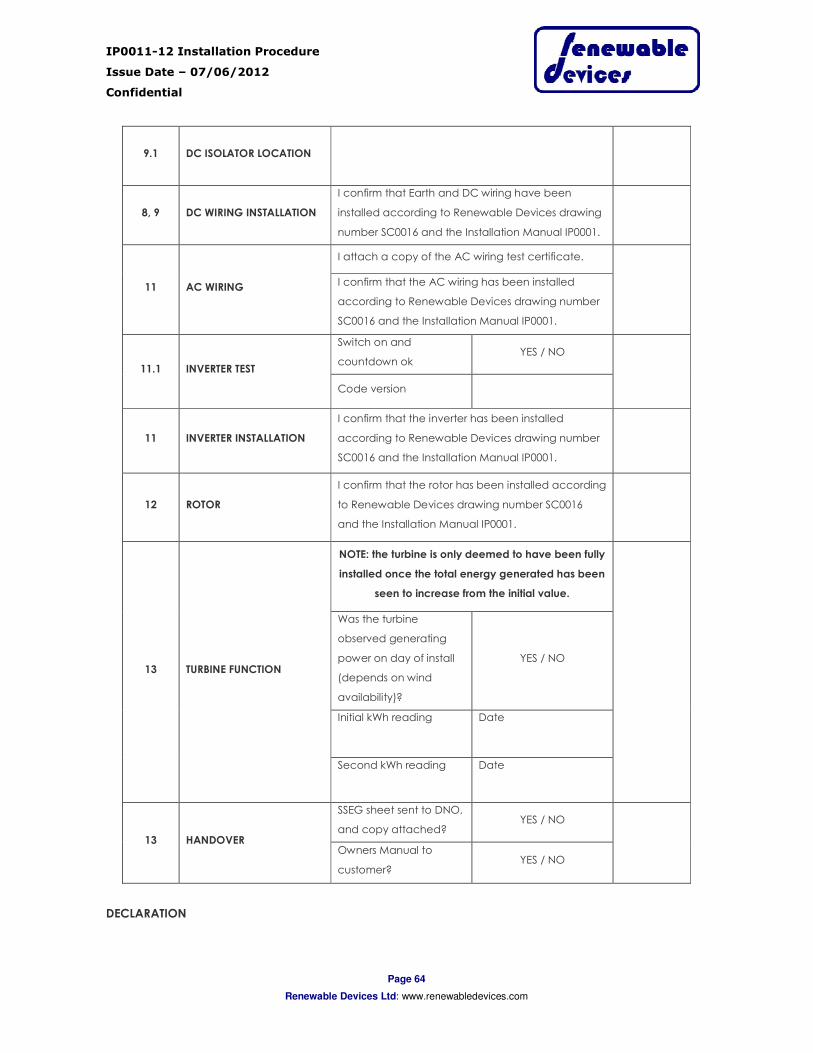
IP0011-12 Installation Procedure
Issue Date – 07/06/2012
Confidential
Page 64
Renewable Devices Ltd: www.renewabledevices.com
9.1 DC ISOLATOR LOCATION
8, 9 DC WIRING INSTALLATION
I confirm that Earth and DC wiring have been
installed according to Renewable Devices drawing
number SC0016 and the Installation Manual IP0001.
11 AC WIRING
I attach a copy of the AC wiring test certificate.
I confirm that the AC wiring has been installed
according to Renewable Devices drawing number
SC0016 and the Installation Manual IP0001.
11.1 INVERTER TEST
Switch on and
countdown ok YES / NO
Code version
11 INVERTER INSTALLATION
I confirm that the inverter has been installed
according to Renewable Devices drawing number
SC0016 and the Installation Manual IP0001.
12 ROTOR
I confirm that the rotor has been installed according
to Renewable Devices drawing number SC0016
and the Installation Manual IP0001.
13 TURBINE FUNCTION
NOTE: the turbine is only deemed to have been fully
installed once the total energy generated has been
seen to increase from the initial value.
Was the turbine
observed generating
power on day of install
(depends on wind
availability)?
YES / NO
Initial kWh reading Date
Second kWh reading Date
13 HANDOVER
SSEG sheet sent to DNO,
and copy attached? YES / NO
Owners Manual to
customer? YES / NO
DECLARATION
IP0011-12 Installation Procedure
Issue Date – 07/06/2012
Confidential
Page 65
Renewable Devices Ltd: www.renewabledevices.com
I/we, being the person(s) responsible for the installation of the SWIFT™ Rooftop Wind Energy System(s) noted above,
hereby CERTIFY that I/we have been trained and authorised by Renewable Devices Ltd to carry out this work, and
that the installation and commissioning has been carried out in complete compliance with the most recent SWIFT™
installation specification as issued by Renewable Devices Ltd, and all appropriate Health & Safety legislation.
I hereby CERTIFY that all of the tests detailed in the SWIFT installation specification have been carried out, that the
above tests were carried out by me, and that the results are as shown above.
I hereby CERTIFY that the G83/1 SSEC Installation Commissioning Confirmation has been completed and submitted
to the DNO. Attach a copy of the SSEG Installation Commissioning Confirmation to this document when returning to
Renewable Devices Ltd.
NAME (Please print full name)
SIGNATURE
COMPANY/CONTRACTOR
INSTALLATION DATE
Return to Installer Returns; Renewable Devices Ltd; SAC Bush Estate
Edinburgh EH26 0PH within 28 days of commissioning.

IP0011-12 Installation Procedure
Issue Date – 07/06/2012
Confidential
Page 66
Renewable Devices Ltd: www.renewabledevices.com
18. Appendix G SC0016, SC0018 & Technical Drawings