Embed Size (px)
Citation preview

© Warren Singer 2015 www.technical-communicators.com Page 1
Introduction Framemaker is part of the Adobe Communications Suite, a professional desktop
publishing suite that includes Framemaker, Robohelp, Adobe Captivate and Adobe
Acrobat and other products. It is a preferred tool of choice, popular with technical
communicators and certain sectors of the publishing industry. Framemaker provides the
following benefits:
Enables content management through use of conditional text, user-defined
variables and book management features. This will be a great aid in enabling the
sharing of content between different guides.
Robust numbering, cross-reference and graphics handling, eliminating some of
the issues with Word.
Provides better control over content, including layout and styles.
Enables the creation of structured content and output to multiple formats
including XML, web help and responsive HTML (HTML5 ). This is an important
feature to enable integration of content into online support sites and remove or
reduce the need for manual content creation and update in HTML or
markup/markdown language.
Plugs in to existing CMS solutions such as SharePoint.
Enables the provision of integrated content, including tutorials and videos.
Adobe tools such as Captivate and Robohelp are integrated closely with
Framemaker, enabling the inclusion of dynamic content.
The instructions below provide basic steps and information when using FrameMaker. If
you need more detailed advice, refer to the FrameMaker online help guide maintained
by Adobe.
Introduction to Adobe Framemaker Warren Singer provides an overview of Adobe Framemaker and describes how to migrate your projects from Word to Framemaker.
© Warren Singer 2015 www.technical-communicators.com Page 2
Working with books in FrameMaker
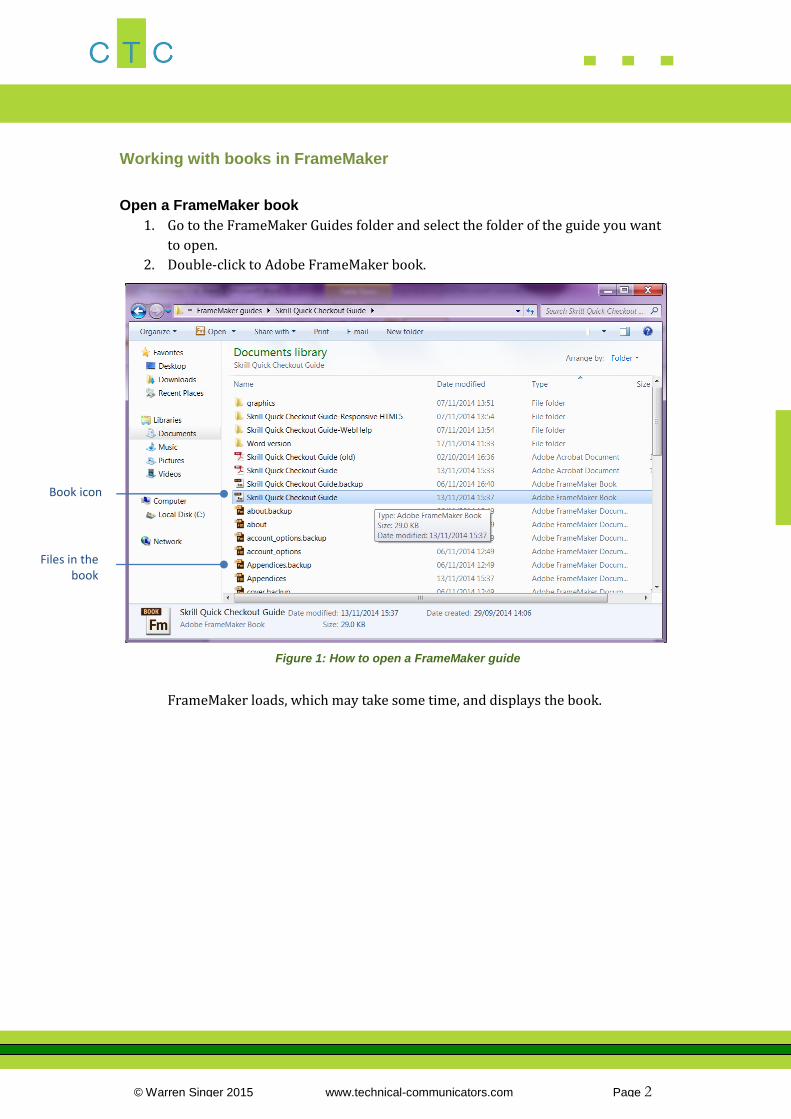
Open a FrameMaker book
1. Go to the FrameMaker Guides folder and select the folder of the guide you want
to open.
2. Double-click to Adobe FrameMaker book.
Figure 1: How to open a FrameMaker guide
FrameMaker loads, which may take some time, and displays the book.
Book icon
Files in the book
© Warren Singer 2015 www.technical-communicators.com Page 3
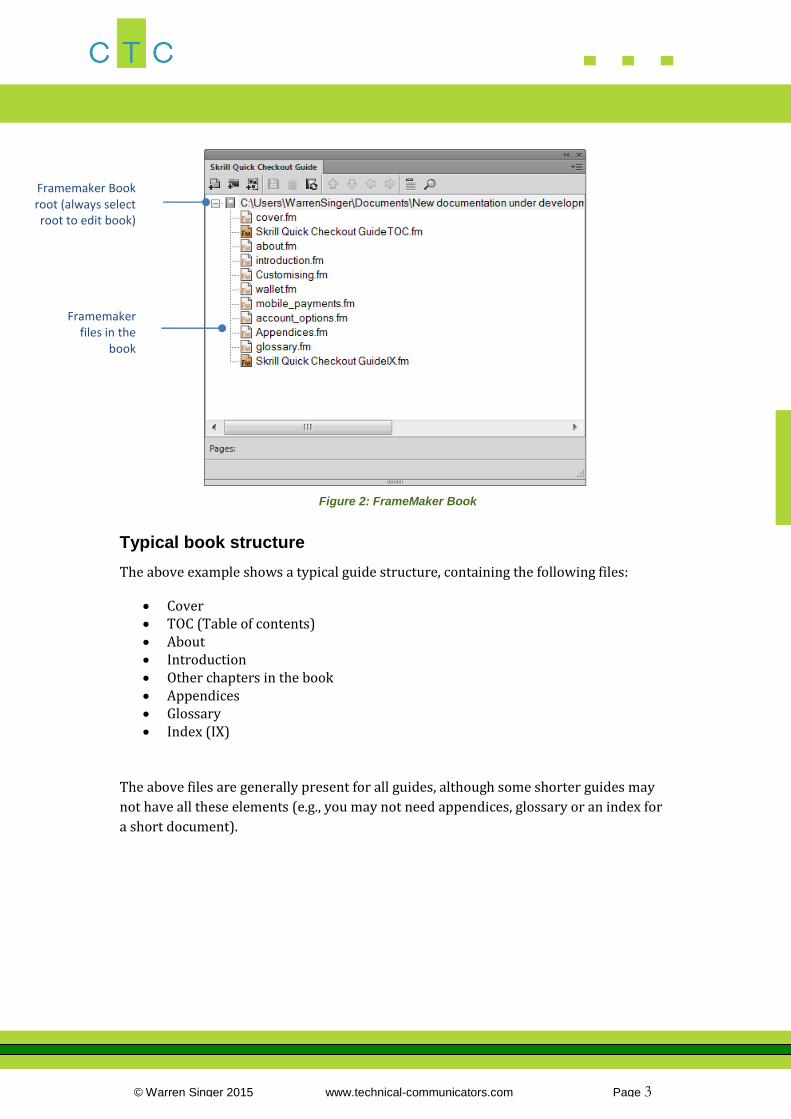
Figure 2: FrameMaker Book
Typical book structure
The above example shows a typical guide structure, containing the following files:
Cover TOC (Table of contents) About Introduction Other chapters in the book Appendices Glossary Index (IX)
The above files are generally present for all guides, although some shorter guides may
not have all these elements (e.g., you may not need appendices, glossary or an index for
a short document).
Framemaker Book root (always select root to edit book)
Framemaker files in the
book
© Warren Singer 2015 www.technical-communicators.com Page 4
Editing and updating books
Below are some quick crib tasks you may need to do.
Table 1: Quick Crib Tasks – Editing Books
Task Description
Delete a file Select the file in the book and click delete.
Save Ctrl S on the keyboard or click the Save button.
Add a file From the menu, select Add > Files. Browse to the file(s) you
want to add and click Add.
Rename a file Right-click the file and select Rename.
Save Book as/ create a
new book
You can save the entire book by selecting the book (root in the
book window) and then selecting File > Save Book As.
This will create a new book and rename the TOC and IX files in
the guide. You will then need to rename your TOC and IX files
in Explorer so that they will be picked up by the new book.
Delete any files not required in the new book.
Save File as/ create a
new chapter
Double-click to open the file and then select File >Save as.
Update a book Select the book and then from the menu, select Edit>Update
Book. Check the numbering, cross reference, OLE links, TOC
and index as shown below and then click Update.

© Warren Singer 2015 www.technical-communicators.com Page 5
Task Description
Figure 3: Update Book
Note: Warnings generated when updating are added to the
Book Error Log. Conditional settings and colour definition
errors can be ignored. You should update any broken cross-
reference errors.
Save as PDF Select the book root and from the menu select File >
Save as PDF. Make sure the View Generated PDF in Acrobat
option is checked. Leave everything else as is. If you want to switch off the PDF bookmarks
(displayed in the left-hand pane in acrobat), click the Bookmarks tab and then uncheck the Generate PDF Bookmarks option. This is only recommended for very short documents. Most guides should have bookmarks enabled.
Save and close all
open files
From the menu, select File > Currently opened files. Select
All and click the Save and Close button.

© Warren Singer 2015 www.technical-communicators.com Page 6
Publishing and archiving books
In addition to producing PDF versions of a book, you can publish multi-channel versions
(Responsive HTML and WebHelp), as well as create an archive of your changes.
Table 2: Quick Crib Tasks – Publishing and Archiving Books
Task Description
Publish a book Select the book root and from the menu select File >
Publish. Update the Output path by clicking the Browse Output
Path button and selecting the folder for the output. Click the Settings button and select Edit Settings. Update the Title field with the name of the book. Make
sure you do this for both the WebHelp and Responsive HTML 5 options (displayed in the left-hand pane). Then click Save and Close.
Figure 4: Publish Settings
In the Publish dialog box, select Generate Multiple Outputs.
Ensure that the options are checked and click Generate. To view the output, click View.
Select the Responsive HTML5 and WebHelp
options and update the Title field.
Leave other options as shown in the figure

© Warren Singer 2015 www.technical-communicators.com Page 7
Task Description
Figure 5: Generate Multiple Outputs
Create an Archive Select the book root and from the menu select File > Package.
Check the option Create Package even if files are missing and
then click Package.
This creative a zip file containing all the latest files and graphics
in the book. You should then upload the zip to a secure location,
to ensure that a backup is available.
Advanced
publishing options
If you need to configure the style sheet or template, you can do
the following:
Select the book root and from the menu select File > Publish. Click the Settings button and select Edit Settings. Select the Outputs tab.
Add a favicon: in the Favicon field, select the Browse option and select a favicon.
Responsive HTML layout: The current theme should be Theme1_Standard. To edit, select the Edit button.
Change the WebHelp skin: select the Navigation tab and in the Skin Selection field, select a skin or alternatively, click Import. Then browse to the location of the skin and select the skin (zkn) file.

© Warren Singer 2015 www.technical-communicators.com Page 8
Working with files
The instructions below relate to working with files. To open a file in FrameMaker, open the book and then double-click the file.
Editing files
See the table below for the most common options.
Table 3: Quick Crib Tasks – Editing Files
Task Description
Rename file In the book, right-click the file and select Rename.
Save as Ctrl S on the keyboard or click the Save as button.
Paragraph
formatter
Click in the paragraph you want to format. From the menu, select
Format > Paragraphs > Designer (or press Ctrl +M)
Character
formatter
Select the word or phrase you want to format. From the menu,
select Format > Characters > Designer (or press Ctrl +D)
Paragraph Quick
Style selector
Press F9 on your keyboard. Examples of styles you can create for
your book:
Body_text – use for all regular body text Bullet_list – use for a bulleted list Figure – use for a figure title, displayed beneath the
figure Heading 1, Heading 2, Heading 3, Heading 4 –
standard numbered heading styles Heading – use for non-numbered headings List paragraph – use for numbered lists List paragraph 1st – use for first number in a list Note – use for a note style. No spacing – use for an extra space, typically below a
figure title Table_text – use for table text Tabletitle – use for the table title, displayed above the
table Table_heading – use for table headings
Character Quick
Style selector
Press F8 on your keyboard. Examples of styles:
Default Font – use to clear any previous character formatting
Bold – use to bold a word, e.g., menu or button option Emphasis – use to emphasise a word, e.g., a field name or
parameter

© Warren Singer 2015 www.technical-communicators.com Page 9
Task Description
Glossary term – use for a glossary reference reference – use for a cross-reference
Cross references From the menu select Special > Cross reference. Select the relevant paragraph tag in the left-hand pane
and the topic you want to cross-reference in the right-hand pane.
In the Format field, select Heading & Page (this will add a cross-reference with the topic heading and the page).
Select Insert or Replace.
Figure 6: Cross-references
Once added, all cross-references are automatically updated when
you regenerate or update the book.
Hypertext links From the menu select Special > Hypertext. In the Command field, select Go to URL. Add the URL after the text message URL, as shown below. Click New Hypertext Marker.
Leave as Current if you are linking to a topic in
the current file. Otherwise, select the
file you want to link to
Select the format in which to display the cross reference (e.g.
Heading & Page)
Select a paragraph tag style and then select
the topic to reference to

© Warren Singer 2015 www.technical-communicators.com Page 10
Task Description
Figure 7: Hypertext Marker
Page break From the menu select Special > Hypertext. Select At Top of Next Available Page and click Set.
Figure 8: Page Break
Working with graphics
Graphics are always contained within a frame, so when adding a graphic, always add it to a new or existing frame.
You are recommended to put the graphic source into the graphics folder of the guide and then link it by reference. Linking enables a single graphic file to be referenced and used in multiple locations in the same or different guides. If you update the source file, the graphics in the guide are then automatically updated.
Note: Do not embed graphics as this adds to file sizes and can make it slow to work with files.
See the table below for the most common options.
You can define where you want the
page break to start
Select Go to URL
Enter the URL after the words
“message URL”

© Warren Singer 2015 www.technical-communicators.com Page 11
Table 4: Quick Crib Tasks – Graphics
Task Description
Create a frame for a
graphic
The frame is the placeholder in which the graphic will be
inserted.
From the menu select Special > Anchored Frame. Anchored Position should be Below Current Line. Alignment should be Center. Leave other options as shown in the figure below and
click New Frame.
Figure 9: Anchored Frame
You can resize the frame after you have added it.
Import a graphic First copy the graphic source file to your Graphics
folder. Files are typically in png or jpeg format. Select the anchored frame and from the menu select
File > Import > File. Browse to your Graphics folder and select the graphic you want to import. Click Import.
Select 150 dpi and click Set.
Anchor Position Below Current Line and
Alignment centre.

© Warren Singer 2015 www.technical-communicators.com Page 12
Task Description
Edit a graphic Right-click the graphic and select Object Properties.
Edit a frame Right-click the frame and select Object Properties. Frame
should be 5pts above baseline.
Create a figure title Create a paragraph marker below the graphic, press F9 on
your keyboard and then select the Figure style.
Graphics toolbar From the menu, select Graphics > Tools.
Add a callout to a
graphic
Select your graphics frame and on the Graphics toolbar, select
Add a text frame. Use your mouse cursor to place and size
the text frame, then add to text to it.
To format the text, press F9 and then select the style Callout-
left or Callout-right
Typical resolution is 150 dpi (dots per inch).
You can adjust the graphic size after
importing.

© Warren Singer 2015 www.technical-communicators.com Page 13
Working with tables
The easiest way to create a new table is to copy an existing table and then format and update it.
See the table below for the most common options.
Table 5: Quick Crib Tasks – Tables
Task Description
Insert a new table From the menu, select Table > Insert Table. Enter the number of Columns, Body Rows and
Heading Rows required. Select a Table Format and click Insert.
Figure 10: Insert Table
You can edit the table after you have inserted it.
Add Rows or
Columns
Right-click, and select Add Rows or Columns.
Select the number of rows or columns to add and click Add.
© Warren Singer 2015 www.technical-communicators.com Page 14
Task Description
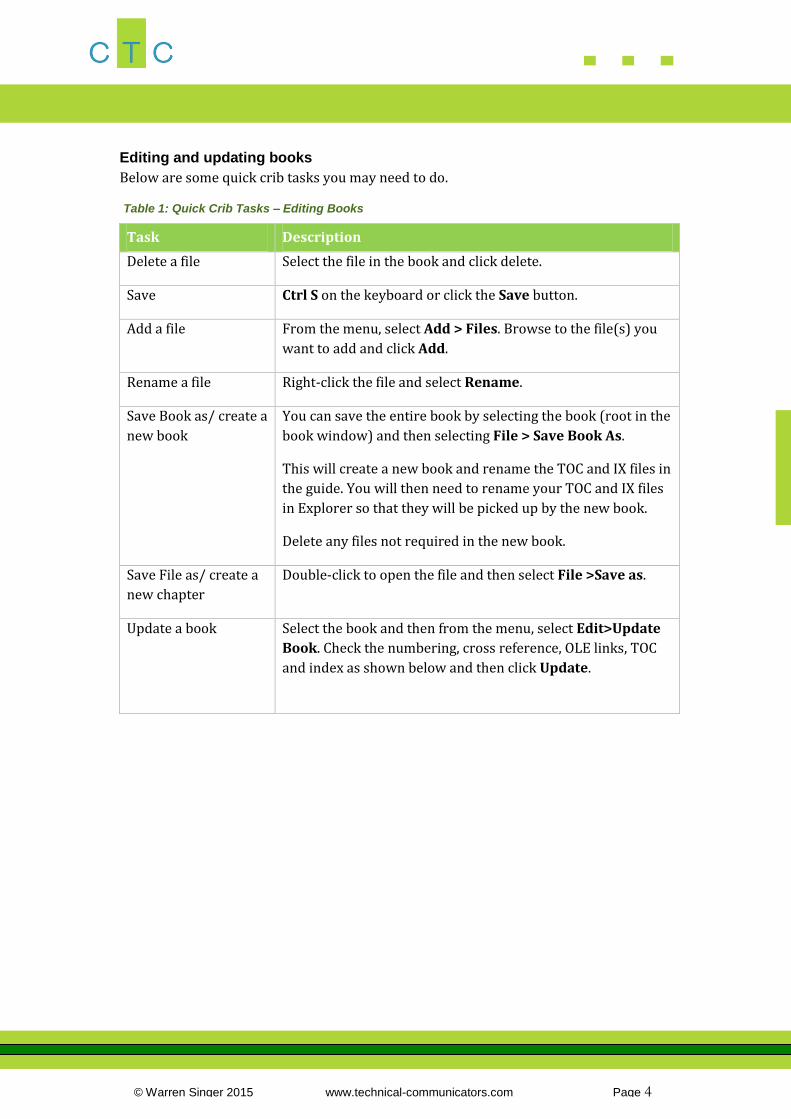
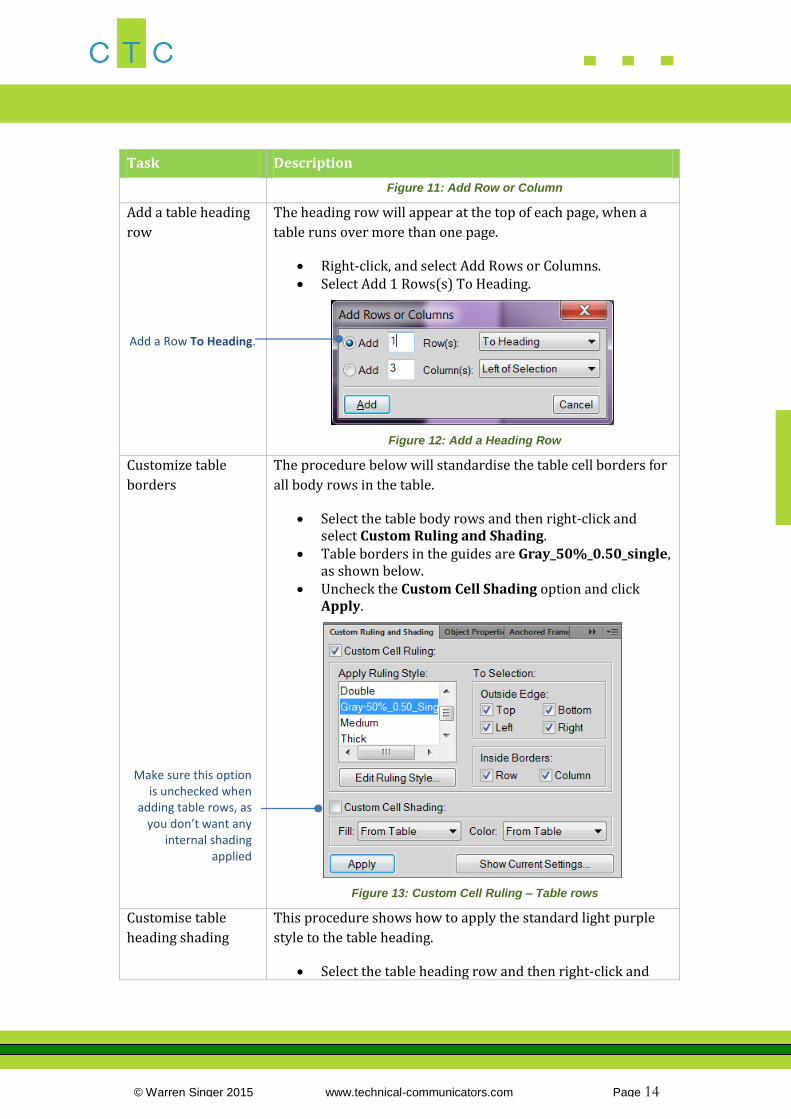
Figure 11: Add Row or Column
Add a table heading
row
The heading row will appear at the top of each page, when a
table runs over more than one page.
Right-click, and select Add Rows or Columns. Select Add 1 Rows(s) To Heading.
Figure 12: Add a Heading Row
Customize table
borders
The procedure below will standardise the table cell borders for
all body rows in the table.
Select the table body rows and then right-click and select Custom Ruling and Shading.
Table borders in the guides are Gray_50%_0.50_single, as shown below.
Uncheck the Custom Cell Shading option and click Apply.
Figure 13: Custom Cell Ruling – Table rows
Customise table
heading shading
This procedure shows how to apply the standard light purple
style to the table heading.
Select the table heading row and then right-click and
Add a Row To Heading.
Make sure this option is unchecked when
adding table rows, as you don’t want any
internal shading applied
© Warren Singer 2015 www.technical-communicators.com Page 15
Task Description
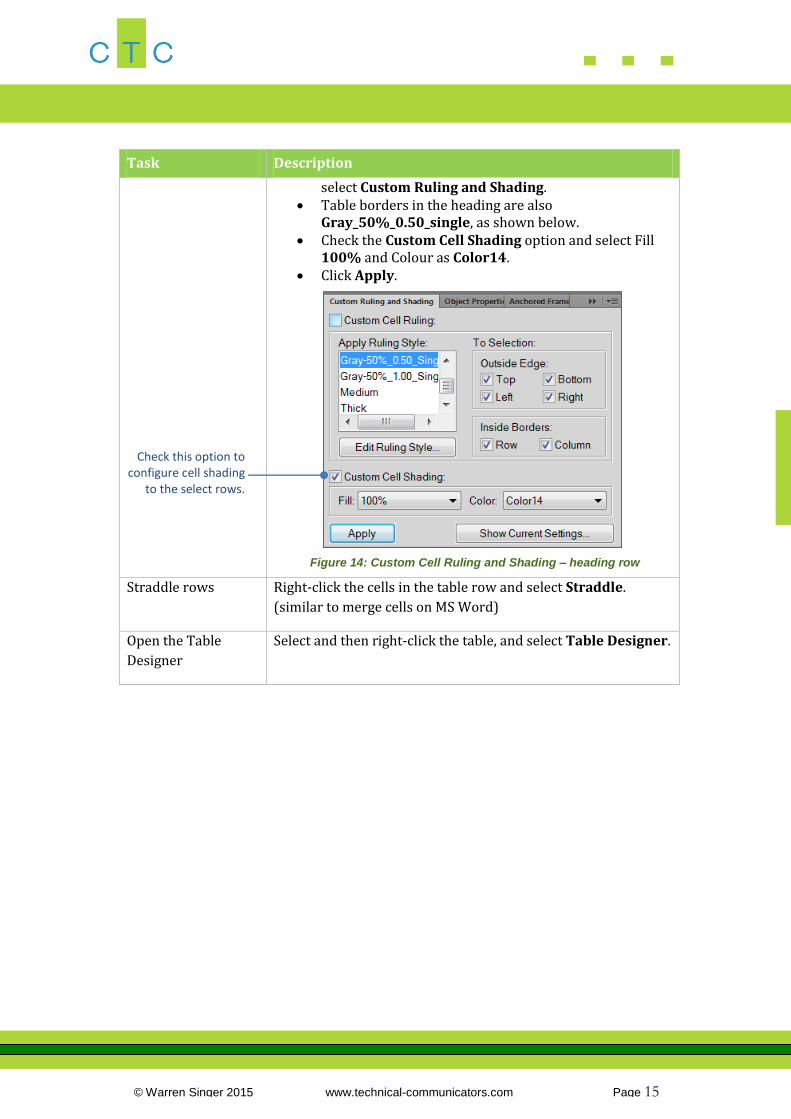
select Custom Ruling and Shading. Table borders in the heading are also
Gray_50%_0.50_single, as shown below. Check the Custom Cell Shading option and select Fill
100% and Colour as Color14. Click Apply.
Figure 14: Custom Cell Ruling and Shading – heading row
Straddle rows Right-click the cells in the table row and select Straddle.
(similar to merge cells on MS Word)
Open the Table
Designer
Select and then right-click the table, and select Table Designer.
Check this option to configure cell shading
to the select rows.
© Warren Singer 2015 www.technical-communicators.com Page 16
Task Description
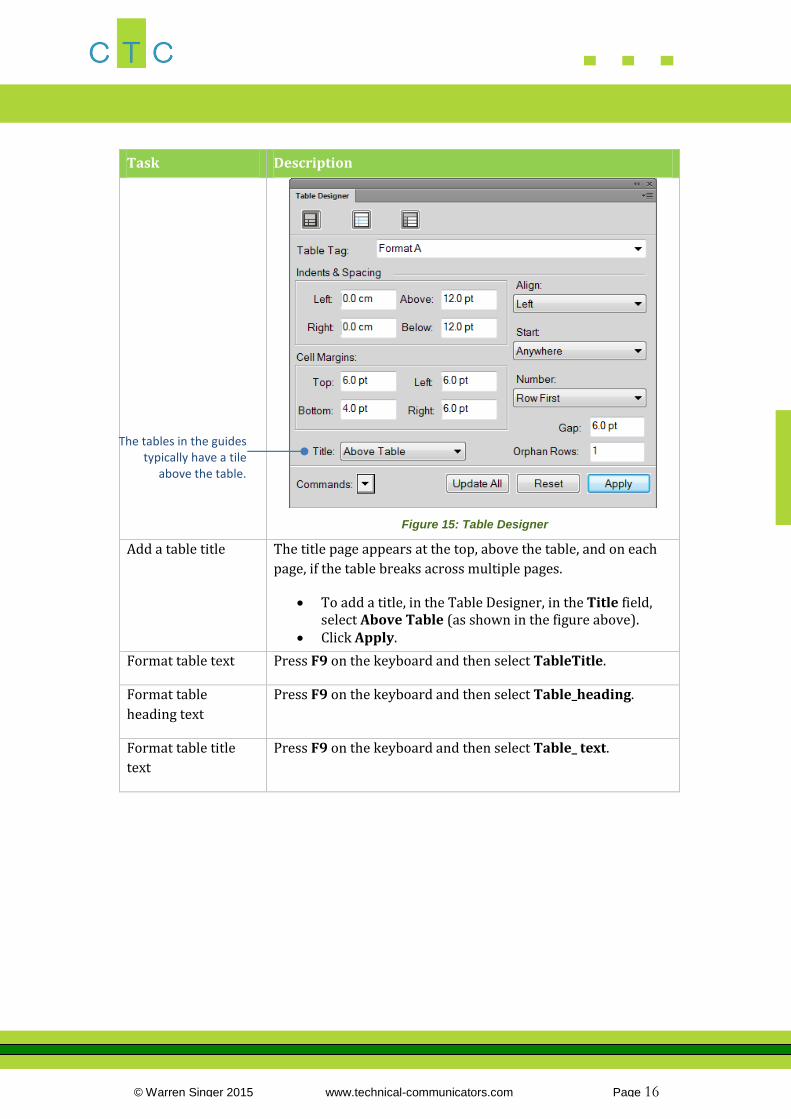
Figure 15: Table Designer
Add a table title The title page appears at the top, above the table, and on each
page, if the table breaks across multiple pages.
To add a title, in the Table Designer, in the Title field, select Above Table (as shown in the figure above).
Click Apply.
Format table text Press F9 on the keyboard and then select TableTitle.
Format table
heading text
Press F9 on the keyboard and then select Table_heading.
Format table title
text
Press F9 on the keyboard and then select Table_ text.
The tables in the guides typically have a tile
above the table.

© Warren Singer 2015 www.technical-communicators.com Page 17
Variables and document properties
Variables enable you to create document properties that can be shared across files and updated from one source. Typically, variables in the guides are first defined in the Cover file and then imported to other files in the book. The following are examples of typical variables used in the guides:
Guide Title – use this variable to edit/update the guide title, which appears in the cover and header of each page in the guide.
Version – use this variable to define the version of the guide, which appears in the cover and header of each page in the guide.
Current Date Short – used as part of the unique publication number at the end of the cover. Will always reflect the current date of publication
See the table below for the most common options.
Table 6: Quick Crib Tasks – Variables
Task Description
Open the Variables
pod You and either double-click an existing variable in a
document or from the menu, select Special > Variables.
Figure 16: Anchored Frame
You can resize the frame after you have added it.
Edit a variable In the variables pod, select the variable you want to edit
and click the Edit (pencil) button. In the Definition field, enter the updated definition text
and click Enter.
Import variable
definition
Make sure the updated Cover.fm file is open before starting this
procedure.
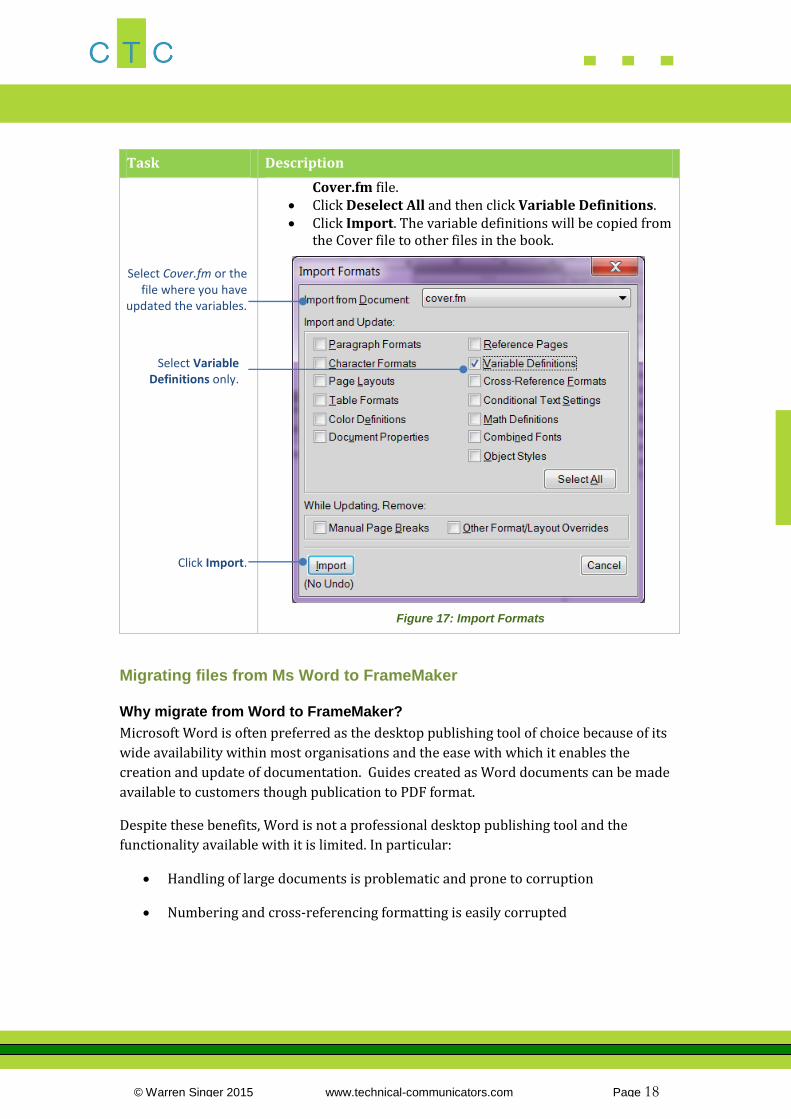
To copy the updated variable definition from the Cover file to other files in the book, in the book, select all files and then from the menu select File > Import > Formats.
In the Import from Document field, select your
Variable pod showing FrameMaker and
custom-defined variables.
© Warren Singer 2015 www.technical-communicators.com Page 18
Task Description
Cover.fm file. Click Deselect All and then click Variable Definitions. Click Import. The variable definitions will be copied from
the Cover file to other files in the book.
Figure 17: Import Formats
Migrating files from Ms Word to FrameMaker
Why migrate from Word to FrameMaker?
Microsoft Word is often preferred as the desktop publishing tool of choice because of its
wide availability within most organisations and the ease with which it enables the
creation and update of documentation. Guides created as Word documents can be made
available to customers though publication to PDF format.
Despite these benefits, Word is not a professional desktop publishing tool and the
functionality available with it is limited. In particular:
Handling of large documents is problematic and prone to corruption
Numbering and cross-referencing formatting is easily corrupted
Select Cover.fm or the file where you have
updated the variables.
Select Variable Definitions only.
Click Import.

© Warren Singer 2015 www.technical-communicators.com Page 19
There are limited content management options available with Word. This means
that content must be copied and pasted and reworked between different
versions and different output formats.
When an organisation has dozens of guides, with alternative versions of each
guide, plus content in both online and PDF formats makes using Word a time-
consuming process. This will not be sustainable for a future architecture that
includes translation.
If you have a source file in MS Word which you want to migrate to FrameMaker, the
recommended procedure is as follows:
Step A. Create a new FrameMaker book
1. Create a new folder for your guide and copy the relevant files from an existing
FrameMaker guide.
2. Open the guide book you have copied and select File > Save Book As. Enter the
name of your new book.
3. Delete any files not needed in your new book. You can also delete these files
from your book folder.
4. Rename your IX (index) and TOC (Table of Contents) files to match the names
referenced in your new book.
5. Open the Cover of the book and update the title, description, version number,
version history table and publication number. Some of these are variable fields,
which can be editing using the Variables pod.
6. Apply the variable definitions to other chapters in your book (select all other
chapters, then File > Import > Format and select Variable Definitions)
7. Update the About chapter with details for your new guide.
8. Leave the TOC for the moment, it will be automatically updated when you update
the book.
Step B. Copy text and images to your new guide
1. Open the Introduction file of your new book and delete all the existing text, then
save your file. Leave it open.
2. Open your source MS Word file and Select All (Ctrl +A) and then copy (Ctl +V).
3. Paste the contents into your FrameMaker Introduction file. This may take some
time, so leave it to do its work. The more graphics you copy, the longer it will
take.

© Warren Singer 2015 www.technical-communicators.com Page 20
Step C. Apply correct style formats to your content
1. Apply the correct styles to the content, using the F9 and F8 style options.
2. You can use the global update option in the Paragraph Designer to update all
instances of a style in your document.
3. Replace embedded graphics with linked graphics in your Graphics folder.
4. Apply correct table style using the Table Designer then apply custom ruling and
shading to the table borders and heading. Update the table text styles.
5. Replace all cross-references in the guide and check that there are no broken
links (which will show in the Error Log when you update the book).
6. If you need to create additional chapters, save the Introduction file as a new file
and then add to the guide (select book root and from menu, select Add > Files).
Then delete the previous contents and copy and paste the new chapter content.
Repeat the steps above for the new chapter.
Step D. Update book and publish
1. On book level, for each chapter, paragraph numbering must be set to restart, so
that figure number restarts for chapter.
2. When the new book is ready, select the book root and then select Edit>Update
Book. Check the Error Log for any broken links. You can ignore any warnings
about colour definitions and conditional tags for the moment.
3. Select the book root and then File > Save as PDF. Select the option View
Generated PDF in Acrobat. Check the generated PDF for errors, and then fix
and update the book again, and regenerate the PDF.
Advanced options
See the table below for advanced options you may need to use.
Table 7: Quick Crib Tasks – Advanced Migration options
Task Description
Global Formatting
Update –paragraphs)
The procedure below describes how to update all instances of a
style in a file (e.g., normal) to one of the standard styles used in
the guide (e.g., body_text).
Select the paragraph you want to update. From the menu, select Format > Paragraphs > Designer (or press Ctrl + M).
In the Paragraph Tag field, select the new style you want to apply to the paragraph (e.g., body_text) and click Apply.
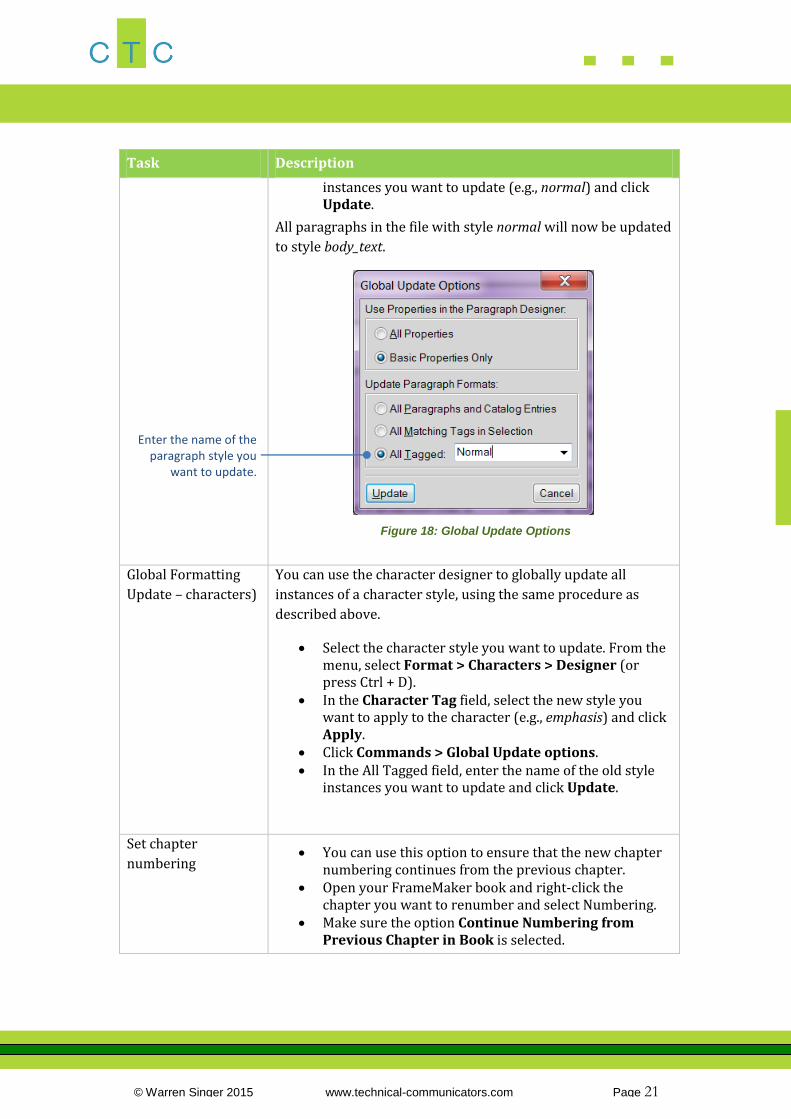
Click Commands > Global Update options. In the All Tagged field, enter the name of the old style
© Warren Singer 2015 www.technical-communicators.com Page 21
Task Description
instances you want to update (e.g., normal) and click Update.
All paragraphs in the file with style normal will now be updated
to style body_text.
Figure 18: Global Update Options
Global Formatting
Update – characters)
You can use the character designer to globally update all
instances of a character style, using the same procedure as
described above.
Select the character style you want to update. From the menu, select Format > Characters > Designer (or press Ctrl + D).
In the Character Tag field, select the new style you want to apply to the character (e.g., emphasis) and click Apply.
Click Commands > Global Update options. In the All Tagged field, enter the name of the old style
instances you want to update and click Update.
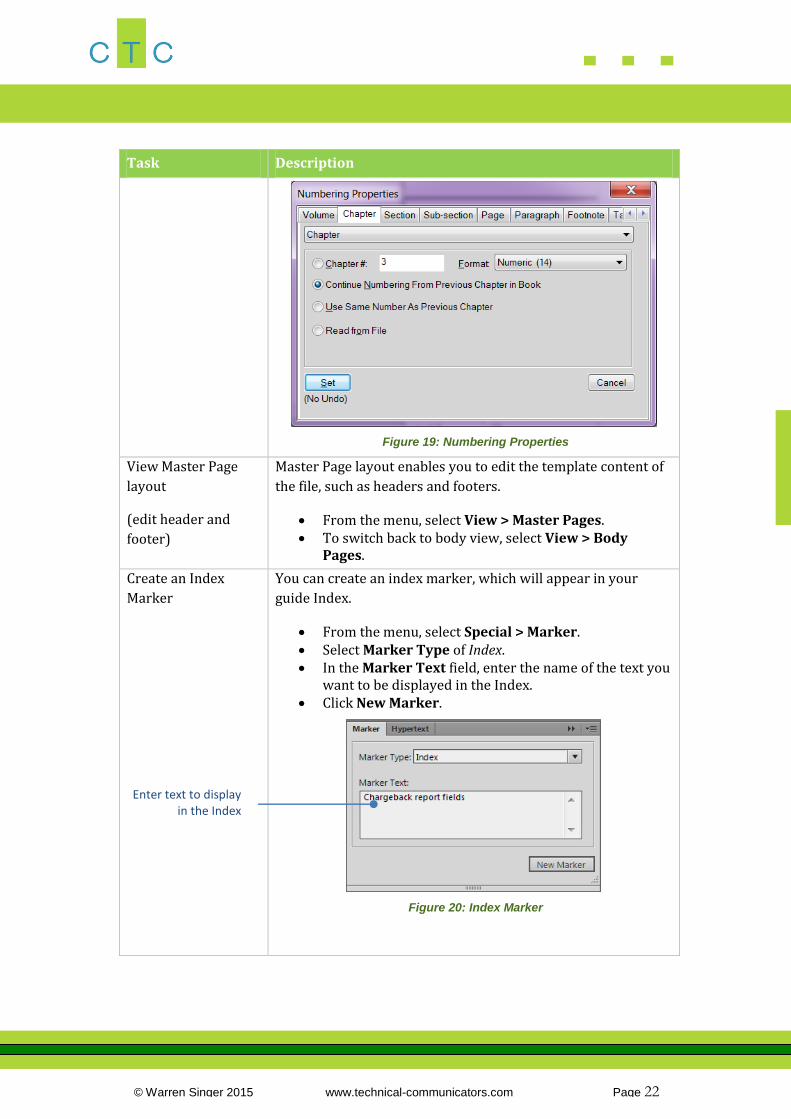
Set chapter
numbering You can use this option to ensure that the new chapter
numbering continues from the previous chapter. Open your FrameMaker book and right-click the
chapter you want to renumber and select Numbering. Make sure the option Continue Numbering from
Previous Chapter in Book is selected.
Enter the name of the paragraph style you
want to update.
© Warren Singer 2015 www.technical-communicators.com Page 22
Task Description
Figure 19: Numbering Properties
View Master Page
layout
(edit header and
footer)
Master Page layout enables you to edit the template content of
the file, such as headers and footers.
From the menu, select View > Master Pages. To switch back to body view, select View > Body
Pages.
Create an Index
Marker
You can create an index marker, which will appear in your
guide Index.
From the menu, select Special > Marker. Select Marker Type of Index. In the Marker Text field, enter the name of the text you
want to be displayed in the Index. Click New Marker.
Figure 20: Index Marker
Enter text to display in the Index

© Warren Singer 2015 www.technical-communicators.com Page 23
Task Description
Edit an Index Marker From the menu, select View > Pods > Markers. Select the Index marker and click the Edit (pencil)
button. In the Marker dialog box, update the marker text and
click Edit Marker.
Find and replace Framemaker enables you to find and replace not only text, but
also tags, styles and unresolved-cross references. Changes can
be applied to a file or all chapters in a book.
From the menu, select Edit > Find/Change.
Figure 21: Find/Change dialog box
Select new tag or property
Select tag or property you want to find
Enter text you want to find
Enter new text