Embed Size (px)
Citation preview
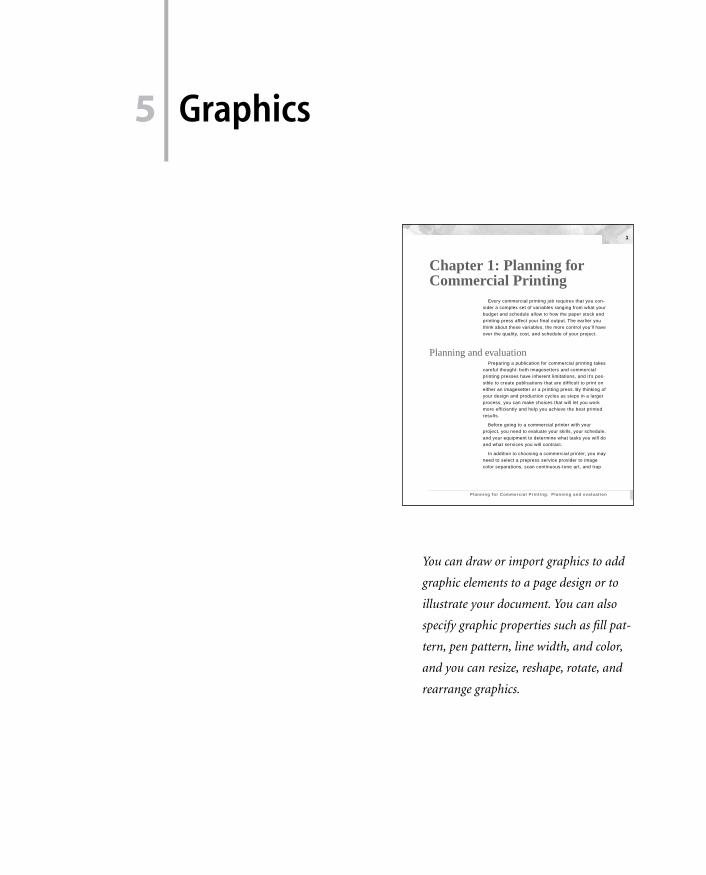
5 Graphics
1
Planning for Commercial Printing: Planning and evaluation
Chapter 1: Planning for Commercial Printing
Every commercial printing job requires that you con-sider a complex set of variables ranging from what your budget and schedule allow to how the paper stock and printing press affect your final output. The earlier you think about these variables, the more control you’ll have over the quality, cost, and schedule of your project.
Planning and evaluationPreparing a publication for commercial printing takes
careful thought: both imagesetters and commercial printing presses have inherent limitations, and it’s pos-sible to create publications that are difficult to print on either an imagesetter or a printing press. By thinking of your design and production cycles as steps in a larger process, you can make choices that will let you work more efficiently and help you achieve the best printed results.
Before going to a commercial printer with your project, you need to evaluate your skills, your schedule, and your equipment to determine what tasks you will do and what services you will contract.
In addition to choosing a commercial printer, you may need to select a prepress service provider to image color separations, scan continuous-tone art, and trap
You can draw or import graphics to add
graphic elements to a page design or to
illustrate your document. You can also
specify graphic properties such as fill pat-
tern, pen pattern, line width, and color,
and you can resize, reshape, rotate, and
rearrange graphics.
LESSON 592Graphics
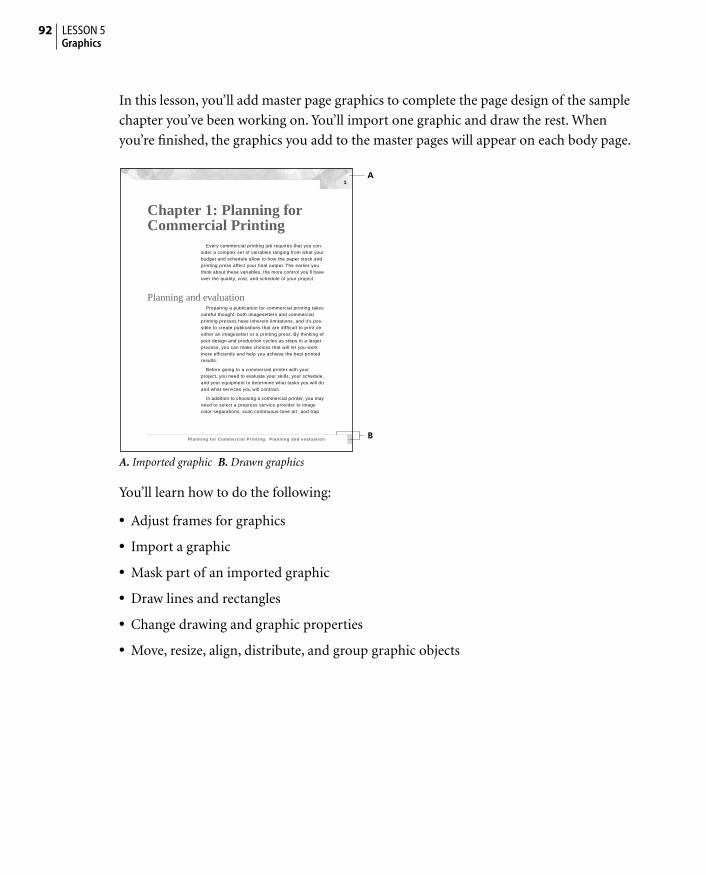
In this lesson, you’ll add master page graphics to complete the page design of the sample
chapter you’ve been working on. You’ll import one graphic and draw the rest. When
you’re finished, the graphics you add to the master pages will appear on each body page.
A. Imported graphic B. Drawn graphics
You’ll learn how to do the following:
• Adjust frames for graphics
• Import a graphic
• Mask part of an imported graphic
• Draw lines and rectangles
• Change drawing and graphic properties
• Move, resize, align, distribute, and group graphic objects
1
Planning for Commercial Printing: Planning and evaluation
Chapter 1: Planning for Commercial Printing
Every commercial printing job requires that you con-sider a complex set of variables ranging from what your budget and schedule allow to how the paper stock and printing press affect your final output. The earlier you think about these variables, the more control you’ll have over the quality, cost, and schedule of your project.
Planning and evaluationPreparing a publication for commercial printing takes
careful thought: both imagesetters and commercial printing presses have inherent limitations, and it’s pos-sible to create publications that are difficult to print on either an imagesetter or a printing press. By thinking of your design and production cycles as steps in a larger process, you can make choices that will let you work more efficiently and help you achieve the best printed results.
Before going to a commercial printer with your project, you need to evaluate your skills, your schedule, and your equipment to determine what tasks you will do and what services you will contract.
In addition to choosing a commercial printer, you may need to select a prepress service provider to image color separations, scan continuous-tone art, and trap
A
B
93ADOBE FRAMEMAKER 6.0Classroom in a Book
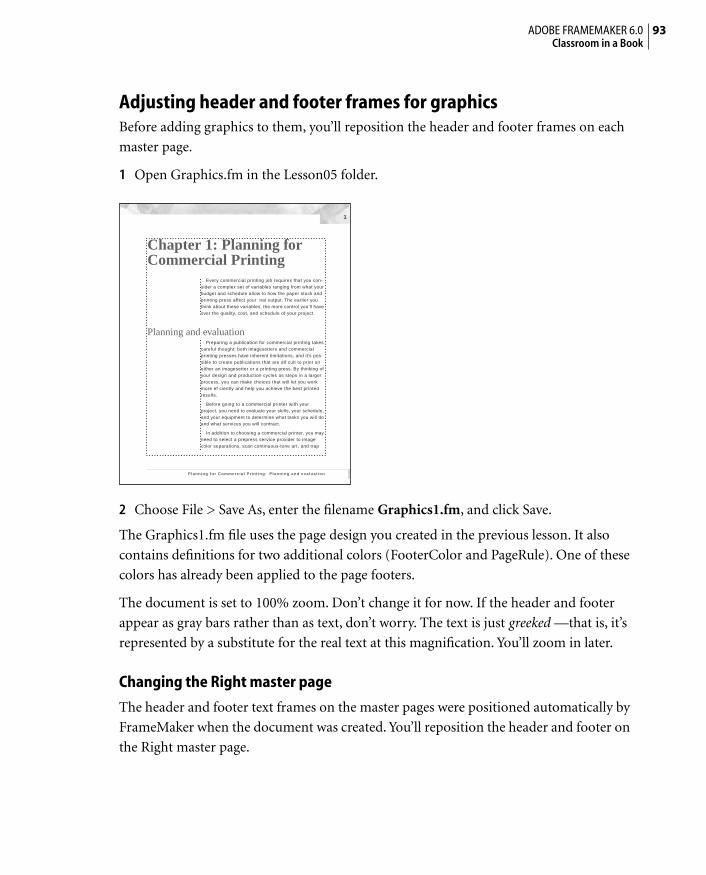
Adjusting header and footer frames for graphicsBefore adding graphics to them, you’ll reposition the header and footer frames on each
master page.
1 Open Graphics.fm in the Lesson05 folder.
2 Choose File > Save As, enter the filename Graphics1.fm, and click Save.
The Graphics1.fm file uses the page design you created in the previous lesson. It also
contains definitions for two additional colors (FooterColor and PageRule). One of these
colors has already been applied to the page footers.
The document is set to 100% zoom. Don’t change it for now. If the header and footer
appear as gray bars rather than as text, don’t worry. The text is just greeked —that is, it’s
represented by a substitute for the real text at this magnification. You’ll zoom in later.
Changing the Right master page
The header and footer text frames on the master pages were positioned automatically by
FrameMaker when the document was created. You’ll reposition the header and footer on
the Right master page.
1
Planning for Commercial Printing: Planning and evaluation
Chapter 1: Planning for Commercial Printing
Every commercial printing job requires that you con-sider a complex set of variables ranging from what your budget and schedule allow to how the paper stock and printing press affect your nal output. The earlier you think about these variables, the more control you’ll have over the quality, cost, and schedule of your project.
Planning and evaluationPreparing a publication for commercial printing takes
careful thought: both imagesetters and commercial printing presses have inherent limitations, and it’s pos-sible to create publications that are dif cult to print on either an imagesetter or a printing press. By thinking of your design and production cycles as steps in a larger process, you can make choices that will let you work more ef ciently and help you achieve the best printed results.
Before going to a commercial printer with your project, you need to evaluate your skills, your schedule, and your equipment to determine what tasks you will do and what services you will contract.
In addition to choosing a commercial printer, you may need to select a prepress service provider to image color separations, scan continuous-tone art, and trap
LESSON 594Graphics
First you’ll move the page header closer to the edge of the page. You’ll use the rulers at the
top and left side of the document window to help you position the header text frame.
The ruler markings are in picas. (Six picas equals one inch or 12 points. There are 72
points in an inch.)
1 Choose View > Master Pages. FrameMaker displays the master page of the body page
you were on. In this case, the Right master page is displayed.
Before you reposition objects, you’ll make sure that the snap grid is on. (Objects snap to
the grid as you drag or resize them.)
2 Pull down the Graphics menu to see whether Snap is turned on (at the bottom of the
menu). If no check mark or filled-in check box appears next to the command, choose
Snap to turn it on.
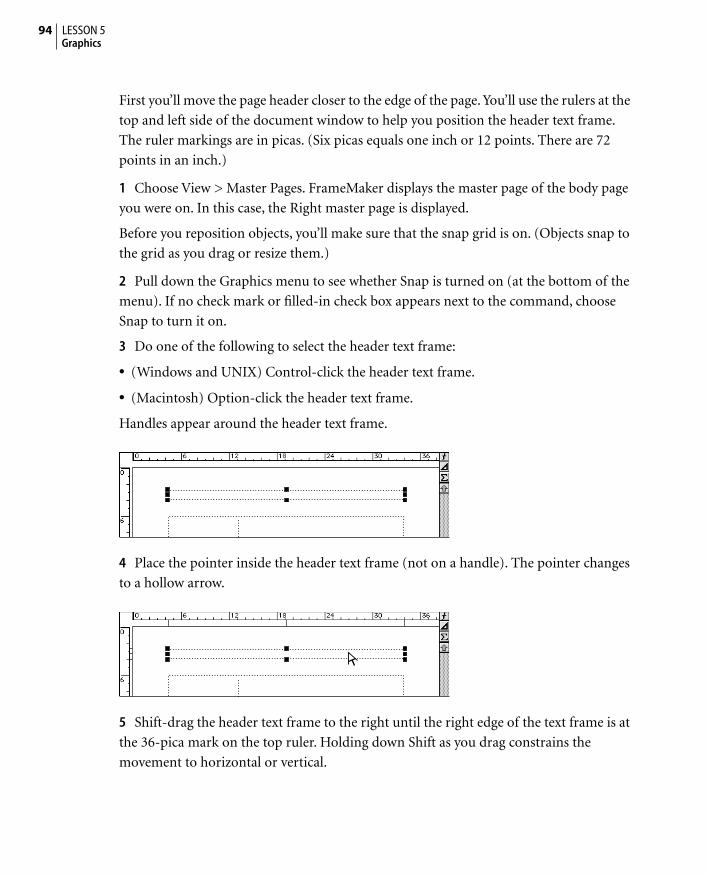
3 Do one of the following to select the header text frame:
• (Windows and UNIX) Control-click the header text frame.
• (Macintosh) Option-click the header text frame.
Handles appear around the header text frame.
4 Place the pointer inside the header text frame (not on a handle). The pointer changes
to a hollow arrow.
5 Shift-drag the header text frame to the right until the right edge of the text frame is at
the 36-pica mark on the top ruler. Holding down Shift as you drag constrains the
movement to horizontal or vertical.
95ADOBE FRAMEMAKER 6.0Classroom in a Book
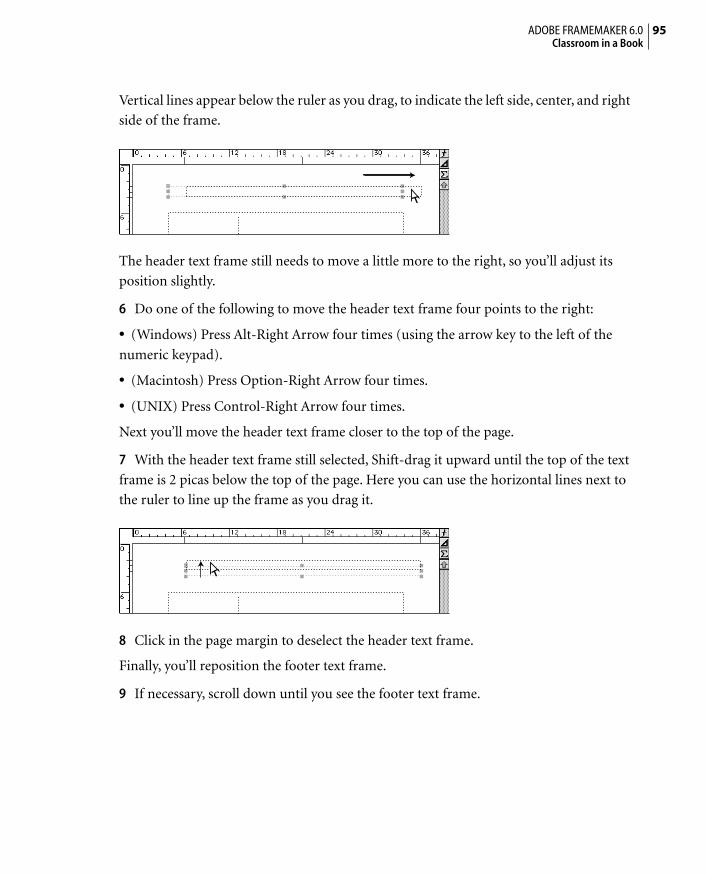
Vertical lines appear below the ruler as you drag, to indicate the left side, center, and right
side of the frame.
The header text frame still needs to move a little more to the right, so you’ll adjust its
position slightly.
6 Do one of the following to move the header text frame four points to the right:
• (Windows) Press Alt-Right Arrow four times (using the arrow key to the left of the
numeric keypad).
• (Macintosh) Press Option-Right Arrow four times.
• (UNIX) Press Control-Right Arrow four times.
Next you’ll move the header text frame closer to the top of the page.
7 With the header text frame still selected, Shift-drag it upward until the top of the text
frame is 2 picas below the top of the page. Here you can use the horizontal lines next to
the ruler to line up the frame as you drag it.
8 Click in the page margin to deselect the header text frame.
Finally, you’ll reposition the footer text frame.
9 If necessary, scroll down until you see the footer text frame.
LESSON 596Graphics
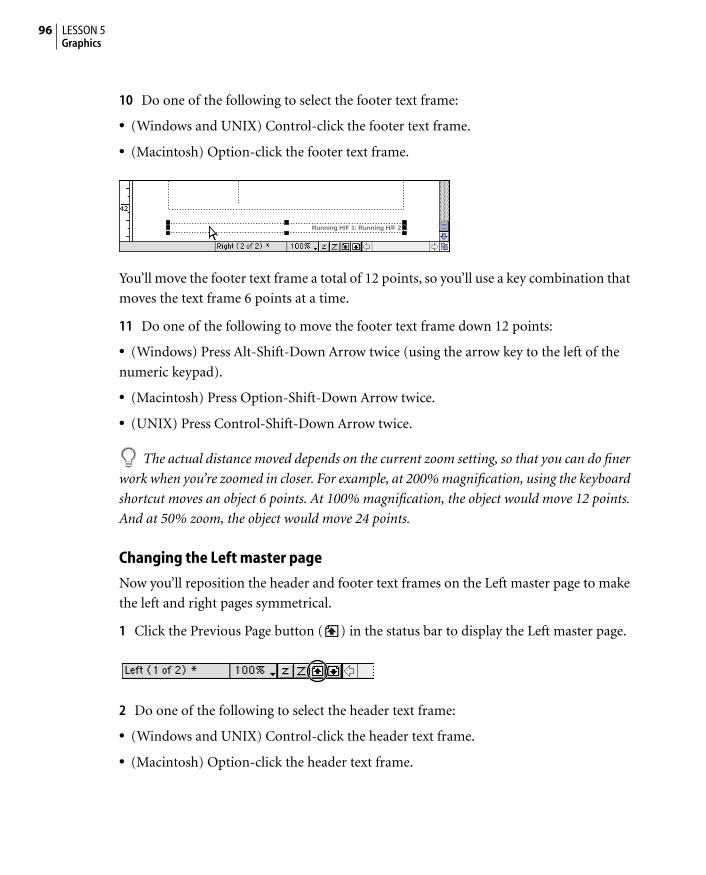
10 Do one of the following to select the footer text frame:
• (Windows and UNIX) Control-click the footer text frame.
• (Macintosh) Option-click the footer text frame.
You’ll move the footer text frame a total of 12 points, so you’ll use a key combination that
moves the text frame 6 points at a time.
11 Do one of the following to move the footer text frame down 12 points:
• (Windows) Press Alt-Shift-Down Arrow twice (using the arrow key to the left of the
numeric keypad).
• (Macintosh) Press Option-Shift-Down Arrow twice.
• (UNIX) Press Control-Shift-Down Arrow twice.
The actual distance moved depends on the current zoom setting, so that you can do finer
work when you’re zoomed in closer. For example, at 200% magnification, using the keyboard
shortcut moves an object 6 points. At 100% magnification, the object would move 12 points.
And at 50% zoom, the object would move 24 points.
Changing the Left master page
Now you’ll reposition the header and footer text frames on the Left master page to make
the left and right pages symmetrical.
1 Click the Previous Page button ( ) in the status bar to display the Left master page.
2 Do one of the following to select the header text frame:
• (Windows and UNIX) Control-click the header text frame.
• (Macintosh) Option-click the header text frame.
Running H/F 1: Running H/F 2
97ADOBE FRAMEMAKER 6.0Classroom in a Book
3 Shift-drag the header text frame to the left until the left edge of the frame is at the
2-pica mark on the top ruler.
4 With the header text frame still selected, Shift-drag it upward until the top of the frame
is 2 picas below the top of the page.
5 Click in the page margin to deselect the header text frame.
6 Select the footer text frame, scrolling down the page if necessary.
You could use the arrow keys to move the footer text frame as you did on the Right master
page. This time, though, you’ll use a dialog box to position it.
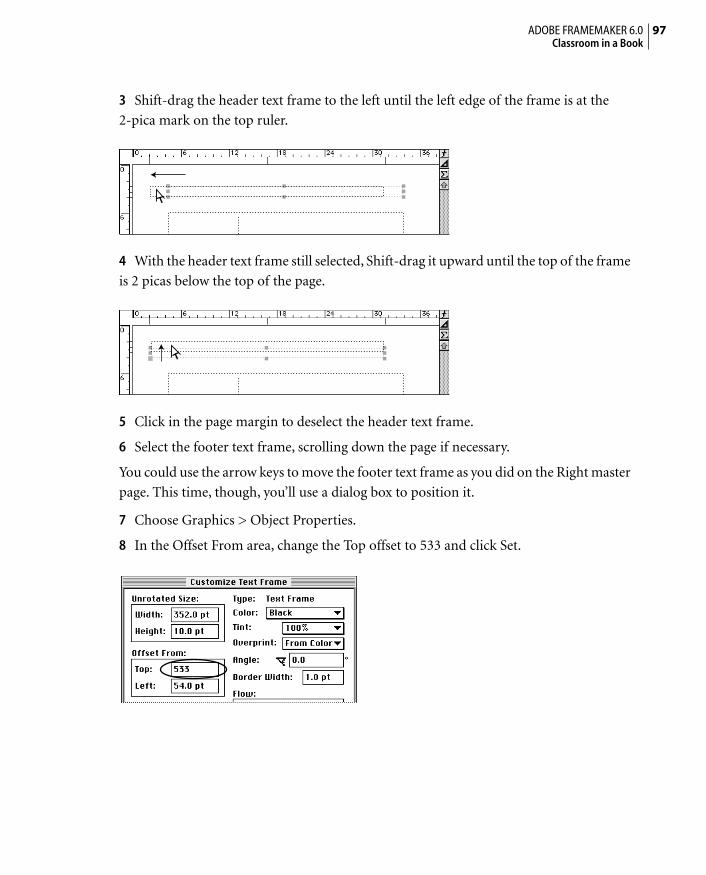
7 Choose Graphics > Object Properties.
8 In the Offset From area, change the Top offset to 533 and click Set.
LESSON 598Graphics
Importing a graphicThe page design calls for a graphic to appear at the top of each page. The graphic was
created in another application and saved in TIFF format. You’ll import the graphic and
position it on the page.
There are two ways to import a graphic: by copying it into the document and by creating
a reference to it.
When you import a graphic by copying, a copy of the original graphic is stored in the
document. There are two advantages to this method:
• If you move the document—for example, to bring it to a print shop—the graphics are
already contained in the document.
• You don’t have to depend on the original graphic file. The original graphic can be
changed, moved to a different directory, or deleted without affecting the copies in your
document.
When you import by reference, the graphic file isn’t stored in the document. Instead, the
document contains a pointer to the original graphic file. There are two advantages to this
method:
• If you import by copying on both the Left and Right master pages, the document
contains the same image twice, increasing the file size. When you import by reference, the
document doesn’t contain any image; instead, it contains only a pointer to the stored
graphic file on the disk. This can greatly reduce the size of a file.
• If you import by copying and then change the graphic file, you need to reimport the
graphic to update the image stored in the document. Because you’re importing by
reference, the graphic in the document will be updated automatically whenever the stored
file is changed.
In this lesson, you’ll import the graphic by reference.
1 If necessary, scroll up until you see the top of the Left master page.
2 Click in the page margin to make sure that nothing is selected on the page and that
there’s no insertion point.
3 Choose File > Import > File.
4 Open the Art folder in the Lesson05 folder.
99ADOBE FRAMEMAKER 6.0Classroom in a Book
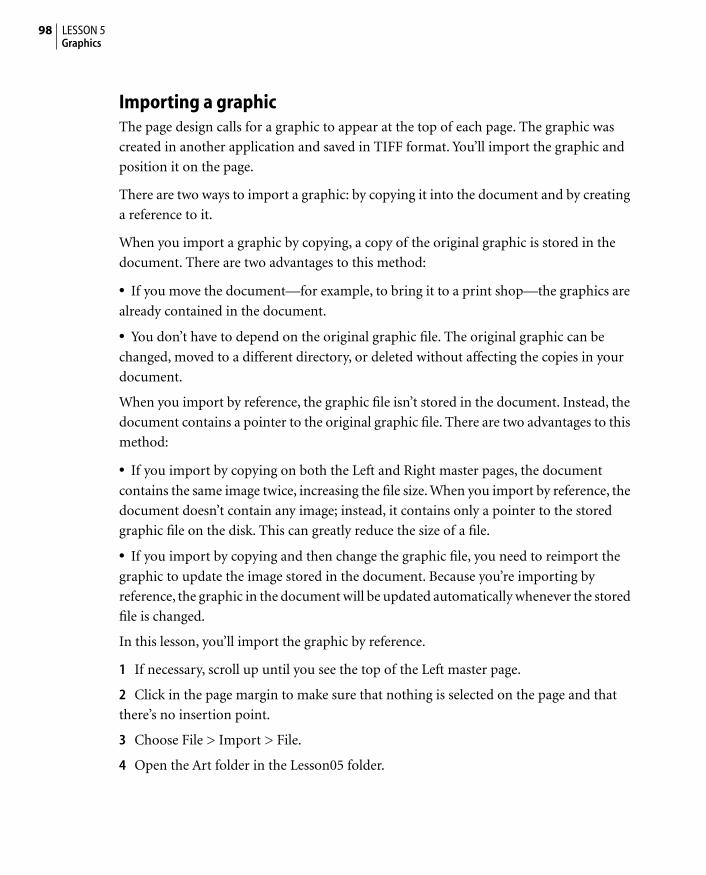
5 Select Import by Reference, then select Banner.tif in the scroll list.
6 Click Import. The Imported Graphic Scaling dialog box appears.
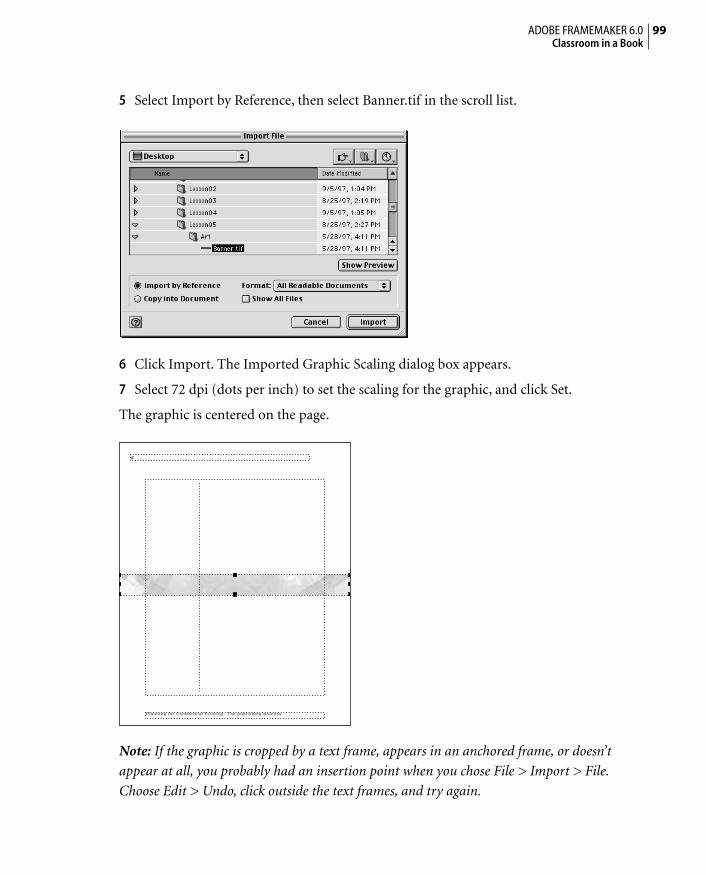
7 Select 72 dpi (dots per inch) to set the scaling for the graphic, and click Set.
The graphic is centered on the page.
Note: If the graphic is cropped by a text frame, appears in an anchored frame, or doesn’t
appear at all, you probably had an insertion point when you chose File > Import > File.
Choose Edit > Undo, click outside the text frames, and try again.
Planning for Commercial Printing: The publishing process
#
LESSON 5100Graphics
Next, you’ll reposition the graphic at the top of the page.
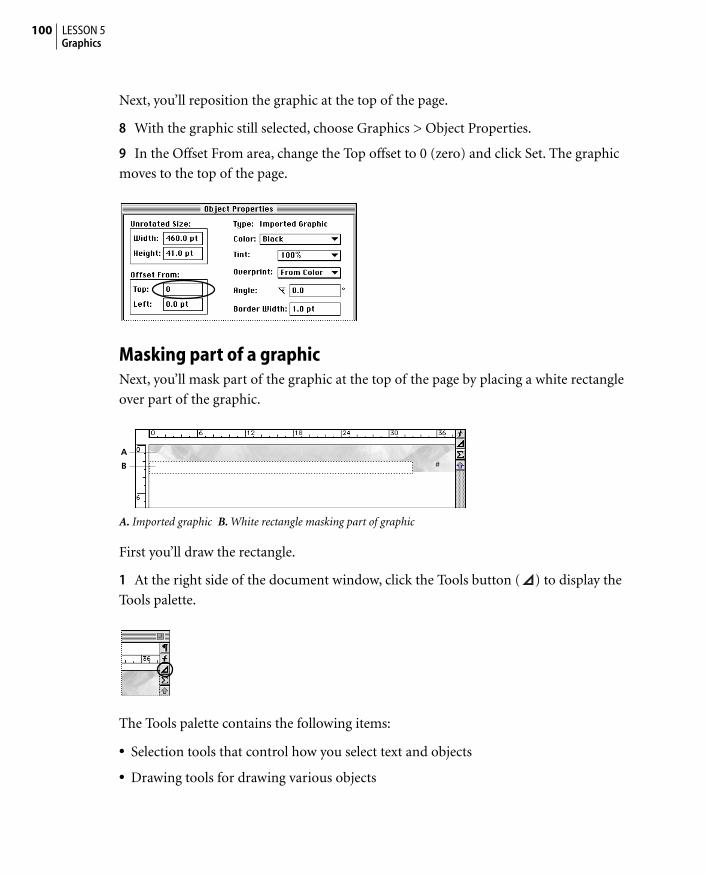
8 With the graphic still selected, choose Graphics > Object Properties.
9 In the Offset From area, change the Top offset to 0 (zero) and click Set. The graphic
moves to the top of the page.
Masking part of a graphicNext, you’ll mask part of the graphic at the top of the page by placing a white rectangle
over part of the graphic.
A. Imported graphic B. White rectangle masking part of graphic
First you’ll draw the rectangle.
1 At the right side of the document window, click the Tools button ( ) to display the
Tools palette.
The Tools palette contains the following items:
• Selection tools that control how you select text and objects
• Drawing tools for drawing various objects
#
A
B
101ADOBE FRAMEMAKER 6.0Classroom in a Book
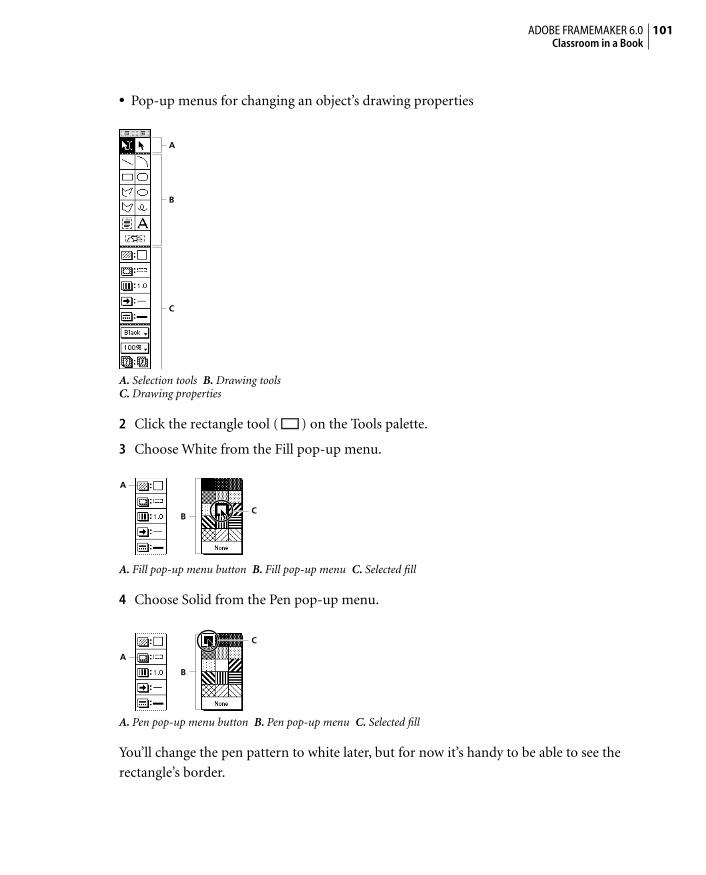
• Pop-up menus for changing an object’s drawing properties
A. Selection tools B. Drawing toolsC. Drawing properties
2 Click the rectangle tool ( ) on the Tools palette.
3 Choose White from the Fill pop-up menu.
A. Fill pop-up menu button B. Fill pop-up menu C. Selected fill
4 Choose Solid from the Pen pop-up menu.
A. Pen pop-up menu button B. Pen pop-up menu C. Selected fill
You’ll change the pen pattern to white later, but for now it’s handy to be able to see the
rectangle’s border.
A
B
C
A
CB
A
B
C
LESSON 5102Graphics
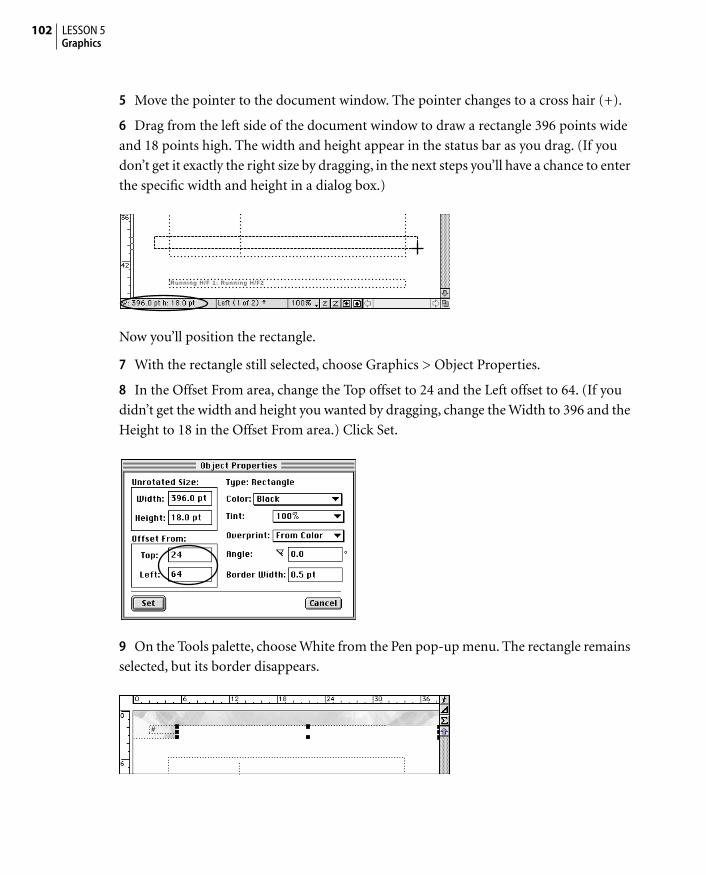
5 Move the pointer to the document window. The pointer changes to a cross hair (+).
6 Drag from the left side of the document window to draw a rectangle 396 points wide
and 18 points high. The width and height appear in the status bar as you drag. (If you
don’t get it exactly the right size by dragging, in the next steps you’ll have a chance to enter
the specific width and height in a dialog box.)
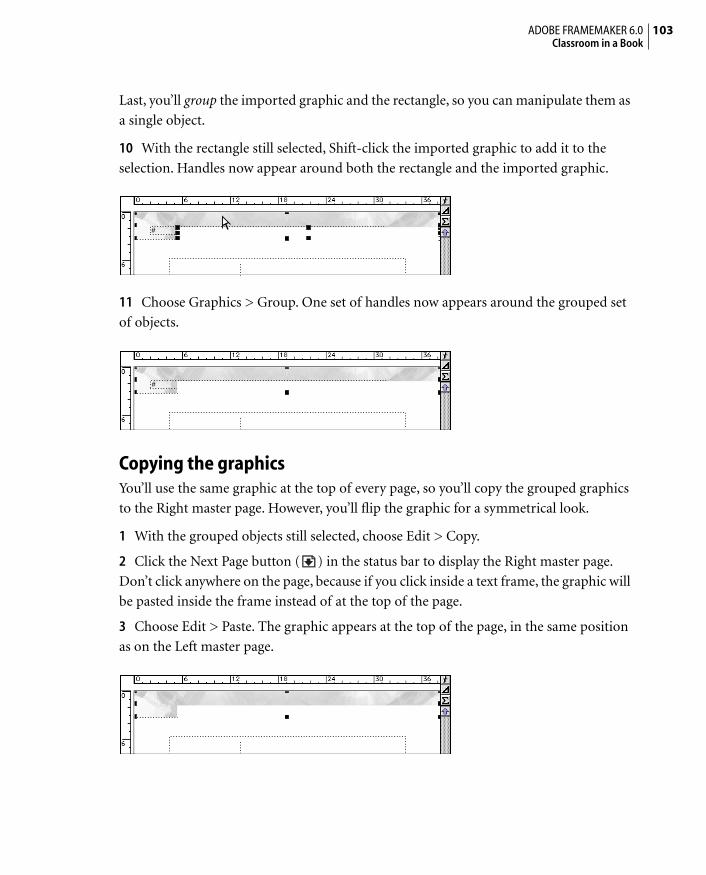
Now you’ll position the rectangle.
7 With the rectangle still selected, choose Graphics > Object Properties.
8 In the Offset From area, change the Top offset to 24 and the Left offset to 64. (If you
didn’t get the width and height you wanted by dragging, change the Width to 396 and the
Height to 18 in the Offset From area.) Click Set.
9 On the Tools palette, choose White from the Pen pop-up menu. The rectangle remains
selected, but its border disappears.
Running H/F 1: Running H/F2
#
103ADOBE FRAMEMAKER 6.0Classroom in a Book
Last, you’ll group the imported graphic and the rectangle, so you can manipulate them as
a single object.
10 With the rectangle still selected, Shift-click the imported graphic to add it to the
selection. Handles now appear around both the rectangle and the imported graphic.
11 Choose Graphics > Group. One set of handles now appears around the grouped set
of objects.
Copying the graphicsYou’ll use the same graphic at the top of every page, so you’ll copy the grouped graphics
to the Right master page. However, you’ll flip the graphic for a symmetrical look.
1 With the grouped objects still selected, choose Edit > Copy.
2 Click the Next Page button ( ) in the status bar to display the Right master page.
Don’t click anywhere on the page, because if you click inside a text frame, the graphic will
be pasted inside the frame instead of at the top of the page.
3 Choose Edit > Paste. The graphic appears at the top of the page, in the same position
as on the Left master page.
#
#
LESSON 5104Graphics
The page header disappeared, because the graphic was pasted in front of the header text
frame.
4 With the graphic still selected, choose Graphics > Send to Back. The header text frame
reappears.
To make the notch in the graphic (created by the white rectangle you drew in the previous
section) appear on the left, you’ll flip the graphic.
5 With the graphic still selected, choose Graphics > Flip Left/Right.
6 If you want, choose View > Body Pages to display the first page of the document, and
then scroll through the document to see the modified headers and footers. When you’re
finished, choose View > Master Pages and make sure the Right master page is displayed.
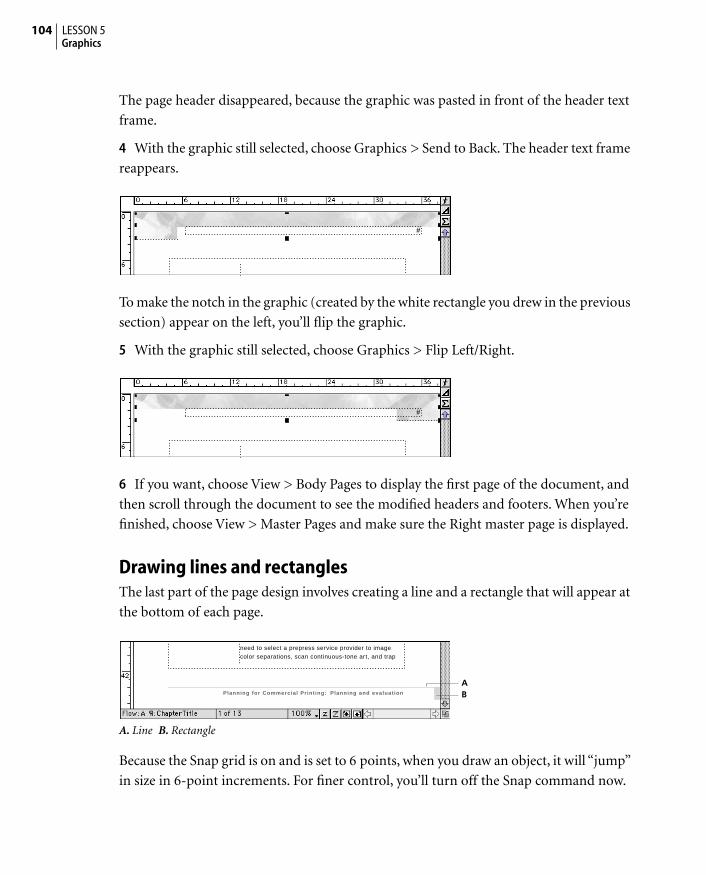
Drawing lines and rectanglesThe last part of the page design involves creating a line and a rectangle that will appear at
the bottom of each page.
A. Line B. Rectangle
Because the Snap grid is on and is set to 6 points, when you draw an object, it will “jump”
in size in 6-point increments. For finer control, you’ll turn off the Snap command now.
#
#
Planning for Commercial Printing: Planning and evaluation
need to select a prepress service provider to image color separations, scan continuous-tone art, and trap
AB
105ADOBE FRAMEMAKER 6.0Classroom in a Book
1 Choose Graphics > Snap to turn off Snap.
Now you’ll draw the line.
2 If necessary, scroll down until you can see the footer on the Right master page.
3 Click the line tool ( ) on the Tools palette.
4 Choose Solid from the Pen pop-up menu.
A. Pen pop-up menu button B. Pen pop-up menu C. Selected fill
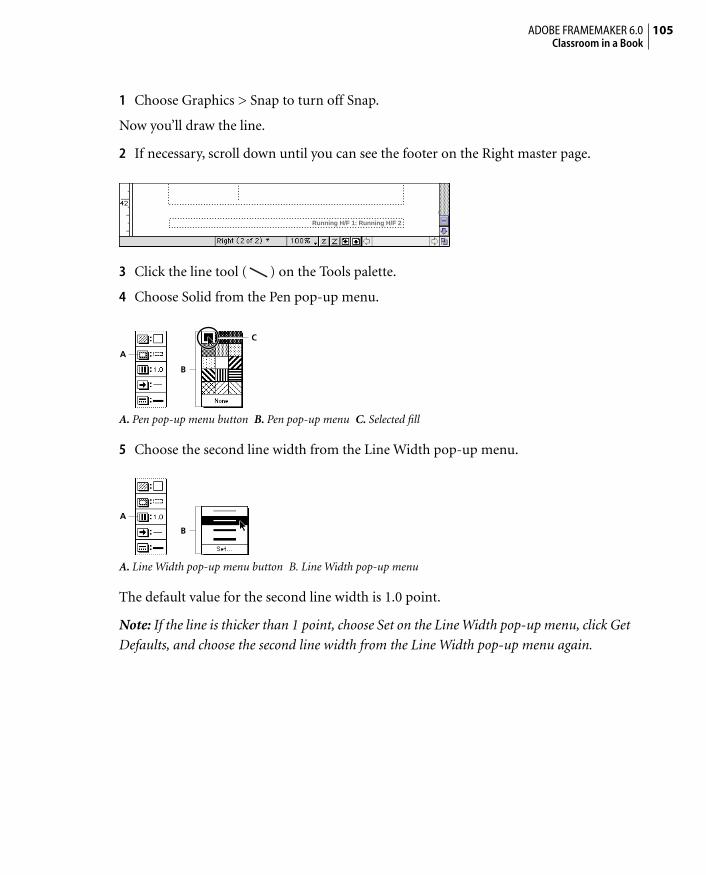
5 Choose the second line width from the Line Width pop-up menu.
A. Line Width pop-up menu button B. Line Width pop-up menu
The default value for the second line width is 1.0 point.
Note: If the line is thicker than 1 point, choose Set on the Line Width pop-up menu, click Get
Defaults, and choose the second line width from the Line Width pop-up menu again.
Running H/F 1: Running H/F 2
A
B
C
A
B
LESSON 5106Graphics
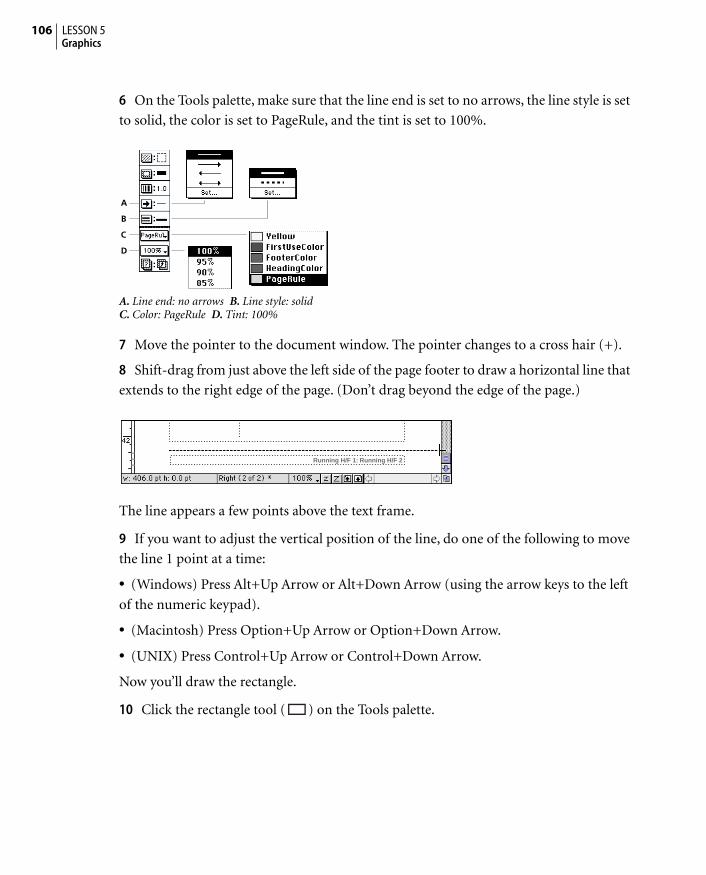
6 On the Tools palette, make sure that the line end is set to no arrows, the line style is set
to solid, the color is set to PageRule, and the tint is set to 100%.
A. Line end: no arrows B. Line style: solidC. Color: PageRule D. Tint: 100%
7 Move the pointer to the document window. The pointer changes to a cross hair (+).
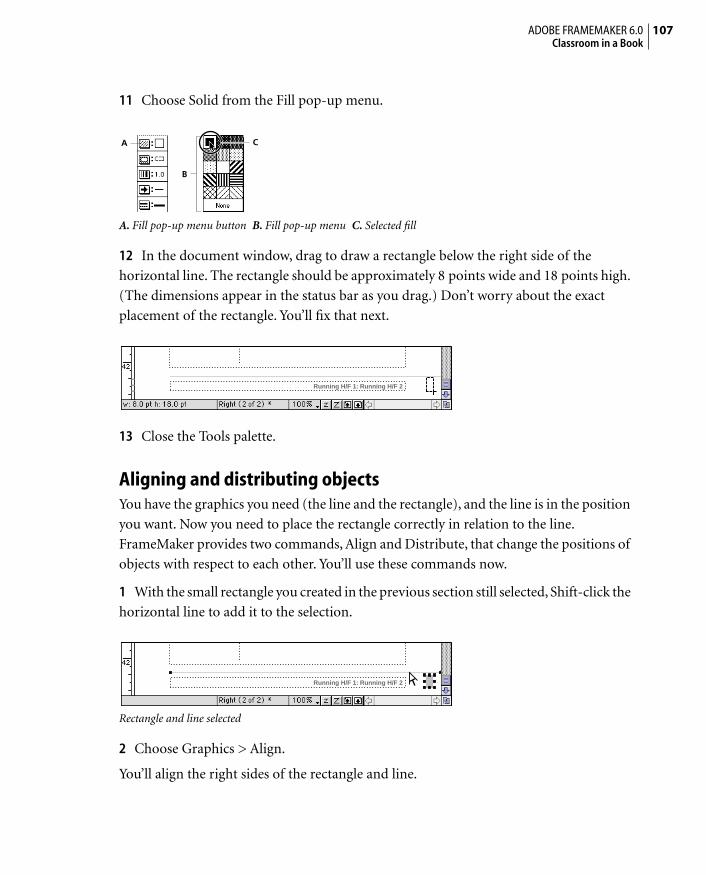
8 Shift-drag from just above the left side of the page footer to draw a horizontal line that
extends to the right edge of the page. (Don’t drag beyond the edge of the page.)
The line appears a few points above the text frame.
9 If you want to adjust the vertical position of the line, do one of the following to move
the line 1 point at a time:
• (Windows) Press Alt+Up Arrow or Alt+Down Arrow (using the arrow keys to the left
of the numeric keypad).
• (Macintosh) Press Option+Up Arrow or Option+Down Arrow.
• (UNIX) Press Control+Up Arrow or Control+Down Arrow.
Now you’ll draw the rectangle.
10 Click the rectangle tool ( ) on the Tools palette.
A
B
C
D
Running H/F 1: Running H/F 2
107ADOBE FRAMEMAKER 6.0Classroom in a Book
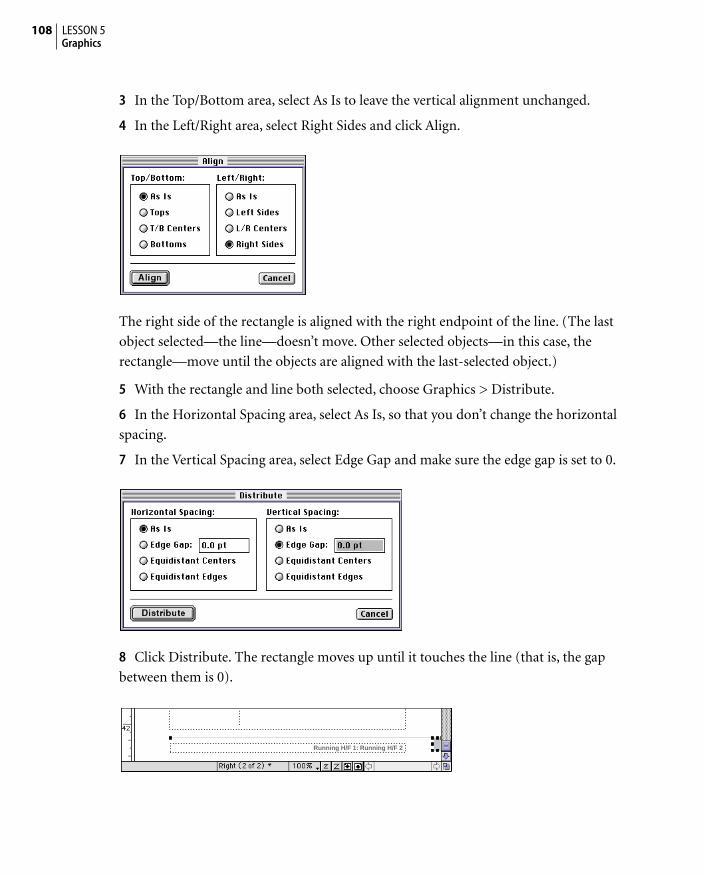
11 Choose Solid from the Fill pop-up menu.
A. Fill pop-up menu button B. Fill pop-up menu C. Selected fill
12 In the document window, drag to draw a rectangle below the right side of the
horizontal line. The rectangle should be approximately 8 points wide and 18 points high.
(The dimensions appear in the status bar as you drag.) Don’t worry about the exact
placement of the rectangle. You’ll fix that next.
13 Close the Tools palette.
Aligning and distributing objectsYou have the graphics you need (the line and the rectangle), and the line is in the position
you want. Now you need to place the rectangle correctly in relation to the line.
FrameMaker provides two commands, Align and Distribute, that change the positions of
objects with respect to each other. You’ll use these commands now.
1 With the small rectangle you created in the previous section still selected, Shift-click the
horizontal line to add it to the selection.
Rectangle and line selected
2 Choose Graphics > Align.
You’ll align the right sides of the rectangle and line.
A
B
C
Running H/F 1: Running H/F 2
Running H/F 1: Running H/F 2
LESSON 5108Graphics
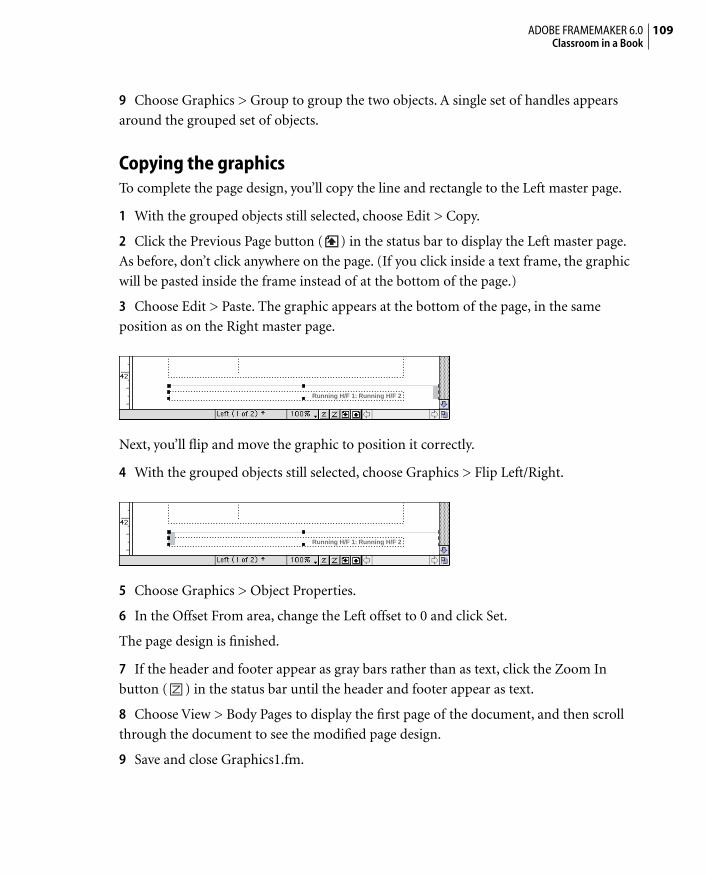
3 In the Top/Bottom area, select As Is to leave the vertical alignment unchanged.
4 In the Left/Right area, select Right Sides and click Align.
The right side of the rectangle is aligned with the right endpoint of the line. (The last
object selected—the line—doesn’t move. Other selected objects—in this case, the
rectangle—move until the objects are aligned with the last-selected object.)
5 With the rectangle and line both selected, choose Graphics > Distribute.
6 In the Horizontal Spacing area, select As Is, so that you don’t change the horizontal
spacing.
7 In the Vertical Spacing area, select Edge Gap and make sure the edge gap is set to 0.
8 Click Distribute. The rectangle moves up until it touches the line (that is, the gap
between them is 0).
Running H/F 1: Running H/F 2
109ADOBE FRAMEMAKER 6.0Classroom in a Book
9 Choose Graphics > Group to group the two objects. A single set of handles appears
around the grouped set of objects.
Copying the graphicsTo complete the page design, you’ll copy the line and rectangle to the Left master page.
1 With the grouped objects still selected, choose Edit > Copy.
2 Click the Previous Page button ( ) in the status bar to display the Left master page.
As before, don’t click anywhere on the page. (If you click inside a text frame, the graphic
will be pasted inside the frame instead of at the bottom of the page.)
3 Choose Edit > Paste. The graphic appears at the bottom of the page, in the same
position as on the Right master page.
Next, you’ll flip and move the graphic to position it correctly.
4 With the grouped objects still selected, choose Graphics > Flip Left/Right.
5 Choose Graphics > Object Properties.
6 In the Offset From area, change the Left offset to 0 and click Set.
The page design is finished.
7 If the header and footer appear as gray bars rather than as text, click the Zoom In
button ( ) in the status bar until the header and footer appear as text.
8 Choose View > Body Pages to display the first page of the document, and then scroll
through the document to see the modified page design.
9 Save and close Graphics1.fm.
Running H/F 1: Running H/F 2
Running H/F 1: Running H/F 2
LESSON 5110Graphics
Moving onYou’ve completed this lesson. For in-depth information about graphics, see Chapter 8,
“Graphics,” and Chapter 17, “Importing, Linking, and Exporting,” in the Adobe
FrameMaker User Guide.
Review questionsFor answers to these questions, see page 374.
1 How large is a point? A pica?
2 What does the Snap command do?
3 What is the difference between importing a graphic by copying it into the document
and importing a graphic by reference?
4 Name an advantage of each method.
5 What is the function of the Tools palette?
6 What does the Group command do?