Embed Size (px)
Citation preview
Order Number: 329685-004US
Intel® Galileo Board Getting Started Guide 16 October 2013
Intel® Galileo Board Getting Started Guide
2 Order Number: 329685-004US
Getting Started Guide This document explains how to connect your Intel® Galileo board to the computer, install the software on your computer, and upload your first sketch.
You should be able to do this in under an hour (not counting your download time).
Note: This release uses a special version of the Arduino IDE. The first thing you must do is download it from the Intel website below and update the SPI flash on the board.
The basic steps you will follow are: 1. Get a board and cables 2. Download the Arduino environment and board firmware 3. Connect the board 4. Install the drivers and other software 5. Launch the Arduino IDE application 6. Update your board firmware 7. Open the blink example 8. Select your board 9. Select your serial port 10. Upload the program See these sections for advanced tasks: 11. Booting your board from an SD card (mandatory for WiFi) 12. Manually update your board firmware (optional)
For more information about Intel® Galileo, including online communities and support, try these links:
http://www.intel.com/support/galileo
http://communities.intel.com/community/makers
http://maker.intel.com
1. Get a board and cables
The kit contains:
• 1x Intel® Galileo Customer Reference Board (CRB) (Fab D with blue PCB)
• 1x 5v power supply with cable Warning: You must use a power supply or you will damage the board!
• 4x standoff separators
• 4x screws
• 1x USB Type A Male to Micro-B Male cable
Intel® Galileo Board Getting Started Guide
Order Number: 329685-004US 3
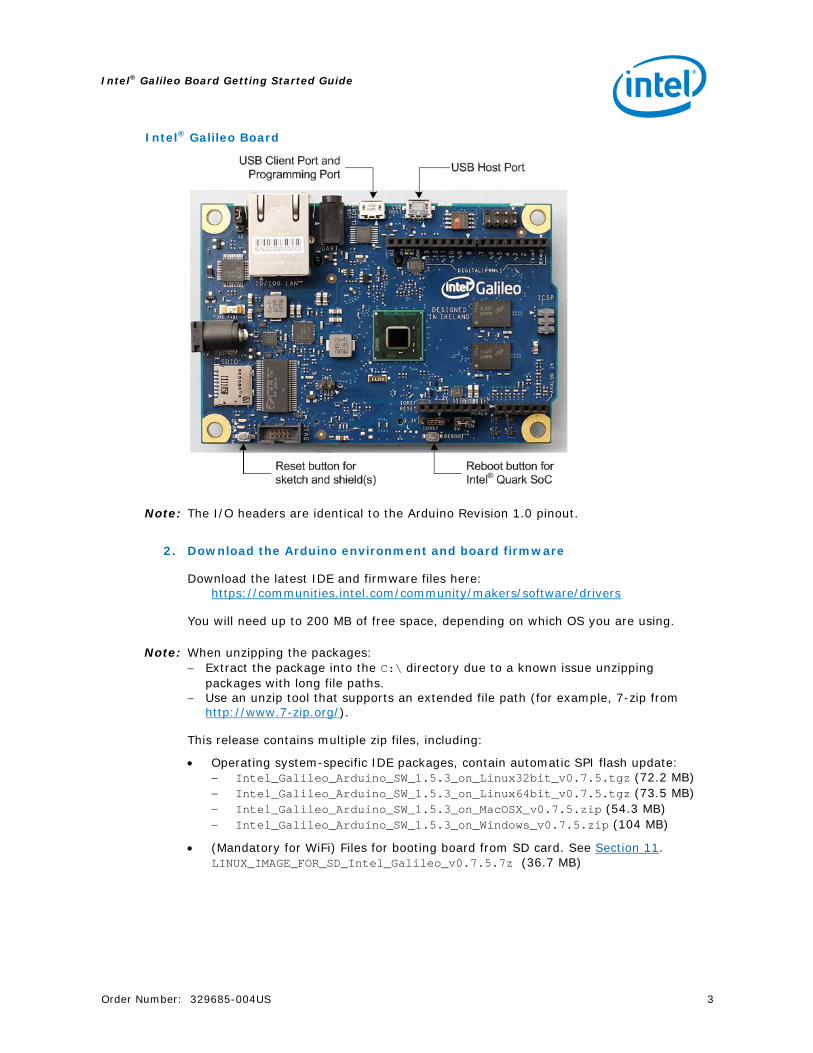
Intel® Galileo Board
Note: The I/O headers are identical to the Arduino Revision 1.0 pinout.
2. Download the Arduino environment and board firmware
Download the latest IDE and firmware files here: https://communities.intel.com/community/makers/software/drivers
You will need up to 200 MB of free space, depending on which OS you are using.
Note: When unzipping the packages: − Extract the package into the C:\ directory due to a known issue unzipping
packages with long file paths. − Use an unzip tool that supports an extended file path (for example, 7-zip from
http://www.7-zip.org/).
This release contains multiple zip files, including:
• Operating system-specific IDE packages, contain automatic SPI flash update: − Intel_Galileo_Arduino_SW_1.5.3_on_Linux32bit_v0.7.5.tgz (72.2 MB) − Intel_Galileo_Arduino_SW_1.5.3_on_Linux64bit_v0.7.5.tgz (73.5 MB) − Intel_Galileo_Arduino_SW_1.5.3_on_MacOSX_v0.7.5.zip (54.3 MB) − Intel_Galileo_Arduino_SW_1.5.3_on_Windows_v0.7.5.zip (104 MB)
• (Mandatory for WiFi) Files for booting board from SD card. See Section 11. LINUX_IMAGE_FOR_SD_Intel_Galileo_v0.7.5.7z (36.7 MB)

Intel® Galileo Board Getting Started Guide
4 Order Number: 329685-004US
• (Optional) Files for updating SPI flash manually. See Section 12 for details. LITTLE_LINUX_IMAGE_FirmwareUpdate_Intel_Galileo_v0.7.5.7z (5.5 MB) − CapsuleApp.efi − sysimage_Intel_Galileo_v0.7.5.cap
• (Optional) Board Support Package (BSP) sources: The BSP build process requires additional 30 GB of free disk space. − Board_Support_Package_Sources_for_Intel_Quark_v0.7.5.7z (3.2 MB)
• (Optional) Board Support Package (BSP) sources including Yocto archive: The BSP build process requires additional 30 GB of free disk space. Board_Support_Package_Sources_for_Intel_Quark_v0.7.5+full_yocto_archive.tar.gz (1.4 GB)
If you are working with the BSP sources, see the Intel® Quark SoC X1000 BSP Build Guide [https://communities.intel.com/docs/DOC-21882]
Windows*: 1. Unzip the IDE file to the C:\ directory. 2. Make sure to preserve the folder structure. Double-click the folder to open it.
If you are updating your IDE, be sure to uninstall the previous IDE version first.
Linux*: 1. In your home directory, extract the package with the appropriate command:
tar -zxvf arduino-1.5.3-linux32.tar.gz or tar -zxvf arduino-1.5.3-linux64.tar.gz
2. To avoid interference with the IDE, you must disable modem manager. The exact command will depend on your Linux distribution. For example, the command sudo apt-get remove modemmanager may work.
3. In the same directory where the package was downloaded, launch the Arduino IDE by executing ./arduino
Note: The first time you compile and install a sketch, the Galileo software will be installed automatically. This requires appropriate file and directory access permissions. You may be required to run the IDE as root or using sudo arduino depending on your Linux distribution.
Mac OS*:
Caution: You must unzip the IDE on your Mac’s normal hard disk. Once the IDE is unzipped, you cannot run it from or transfer it to USB drives or any other media formatted for use in Windows computers or it will be corrupted.
1. Download the zip file on the Mac hard drive and unzip it. 2. Drag and drop the Arduino application onto the Applications folder on your Mac.
3. Connect the board
WARNING: You must use the power supply or you will damage the board. Connect the 5V power cable to the Galileo board and to a power outlet.
Note: Always connect the 5V power before any other connection.
The green power LED (labelled ON) will turn on.
Intel® Galileo Board Getting Started Guide
Order Number: 329685-004US 5
4. Install the drivers and other software
Windows: 1. If not done already, connect the 5V power cable to the Galileo board and to a
power outlet.
Note: Always connect the 5V power before the USB connection.
2. Connect the USB cable to the USB Client Port (closest to the Ethernet) and to a PC. Wait for Windows to begin its driver installation process. After a few moments, the process will fail.
3. Click on the Start Menu, and open up the Control Panel. While in the Control Panel, navigate to System. Next, click on System. Once the System window is up, open the Device Manager.
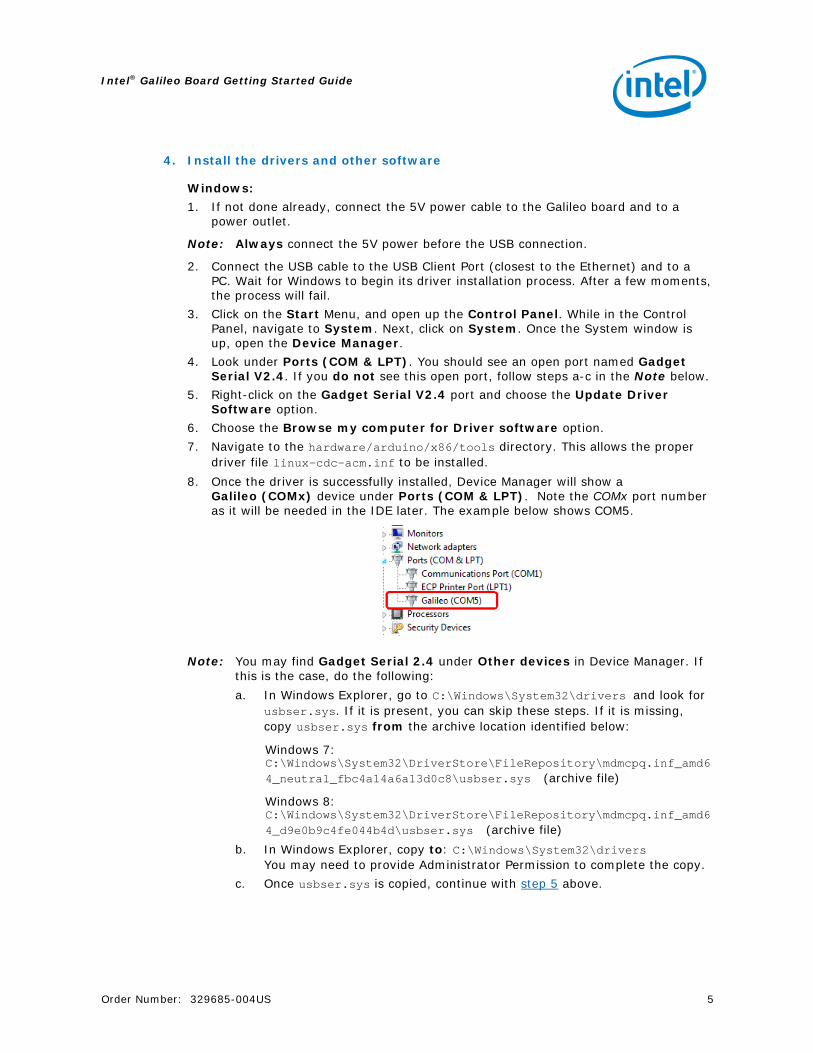
4. Look under Ports (COM & LPT). You should see an open port named Gadget Serial V2.4. If you do not see this open port, follow steps a-c in the Note below.
5. Right-click on the Gadget Serial V2.4 port and choose the Update Driver Software option.
6. Choose the Browse my computer for Driver software option. 7. Navigate to the hardware/arduino/x86/tools directory. This allows the proper
driver file linux-cdc-acm.inf to be installed. 8. Once the driver is successfully installed, Device Manager will show a
Galileo (COMx) device under Ports (COM & LPT). Note the COMx port number as it will be needed in the IDE later. The example below shows COM5.
Note: You may find Gadget Serial 2.4 under Other devices in Device Manager. If this is the case, do the following: a. In Windows Explorer, go to C:\Windows\System32\drivers and look for
usbser.sys. If it is present, you can skip these steps. If it is missing, copy usbser.sys from the archive location identified below:
Windows 7: C:\Windows\System32\DriverStore\FileRepository\mdmcpq.inf_amd64_neutral_fbc4a14a6a13d0c8\usbser.sys (archive file)
Windows 8: C:\Windows\System32\DriverStore\FileRepository\mdmcpq.inf_amd64_d9e0b9c4fe044b4d\usbser.sys (archive file)
b. In Windows Explorer, copy to: C:\Windows\System32\drivers You may need to provide Administrator Permission to complete the copy.
c. Once usbser.sys is copied, continue with step 5 above.
Intel® Galileo Board Getting Started Guide
6 Order Number: 329685-004US
Linux: 1. If not done already, connect the 5V power cable to the board and to a power
outlet. Wait for the board to boot.
Note: Always connect the 5V power before the USB connection.
2. Connect the USB cable to the USB Client Port (closest to the Ethernet) and to a PC.
3. Check that ACM port is available by typing in the terminal ls /dev/ttyACM*
Note: If the /dev/ttyACM0 port is not present, follow the procedure below: a. Create a file etc/udev/rules.d/50-arduino.rules and add the following:
KERNEL=="ttyACM[0-9]*", MODE="0666" b. Restart the udev with the following command: sudo service udev restart
If you are using a virtual machine (VM), you may need to reboot Linux within the VM.
4. Launch the IDE.
The first time you compile and install a sketch, the Galileo software will be installed automatically. This requires appropriate file and directory access permissions. You may be required to run the IDE as root or using sudo arduino depending on your Linux distribution.
5. Select your board via Tools > Board > Intel® Galileo 6. Select the port Tools > Serial Port > /dev/ttyAMC0
Note: If the serial ttyACM0 is not available, make sure you have the proper rights to access the ports. If the serial port is disabled on your IDE, exit the IDE and execute again using the command: sudo arduino
Mac OS:
The Galileo board is supported by the Mac OS built-in USB drivers, however, the board has to boot for it to show up because the port is driven by software on the board. 1. If not done already, connect the 5V power cable to the board and to a power
outlet. Wait for the board to boot.
Note: Always connect the 5V power before the USB connection.
2. Connect the USB cable to the USB Client Port (closest to the Ethernet) and to your Mac. Check the System Profiler > USB setting to be sure that Gadget Serial is selected. If you are installing a new version of the IDE, you may need to re-select this setting.
3. In the Arduino IDE, the correct serial port shows in the Tools > Serial Port menu as /dev/cu.usbmodemnnnnn where nnnnn is a number such as fd121.
Do not select the /dev/tty port.
5. Launch the Arduino IDE application
Windows: In the folder arduino-1.5.3, double-click arduino.exe
Linux: In the folder arduino-1.5.3, launch Arduino by executing ./arduino
Intel® Galileo Board Getting Started Guide
Order Number: 329685-004US 7
Note: You may see an error stating Java is not present. If you are using Ubuntu, run the command sudo apt-get install default-jre to clear this error.
Mac OS: Double-click the Intel Galileo Install disk image. When the disk volume mounts, drag and drop the Arduino application on your Applications folder.
6. Update your board firmware
The IDE contains the release-specific firmware for your board. Follow the steps below to update your board firmware using the IDE. 1. Remove all power from the board (USB and 5 V power cord). This makes sure that
no sketch is running on the board. 2. Remove the SD card from the board (if it is inserted). 3. Power up the board by plugging in the 5V power supply. 4. Connect the USB cable to the USB Client Port (closest to the Ethernet).
Note which COM port it is connected on. 5. Launch the IDE and select the board via Tools > Board > Intel® Galileo 6. Select the correct serial port using Tools > Serial Port
Note: Do not download any sketch to the board before you upgrade the firmware.
7. Launch the software upgrade using Help > Firmware Upgrade 8. A message is displayed asking you to confirm that 5V power cable is plugged in.
Click Yes if it is connected. If no cable is plugged in, exit the upgrade process by selecting No, connect the power, and restart this process.
9. The board can be upgraded to newer software or downgraded to older software. The next message displays the current software version that is on the board and the software version that you are trying to flash onto the board. Select Yes to either Upgrade/Downgrade or flash the same software again.
10. The upgrade progress takes about 6 minutes and is displayed in several popup messages. During the upgrade process, you will not have access to the IDE.
Note: The power and USB cables must stay connected during the upgrade process.
11. When the upgrade completes, a message is displayed stating Target Firmware upgraded successfully. Click OK to close the message.
If you want to flash a different firmware version that is not contained in the IDE, download the SPI flash image capsule files as described in Section 2.
The downloaded capsule should be copied to the following locations, depending upon your operating system. Make sure that there is only one *.cap file in the location below. If you are downloading a new file, rename the previous *.cap to some other extension.
• Windows: Arduino-1.5.3/hardware/tools/x86/bin/
• Linux: Arduino-1.5.3/hardware/tools/
• Mac OS: Arduino.app/Contents/Resources/Java/hardware/tools/x86/bin/
Note: If you see a failure at any stage of the upgrade, refer to the Release Notes for known issues and possible workarounds.
Intel® Galileo Board Getting Started Guide
8 Order Number: 329685-004US
7. Open the blink example
Open the LED blink example sketch: File > Examples > 1.Basics > Blink.
8. Select your board
Select Tools > Board > Intel® Galileo.
Note: If the IDE was closed and then reopened, it will default to a board that was previously selected. You may need to explicitly select Intel® Galileo.
9. Select your serial port
Select the serial device of your board from the Tools > Serial Port menu.
Windows: Use the COMx number assigned earlier. You can retrieve the port number by navigating to: Start > Control Panel > System and Security > System > Device Manager Look under Ports (COM & LPT) to see which COMx is assigned to Gadget Serial.
Linux: Use /dev/ttyAMC0
Mac OS: Use /dev/cu.usbmodemnnnnn
10. Upload the program
Click the Upload button in the IDE and wait a few seconds. If the upload is successful, the message Done uploading. will appear in the status bar.
A few seconds after the upload finishes, you will see a green LED on the board start to blink. Congratulations! You've gotten your board up and running.
For more information about Intel® Galileo, including online communities and support, try these links:
http://www.intel.com/support/galileo
http://communities.intel.com/community/makers
http://maker.intel.com
11. Booting your board from an SD card (mandatory for WiFi)
Follow these steps to boot your board from an SD card. This setup also allows you to save your sketch to the Galileo board, so it will be able to repeat sketches after board power-down. (These steps create a persistent /sketch folder and rootfs.)
Note: If you want to use WiFi, you must follow these steps. The WiFi driver is not present in the Linux image in SPI flash because it is too large. The Linux SD image also includes ALSA, V4L2, python, SSH, node.js, and openCV.
Required files are in the LINUX_IMAGE_FOR_SD_Intel_Galileo_v0.7.5.7z zip file (download link in Section 2).
Intel® Galileo Board Getting Started Guide
Order Number: 329685-004US 9
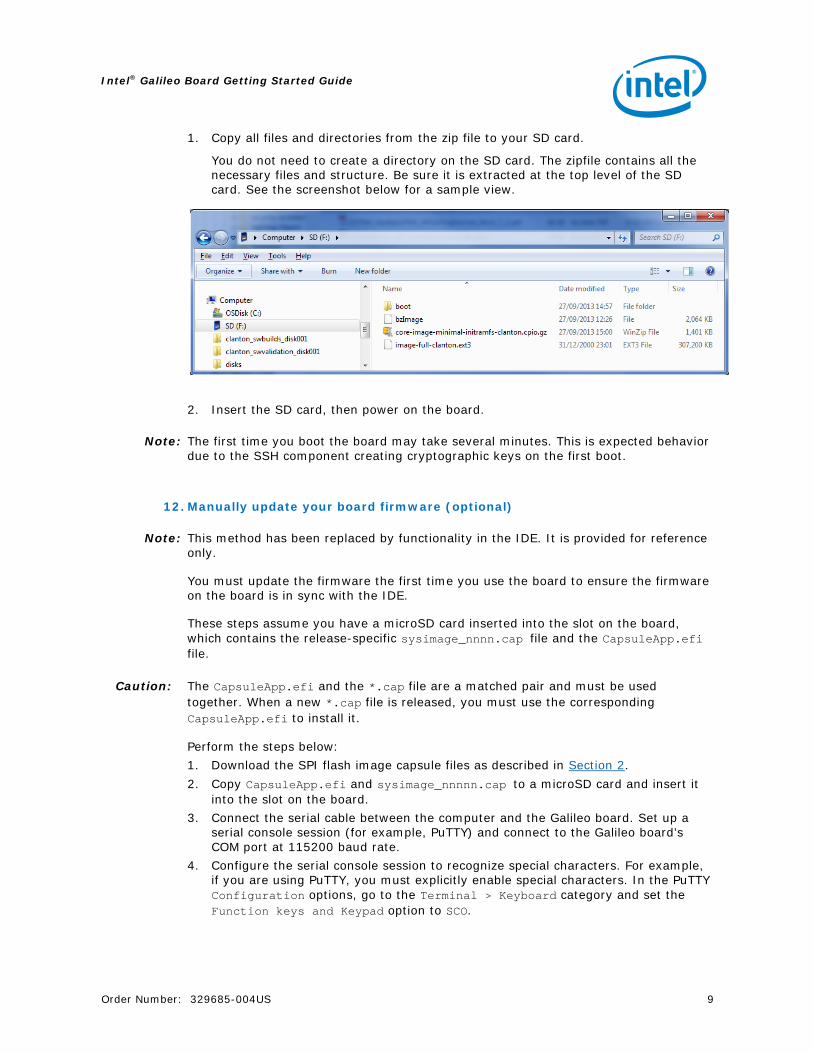
1. Copy all files and directories from the zip file to your SD card.
You do not need to create a directory on the SD card. The zipfile contains all the necessary files and structure. Be sure it is extracted at the top level of the SD card. See the screenshot below for a sample view.
2. Insert the SD card, then power on the board.
Note: The first time you boot the board may take several minutes. This is expected behavior due to the SSH component creating cryptographic keys on the first boot.
12. Manually update your board firmware (optional)
Note: This method has been replaced by functionality in the IDE. It is provided for reference only.
You must update the firmware the first time you use the board to ensure the firmware on the board is in sync with the IDE.
These steps assume you have a microSD card inserted into the slot on the board, which contains the release-specific sysimage_nnnn.cap file and the CapsuleApp.efi file.
Caution: The CapsuleApp.efi and the *.cap file are a matched pair and must be used together. When a new *.cap file is released, you must use the corresponding CapsuleApp.efi to install it.
Perform the steps below: 1. Download the SPI flash image capsule files as described in Section 2. 2. Copy CapsuleApp.efi and sysimage_nnnnn.cap to a microSD card and insert it
into the slot on the board. 3. Connect the serial cable between the computer and the Galileo board. Set up a
serial console session (for example, PuTTY) and connect to the Galileo board’s COM port at 115200 baud rate.
4. Configure the serial console session to recognize special characters. For example, if you are using PuTTY, you must explicitly enable special characters. In the PuTTY Configuration options, go to the Terminal > Keyboard category and set the Function keys and Keypad option to SCO.

Intel® Galileo Board Getting Started Guide
10 Order Number: 329685-004US
5. Power on the board. A GNU GRUB boot loader menu is displayed (below). Exit GRUB by entering c and quit as shown below.
Press c to get a command line.
At the GRUB command line, type quit.
Intel® Galileo Board Getting Started Guide
Order Number: 329685-004US 11
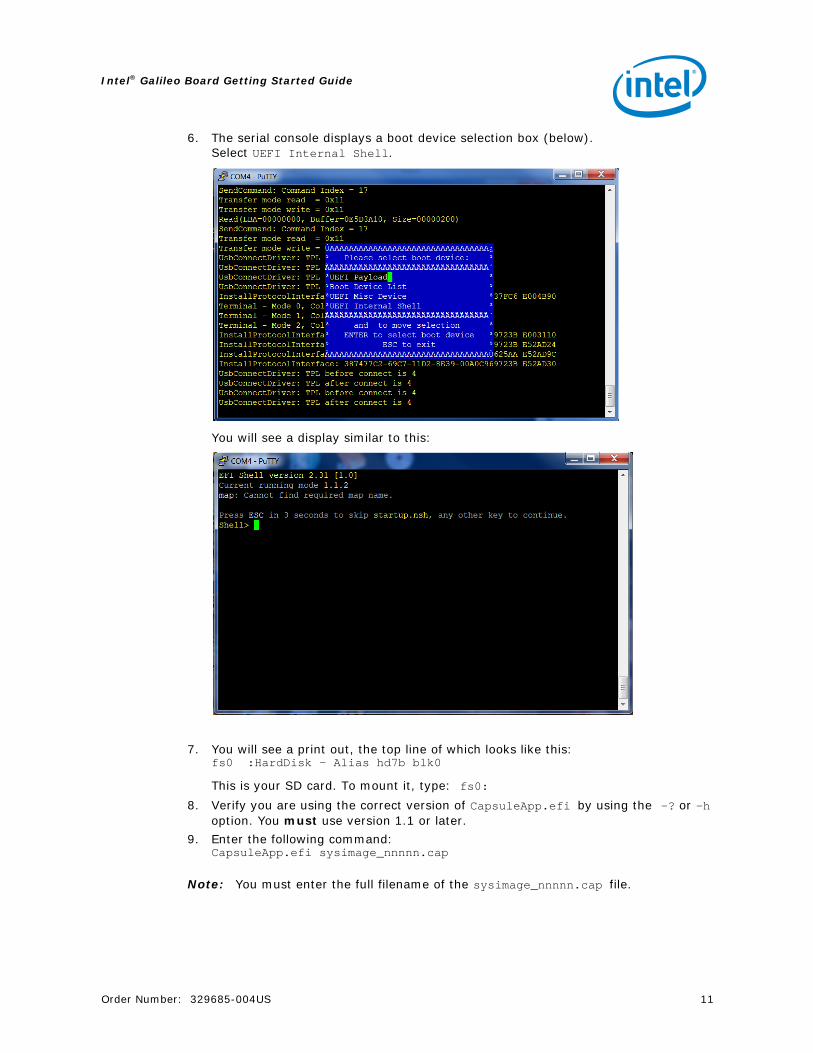
6. The serial console displays a boot device selection box (below). Select UEFI Internal Shell.
You will see a display similar to this:
7. You will see a print out, the top line of which looks like this: fs0 :HardDisk - Alias hd7b blk0
This is your SD card. To mount it, type: fs0: 8. Verify you are using the correct version of CapsuleApp.efi by using the -? or –h
option. You must use version 1.1 or later. 9. Enter the following command:
CapsuleApp.efi sysimage_nnnnn.cap
Note: You must enter the full filename of the sysimage_nnnnn.cap file.
Intel® Galileo Board Getting Started Guide
12 Order Number: 329685-004US
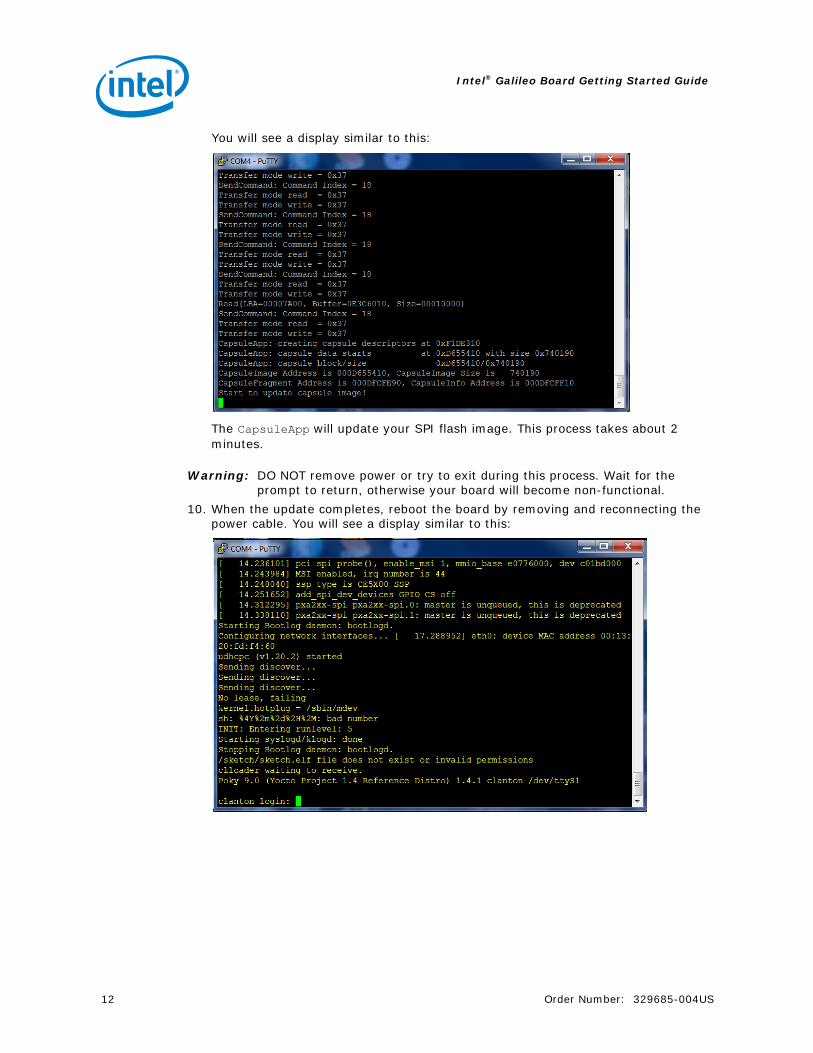
You will see a display similar to this:
The CapsuleApp will update your SPI flash image. This process takes about 2 minutes.
Warning: DO NOT remove power or try to exit during this process. Wait for the prompt to return, otherwise your board will become non-functional.
10. When the update completes, reboot the board by removing and reconnecting the power cable. You will see a display similar to this:
Intel® Galileo Board Getting Started Guide
Order Number: 329685-004US 13
Revision History
Date Document
Revision Description
16 October 2013 004 Updated download URL and other minor text updates.
10 October 2013 003 Updated file names and sizes.
04 October 2013 002 Added links to maker community and support pages. Updated board picture with additional callouts.
02 October 2013 001 First external release: Package Version: 0.7.5 for Arduino IDE v1.5.3
INFORMATION IN THIS DOCUMENT IS PROVIDED IN CONNECTION WITH INTEL PRODUCTS. NO LICENSE, EXPRESS OR IMPLIED, BY ESTOPPEL OR OTHERWISE, TO ANY INTELLECTUAL PROPERTY RIGHTS IS GRANTED BY THIS DOCUMENT. EXCEPT AS PROVIDED IN INTEL'S TERMS AND CONDITIONS OF SALE FOR SUCH PRODUCTS, INTEL ASSUMES NO LIABILITY WHATSOEVER AND INTEL DISCLAIMS ANY EXPRESS OR IMPLIED WARRANTY, RELATING TO SALE AND/OR USE OF INTEL PRODUCTS INCLUDING LIABILITY OR WARRANTIES RELATING TO FITNESS FOR A PARTICULAR PURPOSE, MERCHANTABILITY, OR INFRINGEMENT OF ANY PATENT, COPYRIGHT OR OTHER INTELLECTUAL PROPERTY RIGHT.
A "Mission Critical Application" is any application in which failure of the Intel Product could result, directly or indirectly, in personal injury or death. SHOULD YOU PURCHASE OR USE INTEL'S PRODUCTS FOR ANY SUCH MISSION CRITICAL APPLICATION, YOU SHALL INDEMNIFY AND HOLD INTEL AND ITS SUBSIDIARIES, SUBCONTRACTORS AND AFFILIATES, AND THE DIRECTORS, OFFICERS, AND EMPLOYEES OF EACH, HARMLESS AGAINST ALL CLAIMS COSTS, DAMAGES, AND EXPENSES AND REASONABLE ATTORNEYS' FEES ARISING OUT OF, DIRECTLY OR INDIRECTLY, ANY CLAIM OF PRODUCT LIABILITY, PERSONAL INJURY, OR DEATH ARISING IN ANY WAY OUT OF SUCH MISSION CRITICAL APPLICATION, WHETHER OR NOT INTEL OR ITS SUBCONTRACTOR WAS NEGLIGENT IN THE DESIGN, MANUFACTURE, OR WARNING OF THE INTEL PRODUCT OR ANY OF ITS PARTS.
Intel may make changes to specifications and product descriptions at any time, without notice. Designers must not rely on the absence or characteristics of any features or instructions marked "reserved" or "undefined". Intel reserves these for future definition and shall have no responsibility whatsoever for conflicts or incompatibilities arising from future changes to them. The information here is subject to change without notice. Do not finalize a design with this information.
The products described in this document may contain design defects or errors known as errata which may cause the product to deviate from published specifications. Current characterized errata are available on request.
Contact your local Intel sales office or your distributor to obtain the latest specifications and before placing your product order.
Copies of documents which have an order number and are referenced in this document, or other Intel literature, may be obtained by calling 1-800-548-4725, or go to: http://www.intel.com/design/literature.htm
Intel and the Intel logo are trademarks or registered trademarks of Intel Corporation or its subsidiaries in the United States and other countries.
*Other names and brands may be claimed as the property of others.
Copyright © 2013, Intel Corporation. All rights reserved.