Embed Size (px)
Citation preview
Vaasan ammattikorkeakoulu
University of Applied Sciences
Allan Henrikki Ojala
Installing Paparazzi Autopilot into a Model Airplane
2010
2
Vaasan ammattikorkeakoulu
University of Applied Sciences
Degree Programme of Information Technology
ABSTRACT
Author Allan Ojala
Topic Installing Paparazzi Autopilot into a Model Airplane
Year 2010
Language English
Pages 48
Supervisor Johan Dams
This Bachelor degree study explores the open source Autopilot “Paparazzi” that was installed into a model airplane. The aim for this was to get the model airplane to fly short flight and study what difficulties there are in a project like this. The field of UAV research is innovative and number of companies selling ready UAV products is growing, also many education institutes and amateurs are making their own implementations of UAVs.
Paparazzi autopilot is a complete system of hardware and software made by the ENAC University in France. ENAC stands for “École Nationale de l'Aviation Civile” this tranlates to “The French Civil Aviation University”.
The results from this study can for instance be used to assist in building less expensive unmanned aerial vehicles, or to aid teaching in embebbed system projects.
Keywords Autopilot, Open Source, Paparazzi, Model Airplane
3
Vaasan ammattikorkeakoulu
University of Applied Sciences
Degree Programme of Information Technology
TIIVISTELMÄ
Tekijä Allan Ojala
Opinnäytetyön nimi Paparazzi autopilotin asentaminen lennokkiin
Vuosi 2010
Kieli englanti
Sivumäärä 48
Ohjaaja Johan Dams
Tutkimuksessa asennettiin avoimen lähdekoodin Paparazzi autopilotti radio-ohjattavaan lennokkiin. Tutkimuksen tavoitteena oli saada autopilotilla varustettu lennokki lentämään lyhyen lennon, sekä tutkia minkälaisia vaikeuksia tälläisessä työsssä tulee. Siviikäyttöön tarkoitettujen miehittämättömien lentokoneiden markkinat on uusi ala ja markkinoille tulee jatkuvasti uusia yrityksiä ja tuotteita, myös monet oppilaitokset ja harrastajat tekevät omia toteuksiaan.
Paparazzi -autopilotti on täysiverinen laite- ja ohjelmistokokonaisuus, jonka on kehittänyt Ranskan ENAC yliopisto. ENAC on lyhenne “École Nationale de l'Aviation Civile”, joka on suomeksi “Ranskan siviili-ilmailu yliopisto”.
Tuloksia voidaan käyttää halvempien UAV -järjestelmien rakentamisen apuna tai alustavana työnä opetuksellisten sulautettujen järjestelmien projekteissa.
Asiasanat Autopilotti, avoin lähdekoodi, Paparazzi, lennokki
4
FOREWORD
This thesis was made for Vaasa University of Applied Sciences and was
sponsored by WRD Systems. In this project it was studied how to mount
Paparazzi electronics to an RC airplane and how to configure the system software.
Tasks in this project were to choose, purchase and build an RC airplane. Install
electronics, test, learn to fly an RC airplanes, learn how Paparazzi works and
configure the settings for the autopilot.
The results of this study can benefit makers of inexpensive civilian purpose UAV
planes. Civilian UAV planes could be used for example observing wild game in
forests, searching people and checking crop damage from air. Benefits of less
expensive UAVs would be the same as with aerial photography in general. There
are ready UAV products on the markets but they are expensive and difficult to
obtain and the products are proprietary. Aerial photography has already been done
with RC airplanes for several years now but the planes have been flown manually
and are limited to fly within visibility range and also suffer from other difficulties
like vibration and plane rocking. An RC airplane with autopilot would take away
limitation of flying within visibility range and would help to stabilize the airplane
during taking video or photographs from the air.
5
USED ABBREVIATIONS
Caml Originally acronym for Categorial Abstract Machine Language. Is a general purpose programming language that supports functional, imperative and OOP style.
CLI Command Line Interface. A mechanism to interact with computer using typed commands.
DOM Document Object Model. Is a platform and language-neutral interface that allows programs and scripts to dynamically access and update the content, structure, and style of a document.
DTD Document Type Definition. Defines the legal building blocks of anXML document.
ESC Electronic Speed Controller. An electronic device which varies the speed of a brushed or brushless engine.
FAA Federal Aviation Administration. FG Flight Gear. An open source cross platform flight simulator.FMS Flying Model Simulator. A freeware RC flight simulator software.GCS Ground Control Station. A GUI in the Paparazzi software used to
control the plane.GPS Global Positioning SystemGUI Graphical User InterfaceIO Input OutputOCaml Objective Caml. See Caml abbreviation.OOP Object Oriented Programming. Is the most used style of
programming where entities are divided into classes.OS Operating System. Software that interacts between programs and
hardware in computers.RC Radio Controlled. A common abbreviation of remotely controlled
toys or vehicles.TD Touch Down. The moment when an airplane lands and touches
ground.UAV Unmanned Aerial Vehicle. W3C World Wide Web Consortium. Is an international community where
member organizations, a full-time staff and the public work together to develop web standards.
WP Waypoint. A stopping place on a journey.XML Extended Markup Language. Markup language designed to
transport and store data.XSL Extensible Stylesheet Language. Is a style sheet language for XML
documents.XSLT XSL Transformations. Transformations of XML documents into
other formats like HTML.
6
CONTENTS1. INTRODUCTION................................................................................................8
2. PREVIOUS WORK............................................................................................. 9
3. INTRODUCTION TO PAPARAZZI................................................................. 10
4. RESEARCH PROGRESS..................................................................................13
4.1. Progess timeline......................................................................................... 13
4.2. Difficulties in the project............................................................................14
5. UAV PRODUCTS ON THE MARKET............................................................ 15
6. HARDWARE..................................................................................................... 16
6.1. Electronics.................................................................................................. 16
6.2. The plane.................................................................................................... 17
7. SOFTWARE.......................................................................................................19
7.1. Paparazzi software......................................................................................19
7.2. C Language in paparazzi Software.............................................................19
7.3. Caml in Paparazzi software........................................................................ 21
7.4. Ocaml......................................................................................................... 21
7.4.1. Basics..................................................................................................22
7.4.2. Boolean values....................................................................................26
7.4.3. Functions as values............................................................................. 27
7.4.4. Currying..............................................................................................29
7.4.5. OOP side of Caml............................................................................... 30
7.5. Other software............................................................................................ 30
7.5.1. FlightGear........................................................................................... 30
8. CONFIGURING PAPARAZZI.......................................................................... 33
8.1. Introduction to XML.................................................................................. 33
8.2. Setting up video..........................................................................................35
8.2.1. Installing MPlayer.............................................................................. 36
7
8.2.2. Installing Live555mediaserver ........................................................... 36
8.2.3. Configuring Paparazzi GCS for video plugin .....................................38
8.3. Setting IR neutral values............................................................................ 40
9. LEGAL ISSUES CONCERNING UAVS IN FINLAND.................................. 43
10. CONCLUSION AND FUTURE RESEARCH WORK...................................44
10.1. Conclusion................................................................................................44
10.2. Future research work................................................................................ 44
10.3. Improvement suggestions to Paparazzi software ..................................... 44
10.3.1. Windows version of GCS................................................................. 44
10.3.2. Replace DTD with XML schema..................................................... 45
8
1 INTRODUCTION
This study is about installing the open source Paparazzi autopilot electronics to an
RC airplane and configuring the Paparazzi software. Project started in the summer
2009 and we ended researching early 2010. We ordered the Paparazzi electronics
as a full package and the software is open source so it is avaibable for free. The
first plane we used was the SIG Kadet which is a typical RC trainer airplane with
a powerfull brushless electric engine. The first plane proved to be too light for our
purposes and we changed it later to a bigger plane that had structural faults at first
but later turned out to fit into our purposes better.
We did five manual test flights before the winter of 2010. Test were not performed
in winter time. The new plane “Taigacam” proved to be durable, stable and to
have a good payload capacity. Unfortunately we didn't achieve our goal of flying
the plane on full auto mode for a short run, but we did get the electronics to send
telemetry data and change modes simply by flipping a switch on the radio, we got
the plane to fly well which is crucial because no autopilot can help if the plane
doesn't fly properly itself.
9
2 PREVIOUS WORK
The Paparazzi autopilot system is developed by ENAC University. Universities
and even some highschools have had successful projects using Paparazzi software
and hardware such as University of Stuttgart and Brisbane Grammar School.
Paparazzi has also been used for real life purposes in Spitsbergen Norway.
“Scientists from the Geophysical Institute of the University of Bergen/Norway
flew Paparazzi controlled Funjet aircrafts equipped with meteorological sensors in
the Arctic sea around Spitsbergen only with the help of a RC safety pilot and no
Paparazzi team member nearby. They took off and landed on the helicopter deck
of the Norwegian icebreaking coast guard vessel KV Svalbard for one week and
set a new Paparazzi low temperature record by flying at around -20°C and 15m/s
wind in altitudes up to 1500m. For another two weeks they also collected data on
Spitsbergen near Longyearbyen.”. [1]
The first version of the Paparazzi autopilot was constructed in 2003. The
Paparazzi hardware was release in 2003 and the latest version 2.11 came out in
December 2007.[2] All hardware and software is open-source and freely available
to anyone under the GNU licensing agreement.
10
3 INTRODUCTION TO PAPARAZZI
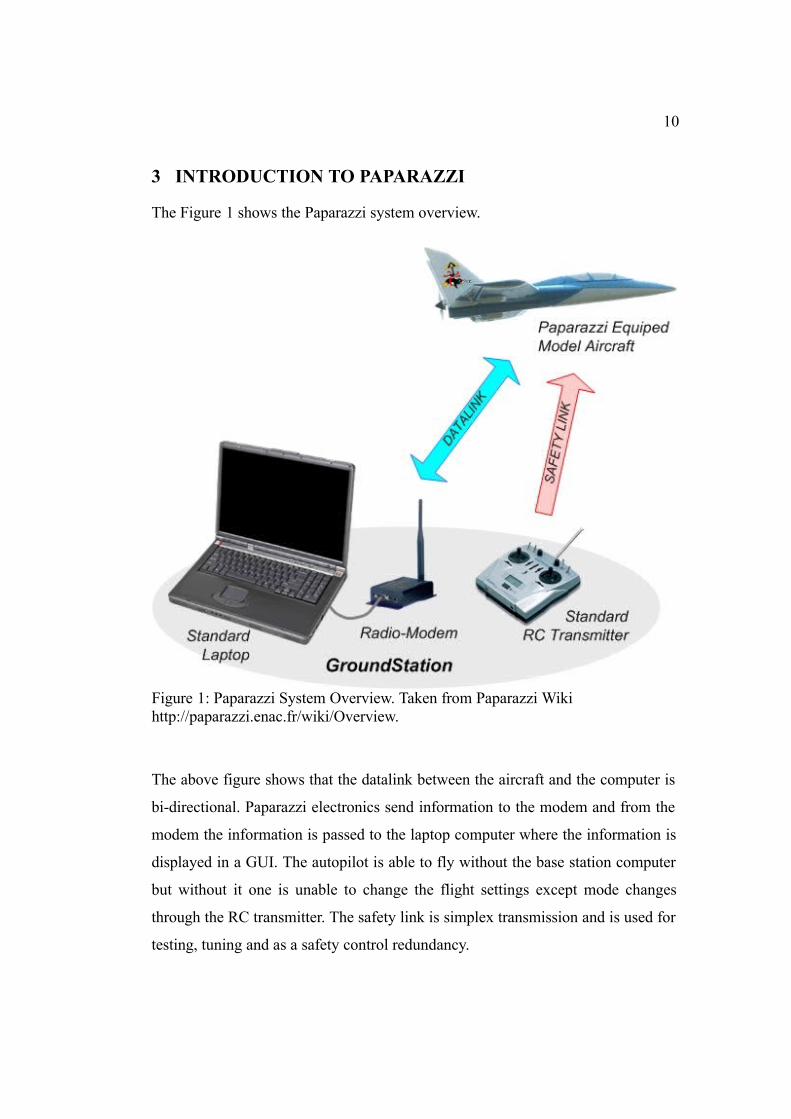
The Figure 1 shows the Paparazzi system overview.
The above figure shows that the datalink between the aircraft and the computer is
bi-directional. Paparazzi electronics send information to the modem and from the
modem the information is passed to the laptop computer where the information is
displayed in a GUI. The autopilot is able to fly without the base station computer
but without it one is unable to change the flight settings except mode changes
through the RC transmitter. The safety link is simplex transmission and is used for
testing, tuning and as a safety control redundancy.
Figure 1: Paparazzi System Overview. Taken from Paparazzi Wiki http://paparazzi.enac.fr/wiki/Overview.
11
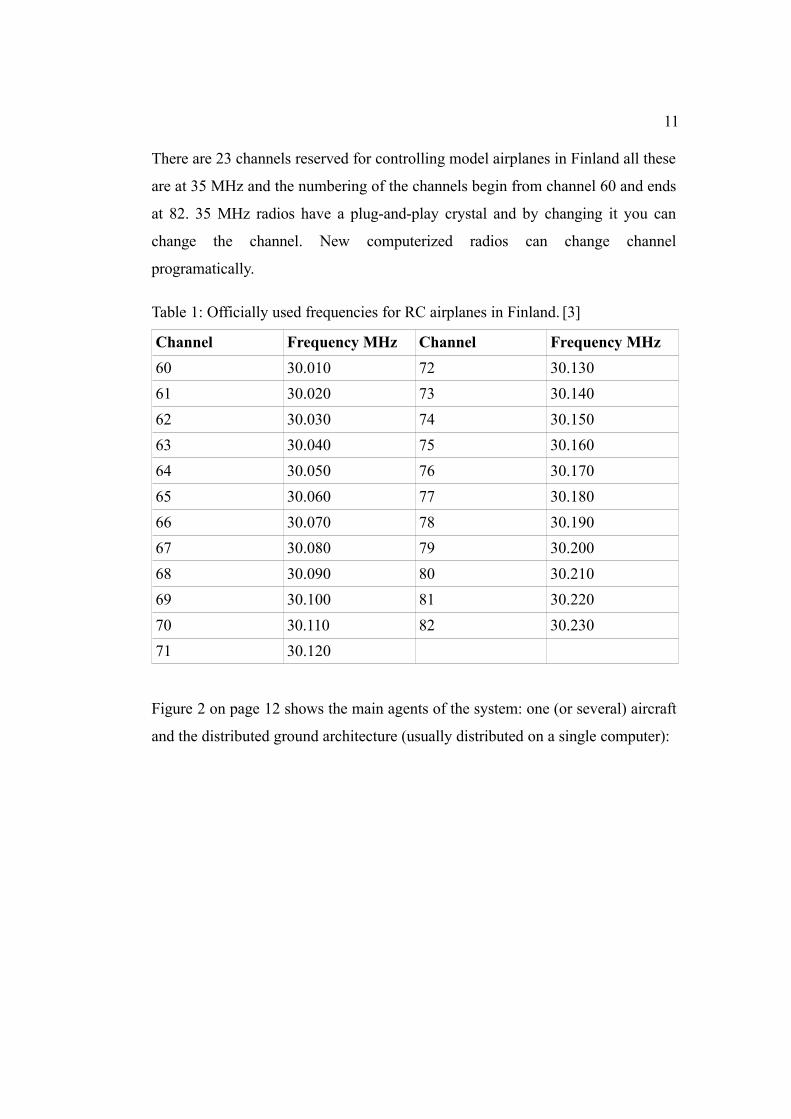
There are 23 channels reserved for controlling model airplanes in Finland all these
are at 35 MHz and the numbering of the channels begin from channel 60 and ends
at 82. 35 MHz radios have a plug-and-play crystal and by changing it you can
change the channel. New computerized radios can change channel
programatically.
Table 1: Officially used frequencies for RC airplanes in Finland. [3]
Channel Frequency MHz Channel Frequency MHz60 30.010 72 30.13061 30.020 73 30.14062 30.030 74 30.15063 30.040 75 30.16064 30.050 76 30.17065 30.060 77 30.18066 30.070 78 30.19067 30.080 79 30.20068 30.090 80 30.21069 30.100 81 30.22070 30.110 82 30.23071 30.120
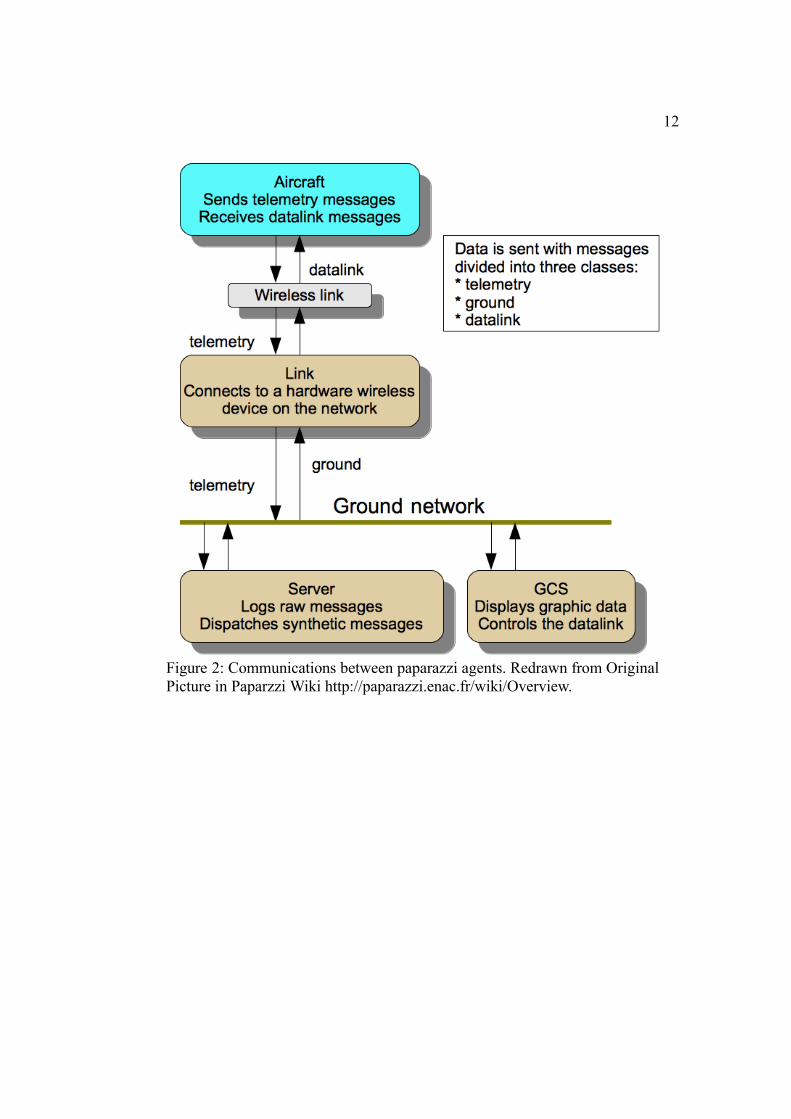
Figure 2 on page 12 shows the main agents of the system: one (or several) aircraft
and the distributed ground architecture (usually distributed on a single computer):
12
Figure 2: Communications between paparazzi agents. Redrawn from Original Picture in Paparzzi Wiki http://paparazzi.enac.fr/wiki/Overview.
13
4 RESEARCH PROGRESS
4.1 Progess timeline
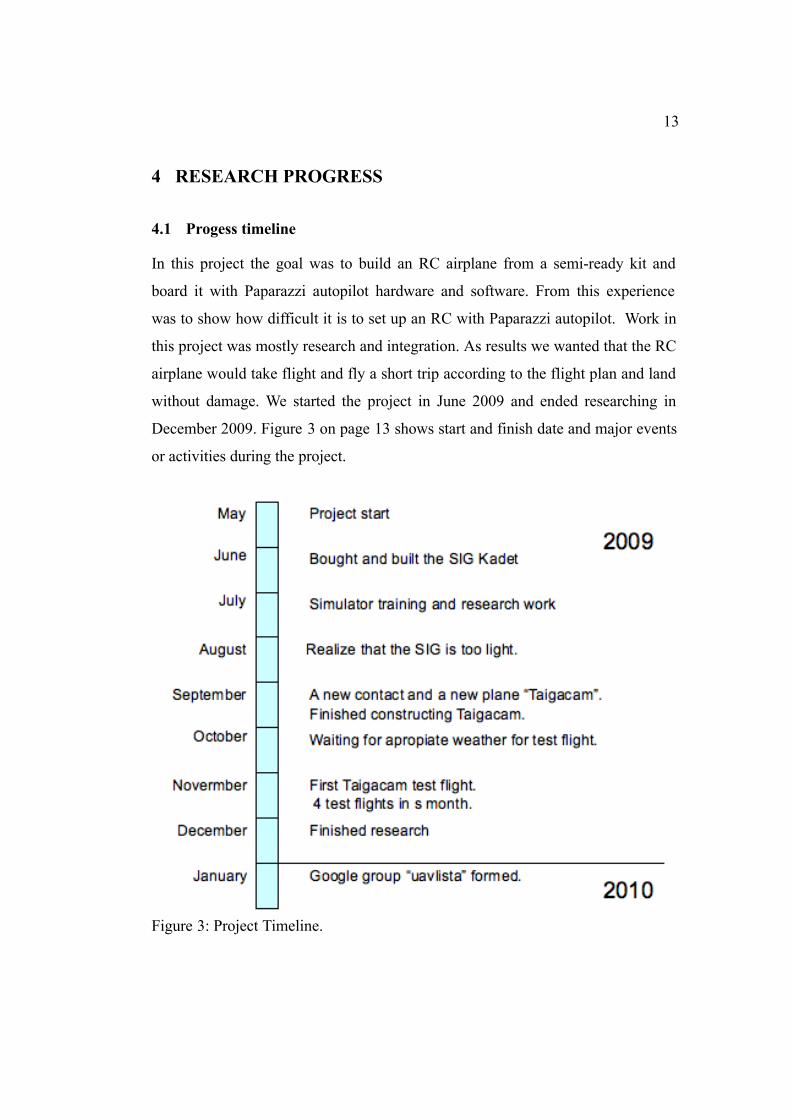
In this project the goal was to build an RC airplane from a semi-ready kit and
board it with Paparazzi autopilot hardware and software. From this experience
was to show how difficult it is to set up an RC with Paparazzi autopilot. Work in
this project was mostly research and integration. As results we wanted that the RC
airplane would take flight and fly a short trip according to the flight plan and land
without damage. We started the project in June 2009 and ended researching in
December 2009. Figure 3 on page 13 shows start and finish date and major events
or activities during the project.
Figure 3: Project Timeline.
14
The first model aircraft used was the SIG Kadet. The SIG Kadet is a typical front
engine trainer airplane, little V-characteristics in the wing and a large T-tail. V-
characteristic means that wings are angled upward from the fuselage this helps
confer lateral stability this is knows as “dihedral”. Some wings may be inclined
the opposite way and this is called “anhedral” and allows aircraft to be very
maneuverable, as is needed for military or aerobatic aircraft. The SIG has a
powerful brushless engine and is controlled by an ESC. The Paparazzi autopilot
system is described later in the text. The first task in this project was getting to
know the basics of flying RC airplanes and building my first RC airplane and
getting it airborne. We got around to flying the SIG Kadet manually in August and
to our disappointment we noticed that it was too light to fly in windy weather. We
originally and falsely assumed that the lightness of the plane could be overcome
with a powerful engine and this was not the case.
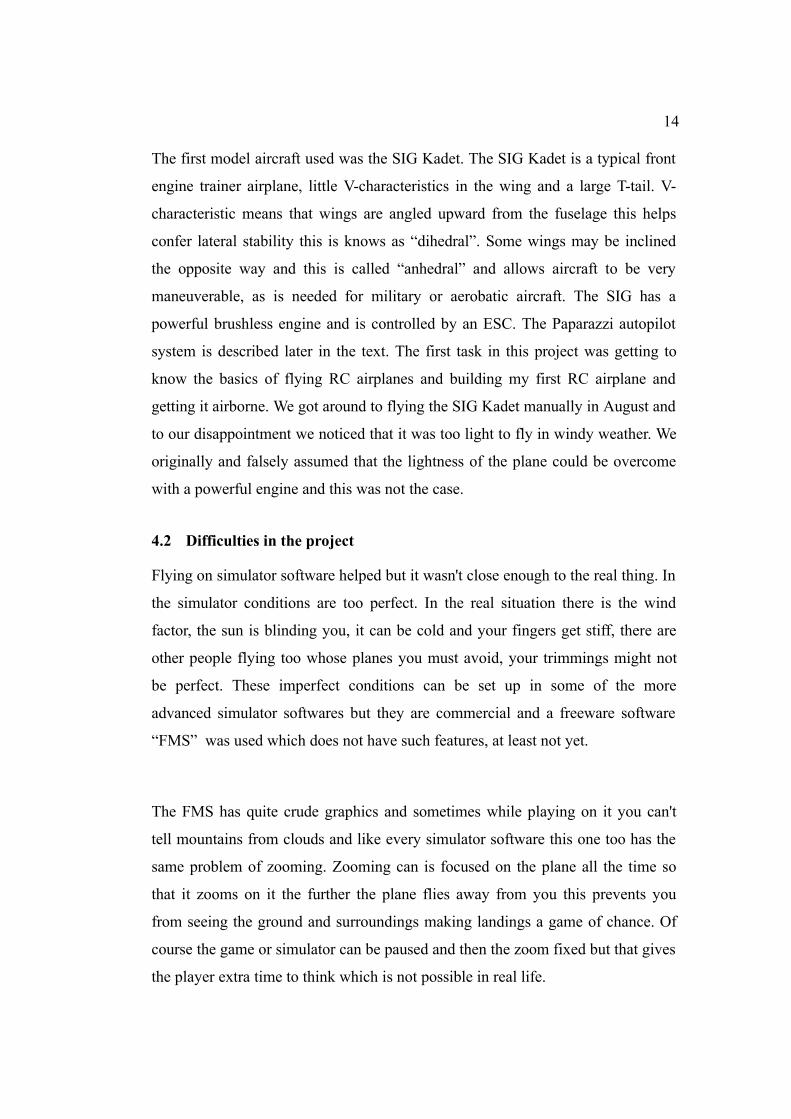
4.2 Difficulties in the project
Flying on simulator software helped but it wasn't close enough to the real thing. In
the simulator conditions are too perfect. In the real situation there is the wind
factor, the sun is blinding you, it can be cold and your fingers get stiff, there are
other people flying too whose planes you must avoid, your trimmings might not
be perfect. These imperfect conditions can be set up in some of the more
advanced simulator softwares but they are commercial and a freeware software
“FMS” was used which does not have such features, at least not yet.
The FMS has quite crude graphics and sometimes while playing on it you can't
tell mountains from clouds and like every simulator software this one too has the
same problem of zooming. Zooming can is focused on the plane all the time so
that it zooms on it the further the plane flies away from you this prevents you
from seeing the ground and surroundings making landings a game of chance. Of
course the game or simulator can be paused and then the zoom fixed but that gives
the player extra time to think which is not possible in real life.
15
5 UAV PRODUCTS ON THE MARKET
There are commercial civilian UAV products available such as: Canadian
company Micropilot's Cropcam and Russian Zala Zero's “Zero” -products only to
name a few. The price tag of the CropCam without the camera, radio, laptop,
VAT, custom fees, batteries and charger is $7000. The price of the Cropcam
autopilot alone is $5500.
Our current system total costs less than 1000 €. Our model would be even cheaper
in other countries because in Finland the price level is much higher compared to
almost any other country. For example in USA you can get a servo for $2.5 and in
Finland you usually pay from 20 to 25 € for one servo. The main material of our
plane is EPP ( Expandable Polypropylene ). As far we know there is only a single
company ( Solumuovi Oy ) in Finland who makes this material and their factory
was out order because of a fire but are now back in business. Availability of EPP
material is better in the rest of Europe but the shipping costs to Finland will be
high because of the size of the package delivered. Our setup is thousands of euros
cheaper than the currently available autopilot UAVs.
16
6 HARDWARE
Our configuration included the following items:
● RC plane. A prototype plane: “Taigacam”. Designed and pre-assembled by
Mr. Alpo Hassinen who works at Mekri Research Center in Eastern in
Finland.
● RC radio controller. Hitec 6 Optic Sport. A programmable six channel
radio.
● Receiver. Hitec HFS-05MS. Scavenged from the SIG Kadet.
● Batteries. Two times 11 V Dualsky 2200 mAh Li-Po fly batteries.
● Paparazzi electronics
● Laptop computer running Ubuntu 8.04 in a virtual machine.
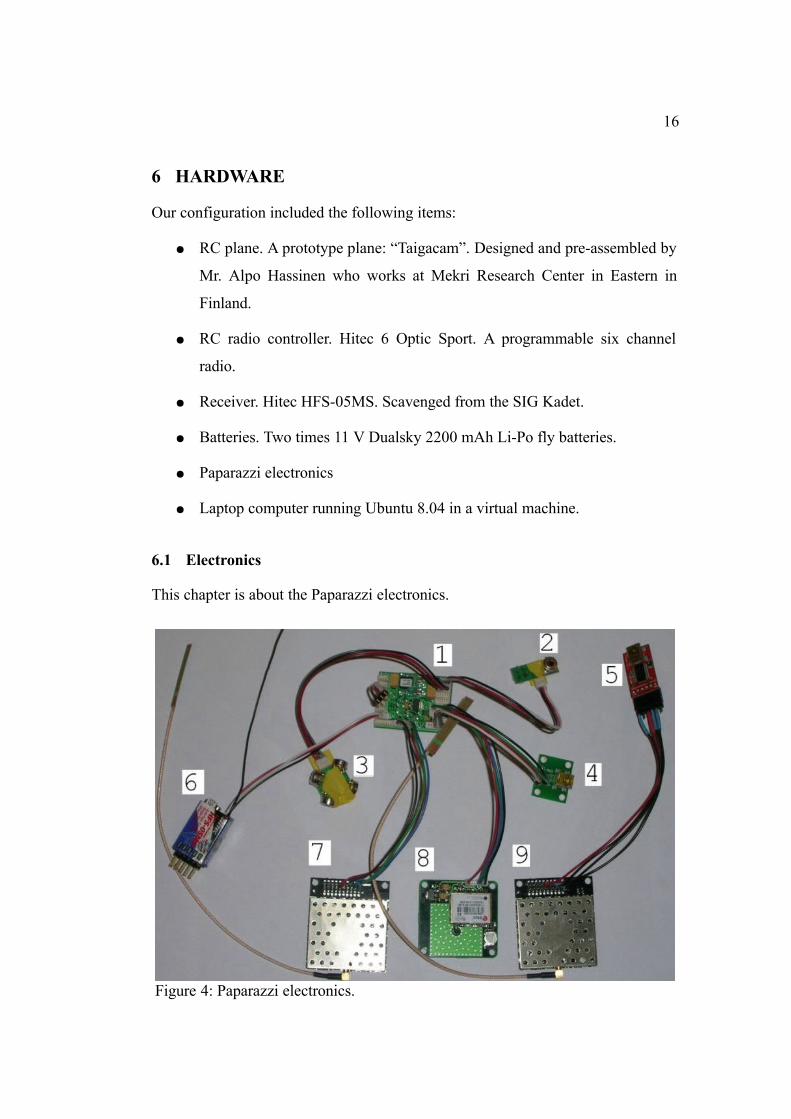
6.1 Electronics
This chapter is about the Paparazzi electronics.
Figure 4: Paparazzi electronics.
17
Items in Figure 4 starting from number 1: TWOG autopilot, vertical infra-red
sensor, horizontal infra-red sensor, USB programming, base station USB/Serial
interface, Hitec HFS-05MS receiver, telemetry datalink AC4790, GPS module
and base station AC4790.
TWOG stands for “Tiny Without GPS” it has among the 603 components on the
board an ARM7 32-bit micro-controller. The modem power draw is 63 mA and
has a range of up to 6 km and works on voltages ranging from 3.3 V to 5.5 V. The
IR sensors are used for plane attitude measuring. The theory is that at zero bank or
pitch angle, the difference in the heat between the two sensors should be zero, and
at 90 degrees it should be maximum. From this relationship a linear regression is
made and angles are calculated during flight.
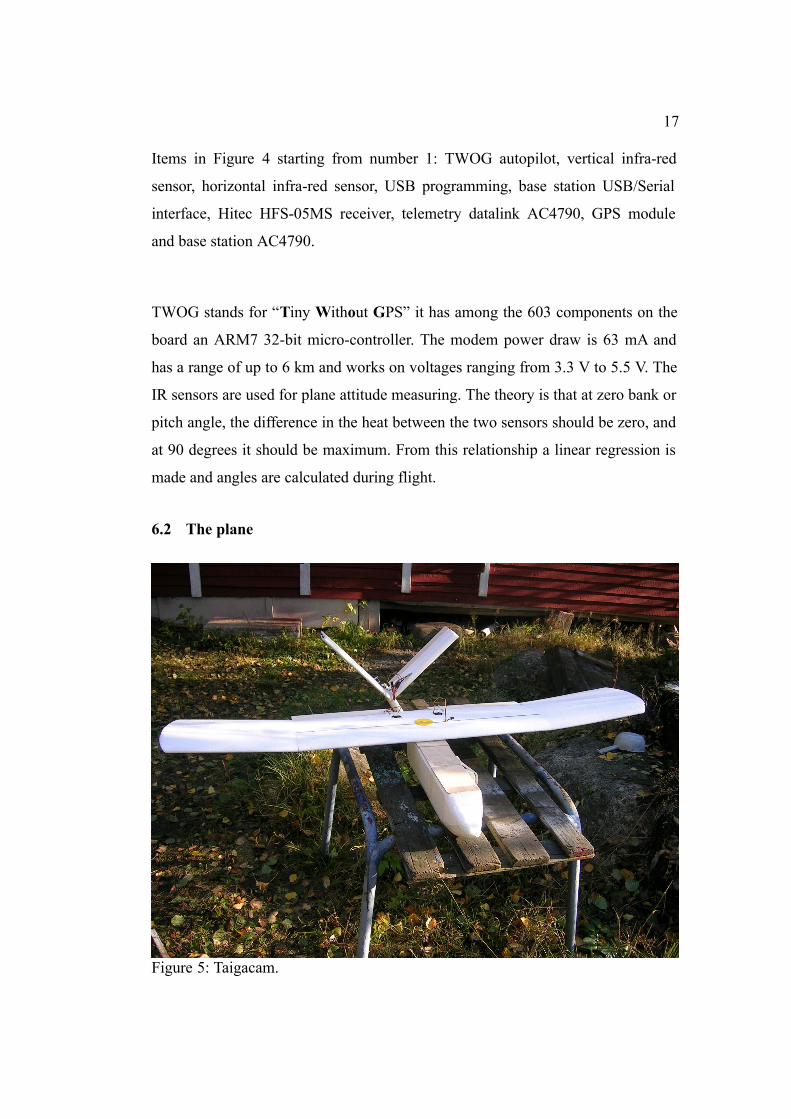
6.2 The plane
Figure 5: Taigacam.
18
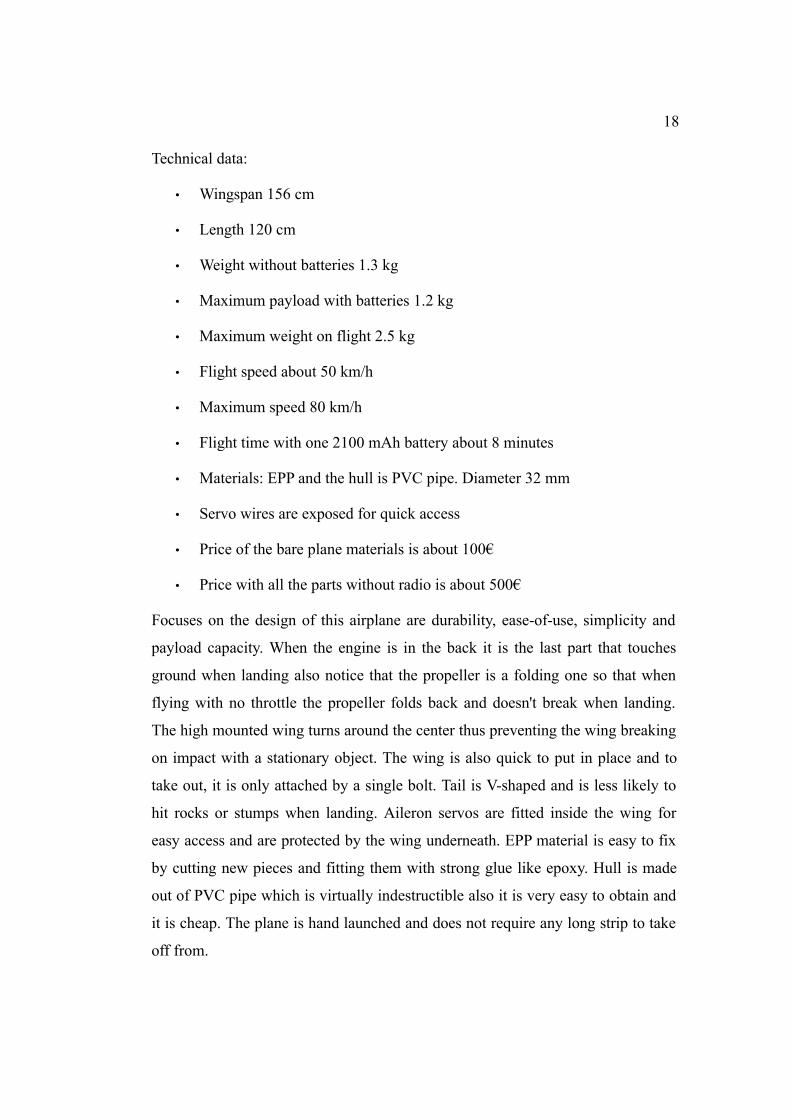
Technical data:
• Wingspan 156 cm
• Length 120 cm
• Weight without batteries 1.3 kg
• Maximum payload with batteries 1.2 kg
• Maximum weight on flight 2.5 kg
• Flight speed about 50 km/h
• Maximum speed 80 km/h
• Flight time with one 2100 mAh battery about 8 minutes
• Materials: EPP and the hull is PVC pipe. Diameter 32 mm
• Servo wires are exposed for quick access
• Price of the bare plane materials is about 100€
• Price with all the parts without radio is about 500€
Focuses on the design of this airplane are durability, ease-of-use, simplicity and
payload capacity. When the engine is in the back it is the last part that touches
ground when landing also notice that the propeller is a folding one so that when
flying with no throttle the propeller folds back and doesn't break when landing.
The high mounted wing turns around the center thus preventing the wing breaking
on impact with a stationary object. The wing is also quick to put in place and to
take out, it is only attached by a single bolt. Tail is V-shaped and is less likely to
hit rocks or stumps when landing. Aileron servos are fitted inside the wing for
easy access and are protected by the wing underneath. EPP material is easy to fix
by cutting new pieces and fitting them with strong glue like epoxy. Hull is made
out of PVC pipe which is virtually indestructible also it is very easy to obtain and
it is cheap. The plane is hand launched and does not require any long strip to take
off from.
19
7 SOFTWARE
7.1 Paparazzi software
Paparazzi is a complete open-source system of hardware and software for
autonomous aircraft as well as complete ground station mission planning and
monitoring software utilizing a bi-directional datalink for telemetry and control.
The system consists of: Paparazzi equipped model aircraft, standard laptop, radio-
modem and a standard RC transmitter. [4]
To help the configuration of the autopilot a set graphical user tools are provided so
that the person configuring doesn't necessarily need programming skills.
Configuration tools include flight plan editing and viewing the ready flight plan in
a simulator. You can either edit the system with GUI tools or use text editors to
edit the XML content. There are pros and cons in both ways of editing. GUI users
may easily view and manipulate multiple things at once. When editing the plain
XML files it is easier to keep track of changes when you edit and comment your
changes one at a time. For example you cannot tell in the graphical user interface
that “I clicked this and moved that dot there” but you can say in code document
that “I changed this variable value x to value y and when and why.”.
Paparazzi software is written in C and Caml languages and is configured with
XML. In this project the Paparazzi GCS software was run under Ubuntu 8.04 call
name “Hardy Heron” in VMWARE Fusion 2.0 under host OS Mac OS 10.5.
7.2 C Language in paparazzi Software
Software running inside the electronics in the plane is C code. This natural since
this is an embedded system. In embedded systems resources are limited. There is
little random access memory to go around, power consumption must be low,
processor are much slower than in desktop computers. Graphical applications
20
running on the laptop controlling the plane is written in a mixture of Caml and C
code. Configurations are saved in XML format and before building and uploading
the configurations are put inside the C code and then compiler preprocessor
processes C and only after that compilation process can begin and the resulting
binaries can be uploaded into the electronics with a USB cable.
C is a general-purpose low level computer programming language invented by
Dennis Ritchie in 1972. C code is compiled into machine code by a compiler.
Being low level code C is a very light language almost without any runtime
overhead penalty in memory or processor usage. Despite being low level, C code
is very portable it can be compiled on many platforms natively. You could very
well say that C is a high level assembly language. An experienced programmer
with good grasp of assembly and C can predict the assembly code what the
compiler will produce.
The paradigm how you program in C is called procedural programming.
Procedural programming means that the details of the program are put inside
functions to clarify the program code. You pass variables or pointers to functions
and act on the either the return value of the function or on side effects which the
called function caused to the variables pointed by the passed pointer or pointers.
This type of programming differs greatly from functional programming where
functions are considered as values like in mathematics. In principal in functional
programming you pass functions to functions and finally get wanted result.
Functional programming is closer to mathematics than other programming
paradigms. There is a third programming paradigm called object oriented
programming. Object oriented programming is the currently mostly used style of
programming. In object oriented programming or OOP for short, entities are
divided into classes. From classes objects are created. Objects are bundles of
functions and data relating to a real-world concept such as vehicles, geometrical
shapes, taxonomies or for example GUI components such as buttons or windows.
21
7.3 Caml in Paparazzi software
The GCS graphical user interface is programmed in Caml. Caml is used because
the Paparazzi project is academic and Caml being functional language, the code
produced can be formally verified.
7.4 Ocaml
Another programming language used in the Paparazzi system is the Caml
language. “Caml is a general-purpose programming language, designed with
program safety and reliability in mind. It is very expressive, yet easy to learn and
use. Caml supports functional, imperative, and object-oriented programming
styles. It has been developed and distributed by INRIA, a French research institute
in computer science and applied mathematics, since 1985.” [5]
The most important implementation of Caml is objective Caml, short form is
“Ocaml”. Ocaml features a rich module system and object oriented layer. One
very interesting part about Caml is that it comes both with native compiler and a
byte-code compiler. All major languages nowadays are either compiled to native
code or byte-code. If code is compiled natively it means that the compiler
produces a ready executable binary file. Byte-code on the other hand means that
the byte-code needs to be reinterpreted for further compilation into machine code
every time it is executed. Reasons for using a native code compiler is that the
executable will be faster and uses less memory. Reason for using the byte-code
compiler is ensuring the portability of the executable itself. Caml is open source
software so everyone can start developing with it for free.
Compilers are available for multiple operating systems such as: different Linux
distributions, Windows product family and Mac OS X. Caml is high performance,
portable and a flexible functional programming language. With caml installation
22
comes interactive system, which is started by running ocaml from the Unix shell,
or by launching the OCamlwin.exe application under Windows. Under the
interactive system, the user types in Caml phrases, terminated by two semicolons
“;;”, in response to the # prompt, and the system compiles them on the fly,
executes them, and prints the outcome of evaluation. The difficulty of learning
Caml comes from its different style and lack of resources. In Caml you do not use
loops in iterating instead you use recursive functions which is different for
someone coming from a C-based language into Caml. There are only few good
resources about Caml compared to how many web pages, books and papers have
been written about C or its derivatives.
A good familiarity with some procedural language is assumed but no experience
with functional languages is required. Examples will be single or just few lines.
This will not be a full guide to Ocaml but just give the reader some insight how
Ocaml code looks and how it is different from C based languages. All lines
starting with a dollar sign mean that they are terminal commands usually followed
by the output on next line, for example:
$ echo “Hello UNIX”
Hello UNIX
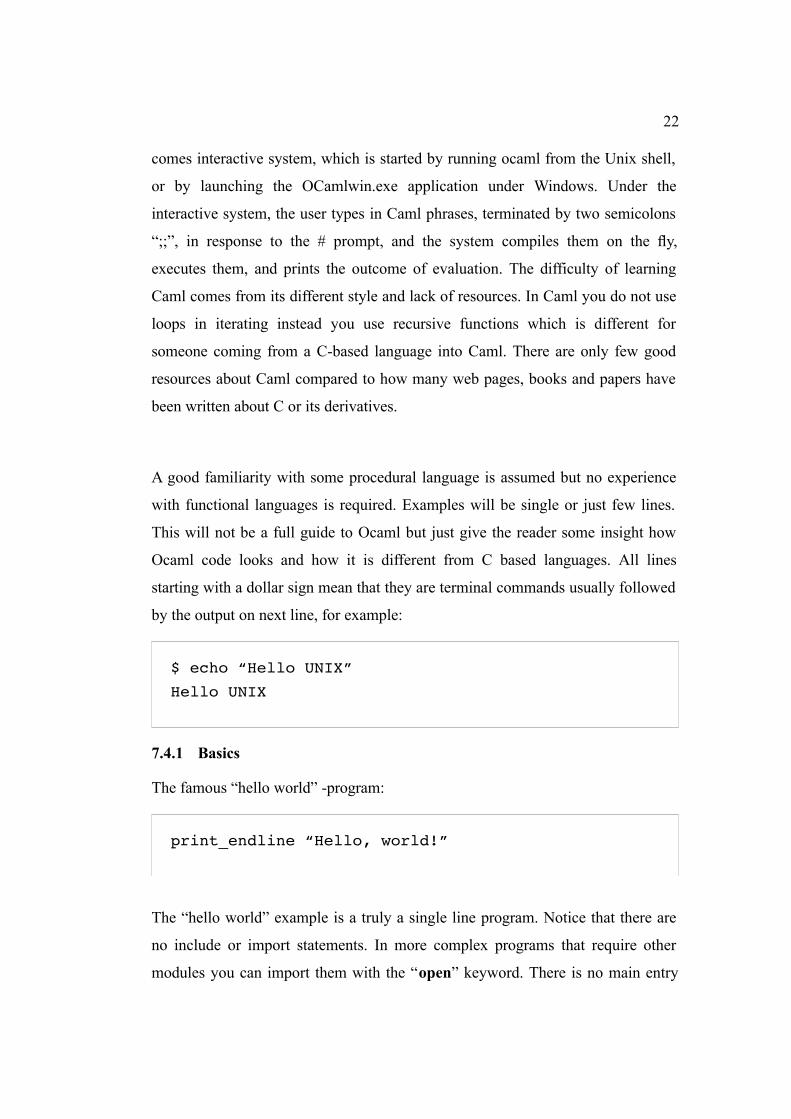
7.4.1 Basics
The famous “hello world” -program:
print_endline “Hello, world!”
The “hello world” example is a truly a single line program. Notice that there are
no include or import statements. In more complex programs that require other
modules you can import them with the “open” keyword. There is no main entry
23
point here, the program is just executed from top to bottom but in real applications
the main function is declared. Notice that the print_endline function parameter is
not inside parentheses but only separated by a space and there is no semicolon at
the end of the line. A line break will be automatically be appended after the
displayed message by the print_endline function. In the interactive system you
will need to put two semi colons at the end of your statement so that the compiler
knows you ended your statement. Only this one line in file containing pure text
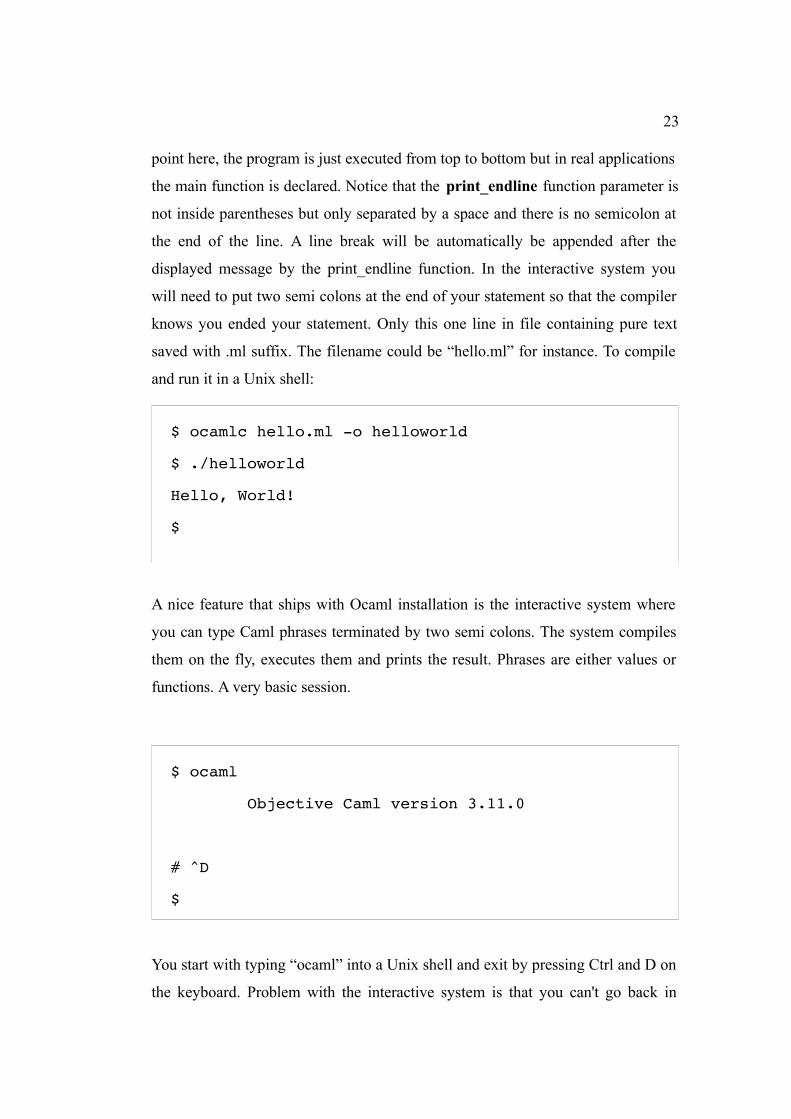
saved with .ml suffix. The filename could be “hello.ml” for instance. To compile
and run it in a Unix shell:
$ ocamlc hello.ml -o helloworld
$ ./helloworld
Hello, World!
$
A nice feature that ships with Ocaml installation is the interactive system where
you can type Caml phrases terminated by two semi colons. The system compiles
them on the fly, executes them and prints the result. Phrases are either values or
functions. A very basic session.
$ ocaml
Objective Caml version 3.11.0
# ^D
$
You start with typing “ocaml” into a Unix shell and exit by pressing Ctrl and D on
the keyboard. Problem with the interactive system is that you can't go back in
24
command history and get the phrases you typed in earlier like you get normally in
a Unix shell when you press the up arrow on the keyboard or use the history
command. This would be handy if you type in a phrase that has errors you could
go back and correct your phrase but instead you must retype the whole phrase.
Also you can't move the cursor left with left arrow. If you make a mistake at the
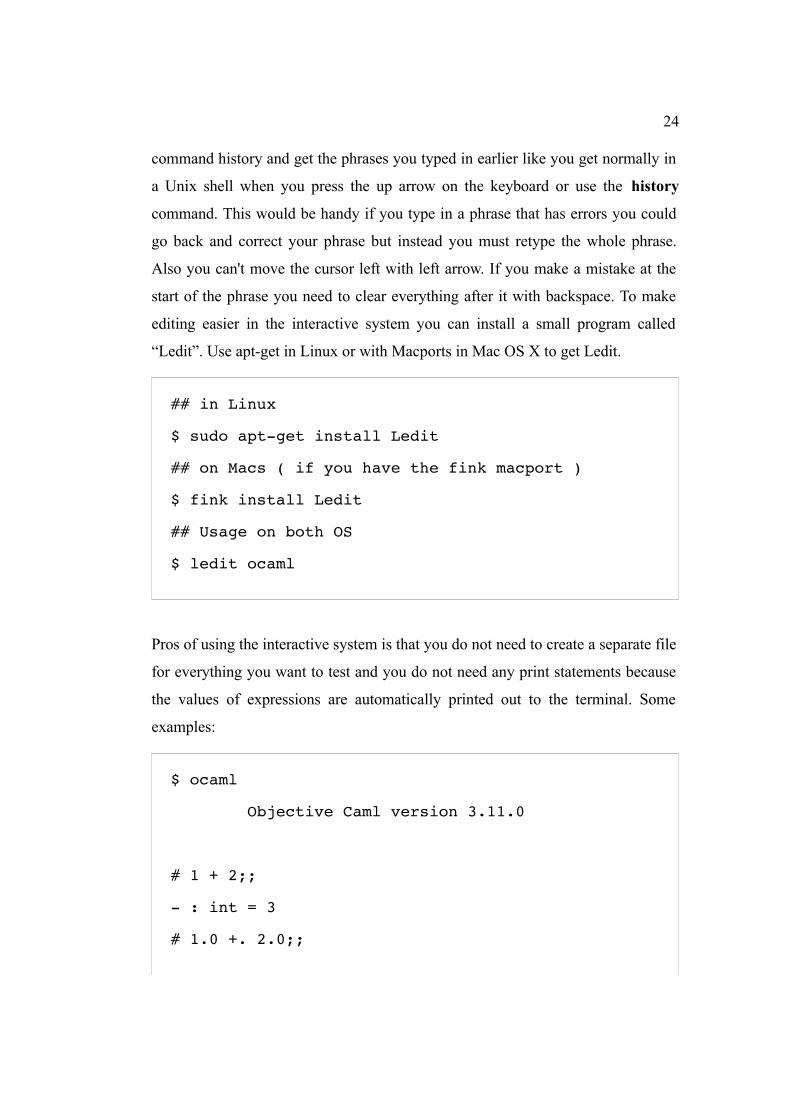
start of the phrase you need to clear everything after it with backspace. To make
editing easier in the interactive system you can install a small program called
“Ledit”. Use apt-get in Linux or with Macports in Mac OS X to get Ledit.
## in Linux
$ sudo apt-get install Ledit
## on Macs ( if you have the fink macport )
$ fink install Ledit
## Usage on both OS
$ ledit ocaml
Pros of using the interactive system is that you do not need to create a separate file
for everything you want to test and you do not need any print statements because
the values of expressions are automatically printed out to the terminal. Some
examples:
$ ocaml
Objective Caml version 3.11.0
# 1 + 2;;
- : int = 3
# 1.0 +. 2.0;;
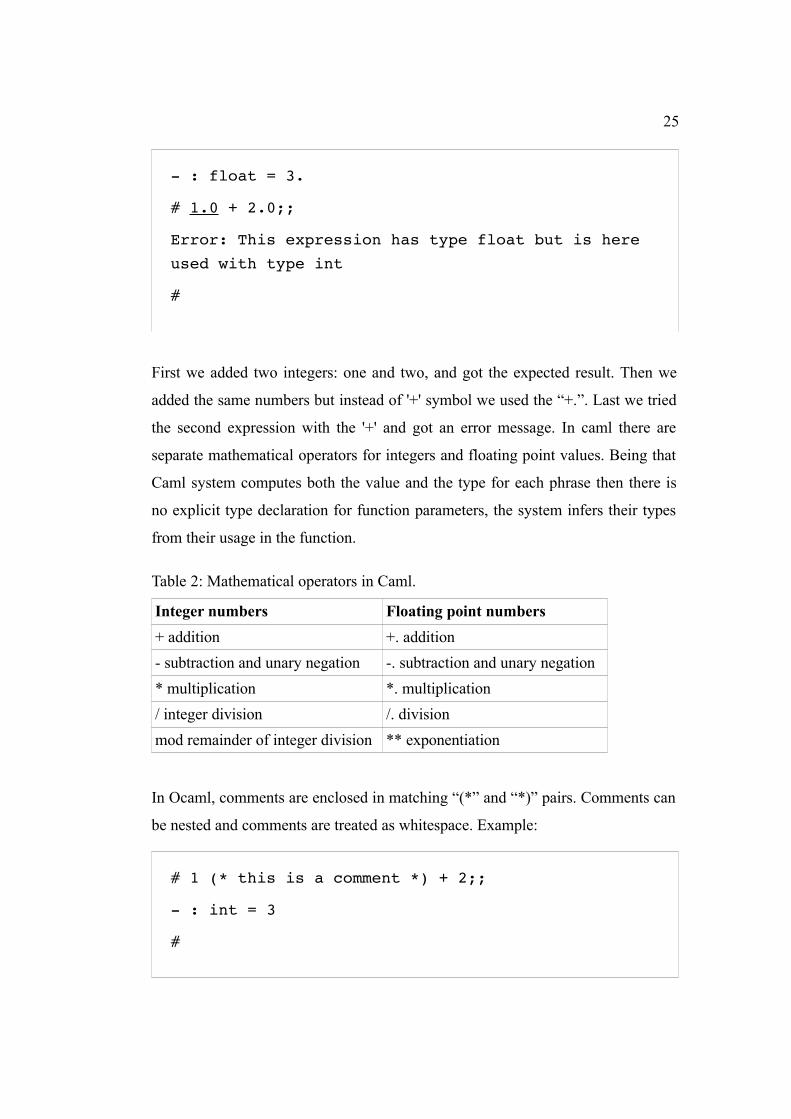
25
- : float = 3.
# 1.0 + 2.0;;
Error: This expression has type float but is here
used with type int
#
First we added two integers: one and two, and got the expected result. Then we
added the same numbers but instead of '+' symbol we used the “+.”. Last we tried
the second expression with the '+' and got an error message. In caml there are
separate mathematical operators for integers and floating point values. Being that
Caml system computes both the value and the type for each phrase then there is
no explicit type declaration for function parameters, the system infers their types
from their usage in the function.
Table 2: Mathematical operators in Caml.
Integer numbers Floating point numbers+ addition +. addition- subtraction and unary negation -. subtraction and unary negation* multiplication *. multiplication/ integer division /. divisionmod remainder of integer division ** exponentiation
In Ocaml, comments are enclosed in matching “(*” and “*)” pairs. Comments can
be nested and comments are treated as whitespace. Example:
# 1 (* this is a comment *) + 2;;
- : int = 3
#
26
List of built-in types in Caml:
● basic types: integers, floating point numbers, booleans, characters, strings
● more sophisticated data types: tuples, arrays, lists, sets, hash tables,
queues, stacks and data streams
Ocaml is a strongly typed language. Even though you do not need explicitly
specify types yourself because the compiler verifies them. If you try to pass in
integer to a function that requires a float value the program will not compile. This
is one of the Caml language safety features. Because the compiler verifies
programs before they can be executed, many programming errors can be avoided
such as: confusing an integer and a pointer, or accessing a non-existent field in a
record.
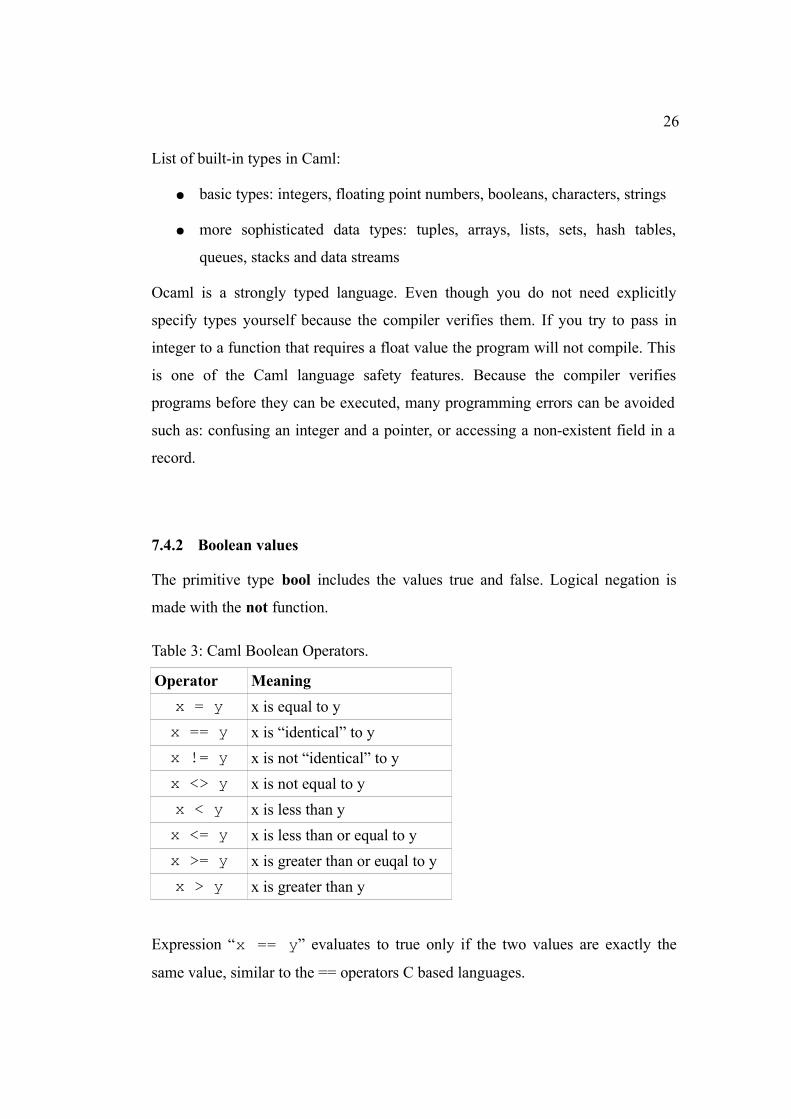
7.4.2 Boolean values
The primitive type bool includes the values true and false. Logical negation is
made with the not function.
Table 3: Caml Boolean Operators.
Operator Meaningx = y x is equal to yx == y x is “identical” to yx != y x is not “identical” to yx <> y x is not equal to yx < y x is less than yx <= y x is less than or equal to yx >= y x is greater than or euqal to yx > y x is greater than y
Expression “x == y” evaluates to true only if the two values are exactly the
same value, similar to the == operators C based languages.
27
# 1.0 = 1.0;;
- : bool = true
# 1.0 == 1.0;;
- : bool = false
# 1 == 1;;
- : bool = true
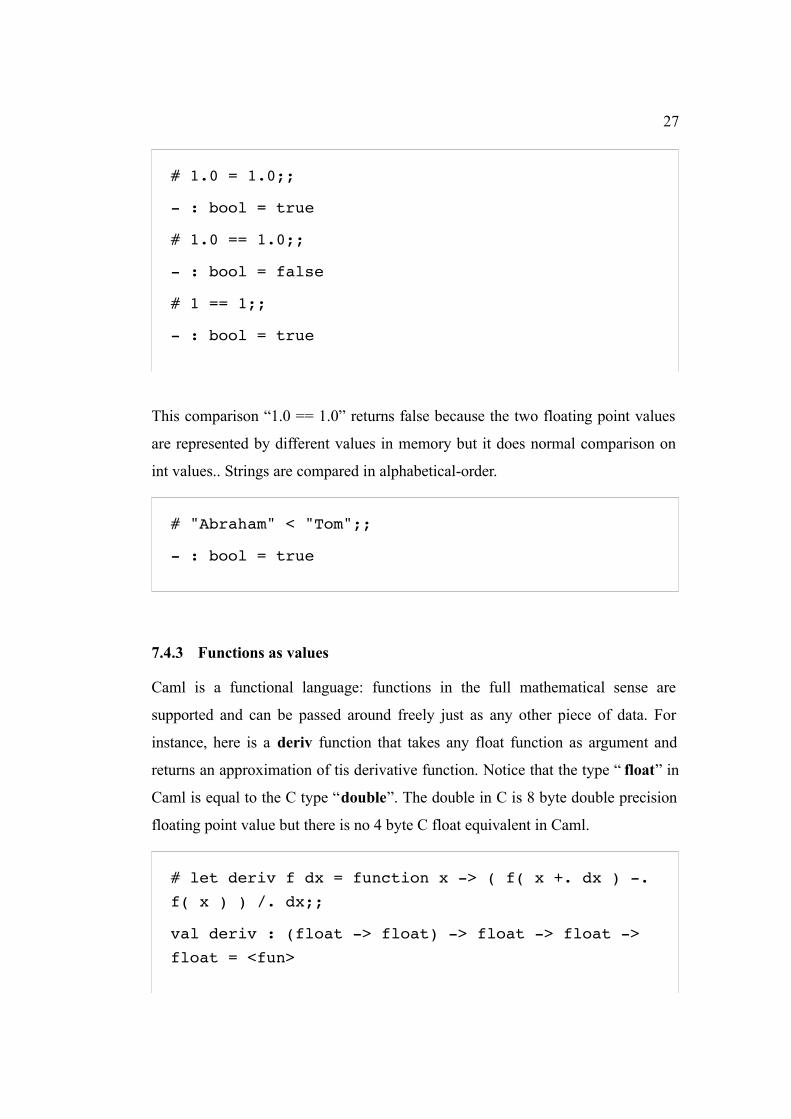
This comparison “1.0 == 1.0” returns false because the two floating point values
are represented by different values in memory but it does normal comparison on
int values.. Strings are compared in alphabetical-order.
# "Abraham" < "Tom";;
- : bool = true
7.4.3 Functions as values
Caml is a functional language: functions in the full mathematical sense are
supported and can be passed around freely just as any other piece of data. For
instance, here is a deriv function that takes any float function as argument and
returns an approximation of tis derivative function. Notice that the type “ float” in
Caml is equal to the C type “double”. The double in C is 8 byte double precision
floating point value but there is no 4 byte C float equivalent in Caml.
# let deriv f dx = function x -> ( f( x +. dx ) -.
f( x ) ) /. dx;;
val deriv : (float -> float) -> float -> float ->
float = <fun>
28
# let myfunc x = 2.0 *. x;;
val myfunc : float -> float = <fun>
# let myfunc' = deriv myfunc 1.0;;
val myfunc' : float -> float = <fun>
# myfunc' 1.0;;
- : float = 2.
# myfunc' 3.0;;
- : float = 2.
#
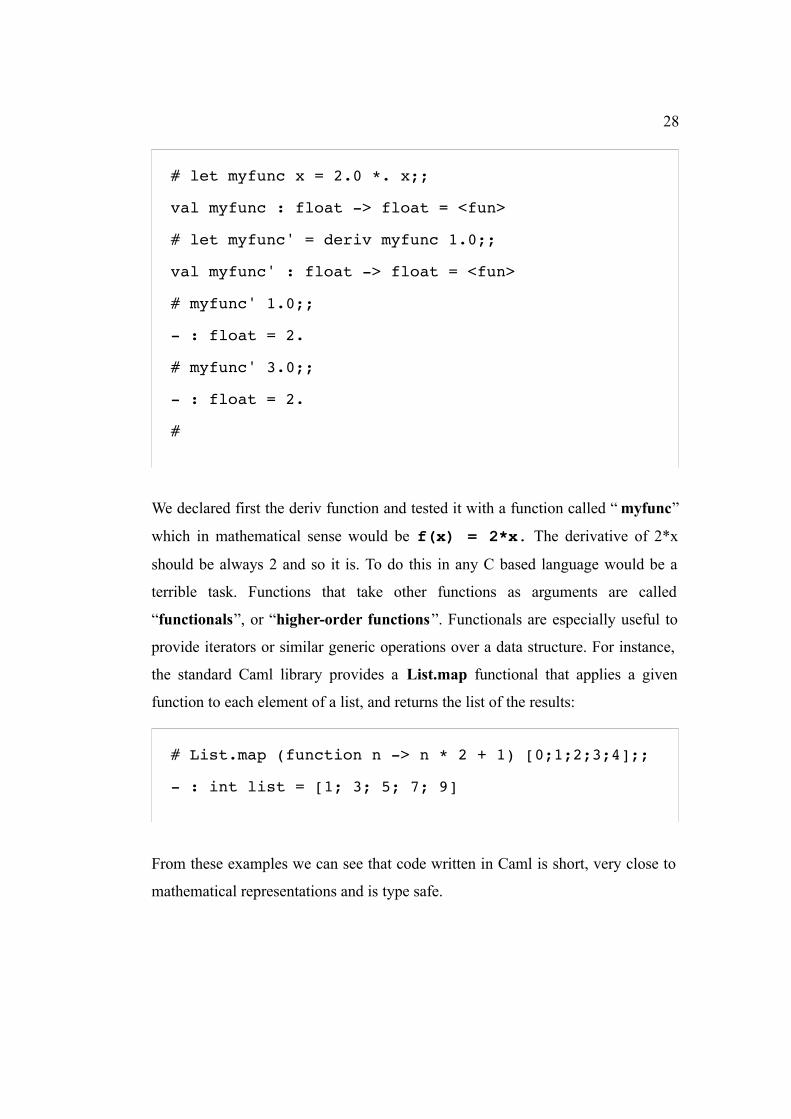
We declared first the deriv function and tested it with a function called “ myfunc”
which in mathematical sense would be f(x) = 2*x. The derivative of 2*x
should be always 2 and so it is. To do this in any C based language would be a
terrible task. Functions that take other functions as arguments are called
“functionals”, or “higher-order functions”. Functionals are especially useful to
provide iterators or similar generic operations over a data structure. For instance,
the standard Caml library provides a List.map functional that applies a given
function to each element of a list, and returns the list of the results:
# List.map (function n -> n * 2 + 1) [0;1;2;3;4];;
- : int list = [1; 3; 5; 7; 9]
From these examples we can see that code written in Caml is short, very close to
mathematical representations and is type safe.
29
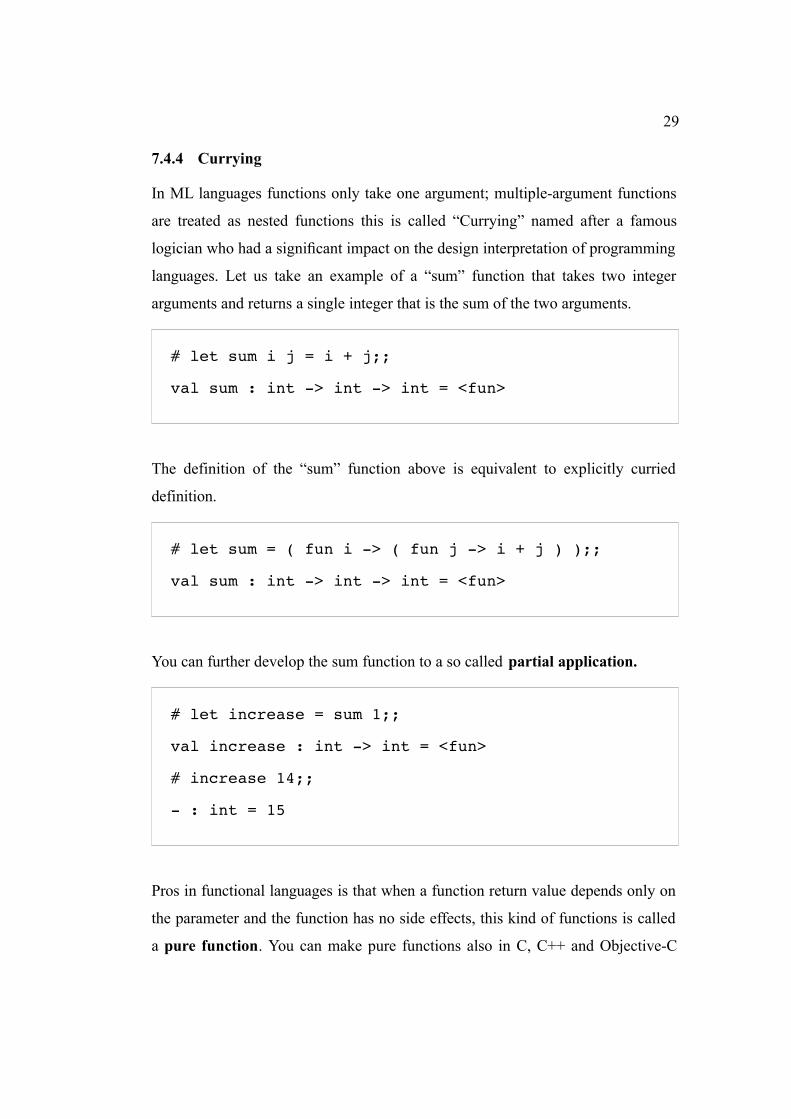
7.4.4 Currying
In ML languages functions only take one argument; multiple-argument functions
are treated as nested functions this is called “Currying” named after a famous
logician who had a significant impact on the design interpretation of programming
languages. Let us take an example of a “sum” function that takes two integer
arguments and returns a single integer that is the sum of the two arguments.
# let sum i j = i + j;;
val sum : int -> int -> int = <fun>
The definition of the “sum” function above is equivalent to explicitly curried
definition.
# let sum = ( fun i -> ( fun j -> i + j ) );;
val sum : int -> int -> int = <fun>
You can further develop the sum function to a so called partial application.
# let increase = sum 1;;
val increase : int -> int = <fun>
# increase 14;;
- : int = 15
Pros in functional languages is that when a function return value depends only on
the parameter and the function has no side effects, this kind of functions is called
a pure function. You can make pure functions also in C, C++ and Objective-C
30
when using GCC compiler. You can tell the GCC compiler that a function is pure
in the following way:
#ifdef __GNUC__
#define pure_function __attribute__((const))
#else
#define pure_function
#endif
double g( double ) pure_function;
double f( double a )
{
return g( a ) * g( a );
}
Here function g is called only once when using GCC compiler other compilers
will make two function calls on g.[6]
7.4.5 OOP side of Caml
Like mentioned earlier objective Caml ( Ocaml ) is the main implementation of
the Caml language and the only Caml implementation that supports OOP. The
module system and object system complement one another: the module system
provides data abstraction, and the object system provides inheritance and re-use.
7.5 Other software
7.5.1 FlightGear
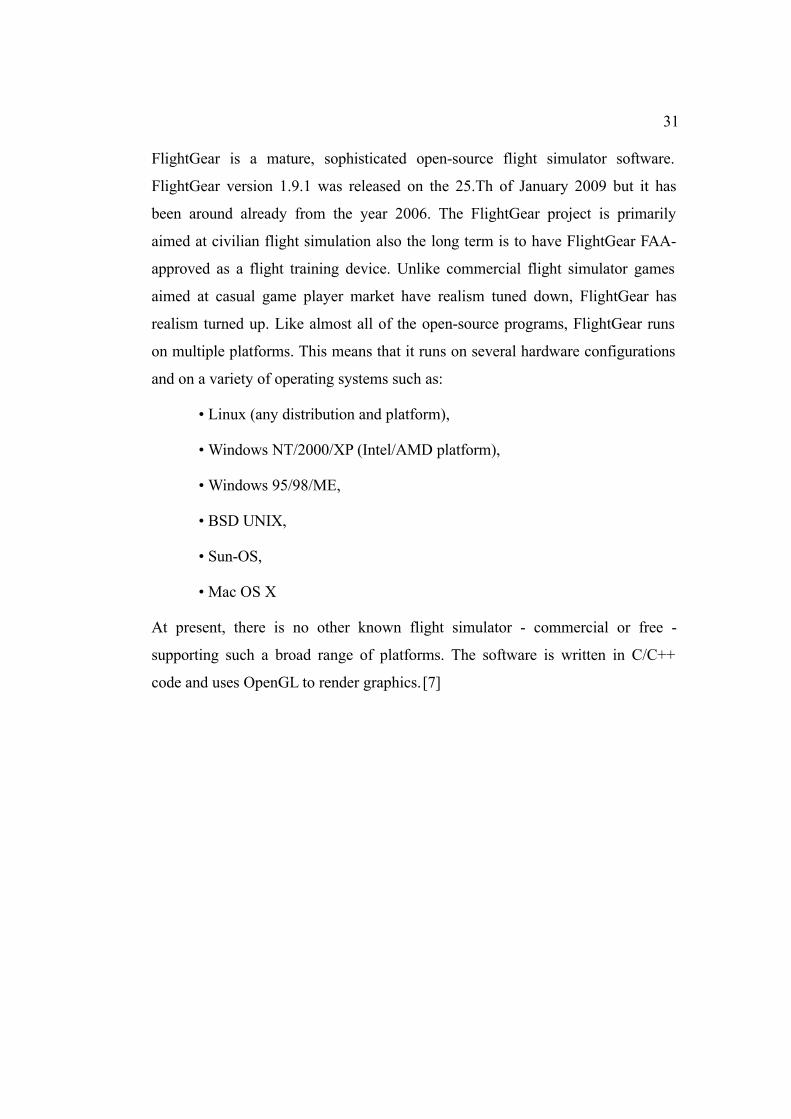
FlightGear is used with Paparazzi to verify the functionality of flight-plans made
in Paparazzi ground station software. For instance you can verify that waypoints
are flown in the correct order and have enough distance between them to make the
expected paths.
31
FlightGear is a mature, sophisticated open-source flight simulator software.
FlightGear version 1.9.1 was released on the 25.Th of January 2009 but it has
been around already from the year 2006. The FlightGear project is primarily
aimed at civilian flight simulation also the long term is to have FlightGear FAA-
approved as a flight training device. Unlike commercial flight simulator games
aimed at casual game player market have realism tuned down, FlightGear has
realism turned up. Like almost all of the open-source programs, FlightGear runs
on multiple platforms. This means that it runs on several hardware configurations
and on a variety of operating systems such as:
• Linux (any distribution and platform),
• Windows NT/2000/XP (Intel/AMD platform),
• Windows 95/98/ME,
• BSD UNIX,
• Sun-OS,
• Mac OS X
At present, there is no other known flight simulator - commercial or free -
supporting such a broad range of platforms. The software is written in C/C++
code and uses OpenGL to render graphics.[7]
32
Figure 6: Screenshot of Flight Gear.
33
8 CONFIGURING PAPARAZZI
One of the most important research areas in this project was configuration of the
configuration XML files. There are numerous XML configuration files located in
Ubuntu under the folder /usr/share/paparazzi/conf. The
configurations are extracted to code from XML and preprocessed to code before
the final compilation. I will explain the basics of XML under the next heading.
The whole paparazzi system consists of more than 900 of .c, .h, .xml, .ml and
other files.
8.1 Introduction to XML
XML stands for EXtensible Markup Language and was designed to carry data, not
to display data like HTML. XML tags are not predefined so you must define your
own tags. Tags are keywords surrounded by angle brackets for example: <h1> or
<p> . XML was designed to be self-descriptive. XML is a W3C recommendation.
XML itself doesn't do anything it was created to structure, store and transport
information. XML does not have predefined tags you need to come up with them
yourself. XML elements must have a closing tag (except the first line which is the
XML declaration it defines XML version and encoding) and they are case
sensitive also they must be properly nested. XML is not special type of file, it is
just a normal text file with file extension .xml. You can edit XML documents in
any text editor. A simple notepad program will do just fine but it is not going to
help you to close tags or highlight the syntax. Here is an example from
w3schools:
<?xml version="1.0" encoding="utf-8"?>
<bookstore>
<book category="COOKING">
<title lang="en">Everyday Italian</title>
34
<author>Giada De Laurentiis</author>
<year>2005</year>
<price>30.00</price>
</book>
<book category="CHILDREN">
<title lang="en">Harry Potter</title>
<author>J K. Rowling</author>
<year>2005</year>
<price>29.99</price>
</book>
<book category="WEB">
<title lang="en">Learning XML</title>
<author>Erik T. Ray</author>
<year>2003</year>
<price>39.95</price>
</book>
</bookstore>
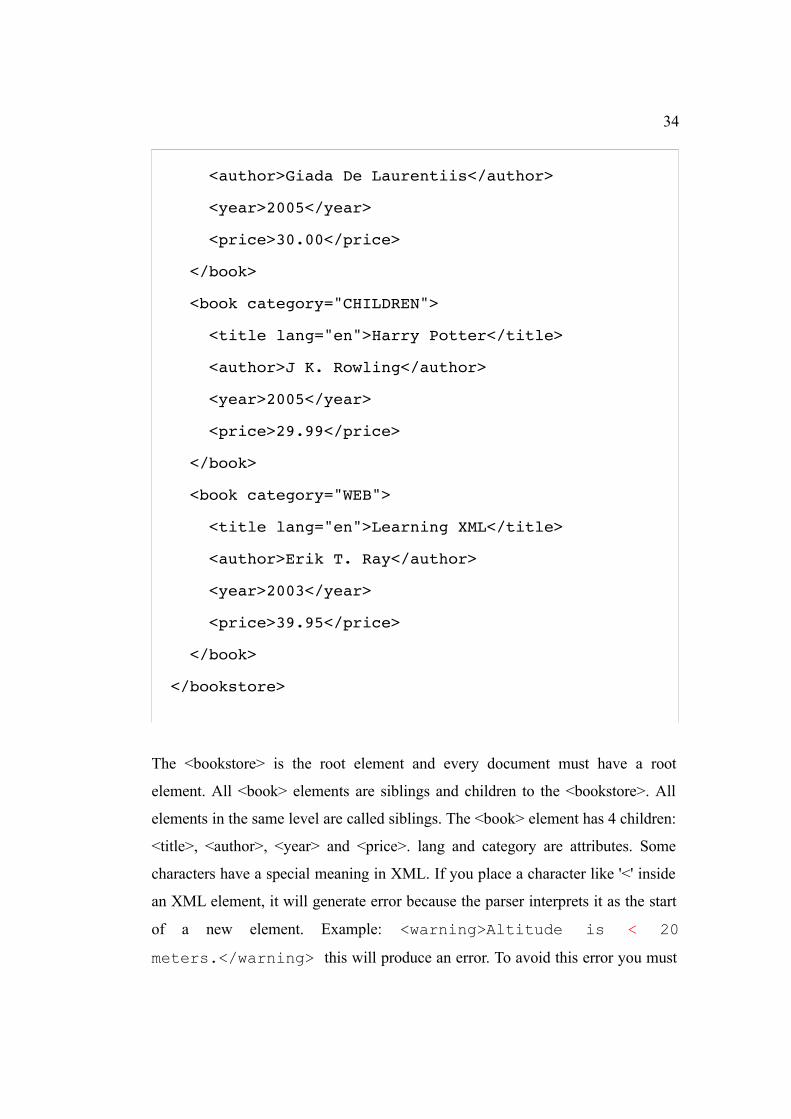
The <bookstore> is the root element and every document must have a root
element. All <book> elements are siblings and children to the <bookstore>. All
elements in the same level are called siblings. The <book> element has 4 children:
<title>, <author>, <year> and <price>. lang and category are attributes. Some
characters have a special meaning in XML. If you place a character like '<' inside
an XML element, it will generate error because the parser interprets it as the start
of a new element. Example: <warning>Altitude is < 20
meters.</warning> this will produce an error. To avoid this error you must
35
use an entity reference <. However this particular error is ignored in
Paparazzi.
Table 4: Predefined entity references in XML.
Entity Reference Character Meaning< < less than> > greater than& & ampersand' ' apostrophe" “ quotation mark
XML with correct syntax is well formed and XML validated against a DTD is valid XML. Well formed XML documents have correct XML syntax. The syntax rules include:
● XML documents must have a root element
● XML elements must have a closing tag
● XML tags are case sensitive
● XML elements must be properly nested
● XML attribute values must be quoted
Valid XML documents is a well formed XML document, which also conforms to
the rules of a document type definition (DTD).
8.2 Setting up video
A video screen in the GCS is used to show the view from the onboard camera in
the plane. In order to setup a window for video in the Paparazzi ground station
you need add a new tag in one of the XML files located in home/paparazzi/
conf. The file is control_panel.xml there is no built-in way to do this in
the Paparazzi graphical user interface this has to be done manually with a text
editor. You will need Mplayer and live555MediaServer to test this. Mplayer is
used to display video and live555mediaserver is to the test video streaming.
Instruction can be also be found on the Internet on the author's log page. [8]
36
8.2.1 Installing MPlayer
On your Linux machine do the following.
1. Open up a terminal window. Applications -> Accessories -> Terminal.
2. Type in the following commands:
$ sudo apt-get install mplayer
$ yourpassword
$ y
3. Close terminal window and open a new terminal window.
4. To start Mplayer:
$ mplayer <filename>
8.2.2 Installing Live555mediaserver
On the same Linux machine where you installed Mplayer do the following.
1. Open up a web browser and paste the following to the address field: http://
www.live555.com/liveMedia/public/
2. Download and extract the package for example to your Documents folder.
I recommend using the file explorer to navigate to the folder and right
click on the package and choose "extract here".
3. Open up a new terminal window. Type “cd ” ( notice the space after cd )
and drag drop the extracted folder icon on the terminal window and hit the
return key.
37
4. You should now be inside the “live” folder in your terminal. Now type the
following:
$ ./genMakeFiles linux
$ make
5. After the procedure is finished you must “cd” to the "path-to-
live/live/mediaServer" folder and type ./live555MediaServer and
hit the return key.
6. Server should now be running. To the stop it use the keyboard
combination Ctrl + C.
7. Media are put under the folder “mediaServer” under “live” folder.
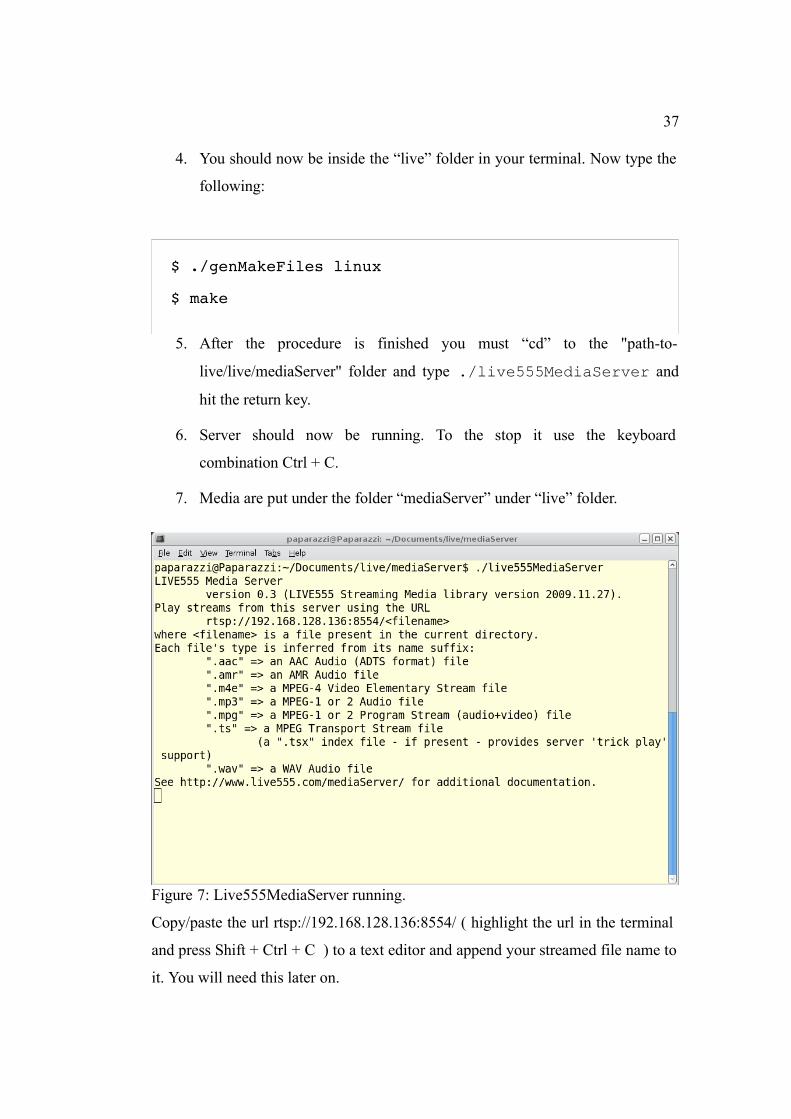
Copy/paste the url rtsp://192.168.128.136:8554/ ( highlight the url in the terminal
and press Shift + Ctrl + C ) to a text editor and append your streamed file name to
it. You will need this later on.
Figure 7: Live555MediaServer running.
38
8.2.3 Configuring Paparazzi GCS for video plugin
To configure the Paparazzi you need to understand how to write XML files. You
can consult on how to edit XML in chapter 8.1 Introduction to XML. Open
Paparazzi center.
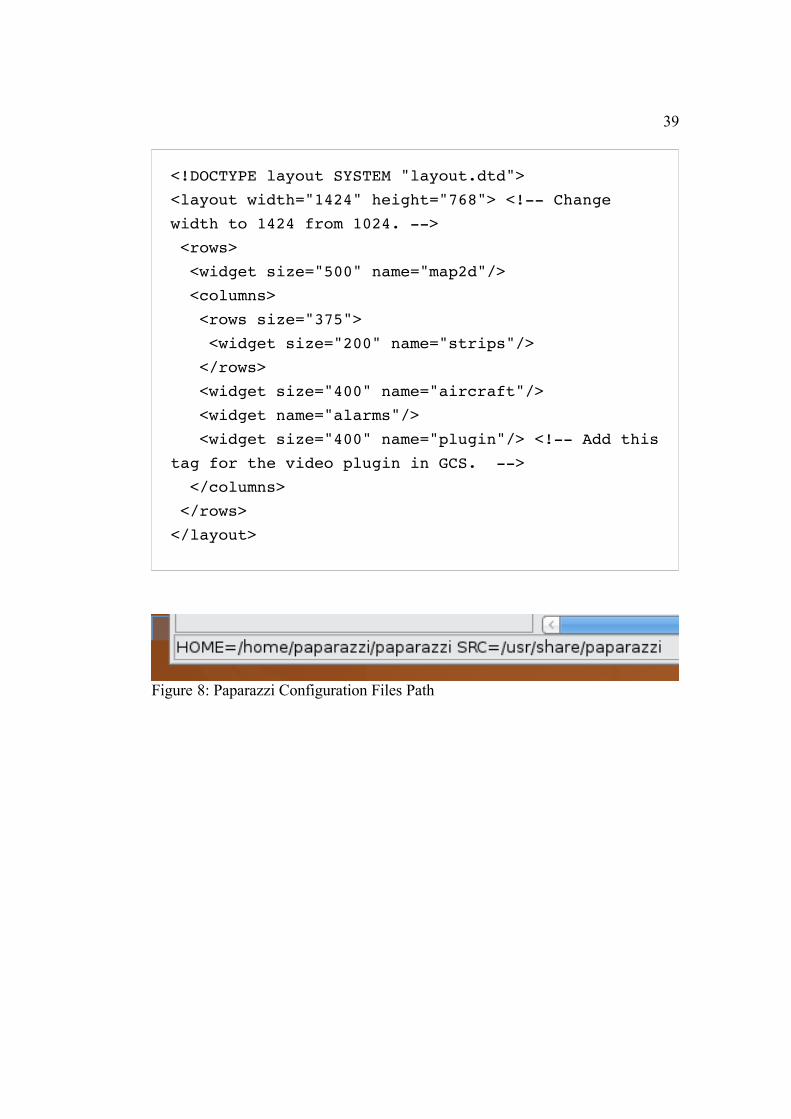
1. Locate your configuration folders from the bottom left corner of the
Paparazzi center. See example in Figure 8 on page 39.
2. Navigate to the HOME folder and find the "conf" folder. Under the conf
folder locate the "control_panel.xml" file and open it in your favourite
editor. HINT: make a backup copy of your working xml file before editing
it if you are uncertain about editing xml files.
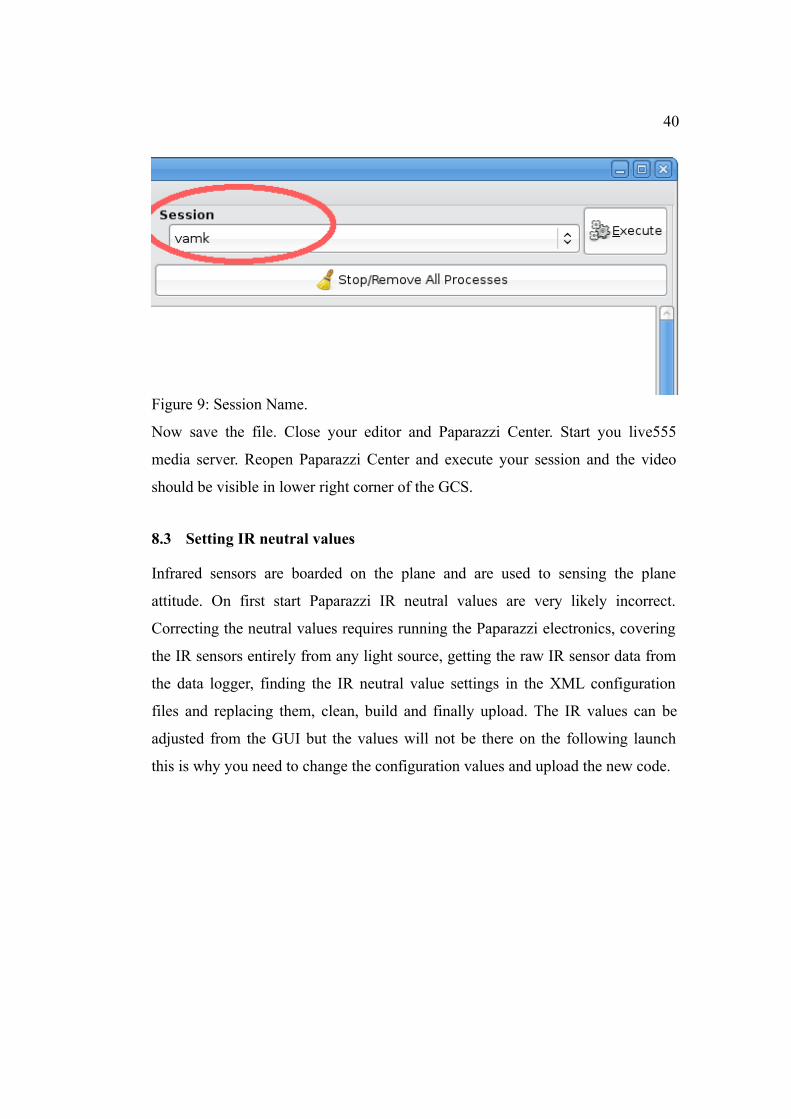
3. Now you must check in which session you want the video to be shown in.
You choose it from the Paparazzi Center. See Figure 9 on page 40.
4. Next open the control_panel.xml and locate a tag <session
name="your-session-name"> in this example <session
name="vamk">.
5. Add a child tag.
<program name="GCS">
<arg flag="-mplayer"
constant="rtsp://192.168.128.136:8554/filename.mpg"
/>
</program>
6. Remember to comment and save.
7. Next locate folder “gcs” under “conf” where you opened
control_panel.xml. Open file “horizontal.xml”.
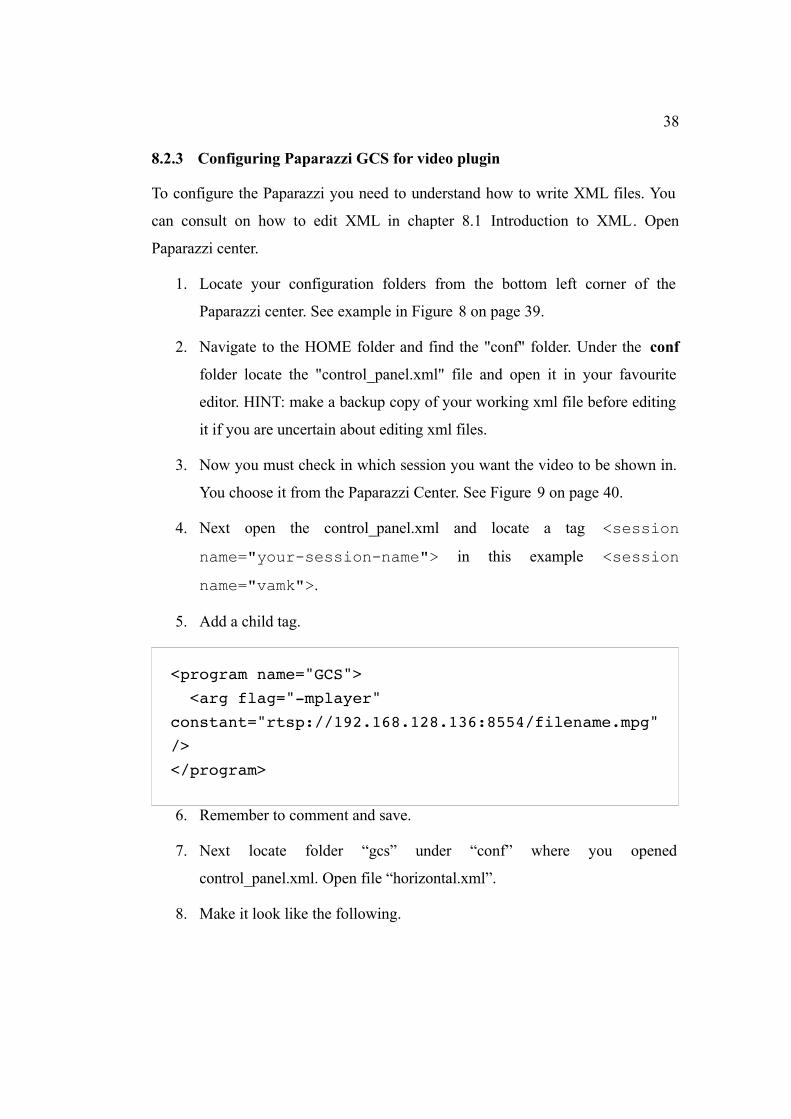
8. Make it look like the following.
39
<!DOCTYPE layout SYSTEM "layout.dtd">
<layout width="1424" height="768"> <!-- Change
width to 1424 from 1024. -->
<rows>
<widget size="500" name="map2d"/>
<columns>
<rows size="375">
<widget size="200" name="strips"/>
</rows>
<widget size="400" name="aircraft"/>
<widget name="alarms"/>
<widget size="400" name="plugin"/> <!-- Add this
tag for the video plugin in GCS. -->
</columns>
</rows>
</layout>
Figure 8: Paparazzi Configuration Files Path
40
Now save the file. Close your editor and Paparazzi Center. Start you live555
media server. Reopen Paparazzi Center and execute your session and the video
should be visible in lower right corner of the GCS.
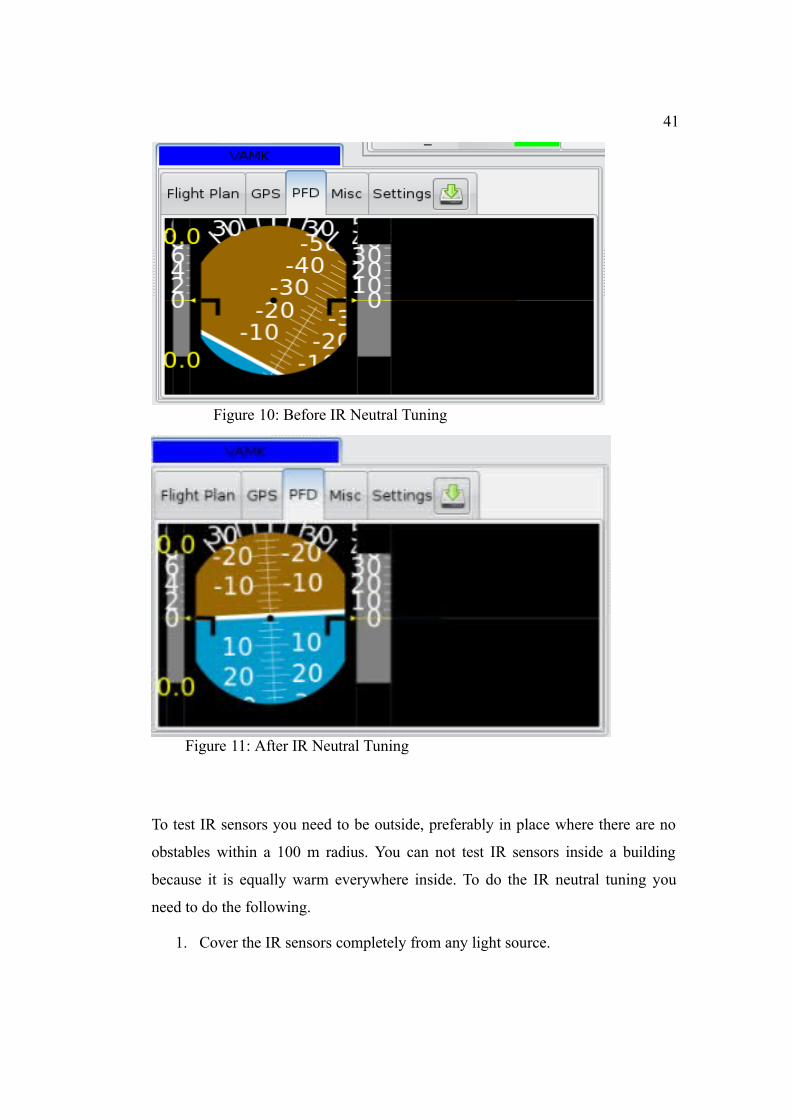
8.3 Setting IR neutral values
Infrared sensors are boarded on the plane and are used to sensing the plane
attitude. On first start Paparazzi IR neutral values are very likely incorrect.
Correcting the neutral values requires running the Paparazzi electronics, covering
the IR sensors entirely from any light source, getting the raw IR sensor data from
the data logger, finding the IR neutral value settings in the XML configuration
files and replacing them, clean, build and finally upload. The IR values can be
adjusted from the GUI but the values will not be there on the following launch
this is why you need to change the configuration values and upload the new code.
Figure 9: Session Name.
41
To test IR sensors you need to be outside, preferably in place where there are no
obstables within a 100 m radius. You can not test IR sensors inside a building
because it is equally warm everywhere inside. To do the IR neutral tuning you
need to do the following.
1. Cover the IR sensors completely from any light source.
Figure 10: Before IR Neutral Tuning
Figure 11: After IR Neutral Tuning
42
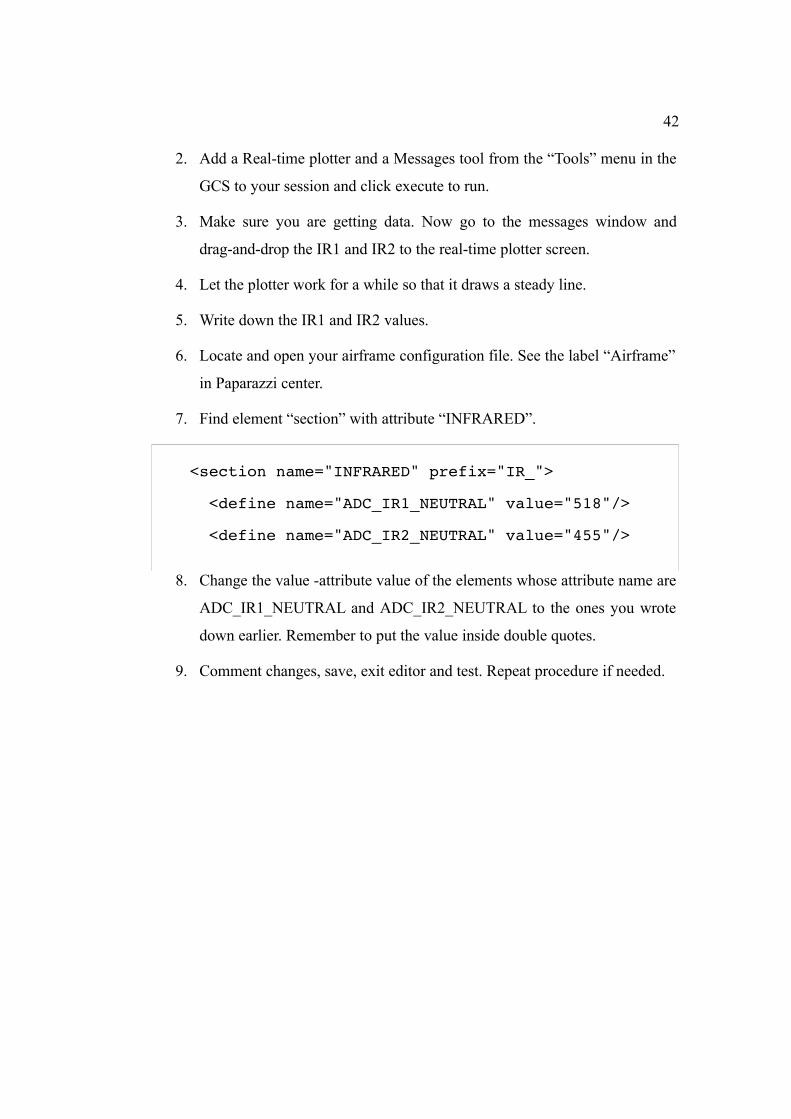
2. Add a Real-time plotter and a Messages tool from the “Tools” menu in the
GCS to your session and click execute to run.
3. Make sure you are getting data. Now go to the messages window and
drag-and-drop the IR1 and IR2 to the real-time plotter screen.
4. Let the plotter work for a while so that it draws a steady line.
5. Write down the IR1 and IR2 values.
6. Locate and open your airframe configuration file. See the label “Airframe”
in Paparazzi center.
7. Find element “section” with attribute “INFRARED”.
<section name="INFRARED" prefix="IR_">
<define name="ADC_IR1_NEUTRAL" value="518"/>
<define name="ADC_IR2_NEUTRAL" value="455"/>
8. Change the value -attribute value of the elements whose attribute name are
ADC_IR1_NEUTRAL and ADC_IR2_NEUTRAL to the ones you wrote
down earlier. Remember to put the value inside double quotes.
9. Comment changes, save, exit editor and test. Repeat procedure if needed.
43
9 LEGAL ISSUES CONCERNING UAVS IN FINLAND
Radio controlled airplanes are not toys and they are laws about we must be aware
of. There are laws about which radio frequencies you can use and laws about what
kind of airplanes you can fly and where. In Finland we have the following laws:
● UAV must weigh under 25 kg.
● UAV must be in sight at all times. How far this is depends on the eyesight
of the controller.
● UAV must not fly higher than 150 m.
● When flying over buildings you must fly at least 30 m above them.
● If you want to fly above 150 m you must apply for a permit 10 weeks
before hand and this costs 250 €. If the permission is granted the area of 6
km radius will be declared as a danger zone.
● There are more limitations when flying near airports, military bases,
prisons, hospitals, power plants, population centers in general and when
flying closer than 15 km distance from national borders.
● It is not required have to have an insurance to fly Rcs in Finland. In some
countries it is required but it is beneficial to get one even if it is not
required.
44
10 CONCLUSION AND FUTURE RESEARCH WORK
10.1 Conclusion
In this project we got a sturdy model airplane with a payload capacity of 1 kg and
test fly it several times and sort out the bugs in it. We made connections with a
handful of people in Finland who are interested in UAVs and therefore we have
received much more information about UAVs. We got the Paparazzi electronics
running and got telemetry data from it and learn how to configure the Paparazzi
systems settings, for example to trim the IR neutral settings.
10.2 Future research work
This work that I have started is a good project for further research by students
studying embedded systems and software. In project requires knowledge in
electronics, both high and low level programing also skills in using Linux. This
project is sure to interest students more than just making some LEDs flash on
some ready kit on a laboratory table. When working with airplanes it is sometimes
necessary to go outdoors into field conditions and one quickly becomes familiar
with the difficulties of working outdoors. Care must be taken when choosing
students to this project. Students participating in this kind project must be hard
working who also study IT in their leisure time.
In future research students could take advantage of wind tunnel simulation
software and test different plane setups and thus avoiding having to spend time
building and spending an afternoon at the runway “seeing how it goes”. Parts to
airplane could be built by using CNC machines to cut precision parts out of EPP.
10.3 Improvement suggestions to Paparazzi software
10.3.1 Windows version of GCS
The Windows OS product family counts for about 90% of the home computer OS
market the rest is Apple Macintosh 6% and Linux 4% in personal desktop

45
computer operating system. [9] These statistics are disputable and not to be taken
too seriously. But the main idea is that Windows OS dominate in desktop
computers. Since Linux is open source you can download a fully configured
distribution of Linux where all Paparazzi software are installed and ready to go.
You can download a live-cd or an virtual machine image. Since Linux is free
software you can download them entirely legally.
• use entity references in XML configuration files to make xml files well
formed.
• use XML schema instead of DTD
• Make a more intuitive Paparazzi Center GUI programs for Windows and
Macintosh operating system to widen the user base.
• Commenting option for the GUI tools to enable some level version
control.
10.3.2 Replace DTD with XML schema
The configuration can be done with the GCS editor which writes the XML for the
user and therefore the XML is valid always but sometimes it necessary or easier to
edit the XML itself and the use XML Schema would prevent mistakes in the XML
files. Use of XML Schema would be more professional and safer but would not
make any difference to the end product. For example:
<?xml version=”1.0” encoding=”UTF-8”?>
<!DOCTYPE mydocument SYSTEM “mydocument.dtd”>
<root>
<somedata>Hello, world!</somedata>
</root>
46
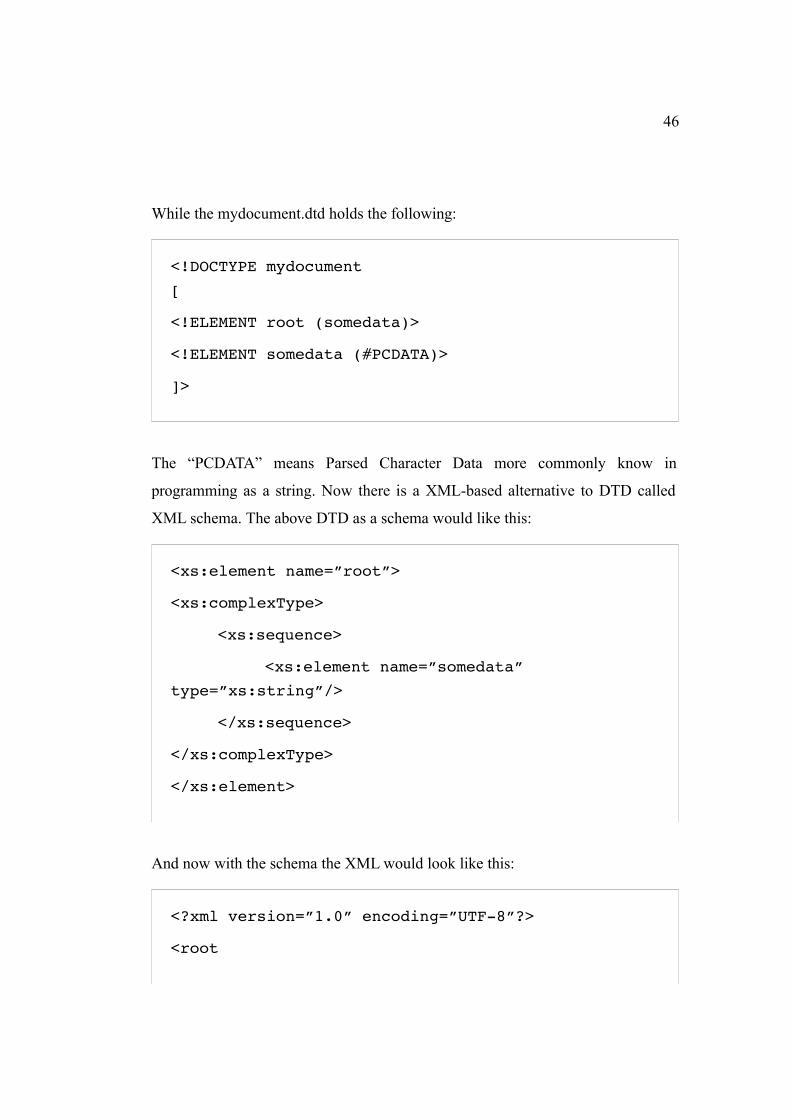
While the mydocument.dtd holds the following:
<!DOCTYPE mydocument
[
<!ELEMENT root (somedata)>
<!ELEMENT somedata (#PCDATA)>
]>
The “PCDATA” means Parsed Character Data more commonly know in
programming as a string. Now there is a XML-based alternative to DTD called
XML schema. The above DTD as a schema would like this:
<xs:element name=”root”>
<xs:complexType>
<xs:sequence>
<xs:element name=”somedata”
type=”xs:string”/>
</xs:sequence>
</xs:complexType>
</xs:element>
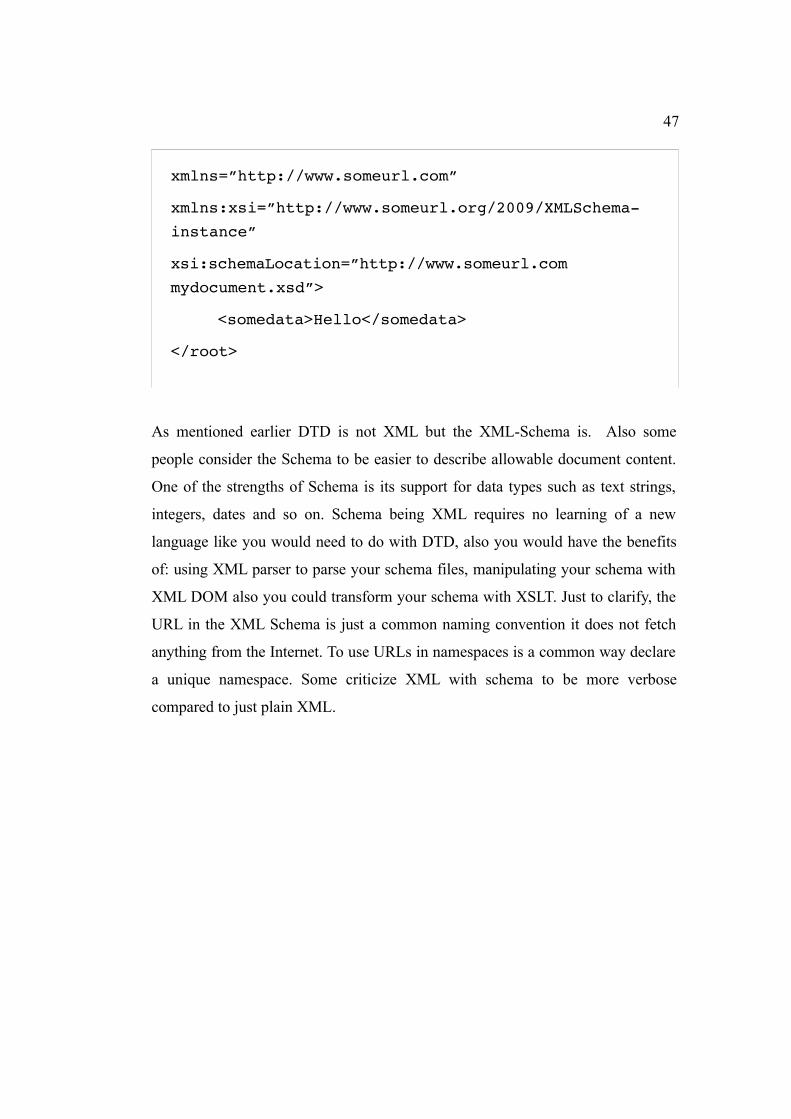
And now with the schema the XML would look like this:
<?xml version=”1.0” encoding=”UTF-8”?>
<root
47
xmlns=”http://www.someurl.com”
xmlns:xsi=”http://www.someurl.org/2009/XMLSchema-
instance”
xsi:schemaLocation=”http://www.someurl.com
mydocument.xsd”>
<somedata>Hello</somedata>
</root>
As mentioned earlier DTD is not XML but the XML-Schema is. Also some
people consider the Schema to be easier to describe allowable document content.
One of the strengths of Schema is its support for data types such as text strings,
integers, dates and so on. Schema being XML requires no learning of a new
language like you would need to do with DTD, also you would have the benefits
of: using XML parser to parse your schema files, manipulating your schema with
XML DOM also you could transform your schema with XSLT. Just to clarify, the
URL in the XML Schema is just a common naming convention it does not fetch
anything from the Internet. To use URLs in namespaces is a common way declare
a unique namespace. Some criticize XML with schema to be more verbose
compared to just plain XML.
48
References1: Paparazzi Wiki. Paparazzi Wiki. [referenced 7th March 2010]. Available in
www-form: http://paparazzi.enac.fr/wiki/Main_Page
2: Paparazzi Wiki. Hardware Page. [refenced 9th March 2010]. Available in
www-form: http://paparazzi.enac.fr/wiki/Tiny_v2
3: Hitec, Hitec Optic Sport 6 Manual,
4: Paparazzi wiki. Paparazzi System Overview. [referenced 16.th of February
2019]. Available in www-form: http://paparazzi.enac.fr/wiki/Overview
5: Inria. Caml Language Home. [referenced 2.nd February 2010]. Available in
www-form: http://caml.inria.fr/
6: Agner Fog, Optimizing software in C++, 2009
7: FlightGear. FlightGear Online Manual. [referenced 9th March 2010]. Available
in www-form: http://www.flightgear.org/Docs/getstart/getstartch1.html#x5-70001
8: Allan Ojala. VAMK Paparazzi Wiki. [referenced 21.st February 2010.].
Available in www-form: http://paparazzi.enac.fr/wiki/User:VAMK
9: W3C. OS Statistics. [referenced 10.th Februabry 2010]. Available in www-
form: http://www.w3schools.com/browsers/browsers_os.asp