Embed Size (px)
Citation preview

Step 1: Remove battery access panel and disconnect the battery. Retire el panel de acceso a la batería y desconecte la batería.
Step 2: Remove the maintenance panel on the side of the generator by removing the 5 bolts that secure it. Retire el panel de mantenimiento en el lado del generador quitando los 5 tornillos que lo aseguran.
Step 3: Remove the control panel by removing the 4 screws on the face and the two screws on each side. Let the control panel hang loose. Retire el panel de control quitando los 4 tornillos de la cara y los dos tornillos de cada lado. Deje que el panel de control cuelgue suelto.
Step 4: Drain all the fuel from the carburetor float bowl into a suitable container. Refer to manual for instructions. Vacíe todo el combustible del recipiente del flotador del carburador en un recipiente adecuado. Consulte el manual para obtener instrucciones.
Step 5: Remove the two bolts that secure the air filter box to the carburetor. Remove the lid and the foam element inside. Retire los dos tornillos que aseguran la caja del filtro de aire al carburador. Retire la tapa y el elemento de espuma en el interior.
Step 6: Remove the clamp on the vapor tube and set is aside. Remove the vapor tube and the crankcase breather. Retire la abrazadera del tubo de vapor y déjela a un lado. Retire el tubo de vapor y el respiradero del cárter.
Step 7: Remove the two nuts that hold the box base to the carburetor and slide it off. Retire las dos tuercas que sujetan la base de la caja al carburador y deslícela hacia afuera.
Step 8: Remove the gasket from the front face of the carburetor then remove the two electrical connections from the stepper motor to the control panel. See images for reference. Retire la junta de la parte frontal del carburador y luego retire las dos conexiones eléctricas del motor paso a paso al panel de control. Ver imágenes para referencia.
Step 9: Slide the carburetor off the studs and turn it sideways to remove the fuel line. Deslice el carburador fuera de los pernos y gírelo hacia los lados para quitar la línea de combustible.
2
3
5
6
8
9
Installation Guide for Carburetor Jet Altitude Kit A058V024 for Cummins P4500i Inverter Generator.Guía de instalación para el kit de altitud del chorro del carburador para el generador inversor P4500i Cummins.
WARNING: Before performing any maintenance make sure the engine is cold and the boot is removed from the spark plug. ADVERTENCIA: Antes de realizar cualquier tarea de mantenimiento, asegúrese de que el motor esté frío y que se haya retirado la cubierta de la bujía.
Copyright © 2019 Cummins Inc. 6-2019 A063U924 (Issue 1)
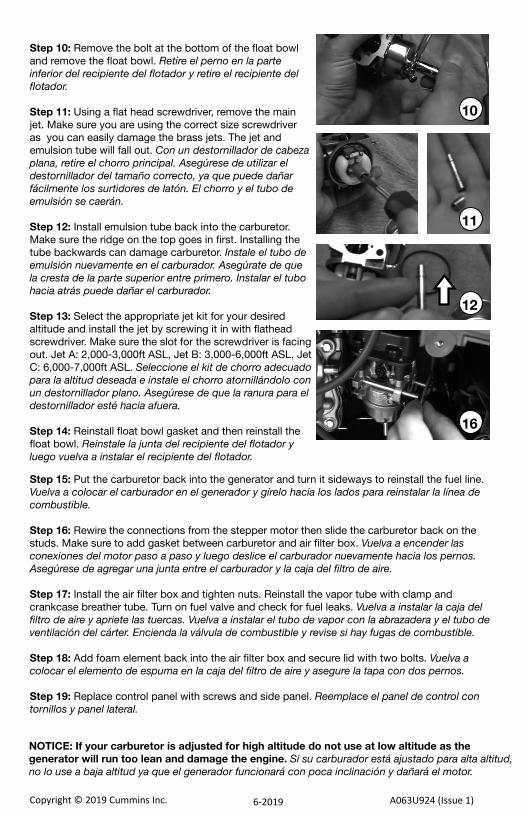
Step 10: Remove the bolt at the bottom of the float bowl and remove the float bowl. Retire el perno en la parte inferior del recipiente del flotador y retire el recipiente del flotador.
Step 11: Using a flat head screwdriver, remove the main jet. Make sure you are using the correct size screwdriver as you can easily damage the brass jets. The jet and emulsion tube will fall out. Con un destornillador de cabeza plana, retire el chorro principal. Asegúrese de utilizar el destornillador del tamaño correcto, ya que puede dañar fácilmente los surtidores de latón. El chorro y el tubo de emulsión se caerán.
Step 12: Install emulsion tube back into the carburetor. Make sure the ridge on the top goes in first. Installing the tube backwards can damage carburetor. Instale el tubo de emulsión nuevamente en el carburador. Asegúrate de que la cresta de la parte superior entre primero. Instalar el tubo hacia atrás puede dañar el carburador.
Step 13: Select the appropriate jet kit for your desired altitude and install the jet by screwing it in with flathead screwdriver. Make sure the slot for the screwdriver is facing out. Jet A: 2,000-3,000ft ASL, Jet B: 3,000-6,000ft ASL, Jet C: 6,000-7,000ft ASL. Seleccione el kit de chorro adecuado para la altitud deseada e instale el chorro atornillándolo con un destornillador plano. Asegúrese de que la ranura para el destornillador esté hacia afuera.
Step 14: Reinstall float bowl gasket and then reinstall the float bowl. Reinstale la junta del recipiente del flotador y luego vuelva a instalar el recipiente del flotador.
NOTICE: If your carburetor is adjusted for high altitude do not use at low altitude as the generator will run too lean and damage the engine. Si su carburador está ajustado para alta altitud, no lo use a baja altitud ya que el generador funcionará con poca inclinación y dañará el motor.
Step 15: Put the carburetor back into the generator and turn it sideways to reinstall the fuel line. Vuelva a colocar el carburador en el generador y gírelo hacia los lados para reinstalar la línea de combustible.
Step 16: Rewire the connections from the stepper motor then slide the carburetor back on the studs. Make sure to add gasket between carburetor and air filter box. Vuelva a encender las conexiones del motor paso a paso y luego deslice el carburador nuevamente hacia los pernos. Asegúrese de agregar una junta entre el carburador y la caja del filtro de aire.
Step 17: Install the air filter box and tighten nuts. Reinstall the vapor tube with clamp and crankcase breather tube. Turn on fuel valve and check for fuel leaks. Vuelva a instalar la caja del filtro de aire y apriete las tuercas. Vuelva a instalar el tubo de vapor con la abrazadera y el tubo de ventilación del cárter. Encienda la válvula de combustible y revise si hay fugas de combustible.
Step 18: Add foam element back into the air filter box and secure lid with two bolts. Vuelva a colocar el elemento de espuma en la caja del filtro de aire y asegure la tapa con dos pernos.
Step 19: Replace control panel with screws and side panel. Reemplace el panel de control con tornillos y panel lateral.
10
11
12
16
Copyright © 2019 Cummins Inc. 6-2019 A063U924 (Issue 1)

Copyright © 2019 Cummins Inc.
Figure 1. Carburetor Jet
Figure 2. Carburetor Jets Included
Figure 3. Altitude Guidelines
6-2019 A063U924 (Issue 1)