Embed Size (px)
Citation preview

Indoor PositioningInstallation GuideVersion 20.1
CONFIDENTIAL

Indoor Positioning Installation Guide► Notices
2CONFIDENTIAL
Important Information NoticesTopics:
• Legal Notices• Document Information
This section contains document notices.
Indoor Positioning Installation Guide► Notices
3CONFIDENTIAL
Legal Notices© 2020 HERE Global B.V. and its Affiliate(s). All rights reserved.
This material, including documentation and any related computer programs, is protected by copyrightcontrolled by HERE. All rights are reserved. Copying, including reproducing, storing, adapting or translating,any or all of this material requires the prior written consent of HERE. This material also contains confidentialinformation, which may not be disclosed to others without the prior written consent of HERE.
Trademark Acknowledgements
HERE is trademark or registered trademark of HERE Global B.V.
Other product and company names mentioned herein may be trademarks or trade names of their respectiveowners.
Disclaimer
This content is provided "as-is" and without warranties of any kind, either express or implied, including, butnot limited to, the implied warranties of merchantability, fitness for a particular purpose, satisfactory qualityand non-infringement. HERE does not warrant that the content is error free and HERE does not warrant ormake any representations regarding the quality, correctness, accuracy, or reliability of the content. Youshould therefore verify any information contained in the content before acting on it.
To the furthest extent permitted by law, under no circumstances, including without limitation the negligenceof HERE, shall HERE be liable for any damages, including, without limitation, direct, special, indirect, punitive,consequential, exemplary and/ or incidental damages that result from the use or application of this content,even if HERE or an authorized representative has been advised of the possibility of such damages.
Indoor Positioning Installation Guide► Notices
4CONFIDENTIAL
Document Information
Product
Name: Indoor Positioning
Version: Version 20.1
Document
Name: Indoor Positioning Installation Guide
ID: c7a801cc-845f-4b80-9d86-ec50e06faa50
Status: FINAL
Date: 2020-Jan-21, 7:47 (GMT)
Indoor Positioning Installation Guide► Contents
5CONFIDENTIAL
Contents
Chapter 1: Introduction.................................................................................................................................................................. 7 HERE Indoor Positioning highlights........................................................................................................................................................ 8
Chapter 2: Quick start......................................................................................................................................................................9Quick start workflow.......................................................................................................................................................................................10
Chapter 3: HERE Indoor Positioning Prerequisites...............................................................................11 Indoor Positioning requirements............................................................................................................................................................12
Indoor Map requirements...........................................................................................................................................................................12
Chapter 4: Preparing the Radio Environment..............................................................................................14Wi-Fi or Bluetooth............................................................................................................................................................................................ 15
Device and platform limitations........................................................................................................................................................... 15
Beacon Requirements.....................................................................................................................................................................................16
General Requirements................................................................................................................................................................................16
Radio Performance Requirements....................................................................................................................................................... 17
Configuration Requirements................................................................................................................................................................... 18
Beacon Constellation Deployment.......................................................................................................................................................... 19
Beacon Deployment Planning................................................................................................................................................................ 19
Site Visit and Plan Refinement.............................................................................................................................................................20
On-site Beacon Installation.....................................................................................................................................................................21
On-site Installation Verification............................................................................................................................................................22
Infrastructure Quality Analysis.............................................................................................................................................................. 22
Deployment Maintenance Operations............................................................................................................................................... 22
Storing Beacons.................................................................................................................................................................................................23
Reference Suppliers........................................................................................................................................................................................ 23
Chapter 5: Collecting And Managing Radio Data..................................................................................... 24HERE Indoor Radio Mapper.........................................................................................................................................................................25
Before Collecting Radio Data.....................................................................................................................................................................26
Collecting Radio Data at Your Site......................................................................................................................................................... 26
Indoor Positioning Installation Guide► Contents
6CONFIDENTIAL
Testing Positioning at the Site.................................................................................................................................................................. 27
Publishing the Radio Data........................................................................................................................................................................... 27
HERE Radio Map Admin Tool..................................................................................................................................................................... 28
Chapter 6: Working with HERE Mobile SDK..................................................................................................... 29Using HERE Mobile SDK and HERE Indoor Positioning................................................................................................................ 30
Using HERE Mobile SDK and indoor maps..........................................................................................................................................31
Testing HERE Mobile SDKs........................................................................................................................................................................... 31
Chapter 7: Technical Information..................................................................................................................................32The Very High Level view............................................................................................................................................................................. 33
Radiomaps in HERE Indoor Positioning............................................................................................................................................... 33
Business Features.............................................................................................................................................................................................35
Data Flows and Business Features......................................................................................................................................................... 35
Change of the Business Features.............................................................................................................................................................37
Chapter 8: Enterprise User Management...........................................................................................................38Introduction......................................................................................................................................................................................................... 39
Customer Admin................................................................................................................................................................................................40
Assigning roles................................................................................................................................................................................................... 42
Accepting roles...................................................................................................................................................................................................45
Management features.....................................................................................................................................................................................47
Chapter 9: FAQ........................................................................................................................................................................................49Frequently Asked Questions on Beacons............................................................................................................................................50
Frequently Asked Questions on Beacon Deployment...................................................................................................................50
Frequently Asked Questions on Radio Data Collection............................................................................................................... 52
Frequently Asked Questions on Positioning......................................................................................................................................53
Frequently Asked Questions on Indoor Maps...................................................................................................................................54
Frequently Asked Questions on HERE Account................................................................................................................................ 55
Indoor Positioning Installation Guide► Introduction
7CONFIDENTIAL
Chapter 1IntroductionTopics:
• HERE Indoor Positioning h...
This guide describes how to install, configure and verify thefunctionality of the HERE Indoor Positioning system:
• Getting the installation pre-requisites right
• The steps and the workflow, when deploying the HERE IndoorPositioning system
• Configuration and the installation of the Bluetooth™ beacons
• Important technical information about the HERE IndoorPositioning
Indoor Positioning Installation Guide► Introduction
8CONFIDENTIAL
HERE Indoor Positioning highlightsHERE Indoor Positioning service features are:
• High accuracy indoor positioning with floor and building detection
• Uses Bluetooth™ beacons and/or existing Wi-Fi infrastructure
Note: Beacons supporting Eddystone™ [preferred] or iBeacon specifications are supported
Note: iBeacon is a trademark of Apple Inc., registered in the U.S. and other countries
• Accuracy better than 5 meters 50% of the time and >90% floor detection rate in a typical case
• Easy-to-use tools (HERE Indoor Radio Mapper and HERE Radio Map Admin Tool) to collect the radio dataat the venue and to manage the radio data
• Radio data can be kept private or exposed publicly to the 3rd party developers
• Integrates seamlessly to other HERE services including HERE cell/Wi-Fi network positioning, HERE Maps,HERE Venue Maps as well as indoor and outdoor routing
• HERE Mobile SDKs for Android and iOS for application developers to access the location informationindoors and outdoors
• Works in the offline mode meaning that no internet connection is required after the positioning data hasbeen downloaded to the device to be positioned
• The position is resolved in the device preserving the user privacy
Indoor Positioning Installation Guide► Quick start
9CONFIDENTIAL
Chapter 2Quick startTopics:
• Quick start workflow
This chapter describes, how to get HERE Indoor Positioningfunctional in the most straighforward manner.

Indoor Positioning Installation Guide► Quick start
10CONFIDENTIAL
Quick start workflowThe following figure shows the most typical workflow for making HERE Indoor Positioning functional. Detailedinformation can be found in the referred chapters.
Figure 1: Quick start workflow
In practice, the deployment of the HERE Indoor Positioning consists of four simple steps:
1. Register and download the HERE Mobile SDK Premium for iOS and/or Android from HERE DeveloperPortal
Note: In case you are simply interested in trying out HERE Indoor Positioning without testingHERE Mobile SDK, skip this step and proceed to installing HERE Indoor Radio Mapper from GooglePlay. It is possible to use HERE Indoor Radio Mapper in demo mode without the SDK registrationfor testing purposes.
2. Install HERE Indoor Radio Mapper from Google Play to your Android device
3. Decide, whether you can use existing Wi-Fi or Bluetooth deployment, or if you need to deploy Bluetoothbeacons at your site
4. Collect radio data at the site using the HERE Indoor Radio Mapper (an Android-based tool). The radiodata collection allows us to create a map of the radio signal behaviour at the site, which understandingis then used, when estimating the device location. This signal strength map is called a radiomap.
5. Develop your application using the HERE Mobile SDK Premium for iOS and/or Android
Indoor Positioning Installation Guide► HERE Indoor Positioning Prerequisites
11CONFIDENTIAL
Chapter 3HERE Indoor PositioningPrerequisitesTopics:
• Indoor Positioning requir...• Indoor Map requirements
This chapter guides you through the first steps in setting up theHERE Indoor Positioning.
Indoor Positioning Installation Guide► HERE Indoor Positioning Prerequisites
12CONFIDENTIAL
Indoor Positioning requirementsTo gain access to the HERE Indoor Positioning tools, documentation and HERE Mobile SDK, please do thefollowing:
• Create a HERE Account here. To use HERE Service you need to register and create a HERE Account withusername and a password. HERE Account is used as a login in the HERE Indoor Positioning toolingincluding HERE Indoor Radio Mapper and HERE Radio Map Admin Tool. HERE Account is also used whenlogging to HERE Developer Portal.
• Access HERE Developer Portal and sign-up for HERE Mobile SDK Premium for Android and/or iOSdepending upon your needs. In the self-serve sign-up, you can choose between the Freemium and Probusiness plans. The main difference between the two plans is that the Pro plan includes dedicatedcustomer support and SLA.
The sign-up provides you an access to the following HERE Indoor Positioning resources:
• HERE Mobile SDK Premium for Android and/or iOS
• Application ID, Application Code and the SDK License key, which are needed, when youdevelop an application using the HERE Mobile SDK
Note: In case you are simply interested in trying out HERE Indoor Positioning without testingHERE Mobile SDK, skip this step and proceed to downloading the HERE Indoor Radio Mapper. It ispossible to use HERE Indoor Radio Mapper in demo mode without the SDK registration for testingpurposes.
• Access Google Play Store from your Android device and search for HERE Indoor Radio Mapper. Install theapplication. This is the tool used in deploying HERE Indoor Positioning.
• After these steps, you are good to use both HERE Indoor Radio Mapper and the HERE Mobile SDK toenable and access indoor positioning at your venue. Moreover, HERE Radio Map Admin Tool is at yourdisposal for radio data management.
Note: Using HERE Indoor Radio Mapper for Wi-Fi radio data collection is not possible in Android9.x device due to the Android platform limitations. In Android 10.x devices the Wi-Fi radio datacolletion can be re-enabled. Please see HERE Indoor Radio Mapper User Guide for further details.
• Finally, use HERE Mobile SDK Premium to power your application with HERE Indoor Positioning. Pleasesee chapter Working with HERE Mobile SDK for details.
Note: Using Wi-Fi for HERE Indoor Positioning in iOS devices is not supported due to the iOSplatform limitations.
Indoor Map requirementsTo map the radio environment in your venue using HERE Indoor Radio Mapper, you need an access to anindoor map of the venue. The indoor map can be one of the following:
• HERE Public Venue Map. The HERE Public Venue Maps are readily available in the HERE Indoor RadioMapper tool, when you have the HERE Public Indoor Positioning license.
• HERE Private Venue Map. These Venue Maps are made on a customer request. Please contact your HERErepresentative to have a HERE Private Venue Map done for your venue, and to have it available for your

Indoor Positioning Installation Guide► HERE Indoor Positioning Prerequisites
13CONFIDENTIAL
HERE Account. After this, the HERE Private Venue Map will be available for your use in HERE Indoor RadioMapper and also through the HERE Mobile SDK for the application development.
• Your own custom image-based indoor map. In this case you use an image that describes a floor in thebuilding. The image needs to be available in some commonly used image format such as .jpg, .gif or .png.
Before the image-based floor plan can be used, HERE Indoor Positioning needs to know, where in theWorld the building is. This process is called the alignment of the indoor map image to the geographicalcoordinates. The alignment is done in HERE Indoor Radio Mapper by inserting, scaling and rotating theindoor map image on the HERE map or satellite image. Alternatively, you can input WGS-84 Latitude andLongitude coordinates in decimal format for two points in the image.
Completing the alignment enables seamless switching of positioning technologies between indoor andoutdoor. Please refer to the HERE Indoor Radio Mapper User Guide for further details on using your ownindoor maps during the radio data collection process.
Note: If you are using your own custom image-based indoor map for radio data collection inHERE Indoor Radio Mapper, the map will not be reflected to HERE Mobile SDK. Custom image-based indoor maps are only meant for testing deployment and HERE Indoor Positioning in HEREIndoor Radio Mapper.
Indoor Positioning Installation Guide► Preparing the Radio Environment
14CONFIDENTIAL
Chapter 4Preparing the Radio EnvironmentTopics:
• Wi-Fi or Bluetooth• Beacon Requirements• Beacon Constellation Deplo...• Storing Beacons• Reference Suppliers
This section provides information on setting up the Bluetoothradio environment at the venue. Bluetooth beacon requirements,deployment and installation are discussed in detail.
Indoor Positioning Installation Guide► Preparing the Radio Environment
15CONFIDENTIAL
Wi-Fi or BluetoothYou can use either Wi-Fi or Bluetooth beacons to support HERE Indoor Positioning. The use of Bluetoothbeacons is mandatory in case iOS support is required, because Wi-Fi cannot be used in the iOS devices. Alsonote that typically Bluetooth beacons can provide better performance simply because Bluetooth beacons arespecifically installed for positioning purposes quite densely. The Wi-Fi network coverage may have gaps andas the deployment is optimized for connectivity, and not for positioning, the positioning performance mayvary quite a lot at different parts of the building.
Moreover, Wi-Fi network is subject to changes depending upon the connectivity needs, whereas specifically-installed Bluetooth beacon deployment can be assumed to be static. Note that whenever the radioenvironment changes significantly (e.g. due to Wi-Fi Access Points being moved from one place to another),the radio data must be collected again.
If you plan to use an existing Wi-Fi infrastructure, make sure that the Wi-Fi coverage is ubiquitous at yourvenue with preferrably more than five physical Wi-Fi access points observable throughout the venue or atleast in the areas, where you want HERE Indoor Positioning to provide high quality location information.Please note that more than ten Wi-Fi APs is preferred for the optimal system performance. The higher thenumber of Wi-Fi access points, the better the system performance. Please refer to Chapter InfrastructureQuality Analysis on page 22 on how to analyze the radio infrastructure quality.
HERE has partner suppliers for Bluetooth beacons (see Reference Suppliers on page 23). These beaconshave been tested to provide the best performance. While you can use your own beacons, they must followthe configuration and hardwarde requirements specified in Beacon Requirements on page 16.
Note: If your venue has an existing Bluetooth deployment for advertising purposes, extra care needsto be taken. Beacons in such deployments may be transmitting at low power and they maybe movedfrom one place to another frequently. Both characteristics make such deployments unsuitable forHERE Indoor Positioning.
If you plan to use an existing Wi-Fi or Bluetooth deployment to support HERE Indoor Positioning, you canproceed to Chapter Collecting And Managing Radio Data on page 24. However, if you plan to deployBluetooth beacons, the rest of the chapter discusses the beacon configuration and installation.
Device and platform limitationsThe following summarizes the few limitations to the usage of Wi-Fi and Bluetooth for HERE IndoorPositioning in different platforms.
Radio data collection using HERE Indoor Radio Mapper
• Bluetooth radio data collection is supported in all the Android versions supported by HERE Indoor RadioMapper.
• Using HERE Indoor Radio Mapper for Wi-Fi radio data collection is not possible in Android 9.x devicedue to the Android platform limitations. In Android 10.x devices the Wi-Fi radio data colletion can be re-enabled. Please see HERE Indoor Radio Mapper User Guide for further details.
HERE Indoor Positioning with HERE Mobile SDK Premium
Indoor Positioning Installation Guide► Preparing the Radio Environment
16CONFIDENTIAL
• Using Bluetooth for HERE Indoor Positioning is supported both in Android and iOS without versionlimitations.
• Using Wi-Fi for HERE Indoor Positioning in iOS devices is not supported due to the iOS platformlimitations.
• Using Wi-Fi for HERE Indoor Positioning is supported in Android devices. However, due to the largevariety in the Android device capabilities, performance may differ significantly between the devicemodels, types and firmware versions.
The most typical difference between the various Android devices and models is the Wi-Fi scan rate.The scan rate directly affects the location update rate: If the Wi-Fi scan rate is low, the location can beupdated less often than in devices with high Wi-Fi scan rate. This not only affects the location updaterate, but also to how quickly positioning reacts to floor changes.
In Android 9.0 and newer the location update rate is once per 30 seconds, when using Wi-Fi for indoorpositioning, due to the Android platform limitations. This also results in delays in reacting to floorchanges. When using Bluetooth for indoor positioning, position can typically be updated every second.
Beacon RequirementsThis section specifies the requirements and configuration that we require of Bluetooth beacons to be usedwith the HERE Indoor Positioning system.
HERE Indoor Positioning is the best compatible with beacons that transmit according to the Eddystonespecification, because it defines and supports telemetry message for beacon monitoring. HERE IndoorPositioning is compatible also with iBeacons as long as the hardware and configuration requirements aremet.
The requirements are divided into three categories, which are specified in detail in the next three chapters.
• General requirements• Radio performance requirements• Configuration requirements
General RequirementsThe following table specifies the general requirements for beacons and their casing.
Table 1: General requirements
Requirement Value
Lifetime With modern Bluetooth modules the required configuration results in approximately 20-microAmp average current draw. A beacon will run up to 10 years with 2000-mAh batterycapacity (e.g. 2xCR2477 or 2xAA alkaline batteries).
Attachment Double-sided tape, screw or cable tie
Indoor Positioning Installation Guide► Preparing the Radio Environment
17CONFIDENTIAL
Requirement Value
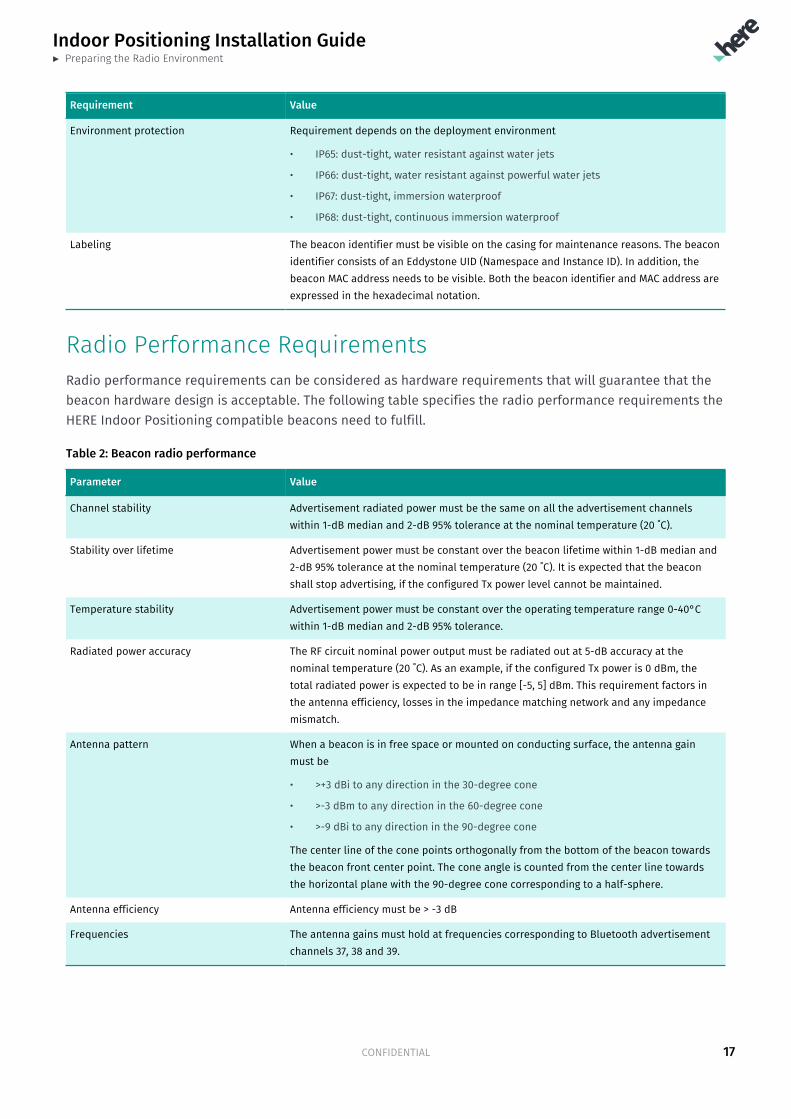
Environment protection Requirement depends on the deployment environment
• IP65: dust-tight, water resistant against water jets
• IP66: dust-tight, water resistant against powerful water jets
• IP67: dust-tight, immersion waterproof
• IP68: dust-tight, continuous immersion waterproof
Labeling The beacon identifier must be visible on the casing for maintenance reasons. The beaconidentifier consists of an Eddystone UID (Namespace and Instance ID). In addition, thebeacon MAC address needs to be visible. Both the beacon identifier and MAC address areexpressed in the hexadecimal notation.
Radio Performance RequirementsRadio performance requirements can be considered as hardware requirements that will guarantee that thebeacon hardware design is acceptable. The following table specifies the radio performance requirements theHERE Indoor Positioning compatible beacons need to fulfill.
Table 2: Beacon radio performance
Parameter Value
Channel stability Advertisement radiated power must be the same on all the advertisement channelswithin 1-dB median and 2-dB 95% tolerance at the nominal temperature (20 ˚C).
Stability over lifetime Advertisement power must be constant over the beacon lifetime within 1-dB median and2-dB 95% tolerance at the nominal temperature (20 ˚C). It is expected that the beaconshall stop advertising, if the configured Tx power level cannot be maintained.
Temperature stability Advertisement power must be constant over the operating temperature range 0-40°Cwithin 1-dB median and 2-dB 95% tolerance.
Radiated power accuracy The RF circuit nominal power output must be radiated out at 5-dB accuracy at thenominal temperature (20 ˚C). As an example, if the configured Tx power is 0 dBm, thetotal radiated power is expected to be in range [-5, 5] dBm. This requirement factors inthe antenna efficiency, losses in the impedance matching network and any impedancemismatch.
Antenna pattern When a beacon is in free space or mounted on conducting surface, the antenna gainmust be
• >+3 dBi to any direction in the 30-degree cone
• >-3 dBm to any direction in the 60-degree cone
• >-9 dBi to any direction in the 90-degree cone
The center line of the cone points orthogonally from the bottom of the beacon towardsthe beacon front center point. The cone angle is counted from the center line towardsthe horizontal plane with the 90-degree cone corresponding to a half-sphere.
Antenna efficiency Antenna efficiency must be > -3 dB
Frequencies The antenna gains must hold at frequencies corresponding to Bluetooth advertisementchannels 37, 38 and 39.
Indoor Positioning Installation Guide► Preparing the Radio Environment
18CONFIDENTIAL
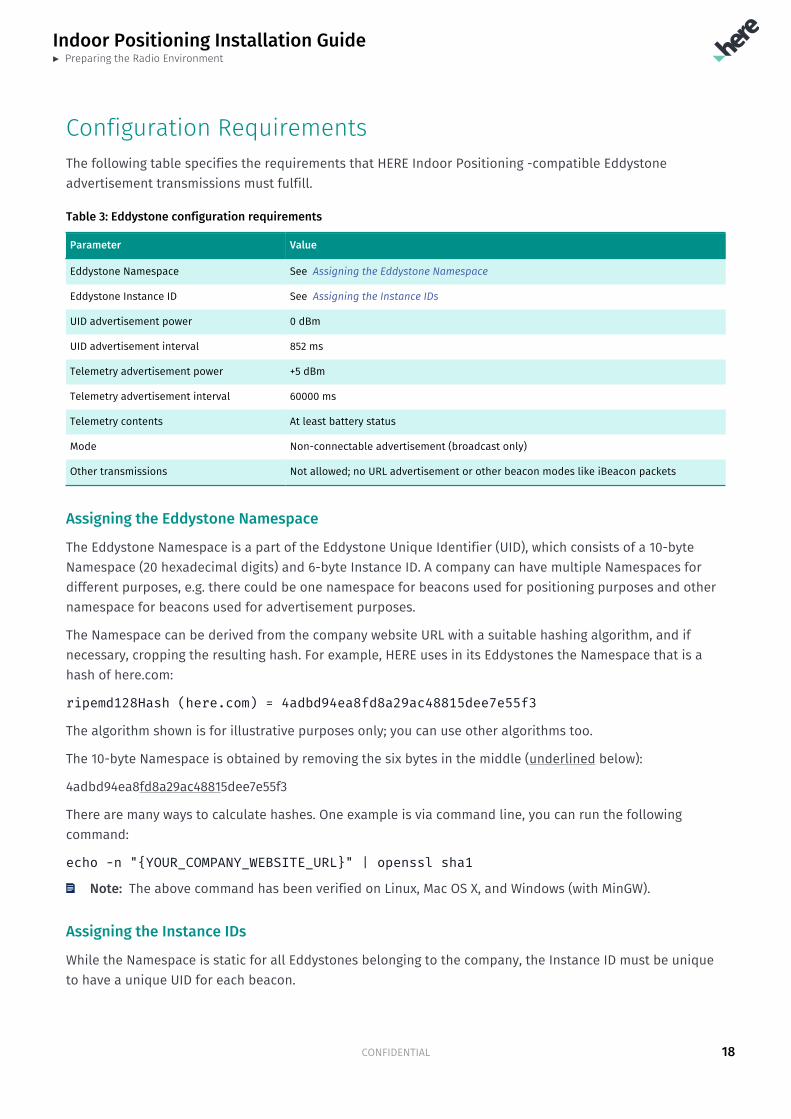
Configuration RequirementsThe following table specifies the requirements that HERE Indoor Positioning -compatible Eddystoneadvertisement transmissions must fulfill.
Table 3: Eddystone configuration requirements
Parameter Value
Eddystone Namespace See Assigning the Eddystone Namespace
Eddystone Instance ID See Assigning the Instance IDs
UID advertisement power 0 dBm
UID advertisement interval 852 ms
Telemetry advertisement power +5 dBm
Telemetry advertisement interval 60000 ms
Telemetry contents At least battery status
Mode Non-connectable advertisement (broadcast only)
Other transmissions Not allowed; no URL advertisement or other beacon modes like iBeacon packets
Assigning the Eddystone Namespace
The Eddystone Namespace is a part of the Eddystone Unique Identifier (UID), which consists of a 10-byteNamespace (20 hexadecimal digits) and 6-byte Instance ID. A company can have multiple Namespaces fordifferent purposes, e.g. there could be one namespace for beacons used for positioning purposes and othernamespace for beacons used for advertisement purposes.
The Namespace can be derived from the company website URL with a suitable hashing algorithm, and ifnecessary, cropping the resulting hash. For example, HERE uses in its Eddystones the Namespace that is ahash of here.com:
ripemd128Hash (here.com) = 4adbd94ea8fd8a29ac48815dee7e55f3
The algorithm shown is for illustrative purposes only; you can use other algorithms too.
The 10-byte Namespace is obtained by removing the six bytes in the middle (underlined below):
4adbd94ea8fd8a29ac48815dee7e55f3
There are many ways to calculate hashes. One example is via command line, you can run the followingcommand:
echo -n "{YOUR_COMPANY_WEBSITE_URL}" | openssl sha1
Note: The above command has been verified on Linux, Mac OS X, and Windows (with MinGW).
Assigning the Instance IDs
While the Namespace is static for all Eddystones belonging to the company, the Instance ID must be uniqueto have a unique UID for each beacon.
Indoor Positioning Installation Guide► Preparing the Radio Environment
19CONFIDENTIAL
The Instance ID is a 6-byte number with a range of [0,248-1]. The Instance ID can simply be a running number.However, some book-keeping is necessary to know the number to start at for the next order. When orderingbeacons, it suffices to state the first Instance ID and instruct that the number increases by one for eachbeacon.
Beacon Constellation DeploymentThe beacon constellation deployment refers to the process of installing a number of beacons to the venue tosupport HERE Indoor Positioning. The process consists of the following steps:
1. Beacon deployment planning
2. Site visit and plan refinement
3. On-site beacon installation
4. On-site installation verification
5. Infrastructure quality analysis during radio mapping
6. Deployment maintenance operations
Beacon Deployment PlanningBeacon deployment planning referes to planning beacon locations on an indoor map map. Good planningcan save a lot of time at the site. The HERE recommended best practices include:
• Beacon locations are marked on the floor plan, which makes the actual deployment work simple and fast• Use a high quality indoor map for deployment planning. The more details the map has, the better plan
you are able to make.• Having a good plan allows a larger group of technicians to make the actual physical deployment• In open areas, cover the area edges with a beacon every 8-10 meters. In the middle of the area, make
sure beacons are no further than 8-10m from each other. Similar guidance applies to corridors. As a ruleof tumb, in an open area a beacon typically covers 80 to 100 square meters.
• In office spaces, consider installing a beacon in each room to have sufficient radio coverage. In officeenvironment each beacon typically covers 30 to 50 square meters.
• The beacons must not be more than 3-4 meters from the floor.• Deploy across the whole area without leaving any gaps. Also ensure that the building edges are covered
with beacons. A good deployment plan allows for visual inspection, if all the areas have a sufficientnumber of beacons.
• When planning the deployment, take a note on the beacon geometry in addition to beacon density. Forthe best performance at a given location, there should be beacons in multiple directions so that signalsare available from sides, front and back.
• For staircases, a good principle is to install one beacon on every floor and one beacon on theintermediate floor between two sections of stairs, if available.
• For large spaces (over 15 m x 15 m) that do not contain pillars or other structures suitable for beaconfastening, consider installing beacons to the ceiling to reduce inter-beacon distances.
• Note that the deployment plan is normative only, because HERE Indoor Positioning does not need toknow the beacon locations. Therefore, the beacon locations only need to be planned approximatelyleaving the final tuning to the actual deployment phase.
Indoor Positioning Installation Guide► Preparing the Radio Environment
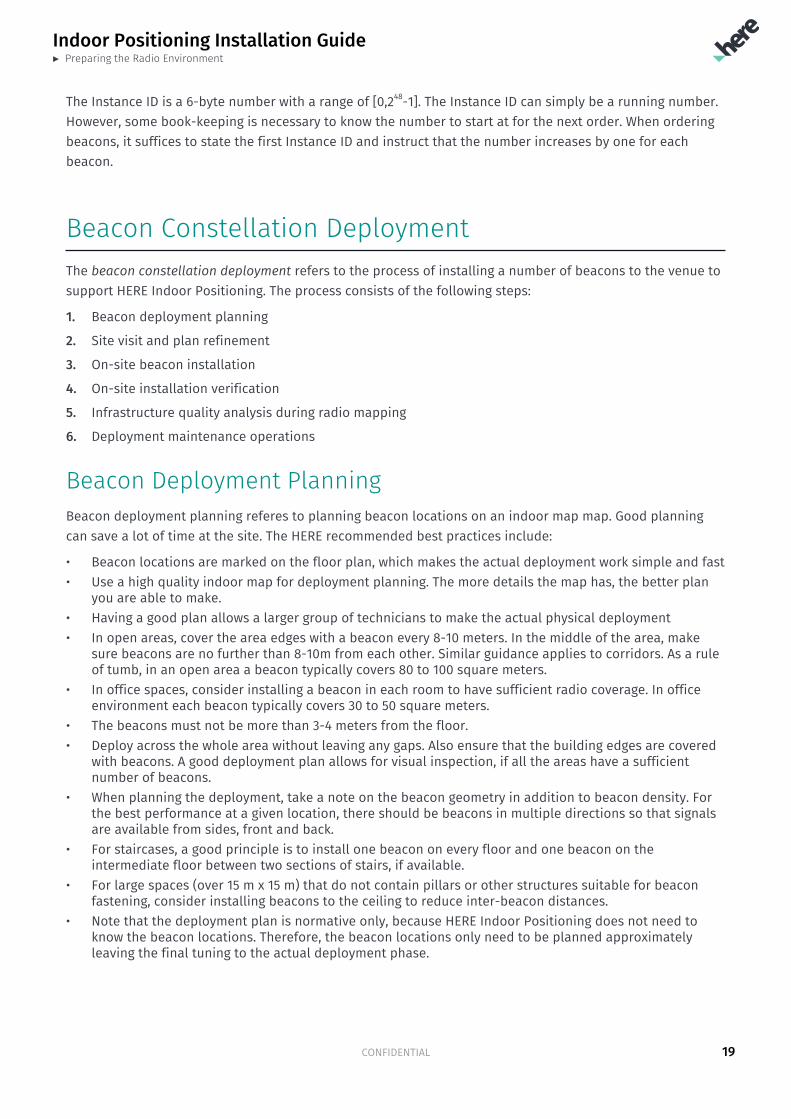
20CONFIDENTIAL
The following figure shows an examplary beacon deployment in a part of the building. The beacons havebeen installed along the building edges as well as in most of the meeting rooms. In open areas the beaconshave been fastened to the pillars.
Figure 2: Exemplary Beacon Deployment
Beacon Deployment Tips• Only use the beacon types recommended by HERE.• Use the same beacon type for your whole deployment.• Use the same battery type in all the beacons to ensure approximately equal battery lifetime for the
whole constellation.• Use beacons and batteries of the same age to ensure equal lifetime for the whole constellation.• When ordering beacons based on the deployment plan, add 10% to have spares.
Site Visit and Plan RefinementMake a site visit after the deployment planning to inspect and validate your plan. During the site visit:
• Verify that beacons can be installed to the planned locations.• Make the necessary fixes to the plan.• Observe the surface materials to decide the appropriate installation methods (tape, glue, screws, etc.)
Indoor Positioning Installation Guide► Preparing the Radio Environment
21CONFIDENTIAL
Note that sometimes it is helpful to make the site visit already before the planning. Understanding how thevenue looks like in practice, may significantly help in the deployment planning.
On-site Beacon InstallationWhen installing beacons, you should consider the following factors:
• Location – To maximize the area that a beacon covers, install the beacon in a way that nearby obstaclesdo not block beacon radio signals.
For example, consider on which side of a pillar the beacon should be placed. One option is to have twobeacons on the adjacent sides of the pillar to cover the area better with radio signals.
Important: Beacons must not be installed on any moving structures like elevators or any suchmobile platforms. Install beacons on fixed structures that cannot be moved; the beacon positionmust be static all the time.
• Height – Install beacons at a height where neither furniture nor crowd can block radio signals. Typically2.2 m from the floor should suffice. In public areas, where there is a risk of vandalism or theft, beaconsshould be installed slightly higher, between 2.5 to 2.8 m. For walls, keep a minimum of 5-cm clearancebetween the beacon and the ceiling.
The beacons must not be more than 3-4 meters from the floor.• Orientation – Very often the beacons have preferred orientation to which most of the signal is radiated.
This is typically the front of the beacon. The radiation is typically the worst towards the direction ofbatteries - that side should face wall/ceiling.
• Fastening – Double-sided mounting tape can be used to fasten small beacons. The tape needs a cleanand sleek surface, so we recommend attaching beacons on glass or metal rather than on unfinishedconcrete.
Note that removing an installed beacon from painted wall or wallpaper may damage the surface. Fora temporary installation, first put masking/painter’s tape on the wall, then mount the beacon to themasking tape with double-sided tape.
If tape does not stick to the mounting surface, you can use screws and/or glue to get solid fastening forbeacons.
Instead of tape, glue or screws, it is also worthwhile to check, if cable ties can be used to install beacons.Cable ties are fast to use and also easy to cut, when removing the beacons.
• Conditions – Installation should be done in dry and warm conditions, if possible. Cold and wetconditions may have an impact on fastening, especially when using tape. Pay particular attention whenmounting beacons in cold areas (below 0°C) such as parking garages.
• Changes – You may need to make adjustments to the planned deployment for many reasons, e.g. theremight be non-accessible areas. Technicians installing the beacons should be familiar with the planningguidelines so that adjustments can be made on-the-fly.
Document the changes to the beacon deployment plan.• Unused beacons – Remove any unused beacons from the venue immediately after the deployment
before radio data collection. Take the extra beacons far enough or to e.g. RF chamber so that the extrabeacons do not interfere with the radio data collection.
• Store the final (fixed) deployment plan for later use.
Indoor Positioning Installation Guide► Preparing the Radio Environment
22CONFIDENTIAL
On-site Installation VerificationApproximately one week after installing the beacons, walk through the deployment area and inspect thebeacon installation to at least visually verify that beacons are still fastened properly.
Infrastructure Quality AnalysisThe Radio Data Collection, which is completed after the beacon deployment, is covered in Chapter CollectingAnd Managing Radio Data on page 24. Radio data is collected using HERE Indoor Radio Mapper.
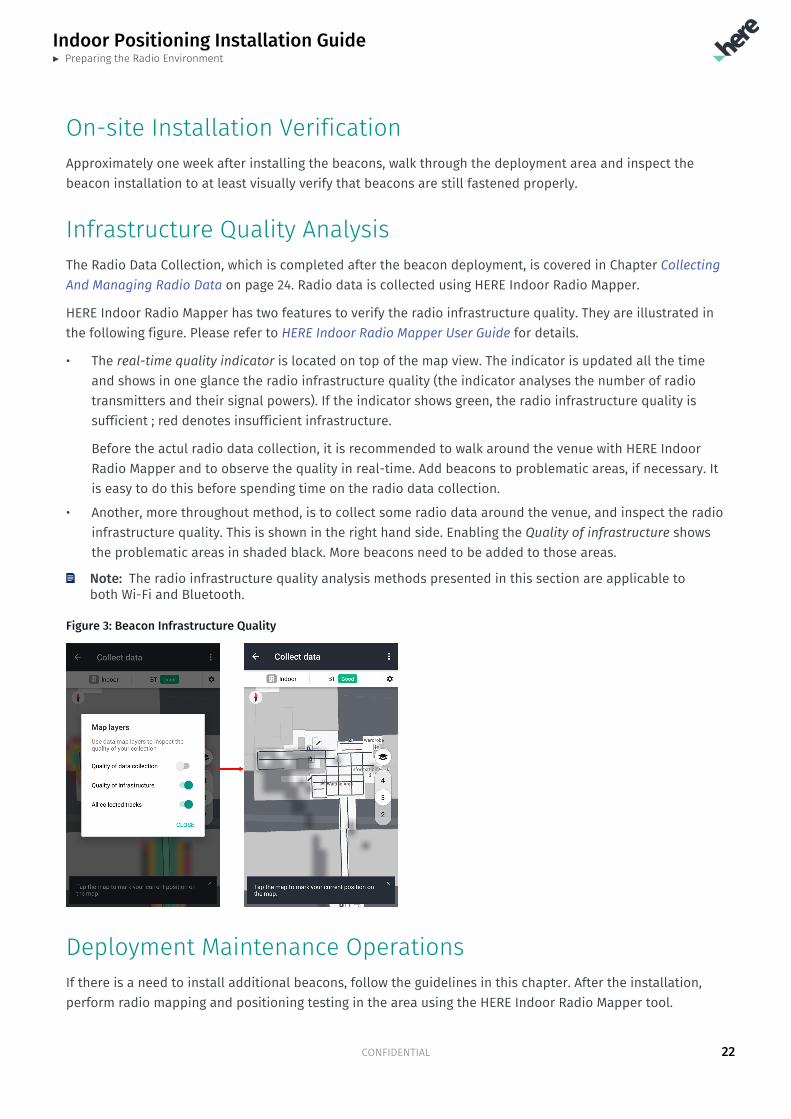
HERE Indoor Radio Mapper has two features to verify the radio infrastructure quality. They are illustrated inthe following figure. Please refer to HERE Indoor Radio Mapper User Guide for details.
• The real-time quality indicator is located on top of the map view. The indicator is updated all the timeand shows in one glance the radio infrastructure quality (the indicator analyses the number of radiotransmitters and their signal powers). If the indicator shows green, the radio infrastructure quality issufficient ; red denotes insufficient infrastructure.
Before the actul radio data collection, it is recommended to walk around the venue with HERE IndoorRadio Mapper and to observe the quality in real-time. Add beacons to problematic areas, if necessary. Itis easy to do this before spending time on the radio data collection.
• Another, more throughout method, is to collect some radio data around the venue, and inspect the radioinfrastructure quality. This is shown in the right hand side. Enabling the Quality of infrastructure showsthe problematic areas in shaded black. More beacons need to be added to those areas.
Note: The radio infrastructure quality analysis methods presented in this section are applicable toboth Wi-Fi and Bluetooth.
Figure 3: Beacon Infrastructure Quality
Deployment Maintenance OperationsIf there is a need to install additional beacons, follow the guidelines in this chapter. After the installation,perform radio mapping and positioning testing in the area using the HERE Indoor Radio Mapper tool.
Indoor Positioning Installation Guide► Preparing the Radio Environment
23CONFIDENTIAL
Sometimes beacons may fail, get lost or stolen. When you have located a failed beacon, remove it carefullyto avoid damage to the underlying surface. Clean the surface from any old tape or glue and fasten the newbeacon in the same position and/or direction. Perform radio mapping and positioning testing in the nearbyarea using the HERE Indoor Radio Mapper tool.
Storing BeaconsBeacons should be stored properly if they are active, i.e. transmitting Bluetooth signals. Unused activebeacons should not be detectable in the deployment area. For this reason, consider the following guidelines:
• Do not leave any unused active beacons lying around on tables or anywhere else.• Do not store any spare active beacons in the same building where the deployment was done.• Find a proper place for the leftover active beacons, such as a storage location away from the building,
preferably in a metal container to block electromagnetic radiation.• If unused active beacons are not stored carefully, HERE Indoor Positioning may be unreliable or its
performance may degrade.
Important: Active beacons continuously transmit Bluetooth signals. It is extremely important thatthere are no unused active beacons in the building. Even though the transmitting power is low, it ispossible for beacon signals to be received through ceilings and walls. Spare active beacons that maybe moved from one place to another may disrupt HERE Indoor Positioning.
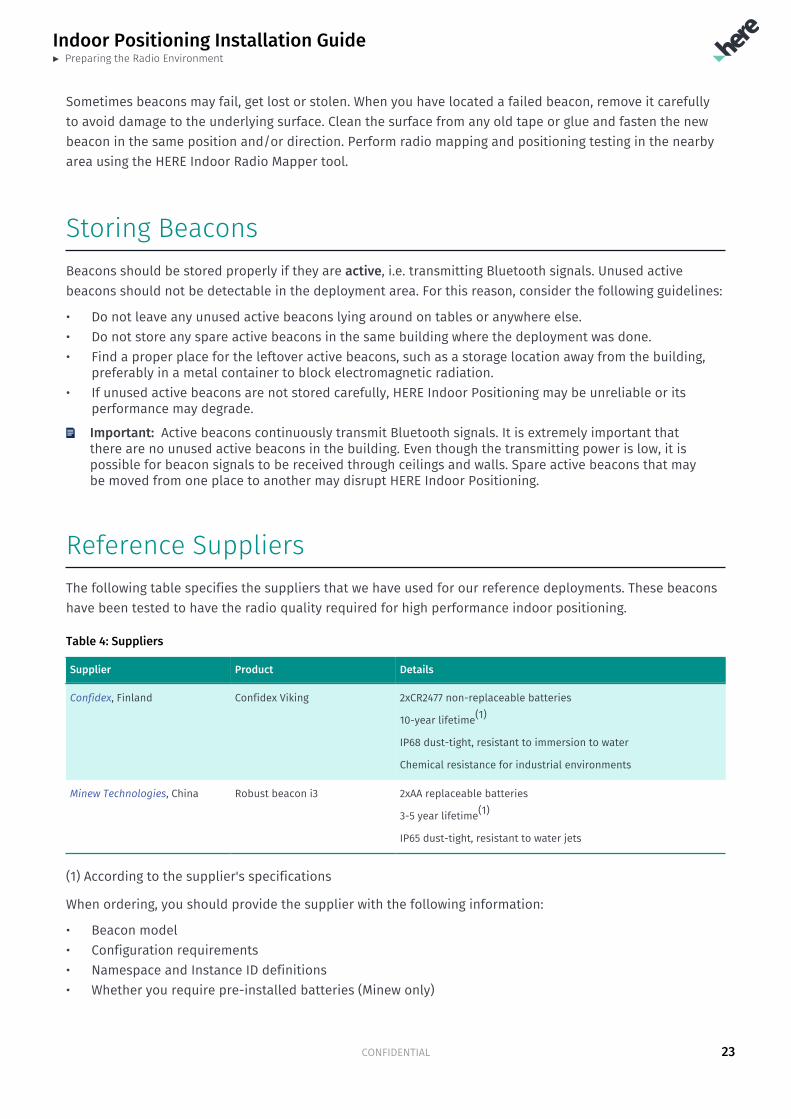
Reference SuppliersThe following table specifies the suppliers that we have used for our reference deployments. These beaconshave been tested to have the radio quality required for high performance indoor positioning.
Table 4: Suppliers
Supplier Product Details
Confidex, Finland Confidex Viking 2xCR2477 non-replaceable batteries
10-year lifetime(1)
IP68 dust-tight, resistant to immersion to water
Chemical resistance for industrial environments
Minew Technologies, China Robust beacon i3 2xAA replaceable batteries
3-5 year lifetime(1)
IP65 dust-tight, resistant to water jets
(1) According to the supplier's specifications
When ordering, you should provide the supplier with the following information:
• Beacon model• Configuration requirements• Namespace and Instance ID definitions• Whether you require pre-installed batteries (Minew only)
Indoor Positioning Installation Guide► Collecting And Managing Radio Data
24CONFIDENTIAL
Chapter 5Collecting And Managing Radio DataTopics:
• HERE Indoor Radio Mapper• Before Collecting Radio Da...• Collecting Radio Data at Y...• Testing Positioning at the...• Publishing the Radio Data• HERE Radio Map Admin Tool
This chapter summarizes the steps you need to perform at the venueto deploy HERE Indoor Positioning after the radio environment hasbeen prepared as specified in the previous chapter. The Chapteralso discusses inspecting and managing the radio data in the laterphases.
Indoor Positioning Installation Guide► Collecting And Managing Radio Data
25CONFIDENTIAL
HERE Indoor Radio MapperHERE Indoor Radio Mapper is an Android application that is used to collect the Wi-Fi and/or Bluetooth radioenvironment at a venue. HERE Indoor Radio Mapper User Guide describes the radio data collection workflowin detail and thus only a short summary is given below.
Note: Using HERE Indoor Radio Mapper for Wi-Fi radio data collection is not possible in Android 9.xdevice due to the Android platform limitations. In Android 10.x devices the Wi-Fi radio data colletioncan be re-enabled. Please see HERE Indoor Radio Mapper User Guide for further details.
Note: If multiple persons will be collecting radio data (Wi-Fi or Bluetooth) for the same building, werecommend that all the persons use the same device type/model with preferably the same Androidversion for radio data collection. This is to ensure that all the radio data is of approximately the samecalibration level - the radio sensitivity varies considerably between device models.
HERE Indoor Radio Mapper is available at Google Play for download. A training video is also available a theGoogle Play application page.
When you launch HERE Indoor Radio Mapper, you need to log in with your HERE Account credentials. After asuccessful login, you will be able to access all the HERE Venue Maps you are eligible to use. Firstly, this mayinclude HERE Public Venue Maps assuming that your license includes HERE Public Indoor Positioning feature.You are free to collect radio data at any of these venues, provided that you have permission to do so.
Moreover, if you already have HERE Private Venue Maps associated with your account, those maps are shownin HERE Indoor Radio Mapper landing page automatically assuming that your license includes includes HEREPrivate Indoor Positioning feature.
You can also use your own custom image-based custom indoor maps, provided you import those images toHERE Indoor Radio Mapper and align those to the geograhical coordinate system. The alignment is neededfor HERE Indoor Positioning to know, where in the World the building is to enable seamless switching ofpositioning technologies between indoor and outdoor. Refer to the HERE Indoor Radio Mapper User Guide forfurther details on the importing and alignment process.
HERE Indoor Positioning is a cloud-based system. This means that if there are multiple instances of the HEREIndoor Radio Mapper collecting radio data for the same account, all the instances see and can manipulatethe same radio data. The radio data from all the instances is combined to create the radiomap to supportindoor positioning. Importantly, in the testing phase all the instances test the same positioning data.
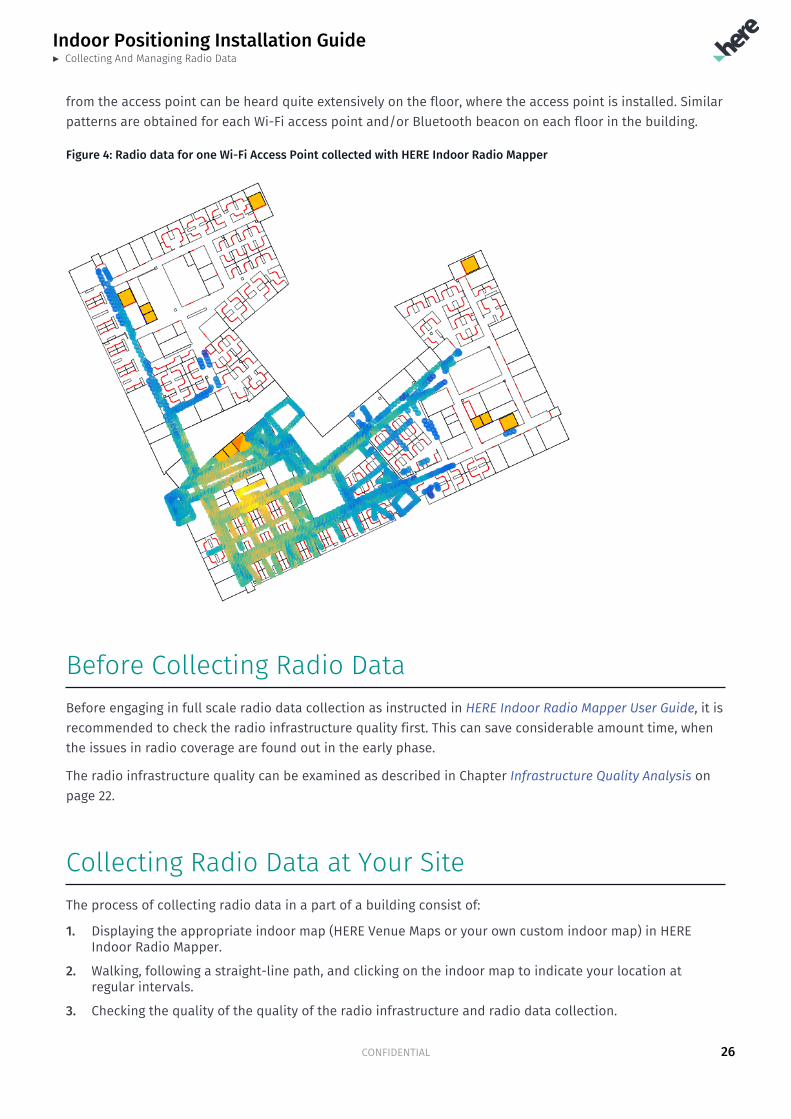
As an example, the image below shows the radio samples for a single Wi-Fi Access Point in a single floorin a venue. The data has been collected along the corridors. Color denotes the signal strength, with blueindicating low signal strength and yellow high signal strength. The data shown is very typical – the signal
Indoor Positioning Installation Guide► Collecting And Managing Radio Data
26CONFIDENTIAL
from the access point can be heard quite extensively on the floor, where the access point is installed. Similarpatterns are obtained for each Wi-Fi access point and/or Bluetooth beacon on each floor in the building.
Figure 4: Radio data for one Wi-Fi Access Point collected with HERE Indoor Radio Mapper
Before Collecting Radio DataBefore engaging in full scale radio data collection as instructed in HERE Indoor Radio Mapper User Guide, it isrecommended to check the radio infrastructure quality first. This can save considerable amount time, whenthe issues in radio coverage are found out in the early phase.
The radio infrastructure quality can be examined as described in Chapter Infrastructure Quality Analysis onpage 22.
Collecting Radio Data at Your SiteThe process of collecting radio data in a part of a building consist of:
1. Displaying the appropriate indoor map (HERE Venue Maps or your own custom indoor map) in HEREIndoor Radio Mapper.
2. Walking, following a straight-line path, and clicking on the indoor map to indicate your location atregular intervals.
3. Checking the quality of the quality of the radio infrastructure and radio data collection.
Indoor Positioning Installation Guide► Collecting And Managing Radio Data
27CONFIDENTIAL
The result is a record of radio samples that are geo-referenced to the correct location and floor in the venueand contain information, at each location, on the Wi-Fi Access Points and/or Bluetooth beacons and theirsignal strengths.
The above process must be repeated in each part of the building in which you want to set up HERE IndoorPositioning. The time required to collect the radio data for a whole building depends on the size and internalstructure of the building. However, the process needs to be completed only once per venue, provided thatthere are no significant changes in the radio environment. The document HERE Indoor Radio Mapper UserGuide provides detailed instructions and practical advice on how to use the tool.
Having collected the radio data, HERE Indoor Radio Mapper provides features to inspect the quality of boththe radio data collection and radio infrastructure. Please refer to Infrastructure Quality Analysis on page 22for further information.
When you are ready with the radio data collection, the radio data gets automatically uploaded to theHERE Indoor Positioning backend for further processing and analysis. The result of this analysis is anunderstanding of how the radio signals behave in the building. This understanding is called a radiomap forthe venue.
Testing Positioning at the SiteYou can test out HERE Indoor Positioning just a few minutes after the collected radio data has beenuploaded to the HERE Indoor Positioning backend. HERE Indoor Radio Mapper will notify you once the datahas been processed and testing can commence. Upon entering the Test view in HERE Indoor Radio Mapper,you can walk around the building and you can see HERE Indoor Positioning in action on an indoor map(either HERE Venue Map or your own custom indoor map).
In addition to the real-time positioning testing, you can also collect a test track allowing you to getquantitative feedback on the positioning quality at the venue. Again, please refer to the HERE Indoor RadioMapper User Guide for detailed information regarding the testing features.
In case you detect that some areas have problems with positioning or insufficient radio data was collectedthere, you can easily collect further radio data at this time and test again.
Publishing the Radio DataOnce you are happy with the positioning performance when you walk around the building and run the testtrack, you need to publish the radiomap to production. Once publishing is complete, the positioning data isavailable for applications using HERE Mobile SDK users. Please refer to the HERE Indoor Radio Mapper UserGuide for further details on publishing.
Upon publishing, the visibility of your data to the Mobile SDK -based applications depends on the indoormap type you are using:
• Private HERE Venue Map or your own image-based indoor map
Indoor Positioning Installation Guide► Collecting And Managing Radio Data
28CONFIDENTIAL
The radio data is controlled by you and you can manipulate the radio data in both HERE Indoor RadioMapper and HERE Radio Map Admin Tool as you wish. Indoor positioning based on your radio data isstrictly available only for your own applications.
• Public HERE Venue Map
The radio data is controlled by you and you can manipulate the radio data in both HERE Indoor RadioMapper and HERE Radio Map Admin Tool as you wish. Once you publish the data, all the applications,yours and others', using the HERE Mobile SDK Indoor Positioning feature will also be able to use indoorpositioning at that public venue.
HERE Radio Map Admin ToolWhile HERE Indoor Radio Mapper application provides some control over the radio data and positioning, themore powerful tool to inspect and manipulate your radio data is HERE Radio Map Admin Tool. You get accessto HERE Radio Map Admin Tool as part of your HERE Indoor Positioning sign-up by default.
HERE Radio Map Admin Tool provides the following features:
• You see the buildings and the floors within those buildings for which your account has indoorpositioning data
• You see the Applications IDs (AppID) for which your private indoor positioning data is available
• You see the radio data collected for a specific building on the building indoor map
• You see the different radio data collections on the indoor map as well as who made them and with whichdevice
• You can enable, disable and delete the radio data collections as required
You can access HERE Radio Map Admin Tool from indoor.here.com by tapping login at the upper right corneror directly here. Once you have indoor map setup and you have collected radio data to your account, theradio data will be visible in the tool.
Indoor Positioning Installation Guide► Working with HERE Mobile SDK
29CONFIDENTIAL
Chapter 6Working with HERE Mobile SDKTopics:
• Using HERE Mobile SDK and ...• Using HERE Mobile SDK and ...• Testing HERE Mobile SDKs
This section discusses accessing the indoor location informationthrough HERE Mobile SDK.
Indoor Positioning Installation Guide► Working with HERE Mobile SDK
30CONFIDENTIAL
Using HERE Mobile SDK and HERE Indoor PositioningHERE Mobile SDK offers a rich set of APIs including positioning, maps and routing. All of these features workboth indoors and outdoors.
For positioning, there is a clean, single simple API that provides positioning information with the bestavailable technology outdoors and indoors, depending upon business features in your license. Thepositioning information can be based on data from satellites (GPS, GLONASS, etc.), crowd-sourced global Wi-Fi and cellular networks data, or Wi-Fi and/or Bluetooth-based indoor positioning.
In summary, the positioning features of the HERE Mobile SDK include:
• High accuracy indoor positioning with building and floor detection using Wi-Fi and Bluetooth radios
Note: Using Wi-Fi for HERE Indoor Positioning in iOS devices is not supported due to the iOSplatform limitations.
• Cellular network positioning in GSM, CDMA, WCDMA, TD-SCDMA and LTE networks as well as global crowd-sourced Wi-Fi network positioning
• Positioning without network connectivity through the download of radiomaps from the HERE IndoorPositioning backend. As soon as the radiomap resides in the device, the device can position itselfwithout network connectivity. The position calculation takes places in the device reducing latencies,improving the positioning accuracy and keeping the location information private within the device.
• Automatic radiomap management. When a device enters the vicinity of a building or radiomaps havebeen updated in the HERE Indoor Positioning backend, the new or updated radiomaps are downloadedto the device automatically. Also, old radiomaps are automatically cleaned.
• Automatic selection of the best available positioning technology. The selection is automatic between Wi-Fi and Bluetooth radiomaps (if both are available) as well as between indoor and outdoor positioningmethods, if enabled in your HERE Mobile SDK license.
• HERE Indoor Positioning supports both private and public data. In case your venue is a private one (HEREPrivate Venue Map or your own custom indoor map), indoor location information is only available foryour applications (identified by AppIDs). In contrast, indoor location information for public venues(HERE Public Venue Maps) is available for all the HERE Mobile SDK users with an appropriate license.
• Global positioning coverage and data hosting infrastructure for the optimal availability, reliability anduser experience
The Positioning API provides access to the following position-related information:
• Location (latitude and longitude)• Estimated location uncertainty in meters as the CEP68 value• Speed and heading• Floor level (floor index)• Building name and ID:
▫ If you use HERE Venue Maps, the building name and building ID are static and automaticallyassigned and managed by HERE
▫ If you use an image-based custom indoor map, you need to set the building name when importingthe custom venue to the HERE Indoor Radio Mapper. The building ID is generated automatically fromthe set name.
• Information on the used positioning technology (Bluetooth, Wi-Fi indoor/outdoor, cell, GNSS)
For detailed descriptions on the Positioning and other APIs, see the HERE Android SDK Developer's GuidePremium Edition or HERE iOS SDK Developer's Guide Premium Edition for details.
Indoor Positioning Installation Guide► Working with HERE Mobile SDK
31CONFIDENTIAL
Using HERE Mobile SDK and indoor mapsWhen it comes to using indoor maps in the HERE Mobile SDK powered application, only HERE Venue Maps aresupported. HERE Venue Maps enable 3D visual experience, routing and navigation. Please visit HERE Venuesto learn how to get a HERE Venue Map for your building.
Note that custom image-based indoor maps are only meant for testing deployment and HERE IndoorPositioning in HERE Indoor Radio Mapper. Search, routing and navigation cannot be supported with image-based maps and, thus, they are not be exposed to applications via HERE Mobile SDK.
Testing HERE Mobile SDKsThe HERE Mobile SDK package includes an example application for both Android and iOS to test the HEREIndoor Positioning (and other positioning methods, too) quickly. It is assumed that the radio data has beencollected at the venue as instructed and that the radio data has been published in HERE Indoor RadioMapper for use by HERE Mobile SDK. Only then can indoor location information be accessed through HEREMobile SDK.
Note: If you are using your own custom image-based indoor map for radio data collection in HEREIndoor Radio Mapper, the map will not be reflected to HERE Mobile SDK. Custom image-based indoormaps are only meant for testing deployment and indoor positioning in HERE Indoor Radio Mapper.
Smoke test application (Android)
An Android tutorial project is available through GitHub. The project helps you to get your first HERE IndoorPositioning application up and running smoothly.
If your current location has indoor positioning coverage and you have everything setup correctly, locationestimate from indoor positioning is displayed on the screen. The application shows the following:
• Location in Latitude and Longitude coordinates. If possible, verify that these match with your test sitelocation.
• Position indicator on a map• The floor level• The building ID• Location type is "INDOOR"
The HERE Mobile SDK indoor positioning smoke test is successful, if these details are visible.
Smoke test application (iOS)
Similarly to Android, there is also an example positioning project for iOS through Github. Please refer to thePositioning section in the HERE iOS SDK Developer's Guide Premium Edition to get HERE Indoor Positioningworking.
Indoor Positioning Installation Guide► Technical Information
32CONFIDENTIAL
Chapter 7Technical InformationTopics:
• The Very High Level view• Radiomaps in HERE Indoor P...• Business Features• Data Flows and Business Fe...• Change of the Business Fea...
This section provides technical information on the data flows in theHERE Indoor Positioning system. An important concept of radiomapsis discussed thoroughly: a radiomap is the description of the radiosignal strength landscape in a venue and is generated based on theradio data collected with HERE Indoor Radio Mapper. The radiomapsand their usage are related to the available business features andindoor map types.

Indoor Positioning Installation Guide► Technical Information
33CONFIDENTIAL
The Very High Level viewConceptually, HERE Indoor Positioning can be reduced to three main components:
• HERE Indoor Radio Mapper that allows the user to collect, test and publish radio data at venues• HERE Positioning Backend service that stores and processes the radio data• HERE Mobile SDK that allows applications to access indoor positioning information
The following figure offers a conceptual representation of the data flows involved in HERE IndoorPositioning.
Figure 5: High level data flow in HERE Indoor Positioning
Radiomaps in HERE Indoor PositioningA radiomap is the description of the radio signal strength landscape in a venue and is generated based onthe radio data collected with the HERE Indoor Radio Mapper. There are three types of radiomaps in HEREIndoor Positioning system:
• Draft Radiomap – your own sandbox for testing and trialing
• Private Radiomap – a production radiomap containing your private radio data. The radio data you collectfor your Private Venue Maps or your own indoor maps goes to this radio map upon publishing. Only yourown applications can access the data.
• Community Radiomap – a production radiomap shared by all the HERE Mobile SDK users. The radio datayou collect for Public Venue Maps goes to this radio map upon publishing. All Mobile SDK users canaccess this data.
Radio data collected with HERE Indoor Radio Mapper is initially included only in the Draft Radiomapwhen uploaded. Moreover, HERE Indoor Radio Mapper always accesses the Draft Radiomap when testingpositioning. Once you are happy with the performance, you can simply publish the Draft Radiomap tothe production (either Private or Community Radiomap) after which applications using HERE Mobile SDK
Indoor Positioning Installation Guide► Technical Information
34CONFIDENTIAL
can access the indoor positioning data. Having done this, you are free to continue working with the DraftRadiomap in HERE Indoor Radio Mapper without affecting the positioning data utilized by the HERE MobileSDK users until you decide to publish new radio data.
The HERE Mobile SDK accesses the production radiomap(s). The production radiomap(s) in use depend onthe Business Features enabled in your subscription (see Business Features).
Important: The HERE Mobile SDK can also be configured to access the Draft Radiomap in thedevelopment phase. Please see the SDK Developer Guide for details.
Radio data flows across radiomaps
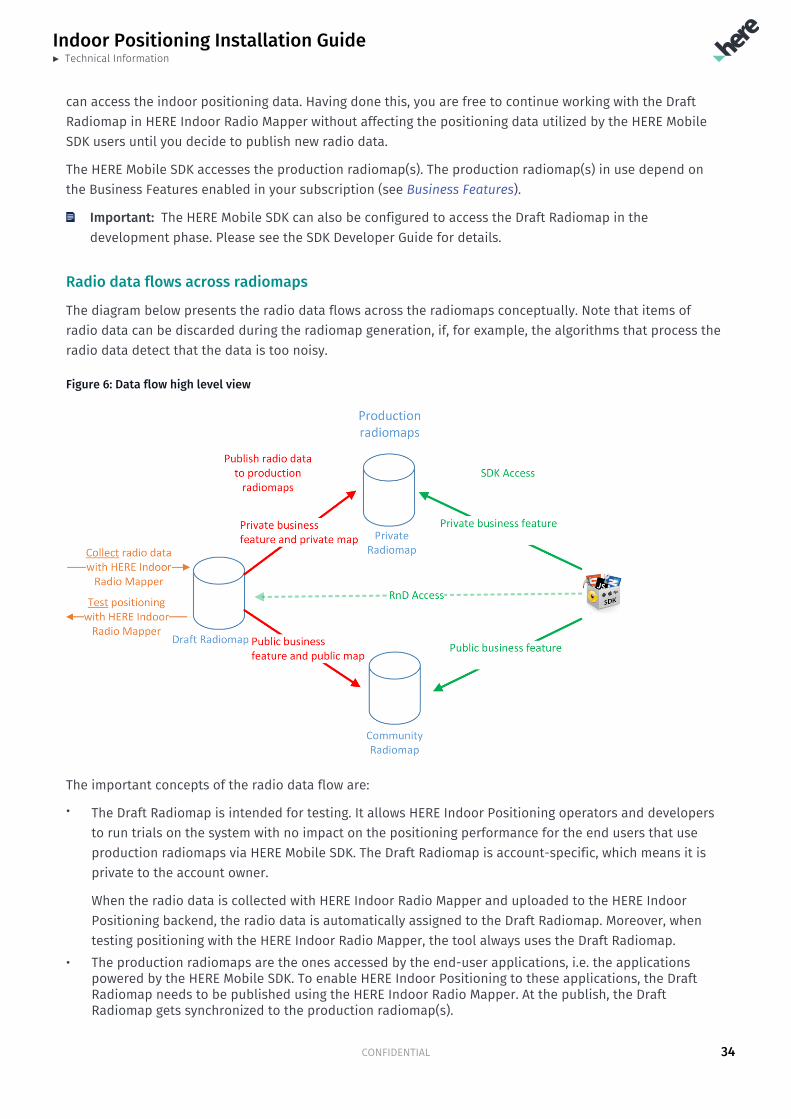
The diagram below presents the radio data flows across the radiomaps conceptually. Note that items ofradio data can be discarded during the radiomap generation, if, for example, the algorithms that process theradio data detect that the data is too noisy.
Figure 6: Data flow high level view
The important concepts of the radio data flow are:
• The Draft Radiomap is intended for testing. It allows HERE Indoor Positioning operators and developersto run trials on the system with no impact on the positioning performance for the end users that useproduction radiomaps via HERE Mobile SDK. The Draft Radiomap is account-specific, which means it isprivate to the account owner.
When the radio data is collected with HERE Indoor Radio Mapper and uploaded to the HERE IndoorPositioning backend, the radio data is automatically assigned to the Draft Radiomap. Moreover, whentesting positioning with the HERE Indoor Radio Mapper, the tool always uses the Draft Radiomap.
• The production radiomaps are the ones accessed by the end-user applications, i.e. the applicationspowered by the HERE Mobile SDK. To enable HERE Indoor Positioning to these applications, the DraftRadiomap needs to be published using the HERE Indoor Radio Mapper. At the publish, the DraftRadiomap gets synchronized to the production radiomap(s).
Indoor Positioning Installation Guide► Technical Information
35CONFIDENTIAL
• There are two production radiomaps the difference being in their privacy level. The first one, theCommunity Radiomap, is available for all the HERE Mobile SDK users that have a license to access thatradiomap. The other one, the Private Radiomap, is only for a specific set of AppIDs associated with yourHERE Account. The Private Radiomap cannot be accessed by the other customers.
• Once the radio data is being published, the production radiomap to which the radio data goes to iscontrolled by your license and the type of the indoor map used for the radio data collection:
▫ The Community Radiomap only accepts radio data that has been collected using HERE Public VenueMaps, and only when you have an active HERE Public Indoor Positioning feature included in yourlicense. All Mobile SDK users can access this data.
▫ The Private Radiomap only accepts radio data that has been collected using HERE Private VenueMaps or your own custom image-based indoor maps, and only when you have an active HERE PrivateIndoor Positioning feature included in your license. Only your own applications can access the data.
• The HERE Mobile SDK can be configured to access the Draft Radiomap for testing and developmentpurposes for a limited number of devices. See HERE Mobile SDK Developer Guide for details.
Business FeaturesHERE Indoor Positioning supports two business features and their combination:
• Private Indoor Positioning feature
With this feature you have access to all the tools (HERE Mobile SDK, HERE Indoor Radio Mapper). You cancontribute radio data to the Draft Radiomap and Private Radiomap, and use the Private Radiomap inyour application.
This feature is included in both the Freemium and Pro business plans available at HERE Developer Portal.• Public Indoor Positioning feature
With this feature you have access to all the tools (HERE Mobile SDK, HERE Indoor Radio Mapper). Youcan contribute radio data to the Draft Radiomap and the Community Radiomap, and use the CommunityRadiomap in your application.
This feature is included in both the Freemium and Pro business plans available at HERE Developer Portal.• Both features enabled
In case your license has both features enabled, you can contribute radio data to the Private Radiomapand Community Radiomap (depending upon the indoor map you use). By default, the HERE MobileSDK chooses, which Radiomap to use. However, you can also explicitly control whether you want touse the Private Radiomap or the Community Radiomap in your application. See the HERE Android SDKDeveloper's Guide Premium Edition or HERE iOS SDK Developer's Guide Premium Edition for details.
Note: Regardless of the business features in your HERE Mobile SDK license, the Draft Radiomap is atyour disposal for development purposes in HERE Mobile SDK for Android. See the HERE Android SDKDeveloper's Guide Premium Edition.
Data Flows and Business FeaturesThis section details the data flows within the HERE Indoor Positioning system. There are several factorsaffecting the data flows:
Indoor Positioning Installation Guide► Technical Information
36CONFIDENTIAL
• Your business features• Radiomap type (Draft, Private and Community) – access to the production radiomaps depends on your
business features• Type of the indoor map used in the radio data collection
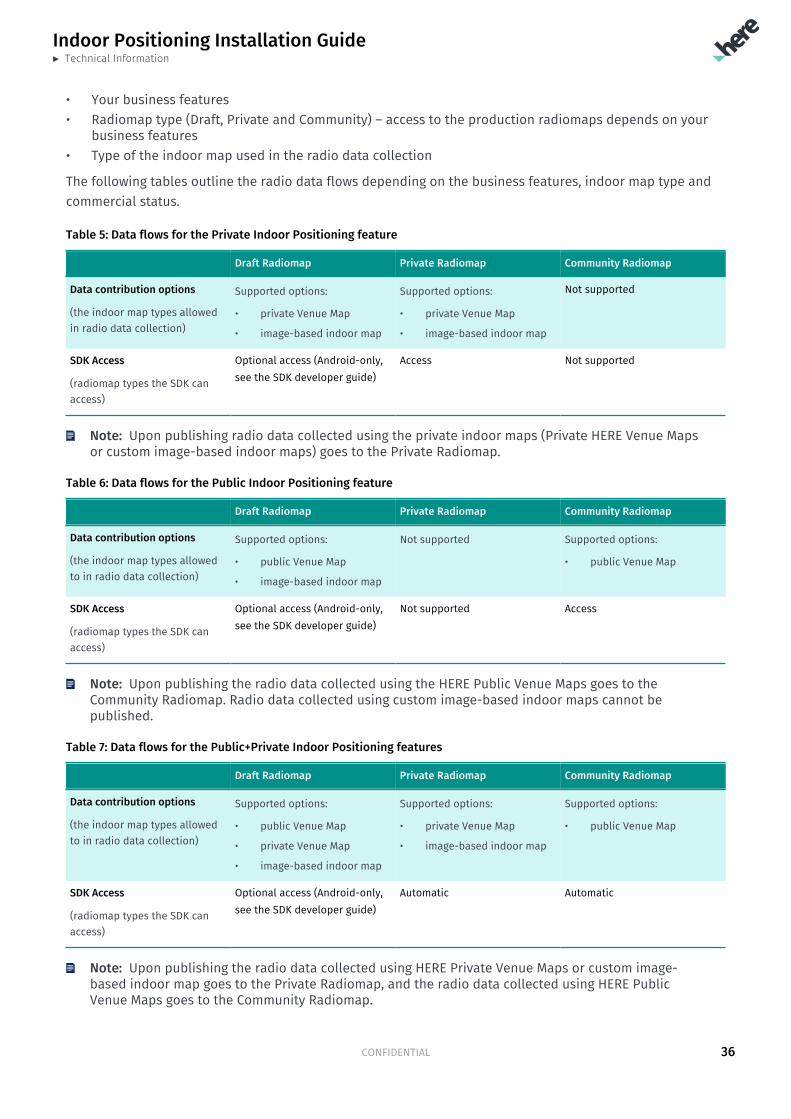
The following tables outline the radio data flows depending on the business features, indoor map type andcommercial status.
Table 5: Data flows for the Private Indoor Positioning feature
Draft Radiomap Private Radiomap Community Radiomap
Data contribution options
(the indoor map types allowedin radio data collection)
Supported options:
• private Venue Map
• image-based indoor map
Supported options:
• private Venue Map
• image-based indoor map
Not supported
SDK Access
(radiomap types the SDK canaccess)
Optional access (Android-only,see the SDK developer guide)
Access Not supported
Note: Upon publishing radio data collected using the private indoor maps (Private HERE Venue Mapsor custom image-based indoor maps) goes to the Private Radiomap.
Table 6: Data flows for the Public Indoor Positioning feature
Draft Radiomap Private Radiomap Community Radiomap
Data contribution options
(the indoor map types allowedto in radio data collection)
Supported options:
• public Venue Map
• image-based indoor map
Not supported Supported options:
• public Venue Map
SDK Access
(radiomap types the SDK canaccess)
Optional access (Android-only,see the SDK developer guide)
Not supported Access
Note: Upon publishing the radio data collected using the HERE Public Venue Maps goes to theCommunity Radiomap. Radio data collected using custom image-based indoor maps cannot bepublished.
Table 7: Data flows for the Public+Private Indoor Positioning features
Draft Radiomap Private Radiomap Community Radiomap
Data contribution options
(the indoor map types allowedto in radio data collection)
Supported options:
• public Venue Map
• private Venue Map
• image-based indoor map
Supported options:
• private Venue Map
• image-based indoor map
Supported options:
• public Venue Map
SDK Access
(radiomap types the SDK canaccess)
Optional access (Android-only,see the SDK developer guide)
Automatic Automatic
Note: Upon publishing the radio data collected using HERE Private Venue Maps or custom image-based indoor map goes to the Private Radiomap, and the radio data collected using HERE PublicVenue Maps goes to the Community Radiomap.
Indoor Positioning Installation Guide► Technical Information
37CONFIDENTIAL
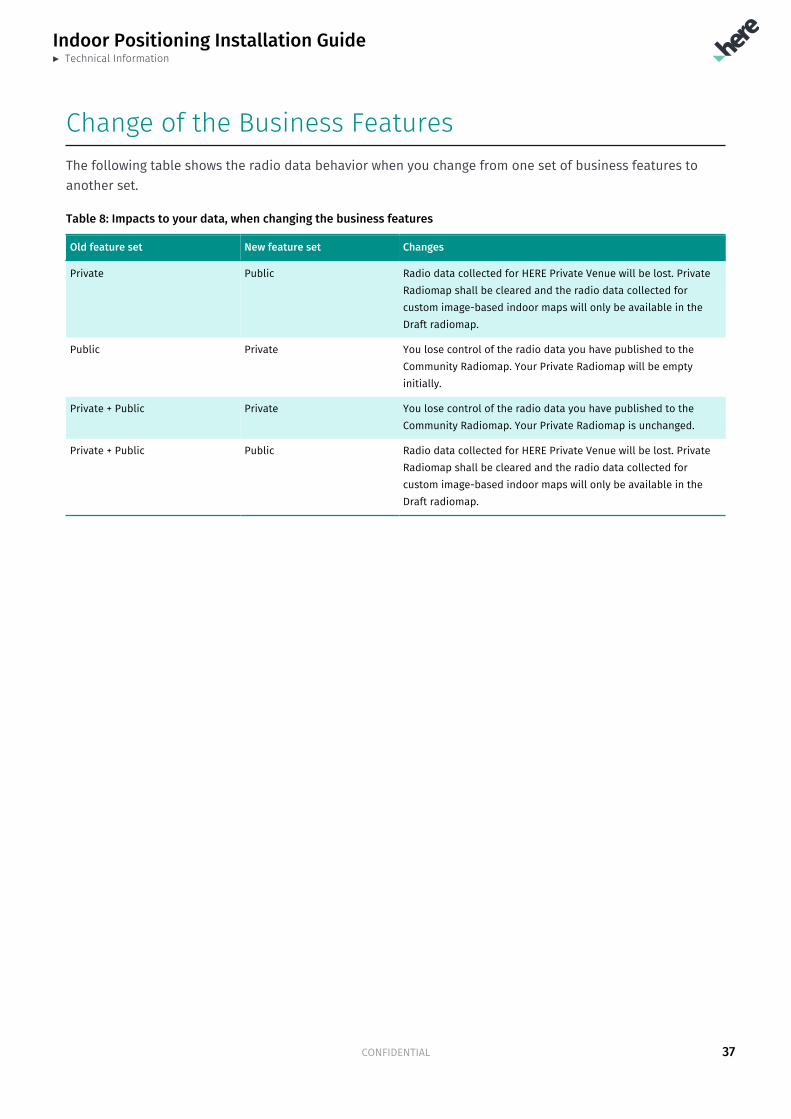
Change of the Business FeaturesThe following table shows the radio data behavior when you change from one set of business features toanother set.
Table 8: Impacts to your data, when changing the business features
Old feature set New feature set Changes
Private Public Radio data collected for HERE Private Venue will be lost. PrivateRadiomap shall be cleared and the radio data collected forcustom image-based indoor maps will only be available in theDraft radiomap.
Public Private You lose control of the radio data you have published to theCommunity Radiomap. Your Private Radiomap will be emptyinitially.
Private + Public Private You lose control of the radio data you have published to theCommunity Radiomap. Your Private Radiomap is unchanged.
Private + Public Public Radio data collected for HERE Private Venue will be lost. PrivateRadiomap shall be cleared and the radio data collected forcustom image-based indoor maps will only be available in theDraft radiomap.
Indoor Positioning Installation Guide► Enterprise User Management
38CONFIDENTIAL
Chapter 8Enterprise User ManagementTopics:
• Introduction• Customer Admin• Assigning roles• Accepting roles• Management features
This chapter is about Enterprise User Management (EUM). HERE EUMis a HERE Indoor Positioning feature that allows binding multipleHERE Accounts to a single HERE Indoor Positioning customer.
Indoor Positioning Installation Guide► Enterprise User Management
39CONFIDENTIAL
IntroductionHERE Enterprise User Management is a mechanism to bind multiple HERE Accounts to a single HERE IndoorPositioning customer. This allows multiple persons to act on behalf of the customer in different roles insteadof all the persons using the same company HERE Account.
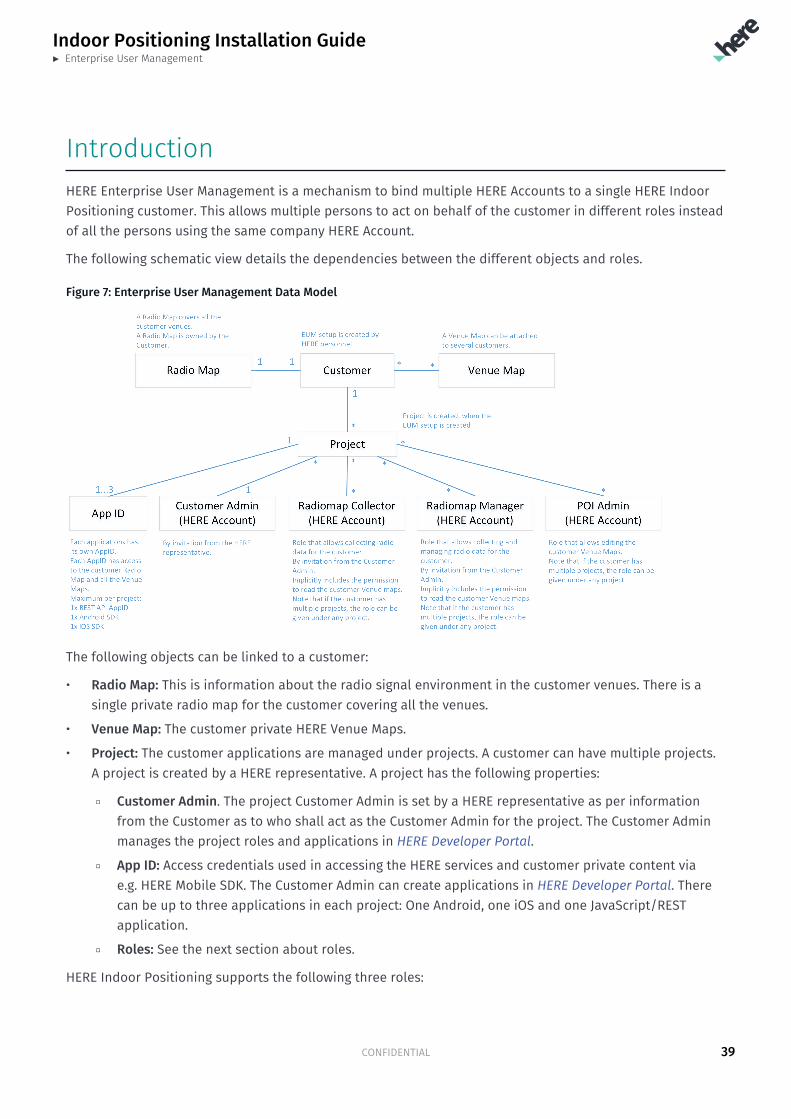
The following schematic view details the dependencies between the different objects and roles.
Figure 7: Enterprise User Management Data Model
The following objects can be linked to a customer:
• Radio Map: This is information about the radio signal environment in the customer venues. There is asingle private radio map for the customer covering all the venues.
• Venue Map: The customer private HERE Venue Maps.
• Project: The customer applications are managed under projects. A customer can have multiple projects.A project is created by a HERE representative. A project has the following properties:
▫ Customer Admin. The project Customer Admin is set by a HERE representative as per informationfrom the Customer as to who shall act as the Customer Admin for the project. The Customer Adminmanages the project roles and applications in HERE Developer Portal.
▫ App ID: Access credentials used in accessing the HERE services and customer private content viae.g. HERE Mobile SDK. The Customer Admin can create applications in HERE Developer Portal. Therecan be up to three applications in each project: One Android, one iOS and one JavaScript/RESTapplication.
▫ Roles: See the next section about roles.
HERE Indoor Positioning supports the following three roles:
Indoor Positioning Installation Guide► Enterprise User Management
40CONFIDENTIAL
• Radiomap Collector: This role has limited capabilities. The HERE Account having this role can collectradio data for the customer and operate (enable, disable, delete) the radio data collected by the roleowner. However, the role owner cannot operate with the radio data collected by others. The role ownercan, on the other hand, test the positioning performance using all the radio data. Moreover, this roleowner cannot publish the radio data to production to be used by the HERE Mobile SDK. The role hasaccess to all the Private Venue Maps owned by the customer.
• Radiomap Manager: This role has all the capabilities. The role can do everything that the RadiomapCollector can, but can also operate on the radio data collected by anyone for the particular customer.Moreover, the role owner can publish the radio data to production to be used by the HERE Mobile SDK.The role has access to all the Private Venue Maps owned by the customer.
• POI Admin: This role has the capabilities required to edit and modify the customer HERE Venue Maps inthe HERE Venue Maps tools.
Each role can be given to an unlimited number of persons.
Note: Roles are created under projects, but are in fact global within the customer scope, i.e. theroles given for the project scope are propageted to the customer and inherited by all the customerprojects.
Customer AdminEach customer has a single Customer Admin that manages the customer applications as well as the roleinvitations and assignments. The Customer Admin email is set by a HERE representative, when setting thecustomer record up. Once the HERE representative sets the Customer Admin, the admin gets the belowinvitation email. The invitation is accepted by clicking the Get Started -link in the email and logging in to theHERE Developer Portal. If the admin does not have a prior HERE Account, the admin needs to create it as partof the acceptance process.
Indoor Positioning Installation Guide► Enterprise User Management
41CONFIDENTIAL
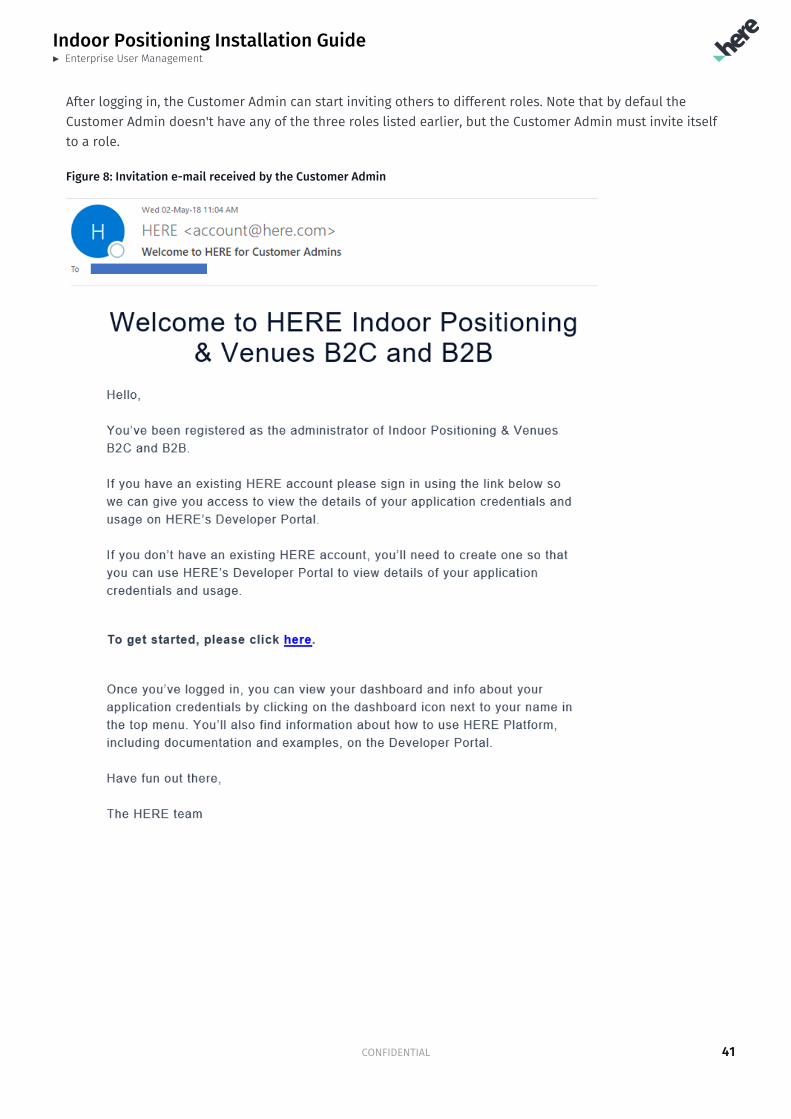
After logging in, the Customer Admin can start inviting others to different roles. Note that by defaul theCustomer Admin doesn't have any of the three roles listed earlier, but the Customer Admin must invite itselfto a role.
Figure 8: Invitation e-mail received by the Customer Admin
Indoor Positioning Installation Guide► Enterprise User Management
42CONFIDENTIAL
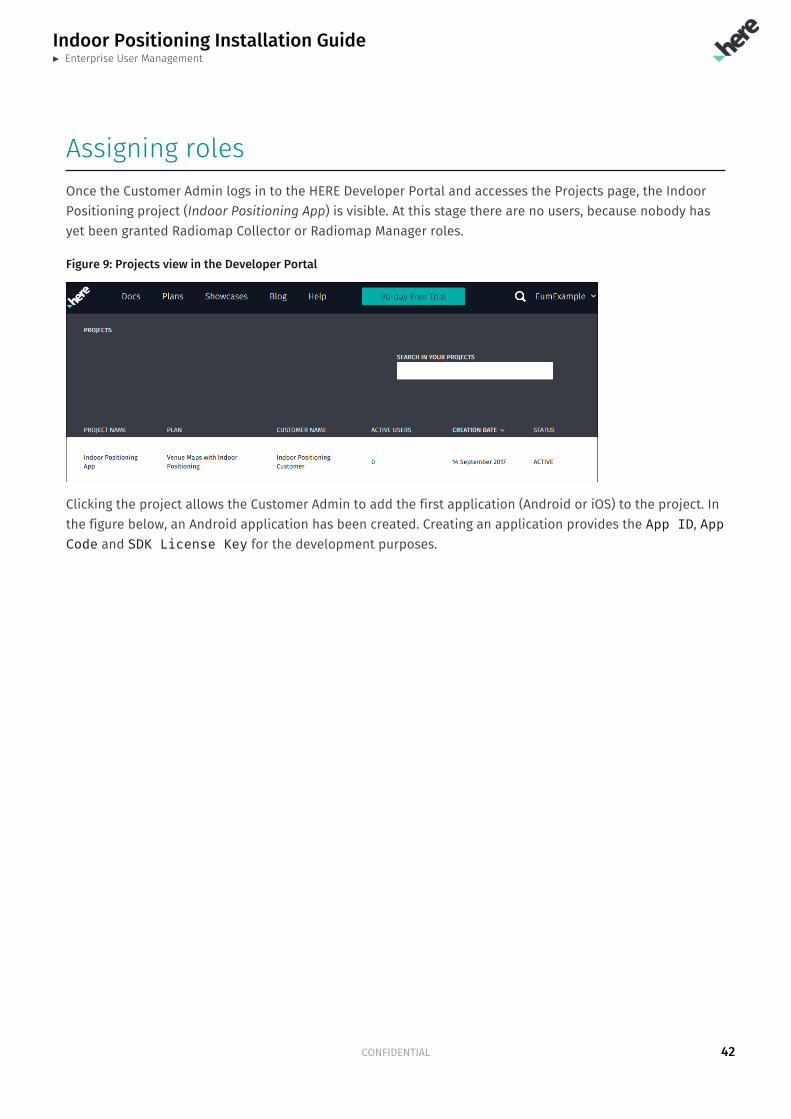
Assigning rolesOnce the Customer Admin logs in to the HERE Developer Portal and accesses the Projects page, the IndoorPositioning project (Indoor Positioning App) is visible. At this stage there are no users, because nobody hasyet been granted Radiomap Collector or Radiomap Manager roles.
Figure 9: Projects view in the Developer Portal
Clicking the project allows the Customer Admin to add the first application (Android or iOS) to the project. Inthe figure below, an Android application has been created. Creating an application provides the App ID, AppCode and SDK License Key for the development purposes.
Indoor Positioning Installation Guide► Enterprise User Management
43CONFIDENTIAL
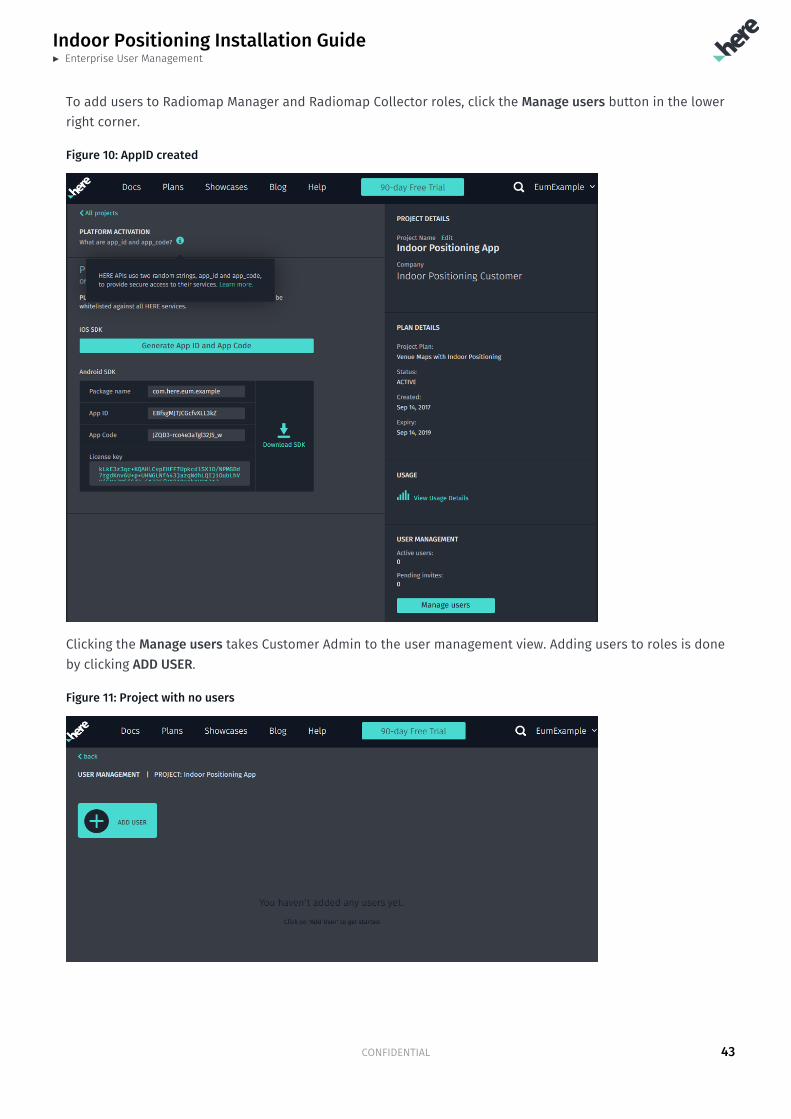
To add users to Radiomap Manager and Radiomap Collector roles, click the Manage users button in the lowerright corner.
Figure 10: AppID created
Clicking the Manage users takes Customer Admin to the user management view. Adding users to roles is doneby clicking ADD USER.
Figure 11: Project with no users
Indoor Positioning Installation Guide► Enterprise User Management
44CONFIDENTIAL
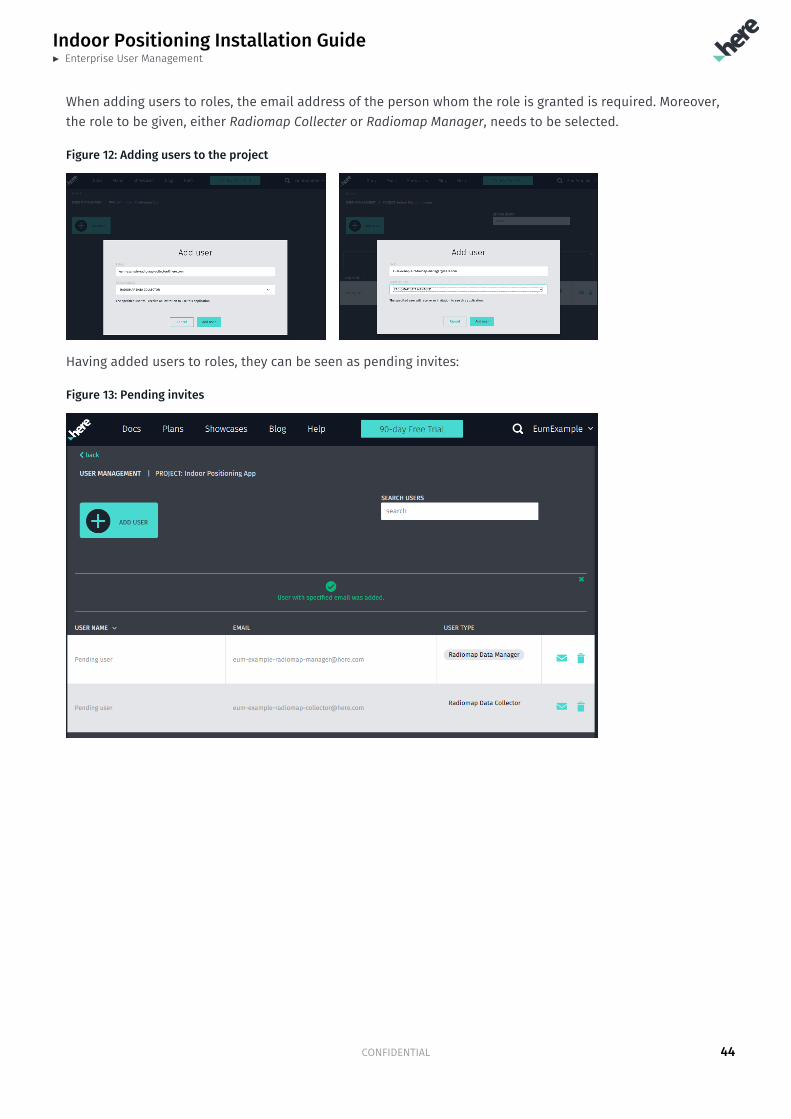
When adding users to roles, the email address of the person whom the role is granted is required. Moreover,the role to be given, either Radiomap Collecter or Radiomap Manager, needs to be selected.
Figure 12: Adding users to the project
Having added users to roles, they can be seen as pending invites:
Figure 13: Pending invites
Indoor Positioning Installation Guide► Enterprise User Management
45CONFIDENTIAL
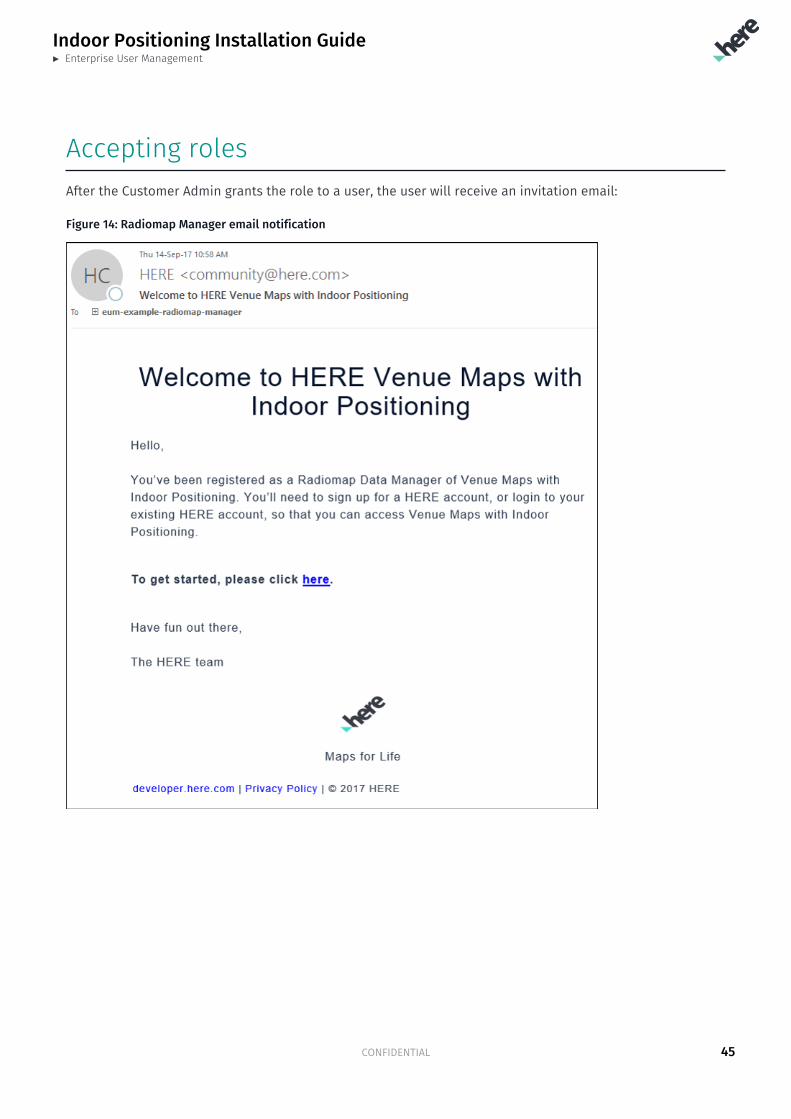
Accepting rolesAfter the Customer Admin grants the role to a user, the user will receive an invitation email:
Figure 14: Radiomap Manager email notification
Indoor Positioning Installation Guide► Enterprise User Management
46CONFIDENTIAL
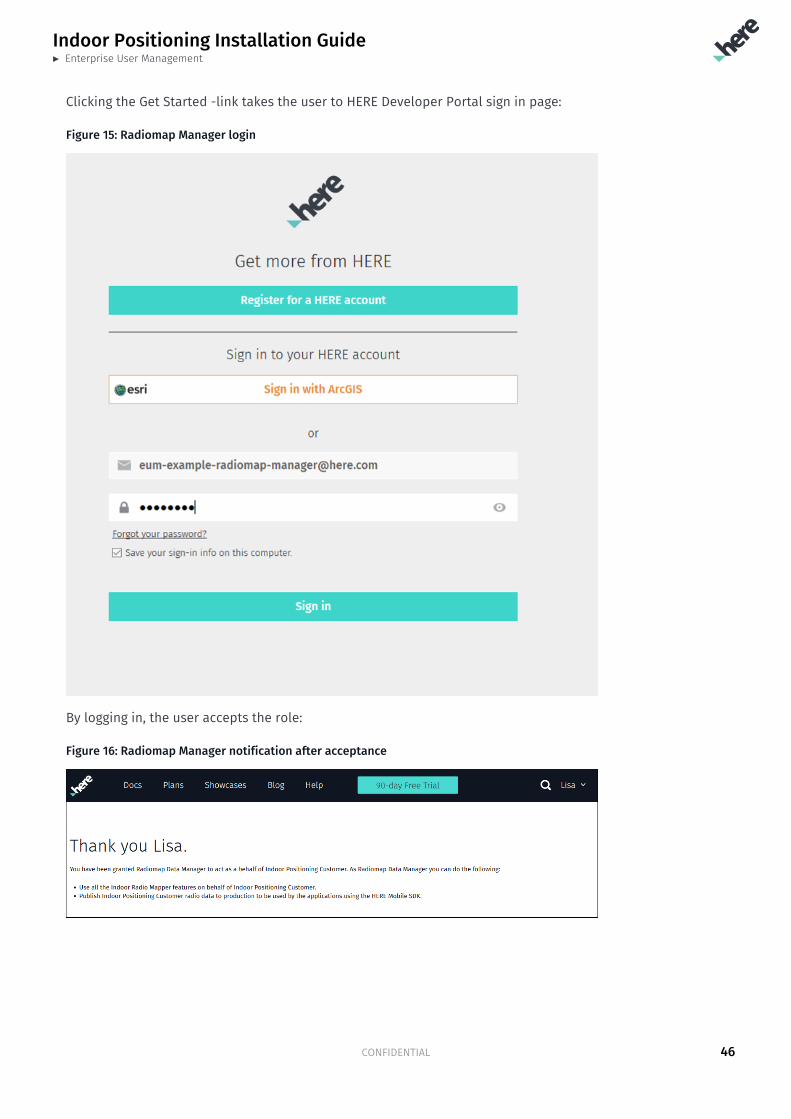
Clicking the Get Started -link takes the user to HERE Developer Portal sign in page:
Figure 15: Radiomap Manager login
By logging in, the user accepts the role:
Figure 16: Radiomap Manager notification after acceptance

Indoor Positioning Installation Guide► Enterprise User Management
47CONFIDENTIAL
Management featuresThe following assumes that the Radiomap Manager invite was accepted by a user, but the RadiomapCollector invite sent to another user is still pending. In such a scenario, the Projects page in the HEREDeveloper Portal shows one active user for Indoor Positioning App, when the Customer Admin logs in:
Figure 17: Customer Admin projects view
Upon entering the user management page for the project, the role owners can be seen and managed:
Figure 18: Customer Admin user management view with two users
Indoor Positioning Installation Guide► Enterprise User Management
48CONFIDENTIAL
Finally, in case a role needs to be removed from a user, this is done by clicking the trash can icon in theappropriate row. Having tapped the icon, a confirmation is requested:
Figure 19: Deleting the permission
Indoor Positioning Installation Guide► FAQ
49CONFIDENTIAL
Chapter 9FAQTopics:
• Frequently Asked Questions...• Frequently Asked Questions...• Frequently Asked Questions...• Frequently Asked Questions...• Frequently Asked Questions...• Frequently Asked Questions...
The sections below contain frequently asked questions, groupedby category, reflecting issues users may have when setting up HEREIndoor Positioning.

Indoor Positioning Installation Guide► FAQ
50CONFIDENTIAL
Frequently Asked Questions on Beacons
Why does HERE recommend the use of Eddystone beacons?
The Eddystone standard defines a telemetry message that can be used to monitor the beacon health statuswithout any proprietary techniques.
Can I use my own beacons?
HERE does not recommend this. While the configuration aspects are straighforward to verify, the hardwarequality aspects may be an issue. When you are using beacons that we have not tested and certified, wecannot guarantee that e.g. radio and antenna performance are at the required level.
HERE does not provide support for enabling HERE Indoor Positioning using beacons unknown to HERE.
Can I use an existing beacon deployment?
Similarly to the above, HERE does not recommend using your existing deployment. The beacons maysuffer from configuration, deployment location and hardware issues. To exemplify, if the existing beacondeployment has been installed for advertisement purposes, beacons in such a setup are typically movedfrom one location to another frequently. Such a beacon deployment is unsuitable to be used with HEREIndoor Positioning.
HERE does not provide support for enabling HERE Indoor Positioning using beacon deployments unknown toHERE.
Frequently Asked Questions on Beacon Deployment
Can I move a beacon that is already installed to a new location?
Currently it is not possible to move a beacon to a new location. Do not relocate or recycle beacons.
Can I remove a beacon that is already installed?
Yes you can, but make sure that the recommended beacon density remains.
How should I handle beacons that have been removed?
Always remove batteries from the beacon that has been removed or take the beacon to a storage away fromthe deployment area. Do not relocate or recycle beacons.
Is it possible to re-plan an existing beacon installation?
Re-planning requires some additional operations. The previously collected radio data needs to be deletedand new radio data collection needs to be performed after the beacons are redeployed.
Indoor Positioning Installation Guide► FAQ
51CONFIDENTIAL
What happens if the beacon deployment does not follow the recommended grid size?
A smaller grid size may only have a negligible positive impact on the quality of positioning. A larger grid sizedegrades positioning quality.
Which way should I orient the beacon?
Most typically beacons radiate most powerful towards the front of the beacon.
Can I deploy incrementally for a building, or do I need to do it all at once?
We recommend that you deploy across the whole building at once. This is because the radio signalspenetrate quite well through the walls and ceilings. Thus any new deployment may disrupt the positioningservice in the areas with earlier sub-deployments.
Can I deploy for only a part of the building?
It is possible, but some special considerations need to be taken into account, such as making sure to collectradio data in all the areas in which the beacon signals can be observed. This means collecting radio dataover quite a large area around the actual beacon deployment. You may also have to visit parts of the floorsabove/below the beacon deployment.
Can I mix different beacon types in one deployment?
Yes it is possible, but we strongly discourage that. This may cause some difficulty for maintenance work,because of the different battery types and battery lifetimes, and so on.
What should I do if a beacon is constantly falling off from the wall?
Because of different types of wall surface, sometimes a beacon might not stick. Try a different tape or glueand check the surface purity. If the surface is really problematic, you may need to mount the beacon withscews. In addition, using cable ties is one reliable option for fastening beacons.
Is it enough to deploy beacons just inside the building?
There is no need to deploy beacons outside a building to make the positioning work inside a building.However, if you wish to use positioning outside as well, with a smooth transition from indoor to outdoor(and vice versa), it is worth considering deploying beacons outside. Or, at least indoors close to the outerwall or windows. This ensures that the signal penetrates well outside of the building. In this case, you shouldalso remember to perform radio data collection outside of the building. See HERE Indoor Radio Mapper UserGuide User Guide for further details on collecting radio data outdoors.
How can I prevent malicious people from reconfiguring my beacons?
The HERE recommended beacon configuration does not allow any connections to the beacon thus makingremote reconfiguration impossible.
Indoor Positioning Installation Guide► FAQ
52CONFIDENTIAL
Frequently Asked Questions on Radio Data Collection
What are the recommended devices for the radio data collection?
HERE recommends to use the following devices in the radio data collection:
• Acer Iconia One 10 B3-A20B 32GB Wi-Fi edition
• Google Pixel XL
When is new radio data collection required?
Noticeable degradation in positioning performance is a clear sign that new radio data collection is required.However, it is essential to understand the root cause for the degradation. There may be several reasons tothis:
• Structural changes. If the degradation is due to the structural changes in the building, then deleting theold radio data in HERE Indoor Radio Mapper and collecting new radio data is a must.
• Radio node re-arrangement. In case radio nodes are moved around in the building, again deleting theold radio data in HERE Indoor Radio Mapper and collecting new radio data is a must. Note that HEREIndoor Positioning can tolerate some changes, but if a large number of radio nodes is moved around, theradio data must be re-collected.
• Losing or removing radio nodes. Losing or removing a small number of radio nodes from a venuetypically has a negligible effect on positioning performance. However, performance degradation is likelyif a significant number of nodes is lost or removed, especially locally. Therefore, if you need to removeradio nodes, it is best to install new ones in their place and perform re-collection of the radio data.
The addition of new radio nodes does not compromise positioning performance. HERE Mobile SDK canobserve the new nodes, but because they are not included in the radiomap, they are not used in positioningand thus do not affect location estimation. However, if you decide to perform radio data collection afteradding a new radio node, ensure that you visit carefully the whole area covered by the new node. Also, youneed to collect radio data in floors above and below in case the building structure allows radio signals topenetrate from one floor to another.
Can I use partial radio data collection to enable positioning in a small area?
You can do this, but it is not advisable if the users of the positioning service can access the floor aboveand/or the floor below the area of interest. Radio signals typically penetrate from one floor to another andthus, when a user passes above or below the area, the user device can observe the signals from the area ofinterest. There is a high likelihood of incorrectly locating the user on the wrong floor. To avoid such errors,it is best to collect radio data for the same area in the floor above and the floor below the area that was theprimary target for positioning and, thus, radio data collection.
For example, if you collect radio data in a small area on the floor 5, cover approximately the same area onthe floors 4 and 6 as well. Note, however, that this approach leaves open the possibility that a person movingon the floor 3 below the collected area is likely to be positioned to the floor 4. The best guarantee of correctindoor positioning is to collect radio data from the whole venue. However, if the venue has a single floor orthe users can only access one floor, then partial radio data collection is sufficient.
Indoor Positioning Installation Guide► FAQ
53CONFIDENTIAL
If you opt for the partial radio data collection, please collect in a larger area than the part of the buildingwhere you require optimum positioning performance. Bear in mind, that devices observe radio nodes fromthe radiomap outside of the collected area, both before they enter that area and after they leave it. Thismay cause some transient issues, when moving from an area, where radio data has been collected, to anunvisited area.
To geofence in a small area, do I need to collect radio data in the whole venue?
Not necessarily. Please see the discussion of partial radio collection, because similar considerations applyin geofencing. This includes the likelihood that the partial radio data collection may produce good results,when users have access to only one floor.
Should I also collect radio data outside of the building?
If, in your use case, it is important that the positioning technology changes smoothly from indoor methods tooutdoor methods (cellular, Wi-Fi, or GNSS), then it is advisable to collect radio data outside of your building.Refer to the HERE Indoor Radio Mapper User Guide for instructions on how to change the collection methodbetween indoor and outdoor radio data collection.
Frequently Asked Questions on Positioning
What factors affect HERE Indoor Positioning performance?
HERE Indoor Positioning performance (accuracy) is a sum of many factors, including:
• The radio environment (density of radio nodes, variability of the signal strength field)
• Devices used in data collection (some devices have better scan quality)
• Device used for positioning (some devices have better scan quality)
• Building geometry (some buildings are more challenging e.g. for floor detection)
It is hard to quantify the impact of each of these to the observed performance. HERE Indoor Positioningalgorithms are designed to mitigate the effects of the varying device characteristics.
When it comes to the radio environment, the best performance is typically achieved when five to tenBluetooth beacons are observable in each scan, assuming that the beacon deployment is optimized forpositioning rather than, for example, for advertising purposes. Similarly, when Wi-Fi is used, it is desirableto have roughly ten true physical Wi-Fi access points in each scan for the best performance. Now, very oftenthe Wi-Fi access points in modern deployments are MIMO access points, which means that a single physicalaccess point acts as multiple logical ones. Such logical access points do not significantly contribute to thepositioning performance.
Where is the position estimate calculated?
The position estimate is calculated in the device itself. The HERE Mobile SDK only accesses the network todownload the new or updated radiomap after which device can be used in the offline mode. All the requiredcomputations take place in the device resulting in less latency and better accuracy than network-based
Indoor Positioning Installation Guide► FAQ
54CONFIDENTIAL
solutions. The added benefit of this approach is user privacy, because no location information is sent fromthe device to the cloud.
How do you handle positioning technology changes?
The algorithms inside the HERE Mobile SDK handle the positioning technology changes automatically. The setof the location technologies available to the HERE Mobile SDK depends on:
• Your SDK license• Device capabilities• Operating System settings (for example whether Wi-Fi and/or Bluetooth are enabled)• Positioning mode set via the API (indoor-only or hybrid)• Operating System itself (in iOS we can only support Bluetooth-based indoor positioning)
What happens if a device moves from indoors to outdoors or vice versa?
The HERE Mobile SDK algorithms detect whether and when a device moves from an indoor space outdoorsand switch from indoor positioning technology to, for example, GNSS. Similarly, when a device enters anindoor space, the switch to indoor positioning occurs automatically and seamlessly. Again, the set of outdoorpositioning technologies at your disposal depends on the same factors as listed above.
Frequently Asked Questions on Indoor Maps
Why does HERE recommend the use of HERE Venue Maps instead of my own custom image-based maps?
HERE strongly recommends the use of HERE Venue Maps with HERE Indoor Positioning, for the followingreasons:
• HERE Venue Maps are encoded using global geographical Latitude and Longitude coordinates. Weguarantee the correctness of the coordinates as well as the proper alignment between the HERE outdoormaps and HERE Venue Maps. This further ensures that the coordinate systems used by the HERE outdoorpositioning technologies and HERE Indoor Positioning match and the indoor-outdoor transition will workseamlessly.
• With HERE Venue Maps you save the hassle with aligning the floor plan images with the Latitude-Longitude coordinate system.
• HERE Venue Map floor indexing is standard and static.
However, in recognition that there are valid use cases for the use of custom image-based indoor maps, HEREIndoor Positioning supports their use in the Draft Radiomap and Private Radiomap, but note that radio datacollected using image-based indoor maps cannot be contributed to the Community Radiomap.

Indoor Positioning Installation Guide► FAQ
55CONFIDENTIAL
Frequently Asked Questions on HERE Account
What happens to my data when my HERE Account is closed or my Indoor Positioningsubscription ends?
If you delete your HERE Account, we will delete all your private data. However, HERE keeps any radio data youhave collected for Public HERE Venue Maps.
If your HERE Indoor Positioning subscription ends, we will keep your data in storage for six (6) months. Afterthis period, HERE will act as in the case of HERE Account deletion (see above).