Embed Size (px)
Citation preview
IMPRESS Scan Setting up a bar code printer with 7.21 InterDrivers or newer
Page 1 of 22
#CF-PM4iGUIDE(6/11)/INFORMS
Setting up a bar code printer with 7.21 Intermec drivers or newer
IMPORTANT!! WHEN YOU FIRST POWER-UP YOUR INTERMEC PM4i PRINTER, YOU WILL NEED TO SELECT IPL COMMAND LANGUAGE (SEE BELOW).

IMPRESS Scan Setting up a bar code printer with 7.21 Intermec drivers or newer
Page 2 of 22
If your printer is showing a different language on the display, you can change it to IPL LANGUAGE by following the steps below:
For assistance with loading labels and ribbons, please visit our IMPRESS support page to view videos showing step-by-step instructions:
www.informsinc.com/healthcare/impress
IMPRESS Scan Setting up a bar code printer with 7.21 Intermec drivers or newer
Page 3 of 22
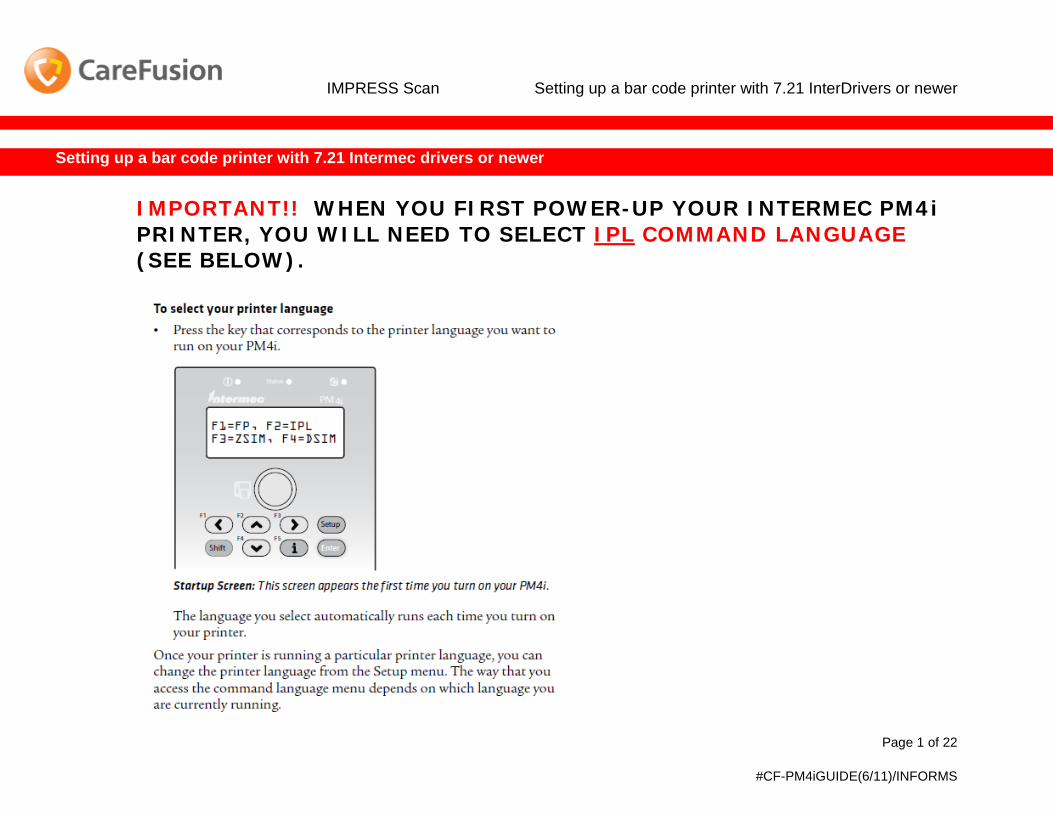
0 INSTALL PRINTER DRIVERS – InterDriver 7.1.3 (this may require “Administrator” rights within Windows) – PLEASE NOTE: If you have an older version of Intermec InterDriver, you will need to remove the older drivers using Intermec’s “InterDriver Removal Tool”. Contact Rich Greene at Informs for assistance with this procedure – (480) 874-9874.
a. Go to www.intermec.com – select “Support” and then “Downloads”
IMPRESS Scan Setting up a bar code printer with 7.21 Intermec drivers or newer
Page 4 of 22
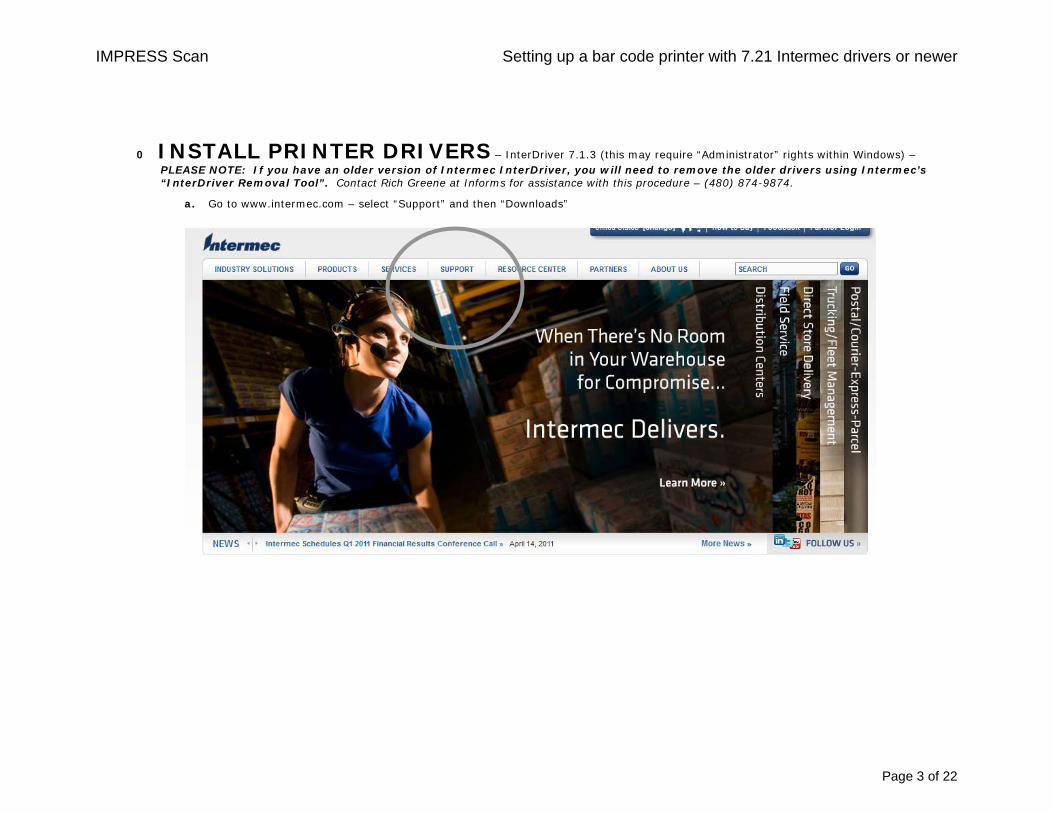
b. Complete the filters below and select the printer model number (i.e. PM4i), and press Submit:
IMPRESS Scan Setting up a bar code printer with 7.21 Intermec drivers or newer
Page 5 of 22
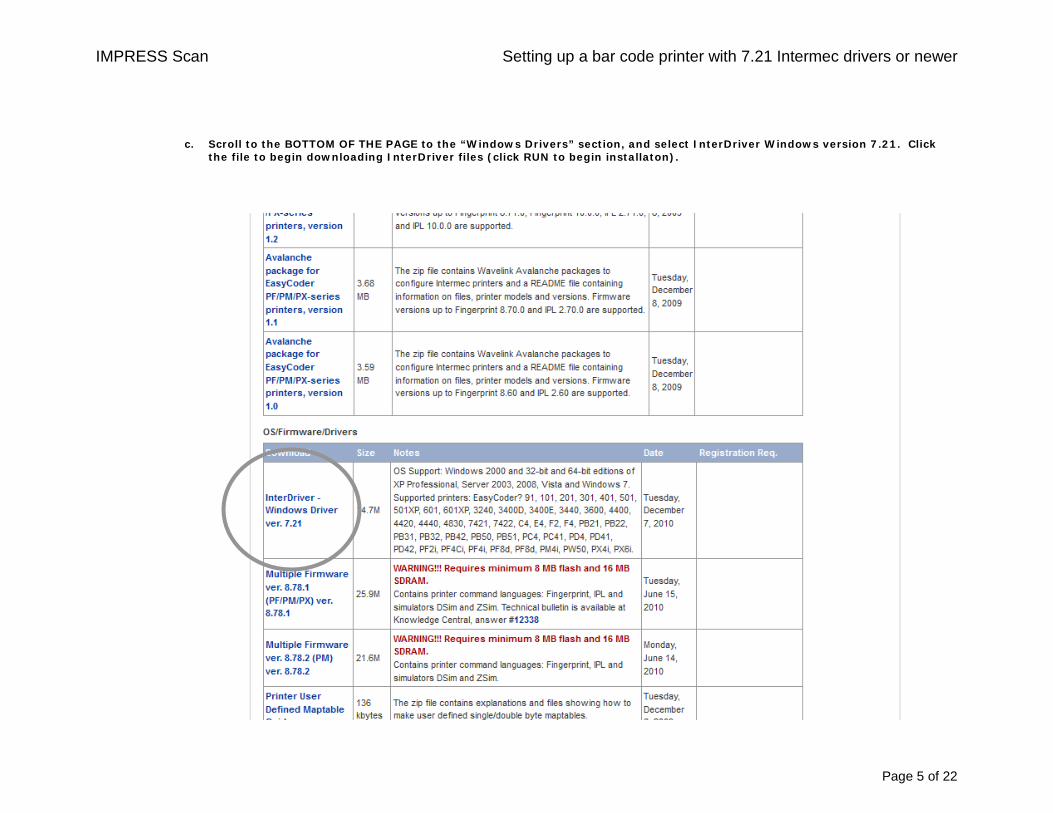
c. Scroll to the BOTTOM OF THE PAGE to the “Windows Drivers” section, and select InterDriver Windows version 7.21. Click the file to begin downloading InterDriver files (click RUN to begin installaton).

IMPRESS Scan Setting up a bar code printer with 7.21 Intermec drivers or newer
Page 6 of 22
d. After installation is complete, you should now ADD the printer. To do this, click “START” – Control Panel – and open Printers and Faxes. Click “Add a printer” to begin the process. Follow the prompts for the desired setup, and select the model of printer that you wish to install from the list.
IMPORTANT: Be sure to select the correct model with the CORRECT RESOLUTION and CORRECT LANGUAGE. You should select “EasyCoder PM4i (203dpi) - IPL.
IMPRESS Scan Setting up a bar code printer with 7.21 Intermec drivers or newer
Page 7 of 22
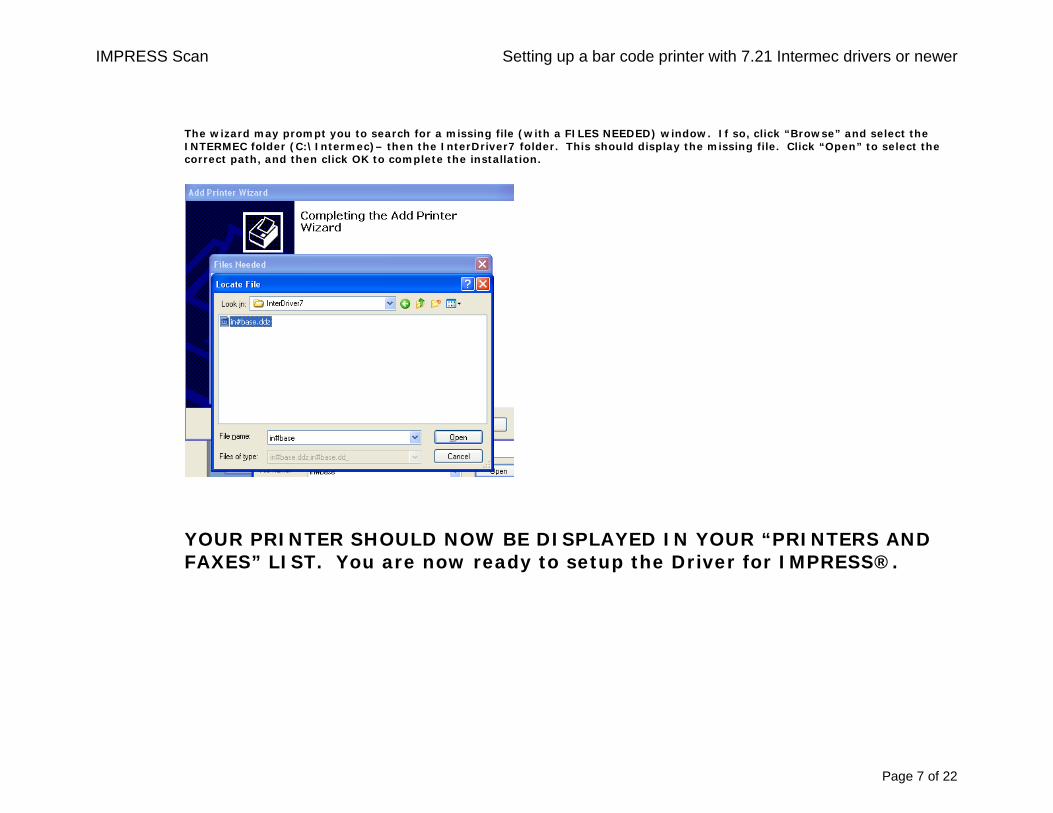
The wizard may prompt you to search for a missing file (with a FILES NEEDED) window. If so, click “Browse” and select the INTERMEC folder (C:\Intermec)– then the InterDriver7 folder. This should display the missing file. Click “Open” to select the correct path, and then click OK to complete the installation.
YOUR PRINTER SHOULD NOW BE DISPLAYED IN YOUR “PRINTERS AND FAXES” LIST. You are now ready to setup the Driver for IMPRESS®.
IMPRESS Scan Setting up a bar code printer with 7.21 Intermec drivers or newer
Page 8 of 22
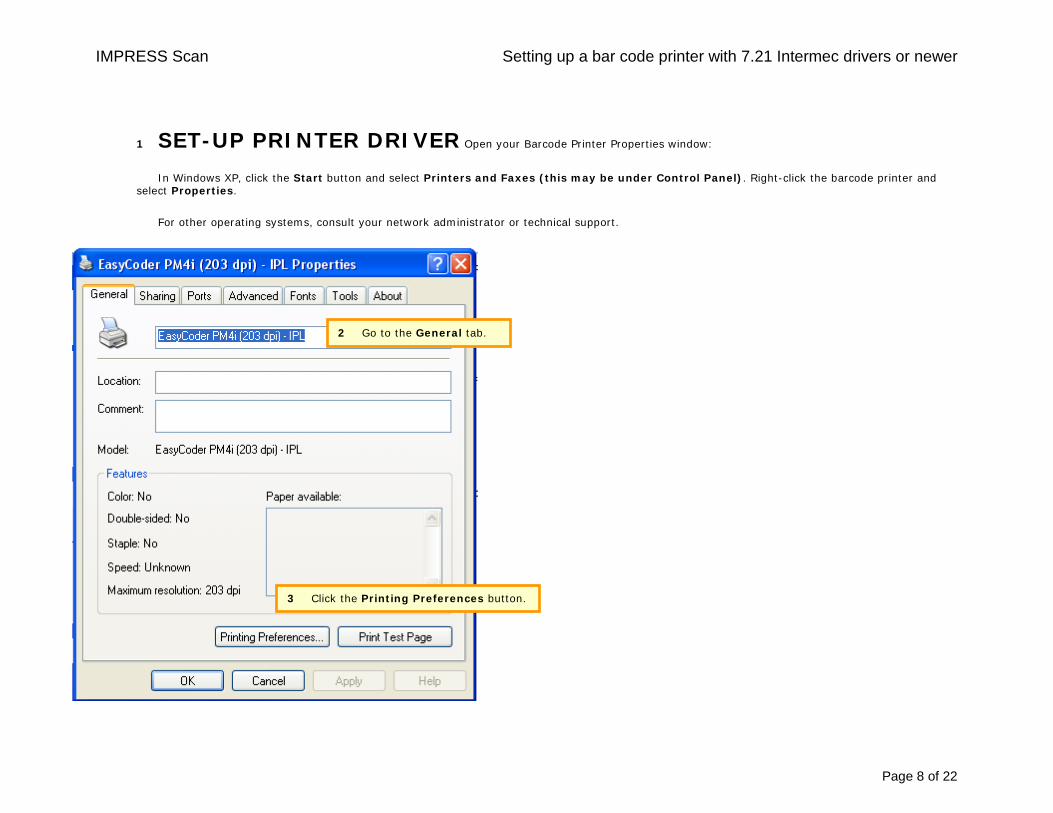
1 SET-UP PRINTER DRIVER Open your Barcode Printer Properties window:
In Windows XP, click the Start button and select Printers and Faxes (this may be under Control Panel). Right-click the barcode printer and select Properties.
For other operating systems, consult your network administrator or technical support.
2 Go to the General tab.
3 Click the Printing Preferences button.
IMPRESS Scan Setting up a bar code printer with 7.21 Intermec drivers or newer
Page 9 of 22
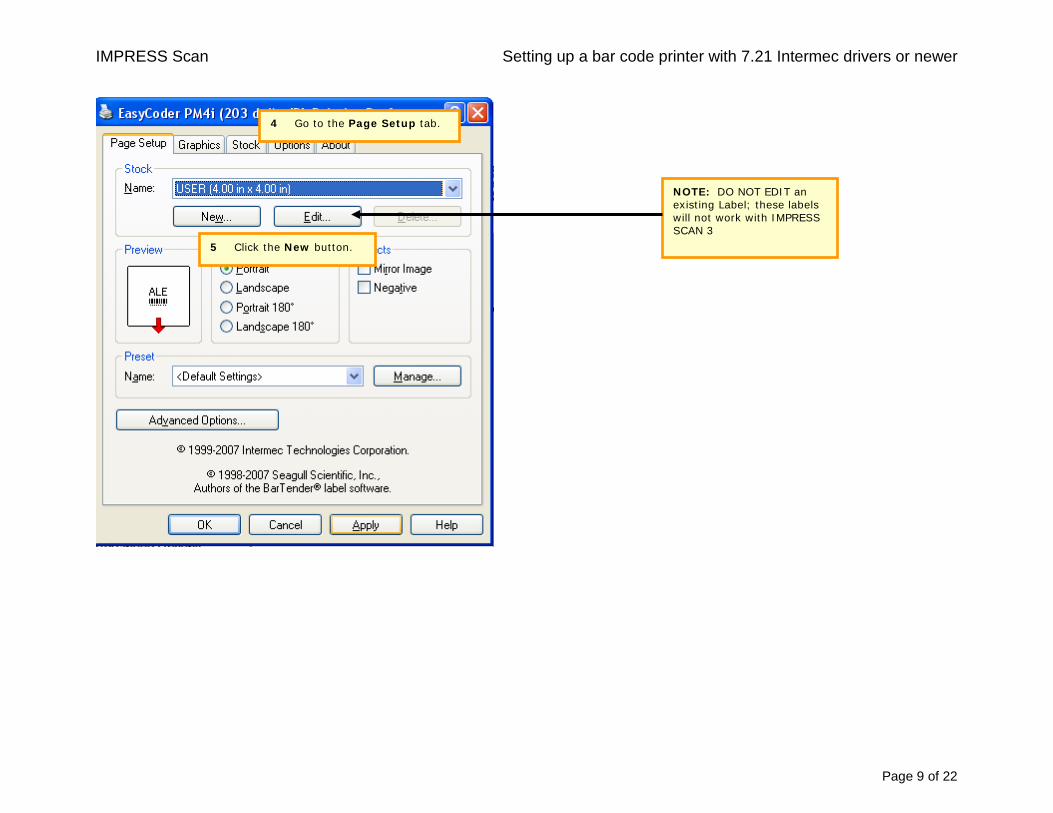
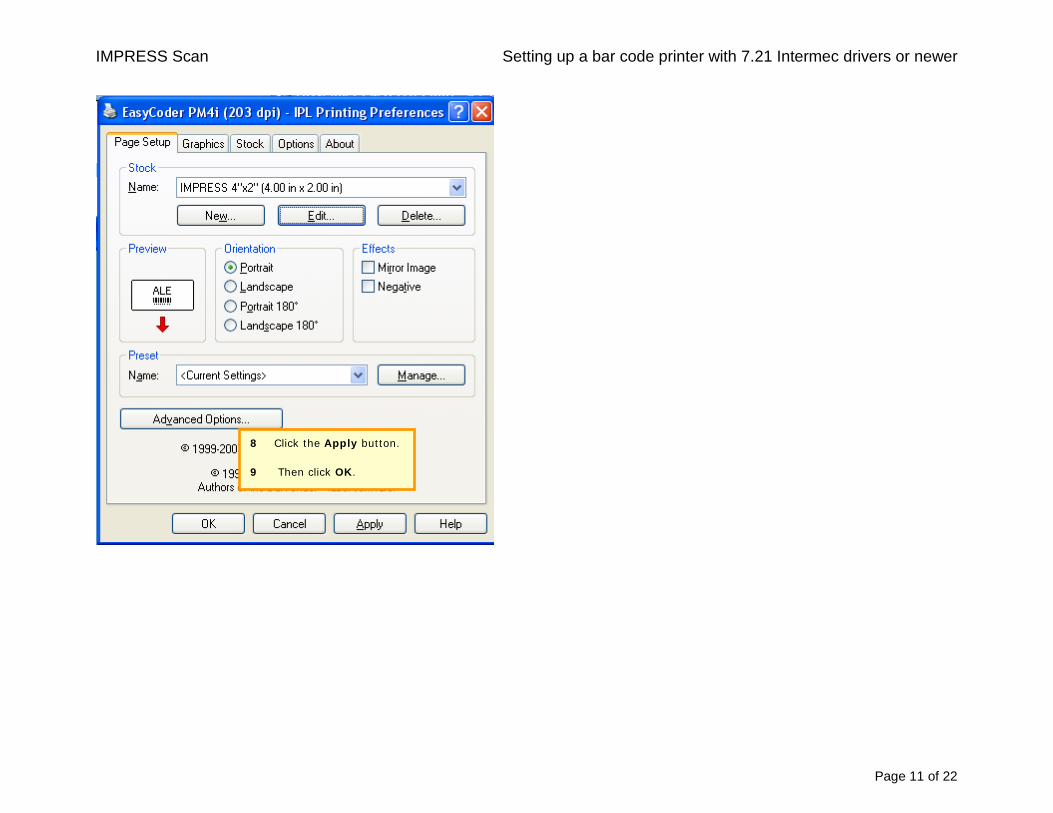
4 Go to the Page Setup tab.
5 Click the New button.
NOTE: DO NOT EDIT an existing Label; these labels will not work with IMPRESS SCAN 3

IMPRESS Scan Setting up a bar code printer with 7.21 Intermec drivers or newer
Page 10 of 22
Repeat steps 5 – 7 to create new labels for IMPRESS 2x1 with width of 2, height 1; and IMPRESS 4x1, width of 4, height of 1, if applicable.
6 Enter the following:
a. Name: IMPRESS 4x2
b. Width: 4.00 in
c. Height: 2.0 in
d. Left Exposed Liner 0.00in
e. Right Exposed Liner 0.00in
7 Click the OK button.
IMPRESS Scan Setting up a bar code printer with 7.21 Intermec drivers or newer
Page 11 of 22
8 Click the Apply button.
9 Then click OK.

IMPRESS Scan Setting up a bar code printer with 7.21 Intermec drivers or newer
Page 12 of 22
2 Open your Barcode Printer Properties window:
In Windows XP, click the Start button and select Printers and Faxes. Right-click the barcode printer and select Properties.
For other operating systems, consult your network administrator or technical support.
1. Click on Tool Tab.
2. Click on Driver Options

IMPRESS Scan Setting up a bar code printer with 7.21 Intermec drivers or newer
Page 13 of 22
3. Click on Network Setting Tab.
4. Under Printing Preference check the following
a. Share Setting between all Users
b. Share Setting between all user
Under Security, the Information Service department has the option to set which user can make changes to the setting for the printer. If they opt to allow USER to make these change it will decrease the need to call them for assistance with printer issues.
IMPRESS Scan Setting up a bar code printer with 7.21 Intermec drivers or newer
Page 14 of 22
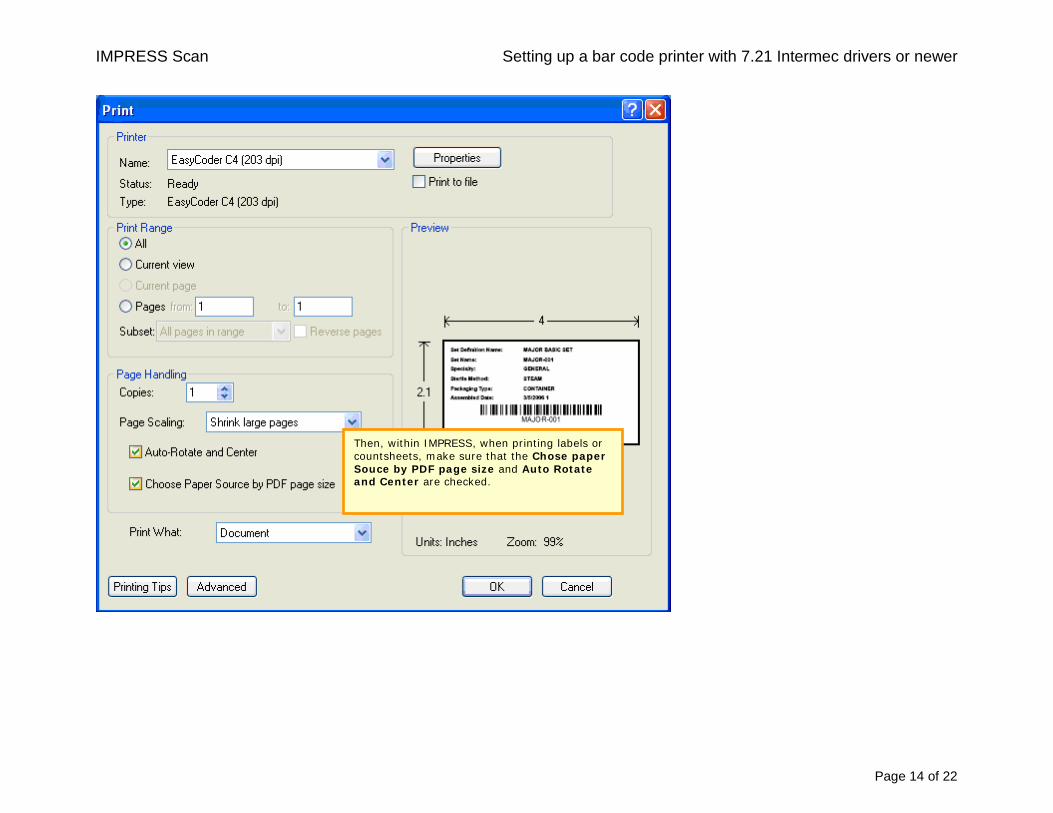
Then, within IMPRESS, when printing labels or countsheets, make sure that the Chose paper Souce by PDF page size and Auto Rotate and Center are checked.
IMPRESS Scan Setting up a bar code printer with 7.21 Intermec drivers or newer
Page 15 of 22
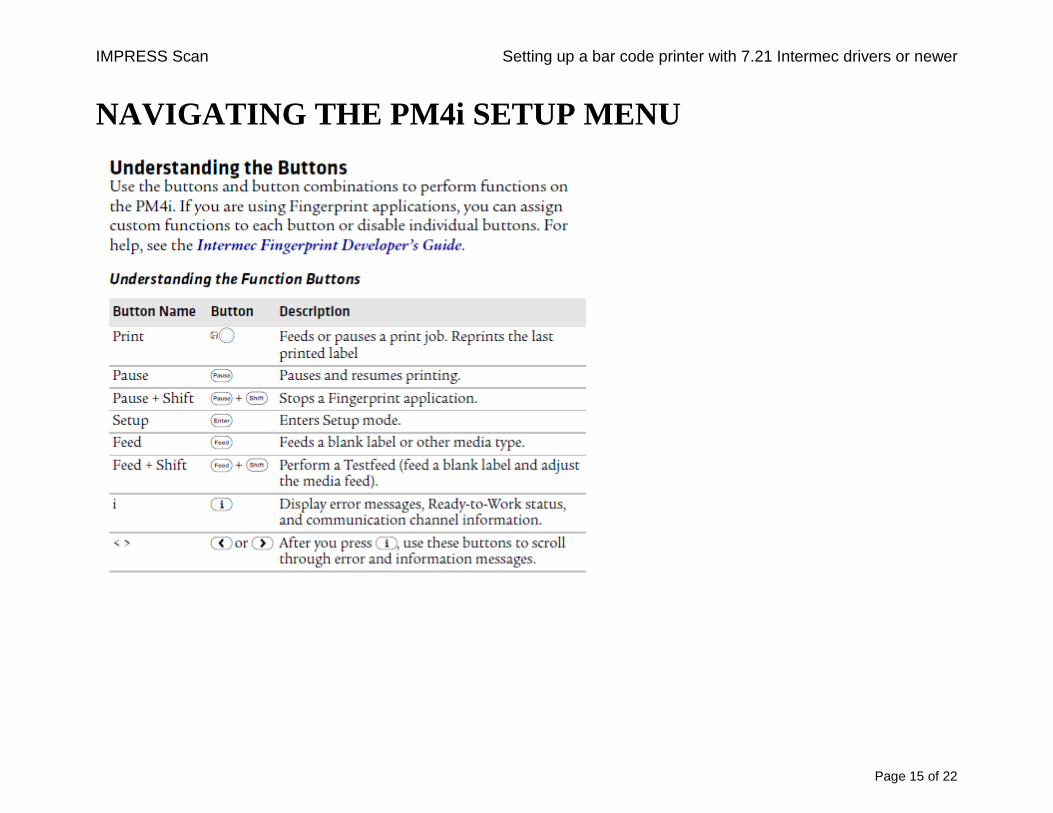
NAVIGATING THE PM4i SETUP MENU

IMPRESS Scan Setting up a bar code printer with 7.21 Intermec drivers or newer
Page 16 of 22
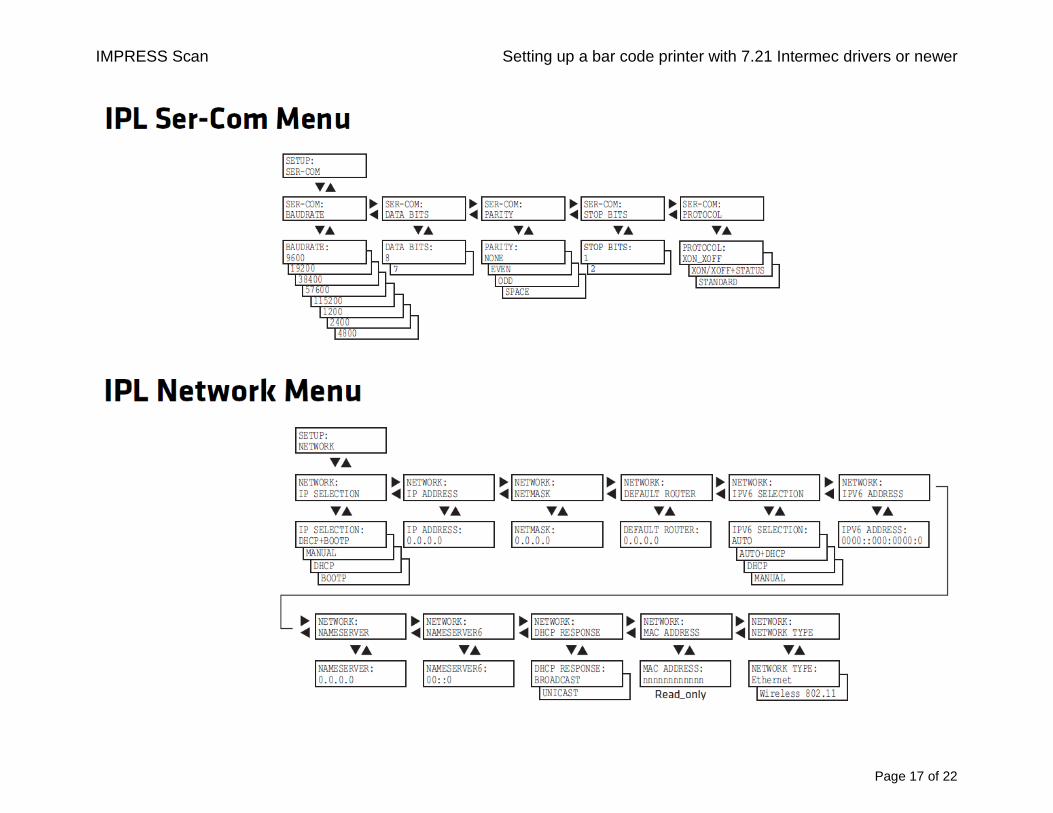
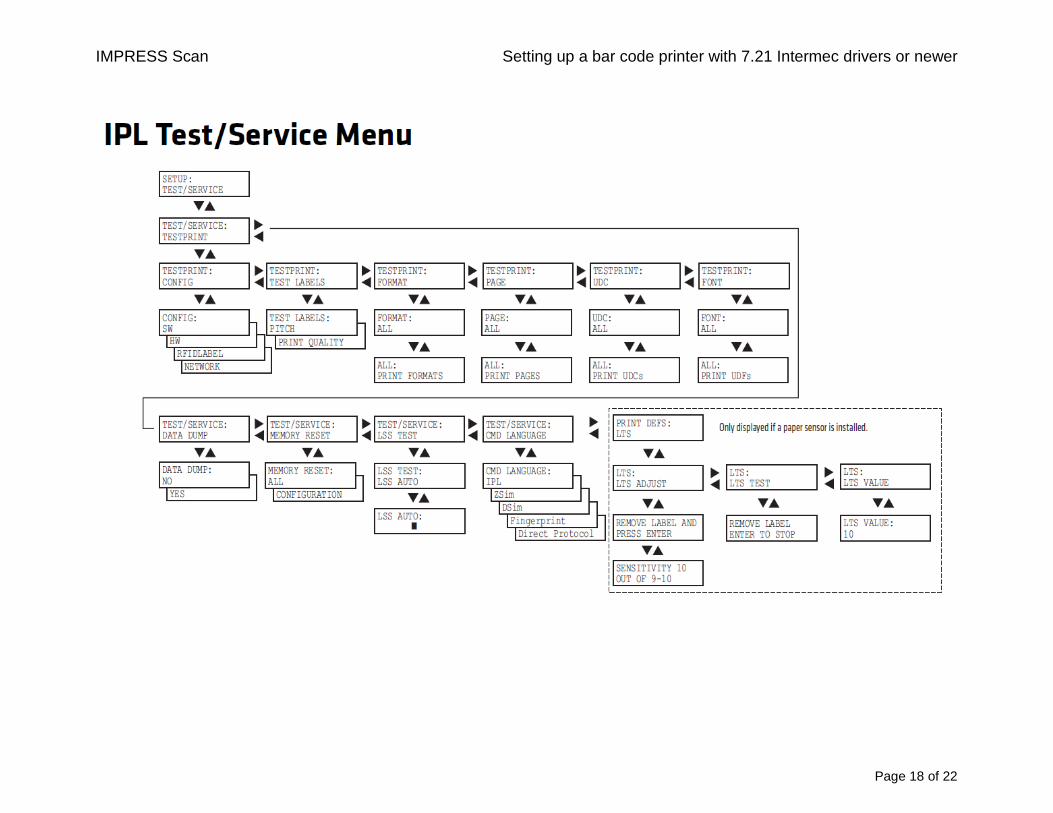
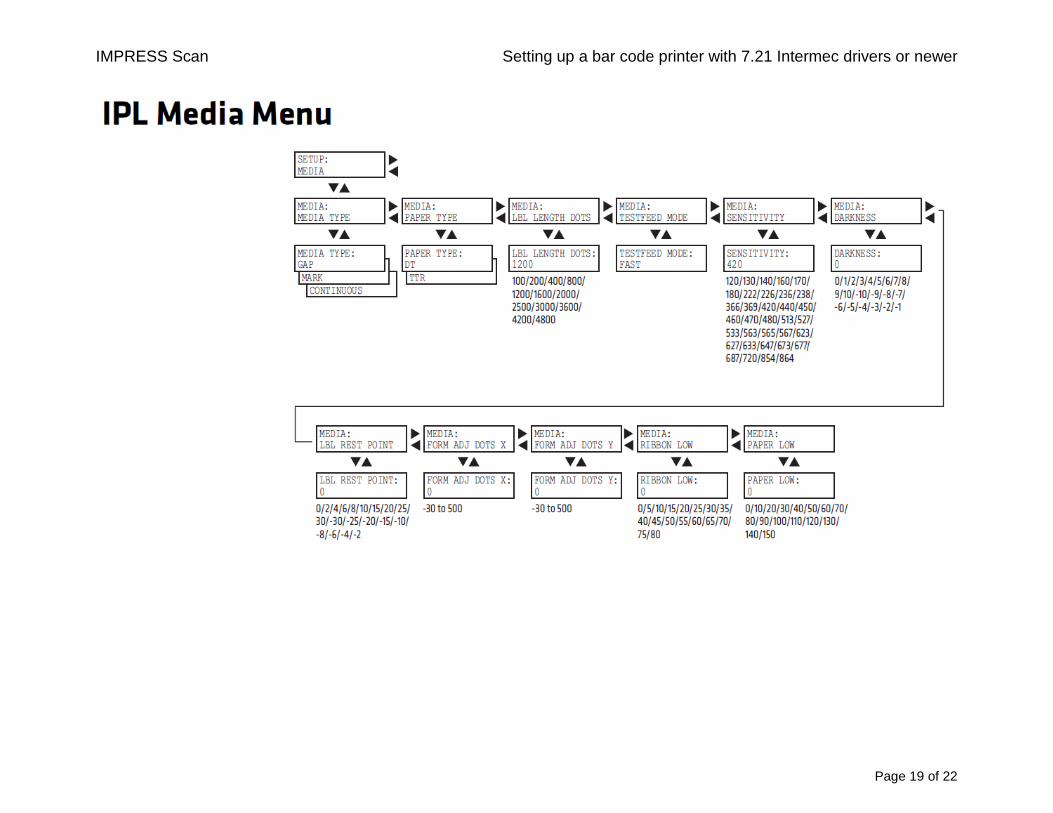
The following diagrams will help you navigate the SETUP menu on the PM4i Printer. Press SETUP to enter the setup menu, and press it again at anytime to return to normal operation.
IMPRESS Scan Setting up a bar code printer with 7.21 Intermec drivers or newer
Page 17 of 22
IMPRESS Scan Setting up a bar code printer with 7.21 Intermec drivers or newer
Page 18 of 22
IMPRESS Scan Setting up a bar code printer with 7.21 Intermec drivers or newer
Page 19 of 22

IMPRESS Scan Setting up a bar code printer with 7.21 Intermec drivers or newer
Page 20 of 22
NETWORKING The setup diagrams above will help get to the networking settings on the printer, but it is STRONGLY RECOMMENDED that you change the IP Selection (in the Network Menu) is set to MANUAL. By default, the printer is set to DHCP+BOOTP, but this may cause the IP Address to change each time the power is cycled on the printer. If the printer is configured properly for your network, the blue light on the front of the printer should be solid. If it’s flashing, the printer is probably still setup for DHCP, or does not have proper IP Address information loaded.

IMPRESS Scan Setting up a bar code printer with 7.21 Intermec drivers or newer
Page 21 of 22
TROUBLESHOOTING STEPS / FAQs If you are having trouble with printing to the PM4i printer, follow these steps:
1) Make sure the labels and ribbons are loaded properly. Double check the diagram on the inside of the door. To do a test print, hit SETUP, scroll to the right to TEST/SERVICE, and hit ENTER until you get to TEST PRINT/CONFIG. Hit ENTER, and when the display says TEST PRINT/CONFIG/SW, hit ENTER and a configuration label should print. If it prints, the labels and ribbons are loaded correctly.
a. If the ribbon feeds out with the labels (and does not rewind on the ribbon take-up spool), the printer is probably in DT (direct thermal) mode. Change the “Paper Type” to “TTR” in the Media menu.
b. If a label prints, but is too light, check to make sure that the “Sensitivity” (in the Media menu) is set to 366. If not, scroll left or right in the “Sensitivity” setting until it shows that value. Then print another test label. Keep in mind that you need to use the IMPRESS labels and ribbons from Informs, and not any other labels that may have come with the printer (i.e. 4”x4” DT labels).
2) Once you know the printer can print labels, you need to ensure that the printer is properly connected to the PC (either via the Network or USB/Serial cable. To test this, open the Windows Printer Driver on the PC (Start – Control Panel – Printers & Faxes – right-click the PM4i printer). On the General tab, click “Print Test Page”. A label should print. If it does not, there is an incorrect setting, either in the Windows Driver on the Ports Tab, or in the printer itself. If you’re printing via the network (Ethernet), you need to make sure that the “Port” selected is a “Standard TCP/IP Port”, and make sure that the IP Address matches the IP Address set in printer (under the Network menu). IP Addresses are normally assigned by the IT Department, and any IP Address or Networking issues should involve the Hospital’s IT Department.
3) Once the printer can print quality labels, and is connected to all PCs, you are ready to print using IMPRESS. A few other common issues you may run across once up and running with the PM4i are:
a. “Paper Out” error when you know a full roll and ribbon are loaded. This often happens when the ribbon has been fed incorrectly, and is fed through the plastic (smoke-colored) label guide. The labels go through this guide, but the ribbon should above it.
b. Flashing blue light, and the label jobs won’t print. This usually means that the IP Address is incorrect, usually because the “IP Selection” is set to DHCP and not Manual (it should be set to Manual).
c. Uneven print quality from one side of the label to the other. The metal arm (magnetic) that holds the printhead in place can be moved from side to side. It should be in the center of the labels that you are printing (i.e. at the 2” point for 4” wide labels, or the 1” point for 2” wide labels). If the print is uneven, move the position of the arm slightly to apply more pressure toward the “

IMPRESS Scan Setting up a bar code printer with 7.21 Intermec drivers or newer
Page 22 of 22
4) Print is too big – the standard label seems to print on multiple labels like it is “blown up”. This is normally caused by using the incorrect Printer Driver. The standard PM4i for IMPRESS should be a 203dpi (dots per inch) machine, so you need to use the 203dpi driver. If you loaded the 300dpi driver (see instructions above), the result will be an image that seems to be 50% too big. Delete that driver and follow the “add a printer” procedure to load the correct 203dpi (IPL) driver.
5) Ribbon Wrinkle – If you experience jagged voids in your label, they are likely caused by wrinkles in the ribbon. If this is happening, or if you notice that the ribbon take-up is not rewinding straight, you may need to adjust the “ribbon break shaft” in the front of the printer: