Embed Size (px)
Citation preview
Is this guide for you?
Canvas is a next-generation learning management system with a lot of advanced functionality, but many instructors want to use Canvas for the same things that they used EEE: hosting course information like a syllabus and some readings, and keeping a gradebook. If that sounds like you, jump right in!
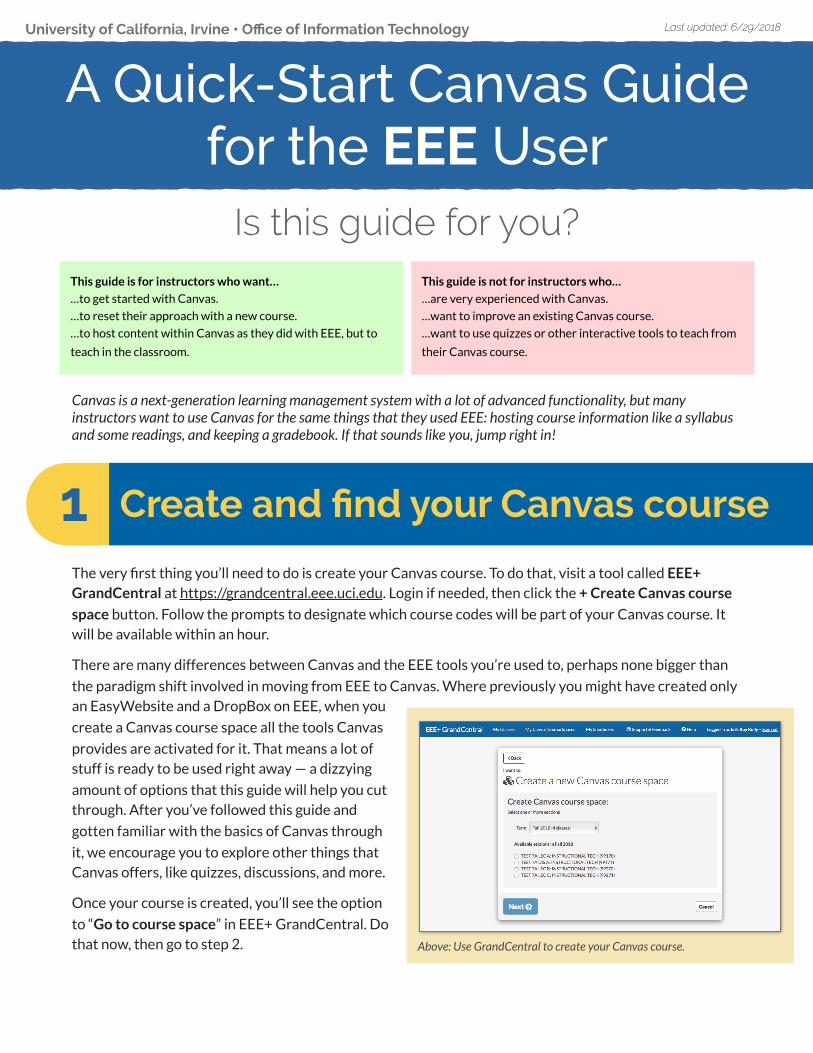
The very first thing you’ll need to do is create your Canvas course. To do that, visit a tool called EEE+ GrandCentral at https://grandcentral.eee.uci.edu. Login if needed, then click the + Create Canvas course
space button. Follow the prompts to designate which course codes will be part of your Canvas course. It will be available within an hour.
There are many differences between Canvas and the EEE tools you’re used to, perhaps none bigger than
the paradigm shift involved in moving from EEE to Canvas. Where previously you might have created only an EasyWebsite and a DropBox on EEE, when you
create a Canvas course space all the tools Canvas
provides are activated for it. That means a lot of stuff is ready to be used right away — a dizzying
amount of options that this guide will help you cut through. After you’ve followed this guide and
gotten familiar with the basics of Canvas through
it, we encourage you to explore other things that Canvas offers, like quizzes, discussions, and more.
Once your course is created, you’ll see the option
to “Go to course space” in EEE+ GrandCentral. Do that now, then go to step 2. Above: Use GrandCentral to create your Canvas course.
This guide is for instructors who want…
…to get started with Canvas.
…to reset their approach with a new course.
…to host content within Canvas as they did with EEE, but to
teach in the classroom.
This guide is not for instructors who…
…are very experienced with Canvas.
…want to improve an existing Canvas course.
…want to use quizzes or other interactive tools to teach from
their Canvas course.
Create and find your Canvas course1
University of California, Irvine • Office of Information Technology Last updated: 6/29/2018
A Quick-Start Canvas Guidefor the EEE User
Canvas and EEE don’t look much alike, so if you’re a long-time EEE user your first visit to your Canvas course is going to be disorienting. Let’s talk about the
interface before moving on to setting up your course.
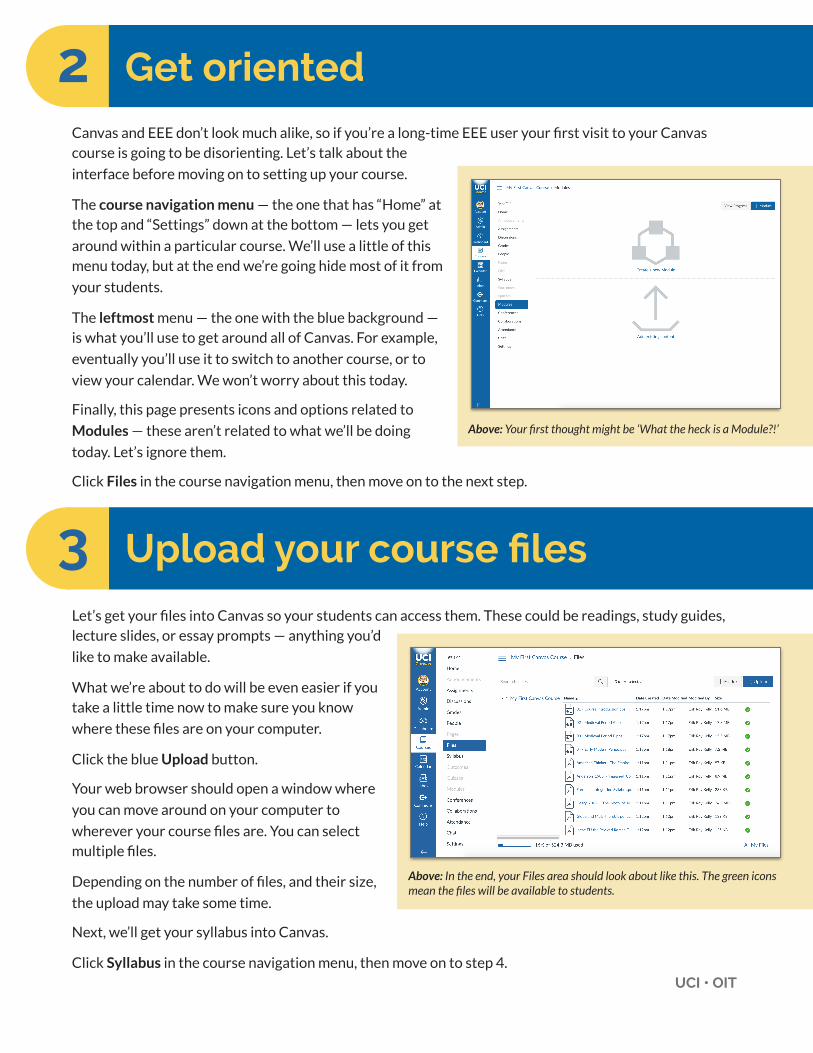
The course navigation menu — the one that has “Home” at the top and “Settings” down at the bottom — lets you get
around within a particular course. We’ll use a little of this menu today, but at the end we’re going hide most of it from
your students.
The leftmost menu — the one with the blue background — is what you’ll use to get around all of Canvas. For example,
eventually you’ll use it to switch to another course, or to
view your calendar. We won’t worry about this today.
Finally, this page presents icons and options related to
Modules — these aren’t related to what we’ll be doing
today. Let’s ignore them.
Click Files in the course navigation menu, then move on to the next step.
Let’s get your files into Canvas so your students can access them. These could be readings, study guides, lecture slides, or essay prompts — anything you’d
like to make available.
What we’re about to do will be even easier if you take a little time now to make sure you know
where these files are on your computer.
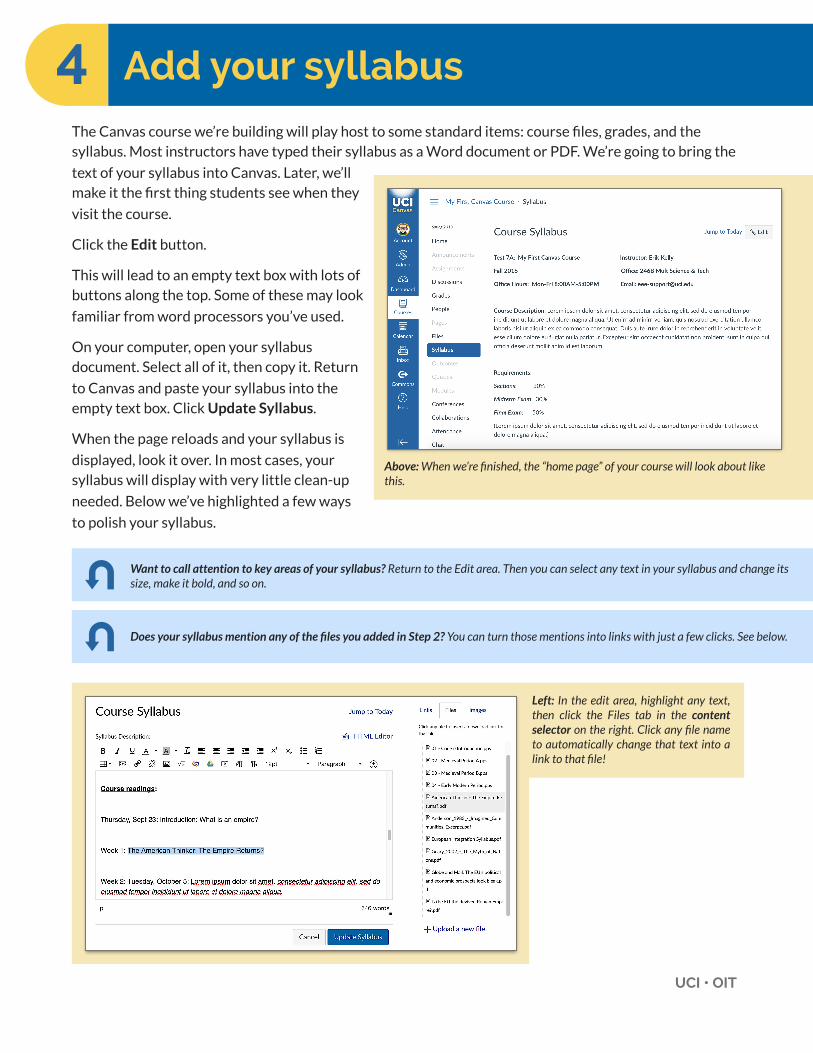
Click the blue Upload button.
Your web browser should open a window where
you can move around on your computer to
wherever your course files are. You can select multiple files.
Depending on the number of files, and their size,
the upload may take some time.
Next, we’ll get your syllabus into Canvas.
Click Syllabus in the course navigation menu, then move on to step 4.
Above: In the end, your Files area should look about like this. The green icons mean the files will be available to students.
Above: Your first thought might be ‘What the heck is a Module?!’
Get oriented2
Upload your course files3
UCI • OIT
The Canvas course we’re building will play host to some standard items: course files, grades, and the syllabus. Most instructors have typed their syllabus as a Word document or PDF. We’re going to bring the
text of your syllabus into Canvas. Later, we’ll make it the first thing students see when they
visit the course.
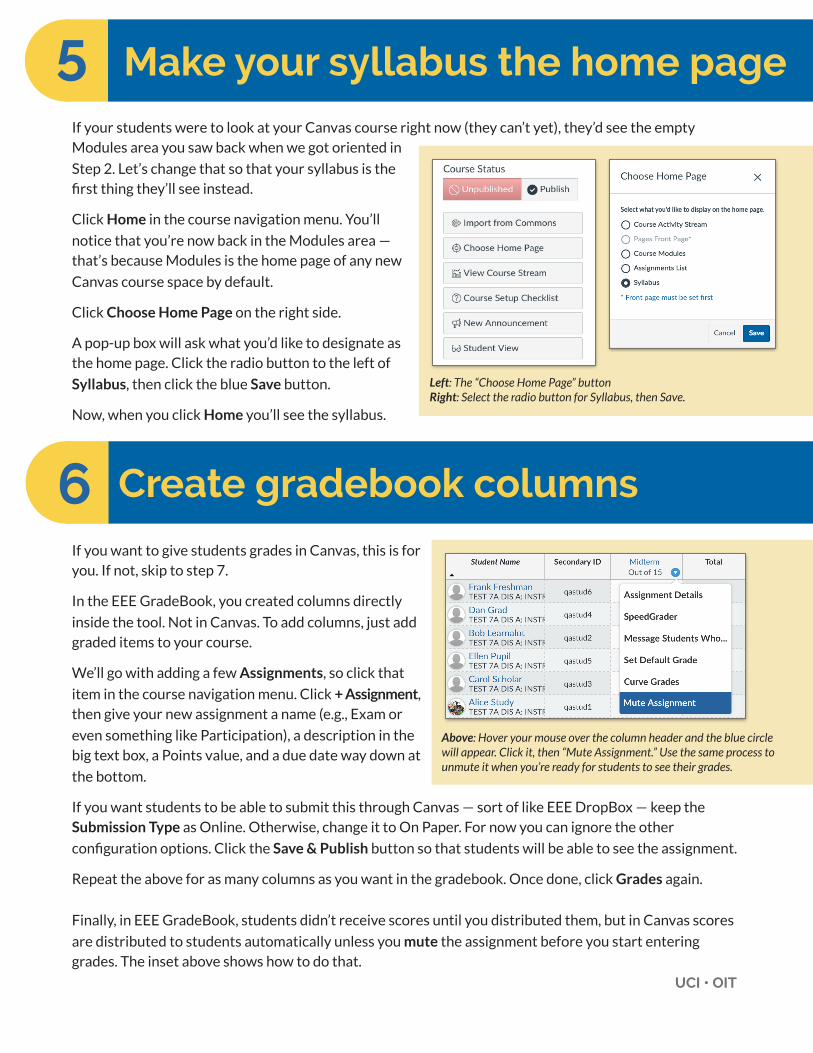
Click the Edit button.
This will lead to an empty text box with lots of buttons along the top. Some of these may look
familiar from word processors you’ve used.
On your computer, open your syllabus document. Select all of it, then copy it. Return
to Canvas and paste your syllabus into the empty text box. Click Update Syllabus.
When the page reloads and your syllabus is
displayed, look it over. In most cases, your syllabus will display with very little clean-up
needed. Below we’ve highlighted a few ways
to polish your syllabus.
Above: When we’re finished, the “home page” of your course will look about like this.
Add your syllabus4
Left: In the edit area, highlight any text, then click the Files tab in the content selector on the right. Click any file name to automatically change that text into a link to that file!
Does your syllabus mention any of the files you added in Step 2? You can turn those mentions into links with just a few clicks. See below.
Want to call attention to key areas of your syllabus? Return to the Edit area. Then you can select any text in your syllabus and change its size, make it bold, and so on.
UCI • OIT
If your students were to look at your Canvas course right now (they can’t yet), they’d see the empty Modules area you saw back when we got oriented in
Step 2. Let’s change that so that your syllabus is the first thing they’ll see instead.
Click Home in the course navigation menu. You’ll
notice that you’re now back in the Modules area — that’s because Modules is the home page of any new
Canvas course space by default.
Click Choose Home Page on the right side.
A pop-up box will ask what you’d like to designate as the home page. Click the radio button to the left of
Syllabus, then click the blue Save button.
Now, when you click Home you’ll see the syllabus.
If you want to give students grades in Canvas, this is for you. If not, skip to step 7.
In the EEE GradeBook, you created columns directly
inside the tool. Not in Canvas. To add columns, just add graded items to your course.
We’ll go with adding a few Assignments, so click that
item in the course navigation menu. Click + Assignment, then give your new assignment a name (e.g., Exam or
even something like Participation), a description in the big text box, a Points value, and a due date way down at
the bottom.
If you want students to be able to submit this through Canvas — sort of like EEE DropBox — keep the Submission Type as Online. Otherwise, change it to On Paper. For now you can ignore the other
configuration options. Click the Save & Publish button so that students will be able to see the assignment.
Repeat the above for as many columns as you want in the gradebook. Once done, click Grades again.
Finally, in EEE GradeBook, students didn’t receive scores until you distributed them, but in Canvas scores
are distributed to students automatically unless you mute the assignment before you start entering grades. The inset above shows how to do that.
Left: The “Choose Home Page” button Right: Select the radio button for Syllabus, then Save.
Above: Hover your mouse over the column header and the blue circlewill appear. Click it, then “Mute Assignment.” Use the same process to unmute it when you’re ready for students to see their grades.
Make your syllabus the home page5
Create gradebook columns6
UCI • OIT
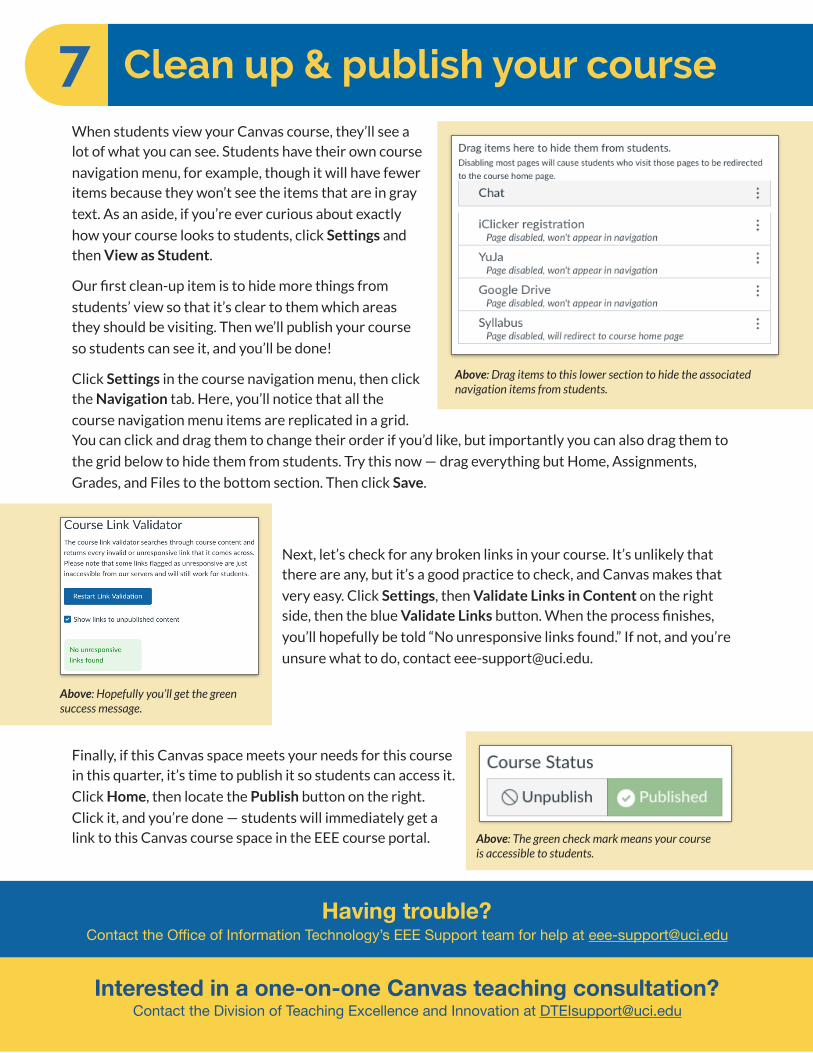
When students view your Canvas course, they’ll see a lot of what you can see. Students have their own course
navigation menu, for example, though it will have fewer items because they won’t see the items that are in gray
text. As an aside, if you’re ever curious about exactly
how your course looks to students, click Settings and then View as Student.
Our first clean-up item is to hide more things from
students’ view so that it’s clear to them which areas they should be visiting. Then we’ll publish your course
so students can see it, and you’ll be done!
Click Settings in the course navigation menu, then click the Navigation tab. Here, you’ll notice that all the
course navigation menu items are replicated in a grid. You can click and drag them to change their order if you’d like, but importantly you can also drag them to
the grid below to hide them from students. Try this now — drag everything but Home, Assignments,
Grades, and Files to the bottom section. Then click Save.
Next, let’s check for any broken links in your course. It’s unlikely that there are any, but it’s a good practice to check, and Canvas makes that
very easy. Click Settings, then Validate Links in Content on the right side, then the blue Validate Links button. When the process finishes,
you’ll hopefully be told “No unresponsive links found.” If not, and you’re
unsure what to do, contact [email protected].
Finally, if this Canvas space meets your needs for this course in this quarter, it’s time to publish it so students can access it.
Click Home, then locate the Publish button on the right.
Click it, and you’re done — students will immediately get a link to this Canvas course space in the EEE course portal.
Interested in a one-on-one Canvas teaching consultation? Contact the Division of Teaching Excellence and Innovation at [email protected]
Having trouble? Contact the Office of Information Technology’s EEE Support team for help at [email protected]
Above: Hopefully you’ll get the green success message.
Above: The green check mark means your course is accessible to students.
Clean up & publish your course7
Above: Drag items to this lower section to hide the associated navigation items from students.