Embed Size (px)
Citation preview

HP Jornada420 Palm-size PC
User�s Guide
Part number F1255-90002Printed in Singapore
Edition 1

ii Hewlett-Packard Jornada 420 Palm-size PC
Copyright noticeThis manual and any examples contained herein are provided “asis” and are subject to change without notice. Hewlett-PackardCompany makes no warranty of any kind with regard to thismanual, including, but not limited to, the implied warranties ofmerchantability and fitness for a particular purpose. Hewlett-Packard Co. shall not be liable for any errors or for incidental orconsequential damages in connection with the furnishing,performance, or use of this manual or the examples herein.
The above disclaimers and limitations shall not apply toconsumer transactions in Australia and the United Kingdom andshall not affect the statutory rights of consumers.
© Hewlett-Packard Co. 1999. All rights reserved. Reproduction,adaptation, or translation of this manual is prohibited withoutprior written permission of Hewlett-Packard Company, except asallowed under the copyright laws.
The programs that control this product are copyrighted and allrights are reserved. Reproduction, adaptation, or translation ofthose programs without prior written permission of Hewlett-Packard Co. is also prohibited.
Microsoft, MS, ActiveSync, Active Desktop, Outlook, Windows,Windows NT, and the Windows logo are either registeredtrademarks or trademarks of Microsoft Corporation in the UnitedStates and/or other countries. Microsoft products are licensed toOEMs by Microsoft Licensing, Inc., a wholly owned subsidiary ofMicrosoft Corporation.
CIC and Jot are registered trademarks or trademarks ofCommunication Intelligence Corporation.
BSQUARE and bTask are either registered trademarks ortrademarks of BSQUARE Corporation. OmniSolve is copyright1998-99 LandWare Inc. with all rights reserved. LandWare is atrademark of LandWare, Inc.
EZOS, EZOS EzExplorer, EzExplorer are either registeredtrademarks or trademarks of EZOS S.A. in Belgium and/or othercountries.
Hewlett-Packard Singapore (Pte) Ltd.Asia Pacific Personal Computer Division452 Alexandra RoadSingapore 119961

Table of Contents | iii
Table of ContentsChapterChapter 1 | Welcome1 | Welcome ........................................................... 1
Taking inventory ............................................................1Using the manual ...........................................................2Using HP Jornada’s built-in programs..........................3Finding more information ..............................................5Registering the HP Jornada ..........................................6Understanding conventions ...........................................6
Chapter 2 | Setting upChapter 2 | Setting up ......................................................... 7Identifying the hardware features ................................8Setting up for the first time .........................................11Managing battery power ..............................................16Caring for the HP Jornada...........................................20
Chapter 3 | Learning the basicsChapter 3 | Learning the basics............................................ 21Turning the HP Jornada 420 on and off .....................21Locking the hardware buttons.....................................22Using the hard icons.....................................................22Using the Active Desktop.............................................23Using the Start Menu and taskbar..............................24Using the command bar ...............................................25Typing, writing, and drawing on the HP Jornada......25Finding files and documents........................................28Finding information .....................................................29Viewing information.....................................................29Adjusting settings.........................................................30Using HP settings.........................................................31Learning the shortcuts .................................................36
Chapter 4 | Connecting to a desktop PCChapter 4 | Connecting to a desktop PC................................ 39Connecting for the first time........................................39Connecting and disconnecting .....................................46Connecting by infrared.................................................47Connecting to another PC ............................................48Browsing the HP Jornada desktop ..............................49Synchronizing data.......................................................50Using channels..............................................................52Transferring files ..........................................................54Printing .........................................................................54
Chapter 5 | Sending and receiving e-mailChapter 5 | Sending and receiving e-mail .............................. 55Synchronizing messages ..............................................55Using Windows CE Inbox Transfer.............................56

iv Hewlett-Packard Jornada 420 Palm-size PC
Sending and receiving messages using a dial-upconnection .....................................................................57Setting up an Ethernet connection..............................60Using Inbox...................................................................61Sending and receiving CompuServe e-mail ................65
Chapter 6 | Staying OrganizedChapter 6 | Staying Organized ............................................67Scheduling meetings and appointments .....................68Tracking friends and colleagues ..................................70Keeping a to-do list.......................................................71Recording voice memos ................................................72
Chapter 7 | Getting down to businessChapter 7 | Getting down to business ....................................77Creating notes and drawings.......................................77Using bTask ..................................................................82Using OmniSolve ..........................................................83Backing up and restoring data ....................................83Customizing the HP Jornada.......................................86
Chapter 8 | TroubleshootingChapter 8 | Troubleshooting ...............................................95Troubleshooting basic problems ..................................95Troubleshooting remote connections...........................97Troubleshooting viewing problems..............................98Resetting .......................................................................99
Chapter 9 | Warranty, support, and serviceChapter 9 | Warranty, support, and service............................ 103Appendix A | Jot Character RecognizerAppendix A | Jot Character Recognizer ................................109
Areas of the Input Panel ............................................110Symbols .......................................................................111Help Writing Characters............................................112Options ........................................................................112Natural Character Set................................................112Simplified Uppercase Character Set .........................119
AppendixAppendix B | Migrating data from non�Windows CE HP handheldB | Migrating data from non�Windows CE HP handheldPC devicesPC devices.................................................................... 129
Translating appointment data...................................129Translating Phone Book data ....................................130
IndexIndex .......................................................................... 133HP software product license agreementHP software product license agreement...............................139
Use...............................................................................139Copies and adaptations ..............................................139Ownership...................................................................140Transfer of rights in software ....................................140HP shrink-wrap license terms ...................................141

Chapter 1 | Welcome | 1
1 | Welcome
The Hewlett-Packard Jornada 420 Palm-size PC (P/PC) is amobile computer running the Microsoft® Windows® CEoperating system. It allows you to store your business andpersonal information, manage your appointments and contacts,and check e-mail while on the road. It then allows you to uploadupdated information to your desktop or notebook PC afterreturning to the office.
In addition to Microsoft Windows products, the HP Jornada hasbuilt-in programs from Hewlett-Packard, BSQUARE™, andLandWare that help you manage the system, manage tasks, andperform financial calculations. It also allows you to loadprograms from the HP Jornada compact disk.
This chapter includes the following:
· An inventory list of the HP Jornada package
· A description of the contents of this User’s Guide
· An overview of built-in programs
Taking inventoryThe HP Jornada package includes the following items:
· HP Jornada 420 and stylus
· HP Jornada battery
· AC adapter, DC cable, and power cable
· Sync cable
· Cradle
· HP Jornada Quick Start Card—A guide to getting startedquickly with the HP Jornada

2 Hewlett-Packard Jornada 420 Palm-size PC
· Desktop Software for Microsoft Windows CE compact disk—Contains Microsoft Windows CE Services, plus software andsystem updates for both the HP Jornada and desktop PC
· HP Jornada compact disk—Programs that can be loaded ontothe HP Jornada
· Documentation pack—This User’s Guide and the RegulatoryInformation Leaflet
· HP Jornada Accessory Guide—Information on accessories andproducts that can help you get the most from the HP Jornada
Using the manualThis User’s Guide is designed to help you use your HP Jornadaquickly and easily. Although great care has been taken to ensurethe accuracy of procedures and screen art, some actual screensmay be different than the ones that appear in this User’s Guide.
This guide includes the following chapters:
· Chapter 1, Welcome—Contains an overview of the HPJornada’s built-in applications, where to find moreinformation, and conventions used in this guide.
· Chapter 2, Setting up—Explains the hardware features, howto set up and care for the HP Jornada, and how to manage thebattery power.
· Chapter 3, Learning the basics—Describes how to turn the HPJornada on and off, reconfigure the hard icons, work with theStart menu and taskbar, and adjust settings. Also includestips and shortcuts to help you work faster.
· Chapter 4, Connecting to a desktop PC —Explains how toinstall Windows CE Services on your desktop or notebook PC,how to transfer files, how to synchronize data, e-mailmessages, and channels, and how to print.
· Chapter 5, Sending and receiving e-mail—Describes how touse Inbox.
· Chapter 6, Staying organized—Explains how to use the HPJornada to manage your calendar and address book anddescribes to-do lists, alarms, and reminders.
· Chapter 7, Getting down to business—DescribesMicrosoft Note Taker ®, bTask from BSQUARE, and

Chapter 1 | Welcome | 3
OmniSolve from LandWare. Also explains how to back up andrestore data, and how to customize the HP Jornada.
· Chapter 8, Troubleshooting—Contains tips and procedures tofollow when things do not work quite as you expected, andexplains how to reset the HP Jornada.
· Chapter 9, Warranty, support, and service—Explains thewarranty and how to get service.
· Appendix A, Jot Character Recognizer—Describes how to usethe Jot character recognizer, and shows how and where todraw characters on the screen for each of the two charactersets: the Natural Character Set and the Simplified UppercaseCharacter Set.
· Appendix B, Migrating data from non–Windows CE HPhandheld PC devices—Describes how to use the HP PIMTranslation Utility to transfer PIM data from a non–WindowsCE HP organizer or Palmtop PC to the HP Jornada.
Using HP Jornada�s built-in programsThis section lists the HP Jornada’s built-in programs. Theseprograms are installed in ROM and cannot be erased or removed.
· Calendar—Keeps track of important dates and events, andhelps manage your schedule.
· Tasks—Keeps track of to-do lists. Allows you to set an alarmor a reminder.
· Contacts—Stores names, addresses, and telephone numbers.When you update your contacts list, you can synchronize itwith your desktop PC, so that contacts are always up to date.
· Inbox—Sends and receives e-mail messages. Alsosynchronizes with Microsoft Outlook or Microsoft Exchange onyour desktop PC.
· EZOS EzExplorer—Finds files and documents on the P/PC.
· bTask from BSQUARE—Allows you to switch betweenapplications or view the ones currently running. It also allowsyou to close applications with a single step.
· Note Taker—Allows you to jot quick notes or to createsketches while in a meeting.

4 Hewlett-Packard Jornada 420 Palm-size PC
· Voice Recorder—Records reminders or vital information whenthere is no time to type. The dedicated Record button allowsyou to record messages with one hand.
· Channels—Downloads Web information to the HP Jornada sothat it can be viewed offline.
· Connections—Sets up connections for communications withother computers or the Internet.
· ActiveSync™—Synchronizes the HP Jornada with yourdesktop or notebook PC over a network or dial-up connectionfrom a remote location.
· PC Link—Establishes the connection between the HP Jornadaand desktop PC partner.
· Calculator—Performs simple calculations in an on-screencalculator. Allows you to copy the results to any opendocument.
· OmniSolve from LandWare—Performs complex mathematicaland business calculations.
· HP settings—Adjusts and stores up to three settings for thedisplay, sets a password, and displays memory usage.
· HP backup—Backs up Contacts, Calendar, and Tasks data oryour entire P/PC to a CompactFlash Memory Card.
· Find—Searches for appointments, channel items, contacts,mail messages, Note Taker notes, tasks, or voice recordings.
· Help—Gives you access to online help.
· Solitaire—Passes the time at the airport, on the train, orduring a not-so-interesting meeting or lecture.
· Settings—Adjusts settings for buttons, communications, thestylus, and more.

Chapter 1 | Welcome | 5
Finding more informationThe following table is a guide to the different types ofinformation available to help you use the HP Jornada. Althoughthis book introduces the programs on your P/PC, it does notdescribe them completely. For more information, see thecomprehensive online Help for each program.
Information Source
Programs This User’s Guide.
–or–
Online Help on your P/PC. Tap Startand then Help.
Synchronizing andexchanging fileswith a desktop PC(includinginformation onconnecting whiletraveling)
This User’s Guide.
–or–
Online Help on your P/PC. Tap Startand then Help.
–or–
Windows CE Services online Help onyour desktop PC. In the MobileDevices window, click Help, and thenclick Windows CE Services HelpTopics.
Toolbar buttons anddialog box items
Tap and hold on a toolbar button ordialog box item to see its name or ashort description. Drag off the toolbarbutton or item before lifting to avoidactivating it.
Troubleshootinginformation onconnections
Windows CE Services online Help onyour desktop computer. In the MobileDevices window, click Help, thenWindows CE Services HelpTopics.
Up-to-dateinformation onWindows CE–baseddevices
http://www.microsoft.com/windowsce.

6 Hewlett-Packard Jornada 420 Palm-size PC
Information on thisrelease of WindowsCE
The Release Notes on your desktopcomputer. Click Start, point toPrograms, Microsoft Windows CEServices, and then click ReleaseNotes.
The complete text of this User’s Guide is also available on theHewlett-Packard Web site at www.hp.com/jornada. You candownload the User’s Guide to your desktop PC and view it usingthe Adobe™ Acrobat Reader, available from the Adobe Web siteat www.adobe.com.
Registering the HP JornadaTo register the HP Jornada, go to www.hp.com/jornada.
Understanding conventionsThis User’s Guide includes visual cues to help you find tips andwarnings.
A shortcut, another way to dosomething, or expandedinformation about the topic.
Caution or warning informationabout the topic. This is importantinformation that should beobserved to prevent loss of data ordamage to the HP Jornada.

Chapter 2 | Setting up | 7
2 | Setting up
This chapter includes instructions to help you:
· identify hardware features
· set up the HP Jornada for the first time
· manage battery power
· care for the HP Jornada

8 Hewlett-Packard Jornada 420 Palm-size PC
Identifying the hardware featuresThe views below introduce you to the connectors, ports, and otherfeatures of the HP Jornada.
Front view of the HP Jornada
1. AC Charging LED—When connected to AC power, thisLED glows with one of two colors:
· Amber—Indicates that the battery is charging(connected to AC power).
· Green—Indicates that the battery is fully charged.
2. Notification LED—Blinks red when you have anappointment. Glows red when you are recording.
3. Infrared port (IrDA–compliant transceiver)— Enablesyou to send and receive files by infrared beam betweenP/PCs, between the P/PC and a Handheld PC (H/PC), orbetween the P/PC and a desktop PC. (For moreinformation, see “Connecting by infrared” on page 47.)
4. Microphone—Allows you to record voice memos.

Chapter 2 | Setting up | 9
5. Record button—Starts the Voice Recorder. When held,turns on the P/PC when it is off, and records until thebutton is released.
6. Action button—Pressing this button selects thehighlighted item. Rocking this button allows you toscroll (also referred to as Up/Down control).
7. Exit button—Exits dialog windows and menus.
8. Start button—Displays the Start menu. Also turns onthe P/PC when it is off, and, if held, brings upHP settings.
9. Earphone jack—Accepts a plug for standard earphones.
10. Battery door release—When pressed with the stylus,releases the battery door.
11. Battery door—Slides down when the battery doorrelease is pressed. Open only when replacing thebattery.
12. Hard icon panel—Allows one-touch access to fourapplications. By default, the applications are Contacts,Calendar, Tasks, and OmniSolve, but these can bereconfigured. To do this, tap Settings from the Startmenu, tap Buttons, tap the Program tab, and thenfollow the directions on the control panel.
13. Power on/off button—Press to power on and off.
14. Display cover—Open the display cover when you want totap the screen.

10 Hewlett-Packard Jornada 420 Palm-size PC
Back view of the HP Jornada
15. CompactFlash Type I and II Card slot—Enables you toadd memory or use accessories on CompactFlash Cards.(For a list of recommended accessory cards, go to theHewlett-Packard Web site at www.hp.com/jornada.)
16. Stylus—Use the stylus as a mouse substitute. Forexample, tap to select a button or menu item, double-tapto open an application, drag the stylus across words oritems to select them.
17. Reset button—Restarts the HP Jornada. For moreinformation about soft and full resets, see “Resetting” onpage 99.
18. Audio speaker—Lets you listen to system sounds orvoice memos.
19. P/PC connector —Connects the P/PC to the cradle.

Chapter 2 | Setting up | 11
Setting up for the first timeAs part of the setup process, you:
· install the battery
· connect the AC adapter
· start the HP Jornada
· complete the Windows CE Welcome Wizard
Follow the steps described below in the order they arepresented.
Installing the batteryThe battery powers the HP Jornada when it is not connected toAC power. The battery fits into a compartment on the bottom ofthe HP Jornada, as shown in the diagram. The switch on thebattery does not have any electrical function.
When the battery is drained, you can flip the switch so thatthe red dot shows to indicate this battery needs to berecharged. This can be convenient if you have more batteries.

12 Hewlett-Packard Jornada 420 Palm-size PC
This view of the left side of the HP Jornada shows how toinsert the battery.
To install the battery
1. Release the battery door by pushing the stylus into thesmall hole above the door. Then, slide the door down andoff.
2. Slide the battery into the battery slot. If the battery doesnot slide in easily, check the battery orientation and tryagain. If you are putting the battery in correctly, you donot need to force it.
3. Replace the battery door, and slide it up until it snapsshut.
After you install the battery, the HP Jornada turns onautomatically. Before using your P/PC on battery power,though, you should charge the battery by connecting the ACadapter. You can use the P/PC while charging. Charging thebattery takes approximately 3 to 4 hours. For information onconnecting the AC adapter, read the next sections.

Chapter 2 | Setting up | 13
The rechargeable backup battery is a permanent part of theHP Jornada, so you do not need to install or replace it.
The backup battery is charged automatically when the P/PC isconnected to AC power.
Make sure you connect to AC power to charge as soon as yousee a backup battery low warning.
Do NOT replace your main battery when the backup battery islow.
Using the cradleThe views below show the features of the cradle and how theP/PC docks with it.
1. Release buttons—To release the HP Jornada from the cradle,press the buttons on both sides of the cradle.
2. Connector to the P/PC—Connects the cradle to the P/PC.

14 Hewlett-Packard Jornada 420 Palm-size PC
Back view of the cradle.
1. DC jack—Connects the P/PC to AC power, which also chargesboth the main and backup batteries.
2. Serial port (RS-232C)—Connects the HP Jornada to yourdesktop PC to transfer files or to synchronize data. (For moreinformation, see “Connecting for the first time” on page 39.)
The HP Jornada must be in its cradle in order to connect to anAC adapter or to a PC.
Connecting the AC adapterYou can operate the HP Jornada on AC power using the ACadapter and cradle. The AC adapter accepts voltages from 100 Vto 240 V, so you can use it anywhere in the world. However, youmay need a plug adapter to accommodate different electricaloutlets.
When the HP Jornada is connected to AC power, the mainbattery and backup battery are charged automatically. TheAC Charging LED indicates the charging status of the mainbattery:
· Amber—Indicates that the battery is charging (connected toAC power).
· Green—Indicates that the battery is fully charged.
The AC Charging LED is illuminated only if the P/PC isconnected to AC power.
A dialog box pops up when the backup battery power is low.Connect to AC power immediately to recharge the backupbattery.
Chapter 2 | Setting up | 15
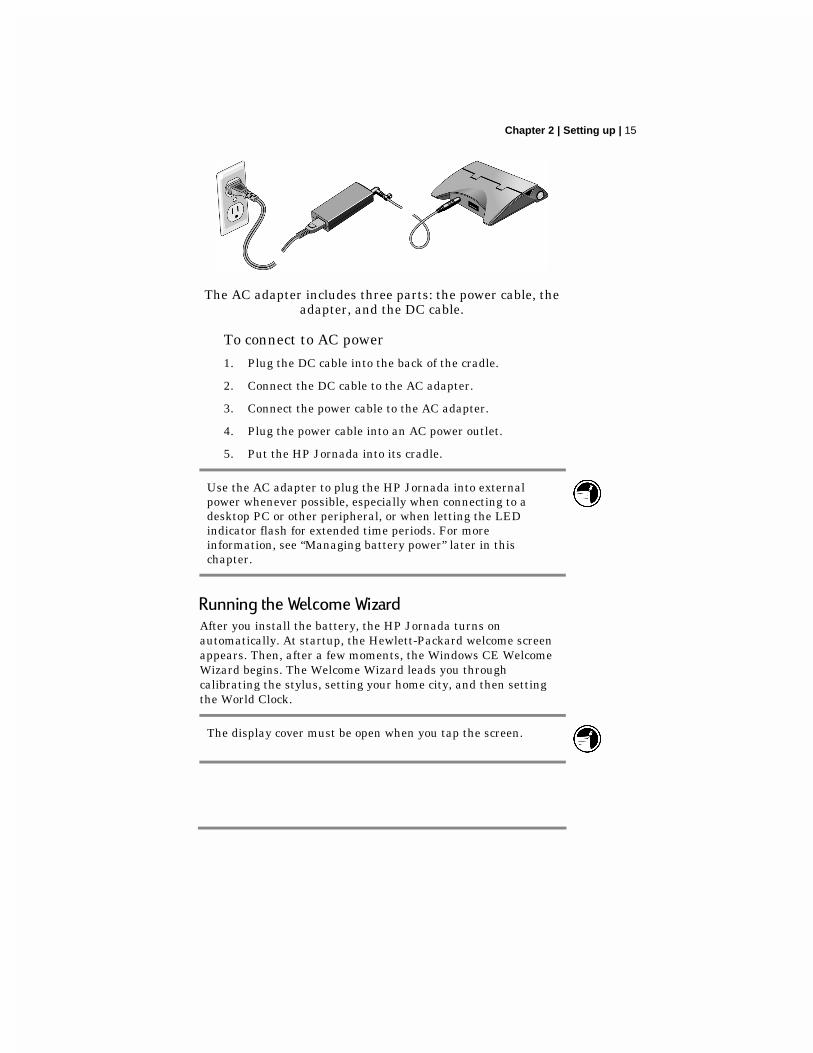
The AC adapter includes three parts: the power cable, theadapter, and the DC cable.
To connect to AC power
1. Plug the DC cable into the back of the cradle.
2. Connect the DC cable to the AC adapter.
3. Connect the power cable to the AC adapter.
4. Plug the power cable into an AC power outlet.
5. Put the HP Jornada into its cradle.
Use the AC adapter to plug the HP Jornada into externalpower whenever possible, especially when connecting to adesktop PC or other peripheral, or when letting the LEDindicator flash for extended time periods. For moreinformation, see “Managing battery power” later in thischapter.
Running the Welcome WizardAfter you install the battery, the HP Jornada turns onautomatically. At startup, the Hewlett-Packard welcome screenappears. Then, after a few moments, the Windows CE WelcomeWizard begins. The Welcome Wizard leads you throughcalibrating the stylus, setting your home city, and then settingthe World Clock.
The display cover must be open when you tap the screen.

16 Hewlett-Packard Jornada 420 Palm-size PC
Managing battery powerBecause the data and files you save on the HP Jornada arestored in RAM, it is extremely important that you maintain acontinuous power supply to the HP Jornada at all times. If theHP Jornada runs out of power, all information you have enteredis lost. Although the Windows CE operating system andprograms are stored in ROM and cannot be erased, any customsettings and programs you have added are lost.
When taking out the battery, keep in mind that when theP/PC is without power, data retention is guaranteed for only 1minute. You do not need to take out the main battery except toreplace it with a spare battery (F1287A).
The HP Jornada uses a rechargeable lithium-ion battery, whichsupplies power whenever the P/PC is not connected to AC power.Under normal operating conditions, the battery should last for upto 6 hours of continuous use without recharging. Battery lifevaries, however, depending on how you use the P/PC.
You should respond immediately when a message warning oflow battery power is displayed. When the battery power is low,simply connect the HP Jornada to AC power to recharge.
Using the Power control panelThe Power control panel displays information about the currentstate of your battery and allows you to control options that canconserve battery power.
To open the Power control panel
1. Tap the Start button, tap Settings, and then tapPower. If you are not familiar with using the Startmenu, read “Using the Start Menu and taskbar” on page24.
–or–
If the power plug icon is on the taskbar, double-tap it.
2. Tap the Status, Power, or Dimming tab.

Chapter 2 | Setting up | 17
3. Select your preferences. For more information, read thefollowing paragraphs, or tap the Help button.
4. Tap OK to save the changes and exit, or tap the Closebutton (X in the upper right corner) to abandon thechanges.
Status tab
The Status tab displays the status of the main and backupbatteries.
Status tab

18 Hewlett-Packard Jornada 420 Palm-size PC
Power tab
The Power tab lets you customize how and when your P/PCsuspends operation to help maximize battery life:
· Touch screen to power On—Select this option to allow yourP/PC to awake from suspend mode when you tap the screen orhard icon panel.
· Suspend while on battery power—To conserve batterypower, your P/PC automatically suspends operation after aperiod of continuous idle time while running on battery power.Select the amount of idle time from the dropdown list.
· Enable suspend while on AC line power—Select thisoption to automatically suspend operation after a period ofcontinuous idle time while running on AC power. Select theamount of idle time from the dropdown list.
The Touch screen to power On option is checked by default.When you uncheck this option, you are no longer able to use thehard icon panel to power on the P/PC.
Power tab

Chapter 2 | Setting up | 19
Dimming tab
The Dimming tab lets you control backlight dimming to helpconserve battery power:
· Automatically dim while on Battery Power—To conservebattery power, select this option to automatically dim thebacklight after a period of continuous idle time while runningon battery power. Select the amount of idle time from thedropdown list.
· Automatically dim while on AC Power—Select this optionto automatically dim the backlight after a period of continuousidle time while running on AC power. Select the amount ofidle time from the dropdown list.
Dimming tab
Conserving battery powerThe following tips can conserve battery power, ensuring thelongest use of your P/PC between charges:
· Shorten auto-suspend time. To set auto-suspend time: fromthe Start menu, tap Settings, tap Power, and then tap thePower tab.

20 Hewlett-Packard Jornada 420 Palm-size PC
· Set the display to dim automatically after a short time. To setdimming: from the Start menu, tap Settings, tap Power,and then tap the Dimming tab.
· Minimize brightness and use contrast to increase readability.To set brightness and contrast: from the Start menu, tapHP settings. For more information about HP settings, see“Using HP settings” on page 31.
· Turn off sounds you do not need or mute the system speaker.To mute sounds: from the Start menu, tap HP settings. Formore information about HP settings, see “Using HP settings”on page 31.
· Connect to AC power when connected to any peripheralsrequiring power.
· Connect to AC power when connected to your desktop PC.
Caring for the HP JornadaFollow these suggestions for long and trouble-free use.
· To clean the screen, wipe it with a damp, lint-free cloth.
· Do not drop the HP Jornada. Accidental damage is not coveredunder the Hewlett-Packard express warranty.
· Radiated interference from other electronic equipment mayaffect the appearance of the display. To return the display tonormal, remove the P/PC from the source of the interference.
· The HP Jornada is designed to operate at temperaturesbetween 0 to 40 ºC (32 to 104 ºF). It is designed to maintaindata at temperatures between 0 to 55 ºC (32 to 131 ºF).
Subjecting the P/PC to temperatures outside those rangesmay damage the P/PC or result in loss of data. Be especiallycareful not to leave the HP Jornada in direct sunlight or in acar where temperatures can rise to harmful levels.

Chapter 3 | Learning the basics | 21
3 | Learning the basics
This chapter describes the following:
· turning the HP Jornada on and off
· using and reconfiguring the hard icons
· working with the Start menu, taskbar, command bar, andonline help
· adjusting settings, such as volume and the world clock
· using shortcuts to help you work faster
Turning the HP Jornada 420 on and offThe HP Jornada does not need to be started up or shut down; youcan start working immediately by pressing the On/Off button atthe lower right corner of the P/PC. When you are finished, turnoff the HP Jornada by pressing the On/Off button. Turning offthe HP Jornada simply suspends operation. When you turn it onagain, you can start working where you left off.
You can also turn on the HP Jornada in the following ways:
· by pressing the Start button
· by pressing the Record button
· by holding the stylus down on one of the hard icons
· by tapping the screen.
To conserve battery power, you can set the HP Jornada to auto-suspend after a preset period of continuous idle time. By default,the P/PC auto-suspends after 3 minutes while running on batterypower. (For more information on auto-suspend and tips forconserving battery power, see “Managing battery power” on page16.)

22 Hewlett-Packard Jornada 420 Palm-size PC
Locking the hardware buttonsPressing the Record button or the Start button powers on theP/PC. To avoid powering on the P/PC accidentally (which woulddrain the battery), you can lock the hardware buttons that are onthe left side of the P/PC.
To lock the buttons
1. Press and hold the On/Off button to lock the buttons.When the volume is not muted, a sound indicates that
Button Lock is enabled, and the lock icon appearsin the taskbar.
To unlock the buttons
1. When the buttons are locked, press and hold the On/Offbutton to unlock the buttons. When the volume is notmuted, a sound indicates that Button Lock is disabled,
and the lock icon disappears from the taskbar.
When Button Lock is enabled, all hardware buttons are disabled,except for the On/Off button.
Using the hard iconsTo launch Contacts, Calendar, Tasks, or OmniSolve, tap theappropriate icon at the bottom of the display. If you double-tapthe icon, the Edit windows for Contacts, Calendar, and Tasks aredisplayed.
To reconfigure the hard icons
1. Tap Settings from the Start menu.
2. Tap Buttons.
3. Tap the Program tab.
4. Tap the name of the hard icon (under Program button)that you want to reconfigure.
Chapter 3 | Learning the basics | 23
5. Tap the name of the program (under Buttonassignment) that you want to associate with the hardicon.
6. Tap OK.
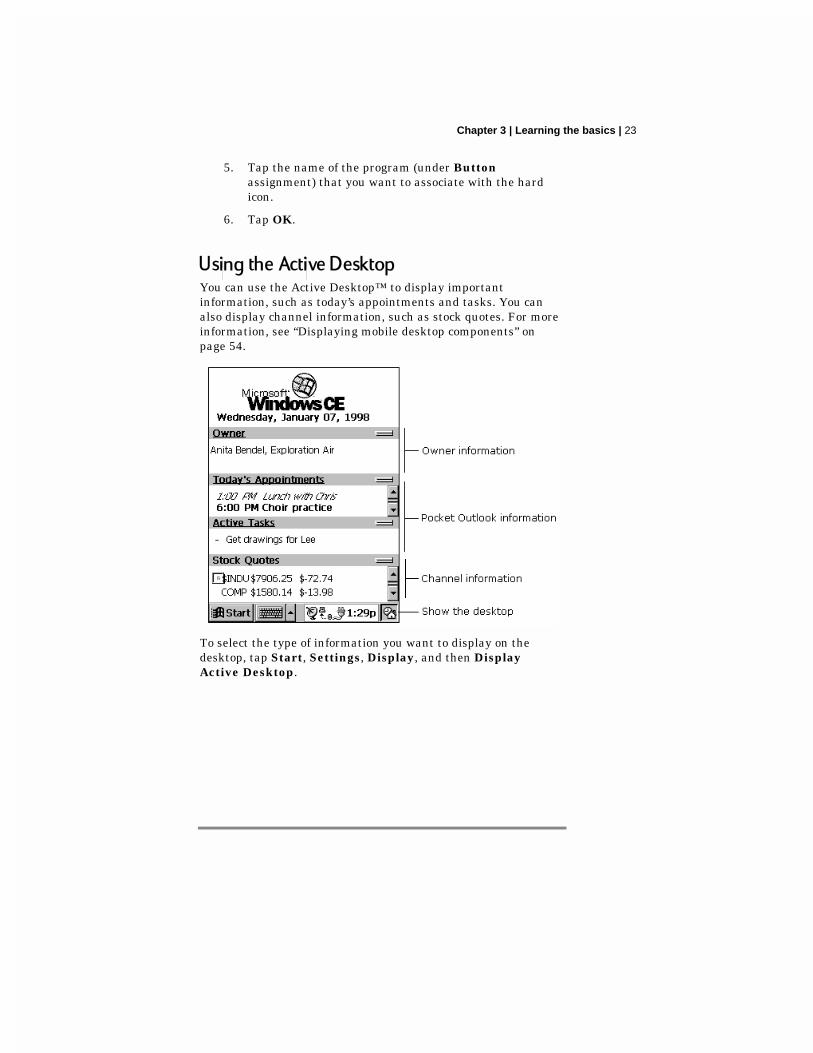
Using the Active DesktopYou can use the Active Desktop™ to display importantinformation, such as today’s appointments and tasks. You canalso display channel information, such as stock quotes. For moreinformation, see “Displaying mobile desktop components” onpage 54.
To select the type of information you want to display on thedesktop, tap Start, Settings, Display, and then DisplayActive Desktop.

24 Hewlett-Packard Jornada 420 Palm-size PC
Using the Start Menu and taskbarUse the Start menu on the taskbar to switch programs, displaysettings, find information, and view Help for the currentprogram.

Chapter 3 | Learning the basics | 25
On the taskbar, you can also do the following.
You can change what you see on the Start menu and taskbar bytapping Start, Settings, and then Taskbar.
Using the command barThe command bar at the top of the P/PC screen includes bothmenu names and toolbar buttons. You can decide which you wantto display.
Typing, writing, and drawing on the
HP JornadaWith your P/PC, you can quickly type, write, and draw in the waythat is most convenient for you. You can type with the softkeyboard, write using character recognition, or write and drawdirectly on the screen using your stylus.
In Note Taker, and in notes that you attach to entries inCalendar, Contacts, and Tasks, you can use your stylus to write

26 Hewlett-Packard Jornada 420 Palm-size PC
on the screen. For more information, see “Creating notes anddrawings“ on page 77.
You can enter information in any program on your P/PC bytyping with the soft keyboard or writing using characterrecognition. First select the input method you want to use in yourP/PC’s input panel. Tap the Input Method arrow to see yourchoices.
Typing with the keyboardTo type, tap the Input Method arrow and select Keyboard.Then tap the keys with your stylus.
You can adjust keyboard settings to suit the way you work. TapStart, Settings, and then Input Panel. Select Keyboard as theinput method, and then tap Options.
Enable swipe shortcuts (gestures) on your keyboard so that youcan do the following:
· To insert a space, swipe across the keyboard from left to right.
· To delete a character, swipe across the keyboard from right toleft.
· To enter a carriage return, swipe the keyboard from top tobottom.

Chapter 3 | Learning the basics | 27
· To enter the character in uppercase, starting on a key, swipeup.
Using character recognitionYou can use the character recognition software, CIC® Jot™, towrite. Tap the Input Method arrow and select Jot CharacterRecognizer. When you write a letter in the box, yourhandwritten character is converted to typed text that appears onthe screen.
Some letters must be written in a particular way to berecognized. To see how to write letters, tap the Help button foran online demonstration or see Appendix A.

28 Hewlett-Packard Jornada 420 Palm-size PC
Drag your stylus across the panel horizontally from right toleft to delete a character. Drag from left to right to type aspace.
As you type or write, your P/PC anticipates the word you arewriting and displays it above the input panel. When you tap thedisplayed word, it is inserted into your text at the insertion point.The more you use your P/PC, the more words it learns toanticipate.
To customize the suggested words, tap Start, Settings, InputPanel, and then the Word Completion tab.
Finding files and documentsEzExplorer is your gateway to all the applications, documents,and other files on your P/PC. It displays information usingfamiliar folder and file names. In EzExplorer, you can browse,copy, move, delete, and rename the files and folders in yoursystem, and you can create shortcuts to frequently used items.
To start EzExplorer
1. From the Start menu, tap Programs, and then tapEzExplorer.

Chapter 3 | Learning the basics | 29
For detailed procedures about using EzExplorer, refer to onlineHelp.
Finding informationThe Find feature on your P/PC helps you quickly locateinformation. Tap Start and then Find. Enter the text you wantto find, select a data type, and then tap OK to start the search.
Viewing informationMost programs provide a list view, showing the items or files youhave already created in that program. You can display the list inthe manner that is most helpful for you.
You can sort the list on a particular column by tapping thecolumn heading.
In Calendar, Contacts, and Tasks, you can assign entries toparticular categories and then filter the list to show a specificcategory.
In Note Taker, Voice Recorder, and Inbox, you can place files ormessages in folders, and then filter the list to show only the filesor messages in a specific folder.

30 Hewlett-Packard Jornada 420 Palm-size PC
Adjusting settingsYou can adjust P/PC settings to suit the way you work. SelectStart and then Settings to see the settings available on yourP/PC.
You might want to adjust the following:
· Buttons, to associate program buttons with specific programsand to adjust the Up/Down control.
· Owner, to enter contact information in case your P/PC ismisplaced.
· Power, to maximize battery life.
· System, to adjust memory allocation between storage memoryand program memory.
· Password, to limit access to your P/PC.
· Volume & Sounds, to customize or turn off sounds.
· World Clock, to set the date and time for your location and asecond location.
For information on a particular setting, you can do either of thefollowing:
· Open the setting, tap Start, and then tap Help.
· Open the setting, and then tap and hold on the label of theitem you want more information about, as shown in the figureon the next page.

Chapter 3 | Learning the basics | 31
Using HP settingsUse HP settings to adjust screen brightness and contrast,speaker volume, your password, and password protection. Youcan also display system information such as memory status andremaining battery power.
Setting brightness, contrast, and volumeYou can adjust the screen brightness and contrast, adjust thespeaker volume to suit your work environment, and check theremaining battery power and memory status. You can also mutethe speaker by selecting the speaker mute checkbox.
To set brightness, contrast, and volume
1. Tap the Start button, and then tap HP settings.
–or–
Hold the Start button for 1 second.
2. Adjust the contrast, brightness, and volume sliders onthe Settings tab, and then select or deselect the Mutecheck box to mute or restore the system volume.

32 Hewlett-Packard Jornada 420 Palm-size PC
HP settings allows you to adjust brightness, contrast, andvolume by using the Action button. Hold the Start button toopen HP settings, and use the Action button to cycle theprofiles and to select the preferred one.
Settings tab
The HP Jornada has four preset HP settings profiles. You canlaunch any profile by selecting the radio button associated withit. You can also adjust any of the settings in any profile to suityour preference.

Chapter 3 | Learning the basics | 33
To change profiles
1. Select the radio button of the profile you want to change.
2. Adjust sound, brightness, and contrast sliders to yourpreference.
3. Tap OK to save the new settings. Tapping the Closebutton exits this window and abandons all changes.
You can switch to the Volume & Sounds control panel bytapping the Speaker button.
Viewing battery statusThe Settings tab displays the remaining battery capacity on astatus bar at the bottom of the window. You can also view powerstatus on the Power control panel.
To switch to the Power control panel
1. Tap the Battery button next to the battery status bar.

34 Hewlett-Packard Jornada 420 Palm-size PC
Viewing memory statusThe Memory tab displays total and available (free) Storage andProgram memory.
Memory tab
To adjust how memory is allocated betweenstorage and programs
1. Switch to the System control panel by tapping theWindows button next to the memory status display.
2. Tap the Memory tab.
3. Move the slider to the left or right.

Chapter 3 | Learning the basics | 35
4. Press the Action button or tap the OK button to exitand save all changes.
–or–
Press the Exit button or tap the Close button to exitthis window and abandon all changes.
Setting a password and delay timerYou can protect the HP Jornada by setting a password. You canalso choose to be prompted to enter the password each time youturn on the P/PC.
Password tab
To set your password and an optional passworddelay timer
1. Tap the Start button, and then tap HP settings.
–or–
Hold the Start button for 1 second.
2. Tap the Password tab.

36 Hewlett-Packard Jornada 420 Palm-size PC
3. Tap Set Password.
4. Enter a password by tapping characters on thekeyboard, and then enter the same password in theConfirm password text box.
5. If you want, tap the Enable password protection atpower–on checkbox.
6. Press the Action button or tap the OK button to exitand save all changes.
–or–
Press the Exit button or tap the Close button to exitthis window and abandon all changes.
7. If you enabled password protection at power–on, theActivate password protection radio buttons becomeactive. The default is to activate immediately aftersuspend.
8. If you want, choose the After suspending for radiobutton, and then select one of the preset delay timesfrom the list. The delay allows you to turn your P/PCback on within the allotted time without having to enteryour password.
9. Press the Action button or tap the OK button to exitand save all changes.
–or–
Press the Exit button or tap the Close button to exitthis window and abandon all changes.
Learning the shortcutsThe following tips and shortcuts help you work faster.
· Turn on the HP Jornada by pressing the On/Off button, bypressing the Start button, by pressing the Record button, byholding the stylus down on one of the hard icons, or by tappingthe screen.
· Press the Start button to bring up the Start menu.
· Hold down the Start button to bring up HP settings.

Chapter 3 | Learning the basics | 37
· Hold down the Record button to start recording. Recordingstops when you release the button.
To play all of your recordings one after another, press theAction button twice. A short beep sounds between recordings.
· Press the Action button to execute a highlighted item. Rockthis button to scroll up and down through dropdown lists.
· Press the Exit button to exit dialog windows.
· Reconfigure the hard icons so that they start the applicationsthat you use most often. To do this, tap Settings from theStart menu, tap Buttons, tap the Program tab, and thenfollow the directions on the control panel.
· Use the AC adapter to plug the HP Jornada into externalpower whenever possible, especially when connecting to adesktop PC or other peripheral, or when letting the LEDindicator flash for extended time periods. For moreinformation, see “Managing battery power” on page 16.
· In Calendar, to choose the way you prefer to be notified, onthe Tools menu, tap Options, tap the Alarm button, andthen tap Reminder Options.
· If you have lost the HP Jornada or replaced it with anotherHP Jornada, you can set up the new P/PC with the same dataand settings as the old one, if you previously performed a fullbackup using Windows CE Services or HP backup.
If you used Windows CE Services to back up your data, thenwhen you connect the new P/PC to your desktop PC for thefirst time, choose Restore rather than Synchronize or Browse.If you backed up the P/PC using HP backup, then restore theinformation as described in “Using HP backup” on page 84.
· Speed up the synchronization process by synchronizingregularly. If you use Microsoft Outlook, Windows CE Servicessynchronizes only 2 weeks of calendar data by default.
· To open the World Clock control panel quickly, double-tapthe clock in the status area of the taskbar.
· 'To close applications use bTask, or from the Start menu, tapSettings, tap System, tap Task Manager, select theapplication you want to close, and then tap End Task.

38 Hewlett-Packard Jornada 420 Palm-size PC

Chapter 4 | Connecting to a desktop PC | 39
4 | Connecting to adesktop PC
This chapter describes how to:
· install Windows CE Services
· establish a partnership between the HP Jornada and yourdesktop PC
· use Windows CE Services to browse the contents of the HPJornada
· synchronize data, e-mail messages, and channels
· transfer files between the HP Jornada and desktop PC
Connecting for the first timeYou can connect to a desktop PC using the HP Jornada serialport, or you can connect to an infrared-equipped desktop ornotebook PC using the infrared port. Before you connect, youmust install Windows CE Services on the desktop PC. Then, youcan connect the HP Jornada to your desktop PC with the synccable or the infrared port, and establish a partnership.
Understanding Windows CE ServicesMicrosoft Windows CE Services with ActiveSync enables you tosynchronize the information on your desktop computer with theinformation on your P/PC. Synchronization is the process ofcomparing the data on your P/PC with your desktop computerand updating both computers with the most recent information.For example:
· Keep Contacts, Calendar, and Tasks data up-to-date bysynchronizing your mobile device with your choice of MicrosoftOutlook (Inbox synchronization with Outlook Express is not

40 Hewlett-Packard Jornada 420 Palm-size PC
currently supported), Microsoft Schedule+, or MicrosoftExchange on your desktop computer.
· Synchronize Voice Recorder and Note Taker documentsbetween your P/PC and desktop computer. Your files areautomatically converted to the correct format.
With Windows CE Services, you can also:
· back up and restore your P/PC data
· add and remove programs on your P/PC
· copy (rather than synchronize) files between your P/PC andyour desktop computer
Windows CE Services includes several components. TheWindows CE Services Setup Wizard detects which softwarecomponents are needed and prompts you to set up only thenecessary components. For instance,
· If you do not already have Outlook or Schedule+ installed, theSetup Wizard attempts to install Schedule+ version 7.0a.
· The Setup Wizard can add Inbox extensions to enable you totransfer messages to your desktop mail client—Exchange orOutlook.
You may need to restart your PC after installing eachcomponent.
Contents of the Desktop Software for Microsoft Windows CE
compact disk
The Desktop Software for Microsoft Windows CE compact diskincludes the following software options for your desktop PC.
· Windows CE Services—Allows you to connect the HP Jornadato a desktop or notebook PC running Windows 95 or WindowsNT.
· Microsoft Exchange Update—Adds an option to the Toolsmenu in Microsoft Exchange, allowing you to synchronize theHP Jornada Inbox with your Windows Inbox.
· Microsoft Schedule+ 7.0a—A schedule management programfor Windows 95 or NT.
· Ethernet Components—Network drivers for your WindowsCE.

Chapter 4 | Connecting to a desktop PC | 41
· Microsoft Pocket Streets—A maps-and-navigation program forWindows CE.
· Windows 95 infrared drivers version 2.0—Allow you to installan infrared port on a desktop PC.
· Windows 95 Dial-Up Networking version 1.2 upgrade—Allows you to establish a remote connection to your desktopPC by modem.
· Microsoft Internet Explorer version 4.01—The most recentversion of the Internet browser for Windows 95 or WindowsNT.
· Windows NT Service Pack 3—System updates for WindowsNT.
Many Windows CE programs are available, including freewareand shareware. Go to www.microsoft.com/windowsce, or trysearching the Web on the keyword “Windows CE” to findadditional programs for your P/PC.
Minimum PC requirements for Windows CE Services
The minimum PC requirements for running Windows CEServices are as follows:
· Microsoft Windows NT Workstation 4.0 or Windows 95 (orlater)
· Desktop PC with a 486/33DX or higher processor (Pentium®P90 recommended)
· 8 MB of memory (12 MB recommended) for Windows 95 (orlater), and 16 MB of memory (32MB recommended) forWindows NT Workstation
· Hard disk drive with 10 to 50 MB of available hard disk space(actual requirements vary, based on selection of features andcurrent system configuration)
· Available 9-pin serial communications port
· CD-ROM drive
· VGA or higher resolution graphics card (SVGA 256-colorrecommended)

42 Hewlett-Packard Jornada 420 Palm-size PC
To install Windows CE Services
1. If you want to upgrade to Microsoft Outlook 98, install itfirst.
2. Insert the Desktop Software for Microsoft Windows CEcompact disk into the CD-ROM drive on your desktopPC.
3. The Windows CE Services Setup Wizard should startautomatically. If it does not start, click Run on theStart menu, and then type d:\setup, where d is theletter assigned to your CD-ROM drive.
4. Follow the instructions that appear on your screen to setup Windows CE Services.
5. The Windows CE Services Get Connected dialog boxappears and prompts you to connect the HP Jornada.
· If you connect using the sync cable, connect yourP/PC as described in “Connecting by sync cable” onpage 42, and then click Start.
· If you connect by infrared, click Cancel, and skip to“Connecting by infrared” on page 47.
If you chose Manual synchronization, you need to tap Start,tap Programs, tap Communication, and then tap PC Link.
Connecting by sync cableThe HP Jornada uses a serial connection to communicate with adesktop PC. The serial connection is established with the synccable (included with the HP Jornada) and a 9-pin serialcommunications port on your desktop PC.
The HP Jornada 420 connects to the sync cable via the cradle.
If you do not have a 9-pin serial port on your desktop PC, or ifthe port is in use by another device, such as a printer or modem,you may need to obtain an adapter from your computermanufacturer.

Chapter 4 | Connecting to a desktop PC | 43
To connect the HP Jornada to your desktop PC
1. Insert the 9-pin end of the sync cable into a serial porton your desktop PC.
2. Fully insert the flat end of the sync cable, arrow side up,into the serial port on the cradle.
3. Insert AC adapter into the DC jack on the cradle.
4. Mount the HP Jornada in the cradle.
Fully insert the flat end of the sync cable, arrow side up,into the serial port on the cradle.
Establishing a partnershipAfter you set up Windows CE Services on your desktop PC andconnect your HP Jornada with the serial cable to the desktop PC,you are prompted to establish a partnership between yourdesktop PC and the HP Jornada. The partnership enables yourdesktop PC to recognize the HP Jornada when transferring filesor synchronizing data.
You can establish partnerships between the HP Jornada and upto two desktop PCs (for example, your home PC and your officePC). A single desktop PC can partner with any number of H/PCsor P/PCs. This is useful if you have more than one computerrunning Windows CE, or if several people share a single desktopPC.

44 Hewlett-Packard Jornada 420 Palm-size PC
Following the New Partnership WizardThe New Partnership Wizard helps you create a partnership andgives you options for synchronizing data, e-mail messages, andfiles between the HP Jornada and desktop PC. When the NewMobile Device Detected dialog box appears on your desktop PC,click Synchronize, and then follow the instructions on the screenof your desktop PC to complete the New Partnership Wizard.
The Wizard prompts you to type a name and a description for theP/PC. The name can be anything you choose (up to 15alphanumeric characters, no spaces) and should make it easy foryou to identify the HP Jornada. The description could be themake and model (for example, HP Jornada 420) or a propertycontrol number.
You can later change the device name and description usingthe Communication control panel on the HP Jornada. On theStart menu, tap Programs, tap Communication, and thentap Connections.
The Wizard also prompts you to choose settings forsynchronization: Manual, On Connect, or Continuous. If youchoose Continuous, information is synchronized whenever itchanges for as long as the computers are connected.
The P/PC icon appears in the Mobile Devices window after thenew partnership is created, which can take a minute or two.
To change the type of items that are synchronized after youhave completed the wizard, select the P/PC icon in the MobileDevices folder and then click ActiveSync Options on theTools menu.
Also, regardless of the options you choose while completing theWizard, you can also synchronize at any moment by choosingthe Synchronize Now command from the Tools menu of theMobile Devices window. Or, right-click the connection icon inthe taskbar of the desktop PC, and then click SynchronizeNow. For more information, see “Synchronizing data” on page50.

Chapter 4 | Connecting to a desktop PC | 45
Troubleshooting partnershipsIf you are unable to establish a connection between the HPJornada and your desktop PC, try the following:
· Confirm that both the desktop PC and the HP Jornada arecommunicating at the same baud rate.
To check the baud rate on your desktop PC
1. Click Communications on the File menu of the MobileDevices window.
To check and change the baud rate on theHP Jornada
1. On the Start menu, tap Settings, tapCommunications, and then tap the PC Connectiontab.
Communications Properties, PC Connection tab
2. To change the baud rate setting, tap ChangeConnection.
· Verify that the sync cable from the HP Jornada is connected tothe port listed on the Communications tab of the Windows

46 Hewlett-Packard Jornada 420 Palm-size PC
CE Services Properties dialog box (this is the port you selectedwhen setting up Windows CE Services).
If these steps fail to correct the problem, use the Windows CEServices Communications Troubleshooter. The CommunicationsTroubleshooter provides detailed diagnostic steps to identify andcorrect common problems.
To start the Communications Troubleshooter
1. On the Start menu of your desktop PC, point toMicrosoft Windows CE Services, and click MobileDevices.
2. On the Help menu in the Mobile Devices window, clickCommunications Troubleshooter.
Connecting and disconnectingAfter you have established a partnership, you can set WindowsCE Services to automatically detect the HP Jornada andestablish a connection whenever you connect the sync cable.Using the COM port on your desktop PC is the easiest way foryou to connect, unless you use that port for other peripherals.
To enable automatic connection
1. On the Start menu of your desktop PC, point toMicrosoft Windows CE Services, and click MobileDevices.
2. On the File menu in the Mobile Devices window, clickCommunications.
3. Under Device Connections via Serial Port, click EnableAuto Connect.
If you use the COM port of your desktop PC for other devices, orif you have disconnected the HP Jornada and need to reestablishthe connection, you can establish a manual connection using thePC Link program on the HP Jornada.
To connect manually
1. On the HP Jornada Start menu, tap Programs, tapCommunications, and then tap PC Link. TheConnection Status dialog box appears. After a few

Chapter 4 | Connecting to a desktop PC | 47
moments a sound indicates that the connection is beingestablished.
The HP Jornada icon in the Mobile Devices window is grayedout until the connection is established, which can take aminute or two.
To close the connection
1. On the HP Jornada, double-tap the connection icon inthe status area of the taskbar.
2. In the Connection Status dialog box, tap Disconnect.
Connecting by infraredYou can use the infrared port on the HP Jornada to connect to adesktop or notebook PC that is running Windows 95 (or later).Once connected, you can transfer files and synchronize data ande-mail messages just as if you had connected using the synccable.
Line up the IR ports on the two devices so that they are within20 centimeters (8 inches) of one another.
Before you can connect by infrared, you must set up andconfigure an infrared port on your desktop or notebook PC. Manynotebook PCs have a built-in infrared port; however, you mayneed to install a third-party infrared transceiver on your desktopPC. For more information about installing and configuring thatdevice for use with your desktop PC, refer to the instructions thatcame with your infrared port.
The Desktop Software for Microsoft Windows CE compact diskalso includes infrared device drivers for Windows 95.
To configure Windows CE Services for infraredconnection
1. Insert the Desktop Software for Microsoft Windows CEcompact disk into the CD-ROM drive on your desktopPC, and then run Setup.exe.
2. Click Optional Components, and then select theWindows 95 Communications Driver setup program.

48 Hewlett-Packard Jornada 420 Palm-size PC
3. When the setup program prompts you to specify acommunications port, select a virtual port (typicallyCOM3).
4. When setup is complete, restart your desktop PC, andthen open the Mobile Devices window.
5. In the Mobile Devices window, click Communicationson the File menu.
6. Under Port, select the infrared port you installed whenyou set up the infrared device.
–or–
Click New to install the port. (If you install a new port,you may need to reinstall Windows CE Services.)
To configure the HP Jornada for infraredconnection
1. On the HP Jornada Start menu, tap Settings, then tapCommunications.
2. Tap the PC Connection tab. If the control panel doesnot show Connect using Infrared Port, tap ChangeConnection, and then select Infrared Port from thelist of available connections.
To establish an infrared connection
1. Line up the infrared port on the HP Jornada with theinfrared device on your notebook or desktop PC.
2. On the HP Jornada Start menu, tap Programs, tapCommunications, and then tap PC Link.
Connecting to another PCIn some cases, you may need to connect the HP Jornada to adesktop PC other than your partner. Or, there may be timeswhen your desktop PC does not recognize the HP Jornada as itspartner. This occurs if you have logged on to the desktop PC witha different user name or if you performed a full reset of the HPJornada by removing all power or allowing the batteries to die.
In these cases, when you connect the HP Jornada to a PC, theNew Mobile Device Detected dialog box appears, offering you the

Chapter 4 | Connecting to a desktop PC | 49
option to Synchronize, Browse, or to Restore data from anexisting backup file.
If you choose Synchronize, the New Partnership Wizard begins,and the HP Jornada is designated as a partner of the desktopPC.
If you choose Browse, the HP Jornada is connected as a “guest.”As a guest, you can view files and folders on the HP Jornada,transfer files and folders, and manually back up or restore.However, you cannot synchronize data or automatically back upand restore data.
If you choose Restore, you are given the option to restore datafrom an existing backup file on the desktop PC. Restoring data inthis way replaces all existing data on the HP Jornada with thedata in the backup file on your PC.
If you have lost the HP Jornada or replaced it with another HPJornada, you can set up the new P/PC with the same data andsettings as the old one, if you previously performed a fullbackup using Windows CE Services or HP backup.
If you used Windows CE Services to back up your data, thenwhen you connect the new P/PC to your desktop PC for thefirst time, choose Restore rather than Synchronize or Browse.If you backed up the P/PC using HP backup, then restore theinformation as described in “Using HP backup” on page 84.
Browsing the HP Jornada desktopWhile the HP Jornada is connected to a desktop PC, you can useWindows CE Services to browse the contents of the HP Jornadafrom your desktop.
To browse the HP Jornada desktop
1. Double-click the HP Jornada icon in the Mobile Deviceswindow on your desktop PC. The contents are displayedas any other folder on your desktop PC.
You can cut, paste, and copy files between folders on the P/PC, ortransfer files between the P/PC and your desktop PC, simply bydragging the file icons between the appropriate folders.

50 Hewlett-Packard Jornada 420 Palm-size PC
For more information about transferring files, see“Transferring files” on page 54.
You cannot open files or start programs stored on the P/PC bydouble-clicking their icons in the Mobile Devices window. Whenyou double-click the icon for a file or program that is stored onthe P/PC, Windows CE Services displays the properties for thatfile or program, as if you had clicked Properties on the Filemenu.
Synchronizing dataWindows CE Services with ActiveSync enables you tosynchronize data between the HP Jornada and desktop PC, sothe names you add to your Contacts database and theappointments you add to your Calendar while traveling can beautomatically updated on your desktop PC when you return. Youcan also synchronize messages in the HP Jornada Inbox withMicrosoft Outlook or Microsoft Exchange on your desktop PC,and download channels.
You can set ActiveSync either to synchronize automatically eachtime you connect the HP Jornada to your desktop PC, or tosynchronize continuously whenever the synchronizedinformation changes, for as long as the computers are connected.You can also synchronize at any moment by choosingSynchronize Now from the Tools menu in the Mobile Deviceswindow.
Synchronizing selected dataYou can choose some or all of the following items to besynchronized:
· Calendar, Contacts, or Tasks information—Exchange andupdate information on the HP Jornada with informationstored in Outlook or Schedule+ on your desktop PC.
· E-mail messages—Share messages between selected folders inthe HP Jornada Inbox and Exchange or Outlook on yourdesktop PC. For information on Inbox, see “Using Inbox” onpage 61.

Chapter 4 | Connecting to a desktop PC | 51
· Channels—Download Internet, intranet, or other Web-formatted content to the P/PC. For information on channels,see “Using channels” on page 52.
All files you create on your P/PC, such as Voice Recorder andNote Taker files, are stored in a My Documents folder. You cansee these files by double-clicking your P/PC icon in the MobileDevices window on your desktop computer.
When Note Taker files are copied to the desktop computer, theyare converted to .doc files and can be opened in Microsoft Word.When Microsoft Word (.doc) files are copied to the P/PC, theymust be converted manually to Note Taker (.pwi) files in order tobe opened in Note Taker.
To convert .doc files to .pwi files
1. In the Mobile Devices window on your desktop PC, go tothe Tools menu, and then select File Conversion.
2. Select the Desktop to Device tab, and selectMicrosoft Word Document from the list.
3. Click Edit, and in the Convert to mobile device fileof the type drop-down list, select the Note Taker (*.pwi)format.
4. Click OK to exit. For more information, see Windows CEServices Help.
Voice Recorder files remain .wav files on both your P/PC anddesktop computer. Synchronization gives you a handy way tomove your Voice Recorder files to your desktop computer. Aspecial playback codec, provided with the Windows CE Servicesinstallation, is needed to play P/PC .wav files recorded in MobileVoice format on your desktop computer. PCM files can be playedon any desktop PC.
To specify data to synchronize
1. On your desktop PC, open the Mobile Devices window,and then select the P/PC icon.
2. On the Tools menu, click ActiveSync Options.
3. On the General tab of the ActiveSync Options dialogbox, select the check boxes beside the services you wantto synchronize.
52 Hewlett-Packard Jornada 420 Palm-size PC
4. To set specific options (for example, to indicate howmany weeks of Calendar data to synchronize, or tosynchronize only active tasks), select the appropriateservice, and then click Options.
Speed up the synchronization process by synchronizingregularly. If you use Microsoft Outlook, Windows CE Servicessynchronizes only 2 weeks of calendar data by default.
Resolving synchronization conflictsIf the same item (for example, an appointment or a task) hasbeen modified on both the desktop PC and on the HP Jornada,ActiveSync indicates that a synchronization conflict has occurred.When the Resolve Conflicts dialog box appears, you can eitherresolve the conflict by selecting one of the items to replace or youcan ignore the conflict.
You can resolve each conflict manually, at the time ofsynchronization, or you can resolve conflicts automatically bysetting a default option for conflict resolution.
To set a default option for conflict resolution
1. Open the Mobile Devices window, and then select theP/PC icon.
2. On the Tools menu, click ActiveSync Options.
3. On the General tab of the ActiveSync Options dialogbox, click Advanced.
4. Select the option you prefer to resolve conflicts.
Using channelsA channel is a Web site or other Web-formatted content that isavailable for offline viewing on your P/PC. Channels allowsInternet, intranet, or other Web-formatted content to beautomatically downloaded to your P/PC from your desktopcomputer via synchronization.
Content can be updated on a regular basis, such as updates froma news channel, or on a one-time basis, such as movie listingsfrom an entertainment channel.

Chapter 4 | Connecting to a desktop PC | 53
Channels and automatic updates to them are managed on thedesktop computer by Internet Explorer 4.0. Use InternetExplorer 4.0 on your desktop computer to subscribe to MobileChannels.
A special Web site has been set up to help you get started usingChannels. For information on getting started with Channels onyour P/PC, go to http://www.microsoft.com/windowsce/channels/.
Personalizing channelsSome channels are divided into content areas. You can choosewhich content areas you want to download to your P/PC. InChannels, tap File, then Channels, and select the channels andcontent areas you want.
You can specify the amount of channel information that istransferred to your P/PC. Tap View, then Options. Channelinformation is stored on your P/PC, and new content replacesolder content.
To remove a channel and all of its content, tap File, thenChannels, and clear the channel that you want to remove.
Synchronizing channel informationChannel information can be synchronized as part of the generalsynchronization process described above. In the Mobile Deviceswindow of Windows CE Services, click Tools, ActiveSyncOptions, then select Channel Item.
During synchronization, channel information is copied to yourP/PC. It can be viewed either from Channels or on your ActiveDesktop as a mobile desktop component, depending on thechannel format you have subscribed to. See “Mobile desktopcomponents” later in this chapter for more information.
Viewing channel contentWhenever new content is available for one of your channels, yousee the Channel icon in the status area of the taskbar. Double-tap the icon to switch to Channels, or tap Start, then Channels.

54 Hewlett-Packard Jornada 420 Palm-size PC
To view channel content, tap an icon on the Channel bar, or tapthe Explore Channel button to quickly navigate to a channel orto a specific page within a channel.
Displaying mobile desktop componentsThe P/PC also includes an Active Desktop feature that candisplay specialized channel content for quick reference. Similarto Channels, content for mobile desktop components issynchronized with the desktop computer. For example, a contentprovider might create a mobile desktop component that updatesand displays key financial market indices during the day.
To display mobile desktop components on the Active Desktop, tapStart, Settings, Display, and then select the components youwant to display.
Transferring filesYou can copy files between the HP Jornada and desktop PC bydragging icons to or from the P/PC icon in the Mobile Deviceswindow on your desktop PC or by using the Cut, Copy, andPaste commands on the Edit menu.
PrintingIf you want hard copies of files on your P/PC, you must transferthem to your desktop PC for printing. You cannot print filesdirectly from the P/PC.

Chapter 5 | Sending and receiving e-mail | 55
5 | Sending andreceiving e-mail
With Inbox, you can keep in touch with your office, home, andclients by sending and receiving e-mail messages in any of theseways:
· synchronize messages with Microsoft Exchange or MicrosoftOutlook on your desktop computer
· transfer individual messages using Windows CE InboxTransfer
· send and receive messages using a dial-up connection to anISP or an Ethernet connection to your Corporate Network
Synchronizing messagesE-mail messages can be synchronized as part of the generalsynchronization process described in “Synchronizing data” onpage 50. During synchronization:
· Messages are copied from the Inbox folder of Exchange orOutlook on your desktop computer to the Inbox folder on yourP/PC. The messages on the two computers are linked, so whenyou delete a message on your P/PC, it is deleted from yourdesktop computer as well the next time you synchronize.
· Messages in the Outbox folder on your P/PC are transferred toExchange or Outlook, and then sent from those programs.
Features available on your desktop computer, such as schedulingmeetings and selective downloading of file attachments, are alsoavailable on your P/PC.
By default, e-mail synchronization is disabled. To enable e-mailsynchronization, in the Mobile Devices window on your desktopcomputer, click Tools, ActiveSync Options, select Message,and then click OK.

56 Hewlett-Packard Jornada 420 Palm-size PC
After you have enabled message synchronization, you can setmessage synchronization options by closing the dialog box andthen reopening it. Select Message and then click Options.
Using Windows CE Inbox TransferYou can use Windows CE Inbox Transfer to copy or move specificmessages between Exchange or Outlook and your P/PC, and youcan move them into folders other than the Inbox. The messageson the two computers are not linked. You can modify or deletemessages from one location without affecting the other.
You can also use this method to move messages to your desktopcomputer that you have received on your P/PC from otherservices, such as paging and faxing services.
To transfer messages, connect the P/PC to the desktop computer.In either Exchange or Outlook, click Tools, then Windows CEInbox Transfer, and then indicate what you want to do.

Chapter 5 | Sending and receiving e-mail | 57
Sending and receiving messages using a dial-
up connectionIf you want e-mail service, you need:
· a modem
· a PPP (Point-to-Point Protocol) or SLIP (Serial Line InternetProtocol) account to an Internet service provider (ISP)
· a dial-up connection set up on the HP Jornada
· access to a phone line

58 Hewlett-Packard Jornada 420 Palm-size PC
The following figure depicts how the connection is made.
Connecting to the Internet
Installing and configuring a modemThe HP Jornada 420 supports CompactFlash Card modems.Follow the manufacturer’s instructions included with theCompactFlash Card modem to install and configure it for usewith the HP Jornada.
Getting an account with an Internet service providerTo send and receive e-mail, you need to contact an ISP to set up aPPP account. SLIP accounts are offered by some ISPs instead ofPPP accounts. The HP Jornada supports the use of SLIP as wellas PPP.
Your ISP gives you the configuration information you need toconnect the HP Jornada to e-mail service:
· your account user name
· your account password
· phone number of your ISP’s modem
· IP and DNS addresses, if necessary
· your e-mail user name or ID (this may be the same as the username for your ISP account)
· your e-mail password (this may be the same as the passwordfor your ISP account)

Chapter 5 | Sending and receiving e-mail | 59
· the POP3 host name of your ISP
· the SMTP host name of your ISP (if required by your ISP)
Setting up a dial-up connection to your ISPAfter you have established an account with an ISP, you can setup a connection on the HP Jornada and send and receive e-mailwhenever you want.
To set up a dial-up connection
1. On the Start menu, tap Programs, tapCommunication, and then tap Connections.
2. In the Connections folder, double-tap Make NewConnection, and type a name for the connection.
3. In the Make New Connection dialog box, select Dial-Up Connection, and then tap Next.
4. Select the down-arrow button next to the Select amodem box, and highlight the name of your modem.
If you do not see your modem listed in the drop-downlist, your modem may not be properly connected to yourP/PC. Make sure that the modem is connected to yourP/PC properly, based on the installation instructionsthat came with the modem.
5. Tap Next and fill in the phone number you wish to dial.Tap Finish. A new icon appears with the name youspecified in the Connections folder. This connectionalso appears on the Start menu in the Connectionssubmenu.
Connecting to your ISPAfter you have configured your connection to your ISP, you areready to connect your phone line to your modem, and then dialin. Make sure you connect to the phone line supported by yourmodem, follow the instructions provided by the manufacturer.Most CompactFlash Card modems use analog phone lines.

60 Hewlett-Packard Jornada 420 Palm-size PC
To connect to your ISP
1. Plug your modem’s phone cord into a standard phonejack.
2. To use your new connection, double-tap the new icon inthe Connection folder (or select the new icon from theStart/Programs/Communication menu).
3. Fill in the requested information before you dial.
After you are connected to your ISP, use the Inbox program tosend and receive e-mail, as explained in “Using Inbox” on page61.
If you are unable to find an analog phone line, use the linededicated to a fax machine. Fax machines use only analoglines.
Setting up an Ethernet connectionThe HP Jornada can also connect to networks via Ethernet cards(CompactFlash Type II cards). Check the manufacturer’sinstallation instructions for information on how to set up theconnection.

Chapter 5 | Sending and receiving e-mail | 61
Using InboxIn Inbox on your P/PC, tap Compose, Options, the Servicestab, and then the Add button. A setup wizard walks you throughthe steps.
To download your messages from the server
1. Tap Service, and select the connection you want to use.
2. Tap Connect to start downloading.
The mail that you receive using a dial-up connection appears inthe Inbox folder on your P/PC, together with the mail yousynchronize with your desktop computer. Messages that youreceive remotely are linked to your mail server rather than yourdesktop computer.
You can work online, which means that you read and respond tomessages while connected to the server. Messages are sent assoon as you tap Send, which saves space on your P/PC.
You can also work offline. Once you have downloaded newmessage headers or partial messages, you can disconnect fromthe server and then decide which messages to downloadcompletely. The next time you connect, Inbox downloads thecomplete messages you have marked for retrieval and sends themessages you have composed (see “Receiving messages” fordetails).

62 Hewlett-Packard Jornada 420 Palm-size PC
Receiving messagesWhen you receive a message, double-tap it to open it.
When you connect to your Internet mail service, by default Inboxdownloads only the first 100 lines of each new message to theInbox folder. No mail attachments are downloaded. When yousynchronize with your desktop computer, only the first 50 lines ofeach new message are downloaded. The original messagesremain on the mail server or your desktop computer.
You can mark the messages that you want to retrieve in theirentirety the next time you synchronize or connect to your mailservice. Select the message, tap Service, and then tap RetrieveFull Copy. The icons in the Inbox message list give you visualindications of message status.

Chapter 5 | Sending and receiving e-mail | 63
You specify your downloading preferences when you set up theservice or select your synchronization options. You can changethem at any time.
To change Inbox delivery options for mail synchronization, in theMobile Devices window on your desktop computer, select yourP/PC icon, click Tools, and then click ActiveSync Options.Select Message and then click Options. (For the Optionsbutton to be available, you must have previously enabledmessage synchronization.)
To change Inbox delivery options for remote mail, in Inbox onyour P/PC, tap Service and then tap the service name. Then tapService again and tap Properties.
You need to download a full message before you can view itsattachments.
Microsoft Exchange users can use Inbox to schedule meetingsremotely. Your network administrator must enable Microsoftrich text support for any accounts that are accessed by mobiledevice users.
To process meeting requests, you need to download the completemessage, either by marking specific messages for downloading orby choosing to download all messages completely during theservice setup. In addition, make sure to enable the Meetingrequests option during the service setup.

64 Hewlett-Packard Jornada 420 Palm-size PC
Sending messagesTo compose a new message, tap the New Message button on thetoolbar. You can enter an e-mail address in the To box, or youcan select a name from the Address Book. All e-mail addressesentered in the e-mail fields in Contacts appear in the AddressBook.
To send your message, tap File and then Send. Messages areplaced in your Outbox folder on your P/PC and are delivered totheir destination in one of two ways.
They are transferred to the Outbox folder in Exchange or Outlookon your desktop computer the next time you synchronize.
They are transmitted to your mail server the next time youconnect remotely. In Inbox, make sure the appropriate service isselected on the Service menu. Then tap Connect.

Chapter 5 | Sending and receiving e-mail | 65
Sending and receiving CompuServe e-mailIf you are a member of CompuServe, you can use Inbox to receiveyour CompuServe e-mail on the HP Jornada. To do this, you needto
· Use the Web browser and Internet account on your desktopPC (partner) to go to the CompuServe Web site atwww.csi.com/communications.
· Follow the instructions that are provided at that site forcreating a POP3 mailbox. Be sure to choose a mailboxpassword that the HP Jornada can support (that is, cleartext).
· Create a connection on the HP Jornada, as described in“Setting up a dial-up connection to your ISP” on page 59. Youhave all the account information you need when you finishcreating your POP3 mailbox at the CompuServe site.
· Set up (and name) the Inbox mail service connection. See“Using Inbox” on page 61.
After you have completed these initial setup procedures, you areable to send and receive your CompuServe e-mail just as youwould with any other Internet e-mail account.

66 Hewlett-Packard Jornada 420 Palm-size PC

Chapter 6 | Staying Organized | 67
6 | Staying Organized
The Hewlett-Packard Jornada 420 comes with programsdesigned to help you stay organized. You can manage yourcontacts, tasks, and calendar while you are away from youroffice. When you return, you can synchronize the HP Jornadawith your desktop or notebook PC to ensure that the databaseson the HP Jornada are always up to date with the MicrosoftOutlook or Schedule+ data on your desktop.
You can also set alarms and reminders so you never forget anappointment or meeting, and you can record voice memos toyourself with Microsoft Voice Recorder. This chapter containsinformation about and basic procedures for:
· Calendar
· Contacts
· Tasks
· Voice Recorder
Calendar, Contacts, and Tasks have a card view and a list view.Card view allows you to enter or view the details for each entry.List view allows you to view all entries.
You can switch to these programs at any time by tapping themon the Start menu.
More information on the procedures described in this chapter,as well as information on additional procedures, can be foundin online Help on the P/PC. Tap Start, Help, and then theitem you want information on.

68 Hewlett-Packard Jornada 420 Palm-size PC
Scheduling meetings and appointmentsUse Calendar to schedule appointments, meetings, and otherevents. Check your appointments in one of several views (Day,Week, Month, Year, and Agenda). Switch among the views bytapping the corresponding command bar button.
You can display today’s appointments on your Active Desktop.Tap Start, Settings, Display, Display Active Desktop, andthen select Appointments.
Enter the details for an appointment on the appointment card.
You can quickly display a new appointment card by double-tapping the Calendar hard icon.

Chapter 6 | Staying Organized | 69
If you need to schedule a meeting with people who use Outlook,Pocket Outlook, or Schedule+, you can use Calendar to schedulethe meeting. When attendees receive a meeting request, they canaccept or decline the meeting. If they accept, the meeting isautomatically added to their schedule. In addition, their responseis automatically sent back to you, and your calendar is updated.
Before you can send a meeting request, you need to enter e-mailaddresses in Contacts and set up Inbox to send and receivemessages. For information on using Contacts and Inbox, see“Tracking friends and colleagues” on page 70, and “Using Inbox”on page 61.
To create a meeting request
1. Tap Tools, Options, and then select a mail transport. Ifyou send and receive messages using synchronization,select Windows CE Inbox Services. If you connect toan ISP or network, select the service you set up in Inbox.
2. Tap File and then Make Meeting.
3. Enter the meeting information.
4. Select the contacts you want to invite.
5. Select other desired options and then OK.

70 Hewlett-Packard Jornada 420 Palm-size PC
Inbox automatically creates a meeting request and sends it to theattendees the next time you connect to your mail server orsynchronize with your desktop computer.
Your P/PC reminds you about your appointments andmeetings by sounding an alarm, flashing the notification light,or displaying a message on the screen. To change how your arenotified, tap Tools and then Options. Tap the Alarm buttonand then Reminder Options.
Tracking friends and colleaguesContacts maintains a list of your friends and colleagues so thatyou can easily find the information you are looking for, whetherat home or on the road. Using the P/PC IR port, you can alsoquickly share Contacts information with other Windows CE-based mobile device users.
You can quickly create a contact card by double-tapping theContacts hard icon.
Enter the details for a contact on the contact card. You can enterboth business and personal information.
To change the type of information that appears in your list,tap Tools and then Customize Columns.

Chapter 6 | Staying Organized | 71
Keeping a to-do listUse Tasks to keep track of what you have to do. Overdue tasksare displayed in red.
Enter the details for a task on the task card. You can assign atask to a category, and if you associate a date with a task, youcan set a reminder for it.

72 Hewlett-Packard Jornada 420 Palm-size PC
All active tasks (tasks that have a start date before the currentdate and are not marked completed) are displayed in the ActiveTasks box in the Agenda view of Calendar.
Display your active tasks on the Active Desktop. For moreinformation, see “Using the Active Desktop” on page 23.
Recording voice memosQuickly capture thoughts and reminders, ideas, and phonenumbers with Voice Recorder. Use it in the way that is mostconvenient for you: using the hardware buttons on your P/PC orusing the buttons on your screen.
You can use the buttons on your P/PC to record and playrecordings one-handed.
Making a recordingTo Do this
Record Press and hold the Record button.You hear one beep when it is readyto record.
Stop recording Release the Record button. Youhear two beeps when recordingstops.

Chapter 6 | Staying Organized | 73
Playing a recordingTo Do this
Play Press the Action button.
Pause/resume Press the Action button.
Stop Press the Exit button (returns tothe beginning of the recording).
Play all Press the Action button twice(plays all messages in the list).
NavigatingTo Do this
Fast-forward, whileplaying
Press and hold the Action button inthe down position.
Rewind, while playing Press and hold the Action button inthe up position.
Scroll through the listof recordings
Press the Action button up or downand then quickly release.
Using the screen buttonsInstead of using the P/PC buttons, you can tap the buttons onyour screen to record and play your recordings. A progress barand a status bar provide visual indications of the process.
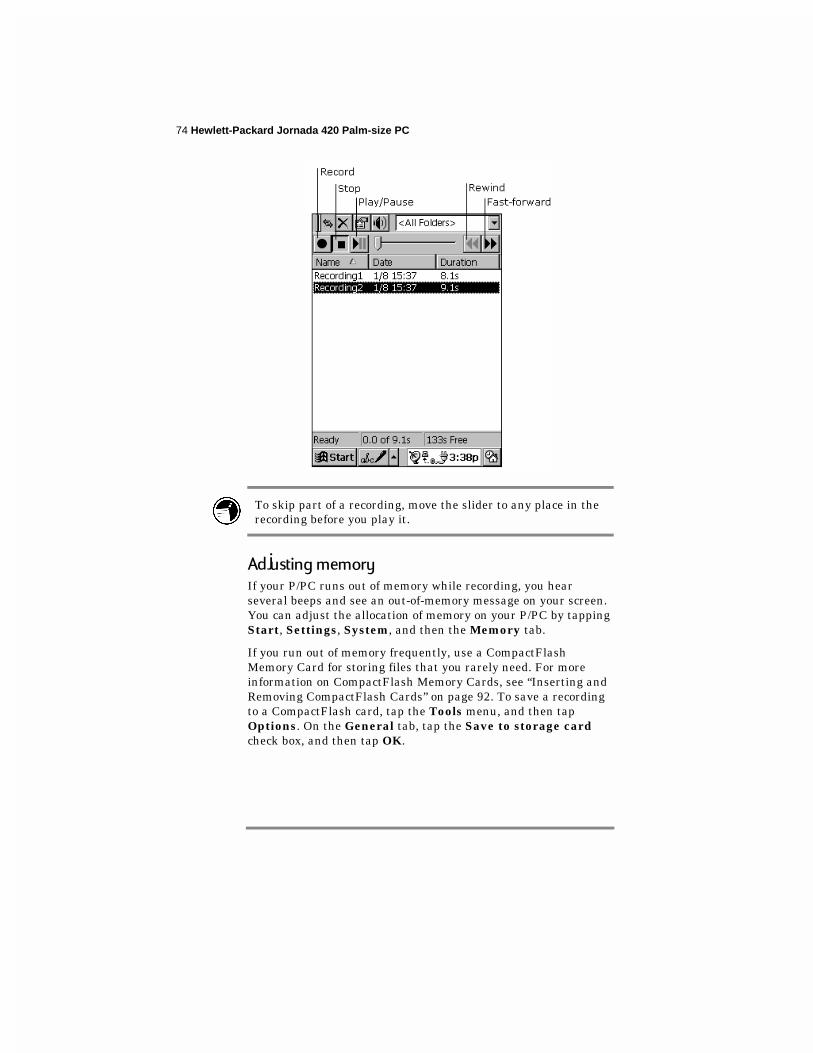
74 Hewlett-Packard Jornada 420 Palm-size PC
To skip part of a recording, move the slider to any place in therecording before you play it.
Adjusting memoryIf your P/PC runs out of memory while recording, you hearseveral beeps and see an out-of-memory message on your screen.You can adjust the allocation of memory on your P/PC by tappingStart, Settings, System, and then the Memory tab.
If you run out of memory frequently, use a CompactFlashMemory Card for storing files that you rarely need. For moreinformation on CompactFlash Memory Cards, see “Inserting andRemoving CompactFlash Cards” on page 92. To save a recordingto a CompactFlash card, tap the Tools menu, and then tapOptions. On the General tab, tap the Save to storage cardcheck box, and then tap OK.

Chapter 6 | Staying Organized | 75
Voice Recorder uses approximately 300 bytes per second forrecording, using the Mobile Voice format. For example, a 10-second note uses approximately 3K.
Choosing a recording formatVoice Recorder uses a codec called Mobile Voice to compress files,making them 25 times smaller than the original size. Thisenables you to store more recordings, although the sound qualityis less than optimal. For the best sound quality, use the PCMformat. These files are larger than those stored in Mobile Voiceformat. To switch formats, tap Tools and then RecordingFormat.
Your recordings are saved as .wav files, which you can transfer toyour desktop computer for playback, editing, and archiving. Youneed desktop software that can play .wav files, and you need thesame codec used to make the recording. You can get the MobileVoice codec by installing Windows CE Services (see“Understanding Windows CE Services” on page 39) or go to thefollowing Web site: http://www.microsoft.com/windowsce/info/.
If you want to email your recording from your P/PC, use thePCM file format.
Organizing recordingsYour recordings are saved automatically and given the namesRecording1, Recording2, and so on, by default. Theserecordings are listed in the Voice Recorder window.
To quickly rename a recording
1. Tap the recording to select it.
2. Tap it again, and then enter the new name.
You can organize your recordings by renaming them and placingthem in folders. For example, you can create a folder called MyNovel and place all relevant recordings in that folder.
If you display recordings for a particular folder in the VoiceRecorder window, any new recordings you make while that folderis selected are placed in that folder. They are given the folder

76 Hewlett-Packard Jornada 420 Palm-size PC
name and an incremental number (My Novel1, My Novel2, andso on).

Chapter 7 | Getting down to business | 77
7 | Getting down tobusiness
The Hewlett-Packard Jornada 420 can help you stay productiveand be efficient, even when you are away from your desktop ornotebook PC. You have access to pre-installed programs to helpyou calculate expenses and conduct searches.
This chapter contains information about:
· Microsoft Note Taker
· bTASK from BSQUARE
· OmniSolve from LandWare
· HP backup
· Customizing the HP Jornada
Creating notes and drawingsNote Taker with Rich Ink technology makes it easy to write,draw, and make lists quickly, the way you are used to writing onpaper¾but even better, because you can edit and format whatyou have written or drawn.
To use Note Taker, tap Start, then Note Taker.
You can create a new note by tapping the New button, or you cantap the New arrow and tap a template to start with a note inwhich the formatting and structure are already in place.
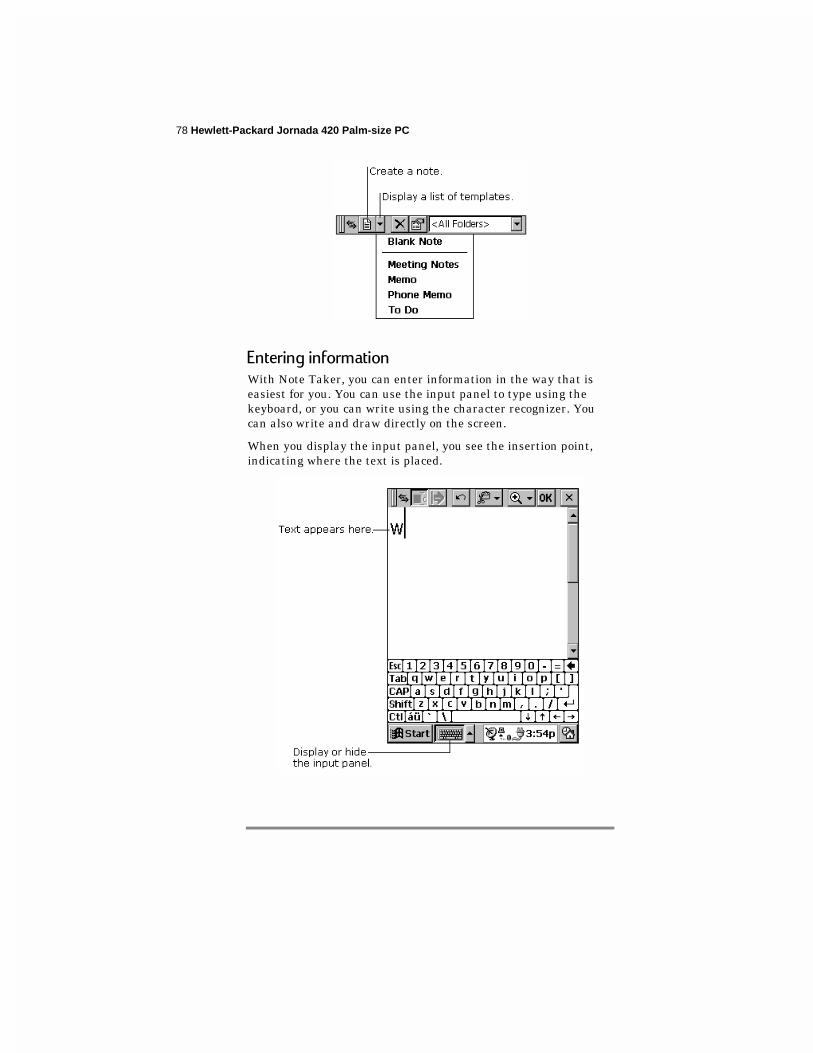
78 Hewlett-Packard Jornada 420 Palm-size PC
Entering informationWith Note Taker, you can enter information in the way that iseasiest for you. You can use the input panel to type using thekeyboard, or you can write using the character recognizer. Youcan also write and draw directly on the screen.
When you display the input panel, you see the insertion point,indicating where the text is placed.

Chapter 7 | Getting down to business | 79
When you hide the input panel, the insertion point disappears,and you can write or draw anywhere on the screen.
Writing and drawingYou can use your stylus to write and draw directly on the screen.
To create a drawing, on your first stroke, cross three ruled lines.A drawing box appears. Subsequent strokes in or outside theborder of the drawing box become part of the drawing.
You might want to switch to full-screen display so that you cansee as much as possible on the screen. Tap View, then FullScreen. Tap Restore to see the command bar again.
Editing and formatting a noteYou can edit text you have entered using a keyboard or characterrecognizer. You can also edit handwritten notes and drawings. Toselect the text or picture you want to edit, hide the input panel,tap the Select button, and drag your stylus over the text ordrawing.
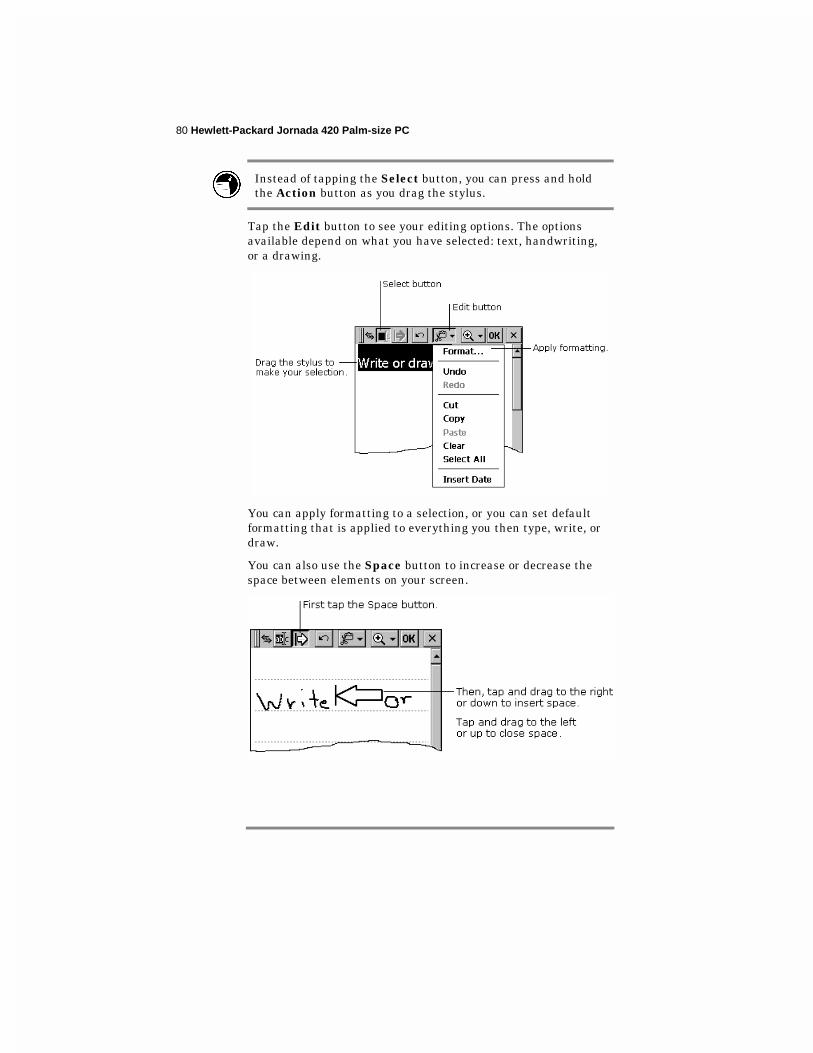
80 Hewlett-Packard Jornada 420 Palm-size PC
Instead of tapping the Select button, you can press and holdthe Action button as you drag the stylus.
Tap the Edit button to see your editing options. The optionsavailable depend on what you have selected: text, handwriting,or a drawing.
You can apply formatting to a selection, or you can set defaultformatting that is applied to everything you then type, write, ordraw.
You can also use the Space button to increase or decrease thespace between elements on your screen.

Chapter 7 | Getting down to business | 81
Instead of tapping the Space button, you can insert andremove space by pressing and holding the Exit button as youdrag the stylus.
Saving your notesWhen you have finished a note, tap OK to save it and return toyour list of notes. Note Taker automatically names your note asfollows.
The first 21 characters of the first line of typed text are used asthe note name.
If no text is included in the note, but the note has been assignedto a folder, the notes are given the folder name and anincremental number (Tradeshow1, Tradeshow2, and so on).
If no text is included and no folder is assigned, the notes arenamed Note1, Note2, etc.
To name a note yourself, to place it in a folder, or to change thefile format, tap File and then Save As.
Each note in Note Taker is a file. Note Taker files are saved inNote Taker (.pwi) format, which synchronizes with MicrosoftWord files, as described in Chapter 6. You have two additionalchoices for file formats:
To import the file into a program that supports rich text, save thenote in Rich text format (.rtf). Handwritten words anddrawings are lost.
To import the file into a program that does not support rich text,save the note as a Text only note (.txt). Handwritten words anddrawings, and all formatting, are lost.

82 Hewlett-Packard Jornada 420 Palm-size PC
Organizing your notesYou can keep track of your notes by renaming them and placingthem in folders. For example, you can create a folder called MyNovel and place all relevant notes in that folder. All the notes inthe selected folder appear in the list view.
Using bTaskUse bTask to switch between applications, view the applicationscurrently running, or close applications with a single step.
Tasks are closed automatically when memory is running low.
To start bTask
1. From the Start menu, tap Programs, and then tapbTask. The bTask icon is added to the taskbar.
To switch between open applications
1. Tap the bTask icon on the taskbar.
2. Tap the application to which you want to switch.
To close the active application or all openapplications
1. Tap the bTask icon on the taskbar.
2. Tap Close Active or Close All.

Chapter 7 | Getting down to business | 83
To close bTask
1. Tap the bTask icon on the taskbar.
2. Tap Exit.
Using OmniSolveOmniSolve is a financial application designed specifically for realestate, retail, and business professionals who use P/PCs to makefinancial decisions quickly and accurately. OmniSolve employs a“form filling” metaphor to give you a problem-solvingenvironment that is easy, powerful, and flexible.
To start OmniSolve
1. From the Start menu, tap Programs, and then tapOmniSolve.
For detailed procedures about using OmniSolve, refer to onlineHelp.
Backing up and restoring dataTo prevent loss of data, you should back up the HP Jornada datafrequently. You can back up the HP Jornada two convenientways:
· Use Windows CE Services to back up all data to your desktopPC.
· Use the HP backup application to back up all data or onlyCalendar, Task, and Contact (PIM) databases to internalmemory or a CompactFlash Card.
Using Windows CE Services Backup at your PCThe Windows CE Services Backup feature creates a completeduplicate of all data stored on the HP Jornada. If you routinelyconnect to your desktop PC, this is the best method of databackup. The backup file is saved on the hard disk of your desktopPC.
When you restore data from a backup file created byWindows CE Services, all data on the HP Jornada is replaced by

84 Hewlett-Packard Jornada 420 Palm-size PC
the data in the backup file, including files you have created,programs you have installed, and any system settings andoptions you have set.
To access the Windows CE Services Backup feature, clickBackup/Restore on the Tools menu in the Mobile Deviceswindow.
Using HP backupHP backup provides a convenient way to back up data while youare traveling or while you are away from your desktop PC. Youcan back up the information to a CompactFlash Card for securestorage. You can also back up data to a folder on the HP Jornada.However, this does not preserve the information if you lose poweror need to perform a full reset.
The backup file (.dbe or .dbb) is always placed in the MyDocuments directory. When saving to a CompactFlash Card, aMy Documents directory is automatically created.
To back up data
1. On the Start menu, tap Settings, and tap HP backup.

Chapter 7 | Getting down to business | 85
2. Tap Backup, and then choose one of the backup options:
· Select Backup all data to back up all informationstored in RAM, including files you have created,programs you have installed, and any systemsettings and options you have set.
· Select Backup PIM databases to back up onlyyour Contacts, Tasks, and Calendar databases.
3. Follow the instructions on your screen to complete thebackup process.
To restore from a backup file
1. On the Start menu, tap Settings, and tap HP backup.
2. Tap Restore.
3. Tap either Restore all data or Restore PIMdatabases.
4. Select the backup file you want to restore, and then tapOK.

86 Hewlett-Packard Jornada 420 Palm-size PC
The HP Jornada must have the same regional settings whenyou restore as you had when you completed the backup.Otherwise, you cannot restore the files. To change regionalsettings, on the Start menu, tap Settings, and then tapRegional Settings.
Customizing the HP JornadaThis section describes ways you can add software and accessoriesto the HP Jornada.
Finding third-party softwareYou can add more capabilities to the HP Jornada by installingthird-party software. A variety of commercial software isavailable for Windows CE, including custom businessapplications, system utilities, and games.

Chapter 7 | Getting down to business | 87
You can get these programs from:
· the HP Jornada compact disk and the Desktop Software forMicrosoft Windows CE compact disk included with theHP Jornada
· software distributors and their web sites, including the HPweb site at www.hp.com/jornada/solutions/solution.html
You cannot run programs designed for Windows 95 orWindows NT on the HP Jornada. The programs that run onthe P/PC must be designed specifically for Windows CE Palm-size PCs.
Contents of the HP Jornada compact disk
The HP Jornada compact disk includes the following programs:
· Outside In from Inso—View Microsoft Word files (withgraphics) from your P/PC.
· Quicken ExpensAble from On-The-Go Software—Createexpense reports while on the road.
· PhoneManager 2.0 from Trio—Send and receive SMSmessages via GSM phone, and manage the handphonedirectory from P/PC.
· PIM Translation Utility from Hewlett-Packard—TranslateAppointments and Phone Book data from older HP electronicorganizers for use in your HP Jornada.
Explore the HP Jornada compact disk to enjoy these freeprograms. For more information about a particular program, goto the program manufacturer’s website.
Minimum PC requirements for HP Jornada compact disk
The minimum PC requirements for the HP Jornada compact diskare as follows:
· Microsoft Windows 95, Windows 98, or Windows NT 4.0
· 486 66MHz or faster processor
· 2x or faster CD-ROM drive

88 Hewlett-Packard Jornada 420 Palm-size PC
· VGA (640 x 480) 256-color monitor
· Web browser: Netscape Navigator 2.0 or higher, or MicrosoftInternet Explorer 2.0 or higher.
To install a program
1. Download the software program or installer from theWeb to your desktop PC.
–or–
Insert the floppy disk or compact disk into theappropriate drive on your desktop PC.
2. Connect the HP Jornada to your desktop PC.
3. If the program includes an installer program (typicallynamed Setup.exe or Install.exe), double-tap the installerprogram on the desktop PC. The installer programcopies the necessary files to the HP Jornada.
–or–
If the program does not have an associated installer orsetup program, drag the program file (typically an *.exefile type) to the HP Jornada icon in the Mobile Deviceswindow. If the No Converter Selected dialog boxappears, tap OK to copy the file without conversion.
Install software by dragging the program file to the MobileDevices window only if no installer program is available.Software installed in this way may not appear on the RemovePrograms list, and you may have to delete the programmanually if you wish to remove it from the HP Jornada.
To add programs with Application Manager
1. Connect the HP Jornada to your desktop PC, and thenopen the Mobile Devices window.
2. On the Tools menu in the Mobile Devices window, clickApplication Manager.
3. In the list of programs, select the program you wish toinstall, and then click Add.

Chapter 7 | Getting down to business | 89
Removing programsAfter you have installed a program on the HP Jornada, you canuse the Windows CE Application Manager to remove theprogram or to reinstall the program after it has been removed. Ifyou do not have enough storage memory on the HP Jornada, youmay want to use the Application Manager to temporarily removeprograms you no longer use or programs that you useinfrequently.
You can use either the Application Manager (on your desktopPC) or the Remove Programs control panel (on theHP Jornada) to remove programs.
To remove programs with Application Manager
1. Connect the HP Jornada to your desktop PC, and thenopen the Mobile Devices window.
2. On the Tools menu in the Mobile Devices window, clickApplication Manager.
3. In the list of programs, select the program you want todelete, and then click Remove.
To remove programs from the HP Jornada withthe Remove Programs control panel
1. On the Start menu, tap Settings, and then tapRemove Programs.
2. From the Programs list, select the program you want toremove.
3. Tap Remove.
Programs stored in ROM cannot be removed. (For a list ofthese programs see “Using HP Jornada’s built-in programs” onpage 3.)

90 Hewlett-Packard Jornada 420 Palm-size PC
Adding soundsThe HP Jornada plays sounds (.wav files). You can copy a newsound file from your desktop PC to the HP Jornada withoutconverting the file.
To add sounds
1. Connect the HP Jornada to a desktop PC and startWindows CE Services.
2. Double-click the HP Jornada icon.
3. Drag the .wav file you want to copy from its location onyour desktop PC to the Windows folder in the MobileDevices window.
To use the new sound
1. On the HP Jornada Start menu, tap Settings, and thentap Volume & Sounds.
2. Tap the Sounds tab.
3. Choose an event name from the first dropdown list.
4. Choose the new sound from the second dropdown list.
5. Tap OK.
Adding desktop wallpaperThe HP Jornada can display Windows CE bitmaps (.2bp files).You can copy Windows CE bitmap images from your desktop PCto the HP Jornada without converting the files, and you can usethese images as desktop wallpaper on your Windows CE desktop.
To add desktop wallpaper
1. Connect the HP Jornada to a desktop PC and startWindows CE Services.
2. Double-click the HP Jornada icon.
3. Drag the bitmap image you want to copy from itslocation on your desktop PC to the Windows folder in theMobile Devices window.
Chapter 7 | Getting down to business | 91
To use the new wallpaper
1. On the HP Jornada Start menu, tap Settings, and thentap Display.
2. Choose the Display wallpaper radio button.
3. Choose the new bitmap image from the Wallpaperimage dropdown list, and examine the preview imageon the right side of the dialog box.
4. If desired, tap the Tile checkbox.
5. Tap OK.
Adding accessoriesYou can purchase the following optional accessories.
· CompactFlash Card and adapter (4MB) (F1231A)—Addsstorage memory.
· CompactFlash Card and adapter (10MB) (F1233A)—Addsstorage memory.
· Sync Cable (F1258A)
· External keyboard (F1275A)
· Battery Pack (F1287A)
· Pens (F1288A)
· Cradle (F1289A)
· AC Adapter (F1290A)
· External charger (F1293A)
Go to the Hewlett-Packard website at www.hp.com/jornada tocheck for new accessories.

92 Hewlett-Packard Jornada 420 Palm-size PC
Inserting and Removing CompactFlash CardsCompactFlash Type I and II Cards give the HP Jornadaadditional capabilities, such as additional memory, removablestorage, cellular modems, and Ethernet cards. Many cards havebeen tested specifically for compatibility with the HP Jornada.For a list of recommended compatible devices, go to the Hewlett-Packard Web site at www.hp.com/jornada.
You may also need to install a software driver for a particularcard. The software drivers for Windows CE should be includedwith the card or be available from the card manufacturer.
To insert the CF card
1. Turn off the P/PC, and close the display cover.
2. Remove the CF card slot door by pressing onto thefingernail recess and pulling the door off.
3. Connect the P/PC to AC power by mounting it into thecradle.
4. Push the card, connector-side first, into the slot until itstops. The P/PC turns back on.
5. Replace the card slot door by positioning the two tabs inthe slot groove and pressing onto the fingernail recess topush the door locked.
View showing how to insert a CF card

Chapter 7 | Getting down to business | 93
To remove the CF card
1. Close all applications on the P/PC that have open fileson the CF card.
2. Turn off the P/PC, and close the display cover.
3. Remove the CF card slot door by pressing onto thefingernail recess and pulling the door off.
4. Use the end of the stylus to lever the CF card out.
5. Replace the card slot door by positioning the two tabs inthe slot groove and pressing onto the fingernail recess topush the door locked.

94 Hewlett-Packard Jornada 420 Palm-size PC

Chapter 8 | Troubleshooting | 95
8 | Troubleshooting
If you encounter difficulties while using your HP Jornada 420,this chapter helps you find answers. If you need informationabout troubleshooting Microsoft® Windows® CE Services, clickWindows CE Services Help Topics on the Help menu in theMobile Devices window on your desktop PC.
The information in this chapter helps you:
· Troubleshoot basic problems
· Troubleshoot problems with remote connections
· Troubleshoot problems with the display
· Troubleshoot problems connecting by infrared
Troubleshooting basic problemsIf you have a specific problem, review the information below tosee if you can find the answer quickly. Or, go to the HP JornadaWeb site at www.hp.com/jornada for current information aboutcommon difficulties.
Problem Diagnosis / Remedy
HP Jornada does notturn on when notconnected to AC power.
Battery power is too low to run theP/PC. Connect to AC power, andthen turn on your HP Jornada.(Charge the battery regularly toavoid running out of batterypower.)
Battery runs out ofpower quickly.
You are using your HP Jornada inways that drain the batteriesquickly. See “Managing batterypower” on page 16.
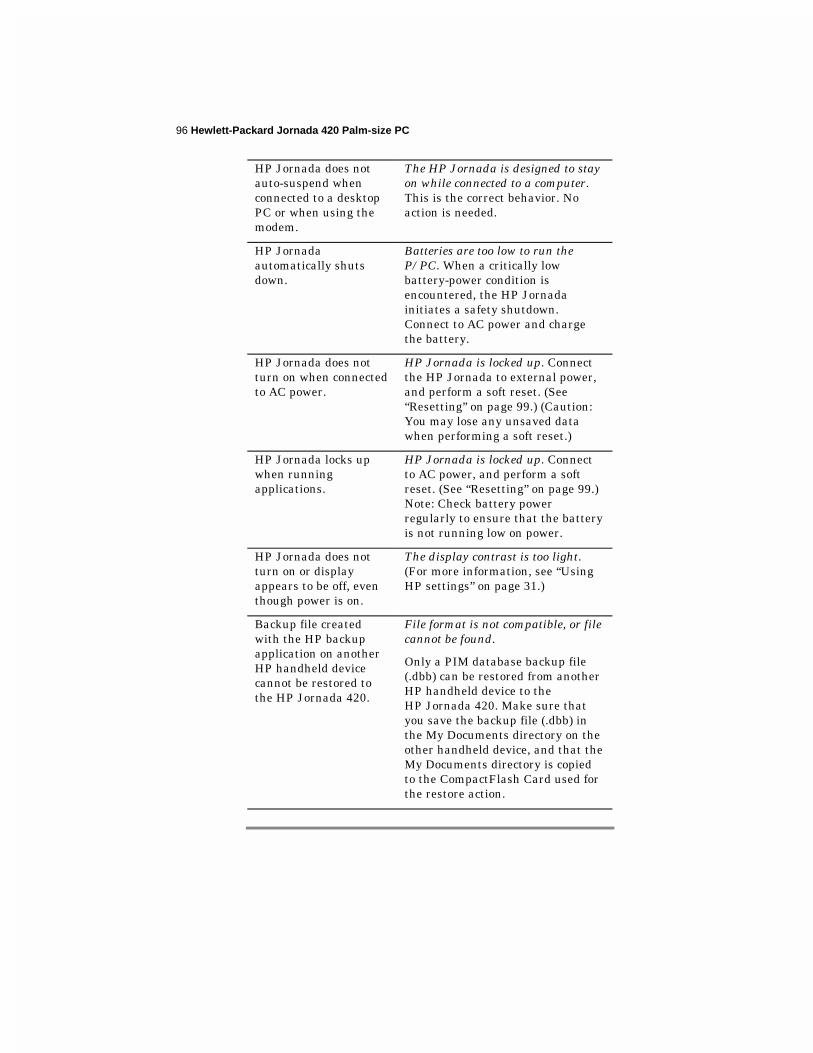
96 Hewlett-Packard Jornada 420 Palm-size PC
HP Jornada does notauto-suspend whenconnected to a desktopPC or when using themodem.
The HP Jornada is designed to stayon while connected to a computer.This is the correct behavior. Noaction is needed.
HP Jornadaautomatically shutsdown.
Batteries are too low to run theP/PC. When a critically lowbattery-power condition isencountered, the HP Jornadainitiates a safety shutdown.Connect to AC power and chargethe battery.
HP Jornada does notturn on when connectedto AC power.
HP Jornada is locked up. Connectthe HP Jornada to external power,and perform a soft reset. (See“Resetting” on page 99.) (Caution:You may lose any unsaved datawhen performing a soft reset.)
HP Jornada locks upwhen runningapplications.
HP Jornada is locked up. Connectto AC power, and perform a softreset. (See “Resetting” on page 99.)Note: Check battery powerregularly to ensure that the batteryis not running low on power.
HP Jornada does notturn on or displayappears to be off, eventhough power is on.
The display contrast is too light.(For more information, see “UsingHP settings” on page 31.)
Backup file createdwith the HP backupapplication on anotherHP handheld devicecannot be restored tothe HP Jornada 420.
File format is not compatible, or filecannot be found.
Only a PIM database backup file(.dbb) can be restored from anotherHP handheld device to theHP Jornada 420. Make sure thatyou save the backup file (.dbb) inthe My Documents directory on theother handheld device, and that theMy Documents directory is copiedto the CompactFlash Card used forthe restore action.

Chapter 8 | Troubleshooting | 97
Data is lost. Main battery was removed for morethan 1 minute. Do not remove themain battery except when replacingit with a spare one.
HP Jornada was not charged formore than 2 weeks. Withoutcharging data will be retained forup to 2 weeks.
A hard reset (cold boot) wasperformed. Backup regularly andmake sure you backup beforestoring your HP Jornada for longerperiods.
Troubleshooting remote connectionsThis section offers troubleshooting help for trying to connect yourHP Jornada to other computers. For problems communicatingwith your desktop, see Windows CE Services Help.
Able to dial out, but unable to make a properconnection· Make sure the network to which you are trying to connect
supports Point-to-Point Protocol (PPP). Your Internet serviceprovider or network administrator can verify this.
· Verify that the location is correct. Tap Start, Settings, thenDialing. Make sure that the Location field reflects yourcurrent location; that the location’s dialing pattern isappropriate; and that the local country and area code arecorrect.
Connection is unreliable· Make sure the modem is firmly seated and connected to your
device and the telephone jack.
· Disable call waiting. Tap Start, Settings, then Dialing.Select Disable call waiting. Then enter the disable codespecified by your telephone company.

98 Hewlett-Packard Jornada 420 Palm-size PC
Unable to use infrared transfer between Windows CE-based devicesIf you are unable to use infrared to transfer information betweenWindows CE-based devices, try the following.
· Transfer only one file, or no more than 25 contact cards, at atime.
· Position the infrared ports so that they line up and are lessthan 20 centimeters (8 inches) but more than 2 inches apart.
· Make sure nothing is between the two infrared ports.
· Adjust the room lighting. Some types of light interfere withinfrared communication. Try moving to a different location orturning off some lights.
Troubleshooting viewing problemsIf you are having trouble viewing your data, here are somesuggestions.
Screen is blank
If the device does not respond when you briefly press the Onbutton:
· Make sure your battery cover is locked.
· Adjust the display contrast. On some devices, the screen candarken or lighten to the point that it appears to be poweredoff. For information on adjusting contrast, see “Settingbrightness, contrast, and volume” on page 31.
· Reset the device.
· Charge the main battery by connecting to AC power.
Screen is dark
Prolonged exposure to direct sunlight may cause your devicescreen to temporarily darken. This is normal for LCD screensand is not permanent.

Chapter 8 | Troubleshooting | 99
Screen is hard to read
The display can be hard to read if the P/PC has been off for along time. The display returns to normal after using it for about1 minute.
If you are having a hard time viewing a Note Taker document,try changing the size of the view. To do this, tap the Zoom arrowon the command bar and select a zoom percentage.
If you are having a hard time viewing Calendar, Tasks, orContacts data, try enlarging the display font. To do this withinCalendar, Tasks, or Contacts, tap Tools, Options, and thenselect Use large font.
ResettingOccasionally, you may need to reset the HP Jornada; forexample, you may reset after you restore data from your desktopPC or when the operating system stops responding.
There are two methods of resetting:
· Soft reset—A soft reset (also called “warm boot”) is similar torestarting your desktop PC. It restarts the operating systemand preserves any saved data, but loses any unsaved data.
· Full reset—A full reset (also called “cold boot”) restores theHP Jornada to its original state, erasing all information,including saved and unsaved data, you have entered.
To ensure the safety of your information in case a full reset isnecessary, you should regularly back up your data to yourdesktop PC (using Windows CE Services) or to a CompactFlashCard (using the HP backup application). For more information onbacking up data, see “Backing up and restoring data” on page 83.
Soft resetPerform a soft reset after restoring data from a backup file orwhen the HP Jornada appears to be “frozen” or “locked up.”
When you perform a soft reset you lose unsaved data in allopen documents or programs. To close all open documentsand programs, use bTask as described in “Using bTask” onpage 82.

100 Hewlett-Packard Jornada 420 Palm-size PC
To perform a soft reset
1. Use the stylus to press the Reset button on the back ofthe HP Jornada, as illustrated above.
Full resetPerform a full reset only when the HP Jornada does not respondto a soft reset. A full reset erases all data you have entered,including all files, system settings, and programs you haveinstalled. If you have forgotten your password, you also need toperform a full reset.
Performing a full reset erases all files, programs, and data youhave entered. You can restore only data that has been backedup to your desktop PC or CompactFlash Card. (For moreinformation, see “Backing up and restoring data” on page 83.)
To perform a full reset
1. Disconnect the AC adapter from the HP Jornada.
2. Remove the battery.
3. Use the stylus to press the Reset button for at least 5seconds.
4. Reinsert the battery.

Chapter 8 | Troubleshooting | 101
5. Restore data to the HP Jornada from your most recentbackup file. For more information, see “Backing up andrestoring data” on page 83.

102 Hewlett-Packard Jornada 420 Palm-size PC

Chapter 9 | Warranty, support, and service | 103
9 | Warranty, support,and service
Limited one-year warrantyThe HP Jornada model 420 comes with a limited one-yearwarranty.
What is coveredThe HP Jornada model 420 (including the rechargeable backupbattery) and accessories are warranted by Hewlett-Packardagainst defects in materials and workmanship for one year fromthe date of original purchase. If you sell your P/PC or give it as agift, the warranty is automatically transferred to the new ownerand remains in effect for the original one-year period beginningat the time of purchase. During the warranty period, we willrepair or, at our option, replace at no charge a product thatproves to be defective, provided you return the product, shippingprepaid, to a Hewlett-Packard service center. (Replacement maybe made with a new or reconditioned P/PC, or with a newermodel of equal or better functionality.)
This warranty gives you specific legal rights, and you may alsohave other rights that vary from state to state, province toprovince, or country to country.
What is not coveredThis warranty does not apply if the product:
· has been damaged by accident or misuse, or as the result ofservice or modification by other than an authorized Hewlett-Packard service center.

104 Hewlett-Packard Jornada 420 Palm-size PC
· has been opened for any reason except to perform an officialupgrade using an HP Upgrade Kit.
No other express warranty is given. The repair or replacement ofa product is your exclusive remedy. ANY OTHER IMPLIEDWARRANTY OR MERCHANTABILITY OR FITNESS ISLIMITED TO THE ONE-YEAR DURATION OF THIS WRITTENWARRANTY. Some states, provinces, or countries do not allowlimitations on how long an implied warranty lasts, so the abovelimitation may not apply to you. IN NO EVENT SHALLHEWLETT-PACKARD COMPANY BE LIABLE FORCONSEQUENTIAL DAMAGES. Some states, provinces, orcountries do not allow the exclusion or limitation of incidental orconsequential damages, so the above limitation or exclusion maynot apply to you.
Products are sold on the basis of specifications applicable at thetime of manufacture. Hewlett-Packard shall have no obligation tomodify or update products, once sold.
Consumer transactions in Australia, New Zealandand the United KingdomThe preceding disclaimers and limitations shall not apply toconsumer transactions in Australia, New Zealand and the UnitedKingdom, and shall not affect the statutory rights of consumers.
For consumers in Australia
The above warranty terms and any other warranty statementenclosed with this product, except to the extent lawfullypermitted, do not exclude, restrict, or modify and are in additionto the statutory rights implied by the Trade Practices Act 1974 orany corresponding State or territory legislation applicable to thesale of this product to you. If you have any queries about yourrights, contact the Hewlett-Packard Customer Care Center at 61-3-88778000.
For consumers in New Zealand
The above warranty terms or any other warranty statementenclosed with this product, except to the extent lawfullypermitted, do not exclude, restrict or modify and are in additionto the statutory rights implied by the Consumer Guarantees Act

Chapter 9 | Warranty, support, and service | 105
1993 applicable to the sale of this product to you. If you have anyqueries about your rights contact the Hewlett-Packard End UserSupport line at 0800-733547.
Year 2000 warrantySubject to all of the terms and limitations of the HP LimitedWarranty Statement provided with this HP Product, HPwarrants that this HP product will be able to accurately processdate data (including, but not limited to, calculating, comparing,and sequencing) from, into, and between the twentieth andtwenty-first centuries, and the year 1999 and 2000, includingleap year calculations, when used in accordance with the Productdocumentation provided by HP (including any instructions forinstalling patches or upgrades), provided that all other products(e.g. hardware, software, firmware) used in combination withsuch HP product(s) properly exchange date data. The duration ofthe Year 2000 warranty extends through January 31, 2001.
HP makes no representation or warranty respecting the accuracyor reliability of information about non–HP products. Suchinformation is provided by the manufacturers of those products,and customers are urged to contact the manufacturer directly toverify Year 2000 readiness.
Customer supportIf you have questions that this User’s Guide does not answer(after checking the contents and index), you can contact Hewlett-Packard Worldwide Support and Services for Handheld Productsat the telephone numbers listed in the following table. If theP/PC requires service, contact Hewlett-Packard for serviceinformation, shipping instructions, and out-of-warranty servicecharges before you send your P/PC to HP for repair. In countriesnot listed in the table, contact the Hewlett-Packard authorizeddealer or sales office.
ServiceFor diagnostic instructions and other service information, contactone of the technical support numbers listed. Please do not shipyour P/PC for service without first contacting a Hewlett-Packardoffice. If your P/PC qualifies for in-warranty service, be ready tosupply a dated proof of purchase.

106 Hewlett-Packard Jornada 420 Palm-size PC
In countries not listed in the following table, contact the Hewlett-Packard authorized dealer or sales office. Before you contact usfor help, be sure to:
1. Review the manuals whenever possible.
2. Have the following information about the product:
· Model number
· Serial number
· Purchase date
3. Have your product ready to use. The support personnelmay ask you to run tests and other operations.
4. Organize your question or problem. The more detailedinformation you can provide, the quicker the supportpersonnel can help you.
Web siteYou can also obtain product information as well as tips and hintson how to get more from the HP Jornada product at ourworldwide Web site. This computer service is provided free ofcharge; you pay only for telephone charges and Internet servicefees. To connect to this Web site from a computer via theInternet, go to www.hp.com/jornada.
Contacting Hewlett-Packard worldwideYou will be pleased to know that our commitment to quality doesnot stop at the sale. Our worldwide customer support network isavailable to give you personal telephone service should you needit.
Argentina 54-1-7788380
Australia 61-3-88778000
Austria 43-711-4201080
Belgium (Dutch) 32-2-6268806
Belgium (French) 32-2-6268807
TelephoneCountry/Region
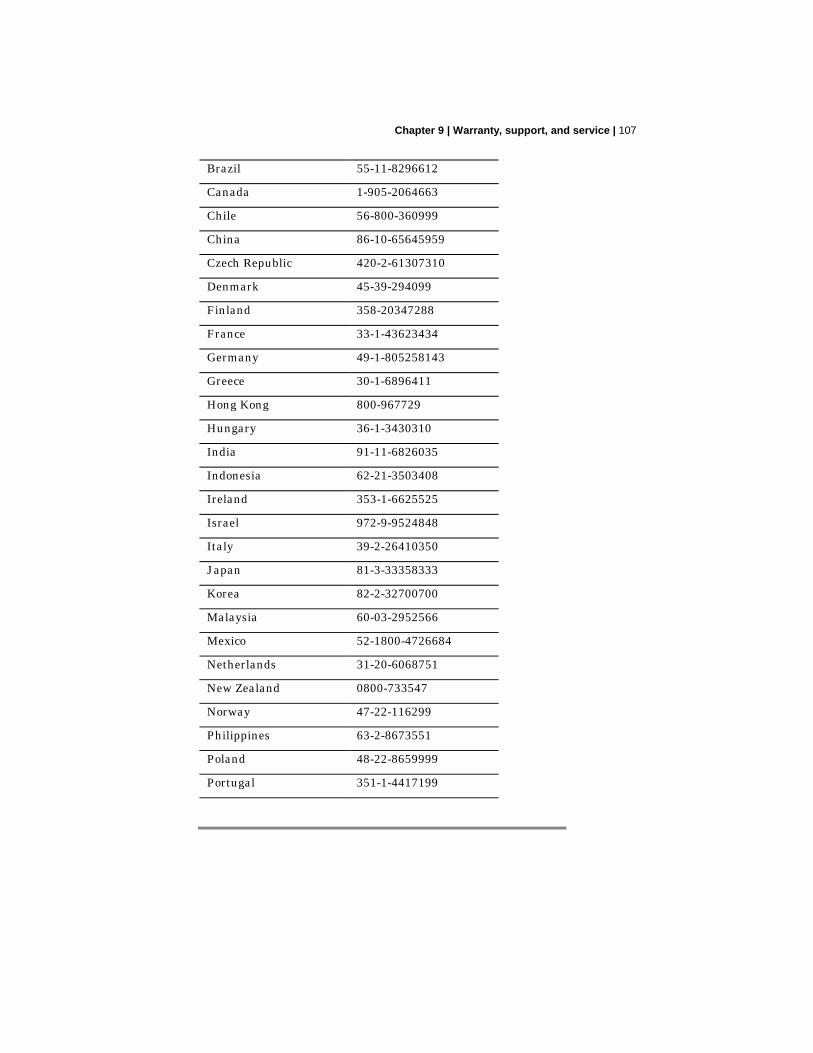
Chapter 9 | Warranty, support, and service | 107
Brazil 55-11-8296612
Canada 1-905-2064663
Chile 56-800-360999
China 86-10-65645959
Czech Republic 420-2-61307310
Denmark 45-39-294099
Finland 358-20347288
France 33-1-43623434
Germany 49-1-805258143
Greece 30-1-6896411
Hong Kong 800-967729
Hungary 36-1-3430310
India 91-11-6826035
Indonesia 62-21-3503408
Ireland 353-1-6625525
Israel 972-9-9524848
Italy 39-2-26410350
Japan 81-3-33358333
Korea 82-2-32700700
Malaysia 60-03-2952566
Mexico 52-1800-4726684
Netherlands 31-20-6068751
New Zealand 0800-733547
Norway 47-22-116299
Philippines 63-2-8673551
Poland 48-22-8659999
Portugal 351-1-4417199

108 Hewlett-Packard Jornada 420 Palm-size PC
Russia 7-095-9169821
Singapore 65-2725300
South Africa 27-11-4481140
Spain 34-91-7820109
Sweden 46-8-6192170
Switzerland 41-848-801111
Taiwan 886-2-7170055
Thailand 66-2-6614011
Turkey 90-212-2245925
UK 44-870-6083003
USA
Pre-sales Information
Support & Service
1-800-443-1254
(toll-free, no operator isavailable)
1-970-635-1000
Palmtops & Organizers(toll call)
Venezuela 58-800-47888 or58-2-2078488
All Customer Care Centers are available during office hours. Pre-sales Information in the USA is available 24 hours per day, 7days per week. Support & Service in the USA can be contactedfrom 5 am to 5 pm Pacific Time, Monday through Friday.

Appendix A | Jot Character Recognizer | 109
A | Jot CharacterRecognizer
The character recognition software, CIC Jot, gives you a fast andeasy-to-use method for entering information in any program onyour device: just write in the input panel. Each character youwrite is translated into typed text and displayed on the screen.
This appendix describes how to use the Jot character recognizer.It also provides tables showing how and where to drawcharacters on the screen for each of the two character sets: theNatural Character Set and the Simplified Uppercase CharacterSet.
Select character recognition as your input method by tapping theInput Method arrow on your taskbar and tapping JotCharacter Recognizer.
Using your stylus, write a character in the input panel. Thecharacter is translated into typed text and displayed at theinsertion point on the screen.

110 Hewlett-Packard Jornada 420 Palm-size PC
Areas of the Input PanelYou can write letters in either uppercase or lowercase. How theletter is interpreted and displayed depends on where you write itin the input panel. For example, you can write a letter inlowercase or uppercase, and it will appear in lowercase if youwrite it in the lowercase letter area (abc) of the input panel.

Appendix A | Jot Character Recognizer | 111
You can also write punctuation and editing marks, and add ordelete space in the letter areas (abc and ABC) of the inputpanel. For example, draw a horizontal line from left to right toadd space, and from right to left to backspace. See the tables atthe end of this appendix for details.
You can write numbers in the number area (123) of the panel.
You can also enter common punctuation marks in the numberarea. This allows you to write telephone numbers, birthdays, andSocial Security numbers entirely in the number area. See thetables at the end of this appendix for details.
SymbolsEnter symbols, such as @ or #, on the symbol input panel.Display the symbol panel by tapping the Symb button on theinput panel or by drawing a vertical line from bottom to top,anywhere in the panel.
When you’ve drawn the symbol, wait and Jot will display themain panel again automatically, or tap the Symb button toreturn to the main panel immediately.

112 Hewlett-Packard Jornada 420 Palm-size PC
See the tables at the end of this appendix for a list of symbolsthat can be entered in this panel.
Help Writing CharactersThe software recognizes several alternative ways of writing acharacter. If a character you are writing is misinterpreted, youcan use Help to see an animated demonstration of how to writethe letter. Tap the Help button on the input panel, and then tapNext. Select the character you want to see, and tap Show.
OptionsYou can adjust settings to suit the way you work. Tap Start,Settings, then Input Panel. Select Jot Character Recognizeras the input method, and then tap Options.
One of your options is to use the Simplified Uppercase CharacterSet. For more information about how and where to writecharacters using this character set, see “Simplified UppercaseCharacter Set” later in this appendix or select this character setin the Options dialog box and then tap the Help button on theinput panel.
Natural Character SetThe tables in this section show how to use the Natural CharacterSet to write letters, numbers, punctuation marks, editing marks,and symbols. For each character, the tables show alternatives forwriting the characters. The dots indicate where the strokesbegin; strokes with no dots can be written in either direction.Where appropriate, the stroke sequence is numbered.
Using the letter areasYou can enter letters, punctuation, and editing marks in theletter areas (abc and ABC) of the input panel.
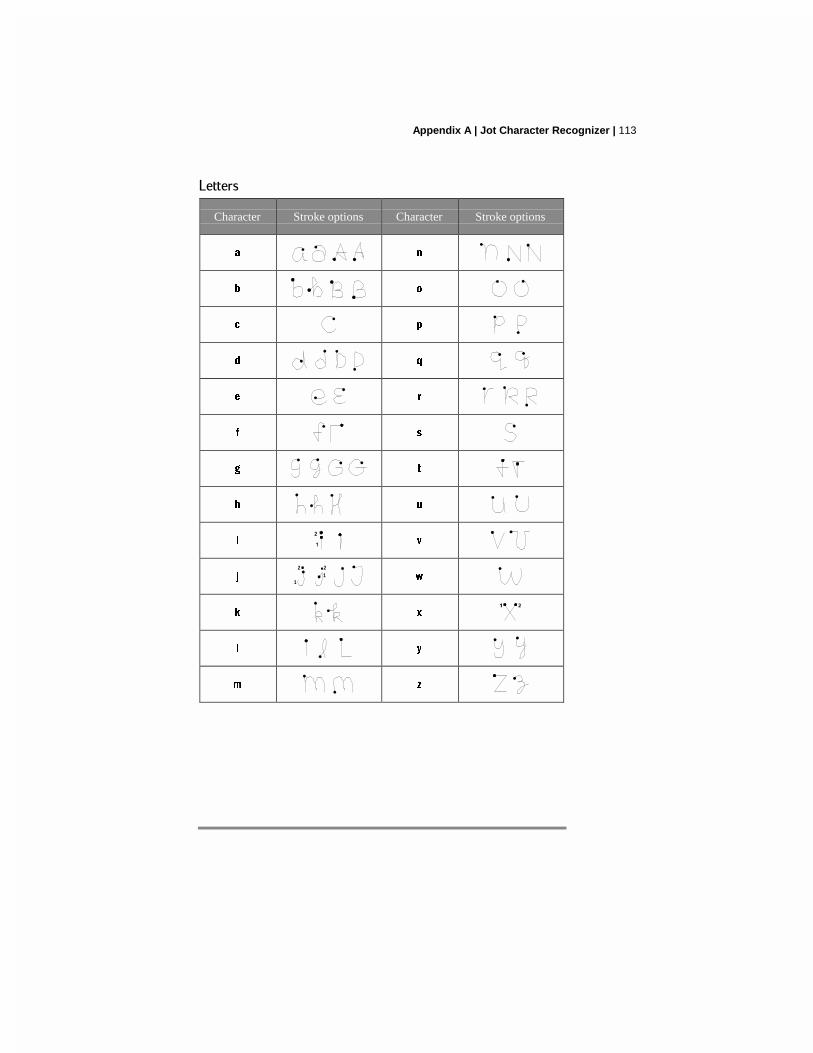
Appendix A | Jot Character Recognizer | 113
Letters
Character Stroke options Character Stroke options
a n
b o
c p
d q
e r
f s
g t
h u
i v
j1
12 2
w
k x
l y
m z

114 Hewlett-Packard Jornada 420 Palm-size PC
Punctuation
Character Stroke options Character Stroke options
period • at
comma double quote
apostrophe tab
question space
exclamation backspace
ampersand
Editing
Character Stroke options Character Stroke options
forwarddelete
paste
cut undo
copycarriagereturn
Using the number areaYou can enter numbers, punctuation, and editing marks in thenumber area (123) of the input panel.
A horizontal line drawn from left to right is recognized as aspace character in the letter area of the input panel and as a

Appendix A | Jot Character Recognizer | 115
dash in the number area.
Numbers
Character Stroke options Character Stroke options
0 5 12
1 6
2 7
3 8
4 9
Punctuation
Character Stroke options Character Stroke options
period • /
comma \
dash (
tilde )
+ =
* backspace

116 Hewlett-Packard Jornada 420 Palm-size PC
Editing
Character Stroke options Character Stroke options
cut undo
copy tab
paste
Writing accented lettersTo write an accented letter, write the letter in the letter area andthe accent in the number area.
Accented letters
Accentmark
Stroke optionsAccentmark
Stroke options
à ã
á ä ••
â å
Using the symbol panelIn the symbol panel, you can enter symbols and characters thatcan’t be entered in the standard input panel.

Appendix A | Jot Character Recognizer | 117
CharacterStrokeoptions Character
Strokeoptions Character
Strokeoptions
. � | &
, ! ¹
' ? ²
- $ ³
_ % ±
~ / x
@ \ ÷
< " ¼
> + ½
( : : ¾
) ; ®
[ = ©

118 Hewlett-Packard Jornada 420 Palm-size PC
CharacterStrokeoptions Character
Strokeoptions Character
Strokeoptions
] # ^
{ * §
} £ ¢
Æ ¶ �
æ ¤ � �
Ç ° �
ç « �
ª » �
° ¨ �
¸ ¯ �
¿ · �
¡ ¬ �

Appendix A | Jot Character Recognizer | 119
CharacterStrokeoptions Character
Strokeoptions Character
Strokeoptions
þ ` �
Þ ´ �
Ð ¦ �
ð �
Ø � �
ø � �
ß � �
µ � �
¥ � �
Simplified Uppercase Character SetYou can choose to use this character set instead of the NaturalCharacter Set by selecting it in the CIC Jot Options dialog box.This character set gives you fewer options for entering eachcharacter, as you’re writing in uppercase only, but allows forgreater flexibility in writing the letters, so you can write faster.
The tables in this section show how to use the SimplifiedUppercase Character Set to write letters, numbers, punctuation

120 Hewlett-Packard Jornada 420 Palm-size PC
marks, editing marks, and symbols. For each character, thetables show alternatives for writing the characters. The dotsindicate where the strokes begin; strokes with no dots can bewritten in either direction. Where appropriate, the strokesequence is numbered.
Using the letter areasYou can enter letters, punctuation, and editing marks in theletter areas (abc and ABC) of the input panel.
Letters
CharacterStrokeoptions
CharacterStrokeoptions
A P
B Q
C R
D S
E T
F U
G V
H W
I X
J Y
K Z

Appendix A | Jot Character Recognizer | 121
CharacterStrokeoptions
CharacterStrokeoptions
L Ç
M æ
N ß
O
Editing
Character Stroke options Character Stroke options
space copy
back delete(backspace)
paste
forwarddelete
undo
cutcarriagereturn
Using the number area
In addition to numbers, you can enter punctuation and editingmarks in the number area (123) of the input panel.
A horizontal line drawn from left to right is recognized as aspace character in the letter area of the input panel, and as adash in the number area.

122 Hewlett-Packard Jornada 420 Palm-size PC
Numbers
Character Stroke options Character Stroke options
0 5
1 6
2 7
3 8
4 9
Punctuation
Character Stroke options Character Stroke options
( /
) ^
= %
+ .
*

Appendix A | Jot Character Recognizer | 123
Editing
Character Stroke options Character Stroke options
undo paste
cutcarriagereturn
copy dash -
Writing accented lettersTo write an accented letter, write the letter in the letter area andthe accent in the number area.
Accented letters
Accentmark
Stroke optionsAccentmark
Stroke options
à ã
á ä ��
â å
Using the symbol panelIn the symbol panel, you can enter symbols and characters thatcan’t be entered in the standard input panel.
You can enter punctuation in the punctuation area (punct) andsymbols in the symbol area (symb).

124 Hewlett-Packard Jornada 420 Palm-size PC
Punctuation
Character Stroke options Character Stroke options
period � &
comma ^
apostrophe <
? >
! {
dash }
underscore $
/ *
\ +
( %
) TAB
= ~

Appendix A | Jot Character Recognizer | 125
Symbols
CharacterStrokeoptions
CharacterStrokeoptions
CharacterStrokeoptions
! ± Þ
@ x Ð
# ÷ ð
$ ¼ Ø
% ½ ø
& ¾ ß
* ® µ
" © ¥
: : § £
; ¶ ¢
? Æ ¤
+ æ «

126 Hewlett-Packard Jornada 420 Palm-size PC
CharacterStrokeoptions
CharacterStrokeoptions
CharacterStrokeoptions
= Ç »
[ ç °
] ª
| ° ¬
¦ ¸ `
¹ ¿ ´
² ¡ ¨
³ þ ¯
· � �
� � �
� � �
� � �
� � �

Appendix A | Jot Character Recognizer | 127
CharacterStrokeoptions
CharacterStrokeoptions
CharacterStrokeoptions
� � �
� � �
� � � �

128 Hewlett-Packard Jornada 420 Palm-size PC

Appendix B | Migrating data from non–Windows CEHP handheld PC devices | 129
B | Migrating data fromnon�Windows CE
HP handheld PC devices
If your data is stored on an HP 100/200LX Palmtop PC or anHP OmniGo Organizer, you must first transfer the data to yourdesktop PC. Use the Hewlett-Packard PIM Translation Utility(for HP devices only) to import the data into Microsoft Outlook orSchedule+ 7.0a on your desktop PC. After you have imported thedata into Outlook or Schedule+, you can update the informationon your HP Jornada by synchronizing with Outlook or Schedule+using Windows CE Services 2.2.
The HP PIM Translation Utility is available from theHP Jornada compact disk and on the web at http://www.hp.com/cposupport/handheld_computers/software/setup.exe.html.
This procedure migrates only Appointment Book and Phone Bookdata. Before translating PIM data files, you must install theversion of Schedule+ 7.0a found on the Desktop Software forMicrosoft Windows CE compact disk on your desktop PC.
You can translate only one file at a time. To translate multiplePIM data files, you need to repeat the Translation operation foreach file separately.
Translating appointment dataAlthough daily, weekly, monthly, and yearly repeated events aresupported in the Appointment Book applications on theHP 100LX/200LX palm-size PCs and HP OmniGo 100/120organizers and in the Calendar application on the HP Jornada,the Schedule+ application supports only daily and yearlyrepeated events. Because all translation goes through Schedule+,no direct mapping is available from the older device to Schedule+

130 Hewlett-Packard Jornada 420 Palm-size PC
for repeating weekly and monthly events. As long as you do notedit imported repeating weekly or monthly events in Schedule+before you synchronize them with the HP Jornada, they translatecorrectly into repeating events on the HP Jornada. If, however,you edit them in Schedule+, they lose their weekly/monthlyattribute and are treated as single events.
To translate appointment data
1. Double-click the HP PIM Translation Utility icon tostart the program.
2. In the Welcome screen, click Appointments.
3. In the Open File dialog box that appears, specify theappointment data file to translate, and then click OK. Ifthe file you specify is not a PIM database file of theappropriate type, you get an error message.
4. In the Appointment Book Translation Note screen, clickOK. The Data Translation Progress screen appears,showing the progress of current translation activity.
5. When the translation has successfully completed, amessage appears. Click OK to return to the Welcomescreen.
Translating Phone Book dataThis section describes how to translate Phone Book data, anddescribes Phone Book field mapping and how to modify it.
To translate a Phone Book data file
1. Double-click the HP PIM Translation Utility icon tostart the program.
2. In the Welcome screen, click Phone Book.
3. In the Open File dialog box, specify the phone book datafile to translate, and then click OK.

Appendix B | Migrating data from non–Windows CEHP handheld PC devices | 131
4. In the Phone Book Translation Field Map window, selectmapping options. For more information, see the sectionsbelow.
5. When translation is complete, a message appears. ClickOK to return to the Welcome screen.
Phone Book field mappingThe HP PIM Translation Utility attempts to map the fields inyour Phone Book data file to standard fields in a Schedule+record. As long as your Phone Book fields have standard names(that is, you have not modified the Phone Book database fieldstructure), the translation is straightforward. The suggestedmapping appears in a table in the Phone Book Translation FieldMap screen:
· The left column shows the names of fields extracted from thePhone Book data file. (Only the fields that have data areincluded.)
· The right column shows the names of Schedule+ fields.
· An arrow in the center column indicates that the data in aPhone Book field in the left column is copied to thecorresponding Schedule+ field in the right column. Note thatmultiple Phone Book fields (for example, Address1 andAddress2) can be mapped to the same Schedule+ field (forexample, Business address). No arrow in the center columnindicates that there is no mapping and, therefore, the data isnot copied.
You can add or modify the suggested mappings beforetranslating the data. For example, if you have customized thename of a Phone Book field so that the HP PIM TranslationUtility does not know how to map it, you can define a mappingfor it yourself.
Name mappingThe Name field in the Phone Book data file can be mapped inthree ways in Schedule+:
· If the name in the Phone Book data file is entered as Name1,Name2 [Name3] (that is, with a comma after the first word), it

132 Hewlett-Packard Jornada 420 Palm-size PC
is always mapped to the two name fields in Schedule+ withName1 = Last Name and Name2 [Name3] = First Name.
· If the name in the Phone Book data file does not have acomma after the first word, you can choose one of two optionsfor its mapping:
· Last name/First name - (default) Name1 [Name3] Name2maps to Name1 = = Last Name and [Name3] Name2 = FirstName.
· First name/Last name - Name1 [Name3] Name2 maps toName1 [Name3] = First Name and Name2 = Last Name.
In all cases, Last name is mapped to a single word, with anyadditional words such as [Name3] becoming part of First name.
Mapping additionsIf a field appears in the left column with no mapping (that is, noarrow in the center column) select a field name from thedropdown list of the Schedule+ field immediately to the right ofthe field whose mapping you want to define. The field nameappears in the appropriate cell in the right column and amapping arrow appears in the center column.
Mapping changesIf a field in the left column is mapped to the wrong field in theright column, change the mapping by selecting a differentSchedule+ field name from the dropdown list for thecorresponding cell in the right column.
Mapping removalIf a field in the left column should not be mapped to anything,click None from the dropdown list for the corresponding cell inthe right column. The None option is not available for the Namefield. Translation status review After each translation isfinished, whether it completed successfully or was interrupted,the results are written onto the Status screen. Click the Statusbutton on the Welcome screen to see the history of anytranslations begun during the current execution of the HP PIMTranslation Utility.

Index | 133
Index
A
AC adapterconnecting, 14
AC Charging LED, 8accessories
adding, 91action button, 9Active Desktop, 23ActiveSync, 39, 50adding
desktop wallpaper, 90programs from the HP
Jornada compact disk,88
programs withApplication Manager,88
sounds, 90address book, 70adjusting
button assignments, 30owner, 30password, 30power, 30settings, 30system, 30volume & sounds, 30World Clock, 30
Application Managerinstalling programs with,
88automatic connection, 46
B
backing up datausing HP Jornada
backup, 84using Microsoft Windows
CE Services, 83battery
conserving power, 19installation, 11managing power, 16power control panel, 16viewing status, 33
brightnessadjusting, 31, 32
browsingHP Jornada desktop, 49
bTask, 82buttons
action, 9close, 17exit, 9locking, 22power on/off, 9, 21record, 9release, on cradle, 13reset, 10start, 9unlocking, 22
C
Calendarusing, 68
caring for the HP Jornada,20

134 Hewlett-Packard Jornada 420 Palm-size PC
channelsabout, 52personalizing, 53synchronizing, 53viewing content, 53
character recognition, 27close button, 17closing the connection to a
desktop PC, 47command bar, 25CompactFlash cards
inserting and removing,92
locating the slot, 10CompuServe
sending and receiving e-mail, 65
conflictssynchronization, 52
connectingAC adapter, 14automatically to a
desktop PC, 46by infrared to a desktop
PC, 47manually to a desktop
PC, 46to a desktop PC by sync
cable, 42to a non-partner PC, 48to an Internet service
provider, 60connecting via Ethernet, 60Contacts
using, 70contrast
adjusting, 31, 32cradle
release buttons, 13using, 13
customizing HP Jornadadesktop wallpaper, 90sounds, 90, 91third-party software, 86
D
DC jack, 14deleting
characters, 28desktop PCs
connecting to, 46disconnecting from, 47
dial-up connectionssetting up, 59
disconnecting from adesktop PC, 47
displayingchannel content on the
desktop, 54information on the
desktop, 23mobile desktop
components, 54drawing, 77, 79
E
editingdrawings, 79text, 79
e-mailconnecting to an Internet
service provider, 60enabling synchronization,
55getting accounts with
Internet serviceproviders, 58
setting up a dial-upconnection, 59
synchronizing, 55using dial-up connections
to send and receive, 57using Windows CE Inbox
Transfer to transfer, 56establishing
partnerships, 43Ethernet connections, 60exit button, 9EzExplorer, 28

Index | 135
F
file conversion, 51files
finding, 28finding information, 29freeware, 41full reset, 100
G
gamesSolitaire, 4
H
hard iconslocating, 9reconfiguring, 22using, 22
hard reset. See full resetHP Jornada
browsing the desktop, 49caring for, 20turning on and off, 21
HP Jornada compact diskcontents of, 87installing programs from,
88minimum PC
requirements, 87HP settings
adjusting brightness,contrast, volume, 31
password delay timer, 35setting a password, 35using, 31viewing battery status, 33viewing memory status,
34
I
Inboxreceiving e-mail, 62
sending and receivingCompuServe e-mail, 65
sending e-mail, 64using, 61
infraredconnecting, 47
infrared port, 8installing
battery, 11programs from the HP
Jornada compact disk,88
programs withApplication Manager,88
L
LEDsAC Charging, 8notification, 8
list view, 29locking the hardware
buttons, 22
M
managing battery power, 16manual connection, 46memory
adjusting allocation, 34viewing status, 34
microphone, 8Microsoft Windows CE
Servicesabout, 39contents of compact disk,
40installing, 42minimum PC
requirements, 41modems, 58

136 Hewlett-Packard Jornada 420 Palm-size PC
N
New Partnership Wizard,44
Note Takerediting and formatting,
79saving notes, 81using, 77writing and drawing, 79
notification LED, 8
O
OmniSolve calculator, 83organizing notes, 82
P
partnershipsestablishing, 43troubleshooting, 45
passworddelay timer, 35setting, 35
playing recordings, 73power control panel
using, 16power on/off button, 9, 21printing, 54
R
record button, 9recordings
fast-forward, 73formats, 75making, 72memory use, 74organizing, 75playing back, 73rewinding, 73skipping parts, 74
release buttons on cradle,13
reminders, 71
removing programs, 89with Application
Manager, 89with the Remove
Programs control panel,89
reset button, 10resetting
full, 100soft, 99
resolving synchronizationconflicts, 52
S
saving notes, 81scheduling appointments,
68serial port, 14setting up a dial-up
connection, 59settings
adjusting, 30shareware, 41shortcuts, 36soft reset, 99Solitaire, 4sounds
adding, 90start button, 9Start menu, 24support, 105suspend, 18sync cable
connecting P/PC todesktop PC, 42
synchronization conflicts, 52synchronizing, 50
channels, 53specifying data, 51
T
taskbar, 24Tasks
using, 71

Index | 137
third-party software, 86tips, 36transferring files, 54troubleshooting
partnerships, 45viewing problems, 98
turning the HP Jornada onand off, 21
typing with the keyboard,26
U
unlocking the hardwarebuttons, 22
V
viewingchannel content, 53
information, 29Voice Recorder
using, 72volume
adjusting, 31
W
wallpaperadding, 90
warranty, 103Welcome Wizard, 15Windows CE Services. See
Microsoft Windows CEServices
writing, 77, 79writing with the Jot
Character Recognizer, 27

138 Hewlett-Packard Jornada 420 Palm-size PC

HP software product license agreement | 139
HP software productlicense agreement
Important: Please carefully read this License Agreement beforeoperating the equipment. Rights to the software are offered onlyon the condition that the Customer agrees to all terms andconditions of the License Agreement. Operating the equipmentindicates your acceptance of these terms and conditions. If you donot agree to the License Agreement, you may return theunopened package for a full refund. In return for payment of theapplicable fee, HP grants the Customer a license to the software,until terminated, subject to the following:
Use· Customer may use the software on any one computer.
· Customer may not reverse, assemble, or decompile thesoftware.
Copies and adaptations· Customer may make copies or adaptations of the software:
for archival purposes, or
when copying or adaptation is an essential step in the use ofthe software with a computer so long as the copies andadaptations are used in no other manner.
· Customer has no other rights to copy unless Customeracquires an appropriate license to reproduce which isavailable from HP for some software.

140 Hewlett-Packard Jornada 420 Palm-size PC
· Customer agrees that no warranty, free installation, or freetraining is provided by HP for any copies or adaptations madeby Customer.
· All copies and adaptations of the software must bear thecopyright notice(s) contained in or on the original.
Ownership· Customer agrees that they do not have any title or ownership
of the software, other than ownership of the physical media.
· Customer acknowledges and agrees that the software iscopyrighted and protected under the copyright laws.
· Customer acknowledges and agrees that the software mayhave been developed by a third-party software supplier namedin the copyright notice(s) included with the software, whoshall be authorized to hold the Customer responsible for anycopyright infringement or violation of this License Agreement.
Transfer of rights in software· Customer may transfer rights to the software to a third party
only as part of the transfer of all their rights and only ifCustomer obtains the prior agreement of the third party to bebound by the terms of this License Agreement.
· Upon such a transfer, Customer agrees that their rights to thesoftware are terminated and that they will either destroy theircopies and adaptations or deliver them to the third party.
· Transfer to a U.S. government department or agency or to aprime or lower tier contractor in connection with a U.S.government contract shall be made only upon prior writtenagreement to terms required by HP.
Sublicensing and distribution: Customer may not sublicense thesoftware or distribute copies or adaptations of the software to thepublic in physical media or by telecommunication without theprior written consent of HP.
Termination: HP may terminate this software license for failureto comply with any of these terms, provided HP has requestedCustomer to cure the failure and Customer has failed to do sowithin thirty (30) days of such notice.

HP software product license agreement | 141
Updates and upgrades: Customer agrees that the software doesnot include updates and upgrades that may be available from HPunder a separate support agreement.
Export clause: Customer agrees not to export or re-export thesoftware or any copy or adaptation in violation of the U.S. ExportAdministration regulations or other applicable regulations.
HP shrink-wrap license termsThe following License Terms govern your use of theaccompanying Software unless you have a separate signedagreement with HP.
License grant: HP grants you a license to use one copy of theSoftware. “Use” means storing, loading, installing, executing ordisplaying the Software. You may not modify the Software ordisable any licensing or control features of the Software. If theSoftware is licensed for “concurrent use”, you may not allow morethan the maximum number of authorized users to use thesoftware concurrently.
Ownership: The Software is owned and copyrighted by HP or itsthird party suppliers. Your license confers no title to, orownership in, the Software and is not a sale of any rights in theSoftware. Third party suppliers to HP may protect their rights inthe event of any violation of these License Terms.
Copies and adaptations: You may only make copies oradaptations of the Software for archival purposes or whencopying or adaptation is an essential step in the authorized Useof the Software. You must reproduce all copyright notices in theoriginal Software on all copies or adaptations. You may not copythe Software onto any public network.
No disassembly or decryption: You may not disassemble ordecompile the Software unless prior written consent is obtainedfrom HP. In some jurisdictions, consent from HP may not berequired for limited disassembly or decompilation. Upon request,you will provide HP with reasonably detailed informationregarding any disassembly or decompilation. You may notdecrypt the Software unless decryption is a necessary part of theoperation of the Software.
Transfer: Your license will automatically terminate upon anytransfer of the Software. Upon transfer, you must deliver theSoftware, including any copies and related documentation, to the

142 Hewlett-Packard Jornada 420 Palm-size PC
transferee. The transferee must accept these License Terms as acondition to the transfer.
Termination: HP may terminate your license upon notice forfailure to comply with any of these License Terms. Upontermination, you must immediately destroy the Software,together with all copies, adaptations, and merged portions in anyform.
Export requirements: You may not export or re-export theSoftware or any copy or adaptation in violation of any applicablelaws or regulations.
U.S. government restricted rights: The Software andDocumentation have been developed entirely at private expense.They are delivered and licensed as “commercial computersoftware” as defined in DFARS 252.227-7013 (Oct 1988), DFARS252.211-7015 (May 1991) or DFARS 252.227- 7014 (Jun 1995), as“commercial item” as defined in FAR 2.101 (a), or as “Restrictedcomputer software” as defined in FAR 52.227-19 (Jun 1987) (orany equivalent agency regulation or contract clause), whicheveris applicable. You have only those rights provided for suchSoftware and Documentation by the applicable FAR or DFARSclause or the HP standard software agreement for the productinvolved.