Embed Size (px)
Citation preview
HP Enterprise SQL Optimizer (HP ESO) 3.5User Guide
AbstractThis document describes how to install and use HP's Enterprise SQL Optimizer (HP ESO) software. HP ESO is designed forsystem administrators and HP support personnel responsible for installing, configuring, and managing HP ProLiant serversrunning Microsoft SQL Server. This document is not a tutorial.
HP Part Number: AM426-9013EPublished: September 2013Edition: 1.0
© Copyright 2011–2013 Hewlett-Packard Development Company, L.P.
Legal Notices
Confidential computer software. Valid license from HP required for possession, use or copying. Consistent with FAR 12.211 and 12.212, CommercialComputer Software, Computer Software Documentation, and Technical Data for Commercial Items are licensed to the U.S. Government undervendor's standard commercial license.
The information contained herein is subject to change without notice. The only warranties for HP products and services are set forth in the expresswarranty statements accompanying such products and services. Nothing herein should be construed as constituting an additional warranty. HP shallnot be liable for technical or editorial errors or omissions contained herein.
Microsoft, SQL Server, and Windows are U.S. registered trademarks of Microsoft Corporation.
Intel is a U.S. registered trademark of Intel Corporation.
Publishing history
Publication DateSupported Products(Servers)
Supported SQL ServerSupported OperatingSystems
Manufacturing PartNumber
November 2011HP ProLiant DL980 G7Microsoft SQL Server2008 R2 x64 Edition
Microsoft WindowsServer 2008 R2 x64
AM426-9013A(HP ESO 1.0)
with Service Pack 2Edition with Service Pack1 (SP1) (SP2) — Enterprise, DataMicrosoft WindowsServer 2008 withService Pack 2 (SP2)
Center, and StandardEditionsMicrosoft SQL Server2008 x64 Edition withService Pack 2 (SP3) —Enterprise, Data Center,and Standard Editions
April 2012No changesNo changesNo changesAM426-9013A(HP ESO 1.0)
June 2012No changesAdds support forMicrosoft SQL Server
No changesAM426-9013B(HP ESO 2.0)
2012 — Enterprise,Business Intelligence,and Standard Editions
August 2012No changesNo changesNo changesAM426-9013C(HP ESO 2.1)
January 2013No changesNo changesAdds support forMicrosoft WindowsServer 2012
AM426-9013D(HP ESO 3.0)
September 2013No changesNo changesNo changesAM426-9013E(HP ESO 3.5)
For the latest version of this document, see the HP Technical Documentation website:
http://hp.com/go/proliant-DL980-docs
Contents1 Introduction...............................................................................................6
Benefits of using HP ESO...........................................................................................................6Main features of HP ESO...........................................................................................................6New features in release 3.5.......................................................................................................7New features in release 3.0.......................................................................................................7New features in release 2.0 and 2.1...........................................................................................9
2 Installing HP ESO.....................................................................................10Software requirements.............................................................................................................10Installing the software..............................................................................................................10Uninstalling the software..........................................................................................................12Upgrading the software...........................................................................................................12Silent installation....................................................................................................................13
3 Configuring user accounts to enable access to SQL Server and Analysis Servicesinstances....................................................................................................14
Set user account privileges in Database Engine security...............................................................14Set user account privileges in Analysis Services security...............................................................15
4 Using HP ESO..........................................................................................18Getting started.......................................................................................................................19
Launching HP ESO.............................................................................................................19Getting Started pages........................................................................................................22
HP ESO Introduction page..............................................................................................22HP ESO SQL Login page................................................................................................23
Quick start: Tasks performed in a typical HP ESO user session.................................................24Floating help for items on a page........................................................................................27Starting an authenticated Administrator Session (Admin Session)..............................................28SQL Login page: Setting credentials and logging in to SQL Server and Analysis Servicesinstances..........................................................................................................................29Modifying the Admin Session timeout value...........................................................................30
Settings pages: Setting parameters for data collection.................................................................31Data Collection page: Collecting data for analysis and optimization recommendations...............31
Optimizations pages: Viewing and controlling optimization recommendations ...............................33Summary page: Viewing recommended optimization values for settable parameters obtained fromall optimization pages; generating a PowerShell script for setting these recommended values.......34
Modifying how the Summary page displays and generates recommended values..................36Downloading the PowerShell script..................................................................................36
SQL Server page: Viewing and controlling SQL Server and Analysis Services parameters andoptimization recommendations............................................................................................37
SQL Server database instance parameters........................................................................38Max Degree of Parallelism.........................................................................................38Lightweight Pooling...................................................................................................38Priority Boost............................................................................................................38Min Server Memory (in MB).......................................................................................38Max Server Memory (in MB)......................................................................................38Recovery Interval......................................................................................................38Lock Page................................................................................................................38Max Worker Threads................................................................................................39Xp_CmdShell...........................................................................................................39
Analysis Services instance parameters..............................................................................39Flight Recorder.........................................................................................................39Random File Access..................................................................................................39
Contents 3

Low Memory Limit.....................................................................................................40Total Memory Limit...................................................................................................40Coordinator Query Balancing Factor and Coordinator Query Boost Priority Level..............40Enable Rolap Distinct Count On DataSource................................................................40Process Min Threads.................................................................................................40Vertipaq Memory Limit..............................................................................................40Resource Monitor.....................................................................................................40Server modes (Multidimensional Mode, Tabular Mode, Sharepoint Mode).......................41
Database page: Viewing and controlling database parameters and optimizationrecommendations..............................................................................................................42
SQL Server Database Engine properties...........................................................................43Growth...................................................................................................................43Auto Create Statistics................................................................................................43Auto Update Statistics...............................................................................................43Auto Update Statistics Async......................................................................................44
Analysis Services properties............................................................................................44Tabular Compatibility Level Number...........................................................................44Data Dir..................................................................................................................44Temp Dir.................................................................................................................44Log Dir....................................................................................................................44Measure Group........................................................................................................44Partition..................................................................................................................44Estimated Rows........................................................................................................44Estimated Size..........................................................................................................45Proactive Caching....................................................................................................45
ESO database recommendation statements.......................................................................45Database File on OS Drive........................................................................................45Multiple Files...........................................................................................................45Create Column Store Index .......................................................................................45tempdb Data File......................................................................................................45Split the Partition......................................................................................................45Enable Proactive Caching..........................................................................................45
Viewing high availability and disaster recovery configurations............................................45Availability Group....................................................................................................45Mirrored database...................................................................................................46Clustered SQL Server instance....................................................................................48
CPU page: Viewing and controlling CPU assignment parameters and optimizationrecommendations..............................................................................................................49
Database Engine Processor Affinity..................................................................................50Viewing and understanding Database Engine Processor Affinity.....................................51Modifying and setting Database Engine Processor Affinity.............................................53
Analysis Services Process GroupAffinity............................................................................56SQL Startup Option page: Viewing and controlling SQL Server startup options..........................57
Trace flag 8048............................................................................................................57Trace flag 834..............................................................................................................57Trace flag 1117..............................................................................................................58Trace flag 1118..............................................................................................................58Trace flag 2371............................................................................................................58Trace flag 2549............................................................................................................58Trace flag 2562............................................................................................................58
Storage page: Viewing and controlling storage parameters and optimization recommendations....59Database RAID level......................................................................................................59User Write Cache Setting...............................................................................................59Cache Power Protection..................................................................................................59Drive free space............................................................................................................59
4 Contents
Volume mount point.......................................................................................................60Drive Latency................................................................................................................60
Network page: Viewing and controlling network parameters and optimizationrecommendations..............................................................................................................60
NUMA Node Affinity and Interrupt Policy.........................................................................60Port affinity...................................................................................................................61Receive-Side Scaling......................................................................................................62NIC teaming................................................................................................................63
Configuring a NIC team............................................................................................64Modifying a NIC team..............................................................................................64Deleting a NIC team.................................................................................................65Viewing NIC teaming information and recommendations on the Network page................65
System page: Viewing and controlling system parameters and optimization recommendations......66PCI Controller Information..............................................................................................66Software Discovery .......................................................................................................66System software and firmware status................................................................................67
Reports pages: Viewing workload/performance data and saving/restoring SQL configurations........67Workload and Performance History......................................................................................67Save/Rollback Configuration...............................................................................................69
Help pages: Viewing and searching help topics.........................................................................71Accessing online help.........................................................................................................71Using the online help Welcome page...................................................................................71Using the help search facility...............................................................................................72
Using a PowerShell script to apply all recommended optimization values of settable parameters andto initialize software discovery..................................................................................................74
Using the PowerShell script to apply HP ESO optimization recommendations for all settableparameters.......................................................................................................................75Using the PowerShell script to initiate software discovery.........................................................76
5 Troubleshooting........................................................................................78HP ESO is not found on the SMH page and HP Enterprise SQL Optimizer is in Disabled state in theservice list..............................................................................................................................78Access to SQL Server or Analysis Services instance is denied.......................................................78PowerShell script fails..............................................................................................................78
6 Support and other resources......................................................................79Contacting HP .......................................................................................................................79
Before you contact HP........................................................................................................79HP contact information.......................................................................................................79Subscription service............................................................................................................79
New and changed information in this edition.............................................................................79Related information.................................................................................................................80Typographic conventions.........................................................................................................80
7 Documentation feedback...........................................................................81
Contents 5
1 IntroductionThis chapter describes the main benefits and features of the HP Enterprise SQL Optimizer (HP ESO).
Benefits of using HP ESOHP Enterprise SQL Optimizer (HP ESO) is a software tool that greatly simplifies and consolidatesthe process of tuning HP ProLiant DL980 G7 servers running Microsoft Windows Server 2008 orWindows Server 2012 x64 editions, and SQL Server 2008, SQL Server 2008 R2, or SQL Server2012. Use HP ESO to:• Reduce the time and complexity of configuring and tuning systems running SQL Server
• Reduce the number of support calls due to misconfigured systems
• Help users optimize their configuration to ensure top SQL Server performance
• Improve customer satisfactionHP ESO achieves these goals by providing optimization tools for the following system components:• Server – Includes hardware-related recommendations such as placement of PCI cards and
proper storage drive configurations, and information on the update status of HP software,drivers, and firmware
• Operating System – Includes settings for Power Management Options and storage volumes
• Microsoft SQL Server – Includes settings such as priority boost, light-weight pooling, CPUaffinity, and more
You access these optimization tools by logging in to SQL instances. There are two types of SQLinstances:
• SQL Server Database Engine instances — Handle user requests for reading and writing datain databases for any of three different types of applications:
◦ Online Transaction Processing (OLTP) Database Engine
◦ Data Warehouse (DW) Database Engine
◦ SAP Database Engine
In general, the term “Database Engine” refers to the OLTP Database Engine, unless one of theother two types of Database Engine is specifically mentioned.
• Analysis Services instances — Analyze the transactions that occur in the database. It providesonline analytical processing (OLAP) and data mining capabilities.
Main features of HP ESOHP ESO provides the following functionality for configuring and tuning your server and MicrosoftSQL Server:• Scheduled or manual data collection, for use as reference when optimizing the system and
SQL Server• Built in knowledge of the hardware architecture, to properly optimize the server
• Reports page that provides a graphical display of data collection parameters, for use inanalysis and interpretation, with the ability to export to a file
• Built-in WBEM-based instrumentation for quick integration with other management tools suchas HP System Insight Manager
• Capability to roll back to previously saved configurations. Use this feature to save the currentconfiguration, then retrieve and apply it in the future if necessary
6 Introduction
New features in release 3.5HP ESO 3.5 provides the following new features:
• A Summary page that:
Displays all recommended settable parameter values gathered from each optimizationpage (by default, the Summary page displays only those values that differ from the currentvalues)
◦
◦ Generates and downloads a PowerShell script for applying all the recommended settableparameter values gathered from each optimization page (by default, only the values thatdiffer from the current values)
• Two types of PowerShell script:
Generated from the Summary page, a script used for applying recommended values ofsettable parameters gathered from all optimization pages
◦
◦ Generated when HP ESO is installed, a script used for running software discovery andfor listing the components that are already up to date and those that need updating
• NIC teaming support on Windows Server 2012The Network page displays the following NIC teaming information:
◦ Adapter status
◦ Member adapter status
◦ Adapter RSS status information
◦ Free NIC for Team recommendation (HP ESO detects that an adapter is not participatingin NIC teaming and recommends that the adapter be used for creating a NIC team)
• Xvelocity supportHP ESO 3.5 provides Xvelocity information and options on the following pages, as indicated:
◦ SQL Server pageThree type modes (relevant to Analysis Services instances only)–
– Process Min Threads parameter
– VertiPaq Memory Limit parameter
◦ Database page– Three type modes (relevant to Analysis Services instances only)
– Tabular Compatibility Level Number parameter
– Column Store Index parameter
New features in release 3.0HP ESO 3.0 provides the following new features:
• Windows 2012 support
• Windows 2012 Server Core support
New features in release 3.5 7

• Data Warehouse (DW) / Business Intelligence (BI) identification and support
User interface for entering login credentials for DW and BI instances◦◦ Recommendations for optimized settings for the following parameters in DW instances
and databases, based on monitored workload:– Max Degree of Parallelism (MAXDOP)
– Max Worker Threads
– Startup options (trace flags) T834, T8048, T1117, and T1118
◦ Recommendations for optimized settings for the following parameters in SQL ServerAnalysis Services (SSAS) instances, based on monitored workload:– Resource Monitor
– RandomFileAccessMode
– FlightRecorder
– Enable ROLAP Distinct Count On DataSource
– Coordinator Query Balancing Factor
– CordinatorQueryBoostPriorityLevel
– MemoryLimit (Low/Total)
– Analysis Services Process GroupAffinity (only for SQL Server 2012 Analysis Services)
◦ Recommendations for optimized storage settings for the following parameters in DWinstances:– Database file autogrowth (Growth)
– Storage layout of database files
◦ Recommendations for optimized storage settings for the following parameters in SSASinstances:– DataDir, LogDir, and TempDir
– Custom storage location of databases
– Partition information such as Proactive Caching, Estimated Rows, Estimated Size
• SAP Database Engine identification and support
Recommendations for optimized settings for the following parameters in databases, basedon monitored workload:
◦
– Max Degree of Parallelism (MAXDOP)
– Checkpoint
– Xp_CmdShell
– Startup options (trace flags) T1117, T1118, T2371, T2549, and T2562
– Database auto create/update/async statistics
◦ Recommendations for optimized storage settings for the following parameters:– Database file autogrowth (Growth)
– Storage layout of database files
• Improved response times for page loading, saving, and rollback
8 Introduction
• Improved graphical user interface (GUI) on all pages, with most significant changes on:
CPU page — CPU affinity settings of all SQL instances are shown side by side forconvenience of comparison and analysis
◦
◦ SQL Startup Option page — Current status and additional details about trace flags inone single page
• Enhanced error handling, including additional detailed error messages presented in GUI andlog file
New features in release 2.0 and 2.1HP ESO 2.0 additionally provides:• Windows 2008 R2 Server core support
• SQL Server 2012 support
• Volume Mount Point support (see “Volume mount point” (page 60))
• New SQL Login page that allows users to specify login credentials for SQL Server instances(see “Setting credentials and logging in to SQL Server and Analysis Servicesinstances” (page 29))
• Session-based usage model to prevent simultaneous access and control of the tool (see “Quickstart: Tasks performed in a typical HP ESO user session” (page 24))
• Support for SQL Server startup options (trace flags) settings (see “Viewing and controlling SQLServer startup options” (page 57))
• Network RSS (Receive Side Scaling) settings recommendations (see “Receive-Side Scaling”(page 62))
• New information on HADR (High Availability Disaster Recovery) configured databases andSQL servers (see “Viewing high availability and disaster recovery configurations andrecommendations” (page 45))
HP ESO 2.1 additionally provides a fix for more efficient CPU and memory resources usage.Previous resources usage caused SQL Server, Database, CPU, and Network optimization pagesto hang for certain storage settings.
New features in release 2.0 and 2.1 9

2 Installing HP ESOSoftware requirements
The following prerequisite software is required in order for HP ESO to function properly:• HP System Management Homepage (HP SMH), Version 6.0 or later
• Any Internet browser supported by HP SMH (refer to your HP SMH documentation for moreinformation)
• Microsoft .NET Framework, Version 3.5
• Microsoft SQL Server 2012 Shared Management Objects
• Microsoft System CLR Types for Microsoft SQL Server 2012
• The following Microsoft SQL Server versions and editions are supported:
Microsoft SQL Server 2012 Enterprise, Business Intelligence, and Standard Editions◦◦ Microsoft SQL Server 2008 R2 Datacenter, Enterprise, and Standard Editions
◦ Microsoft SQL Server 2008 Datacenter, Enterprise, and Standard Editions
• Microsoft SQL Server 2012 Analysis Management Objects
• HP Insight Management WBEM Providers (highly recommended)
Installing the softwareTo install HP Enterprise SQL Optimizer, follow these steps:1. Login as Administrator on the target system.2. Obtain the HP ESO installation file (file name: cpnnnnnn.exe) and either double-click it, or
right-click and select Open.3. The first installation window displays, as shown in Figure 1 (page 10). Click Install to continue.
Figure 1 Package Setup window
4. The second installation window displays, as shown in Figure 2 (page 11). Click Install tocontinue. The installation begins, with a progress bar indicating status.
10 Installing HP ESO
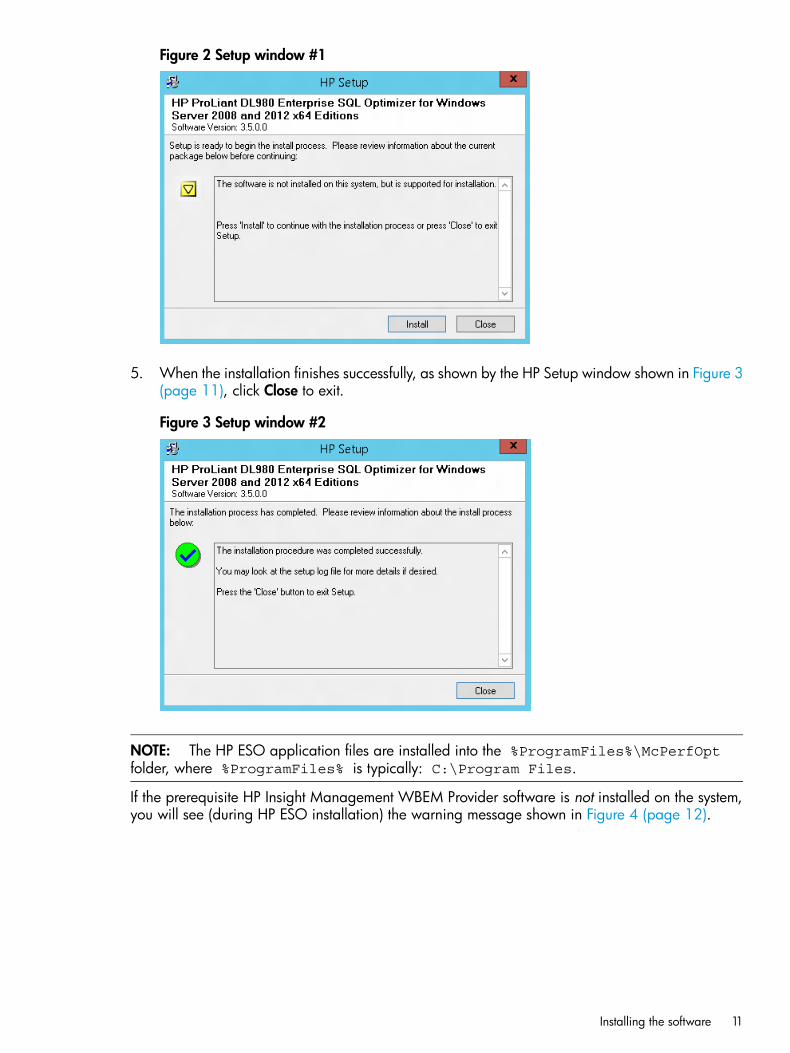
Figure 2 Setup window #1
5. When the installation finishes successfully, as shown by the HP Setup window shown in Figure 3(page 11), click Close to exit.
Figure 3 Setup window #2
NOTE: The HP ESO application files are installed into the %ProgramFiles%\McPerfOptfolder, where %ProgramFiles% is typically: C:\Program Files.
If the prerequisite HP Insight Management WBEM Provider software is not installed on the system,you will see (during HP ESO installation) the warning message shown in Figure 4 (page 12).
Installing the software 11
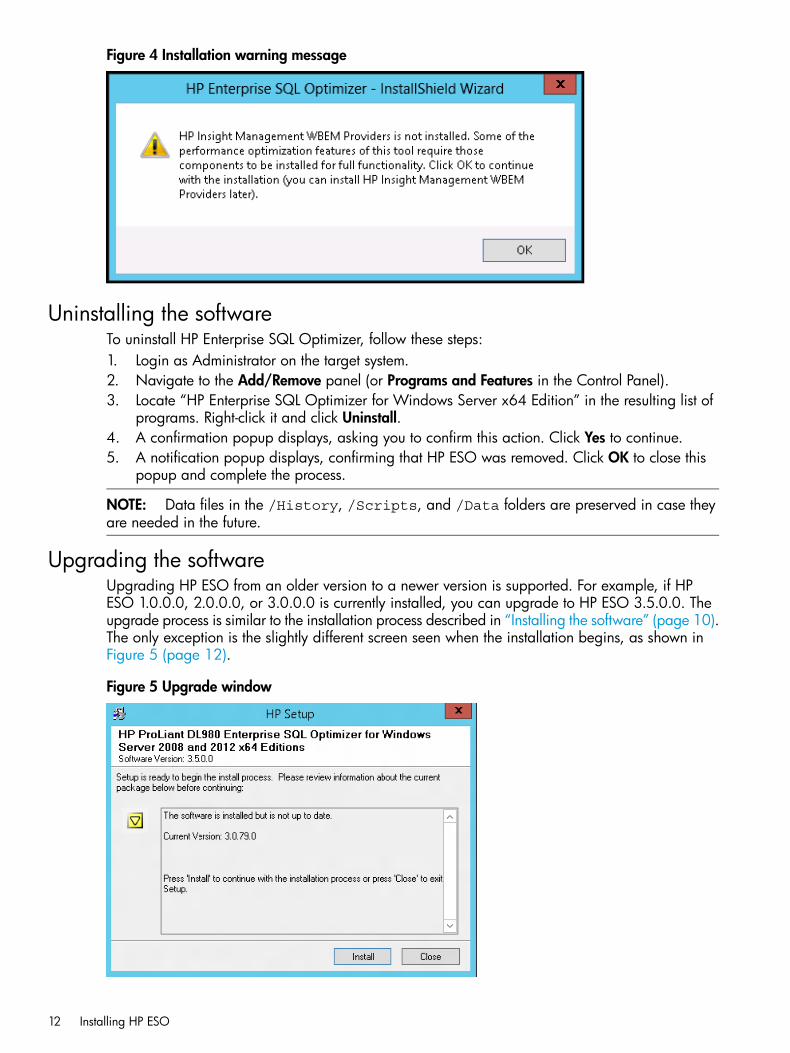
Figure 4 Installation warning message
Uninstalling the softwareTo uninstall HP Enterprise SQL Optimizer, follow these steps:1. Login as Administrator on the target system.2. Navigate to the Add/Remove panel (or Programs and Features in the Control Panel).3. Locate “HP Enterprise SQL Optimizer for Windows Server x64 Edition” in the resulting list of
programs. Right-click it and click Uninstall.4. A confirmation popup displays, asking you to confirm this action. Click Yes to continue.5. A notification popup displays, confirming that HP ESO was removed. Click OK to close this
popup and complete the process.
NOTE: Data files in the /History, /Scripts, and /Data folders are preserved in case theyare needed in the future.
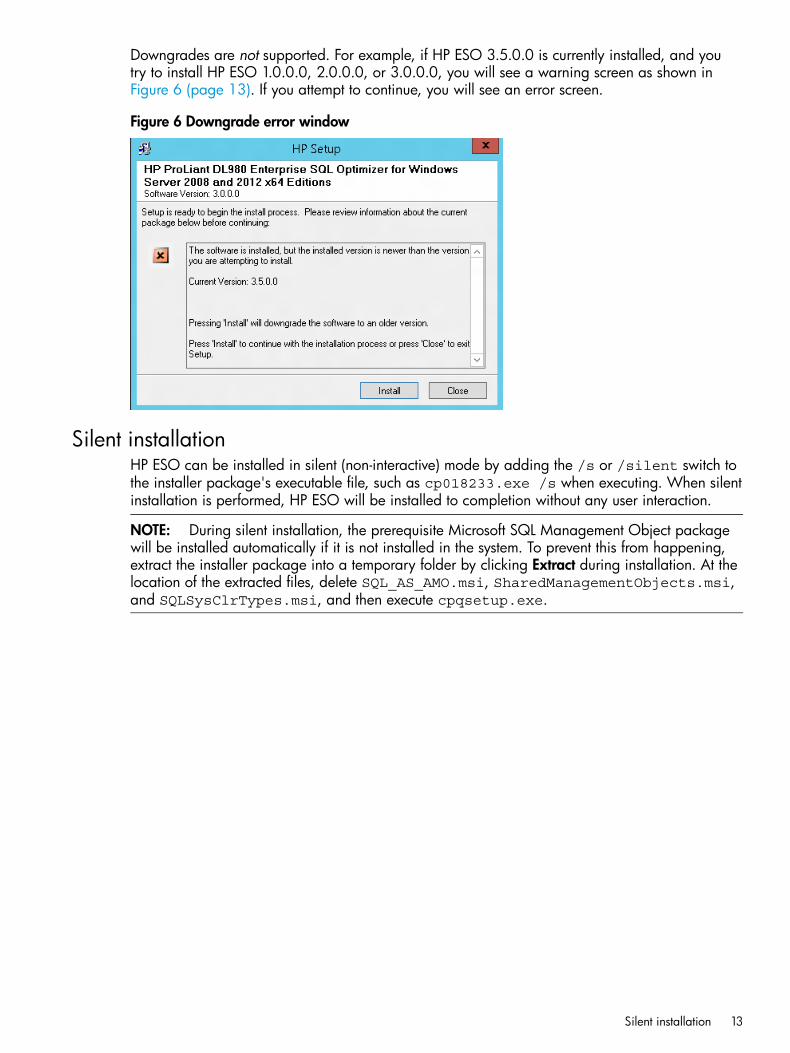
Upgrading the softwareUpgrading HP ESO from an older version to a newer version is supported. For example, if HPESO 1.0.0.0, 2.0.0.0, or 3.0.0.0 is currently installed, you can upgrade to HP ESO 3.5.0.0. Theupgrade process is similar to the installation process described in “Installing the software” (page 10).The only exception is the slightly different screen seen when the installation begins, as shown inFigure 5 (page 12).
Figure 5 Upgrade window
12 Installing HP ESO
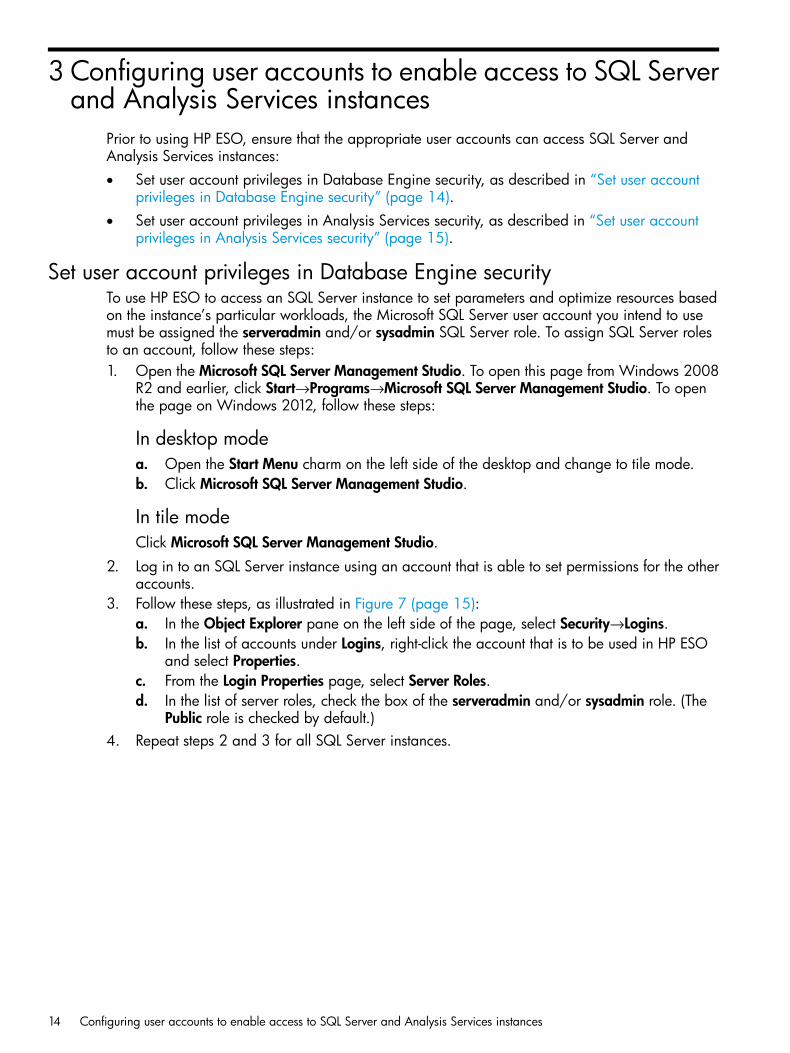
Downgrades are not supported. For example, if HP ESO 3.5.0.0 is currently installed, and youtry to install HP ESO 1.0.0.0, 2.0.0.0, or 3.0.0.0, you will see a warning screen as shown inFigure 6 (page 13). If you attempt to continue, you will see an error screen.
Figure 6 Downgrade error window
Silent installationHP ESO can be installed in silent (non-interactive) mode by adding the /s or /silent switch tothe installer package's executable file, such as cp018233.exe /s when executing. When silentinstallation is performed, HP ESO will be installed to completion without any user interaction.
NOTE: During silent installation, the prerequisite Microsoft SQL Management Object packagewill be installed automatically if it is not installed in the system. To prevent this from happening,extract the installer package into a temporary folder by clicking Extract during installation. At thelocation of the extracted files, delete SQL_AS_AMO.msi, SharedManagementObjects.msi,and SQLSysClrTypes.msi, and then execute cpqsetup.exe.
Silent installation 13
3 Configuring user accounts to enable access to SQL Serverand Analysis Services instances
Prior to using HP ESO, ensure that the appropriate user accounts can access SQL Server andAnalysis Services instances:• Set user account privileges in Database Engine security, as described in “Set user account
privileges in Database Engine security” (page 14).• Set user account privileges in Analysis Services security, as described in “Set user account
privileges in Analysis Services security” (page 15).
Set user account privileges in Database Engine securityTo use HP ESO to access an SQL Server instance to set parameters and optimize resources basedon the instance’s particular workloads, the Microsoft SQL Server user account you intend to usemust be assigned the serveradmin and/or sysadmin SQL Server role. To assign SQL Server rolesto an account, follow these steps:1. Open the Microsoft SQL Server Management Studio. To open this page from Windows 2008
R2 and earlier, click Start→Programs→Microsoft SQL Server Management Studio. To openthe page on Windows 2012, follow these steps:
In desktop modea. Open the Start Menu charm on the left side of the desktop and change to tile mode.b. Click Microsoft SQL Server Management Studio.
In tile modeClick Microsoft SQL Server Management Studio.
2. Log in to an SQL Server instance using an account that is able to set permissions for the otheraccounts.
3. Follow these steps, as illustrated in Figure 7 (page 15):a. In the Object Explorer pane on the left side of the page, select Security→Logins.b. In the list of accounts under Logins, right-click the account that is to be used in HP ESO
and select Properties.c. From the Login Properties page, select Server Roles.d. In the list of server roles, check the box of the serveradmin and/or sysadmin role. (The
Public role is checked by default.)4. Repeat steps 2 and 3 for all SQL Server instances.
14 Configuring user accounts to enable access to SQL Server and Analysis Services instances
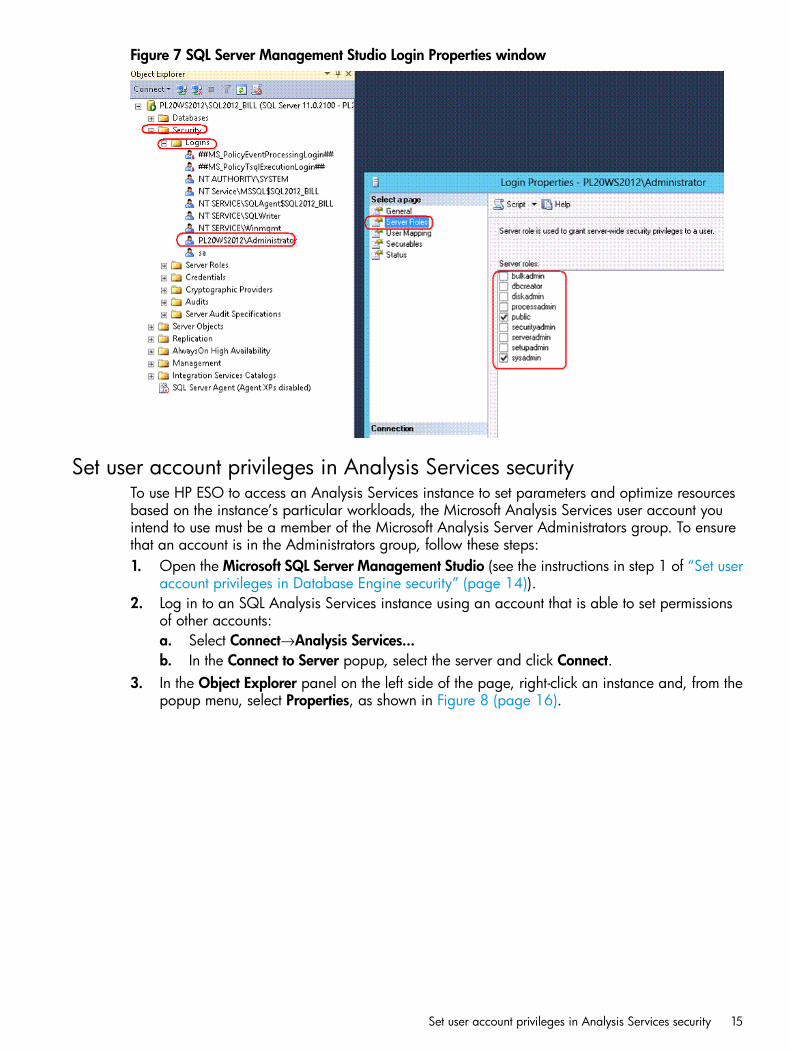
Figure 7 SQL Server Management Studio Login Properties window
Set user account privileges in Analysis Services securityTo use HP ESO to access an Analysis Services instance to set parameters and optimize resourcesbased on the instance’s particular workloads, the Microsoft Analysis Services user account youintend to use must be a member of the Microsoft Analysis Server Administrators group. To ensurethat an account is in the Administrators group, follow these steps:1. Open the Microsoft SQL Server Management Studio (see the instructions in step 1 of “Set user
account privileges in Database Engine security” (page 14)).2. Log in to an SQL Analysis Services instance using an account that is able to set permissions
of other accounts:a. Select Connect→Analysis Services...b. In the Connect to Server popup, select the server and click Connect.
3. In the Object Explorer panel on the left side of the page, right-click an instance and, from thepopup menu, select Properties, as shown in Figure 8 (page 16).
Set user account privileges in Analysis Services security 15
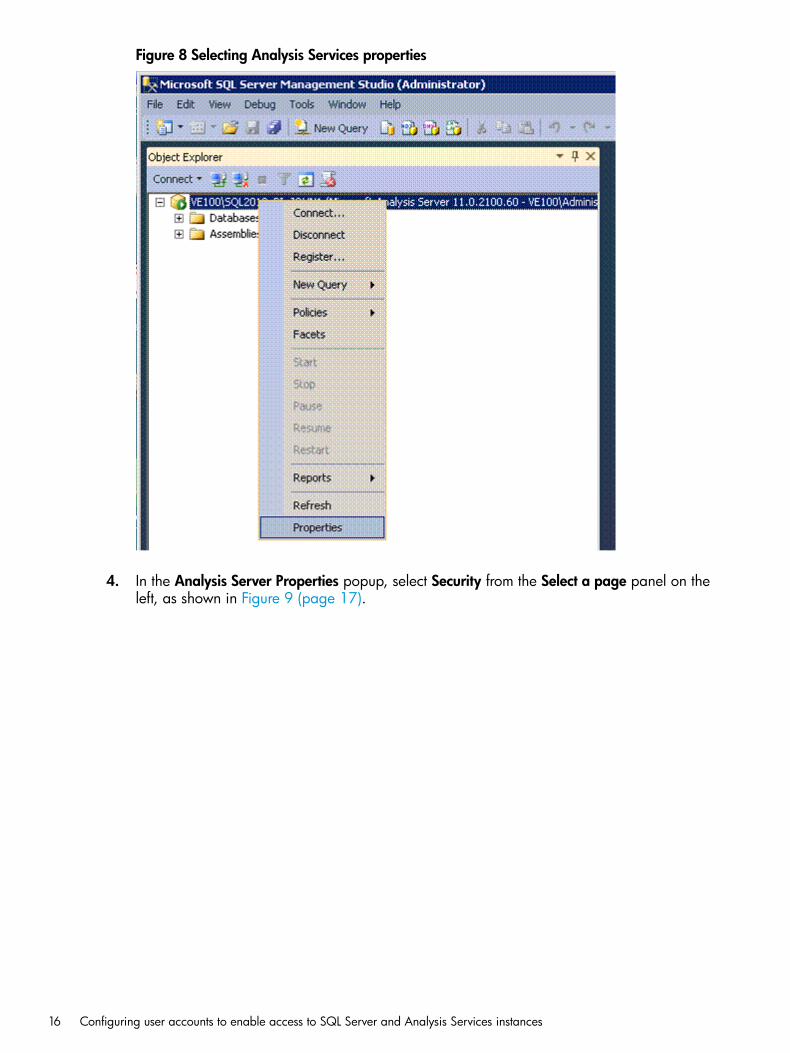
Figure 8 Selecting Analysis Services properties
4. In the Analysis Server Properties popup, select Security from the Select a page panel on theleft, as shown in Figure 9 (page 17).
16 Configuring user accounts to enable access to SQL Server and Analysis Services instances
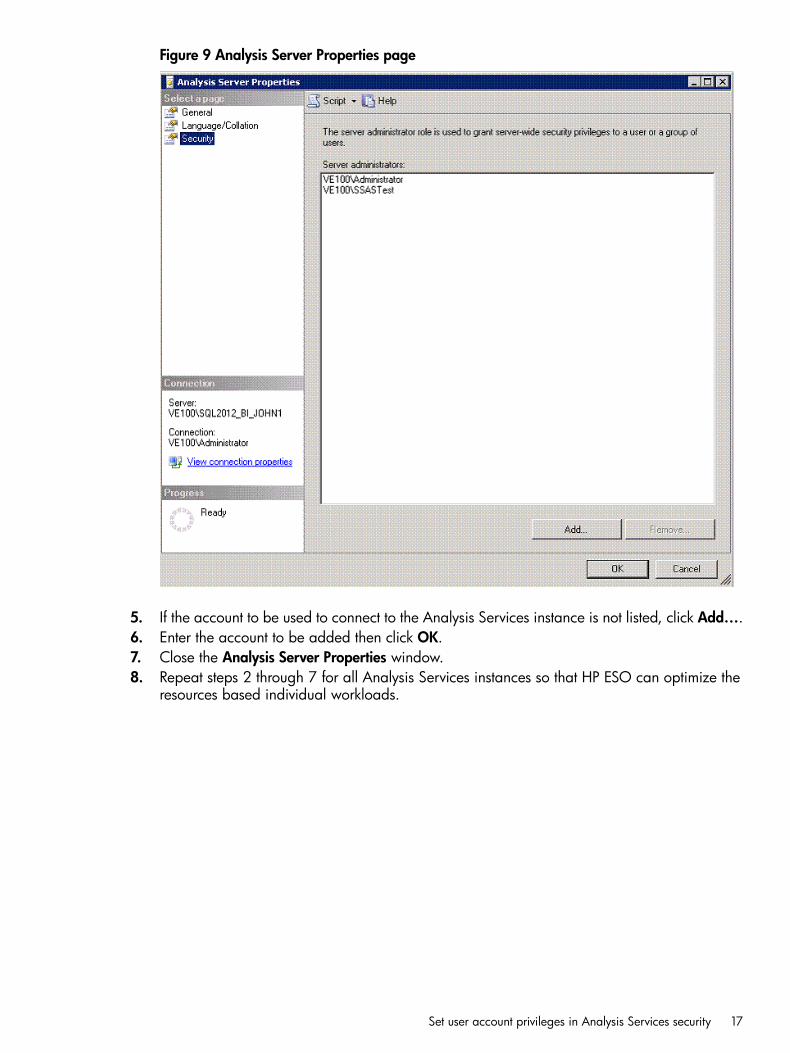
Figure 9 Analysis Server Properties page
5. If the account to be used to connect to the Analysis Services instance is not listed, click Add….6. Enter the account to be added then click OK.7. Close the Analysis Server Properties window.8. Repeat steps 2 through 7 for all Analysis Services instances so that HP ESO can optimize the
resources based individual workloads.
Set user account privileges in Analysis Services security 17
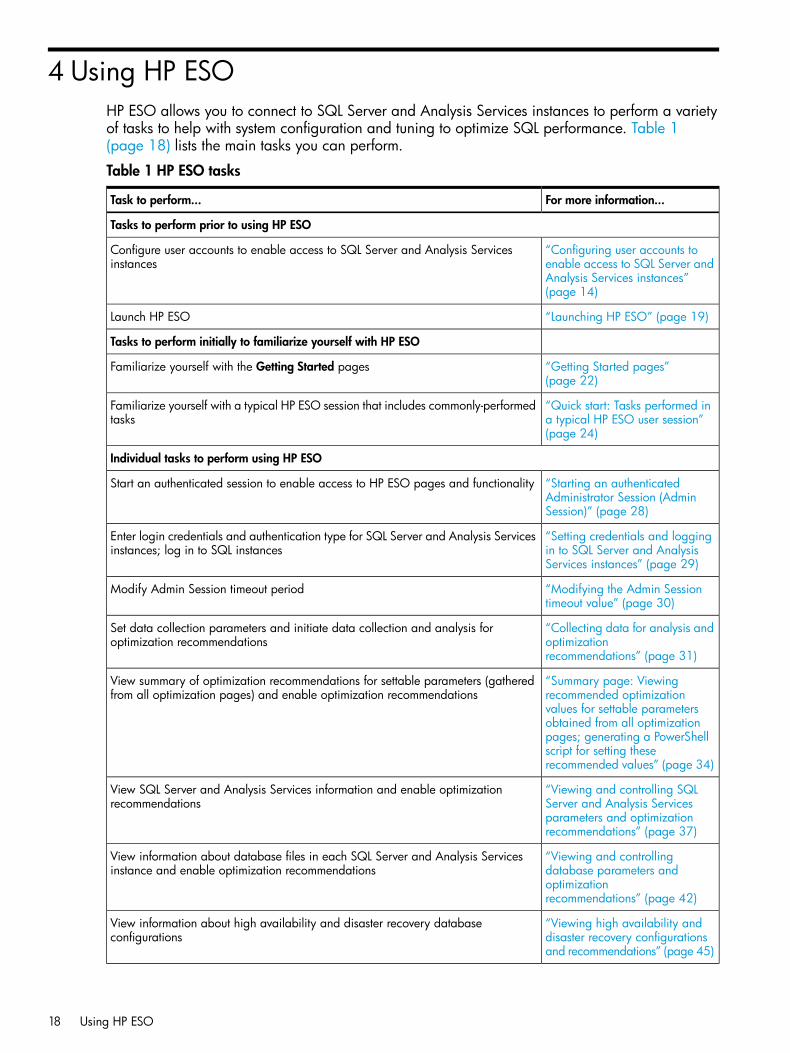
4 Using HP ESOHP ESO allows you to connect to SQL Server and Analysis Services instances to perform a varietyof tasks to help with system configuration and tuning to optimize SQL performance. Table 1(page 18) lists the main tasks you can perform.
Table 1 HP ESO tasks
For more information...Task to perform...
Tasks to perform prior to using HP ESO
“Configuring user accounts toenable access to SQL Server and
Configure user accounts to enable access to SQL Server and Analysis Servicesinstances
Analysis Services instances”(page 14)
“Launching HP ESO” (page 19)Launch HP ESO
Tasks to perform initially to familiarize yourself with HP ESO
“Getting Started pages”(page 22)
Familiarize yourself with the Getting Started pages
“Quick start: Tasks performed ina typical HP ESO user session”(page 24)
Familiarize yourself with a typical HP ESO session that includes commonly-performedtasks
Individual tasks to perform using HP ESO
“Starting an authenticatedAdministrator Session (AdminSession)” (page 28)
Start an authenticated session to enable access to HP ESO pages and functionality
“Setting credentials and loggingin to SQL Server and AnalysisServices instances” (page 29)
Enter login credentials and authentication type for SQL Server and Analysis Servicesinstances; log in to SQL instances
“Modifying the Admin Sessiontimeout value” (page 30)
Modify Admin Session timeout period
“Collecting data for analysis andoptimizationrecommendations” (page 31)
Set data collection parameters and initiate data collection and analysis foroptimization recommendations
“Summary page: Viewingrecommended optimization
View summary of optimization recommendations for settable parameters (gatheredfrom all optimization pages) and enable optimization recommendations
values for settable parametersobtained from all optimizationpages; generating a PowerShellscript for setting theserecommended values” (page 34)
“Viewing and controlling SQLServer and Analysis Services
View SQL Server and Analysis Services information and enable optimizationrecommendations
parameters and optimizationrecommendations” (page 37)
“Viewing and controllingdatabase parameters and
View information about database files in each SQL Server and Analysis Servicesinstance and enable optimization recommendations
optimizationrecommendations” (page 42)
“Viewing high availability anddisaster recovery configurationsand recommendations” (page 45)
View information about high availability and disaster recovery databaseconfigurations
18 Using HP ESO
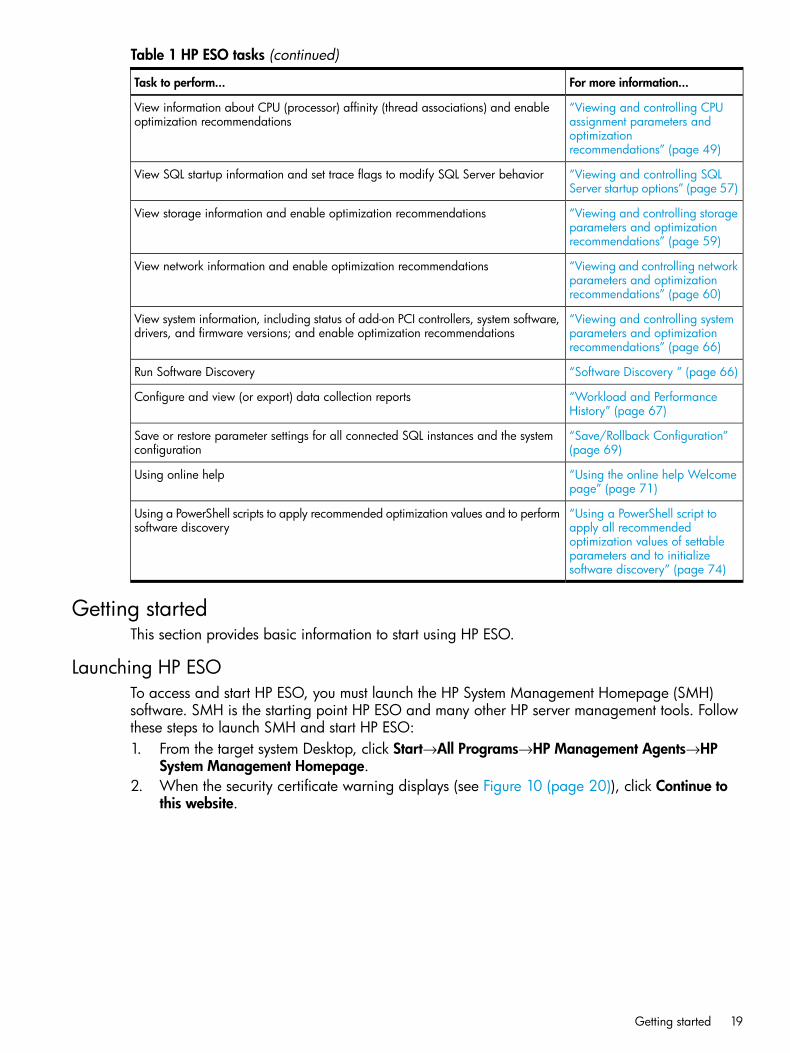
Table 1 HP ESO tasks (continued)
For more information...Task to perform...
“Viewing and controlling CPUassignment parameters and
View information about CPU (processor) affinity (thread associations) and enableoptimization recommendations
optimizationrecommendations” (page 49)
“Viewing and controlling SQLServer startup options” (page 57)
View SQL startup information and set trace flags to modify SQL Server behavior
“Viewing and controlling storageparameters and optimizationrecommendations” (page 59)
View storage information and enable optimization recommendations
“Viewing and controlling networkparameters and optimizationrecommendations” (page 60)
View network information and enable optimization recommendations
“Viewing and controlling systemparameters and optimizationrecommendations” (page 66)
View system information, including status of add-on PCI controllers, system software,drivers, and firmware versions; and enable optimization recommendations
“Software Discovery ” (page 66)Run Software Discovery
“Workload and PerformanceHistory” (page 67)
Configure and view (or export) data collection reports
“Save/Rollback Configuration”(page 69)
Save or restore parameter settings for all connected SQL instances and the systemconfiguration
“Using the online help Welcomepage” (page 71)
Using online help
“Using a PowerShell script toapply all recommended
Using a PowerShell scripts to apply recommended optimization values and to performsoftware discovery
optimization values of settableparameters and to initializesoftware discovery” (page 74)
Getting startedThis section provides basic information to start using HP ESO.
Launching HP ESOTo access and start HP ESO, you must launch the HP System Management Homepage (SMH)software. SMH is the starting point HP ESO and many other HP server management tools. Followthese steps to launch SMH and start HP ESO:1. From the target system Desktop, click Start→All Programs→HP Management Agents→HP
System Management Homepage.2. When the security certificate warning displays (see Figure 10 (page 20)), click Continue to
this website.
Getting started 19
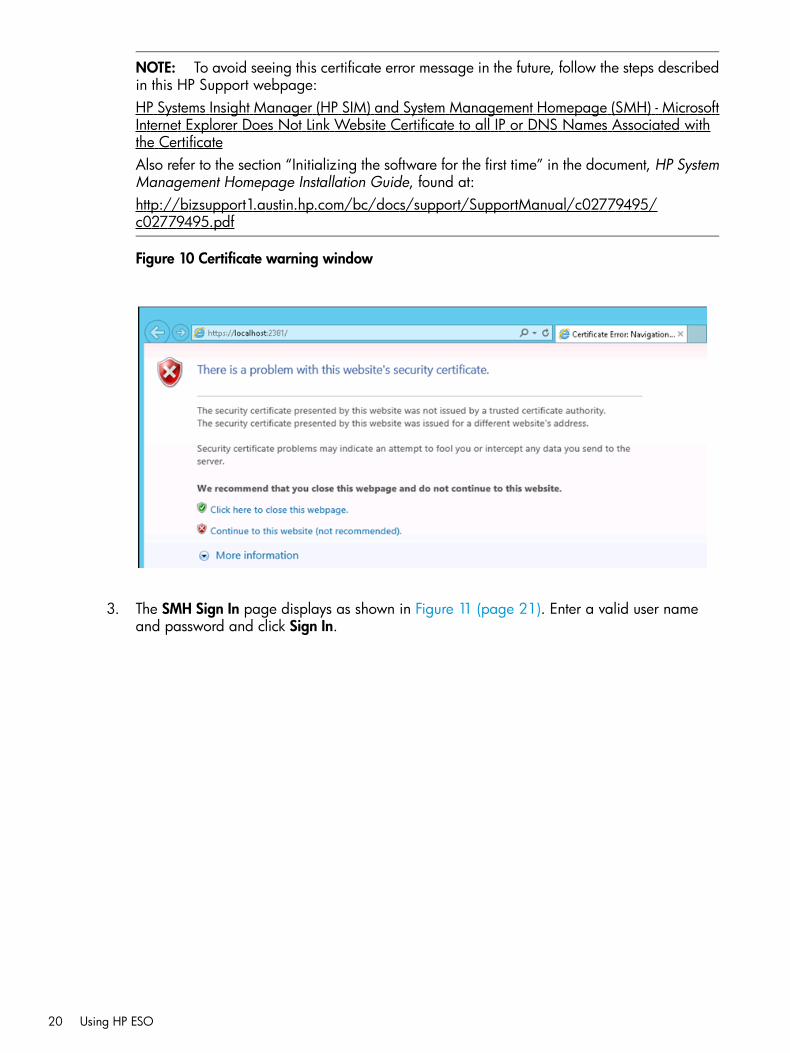
NOTE: To avoid seeing this certificate error message in the future, follow the steps describedin this HP Support webpage:HP Systems Insight Manager (HP SIM) and System Management Homepage (SMH) - MicrosoftInternet Explorer Does Not Link Website Certificate to all IP or DNS Names Associated withthe CertificateAlso refer to the section “Initializing the software for the first time” in the document, HP SystemManagement Homepage Installation Guide, found at:http://bizsupport1.austin.hp.com/bc/docs/support/SupportManual/c02779495/c02779495.pdf
Figure 10 Certificate warning window
3. The SMH Sign In page displays as shown in Figure 11 (page 21). Enter a valid user nameand password and click Sign In.
20 Using HP ESO
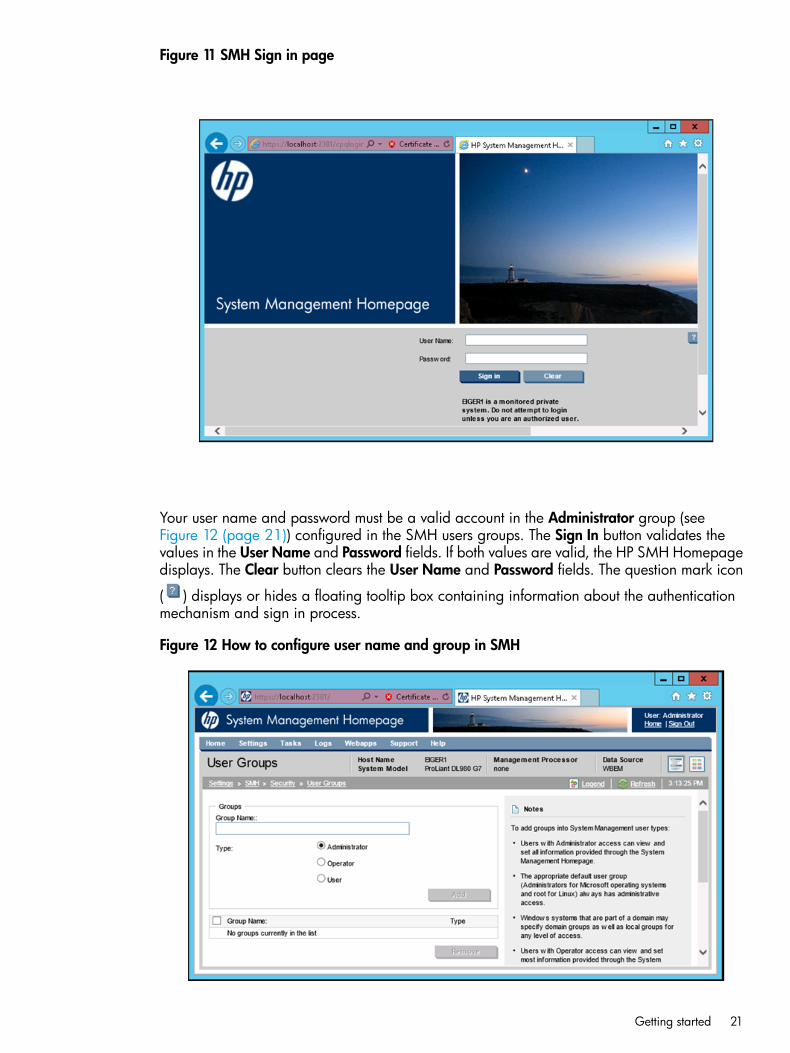
Figure 11 SMH Sign in page
Your user name and password must be a valid account in the Administrator group (seeFigure 12 (page 21)) configured in the SMH users groups. The Sign In button validates thevalues in the User Name and Password fields. If both values are valid, the HP SMH Homepagedisplays. The Clear button clears the User Name and Password fields. The question mark icon
( ) displays or hides a floating tooltip box containing information about the authenticationmechanism and sign in process.
Figure 12 How to configure user name and group in SMH
Getting started 21

4. In the SMH Homepage (see Figure 13 (page 22)), click the HP ESO link in the Enterprise SQLOptimizer box.
Figure 13 SMH Homepage
5. The Enterprise SQL Optimizer Introduction page displays, as shown in “HP ESO Introductionpage” (page 22).
Getting Started pagesThis section describes the two HP ESO Getting Started pages:• Introduction page — the first page displayed after you start HP ESO
• SQL Login page — the page that allows you to set credentials and log in to SQL Server andAnalysis Services instances
For information to help you get started using HP ESO, skip to “Quick start: Tasks performed in atypical HP ESO user session” (page 24).
HP ESO Introduction pageWhen you start HP ESO, the Introduction page displays as shown in Figure 14 (page 23). The leftnavigation pane displays links to other HP ESO pages. To use these pages, you must start anAdministrator Session by clicking Enter Admin Session on the top left corner of the page, asdescribed in “Starting an authenticated Administrator Session (Admin Session)” (page 28).
22 Using HP ESO
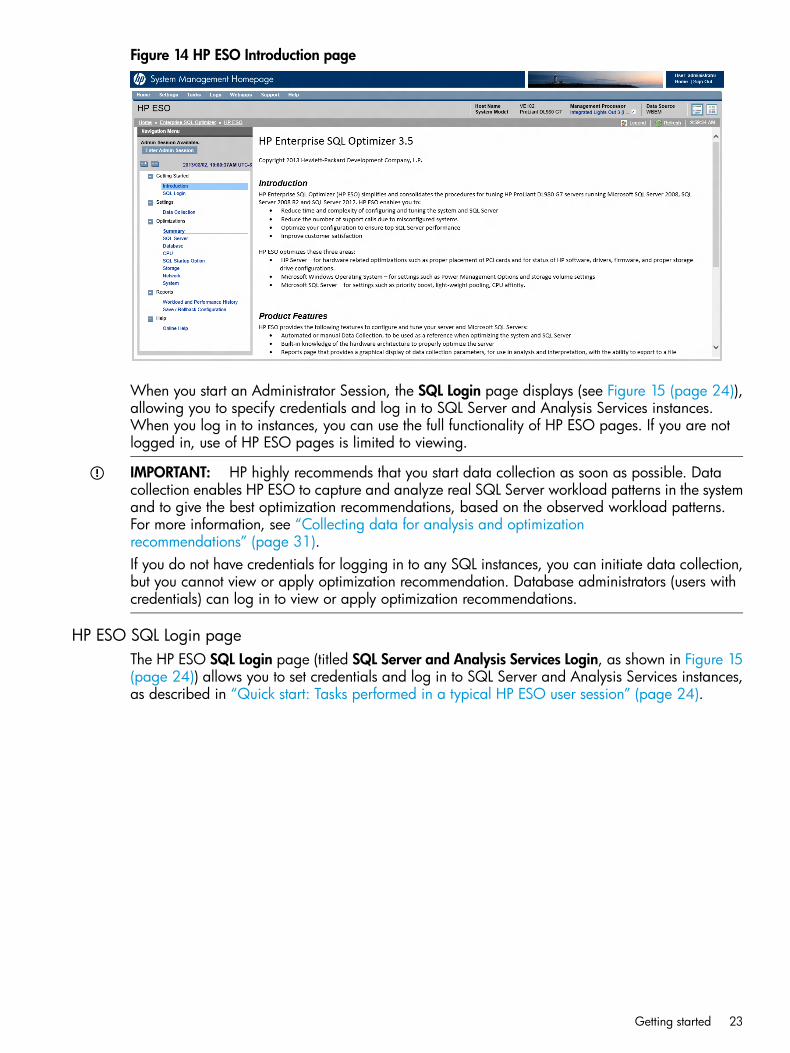
Figure 14 HP ESO Introduction page
When you start an Administrator Session, the SQL Login page displays (see Figure 15 (page 24)),allowing you to specify credentials and log in to SQL Server and Analysis Services instances.When you log in to instances, you can use the full functionality of HP ESO pages. If you are notlogged in, use of HP ESO pages is limited to viewing.
IMPORTANT: HP highly recommends that you start data collection as soon as possible. Datacollection enables HP ESO to capture and analyze real SQL Server workload patterns in the systemand to give the best optimization recommendations, based on the observed workload patterns.For more information, see “Collecting data for analysis and optimizationrecommendations” (page 31).If you do not have credentials for logging in to any SQL instances, you can initiate data collection,but you cannot view or apply optimization recommendation. Database administrators (users withcredentials) can log in to view or apply optimization recommendations.
HP ESO SQL Login pageThe HP ESO SQL Login page (titled SQL Server and Analysis Services Login, as shown in Figure 15(page 24)) allows you to set credentials and log in to SQL Server and Analysis Services instances,as described in “Quick start: Tasks performed in a typical HP ESO user session” (page 24).
Getting started 23
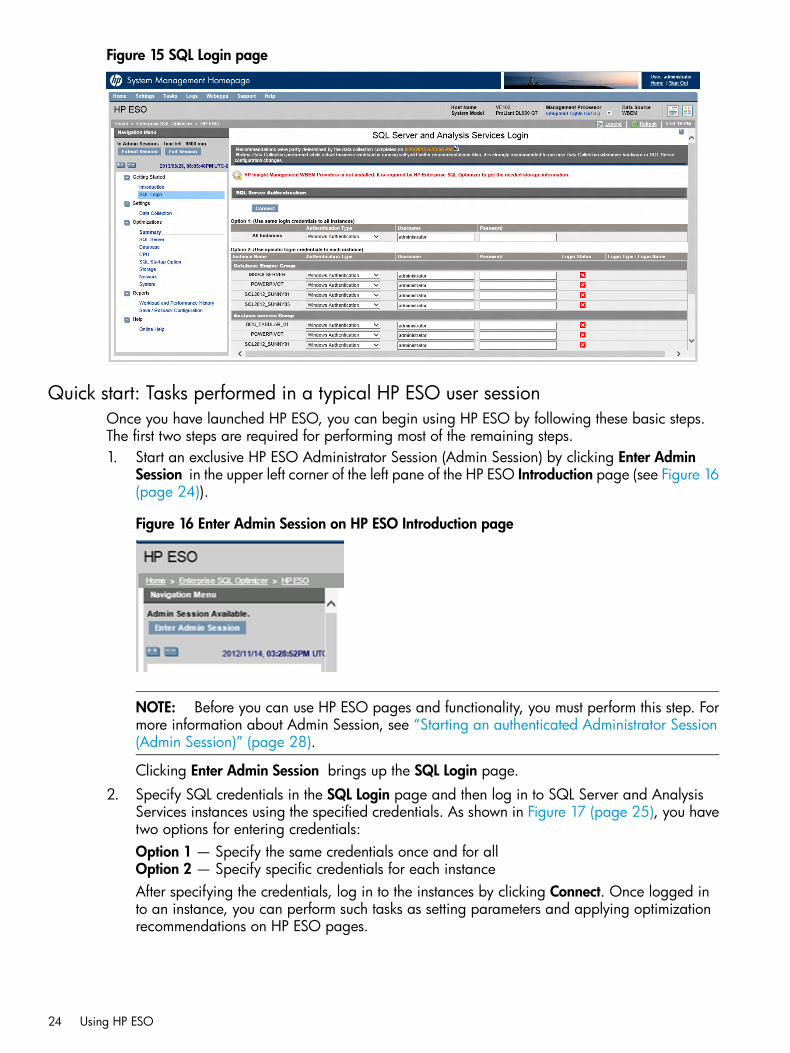
Figure 15 SQL Login page
Quick start: Tasks performed in a typical HP ESO user sessionOnce you have launched HP ESO, you can begin using HP ESO by following these basic steps.The first two steps are required for performing most of the remaining steps.1. Start an exclusive HP ESO Administrator Session (Admin Session) by clicking Enter Admin
Session in the upper left corner of the left pane of the HP ESO Introduction page (see Figure 16(page 24)).
Figure 16 Enter Admin Session on HP ESO Introduction page
NOTE: Before you can use HP ESO pages and functionality, you must perform this step. Formore information about Admin Session, see “Starting an authenticated Administrator Session(Admin Session)” (page 28).
Clicking Enter Admin Session brings up the SQL Login page.2. Specify SQL credentials in the SQL Login page and then log in to SQL Server and Analysis
Services instances using the specified credentials. As shown in Figure 17 (page 25), you havetwo options for entering credentials:Option 1 — Specify the same credentials once and for allOption 2 — Specify specific credentials for each instanceAfter specifying the credentials, log in to the instances by clicking Connect. Once logged into an instance, you can perform such tasks as setting parameters and applying optimizationrecommendations on HP ESO pages.
24 Using HP ESO
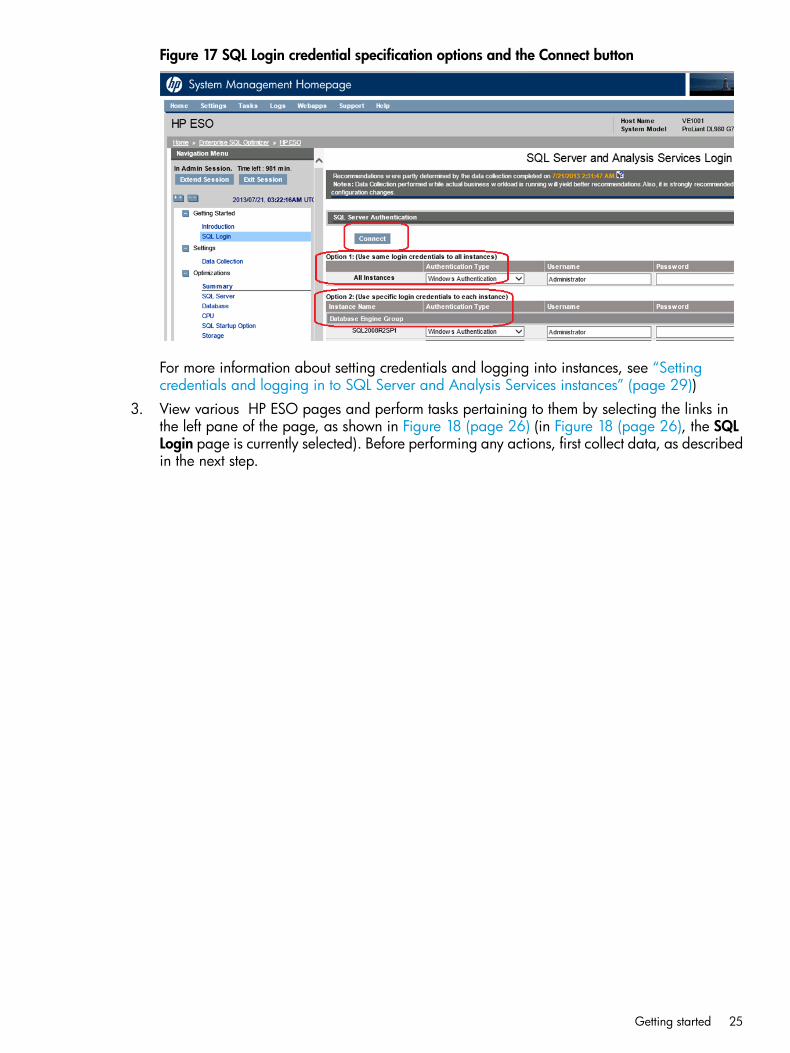
Figure 17 SQL Login credential specification options and the Connect button
For more information about setting credentials and logging into instances, see “Settingcredentials and logging in to SQL Server and Analysis Services instances” (page 29))
3. View various HP ESO pages and perform tasks pertaining to them by selecting the links inthe left pane of the page, as shown in Figure 18 (page 26) (in Figure 18 (page 26), the SQLLogin page is currently selected). Before performing any actions, first collect data, as describedin the next step.
Getting started 25
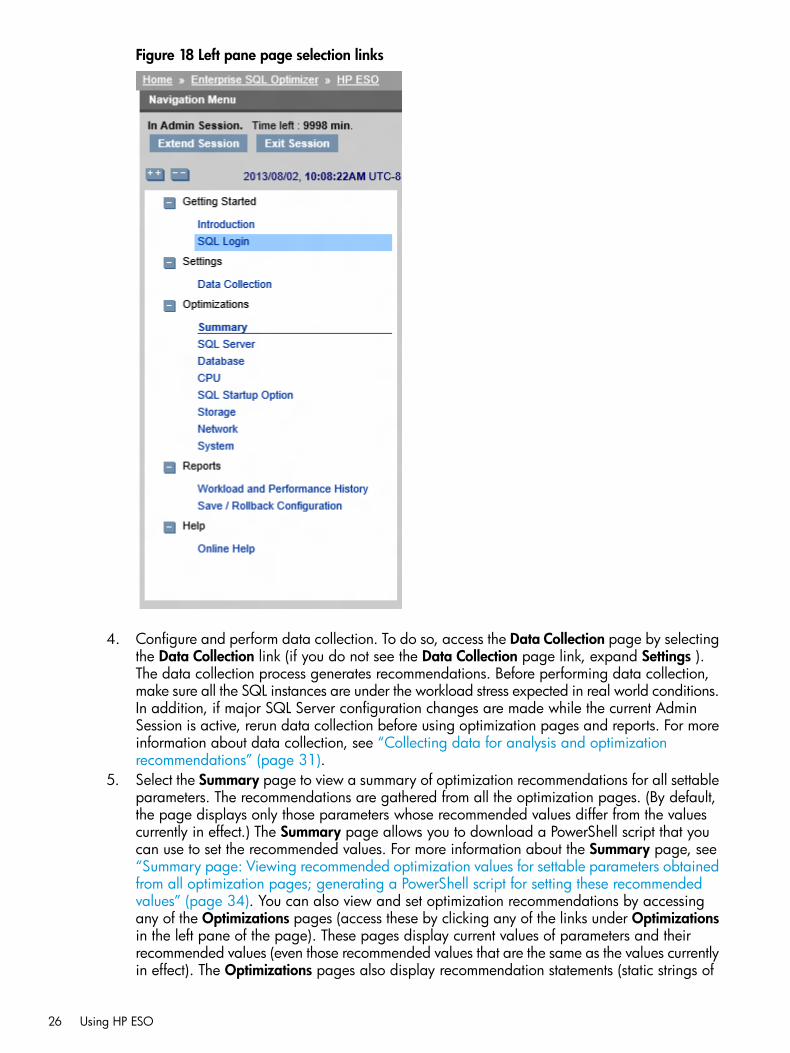
Figure 18 Left pane page selection links
4. Configure and perform data collection. To do so, access the Data Collection page by selectingthe Data Collection link (if you do not see the Data Collection page link, expand Settings ).The data collection process generates recommendations. Before performing data collection,make sure all the SQL instances are under the workload stress expected in real world conditions.In addition, if major SQL Server configuration changes are made while the current AdminSession is active, rerun data collection before using optimization pages and reports. For moreinformation about data collection, see “Collecting data for analysis and optimizationrecommendations” (page 31).
5. Select the Summary page to view a summary of optimization recommendations for all settableparameters. The recommendations are gathered from all the optimization pages. (By default,the page displays only those parameters whose recommended values differ from the valuescurrently in effect.) The Summary page allows you to download a PowerShell script that youcan use to set the recommended values. For more information about the Summary page, see“Summary page: Viewing recommended optimization values for settable parameters obtainedfrom all optimization pages; generating a PowerShell script for setting these recommendedvalues” (page 34). You can also view and set optimization recommendations by accessingany of the Optimizations pages (access these by clicking any of the links under Optimizationsin the left pane of the page). These pages display current values of parameters and theirrecommended values (even those recommended values that are the same as the values currentlyin effect). The Optimizations pages also display recommendation statements (static strings of
26 Using HP ESO

text that cannot be updated dynamically). The recommendation statements suggest changesthat you can make manually.
IMPORTANT: To ensure suitability of HP ESO’s optimization recommendations, perform datacollection during typical business workloads. To obtain the most up-to-date recommendations,run and complete (stop) the data collection process prior to accessing the reports page.
6. View data collected by the data collection process by accessing the Workload and PerformanceHistory reports page. For more information, see “Workload and Performance History”(page 67).
NOTE: To obtain the most up-to-date reports, run and complete (stop) the data collectionprocess prior to accessing the reports page.
7. The upper left corner of each HP ESO page indicates how much time is left in the currentAdmin Session (see Figure 19 (page 27)). Whenever the HP ESO Admin Session is about toexpire, click Extend Session to reset the timeout value. When less than one minute remains,some pages might not be accessible. Clicking Extend Session makes those pages accessibleagain.
Figure 19 Session timer and Extend Session button
The default Admin Session timeout is 30 minutes. You can change the timeout value in theESO Session Configuration section of the SQL Login page. To see this section of the SQL Loginpage, you might have to scroll down to the bottom of the page. Figure 20 (page 27) showsthe ESO Session Configuration section. For more information, see “Modifying the AdminSession timeout value” (page 30).
Figure 20 ESO Session Configuration: Session Time Out
8. To end the ESO Admin Session, click Exit Session (directly beneath the Time left field in theupper left corner of the HP ESO page). For security purposes, this clears all SQL credentials.You need to re-enter SQL credentials when running HP ESO again. When an HP ESO AdminSession expires, all SQL credentials are cleared automatically and must be re-entered.
Floating help for items on a pageAnytime you mouse over a setting or section that has the cursor/question mark symbol “ ”, clickingthat symbol brings up floating help text, as shown in Figure 21 (page 28). This feature is extremelyuseful in learning about the many settings that HP ESO provides.
Getting started 27
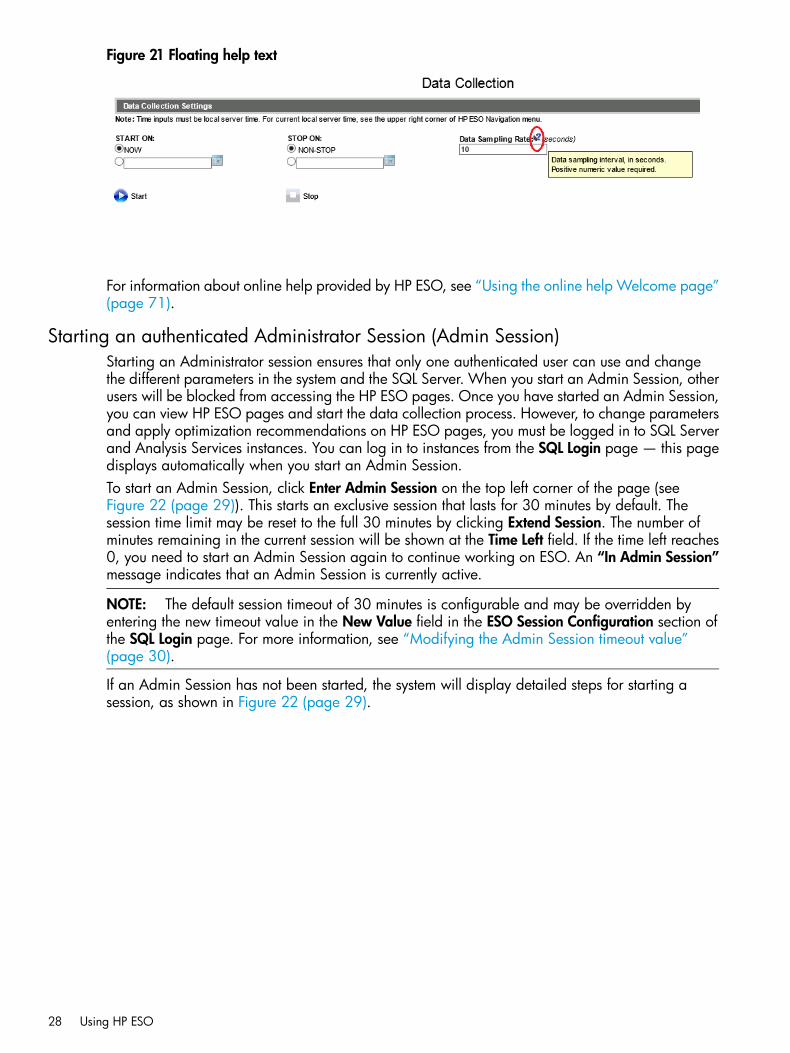
Figure 21 Floating help text
For information about online help provided by HP ESO, see “Using the online help Welcome page”(page 71).
Starting an authenticated Administrator Session (Admin Session)Starting an Administrator session ensures that only one authenticated user can use and changethe different parameters in the system and the SQL Server. When you start an Admin Session, otherusers will be blocked from accessing the HP ESO pages. Once you have started an Admin Session,you can view HP ESO pages and start the data collection process. However, to change parametersand apply optimization recommendations on HP ESO pages, you must be logged in to SQL Serverand Analysis Services instances. You can log in to instances from the SQL Login page — this pagedisplays automatically when you start an Admin Session.To start an Admin Session, click Enter Admin Session on the top left corner of the page (seeFigure 22 (page 29)). This starts an exclusive session that lasts for 30 minutes by default. Thesession time limit may be reset to the full 30 minutes by clicking Extend Session. The number ofminutes remaining in the current session will be shown at the Time Left field. If the time left reaches0, you need to start an Admin Session again to continue working on ESO. An “In Admin Session”message indicates that an Admin Session is currently active.
NOTE: The default session timeout of 30 minutes is configurable and may be overridden byentering the new timeout value in the New Value field in the ESO Session Configuration section ofthe SQL Login page. For more information, see “Modifying the Admin Session timeout value”(page 30).
If an Admin Session has not been started, the system will display detailed steps for starting asession, as shown in Figure 22 (page 29).
28 Using HP ESO
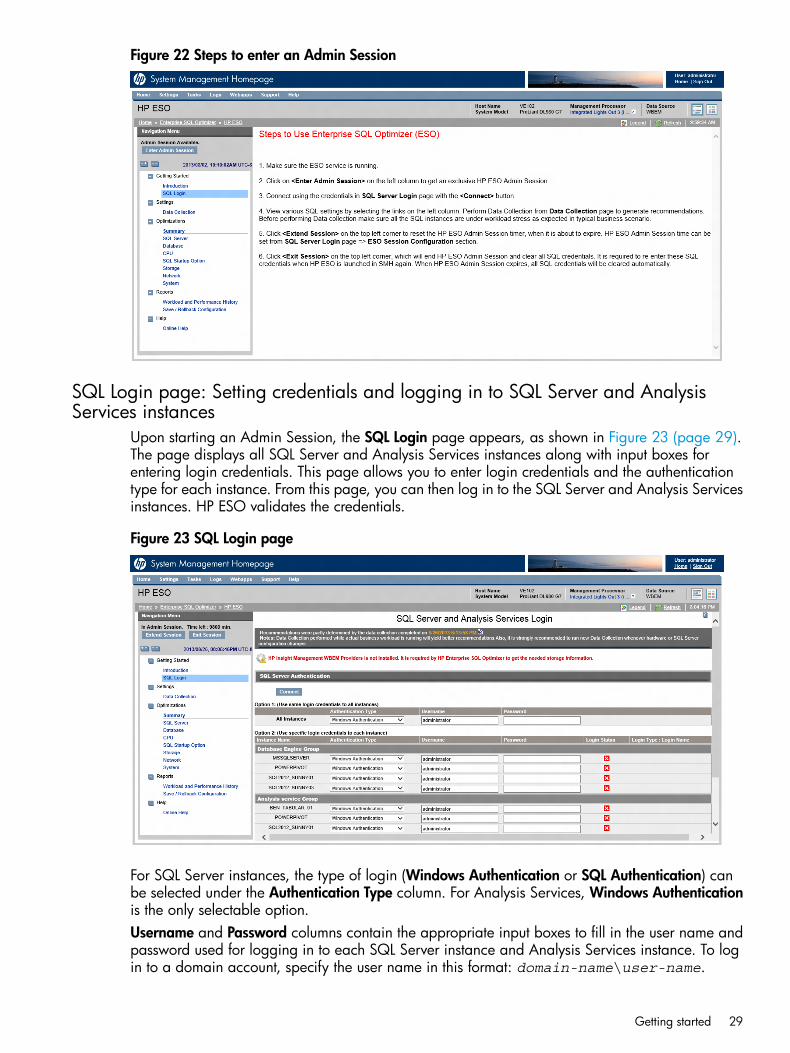
Figure 22 Steps to enter an Admin Session
SQL Login page: Setting credentials and logging in to SQL Server and AnalysisServices instances
Upon starting an Admin Session, the SQL Login page appears, as shown in Figure 23 (page 29).The page displays all SQL Server and Analysis Services instances along with input boxes forentering login credentials. This page allows you to enter login credentials and the authenticationtype for each instance. From this page, you can then log in to the SQL Server and Analysis Servicesinstances. HP ESO validates the credentials.
Figure 23 SQL Login page
For SQL Server instances, the type of login (Windows Authentication or SQL Authentication) canbe selected under the Authentication Type column. For Analysis Services, Windows Authenticationis the only selectable option.Username and Password columns contain the appropriate input boxes to fill in the user name andpassword used for logging in to each SQL Server instance and Analysis Services instance. To login to a domain account, specify the user name in this format: domain-name\user-name.
Getting started 29
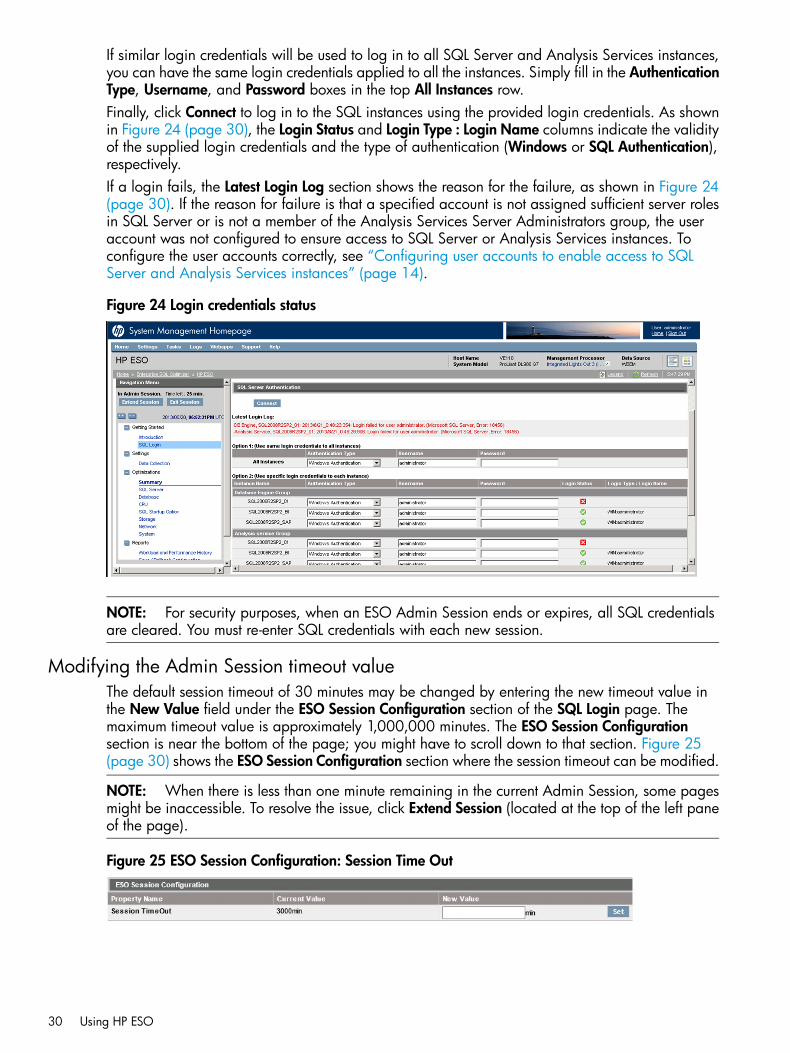
If similar login credentials will be used to log in to all SQL Server and Analysis Services instances,you can have the same login credentials applied to all the instances. Simply fill in the AuthenticationType, Username, and Password boxes in the top All Instances row.Finally, click Connect to log in to the SQL instances using the provided login credentials. As shownin Figure 24 (page 30), the Login Status and Login Type : Login Name columns indicate the validityof the supplied login credentials and the type of authentication (Windows or SQL Authentication),respectively.If a login fails, the Latest Login Log section shows the reason for the failure, as shown in Figure 24(page 30). If the reason for failure is that a specified account is not assigned sufficient server rolesin SQL Server or is not a member of the Analysis Services Server Administrators group, the useraccount was not configured to ensure access to SQL Server or Analysis Services instances. Toconfigure the user accounts correctly, see “Configuring user accounts to enable access to SQLServer and Analysis Services instances” (page 14).
Figure 24 Login credentials status
NOTE: For security purposes, when an ESO Admin Session ends or expires, all SQL credentialsare cleared. You must re-enter SQL credentials with each new session.
Modifying the Admin Session timeout valueThe default session timeout of 30 minutes may be changed by entering the new timeout value inthe New Value field under the ESO Session Configuration section of the SQL Login page. Themaximum timeout value is approximately 1,000,000 minutes. The ESO Session Configurationsection is near the bottom of the page; you might have to scroll down to that section. Figure 25(page 30) shows the ESO Session Configuration section where the session timeout can be modified.
NOTE: When there is less than one minute remaining in the current Admin Session, some pagesmight be inaccessible. To resolve the issue, click Extend Session (located at the top of the left paneof the page).
Figure 25 ESO Session Configuration: Session Time Out
30 Using HP ESO
Settings pages: Setting parameters for data collectionUse the Data Collection page to configure some of your data collection settings prior to discoveryand optimization of the HP server, the Windows Operating System (OS), and SQL Server.
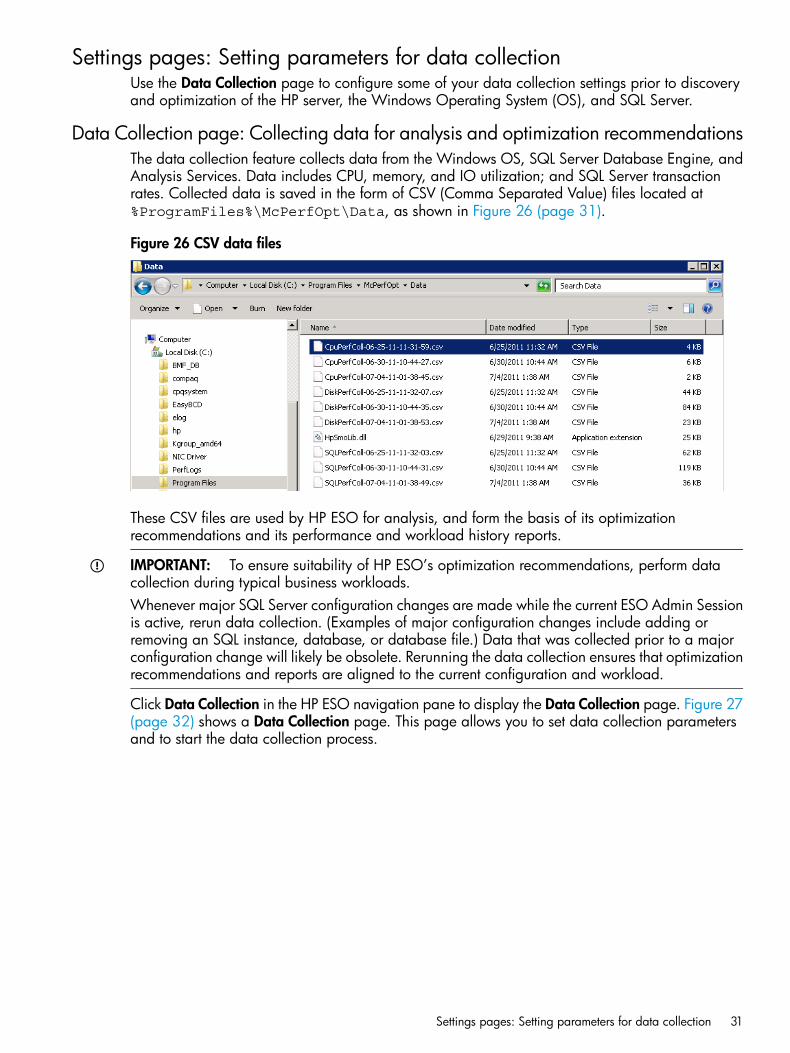
Data Collection page: Collecting data for analysis and optimization recommendationsThe data collection feature collects data from the Windows OS, SQL Server Database Engine, andAnalysis Services. Data includes CPU, memory, and IO utilization; and SQL Server transactionrates. Collected data is saved in the form of CSV (Comma Separated Value) files located at%ProgramFiles%\McPerfOpt\Data, as shown in Figure 26 (page 31).
Figure 26 CSV data files
These CSV files are used by HP ESO for analysis, and form the basis of its optimizationrecommendations and its performance and workload history reports.
IMPORTANT: To ensure suitability of HP ESO’s optimization recommendations, perform datacollection during typical business workloads.Whenever major SQL Server configuration changes are made while the current ESO Admin Sessionis active, rerun data collection. (Examples of major configuration changes include adding orremoving an SQL instance, database, or database file.) Data that was collected prior to a majorconfiguration change will likely be obsolete. Rerunning the data collection ensures that optimizationrecommendations and reports are aligned to the current configuration and workload.
Click Data Collection in the HP ESO navigation pane to display the Data Collection page. Figure 27(page 32) shows a Data Collection page. This page allows you to set data collection parametersand to start the data collection process.
Settings pages: Setting parameters for data collection 31
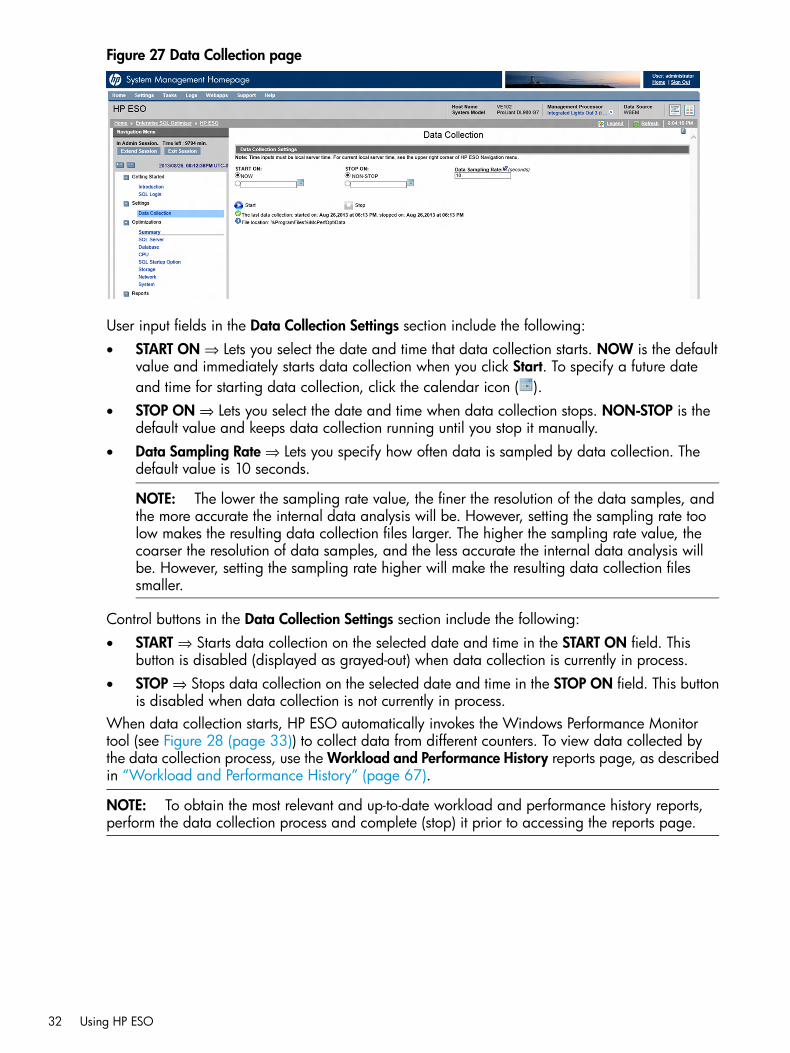
Figure 27 Data Collection page
User input fields in the Data Collection Settings section include the following:• START ON ⇒ Lets you select the date and time that data collection starts. NOW is the default
value and immediately starts data collection when you click Start. To specify a future dateand time for starting data collection, click the calendar icon ( ).
• STOP ON ⇒ Lets you select the date and time when data collection stops. NON-STOP is thedefault value and keeps data collection running until you stop it manually.
• Data Sampling Rate ⇒ Lets you specify how often data is sampled by data collection. Thedefault value is 10 seconds.
NOTE: The lower the sampling rate value, the finer the resolution of the data samples, andthe more accurate the internal data analysis will be. However, setting the sampling rate toolow makes the resulting data collection files larger. The higher the sampling rate value, thecoarser the resolution of data samples, and the less accurate the internal data analysis willbe. However, setting the sampling rate higher will make the resulting data collection filessmaller.
Control buttons in the Data Collection Settings section include the following:• START ⇒ Starts data collection on the selected date and time in the START ON field. This
button is disabled (displayed as grayed-out) when data collection is currently in process.• STOP ⇒ Stops data collection on the selected date and time in the STOP ON field. This button
is disabled when data collection is not currently in process.When data collection starts, HP ESO automatically invokes the Windows Performance Monitortool (see Figure 28 (page 33)) to collect data from different counters. To view data collected bythe data collection process, use the Workload and Performance History reports page, as describedin “Workload and Performance History” (page 67).
NOTE: To obtain the most relevant and up-to-date workload and performance history reports,perform the data collection process and complete (stop) it prior to accessing the reports page.
32 Using HP ESO

Figure 28 Performance Monitor
Optimizations pages: Viewing and controlling optimizationrecommendations
The Optimizations pages provide various types of optimization recommendations based on collecteddata.
IMPORTANT: HP highly recommends that you run data collection and complete the processbefore visiting or modifying the optimization pages. To ensure suitability of HP ESO’s optimizationrecommendations, perform data collection during typical business workloads.Whenever major SQL Server configuration changes are made while the current ESO Admin Sessionis active, rerun data collection prior to using Optimizations pages. (Examples of major configurationchanges include adding or removing an SQL instance, database, or database file.) Data that wascollected prior to a major configuration change will likely be obsolete. Rerunning the data collectionensures that optimization recommendations and reports are aligned to the current configurationand workload.If you have used a domain user account to log into SQL instances, Optimizations pages may takea few minutes to load the first time after logging in to the SQL instances or completing datacollection, as HP ESO initially gathers data from multiple sources and calculates optimizationrecommendations.
HP ESO optimization pages typically display the following values or controls (see Figure 29(page 34)):
• N/A ⇒ No recommendation can be provided for the parameter at the current state andenvironment.
• Current ⇒ The current parameter value discovered in the system.
• Recommended ⇒ The parameter value recommended by HP ESO.
• New Value ⇒ This field contains the new parameter value to be applied to the system. Bydefault, this field contains the recommended value. However, you can change this value ifdesired.
• SET ALL ⇒ Sets all of the parameters shown in the New Value field on the page. Click thisbutton to make the changes take effect immediately. Changes requiring a system or SQL Serverservice restart are indicated after the changes are applied.
Optimizations pages: Viewing and controlling optimization recommendations 33
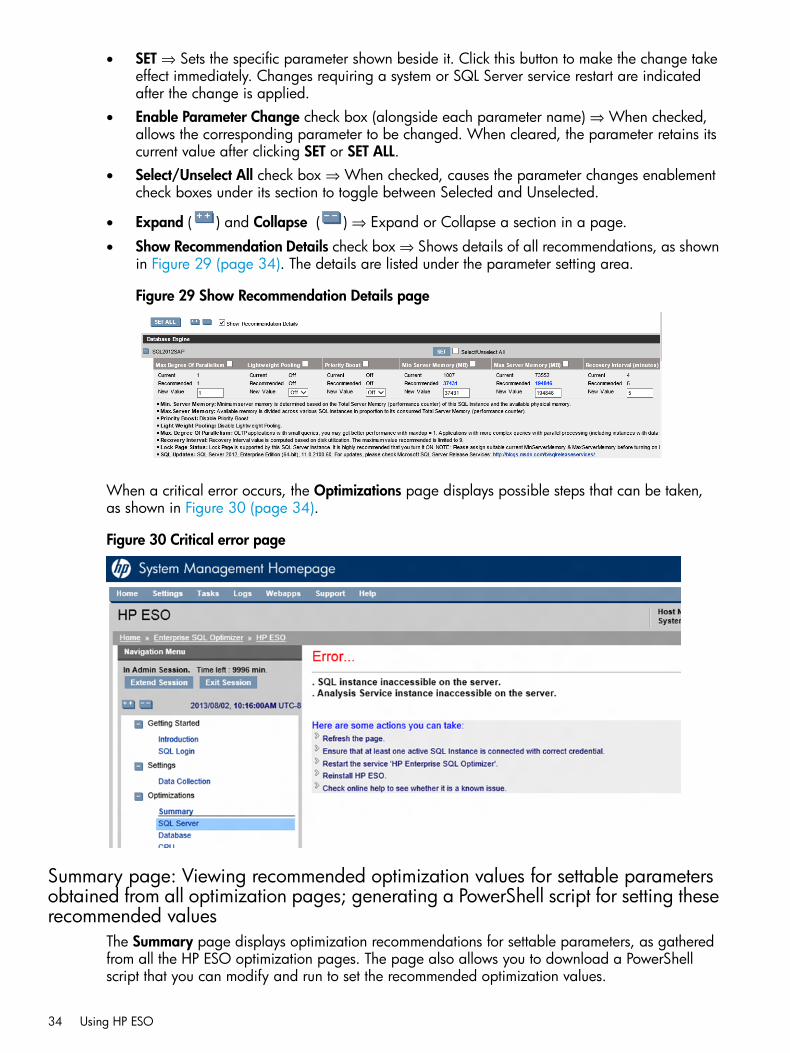
• SET ⇒ Sets the specific parameter shown beside it. Click this button to make the change takeeffect immediately. Changes requiring a system or SQL Server service restart are indicatedafter the change is applied.
• Enable Parameter Change check box (alongside each parameter name) ⇒ When checked,allows the corresponding parameter to be changed. When cleared, the parameter retains itscurrent value after clicking SET or SET ALL.
• Select/Unselect All check box ⇒ When checked, causes the parameter changes enablementcheck boxes under its section to toggle between Selected and Unselected.
• Expand ( ) and Collapse ( ) ⇒ Expand or Collapse a section in a page.
• Show Recommendation Details check box ⇒ Shows details of all recommendations, as shownin Figure 29 (page 34). The details are listed under the parameter setting area.
Figure 29 Show Recommendation Details page
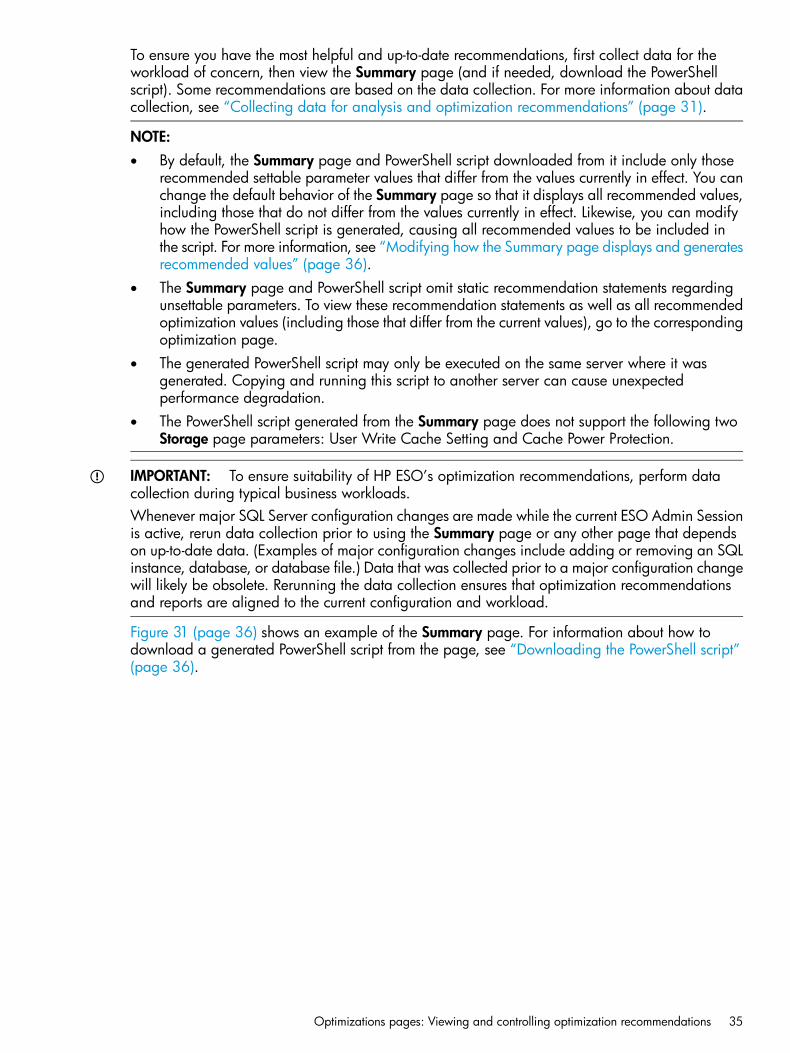
When a critical error occurs, the Optimizations page displays possible steps that can be taken,as shown in Figure 30 (page 34).
Figure 30 Critical error page
Summary page: Viewing recommended optimization values for settable parametersobtained from all optimization pages; generating a PowerShell script for setting theserecommended values
The Summary page displays optimization recommendations for settable parameters, as gatheredfrom all the HP ESO optimization pages. The page also allows you to download a PowerShellscript that you can modify and run to set the recommended optimization values.
34 Using HP ESO
To ensure you have the most helpful and up-to-date recommendations, first collect data for theworkload of concern, then view the Summary page (and if needed, download the PowerShellscript). Some recommendations are based on the data collection. For more information about datacollection, see “Collecting data for analysis and optimization recommendations” (page 31).
NOTE:• By default, the Summary page and PowerShell script downloaded from it include only those
recommended settable parameter values that differ from the values currently in effect. You canchange the default behavior of the Summary page so that it displays all recommended values,including those that do not differ from the values currently in effect. Likewise, you can modifyhow the PowerShell script is generated, causing all recommended values to be included inthe script. For more information, see “Modifying how the Summary page displays and generatesrecommended values” (page 36).
• The Summary page and PowerShell script omit static recommendation statements regardingunsettable parameters. To view these recommendation statements as well as all recommendedoptimization values (including those that differ from the current values), go to the correspondingoptimization page.
• The generated PowerShell script may only be executed on the same server where it wasgenerated. Copying and running this script to another server can cause unexpectedperformance degradation.
• The PowerShell script generated from the Summary page does not support the following twoStorage page parameters: User Write Cache Setting and Cache Power Protection.
IMPORTANT: To ensure suitability of HP ESO’s optimization recommendations, perform datacollection during typical business workloads.Whenever major SQL Server configuration changes are made while the current ESO Admin Sessionis active, rerun data collection prior to using the Summary page or any other page that dependson up-to-date data. (Examples of major configuration changes include adding or removing an SQLinstance, database, or database file.) Data that was collected prior to a major configuration changewill likely be obsolete. Rerunning the data collection ensures that optimization recommendationsand reports are aligned to the current configuration and workload.
Figure 31 (page 36) shows an example of the Summary page. For information about how todownload a generated PowerShell script from the page, see “Downloading the PowerShell script”(page 36).
Optimizations pages: Viewing and controlling optimization recommendations 35
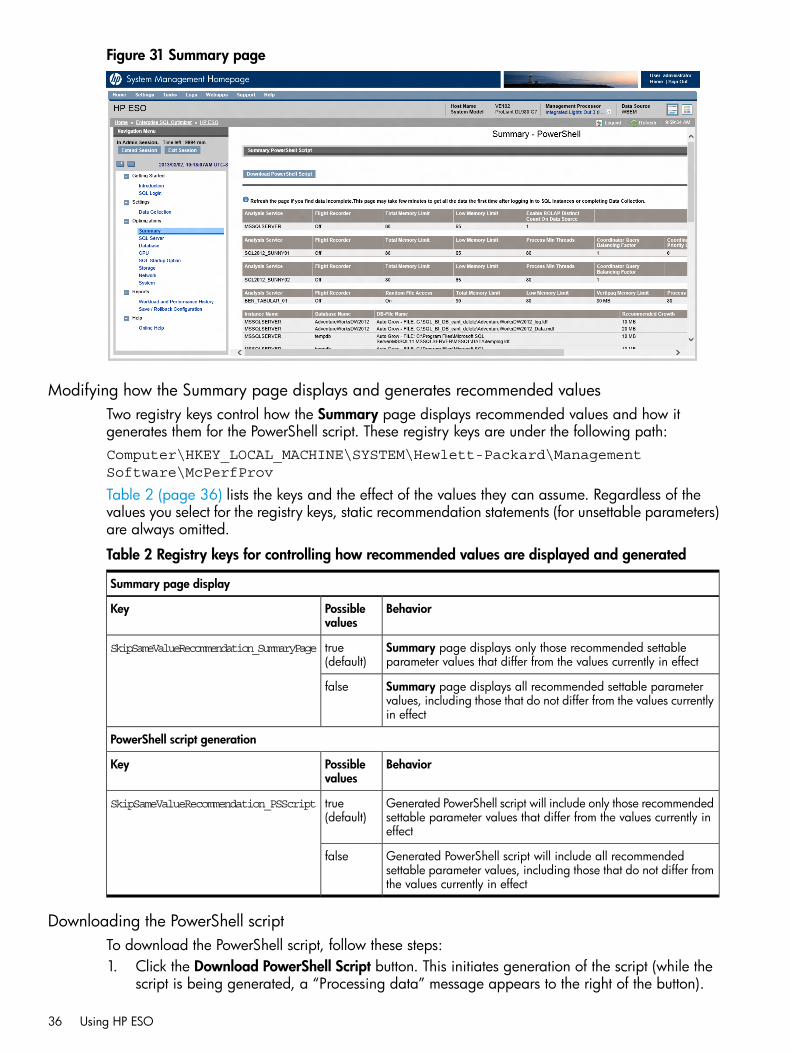
Figure 31 Summary page
Modifying how the Summary page displays and generates recommended valuesTwo registry keys control how the Summary page displays recommended values and how itgenerates them for the PowerShell script. These registry keys are under the following path:Computer\HKEY_LOCAL_MACHINE\SYSTEM\Hewlett-Packard\ManagementSoftware\McPerfProv
Table 2 (page 36) lists the keys and the effect of the values they can assume. Regardless of thevalues you select for the registry keys, static recommendation statements (for unsettable parameters)are always omitted.
Table 2 Registry keys for controlling how recommended values are displayed and generated
Summary page display
BehaviorPossiblevalues
Key
Summary page displays only those recommended settableparameter values that differ from the values currently in effect
true(default)
SkipSameValueRecommendation_SummaryPage
Summary page displays all recommended settable parametervalues, including those that do not differ from the values currentlyin effect
false
PowerShell script generation
BehaviorPossiblevalues
Key
Generated PowerShell script will include only those recommendedsettable parameter values that differ from the values currently ineffect
true(default)
SkipSameValueRecommendation_PSScript
Generated PowerShell script will include all recommendedsettable parameter values, including those that do not differ fromthe values currently in effect
false
Downloading the PowerShell scriptTo download the PowerShell script, follow these steps:1. Click the Download PowerShell Script button. This initiates generation of the script (while the
script is being generated, a “Processing data” message appears to the right of the button).
36 Using HP ESO
2. After the script is generated, a link to the script appears further to the right of the button, asshown in Figure 32 (page 37).
Figure 32 PowerShell script link
3. Right-click the link and save the script, removing the .txt extension. For example, save the scriptshown in the preceding example as file named:ESO_All_Recommendations_20130715_032650.ps1
4. To edit and run the script, follow the directions provided in “Using the PowerShell script toapply HP ESO optimization recommendations for all settable parameters” (page 75).
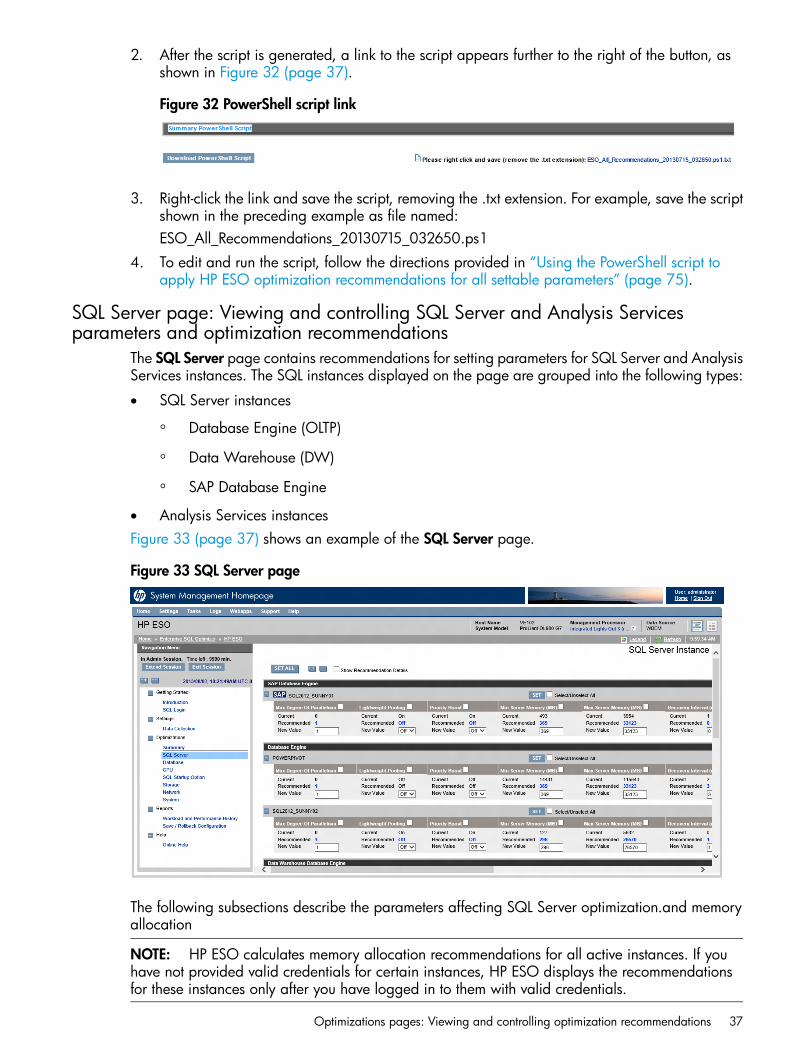
SQL Server page: Viewing and controlling SQL Server and Analysis Servicesparameters and optimization recommendations
The SQL Server page contains recommendations for setting parameters for SQL Server and AnalysisServices instances. The SQL instances displayed on the page are grouped into the following types:
• SQL Server instances
Database Engine (OLTP)◦◦ Data Warehouse (DW)
◦ SAP Database Engine
• Analysis Services instancesFigure 33 (page 37) shows an example of the SQL Server page.
Figure 33 SQL Server page
The following subsections describe the parameters affecting SQL Server optimization.and memoryallocation
NOTE: HP ESO calculates memory allocation recommendations for all active instances. If youhave not provided valid credentials for certain instances, HP ESO displays the recommendationsfor these instances only after you have logged in to them with valid credentials.
Optimizations pages: Viewing and controlling optimization recommendations 37
SQL Server database instance parametersInformation about some parameters might not be displayed, depending on the availability of thecomponents to which the parameters apply.
NOTE: Cluster-related parameters (Cluster Network Name, Computer Name, Status, and ComputerRole) are described in “Clustered SQL Server instance” (page 48).
Max Degree of ParallelismWhen SQL Server runs on a system with more than one microprocessor or CPU, it detects the bestdegree of parallelism. Specifically, it recognizes the number of processors employed to run a singlestatement, for each parallel plan execution. Use the Max Degree of Parallelism (MAXDOP) optionto limit the number of processors to use in parallel plan execution.
Lightweight PoolingUse the Lightweight Pooling option to reduce system overhead associated with the excessive contextswitching sometimes seen in symmetric multiprocessing (SMP) environments. When excessivecontext switching is present, lightweight pooling can provide better throughput by performing thecontext switching inline, thus helping to reduce user/kernel ring transitions.
Priority BoostUse the Priority Boost option to specify whether Microsoft SQL Server should run at a higherWindows Server 2008, Windows Server 2008 R2, or Windows Server 2012 scheduling prioritythan other processes on the same system. If you set this option to 1, SQL Server runs at a prioritybase of 13 in the scheduler. The default is 0, which is a priority base of 7.
Min Server Memory (in MB)Use the Min Server Memory option to specify whether SQL Server should start with at least theminimum amount of allocated memory and not release memory below this value. Set this valuebased on the size and activity of your SQL Server instance. Always set the option to a reasonablevalue to ensure the operating system does not request too much memory from SQL Server andinhibit Windows performance.
Max Server Memory (in MB)The Max Server Memory option specifies the maximum amount of memory SQL Server can allocatewhen it starts and while it runs. Set this option to a specific value if you know there are multipleapplications running at the same time as SQL Server and you want to guarantee these applicationshave sufficient memory to run. If these other applications, such as Web or e-mail servers, requestmemory only as needed, then do not set the option because SQL Server will release memory tothem as needed. However, applications often use whatever memory is available when they startand do not request more if needed. If an application that behaves in this manner runs on the samesystem at the same time as SQL Server, set the option to a value that guarantees the memoryrequired by the application is not allocated by SQL Server.
Recovery IntervalThe Recovery Interval option writes all dirty pages for the current database to disk. Dirty pagesare data pages that have been entered into the buffer cache and modified, but not yet written todisk. Check points save time during a later recovery by creating a point at which all dirty pagesare guaranteed to have been written to disk.
Lock PageLock Page is a setting for use on 64-bit operating systems. When this setting is enabled, Windowsretains the SQL Server process working set (the committed, buffer pool memory) in physical memoryuntil the application in use frees the memory or exits. The Windows operating system prevents the
38 Using HP ESO
SQL Server from paging (swapping) the data to virtual memory on disk or from trimming the data.However, the Windows operating system can still page out the nonbuffer pool memory within theSQL Server process. Locking pages in memory can improve server performance and responsivenesswhen paging memory to disk occurs. By default, this setting is turned off on 64-bit systems.
NOTE: If the Database Engine instance is running under a local system account, MicrosoftWindows does not support turning off Lock Page.
Max Worker ThreadsThis parameter applies to the Data Warehouse Database engine only. Use this option to configurethe number of worker threads available to Microsoft SQL Server processes. Thread pooling helpsoptimize performance when large numbers of clients are connected to the server. Usually, a separateoperating system thread is created for each query request. However, with hundreds of connectionsto the server, using one thread per query request can consume large amounts of system resources.The Max Worker Threads option enables SQL Server to create a pool of worker threads to servicea larger number of query request, which improves performance.
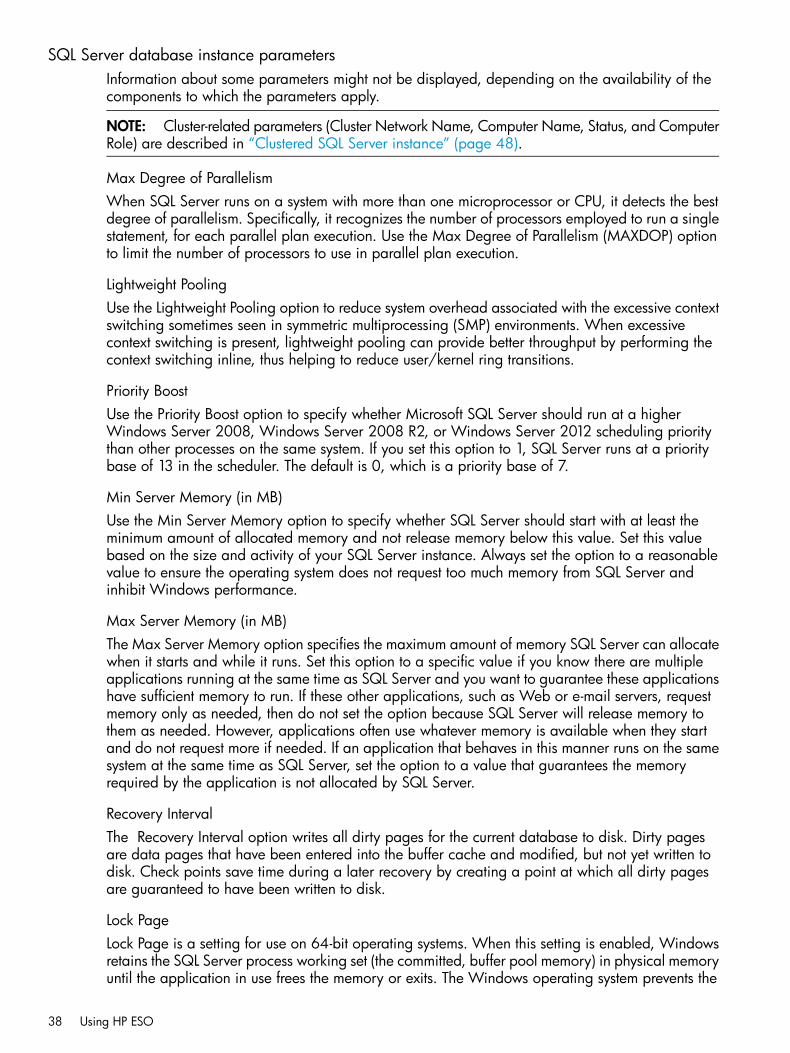
Xp_CmdShellThis parameter applies to the SAP Database Engine only. Some SAP transactions such as thosemade by the database monitor need to execute the stored procedure xp_cmdshell. This failsunless you have set the SAP Database Engine Xp_CmdShell configuration option to 1. To executethe stored procedure, select On (this is equivalent to setting it to 1) at the drop down box, as shownin Figure 34 (page 39).
Figure 34 Setting the Xp_CmdShell option
Analysis Services instance parametersInformation about some parameters might not be displayed, depending on the availability of thecomponents to which the parameters apply.
Flight RecorderSQL Server Analysis Services Flight Recorder provides a mechanism to record server activity intoa short-term log. Information captured by Flight Recorder can be helpful for troubleshooting specificissues; however the load placed on the server when capturing the snapshots and trace events canhave a small impact on overall performance. For optimal performance, the flight recorder shouldbe disabled unless attempting to capture diagnostic information relevant to troubleshooting aspecific problem.
Random File AccessA Boolean property that indicates whether database files and cached files are accessed in randomfile access mode. This property is disabled by default. By default, Analysis Services does not setthe random file access flag when opening partition data files for read access. On high-end systems,particularly those with large memory resources and multiple NUMA nodes, it can be advantageousto use random file access. In random access mode, Windows bypasses page mapping operations
Optimizations pages: Viewing and controlling optimization recommendations 39
that read data from disk into the system file cache, thereby lowering contention on the cache.Available only on SQL 2012 and later.
Low Memory LimitSpecifies the amount of memory allocated by Analysis Services at startup. When this limit is reached,the instance starts to slowly clear memory out of caches by closing expired sessions and unloadingunused calculations. The server will not release memory below this limit. The default value is 65,which indicates the low memory limit is 65% of physical memory or the virtual address space,whichever is less.
Total Memory LimitDefines a threshold that, when reached, causes the server to deallocate memory more aggressively.The default value is 80% of physical memory or the virtual address space, whichever is less.
Coordinator Query Balancing Factor and Coordinator Query Boost Priority LevelWhen multiple users access SQL Server Analysis Services concurrently, an expensive query thatneeds to scan large number of partitions can monopolize the system and block other users. Toavoid this problem and achieve high concurrency, HP recommends that Coordinator QueryBalancing Factor be set to 1 and Coordinator Query Boost Priority Level to 0.
Enable Rolap Distinct Count On DataSourceQueries that include DistinctCount in a ROLAP process can run faster, assuming certain criteriaare met. Performance is improved because more of the operation has been off-loaded to therelational database engine, where COUNT(DISTINCT column) is used to return unique non-nullvalues, eliminating the need for more expensive ordering operations that degrade queryperformance. This optimization is disabled by default because the query results produced by thenew and older algorithms are not always identical. Transact-SQL counting can vary for NULL valuesand different collations. If you want to use the optimization, set the OLAP\ProcessPlan\EnableRolap Distinct Count On DataSource property to 1.
Process Min ThreadsA signed 32-bit integer that determines the minimum number of threads for queries. HP ESO alwaysrecommends that the value be equal to the total number of logical CPUs on the local system.
Vertipaq Memory LimitIf you use VertipaqPagingPolicy mode 0 (Vertipaq is the Microsoft xVelocity in-memory analyticsengine), the VertiPaq Memory Limit defines the total amount of memory Vertipaq is allowed to lockin the working set (this is the total that can be used for in-memory databases; the Analysis Servicesservice might use more memory for other reasons).If you use VertipaqPagingPolicy mode 1 (the default), this defines a limit for the physical memoryused by VertiPaq, allowing paging for the remaining memory (virtual committed memory) abovethis limit. This property is specific to Tabular mode Analysis Services only.The VertipaqPagingPolicy mode is not settable by the HP ESO interface. You can set or changethe mode using the msmdsrv.ini file.
Resource MonitorResource Monitor provides a communication, monitoring, and processing layer between the Clusterservice and one or more resources. HP ESO always recommends it be disabled (OFF). The propertyis specific to SQL 2012.
40 Using HP ESO
Server modes (Multidimensional Mode, Tabular Mode, Sharepoint Mode)When installing SQL Server Analysis Services (SSAS), you can configure one of the following threemodes of operation for Analysis Services:
• Multidimensional ModeAnalysis Services provides online analytical processing (OLAP) and data mining functionalityfor business intelligence applications. Multidimensional and data mining solutions use OLAPmodeling constructs (cubes and dimensions, availability of which requires setting up BusinessIntelligence [BI]). This mode is the default mode. If you install Analysis Services using defaultvalues, you get an instance that runs in this mode.
• Tabular ModeTabular solutions use relational modeling constructs such as tables and relationships formodeling data, and they use the xVelocity in-memory analytics engine for storing andcalculating data. When you choose Tabular mode during installation of Analysis Services,the xVelocity engine is enabled. You can then author and deploy tabular model projects byusing the Analysis Services Tabular Project, Import from PowerPivot, or Import from Serverproject templates in SQL Server Data Tools. xVelocity is not available with Analysis ServicesMultidimensional and Data Mining solutions.This mode is supported only with SQL 2012 or later versions.
• Sharepoint ModeThis mode enables PowerPivot, a self-service BI solution that lets business analysts build ananalytical data model inside a Microsoft Excel workbook using the PowerPivot for Excel add-in.PowerPivot also uses the xVelocity in-memory analytics engine within Excel and on SharePoint.Because PowerPivot solutions use Excel for both data modeling and rendering, deploying aworkbook on a server for centralized and controlled data access requires SharePoint andExcel Services. You can configure this mode while installing SQL Server Analysis Services(SSAS).This mode is supported only with SQL 2012 or later versions.
Figure 35 (page 42) shows a portion of the SQL Server page displaying the Analysis Servicesmode types (information for the instances is not seen in this view; to display the information, clickthe expand button next to each instance name).
Optimizations pages: Viewing and controlling optimization recommendations 41
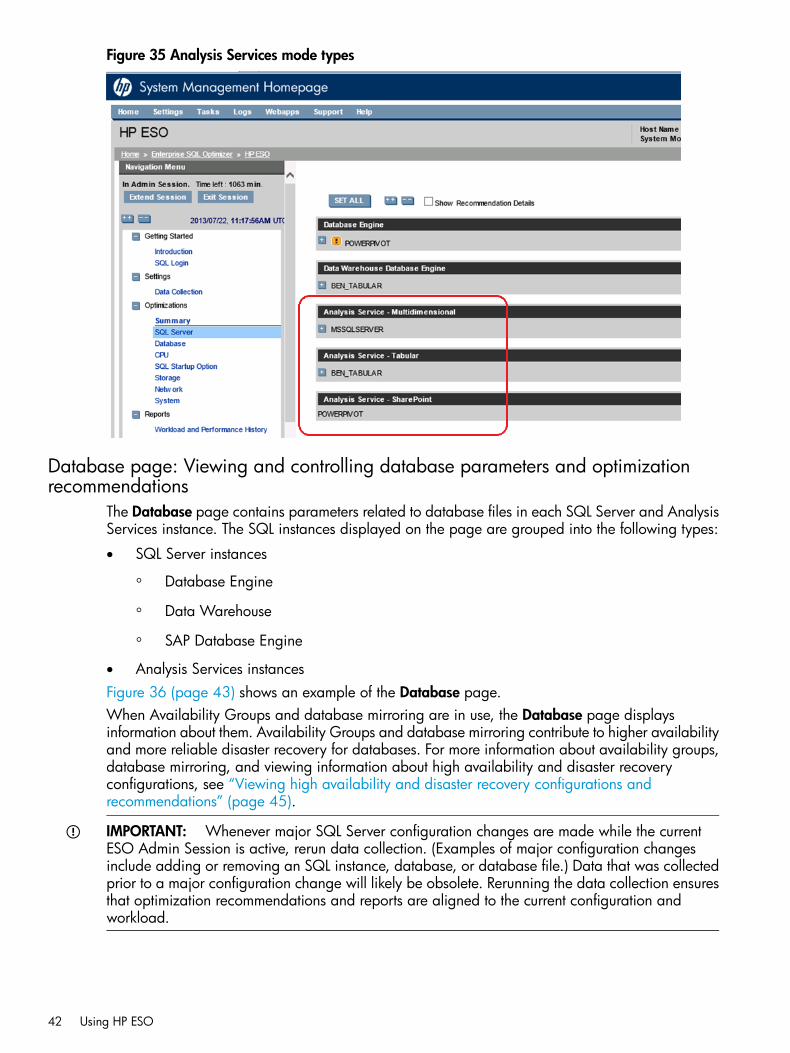
Figure 35 Analysis Services mode types
Database page: Viewing and controlling database parameters and optimizationrecommendations
The Database page contains parameters related to database files in each SQL Server and AnalysisServices instance. The SQL instances displayed on the page are grouped into the following types:
• SQL Server instances
Database Engine◦◦ Data Warehouse
◦ SAP Database Engine
• Analysis Services instancesFigure 36 (page 43) shows an example of the Database page.When Availability Groups and database mirroring are in use, the Database page displaysinformation about them. Availability Groups and database mirroring contribute to higher availabilityand more reliable disaster recovery for databases. For more information about availability groups,database mirroring, and viewing information about high availability and disaster recoveryconfigurations, see “Viewing high availability and disaster recovery configurations andrecommendations” (page 45).
IMPORTANT: Whenever major SQL Server configuration changes are made while the currentESO Admin Session is active, rerun data collection. (Examples of major configuration changesinclude adding or removing an SQL instance, database, or database file.) Data that was collectedprior to a major configuration change will likely be obsolete. Rerunning the data collection ensuresthat optimization recommendations and reports are aligned to the current configuration andworkload.
42 Using HP ESO
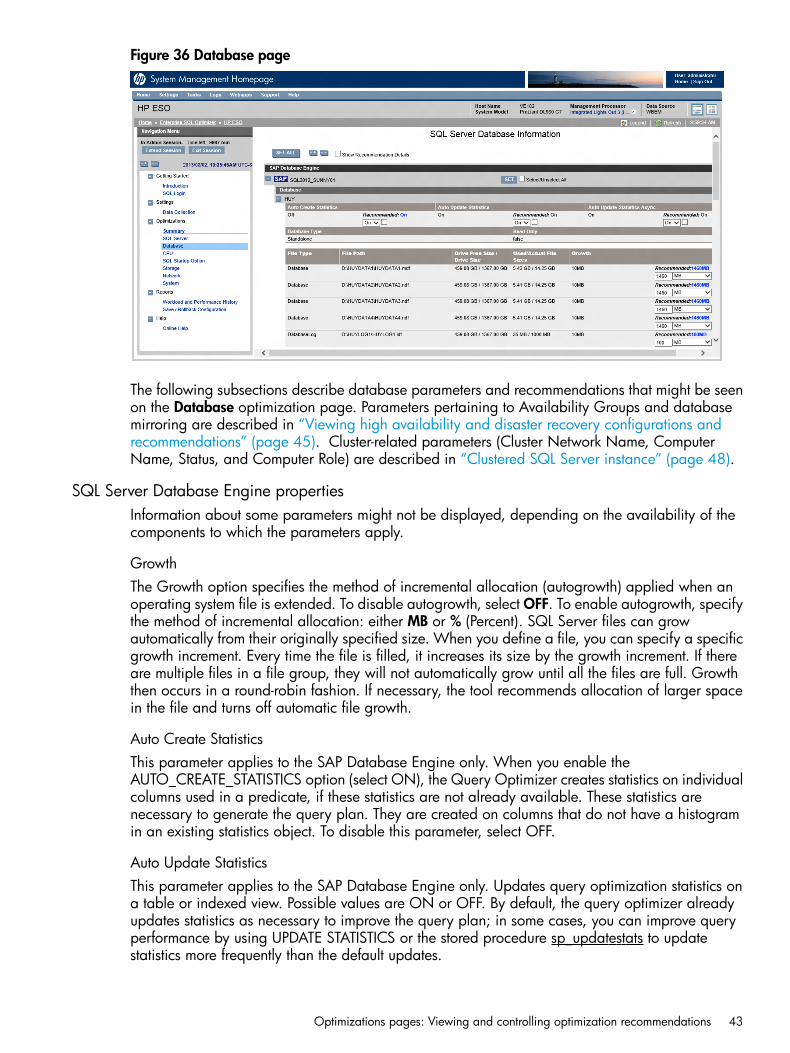
Figure 36 Database page
The following subsections describe database parameters and recommendations that might be seenon the Database optimization page. Parameters pertaining to Availability Groups and databasemirroring are described in “Viewing high availability and disaster recovery configurations andrecommendations” (page 45). Cluster-related parameters (Cluster Network Name, ComputerName, Status, and Computer Role) are described in “Clustered SQL Server instance” (page 48).
SQL Server Database Engine propertiesInformation about some parameters might not be displayed, depending on the availability of thecomponents to which the parameters apply.
GrowthThe Growth option specifies the method of incremental allocation (autogrowth) applied when anoperating system file is extended. To disable autogrowth, select OFF. To enable autogrowth, specifythe method of incremental allocation: either MB or % (Percent). SQL Server files can growautomatically from their originally specified size. When you define a file, you can specify a specificgrowth increment. Every time the file is filled, it increases its size by the growth increment. If thereare multiple files in a file group, they will not automatically grow until all the files are full. Growththen occurs in a round-robin fashion. If necessary, the tool recommends allocation of larger spacein the file and turns off automatic file growth.
Auto Create StatisticsThis parameter applies to the SAP Database Engine only. When you enable theAUTO_CREATE_STATISTICS option (select ON), the Query Optimizer creates statistics on individualcolumns used in a predicate, if these statistics are not already available. These statistics arenecessary to generate the query plan. They are created on columns that do not have a histogramin an existing statistics object. To disable this parameter, select OFF.
Auto Update StatisticsThis parameter applies to the SAP Database Engine only. Updates query optimization statistics ona table or indexed view. Possible values are ON or OFF. By default, the query optimizer alreadyupdates statistics as necessary to improve the query plan; in some cases, you can improve queryperformance by using UPDATE STATISTICS or the stored procedure sp_updatestats to updatestatistics more frequently than the default updates.
Optimizations pages: Viewing and controlling optimization recommendations 43
Updating statistics ensures that queries compile with up-to-date statistics. However, updating statisticscauses queries to recompile. HP recommends that you avoid updating statistics too frequently:there is a performance trade-off between improving query plans and the time it takes to recompilequeries. The specific trade-offs depend on your application. UPDATE STATISTICS can use tempdbto sort the sample of rows for building statistics.
Auto Update Statistics AsyncThis parameter applies to the SAP Database Engine only. When you enable this option (selectON), the SQL Server will start updating statistics asynchronously, using a separate backgroundthread. Client queries will not have to wait for the process to complete, and they can continueusing the current statistics while the update is processing in background. When the update processcompletes, the Query Optimizer can start using the updated statistics. This means that until theupdate process is complete, the Query Optimizer will produce execution plans based on thecurrent/old statistics. To disable this parameter, select OFF.
Analysis Services propertiesThe following properties are informational only; they are not settable from HP ESO.
Tabular Compatibility Level NumberAnalysis Services instances with SQL Server 2012 support compatibility levels 1100 and 1103.The SQL Server Database page displays the database version as “SQL Server 2012 (1100)” or“SQL Server 2012 (1103)”.
Data DirThe Data Dir property indicates where Analysis Services data is stored per server instance.
Temp DirThe Temp Dir property indicates where Analysis Services places temporary files that it uses duringprocessing operations.
Log DirThe Log Dir property indicates where Analysis Services logs and traces are stored.
Measure GroupA Measure Group (MeasureGroup object) is composed of basic information, measures, dimensions,and partitions.• Basic information includes the name of the measure group, the type of measures, the storage
mode, the processing mode, and others.• Measures are the actual set of measures that compose the measure group. For each measure
there is a definition for the aggregate function, the formatting attribute, the data item source,and others.
• Dimensions are a subset of cube dimensions used for creating the processed measure group.
• Partitions are the collection of physical splits of the processed measure group.
PartitionA partition is a container for a portion of the measure group data. Partitions are not seen fromMDX queries; all queries reflect the whole content of the measure group, regardless of how manypartitions are defined for the measure group. The data content of a partition is defined by thequery bindings of the partition and by the slicing expression.
Estimated RowsThe estimated number of rows in the partition.
44 Using HP ESO
Estimated SizeThe estimated size of the partition in megabytes.
Proactive CachingProactive caching provides automatic MOLAP cache creation and management for OLAP objects.The cubes immediately incorporate changes that are made to the data in the database, basedupon notifications received from the database. The goal of proactive caching is to provide theperformance of traditional MOLAP, while retaining the immediacy and ease of management offeredby ROLAP.
ESO database recommendation statements
Database File on OS DriveHP ESO recommends that you store the database file in a location other than the system (OS) drive.If a database file is found on the system drive, HP ESO displays a recommendation statement touse a non-system drive for the database.
Multiple FilesHP ESO recommends that each database file be located on a separate, dedicated drive. If multipledatabase files are found on a drive, HP ESO displays a recommendation statement to use adedicated drive for each database file and to use 80% of the drive space as the initial size of eachdatabase file.
Create Column Store IndexThe Column Store index in the SQL Server Database Engine can be used to significantly speed upthe processing time of common data warehousing queries. Typical data warehousing workloadsrequire summarizing large amounts of data. The techniques typically used in data warehousingand decision support systems to improve performance are pre-computed summary tables, indexedviews, OLAP cubes, and so on. The HP ESO recommendation is to create a column store indexfor data warehousing if its Analysis Services instance is running in Tabular mode.
tempdb Data FileHP ESO recommends that the number of tempdb data files be the same as the socket number orcore number in the socket.
Split the PartitionIf the Partition size is greater than 3GB, HP ESO recommends splitting the partition. Thisrecommendation statement appears only when the database of the Analysis Services instance hasa database cube built inside.
Enable Proactive CachingTurn on Proactive Caching for partitions. This recommendation statement appears only when thedatabase of the Analysis Services instance has a database cube built inside.
Viewing high availability and disaster recovery configurationsHP ESO Database page can provide information about high availability and disaster recoveryconfigurations for SQL Server and Analysis Services databases.
Availability GroupAn Availability Group, a feature introduced with SQL Server 2012, provides high availability forapplication databases. Availability Groups support a failover environment for a discrete set of userdatabases known as availability databases. An Availability Group provides all the benefits ofDatabase Mirroring but also comes with a powerful set of new options that increase application
Optimizations pages: Viewing and controlling optimization recommendations 45
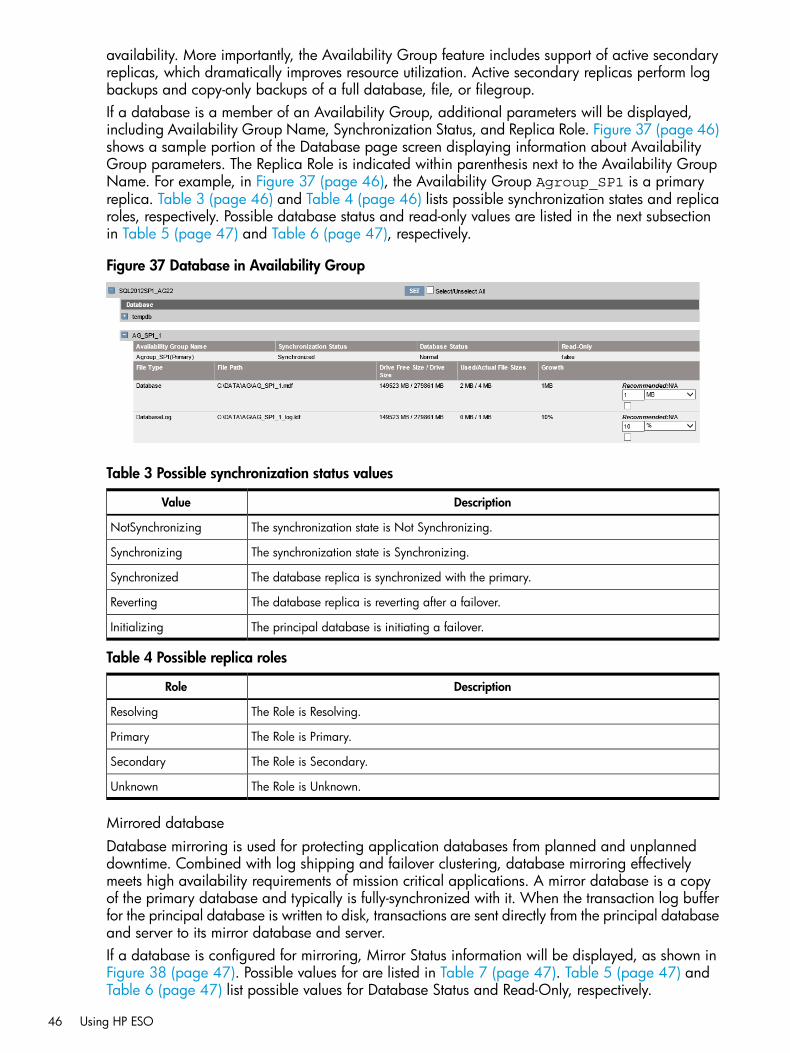
availability. More importantly, the Availability Group feature includes support of active secondaryreplicas, which dramatically improves resource utilization. Active secondary replicas perform logbackups and copy-only backups of a full database, file, or filegroup.If a database is a member of an Availability Group, additional parameters will be displayed,including Availability Group Name, Synchronization Status, and Replica Role. Figure 37 (page 46)shows a sample portion of the Database page screen displaying information about AvailabilityGroup parameters. The Replica Role is indicated within parenthesis next to the Availability GroupName. For example, in Figure 37 (page 46), the Availability Group Agroup_SP1 is a primaryreplica. Table 3 (page 46) and Table 4 (page 46) lists possible synchronization states and replicaroles, respectively. Possible database status and read-only values are listed in the next subsectionin Table 5 (page 47) and Table 6 (page 47), respectively.
Figure 37 Database in Availability Group
Table 3 Possible synchronization status values
DescriptionValue
The synchronization state is Not Synchronizing.NotSynchronizing
The synchronization state is Synchronizing.Synchronizing
The database replica is synchronized with the primary.Synchronized
The database replica is reverting after a failover.Reverting
The principal database is initiating a failover.Initializing
Table 4 Possible replica roles
DescriptionRole
The Role is Resolving.Resolving
The Role is Primary.Primary
The Role is Secondary.Secondary
The Role is Unknown.Unknown
Mirrored databaseDatabase mirroring is used for protecting application databases from planned and unplanneddowntime. Combined with log shipping and failover clustering, database mirroring effectivelymeets high availability requirements of mission critical applications. A mirror database is a copyof the primary database and typically is fully-synchronized with it. When the transaction log bufferfor the principal database is written to disk, transactions are sent directly from the principal databaseand server to its mirror database and server.If a database is configured for mirroring, Mirror Status information will be displayed, as shown inFigure 38 (page 47). Possible values for are listed in Table 7 (page 47). Table 5 (page 47) andTable 6 (page 47) list possible values for Database Status and Read-Only, respectively.
46 Using HP ESO
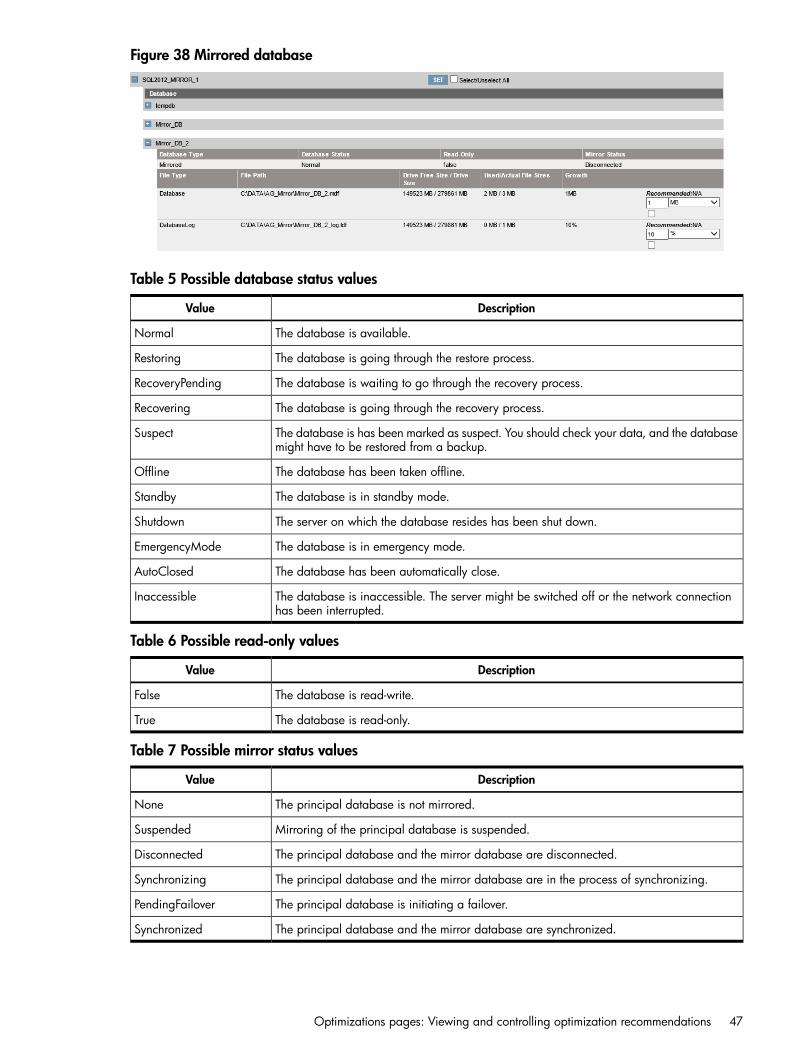
Figure 38 Mirrored database
Table 5 Possible database status values
DescriptionValue
The database is available.Normal
The database is going through the restore process.Restoring
The database is waiting to go through the recovery process.RecoveryPending
The database is going through the recovery process.Recovering
The database is has been marked as suspect. You should check your data, and the databasemight have to be restored from a backup.
Suspect
The database has been taken offline.Offline
The database is in standby mode.Standby
The server on which the database resides has been shut down.Shutdown
The database is in emergency mode.EmergencyMode
The database has been automatically close.AutoClosed
The database is inaccessible. The server might be switched off or the network connectionhas been interrupted.
Inaccessible
Table 6 Possible read-only values
DescriptionValue
The database is read-write.False
The database is read-only.True
Table 7 Possible mirror status values
DescriptionValue
The principal database is not mirrored.None
Mirroring of the principal database is suspended.Suspended
The principal database and the mirror database are disconnected.Disconnected
The principal database and the mirror database are in the process of synchronizing.Synchronizing
The principal database is initiating a failover.PendingFailover
The principal database and the mirror database are synchronized.Synchronized
Optimizations pages: Viewing and controlling optimization recommendations 47
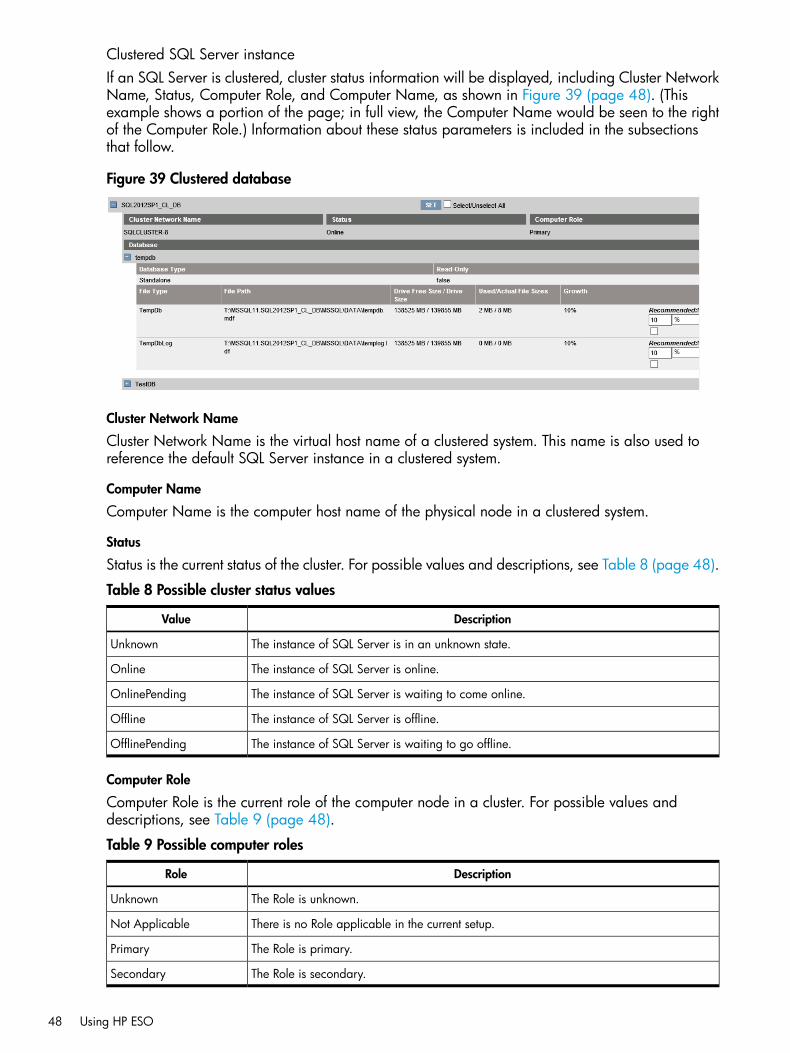
Clustered SQL Server instanceIf an SQL Server is clustered, cluster status information will be displayed, including Cluster NetworkName, Status, Computer Role, and Computer Name, as shown in Figure 39 (page 48). (Thisexample shows a portion of the page; in full view, the Computer Name would be seen to the rightof the Computer Role.) Information about these status parameters is included in the subsectionsthat follow.
Figure 39 Clustered database
Cluster Network Name
Cluster Network Name is the virtual host name of a clustered system. This name is also used toreference the default SQL Server instance in a clustered system.
Computer Name
Computer Name is the computer host name of the physical node in a clustered system.
Status
Status is the current status of the cluster. For possible values and descriptions, see Table 8 (page 48).
Table 8 Possible cluster status values
DescriptionValue
The instance of SQL Server is in an unknown state.Unknown
The instance of SQL Server is online.Online
The instance of SQL Server is waiting to come online.OnlinePending
The instance of SQL Server is offline.Offline
The instance of SQL Server is waiting to go offline.OfflinePending
Computer Role
Computer Role is the current role of the computer node in a cluster. For possible values anddescriptions, see Table 9 (page 48).
Table 9 Possible computer roles
DescriptionRole
The Role is unknown.Unknown
There is no Role applicable in the current setup.Not Applicable
The Role is primary.Primary
The Role is secondary.Secondary
48 Using HP ESO
CPU page: Viewing and controlling CPU assignment parameters and optimizationrecommendations
The CPU page (see Figure 40 (page 50)) displays SQL Server Database Engine Processor Affinityand Analysis Services Process GroupAffinity settings and recommendations for each SQL instancein the system.As shown in Figure 40 (page 50), the CPU page shows CPU resources organized in NUMA nodesand KGroups. In NUMA (Non-Uniform Memory Architecture) systems, logical CPUs (also referredto as logical processors) are arranged in smaller systems called NUMA nodes. Each node has itsown processors and memory. The system attempts to improve performance by scheduling threadson processors that are in the same node as the memory being used. (The NUMA architecture isnon-uniform because each processor is close to some parts of memory and farther from other partsof memory; the processor quickly gains access to the memory that is close by.)Kgroups (also referred to as K-groups) are supported on Windows Server 2008 R2 and newerversions that support more than 64 logical CPUs in the server. A KGroup is a processor groupconsisting of a static set of up to 64 logical CPUs that is treated as a single scheduling entity.KGroups are numbered starting with 0. Systems with fewer than 64 logical CPUs always have asingle group: KGroup 0.Multiple logical CPUs are provided by systems with more than one physical processor or systemswith physical processors that have multiple cores. A logical CPU is one logical computing enginefrom the perspective of the OS, application, or driver. Logical CPUs are also provided by threadsthat are carved from cores when Intel® Hyper-Threading is enabled — in this case, a core appearsas two logical CPUs corresponding to thread 0 and thread 1.For better performance, the OS takes physical locality into account when assigning logical CPUsto groups. All of the logical CPUs in a core, and all of the cores in a physical processor, areassigned to the same group, if possible. Physical processors that are physically close to one anotherare assigned to the same group.
NOTE: Windows 2008 R2 and newer versions can detect more than 64 logical CPUs are in theserver and attempts to group them into KGroups. The OS balances the number of logical CPUsper KGroup. For example, if the server has 80 logical CPUs, the OS will create two KGroups.SQL Server 2008 or older versions do not detect or support more than 64 logical CPUs. They onlysee the first KGroup. In the preceding example of the server with 80 logical CPUs, an SQL Server2008 (or older) running on that system would only use logical CPUs from the first group, wastingavailable processing power. Therefore, if you are running SQL Server 2008 or older on WindowsServer 2008 R2 and newer systems, to maximize utilization of all available processor resourceson the system, make sure that the server has fewer than 64 logical CPUs. To ensure this, disablehyper-threading or disable cores in CPU sockets. For more information, see the SQL Server tuningrecommendations documented in the Best Practices for Tuning Microsoft SQL Server on the HPProLiant DL980 white paper at:http://bizsupport2.austin.hp.com/bc/docs/support/SupportManual/c02861709/c02861709.pdf
Optimizations pages: Viewing and controlling optimization recommendations 49
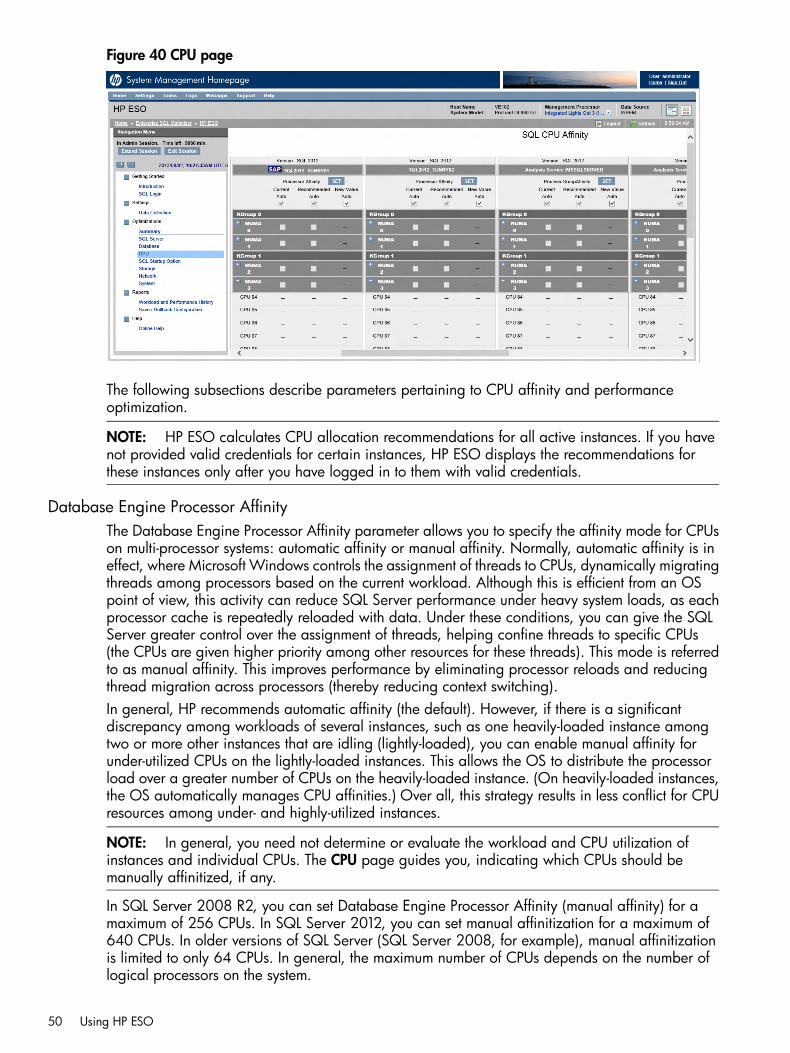
Figure 40 CPU page
The following subsections describe parameters pertaining to CPU affinity and performanceoptimization.
NOTE: HP ESO calculates CPU allocation recommendations for all active instances. If you havenot provided valid credentials for certain instances, HP ESO displays the recommendations forthese instances only after you have logged in to them with valid credentials.
Database Engine Processor AffinityThe Database Engine Processor Affinity parameter allows you to specify the affinity mode for CPUson multi-processor systems: automatic affinity or manual affinity. Normally, automatic affinity is ineffect, where Microsoft Windows controls the assignment of threads to CPUs, dynamically migratingthreads among processors based on the current workload. Although this is efficient from an OSpoint of view, this activity can reduce SQL Server performance under heavy system loads, as eachprocessor cache is repeatedly reloaded with data. Under these conditions, you can give the SQLServer greater control over the assignment of threads, helping confine threads to specific CPUs(the CPUs are given higher priority among other resources for these threads). This mode is referredto as manual affinity. This improves performance by eliminating processor reloads and reducingthread migration across processors (thereby reducing context switching).In general, HP recommends automatic affinity (the default). However, if there is a significantdiscrepancy among workloads of several instances, such as one heavily-loaded instance amongtwo or more other instances that are idling (lightly-loaded), you can enable manual affinity forunder-utilized CPUs on the lightly-loaded instances. This allows the OS to distribute the processorload over a greater number of CPUs on the heavily-loaded instance. (On heavily-loaded instances,the OS automatically manages CPU affinities.) Over all, this strategy results in less conflict for CPUresources among under- and highly-utilized instances.
NOTE: In general, you need not determine or evaluate the workload and CPU utilization ofinstances and individual CPUs. The CPU page guides you, indicating which CPUs should bemanually affinitized, if any.
In SQL Server 2008 R2, you can set Database Engine Processor Affinity (manual affinity) for amaximum of 256 CPUs. In SQL Server 2012, you can set manual affinitization for a maximum of640 CPUs. In older versions of SQL Server (SQL Server 2008, for example), manual affinitizationis limited to only 64 CPUs. In general, the maximum number of CPUs depends on the number oflogical processors on the system.
50 Using HP ESO

Viewing and understanding Database Engine Processor AffinityTo view current and recommended Database Engine Processor Affinity settings, expand the DatabaseEngine instance CPU list (if necessary) that you want to view or modify. For example, in Figure 41(page 51), to display the CPU list for NUMA 0, click the expand button shown circled in red.
Figure 41 Expand the CPU list
Figure 42 (page 51) shows an example of an expanded NUMA CPU list for an SQL 2012 DatabaseEngine instance.
Figure 42 Expanded CPU list
At the top of an instance section, the Auto boxes for the Current, Recommended, and New Valuecolumns reflect or control the affinity setting for all the instance’s CPUs. The only box you can checkat the top of an instance section is the New Value column’s Auto check box, referred to as the
Optimizations pages: Viewing and controlling optimization recommendations 51
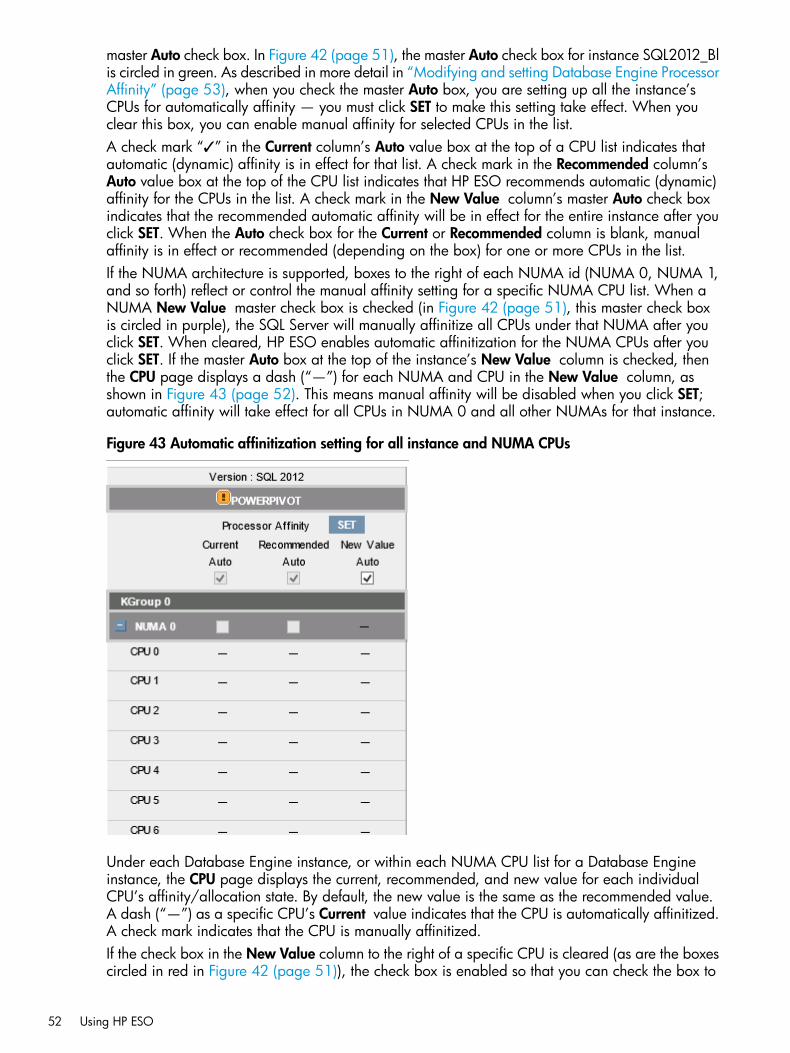
master Auto check box. In Figure 42 (page 51), the master Auto check box for instance SQL2012_Blis circled in green. As described in more detail in “Modifying and setting Database Engine ProcessorAffinity” (page 53), when you check the master Auto box, you are setting up all the instance’sCPUs for automatically affinity — you must click SET to make this setting take effect. When youclear this box, you can enable manual affinity for selected CPUs in the list.A check mark “✓” in the Current column’s Auto value box at the top of a CPU list indicates thatautomatic (dynamic) affinity is in effect for that list. A check mark in the Recommended column’sAuto value box at the top of the CPU list indicates that HP ESO recommends automatic (dynamic)affinity for the CPUs in the list. A check mark in the New Value column’s master Auto check boxindicates that the recommended automatic affinity will be in effect for the entire instance after youclick SET. When the Auto check box for the Current or Recommended column is blank, manualaffinity is in effect or recommended (depending on the box) for one or more CPUs in the list.If the NUMA architecture is supported, boxes to the right of each NUMA id (NUMA 0, NUMA 1,and so forth) reflect or control the manual affinity setting for a specific NUMA CPU list. When aNUMA New Value master check box is checked (in Figure 42 (page 51), this master check boxis circled in purple), the SQL Server will manually affinitize all CPUs under that NUMA after youclick SET. When cleared, HP ESO enables automatic affinitization for the NUMA CPUs after youclick SET. If the master Auto box at the top of the instance’s New Value column is checked, thenthe CPU page displays a dash (“—”) for each NUMA and CPU in the New Value column, asshown in Figure 43 (page 52). This means manual affinity will be disabled when you click SET;automatic affinity will take effect for all CPUs in NUMA 0 and all other NUMAs for that instance.
Figure 43 Automatic affinitization setting for all instance and NUMA CPUs
Under each Database Engine instance, or within each NUMA CPU list for a Database Engineinstance, the CPU page displays the current, recommended, and new value for each individualCPU’s affinity/allocation state. By default, the new value is the same as the recommended value.A dash (“—”) as a specific CPU’s Current value indicates that the CPU is automatically affinitized.A check mark indicates that the CPU is manually affinitized.If the check box in the New Value column to the right of a specific CPU is cleared (as are the boxescircled in red in Figure 42 (page 51)), the check box is enabled so that you can check the box to
52 Using HP ESO
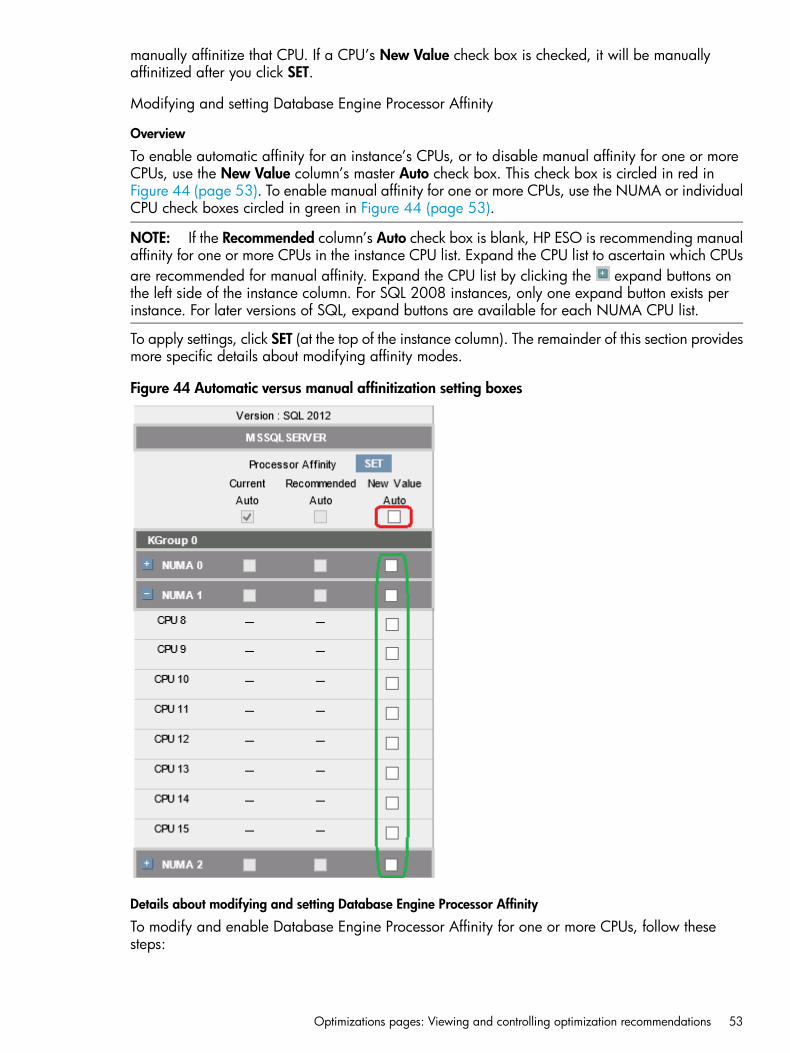
manually affinitize that CPU. If a CPU’s New Value check box is checked, it will be manuallyaffinitized after you click SET.
Modifying and setting Database Engine Processor Affinity
Overview
To enable automatic affinity for an instance’s CPUs, or to disable manual affinity for one or moreCPUs, use the New Value column’s master Auto check box. This check box is circled in red inFigure 44 (page 53). To enable manual affinity for one or more CPUs, use the NUMA or individualCPU check boxes circled in green in Figure 44 (page 53).
NOTE: If the Recommended column’s Auto check box is blank, HP ESO is recommending manualaffinity for one or more CPUs in the instance CPU list. Expand the CPU list to ascertain which CPUsare recommended for manual affinity. Expand the CPU list by clicking the expand buttons onthe left side of the instance column. For SQL 2008 instances, only one expand button exists perinstance. For later versions of SQL, expand buttons are available for each NUMA CPU list.
To apply settings, click SET (at the top of the instance column). The remainder of this section providesmore specific details about modifying affinity modes.
Figure 44 Automatic versus manual affinitization setting boxes
Details about modifying and setting Database Engine Processor Affinity
To modify and enable Database Engine Processor Affinity for one or more CPUs, follow thesesteps:
Optimizations pages: Viewing and controlling optimization recommendations 53
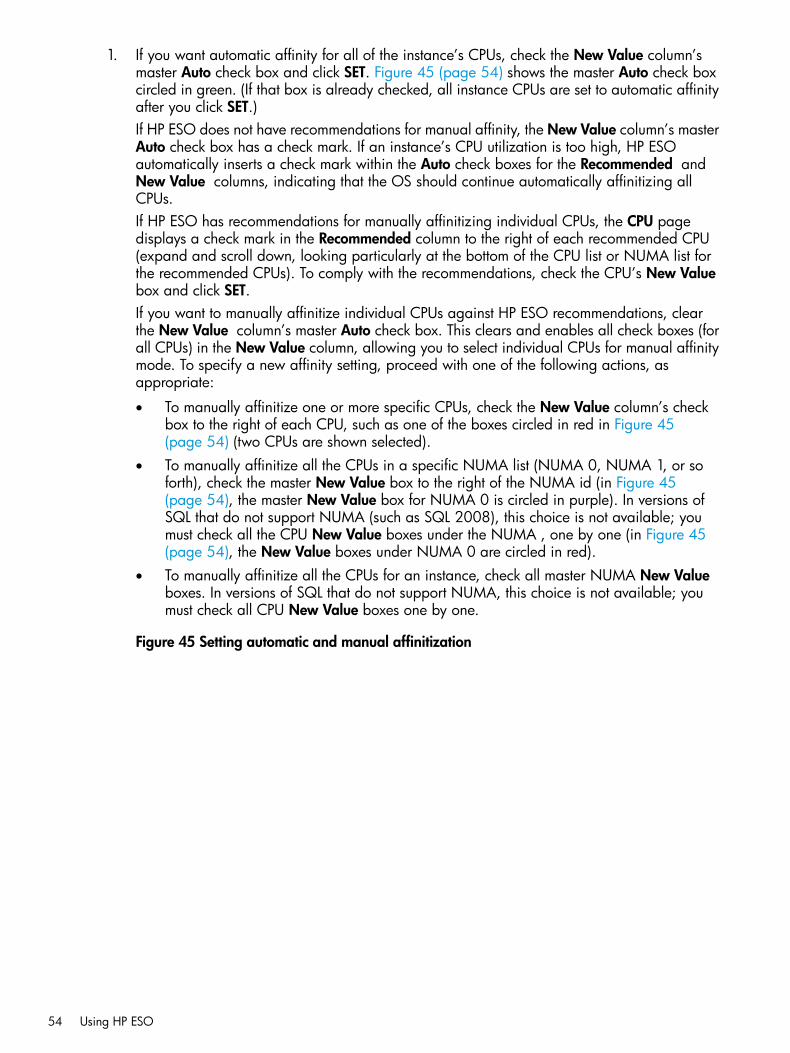
1. If you want automatic affinity for all of the instance’s CPUs, check the New Value column’smaster Auto check box and click SET. Figure 45 (page 54) shows the master Auto check boxcircled in green. (If that box is already checked, all instance CPUs are set to automatic affinityafter you click SET.)If HP ESO does not have recommendations for manual affinity, the New Value column’s masterAuto check box has a check mark. If an instance’s CPU utilization is too high, HP ESOautomatically inserts a check mark within the Auto check boxes for the Recommended andNew Value columns, indicating that the OS should continue automatically affinitizing allCPUs.If HP ESO has recommendations for manually affinitizing individual CPUs, the CPU pagedisplays a check mark in the Recommended column to the right of each recommended CPU(expand and scroll down, looking particularly at the bottom of the CPU list or NUMA list forthe recommended CPUs). To comply with the recommendations, check the CPU’s New Valuebox and click SET.If you want to manually affinitize individual CPUs against HP ESO recommendations, clearthe New Value column’s master Auto check box. This clears and enables all check boxes (forall CPUs) in the New Value column, allowing you to select individual CPUs for manual affinitymode. To specify a new affinity setting, proceed with one of the following actions, asappropriate:
• To manually affinitize one or more specific CPUs, check the New Value column’s checkbox to the right of each CPU, such as one of the boxes circled in red in Figure 45(page 54) (two CPUs are shown selected).
• To manually affinitize all the CPUs in a specific NUMA list (NUMA 0, NUMA 1, or soforth), check the master New Value box to the right of the NUMA id (in Figure 45(page 54), the master New Value box for NUMA 0 is circled in purple). In versions ofSQL that do not support NUMA (such as SQL 2008), this choice is not available; youmust check all the CPU New Value boxes under the NUMA , one by one (in Figure 45(page 54), the New Value boxes under NUMA 0 are circled in red).
• To manually affinitize all the CPUs for an instance, check all master NUMA New Valueboxes. In versions of SQL that do not support NUMA, this choice is not available; youmust check all CPU New Value boxes one by one.
Figure 45 Setting automatic and manual affinitization
54 Using HP ESO
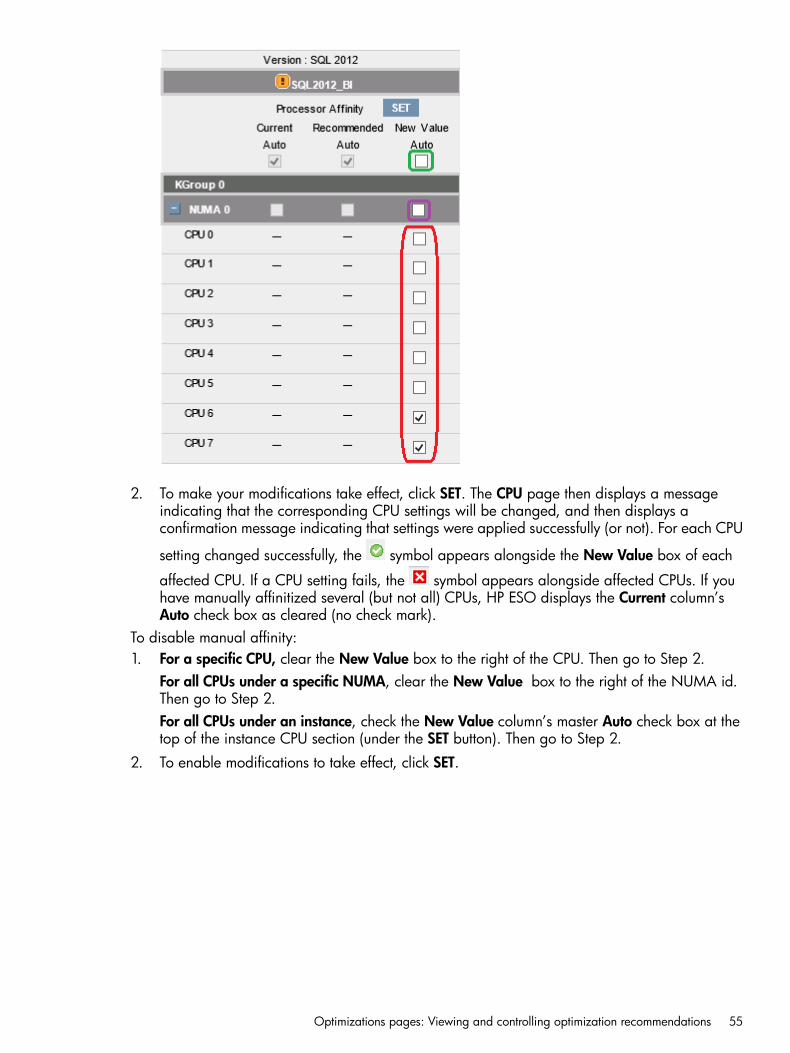
2. To make your modifications take effect, click SET. The CPU page then displays a messageindicating that the corresponding CPU settings will be changed, and then displays aconfirmation message indicating that settings were applied successfully (or not). For each CPU
setting changed successfully, the symbol appears alongside the New Value box of each
affected CPU. If a CPU setting fails, the symbol appears alongside affected CPUs. If youhave manually affinitized several (but not all) CPUs, HP ESO displays the Current column’sAuto check box as cleared (no check mark).
To disable manual affinity:1. For a specific CPU, clear the New Value box to the right of the CPU. Then go to Step 2.
For all CPUs under a specific NUMA, clear the New Value box to the right of the NUMA id.Then go to Step 2.For all CPUs under an instance, check the New Value column’s master Auto check box at thetop of the instance CPU section (under the SET button). Then go to Step 2.
2. To enable modifications to take effect, click SET.
Optimizations pages: Viewing and controlling optimization recommendations 55
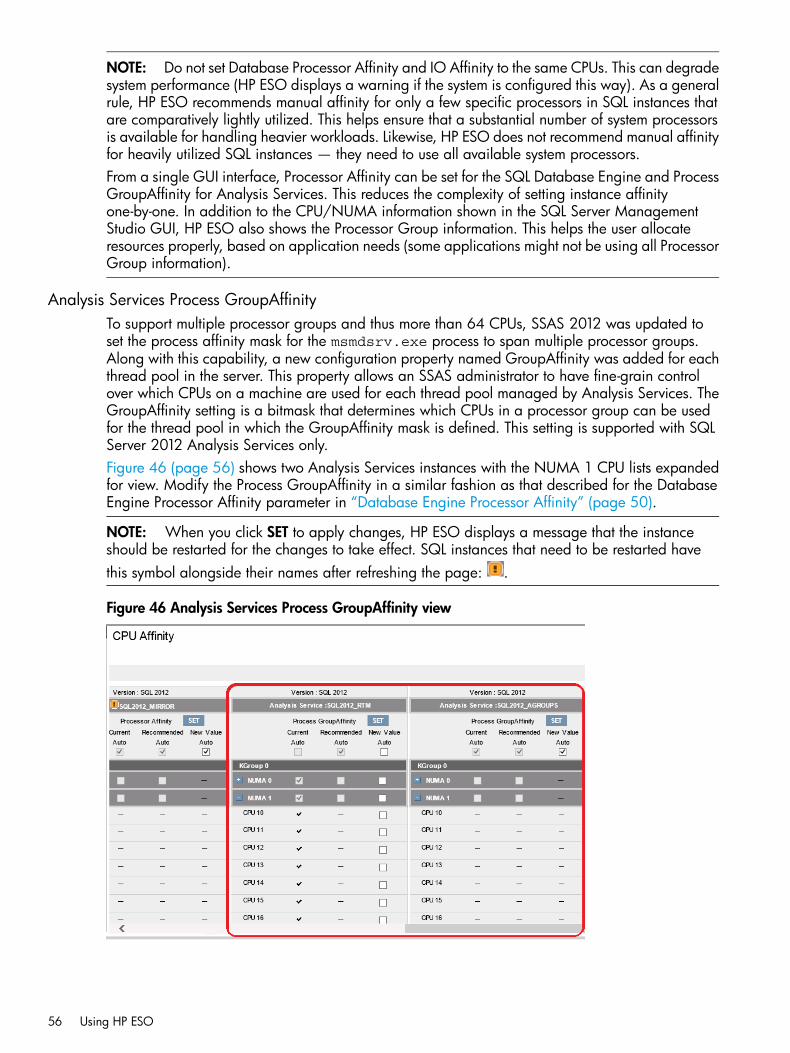
NOTE: Do not set Database Processor Affinity and IO Affinity to the same CPUs. This can degradesystem performance (HP ESO displays a warning if the system is configured this way). As a generalrule, HP ESO recommends manual affinity for only a few specific processors in SQL instances thatare comparatively lightly utilized. This helps ensure that a substantial number of system processorsis available for handling heavier workloads. Likewise, HP ESO does not recommend manual affinityfor heavily utilized SQL instances — they need to use all available system processors.From a single GUI interface, Processor Affinity can be set for the SQL Database Engine and ProcessGroupAffinity for Analysis Services. This reduces the complexity of setting instance affinityone-by-one. In addition to the CPU/NUMA information shown in the SQL Server ManagementStudio GUI, HP ESO also shows the Processor Group information. This helps the user allocateresources properly, based on application needs (some applications might not be using all ProcessorGroup information).
Analysis Services Process GroupAffinityTo support multiple processor groups and thus more than 64 CPUs, SSAS 2012 was updated toset the process affinity mask for the msmdsrv.exe process to span multiple processor groups.Along with this capability, a new configuration property named GroupAffinity was added for eachthread pool in the server. This property allows an SSAS administrator to have fine-grain controlover which CPUs on a machine are used for each thread pool managed by Analysis Services. TheGroupAffinity setting is a bitmask that determines which CPUs in a processor group can be usedfor the thread pool in which the GroupAffinity mask is defined. This setting is supported with SQLServer 2012 Analysis Services only.Figure 46 (page 56) shows two Analysis Services instances with the NUMA 1 CPU lists expandedfor view. Modify the Process GroupAffinity in a similar fashion as that described for the DatabaseEngine Processor Affinity parameter in “Database Engine Processor Affinity” (page 50).
NOTE: When you click SET to apply changes, HP ESO displays a message that the instanceshould be restarted for the changes to take effect. SQL instances that need to be restarted havethis symbol alongside their names after refreshing the page: .
Figure 46 Analysis Services Process GroupAffinity view
56 Using HP ESO
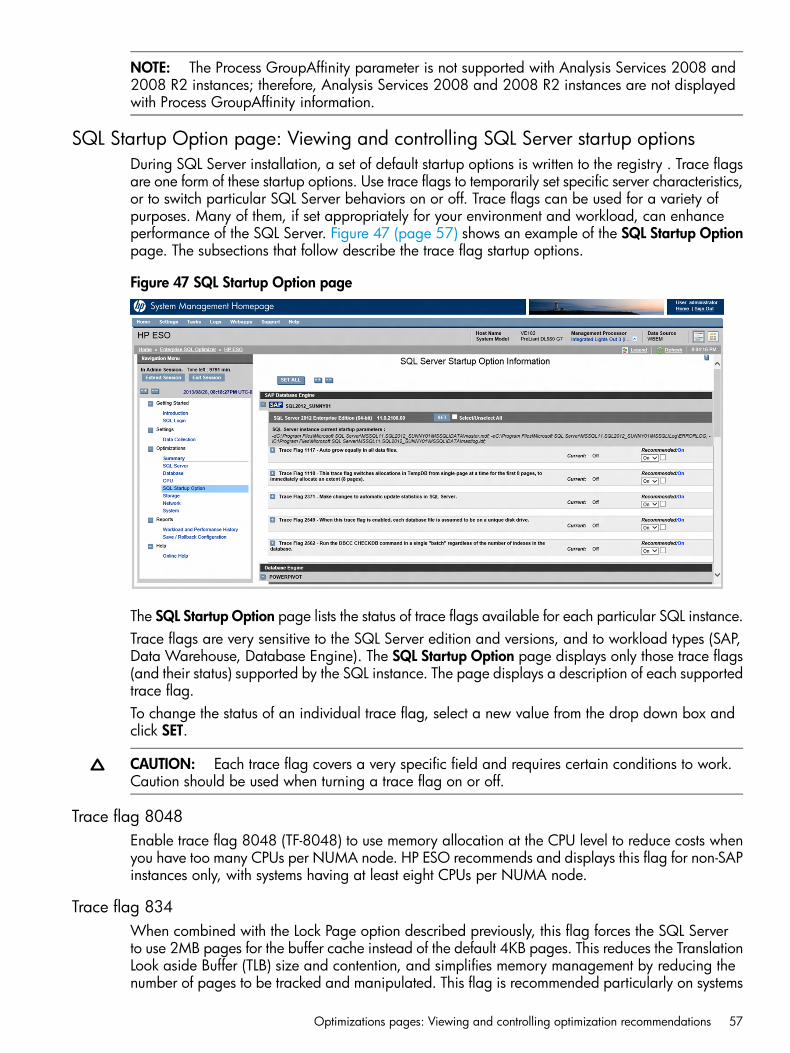
NOTE: The Process GroupAffinity parameter is not supported with Analysis Services 2008 and2008 R2 instances; therefore, Analysis Services 2008 and 2008 R2 instances are not displayedwith Process GroupAffinity information.
SQL Startup Option page: Viewing and controlling SQL Server startup optionsDuring SQL Server installation, a set of default startup options is written to the registry . Trace flagsare one form of these startup options. Use trace flags to temporarily set specific server characteristics,or to switch particular SQL Server behaviors on or off. Trace flags can be used for a variety ofpurposes. Many of them, if set appropriately for your environment and workload, can enhanceperformance of the SQL Server. Figure 47 (page 57) shows an example of the SQL Startup Optionpage. The subsections that follow describe the trace flag startup options.
Figure 47 SQL Startup Option page
The SQL Startup Option page lists the status of trace flags available for each particular SQL instance.Trace flags are very sensitive to the SQL Server edition and versions, and to workload types (SAP,Data Warehouse, Database Engine). The SQL Startup Option page displays only those trace flags(and their status) supported by the SQL instance. The page displays a description of each supportedtrace flag.To change the status of an individual trace flag, select a new value from the drop down box andclick SET.
CAUTION: Each trace flag covers a very specific field and requires certain conditions to work.Caution should be used when turning a trace flag on or off.
Trace flag 8048Enable trace flag 8048 (TF-8048) to use memory allocation at the CPU level to reduce costs whenyou have too many CPUs per NUMA node. HP ESO recommends and displays this flag for non-SAPinstances only, with systems having at least eight CPUs per NUMA node.
Trace flag 834When combined with the Lock Page option described previously, this flag forces the SQL Serverto use 2MB pages for the buffer cache instead of the default 4KB pages. This reduces the TranslationLook aside Buffer (TLB) size and contention, and simplifies memory management by reducing thenumber of pages to be tracked and manipulated. This flag is recommended particularly on systems
Optimizations pages: Viewing and controlling optimization recommendations 57
where the SQL Server is the main (or only) application running. HP ESO recommends and displaysthis flag for non-SAP instances only.
Trace flag 1117Trace flag 1117 determines how the SQL Server automatically extends (grows) data files in a filegroup when automatic file growth is needed. Enable trace flag 1117 to cause the SQL Server toautomatically grow all of the files at the same time. Otherwise, the files will automatically grow inround-robin fashion.
Trace flag 1118Trace flag 1118 is used to help alleviate allocation bitmap contention in tempdb when under aheavy load of small temp table creation and deletion.
Trace flag 2371Trace flag 2371 is used to address the well-known problem caused by the current 20% thresholdthat determines when automatic statistics updates occur. The statistics keep track of the number ofchanges made to a table. The threshold is the percentage of the number of rows in the table. Whenthe number of changes exceed 20% of the number of rows in the table, the statistics areautomatically updated. For large applications with correspondingly large tables, this could meanthat automatic updates would not occur often enough to accurately reflect current statistics. As aresult, administrators would have to manually update the statistics (using a query plan, for example).Because the manual updates usually require excessive I/O, this was not optimal for manyapplications. The 2371 trace flag changes the threshold from a fixed-rate of 20% to a dynamicrate based on the table size. The higher the number of rows in the table, the lower the thresholdwill become to trigger an update of the statistics. Enable the 2371 trace flag to prevent the needfor manually updating the statistics. HP ESO recommends and displays this flag for SAP instancesonly.
NOTE: To prevent small tables from being updated too frequently, automatic updates require aminimum of 500 rows in a static table and 6 rows in a temp table.
Trace flag 2549The DBCC CHECKDB checks the logical and physical integrity of all objects in the specified database.The command builds an internal list of pages to read per unique disk drive across all databasefiles. The logic determines unique disk drives based on the drive letter of the physical file name ofeach file. If the underlying disks are actually unique when the drive letters are not, the DBCCCHECKDB command treats these database files as residing on one disk. Enable the trace flag tooptimize the CHECKDB process by treating each database file as residing on a separate, uniquedisk drive. Do not use this trace flag unless you know that each file is based on a unique physicaldisk. HP ESO recommends and displays this flag for SAP instances only.
Trace flag 2562By default, the DBCC CHECKDB command tries to minimize the amount of tempdb resourcesrequired to check the entire database. The command does this by breaking up the database intobatches. This reduces the number of indexes or "facts" that it generates. Trace flag 2562 implementsthe following changes:
• Forces the DBCC CHECKDB command to run all processing in a single batch regardless of thenumber of indexes in the database.
• Improves the internal process for determining which pages to read from the database. Thisreduces contention on the DBCC_MULTIOBJECT_SCANNER latch, helping avoid such errorsas:Timeout occurred while waiting for latch: class ‘DBCC_MULTIOBJECT_SCANNER’.
58 Using HP ESO
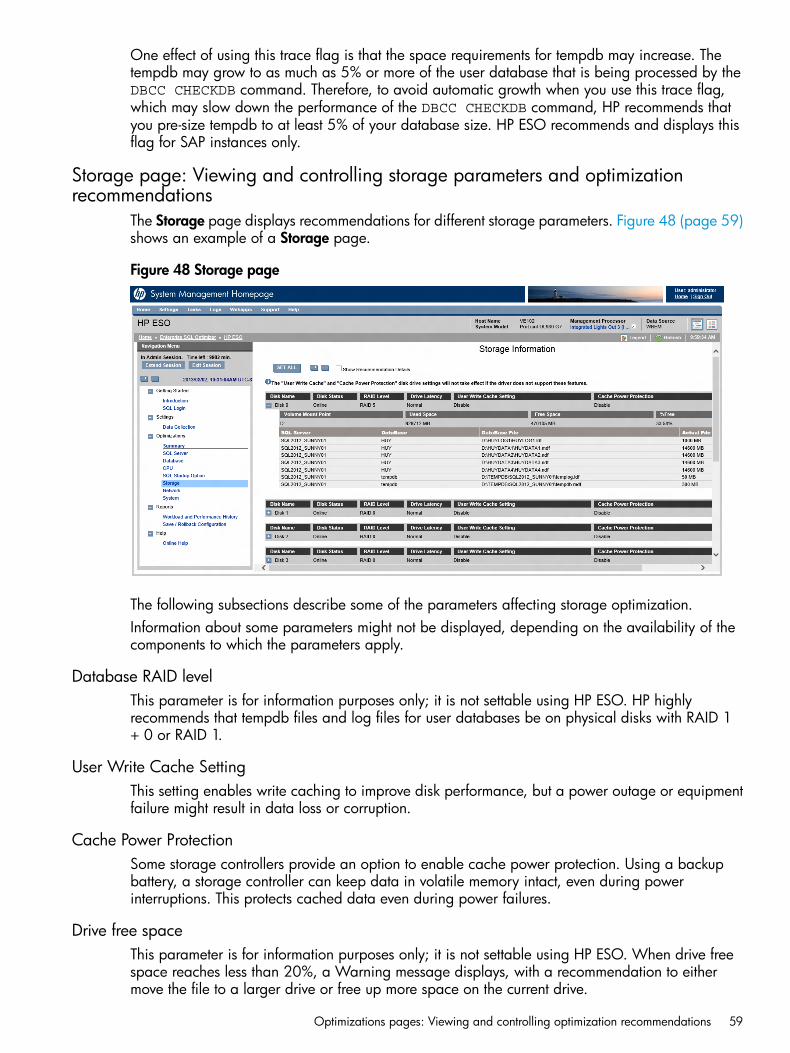
One effect of using this trace flag is that the space requirements for tempdb may increase. Thetempdb may grow to as much as 5% or more of the user database that is being processed by theDBCC CHECKDB command. Therefore, to avoid automatic growth when you use this trace flag,which may slow down the performance of the DBCC CHECKDB command, HP recommends thatyou pre-size tempdb to at least 5% of your database size. HP ESO recommends and displays thisflag for SAP instances only.
Storage page: Viewing and controlling storage parameters and optimizationrecommendations
The Storage page displays recommendations for different storage parameters. Figure 48 (page 59)shows an example of a Storage page.
Figure 48 Storage page
The following subsections describe some of the parameters affecting storage optimization.Information about some parameters might not be displayed, depending on the availability of thecomponents to which the parameters apply.
Database RAID levelThis parameter is for information purposes only; it is not settable using HP ESO. HP highlyrecommends that tempdb files and log files for user databases be on physical disks with RAID 1+ 0 or RAID 1.
User Write Cache SettingThis setting enables write caching to improve disk performance, but a power outage or equipmentfailure might result in data loss or corruption.
Cache Power ProtectionSome storage controllers provide an option to enable cache power protection. Using a backupbattery, a storage controller can keep data in volatile memory intact, even during powerinterruptions. This protects cached data even during power failures.
Drive free spaceThis parameter is for information purposes only; it is not settable using HP ESO. When drive freespace reaches less than 20%, a Warning message displays, with a recommendation to eithermove the file to a larger drive or free up more space on the current drive.
Optimizations pages: Viewing and controlling optimization recommendations 59
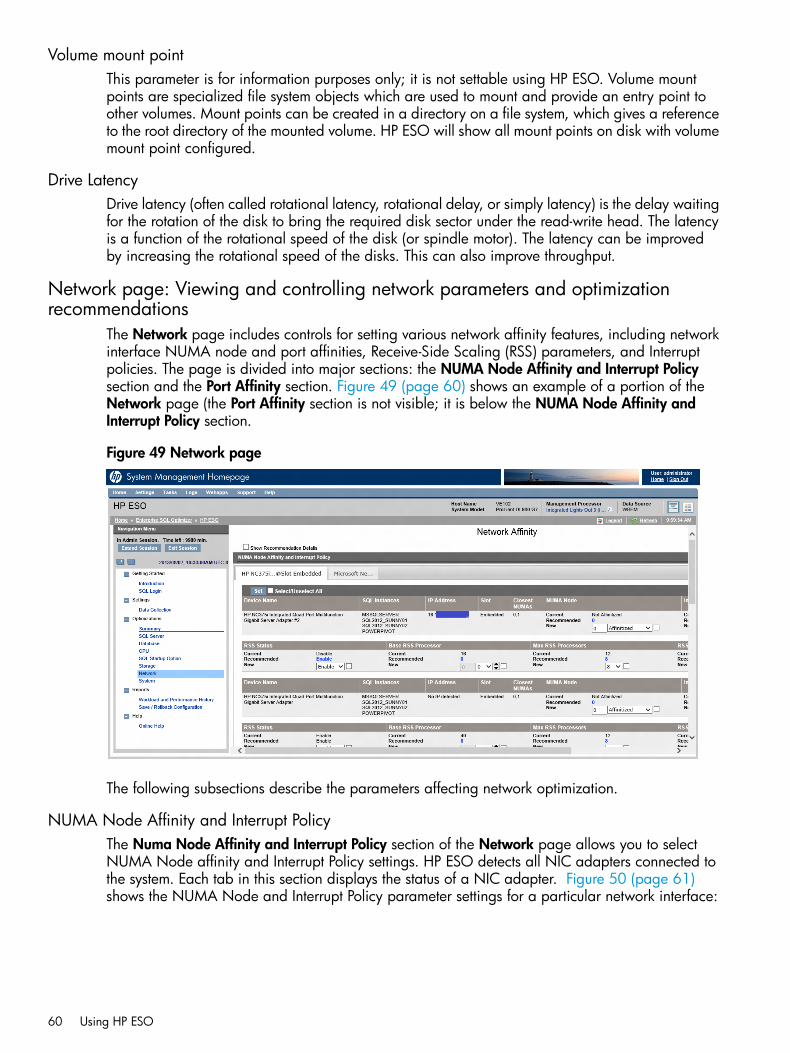
Volume mount pointThis parameter is for information purposes only; it is not settable using HP ESO. Volume mountpoints are specialized file system objects which are used to mount and provide an entry point toother volumes. Mount points can be created in a directory on a file system, which gives a referenceto the root directory of the mounted volume. HP ESO will show all mount points on disk with volumemount point configured.
Drive LatencyDrive latency (often called rotational latency, rotational delay, or simply latency) is the delay waitingfor the rotation of the disk to bring the required disk sector under the read-write head. The latencyis a function of the rotational speed of the disk (or spindle motor). The latency can be improvedby increasing the rotational speed of the disks. This can also improve throughput.
Network page: Viewing and controlling network parameters and optimizationrecommendations
The Network page includes controls for setting various network affinity features, including networkinterface NUMA node and port affinities, Receive-Side Scaling (RSS) parameters, and Interruptpolicies. The page is divided into major sections: the NUMA Node Affinity and Interrupt Policysection and the Port Affinity section. Figure 49 (page 60) shows an example of a portion of theNetwork page (the Port Affinity section is not visible; it is below the NUMA Node Affinity andInterrupt Policy section.
Figure 49 Network page
The following subsections describe the parameters affecting network optimization.
NUMA Node Affinity and Interrupt PolicyThe Numa Node Affinity and Interrupt Policy section of the Network page allows you to selectNUMA Node affinity and Interrupt Policy settings. HP ESO detects all NIC adapters connected tothe system. Each tab in this section displays the status of a NIC adapter. Figure 50 (page 61)shows the NUMA Node and Interrupt Policy parameter settings for a particular network interface:
60 Using HP ESO
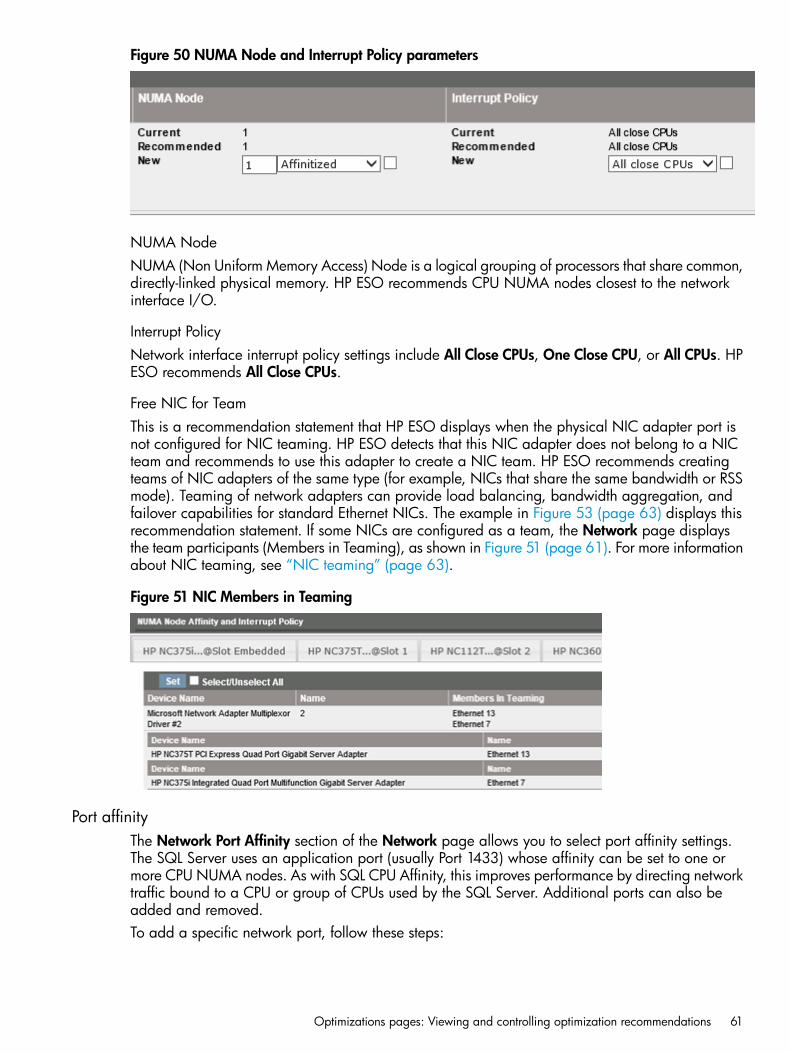
Figure 50 NUMA Node and Interrupt Policy parameters
NUMA NodeNUMA (Non Uniform Memory Access) Node is a logical grouping of processors that share common,directly-linked physical memory. HP ESO recommends CPU NUMA nodes closest to the networkinterface I/O.
Interrupt PolicyNetwork interface interrupt policy settings include All Close CPUs, One Close CPU, or All CPUs. HPESO recommends All Close CPUs.
Free NIC for TeamThis is a recommendation statement that HP ESO displays when the physical NIC adapter port isnot configured for NIC teaming. HP ESO detects that this NIC adapter does not belong to a NICteam and recommends to use this adapter to create a NIC team. HP ESO recommends creatingteams of NIC adapters of the same type (for example, NICs that share the same bandwidth or RSSmode). Teaming of network adapters can provide load balancing, bandwidth aggregation, andfailover capabilities for standard Ethernet NICs. The example in Figure 53 (page 63) displays thisrecommendation statement. If some NICs are configured as a team, the Network page displaysthe team participants (Members in Teaming), as shown in Figure 51 (page 61). For more informationabout NIC teaming, see “NIC teaming” (page 63).
Figure 51 NIC Members in Teaming
Port affinityThe Network Port Affinity section of the Network page allows you to select port affinity settings.The SQL Server uses an application port (usually Port 1433) whose affinity can be set to one ormore CPU NUMA nodes. As with SQL CPU Affinity, this improves performance by directing networktraffic bound to a CPU or group of CPUs used by the SQL Server. Additional ports can also beadded and removed.To add a specific network port, follow these steps:
Optimizations pages: Viewing and controlling optimization recommendations 61
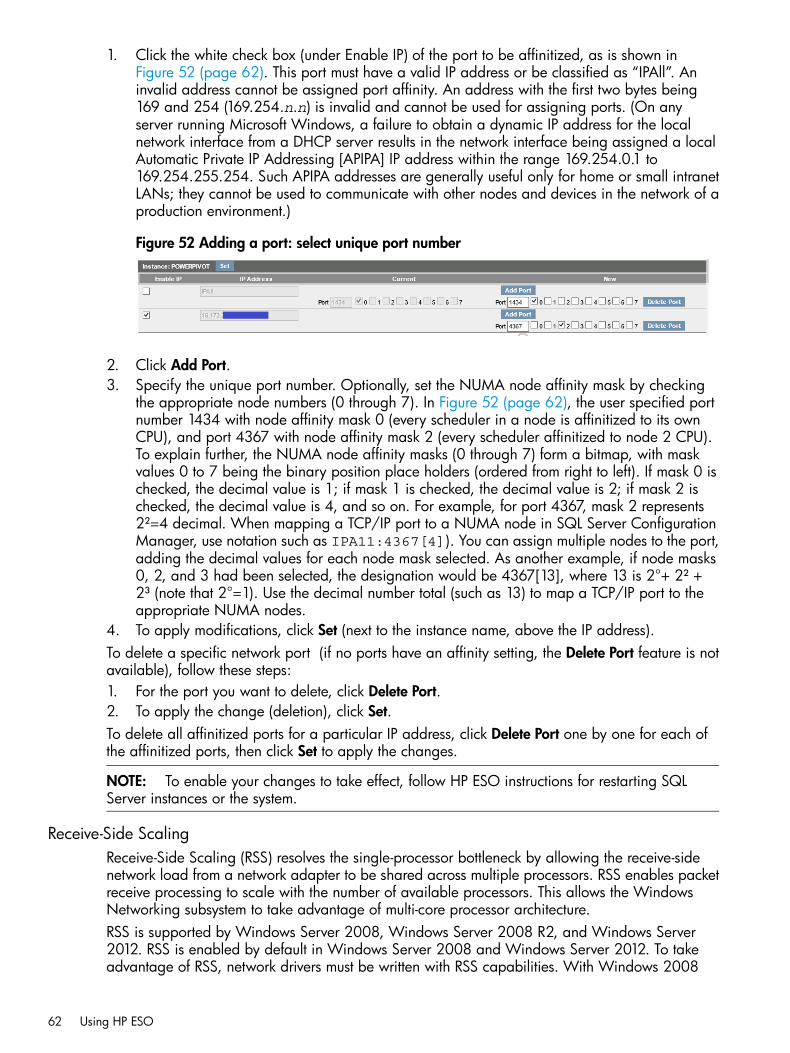
1. Click the white check box (under Enable IP) of the port to be affinitized, as is shown inFigure 52 (page 62). This port must have a valid IP address or be classified as “IPAll”. Aninvalid address cannot be assigned port affinity. An address with the first two bytes being169 and 254 (169.254.n.n) is invalid and cannot be used for assigning ports. (On anyserver running Microsoft Windows, a failure to obtain a dynamic IP address for the localnetwork interface from a DHCP server results in the network interface being assigned a localAutomatic Private IP Addressing [APIPA] IP address within the range 169.254.0.1 to169.254.255.254. Such APIPA addresses are generally useful only for home or small intranetLANs; they cannot be used to communicate with other nodes and devices in the network of aproduction environment.)
Figure 52 Adding a port: select unique port number
2. Click Add Port.3. Specify the unique port number. Optionally, set the NUMA node affinity mask by checking
the appropriate node numbers (0 through 7). In Figure 52 (page 62), the user specified portnumber 1434 with node affinity mask 0 (every scheduler in a node is affinitized to its ownCPU), and port 4367 with node affinity mask 2 (every scheduler affinitized to node 2 CPU).To explain further, the NUMA node affinity masks (0 through 7) form a bitmap, with maskvalues 0 to 7 being the binary position place holders (ordered from right to left). If mask 0 ischecked, the decimal value is 1; if mask 1 is checked, the decimal value is 2; if mask 2 ischecked, the decimal value is 4, and so on. For example, for port 4367, mask 2 represents2²=4 decimal. When mapping a TCP/IP port to a NUMA node in SQL Server ConfigurationManager, use notation such as IPA11:4367[4]). You can assign multiple nodes to the port,adding the decimal values for each node mask selected. As another example, if node masks0, 2, and 3 had been selected, the designation would be 4367[13], where 13 is 2°+ 2² +2³ (note that 2°=1). Use the decimal number total (such as 13) to map a TCP/IP port to theappropriate NUMA nodes.
4. To apply modifications, click Set (next to the instance name, above the IP address).To delete a specific network port (if no ports have an affinity setting, the Delete Port feature is notavailable), follow these steps:1. For the port you want to delete, click Delete Port.2. To apply the change (deletion), click Set.To delete all affinitized ports for a particular IP address, click Delete Port one by one for each ofthe affinitized ports, then click Set to apply the changes.
NOTE: To enable your changes to take effect, follow HP ESO instructions for restarting SQLServer instances or the system.
Receive-Side ScalingReceive-Side Scaling (RSS) resolves the single-processor bottleneck by allowing the receive-sidenetwork load from a network adapter to be shared across multiple processors. RSS enables packetreceive processing to scale with the number of available processors. This allows the WindowsNetworking subsystem to take advantage of multi-core processor architecture.RSS is supported by Windows Server 2008, Windows Server 2008 R2, and Windows Server2012. RSS is enabled by default in Windows Server 2008 and Windows Server 2012. To takeadvantage of RSS, network drivers must be written with RSS capabilities. With Windows 2008
62 Using HP ESO
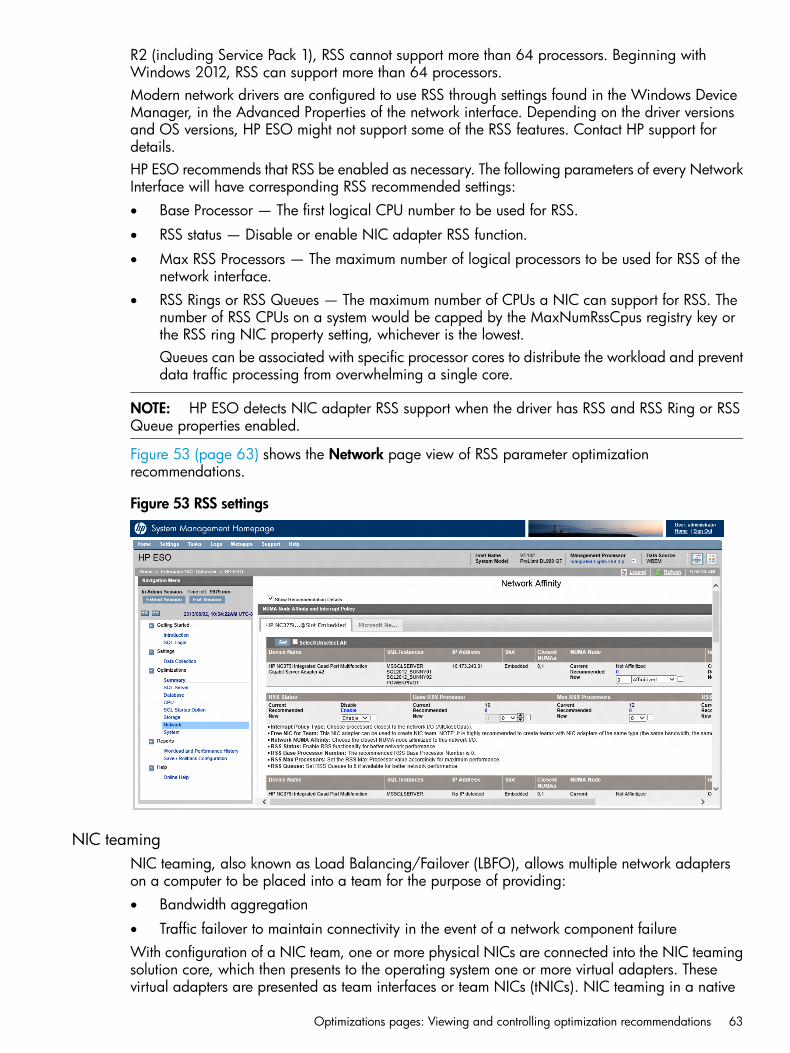
R2 (including Service Pack 1), RSS cannot support more than 64 processors. Beginning withWindows 2012, RSS can support more than 64 processors.Modern network drivers are configured to use RSS through settings found in the Windows DeviceManager, in the Advanced Properties of the network interface. Depending on the driver versionsand OS versions, HP ESO might not support some of the RSS features. Contact HP support fordetails.HP ESO recommends that RSS be enabled as necessary. The following parameters of every NetworkInterface will have corresponding RSS recommended settings:• Base Processor — The first logical CPU number to be used for RSS.
• RSS status — Disable or enable NIC adapter RSS function.
• Max RSS Processors — The maximum number of logical processors to be used for RSS of thenetwork interface.
• RSS Rings or RSS Queues — The maximum number of CPUs a NIC can support for RSS. Thenumber of RSS CPUs on a system would be capped by the MaxNumRssCpus registry key orthe RSS ring NIC property setting, whichever is the lowest.Queues can be associated with specific processor cores to distribute the workload and preventdata traffic processing from overwhelming a single core.
NOTE: HP ESO detects NIC adapter RSS support when the driver has RSS and RSS Ring or RSSQueue properties enabled.
Figure 53 (page 63) shows the Network page view of RSS parameter optimizationrecommendations.
Figure 53 RSS settings
NIC teamingNIC teaming, also known as Load Balancing/Failover (LBFO), allows multiple network adapterson a computer to be placed into a team for the purpose of providing:• Bandwidth aggregation
• Traffic failover to maintain connectivity in the event of a network component failureWith configuration of a NIC team, one or more physical NICs are connected into the NIC teamingsolution core, which then presents to the operating system one or more virtual adapters. Thesevirtual adapters are presented as team interfaces or team NICs (tNICs). NIC teaming in a native
Optimizations pages: Viewing and controlling optimization recommendations 63

host requires the presence of at least one Ethernet NIC. Windows 2012 supports up to 32 NICteams. NIC teaming supports RSS. The Windows Server TCP/IP stack programs the RSS informationdirectly to team members.To configure NIC teaming on a client system, perform these steps:
Configuring a NIC teamTo configure a NIC team, access the Server Manager Local Server properties tile (ServerManager→Local Server→Properties). Then, follow these steps.1. Click the hypertext value shown for NIC Teaming (Enabled or Disabled). Figure 54 (page 64)
shows the NIC Teaming hypertext value (Disabled). When you click the value, the NIC Teamingdialog box appears.
Figure 54 Clickable (hypertext) NIC Teaming value in Server Manager Local Server propertiestable
2. In the NIC Teaming dialog box, click the server name in the list of servers (even if there is onlyone server listed).
3. From the Tasks drop-down menu in the Teams section, select New Team.4. In the Add Team dialog box, specify a team name and select the network adapters to join the
team.5. If you want to use a mode other than the default, click Advanced, select the teaming mode
(Switch Independent, Static Teaming, or LACP), and the distribution mode (Address Hash) asneeded.
6. Click OK to create the team.
Modifying a NIC teamTo modify a NIC team, perform these steps from the NIC Teaming dialog box (for informationabout accessing the dialog box, see “Configuring a NIC team” (page 64)):1. In the list of teams provided by the NIC Teaming dialog box, right-click the name of the team
you want to modify.
64 Using HP ESO
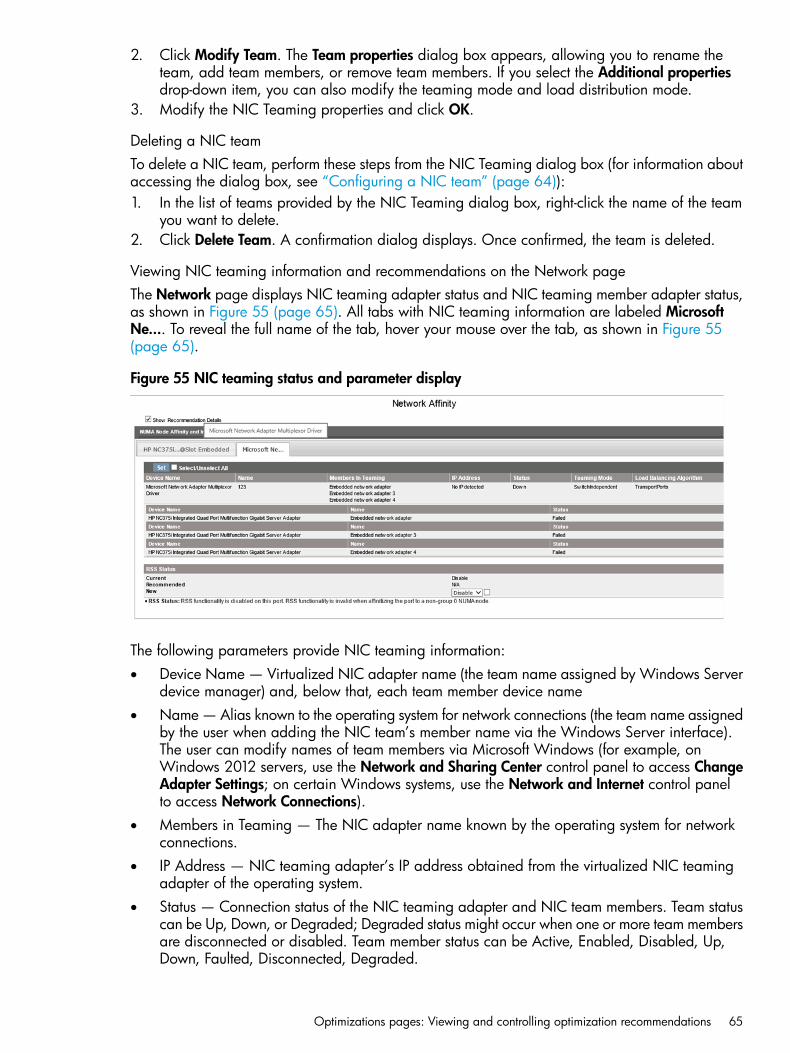
2. Click Modify Team. The Team properties dialog box appears, allowing you to rename theteam, add team members, or remove team members. If you select the Additional propertiesdrop-down item, you can also modify the teaming mode and load distribution mode.
3. Modify the NIC Teaming properties and click OK.
Deleting a NIC teamTo delete a NIC team, perform these steps from the NIC Teaming dialog box (for information aboutaccessing the dialog box, see “Configuring a NIC team” (page 64)):1. In the list of teams provided by the NIC Teaming dialog box, right-click the name of the team
you want to delete.2. Click Delete Team. A confirmation dialog displays. Once confirmed, the team is deleted.
Viewing NIC teaming information and recommendations on the Network pageThe Network page displays NIC teaming adapter status and NIC teaming member adapter status,as shown in Figure 55 (page 65). All tabs with NIC teaming information are labeled MicrosoftNe.... To reveal the full name of the tab, hover your mouse over the tab, as shown in Figure 55(page 65).
Figure 55 NIC teaming status and parameter display
The following parameters provide NIC teaming information:• Device Name — Virtualized NIC adapter name (the team name assigned by Windows Server
device manager) and, below that, each team member device name• Name — Alias known to the operating system for network connections (the team name assigned
by the user when adding the NIC team’s member name via the Windows Server interface).The user can modify names of team members via Microsoft Windows (for example, onWindows 2012 servers, use the Network and Sharing Center control panel to access ChangeAdapter Settings; on certain Windows systems, use the Network and Internet control panelto access Network Connections).
• Members in Teaming — The NIC adapter name known by the operating system for networkconnections.
• IP Address — NIC teaming adapter’s IP address obtained from the virtualized NIC teamingadapter of the operating system.
• Status — Connection status of the NIC teaming adapter and NIC team members. Team statuscan be Up, Down, or Degraded; Degraded status might occur when one or more team membersare disconnected or disabled. Team member status can be Active, Enabled, Disabled, Up,Down, Faulted, Disconnected, Degraded.
Optimizations pages: Viewing and controlling optimization recommendations 65
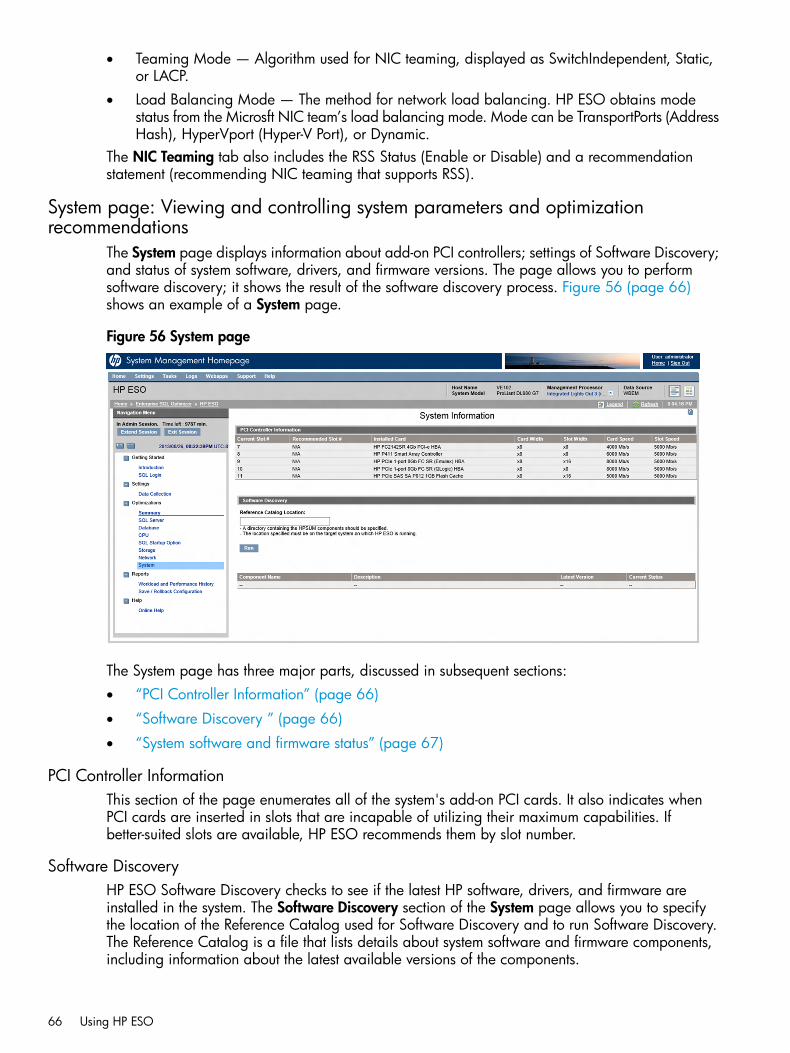
• Teaming Mode — Algorithm used for NIC teaming, displayed as SwitchIndependent, Static,or LACP.
• Load Balancing Mode — The method for network load balancing. HP ESO obtains modestatus from the Microsft NIC team’s load balancing mode. Mode can be TransportPorts (AddressHash), HyperVport (Hyper-V Port), or Dynamic.
The NIC Teaming tab also includes the RSS Status (Enable or Disable) and a recommendationstatement (recommending NIC teaming that supports RSS).
System page: Viewing and controlling system parameters and optimizationrecommendations
The System page displays information about add-on PCI controllers; settings of Software Discovery;and status of system software, drivers, and firmware versions. The page allows you to performsoftware discovery; it shows the result of the software discovery process. Figure 56 (page 66)shows an example of a System page.
Figure 56 System page
The System page has three major parts, discussed in subsequent sections:• “PCI Controller Information” (page 66)
• “Software Discovery ” (page 66)
• “System software and firmware status” (page 67)
PCI Controller InformationThis section of the page enumerates all of the system's add-on PCI cards. It also indicates whenPCI cards are inserted in slots that are incapable of utilizing their maximum capabilities. Ifbetter-suited slots are available, HP ESO recommends them by slot number.
Software DiscoveryHP ESO Software Discovery checks to see if the latest HP software, drivers, and firmware areinstalled in the system. The Software Discovery section of the System page allows you to specifythe location of the Reference Catalog used for Software Discovery and to run Software Discovery.The Reference Catalog is a file that lists details about system software and firmware components,including information about the latest available versions of the components.
66 Using HP ESO
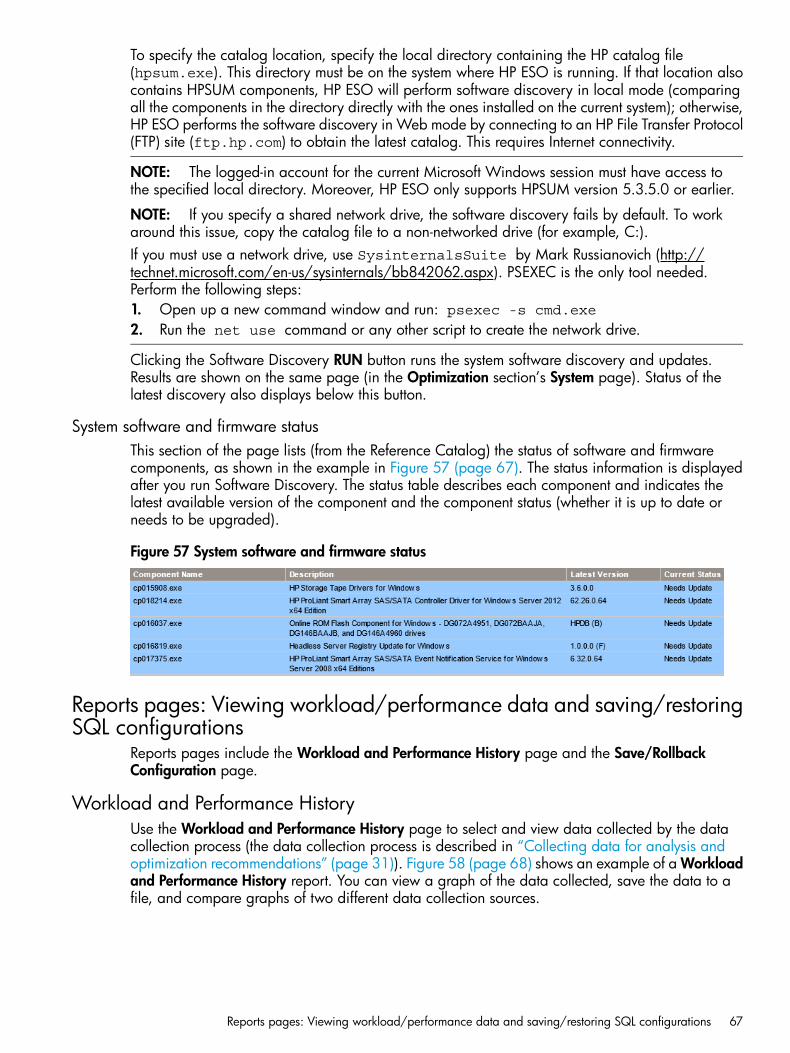
To specify the catalog location, specify the local directory containing the HP catalog file(hpsum.exe). This directory must be on the system where HP ESO is running. If that location alsocontains HPSUM components, HP ESO will perform software discovery in local mode (comparingall the components in the directory directly with the ones installed on the current system); otherwise,HP ESO performs the software discovery in Web mode by connecting to an HP File Transfer Protocol(FTP) site (ftp.hp.com) to obtain the latest catalog. This requires Internet connectivity.
NOTE: The logged-in account for the current Microsoft Windows session must have access tothe specified local directory. Moreover, HP ESO only supports HPSUM version 5.3.5.0 or earlier.
NOTE: If you specify a shared network drive, the software discovery fails by default. To workaround this issue, copy the catalog file to a non-networked drive (for example, C:).If you must use a network drive, use SysinternalsSuite by Mark Russianovich (http://technet.microsoft.com/en-us/sysinternals/bb842062.aspx). PSEXEC is the only tool needed.Perform the following steps:1. Open up a new command window and run: psexec -s cmd.exe2. Run the net use command or any other script to create the network drive.
Clicking the Software Discovery RUN button runs the system software discovery and updates.Results are shown on the same page (in the Optimization section’s System page). Status of thelatest discovery also displays below this button.
System software and firmware statusThis section of the page lists (from the Reference Catalog) the status of software and firmwarecomponents, as shown in the example in Figure 57 (page 67). The status information is displayedafter you run Software Discovery. The status table describes each component and indicates thelatest available version of the component and the component status (whether it is up to date orneeds to be upgraded).
Figure 57 System software and firmware status
Reports pages: Viewing workload/performance data and saving/restoringSQL configurations
Reports pages include the Workload and Performance History page and the Save/RollbackConfiguration page.
Workload and Performance HistoryUse the Workload and Performance History page to select and view data collected by the datacollection process (the data collection process is described in “Collecting data for analysis andoptimization recommendations” (page 31)). Figure 58 (page 68) shows an example of a Workloadand Performance History report. You can view a graph of the data collected, save the data to afile, and compare graphs of two different data collection sources.
Reports pages: Viewing workload/performance data and saving/restoring SQL configurations 67

Figure 58 Workload and Performance History page
To view and/or export a report, follow these steps:
IMPORTANT: To ensure that reports are most relevant and up-to-date, perform data collectionand complete the process prior to generating or exporting a report. This saves an up-to-date CSVdata collection log file that you can use as the basis of your report (select the file in step 1).Whenever major SQL Server configuration changes are made while the current ESO Admin Sessionis active, rerun data collection prior to viewing or generating reports. (Examples of majorconfiguration changes include adding or removing an SQL instance, database, or database file.)Data that was collected prior to a major configuration change will likely be obsolete. Rerunningthe data collection ensures that optimization recommendations and reports are aligned to thecurrent configuration and workload.
1. In the first field in the Specify Data Report file section, click the drop-down menu ( ) buttonon the right to list the available CSV data collection log files, and select the file you want toview. To view a report based on the most recently-collected data, select the most recent logfile, as denoted by the file name.
2. If you want to export this file, select the desired export file format (XML or CSV) and clickGenerate File.Right-click the file name to open or save the file, as shown in Figure 59 (page 69). If youchoose to generate an XML file, you can open the file in your browser. To export the file to aspecific destination, select Save target as... and indicate the location.
68 Using HP ESO
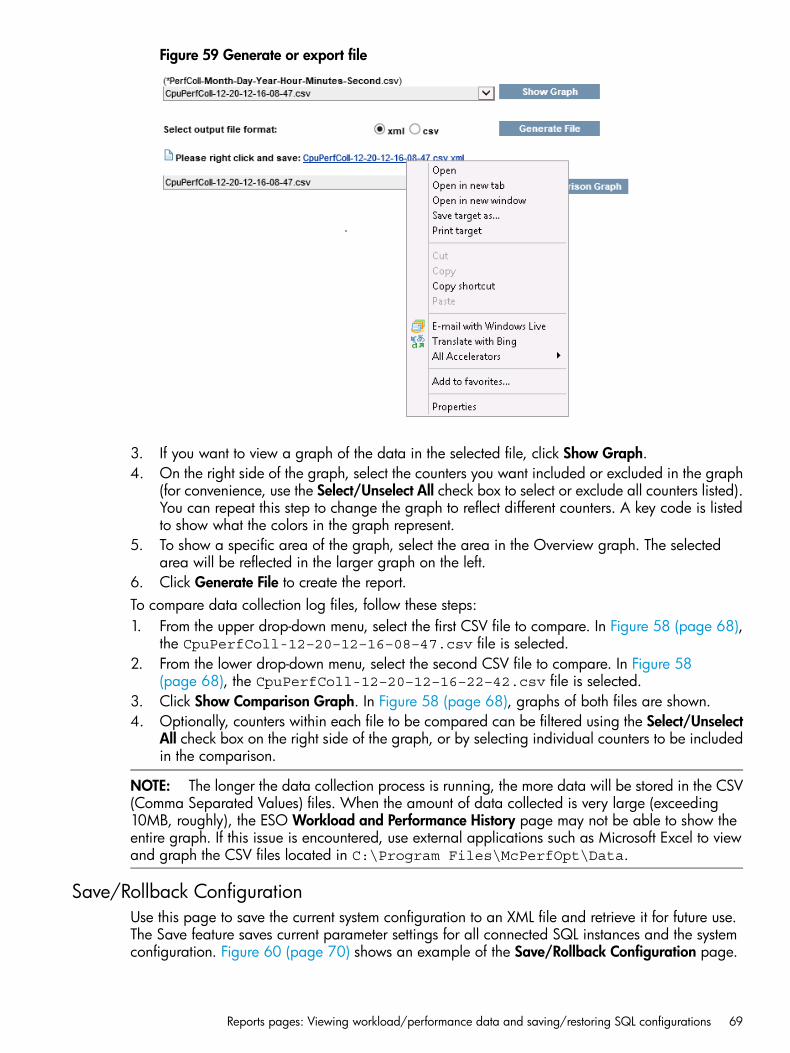
Figure 59 Generate or export file
3. If you want to view a graph of the data in the selected file, click Show Graph.4. On the right side of the graph, select the counters you want included or excluded in the graph
(for convenience, use the Select/Unselect All check box to select or exclude all counters listed).You can repeat this step to change the graph to reflect different counters. A key code is listedto show what the colors in the graph represent.
5. To show a specific area of the graph, select the area in the Overview graph. The selectedarea will be reflected in the larger graph on the left.
6. Click Generate File to create the report.To compare data collection log files, follow these steps:1. From the upper drop-down menu, select the first CSV file to compare. In Figure 58 (page 68),
the CpuPerfColl-12–20–12–16–08–47.csv file is selected.2. From the lower drop-down menu, select the second CSV file to compare. In Figure 58
(page 68), the CpuPerfColl-12–20–12–16–22–42.csv file is selected.3. Click Show Comparison Graph. In Figure 58 (page 68), graphs of both files are shown.4. Optionally, counters within each file to be compared can be filtered using the Select/Unselect
All check box on the right side of the graph, or by selecting individual counters to be includedin the comparison.
NOTE: The longer the data collection process is running, the more data will be stored in the CSV(Comma Separated Values) files. When the amount of data collected is very large (exceeding10MB, roughly), the ESO Workload and Performance History page may not be able to show theentire graph. If this issue is encountered, use external applications such as Microsoft Excel to viewand graph the CSV files located in C:\Program Files\McPerfOpt\Data.
Save/Rollback ConfigurationUse this page to save the current system configuration to an XML file and retrieve it for future use.The Save feature saves current parameter settings for all connected SQL instances and the systemconfiguration. Figure 60 (page 70) shows an example of the Save/Rollback Configuration page.
Reports pages: Viewing workload/performance data and saving/restoring SQL configurations 69
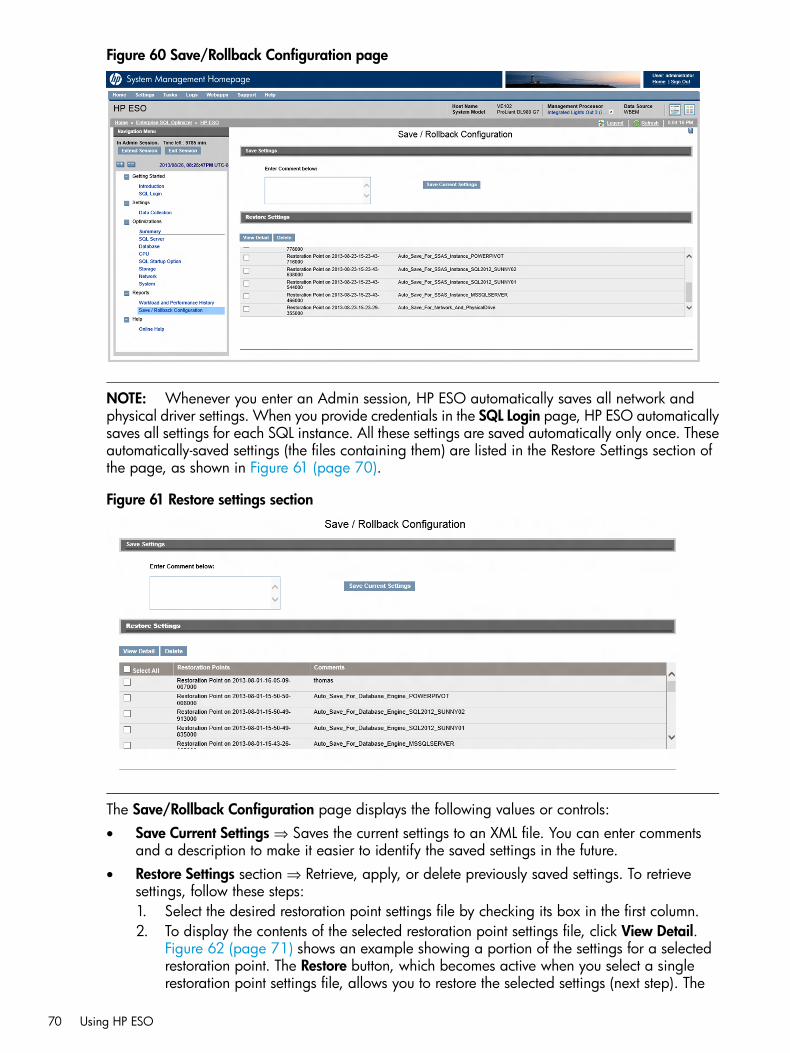
Figure 60 Save/Rollback Configuration page
NOTE: Whenever you enter an Admin session, HP ESO automatically saves all network andphysical driver settings. When you provide credentials in the SQL Login page, HP ESO automaticallysaves all settings for each SQL instance. All these settings are saved automatically only once. Theseautomatically-saved settings (the files containing them) are listed in the Restore Settings section ofthe page, as shown in Figure 61 (page 70).
Figure 61 Restore settings section
The Save/Rollback Configuration page displays the following values or controls:• Save Current Settings ⇒ Saves the current settings to an XML file. You can enter comments
and a description to make it easier to identify the saved settings in the future.• Restore Settings section ⇒ Retrieve, apply, or delete previously saved settings. To retrieve
settings, follow these steps:1. Select the desired restoration point settings file by checking its box in the first column.2. To display the contents of the selected restoration point settings file, click View Detail.
Figure 62 (page 71) shows an example showing a portion of the settings for a selectedrestoration point. The Restore button, which becomes active when you select a singlerestoration point settings file, allows you to restore the selected settings (next step). The
70 Using HP ESO
View Detail feature responds only if the selected restoration point settings differ from thecurrent settings. To view details of a restoration point settings file, you must select onlyone file; do not select the Select All check box.
3. To apply the settings contained in the selected restoration file, click Restore.
NOTE: Restore points created by older versions of HP ESO cannot be restored successfully.Before restoring such restore points, install the version of HP ESO that was used to createthem.
Figure 62 Restoring selected settings
To delete saved restoration point settings, select the restoration point settings files and click Delete;you can select the Select All check box to delete all of the saved settings. Refer to Figure 61(page 70).
NOTE: With the current version of ESO, the Save/Rollback Configuration feature handlesparameters for all HP ESO pages except the System page.
Help pages: Viewing and searching help topicsThe Help pages display the HP ESO Online Help system. Available topics are similar in structureand content to the HP ESO User Guide document, with the exception that HP ESO installationinformation is in the User Guide only. Use the Help pages to find the information you need to useHP ESO effectively.
Accessing online helpAccess online help by either clicking on the Online Help link in the left (navigation) pane of the HP
ESO page or by clicking the question mark icon “ ” in the upper right corner of an HP ESOpage. In either case, the online help appears in a separate browser window or tab.
• When you access online help from the HP ESO navigation pane, the online help Welcomepage displays, as shown in Figure 63 (page 72). To navigate, you can use the table of contentsin the left pane or any of the convenient links provided in the Welcome page.
• When you access online help by clicking the question mark icon on a page, HP ESO displaysonline help for that particular page. To access help information for other HP ESO pages, youcan scroll up or down, or use the online help table of contents.
In addition, HP ESO also provides floating help for individual items on a page. Anytime you mouseover a setting or section that has the cursor/question mark symbol “ ”, clicking that symbol bringsup floating help text, as described in “Floating help for items on a page” (page 27). This featurecan give you more information about parameters that HP ESO allows you to modify.
Using the online help Welcome pageFigure 63 (page 72) shows the online help Welcome page displayed when you access online helpfrom the HP ESO navigation pane. To navigate to other help pages, click the table of contentslinks in the left pane or the links provided by the Welcome page. The Welcome page links take
Help pages: Viewing and searching help topics 71
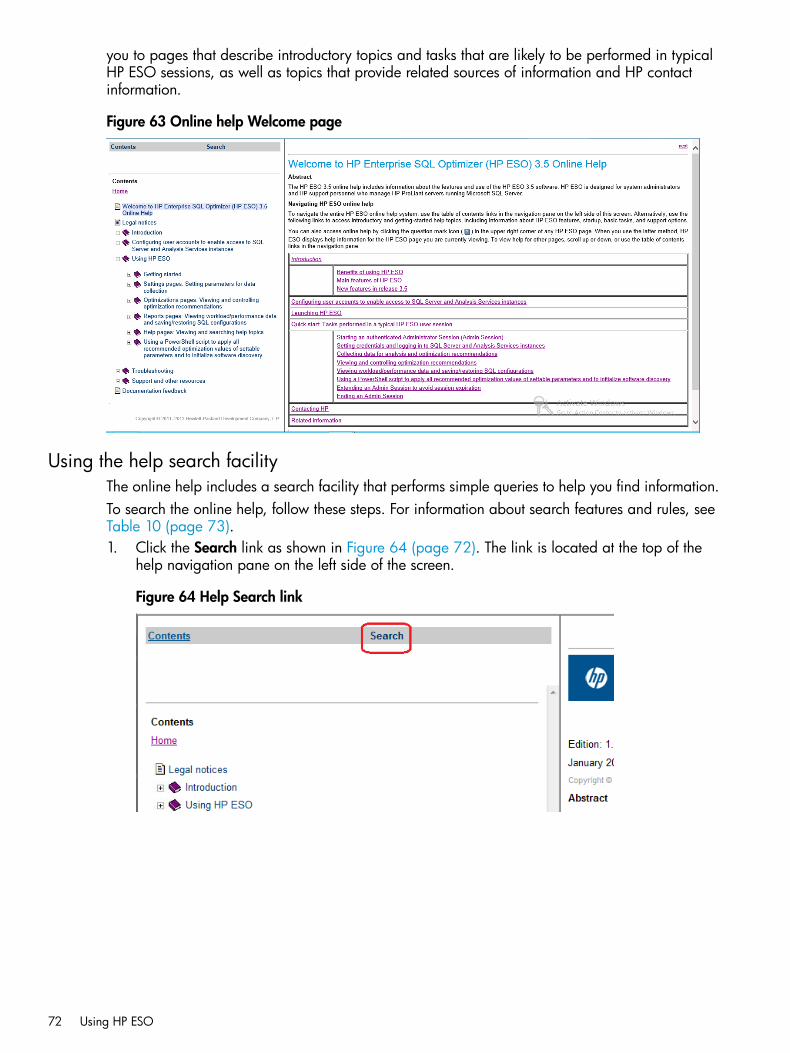
you to pages that describe introductory topics and tasks that are likely to be performed in typicalHP ESO sessions, as well as topics that provide related sources of information and HP contactinformation.
Figure 63 Online help Welcome page
Using the help search facilityThe online help includes a search facility that performs simple queries to help you find information.To search the online help, follow these steps. For information about search features and rules, seeTable 10 (page 73).1. Click the Search link as shown in Figure 64 (page 72). The link is located at the top of the
help navigation pane on the left side of the screen.
Figure 64 Help Search link
72 Using HP ESO
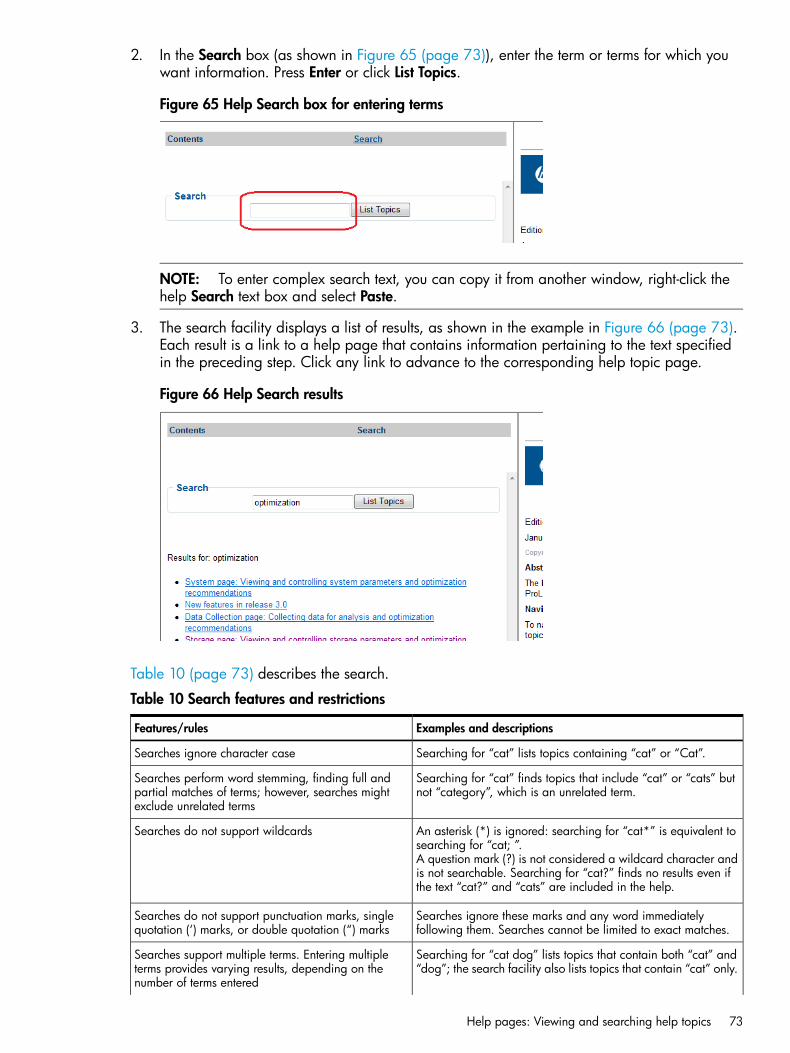
2. In the Search box (as shown in Figure 65 (page 73)), enter the term or terms for which youwant information. Press Enter or click List Topics.
Figure 65 Help Search box for entering terms
NOTE: To enter complex search text, you can copy it from another window, right-click thehelp Search text box and select Paste.
3. The search facility displays a list of results, as shown in the example in Figure 66 (page 73).Each result is a link to a help page that contains information pertaining to the text specifiedin the preceding step. Click any link to advance to the corresponding help topic page.
Figure 66 Help Search results
Table 10 (page 73) describes the search.
Table 10 Search features and restrictions
Examples and descriptionsFeatures/rules
Searching for “cat” lists topics containing “cat” or “Cat”.Searches ignore character case
Searching for “cat” finds topics that include “cat” or “cats” butnot “category”, which is an unrelated term.
Searches perform word stemming, finding full andpartial matches of terms; however, searches mightexclude unrelated terms
Searches do not support wildcards An asterisk (*) is ignored: searching for “cat*” is equivalent tosearching for “cat; ”.A question mark (?) is not considered a wildcard character andis not searchable. Searching for “cat?” finds no results even ifthe text “cat?” and “cats” are included in the help.
Searches ignore these marks and any word immediatelyfollowing them. Searches cannot be limited to exact matches.
Searches do not support punctuation marks, singlequotation (‘) marks, or double quotation (“) marks
Searches support multiple terms. Entering multipleterms provides varying results, depending on thenumber of terms entered
Searching for “cat dog” lists topics that contain both “cat” and“dog”; the search facility also lists topics that contain “cat” only.
Help pages: Viewing and searching help topics 73
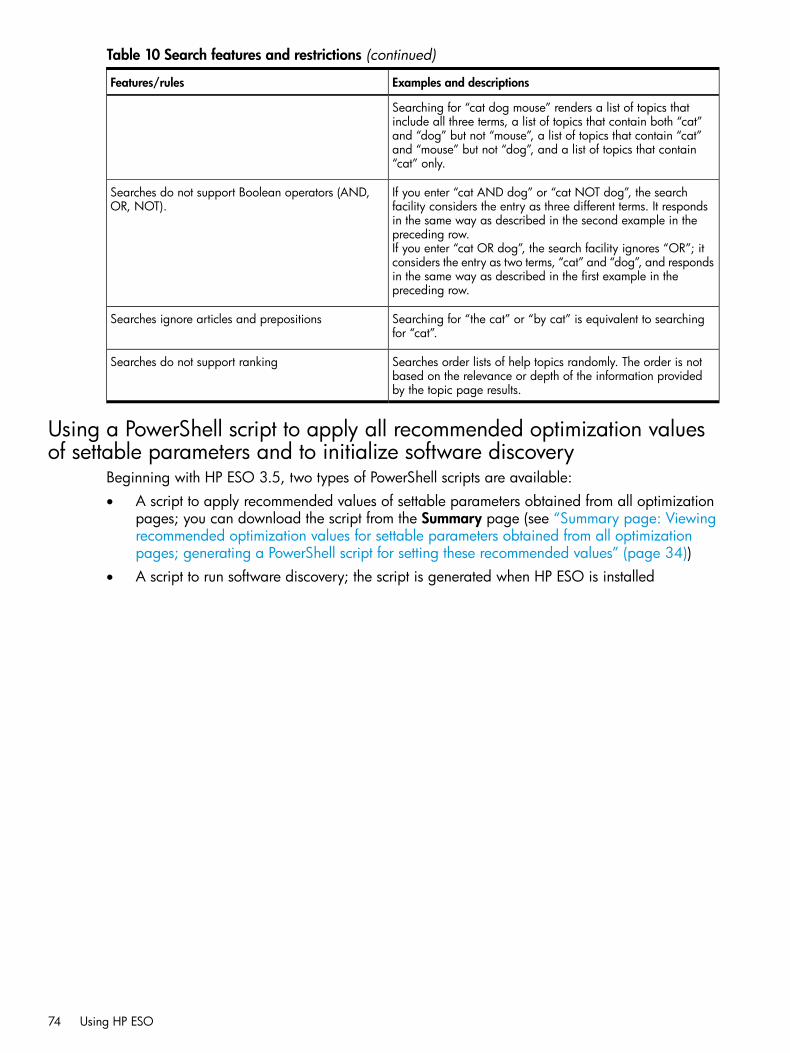
Table 10 Search features and restrictions (continued)
Examples and descriptionsFeatures/rules
Searching for “cat dog mouse” renders a list of topics thatinclude all three terms, a list of topics that contain both “cat”and “dog” but not “mouse”, a list of topics that contain “cat”and “mouse” but not “dog”, and a list of topics that contain“cat” only.
Searches do not support Boolean operators (AND,OR, NOT).
If you enter “cat AND dog” or “cat NOT dog”, the searchfacility considers the entry as three different terms. It respondsin the same way as described in the second example in thepreceding row.If you enter “cat OR dog”, the search facility ignores “OR”; itconsiders the entry as two terms, “cat” and “dog”, and respondsin the same way as described in the first example in thepreceding row.
Searches ignore articles and prepositions Searching for “the cat” or “by cat” is equivalent to searchingfor “cat”.
Searches order lists of help topics randomly. The order is notbased on the relevance or depth of the information providedby the topic page results.
Searches do not support ranking
Using a PowerShell script to apply all recommended optimization valuesof settable parameters and to initialize software discovery
Beginning with HP ESO 3.5, two types of PowerShell scripts are available:• A script to apply recommended values of settable parameters obtained from all optimization
pages; you can download the script from the Summary page (see “Summary page: Viewingrecommended optimization values for settable parameters obtained from all optimizationpages; generating a PowerShell script for setting these recommended values” (page 34))
• A script to run software discovery; the script is generated when HP ESO is installed
74 Using HP ESO
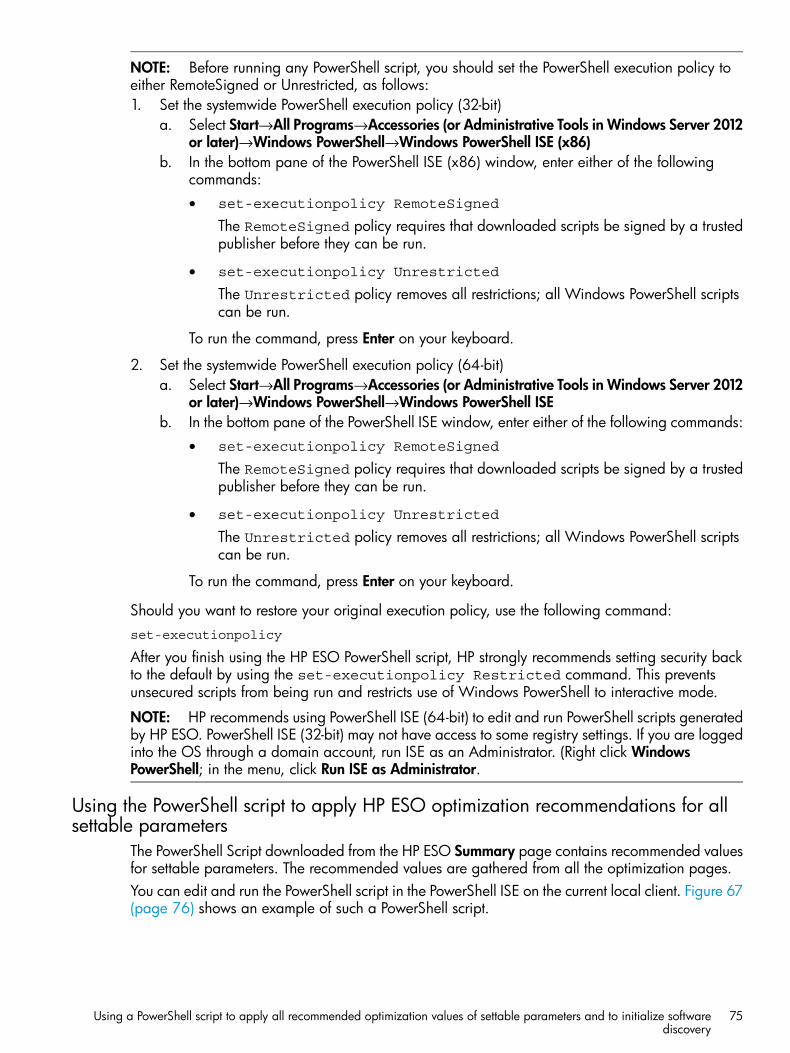
NOTE: Before running any PowerShell script, you should set the PowerShell execution policy toeither RemoteSigned or Unrestricted, as follows:1. Set the systemwide PowerShell execution policy (32-bit)
a. Select Start→All Programs→Accessories (or Administrative Tools in Windows Server 2012or later)→Windows PowerShell→Windows PowerShell ISE (x86)
b. In the bottom pane of the PowerShell ISE (x86) window, enter either of the followingcommands:• set-executionpolicy RemoteSigned
The RemoteSigned policy requires that downloaded scripts be signed by a trustedpublisher before they can be run.
• set-executionpolicy Unrestricted
The Unrestricted policy removes all restrictions; all Windows PowerShell scriptscan be run.
To run the command, press Enter on your keyboard.
2. Set the systemwide PowerShell execution policy (64-bit)a. Select Start→All Programs→Accessories (or Administrative Tools in Windows Server 2012
or later)→Windows PowerShell→Windows PowerShell ISEb. In the bottom pane of the PowerShell ISE window, enter either of the following commands:
• set-executionpolicy RemoteSigned
The RemoteSigned policy requires that downloaded scripts be signed by a trustedpublisher before they can be run.
• set-executionpolicy Unrestricted
The Unrestricted policy removes all restrictions; all Windows PowerShell scriptscan be run.
To run the command, press Enter on your keyboard.
Should you want to restore your original execution policy, use the following command:set-executionpolicy
After you finish using the HP ESO PowerShell script, HP strongly recommends setting security backto the default by using the set-executionpolicy Restricted command. This preventsunsecured scripts from being run and restricts use of Windows PowerShell to interactive mode.
NOTE: HP recommends using PowerShell ISE (64-bit) to edit and run PowerShell scripts generatedby HP ESO. PowerShell ISE (32-bit) may not have access to some registry settings. If you are loggedinto the OS through a domain account, run ISE as an Administrator. (Right click WindowsPowerShell; in the menu, click Run ISE as Administrator.
Using the PowerShell script to apply HP ESO optimization recommendations for allsettable parameters
The PowerShell Script downloaded from the HP ESO Summary page contains recommended valuesfor settable parameters. The recommended values are gathered from all the optimization pages.You can edit and run the PowerShell script in the PowerShell ISE on the current local client. Figure 67(page 76) shows an example of such a PowerShell script.
Using a PowerShell script to apply all recommended optimization values of settable parameters and to initialize softwarediscovery
75
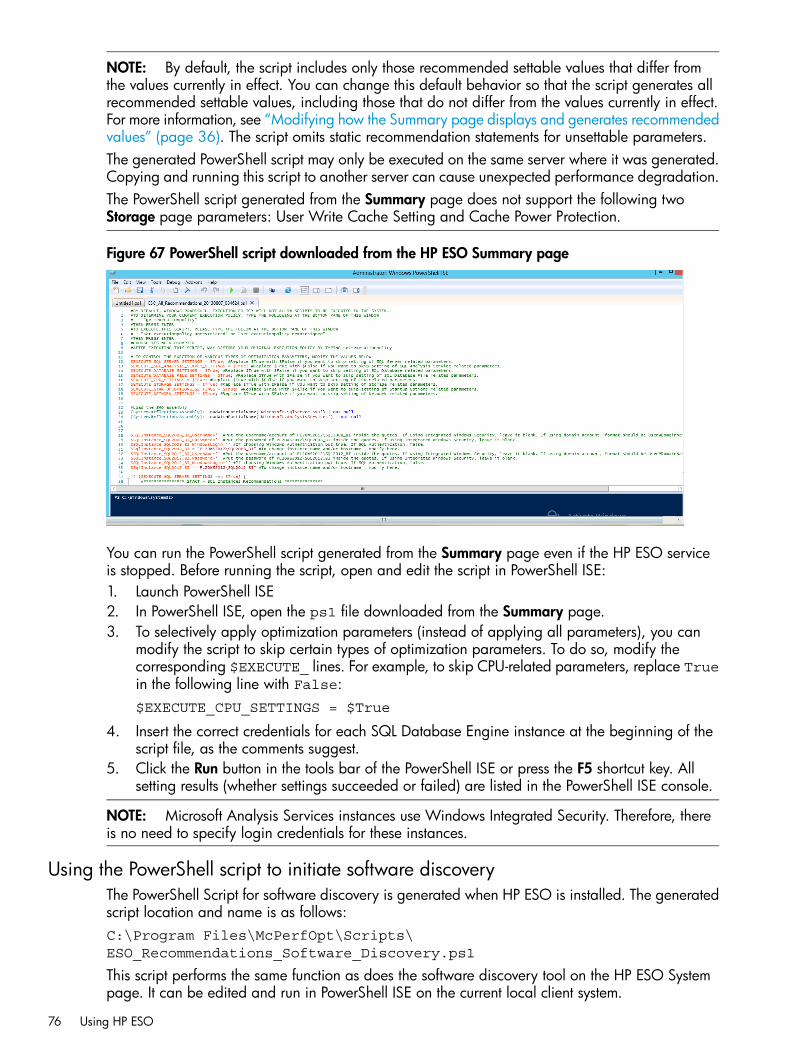
NOTE: By default, the script includes only those recommended settable values that differ fromthe values currently in effect. You can change this default behavior so that the script generates allrecommended settable values, including those that do not differ from the values currently in effect.For more information, see “Modifying how the Summary page displays and generates recommendedvalues” (page 36). The script omits static recommendation statements for unsettable parameters.The generated PowerShell script may only be executed on the same server where it was generated.Copying and running this script to another server can cause unexpected performance degradation.The PowerShell script generated from the Summary page does not support the following twoStorage page parameters: User Write Cache Setting and Cache Power Protection.
Figure 67 PowerShell script downloaded from the HP ESO Summary page
You can run the PowerShell script generated from the Summary page even if the HP ESO serviceis stopped. Before running the script, open and edit the script in PowerShell ISE:1. Launch PowerShell ISE2. In PowerShell ISE, open the ps1 file downloaded from the Summary page.3. To selectively apply optimization parameters (instead of applying all parameters), you can
modify the script to skip certain types of optimization parameters. To do so, modify thecorresponding $EXECUTE_ lines. For example, to skip CPU-related parameters, replace Truein the following line with False:$EXECUTE_CPU_SETTINGS = $True
4. Insert the correct credentials for each SQL Database Engine instance at the beginning of thescript file, as the comments suggest.
5. Click the Run button in the tools bar of the PowerShell ISE or press the F5 shortcut key. Allsetting results (whether settings succeeded or failed) are listed in the PowerShell ISE console.
NOTE: Microsoft Analysis Services instances use Windows Integrated Security. Therefore, thereis no need to specify login credentials for these instances.
Using the PowerShell script to initiate software discoveryThe PowerShell Script for software discovery is generated when HP ESO is installed. The generatedscript location and name is as follows:C:\Program Files\McPerfOpt\Scripts\ESO_Recommendations_Software_Discovery.ps1
This script performs the same function as does the software discovery tool on the HP ESO Systempage. It can be edited and run in PowerShell ISE on the current local client system.
76 Using HP ESO
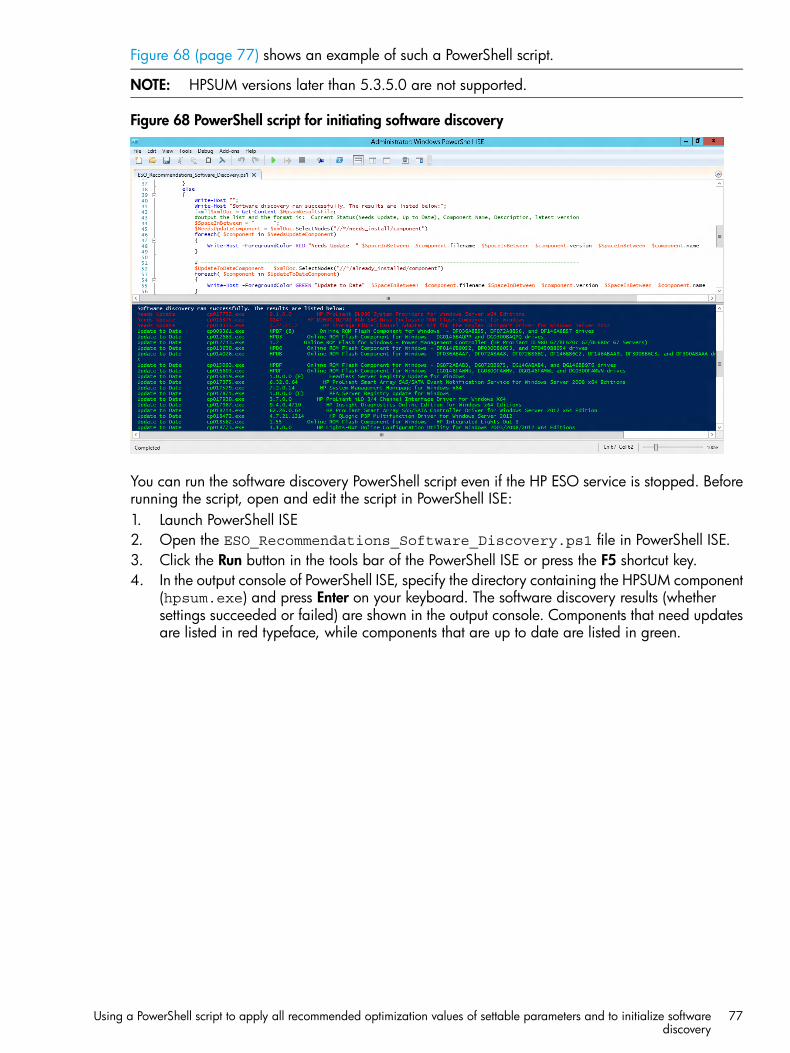
Figure 68 (page 77) shows an example of such a PowerShell script.
NOTE: HPSUM versions later than 5.3.5.0 are not supported.
Figure 68 PowerShell script for initiating software discovery
You can run the software discovery PowerShell script even if the HP ESO service is stopped. Beforerunning the script, open and edit the script in PowerShell ISE:1. Launch PowerShell ISE2. Open the ESO_Recommendations_Software_Discovery.ps1 file in PowerShell ISE.3. Click the Run button in the tools bar of the PowerShell ISE or press the F5 shortcut key.4. In the output console of PowerShell ISE, specify the directory containing the HPSUM component
(hpsum.exe) and press Enter on your keyboard. The software discovery results (whethersettings succeeded or failed) are shown in the output console. Components that need updatesare listed in red typeface, while components that are up to date are listed in green.
Using a PowerShell script to apply all recommended optimization values of settable parameters and to initialize softwarediscovery
77
5 TroubleshootingThe following sections describe tips for troubleshooting problems that might arise while using HPESO.
HP ESO is not found on the SMH page and HP Enterprise SQL Optimizeris in Disabled state in the service list
Problem description:After uninstalling and then reinstalling HP ESO, HP ESO is not seen on the HP SMH homepage.The HP Enterprise SQL Optimizer in the OS service list is Disabled. This occurs when multiple usersare connecting to the system during the reinstallation or upgrade process.
Resolving the problem:Make sure you are the only user connecting to the system. Then uninstall and reinstall HP ESOagain.
Access to SQL Server or Analysis Services instance is denied
Problem description:When attempting to log in to an instance from the SQL Login page login fails: the Login Status field
in the fifth column displays the symbol, and the Latest Login Log field near the top of the pageindicates either of the following two problems:
• The specified account is not assigned sufficient server roles in the SQL Server, as required foraccess to the indicated SQL Server instance.
• The specified account is not a member of the Server Administrators group, as required foraccess to the indicated Analysis Services instance..
Resolving the problem:This problem indicates that the affected user account was not configured properly to access theindicated instance. To ensure access to SQL Server instances, follow the instructions given in “Setuser account privileges in Database Engine security” (page 14). To ensure access to AnalysisServices instances, follow the instructions given in “Set user account privileges in Analysis Servicessecurity” (page 15).
PowerShell script fails
Problem description:On attempting to run a PowerShell script, an error message indicates that the script cannot beloaded because running scripts is disabled on the system. The likely cause of this problem is thatthe systemwide PowerShell policy is not set. The policy must be set when running any PowerShellscript (not only HP ESO scripts) on a Windows system.
Resolving the problem:Make sure the execution policy is set before running any PowerShell Script. Instructions for settingthe policy are included in “Using a PowerShell script to apply all recommended optimization valuesof settable parameters and to initialize software discovery” (page 74).
78 Troubleshooting
6 Support and other resourcesContacting HP
Before you contact HPBe sure to have the following information available before you call or contact HP:
• Technical support registration number (if applicable)
• Product serial number
• Product model name and number
• Product identification number
• Applicable error message
• Add-on boards or hardware
• Third-party hardware or software
• Operating system type and revision level
HP contact informationFor the name of the nearest HP authorized reseller:
• See the Contact HP worldwide (in English) webpage:http://www8.hp.com/us/en/hp-information/summary/ww-contact-us.html
For HP technical support:
• In the United States, for contact options see the Contact HP/Customer Service webpage:http://www8.hp.com/us/en/contact-hp/contact.htmlTo contact HP by phone:
◦ Phone:1-800-HP-INVENT (1-800-474-6836). This service is available 24 hours a day, 7days a week. For continuous quality improvement, calls may be recorded or monitored.
◦ If you have purchased a Care Pack (service upgrade), call 1-800-633-3600. For moreinformation about Care Packs, see the following HP webpage:http://www.hp.com/go/carepack
• In other locations, see the Contact HP worldwide (in English) webpage:http://welcome.hp.com/country/us/en/wwcontact_us.html
Subscription serviceHP recommends that you register your product at the Subscriber's Choice for Business webpage:http://www.hp.com/united-states/subscribe/gateway/After registering, you will receive email notification of product enhancements, new driver versions,firmware updates, and other product resources.
New and changed information in this editionThis edition covers updates for the HP ESO 3.5 release, including new ESO 3.5 features andchanges. Illustrations have been updated to show revised windows and webpages. The newfeatures for HP ESO 3.5 are summarized in “New features in release 3.5” (page 7).
Contacting HP 79
Related informationThe HP ESO release notes are available on the HP Business Support Center website from wherethe HP ESO software is obtained.The latest release of the HP Enterprise SQL Optimizer (HP ESO) User Guide and other HP ProLiantDL980 documentation can be found at the following HP Business Support Center webpage:http://hp.com/go/proliant-DL980-docsFor information about HP ProLiant servers, see the following HP webpage:http://www.hp.com/go/proliant
Typographic conventionsThis document uses the following typographical conventions:WARNING A warning calls attention to important information that, if not understood
or followed, results in personal injury or nonrecoverable system problems.CAUTION A caution calls attention to important information that, if not understood
or followed, might result in data loss, data corruption, or damage tohardware or software.
IMPORTANT This alert provides essential information to explain a concept or tocomplete a task.
NOTE A note contains additional information to emphasize or supplementimportant points of the main text.
KeyCap The name of a keyboard key or graphical interface item (such as buttons,tabs, and menu items).
Computer output Text displayed by the computer.User input Commands and other text that you type.Variable The name of a placeholder in a command, function, or other syntax display
that you replace with an actual value (for example, cpnnnnnn.exe).Command A command name or qualified command phrase.Ctrl+x A key sequence. A sequence such as Ctrl+x indicates that you must press
the key labeled Ctrl while you press another key or mouse button.
80 Support and other resources

7 Documentation feedbackHP is committed to providing documentation that meets your needs. To help us improve thedocumentation, send any errors, suggestions, or comments to Documentation Feedback([email protected]). Include the document title and part number, version number, or the URLwhen submitting your feedback.
81