Embed Size (px)
Citation preview
How To TranscribeDocuments with Transkribus -
Simple ModeThis is a short introduction to the basic steps for transcribing documents with Transkribus. Thisplatform is specifically designed to enable users to generate highly standardized output. There arevarious options for transcribing documents and transcripts can also be used to train HandwrittenText Recognition software.
For further information see the following papers and websites:
- How To Transcribe Documents with Transkribus – Advanced Mode- How To Prepare Test Projects with Transkribus –for Archives and Libraries
Download the Transkribus Expert Client, or make sure you are using the latest version:
- https://transkribus.eu/
Consult the Transkribus Wiki for further information and a Users’ Guide:
- https://transkribus.eu/wiki/- https://transkribus.eu/wiki/index.php/Users_guide
Transkribus and the technology behind it are made available via the following projects and sites:
- https://read.transkribus.eu/- https://transcriptorium.eu/- https://github.com/transkribus/
Contact
- The Transkribus Team: [email protected]
2 HowToTranscribe – Simple Mode
Contents
Introduction............................................................................................................................................. 3
Getting started .................................................................................................................................... 3
Benefits................................................................................................................................................ 3
General rules ....................................................................................................................................... 4
Learning by doing ................................................................................................................................ 5
Upload Example Package to Transkribus ............................................................................................ 7
Segmentation .......................................................................................................................................... 9
Introduction......................................................................................................................................... 9
Viewing modes .................................................................................................................................. 11
Step 1: Define text regions ................................................................................................................ 12
Step 2: Define lines/baselines ........................................................................................................... 13
Tables ................................................................................................................................................ 15
Transcription ......................................................................................................................................... 16
Introduction....................................................................................................................................... 16
Transcribe text................................................................................................................................... 16
Text mark up...................................................................................................................................... 16
Additions ........................................................................................................................................... 17
Credits ................................................................................................................................................... 17
The READ project has received funding from the European Union’s Horizon2020 research and innovation programme under grant agreement No674943.
3 HowToTranscribe – Simple Mode
IntroductionGetting started
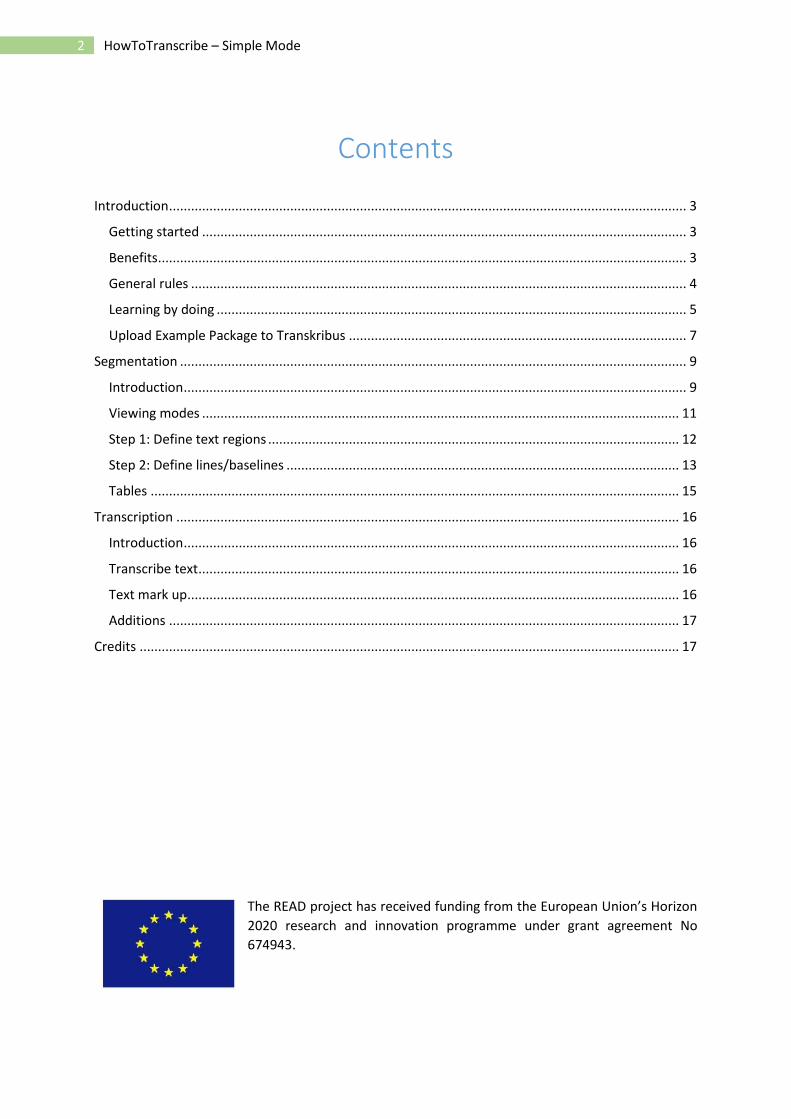
- Everyone can easily learn how to transcribe historical documents with Transkribus.o Download Transkribus from the following web-site:o https://transkribus.eu/o Further instructions on installing the platform can be found in the Transkribus Wikio Once Transkribus has been installed, open the platform and click the ‘Login’ button
on the Main Menu.o Log in using the email address and password you used when registering your account
Figure 1 Login button
- Detailed background information can be found in the Transkribus Wiki and the User’s Guide.Though Transkribus is an expert programme you will get familiar within a short while withthe basic functionality needed to upload documents, to segment, transcribe and exportthem.
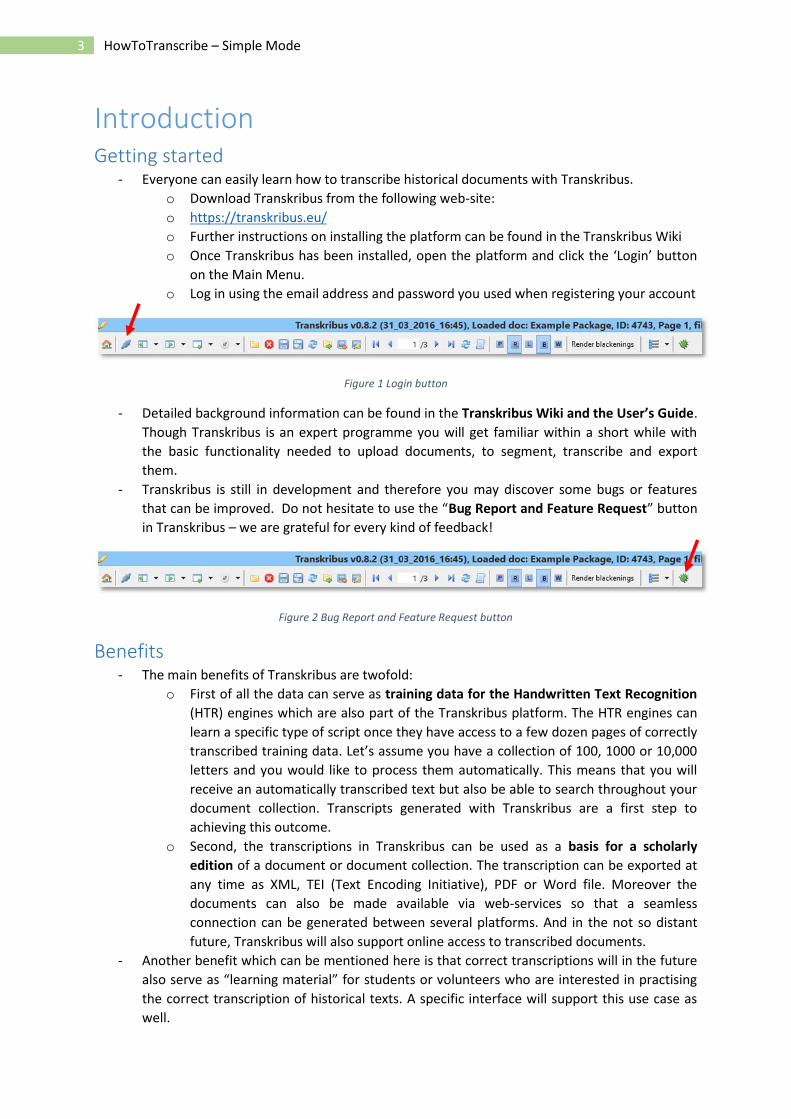
- Transkribus is still in development and therefore you may discover some bugs or featuresthat can be improved. Do not hesitate to use the “Bug Report and Feature Request” buttonin Transkribus – we are grateful for every kind of feedback!
Figure 2 Bug Report and Feature Request button
Benefits- The main benefits of Transkribus are twofold:
o First of all the data can serve as training data for the Handwritten Text Recognition(HTR) engines which are also part of the Transkribus platform. The HTR engines canlearn a specific type of script once they have access to a few dozen pages of correctlytranscribed training data. Let’s assume you have a collection of 100, 1000 or 10,000letters and you would like to process them automatically. This means that you willreceive an automatically transcribed text but also be able to search throughout yourdocument collection. Transcripts generated with Transkribus are a first step toachieving this outcome.
o Second, the transcriptions in Transkribus can be used as a basis for a scholarlyedition of a document or document collection. The transcription can be exported atany time as XML, TEI (Text Encoding Initiative), PDF or Word file. Moreover thedocuments can also be made available via web-services so that a seamlessconnection can be generated between several platforms. And in the not so distantfuture, Transkribus will also support online access to transcribed documents.
- Another benefit which can be mentioned here is that correct transcriptions will in the futurealso serve as “learning material” for students or volunteers who are interested in practisingthe correct transcription of historical texts. A specific interface will support this use case aswell.
4 HowToTranscribe – Simple Mode
General rules- There are only a few simple rules which you should bear in mind before starting with your
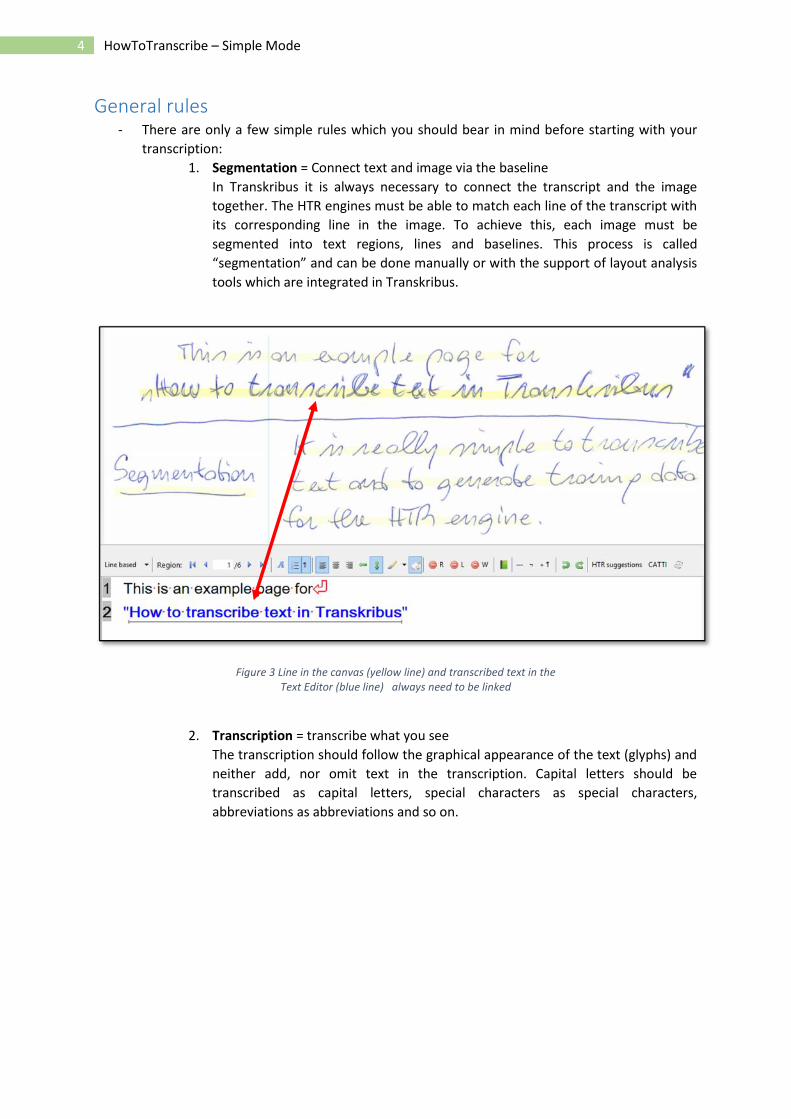
transcription:1. Segmentation = Connect text and image via the baseline
In Transkribus it is always necessary to connect the transcript and the imagetogether. The HTR engines must be able to match each line of the transcript withits corresponding line in the image. To achieve this, each image must besegmented into text regions, lines and baselines. This process is called“segmentation” and can be done manually or with the support of layout analysistools which are integrated in Transkribus.
Figure 3 Line in the canvas (yellow line) and transcribed text in theText Editor (blue line) always need to be linked
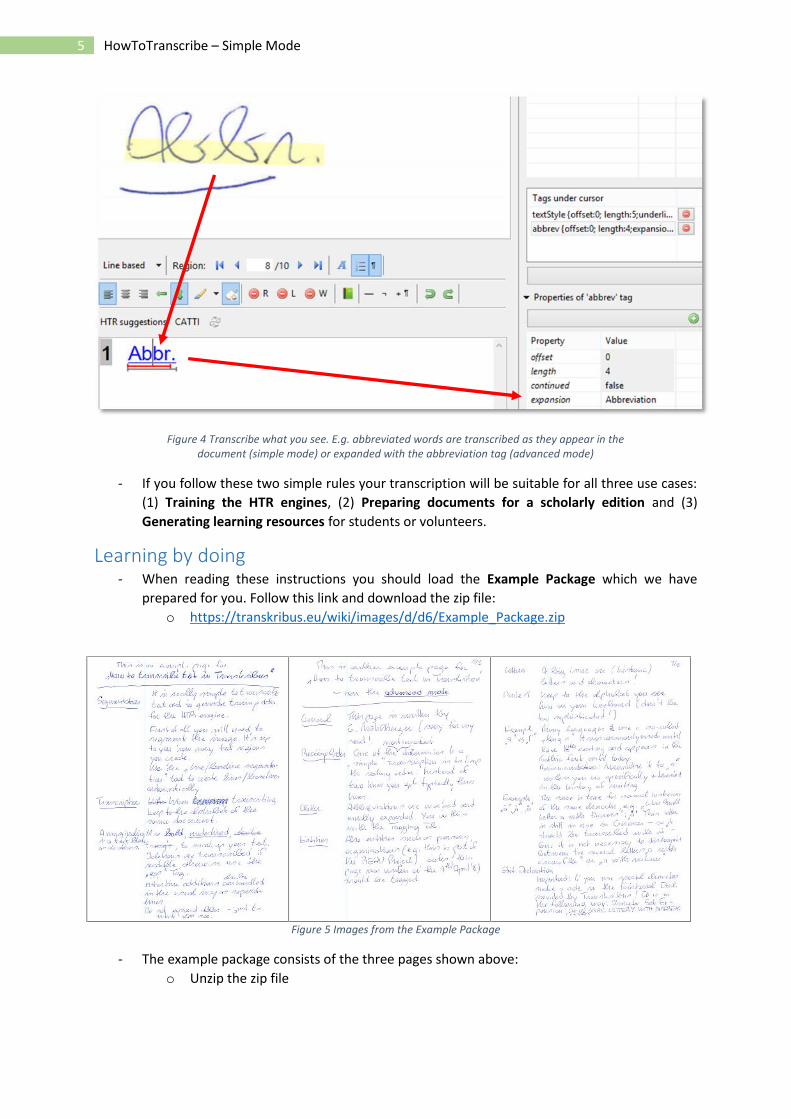
2. Transcription = transcribe what you seeThe transcription should follow the graphical appearance of the text (glyphs) andneither add, nor omit text in the transcription. Capital letters should betranscribed as capital letters, special characters as special characters,abbreviations as abbreviations and so on.
5 HowToTranscribe – Simple Mode
Figure 4 Transcribe what you see. E.g. abbreviated words are transcribed as they appear in thedocument (simple mode) or expanded with the abbreviation tag (advanced mode)
- If you follow these two simple rules your transcription will be suitable for all three use cases:(1) Training the HTR engines, (2) Preparing documents for a scholarly edition and (3)Generating learning resources for students or volunteers.
Learning by doing- When reading these instructions you should load the Example Package which we have
prepared for you. Follow this link and download the zip file:o https://transkribus.eu/wiki/images/d/d6/Example_Package.zip
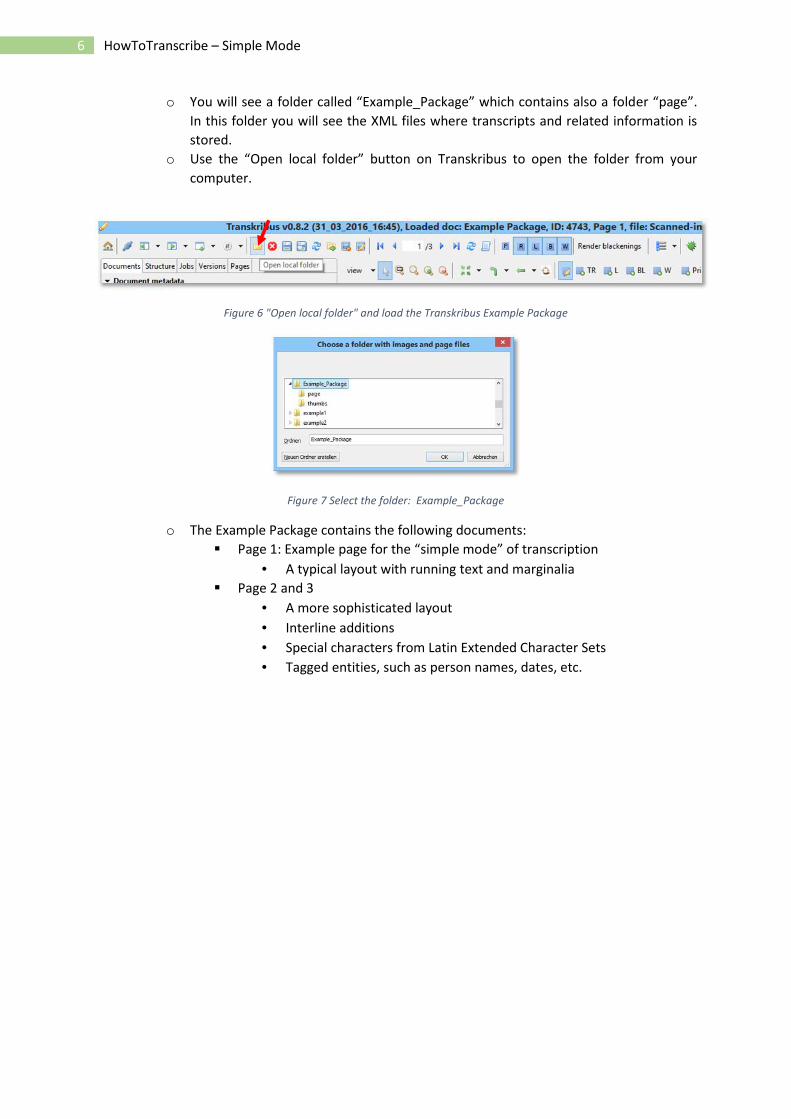
Figure 5 Images from the Example Package
- The example package consists of the three pages shown above:o Unzip the zip file
6 HowToTranscribe – Simple Mode
o You will see a folder called “Example_Package” which contains also a folder “page”.In this folder you will see the XML files where transcripts and related information isstored.
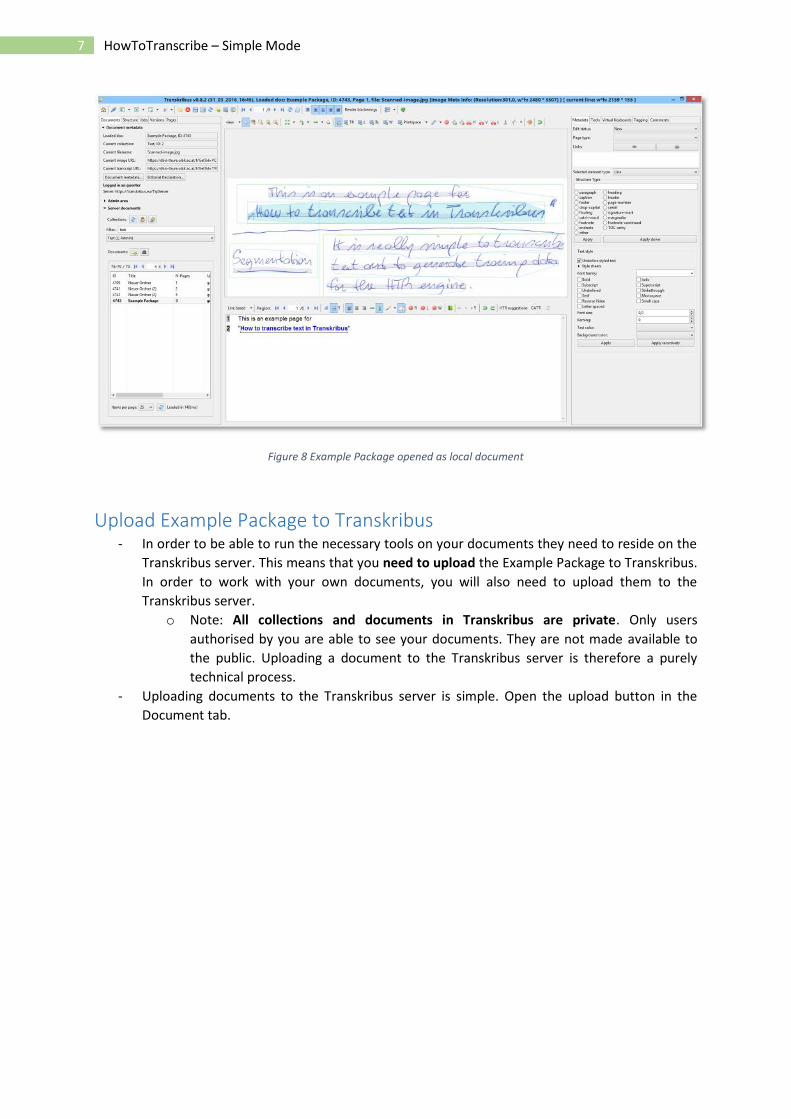
o Use the “Open local folder” button on Transkribus to open the folder from yourcomputer.
Figure 6 "Open local folder" and load the Transkribus Example Package
Figure 7 Select the folder: Example_Package
o The Example Package contains the following documents: Page 1: Example page for the “simple mode” of transcription
A typical layout with running text and marginalia Page 2 and 3
A more sophisticated layout Interline additions Special characters from Latin Extended Character Sets Tagged entities, such as person names, dates, etc.
7 HowToTranscribe – Simple Mode
Figure 8 Example Package opened as local document
Upload Example Package to Transkribus- In order to be able to run the necessary tools on your documents they need to reside on the
Transkribus server. This means that you need to upload the Example Package to Transkribus.In order to work with your own documents, you will also need to upload them to theTranskribus server.
o Note: All collections and documents in Transkribus are private. Only usersauthorised by you are able to see your documents. They are not made available tothe public. Uploading a document to the Transkribus server is therefore a purelytechnical process.
- Uploading documents to the Transkribus server is simple. Open the upload button in theDocument tab.
8 HowToTranscribe – Simple Mode
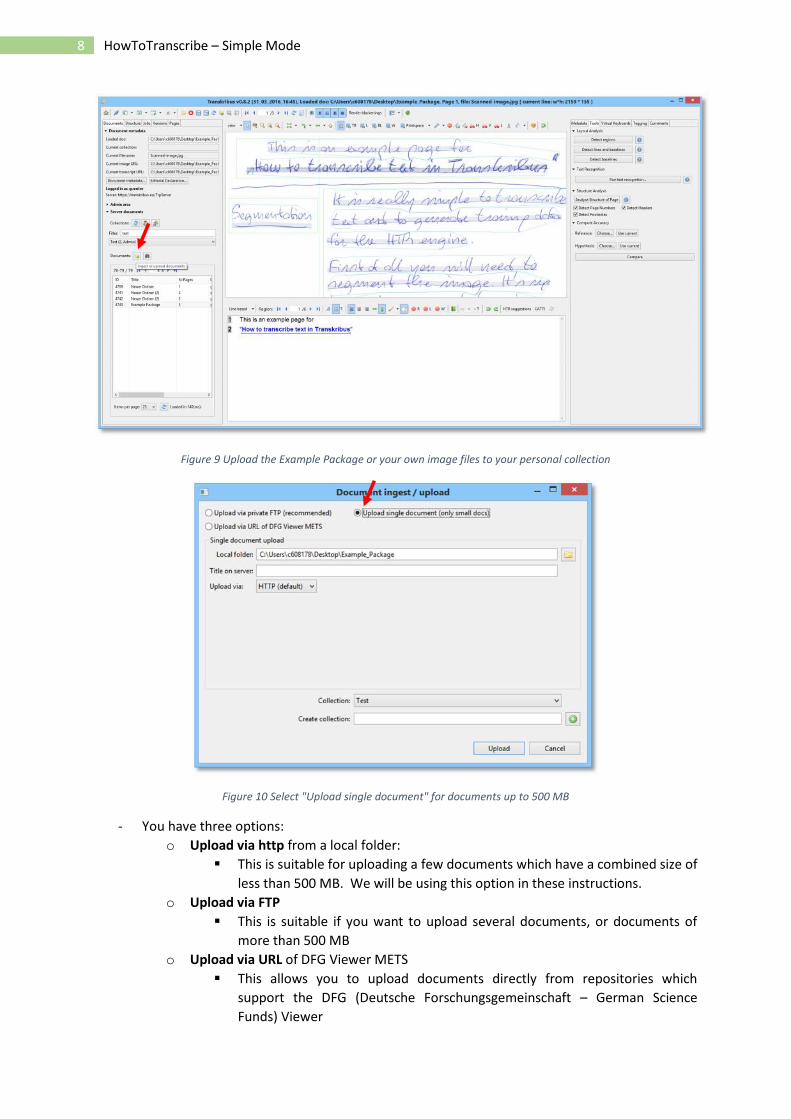
Figure 9 Upload the Example Package or your own image files to your personal collection
Figure 10 Select "Upload single document" for documents up to 500 MB
- You have three options:o Upload via http from a local folder:
This is suitable for uploading a few documents which have a combined size ofless than 500 MB. We will be using this option in these instructions.
o Upload via FTP This is suitable if you want to upload several documents, or documents of
more than 500 MBo Upload via URL of DFG Viewer METS
This allows you to upload documents directly from repositories whichsupport the DFG (Deutsche Forschungsgemeinschaft – German ScienceFunds) Viewer

9 HowToTranscribe – Simple Mode
o Note: it is not currently possible to upload images as single PDF files. Beforeuploading to Transkribus, you should first extract the image files from the PDF files.You can do this with specific software, e.g. Adobe Acrobat Professional.
To upload the Example Package:
- Click on “Ingest or upload documents”- Select “Upload single document”- Use the “Local folder” section to find the Example Package on your computer- Select an already available collection from the drop down menu, or create your own
collection.o Write the name of the collection you want to create into the “Create collection”
field, here: “guenters_collection”o Press the green + Buttono Select the new collection from the drop down menu above and click “Upload”
Figure 11 Create your own collection by writing the title (here: guenters_collection) into the field and press the green +button. Then select the new collection from drop down menu above
- Uploading may take several minutes depending on your Internet connection.
SegmentationIntroduction- For the HTR to work, the text and image need to be connected in Transkribus. This is
achieved by segmenting each document into:o Text regions (TR): The text region must contain all the relevant text which shall be
transcribed.o Lines (L): The line region is here for technical reasons and does not play a role for the
end-user.
10 HowToTranscribe – Simple Mode
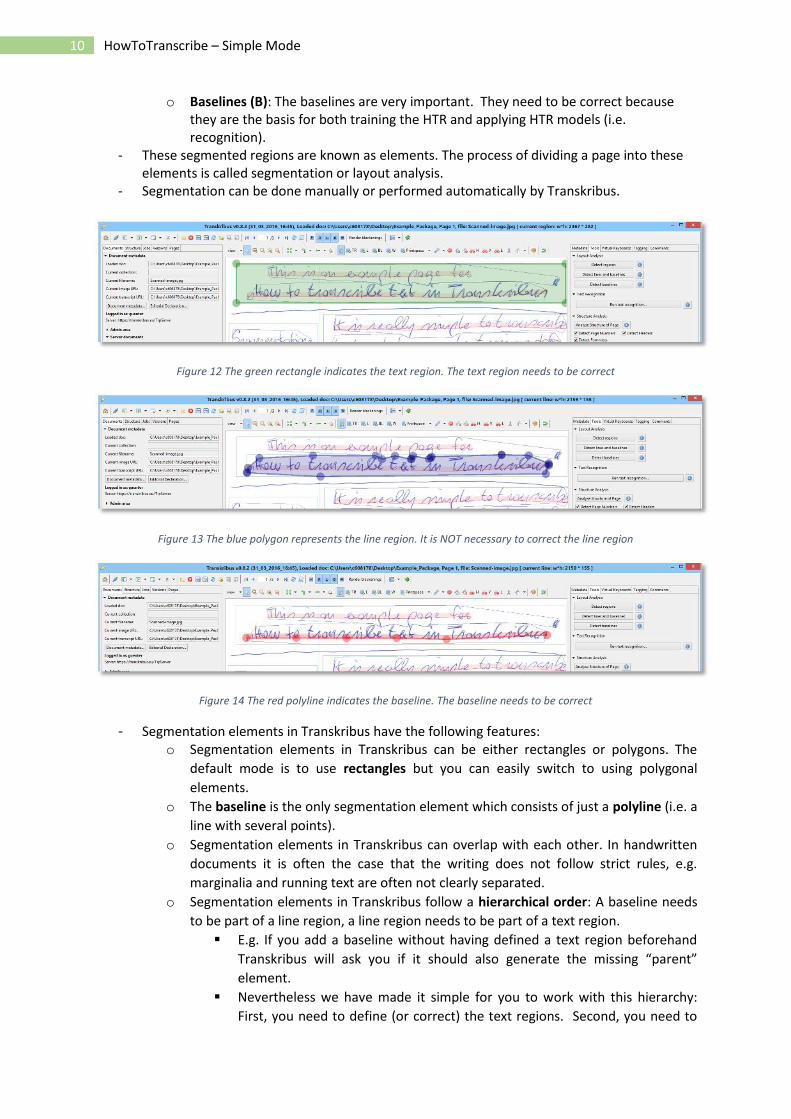
o Baselines (B): The baselines are very important. They need to be correct becausethey are the basis for both training the HTR and applying HTR models (i.e.recognition).
- These segmented regions are known as elements. The process of dividing a page into theseelements is called segmentation or layout analysis.
- Segmentation can be done manually or performed automatically by Transkribus.
Figure 12 The green rectangle indicates the text region. The text region needs to be correct
Figure 13 The blue polygon represents the line region. It is NOT necessary to correct the line region
Figure 14 The red polyline indicates the baseline. The baseline needs to be correct
- Segmentation elements in Transkribus have the following features:o Segmentation elements in Transkribus can be either rectangles or polygons. The
default mode is to use rectangles but you can easily switch to using polygonalelements.
o The baseline is the only segmentation element which consists of just a polyline (i.e. aline with several points).
o Segmentation elements in Transkribus can overlap with each other. In handwrittendocuments it is often the case that the writing does not follow strict rules, e.g.marginalia and running text are often not clearly separated.
o Segmentation elements in Transkribus follow a hierarchical order: A baseline needsto be part of a line region, a line region needs to be part of a text region. E.g. If you add a baseline without having defined a text region beforehand
Transkribus will ask you if it should also generate the missing “parent”element.
Nevertheless we have made it simple for you to work with this hierarchy:First, you need to define (or correct) the text regions. Second, you need to
11 HowToTranscribe – Simple Mode
define (or correct) the baselines. That’s all that needs to be done. A singlepage can be completed within a few minutes, or even quicker!
Viewing modeso Before starting to try out the features in Transkribus you should be familiar with the
Viewing modes which are offered in the platform. We have prepared two Viewingmodes for you, one for the Segmentation task, one for the Transcription task. You can also configure and store your preferred viewing mode in
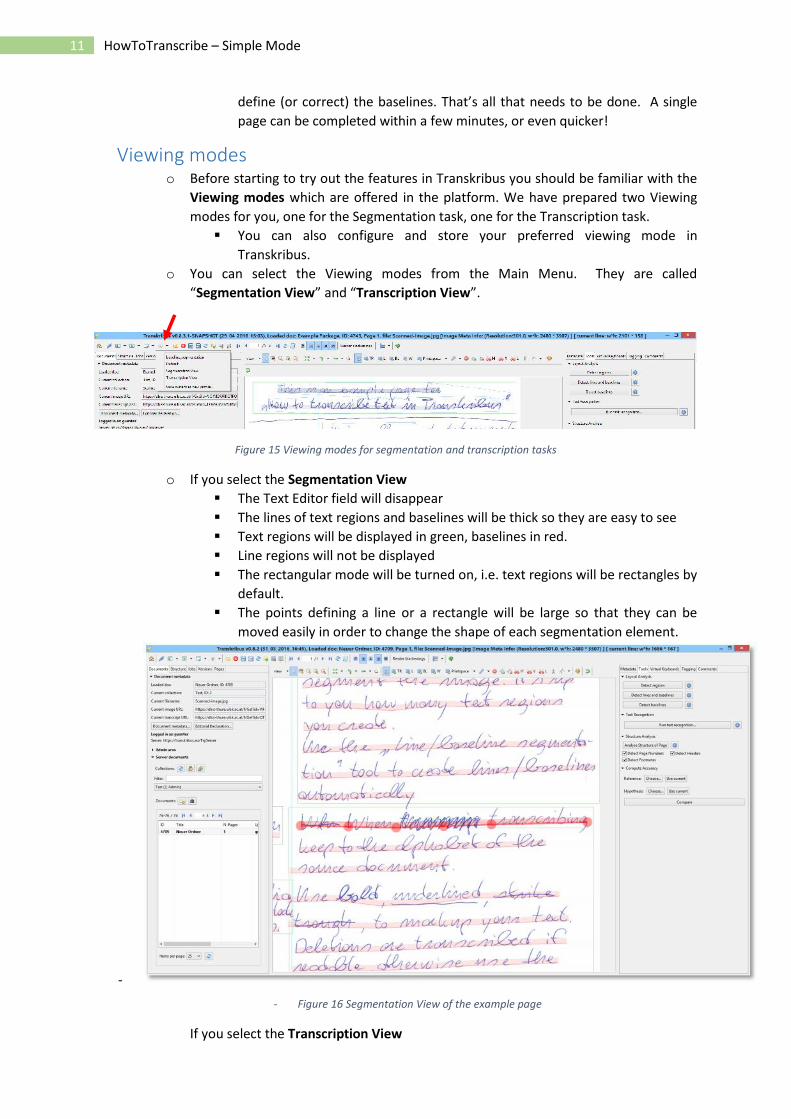
Transkribus.o You can select the Viewing modes from the Main Menu. They are called
“Segmentation View” and “Transcription View”.
Figure 15 Viewing modes for segmentation and transcription tasks
o If you select the Segmentation View The Text Editor field will disappear The lines of text regions and baselines will be thick so they are easy to see Text regions will be displayed in green, baselines in red. Line regions will not be displayed The rectangular mode will be turned on, i.e. text regions will be rectangles by
default. The points defining a line or a rectangle will be large so that they can be
moved easily in order to change the shape of each segmentation element.
-- Figure 16 Segmentation View of the example page
If you select the Transcription View
12 HowToTranscribe – Simple Mode
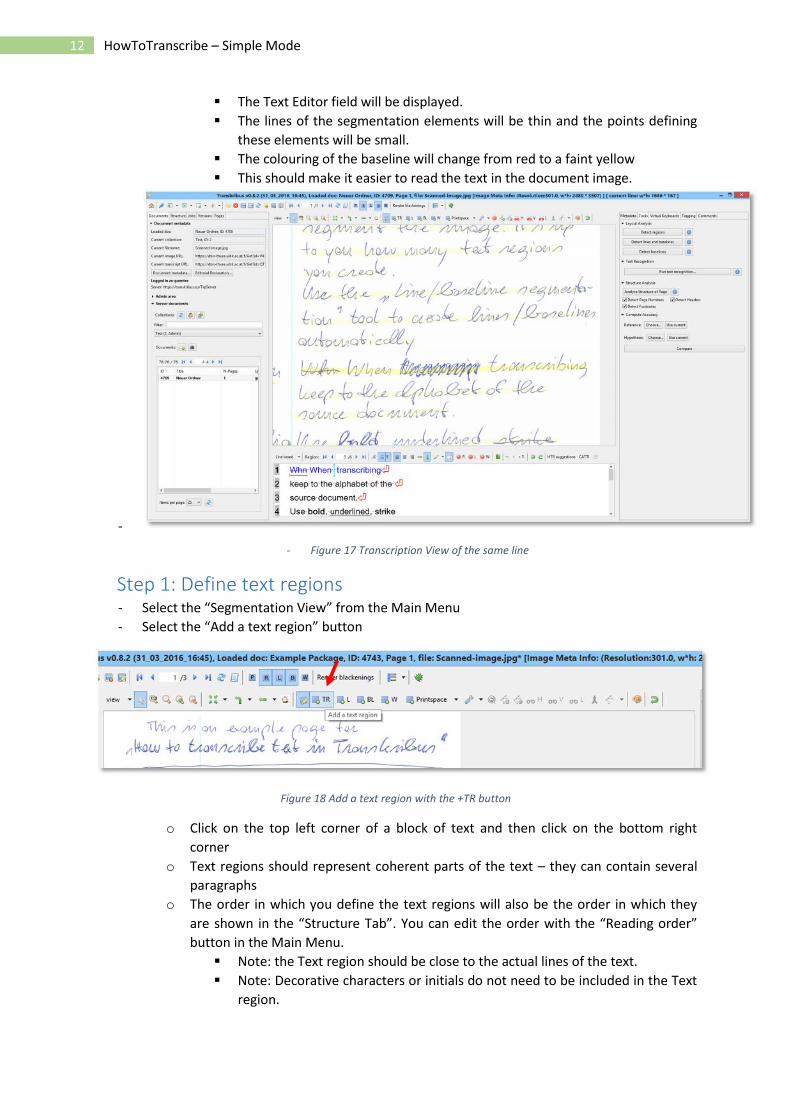
The Text Editor field will be displayed. The lines of the segmentation elements will be thin and the points defining
these elements will be small. The colouring of the baseline will change from red to a faint yellow This should make it easier to read the text in the document image.
-- Figure 17 Transcription View of the same line
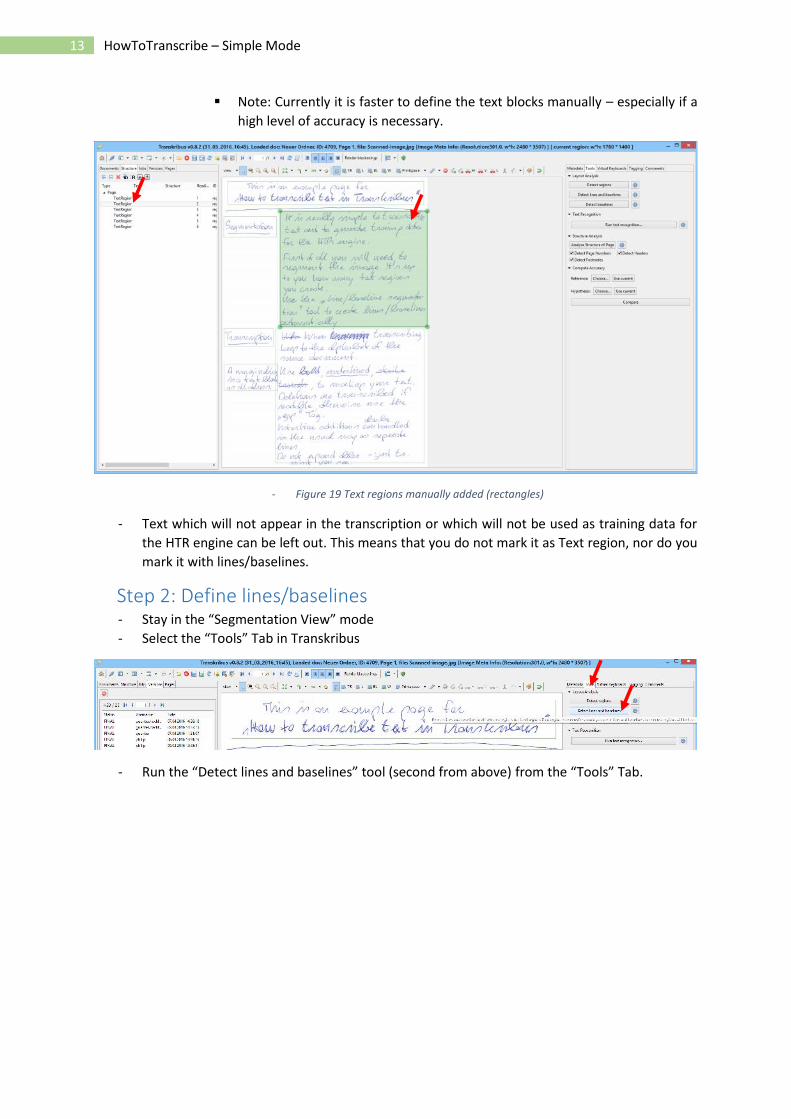
Step 1: Define text regions- Select the “Segmentation View” from the Main Menu- Select the “Add a text region” button
Figure 18 Add a text region with the +TR button
o Click on the top left corner of a block of text and then click on the bottom rightcorner
o Text regions should represent coherent parts of the text – they can contain severalparagraphs
o The order in which you define the text regions will also be the order in which theyare shown in the “Structure Tab”. You can edit the order with the “Reading order”button in the Main Menu. Note: the Text region should be close to the actual lines of the text. Note: Decorative characters or initials do not need to be included in the Text
region.
13 HowToTranscribe – Simple Mode
Note: Currently it is faster to define the text blocks manually – especially if ahigh level of accuracy is necessary.
- Figure 19 Text regions manually added (rectangles)
- Text which will not appear in the transcription or which will not be used as training data forthe HTR engine can be left out. This means that you do not mark it as Text region, nor do youmark it with lines/baselines.
Step 2: Define lines/baselines- Stay in the “Segmentation View” mode- Select the “Tools” Tab in Transkribus
- Run the “Detect lines and baselines” tool (second from above) from the “Tools” Tab.
14 HowToTranscribe – Simple Mode
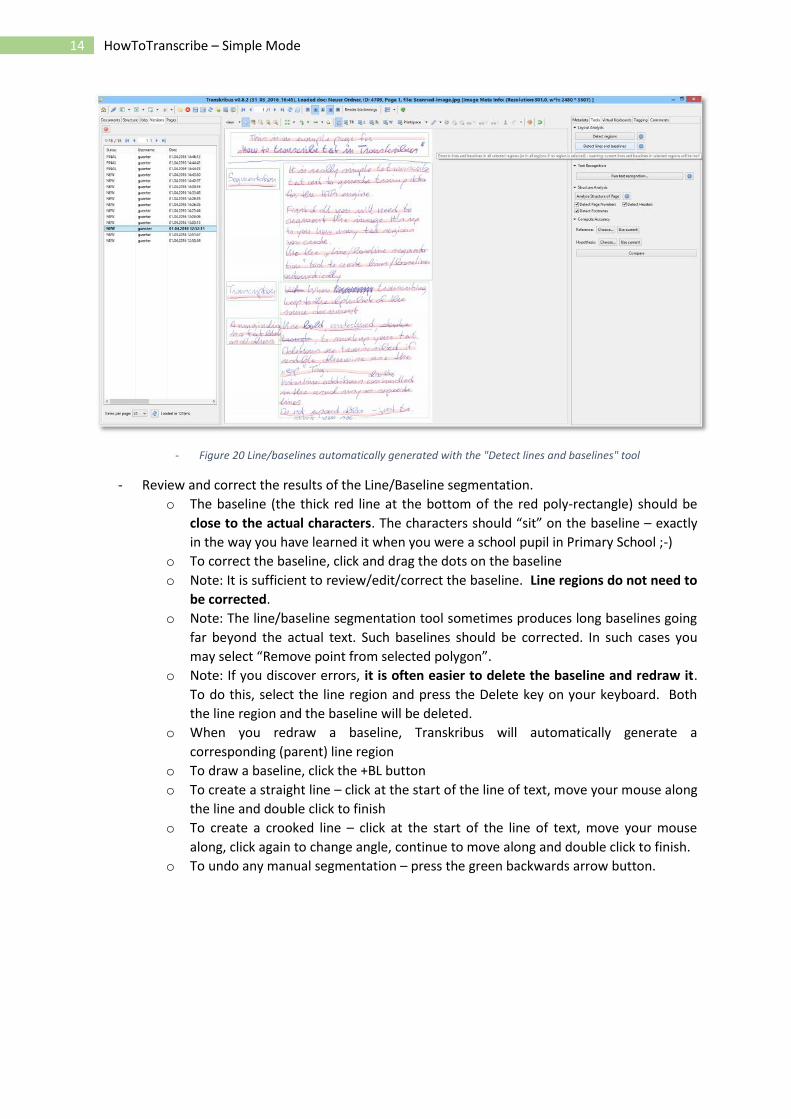
- Figure 20 Line/baselines automatically generated with the "Detect lines and baselines" tool
- Review and correct the results of the Line/Baseline segmentation.o The baseline (the thick red line at the bottom of the red poly-rectangle) should be
close to the actual characters. The characters should “sit” on the baseline – exactlyin the way you have learned it when you were a school pupil in Primary School ;-)
o To correct the baseline, click and drag the dots on the baselineo Note: It is sufficient to review/edit/correct the baseline. Line regions do not need to
be corrected.o Note: The line/baseline segmentation tool sometimes produces long baselines going
far beyond the actual text. Such baselines should be corrected. In such cases youmay select “Remove point from selected polygon”.
o Note: If you discover errors, it is often easier to delete the baseline and redraw it.To do this, select the line region and press the Delete key on your keyboard. Boththe line region and the baseline will be deleted.
o When you redraw a baseline, Transkribus will automatically generate acorresponding (parent) line region
o To draw a baseline, click the +BL buttono To create a straight line – click at the start of the line of text, move your mouse along
the line and double click to finisho To create a crooked line – click at the start of the line of text, move your mouse
along, click again to change angle, continue to move along and double click to finish.o To undo any manual segmentation – press the green backwards arrow button.
15 HowToTranscribe – Simple Mode
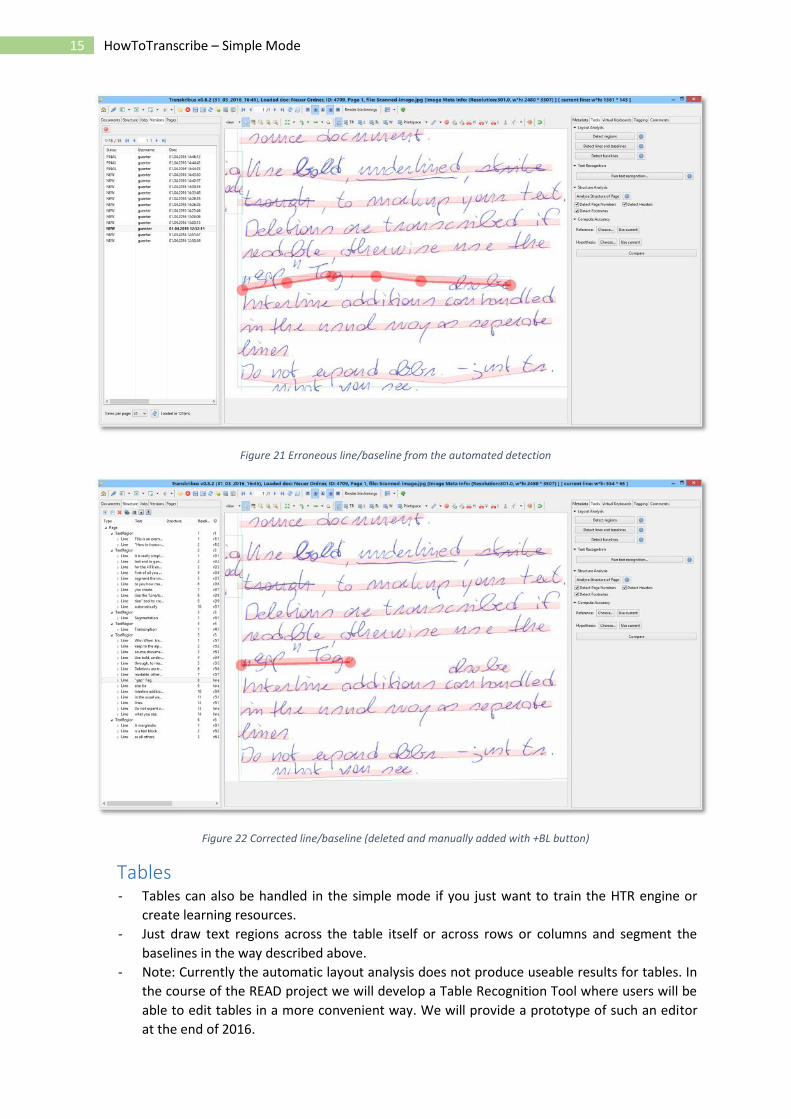
Figure 21 Erroneous line/baseline from the automated detection
Figure 22 Corrected line/baseline (deleted and manually added with +BL button)
Tables- Tables can also be handled in the simple mode if you just want to train the HTR engine or
create learning resources.- Just draw text regions across the table itself or across rows or columns and segment the
baselines in the way described above.- Note: Currently the automatic layout analysis does not produce useable results for tables. In
the course of the READ project we will develop a Table Recognition Tool where users will beable to edit tables in a more convenient way. We will provide a prototype of such an editorat the end of 2016.
16 HowToTranscribe – Simple Mode
TranscriptionIntroduction- The main purpose of any transcription is to capture all the information available in a
document.- Transkribus supports UTF8 and stores all characters in Unicode.- A correct “diplomatic” transcription is the basis for this.- Nevertheless there is also “hidden” information, such as emphasized words (underlined,
bold), notes which were added at a later time, or abbreviations which need to be expandedin order to understand the content of the document. All this can be marked as well.
Transcribe text- Select the “Transcription View” from the Main menu- You will see the Text Editor field: For each line/baseline in the image you will find a
corresponding line in the Text Editor. The image and the text are connected in this way.- Transcribe the text according to the language of your source document. Use the characters
of your keyboard.
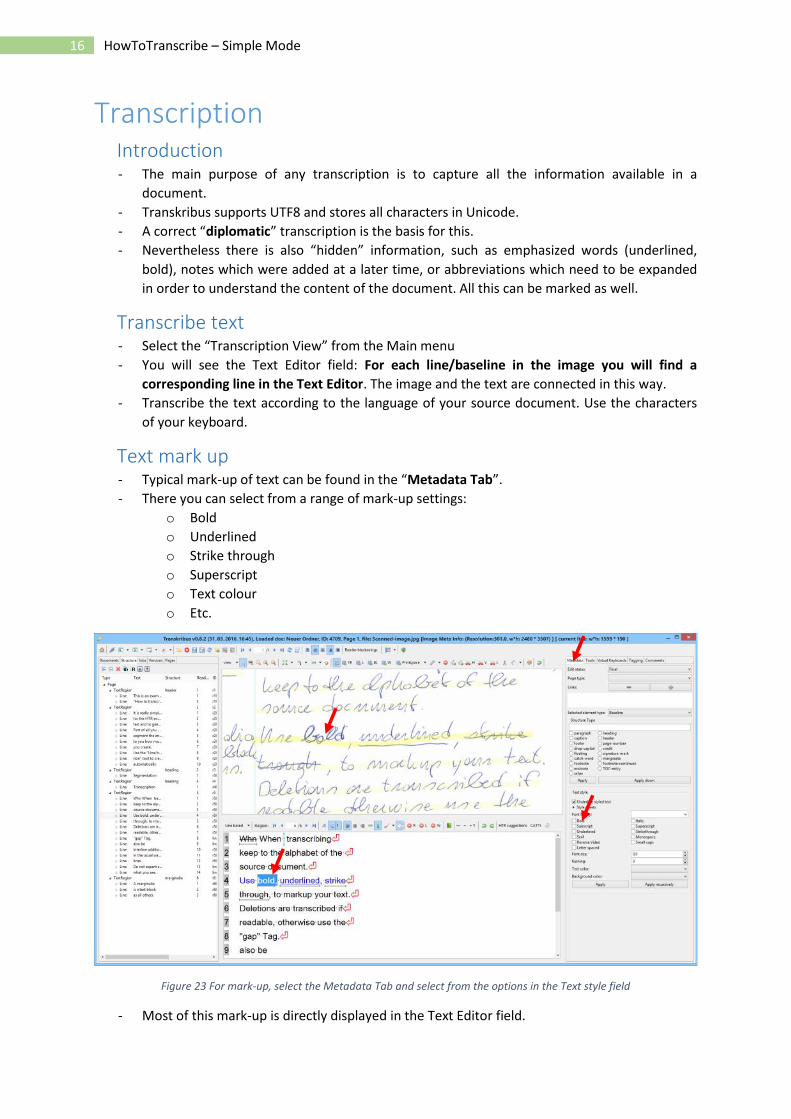
Text mark up- Typical mark-up of text can be found in the “Metadata Tab”.- There you can select from a range of mark-up settings:
o Boldo Underlinedo Strike througho Superscripto Text colouro Etc.
Figure 23 For mark-up, select the Metadata Tab and select from the options in the Text style field
- Most of this mark-up is directly displayed in the Text Editor field.
17 HowToTranscribe – Simple Mode
- Hyphenated words at the end of the line should be indicated with “¬”.
Additions- Additions, especially interline additions need not to be handled in a specific way in the
“simple” mode. You should just transcribe exactly what you see.- Note: If you export the transcription to a Word or TEI file, the reading order of your
document may be incorrect. For training the HTR engine this does not make a difference.
CreditsWe would like to thank the many users who have contributed their feedback to help improve theTranskribus software.
Transkribus is made available to the public as part of H2020 e-Infrastructure Project READ(Recognition and Enrichment of Archival Documents) which received funding from the EuropeanCommission under grant agreement No 674943.