Embed Size (px)
Citation preview
How to set up your Roku® Streaming Stick®
Background
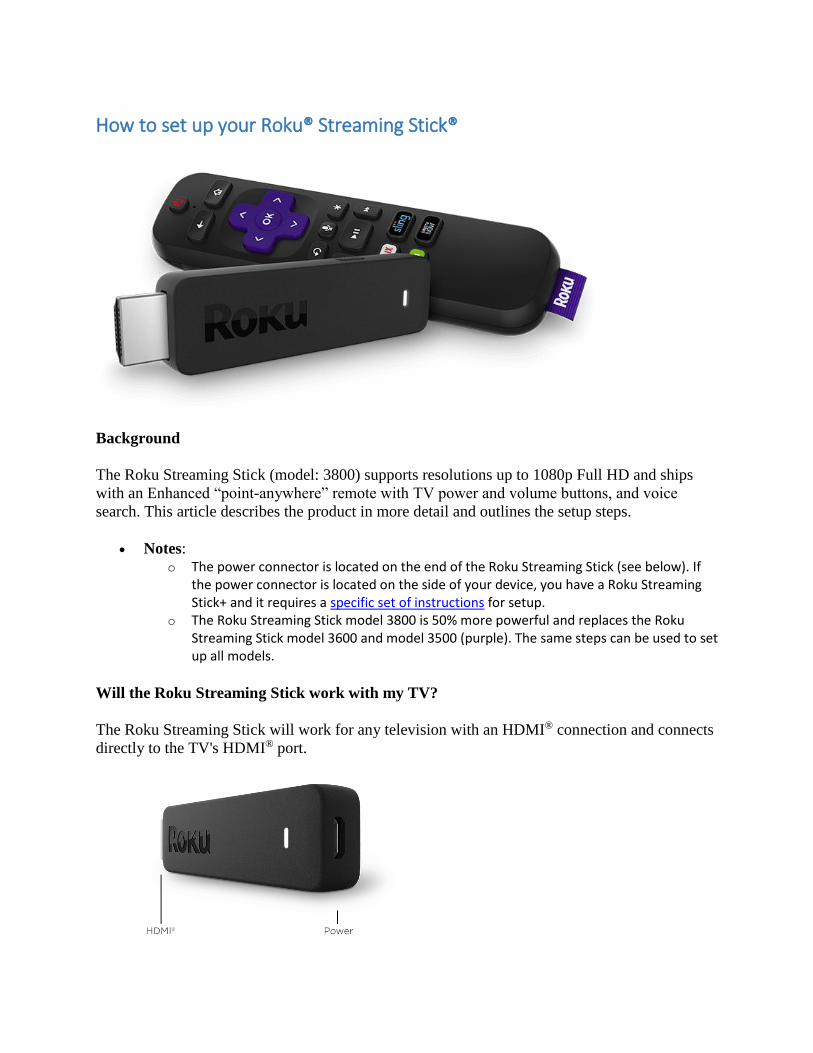
The Roku Streaming Stick (model: 3800) supports resolutions up to 1080p Full HD and ships
with an Enhanced “point-anywhere” remote with TV power and volume buttons, and voice
search. This article describes the product in more detail and outlines the setup steps.
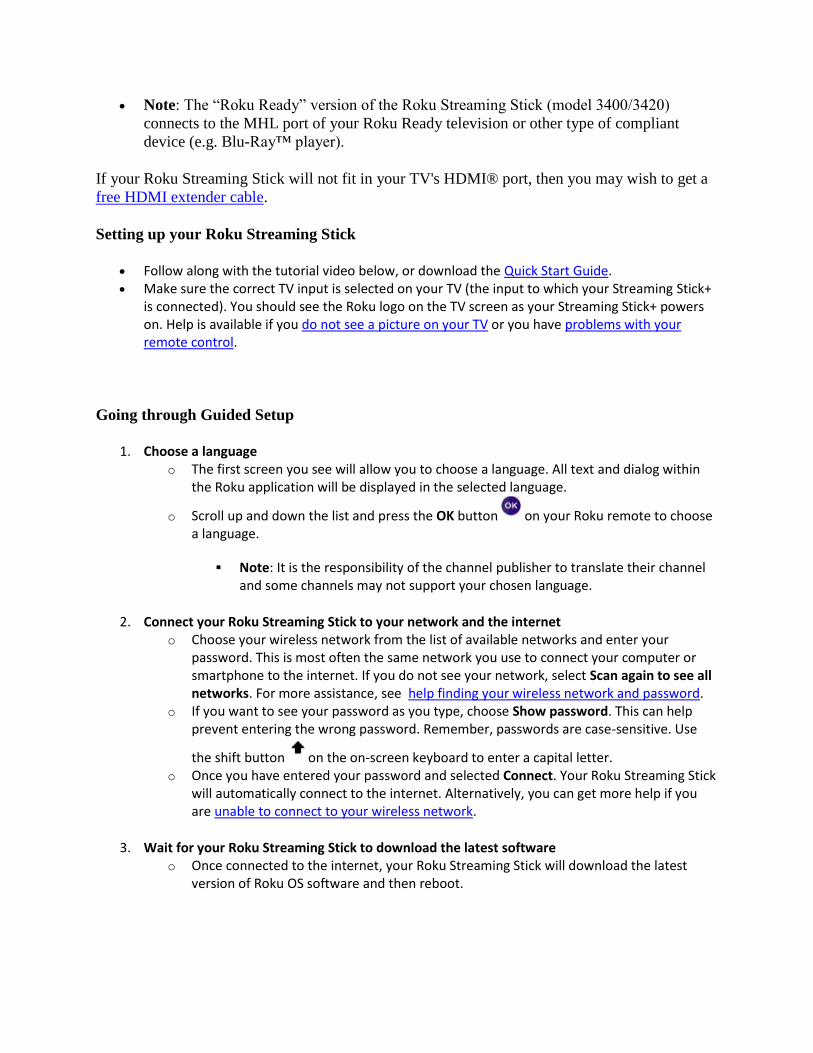
Notes: o The power connector is located on the end of the Roku Streaming Stick (see below). If
the power connector is located on the side of your device, you have a Roku Streaming Stick+ and it requires a specific set of instructions for setup.
o The Roku Streaming Stick model 3800 is 50% more powerful and replaces the Roku Streaming Stick model 3600 and model 3500 (purple). The same steps can be used to set up all models.
Will the Roku Streaming Stick work with my TV?
The Roku Streaming Stick will work for any television with an HDMI® connection and connects
directly to the TV's HDMI® port.
Note: The “Roku Ready” version of the Roku Streaming Stick (model 3400/3420)
connects to the MHL port of your Roku Ready television or other type of compliant
device (e.g. Blu-Ray™ player).
If your Roku Streaming Stick will not fit in your TV's HDMI® port, then you may wish to get a
free HDMI extender cable.
Setting up your Roku Streaming Stick
Follow along with the tutorial video below, or download the Quick Start Guide. Make sure the correct TV input is selected on your TV (the input to which your Streaming Stick+
is connected). You should see the Roku logo on the TV screen as your Streaming Stick+ powers on. Help is available if you do not see a picture on your TV or you have problems with your remote control.
Going through Guided Setup
1. Choose a language o The first screen you see will allow you to choose a language. All text and dialog within
the Roku application will be displayed in the selected language.
o Scroll up and down the list and press the OK button on your Roku remote to choose a language.
Note: It is the responsibility of the channel publisher to translate their channel and some channels may not support your chosen language.
2. Connect your Roku Streaming Stick to your network and the internet o Choose your wireless network from the list of available networks and enter your
password. This is most often the same network you use to connect your computer or smartphone to the internet. If you do not see your network, select Scan again to see all networks. For more assistance, see help finding your wireless network and password.
o If you want to see your password as you type, choose Show password. This can help prevent entering the wrong password. Remember, passwords are case-sensitive. Use
the shift button on the on-screen keyboard to enter a capital letter. o Once you have entered your password and selected Connect. Your Roku Streaming Stick
will automatically connect to the internet. Alternatively, you can get more help if you are unable to connect to your wireless network.
3. Wait for your Roku Streaming Stick to download the latest software o Once connected to the internet, your Roku Streaming Stick will download the latest
version of Roku OS software and then reboot.
4. Set the display type o Select Set display type and let your Roku Streaming Stick auto detect the best display
resolution so you don’t have to manually configure the settings. To change the display type at a later time, go to Settings > Display type.
5. Set up your Roku Enhanced remote to control your TV o Select Check remote settings to automatically set up your Roku Enhanced remote to
control the power and volume for your TV. If you prefer, you can set up your remote at any time from the settings menu. Go to Settings > Remote > Set up remote for TV control. Notes:
This step only appears if you are using a Roku Enhanced Remote with TV power and volume buttons. Roku Streaming Stick model 3800 includes this remote.
With some TV models, your Roku Enhanced remote may only be able to control the volume, and not the power on/off.
6. Create a Roku account and activate your Roku Streaming Stick o In order to activate your Roku Streaming Stick, it must be linked to a Roku account. Your
Roku account keeps track of which Roku devices you own and allows you to add free and purchase channels from the Roku Channel Store.
Note: There is NEVER a charge to create a Roku account.
o Instructions for activating your Roku Streaming Stick will be displayed on your TV, including an activation code; e.g. “XCV5TG”. You will be required to visit roku.com/link on your computer or smartphone, enter the code and follow the instructions to activate your Roku Streaming Stick.
Note: Roku does NOT charge for device activation. When entering roku.com/link into your web browser, type it correctly to avoid fraudulent websites.
7. You are done! Once you have completed all the activation steps, your Roku Streaming Stick will be ready to use.
Tips: You can personalize your Roku Streaming Stick by changing your theme or screensaver.
You can use the Roku Channel Store to add new streaming channels, games, themes,
screensavers, and other apps.
What to do if you cannot see the video from your Roku® streaming player
on your TV
Background
This article is for users who can power on their Roku player, but cannot see the video on their
TV. If your player will not power on or you do not hear audio, review the suggestions in the
appropriate article below:
What to do if you cannot hear audio from your Roku streaming player What to do if your Roku streaming player will not power on
What should I do?
Make sure your Roku player is connected directly to the TV. If you have the Roku player
connected to an audio/vidoe receiver (AVR) or sound bar, then first disconnect it and connect
directly to the TV. This will remove any issue with the AVR or sound bar and make it easier to
troubleshoot the problem.
First, make sure the TV is turned on and press a button on the Roku remote control to ensure that
the Roku device is not in standby or screensaver mode.
These are the most common reasons you may not see video on your TV:
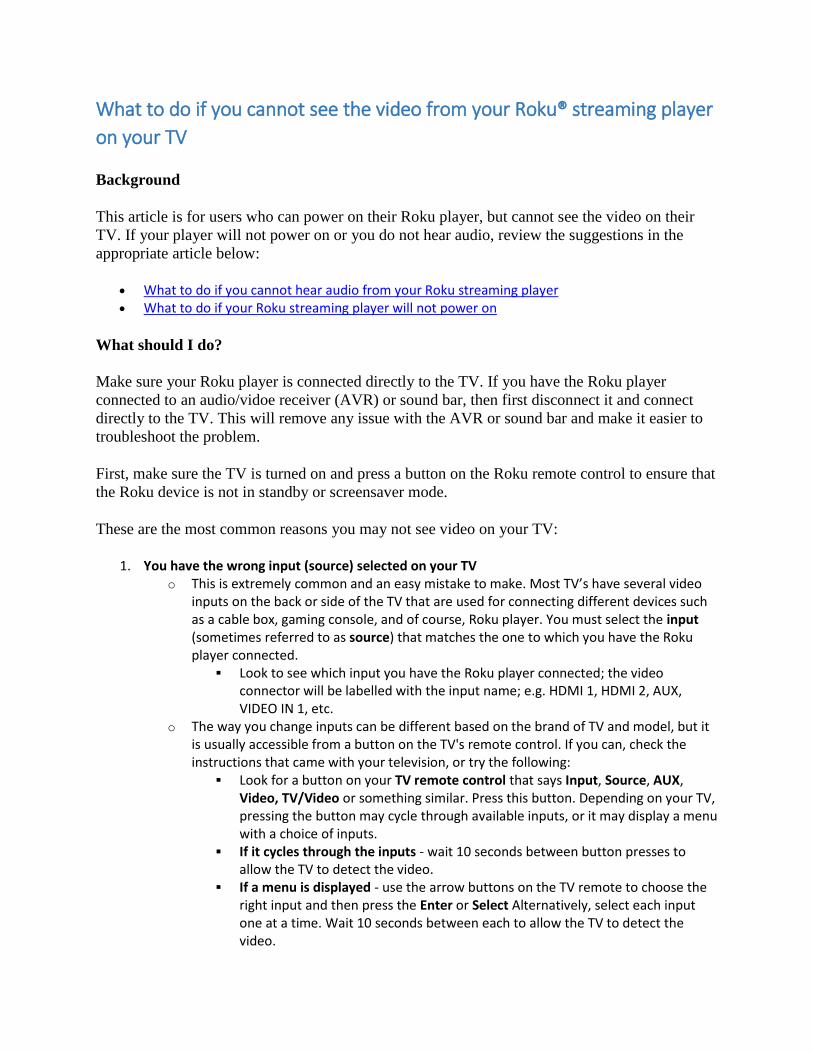
1. You have the wrong input (source) selected on your TV o This is extremely common and an easy mistake to make. Most TV’s have several video
inputs on the back or side of the TV that are used for connecting different devices such as a cable box, gaming console, and of course, Roku player. You must select the input (sometimes referred to as source) that matches the one to which you have the Roku player connected.
Look to see which input you have the Roku player connected; the video connector will be labelled with the input name; e.g. HDMI 1, HDMI 2, AUX, VIDEO IN 1, etc.
o The way you change inputs can be different based on the brand of TV and model, but it is usually accessible from a button on the TV's remote control. If you can, check the instructions that came with your television, or try the following:
Look for a button on your TV remote control that says Input, Source, AUX, Video, TV/Video or something similar. Press this button. Depending on your TV, pressing the button may cycle through available inputs, or it may display a menu with a choice of inputs.
If it cycles through the inputs - wait 10 seconds between button presses to allow the TV to detect the video.
If a menu is displayed - use the arrow buttons on the TV remote to choose the right input and then press the Enter or Select Alternatively, select each input one at a time. Wait 10 seconds between each to allow the TV to detect the video.
In both cases, if no video is detected on the input, then the TV will usual show a message such as “No video” or “No signal detected”.
2. The video cable is not connected properly or the cable is faulty o Check that the video cable is firmly connected to the back of your Roku player and to
the HDMI or composite connector on the TV. If you have a Roku Streaming Stick, then make sure it is firmly connected to the HDMI connector on your TV.
o If you can, check to see if you have a faulty cable by connecting your Roku player with a different cable.
3. There is a problem with the TV o If you can, try connecting the Roku player to a different input on the TV to see if the
problem is with connector on the TV. o If you can, try connecting the Roku player to a different television to see if the problem
is with your Roku player or the TV. 4. If all else fails…
o Disconnect and reconnect all cables including the power cable.
If you are connected to a television or AVR capable of displaying 4K
If you are connected to a television or AVR that it is capable of displaying 4K resolution, then
you may wish to check how to setup your Roku streaming player for 4K.
What to do if your Roku® streaming player will not power on
Background
Many Roku streaming players require that they are connected to a wall power outlet using the
power adapter that came with the device. Alternatively, some Roku players (e.g. Roku Express*)
and Roku® Streaming Sticks® can also be powered from the USB port on select TVs.
Note: The USB port on some TV’s may be unable to power a Roku streaming player.
Most Roku streaming players also have a white light on the front of the device that indicates
when the device is ON. This article describes what to do if you do not see the video from your
Roku player on the TV and the light on the front of the device is OFF.
If the light is ON, learn what to do if you cannot see the video from your Roku player on the TV. If there is a SOLID RED LIGHT, then your Roku player may be overheating If there is a FLASHING RED light, then your Roku player is getting insufficient power.
* Some models not available in all countries.
Connected to a wall power outlet
If your Roku player or Roku Streaming Stick is connected to a power outlet:
1. Use the included power adapter o Only use the power adapter included in the box with your Roku player. o Using a different power adapter, even one used with another Roku player, may be the
reason that your Roku player will not power on. 2. Securely attach the power adapter
o Remove and reattach the power adapter making sure it is securely and firmly connected to the Roku player and the wall power outlet.
3. Try a different power outlet o Try connecting the power adapter to a different power outlet. o Alternatively, you can try testing another electronic device you know works in the same
power outlet. o If your Roku player is connected to a power strip, unplug it and connect the power
adapter directly to a wall power outlet. 4. Check the light
o In the rare case that the light on your Roku player may not be functional, learn what to check if you cannot see the video from your Roku player on the TV.
5. Try the USB port on your TV o If your Roku player or Roku Streaming Stick supports USB power, then try connecting it
to the USB port on your TV using the power adapter that came with your device.
If your Roku player still does not power on, then the problem may be with the power supply. If
your Roku player is under warranty, contact Roku Customer Support to return your player and
power adapter and get a replacement.
If the warranty has expired, a new power adapter can be purchased from the Roku accessories
store.
Connected to the USB port on the TV
If you have a Roku player or Roku Streaming Stick connected to the USB port on your TV:
1. Only use the USB cable that came with your Roku player o Do not use any USB cable other than what was included in the box with your Roku
player. This includes using the USB cable that came with another Roku player. 2. Securely attach the USB cable
o Remove and reattach the USB cable making sure it is securely and firmly connected to the TV and the power connector on your Roku streaming player.
3. Try a different USB port o Some USB ports have different power characteristics. If your TV has more than one USB
port, try connecting your Roku player or Roku Streaming Stick to a different USB port. o If a USB port has insufficient power, your Roku player may power on only to display a
low-power warning. o

4. Try a different TV o If possible, temporarily connect your Roku player to the USB port on a different TV. This
will help you determine if the problem is due to the Roku player or your TV. 5. Connect to a wall power outlet
o Using the included power cord and power adapter, connect the Roku player or Roku Streaming Stick to a working power outlet in the wall.
o Connecting to a power outlet in the wall has the additional advantage that your Roku player will not need to power-up every time you turn on your TV. This means your Roku player will be up and running faster than it would connected to the USB port on your TV.
Note: Most Roku players and Roku Streaming Sticks connected to the USB port on your TV will
lose power when the TV goes into standby. This means that your Roku device will “boot-up”
every time the TV is turned on. Although this is generally fast, it can be avoided by connecting
the Roku device to a wall power outlet. Also, much like “apps” on your smartphone, Roku
channels are cached the first time they are launched so they load faster; however, the cache is
emptied when the Roku device powers down.
What to do if you cannot connect to your home network or the internet
Background
Your Roku® streaming player or Roku TV™ provides you with access to stream audio and
video from the internet. For this to work, you need a good connection from your Roku device to
your home network, and from your home network to the internet.
This article provides steps to help check that these connections are working properly, along with
suggestions for troubleshooting any problems.
Why do I see an error message such as “Unable to connect to wireless network” or “Not
connected to the internet”?
When you set up your Roku player or Roku TV for streaming, you must connect this device to
your home network in the same way that you connect your computer or mobile device. Simply
select your wireless network name and enter the correct password. In doing so, a wireless
connection is established from your Roku device to your home access point or router*. Your
router will then grant access to the internet through a broadband service provided by your
internet service provider, or ISP (usually your cable or phone company).
Note: On Roku streaming devices that have an Ethernet port, you can alternatively
choose to connect to your router using an Ethernet, or wired network cable.
If your Roku device is unable to connect to your home router or gain access to the internet
through the router, you may not be able to set up your device. In cases where the network or

internet connection is lost after your device is set up; you may not be able to launch channels that
require an internet connection or you may experience interruptions when streaming.
Below are some example error screens you may see should your Roku device encounter a
connectivity issue.
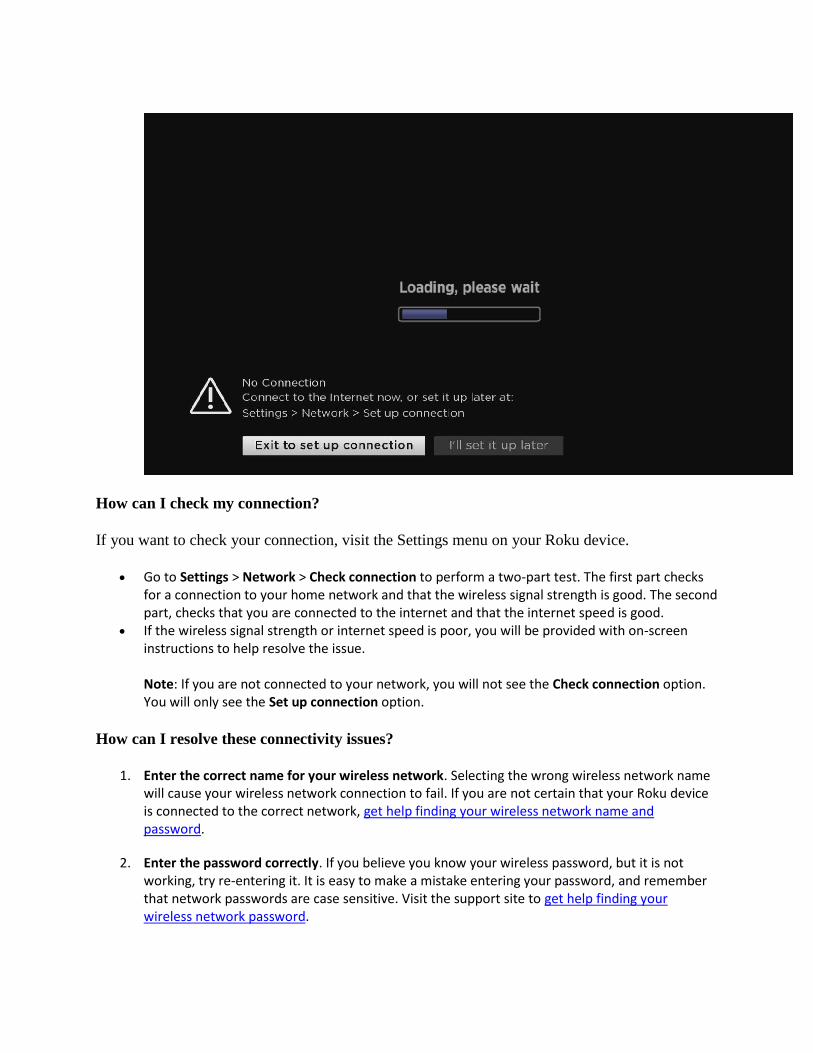
This screen may appear when you are initially trying to connect your Roku streaming device to your wireless network.
The screen below may appear when your Roku device is trying to make the connection after your wireless network name and password have been entered.
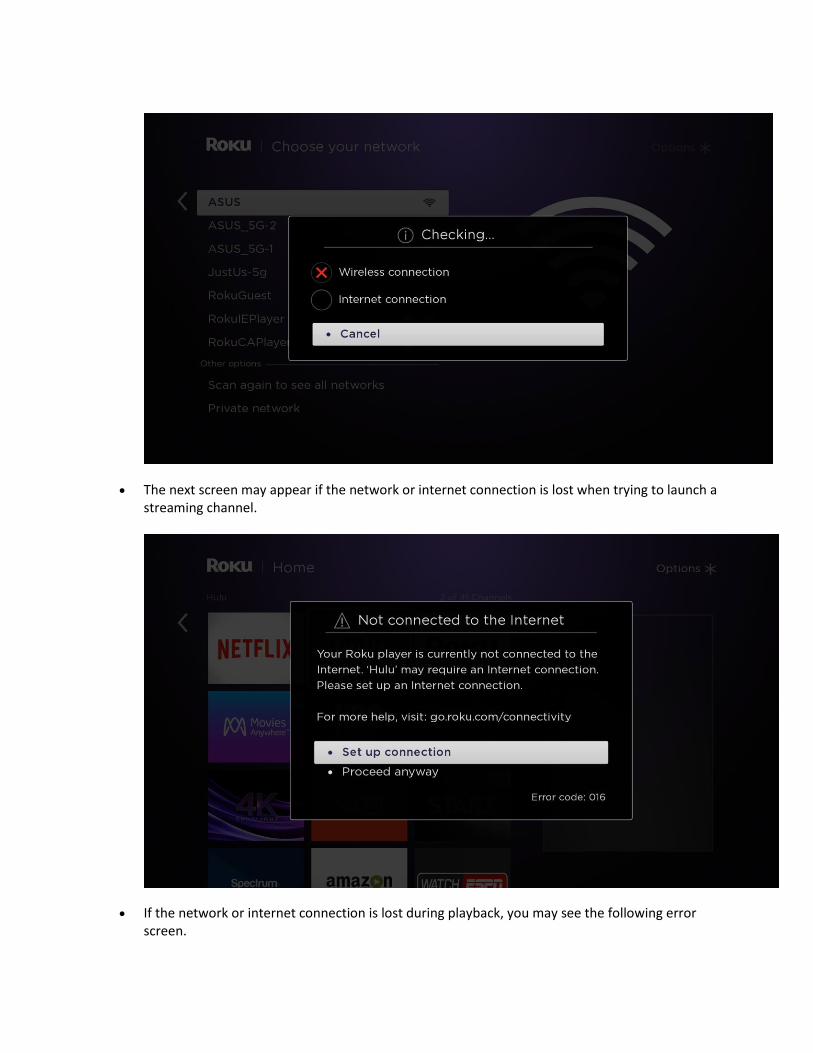
The next screen may appear if the network or internet connection is lost when trying to launch a streaming channel.
If the network or internet connection is lost during playback, you may see the following error screen.
How can I check my connection?
If you want to check your connection, visit the Settings menu on your Roku device.
Go to Settings > Network > Check connection to perform a two-part test. The first part checks for a connection to your home network and that the wireless signal strength is good. The second part, checks that you are connected to the internet and that the internet speed is good.
If the wireless signal strength or internet speed is poor, you will be provided with on-screen instructions to help resolve the issue. Note: If you are not connected to your network, you will not see the Check connection option. You will only see the Set up connection option.
How can I resolve these connectivity issues?
1. Enter the correct name for your wireless network. Selecting the wrong wireless network name will cause your wireless network connection to fail. If you are not certain that your Roku device is connected to the correct network, get help finding your wireless network name and password.
2. Enter the password correctly. If you believe you know your wireless password, but it is not working, try re-entering it. It is easy to make a mistake entering your password, and remember that network passwords are case sensitive. Visit the support site to get help finding your wireless network password.
3. Check to see that your router is working properly. Using your computer or mobile device, connect to your home network and try accessing the internet by launching a public website like www.roku.com. If you can connect to the internet from another device, your router is successfully providing internet access and you can move to the next step. If you are unable to connect to the internet, try restarting your router (see step 5b below) before contacting your ISP.
4. Improve the wireless signal strength. If your password is correct and other devices can access the router, but your Roku device is still failing to connect to your wireless network, the most likely problem is the strength of the wireless signal. The wireless signal gets weaker the farther your Roku device is from your router, and with more obstacles (like walls and cabinets) between your router and your Roku device. Review these tips to help improve your wireless signal.
5. Restart your Roku device and your router.
a. To restart your Roku player, go to Settings > System > System restart. To restart your Roku TV, go to Settings > System > Power > System restart. You can also unplug the Roku device from the power source, wait a few moments, and then plug it back in.
b. To restart your router, check the instructions from your ISP or router vendor. In some cases, you can simply unplug it and plug it back in, and in other cases it may require pressing a reset button on the device. Note: It will take a few minutes before both devices have restarted.
If you have previously connected your Roku device to your router, it should
automatically reconnect. If it is not reconnecting, or if you are setting up your Roku
device for the first time, complete the network setup process.
Common Roku error codes and recommended actions
Error code 009 o Try Step 3 above: This code means your Roku device is connected to the router, but not
able to connect to the internet. If no connection exists, contact your ISP for help. If your computer has an internet connection and you still see Error 009, restart the Roku device (see step 5b above).
Error code 012
o This is specifically an Ethernet-related error. Verify that your Ethernet cable is securely connected to your Roku device and router. Test with a second Ethernet cable if possible. If the cable is good, try step 5 above to restart your Roku device and router.
Error code 013
o This is specifically an Ethernet-related error. Try step 3 above: Check to see that your router is working properly. If you can connect to the internet from another device,

restart your Roku device (see step 5a above). If you are unable to connect to the internet from another device, try disconnecting and then re-connecting the Ethernet cable. If the problem continues, reset your router (see step 5b above) before contacting your ISP.
Error code 14
o Start with Step 1 above: This is a failure to connect to the wireless network.
Error code 14.20
o Try Step 4 above: Check that the signal strength is adequate o Try Step 5 above: Restart the router and Roku device
Error code 14.30
o Try Step 5 above: Restart both the router and the Roku device
Error code 14.40 or 14.41
o Try Steps 1 and 2 above: These are caused by an incorrect password for your network. Check that you have selected the correct network and have entered your password correctly. If the issue continues, try step 5 above.
Error code 14.50
o Try Step 5 above: Restart both the router and the Roku device
Error code 016 o This occurs when you are trying to launch a channel but the network or internet
connection has been lost. Select Set up connection to go to the settings on your Roku device and follow the on-screen instructions. If the behavior continues, the wireless signal may be too weak. Try step 4 above.
Error code 017
o This code occurs when your Roku device detects poor wireless signal strength. Follow the on-screen instructions and try moving your Roku device and the router closer to each other. Try steps 4 and 5 above.
Error code 018
o This code occurs when your Roku device detects slow internet speeds. Check with your ISP to determine what speed connection you subscribe to. You may want to consider upgrading to a faster connection.
Wireless vs. Ethernet
All Roku streaming devices have the ability to connect to your router via wireless. Some Roku
streaming devices also have an Ethernet port, which uses a cable to connect.
If it is convenient to connect the cable from your router to the Roku device, Ethernet will provide a faster and more reliable connection. Simply connect a standard Ethernet cable from an available port on your router to the port on the rear of your Roku device.
A wireless connection can also give you excellent results, provided you are located close enough to your router to receive a clear signal.
*A note on terminology:
To access your network and ultimately the internet, you will typically connect to a device called
a router; but it may also be referred to as a wireless router, wireless access point, home gateway
or cable modem. In some cases, your internet service provider (ISP) may have provided you with
a single integrated device that includes a cable modem and a router, or you may have purchased
a stand-alone router from a company such as Linksys, NETGEAR, ASUS, Belkin or D-Link. In
this article, the term router is used as a generic term to refer to the network device that your
Roku device must connect to access the internet. For more information refer to the
documentation provided by your ISP or router manufacturer.
How to find your wireless network name and password
Background
When connecting your Roku® streaming player or Roku TV™ to your home wireless network,
you will need to select the name of the wireless network. The Roku device scans all available
networks and presents a list that is ordered by the strength of the wireless signal.
The wireless network name, sometimes called the SSID, is either the default name that was set
by your ISP or router manufacturer, or the name you chose when you set up your wireless
network.
How to find your wireless network name
Check to see which network your computer or mobile device is connected to. The Roku device will connect to the same network.
If you do not see your network name on the list of available networks in the “Choose your Network” screen, select Scan again to see all networks. This will present a list of all networks that are available.
If you cannot remember the name of your wireless network, go to the support sites for your internet service provider or router manufacturer. Also, sometimes the default name is listed on the bottom of the router.
How to get your wireless password
Enter the same wireless password that you use to connect your computer or mobile device to your home network.
If you have forgotten the password, go the support sites for your internet service provider or router manufacturer. They will be able to suggest the specific methods for their products to recover the password or reset it. Sometimes the default password is listed on the bottom of the router.
Tips for entering passwords
Passwords are case sensitive – use the shift key on the on-screen keyboard to enter a capital letter.
Select Show password or hide password on the password entry screen. This will allow you to view or hide your password as you enter it.
What to do if you do not hear the audio from your Roku® streaming
player
Background
This article is for users who can see video from the Roku player on the TV, but cannot hear the
associated audio. This confirms that your Roku player is powered on and the correct input on
your television is selected. If your player will not power on or you do not see video, review the
suggestions in the appropriate article below:
What to do if you cannot see the video from your Roku streaming player on the TV What to do if your Roku streaming player will not power on
Your Roku player is connected directly to your television
If you are connecting your Roku player directly to your TV and not through another device such
as an audio/video receiver or sound bar, then try the following:
1. Check the volume level and mute settings on your television. Make sure mute is OFF and that the volume setting is at an appropriately audible level. If you need help, check the documentation for your TV manufacturer.
2. If you are using a composite cable, check that the audio connectors are snugly attached at both ends. Composite audio cables commonly have a red or white connector.
3. Connect the Roku player to a different input (ideally one you know works) and see if you can now hear audio. If you can, then there is a problem with the previous input on the TV.
4. Try changing the cable.
Your Roku player is connected to an audio/video receiver (AVR) or sound bar
If you are connecting the Roku player through another device such as an AVR or sound bar, then
try the following:
1. Make sure the correct input is selected on your AVR or sound bar. 2. Check the volume level and mute settings on your television and the master volume level on the
AVR or sound bar. Make sure mute is OFF and that the volume setting is at an appropriately audible level. If you need help, check the manufacturers documentation for your TV and AVR or sound bar.
3. If you are using a composite cable, check that the audio connectors are snugly attached between your Roku player and the AVR or sound bar, and the AVR or sound bar and the TV. Composite audio cables commonly have a red or white connector.
4. Connect the Roku player to a different input on the AVR or sound bar (ideally one you know works) and see if you can now hear audio. If you can, then there is a problem with the previous input on AVR or sound bar.
5. Try changing the cables, one at a time.
Your Roku player is connected to an AVR or sound bar using an optical (S/PDIF) cable
If you have a Roku player that has an optical port and you have connected it to an AVR or sound
bar using an optical cable, try changing the audio mode (on your Roku player) to Dolby Digital.
1. Press the Home button on your Roku remote. 2. Scroll up or down and select Settings. 3. Select Audio. 4. Set HDMI and S/PDIF to Dolby D (Dolby Digital).
You do not hear audio ONLY when trying to play surround sound
If you do not hear audio only when trying to play a movie or TV show in surround sound, then it
is possible that your TV, AVR, or sound bar does not support the surround sound format used by
the content provider (e.g. Dolby Digital Plus, Dolby Atmos, etc.).
1. Press the Home button on your Roku remote. 2. Scroll up or down and select Settings. 3. Select Audio. 4. Set Audio mode to Stereo. 5. Set HDMI to PCM-Stereo.
Note: On Roku players with an optical port, you will set HDMI and S/PDIF to PCM-Stereo.
If you need help connecting to an AVR or sound bar, learn more about setting up your Roku
player for surround sound.
I still do not hear audio, what should I do?
Disconnect and reconnect all cables including the power cable, and then:
1. Press the Home button on your Roku remote. 2. Scroll up or down and select Settings. 3. Select Audio. 4. Set Audio mode to Stereo. 5. Set HDMI to PCM-Stereo.
Note: On Roku players with an optical port, you will set HDMI and S/PDIF to PCM-Stereo.
How to set up your Roku® streaming player for surround sound
Background
All the movies and TV shows accessible through your Roku streaming player are available in
stereo; however, some are also available in surround sound. Although most Roku streaming
players do not decode surround sound formats such as Dolby® Digital or DTS®, they can pass-
through the signal to an audio/video receiver (AVR), sound bar, or TV, that is capable of
decoding surround sound.
Note: Surround sound pass-through is only available when your Roku streaming player is
connected via HDMI® or optical (when available).
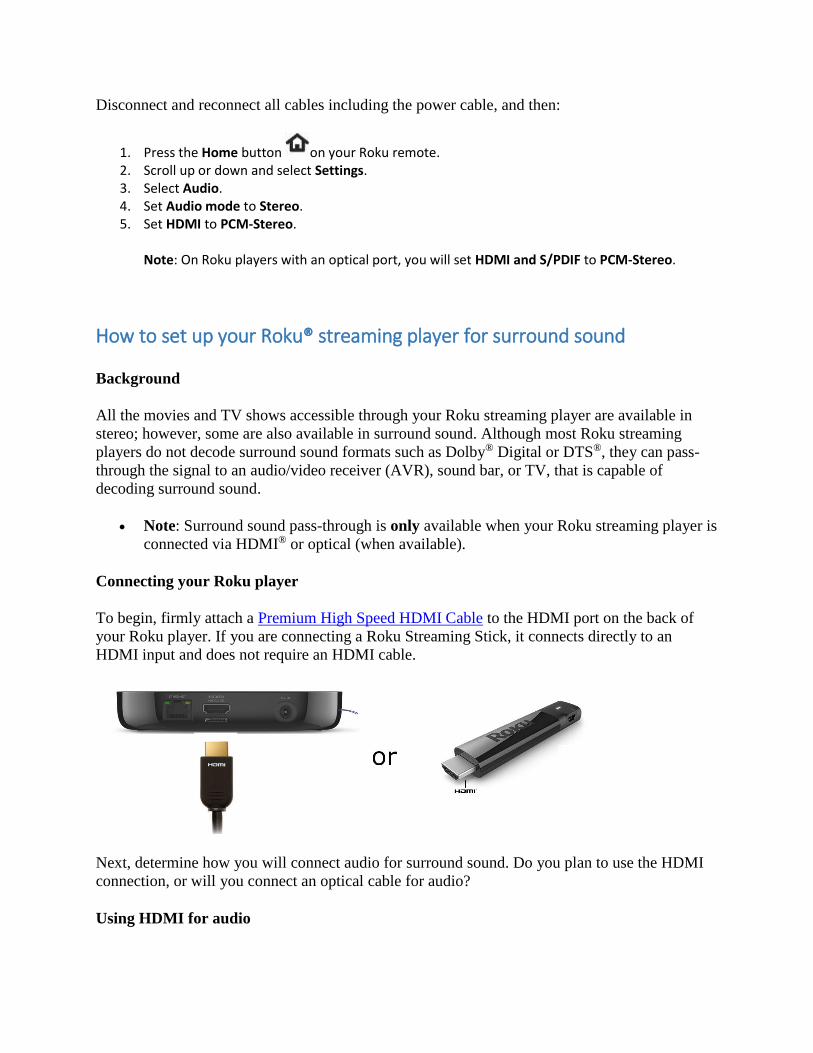
Connecting your Roku player
To begin, firmly attach a Premium High Speed HDMI Cable to the HDMI port on the back of
your Roku player. If you are connecting a Roku Streaming Stick, it connects directly to an
HDMI input and does not require an HDMI cable.
Next, determine how you will connect audio for surround sound. Do you plan to use the HDMI
connection, or will you connect an optical cable for audio?
Using HDMI for audio
To achieve the best performance with the simplest configuration, use HDMI for both video and
audio. If your Roku player is capable of outputting 4K or 4K HDR, be sure you also review the
4K requirements and setup instructions or the 4K HDR requirements and setup instructions.
Once your Roku player is ready to be connected to your other devices, use the recommended
option below that matches your configuration.
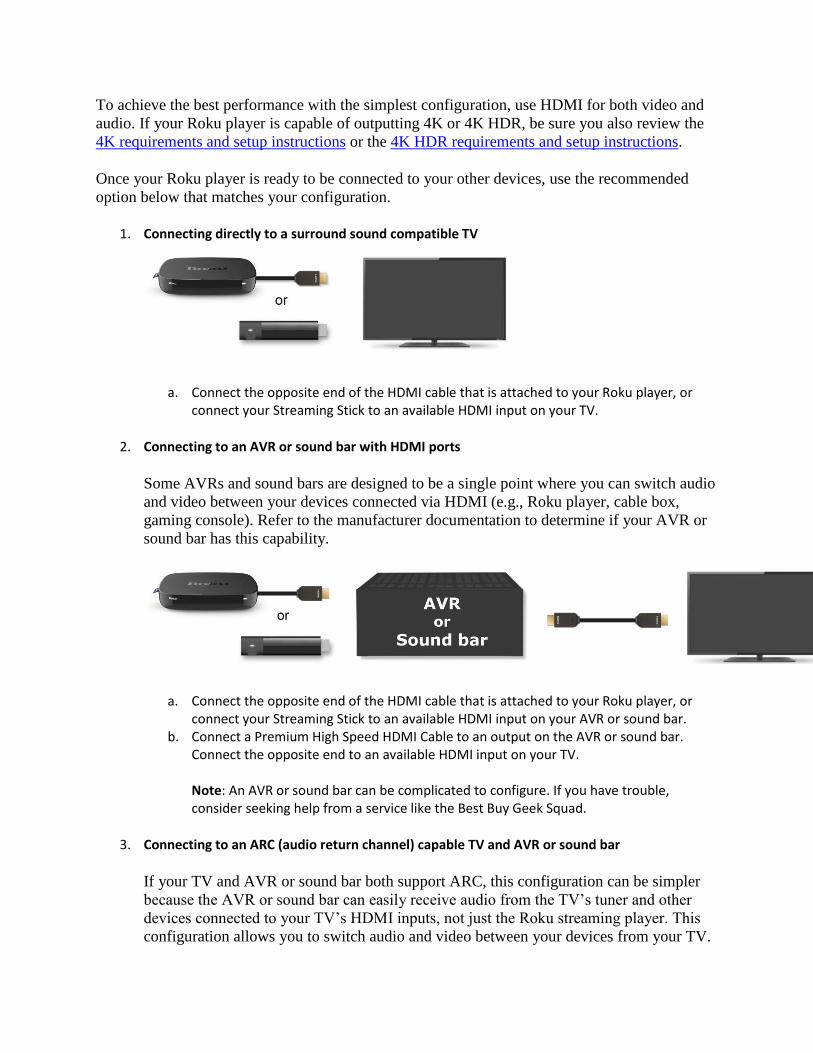
1. Connecting directly to a surround sound compatible TV
a. Connect the opposite end of the HDMI cable that is attached to your Roku player, or connect your Streaming Stick to an available HDMI input on your TV.
2. Connecting to an AVR or sound bar with HDMI ports
Some AVRs and sound bars are designed to be a single point where you can switch audio
and video between your devices connected via HDMI (e.g., Roku player, cable box,
gaming console). Refer to the manufacturer documentation to determine if your AVR or
sound bar has this capability.
a. Connect the opposite end of the HDMI cable that is attached to your Roku player, or connect your Streaming Stick to an available HDMI input on your AVR or sound bar.
b. Connect a Premium High Speed HDMI Cable to an output on the AVR or sound bar. Connect the opposite end to an available HDMI input on your TV. Note: An AVR or sound bar can be complicated to configure. If you have trouble, consider seeking help from a service like the Best Buy Geek Squad.
3. Connecting to an ARC (audio return channel) capable TV and AVR or sound bar
If your TV and AVR or sound bar both support ARC, this configuration can be simpler
because the AVR or sound bar can easily receive audio from the TV’s tuner and other
devices connected to your TV’s HDMI inputs, not just the Roku streaming player. This
configuration allows you to switch audio and video between your devices from your TV.
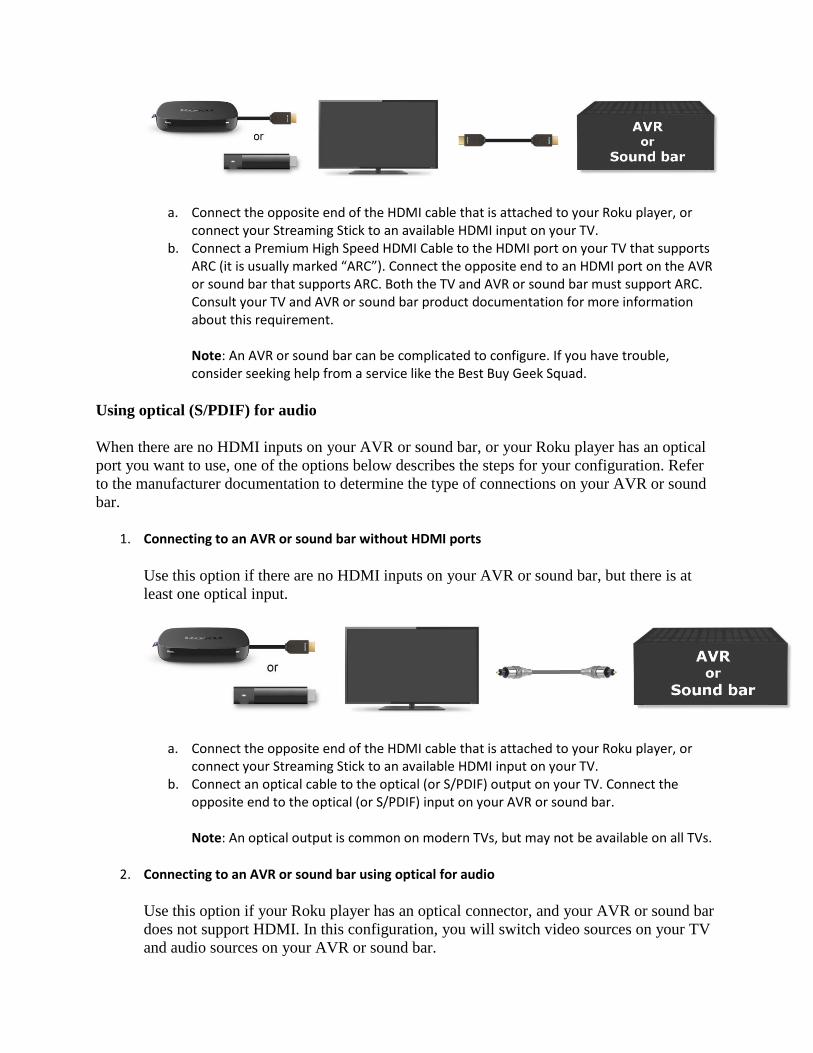
a. Connect the opposite end of the HDMI cable that is attached to your Roku player, or connect your Streaming Stick to an available HDMI input on your TV.
b. Connect a Premium High Speed HDMI Cable to the HDMI port on your TV that supports ARC (it is usually marked “ARC”). Connect the opposite end to an HDMI port on the AVR or sound bar that supports ARC. Both the TV and AVR or sound bar must support ARC. Consult your TV and AVR or sound bar product documentation for more information about this requirement. Note: An AVR or sound bar can be complicated to configure. If you have trouble, consider seeking help from a service like the Best Buy Geek Squad.
Using optical (S/PDIF) for audio
When there are no HDMI inputs on your AVR or sound bar, or your Roku player has an optical
port you want to use, one of the options below describes the steps for your configuration. Refer
to the manufacturer documentation to determine the type of connections on your AVR or sound
bar.
1. Connecting to an AVR or sound bar without HDMI ports
Use this option if there are no HDMI inputs on your AVR or sound bar, but there is at
least one optical input.
a. Connect the opposite end of the HDMI cable that is attached to your Roku player, or connect your Streaming Stick to an available HDMI input on your TV.
b. Connect an optical cable to the optical (or S/PDIF) output on your TV. Connect the opposite end to the optical (or S/PDIF) input on your AVR or sound bar. Note: An optical output is common on modern TVs, but may not be available on all TVs.
2. Connecting to an AVR or sound bar using optical for audio
Use this option if your Roku player has an optical connector, and your AVR or sound bar
does not support HDMI. In this configuration, you will switch video sources on your TV
and audio sources on your AVR or sound bar.

a. Connect the opposite end of the HDMI cable that is attached to your Roku player to an available HDMI input on your TV.
b. Connect an optical cable to the optical output on your Roku player. Connect the opposite end to an optical (or S/PDIF) input on your AVR or sound bar. Note: Select Roku players include an optical port. If your player does not have one, you need to use HDMI to pass-through surround sound.
Guided setup
After the connections are made, power on your Roku player and complete guided setup using
instructions from the appropriate article or video on the Setup page.
More about audio formats
Different AVRs, sound bars, and TVs support different audio formats; some may only decode
Dolby Digital (Dolby D) audio; whereas others may decode Dolby Digital Plus™ (Dolby D+),
Dolby ATMOS™, and/or DTS. Check the manufacturer documentation to understand which
audio formats are supported.
Content partners such as Netflix, Amazon and Hulu may provide surround sound in different
formats; for example, Netflix encodes their audio in Dolby Digital Plus (and stereo). VUDU
encodes some audio in Dolby Digital, some in Dolby Digital Plus, and some in Dolby ATMOS
(and all in stereo). To play the audio in surround sound, your Roku player must be connected to
an AVR, sound bar, or TV capable of decoding the format used by the content partner.
Note: The Roku Ultra* provides an additional option to transcode Dolby Digital Plus to Dolby Digital. This allows you to connect your Roku Ultra to an AVR, sound bar, or TV that supports Dolby Digital, but not Dolby Digital Plus, and still hear the audio in surround sound.
* Not available in all countries.
Troubleshooting
If you do not hear audio:
Press Home on your remote control, scroll down to Settings and select Audio > HDMI (or HDMI and S/PDIF on Roku players with an optical connector). Instead of “Auto detect”, select the option that matches the capabilities of your TV, AVR or sound bar. If the behavior continues, review more suggestions for determining why you do not hear audio.
If you are using optical for audio, check that the input you are using on your AVR or sound bar has optical (or S/PDIF) assigned as the audio source. Refer to the manufacturer documentation to determine how to assign the audio source for an input on your AVR or sound bar.
If you can only hear stereo audio:
Press Home on your remote control, scroll down to Settings and select Audio > HDMI (or HDMI and S/PDIF on Roku players with an optical connector). Instead of “Auto detect”, select the option that matches the capabilities of your TV, AVR or sound bar.
Some channels may also require you to change the audio setting within the channel. For example, Netflix may require you to select “English (5.1)” under “Audio and Subtitles”.
If you do not see video:
Make sure the correct input is selected on your TV. If you are running video through an AVR or sound bar, check that the correct input is selected. Make sure your Premium High Speed HDMI Cables (if any) are firmly connected to all devices. If
you are using a Roku Streaming Stick, make sure its connections are all secure and it is firmly attached to the HDMI input of your TV, AVR, or sound bar.
If the behavior continues, review the suggestions for determining why you do not see video.
If you cannot see 4K or 4K HDR video:
When connecting your 4K or 4K HDR capable Roku player, be sure you are using Premium HDMI cables and HDMI 2.0 inputs that supports HDCP 2.2. Learn about all the requirements for setting up your Roku player for 4K or the requirements for setting up your Roku player for 4K HDR.
How to set up your Roku® streaming player for 4K
Background
The term “4K” (also known as 4K Ultra High Definition, 4K Ultra HD or just 4K UHD) refers to
the resolution of the TV, which is a measure of how much detail you can see on the screen. The
resolution of a traditional 1080p Full HD TV is limited to 1,920 columns and 1,080 rows of
pixels, while a 4K Ultra HD TV has an increased resolution of 3,840 columns and 2,160 rows of
pixels. With four times the resolution of 1080p, 4K offers improvement in picture clarity over
existing HD resolutions.
Requirements
The following are required to enjoy 4K Ultra HD content on a compatible Roku player.
Compatible 4K Ultra HD TV with an available HDMI 2.0 input that supports HDCP 2.2 Roku player capable of streaming 4K Ultra HD Good internet connection with enough bandwidth to stream 4K Ultra HD (up to 25 Mbps may be
needed)
Streaming service like Netflix with a plan that supports streaming in 4K Ultra HD Premium High Speed HDMI® Cable (*not needed when connecting a Roku® Streaming Stick®+
directly to compatible TV)
HDMI 2.0 and HDCP 2.2
To successfully stream 4K content, all devices connected to your compatible Roku device must
support HDMI 2.0 and HDCP 2.2. This includes your TV, an AVR, and any other devices
connected in between. If even one device does not support HDMI 2.0 and HDCP 2.2, then the
4K movie or TV show can only be viewed in a lower resolution, such as 720p or 1080p.
HDCP 2.2 is a copy and content protection standard required by the TV and movie industry.
Some older 4K Ultra HD TVs do not support HDCP 2.2, while others may only support HDCP
2.2 on a single HDMI input. Learn what to look for when trying to identify an HDMI input that
supports HDCP 2.2.
Audio/video connections
Once you confirm your other devices support HDMI 2.0 and you identify the inputs that support
HDCP 2.2, use the instructions below to connect your Roku player.
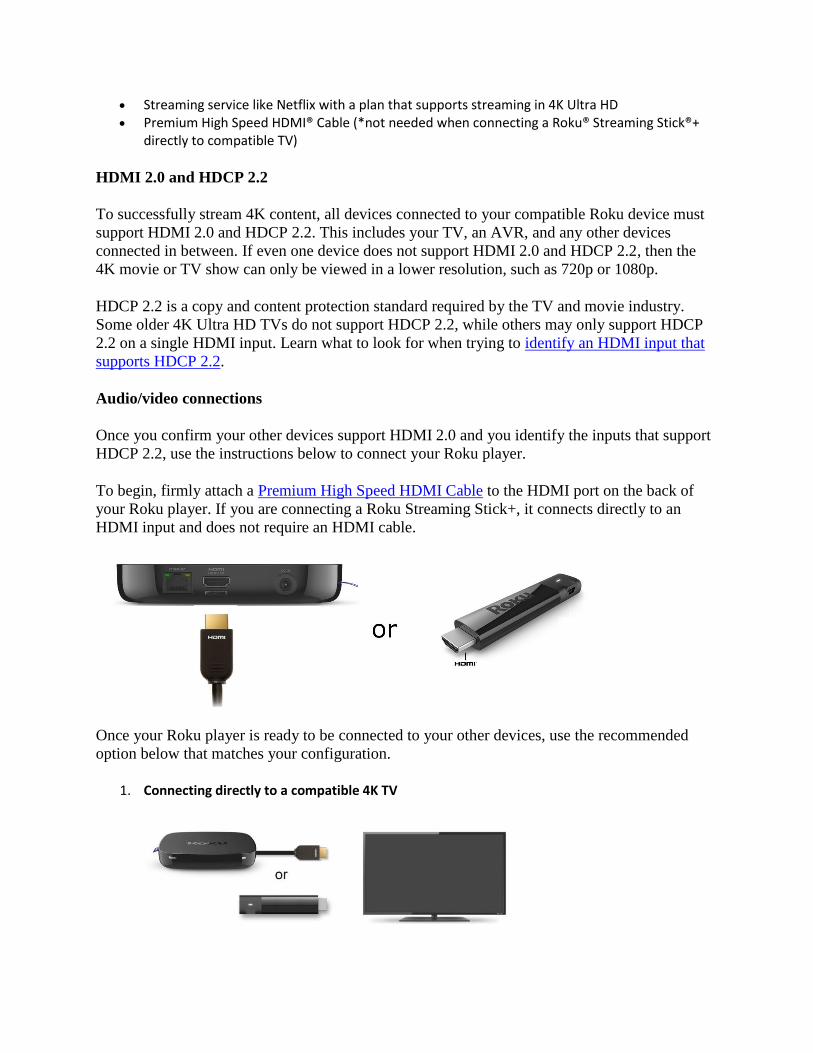
To begin, firmly attach a Premium High Speed HDMI Cable to the HDMI port on the back of
your Roku player. If you are connecting a Roku Streaming Stick+, it connects directly to an
HDMI input and does not require an HDMI cable.
Once your Roku player is ready to be connected to your other devices, use the recommended
option below that matches your configuration.
1. Connecting directly to a compatible 4K TV
a. Connect the opposite end of the HDMI cable that is attached to your Roku player, or connect your Streaming Stick+ to an available HDMI 2.0 input on your TV that supports HDCP 2.2.
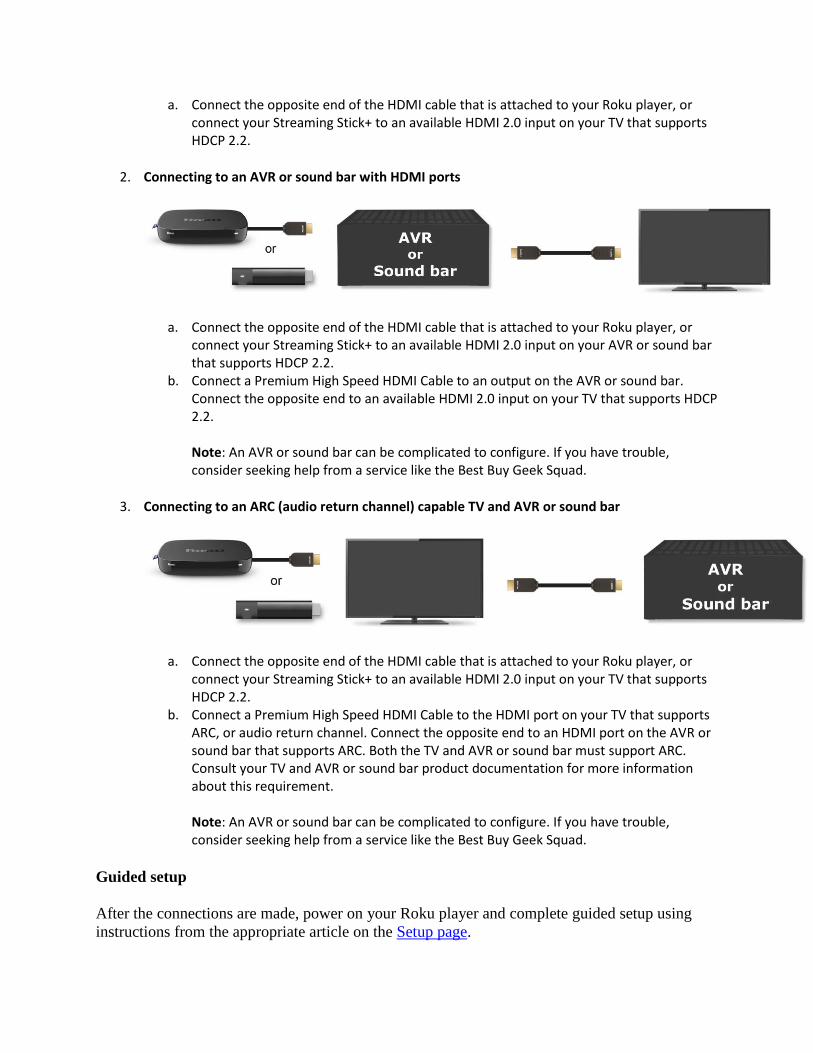
2. Connecting to an AVR or sound bar with HDMI ports
a. Connect the opposite end of the HDMI cable that is attached to your Roku player, or connect your Streaming Stick+ to an available HDMI 2.0 input on your AVR or sound bar that supports HDCP 2.2.
b. Connect a Premium High Speed HDMI Cable to an output on the AVR or sound bar. Connect the opposite end to an available HDMI 2.0 input on your TV that supports HDCP 2.2. Note: An AVR or sound bar can be complicated to configure. If you have trouble, consider seeking help from a service like the Best Buy Geek Squad.
3. Connecting to an ARC (audio return channel) capable TV and AVR or sound bar
a. Connect the opposite end of the HDMI cable that is attached to your Roku player, or connect your Streaming Stick+ to an available HDMI 2.0 input on your TV that supports HDCP 2.2.
b. Connect a Premium High Speed HDMI Cable to the HDMI port on your TV that supports ARC, or audio return channel. Connect the opposite end to an HDMI port on the AVR or sound bar that supports ARC. Both the TV and AVR or sound bar must support ARC. Consult your TV and AVR or sound bar product documentation for more information about this requirement. Note: An AVR or sound bar can be complicated to configure. If you have trouble, consider seeking help from a service like the Best Buy Geek Squad.
Guided setup
After the connections are made, power on your Roku player and complete guided setup using
instructions from the appropriate article on the Setup page.
Where can I find 4K Ultra HD content?
Whether accessing the Roku Channel Store or the 4K Spotlight channel, learn how to find 4K
Ultra HD movies and TV shows on your Roku player from various streaming channels.
How to set up your Roku® Enhanced Remote to control your TV
Background
Some Roku Enhanced Remotes incorporate both wireless and Infra-Red (IR) technologies to
seamlessly control your Roku streaming player and aspects of your TV. Once you set up your
Roku player and Roku Enhanced Remote, you can control volume and power on/off for select
TV brands and models.
Note: The ability to control your TV is only available with the Roku Enhanced Remote
included with the Roku Ultra, Roku® Streaming Stick® and Roku Streaming Stick+
introduced in 2017 or later.
Can I use my Roku Enhanced Remote to control other devices?
Your Roku Enhanced remote is designed to control volume and power for your TV. It cannot
directly control other devices connected to your TV, such as an audio/video receiver (AVR) or
sound bar.
However, your TV may be able to issue volume commands to your AVR or sound bar using a
technology called HDMI CEC. In these cases, your Roku Enhanced Remote can indirectly
control volume for your AVR or sound bar. For this to work, all your devices must be connected
via HDMI, and all devices must support HDMI CEC and have this feature enabled. To learn if
your TV, AVR or sound bar supports this technology refer to the device's documentation. Be
aware that manufacturers may refer to HDMI CEC by a different name.
What should I know before setting up my Roku Enhanced Remote?
During initial setup and activation, you will be able to set up your Roku Enhanced remote to control volume and power for your TV. You can also set it up later by visiting Settings > Remote > Set up remote for TV control.
During the remote setup, your Roku player will attempt to automatically detect the brand of your TV (over the HDMI connection) and program your Roku Enhanced remote. In cases where the brand cannot be detected automatically, you will be taken through a series of steps to manually enter the brand and help program your remote (see setup section below).
When information is gathered via HDMI, often only the brand of the device connected directly to your Roku player can be detected. For this reason, we recommend you always connect your Roku player directly to your TV during setup. If you plan to set up your Roku player for
surround sound, temporarily connect your Roku player directly to your TV and complete setup before making any connections to the audio/video receiver or sound bar.
How do I set up my Roku Enhanced Remote during initial setup and activation?
When you set up your Roku player for the first time, you will need to connect it to the internet
and set the display type before you are presented with the screen to Check remote settings. This
is the first step to setting up your Roku Enhanced remote to control volume and power for your
TV.
Before you begin, set the volume of your TV to an audible level. As you make selections, keep
your Roku Enhanced Remote pointed directly at the TV.
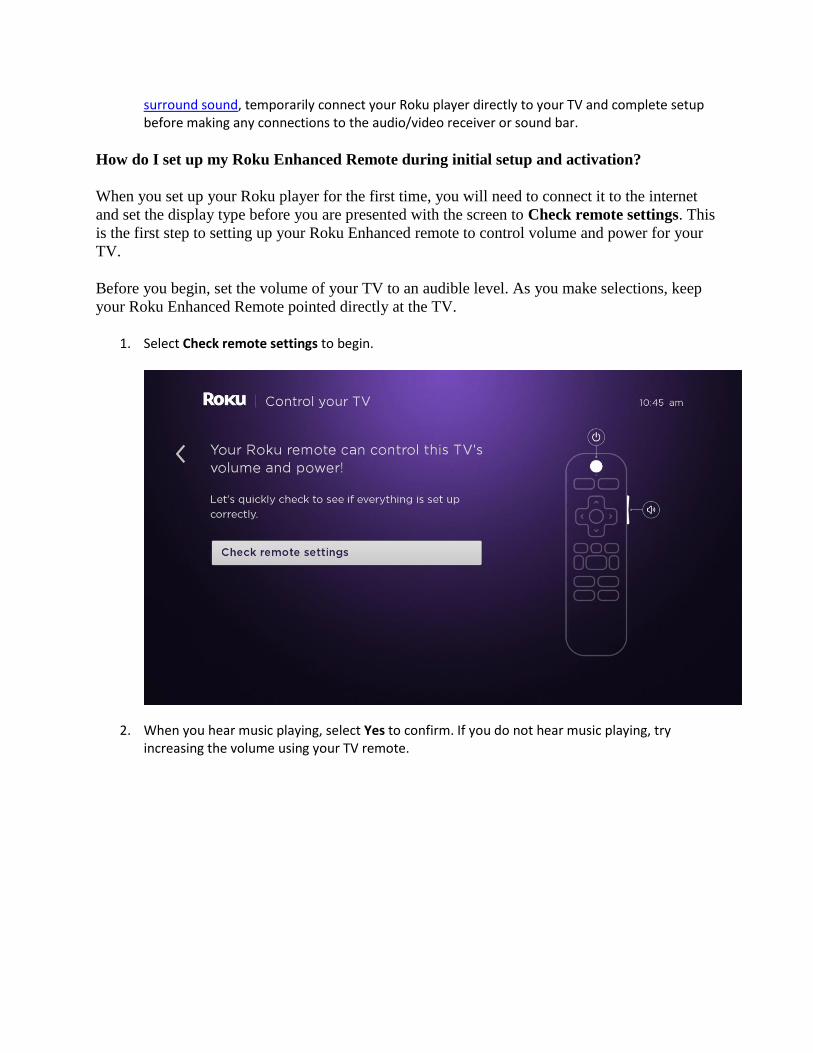
1. Select Check remote settings to begin.
2. When you hear music playing, select Yes to confirm. If you do not hear music playing, try increasing the volume using your TV remote.
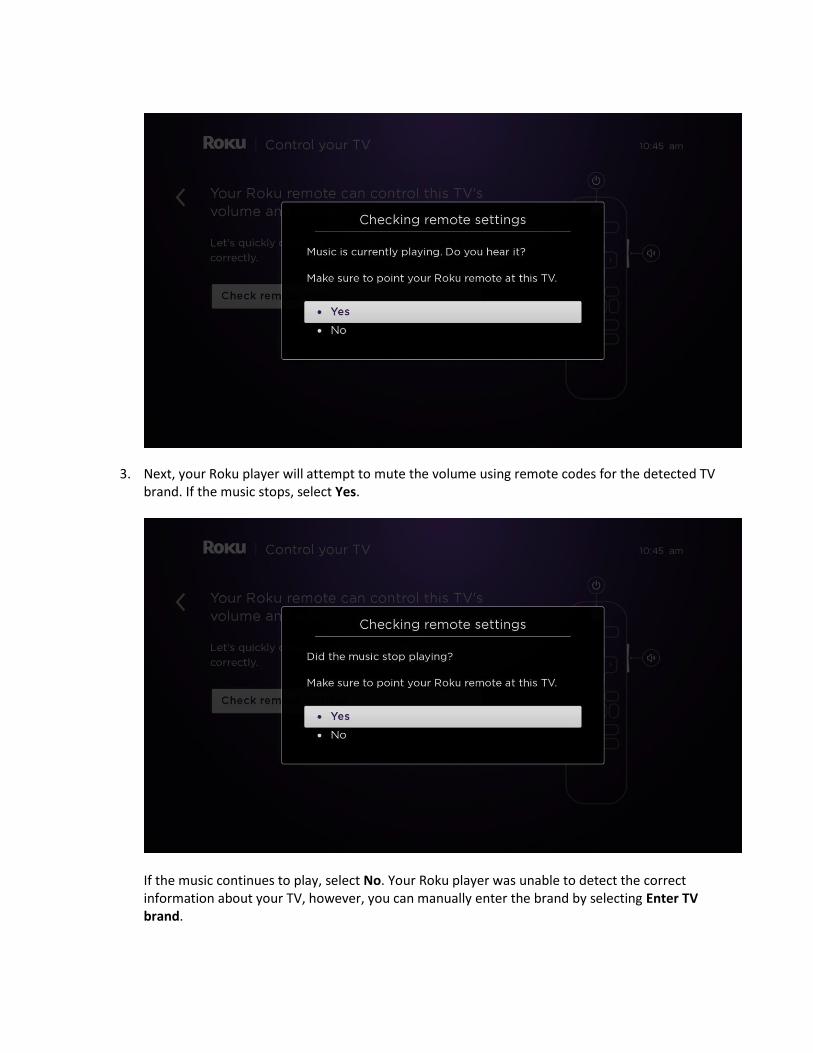
3. Next, your Roku player will attempt to mute the volume using remote codes for the detected TV brand. If the music stops, select Yes.
If the music continues to play, select No. Your Roku player was unable to detect the correct information about your TV, however, you can manually enter the brand by selecting Enter TV brand.
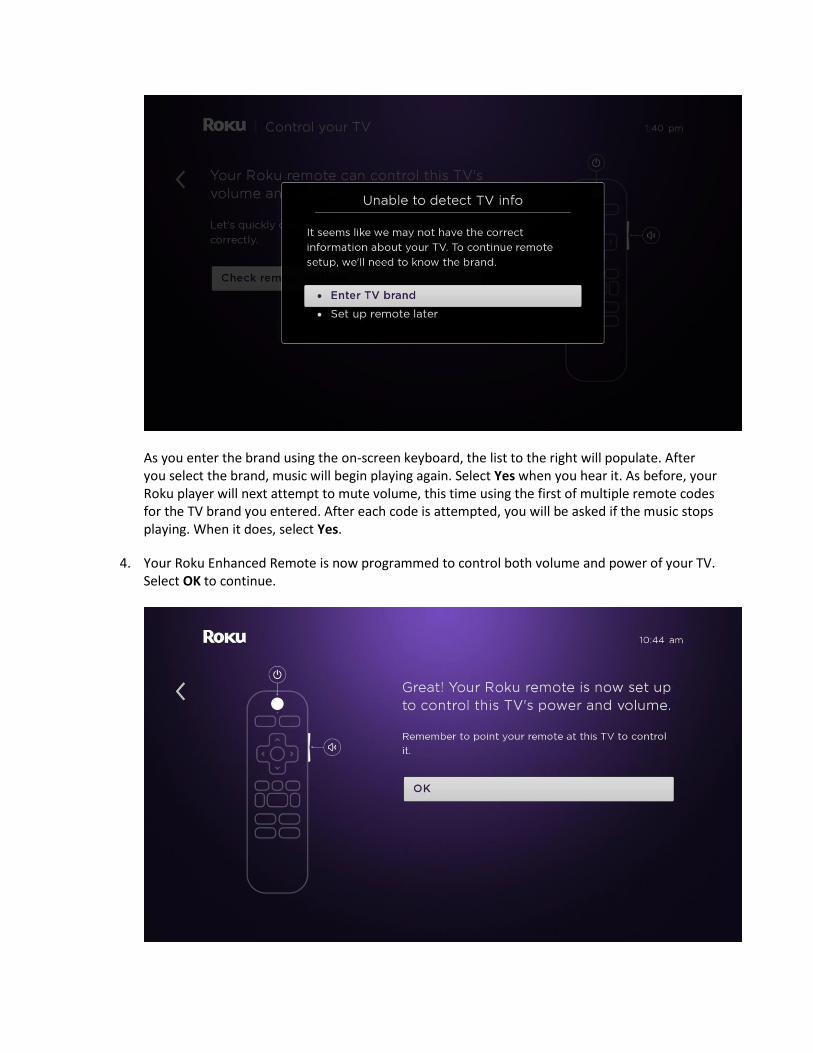
As you enter the brand using the on-screen keyboard, the list to the right will populate. After you select the brand, music will begin playing again. Select Yes when you hear it. As before, your Roku player will next attempt to mute volume, this time using the first of multiple remote codes for the TV brand you entered. After each code is attempted, you will be asked if the music stops playing. When it does, select Yes.
4. Your Roku Enhanced Remote is now programmed to control both volume and power of your TV. Select OK to continue.

Note: The Roku Enhanced Remote may not be able to control volume and power on all TV models. With some TV models, you may only be able to control volume, and not power.
How do I set up my Roku Enhanced Remote after initial setup and activation?
After your Roku player is activated and set up, you can access the settings menu any time to set
up the Roku Enhanced Remote to control your TV. If your Roku player is connected to an AVR
or sound bar, we recommend temporarily connecting it directly to your TV during setup to
successfully detect the brand of your TV.
1. Press the Home button on your Roku Enhanced Remote. 2. Scroll up or down and select Settings. 3. Select Remote and then select Set up remote for TV control.
4. Select Start to automatically set up your Roku Enhanced Remote to control the volume and power on your TV.
5. Follow the on-screen prompts to complete the process.
Troubleshooting
Why do I not hear music during setup?
If you cannot hear the music playing after increasing the volume using the TV remote
with fresh batteries, check the following:
o Make sure all devices connected to your Roku player support audio over HDMI. For example, many overhead projectors do not have speakers.
Why am I unable to mute the music with my Roku Enhanced Remote?
When the music cannot be muted, the on-screen menu prompts you to enter the brand of
your TV and try setup again. If you still are unable to get your Roku Enhanced Remote
programmed with this method, take note of the following:
o Limit the number of devices connected between your Roku player and the TV. Removing a device, even if done temporarily, may confirm that the device is causing the behavior. You may even be able to setup your Roku Enhanced Remote with the device removed, and have it continue to work after reconnecting the device.
o Certain television brands such as Bang & Olufsen may not be supported.
Why is my Roku Enhanced Remote able to control the volume or power for my TV,
but not both?
With manufacturers producing various models, most TV brands have a number of remote
codes. During the remote setup, your Roku player will attempt to narrow this list of
possible codes on your specific TV brand and program the Enhanced remote to the
correct code. It is possible that the code programmed into your Roku Enhanced Remote
when you heard the music stop only contains commands to control either volume or
power, but not both. Using a different code for the TV brand may work to control both
volume and power.
To have your Roku player try additional remote codes, restart the setup process for your
Roku Enhanced Remote as described above and alter the steps as follows:
4. When you first hear the music stop and are asked “Did the music stop playing?”, do not answer the question. Instead, turn the volume back up with your TV remote until the music is audible again.
5. Answer the question with No, and your Roku player will move on to try the next remote code.
6. The next time you hear the music stop, answer the question with Yes, and your Roku Enhanced Remote will be programmed with the new code.
7. In rare cases, you may need to repeat this process to find a code that controls both volume and power.