Embed Size (px)
Citation preview
How to configure NetComm IAC3000 with NCT192 IP DSLAM using Port Location Mapping
Introduction
The following paper provides instructions on how to configure NetComm’s IAC3000 Internet Access Controller with NetComm NCT192 IP DSLAM for user-free and a user-pay application using port location mapping.
This document is being created at a time when the following versions of firmware were in production:
• IAC3000: Firmware V2.00.01_01000• NCT1902: Firmware R2.4.1• NCT1901: Firmware R2.4.0
The test PCs that used in this white paper were running WinXP with Internet browser IE7.0.
It is recommended that the readers of this document have read and understood the IAC3000 user manual, the NCT192 System Installation Guide, the Local Craft Terminal (LCT) software operation guide and the Command Line Interface (CLI) operation guide in the NCT192 user manual. It is also assumed that readers of this document understand the concepts used in Virtual Local Area Network (VLAN), such as trunk mode and access mode. The configuration of the GE switch is not described in this white paper.
This white paper includes three sections: Part 1 describes the IAC3000 device configuration (see page 13 to page 41); Part 2 describes the NCT192 VLAN tagging configuration (see page 42 to page 71); Part 3 describes how to test and verify the Port Location Mapping function of the entire system from a guest and administrator’s perspective (see page 72 to page 80).
How to configure NetComm IAC3000 with NCT192 IP DSLAM using Port Location Mapping.docDoc Version: 2.0 page 1 Sept 2009C.L
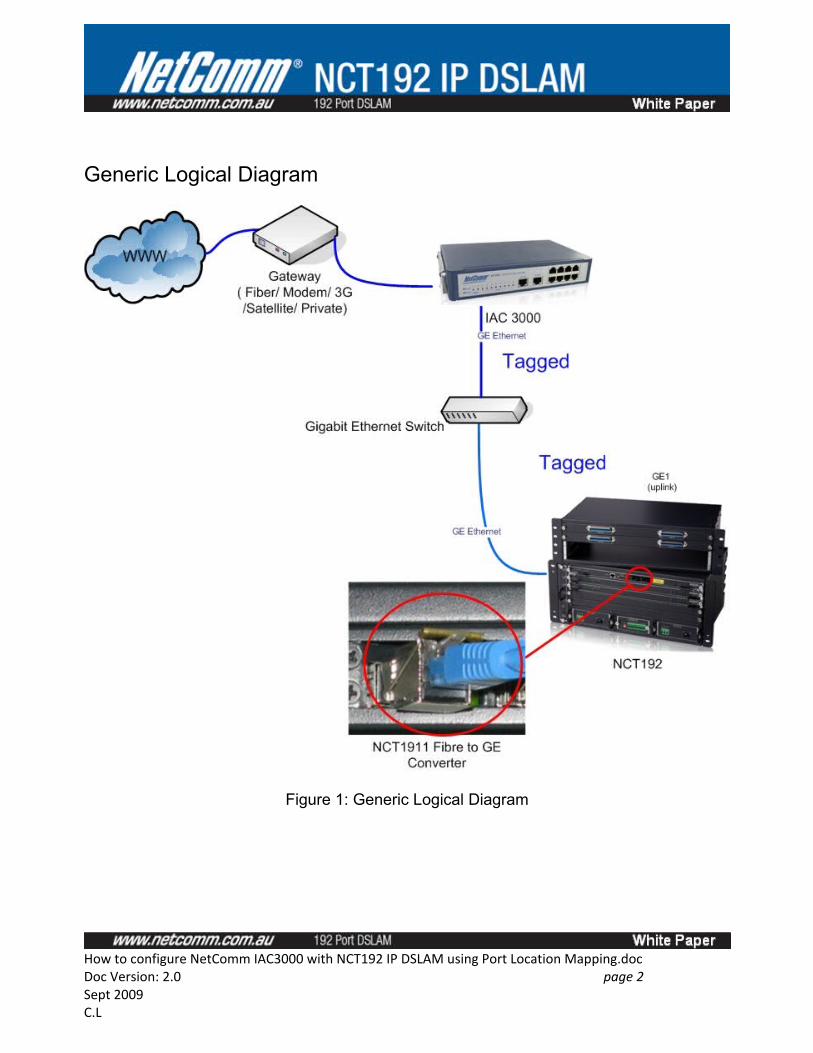
Generic Logical Diagram
Figure 1: Generic Logical Diagram
How to configure NetComm IAC3000 with NCT192 IP DSLAM using Port Location Mapping.docDoc Version: 2.0 page 2 Sept 2009C.L
Terms & Concepts
PMS
It stands for Property Management System. Property management systems may be used in real estate, logistics, intellectual property, or hospitality accommodation management. They are computerised systems that facilitate the management of properties, including maintenance, legalities and personnel all through a single piece of software. In this white paper it is referred to the software used by hotel/motel/service apartment to keep guest check-in check –out records and to produce billing invoices and receipts.
AAA
It stands for Authentication, Authorization, and Accounting (AAA) management for computers to connect and use a network service.
IAC
It stands for Internet Access Controller; it is referring to the NetComm IAC3000 in this white paper which is responsible for guest Internet AAA management control.
Net Retriever
It is a middleware that acts as an interpreter to between the data that is outputted from the IAC system to the PMS server for billing purposes.
PLM
It stands for Port Location Mapping. It is an IEEE802.1Q VLAN tagging feature implemented in IAC3000.
R2T8
Postfix ‘R2T8’ of the modem router NB6plus4_R2T8 is referring to a modem router that is running bridge mode hotel firmware. It acts as a plug and play device to convert ADSL signals to Ethernet signals for the IAC3000 – NCT192 system.
How to configure NetComm IAC3000 with NCT192 IP DSLAM using Port Location Mapping.docDoc Version: 2.0 page 3 Sept 2009C.L
GE
It stands for Gigabit Ethernet. It is the standard for a high-speed Ethernet. It has a maximum data transmission rate of 1000Mb/s or 1 Gigabit/s.
LCT
It stands for Local Craft Terminal. It is a name for the proprietary NCT192 management program. NCT192 LCT is a SNMP management program that can monitor and control one NCT192 IP DSLAM at a time.
NE
NE/NEs mentioned in this document means NCT192 IP DSLAM unless specifically indicated.
xDSL
It is refer ADSL in this document. It covers ADSL, ADSL2, and ADSL2+, unless otherwise indicated.
NC
It stands for Network Card. One network card is required to be installed in each NCT192 IP DSLAM. The product code for NCT192’s NC card is NCT1902. This product code is displayed in LCT operation menu once the NC card completes initialization.
LC
It stands for Line Card. Each NCT192 LC card has 48 ADSL ports. Up to 4 ADSL LC cards can be installed in each NCT192 system for 192 ports in total. The product code for NCT192’s LC card is NCT1901. This product code is displayed in LCT operation menu once the LC card completes initialization.
How to configure NetComm IAC3000 with NCT192 IP DSLAM using Port Location Mapping.docDoc Version: 2.0 page 4 Sept 2009C.L
IAC3000 VLAN Management
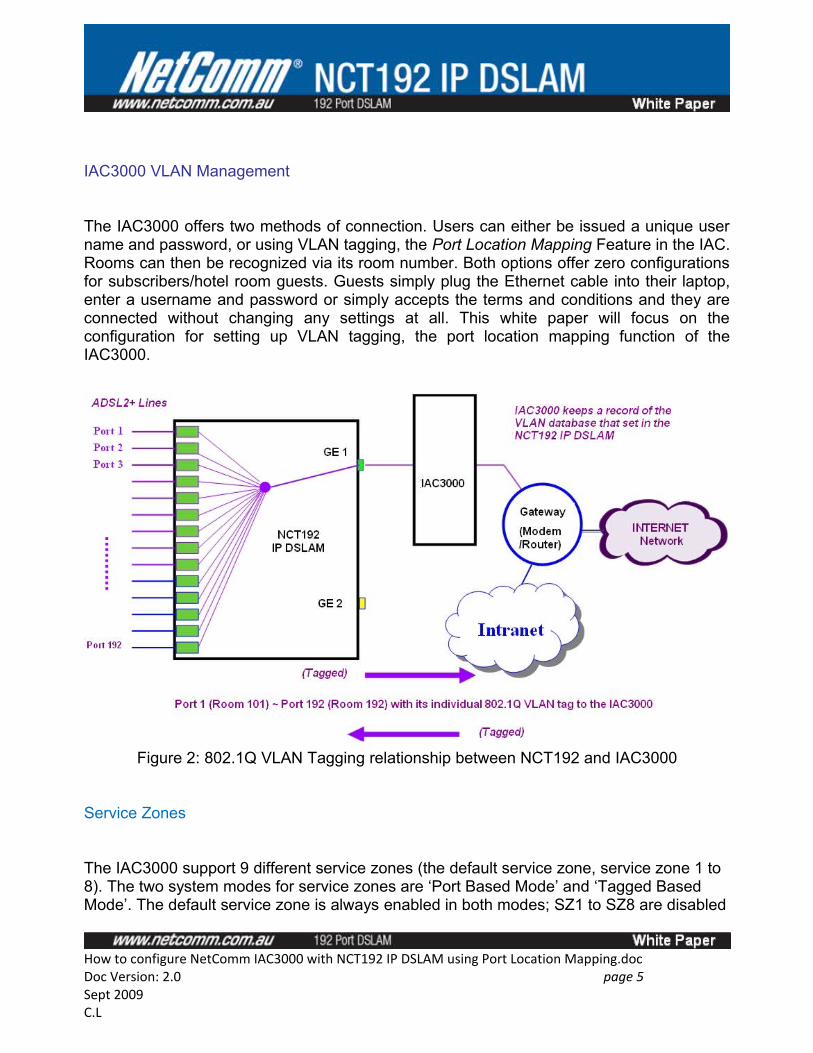
The IAC3000 offers two methods of connection. Users can either be issued a unique user name and password, or using VLAN tagging, the Port Location Mapping Feature in the IAC. Rooms can then be recognized via its room number. Both options offer zero configurations for subscribers/hotel room guests. Guests simply plug the Ethernet cable into their laptop, enter a username and password or simply accepts the terms and conditions and they are connected without changing any settings at all. This white paper will focus on the configuration for setting up VLAN tagging, the port location mapping function of the IAC3000.
Figure 2: 802.1Q VLAN Tagging relationship between NCT192 and IAC3000
Service Zones
The IAC3000 support 9 different service zones (the default service zone, service zone 1 to 8). The two system modes for service zones are ‘Port Based Mode’ and ‘Tagged Based Mode’. The default service zone is always enabled in both modes; SZ1 to SZ8 are disabled
How to configure NetComm IAC3000 with NCT192 IP DSLAM using Port Location Mapping.docDoc Version: 2.0 page 5 Sept 2009C.L

by default and require the administrator to enable it and make necessary configurations when needed.
Each SZ configuration page is a summarized page that consists of hyperlinks to its sub configuration pages. The settings that you can make in a SZ configuration are:
• Service Zone Status• Service Zone Name• Service Zone VLAN Tagged Number (required in tagged based mode)• Service Zone Mgmt IP address• Service Zone DHCP Server/Relay• Service Zone Authentication Setting/Options (Which Authentication server to be
used in this SZ)• Service Zone Authentication Setting/Options > Configure Authentication Server/s• Service Zone Custom Pages ( this means every SZ in the IAC3000 can have its own
custom login/logout pages; the custom pages include PLM user charge / free login pages)
• Service Zone Group Configuration (Bandwidth, QoS)• Service Zone Policy Configuration (FW Rule, Route Rule, Session Limit)• Service Zone APs (central management)
By default under ‘Tagged based’ Mode, each SZ has its pre-assigned VLAN tagged num-ber 1 to 8. See screen shot below.
How to configure NetComm IAC3000 with NCT192 IP DSLAM using Port Location Mapping.docDoc Version: 2.0 page 6 Sept 2009C.L
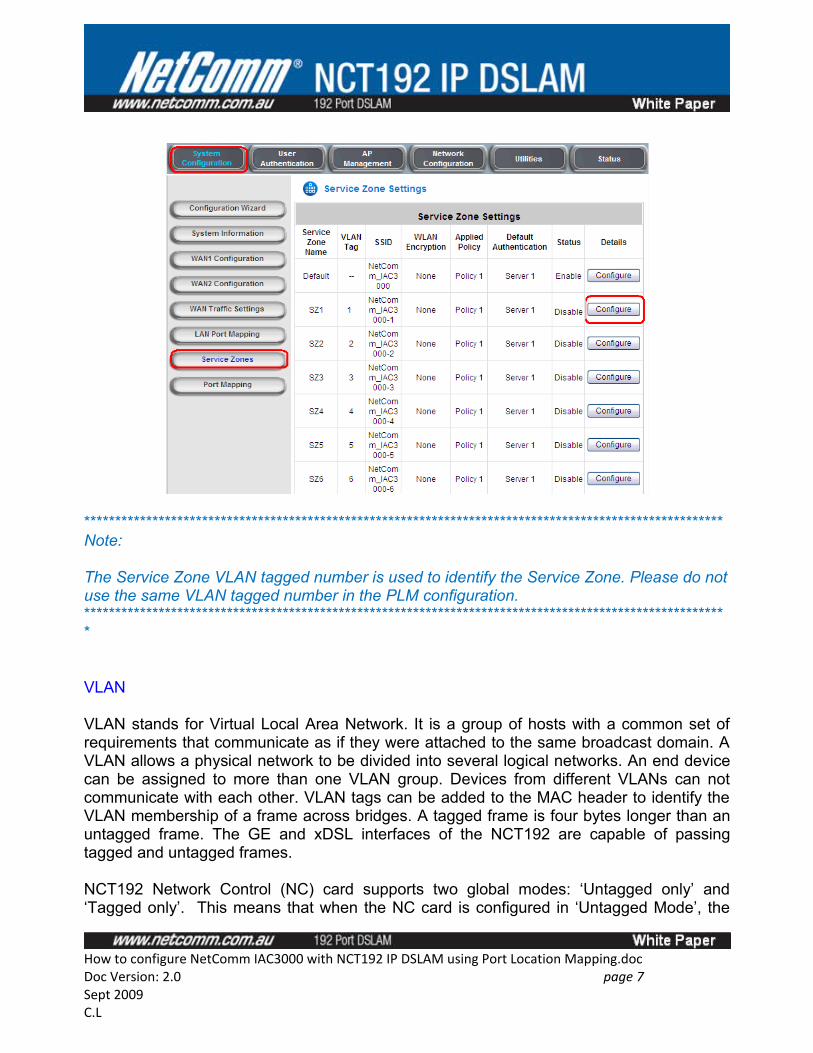
*******************************************************************************************************Note:
The Service Zone VLAN tagged number is used to identify the Service Zone. Please do not use the same VLAN tagged number in the PLM configuration.********************************************************************************************************
VLAN VLAN stands for Virtual Local Area Network. It is a group of hosts with a common set of requirements that communicate as if they were attached to the same broadcast domain. A VLAN allows a physical network to be divided into several logical networks. An end device can be assigned to more than one VLAN group. Devices from different VLANs can not communicate with each other. VLAN tags can be added to the MAC header to identify the VLAN membership of a frame across bridges. A tagged frame is four bytes longer than an untagged frame. The GE and xDSL interfaces of the NCT192 are capable of passing tagged and untagged frames.
NCT192 Network Control (NC) card supports two global modes: ‘Untagged only’ and ‘Tagged only’. This means that when the NC card is configured in ‘Untagged Mode’, the
How to configure NetComm IAC3000 with NCT192 IP DSLAM using Port Location Mapping.docDoc Version: 2.0 page 7 Sept 2009C.L
traffic that going through the IP DSLAM will be untagged. In addition, when in ‘Tagged Mode’, the traffic going through the IP DSLAM will be tagged. For further NCT192 VLAN terms and concepts please refer to the NCT192 User Manual.
System Management
The IAC3000 supports HTTP/HTTPS web base device management and a simple console for network diagnosis and password recovery. It is recommended to use the IAC3000 web management interface to perform all device configurations.
The NCT192 supports SNMP, CLI, Telnet, FTP and TFTP for system management. A proprietary SNMP management program is used to manage NCT192 locally or remotely. This software is called the Local Craft Terminal (LCT) and it comes with the product CD ROM when the product is shipped.
The default inbound management IP address for the NCT192 local management port is 192.168.192.1/24; the default outbound management IP address for NCT192 uplink port is via VLAN 2094 with IP address 172.17.192.1/16; the default user name and SNMP community for logging into the LCT is admin/netman.
It is recommended to use the local management port for device management. Figure 5 illustrates how multiple NCT192s are managed.
How to configure NetComm IAC3000 with NCT192 IP DSLAM using Port Location Mapping.docDoc Version: 2.0 page 8 Sept 2009C.L
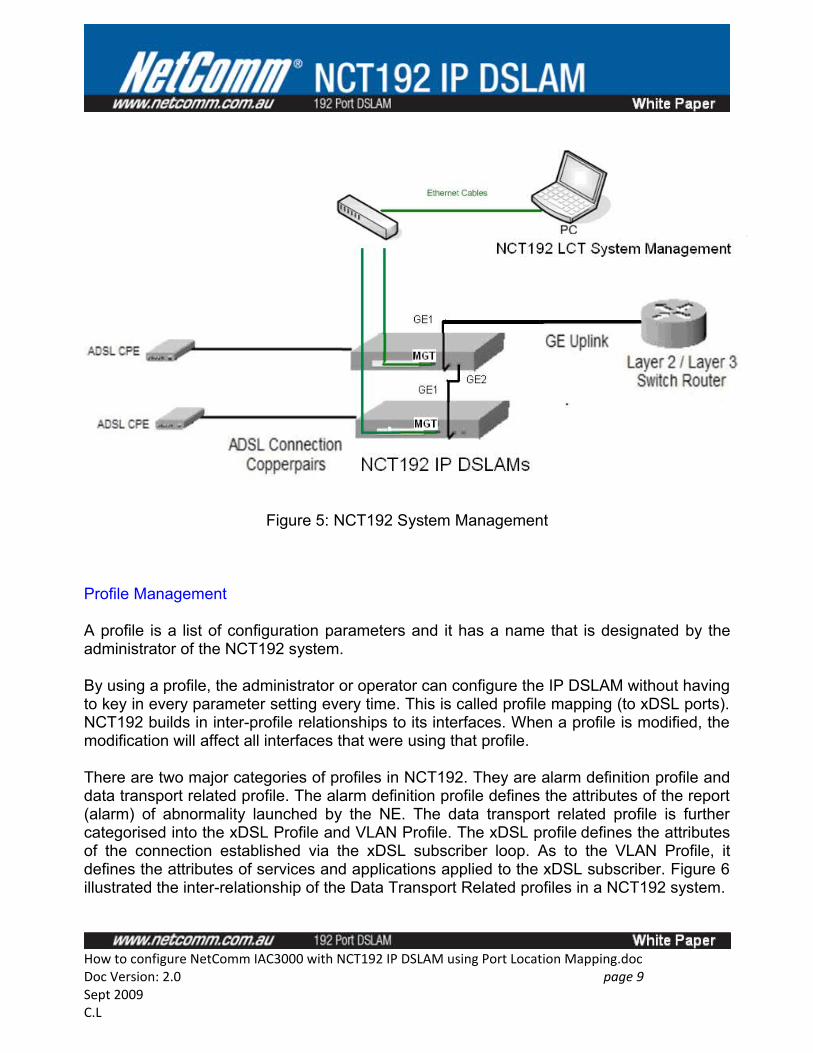
Figure 5: NCT192 System Management
Profile Management
A profile is a list of configuration parameters and it has a name that is designated by the administrator of the NCT192 system.
By using a profile, the administrator or operator can configure the IP DSLAM without having to key in every parameter setting every time. This is called profile mapping (to xDSL ports). NCT192 builds in inter-profile relationships to its interfaces. When a profile is modified, the modification will affect all interfaces that were using that profile.
There are two major categories of profiles in NCT192. They are alarm definition profile and data transport related profile. The alarm definition profile defines the attributes of the report (alarm) of abnormality launched by the NE. The data transport related profile is further categorised into the xDSL Profile and VLAN Profile. The xDSL profile defines the attributes of the connection established via the xDSL subscriber loop. As to the VLAN Profile, it defines the attributes of services and applications applied to the xDSL subscriber. Figure 6 illustrated the inter-relationship of the Data Transport Related profiles in a NCT192 system.
How to configure NetComm IAC3000 with NCT192 IP DSLAM using Port Location Mapping.docDoc Version: 2.0 page 9 Sept 2009C.L
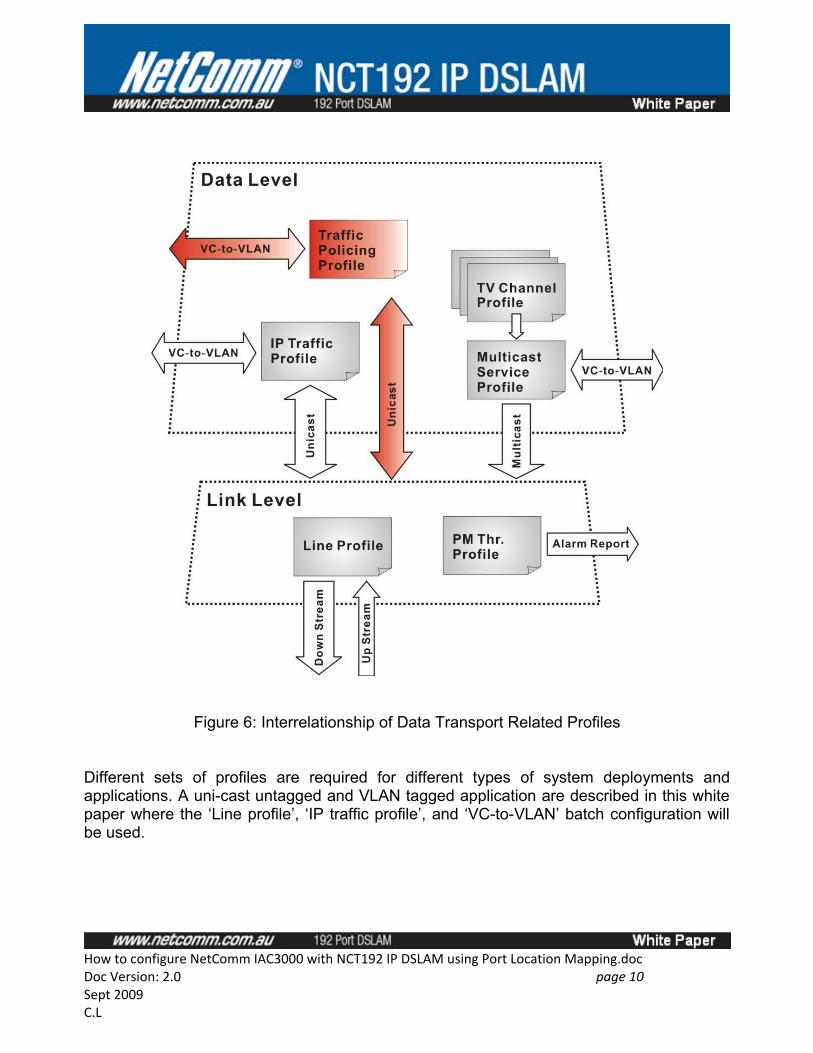
Figure 6: Interrelationship of Data Transport Related Profiles
Different sets of profiles are required for different types of system deployments and applications. A uni-cast untagged and VLAN tagged application are described in this white paper where the ‘Line profile’, ‘IP traffic profile’, and ‘VC-to-VLAN’ batch configuration will be used.
How to configure NetComm IAC3000 with NCT192 IP DSLAM using Port Location Mapping.docDoc Version: 2.0 page 10 Sept 2009C.L
System Requirement
This white paper is written using LCT to configure the stacked NCT192 system. It is recommended to use the following hardware and software to run the LCT software.
Hardware:
> Pentium 4 1.6 GHz or higher> 512 MB RAM or higher> 40 GB Hard disk> 10/100 Base-T Ethernet network card
Software:
> Operating System – Microsoft Windows 98SE/ME/2000/XP > NCT192 Installation Package (Refer to NCT192 product CD ROM)
How to configure NetComm IAC3000 with NCT192 IP DSLAM using Port Location Mapping.docDoc Version: 2.0 page 11 Sept 2009C.L
Equipment List
Hardware
1 x Gateway (modem router/ 3G router)1 x IAC3000 (acts as the backbone for the NCT192 system)1 x NCT192 systems (with 1 x NCT1902 NC Card; 1 x NCT1901 LC card)1 x NCT192S POTS Splitter shelf (with 1 x NCT1901S POTS Splitter Card)2 x NCT2030 Power supply for NCT192 system1 x NCT1911 Mini GBIC Fibre to Copper RJ45 GE Converters3 x CAT5E RJ45 Ethernet Cables (straight-through or cross-over)1 x GE Switch (such as the NP2724M, NP3005)2 x NB6+4W_R2T8 Bridged Modem routers2 x Splitter Filter 2 x NCT1906 DSLAM cables (6m Male 180 degrees connector to Open)2 x NCT1904 DSLAM cables (1m Male 90 degrees to 180 Male)
Please note that the quantity of hardware items used in this whitepaper does not represent a fully equipped NCT192 system.
The NCT192 has optical uplink interfaces only by default, to connect to the IAC3000 Ethernet LAN interface, a fibre to copper RJ45 GE converter NCT1911 and a GE switch is used to convert the NCT192 optical uplink connection to copper to connect to the IAC3000.
For NCT192 power redundancy purposes, it is recommended to use two NCT2030 power supplies per NCT192 system.
Software
IAC3000 Internet Access Controller firmware: V2.00.01_01000NCT1902 Network Control Card Firmware: R2.4.1NCT1901 ADSL2+ Line Card Firmware: R2.4.0NCT192 LCT Software version: V4.6.0.5NB6+4W_R2T8 FW 3.63u Bridged firmware
How to configure NetComm IAC3000 with NCT192 IP DSLAM using Port Location Mapping.docDoc Version: 2.0 page 12 Sept 2009C.L
Part 1: IAC3000 Port Location Mapping Configuration
Overview
Part 1 describes how to configure the IAC3000 for Port Location Mapping application with PMS billing integration.
The logical order of configuration described in this section is as follows.
• Configure IAC3000 system information• Configure administration accounts• Configure WAN 1, WAN 2, and WAN traffic load balancing settings• Configure system to tag-based mode • Configure service zone (SZ) settings• Configure ‘on-demand billing plans’ under on-demand user server • Configure ‘custom login pages’• Configure ‘group’ and ‘policy’ setting for user bandwidth control • Configure port location mapping VLAN entries and map to the appropriate service
zone• Configure NetRetriever parameters for PMS billing integration
IAC3000 described in this white paper will have two service zone enabled. The two service zones are the default SZ: 192.168.30.1/24 and SZ 1:192.168.31.1/24. Default service zone provides user login page for untagged traffic and for VLAN account roaming purposes. SZ1 is set up for Port Location Mapping VLAN users. The default service zone is enabled by default but SZ1 and its configuration will require administrator configuration; details are discussed in the next section.
How to configure NetComm IAC3000 with NCT192 IP DSLAM using Port Location Mapping.docDoc Version: 2.0 page 13 Sept 2009C.L
Steps & Procedures
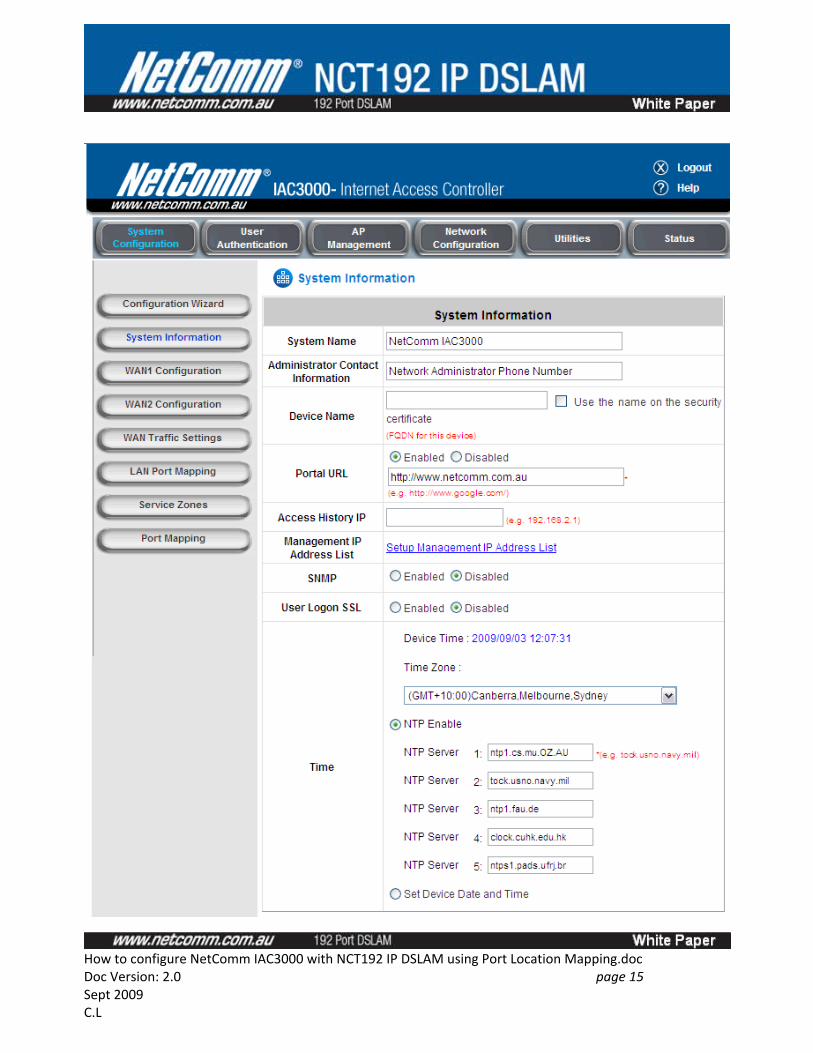
Step 1:
Connect an Ethernet cable to one of the LAN port of the IAC3000. Open the IAC3000 web management interface by using the following login details
Default LAN Mgt IP address: http://192.168.30.1Default admin user name: adminDefault admin Password: admin
This document is being created at a time when the following version of firmware was in production:
• IAC3000: Firmware V2.00.01_01000
Please make sure the IAC3000 is running the firmware V2.00.01_01000 or later to use port location mapping feature. For more details please visit the NetComm website http://www.netcomm.com.au/support for more details.
Configure IAC3000 system information:
How to configure NetComm IAC3000 with NCT192 IP DSLAM using Port Location Mapping.docDoc Version: 2.0 page 14 Sept 2009C.L
How to configure NetComm IAC3000 with NCT192 IP DSLAM using Port Location Mapping.docDoc Version: 2.0 page 15 Sept 2009C.L
*******************************************************************************************************Note:
‘Management IP Address List’ by default is set to allow IP address 0.0.0.0/0.0.0.0 to see the IAC3000 web management interface, this settings will be site specific. It is recommended to only allow a specific IP address or a specific IP address range to access the IAC3000 device management interface. For example, if you only allow the device management via the WAN interface, you need to remove the 0.0.0.0/0.0.0.0 in the first entry and replace it with your desired IP address range, eg: 172.16.1.0/24. Please refer to the IAC3000 user manual for more details.********************************************************************************************************
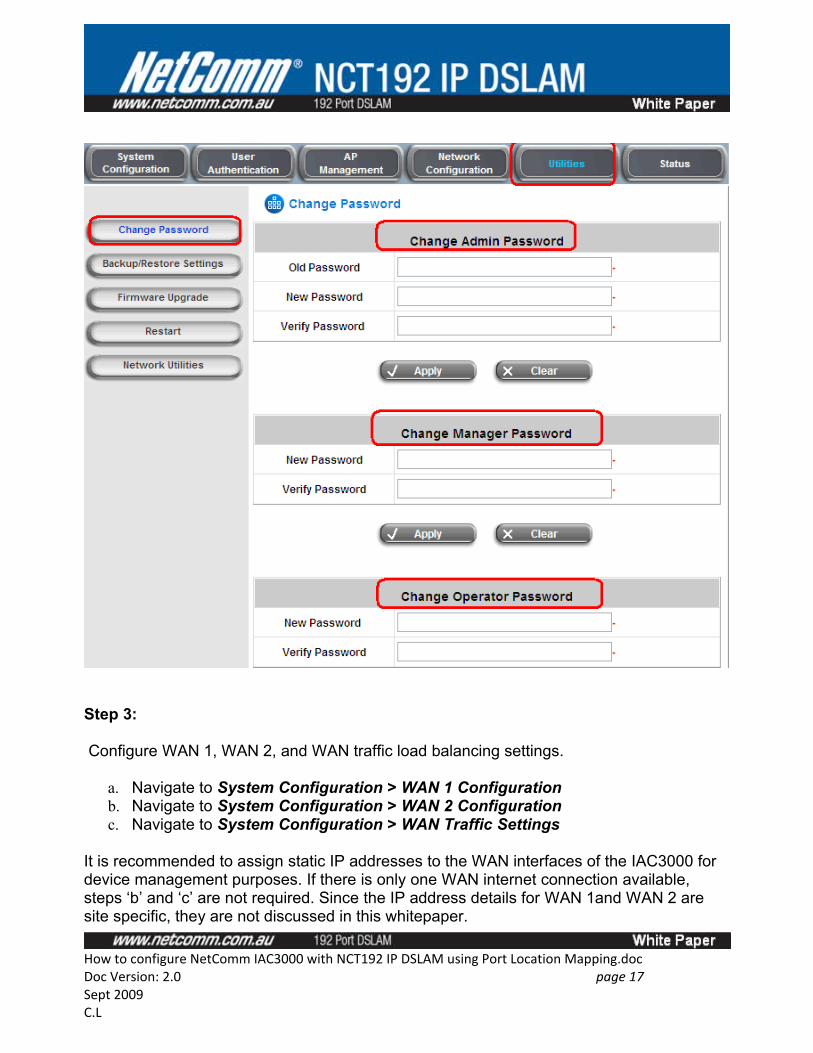
Step 2:
Change IAC3000 administration password.
Navigate to Utilities > Change Password > change administrator, manager and opera-tor password.
Default Admin user name: adminDefault Admin password: adminDefault Manager User name: managerDefault Manager Password: managerDefault Operator User name: operatorDefault Operator Password: operator
How to configure NetComm IAC3000 with NCT192 IP DSLAM using Port Location Mapping.docDoc Version: 2.0 page 16 Sept 2009C.L
Step 3:
Configure WAN 1, WAN 2, and WAN traffic load balancing settings.
a. Navigate to System Configuration > WAN 1 Configuration b. Navigate to System Configuration > WAN 2 Configuration c. Navigate to System Configuration > WAN Traffic Settings
It is recommended to assign static IP addresses to the WAN interfaces of the IAC3000 for device management purposes. If there is only one WAN internet connection available, steps ‘b’ and ‘c’ are not required. Since the IP address details for WAN 1and WAN 2 are site specific, they are not discussed in this whitepaper.
How to configure NetComm IAC3000 with NCT192 IP DSLAM using Port Location Mapping.docDoc Version: 2.0 page 17 Sept 2009C.L

Step 4:
Configure and confirm that the IAC3000 is set to tag-based mode. By default the IAC3000 LAN Port Mapping is set to Tagged Mode. To begin with, it is assumed that you have performed a factory load default to the IAC3000 via the management interface. Please verify IAC3000 is configured in VLAN Tagged Mode.
Navigate to System Configuration > LAN Port Mapping > Service Zone Mode > Tagged based.
How to configure NetComm IAC3000 with NCT192 IP DSLAM using Port Location Mapping.docDoc Version: 2.0 page 18 Sept 2009C.L
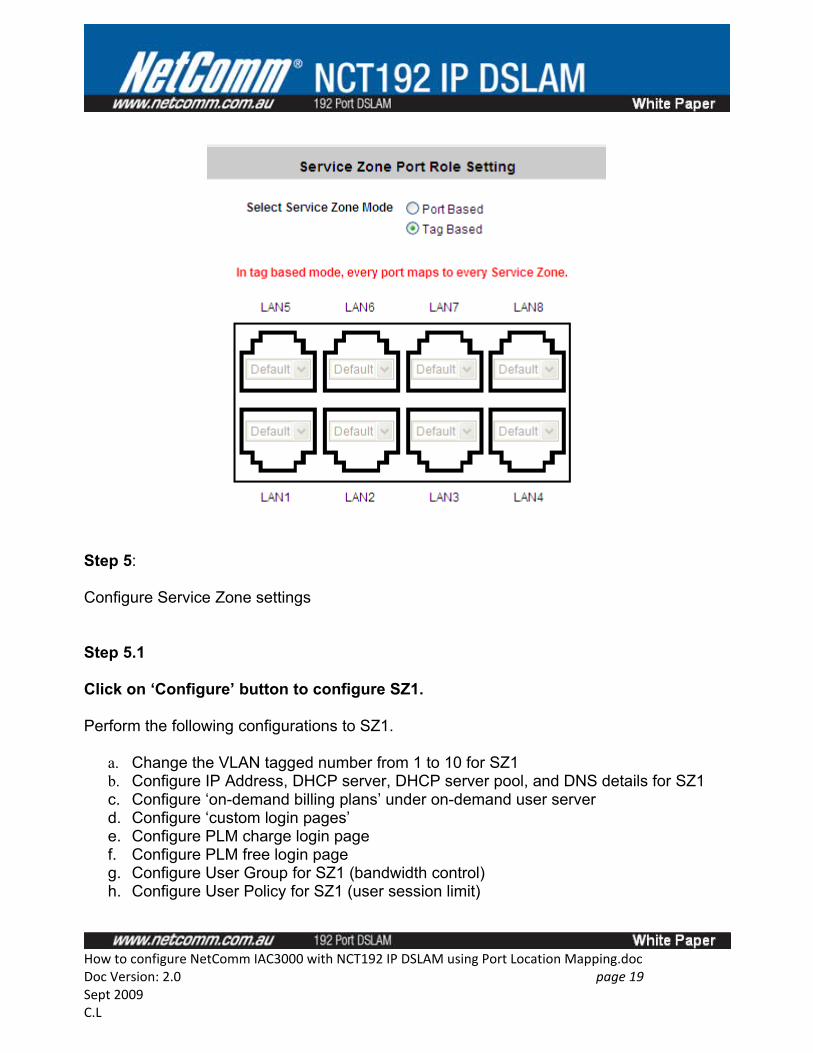
Step 5:
Configure Service Zone settings
Step 5.1
Click on ‘Configure’ button to configure SZ1.
Perform the following configurations to SZ1.
a. Change the VLAN tagged number from 1 to 10 for SZ1b. Configure IP Address, DHCP server, DHCP server pool, and DNS details for SZ1c. Configure ‘on-demand billing plans’ under on-demand user server d. Configure ‘custom login pages’e. Configure PLM charge login pagef. Configure PLM free login pageg. Configure User Group for SZ1 (bandwidth control)h. Configure User Policy for SZ1 (user session limit)
How to configure NetComm IAC3000 with NCT192 IP DSLAM using Port Location Mapping.docDoc Version: 2.0 page 19 Sept 2009C.L
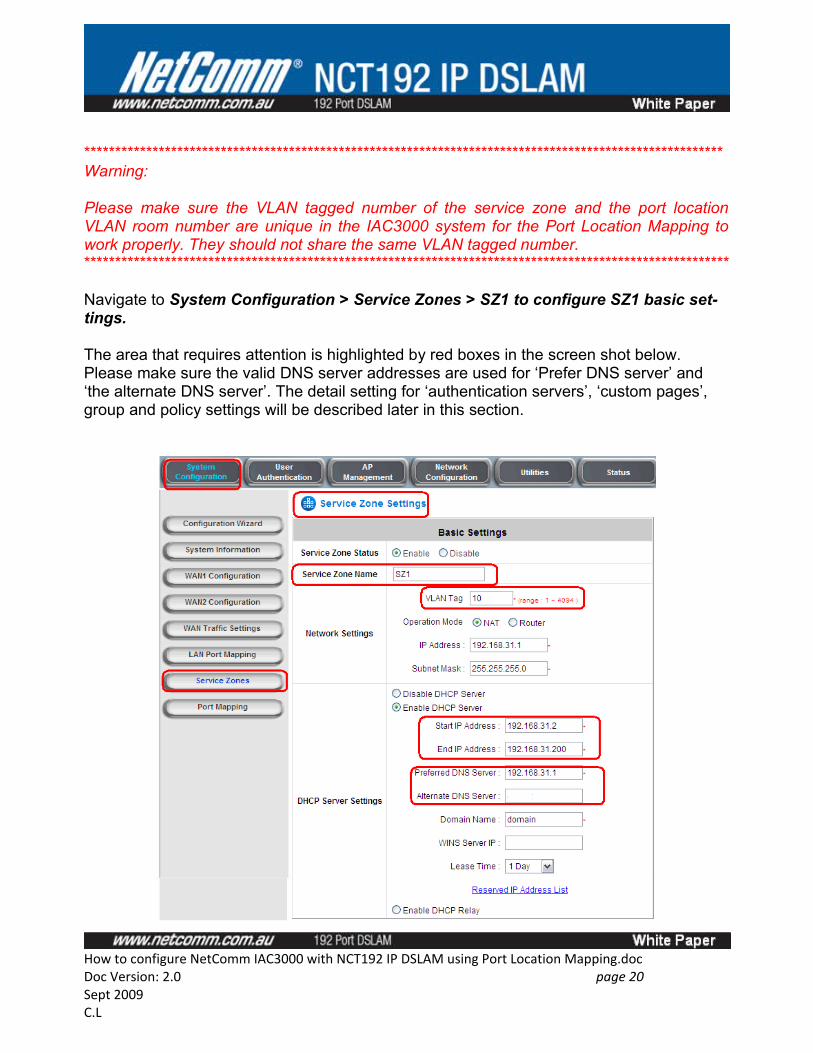
*******************************************************************************************************Warning:
Please make sure the VLAN tagged number of the service zone and the port location VLAN room number are unique in the IAC3000 system for the Port Location Mapping to work properly. They should not share the same VLAN tagged number.********************************************************************************************************
Navigate to System Configuration > Service Zones > SZ1 to configure SZ1 basic set-tings.
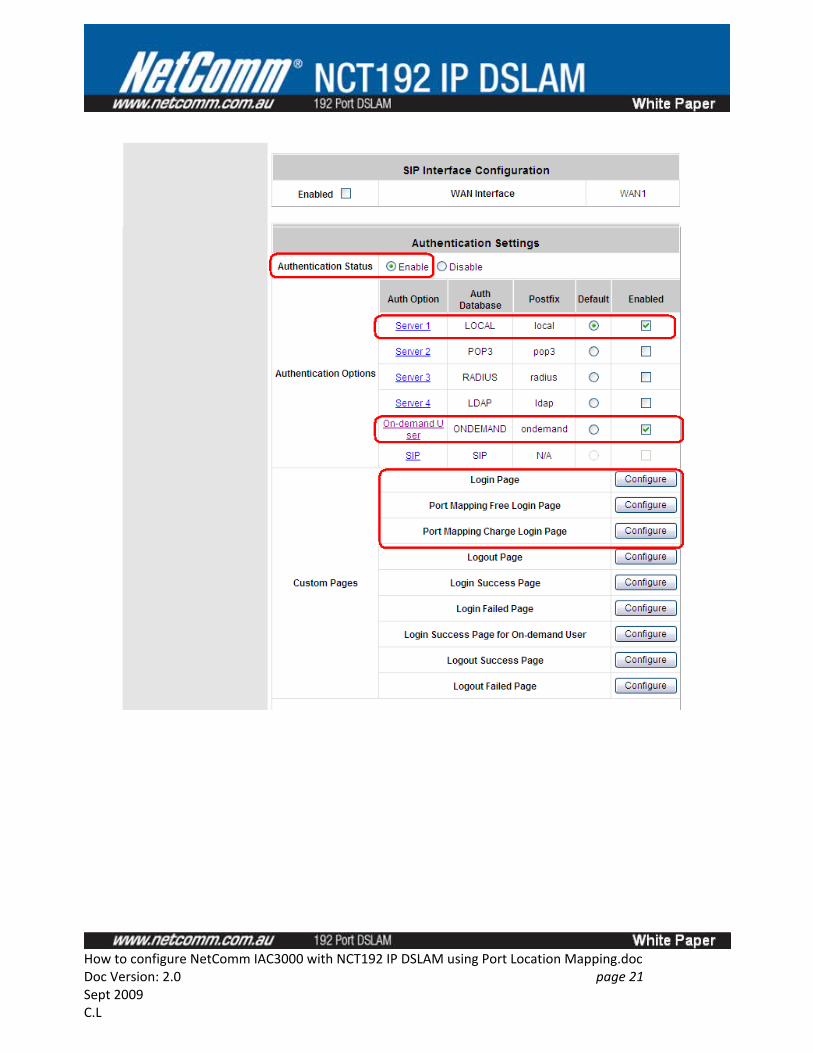
The area that requires attention is highlighted by red boxes in the screen shot below. Please make sure the valid DNS server addresses are used for ‘Prefer DNS server’ and ‘the alternate DNS server’. The detail setting for ‘authentication servers’, ‘custom pages’, group and policy settings will be described later in this section.
How to configure NetComm IAC3000 with NCT192 IP DSLAM using Port Location Mapping.docDoc Version: 2.0 page 20 Sept 2009C.L
How to configure NetComm IAC3000 with NCT192 IP DSLAM using Port Location Mapping.docDoc Version: 2.0 page 21 Sept 2009C.L
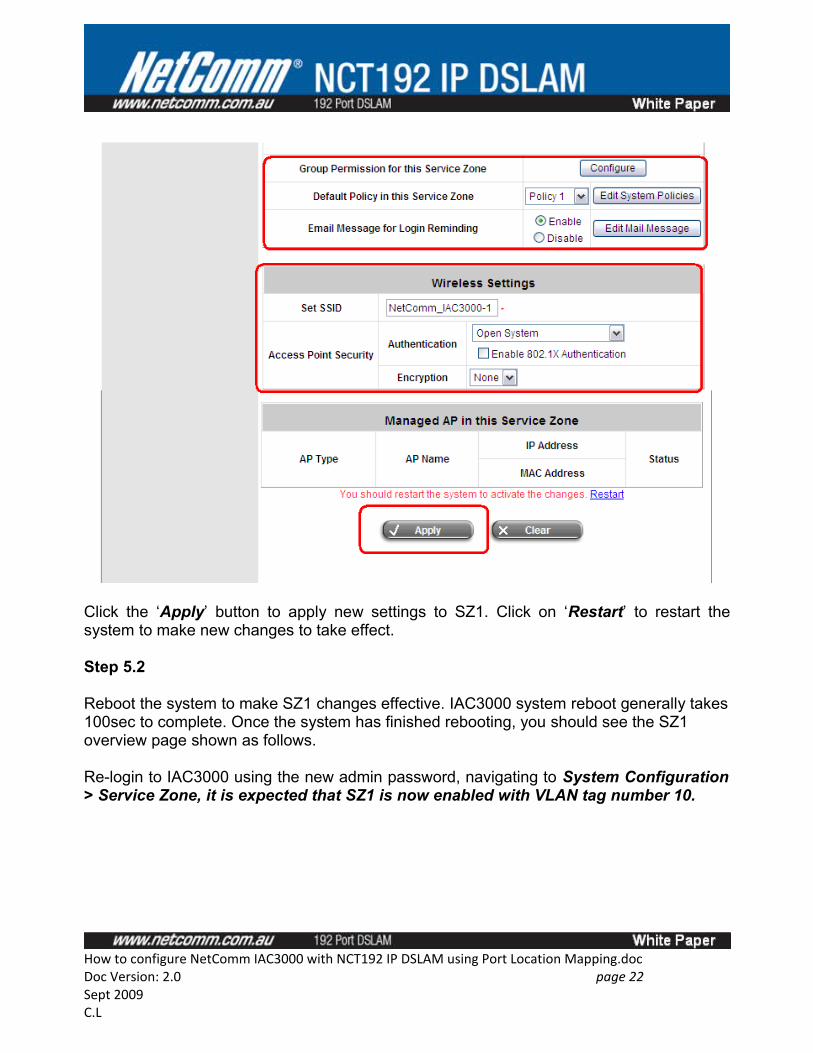
Click the ‘Apply’ button to apply new settings to SZ1. Click on ‘Restart’ to restart the system to make new changes to take effect.
Step 5.2
Reboot the system to make SZ1 changes effective. IAC3000 system reboot generally takes 100sec to complete. Once the system has finished rebooting, you should see the SZ1 overview page shown as follows.
Re-login to IAC3000 using the new admin password, navigating to System Configuration > Service Zone, it is expected that SZ1 is now enabled with VLAN tag number 10.
How to configure NetComm IAC3000 with NCT192 IP DSLAM using Port Location Mapping.docDoc Version: 2.0 page 22 Sept 2009C.L
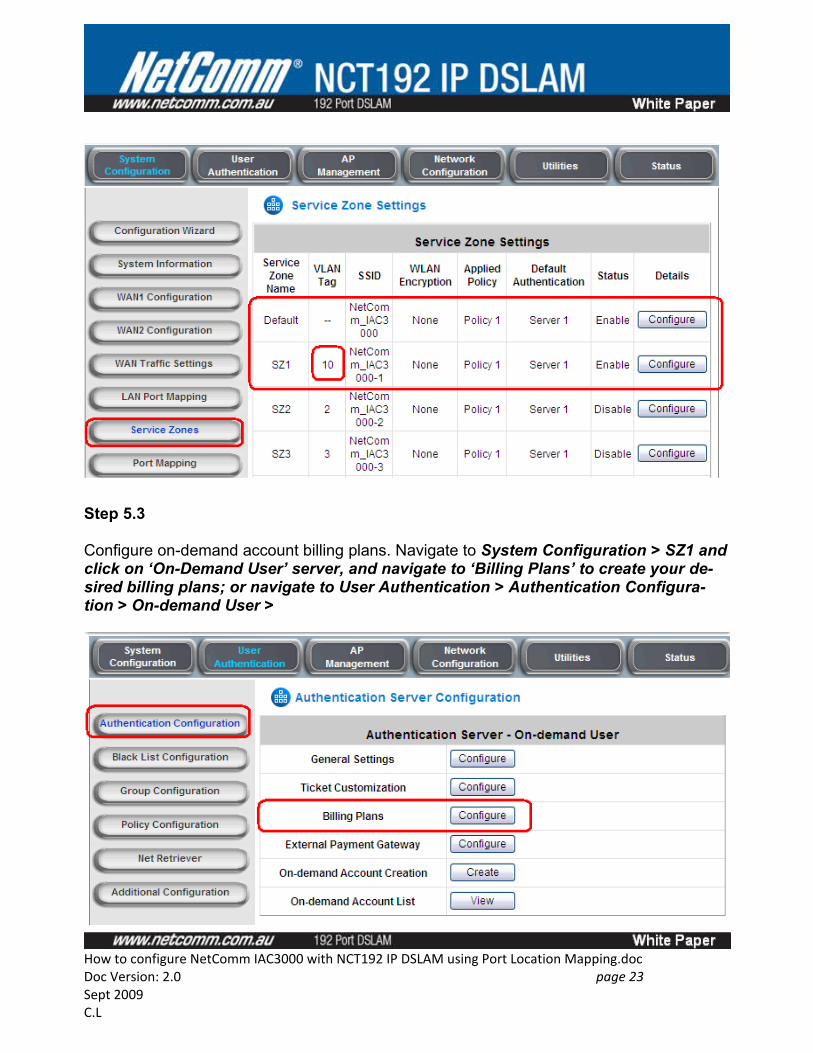
Step 5.3
Configure on-demand account billing plans. Navigate to System Configuration > SZ1 and click on ‘On-Demand User’ server, and navigate to ‘Billing Plans’ to create your de-sired billing plans; or navigate to User Authentication > Authentication Configura-tion > On-demand User >
How to configure NetComm IAC3000 with NCT192 IP DSLAM using Port Location Mapping.docDoc Version: 2.0 page 23 Sept 2009C.L
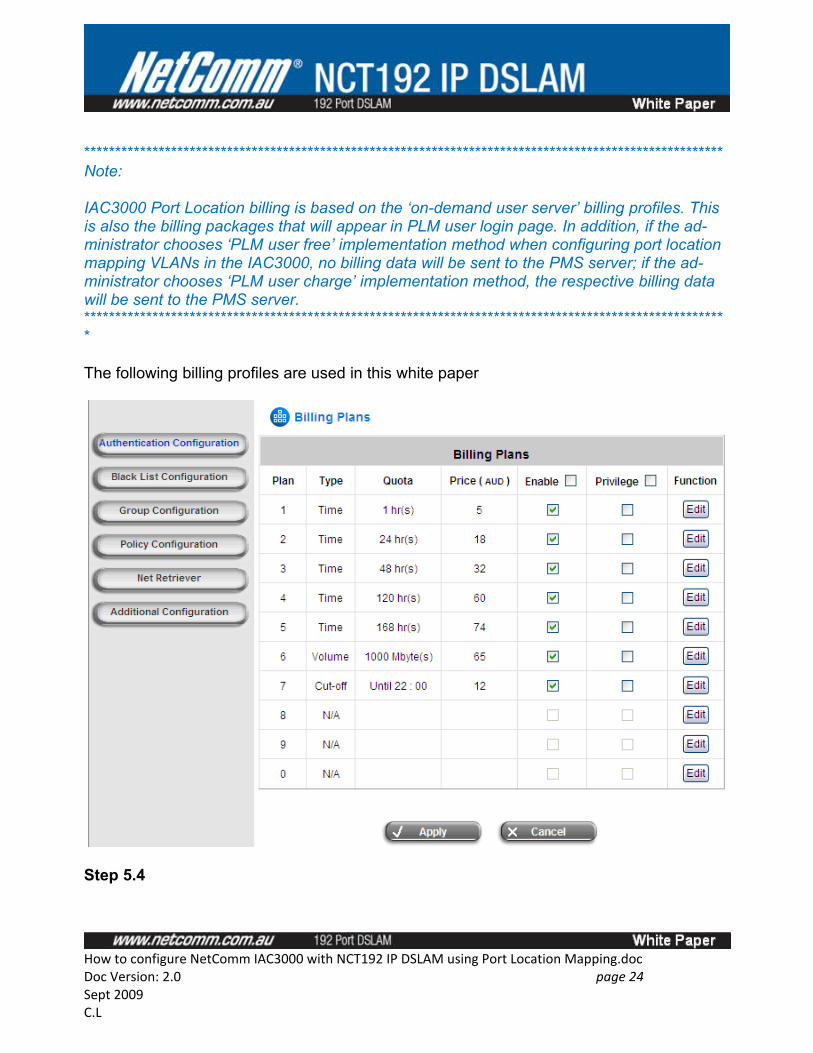
*******************************************************************************************************Note:
IAC3000 Port Location billing is based on the ‘on-demand user server’ billing profiles. This is also the billing packages that will appear in PLM user login page. In addition, if the ad-ministrator chooses ‘PLM user free’ implementation method when configuring port location mapping VLANs in the IAC3000, no billing data will be sent to the PMS server; if the ad-ministrator chooses ‘PLM user charge’ implementation method, the respective billing data will be sent to the PMS server.********************************************************************************************************
The following billing profiles are used in this white paper
Step 5.4
How to configure NetComm IAC3000 with NCT192 IP DSLAM using Port Location Mapping.docDoc Version: 2.0 page 24 Sept 2009C.L
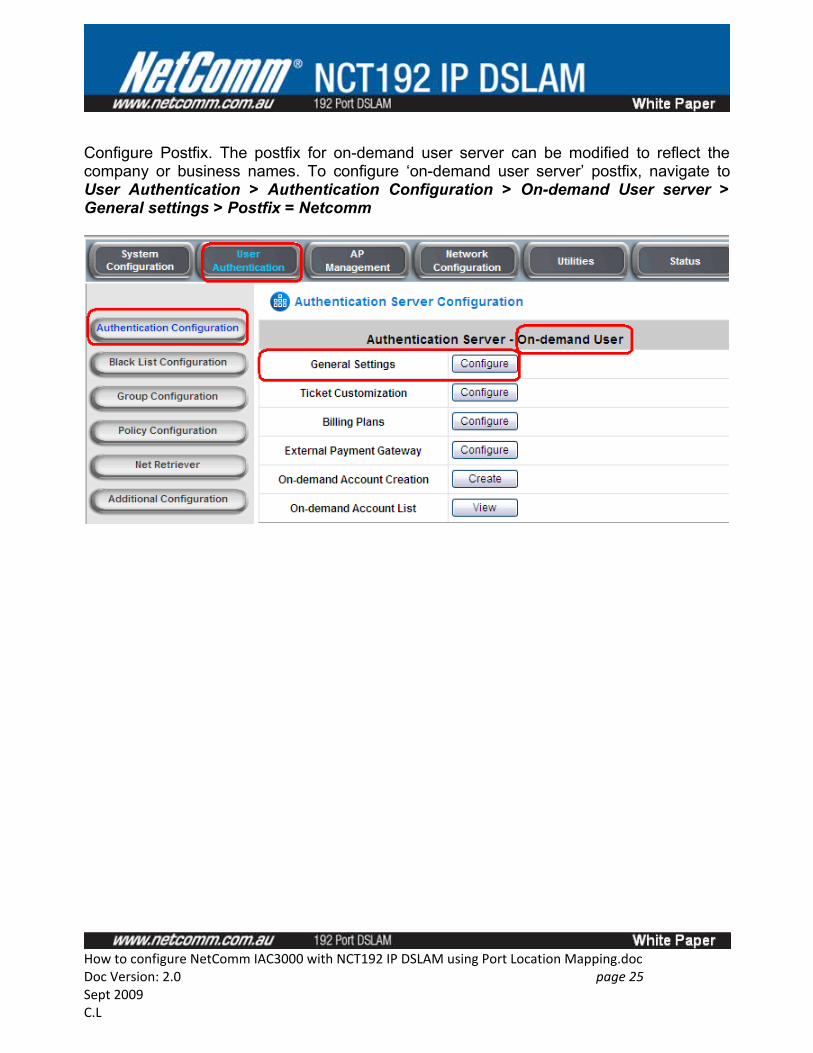
Configure Postfix. The postfix for on-demand user server can be modified to reflect the company or business names. To configure ‘on-demand user server’ postfix, navigate to User Authentication > Authentication Configuration > On-demand User server > General settings > Postfix = Netcomm
How to configure NetComm IAC3000 with NCT192 IP DSLAM using Port Location Mapping.docDoc Version: 2.0 page 25 Sept 2009C.L
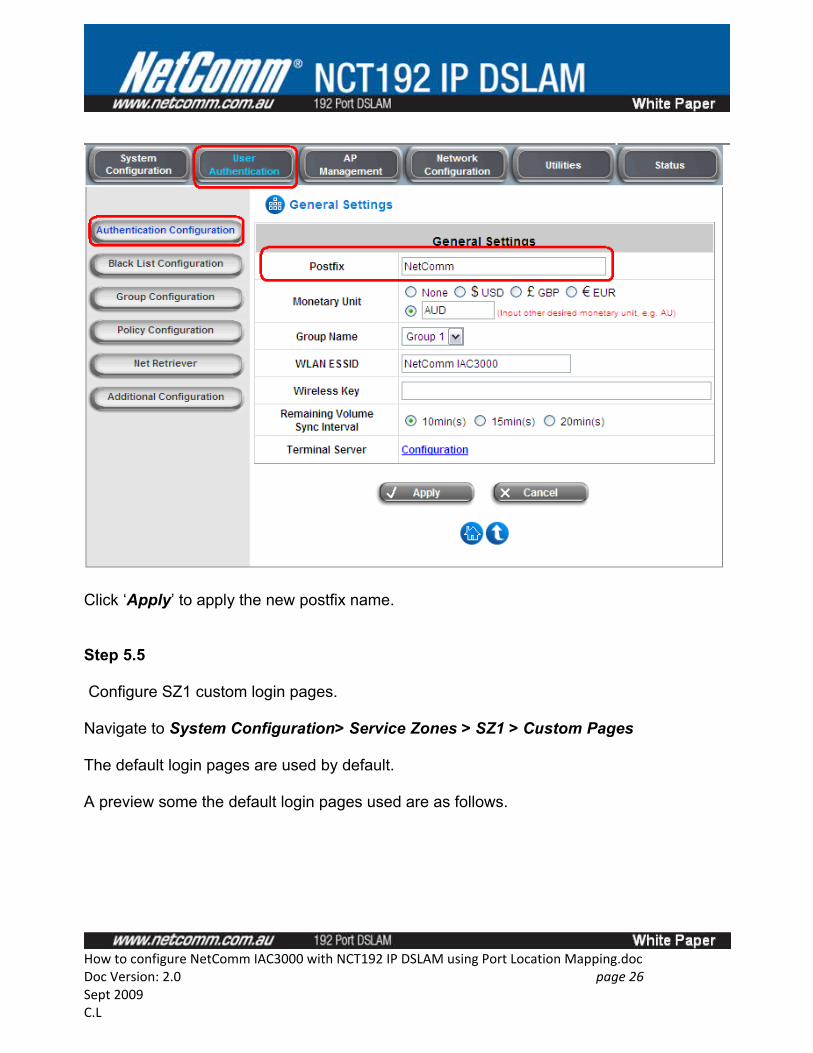
Click ‘Apply’ to apply the new postfix name.
Step 5.5
Configure SZ1 custom login pages.
Navigate to System Configuration> Service Zones > SZ1 > Custom Pages
The default login pages are used by default.
A preview some the default login pages used are as follows.
How to configure NetComm IAC3000 with NCT192 IP DSLAM using Port Location Mapping.docDoc Version: 2.0 page 26 Sept 2009C.L
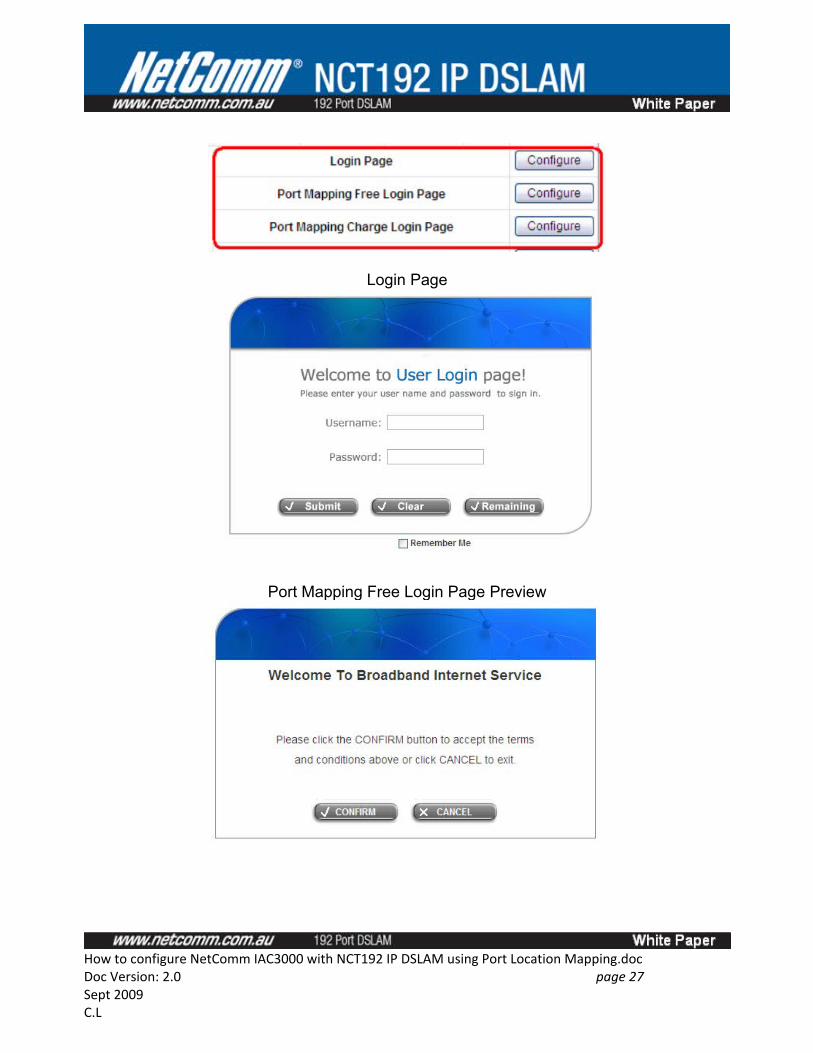
Login Page
Port Mapping Free Login Page Preview
How to configure NetComm IAC3000 with NCT192 IP DSLAM using Port Location Mapping.docDoc Version: 2.0 page 27 Sept 2009C.L
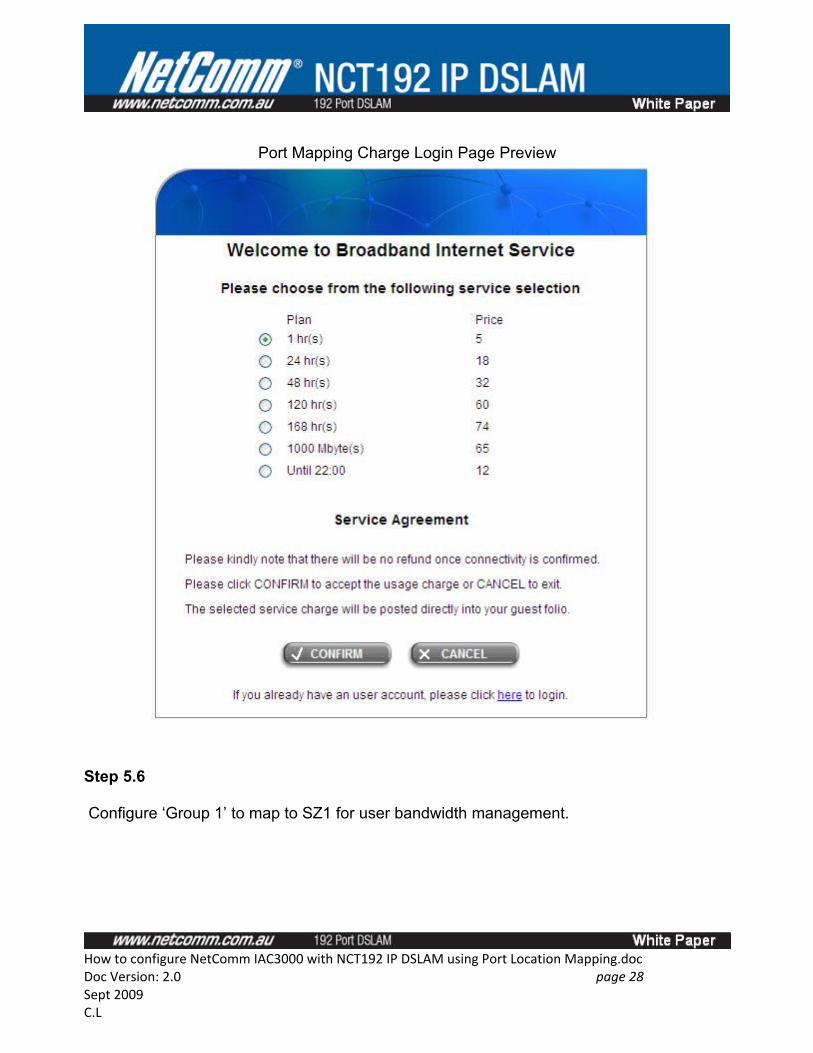
Port Mapping Charge Login Page Preview
Step 5.6
Configure ‘Group 1’ to map to SZ1 for user bandwidth management.
How to configure NetComm IAC3000 with NCT192 IP DSLAM using Port Location Mapping.docDoc Version: 2.0 page 28 Sept 2009C.L
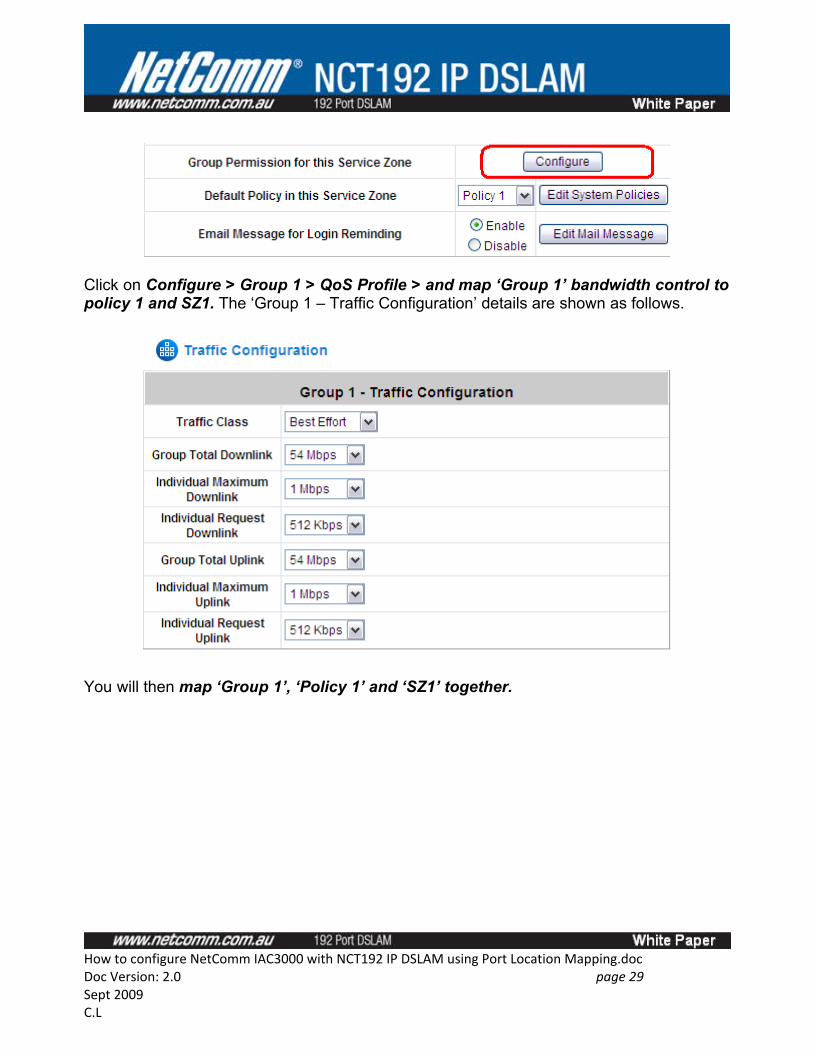
Click on Configure > Group 1 > QoS Profile > and map ‘Group 1’ bandwidth control to policy 1 and SZ1. The ‘Group 1 – Traffic Configuration’ details are shown as follows.
You will then map ‘Group 1’, ‘Policy 1’ and ‘SZ1’ together.
How to configure NetComm IAC3000 with NCT192 IP DSLAM using Port Location Mapping.docDoc Version: 2.0 page 29 Sept 2009C.L
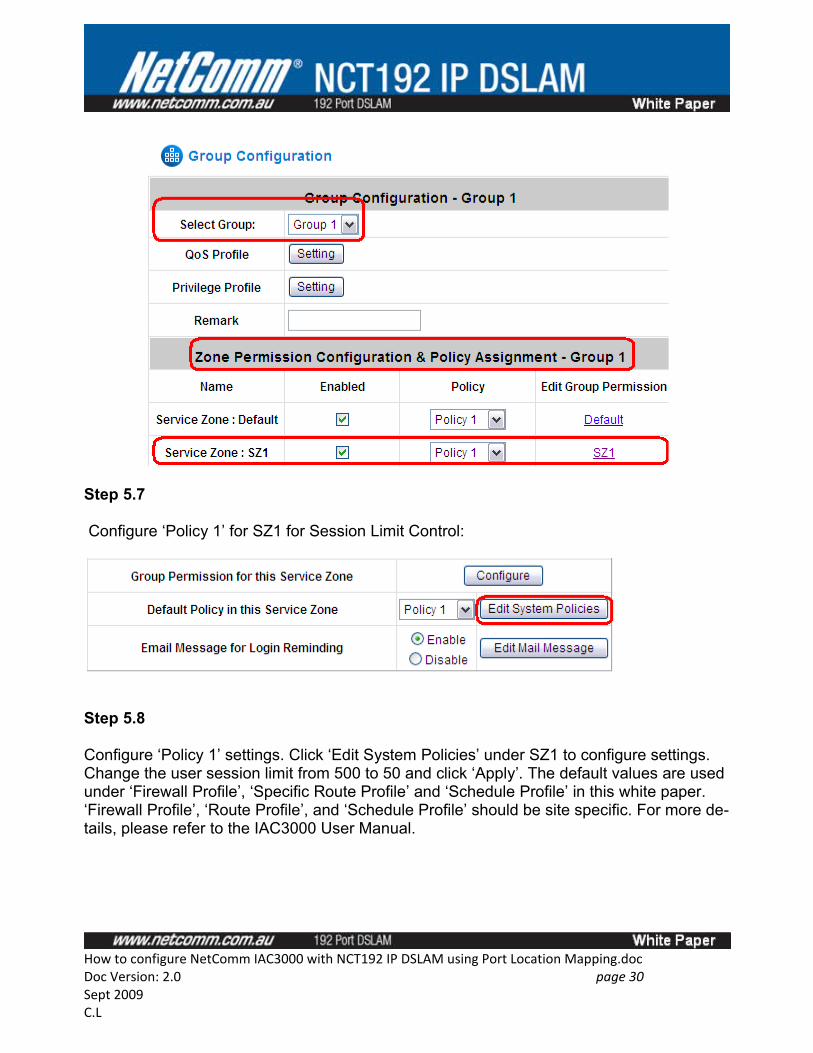
Step 5.7
Configure ‘Policy 1’ for SZ1 for Session Limit Control:
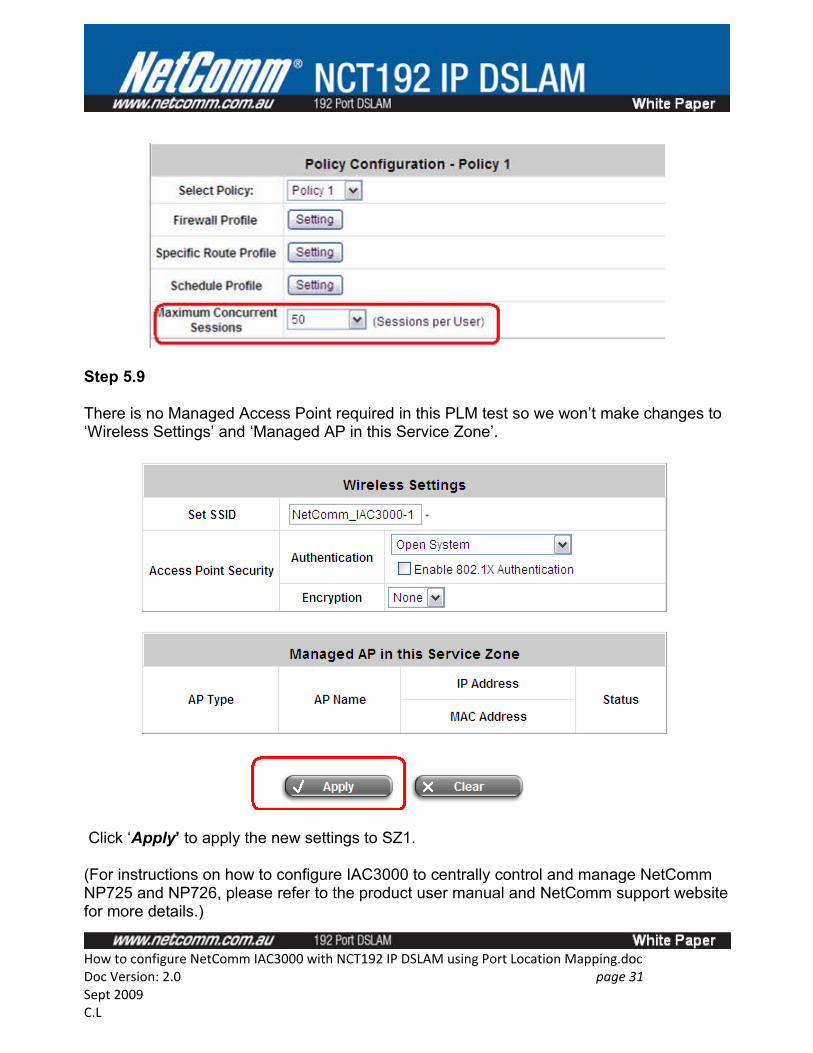
Step 5.8
Configure ‘Policy 1’ settings. Click ‘Edit System Policies’ under SZ1 to configure settings. Change the user session limit from 500 to 50 and click ‘Apply’. The default values are used under ‘Firewall Profile’, ‘Specific Route Profile’ and ‘Schedule Profile’ in this white paper. ‘Firewall Profile’, ‘Route Profile’, and ‘Schedule Profile’ should be site specific. For more de-tails, please refer to the IAC3000 User Manual.
How to configure NetComm IAC3000 with NCT192 IP DSLAM using Port Location Mapping.docDoc Version: 2.0 page 30 Sept 2009C.L
Step 5.9
There is no Managed Access Point required in this PLM test so we won’t make changes to ‘Wireless Settings’ and ‘Managed AP in this Service Zone’.
Click ‘Apply’ to apply the new settings to SZ1.
(For instructions on how to configure IAC3000 to centrally control and manage NetComm NP725 and NP726, please refer to the product user manual and NetComm support website for more details.)
How to configure NetComm IAC3000 with NCT192 IP DSLAM using Port Location Mapping.docDoc Version: 2.0 page 31 Sept 2009C.L
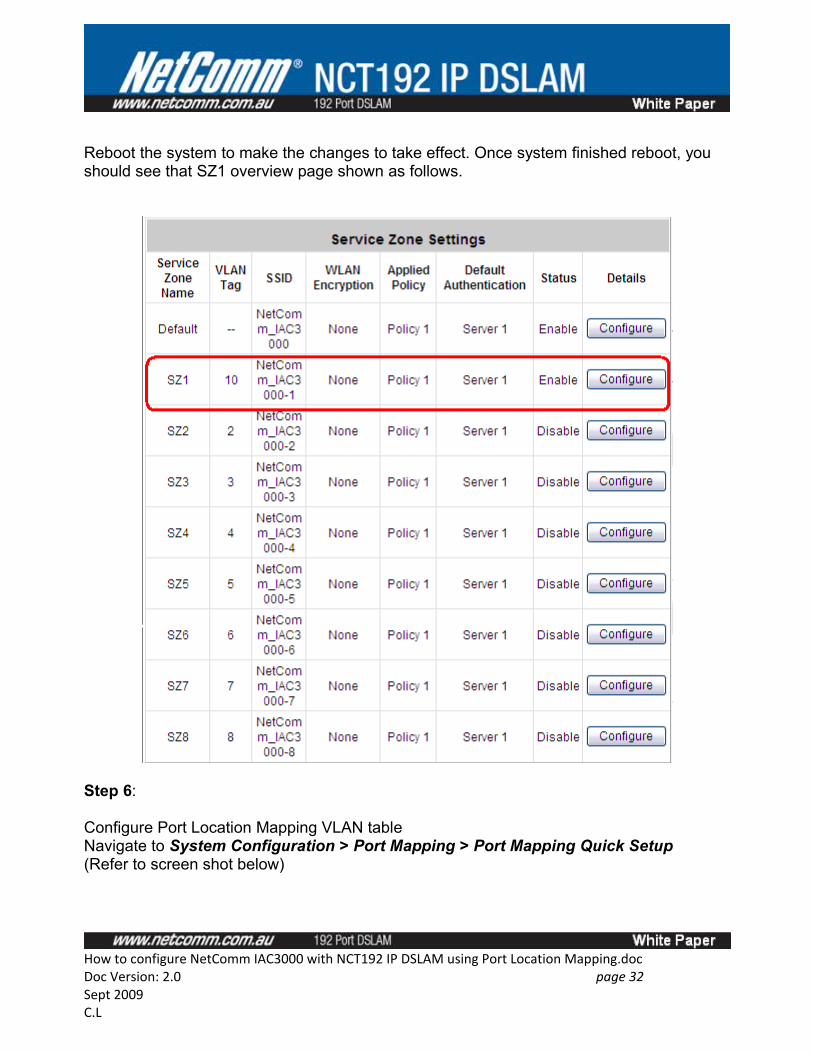
Reboot the system to make the changes to take effect. Once system finished reboot, you should see that SZ1 overview page shown as follows.
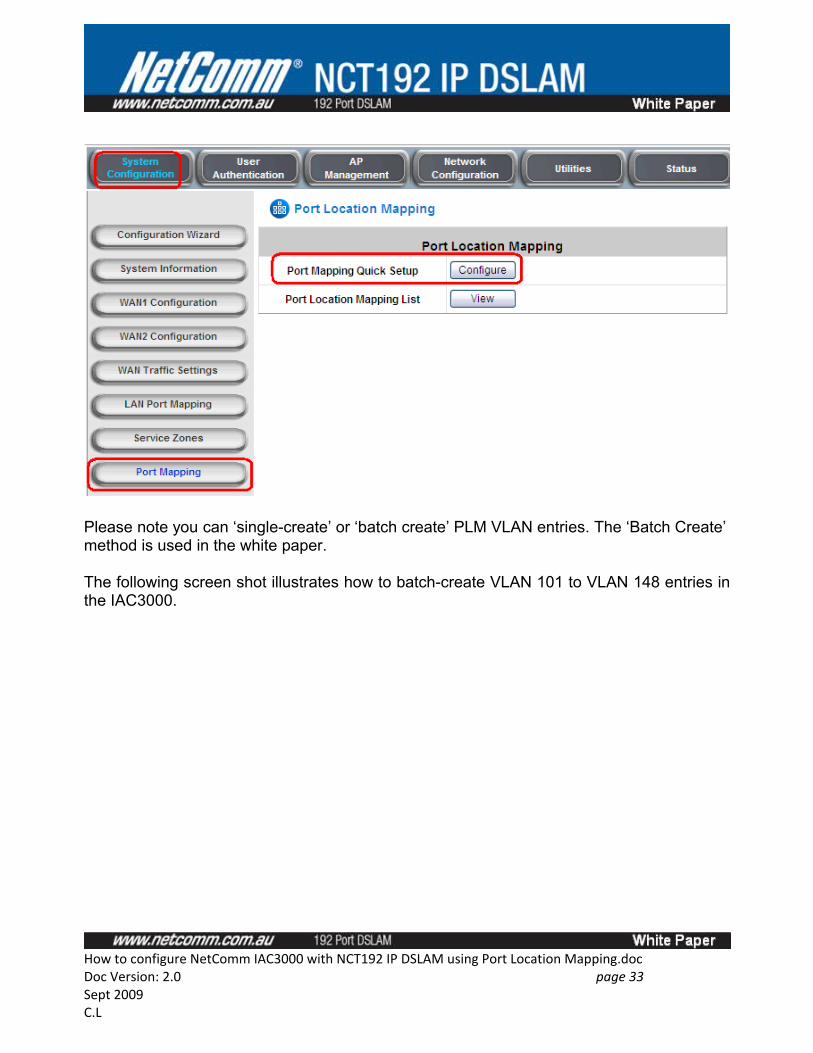
Step 6:
Configure Port Location Mapping VLAN tableNavigate to System Configuration > Port Mapping > Port Mapping Quick Setup(Refer to screen shot below)
How to configure NetComm IAC3000 with NCT192 IP DSLAM using Port Location Mapping.docDoc Version: 2.0 page 32 Sept 2009C.L
Please note you can ‘single-create’ or ‘batch create’ PLM VLAN entries. The ‘Batch Create’ method is used in the white paper.
The following screen shot illustrates how to batch-create VLAN 101 to VLAN 148 entries in the IAC3000.
How to configure NetComm IAC3000 with NCT192 IP DSLAM using Port Location Mapping.docDoc Version: 2.0 page 33 Sept 2009C.L
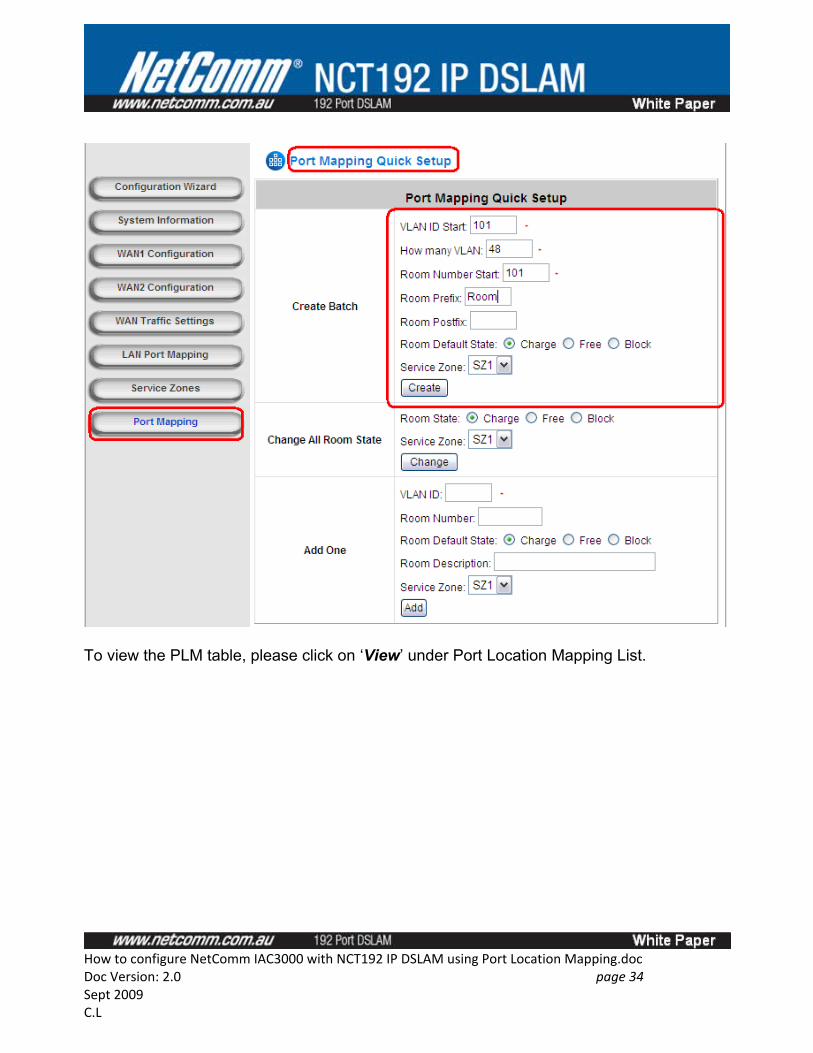
To view the PLM table, please click on ‘View’ under Port Location Mapping List.
How to configure NetComm IAC3000 with NCT192 IP DSLAM using Port Location Mapping.docDoc Version: 2.0 page 34 Sept 2009C.L
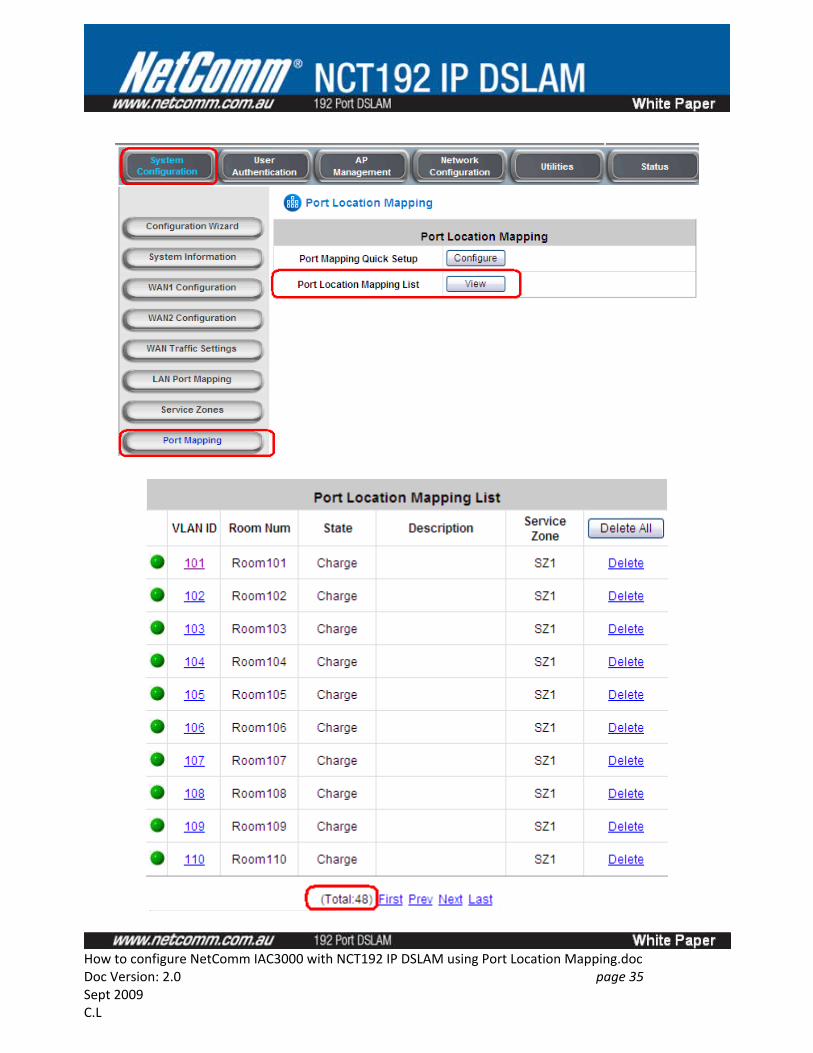
How to configure NetComm IAC3000 with NCT192 IP DSLAM using Port Location Mapping.docDoc Version: 2.0 page 35 Sept 2009C.L
*******************************************************************************************************Note:
Room description cannot be added via ‘Batch Create’ batch configuration.********************************************************************************************************
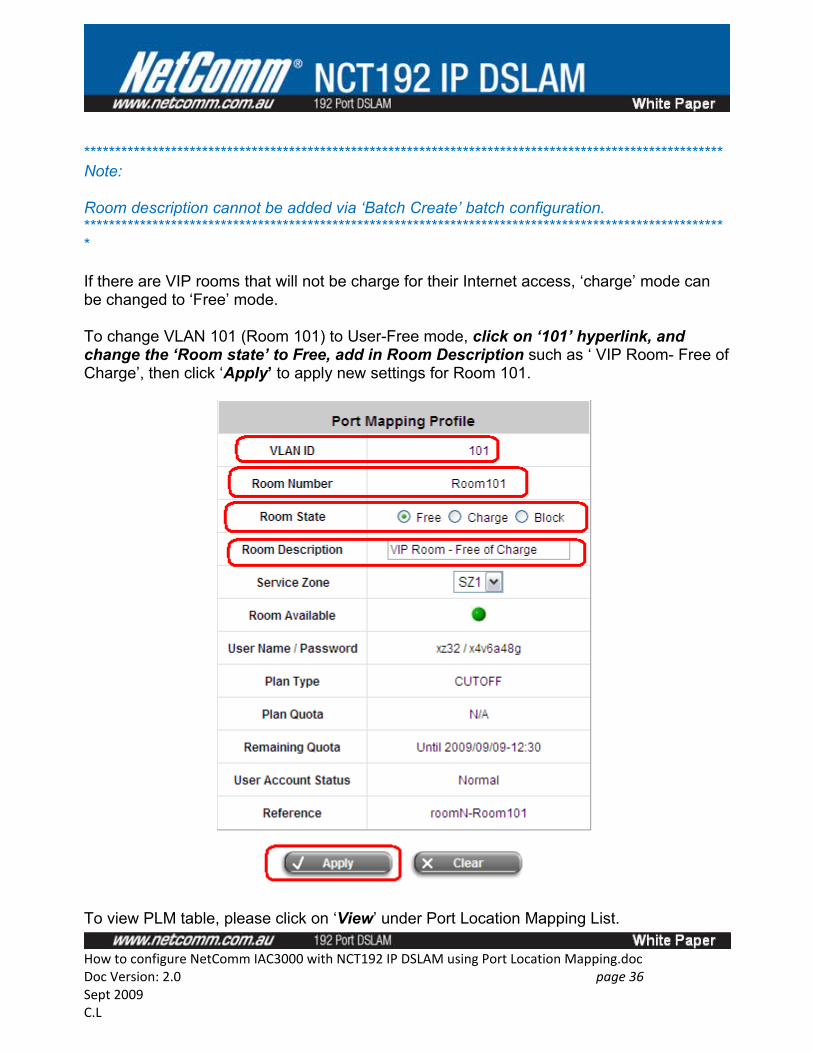
If there are VIP rooms that will not be charge for their Internet access, ‘charge’ mode can be changed to ‘Free’ mode.
To change VLAN 101 (Room 101) to User-Free mode, click on ‘101’ hyperlink, and change the ‘Room state’ to Free, add in Room Description such as ‘ VIP Room- Free of Charge’, then click ‘Apply’ to apply new settings for Room 101.
To view PLM table, please click on ‘View’ under Port Location Mapping List.
How to configure NetComm IAC3000 with NCT192 IP DSLAM using Port Location Mapping.docDoc Version: 2.0 page 36 Sept 2009C.L
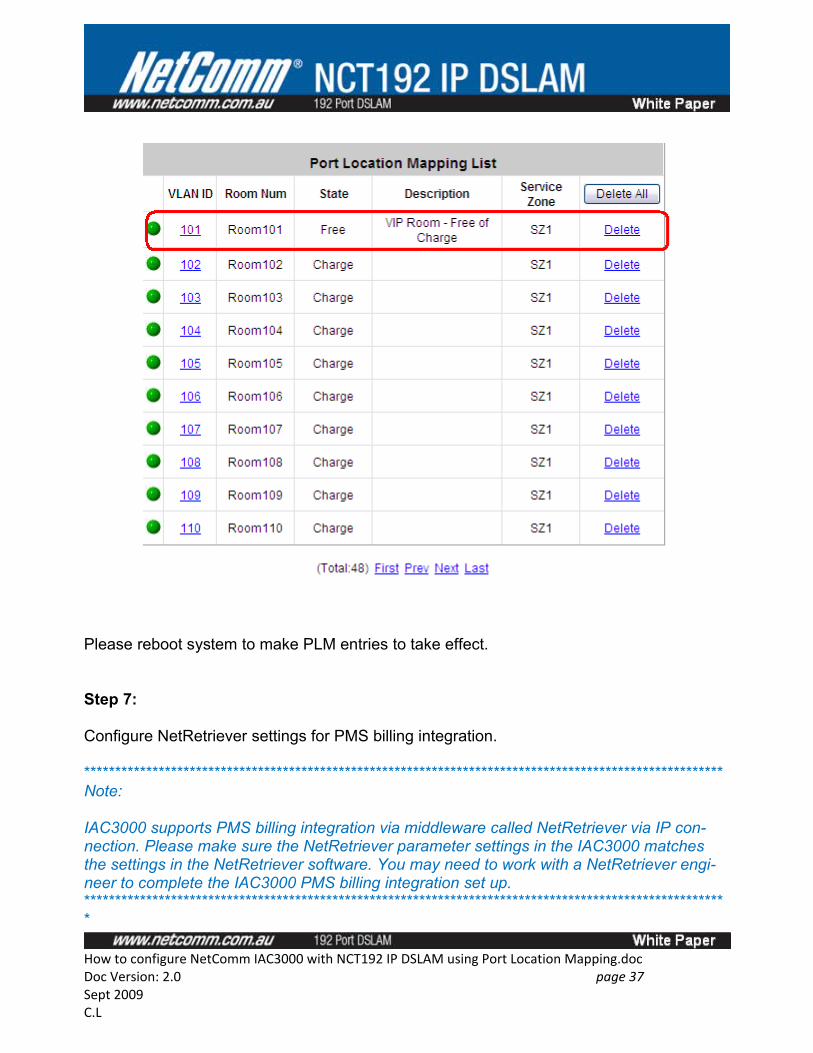
Please reboot system to make PLM entries to take effect.
Step 7:
Configure NetRetriever settings for PMS billing integration.
*******************************************************************************************************Note:
IAC3000 supports PMS billing integration via middleware called NetRetriever via IP con-nection. Please make sure the NetRetriever parameter settings in the IAC3000 matches the settings in the NetRetriever software. You may need to work with a NetRetriever engi-neer to complete the IAC3000 PMS billing integration set up.********************************************************************************************************
How to configure NetComm IAC3000 with NCT192 IP DSLAM using Port Location Mapping.docDoc Version: 2.0 page 37 Sept 2009C.L
*******************************************************************************************************Note:
IAC3000 keeps a record of the billing data locally. If no PMS integration is required, you may make use of the local billing data and produce internet usage billing report in your own format. To see the billing data, please navigate to User Authentication > Net Retriever > Event Log or navigate to Status > Traffic History > On-demand User Log.********************************************************************************************************
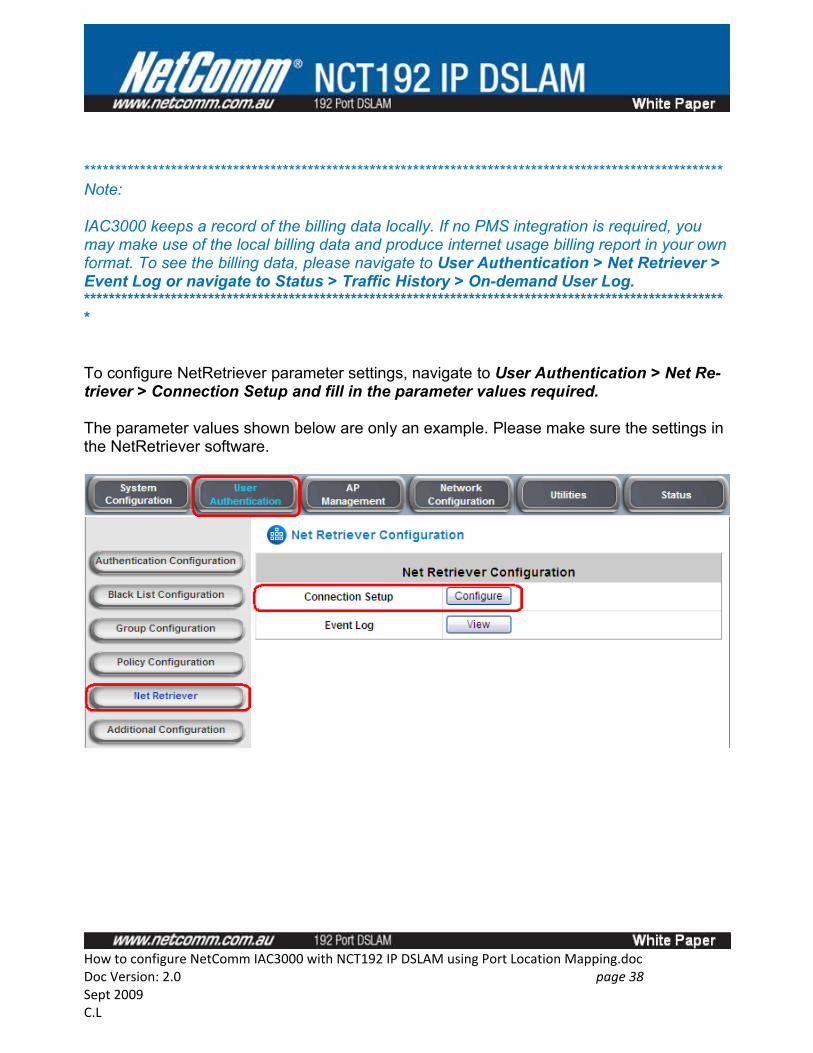
To configure NetRetriever parameter settings, navigate to User Authentication > Net Re-triever > Connection Setup and fill in the parameter values required.
The parameter values shown below are only an example. Please make sure the settings in the NetRetriever software.
How to configure NetComm IAC3000 with NCT192 IP DSLAM using Port Location Mapping.docDoc Version: 2.0 page 38 Sept 2009C.L

Click ‘Apply’ to apply the new settings. Click ‘Restart’ to reboot system.
Step 8:
Configure IAC3000 ‘Walled Garden List’ and ‘Walled Garden Ad List’
Navigate to Network Configuration > Walled Garden List >, add ‘www.netcomm.com.au’ as a free access website and click ‘Apply’.
How to configure NetComm IAC3000 with NCT192 IP DSLAM using Port Location Mapping.docDoc Version: 2.0 page 39 Sept 2009C.L
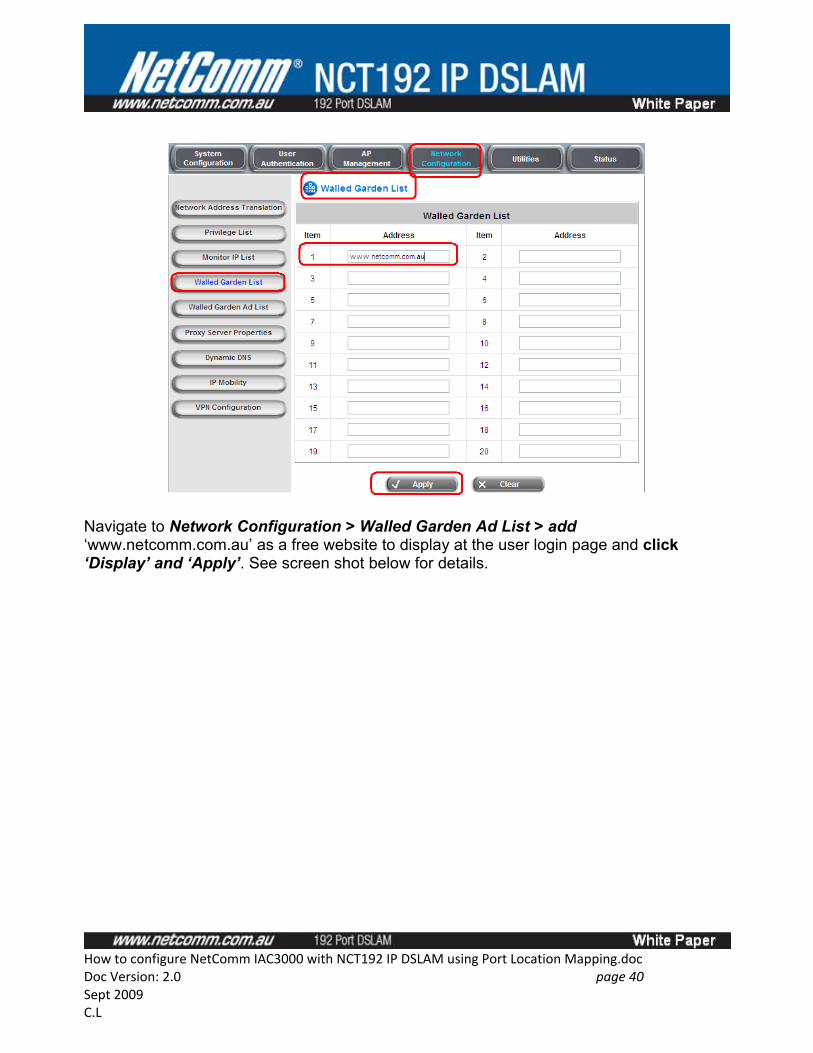
Navigate to Network Configuration > Walled Garden Ad List > add ‘www.netcomm.com.au’ as a free website to display at the user login page and click ‘Display’ and ‘Apply’. See screen shot below for details.
How to configure NetComm IAC3000 with NCT192 IP DSLAM using Port Location Mapping.docDoc Version: 2.0 page 40 Sept 2009C.L
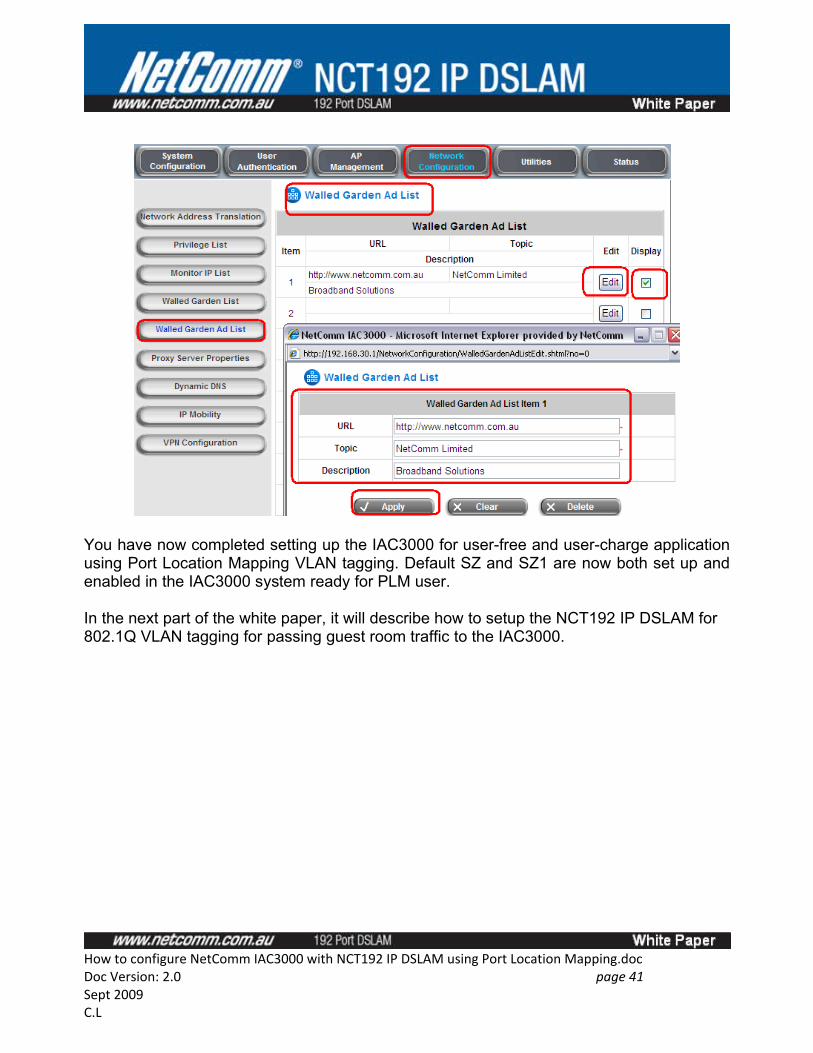
You have now completed setting up the IAC3000 for user-free and user-charge application using Port Location Mapping VLAN tagging. Default SZ and SZ1 are now both set up and enabled in the IAC3000 system ready for PLM user.
In the next part of the white paper, it will describe how to setup the NCT192 IP DSLAM for 802.1Q VLAN tagging for passing guest room traffic to the IAC3000.
How to configure NetComm IAC3000 with NCT192 IP DSLAM using Port Location Mapping.docDoc Version: 2.0 page 41 Sept 2009C.L
Part 2: How to configure NCT192 IP DSLAM for 802.1Q VLAN Tagging
Overview
Part 2 describes the steps and procedure for configuring the NCT192 IP DSLAMs for VLAN tagging.
Please note only 1 x NCT1902 Network control card and 1 x NCT1901 48-port ADSL Line are used in this example to demonstrate the idea of setting up VLAN tagging in NCT192. The quantity of the NCT1901 ADSL2+ line cards used will be varied from site to site depending on the service capacity required.
The logical order of configuration described is as follows.
• Initialize LC card• Initialize NC card and set to tagged mode• Configure ADSL Line Profile • Configure VLAN Profile• Batch create PVC-VLAN mapping• Configure VLAN entries on trunk port GE1• Configure SNMP manager• Configure Secure Host IP• Configure Admin user account• Save and backup configuration
The following VLAN numbers are to assigned to NCT192
LC4: Port 1 (VLAN 101), Port 2 (VLAN 102); . . . Port 48 (VLAN 148). GE 1: VLAN 101 to 148 VLAN Tagged; GE 2: unconnected NC card: Tagged Mode
The following IP DSLAM IP address and device login details will be used in Part 2.
NCT192 Mgt IP Address: 192.168.192.1/24Mgt PC: 192.168.192.200/24
How to configure NetComm IAC3000 with NCT192 IP DSLAM using Port Location Mapping.docDoc Version: 2.0 page 42 Sept 2009C.L
SNMP Manager IP in NCT192: 192.168.192.200 (Default: 192.168.192.2)SNMP Manager Community in NCT192: hotelmotel (Default: netman)User Name / Password in NCT192: admin/admin123 (Default: admin/admin) NB6+4W_R2T8: Bridged mode
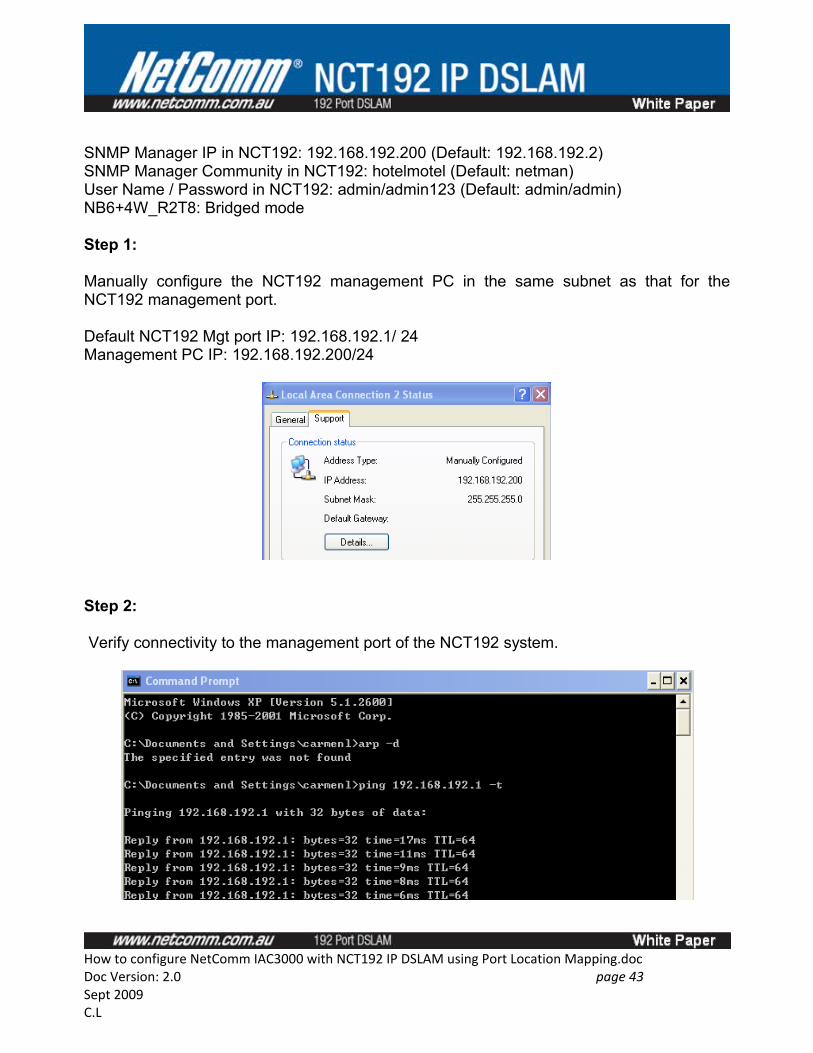
Step 1:
Manually configure the NCT192 management PC in the same subnet as that for the NCT192 management port.
Default NCT192 Mgt port IP: 192.168.192.1/ 24Management PC IP: 192.168.192.200/24
Step 2:
Verify connectivity to the management port of the NCT192 system.
How to configure NetComm IAC3000 with NCT192 IP DSLAM using Port Location Mapping.docDoc Version: 2.0 page 43 Sept 2009C.L

Step 3:
Login to the NCT192 LCT.
How to configure NetComm IAC3000 with NCT192 IP DSLAM using Port Location Mapping.docDoc Version: 2.0 page 44 Sept 2009C.L
The question mark appearing in the NC and LC slot means that there is hardware inserted but they have not been initialised.
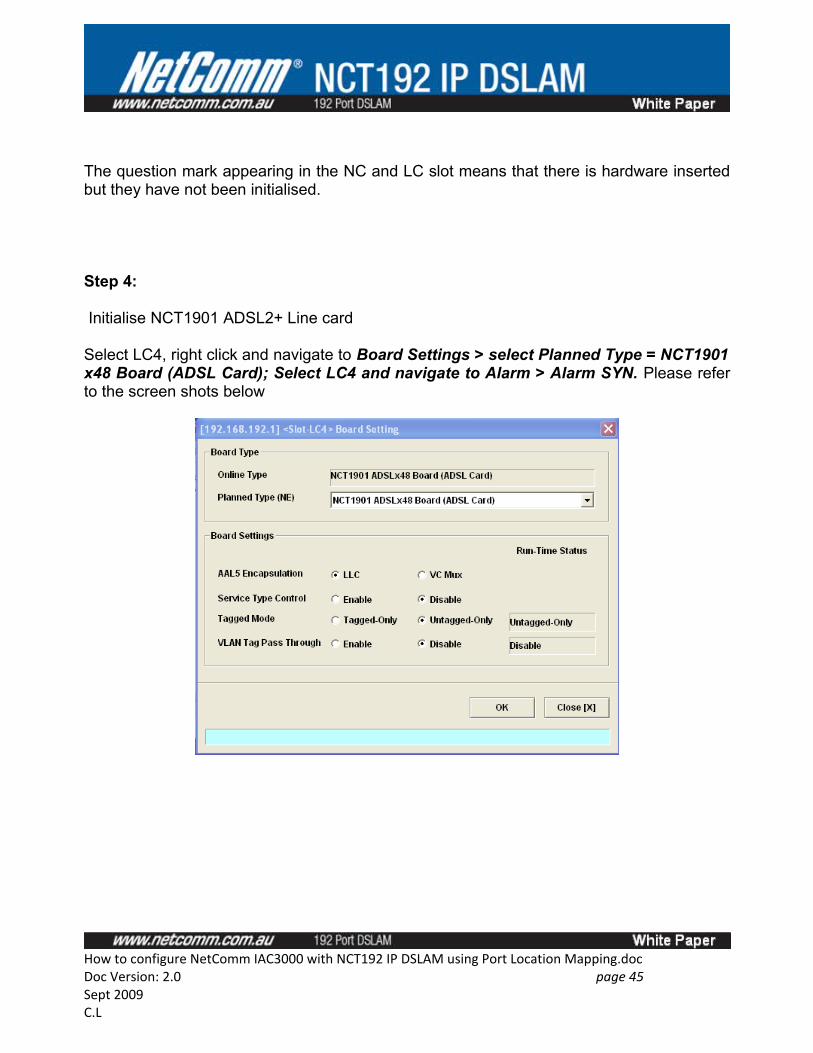
Step 4:
Initialise NCT1901 ADSL2+ Line card
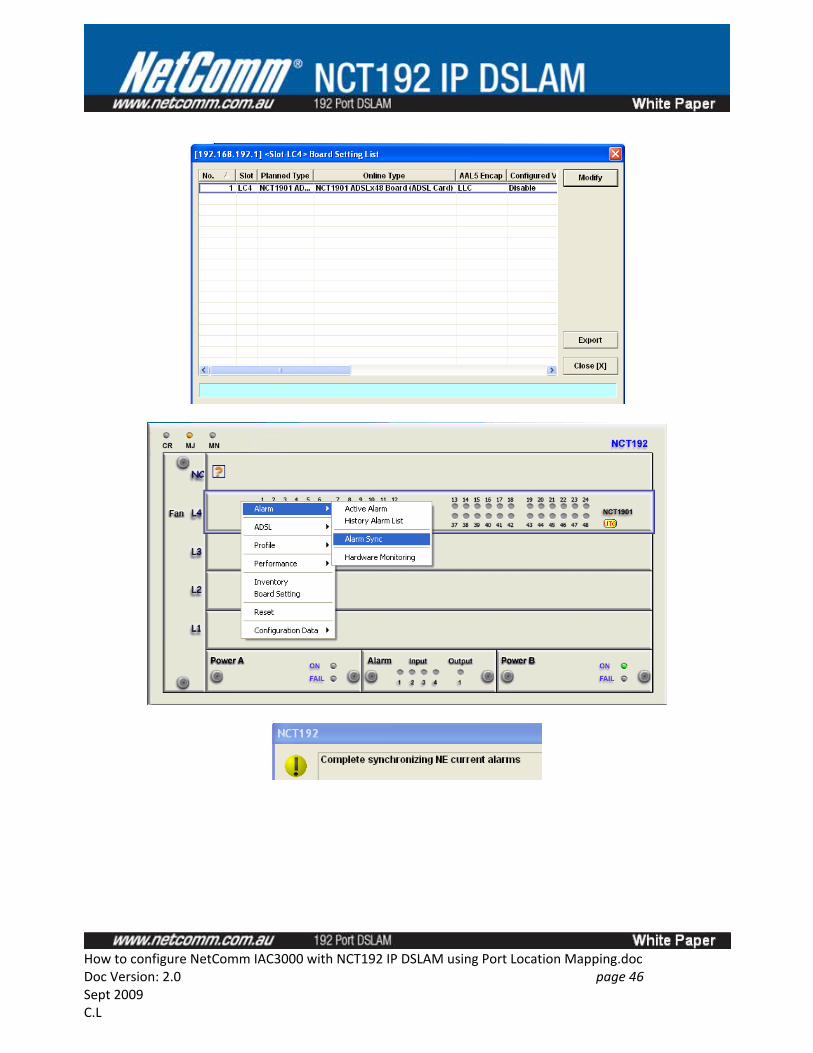
Select LC4, right click and navigate to Board Settings > select Planned Type = NCT1901 x48 Board (ADSL Card); Select LC4 and navigate to Alarm > Alarm SYN. Please refer to the screen shots below
How to configure NetComm IAC3000 with NCT192 IP DSLAM using Port Location Mapping.docDoc Version: 2.0 page 45 Sept 2009C.L
How to configure NetComm IAC3000 with NCT192 IP DSLAM using Port Location Mapping.docDoc Version: 2.0 page 46 Sept 2009C.L
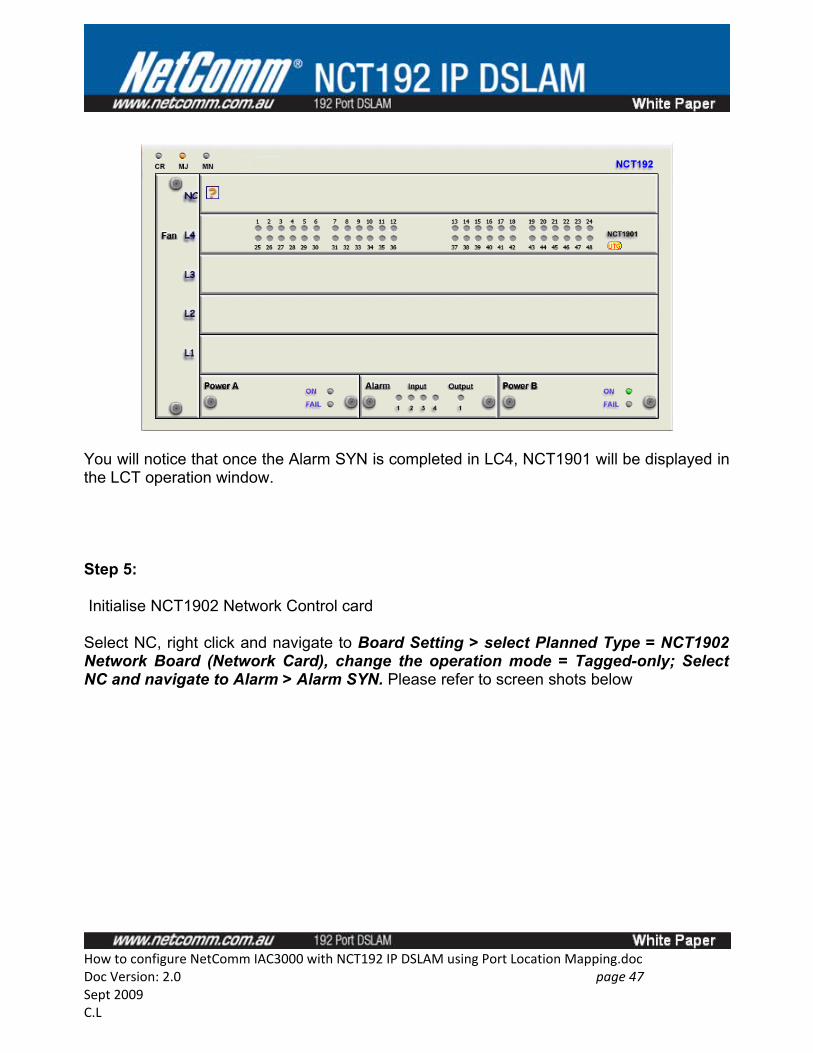
You will notice that once the Alarm SYN is completed in LC4, NCT1901 will be displayed in the LCT operation window.
Step 5:
Initialise NCT1902 Network Control card
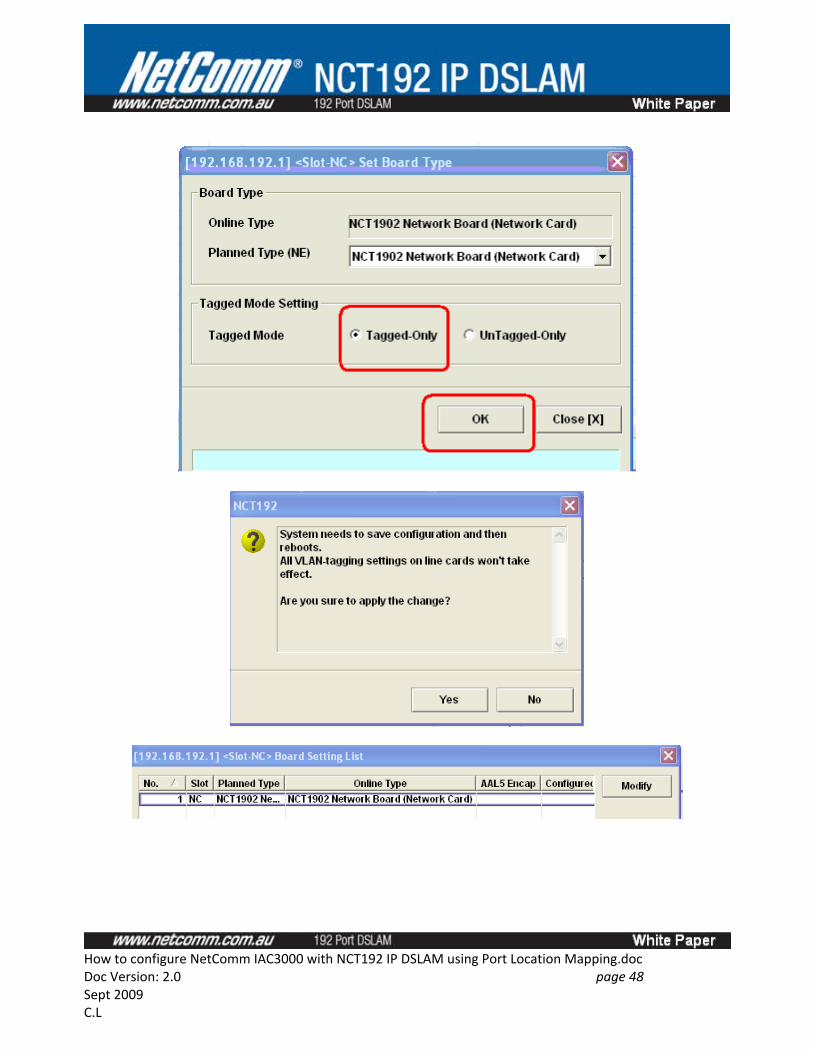
Select NC, right click and navigate to Board Setting > select Planned Type = NCT1902 Network Board (Network Card), change the operation mode = Tagged-only; Select NC and navigate to Alarm > Alarm SYN. Please refer to screen shots below
How to configure NetComm IAC3000 with NCT192 IP DSLAM using Port Location Mapping.docDoc Version: 2.0 page 47 Sept 2009C.L
How to configure NetComm IAC3000 with NCT192 IP DSLAM using Port Location Mapping.docDoc Version: 2.0 page 48 Sept 2009C.L
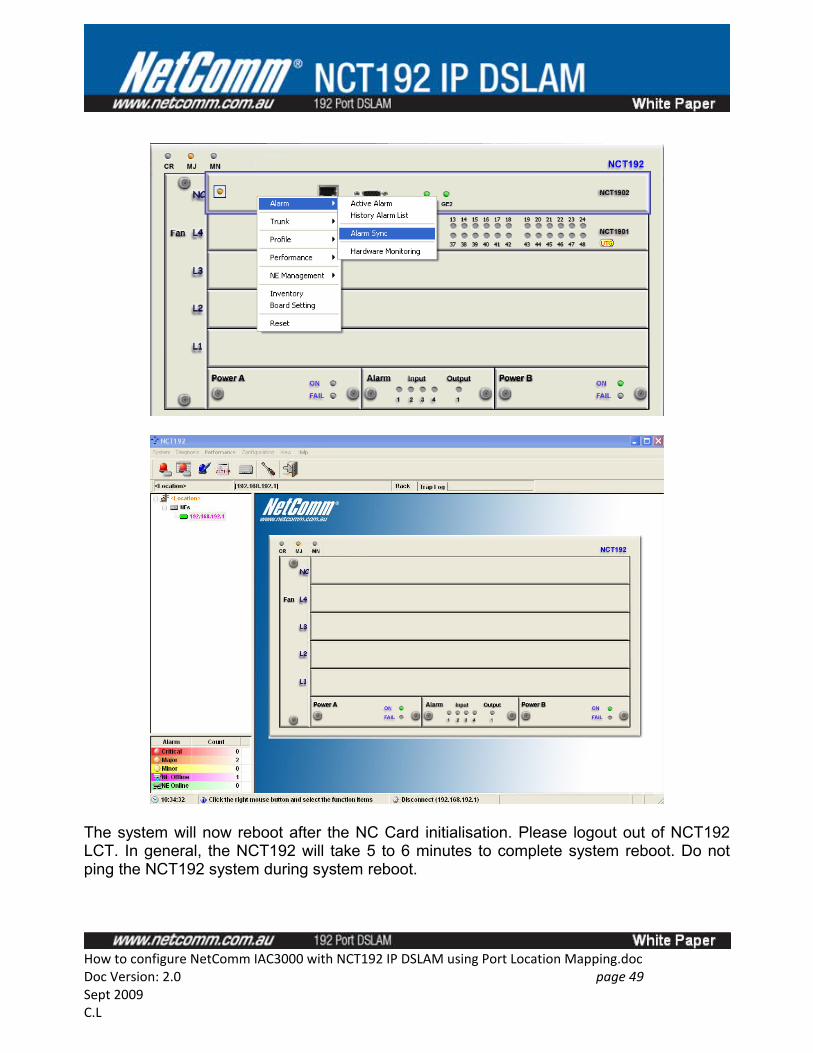
The system will now reboot after the NC Card initialisation. Please logout out of NCT192 LCT. In general, the NCT192 will take 5 to 6 minutes to complete system reboot. Do not ping the NCT192 system during system reboot.
How to configure NetComm IAC3000 with NCT192 IP DSLAM using Port Location Mapping.docDoc Version: 2.0 page 49 Sept 2009C.L
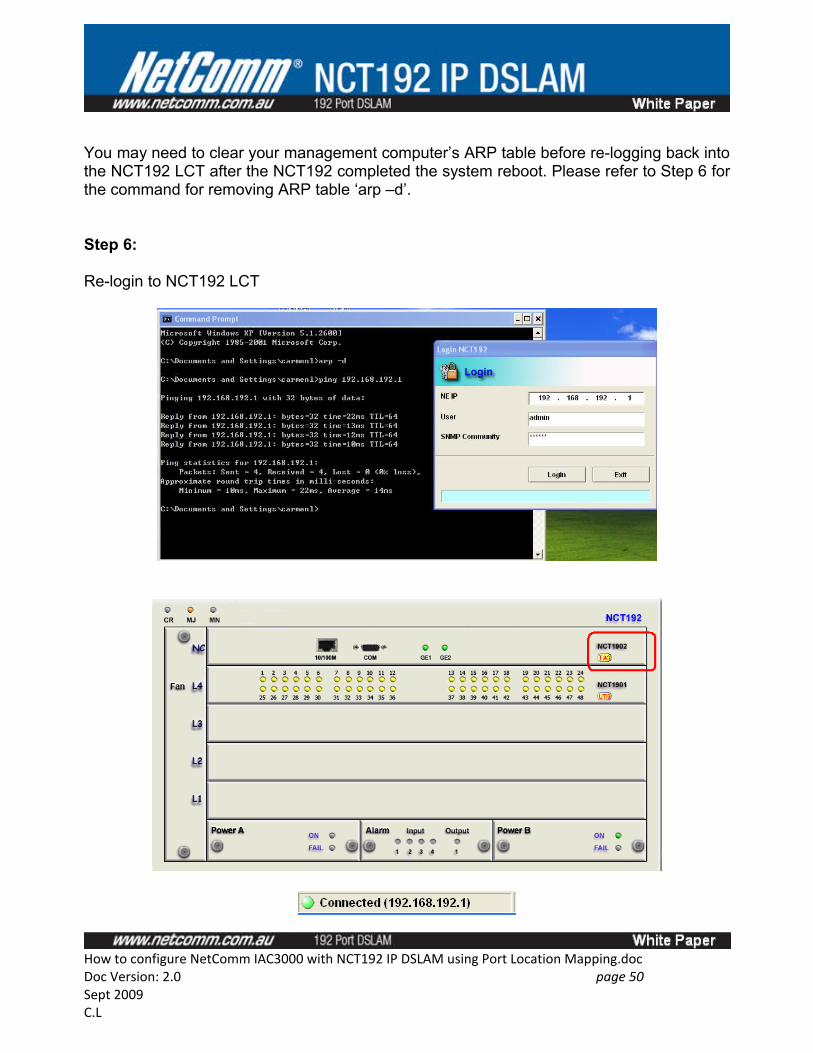
You may need to clear your management computer’s ARP table before re-logging back into the NCT192 LCT after the NCT192 completed the system reboot. Please refer to Step 6 for the command for removing ARP table ‘arp –d’.
Step 6:
Re-login to NCT192 LCT
How to configure NetComm IAC3000 with NCT192 IP DSLAM using Port Location Mapping.docDoc Version: 2.0 page 50 Sept 2009C.L

Step 7:
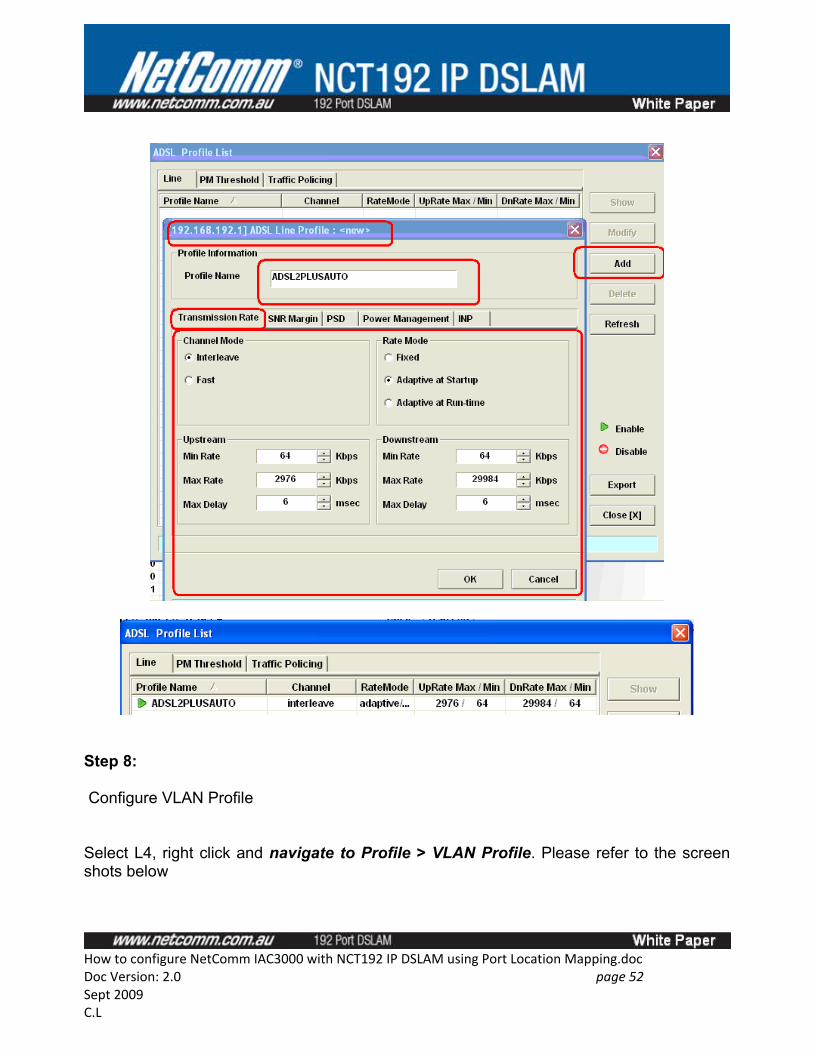
Configure NCT192 Line profile
Select L4, right click and navigate to Profile > ADSL Profile. Please refer to the screen shots below
How to configure NetComm IAC3000 with NCT192 IP DSLAM using Port Location Mapping.docDoc Version: 2.0 page 51 Sept 2009C.L
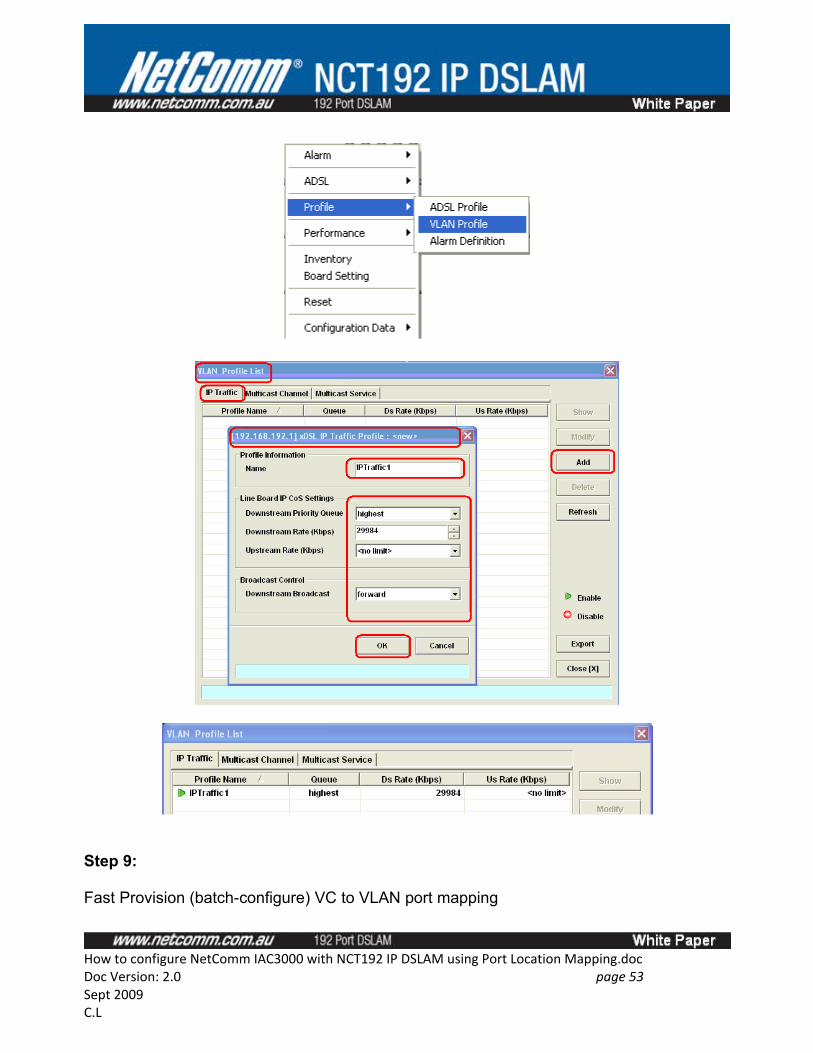
Step 8:
Configure VLAN Profile
Select L4, right click and navigate to Profile > VLAN Profile. Please refer to the screen shots below
How to configure NetComm IAC3000 with NCT192 IP DSLAM using Port Location Mapping.docDoc Version: 2.0 page 52 Sept 2009C.L
Step 9:
Fast Provision (batch-configure) VC to VLAN port mapping
How to configure NetComm IAC3000 with NCT192 IP DSLAM using Port Location Mapping.docDoc Version: 2.0 page 53 Sept 2009C.L
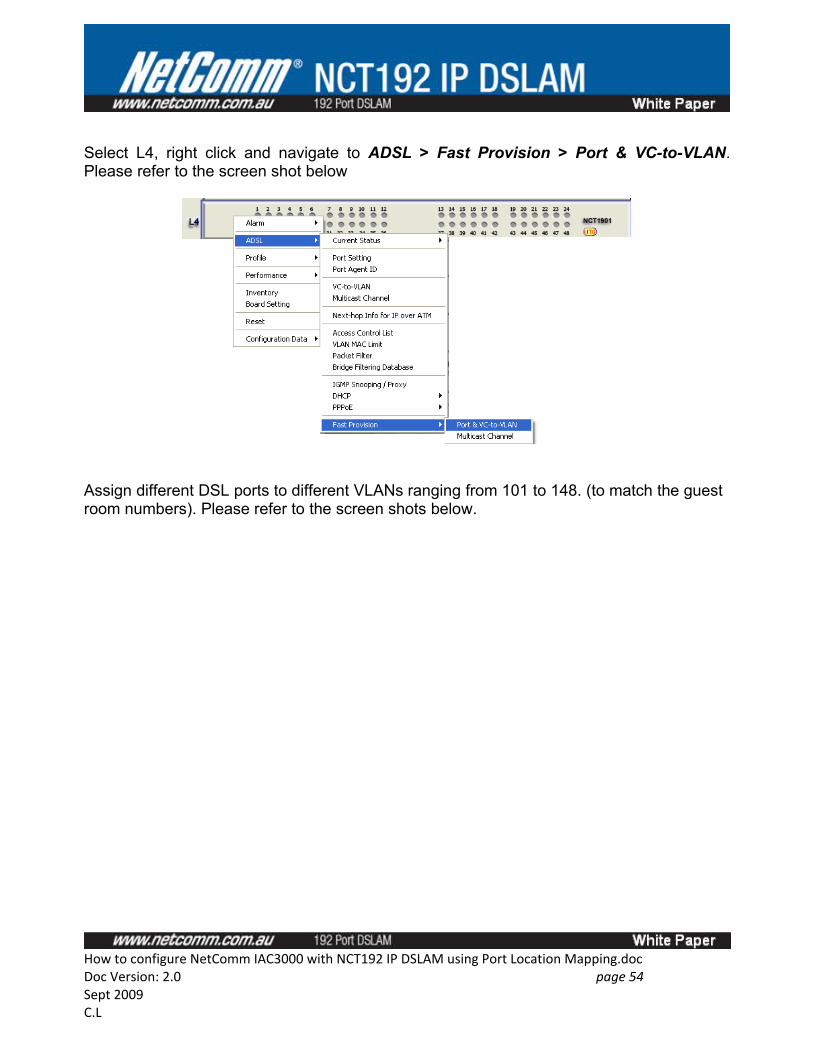
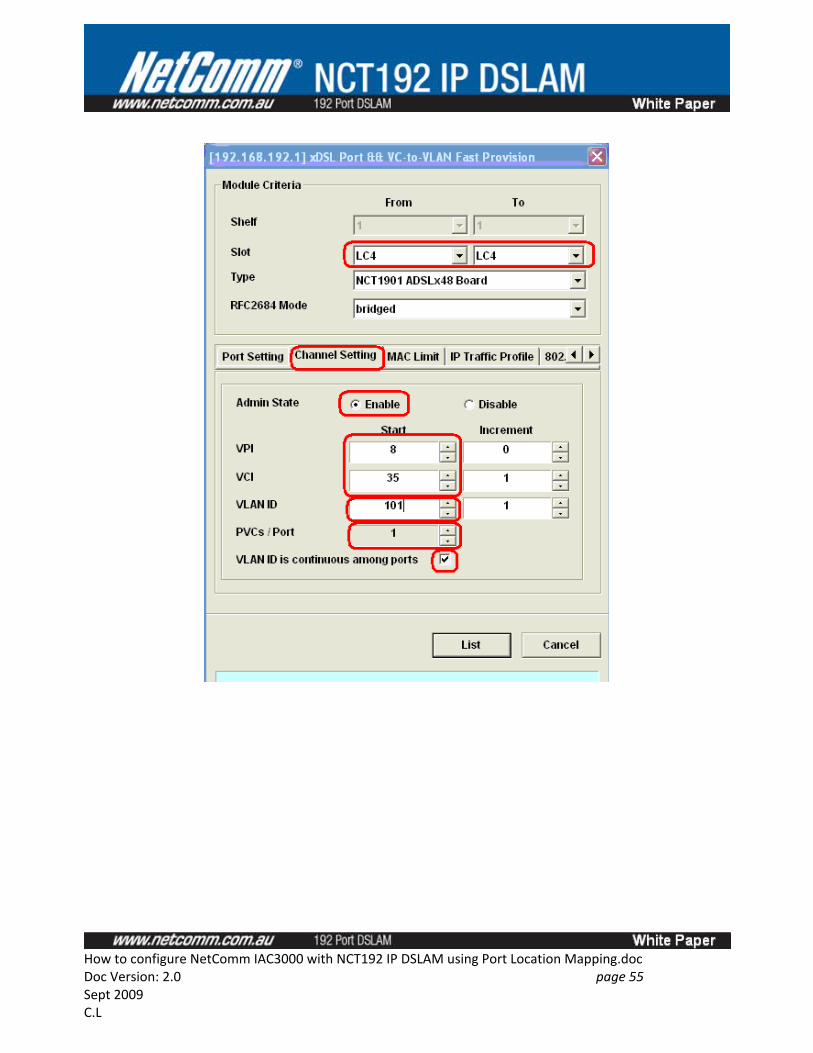
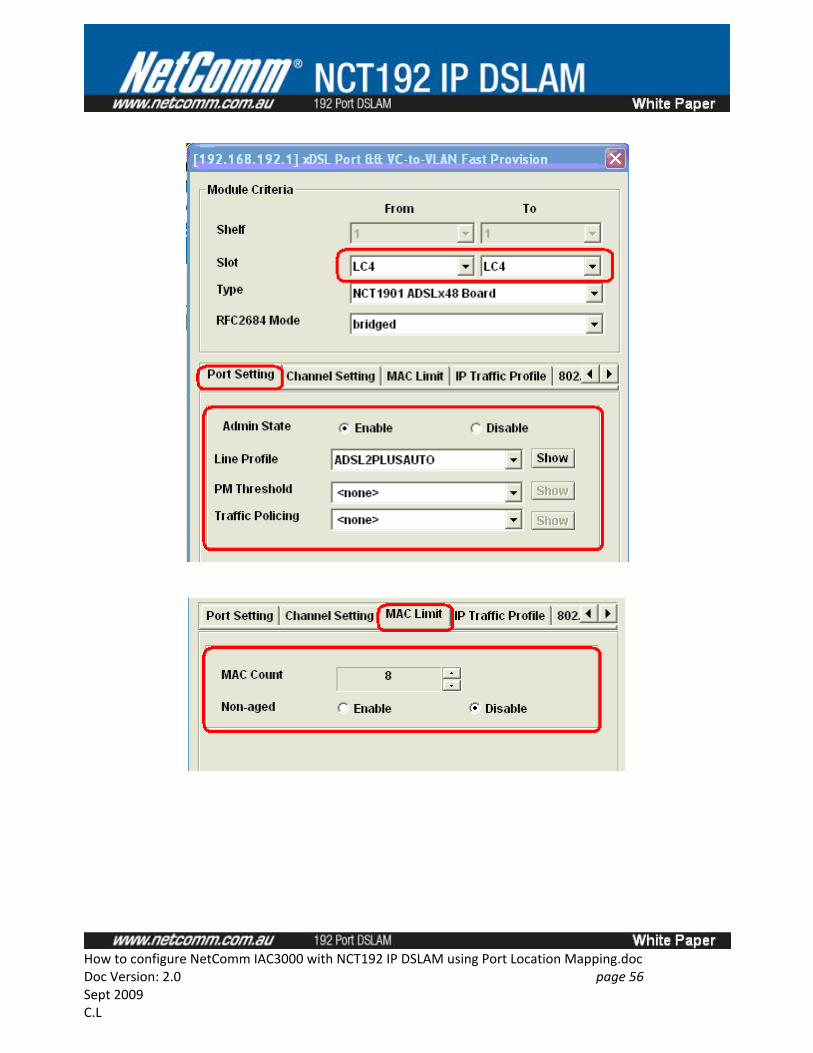
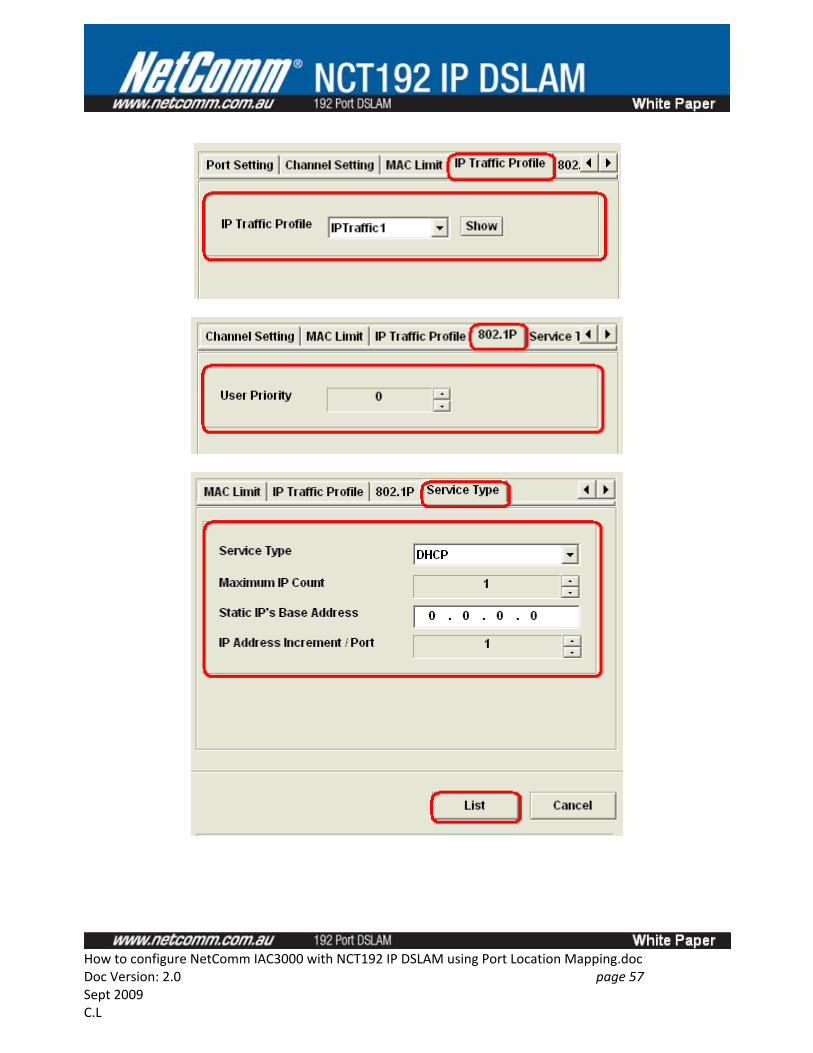
Select L4, right click and navigate to ADSL > Fast Provision > Port & VC-to-VLAN. Please refer to the screen shot below
Assign different DSL ports to different VLANs ranging from 101 to 148. (to match the guest room numbers). Please refer to the screen shots below.
How to configure NetComm IAC3000 with NCT192 IP DSLAM using Port Location Mapping.docDoc Version: 2.0 page 54 Sept 2009C.L
How to configure NetComm IAC3000 with NCT192 IP DSLAM using Port Location Mapping.docDoc Version: 2.0 page 55 Sept 2009C.L
How to configure NetComm IAC3000 with NCT192 IP DSLAM using Port Location Mapping.docDoc Version: 2.0 page 56 Sept 2009C.L
How to configure NetComm IAC3000 with NCT192 IP DSLAM using Port Location Mapping.docDoc Version: 2.0 page 57 Sept 2009C.L

*******************************************************************************************************Note:The ‘service type’ here is not applicable because in Step 4, the NCT1901 board initialisation indicates that the ‘Service Type Control’ option was set to ‘disabled’.********************************************************************************************************
Click on ‘List’ to list all the profiles and setting for LC4 from port 1 to port 48. You will then need to check whether all profiles are mapped correctly before batch configuration starts.
Select L4, right click and navigate to Alarm > Alarm Syn to reflect the latest settings.
How to configure NetComm IAC3000 with NCT192 IP DSLAM using Port Location Mapping.docDoc Version: 2.0 page 58 Sept 2009C.L
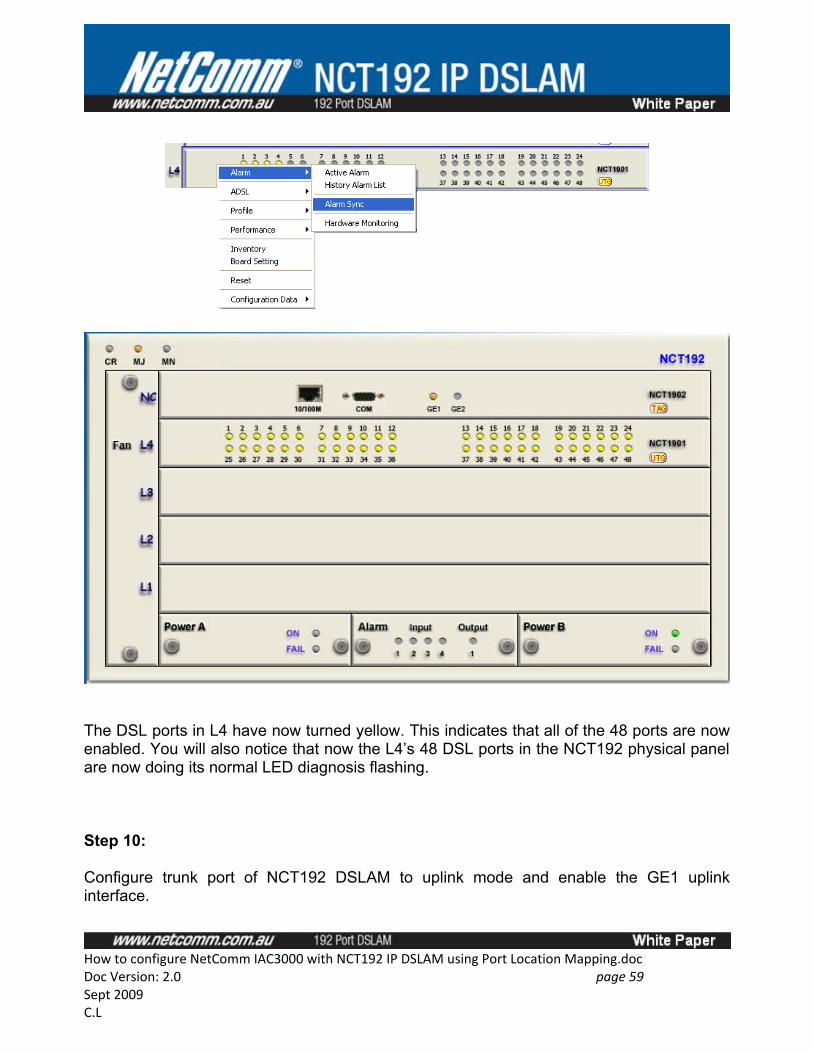
The DSL ports in L4 have now turned yellow. This indicates that all of the 48 ports are now enabled. You will also notice that now the L4’s 48 DSL ports in the NCT192 physical panel are now doing its normal LED diagnosis flashing.
Step 10:
Configure trunk port of NCT192 DSLAM to uplink mode and enable the GE1 uplink interface.
How to configure NetComm IAC3000 with NCT192 IP DSLAM using Port Location Mapping.docDoc Version: 2.0 page 59 Sept 2009C.L
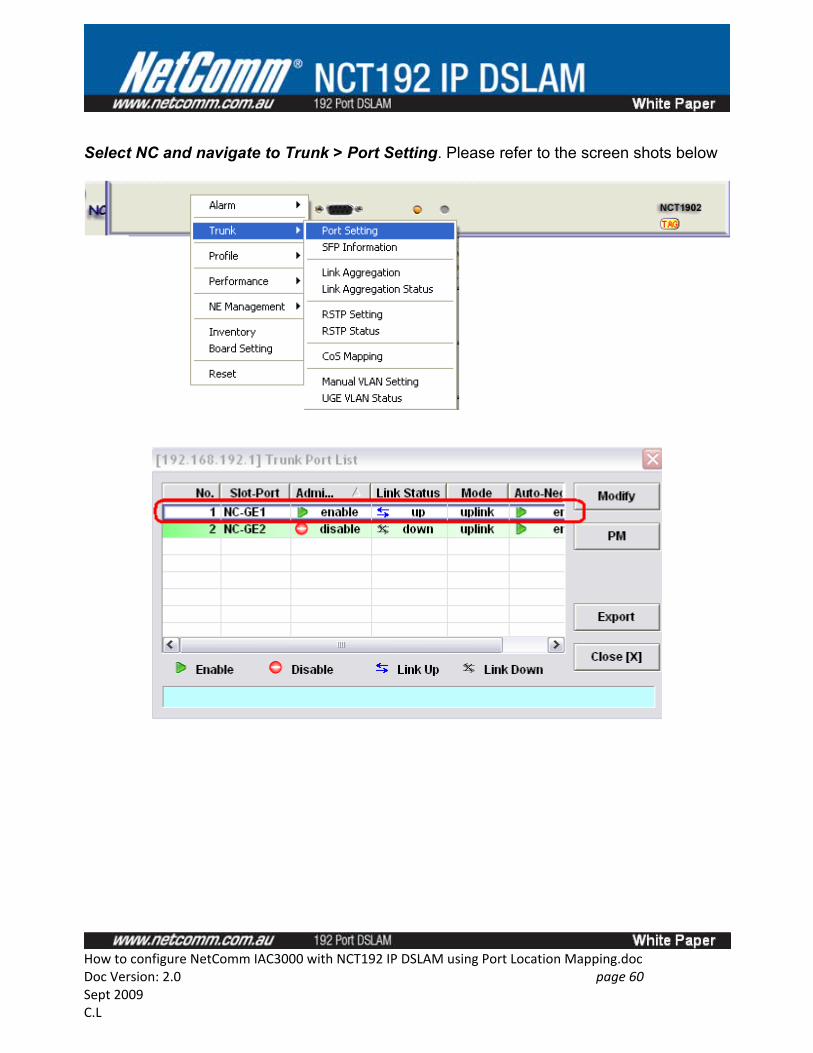
Select NC and navigate to Trunk > Port Setting. Please refer to the screen shots below
How to configure NetComm IAC3000 with NCT192 IP DSLAM using Port Location Mapping.docDoc Version: 2.0 page 60 Sept 2009C.L
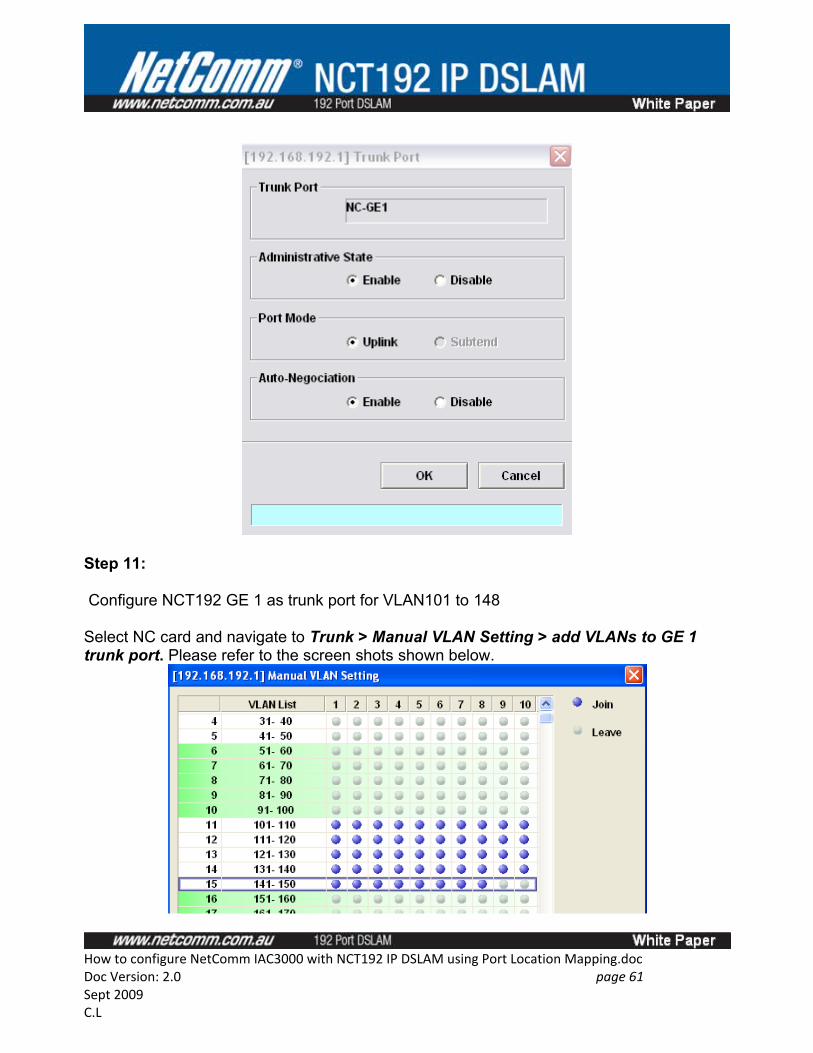
Step 11:
Configure NCT192 GE 1 as trunk port for VLAN101 to 148
Select NC card and navigate to Trunk > Manual VLAN Setting > add VLANs to GE 1 trunk port. Please refer to the screen shots shown below.
How to configure NetComm IAC3000 with NCT192 IP DSLAM using Port Location Mapping.docDoc Version: 2.0 page 61 Sept 2009C.L
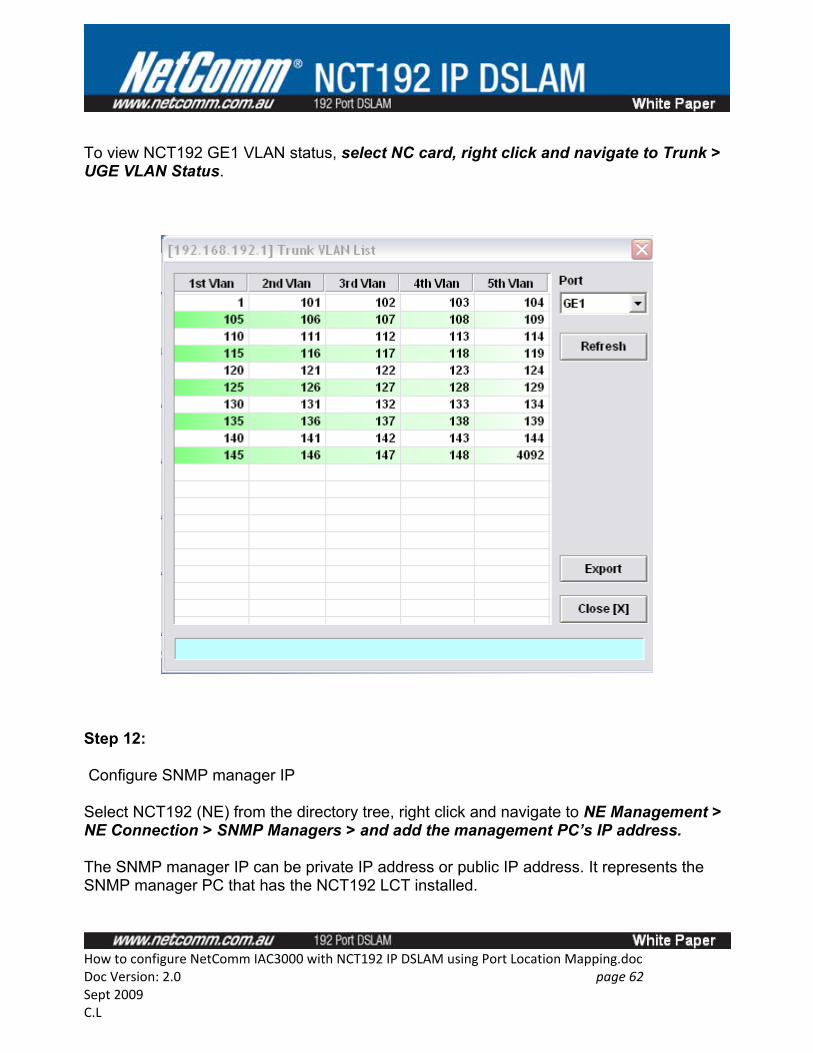
To view NCT192 GE1 VLAN status, select NC card, right click and navigate to Trunk > UGE VLAN Status.
Step 12:
Configure SNMP manager IP
Select NCT192 (NE) from the directory tree, right click and navigate to NE Management > NE Connection > SNMP Managers > and add the management PC’s IP address.
The SNMP manager IP can be private IP address or public IP address. It represents the SNMP manager PC that has the NCT192 LCT installed.
How to configure NetComm IAC3000 with NCT192 IP DSLAM using Port Location Mapping.docDoc Version: 2.0 page 62 Sept 2009C.L
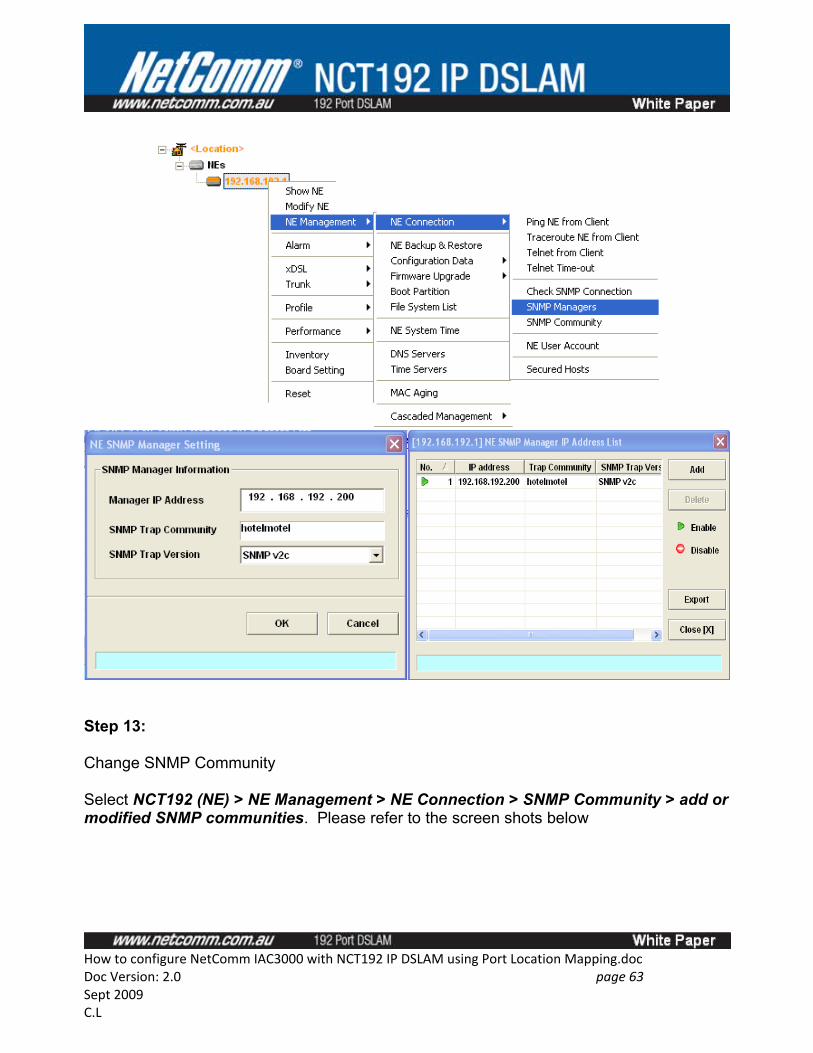
Step 13:
Change SNMP Community
Select NCT192 (NE) > NE Management > NE Connection > SNMP Community > add or modified SNMP communities. Please refer to the screen shots below
How to configure NetComm IAC3000 with NCT192 IP DSLAM using Port Location Mapping.docDoc Version: 2.0 page 63 Sept 2009C.L
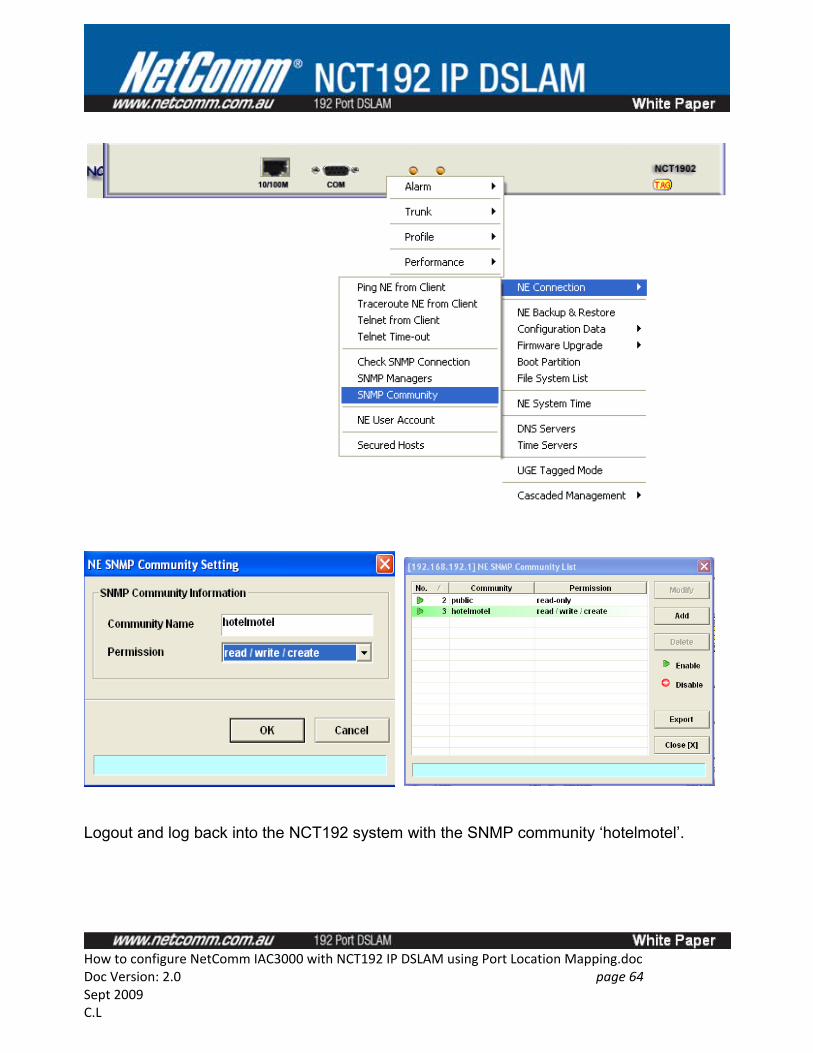
Logout and log back into the NCT192 system with the SNMP community ‘hotelmotel’.
How to configure NetComm IAC3000 with NCT192 IP DSLAM using Port Location Mapping.docDoc Version: 2.0 page 64 Sept 2009C.L
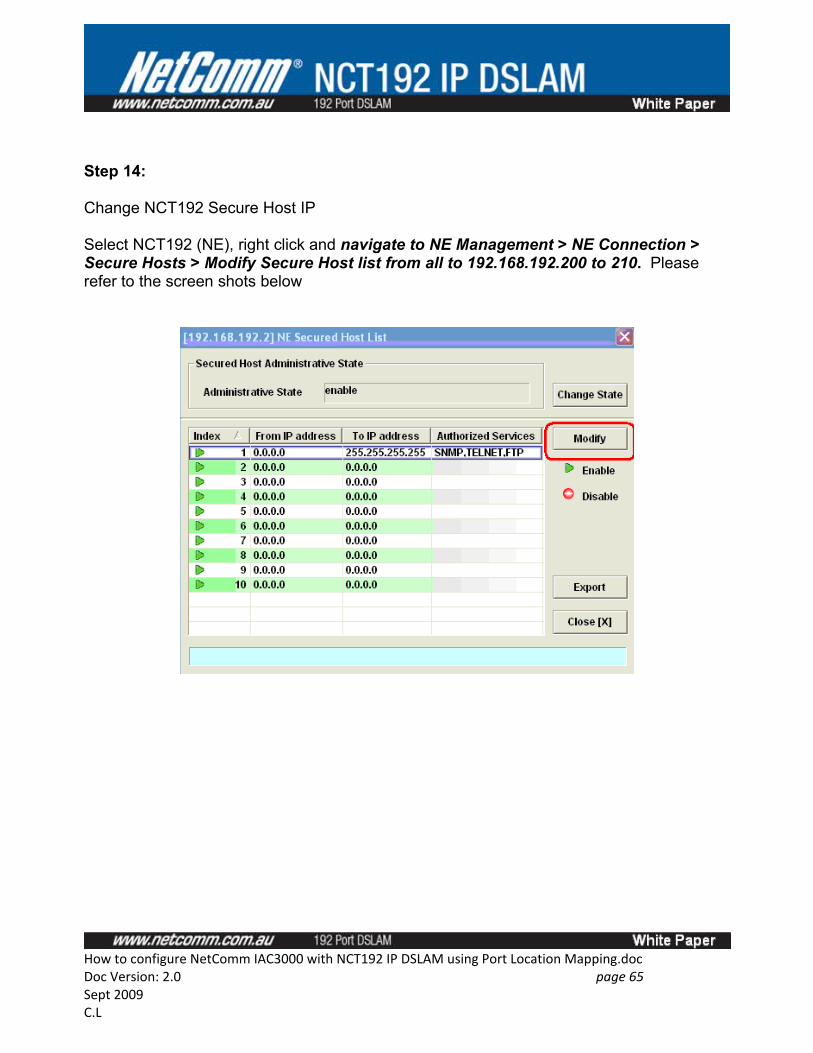
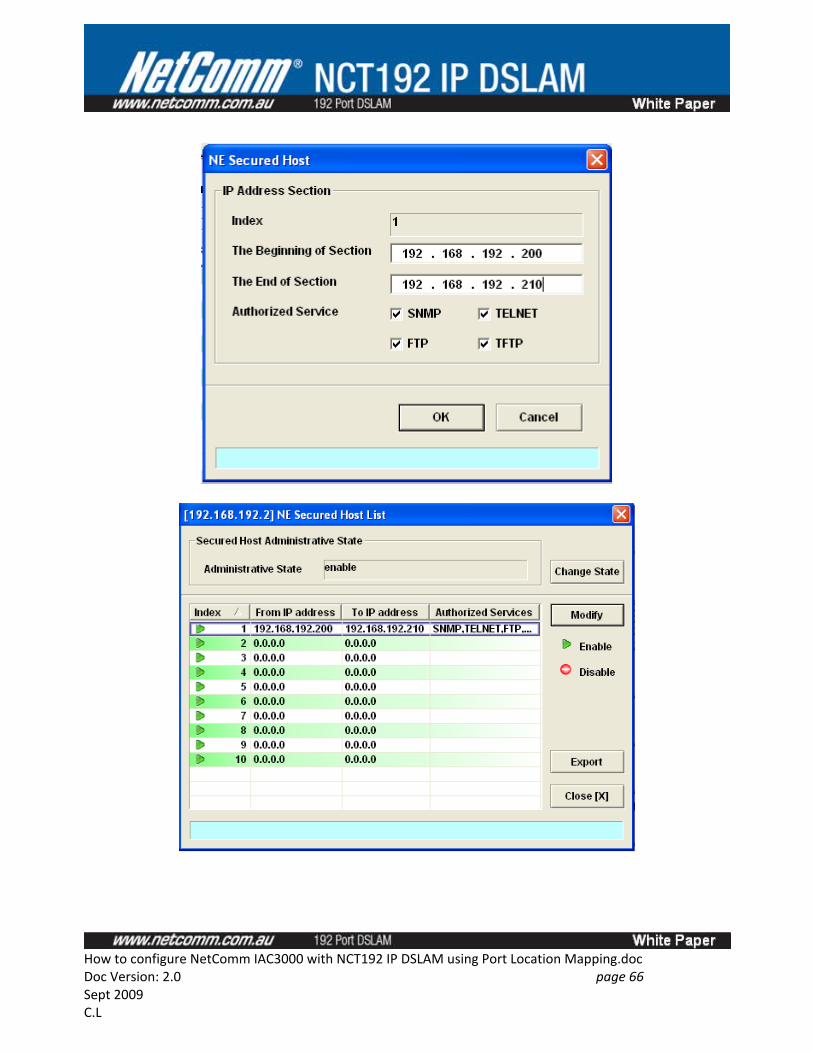
Step 14:
Change NCT192 Secure Host IP
Select NCT192 (NE), right click and navigate to NE Management > NE Connection > Secure Hosts > Modify Secure Host list from all to 192.168.192.200 to 210. Please refer to the screen shots below
How to configure NetComm IAC3000 with NCT192 IP DSLAM using Port Location Mapping.docDoc Version: 2.0 page 65 Sept 2009C.L
How to configure NetComm IAC3000 with NCT192 IP DSLAM using Port Location Mapping.docDoc Version: 2.0 page 66 Sept 2009C.L
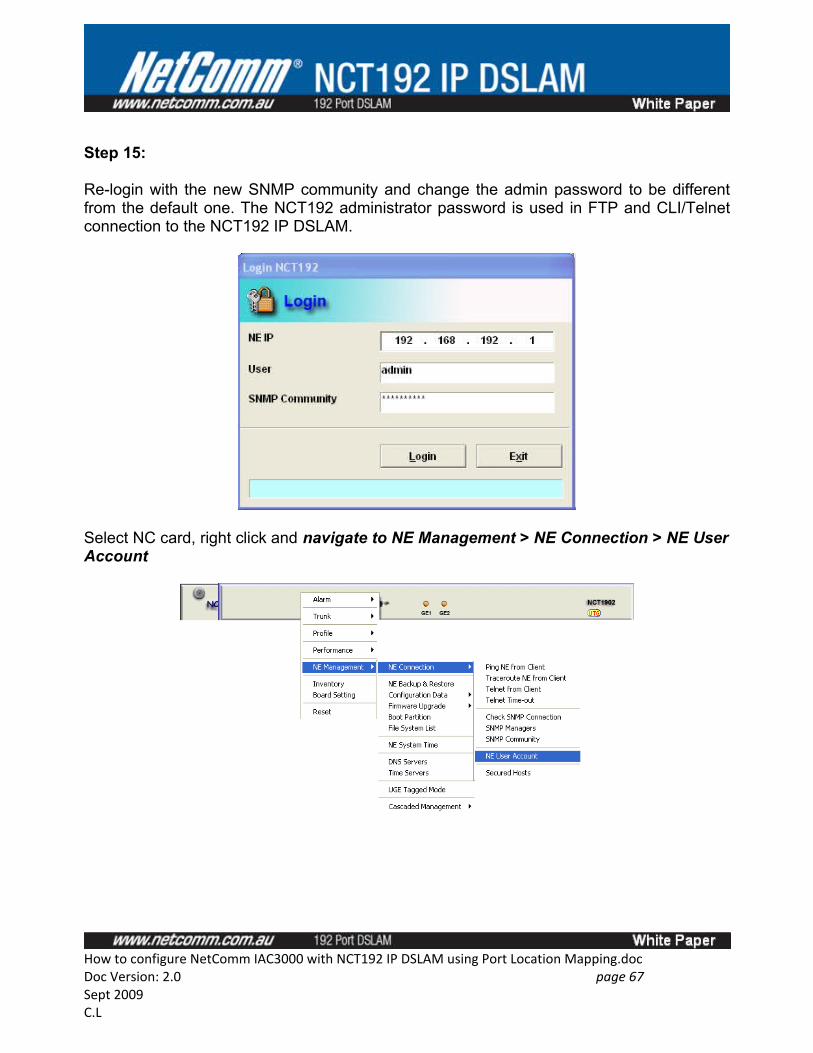
Step 15:
Re-login with the new SNMP community and change the admin password to be different from the default one. The NCT192 administrator password is used in FTP and CLI/Telnet connection to the NCT192 IP DSLAM.
Select NC card, right click and navigate to NE Management > NE Connection > NE User Account
How to configure NetComm IAC3000 with NCT192 IP DSLAM using Port Location Mapping.docDoc Version: 2.0 page 67 Sept 2009C.L
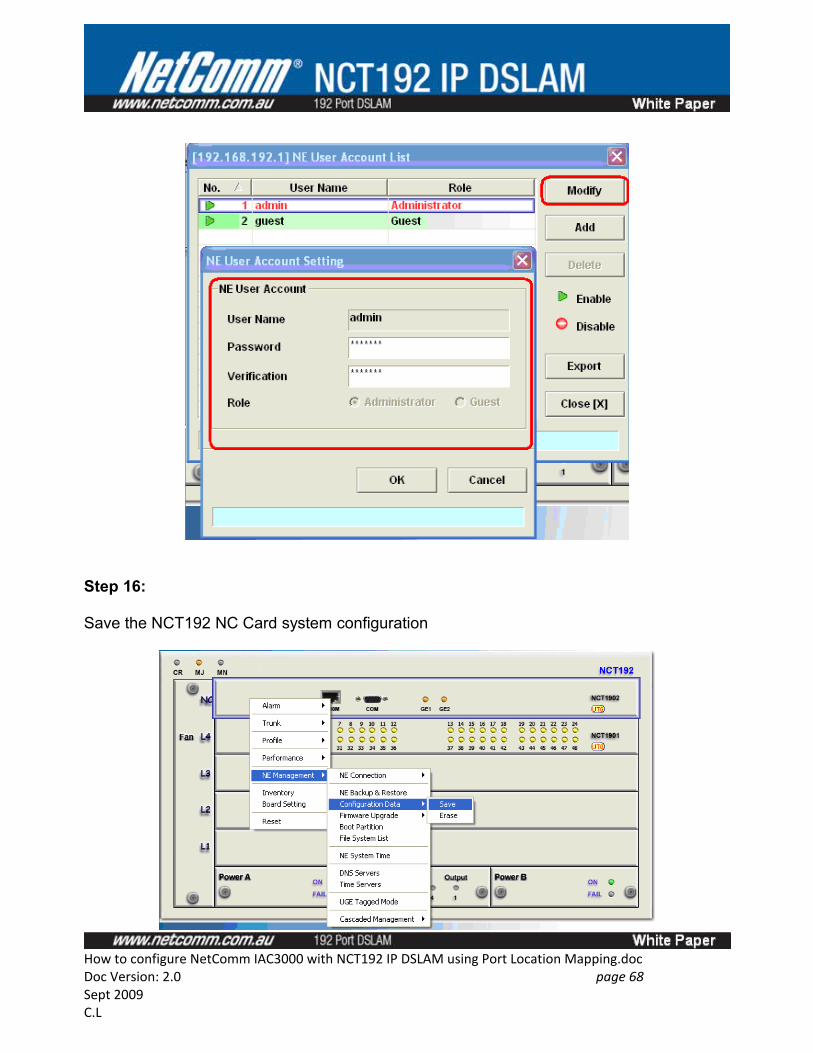
Step 16:
Save the NCT192 NC Card system configuration
How to configure NetComm IAC3000 with NCT192 IP DSLAM using Port Location Mapping.docDoc Version: 2.0 page 68 Sept 2009C.L
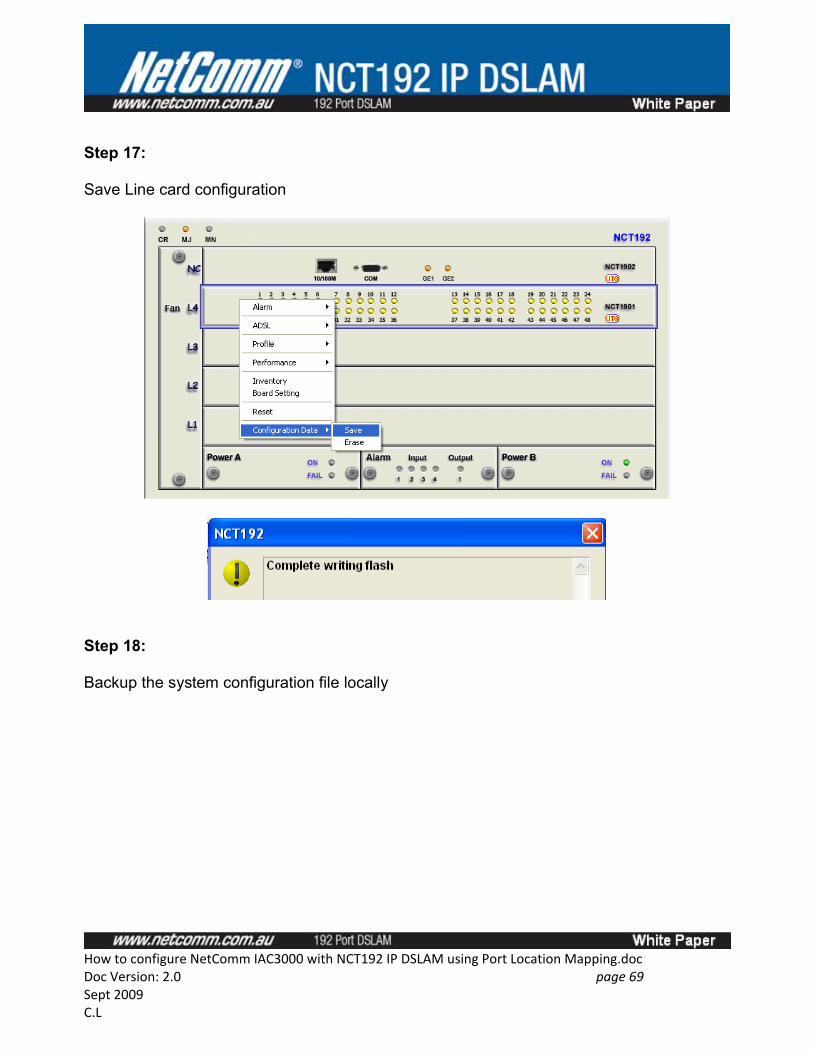
Step 17:
Save Line card configuration
Step 18:
Backup the system configuration file locally
How to configure NetComm IAC3000 with NCT192 IP DSLAM using Port Location Mapping.docDoc Version: 2.0 page 69 Sept 2009C.L
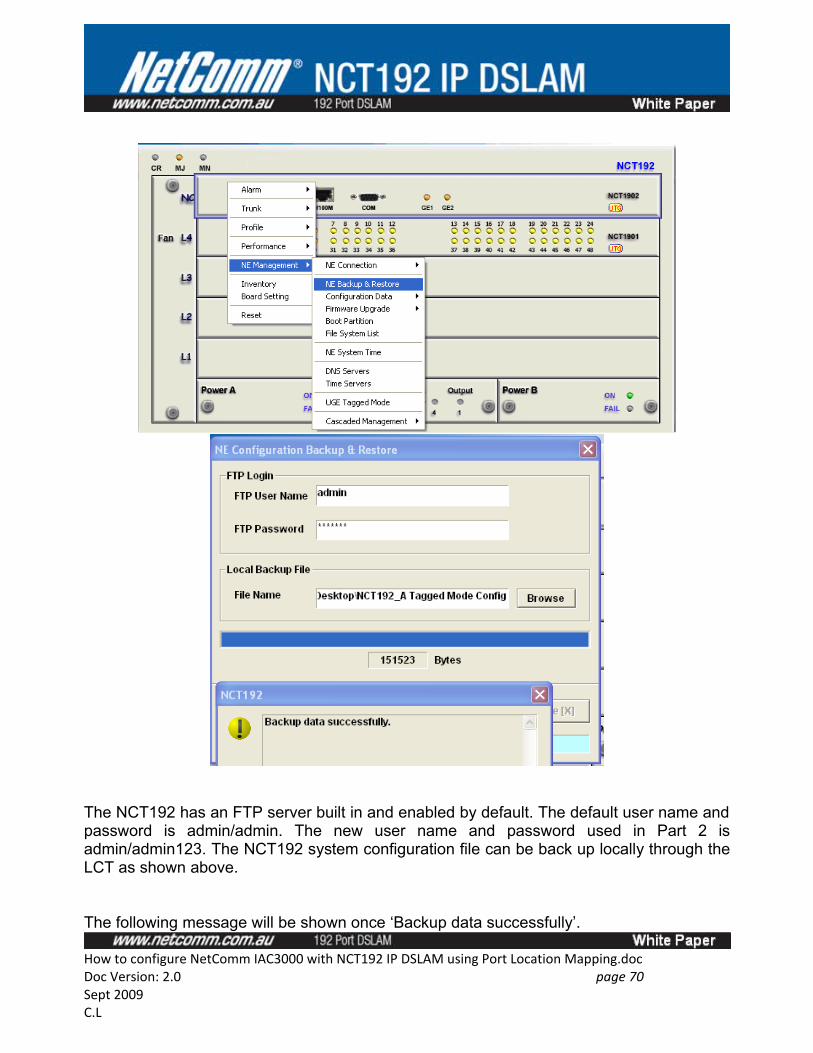
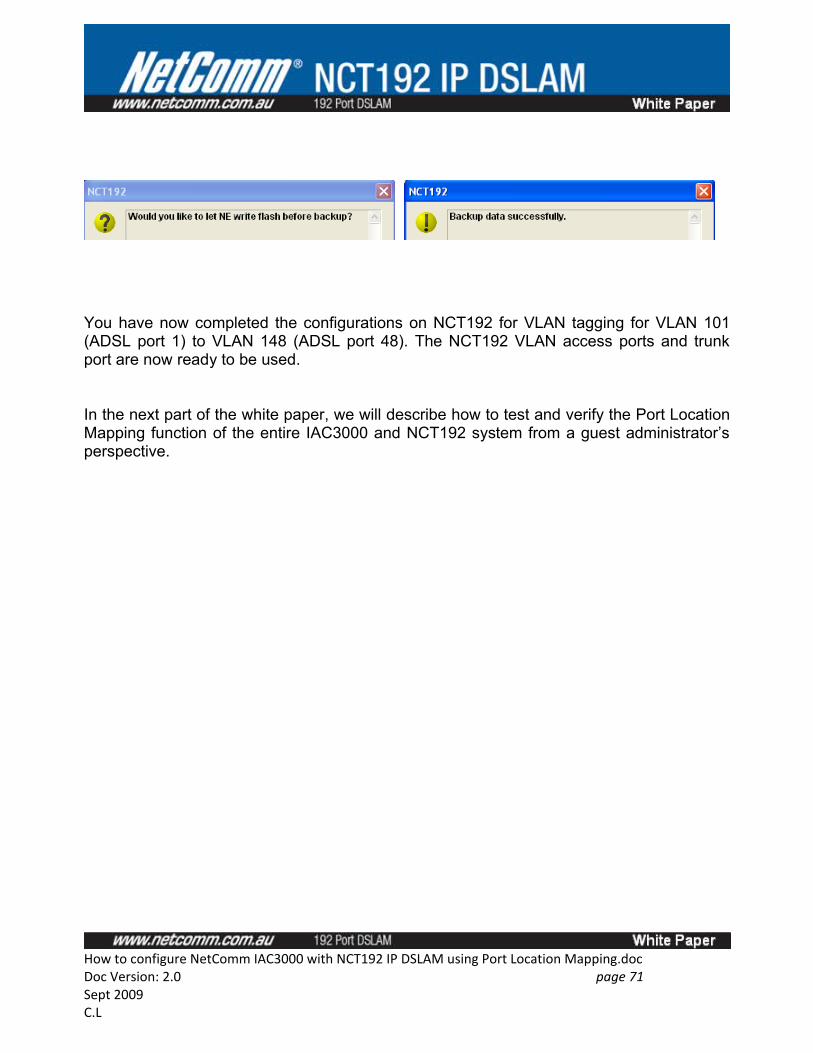
The NCT192 has an FTP server built in and enabled by default. The default user name and password is admin/admin. The new user name and password used in Part 2 is admin/admin123. The NCT192 system configuration file can be back up locally through the LCT as shown above.
The following message will be shown once ‘Backup data successfully’.
How to configure NetComm IAC3000 with NCT192 IP DSLAM using Port Location Mapping.docDoc Version: 2.0 page 70 Sept 2009C.L
You have now completed the configurations on NCT192 for VLAN tagging for VLAN 101 (ADSL port 1) to VLAN 148 (ADSL port 48). The NCT192 VLAN access ports and trunk port are now ready to be used.
In the next part of the white paper, we will describe how to test and verify the Port Location Mapping function of the entire IAC3000 and NCT192 system from a guest administrator’s perspective.
How to configure NetComm IAC3000 with NCT192 IP DSLAM using Port Location Mapping.docDoc Version: 2.0 page 71 Sept 2009C.L
Part 3: Test and verify the port location mapping function of the IAC3000 and NCT192 system
Connect the Bridged NB6+4W_R2T8 to the line tails of the NCT192 on LC 4 port 1; connect the GE1 of the NCT192 to a GE switch, then connect the GE switch to the IAC3000 LAN port.
*******************************************************************************************************Note:
Gigabit Ethernet Switch (GE switch)
NCT192 only supports MINI GBIC Fibre optic Gigabit interface, the uplink of the NCT192 GE1 can not be connected directly to the IAC3000 LAN because GE1 only supports 1000Mb/s, not 10/100Mb/s.
In this white paper, the following equipment is used in between the NCT192 GE 1 port and the IAC3000.
• 1 x NCT1911 MINI GBIC to Gigabit Ethernet Converter (plug and play, no special configuration required)
• 1 x NP3005 5-port Gigabit Ethernet switch (plug and play, no special configuration required)
Depending on what types of equipment you have available, another alternative is to use the following equipment to convert the optical signal of the NCT192 GE1 to Ethernet so that you can connect to the IAC3000 LAN ports.
• 1x NP2724M 24-port VLAN switches (Trunk ports need to be configured to pass all the VLAN 101 to VLAN 148 tagged traffic from NCT192)
• 2 x NCT1907 MINI GBIC M-Mode Module (500m) (one plug into NCT192 GE1, the other plug into NP2724M MINI GBIC port.
• 1 x NCT1909 3m multimode optical fibre********************************************************************************************************
How to configure NetComm IAC3000 with NCT192 IP DSLAM using Port Location Mapping.docDoc Version: 2.0 page 72 Sept 2009C.L
Steps and Procedures
Step 1:
Connect the test modems NB6plus4_R2T8 to an ADSL Port of the NCT192 DSLAM system (The ADSL data point socket in the guest room) and wait for ADSL light on the test modem turn solid green.
Step 2:
Connect the test PC to the LAN Port of the test modem. (Note: TCP/IP setting of the PC is to be set to obtain IP Address/ DNS address from DHCP server automatically).
Step 3:
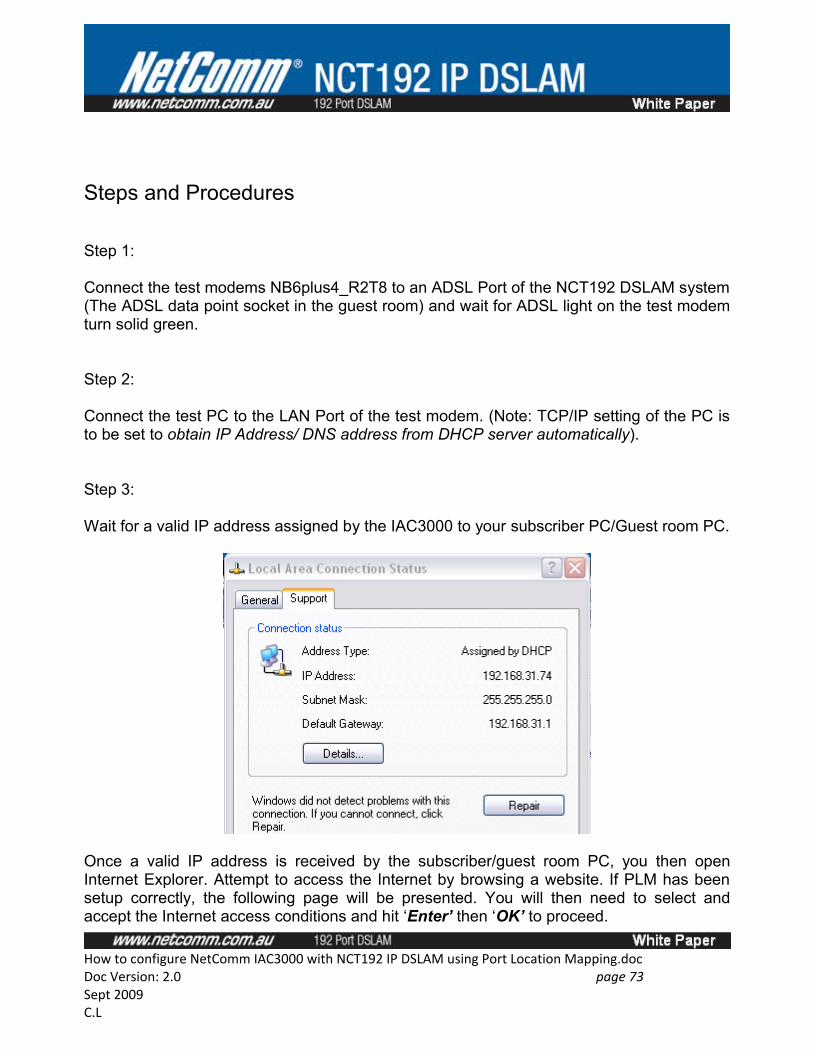
Wait for a valid IP address assigned by the IAC3000 to your subscriber PC/Guest room PC.
Once a valid IP address is received by the subscriber/guest room PC, you then open Internet Explorer. Attempt to access the Internet by browsing a website. If PLM has been setup correctly, the following page will be presented. You will then need to select and accept the Internet access conditions and hit ‘Enter’ then ‘OK’ to proceed.
How to configure NetComm IAC3000 with NCT192 IP DSLAM using Port Location Mapping.docDoc Version: 2.0 page 73 Sept 2009C.L
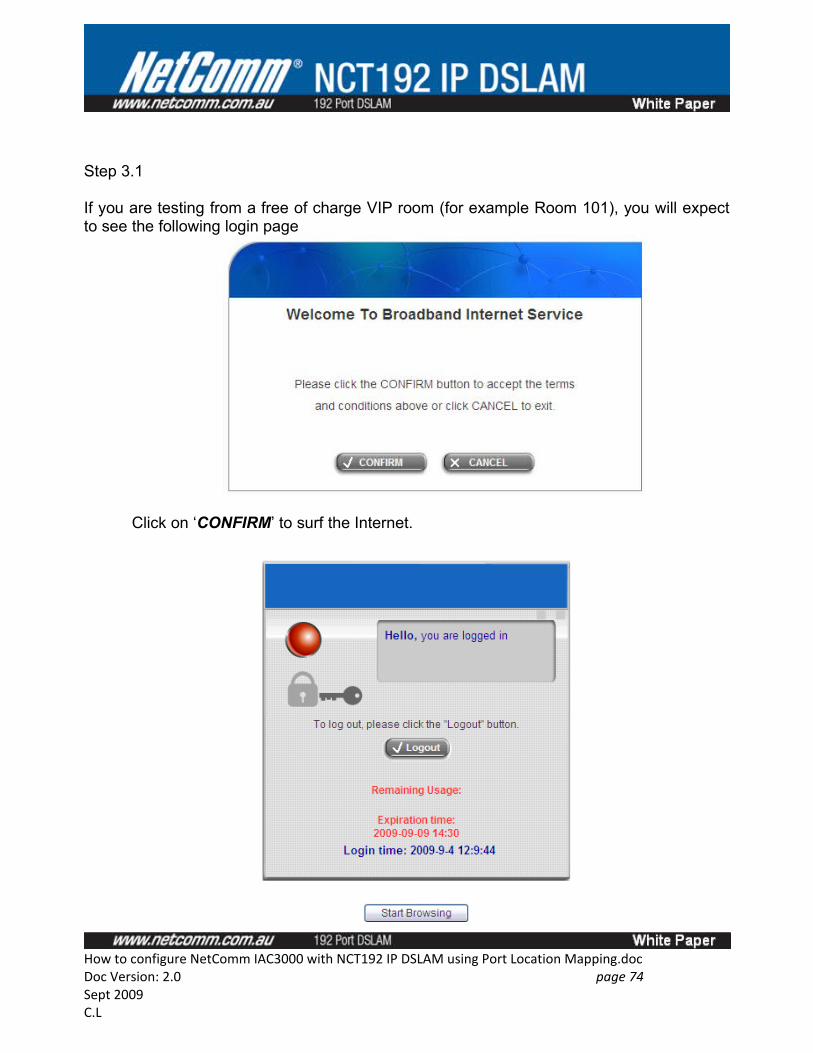
Step 3.1
If you are testing from a free of charge VIP room (for example Room 101), you will expect to see the following login page
Click on ‘CONFIRM’ to surf the Internet.
How to configure NetComm IAC3000 with NCT192 IP DSLAM using Port Location Mapping.docDoc Version: 2.0 page 74 Sept 2009C.L
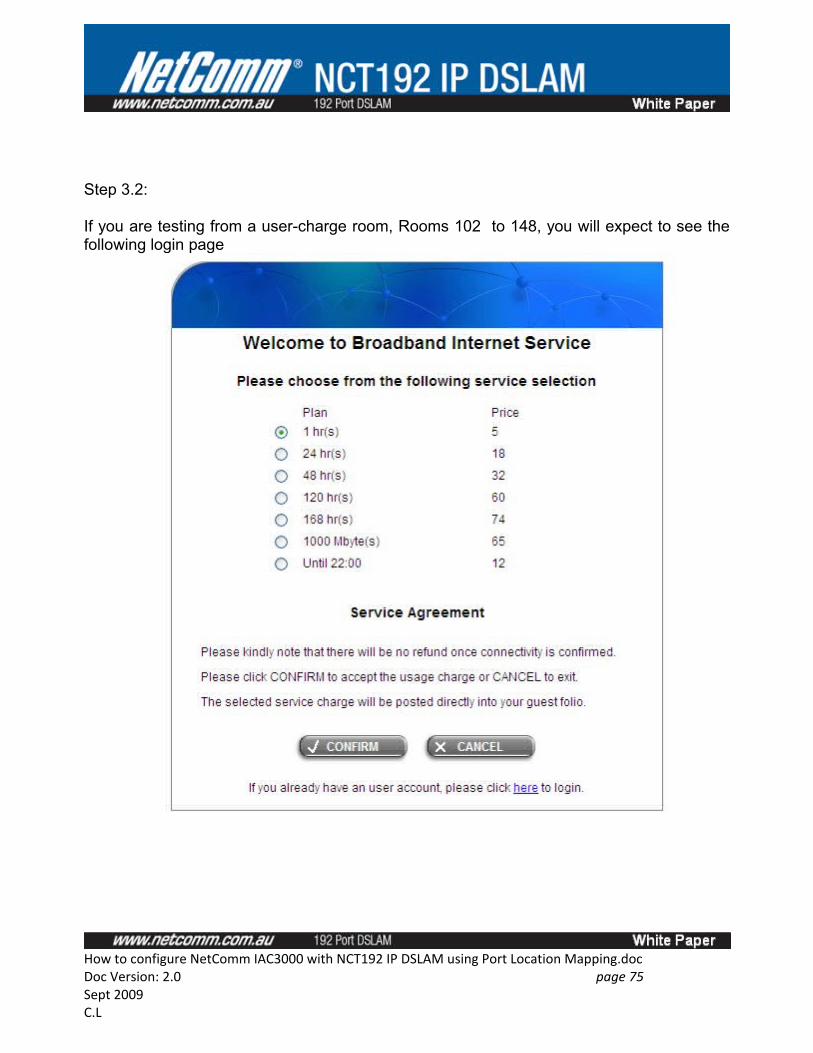
Step 3.2:
If you are testing from a user-charge room, Rooms 102 to 148, you will expect to see the following login page
How to configure NetComm IAC3000 with NCT192 IP DSLAM using Port Location Mapping.docDoc Version: 2.0 page 75 Sept 2009C.L
*******************************************************************************************************Note:
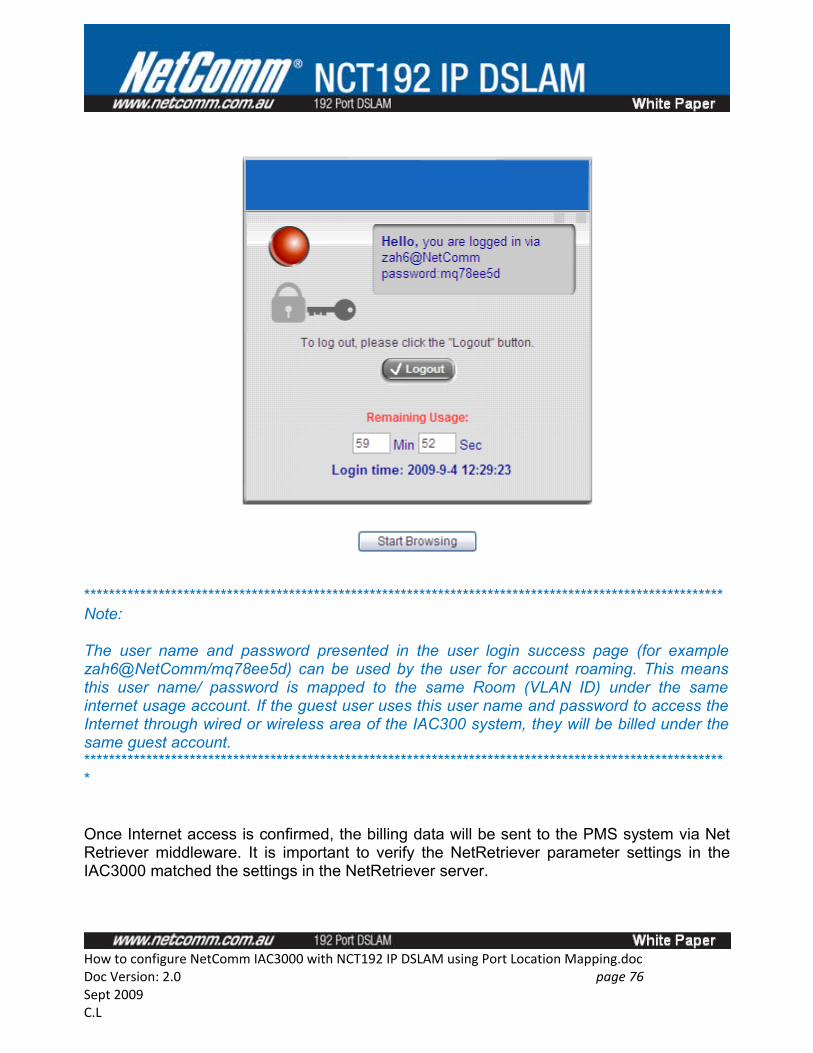
The user name and password presented in the user login success page (for example zah6@NetComm/mq78ee5d) can be used by the user for account roaming. This means this user name/ password is mapped to the same Room (VLAN ID) under the same internet usage account. If the guest user uses this user name and password to access the Internet through wired or wireless area of the IAC300 system, they will be billed under the same guest account. ********************************************************************************************************
Once Internet access is confirmed, the billing data will be sent to the PMS system via Net Retriever middleware. It is important to verify the NetRetriever parameter settings in the IAC3000 matched the settings in the NetRetriever server.
How to configure NetComm IAC3000 with NCT192 IP DSLAM using Port Location Mapping.docDoc Version: 2.0 page 76 Sept 2009C.L
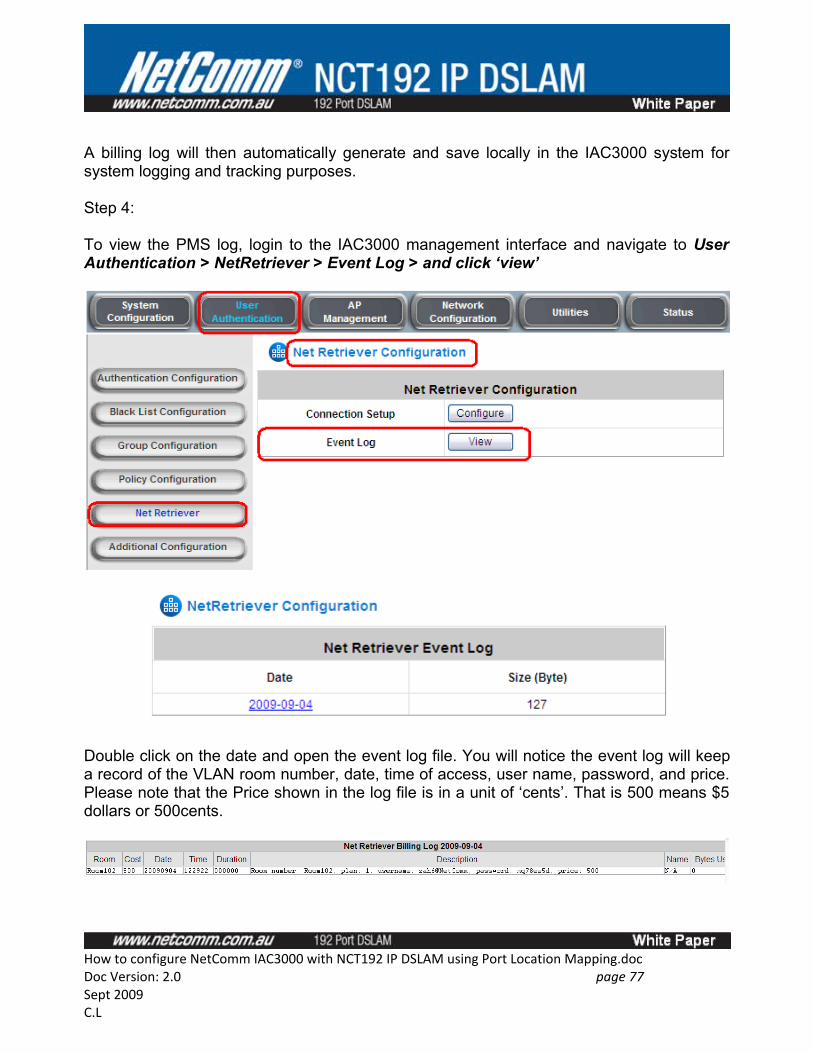
A billing log will then automatically generate and save locally in the IAC3000 system for system logging and tracking purposes.
Step 4:
To view the PMS log, login to the IAC3000 management interface and navigate to User Authentication > NetRetriever > Event Log > and click ‘view’
Double click on the date and open the event log file. You will notice the event log will keep a record of the VLAN room number, date, time of access, user name, password, and price. Please note that the Price shown in the log file is in a unit of ‘cents’. That is 500 means $5 dollars or 500cents.
How to configure NetComm IAC3000 with NCT192 IP DSLAM using Port Location Mapping.docDoc Version: 2.0 page 77 Sept 2009C.L
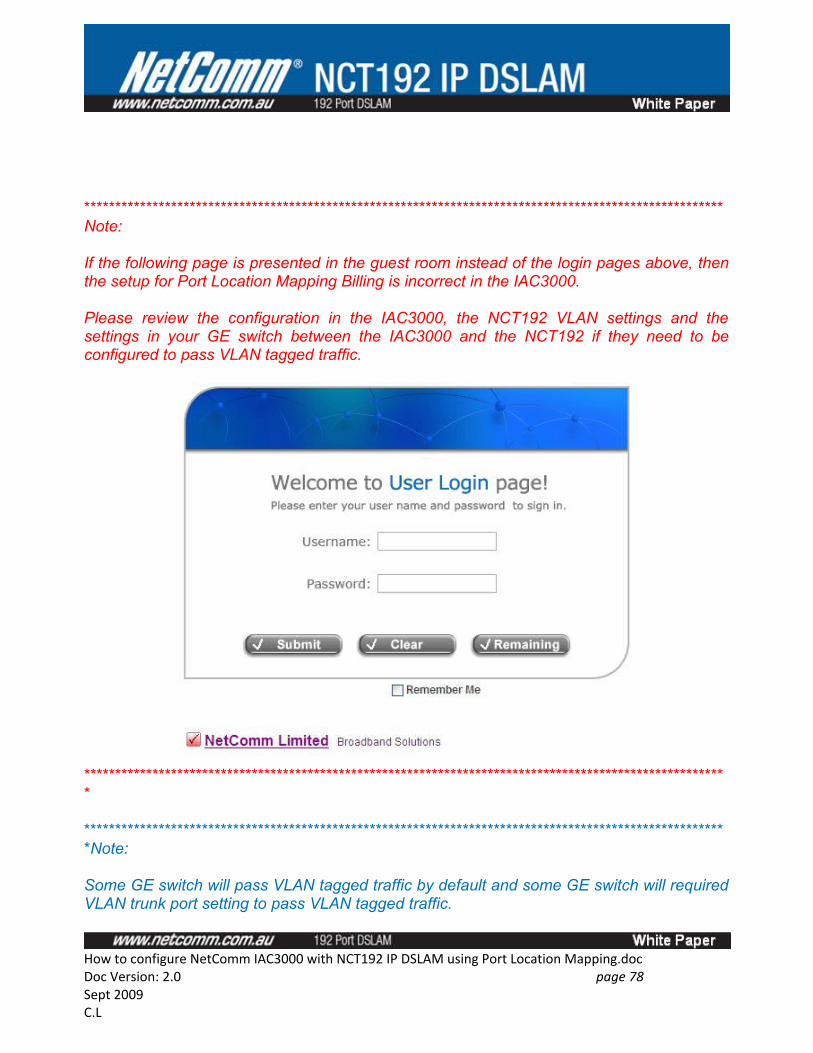
*******************************************************************************************************Note:
If the following page is presented in the guest room instead of the login pages above, then the setup for Port Location Mapping Billing is incorrect in the IAC3000.
Please review the configuration in the IAC3000, the NCT192 VLAN settings and the settings in your GE switch between the IAC3000 and the NCT192 if they need to be configured to pass VLAN tagged traffic.
********************************************************************************************************
********************************************************************************************************Note:
Some GE switch will pass VLAN tagged traffic by default and some GE switch will required VLAN trunk port setting to pass VLAN tagged traffic.
How to configure NetComm IAC3000 with NCT192 IP DSLAM using Port Location Mapping.docDoc Version: 2.0 page 78 Sept 2009C.L
********************************************************************************************************
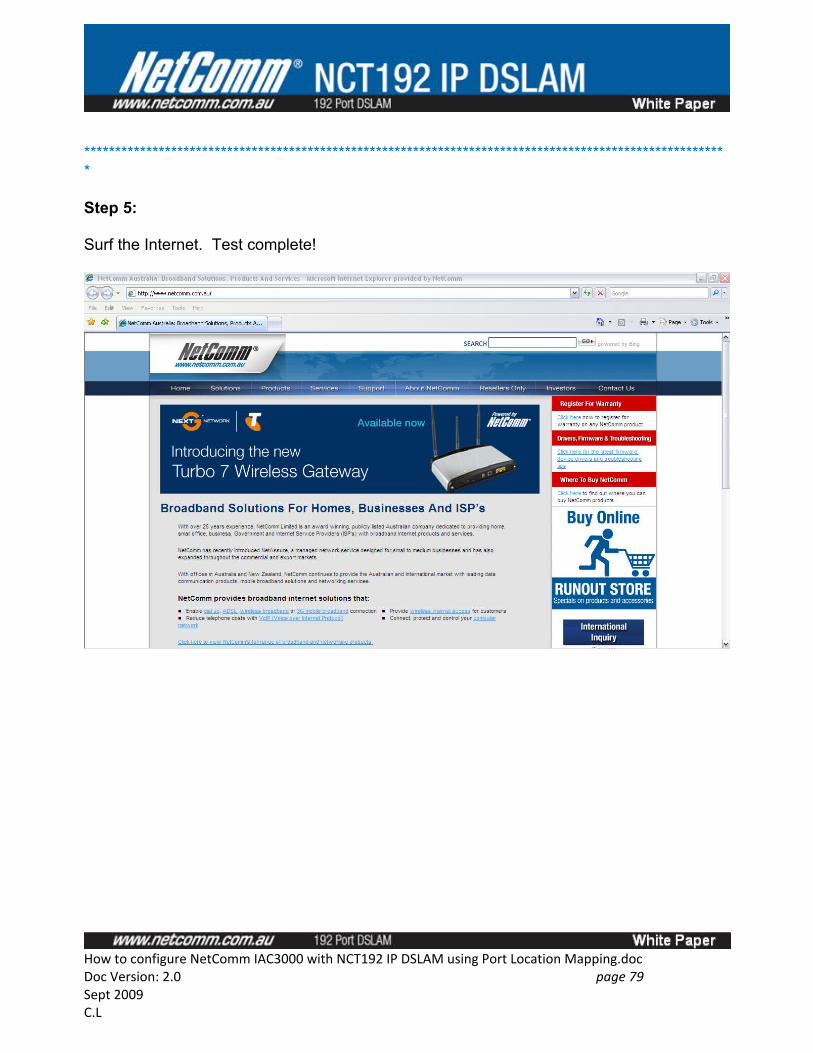
Step 5:
Surf the Internet. Test complete!
How to configure NetComm IAC3000 with NCT192 IP DSLAM using Port Location Mapping.docDoc Version: 2.0 page 79 Sept 2009C.L
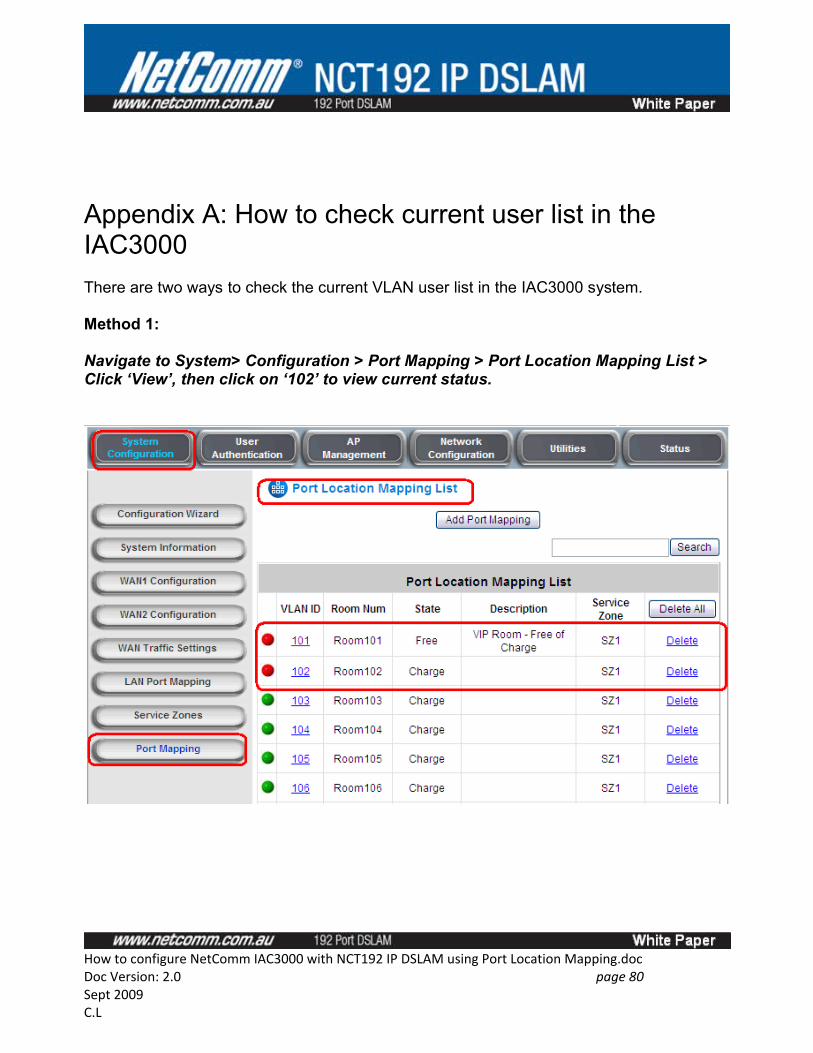
Appendix A: How to check current user list in the IAC3000There are two ways to check the current VLAN user list in the IAC3000 system.
Method 1:
Navigate to System> Configuration > Port Mapping > Port Location Mapping List > Click ‘View’, then click on ‘102’ to view current status.
How to configure NetComm IAC3000 with NCT192 IP DSLAM using Port Location Mapping.docDoc Version: 2.0 page 80 Sept 2009C.L

You will notice that Room 102 is currently ‘Online’
*******************************************************************************************************Note:
The ‘Remaining Quota’ shown under VLAN rooms will only updated after guest user has logout or click ‘logout’ button on the ‘success user login page’ window.********************************************************************************************************
Method 2:
How to configure NetComm IAC3000 with NCT192 IP DSLAM using Port Location Mapping.docDoc Version: 2.0 page 81 Sept 2009C.L
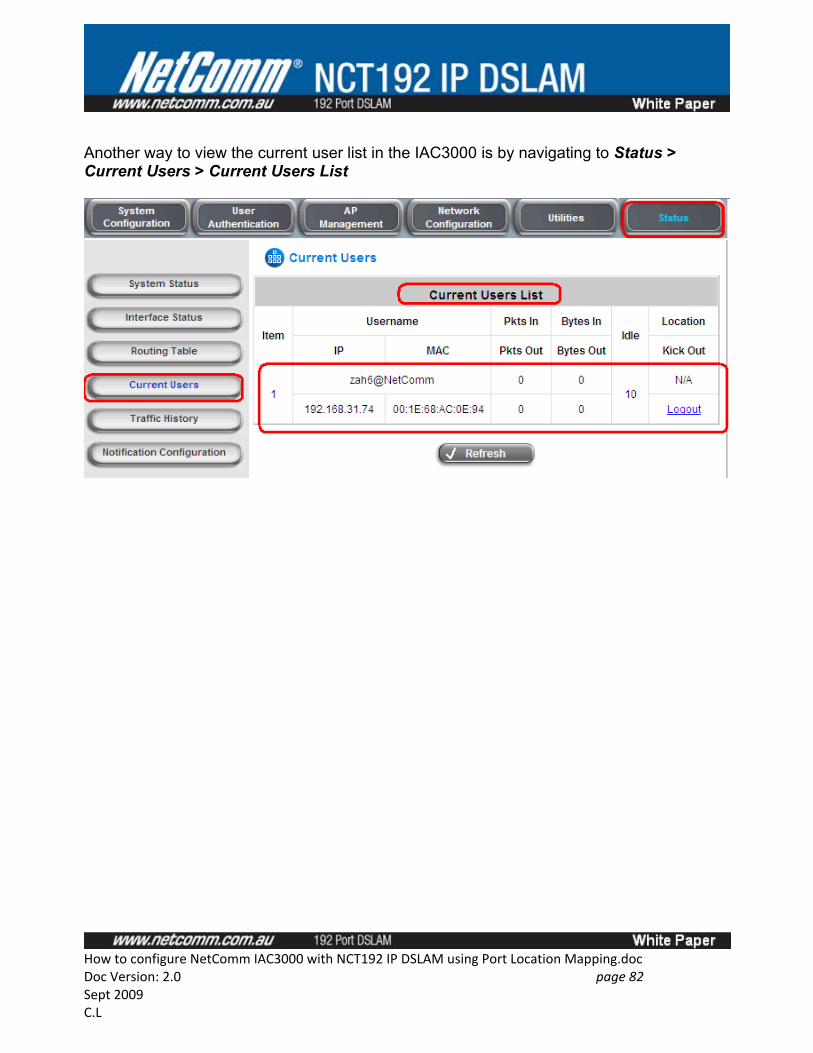
Another way to view the current user list in the IAC3000 is by navigating to Status > Current Users > Current Users List
How to configure NetComm IAC3000 with NCT192 IP DSLAM using Port Location Mapping.docDoc Version: 2.0 page 82 Sept 2009C.L
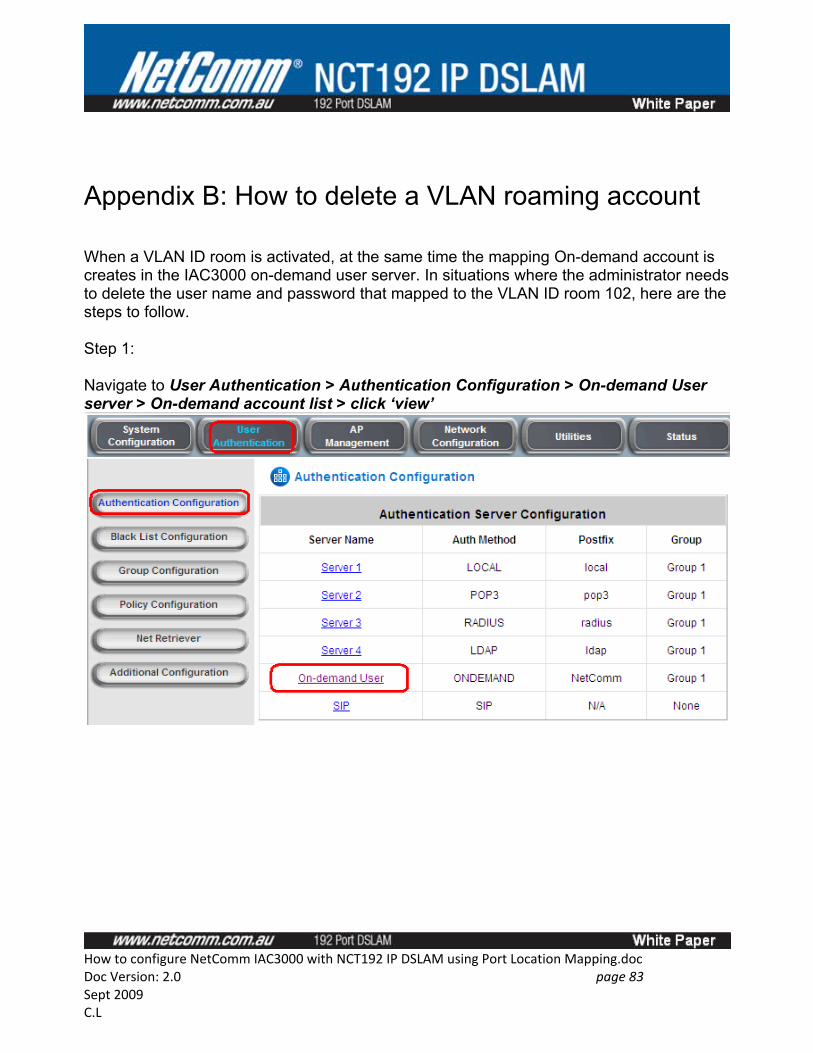
Appendix B: How to delete a VLAN roaming account
When a VLAN ID room is activated, at the same time the mapping On-demand account is creates in the IAC3000 on-demand user server. In situations where the administrator needs to delete the user name and password that mapped to the VLAN ID room 102, here are the steps to follow.
Step 1:
Navigate to User Authentication > Authentication Configuration > On-demand User server > On-demand account list > click ‘view’
How to configure NetComm IAC3000 with NCT192 IP DSLAM using Port Location Mapping.docDoc Version: 2.0 page 83 Sept 2009C.L
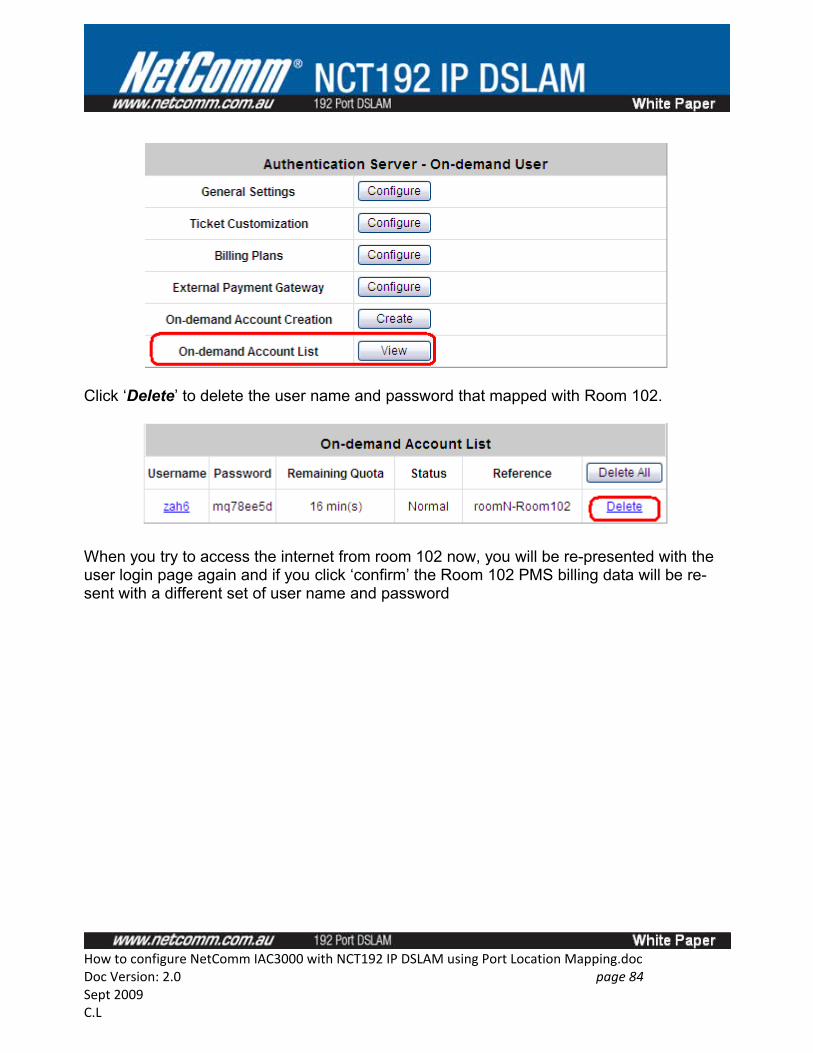
Click ‘Delete’ to delete the user name and password that mapped with Room 102.
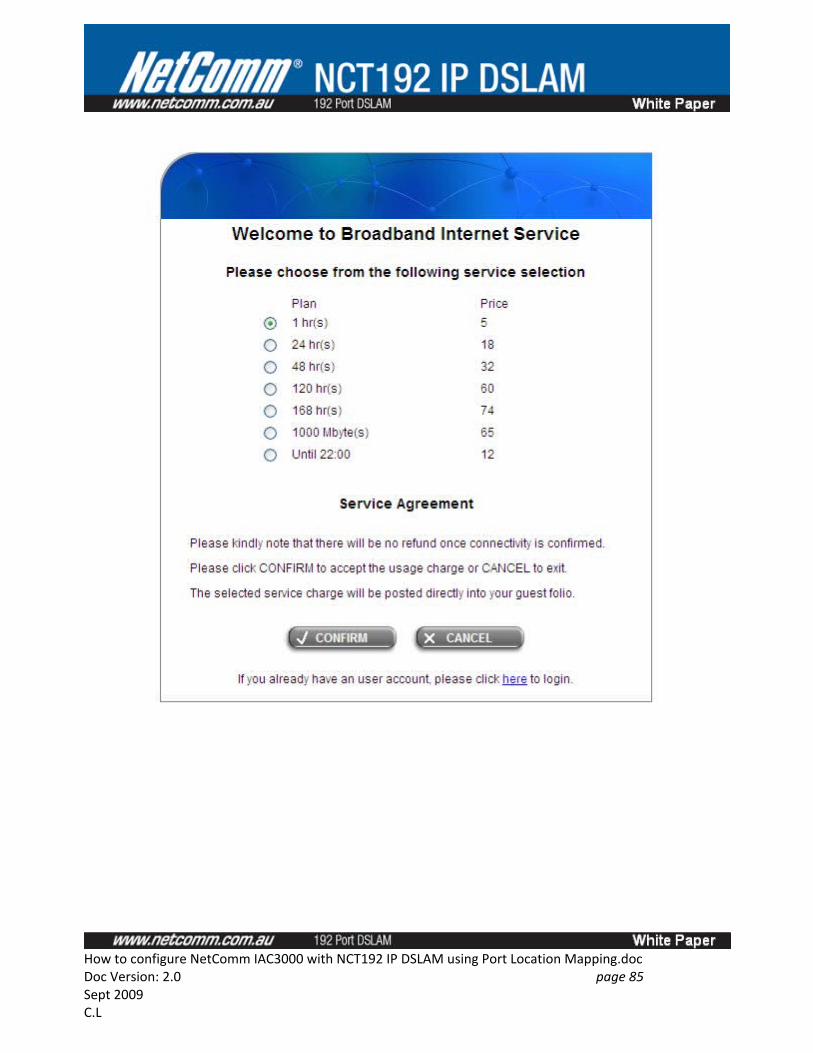
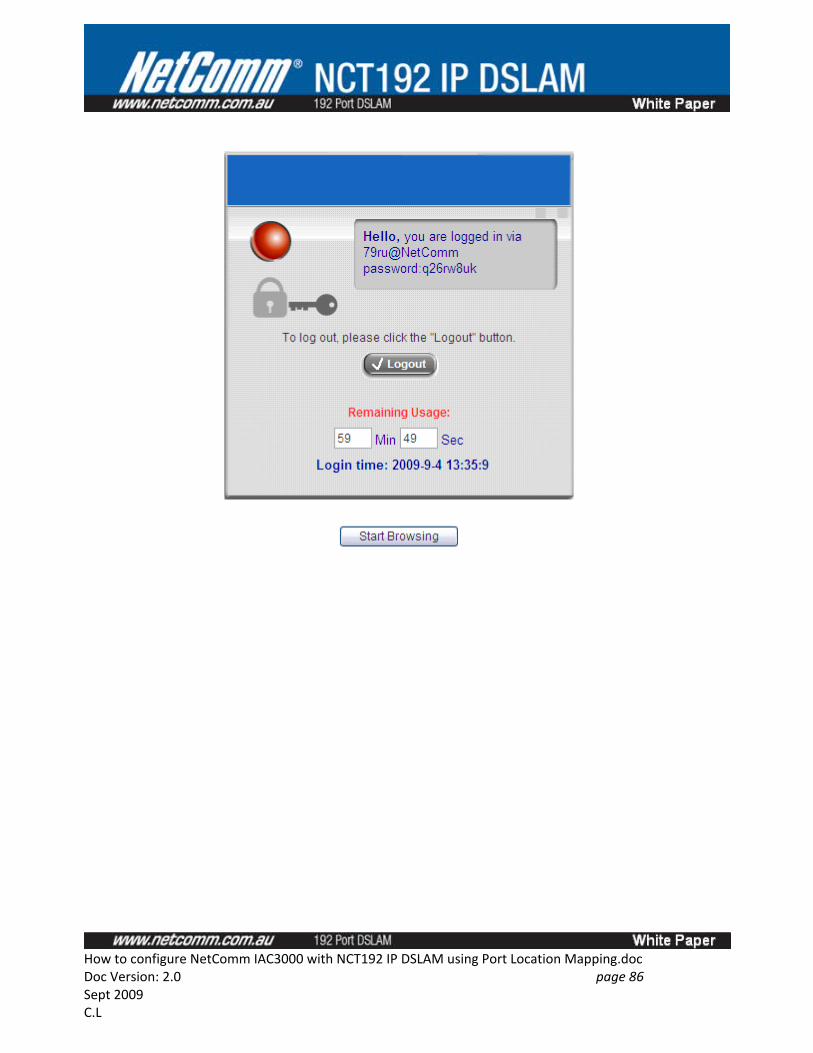
When you try to access the internet from room 102 now, you will be re-presented with the user login page again and if you click ‘confirm’ the Room 102 PMS billing data will be re-sent with a different set of user name and password
How to configure NetComm IAC3000 with NCT192 IP DSLAM using Port Location Mapping.docDoc Version: 2.0 page 84 Sept 2009C.L
How to configure NetComm IAC3000 with NCT192 IP DSLAM using Port Location Mapping.docDoc Version: 2.0 page 85 Sept 2009C.L
How to configure NetComm IAC3000 with NCT192 IP DSLAM using Port Location Mapping.docDoc Version: 2.0 page 86 Sept 2009C.L
Appendix C: How to view VLAN data and ADSL port status in NCT192 IP DSLAM
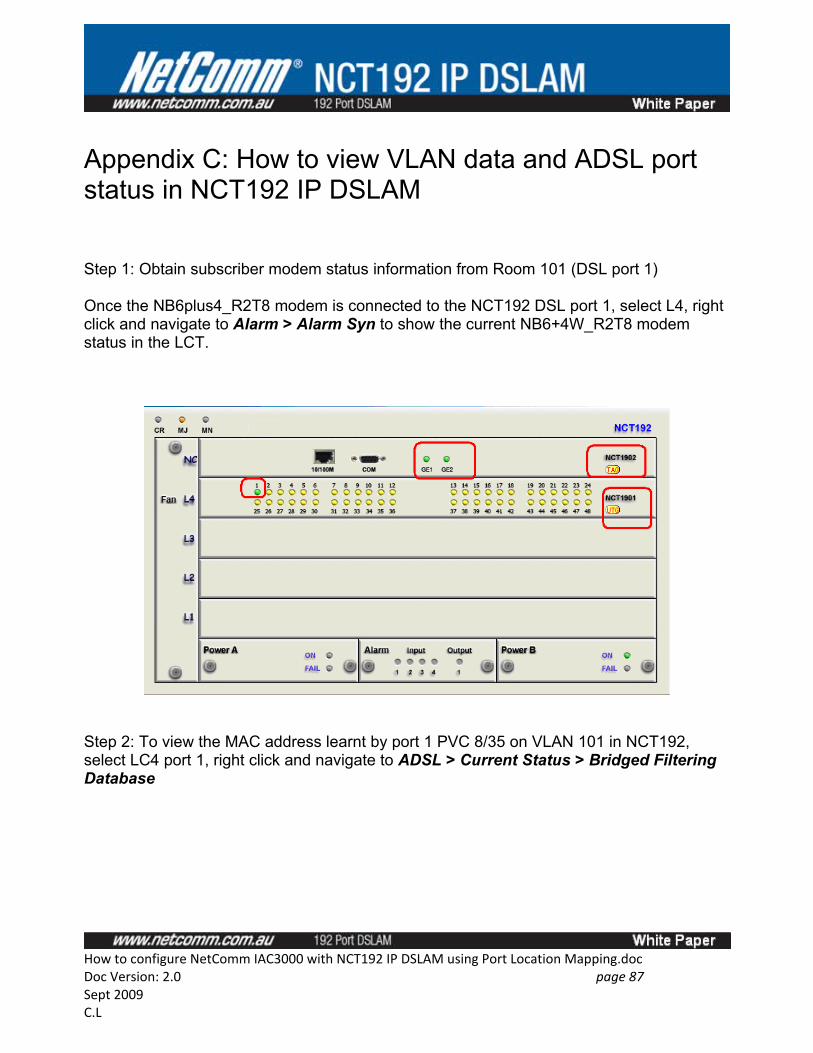
Step 1: Obtain subscriber modem status information from Room 101 (DSL port 1)
Once the NB6plus4_R2T8 modem is connected to the NCT192 DSL port 1, select L4, right click and navigate to Alarm > Alarm Syn to show the current NB6+4W_R2T8 modem status in the LCT.
Step 2: To view the MAC address learnt by port 1 PVC 8/35 on VLAN 101 in NCT192, select LC4 port 1, right click and navigate to ADSL > Current Status > Bridged Filtering Database
How to configure NetComm IAC3000 with NCT192 IP DSLAM using Port Location Mapping.docDoc Version: 2.0 page 87 Sept 2009C.L
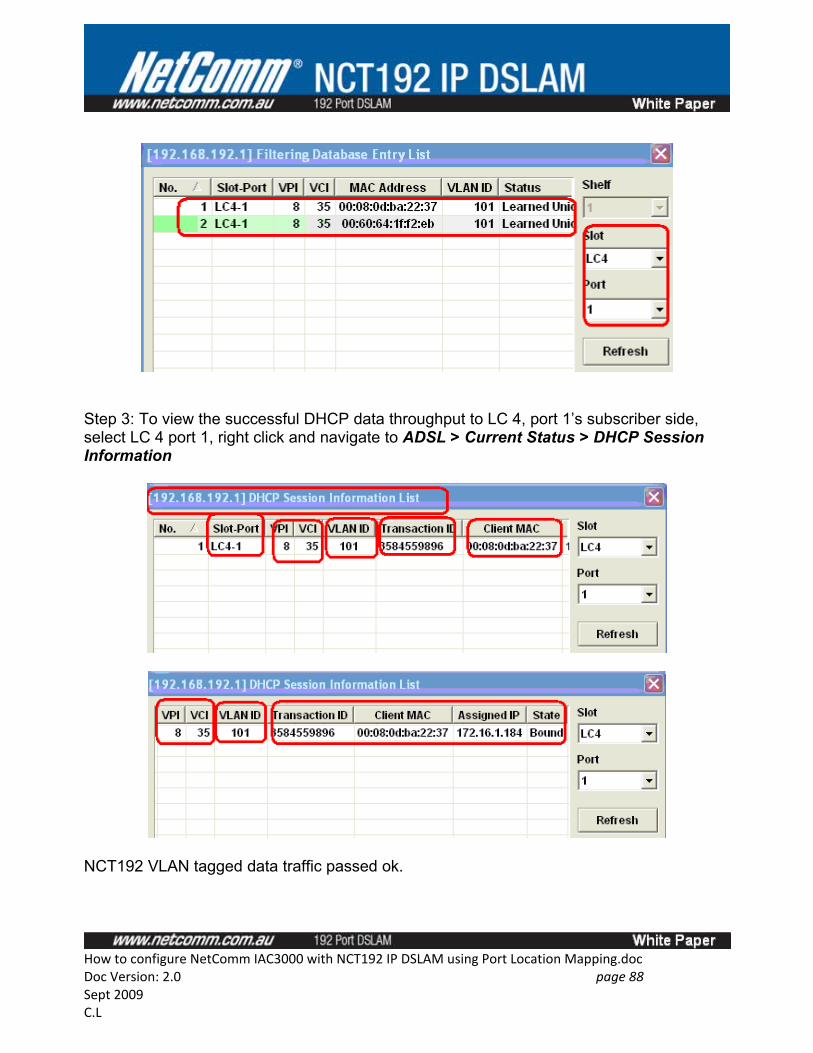
Step 3: To view the successful DHCP data throughput to LC 4, port 1’s subscriber side, select LC 4 port 1, right click and navigate to ADSL > Current Status > DHCP Session Information
NCT192 VLAN tagged data traffic passed ok.
How to configure NetComm IAC3000 with NCT192 IP DSLAM using Port Location Mapping.docDoc Version: 2.0 page 88 Sept 2009C.L