Embed Size (px)
Citation preview
HOW TO BUILDYOUR VERY OWN HHOROOM HEATER AND COOK TOP STOVE
By T. M. Lamb
- BURNING ONLY WATER FOR FUEL –
Most people who even know about HHOthink only about using it in your car orpickup to increase gas mileage, but didyou know you can heat your home withHHO gas and you can even cook with HHOgas.
If you have a 12 volt system installed as I do(with 12 voltsolar panels, 12 volt wind turbine and 12 volt batteries) it’s asimple matter of hooking up a couple of color coded batterycable clips and you are ready to go. I will show you how Iheat with HHO gas and I can even cook with HHO gas. Ifyou do not have a 12 volt system you can still use thisheater/cooker with a 12 volt power supply.
Now if times get tough and you run out of firewood andpropane this can come in very handy. Especially if you aremaking lots of power when the sun is shinning and you are

not able to use all the power you make this is an extra wayyou can make use of your 12 volt power for something veryuseful, cooking and heating.
The first thing you will need is a box to build your system in. I found this tool box onebay for $40 plus $20 shipping, It had only 1 removable shelf which was handy. Iinstalled the casters and cut all my own holes. My tool box measures 23” tall by 18” wideand 11” deep, these measurements are not critical and you can work with a smaller box ifneed be or a larger box but not grossly bigger or smaller.
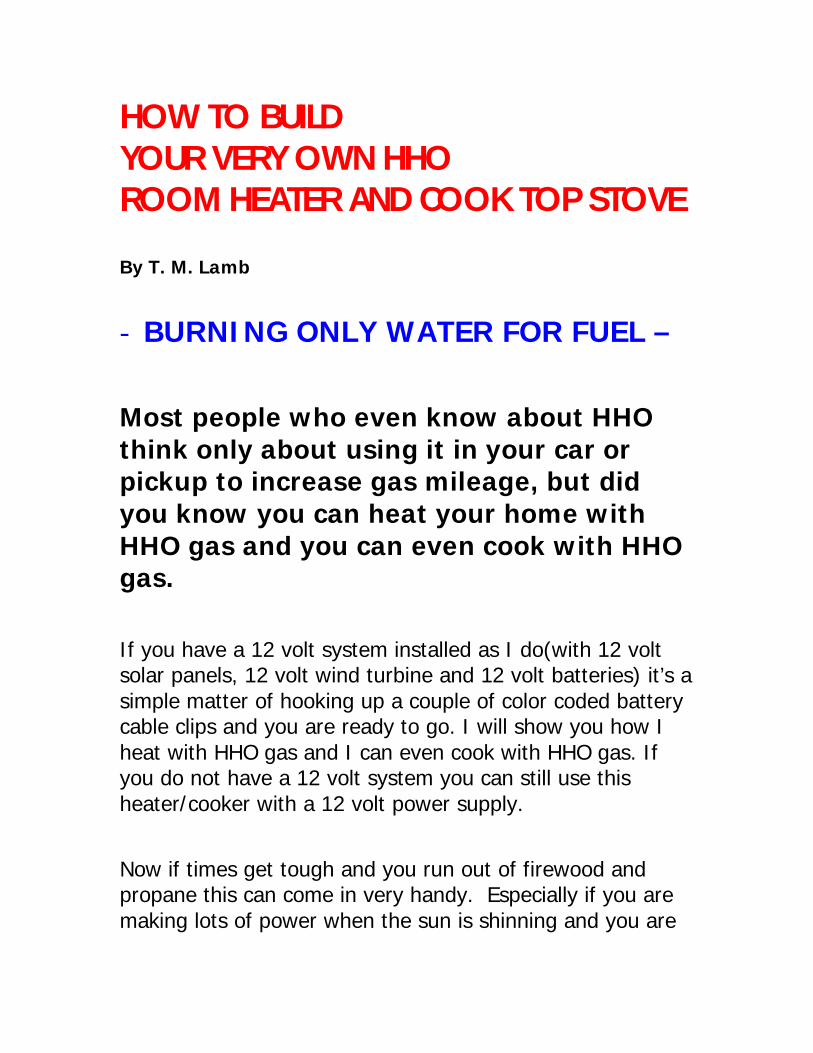
This is the back side of my box showing the power cables and the gas line comingthrough the back side of the box. Also you can see my red fan on the left but you will notneed that. Also shown on the left of the small black PWM cell Exciter which you willprobably not need, but if you think you need this device you can get one atwww.hydrogengarage.com and most other HHO suppliers.

Close up of the power connectors for my HHO heater/cooker
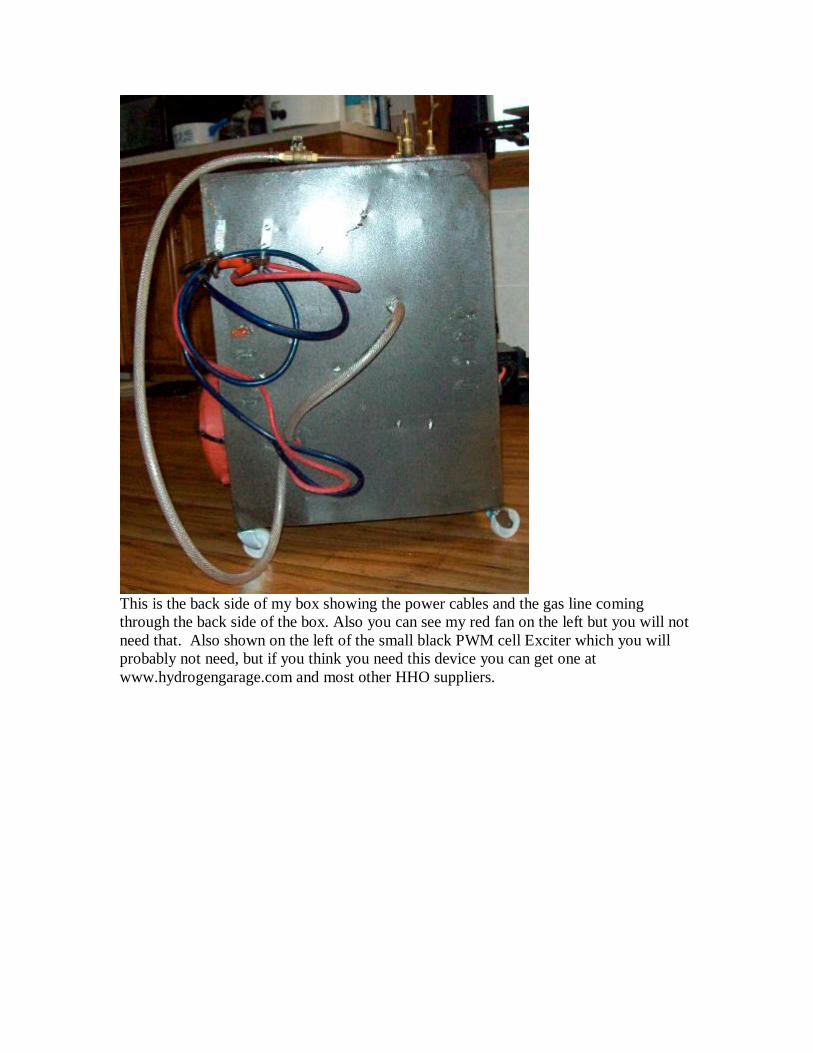
Next you will need one or two HHO generating units. Your total gas output should beabout 3 liters per minute. So shop around and you will probably need two small units orone big unit but be forewarned these units are not cheap. The smaller unit will cost youabout $100 to $140 each and a big unit will run you about $250 up. Be sure to use ONLYa dry cell HHO generator they make cheap HHO generators out of fruit jars these WILLNOT WORK as they produce way to little gas, are dangerous and are considered wetcells NOT dry cells.

Another view of my HHO generator mounted in my case. Because of limited space Iinstalled my braded plastic 3/8” line before I installed the HHO generators in my case, Ijust made sure I had plenty of hose to run it where I needed to go with it.Sorry about all the wiring but the extra wires are because of the fan and the PWM cellexciter I have installed on my unit which you will NOT need. So your case should besimpler with fewer wires. Keep in mind a rule of thumb, a cable, a hose is best if it’s acouple inches to long verses an inch to short, so do not be skimpy on the hoses and wires.If you find you have WAY to much wire or hose AFTER you install something it is asimple matter of cutting the hose or wire to trim it back some IF it’s needed.

Larger HHO generating cell, be sure your barb fittings will fit a 3/8” hose, if not you willneed to replace the hose barb.
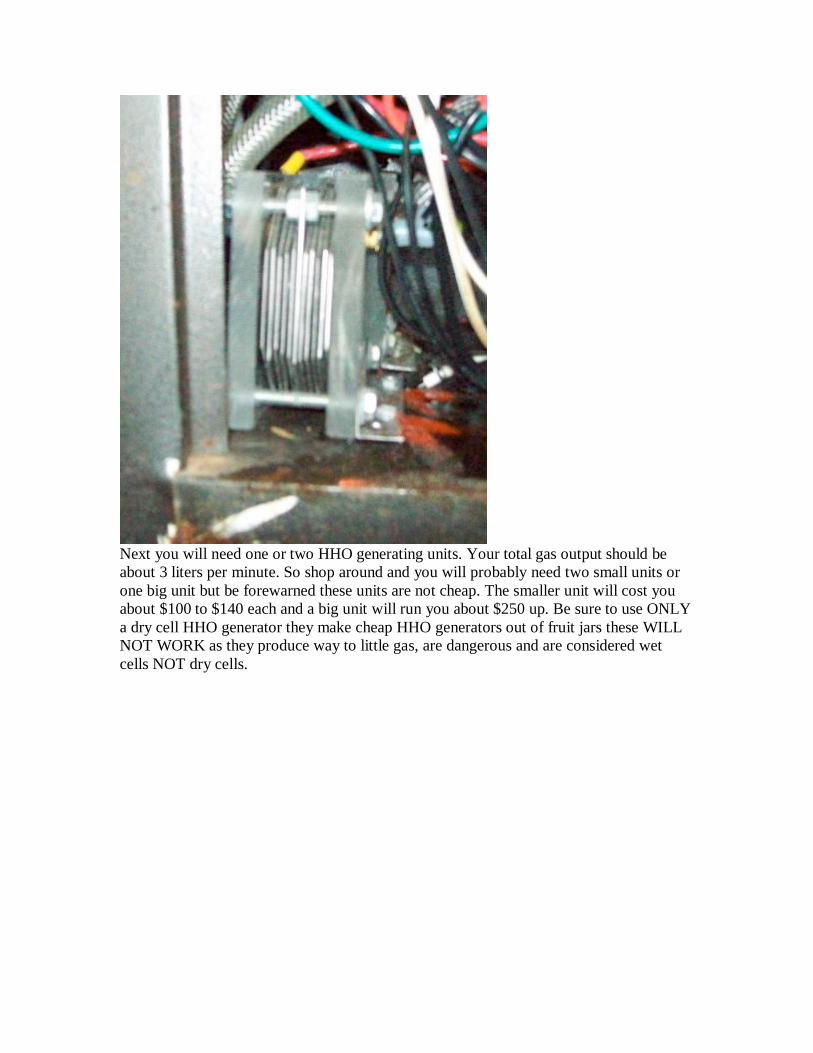
Smaller HHO generating cell, be sure your barb fittings will accept a 3/8” hose if theydon’t you will need to replace these barbs with a 3/8” barb. These smaller HHOGenerating Cells usually make gas at about 1 1/2 liters per minute so two of these unitswill put you at the bottom of the scale of needed gas production. But keep in mindmanufactures some time fudge the numbers and you may find at 10 to 12 amps (per unit)you are only making about ½ liter of gas per minute. This does NOT mean you will notget a flame it just will not be a strong or hot enough flame. So when it comes to HHOgenerating units you are better off biting the bullet and getting a good unit and paying theprice and being happy with the results then going cheap and NOT being happy with theoutcome of your heat production.We do not get any favors for recommending anyone or anything, it is simply our opinionand if you find a better HHO generator great for you.
Some of our HHO generator manufactures are:
http://hydrogengarage.com/
http://www.hydrogenjunkie.com/

Water Reservoir tank collects incoming water and gas and dispenses gas to the dryer andcollects water at the bottom to return it by pump to the HHO generators again. Be sureyour barb fittings are for a 3/8” hose.

This is what the dryer looks like. The theory is the gas as it’s made and carried via waterinto the collection tank has a lot of moisture in it so this device will take out the excessmoisture before it gets to your torch. This device also works as a spark arrestor too.Again be sure your fittings are for 3/8” hose.

Note my dryer has a 3/8” soft copper line wrapped around it. The HHO generatingprocess creates heat and you will need a coil of 3/8”soft copper pipe as a heat exchangerto help reduce any excess heat. I wound mine around my dryer to help hold it in place. Iadded a fan to help keep this coil cool but it was not needed.
As for the water pump Engine cooling, intercooling, fluid transfer and heat exchangers.
Smooth flow. Quiet operation. Handles aggressive liquids. Max. Liquid Temperature 110 °C 212 °F. Long life brushless DC motor.This pump is Jabsco, a little pricy but it is a good pump, quiet, can handle hot water,brushless and has long life, you can pay a lot less and get a lot less too.You can find this pump at: http://www.marinesuperstore.com/item/99351571/jabsco-59510-cirrculation-pump
You will need to take this pump to your local hardware and ask them how to plumb thispump with it’s 1” fitting and downsize it to fit 3/8” Inside Diameter (5/8” OutsideDiameter) tubing. (if you have (2) HHO generators you will need to figure out how tostep your fittings from 1 inch down to two 3/8” fittings to run through your braded plasticline into your HHO generators) And do now forget you have your return lines that nowhave to be stepped up from 3/8” to fit the 1” barb fitting on the water pump. Every singleconnection where you are attaching a plastic braded line onto a brass or plastic fitting youwill need a hose clamp.
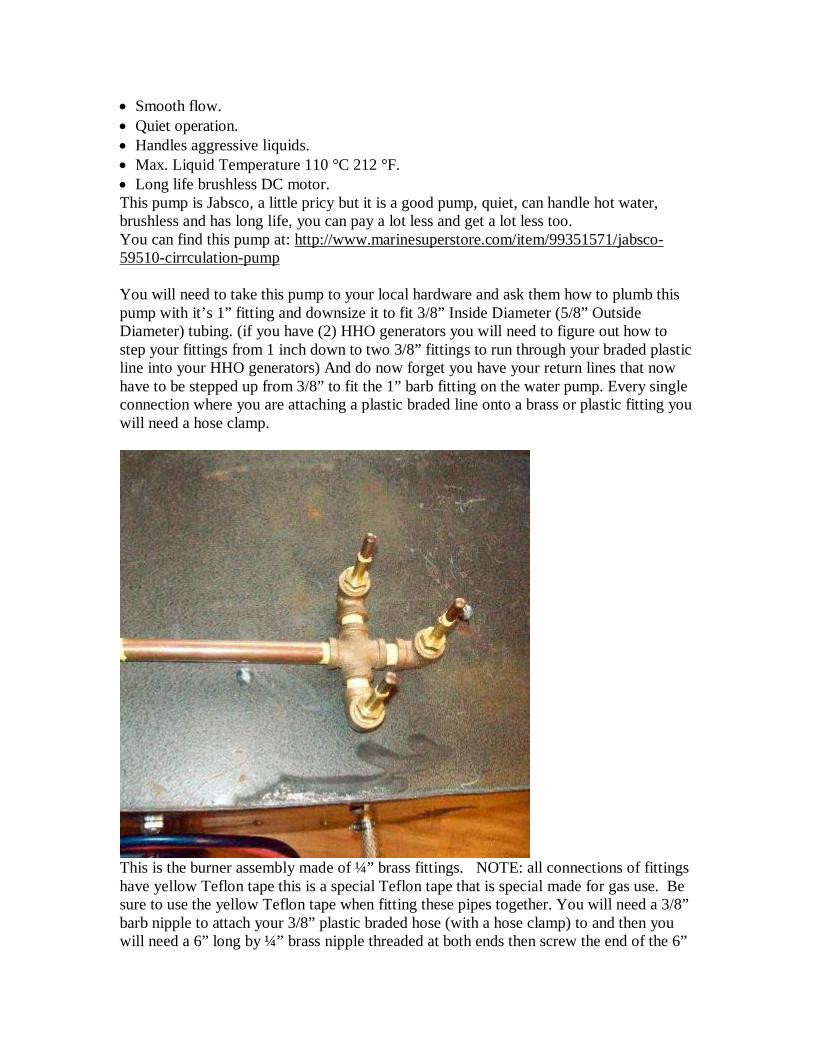
This is the burner assembly made of ¼” brass fittings. NOTE: all connections of fittingshave yellow Teflon tape this is a special Teflon tape that is special made for gas use. Besure to use the yellow Teflon tape when fitting these pipes together. You will need a 3/8”barb nipple to attach your 3/8” plastic braded hose (with a hose clamp) to and then youwill need a 6” long by ¼” brass nipple threaded at both ends then screw the end of the 6”

long nipple into the 4 way by ¼” fitting then you will need 3 – 1” by ¼” nipple fittings,then you will need 3 – 90 degree elbows that are 90 degrees, then you will need 3 – 3/8”hose barbs that are threaded inside to accept the welding torch tips. Be sure you use theyellow Teflon tape on all connections and as you assemble these be sure you pack the 6’pipe with brass wool and then pack the 4 way with brass wool too.
You may be asking just why we have a picture of a package of brass wool? The truth isBrass Wool is very important to stop flashbacks in your burner assembly. Use a penciland pack the 6” long 1/4” brass nipple fitting with brass wool, also pack the 4 way fittingwith brass wool and even pack the 1” by 1/4” nipples with brass wool this will preventany flash backs from happening. This step is very important be sure you do this as aminor explosion can happen if you don’t. You can also pack the 90 degree ¼” elbowswith brass wool also just to be extra safe. Don’t worry about packing it to tight as there islots of space to get the gas around the brass wool to the burner tip.
WARNING:HHO gas is explosive and it carries it’s own Oxygen so it willburn/explode just fine in your burner tip, hose barb, 90degree elbow etc. So somewhere you need to stop it withthe fitting packed with Brass Wool. Do not test this unit inyour home until your sure it has NO leaks and is safe to useand operate indoors. When starting this unit as soon as

power hits the HHO generators and the water pump you willstart making gas right away so do NOT delay in lighting yourburners ASAP.This unit has NO storage capacity so DO NOT attempt toshut off or block the gas going to the burner while power isstill applied to the HHO generator/s and/or water pump todo so a bigger explosion WILL occur, one you will NOT like Iguarantee, death, injury, destruction can occur.To shut the unit off simply un-plug the unit from it’s power,by disconnecting the power it stops the pump from pumpingand stops the HHO reaction and the gas will simply burn outthat is in the lines, usually with a mild pop to let you knowit’s out.
Another view of my burner assembly.

Note ¼” hose barb fittings that will accept 3/8” hose and the ¼” hose barb is threaded onthe inside to accept the welding torch tip that is .028 (.026 to .030 will work fine also)You will probably need to take the hose barbs and the welding torch tips to a machineshop to have them thread the inside of the hose barb to accept the torch tip. I didn’t knowthere was a difference in 3/8” hose barbs but there is, you will need the longer hose barband IF your machine shop tells you they can NOT thread your hose barb take it back andask for a different style and if they don’t have it in a different style go to anotherplumbing supply or hardware till you find the right kind of 3/8” hose barb that can bethreaded to accept the welding torch tip. With this type of burner you can power it usingonly about 500 watts.To turbo boost your room heater you can buy a 18” section of square duct work that is13” wide by 6” tall and drill (3) holes to match the burner you built in the center of theduct. Now take your burner and slip it through the holes in your duct, now place a ½”thick round steel plate that is 10 to 12 inches in diameter inside the duct and brace itabout ½” above the burner and then place a 12 volt fan one that you can adjust the speedof the fan as if it blows to much air it will not have time to heat the air before it blows itout of the duct into your home. You can increase your heat out put greatly by doing this.

You can adjust the height of the round piece of steel until you get the right amount ofheat generated through it that is transferred to the air being blown across it in the duct..
This burner is available from www.hydrogengarage.com With this burner you will needmore gas production, about 4 liters per minute and more power. This is probably thebiggest burner you can power or should power with your 12 volt system and it will stilltake about 48 amps to power this burner. So this burner is NOT for the smaller HHOsystem. Only if you have the extra power and if you have the proper HHO generatorsshould you consider this burner.

This burner is also available from www.hydrogengarage.com With this unit you willneed more gas production about 6 liters per minute. Unless you have a very large 12 voltsystem this may not be appropriate for you to use this unit as it will take about 68 amps torun the HHO units to produce this much HHO gas.

Note burner assembly will slide easily under the cast iron propane camping cook top Ibought at the local hardware..

This is a close up of the burner assembly under the cast iron cook top I bought at the localhardware this burner is suppose to be attached to a propane bottle but I by-passed thepropane for HHO gas. Obviously this burner works better with cast iron pans as cast irondissipates the heat better than most other cook wear.As for heat I have a ½” steel plate I place on the burner and the burner heats the steelplate but what I find works better is an old cast iron pot where you place water in it so asit evaporates it puts moisture back in your room air.
What I did is I took a couple of months to build this and did a little bit at a time so it wasnot so overwhelming.I will start at the beginning of the process, the Reservoir water bottle at the bottom youwill note it has a barb to attach a plastic line slip on your braded 3/8” plastic line over thisbarb and tighten the hose clamp. (Remember this is plastic so not to tight) I like to mountmy Reservoir water bottle on my door but when you do this you have to be careful of thehoses as they can kink when you close the door but that makes it easier if you ever haveto add water to the Reservoir water tank.
That line will run into the Water (In) side of your water pump. As you water line is 3/8”and the water pump has a 1” or there abouts inlet side. You will need to take the pumpdown to your local hardware and ask them to fix you up with a step up from 3/8” to fitthe water (in) side of your water pump. They will sell you a few pieces that will have to

be assembled, remember to use the yellow Teflon tape if it’s a threaded fitting and if it’sa slip fitting use a hose clamp. Now that is done, here is what is next.On the OUT side of the water pump it will be about 1” size and you will need to take thepump back to the hardware and ask them how to plumb the pump from the (out) fittingdown to your original 3/8” hose fitting. (Remember if you have TWO HHO generatorsyou will need to reduce the fittings down to 2 (two) 3/8” hose fittings. With this projectyou will get real friendly with the people at the hardware, believe me.
Now take your one (or two) 3/8” plastic lines coming off your water pump and have themplug into your HHO generator/s. Note if your HHO Generator manufacture has a water(IN) and a water (OUT) side of the generator/s watch for that.
Now take the one (or two) 3/8” barbs coming out of your HHO generators and run themto your 3/8” heat exchanger (if you have two 3/8” hoses you will need to go to thehardware and ask about how to reduce the two 3/8” hoses down to one 3/8” hose). For theHeat Exchanger, what I did was to buy a 12 foot of 3/8” soft copper line and bend itaround and around the dryer until I had about 6” on either end that was relatively straight.At the bottom I plugged the 3/8” copper line into the 3/8” plastic braded line coming offthe HHO Generator and put a hose clamp on it.
I ran the other end of that line into the top of the Reservoir water tank.I now ran a plastic braded 3/8” line out the other top barb fitting on your Reservoir watertank, run this line into the IN side of your Dryer and on the OUT side plug another 3/8”plastic braded line with a hose clamp on both. This line will run through a hole drilled toaccept the line going through the case where ever it is convenient. To avoid wear on theplastic line you may need to use a rubber grommet to line the hole you cut so it will notwear a hole in your plastic gas line.
Now for the wiring you have seen above how I attached two color coded heavy gagewires with big battery clips to attach to your batteries.Where you run the cables through the case be sure to line the holes with a rubbergrommet and what I did was to use a hose clamp to hold each line from pulling on theguts inside the case just in case someone ever pulls on the cables.
Now take the red or Positive cable and run it to a step down by crimping each wire untilyou get down to a 10 gauge wire (if you have two HHO generators use two 10 gaugewires) use a 30 amp fuse for your protection in line and then attach your positive wire tothe RED or POSATIVE side of your HHO generator/s and do the same with yourNegative wires.
Be sure to attach a 12 gage wire running from a crimp connection off your positive andnegative cables as these will need to be attached to your water pump. Be sure to put afuse in the positive line going to the water pump this will usually be 10 amps.

Example of step down crimp method.
This shows my switches, most people do not like the idea of the power cables archingwhen they hook them up so then you will need a pair of 20 amp switches. One for thepower cable (Positive cable) coming from your crimp connection before it goes to yourwater pump and then have the other end coming off the switch go to your water pump.For the other switch take your Positive cable going to your HHO generating unit/s andhave it go into a switch and then off the switch into your HHO generating unit/s. Thatshould cure the arching problem. (My switches are on the right and are Green, Yellowand Blue from top to bottom. The Green switch operates my fan, which you will NOTneed.)
Also note the amp meter I have installed, this is a simple meter with a built in shunt andcost me about $7.00 on ebay and is simple to wire in just follow included instructions.And you will see my PWM Cell Exciter this unit chops the current and controls the waveof the current coming into your HHO generating cell/s. You will NOT need this as I havefound no great advantage with the unit. Your amperage is controlled by the amount ofKOH (Potassium Hydroxide) you have in your water, to much KOH and your amperagewill run up to 25, 30 or more amps, this you do not want. Dump some of the water out
and replace with distilled water until you get the amperage down to 20 amps or slightlylower.
Conditioning a new HHO dry cell Generator
Everyone has seen HHO generators where the water is muddy brown to muddy grey thereis a way you can stop that from happening and here is how.
Mix a 7% concentration (by weight) of Citric Acid Powder with each Liter of
water and pump it through the cell for at least 30 minutes, then rinse out.
Rinse out with distilled water not once but at least 4 times.
Blow air through the cell to help it dry.
After this process is done, you can start conditioning using low current and a 5%
KOH distilled water concentration.
Run the cell at low amperage, no more than 4 amps, for at least 2 hours.
Rinse out after conditioning, with distilled water, and rinse again.
Mix your electrolyte solution (KOH) as needed; do not use more than 28% by
weight. Amperage decreases if you use more than 28%
When ever adding water to the system ONLY use distilled water as all other water
has impurities that will discolor your water and could hinder your HHO gas
production.
IF you ever find you need to ad water keep in mind KOH does not evaporate so
you probably will not need to add extra KOH, add distilled water to where you
need it then check your amps, if they are right then you are done, if they are low it
is easy to then add a small amount of KOH to bring the amps up to within range.
The amperage you put into your HHO generators is determined by how much PotassiumHydroxide (KOH) you have in your water. At this point I highly recommend you add aamp meter to your HHO heater/cooker so you can see what amps you are drawing. Iwould use the analog meter as they are easier to install and get one that has the shunt builtin and they are simple to install. (You can find these on Ebay) Just follow directions. I cut
a hole in my case by drilling a ½” hole and then used a saber saw to cut a bigger hole toallow the fitting of the amp meter.
What I did was when the system was all set up and I had the pump running and checkedfor leaks etc. Also keep in mind this water pump is NOT self priming, IF you plug it inand it does NOT work don’t get upset just rock the unit back and forth to work waterdown into the pump. I added a heaping tablespoon full of KOH or Potassium Hydroxideand ran the unit for about 30 minutes. After that I added another heaping tablespoon fullof KOH and I kept doing this until I got my amperage up between 15 and 20 amps. Youshould try and keep your HHO heater/cooker down to 20 amps max and 20 amps is a lotof power draw for this unit, but it can handle up to 30 amps.
You can find KOH on ebay or you can buy if from Aloha Services, 4226 126th PineMarysville, WA 98217 It’s about $28.00 for 10 pounds. Plus shipping
WARNING:
HHO gas is explosive do not test this unit in your home untilyour sure it has NO leaks and is safe to use and operateindoors. When starting this unit as soon as power hits theHHO generators and the water pump you will start makinggas right away so do NOT delay in lighting your burnersASAP.
This unit has NO storage capacity so DO NOT attempt toshut off or block the gas going to the burner while power is
still applied to the HHO generator/s and/or water pump todo so a bigger explosion WILL occur, one you will NOT like Iguarantee, death, injury, destruction can occur.To shut the unit off simply un-plug the unit from it’s power,by disconnecting the power it stops the pump from pumpingand stops the HHO reaction and the gas will simply burn outthat is in the lines, usually with a mild pop to let you knowit’s out.
This unit does not need the gas shut off valve on the burnerassembly, you simply do not need it. The reason my unithas a shut off valve is I have two burners and this way I canshut off one and open the other as needed.
Copyright 2013 by T. M. Lamb